

World Time Center
Introduction
Congratulations on purchasing this state-of-the-art World Time Center as an example of superior design and
engineering. Providing radio controlled time, indoor temperature and humidity displays, outdoor temperature, this unit will
never keep you guessing on time, date or current and future weather conditions. Operation of this product is simple and
straightforward. By reading this operating manual, the user will however receive a better understanding of the Wor ldTime
Center together with the optimum benefit o f all its features.
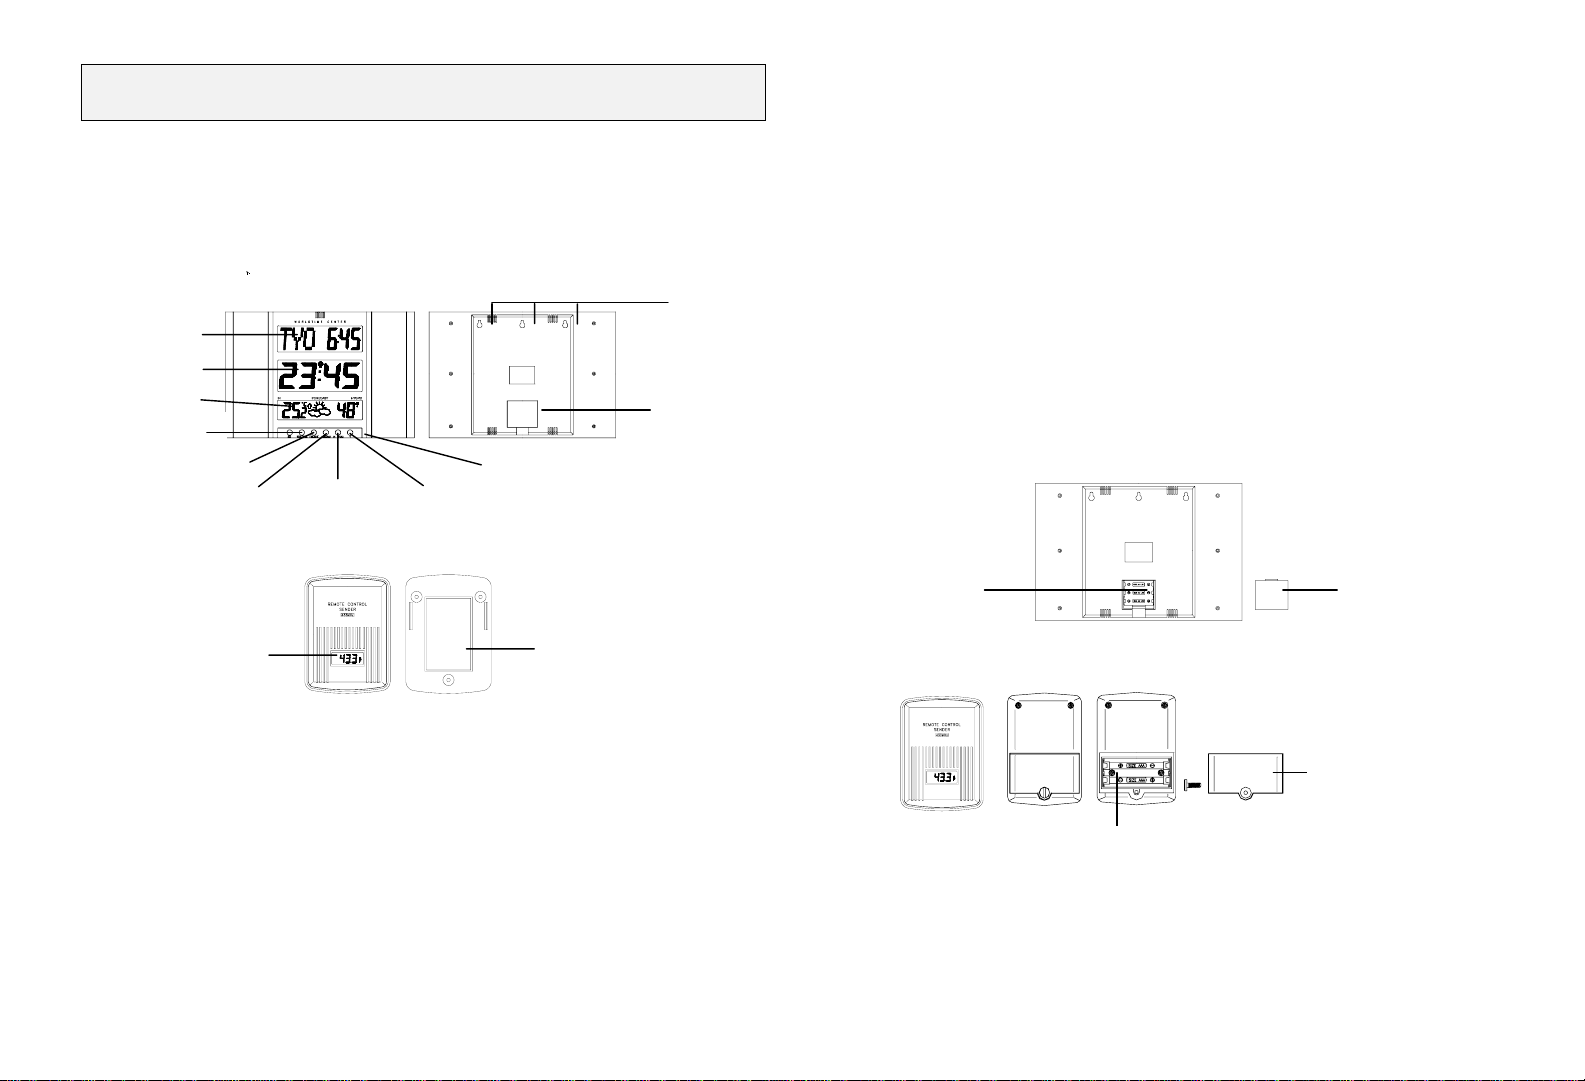
World Time Center
Hanging Hole
LCD1
LCD2
LCD3
SET-Key
WORLDTIME-Key
Outdoor temperature sensor
TIMEZONE-Key
HYGRO-Key
+ -Key
LCD display
Features
World Time Center
• 4 digits showing Hour and Minute in the main display
• WWVB time signal radio-control led clock with manual time display
• 12/24 hour display
• Time zone selectable
• World time display with specific place r epresented by 3 sucessive characters
• Calendar display
• Display of weekday (8 languages to choose from)
• Display of current indoor temperature
• Display of current indoor relative humidit y
• Three weather icons for weather forecasting
• Weather tendency indicators
• °C or °F temperature display selectable
• LCD contrast changeable to 8 different t ones
• Low battery indicator
• Wall Mounting
Holder
Battery cover
Outdoor temperature sensor
• Remote transmission of outdoor temper ature via 433MHz to base World Time Center.
• LCD display showing current outdoor tempera ture in Fahrenheit (ºF)
• Shower proof casing
• Wall mounting case
Getting started
Remove all parts from the packaging and place onto a t able in front of you. Ensure that the following parts are included:
1. World Time Center (main unit)
2. Outdoor temperature sensor
3. Instruction manual
If any one of the above mentioned parts is missing please contact your supplier.
Please follow all further explanations and descriptions in this manual in order to ensure that your World Time
Center and Outdoor temperature sensor work correctly.
Important Note:
For all users wanting to get additional informations on the function of the World Time Center there is an
alphabetically sorted subject index at the end of this manual offering a number of technical and funct ional
explanations. For use and operation of this product however the knowledge of this index is not necessary.
Putting into Operation
Basic Setup
Battery
Compartment
1. Open the battery cover of the World Time Center and - checking the correct polarities –
insert 3 x AA, IEC LR6 1.5V batteries into the battery compartment as indicated above and replac e the cover.
2. Unscrew the screw on the back of the Outdoor temperature s ensor compartment and remove the cover.
3. Insert the 2 x AAA, IEC LR3, 1.5V batteries observing correct polarity.
4. Replace battery cover on unit and seal by re-screwing
5. When replacing the battery covers, ensure that the batter ies do not spring free from the contacts.
6. Your World Time Center and Outdoor temperature sensor are now operational.
Reset
Battery
Battery Cover
Battery cover
To reset the World Time Center and the Outdoor temperature sensor, simply take out the batteries from both unit. Wait
for at least 30 seconds and repeat the setup procedure above.
Important!
After putting into operation (basic setup or reset) all key functions except for the “SET” and the “+” keys should
not be operated until the WWVB time signal has been received or the time is manually set.
Self Programming after Basic Setup or Reset (Putting i nto Operat ion)
After the the batteries are inserted (see “Putting into Operation”) into World Time Center and a self programming
sequence will start which cannot be influenced by the user. At first all segments in the LCD will light up for appr. 3
seconds. Next, the unit will perform a battery test followed by the measurements of indoor temperature and humidity, air
pressure and a scanning of the WWVB time signals. After this starting phase the indoor temperature (Left on LCD 3) will
be displayed along with the displays “- - -” in the weekday, time (LCD 1), W WVB time (LCD 2) and outdoor
temperature/humidity sections (Right on LCD 3 ). If measurements and signal receptions are successful, the dashes will
be updated one by one by the real values measured and received.
Initial Displays
If the “SET” key is pressed after “- - -” is displayed (as described in 7.1) , but before the real measurements are
displayed, the learning mode will be terminated. Apart f rom the temperature already displayed on LCD 3 the following
initial displays will now be assigned to the various sections o n the LCD:
• Date (LCD 1) “MON 1.1.98”
• Time of day (LCD 2) “0:00”
If selected:
• Worldtime location (LCD 1) “- - -”
• Worldtime (LCD 1) “0:00”
• Time zone (LCD 2) “0”
Further default values:
Display modes
• Time: 24 hours
• Temperature: °F (degrees Fahrenheit)
• Language for weekday display: GB (English)
• LCD Contrast: Level 5
Note:
After completion of the self programming procedure check that all frequency signals are correctly received and displayed
in the appropriate sections of the LCD screens. Should any one signal not be received, then see Items “WWVB
Reception Check” below before performing a reset (see Reset abo ve).
LCD Screens
The LCD of your World Time Center consists of t h r ee separate screens which provide - from top to bott om - the following
information:
LCD 1 - Worldtime and Date/Weekday
City
• In normal mode display of current date (Day and Month. Year will only show in programming mode) with current
weekday (abbreviated to 3 letters; 8 languages to c hoose from).
• By key stroke display of radio controlled, highly accurate worldtime at any location on earth (identified by 3 letter
abbreviation).
• By key stroke alternating display of both above modes every 5 seconds.
LCD 2 - Time of Day
World
Time
• In normal mode display of radio controlled, highly accurate time of day depending on programming - 12 or 24 hours
mode.
• A transmission tower symbol in the upper center of the di splay indicates that the WWVB time signal is scanned for
(flashing) or received (steady).
• A battery symbol in the lower center indicates low running batt eries.
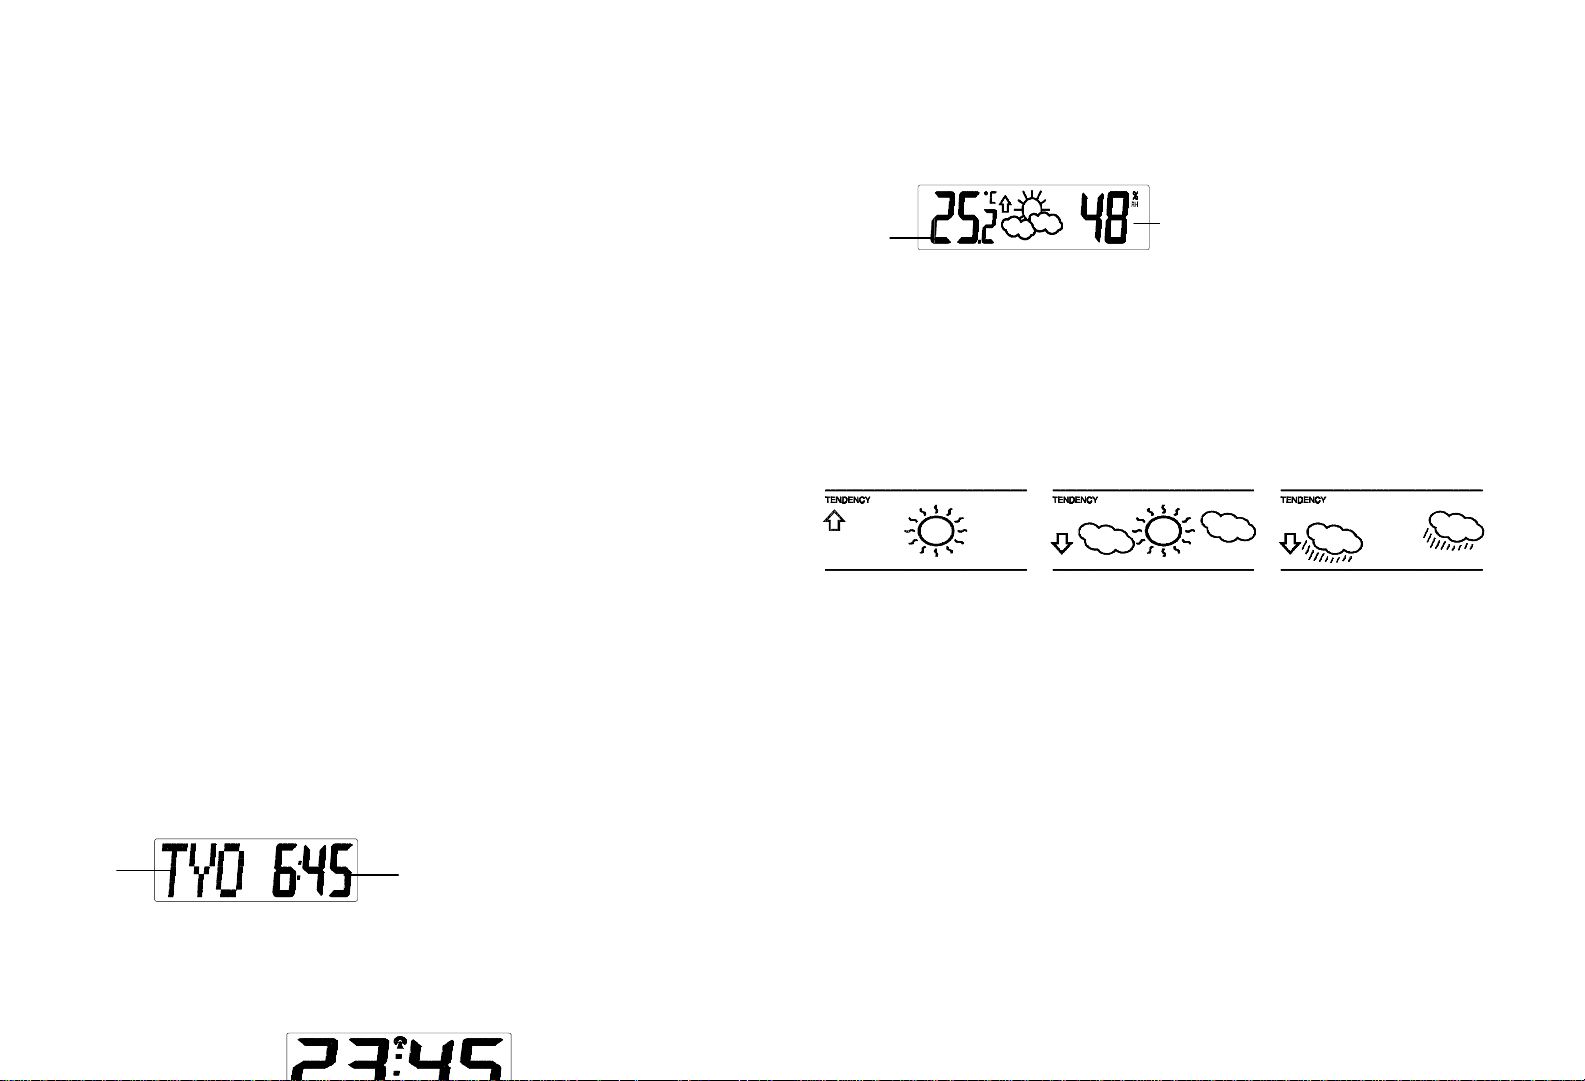
LCD 3 - Temperature/Indoor Humiditiy and Weather Forecast
Indoor
• On the left, display of current indoor temperature.
• On the right, display of current outdoor t emperature and by pressing the “ Hygro ” key, alternate between
• In the center, the display shows the expected weather in the f orm of three weather symbols and weather tendency
• In normal mode display on the right shows the current indoor humidity.
Weather Symbols:
The weather symbols will in the following combinations provide a weather forecast upon reading any sudden changes in
air pressure:
Common to weather forecasting, absolute accur acy cannot be guaranteed. The weather forecasting feature is estimated
to have an accuracy level of about 75% due to the various areas it has been designed to be used in.
Weather Tendency Indicators :
The weather tendency indicator arrows are located to the left and right of the weather symbols. They indicate the air
pressure development and thus, also provide a forecast of the weather to be expected.
The tendency arrows can be displayed as follows:
• Tendency arrow pointing upwards:
• Tendency arrow pointing downwards:
This means that the air pressure is decreasing and the weather is expected to become worse.
Function Keys
SET Key
• Serves in normal mode to enter the programming mode and - once in programming mode - the selection of the
1. the indoor relative humidity,
2. indoor relative humidity and outdoor tempera ture, and
3. outdoor temperature
indicator in the form of an arrow.
Sunny Cloudy with sunny intervals Rainy
This means that the air pressure is increasing and the weather is expected to improve.
various setting modes as well as the acknowledgements of the selected values.
Indoor relative
humidity

WORLDTIME Key
• Serves the selection of the displays of current date with weekday, worldtime with location or alternating display of
both above modes every 5 seconds on LCD 1.
TIMEZONE Key
• Serves to enter the time zone change mode. The preset time zone on LCD 2 will start flashing. B y use of the + key
the time zone can now be selected (±12hours) . Alter the time zone to Hawaii (HAW, -10), Alaska (ALA, -9), Pacific
(PST, -8), Mountain (MST, -7), Central (CST, -6), Eastern (EST, -5; default time zone), Atlantic ( AST, -4) and
Greenwich Mean Time (GMT, 0).To acknowledge the selected value and to exit this setting mode and return to
normal display mode, press the SET key or wait appr. 15 se conds for an automatic switch back.
LANGUAGE Key
• Serves to enter the selection mode for the one language by which the weekday is to be displayed on LCD 1.
Selection takes place by use of the “+” key from f ollowing languages:
D German
GB English
F French
I Italian
NL Dutch
DK Danish
E Spanish
J Japanese
To acknowledge the selected language and to exit this set ting mode and return to normal display mode, press the
LANGUAGE key or wait appr. 15 seconds for an automatic switch back.
HYGRO Key
• Serves to select humidity and outdoor display. Pressing of the key will subsequently switch the display to the next
mode.
1. Indoor relative humidity
2. Indoor relative humidity / Outdoor temperat ure
3. Outdoor temperature
+ Key
• Serves in programming mode the change/selection of all changeable/selectable values and displays.
Manual programming
Note:
If the World Time Center has already successfully received the WWVB time signal and displays the correct time
and date, then the Manual programming can be omitted.
After completion of the above described procedures in “Basic Setup” the manual programming mode c an be entered
by pressing the “SET” key for about 2 seconds.The f ollowing settings can now be programmed:
• 12/24 hour setting
• Time setting
• Weekday setting
• Month setting
• Date setting
• Year setting
• World Time location setting
• World Time setting
• ºC or ºF setting
• LCD contrast setting
Note:
If in programming mode no key is pressed for appr. 15 seconds then the LCD will switch back to the nor mal display
mode.
12/24 Hours Setting
After entering the programming mode as described above the 12/24 hours display can be selected on LCD 2 in t he
following way:
1. The “12h” or “24h” will start flashing (Default setting 12h) . Select the desired time display mode by use of the
“+”key.
Note:
In 12 hours mode the date will be displayed in the conf iguration “Weekday / Month / Day”, in 24 hours mode in
“Weekday / Date / Month”.
2. Press the “SET” key to enter the “Time Setting“.
Time Setting
1. The hour digits will start flashing on LCD 2 . Set the desired hours by pressing the “+” key followed by pressing the
“SET” key.
2. Now the minute digits will start flashing. Set the desired minutes by pressing the “+” key followed by pressing the
“SET” key to move to the “Weekday Setting”.
Note:
In 12 hours mode the time will be displayed with an additional “PM” for the time from 12:00 noon until 11:59.
Weekday Setting
1. The weekday symbols will be displayed on LCD 1 in the preset language and flashin g. Set the desired weekday by
use of the “+” key.
2. Press the “SET” key to enter the mode “Month Setting”.
Month Setting
1. The month digits on LCD 1 will start flashing. Set the desired month by use of then “+” key.
2. Press the
Date Setting
1. The digits for the date will start fl ashing on LCD 1 (Default setting 1). Set the desired date by use of the “+” key.
2. Press the “SET” key to enter the mode “Setting of Year”.
Year Setting
1. The year digits will start flashing on LCD 1 (Default setting 1998). Select the desired year by use of the “+” key.
3. Press the “SET” key to switch to the mode “Worldtime Location Setting”.
Worldtime Location Setting
1. The dash representing the first c har acter of the worldtime location (Default setting - - -) on LCD 1 will start flas hing.
2. Press the “SET” key to move to the second character.
3. The second dash will start flashing. Select t he desired character by use of the “+” key.
4. Press the “SET” key to switch to the third character.
4. The third dash will start flashing. Select the desired character by use of the “+” key.
6. Press the “SET” key to move to the mode “World Time Setting”.
“SET” key to move to the mode “Date Setting”.
Note:
The date can only be set in conjunction with the selected month. I.e., it is not pos sible to set the date 30 if the
month of February is selected.
Note:
The year can be selected sequentially from 1998 to 2020 and will then start over again. The year furthermore will
only be visible on the display of LCD 1 in programming mode.
Select the desired character by use of the “+” key.
Note:
For designation of the worldtime location t he characters “A” through “Z” and “0” as well as “-” and “ ” (Space)
can be chosen.
World Time Setting
1. The hour digits of the worldtime on LCD 1 will start flashing. Select the desired hour by use of the “+” key. Setting
of minutes is neither possible nor necessary.
2. Press the “SET” key to move on to the “ °C/°F Setting”.
°C/°F Setting
1. The temperature displays including the characters “°C” or “°F” will start flashing on LCD 3 (Def ault setting °F). By
use of the “+” key select “°C” for temperature display in degr ees Celsius or “°F” for degrees Fahrenheit.
2. Press the “SET” key to move to the mode “LCD Contrast Setting”.
LCD Contrast Setting
1. The word “LCD 5” will be flashing on LCD 1. This is the manufacturer's default setting.
2. Using the “+” key choose the most convenient contrast (0 - 7 contrast levels) for the location of the World Time
Center.
3. Press the “SET” key to exit the programming mode and switch back to the normal display mode.
Leaving the P rogramming Mode
• To return to the normal display mode from anywhere in programming mod e simply press any desired key but the
“SET” or the “+” key at any time.
• If no keys are pressed for at least 15 seconds in programming mode, the Wallclock Weather Station will
automatically switch back to normal display mode.
Reset of all Data
By removing the batteries from both World Time Cent er and Temperature sensor all displayed data will be lost . To reset
all data perform a basic setup as described in “Reset” above.
Data Reception
Criteria for Reception
For reception and computing of displayed values, the software of the World Time Center perf orms a number of
comprehensive operations (see Index) which are not necessarily important for the user to know. In case the time is not
correctly displayed on LCD 2, then please see “ WWVB Reception Check”.
WWVB-Signal Test
The World Time Center will automatically start scanning for the WWVB frequency signal ( time signal transmission) after
the batteries are inserted. In normal surroundings (i.e. at a safe dis tance from interferring sources such as TV sets), it
takes between 3 to 5 minutes to receive the signal . If after 10 minutes of inserting th e batteries the WWVB signal is not
properly received then check the following list before manually setting the time (see “Time Sett ing”) in programming
mode.
1. The distance of the units should be at leas t 1.5 - 2.0 Meters away from interferring sources such as computer
monitors or TV sets.
2. Avoid placing the units onto or in the immediat e proximity of metal window frames.
4. Within thick concrete rooms such as basements and tower blocks, the WWVB frequency signal is nat urally
weaker for reception. In extreme cases, place the unit closer to a window and/or point its f ront or rear towards the
general direction of NIST Radio Station WWVB in Ft. Collins, Colorado ( again avoid placing near metal frames or
structures).
Note:
Users may be located in areas where atmospheric disturbances are the immediate cause for not receiving the W WVB
frequency signal. During nighttime, atmospheric disturbances are usually less severe and reception is possible in most
cases. With a single daily reception, it is adequate for the World ti me Center to keep time accuracy deviation to below
0.5 seconds in a period of 24 hours.
When reception is successful, the WWVB transmission t ower icon will start flashing in the upper cent er of LCD 2 as a
sign that the signal has been located a nd is about to be received. Once the signal has been locked, the WWVB tower
icon will stay fixed on the LCD and the received time will then update and correct the manually set time.
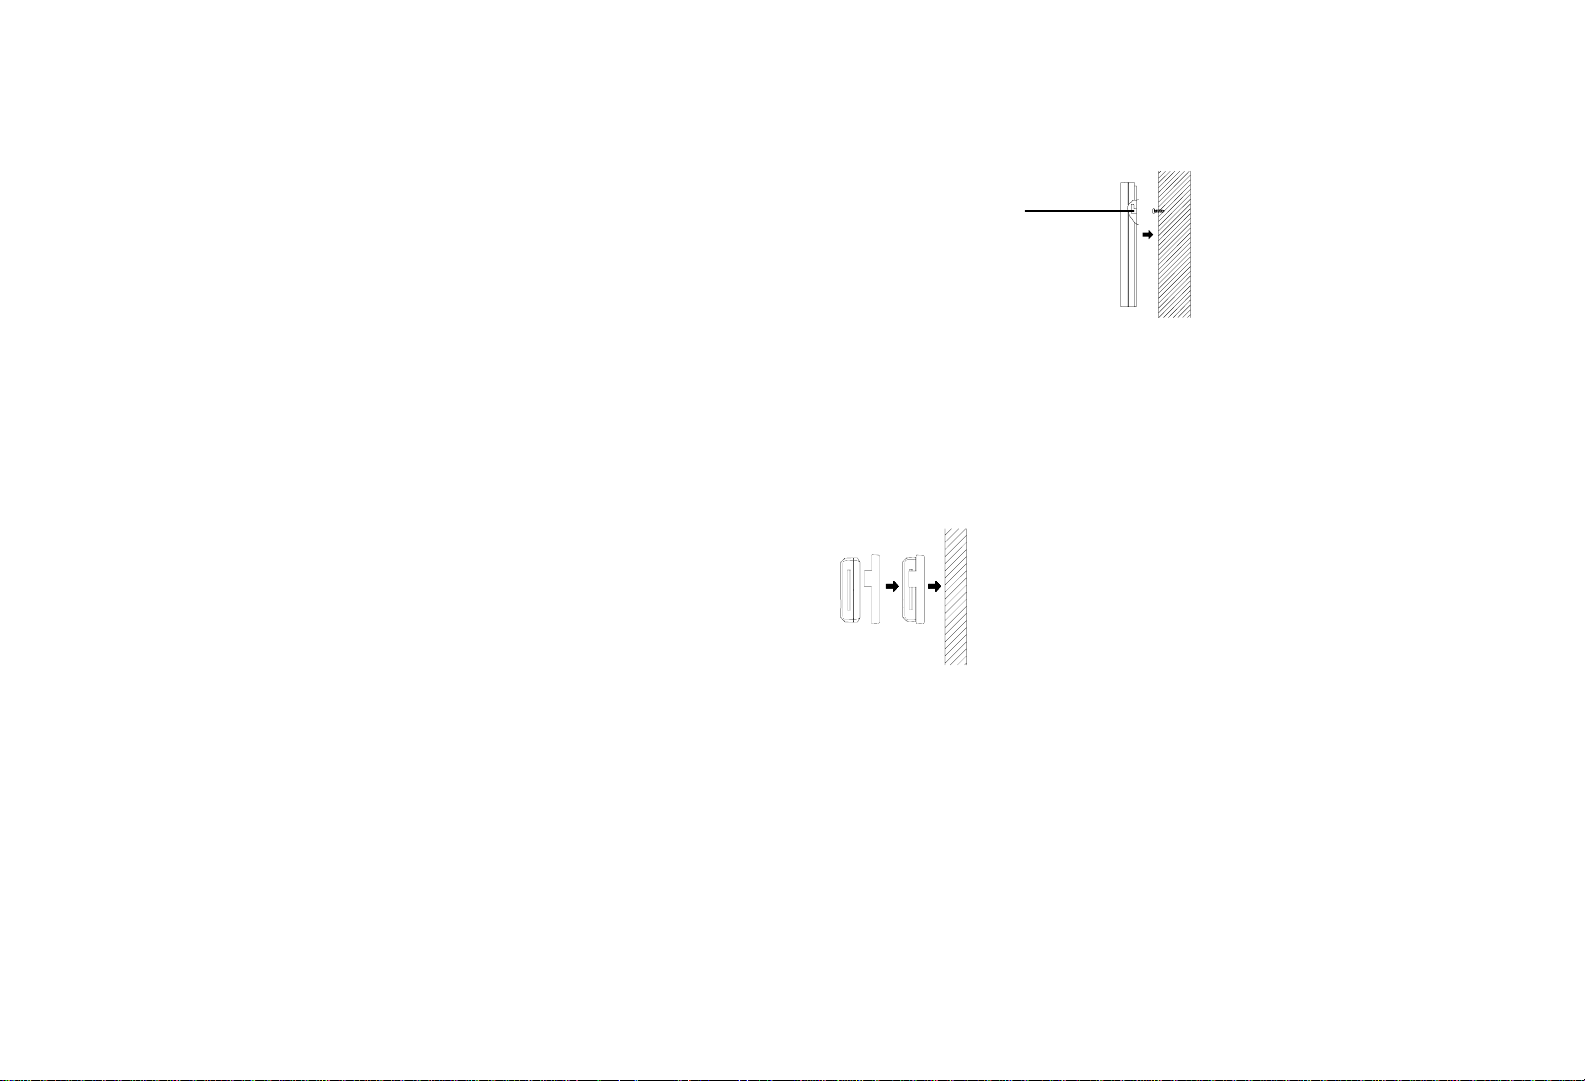
Positioning
Positioning of World Time Center
Hanging
Hole
The World Time Center has been designed to be hung on a wall. To mount please do the following:
1. Fix a screw (not supplied) into the desired wall, leaving the head extended out the wall by about 5 mm as indicated
above.
2. Using the World Time Center's hanging hole on the back of the unit, carefully hang it onto the screw. Always
ensure that the product securely locks on to the screw head before releasing.
Positionning of the Outdoor temperature sensor
The Outdoor temperature sensor has a holder and is supplied screws and double sided tape for affixing by method of
sticking or by screw. Before securing the transmitter to the desired location, check that the temperature can be
received first.
To affix using double sided tape, follow t hese steps:
1.
Peel one side of the tape and press it fir ml y agains t the back of the holder
2.
Now peel the other side of the tape and stic k the holder firmly onto the surface. Do not st ick onto bricks, enamel
finished or greasy surfaces.
Note:
Users are recommended to check that the WWVB time signal or temperatuire from the transmitter is
properly received before permanent standing, hanging or mounting of World Time Center. Should the
World Time Center not pick up the signal from the desired location, then relocate slightly. Once the signal
is received, mount your system units permanently.
Important Notes
To affix by screw, follow these steps:
1. Using the holes in the holder as a guide, mark the holes on the drilling surf ace.
2. Drill the marked area to the required depth
3. Screw the holder onto wall and click the transmitter into holder

• Avoid placing the World Time Center where it can be exposed to sudden changes in temperature, i.e. direct
sunlight, extreme cold and wet/moist conditions since the design of this product is for indoor use only. This will help
to avoid any inaccurate readings and any possible damage to the unit.
• Should the World Time Center be exposed to extreme and sudden temperature changes, it will lead to rapid
changes in its readings and thereby reduce its ac curacy.
• Should the World Time Center be moved to another location that is significantly higher or lower than its initial
standing point (e.g. from the ground floor to the upper floors of a house), t hen inaccurate readings may occur. In
such a case either reset the unit s or discard the readings of the weather f orecast for the next 12 to 24 hours. By
doing so, this will allow sufficient time f or operation at a constant altitude, thus enabling a more accurate forecast.
Care and Maintenance
• Avoid placing the units in places prone to extreme tempe ratures, vibration and shock as these may cause damage
and inaccurate readings.
• When cleaning the World Time Center and Temperatur e Sensor's displays and casings, use a soft damp cloth
only. Do not use solvents or scouring agents as they may mark the LCDs and casing.
• Do not submerge the units in water.
• Immediately remove all low powered batteries to avoid leakage and damag e. Replace only with new batteries of
the recommended size.
• Do not make any attempts to repair the units. Return them to their original point of purchase for repair by a
qualified engineer. Opening and tampering with the units may invalidate their guarantee.
Battery Change
For best performance, batteries to all uni ts should be replaced when the low battery indicator is displayed on the LCD of
the World Time Center and the Outdoor temperature sensor or at least once a year to maintain maximum running
accuracy.
Please help in the preservation of the environment and return used up batteries only to an
Specifications
Radio controlled time signal : WWVB
Recommended operating temperature
World Time Center : 0°C to +50°C
LCD contrast : 8 levels
Temperature measuring range
Indoor : +14ºF to +158ºF with 0.2ºF resolution
(-9,9°C to +59,9°C with 0.1°C
(“OFL“ displayed if outside this range)
Outdoor : -22ºF to +158ºF with 0.2ºF resolution
(-29.9°C to +69,9°C with 0.1°C
(“OFL“ displayed if outside this range)
Relative indoor humidity range : 19% to 96% with 1% resolution
(Display “- - -” if outside this range)
Data checking intervals
Indoor Temperature : Every 20 seconds
Indoor Humiditiy : Every 1 minute
Outdoor temperature : Every 10 seconds
Power Supply
World Time Center : 3 x 1.5V Battery Typ AA, IEC LR6
Temperature Sensor : 2 x 1.5V Battery Typ AA, IEC LR3
Dimensions (L x W x D)
World Time Center : 375 x 30 x 250mm
Temperature Sensor : 56 x 24 x 80mm
Liability Disclaimer
authorized depot.
resolution)
resolution)
• The manufacturer and supplier cannot acce pt any responsibility for any incorrect readings and any consequences
that occur should any inaccurate reading take place.
• This product is not to be used for medic a l purposes or for public information.
• This product has been designed for strict use in the home as an indicator of the future weather and is not 100%
accurate. Weather forecast readings given by this product should be taken only as an indication and not as being
totally accurate.
• The specifications of this product may change witho ut prior notice.
• This product is not a toy. Keep out of the reach of children.
• No part of this manual may be reproduced without written consent of the manufacturer.
Subject Index
Here the interested user will find a number of additional informations regarding the function of this Wallclock
Weather Station. Their knowledge however is not necessary for efficient operation of this system.
Clock, Radio Controlled
The time base for radio controlled time and d ate is a operated by the NIST radio station W WVB in Ft. Collins, Colorado.
WWVB broadcasts are used by millions of people throughout the United States to synchronize electronic products like
clocks, clock radios and wristwatches. WWVB continuously broadcasts time and fr equenzy signals at 60kHz and the
time information received and displayed is absolutely accurate regardless of summer or wintertime.
Software Operations
• WWVB Time Signal
Every full hour, after every setup or reset and af ter leaving the programming mode the software of the World Time
Center will start a reception of the WWVB time signal.
• Indoor Temperature and Humidity/Air Pressure
The software of the World Time Center will perf orm measurements of the current indoor temperature every 20
seconds, the current indoor hu midity every 1 minute and the current air pressure every 1 minute. I n programming
mode and while any one key is pressed no WWVB reception will take place.
• Battery
After setup, reset or after every outdoor data reception a low-battery detection is started by the software of the
World Time Center. If the batter ies run low, a low battery indication flag is shown on the display.
Weather Symbols
For every sudden or definite change in air pressure, the weather symbols will update accordingly to represent this
change. This means that the icons will not change if there is no noticable movement in the weather . If the symbols do not
change it simply means that either
1) the weather has not changed or
2) the weather change has been so slow that is has not been possible to read when the actual change had tak en
place.
The weather icons displayed forecast the fut ure weather in terms of getting better or worse and not necessarily sunny or
rainy as each icon indicates. E.g., if the current weather is cloudy and the rain icon is displayed, it does not mean that
the product is faulty because it is not raining. It simply means that the air pres sure has dropped and the weather is
expected to get worse but not necessarily raining.
Weather Tendency
Because of the combination of weather icons and weather tendency arrows, the World Time Center can also show how
the weather has changed and is expected to change. E.g., if the tendency arrow pointing downwards is displayed along
with the cloud and sun symbols then the last noticeable change in the weather was when it was sunny (sun icon only).
This means that the next change in weather will show the rainy ic on since the tendency indicator is pointing downwards..
The weather tendency indicator arrow will remain on the LCD regar dless of the weather. E.g., if the cur rent weather is
raining and the indicator is pointing downwards, it means that the weather will remain poor. If the weather is sunny and
the indicator is pointing upwards, it means that the weather is expected to continue being fine.

La Crosse Technology, Ltd provides a 1-year limited warranty on this produc t against manufacturing defects in materials
and workmanship.
This limited warranty begins on the original date of pur chase, is valid only on products purchased and used i n Nor th
America and only to the original purchaser of this product. To receive warranty service, the purchaser must contact La
Crosse Technology, Ltd for problem determination and service procedures. Warranty service can only be performed by
a La Crosse Technology, Ltd authorized service center . The original dated bill of sale must be presented upon request
as proof of purchase to La Crosse Technology, Lt d or La Crosse Technology, Ltd’s authorized service cent er.
La Crosse Technology, Ltd will repair or replace this product, at our option and at no charge as stipulated herein, with
new or reconditioned parts or products if found to be defective during the limited warrant y peri od specified above. All
replaced parts and products become the property of La Crosse Technology, Ltd and must be returned to La Crosse
Technology, Ltd. Replacement parts and products assume the remaining original warranty, or ninety (90) days,
whichever is longer. La Crosse Technology, Ltd will pay all expenses f or labor and materials for all repairs covered by
this warranty. If necessary repairs are not covered by this warranty, or if a product is examined which is not in need or
repair, you will be charged for the repairs or examinatio n. The owner must pay any shipping charges incurred in getting
your La Crosse Technology, Ltd product to a La Crosse Technology, Ltd authorized service center. La Crosse
Technology, Ltd will pay reasonable return shipping charges t o the owner of the product.
Your La Crosse Technology, Ltd warranty covers all defects in material and workmanship with the following
specified exceptions: (1) damage caused by accident, unreasonable use or neglect (including the lack of
reasonable and necessary maintenance); (2) damage occurring during shipment (claims must be presented to
the carrier); (3) damage to, or deterioration of, any accessory or decorative surface; (4) damage resulting from
failure to follow instructions contained in your owner’s manual; (5) damage resulting from the performance of
repairs or alterations by someone other than an authorized La Crosse Technology, Ltd authorized service
center; (6) units used for other than home use (7) applications and uses that this product was not intended or (8)
the products inability to receive a signal due to any source of interference.. This warranty covers only actual
defects within the product itself, and does not cover the cost of installation or removal from a fixed installation,
normal set-up or adjustments, claims based on misrepresentation by the seller or performance variations
resulting from installation-related circumstances.
LA CROSSE TECHNOLOGY, LTD WILL NOT ASSUME LIA BILITY FOR INCIDENTAL, CONSEQUENTIAL, PUNITI VE,
OR OTHER SIMILAR DAMAGES ASSOCIATED WITH THE OPERATION OR MALFUNCTION OF THIS PRODUCT.
THIS PRODUCT IS NOT TO BE USED FOR MEDICAL PURPOSES O R FOR PUBLIC INFORMATION. THIS
PRODUCT IS NOT A TOY. KEEP OUT OF CHILDREN’S REACH.
This warranty gives you specific legal rights. You may also have other rights s pecific to your State. Some States do no
allow the exclusion of consequential or incidental damages therefore the above exclusion of limita tion may not apply to
you.
For warranty work, technical support, or information con tact:
WARRANTY INFORMATION
La Crosse Technology, Ltd
2809 Losey Blvd. S.
La Crosse, WI 54601
Phone: 608.782.1610
Fax: 608.796.1020
support@lacrossetechnology.com
sales@lacrossetechnology.com
(information on other products)
www.lacrossetechnology.com
Questions ? Instructions? Please visit :
www.lacrossetechnology.com
e-mail:
(warranty work)
web:
THIS DEVICE COMPLIES WITH PART 15 OF THE FCC RULES.
OPERATION IS SUBJECT TO THE FOLLOWING TWO CONDITIONS:
1. THIS DEVICE MAY NOT CAUSE HARMFUL INTERFERENCE, AND
2. THIS DEVICE MUST ACCEPT INTERFERENCE RECEIVED, INCLUDING I NTERFERENCE THAT MAY
CAUSE UNDESIRED OPERATION.
World Time Center
Operating Manual
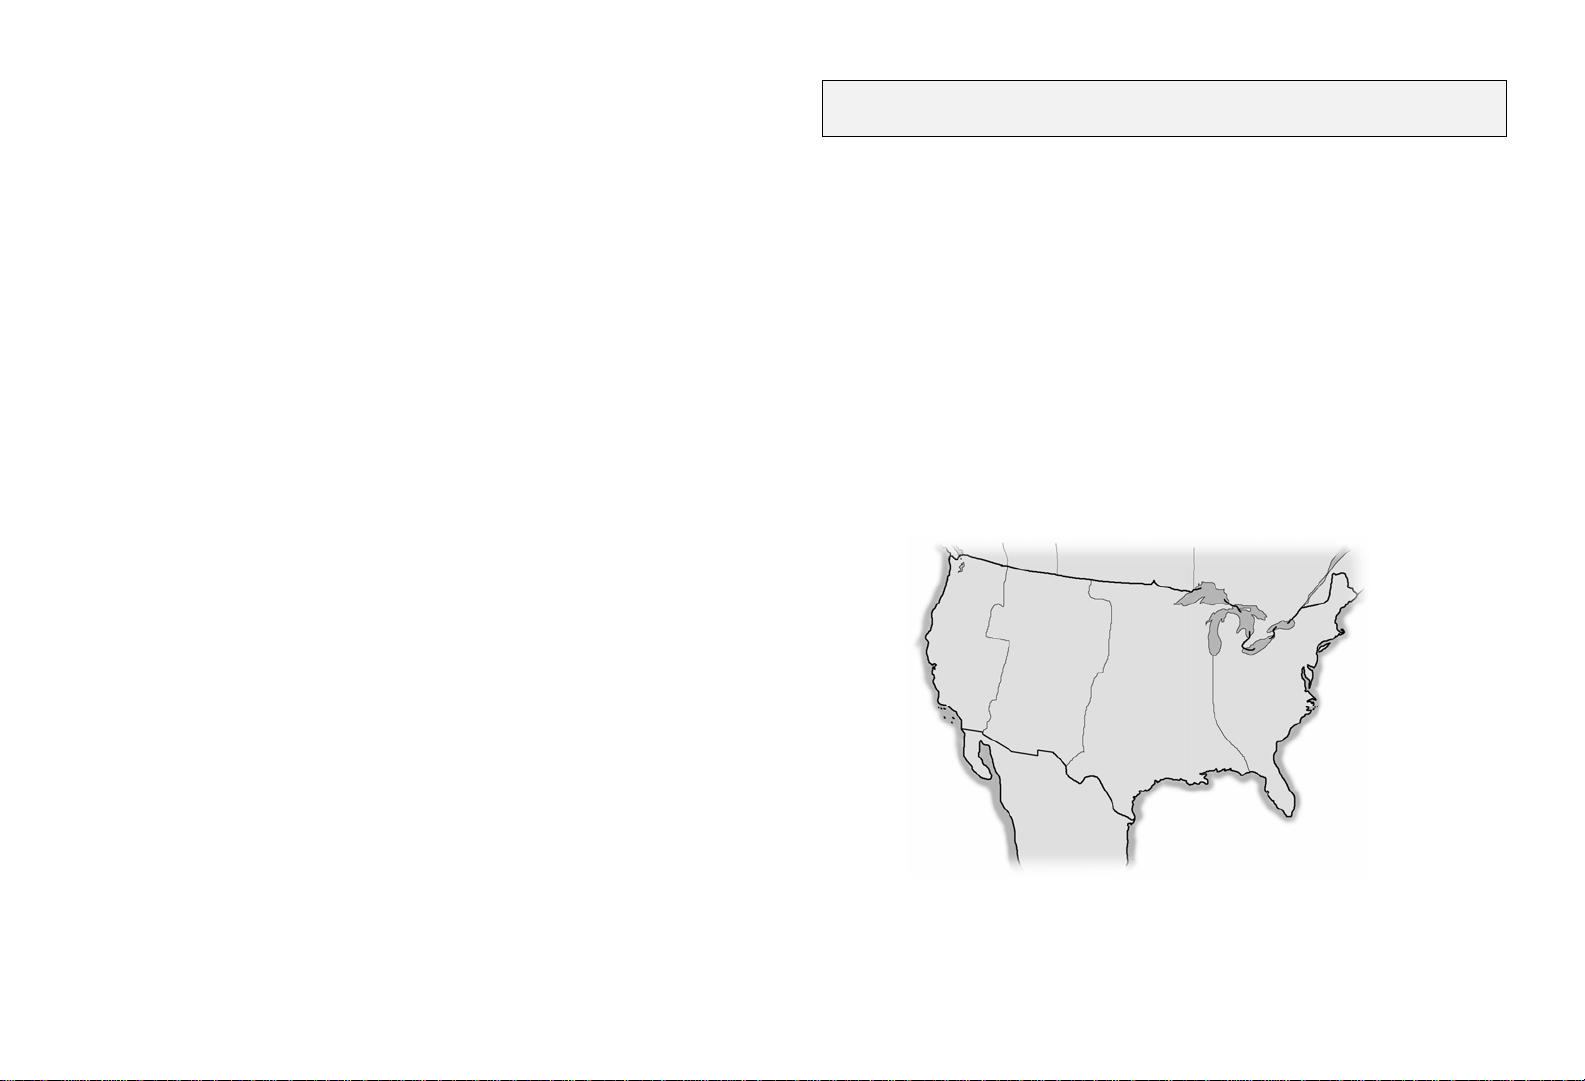
Canada
Mountain Time
(-7h GMT)
Pacific Time
(-8h GMT)
Mexico
Central Time
(-6h GMT)
United States
Eastern Time
(-5h GMT)
 Loading...