

La Crosse Technology V41-PRO-INT Instructions

Wi-Fi PROFESSIONAL
WEATHER STATION
SET UP GUIDE
MODEL NUMBER V41
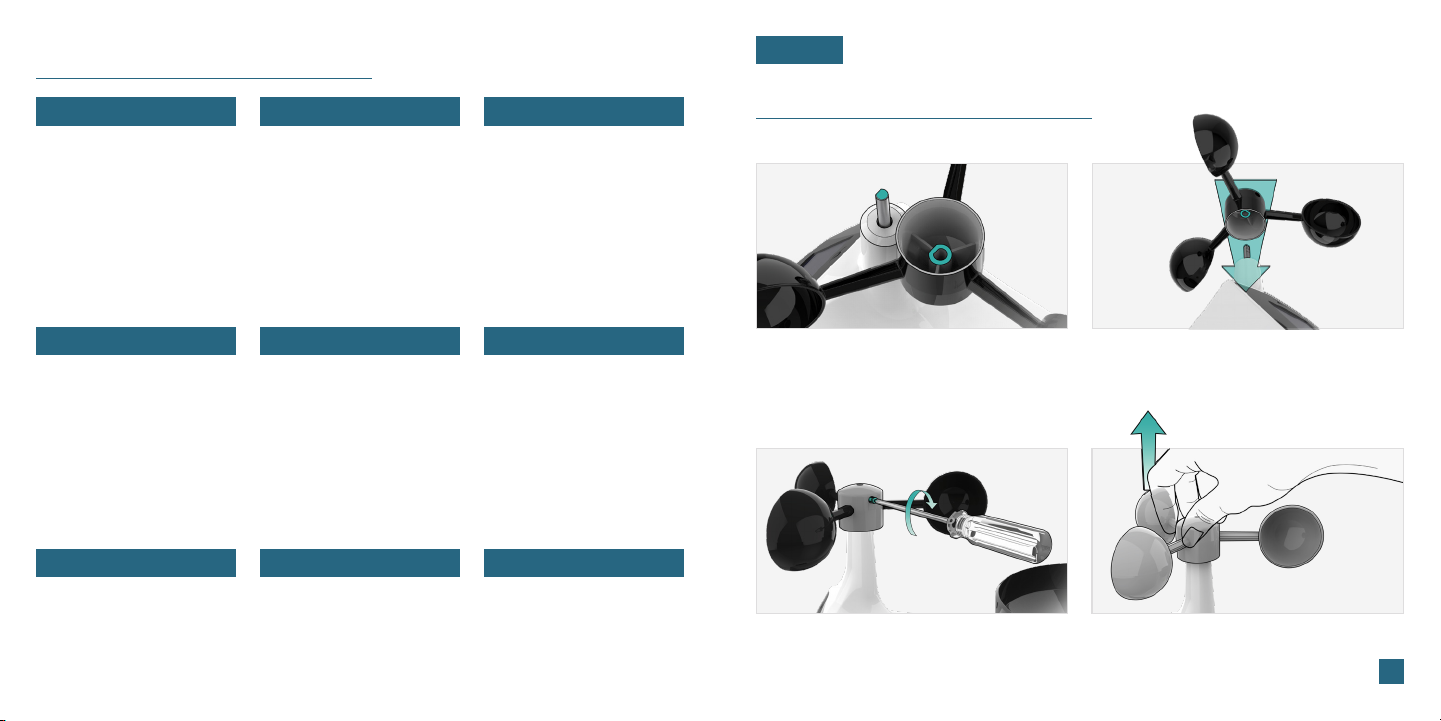
Table of Contents
SENSORS
BASICS
Initial Setup
Station Settings
Buttons
LCD Display Brightness
Auto-Dim Settings
Time & Calendar Display
WIND
Viewing Wind Data
Wind Speed Records
Customizable Alerts
SENSORS
Wind Cup Installation
Placement & Mounting
Rain Sensor Cleaning
Add-On Sensors
02-03
07
08
09
09
20
02
21-23
24
25
LA CROSSE VIEW
Connecting to the App
Connecting Your Station
Adding Your Sensors to
the App
Manually Add Sensors to
the App
10
Data Stream Technology
RAIN
Viewing Rain Data
13
Rainfall Records
14
Customizable Alerts
APPENDIX
Specifications
Cautions & Statements
Warranty
Recycling & Disposal
04
05
06
06
15-16
20
26
26-29
29
29
FORECAST
Viewing Your Forecast
Data
Viewing Extended
Forecasts Data
Moon Phase
Seasonal Trees
Trend Arrows
10
TEMP. AND HUMIDITY
Viewing Temperature
& Humidity Data
17
Indoor Comfort Meter
Temperature & Humidity
Records
“Feels Like” Temperature
Customizable Alerts
SUPPORT
We’re Here to Help
Factory Reset
Stay in Touch
20
29
29
29
Initial Setup
11
12
12
12
12
18
18
19
19
Installing the Wind Cups (if needed)
Remove the Cyclone Sensor, Wind Cups,
1.
and Mini Screwdriver from the package.
Take note of the flat edges located on the
head of the Cyclone Sensor and underside
of the Wind Cups.
Carefully tighten the screw on the side of the
3.
cups using the Mini Screwdriver. The screw
should tighten into the flat edge of the post.
Align the flat edges and place the Wind
2.
Cups on top of the Cyclone Sensor.
When the screw is tight, gently pull up on
4.
the cups to ensure they are secure.
If they pull o, start again with step two.
02
BASICS LA CROSSE VIEW
Initial Setup Connecting to the App
Stay connected to your home anytime, anywhere with the
La Crosse View app.
Monitor your home environment and set custom alerts to notify
you when conditions change.
Connecting your station is optional and the display will function
as a standalone unit without the Wi-Fi connection. However, we
recommend connecting during the initial setup, as it will save you
time and allows access to some advanced features right away.
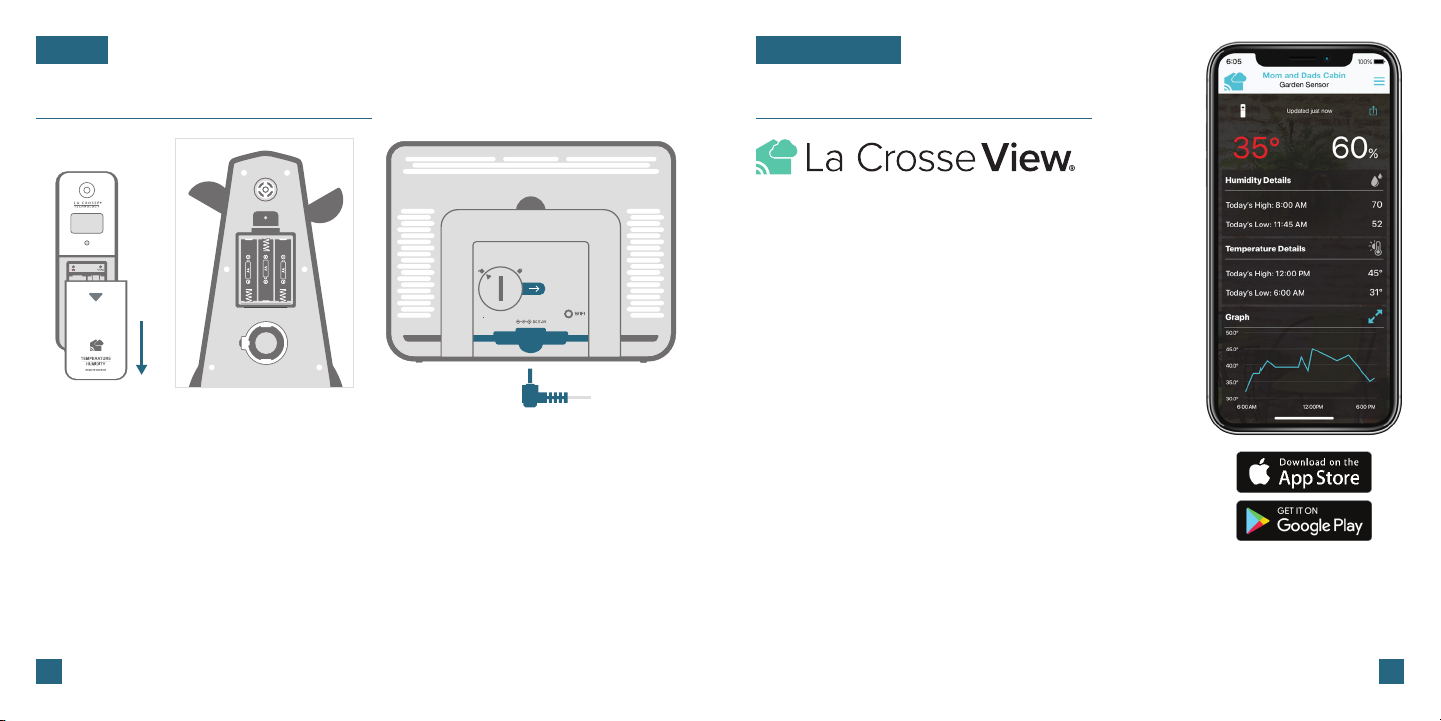
Thermo-Hygro Sensor
(LTV-TH2i)
Bottom of Cyclone Sensor
Back of Station (V41)
(LTV-WSDR1)
Power Jack
Power Up
Thermo-Hygro Sensor: Install 2 fresh “AA” batteries according to polarity and replace battery cover.
The blue LED light will flash when transmitting.
Cyclone Sensor: Install 3 fresh “AA” batteries according to polarity and replace battery cover.
Weather Station: Insert the 5V Power Adapter into an outlet, and then plug it into the Power Jack
on the bottom of the station. Next, remove the Insulation Tab from the Station’s Battery Compartment.
About 30 seconds after powering the station on, it will automatically enter the Settings Menu.
See page 07 for more details.
03
Note: It may take up to 10 minutes for the sensor data to appear on your station’s screen.
Download the La Crosse View App
Visit the App Store or Google Play Store to download the free
La Crosse View app onto your mobile device.
Launch the App
Open the La Crosse View app. Follow the on-screen setup
instructions to create an account, add new devices, and connect
your station to your Wi-Fi network.
Connecting Your Station to the App
Now that you’ve created your La Crosse View account, it’s time to add your station into your
account and connect it to your home router using the La Crosse View app.
NOTE: For the steps listed on the next page, you’ll need your Wi-Fi network name (SSID)
and password. Make sure your mobile device is connected to the same Wi-Fi network.
04
LA CROSSE VIEW
100%
12:34
123456-ABC
LA CROSSE VIEW
Adding & Connecting Your Station to Wi-Fi
The La Crosse View app is required to connect the station to your Wi-Fi network. Download, install,
1.
and log into your La Crosse View account first.
Follow the initial app instructions or manually add the display into your account. 2.
New User Initial Setup: When first setting up your
station, the app will lead you through a series of
instructions to help get your station added into your
account and connected to your home Wi-Fi network.
Next, the app will prompt you to use your phone to scan the device ID barcode located on the back of
3.
the station. Please note, adding a device to your account and connecting it to Wi-Fi are two dierent
steps. You can complete either step separately if you have any trouble.
When connected, the station will beep, and time and forecast information should populate on the
4.
display. The indicator will also become solid.
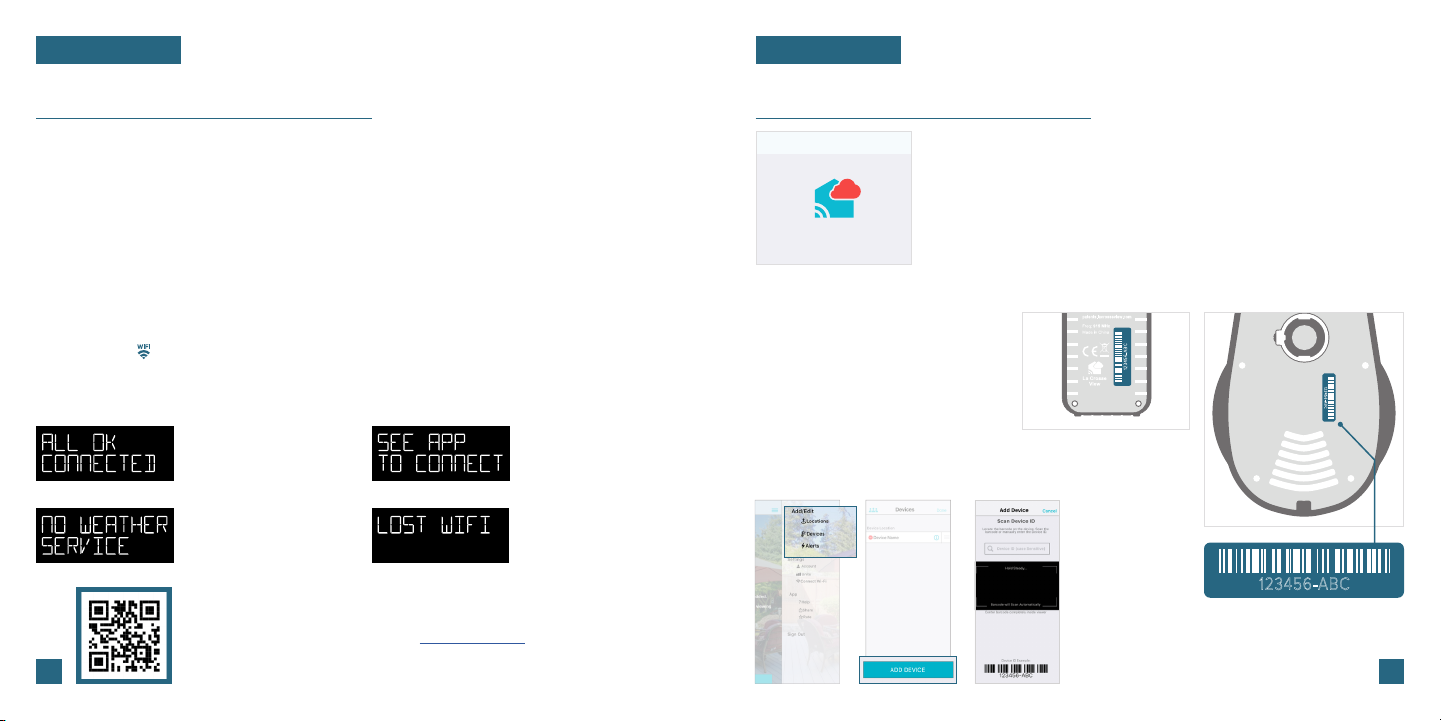
Checking Your Station’s Wi-Fi Status
Press the SET button on the top of the station to view your Wi-Fi Status.
ALL OK CONNECTED
Your station is connected to your
Wi-Fi network and its data should
be available on the station and
in the app.
NO WEATHER SERVICE
Your Internet weather and time
services are not connecting.
These should resolve on their
05
own, please be patient.
Having Trouble Connecting to Wi-Fi?
The app should guide you through the best method for your Wi-Fi network and router. However,
if you have trouble connecting, please go to: bit.ly/wifi_questions or scan the QR code. This will
explain additional connectivity options, including connecting by WPS or contacting our technical
support team for further assistance.
Manually Add & Connect Display: After the initial walkthrough,
stations can be added and connected via the Devices tab in the
app’s main menu. Simply tap the Add Device or + button at the
bottom of the Devices page in the app.
SEE APP TO CONNECT
Check the app for notifications.
LOST WIFI
Check your router and network
connections.
Adding Your Sensors to the App
Add Device SaveCancel
2
Please wait up to 15 minutes
for your additional devices
to connect to your account.
Manually Add Your Sensors to the App*
1.
Open your La Crosse View app. On the
Main Menu, scroll to ADD/EDIT and select
DEVICES.
2.
On the Devices page, select the ADD
DEVICE or PLUS (+) button.
3.
Scan the Barcode on your Sensor or type
in the Device ID manually.
4.
Confirm the sensor image and Device
ID and add a Device Name and Location
Name. Select DONE.
Upon getting the station connected to your Wi-Fi network, the app will
explain how your connected sensor should be brought in. Within the next
15 minutes, you should receive an Add Device notification in your app.
This is indicated by the Red Cloud and the numbers inside of it. Tap this
icon to begin adding your sensor into the app.
123456-ABC
▲ Back of Thermo-Hygro Sensor
Bottom of Cyclone Sensor ⊲
* This step is only required if you do not receive the Add Device
notification within the app.
Prior to mounting/positioning your sensors, make sure your
station is receiving sensor data.
123456-ABC
02
06
BASICS
BASICS
Station Settings
About 30 seconds after powering the station on, it will automatically enter the Settings Menu.
Use the steps below to navigate the menu and get your station working the way you’d like.
Navigating the Settings Menu
To manually set language, time/date, and other
1.
settings, hold the SET button to enter the
Settings Menu.
Use the +/- buttons on the top of the station to
2.
adjust the values.
Press the SET button to confirm your selection
3.
and move to the next setting.
You may exit the Settings Menu at any time
4.
by pressing the DISPLAY BRIGHTNESS ( )
button on the front of the station.
07
Settings Menu Order
• Greeting/HELLO
• Language (English/Spanish/French/German)
• Beep ON/OFF
• 12/24 Hour Time Format
• Hour | Minute | Year | Month | Date
• Calendar Order Month/Date or Date/Month
• Temperature Units (Fahrenheit/Celsius)
• Temperature Decimal ON/OFF
• Wind Speed Units (MPH/KPH)
• Wind Direction (Letters/Degrees)
• Rainfall (Inches or Millimeters)
• THANK YOU
Important: Settings such as language and units of measure must
be set manually within the station’s Settings Menu. These are not
controlled by the La Crosse View app.
The language selected will aect menu instructions as well as
weekday and month readouts.
Weekday will set automatically after year, month, and date
settings are adjusted.
When in 24 hour time format, seconds will show in place of
AM/PM markings.
If you’re connected to Wi-Fi, the time/date will automatically
update from the Internet. See pages 04-06 for more info.
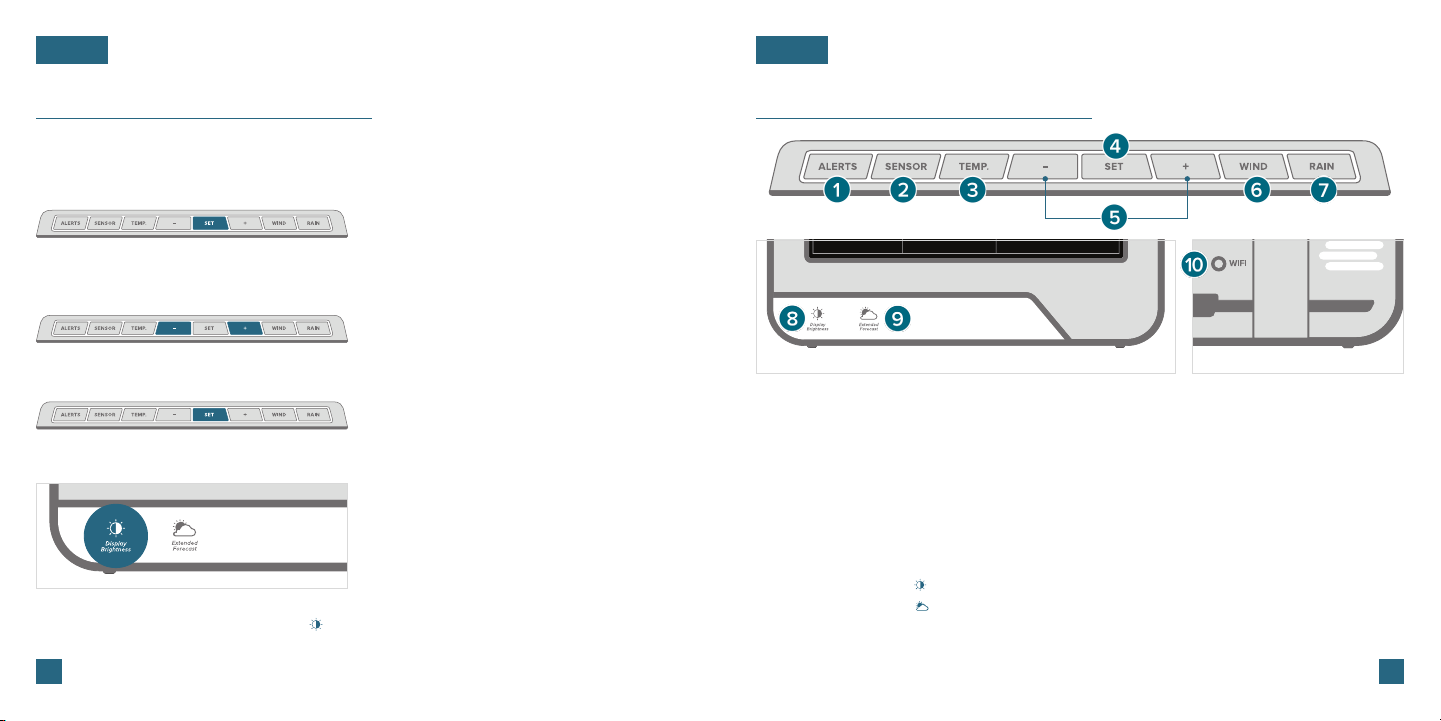
Buttons
Front of Station Back of Station
1. ALERTS: Hold to enter Alert Settings. Press to confirm and move to next item. Use the + or - buttons to arm
or disarm an alert.
2. SENSOR: Press to view sensor ID numbers. While viewing, hold the MINUS (-) button delete the sensor.
3. TEMP: Press to view Temp. & Humidity History. While viewing, hold the MINUS (-) button to reset history value.
Hold to search for Outdoor Sensor.
4. SET: Press to view Wi-Fi status. Hold to enter the Settings Menu.
5. PLUS/MINUS (+/-): Use to adjust values. When in Alert Settings, press to arm/disarm alert.
6. WIND: Press to view Wind Speed History. While viewing, hold the MINUS (-) button to reset the history value.
7. RAIN: Press to view Rain History. While viewing, hold the MINUS (-) button to reset the history value.
8. DISPLAY BRIGHTNESS ( ): Press to adjust backlight or to exit settings. Hold to enter Auto-Dim settings.
9. EXTENDED FORECAST ( ): Press to see Daily or Hourly Forecast. Hold to auto-scroll forecast data.*
10. WIFI: Press during initial setup for Wi-Fi Connection. Hold to re-enter Configuration Mode and clear previous
Wi-Fi settings.
* Your display must be connected to Wi-Fi to receive Daily/Hourly forecast information.
08
 Loading...