

UV Master
Prevent You Getting UV Over-Exposure
Instruction Manual
2.0 Parts and Its Functions
UV Index
Color Code
Light
Mode
Display
Note: The operations of the buttons
are summarized in the adjacent
paragraphs. However, for the detail
operations, please check the coming
chapters.
Start/Stop
Lap/Reset
UV Sensor
[mode] Button
l Press the button to select among the 5 function
modes l In function modes: Press and hold the button
to select setting display l During setting displays: Press
the button to select among different setting items. Press
and hold the button to exit setting sequence.
[start/stop] Button
l In Current Time Mode: Press the button to select
between the Date Display and UV Index Display l In
Daily Alarm Mode: Press the button to select between
ON and OFF the daily alarm l In Chronograph Mode
and Timer Mode: Press the button to start/stop the
counting l In setting displays: Press the button to scroll
through the setting.
[lap/reset] Button
l In Daily Alarm Mode: Press the button to select
between ON and OFF of the hourly chime In
Chronograph Mode: When counting, press the button to
select the Lap time display. When stop-counting, pres s
the button to reset to zero display l In Timer Mode:
When stop-counting, press the button to reset the timer
to target time l In setting displays: Press the
button to scroll the setting.
[light] Button
l In any mode, press the button once to turn ON the EL
back light for about 3 seconds.
1
1.0 Introduction
Thank you for purchasing this model. Your
Watch includes 5 functional modes. They are
the Current Time Mode, UV Index Mode, Daily
Alarm Mode, Chronograph Mode and Timer
Mode.
This Watch equipped with an UV sensor that
measures UV radiation in terms of UV index.
This model also includes 2 UV index alarms.
In addition to the UV sensing, this model also
included current time, daily alarm,
chronograph and timer functions.
Your Watch is carefully designed and
produced, in order to utilize this feature of
your Watch, it is advisable to use the Watch in
conformity with the below notes:
! Read this manual before using the Watch.
! Avoid exposing your Watch to extreme
conditions for an unreasonable time.
! Avoid rough use or severe impacts to your
Watch.
! Store your Watch in a dry place when it is
not in use.
2
! It is recommended to have the battery
replacement done by a certified service
agency as this practice will
maintain the water resistance standard
on your Watch.
! Clean your Watch occasionally with a soft
moistened cloth. DO NOT expose the
Watch to strong chemicals such as
gasoline and alcohol, as they will damage
your Watch.
! DO NOT use this Watch for commercial or
professional purpose.
! Make sure that you fully understand the
functions and limitations of this Watch
before using it.
! Always compare the UV reading with the
one broadcasted by local weather station.
! Excessive exposure to UV radiation could
cause fatal harm to a human body, always
follow the 'Basic Sun Protection
Messages' by the World Health
Organization when you go out in the Sun.
WARNING
3
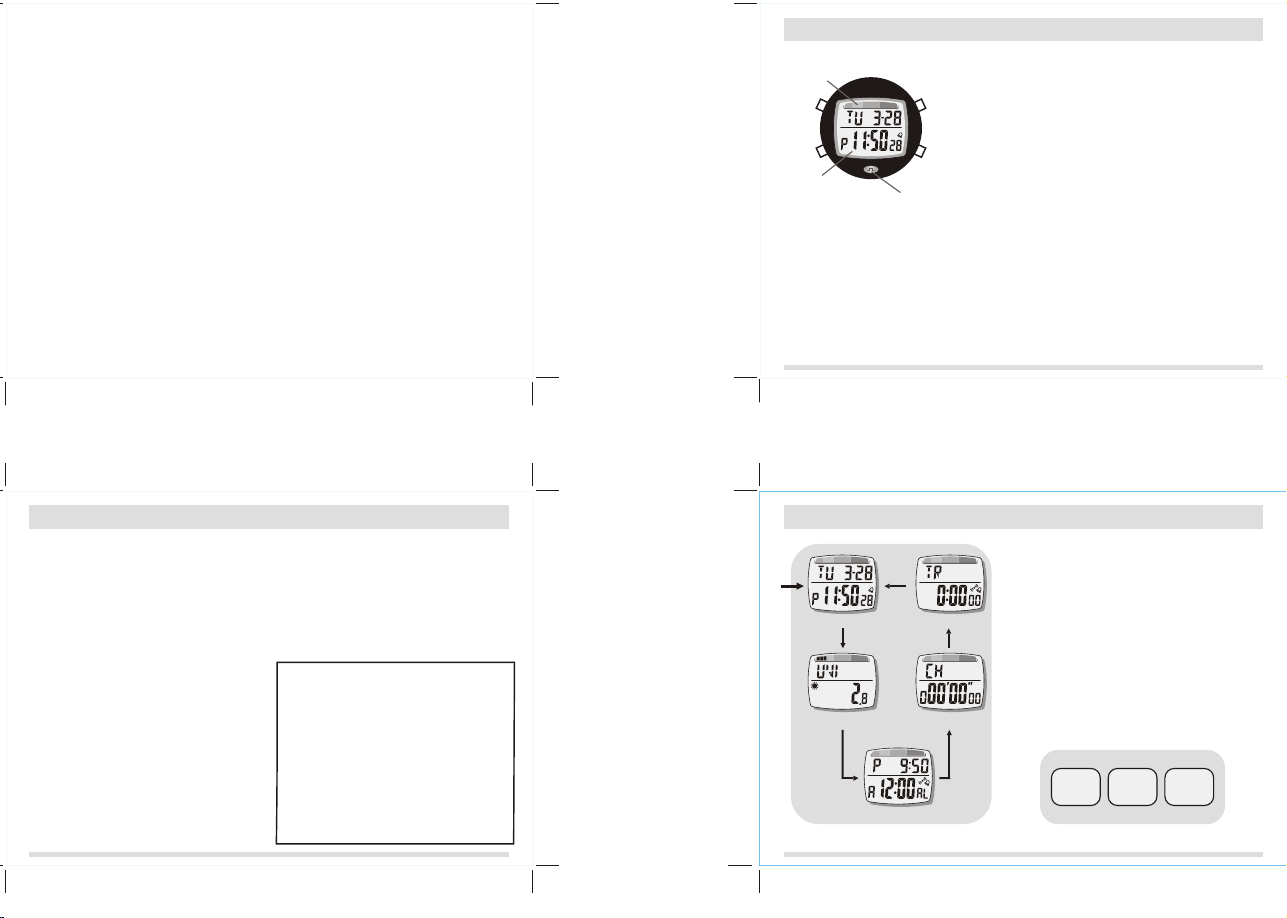
3.0 Functional Mode and Functional Display
! The Watch includes 5 functional modes. They
are the Normal Time Mode, UV Index Mode, Daily
[mode]
button
Current Time Mode
[mode]
button
UV Index Mode
[mode]
button
Daily Alarm Mode
Function Mode Selection Sequence
Timer Mode
Chronograph Mode
Alarm Mode, Chronograph Mode and Timer Mode.
! Every function mode may include one or more
than one function display, it provides
supplementary features to the corresponding
function mode.
To Switch among the 5 Functional Modes
[mode]
button
! To select among the ress
the [mode] button
To Switch among the Function Displays
! To select among the function displays, check the
coming chapters for the detail on how to switch
among different function displays.
[mode]
button
following the adjacent figure.
Function
Function
Display
Function Mode
Function Mode and Function Display
4
5 function modes, p
Function
Display
Display

4.0 Current Time Mode - Date Display & UV Index Display
Day of week
[start/stop] *2
Current UV
Index represents
by bar segments
UV Index
Alarm Icon
Peak UV Index represents
by bar segments
Peak UVI
Indicator
Date Display
[start/stop] *1
UV Index Display
(Current UV Index)
UV Index Display
(Peak UV Index)
Date
Current Time
(hour, minute,
second)
UV Index
Color Code
Current
UV Index
Current Time
(hour, minute,
second)
UV Index
Color Code
Peak
UV Index
Current Time
(hour, minute,
second)
! The Current Time Mode includes two function
displays. They are the Date Display and UV Index
Display.
Date Display
!The day of week and date appear on the upper
row of the display. The current time (hour, minute,
second) appears on the lower row of the display.
UV Index Display
! Either the Current UV Index info or Peak UV
Index info appears on the upper row.
Note 1: The Current UV Index info will appear in
this display if the Current UV Index has been
selected in the UV Index Mode.
Note 2: The Peak UV Index info will appear in this
display if the Peak UV Index has been selected in
the UV Index Mode.
Check the coming '5.4 Current & Peak UV Index
Display' Section for more detail on how to select
between Current UV Index and Peak UV Index.
! The UV Index Alarm Indicator and the Current
Time appear on the lower row of the display.
To Select between the Date Display and UV
Index Display
! Press the [start/stop] button once to select
between the Date Display and UV Index Display.
5.0 UV Index Mode - What Does the UV Index Mean
The UV Index is a measure of the solar UV
1
0.1
0.01
0.001
Erythemal Weighting Factor
0.0001
280 290 300 310 320 330 340 350 360 370 380 390 400
Wavelength (nm)
Erythemal Action Spectrum
Source: The International Commission on Illumination
!
(ultraviolet) intensity at the Earth's surface
relevant to the effect on human skin.
The skin-damaging UV radiation is governed by
!
the erythemal action spectrum, the black line in
the adjacent figure.
This spectrum has been adopted by the
!
International Commission on Illumination (CIE) to
represent the average skin response over the
solar UV spectrum.
Source:
! World Health Organization
! National Oceanic Atmospheric Administration
Hong Kong Observatory
!
Further information (28 August 2003):
1)www.who.int/peh-uv/uv_radiation.htm
2)www.cpc.ncep.noaa.gov/products/stratosphere/
uv_index/uv_information.html
3)www.hko.gov.hk/wxinfo/uvindex/english/
uvbginfo.htm
5
4.1 Current Time Mode - To Set the Current Time
! To set the current time and date, and their display
formats, press and hold the [mode] button for
about 2 seconds to select the setting display.
! When the '12Hr' or '24Hr' is flashing, press the
[start/stop] or [lap/reset] button to switch between
'12Hr' (12 hour format) and '24Hr' (24 hour
format).
! When the 'second' flashes on the display,
second
[mode]
minute
M-D/
D-M
[mode]
month
press [start/stop] or [lap/reset] button to reset
the second to zero.
! If one of the setting items (minute, hour, year,
month, day) is flashing, press the [start/stop] or
[lap/reset] button to scroll the setting (hold down
the button to scroll the setting faster).
! When the 'M-D' or 'D-M' is flashing, press the
[start/stop] or [lap/reset] button to switch between
'M-D' (month-day) and 'D-M' (day-month).
! When the above settings are finished, press and
hold the [mode] button for about 2 seconds to exit
the setting sequence.
! The setting display will change to Current Time
Mode automatically if no key-stoke has been
activated for about 3 minutes.
Current Time Mode
hold
hold
[mode]
[mode]
[start/stop]
scroll the
setting by
increment of 1
hold
[start/stop]
scroll
the setting
faster
[lap/reset]
scroll the
setting by
decrement of 1
hold
[lap/reset]
scroll
the setting
faster
reset Second to zero
'12' changes to '24';
'24' changes to '12'.
[start/stop]
or [lap/reset]
[mode]
[start/stop]
or [lap/reset]
[mode]
12/24
[mode]
hour
[mode]
[mode]
year
[mode]
day
Current Time
Setting Sequence
[start/stop] or [lap/reset]
'day-month' changes to 'month-day';
'month-day' changes to 'day-month'.
6
7
5.1 UV Index Mode - UV Index Range, Exposure Category and Color Code
! As categorized by the World Health Organization,
he UV Index
UV Index
Range
Exposure
Category
0 - 2
3 - 5
6 - 7
8 - 10
11
UV Radiation Exposure Categories
Source: World Health Organization
Low
Moderate Yellow
High
Very High
Extreme
Color
Code
Green
Orange
Red
Purple
t ranges between 0 and 11+. Each
UV index is matched with an exposure category
and color code. Check the adjacent table for more
detail on UV index range, exposure category and
color code.
! The lower the UV Index, the lower the UV
exposure category, the less likely the damage to
our body, while the higher the index, the higher
the UV exposure category, the more likely the
damage to our body.
! This Watch exhibits UV Index.
use of the exhibited to cross-check
his/her exposure level, and hence to taking the
appropriate protections to safeguard his/her body
from the potential harms of UV radiation.
Source:
! World Health Organization
! National Oceanic Atmospheric Administration
! Hong Kong Observatory
Further information (28 August 2003):
1) www.who.int/peh-uv/uv_radiation.htm
2)www.cpc.ncep.noaa.gov/products/stratosphere/
uv_index/uv_information.html
3) www.hko.gov.hk/wxinfo/uvindex/english/
uvbginfo.htm
UV Index
User can make
8
5.2 UV Index Mode - Basic Sun Protection Messages
!When you go out in the sun, World Health
1.
Check The
Latest
Uv Index
3.
Wear
Long-sleeved
and Loose-fitting
Clothing
5.
Wear UV
Blocking
Sunglasses
7.
Avoid
Tanning
Beds
2.
Stay Away
From The Sun
If the UV Index is
Very High
4.
Wear a
Broad Brim Hat or
Use An Umbrella
6.
Apply UV
Blocking Lotion
Regularly
8.
Protect Babies
and
Young Child
Organization (WHO) suggests taking the following
protective measures against UV radiation:
1) Limit exposure during midday hours.
2) Seek shade.
3) Wear protective clothing.
4) Wear a broad-brimmed hat to protect the
eyes, face and neck.
5) Protect the eyes with wrap-around-design
sunglasses or sunglass with side panels.
6) Use and reapply broad-spectru sunscreen
of sun protection factor (SPF) 15+ liberally.
7) Avoid tanning beds.
8) Protect babies and young children.
Source:
!
World Health Organization
! Hong Kong Observatory
Further information (28-08-2003):
1) www.who.int/peh-uv/uvindex.htm
2) www.hko.gov.hk/wxinfo/uvindex/english/
euvtoday.htm
5.4 UV Index Mode - Current & Peak UV Index Display
! The UV Index Mode includes two functional
[start/stop]
UV Index
Color Code
Current
UV Index
Peak
UV Index
displays. They are the Current UV Index Display
and Peak UV Index Display.
Current UV Index Display
! The Current UV Index Bar Segment displays on
the upper row of the display. The Cu rr en t UV
Index and UV Index Alarm Indicator display on the
lower row of the display.
Note: When this display has been selected, and
then the watch returns to Current Time Mode: the
Current UV Index Bar Segment and Current UV
Index will display if UV Index Display is selected.
Peak UV Index Display
! The Peak UV Index Bar Segment appears on the
upper row of the display. The Peak UV Index and
the UV Index Alarm Indicator appear on the lower
row of the display.
Note: When this display has been selected, and
then the watch returns to Current Time Mode: the
Peak UV Index Bar Segment and Peak UV Index
will display if UV Index Display is selected.
To Select between the Current and Peak UV
Index Display
! Press the [start/stop] button once to select
between the Current UV Index Display and Peak
UV Index Display.
Current UV Index
bar segment
Current UV Index
Indicator
UV Alarm
Indicator
Peak UV Index
bar segment
Peak UV Index
Indicator
UV Index Mode
(Current UV Index Display)
UV Index Mode
(Peak UV Index Display)
9
5.3 UV Index Mode - How UV is Sensing
! This Watch uses a built-in UV sensor to detect
ambient Ultraviolet radiation which is then
converted to UV Index.
! The UV Sensor is the small spot that is located
on the lower part of the dial. Check the previous
'2.0 Parts and Its Functions' Section for the
detail on the location of the UV Sensor.
Notes to UV Measurement
! To make an accurate result, employ the
following steps when taking a UV measurement:
1) Position the UV Sensor directly to the source
of radiation, for example the Sun.
2) Avoid sheltering the UV Sensor unintentionally.
3) Rotate the Watch slowly and search for the
maximum reading.
4) Clean the lens of the Watch with a soft
cloth before the measurement, this practice
allows NO dirt or dust sheltering the UV sensor.
! During the first five minutes of UV Index Mode, the
Watch needs two seconds to get a reading.
! After the first five minutes of UV Index Mode, the
Watch needs 10 seconds to get a reading.
Ultraviolet Radiation
How UV is Sensing
1.
Position the
UV Sensor
directly to
the source
3.
Rotate the
Watch Slowly
and Search for
Maximum Reading
Notes to UV Measurement
the Sun
UV Sensor
UV Index
the Watch
2.
Avoid Shelter
the UV Sensor
Unintentionally
4.
Clean the lens
of the Watch with
a Soft Cloth before
the measurement
10
11
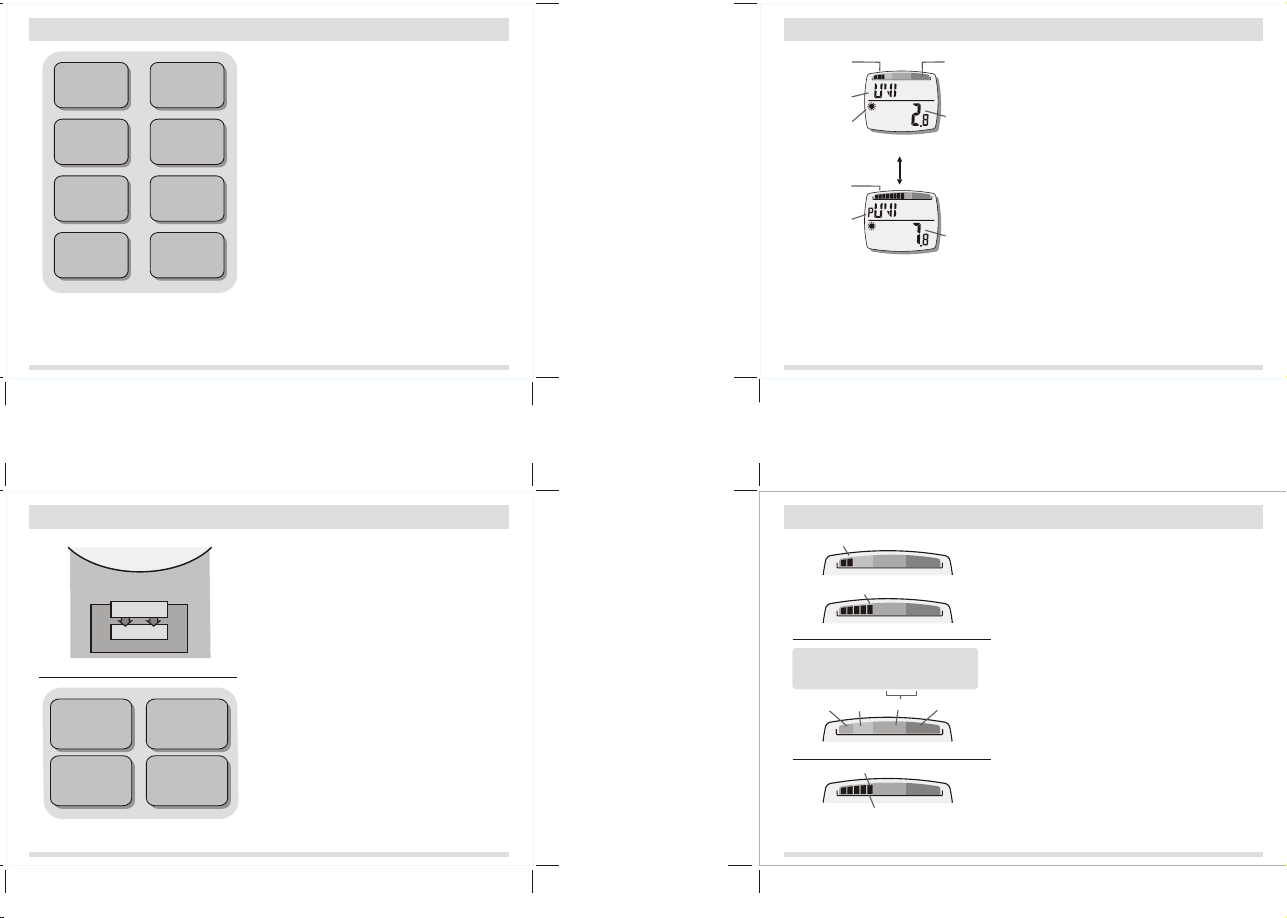
5.5 UV Index Mode - How to Read UV Index Bar Segment & Color Code
2 Bar Segments; hence UV Index = 2
5 Bar Segments; hence UV Index = 5
UV Index Bar Segment
The color code categorized by
the World Health Organization
Green
Yellow
Orange
(0-2)
(3-5)
Green
Yellow
UV Index = 5
UV Index Bar Segment & Color Code
Red
(6-7)
(8-10)
Red
UV Index Color Code
Color Code: Yellow
Purple
(11+)
Purple
UV Index Bar Segment
! To provide user a quick concept about the Current
and Peak UV Indexes, this Watch exhibits them
by displaying a different number of bar segments on
the upper row of the display.
! Whether the Current or Peak UV Index Bar
Segment appear on the upper row of the display,
one exhibited bar segment equals one UV Index.
For example, if there are 5 bar segments
displayed on the upper row of the display, the UV
Index is 5.
UV Index Color Code
! As categorized by the World Health Organization,
each UV index is matched with a color code.
Check the previous '5.1 UV Index Range,
Exposure Category and Color Code' Section for
more detail on the Color Code.
! To provide user a quick concept about the color
code of the current and peak UV index, this
Watch also printed green, yellow, red (stand for
orange and red) and purple color on the display.
!
Read the color code of a UV index by checking
the color background of the right-most exhibited
UV index bar segment. For example, if there are 5
bar segments displayed on the upper row of the
display, the color code is Yellow.
12

5.6 UV Index Mode - UV Index Alarm
Lower UV Index Alarm
represents by the
flashing bar segment
Current UV Index
bar segments
UV Index
Alarm Icon
UV Index
the Upper
UV Index
'HI' Alarm
the Lower
UV Index
'LO' Alarm
0
Alarm Sound and UV Alarm Indicator
UV Index Mode
(Current UV Index Display)
the whole UV Index
Alarm Indicator flash
the 'Ray' of the UV Index
Alarm Indicator flash
the UV Index Alarm
Indicator appear steadily
The UV Index Alarm -
Upper UV
Index Alarm
represents by
the flashing
bar segment
Current
UV Index
'beep'
for 10
seconds
'beep'
for 10
seconds
Time
! To prevent user getting UV over-exposure, this
Watch includes two UV Index Alarms. They are
the Upper UV Index Alarm and Lower UV Index
Alarm.
! These UV Index Alarms can be set separately by
the user. Check the coming '5.7 Setting the Upper
and Lower UV Index Alarms' Section for more
detail on how to set the UV Index Alarms.
! When one UV Index Alarm has been set, the
corresponding bar segment will be flashing on
display.
UV Index Alarm Sound
! In all of the modes: Whenever the Current UV
Index is equal to or larger than the Upper or
Lower UV Index Alarm, the Watch starts beeping
for about 10 seconds.
UV Index Alarm Indicator
! In all of the UV Index displaying modes: When the
Current UV Index equal to or larger than the
Lower UV Index Alarm, the 'Rays' of the UV Index
Alarm Indicator starts flashing on the display.
! In all of the UV Index displaying mode: When the
Current UV Index equal to or larger than the
Upper UV Index Alarm, the whole UV Index Alarm
Indicator starts flashing on the display.
the
5.8 UV Index Mode - Precautions to UV Index Calibration
The Watch's UV sensor has been calibrated
!
15-minute mean
UV Index
UV Index Broadcasted
by Weather Station
equal to
The Time Frame Effect on UV Index
the Sun
Ultraviolet
Radiation
Location A
(with an Higher
UV Index)
The Cloud Effect on UV Index
May
NOT
UV Index Exhibited
Location B
(with a Lower
UV Index)
Instantaneous
UV Index
by the Watch
in the factory. The most possible cause
for deviation is the Ozone thickness,
difference between the place of use and cali-
bration of the Watch. For normal usage, you
should not need to calibrate the Watch again.
! DO NOT attempt to calibrate the UV index unless
you have the following items to determine the
Calibration Factor (CAL):
1) Standard UV generator or
2) Correct immediate local UV Index
DO NOT use the UV Index broadcasted by the
!
local weather station as the correct UV index, it
may NOT the correct one at your place when you
calibrating your Watch, this is because:
1) Weather stations usually broadcast the 15minute mean UV Index to public. It is different
from the instantaneous UV radiation that your
Watch is now sensing.
2) Cloud condition affects UV Index. Hence, the
UV Index at your location may not be
identical to the one at weather station if the two
cloud conditions are not alike.
Check the coming '5.9 To Determine the
!
Calibration Factor (CAL)' Sections for more detail
on how to determine CAL.
13
5.7 UV Index Mode - Setting the Upper and Lower UV Index Alarms
scroll the
setting by
increment of 1
UV Index Mode
(Current UV Index Display)
hold
[mode]
hold
[mode]
[start/stop]
[lap/reset]
decrement of 1
' LO' Lower
UV Index
Alarm
[mode]
UV Index Mode
Setting Sequence
scroll the
setting by
[start/stop]
[mode]
Calibration
[lap/reset]
! To set the Upper, Lower UV Index Alarm and
calibrate the UV Index, press and hold the [mode]
button for about 2 seconds to select the setting
scroll
the setting
faster
hold
'HI' Upper
UV Index
Alarm
[mode]
'CAL'
hold
scroll
the setting
faster
display.
! When the 'LO' indicator appear: Press the
[start/stop] or [lap/reset] button to select the
Lower UV Index Alarm setting among 0 to 25
(select ' -- ' to turn OFF the alarm) by scrolling of
1 (hold down the button to scroll the setting faster).
! When the 'HI' indicator appear: Press the
[start/stop] or [lap/reset] button to select the
Upper UV Index Alarm setting among 0 to 25
(select ' -- ' to turn OFF the alarm) by scrolling of
1 (hold down the button to scroll the setting faster).
Note: To control the UV exposure by a two-level
alarm, set a smaller value (for example: 6) for the
Lower UV Index Alarm, and set a larger value (for
example: 10) for the Upper Index Alarm.
! When the above settings finished, either press
and hold the [mode] button for about 2 seconds
to exit the setting sequence or press the [mode]
button once to calibrate the UV Index.
! To calibrate the UV Index, check the coming '5.8
Precautions to UV Index Calibration', '5.9 To
Determine the Calibration Factor (CAL)' and '5.10
Calibrating the UV Index' Sections for more detail
on the UV Index Calibration.
14
15
5.9 UV Index Mode - To Determine the Calibration Factor (CAL)
! Determine the CAL by using the following rules:
Standard UV Generator
(Correct UV Index)
Ultraviolet
Radiation
UV Sensor
Exhibited
UV Index
the Watch
How Exhibited UV Index
is obtained for determent of CAL
1)Correct UV Index: The UV index produced
by a standard UV generator or other similar
means.
2)Exhibited UV Index: The UV Index exhibited by
the Watch when it is exposed to the previous
standard UV generator.
3)ADJ: The percentage change of UV Index.
Hence ADJ = ((Correct UV Index - Exhibited
UV index) / Exhibited UV index) X 100%
4)Calibration Factor (CAL): The value that to be
selected for the calibration. CAL= 25 + ADJ.
Example 1: To adjust the UV Index from 4.8
(Exhibited UV index) to 4.0 (Correct UV Index).
! ADJ = ((4.0 - 4.8) / 4.8) X 100 = -17;
! CAL= 25 + ADJ;
! Hence, CAL=25 -17 = 8.
Example 2: To adjust the UV Index from 7.8
(Exhibited UV index) to 8.0 (Correct UV Index).
! ADJ = ((8.0 - 7.8) / 7.8) X 100 = 3;
! CAL= 25 + ADJ;
! Hence, CAL=25 +3 = 28.
!
To resume the Watch to its original setting
for sensing UV radiation, select the default
value (25) as the CAL during the calibration.
16

5.10 UV Index Mode - Calibrating the UV Index
To Calibrate the UV Index
! When the settings of the previous '5.7 Setting the
Upper and Lower UV Index Alarms' Section
are finished, press the [mode] button once to
calibrate the UV Index.
! When the 'CAL' indicator appears, press the
[start/stop] or [lap/reset] button to select the predetermined CAL between 0 to 50 by scrolling of 1
(hold down the button to scroll the setting faster).
Check the previous '5.9 To Determine the
Calibration Factor (CAL)' for more detail on how
to determine the CAL.
! When the above settings finished, press and hold
the [mode] button for about 2 seconds to exit the
setting sequence.
! The setting display will change to UV Index Mode
automatically if no key-stoke has been activated
for about 3 minutes.
UV Index Mode
(Current UV Index Display)
hold
[mode]
hold
[mode]
scroll the
setting by
increment of 1
[start/stop]
'LO' Lower
UV Index
Alarm
UV Index Mode
Setting Sequence
[lap/reset]
scroll the
setting by
decrement of 1
[mode]
[mode]
the setting
[start/stop]
'HI' Upper
UV Index
Alarm
[mode]
Calibration
[lap/reset]
the setting
scroll
faster
hold
'CAL'
hold
scroll
faster
6.1 Daily Alarm Mode - Setting the Daily Alarm Mode
! To set the Daily Alarm Time, press and hold the
[mode] button to select the setting display.
! When the 'minute' digits flash on the display,
Daily Alarm Mode
hold
hold
[mode]
[mode]
scroll the
setting by
increment of 1
[start/stop]
Daily Alarm Mode
Setting Sequence
[lap/reset]
scroll the
setting by
decrement of 1
[mode]
[mode]
the setting
[start/stop]
[lap/reset]
the setting
scroll
faster
hold
HourMinute
hold
scroll
faster
press the [start/stop] or [lap/reset] button to set
the minute by scrolling of 1 (hold down the button
to scroll the setting faster).
! When the 'hour' digits flash on the display, press
the [start/stop] or [lap/reset] button to set the hour
by scrolling of 1 (hold down the button to scroll
the setting faster).
! When the setting is finished, press and hold
the [mode] button to exit the setting sequence.
! The setting display will change to Daily Alarm
Mode automatically if no key-stoke has been
activated for about 3 minutes.
Daily Alarm Sound
! When the daily alarm is ON, the watch starts
beeping at the alarm time for about 30 seconds.
! When the beeps sounds, it can be stopped
prematurely by pressing one of the buttons,
except the [light] button.
17
6.0 Daily Alarm Mode - Daily Alarm Mode
! This Watch includes a daily alarm for user's
convenience. The daily alarm can be set by the
user.
! Check the coming '6.1 Setting the Daily Alarm
Mode' Section for more detail on how to set the
Daily Alarm Mode.
The Daily Alarm Display
! The Current Time (hours, minutes) shows on the
upper row of the display.
! The Alarm Time (hours, minutes) shows on the
lower row of the display.
To Select between ON and OFF the Daily Alarm
! Press the [start/stop] button once to set between
ON and OFF the Daily Alarm. When the Daily
Alarm Indicator ' ' appears, the daily alarm is
ON (the watch starts beeping at the alarm time for
about 30 seconds).
To Select between ON and OFF for the
Hourly Chime
! Press the [lap/reset] button once to select
between ON and OFF the hourly chime. When
the Hourly Chime Indicator ' ' appears, the
hourly chime is ON (the Watch will beep once on
the hour).
Alarm
Time
Daily Alarm Mode
(Alarm OFF & Chime OFF)
Daily Alarm Mode
[lap/reset]
Daily Alarm Mode
(Alarm ON)
(Chime ON)
[start/stop]
Current Time
Mode
Indicator
Daily Alarm
Indicator
Hourly Chime
Indicator
18
19
7.0 Chronograph Mode - Chronograph Mode
This Watch includes a Chronograph Mode, it can
Mode Indicator
Chronograph
Time (hour)
Chronograph
Time (minute)
Elapsed Time, Accumulative Elapsed Time and Lap Time
Chronograph Mode
(Zero Display)
1. Elapsed time
2. Accumulative
elapsed time
3. Lap time
(1 lap only)
[start/stop]
[start/stop]
[start/stop]
0 10 20 30 40
time
: Stop Counting : Counting
100 10
[start/stop]
[lap/reset]
Chronograph Time
(1/100 Second)
Chronograph
Time (second)
[start/stop]
[start/stop]
[start/stop]
20100
[lap/reset]
!
measure 3 different types period of time:
1) Elapsed time,
2) Accumulative elapsed time, and
3) Lap time (1 lap only)
Chronograph Display
! The display shows the 'Zero' display, if the Watch
or the chronograph has been reset.
! The Chronograph Mode Indicator exhibits on the
300
upper row of the display.
! The chronograph time (hours, minutes, seconds
and 1/100 second) exhibits on the lower row of
20
the display.
! The maximum counting range of the
chronograph is 9 hours, 59 minutes and 59.99
seconds.
20

7.1 Chronograph Mode - Using the Chronograph
! In 'Zero' Display, press the [start/stop] button
once to start the counting. When it is counting,
press the [start/stop] button once again to stop
Lap Time
(the chronograph
is counting in the
background)
[start/stop]
Chronograph Mode
('Zero' Display)
Note:
This diagram illustrates the flow
among different functional
displays only, hence, these
displays DO NOT conform to fact
in all instances.
counting
Elapsed Time
(the chronograph
is stop counting)
[lap/reset]
Chronograph Mode
(Lap Time Display)
[lap/reset]
Chronograph Mode
(Counting Display)
[start/stop]
Chronograph Mode
(Stop Counting Display)
the counting, and the elapsed time of which the
chronograph is counting will appear.
flash
! When the elapsed time is displaying, repeat the
above mentioned key operations to get the
accumulative elapsed time or press the [lap/reset]
button to reset the chronograph (ready for a new
counting). Check the below 'To Reset the
Chronograph' Section for more detail on how to
reset the chronograph.
To Get the Lap Time
! When the chronograph is counting in the previous
operations, press the [lap/reset] button to get the
Lap Time Display (the ' ' and ' ' start flashing).
When the Lap Time is displaying, the
chronograph is counting in the background.
! In Lap Time Display, press the [lap/reset] button
once to return to the Counting Display. When the
Counting Display return, press the [lap/reset]
button at any designated moment to get a new
lap time (the previous lap time will be erased).
To Reset the Chronograph
! To reset the chronograph to 'Zero' Display, press
the [lap/reset] button once when the chronograph
is stopped counting.
8.1 Timer Mode - Setting the Timer Mode
To Set the Timer Mode
! To set the target time for the Timer Mode, press
and hold the [mode] button for about 2 seconds to
select the setting display.
! When the 'hour' digits flash on the display, press
the [start/stop] or [lap/reset] button to set the hour
by scrolling of 1 (hold down the button to scroll
the setting faster).
! When the 'minute' digits flash on the display,
press the [start/stop] or [lap/reset] button to set
the minute by scrolling of 1 (hold down the button
to scroll the setting faster).
! When the 'second' digits flash on the display,
press the [start/stop] or [lap/reset] button to set
the second by scrolling of 1 (hold down the button
to scroll the setting faster).
! When the setting is finished, press and hold
the [mode] button to exit the setting sequence.
! The setting display will change to Timer Mode
automatically if no key-stoke has been activated
for about 3 minutes.
Timer Mode
hold
[mode]
hold
[mode]
scroll the
setting by
increment of 1
[start/stop]
[mode]
Setting Sequence
[lap/reset]
scroll the
setting by
decrement of 1
[start/stop]
[mode]
[mode]
Timer Mode
[lap/reset]
scroll
the setting
faster
hold
MinuteHour
Second
hold
scroll
the setting
faster
21
8.0 Timer Mode - Timer Mode
Mode
Indicator
Target Time
(Hour, minute, second)
1. Single-phase
down
counting
2. Multi-phases
down
counting
3. Reset to
preset
target time
Timer Mode
30
[start/stop]
30
[start/stop]
[start/stop]
30 30
[start/stop]
[start/stop]
0 10 20 30 40
time
Single/multi-down Counting & Reset
: Stop Counting : Counting
beep
202020 0
[start/stop]
[lap/reset]
0
beep
22
! This Watch includes a countdown timer for
timekeeping a fixed period of time (target time).
The Target Time
! The target time is the time which the timer start
down-counting from.
! The target time can be set by the user, and its
setting limit is 23 hours, 59 minutes 59 seconds.
! Check the coming '8.1 Setting the Timer Mode'
Section for more detail on how to set the Timer
Mode - Target Time.
Timer Display
! The Timer Mode Indicator exhibits on the upper
row of the display.
! The target time (hours, minutes and seconds)
exhibits on the lower row of the display.
8.2 Timer Mode - Using the Timer
beeps
stop
counting
set the
target
time to
30 minute
Timer Mode
(Zero Display)
Timer Mode
(Stop-Counting)
[lap/reset]
[lap/reset]
[start/stop]
counting
stop
counting
(Stop-Counting)
[start/stop]
(Stop-Counting)
Timer Mode
Timer Mode
(Counting)
Timer Mode
29'59"
23
! If a target time has been set (for example 30
minutes), press the [start/stop] button once to
start the countdown. When it is counting, press
the [start/stop] button once to stop the counting.
! As long as the timer is counting, the countdown
time will be displaying on the display continuously.
To Reset the Timer
! To reset the timer to the preset target time before
counting to zero, press the [lap/reset] button
once when the timer is stopped.
! To count from a new target time, set a new value
for the target time. Check the previous '8.1
Setting the Timer Mode' Section for more detail
on how to set the Timer Mode.
Timer Alarm Sound
! When it counts to the last 5 seconds, the Watch
will beep once for every second. When it is zero,
the Watch will beep for about 10 seconds.
! During this 10 seconds beep sound, it can be
stopped prematurely by pressing one of the
buttons except the [light] button.
Note: The adjacent diagram illustrates the flow
among different functional displays only, hence,
these displays DO NOT conform to fact in all
instances.
24

9.0 Specifications
Current Time Mode
! Hour, minute and second
! Month, day, day of week and year
! 12 / 24 hour format selectable
! Month-day/Day-month selectable
! Auto calendar from year 2000 to 2099
! Hourly Chime on the hours
UV Index Mode
! Display range (bar segment): 0 to 15
! Measuring range(numeric): 0 to 25
! Resolution (bar segment): 1 UV Index
! Resolution (numeric): 0.1 UV Index
! Alarm: 2 UV Index Alarms
! Color Code: 4 colors (Green, Yellow, Red
and Purple).
Daily Alarm Mode
! Daily Alarm: 1 daily alarm
! Alarm Duration: about 30 seconds
25
10.0 Limited Liabilities
The Company is not liable for any
damages caused by the product or the
failure of the product to perform, including
any loss of profits or savings, incidental
damages, or consequential damages.
There is no liability of the Company
against any claim made by a third party or
made by you on behalf of a third party.
Even if you have advised the Company or
an authorized representative of the
Company of the possibility of any such
damages, this limitation will still be in
effect. This limitation of liability cannot be
waived or amended by any person. This
limitation is applicable under the condition
that whether damages are sought, or a
claim made, under the limited warranty as
mentioned in this manual or as a tort claim
(including negligence and strict product
liability), a contract claim, or any other
claim.
Chronograph Mode
! Resolution: 1/100 second
! Counting range: 9 hours, 59 minutes, 59.99
seconds
! Measuring mode: Elapsed time,
accumulative elapsed time and lap time
(1 lap only)
Timer Mode
! Resolution: 1 second
! Setting limit: 23 hours, 59 minutes, 59
seconds
! Alarm sound: One beep at the 5,4,3,2 and1
second(s).
! Alarm sound: 'Beep-beep-beep' at 0 second
! Alarm duration: about 10 seconds.
Others
! Electro-luminescent back light
The Company disclaims all warranties that
are not stated in the express limited
warranties in this manual. We makes no
other express or implied warranties,
including any implied warranties of
merchantability and fitness for a particular
purpose. All implied warranties that maybe
imposed by law are limited to the terms of
this limitation and the limited warranty.
Some countries do not allow the exclusion
of incidental or consequential damages or
a limitation on how an implied warranty
lasts. Some exclusion or limitation of this
limited warranty may not apply to you. This
limited warranty gives you specific legal
rights and you may have other rights vary
from country to country.
26

WARRANTY INFORMATION
La Crosse Technology, Ltd provides a 1-year limited warranty on this product against manufacturing defects in materials and
workmanship.
This limited warranty begins on the original date of purchase, is valid only on pro ducts purchased and used in North America and only
to the original purchaser of this product. To receive warranty service, the purchaser must contact La Crosse Technology, Ltd for
problem determination and service procedures. Warranty service can only be performed by a La Crosse Technology, Ltd authorized
service center. The original dated bill of sale must be presented upon request as proof of purchase to La Crosse Technolo gy, Ltd or La
Crosse Technology, Ltd’s authorized service center.
La Crosse Technology, Ltd will repair or replace this product, at our option and at no charge as stipulated here in, with new or
reconditioned parts or products if found to be defective during the limited warranty perio d specifi ed above. All replaced parts and
products become the property of La Crosse Technology, Ltd and must be returned to La Crosse T echno logy, Ltd. Replacement parts
and products assume the remaining original warranty, or ninety (90) days, whichever is longer. La Crosse Technology, Ltd will pay all
expenses for labor and materials for all repairs covered by this warranty. If necessary repairs are not covered by this warranty, or if a
product is examined which is not in need or repair, you will be charged for the repairs or examination. The owner must pay any
shipping charges incurred in getting your La Crosse Technolog y, Ltd product to a La Crosse Technology, Ltd authorized service center.
La Crosse Technology, Ltd will pay ground return shipping charges to the owner of the product to a USA address only.
Your La Crosse Technology, Ltd warranty covers all defects in material and workmanship with the following spec ified exceptions: (1)
damage caused by accident, unreasonable use or neglect (including the lack of reasonable and necessary maintenance); (2) damage
occurring during shipment (claims must be presented to the carrier); (3) damage to, or deterioration of, any accessory or decorative
surface; (4) damage resulting from failure to follow instructions contained in your owner’s manual; (5) damage resulting from t he
performance of repairs or alterations by someone other than an authorized La Crosse Technology, Ltd authorized service center; (6)
units used for other than home use (7) applications and uses that this product was not intended or (8) the products inability to receive a
signal due to any source of interference.. This warranty covers only actual defects within the product itself, and does not cover the cost
of installation or removal from a fixed installation, normal set-up or adjustments, claims based on misrepr esentation by the seller or
performance variations resulting from installation-related circumstances.
LA CROSSE TECHNOLOGY, LTD WILL NOT ASSUME LIABILITY FOR INCIDENTAL, CONSEQUENTIAL, PUNITIVE, OR OTHER
SIMILAR DAMAGES ASSOCIATED WITH THE OPERATION OR MALFUNCTION OF THIS PRODUCT. THIS PRODUCT IS NOT TO
BE USED FOR MEDICAL PURPOSES OR FOR PUBLIC INFORMATION. THIS PRODUCT IS NOT A TOY. KEEP OUT OF
CHILDREN’S REACH.
This warranty gives you specific legal rights. You may also have other rights specific to your State. Some States do no allow the
exclusion of consequential or incidental damages therefore the above exclusion of limitation may not apply to you.
For warranty work, technical support, or information contact:
La Crosse Technology, Ltd
2809 Losey Blvd S.
La Crosse, WI 54601
Phone: 608.782.1610
Fax: 608.796.1020
e-mail:
support@lacrossetechnology.com
(warranty work)
sales@lacrossetechnology.com
(information on other products)
web:
www.lacrossetechnology.com
All rights reserved. This handbook must not be reproduced in any form, even in excerpts, or duplicated or processed using electronic,
mechanical or chemical procedures without written permission of the publisher.
This handbook may contain mistakes and printing errors. The information in this handbook is regularly checked and corrections made
in the next issue. We accept no liability for technical mistakes or printing errors, or their consequences.
All trademarks and patents are acknowledged.
1
 Loading...