

Page 1

Wi-Fi COLOR FORECAST
STATION
SET UP GUIDE
MODEL NUMBER V15
Page 2

Table of Contents
BASICS
Initial Setup
Station Settings
Buttons
LCD Display Brightness
Auto-Dim Settings
Low Battery Indicators
FORECAST
Viewing Your Forecast Data
Viewing Extended Forecasts
Standalone Forecast Icons
Enhanced Forecast Data
Relative Pressure
SUPPORT
We’re Here to Help
Factory Reset
Stay in Touch
LA CROSSE VIEW
02
Connecting to the App
06
Connecting Your Station
07
Adding Your Sensor to
the App
08
Manually Add Sensor to
08
the App
16
SENSORS
13
Placement & Mounting
14
Add-On Sensors
15
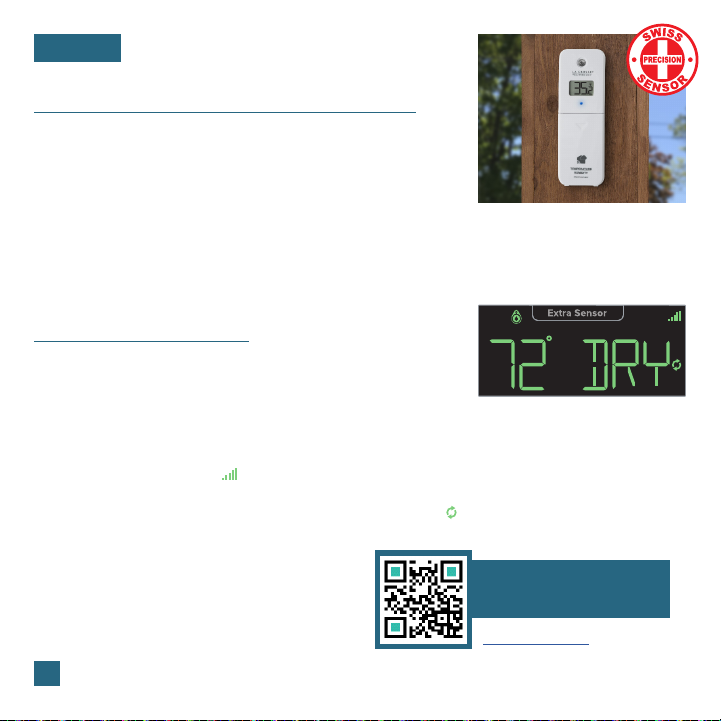
Adding Extra Sensors
15
16
21
21
21
TEMP. AND HUMIDITY
Viewing Current
03
Conditions
04
Accessing Indoor/Outdoor
05
Readings
Viewing TH Records
05
Temp. & Humidity Alerts
APPENDIX
Cautions/Statements
17
Warranty
17
Recycling & Disposal
17
Specifications
FCC Statement
Canada Statement
09-13
09
12
13
18-20
19
19
19
20
20
Page 3

BASICS
Initial Setup
Thermo-Hygro Sensor
(LTV-TH5i)
Power Up
Weather Station
Insert the 5V Power Adapter into an outlet, and then plug it into the Power Jack on the back of
the station. Next, remove the Insulation Tab from the Station’s Battery Compartment.
Thermo-Hygro Sensor
Install 2 fresh “AA” batteries according to polarity and replace battery cover. The blue LED light
will flash when transmitting.
Back of Station
(V15)
Power Jack
Note: It may take up to 10 minutes for your sensor data to appear on your
station’s screen.
02
Page 4

LA CROSSE VIEW
Connecting to the App
Stay connected to your home anytime, anywhere with the
La Crosse View app.
Monitor your home environment and set custom alerts to
notify you when conditions change.
Connecting your station is optional and the display will
function as a standalone unit without the Wi-Fi connection.
However, we recommend connecting during the initial
setup, as it will save you time and allows access to some
advanced features right away.
Download the La Crosse View App
Visit the App Store or Google Play Store to download the free
La Crosse View app onto your mobile device.
Launch the App
Open the La Crosse View app. Follow the on-screen setup instructions
to create an account, add new devices, and connect your station to
your Wi-Fi network.
Connecting Your Station to the App
Now that you’ve created your La Crosse View account, it’s time to add your station into your account
and connect your station to your home router using the La Crosse View app.
NOTE: For the steps listed on the next page, you’ll need your Wi-Fi network name (SSID) and password.
Make sure your mobile device is connected to the same Wi-Fi network.
03
Page 5

LA CROSSE VIEW
Adding & Connecting Your Station to Wi-Fi
The La Crosse View app is required to connect the station to your Wi-Fi network. Download, install,
1.
and log into your La Crosse View account first.
Follow the initial app instructions or manually add the display into your account. 2.
New User Initial Setup: When first setting up your
station, the app will lead you through a series of
instructions to help get your station added into your
account and connected to your home Wi-Fi network.
Next, the app will prompt you to use your phone to scan the device ID barcode located on the back of
3.
the station. Please note, adding a device to your account and connecting it to Wi-Fi are two dierent
steps. You can complete either step separately after if you have any trouble.
When connected, the station will beep, and time and forecast information should populate on the
4.
display. The indicator will become solid.
Checking Your Station’s Wi-Fi Status
Press the SET button on the top of the station to view your Wi-Fi Status.
Manually Add & Connect Display: After the initial walkthrough,
stations can be added and connected via the Devices tab in the
app’s main menu. Simply tap the Add Device or + button at the
bottom of the Devices page in the app.
ALL OK CONNECTED: Your station is connected to your
Wi-Fi and its data should be available on the station and
in the app.
SEE APP TO CONNECT: Check the app for notifications.
Having Trouble Connecting to Wi-Fi?
The app should guide you through the best method for your Wi-Fi network and router. However, if you
have trouble connecting, please go to: bit.ly/v15_wifi or scan the QR code. This will explain additional
connectivity options, including connecting by WPS or contacting our technical support team for
further assistance.
NO WEATHER SERVICE: Your Internet weather and time
services are not connecting. These should resolve on their
own, please be patient.
LOST WIFI: Check your router and network connections.
04
Page 6

LA CROSSE VIEW
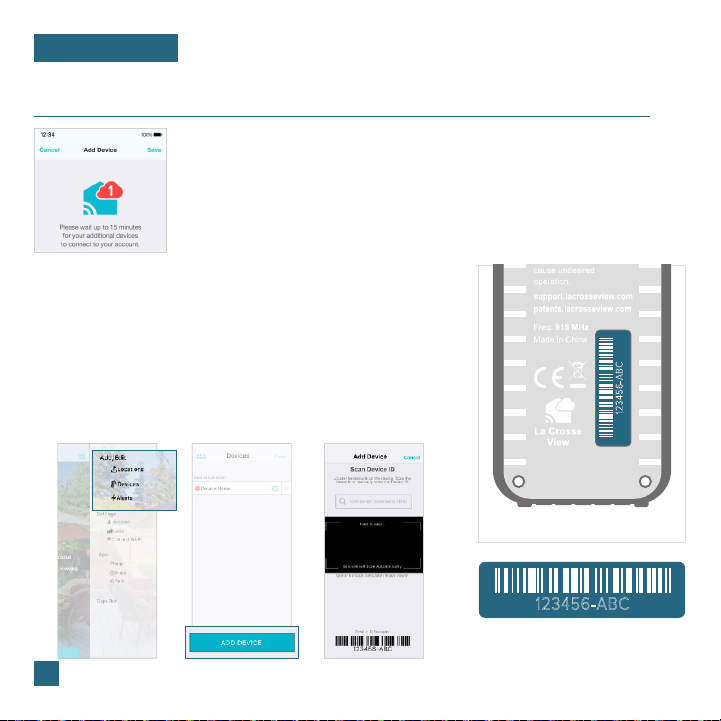
Add Your Sensors to the App
Upon getting the station connected to your Wi-Fi network, the app will
explain how your connected sensor should be brought in. Within the
next 15 minutes, you should receive an Add Device notification in your
app. This is indicated by the Red Cloud and the numbers inside of it.
Tap this icon to begin adding your sensor into the app.
Manually Add Your Sensor to the App*
1.
Open your La Crosse View app. On the Main Menu, scroll to
ADD/EDIT and select DEVICES.
2.
On the Devices page, select the ADD DEVICE or PLUS (+) button.
3.
Scan the Barcode on your Sensor or type in the Device ID
manually.
4.
Confirm the sensor image and Device ID and add a Device
Name and Location Name. Select DONE.
123456-ABC
Back of Sensor
123456-ABC
* This step is only required if you do not receive the Add Device notification within the app.
05
Prior to mounting/positioning your sensor, make sure your station is receiving sensor data.
Page 7

BASICS
Station Settings
When the station is first powered on, it will begin searching for the sensor, which should
connect within 10 minutes.
Navigating the Settings Menu
To manually set language, time/date, and other
1.
settings, hold the SET button to enter the
Settings Menu.
Use the +/- buttons on the top of the station to
2.
adjust the values.
Press the SET button to confirm your selection
3.
and move to the next setting.
You may exit the Settings Menu at any time by
4.
pressing the button on the front of the station.
Settings Menu Order
• Greeting/HELLO
• Language (English/Spanish/French/German)
• Beep ON/OFF
• 12/24 Hour Time Format
• Hour | Minute | Year | Month | Date
• Calendar Order Month/Date or Date/Month
• Temperature Units (Fahrenheit/Celsius)
• Pressure Units (InHg/hPa)
• Pressure Number Setting
The default pressure reading is 29.91 INHg (1013 hPa).
The station will acclimate on it’s own if the pressure
number is not set. Learn more on page 16
• THANK YOU
Important: Settings such as language and units of measure must
be set manually within the station’s Settings Menu. These are not
controlled by the La Crosse View app.
The language selected will aect menu instructions as well as
weekday and month readouts.
Weekday will set automatically after year, month, and date
settings are adjusted.
When in 24 hour time format, seconds will show in place of
AM/PM markings.
If you’re connected to Wi-Fi, the time/date will automatically
update from the Internet. See pages 3-4 for more info.
06
Page 8

BASICS
Buttons
Front of Station Back of Station
1. ALERTS: Hold to enter alerts setting. Use +/-
buttons to turn alerts on/o.
3. EXTRA SENSOR: Press to view sensor ID
numbers. Hold to add sensors. While viewing,
hold the MINUS button delete the sensor.
5. PLUS/MINUS (+/-): Use to adjust values.
7. FORECAST REFRESH*: Press to refresh
Forecast Readings.
9. BACKLIGHT ( ): Press to adjust backlight.
Hold to enter Auto-Dim settings.
07
* Your display must be connected to Wi-Fi to receive Daily/Hourly forecast information.
2. TEMP: Press to view Temp. & Humidity History.
While viewing, hold MINUS button to reset the
history reading.
4. SET: Press to view Wi-Fi status. Hold to enter
Settings Menu.
6. IN/OUT: Press to view switch between Indoor
Outdoor Temperature/Humidity display or
autoscroll
8. FORECAST/PRECIP. ( )*: Press to change
Forecast Times. Hold to select Percent of
Precipitation or Amount of Precipitation reading.
10. WIFI: Press during initial setup for Wi-Fi
Connection. Hold to re-enter Configuration
Mode and clear previous Wi-Fi settings.
Page 9

BASICS
LCD Display Brightness
Auto-Dim Settings
Program your display to automatically
dim during preselected times.
1. Hold the button to enter the
Auto-Dim Settings Menu.
2. Press the +/- buttons to turn the
Auto-Dim feature on or o.
Press to confirm.
3. Press the +/- buttons to adjust the
starting hour. Press to confirm.
4. Press the +/- buttons to adjust the
stopping hour. Press to confirm
and exit.
Please Note: Only the hour can be set.
Adjusting the LCD Display Brightness
Press the button to adjust the backlight
intensity. There are 4 brightness levels,
plus an o option.
The Auto-Dim Icon ( ) will appear on the LCD when the Auto-Dim feature is activated.
08
Page 10
TEMPERATURE & HUMIDITY
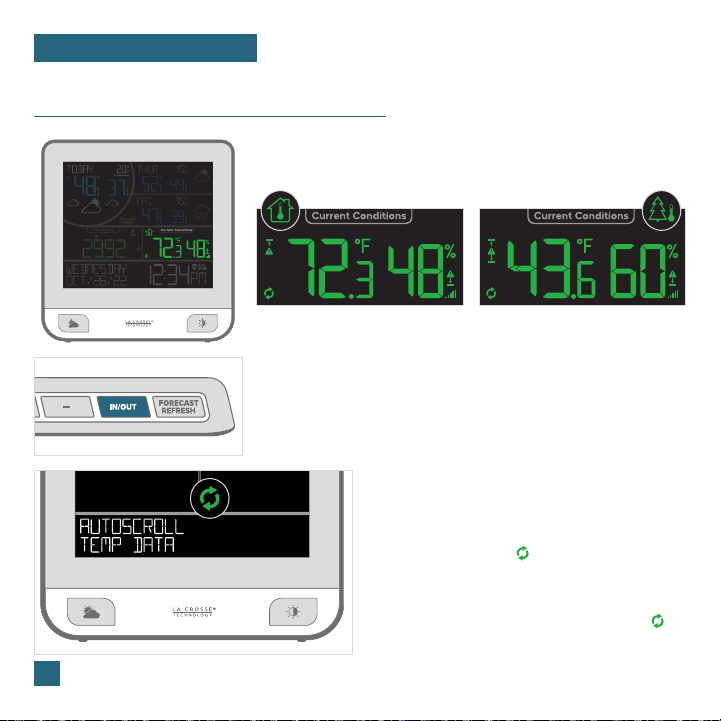
Viewing Current Conditions
Your indoor/outdoor temperature & humidity readings
share the same section on the LCD.
09
Indoor Data Example
Indicated by house icon in top left
Outdoor Data Example
Indicated by tree icon in top right
Accessing Indoor/Outdoor Readings
Press the IN/OUT button on the top of the station to
switch between Indoor & Outdoor readings, or select
the Auto-Scroll option to alternate between readings.
Programming the Auto-Scroll Option
Press the IN/OUT button until AUTOSCROLL
TEMP DATA appears on the LCD.
The Auto-Scroll icon ( ) located in the bottom
left corner will appear when active.
To deactivate the Auto-Scroll option, press the
IN/OUT button until the Auto-Scroll Icon ( )
disappears. The station will stay on your
current selection.
Page 11

TEMPERATURE & HUMIDITY
Viewing Current Conditions
Current Conditions Section Close-Up
1. INDOOR ICON ( )
Indicates you are viewing indoor temperature
and humidity
3. INDOOR OR OUTDOOR TEMPERATURE
Current indoor or outdoor temperature
(based on setting)
5. OUTDOOR ICON ( )
Indicates you are viewing outdoor temperature
and humidity
7. LOW BATTERY INDICATOR ( )
Indicates the batteries in the thermo-hygro
sensor should be replaced soon
9. SENSOR RECEPTION INDICATOR ( )
Indicates if the station is receiving data from the thermo-hygro sensor
2. TEMPERATURE ALERT ICONS
Indicates an active high ( ) or low ( )
temperature alert
4. INDOOR OR OUTDOOR HUMIDITY
Current indoor or outdoor humidity
(based on setting)
6. AUTO-SCROLL ICON ( )
Icon will appear when auto-scroll is active
8. HUMIDITY ALERT ICONS
Indicates an active high ( ) or low ( )
humidity alert
10
Page 12

TEMPERATURE & HUMIDITY
Viewing Current Conditions
Viewing Records
Press the TEMP. button to toggle through indoor/
outdoor temperature and humidity records with time
and date stamps.
Records Viewing Order
• Outdoor High Temperature
• Outdoor Low Temperature
• Outdoor High Humidity
• Outdoor Low Humidity
• Indoor High Temperature
• Indoor Low Temperature
• Indoor High Humidity
• Indoor Low Humidity
• Heat Index
• Dew Point
Resetting Individual Records
Outdoor Low Temperature Record Example Heat Index Example
Press the TEMP. button to view the
individual values you’d like to reset.
11
Next, hold the MINUS (-) button until
dashes appear on the LCD. This reading
is now reset to your current temperature
or humidity value.
Page 13
TEMPERATURE & HUMIDITY
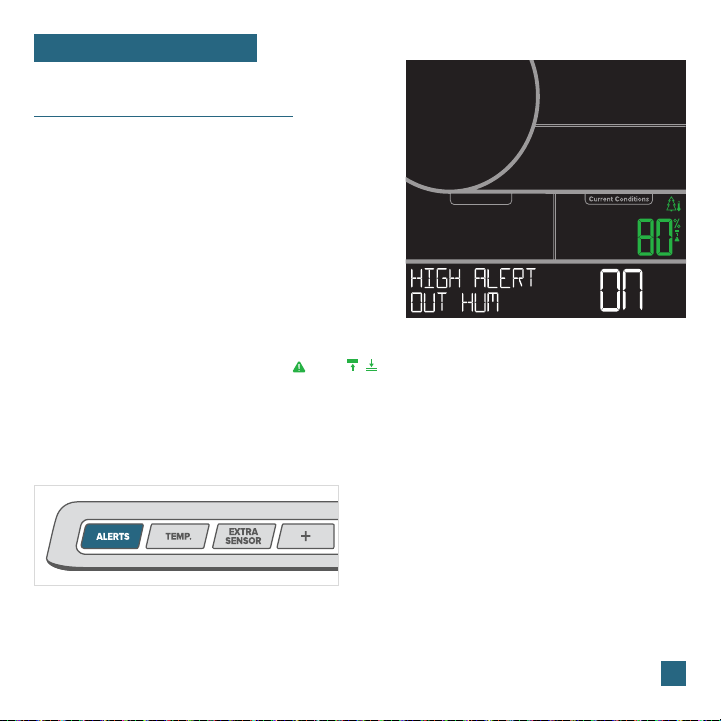
Customizable Alerts
Setting Custom Alerts
1.
Hold the ALERTS button to enter the
Alert Settings Menu.
2.
Use the +/- buttons to activate/deactivate
individual alerts, or press the ALERTS
button to skip to the next alert option.
3.
Once activated, use the +/- buttons to
adjust the alert value. Press the ALERTS
button to confirm and move forward.
Active alerts are indicated by the and / icons in
the Current Conditions section on the screen.
Alerts Setting Order
Outdoor High Temperature • Outdoor Low Temperature • Outdoor High Humidity • Outdoor Low Humidity
Indoor High Temperature • Indoor Low Temperature • Indoor High Humidity • Indoor Low Humidity
Alerts Sounds
• If the alert sounds and you do not see a flashing
alert icon, press the IN/OUT button to view the
other reading.
• When an alert value is reached, the station will
Activating/Deactivating Alerts
1.2.Hold the ALERTS button to enter alert settings.
Use the +/- buttons to activate/deactivate alerts.
beep 5 times each minute until the value moves
out of the alert range.
• Press any button to stop the alert sound.
• Alerts set on the station are separate from
those created within the app.
Outdoor High Humidity Alert LCD Example
Note: The default setting for
alerts is OFF.
12
Page 14
FORECAST
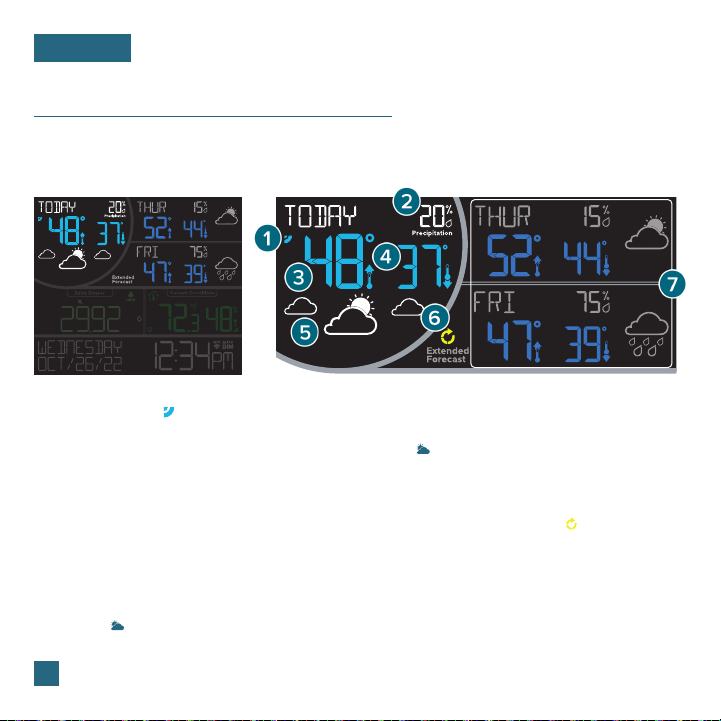
Viewing Your Forecast Data
You can view up to 6 days of forecasts and 12 hours of forecast data. The default display will
show your current and following 2 days of forecasts, detailing weather conditions, chance of
precipitation, and high/low temperature predictions.
Forecast Section Close-Up
1. INTERNET ICON ( )
Indicates the station is connected and receiving
AccuWeather forecasts*
3. DAILY FORECASTED HIGH TEMPERATURE
Forecasted daily high temperature*
5. FORECAST ICONS
Predicts weather conditions in the next 12 hours**
7. EXTENDED FORECAST SECTION
Forecast icons and daily forecasted highs and lows for the next 2 days
Press the button to view additional 3-day and 12-hour forecast information
* Your display must be connected to Wi-Fi to receive AccuWeather forecast data.
** When connected, your station will display 6 additional forecast icons.
13
*** Refreshing the forecast may result in the same readings if they are current.
2. CHANCE OF PRECIPITATION
Percent chance of precipitation*
Hold button to view amount of precipitation*
4. DAILY FORECASTED LOW TEMPERATURE
Forecasted daily low temperature*
6. FORECAST REFRESH ICON ( )
Press the FORECAST REFRESH button to
refresh the 3-day forecast. The icon will cycle
for 30 seconds***
Page 15

FORECAST
Viewing Your Forecast Data
Viewing Extended Forecast
Press the button to view the next 3 days and next
12 hours forecast.
Extended Forecast Examples
Forecast data for upcoming 4-6 days Forecast data for next, 2nd, and 3rd hours Forecast data for upcoming 4th, 5th, and 6th hours
Forecast When not Connected Day/Night Forecast
When station is not connected, you’ll see current
temperature and humidity, as well as daily high/low
temperature and humidity records from your sensor.
Forecast icons will only appear in the circular area.
When connected, the sun icon will show in daylight
hours and the moon icon will show during nighttime
hours if the forecast is for sunny or partly sunny.
Sun Icon (7:00am to 6:59pm) Moon Icon (7:00pm to 6:59am)
• The times the sun and moon icons appear are
pre-programmed and cannot be adjusted.
• The station must be connected Wi-Fi to
activate the day/night forecast feature.
14
Page 16
FORECAST
Viewing Your Forecast Data
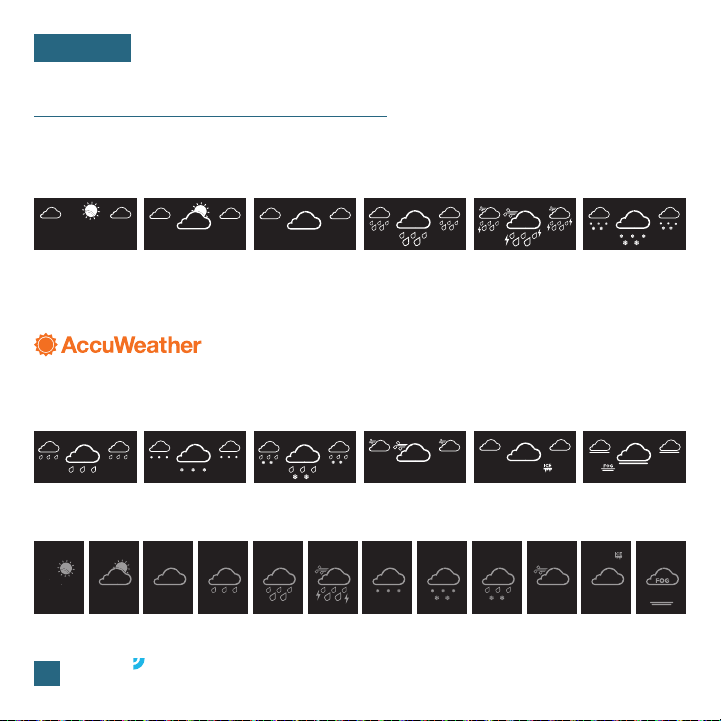
Forecast Icons
When using as a standalone station, the display will use changes in barometric pressure to predict your
weather to come in the next 12 hours. These will be represented by the following 6 forecast scenes:
Sunny
Partly Sunny
Clouds
Rain
T-Storms
Snow
Please Note: The Forecast Icons may not represent your current weather. They are a future prediction of
the weather to come over the next 12 hours.
When connected to Wi-Fi, the station will receive additional weather icons, chance of precipitation values,
and future forecast information. These enhanced Internet features are powered by AccuWeather.
Additional forecast scenes include:
Light Rain
Light Snow
Wintry Mix
Wind
Ice
Fog
Secondary Forecast Icons | The following icons appear in the extended forecast section:
Sunny Rain SnowClouds Light
Sunny
Tip: The icon will appear in the top right corner of the forecast section when your display is
15
connected and receiving AccuWeather forecasts.
Rain
T-Storms WindLight
Snow
Wintry
Mix
IcePartly
Fog
Page 17

FORECAST
Relative Pressure
• Your Relative Pressure reading will come
from your station’s internal barometer.
• Please allow up to 10 days for automatic
calibration, or program your local pressure
value in the Settings Menu.
• The green arrows located above the values
represent Pressure Tendency.
Pressure Tendency Arrows
• Select your desired unit of measurement (InHg or hPa) in the Settings Menu.
You can also set a specific pressure number setting if desired.
Note: The default pressure reading is 29.91 InHg (1013 hPa). The station will acclimate on its own if the pressure number is not set.
BASICS
Low Battery Indicators
• If a blue low battery indicator appears in the forecast/
circular section, replace batteries in the TH sensor. You’ll
only see this icon if you’re not connected to the app.
• If a light green low battery indicator appears in the
extra sensor section, replace batteries in the extra sensor.
• If an green low battery indicator appears in the outdoor
temperature section, replace batteries in the TH sensor.
• If a white low battery indicator appears next to the time
display, replace the coin cell battery in the station.
16
Page 18
SENSORS
Sensor Placement & Mounting
• Use the hole at the top to hang your sensor from the back using a
nail. Or, insert one mounting screw through the front of your sensor.
• Mount your sensor on a north-facing wall or in any shaded area.
Under an eave or deck rail is preferred to avoid inaccurate
readings from the sun.
• The maximum wireless transmission range to the station is up to
400 feet (121 meters) in open air, not including walls or floors.
• Be sure your sensor is mounted vertically, to allow moisture to
drain out properly.
SENSORION SENSOR: This thermohygro sensor features a sensorion chip,
providing improved temperature &
humidity readings, unrivaled accuracy
tolerances, and faster data transfer.
Add-On Sensors
Whether you choose to connect to the La Crosse View app or not, this
station can display data for up to 4 extra sensors. This data will appear
in the light green section on the LCD and in your La Crosse View app
if connected.
Adding Sensors to Your Station
1. Hold the EXTRA SENSOR button until the
Sensor Reception Indicator starts to animate.
2. Install batteries into your sensor. If the sensor
has a TX button, press it to force a transmission
signal. This button is usually located in or near
the sensor’s battery compartment. The LED light
on the sensor will flash once.
3. Your sensor should connect within the next 3
minutes, briefly displaying its ID and type on the
LCD. The Sensor Reception Indicator will show
solid on the screen when a sensor is connected.
17
Note: When first powering up, or after a factory reset, extra sensors should automatically connect to your station.
Viewing Add-On Sensor Data
If you have multiple add-on sensors connected,
press the EXTRA SENSOR button to cycle through
the data you’d like displayed on the LCD. The Auto
Scroll Icon ( ) will appear if activated. This setting
will also include relative pressure data in the cycle.
^ Water Leak Sensor Example
Find all of your add-on
sensor options by scanning
the QR code or visiting:
bit.ly/v15_parts
Page 19

APPENDIX
Caution!
Care & Maintenance
Replace the Coin Cell Battery
1. Use a coin to turn the battery cover to the left to remove it.
2. Pull back the metal pin and gently remove thebattery.
3. Insert a fresh CR2032 battery with the + side up and snap
into place.
4. Replace the battery cover and use the coin to turn it to the
right to lock.
Battery Replacement Instructions
When batteries of dierent brand or type are used together,
or new and old batteries are used together, some batteries
may be over-discharged due to a dierence of voltage or
capacity. This can result in venting, leakage, and rupture and
may cause personal injury.
• Always purchase the correct size and grade of battery
most suitable for the intended use.
• Always replace the whole set of batteries at one time,
taking care not to mix old and new ones, or batteries of
dierent types.
• Clean the battery contacts and also those of the device
prior to battery installation.
• Ensure the batteries are installed correctly with regard to
polarity (+ and -).
• Remove batteries from product during periods of non-use.
Battery leakage can cause corrosion and damage to this
product.
• Remove used batteries promptly.
• For recycling and disposal of batteries, and to protect the
environment, please check the internet or your local phone
directory for local recycling centers and/or follow local
government regulations.
WARNING
This product contains a button battery.
1.
If swallowed, it could cause severe injury or death in just 2 hours.
2.
Seek medical attention immediately.
3.
WARNING: KEEP BATTERIES OUT OF REACH OF CHILDREN
1.
Swallowing may lead to serious injury in as little as 2 hours or death,
due to chemical burns and potential perforation of the esophagus.
2.
If you suspect your child has swallowed or inserted a button battery,
immediately seek urgent medical assistance.
3.
Examine devices and make sure the battery compartment is correctly
secured, e.g. that the screw or other mechanical fastener is tightened.
4.
Do not use if compartment is not secure.
5.
Dispose of used button batteries immediately and safely. Flat batteries
can still be dangerous.
6.
Tell others about the risk associated with button batteries and
how to keep their children safe.
California Residents
WARNING: This product can expose you to chemicals
including styrene, which is known in the State of
California to cause cancer. For more information, go to:
www.P65Warnings.ca.gov
The manufacturer is not responsible for any radio or TV
interference caused by unauthorized changes or modifications
to this equipment. Such changes or modifications could void
the user authority to operate the equipment.
All rights reserved. This manual may not be reproduced
in any form, even in part, or duplicated or processed using
electronic, mechanical or chemical process without the written
permission of the publisher.
This booklet may contain errors or misprints. The information
it contains is regularly checked and corrections are included
in subsequent editions. We disclaim any responsibility for any
technical error or printing error, or their consequences.
All trademarks and patents are recognized.
18
Page 20

APPENDIX
Specifications
Warranty
La Crosse Technology, Ltd. provides a 1-year
limited time warranty (from date of purchase) on
this product, relating to manufacturing defects in
materials and workmanship.
For full warranty details, visit:
www.lacrossetechnology.com/support
La Crosse Technology, Ltd.
2830 S. 26th Street, La Crosse, Wisconsin 54601
Recycling & Disposal
Please consider the environment when deciding
to dispose of this product. Although household
electronics are generally safe to use on a daily
basis, incorrect disposal can cause negative and
potentially irreversible impacts on our environment.
Check with local donation centers to see if your
product can be donated for future use. If disposal is
the only option, federal agencies, local governments,
and certified retailers may have electronic recycling
programs in place. Programs may vary based on
location.
Please Recycle
19
Wi-Fi NETWORK REQUIREMENTS
• Broadcast Frequency: 2.4GHz (802.11 b/g/n)
• Network Name/Password: Must Not Exceed 45
Characters
• Network Speed: Must Be Greater than 1 Mbps
Note: If you have multiple band router, this device will
connect to the 2.4GHz band when connecting to Wi-Fi.
MOBILE REQUIREMENTS
• Apple phones require iOS with cellular or Wi-Fi service.
• Android phones require Android OS with cellular or
Wi-Fi service.
STATION SPECIFICATIONS (V15)
• Indoor Temperature Range: 32°F to 122°F
(0°C to 50°C)
• Indoor Humidity Range: 10 to 99%RH
• Relative Pressure Range: 23.62 to 32.48 InHg
(800 to 1100 hPa)
• Power Requirements:
• Primary Power: 5.0V Adapter (included)
• Battery Backup: 1 “CR2032” Coin Cell Battery
(included)
• Station Dimensions: 6.50 in. L x 1.09 in. W x 6.81 in. H
(16.5 cm L x 2.78 cm W x 17.3 cm H)
• LCD Brightness: 4 Intensity Levels + OFF
(Programmable Auto-Dim Backlight Option)
• Language Options: English, Spanish, French, and
German (Translation Available for Menus & Calendar)
SENSOR SPECIFICATIONS (LTV-TH5i)
• Outdoor Temperature Range: -40°F to 140°F
(-40°C to 60°C)
• Outdoor Humidity Range: 10 to 99%RH
• Transmission Range: 400 feet (121 Meters) open air
• Update Interval: Every 51 Seconds
• Power Requirements: 2 “AA” Batteries (not included)
• Sensor Dimensions: 1.97 in. L x 0.75 in. W x 5.73 in. H
(5.0 cm L x 1.91 cm W x 14.55 cm H)
Page 21

APPENDIXAPPENDIX
FCC Statement
This equipment has been tested and found to comply with the limits for a Class B digital device, pursuant to part 15 of the FCC
Rules. These limits are designed to provide reasonable protection against harmful interference in a residential installation.
This equipment generates, uses and can radiate radio frequency energy and, if not installed and used in accordance with the
instructions, may cause harmful interference to radio communications. However, there is no guarantee that interference will not
occur in a particular installation. If this equipment does cause harmful interference to radio or television reception, which can be
determined by turning the equipment o and on, the user is encouraged to try to correct the interference by one or more of the
following measures:
• Reorient or relocate the receiving antenna.
• Connect the equipment into an outlet on a circuit dierent
from that to which the receiver is connected.
FCC Radiation Exposure Statement
This device complies with FCC radiation exposure limits set
forth for an uncontrolled environment and it also complies with
Part 15 of the FCC RF Rules. This equipment must be installed
and operated in accordance with provided instructions and the
antenna(s) used for this transmitter must be installed to provide
a separation distance of at least 20 cm from all persons and
must not be co-located or operating in conjunction with any
other antenna or transmitter. End-users and installers must be
provided with antenna installation instructions and consider
removing the no-collocation statement.
• Increase the separation between the equipment and receiver.
• Consult the dealer or an experienced radio/TV technician
for help.
This device complies with Part 15 of the FCC Rules.
Operation is subject to the following two conditions:
(1) This device may not cause harmful interference, and
(2) This device must accept any interference received,
including interference that may cause undesired operation.
Caution: Any changes or modifications not expressly approved
by the party responsible for compliance could void the user's
authority to operate the equipment.
Canada Statement
This device contains licence-exempt transmitter(s)/
receiver(s) that comply with Innovation, Science and
Economic Development Canada’s licence-exempt RSS(s).
Operation is subject to the following two conditions:
(1) This device may not cause interference; and
(2) This device must accept any interference, including
interference that may cause undesired operation of the
device.
The device meets the exemption from the routine
evaluation limits in section 2.5 of RSS 102 and compliance
with RSS-102 RF exposure, users can obtain Canadian
information on RF exposure and compliance. This transmitter
must not be co-located or operating in conjunction with
any other antenna or transmitter. This equipment should
be installed and operated with a minimum distance of
20 centimeters between the radiator and your body.
20
Page 22

SUPPORT
Having Trouble? We’re here to help.
To find answers to FAQs and additional self-help options, scan the QR code or visit:
bit.ly/v15_support
If you need additional support, get in touch with our friendly customer
support team:
Online: bit.ly/contact_techsupport
Phone Number: 1.844.200.8752
Representatives are available Monday-Friday, 8:00am to 6:00pm CST
La Crosse Technology® Patents
Visit www.lacrossetechnology.com/patents for patent information.
Factory Reset Stay in Touch
Ask questions, watch setup videos, and provide
feedback on our social media outlets.
If you are experiencing issues, press and hold the
ALERTS and FORECAST REFRESH buttons down
together until the display beeps. You do not need
to remove the coin cell battery to reset the station.
Follow La Crosse Technology on Facebook,
Instagram, YouTube, and Twitter.
21
Designed in La Crosse, Wisconsin • Made in China • Printed in China • DC 090821
Page 23

STATION MÉTÉO WIFI
COLORÉE
SET UP GUIDE
Modèle V15
Page 24

Sommaire
LES BASES
Configuration initiale
Paramètres de la station
Touches
Luminosité de l’écran LCD
Réglage de la temporisation
automatique (Auto-Dim)
Indicateur de piles faibles
PREVISION METEO
Visualisation des prévisions
Visualisation des prévisions
météo étendues
Icônes de prévision
Icônes de prévisions
secondaires
Pression relative
LA CROSSE VIEW
02
Connexion à l’application
06
Ajouter et connecter votre
07
station au Wi-Fi
08
Ajouter vos capteurs à
08
l’application
16
CAPTEURS
13
Installation de votre
capteur Thermo-Hygro
14
Addition de capteurs
supplémentaires
15
Capteurs supplémentaires
15
SUPPORT
16
Nous sommes là pour
vous aider
Retour aux paramètres
d’usine
Rester en contact
TEMP. ET HYGROMETRIE
Achage des conditions
03
actuelles
04
Accés aux données
intérieures/extérieures
05
Icônes pour l’humidité de
la température
Visualisation des données
de températures et
d’hygrométries
Alertes personnalisables
APPENDICE
Précautions /
17
Avertissement
Garantie
17
Caractéristiques
Recyclage et elimination
17
Déclaration de la FCC
Déclaration du Canada
21
21
21
09-13
09
10
11
12
18-20
19
19
19
20
20
Page 25

LES BASES
La configuration initiale
Capteur Thermo-Hygro
(LTV-TH5i)
Mise sous tension
Station Météo
(V15)
Power Jack
Station météo
Insérez l’adaptateur d’alimentation 5 V dans une prise, puis branchez-le dans la
prise d’alimentation à l’arrière de la station. Ensuite, retirez la languette d’isolation du
compartiment à piles de la station.
Capteur Thermo-Hygro
Installez 2 piles « AA » neuves en respectant la polarité et remettez le couvercle des piles
en place. La lumière LED bleue clignotera lors de la transmission.
Remarque : Il peut s’écouler jusqu’à 10 minutes avant que les données de votre
capteur n’apparaissent sur l’écran de votre station.
02
Page 26

LA CROSSE VIEW
Connexion à l’application
Restez connecté à votre maison à tout moment, n’importe
où avec l’application La Crosse View. Surveillez votre
environnement domestique et définissez des alertes
personnalisées pour vous avertir lorsque les conditions
changent.
La connexion de votre station est facultative et l’écran
fonctionnera comme une unité autonome sans connexion
Wi-Fi. Cependant, nous vous recommandons de vous
connecter lors de la configuration initiale, car cela vous
fera gagner du temps et vous permettra d’accéder
immédiatement à certaines fonctionnalités avancées.
Téléchargez l’application La Crosse View
Visitez l’App Store ou le Google Play Store pour télécharger
l’application gratuite La Crosse View sur votre appareil mobile.
Lancer l’application
Ouvrez l’application La Crosse View. Suivez les instructions de
configuration à l’écran pour créer un compte, ajouter de nouveaux
appareils et connecter votre station à votre réseau Wi-Fi.
Connecter votre station à l’application
Maintenant que vous avez créé votre compte La Crosse View, il est temps d’ajouter votre station à votre
compte et de connecter votre station à votre routeur domestique à l’aide de l’application La Crosse
View.
Remarque : pour les étapes répertoriées sur la page suivante, vous aurez besoin de votre nom de
réseau Wi-Fi (SSID) et de votre mot de passe. Assurez-vous que votre appareil mobile soit connecté au
même réseau Wi-Fi.
03
Page 27

LA CROSSE VIEW
Ajouter et connecter votre station au Wi-Fi
L’application La Crosse View est nécessaire pour connecter la station à votre réseau Wi-Fi.
1.
Téléchargez, installez et connectez-vous d’abord à votre compte La Crosse View.
Suivez les instructions initiales de l’application ou ajoutez manuellement l’écran à votre compte.2.
Configuration initiale du nouvel utilisateur:
lors de la première configuration de votre
station, l’application vous guidera à travers une
série d’instructions pour vous aider à ajouter
votre station à votre compte et à la connecter à
votre réseau Wi-Fi domestique.
Ensuite, l’application vous demandera d’utiliser votre téléphone pour scanner le code-barres
3.
d’identification de l’appareil situé à l’arrière de la station. Veuillez noter que l’ajout d’un appareil à votre
compte et sa connexion au Wi-Fi sont deux étapes diérentes. Vous pouvez eectuer l’une ou l’autre
étape séparément si vous rencontrez des problèmes.
Lorsqu’elle est connectée, la station émet un bip et les informations sur l’heure et les prévisions doivent
4.
s’acher à l’écran. L’indicateur deviendra solide.
Vérification de l’état du Wi-Fi de votre station
Appuyez sur la touche SET en haut de la station pour acher votre statut Wi-Fi.
Ajouter et connecter manuellement l’achage
: après la visite initiale, les stations peuvent être
ajoutées et connectées via l’onglet Appareils
dans le menu principal de l’application. Appuyez
simplement sur la touche Ajouter un appareil ou +
en bas de la page Appareils de l’application.
ALL OK CONNECTED: Votre station est connectée à votre
Wi-Fi et ses données devraient être disponibles sur la station
et dans l’application.
VOIR L’APPLICATION POUR SE CONNECTER : Vérifiez
l’application pour les notifications.
Vous rencontrez des problèmes pour vous connecter au Wi-Fi ?
L’application devrait vous guider à travers la meilleure méthode pour votre réseau Wi-Fi et votre
routeur. Cependant, si vous rencontrez des dicultés pour vous connecter, rendez-vous sur :
bit.ly/v15_wifi ou scannez le QR code. Cela expliquera les options de connectivité
supplémentaires, y compris la connexion par WPS ou la prise de contact avec notre équipe
d’assistance technique pour une assistance supplémentaire.
AUCUN SERVICE MÉTÉO : Vos services Internet de météo
et d’heure ne se connectent pas. Ceux-ci devraient se
résoudre d’eux-mêmes, s’il vous plaît soyez patient.
LOST WIFI: Vérifiez votre routeur et vos connexions réseau.
04
Page 28
LA CROSSE VIEW
Ajouter vos capteurs à l’application
Une fois la station connectée à votre réseau Wi-Fi, l’application vous
expliquera comment votre capteur connecté doit être mis en place.
Dans les 15 prochaines minutes, vous devriez recevoir une notification
Ajouter un appareil dans votre application. Ceci est indiqué par le
nuage rouge et les chires à l’intérieur. Appuyez sur cette icône pour
commencer à ajouter vos capteurs dans l’application.
Ajouter manuellement des capteurs dans l’application*
1.
OOuvrez votre application La Crosse View. Dans le menu principal,
faites défiler jusqu’à AJOUTER/MODIFIER et sélectionnez APPAREILS.
2.
Sur la page Appareils, sélectionnez la touche AJOUTER UN
APPAREIL ou PLUS (+).
3.
Scannez le code-barres sur votre capteur ou saisissez
manuellement l’ID de l’appareil.
4.
Confirmez l’image du capteur et l’ID de l’appareil et ajoutez un nom
d’appareil et un nom d’emplacement. Sélectionnez TERMINÉ.
123456-ABC
Arrière du capteur
123456-ABC
*Cette étape n’est requise que si vous ne recevez pas la notification Ajouter un appareil dans l’application. Avant de monter/
05
positionner vos capteurs, assurez-vous que votre station reçoive les données des capteurs.
Page 29

LES BASES
Paramètres de la station
Lorsque la station est allumée pour la première fois, elle commencera à
rechercher vos capteurs, qui devraient se connecter dans les 10 minutes.
Navigation dans le menu Paramètres
1.
Pour régler manuellement la langue,
l’heure/la date et d’autres paramètres,
appuyez de façon continue sur la touche
SET pour accéder au menu Paramètres.
2.
Utilisez les touches +/- sur le dessus de
la station pour ajuster les valeurs.
3.
Appuyez sur la touche SET pour
confirmer votre sélection et passer au
paramètre suivant.
4.
Vous pouvez quitter le menu Paramètres
à tout moment en appuyant sur la touche
Ordre du menu des paramètres
• Salutation/Bonjour
• Langue (anglais/espagnol/français)
• Bip ON/OFF
• FORMAT12/24 heures
• Heure | Minutes | Année | Mois | Date
• Ordre du calendrier Mois/Date ou Date/Mois
• Unités de temperature (Fahrenheit/Celsius)
• Unités de pression (InHg/hPa)
• Rélege du nombre de pression
La lecture de pression par défaut est de 29,91 INHg (1013
hPa). La station s’acclimatera d’elle-même si le nombre de
pression n’est pas réglé. En savoir plus à la page 16
• Merci
Important : les paramètres tels que la langue et les unités
de mesure doivent être définis manuellement dans le menu
Paramètres de la station. Ceux-ci ne sont pas contrôlés par
l’application La Crosse View.
• Lorsqu’une langue est sélectionnée, les instructions et le jour
de la semaine suivants seront présentés dans cette langue.
• Le jour de la semaine sera défini automatiquement une fois les
paramètres de l’année, du mois et de la date ajustés.
• Au format 24 heures, les secondes s’acheront à la place des
marques AM/PM.
• Si vous êtes connecté au Wi-Fi, l’heure/la date seront
automatiquement mises à jour à partir d’Internet. Voir pages 3-4
pour plus d’informations.
06
Page 30

LES BASES
* Votre écran doit être connecté au Wi-Fi pour recevoir les informations de prévisions
quotidiennes/horaires.
Touches
1. ALERTS:
Maintenez cette touche pour accéder aux
réglages des alertes.
2. EXTRA SENSOR:
Appuyez sur cette touche pour naviguer entre
les capteurs supplémentaires et la pression
atmosphérique. Maintenez cette touche
pour ajouter des capteurs. Durant la lecture,
maintenez la touche MOINS pour supprimer le
capteur.
5. PLUS/MINUS (+/-):
Utilisez cette touche pour ajuster une valeur.
7. FORECAST REFRESH*:
Appuyez sur cette touche pour actualiser
les Prévisions.
9. BACKLIGHT ( ):
Appuyez sur cette touche pour ajuster le rétroéclairage. Maintenez cette touche pour accéder
au réglage de la temporisation automatique
(Auto-Dim).
10. WIFI:
Appuyez sur cette touche pour lancer la recherche du signal Wi-Fi. Maintenez cette touche pour
supprimer les informations de connexion réseau actuellement enregistrées et rechercher un
nouveau signal Wi-Fi.
2. TEMP: Appuyez sur cette touche pour consulter
l’historique des températures et hygrométries.
Durant la lecture, maintenez la touche MOINS
pour supprimer la valeur.
4. SET:
Appuyez sur cette touche pour consulter le statut
du Wi-Fi. Maintenez cette touche pour accéder
au menu des réglages.
6. IN/OUT:
Appuyez sur cette touche pour naviguer entre
les affichages des Températures/Hygrométries
Intérieures et Extérieures ou défilement
automatique.
8. FORECAST/PRECIP. ( )*:
Appuyez sur cette touche pour modifier
les heures de prévisions. Maintenez cette
touche pour sélectionner le pourcentage de
précipitations ou la valeur des précipitations.
07
Page 31

LES BASES
Luminosité de l’écran LCD
Réglage de la temporisation
automatique (Auto-Dim)
Programmez votre station afin que l’écran
s’allume/ s’éteigne automatiquement aux
heures sélectionnées.
1. Maintenez la touche pour entrer dans le
menu des réglages Auto-Dim.
2. Utilisez les touches +/- pour activer/
désactiver la fonction Auto-Dim.
3. Appuyez pour confirmer.
4. Utilisez les touches +/- pour ajuster l’heure
de début. Appuyez pour confirmer.
5. Utilisez les touches +/- pour ajuster l’heure
de fin. Appuyez pour confirmer et quitter.
L’icône apparraitra sur l’écran lorsque la
fonction Auto-Dim est activée.
Ajustement de la luminosité de l’écran
LCD Appuyez sur cette touche pour
ajuster l’intensité du rétro-éclairage.
Il y a 4 niveaux de luminosité, plus une
position éteinte (OFF).
L’icône d’atténuation automatique ( ) apparaîtra sur l’écran LCD lorsque la fonction
d’atténuation automatique est activée.
08
Page 32

TEMPERATURE ET HUMIDITE
Achage des conditions actuelles
Les données intérieures et extérieures s’achent dans
la même section de l’écran LCD.
09
Exemple de données intérieures
Indiqué par l’icône de la maison en
haut à gauche
Accés aux données intérieures/extérieures
Appuyez sur la touche IN/OUT située sur le dessus de
Exemple de données exterieures
Indiqué par l’icône d’arbre en haut à
droite
la station pour basculer entre les données intérieures /
extérieures de température et d’hygrométrie ou sélectionnez
l’option de défilement automatique.
Programmation du défilement
automatique (Auto-Scroll)
• Lorsque le défilement automatique est
sélectionné, AUTOSCROLL TEMP INFO va
s’acher à l’écran. Les données de température et
d’hygrométrie vont s’alterner toutes les 5
secondes.
• L’icône de défilement ( ) s’ache dans le coin en
bas à gauche de l’écran lorsque la fonction est
activée.
• Pour désactiver la fonction de défilement, appuyez
sur la touche IN/EXT jusqu’à ce que l’icône Auto Scroll ( ) disparaisse. La station achera la
sélection actuelle.
Page 33

TEMPERATURE ET HUMIDITE
Icônes pour l’humidité de la température
1. ICONE “INTERIEUR”
Indique que les données achées sont
les données intérieures et température et
d’hygrométrie
3. TEMPERATURE INTERIEURE OU EXTERIEURE
Température intérieure ou extérieure
actuelle (selon les réglages)
5. ICONE “EXTERIEUR”
Indique que les données achées sont
les données extérieures et température et
d’hygrométrie
7. INDICATEUR DE PILES FAIBLES
Indique que les piles du capteur thermohygro doivent être changées
9. INDICATEUR DE RECEPTION DU CAPTEUR
Indique si la station reçoit les données du capteur thermo-hygro
2. ICONE D’ALERTE DE TEMPERATURE
4. HYGROMETRIE INTERIEURE OU EXTERIEURE
6. ICONE AUTO-SCROLL
8. ICONE D’ALERTE D’HYGROMETRIE
Indique qu’une alerte de température haute ( )
ou basse ( ) est active
Hygrométrie intérieure ou extérieure actuelle
(selon les réglages)
L’icône s’ache quand la fonction de défilement
automatique est active
Indique qu’une alerte d’hygrométrie haute ( ) ou
basse ( ) est active
10
Page 34

TEMPERATURE ET HUMIDITE
Visualisation des données de températures et d’hygrométries
Consultation des enregistrements
Appuyez sur la touche TEMP. pour basculer entre
les enregistrements de température et d’humidité
intérieure / extérieure avec horodatage.
Ordre des enregistrements
• HAUTE TEMPÉRATURE EXTÉRIEURE
• BASSE TEMPÉRATURE EXTÉRIEURE
• FORTE HUMIDITÉ EXTÉRIEURE
• FAIBLE HUMIDITÉ EXTÉRIEURE
• HAUTE TEMPÉRATURE INTÉRIEURE
• BASSE TEMPÉRATURE INTÉRIEURE
• HAUTE HUMIDITÉ INTÉRIEURE
• FAIBLE HUMIDITÉ INTERIEURE
• INDICE DE CHALEUR
• POINT DE ROSÉE
Ré-initialisation individuelle des enregistrements
Exemple d’enregistrement de température basse Exemple d’enregistrement d’indice de chaleur
Appuyez sur la touche TEMP. pour acher
la valeur individuelle que vous souhaitez
ré-initialiser.
11
Maintenez ensuite la touche MOINS (-)
jusqu’à ce que des tirets s’achent sur
l’écran. La valeur est alors ré-initialisée
à la valeur actuelle de température ou
d’hygrométrie.
Page 35

TEMPERATURE ET HUMIDITE
Alertes personnalisables
Réglage des alertes de température et d’humidité
1. Maintenez la touche ALERTS pour entrer dans le
menu des réglages des alertes
2. Utilisez la touche +/- pour activer/désactiver et
ajuster les alertes.
3. Appuyez sur la touche ALERTS pour confirmer le
réglage.
4. Les alertes programmées sont actives quand les
icônes ( ) et ( / ) sont achées à l’écran.
Ordre de réglage des alertes
Température haute extérieure • Température basse extérieure • Hygrométrie haute extérieure •
Hygrométrie basse extérieure • Température haute intérieure • Température basse intérieure •
Hygrométrie haute intérieure • Hygrométrie basse intérieure
Sonnerie de l’alerte
• Lorsque la valeur d’alerte est atteinte, la station
émet un bip 5 fois par minute, et ce jusqu’à un
retour à des valeurs hors des valeurs
programmées.
• Les alertes sont désactivées (OFF) par défaut
• Lorsque la valeur d’alerte est atteinte, la station
Activer/Désactiver les alertes
1.2.Maintenez le bouton ALERTS enfoncé pour
entrer les paramètres d’alerte.
Utilisez la touche +/- pour activer ou désactiver
les alertes
émet un bip et l’icône clignote. Appuyez sur
n’importe quelle touche pour arrêter la sonnerie
d’alerte.
• L’icône d’alerte continuera de clignoter, et ce
jusqu’à un retour à des valeurs hors des valeurs
programmées.
• Cette alerte concerne uniquement la station et
n’aectera pas l’application
Exemple d’alerte haute de température active
12
Page 36

PREVISIONS
Visualisation des prévisions
Vous pouvez acher jusqu’à 6 jours de prévisions et 12 heures de données de prévision.
L’achage par défaut est celui avec les prévisions actuelles et les températures hautes /
basses prévues pour les 2 prochains jours.
1. ICONE INTERNET ( )
Indique que la station est connectée et qu’elle
réceptionne bien les prévisions de AccuWeather *
3. TEMPERATURE HAUTE PREVUE POUR LE JOUR EN COURS
Température haute prévue pour le jour en cours*
5. ICONES DE PREVISION
Prévisions météo pour les 12 heures à venir** Appuyez sur la touche PREVISIONS pour
7. SECTION DES PREVISIONS METEO ETENDUES
Icônes de prévision et prévisions quotidiennes hautes et basses pour les deux prochains jours.
Appuyez sur la touche pour acher des informations supplémentaires sur les prévisions sur 3 jours et
12 heures.
* Votre station doit être connectée au Wi-Fi pour recevoir les données de prévision AccuWeather.
** Une fois connectée, votre station achera 6 icônes de prévisions supplémentaires.
13
*** L’actualisation des prévisions peut entraîner les mêmes lectures si elles sont actuelles.
2. PROBABILITE DE PRECIPITATIONS
Pourcentage de chance de précipitations*
Maintenez la touche pour visualiser la valeur
des précipitations*
4. TEMPERATURE BASSE PREVUE POUR LE JOUR EN COURS
Température basse prévue pour le jour en cours*
6. ICONE DE MISE A JOUR DES PREVISIONS
actualiser les 3 jours de prévisions. L’icône
s’achera par cycle de 30 secondes ***
Page 37

PREVISIONS
Visualisation des prévisions
Visualisation des prévisions météo étendues
Appuyez sur la touche pour visualiser les prévisions
des 3 prochains jours et des 12 prochaines heures.
Exemple de prévisions météo étendues
Prévisions pour les 4 à 6 prochains jours Prévisions pour les 2 et 3 heures à venir Prévisions pour les 4, 5 et 6 heures à venir
Prévisions lorsque la station n’est pas connectée Prévisions Jour/Nuit
Lorsque la station n’est pas connectée, vous
verrez la température et l’humidité actuelles, ainsi
que les enregistrements quotidiens hauts/bas de
température et d’humidité de votre capteur.
Les prévisions n’apparaîtront que dans la zone circulaire.
Une fois connecté, l’icône du soleil s’ache
pendant les heures de jour et l’icône de la
lune s’ache pendant la nuit si la prévision est
ensoleillée ou partiellement ensoleillée.
Icône Soleil (de 7h00 à 19h) Icône Lune (de 19h00 à 7h00)
• Les heures auxquelles les icônes du soleil et de la lune
apparaissent sont préprogrammées et ne peuvent pas être
ajustées.
• La station doit être connectée au Wi-Fi pour activer la
fonction de prévision jour / nuit.
14
Page 38

PREVISIONS
Visualisation des prévisions
Icônes de prévision
Lors de l’utilisation en tant que station autonome, celle-ci utilisera les changements de pression
barométrique pour prédire votre météo pour les 12 prochaines heures. La prévision est représentée par
6 icônes de prévision (ensoleillé, partiellement ensoleillé, nuages, pluie, tempête et neige).
Ensoleillé
Partiellement ensoleillé
Nuages
Pluie
Tempête
Neige
Remarque: les icônes de prévision peuvent ne pas représenter votre météo actuelle. Il s’agit d’une
prévision future, pour la météo à venir au cours des 12 prochaines heures.
Lorsqu’elle est connectée au Wi-Fi, la station recevra des icônes météo supplémentaires, des valeurs de
probabilité de précipitations et des informations sur les prévisions futures. Ces fonctionnalités Internet
améliorées sont alimentées par AccuWeather.
Pluie légère
Neige légère
Mélange Hivernal
Vent
Glace
Brouillard
Icônes de prévisions secondaires | Les icônes suivantes apparaissent dans la section des prévisions
étendues:
Ensoleillé Pluie NeigeNuageux Neige
ensoleillé
Conseil : l’icône ( ) apparaît dans le coin supérieur droit de la section des prévisions lorsque
15
votre station est connectée et reçoit les prévisions AccuWeather.
légère
Tempête VentPluie
légère
Mélange
Hivernal
GlacePartiellement
Brouillard
Page 39

PREVISIONS
Pression Relative
• La valeur de pression relative est relevée par
le senseur barométrique interne à la station
elle-même.
• Veuillez prévoir jusqu’à 10 jours pour
l’étalonnage automatique ou programmer
votre valeur de pression locale dans le menu
des réglages.
• Les flèches rouges situées au-dessus des
valeurs représentent la tendance de la
pression.
• Sélectionnez l’unité de mesure souhaitée
(hPa ou InHg) dans le menu des réglages.
Vous pouvez également définir la valeur de
pression manuellement si vous le souhaitez.
Remarque: la lecture de pression par défaut est de 1013 hPa
(29,92 InHg). La station s’acclimatera d’elle-même si la valeur de
pression n’est pas réglée.
LES BASES
Indicateurs de piles faibles
• Si un indicateur orange de piles faibles
apparaît dans la section de température
extérieure, remplacez les piles du capteur
thermo/hygro.
• Si un indicateur blanc de piles faibles apparaît
à côté de l’achage de l’heure, remplacez les
piles de la station.
Flèches de tendance de la pression
• Si un indicateur rouge de pile faible apparaît
dans la section du capteur de pression /
supplémentaire, remplacez les piles du
capteur supplémentaire.
• Si un indicateur vert de pile faible apparaît
dans la section circulaire, remplacez les piles
du capteur correspondant.
16
Page 40

LES CAPTEURS
Installation de votre capteur Thermo-Hygro
• Utilisez l’encoche en haut à l’arrière du capteur pour accrocher
celui-ci à l’aide d’un clou. Ou insérez une vis de montage à l’avant de
votre capteur.
• Installez votre capteur sur un mur orienté au Nord ou dans une zone
ombragée. Sous un avant-toit est préférable pour éviter des lectures
faussées par la chaleur du soleil.
• La portée maximale de transmission sans fil vers la station est de 121
mètres (400 pieds) en plein air, murs ou planchers non compris.
• Assurez-vous que votre capteur est installé verticalement pour
permettre à l’humidité de s’écouler correctement.
Addition de capteurs à votre station
1. Appuyez sur la touche EXTRA SENSOR de façon
continue jusqu’à ce que l’indicateur de réception
du capteur commence à s’animer.
2.
Installez les piles dans votre capteur. Si le
capteur a un bouton TX, appuyez dessus pour
forcer un signal de transmission. Ce bouton
est généralement situé dans ou à proximité du
compartiment à piles du capteur. La lumière LED
sur le capteur clignotera une fois.
Votre capteur devrait se connecter dans les 3
3.
prochaines minutes, achant brièvement son
ID et son type sur l’écran LCD. L’indicateur de
réception du capteur s’achera en continu sur
l’écran lorsqu’un capteur est connecté.
Remarque : lors de la première mise sous tension ou après
une réinitialisation d’usine, des capteurs supplémentaires
doivent se connecter automatiquement à votre station.
17
Achage des données du capteur
Si plusieurs capteurs supplémentaires sont
connectés, appuyez sur la touche EXTRA SENSOR
pour faire défiler les données que vous souhaitez
acher sur l’écran LCD. L’icône de défilement
automatique ( ) apparaîtra si elle est activée. Ce
réglage inclura également les données de pression
relative dans le cycle.
CAPTEUR DE SENSORION : Ce capteur
thermo-hygro est doté d’une puce
de détection, orant des lectures de
température et d’humidité améliorées,
des tolérances de précision inégalées et
un transfert de données plus rapide.
Exemple de capteur de fuite d’eau
Trouvez toutes vos options
de capteurs complémentaires
en scannant le code QR ou en
visitant :
bit.ly/v15_parts
Page 41

APPENDICE
Avertir!
Entretien et maintenance
Remplacer la pile bouton
1. Utilisez une pièce de monnaie pour tourner le couvercle
de la batterie vers la gauche pour le retirer.
2. Tirez sur la goupille métallique et retirez délicatement la
batterie.
3. Insérez une nouvelle pile CR2032 avec le côté + vers le
haut et enclenchez en place.
4. Replacez le couvercle de la batterie et utilisez la pièce
pour le tourner vers le droit de verrouiller..
Instructions de remplacement de la batterie
Lorsque des batteries de marques ou de types diérents
sont utilisées ensemble, ou que des batteries neuves et
anciennes sont utilisées ensemble, certaines batteries
peuvent être surdéchargées en raison d’une diérence de
tension ou de capacité. Cela peut entraîner une ventilation,
une fuite et une rupture et peut causer des blessures.
• Achetez toujours la taille et la qualité de batterie les mieux
adaptées à l’utilisation prévue.
• Remplacez toujours l’ensemble des piles en meme temps,
en prenant soin de ne pas mélanger les anciennes et les
nouvelles, ou des piles de types diérents.
• Nettoyez les contacts de la batterie et ceux de l’appareil
avant l’installation de la batterie.
• Assurez-vous que les piles soient correctement installées
en respectant la polarité (+ et -).
• Retirez les piles du produit pendant les périodes de
non-utilisation. Une fuite de batterie peut provoquer de la
corrosion et endommager ce produit.
• Retirez aussitôt que possible les piles usagées.
• Pour le recyclage et la mise au rebut des piles et pour
protéger l’environnement, veuillez consulter l’Internet
ou votre annuaire téléphonique local pour connaître
les centres de recyclage locaux et/ou suivre les
réglementations gouvernementales locales.
Résidents de Californie
AVERTISSEMENT : ce produit peut vous exposer à des produits chimiques, notamment le styrène, qui est connu
dans l’État de Californie pour provoquer le cancer. Pour plus d’informations, visitez : www.P65Warnings.ca.gov
ATTENTION
1. Ce produit contient une pile bouton.
2. En cas d’ingestion, il peut causer des blessures graves ou
la mort en seulement 2 heures.
3. Consulter un médecin immédiatement.
AVERTISSEMENT : GARDER LES BATTERIES HORS DE LA
PORTÉE DES ENFANTS
1. L’ingestion peut entraîner des blessures graves en aussi peu
que 2 heures ou la mort, en raison de brûlures chimiques et
d’une perforation potentielle de l’œsophage.
2. Si vous pensez que votre enfant a avalé ou inséré une pile
bouton, consultez immédiatement un médecin d’urgence.
3. Examinez les appareils et assurez-vous que le
compartiment à piles est correctement sécurisé, par ex. que
la vis ou autre attache mécanique est serrée.
4. Ne pas utiliser si le compartiment n’est pas sécurisé.
5. Jetez immédiatement et en toute sécurité les piles bouton
usagées. Les piles à plat peuvent toujours être
dangereuses.
6. Informez les autres des risques associés aux piles bouton
et comment assurer la sécurité de leurs enfants.
Le fabricant n’est pas responsable des interférences radio
ou TV causées par des changements ou des modifications
non autorisés de cet équipement. De tels changements ou
modifications pourraient annuler le droit de l’utilisateur à
utiliser l’équipement.
Tous les droits sont réservés. Ce manuel ne peut être
reproduit sous aucune forme, même en partie, ni dupliqué ou
traité à l’aide procédé électronique, mécanique ou chimique
sans l’autorisation écrite de l’éditeur.
Ce livret peut contenir des erreurs ou des fautes d’impression.
Les informations qu’il contient sont régulièrement vérifiées et
des corrections sont apportées dans les éditions ultérieures.
Nous déclinons toute responsabilité pour toute erreur
technique ou erreur d’impression, ou leurs conséquences.
Toutes les marques et brevets sont reconnus.
18
Page 42

APPENDICE
Garantie
La Crosse Technology, Ltd. ore une garantie limitée
d’un an (à compter de la date d’achat) sur ce produit,
concernant les défauts de fabrication des matériaux
et de fabrication.
Pour tous les détails de la garantie, visitez :
www.lacrossetechnology.com/support
La Crosse Technology, Ltd.
2830 S. 26th Street, La Crosse, Wisconsin 54601
Caractéristiques
SPÉCIFICATIONS DE LA STATION (V15)
• Gamme de température intérieure : 32 °F à 122 °F
(0 °C à 50 °C)
• Gamme d’humidité intérieure : 10 à 99 % HR
• Gamme de pression relative : 23,62 à 32,48 InHg
(800 à 1 100 hPa)
• Alimentation requise :
• Alimentation principale : adaptateur 5,0 V (inclus)
• Batterie de secours : 1 pile touche « CR2032 » (incluse)
• Dimensions de la station : 6,50 po de longueur x 1,09
po de largeur x 6,81 po de hauteur 16,50 cm de
longueur x 2,78 cm de largeur x 17,30 cm de hauteur)
• Luminosité LCD : 4 niveaux d’intensité + OFF
(Option de rétroéclairage à atténuation automatique
programmable)
• Options de langue : anglais, espagnol et français
(Traduction disponible pour les menus et le calendrier)
19
Please Recycle
CARACTÉRISTIQUES DU CAPTEUR (LTV-TH5i)
• Gamme de température extérieure : -40°F à 140°F
(-40°C à 60°C)
• Gamme d’humidité extérieure : 10 à 99 % HR
• Portée de transmission : 400 pieds (121 mètres) en
plein air 915MHz
• Alimentation requise : 2 piles « AA » (non incluses)
• Dimensions du capteur : 1,97 de longueur x 0,75 de
largeur x 5,73 de hauteur (5,0 cm de longueur x 1,91
cm de largeur x 14,55 cm de hauteur)
EXIGENCES DU RÉSEAU Wi-Fi
• Fréquence de diusion : 2,4 GHz (802.11 b/g/n)
• Nom/mot de passe du réseau : ne doit pas dépasser
45 caractères
• Vitesse du réseau : doit être supérieure à 1 Mbit/s
Remarque : si vous disposez d’un routeur à plusieurs bandes,
cet appareil se connectera à la bande 2,4 GHz lors de la
connexion au Wi-Fi.
EXIGENCES MOBILES
• Les téléphones Apple nécessitent iOS avec un service
cellulaire ou Wi-Fi.
• Les téléphones Android nécessitent un système
d’exploitation Android avec un service cellulaire ou Wi-Fi.
Recyclage et élimination
Veuillez tenir compte de l’environnement lorsque vous
décidez de vous débarrasser de ce produit. Bien que les
appareils électroniques ménagers soient généralement sûrs
à utiliser au quotidien, une mise au rebut incorrecte peut
avoir des impacts négatifs et potentiellement irréversibles sur
notre environnement.
Vérifiez auprès des centres de dons locaux pour voir si
votre produit peut être donné pour une utilisation future.
Si l’élimination est la seule option, les agences fédérales,
les gouvernements locaux et les détaillants certifiés
peuvent avoir mis en place des programmes de recyclage
électronique. Les programmes peuvent varier en fonction de
l’emplacement.
Page 43

APPENDICE
Déclaration de la FCC
Cet équipement a été testé et déclaré conforme aux limites d’un appareil numérique de classe B, conformément à la partie 15 des
règles de la FCC. Ces limites sont conçues pour fournir une protection raisonnable contre les interférences nuisibles dans une
installation résidentielle.
Cet équipement génère, utilise et peut émettre de l’énergie radiofréquence et, s’il n’est pas installé et utilisé conformément aux
instructions, peut provoquer des interférences nuisibles aux communications radio. Cependant, il n’y a aucune garantie que des
interférences ne se produiront pas dans une installation particulière. Si cet équipement provoque des interférences nuisibles à
la réception de la radio ou de la télévision, ce qui peut être déterminé en éteignant et en rallumant l’équipement, l’utilisateur est
encouragé à essayer de corriger les interférences par une ou plusieurs des mesures suivantes :
• Réorientez ou déplacez l’antenne de réception.
• Branchez l’équipement dans une prise sur un circuit diérent de celui auquel le récepteur est connecté.
• Augmenter la séparation entre l’équipement et le récepteur.
• Consultez le revendeur ou un technicien radio/TV expérimenté pour obtenir de l’aide.
Déclaration de la FCC sur l’exposition à la radiation
Cet appareil est conforme aux limites d’exposition aux rayonnements de la FCC définies pour un environnement non contrôlé et
il est également conforme à la partie 15 des règles RF de la FCC. Cet équipement doit être installé et utilisé conformément aux
instructions fournies et les antennes utilisées pour cet émetteur doivent être installées pour fournir une distance de séparation
d’au moins 20 cm de toutes les personnes et ne doivent pas être co-localisées ou fonctionner en conjonction avec toute autre
antenne ou émetteur. Les utilisateurs finaux et les installateurs doivent recevoir des instructions d’installation de l’antenne et
envisager de supprimer la déclaration de non-collocation.
Cet appareil est conforme à la partie 15 des règles de la FCC. L’exploitation est soumise aux deux conditions suivantes :
(1) Cet appareil ne doit pas causer d’interférences nuisibles, et (2) Cet appareil doit accepter toute interférence reçue, y compris les
interférences pouvant provoquer un fonctionnement indésirable.
Attention : Tout changement ou modification non expressément approuvé par la partie responsable de la conformité peut annuler
le droit de l’utilisateur à utiliser l’équipement.
Déclaration du Canada
Cet appareil contient des émetteurs/récepteurs exempts de licence qui sont conformes aux RSS exemptés de licence
d’Innovation, Sciences et Développement économique Canada. L’exploitation est soumise aux deux conditions suivantes :
(1) Cet appareil ne doit pas provoquer d’interférences ; et (2) Cet appareil doit accepter toute interférence, y compris les
interférences susceptibles de provoquer un fonctionnement indésirable de l’appareil.
L’appareil répond à l’exemption des limites d’évaluation de routine de la section 2.5 de RSS 102 et à la conformité à
l’exposition RF RSS-102, les utilisateurs peuvent obtenir des informations canadiennes sur l’exposition aux RF et la conformité.
Cet émetteur ne doit pas être co-localisé ou fonctionner en conjonction avec toute autre antenne ou émetteur. Cet
équipement doit être installé et utilisé avec une distance minimale de 20 centimètres entre le radiateur et votre corps
20
Page 44

SUPPORT
Des problèmes? Nous sommes là pour vous aider.
Pour trouver des réponses aux FAQ et des options d’auto-assistance
supplémentaires, scannez le code QR ou accédez à :bit.ly/v15_support
Si vous avez besoin d’une assistance supplémentaire, contactez
notre sympathique équipe d’assistance client :
En ligne : bit.ly/contact_techsupport
Numéro de téléphone : 1.844.200.8752
Les représentants sont disponibles du lundi au vendredi, de 8h00 à
18h00 CST
Brevets Technologiques La Crosse
Visitez www.lacrossetechnology.com/patents pour obtenir des informations sur les brevets.
Retour aux paramètres d’usine
Si vous rencontrez des problèmes, appuyez dessus
les touches ALERTS et FORECAST REFRESH
simultanément jusqu’à ce que l’écran émette un bip.
Vous n’avez pas besoin de retirer la pile bouton pour
redémarrer la station.
Apple et le logo Apple sont des marques commerciales d’Apple Inc., déposées aux États-Unis et dans d’autres pays. App
Store est une marque de service d’Apple Inc. Google Play et le logo Google Play sont des marques de Google Inc.
21
Conçu à La Crosse, Wisconsin • Fabriqué en Chine • Imprimé en Chine • DC 092721
Restez en contact
Posez des questions, regardez des vidéos de
configuration et faites part de vos commentaires sur
nos réseaux sociaux.
Suivez La Crosse Technology à Facebook, Instagram,
YouTube et Twitter.
 Loading...