


Installation and Operation Instructions |
Document 1255B |
|
|
Installation and
Operation Instructions for
NEOTHERM® LC
Modulating Boiler |
Water Heater |
Model NTH1000 |
Model NTV1000 |
1,000 MBTU/h |
1,000 MBTU/h |
Model NTH1700 |
Model NTV1700 |
1,700 MBTU/h |
1,700 MBTU/h |
FOR YOUR SAFETY: This product must be installed and serviced by a professional service technician, qualified in hot water boiler and heater installation and maintenance. Improper installation and/or operation could create carbon monoxide gas in flue gases which could cause serious injury, property damage, or death. Improper installation and/or operation will void the warranty.
 WARNING
If the information in this manual is not followed exactly, a fire or explosion may result causing property damage, personal injury or loss of life.
Do not store or use gasoline or other flammable vapors and liquids in the vicinity of this or any other appliance.
WHAT TO DO IF YOU SMELL GAS
•Do not try to light any appliance.
•Do not touch any electrical switch; do not use any phone in your building.
•Immediately call your gas supplier from a nearby phone. Follow the gas supplier’s instructions.
•If you cannot reach your gas supplier, call the fire department.
Installation and service must be performed by a qualified installer, service agency, or gas supplier.
H2352900B
 AVERTISSEMENT
Assurez-vous de bien suivres les instructions données dans cette notice pour réduire au minimum le risque d’incendie ou d’explosion ou pour éviter tout dommage matériel, toute blessure ou la mort.
Ne pas entreposer ni utiliser d’essence ni d’autres vapeurs ou liquides inflammables dans le voisinage de cet appareil ou de tout autre appareil.
QUE FAIRE SI VOUS SENTEZ UNE ODEUR DE GAZ:
•Ne pas tenter d’allumer d’appareils.
•Ne touchez à aucun interrupteur. Ne pas vous servir des téléphones dansle bâtiment où vous vous trouvez.
•Appelez immédiatement votre fournisseur de gaz depuis un voisin. Suivez les instructions du fournisseur.
•Si vous ne pouvez rejoindre le fournisseur de gaz, appelez le sservice des incendies.
L’installation et l’entretien doivent être assurés par un installateur ou un service d’entretien qualifié ou par le fournisseur de gaz.

NeoTherm LC Boilers and Water Heaters
Table of Contents
Section 1 |
|
|
General Information....................................... |
1 |
|
1.1 |
Introduction................................................ |
1 |
1.2 |
About the Touch Screen............................ |
1 |
1.3 |
Safety Notes.............................................. |
3 |
1.4 |
Model Identification / Nomenclature.......... |
3 |
1.5 |
Warranty.................................................... |
4 |
1.6 |
Appliance Overview................................... |
4 |
1.7 |
Dimensions................................................ |
6 |
1.8 |
Unpacking................................................. |
6 |
Section 2 |
|
|
Locating the Appliance................................... |
8 |
|
2.1 |
Locating the Appliance.............................. |
8 |
2.2Correct Vent Distance
|
from Outside Wall or Roof Termination |
...... 8 |
Section 3 |
|
|
Venting and Combustion Air.......................... |
9 |
|
3.1 |
Combustion Air.......................................... |
9 |
3.1.1 |
Combustion Air From Room...................... |
9 |
3.1.2 |
Ducted Combustion Air............................ |
10 |
3.2 |
Venting..................................................... |
11 |
3.2.1 |
Common Venting...................................... |
11 |
3.2.3Venting Requirements Unique to Canada11
3.3Locating the Vent and Combustion Air
|
Terminals................................................. |
12 |
3.3.1 |
Side Wall Vent Terminal........................... |
12 |
3.3.2 |
Side Wall Combustion Air Terminal......... |
14 |
3.3.3 |
Vertical Vent Terminal.............................. |
15 |
3.3.4 |
Vertical Combustion Air Terminal............. |
15 |
3.3.5 |
Installations in the Commonwealth of |
|
|
massachusetts........................................ |
15 |
3.4 |
Common Vent Test.................................. |
15 |
3.5 |
Outdoor Installation................................. |
16 |
3.6 |
Condensate Trap..................................... |
16 |
Section 4 |
|
|
Gas Supply and Piping.................................... |
17 |
|
4.1 |
Gas Supply and Piping............................ |
17 |
|
Distance & Pipe Size, Tables.................. |
18 |
Section 5 |
|
|
Pump Requirements........................................ |
19 |
|
5.1NeoTherm LC Boiler Flow and Head
|
Requirements.......................................... |
20 |
5.2 |
NeoTherm LC Water Heater Flow and ....... |
|
|
Head Requirements................................ |
19 |
Section 6 |
|
|
Water Connections........................................ |
20 |
|
Section 6A - NTH Systems...................................... |
20 |
|
6A.1 |
NTH System Piping: Hot Supply |
|
|
connections............................................ |
20 |
6A.2 |
NTH Cold Water Make-Up...................... |
20 |
6A.3 |
NTH Freeze Protection............................ |
21 |
6A.4 |
NTH Suggested Piping Schematics........ |
21 |
6A.5 |
Condensate Trap..................................... |
21 |
Section 6B - NTV Systems...................................... |
27 |
|
6B.1 |
NTV Water Quality.................................. |
27 |
6B.2 |
NTV Piping Requirements....................... |
27 |
6B.3 |
NTV Cold Water Make-Up....................... |
28 |
6B.4 |
NTV Freeze Protection............................ |
28 |
6B.5 |
NTV Suggested Piping Schematics........ |
28 |
6B.6 |
NTV Suggested Pumps........................... |
29 |
6B.7 |
Condensate Trap..................................... |
29 |
Section 7 |
|
|
Electrical Connections.............................. |
30 |
|
7.1 |
Main Power............................................. |
30 |
7.2 |
Pump Connections.................................. |
30 |
7.324 VAC Transformer with Integral
|
circuit Breaker......................................... |
32 |
7.4 |
Signal Connections................................. |
32 |
7.5 |
Optional Field Connections..................... |
32 |
7.6 |
Ladder Diagrams..................................... |
33 |
|
Wiring Diagrams...................................... |
34 |
Section 8 |
|
|
Using the Touch Screen and Gauges...... |
36 |
|
8.1the Touch Screen and Gauges on the Front
|
of the NeoTherm LC................................ |
36 |
8.2 |
Using the Touch Screen.......................... |
36 |
8.3While Operating – Checking Lead/Lag
|
Operating Information.............................. |
38 |
8.4 |
Checking Lead/Lag Master..................... |
38 |
8.5While Operating - Checking Individual
|
Parameters.............................................. |
39 |
8.6 |
Checking Individual Details..................... |
40 |
8.7Configuring Parameters on Individual
controllers............................................... |
40 |
8.8Verification Process for Safety-Related
Parameters.............................................. |
41 |
i

LAARS Heating Systems
Section 9 – |
|
|
Setup and Configuration............................. |
44 |
|
9.1 |
Review of Lead/Lag Control System....... |
44 |
9.1.1 |
About Lead/Lag Operation...................... |
44 |
9.1.2 |
Lead/Lag Modulation Cycle..................... |
45 |
9.1.3 |
NTH Lead/Lag with Indirect |
|
|
Domestic Hot Water................................ |
46 |
9.2 |
Connection Terminals.............................. |
46 |
9.3 |
NeoTherm LC System Configurations... |
46-54 |
9.4 |
Installation Jobs....................................... |
55 |
ANote for Systems Using Common
|
Venting.................................................... |
55 |
B |
Naming the Controllers............................ |
55 |
CMake One Control the Lead/Lag
master..................................................... |
56 |
DDisable the Lead/Lag Master Function
|
on the Lead/Lag Slaves.......................... |
57 |
e |
Set up the Modbus Control Addressing... |
58 |
f |
Set the Flap Valve IDs............................. |
59 |
G |
Disconnect Unused Operator |
|
|
Interfaces................................................. |
63 |
h |
connect the Modbus Wiring.................... |
63 |
I |
Set the Parameters Used by the |
|
|
Lead/Lag System.................................... |
64 |
|
About the “Time of Day” Function........... |
68 |
JInstall the System Sensor and Adjust
the Setpoint............................................. |
68 |
KSet the Lead/Lag Outdoor Reset and
Warm Weather Shutdown....................... |
68 |
About “Outdoor Reset”............................ |
69 |
LBuilding Automation or Multiple Boiler
Control Thermostat Demand.................. |
70 |
MBuilding Automation or Multiple Boiler
4-20mA Setpoint Control........................ |
70 |
NBuilding Automation or Multiple Boiler
|
4-20mA Modulation Control..................... |
71 |
O |
Combustion Setup Procedure................. |
71 |
PSetting the Date and Time on the
System Display........................................ |
76 |
9.5Setup for Domestic Hot Water on a
|
Lead/Lag System.................................... |
77 |
|
Setup Type 1............................................ |
77 |
|
Setup Type 2............................................ |
78 |
|
Setup Type 3............................................ |
79 |
9.6 |
Gateway Connections to a |
|
|
Building Automation System................... |
80 |
9.7Setup for High Altitude Operation -
|
nt 1700 Only.......................................... |
80 |
9.8 |
Installer Parameters........................... |
81-87 |
Section 10 - |
|
|
Initial Startup Instructions....................... |
88 |
|
10.1 |
Filling the Boiler System.......................... |
88 |
10.2 |
Initial Operation....................................... |
89 |
10.2.1 |
Initial Burner Operation........................... |
89 |
10.2.2 |
Combustion Setup Procedure................. |
89 |
10.3 |
Shutting Down the NeoTherm LC........... |
89 |
10.4 |
Restarting the NeoTherm LC.................. |
89 |
Section 11 |
|
|
Maintenance...................................................... |
90 |
|
11.1 |
System Maintenance............................... |
90 |
11.2 |
Maintenance Notes................................. |
90 |
11.2.1 |
Burner...................................................... |
90 |
11.2.2 |
Modulating Gas Valve/ Venturi................ |
90 |
11.2.3 |
Controllers............................................... |
91 |
11.2.4 |
Ignitor Assembly...................................... |
91 |
11.2.5 |
Flame Sensor.......................................... |
91 |
11.2.6 |
Transformer with Integral |
|
|
circuit Breaker......................................... |
91 |
11.2.7 |
Blower..................................................... |
92 |
11.2.8 |
Heat Exchanger Coils.............................. |
92 |
11.2.9 |
Gas Pressure Switches (optional)........... |
92 |
11.2.10 |
Natural/Propane Gas Conversion......... |
93 |
11.2.11 Condensate Trap................................... |
93 |
|
11.2.12 Battery (Date & Time Back-Up)............. |
93 |
|
Section 12 |
|
|
Troubleshooting............................................ |
94 |
|
12.1Potential Setup and Synchronization
|
Problems................................................. |
94 |
12.1.1 Controller Synchronization...................... |
94 |
|
12.1.2 Flap Valve Status Checks....................... |
95 |
|
12.2 |
About Lockouts, Holds, and Alerts.......... |
95 |
12.2.1 Responding to a Lockout, Hold, |
|
|
|
or Alert..................................................... |
95 |
12.2.2 Viewing the Lockout and Alert |
|
|
|
histories.................................................. |
96 |
12.3 |
troubleshooting Tables (all codes)...... |
98-112 |
12.4Diagnostic Tests and Input/Output
|
Indicators................................................ |
113 |
12.5 |
Lead/Lag Slave Diagnostics................... |
114 |
12.6 |
Statistics................................................. |
114 |
12.7 |
Analysis.................................................. |
114 |
12.8 |
Control Snapshot.................................... |
115 |
12.9 |
Operating Sequence.............................. |
115 |
Section 13 |
|
|
Replacement Parts........................................ |
118 |
|
13.1 |
General Information................................ |
118 |
13.2 |
Parts List................................................ |
118 |
13.3 |
Parts Illustrations................................... |
124 |
ii

LAARS Heating Systems

NeoTherm LC Boilers and Water Heaters |
Page 1 |
|
|
|
|
Section 1
GENERAL INFORMATION
1.1Introduction
This manual includes information which will help you to install, operate, and maintain the NeoTherm LC 1000 and 1700 systems. Please read this manual completely before proceeding with the installation. If you have any questions regarding this equipment, please consult the LAARS Heating Systems factory, or a local factory representative. Many operating
problems are caused by improper installation.
Touch Screen Display (behind the plastic cover which slides downward)
Pressure and temperature gauge
Power switch
 WARNING
NeoTherm LC units must be installed in accordance with the procedures detailed in this manual, or the LAARS Heating Systems warranty will be voided. The installation must conform to the requirements of the local jurisdiction having authority, and, in the United States, to the latest edition of the National Fuel Gas Code, ANSI Z223.1/NFPA54. In Canada,
the installation must conform to the latest edition of CSA B149.1 Natural Gas and Propane Gas Installation Code, and/or local codes. Where required by the authority having jurisdiction,
the installation of NeoTherm LC boilers must conform to the Standard for Controls and Safety Devices for Automatically Fired Boilers, ANSI/
ASME CSD-1. Any modifications to the boiler, its gas controls, or wiring may void the warranty.
If field conditions require modifications, consult the factory representative before initiating such modifications.
1.2About the NeoTherm LC Touch Screen Display
The NeoTherm LC has an advanced control system which can perform many functions. This is part
of the reason why the NeoTherm LC 1000 or 1700 can deliver such outstanding performance. You can access the control system using the ‘Touch Screen Display’ (see Section 8). There are several “branches” in the control software, and many different display screens. For clarity, throughout this manual we have made a special effort to show you how to reach each of the important setup and
operating functions. We have done this in two ways:
•In many cases, we have shown you the actual touch screen display that you will see while performing a function.
•Sometimes, instead of showing the screens, we have just listed the series of choices you should make in order to reach the section you want.
The arrangement of the control software is actually quite logical, and after you have worked with it a bit, you will not have any problems “finding your way around.” We just want to give you some help with the first part of the process, when you are “getting used to” the control system .
Later in this manual, we will detail information on the setup and operating procedures. There are a couple of concepts you will need to understand right from the start.
•Each boiler has two controllers (internal electronic burner controllers) and two burners, as shown in Fig. 1.
•A single Touch Screen is used to communicate with these two controllers.
Boiler 1
Touch |
Primary |
Primary |
Screen |
controller |
burner |
|
Gas |
|
|
valve |
|
|
Gas |
|
|
valve |
|
|
Secondary |
Secondary |
|
controller |
burner |
Fig. 1 – Control Arrangement in a Single-Boiler
Installation

Page 2 |
LAARS Heating Systems |
|
|
|
|
•Each controller and burner work together. Each boiler includes two of these controller/burner combinations.
Notice the different terms we are using here. The term boiler refers to the whole appliance
– the complete NeoTherm LC 1000 or 1700. Each boiler includes two separate controller/ burner pairs.
•NeoTherm LC 1000 and 1700 units are always set up for “Lead/Lag” operation. The term “Lead/Lag” means that, as the heating load increases, the control system brings additional burners on automatically.
|
Boiler 1 |
|
|
Boiler 2 |
|
|
Boiler 3 |
|
|
|
Boiler 4 |
|||||||||||||||||||||||
Touch |
|
|
|
|
|
|
|
|
|
|
|
|
|
|
|
|
|
|
|
|
|
|
|
|
|
|
|
|
|
|
|
|
|
|
Screen |
|
|
|
|
|
|
|
|
|
|
|
|
|
|
|
|
|
|
|
|
|
|
|
|
|
|
|
|
|
|
|
|
|
|
|
|
|
|
|
|
|
|
|
|
|
|
|
|
|
|
|
|
|
|
|
|
|
|
|
|
|
|
|
|
|
|
|
|
|
|
Addr |
|
Addr |
|
|
|
Addr |
|
Addr |
|
|
|
Addr |
|
Addr |
|
|
|
Addr |
|
Addr |
|
||||||||||||
|
1 |
|
|
2 |
|
|
|
|
3 |
|
|
4 |
|
|
|
|
5 |
|
|
6 |
|
|
|
|
7 |
|
|
8 |
|
|||||
|
|
|
|
|
|
|
|
|
|
|
|
|
|
|
|
|
|
|
|
|
|
|
|
|
|
|
|
|
|
|
|
|
|
|
|
|
|
|
|
|
|
|
|
|
|
|
|
|
|
|
|
|
|
|
|
|
|
|
|
|
|
|
|
|
|
|
|
|
|
Lead Lag |
|
Slave 3 |
|
|
|
|
|
Slave 5 |
|
|
|
|
|
Slave 7 |
|
|
|
|||||||||||||||||
Master and |
|
|
|
Slave 4 |
|
|
|
Slave 6 |
|
|
|
|
Slave 8 |
|||||||||||||||||||||
Slave 1 |
Slave 2 |
|
|
|
|
|
|
|
|
|
|
|||||||||||||||||||||||
|
|
|
|
|
|
|
|
|
|
|
|
|
|
|
|
|
|
|
|
|
|
|
|
|
|
|
|
|
|
|||||
Fig. 2 – Lead/Lag Arrangement in a Multiple-
Boiler Installation
On a multiple-boiler installation, each of the individual boilers is still set up as shown in Fig. 1 above, but the controller/burner pairs on all of the boilers are arranged in a “daisy chain.”
Up to four boilers, with up to eight controller/burner pairs, can be connected in this way. See Fig. 2.
In all NeoTherm LC multiple-boiler installations, just one of the Touch Screens is active. It can communicate with all of the controller/burner pairs in the system, so it displays information from all of the burners. A single system sensor provides the control input for the system.
All NeoTherm LC’s that are set up as a single boiler will still uses a Lead/Lag operation. If the heating load becomes too great for the first burner, the control system automatically starts the second burner.
To work with this control system, you will need to understand the difference between two kinds of control functions:
•SYSTEM FUNCTIONS, Some of the functions control all of the controller/burner pairs, working together as part of the Lead/ Lag system. As an example, the setpoint for a whole multiple-boiler system is set by a single value: “Central Heat Lead/Lag Setpoint.”
By changing this one value, you change the setpoint used by the whole system. The action of all of the controller/burner pairs will refer back to that single value.
On the Touch Screen, from the ‘home’ screen you can reach all of the Lead/Lag functions by pressing the View Lead Lag button. See Fig. 3.
•INDIVIDUAL FUNCTIONS, Other functions apply only to each separate controller/burner pair. As an example, each controller/burner has a name, and this can be changed.
The ‘home’ screen on the Touch Screen will show icons for each of the controller/burner pairs connected to the system. To reach one of the functions for an individual controller/ burner, press the icon for that controller/ burner. On the following screen, press the
Configure button. This will take you to all of the configuration options for that individual controller/burner.
|
|
Press here for |
|
|
system setup |
Press here to |
Press here |
Press here |
see current |
for individual |
for Lead/ Lag |
Lead/ Lag |
controller/ |
setup |
performance |
burner pairs |
|
Fig. 3 – Going to Lead/Lag and Individual Functions
Note – For individual functions, if you want to make a change on all of the controller/burner pairs in the system, you will have to go to each controller/burner separately and repeat the change for each of them. If there are eight controller/burners in the system, and you want to make the same change on all of them, go to each of the eight controller/burner pairs separately.
As we go through the explanations in this manual, we will point out whether a control function affects the whole Lead/Lag system, or just an individual controller/burner pair.
This has been just a quick introduction, but this
NeoTherm LC Boilers and Water Heaters |
Page 3 |
|
|
|
|
manual includes two longer sections that will help you to work with the control system:
•Section 8 – “Using the Touch Screen and the Gauges.”
This section will explain how to “Navigate” through the Touch Screen : how to enter and change values, and so on.
•Section 9 – “Setup and Configuration”
The first part of this section includes a more complete explanation of the Lead/Lag system. The rest of the section includes detailed setup instructions.
If you are not familiar with the control system, the installation and setup process will go much more smoothly if you read through these three sections before beginning work.
1.3Safety Notes
 WARNING
Fire or Explosion Hazard
Improper configuration can cause fuel buildup and explosion. Improper user operation may result in property loss, severe physical injury, or death.
Any changes to safety-related configuration parameters must only be done by experienced and/or licensed burner/boiler operators and mechanics.
If any odor of gas is detected, or if the gas burner does not appear to be functioning in a normal manner, close the main gas shutoff valve. Do not shut off the power switch. Contact your heating contractor, gas company, or factory representative.
The NeoTherm LC Appliance is protected against over-pressurization. A pressure relief valve is included with each NeoTherm LC.
The inlet gas pressure to the appliance must not exceed 13” W.C. (3.2 kPa).
All installations must be made in accordance with 1) American National Standard Z223.1/NFPA54Latest Edition “National Fuel Gas Code” or 2) CSA B149.1 “Natural Gas and Propane Installation Code” and with the requirement of the local utility or other authorities having jurisdiction. Such applicable
Model Nomenclature
1 |
2 |
3 |
|
4 |
5 |
6 |
7 |
|
8 |
|
||||||||||
|
|
|
|
|
|
|
|
|
|
|
|
|
|
|
|
|
|
|
|
|
N |
T |
|
|
H |
|
|
|
|
|
|
|
|
|
|
|
|
|
|
|
|
|
|
|
|
|
|
|
|
|
|
|
|
|
|
|
|
|
|
|
|
|
|
|
|
|
|
|
|
|
|
|
|
|
|
|
|
|
|
|
|||
SERIES |
|
USAGE |
|
|
|
|
SIZE |
|
|
|
|
|
FUEL |
|||||||
N |
T |
|
H - HYDRONIC |
|
|
|
MBTU/h |
|
|
|
N - NATURAL |
|||||||||
|
|
|
V - VOLUME |
|
|
|
1 0 |
0 |
0 |
|
|
|
P - PROPANE |
|||||||
|
|
|
|
|
|
|
|
|
||||||||||||
|
|
|
|
|
|
1 7 0 0 |
|
|
|
|||||||||||
|
|
|
WATER |
|
|
|
|
|
|
|
|
|
|
|||||||
|
|
|
|
|
|
|
|
|
|
|
|
|
||||||||
requirements take precedence over the general instructions contained herein.
 WARNING
Carbon Monoxide Hazard
Improper adjustment of the burners may lead to poor combustion quality, increasing the amount of carbon monoxide produced. Excessive carbon monoxide levels may lead to personal injury or death.
 WARNING
Electrical Shock Hazard
Electrical shock can cause severe injury, death or property damage. Disconnect the power supply before beginning installation or changing the wiring to prevent electrical shock or damage to the
equipment. It may be necessary to turn off more than one power supply disconnect.
All electrical wiring is to be done in accordance with local codes, or in the absence of local codes, with: 1) The National Electrical Code ANSI/NFPA No.
70 - latest Edition, or 2) CSA STD. C22.1 “Canadian Electrical Code - Part 1.” This appliance must be electrically grounded in accordance with these codes.
1.4Model Identification
Consult the rating plate on the unit. The following information describes the model number structure.
(1-2) Model Series Designation
N T = NeoTherm LC
(3)Usage
H = Hydronic
V = Volume Water
(4-7) Size
1 0 0 0 = 1,000,000 BTU/hr input
1 7 0 0 = 1,700,000 BTU/hr input
(8)Fuel
N = Natural Gas P = LP Gas
(9)Options Code
J = CSD1 Version X = Standard Unit
(10)Pump Options
X = No pump
(11)Revision
1 = First version
9 |
|
10 |
|
11 |
|
||||||||
|
|
|
|
|
|
|
|
|
|
|
|
|
|
|
|
|
|
|
|
|
|
|
|
|
1 |
|
|
|
|
|
|
|
|
|
|
|
|
|
|
|
|
|
|
|
|
|
|
|
|
||||||
OPTIONS |
CODE |
PUMP |
OPTIONS |
|
REVISION |
||||||||
J - CSD1 |
|
X - NO PUMP |
|
1 - FIRST |
|||||||||
X - STANDARD |
|
|
|
|
|
|
|
|
|
|
|||
|
|
|
|
|
|
|
|
|
|
||||
|
|
|
|
|
|
|
|
|
|
|
|
|
|

Page 4 |
LAARS Heating Systems |
|
|
|
|
1.5Warranty
LAARS Heating Systems’ NeoTherm LC appliances are covered by a limited warranty. The owner should complete the warranty registration at:
http://www.Laars.com
All warranty claims must be made to an authorized LAARS Heating Systems representative. Claims must include the serial number and model. (This information can be found on the rating plate.) The
1.6Appliance Overview
claim must also include the installation date and name of the installer. Shipping costs are not included in the warranty coverage.
Some accessory items may be shipped in separate packages. Verify receipt of all packages listed on the packing slip. Inspect everything for damage immediately upon delivery, and advise the carrier of any shortages or damage. Any such claims should be filed with the carrier. The carrier, not the shipper, is responsible for shortages and damage to the shipment whether visible or concealed.
Protective Cover |
Power switch |
Ducted air inlet |
(slides downward) |
Touchscreen |
Electrical box |
|
||
Pressure and |
* |
|
temperature |
|
|
gauge |
|
PRV and |
|
|
|
Blower 1 |
|
flow switch |
|
|
|
(under bezel) |
|
|
Automatic |
|
|
gas valves |
|
Outlet |
|
|
|
|
|
temperature |
|
|
sensors |
Manual |
|
Inlet |
gas valve |
|
temperature |
|
|
sensors |
Blower 2 |
|
|
|
|
Condensate |
|
|
trap |
|
|
Leveling feet |
Model 1000

NeoTherm Boilers and Water Heaters |
Page 5 |
|
|
|
|
*The Touchscreen does have an internal battery for back-up of the date and time settings. To access the battery, the front panel and the Touchscreen must be removed so that the small plastic door on the back of the touchscreen can be accessed.
The battery is a CR2032 ‘coin type’ battery and has an expected shelf life of 10 years.
Protective Cover |
Power switch |
Ducted air inlet |
Electrical box |
(slides downward) |
|
|
|
Touchscreen |
|
|
|
Pressure and |
|
|
|
* |
|
|
|
temperature |
|
|
|
gauge |
|
|
PRV and |
|
|
|
|
Blower 1 |
|
|
flow switch |
|
|
|
|
(behind bezel) |
|
|
|
|
|
|
Outlet |
|
|
|
temperature |
|
|
|
sensors |
Automatic
gas valves Inlet temperature
sensors
|
Manual |
|
gas valve |
Blower 2 |
(on back) |
|
Condensate |
|
trap |
|
Leveling feet |
Model 1700

Page 6 |
LAARS Heating Systems |
|
|
|
|
Fig. 5 - Dimensions - NT 1000
1.7Dimensions
The dimensions are shown in Fig. 5 and Fig. 6.
1.8Unpacking
The NeoTherm LC is shipped in a single crate. The standard outdoor/system sensor kit is packed inside the same crate.
1.Remove all packing and tie-down materials.
2.Check that the outdoor/system sensor kit is included.
 DANGER
•Water temperature over 125°F (52°C) can cause severe burns instantly or death from scalds.
•Children, disabled and elderly are at highest risk of being scalded.
•See instruction manual before setting temperature at heating appliance.
•Feel water before bathing or showering.
•If this appliance is used to produce water that could scald if too hot,
such as domestic hot water use, adjust the outlet
control (limit) or use temperature limiting valves to obtain a maximum water temperature of 125°F (52°C).
NeoTherm LC Boilers and Water Heaters |
Page 7 |
|
|
|
|
Fig. 6 - Dimensions - NT 1700

Page 8 |
LAARS Heating Systems |
|
|
|
|
Section 2
LOCATING THE APPLIANCE
2.1Locating the Appliance
The NeoTherm LC may be installed indoors or outdoors. The unit may only be installed outdoors in a location which will never experience freezing temperatures. Choose a location for the unit which allows clearances on all sides for maintenance and inspection. See Table 1. Always install the unit on a firm, level surface. Level the unit using the leveling feet.
The unit should not be located in an area where leakage of any connections will result in damage to the area adjacent to the appliance, or to lower floors of the structure.
When this type of location is not available, install a suitable drain pan, adequately drained, under the appliance.
The appliance is design-certified by CSAInternational for installation on combustible flooring; in basements; in closets, utility rooms or alcoves.
NeoTherm LC boilers must never be installed on carpeting. The location for the appliance should be chosen with regard to the vent pipe lengths and external plumbing.
The unit shall be installed such that the gas ignition system components are protected from water (dripping, spraying, rain, etc.) during operation and service (circulator replacement, control replacement, etc.).
When vented vertically, the NeoTherm LC must be located as close as practical to the vertical section of the vent. If the vent terminal and/or combustion air terminal terminate through a wall, and there is potential for snow accumulation in the local area, both terminals should be installed at an appropriate level above grade or the maximum expected snow line.
The dimensions and requirements that are shown in Table 1 should be met when choosing the locations for the appliance.
2.2Correct Vent Distance from Outside Wall or Roof Termination
The forced draft combustion air blower in the appliance has sufficient power to vent properly when the guidelines in Table 2 are followed.
Note - When located on the same wall, the NeoTherm LC combustion air intake terminal must be installed a minimum of 12” below the exhaust terminal. There must also be a minimum horizontal distance from intake to the exhaust terminal of 36.”
APPLIANCE |
SUGGESTED SERVICE ACCESS CLEARANCE |
|
SURFACE |
INCHES |
CM |
|
|
|
Front |
24 |
60.9 |
|
|
|
Left Side |
12 |
30.5 |
|
|
|
Right Side |
18 |
45.7 |
|
|
|
Back |
24 |
60.9 |
|
|
|
Top |
24 |
60.9 |
|
|
|
|
|
|
APPLIANCE |
REQUIRED CLEARANCE TO COMBUSTIBLES |
|
SURFACE |
INCHES |
CM |
|
|
|
Front |
2 |
5.1 |
|
|
|
Left Side |
0 |
0 |
|
|
|
Right Side |
0 |
0 |
|
|
|
Back |
0 |
0 |
|
|
|
Top |
8 |
20.3 |
|
|
|
Vent |
1 |
2.6 |
|
|
|
Table 1 - Clearances
INTAKE / EXHAUST
|
STANDARD |
MAX EQUIV. |
|
SIZE |
VENT |
FT. |
M |
|
|
|
|
1000 |
6” |
100 |
30 |
1700 |
8” |
100 |
30 |
Installations in the U.S. require exhaust vent pipe that is PVC or CPVC complying with ANSI/ASTM D1785 F441, polypropylene complying with ULC-S636, or stainless steel complying with UL1738. Installations in Canada require exhaust vent pipe that is certified to ULC S636.
Intake (air) pipe must be PVC or CPVC that complies with ANSI/ ASTM D1785 F441, ABS that complies with ANSI/ASTM D1527, stainless steel, or galvanized material.
Closet and alcove installations do not allow the use of PVC under any circumstances
To calculate max equivalent length, measure the linear feet of the pipe, and add 5 feet (1.5 m) for each elbow used.
Table 2 - Vent / Air Pipe Sizes
For the concentric vent terminal kit (optional), follow the installation instructions included with the kit.
NeoTherm LC Boilers and Water Heaters |
Page 9 |
|
|
|
|
Section 3
VENTING AND COMBUSTION AIR
3.1Combustion Air
NeoTherm LC boilers and water heaters must have provisions for combustion and ventilation air in accordance with the applicable requirements for Combustion Air Supply and Ventilation in the
National Fuel Gas Code, ANSI Z223 1; or in Canada, the Natural Gas and Propane Installation Code, CSA B149.1. All applicable provisions of local building codes must also be adhered to.
A NeoTherm LC can take combustion air from the space in which it is installed, or the
combustion air can be ducted directly to the unit. Ventilation air must be provided in either case.
3.1.1Combustion Air From Room
In the United States, the most common requirements specify that the space shall communicate with the outdoors in accordance with Method 1 or 2. (See the following descriptions.) Where ducts are used, they
shall be of the same cross-sectional area as the free area of the openings to which they connect.
Method 1: Two permanent openings, one commencing within 12” (300 mm) of the top and one commencing within 12” (300 mm) of the bottom, of the enclosure shall be provided. The openings shall communicate directly, or by ducts, with the outdoors or spaces that freely communicate with the outdoors. When directly communicating with the outdoors, or when communicating to the outdoors through vertical ducts, each opening shall have a minimum free area of 1 square inch per 4000 Btu/hr (550 square mm/kW) of total input rating of all equipment in the enclosure. When communicating to the outdoors through horizontal ducts, each opening shall have a minimum free area of not less than 1 square inch per 2000 Btu/
hr (1100 square mm/kW) of total input rating of all equipment in the enclosure.
|
PVC |
CPVC |
Stainless Steel |
Polypropylene |
||||
Model |
Ducted Air |
Exhaust |
Ducted Air |
Exhaust |
Ducted Air |
Exhaust |
Ducted Air |
Exhaust |
1,000 |
CA008100 |
CA008300 |
CA008100 |
CA008300 |
CA008200 |
D2004500 |
CA008500 |
CS008500 |
1,700 |
CA010700 |
CA010900 |
CA010700 |
CA010900 |
CA011000 |
CA011100 |
CA011000 |
CA011100 |
|
|
Table 3a - Horizontal Terminations for Indoor Use |
|
|
||||
|
|
|
|
|
|
|
|
|
|
PVC |
CPVC |
Stainless Steel |
Polypropylene |
||||
Model |
Ducted Air |
Exhaust |
Ducted Air |
Exhaust |
Ducted Air |
Exhaust |
Ducted Air |
Exhaust |
1,000 |
CA008400 |
CA008300 |
CA008400 |
CA008300 |
CA008500 |
CA008500 |
CA008500 |
CA008500 |
1,700 |
CA010800 |
CA010900 |
CA010700 |
CA010900 |
CA011300 |
CA011200 |
CA011200 |
CA011200 |
Table 3b - Vertical Terminations for Indoor Use
Model |
Ducted Air |
Exhaust |
|
|
|
1,000 |
CA008700 |
CA008900 |
1,700 |
CA010400 |
CA011500 |
Table 3c - Outdoor Terminations
Material |
United States |
Canada |
|
|
|
|
|
ABS |
ANSI/ASTM D1527 |
The air pipe material must be chosen based upon |
|
|
|
the intended application of the boiler, and must |
|
PVC, sch. 40 |
ANSI/ASTM D1785 or D2665 |
||
be installed according to the vent manufacturer’s |
|||
|
|
||
CPVC, sch. 40 |
ANSI/ASTM F441 |
||
installation instructions. |
|||
Single wall galv. steel |
26 gauge |
|
|
Polypropylene |
ULC-S636 Class 2C |
|
|
|
|
|
Table 4 - Required Combustion Air Pipe Material

Page 10 |
LAARS Heating Systems |
|
|
|
|
Method 2: One permanent opening, commencing within 12” (300 mm) of the top of the enclosure, shall be permitted. The opening shall directly communicate with the outdoors or shall communicate through a vertical or horizontal duct to the outdoors or spaces that directly communicate with the outdoors and shall have a minimum free area of 1 square inch per 3000 Btu/hr (734 square mm/kW) of the total input rating of all equipment located in the enclosure. This opening must not be less than the sum of the areas of all vent connectors in the confined space.
Other methods of introducing combustion and ventilation air are acceptable, providing they conform to the requirements in the applicable codes listed above.
In Canada, consult local building and safety codes or, in absence of such requirements, follow CAN/ CSA B149.
3.1.2 Ducted Combustion Air
The combustion air can be taken through the wall, or through the roof. When taken from the wall, it must be taken from out-of-doors by means of the LAARS horizontal wall terminal, shown in Table 3a. See Table 2 to select the appropriate diameter air pipe.
When taken from the roof, a field-supplied rain cap or an elbow arrangement must be used to prevent entry of rain water. (See Fig. 7).
Use ABS, PVC, CPVC, polypropylene, stainless steel, or galvanized pipe for the combustion air intake. (See Table 4.) The intake must be sized per Table 2. Route the intake to the boiler as directly as possible. Seal all joints. Provide adequate hangers. The unit must not support the weight of the combustion air intake pipe. The maximum linear pipe length allowed is 100 feet (39 m). Subtract 5 allowable linear ft. (1.5 m) for every elbow used.
When using polypropylene or stainless steel materials in horizontal duct configurations, a single elbow must be installed on the end of the air inlet to act as an outdoor terminal. In vertical duct
applications, two elbows must be installed on the end of the inlet to act as a vent terminal. In both installation types, Laars part number CA008500 (for Model 1,000) or CA011300 (for Model 1,700) can then be installed into the elbow to prevent foreign objects from entering the air inlet system. The elbow(s) required to complete the vent terminal is not included.
The connection for the intake air pipe is on the back panel.
In addition to air needed for combustion, air shall also be supplied for ventilation, including air required for comfort and proper working conditions for personnel. Refer to the applicable codes.
* |
* |
|
|
||
* |
* |
|
* |
||
|
* In Canada, refer to CAN/CSA B199.1


 *
*
Fig. 7 - Combustion Air and Vent Through Roof
|
Installation Standards |
||
|
|
|
|
Material |
United States |
Canada |
|
|
|
|
|
Stainless steel |
UL 1738 |
Venting must be ULC-S636 certified for use as |
|
|
|
venting material. The venting material class must |
|
PVC*, sch 40 |
ANSI/ASTM D178 |
||
|
|
be chosen based upon the intended application |
|
CPVC, sch 40 |
ANSI/ASTM F441 |
||
of the boiler, and must be installed according to |
|||
|
|
||
Polypropylene |
UL-S636 Class 2C |
||
the maximum flue gas temperature and the vent |
|||
|
|
||
|
|
manufacturer’s instructions. |
|
* PVC cannot be used for the first 12 inches of vent material |
|
||
Table 5 - Required Exhaust Vent Material
NeoTherm LC Boilers and Water Heaters |
Page 11 |
|
|
|
|
3.2Venting
 WARNING
Selection of improper vent materials for installations that are installed in closets, or will be operated
in high ambient temperature levels, may lead to property damage, personal injury, or death.
 WARNING
A 12” or 305 mm section (for Model 1000) or 36” or 915 mm section (for Model 1700) of CPVC must be connected directly to the boiler before a PVC vent system can be used. Connecting PVC directly to the boiler’s flue collar may cause vent failure, leading to property damage, personal injury, or death.
 WARNING
Failure to use the appropriate vent material, installation techniques, or glues and sealants could lead to vent failure causing property damage, personal injury or death.
 WARNING
All venting must be installed according to this manual and any other applicable local codes, including but not limited to, ANSI Z223.1/NFPA 54, CSA B149.1, CSAB149.2 and ULC-S636. Failure to follow this manual and applicable codes may lead to property damage, severe injury, or death.
The flue temperature of the NeoTherm LC changes dramatically with changes in operating water temperature. Therefore, it is necessary to assess the application of the boiler to determine the required certified vent class. If the NeoTherm
LC is installed in an application where the ambient temperature is elevated, and/or installed in a closet/alcove, CPVC, polypropylene, or stainless steel material is required. If the system temperatures are unknown at the time of installation, class IIC or higher venting material is recommended.
The NeoTherm LC is a Category IV appliance and may be installed with PVC, CPVC that complies with ANSI/ASTM D1785 F441, or polypropylene that complies with ULC-S636 Class 2C, or a stainless steel venting system that complies with the UL 1738 Standard. (See Table 5.) The unit’s vent can terminate through the roof, or through an outside wall.
The use of polypropylene vent material has been accepted by CSA for use with exhaust and
combustion. The polypropylene vent manufacturer shall have ULCS636 Class 2C approval or higher with a recognized listing agency for all components used in the venting system. All components used must be from the same manufacturer and designed for use with exhaust temperatures of 195°F
(90°C) or higher. When installing polypropylene vent systems, please, refer to the vent supplier’s installation instructions for proper installation techniques.
When using PVC/CPVC for the vent material, the first 12 inches or 305 mm (for Model 1000) or 36” or 915 mm (for Model 1700) of the vent must be connected to the CPVC section included with the NeoTherm LC. The CPVC vent section included with the NeoTherm LC may be broken by CPVC fittings if necessary, but never reduced in total length. See Table 2 to select the appropriate vent pipe diameter.
When using polypropylene, all vent material must be from the same manufacturer and UL-S636 rated.
All installations must be done following the vent supplier’s recommended installation techniques. If these are not available, refer to the Laars recommendations for the material used.
The vent pipe must pitch upward, toward the vent terminal, not less than 1/4” per foot, so that condensate will run back to the NeoTherm LC to
drain. Route the vent pipe to the heater as directly as possible. Seal all joints. Provide adequate hangers as required in the venting system manufacturer’s Installation Instructions. Horizontal portions of the venting system must be supported to prevent sagging and may not have any low sections that could trap condensate. The unit must not support the weight of the vent pipe. Please see Table 2 for proper diameter vs. length allowed.
3.2.1Common Venting
A single vent that is shared by multiple NeoTherm LC’s must be engineered by a competent venting specialist, and could involve the selection of draft inducing equipment, hardware and controls to properly balance flue gas pressures. Do not common vent NeoTherm LC’s unless the vent system meets this requirement. NeoTherm LC’s are never permitted to share a vent with Category I appliances.
3.2.2Venting Requirements Unique to Canada
NeoTherm LC boilers and water heaters are Vent Category IV appliances. Per the requirements of CAN/CSA-B149.1, only BH vent systems can be connected to these units and such vent systems, either ULC S636 certified stainless steel or other ULC S636 certified BH vent (eg. plastics) must be installed per the vent manufacturer’s certified installation instructions.

Page 12 |
LAARS Heating Systems |
|
|
|
|
It is the responsibility of the appropriately licensed technician installing this NeoTherm LC to use
ULC S636 certified vent material consistent with the requirements as described in the Venting and Combustion Air section.
Class I venting systems are suitable for gas-fired appliances producing flue gas temperature of more than 135°C, but not more than 245°C.
Class II venting systems are suitable for gas-fired appliances producing flue gas temperatures of 135°C or less.
Class II venting systems are further classified into four temperature ratings as follows:
AUp to and including 65°C
BUp to and including 90°C
CUp to and including 110°C, and
DUp to and including 135°C
Flue Gas Sampling Port -
It is also the responsibility of the installer to ensure that a flue gas sampling port is installed in the vent system. This flue gas sampling port must be installed near the flue connection of the NeoTherm LC: within 2 feet of the flue connection. There is no flue gas sampling port internal to the NeoTherm
LC, so one must be installed in the vent system external to the NeoTherm LC. A flue gas sampling port available as a component of the ULC S636 certified vent system is preferred. However, if one is not available with the certified vent system, Laars suggests using a tee with the branch connection sized to allow for insertion of a flue gas analyzer probe. The branch connection must be resealable with a cap or other means to ensure the vent system remains sealed. (See Fig. 8.)
Consideration must be given to the placement and orientation of the flue gas sampling port to ensure that condensate is free to flow back into the
NeoTherm LC and not collect anywhere in the vent system - including in the flue gas sampling port.
Exhaust Vent Terminal -
An exhaust vent terminal must be installed. If an exhaust vent terminal is not available with the certified vent system, Laars suggests the use of a coupler fitting from the certified vent system into which the vent terminal screen can be installed. Be sure to install and terminate both vent and combustion air pipes per the instructions in this section.
Fig. 8 - Test Port
3.3Locating the Vent and Combustion Air Terminals
3.3.1 Side Wall Vent Terminal
The appropriate Laars side wall vent terminal must be used. The terminal must be located in accordance with ANSI Z223.1/NFPA 54 and applicable
local codes. In Canada, the installation must be in accordance with CSA B149.1 or .2 and local applicable codes.
Consider the following when installing the terminal:
1.Figure 9 shows the requirements for mechanical vent terminal clearances for the U.S. and Canada.
2.Vent terminals for condensing appliances or appliances with condensing vents are not permitted to terminate above a public walkway, or over an area where condensate or vapor could create a nuisance or hazard.
3.Locate the vent terminal so that vent gases cannot be drawn into air conditioning system inlets.
4.Locate the vent terminal so that vent gases cannot enter the building through doors, windows, gravity inlets or other openings. Whenever possible, avoid locations under windows or near doors.
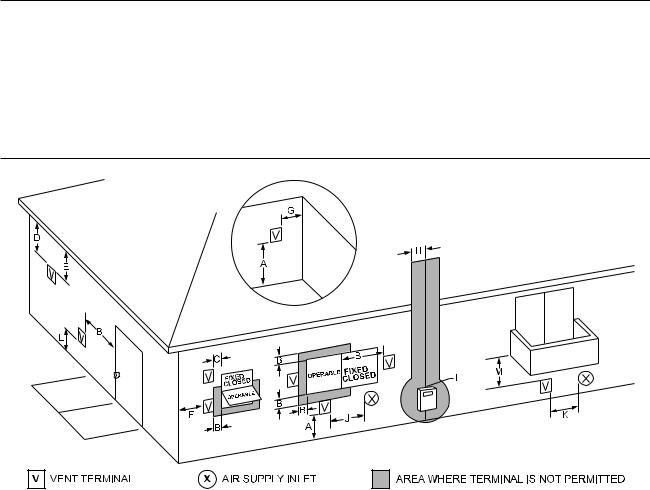
NeoTherm LC Boilers and Water Heaters |
Page 13 |
|
|||
|
|
|
|
|
|
|
|
|
|
|
|
|
|
|
U.S. Installations (see note 1) |
Canadian Installations (see note 2) |
|
|
A= |
Clearance above grade, veranda, porch, |
12 inches (30 cm) |
12 inches (30 cm) |
|
|
|
deck, or balcony |
See note 6 |
See note 6 |
|
|
B= |
Clearance to window or door that may be |
Direct vent only: 12 inches (30 cm); |
36 inches (91 cm) |
|
|
|
opened |
Other than Direct vent: 4 ft (1.2m) below or to |
|
|
|
|
|
side of opening; 1 ft (30 cm) above opening |
|
|
|
C= |
Clearance to permanently closed window |
See note 4 |
See note 5 |
|
|
D= |
Vertical clearance to ventilated soffit located |
|
|
|
|
|
above the terminal within a horizontal |
See note 4 |
See note 5 |
|
|
|
distance of 2 feet (61 cm) from the center |
|
|
|
|
|
line of the terminal |
|
|
|
|
E= |
Clearance to unventilated soffit |
See note 4 |
See note 5 |
|
|
F= |
Clearance to outside corner |
See note 4 |
See note 5 |
|
|
G= |
Clearance to inside corner |
See note 4 |
See note 5 |
|
|
H= |
Clearance to each side of center line |
|
3 feet (91 cm) within a height 15 feet |
|
|
|
extended above meter/regulator assembly |
See note 4 |
above the meter/regulator assembly |
|
|
I= |
Clearance to service regulator vent outlet |
See note 4 |
3 feet (91 cm) |
|
|
J= |
Clearance to nonmechanical air supply |
Direct vent only: 36” (91cm) |
|
|
|
|
inlet to building or the combustion air inlet |
Other than Direct vent: 4 ft (1.2m) below |
36 inches (91 cm) |
|
|
|
to any other appliance |
or to side of opening; 1 ft (30 cm) above opening |
|
|
|
K= |
Clearance to a mechanical air supply inlet |
3 feet (91 cm) above if within 10 feet (3 m) |
6 feet (1.83 m) |
|
|
|
|
horizontally |
|
|
|
L= |
Clearance above paved sidewalk or paved |
Vent termination not allowed in this location |
7 ft (2.1 m) |
|
|
|
driveway located on public property |
for category IV appliances. |
See note 5 |
|
|
M= |
Clearance under veranda, porch, deck, |
See note 4 |
12 inches (30 cm) |
|
|
|
or balcony |
|
See note 5 |
|
Notes:
1.In accordance with the current ANSI Z223.1 / NFPA 54 National Fuel Gas Code.
2.In accordance with the current CAN/CSA-B149 Installation Codes.
3.Permitted only if veranda, porch, deck, or balcony is fully open on a minimum of two sides beneath the floor.
4.For clearances not specified in ANSI Z223.1 / NFPA 54, clearance is in accordance with local installation codes and the requirements of the gas supplier.
5.For clearances not specified in CAN/CSA-B149, clearance is in accordance with local installation codes and the requirements of the gas supplier.
6.IMPORTANT: All terminals must be placed so that they remain a minimum 12” above expected snow line. Local codes may have more specific requirements, and must be consulted.
*When vent terminal is less than 10 feet (3 m) horizontally from a forced air inlet, the terminal must be at least 3 feet (0.9 m) above the air inlet. (US only)
Fig. 9 - Combustion Air and Vent Through Side Wall

Page 14 |
LAARS Heating Systems |
|
|
|
|
IMPORTANT: All terminals must be placed so that they remain at least 12” above the expected snow line. Local codes may have more specific requirements, and must be consulted. Refer to the NFPA54 National Fuel Gas Code and your local codes for all required clearances for venting.
Fig. 10 - Multiple Side-Wall Terminals, Air and
Vent
5.Locate the vent terminal so that it cannot be blocked by snow. The installer may determine that a vent terminal must be higher than the minimum shown in codes, depending upon local conditions.
6.Locate the terminal so the vent exhaust does not settle on building surfaces or other nearby objects. Vent products may damage surfaces or objects.
7.If the boiler or water heater uses ducted combustion air from an intake terminal located on the same wall, see Figures 10 and 11 for proper spacing and orientation.
If the vent termination is located in an area exposed to high winds, an optional PVC tee (the same diameter as the vent pipe) may be used. The tee’d vent termination offers greater protection from wind related operating issues.
3.3.2 Side Wall Combustion Air Terminal
The LAARS side wall combustion air terminal must be used when the heater takes air from a side wall. (See Table 3.) Contact Laars for AL29-4C termination fittings. Consider the following when installing the terminal. (See Figures 10 and 11).
1.Do not locate the air inlet terminal near a source of corrosive chemical fumes (e.g., cleaning fluid, chlorine compounds, etc.).
2.Locate the terminal so that it will not be subject to damage by accident or vandalism. It must be at least 7 feet ( 2.1 m) above a public walkway.
3.Locate the combustion air terminal so that it cannot be blocked by snow. The National Fuel Gas Code requires that it be at least 12 inches (30 cm) above grade, but the installer may determine it should be higher, depending upon local conditions.
4.If the NeoTherm LC is side-wall vented to the same wall, locate the vent terminal at least 1 foot (0.3 m) above the combustion air terminal.
5.Multiple vent kits should be installed such that the horizontal distance between outlet group and inlet group is 36” (90 cm). (See Figure 10.)
6.The vent outlet must be at least 12” above the top of the air inlet, and must be at least 36” (90 cm) horizontally from the air inlet. (See Figure 10.)
Fig. 11 - Minimum Venting Distance
NeoTherm LC Boilers and Water Heaters |
Page 15 |
|
|
|
|
3.3.3 Vertical Vent Terminal
When the unit is vented through the roof, the vent must extend at least 3 feet (0.9 m) above the point at which it penetrates the roof. It must extend at least 2 feet (0.6 m) higher than any portion of a building within a horizontal distance of 10 feet (3.0 m), and high enough above the roof line to prevent blockage from snow. The vent terminal offered with the NeoTherm LC can be used in both vertical and horizontal applications. When the combustion air is
taken from the roof, the combustion air must terminate at least 12” (30 cm) below the vent terminal.
3.3.4Vertical Combustion Air Terminal
When combustion air is taken from the roof, a fieldsupplied rain cap or an elbow arrangement must be used to prevent entry of rain water. The opening on the end of the terminal must be at least 12” (30 cm) above the point at which it penetrates the roof, and high enough above the roof line to prevent blockage from snow. When the vent terminates on the roof, the combustion air must terminate at least 12” (30 cm) below the vent terminal.
3.3.5Installations in the Commonwealth of Massachusetts
In Massachusetts the following items are required if the side-wall exhaust vent termination is less than seven (7) feet above finished grade in the area of the venting, including but not limited to decks and porches. (From Massachusetts Rules and regulations 248 CMR 5.08.)
1.Installation of Carbon Monoxide Detectors
At the time of installation of the side wall vented gas fueled appliance, the installing plumber or gas-fitter shall observe that a hard-wired carbon monoxide detector with an alarm battery back-up is installed on the floor level where the gas appliance is to be installed. In addition, the installing plumber or gasfitter shall observe that a battery operated or hard-wired carbon monoxide detector with an alarm is installed on each additional level of the dwelling, building or structure served by the side-wall horizontally vented gas fueled equipment. It shall be the responsibility of the property owner to secure the services of qualified licensed professionals for installation of hardwired carbon monoxide detectors.
a.In the event that the side-wall horizontally vented gas fueled equipment is installed in a crawl space or an attic, the hard-wired carbon monoxide with alarm and battery back-up may be installed on the next adjacent floor level.
b.In the event that the requirements of the subdivision cannot be met at the time of completion
of installation, the owner shall have a period of thirty (30) days to comply with the above requirements, provided, however, that during said thirty (30) day period, a battery operated carbon monoxide detector with an alarm be installed.
2.Approved Carbon Monoxide Detectors
Each carbon monoxide detector shall comply with NFPA 720 and be ANSI/UL 2034 listed and IAS certified.
3.Signage
A metal or plastic identification plate shall be permanently mounted to the exterior of the building at a minimum height of eight (8) feet above grade directly in line with the exhaust vent terminal for horizontally vented gas fueled heating appliance or equipment. The sign shall read, in print no less than one-half (1/2) inch in size: “GAS VENT DIRECTLY BELOW, KEEP CLEAR OF ALL OBSTRUCTIONS.”
4.Inspection
The state or local gas inspector of the side-wall horizontally vented gas fueled appliance shall not approve the installation unless, upon inspection, the inspector observes carbon monoxide detectors and signage installed in accordance with the provisions of 248 CMR 5.08(2)(a) 1-4.
3.4Common Vent Test
Note -This section does not describe a method for common venting NeoTherm LC’s. It describes what must be done when a unit is removed from a common vent system. NeoTherm LC’s require special vent systems and fans for common vent. Contact the factory if you have questions about common venting NeoTherm LC’s.
When an existing boiler is removed from a common venting system, the common venting system is likely to be too large for proper venting of the appliances remaining connected to it.
At the time of removal of an existing boiler, the following steps shall be followed with each appliance remaining connected to the common
venting system placed in operation, while the other appliances remaining connected to the common venting system are not in operation.
1.Seal any unused openings in the common venting system.
2.Visually inspect the venting system for proper size and horizontal pitch and determine there is no blockage or restriction, leakage, corrosion or other deficiencies which could cause an unsafe condition.
Page 16 |
LAARS Heating Systems |
|
|
|
|
3.As much as possible, close all building doors and windows. Also close all doors between the space in which the appliances remaining connected to the common venting system are located and other spaces of the building. Turn on any clothes dryers or other appliances not connected to the common venting system. Turn on any exhaust fans, such as range hoods and bathroom exhausts, so they will operate at maximum speed. Do not operate a summer exhaust fan. Close any fireplace dampers.
4.Place in operation the appliance being inspected. Follow the lighting instructions. Adjust the thermostat so the appliance will operate continuously.
5.Test for spillage at the draft hood relief opening after five minutes of main burner operation. Use the flame of a match or candle, or smoke from a cigarette, cigar or pipe.
6.After it has been determined that each appliance remaining connected to the common venting system properly vents when tested as outlined above, return the doors, windows, exhaust fans, fireplace dampers and any other gas burning appliances to their previous conditions of use.
7.Any improper operation of the common venting system should be corrected so that the installation conforms to the National Fuel Gas Code, ANSI Z223.1/NFPA 54 and/or CSA B149.1, Installation Codes. When resizing any portion of the common venting system, the common venting system should be resized to approach the minimum size as determined using the appropriate tables and guidelines in the National Fuel Gas Code, ANSI Z223.1 NFPA 54 and/or CSA B149.1, Installation Codes.
3.5Outdoor Installation
The NeoTherm LC may only be installed outdoors in applications where the outdoor temperature doesn’t drop below freezing. For proper operation in outdoor installations, the boiler must be equipped with the inlet air and exhaust terminal kits listed in Table 3C. The bottom panel cover plate must be removed. Additional instructions are supplied with the terminal kits.
3.6Condensate Drain Trap
A condensate drain trap is included with the NeoTherm LC and is designed to drain the boiler of condensate. The vent condensate should be drained through a drain tee located in the vent line. This will help prevent excessive condensate from entering the boiler condensate trap and preventing the boiler from operating.
Connect a 3/4” PVC pipe between the drain connection and a floor drain (or condensate pump if a floor drain is not accessible).
The condensate drain must be installed to prevent the accumulation of condensate. When a condensate pump is not used, the tubing must continuously slope downward toward the drain with no spiraling.
Consult local codes for the disposal method.
 Caution
Condensate is mildly acidic (pH=5), and may harm some floor drains and/or pipes, particularly those that are metal. Ensure that the drain, drainpipe, and anything that will come in contact with the condensate can withstand the acidity, or neutralize the condensate before disposal. Damage caused by failure to
install a neutralizer kit or to adequately treat condensate will not be the manufacturer’s responsibility.
NeoTherm LC Boilers and Water Heaters |
Page 17 |
|
|
|
|
Section 4
GAS SUPPLY AND PIPING
4.1Gas Supply and Piping
Gas piping should be supported by suitable hangers or floor stands, not the appliance.
Installers should refer to local building and safety codes or, in the absence of such requirements, follow the National Fuel Gas Code, ANSI Z223.1 NFPA 54 and/or CSA B149.1, Installation Codes.
Review the following instructions before proceeding with the installation.
1.Verify that the appliance is fitted for the proper type of gas by checking the rating plate. NeoTherm LC will function properly
without the use of high altitude modification at elevations up to 10,000 feet (3050 m).
2.The maximum inlet gas pressure must not exceed 13” W.C. (3.2 kPa). The minimum inlet gas pressure is 4” W.C. (1.0 kPa).
3.Refer to Tables 6A, 6B, 6C and 6D to size the piping.
4.Run the gas supply line in accordance with all applicable codes.
5.Locate and install manual shutoff valves in accordance with state and local requirements.
6.A sediment trap must be provided upstream of the gas controls.
7.All threaded joints should be coated with piping compound resistant to the action of liquefied petroleum gas.
8.The appliance and its individual shutoff valve must be disconnected from the gas supply piping during any pressure testing of that system at test pressures in excess of 1/2 PSIG (3.45 kPa).
9.The unit must be isolated from the gas supply system by closing its individual manual shutoff valve during any pressure testing of the gas supply piping system at test pressures equal to or less than 1/2 PSIG (3.45 kPa).
10.The appliance and its gas connection must be leak tested before placing it in operation.
11.Purge all air from gas lines.
 WARNING
Open flame can cause gas to ignite and result in property damage, severe injury, or loss of life.
Note - The NeoTherm LC appliance and all other gas appliances sharing the gas supply line must be firing at maximum capacity to properly measure the inlet supply pressure. The pressure can be measured at the supply pressure port on the gas valve. Low gas pressure could be an indication of an undersized gas meter, undersized gas supply lines and/or an obstructed gas supply line. Some
NeoTherm LC’s are equipped with low and high gas pressure switches that are integrally vent limited. These types of devices do not require venting to atmosphere.

Page 18 |
LAARS Heating Systems |
|
|
|
|
NeoTherm LC NATURAL GAS REQUIRED
|
CU FT |
SIZE |
/ HR. |
1000 |
1000 |
1700 |
1700 |
TO SIZE PIPING:
Measure linear distance from meter outlet to last boiler. Add total input of all boilers and divide by 1000 to obtain cu ft / hr required. Add total equivalent length of fittings used according to Table 6B. Align total length (pipe and fittings) on left side column of Table 6C with highest cubic feet of gas required.
Notes:
Consult and confirm with Applicable Fuel
Gas Code before beginning work.
Verify gas inlet pressure is between 4 and 13 in W.C. before starting boiler.
Table 6A - Natural Gas Requirements
EQUIVALENT LENGTHS OF STRAIGHT PIPE FOR TYPICAL
SCH 40 FITTINGS
NOMINAL PIPE SIZE
FITTING |
1/2” |
3/4” |
1” |
1-1/4” |
1-1/2” |
2” |
|
|
LINEAR FEET |
|
|
|
|
90° ELBOW |
3.6 |
4.4 |
5.2 |
6.6 |
7.4 |
8.5 |
TEE |
4.2 |
5.3 |
6.6 |
8.7 |
9.9 |
12 |
Table 6B - Equivalent Pipe Lengths
SCH 40 METAL PIPE CAPACITY FOR 0.60 SPECIFIC GRAVITY
NATURAL GAS
NOMINAL PIPE SIZE @ 0.30” W.C. PRESSURE DROP
LENGTH |
1/2” |
3/4” |
1” |
1-1/4” 1-1/2” |
2” |
|
FT |
|
CUBIC FEET OF GAS PER HOUR |
|
|||
|
|
|
|
|
|
|
20 |
92 |
190 |
350 |
730 |
1100 |
2100 |
40 |
|
130 |
245 |
500 |
760 |
1450 |
60 |
|
105 |
195 |
400 |
610 |
1150 |
80 |
|
90 |
170 |
350 |
530 |
990 |
100 |
|
|
150 |
305 |
460 |
870 |
Table 6C - Pipe Capacity for Natural Gas
SCHED 40 METAL PIPE CAPACITY FOR 1.50 SPECIFIC
GRAVITY UNDILUTED PROPANE
NOMINAL PIPE SIZE @ 11” W.C. INLET AND 0.5” W.C.
PRESSURE DROP
SIZE |
1/2” |
3/4” |
1” |
1-1/4” |
1-1/2” |
2” |
LENGTH |
MAXIMUM CAPACITY IN THOUSANDS OF BTU PER |
|||||
|
|
|
HOUR |
|
|
|
20 |
200 |
418 |
787 |
1616 |
2422 |
4664 |
40 |
137 |
287 |
541 |
1111 |
1664 |
3205 |
60 |
110 |
231 |
434 |
892 |
1337 |
2574 |
80 |
94 |
197 |
372 |
763 |
1144 |
2203 |
100 |
84 |
175 |
330 |
677 |
1014 |
1952 |
Notes:
1.Follow all local and national LP gas codes for line sizing and equipment requirements.
2.Verify that inlet gas pressure remains between 4 and 13 inches of water column before and during operation.
Source: ANSI Z223.1-80 National Fuel Gas Code.
Table 6D - Pipe Capacity for Propane

NeoTherm LC Boilers and Water Heaters |
Page 19 |
|
|
|
|
Section 5
PUMP REQUIREMENTS
5.1NeoTherm LC Boiler Flow and Head Requirements
Temperature Rise in °F
Model |
20°F |
25°F |
|
30°F |
35°F |
40°F |
45°F |
||||||
Flow |
H/L-Ft |
Flow |
H/L-Ft |
|
Flow |
H/L-Ft |
Flow |
H/L- |
Flow |
H/L- |
Flow |
H/L-Ft |
|
|
|
||||||||||||
|
GPM |
|
GPM |
|
|
GPM |
|
GPM |
Ft |
GPM |
Ft |
GPM |
|
1,000 |
95 |
30 |
75 |
20 |
|
62 |
15 |
54 |
11 |
48 |
9 |
42 |
7 |
1,700 |
161 |
41 |
129 |
27 |
|
107 |
19 |
92 |
14 |
81 |
11 |
72 |
9 |
|
|
|
|
|
|
|
|
|
|
|
|
|
|
|
|
|
|
|
Temperature Rise in °C |
|
|
|
|
|
|||
Model |
11.0°C |
13.7°C |
|
16.5°C |
19.3°C |
22.0°C |
24.7°C |
||||||
Flow |
H/L-m |
Flow |
H/L-m |
|
Flow |
H/L-m |
Flow |
H/L-m |
Flow |
H/L-m |
Flow |
H/L-m |
|
|
|
||||||||||||
|
LPM |
|
LPM |
|
|
LPM |
|
LPM |
|
LPM |
|
LPM |
|
1,000 |
359 |
9.0 |
283 |
6.0 |
|
234 |
4.5 |
204 |
3.3 |
182 |
2.7 |
159 |
2.1 |
1,700 |
609 |
12.3 |
488 |
8.1 |
|
405 |
5.7 |
348 |
4.3 |
306 |
3.3 |
272 |
2.7 |
Table 7 - Water Flow Requirements
5.2NeoTherm LC Water Heater Flow and Head Requirements
Temperature Rise
Model |
|
20°F |
|
11.0°C |
||
|
|
|
|
|
|
|
Flow GPM |
|
H/L-Ft |
Flow LPM |
|
H/L-m |
|
|
|
|
||||
1,000 |
95 |
|
30 |
359 |
|
9.0 |
1,700 |
161 |
|
41 |
609 |
|
12.3 |
Notes -
Figures listed are for soft/normal water.
Maximum hardness of 10 grains per gallon allowed.
Table 8 - NeoTherm LC Water Heater Flow Data

Page 20 |
LAARS Heating Systems |
|
|
|
|
Section 6 -
WATER CONNECTIONS
Section 6 is divided into TWO parts. Section 6A covers NTH units designed for hydronic heating. Many installations include indirect domestic hot water. Section 6B covers NTV models, which are designed exclusively for “volume water” domestic hot water applications. Refer
to the proper section for instructions on installing and piping your product. Refer to Table 9 for the connection pipe sizes required.
Section 6A - NTH Systems
6A.1 NTH System Piping: Hot Supply Connections
Note -This appliance must be installed in a closed pressure system with a minimum of 12 psi (82.7 kPa) static pressure at the boiler.
The hot water piping should be supported by suitable hangers or floor stands. Do not support the piping with this appliance. The hangers used should allow for expansion and contraction of copper pipe. Rigid hangers may transmit noise through the system resulting from the piping sliding in the hangers. We recommend that padding be used when rigid hangers are installed. Maintain 1” (2.5 cm) clearance to combustibles for all hot water pipes.
Pipe the discharge of the relief valve (full size) to a drain or in a manner to prevent injury in the event of pressure relief. Install an air purger, an air vent, a diaphragm-type expansion tank, a hydronic flow check in the system supply loop, and any other devices required by local codes. The minimum fill pressure must be 12 psig (82.7 kPa). Install shutoff valves where required by code.
NTH |
PIPE SIZE, |
NTV |
PIPE SIZE, |
SIZE |
INCHES |
SIZE |
INCHES |
1000 |
2 |
1000 |
2 |
1700 |
2.5 |
1700 |
2.5 |
Suggested piping diagrams are shown in Figures 12 through 16. These diagrams are meant only as
guides. Components required by local codes must be properly installed.
The NeoTherm LC’s efficiency is higher with lower return water temperatures. Therefore, to get the best low return temperature with multiple boilers, pipe as shown in Figures 15 and 16.
6A.2 NTH Cold Water Make-Up
1.Connect the cold water supply to the inlet connection of an automatic fill valve.
2.Install a suitable back flow preventer between the automatic fill valve and the cold water supply.
3.Install shut off valves where required.
In some installations, a hot water heating boiler is connected to heating coils located in an air handling appliance where the coils may be exposed to refrigerated air circulation. In these cases, the boiler piping system must be equipped with flow control valves or other automatic means to prevent gravity circulation of the boiler water during the cooling cycle.
A boiler installed above radiation level, or as required by the authority having jurisdiction, must be provided with a low water cutoff device either as a part of the boiler or at the time of boiler installation.
Table 9 - Water Connection Pipe Sizes
NeoTherm LC Boilers and Water Heaters |
Page 21 |
|
|
|
|
6A.3 NTH Freeze Protection
 WARNING
Glycol must not be used in domestic hot water applications. Refer to Section 6B.4 for instructions on freeze protection for NTV units (domestic hot water).
NeoTherm LC’s may be installed indoors or outdoors. If installed outdoors, the NTH unit must never be installed in a location which may experience freezing temperatures. If installed indoors, and there is an event such as a power
outage, interruption of gas supply, failure of system components, activation of safety devices, etc., this may prevent a boiler from firing. Any time a boiler is subjected to freezing conditions, and the boiler is not able to fire, and/or the water is not able to circulate, there is a risk of freezing in the boiler or in the pipes in the system. When water freezes, it expands. This may result in bursting of pipes, or damage to the boiler, and this could result in leaking or flooding conditions.
Do not use automotive antifreeze. To help prevent freezing, Laars recommends the use of inhibited glycol concentrations between 20% and 35% glycol. Typically, this concentration will serve as burst protection for temperatures down to approximately -5°F (-20°C). If temperatures are expected to be lower than -5°F (-20°C), glycol concentrations up to 50% can be used. When concentrations greater than 35% are used, water flow rates must be increased to maintain a 20°F to 25°F temperature rise through the boiler.
Different glycol products may provide varying degrees of protection. Glycol products must be maintained properly in a heating system, or
they may become ineffective. Consult the glycol specifications, or the glycol manufacturer, for information about specific products, maintenance of solutions, and set up according to your particular conditions.
The following manufacturers offer glycols, inhibitors, and anti foamants that are suitable for use in the NeoTherm LC. Please refer to the
manufacturers instructions for proper selection and application.
•Sentinel Performance Solutions Group
•Hercules Chemical Company
•Dow Chemical Company
6A.4 NTH Suggested Piping Schematics
Figures 12 through 16 (the next several pages) show suggested piping configurations for NTH boilers.
These diagrams are only meant as guides. All components or piping required by local code must be installed.
6A.5 Condensate Drain Trap
A condensate drain trap is included with the NeoTherm LC and is designed to drain the boiler of condensate. The vent condensate should be drained through a drain tee located in the vent line. This will help prevent excessive condensate from entering the boiler condensate trap and preventing the boiler from operating.
Connect a 3/4” PVC pipe between the drain connection and a floor drain (or condensate pump if a floor drain is not accessible).
The condensate drain must be installed to prevent the accumulation of condensate. When a condensate pump is not used, the tubing must continuously slope downward toward the drain with no spiraling.
Consult local codes for the disposal method.
 Caution
Condensate is mildly acidic (pH=5), and may harm some floor drains and/or pipes, particularly those that are metal. Ensure that the drain, drainpipe, and anything that will come in contact with the condensate can withstand the acidity, or neutralize the condensate before disposal. Damage caused by failure to
install a neutralizer kit or to adequately treat condensate will not be the manufacturer’s responsibility.

Page 22 |
LAARS Heating Systems |
|
|
|
|
|
|
|
Low temp. radiant zone |
|
Space heating zone circuits |
|
|
Space heating zone circuit |
|
|
|
Air vent |
System pump |
|
|
|
4 pipe dia. max. |
4 pipe dia. max. |
4 pipe dia. max. |
|
Water feed |
|
|
|
controls |
|
|
4 pipe dia. max. |
|
|
|
Note -
This drawing is a schematic representation of a piping style, and is not intended to be used as a working installation drawing. Local code requirements
must be met.
Fig. 12 - Hydronic Piping — Single Boiler, Multiple Temperature Zones
Zoning with circulators

NeoTherm LC Boilers and Water Heaters |
Page 23 |
|
|
|
|
Air vent |
4 pipe dia. max. |
||||
|
|
|
|
|
|
Water feed controls
4 pipe
dia. max.
Expansion tank
Note -
This drawing is a schematic representation of a piping style, and is not intended to be used as a working installation drawing. Local code requirements
must be met.
Anti-scald
mixing valve Domestic hot water out
Indirect DHW tank
Cold water
Fig. 13 - Hydronic Piping — Single Boiler, Zoning with Circulators, Indirect DHW Tank with Zone Pumps
Indirect tank directly off of boiler

Page 24 |
LAARS Heating Systems |
|
|
|
|
Note -
This drawing is a schematic representation of a piping style, and is not intended to be used as a working installation drawing. Local code requirements
must be met.
Low temp. radiant zone |
Low temp. radiant zone |
Air vent
Water feed controls
Expansion tank
4 pipe dia. max.
Anti-scald mixing valve
Domestic Indirect DHW tank hot water
out
Cold water
Fig. 14 - Hydronic Piping — Single Boiler with Low Temperature Zones and Indirect DHW Tank
Indirect tank directly off of boiler

NeoTherm LC Boilers and Water Heaters |
Page 25 |
|
|
|
|
Note -
This drawing is a schematic representation of a piping style, and is not intended to be used as a working installation drawing. Local code requirements
must be met.
Space heating zone circuit
Air vent
Water feed controls
Expansion tank
4 pipe dia. max.
Space heating zone circuits
Low temp. radiant zone
4 pipe dia. max. |
4 pipe dia. max. |
Common piping must be sized for the combined water flow of all of the boilers.
Fig. 15 - Hydronic Piping — Multiple Boilers, Multiple Temperature Zones, Reverse Return
Zoning with circulators

Page 26 |
LAARS Heating Systems |
|
|
|
|
Space heating zone circuits
High temp. space heating zone circuit
Space heating zone circuit |
Air vent
4 pipe dia. max. 4
 pipe dia.
 max.
max.
Water feed controls
Expansion tank 4 pipe dia. max.
Common piping must be sized for the combined water flow of all the boilers.
Note -
This drawing is a schematic representation of a piping style, and is not intended to be used as a working installation drawing. Local code requirements
must be met.
Note - |
Anti-scald |
|
Indirect pump |
mixing valve |
|
must be sized |
|
|
for boiler and |
|
|
indirect |
|
|
Indirect |
|
Domestic |
DHW tank |
hot water |
|
|
|
out |
|
|
Cold |
|
|
water |
Note - |
|
|
In this piping arrangement, |
|
|
the boiler pump must turn off |
|
|
during DHW operation. |
|
|
Fig. 16 - Hydronic Piping — Multiple Boilers, Indirect DHW Off of One Boiler
 Loading...