

Page 1
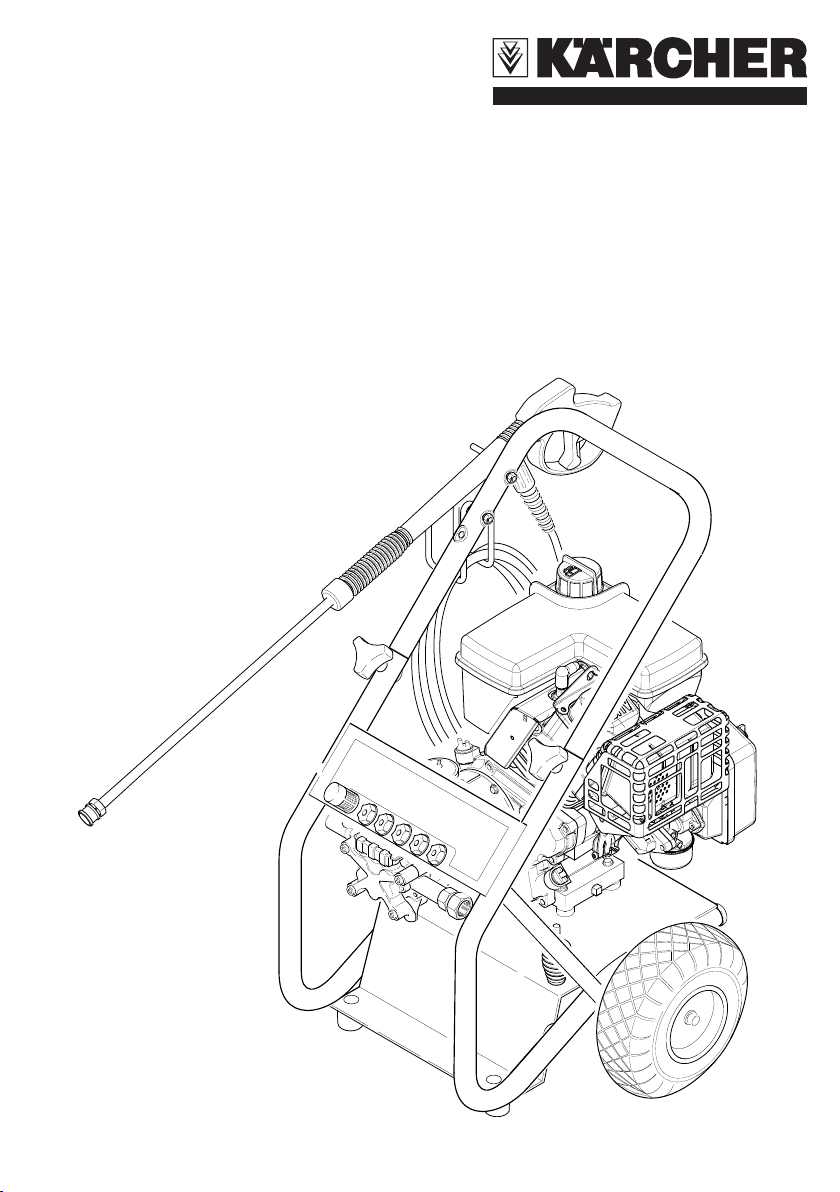
G 2500 HT
English ....................... 2
Español .................... 14
Français ................... 26
9.139-144 (06/04)
Page 2

High Pressure Washer Operator Manual
Overview ........................................................................ 3
Precautions ................................................................... 4
Assembly Instructions .................................................. 5
Operating Instructions .................................................. 6
Using the Accessories .................................................. 7
Working with Detergents .............................................. 8
Shut Down and Clean-Up ............................................. 9
Taking a Break............................................................... 9
Winterizing and Long-Term Storage ............................ 9
Cleaning Tips ......................................................... 10-11
Optional Cleaning Accessories .................................. 11
Troubleshooting ..................................................... 12-13
2
Specifications
Max. Operating pressure 2500 PSI
Water volume 2.5 GPM
Detergent suction 0.15 – 0.20 GPM
Engine 6 HP Tecumseh OV 195
Part No. 1.194-307
Serial No. ______________
Kärcher Customer Support USA
Call: 1-800-537-4129 for help
or visit our website:
www.karcher-usa.com
Kärcher Customer Service CDN
Call: 1-800-465-4980 for help
or visit our website:
www.karcher.ca
Page 3
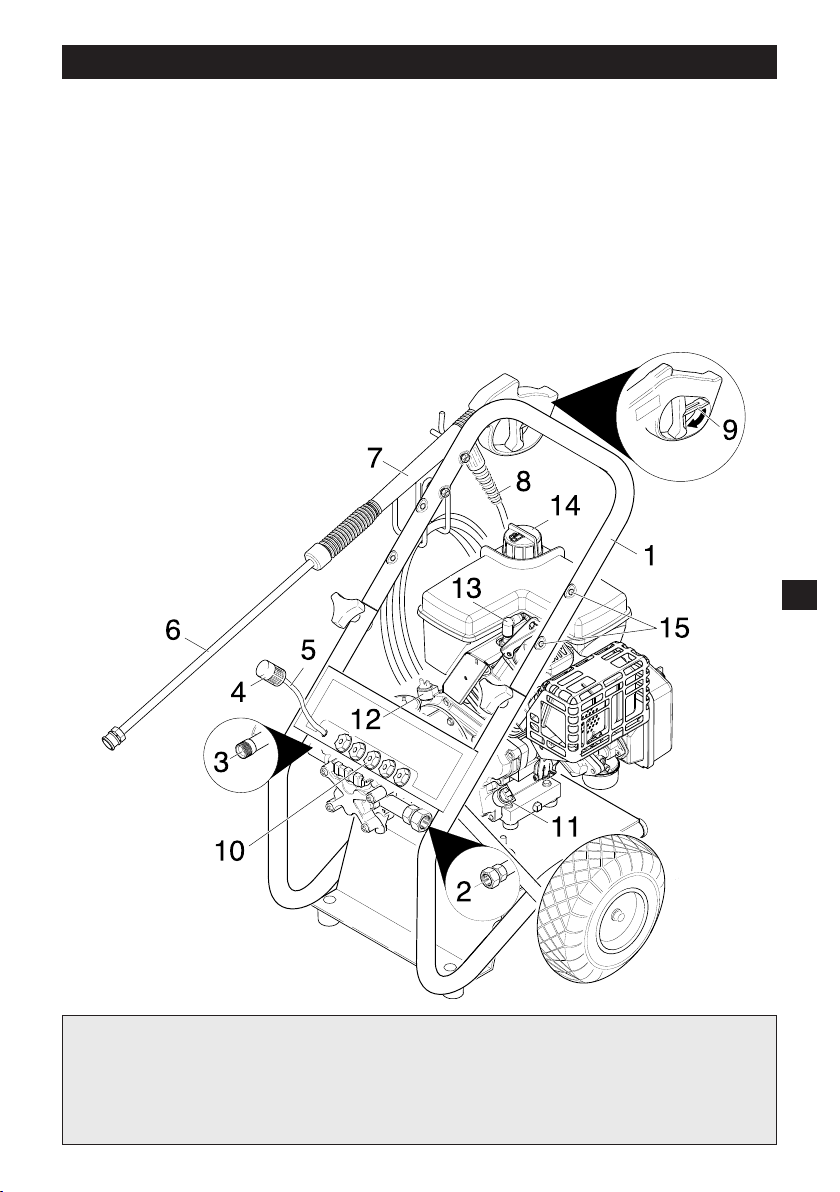
Model G 2500 HT OVERVIEW
Item Description
1 Handle
2 Water inlet with garden hose connector
3 High pressure outlet
4 Detergent filter
5 Detergent suction tube
6 Spray wand
7 Trigger gun
8 High pressure hose
9 Trigger gun safety lock
10 Quick connect nozzles
(Red, Yellow, Green, White, Black)
11 Oil fill cap
12 Dipstick
13 Spark plug
14 Gas tank
15 Hose Reel (optional) Mounting Holes
Not pictured
- Dirtblaster nozzle
- Rubber grommets (5 pcs)
3
Caution
Follow the maintenance instructions specified in the manual
This machine has been designed for use with cleaning detergents by the
manufacturer. The use of other cleaning detergents may affect the operation of the
machine and void the warranty.
Page 4

IMPORTANT PRECAUTIONS – Read First!
IMPORTANT SAFETY INSTRUCTIONS
WARNING When using this product basic
precautions should always be followed,
including the following:
WARNING Risk of Injection or Injury
Do Not Direct Discharge Stream At Persons.
Read all the instructions before using the
product.
Fire hazard! Do not add fuel with the en-
gine running. Do not operate if fuel has
been spilled. Instead, move the machine
to a different location and avoid creating
sparks.
Operate and fuel machine in a well venti-
lated area, free of devices featuring an
open pilot or flame such as boilers, water
heaters, etc.
High pressure jets can be dangerous if
subject to misuse. The jet must not be
directed at persons, animals, electrical
devices, or the machine itself.
4
Wear safety goggles.
Do not use acids, alkaline, solvents, or
any flammable material in this product.
These products can cause physical injuries to the operator and irreversible damage to the machine.
The machine has hot surfaces which can
cause burns. Operate the unit in a safe
environment and away from children.
Do not allow the high pressure hose to
come into contact with the muffler guard.
Do not leave the machine running unat-
tended.
Learn how to stop the machine and re-
lease pressure quickly. Be thoroughly fa-
miliar with the controls.
Stay alert watch what you are doing.
Do not operate the product when fatigued
or under the influence of alcohol or drugs.
Do not stand on unstable surfaces. Stand
with both feet balanced at all times.
Avoid tipping the machine on its side.
The Gun Safety Lock PREVENTS the
trigger from accidentally being engaged.
This safety feature DOES NOT lock
trigger in the on position.
Do not spray electrical connections, elec-
trical outlets or fixtures.
Do not touch hot surfaces or allow acces-
sories to contact hot surfaces.
Do not operate in an enclosed space, ex-
haust fumes are dangerous.
Do not operate near utilities with open fla-
mes.
Do not operate pressure washer without
the water turned on.
Do not use hot water.
WATER SUPPLY (Cold Water Only)
Water hose must be at least 5/8 inch in
diameter.
Flow rate of water supply must not fall
below 2.5 GPM (gallons per minute).
Flow rate can be determined by running
the water for one minute into an empty
5-gallon container.
The water supply temperature must not
exceed 104°F/40°C.
Never use the pressure washer to draw
in water contaminated with solvents, e.g.
paint thinners, gasoline, oil, etc.
Always prevent debris from being drawn
into the unit by using a clean water
source.
We strongly recommend that this high pressure washer not be left running for periods
of 5 minutes or longer without the trigger
gun being engaged.
- SAVE THESE INSTRUCTIONS -
Page 5
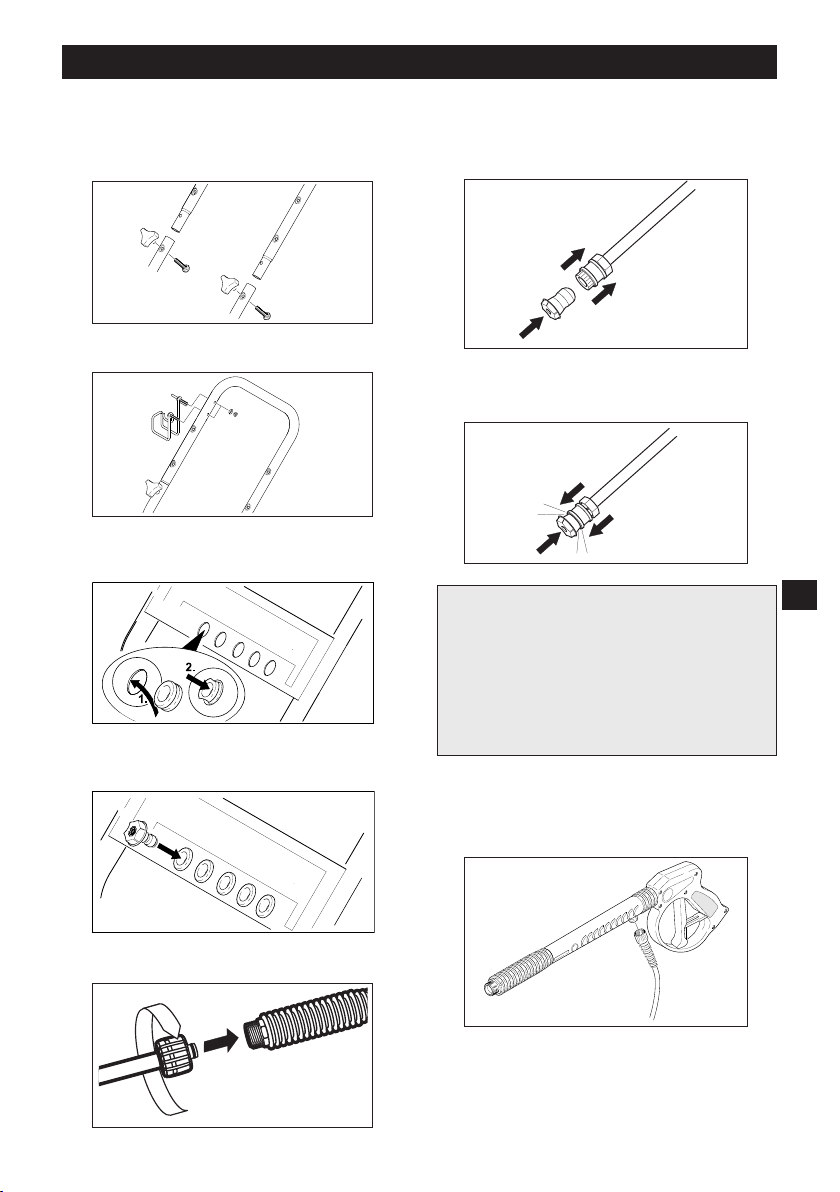
ASSEMBLY INSTRUCTIONS
Step 1
Attach the handle to the frame of the
pressure washer. Align holes, insert bolts,
and tighten with knobs.
Step 2
Attach the gun/hose storage handle.
Step 3
Fasten the rubber grommets in the nozzle
holder.
Step 4
Place the quick connect nozzles in the
nozzle holder.
Step 6
Pull the spring-loaded collar of the wand
back to insert your choice of quick connect
nozzle.
Step 7
Release the collar and push the nozzle until
the collar clicks.
DANGER
High pressure in nozzle area.
Risk of injury caused by improper locked
nozzle.
Make sure you hear a click when
inserting the nozzle tip into the wand.
Pull the nozzle to make sure it is seated
properly before operating your unit.
Step 8
Attach the high pressure hose to the spray
gun.
5
Step 5
Attach the wand to the spray gun.
Page 6

OPERATING INSTRUCTIONS
Important!
Do not run the engine with a high or low
oil level as this can cause engine damage.
If you have further questions regarding the
engine, please refer to the engines
operating manual included with the unit.
Step 1
Check oil level.
Oil level should always be between the
FULL and ADD marks on the dipstick.
Be sure the machine is level when checking
the oil level. (Refer to the engines operating
manual for seasonal grades.).
Note: Improper oil levels will cause low oil
sensor to shut off engine.
Step 2
Fill gas tank with unleaded gasoline.
Do not use leaded gasoline.
Step 3
6
Connect the high pressure hose to the units
high pressure outlet.
Step 4
Connect garden hose to units water inlet.
Step 8
Slide the throttle lever up about
1/3 of the way toward the fast position.
Step 9
Pull the starter handle. If the engine fails to
start after 3 pulls, squeeze the trigger gun
to release pressure, and repeat step.
After the engine warms up enough to run
smoothly, move choke to open position and
throttle to fast position.
Step 5
Connect garden hose to the cold water
source and turn water on completely.
Do not use hot water.
Step 6
Trigger the gun to eliminate trapped air, wait
for a steady flow of water to emerge from
the spray nozzle.
Step 7
Slide the choke lever out to the closed
position (on a warm engine, leave the choke
lever in the open position).
Page 7
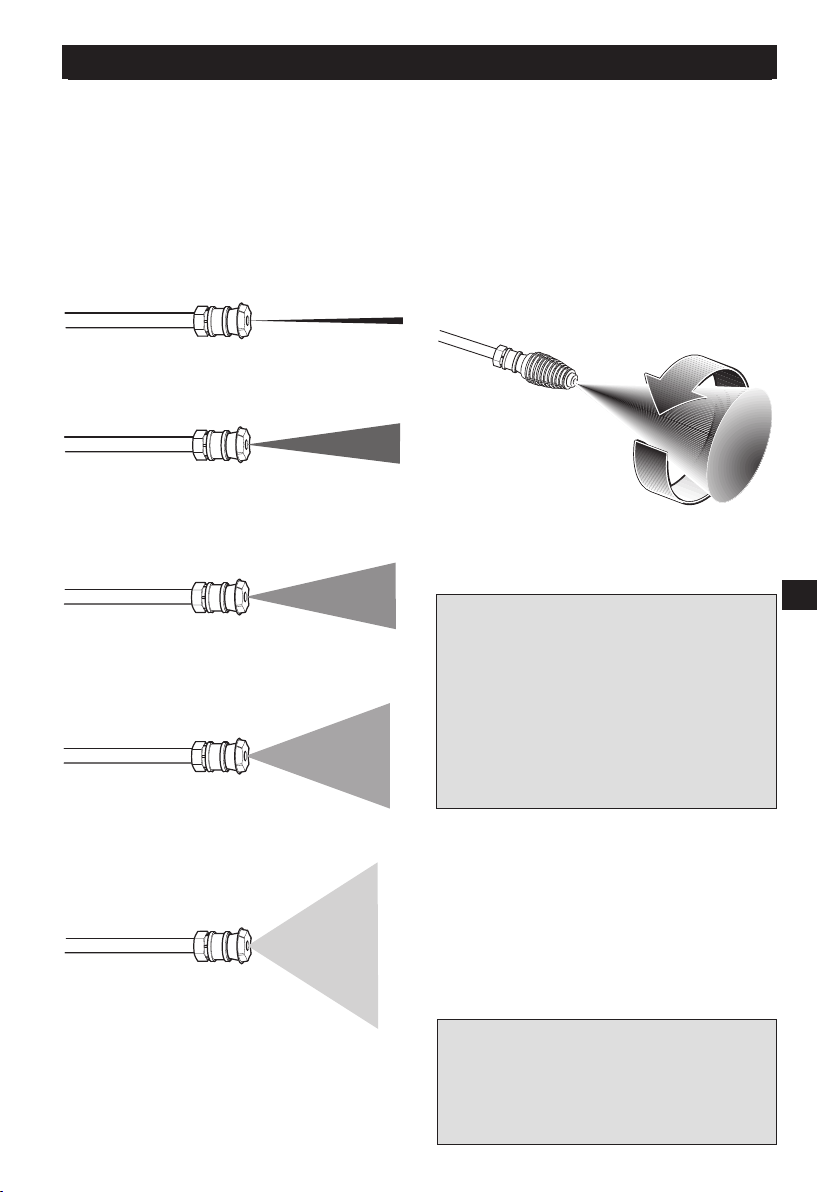
USING THE ACCESSORIES
The color-coded quick connect nozzles
provide a wide array of spray widths from
0° to 65° and are easily accessible when
placed in the convenient rubber nozzle holder, which is provided on the front of the
machine.
Red nozzle= 0°
for particularly stubborn accumulation
of grime.
Yellow nozzle = 15°
for dirt accumulation over a surface.
Green nozzle = 25°
for dirt accumulation over a large surface.
accumulation
White nozzle = 40°
for dirt accumulation over a large surface.
accumulation
Black detergent nozzle = 65°
for operating with detergent or cleaning
with negligible pressure.
Dirtblaster® nozzle
This nozzle features a 0º pencil jet which
rotates 360º for maximum dirt cutting action,
effectively increasing cleaning performance
up to 50%. This nozzle combines the
cleaning performance of a 0º pencil jet with
the surface coverage of a wide angle
nozzle.
Not recommended for soft materials,
siding, painted surfaces, decks or autos.
7
DANGER
High pressure in nozzle area.
Risk of injury caused by improper locked
nozzle.
Make sure you hear a click when
inserting the nozzle tip into the wand.
Pull the nozzle to make sure it is seated
properly before operating your unit. (See
page 5 step 5 + step 6)
WARNING
TO AVOID SERIOUS INJURY,
NEVER POINT SPRAY NOZZLE
AT YOURSELF, OTHER PERSONS
OR ANIMALS
Page 8
WORKING WITH DETERGENTS
Detergents can only be applied with the
black nozzle.
Step 1
Install the black quick-connect low pressure
nozzle for detergent application at low
pressure.
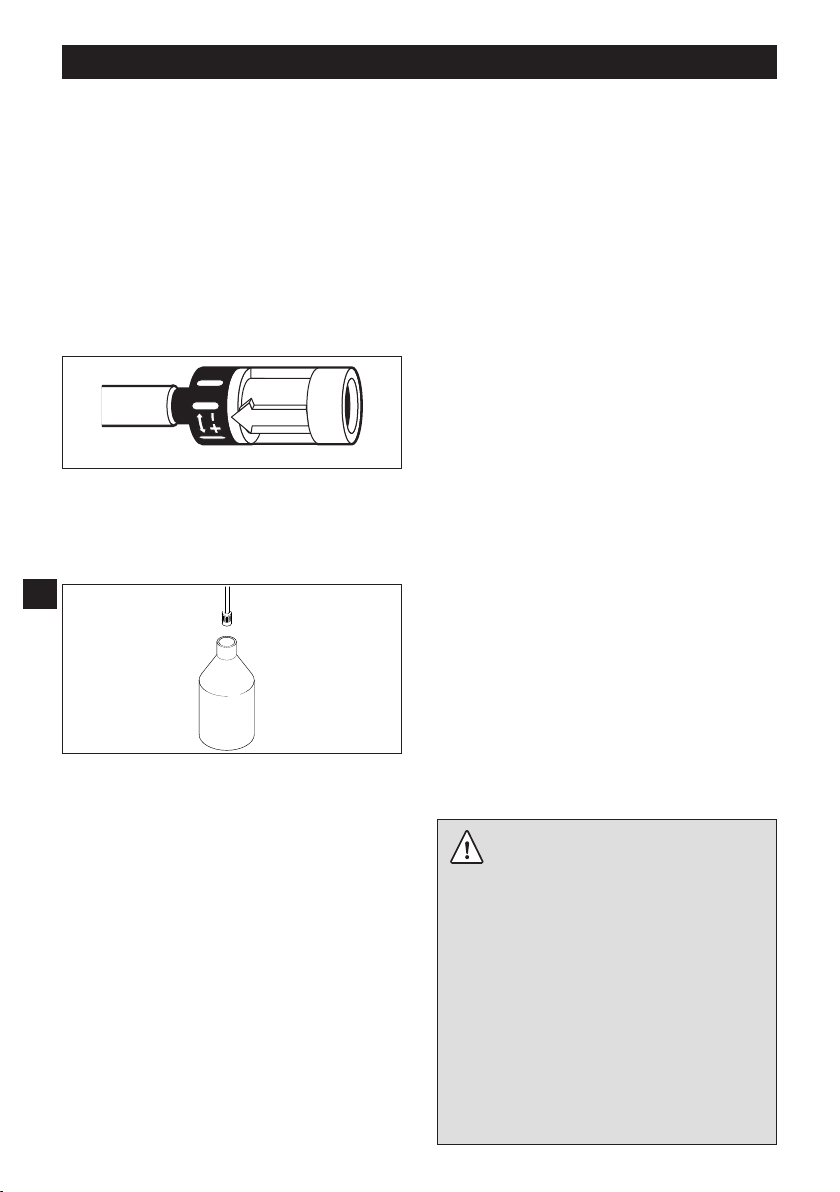
Step 2
Adjust the filter end of the detergent tube
for light ( / 0.15 gpm), or maximum (+ /
0.20 gpm) detergent coverage.
Step 3
Fill a container with Kärcher detergent.
Place the filter end of detergent suction tube
into the detergent.
8
For best results see Cleaning Tips on
pages 10 & 11 for specific information
on how to clean different surfaces.
Always Use Kärcher
Detergents for Best Results.
Kärcher biodegradable detergents are
specially formulated to protect the
environment and your pressure washer.
Special formula wont clog the suction tube
filter and will protect the internal parts of
the pressure washer for a longer life. For
Kärcher Detergents, check your retailer
or call our service center for help.
The following Kärcher detergents are
available in USA / Mexico:
All Purpose and Vehicle Wash
Exterior House Cleaner
Deck & Patio Cleaner
Heavy Duty Degreaser
The following Kärcher detergents are
available in Canada:
Vehicle Wash
Pressure Wash
Deck + Fence Wash
Degreaser
Step 4
With the engine running, pull trigger to
operate unit. Liquid detergent is drawn into
the unit and mixed with water.
Apply detergent to work area.
Do not allow detergent to dry on surface.
Caution Never use:
• Bleach, Chlorine products and
other corrosive chemicals
• Liquids containing solvents
(i.e., paint thinners, gasoline, oils)
• Tri-sodium phosphate products
• Ammonia products
• Acid-based products
These chemicals will harm the unit
and will damage the surface being
cleaned.
Page 9

SHUTTING DOWN
Step 1
Remove detergent suction tube from
container and insert into 1 gallon of fresh
water. Siphon water at low pressure for one
minute.
Step 2
Press the throttle down to stop the engine.
Step 3
Turn off the water supply.
Step 4
Press trigger to release water pressure.
Step 5
Disconnect the garden hose from the water
inlet on the unit.
Step 6
Disconnect the high pressure hose from the
high pressure outlet.
Step7
Engage the gun safety lock.
WINTERIZING AND LONG-TERM
STORAGE
1.Disconnect all water connections.
2.Turn on the machine for a few
seconds, until the water which had
remained in the pump exits.
Turn off immediately.
3.Do not allow high pressure hose to
become kinked.
4.Store the machine and accessories in
a room which does not reach freezing
temperatures.
Caution: Failure to follow the above
directions will result in damage to the
pump assembly and accessories.
Kärcher also recommends the regular
practice of using a pump protector like
Kärcher Pump Protector to help during
storage in the winter months.
9
TAKING A BREAK
... FIVE MINUTES OR MORE
Step 1
Slide the throttle down to stop the engine.
Step 2
Press trigger to release water pressure.
Step 3
Engage gun safety lock.
Page 10

CLEANING TIPS
Deck Cleaning
(with or without detergent)
Pre-rinse deck and surrounding area with
fresh water. If using Kärcher Deck & Patio
Cleaner, (Canada: Deck + Fence Wash)
place detergent suction tube directly into
cleaning solution and apply to surface at
low pressure. For best results, limit your
work area to smaller sections of approximately 25 square feet. Allow detergent to
remain on surface 1-3 minutes. Do not allow
detergent to dry on surface. Rinse at high
pressure in a long sweeping motion keeping
the spray nozzle approximately 3-6 inches
from the cleaning surface. Always clean
from top to bottom and from left to right.
When moving on to a new section of the
cleaning surface, be sure to overlap the
previous section to eliminate stop marks
and ensure a more even cleaning result.
Caution: Do not use rotating nozzle spray
wand on wood surface as it may cause
damage.
House Siding
10
(with or without detergent)
Pre-rinse cleaning surface with fresh water.
If using Kärcher Exterior House Cleaner
(Canada: Pressure Wash), place detergent
suction tube directly into cleaning solution
and apply to surface at low pressure (for
best results, limit your work area to sections
of approximately 6 feet and always apply
detergent from bottom to top). Allow
detergent to remain on surface 1-3 minutes.
Do not allow detergent to dry on surface, if
surface appears to be drying, simply wet
down surface with fresh water. Rinse at high
pressure from top to bottom in an even
sweeping motion keeping the spray nozzle
approximately 6 inches from the cleaning
surface.
Caution: Do not use rotating nozzle spray
wand on siding as it may cause damage.
Cement Patios, Brick and Stone
(with or without detergent)
Pre-rinse cleaning surface with fresh water.
If using Kärcher All Purpose and Vehicle
Wash (Canada: Pressure Wash or
Degreaser), place detergent suction tube
directly into cleaning solution and apply to
surface at low pressure. For best results,
limit your work area to smaller sections of
approximately 25 square feet. Allow
detergent to remain on surface 1-3 minutes.
Do not allow detergent to dry on surface.
Rinse at high pressure in a sweeping motion
keeping the spray nozzle approximately 36 inches from the cleaning surface. Always
clean from top to bottom and from left to
right. For removing extremely stubborn
stains, use Kärcher Rotating Nozzle Spray
Wand.
Cars, Boats & Motorcycles
(with or without detergent)
Pre-rinse vehicle with fresh water. If using
Kärcher All Purpose and Vehicle Wash,
place detergent suction tube directly into
cleaning solution and apply to surface at
low pressure. For best results, clean one
side of vehicle at a time and always apply
detergent from bottom to top, do not allow
detergent to dry on surface. Rinse at high
pressure in a sweeping motion keeping the
spray nozzle approximately 6-8 inches from
the cleaning surface (distance should
increase when rinsing pin-striping or other
sensitive surfaces). Always clean from top
to bottom and from left to right. For best
results, wipe surface dry with a chamois or
soft dry cloth.
Caution: Do not use rotating nozzle spray
wand on vehicles as it may cause damage.
Page 11

CLEANING TIPS –
continued
Barbecue Grills, Outdoor Power
Equipment & Gardening Tools
(with or without detergent)
Pre-rinse cleaning surface with fresh water.
If using Kärcher All Purpose and Vehicle
Wash or Heavy Duty Degreaser (Canada:
Pressure Wash or Degreaser), place
detergent suction tube directly into cleaning
solution and apply detergent at low
pressure. Allow detergent to remain on
surface 1-3 minutes. Do not allow detergent
to dry on surface. Rinse at high pressure
keeping the spray nozzle approximately 36 inches from the cleaning surface. For
removing extremely stubborn dirt, it may be
necessary to move the spray nozzle even
closer to the surface for greater dirt cutting
action. To remove caked on mud from
garbage cans, lawn mower blades, wheel
barrels or other non-sensitive metal
surfaces, you may want to use the Kärcher
Rotating Nozzle Spray Wand.
Caution: Do not use rotating nozzle spray
wand on cloth, plastic or other sensitive
surfaces as it may cause damage.
Patio & Lawn Furniture
(with or without detergent)
Pre-rinse furniture and surrounding area
with fresh water. If using Kärcher All Purpose and Vehicle Wash (Canada: Pressure
Wash), place detergent suction tube directly
into cleaning solution and apply to surface
at low pressure. Allow Kärcher detergent
to remain on surface 1-3 minutes. Do not
allow detergent to dry on surface. Rinse at
high pressure in a sweeping motion keeping
the spray nozzle approximately 3-6 inches
from the cleaning surface. For best results,
clean from top to bottom and from left to
right.
Caution: Do not use rotating nozzle spray
wand on patio or lawn furniture as it may
cause damage.
Recommendations
Before cleaning any surface an
inconspicuous area should be cleaned to
test spray pattern and distance for
maximum cleaning results.
If painted surfaces are pealing or
chipping, use extreme caution as
pressure washer may remove the loose
paint from the surface.
When using on surfaces which might
come in contact with food, flush
surfaces with plenty of drinking water.
OPTIONAL CLEANING ACCESSORIES
Optional cleaning accessories are available
to further enhance your cleaning
capabilities.
Wash Brush
Underbody Wand
Extension Wand
Extension Hose
Hose Reel
Water Siphon Kit
11
Page 12

TROUBLESHOOTING
Please remove the spark plug cable to
prevent accidental ignition of the engine
before making any repair.
Engine will not start.
• No gasoline.
- Fill gas tank.
• Low oil level sensor activated.
- Add oil.
• Choke is not in correct position.
- Slide choke lever out to closed
position.
• Engine throttle is not in correct
position.
- Slide the throttle lever up about 1/3 of
the way toward the fast positon.
• Pressure built up in the high pressure
washer.
- Squeeze the trigger to release the
pressure.
For additional engine problems refer
to the engine owners manual.
12
Unit does not reach high pressure.
• Diameter of garden hose is too small.
- Replace with a 3/4 inch garden hose.
• Water supply is restricted.
- Check garden hose for kinks, leaks
and blockage.
• Not enough inlet water supply.
- Open water source full force.
• Water inlet filter is clogged.
- Remove filter and rinse out in warm
water.
• Black detergent nozzle is attached.
- Remove black detergent nozzle and
attach a high pressure nozzle.
Output pressure varies high and low.
• Not enough inlet water supply.
- Turn water on full force. Check garden
hose for kinks, leaks or blockage.
• Pump is sucking air.
- Check that hoses and fittings are air
tight. Turn off machine and purge
pump by squeezing trigger gun until a
steady flow of water emerges through
the nozzle.
• Water inlet filter is clogged.
- Remove filter and rinse out in warm
water.
• Spray nozzle is obstructed.
- Blow out or remove debris with a fine
needle.
• Calcified gun, hose or spray wand.
- Run distilled vinegar through
detergent suction tube.
No detergent.
• Detergent suction tube not properly
connected to the machine.
- Check connection.
• Detergent is too thick.
- Dilute detergent. For best results, use
Kärcher detergent.
• Detergent filter valve is at lowest
setting.
- Set detergent filter valve to a higher
setting.
• Filter on detergent suction tube is
clogged.
- Run warm water through filter to
remove debris.
• Damaged or clogged detergent
suction tube.
- Remove obstruction or replace
detergent suction tube.
• A high pressure nozzle is attached.
- Replace with black detergent nozzle.
• Spray nozzle is obstructed.
- Blow out or remove debris with fine
needle.
Page 13

TROUBLESHOOTING –
continued
Garden hose connection leaks.
• Loose fittings.
- Tighten fittings.
• Missing/worn rubber washer.
- Insert new washer.
Spray wand leaks.
• Spray wand not properly attached.
- Attach the wand to the spray gun.
Turn the wand collar clockwise onto
the gun threads until tight.
• Broken o-ring.
- Call Kärcher customer service hotline
and order an o-ring.
Pump is noisy.
• Pump is sucking air.
- Check that hoses and fittings are air
tight. Turn off machine and
purgepump by squeezing trigger gun
until a steady flow of water emerges
through the nozzle.
Water leaks from pump.
• Loose fittings.
- Check that all fittings are tight.
• Water seals are damaged or worn.
- Call service center.
• Thermal protection device is
activated.
- Thermal protection device will auto
reset.
WARRANTY USA
See enclosed warranty card.
WARRANTY CDN
Kärcher Canada Inc. warrants to the original owner that this product shall be free from
defects in material and workmanship for
two years from the date of its original
purchase. If such a defect appears during
the warranty period, upon presentation of
proof of purchase, Kärcher Canada Inc. will
repair or replace (at its option) your product
without charge.
This warranty does not cover accidental
damage, unreasonable use, normal wear
and tear, loss of use or other consequential
damages, nor does it cover repairs made
or attempted by unauthorized persons.
Trigger gun, hose, spray wands and other
accessories are warranted for 3 months.
Please note that no returns will be accepted
without prior authorization from our
customer service department.
It is the owners responsibility to file claims
for damage caused by public transportation
carriers directly with the carrier concerned.
13
Oil Drip.
• Oil seals are damaged or worn.
Call service center.
If you encounter any additional
difficulties not listed, please call our
customer support for help.
Kärcher Customer Support USA
Call: 1-800-537-4129 for help
or visit our website:
www.karcher-usa.com
Kärcher Customer Service CDN
Call: 1-800-465-4980 for help
or visit our website:
www.karcher.ca
Page 14

Manual del Operador
Generalidades ............................................................. 14
Precauciones .............................................................. 15
Instrucciones de Ensamblaje ..................................... 16
Instrucciones de Operación ....................................... 17
Uso de los Accesorios ................................................ 18
Trabajo con Detergentes ............................................ 19
Tomando un descanso ............................................... 20
Preparación para el Invierno
y Almacenaje de Largo Plazo ..................................... 21
Sugerencias de Limpieza ...................................... 22-23
Accesorios de Limpieza Opcionales.......................... 23
Localización de Fallas Mecánicas ........................ 24-25
14
EspecificacionesEspecificaciones
Especificaciones
EspecificacionesEspecificaciones
Presión de operación 2500 PSI
Volumen de agua 2.5 GPM
Aspiración de detergent 0.15 – 0.20 GPM
Motor 6 HP Tecumseh OV 195
Part No. 1.194-307
Serial No. ______________
Kärcher En USA
llame al: 1-800-537-4129
o visite nuestro sitio web:
www.karcher-usa.com
:
Kärcher En Mexico
llame al: 01-800-024-13-13
o visite nuestro sitio web:
www.karcher.com.mx
Page 15

GENERALIDADES DEL MODELO G 2500 HT
Artículo Descripción
1 Agarradera
2 Entrada de agua con conexión
para manguera de jardín y filtro
3 Salida de alta presión
4 Filtro para el detergente
5 Tubo de succión para detergente
6 Lanza de rociado
7 Gatillo de la pistola
8 Manguera de alta presión
9 Seguro del gatillo de la pistola
10 Boquillas de conexión rápida
11 Tapón para llenado de aceite
12 Varilla Indicadora de nivel
13 Bujía
14 Tanque de gasolina
15 Agujero (Carrete de mangueras -
opción)
No ilustrado
- Boquilla Dirtblaster
- Rubber grommets (5 pcs)
15
PRECAUCIÓN
Siga las instrucciones de mantenimiento especificadas en el manual.
Esta máquina ha sido diseñada para utilizarse con detergente de limpieza
suministrado o recomendado por el fabricante. La utilización de otros detergentes
puede afectar el funcionamiento de la máquina e invalidar la garantía.
Page 16

PRECAUCIONES IMPORTANTES
– Read First!
Advertencias de Seguridad
Cuando utilice esta máquina, siempre debe
seguir estas precauciones básicas
Lea todas las instrucciones antes de
utilizar la máquina.
¡Peligro de incendio! No agregue
combustible con el motor en marcha. No
opere la máquina si se derramó
combustible. En lugar de eso, mueva la
máquina a otra ubicación y evite la
generación de chispas.
Opere y agregue combustible en un área
bien ventilada, sin aparatos que tengan
un piloto o llama abierta como
calentadores de agua, calderas, etc.
Los chorros de alta presión pueden ser
peligrosos si no se emplean
adecuadamente. El chorro no debe ser
dirigido hacia personas, animales,
aparatos eléctricos o hacia la misma
máquina.
Utilice lentes de seguridad.
No use ácidos, alcalinos, solventes o
16
cualquier otro material inflamable en esta
máquina. Estos productos pueden
ocasionar lesiones físicas al operador y
daños irreversibles a la máquina.
La máquina tiene superficies calientes,
que pueden provocar quemaduras.
Opere la unidad en un ambiente seguro
y lejos de los niños.
No permita que la manguera de alta
presión entre en contacto con la
protección del amortiguador.
No deje funcionando la máquina sin
ponerle atención.
Aprenda cómo apagar la máquina y
liberar la presión rápidamente.
Familiarícese extensamente con los
controles.
Manténgase alerta - observe lo que esté
haciendo.
No opere la máquina cuando se
encuentre cansado o bajo la influencia
de alcohol o drogas.
No se pare sobre superficies inestables.
Párese siempre con ambos pies
balanceados.
No incline la máquina hacia los lados.
El seguro de la pistola IMPIDE que el
gatillo se accione accidentalmente. Este
dispositivo de seguridad NO bloquea el
gatillo en la posición de encendido.
Nunca toque las superficies calientes; ni
permita que los accesorios entren en
contacto con superficies calientes.
Nunca la opere en espacios cerrados.
Los vapores del escape son peligrosos.
Nunca la opere cerca de servicios
públicos con llamas abiertas.
Nunca opere la máquina lavadora a
presión sin abrir la llave de agua.
Nunca utilice agua caliente.
Suministro de Agua
(Solamente Agua Fría)
La manguera de agua debe tener un
diámetro mínimo de 5/8 de pulgada.
La presión de flujo del agua no debe caer
por debajo de 2.5 GPM (galones por
minuto).
La presión de flujo puede determinarse
haciendo correr el agua durante un
minuto hacia un recipiente vacío de 5
galones de capacidad.
La temperatura del agua no debe exceder
de 104°F/40°C.
Nunca utilice la máquina lavadora a
presión para lanzar agua contaminada
con solventes, por ejemplo, thinner,
gasolina, aceite, etc.
Evite que entre basura a la máquina
utilizando siempre una fuente de agua
limpia.
Recomendamos encarecidamente que
esta lavadora de alta presión no se deje
funcionando por periodos de 5 minutos o
mayores, sin oprimir el gatillo de la pistola.
Esta lavadora de alta presión Kärcher está
equipada con una protección térmica para
prolongar la vida de la lavadora. Dicha
protección se activará automáticamente al
llegar a una temperatura elevada
predeterminada, expulsando agua caliente
antes de reiniciarse. Esto asegura que no
se dañe la bomba.
Page 17

INSTRUCCIONES DE ENSAMBLAJE
Paso 1
Fije la agarradera con los postes de la
lavadora a presión. Alinee los orificios,
inserte los tornillos y apriételos con las
perillas.
Paso 2
Fije el soporte para almacenar la pistola/
manguera.
Paso 3
Fasten the rubber grommets.
Paso 6
Jale del collar accionado por resorte de la
lanza hacia atrás, para insertarlo en la
boquilla de conexión rápida de su elección.
Paso 6
Libere el collar y empuje la boquilla hasta
que el collar haga clic.
PELIGRO
Alta presión en la zona de tobera
Peligro por tobera mal enganchada
!Antes de poner la máquina en marcha
jale la boquilla para asegurarse que esté
puesta adecuadamente.
17
Paso 4
Coloque las boquillas de conexión rápida
en el soporte de boquillas.
Paso 5
Conecte la lanza a la pistola de rociado.
Paso 8
Conecte la manguera de alta presión a la
pistola de rociado.
Page 18

INSTRUCCIONES DE OPERACIÓN
¡IMPORTANTE!
No utilice la máquina con el nivel de
aceite bajo o muy alto, porque esto
puede provocar daños a la máquina. Si
tiene más preguntas acerca de la
máquina, refiérase al manual del
operador de la máquina, incluido en la
unidad.
Paso 1
Revise el nivel del aceite.
Cuando revise el nivel de aceite, asegúrese
que la máquina esté nivelada. (Refiérase
al manual de operación de la máquina para
ver los grados, de acuerdo con las
estaciones del año.)
Nota: Los niveles de aceite no adecuados
provocarán que el sensor apague el motor.
Paso 2
Llene el tanque de gasolina con gasolina
sin plomo.
18
No utilice gasolina con plomo.
Paso 3
Conecte la manguera de alta presión a la
salida de la unidad de alta presión.
Paso 6
Mueva la palanca del acelerador 1/3 de la
distancia a la posición de rápido (fast).
Paso 7
Jale de la manija del arrancador. Si la
máquina no enciende después de tres
tirones, apriete el gatillo de la pistola
para eliminar la presión y repita este paso.
Después que la máquina se caliente y
funcione uniformemente, mueva el
ahogador a la posición de abierto (open)
y el acelerador a la posición de rápido
(fast).
Paso 4
Conecte la manguera de jardín a la entrada
de agua de la unidad.
Paso 3
Conecte la manguera de jardín a la toma
de agua fría y abra completamente la llave
de agua.
Nunca utilice agua caliente.
Paso 4
Oprima el gatillo de la pistola para eliminar
el aire atrapado y espere a que salga un
flujo continuo de agua por la boquilla.
Paso 5
Mueva la palanca del ahogador hacia
afuera a la posición de cerrado (closed)
(si la máquina está caliente, deje la palanca
en la posición de abierto (open)).
Page 19

USO DE LOS ACCESORIOS
Las boquillas de conexión rápida en cinco
colores permiten una amplia variedad de
anchos de rociado, desde 0° hasta 65°, y
tiene acceso a ellas fácilmente cuando las
coloca en el soporte para boquillas de hule,
incluido al frente de la máquina.
Boquilla roja = 0°
para la eliminación de la sucieda
resistente y fuertemente adherida.
Boquilla amarilla = 15°
para la limpieza de la suciedad que se
encuentra cubriendo superficies.
Boquilla verde = 25°
para la limpieza de la suciedad que se
encuentra cubriendo grandes superficies.
Boquilla blanca = 40°
para la limpieza de la suciedad que se
encuentra cubriendo grandes superficies.
Boquilla Dirtblaster
Esta boquilla lanza un chorro delgado de
0° que gira 360°, para una acción máxima
cortante de suciedad, con lo cual aumenta
la limpieza hasta un 50% de forma eficaz.
Esta boquilla combina la limpieza de un
chorro delgado de 0° con la cobertura de
superficie de una boquilla de ángulo amplio.
No se recomienda para materiales suaves,
flancos de casas, superficies pintadas,
cubiertas o automóviles.
19
PELIGRO
Alta presión en la zona de tobera
Peligro por tobera mal enganchada
!Antes de poner la máquina en marcha
jale la boquilla para asegurarse que esté
puesta adecuadamente.
Boquilla negra para detergente = 65°
para la limpieza con detergente o con
escasa presión.
PRECAUCIÓN.
PARA EVITAR LESIONES SERIAS,
NUNCA APUNTE LA BOQUILLA
HACIA USTED MISMO, OTRAS
PERSONAS O ANIMALES.
Page 20

TRABAJO CON DETERGENTES
Los detergentes solamente se pueden
aplicar con la boquilla negra
Paso 1
Instale la boquilla negra de conexión rápida
y baja presión para aplicación de
detergente a baja presión.
Paso 2
Ajuste el extremo con filtro del tubo de
detergente para cobertura ligera ( / 0.15
gpm) o máxima (+ / 0.20 gpm).
Paso 3
Llene el recipiente con detergente Kärcher.
Coloque el extremo con filtro del tubo de
20
succión de detergente dentro del
recipiente.
Para obtener mejores resultados vea las
Sugerencias de Limpieza en las páginas
22 y 23, con información específica para
saber cómo limpiar diferentes superficies.
Siempre utilice detergentes Kärcher
para obtener mejores resultados
Los detergentes biodegradables Kärcher se
formulan especialmente para proteger el
medio ambiente y su máquina lavadora de
presión. Su fórmula especial no tapa el filtro
del tubo de succión y protegerá las partes
internas de su máquina lavadora a presión
por más tiempo. Para obtener los
Detergentes Kärcher, pregunte a su
distribuidor o llame al número:
Se encuentran disponibles los siguientes
detergentes Kärcher:
Jabón para automóviles
Desengrasante
Limpiador para todo uso
Jabón para casas
Jabón para cubiertas
Paso 4
Con el motor en marcha, oprima el gatillo
de la pistola para hacer funcionar la
máquina: el detergente líquido es aspirado
hacia la máquina y se mezcla con el agua.
Aplique el detergente al área de trabajo.
No permita que el detergente se seque
sobre la superficie.
PRECAUCIÓN
Nunca utilice:
Productos blanqueadores, con cloro
y otros productos químicos
corrosivos
Líquidos que contengan solventes
(por ejemplo, thinner, gasolina,
aceites)
Productos de fosfato de trisodio
Productos de amoníaco
Productos ácidos
Estos productos químicos dañarán la
máquina y la superficie a limpiar.
Page 21

DESCONEXIÓN Y LIMPIEZA
Paso 1
Quite el tubo de succión de detergente del
recipiente y colóquelo en un galón de agua
limpia. Aspire el agua a baja presión por
un minuto.
Paso 2
Mueva el acelerador hacia abajo para
detener la máquina.
Paso 3
Cierre el suministro de agua.
Paso 4
Oprima el gatillo de la pistola para liberar
la presión del agua.
Paso 5
Desconecte la manguera de jardín de la
entrada de agua de la máquina.
Paso 6
Desconecte la manguera de alta presión
de la salida de alta presión.
Paso 7
Enganche el seguro del gatillo.
PREPARACIÓN PARA EL INVIERNO Y
ALMACENAJE DE LARGO PLAZO
1.Desconecte todas las conexiones de
agua.
2.Arranque la máquina por unos cuantos
segundos hasta que salga el agua que
haya quedado en la bomba. Apáguela
inmediatamente.
3.Drene la gasolina y el aceite del motor.
4.No permita que la manguera de alta
presión se tuerza.
5.Guarde la máquina y los accesorios en
un cuarto en donde la temperatura no
baje al punto de congelación.
Precaución:
De no seguir las instrucciones previas
puede causar daño al ensamblaje de la
bomba y los accesorios.
21
TOMANDO UN DESCANSO
...DE 5 MINUTOS O MÁS
Paso 1
Mueva el acelerador hacia abajo para
detener la máquina.
Paso 2
Oprima el gatillo de la pistola para liberar
la presión del agua.
Paso 3
Enganche el seguro del gatillo.
Page 22

SUGERENCIAS DE LIMPIEZA
Limpieza de Cubiertas
(con o sin detergente)
Pre-enjuague la cubierta y el área circundante
con agua limpia. Si utiliza el Jabón para
Cubiertas Kärcher, coloque el tubo de succión
de detergente directamente en la solución
limpiadora y aplíquela a la superficie a baja
presión. Para obtener mejores resultados,
limite su área de trabajo a secciones pequeñas
de aproximadamente 25 pies cuadrados (3
2
). Permita que el Jabón para Cubiertas Kär-
m
cher permanezca sobre la superficie de 1 a 3
minutos. No permita que el detergente se
seque sobre la superficie. Enjuague a alta
presión con un movimiento amplio de barrido
manteniendo la boquilla a una distancia
aproximada de 3 a 6 pulgadas (7 a 15 cm) de
la superficie a limpiar. Limpie siempre de arriba
hacia abajo y de izquierda a derecha. Cuando
prosiga hacia una sección nueva de la
superficie a limpiar, asegúrese de empalmar
sobre la sección previa para eliminar marcas
y asegurar una limpieza más uniforme.
Precaución: No utilice la boquilla
Dirtblaster® sobre superficies de madera,
22
ya que puede ocasionar daños.
Flancos de la Casa
(con o sin detergente)
Pre-enjuague la superficie a limpiar con agua
limpia. Si utiliza el Jabón para Casas Kärcher, coloque el tubo de succión de
detergente directamente en la solución
limpiadora y aplíquela a la superficie a baja
presión (para obtener mejores resultados,
limite su área de trabajo a secciones de
aproximadamente 6 pies (1.8 m) y aplique
siempre el detergente de abajo hacia arriba).
Permita que el Jabón para Casas Kärcher
permanezca sobre la superficie de 1 a 3
minutos. No permita que el detergente se
seque sobre la superficie, si parece que la
superficie se está secando, simplemente
mójela con agua limpia. Enjuague a alta
presión de arriba hacia abajo con un
movimiento de barrido uniforme,
manteniendo la boquilla a una distancia
aproximada de 6 pulgadas (15 cm) de la
superficie a limpiar.
Precaución: No utilice la boquilla
Dirtblaster® sobre superficies de madera,
ya que puede ocasionar daños.
Patios de Cemento, Ladrillo y
Piedra
(con o sin detergente)
Pre-enjuague la superficie a limpiar con
agua limpia. Si utiliza el Limpiador para
Todo Uso Kärcher, coloque el tubo de
succión de detergente directamente en la
solución limpiadora y aplíquela a la
superficie a baja presión. Para obtener
mejores resultados, limite su área de
trabajo a secciones pequeñas de
aproximadamente 25 pies cuadrados (3
m2). Permita que el Limpiador para Todo
Uso Kärcher permanezca sobre la
superficie de 1 a 3 minutos. No permita que
el detergente se seque sobre la superficie.
Enjuague a alta presión con un movimiento
de barrido manteniendo la boquilla a una
distancia aproximada de 3 a 6 pulgadas (7
a 15 cm) de la superficie a limpiar. Limpie
siempre de arriba hacia abajo y de izquierda
a derecha. Para eliminar manchas muy
persistentes, utilice la boquilla Dirtblaster®
de Kärcher.
Automóviles, Botes y Motocicletas
(con o sin detergente)
Pre-enjuague el vehículo con agua limpia.
Si utiliza el Jabón para Vehículos Kärcher,
coloque el tubo de succión de detergente
directamente en la solución limpiadora y
aplíquela a la superficie a baja presión.
Para obtener mejores resultados, limpie
todo un lado del vehículo a la vez y aplique
siempre el detergente de abajo hacia arriba.
No permita que el detergente se seque
sobre la superficie. Enjuague a alta presión
con un movimiento de barrido manteniendo
la boquilla a una distancia aproximada de
6 a 8 pulgadas (15 a 20 cm) de la superficie
a limpiar (esta distancia debe aumentar
cuando enjuague superficies que tienen
rayas u otras superficies sensibles). Limpie
siempre de arriba hacia abajo y de izquierda
a derecha. Para obtener mejores
resultados, seque la superficie con una
gamuza o un paño suave y seco.
Precaución: No utilice la boquilla
Dirtblaster® sobre superficies de madera,
ya que puede ocasionar daños.
Page 23

SUGERENCIAS DE LIMPIEZA – continuación
Parrillas para Carne, Equipo
Motorizado para Exteriores y
Herramientas de Jardinería
(con o sin detergente)
Pre-enjuague la superficie a limpiar con agua
limpia. Si utiliza el Limpiador para Todo Uso
Kärcher o el Desengrasante, coloque el tubo
de succión de detergente directamente en la
solución limpiadora y aplique el detergente a
baja presión. Permita que el detergente Kärcher permanezca sobre la superficie de 1 a 3
minutos. No permita que el detergente se
seque sobre la superficie. Enjuague a alta
presión manteniendo la boquilla a una
distancia aproximada de 3 a 6 pulgadas (7 a
15 cm) de la superficie a limpiar. Para eliminar
suciedad muy persistente, puede ser
necesario acercar aún más la boquilla a la
superficie para lograr una acción cortante de
grasa más eficiente. Para quitar muchas
capas de lodo de botes de basura, hojas de
cortadoras de pasto, barriles u otras
superficies metálicas no sensibles, puede
utilizar la boquilla Dirtblaster® de Kärcher.
Precaución: No utilice la boquilla de
rociado Dirtblaster® sobre superficies de
tela, plástico u otras superficies sensibles,
ya que puede ocasionar daños.
Muebles de Patio y Jardín
(con o sin detergente)
Pre-enjuague los muebles y el área
circundante con agua limpia. Si utiliza el
Limpiador para Todo Uso Kärcher, coloque
el tubo de succión de detergente
directamente en la solución limpiadora y
aplíquela a la superficie a baja presión.
Permita que el Limpiador para Todo Uso
Kärcher permanezca sobre la superficie de
1 a 3 minutos. No permita que el detergente
se seque sobre la superficie. Enjuague a
alta presión con un movimiento de barrido
manteniendo la boquilla a una distancia
aproximada de 3 a 6 pulgadas (7 a 15 cm)
de la superficie a limpiar. Para obtener
mejores resultados, limpie de arriba hacia
abajo y de izquierda a derecha.
Precaución: No utilice la boquilla de
rociado Dirtblaster® sobre superficies de
tela, plástico u otras superficies sensibles,
ya que puede ocasionar daños.
Recomendaciones:
Antes de limpiar cualquier superficie,
debe limpiar una superficie oculta para
probar el patrón de rociado y la distancia,
para obtener resultados máximos de
limpieza.
Si la pintura de las superficies se
encuentra levantada o cuarteada, extreme las precauciones, ya que la máquina
lavadora a presión puede desprender la
pintura suelta de la superficie.
ACCESORIOS DE LIMPIEZA
OPCIONALES
Se tienen disponibles accesorios de
limpieza opcionales para mejorar aún más
la capacidad de limpieza.
Boquilla Dirtblaster®
Extensión de lanza de 80
Cepillo de lavado giratorio
Accesorio para lavado con chorro de
arena
Carrete para manguera
Limpiador de tuberías de drenaje
Extensión de manguera de 30 pies
Bandeja para detergente
23
Page 24

LOCALIZACION DE FALLAS MECANICAS
El motor no arranca.
• No hay gasolina.
- Llene el tanque de gasolina.
• Sensor de nivel bajo de aceite
activado.
- Agregue aceite.
• El ahogador no está en la posición
correcta.
- Mueva la palanca del acelerador a la
posición de „cerrado“ (closed).
• El acelerador del motor no está en la
posición correcta.
- Mueva la palanca del acelerador 1/3
de la distancia a la posición de
„rápido“ (fast).
• Se acumuló presión en la lavadora de
alta presión.
- Oprima el gatillo para liberar la
presión.
La máquina no alcanza alta presión
•El diámetro de la manguera de jardín
24
es demasiado pequeño.
- Reemplace con una manguera de
jardín de 3/4 de pulgada.
• La entrada de agua se encuentra
restringida.
- Revise que la manguera de jardín no
esté torcida, tenga fugas o esté
obstruida.
• No hay suficiente entrada de agua.
- Abra la llave de agua al máximo.
• El filtro de entrada de agua está
tapado.
- Quite el filtro y enjuáguelo con agua
tibia.
• Está conectada la boquilla negra para
el detergente.
- Quite la boquilla negra para
detergente y conecte una boquilla de
alta presión.
La presión de salida varía de alta a baja.
• No hay suficiente entrada de agua.
- Abra la llave de agua al máximo. Revise que la manguera de jardín no esté
torcida, tenga fugas o esté obstruida.
• La bomba está aspirando aire.
- Revise que las mangueras y conexiones
no permitan la entrada de aire. Apague
la máquina y cebe la bomba apretando
el gatillo de la pistola hasta que salga
un flujo continuo de agua de la boquilla.
• El filtro de entrada de agua está tapado.
- Quite el filtro y enjuáguelo en agua tibia.
• La boquilla de descarga está obstruida.
- Sople o quite el residuo con una
aguja fina.
• Calcificación de la pistola, manguera
o lanza.
- Haga correr vinagre destilado a través
del tubo de succión de detergente.
No hay detergente.
• El tubo de succión de detergente no está
conectado adecuadamente a la máquina.
- Revise la conexión.
• El detergente está muy espeso.
- Diluya el detergente. Para obtener
mejores resultados utilice el
detergente Kärcher.
• La válvula del filtro de detergente está
en su posición más baja.
- Ajuste la válvula del filtro a una
posición más alta.
• El filtro del tubo de succión de
detergente está tapado.
- Haga correr agua tibia a través del
filtro para eliminar el residuo.
• El tubo de succión de detergente está
dañado o tapado.
- Quite la obstrucción o reemplace el
tubo de succión de detergente.
• Está conectada una boquilla de alta
presión.
- Reemplace con la boquilla negra para
detergente.
• La boquilla de descarga está obstruida.
- Sople o elimine el residuo con una aguja
fina.
Page 25

LOCALIZACIÓN DE FALLAS MECANICAS – continuación
La conexión de la manguera de jardín gotea.
• Las uniones de conexión están flojas.
- Apriete las uniones de conexión.
• Faltan las rondanas o están gastadas.
- Inserte rondanas nuevas.
La lanza o la extensión de la lanza gotea.
• La lanza no está conectada
adecuadamente.
- Inserte la lanza dentro de la extensión
de la lanza. Empuje cuidadosamente
haciendo fuerza contra la tensión del
resorte y dé vuelta a la lanza para
asegurarla en posición.
• El empaque „o-ring“ está roto.
- Llame a la línea de servicio a clientes de
Kärcher y solicite un empaque „o-ring“.
La bomba hace mucho ruido.
• La bomba está aspirando aire.
- Revise que las mangueras y uniones no
permitan el paso de aire. Apague la
máquina y cebe la bomba oprimiendo el
gatillo de la pistola hasta que salga un
flujo constante de agua por la boquilla.
Gotea agua de la bomba
(se permiten hasta 10 gotas por minuto).
• Las piezas de conexión están sueltas.
- Revise que todas las piezas de
conexión estén apretadas.
• Los sellos de agua están dañados o
gastados.
- Llame al centro de servicio.
• El dispositivo de protección térmica
está activado.
- El dispositivo de protección térmica
se reinicia automáticamente.
Si encuentra dificultades adicionales
que no se hayan mencionado, favor de
llamar al centro de servicio para recibir
ayuda.
Servicio de Atención al Cliente Kärcher
en EE.UU.
Kärcher En USA
llame al: 1-800-537-4129
o visite nuestro sitio web:
www.karcher-usa.com
Kärcher En Mexico
llame al: 01-800-024-13-13
o visite nuestro sitio web:
www.karcher.com.mx
25
Gotea aceite.
• Los sellos de aceite están dañados o
gastados.
- Llame al centro de servicio.
Page 26

Nettoyeur haute pression Manuel d’utilisation
Généralités .................................................................. 27
Précautions ................................................................. 28
Instructions d’assemblage ......................................... 29
Mode d’emploi ............................................................ 30
Emploi des accessoires .............................................. 31
Emploi de détergents ................................................. 32
Arrêt de l’appareil et nettoyage.................................. 33
Pause ........................................................................... 33
Remisage hivernal et entreposage à long terme ...... 33
Conseils de nettoyage ........................................... 34-35
Accessoires de nettoyage en option ......................... 35
Dépannage ............................................................. 36-37
26
CaractéristiquesCaractéristiques
Caractéristiques
CaractéristiquesCaractéristiques
Pression 2500 PSI
Débit d’eau 2.5 GPM
Aspiration de détergent 0.15 – 0.20 GPM
Moteur 6 HP Tecumseh OV 195
Part No. 1.194-307
Serial No. ______________
Service à la clientèle Kärcher CDN
Aux Canada appelez: 1-800-465-4980
ou visitez notre site web: www.karcher.ca
Page 27

Modèle G 2500 HT GÉNÉRALITÉS
Pièce Description
1 Manche
2 Prise deau avec connecteur pour
boyau darrosage
3 Sortie haute pression
4 Filtre à détergent
5 Tube de succion à détergent
6 Lance de vaporisation
7 Pistolet
8 Boyau à haute pression
9 Verrou de sûreté du pistolet
10 Buse à connexion rapide
(rouge, jaune, verte, blanche, noire)
11 Bouchon du réservoir à huile
12 Jauge á huile
13 Bougie à résistance
14 Réservoir à essence
15 Perçage (Touret à tuyaux - option)
Non montré
- Buse Dirtblaster
- Rubber grommets (5 pcs)
27
Avertissement
Bien suivre les directives sur lentretien indiquées au manuel.
Cet appareil a été conçu pour être utilisé avec le détergent fourni ou recommandé par
le manufacturier. Lutilisation de tout autre détergent peut affecter le fonctionnement de
lappareil et annuler la garantie.
Page 28

PRÉCAUTIONS IMPORTANTES – Lire d’abord!
PRÉCAUTIONS DE SÉCURITÉ
ATTENTION Lors de lutilisation de ce
produit, les précautions de base doivent
toujours être observées, y compris les
suivantes :
ATTENTION Risque dinjection ou de
blessure - Ne pas décharger directement le
courant sur les personnes.
Bien lire le mode demploi avant dutiliser
ce produit.
Danger dincendie! Ne pas ajouter de
lessence lorsque le moteur est en marche.
Ne pas faire fonctionner si de lessence a
été renversée. Changez plutôt lappareil
dendroit et évitez de provoquer des
étincelles.
Manipulez et remplissez lappareil
dessence dans un endroit bien aéré, sans
dispositif doté dun pilote ou dune flamme
nue tel quune chaudière, un chauffe-eau,
etc.
Les jets à haute pression peuvent être
28
dangereux sils sont mal utilisés. Le jet ne
doit pas être dirigé vers une personne, un
animal, un appareil électrique ou vers
lappareil lui-même.
Portez des lunettes protectrices.
Nemployez pas dacide, de solvants ou
autres matériaux inflammables dans cet
appareil. Ceux-ci pourraient causer des
blessures physiques à son utilisateur et
endommager lappareil de façon
irréversible.
Les surfaces de lappareil peuvent devenir
chaudes et causer des brûlures. Manipulez
lappareil dans un environnement
sécuritaire et loin des enfants.
Ne laissez pas le boyau haute pression
entrer en contact avec le garde du tuyau
déchappement.
Ne laissez pas lappareil fonctionner sans
surveillance.
Apprenez à arrêter lappareil et à relâcher
la pression de façon rapide. Familiarisezvous à fond avec les commandes.
Demeurez alerte soyez attentif à vos
gestes.
Ne pas utiliser lappareil si vous éprouvez
de la fatigue ou si vous êtes sous linfluence
de lalcool ou des drogues.
Ne vous tenez pas sur une surface instable.
Tenez-vous de façon à ce que vos deux
pieds soient en équilibre en tout temps.
Évitez de basculer lappareil sur ses flancs.
Le verrou de sûreté EMPÊCHE le pistolet
de sengager accidentellement. Ce
dispositif de sécurité NE VERROUILLE
PAS le pistolet en position marche.
remplir dessence lorsque le moteur est en
marche ou faire fonctionner si de lessence
a été renversée.
Ne jamais toucher aux surfaces
lorsquelles sont chaudes ou laisser les
accessoires entrer en contact avec ces
derniêres.
Ne jamais employer dans un espace clos
puisque les vapeurs déchappement sont
dangereuses.
Ne jamais employer prês des flammes
nues.
Ne jamais employer le Nettoyeur à
pression lorsque le robinet deau est fermé.
Ne jamais employer deau chaude.
ALIMENTATION DEAU (Eau froide
seulement)
Le boyau doit avoir un diamètre dau moins
5/8 pouce (1,59 cm ).
• Le débit de l’alimentation d’eau ne doit pas
être inférieur à 9,45 lpm (2.5 GPM).
Le débit peut être mesuré en laissant couler
leau durant une minute dans un contenant
de 18,9 litres (5 gallons).
La température de leau ne doit pas excéder
40°C/104°F.
Naspirez jamais de leau contaminée par
un solvant tel que diluant à peinture,
essence, huile, etc.
Utilisez toujours une eau propre afin de
prévenir laspiration de débris.
Nous recommandons fortement de ne pas
faire fonctionner ce nettoyeur à pression
durant plus de 5 minutes si le pistolet nest
pas en fonction.
Page 29

INSTRUCTIONS D’ASSEMBLAGE
Étape1
Fixez le manche au châssis du Nettoyeur à
pression. Alignez les trous, insérez les
boulons et serrez avec les boutons.
Étape 2
Fixez le support de rangement pour pistolet
et boyau.
Étape 3
Fasten the rubber grommets.
Étape 4
Insérez les buses dans le support à buses.
Étape 6
Tirez la bague à ressort de la lance afin
dinsérer la buse à connection rapide de votre
choix.
Étape 7
Relâchez la bague et poussez la buse jusquà
ce que la bague senclenche.
DANGER
Haute pression au niveau de la buse
Risque de blessures dû à un arrêt non
approprié de la buse
Tirez sur la buse pour vérifier quelle est
bien en place (étape 5 et 6).
Étape 8
Fixez le boyau haute pression au pistolet.
29
Étape 5
Fixez la lance au pistolet.
Page 30

INSTRUCTIONS D’OPÉRATION
Important!
Ne démarrez pas le moteur si le niveau
dhuile est trop haut ou trop bas. Ceci
pourrait lendommager.
Si vous avez dautres questions concernant
le moteur, veuillez consulter le manuel
dutilisation inclus avec lappareil.
Étape 1
Vérifiez le niveau dhuile.
Assurez-vous que lappareil est de niveau
lorsque vous vérifiez lhuile. (Voir le manuel
dutilisation pour les calibres saisonniers.)
Note: Sileniveau dhuile est inapproprié, le
détecteur de faible niveau dhuile éteindra le
moteur.
Étape 2
Remplissez le réservoir à essence avec de
lessence sans plomb.
Nutilisez pas dessence au plomb.
30
Étape 3
Fixez le boyau à haute pression à la sortie
haute pression de lappareil.
Étape 8
Glissez le levier daccélérateur vers le haut à
une distance denviron 1/3 de la position
accélérée (« fast »).
Étape 9
Tirez la poignée du démarreur. Si le moteur
ne démarre pas aprês 3 essais, appuyez sur
la gâchette du pistolet pour évacuer la
pression. Essayez de démarrer de nouveau.
Lorsque le moteur est suffisamment réchauffé
pour un bon fonctionnement, placez le levier
détrangleur à la position ouverte (« open »)
et le levier daccélérateur à la position rapide
(« fast »).
Étape 4
Fixez le boyau darrosage à la prise deau
de lappareil.
Étape 5
Fixez le boyau darrosage au robinet deau
froide et louvrir à pleine capacité.
Ne jamais utiliser deau chaude.
Étape 6
Éliminez lair en appuyant sur la gâchette du
pistolet jusquà ce quun débit deau régulier
sécoule.
Étape 7
Placez le levier détrangleur à la position fermée
(«closed »). (Si le moteur est chaud, laissez le
levier à la position ouverte (« open »)).
Page 31

EMPLOI DES ACCESSOIRES
Les buses à connection rapide, codifiées par
couleur, offrent un vaste choix de largeur de
vaporisation allant de 0° à 65°. Elles sont
facilement accessibles lorsque rangées dans
le support de caoutchouc pratique situé sur
le devant de lappareil.
Buse rouge = 0°
pour les salissures particuliérement tenaces.
Buse jaune = 15°
pour salissures surfaces.
Buse verte = 25°
pour salissures grandes surfaces.
Buse blanche = 40°
pour salissures grandes surfaces.
Buse de vaporisation Dirtblaster
Cette buse offre un faisceau « crayon » de 0°
qui pivote à 360° pour une action nettoyante
maximale, permettant ainsi daugmenter les
performances du nettoyage jusquà 50%.
Cette lance combine la performance dun
faisceau « crayon » de 0° à la capacité de
couvrir de grandes surfaces dune buse à
faisceau large.
Non recommandé pour matériaux
souples, parements, surfaces peintes,
terrasses ou automobiles.
DANGER
Haute pression au niveau de la buse
Risque de blessures dû à un arrêt non
approprié de la buse
Tirez sur la buse pour vérifier quelle est
bien en place (page 29, étape 5 et 6).
31
Buse à détergent noire = 65°
à utiliser avec du détergent ou lors d´un
nettoyage basse pression.
AVERTISSEMENT
POUR ÉVITER DES BLESSURES
SÉRIEUSES, NE JAMAIS DIRIGER LA
BUSE DE VAPORISATION VERS
VOUS, VERS UNE AUTRE PERSONNE
OU VERS UN ANIMAL.
Page 32

EMPLOI DE DÉTERGENTS
Les détergents doivent seulement être
appliqués à laide de la buse noire.
Étape 1
Fixez la buse pour basse pression noire
servant à lapplication de détergent à basse
pression.
Étape 2
Ajustez le bout filtre du tube à détergent à la
position « moins » ( / 0.15 gpm) ou « plus »
(+ / 0.20 gpm), selon létendue de détergent
désirée.
Étape 3
Remplissez un contenant avec le détergent
Kärcher. Insérez le bout filtre du tube de
succion de détergent dans le détergent.
32
Pour de meilleurs résultats, voir la section
Conseils de nettoyage aux pages 34 et 35
qui donne des conseils spécifiques pour
le nettoyage de différents types de
surfaces.
Pour de meilleurs résultats, utilisez
toujours un détergent de marque
Kärcher.
KärcherLes détergents biodégradables de
marque Kärcher sont spécialement formulés
pour protéger à la fois lenvironnement et votre
Nettoyeur à pression. Sa formule spéciale
nobstruera pas le filtre du tube de succion et
protégera les pièces internes du Nettoyeur à
pression pour une plus longue durée de vie.
Pour vous procurer les détergents de marque
Kärcher, demandez à votre détaillant ou
appelez le:
Détergents de marque Kärcher
disponibles:
• Presso-Net
• Nettoyant de terrasse et clôture de
bois
• Dégraisseur
• Nettoyant de véhicule
Étape 4
Une fois le moteur en marche, pressez la
gâchette pour faire fonctionner lappareil : le
détergent liquide est dirigé dans le module
et est mélangé à leau. Appliquez le détergent
sur la surface à nettoyer. Ne pas laisser
sécher.
Mise en garde
Ne jamais utiliser de :
• Javelisants, de produits à base de
chlorure et autres produits chimiques
corrosifs
• Liquides contenant des solvants (diluant
à peinture, essence, huile, etc.)
• Produits à base de phosphate trisodique
• Produits à base dammoniaque
• Produits à base dacide
Ces produits chimiques endommageront le
module ainsi que la surface qui est
nettoyée.
Page 33

ARRÊT DE L’APPAREIL
Étape 1
Retirez le tube de succion de détergent du
contenant et le placer dans un contenant de
3,78 litres deau fraîche. À basse pression,
siphonnez leau durant une minute.
Étape 2
Abaissez le levier daccélérateur afin darrêter
le moteur.
Étape 3
Fermez le robinet deau.
Étape 4
Appuyez sur la gâchette pour évacuer la
pression de leau.
Étape 5
Retirez le boyau darrosage de la prise deau
du module.
Étape 6
Retirez le boyau à haute pression de la sortie
haute pression du module.
Étape 7
Enclenchez le verrou de sûreté du pistolet.
REMISAGE HIVERNAL ET
ENTREPOSAGE À LONG TERME
1.Défaites tous les branchements deau.
2.Démarrez lappareil pour quelques
secondes, jusquà ce que toute leau soit
évacuée. Arrêtez lappareil
immédiatement.
3.Ne laissez pas le boyau à haute pression
semmêler.
4.Rangez lappareil et les accessoires dans
un endroit à labri du gel.
Mise en garde : Si ces directives ne sont
pas respectées, la pompe et les accessoires
pourraient sendommager.
33
PRENDRE UN PAUSE
... 5 MINUTES OU PLUS
Étape 1
Abaissez le levier daccélérateur afin darrêter
le moteur.
Étape 2
Appuyez sur la gâchette pour évacuer la
pression de leau.
Étape 3
Enclenchez le verrou de sûreté du pistolet.
Page 34

CONSEILS DE NETTOYAGE
Terrasses en Bois
(avec ou sans détergent)
Rincez dabord la terrasse et les surfaces
avoisinantes à leau claire. Si vous employez
le détergent de terrasse et clôture de bois,
appliquez sur la surface à basse pression.
Pour de meilleurs résultats, limitez votre
surface de travail à de petites sections
denviron 2,3 mètres carrés (25pi. ca.).
Laissez reposer le détergent de terrasse et
clôture de bois de 1 à 3 minutes; ne pas
laisser sécher. Rincez à haute pression dans
un long mouvement de va-et-vient en
maintenant la buse de vaporisation à environ
7,5 -15 cm (3 - 6 po.) de la surface. Nettoyez
toujours de haut en bas et de gauche à droite.
Lorsque vous entamez une nouvelle section,
assurez-vous de chevaucher la section
précédente afin déliminer les démarcations
et dassurer un résultat plus uniforme.
Précautions: Ne pas utiliser la lance rotative
sur des surfaces de bois parce quelle pourrait
les endommager.
34
Parements extérieurs
(avec ou sans détergent)
Rincez dabord la surface à leau claire. Si
vous employez le détergent presso-net,
appliquez sur la surface à basse pression
(pour de meilleurs résultats, limitez votre
surface de travail à des sections denviron 2
mètres (6 pi.) et appliquez le détergent de
bas en haut). Laissez reposer le détergent
presso-net de 1à 3 minutes. Ne pas laisser
le détergent sécher sur la surface. Si la
surface semble sécher, lhumidifier avec de
leau claire. Rincez à haute pression de haut
en bas dans un mouvement de va-et-vient
régulier en gardant la buse de vaporisation à
environ 15 cm (6 po.) de la surface.
Précautions : Ne pas utiliser la lance rotative
sur les parements parce quelle pourrait les
endommager.
Patios de ciment, de brique et de
pierre
(avec ou sans détergent)
Rincez dabord la surface à leau claire. Si
vous employez détergent presso-net ou le
dégraisseur, appliquez sur la surface à basse
pression. Pour de meilleurs résultats, limitez
votre surface de travail à de petites sections
denviron 2,3 mètres carrés (25 pi. ca).
Laissez reposer détergent presso-net ou le
dégraisseur de 1 à 3 minutes. Ne pas laisser
le détergent sécher sur la surface. Rincez à
haute pression dans un mouvement de vaet-vient en gardant la buse de vaporisation à
environ 7,5-15 cm (3-6 po.) de la surface.
Toujours nettoyer de haut en bas et de gauche
à droite. Pour enlever les taches très tenaces,
employez la lance rotative.
Autos, bateaux et motocyclettes
(avec ou sans détergent)
Rincez dabord le véhicule à leau claire. Si
vous employez le détergent de véhicule,
appliquez sur la surface à basse pression.
Pour de meilleurs résultats, nettoyez un côté
du véhicule à la fois et appliquez toujours le
détergent de bas en haut sans le laisser
sécher. Rincez à haute pression dans un
mouvement de va-et-vient en gardant la buse
de vaporisation à environ 15-20 cm. (6-8 po.)
de la surface (augmentez la distance pour
des surfaces fragiles). Nettoyez toujours de
haut en bas et de gauche à droite. Pour de
meilleurs résultats, essuyez la surface avec
un chamois ou un linge doux.
Précautions : Ne pas utiliser la lance rotative
sur les véhicules parce quelle pourrait les
endommager.
Page 35

CONSEILS DE NETTOYAGE –
Suite
Grille de barbecue, outillage
mécanique pour l’extérieur et outils
de jardinage
(avec ou sans détergent)
Rincez dabord la surface à nettoyer à leau
claire. Si vous employez le détergent presso-
net ou le dégraisseur, appliquez sur la surface
à basse pression. Laissez reposer le
détergent tout usage ou le dégraissant de
1à3 minutes; ne pas laisser sécher. Rincez
à haute pression en maintenant la buse de
vaporisation à environ 7,5-15 cm (3-6 po.) de
la surface. Pour enlever la saleté tenace, il
pourrait être utile de rapprocher la buse de
vaporisation plus près de la surface pour une
plus grande action nettoyant. Pour enlever la
boue séchée sur les contenants à déchets,
lames de tondeuses à gazon, brouettes ou
autres surfaces non fragiles, vous pouvez
employer la lance rotative.
Précautions : Ne pas utiliser la lance rotative
sur le tissu, le plastique ou autre surface fragile parce quelle pourrait les endommager.
Mobilier de patio et de jardin
(avec ou sans détergent)
Rincez dabord le mobilier à leau claire. Si
vous employez le détergent presso-net,
appliquez sur la surface à basse pression.
Laissez reposer le détergent tout usage de 1
à 3 minutes; ne pas laisser sécher. Rincez à
haute pression dans un mouvement de vaet-vient en gardant la buse de vaporisation à
environ 7,5 - 15 cm (3-6 po.) de la surface.
Pour de meilleurs résultats, nettoyez de haut
en bas et de gauche à droite.
Précautions: Ne pas utiliser la lance rotative
sur le mobilier de patio ou de jardin parce
quelle pourrait les endommager.
Recommendations
Avant de nettoyer quelque surface que ce
soit, en un endroit dissimulé, testez la
vaporisation ainsi que la distance idéale
pour un résultat de nettoyage optimal.
Si les surfaces peintes sécaillent, faites três
attention car un nettoyeur à pression peut
déloger la peinture aux endroits écaillés.
ACCESSOIRES DE NETTOYAGE EN
OPTION
Des accessoires de nettoyage sont disponibles en option afin daméliorer le rendements
du nettoyage.
• Brosse de lavage
• Brosse de lavage rotative
• Lance de rallonge
• Lance de vaporisation pour dessous de
châssis
• Nettoyeur pour tuyaux
• Boyau de succion d’eau
• Rallonge pour boyau de 7,5 m. (25 pi.)
• Nécessaire de sablage humide
35
Page 36

DÉPANNAGE
TROUBLESHOOTING
Le moteur ne démarre pas.
• Il n’y a pas d’essence.
- Remplissez le réservoir.
• Détecteur de faible niveau d’huile
activé.
- Ajoutez de l’huile.
• L’étrangleur n’est pas à la bonne
position.
- Placez le levier de l’étrangleur à la
position fermée (« closed » ).
• L’accélérateur n’est pas à la bonne
position.
- Glissez le levier d’accélérateur vers le
haut à une distance d’environ 1/3 de
la position accélérée (« fast »).
• Il y a trop de pression dans l’appareil.
- Pressez la gâchette pour évacuer la
pres-sion.
Le module natteint pas le niveau de
haute pression.
36
• Le diamêtre du boyau d’arrosage est
trop petit.
- Remplacez-le par un boyau
d’arrosage d’un diamêtre de 2 cm.
• Le débit d’eau est réduit.
- Vérifiez si le boyau d’arrosage n’est
pas emmêlé, s’il ne coule pas ou s’il
n’est pas obstrué.
• Le débit d’eau est insuffisant.
- Ouvrir le robinet à pleine capacité.
• Le filtre d’entrée d’eau est obstrué.
- Retirez-le et rincez-le à l’eau tiêde.
• La buse noire à détergent est en
place.
- Retirez la buse noire à détergent et
insérez une buse à haute pression.
Le niveau de pression varie.
• Le débit d’eau à la prise n’est pas
suffisant.
- Ouvrir le robinet à pleine capacité.
Vérifiez si le boyau d’arrosage n’est
pas emmêlé, s’il ne coule pas ou s’il
n’est pas obstrué.
• La pompe aspire de l’air.
- Vérifiez l’étanchéité du boyau et des
raccords. Fermez l’appareil et videz
la pompe en pressant la gâchette du
pistolet jusqu’à l’obtention d’un débit
d’eau régulier.
• Le filtre de prise d’eau est obstrué.
- Retirez-le et rincez-le à l’eau tiêde.
• La buse est obstruée.
- Soufflez dans la buse ou retirez les
débris à l’aide d’une fine aiguille.
• Calcification du pistolet, du boyau ou
de la lance de vapo-risation.
- Faites couler du vinaigre distillé dans
le tube de succion de détergent.
No détergent.
• Le tube de succion de détergent n’est
pas bien fixé à l’appareil.
- Vérifier l’ajustement.
• Le détergent est trop épais.
- Diluez le détergent; pour de meilleurs
résultats, utilisez un détergent de
marque Kärcher.
• La valve du filtre à détergent est à la
plus basse position.
- Réglez la valve à détergent à la plus
haute position.
• Le filtre du tube de succion de
détergent est obstrué.
- Faites couler de l’eau dans le filtre
pour éliminer les débris.
• Le tube de succion de détergent est
obstrué ou endommagé.
- Dégagez ou remplacez le tube de
succion de détergent.
• Une buse à haute pression est en
place.
- Remplacez-la par la buse noire à
détergent.
• La buse est obstruée.
- Soufflez dans la buse pour la
dégager ou utilisez une fine aiguille.
Page 37

DÉPANNAGE –
Suite
Le raccord du boyau darrosage fuit.
• Les raccords sont lâches.
- Resserrez les raccords.
• Il n’y a pas de joint de caoutc-houc ou
celui-ci est usé.
- Mettre un nouveau joint de
caoutchouc.
La lance de vaporisation ou la rallonge
de la lance de vaporisation fuit.
• La rallonge de la lance de
vaporisation n’est pas bien fixée.
- Fixez la lance de vaporisation au
pistolet. Dans le sens des aiguilles
d’une montre, tournez la bague dans
le pistolet jusqu’à ce qu’elle soit bien
en place.
• Le joint torique est brisé.
- Appelez le service à la clientêle
Kärcher et commandez un joint
torique.
La pompe est bruyante.
• La pompe aspire de l’air.
- Vérifiez que les boyaux et les
raccords sont bien fixés. Arrêtez
l’appareil et videz la pompe en
appuyant sur la gâchette jusqu’à
l’obtention d’un débit d’eau régulier.
Leau sécoule de la pompe
(un écoulement jusquà 10 gouttes à la
minute est admissible).
• Les raccords sont mal fixés.
- Vérifiez l’ajustement des raccords.
• Les joints sont usés ou
endom-magés.
- Appelez le service d’assistance.
• Le dispositif de protection thermale
est activé.
- Le dispositif de protection thermale
se réinitialisera automatiquement.
Si vous éprouvez dautres difficultés
qui ne sont pas énumérées dans cette liste, veuillez appeler notre centre de
service.
Garantie CDN
Kärcher Canada Inc. garantie cet article à
l’acheteur contre tout défaut de fabrication
et de main-d’oeuvre pour une période de
deux ans suivant l’achat. Si une
défectuosité survenait durant la période de
garantie, Kärcher Canada Inc. sur
présentation de la preuve d’achat, réparera
ou remplacera cet article (selon sa décision)
sans aucun frais.
Cette garantie n’inclut pas les dommages
résultant d’un accident, d’une utilisation
déraisonnable, de l’usure normale, de la
perte d’usage ou autres dommages
consécutifs, non plus que les réparations
effectuées par des gens non-autorisés et les
frais encourus par ceux-ci.
Les pistolets, les boyaux, les buses et les
autres accessoires sont garantis pour 3 mois.
Veuillez s’il vous plaît noter qu’aucun retour de marchandise ne sera accepté sans
un numéro d’autorisation préalablement
obtenu d’un préposé au service à la
clientèle.
Le propriétaire de l’article doit présenter
directement au transporteur public toute
réclamation concernant des dommages
causés par l’équipement ou le personnel
du transporteur.
Service à la clientèle CDN
Aux Canada appelez : 1-800-465-4980
ou visitez notre site web: www.karcher.ca
37
Lhuile coule.
• Les joints sont usés ou
endom-magés.
- Appelez le service d’assistance.
Page 38

Page 39

Page 40

 Loading...