

Page 1

G 2000 MK
English 2
Español 17
Français 32
9.139-204.0 05/07
Page 2
HIGH PRESSURE WASHER OPERATOR MANUAL
Model Overview 3
Important Safety Instructions 4
Assembly Instructions 6
Operating Instructions 6
Using the Accessories 9
Working with Detergents 9
Taking a Break 10
Shutting Down & Clean-Up 10
Winterizing and Long-Term Storage 10
Maintenance Instructions 11
Cleaning Tips 13
Troubleshooting 15
Specifications
Operating pressure 2000 PSI
Water volume 2.0 GPM
Detergent suction 0.15 - 0.20 GPM
Engine 87cc
Grow A154 F
Part No. 1.133-621.0
Serial no.
Safety Alert Symbols
DANGER
indicates “an imminently hazardous situation which, if not avoided, will result in death
or serious injury.”
WARNING
indicates “a potentially hazardous situation
which, if not avoided, could result in death
or injury.”
CAUTION
indicates “a potentially hazardous situation
which, if not avoided, may result in minor or
moderate injury or in property damage incidents.”
Warning information should be emphasized
and understood.
If the operator is not fluent in English, the
manufacturer’s instructions and warnings
shall be read to and discussed with the operator in the operator’s native language by
the purchaser/owner, making sure that the
operator comprehends its contents.
Owner and/or user must study and maintain
for future reference the manufacturers’ instructions.
Kärcher Customer Support USA
Call: 1-800-537-4129 for help or visit our
website:
www.karcher-usa.com/home
Please take a moment to register your pressure washer online at
www.karcher-usa.com/warranty
Kärcher Customer Service CDN
Call: 1-800-537-4129 for help or visit our
website:
www.karcher-canada.com
Kärcher Customer Support Mexico
Call: 01-800-024-13-13 for help or visit our
website: www.karcher.com.mx
Owner/User Responsibility
The owner and/or user must have an understanding of the manufacturer’s operating instructions and warnings before using
this pressure washer.
2 English
Page 3

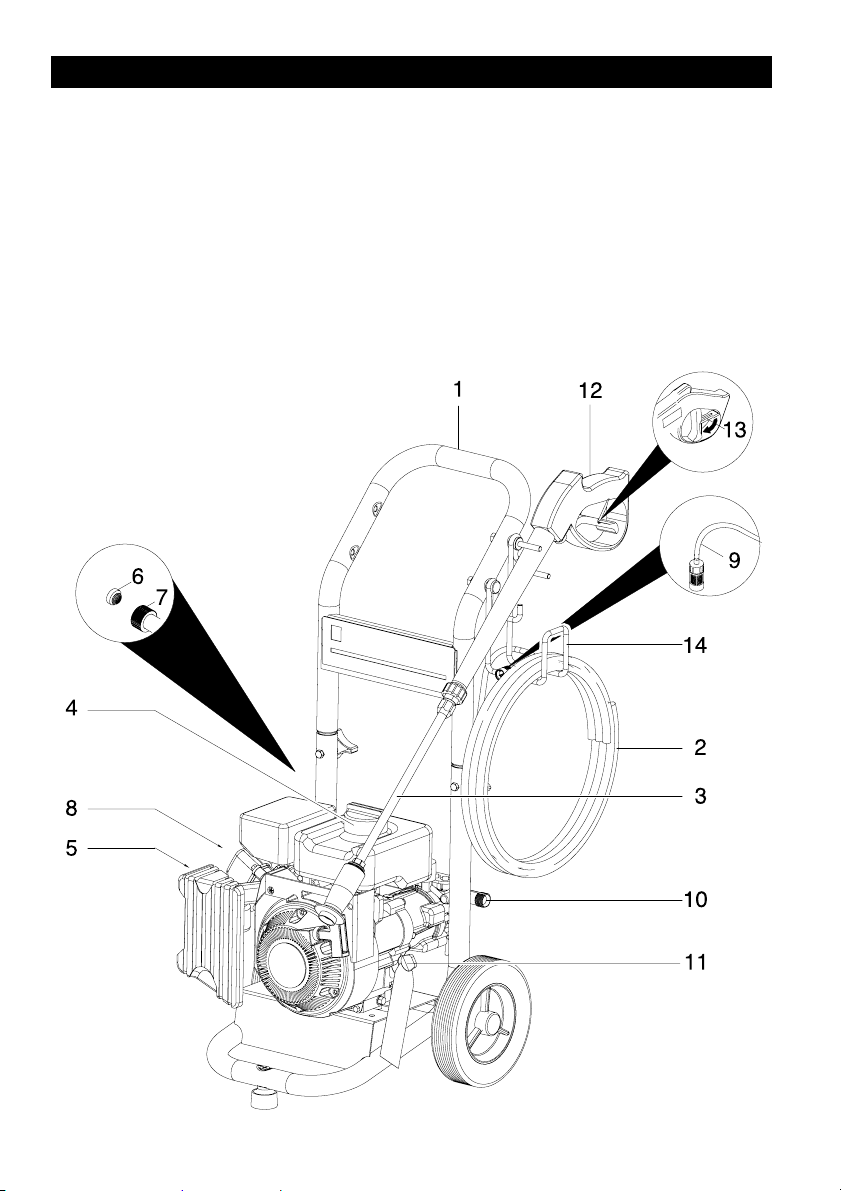
MODEL OVERVIEW
1 Handle
2 High pressure hose
3 Spray wand
4Gas tank
5Choke
(not shown)
6 Water inlet filter
7 Water inlet with garden hose connector
8 Spark plug
(not shown)
9 Detergent suction tube with filter
10 High pressure outlet
11 Dipstick
12 Trigger gun
13 Trigger gun safety lock
14 Gun/hose storage hanger
For engine details see engine manual.
English 3
Page 4

IMPORTANT SAFETY INSTRUCTIONS
Read the operating instructions of the
engine manufacturer before start-up
and follow the safety instructions carefully.
WARNING
When using this product basic precautions
should always be followed, including the
following:
Read all the instructions before using
the product.
To reduce the risk of injury, close super-
vision is necessary when a product is
used near children.
Know how to stop the product and bleed
pressures quickly. Be thoroughly familiar with the controls.
Stay alert – watch what you are doing.
Do not operate the product when fa-
tigued or under the influence of alcohol
or drugs.
Keep operating area clear of all per-
sons.
Do not overreach or stand on unstable
support. Keep good footing and balance
at all times.
Wear safety goggles.
Follow the maintenance instructions
specified in the manual.
WARNING
Risk of Injection or Injury – Do Not Direct Discharge Stream At Persons.
High pressure jets can be dangerous if
misused. The jet must not be directed at
persons, animals, electrical devices, or
the unit itself.
Do not spray electrical connections,
electrical outlets or fixtures.
WARNING
Risk Of Explosion – Do not spray flammable liquids.
Do not use acids, alkaline, solvents, or
any flammable material in this product.
These products can cause physical in-
juries to the operator and irreversible
damage to the machine.
WARNING
Gun Kicks Back – Hold with both hands.
The Trigger Gun Safety Lock prevents
the trigger from accidentally being engaged. This safety feature DOES NOT
lock trigger in the ON position.
CAUTION
Risk of Asphyxiation – Use this product only
in a well ventilated area.
Operate and fuel machine in a well ven-
tilated area, free of devices featuring an
open pilot or flame such as boilers, water heaters, etc.
CAUTION
Risk of Fire – Do not add fuel when the
product is operating.
Do not operate if fuel has been spilled.
Instead, move the machine to a different location and avoid creating sparks.
Do not remove the gas tank cap or add
fuel while the engine is running or hot.
Add fuel after the engine has cooled by
waiting 2 or more minutes after the engine is stopped.
Do not smoke when adding fuel
Do not allow the high pressure hose to
come into contact with the muffler
guard.
Do not leave the machine running unat-
tended.
Avoid tipping the machine on its side.
Do not operate the machine with the
muffler or the air cleaner removed. Especially for the muffler, check the tightness of mounting screw, damage and
leakage periodically, and if abnormality
is found, repair or replace it.
Occasionally inspect the fuel system
componets to check for cracks and
leaks. Replace components when necessary.
4 English
Page 5

WARNING
Do not check for spark with the spark
plug removed.
Do not touch the high-voltage cord or
spark plug cap.
Do not stop the machine by using the
choke lever.
Do not unreasonably adjust the engine
speed.
Do not place hands or feet near moving
or rotating parts.
Do not operate machine with combusti-
ble material in the muffler area.
CAUTION
Do not touch hot surfaces or allow ac-
cessories to contact hot surfaces.
The machine has hot surfaces which
can cause burns. Operate the unit in a
safe environment and away from children.
Remove trash, grass and other debris
from around the cooling fins and recoil
starter.
Allways use new gasoline. Old gasoline
could cause build up in the carburetor
which could cause poor engine opera-
tion.
SAVE THESE INSTRUCTIONS
WATER SUPPLY
(Cold Water Only)
CAUTION
When connecting the water inlet to the
water supply mains, local regulations of
your water company must be observed.
In some areas the unit must not be connected directly to the public drinking water supply. This is to ensure that there is
no feedback of chemicals into the water
supply. Direct connection via a receiver
tank or backflow preventer, for example, is permitted.
Dirt in the feed water will damage the
unit. To avoid this risk, we recommend
fitting a water filter.
Garden hose must be at least 5/8 inch in
diameter.
Flow rate of water supply must not fall
below 2.8 GPM (gallons per minute).
Flow rate can be determined by running
the water for one minute into an empty
5-gallon container.
The water supply temperature must not
exceed 104°F/40°C.
Never use the pressure washer to draw
in water contaminated with solvents,
e.g. paint thinners, gasoline, oil, etc.
Always prevent debris from being
drawn into the unit by using a clean wa-
ter source. Use additional water filter.
Do not operate pressure washer without
the water turned on.
English 5
Page 6
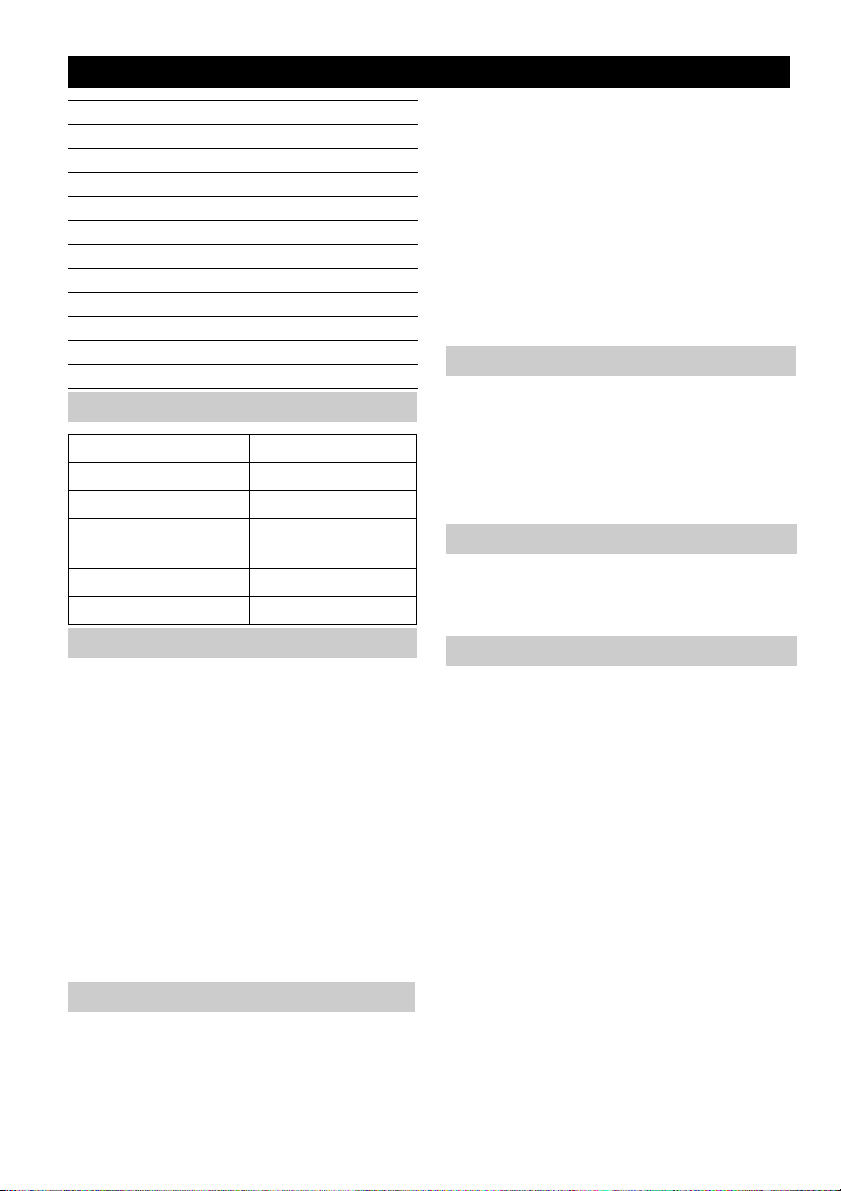
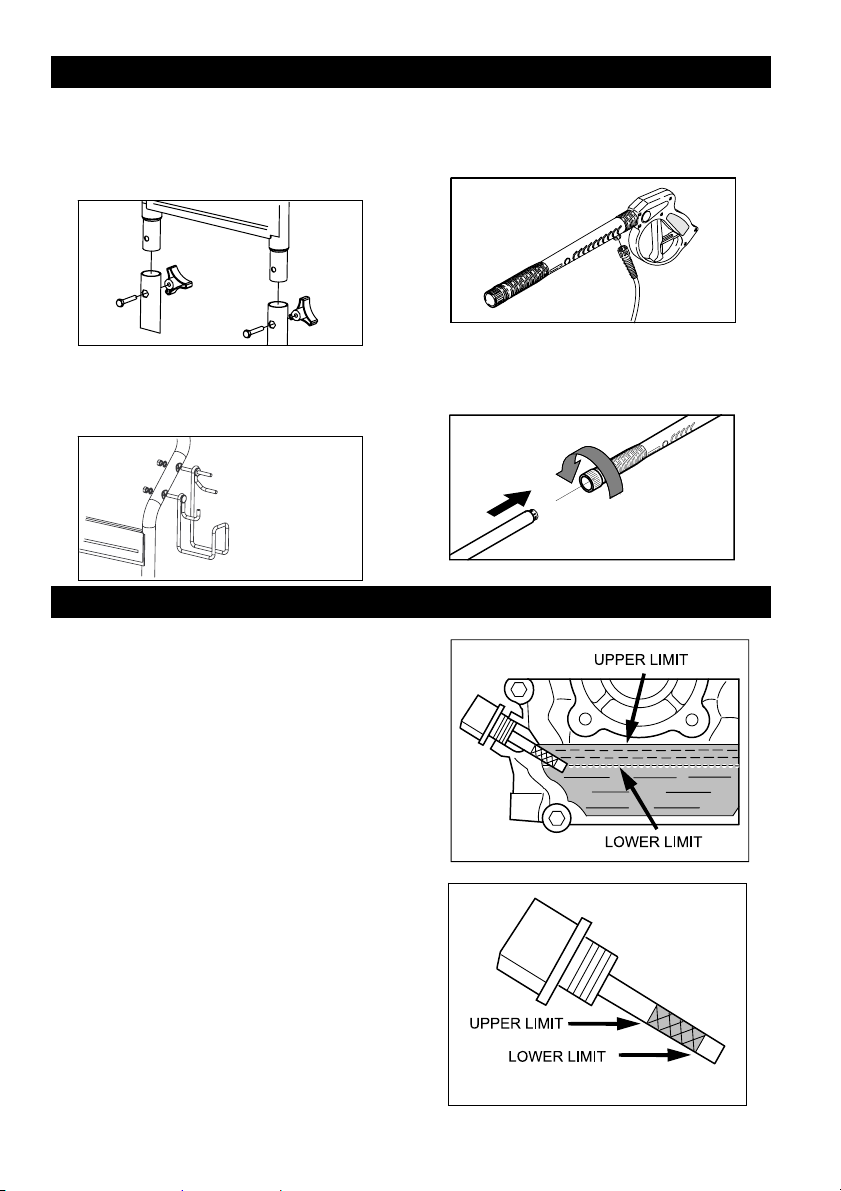
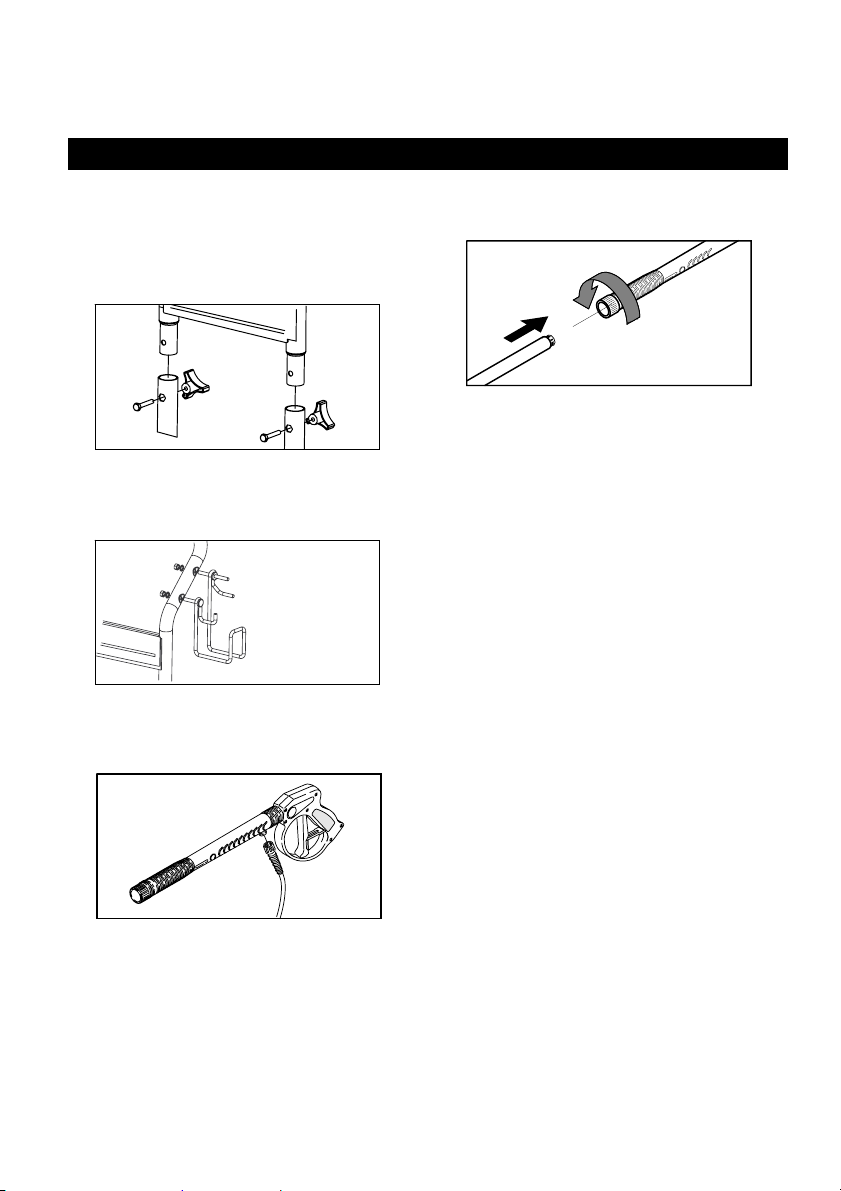
ASSEMBLY INSTRUCTIONS
Î STEP 1:
Attach the handle to the frame of the
pressure washer. Align holes, insert
bolts, and tighten with knobs.
Î STEP 2:
Mount the gun/hose storage hanger.
OPERATING INSTRUCTIONS
Please follow the instructions step-by-step.
Failure to follow the instructions explicitly
could lead to premature failure of the engine.
CAUTION
Engine shipped without oil. Before starting
engine, fill with oil. Do not over-fill. Do not
run the engine with a high or low oil level as
this can cause engine damage.
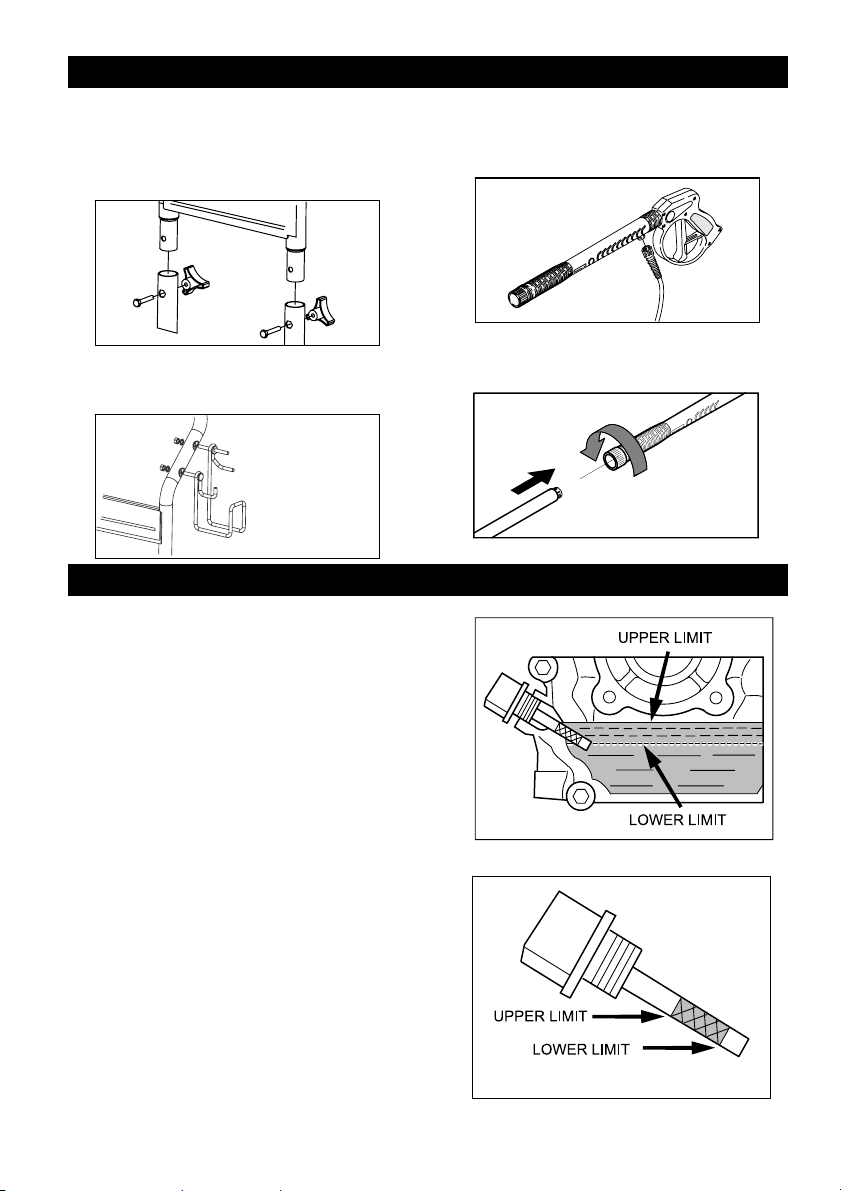
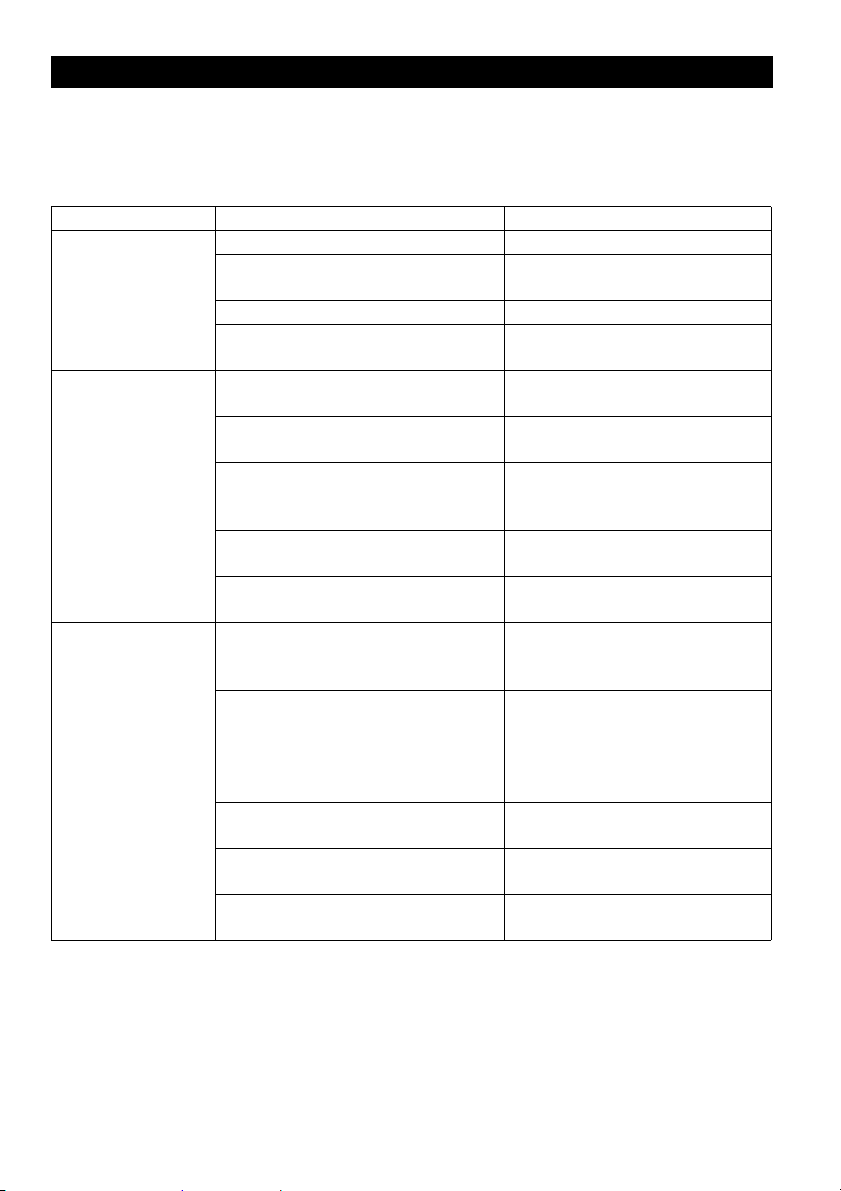
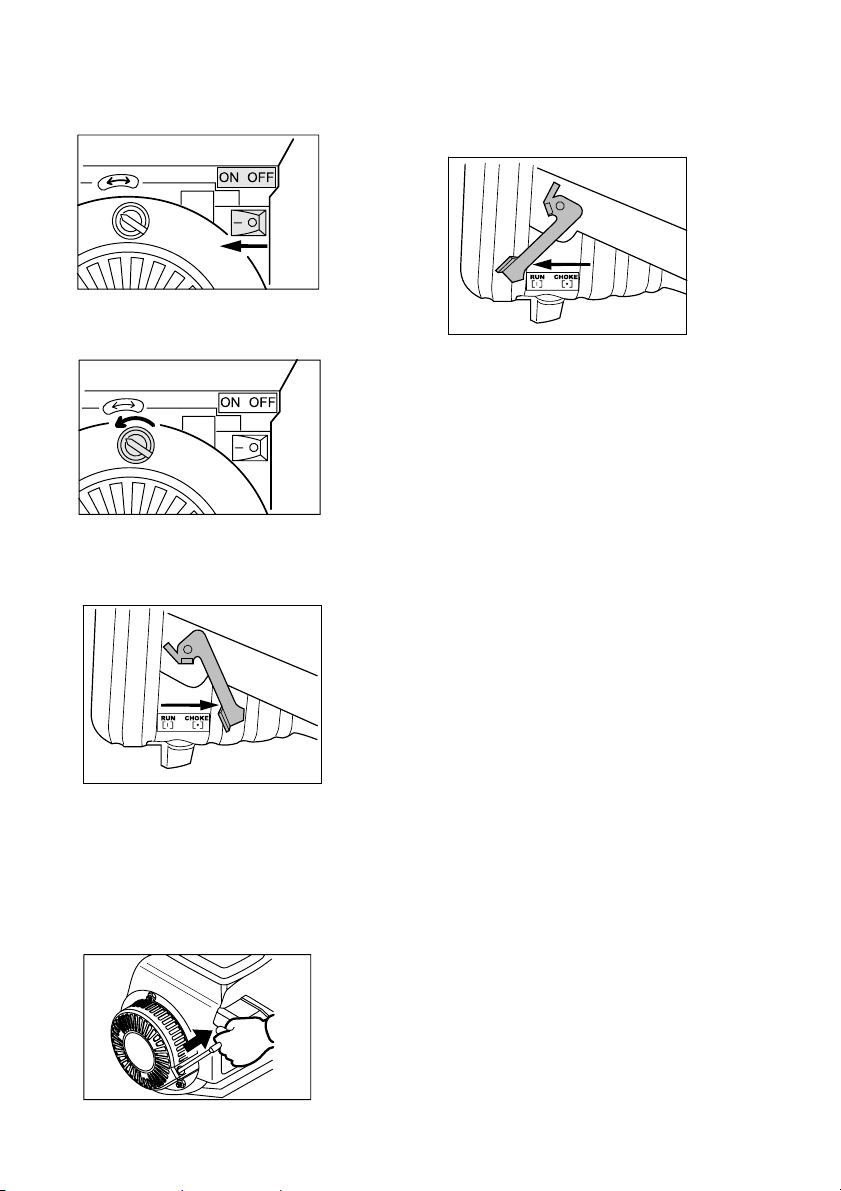
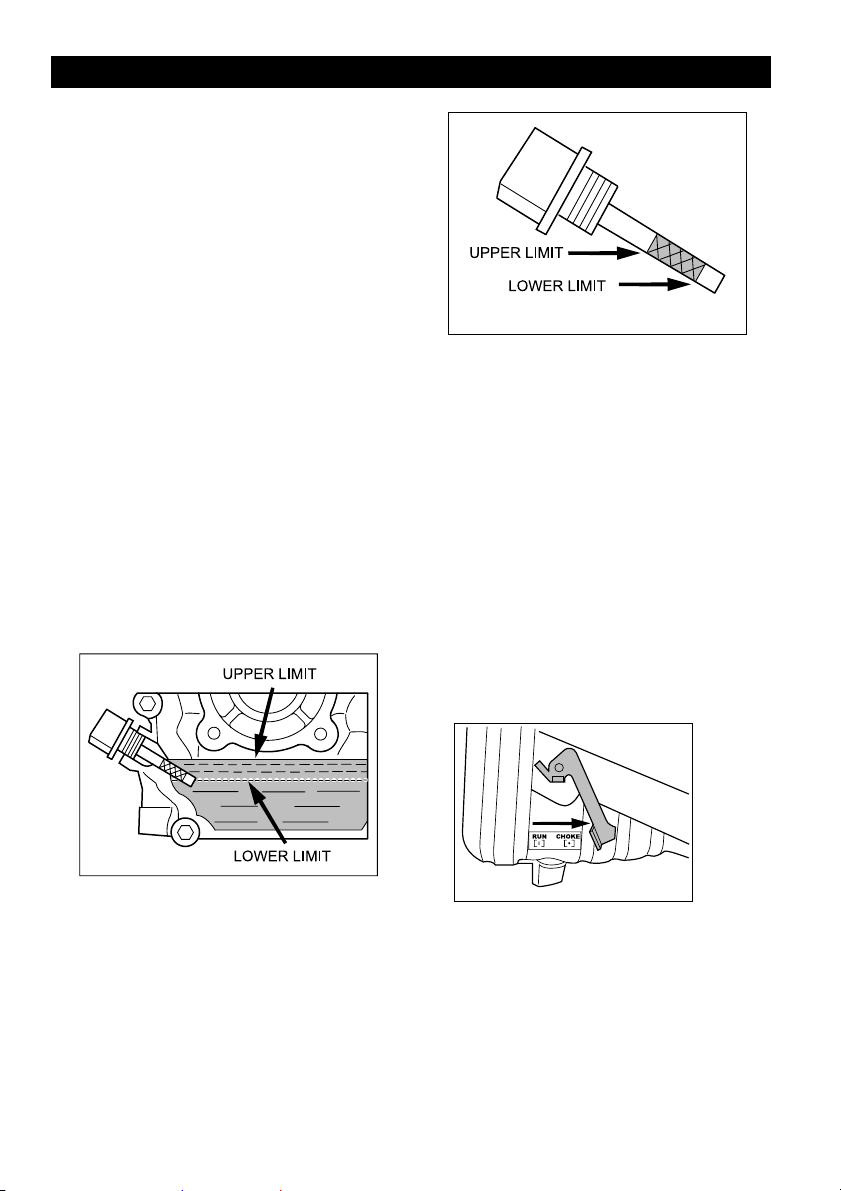
Î STEP 1:
Add the oil (1 bottle of SAE 15W 40SF/
SJ) supplied wiht your pressure washer
to the engine crankcase only. Failure to
add engine oil will cause engine failure.
This type of failure is not covered by the
manufacturer’s warranty.
Oil amount should not exceed 10 oz /
300ml.
Below indicates the optimal levels when
adding or checking oil.
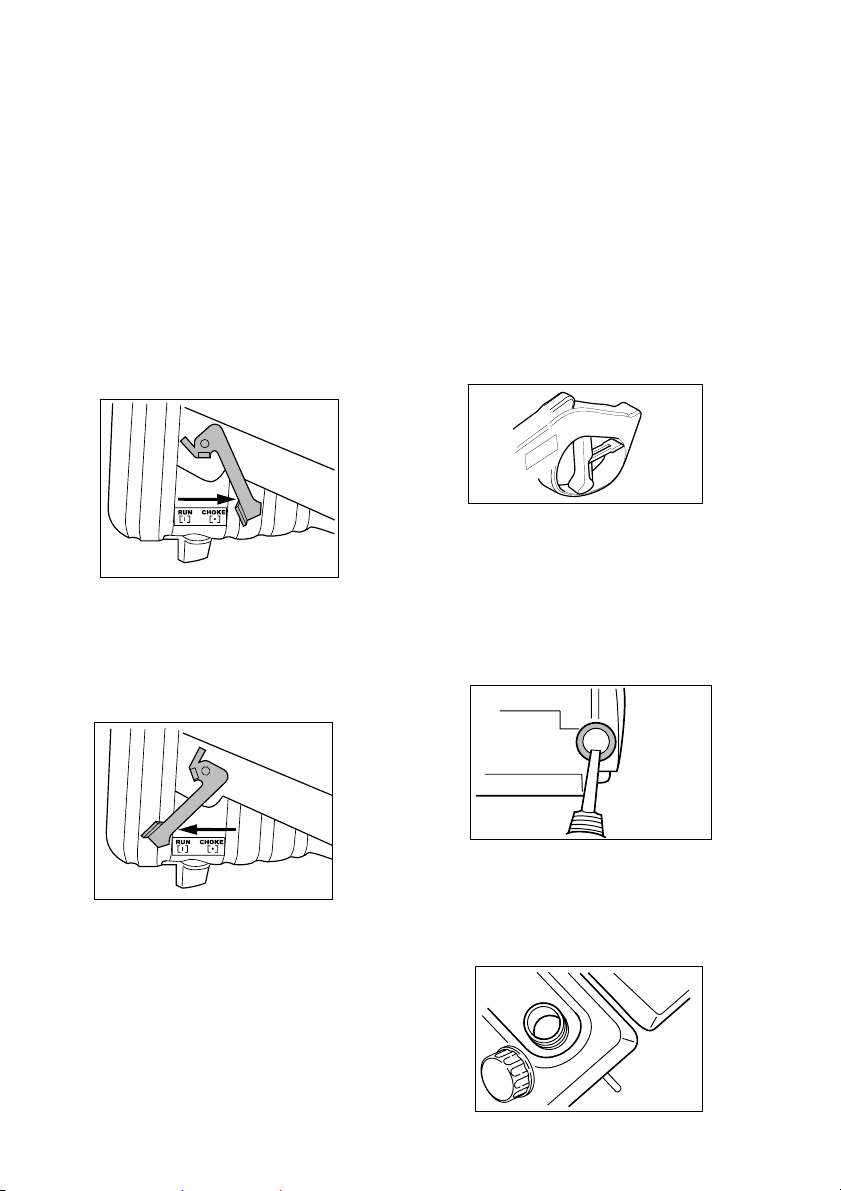
Î STEP 3:
Attach the high pressure hose to the
spray gun.
Î STEP 4:
Attach the wand to the spray gun.
6 English
Page 7
CAUTION
Too much oil can cause the engine to overheat. Signs include but are not limited to the
following: a decrease in engine performance, oil leaking from the governor arm,
an oil seal, or the air filter.
To correct this, immediately drain the oil
from the engine and make sure you are using the correct amount of oil as shown previously.
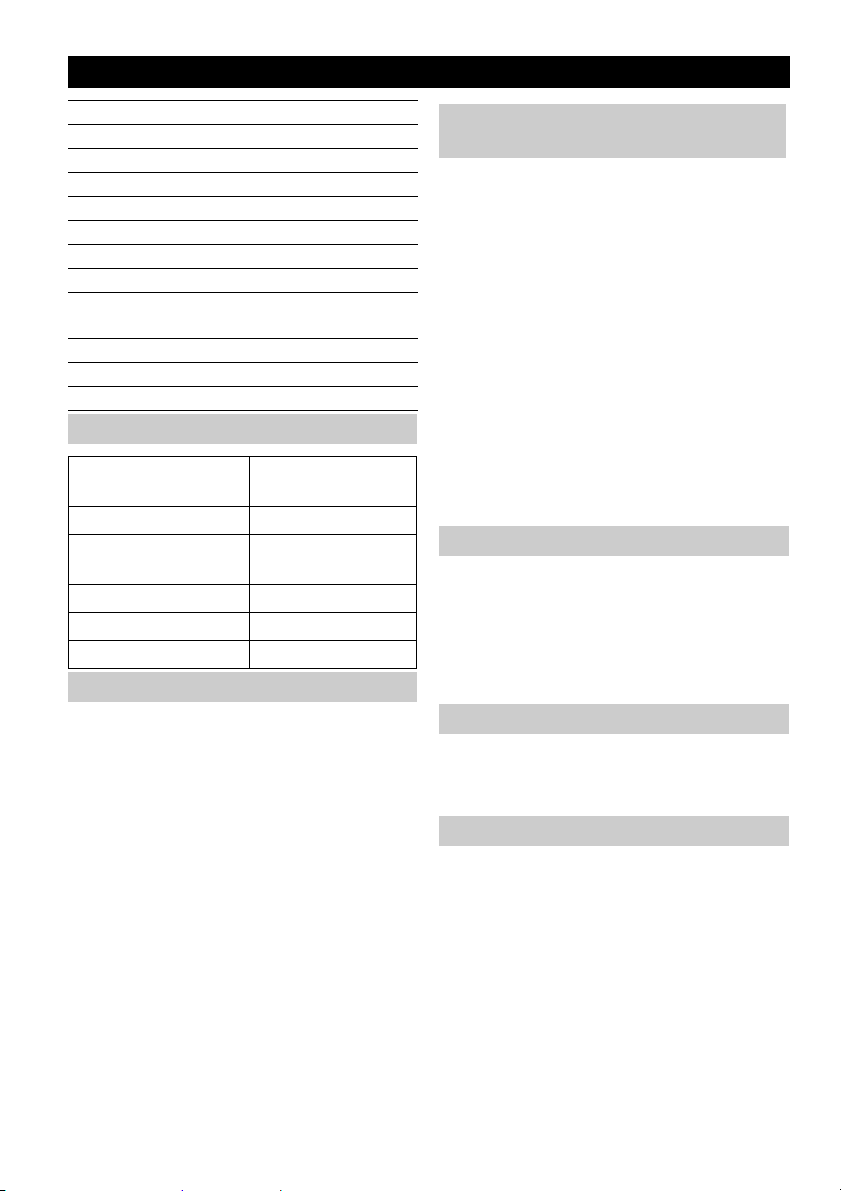
Î STEP 2:
Before starting the engine, move the
CHOKE lever to the CHOKE position
as indicated.
After engine has warmed and idles
smoothly, move CHOKE lever to the
RUN position as indicated.
Î STEP 4:
Connect garden hose to unit’s water in-
let.
Î STEP 5:
Connect garden hose to the cold water
source and turn water on completely.
Do not use hot water.
Î STEP 6:
If the trigger gun safety lock is engaged,
please disengage.
Hold the trigger gun open until all
trapped air is eliminated from the low
pressure water stream.
Î STEP 7:
Check oil level.
Please see STEP1 for details on min/
max levels
Warm engine starting:
Move the CHOKE lever to the CHOKE
position as indicated in the previous
step. Once you have achieved stable
idle, move CHOKE lever back to RUN
position.
Î STEP 3:
Connect the high pressure hose to the
unit’s high pressure outlet.
Î STEP 8:
Fill gas tank with unleaded gasoline.
Do not use leaded gasoline.
Do not mix oil into the gasoline.
English 7
Page 8
Î STEP 9:
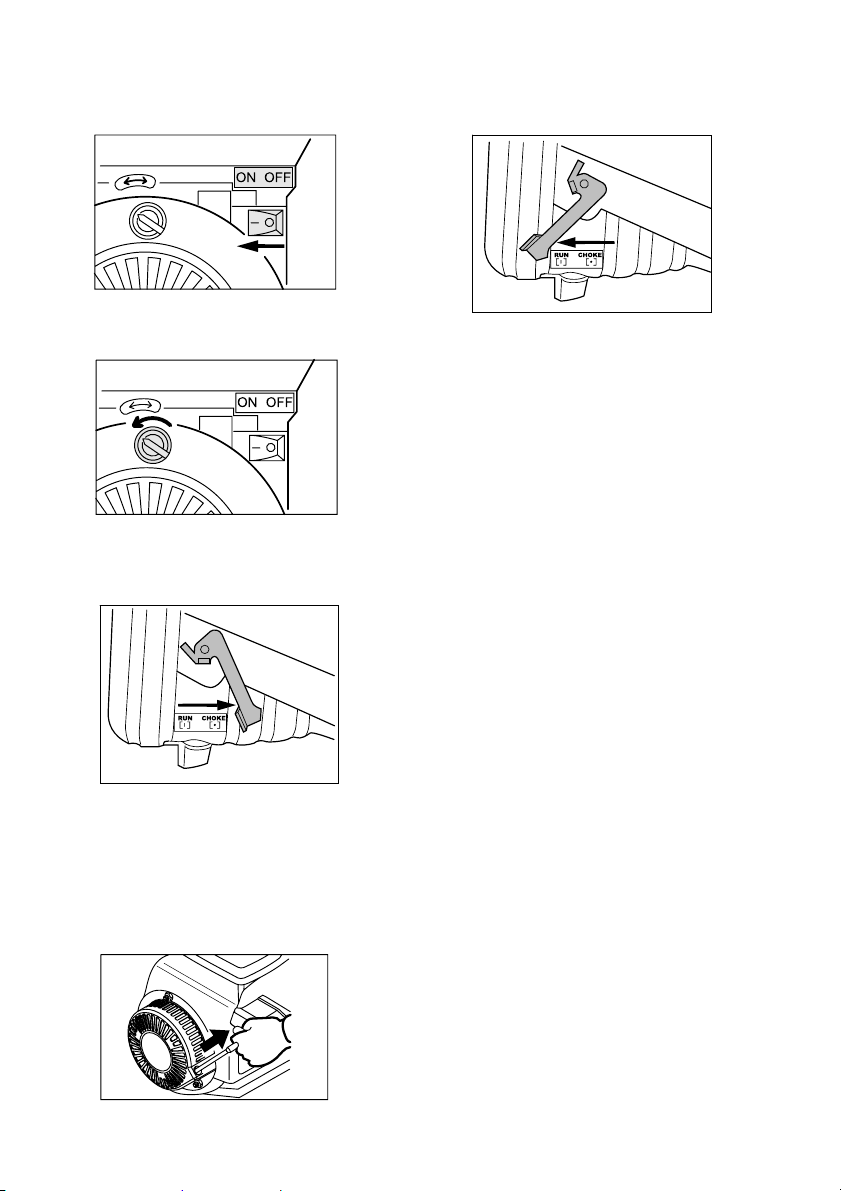
Push the engine switch to the ON position.
Î STEP 10:
Open fuel valve.
Î STEP 11:
Set CHOKE lever to the CHOKE position.
Î STEP 13:
Move back the CHOKE lever to the
RUN position as indicated.
NOTE:
– Always check engine oil and gasoline
before operating your pressure washer.
– Do NOT overfill engine oil
– Move CHOKE lever to the RUN position
once the engine runs warm and stable.
– A WARM start require the CHOKE lever
to be in the CHOKE position.
Î STEP 12:
Pull the starter handle.
If the engine fails to start after 3 pulls,
squeeze the trigger gun to release pressure, and repeat step.
8 English
Page 9
USING THE ACCESSORIES
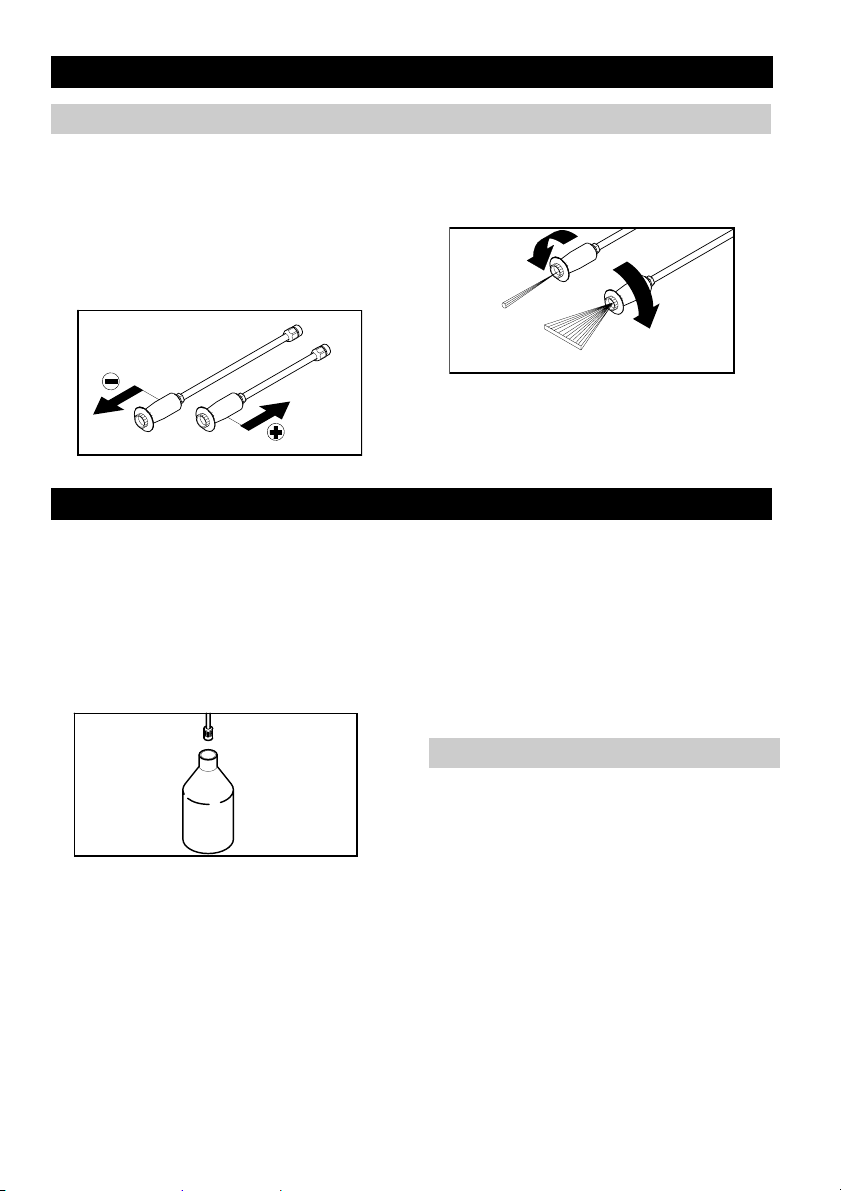
High / Low pressure nozzle
This nozzle features four positions. The
high setting (+) provides a steady powerful
high pressure spray pattern, for general
cleaning. The low setting (-) creates a low
presure spray pattern.
Note: Detergent is applied with the nozzle
set at low pressure.
WORKING WITH DETERGENTS
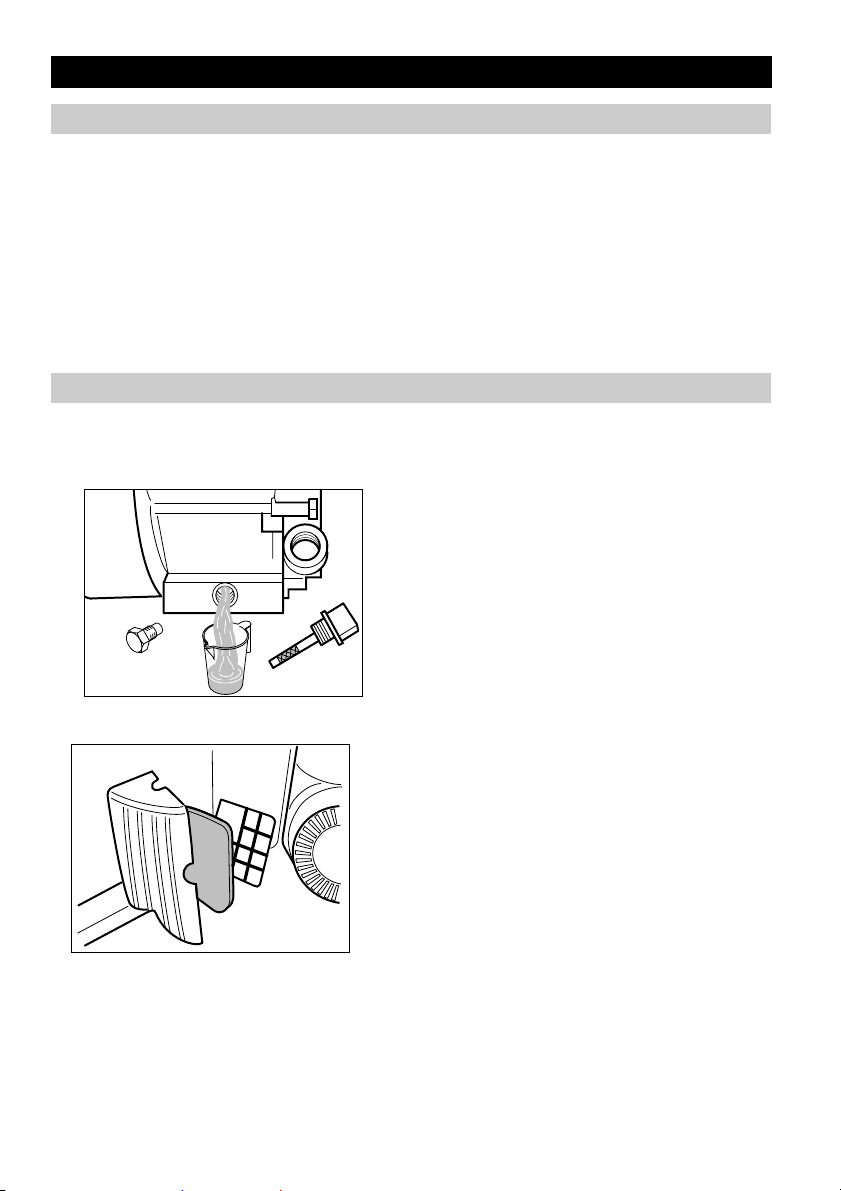
Î STEP 1:
Slide spray wand tip to low pressure position.
Î STEP 2:
Fill a container with Kärcher detergent.
Place the filter end of detergent suction
tube into the container.
After pulling backwards to high pressure,
turn wand left or right to change the spray
pattern between point jet and flat jet.
WARNING
To avoid serious injury never point
spray nozzle at yourself, other persons
or animals.
Î STEP 4:
Always draw fresh water through the
detergent suction tube when the cleaning job is done, to rinse/flush any remaining detergents from the injection
system.
For best results see Cleaning Tips for
specific information on how to clean different surfaces.
Î STEP 3:
With the engine running, pull trigger to
operate unit.
Liquid detergent is drawn into the unit
and mixed with water.
Apply detergent to work area.
Do not allow detergent to dry on surface.
Detergents
CAUTION
This unit has been designed for use with
cleaning detergents recommended by the
manufacturer. The use of other cleaning
detergents may affect the operation of the
machine and void the warranty.
Always Use Kärcher Detergent for Best
Results
Kärcher biodegradable detergents are specially formulated to protect the environment
and your pressure washer. The special formula won’t clog the suction tube filter and
will protect the internal parts of the pressure
washer for a longer life. For Kärcher Deter-
English 9
Page 10

gents, check your retailer or visit our website:
www.karcher-usa.com/home
Kärcher detergents available in USA /
Mexico:
– All Purpose & Vehicle Cleaner
– Exterior House Cleaner
– Deck & Patio Cleaner
– Heavy Duty Degreaser
Kärcher detergents available in Canada:
– Vehicle Wash
– Pressure Wash
– Deck & Fence Wash
TAKING A BREAK ..five minutes or more
Î STEP 1:
Push the engine switch to the OFF position.
SHUTTING DOWN & CLEAN-UP
Î STEP 1:
Remove detergent suction tube from
container and insert into 1 gallon of
fresh water.
Siphon water at low pressure for one
minute.
Î STEP 2:
Push the engine switch to the OFF position.
Î STEP 3:
Close the fuel valve.
– Degreaser
CAUTION
Never use:
– Bleach, Chlorine products and other
corrosive chemicals
– Liquids containing solvents (i.e., paint
thinners, gasoline, oils)
– Tri-sodium phosphate products
– Ammonia products
– Acid-based products
These chemicals will harm the unit and will
damage the surface being cleaned.
Use of these items will void the warranty.
Î STEP 2:
Release trigger and engage gun safety
lock.
Î STEP 4:
Turn off the water source.
Î STEP 5:
Press trigger to release water pressure.
Î STEP 6:
Release trigger and engage gun safety
lock.
Î STEP 7:
Disconnect the garden hose from the
water inlet on the unit.
Î STEP 8:
Disconnect the high pressure hose from
the high pressure outlet.
WINTERIZING AND LONG-TERM STORAGE
Î 1: Disconnect all water connections.
Î 2: Turn on the machine for a few sec-
onds, until the water which had remained in the pump exits, turn off
immediately.
Î 3: Do not allow high pressure hose to
become kinked.
Î 4: Store the machine and accessories in
a room which does not reach freezing
temperatures. DO NOT store near fur-
10 English
nace or other sources of heat as it may
dry out the pump seals.
CAUTION
Failure to follow the above directions will result in damage to the pump assembly and
accessories and will void the warranty.
Kärcher also recommends the regular practice of using a pump protector like “Kärcher
Pump Guard” to prevent cold weather damage during storage in the winter months.
Page 11
MAINTENANCE INSTRUCTIONS
Kärcher pump
Initial Use
All Kärcher pumps ship with oil already inside direct from the factory. There is no
need to add oil.
Pump Inspection
You should routinely make a visual inspection of the pressure washer’s pump. If you
notice oil leaking around the pump seals,
you should take the pressure washer to a
Change the oil within the first 20 hours.
Subsequent oil changes should be every 40
hours.
Kärcher-Authorized Service Center for repair. (You can locate a service center in
your area online at www.karcher-usa.com/
service.)
Pump Maintenance
The pump on your Kärcher pressure washer does not require maintenance. Any attempts to service or alter the pump may
damage your pressure washer and void
your product warranty.
Engine
Clean the air filter every 40 hours.
English 11
Page 12

Regular inspection table:
Inspection and tightening of bolts and nuts. x
Check engine oil and add if necessary. x
Before every use
Every 20 hours
Every 40 hours
Every 100 hours
Change of engine oil only
first
time
Check for fuel and oil leaks. x
Check and cleaning of air filter x
Clean around the recoil starter x
Clean the muffler cover. x
Check and clean the spark plug. x
Removal of carbon in combustion chamber. by distributor only
Check and adjustment of valve clearance. by distributor only
Replace the fuel lines. 3 years (or when necessary)
x
12 English
Page 13

CLEANING TIPS
Deck Cleaning
(with or without detergent). Pre-rinse
deck and surrounding area with fresh water. If using Kärcher Deck Wash, apply to
surface at low pressure. For best results,
limit your work area to smaller sections of
approximately 25 square feet. Allow Deck
Wash to remain on surface 1-3 minutes. Do
not allow detergent to dry on surface. Rinse
at high pressure in a long sweeping motion
keeping the spray nozzle approximately 36 inches from the cleaning surface. Always
clean from top to bottom and from left to
right. When moving on to a new section of
the cleaning surface, be sure to overlap the
previous section to eliminate stop marks
and ensure a more even cleaning result.
몇 CAUTION
Do not use Dirtblaster spray nozzle on
wood surface as it may cause damage.
House Siding
(with or without detergent). Pre-rinse
cleaning surface with fresh water. If using
Kärcher Pressure Wash, apply to surface at
low pressure (for best results, limit your
work area to sections of approximately 6
feet and always apply detergent from bottom to top). Allow Pressure Wash to remain
on surface 1-3 minutes. Do not allow detergent to dry on surface, if surface appears to
be drying, simply wet down surface with
fresh water. If needed, use special wash
brush attachment (not included) to remove
stubborn dirt. Rinse at high pressure from
top to bottom in an even sweeping motion
keeping the spray nozzle approximately 6
inches from the cleaning surface.
몇 CAUTION
Do not use Dirtblaster spray nozzle on
siding as it may cause damage.
Cement Patios, Brick and Stone
(with or without detergent). Pre-rinse
cleaning surface with fresh water. If using
Kärcher Pressure Wash or Degreaser, apply to surface at low pressure. For best results, limit your work area to smaller
sections of approximately 25 square feet.
Allow Pressure Wash or Degreaser to remain on surface 1-3 minutes. Do not allow
detergent to dry on surface. Rinse at high
pressure in a sweeping motion keeping the
spray nozzle approximately 3-6 inches from
the cleaning surface. Always clean from top
to bottom and from left to right. For removing extremely stubborn stains, use the Dirtblaster Nozzle.
Cars, Boats & Motorcycles
(with or without detergent). Pre-rinse ve-
hicle with fresh water. If using Kärcher
Touchless Vehicle Wash, apply to surface
at low pressure. For best results, clean one
side of vehicle at a time and always apply
detergent from bottom to top, do not allow
detergent to dry on surface. If needed, use
special wash brush attachment (not included) to remove stubborn dirt. Rinse at high
pressure in a sweeping motion keeping the
spray nozzle approximately 6-8 inches from
the cleaning surface (distance should increase when rinsing pin-striping or other
sensitive surfaces). Always clean from top
to bottom and from left to right. For best results, wipe surface dry with a chamois or
soft dry cloth.
몇 CAUTION
Do not use Dirtblaster spray nozzle on
vehicles as it may cause damage.
English 13
Page 14

Barbecue Grills, Outdoor Power
Equipment & Gardening Tools
(with or without detergent). Pre-rinse
cleaning surface with fresh water. If using
Kärcher Pressure Wash or Degreaser, apply detergent at low pressure. Allow Pressure Wash to remain on surface 1-3
minutes. Do not allow detergent to dry on
surface. Rinse at high pressure keeping the
spray nozzle approximately 3-6 inches from
the cleaning surface. For removing extremely stubborn dirt, it may be necessary
to move the spray nozzle even closer to the
surface for greater dirt cutting action.
몇 CAUTION
Do not use Dirtblaster spray nozzle on
cloth, plastic or other sensitive surfaces
as it may cause damage.
Patio & Lawn Furniture
(with or without detergent). Pre-rinse fur-
niture and surrounding area with fresh water. If using Pressure Wash, apply to
surface at low pressure. Allow Pressure
Wash to remain on surface 1-3 minutes. Do
not allow detergent to dry on surface. If
needed use special Wash Brush Attachment (not included) to remove stubborn dirt.
Rinse at high pressure in a sweeping motion keeping the spray nozzle approximately 3-6 inches from the cleaning surface. For
best results, clean from top to bottom and
from left to right.
몇 CAUTION
Do not use Dirtblaster spray nozzle on
patio or lawn furniture as it may cause
damage.
Recommendations
Before cleaning any surface an incon-
spicuous area should be cleaned to test
spray pattern and distance for maxi-
mum cleaning results.
If painted surfaces are peeling or chip-
ping, use extreme caution as pressure
washer may remove the loose paint
from the surface.
When using on surfaces which might
come in contact with food, flush surfac-
es with plenty of drinking water.
For additional cleaning tips, visit our
website at www.karcher-usa.com/
home
Optional Accessories
Optional accessories are available to further enhance your cleaning capabilities.
Please check our website www.karcherusa.com/home for pricing and up-to-date
information.
14 English
Page 15
TROUBLESHOOTING
CAUTION
Remove the spark plug cable to prevent accidental ignition of the engine before making any repair.
Symptom Cause Solution
Engine will not start No gasoline Fill gas tank
Engine switch is in the OFF position. Push the engine switch to the ON
position.
Fuel valve is closed Open fuel valve.
Unit does not reach
high pressure.
Output pressure
varies high and low.
Water pressure built up in the machine.
Diameter of garden hose is too
small.
Water supply is restricted. Check garden hose for kinks,
Not enough inlet water supply. Turn water on full force. Check
Water inlet filter is clogged. Remove filter and rinse out in
Spray wand is on low pressure position.
Not enough inlet water supply. Turn water on full force. Check
Pump is sucking air. Check that hoses and fittings are
Water inlet filter is clogged. Remove filter and rinse out in
Spray nozzle is obstructed. Blow out or remove debris with a
Calcified gun, hose or spray wand. Run distilled vinegar through de-
Squeeze the trigger to release
the pressure.
Replace with a 5/8 inch or larger
garden hose.
leaks and blockage.
garden hose for kinks, leaks or
blockage.
warm water.
Slide spray wand tip to low pressure position.
garden hose for kinks, leaks or
blockage.
air tight. Turn off machine and
purge pump by squeezing trigger
gun until a steady flow of water
emerges through the nozzle.
warm water.
fine needle.
tergent suction tube.
English 15
Page 16

Symptom Cause Solution
No detergent. Detergent suction tube not properly
connected to the machine.
Detergent is too thick. Dilute detergent, for best results
Filter on detergent suction tube is
clogged.
Damaged or clogged detergent suction tube.
Spray nozzle is obstructed. Blow out or remove debris with
Garden hose connection leaks.
Spray wand leaks. Spray wand not properly attached. Turn the swivel nut of the gun
Pump is noisy. Pump is sucking air. Check that hoses and fittings are
Water leaks from
pump (up to 10
drops per minute is
permissible).
Oil Drip. Oil seals are damaged or worn. Call Customer Support
Loose fittings. Tighten fittings.
Missing/worn rubber washer. Insert new washer.
Broken o-ring or plastic insert. Call Customer Support
Loose fittings. Tighten fittings.
Water seals are damaged or worn. Call Customer Support
Check connection.
use Kärcher detergent.
Run warm water through filter to
remove debris.
Remove obstruction or replace
detergent suction tube.
fine needle.
clockwise until connection is
tight.
air tight. Turn off machine and
purge pump by squeezing trigger
gun until a steady flow of water
emerges through the nozzle.
If you encounter any additional difficulties
not listed, please call for help or visit our
website.
USA: 1-800-537-4129
www.karcher-usa.com/home
Canada: 1-800-537-4129
www.karcher-canada.com
Mexico: 01-800-024-13-13
www.karcher.com.mx
16 English
Page 17
MANUAL DE USUARIO DEL LIMPIADOR DE ALTA PRESIÓN
Vista general del modelo 18
Instrucciones de seguridad 19
Instrucciones de montaje 21
Instrucciones de funcionamiento 21
Utilicación de los accesorios 24
Trabajar con detergentes 24
Tomarse un descanso 25
Apagado y limpieza 25
Almacenamiento prolongado 26
Instrucciones de mantenimiento 26
Consejos de limpieza 28
Localización y reparación de averías 30
Especificaciones
Presión de trabajo 2000 PSI
Volumen de agua 2,0 GPM
Absorción de detergente
Motor 87cc Grow A154 F
Nº de pieza 1.133-621.0
Nº de serie
0.15 - 0.20 GPM
Símbolos de aviso de seguridad
PELIGRO
indica “una situación de peligro inminente
que, si no se evita, puede causar lesiones
graves e incluso la muerte”.
ADVERTENCIA
indica “una situación de peligro potencial
que, si no se evita, puede causar lesiones e
incluso la muerte”.
ATENCIÓN
indica “una situación de peligro potencial
que, si no se evita, puede causar lesiones
de poca importancia o leves", o daños materiales.
Responsabilidades del propietario/
usuario
El propietario y/o el usuario deben comprender bien las instrucciones de servicio y advertencias del fabricante antes de empezar
a utilizar este limpiador de alta presión.
Debe prestarse especial atención y tener
muy claras las advertencias.
Si el operador no habla bien el inglés, el propietario/comprador debe responsabilizarse
de leer y comentar las instrucciones y las
advertencias en su lengua natal, y asegurarse de que entienda a la perfección su contenido.
El propietario y/o el usuario deben leer y
guardar como referencia para el futuro las
instrucciones del fabricante.
Servicio de asistencia al cliente de
Kärcher de EE.UU.
Llame al: 1-800-537-4129 si necesita ayuda
o visite nuestra página Web:
www.karcher-usa.com/home
Por favor, dedique unos minutos a registrar
su aparato de lavado a presión en
www.karcher-usa.com/warranty
Servicio de atención al cliente de
Kärcher Canadá
Llame al: 1-800-537-4129 para recibir ayuda
o visite nuestra página web:
www.karcher-canada.com
Soporte Kärcher Mexico
Llame al: 01-800-024-13-13 si necesita ayuda o visite nuestra página Web:
www.karcher.com.mx
Español 17
Page 18

VISTA GENERAL DEL MODELO
1 Asa de transporte
2 Manguera de alta presión
3 Barra pulverizadora
4 Depósito de gasolina
5 estrangulador
(no mostrado)
6 Dispositivo de filtrado en la entrada del
agua
7 Toma de agua con conector para man-
guera de jardín
8 Enchufe de chispa
(no mostrado)
9 Tubo de succión de detergente con filtro
10 Salida de alta presión
11 Varilla del aceite
12 Pistola de disparo
13 Pestillo de seguridad de la pistola de dis-
paro
14 Soporte de almacenamiento de la pisto-
la/manguera
Consulte el manual del motor para más información sobre el motor.
18 Español
Page 19

INSTRUCCIONES IMPORTANTES DE SEGURIDAD
Antes de la puesta en marcha, leer el
manual de instrucción del fabricante del
motor, especialmente las indicaciones
de seguridad.
ADVERTENCIA
Al utilizar este producto, tome siempre las
precauciones básicas, incluidas las siguientes:
Lea todas las instrucciones antes de
usar el producto.
Para reducir el riesgo de lesiones, es
preciso vigilar atentamente si se usa el
producto cerca de niños.
Es necesario saber cómo parar rápida-
mente el producto y parar hemorragias.
Estar familiarizado con los mandos.
Estar atento, prestar atención a lo que se
está haciendo.
No ponga en funcionamiento el producto
si está cansado o está bajo la influencia
de alcohol o drogas.
Mantenga la zona de trabajo libre de per-
sonas.
No sobrecargar o colocar sobre un so-
porte inestable. Mantener el equilibrio en
todo momento.
Utilizar gafas de seguridad.
Seguir las instrucciones de manteni-
miento especificadas en el manual.
ADVERTENCIA
Riesgo de inyección o lesiones - no dirigir el chorro directamente sobre personas.
Los aparatos a alta presión pueden re-
sultar peligrosos si se usan de forma incorrecta. No se debe dirigir el aparato a
personas, animales, dispositivos eléctricos o la equipo mismo.
No pulverizar sobre conexiones eléctri-
cas, enchufes o aparatos.
ADVERTENCIA
Riesgo de explosión - no pulverizar sobre líquidos inflamables.
No usar ácidos, alcalinos, disolventes, o
cualquier material inflamable con este
producto. Estos productos pueden causar heridas físicas al operario y daños
irreparables a la máquina.
ADVERTENCIA
La pistola rebota hacia atrás - sujetar
con las dos manos.
El seguro del gatillo de la pistola evita
que el gatillo salte de forma involuntaria.
El dispositivo de seguridad NO bloquea
el gatillo en la posición ON.
ATENCIÓN
Riesgo de asfixia - usar este producto únicamente en una zona bien ventilada.
Operar y repostar la máquina en una
zona bien ventilada, donde no haya dispositivos con un piloto o llama abierta tales como bóiler, calentadores de agua,
etc.
ATENCIÓN
Riesgo de incendio - no repostar la máquina
mientras esté en funcionamiento..
No poner en funcionamiento si se ha de-
rramado gasolina. Mueva la máquina a
otro lugar para evitar que se produzcan
chispas.
No retire la tapa del depósito de gas o
añada combustible mientras el motor
esté en funcionamiento o caliente. Añada combustible cuando el motor se haya
enfriado, espere 2 o más minutos después de que se haya parado el motor.
No fumar cuando se añada combustible
No permitir a la manguera de alta pre-
sión que esté en contacto con la cinta de
protección.
No dejar la máquina sin supervisión
cuando esté en funcionamiento.
Evitar inclinar la máquina hacia un lado.
No opere la máquina con la cinta o el lim-
piador de aire quitados. Especialmente
para la cinta, compruebe periódicamente si el tornillo está bien apretado, está
Español 19
Page 20

dañado o hay fugas, y ni se detecta algo
anormal, repárelo o sustitúyalo.
Inspeccione ocasionalmente los compo-
nentes del sistema de combustible por si
hubiese fisuras o fugas. Sustituya los
componentes cuando sea necesario.
ADVERTENCIA
Compruebe si hay chispas cuando se re-
tire la bujía.
No toque el cable de alto voltaje o la tapa
de la bujía.
No pare la máquina con la palanca del
estrangulador.
No ajuste la velocidad del motor de for-
ma no razonable.
No coloque las manos o los pies cerca
de piezas en movimiento o rotación.
SUMINISTRO DE AGUA (Sólo agua fría)
ATENCIÓN
Cuando conecte la entrada de agua al
suministro de agua principal, respete las
normativas locales de la compañía de
agua. En algunas zonas no se puede conectar directamente al suministro público de agua potable. Esto para asegurar
que no entran productos químicos al suministro de agua. Se permite, por ejemplo, conectar directamente a través de
un depósito receptor o bloqueo de reflujo.
Si entra suciedad en la entrada de agua
se dañará el equipo. Para evitar correr
este riesgo, recomendamos usar un filtro
de agua.
La manguera del jardín debe tener al
menos un diámetro de 5/8 pulgadas.
El índice de flujo de agua no deben ser
inferior a 2.8 GPM (galones por minuto).
El índice de flujo se puede determinar si
se deja correr el agua durante un minuto
en un bidón de 5 galones.
La temperatura de agua no debe exce-
der los 104°F/40°C.
No opere la máquina con material com-
bustible cerca de la cinta.
ATENCIÓN
No tocar las superficies calientes o per-
mitir a los accesorios que estén en contacto con las superficies calientes.
La máquina tiene superficies calientes
que pueden causar quemaduras. Poner
en funcionamiento el aparato en un ambiente seguro y lejos de niños.
Quite la basura, hierba u otros desechos
alrededor de las laminillas refrigerantes
y el arranque con cuerda.
Use siempre gasolina nueva. La gasoli-
na vieja puede causar acumulaciones en
el carburador que podría causar un mal
funcionamiento del motor.
CONSERVE ESTAS INSTRUCCIONES
No usar la limpiadora de alta presión
para agua contaminada con disolventes,
por ejemplo para diluir pintura, gasolina,
aceite etc.
Evitar que entren escombros en la uni-
dad, para ello use una fuente de agua
limpia. Use un filtro adicional de agua.
No utilizar la limpiadora de presión sin el
agua encendida.
20 Español
Page 21
INSTRUCCIONES DE MONTAJE
Î PASO 1:
Conectar el mango al bastidor de la limpiadora a presión. Alinear orificios, insertar pernos y apretar con la empuñadura.
Î PASO 2:
Montar el mango de almacenamiento de
la pistola/manguera.
INSTRUCCIONES DE FUNCIONAMIENTO
Siga las instrucciones paso a paso. Si no sigue las instrucciones podría, explícitamente, provocar un fallo prematuro del motor.
ATENCIÓN
El motor es despachado sin aceite. Antes de
dar arranque al motor, aprovisiónelo de
aceite. No lo llene demasiado. No poner en
funcionamiento el motor con un nivel de
aceite demasiado bajo o demasiado alto ya
que se puede dañar el motor.
Î PASO 1:
Añada el aceite (1 botella de SAE 15W
40SF/SJ) suministrado con su arandela
de presión al cárter únicamente. Si no
agrega aceite de motor podrá causar un
fallo en el motor. Este tipo de fallo no está
cubierto por la garantía del fabricante.
La cantidad de aceite no debería superar
los 10 oz / 300ml.
A continuación se indican los niveles óptimos al añadir o comprobar el aceite.
Î PASO 3:
Conectar la manguera de alta presión a
la pistola pulverizadora.
Î PASO 4:
Conectar la barra con la pistola pulverizadora.
Español 21
Page 22
ATENCIÓN
Demasiado aceite puede sobrecalentar el
motor. Los símbolos incluyen, pero no se limitan a: un aumento en el rendimiento del
motor, fuga de aceite del brazo del gobernador, un sello de aceite, o el filtro de aire.
Para corregir esto, purgue el aceite del motor y asegúrese de usar la cantidad correcta
de aceite como se muestra previamente.
Î PASO 2:
Antes de arrancar el motor, mueva la
palanca del ESTRANGULADOR a la
posición del ESTRANGULAR como
se indica.
Después de que el motor se haya calentado y marche lentamente, mueva la pa-
lanca del ESTRANGULADOR a la
posición RUN como se indica.
Î PASO 3:
Conecte la manguera de alta presión a la
salida de alta presión de la unidad.
Î PASO 4:
Conecte la manguera de jardín a la toma
de agua de la unidad.
Î PASO 5:
Conecte la manguera de jardín a la toma
de agua fría y abra el agua del todo.
No usar agua caliente.
Î PASO 6:
Si el seguro del gatillo de la pistola salta,
evite que salte.
Sujete el gatillo de la pistola abierto hasta que se elimine el aire que haya del
chorro de agua de baja presión.
Î PASO 7:
Comprobar el nivel de aceite.
Véase STEP1 para detalles sobre nive-
les mín/máx
Arranque del motor caliente:
mueva la palanca del ESTRANGULADOR a la posición de ESTRANGULAR
como se indica en el paso anterior. Una
vez alcanzada una marcha lenta estable, mueva la palanca ESTRANGULAR
otra vez a la posición RUN.
22 Español
Î PASO 8:
Llenar el depósito de gasolina con gasolina sin plomo.
No usar gasolina con plomo.
No mezcle aceite con la gasolina.
Page 23
Î PASO 9:
Pulse interruptor de del motor a la posición ON.
Î PASO 10:
Abrir la válvula de combustible.
Î PASO 11:
Dejar la palanca del ESTRANGULADOR en la posición ESTRANGULAR.
Î PASO 13:
Mover hacia atrás la palanca de ESTRANGULAR a la posición RUN como
se indica.
NOTA:
– Compruebe siempre el aceite de motor y
la gasolina antes de operar su arandela
de presión.
– NO agregue demasiado aceite del motor
– Mueva la palanca del ESTRANGULA-
DOR a la posición RUN una vez que el
motor entre en calor y funcione de forma
estable.
– Un arranque CALIENTE requiere que la
palanca del ESTRANGULADOR esté en
la posición ESTRANGULAR.
Î PASO 12:
tirar del mango de arranque.
Si el motor no arranca tras 3 intentos,
apretar la pistola de gatillo para soltar
presión y repetir el paso.
Español 23
Page 24

UTILIZACIÓN DE LOS ACCESORIOS
Tubo aplicador (de presión alta y baja)
Esta boquilla tiene cuatro posiciones. La
configuración (+) ajusta la pulverización a
una presión alta, potente y continua, ideal
para una limpieza general. La configuración
(-) ajusta la pulverización a una presión más
baja.
Nota: Para aplicar detergente, girar el anillo
regulador al símbolo de presión baja (-)
Tras tirar hacia atrás para ajustar a alta presión, mueva la vara de mando hacia la iz-
TRABAJAR CON DETERGENTES
Î PASO 1:
Deslice la punta de la vara de mando
para la posición de baja presión.
Î PASO 2:
Llene el recipiente con detergente Kärcher. Coloque el extremo con filtro del
tubo de succión de detergente dentro del
recipiente.
quierda o hacia la derecha para cambiar de
tipo de pulverización entre chorro en punta y
chorro plano.
ADVERTENCIA
Para evitar heridas graves, nunca dirija
la boquilla pulverizadora hacia usted
mismo, hacia otras personas o hacia animales.
No permitir que el detergente se seque
sobre la superficie.
Î PASO 4:
Dejar correr siempre agua fresca por el
tubo de absorción de detergente al acabar el trabajo de limpieza para limpiar/
extraer los restos de detergente del sistema de inyección.
Para obtener mejores resultados, consulte la sección de consejos de limpieza
para obtener información específica sobre cómo limpiar diferentes superficies.
Î PASO 3:
Con el motor en marcha, tirar del gatillo
para poner el equipo en funcionamiento.
El detergente líquido se introduce en el
equipo y se mezcla con agua.
Aplicar detergente al área de trabajo.
24 Español
Detergentes
ATENCIÓN
Siga las instrucciones de mantenimiento especificadas en el manual
Este aparato ha sido diseñado para ser utilizado con detergentes de limpieza del fabricante. El uso de otros detergentes de
limpieza puede afectar al funcionamiento
del aparato y hacer que deje de tener validez la garantía.
Page 25

Utilice siempre detergente Kärcher para
obtener los mejores resultados
Los detergentes biodegradables de Kärcher
han sido especialmente concebidos para
proteger el medio ambiente y el limpiador a
presión. Su fórmula especial no obstruirá el
filtro del tubo de succión y protegerá las piezas internas del limpiador de alta presión
para que su vida útil sea más larga. Para adquirir los detergentes Kärcher, diríjase a su
comerciante minorista o llame a nuestro
centro de asistencia si necesita ayuda.
Detergentes Kärcher disponibles en
EE.UU. / Méjico:
– Para todos los usos para limpiar automó-
viles
– Limpiador de exteriores de casas
– Limpiador de pisos y patios
– Desengrasante muy potente
TOMARSE UN DESCANSO de cinco minutos o más
Î PASO 1:
Pulse interruptor de del motor a la posi-
ción OFF.
Detergentes Kärcher disponibles en Canadá:
– Lavado de vehículos
– Lavado a presión
– Lavado de pisos y vallas
– Desengrasante
ATENCIÓN
No utilice nunca:
– Lejía, productos que contengan cloro ni
otro tipo de productos químicos corrosivos
– Líquidos que contengan disolventes (p.
ej., diluyentes de pintura, gasolina, acei-
tes)
– Productos de fosfato trisódico
– Productos con amoniaco
– Productos con base ácida
Los productos químicos mencionados dañarán la unidad y dañarán la superficie que se
limpie.
El uso de estos objetos invalidará la garantía.
Î PASO 2:
Suelte el gatillo y accione el pestillo de
seguridad de la pistola.
APAGADO Y LIMPIEZA
Î PASO 1:
Quitar el tubo de absorción de detergente del bidón e introducir en un galón de
agua limpia.
Sacar agua a baja presión durante un
minuto.
Î PASO 2:
Pulse interruptor de del motor a la posición OFF.
Î PASO 3:
Cerrar la válvula de combustible.
Î PASO 4:
Cierre el grifo del agua.
Î PASO 5:
Presione el gatillo para que salga la presión.
Î PASO 6:
Suelte el gatillo y accione el pestillo de
seguridad de la pistola.
Î PASO 7:
Desconecte la manguera de jardín de la
toma de agua de la unidad.
Î PASO 8:
Desconecte la manguera de alta presión
de la salida de alta presión.
Español 25
Page 26

PROTECCIÓN CONTRA LOS AGENTES INVERNALES Y ALMA-
CENAMIENTO PROLONGADO
Î 1: Desconecte todas las conexiones de
agua.
Î 2: Encienda el aparato durante unos se-
gundos hasta que haya salido el agua
que haya quedado en la bomba, y apáguelo inmediatamente.
Î 3: Evite que la manguera de alta presión
se retuerza.
Î 4: Almacene el aparato y los accesorios
en una habitación que no llegue a temperaturas bajo cero. NO lo almacene
cerca de hornos u otras fuentes de calor,
ya que se podrían secar las juntas de estanqueidad de la bomba.
ATENCIÓN
Si no se cumplen las instrucciones mencionadas arriba, el grupo de la bomba y los accesorios sufrirán daños y anular su garantía.
Kärcher también recomienda el práctica general de usar un protector de bomba como
"Protección de bomba Kärcher" para ayudar
en el almacenamiento durante los meses de
invierno.
INSTRUCCIONES DE MANTENIMIENTO
Bomba Kärcher
Uso inicial
Todas las bombas Kärcher viene con aceite
directamente de fábrica. No es necesario
añadir aceite.
Inspección de la bomba
Debe realizar una inspección visual de rutina de la bomba de la limpiadora a presión.
Si ve que pierde aceite en las juntas de la
bomba, lleve la limpiadora a presión a un
Cambie el aceite durante las 20 primeras
horas. Los cambios posteriores de aceite
deben ser cada 40 horas.
servicio técnico autorizado de Kärcher.
(Puede localizar a un servicio técnico en su
zona online en www.karcher-usa.com/service.)
Mantenimiento de la bomba
La bomba de su limpiadora Kärcher no precisa mantenimiento. Cualquier intento de revisar o modificar la bomba puede dañar su
limpiadora a presión y anular su garantía.
Motor
Limpie el filtro de aire cada 40 horas.
26 Español
Page 27

Tabla de inspección regular:
Inspección y apriete de pernos y ranuras. x
Compruebe el aceite del motor y agregue si
fuese necesario.
Antes de cada uso
Cada 20 horas
x
Cada 40 horas
Cada 100 horas
Cambie el aceite del motor sólo la
primera vez
Comprobar si haby fugas de combustible o
aceite.
Comprobar y limpiar el filtro de aire x
Limpiar alrededor del arranque con cuerda x
Limpie la cubierta de la cinta. x
Comprobar y limpiar la bujía. x
Eliminación de carbón en una cámara de
combustión.
Comprobar y ajustar el acceso de la válvula. sólo por el distribui-
Sustituir los conductos de combustible. 3 años (o cuando sea necesario)
x
x
sólo por el distribuidor
dor
Español 27
Page 28

CONSEJOS DE LIMPIEZA
Limpieza de cubiertas
(con o sin detergente). Preenjuague la cu-
bierta y el área circundante con agua limpia.
Si utiliza Deck Wash de Kärcher, aplíquelo
en la superficie a baja presión. Para obtener
mejores resultados, divida el área de trabajo
en pequeñas secciones de aprox. 25 pies
cuadrados. Deje el Deck Wash sobre la superficie durante 1-3 minutos. No deje que se
seque el detergente sobre la superficie. Enjuague a alta presión mediante un movimiento de barrido, manteniendo la boquilla
pulverizadora a aprox. 3-6 pulgadas de la
superficie a limpiar. Limpie siempre de arriba a abajo y de izquierda a derecha. Cuando pase a la siguiente sección de la
superficie a limpiar, asegúrese de solapar la
nueva sección con la sección anterior para
evitar que queden marcas de parada y garantizar, así, un resultado homogéneo.
몇 ATENCIÓN
No usar la boquilla pulverizadora para levantar suciedad sobre una superficie de
madera ya que puede causar daños.
Solapados de la casa
(con o sin detergente). Preenjuague la su-
perficie a limpiar con agua limpia. Si utiliza
Pressure Wash de Kärcher, aplíquelo a la
superficie a baja presión (para obtener mejores resultados, divida la zona de trabajo en
secciones de aproximadamente 6 pies y
aplique siempre el detergente de abajo a
arriba). Deje el Pressure Wash sobre la superficie durante 1-3 minutos. No deje que el
detergente se seque sobre la superficie. Si
ve que la superficie se va a secar, simplemente moje la superficie con agua limpia. Si
es necesario, utilice un accesorio especial
con cepillo de lavado (no incluido) para quitar la suciedad difícil. Enjuague a alta presión mediante un movimiento de barrido
homogéneo, manteniendo la boquilla pulve-
rizadora a aprox. 6 pulgadas de la superficie
a limpiar.
몇 ATENCIÓN
No usar la boquilla pulverizadora para levantar suciedad sobre revestimientos ya
que puede causar daños.
Patios de cemento, ladrillos y pie-
dras
(con o sin detergente).Preenjuague la su-
perficie a limpiar con agua limpia. Si utiliza
Pressure Wash o Degreaser de Kärcher,
aplíquelo en la superficie a baja presión.
Para obtener mejores resultados, divida el
área de trabajo en pequeñas secciones de
aprox. 25 pies cuadrados. Deje el Pressure
Wash o Degreaser sobre la superficie durante 1-3 minutos. No deje que se seque el
detergente sobre la superficie. Enjuague a
alta presión mediante un movimiento de barrido, manteniendo la boquilla pulverizadora
a aprox. 3-6 pulgadas de la superficie a limpiar. Limpie siempre de arriba a abajo y de
izquierda a derecha. Para quitar manchas
especialmente difíciles, utilice la boquilla
desincrustante.
Coches, barcas y motos
(con o sin detergente).Preenjuague el ve-
hículo con agua limpia. Si utiliza Touchless
Vehicle Wash de Kärcher, aplíquelo en la
superficie a baja presión. Para obtener mejores resultados, limpie un lado del vehículo
cada vez y aplique siempre el detergente de
abajo a arriba. No deje que el detergente se
seque sobre la superficie. Si es necesario,
utilice un accesorio especial con cepillo de
lavado (no incluido) para quitar la suciedad
difícil. Enjuague a alta presión mediante un
movimiento de barrido y manteniendo la boquilla pulverizadora a aprox. 6-8 pulgadas
de la superficie a limpiar (la distancia se
debe incrementar en el caso de que se en-
28 Español
Page 29

juaguen superficies con ranuras u otras superficies delicadas). Limpie siempre de
arriba a abajo y de izquierda a derecha.
Para obtener mejores resultados, seque la
superficie con una gamuza o un trapo suave
y seco.
몇 ATENCIÓN
No usar la boquilla pulverizadora para levantar suciedad sobre vehículos ya que
puede causar daños.
Parrillas de barbacoas, equipos con
motor exteriores y herramientas de
jardín
(con o sin detergente).Preenjuague la su-
perficie a limpiar con agua limpia. Si utiliza
Pressure Wash de Kärcher o Degreaser,
aplique el detergente a baja presión. Deje el
Pressure Wash sobre la superficie 1-3 minutos. No deje que el detergente se seque sobre la superficie. Enjuague a alta presión
manteniendo la boquilla pulverizadora a
aprox. 3-6 pulgadas de la superficie a limpiar. Para quitar suciedad especialmente difícil, puede ser necesario tener que poner la
boquilla pulverizadora más cerca para que
la potencia de limpieza sea mayor.
몇 ATENCIÓN
No usar la boquilla pulverizadora para levantar suciedad sobre sobre paños,
plástico u otras superficies delicadas ya
que puede causar daños.
Mobiliario de patios y jardines
(con o sin detergente). Preenjuague el
mueble y el área circundante con agua limpia. Si utiliza Pressure Wash de Kärcher,
aplíquelo a la superficie a baja presión. Deje
el Pressure Wash sobre la superficie durante 1-3 minutos. No deje que se seque el detergente sobre la superficie. Si es necesario,
utilice un accesorio especial con cepillo de
lavado (no incluido) para quitar la suciedad
difícil. Enjuague a alta presión mediante un
movimiento de barrido, manteniendo la boquilla pulverizadora a aprox. 3-6 pulgadas
de la superficie a limpiar. Para obtener mejores resultados, limpie de arriba a abajo y
de izquierda a derecha.
몇 ATENCIÓN
No usar la boquilla pulverizadora para le-
vantar suciedad sobre terrazas o mue-
bles de jardín ya que puede causar
daños.
Recomendaciones
Antes de limpiar cualquier superficie, se
debe limpiar una parte de la misma que
no se vea para probar el ajuste del pul-
verizado y la distancia para obtener los
mejores resultados de limpieza.
Si las superficies pintadas se están pe-
lando o desconchando, extreme las pre-
cauciones, ya que el limpiador a presión
podría arrancar la pintura suelta de la su-
perficie.
Cuando se utilice en superficies que
puedan entrar en contacto con comida,
enjuáguelas abundantemente con agua
potable.
Accesorios opcionales
Se pueden adquirir accesorios opcionales
para mejorar su capacidad de limpieza.
Consulte nuestra página web www.karcherusa.com/home para información sobre precios y novedades.
Español 29
Page 30

LOCALIZACIÓN Y REPARACIÓN DE AVERÍASG
ATENCIÓN
Quitar el cable de enchufe de chispas para
evitar que el motor se encienda de forma in-
Síntoma Causa Solución
El motor no arranca No hay gasolina Llenar el depósito de gasolina
El interruptor del motor está en la
posición OFF.
La válvula de combustible está cerrada
Presión de agua formada en la má-
quina.
La unidad no llega a
la alta presión.
La presión de salida
varía entre alta y
baja presión.
El diámetro de la manguera de jar-
dín es demasiado pequeño.
El suministro de agua está restringi-
do.
El suministro de agua de entrada no
es suficiente.
El filtro de entrada de agua está
obstruido.
El pulverizador telescópico está en
la posición de baja presión.
El suministro de agua de entrada no
es suficiente.
La bomba está succionando aire. Compruebe que las mangueras y
El filtro de entrada de agua está
obstruido.
La boquilla pulverizadora está atas-
cada.
Pistola, manguera o pulverizador te-
lescópico calcificados.
voluntaria antes de realizar cualquier reparación.
Pulse interruptor de del motor a
la posición ON.
Abrir la válvula de combustible.
Apretar el gatillo para liberar presión.
Sustituir con una manguera de
jardín de 5/8 pulgadas o más.
Compruebe si la manguera de
jardín tiene grietas, fugas o si
está obstruida.
Abra el grifo de agua del todo.
Compruebe si la manguera de
jardín tiene grietas, fugas o si
está obstruida.
Quite el filtro y enjuáguelo en
agua caliente.
Deslice la punta de la vara de
mando para la posición de baja
presión.
Abra el grifo de agua del todo.
Compruebe si la manguera de
jardín tiene grietas, fugas o si
está obstruida.
conectores están bien apretados.
Apague el aparato y purgue la
bomba apretando la pistola de
disparo hasta que salga un caudal constante de la boquilla.
Quite el filtro y enjuáguelo en
agua caliente.
Limpie con aire comprimido o
quite la suciedad con una aguja
fina.
Vierta vinagre destilado por el
tubo de succión de detergente.
30 Español
Page 31

Síntoma Causa Solución
No entra detergente.
La conexión de la
manguera de jardín
fuga.
El pulverizador telescópico fuga.
La bomba hace ruido.
Fuga agua de la
bomba (hasta 10
gotas por minuto es
permisible).
Goteo de aceite. La juntas de estanqueidad de aceite
El tubo de succión de detergente no
está correctamente conectado al
aparato.
El detergente está demasiado espeso.
El filtro del tubo de succión de detergente está obstruido.
El tubo de succión de detergente
está dañado u obstruido.
La boquilla pulverizadora está atascada.
Las conexiones están sueltas. Apriete las conexiones.
No hay arandela de gaucho o está
desgastada.
El pulverizador telescópico no está
montado correctamente.
Anillo tórico o inserción de plástico
rotos.
La bomba está succionando aire. Compruebe que las mangueras y
Las conexiones están sueltas. Apriete las conexiones.
Las juntas de estanqueidad de agua
están dañadas o desgastadas.
están dañadas o desgastadas.
Compruebe la conexión.
Diluya el detergente. Para obtener mejores resultados utilice detergente Kärcher.
Deje correr agua caliente por el
filtro para quitar la suciedad.
Quite la obstrucción o reemplace
el tubo de succión de detergente.
Limpie con aire comprimido o
quite la suciedad con una aguja
fina.
Inserte una arandela nueva.
Girar la ranura giratoria de la pistola en el sentido de las agujas
del reloj hasta ajustar la conexión.
Llame al Servicio de asistencia al
cliente.
conectores están bien apretados.
Apague el aparato y purgue la
bomba apretando la pistola de
disparo hasta que salga un caudal constante de la boquilla.
Llame al Servicio de asistencia al
cliente.
Llame al Servicio de asistencia al
cliente.
Si tiene más problemas de los que están indicados, llame o visite nuestra página web.
EE.UU.: 1-800-537-4129
www.karcher-usa.com/home
Canadá: 1-800-537-4129
www.karcher-canada.com
Méjico: 01-800-024-13-13
www.karcher.com.mx
Español 31
Page 32
NETTOYEUR HAUTE PRESSION - MANUEL D'UTILISATION
Généralités 33
Consignes de sécurité importantes 34
Instructions de montage 36
Mode d'emploi 37
Utilisation des accessoires 40
Emploi de détergents 40
Prendre une pause 41
Arrêt de l'appareil et nettoyage 41
Remisage hivernal et entreposage à
long terme
Consignes d'entretien 42
Conseils de nettoyage 44
Dépannage 46
42
Caractéristiques
Pression de fonctionnement
Débit d'eau 2,0 GPM
Aspiration de détergent
Moteur 87cc Grow A154 F
N° de pièce 1.133-621.0
N° de série
2000 livres/pouce²
0,15 - 0,20 GPM
Symboles d'alerte de sécurité
DANGER
Identifie “une situation de danger imminent
qui, si elle n'est pas évitée, entraîne la mort
ou des blessures graves”.
AVERTISSEMENT
Identifie “une situation de danger potentiel
qui, si elle n'est pas évitée, pourrait entraîner
la mort ou des blessures”.
ATTENTION
Identifie “une situation de danger potentiel
qui, si elle n'est pas évitée, peut éventuellement entraîner des blessures légères ou
modérées” ou des dommages matériels.
Responsabilité du propriétaire/de
l'utilisateur
Avant d'utiliser ce nettoyeur pression, le propriétaire et/ou l'utilisateur doit impérativement avoir pris connaissance des consignes
d'utilisation et mises en garde du fabricant.
Il est nécessaire d'insister sur les avertissements et de les comprendre.
Si l'utilisateur ne parle pas couramment l'anglais, l'acheteur/le propriétaire doit lire les
consignes et mises en garde du fabricant
avec l'utilisateur dans la langue maternelle
de ce dernier et s'assurer qu'il en comprend
bien le contenu.
Le propriétaire et/ou l'utilisateur doit se familiariser avec les consignes du fabricant et les
conserver afin de pouvoir s'y référer ultérieurement.
Service à la clientèle aux États-Unis
Appeler : 1-800-537-4129 pour obtenir de
l'aide ou visiter notre site Web :
www.karcher-usa.com/home
Prenez quelques minutes pour enregistrer
votre nettoyeur pression en ligne à l'adresse
suivante www.karcher-usa.com/warranty
Service après-vente Kärcher CDN
Assistance téléphonique : 1-800-537-4129
ou site Web :
www.karcher-canada.com
Assistance Kärcher Mexique
Appeler : 01-800-024-13-13 pour obtenir de
l'aide ou visiter notre site Web :
www.karcher.com.mx
32 Français
Page 33
GÉNÉRALITÉS
1 Poignée
2 Tuyau à haute pression
3Lance
4 Réservoir à essence
5Starter
(non présenté)
6 Filtre dans l'entrée d'eau
7 Entrée d'eau avec raccord pour tuyau
d'arrosage
8 Bougie d'allumage
(non présenté)
9 Tuyau d'aspiration du détergent avec fil-
tre
10 Sortie haute pression
11 Jauge à huile
12 Poignée-pistolet
13 Verrouillage de sécurité de la poignée-
pistolet
14 Support du pistolet/flexible
Pour de plus amples informations à propos
du moteur, reportez-vous au manuel du moteur.
Français 33
Page 34

CONSIGNES DE SÉCURITÉ IMPORTANTES
Avant la mise en service, lire le mode
d'emploi du constructeur du moteur et en
particulier respecter les consignes de
sécurité.
AVERTISSEMENT
En utilisant ce produit, toujours observer une
certaine prudence élémentaire, incluant notamment:
Lire toutes les instructions de service
avant d'utiliser l'appareil.
Afin de minimiser les risques de blessu-
re, ne jamais laisser l'appareil sans surveillance lorsque celui-ci est utilisé à
proximité d'enfants.
Il est impératif de savoir arrêter et mettre
l'appareil hors pression rapidement. Une
connaissance approfondie des commandes est nécessaire.
Rester attentif – se concentrer sur la tâ-
che en cours.
L'utilisateur ne doit jamais faire usage de
l'appareil lorsqu'il est fatigué ou sous
l'emprise d'alcool ou de drogues.
Veiller à ce qu'aucun individu ne se trou-
ve dans la zone de travail.
Ne jamais passer ou monter sur des sup-
ports instables. Toujours rester stable et
équilibré.
Le port de lunettes de protection est obli-
gatoire.
Respecter les consignes d'entretien figu-
rant dans le manuel.
AVERTISSEMENT
Risque de projection ou de blessure –
Ne pas diriger le jet de vapeur en direction d'individus.
En cas d'utilisation incorrecte, les jets
haute pression peuvent être dangereux.
Ne jamais diriger les jets de vapeur en
direction d'individus, d'animaux, de dispositifs électriques ou de l'appareil luimême.
Ne pas vaporiser les branchements
électriques, les prises ou les ferrures.
AVERTISSEMENT
Risque d'explosion – Ne pas vaporiser
de liquides inflammables.
N'utiliser en aucun cas d'acides, de solu-
tions alcalines, de solvants ou de produits inflammables dans cet appareil.
Ces produits peuvent être à l'origine de
blessures graves ou d'endommagement
irréversible de l'appareil.
AVERTISSEMENT
Le pistolet génère une force de propulsion – Le maintenir toujours à deux
mains.
Le dispositif de sécurité de la poignée-
pistolet permet d'éviter tout actionnement accidentel de la gâchette. Ce dispositif de sécurité NE verrouille PAS la
gâchette en position marche (ON).
ATTENTION
Risque d'asphyxie – Utiliser l'appareil uniquement dans des zones bien ventilées.
Utiliser et faire le plein de l'appareil ex-
clusivement dans une zone bien ventilée, exempte de dispositifs à veilleuse ou
présentant une flamme vive, tels que les
chaudières, les chauffe-eau, etc.
ATTENTION
Risque d'incendie – Ne jamais faire l'appoint
de carburant lorsque l'appareil est en fonctionnement.
Ne pas utiliser l'appareil si de l'essence a
été renversée. Dans ce cas, déplacer
l'appareil vers un autre endroit en veillant
à ne pas créer d'étincelles.
Ne pas retirer le bouchon du réservoir de
carburant ou rajouter du carburant pendant que le moteur tourne ou est chaud.
Faire l'appoint de carburant une fois que
le réservoir a refroidi en attendant 2 minutes ou plus après avoir arrêté le moteur.
Ne pas fumer lorsque vous ajouter du
carburant.
34 Français
Page 35

Le flexible haute pression ne doit jamais
entrer en contact avec le carter de
l'échappement.
Ne jamais laisser l'appareil en service
sans surveillance.
Eviter de faire basculer l'appareil sur le
côté.
Ne pas faire fonctionner la machine avec
l'échappement ou le nettoyeur d'air démonté. En particulier pour l'échappement, contrôler périodiquement le
serrage de la vis de montage, la présence de dommage ou de fuite, et si un défaut est trouvé, procéder à la réparation
ou au remplacement.
Inspecter occasionnellement les compo-
sants du système de carburant pour contrôler la présence de fentes ou de fuites.
Remplacer les composants quand cela
est nécessaire.
AVERTISSEMENT
Ne pas contrôler les étincelles lorsque le
connecteur d'étincelles est débranché.
Ne pas toucher le câble haute tension ou
le capuchon du branchement d'étincelle.
Ne pas arrêter la machine en utilisant le
levier de starter.
ALIMENTATION EN EAU (eau froide uniquement)
ATTENTION
Lors du raccordement de l'arrivée d'eau
à la conduite principale d'alimentation en
eau, respecter les réglementations locales de votre société de distribution d'eau.
Dans certaines zones, il est interdit de
raccorder directement l'appareil au système public d'alimentation en eau potable. Cette mesure est destinée à éviter
toute infiltration de produits chimiques
dans le circuit d'alimentation en eau.
Toutefois, l'appareil peut être raccordé
par exemple à un réservoir collecteur ou
à un disconnecteur hydraulique.
Les impuretés contenues dans l'eau
d'alimentation peuvent endommager
l'appareil. Afin d'éviter les risques d'en-
Ne pas régler la vitesse du moteur de
manière déraisonnable.
Ne pas poser les mains ou les pieds à
côté des pièces en mouvement ou en ro-
tation.
Ne pas faire fonctionner la machine avec
des matériaux combustibles dans la
zone de l'échappement.
ATTENTION
Eviter de toucher les surfaces chaudes
ou de mettre des accessoires en contact
avec ces dernières.
La machine présente des surfaces chau-
des. Tout contact avec ces dernières
peut être source de brûlures. Utiliser
l'appareil dans un lieu sûr et à l'écart des
enfants.
Retirer les déchets, l'herbe et les autres
débris autour des ailettes de refroidisse-
ment et du démarreur de recul.
Toujours utiliser du carburant neuf. Du
carburant âgé pourrait former des dé-
pôts dans le carburateur ce qui entraîne-
rait un mauvais fonctionnement du
moteur.
CONSERVER CES INSTRUCTIONS !
dommagement, nous recommandons
l'emploi d'un filtre à eau.
Le tuyau d'arrosage doit avoir un diamè-
tre minimum de 5/8 pouces.
Le débit de l'alimentation en eau ne doit
pas être inférieur à 2,8 GPM (gallons par
minute).
Pour calculer le débit, faire couler l'eau
pendant une minute dans un récipient
vide d'une contenance de 5 gallons.
La température de l'eau d'alimentation
ne doit pas excéder 104 °F/40 °C.
Ne jamais aspirer d'eau contaminée par
des solvants, par exemple des diluants
pour peinture, de l'essence, de l'huile,
etc..
Toujours utiliser une source d'eau propre
afin d'éviter toute infiltration de débris
Français 35
Page 36
dans l'appareil. Utiliser un filtre à eau
supplémentaire.
INSTRUCTIONS DE MONTAGE
Î ETAPE 1 :
Fixer le manche au châssis du nettoyeur
pression. Aligner les orifices, insérer les
boulons et les serrer à l'aide d'écrous
borgnes.
Î ETAPE 2 :
Monter le support de rangement du pistolet/flexible.
Ne pas mettre le nettoyeur pression en
service lorsque l'arrivée d'eau n'est pas
ouverte.
Î ETAPE 4 :
Fixer la lance au pistolet.
Î ETAPE 3 :
Brancher le flexible haute pression sur le
pistolet.
36 Français
Page 37
MODE D'EMPLOI
Veuillez suivre les instructions pas à pas.
Tout manquement à suivre les instructions
explicitement pourrait avoir pour conséquence une défaillance prématurée du moteur.
ATTENTION
Le moteur est expédié sans huile. Avant de
lancer le moteur, faire le plein d’huile. Eviter
de trop remplir. Ne jamais démarrer le moteur si le niveau d'huile est insuffisant ou excessif sous peine d'endommager le moteur.
Î ETAPE 1 :
Ajouter l'huile (1 bouteille SAE 15W
40SF/SJ) fournie avec votre nettoyeur
pression dans le carter moteur uniquement. Si l'huile n'est pas ajoutée, cela
entraînera une défaillance du moteur.
Ce type de défaillance n'est pas couvert
par la garantie du constructeur.
La quantité d'huile ne doit pas dépasser
10 oz / 300ml.
Les niveaux optimum pour ajouter ou
contrôler l'huile sont indiqués ci-dessous.
ATTENTION
Trop d'huile peut entraîner une surchauffe
du moteur. Les signes incluent mais ne sont
pas limités à ce qui suit : une diminution des
performances du moteur, une fuite d'huile du
bras du régulateur, d'un joint d'huile ou du filtre à air.
Pour corriger cela, drainer immédiatement
l'huile du moteur et s'assurer d'utiliser le
montant correct d'huile de la manière présentée auparavant.
Î ETAPE 2 :
Avant de démarrer le moteur, mettre le
levier de STARTER sur la position
STARTER comme indiqué.
Français 37
Page 38

Une fois que le moteur a chauffé et tourne régulièrement, mettre le levier de
STARTER sur la position MARCHE
comme indiqué.
Î ETAPE 7 :
Contrôler le niveau d'huile.
Veuillez consulter ETAPE1 pour obtenir
des détails concernant les niveaux min/
max
Démarrage du moteur à chaud :
Mettre le levier de STARTER sur la position STARTER comme indiqué dans
l'étape précédente. Une fois que vous
avez atteint un régime régulier, ramener
le levier de STARTER dans la position
MARCHE.
Î ETAPE 3 :
Fixer le tuyau à haute pression à la sortie
haute pression de l'appareil.
Î ETAPE 4 :
Raccorder le tuyau d'arrosage à l'entrée
d'eau de l'appareil.
Î ETAPE 5 :
Raccorder le tuyau d'arrosage à la source d'eau froide et ouvrir complètement le
robinet.
Ne pas utiliser d'eau chaude.
Î ETAPE 6 :
Si le cran de sûreté de la gâchette du
pistolet est enclenché, l'enlever.
Î ETAPE 8 :
Remplir le réservoir à essence avec de
l'essence sans plomb.
Ne pas utiliser d'essence au plomb.
Ne pas mélanger d'huile au carburant.
Î ETAPE 9:
Mettre le commutateur du moteur sur
ON.
Maintenir la gâchette du pistolet ouverte
jusqu'à ce que tout l'air soit éliminé du jet
d'eau basse pression.
38 Français
Page 39

Î ETAPE 10:
Ouvrir la vanne d'essence.
Î ETAPE 11 :
Placer le levier de STARTER sur la position STARTER.
Î ETAPE 12 :
Tirer la poignée du starter.
Si le moteur ne démarre pas après 3 tentatives, appuyez sur la gâchette du pisto-
let de manière à libérer la pression puis
recommencer l'opération.
Î ETAPE 13 :
Remettre le levier de STARTER sur la
position MARCHE comme indiqué.
REMARQUE :
– Toujours contrôler l'huile moteur et le
carburant avant de faire fonctionnement
votre nettoyeur pression.
– NE PAS mettre trop d'huile moteur.
– Déplacer le levier de STARTER sur la
position MARCHE une fois que le moteur
est chaud et tourne de manière stable.
– Pour un démarrage à chaud, le levier
STARTER doit être dans la position
STARTER.
Français 39
Page 40

UTILISATION DES ACCESSOIRES
Buse haute/basse pressions
Cette buse propose quatre positions. Le réglage max. (+) génère un jet haute pression
régulier et puissant adapté aux opérations
de nettoyage global. Le réglage min. (-) produit un jet basse pression.
Prudence: Appliquer du détergent avec le
réglage sur la position basse pression.
EMPLOI DE DÉTERGENTS
Î ETAPE 1 :
Faire glisser l’embout de la lance sur la
position basse pression.
Î ETAPE 2 :
Remplir un récipient avec du détergent
Kärcher. Insérer dans le récipient l'extrémité du tuyau d'aspiration de détergent
munie d'un filtre.
Après avoir pousser l'embout sur la position
haute pression, tourner la lance vers la droite ou vers la gauche pour modifier la forme
du jet et passer d'un jet concentré à un jet
plat.
AVERTISSEMENT
Afin d'éviter de graves blessures, ne jamais pointer la lance sur soi-même,
d'autres personnes ou des animaux.
Veiller à ce que le détergent ne sèche
pas.
Î ETAPE 4 :
Une fois les travaux de nettoyage terminés, toujours rincer le réservoir à détergent à l'eau propre afin d'éliminer les
éventuels résidu de détergent du système d'injection.
Pour obtenir les meilleurs résultats, voir
les conseils donnant des informations
propres au nettoyage des différents types de surfaces.
Î ETAPE 3 :
Lorsque le moteur tourne, enfoncer la
gâchette pour actionner l'appareil.
Le détergent est aspiré dans l'appareil et
se mélange à l'eau.
Laisser agir le détergent sur la surface à
nettoyer.
40 Français
Détergents
ATTENTION
Observer les instructions de maintenance figurant dans le présent manuel
Cette machine a été conçue pour être utilisée avec des détergents du fabricant. L'utilisation d'autres détergents peut altérer le
fonctionnement de la machine et annuler la
garantie.
Page 41

Toujours utiliser les détergents Kärcher
pour produire les meilleurs résultats.
Les détergents biodégradables de Kärcher
sont spécialement élaborés pour ménager
l'environnement et le nettoyeur à haute pression. La formule spéciale évite d'encrasser
le filtre du tuyau d'aspiration et protège les
pièces internes du nettoyeur à haute pression pour en prolonger la durée de vie. Pour
obtenir des détergents Kärcher, s'adresser
au revendeur ou appeler le service aprèsvente.
Détergents Kärcher disponibles aux
Etats-Unis / au Mexique :
– Multi-usages et nettoyants pour automo-
biles
– Nettoyant pour extérieur
– Nettoyant terrasses et patios
– Dégraissant ultra puissant
PRENDRE UNE PAUSE ...cinq minutes ou plus
Î ETAPE 1 :
Mettre le commutateur du moteur sur
OFF.
Détergents Kärcher disponibles au
Canada :
– Nettoyant automobile
– Nettoyant pression
– Nettoyant terrasses et barrières
– Dégraissant
ATTENTION
Ne jamais utiliser :
– javellisant, produits à base de chlore et
autres produits chimiques corrosifs
– liquides contenant des solvants (p.ex. di-
luants pour peintures, essence, huiles)
– produits à base de trisodium de phos-
phate
– produits à base d'ammoniaque
– produits à base d'acide
Ces produits chimiques endommagent l'ap-
pareil et altèrent la surface à nettoyer.
L'utilisation de ces produits entraînera
l'annulation de la garantie.
Î ETAPE 2 :
Relâcher la gâchette et engager le ver-
rouillage de sécurité du pistolet.
ARRÊT DE L'APPAREIL ET NETTOYAGE
Î ETAPE 1 :
Retirer le tuyau d'aspiration de détergent
du récipient et ajouter 1 gallon d'eau fraîche.
Siphonner l'eau à basse pression pendant une minute.
Î ETAPE 2 :
Mettre le commutateur du moteur sur
OFF.
Î ETAPE 3 :
Fermer la vanne d'essence.
Î ETAPE 4 :
Fermer l'arrivée d'eau.
Î ETAPE 5 :
Appuyer sur la gâchette pour évacuer la
pression de l'eau.
Î ETAPE 6 :
Relâcher la gâchette et engager le ver-
rouillage de sécurité du pistolet.
Î ETAPE 7 :
Débrancher le tuyau d'arrosage de l'en-
trée d'eau sur l'appareil.
Î ETAPE 8 :
Débrancher le tuyau à haute pression de
la sortie haute pression.
Français 41
Page 42

REMISAGE HIVERNAL ET ENTREPOSAGE A LONG TERME
Î 1: Débrancher tous les raccordements
d'eau.
Î 2: Mettre l'appareil en marche pendant
quelques secondes pour évacuer toute
l'eau restant dans les pompes, puis l'arrêter immédiatement.
Î 3: Ne pas laisser le tuyau d'arrosage tor-
du.
Î 4: Ranger l'appareil et les accessoires
dans une pièce à l'abri du gel. NE PAS
stocker près d'un fourneau ou d'autres
sources de chaleur, afin d'éviter un dessèchement des joints de la pompe.
ATTENTION
L'inobservation des instructions ci-dessus
cause des dégâts au bloc-pompe et aux accessoires en outre, d'entraîner l'annulation
de la garantie .
Kärcher recommande d'utiliser correctement un dispositf de protection de pompe tel
que "Kärcher Pump Guard" afin de garantir
un meilleur stockage au cours de l'hiver.
CONSIGNES D'ENTRETIEN
Pompe Kärcher
Première utilisation
Toutes les pompes Kärcher sont remplies
d'huile d'usine. Il est inutile de rajouter de
l'huile.
Contrôle de la pompe
Contrôler régulièrement l'état de la pompe
du nettoyeur pression (contrôle visuel). En
cas de fuite d'huile au niveau des joints
d'étanchéité de la pompe, faire réparer le
Vidanger l'huile au cours de 20 premières
heures. Les vidanges d'huile suivantes doivent avoir lieu toutes les 40 heures.
nettoyeur vapeur dans un centre de service
agréé Kärcher. (Pour trouver le centre de
service le plus proche, se rendre à l'adresse
www.karcher-usa.com/service.)
Entretien de la pompe
La pompe du nettoyeur pression Kärcher ne
requiert pas d'entretien. Toute tentative
d'entretien risque d'altérer la pompe, d'endommager le nettoyeur pression et, en
outre, d'entraîner l'annulation de la garantie.
Moteur
Veuillez nettoyer le filtre à air toutes les 40
heures.
42 Français
Page 43

Tableau d'inspection régulier :
Avant chaque utilisation
Toutes les 20 heures
Inspection et serrage des écrous et des boulons.
Contrôler l'huile moteur et faire l'appoint si nécessaire.
Vidanger l'huile moteur unique-
Contrôler l'éventuelle présence de fuites de
carburant et d'huile.
Contrôler et nettoyer le filtre à air x
Nettoyer autour du démarreur de recul x
x
x
ment la
première fois
x
Toutes les 40 heures
Toutes les 100 heures
x
Nettoyer le recouvrement de l'échappement. x
Contrôler et nettoyer le connecteur d'étincelles.
Enlèvement du carbone dans la chambre de
combustion.
Contrôler et ajuster l'espace de valve. par le distributeur
Remplacer les lignes de carburant. 3 ans (ou si nécessaire)
x
par le distributeur
uniquement
uniquement
Français 43
Page 44

CONSEILS DE NETTOYAGE
Terrasses en bois
(avec ou sans détergent). Commencer par
un prérinçage de la terrasse et des abords à
l'eau fraîche. S'il est prévu d'utiliser du détergent pour terrasses et clôtures en bois Kärcher, l'appliquer à basse pression. Pour
obtenir de meilleurs résultats, limiter la surface de travail à environ 2,3 mètres carrés.
Laisser le détergent agir 1-3 minutes sur la
surface. Ne pas laisser sécher. Rincer à
haute pression d'un ample mouvement de
balayage en maintenant la buse à environ
7,5-15 cm de la surface à nettoyer. Toujours
nettoyer de haut en bas et de gauche à droite. En entamant une nouvelle section de la
surface à nettoyer, veiller à chevaucher la
section précédente afin de ne pas laisser de
marques et d'assurer un résultat uniforme.
몇 ATTENTION
L'utilisation de la buse Dirtblaster risque
d'endommager les surfaces en bois.
Revêtements de façades
(avec ou sans détergent) Commencer par
un prérinçage à l'eau fraîche. S'il est prévu
d'utiliser du presso-net Kärcher, l'appliquer à
basse pression sur la surface (pour obtenir
de meilleurs résultats, limiter la surface de
travail à des sections d'environ 1,8 mètre et
toujours appliquer le détergent de bas en
haut). Laisser le détergent agir 1-3 minutes
sur la surface. Ne pas laisser sécher. Si la
surface semble sécher, il suffit de la mouiller
avec de l'eau fraîche. Au besoin, utiliser
l'embout spécial à brosse de lavage (non
compris) pour éliminer la saleté tenace. Rincer à haute pression de haut en bas d'un
mouvement de balayage régulier en maintenant la buse à environ 15 cm de la surface à
nettoyer.
몇 ATTENTION
L'utilisation de la buse Dirtblaster risque
d'endommager les parements.
Patios de ciment, briques et pierres
(avec ou sans détergent) Commencer par
un prérinçage à l'eau fraîche. S'il est prévu
d'utiliser du presso-net ou du dégraisseur
Kärcher, l'appliquer à basse pression. Pour
obtenir de meilleurs résultats, limiter la surface de travail à environ 2,3 mètres carrés.
Laisser le presso-net ou le dégraisseur agir
1-3 minutes sur la surface. Ne pas laisser
sécher. Rincer à haute pression d'un mouvemant de balayage en maintenant la buse
à environ 7,5-15 cm de la surface à nettoyer.
Toujours nettoyer de haut en bas et de gauche à droite.. Pour éliminer la saleté extrêmement tenace, utiliser la lance rotative.
Autos, bateaux et motos
(avec ou sans détergent) Commencer par
un prérinçage du véhicule à l'eau fraîche. S'il
est prévu d'utiliser du détergent pour véhicules Kärcher, l'appliquer à basse pression.
Pour otenir de meilleurs résultats, nettoyer
un côté du véhicule après l'autre et toujours
appliquer le détergent de bas en haut. Ne
pas laisser sécher. Au besoin, utiliser l'embout spécial à brosse de lavage (non compris) pour éliminer la saleté tenace. Rincer à
haute pression d'un mouvemant de balayage en maintenant la buse à environ 15-20
cm de la surface à nettoyer (augmenter la
distance pour des surfaces fragiles). Toujours nettoyer de haut en bas et de gauche
à droite.. Pour obtenir de meilleurs résultats,
essuyer la surface avec une peau de chamois ou un chiffon doux.
몇 ATTENTION
L'utilisation de la buse Dirtblaster risque
d'endommager les véhicules.
44 Français
Page 45

Grilles de barbecue, équipements
mécaniques d'extérieur et outils de
jardinage
(avec ou sans détergent) Commencer par
un prérinçage à l'eau fraîche. S'il est prévu
d'utiliser du presso-net ou du dégraisseur
Kärcher, l'appliquer à basse pression. Laisser le détergent agir 1-3 minutes sur la surface. Ne pas laisser sécher. Rincer à haute
pression en maintenant la buse à environ
7,5-15 cm de la surface à nettoyer. Pour éliminer la saleté extrêmement tenace, il peut
s'avérer nécessaire d'approcher la buse
plus près de la surface afin d'augmenter l'efficacité du nettoyage.
몇 ATTENTION
L'utilisation de la buse Dirtblaster risque
d'endommager les surfaces textiles,
plastique ou fragiles.
Meubles de patio et de jardin
(avec ou sans détergent) Commencer par
un prérinçage des meubles et des abords à
l'eau fraîche. S'il est prévu d'utiliser du presso-net Kärcher, l'appliquer à basse pression. Laisser le détergent agir 1-3 minutes
sur la surface. Ne pas laisser sécher. Au besoin, utiliser l'embout spécial à brosse de lavage (non compris) pour éliminer la saleté
tenace. Rincer à haute pression d'un mouvemant de balayage en maintenant la buse
à environ 7,5-15 cm de la surface à nettoyer.
Pour obtenir de meilleurs résultats, nettoyer
de haut en bas et de gauche à droite.
몇 ATTENTION
L'utilisation de la buse Dirtblaster risque
d'endommager les terrasses et les meubles de jardin.
Recommandations
Avant de nettoyer une quelconque surfa-
ce, procéder à un essai sur une petite
surface discrète pour déterminer le
mode d'action et la distance qui produi-
ront les meilleurs résultats de nettoyage.
Si des surfaces peintes s'écaillent, pro-
céder avec une extrême précaution car
le nettoyeur à haute pression peut déta-
cher la peinture à ces endroits.
Rincer abondamment à l'eau potable les
surfaces traitées pouvant éventuelle-
ment entrer en contact avec de la nourri-
ture.
Accessoires optionnels
Des accessoires disponibles en option sont
disponibles pour continuer de renforcer les
capacités de nettoyage. Veuillez contrôler
notre site Web www.karcher-usa.com/home
pour le prix et les informations mises à jour.
Français 45
Page 46

DÉPANNAGE
ATTENTION
Avant de procéder aux réparations, débrancher toujours le câble de la bougie l'alluma-
Symptôme Cause Solution
Le moteur ne démarre pas
L'appareil n'atteint
pas le niveau de
haute pression.
La pression de sortie varie.
Réservoir d'essence vide Remplir le réservoir d'essence
Le commutateur du moteur est en
position OFF.
La soupape de carburant est fer-
mée.
La pression de l'eau augmente dans
la machine.
Diamètre du tuyau d'arrosage insuffisant.
Débit d'eau restreint. Vérifier si le tuyau d'arrosage est
Alimentation d'eau insuffisante. Ouvrir le robinet d'eau à fond. Vé-
Filtre d'admission d'eau encrassé. Retirer le filtre et le rincer à l'eau
Lance en position basse pression. Faire glisser l’embout de la lance
Alimentation d'eau insuffisante. Ouvrir le robinet d'eau à fond. Vé-
Pompe aspirant de l'air. Vérifier l'étanchéité des tuyaux et
Filtre d'admission d'eau encrassé. Retirer le filtre et le rincer à l'eau
La buse de vaporisation est obstruée.
Calcification du pistolet, du tuyau ou
de la lance.
ge afin d'éviter tout démarrage accidentel du
moteur.
Mettre le commutateur du moteur
sur ON.
Ouvrir la vanne d'essence.
Enfoncer la gâchette pour libérer
la pression.
Remplacer par un tuyau d'arrosage de 5/8" ou plus.
tordu, s'il présente des fuites ou
est bouché.
rifier si le tuyau d'arrosage est
tordu, s'il présente des fuites ou
est bouché.
tiède.
sur la position basse pression.
rifier si le tuyau d'arrosage est
tordu, s'il présente des fuites ou
est bouché.
raccords. Arrêter l'appareil et purger la pompe en appuyant sur la
gâchette jusqu'à obtenir un jet
d'eau régulier à la sortie de la buse.
tiède.
Souffler dans la buse ou retirer le
débris à l'aide d'une aiguille.
Faire couler du vinaigre distillé
dans le tube d'aspiration de dé-
tergent.
46 Français
Page 47

Symptôme Cause Solution
Il n'y a pas de détergent.
Le raccord du tuyau
d'arrosage fuit.
La lance fuit. Lance mal fixée. Tourner l'écrou du pistolet dans
La pompe est
bruyante.
La pompe présente
des fuites d'eau
(jusqu'à 10 gouttes
par minute sont admissibles).
De l'huile s'égoutte. Joints d'huile endommagés ou
Tube d'aspiration de détergent mal
raccordé à l'appareil.
Détergent trop épais. Diluer le détergent; pour de
Filtre ou tube d'aspiration de détergent obstrué.
Tube d'aspiration de détergent endommagé ou obstrué.
La buse de vaporisation est obstruée.
Raccords desserrés. Serrer les raccords.
Rondelle caoutchouc perdue ou
usée.
Joint torique ou insert plastique brisé.
Pompe aspirant de l'air. Vérifier l'étanchéité des tuyaux et
Raccords desserrés. Serrer les raccords.
Joints d'eau endommagés ou usés. Appeler le service après-vente.
usés.
Vérifier le raccord.
meilleurs résultats, utiliser du détergent Kärcher.
Faire couler de l'eau tiède à travers le filtre pour éliminer les débris.
Eliminer l'obstruction ou remplacer le tube d'aspiration de détergent.
Souffler dans la buse ou retirer le
débris à l'aide d'une aiguille.
Monter une nouvelle rondelle.
le sens des aiguilles d'une montre jusqu'à ce que le raccord soit
bien serré.
Appeler le service après-vente.
raccords. Arrêter l'appareil et purger la pompe en appuyant sur la
gâchette jusqu'à obtenir un jet
d'eau régulier à la sortie de la buse.
Appeler le service après-vente.
En cas d'apparition d'un problème ne figurant pas dans cette liste, faire appel à l'assistance téléphonique ou se rendre sur le site
Web.
Etats-Unis : 1-800-537-4129 www.karcherusa.com/home
Canada : 1-800-537-4129
www.karcher-canada.com
Mexique : 01-800-024-13-13 www.karcher.com.mx
Français 47
 Loading...