

Page 1
SANYO
user guide
Page 2

Zio™ M6000 User Guide
This manual is based on the production version of the Kyocera
Zio™ M6000 phone. Software changes may have occurred after
this printing. Kyocera reserves the right to make changes in
technical and product specifications without prior notice.
The Kyocera Communications Inc. (“KCI”) products described in
thi
s manual may include copyrighted KCI and third party
software stored in semiconductor memories or other media.
Laws in the United States and other countries preserve for KCI
and third party software providers certain exclusive rights for
copyrighted software, such as the exclusive rights to distribute or
reproduce the copyrighted software. Accordingly, any
copyrighted software contained in the KCI products may not be
modified, reverse engineered, distributed or reproduced in any
manner not permitted by law.
Furthermore, the purchase of the KCI products shall not be
d
eemed to grant—either directly or by implication, estoppel, or
otherwise—any license under the copyrights, patents, or patent
applications of KCI or any third party software provider, except
for the normal, non-exclusive royalty-free license to use that
arises by operation of law in the sale of a product.
Kyocera is a registered trademark of Kyocera Corporation.
“Sanyo” is a registered trademark of SANYO Electric Co., Ltd.
a
nd is used under license.
Kyocera manufactures and markets the SANYO line of wireless
p
roducts.
Bluetooth trademarks are owned by Bluetooth SIG, Inc. and
u
sed by Kyocera Corporation under license.
microSDHC Logo is a trademark.
Android, Android Market, Google Maps, Gmail, Google Talk are
trade
marks of Google, Inc.
iWnnIME OMRON SOFTWARE Co., Ltd. 2009-2011 All Rights
Re
served.
The Wi-Fi CERTIFIED Logo is a certification mark of
the Wi-Fi Alliance.
2
The Wi-Fi Alliance Member Logo is a logo of the Wi-Fi
Alliance.
All other trademarks are the property of their respective owners.
Copyright © 2011 Kyocera Corporation. All rights reserved.
Ringe
r Tones Copyright © 2000-2011 Kyocera Corporation.
FCC Notice
This device complies with part 15 of the FCC rules. Operation is
subject to the following two conditions: (1) This device may not
cause harmful interference, and (2) This device must accept any
interference received, including interference that may cause
undesired operation. To maintain compliance with FCC RF
exposure guidelines, if you wear a phone on your body, use the
Kyocera Communications Inc. (KCI) supplied and approved
accessory designed for this product. Using accessories that are
not supplied or approved by KCI may violate FCC RF exposure
guidelines.
Other accessories used with this device for body-worn
op
erations must not contain any metallic components and must
provide at least 22 mm separation distance including the
antenna and the user’s body.
THIS MODEL PHONE MEETS THE GOVERNMENT’S
REQUIREMENTS FOR EXPOSURE TO RADIO WAVES.
Your wireless phone is a radio transmitter and receiver. It is
designed and manufactured to not exceed the emission limits for
exposure to radio frequency (RF) energy set by the Federal
Communications Commission of the U.S. Government. These
limits are part of comprehensive guidelines and establish
permitted levels of RF energy for the general population. The
guidelines are based on standards that were developed by
independent scientific organizations through periodic and
thorough evaluation of scientific studies. The standards include
a substantial safety margin designed to assure the safety of all
persons, regardless of age and health.
The exposure standard for wireless mobile phones employs a
un
it of measurement known as the Specific Absorption Rate, or
SAR. The SAR limit set by the FCC is 1.6 W/kg.*
Page 3

Tests for SAR are conducted using standard operating positions
specified by the FCC with the phone transmitting at its highest
certified power level in all tested frequency bands.
Although the SAR is determined at the highest certified power
level, the actual SAR level of the phone while operating can be
well below the maximum value. This is because the phone is
designed to operate at multiple power levels so as to use only
the power required to reach the network. In general, the closer
you are to a wireless base station antenna, the lower the power
output.
Before a phone model is available for sale to the public, it must
be tested and certified to the FCC that it does not exceed the
limit established by the government-adopted requirement for
safe exposure. The tests are performed in positions and
locations (e.g., at the ear and worn on the body) as required by
the FCC for each model.
Body-worn measurements differ among phone models,
depending upon availability of accessories and FCC
requirements. While there may be differences between the SAR
levels of various phones and at various positions, they all meet
the government requirement for safe exposure.
The FCC has granted an Equipment Authorization for this model
phone with all reported SAR levels evaluated as in compliance
with the FCC RF emission guidelines.
The maximum SAR levels for this model as reported to the
FCC are:
• Head:1.39 W/kg
• Body-worn:0.54 W/kg
SAR information on this model phone is on file with the FCC and
can be found under the Display Grant section
www.fcc.gov/oet/ea/fccid
V65M6000.
Additional information on SAR can be found on the Cellular
Telecommunications and Internet Association (CTIA) web-site at
www.ctia.org
after searching on the FCC ID:
.
* In the United States and Canada, the SAR limit for mobile
phones used by the public is 1.6 watts/kg (W/kg) averaged over
one gram of tissue.
Bluetooth® Certification
For information about Zio™ M6000 Bluetooth Certification, visit
the Bluetooth Qualification Program Web site at
www.bluetooth.org/tpg/listings.cfm
.
Caution
The user is cautioned that changes or modifications not
expressly approved by the party responsible for compliance
could void the warranty and user’s authority to operate the
equipment.
Optimize your Phone’s Performance
Use the instructions in this guide to learn how to optimize the
performance and life of your phone and battery.
Air Bags
If you have an air bag, DO NOT place installed or portable
phone equipment or other objects over the air bag or in the air
bag deployment area. If equipment is not properly installed, you
and your passengers risk serious injury.
Medical devices
Pacemakers
—Warning to pacemaker wearers: Wireless
phones, when in the ‘on’ position, have been shown to interfere
with pacemakers. The phone should be kept at least six (6)
inches away from the pacemaker to reduce risk.
The Health Industry Manufacturers Association and the wireless
technology research community recommend that you follow
these guidelines to minimize the potential for interference.
• Always keep the phone at least six inches (15 centimeters)
away from your pacemaker when the phone is turned on.
• Do not carry your phone near your heart.
• Use the ear opposite the pacemaker.
• If you have any reason to suspect that interference is taking
place, turn off your phone immediately.
User Guide 3
Page 4

Hearing aids
hearing aids. In the event of such interference, you may want to
consult your service provider or call the customer service line to
discuss alternatives.
Other medical devices
device, consult the manufacturer of the device to determine if it
is adequately shielded from external RF energy. Your physician
may be able to help you obtain this information.
In health care facilities
facilities when instructed. Hospitals and health care facilities
may be using equipment that is sensitive to external RF energy.
—Some digital wireless phones may interfere with
—If you use any other personal medical
—Turn your phone off in health care
Potentially unsafe areas
Posted facilities
posted notices require you to do so.
Aircraft
that is in the air. Turn your phone off or switch it to Airplane
Mode before boarding aircraft.
Vehi cle s
inadequately shielded electronic systems in motor vehicles.
Check with the manufacturer of the device to determine if it is
adequately shielded from external RF energy.
Blasting areas
progress. Observe restrictions, and follow any regulations or
rules.
Potentially explosive atmospheres
when you are in any area with a potentially explosive
atmosphere. Obey all signs and instructions. Sparks in such
areas could cause an explosion or fire, resulting in bodily injury
or death. Areas with a potentially explosive atmosphere are
often, but not always, clearly marked.
—Turn your phone off in any facility when
—FCC regulations prohibit using your phone on a plane
—RF signals may affect improperly installed or
—Turn off your phone where blasting is in
—Turn off your phone
They include:
• fueling areas such as gas stations
• below deck on boats
• transfer or storage facilities for fuel or chemicals
• vehicles using liquefied petroleum gas, such as propane or
butane
• areas where the air contains chemicals or particles such as
grain, dust, or metal powders
• any other area where you would normally be advised to turn
off your vehicle engine
Use with care
Use only in normal position (to ear). Avoid dropping, hitting,
bending, or sitting on the phone.
Avoid magnetic environments
Keep the phone away from magnets which can cause improper
functioning of the phone.
Keep your phone dry
Keep the phone dry. Damage can result if the phone gets wet.
Water damage is not covered under warranty.
Resetting the phone
If the screen seems frozen and the keypad does not respond to
key presses, reset the phone by completing the following steps:
1. Remove the battery cover.
2. Remove and replace the battery.
If the problem persists, return the phone to the dealer for
service.
Accessories
Use only Kyocera-approved accessories with Kyocera phones.
Use of any unauthorized accessories may be dangerous and will
void the phone warranty if said accessories cause damage or a
defect to the phone.
4
Page 5

Radio Frequency (RF) energy
Your telephone is a radio transmitter and receiver. When it is on,
it receives and sends out RF energy. Your service provider’s
network controls the power of the RF signal. This power level
can range from 0.006 to 0.6 watts.
In August 1996, the U.S. Federal Communications Commission
(FCC) adopted RF exposure guidelines with safety levels for
hand-held wireless phones. These guidelines are consistent with
the safety standards previously set by both U.S. and
international standards bodies in the following reports:
• ANSI C95.1 (American National Standards Institute, 1992)
• NCRP Report 86 (National Council on Radiation Protection
and Measurements, 1986)
• ICNIRP (International Commission on Non-Ionizing
Radiation Protection, 1996)
Your phone complies with the standards set by these reports
and the FCC guidelines.
E911 mandates
Where service is available, this handset complies with the Phase
I and Phase II E911 Mandates issued by the FCC.
Hearing Aid Compatibility (HAC) with
Mobile Phones
Some mobile phones and hearing devices (hearing aids and
cochlear implants), when used together, result in buzzing,
humming, or whining noises detected by the user.
Some hearing devices are more immune than others to this
interference noise, and phones also vary in the amount of
interference they generate.
The wireless telephone industry has developed ratings for some
of their mobile phones, to assist hearing device users in finding
phones that may be compatible with their hearing devices. Not
all phones have been rated.
Phones that are rated have the rating on their box or a label on
the box. The ratings are not guarantees and results will vary
depending on the user’s hearing device and hearing loss. If your
hearing device happens to be vulnerable to interference, you
may not be able to use a rated phone successfully. Trying out
the phone with your hearing device is the best way to evaluate it
for your personal needs.
M-Ratings
—Phones rated M3 or M4 meet FCC requirements
and are likely to generate less interference to hearing devices
than phones that are not labeled. M4 is the better/higher of the
two ratings.
T-Ra ting s
—Phones rated T3 or T4 meet FCC requirements and
are likely to be more usable with a hearing device’s telecoil
(“T
Switch” or “Telephone Switch”) than unrated phones. T4 is
the better/higher of the two ratings. (Note that not all hearing
devices have telecoils in them.)
Hearing devices may also be measured for immunity to this type
of interference. Your hearing device manufacturer or hearing
health professional may help you choose the proper rating for
your mobile phone. The more immune your hearing aid is, the
less likely you are to experience interference noise from mobile
phones.
For more information about hearing aid compatibility, visit the
FCC's Consumer & Governmental Affairs Bureau Web site at
www.fcc.gov/cgb/dro
https://kyocera.superiorcommunications.com
.
Kyocera Communications Inc.
www.kyocera-wireless.com
To purchase accessories, visit
User Guide 5
Page 6

Table of Contents
1 Get Started .................................. 8
Phone Overview .......................... 8
Phone Battery ............................ 10
Storage Card .............................. 13
Turn the Device ON or OFF...... 13
Lock or Unlock the Device ....... 14
Navigate Your Device ............... 14
Adjust the Volume..................... 15
2 The Basics ................................. 16
Home Screen ............................. 16
Status Bar .................................. 19
Notifications Panel .................... 20
Applications............................... 21
LED Indicator............................ 23
Text Entry.................................. 23
Adjust Keyboard Settings.......... 26
User Dictionary ......................... 26
3 Call Features ............................. 28
Make Phone Calls...................... 28
Answer Phone Calls .................. 30
Call Options............................... 30
End Phone Calls ........................ 31
Use Call Log.............................. 31
4 Contacts ..................................... 32
Contacts Menu........................... 32
Add Contacts ............................. 33
View Contacts ........................... 33
6
Use Contacts.............................. 33
Customize Contacts ................... 34
Use Favorites ............................. 34
5 Messaging .................................. 36
Send Messages .......................... 36
Use Email .................................. 43
Use Gmail.................................. 45
Use Google Talk........................ 49
6 Make Connections .................... 53
Use Wi-Fi .................................. 53
Use Bluetooth ............................ 54
Connect to a Computer.............. 56
7 Internet ...................................... 57
Browser ..................................... 57
Zio Top Apps............................. 61
8 Google Applications ................. 62
Google Search ........................... 62
Google Maps ............................. 62
Android Market ......................... 64
Latitude...................................... 66
Navigation ................................. 66
Places......................................... 67
News & Weather ....................... 67
9 Camera and Multimedia
Applications .............................. 68
Camera and Camcorder ............. 68
Use Gallery................................ 71
Page 7

Use YouTube ............................. 75
Use Music .................................. 76
10 Tools ...........................................79
Clock .......................................... 79
Calculator................................... 80
Calendar ..................................... 80
File Browser............................... 83
Voice Commands....................... 85
11 Settings .......................................88
Settings Menu ............................ 88
Wireless & Networks ................. 89
Call Settings ............................... 89
Sound ......................................... 90
Display ....................................... 91
Location & Security................... 92
Applications ............................... 93
Accounts & Sync ....................... 94
Privacy ....................................... 94
SD Card & Phone Storage ......... 95
Language & Keyboard............... 95
Voice Input & Output ................ 95
Accessibility............................... 96
Date & Time .............................. 96
About Phone .............................. 96
12 Get Help .....................................97
User Guide ................................. 97
Customer Support ...................... 97
Qualified Service ....................... 97
Phone Accessories ..................... 97
13 Index ..........................................98
User Guide 7
Page 8
1 Get Started
Phone Overview
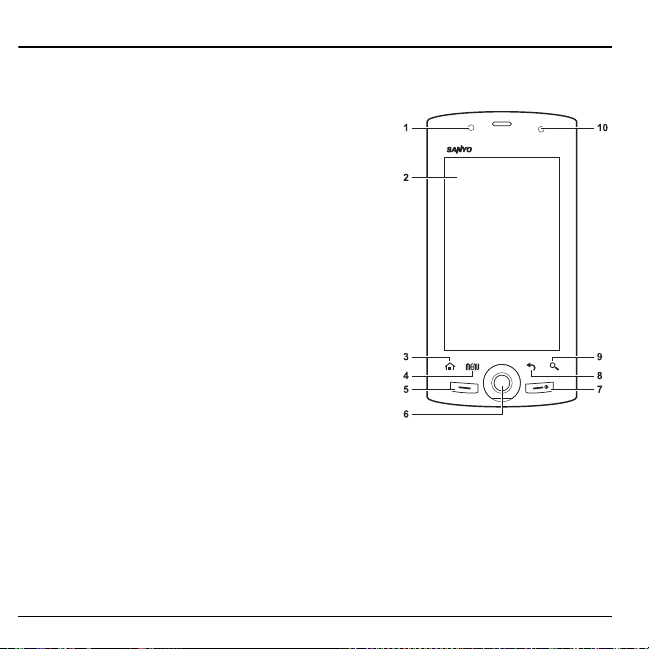
Front Panel
1. Light sensor
2. Touch screen
3. Home
– Touch to return to the Home screen.
– Touch and hold to show the recently-used
applications.
4. Menu
5. Send
6. Trackball
7. End
8. Back
9. Search
10. LED Indicator
8 Phone Overview
: Touch to open the menu of the current screen
or application.
– Press to make or answer a call.
– Press to display the call log screen.
– Press and hold to launch the voice recognition
application.
– Press to turn on the screen backlight while turned
off.
– Roll to highlight items on screen.
– Press to select an item.
– Press and hold to turn the device on.
– Press and hold, then select
– Press to turn on/off the screen backlight.
– During a call, press to end the call.
– During an incoming call, press to reject a call.
– Touch to return to the previous screen or close the dialog box.
: Touch to activate Search. See “Use the Search key” on page 15.
: See “LED Indicator” on page 23.
Power off
to turn the device off.
Page 9
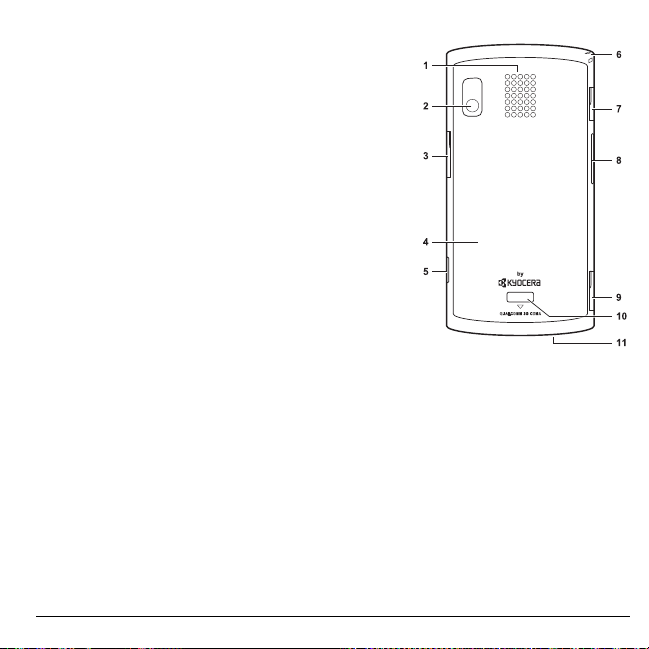
Back and Side Panels
1. Speaker
2. Camera lens
3. Memory card slot
to increase device memory. See “Storage Card” on
page 13.
4. Back cover
5. Camera
6. Strap holder
7. Earphone jack (3.5mm)
8. Volume
9. USB connector
10. Back cover latch
11. Mi crop hon e
– Press and hold to activate camera mode.
– In camera mode, press to capture photos or
videos. See
page 68.
button
lower sound volume during operation. See “Adjust
the Volume” on page 15.
– Connect the Wall/USB Charger to charge the
battery.
– Connect the USB cable to transfer files to and from a computer.
: Insert a storage card into the slot
button
“Camera and Camcorder” on
: Press up to raise or press down to
: Press to release latch and remove the back cover.
War ni ng:
User Guide 9
Inserting an accessory into the incorrect jack will damage the phone.
Page 10
Phone Battery
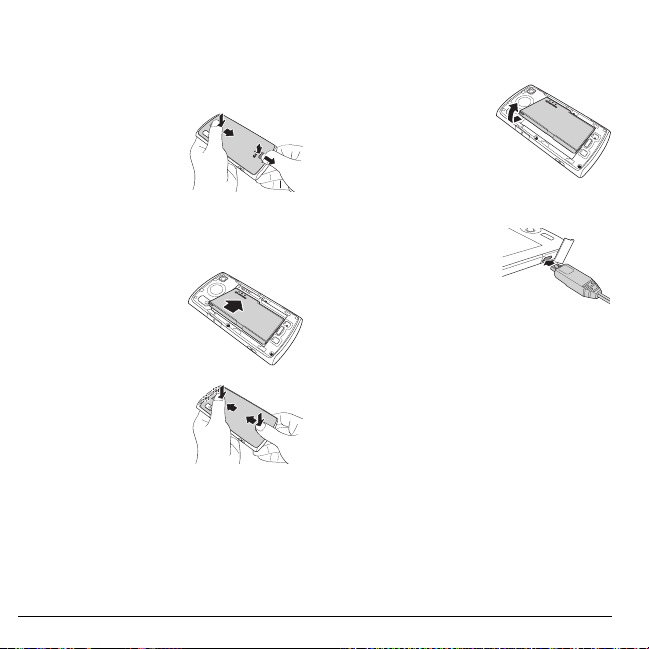
Install the Battery
1. Hold the phone face
down.
2. Using your thumbnail,
press and hold the latch
to release lock.
3. Keep pressing the latch
ess the upper part
and pr
of the back cover with
your other thumb then
slide the cover down to
remove.
4. Insert the battery
the metal
with
contacts facing those
on the device.
5. To replace the back
cover, align then
press the latch area
and upper part of the
cover with your
thumbs to slide the
cover until it snaps into place.
Remove the Battery
1. Make sure the device is turned off.
2. Remove the back cover.
3. Place your fingernail
on the grip
to remove the
battery.
then lift
Charge the Battery
1. Connect the USB cable
to the Wall/USB
Charger, and then
connect the mini-USB
side of the cable to the
USB connector on the left side of the
device.
2. Plug the Wall/USB Charger into a wall
outlet.
Note:
You can also charge your phone by
plugging the USB cable into your PC and the
mini-USB side into the device.
10 Phone Battery
Page 11
The LED indicator and the battery icon in the
upper-right corner of the screen indicate the
battery status:
LED Indicator Battery
Solid RED Battery is charging.
Flashing RED
Solid GREEN
icon
Battery status
Battery is low.
Battery is fully
charged.
You must have at least a partial charge in the
battery to make or receive calls. You can safely
recharge the battery at any time, even if it has a
partial charge.
Note:
Before removing the battery, make sure
the phone is powered off.
War ni ng:
• Do not remove the battery while it is
charging.
• Always remove the Wall/USB Charger
from the wall outlet first before removing
the USB cable from the device.
Battery Safety Guidelines
• Do not disassemble or open the battery.
• Do not crush, bend, deform, puncture, or
shred the battery.
• Do not attempt to insert foreign objects into
the battery.
• Do not immerse the battery or expose it to
water or other liquids. Even if a battery
appears to dry out and operate normally,
internal parts can slowly corrode and pose a
safety hazard.
• Always keep the battery between 15 °C and
25 °C (59 °F and 77 °F). Do not expose the
battery to extremes of temperature (heat or
cold), fire, or other hazards such as a
cooking surface, iron, or radiator.
• Never use any damaged battery.
• Only use the battery for its intended phone.
• Only use the battery with a qualified
charger. Use of an unqualified battery
charger may present a risk of fire,
explosion, leakage, or other hazard. If you
are unsure about whether a charger is
qualified, contact customer support.
• Do not short-circuit the battery or allow
metallic conductive objects—such as keys,
coins, or jewelry—to contact the battery’s
terminals.
• Replace the battery only with another
qualified battery. Use of an unqualified
battery may present a risk of fire,
explosion, leakage, or other hazard. If you
User Guide 11
Page 12

are unsure about whether a replacement
battery is compatible, contact customer
support.
• Promptly dispose of used batteries in
accordance with local regulations and
recycle if possible. Do not dispose as
household waste.
• Supervise all battery usage by children.
• Avoid dropping the phone or battery. If the
phone or battery is dropped, especially on a
hard surface, an internal short-circuit can
occur and pose a safety hazard. If you
suspect battery damage, take it to a service
center for inspection.
• Improper battery use may result in a fire,
explosion, or other hazard.
Battery Life Management
Because your phone provides an abundance of
information and apps at 3G speed, it requires a
lot of power. To get the most out of your
battery, consider turning off options that
require a data connection for notification tasks
like Bluetooth, GPS, and Wi-Fi. You can also
decrease the screen brightness, screen timeout
time and listen to music directly from the
microSD card rather than stream over the
network or via Wi-Fi.
The following can reduce battery life between
charges:
• Playing games or using the Web.
• Keeping backlighting on.
• Operating when far away from a base
station or cell site.
• Using data cables or accessories.
• Operating when no service is available, or
service is available intermittently.
• High earpiece and ringer volume settings.
• Repeating sound, vibration, or lighted
alerts.
12 Phone Battery
Page 13
Storage Card
You can use a compatible microSD™ card for
more storage space to save your photos,
videos, and other files.
Install the Storage Card
1. Open the memory card
slot cover.
2. Insert the microSD™
card into the slot with
the metal contacts
facing the back of the
device.
3. Push the microSD
card until it snaps into
place.
Remove the Storage Card
Note:
Be sure to follow the steps below before
removing the microSD card. Otherwise, the
data on your device may be lost or damaged.
1. Touch
2. Touch
3. Open the memory card slot cover.
4. Push the microSD
Note:
downloading/saving files to the card.
Home > Menu > Settings
& phone storage.
Unmount SD card
eject card.
Do not remove the card while
™
>
> OK.
™
card into the slot to
SD card
Turn the Device ON or OFF
Turn the Device ON
To turn the device on, press and hold the
key.
Turn the Device OFF
1. Press and hold the
End
key. The phone
options window
appears.
2. Touch
Power off
OK
to turn the device
off.
>
Set Device to Silent Mode
1. Press and hold the
options window appears.
2. Touch
Or, on the locked screen, slide the speaker icon
to the left.
To undo silent mode, reverse the steps above or
on the lock
the left.
Silent mode
appears on the status bar.
ed screen, slide the vibrate icon to
End
key. The phone
. The vibrate mode icon
End
User Guide 13
Page 14
Set Device to Airplane Mode
1. Press and hold the
options window appears.
2. Touch
To undo airplane mode, repeat the above steps.
Airplane mode
appears on the status bar.
icon
End
key. The phone
. The airplane mode
Lock or Unlock the Device
To avoid the screen from accidentally being
touched, lock the touch screen.
A length of time to elapse before the touch
is automatically locked follows the
screen
setting of Screen timeout. See “Set Screen
Timeout” on page 91.
Manually Lock the Touch Screen
Press the
End
The backlight turns off.
Unlock the Touch Screen
Press the
the right to unlock the touch screen.
key to lock the touch screen.
End
key, then slide the key icon to
Navigate Your Device
Use the Touch Panel
•
Touch:
Touch the screen panel with your
finger to highlight or select an item on
screen.
Touch and Hold
•
(except an application icon) to open its
options windows.
Drag
: Touch and hold an item then drag
•
your finger to move the item.
Slide or swipe
•
across the screen to scroll or view more
items.
Change Orientation
•
screen orientation, from portrait to
landscape, is automatically changed by
rotating the phone 90º. See “Enable
Orientation” on page 91.
Use the Trackball
• Roll the trackball up, down, left, or right to
highlight items on screen.
• Press the trackball to confirm a selection or
open more windows.
: Touch and hold an item
: Touch and drag your finger
: By default, the
14 Lock or Unlock the Device
Page 15
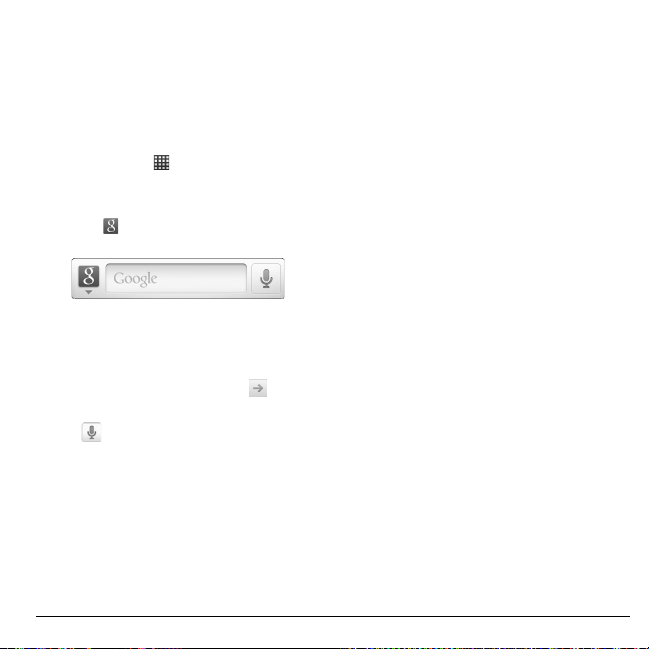
Use the Search key
Use the Search key to search information, such
as Contacts or others on your device or on the
Internet.
Tip:
You can also do one of the following to
activate the search function:
• Touch the Quick Search Bar.
•T
1. Touch the Search key.
2. Touch
3. Enter the text you want to search. As you
4. To select a matched item, touch the item.
Note: Y
Touch
information you want to search.
See “Google Search” on page 62 for more
information.
Home > > Google Search
ouch
want to search in.
type, matching information from your
device is displayed on screen.
T
and select the category you
o browse the Internet, touch
ou can use the Voice Search feature.
> Speak now, and say the
.
.
Adjust the Volume
Your device has 4 adjustable volumes:
Ringtone volume
•
ring and notification sounds.
Media volume
•
media files.
Alarm volume
•
clock. See also “Set Alarm Volume” on
page 80.
To adjust the ringer, media, and alarm
volume:
1. Touch
Sound
2. Touch the corresponding slide bar to
selec
t the volume level.
3. Touch
Note:
If you uncheck “Use incoming call
volume for notifications”, you can select
the notification volume separately.
You can also select the ringer and
fication volume on the screen to select
noti
a ringtone type. See page 90.
•
In-call volume
conversation. To adjust volume, press the
Volume button up or down during a call.
: Volume level of phone
: Volume level when playing
: Volume level of the alarm
Home
>
Menu
>
>
Vo lu m e
OK
.
: Volume level of phone
Settings
.
>
User Guide 15
Page 16
2The Basics
1
5
3
2
4
6
7
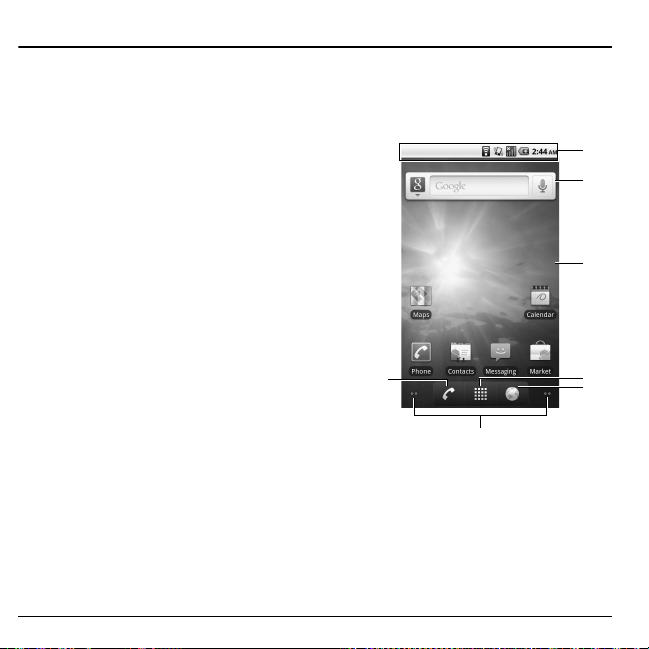
Home Screen
The Home screen is the starting point for all applications. You can access applications, view call
notifications and battery or connection status.
1.
Statu s B ar
– Displays notification and phone status icons.
– Touch and hold to display the device date.
– Slide down to display the notifications panel.
2.
Quick Search Bar
speak a word for a quick search in the device or
browse the Internet.
Main Home Screen
3.
– Displays shortcut icons.
– Touch an icon to open the application.
4.
Phone Icon
screen).
5.
Applications Icon
applications installed in the device.
Browser Icon
6.
Screen Panel Indicator
7.
screens on the left or on the right side of the
current screen.
Note:
From any application screen, touch
: Allows users to enter text or
: Touch to open the Phone (dialer
: Touch to display a list of
: Touch to open the browser.
: Indicates the number of
Home
to go back to the Home screen.
16 Home Screen
Page 17
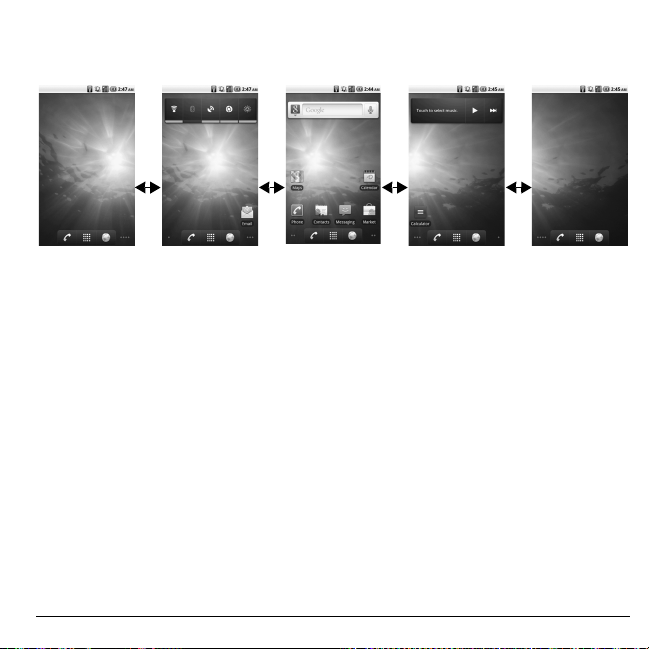
Extended Home Screen
Main Home Screen
Left Extended Home Screens
Right Extended Home Screens
The Home screen has 5 screen panels, slide your finger horizontally across the screen to view the
left or right extended Home screens.
Customize the Home Screens
1. Touch
2. Touch one of the following:
Home
>
Menu
.
Add
: Select to add items to the Home
•
screen. See “Add an Item” on page 18.
Wallpaper
•
: Select to change the
wallpaper. See “Change the Wallpaper”
on page 18.
Search
: Select to search for contacts and
•
other information on your device or on
the web.
Notifications
•
: Select to display the
Reposition an Item
1. Touch and hold the item that you want to
reposition. The item becomes moveable.
2. Drag the item to the desired location.
3. Release your finger to finalize
itioning.
repos
Note:
To reposition the item to the extended
Home screen, drag the item to the edge of the
screen until the Home screen extends. Then
release your finger to reposition the item to
your desired location.
notifications panel. See “Notifications
Panel” on page 20.
Settings
•
: Select to open the Settings
screen. See “Settings Menu” on page 88.
User Guide 17
Page 18

Add an Item
1. Touch and hold an empty spot on the Home
screen or touch
Add
. The
2. Select the type of item you want to add:
Shortcuts
•
application, a bookmarked web page, or a
contact.
Widgets
•
clock, calendar, or the music bar.
Folders
•
organize your home screen items. See
“Create a Folder” on this page.
Wallpapers:
•
wallpaper of the Home screen. See
“Change the Wallpaper” on this page.
Note:
The add option may not be available if
the current screen is full. Delete or move items
to the other screens to make room.
Home
>
Menu
Add to Home screen
: Select to add a shortcut to an
: Select to add a tool such as the
: Select to add a folder to
Select to change the
, then touch
appears.
Remove an Item
1. Touch and hold the item that you want to
remove. The item becomes moveable and
appears at the bottom of the screen.
2. Drag the item to
3. When the item and the icon turn red,
e your finger.
releas
.
Change the Wallpaper
1. Touch
2. Touch either of the following:
3. Touch
Home
>
Menu
Wallpaper
•
•
•
•
.
Gallery
: Select to use saved or captured
pictures on your device. You can crop the
picture before setting it as wallpaper. See
“Crop Pictures” on page 72.
Graphics
: Select to use graphics that you
have downloaded from Storefront.
Live Wallpapers
or interactive wallpapers.
Note: Using live wallpapers will use
additional memory which affect battery
power and performance.
Wallpapers
wallpapers that came with your device.
Save
or
, then touch
: Select to use animated
: Select to use preset
Set wallpaper
.
Create a Folder
1. Touch
2. On the
Home
>
Menu
Folders
.
Select folder
New folder
•
with no items inside.
All contacts
•
folder.
Bluetooth received
•
Bluetooth folder with items that have
been received via Bluetooth.
, then touch
screen, touch:
: Select to create a new folder
: Select to create a Contacts
: Select to create the
Add
>
18 Home Screen
Page 19
•
Contacts with phone numbers
: Select
to create a folder of Contacts that have
phone numbers.
Starred contacts
•
: Select to create a
folder of Favorite Contacts.
Rename the folder
1. Touch the folder to open it.
2. Touch and hold the title bar of the folder.
Rename folder
The
screen appears.
3. Enter the desired folder name.
OK
4. Touch
when done.
Add shortcuts on the Home screen to the
folder
1. Touch and hold the item. The item becomes
moveable.
2. Drag the item to the folder.
Access items inside the folder
1. Touch the folder to open it.
2. Touch the icon of the application you want
to access
.
Remove an item or the folder
Follow the same procedures in “Remove an
Item” on page 18.
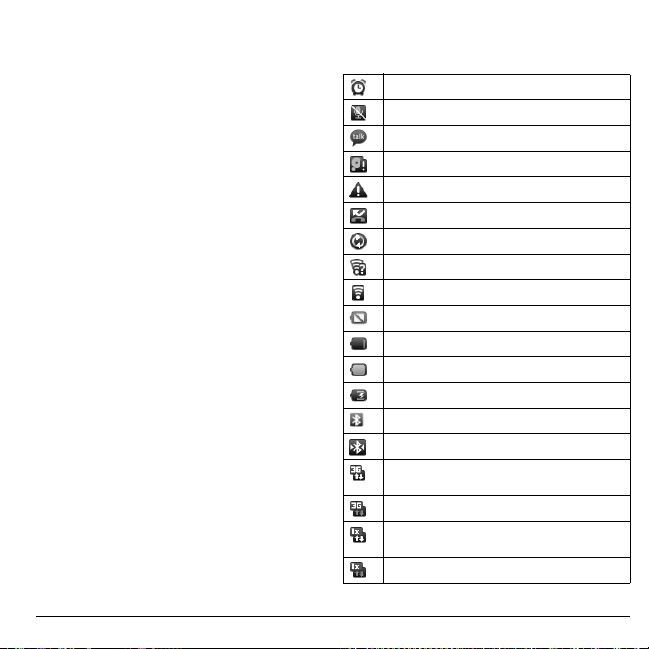
Status Bar
The status bar, which appears on top of the
screen, displays information such as time,
notifications, and device status.
Notification and Status Icons
These icons may appear on the status bar of
your device.
Alarm clock is set.
Microphone is muted. See page 31.
Chat is ongoing.
Memory is full.
Error notification.
Missed call notification.
Synchronization is active.
An open Wi-Fi network is available.
Wi-Fi signal level.
Battery is empty.
Battery is low.
Battery is full.
Battery is charging.
Bluetooth is enabled.
Bluetooth data connection is active.
3G data service is available. The arrow
animation indicates data connection activity.
3G data service is currently dormant.
1x digital mode connected. The arrow
animation indicates data connection activity.
1x digital mode connection is dormant.
User Guide 19
Page 20
Signal level. Fewer bars indicate a weaker
signal.
No signal.
Your phone is roaming in home network.
USB is connected.
Download in progress.
Upload in progress.
GPS is active.
Headset is connected.
Call is ongoing.
Silent mode is active.
Silent mode and Vibrate mode are active.
Airplane mode is active.
Speakerphone is on.
Voicemail notification.
New message notification.
New Gmail message notification.
Touch to display more status bar icons.
TTY mode is enabled.
New software upgrade notification.
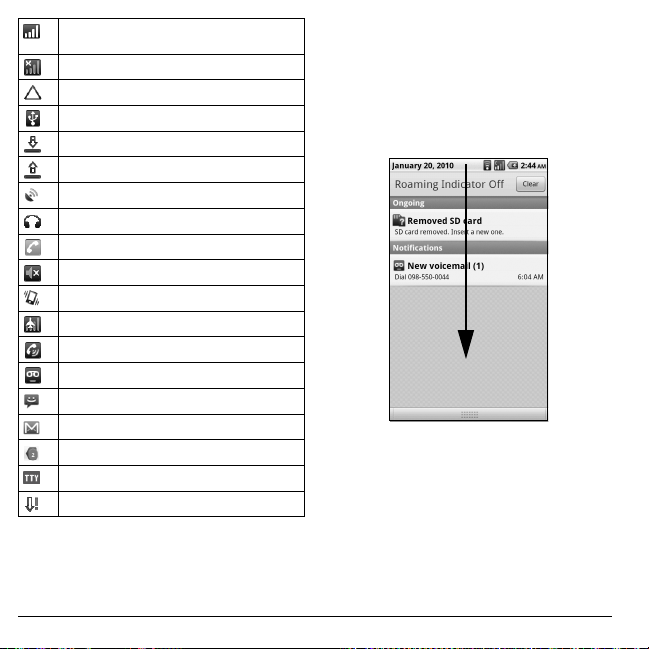
connection, reminders of calendar events,
alarms, and other information. Open the
notifications panel to read the detail of the
notification and open the related applications.
Open the notifications panel
Touch and hold the status bar, then slide
downwards to open the notifications panel.
• Touch the notification to open the related
application.
Clear
•Touch
to clear all notifications
Close the notifications panel
Touch and hold the bottom bar of the notifications
panel, then slide upwards to close it.
Notifications Panel
Notification icons indicate the arrival of new
messages or calls, the establishment of a USB
20 Notifications Panel
Page 21

Applications
From the Home screen, touch
device. The following table shows the applications that come with your device. Touch an
cation icon to open it. To go back the Home screen, touch
appli
Note:
Some applications need a Google account. If you are prompted to make a Google account,
follow the instructions on the screen to set up your account.
Applications Description
Browser
Calculator
Calendar
Camera
Clock
Contacts
Email
File Browser
Gallery
Gmail
Google Search
Latitude
Maps
Market
Messaging
Music
User Guide 21
to view the
pre-installed and downloaded applications on your
.
Allows you to browse the Internet.
Allows you to perform basic mathematical functions.
Allows you to schedule appointments and set reminders.
Allows you to take photos/videos.
Allows you to use the device as the desktop clock and set multiple alarms.
Allows you to create and store Contact information on your device.
Allows you to access your POP3 or IMAP based email accounts on your device.
Manages files and folders stored in the device memory and the storage card.
Organizes media files and allows you to view pictures and playback videos stored
in the storage card.
Allows you to send and receive Gmail.
Allows you to search for text or voice using the Google Search engine.
Allows you to view your friends’ location and share yours with them on Google
TM
.
Maps
Allows you to see Google Maps.
Allows you to download games or applications.
Allows you to send and receive text and multimedia messages.
Allows you to play music files by artists, albums or playlists.
Page 22
Applications Description
Navigation
News & Weather
Phone
Places
Settings
Ta lk
Voice Control
Voice Search
YouTube
Zio Top Apps
Note:
The menu items on your phone can change depending on the options provided by your
Allows you to search for destinations by speaking or typing it.
Provides news feeds and weather updates.
Use to make calls.
Allows you to find places near your location by category.
Allows you to show the Settings menu.
Allows you to send and receive Google instant messages.
Allows you to open the automatic voice recognition program.
Allows you to search for voice files using Google search.
Allows you to view YouTube videos.
Allows you to download applications to use on your Zio.
service provider. Check with your service provider.
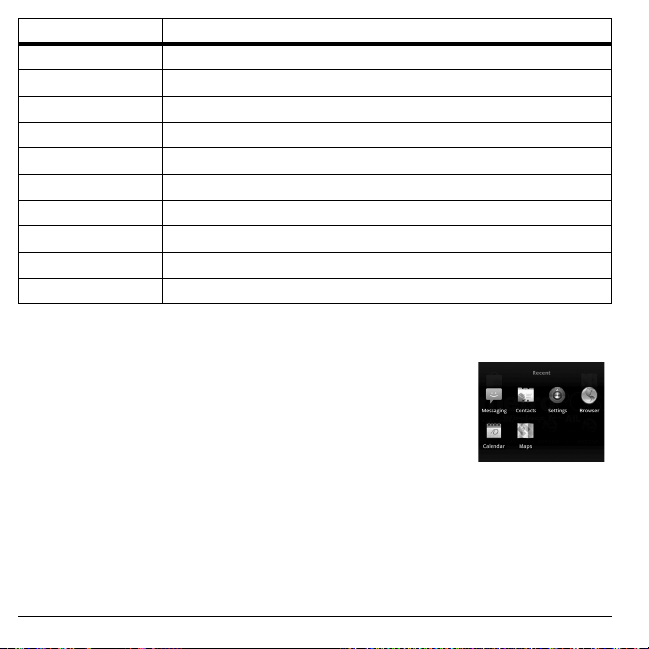
Recently-Used Applications
1. Touch and hold
window. The last 8 used applications are displayed.
2. Touch an application icon to open it.
Home
to open the recently-used applications
22 Applications
Page 23
LED Indicator
The LED indicator provides various status
information.
LED State Device
Flashing
Green
(Quick)
Flashing
Gre
en (Slow)
Solid Green Power ON /
Solid Red Power ON /
Flashing Red
low)
(S
Stat e
Power ON Incoming call.
Power ON Pending notification,
OF
OF
Power ON Battery is low.
F
F
Indication
such as:
• Unread message
• Unread voicemail
essage
m
• Missed call
• Unread
l/Gmail
Emai
• Calendar Event
Battery is fully
charged.
Battery is charging. /
USB connected.
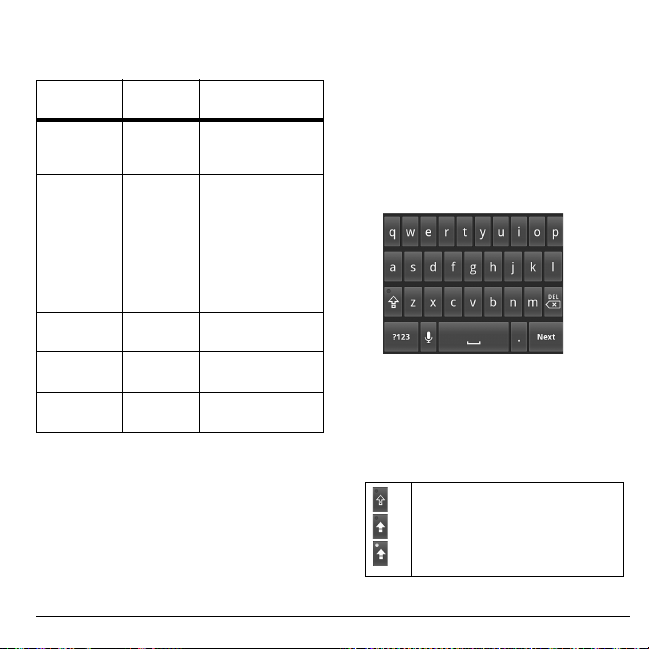
Text Entry
When you open an application that requires
text or numeric entry, you can enter
information using the on-screen keyboard.
Your device has the following on-screen
keybo
and
QWERTY, Numeric & Symbol
ards:
Phone Keypad
. The keyboard that is
displayed depends on the type of information
required.
QWERTY Keyboard
The QWERTY keyboard is activated whenever
an alphanumeric entry is required. The
keyboard layout looks similar to a computer
keyboard.
Note:
Key appearance may vary depending on
the selected application.
Use the QWERTY Keyboard
1. Touch the text entry field to display the
keyboard.
2. Touch the keys to type letters.
Other keyboard functions:
Touch to toggle lower case, upper
case, and Caps lock.
,
User Guide 23
Page 24
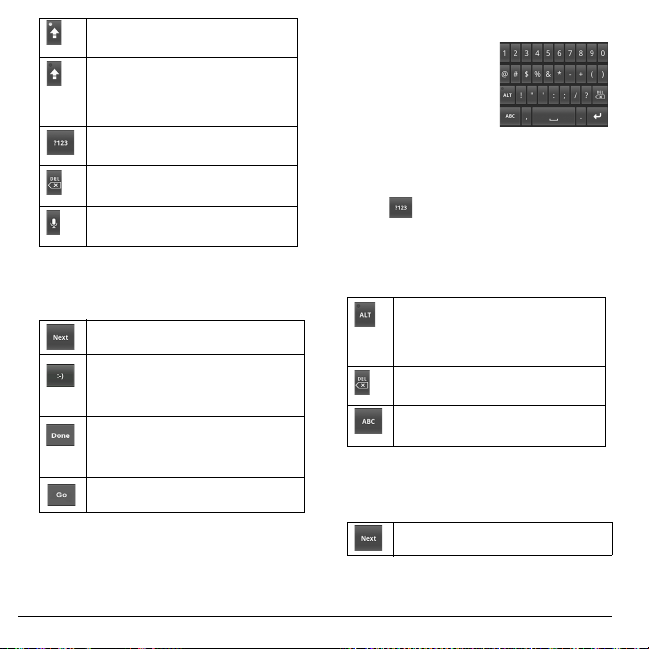
Indicates Caps lock is turned on.
Touch once to turn off Caps lock.
Indicates the first letter will be
entered as upper case, but the
succeeding characters will be entered
as lower case.
Touch to switch to the numeric and
symbols keyboard.
Touch to delete a character.
Touch and hold to delete entire entry.
Touch to input characters using your
voice.
The following keys may appear on the
QWERTY keyboard depending on the
selected application.
Touch to go to the next text entry field.
Touch to insert smiley.
Touch and hold to view and select
her smiley.
ot
Indicates that there is no more required
text field. Touch to complete entry and
hide the keyboard.
Touch to go to the web address.
Numbers & Symbols Keyboard
Use the Numbers &
Symbols keyboard to
enter numbers and
symbols.
Use the Numbers & Symbols Keyboard
1. Touch the text entry field to display the
QWERTY keyboard.
2. Touch
& Symbols.
3. Touch the keys to type numbers and
symbols.
Other keyboard functions:
The following keys may appear on the
Numbers & Symbols keyboard
depending on the selected application.
to change keyboard to Numbers
Touch to display the full set of
symbols keyboard. Touch again to
toggle back to Numbers & Symbols
keyboard.
Touch to delete a character.
Touch and hold to delete entire entry.
Touch to switch back to alphabet
mode keyboard.
Touch to go to the next text entry field.
24 Text Entry
Page 25
Touch to insert smiley.
Touch and hold to view and select
her smiley.
ot
Note: To use this feature, ensure that the
Auto-rotate screen box is checked in
Home > Menu > Settings > Display.
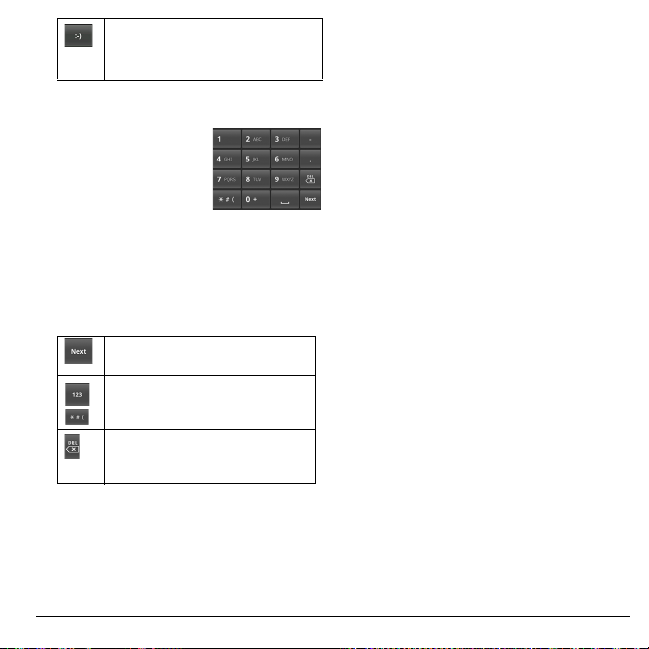
Phone Keypad
The Phone keypad is
automatically activated
when a numeric entry,
such as a phone number,
is required.
Use the Phone Keypad
1. Touch the text entry field to display the
Phone keypad.
2. Touch the keys to enter numbers.
Other keyboard functions:
Touch to go to the next text entry
field.
Touch to toggle the numeric
keyboard and symbol keyboard.
Touch to delete a character.
Touch and hold to continuously
elete characters.
d
Use Landscape Keyboard
For added convenience, you can switch to a
landscape keyboard by rotating the phone 90º.
This brings out a wider keyboard and allows
Input Method
From applications that require text entry, such
as Messaging, use the copy and paste functions
to copy and paste text from one application to
another.
1. Open the application or received message
2. Touch and hold the text body to display the
3. Touch
4. Open the application that you want to paste
5. Touch and hold the text box where you
6. Touch
Copy Text from Web Page
1. When viewing a web page, touch
2. Touch and drag your finger to highlight the
3. Lift your finger to copy the highlighted text
4. Open the application that you want to paste
want to copy text from.
that you
ons menu.
opti
Copy message text
copy the text.
to.
the text
to paste the text.
want
Paste
.
More
>
Select text
text tha
t you want to copy.
to the clipb
the selec
oard.
ted text to.
or
Copy all
to
Menu
>
.
you to type by using two thumbs.
User Guide 25
Page 26

5. Touch and hold the text box where you
want to paste the text.
6. Touch
Paste
.
Copy a URL
1. To copy a URL, touch and hold the URL to
display the options menu.
2. Touch
3. Open the application that you want to paste
4. Touch and hold the text box where you
5. Touch
Copy link URL
the URL to.
want to paste the URL.
Paste
.
or
Copy page url
Adjust Keyboard Settings
To adjust the keyboard settings, do one of the
following:
• On the keyboard, touch and hold or
, then touch
settings
•Touch
Language & keyboard > Android
keyboard
Android Keyboard
Android keyboard settings
•
Vibrate on keypress
vibration when a key is touched.
Sound on keypress
•
clicking sound when a key is touched.
Android keyboard
.
Home > Menu > Settings >
.
: Check to activate
: Check to activate
•
Auto-capitalization
automatically set the first letter of a
sentence in upper case.
Voice Input
•
voice input icon on the Main Keyboard or
the Number & Symbols keyboard.
Input languages
•
.
the language by sliding your finger on the
spacebar. Check the language you want to
select by this operation.
Word Suggestion Settings
•
Quick fixes
the user presses the space key twice to
indicate sentence completion.
Show suggestions
•
suggested words as you type.
Auto-complete
•
highlighted word automatically if a space
or punctuation is typed. Available only
Show suggestions
when
: Check to
: Allows you to display the
: Allows you to change
: Check to add a period when
: Check to display
: Check to enter a
is checked.
User Dictionary
Select to add user preset words to the
dictionary.
Add Words in the Dictionary
1. Touch
2. Type the word you want to add, then touch
Home > Menu > Settings
Language & keyboard
User dictionary
OK
.
>
Menu > Add
>
>
.
26 Adjust Keyboard Settings
Page 27

Customize Words in the Dictionary
1. Touch
2. Touch the word you want to customize, and
3. Do one of the following:
Home > Menu > Settings
Language & keyboard
a pop up window appears.
• To edit the word, touch
• To delete the word from the dictionary,
touch
Delete
.
>
>
User dictionary
Edit
.
.
User Guide 27
Page 28
3 Call Features
1
2
3
4
Make Phone Calls
Use the Phone to make calls.
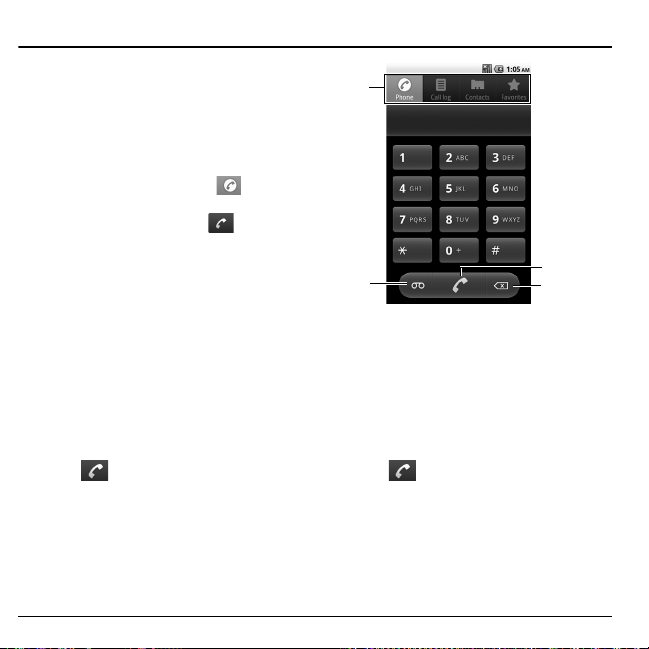
Use the Phone
To open the Phone screen, do one of the
following:
- Press the
- From the Home screen, touch
The
1. Page tabs
2.
3.
4.
Send
the Phone (dialer screen).
open the Phone (dialer screen).
Phone
Voicemail
number.
Call
Backspace
key, then touch to open
screen is shown on the right:
: Touch to call your voicemail
button: Touch to call a number.
: Touch to delete a number.
(Phone) to
Call Using a Number
1. On the
2. Touch
Note:
touch
28 Make Phone Calls
Phone
enter number.
To save the dialed number to Contacts,
Menu
screen, touch the keypad to
or press the
>
Add to contacts
Send
key.
.
Call a Number from Call Log
1. On the
2. Touch
Phone
tab.
want to call.
screen, touch the
of the name or number you
Call log
Page 29
Call a Contact
1. On the
2. Touch desired contact.
3. Touch
tab.
Phone
screen, touch the
.
Contacts
Call a Favorite Contact
1. On the
2. Touch
Phone
tab.
screen, touch the
of your favorite contact.
To save a Favorite contact, see “Add
Contacts to Favorites” on page 34.
Favorites
Call a Number with Pause
Use the Pause function to send DTMF tones
from your phone. Your phone supports two
types of pauses:
Hard Pause
•
that the succeeding numbers are DTMF
tones. For every hard pause, a message
appears to confirm whether to send the
tones.
2-sec Pause
•
sending DTMF tones. To increase the
interval, add a succession of 2-sec pause.
For example, to have an interval of 4
seconds, add two 2-sec pause.
1. On the
enter number to call.
2. To add a hard pause, touch
wait
User Guide 29
: Add a hard pause to indicate
: This is a 2-second interval in
Phone
screen, touch the keypad to
Menu
>
. “;” appears to indicate the hard pause
Add
location. To add a 2-sec pause, touch
Add 2-sec pause
>
the 2-sec pause location.
3. Touch the keypad again to enter number of
the DTMF tone.
Note:
Repeat the above procedures to add
more pauses.
4. Touch
before the hard pause then sends the DTMF
tone
s upon confirmation. For 2-sec pause,
your phone will send the DTMF tones
automatically after 2 seconds.
. “,” appears to indicate
. Your phone dials the number
Call a Number with Prepend
Prepend is used to add prefix numbers in front
of a phone number. For example, if your
contact entry is saved without an area code and
you are out of town, use the prepend function
to add the area code before calling the number.
Phone
1. On the
or
Call log
2. Touch and hold a name or number from the
list.
3. Touch
4. Touch the keypad to enter the number you
want
5. Touch
screen, touch the
tab.
Prepend
.
to add before the phone number.
.
Menu
Contacts
Page 30

The following number can also be added to use
its function:
• To hide your phone number from the
person you are calling to, dial *
.
number
67 + phone
Answer Phone Calls
When a call comes in, the phone rings or
vibrates and a message is displayed on screen.
The phone number of the caller appears. If the
caller is listed in your Contacts, the contact’s
name appears.
Answer a Phone Call
Press the
Send
key.
Reject a Phone Call
Press the
End
key.
Voice Ringer
Your phone will speak the information of an
incoming caller.
1. Touch
2. Touch
Menu
>
Settings
>
.
output
Speak incoming caller ID
.
it
• If the number is saved in Contacts, the
Contacts name will be read.
• If the caller ID is saved, it will be read.
Voice input &
to check
• If the number is only available, it will
be read.
• If music is assigned as a ringtone, it
will be played.
Mute the Ringtone
Press the volume button.
Call Options
Other options are available during a phone call.
Unlock the Screen
The screen of your phone is locked
automatically during a call to avoid
accidentally touching the screen.
To unlock the screen
Touch and slide the lock icon to the right.
You can disable this feature or select your
phone’s behavior after unlocking the screen.
“In-Call Touch Lock” on page 89.
See
Add Another Call
Tou ch
Menu > Add call
number.
Another Incoming Call
When a new call is incoming during an
ongoing call, press the
new call and put the current call on hold.
to call another
Send
key to receive the
30 Answer Phone Calls
Page 31

Swap Calls
When another call is on hold, touch
Swap calls
to swap between calls.
Menu >
Merge Calls
Tou ch
Menu > Merge calls
ongoing calls.
to merge all
Mute the Microphone
Tou ch
Menu > Mute
turning the microphone on or off.
to toggle between
Use the Speakerphone
Tou ch
Menu > Speaker
turning the speaker on or off.
to toggle between
Show Dialpad
Tou ch
Menu > Show dialpad
dialpad during a call.
to display the
Use Bluetooth
Tou ch
Menu > Bluetooth
using the phone’s speaker and the Bluetooth
device speaker.
to toggle between
Select the Earpiece Volume
Press the side volume button up or down to
select the earpiece volume.
End Phone Calls
To end a call, press the
End
key.
Use Call Log
The
Call log
missed, and received calls.
From the Call log tab, you can call a name or
num
information, edit the number, or send a text
message.
1. Press the
2. Do one of the following:
tab lists all the dialed numbers,
ber on the list, view the contact
Send
key.
• Touch
the list to call.
• Touch and hold a name or number to
disp
-
-
-
-
- Prepend
-
• Touch
all Call log.
of the a name or number on
lay the options menu:
Call [number]
phone call.
View contact/Add to contacts
to view the contact information or save
the number to Contacts.
Edit number before call
the number then call the number.
Send text message
text message to the name or number.
in front of a phone number.
Remove from call log
the call information from call log.
Menu > Clear call log
: Touch to return the
: Touch to send a
: Touch to add prefix numbers
: Touch to delete
: Touch
: Touch to edit
to delete
User Guide 31
Page 32

4Contacts
Use
Contacts
email addresses, and other information.
To access
•Touch
•Press the
Contacts
Contacts Menu
My Name Card
Select this option to view or edit your personal
contact information, or send your name card
via Bluetooth.
1. From the
My Name Card
2. Do one of the following:
• To edit your personal information, touch
• To share your name card, touch
Search
Select this option to search for names in your
Contacts.
1. From the
Search
2. Type the name of the contact to search. As
you type
to store names, phone numbers,
Contacts
Home
Menu > Edit contact.
Share
sharing.
:
> >
Send
tab.
Contacts
, then touch an application for
Contacts
.
, the screen displays matching
Contacts
key, then touch the
screen, touch
.
screen, touch
.
Menu >
Menu >
Menu >
contacts based on the characters you are
typing.
Tip:
You can search for names by touching
>
Contacts
the Home screen.
in the Quick Search Bar from
Display Options
Select this option to change the way Contacts
are filtered and displayed on screen.
Contacts
1. From the
Display options
2. Touch one of the following options:
Only contacts with phones
•
display only the contacts with phone
numbers.
Sort list by
•
contacts by the first name or the last
name.
View contact names as
•
to view the contacts by the first name or
the last name first.
screen, touch
.
: Select whether to sort
Menu >
: Select to
: Select whether
32 Contacts Menu
Page 33

Add Contacts
Add field
button
Remove
field button
Field label
button
More info
button
1. From the
New contact
2. Enter the name, phone number, email and
other contact details.
• Scroll up or down to move through the
• To add more information to the name,
• To add more fields, touch the
• To change the field label, touch the
• To display more information, touch
Contacts
screen, touch
.
ct fields.
conta
touch
the
More info
button.
button. To remove field, touch the
Remove field
label
More
button.
button.
.
Menu >
Add field
3. To save the contact, touch
View Contacts
From the
Contacts
the contact to view contact details.
From the View Contact screen, touch
and one of the following:
Edit contact
•
“Edit Contacts” on page 34.
Delete contact
•
See “Delete Contacts” on page 34.
Use Contacts
Call Contacts
From the
Contacts
name and then touch
Send Messages to Contacts
1. From the
2. Compose your message.
3. Touch
Field
Contacts
contact name and then touch
• To attach pictures or audio, touch
Menu > Attach, touch the type of file,
then the file to attach.
Send
.
Done
.
screen, touch the name of
Menu
: Select to edit contact. See
: Select to delete contact.
screen, touch the contact
.
screen, touch the
.
User Guide 33
Page 34

Customize Contacts
Edit Contacts
1. From the
2. Touch
3. Edit the contact information.
4. When done, touch
Delete Contacts
1. From the
2. Touch
3. A warning message appears, touch
Assign Ringtone to Contacts
1. From the
2. Touch a ringtone to play it.
3. Touch
Divert Contacts Call to Voicemail
Incoming calls from a contact can be
automatically diverted to voicemail.
1. From the
2. Touch
Contacts
the contact name to open the options menu.
Edit contact
the contact name to open the options menu.
Delete contact
contact name >
Ringtone
OK
contact name >
Incoming calls
screen, touch and hold
.
Done
.
Contacts
screen, touch and hold
.
Contacts
screen, touch the
Menu
>
Options
Options
>
.
.
to assign the selected ringtone.
Contacts
screen, touch the
Menu
>
to check it.
OK
Send Contacts
1. From the
2. Select an application for sharing.
Contacts
contact name >
screen, touch the
Menu
>
Share
Use Favorites
You can set frequently-called contacts as
Favorites
View Favorites
To v i e w
touch
.
Add Contacts to Favorites
1. From the
2. Touch
1. From the
2. Touch a star mark at the right of the name.
Call Favorite Contacts
Tou ch of the favorite contact that you want
to call.
.
Favorites
Favorites
the contact name to open the options menu.
-or-
contact name to display the detail screen.
If the star
Favorites
to
, press the
tab.
Contacts
screen, touch and hold
Add to favorites
Contacts
turns orange, the contact is added
.
.
screen, touch the
Send
.
key, then
34 Customize Contacts
Page 35

Send Message to Favorite Contacts
1. Touch the favorite contact that you want to
send a message and touch
2. Compose your message.
• To attach pictures or audio, touch
Menu > Attach, touch the type of file,
then the file to attach.
3. Touch
Send
.
.
Remove From Favorites
1. From the
the contact name to open the options menu.
2. Touch
Favorites
screen, touch and hold
Remove from favorites
.
User Guide 35
Page 36

5 Messaging
1
2
3
Use
Messaging
multimedia messages.
To access
Messaging
1.
New Message:
message
Message Threads
2.
3.
Attachment icon:
message has an attachment.
to send and receive text or
Messaging
, touch
.
Touch to compose a new
Home
>
Indicates that the
Send Messages
A message can contain numbers, text, symbols,
>
subject, pictures, videos, and audio files.
message
Messaging
.
1. From the
2. Touch the To field, then type the recipient’s
number or email address. Or touch and hold
To
field, and then touch
the
.
Contacts
screen, touch
New
Select
36 Send Messages
Page 37

The Contacts list is displayed:
• To use the desired Contact, touch the
Contact.You can select more than one
contact.
3. Type your message in the
field.
4. To access more features, touch
the option:
Note: Some menus may require you to
touch Menu > More.
•
Add subject
subject.
•
Attach
or audio files to your message.
•
Insert smiley
smiley
insert.
•
Discard
•
All threads
draft and close the compose message
screen.
•
Select Contacts
contacts as a recipient.
5. When done, touch
: Touch to add a message
: Touch to attach a picture, video,
window and touch the image to
: Touch to discard the message.
: Touch to save message as
Typ e to co mpose
Menu
: Touch to open the
: Touch to add another
Send
.
then
Insert
Attach Files to Message
To attach a file, touch
select one of the following:
•
Pictures
•
•
•
•
•
•
: Touch to attach a picture.
Capture picture
image to attach using the device camera.
Videos
: Touch to attach a video.
Capture video
using the device camcorder and attach to
the message.
Audio
: Touch to attach an audio file.
Record audio
attach.
Slideshow
Attach Pictures/Videos
1. From the compose message screen, touch
Menu > Attach
2. Touch
3. Touch the thumbnail of desired picture or
4. Do one of the following if necessary:
Pictures
video to attach.
• To view the attached picture/video, touch
View
.
• To replace the attached picture/video,
Replace
touch
• To remove the attached picture/video,
Remove
touch
Menu > Attach
: Touch to capture an
: Touch to record a video
: Touch to record audio to
: Touch to attach a slide.
.
or
Vide os
.
.
.
, then
User Guide 37
Page 38

Capture Pictures/Videos to Attach
1. From the compose message screen, touch
Menu > Attach
2. Touch
to activate the camera/camcorder.
3. Press the
picture/video.
4. Do one of the following if necessary:
• To view the captured video, touch
• To capture again, touch
• To cancel, touch
5. Touch
picture/video.
6. On the compose message screen, do one of
the follo
• To view the attached picture/video, touch
View
• To replace the attached picture/video,
touch
• To remove the attached picture/video,
touch
.
Capture picture
Camera
button to capture
CANCEL
OK
to attach the captured
wing if necessary:
.
Replace
.
Remove
.
or
Capture video
RETAKE
.
PLAY
.
Attach Audio
1. From the compose message screen, touch
Menu > Attach
2. Touch
3. Touch the filename of the desired audio to
.
play
4. Touch
5. On the compose message screen, do one of
the follo
.
Audio
.
OK
to attach audio.
wing if necessary:
• To play the attached audio, touch
• To replace the attached audio, touch
Replace
Remove
.
.
• To remove the attached audio, touch
Record Audio to Attach
1. From the compose message screen, touch
Menu > Attach
.
2. Touch
screen.
3. Touch
4. Touch
5. Touch
6. Touch
recorded audio.
7. On the compose message screen, do one of
the follo
• To play the attached audio, touch
• To replace the attached audio, touch
Replace
• To remove the attached audio, touch
Remove
.
Record audio
to start recording.
to stop recording.
to play recording.
Use this recording
wing if necessary:
.
.
to open the recording
to attach
Attach Slideshow
1. From the compose message screen, touch
Menu > Attach
2. Touch
3. Touch
4. Touch the
Slideshow
Slide 1
to create a slide.
Add picture
.
.
button.
Play
Play
.
.
38 Send Messages
Page 39

5. Touch the thumbnail of the desired picture
Displays
added
picture.
Tou ch t o
view the
previous
or the next
slide.
to add to slideshow.
6. Do one of the following if necessary:
• To add text, touch the text field and type
ose text.
to comp
• To preview slideshow, touch
• To replace a picture, touch
.
picture
• To remove a picture, touch
.
slide
• To add more slides, touch
, then repeat step 4 to 5.
slide
Replace
Remove
Menu > Add
Preview
• To add background music, touch
Add music
.
• To set the duration of slideshow, touch
Menu > Duration (* sec)
option.
• To change text layout, touch
Layout (top or bottom)
or
Text on bottom
on top
• To remove inserted text or picture, touch
Menu
>
Remove text
.
picture
Note:
Some menus may require you to
Menu
>
More
touch
7. Touch
Done
.
to complete slideshow.
Handle Received Messages
When messages are received, a message is
displayed briefly and a new message icon
appears on the status bar.
.
Open and View Text Messages
Do one of the following to open a message:
•Touch
•Touch
Home
, then touch and slide the
status bar down to open the Notifications
panel. Touch the new message to open and
read it.
Home >
>
Messaging
message list, touch the message thread to
open and read it.
, then select an
Menu
, then select
.
or
Remove
. On the
Menu >
>
Te xt
User Guide 39
Page 40

Reply to Text Messages
1. On the
2. Touch the text box at the bottom of the
3. Type your message, then touch
Messaging
message or message thread to open it.
.
screen
screen, touch the text
Send
.
Reply to Text Messages with Multimedia Messages
1. On the
2. Touch
3. Touch the text box at the bottom of the
4. Type your message, then touch
Messaging
message or message thread to open it.
Menu
The text message automatically converts
into a multimedia message.
.
screen
screen, touch the text
>
Add subject
or
Attach
Send
.
.
Open and View Multimedia Messages
Note:
The attachment icon indicates that
the message is a multimedia message.
Auto Retrieve Enabled
1. On the
2. Touch
Messaging
multimedia message to open it.
screen, touch the
to play the file.
Auto Retrieve Disabled
1. On the
2. Touch
Messaging
multimedia message to open it.
Download
message.
screen, touch the
to download the entire
Reply to Multimedia Messages
1. On the
2. To reply, touch the text box at the bottom of
3. Type your message, then touch
Messaging
multimedia message to open it.
n.
the scree
screen, touch the
Send
.
40 Send Messages
Page 41

Forward Messages
1. When viewing the received message, touch
and hold on the message thread that you
want to forward.
2. On the options menu, touch
3. On the To field, enter the recipient’s name
or number.
4. Touch
Send
to forward the message.
Forward
.
Reply with a Copy of the Message
1. When viewing the received message, touch
and hold on the message that you want to
copy.
2. On the options menu, touch
.
text
3. Touch and hold the text box to open the
Edit text
4. Touch
5. Complete your message, then touch
window.
Paste
.
Copy message
Send
Call Sender
When viewing the received message, touch
Menu
>
Call
to call the sender.
View Message Information
1. When viewing the received message, touch
and hold the message.
2. On the options menu, touch
to view the message type, sender
details
and sent date and time.
View message
3. Touch OK to close the message details
window.
Delete Messages
Delete a message in a thread
1. When viewing the received message, touch
and hold the message.
2. On the options menu, touch
3. Confirm deletion or cancel.
message
.
Delete
Delete a thread
1. On the
2. On the options menu, touch
3. Confirm deletion or cancel.
Messaging
the message thread.
screen, touch and hold
Delete thread
Handle Attached Files
Play Attached Files
.
1. When viewing a received message with
files attached, touch the play button to play
the file.
2. During playback, use the playback controls
to rewind, pause/play, or forward the file.
Save Attached Files
You can save the file attachment on the
multimedia message to the SD card.
1. When viewing a received message with
files attached, touch and hold the file.
.
User Guide 41
Page 42

2. On the options menu, touch
to SD card
.
Copy attached
Message Settings
To adjust message settings, from the
Messaging
Storage Settings
Delete Old Messages
Touch to enable or disable this option to delete
old messages as limits are reached.
Text Message Limit
Touch to set the maximum number of text
messages per message thread.
Multimedia Message Limit
Touch to set the maximum number of
multimedia messages per message thread.
Multimedia Message (MMS) Settings
Auto-retrieve
Touch to enable or disable this option if you
want to automatically retrieve multimedia
messages completely. When selected, the
multimedia message header, body, and
attachments are automatically downloaded to
your device. If this option is disabled, only the
message header is retrieved.
screen, touch
Menu > Settings
.
Notification Settings
Notifications
Touch to enable or disable this option if you
want to receive a notification on the status bar
when a new message is received.
Select Ringtone
This option allows you to set the ringtone when
a new message is received.
1. Touch this option to open the Ringtones
window.
2. Touch a ringtone to play it briefly.
3. Touch OK to select ringtone.
Vib rate
Touch to select the vibrate status when a new
message is received.
42 Send Messages
Page 43

Use Email
Email
allows you to add external POP3 or
IMAP email accounts from web-based email
service providers such as Yahoo!™ Mail,
AOL, or Hotmail.
To access
Add Email Accounts
1. Touch
2. Touch the
3. Touch
4. On the
5. Touch
6. Touch
7. Touch
Create Another Email Account
1. On the Accounts list screen, touch
2. Touch the
3. Touch
4. On the
5. Touch
6. Touch
7. Touch
User Guide 43
Email
, touch
Home >
Home
>
>
Email
your email address.
automatically retrieves the email settings.
Add account
your email address.
automatically retrieves the email settings.
Email address
Next
on the keyboard.
Password
Done
Next
Done
Next
Password
Done
Next
Done
box, type your password.
on the keyboard.
to continue. The device
.
.
Email address
on the keyboard.
box, type your password.
on the keyboard.
to continue. The device
.
>
Email
.
box, then type
Menu >
box, then type
Setting Up a Corporate Email Account
using Microsoft
If your company uses MS Exchange Server
2003 or 2007 as the corporate email system,
you can use this email applicatioin to
wirelessly synchronize your email, contacts,
.
calendar and task information directly with
your company’s Exchange server.
1. Touch
2. Touch
3. Enter your
information, and then touch
your network administrator for further
details.
Email address
•
email address.
Password
•
access password (case-sensitive).
• Select
4. Enter
Server
Domain/User ID
•
domain and user ID.
Password
•
access password (case-sensitive).
Server
•
email address. Typically is in the form
webmail.XXX.com.
Obtain this information from your
company network administrator.
5. Check to select the SSL encryption status,
and tou
®
Exchange ActiveSync®
Home >
Configure your Account
Exchange
User ID, Domain, Password
, and touch
ch
>
Email
.
Email address
: Typically your network
: Typically your network
: Your Exchange server remote
Next
.
and
Next
: Your Outlook corporate
.
Next
.
: Enter your network
.
Password
. Consult
, and
Page 44

6. Read the onscreen activate disclaimer and
Next
touch
7. If desired, touch
contacts and/or calendar.
to continue configuration.
Sync
to synchronize
3. On the options menu, touch
4. Touch
account
.
OK
to confirm.
Remove
Email Account Settings
Compose and Send Emails
1. Touch
2. On the email account inbox, touch
3. On the
Note:
the email addresses with a comma.
4. Enter the subject and complete your
5. Touch
Home >
Compose
To
address. As you type, matching contacts
appear on screen. Touch the contact or
continue typing the email address.
• To add a carbon copy (Cc) or a blind
copy (Bcc), touch
carbon
Cc/Bcc
To send to multiple recipients, separate
age.
mess
Send
>
Email
.
.
field, enter the recipient’s email
.
.
Menu >
Menu > Add
Delete Messages
1. On the email account inbox, touch and hold
the email you want to delete.
Delete
2. On the options menu, touch
.
Delete Email Accounts
1. Touch
2. Touch and hold the email account you want
44 Use Email
to delete
Home >
.
>
Email
.
1. Touch
2. Touch and hold the email account you want
3. On the options menu, touch
4. Touch one of the following to change the
Home
>
> Email
.
to edit.
.
settings
setti
ngs:
Account name
•
account name.
Your name
•
that appears on all your outgoing
messages.
Signature
•
appear on all your outgoing messages.
Email check frequency
•
interval of checking emails from the
server.
Default account
•
the current account as the default email
account.
Email notifications
•
show a notification icon on the status bar
when a new email is received.
Select ringtone
•
device to ring when a new email is
received. On the ringtone menu, touch a
ringtone to play the tone briefly, then
: Select to change the
: Select to change the name
: Select to enter a signature to
: Select if you want the
Account
: Select the
: Select this option to set
: Select this option to
Page 45

touch OK to confirm selection. Select
Silent
if you do not want the device to
ring when a new email is received.
Vibrate
•
•
•
: Select the vibration status when
a new email is received.
Incoming settings
incoming server settings.
Outgoing settings
server settings.
: Select to set
: Select to set outgoing
Use Gmail
Gmail
is the web-based email service provided
by Google. Gmail comes preconfigured on
your device. You can synchronize your Gmail
account on your device with your Gmail
account on the web.
Gmail
, touch
To access
Home >
Setup Gmail
1. Touch
2. Follow the instructions on the screen to
setup
Home
Gmail.
>
>
Gmail
Refresh Email
The Inbox displays all received email
messages on your Gmail account.
Menu > Refresh
Tou ch
emails and synchronize your emails with your
Gmail web account.
User Guide 45
to send or receive new
>
Gmail
.
Create and Send Emails
1. From the Inbox, touch
2. On the
3. Enter the subject and compose your email.
4. Touch
To
address. To send to multiple recipients,
separate the email addresses with a comma
and add as many recipients as you want.
• To add a carbon copy (Cc) or blind
field, enter the recipient’s email
n copy (Bcc), touch
carbo
Cc/Bcc
.
.
Attach Picture File to Email
1. On the compose email screen, touch
Menu > Attach
2. Select the picture you want to attach.
3. Complete your email.
.
4. Touch
.
Remove Attached File
To remove the attachment, touch the x button
next to the filename.
Add Signature to Email
1. From the Inbox, touch
Settings > Signature
2. On the text box, type your signature.
OK
3. Touch
.
View Sent Messages
From the Inbox, touch
.
Sent
Menu > Compose
Menu > Add
.
Menu > More >
.
Menu > Go to labels >
.
Page 46

Save Email as Draft
On the compose email screen, touch to save
the email as a draft.
View Draft Email
From the Inbox, touch
to display your draft email message.
Drafts
Menu > Go to labels >
Reply to All Recipients
1. From the Inbox, touch to open and view the
email message.
>
2. Touch
3. Type your reply message.
4. Touch
.
.
Receive and Read Emails
When new email messages are received, a
message is displayed briefly and a new email
message icon appears on the status bar.
Open and Read Received Email
To view emails, do one of the following:
•Touch
• From the Inbox, touch the email message to
Note:
Reply to Sender
1. From the Inbox, touch to open and view the
2. Touch
3. Type your reply message.
4. Touch
46 Use Gmail
Home
bar to open the notifications panel. Touch
the new email to open and read it.
open and read it.
Unread messages are bolded.
email message.
, then slide down the status
.
.
Forward Email
1. From the Inbox, touch to open and view the
email message.
>
2. Touch
3. On the To field, enter the recipient’s email
address. To send to multiple recipients,
separate the email addresses with a comma
and add as many recipients as you want.
4. Touch
.
.
Handle Emails
Search for Email
You can search email by sender, subject or
label.
1. From the Inbox, touch
2. Touch the search box, then type the words
3. Touch
to search
.
Search
Archive Email Messages
1. In the message thread, touch the email
header or message.
2. Touch
Archive
.
.
Menu > Search
.
Page 47

Display Archived Email
From the Inbox, touch
.
All Mail
Menu > Go to labels >
Add or Remove Star on Email
1. In the message thread, touch the email
header or message.
2. Touch
Menu > Add star
to add or remove star.
or
Remove star
Change Labels
1. In the message thread, touch the email
header or message.
2. Touch
Note:
labels. This can only be done on Gmail’s web
site.
Menu > Change labels
change the label of the conversation.
You cannot use the device to create
to add or
Delete Email
1. In the message thread, touch the email
header or message.
2. Touch
Delete
to delete the email message.
Mute Email
1. In the message thread, touch the email
header or message.
2. Touch
Menu > Mute
additions to the message thread out of your
Inbox.
to keep all future
Report Spam Email
1. In the message thread, touch the email
header or message.
2. Touch
Menu > More > Report spam
report the email message as spam.
Handle Email Message Threads
Open and Read Message Threads
1. From the Inbox, touch and hold the
message thread.
2. Touch
Archive Message Threads
1. From the Inbox, touch and hold the
2. On the options menu, touch
Display Archived Message Threads
From the Inbox, touch
All Mail
Mute Message Threads
1. From the Inbox, touch and hold the
2. On the options menu, touch
Read
.
message thread.
.
message thread.
all future additions to the message thread
out of your Inbox.
Menu > Go to labels >
Archive
Mute
to
.
to keep
User Guide 47
Page 48

Mark Email Read or Unread
1. From the Inbox, touch and hold the
message thread.
2. On the options menu, touch
Mark unread
bold in the Inbox.
. Unread messages appear in
Mark read
or
Delete Message Threads
1. From the Inbox, touch and hold the
message thread.
2. On the options menu, touch
Delete
.
Add or Remove Star on Message Threads
1. From the Inbox, touch and hold the
message thread.
2. On the options menu, touch
Remove star
message thread.
to add or remove star on the
Add star
or
Change Labels
1. From the Inbox, touch and hold the
message thread.
2. On the options menu, touch
to add or change the label of the message
thread.
Note:
You cannot use the device to create
labels. This can only be done on Gmail’s web
site.
Change labels
Report Spam Message Threads
1. From the Inbox, touch and hold the
message thread.
2. On the options menu, touch
to report the message threads as spam.
Report spam
Gmail Account Settings
1. From the Inbox, touch
Settings
.
2. Touch one of the following to change the
settings:
•
Signature
is added at the end of the emails.
•
Confirm actions
confirmation box when you manage a
message thread.
•
Reply all
responding to messages.
•
Auto-advance
show after you delete or archive a
conversation.
•
Message text size
message text size.
•
Batch operations
batch operations features, such as:
archive, delete, or apply a label to
multiple emails at once.
•
Clear search history
search history.
•
Labels
to synchronize.
: Select to enter a signature that
: Select to reply to all when
: Select to set which Gmail labels
Menu > More
: Select to show a
: Select which screen to
: Select to set the
: Select to allow the
: Select to clear the
>
48 Use Gmail
Page 49

•
Email notifications
notification icon on the status bar when
you receive a new email.
Select ringtone
•
device to ring when a new email is
received. On the ringtone menu, touch a
ringtone to play the tone briefly, then
OK
to confirm selection. Select
touch
Silent
if you do not want the device to
ring when a new email is received.
Vibr ate
•
•
3. Touch
: Select the vibrate status when a
new email is received.
Notify once
notification only once.
Back
to save your changes.
: Select to show a
: Select if you want the
: Select to enable email
Use Google Talk
Google Talk
provided by Google. Google Talk lets you chat
with other people that also have a Google
account. Your Google Talk account is based on
the Google account set on your device.
Sign In and Chat
Tou ch
Tal k.
Add New Friends
You can only add people who have a Google
account.
1. On the Friends list screen, touch
is the instant messaging program
Home >
Add friend
>
Ta lk
.
to open Google
Menu >
User Guide 49
Page 50

2. Enter the Google Talk ID or the Gmail
email address of the person you want to
add.
3. Touch
Send invitation
.
View Your Invitations
On the Friends list screen, touch
More > Invites
screen lists all chat invitations that you have
sent.
Note:
that invitation disappears from the list.
. The pending invitations
When a person accepts your invitation,
Menu >
Accept and Cancel Invitations
On the Friends list screen, touch
invitation
, and touch
Accept
or
Chat
Cancel
.
Change Online Status and Message
1. On the Friends list screen, touch the online
status icon that appears beside your email
address.
2. Select the status that you want from the
menu.
3. Type your desired status message.
4. Touch
Done
on the on-screen keyboard.
Start a Chat
1. Touch a friend on the Friends list.
2. Touch the text box, then type your
message.
3. Touch
Send
.
Switch Between Active Chats
You can conduct multiple chats at the same
time and switch between active chats.
1. On a chat screen, touch
.
chats
2. On the panel, touch the friend you want to
chat with.
Menu > Switch
Close a Chat
Do one of the following:
• On the Friends list screen, touch and hold a
friend. On the options menu, touch
.
chat
• On a chat screen, touch
•Touch
Menu
close all the active chats.
>
More
>
Menu > End chat
Close all chats
End
to
Manage Your Friends
Friends on the friends list screen are sorted
according to their online status and are listed
alphabetically.
View Friends List
By default, only the friends that you frequently
chat with are displayed on the friends list
screen.
To list all your friends, touch
.
friends
To display only the friends that you frequently
chat with, touch
Menu > Most popular
Menu > All
.
.
50 Use Google Talk
Page 51

Block Friends
You can block friends from sending you
messages. Blocked friends are removed from
your friends list.
1. On the Friends list screen, touch and hold
the name of the friend you want to block.
2. On the options menu, touch
That friend is removed from your friends
list and is added to the blocked friends list.
Block friend
Unblock Friends
1. On the Friends list screen, touch
>
Blocked
More
2. On the Blocked Friends list, touch the name
of the friend you want to unblock.
3. Touch OK to confirm.
.
Menu >
Mobile Indicators
Check Friends’ Device
You can check what device your friends use to
chat in Google Talk.
• If an Android icon appears on the right of
your friend’s name, it indicates that your
friend is using an Android phone.
• If no icon is displayed, it indicates that your
friend is using a computer.
Display Mobile Indicator
You can choose to show a mobile indicator
along with your name to let your friends know
the type of mobile device you are using.
User Guide 51
1. On the Friends list screen, touch
2. Touch
.
Settings
Mobile indicator
Sign Out
On the Friends list screen, touch
.
to sign out from Google Talk.
out
Google Talk Settings
1. On the Friends list screen, touch
2. Touch one of the following to change the
.
Settings
settings:
• Automatically sign in
automatically sign in to Google Talk
every time you turn on your device.
•
Mobile indicator
status to your friends.
•
Automatic away-status
away status when the screen is turned off.
•
Clear search history
search history.
•
IM notifications
notification on the status bar when a new
instant message is received.
•
Select ringtone
device to ring when a new instant
message is received. On the ringtone
menu, touch a ringtone to play the tone
briefly, then touch
selection. Select
: Select to show your
: Select to receive a
: Select if you want the
OK
Silent
Menu >
, then touch
: Select to
: Select to show
: Select to clear the
to confirm
if you do not want
Back
Menu > Sign
Menu >
.
Page 52

the device to ring when a new instant
message is received.
•
Vibr ate
: Select the vibrate status when a
new instant message is received.
•
Terms & privacy
: Select to display the
Google legal information.
52 Use Google Talk
Page 53

6 Make Connections
Use Wi-Fi
Wi-Fi provides wireless Internet connection
when connected to a wireless access point
within a 328-feet (100-meter) distance.
Note:
The availability and range of Wi-Fi
varies depending on environmental
obstructions through which the signal passes.
Turn On Wi-Fi
1. Touch
2. Touch the
Connect to a Wireless Network
1. Touch
2. Touch
3. Touch a Wi-Fi network to connect to.
Home > Menu > Settings >
Wireless & networks
Wi-Fi
Wi-Fi. The device scans for available
wireless networks.
Home > Menu > Settings >
Wireless & networks
Wi-Fi settings
name and security settings of available
wireless networks under the Wi-Fi
networks list.
• If you select an open network, your
device will automatically be connected.
• If you select a network that is secured
with WPA or WEP, enter the WPA or
WEP key, then touch
.
check box to turn on
.
to view the network
Connect
.
Note:
The next time your device connects to a
previously accessed secured network, you will
not be prompted for the security key again.
Connect to Another Wi-Fi Network
1. Touch
2. Under Wi-Fi networks, do one of the
Home > Menu > Settings >
Wireless & networks
following:
• Touch an available Wi-Fi network to
connect to.
• Touch
Add Wi-Fi network
network you want to connect to is not on
the list. Enter the Network SSID and
select the security level, then touch
• Touch
Menu > Scan
available Wi-Fi networks.
>
Wi-Fi settings
if the
to manually scan for
.
Save
Network Notification
Tou c h the
notify
Network notification
you when an open network is available.
checkbox to
Use WPS (Wi-Fi Protected Setup)
Connect another device using WPS (Wi-Fi
Protected Setup)
1. Touch
Home
>
Wireless & networks
settings
Menu
>
Add WPS network
>
Settings
>
Wi-Fi
>
.
.
User Guide 53
Page 54

2. Select
3. If you select
4. Touch
Pin number
WPS method
enter the PIN number.
Start
.
or
Push button
.
Pin number
, select
SSID
in
, and
and other devices can also detect your
device for 120 seconds.
Off
: Bluetooth is turned off. Information
•
cannot be sent or received when Bluetooth
is turned off.
Check the Wireless Network Status
Do one of the following to check the
connection status of a wireless network:
• Check if the Wi-Fi icon appears on the
status bar. The lighted bars indicate the
signal strength.
•Touch
Home > Menu > Settings >
Wireless & networks
and the wireless network that the device is
currently connected to. The Wi-Fi network
name, status, speed, signal strength,
security, and IP address are displayed.
>
Wi-Fi settings
Use Bluetooth
Bluetooth technology allows devices to
wirelessly exchange information over a short
distance of up to 32 feet (9.8 meters).
Bluetooth operates in three modes:
•On: Bluetooth is turned on. Your device
can detect other Bluetooth devices but
other devices cannot detect your device.
Discoverable
•
device can detect other Bluetooth devices
54 Use Bluetooth
: Bluetooth is turned on. Your
Turn On Bluetooth
1. Touch
2. Touch the
3. To make your device discoverable, touch
,
Change Device Name
The device name is the name used to identify
your device in a Bluetooth network.
1. Turn on Bluetooth.
2. On the
3. Type the name of your device.
4. Touch OK.
Home > Menu > Settings
Wireless & ne tworks
Bluetooth.
Bluetooth settings
Discoverable
Bluetooth devices to detect your device for
120 seconds.
screen, touch
name
Bluetooth
Wireless & network settings
.
.
check box to turn on
, then select
check box to enable other
Bluetooth settings > Device
>
Page 55

Pair and Connect to Bluetooth Devices
Before you can connect to other Bluetooth
devices, you must pair the devices first.
1. Turn on Bluetooth.
2. On the
3. To start pairing, touch the device name that
4. If prompted, enter a passcode to start
5. The pairing and connection status appears
Wireless & networks
Bluetooth settings > Scan for devices
Your device starts scanning for Bluetooth
devices. All detected devices are displayed
Bluetooth devices
under
Note:
Make sure the device that you want
to pair with has Bluetooth turned on and is
discoverable.
you want to pair with.
pairing. The same passcode must also be
entered on the Bluetooth device.
Note:
For car kits, enter “0000” or “1234”.
If it does not work, consult the Bluetooth
devices documentation.
below the Bluetooth device name. When
Bluetooth hands-free headsets or car kits
are connected to your device, the Bluetooth
connection icon appears on the status bar.
Note:
When a second headset is paired, the
first headset is automatically disconnected.
Once a Bluetooth device has been paired,
the devices will not prompt for passcode
entry again.
screen, touch
.
.
Disconnect Bluetooth Devices
1. Touch
2. Under the Bluetooth devices section, touch
3. On the options menu, touch
Home > Menu > Settings >
Wireless & networks > Bluetooth
.
settings
and hold the connected device.
Disconnect
.
Unpair Bluetooth Devices
1. Touch
2. Under the Bluetooth devices section, touch
3. On the options menu, touch
Home > Menu > Settings >
Wireless & networks > Bluetooth
.
settings
and hold the paired device.
Disconnect & unpair
Unpair
(when connected).
or
Send Contacts via Bluetooth
1. Touch
2. Touch a contact.
3. Touch
4. Select a device.
Note:
this feature.
Home > Contacts
Menu
>
Turn on Bluetooth function before using
Share
.
>
Bluetooth
.
User Guide 55
Page 56

Connect to a Computer
You can connect your device to a computer to
transfer pictures, videos, and music files. To do
this, you must set the device’s storage card as a
USB drive.
Use the Storage Card as a USB Drive
1. Connect the device to the computer using
the supplied USB cable.
2. Touch the status bar and slide it downwards
to open the notifications panel.
3. On the notifications panel, touch
connected
4. Touch
5. Transfer files from your computer to your
device or vice versa using copy and paste
functions.
Note:
the computer, your device will not recognize
the storage card and you will not be able to use
some of the applications such as Camera.
.
Turn on USB storage
When the storage device is mounted to
USB
> OK.
4. Touch
Remove the Storage Card
When you need to remove the storage card
while the device is turned on, you must
unmount the storage card first to avoid
damaging the card or corrupting stored data.
1. Touch
2. Touch
3. Remove the storage card. See “Remove the
Turn off USB storage
Home > Menu > Settings
card & phone storage
Unmount SD card
Storage Card” on page 13.
.
.
> OK.
>
SD
Turn Off USB Storage
1. Check the USB device icon on the task bar
of your computer and follow the
instructions to safely unplug the USB
cable.
2. Touch the status bar and slide it downwards
to open the notifications panel.
3. On the notifications panel, touch
USB storage
56 Connect to a Computer
.
Turn off
Page 57

7 Internet
This section provides information on using the
Browser, and other Internet-based applications
on your device.
Note:
Wi-Fi connections must be enabled first
to use these applications. See “Use Wi-Fi” on
page 53.
Browser
Use
Browser
device.
Launch Browser
Do one of the following:
•Touch
• Touch a web link in an email message or a
text message.
Open Web Pages
1. Launch Browser.
2. Touch the web address field and type the
web
type, matching web page addresses are
displayed on screen. Touch an address to go
directly to the web page or continue typing
the web page address.
3. Touch
User Guide 57
to surf the Internet on your
Home >
page address you want to open. As you
>
Browser
.
.
Set Your Home Page
1. Launch Browser.
2. Touch
3. Enter the web page address that you want
4. Touch
Menu > More > Settings > Set
home page
to set as your hom
current page
page as your home page.
.
e page, or touch
to set the currently displayed
OK
.
Use
Bookmark a Page
1. Launch Browser.
2. Go to the web page that you want to
book
mark.
3. Touch
4. On the
5. Edit the bookmark
Menu > Bookmarks
Bookmarks
bookmark...
OK
.
touch
or
Add
.
tab, touch
.
Name
if necessary, then
Add
Page 58

Open a Bookmark
1. Launch Browser.
2. Touch
3. On the
Menu > Bookmarks
Bookmarks
following:
• Touch the bookmark you want to open.
• Touch and hold a bookmark name. On the
options menu, touch
new window
.
.
tab, do one of the
Open
or
Open in
Edit a Bookmark
1. Launch Browser.
2. Touch
3. On the
4. On the options menu, touch
5. Enter the changes and touch OK.
Menu > Bookmarks
Bookmarks
bookmark name.
bookmark
.
.
tab, touch and hold a
Edit
Navigate on Web Pages
Use the Trackball or slide your finger on the
screen to navigate the areas of a web page.
Zoom In or Out on Web Pages
1. Slide your finger on the screen to display
the zoom buttons.
2. Touch the + button to zoom in or the button to zoom out on the web page.
Open a New Window
You can open a new browser window to easily
view and switch between multiple web sites.
1. Launch Browser.
2. Touch
3. Type a web page address on the address
Menu > New window
field or open a bookmark page.
.
Switch Between Windows
1. On a browser window, touch
Windows
2. Touch the browser window you want to
view.
Note:
button at the right of the Web page name you
want to close.
.
To close a browser window, touch the x
Menu >
Find Text on Web Pages
Your device supports searching for text within
web page.
1. On the browser window, touch
More > Find on page
2. Type the text you want to find. As you type,
matching characters are highlighted in
green.
• Touch
Done
• Touch the left or right arrows to go to the
previous or next matching item.
3. Touch the x button to close the search bar.
on the on-screen keyboard.
Menu >
.
58 Browser
Page 59

Copy Text From Web Pages
You can highlight items on the web page and
copy them to the clipboard.
1. On the browser window, touch
More > Select text
2. Touch and drag your finger to highlight the
text that you want to copy. When you lift
your finger, the highlighted text are
automatically copied to the clipboard.
.
Menu >
View Web Page Information
1. On the browser window, touch
More > Page info
2. The web page information is displayed.
Tou ch
window.
OK
.
to close the information
Menu >
Share Web Page
1. On the browser window, touch
More > Share page
2. Select an application for sharing.
.
Menu >
View Downloads
On the browser window, touch
Downloads
•Touch
to display the download history list.
Menu > Cancel all downloads
cancel current download process.
Menu > More >
to
Set Browser Settings
Set Text Size
1. On the browser window, touch
More > Settings
2. Touch an option.
>
Text s i z e
Set Zoom
1. On the browser window, touch
More > Settings
2. Touch an option.
>
Default zoom
Overview Pages
On the browser window, touch
>
Settings
the overview of newly opened web pages.
Open pages in overview
Set Text Encoding
1. On the browser window, touch
More > Settings
2. Touch an option.
>
Text encoding
Block Pop-up Windows
On the browser window, touch
>
Settings
Block pop-up windows
Load Images
On the browser window, touch
>
Settings
web pages.
Load images
to display images on
Menu >
.
Menu >
Menu > More >
to display
Menu >
Menu > More >
.
Menu > More >
.
.
User Guide 59
Page 60

Auto-fit Pages
On the browser window, touch
>
Settings
fit the screen.
Auto-fit pages
Menu > More >
to format web pages to
Landscape-only Display
On the browser window, touch
>
Settings
web pages in landscape mode.
Landscape-only display
Menu > More >
to display
Enable JavaScript
On the browser window, touch
>
Settings
Enable JavaScript
Menu > More >
.
Enable Plug-Ins
1. On the browser window, touch
More > Settings
2. Touch an option.
>
Enable plug-ins
Menu >
.
Open In Background
On the browser window, touch
>
Settings
windows behind the current one.
Open in background
Menu > More >
to open new
Clear Cache
1. On the browser window, touch
More > Settings
2. Touch OK to delete all cache.
>
Clear cache
Menu >
.
Clear History
1. On the browser window, touch
More > Settings
60 Browser
>
Clear history
Menu >
.
2. Touch OK to delete the browser navigation
history.
Accept Cookies
On the browser window, touch
>
Settings
and read cookies.
Accept cookies
Menu > More >
to allow sites to save
Clear All Cookie Data
1. On the browser window, touch
More > Settings
2. Touch OK to delete all cookies.
>
Clear all cookie data
Menu >
Remember Form Data
On the browser window, touch
>
Settings
data in forms for later use.
Remember form data
Menu > More >
to remember
Clear Form Data
1. On the browser window, touch
More > Settings
2. Touch OK to delete all form data.
>
Clear form data
Menu >
.
Enable Location
On the browser window, touch
>
Settings
request access to your location.
Enable location
Menu > More >
to allow web sites to
Clear Location Access
1. On the browser window, touch
More > Settings
>
Clear location access
Menu >
.
.
Page 61

2. Touch OK to clear all location access of
websites.
Remember Passwords
On the browser window, touch
>
Settings
names and passwords of web sites.
Remember passwords
Menu > More >
to save user
Clear Passwords
1. On the browser window, touch
More > Settings
2. Touch
OK
>
Clear passwords
to clear all saved passwords.
Menu >
.
Show Security Warnings
On the browser window, touch
>
Settings
warnings if there is a problem with a site’s
security.
Show security warnings
Menu > More >
to show
Website Settings
On the browser window, touch
>
Settings
settings for individual web sites.
Website settings
Menu > More >
to set more advanced
Reset to Default
1. On the browser window, touch
More > Settings
2. Touch
OK
reset to default values.
>
Reset to default
to clear all browser data and
Menu >
.
Close Browser
On the browser window, touch the Home key.
Zio Top Apps
Get the latest information about your device,
such as new applications and other updates
Zio Top Apps
from
Open Zio Top Apps
Tou ch
Home >
.
>
Zio Top Apps
.
User Guide 61
Page 62

8 Google Applications
Google Search
Google Search allows you to search text on
the Internet directly from your device.
Open Google Search
To open Google Search, do one of the
following:
•Touch Se
• Touch the Quick Search Bar.
•Touch Home >
See “Use the Search key” on page 15.
Voice Search
1. Touch Home >
2. Say the information you want to search.
3. Touch a matching item to display the
Search Settings
Open Google Search, then touch Menu >
Search settings.
arch.
>
Google Search.
>
Speak now
A list of possible matches are displayed
on screen.
information.
.
Voice Search
>
• Show w
• Use My
• Sear
• Mana
Phone
Touch one of the following options:
• Sear
to search on the phone.
• Clear shortcuts: Select to clear shortcuts
to recently chosen search suggestions.
Google Maps
Google Maps allows you to keep track of
your location, find places of interest, view
traffic situations, and view detailed
directions to your destination.
eb suggestions: Select to show
suggestions from the Google search
engine as you type on the search bar.
Location: Select to use your
location for Google search results and
other Google services.
ch history: Select to import your
search into suggestions.
ge search history: Select to
manage your search history on the
Web .
chable items: Select to choose what
Open Google Maps
Web
1. Touch Google search.
2. Touch one of the following options:
62 Google Search
Tou ch Home >
>
Maps.
Page 63

Zoom Map
Touch the - button to zoom out on the map
or touch the + button zoom in on the map.
Navigate the Map
To navigate on the map, slide your finger on
the screen towards the direction of the area
you want to view.
Add Map Layer
Layers allow you to view locations and
additional info overlaid on the map.
On the Google Maps screen, touch
touch one or multiple layers of the following
tions:
op
raffic: Add this layer to view real-time
• T
traffic conditions with roads marked in
color-coded lines that indicate the traffic
condition. This mode is available in
selected areas only.
• Satellite: Add this layer to use the same
satellite data as Google Earth. The
images are not real-time and are
approximately one to three years old.
• Terrain: Add this layer to see relief maps
of 3D terrain which will be useful if you
are going hiking, mountain biking,
skiing, etc.
• Buzz: Add this layer to read the
comments posted from the location
shown on Google Maps.
• Latitude: Add this layer to see your
friends’ locations and share yours with
them. You may sign in with your Google
Account to use this feature.
•Touch More Layers to add other layers
including My Maps, Wikipedia, Tra ns it
Lines, and Favorite Places.
, then
Find Your Current Location
On the Google Maps screen, touch . A
blinking blue dot indicates your current
on the map.
location
User Guide 63
Page 64

Note:
My Location setting must be enabled to
use this feature. See “My Location” on
page 92.
Find Places
On the Google Maps screen, touch
touch the category you want to find in the
rby area.
nea
and then
Search Places
1. On the Google Maps screen, touch
Search Maps field
2. On the search box, type the place that
you want to sea
address, a city or type of establishments.
3. Touch
4. Touch a place in the list. A callout
appea
location.
5. Touch the callout to open the location
de
.
rs on the map to indicate the
tails.
.
rch. You can enter an
Get Directions
1. On the Google Maps screen, touch
Menu > Directions.
2. Do one of the following:
• In the first text box, type your starting
point place, then type the destination in
the second te
• Touch the location source buttons to
open the locati
select a starting point and destination.
3. Touch Go.
destination appears in a list.
xt box.
on source menu and
The directions to your
View Directions on Map
On the Directions list screen, touch Menu >
See map to view the directions on a map.
Clear the Map
On the Google Maps screen, touch Menu >
Map to reset the map.
Clear
Android Market
Android Market
download and install applications and fun
games on your phone.
Note:
Some applications may require purchase
via credit card.
allows you to access,
64 Android Market
Page 65

Open Android Market
1. Touch
2. When Android Market is opened for the
3. On the Android Market screen, do one of
Home > >
e, the Terms of Service window
first tim
appears. Touch
the follo
wing:
Search
• Touch
• Touch a category to open a sub-category
• Touch
and view
My apps
more applications.
Market
.
Accept
to continue.
to search Android Market.
to view your downloads.
Get Help About Android Market
On the Android Market screen, touch
to go to the Android Market web site.
Help
Menu >
Find Applications
You can select an application through one of
the following means:
• Select an icon in
• Select a category to browse its content, then
select a subcategory.
Featured
applications.
Install Applications
1. Select the item that you want to download.
2. On the item details screen, view ratings of
the appl
ication, comments by users and
developer information.
Buy
or
Install
3. Touch
Note:
To check the status of download, open
the Notifications panel. To stop the download,
Cancel
download
.
apps
.
icon will appear on the status bar.
touch
4. When installation is complete, the content
5. On the Android Market screen, touch
6. Touch the application, then touch
to start installation.
My
Open
.
User Guide 65
Page 66

Uninstall Applications
1. On the Android Market screen, touch
to view downloaded applications.
apps
2. Touch the application that you want to
remo
ve.
Uninstall
OK
to confirm.
.
OK
.
3. Touch
4. Touch
5. Select the reason for removing the
appli
cation, then touch
Latitude
My
Latitude allows you to view your friends’
location and share your location with them
on Google Maps.
Note:
• My Location setting must be enabled to
e this feature. See “My Location” on
us
page 92.
• You need to login with your Google
account to use this feature.
Open Latitude
Tou ch Home >
>
Latitude.
Navigation
Google Maps Navigation is an Internet
based GPS navigation which allows you to
search for destinations and provide
directions by voice.
Open Navigation
Tou ch Home >
Note: This feature i
locations.
>
Navigation.
s not available in all
66 Latitude
Page 67

Places
Places allows you to find places that are
near your current location.
Note: My L
to use this feature. See “My Location” on
page 92.
ocation setting must be enabled
Use Places
1. Touch Home >
2. Touch a category to view the list of
establishments near
the place to search on the Search bar.
>
Places.
your location or type
News & Weather
News & Weather
weather forecast in your location and read the
latest stories, sports, and entertainment news
headlines on your device.
Use News & Weather
Tou ch Home >
• Swipe your finger to the right or to the left
to browse the categories.
• Touch a headline to open Browser and read
the complete news story.
• To refresh News & Weather, touch
Menu
allows you to view the
>
News & Weather.
>
Refresh
.
News & Weather Settings
On the News & Weather screen, touch
Menu > Settings.
Weather settings
Use this setting to set the location and the
temperature unit to use.
News settings
Use this setting to choose the news topics that
you want to view on your device and manage
other downloads.
Refresh settings
Use this setting to set up auto-refresh and
refresh interval.
User Guide 67
Page 68

9 Camera and Multimedia Applications
1
3
6
5
4
2
7
Camera and Camcorder
Your device has a camera which allows you to
The screen automatically switches to landscape
orien
tation.
take pictures and videos.
Camera
• To take pictures, activate the
• To record videos, activate the
.
Camcorder
.
Camera Tips
Before using your device’s camera, here are
some tips:
• You must have a microSD™ card installed
before taking pictures or videos.
• You cannot use your camera while your
device is connected to a PC and the storage
card is recognized as a USB drive of the PC.
• If you get a low memory error, check the
resolution and quality compression
settings.
Activate the Camera
Do one of the following to activate the camera.
Home
•Touch
• Press and hold the
68 Camera and Camcorder
>
>
Camera
Camera
button.
.
1.
Store location
on page 69)
Settings
2.
page 71)
Review
3.
button
4. Slide to select capture mode.
Camera
5.
White balance
6.
Balance” on page 69)
Zoom control
7.
page 69)
icon (see “Store Location”
icon (see “Camera Settings” on
button
icon (see “Set White
icon (see “Zoom Images” on
Page 69

Take Pictures
1. Activate the camera.
2. Frame your subject on the screen.
3. Scroll the trackball to adjust the brightness
level.
4. Do one of the following to take the picture:
• Press the
• Touch the
Change Settings
Tou c h t he
the camera settings. See “Camera Settings” on
page 71.
Store Location
Tou c h t he
to save the location information of the image.
Set White Balance
Tou c h t he
option:
Fluorescent
Zoom Images
Tou c h t he
slider to adjust zoom.
Preview Pictures
Tou c h t he
captured or saved picture in the microSD card.
Camera
button.
Camera
button on the screen.
Settings
icon to access and modify
Store location
White Balance
Auto, Incandescent, Daylight
, or
Zoom control
Review
icon, then select On
icon, then select an
Cloudy
.
icon, then slide the
button to review the just
,
To see saved pictures, touch the screen and
swip
e your finger to the left or to the right to
see the previous or the next picture.
Review
The
picture.
Touch one of the following buttons:
•
•
•
•
•
•
See “Use Gallery” on page 71 for more
information.
screen allows you to manage the
Share
: Select to send the picture via
multimedia message, Email, Gmail, Picasa,
or Bluetooth.
Delete
: Select to delete the picture from the
storage card. Touch
confirm.
More
>
Details
the picture.
More
>
Set as
contact icon or wallpaper.
More
>
Crop
More
>
Rotate Left/Rotate Right
to rotate the picture.
Confirm Delete
: Select to see the details of
: Select to set the picture as a
: Select to crop the picture.
to
: Select
Activate the Camcorder
To activate the camcorder, press and hold the
Camera
button, then slide the slider to the
Video icon
.
User Guide 69
Page 70

2
4
3
1
65
Set Video Quality
Tou c h the
video quality option:
•
•
•
1.
Settings
icon
Review
2.
3. Slide to select capture mode
4.
5.
6.
Record Videos
1. Activate the camcorder.
2. To start recording, press the
3. To stop recording, press the
Set White Balance
Tou c h t he
option:
Fluorescent
70 Camera and Camcorder
button
Record/Stop
White balance
Video Quality
button or touch the
button
icon
icon
Record
screen.
Stop
again or touch the
button on the
screen.
White Balance
icon, then select an
Auto, Incandescent, Daylight
, or
Cloudy
.
Camera
button on the
Camera
button
,
•
Preview Videos
Tou c h the
screen to play the just recorded video. Touch
the playback buttons to rewind, pause, or
forward playback.
To see saved videos, swipe your finger to the
left
next video.
The
recorded video.
Video Quality
High (30m)
: Select this option for a high
icon, then touch a
quality video with a maximum length of 30
minutes.
Low (30m)
: Select this option for a normal
quality video with a maximum length of 30
minutes.
MMS (Low, 30s)
: Select this option to
record videos that you want to send via
MMS. The recording automatically stops if
the video length reaches 30 seconds.
YouTube (High, 10m)
: Select this option
to record video that you want to upload to
YouTube. The recording automatically
stops if the video length reaches 10
minutes.
Review
button, then touch the
or to the right to see the previous or the
Review
screen allows you to manage the
Page 71

Touch one of the following buttons:
• Share
: Select to share the recorded video
via Bluetooth, Messaging, YouTube,
Gmail, or Email.
Delete
•
•
: Select to delete the recorded video
from the storage card. Touch
to confirm.
Delete
More > Details
information.
: Select to view the video
Confirm
Camera Settings
You can access the capture settings both in
Camera
or
Tou c h t he
scroll through the following settings:
Note:
Camera mode.
•
•
•
•
•
•
User Guide 71
Camcorder
Settings
Some options may only be available in
Focus mode
Auto, Macro
Picture size
3.2M Pixels, 2.0M Pixels, 0.8M Pixels
VGA
.
Picture quality
Super Fine, Fine
option:
Color effect
None, Mono, Sepia, Negative
effect:
Aqua
.
Night mode
mode.
Auto exposure
Frame average, Center weighted
.
metering
mode.
icon. Slide the slider to
: Touch a focus mode option:
, or
Off
.
: Touch a picture size option:
: Touch a picture quality
, or
Enable
Normal
to enable night
: Touch an option to add color
: Touch
: Touch an exposure option:
, or
, or
.
, or
Spot
Lens shading
•
lens shading.
Camera settings
•
defaults
settings.
: Touch
Enable
to enable
: Touch
to restore the default camera
Restore to
Use Gallery
Use the
Gallery
captured pictures, videos, and media files
stored on the storage card and other
downloads.
Open Gallery
Tou ch
If files in the storage card are saved in folders,
ery displays these folders as separate
Gall
albums. “
collection.
is inserted or no media files are in the folders.
Gallery may have the following albums:
Camera
•
the device camera are displayed in this
album. To open this album from
mode, touch the
[SD card label]
•
storage card are displayed in this album.
download
•
emails or text messages.
to retrieve and playback
Home
>
>
Gallery
.
There are no items in your
” is displayed when no storage card
: Pictures or videos captured using
Review
: Media files stored in the
: Media files downloaded from
Camera
button.
Page 72

Pictures
View Pictures
1. On the Gallery screen, touch the album to
view pictures inside the album.
2. To view a picture in full screen, touch the
thumbnail.
Browse Through Pictures
While viewing pictures in full screen, swipe
your finger to the left or to the right to view the
next or the previous picture.
Zoom Pictures
1. While viewing pictures in full screen, touch
the screen to display the zoom controls.
2. Touch the - button to zoom out or touch the
+
button to zoom in.
Select More Folders or Pictures
1. On the Gallery screen, touch and hold a
folder or thumbnail. Check boxes appear on
the upper right corner of the folder or
thumbnail and turns to green if selected.
2. Touch the checkboxes to select the folders
or pictures or touch
folders or pictures.
Select All
to select all
Rotate Pictures
Pictures can be rotated 90 degrees each time a
rotate function is executed.
1. On the Gallery screen, touch and hold a
thumbnail or while viewing pictures in full
screen, touch
2. Touch
Right
More
.
Menu
>
Rotate Left
.
or
Rotate
Crop Pictures
1. On the Gallery screen, touch and hold a
thumbnail or while viewing pictures in full
screen, touch
2. Touch
tool.
3. Do one of the following:
• To adjust the crop size, touch and hold
the edge of the cropper tool to display the
cropper arrows. Drag your finger to
resize it.
• To adjust the crop size while keeping the
aspect ratio, touch and hold one of the
four corners of the cropper tool then drag
inwards or outwards from the center.
• To move the cropper tool to another area
on the picture, touch and hold inside the
cropper tool, then drag your finger to the
desired area.
4. Touch
new file. The original picture is unchanged.
Menu
.
More
>
Crop
to display the crop
Save
to save cropped picture as a
72 Use Gallery
Page 73

Send Pictures Using Messaging / Email / Gmail
1. On the Gallery screen, touch and hold a
thumbnail or while viewing pictures in full
screen, touch
2. Touch
3. Touch one of the following:
Gmail
4. The picture is automatically attached to
your
compose your email message.
5. Touch
Menu
Share
, or
email. Enter the recipient and
Send
.
to display the options menu.
Email
or
.
.
Messaging
Upload Pictures to Picasa
Picasa is a photo organizing service provided
by Google. You must have a Google account in
order to use this service.
1. On the Gallery screen, touch and hold a
bnail or while viewing pictures in full
thum
screen, touch
2. Touch
3. Touch
4. Enter the
the
picture.
5. Touch
http://picasaweb.google.com.
Menu
.
Share
to display the options menu.
Picasa
.
Caption
Album
Upload
for the picture and select
where you want to upload the
. Pictures are uploaded to
discoverable and pair devices. See “Use
Bluetooth” on page 54.
1. On the Gallery screen, touch and hold a
thum
bnail or while viewing pictures in full
Menu
screen, touch
2. Touch
3. Touch
,
4. Touch the device name of the Bluetooth
Share
Bluetooth
devi
ce that you want to send the picture to.
.
to display the options menu.
.
Delete Pictures
1. On the Gallery screen, touch and hold a
thumbnail or while viewing pictures in full
screen, touch
2. Touch
3. Touch
Menu
.
Delete
.
Confirm Delete
Set Pictures as Contact Icons
1. On the Gallery screen, touch and hold a
thumbnail or while viewing pictures in full
screen, touch
2. Touch
menu.
3. Touch
4. Touch a contact name that you want to
assig
picture.
5. Touch
Menu
.
More > Set as
Contact icon
n the picture to. If necessary, crop the
Save
to open the options
.
.
.
Send Pictures via Bluetooth
To send pictures via Bluetooth, you must turn
on Bluetooth first, make your device
User Guide 73
Page 74

Set Pictures as Wallpaper
1. On the Gallery screen, touch and hold a
thumbnail or while viewing pictures in full
screen, touch
2. Touch
menu.
3. Touch
4. Touch the crop tool to adjust the picture
size.
5. Touch
Menu
More
>
Set as
Wallpaper
Save
.
.
to open the options
.
View Picture Details
1. On the Gallery screen, touch and hold a
thumbnail or while viewing pictures in full
screen, touch
2. Touch
information such as size, file type, and date
when the picture was taken.
3. Touch
Menu
More
OK
.
>
Details
to display file
to close the detail window.
Play and Stop Slideshow
1. On the Gallery screen, touch an album,
then a thumbnail to view in full screen.
2. Touch
3. To stop slideshow, touch the screen.
Slideshow
to start slideshow.
Send Videos Using Messaging / Email / Gmail
1. On the Gallery screen, touch and hold a
thumbnail.
Share
2. Touch
3. Touch one of the following:
Gmail
4. The video is automatically attached to your
emai
your email message.
5. Touch
to display the options menu.
, or
Email
.
l. Enter the recipient and compose
Send
or
.
Messaging
,
Upload Videos to YouTube
You can upload your video to YouTube. A
YouTube account and Wi-Fi connection is
required to use this function.
1. On the Gallery screen, touch and hold the
bnail that you want to upload.
thum
Share
2. Touch
3. Touch
4. Enter the
your video. Select the
you want to share the video with everyone.
5. Touch
to display the options menu.
YouTube
.
Title, Description
Upload
Public
.
, and
Tags
check box if
for
Send Videos via Bluetooth
Videos
Play Videos
1. On the Gallery screen, touch an album to
view the video thumbnails inside.
2. To play video, touch the thumbnail.
74 Use Gallery
To send videos via Bluetooth, you must turn on
Bluetooth first, make sure your device
discoverable and pair devices. See “Use
Bluetooth” on page 54.
Page 75

1. On the Gallery screen, touch and hold a
thumbnail.
Share
2. Touch
3. Touch
4. Touch the device name of the Bluetooth
devic
to display the options menu.
Bluetooth
e that you want to send the video to.
.
Delete Videos
1. On the Gallery screen, touch and hold the
video thumbnail that you want to delete.
Delete
2. Touch
3. Touch
.
Confirm Delete
.
Vie w Vide o Deta ils
1. On the Gallery screen, touch and hold the
video thumbnail that you want to view.
More
>
Details
2. Touch
3. Touch
OK
to close the detail window.
.
Select More Folders or Videos
1. On the Gallery screen, touch and hold a
folder or thumbnail. Check boxes appear on
the upper right corner of the folder or
thumbnail.
2. Touch the check boxes to select the folders
videos or touch
or
folders or videos.
Select All
to select all
Use YouTube
YouTube
that allows you to view videos uploaded by
YouTube members.
Open YouTube
Tou ch
Watch YouTube Videos
1. On the YouTube screen, touch a video to
2. Touch the screen to display the playback
3. Touch
Search for Videos
1. On the YouTube screen, touch at the
2. Enter the keyword to search, and then touch
3. Search results appear below the status bar.
is an online video streaming service
Home >
watch it.
rols. Use the playback controls to
cont
rewind, pause/play, or forward the video.
upper right of the screen to open the search
box.
.
ll through the results and touch a video
Scro
to watch it.
>
Back
to stop playback.
YouTube
.
User Guide 75
Page 76

Share Videos
Playlist button
Shuffle button
Repeat button
Playback
controls
Slider
Elapsed
time
Tot al tim e
1. While viewing videos in a list, touch the
video you want to share.
More
>
Share
2. Touch
3. Touch one of the following:
Gmail
, or
Email
.
Messaging
,
.
4. The video is automatically attached to your
age. Enter the recipient and compose
mess
your email message.
Send
or
5. Touch
.
Use Music
Music
plays digital audio files saved on the
storage card.
To play audio files which are not saved in the
e card, copy the files to the storage card
storag
first. See “Use the Storage Card as a USB
Drive” on page 56 for more details on copying
files.
2. Keep touching to browse through folders
l you reach the music you want to play.
unti
Play Music
1. Open Music and browse for the music you
want to play.
2. Touch the music name to play it. The
back screen opens.
play
Open Music
Tou ch
Home >
screen appears.
Browse for Music
>
Music
. The Music library
1. On the Music library screen, touch a
category to view the contents under that
category. Options are:
Songs
, and
76 Use Music
Playlists
Artists, Albums
.
3. Do one of the following:
• Touch the playback controls to rewind,
e/play, forward playback.
paus
• Touch the rewind button twice to play the
previ
• Touch the Playlist button to view the
,
curren
• Touch the Shuffle button to toggle shuffle
on or of
ous music.
t playlist.
f.
Page 77

• Touch the Repeat button to cycle through
the repeat modes:
Repeating current song
.
off
Repeating all songs
, or
Repeat is
Use Playlist
Create a playlist to organize your music.
Remove Music From Playlists
,
1. Open Music library and browse for the
music that you want to remove from the
playlist.
2. Touch and hold the music to open the
options menu.
3. Touch
Remove from playlist
.
Create Playlists
1. Open Music library and browse for the
music that you want to add to the playlist.
2. Touch and hold the music to open the
options menu.
3. Touch
4. On the
5. Type the name of your new playlist.
6. Touch
New
.
Add to playlist
Add to playlist
Save
.
.
window, touch
Add Music to Existing Playlists
1. Open Music library and browse for the
music that you want to add to the playlist.
2. Touch and hold the music to open the
options menu.
3. Touch
4. On the
User Guide 77
Add to playlist
Add to playlist
name of the playlist that you want to add
the music to.
.
window, touch the
Rename Playlists
1. Open Music library and browse for the
playlist that you want to rename.
2. Touch and hold the playlist.
3. On the options menu, touch
4. Type the new name of the playlist.
5. Touch
Save
.
Rename
Play Music in Playlists
1. Open Music library and browse for the
playlist that you want to play.
2. Touch and hold the playlist.
3. On the options menu, touch
Play
.
Delete Playlists
1. Open Music library and browse for the
playlist that you want to delete.
2. Touch and hold the playlist.
3. On the options menu, touch
Delete
.
.
Page 78

Set Music As Ringtone
1. Open Music and browse for the music that
you want to set as ringtone.
2. Touch and hold the music, then touch
as phone ringtone
.
Use
Delete Music
You can delete music files from the storage
card.
1. Open Music and browse for the music that
you want to delete.
2. Touch and hold the music, then touch
Delete
3. Touch OK to confirm.
.
78 Use Music
Page 79

10 Tools
Clock
You can use your device clock as an alarm
clock or desk clock.
Tip:
Tou c h to turn on/off the backlight.
When turned off, only the date and time
information
Set Alarms
1. Touch
2. Touch
3. Set the time.
4. Touch
5. Touch
6. Touch
7. Touch the
8. Touch
9. Touch
User Guide 79
in green is displayed.
Home >
the Alarms screen.
Add alarm
• Touch the
time.
• Touch to select
Set
Repeat
want the alarm to sound, then touch
Ringtone
Touch a tone to play it briefly, then touch
OK
. Press the Volume button up or down to
select the volume level.
device to vibrate when the alarm sounds.
Label
the name on the text box, then touch
Done
>
Clock
>
to open
.
+
or - buttons to adjust the
AM
or
PM
.
to set the alarm time.
. Select the days that you
to set the alarm ringtone.
Vibrate
check box to set the
to set the alarm name. Type
.
OK
OK
Enable or Disable Alarms
1. Touch
2. Touch the corresponding icon of the
Home >
the Alarms screen.
alarm time that you want to enable. Touch
ain to disable it. If enabled, the indicator
ag
turns green.
>
Clock
Edit Alarms
1. Touch
2. Touch the alarm that you want to edit.
3. Modify the necessary fields.
4. Touch
Home >
the Alarms screen.
Done
.
>
Clock
Delete Alarms
1. Touch
.
2. Touch the alarm that you want to delete.
3. Touch
4. Touch
.
Home >
the Alarms screen.
Delete
.
OK
to confirm.
>
Clock
>
>
>
to open
to open
to open
Page 80

Alarm Clock Settings
1. Touch
2. Touch
Set Alarm in Silent Mode
Tou c h t he
set the alarm to sound even when the device is
in silent mode.
Set Alarm Volume
1. Touch
2. Drag the slider to adjust the alarm volume.
3. Touch
Set Snooze Duration
1. Touch
2. Touch an option.
Set Button Effect
You can set what the volume and camera
buttons do when pressed during an alarm.
1. Touch
2. Touch an option.
Home >
the Alarms screen.
Menu > Settings
Alarm in silent mode
Alarm volume
OK
.
Snooze duration
Volume and Camera
>
Clock
.
.
.
>
to open
check box to
.
Calculator
Use
Calculator
mathematical operations.
to perform basic and advanced
Open Calculator
Tou ch
Home >
>
Calculator
.
Use Calculator
1. Open Calculator.
2. Touch the keys to enter numbers and
symbols to perfo
operations.
• Touch
• Touch
change the panel to advanced operations
panel. Touch a symbol to perform the
operation.
3. Touch
Back
rm mathematical
CLEAR
to delete entries.
Menu > Advanced panel
to close Calculator.
Calendar
Use
Calendar
set reminder alerts.
Open Calendar
Tou ch
to view and schedule events and
Home >
>
Calendar
.
to
80 Calculator
Page 81

Create Events
1. On any Calendar screen, touch
>
2. On the
3. Do one of the following to set the date and
4. Enter the event location and description.
5. If you have more than one Google account,
6. If you want to inform this event to your
7. Touch the
8. Touch the
9. Scroll down to the bottom of the page, then
What
time.
• To set the date and time, touch the
To
date and time boxes. Touch the +
and
-
buttons to adjust the date and time,
or
then touch
• If the event is an all day affair, such as a
birthday, touch the
Tou ch the
+
or - buttons to adjust the date, then
the
Set
touch
select the account to sync in
friend, etc. enter the email address in
Guests
field.
repeat mode option.
reminder option.
• To add more reminders, touch the +
button. You can add up to five reminders.
Done
touch
New event
More
.
box, type the event name.
Set
.
All day
From
and To date boxes, touch
.
Repetition
Reminders
.
Menu >
From
check box.
Calendar
box, then touch a
box, then touch a
.
View Events
You can view the Calendar in a list, by day, by
week, or by month.
View Events by List
On any Calendar screen, select
.
Agenda
View Events by Day
On any Calendar screen, select
• Scroll left to go to the next day’s calendar.
• Scroll right to go to the previous day’s
calendar.
View Events by Week
On any Calendar screen, select
• Scroll left to go to the next week’s calendar.
• Scroll right to go to the previous week’s
calendar.
View Events by Month
On any Calendar screen, select
.
Month
• Scroll up to view the next month’s calendar.
• Scroll down to view the previous month’s
calendar.
• Touch a date to view the event details.
Menu >
Menu > Day
Menu > Week
Menu >
.
.
User Guide 81
Page 82

Modify Events
1. On any Calendar screen, touch the date or
time to open the Event screen.
2. Touch
3. Modify the event, then touch
Menu > Edit event
.
Done
.
Delete Events
1. On any Calendar screen, touch the date or
time to open the Event screen.
2. Touch
3. Touch OK to confirm.
Menu > Delete event
.
Sync Calendar
You can sync Calendar with your email
account.
1. On any Calendar screen, touch
More
>
2. Select an email account to sync
Calendars
3. Touch the email account icon to scroll
through the sync options:
• sync, visible
• synced, not visible
• not synced, not visible.
4. Touch OK.
.
Menu
>
Handle Reminders
When you have an upcoming event, the
calendar icon appears on the status bar. Touch
and hold the status bar then slide downwards to
open the notifications panel.
1. Touch the event on the notification panel.
2. Touch either of the following:
•
Snooze all
reminders for 5 minutes.
•
Dismiss all
reminders.
• Touch
screen.
: Select to snooze all event
: Select to dismiss all event
Back
to close the event detail
Calendar Settings
Hide Declined Events
1. On any Calendar screen, touch
2. Touch the
>
Settings
More
to hide all declined events.
.
Hide declined events
Set Alerts and Notifications
1. On any Calendar screen, touch
2. On the options menu, touch an alert and
>
Settings > Set alerts &
More
notifications
notification option:
•
Alert
display calendar notification to remind
the event.
•
Status bar notification
an alarm and display notification icon on
the status bar.
.
: Select to sound an alarm and
Menu >
check box
Menu >
: Select to sound
82 Calendar
Page 83

•
Off
: Select to disable alert and
notifications.
Set Alert Ringtone
1. On any Calendar screen, touch
2. On the options menu, touch a ringtone to
>
Settings > Select ringtone
More
play the ton
e briefly, then touch
Menu >
.
OK
.
Set Vibrate Mode
1. On any Calendar screen, touch
2. Touch
>
Settings
More
Vibr ate
when an event reminder occurs.
.
to select the vibration status
Menu >
Set Default Reminder Time
1. On any Calendar screen, touch
2. On the options menu, touch a reminder
>
Settings > Default reminder
More
.
time
.
time
Menu >
File Browser
Use
File Browser
device.
Open File Browser
Tou ch
Home >
to view the contents of your
>
File Browser
.
Browse Files and Folders
• Touch a folder to view its contents. A
button with the folder name appears on the
bottom of the screen.
• Touch on the bottom of the screen to
return to the previous folder.
• Touch on the bottom of the screen to
show the root folder of your SD card.
Refresh File Browser
On the File Browser screen, touch
to refresh the list. The list shows the
Refresh
latest updated file or folder from top.
Menu >
Create Folders
1. On the File Browser screen, touch
New Folder
2. Type the folder name in the text box, then
touc
.
OK
.
h
Menu >
Copy Files or Folders
1. On the File Browser screen, browse for the
file or folder that you want to copy.
2. Touch and hold the file or folder.
Copy
3. On the options menu, touch
4. Select the destination location.
5. Touch the
of the screen to paste the copied item.
Paste here
button on the bottom
.
User Guide 83
Page 84

•
Move Files or Folders
1. On the File Browser screen, browse for the
file or folder that you want to move.
2. Touch and hold the file or folder.
3. On the options menu, touch
4. Select the destination location.
5. Touch the
of the screen to move the item.
Move here
Move
.
button on the bottom
Delete Files or Folders
1. On the File Browser screen, browse for the
file or folder that you want to delete.
2. Touch and hold the file or folder.
3. On the options menu, touch
4. Touch OK to confirm.
Delete
.
Rename Files or Folders
1. On the File Browser screen, browse for the
file or folder that you want to rename.
2. Touch and hold the file or folder.
3. On the options menu, touch
4. Type the new name in the text box, then
OK
touch
.
Rename
.
Send Files
1. On the File Browser screen, browse for the
file that you want to send.
2. Touch and hold the file.
3. On the options menu, touch
4. Touch an application for sharing:
84 File Browser
Send
.
Bluetooth
•
Email
•
Gmail
•
Messaging
message.
•
Picasa
“Upload Pictures to Picasa” on page 73.
•
YouTube
See
page 74
Note:
The available applications for sharing
may vary depending on the type of file.
View File Information
1. On the File Browser screen, browse for the
file that you want to view.
2. Touch and hold the file.
3. On the options menu, touch
4. Touch
window.
Assign Files
1. On the File Browser screen, browse for the
file that you want to assign as a wallpaper,
a ringtone, etc.
2. Touch and hold the file.
3. On the options menu, touch
Wallpaper
Close File Browser
Tou ch
: Send file via Bluetooth.
: Send file via email.
: Send file via Gmail.
: Send file via multimedia
: Upload a picture to Picasa. See
: Upload a video to YouTube.
“Upload Videos to YouTube” on
OK
to close the information
or
Set As Ringtone
Home
to close the File Browser screen.
Info
Set As
.
.
Page 85

Voice Commands
Use
Voice Control
to say commands for the phone to execute.
Start Voice Control
Do one of the following to start
• Press and hold the
•Touch
Use Voice Control
1. Start
Voice Control
2. When prompted to speak, say a command
from the displayed list on screen. When the
application recognizes the command, it
executes the command right away.
voice command application
Home >
Send
>
Voice Control
.
Voice Control
key.
.
Send Text Message By Voice Command
1. Start
Voice Control
2. When prompted to speak, say
[contact name or number]
to send a text message to Joe, say
:
Text Joe”.
Note:
If the application cannot recognize
the number or name, it displays several
possible matches. Say or touch
3. The compose message screen appears. The
contact name or number that you said is
displayed on the
message.
4. Touch
Send
.
Send Text
. For example,
Ye s
To
box. Complete your
to send the text message.
“Send
or No.
Call a Number By Voice Command
1. Start
Voice Control
2. When prompted to speak, say
name or number]
John Smith’s mobile phone, say
John Smith Mobile”
automatically call the said contact.
Note:
If the application cannot recognize
the number or name, it displays several
possible matches. Say or touch
User Guide 85
.
. For example, to call
Call [contact
. Your phone will
“Call
Ye s
or No.
Send a Multimedia Message By Voice Command
1. Start
Voice Control
2. When prompted to speak, say
[contact name or number]
to send a multimedia message to Joe, say
“Send MMS Joe”
Note:
If the application cannot recognize
the number or name, it displays several
possible matches. Say or touch
3. The compose message screen appears. The
contact name or number that you said is
displayed on the
message.
.
Send MMS
. For example,
.
Ye s
To
box. Complete your
or No.
Page 86

4. Touch
Send
to send a multimedia message.
Send Email/Gmail By Voice Command
1. Start
Voice Control
2. When prompted to speak, say
[contact name]
email to Sean, say
3. If this is the first time, or you have not set a
t mail application and you have your
defaul
account for both Email and Gmail, and
same contact or email address is saved in
both Email and Gmail, you must select
Email or Gmail to send using the voice
command. Touch
Email
and
4. The compose message screen appears. The
address of the contact name you said
email
is displayed on the
message.
5. Touch
Send
.
. For example, to send an
“Send E-mail Sean”
Compose
to use Email.
To
or to send your email.
Send E-mail
to use Gmail,
box. Complete your
.
Search Contact Details By Voice Command
1. Start
Voice Control
2. When prompted to speak, say
[contact name]
Jessica’s contact details, say
. The contact details screen is
Jessica”
displayed.
.
Lookup
. For example, to search for
“Lookup
Open an Application By Voice Command
1. Start
Voice Control
2. When prompted to speak, say
[application name]
Calculator, say
application screen is displayed.
Note:
If you do not specify an application after
the command
of applications, then waits for you to say an
application name.
.
. For example, to open
“Go To Calculator”
Go To
, the screen displays a list
Go To
. The
Play Media Files By Voice Command
1. Start
Voice Control
2. When prompted to speak, say
[playlist name]
, say
Playlist
3. The media player is opened and
automatically plays the playlist that you
said.
.
Play
. For example, to play
“Play My Playlist”.
My
Check Other Details By Voice Command
1. Start
Voice Control
2. When prompted to speak, say
. For example, to check the signal
[item]
strength status, say
Strengt h”
screen.
.
Check
“Check Signal
to display information on
86 Voice Commands
Page 87

Note:
If you do not specify an item after the
Check
command
available items, then waits for you to say an
item.
Available checkable items are as follows:
Statu s, Voicemail, Messages, Missed Calls
Time, Signal Stre ngth, Network, Battery
My Phone Number
, the screen displays a list of
, and
Vo lu me
.
View Voice Control Tutorial
1. Start
2. Touch
Voice Control
Menu
>
Tu to ri a l
.
.
Configure Voice Control Settings
1. Start
Voice Control
2. Touch
3. Touch to configure one of the following
Menu
settings:
•
Confirmation
the system asks you to confirm a name or
number.
•
Adaptation
accuracy of the application’s speech
recognition.
•
Audio Modes
audio assistance.
•
Shortcuts
activated with the Go To command.
•
About
: Select to view the software
version.
.
>
Settings
.
: Select to control when
: Select to improve the
: Select to set the level of
: Select what application is
,
,
User Guide 87
Page 88

11 Settings
To open Settings, do either of the following:
•Touch
•Touch
Home > Menu > Settings
Home >
>
Settings
.
.
Settings Menu
Wireless & networks Manage Wi-Fi, Bluetooth, Airplane mode, and mobile networks.
Call settings Set up voicemail, TTY setting, and In-call touch lock setting.
Sound Set ringtones, vibration, volume, notifications, and other system sound settings.
Display Set brightness, screen orientation, animation, screen timeout, and backlight
Location & security Set location, enable screen lock patterns, and storage lock security settings.
Applications Manage applications.
Accounts & sync Manage synchronized account settings.
Privacy Enable backup and restore data options and reset your phone.
SD card & phone storage Unmount or format the SD card, or view storage space.
Language & keyboard Set the language, text, and user dictionary settings
Voice input & output Set the voice recognizer settings.
Accessibility Manage accessibility options.
Date & time Set the system date and time.
About phone View device information such as phone and battery status, legal information,
88 Settings Menu
ttings.
se
del number and firmware version.
mo
Page 89

Wireless & Networks
Set Airplane Mode
From
Wireless & networks
Airplane mode
mode and disable all wireless communications.
check box to activate airplane
Wi-Fi
See “Use Wi-Fi” on page 53.
Bluetooth
See “Use Bluetooth” on page 54.
, touch the
2. Select your voicemail service provider.
Set Voicemail
1. From
Call settings
>
settings
2. Do one of the following:
• Type the voicemail number on the text
box.
• Touch the Contacts icon then select a
Contact name or number to set as
voicemail number.
3. Touch OK.
, touch
Voicemail number
Voicemail
.
Mobile Network
Enable Data Connection
1. From
Wireless & networks
networks.
2. Touch the
connect to data services.
Data enabled
, touch
Mobile
check box to
Set System Mode
1. From
Wireless & networks
>
or
Automatic
System select
networks
2. On the options menu, touch either
only
, touch
Mobile
.
.
Home
Call Settings
Voicemail Service
1. From
Call settings
.
service
User Guide 89
, touch
Vo ic e ma i l
Set TTY Mode
You can connect the phone to a teletype (TTY)
device for the hearing impaired.
1. From
Call settings
2. Touch an option:
•
TTY Off
•
TTY Full
•
TTY HCO
you can hear.
•
TTY VCO
you can talk.
, touch
TTY mode
: Disables TTY.
: Enables TTY devices.
: Enables TTY devices but
: Enables TTY devices but
.
In-Call Touch Lock
The touch screen is locked during a call to
avoid accidentally touching it.
1. From
Call settings
check box to enable in-call touch lock.
lock
, touch
In-call touch
Page 90

2. Touch
Note:
touch screen will be locked every time you
make or receive a call.
Sound
Set Silent Mode
From
to silence all sounds except media and alarm
sounds.
Enable Vibrate Mode
Enable the device to vibrate when there is an
incoming call.
From
your phone vibrates.
Set Volume
1. From
2. Drag the
90 Sound
In-call touch lock settings
select one of the following:
•
Manual lock
manually by sliding the arrow during a
call.
•
With auto lock on
automatically after 5 seconds without
operation during a call.
This setting is effective per call. The
Sound
Sound
Notification
the sliders to adjust the volume. To use the
same volume level as the ringtone for
: To lock the screen
: To lock the screen
, touch the
, touch the
Sound
Ringtone, Media, Alarm
Silent mode
Vibr ate
, touch
Vo lu me
sliders or touch a position of
, and
check box
to select when
.
or
notifications, touch the
volume for notifications
3. Touch OK.
Use incoming call
check box.
Set Ringtone
Set the incoming call ringtone.
1. From
Sound
, touch
2. Touch either of the following:
•
Preloaded ringtones
from the ringtones that are preloaded on
your device.
•
User added ringtones
from the ringtones that are copied to or
recorded on your SD card.
3. Touch a ringtone to play the tone briefly.
4. Press the volume button up or down to
select the volume level.
5. Touch OK.
Phone ringtone
: Select to choose
: Select to choose
.
Set Notification Ringtone
1. From
Sound
, touch
Notification ringtone
2. Touch a ringtone to play the tone briefly.
3. Press the volume button up or down to
select the volume level.
4. Touch OK.
Enable Touch Tone
Play sound when keys are touched on the dial
pad.
From
Sound
, touch the
Audible touch tones
.
.
Page 91

Enable Screen Selection Sound
Play sound when a screen is selected.
From
Sound
, touch the
Audible selection
Enable Screen Lock Sound
Play sound when locking or unlocking a
screen.
From
Sound
, touch the
Screen lock sounds
Enable Haptic feedback
Vibrate when soft keys are pressed on some
user interfaces.
From
Sound
, touch
Haptic feedback
.
Set Emergency Tone
Set the behavior when an emergency call is
placed.
1. From
Sound
, touch
2. Touch one of the following options:
•
Off
: No sound.
•
Alert
: Sound an alert.
•
Vibr ate
: Phone will vibrate.
Emergency tone
.
Display
Set Brightness
.
1. From
Display
, touch
Brightness
2. Drag the slider to adjust brightness or
check the
box to set brightness automatically.
3. Touch OK.
.
Enable Orientation
From
check box to automatically switch orientation
when the phone is rotated 90º.
Enable Animation
From
the animation status when opening or closing
windows.
Enable Key Backlight
From
box to synchronized the key backlight with the
screen.
Automatic brightness
Display
, touch the
Display
, touch the
Display
, touch the
Auto-rotate screen
Animation
Key Backlight
.
check
to select
check
Enable Hearing Aid
From
Sound
to use hearing aid devices.
, touch the
Your phone has an M-4 and T-4 rating.
User Guide 91
Hearing aid
check box
Set Screen Timeout
Set the idle time before the screen
automatically turns off.
1. From
Display
, touch
Screen timeout
2. Touch a screen timeout option.
.
Page 92

Location & Security
My Location
This setting allows applications, such as Maps,
to determine and show your location.
From
Location & security
and
networks
My Location.
Use GPS satellites
Screen Unlock
You can lock the device screen using a pattern,
a pin, or a password to further protect your
device from unauthorized use.
Set Screen Lock By Pattern
1. From
Location & security
Next
>
.
.
screen lock
2. Read the information on the screen, then
touch
3. Study the example pattern on the screen,
then touch Next.
4. Draw the screen lock pattern by connecting
at least four dots in a vertical, horizontal
and/or diagonal direction. Lift your finger
from the screen when finished.
5. The phone records the pattern. Touch
Continue
6. When prompted, draw the screen lock
pattern again.
7. Touch Confirm.
Pattern
, touch
.
Use wireless
to enable
, touch
Set up
8. To confirm pattern visibly, touch
visible pattern
vibration, touch
. To confirm touch with
Use tactile feedback
Use
.
Set Screen Lock By PIN
1. From
Location & security
>
screen lock
2. Enter desired PIN number, then touch
Continue
Note:
characters.
3. Enter the PIN number again, then touch
OK
.
4. To confirm touch with vibration, touch
tactile feedback
PIN
.
The PIN must be at least 4
.
, touch
.
Set up
Use
Set Screen Lock By Password
1. From
Location & security
>
screen lock
2. Enter desired password, then touch
Continue
Note:
letter and must be at least 4 characters in
length.
3. Enter the password again, then touch OK.
4. To confirm touch with vibration, touch
tactile feedback
Password
.
The password must contain at least 1
.
, touch
.
Set up
Use
92 Location & Security
Page 93

Disable Screen Lock
1. From
Location & security
None
.
.
screen lock
2. Draw the current screen lock pattern or
enter the PIN or password.
3. Touch
, touch
Change
Change Screen Lock
1. From
Location & security
screen lock
2. Draw the current screen lock pattern or
enter the current PIN or password.
3. Touch
Note:
have a screen lock set.
.
Pattern, PIN
You will see this screen only when you
, or
Password
, touch
Change
.
Passwords
Show your password as you type it.
From
Location & security
passwords
.
, touch
Visi ble
Device Administrators
The device administrator is typical for the
enterprise application.
1. From
Location & security
device administrators
2. Select the application you want to remove
the administrator authority.
.
, touch
Select
Credential Storage
Allow applications to access secure
certificates.
Set Password
To use the secure credentials, first set your
password. From
Set password
storage password.
Location & security
to set or change the credential
, touch
Use Secure Credentials
From
Location & security
credentials
secure certificates and other credentials.
to allows applications to access
, touch
Use secure
Install From SD Card
From
Location & security
to install encrypted certificates from
SD card
the SD card.
, touch
Install from
Clear Storage
From
Location & security
to clear credential storage of all
storage
contents and reset its password.
, touch
Clear
Applications
From the Settings screen, touch
to manage the applications installed on your
device.
Applications
User Guide 93
Page 94

Note:
Unknown Sources
Tou c h t he
allow installation of non-market applications.
Read the message and touch
Unknown sources
check box to
OK
to confirm it.
Manage Applications
Tou ch
Manage applications
applications on your device.
Tou ch
Downloaded, Running, All
to sort applications.
card
to add or remove
, or
On SD
Running Services
Tou ch
Running services
currently running services.
to view and control
Development
Set options for application development.
1. From
Application settings
Development
2. Touch one of the following options:
•
USB debugging
between other devices and install
applications without notification when
USB is connected.
•
Stay awake
awake while charging.
.
: Select to keep the screen
, touch
: Select to copy data
Accounts & Sync
Select the applications that you want to
synchronize with your device.
94 Accounts & Sync
Setup your Google account before using
this feature. To add an account, touch
.
account
1. From the Settings screen, touch
2. Touch the check box of the following:
3. If you select
4. Touch any or all of the following options:
Note:
manually if auto-sync is unchecked.
.
& sync
•
Background data
background.
•
Auto-sync
applications. Select applications on step 4.
you want to synchronize.
•
Sync Contacts
•
Sync Gmail
•
Sync Calendar
Touch an option to synchronize
: Synchronize
: Automatically synchronize
Auto-sync
, touch the account
: Synchronize Contacts.
: Synchronize Gmail.
: Synchronize Calendar.
Add
Accounts
Privacy
Select your phone's privacy setting.
•
Back up my data
settings and other application data.
Automatic restore
•
settings and data of the application if the
application is removed, and restore them
when the application is reinstalled again.
Factory data reset
•
data on your phone and returns to the
default status from the factory.
:Select to backup my
:Select to backup
:Select to erase all the
Page 95

SD Card & Phone Storage
From the Settings screen, touch the
phone storage
You can check the available space on your SD
card.
.
Unmount SD Card
Tou ch
Unmount SD card > OK
the SD card for safe removal.
Note:
Be sure to follow the step above before
removing the microSD card. Otherwise, the
data on your device may be lost or damaged.
SD card &
to unmount
Voice Input & Output
Voice Recognizer Settings
From
Voice input & output
Voice recognizer settings
•
Language
language
SafeSearch
•
results.
Block offensive words
•
hide recognized offensive voice results.
Show hints
•
on the search box.
: Touch to select the input
: Select to filter voice search
: Check this box to show hints
settings, touch
.
: Check this box to
Format SD Card
Tou ch
Format SD card > Format SD card >
Erase everything
contents in the SD card will be erased.
to format the SD card. All
Language & Keyboard
Select Language
Select to change the language.
Android keyboard
See “Adjust Keyboard Settings” on page 26.
User Guide 95
Text-to-speech Settings
From
Voice input & output
Text-to-speech settings
•
Listen to an example
short demonstration of speech synthesis.
Always use my settings
•
the applications settings with the default
settings.
Default Engine
•
search engine used for spoken text.
Install voice data
•
voice data required for speech synthesis.
Speech rate
•
which the text is spoken.
Language
•
language-specific voice for the spoken text.
Pico TTS
•
: Touch to set Pico TTS settings.
.
: Select to play a
: Select to override
: Select to set the default
: Select to install the
: Select to set the speed at
: Select to set the
settings, touch
Page 96

Accessibility
From the Settings screen, touch
When you download an application with an
accessibility feature, it may be listed under
Accessibility settings and its settings may be
configured by touching the application.
Accessibility
Date & Time
Automatically Set Date & Time
From
Date & time settings
Automatic
provided by the network.
check box to use the date and time
Manually Set Date & Time
1. From
Date & time settings
Automatic
2. Touch
adjust the date, then touch
3. Touch
zone.
4. Touch
adjust the time. Touch the
button, then touch
5. Touch the
if you want to display time in a 24-hour
format.
6. Touch
date format.
check box.
Set date
Select time zone
Set time.
Use 24-hour format
Select date format
, touch the
, uncheck the
. Touch the + or - buttons to
Touch the + or - buttons to
Set
.
, then touch a time
AM
Set
.
, then touch a
or
PM
check box
About Phone
.
From the Settings screen, touch
to view device information such as model
number, phone and battery status, legal
information, and firmware version.
About phone
96 Accessibility
Page 97

12 Get Help
User Guide
You can also find the user guide at
www.ziobykyocera.com/downloads
.
Customer Support
Your service provider's customer support
department may be accessible directly from
your phone when you dial a number, such as
*611 (check with your service provider). They
can answer questions about your phone, phone
bill, call coverage area, and specific features
available to you, such as call forwarding or
voicemail. For questions about the phone
features, refer to the materials provided with
your phone, or visit
www.kyocera-wireless.com
To register your computer for software
updates, go to
www.ziobykyocera.com/registration
For additional questions, you may contact the
Kyocera Communications Inc. Customer Care
Center in any of the following ways:
• Web site:
• Email: phone-help@kyocera-wireless.com.
• Phone: 800-349-4478
When you contact the Customer Care Center,
call from another phone instead of your
Kyocera phone since you’ll need to access
User Guide 97
www.kyocera-wireless.com
.
.
information from your Kyocera phone during
the support call. Be ready to provide the
following information:
• The name of your service provider.
• The actual error message or problem you
are experiencing.
• The steps you took to reproduce the
problem.
• The phone’s mobile equipment identifier
(MEID).
Note:
From
About phone
Scroll down to
the MEID number. If your phone uses an
electronic service number (ESN), see
MEID
, select
. The 18-digit number is
Qualified Service
If the problem with your phone persists, return
the phone with all accessories and packaging to
the dealer for qualified service.
Phone Accessories
To shop for phone accessories, visit
https://kyocera.superiorcommunications.com.
.
Sta tus
ESN
.
.
Page 98

13 Index
A
airplane mode 14
alarm
deleting 79
enabling 79
setting 79
settings 80
Android Market 64
applications
installing 65
recently-used 22
uninstalling 66
attached files
playing 41
saving 41
B
battery
charging 10
drain 12
installing 10
recharging 11
safety guidelines 11
Bluetooth
activating 54
connecting 55
pairing devices 55
renaming device 54
browser
bookmarks 57
copying text 59
finding text 58
home page 57
launching 57
98
navigating 58
sharing 59
zooming 58
C
calculator 80
calendar
alert ringtone 83
alerts and notifications 82
creating events 81
deleting events 82
modifying events 82
reminder time 83
settings 82
sync 82
viewing events 81
calls
answering 30
call log 28
contact 29
divert to voicemail 34
ending 31
favorite contact 29
making 28
muting microphone 31
options 30
rejecting 30
camcorder
recording videos 70
camera
taking pictures 69
connect
computer 56
Wi-Fi 53
Page 99

contacts
adding 33
adding to favorites 34
assigning ringtones 34
deleting 34
editing 34
menu 32
searching 32
sending messages 33
viewing 33
D
dialer 28
dictionary 26
E
email
account settings 44
adding accounts 43
composing 44
deleting 44
F
favorites
calling 34
removing 35
sending messages 35
viewing 34
files
browsing 83
copying 83
creating folders 83
deleting 84
information 84
moving 84
renaming 84
sending 84
G
gallery
using 71
Gmail
account settings 48
adding signature 45
adding star 47
archiving Emails 46
attaching files 45
composing Emails 45
deleting Emails 47
forwarding Emails 46
muting Emails 47
receiving Emails 46
refreshing 45
save as draft 46
searching Emails 46
spam 47
using 45
Google Maps
enable location setting 92
zooming 63
Google Search 62
Google Talk
accepting invitations 50
adding friends 49
closing chat 50
managing friends 50
online status 50
settings 51
starting a chat 50
switching chats 50
viewing invitations 50
H
home screen
customize 17
User Guide 99
Page 100

extended 17
I
in-call volume 15
K
keyboard
landscape 25
numbers & symbols 24
QWERTY 23
settings 26
L
LED 8, 11, 23
light sensor 8
lock device 14
M
media volume 15
message threads 47
messages
attach files 37
attaching audio 38
attaching pictures 37
attaching slideshow 38
auto retrieve 40
calling sender 41
deleting 41
forward 41
replying 40
replying with copy 41
replying with multimedia message 40
ringtone 42
settings 42
vibrate mode 42
viewing 39
multimedia message
replying 40
viewing 40
100
music
browsing 76
creating playlists 77
deleting 78
playing 76
setting as ringtone 78
N
name card 32
navigate device 14
notification
icons 19
panel 20
P
phone keypad 25
pictures
cropping 72
deleting 73
rotating 72
sending through Email/Gmail 73
sending via Bluetooth 73
setting as contact icons 73
slideshow 74
uploading to Picasa 73
viewing 72
zooming 72
R
reminders 82
ringer volume 15
S
search 8, 15
settings
Accounts and Sync 94
applications 93
calls 89
date & time 96
 Loading...