

Page 1
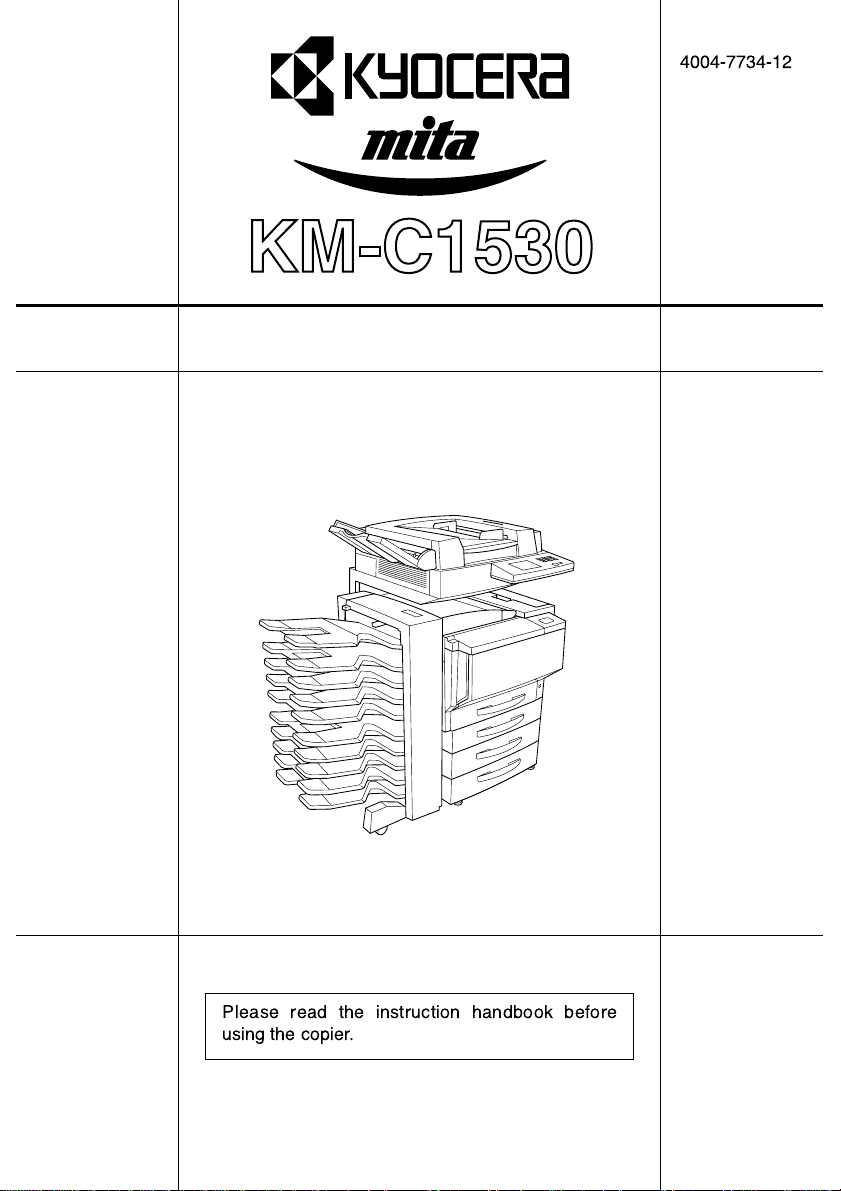
INSTRUCTION HANDBOOK
4004-7734-12
Please read the instruction handbook before
using the copier.
Page 2
As an ENERGY STAR Partner, KYOCERA MITA AMERICA, INC. has de-
termined that this product meets the ENERGY STAR guidelines for ener-
gy efficiency.
* ENERGY STAR is a U.S. registered mark.
All rights reserved. No part of this material may be reproduced or trans-
mitted in any form or by any means, electronic or mechanical, including
photocopying, recording or by any information storage and retrieval sys-
tem, without permission in writing from the Publisher.
Legal Restriction On Copying
¥ It may be prohibited to copy copyrighted material without permission of
the copy-right owner.
It is prohibitedunder any circumstances to copydomestic or foreign cur-
rencies.
Copying other items may be prohibited
Page 3
Please read the instruction handbook before using the copier. Keep it in the designated location for easy reference.
The sections of this handbook and parts of the copier marked with symbols are safety
warnings meant to protect the user, other individuals and surrounding objects, and ensure
correct and safe usage of the copier. The symbols and their meanin gs are indicated below.
DANGER: Indicates that serious injury or even death will very possibly result from
insufficient attention to or incorrect compliance with the related points.
WARNING: Indicates that serious injury or even death may result from insufficient
attention to or incorrect compliance with the related points.
CAUTION: Indicates that person al i nju ry or m ec han ic al dam ag e m ay res ult from in -
sufficient attention to or incorrect compliance with the related points.
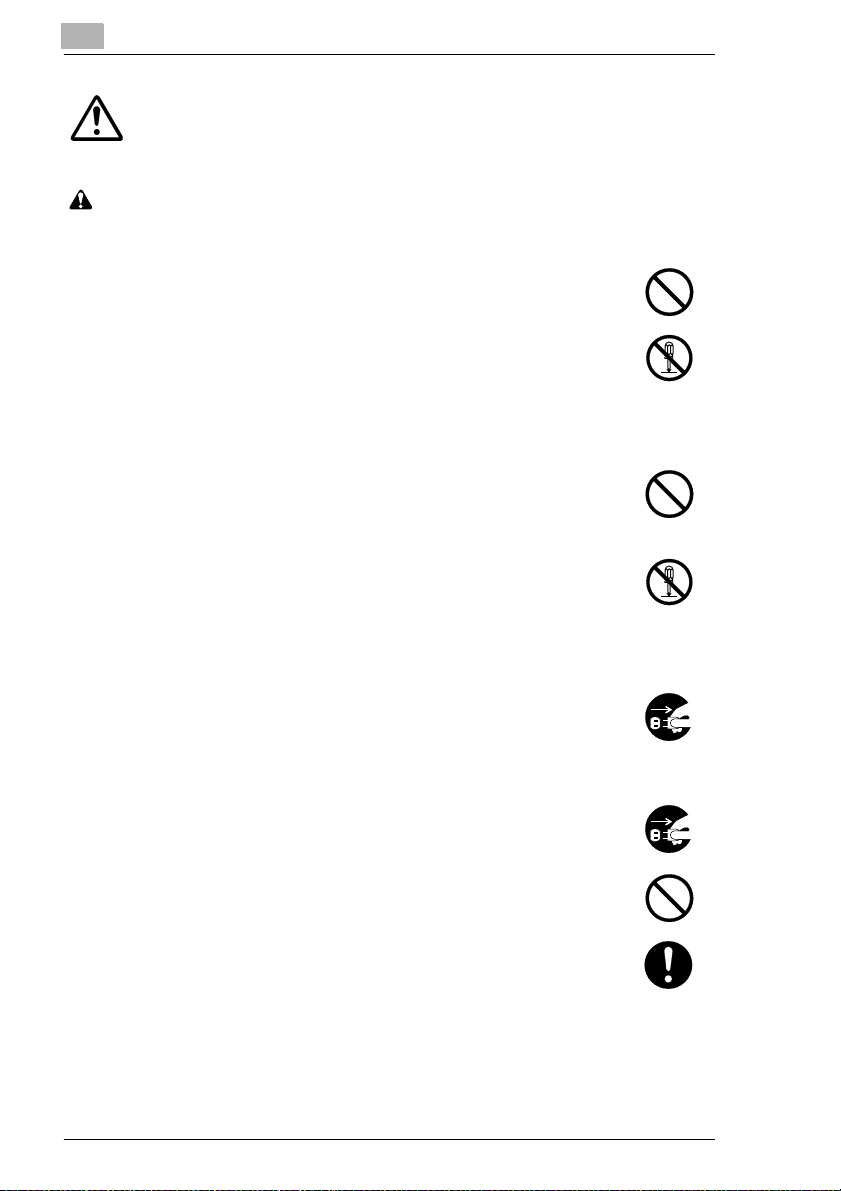
Symbols
The symbol indicates that the related section includes safety warnings. Specific
points of attention are indicated inside the symbol.
...............[General warning]
...............[Warning of danger of electrical shock]
...............[Warning of high temperature]
The symbol indicates that the related section includes information on prohibited actions. Specifics of the prohibited action are indicated inside the symbol.
...............[Warning of prohibited action]
...............[Disassembly prohibited]
The symbol indicates that the related section includes information on actions which
must be performed. Specifics of the required action are indicated inside the symbol.
...............[Alert of required action]
...............[Remove the power plug from the outlet]
.................[Always connect the copier to an outlet with a ground connection]
Please contact you r serv ice re prese ntative to o rder a replac emen t if t he sa fety warni ngs
in the handbook are illegible or if the handbook itself is missing. (fee required)
Page 4

1 IMPORTANT! PLEASE READ FIRST
CAUTION LABELS .................................... ...... .......................1-1
INSTALLATION PRECAUTIONS ...........................................1-4
PRECAUTIONS FOR USE ...................................................... 1-6
LED Radiation Safety...................................................................1-11
1.1 Explanation of Basic Concepts and Symbols.........................1-11
Paper Feeding....... ..... ...... ..... .................................. ...... ..... ...... ....1-11
“Width” and “Length”.....................................................................1-12
Paper Orientation .........................................................................1-12
Display Icons................................................................................1-12
2 Before Making Copies
2.1 Available Features ........................................................................2-1
2.2 Components and Their Functions................. .............................2-6
2.3 Parts Names and Their Functions........................................ ....2-10
Outside of Copier..........................................................................2-10
Inside of Copier ....................................................... ...... ...............2-12
Supplies and Parts.......................................................................2-13
Duplexing Document Feeder (Optional).......................................2-14
Duplex Unit (Optional)..................................................................2-15
10-Mailbin Sorter (Optional) .........................................................2-16
Finisher (Optional)........................................................................2-17
Paper Feed Unit (Optional)...........................................................2-18
Large-Capacity Cabinet (Optio nal )...............................................2-19
Printer Controller FIERY X3e.......................................................2-19
2.4 Names of Control Panel Parts and Their Functions................2-20
Names of Control Panel Parts and Their Functions.....................2-20
2.5 Using the Touch Panel............................................................... 2-22
Description of Touch Panel................................................ ...... ....2-22
Organization of Screens...............................................................2-22
Operating the Touch Panel..................... ...... ..... ...... ...... ...............2-24
2.6 Useful Operations.......................................................................2-25
Cancelling Settings.......................................................................2-25
Auto Panel Reset..........................................................................2-25
Energy Saver Mode......................................................................2-26
Delayed Copy Jobs ....................................................... ..... ...... ....2-26
Sleep Mode..................................................................................2-26
Interrupting Copy Jobs............................................ ...... ..... ...... ....2-27
To interrupt a copy job..................................................................2-27
Auto Paper Source Change Feature....................... ...... ..... ...... ....2-27
Access Codes...............................................................................2-28
ii
Page 5

To enter an access code...............................................................2-28
Printing From the Computer..........................................................2-28
Scanning From the Computer.......................................................2-28
2.7 Power Switch and Default Settings...........................................2-29
Turning the copier on and off........................................................2-29
To turn the copier on.....................................................................2-29
To turn the copier off.....................................................................2-29
Turning On the Copier...................................................................2-30
Default Settings.............................................................................2-30
3 Copy Paper
3.1 Paper Specifications.....................................................................3-1
Paper Types....................................................................................3-1
Paper Sizes.....................................................................................3-2
Paper Types To Be Avoided...........................................................3-5
3.2 Print Area.......................................................................................3-6
3.3 Paper Storage................................................................................3-6
3.4 Loading Paper...............................................................................3-7
To load paper into the 1st drawer (250-sheet multipurpose tray)...3-7
To set the paper size for the 1st drawer........................................3-11
To load paper into the 2nd drawer or the 500-sheet
paper feed unit..............................................................................3-13
To load paper into the large-capacity cabinet...............................3-15
To load paper into the manual bypass tray...................................3-17
4 Original Documents
4.1 Feeding the Document .................................................................4-1
Document Paper Types..................................................................4-2
Precautions for Multi-Sheet Feeding and Single-Sheet Feeding....4-2
Precautions for Manual Feeding.....................................................4-3
4.2 Feeding the Document Through the Duplexing Document
Feeder ............................................................................................4-4
Multi-Sheet Feeding (Sheet Documents)........................................4-4
To make copies using multi-sheet feeding (sheet documents).......4-4
Multi-Sheet Feeding (Documents of Mixed Sizes)..........................4-5
To make copies using multi-sheet feeding (documents of
mixed sizes)....................................................................................4-6
Single-Sheet Feeding (Standard Paper/Thick Paper)..................... 4-7
To make copies using single-sheet feeding....................................4-7
Single-Sheet Feeding (Thin Paper).................................................4-9
To make copies using single-sheet feeding....................................4-9
iii
Page 6

4.3 Positioning the Document on the Original Glass....................4-10
Manual Feeding (Sheet Documents)............................................4-11
To make copies using manual feeding (sheet documents).......... 4-11
Manual Feeding (Transparent or Translucent Documents).......... 4-12
To make copies using manual feeding (transparent or translucent
documents)...................................................................................4-12
Manual Feeding (Books)..............................................................4-13
To make copies using manual feeding (books)............................4-13
Manual Feeding (“12-1/4 × 18” Paper).........................................4-14
To make copies using manual feeding (“12-1/4 × 18” paper).......4-14
5 Basic Operations
5.1 Making Copies..............................................................................5-1
To copy a document (To make a basic copy).................................5-1
5.2 Selecting the Paper Source.........................................................5-4
To select the paper source before copying ....................................5-4
5.3 Making Copies on Paper Loaded into the 1st Drawer
(Multipurpose Paper Drawer) ......................................................5-5
To copy a document.......................................................................5-6
5.4 Feeding Paper Manually ..............................................................5-7
To feed the paper manually ............................................................5-7
To make copies onto overhead projector transparencies...............5-9
To make copies onto postcards....................................................5-11
To make copies onto thick paper..................................................5-12
5.5 Specifying a Zoom Setting ........................................................5-14
To specify the zoom ratio before copying.....................................5-15
To record a zoom ratio.................................................................5-16
To recall a recorded zoom ratio....................................................5-17
5.6 Selecting the Original Image Type............................................5-18
To select the document type before copying................................5-19
5.7 Specifying the Copy Density.....................................................5-20
To specify the copy density before copying..................................5-20
5.8 Interrupting a Copy Job........................................ ...... ..... ...... ....5-22
To interrupt a copy job..................................................................5-22
6 Advanced Operations
6.1 Making Single-Sided/Double-Sided Copies............................... 6-1
Single-Sided Ö Single-Sided:..........................................................6-1
Single-Sided Ö Double-Sided:.........................................................6-1
Single-Sided Ö Single–2in1:............................................................6-1
Single-Sided Ö Double–2in1:..........................................................6-2
iv
Page 7

Double-Sided Ö Single-Sided:....................................................... ..6-2
Double-Sided Ö Double-Sided:................................................ ........6-2
Book (Separation) Ö Single-Sided:..................................................6-2
Book (Spread) Ö Single-Sided:........................................................6-3
Book (either Standard Book or RightBound) Ö Book Erase: ...........6-3
To make settings for single- or double-sided documents
and copies............................................. ...... ...... ..............................6-4
To make settings for copying a book..............................................6-5
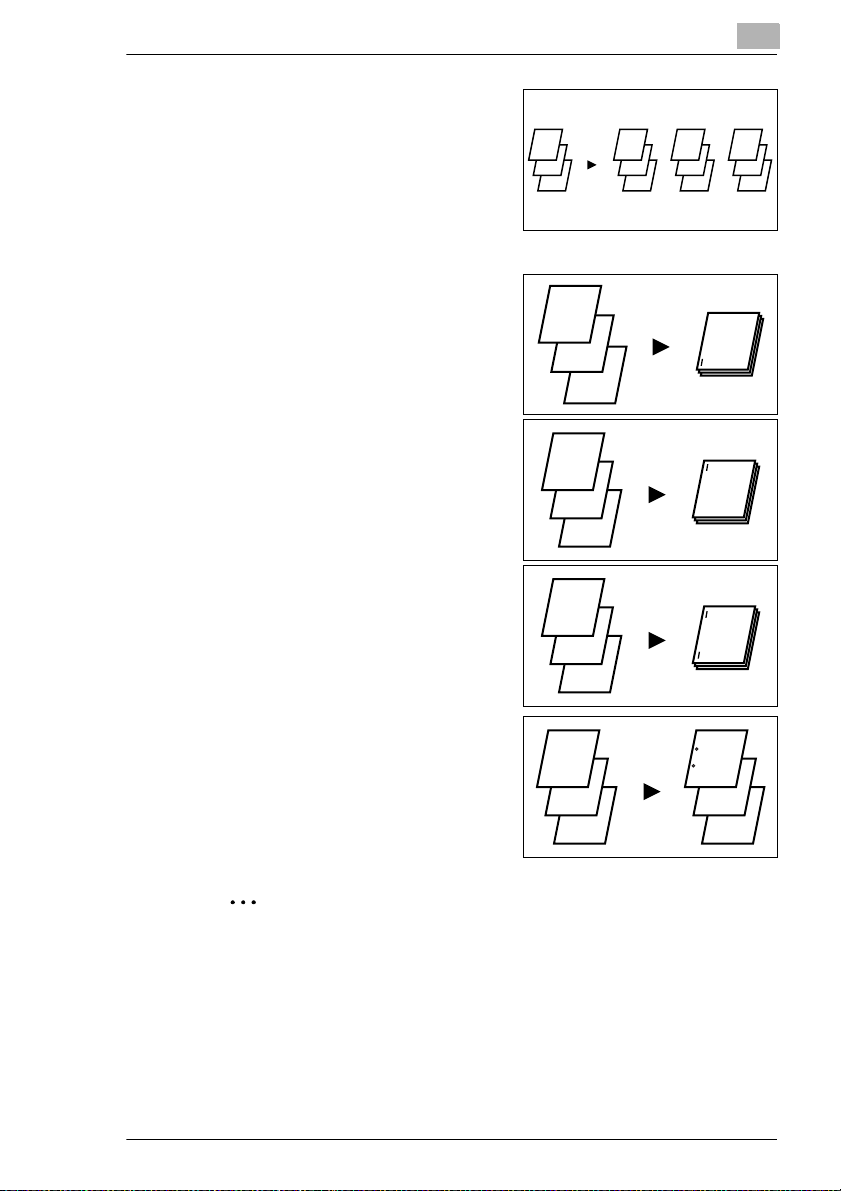
6.2 Finishing (“Sort” and “Group” settings)....................................6-8
Non-Sort:.........................................................................................6-8
Sort:.................................................................................................6-8
Group:.............................................................................................6-9
Sorting/Grouping...........................................................................6-10
To select the finishing settings......................................................6-11
6.3 Staple Binding.............................................................................6-12
Types of stapling.............................. ..... ...... ..................................6-12
Staple position...............................................................................6-13
6.4 Hole Punching (“Hole-Punch” Setting).....................................6-15
Types of hole punching.................................................................6-15
Punched hole position:..................................................................6-15
6.5 Feeding Documents of Different Sizes (“Mixed Orig
Detection” Function)...................................................................6-17
To set the “Mixed Orig Detection” function....................................6-17
6.6 Erasing Edges (“Frame Erase” Function)................................6-19
To set the “Frame Erase” function ................................................6-19
6.7 Creating Mirror Image Copy (“Mirror Image” Function)..........6-21
To set the “Mirror Image” function.................................................6-21
6.8 Improving Copy Quality (“Color Adjustment” Function)........6-23
To make color adjustments...........................................................6-23
To make test prints........................................................................6-24
To adjust the hue..........................................................................6-25
To adjust the saturation.................................................................6-25
To adjust the brightness................................................................6-26
To adjust the sharpness................................................................6-27
To adjust the contrast....................................................................6-27
To adjust the color balance...........................................................6-28
To adjust the density.....................................................................6-29
6.9 Inserting Pages Between Copies of Overhead
Transparencies (“OHP Interleaving” Function).......................6-30
To set the “OHP Interleaving” function..........................................6-30
v
Page 8

6.10 Specifying Different Vertical and Horizontal Scaling
Proportions (“X/Y Zoom” Function) .........................................6-32
To specify the vertical and horizontal scaling proportions............6-32
6.11 Reducing the Document to Postcard Size and Printing
Multiple Copies on One Page (“Postcard” Function) ............. 6-33
To set the “Postcard” function ......................................................6-33
6.12 Tiling Copies (“Image Repeat” Function) ................................6-35
To set the “Image Repeat” function..............................................6-35
7 Utility Mode Operations
7.1 Resetting the Copier (“Default Settings” Function)..................7-1
To specify the default settings........................................................7-1
7.2 Viewing Counters (“Meter Count” Function).............................7-2
To view the meter counts...............................................................7-3
7.3 Storing and Recalling Jobs (“Job Memory Input” Function)... 7-4
To store a job..................................................................................7-4
To delete a job................................................................................7-5
To recall a stored job......................................................................7-6
7.4 Specifying Default Settings (“User’s Choice” Function)..........7-8
To change the User’s Choice settings...................................... ......7-8
To set the “Language selected” parameter....................................7-9
To set the “2in1copy zoom” parameter.........................................7-10
To set the “Intelligent Sorting” parameter.....................................7-11
To set the “ACS Determination level Adjust.” parameter..............7-12
To set the “Confirmation Beep” parameter...................................7-13
To set the “Mail Bin Assignment” parameter................................7-14
To set the “Auto Panel Reset” parameter.....................................7-15
To set the “Energy Save Mode” parameter..................................7-16
To set the “Sleep Mode” parameter..............................................7-17
To set the “1st Drawer Paper Select” parameter..........................7-18
8 Administrator Mode Operations
8.1 Supervising Copier Use (“Copy Track” Function).................... 8-1
To change the Administrator Mode settings...................................8-1
To register access codes................................................................8-3
To change the account numbers registered...................................8-4
To reset Copy Track mode.............................................................8-6
To check the number of copies made by each account.................8-7
To reset the counters for each account..........................................8-8
To limit the type of copies for an account.......................................8-9
To limit the number of copies for an account................................8-11
vi
Page 9

8.2 Adjusting the Gradation Levels (“Gradation Adjust”
Function)......................................................................................8-13
To adjust the gradation levels.......................................................8-13
8.3 Turning off the Sleep function (“Disable Sleep Mode”
Function)......................................................................................8-15
To turn off the Sleep function........................................................8-15
8.4 Erasing Copy Edges (“Erase” Function)..................................8-18
To set the “Erase” function............................................................8-18
8.5 Specifying the Expert Settings (“Expert User’s Mode”
Function)......................................................................................8-20
To change the Expert User’s Mode settings.................................8-20
To set the “Thick Paper and OHP Film Image Density”
parameter......................................................................................8-22
To set the “Color Shift Correction” parameters.............................8-23
To set the “Stabilizer” parameter...................................................8-26
To set the “PRT Area (Top Margin)” parameter............................8-27
To set the “PRT Area (Left Margin)” parameter............................8-29
To set the “PRT Area (Dup. Left Margin)” parameter....................8-31
To set the “Thin Orig.” parameter..................................................8-33
8.6 Registering Scan Save Locations (“Scanner Addr. Input”
Function)......................................................................................8-34
9 Touch Panel Messages
9.1 When the Message “Replenish paper.” Appears.......................9-1
To load paper into the 1st drawer (250-sheet multipurpose
paper drawer)..................................................................................9-2
To load paper into the 500-sheet paper feed unit...........................9-3
To load paper into the large-capacity cabinet.................................9-5
9.2 When the Message “Please add Tone r.” Appears.....................9-6
To add toner....................................................................................9-8
9.3 When the Message “Replace Staple Cartridge X.” Appears...9-11
To replace the staple cartridge......................................................9-11
9.4 When the Message “Misfeed detected.” Appears....................9-16
Paper Misfeed in the Manual Bypass Tray............................. ......9-19
To clear a paper misfeed in the manual bypass tray....................9-19
Paper Misfeed in the Duplex Unit............................................ ......9-21
To clear a paper misfeed in the duplex unit..................................9-21
Paper Misfeed in the Paper Feed Unit..........................................9-22
To clear a paper misfeed in the paper feed unit............................9-22
Paper Misfeed in the Copier............. ..... ...... ..................................9-24
To clear a paper misfeed in the copier..........................................9-24
Paper Misfeed in the Duplexing Docum ent Fee der......................9-28
To clear a paper misfeed in the duplexing document feeder........9-28
vii
Page 10

Paper Misfeed in Finisher F-8110/F-8430....................................9-30
To clear a paper misfeed in finisher F-8110/F-8430.....................9-30
Paper Misfeed in the 10-Mailbin Sorter........................................9-34
To clear a paper misfeed in the 10-mailbin sorter........................9-34
9.5 When the Message “Cannot staple.” Appears........................9-37
To clear jammed staples ..............................................................9-37
9.6 When the Inspection Mark “ ” Appears ................................9-41
9.7 When the Message “Malfunction detected.” Appears............9-42
9.8 When the Message “Need to Replace XXXXX.” Appears ....... 9-43
9.9 Other Messages.......................................... ................................9-44
10 Troubleshooting
10.1 When Incorrect Copies are Produced ......................................10-1
10.2 When the Copier Is Not Operating Correctly...........................10-3
11 Appendix
11.1 Specifications.............................................................................11-1
Copier KM-C1530.........................................................................11-1
Duplexing Document Feeder RADF-11 ........................................11-3
500-sheet Paper Feed Unit ST-530..............................................11-3
Large-capacity Cabinet ST-2500 ..................................................11-4
Duplex Unit AD-35........................................................................11-4
10-Mailbin Sorter AS-M4110........................................................11-5
Finisher F-8430............................................................................11-6
Finisher F-8110............................................................................11-7
11.2 Care of the Copier ......................................................................11-8
Cleaning .......................................................................................11-8
Housing cover.......................................................... ...... ..... ...... ....11-8
Original glass................................................................................11-8
Operation panel............................................................................11-8
Document transfer belt.................................................................11-9
11.3 Function Combination Table...................................................11-10
Function combination table.........................................................11-10
Function combination code keys................................................11-12
11.4 Paper Size and Zoom Ratio Tables.........................................11-13
Paper sizes.............................................................. ...... ..... ........11-13
Zoom ratios.................................................................................11-14
viii
Page 11
IMPORTANT! PLEASE READ FIRST
1
1 IMPORTANT! PLEASE READ FIRST
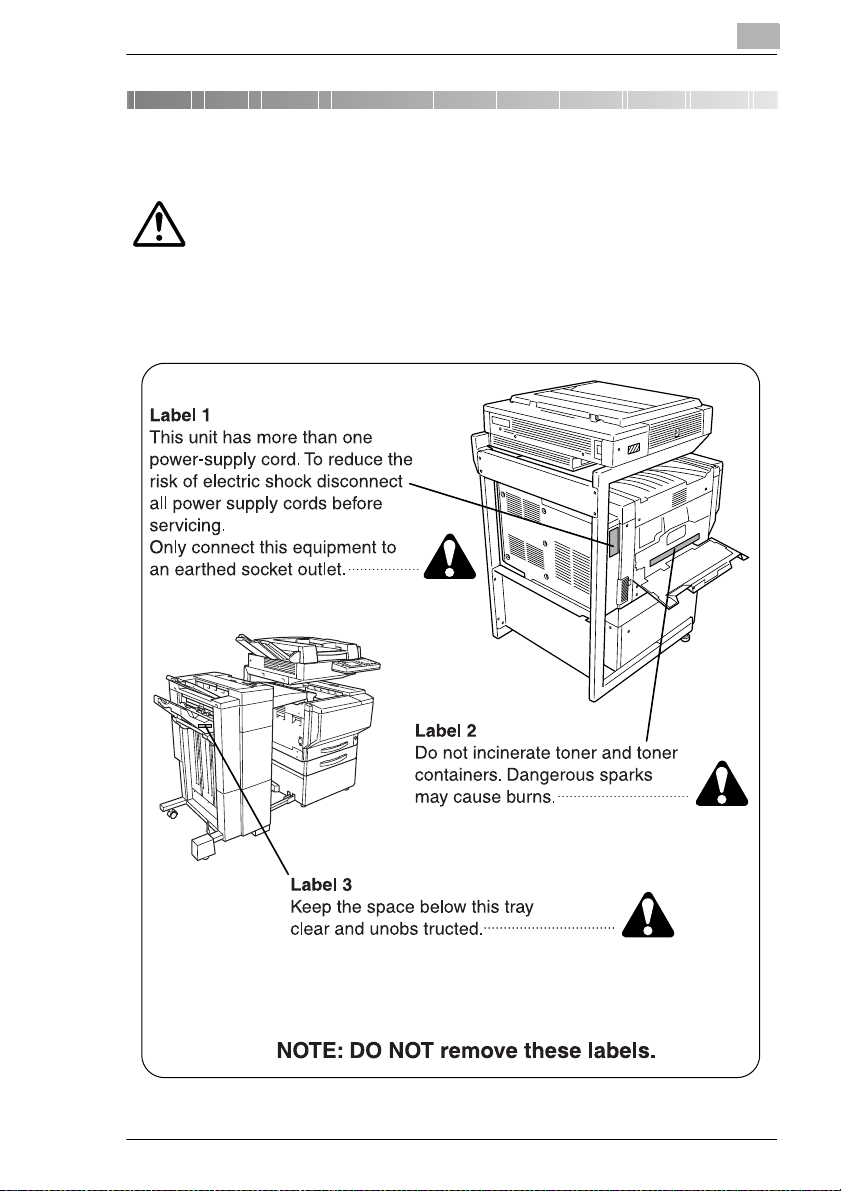
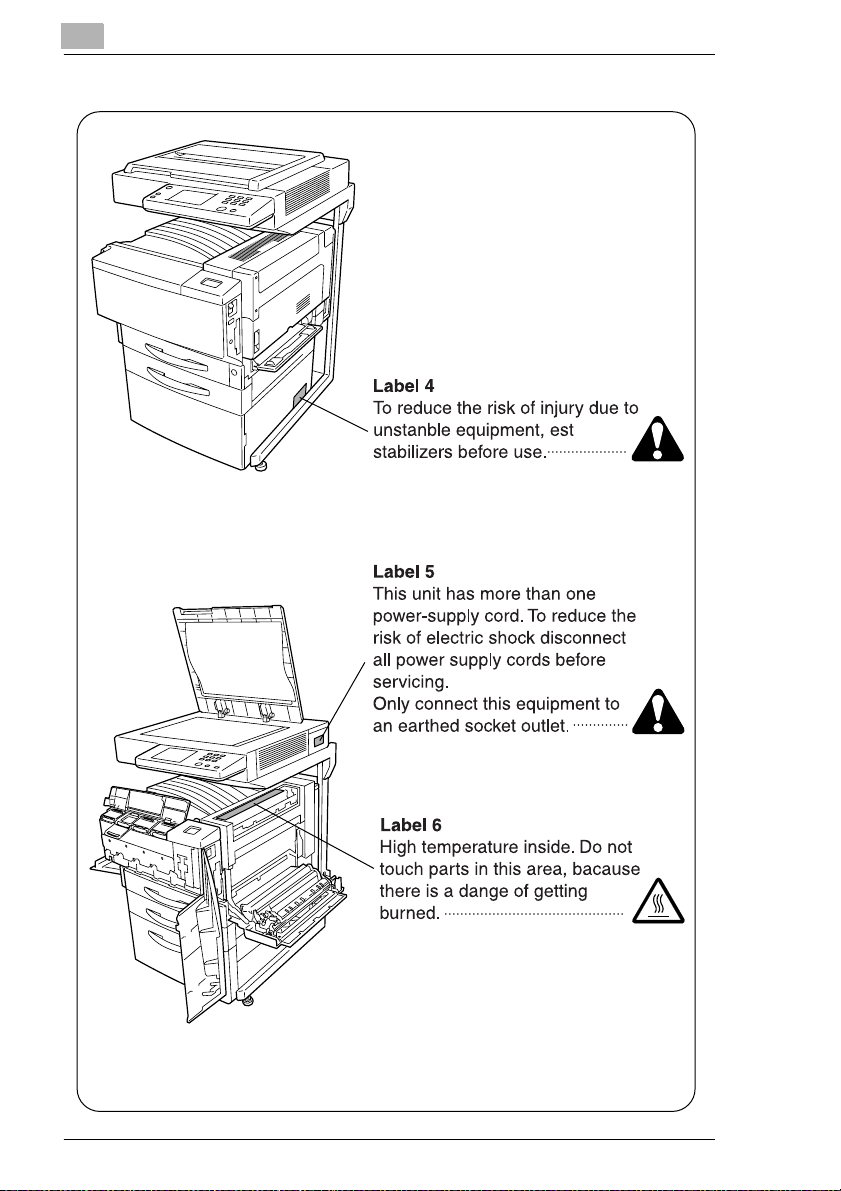
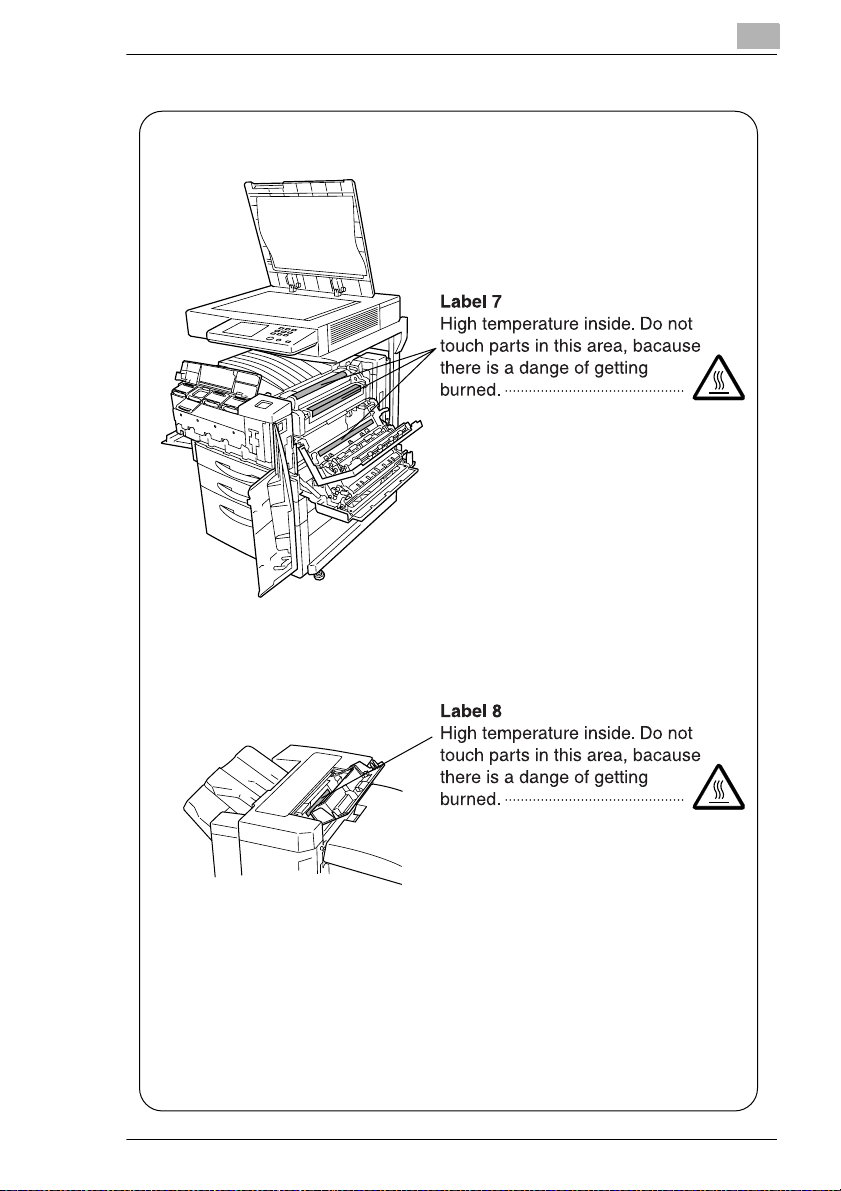
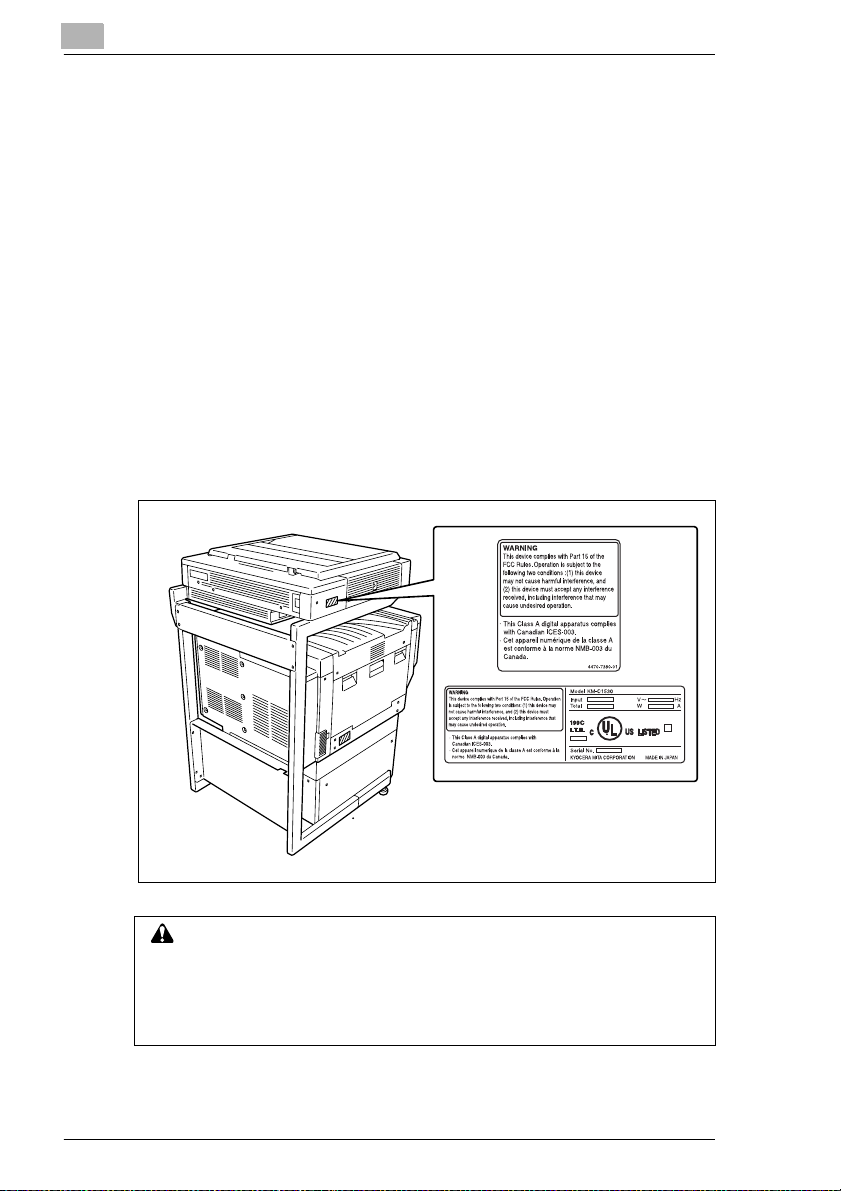
CAUTION LABELS
Caution labels ha ve been attac hed to the c opier at the fo llowing loca tions for saf ety
purposes. BE SUFFICIENTLY CAREFUL to avoid fire or electric shock when
removing a paper jam or when replacing toner.
KM-C1530 1-1
Page 12
1
IMPORTANT! PLEASE READ FIRST
1-2 KM-C1530
Page 13
IMPORTANT! PLEASE READ FIRST
1
KM-C1530 1-3
Page 14
1
IMPORTANT! PLEASE READ FIRST
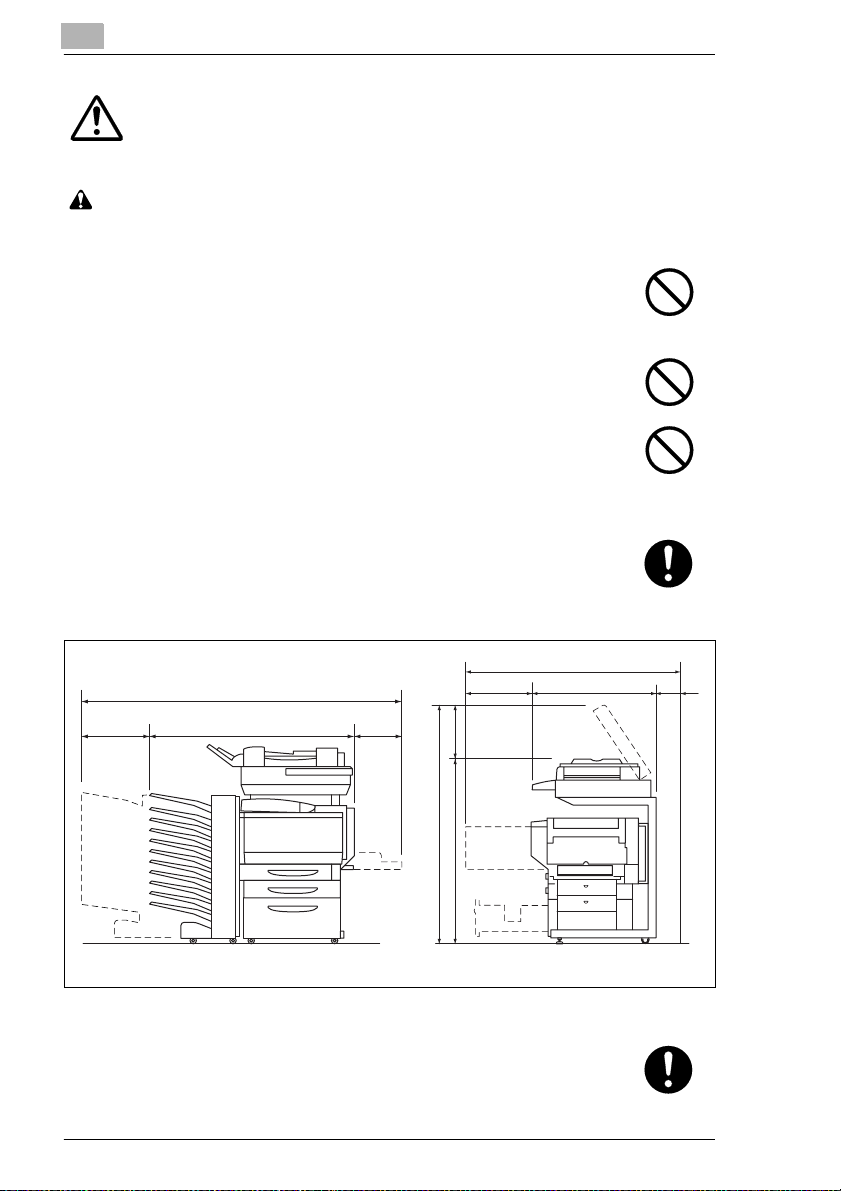
INSTALLATION PRECAUTIONS
Environment
CAUTION
• Avoid placing the copier on or in locations which are unstable or not
level. Such locations may cause the copier to fall down or fail over.
This type of situati on presents a danger of personal in jur y or d am age
to the copier........................................................................................
• Avoid locations with humidity or dust and dirt. if dust or dirt become
attached to the power plug, clean the plug to avoid the danger of fire
or electrical shock...............................................................................
• Avoid locations near radiators, heaters, or other heat sources. or
locations near flammable items, to avoid the danger of fire...............
• To keep the copier cool and facilitate changing of parts and
maintenance, allow access space as shown below.
Leave adequate space, especially around the left cover, to allow air
to be properly ventilated out of the copier..........................................
67-1/4 (1,707)
10-3/4 8-1/4
(275) (210)
48 (1,222)
55 (1,397)
20 (510)
11-1/4(285)
58-1/4 (1,477)
47 (1,192)
31 (787)
Unit: inch (mm)
4
(100)
• Always use the caster stoppers to stabilize the copier once it is in
place to keep it from mov ing and /or f all ing ov er an d c aus ing in jury , in
case of installing the large capacity cabinet and the scanner rack.....
1-4 KM-C1530
Page 15
IMPORTANT! PLEASE READ FIRST
Other precautions
• Adverse environmental conditions may affect the safe operation and
performance of the copier. Install in an air-conditioned room
(recommended room temperature: around 68ºF, humidity: around
65%RH) and avoid the following locations when selecting a site for
the copier.
• Avoid locations near a window or with exposure to direct sunlight.
• Avoid locations with vibrations.
• Avoid locations with drastic temperature fluctuations.
• Avoid locations with direct exposure to hot or cold air.
• Avoid poorly ventilated locations.
Power supply/Grounding the copier
WARNING
• DO NOT use a power supply with a voltage other than that specified.
Avoid multiple connections in the same outlet. These types of situations
present a danger of fire or electrical shock...........................................
• Plug the power cord securely into the outlet. If metallic objects come
in contact with the prongs on the plug, it may cause a fire or electric
shock..................................................................................................
1
• Always connect the copier to an outlet with a ground connection to
avoid the danger of fir e or e lectri cal sho ck i n case of an el ectric s hort.
If an earth connection is not possible, contact your service
representative....................................................................................
Other precautions
• Connect the power plug to the closest outlet possible to the copier.
• The power sup ply cord is used as the main disconnect dev ice. Ensure
that the socket/outlet is located/installed near the equipment and is
easily accessible.
Handling of plastic bags
WARNING
• Keep the plastic bags that are used with the copier away from
children. The plastic may cling to their nose and mouth causing
suffocation..........................................................................................
KM-C1530 1-5
Page 16
1
IMPORTANT! PLEASE READ FIRST
PRECAUTIONS FO R USE
Cautions when using the copier
WARNING
• DO NOT place metallic objects or containers with water (flower
vases, flower pots, cups, etc.) on or near the copier. This type of
situation presents a danger of fire or electrical shock should they fall
inside. ............................................................................................
• DO NOT remove any of the covers from the copier as there is a danger
of electrical shock from high voltage parts inside the copier.................
• DO NOT damage, break or attempt to repair t he power cord. DO
NOT place heavy objects on the cord, pull it, bend it unnecessarily
or cause any other type of damage.
These types of situations present a danger of fire or electrical
shock. ........................................................................................
• NEVER attempt to repair or disassemble the copier or its parts as
there is a danger of fire, electrical sho ck or damage to the laser. If the
laser beam escapes, there is a danger of it causing blindness..........
• If the copier becomes excessively hot, smoke appears from the
copier, there is an odd smell, or an y ot her ab norm al sit uati on oc c urs ,
there is a danger of fi re or electrical s hock. Turn the po wer switch OFF
immediately, remo ve the pow e r pl ug from the outlet and co nta ct y ou r
service representative........................................................................
• If anything harmful (paper clips, water, other fluids, etc.) fails into the
copier, turn the power switch OFF immediately. Next, remove the
power plug from the outlet to avoid the danger of fire or electrical
shock. Then contact your service representative...............................
• DO NOT remove or conn ec t the po wer plu g w ith wet hands, as there
is a danger of electrical shock............................................................
• ALWAYS contact your service representative for maintenance or
repair of internal parts.........................................................................
1-6 KM-C1530
Page 17
IMPORTANT! PLEASE READ FIRST
CAUTION
• DO NOT pull the power cord when removing it from the outlet. If the
power cord is pulled, the wires may become broken and there is a
danger of fire or electrical shock. (ALWAYS grasp the power plug
when removing the power cord from the outlet.)................................
• ALWAYS remove the power plug from the outlet when moving the
copier. If the power cord is damaged, there is a danger of fire or
electrical shock...................................................................................
• If the copier w ill not be use d for a short pe riod of time (overn ight, etc.),
turn the power switch OFF.
If it will not be used for an extended period of time (vacations, etc.),
remove the power plug from the outlet for safety purposes during the
time the copier is not in use. ..............................................................
• ALWAYS hold the designated parts only when lifting or moving the
copier. ...............................................................................................
• For safety pu rposes. ALWAYS re move the powe r plug from the outle t
when performing cleaning operations................................................
• If dust accumulate s within the copi er, there is a dange r of fire or other
trouble. It is therefore recommended that you consult with your
service representative in regard to cleaning of internal parts. This is
particularly effective if accomplished prior to seasons of high
humidity.
Consult with your service representative in regard to the cost of
cleaning the internal parts of the copier.............................................
1
Other precautions
• DO NOT place heavy objects on the copier or cause other damage to
the copier.
• DO NOT open the front co ver, turn off the power switch, or pull out the
power plug during copying.
• During copying, some ozone is released, but the amount does not
cause any ill effect to o ne's health. If, however, the copier is used over
a long period of time in a poorly ventilated room or when making an
extremely large n umber of co pies, the s mell may be come un pleasant.
To maintain the appropriate environment for copy work, it is
suggested that the room be properly ventilated.
KM-C1530 1-7
Page 18
1
• When lifting or mov ing the copier, contact your service representative .
• Do not touch electrical parts, such as connectors or printed circuit
boards. They could be damaged by static electricity.
• DO NOT attempt to perform any operations not explained in this
handbook.
• CAUTION : Use of controls or adjustments or performance of
procedures other than those s pecified herein may res ult in h azardous
radiation exposure.
IMPORTANT! PLEASE READ FIRST
Cautions when handling consumables
CAUTION
• Avoid inhalation, ingestion, skin or eye contact. If ingestion occurs,
dilute stomach contents thoroughly with water and seek medical
treatment. If skin contact oc curs, wash with soap and water. If contact
with eyes occurs, flush thoroughly with water and seek medical
treatment. ...........................................................................................
• Prolonged inhalation of excessive dusts may cause lung damage.
Use of this product, as intended, does not result in inhalation of
excessive dusts..................................................................................
• Keep away from children....................................................................
• Do not incinerate toner and toner containers. Dangerous sparks may
cause burn..........................................................................................
Other precautions
• Always read the safety instructions which are included in the box or
printed on the container when handling consumables.
• Dispose of the toner or toner containers in accordance with Federal,
State and Local rules and regulations.
• Store consumables in a cool, dark location.
• If the copier will not be used for an extended period of time, remove
the paper from the cassette, re turn it to its original p ackage and reseal
it.
1-8 KM-C1530
Page 19

IMPORTANT! PLEASE READ FIRST
USER INSTRUCTIONS
FCC PART 15 - RADIO FREQUENCY DEVICES (For U.S.A. Users)
NOTE: This equipment has been tested and found to comply with the
limits for a Class A digital device, pursuant to Part 15 of the FCC Rules.
These limits are designed to provide reasonable protection against
harmful interference when the equipment is operated in a commercial
environment. This equipment generates, uses and can radiate radio
frequency energy and, if not installed and used in accordance with the
instruction manual, may cause harmful interference to radio
communications. O peration of this equ ipment in a residen tial area is likel y
to cause harmful interference in which case the user will be required to
correct the interference at his own expense.
WARNING: The design and production of this unit conform to FCC
regulations, and any changes or mo difications mu st be register ed with the
FCC and are subject to FCC control. Any c hanges made by the purchaser
or user without firs t cont acting th e ma nufactu rer w ill be s ubjec t to pe nalty
under FCC regulations.
This device must be used with a shielded interface (Parallel) cabl e and
shielded network (10/100BaseT) cable.
The use of non-shield cables is likely to result in interference with radio
communications and is proh ib ited under FCC rules .
INTERFERENCE-CAUSING EQUIPMENT STANDARD (ICES-003
ISSUE 3) (For Canada Users)
This Class A digital apparatus complies with Canadian ICES-003.
Cet appareil numé rique de la clas se A es t conforme à la norm e NMB-003
du Canada.
For users in countries subject to Class B regulations
This device must be used with shielded interface (Parallel) cable and
shielded ne twork (10/100Base-T) ca ble.
The use of non-shield cables is likely to result in interference with radio
communications and is prohibited under CISPR 22 and local rules.
For users in countries not subject to Class B regulations
WARNING
This is a Class A product. In a domestic environment this product may
cause radio interference in which case the user may be required to take
adequate measures.
This device must be used with shielded interface (Parallel) cable and
shielded ne twork (10/100Base-T) ca ble.
The use of non-shield cables is likely to result in interference with radio
communications and is prohibited under CISPR 22 and local rules.
1
KM-C1530 1-9
Page 20
1
IMPORTANT! PLEASE READ FIRST
Ozone Release
Locate the machine in a Well Ventilated Room
A negligible amount of oz one is generated during normal opera tion of this
machine. An unpleasant odor may, however, be created in poorly
ventilated rooms durin g extensive machine o perations. For a comfortabl e,
healthy and safe ope rating environ ment, it is recom mended that the room
be well ventilated.
Placer l’appareil dans une pièce largement ventilée
Une quantité d’ozo ne nég ligab le est dég agée p endan t le fon ction nemen t
de l’appareil quand celui-ci est utilisé normalement. Cependant, une
odeur désagréable peut être res sentie dan s les pièce s dont l’aéra tion est
insuffisante et lorsque une utilisation prolongée de l’appareil est
effectuée. Pour avoir la certitude de travailler dans un environnment
réunissant des con ditions de conf ort, santé et de sé curité, il est pré férable
de bien aérer la pièce ou se trouve l’appareil.
WARNING LABEL
CAUTION
Install this machine so tha t it ca n qui ckl y be unplugged from the
electrical outlet in case of an emergency.
§ The socket-outlet shall be installed near the machine and shall be
easily accessible.
1-10 KM-C1530
Page 21
IMPORTANT! PLEASE READ FIRST
LED Radiation Safety
This product i s a copie r wh ich operate s by mea ns of a LED (ligh t emi tting
diodes) exposure system. There is no possibility of danger from the LED
optical radiation, because the LED optical radiation level does not exceed
the accessible radiation limit of class 1 under all conditions of operation,
maintenance, service and failure.
1.1 Explanation of Basic Concepts and Symbols
The use of words and symbols in this manual are explained below.
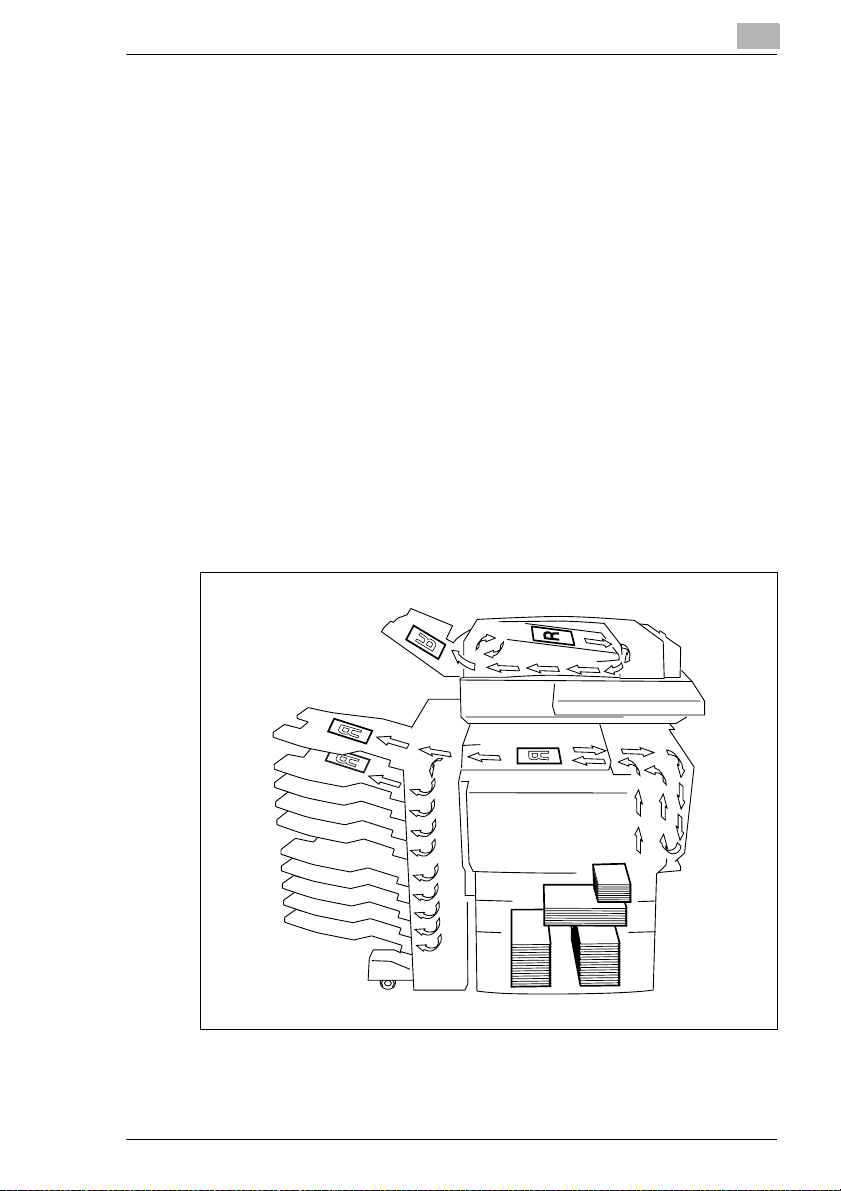
Paper Feeding
During printing, pa per is supp lied f rom the ri ght si de of the co pier a nd fed
into the output tray on top or the output option at the left with the printed
surface of the page facing down. The paper feed di rection is shown by the
arrows in the diagram below.
During copying, p aper is s upplied f rom the rig ht side o f the copi er and fed
into the copy tray on the top or the output option at the left with the print ed
surface of the copy f acing down . The paper fee d direction is shown by the
arrows in the diagram below.
1
KM-C1530 1-11
Page 22
1
IMPORTANT! PLEASE READ FIRST
“Width” and “Length”
Whenever paper dimensions are mentioned in this manual, the first value always refers to the width of the paper
(shown as “A” in the illustratio n) and the
second to the length (shown as “B”).
Paper Orientation
Lengthwise ( )
If the width (A) of the paper is shorter
than the length (B), the p aper has a v ertical or portrait or ientat ion, in dicate d by
either “L” or .
Crosswise ( )
If the width (A) of the paper is longer
than the length (B), the pa per has a horizontal or landscape orientation, indicated by either “C” or .
Display Icons
The icons shown below are displayed when the corresponding paper is
loaded or copy is made.
G : Overhead projector transparencies
G : Thick paper 1
G : Second side of a double-sided copy
G : Second side of a double-sided copy on thick paper
1-12 KM-C1530
Page 23
Before Making Copies
2 Before Making Copies
2.1 Available Feature s
The main copy settings available with this copier are listed below. For
details on their operation, refer to the pages indicated.
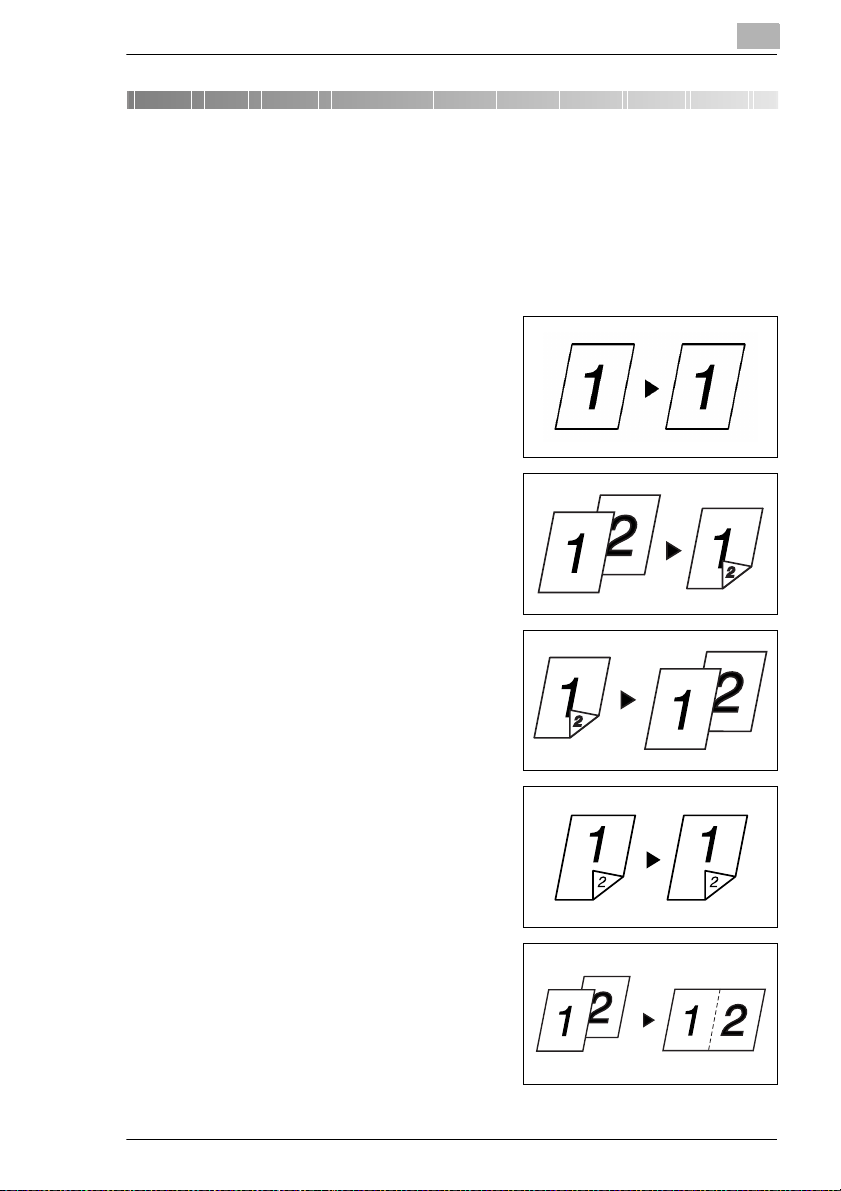
Orig. Ö Copy (Refer to page 6-1.)
G Single-Sided Ö Single-Sided
G Single-Sided Ö Double-Sided
2
G Double-Sided Ö Single-Sided
G Double-Sided Ö Double-Sided
G Single-Sided Ö Single–2in1
KM-C1530 2-1
Page 24
2
4
3
4
3
2
1
3
2
1
3
2
1
3
2
1
Before Making Copies
G Double-Sided Ö Double–2in1
G Book Ö Separation
G Book Ö Spread
Note
The “Double-Sided” Original setting is only available if the duplexing
document feeder is installed.
The “Double-Sided” and the “Double–2in1” Copy settings are only
available if the duplex unit and the memory are installed.
Zoom settings (Refer to page 5-14.)
G Reduced/Full Size/Enlarged
Finishing (Refer to page 6-8, page 6-12, and page 6-15.)
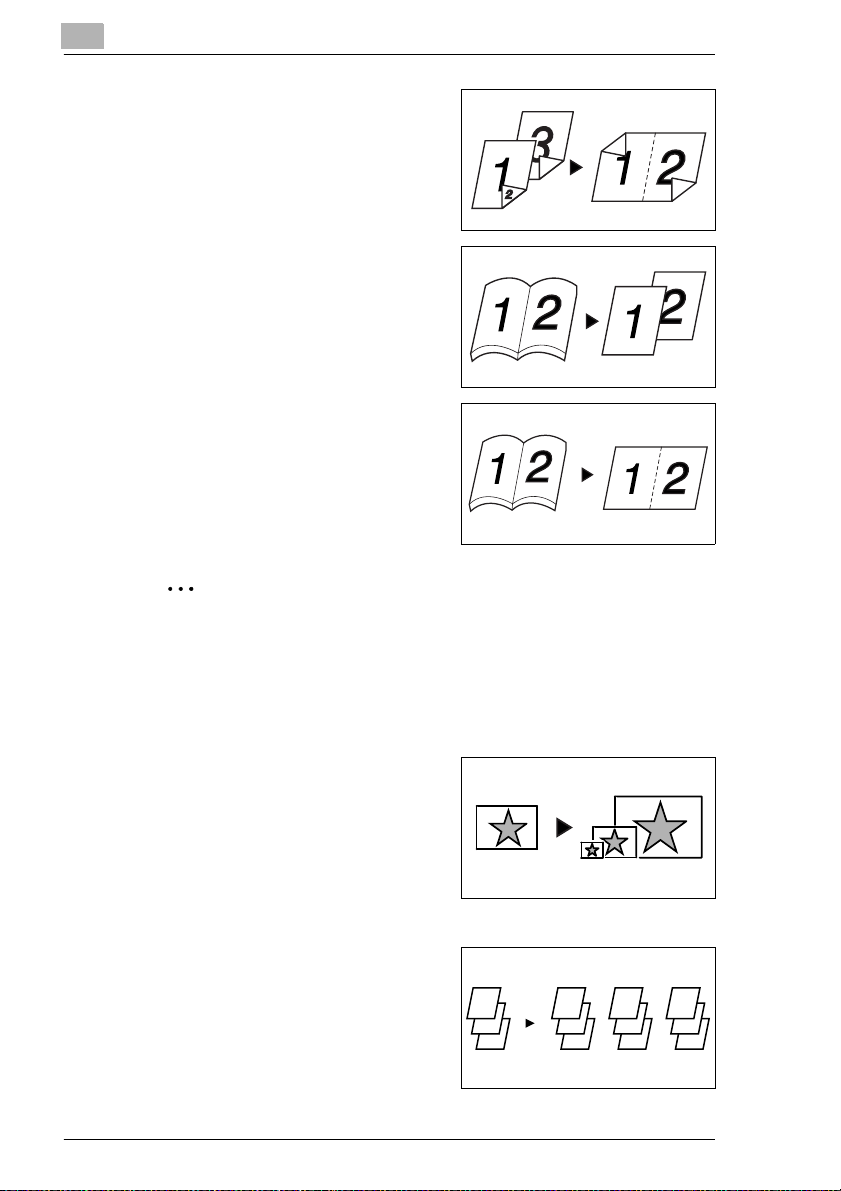
G “Sort” setting
2-2 KM-C1530
Page 25
Before Making Copies
3
2
1
1
3
2
1
1
3
2
1
1
3
2
1
3
2
1
G “Group” setting
2
G “Staple” setting
H (Fro nt staple )
H (Rear staple)
H (Double stapling)
G “Hole-Punch” setting
1
2
3
1
2
1
1
3
2
3
2
3
Note
The “Sort” and “Group” settings are only available if the 10-mailbin
sorter is installed.
The “Staple” and “Hole-Punch” settings are only available if both the
finisher and the printer co ntroller are instal led, and the print job is sent
from the computer.
KM-C1530 2-3
Page 26
2
Before Making Copies
Applications
G “OHP Interleaving” function (Refer
to page 6-30.)
G “Frame Erase” function (Refer to
page 6-19.)
G “Mirror Image” function (Refer to
page 6-21.)
G “X/Y Zoom” function (Refer to
page 6-32.)
G “Postcard” function (Refer to
page 6-33.)
2-4 KM-C1530
Page 27
Before Making Copies
G “Image Repeat” functi on (Refer to
page 6-35.)
Note
The “X/Y Zoom”, “Postcard” and “Image Repeat” functions are only
available if the memory is installed.
“Mixed Orig Detection” function (Refer to page 6-17.)
G Mixed originals
2
1
2
3
1
2
3
Note
The “Mixed Orig Detection” function is only available if the duplexing
document feeder is installed.
1
2
3
KM-C1530 2-5
Page 28

2
2.2 Components and Their Functions
The following describes each of the units that the copier is composed of
as well as their functions.
G Copier scanner section <scanner>
Scans the document
G Copier printer section <printer>
Prints the image scanned with the
scanner
G Original cover PLATEN COVER
TYPE C(optional)
Presses down on the loaded
document
Before Making Copies
G Duplexing document feeder RADF-
11 (option al)
Automatically feeds and scans one
document sheet at a time, and
automatically turns over dou ble sided documents and scans them
2-6 KM-C1530
Page 29
Before Making Copies
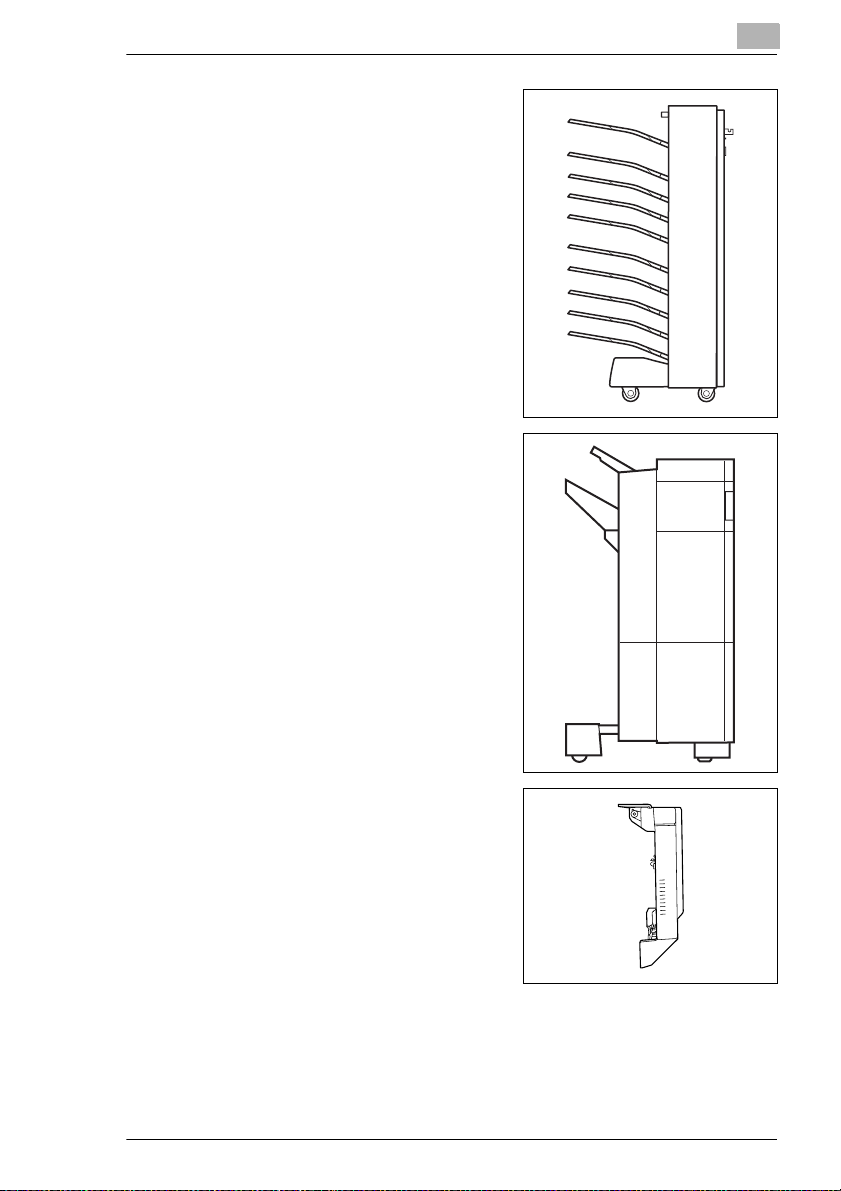
G 10-Mailbin sorter AS-M4110
(optional)
Automatically sorts or groups pages
and feeds them into the mailbin
specified at the computer
G Finisher F-8110/F-8430 (optiona l)
When printing from the computer,
finishes pages according to the
mode (sorting, groupi ng, staplin g or
hole-punching) selected at the
computer, then feeds out the pages
2
G Duplex unit AD-35 (optional)
Automatically turns over copies,
allowing double-sided copies to be
made
KM-C1530 2-7
Page 30
2
Before Making Copies
G Paper feed unit ST-530 (optional)
Can supply 500 sheet s of paper; up
to two paper feed units can be
installed
G Large-capacity cabinet ST-2500
(optional)
Can supply 2,500 sheets of paper
G Scanner rack (optional)
Decreases the equipment area by
installing the scanner above the
copier
G Copy desk (optional)
Used when the optional 10-mailbin
sorter (AS-M4110) or an optional
finisher (F-8110/F-8430 ) is installed
without an optional paper feed unit
G Copy table (optional)
Used when the optional 10-mailbin
sorter (AS-M4110) or an optional
finisher (F-8110/F-8430 ) is installed
with two optional paper feed units
installed
2-8 KM-C1530
Page 31

Before Making Copies
G Printer controller FIERY X3e (optional)
Internal printer controller that allows the copier to be used as both a
color printer and a color scanner on a network
G Memory (256 MB: 128 MB × 2)
(recommended with KM-C1530 )
Increases the memory of the copier, allowing functions such as
double-sided and 2in1 copying to be performed
2
KM-C1530 2-9
Page 32

2
2.3 Parts Names and Their Functions
Outside of Copier
Before Making Copies
1
2
3
4
5
18
1617
6
7
8
9
10
12
13
14
15
11
19
20
21
22
2-10 KM-C1530
Page 33

Before Making Copies
* The origin al cover, scanner rack, and copy desk shown installed in the
illustrat ion are optional.
No. Part Name Description
1 Copy output tray Holds copies fed out of the copier
2 Toner supply door Opened when adding toner
3 Front door Opened when replacing the imaging unit
4 1st drawer Holds 250 sheets of paper
5 2nd drawer Holds 500 sheets of paper
6 Power switch Used to turn the copier on and off
7 Right-side door Opened when servicing the copier and clearing misfeeds
8 Right-side door release
lever
9 Manual bypass tray Used for manual feeding of paper
10 Lower right-side door Opened when clearing misfeeds
11 Left-side door Opened when servicing the copier
12 Original cover
(optional)
13 Document scale Used to align the document
14 Original glass When manually feeding the document, place it on the glas s
15 Control panel Used to start copying or to make settings
16 Duplexing document
feeder connector
17 Scanner connector Used for connecting the scanner hookup cord
18 Scanner power cord
socket (inlet)
19 Scanner power cord
socket (outlet)
20 Scanner connector Used for connecting the scanner hookup cord
21 Printer power cord
socket
22 Sorter/finisher
connector
See p. 9-43 .
The paper size can be adjusted freely.
Special paper can be used. See p. 3-7.
The paper size can be adjusted freely. See p. 3-13.
See p. 2-29 .
Used to open and close the right-side door
The paper is fed one sheet at a time.
Special paper can be used. See p. 3-17.
Presses the document against the original glass
See p. 4-11 .
so the document can be scanned.
Place the document face down on the glass. See p. 4-10.
See p. 2-20 .
Used for connecting the duplexing document feeder
hookup cord
Used for connecting the scanner’s power cord
Used for connecting the scanner’s power cord
Used for connecting the printer’s power cord
Used for connecting the sorter or finisher hookup cord
2
KM-C1530 2-11
Page 34

2
Before Making Copies
Inside of Copier
1
2
3
No. Part Name Description
1 Toner hopper lid Opened when adding toner
2 Imaging unit release
lever
3 Imaging unit removing
bracket
4 Upper right-side door Opened when replacing the fusing unit or clearing misfeeds
Used to install and replace the imaging unit
Used to remove the imaging unit
4
2-12 KM-C1530
Page 35

Before Making Copies
Supplies and Parts
2
1
4
7
2
5
8
3
6
9
No. Part Name Description
1 Imaging unit Generates the copied image
2 Image transfer belt unit Layers onto the image transfer belt each of the single
3 Image transfer roller
unit
4 Waste toner bottle Collects waste toner
5 Oil-coating unit Supplies oil to the fusing roller
6 Fusing web unit Supplies oil to the fusing belt
7 Fusing unit Fuses the transferred toner to the paper
8 Ozone filter Collects the ozone generated in the copier
9 LED cleaning tool Used to clean the surface of the LED unit, for example
colors of the image generated by the imaging unit in order
to create a full-color image
Transfers onto the paper a full-color image generated by
the image transfer belt unit
when replacing the image transfer belt unit
Store in a safe place for later use.
KM-C1530 2-13
Page 36

2
Before Making Copies
Duplexing Document Feeder (Optional)
1
2
No. Part Name Description
1 Document output tray Collects documents that have been copied
2 Document guide Align one side of the document along the fixed document
3 Document feed tray Load the documents to be copied face up. See p. 4-4.
4 Misfeed clearing cover
F1/F2
5 Single-sheet feed tray Open to feed one sheet of the document at a time
guide, and then adjust the other guide to the width of the
document. See p. 4-4.
Opened when clearing a misfed document
3
4
5
2-14 KM-C1530
Page 37

Before Making Copies
Duplex Unit (Optional)
2
1
No. Part Name Description
1 Duplex unit door Opened when clearing paper misfed within the duplex unit
KM-C1530 2-15
Page 38

2
Before Making Copies
10-Mailbin Sorter (Optional)
3, 4
1
2
No. Part Name Description
1 Mailbins Collects copies that are sorted
2 Upper door/Lower door Opened when clearing paper misfed within the sorter
3 Horizontal transport
unit
4 Horizontal transport
unit cover
Transports copies to the sorter or finisher
Opened when clearing paper misfed within the horizontal
transport unit
2-16 KM-C1530
Page 39

Before Making Copies
Finisher (Optional)
2
2
3
4
5
No. Part Name Description
1 Upper cover Opened when clearing paper misfed within the finisher
2 Upper paper output
tray
3 Lower paper output
tray
4 Front door Opened when clearing paper misfed within the finisher
5 Right-side door
(Finisher F-8430 only)
1
Collects copies that are not sorted (made with the “NonSort” setting)
Collects copies that are sorted
Opened when replacin g the staple cartridge or clearing
paper misfeeds
KM-C1530 2-17
Page 40

2
Paper Feed Unit (Optional)
No. Part Name Description
1 3rd drawer Holds 500 sheets of paper
2 4th drawer
The paper size can be adjusted freely.
As many as two units can be installed. See p.3-13.
Before Making Copies
1
2
2-18 KM-C1530
Page 41

Before Making Copies
Large-Capacity Cabinet (Optional)
No. Part Name Description
1 3rd drawer Holds 2,500 sheets of paper
2
1
See p. 3-15.
Printer Controller FIERY X3e
For more details, refer to the manual of the printer controller.
KM-C1530 2-19
Page 42

2
Before Making Copies
2.4 Names of Control Panel Parts and Their Functions
Names of Control Panel Parts and Their Functions
13
15
14
1
2
3
45678
No. Part Name Description
1 Touch panel contrast-
adjusting dial
2 Utility key • Press to display the Utility screen, which allows you to
3 Job Recall key • Press to display the Job Recall screen, which allows you
4 Touch panel • Displays various screens and messages
5 Auto Color, Full Color,
and Black keys
• Adjusts the contrast of the touch panel
select the following functions:
Default Settings
Meter Count
Job Memory Input
User’s Choice
Administrator Mode
Scanner Addr. Input
Refer to “7 Utility Mode Operations” and “8 Administrator
Mode Operations”.
to recall and check stored copy jobs.
Refer to “To recall a stored job” on page 7-6.
Refer to “Using the Touch Panel” on page 2-22.
• Auto Color: The copier automatically determines
whether the document is in color or in black and white,
and then makes a full-color or black-and-white copy
depending on the color of the document.
• Full Color: The copier makes a full-color copy of the
document.
• Black: The copier makes a black-and-white copy
regardless of the color of the document.
12
11
10
9
2-20 KM-C1530
Page 43

Before Making Copies
No. Part Name Description
6 Start key • Press to start the copy operation.
7 Stop key • Press to stop a continuous copy operation.
8 C (clear) key • Press to reset the number of copies to “1”.
9 Panel Reset key • Press to reset all copy functions and settings to their
10 Interrupt key • Press to interrupt a copy job. (The [Interrupt] key
11 Energy Saver key • Press to enter Energy Saver mode. See p. 2-26.
12 Access key • Press when making copies using an access code.
13 Copy key • Press to enter Copy mode and use the copier as a
14 Scan key • Press to enter Scanner mode and use the copier as a
15 Keypad • Use to type in the number of copies to be made.
• If this key is pressed while the copier is warming up, the
copy job is delayed until the copier is finished warming
up. See p.2-26.
• The [Start] key i ndicator lights up in green t o indicat e that
the copier can begin copying. The [Start] key indicator
lights up in orange to indicate that the copier cannot
make copies.
• Press to erase a setting, such as the zoom ratio or size,
selected using the keypad.
defaults. (All selected set tings are cancelled.)
See p. 2-2 5.
* Stored zoom ratios, stored job settings, and interrupted or
delayed copy jobs are not cancelled.
indicator lights up in green to indicate that the copier is
in Interrupt mode.)
• Press again to cancel Interrupt mode or to return the
copier to the mode before it entered Interrupt mode. See
p. 2-27.
See p. 2-2 8.
copier.
• The [Copy] key indicator lights up in green to indicate
that the copier is in Copy mode.
color scanner.
• The [Scan] key indicator lights up in green to indicate
that the copier is in Scanner mode.
• Use to type in the zoom ratio.
• Use to type in the various settings.
2
KM-C1530 2-21
Page 44

2
2.5 Using the Touch Panel
Description of Touch Panel
When the copier is turned on (1), the Basic screen appears in the touch
panel. It shows, with messages and graphics, the currently selected
settings, the settings that are available, and the copier status.
Note
The screen illustrations in this manual may be slightly different from
the screens that appear on your copier’s touch panel.
Organization of Screens
Before Making Copies
Screen tabs
1
Message display
2
Available functions/settings
3
Selected settings
4
2-22 KM-C1530
Page 45

Before Making Copies
No. Part Name Description
1 Screen tabs These are the tabs for the Basic, Orig.
2 Message display The current copier status, operating instructions, warnings/
3 Available functions/
settings
Ö
and Auxiliary screens. Touch a tab to display the
corresponding screen.
Example) The Auxiliary screen is selected above.
* Touch “Basic” to display the Basic screen (the default
screen).
precaution s, and ot her data i ncludi ng the nu mber of cop ies
selected are displayed here.
Example) The message “Add paper.” appears in the
message display of the screen shown above.
Selecting a function displays a screen that allows you to
select the desired setting.
Select a different function to display the corresponding
screen.
Copy, Finishing,
2
Example) The available zoom ratio settings are shown
above.
* The currently selected setting appears in the tab.
4 Selected settings The current settings are shown by messages and graphics.
KM-C1530 2-23
Page 46

2
Before Making Copies
Operating the Touch Panel
To activate a function or to select a setting, lightly touch the desired
function or setting shown on the touch panel.
CAUTION
Be careful not to damage the touch panel.
§ Never push on the touch panel, and never push on it using a hard
or pointed object.
2-24 KM-C1530
Page 47

Before Making Copies
2.6 Useful Operations
Cancelling Settings
Press the [Panel Rese t] key to canc el all modes and fu nctions (zoom rat io,
number of copies, etc.) and reset them to their defaults. (All selected
settings are cancelled.)
If the duplexing d ocument feed er is being u sed and a docum ent has been
fed onto the original glass, the document will automatically be fed out.
Tip
Pressing the [Panel Reset] ke y is the easiest way to cancel all selec ted
settings at one time.
In order to av oid accidentally us in g settings from a prev io us c op y jo b,
press the [Panel Rese t] key to retu rn all func tions and sett ings to the ir
defaults, and then select the desired settings.
Auto Panel Reset
Without pressing the [Panel Reset] key, the cop ier automaticall y resets all
functions and setting s to their defaults one minute after co pying is finished
or after a key or the touch panel is pressed.
2
Tip
The length of time unti l the copier aut omatically resets itself can be set
between 1 and 9 minutes. The “Auto Panel Reset” p arameter can ev en
be turned off.
For more details, refer t o “Specifying Default Se ttings (“User’s Choi ce”
Function)” on page7-8 and page 7-15.
KM-C1530 2-25
Page 48

2
Before Making Copies
Energy Saver Mode
Instead of turning o ff the copier, it can be put into a stand by mode (Energy
Saver mode).
Turn the Energy Saver mode on by pressing the [Energy Saver] key. In
addition, if the copier is not used for a set length of time, it automatically
enters Energy Saver mode. The default length of time is 15 minutes.
To cancel Energy Saver mode, press any key in the control panel.
Note
If the copier enters Sleep mode while it is in Energy Saver mode, the
copier will automatically turn itself off.
Tip
The length of time until the copier enters Energy Saver mode can be
set between 1 and 240 minutes.
For more details, refer to “Specifying Default Setti ngs (“User’s Choice”
Function)” on page7-8 and page 7-16.
Delayed Copy Jobs
If a document is loaded and the [Start] key is pressed during the period
after the copier is turned on but before it is ready to begin copying, the
copier will automatically begin copying after it has finished warming up.
Sleep Mode
When the printer controller is not installed:
If the copier is not used for a set length of time, it can automatically turn
itself off in order to save energy. The default length of time is 30 minutes.
When the printer controller is installed:
If the copier is not used for a set length of time, it will automatically enter
a standby mode (En ergy Saver mode) in ord er to save energy. Th e default
length of time is 30 minutes. To cancel this mode, press any key in the
control panel.
Tip
The length of time until the copier enters Sleep mode can be set
between 15 and 240 mi nut es. The “Sleep M ode” para meter c an eve n
be turned off.
For more details, refer to “Specifying Default Setti ngs (“User’s Choice”
2-26 KM-C1530
Page 49

Before Making Copies
Function)” on page7-8 and page 7-17.
Interrupting Copy Jobs
During long continuous copy operations or print jobs, the copier may be
needed to quickly copy a different document.
To interrupt a copy job
§ Press the [Interrupt] key to temporarily stop the current copy
operation.
Press the [Interrupt] key again to continue the previously stoppe d copy
operation.
Note
The Interrupt mode is also cancelled when the copier automatically
resets itself 1 minute after the las t key is p resse d (“Auto Panel Re se t”
parameter). However, the Interrupt mode is not cancelled if a copy job
is still interrupted.
The length of time unt il the copier autom atically resets its elf can be set
between 1 and 9 minutes. The “Auto Panel Reset” parameter can ev en
be turned off. By turning off the “Auto Panel Reset” parameter, the
Interrupt mode will not be cancelled automatically. For more details,
refer to “Specifying Default Settings (“User’s Choice” Function)” on
page 7-8 and page7-15.
Some functions cannot be interrupted. In addition, some settings are
not available while a copy job is interru pted. For m ore detai ls, refer to
the the “Function Combination Table” on page 11-10.
2
Tip
Pressing the [Interrupt] key resets all functions and settings to their
defaults and selects the “Non-Sort” setting on the Finishing screen.
For more details, refer to “Resetting the Copier (“Default Settings”
Function)” on page7-1.
Settings cannot be stored during Interrupt mode. In addition, the “OHP
Interleaving” and “Job Recall” functions are not available.
Auto Paper Source Change Feature
If the tray or drawer runs out of paper while copying, the copier will
automatically switch to a different paper source and continue copying
provided that the new tray or drawer c ontains p aper of the same type and
size in the same or ientation. If the larg e-capacity cabinet (ST -2500) is also
installed, up to 3,250 sheets of “LetterC” paper can be fed continuously.
KM-C1530 2-27
Page 50

2
Before Making Copies
Access Codes
If access codes have been specified, use of the copier can be limited to
certain people or to a specified number of copies for each account.
Note
If access codes have been
specified, the c opier cannot be used
unless the access code/account
number is entered first.
<Access # Input screen>
The access codes ca n be spec ified
using the “Copy Track” function of
the Administrator mode. (Refer to
page 8-1.)
To enter an access code
1
Using the keypad, enter the fourdigit access code, and then press
the [Access] ke y.
Do you wish to cor rect the
?
entered access code?
§
Press the [C] (clear) key to
erase the entered ac ces s co de ,
and then enter the correct
access code.
2
The Basic screen appears and printing can begin. Select the desired
settings.
3
After you are finished making your copies, press the [Access] key.
Printing From the Computer
If the optional printer controller is installed, the copier can be used as an
11 × 17 in. full-color printer configured into a computer network.
For operating details, refer to the manual for the printer controller.
Scanning From the Computer
If the optional printer controller is installed, the copier can be used as an
11 × 17 in. full-color scanner configured into a computer network.
For operating details, refer to the manual for the printer controller.
2-28 KM-C1530
Page 51

Before Making Copies
2.7 Power Switch and Default Settings
Turning the copier on and off
To turn the copier on
§ Set the power switch to “1”.
To turn the copier off
§ Set the power switch to “2”.
Note
Do not turn off the c opi er wh ile it is making copie s, otherwise a paper
misfeed may occur. Make sure that all copy operations are finished
before turning off the copier.
When the copier is turned off, all settings except the stored zoom
ratios and other stored setting s in add ition to the Util ity mode s etting s
are reset to their defaults.
2
Note
If the copier is not used for 15 m inutes, it a utoma ticall y ente rs Energy
Saver mode. In addition, after the copier is not used for 30 min utes, it
automatically turns itself off (Sleep mode).
The length of time unt il the copier en ters Energy Save r mode or Sleep
mode can be set using the “User’s Ch oice” funct ion. For more details,
refer to “Specifying Default Settings (“User’s Choice” Function)” on
page 7-8, page 7-16, and page 7-17.
CAUTION
If the copier will not be us ed for a short p eriod of time (overnight,
etc.), turn the main switch OFF (O). If it wil l no t be us ed for an ex tended period of time (vacations, etc.), remove the power plug
from the outlet for safety purposes during the time the copier is
not in use.
KM-C1530 2-29
Page 52

2
Before Making Copies
Turning On the Copier
A few seconds after the copier i s turned on, the indicator on the [Start] key
lights up in green and the message “Warming up. Pre-program a job.”
appears on the touch panel.
At this time, a delay ed c op y j ob ca n be specified. (For more de tai ls , refe r
to page 2-26.)
However, even though the [Start] key is pressed, the cop y operation is no t
performed until t he copie r has finished w arming u p (after ab out 5 mi nutes
at normal room temperature (68°F/20°C)).
Default Settings
The Basic screen, which appears on the touch panel when the copier is
turned on, displays the default settings. The Basic screen serves as a
reference for all settings that are to be made.
Default settings
G Number of copies: 1
G Original Image Type: Text&Photo
G Zoom: Full Size (×1.000)
G Paper: Auto Paper
G Orig. Ö Copy: Single-Sided Ö Single-Sided
G Finishing: Non-Sort
Tip
The default settings can be customized using the “User’s Choice”
function. (Refer to page 7-1.)
2-30 KM-C1530
Page 53

Copy Paper
3 Copy Paper
3.1 Paper Specifications
Use paper that meets the following specifications.
Paper Types
3
Paper Types
Weight (lbs.)
Weight (g/m2)
Manual Bypass
Tray
1st Drawer
2nd Drawer
Paper Feed
*1
Unit
Large-Capacity
*1
Cabinet
Double-Sided
*2
Copies
Finished
*3
Copies
* 1: The paper feed unit and large-capacity cabinet are optional.
2: If the optional duplex unit is used to make double-sided copies, only certain types of paper
can be used.
3: If the optional 10-mailbin sorter is used to sort or group copies, only certain types of paper
can be used.
Standard
Paper
16 lbs. to 24
lbs.
(64 g/m2 to
90 g/m
22222
22
2
2
2
2
2
Special Paper
Thick
Paper1
24-1/4 lbs.
to 43-1/4
lbs.
(91 g/m2 to
2
)
163 g/m
————
————
————
————
————
2
)
Thick
Paper2
43-1/2 lbs.
to 55-1/2
lbs.
(164 g/m2
to 209 g/
2
m
)
—
Overhead
Projector
Transparen
cies
22
Postcards
KM-C1530 3-1
Page 54

3
Paper Sizes
Non-standard paper:
Paper Source Paper Width Paper Length
Manual Bypass Tray 3-9/16 in. to 12-1/4 in. (90
1st Drawer
2nd Drawer — —
Paper Feed Unit
Large-Capacity Cabinet
* 1: The paper feed unit and large-capacity cabinet are optional.
*1
mm to 311 mm)
*1
——
5-1/2 in. to 18 in. (140 mm to
457 mm)
Standard paper:
Copy Paper
Paper Size LetterL LetterC LegalL
Paper Source,
Etc.
Manual Bypass
Tray
1st Drawer
2nd Drawer
Paper Feed
*1
Unit
Large-Capacity
*1
Cabinet
Double-Sided
*2
Copies
Finished
*3
Copies
2222222
2222222
222
222
—
2222222
2222222
2
—————
Executi
veL
———
————
Executi
veC
12-1/4
× 18L
11 × 17
L
2
3-2 KM-C1530
Page 55

Copy Paper
3
Paper Size
11 × 14L8-1/4 ×
13L
8 × 13L
8-1/2 ×
13L
8-3/4 ×
13L
8 × 101/2L
8 × 10L
Paper Source,
Etc.
Manual Bypass
Tray
1st Drawer
2nd Drawer
Paper Feed
*1
Unit
Large-Capacity
*1
Cabinet
Double-Sided
*2
Copies
Finished
*3
Copies
Paper Size
2222222
222222
22
*5
22*52
*5
2
*5
*5
2
*5
2
*5
2
*5
2
*4
2
——
——
———————
2222222
2222222
5-1/2 ×
8-1/2L
10-1/2
× 8C
10 × 8C
8-1/2 ×
5-1/2C
4 × 6L
Paper Source,
Etc.
Manual Bypass
22222
Tray
*4
1st Drawer
2nd Drawer —
Paper Feed
*1
Unit
Large-Capacity
*1
Cabinet
Double-Sided
*2
Copies
Finished
*3
Copies
* 1: The paper feed unit and large-capacity cabinet are optional.
2: If the optional duplex unit is used to make double-sided copies, only certain types of paper
22
2
—
2
—————
222
2222
222
———
———
——
—
can be used.
3: If the optional 10-mailbin sorter is used to sort or group copies, only certain types of paper
can be used.
4: The size should be entered using the “User’s Choice” function.
5: The paper size should be changed by your service representative.
KM-C1530 3-3
Page 56

3
Copy Paper
Paper capacity:
Paper Type
Paper Source,
Etc.
Manual Bypass
Tray
1st Drawer 250 sheets 20 sheets — 20 sheets 20 sheets
2nd Drawer 500 sheets — — — —
Paper Feed Unit
Large-Capacity
*1
Cabinet
* 1: The paper feed unit and large-capacity cabinet are optional.
Standard
Paper
1 sheet 1 sheet 1 sheet 1 sheet 1 sheet
*1
500 sheets — — — —
2,500
sheets
Special Paper
Thick
Paper1
————
Thick
Paper2
Overhead
Projector
Transpare
ncies
Postcards
Recommended paper:
Paper Type Recommende d Pa per
Standard Paper For full-color copies Hammermill Laser Print New Radiant White
24 lbs.
For black-and-white
copies
Thick Paper 1 NS 700
Thick Paper 2 NS 1000C
Overhead
Projector
Transparencies
For full-color copies V558
For black-and-white
copies
Hammermill tidal DP
JE001
3-4 KM-C1530
Page 57

Copy Paper
Paper Types To Be Avoided
The following types of paper should not be used, otherwise decreased
print quality, paper misfeeds or damage to the copier may occur.
G Overhead transparencies that have already been fed through the
G Paper that has been printed on by a heat-transfer printer or an inkjet
G Paper that is either extremely thick or extremely thin
G Folded, rolled, wrinkled, or torn paper
G Perforated paper or paper with holes punched in it
G Extremely smooth or extre mely rough pa per, or pape r with an une ven
G Paper that has been treated, such as carbon-backed paper, or heat-
G Paper that has been decorated with foil or embossing
G Paper of various sizes
G Paper of a non-standard shape (not rectangular)
G Paper that is bound with glue, staples, or clips
G Paper with labels attached
G Paper with ribbons, hooks, buttons, etc. attached
3
copier (even if the transparency is still blank)
printer
surface
sensitive or pressure-sensitive paper
KM-C1530 3-5
Page 58

3
3.2 Print Area
Any part of the image within the area shown below is not copied.
G A margin 0.2 in. (5 mm) from the leading edge of the paper (A)
G A margin 0.12 in. (3 mm) from the trailing edge of the paper (B)
G A margin 0.12 in. (3 mm) on both sides of the paper (C)
When using the printer controller to print from a computer, the image
cannot be printed within the area 0.2 in. (5 mm) from all edges of the
paper.
Copy Paper
AB
C
Paper output direction
3.3 Paper Storage
Observe the following precautions when storing the paper.
Store the paper in a location that meets the following requirements.
Not exposed to direct sunlight
Not exposed to fire
Not exposed to high humidity
Not extremely dusty
Unwrapped paper should be stored in a plastic bag in a cool, dry
location.
-
Keep paper out of the re ach of children.
C
A: 0.2 in. (5 mm)
B: 0.12 in. (3 mm)
C: 0.12 in. (3 mm)
3-6 KM-C1530
Page 59

Copy Paper
3.4 Loading Paper
To load paper into the 1st drawer (250-sheet multipurpose tray)
1
Pull out the paper drawer for the 1st
drawer.
Has the paper take-up roller
?
been touched?
§ Be careful not to touch the
surface of the paper take-up
roller with your hands. If the
roller has been touched, wipe it
with a dry cloth.
2
Press down on the paper-lifting
plate until it locks into place.
3
Paper takeup roller
3
Slide the lateral guides to fit t he size
of paper to be loaded.
H For paper of a non-standard
size, first load the paper, and
then adjust the lateral guides to
the size of the loaded paper.
KM-C1530 3-7
Page 60

3
Copy Paper
H For “12-1/4 × 18” paper, adjust
the trailing-edge guides as
shown in the illustration.
4
Load the paper into the drawer so
that the front side of the paper (the
side facing up when the package
was unwrapped) faces up.
Has the paper been loaded
?
correctly?
If the paper is not loaded
correctly, a paper misfeed may
occur.
§ Do not load so much paper tha t th e top of the stack is h igh er t han
the Ä mark.
§ Do not load more than 20 sheets of thick paper 1, overhead
projector transparencies, or postcards.
§ Do not load thick paper 2 into the 1st drawer. If you wish to make
copies onto thick paper 2, feed it through the manual bypass tray.
§ When loadin g additional paper, re move any paper remaini ng in the
drawer, place it on the new pa per, and th en a lign the paper in the
stack well before loading it into the drawer.
§ We recommend replenishing the paper only after all of the paper
in the drawer has been used.
3-8 KM-C1530
Page 61

Copy Paper
Are postcards loaded?
?
§ When loading postcards, load
them as shown.
§ Do not load postcards cross-
wise, as shown.
Are the recommended o verhea d pr oject or trans parenc ies l oaded ?
?
§ When loading the
recommended overhead
projector transparencies, load
them as shown in the
illustration.
3
KM-C1530 3-9
Page 62

3
5
Slide the lateral guides against the
edges of the paper.
H Make sure that the paper is not
curled when it is loaded.
Check that the lateral gui des are
pushed up agains t th e e dge s of
the paper.
6
Close the paper drawer.
7
Turn the media type selection dial
on the drawer to the setting for the
type of paper loaded.
Are postcards loaded into the
?
1st drawer?
§ If postcards are loaded into the
1st drawer, set the paper type
dial to “Thick 1”.
Copy Paper
Setting the Paper Size
The default setting for th e paper size of the 1s t drawer is “Auto Detect”.
For postcards, no n-s tand ard or metric paper sizes , c ha nge th e p ape r
size according to the procedure in the following section.
3-10 KM-C1530
Page 63

Copy Paper
To set the paper size for the 1st drawer
1
2
3
3
Press the [Utility] key to ente r Utility
mode.
Touch [User’s Choice].
Touch [2/2] to view the next page.
4
Touch [1st Drawer Paper Select].
KM-C1530 3-11
Page 64

3
5
Touch [Input Size].
6
Select the desired paper size, and
then touch [Enter].
Will postcards be loaded into the
?
1st drawer?
§ If postcards are to loaded into
the 1st drawer, select [4 × 6].
7
To specify a paper size other than
those listed, touch [Custom Size],
touch , , , and
to specify the desired size, and then
touch [Enter].
Copy Paper
8
In the Input Size screen, touch [Enter].
9
In the 1st Drawer Paper Size screen, touch [Enter].
10
In the User’s Choice screen, touch [Exit].
3-12 KM-C1530
Page 65

Copy Paper
To load paper into the 2nd drawer or the 500-sheet paper feed unit
1
2
3
Pull out the paper drawer.
Has the paper take-up roller
?
been touched?
§ Be careful not to touch the
surface of the paper take-up
roller with your hands. If the
roller has been touched, wipe it
with a dry cloth.
Press down on the paper-lifting
plate until it locks into place.
Remove the trailing-edge gui de,
and then re-install it for the size of
paper to be loaded.
3
Paper takeup roller
3
4
4
Slide the lateral guides to fit t he size
of paper to be loaded.
KM-C1530 3-13
Page 66

3
Copy Paper
5
Load the paper into the drawer so
that the front side of the paper (the
side facing up when the package
was unwrapped) faces up.
Has the paper been loaded
?
correctly?
If the paper is not loaded
correctly, a paper misfeed may
occur.
§ Do not load so much paper tha t th e top of the stack is h igh er t han
the Ä mark.
§ Special pape r cannot b e fed from the 2nd d rawer or o ptional pa per
feed units. If you wish to make copies onto special paper, feed it
through the manual bypass tray or the 1st drawer.
§ When loadin g additional paper, re move any paper remaini ng in the
drawer, place it on the new pa per, and th en a lign the paper in the
stack well before loading it into the drawer.
§ We recommend replenishing the paper only after all of the paper
in the drawer has been used.
6
Slide the lateral guides against the
edges of the paper.
H Make sure that the paper is not
curled when it is loaded.
Check that the lateral gui des are
pushed up agains t th e e dge s of
the paper.
7
Close the paper drawer.
3-14 KM-C1530
Page 67

Copy Paper
To load paper into the large-capacity cabinet
1
2
3
Pull out the paper drawer.
Load paper into the right sid e of the
drawer so that the front side of the
paper (the side facing up when the
package was unwrapped) faces up.
Has the paper been loaded
?
correctly?
If the paper is not loaded
correctly, a paper misfeed may
occur.
§ Make sure that the paper is not curled when it is loaded.
§ Do not load so much paper tha t th e to p o f the stack is high er t han
the Ä mark.
§ Special paper can not be fed from the 2nd drawer o r optional paper
feed units. If you wish to make copies onto special paper, feed it
through the manual bypass tray or the 1st drawer.
§ When loadin g additional paper, remov e any paper remaining i n the
drawer, place it on the new paper, and then align the paper in the
stack well before loading it into the drawer.
§ We recommend replenishing the paper only after all of the paper
in the drawer has been us ed.
KM-C1530 3-15
Page 68

3
Copy Paper
3
Load paper into the left side of the
drawer so that the front side of the
paper (the side facing up when the
package was unwrapped) faces up.
Has the paper been loaded
?
correctly?
If the paper is not loaded
correctly, a paper misfeed may
occur.
§ Make sure that the paper is not curled when it is loaded.
§ Do not load so much paper tha t th e top of the stack is h igh er t han
the Ä mark.
§ Special pape r cannot b e fed from the 2nd d rawer or o ptional pa per
feed units. If you wish to make copies onto special paper, feed it
through the manual bypass tray or the 1st drawer.
§ When loadin g additional paper, re move any paper remaini ng in the
drawer, place it on the new pa per, and th en a lign the paper in the
stack well before loading it into the drawer.
§ We recommend replenishing the paper only after all of the paper
in the drawer has been used.
4
Close the paper drawer.
3-16 KM-C1530
Page 69

Copy Paper
To load paper into the manual bypass tray
Paper can be fed man ually thro ugh the ma nual b ypass tra y if yo u wis h to
copy onto paper that is not loaded into a draw er or if you wish to c opy onto
special paper, such as overhead transparencies, p ostcards, or t hick paper
1 or 2.
1
2
3
Open the manual bypass tray.
Adjust the paper guides to the size
of the paper, and then load the
paper so that the front side of the
paper (the side facing up when the
package was unwrapped) faces
down. Lightly slide the paper into
the feed slot as much as poss ible so
that it is ready to be fed into the
copier.
Do you need more information
?
on feeding paper through the manual bypass tray?
§ Feed only one sheet of paper at a time.
§ Copies will be made on the surface of the paper facing down when
it is loaded into the manual bypass tray.
KM-C1530 3-17
Page 70

3
Is a postcard loaded?
?
§ When loadi ng a postcard, l oad it
as shown.
§ Do not load the postcard
crosswise, as shown.
Is the recommended overhead projector transparency loaded?
?
§ When loading the
recommended overhe ad
projector transparency, load it
as shown in the illustration.
Copy Paper
3-18 KM-C1530
Page 71

Copy Paper
3
3
Make sure that the screen that
allows you to select the manual bypass tray pa per size is displayed,
and then select the desired paper
size.
or
For a paper size prec eded by “A” o r
“B”, touch [Metric] to display a
screen containing me tric paper size
settings.
or
For a paper size other than the
standard sizes li sted on the screen,
touch [Custom Size] to display a
screen that allows you specify a
size.
Do you wish to return to the
?
screen displaying paper sizes in
inches?
§ Touch [Inch] to display the inch paper size settings.
Do you wish to specify a non-standard paper size?
?
§ Touch , , and , to select the desired si ze, and then
touch [Enter].
4
Touch [Paper Type], select the
setting for the type of paper loa ded,
and then touch [Enter].
KM-C1530 3-19
Page 72

3
Copy Paper
3-20 KM-C1530
Page 73

Original Documents
4 Original Documents
4.1 Feeding the Document
The document can b e fed in t hree different ways. Dependin g on the type
of document being fed, position the document correctly so that it is fed
using the appropriate feed method.
Document Feed Method Features
Multi-sheet feeding Using the duplexing document feeder, a multi-page document
Single-sheet feeding Using the duplexing document feeder, the document is fed one
Manual feeding The document is placed directly on the original glass, then
can be fed automatically. This feed method can also be used
with double-sided documents, and is best with multi-page
double-sided documents. See p. 4-4, p. 4-5, p. 6-17.
page at a time. This feed method cannot be used with doublesided documents (however, they can be scanned one side at a
time). This feed method is best with a document consisting of
a few single-sided pages. In addition, thick paper and thin
paper can be scanned using this feed method. See p. 4-7,
p. 4-9.
scanned. Each document must be positioned manually (the
previous one must be removed and the next one placed on the
original glass). This method is best with books and oth er
documents that cannot be fed through the duplexing document
feeder. See p. 4-11, p. 4-12, p. 4-13, p. 4-14.
4
KM-C1530 4-1
Page 74

4
Original Docume nts
Document Paper Types
Note
Be sure to use the document paper type appropriate for the feed
method being used.
If the correct paper type is n ot used, a paper misfeed or damage to the
document may occur.
Document Feed
Method
Multi-sheet feeding Sheet documents
Single-sheet feeding Sheet documents
Manual feeding Documents, books, large objects
Document Paper Type Document Paper Size
• Capacity of single-sided
documents: 13-1/4 lbs. to 291/4 lbs.
• Capacity of double-sided
documents: 16 lbs. to 24 lbs.
• Capacity of documents of
mixed sizes: 16 lbs. to 24 lbs.
• Capacity of single-sided
documents: 9-1/4 lbs. to 53-1/
4 lbs.
up to a weight of 4-1/2 lbs.
Document width: 5-1/2 in. to 113/4 in.
Document length: 8-1/4 in. to 17
in.
Document width: 5-1/2 in. to 113/4 in.
Document length: 8-1/4 in. to 17
in.
Document width: Less than 11-3/
4 in.
Document length: Less than 17
in.
Precautions for Multi-Sheet Feeding and Single-Sheet Feeding
The following types of documents should not be used for multi-sheet
feeding or single-sheet feeding, otherwise paper misfeeds or damage to
the document may occur. Instead, these types of documents should be
fed manually.
G
Thin documents such as typewriter paper or paraffin paper
G
Thick documents
G
Standard size docum ents larg er than 11 × 17L or s maller t han 5-1/2 ×
8-1/2
G
Documents that are transparent or translucent, such as overhead
transparencies or diazo photosensitive paper
G
Wrinkled, folded, rolled, or torn documents
G
Documents bound with cli ps or staple s
G
Coated documents such as carbon-backed paper
4-2 KM-C1530
Page 75

Original Documents
Precautions for Manual Feeding
The following precau tions should be ob served when ma nually feeding th e
types of documents listed.
G For non-standard sized documents:
The document size cannot be detected automatically, therefore, the
Paper setting “Auto Paper” and the Zoom setting “Auto Size” cannot
be used together. Selec t a differen t Paper setting by touchi ng “Paper”
on the Basic screen, the n selecting th e paper size of the document, or
select a different Zoom setting by touching [Zoom] on the Basic
screen, then selecting a zoom ratio. (Refer to page 5-14 for more
details.)
G For documents th at a re t r ans pa rent or translucent, su ch as ov erh ead
transparencies or diazo photosensitive paper:
Place a blank sheet of paper of the same size as the document over
the document. (Refer to page 4-12 for more details.)
G For thick objects, such as bo oks:
Scan without closing the original cover or d uplexing docum ent feeder.
In addition, do not press down extremely hard on the document,
otherwise the copier may be damaged. (The original glass can only
resist a weight of up to 4-1/2 lbs.)
4
KM-C1530 4-3
Page 76

4
Original Docume nts
4.2 Feeding the Document Through the Duplexing
Document Feeder
The duplexing docu ment feeder feeds in, scans, then au tomatically feeds
out each page i n a mult i-pa ge docum ent, o ne pa ge at a ti me. Th e corr ect
types of documents must be loaded in order for the duplexing document
feeder to function properly.
CAUTION
DO NOT leave the document feeder open as there is a danger of
personal injury.
Multi-Sheet Feeding (Sheet Documents)
A stack of documents of different sizes can be copied as a set using the
duplexing document feeder. (Refer to “Feeding Documents of Different
Sizes (“Mixed Orig Detection” Function)” on page 6-17.)
To make copies using multi-sheet feeding (sheet documents)
A maximum of 50 document pages can be loaded.
When loading the documents:
Be sure to adjust the paper guide to the size of the document,
otherwise the documents may not be fed in straight.
1
Slide the adjustable document guide
to fit the size of the documents.
2
Load the documents face up into the
document feed tray.
4-4 KM-C1530
Page 77

Original Documents
3
Press the [Start] key to start feeding
and copying the docum en ts fro m th e
top page.
Multi-Sheet Feeding (Documents of Mixed Sizes)
With this feature, a stack of doc uments of d ifferent size s can be copied as
a set using the duplexing document feeder. (For more details, refer to
“Feeding Documents of Different Sizes (“Mixed Ori g Detection” Function)”
on page 6-17.)
4
KM-C1530 4-5
Page 78

4
Original Docume nts
To make copies using multi-sheet feeding (documents of mixed
sizes)
A maximum of 50 document pages can be loaded.
When loading the documents:
Be sure to adjust the paper guide to the size of the document,
otherwise the documents may not be fed in straight.
1
Slide the adjustable document guide
to fit the size of the documents.
2
Load the documents face up into the
document feed tray , making sure tha t
one side of al l loa ded doc ument s are
aligned along the fixed document
guide.
P
P
3
Slide the adjustable document guide
to the edge of the largest document.
4
Press the [Start] key to start feeding
and copying the docum en ts fro m th e
top page.
4-6 KM-C1530
Page 79

Original Documents
Single-Sheet Feeding (Standard Paper /Thick Paper)
With single-sheet feeding, the following are not available:
“Double-Sided” setting, “2in1” setting, “Book” setting, “Sort” setting, “OHP
Interleaving” function, manual feeding
To make copies using single-sheet feeding
When loading the documents:
Be sure to load the documents one sheet at a time.
Be sure the documents are not folded or curled when they are fed.
1
Specify the settings th at can be used with single-sheet feedi ng (for
example, the Zoom setting and the number of copies).
Do you need more information about the settings?
?
§ Refer to “5 Basic Operations” and “6 Advanced Operations”.
2
Open the single-shee t fee d tray , an d
then slide the adjustable document
guide to fit the size of the document.
4
KM-C1530 4-7
Page 80

4
Original Docume nts
3
When the indicator on the [Start] key
lights up in green, insert on e pag e of
the document face down into the
single-sheet feed tray.
The indicator on the [St art] key lights
up in orange and the doc ument is fed
and copied.
Is the document inserted
?
correctly?
§ Insert the document pages one at
a time.
§ Be sure the documents are not
folded or curled when they are
fed.
4
Make sure the indicator on the [Start] key lights up in green before
feeding the next page of the document.
4-8 KM-C1530
Page 81

Original Documents
Single- Sheet Feeding (Thin P aper)
With single-sheet feeding, the following are not available:
“Double-Sided” setting, “2in 1” setting, “Book” setting, “Sort” setti ng, “OHP”
Interleaving function, manual feeding
Before loading d ocu me nts p rinted on thin pa per (th ic kne ss : 9-1/ 4 to 13-1/
4 lbs.), set the “Th in Or ig.” pa ram ete r of th e Ex pe rt Us er’ s mod e to “ON”.
For more details, refer to the section “To set the “Thin Orig.” parameter”
of “Specifying the Expert Settings (“Expert User’s Mode” Function)” on
page 8-33.
To make copies using single-sheet feeding
When loading the documents:
Be sure to load the documents one sheet at a time.
Be sure the documents are not folded or curled when they are fed.
1
Touch [Orig. Ö Copy].
2
Touch [Thin Orig.]
4
3
Select the desired settings for functions that can be used with singlesheet feeding (such as the zo om rati o and th e numb er of cop ies). F or
more details, refer to “5 Basic Operations” and “6Advanced
Operations”.
4
Continue with steps 2 through 4 of “Single-Sheet Feeding (Standard
Paper/Thick Paper)” on page 4-7.
KM-C1530 4-9
Page 82

4
Original Docume nts
4.3 Positioning the Document on the Original Glass
The method for positioni ng the document dif fers depending on the type of
document being copied, therefore be sure the document is positioned
correctly. For information on using the duplexing document feeder, refer
to page 4-4.
Note
Lift open the original cover, or the duplexing document feeder if it is
installed, 15° or more, otherwise the document size will not be
detected and the correct pa per size or zoo m ratio may not be selec ted
automaticall y.
15°
CAUTION
DO NOT leave the document feeder open as there is a danger of
personal injury.
4-10 KM-C1530
Page 83

Original Documents
Manual Feeding (Sheet Documents)
To make copies using manual feeding (sheet documents)
1
Lift open the original cover, or the duplexing document feeder if it is
installed.
2
Position the document face down
onto the original glass.
Does the object that is placed on
?
the original glass exceed the
maximum weight allowable?
§ Do not place a doc umen t heavi er
than 4-1/2 lbs. on the original
glass.
3
Align the corner of the document with
the arrow marks on the document
scales above and to the left of the
original glass.
4
4
Close the original cover, or the duplexing document feeder if it is
installed.
5
Select the desired settings.
Do you need more information about the settings?
?
§ Refer to “5 Basic Operations” and “6 Advanced Operations”.
6
Press the [Start] key to copy the document.
KM-C1530 4-11
Page 84

4
Original Docume nts
Manual Feeding (Transparent or Translucent Documents)
To make copies using manual feeding (transparent or translucent
documents)
When copying a transparent or translucent document, such as overhead
transparencies, t racing paper or diazo photos ensitive pa per, position i t as
described below.
1
Lift open the original cover, or the duplexing document feeder if it is
installed.
2
Position the document face down
onto the original glass.
3
Align the corner of th e document with
the arrow marks on the document
scales above and to the left of the
original glass.
4
Place a blank sheet of paper of the
same size as the document over the
document.
5
Close the original cover, or the duplexing document feeder if it is
installed.
4-12 KM-C1530
Page 85

Original Documents
6
Select the desired settings.
Do you need more information about the settings?
?
§ Refer to “5 Basic Operations” and “6 Advanced Operations”.
7
Press the [Start] key to copy the document.
Manual Feeding (Books)
Note
Do not place objects weighing more than 4-1/2 lbs. on the ori ginal
glass. In additi on, do not press do wn extremely ha rd on the document.
Applying a strong force to the original glass may damage it.
To make copies using manual feeding (books)
When copying a document spread over two facing pages, such as in a
book or magazine, position it as described below.
1
Lift open the original cover, or the duplexing document feeder if it is
installed.
2
Position the book fac e down onto the
original glass, with the top of the book
toward the rear of the copier and with
the center of the book aligned with
the book mark ( ) on the
document scale.
4
3
Close the original cover, or the duplexing document feeder if it is
installed.
Is a thick book or object being copied?
?
§ Make the copy without closing the original cover or duplexing
document feeder.
KM-C1530 4-13
Page 86

4
Original Docume nts
Is the document being scanned without closing the original cover
?
or duplexing document feeder?
§ Do not look directly at the bright light that may shine through the
original glass. Although the light that shines through the glass is
bright, it is not a laser beam and, therefore, is not as dangerous.
4
Select the desired settings.
Do you need more information about the settings?
?
§ Refer to “5 Basic Operations” and “6 Advanced Operations”.
5
Press the [Start] key to copy the document.
Manual Feeding (“12-1/4 × 18” Paper)
Note
Do not place objects weighing more than 4-1/2 lbs. on the original
glass. In additi on, do not press do wn extremely ha rd on the document .
Applying a strong force to the original glass may damage it.
To make copies using manual feeding (“12-1/4 × 18” paper)
When copying 11 × 17-size d ocument s onto “12-1 /4 × 18” pape r, positio n
the document as described below.
1
Lift open the original cover, or the duplexing document feeder if it is
installed.
2
Position the document face down
onto the original glas s, aligning it
with the “12-1/4 × 18” mark on the
top document width scale as
shown in the illustration.
3
Close the original cover, or the duplexing document feeder if it is
installed.
4-14 KM-C1530
Page 87

Original Documents
4
Select the desired settings.
Do you need more information about the settings?
?
§ Refer to “5 Basic Operations” and “6 Advanced Operations”.
5
Press the [Start] key to copy the document.
4
KM-C1530 4-15
Page 88

4
Original Docume nts
4-16 KM-C1530
Page 89

Basic Operation s
5 Basic Operations
5.1 Making Copies
The following pr ocedu re desc ribes how to ins ert the d ocument and make
a basic copy of it.
To copy a document (To make a basic copy)
The default settings (s pecified dur ing manufacturing of the copier) of the
Basic screen are: the “Full Color” copy mode selected, Original Image
Type set to “Text&Photo”, Zoom set to “×1.000”, Paper set to “Auto
Paper”, and the number of copies set to “1”.
1
Press the [Copy] key to enter Copy
mode.
2
Position the document(s) to be
copied. (Refer to pa ge 4-1 for more
details.)
5
KM-C1530 5-1
Page 90

5
3
Select the desired color mode (Auto
Color, Full Color, or Black). (Refe r
to page 2-20 for more details.)
4
Make sure that t he Basic screen is
displayed.
Basic Operations
5
Specify any other necessary settings.
H Paper (Refer to page 5-4 for more details.)
H Zoom (Refer to page 5-14 for more details.)
H Original Image Type (Refer to page 5-18 for more details.)
H Density (Refer to page 5-20 for more details.)
6
Using the keypad, ente r the number
of copies you wish to make.
Does the wrong number of
?
copies appear?
§ Press the [C] (clear) key, and
then enter the corre ct number of
copies.
§ The number of copies can only
be set to a number between 1
and 100.
5-2 KM-C1530
Page 91

Basic Operation s
7
Press the [Start] key.
The set number o f copies are made.
?
§ Press the [Stop] key.
5
Do you wish to stop copying
before the set number of copi es
are made?
KM-C1530 5-3
Page 92

5
5.2 Selecting the Paper Source
Before making a copy, th e tray or draw er contai ning the pa per that will b e
used must be selected.
Either the paper source is selected automatically when the size of the
document is detected, or the desired paper source can be selected
manually.
G Auto Paper:
If “Auto Paper” is selected, the tray or drawer containing the most
suitable size of paper is selected based on the size of the document
and the specified Zoom setting.
G Manual paper selection:
The tray or drawer containing the paper that you wish to use can be
selected.
To select the paper source before copying
1
Position the document(s) to be copied. (Refer to page 4-1 for more
details.)
2
Select the desired color mode. (Refer to page 2-20 for more details.)
3
Make sure that t he Basic screen is
displayed, and then touch [Paper].
A screen that allows you to select
the paper source appears.
Basic Operations
4
Select the tray or drawer containing the paper that you wish to use.
5
Specify any other necessary settings.
H Zoom (Refer to page 5-14 for more details.)
H Original Image Type (Refer to page page 5-18 for more details.)
H Density (Refer to page 5-20 for more details.)
6
Using the keypad, enter the number of copies you wish to make, and
then press the [Start] key.
5-4 KM-C1530
Page 93

Basic Operation s
5.3 Making Copies on Paper Loaded into the 1st
Drawer (Multipurpose Paper Drawer)
When making continuous copies onto special paper, such as overhead
projector transparencies, postcards or thick paper, whether a standard or
non-standard size, load the paper into the 1st drawer (the multipurpose
paper drawer).
Sizes and types of paper that can be used:
G Automatica lly detected paper sizes:
5-1/2 × 8-1/2L, 5-1/2 × 8-1/2C, ExecutiveL, ExecutiveC, LetterL,
LetterC, LegalL, 11 × 17L, 12-1/4 × 18L
G Manually set paper sizes:
A6L, B6L, A5L, A5C, B5L, B5C, A4L, A4C, B4L, A3L, 11 × 14L, FL S L,
4 × 6
Refer to the section “To set the “1st Drawer Pape r Select” parameter”
on page 7-18 for more details.
G Selectable paper sizes
Width: 3-9/16 to 12-1/4 in. (90 to 311 mm)
Length: 5-1/2 to 18 in. (140 to 457 mm)
Refer to the section “To set the “1st Drawer Pape r Select” parameter”
on page 7-18 for more details.
G Paper types:
Standard paper (thickness: 17 to 24 lbs.)
Thick paper 1 (thickness: 24-1/4 to 43-1/4 lbs.)
Overhead projector transparencies
Second side of a double-sided copy on standard paper
Second side of a double-sided copy on thick paper 1
5
KM-C1530 5-5
Page 94

5
Basic Operations
To copy a document
1
Position the document(s) to be copied. (Refer to page 4-1 for more
details.)
2
Turn the pa per type dial on the 1st
drawer to the setting for the type of
paper loaded. (Refe r to page 3-7 for
more details.)
3
Select the desired color mode. (Refer to page 2-20 for more details.)
4
Make sure that t he Basic screen is
displayed, and then touch [Paper].
A screen that allows you to select
the paper source appears.
5
Select the 1st drawer. (In the
example screen shown at the righ t,
overhead projector transparencies
have been loaded into the 1st
drawer.)
6
Specify any other necessary settings.
H Zoom (Refer to page 5-14 for more details.)
H Original Image Type (Refer to page 5-18 for more details.)
H Density (Refer to page 5-20 for more details.)
7
Using the keypad, enter the number of copies you wish to make, and
then press the [Start] key.
5-6 KM-C1530
Page 95

Basic Operation s
5.4 Feeding Paper Manually
Paper can be fed man ually thro ugh the ma nual b ypass tra y if yo u wis h to
copy onto paper that i s not loaded into a drawer, or if you wish to copy onto
special paper, su ch as overhead transp arencies, postc ards or thick paper.
Types of paper that can be fed through the manual bypass tray:
G Normal paper with a thi cknes s bet we en 17 a nd 24 l bs . (“Pla in Pape r”
setting)
G Thick paper with a thickness between 24-1/4 and 43-1/4 lbs. (“Thick
Paper 1” setting)
G Thick paper with a thickness between 43-1/2 and 55-1/2 lbs. (“Thick
Paper 2” setting)
G Overhead projector transparencies (“OHP Film” setting)
G Postcards.
Size of paper that can be fed through the manual bypass tray:
G Maximum size: 12-1/4 × 18 in. (311 × 457 mm)
G Minimum size: 3-9/16 × 5-1/2 in. (90 × 140 mm)
To feed the paper manually
1
Position the document(s) to be copied. (Refer to page 4-1 for more
details.)
5
2
Select the desired color mode. (Refer to page 2-20 for more details.)
3
Open the manual bypass tray.
KM-C1530 5-7
Page 96

5
Basic Operations
4
Adjust the paper guides to the size
of the paper, and then load the
paper so that the front side of the
paper (the side facing up when the
package was unwrapped) faces
down. Lightly slide the paper into
the feed slot as much as poss ible so
that it is ready to be fed into the
copier.
Do you wish to use the manual
?
bypass tray to feed paper manually?
§ Feed only one sheet of paper at a time.
§ Copies will be made on the surface of the paper facing down when
it is loaded into the manual bypass tray.
5
Make sure that the screen that
allows you to select the manual
bypass tray paper s ize is di splayed,
and then select the desired paper
size.
H For paper sizes in metric
measurements, touch [Metric] to
display a screen that allows you
to select metri c paper sizes.
H To specify a paper size other
than the standard si zes listed on
the screen, touch [Custom
Size].
Touch , , , and
to select the desired size,
and then touch [Enter].
Do you wish to set the fractional
?
units?
§ Touch or until the cursor moves be low t he frac tion tha t
you wish to change.
Has paper not been loaded into the manual bypass tray yet?
?
§ Copies can a lso be made by l oading paper into the manual bypa ss
tray after selecting the paper size by touch ing [Paper] in the Basic
screen, then touching [Bypass].
5-8 KM-C1530
Page 97

Basic Operation s
6
Touch [Paper Type] , select the type
of paper that will be loaded, and
then touch [Enter].
?
§ For best results when copying
7
Specify any other necessary settings.
H Zoom (Refer to page 5-14 for more details.)
H Original Image Type (Refer to page 5-18 for more details.)
H Density (Refer to page 5-20 for more details.)
8
Press the [Start] key.
?
§ To copy more pages after the seco nd page with the same settings ,
To make copies onto overhead projector transparencies
Overhead transparencies have a top and bottom side.
In order to make crisp copies, be sure to insert the overhead
transparencies correctly into the tray.
When using overhead transparencies with a white frame printed on
them, load them so that the top surface faces down.
5
Do you wish to cont inue copying
on the back of a manually fed
copy?
onto the back of a manually fed
copy, touch [2nd Side for Dup.].
Do you wish to continue copying using the same settings?
feed paper into the manual bypass tray to begin making copies
automatically.
1
Position the document(s) to be copied. (Refer to page 4-1 for more
details.)
2
Select the desired color mode. (Refer to page 2-20 for more details.)
3
Open the manual bypass tray.
KM-C1530 5-9
Page 98

5
4
Adjust the paper guides to the size
of the paper, and then load the
paper so that the front side of the
paper faces down. Lightly slide the
paper into the feed s lot as mu ch as
possible so that it is rea dy to b e fed
into the copier.
Are the recomm ended overhead
?
projector transparencies being
used?
§ When using the recommended
overhead projector transparencies, load them as described on
page 3-17.
5
Make sure that the screen that
allows you to select the manual
bypass tray paper s ize is di splayed,
check that the d esired pape r siz e is
selected, and then touch [Paper
Type].
Basic Operations
6
Touch [OHP Film], and then touch
[Enter].
7
Specify any other necessary settings.
H Zoom (Refer to page 5-14 for more details.)
H Original Image Type (Refer to page 5-18 for more details.)
H Density (Refer to page 5-20 for more details.)
8
Press the [Start] key.
5-10 KM-C1530
Page 99

Basic Operation s
To make copies onto postcards
1
Position the document(s) to be copied. (Refer to page 4-1 for more
details.)
2
Select the desired color mode. (Refer to page 2-20 for more details.)
3
Open the manual bypass tray.
4
Adjust the paper guides to the size
of the paper, and then load the
paper so that the front side of the
paper faces down. Lightly slide the
paper into the feed sl ot as much as
possible so that it is ready to be fed
into the copier.
H Load postcards widthwise into
5
the manual bypass tray with the
surface to be copied ont o facing
down.
5
Make sure that the screen allowing
you to select the manual bypass
tray paper size is displayed, and
then touch [4 × 6].
The “Paper Type” setting
automatically changes to “Thick
Paper 2”.
(* Setting the paper size for the
manual bypass tray to “4 × 6”
automatically changes the “Paper
Type” setting to “Thick Paper 2”.)
KM-C1530 5-11
Page 100

5
Basic Operations
6
Specify any other necessary settings.
H Zoom (Refer to page 5-14 for more details.)
H Original Image Type (Refer to page 5-18 for more details.)
H Density (Refer to page 5-20 for more details.)
7
Press the [Start] key.
To make copies onto thick paper
1
Position the document(s) to be copied. (Refer to page 4-1 for more
details.)
2
Select the desired color mode. (Refer to page 2-20 for more details.)
3
Open the manual bypass tray.
4
Adjust the paper guides to the size
of the paper, and then load the
paper so that the front side of the
paper faces down. Lightly slide the
paper into the feed s lot as mu ch as
possible so that it is rea dy to b e fed
into the copier.
H Load paper into the manual
bypass tray with the surface to
be copied onto facing down.
5
Make sure that the screen that
allows you to select the manual
bypass tray paper s ize is di splayed,
check that the d esired pape r siz e is
selected, and then touch [Paper
Type].
5-12 KM-C1530
 Loading...