

Page 1
INSTRUCTION HANDBOOK
Please read the instruction handbook before using the copier. Keep it in the
designated location for inside front cover.
Page 2

As an ENERGY STAR Partner, KYOCERA MITA CORPORATION has determined
that this product meets the ENERGY STAR guidelines for energy efficiency.
The ENERGY STAR program is an energy reduction plan introduced by the United
States Environmental Protection Agency in response to environmental issues and for
the purpose of advancing the development and utilization of more energy efficient
office equipment.
* ENERGY STAR is a U.S. registered mark.
The Auto-Shut-off time setting becomes 15 to 120 minutes in the areas
corresponding to the Swiss Energy 2000 program.
All rights reserved. No part of this material may be reproduced or transmitted in any
form or by any means, electronic or mechanical, including photocopying, recording
or by any information storage and retrieval system, without permission in writing from
the Publisher.
Legal Restriction On Copying
• It may be prohibited to copy copyrighted material without permission of the copyright owner.
• It is prohibited under any circumstances to copy domestic or foreign currencies.
• Copying other items may be prohibited.
Page 3

Please read the instruction handbook before using the copier. Keep it in the designated location for
easy reference.
The sections of this handbook and parts of the copier marked with symbols are safety warnings meant to
protect the user, other individuals and surrounding objects, and ensure correct and safe usage of the copier.
The symbols and their meanings are indicated below.
DANGER: Indicates that serious injury or even death will very possibly result from insufficient attention to
or incorrect compliance with the related points.
WARNING: Indicates that serious injury or even death may result from insufficient attention to or incorrect
compliance with the related points.
CAUTION: Indicates that personal injury or mechanical damage may result from insufficient attention to
or incorrect compliance with the related points.
Symbols
The m symbol indicates that the related section includes safety warnings. Specific points of attention are
indicated inside the symbol.
.................... [General warning]
.................... [Warning of danger of electrical shock]
.................... [Warning of high temperature]
The symbol indicates that the related section includes information on prohibited actions. Specifics of the
prohibited action are indicated inside the symbol.
.................... [Warning of prohibited action]
.................... [Disassembly prohibited]
The ● symbol indicates that the related section includes information on actions which must be performed.
Specifics of the required action are indicated inside the symbol.
.................... [Alert of required action]
.................... [Remove the power plug from the outlet]
.................... [Always connect the copier to an outlet with a ground connection]
Please contact your service representative to order a replacement if the safety warnings in the handbook are
illegible or if the handbook itself is missing. (fee required)
Page 4

Page 5

CONTENTS
Section 1 IMPORTANT! PLEASE READ FIRST............. 1-1
CAUTION LABELS
INSTALLATION PRECAUTIONS
PRECAUTIONS FOR USE
..................................................................
.............................................
...................................................... 1-3
1-1
1-2
Section 2 NAMES OF PARTS ........................................ 2-1
(1) Main body .................................................................................. 2-2
(2) Operation panel ......................................................................... 2-3
(3) Basic screen on the touch panel ............................................... 2-4
(4) Optional units ............................................................................. 2-5
● Finisher .................................................................................. 2-5
● Side Deck ............................................................................... 2-6
Section 3 PREPARATIONS ............................................ 3-1
1. Loading paper ............................................................................. 3-1
(1) How to load copy paper ......................................................... 3-1
1 Loading paper into the drawers ......................................... 3-1
2 Loading paper into the Front Deck .................................... 3-2
3 Loading paper into the stack bypass tray .......................... 3-2
4 Loading paper into the Side Deck (option) ........................ 3-3
2. Setting originals .......................................................................... 3-4
1 What is the DF for? ................................................................ 3-4
2 Originals that can be set in the DF… ..................................... 3-4
3 Cautions when using the DF .................................................. 3-4
4 Setting originals in the DF ...................................................... 3-4
5 Auto selection mode ............................................................... 3-5
6 Setting originals on the platen ................................................ 3-5
3. Adding toner ................................................................................ 3-5
Section 4 BASIC OPERATION ....................................... 4-1
(1) Basic copying procedure ........................................................... 4-1
(2) Enlargement/reduction .............................................................. 4-3
1 Auto magnification selection mode ....................................... 4-3
2 Zoom copy mode .................................................................. 4-3
3 Standard zoom mode ............................................................ 4-4
4 Fixed-size zoom mode .......................................................... 4-4
5 XY zoom mode ..................................................................... 4-5
(3) Two-sided copying from various originals
[Two-sided copy mode] .............................................................. 4-5
● Two-sided copying from two-sided originals ........................... 4-5
● Two-sided copying from two-page [open-face] originals......... 4-6
● Two-sided copying from one-sided originals........................... 4-6
(4) Interrupt copying ........................................................................ 4-7
(5) Rotate copy ............................................................................... 4-8
(6) Before you make a large number of copies at one time
[Test copying] .............................................................................. 4-8
(7) Recall mode ............................................................................... 4-9
(8) Change settings function ........................................................... 4-9
(9) Energy-saving (auto preheat) function .................................... 4-10
(10) Auto shut-off function ............................................................. 4-10
Section 5 OTHER CONVENIENT FUNCTIONS ............. 5-1
(1) Making a margin space in the copies for binding, etc.
[Margin mode] ............................................................................ 5-1
● Left margin .............................................................................. 5-1
● Top margin .............................................................................. 5-1
● Front & back margin ............................................................... 5-1
(2) Printing page numbers on the copies [Print page numbers] ...... 5-3
(3) Copying each side of two-page [open-face] originals onto
separate sheets [Page separation mode] ................................. 5-5
● Page separation from two-page [open-face] originals ........... 5-5
● Page separation from two-sided originals ....................................
(4) Erasing the edges around copies from books, etc.
[Border erase mode] ................................................................. 5-6
● Erasing blemishes from the edges of copies (Sheet) ............ 5-6
Erasing blemishes from the edges and middle of copies (Book) ......
●
● Selecting the area to be erased (Custom) ............................. 5-6
5-6
(5) Adding covers for or insert sheets between copies
[Sheet copy mode] ..................................................................... 5-7
1 Submodes ............................................................................ 5-8
● Cover mode ...................................................................... 5-8
● Insert mode ...................................................................... 5-8
● Chapter mode ................................................................... 5-9
2 Combining modes ............................................................... 5-10
3 Making copies with the sheet copy mode ........................... 5-10
(6) Making handout materials together withTransparencies
[Presentation mode] ................................................................. 5-13
● Presentation mode (copying onto the backing sheet) .......... 5-13
● Presentation mode (leaving the backing sheet blank) ......... 5-14
(7) Feeding paper as a backing sheet for transparencies
[Transparency + backing sheet modes] ................................... 5-16
● Copying onto the backing sheet ........................................... 5-16
● Leaving the backing sheet blank .......................................... 5-16
(8) Overlaying images [Form overlay] ........................................... 5-18
(9) Copying the images from either two or four originals onto a
single copy sheet [Combine copy] ........................................... 5-19
1 Combination styles .............................................................. 5-19
2 Borderline indication ........................................................... 5-20
(10) Making a booklet (sheet originals) [Booklet copy] ................. 5-21
(11) Making a booklet (two-page [open-face] originals)
[Booklet + cover copy mode] .................................................. 5-22
(12) Copying and binding into a booklet (sheet originals)
[Binding mode] ........................................................................ 5-24
(13) Inverting black and white [Invert copy mode] ........................ 5-26
(14) Making mirror-image copies [Mirror image mode] ................. 5-26
(15) Automated sorting [Sort copy] ............................................... 5-27
(16) Memorizing frequency used settings [Program mode] .......... 5-27
1 Registering various settings as an single program ........... 5-27
2 Copying with a registered program .................................. 5-28
Section 6 ADVANCED COPY MODES ........................... 6-1
(1) Scheduling one copy job during copying of another
[Job reservation] ........................................................................ 6-1
● The job reservation screen ..................................................... 6-1
1 Adding a job .......................................................................... 6-1
2 Modifying the settings for a reserved job .............................. 6-2
3 Deleting a reserved job ......................................................... 6-2
4 Changing the order of reserved jobs ..................................... 6-3
(2) Copying various originals in one batch [Job build function] ....... 6-3
1 Memory copying from the DF or platen ................................. 6-3
● Large number of originals ................................................. 6-3
● Uniform copy size [Auto size] ............................................ 6-3
● Continuous manual scanning [Choose size] ..................... 6-3
2 Two-sided copies from a mixture of one-sided and two-sided
originals ................................................................................ 6-6
● Making copies like the originals [Print as originals] .......... 6-6
● Two-sided copies from all types of originals
[Duplex All Originals] ........................................................ 6-6
● Copying onto the front side of specified pages
[Chapterize] ....................................................................... 6-6
3 Batch copy from the platen ................................................... 6-8
● Sheet originals only .......................................................... 6-8
● Two-page [open-face] originals ........................................ 6-8
● Sheet & book originals ..................................................... 6-8
Section 7 DOCUMENT MANAGEMENT FUNCTIONS .. 7-1
(1) Registering an image for form overlay ....................................... 7-1
1 Registering an image ............................................................ 7-1
2 Checking registered images ................................................. 7-2
3 Deleting an image ................................................................. 7-2
4 Modifying information for an image ....................................... 7-3
(2) Repeat copying .......................................................................... 7-4
(3) Quick copying ............................................................................ 7-4
1 Printing out data .................................................................... 7-4
2 Checking data for a print job ................................................. 7-5
3 Deleting data for a print job ................................................... 7-6
i
Page 6

Contents
(4) Shared data box ........................................................................ 7-6
1 Registering shared data ........................................................ 7-7
2 Printing out shared data ........................................................ 7-7
3 Checking shared data ........................................................... 7-8
4 Deleting shared data ............................................................. 7-9
5 Modifying information for shared data ................................. 7-10
(5) Synergy print boxes ................................................................. 7-10
1 Registering originals in a synergy print box ......................... 7-11
2 Printing out more than one set of originals from a synergy
print box .............................................................................. 7-12
3 Checking originals in a synergy print box ........................... 7-13
4 Deleting originals from a synergy print box ......................... 7-14
5 Changing the order of printing ............................................ 7-15
6 Modifying information for a registered synergy print box .... 7-15
(6) Virtual mailboxes ..................................................................... 7-17
1 Printing out all of the originals in a virtual mailbox .............. 7-17
2 Changing the password ...................................................... 7-18
3 Deleting data from a virtual mailbox .................................... 7-18
Section 8 COPIER MANAGEMENT ............................... 8-1
(1) Copy management .................................................................... 8-1
1 The copy management procedures and settings ................. 8-1
● Registering new department codes .................................. 8-1
● Deleting department codes .............................................. 8-1
● Changing limits ................................................................. 8-1
● Clearing copy counts ........................................................ 8-1
● Checking copy counts ...................................................... 8-1
● Printing out the copy management report ........................ 8-1
● Turning copy management ON/OFF ................................ 8-1
2 How to enter the copy management select mode ................ 8-1
3 How to register the various management settings ............... 8-2
4 Making copies when copy management is turned ON ......... 8-6
(2) Weekly timer .............................................................................. 8-7
1 The weekly timer procedures and settings ........................... 8-7
● Setting the time ................................................................. 8-7
● Programming the weekly timer ......................................... 8-7
● Canceling the timer function ............................................. 8-7
● Turning the weekly timer ON/OFF .................................... 8-7
2 How to enter the weekly timer select mode .......................... 8-7
3 How to register the various timer settings ............................. 8-8
4 Making copies after the copier has been turned OFF by the
weekly timer ........................................................................ 8-10
(3) Default settings and procedures .............................................. 8-10
[1] Machine defaults ................................................................. 8-11
● Types of machine defaults............................................... 8-11
1 Custom size paper in stack bypass ............................8-11
2 Automatic drawer switching ON/OFF ......................... 8-11
3 Drawer paper size ...................................................... 8-11
4 Special paper designation .......................................... 8-11
5 APS mode for special paper ....................................... 8-11
6 Key sound ON/OFF .................................................... 8-11
7 Auto preheat time ....................................................... 8-11
8 Auto shut-off time ....................................................... 8-11
9 Management pin code change ................................... 8-11
0 Auto shut-off ON/OFF................................................. 8-11
! Date & time ................................................................. 8-11
● Accessing the machine default setting mode ................. 8-12
● Changing the default settings ......................................... 8-12
[2] Copy-related defaults ......................................................... 8-15
● Types of copy defaults.................................................... 8-15
1 Exposure mode ......................................................... 8-15
2 Exposure step ........................................................... 8-15
3 Toner economy mode ................................................ 8-15
4 Auto exposure adjustment ......................................... 8-15
5 Manual exposure adjustment .................................... 8-16
6 Copy quality mode ..................................................... 8-16
7 Sort mode ON/OFF ................................................... 8-16
8 Paper selection .......................................................... 8-16
9 Job Programming ...................................................... 8-16
0 Default drawer ........................................................... 8-16
! Zoom mode ............................................................... 8-16
@ Copy limit ................................................................... 8-16
# Custom border erase size ......................................... 8-16
$ Front & back margin key ON/OFF ............................. 8-16
% Drawer for insert sheets ............................................ 8-16
^ Drawer for cover sheet ............................................... 8-16
& Rotate-sort ................................................................. 8-16
* Repeat copying .......................................................... 8-16
( Create shortcut (#1, #2) ............................................. 8-16
) Customize function display screen (#1 - #5) .............. 8-16
● Accessing the copy default setting mode ....................... 8-17
● Changing the default settings ......................................... 8-18
[3] Box management procedures ............................................ 8-23
● Types of box management procedures .......................... 8-23
1 Reset box (delete all) ................................................ 8-23
2 Box name & password / Clear data in box ................ 8-23
3 Box default ................................................................ 8-23
4 Document list ............................................................. 8-23
● Accessing the box management procedures ................. 8-24
● Procedures ..................................................................... 8-24
[4] Deleting stored data ........................................................... 8-27
[5] Toner usage information ..................................................... 8-28
(4) Touch panel language selection .............................................. 8-28
(5) Entering characters ................................................................. 8-29
1 Character input screen ....................................................... 8-29
2 Name registration example ................................................ 8-29
Section 9 OPTIONAL EQUIPMENT ............................... 9-1
(1) Finisher ...................................................................................... 9-1
1 Selecting the desired mode .................................................. 9-1
2 Copying in the Sort mode ..................................................... 9-2
3 Copying in the Group mode .................................................. 9-2
4 Copying in the Sort-Staple mode .......................................... 9-3
5 Copying in the Hole Punch mode ......................................... 9-4
6 Copying in the Non-sort mode .............................................. 9-5
7 Stacking mode ...................................................................... 9-5
8 Acceptable capacity for the Sort and the Non-sort trays ....... 9-5
9 Stapling Unit .......................................................................... 9-6
0 Refilling the Stapling Unit ...................................................... 9-6
! Clearing a staple jam ............................................................ 9-8
@ Disposing of hole-punch scraps ............................................ 9-9
(2) Booklet Stitcher ....................................................................... 9-10
(3) Side Deck ................................................................................. 9-11
(4) Key Counter .............................................................................. 9-11
(5) Mailbox Unit ............................................................................. 9-12
(6) Print/Scan System ................................................................... 9-12
(7) Tandem Board ......................................................................... 9-12
Section 10 TROUBLESHOOTING................................ 10-1
1. Messages during copying ......................................................... 10-1
2. Replacing the waste toner tank ................................................. 10-3
3. If paper misfeeds ...................................................................... 10-4
(1) Misfeed location indicators .................................................. 10-4
(2) Cautions ............................................................................... 10-4
(3) Removal procedures ............................................................ 10-5
4. Troubleshooting tables ............................................................ 10-18
5. Cleaning the copier ................................................................. 10-20
Section 11 SPECIFICATIONS ...................................... 11-1
Laser safety ................................................................................... 11-2
ii
Page 7
● MAKING FULL USE OF THE MACHINE'S ADVANCED FUNCTIONS
Registering an image for form overlay
1
(page 7-1)
Storing often-used forms, etc.
4
<Shared data box> (page 7-6)
Minimizing copy time <Repeat copying>
2
(page 7-4)
Selecting multiple sets of originals for print
56
out <Synergy print boxes> (page 7-10)
Storing data that is received from your
3
computer <Quick copying> (page 7-4)
* The copier must be equipped with the
optional Print/Scan System.
Storing data from different computers
<Virtual mailboxes> (page 7-17)
* The copier must be equipped with the
optional Print/Scan System.
Enlargement/reduction (page 7-3) Making a margin space in the copies for
7
Printing page numbers on the copies
10
<Print page numbers function>
(page 5-3)
Copying onto both the front and back of
8
the copy paper from various originals
<Two-sided copy mode> (page 4-5)
Copying each side of two-page [open-
11
face] originals onto separate sheets
<Page separation mode> (page 5-5)
9
binding, etc. <Margin mode> (page 5-1)
Erasing the edges around copies from
12
books, etc. <Border erase mode>
(page 5-6)
Adding covers for or insert sheets be-
13
tween copies <Sheet copy mode>
(page 5-7)
iii
Making handout materials together with
14
Transparencies
<Presentation mode> (page 5-13)
Feeding paper as a backing sheet for
15
transparencies <Transparency +
backing sheet modes> (page 5-16)
Page 8
● MAKING FULL USE OF THE MACHINE'S ADVANCED FUNCTIONS
Overlaying images <Form overlay
16
mode> (page 5-18)
Making a booklet (two-page [open-face]
19
originals) <Booklet + cover copy mode>
(page 5-22)
Copying the images from either two or
17
four originals onto a single copy sheet
<Combined copy mode> (page 5-19)
Copying and binding into a booklet (sheet
20
originals) <Binding mode> (page 5-24)
* The copier must be equipped with the
optional Booklet Stitcher.
Making a booklet (sheet originals)
18
<Booklet copy mode> (page 5-21)
Automated sorting <Sort copy mode>
21
(page 5-27)
Changing the direction of the copy image
22
for easy sorting <Rotate-Sort copy
mode> (page 5-27)
Memorizing frequency used settings
25
<Program mode> (page 5-27)
Inverting black and white <Invert copy
23
mode> (page 5-26)
Copying various originals in one batch
26
<Job build function> (page 6-3)
Making mirror-image copies
24
<Mirror image mode> (page 5-26)
Setting different size originals at the same
27
time <Auto selection> (page 3-5)
Using department codes to manage the
28
number of copies made by each department <Copy management mode>
(page 8-1)
Turning the main switch ON/OFF auto-
29
matically <Weekly timer> (page 8-7)
Changing the language used on the touch
30
panel <Touch panel language
selection> (page 8-27)
iv
Page 9
● MAKING FULL USE OF THE MACHINE'S ADVANCED FUNCTIONS
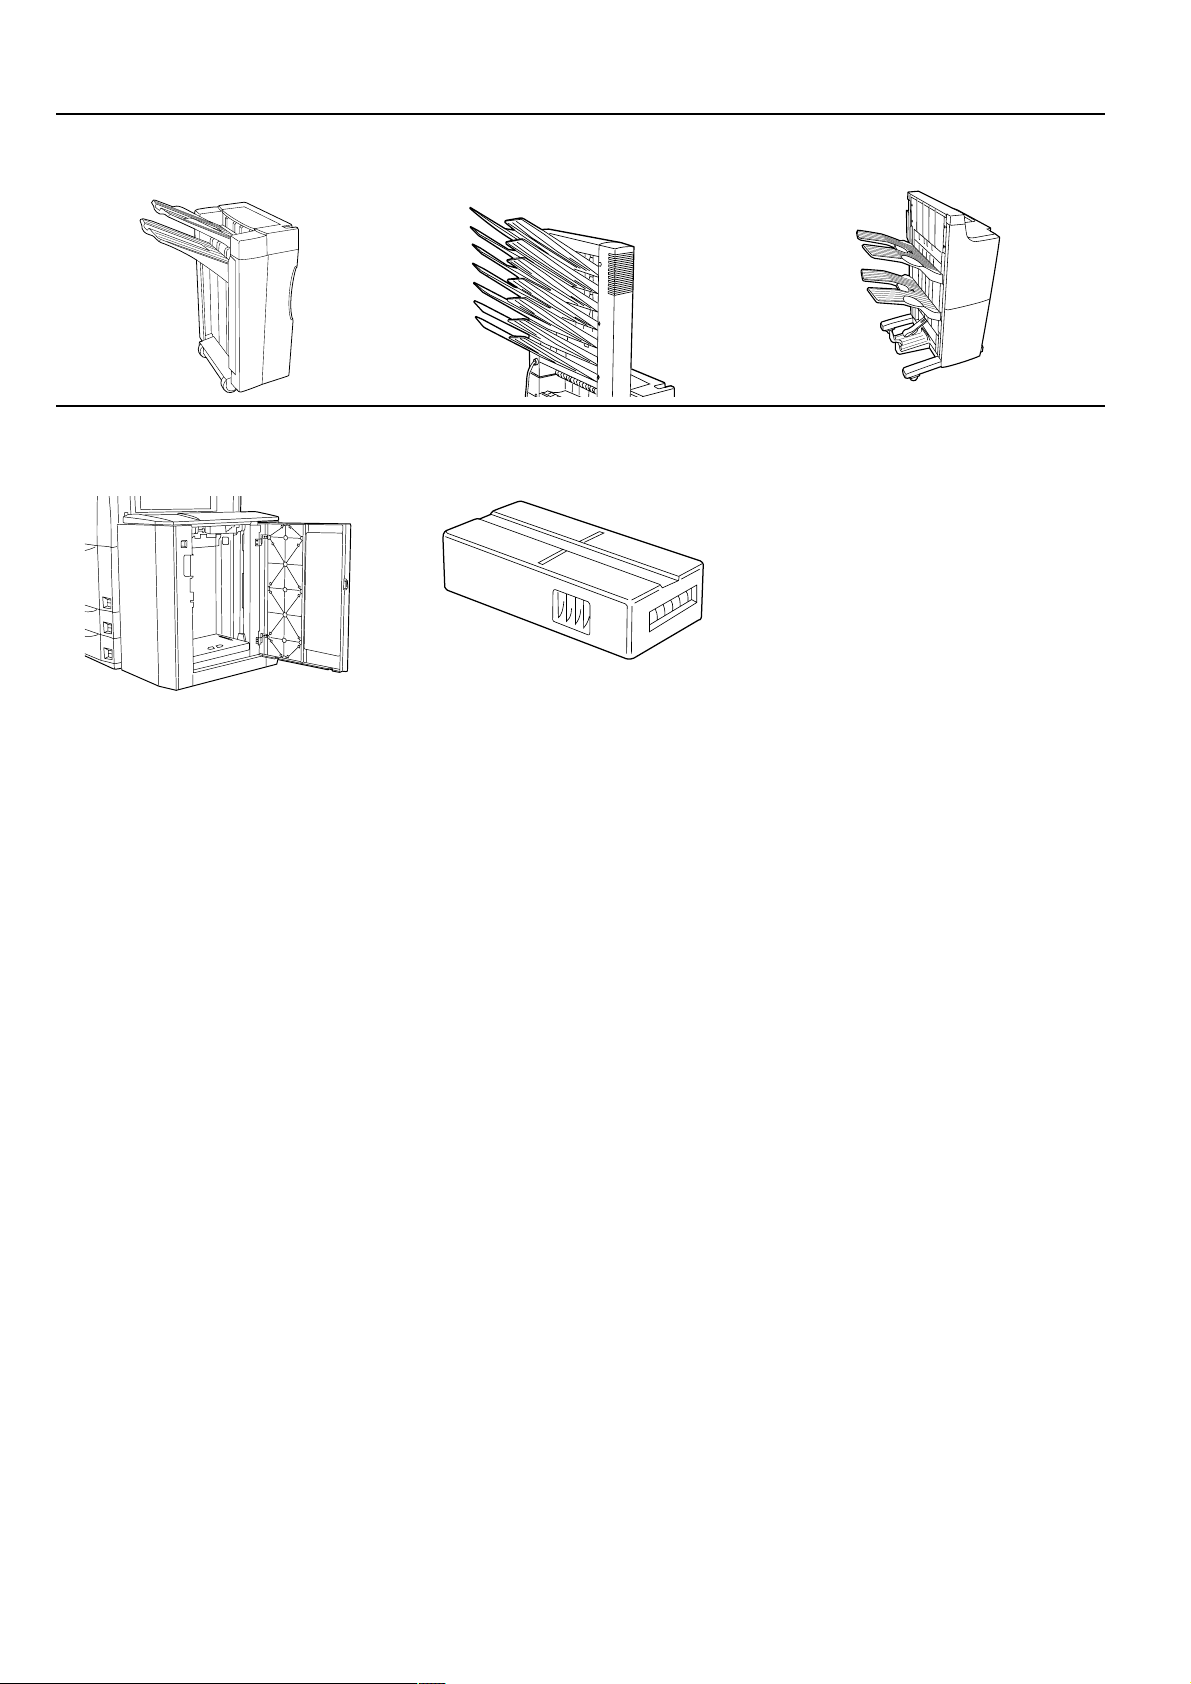
A full range of optional equipment is avail-
31
able…
■ Finisher (page 9-1)
■ Side Deck (page 9-11) ■ Key Counter (page 9-11) ■ Print/Scan System (page 9-12)
■ Booklet Stitcher (page 9-10)■ Mailbox Unit (page 9-12)
■ Tandem Board (page 9-12)
v
Page 10
Section 1 IMPORTANT! PLEASE READ FIRST.
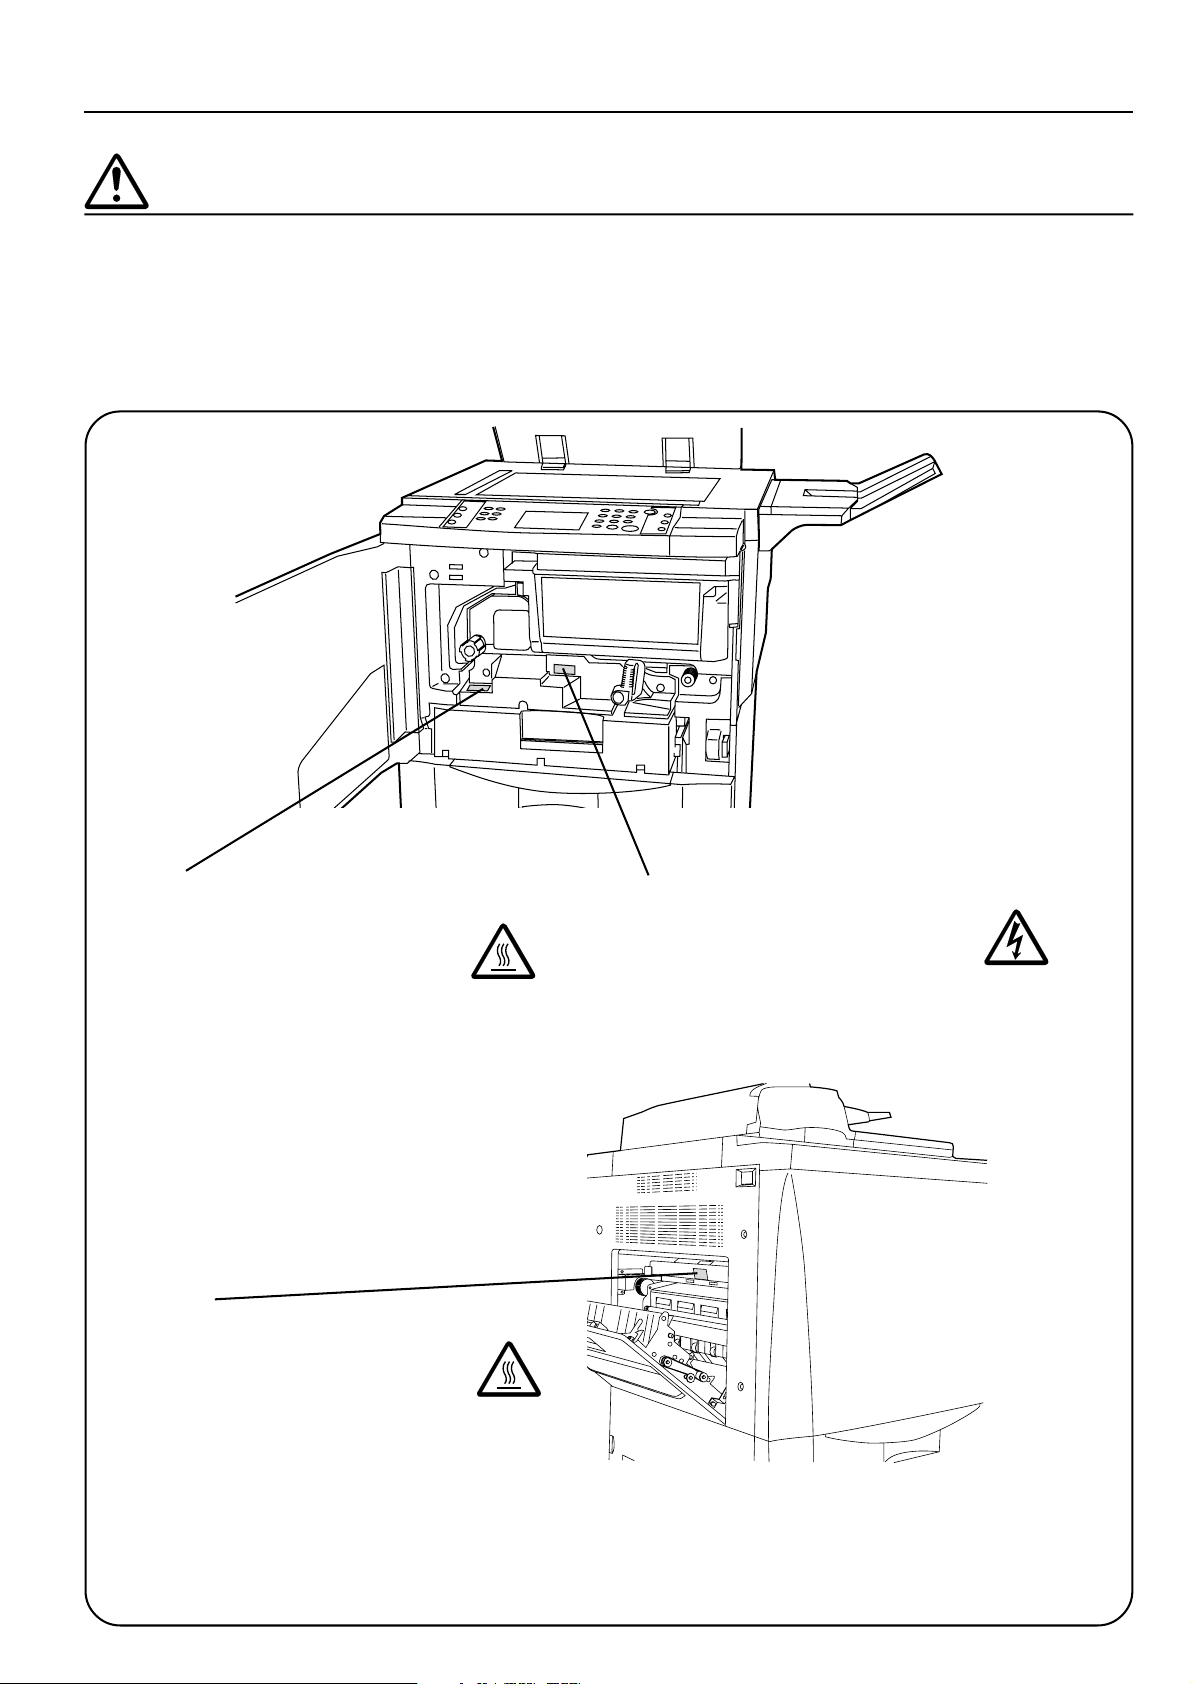
CAUTION LABELS
Caution labels have been attached to the copier at the following locations for safety purposes.
BE SUFFICIENTLY CAREFUL to avoid fire or electric shock when removing a paper jam or
when replacing toner.
Label 2
High temperature inside. Do not touch
parts in this area, because there is a dan-
ger of getting burned. ...............................
Label 3
High temperature inside. Do not touch
parts in this area, because there is a dan-
ger of getting burned. ...............................
Label 1
High voltage inside. NEVER touch parts
in this area, because there is a danger of
electric shock. ...........................................
NOTE: DO NOT remove these labels.
1-1
Page 11
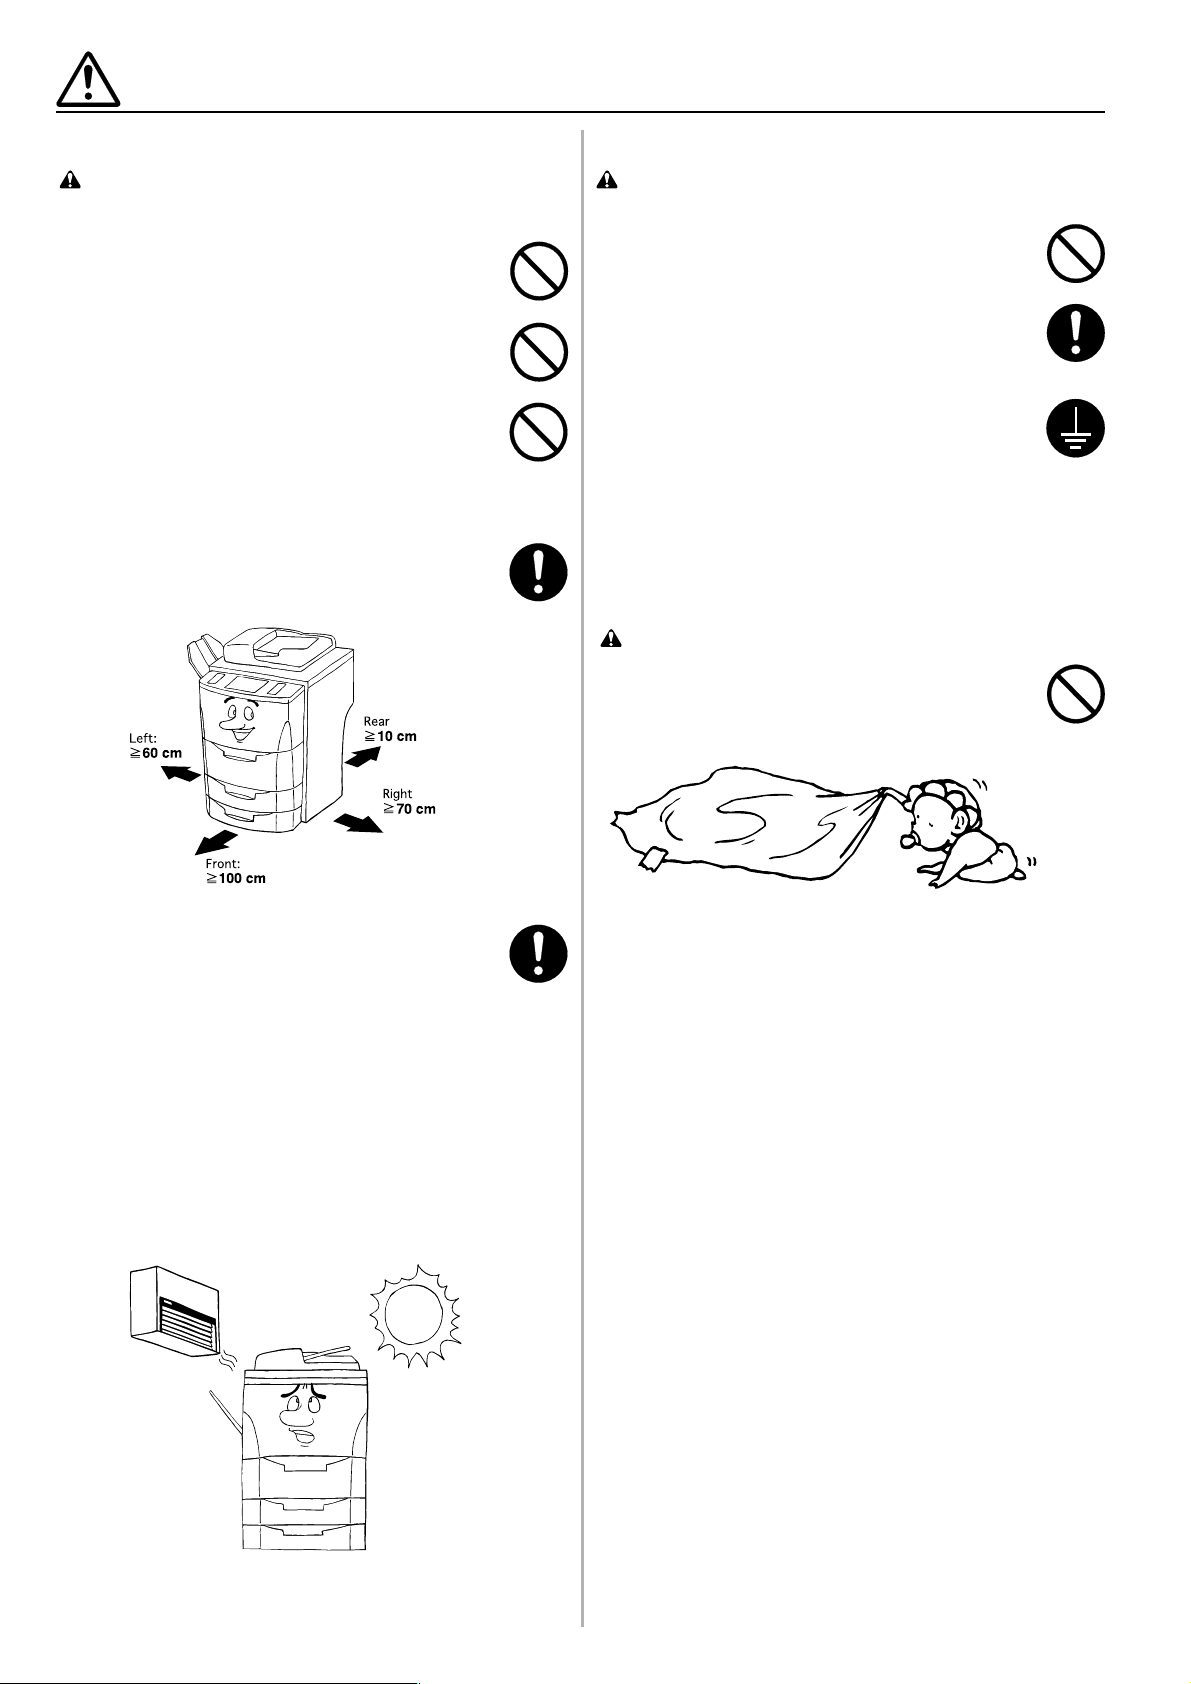
INSTALLATION PRECAUTIONS
■ Environment
CAUTION
• Avoid placing the copier on or in locations which are
unstable or not level. Such locations may cause the
copier to fall down or fall over. This type of situation
presents a danger of personal injury or damage to the
copier. .........................................................................
• Avoid locations with humidity or dust and dirt. If dust or
dirt become attached to the power plug, clean the plug
to avoid the danger of fire or electrical shock. ............
• Avoid locations near radiators, heaters, or other heat
sources, or locations near flammable items, to avoid
the danger of fire. ........................................................
• To keep the copier cool and facilitate changing of
parts and maintenance, allow access space as shown
below.
Leave adequate space, especially around the left
cover, to allow air to be properly ventilated out of
the copier. .................................................................
■ Power supply/Grounding the copier
WARNING
• DO NOT use a power supply with a voltage other than
that specified. Avoid multiple connections in the same
outlet. These types of situations present a danger of
fire or electrical shock. ...............................................
• Plug the power cord securely into the outlet. If metallic
objects come in contact with the prongs on the plug, it
may cause a fire or electric shock. .............................
• Always connect the copier to an outlet with a ground
connection to avoid the danger of fire or electrical shock
in case of an electric short. If an earth connection is
not possible, contact your service representative. .....
Other precautions
• Connect the power plug to the closest outlet possible to
the copier.
■ Handling of plastic bags
WARNING
• Keep the plastic bags that are used with the copier away
from children. The plastic may cling to their nose and
mouth causing suffocation. .........................................
• Always use the caster stoppers to stabilize the copier
once it is in place to keep it from moving and/or falling
over and causing injury. ..............................................
Other precautions
• Adverse environmental conditions may affect the safe
operation and performance of the copier. Install in an
air-conditioned room (recommended room temperature:
around 20°C, humidity: around 65%RH) and avoid the
following locations when selecting a site for the copier.
. Avoid locations near a window or with exposure to
direct sunlight.
. Avoid locations with vibrations.
. Avoid locations with drastic temperature fluctuations.
. Avoid locations with direct exposure to hot or cold air.
. Avoid poorly ventilated locations.
1-2
Page 12
PRECAUTIONS FOR USE
■ Cautions when using the copier
WARNING
• DO NOT place metallic objects or containers with water
(flower vases, flower pots, cups, etc.) on or near the
copier. This type of situation presents a danger of fire
or electrical shock should they fall inside. ...................
• DO NOT remove any of the covers from the copier as
there is a danger of electrical shock from high voltage
parts inside the copier. ................................................
• DO NOT damage, break or attempt to repair the power
cord. DO NOT place heavy objects on the cord, pull it,
bend it unnecessarily or cause any other type of damage.
These types of situations present a danger of fire or
electrical shock. ..........................................................
• NEVER attempt to repair or disassemble the copier or
its parts as there is a danger of fire, electrical shock or
damage to the laser. If the laser beam escapes, there
is a danger of it causing blindness. .............................
• If the copier becomes excessively hot, smoke appears
from the copier, there is an odd smell, or any other
abnormal situation occurs, there is a danger of fire or
electrical shock. Turn the main switch OFF (O)
immediately, remove the power plug from the outlet and
contact your service representative. ...........................
• If anything harmful (paper clips, water, other fluids, etc.)
falls into the copier, turn the main switch OFF (O)
immediately. Next, remove the power plug from the
outlet to avoid the danger of fire or electrical shock. Then
contact your service representative. ...........................
• DO NOT remove or connect the power plug with wet
hands, as there is a danger of electrical shock. ..........
• ALWAYS contact your service representative for
maintenance or repair of internal parts. ......................
CAUTION
• DO NOT pull the power cord when removing it from the
outlet. If the power cord is pulled, the wires may become
broken and there is a danger of fire or electrical shock.
(ALWAYS grasp the power plug when removing the
power cord from the outlet.) ........................................
• ALWAYS remove the power plug from the outlet when
moving the copier. If the power cord is damaged, there
is a danger of fire or electrical shock. .........................
• If the copier will not be used for a short period of time
(overnight, etc.), turn the main switch OFF (O).
If it will not be used for an extended period of time
(vacations, etc.), remove the power plug from the outlet
for safety purposes during the time the copier is not in
use. .............................................................................
• ALWAYS hold the designated parts only when lifting or
moving the copier........................................................
For safety purposes, ALWAYS remove the power plug
•
from the outlet when performing cleaning operations. ..
• If dust accumulates within the copier, there is a danger
of fire or other trouble. It is therefore recommended that
you consult with your service representative in regard
to cleaning of internal parts. This is particularly effective
if accomplished prior to seasons of high humidity.
Consult with your service representative in regard to
the cost of cleaning the internal parts of the copier. ...
• DO NOT leave the document feeder open as there is a
danger of personal injury. ...........................................
Other precautions
• DO NOT place heavy objects on the copier or cause
other damage to the copier.
• DO NOT open the front cover, turn off the main switch,
or pull out the power plug during copying.
• During copying, some ozone is released, but the amount
does not cause any ill effect to one's health. If, however,
the copier is used over a long period of time in a poorly
ventilated room or when making an extremely large
number of copies, the smell may become unpleasant.
To maintain the appropriate environment for copy work,
it is suggested that the room be properly ventilated.
• When lifting or moving the copier, contact your service
representative.
• Do not touch electrical parts, such as connectors or
printed circuit boards. They could be damaged by static
electricity.
• DO NOT attempt to perform any operations not
explained in this handbook.
• CAUTION : Use of controls or adjustments or
performance of procedures other than those specified
herein may result in hazardous radiation exposure.
■ Cautions when handling
consumables
CAUTION
• Avoid inhalation, ingestion, skin or eye contact. If
ingestion occurs, dilute stomach contents thoroughly
with water and seek medical treatment. If skin contact
occurs, wash with soap and water. If contact with eyes
occurs, flush thoroughly with water and seek medical
treatment. ....................................................................
• Prolonged inhalation of excessive dusts may cause lung
damage. Use of this product, as intended, does not result
in inhalation of excessive dusts. .................................
• Keep away from children. ...........................................
• Do not incinerate toner and toner containers. Dangerous
sparks may cause burn. ..............................................
Other precautions
• Always read the safety instructions which are included
in the box or printed on the container when handling
consumables.
• Dispose of the toner or toner containers in accordance
with Federal, State and Local rules and regulations.
• Store consumables in a cool, dark location.
• If the copier will not be used for an extended period of
time, remove the paper from the cassette, return it to its
original package and reseal it.
1-3
Page 13

2-1
Page 14

Section 2 NAMES OF PARTS
Section 2 NAMES OF PARTS
2-1
Page 15

(1) Main body
1 Front cover
2 Operation panel
3 Original size indicator lines
(When setting an original on the platen, align it with the appropriate
lines.)
4 Platen
5 Cover on the right side of the operation panel
(Open this cover when adding toner.)
6 Original tray
(Depending upon the country or region where you purchased your
copier, this part may not be included.)
7 Right upper cover
(Open this cover if paper misfeeds in the paper feed section.)
8 Right lower cover
(Open this cover if paper misfeeds in the paper feed section.)
9 Front Deck
(Holds up to 3,000 sheets of standard [75 g/m
0 Drawer 1
(Holds up to 500 sheets of standard [75 g/m
! Drawer 2
(Holds up to 500 sheets of standard [75 g/m
2
or 80 g/m2] paper.)
2
or 80 g/m2] paper.)
2
or 80 g/m2] paper.)
@ Paper width guides
# Paper length guide
$ Stack bypass tray
(Load paper here when copying onto small-size or special paper.)
% Support extension
^ Insert guides
& Paper feed section knob
(Turn this knob to remove paper that has been misfed in the paper
conveyor section.)
* Paper conveyor section
( Paper conveyor section release lever
(Operate this lever if paper misfeeds in the paper conveyor section.)
) Fixing unit
⁄ Fixing unit knob
(Turn this knob to remove paper that has been misfed in the fixing
unit.)
¤ Total counters
(The number displayed on the upper line indicates the number of originals that have been scanned for copying. The bottom line indicates
the number of copies made.)
‹ Instruction handbook box
(Keep the instruction handbook here.)
Section 2 NAMES OF PARTS
● DF (Document Feeder)
(Automatically feeds and scans each original, one by one, for copying.)
· Original table
(Set the originals that you want to copy on this table.)
‚ Original insert guides
(Adjust these guides to match the width of the originals set in the DF.)
ΠOriginal set indicator
(Indicates the status of the originals in the DF.)
Lights green: The originals are set properly . Press the Start key to start
copying.
Blinks green: The originals are not set properly. Reset the originals in
the DF.
Blinks red: An original has been misfed. See page 10-11 and remove
the misfed originals.)
„ DF open/close handle
(Hold this handle when opening and closing the DF.)
´ Original ejection table
(Copied originals are stored here.)
‰ Original reversing cover
(Open this cover if an original misfeeds in the DF.)
ˇ Original ejection guide
(Open this guide when copying from originals of 8-1/2" x 14" [A4] or
larger.)
● Duplex unit
(Paper is turned over in this unit when you make two-sided copies.)
Á Re-feeding section
¨ Duplex cover
(Open this cover if paper misfeeds in the duplex unit.)
› Transport handles
(Use these handles when moving this machine. There are a total of
four transport handles in all.)
fi Paper ejection cover
(Open this cover if paper misfeeds in the fixing unit or ejection section.)
fl Main switch
(Turn this switch ON ( | ) before copying.)
‡ Waste toner tank cover
(Open this cover when replacing the waste toner tank.)
Waste toner tank
2-2
Page 16
Section 2 NAMES OF PARTS
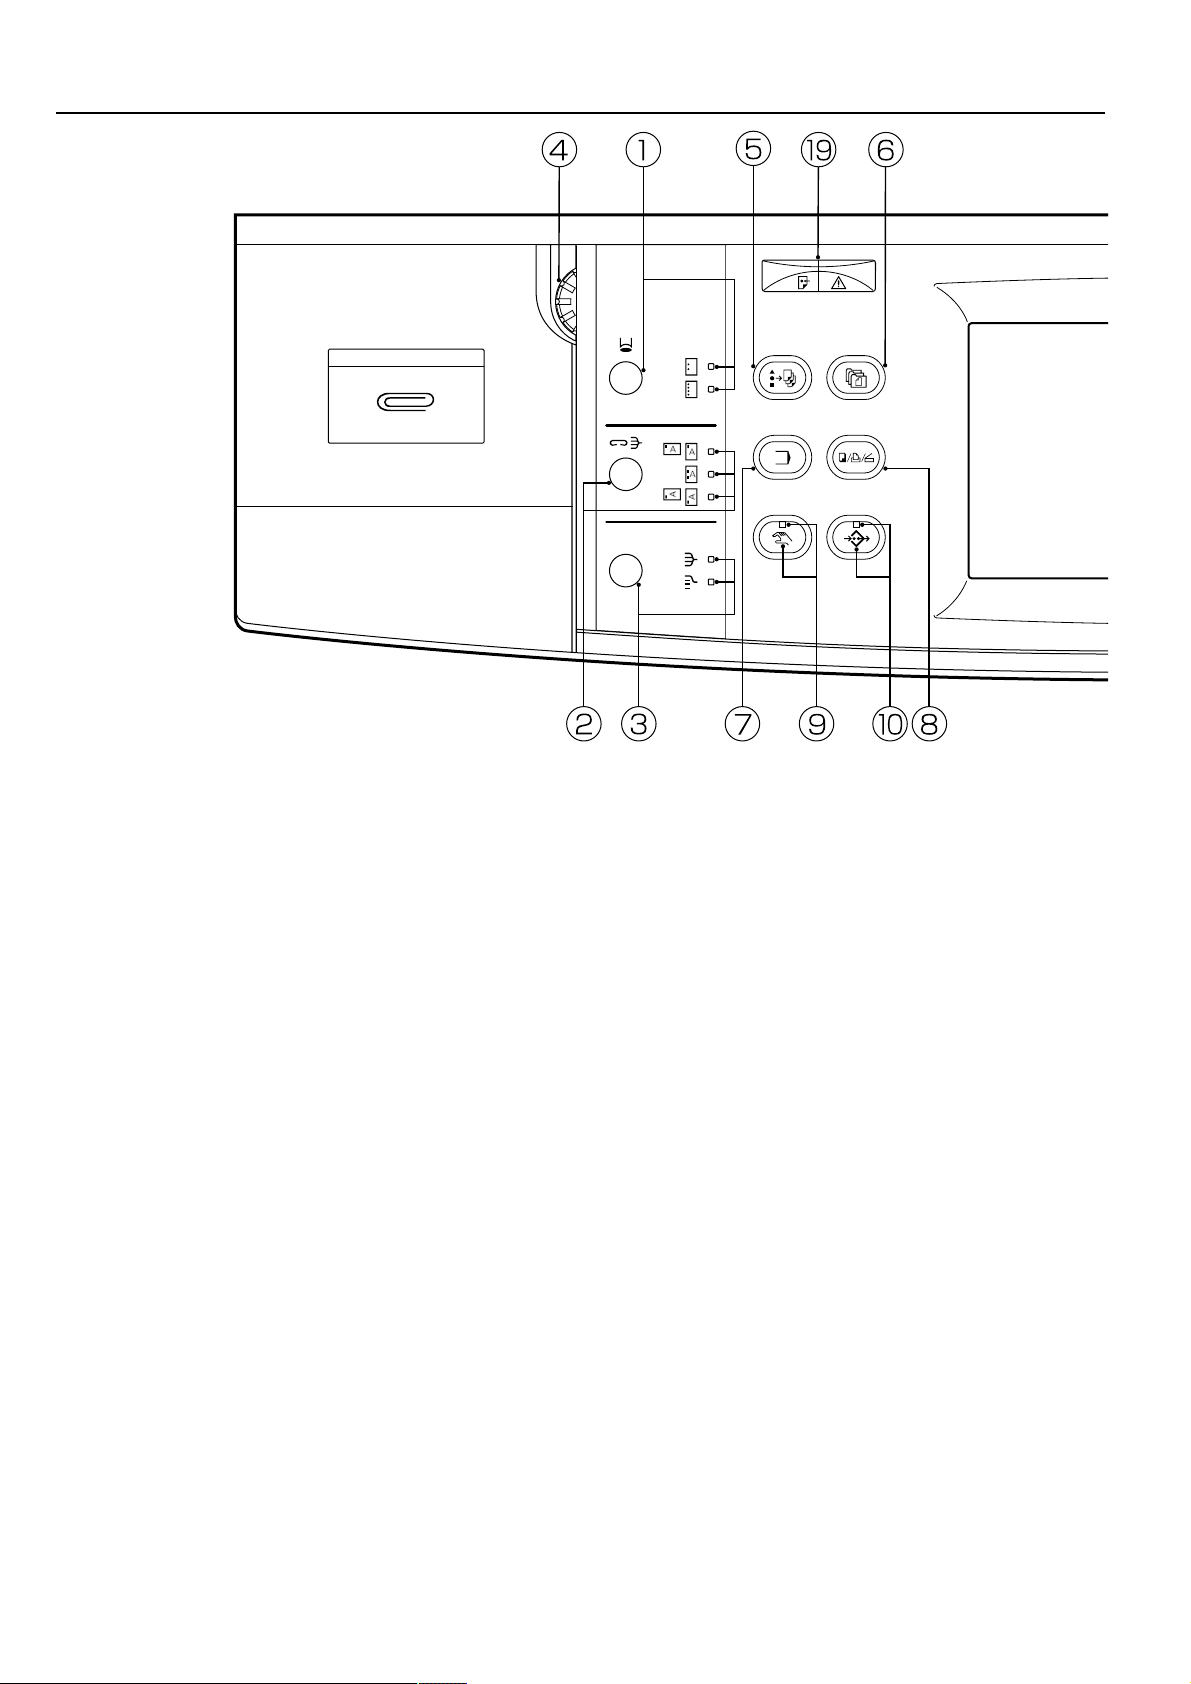
(2) Operation panel
1 Punch key / Punch mode indicators
(In order to punch holes in your copies with the optional Finisher, press
this key until the appropriate indicator [for either 2- or 3-hole punch] is
lit. See page 9-1.)
2 Staple Sort key / Staple Sort mode indicators
(In order to staple your copies with the optional Finisher, press this key
until the indicator that corresponds to the desired stapling style is lit.
See page 9-1.)
3 Sort-Group key / Sort and Group indicators
(In order to sort or group your copies, press this key until the indicator
that corresponds to the desired mode is lit. See pages 9-1 and 9-10.)
4 Brightness adjustment control dial
(Turn this dial when you want to adjust the brightness of the touch
panel [liquid crystal display].)
5 Job Build key
(Press this key when you want to access the job build functions of this
copier. See page 6-3.)
6 Doc. Mgmt. key
(Press this key when you want to access the document management
functions of this copier. See page 7-1.)
7 Program key
(Press this key when you want to register various copy settings as a
single program. See page 5-27.)
8 Copier/Printer/Scanner key
(Press this key when you want to use the optional printer or scanner
functions of this machine.)
9 Manual key and indicator
(Press this key to light the indicator when, rather than using the auto
paper selection mode or the auto magnification selection mode, you
want to manually select the size of the copy paper or the copy magnification ratio.)
0 Add Job key and indicator
(Press this key to light the indicator when you want to access the job
reservation functions of this copier.)
! Touch panel
(Displays such information as the number of copies, machine status,
operation procedures, etc. By gently touching the displayed keys, you
can select a desired item, setting, function, etc. Do not press on the
touch panel with wooden, metal or other hard objects, and do not prick
it with pointed objects. In this handbook, touch keys are indicated in
double quotation marks.)
@ Numeric keys
(Press these keys when you want to set the number of copies to be
made or to enter a desired value.)
# Reset key (See “● Initial mode” at right.)
$ Stop/Clear key
(Press this key when you want to stop copying or want to change the
number of copies to be made.)
% Start key and indicator
(Press this key when the indicator is lit green in order to start copying.)
^ Proof Copy key and indicator
(Press this key to light the indicator when you want to make a test
copy. See page 4-8.)
& Energy Saver key and indicator
(Press this key to light the indicator when you want to use the energysaving auto preheat function. See page 4-10.)
* Interrupt key and indicator
(Press this key to light the indicator when you want to use the interrupt
copying function. See page 4-7.)
( Data / Error indicator
(This indicator will blink and then light continuously during reception of
data from your computer. It will blink and then light red when an error
has occurred during data verification, etc.)
● Initial mode (at the end of warm-up or when the Reset key is pressed)
In the initial mode, the copying mode is automatically set to the “auto
paper selection mode” where copying is accomplished at 100% magnification (same size) onto paper of the same size as the original, the
number of copies to be made is set to “1”, and the copy exposure is set
to the “manual exposure mode”.
* It is possible to change the default setting in the initial mode to the
“auto exposure mode”. (See “1 Exposure mode” on page 8-15.)
* It is also possible to change the default setting so that you can manu-
ally select the size of paper that you will copy onto. (See “8 Paper
selection” on page 8-16.)
● Auto clear function
About 90 seconds after copying stops, the copier will automatically
return to the same settings as those after warm up. (However, the copy
exposure mode will not change.) Copying can be performed repeatedly
with the same copy mode, number of copies, and exposure settings as
long as copying is started before the auto clear function engages.
● Automatic drawer switching function
If two drawers contain the same size of paper and one of the drawers
runs out of paper during copying, this function will automatically switch
to feeding paper from the other drawer.
* The automatic drawer switching function can be deactivated.
(See “2 Automatic drawer switching” on page 8-11.)
2-3
Page 17

○○○○○○○○○○○○○○○○○○○○
Section 2 NAMES OF PARTS
/
(3) Basic screen on the touch panel
1 “BASIC” key
(Touch this key when you want to return to the basic screen.)
2 “ZOOM” key
(Touch this key when you want to change the copy magnification
ratio. See page 4-3.)
3 “FUNCTION” key
(T ouch this key when you want to select the copy function. The function select screen will appear.)
4 “SPECIAL” [Management mode] key
(Touch this key when you want to change the language used on the
touch panel or to set the weekly timer, etc. The management mode
select screen will appear.)
5 Message display
(Displays messages on how to operate the machine and shows indications of the machine’s status.)
6 Copy number display
(Displays, at the start and end of copying, the number of copies that
were set. During copying, it displays the number of copies that have
been finished to that point and, above that, the number of copies that
were set.)
7 Copy magnification ratio display
(Displays the selected copy magnification ratio.)
8 Copy quality mode selection keys
(Touch either the “MIXED” (text and photos), “TEXT” or “PHOTO”
keys to select the mode that corresponds to the content of the originals being used. The highlighted key indicates the currently selected
mode. See page 4-2.)
9 Copy exposure scale
(Appears in the manual exposure mode. Move the scroll box within
the exposure scale to the right to make darker copies, and move it to
left to make lighter copies. The total number of exposure steps can
be set to either 7 or 13. See “2 Exposure steps” on page 8-15.)
0 Copy exposure adjustment keys
(Touch the appropriate key when you want to manually adjust the
copy exposure. Touch the “LIGHTER” key to lighten the exposure
and the “DARKER” key to darken it. )
! “AUTO” [Auto/manual exposure mode selection] key
(T ouch this key when you want to switch between the auto exposure
mode and manual exposure mode. When the key is highlighted, the
auto exposure mode is selected. When the manual exposure mode
is selected, the copy exposure scale will be displayed.)
@ “ECO” key
(Touch this key to highlight it when you want to enter the toner
economy mode where the exposure level will be lowered and toner
consumption reduced. Use this mode as well for test printing and the
like when high quality printing is not a requirement. In order to select
whether you want this key to be displayed or not, see “3 Toner
economy mode” on page 8-15.)
# Stack bypass key
(Touch this key when you want to copy onto paper that is set in the
stack bypass tray.)
$ Paper size keys
(Display the size of paper that is set in each of the drawers. When
you want to select the drawer from which paper will be fed, touch the
appropriate key to highlight that key.)
% “DUPLEX” key
(Touch this key when you want to make settings for two-sided copying. The two-sided copy set-up screen will appear. See page 4-6.)
^ Paper size key
(This key will only be displayed when the copier is equipped with the
optional Side Deck.)
& Copy time display
(Displays the amount of time that elapsed from the start to finish of
each copy job.)
2-4
Page 18
Section 2 NAMES OF PARTS
(4) Optional units
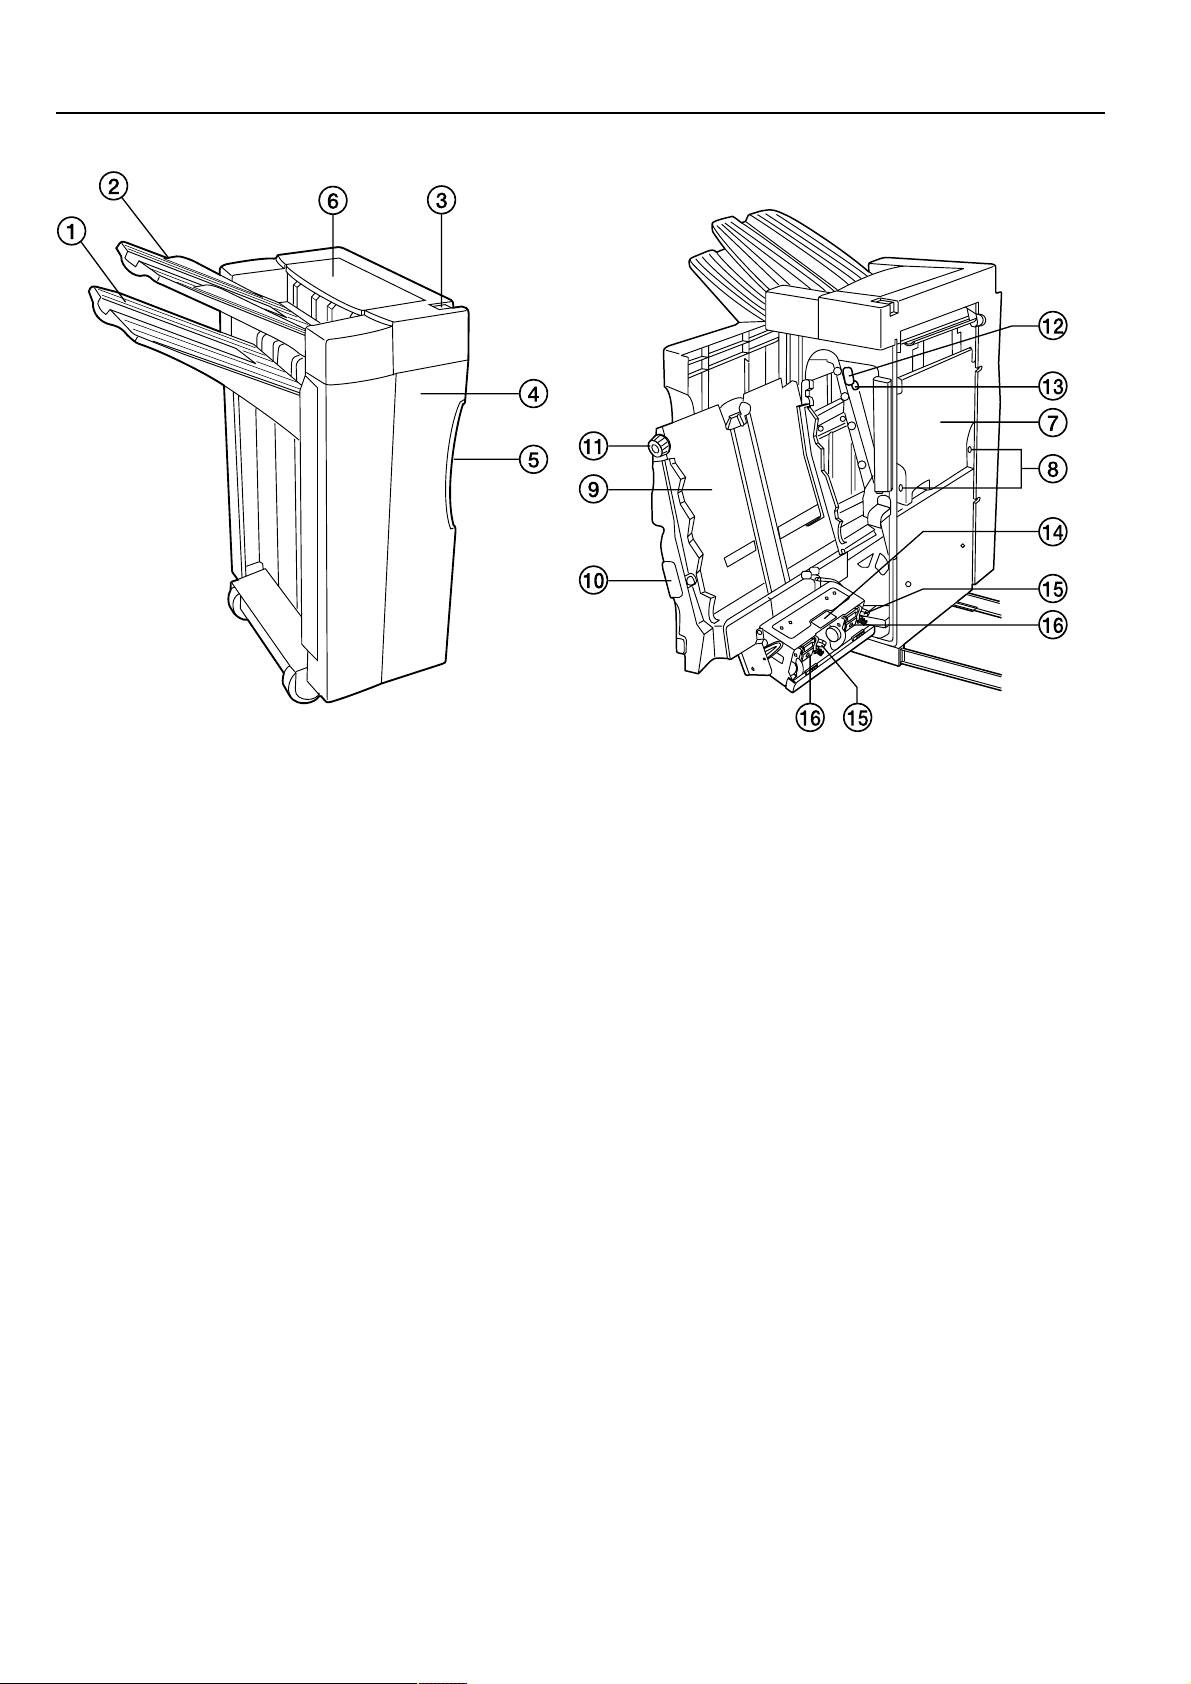
● Finisher
1 Sort tray
(When you are Sort copying or Group copying, finished copies will be ejected onto this tray. The Sort tray will automatically lower as the number of
copies increases and will be raised when the number of copies is minimal.)
2 Non-sort tray
(When you are copying in the Non-sort mode, finished copies will be ejected onto the Non-sort tray. The maximum number of copies that can be
stored on the Non-sort tray will differ depending on the size of copy paper that is being used. See page 9-5.)
3 Finisher release button
(Hold this button down when you want to separate the Finisher from the copier.)
4 Front cover
(Open this cover if paper misfeeds inside the Finisher or when replenishing staples in the stapler holders.)
5 Front cover handle
(Use this handle to open the front cover.)
6 Upper cover
(Open this cover if paper misfeeds during ejection onto the Non-sort tray.)
7 Scrap hole-punch tank
(The scraps left over from the hole puncher are collected here.)
8 Scrap hole-punch tank knobs
(Use these knobs to remove the scrap hole-punch tank.)
9 Internal tray
0 Internal tray handle
(Use this handle to pull out the internal tray if paper misfeeds or another problem occurs.)
! Conveyor knob
(Use this knob if paper misfeeds between the internal tray and the Sort tray.)
@ Conveyor guide handle A
(Use this handle if paper misfeeds.)
# Conveyor guide handle B
(Use this handle if paper misfeeds.)
$ Stapling Unit handle
(Use this handle when removing the staple holder.)
% Staple holder release lever
(Use this lever when removing the staple cartridge.)
^ Staple holder
(Insert staples here.)
2-5
Page 19
Section 2 NAMES OF PARTS
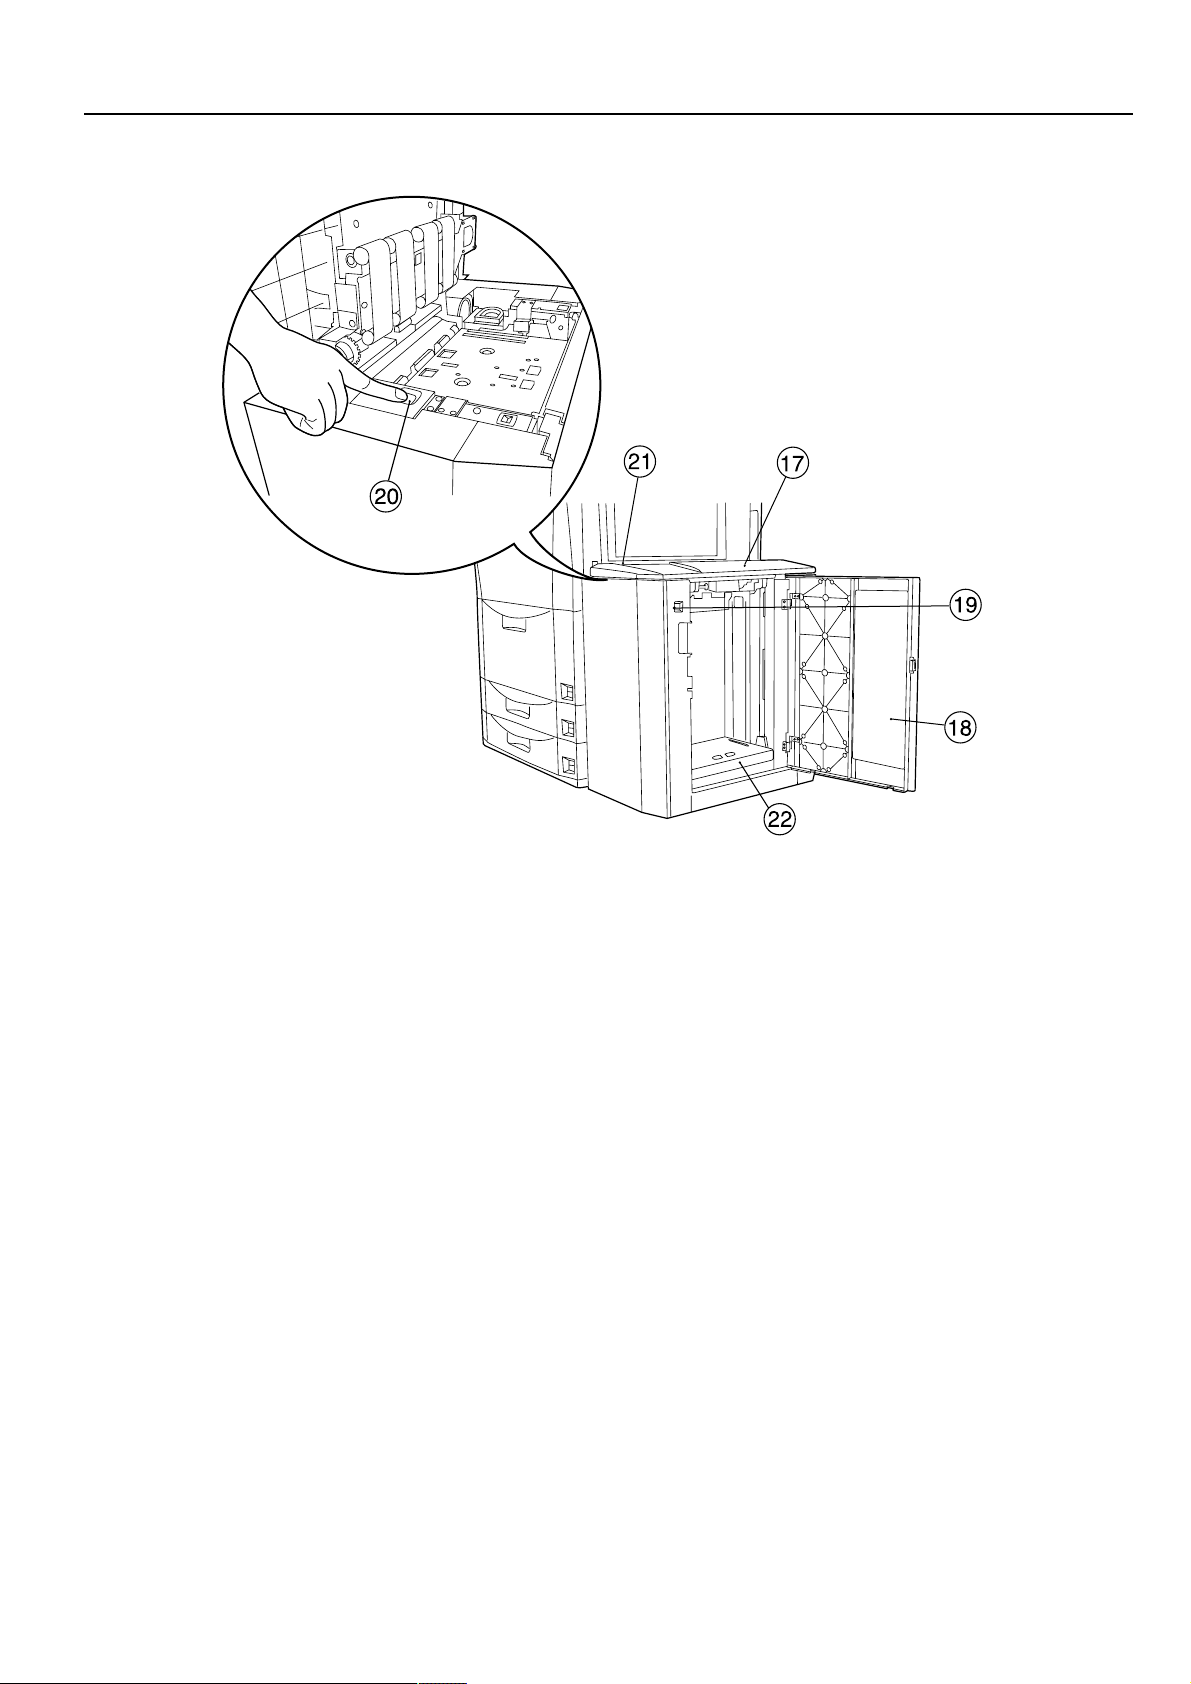
● Side Deck
& Upper cover
* Right cover
(Open this cover when you want to load paper into the Side Deck.)
( Paper plate up/down switch (for right cover)
(Hold this switch down when you want to raise or lower the paper plate inside the
Side Deck. If either the upper cover or the right cover is open, the paper plate will not
move even if you press this switch.)
) Paper plate up/down switch (for upper cover)
(Press or hold down this switch when you want to raise or lower the paper plate inside
the Side Deck. Press it once to lower the paper plate to a level where 1,000 sheets of
paper can be loaded. Hold the switch down to lower the plate to a level where 4,000
sheets of paper can be loaded. If the right cover is open, the paper plate will not move
even if you press this switch.)
⁄ Side Deck release button
(Hold this button down when you want to separate the Side Deck from the copier.)
¤ Paper plate
2-6
Page 20

3-1
Page 21
Section 3 PREPARATIONS
Section 3 PREPARATIONS
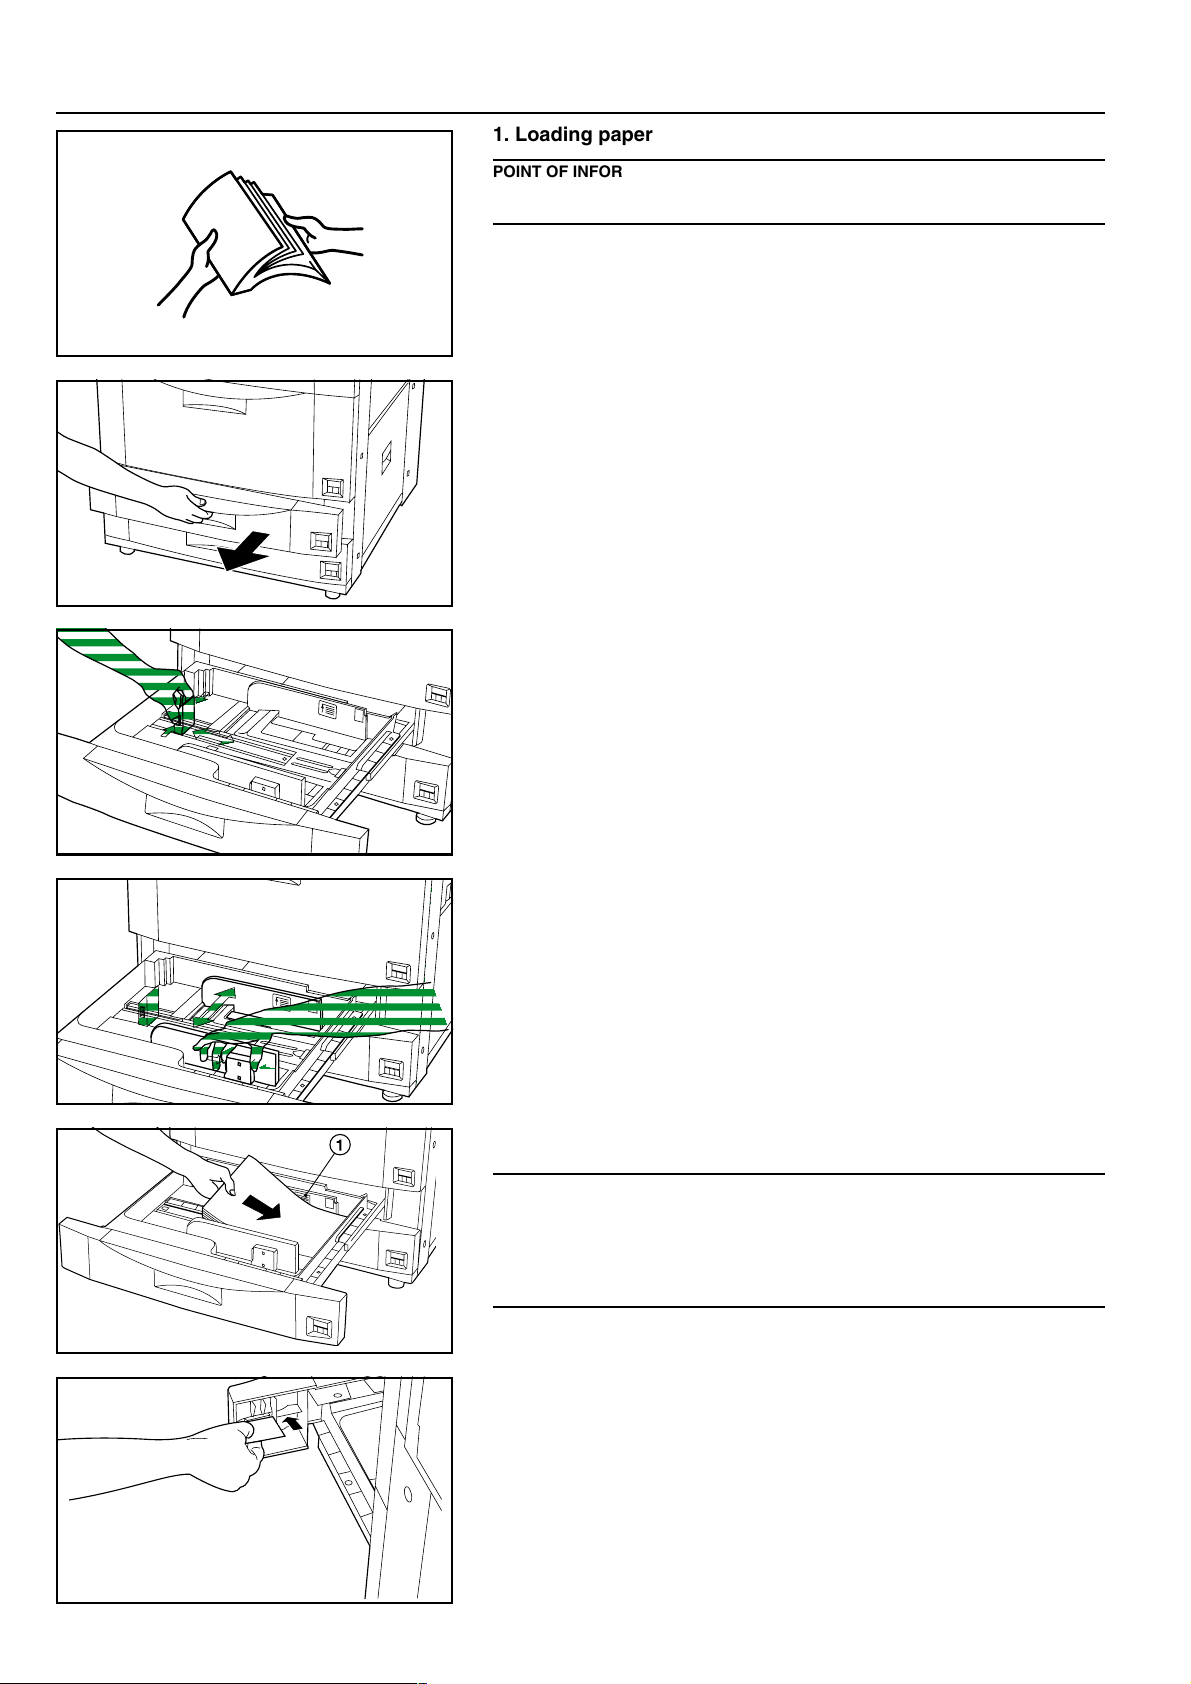
1. Loading paper
POINT OF INFORMATION
After you remove a stack of paper from its original wrapping, fan it out a few times before
loading it into the drawers, decks or the stack bypass tray.
(1) How to load copy paper
Paper can be loaded into 4 different locations: the Front Deck, the two drawers and
the stack bypass tray.
1 Loading paper into the drawers
Each drawer will hold up to 500 sheets of standard (75 g/m
(Inch version)
* Each drawer can be set to hold paper of any size between 5-1/2" x 8-1/2" and 11" x 17".
(Metric version)
* Each drawer can be set to hold paper of any size between A5R and A3.
1. Pull out the desired drawer towards you as far as it will go.
* DO NOT pull out any other drawer or deck at the same time.
2. Press the button on the paper length guide and slide the guide until it is aligned with
the length of the paper that will be loaded in that drawer.
3. Press the button on the closest paper width guide and slide the guides until both of
them are aligned with the width of the paper that will be loaded in that drawer.
2
or 80 g/m2) or colored paper.
3-1
4. Set the paper against the right-hand side of the drawer first and then let go of the
paper so that it rests on the bottom plate of the drawer.
IMPORTANT!
• The sticker 1 inside the drawer indicates how high paper can be loaded. Do not ex-
ceed the limit indicated on that sticker.
• When you load paper into a drawer, set the side that you want to copy onto face down.
(The copy side is usually face up in the original wrapping.)
• Make sure that the paper length guide is aligned closely with the edge of the paper.
Realign the guide if there is any gap between it and the paper.
5. Set the paper size label into the space provided in the front of the drawer in order to
indicate the size of paper loaded in that drawer.
6. Gently push the drawer back into the copier.
* The size of paper that was loaded in the drawer will be displayed on the touch panel.
* If you will not be using the copier for a prolonged period of time, remove all paper
from the drawer(s) and Deck(s), replace it in its original wrapping, and seal it in order
to protect it against moisture.
Page 22

Section 3 PREPARATIONS
2 Loading paper into the Front Deck
The Front Deck will hold up to 1,500 sheets of 11" x 8-1/2" [A4] size standard (75 g/m
2
) or colored paper in each of its two rows for a total capacity of 3,000 sheets.
80 g/m
1. Pull the Front Deck out towards you as far as it will go.
* DO NOT pull out any of the drawers when the Front Deck is open.
2. Load the paper in both rows.
IMPORTANT!
The sticker inside the Front Deck indicates how high paper can be loaded. Do not exceed the limit indicated on that sticker.
3. Gently push the Front Deck back into the copier.
2
or
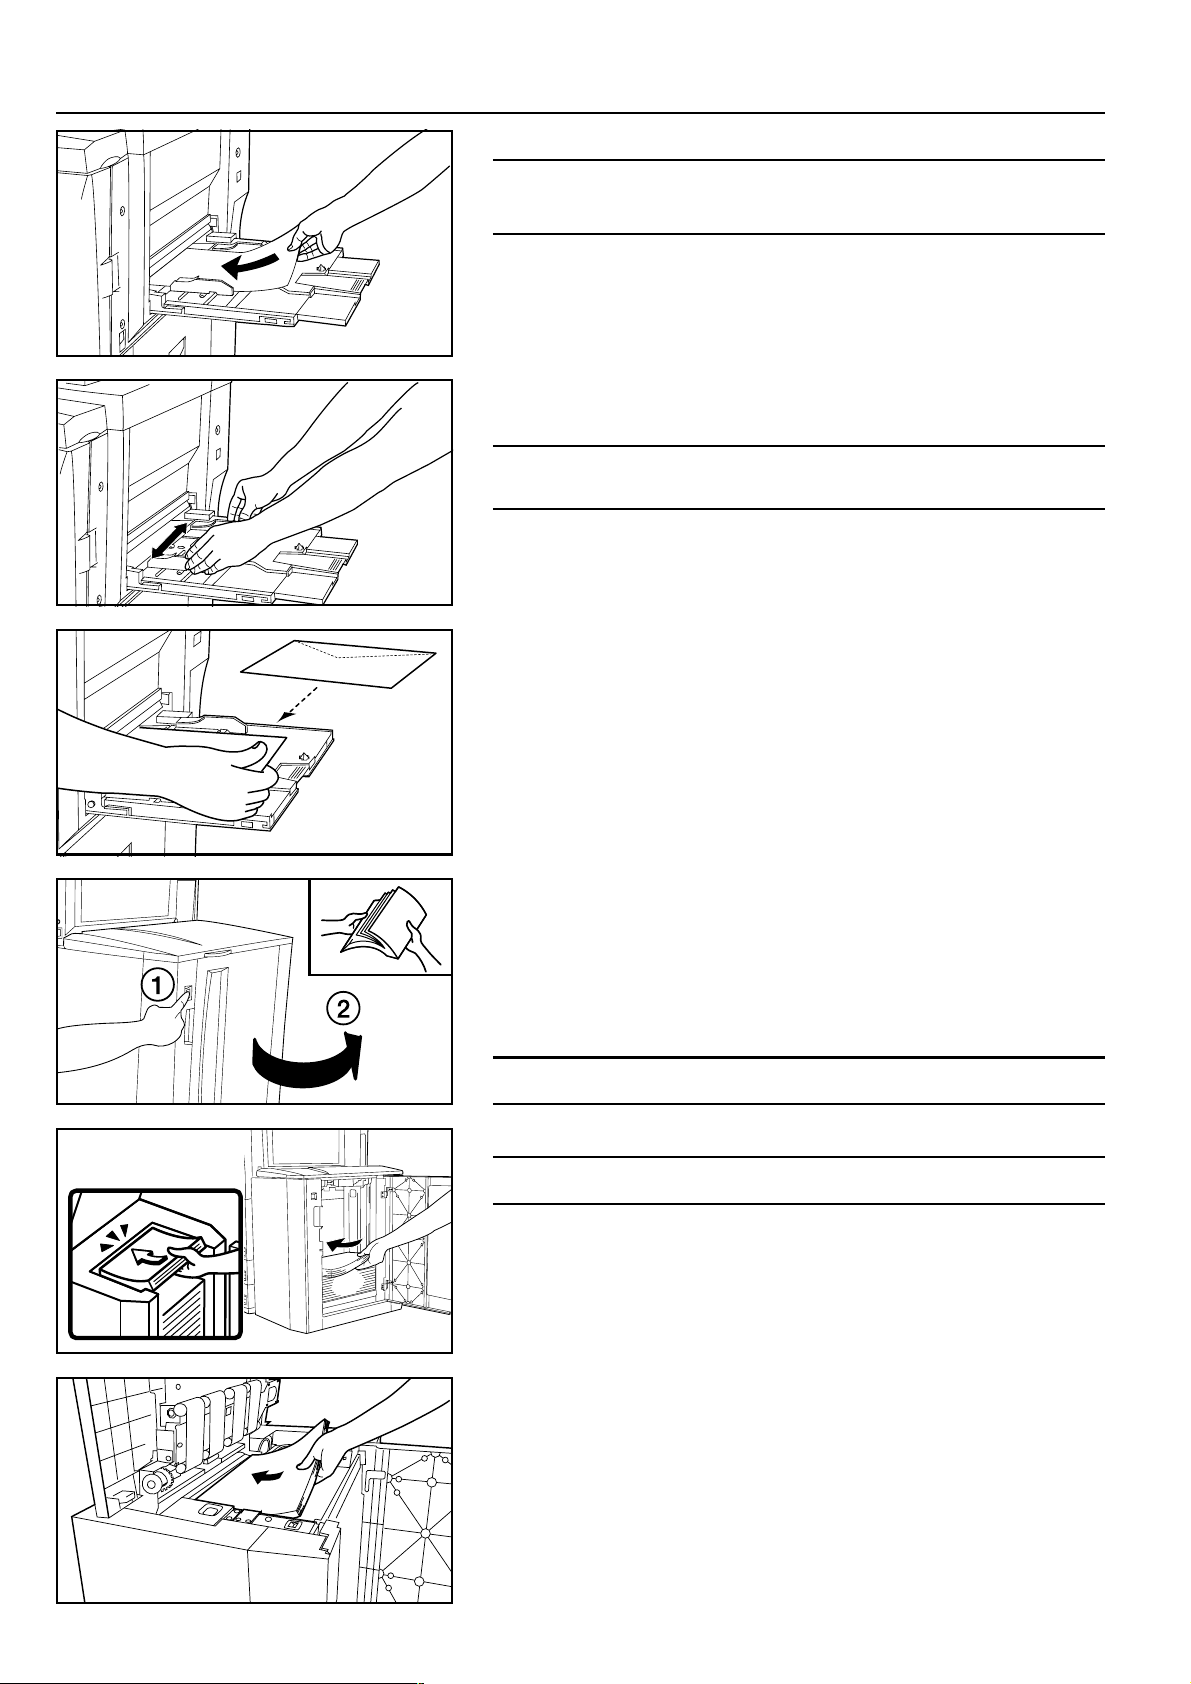
3 Loading paper into the stack bypass tray
The stack bypass will hold up to 100 sheets of standard (75 g/m
2
or 80 g/m2) paper. The
paper can be of any size between 5-1/2" x 8-1/2" and 11" x 17" [A6R and A3]. When
copying onto special paper, always use this tray to feed the paper.
* If you want to copy onto non-standard size paper, register the size of paper that you
want to use in advance. See “● How to register a custom size” on page 8-12.
* Types of paper and the number of sheets that can be set in the stack bypass tray:
• Tracing paper: 1 sheet
• Letterhead: 100 sheets
• Envelopes: 10 envelopes
• Color paper: 100 sheets
• Standard (120 g/m
2
, 160 g/m2) paper: 25 sheets
• Transparencies: 25 sheets (When copying onto transparencies, fan them out at least
once before setting them in the stack bypass tray.)
1. Open the stack bypass tray.
* When setting large size paper such as 8 1/2" x 11", A4R or larger, pull out the support
extension.
2. Adjust the insert guides to fit the width of the paper to be loaded.
3-2
Page 23
Section 3 PREPARATIONS
3. Slide the paper along the guides and into the stack bypass tray, as far as they will go.
IMPORTANT!
When you set paper into the stack bypass tray, set the side that you want to copy onto
face up. (The copy side is usually face up in the original wrapping.)
● Using envelopes
It is possible to print onto envelopes by feeding them from the stack bypass tray when
you are using the optional printer functions of this machine.
POINT OF INFORMATION
The stack bypass tray can hold up to ten COM-10, Monarch, DL or C5 envelopes at one
time.
1. Open the stack bypass tray.
2. Adjust the insert guides to fit the width of the envelopes to be loaded.
3. Close the flap on the envelopes and, with the envelopes face up (flap side down)
and the flap towards the rear of the copier, slide them along the guides and into the
stack bypass tray, as far as they will go.
* If you do not set the envelopes in the proper orientation, printing may be carried out
onto the wrong side or in the wrong direction.
* To register the size of envelopes that you want to use, see “● How to register a
custom size” on page 8-12.
4 Loading paper into the Side Deck (option) The optional Side Deck will hold up to 4,000 sheets of 11" x 8-1/2" [A4] size standard (75
2
or 80 g/m2) paper.
g/m
1. Hold down the paper plate up/down switch to lower the paper plate inside the Side
Deck to its lowermost position.
* If either the upper cover or the right cover of the Side Deck is open, the paper plate
will not move even if you press this switch.
2. Open the right cover of the Side Deck.
IMPORTANT!
Fan out all stacks of paper before loading them in the Side Deck.
3. Load paper onto the paper plate.
IMPORTANT!
BE SURE to load paper all the way into the Side Deck as far as it will go.
4. Close the right cover.
* If you will not be using the copier for a prolonged period of time, remove all paper
from the drawer(s) and Deck(s), replace it in its original wrapping, and seal it in order
to protect it against moisture.
● Loading paper from the top of the Side Deck
1. Open the upper cover of the Side Deck.
2. Press the paper plate up/down switch to lower the paper plate inside the Side Deck.
3. Load paper onto the paper plate.
4. Close the upper cover.
3-3
Page 24
Section 3 PREPARATIONS
2. Setting originals
1 What is the DF for? The DF (Document Feeder) automatically feeds and scans each original, one by one, for copying. When you make copies from two-sided originals, it will automatically turn the originals over in order to copy the reverse side as well.
2 Originals that can be set in the DF…
• Sheet originals
• Thickness:
One-sided originals: between 35 g/m
Two-sided originals: between 50 g/m2 - 120 g/m
• Size: Max. 11" x 17" (A3) - Min. 5-1/2" x 8-1/2" (A5R)
• Number of sheets:
100 sheets (11" x 8-1/2" [A4] or smaller [75 g/m
70 sheets (8-1/2" x 14" [B4] or larger [75 g/m
(However, 30 sheets maximum when using the auto selection mode)
3 Cautions when using the DF DO NOT set originals of the follow types in the DF. In addition, when using perforated sheets or originals with punch holes, DO NOT insert the end with the perforations or holes first.
• Transparencies
• Carbon paper, crumpled originals or originals with strong folds, and soft originals such
as vinyl
• Originals which are not rectangular, wet originals, and originals with adhesive tape or
glue
• Originals with clips or staples (In order to use such originals, remove the clips or staples
and straighten any crumples or folds before using them.)
• Clippings or originals with very slippery surfaces
• Originals with wet correction fluid
• Originals with folds (If you must use such originals, smooth out the folded portions
before setting them in the DF.)
2
- 160 g/m
2
2
2
or 80 g/m2])
2
or 80 g/m2])
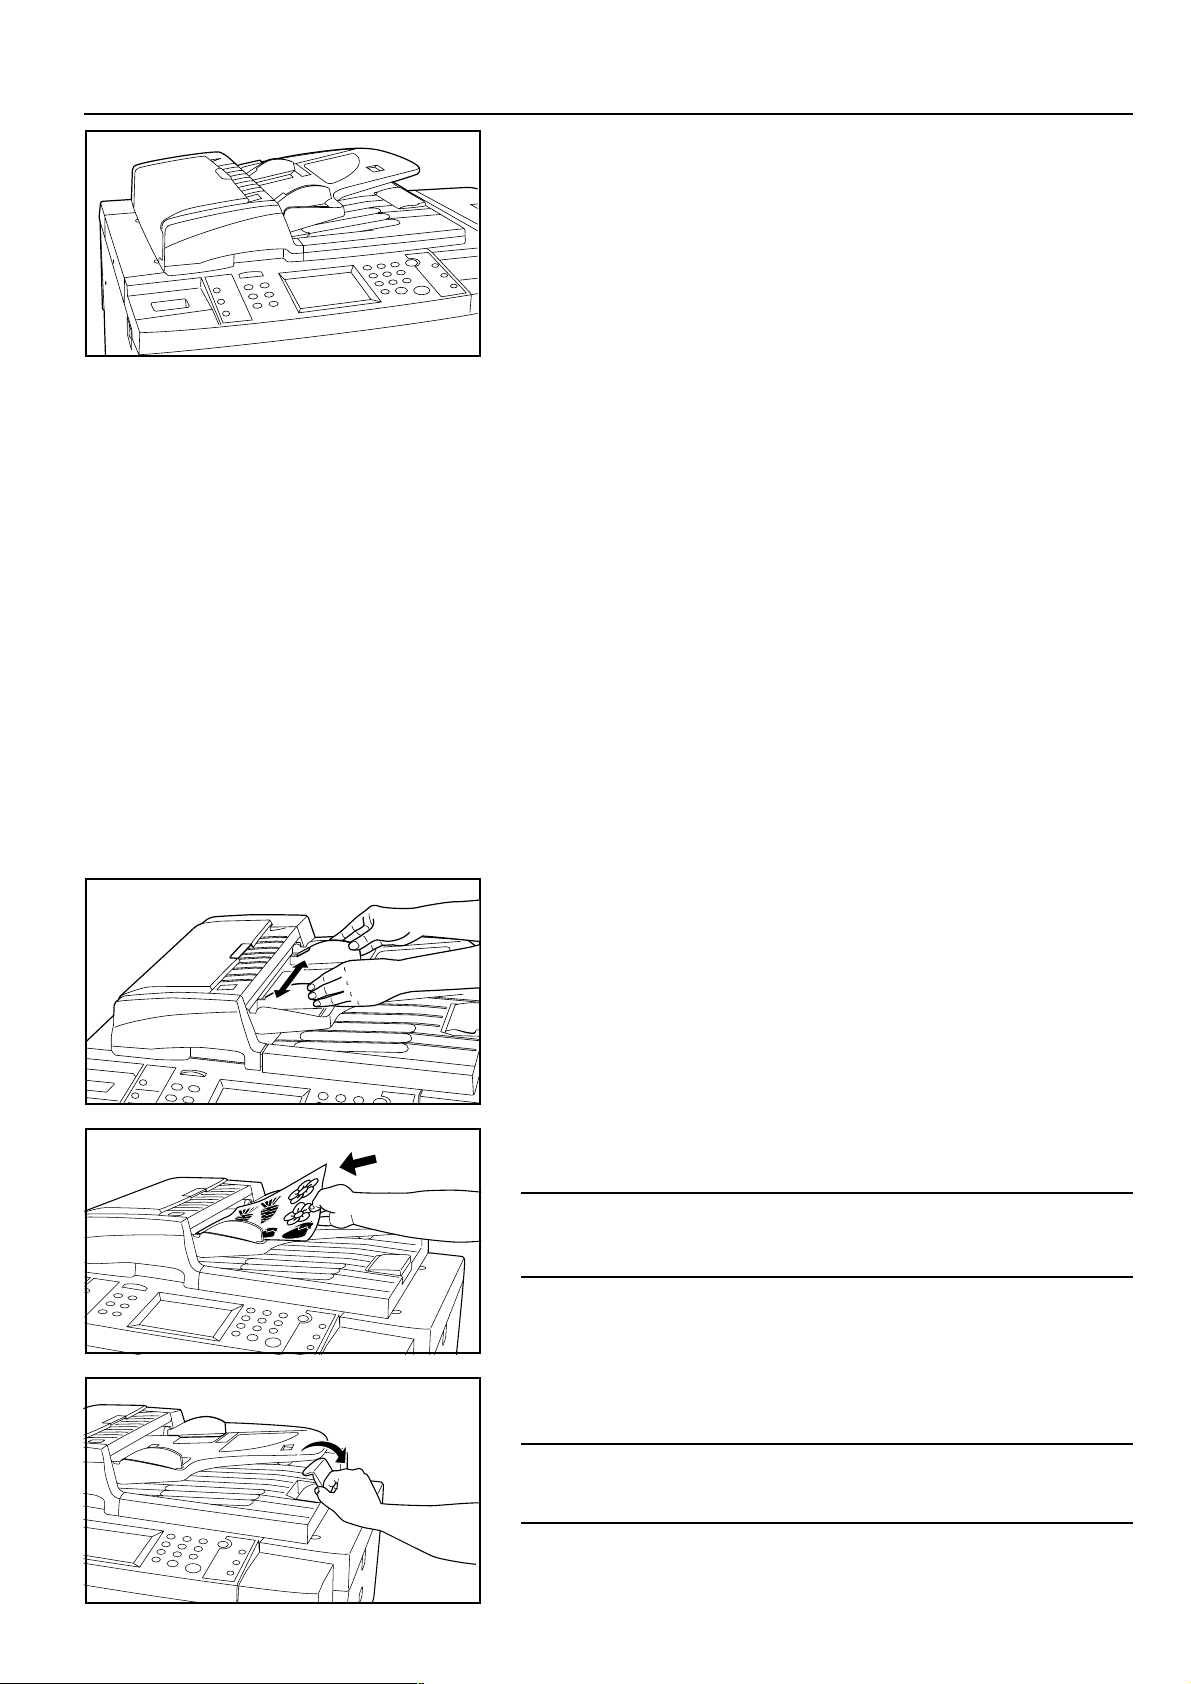
4 Setting originals in the DF
1. Adjust the original insert guides to fit the size of the originals.
* Before setting any new originals, remove any originals that are remaining on the
original ejection table. If ejected originals are left on the original ejection table, they
may cause other originals to misfeed.
2. Arrange the originals in order and set them face up (first page face up for two-sided
originals) onto the original table. The original set indicator will light green. If the indicator does not light, reset the originals in the DF.
IMPORTANT!
DO NOT set more originals than indicated on the sticker that is attached to the rear
original insert guide. If more than the acceptable number of originals is set, the originals
may not feed properly.
* When setting large size originals such as 8-1/2" x 14" and 11" x 17" (B4, Folio, A3),
open the original ejection guide to prevent the ejected originals from sliding off the
original ejection table.
IMPORTANT!
When copying from two-sided originals, each original will be ejected temporarily out of
the original reversing cover before being turned over. DO NOT touch or attempt to remove any original at this time as it will cause a misfeed error.
3-4
Page 25

Section 3 PREPARATIONS
5 Auto selection mode The copier will automatically detect the size of each original and select paper of that same size to copy onto.
POINT OF INFORMATION
• A maximum of 50 originals can be set in DF at one time with this mode.
• The size of originals that can be used in this mode is limited to 11" x 17" and
11" x 8-1/2" (A3 and A4) and all originals must be of the same width.
1. Touch the “FUNCTION” key.
The function select screen will appear.
2. Touch the “AUTO SELECTION” key. (If that key is not displayed, touch the “▼” key or
the “▲” key until it is displayed.)
The touch panel will return to the basic screen.
6 Setting originals on the platen To make copies from originals that cannot be set in the DF (books, magazines, etc.), lift open the DF and set one original at a time on the platen.
1. Hold the DF open/close handle and lift the DF open.
* Before opening the DF, remove any originals that are on the original table and the
original ejection table to prevent them from falling off the DF when it is opened.
2. Set the original face down on the platen and align it with original size indicator lines.
3. Hold the DF open/close handle and close the DF.
IMPORTANT!
Avoid placing excessive pressure on the platen when closing the DF. Too much pressure
on the platen may cause the glass to break.
CAUTION
DO NOT leave the document feeder open as there is a danger of personal
injury.
3-5
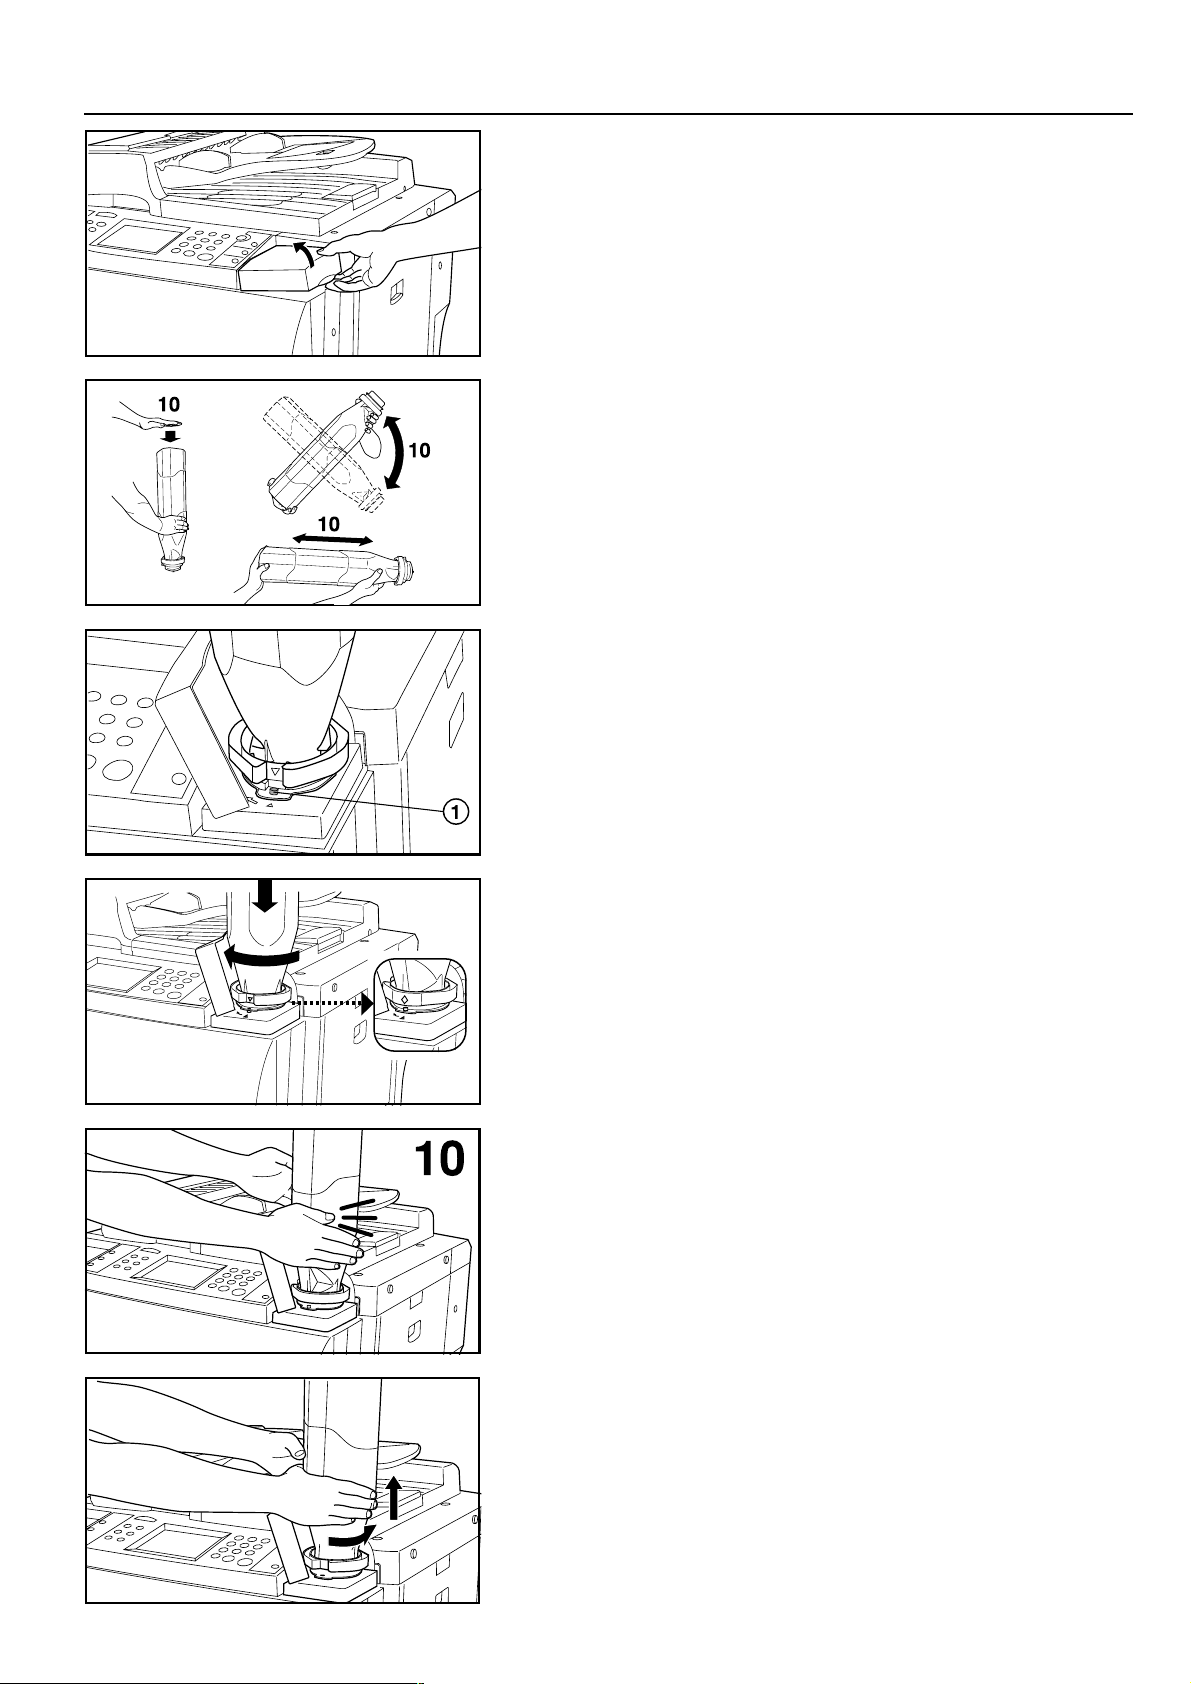
3. Adding toner
Add toner when “ADD TONER TO RESUME COPYING.” appears in the message display.
* DO NOT add toner unless this message is displayed.
* Touch the “? TONER” key on the touch panel to display the procedure for adding toner.
CAUTION
Do not incinerate toner and toner containers. Dangerous sparks may cause
burns.
Page 26
Section 3 PREPARATIONS
1. Open the cover on the right side of the operation panel.
2. Turn the new toner bottle upside down and tap the bottom about 10 times or so.
3. Hold the bottle firmly and shake up the contents by turning it upside down and then
right-side up 10 or more times in the manner shown in the illustration.
4. Next, hold the bottle horizontally and shake it back and forth 10 or more times.
5. Fit the hole in the toner bottle (located below the ▼) over the metal pin 1 that is
protruding out of the toner supply slot.
6. Turn the bottle clockwise 90 degrees and the toner in the bottle will be emptied into the
copier.
* Be sure to turn the bottle all the way until it stops, so that the ◆ on the bottle is
aligned with the ▲ on the main body of the copier.
7. Wait about 60 seconds and then tap the sides of the bottle in order to get all of the
remaining toner out.
8. Turn the toner bottle back counterclockwise to its original position and slowly remove
it from the toner supply slot.
9. Close the cover on the right side of the operation panel.
3-6
Page 27

4-1
Page 28
Section 4 BASIC OPERATION
(1) Basic copying procedure
21
1. Warm-up
Turn the main switch ON ( | ). At the end of warm-up, “READY TO
COPY.” will appear in the message display.
* If you set the originals that you want to copy and press the Start
key while the copier is still warming up, copying will begin as soon
as warm-up is finished.
* If you use job build functions (see page 6-3) or job reservation
functions (see page 6-1), scanning of the originals can begin while
the copier is still warming up.
4
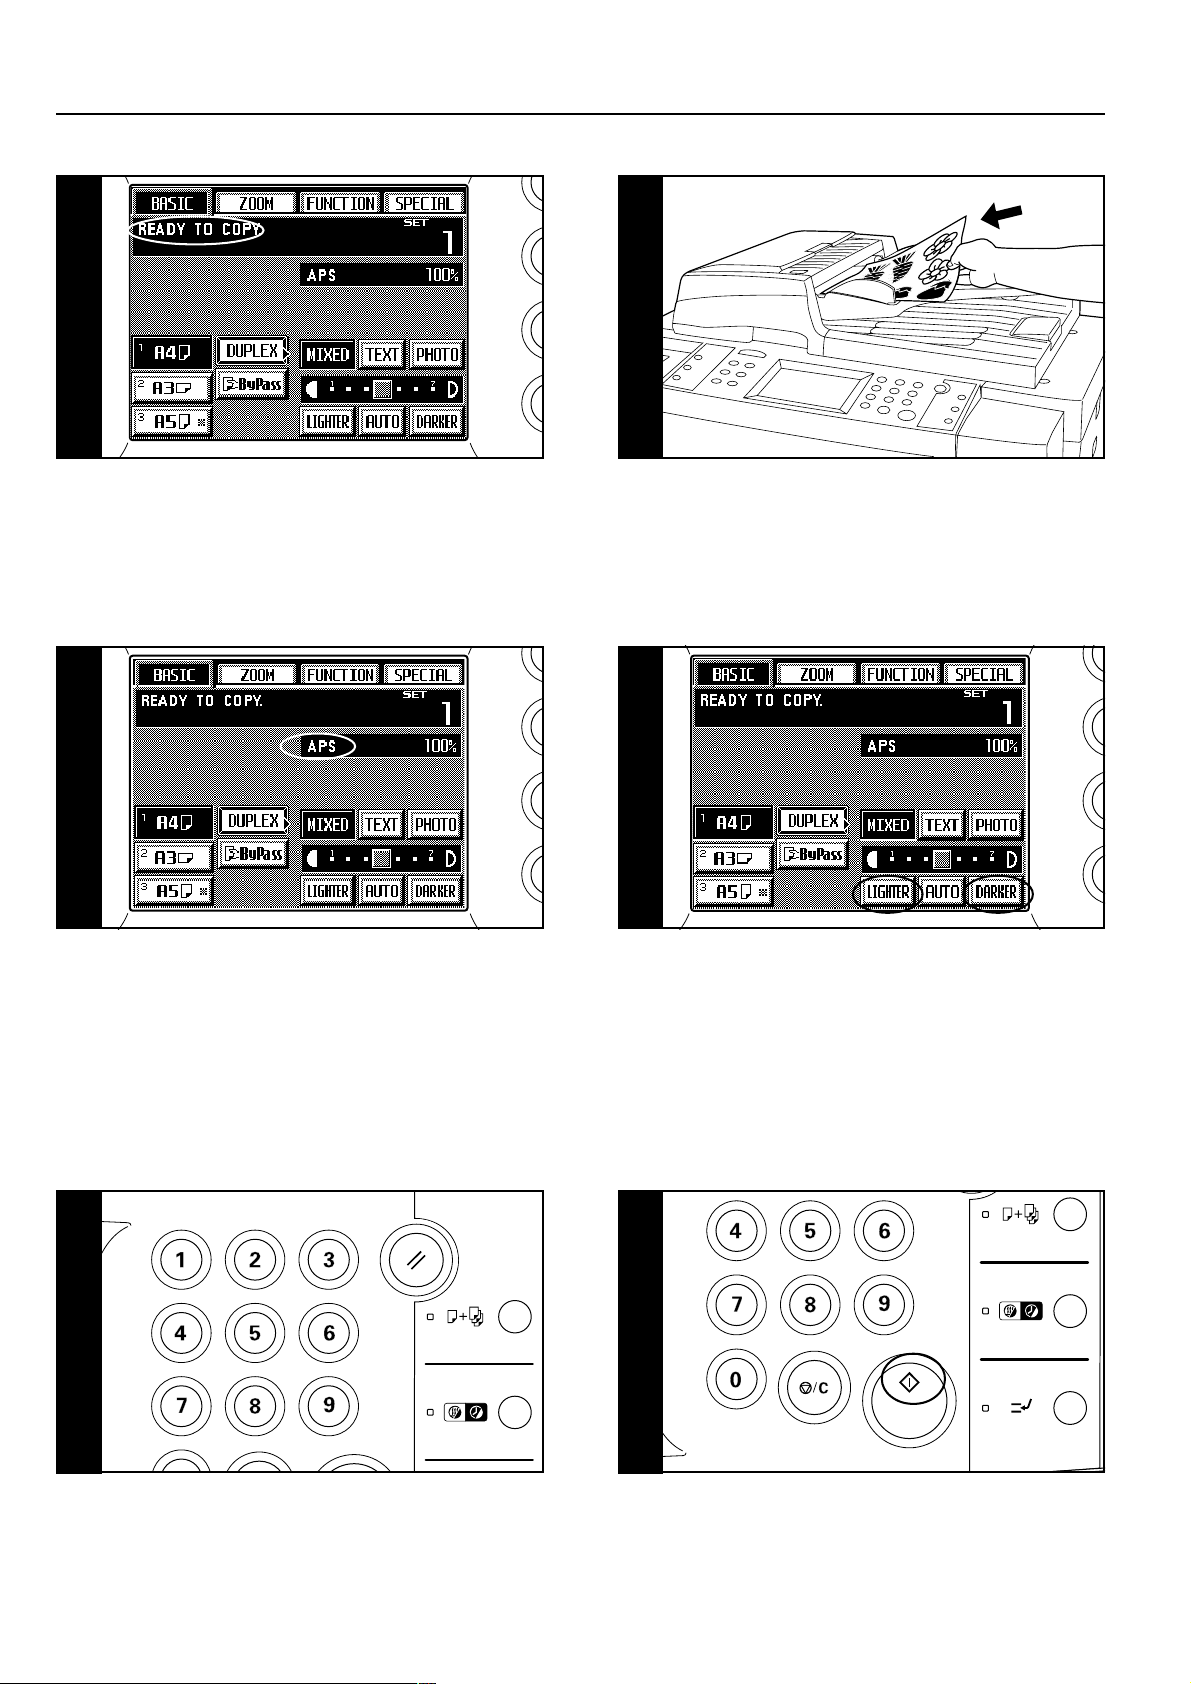
4. Selecting the paper size
When “APS” is displayed, paper of the same size as the original will
be automatically selected. In order to copy the original onto a
different size of paper without changing the size of the image, touch
the paper size key that corresponds to the paper size that you want
to use, and then press the Manual key. To make copies at 100%
magnification (same size) onto paper of the same size as the
original, no special settings are required.
2. Setting originals
Set the originals that you want to copy in the DF or on the platen.
(See page 3-4.)
5
-1
5. Copy exposure adjustment
In the initial mode, manual exposure mode is selected, the exposure
scale will be displayed and the copy exposure can be adjusted as
desired. When you want to darken the exposure, touch the
“DARKER” key to move the scroll box within the exposure scale to
the right. When you want to lighten the exposure, touch the
“LIGHTER” key to move the scroll box to the left.
* If copies are consistently too dark or too light, the overall exposure
level can be adjusted as well. (See “5 Manual exposure adjustment” on page 8-15.)
* The total number of exposure steps can be set to either 7 or 13.
(See “2 Exposure steps” on page 8-15.)
7. Setting the number of copies
Use the numeric keys to enter the number of copies that you want to
make into the copy number display on the touch panel. You may
select up to 999 copies to be made at one time.
* It is possible to place a lower limit on the number of copies that can
be made at one time. (See “@ Copy limit” on page 8-16.)
4-2
4-1
87
8. Start copying
Press the Start key. Copying is possible anytime
“READY TO COPY.” is shown in the message display and the Start
indicator is lit green.
Page 29

Section 4 BASIC OPERATION
3
3. Selecting the desired functions
Select from among the copier’s various functions.
* Touch the “▼” key or the “▲ ” key to access all of the available
functions.
* It is possible to select the functions that will be displayed on the
screen that appears when you touch the “FUNCTION” key. (See
“) Customize function display screen (#1 - #5)” on page 8-16.)
5
-2
■ Various functions
• Enlargement/reduction
• Two-sided copying from various originals
• Interrupt copying
• Making a margin space for binding, etc.
• Printing page numbers on the copies
• Copying each side of two-page [open-face] originals onto
separate sheets
• Erasing the edges around copies from books, etc.
• Adding covers for or insert sheets between copies
• Making copies onto transparencies
• Feeding paper as a backing sheet for transparencies
• Overlaying images
• Copying the images from either two or four originals onto a
single copy sheet
• Making a booklet (sheet originals)
• Making a booklet (two-page [open-face] originals)
• Copying and binding into a booklet (sheet originals)
• Inverting black and white
• Making mirror-image copies
• Automated sorting
• Memorizing frequent used settings
6
When the “AUTO” key is highlighted on the touch panel, the auto
exposure mode is selected. In the auto exposure mode, the
exposure of original will be detected and the optimum exposure
automatically selected. It is also possible to increase the contrast
and thereby have the copier erase the background color of the
originals in order to make clearer copies.
* If copies are consistently too dark or too light, the overall exposure
level can be adjusted as well. (See “4 Auto exposure adjustment”
on page 8-15.)
* It is possible to change the exposure mode in the initial mode from
“MANUAL” to “AUTO”. (See “1 Exposure mode” on page 8-15.)
9
9. End of copying
Finished copies will be ejected onto the installed option (the Copy
Tray, Finisher or Booklet Stitcher).
* Depending upon the copy mode, the copies may be ejected face
up or face down.
* If the copier is equipped with the optional Copy Tray, a maximum of
250 copies can be stored at one time.
6. Selecting the copy quality
Touch the “TEXT”, “PHOTO”, or “MIXED” key, as desired, until that
key is highlighted.
TEXT: For originals that consist primarily of text
PHOTO: For originals that consist primarily of photos and other half-
tone images
MIXED: For originals with both text and photos
* It is possible to select the default copy quality mode.
(See “6 Copy quality mode” on page 8-16.)
CAUTION
If the copier will not be used for a short period of time (overnight, etc.), turn the main switch OFF (O). If it will not be
used for an extended period of time (vacations, etc.), remove the power plug from the outlet for safety purposes
during the time the copier is not in use.
4-3
4-2
Page 30
Section 4 BASIC OPERATION
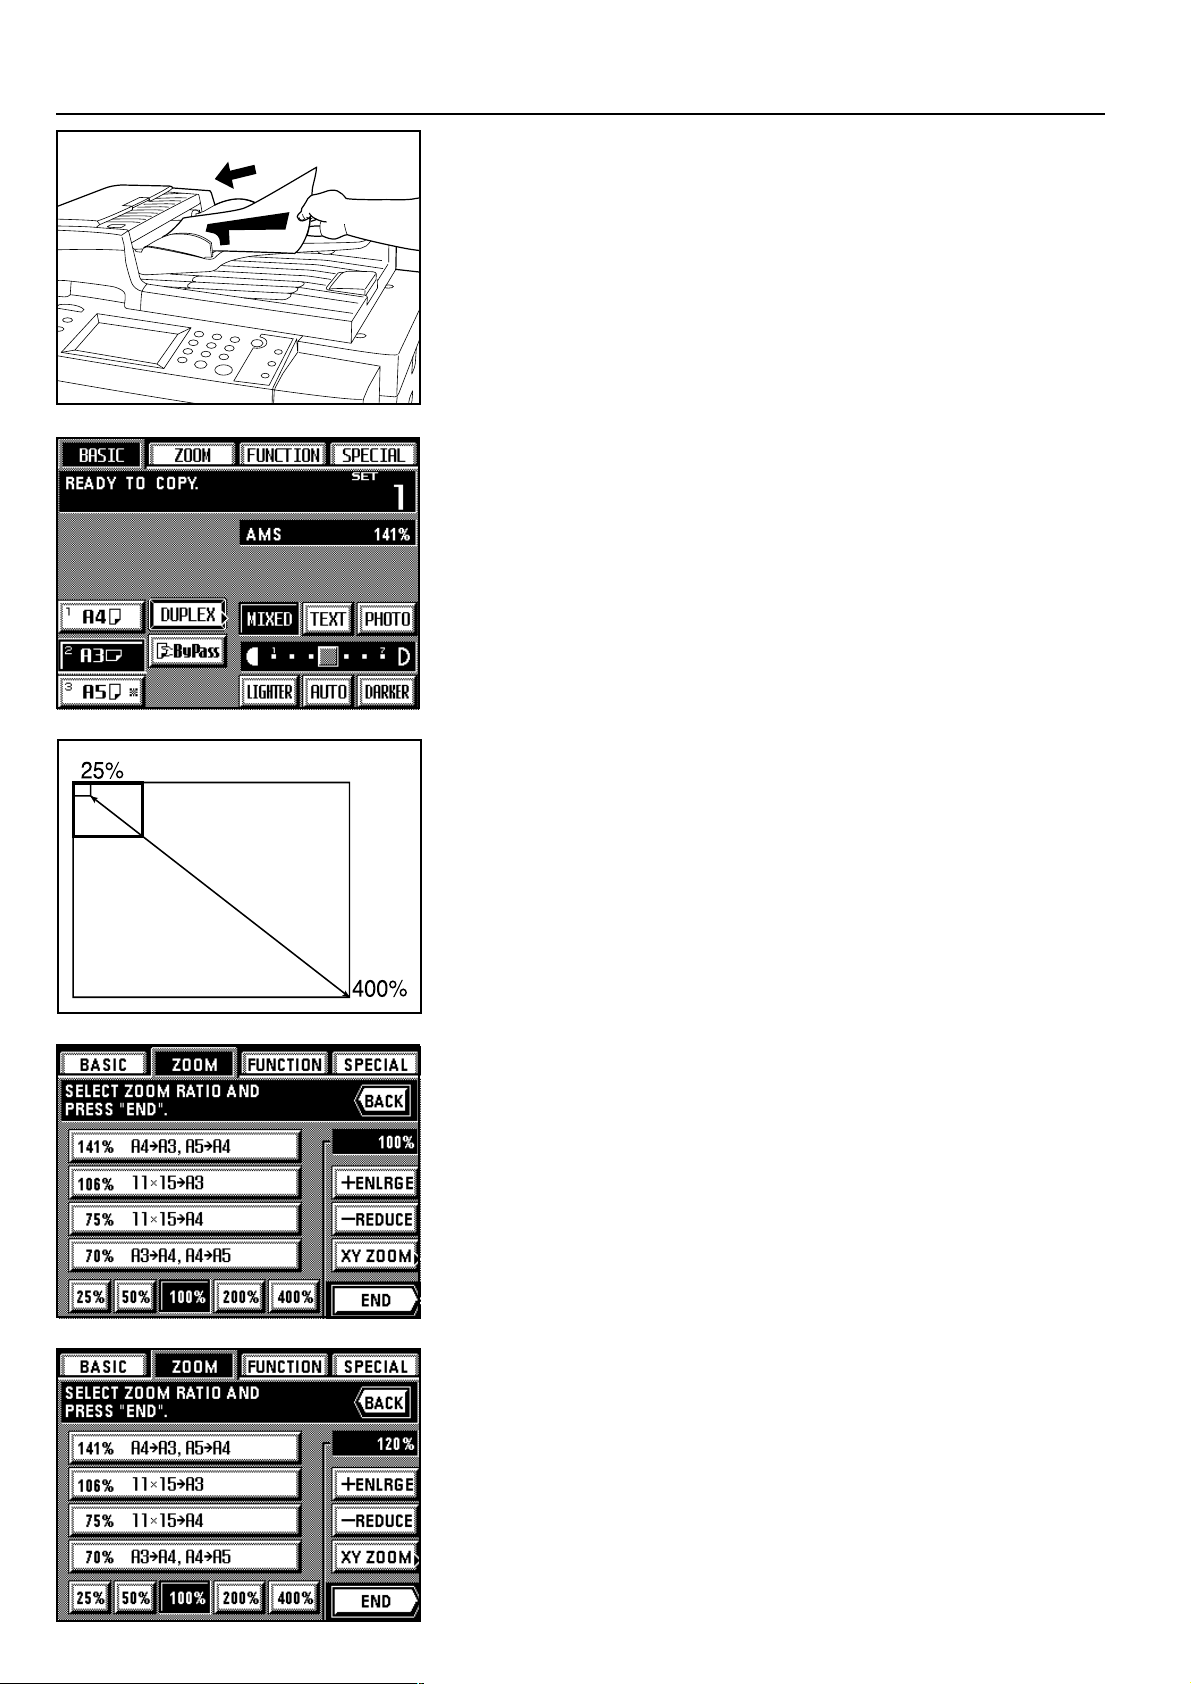
(2) Enlargement/reduction 1 Auto magnification selection mode
Enlargement/reduction is automatically performed in order to fit the size of the selected copy
paper.
1. Set the originals.
The copier will automatically detect the size of the originals and select copy paper of that
same size.
2. Select the size of paper that you want to copy onto by touching the appropriate paper size
key.
The corresponding zoom ratio will be displayed.
* Copying will begin when the Start key is pressed.
2 Zoom copy mode The zoom ratio can be set to any 1% increment between 25% and 400%. * If you set the originals in the DF, the zoom ratio can be set to any value between 25% and
200%.
1. Set the originals.
2. Touch the “ZOOM” key.
The zoom mode set-up screen will appear.
3. Touch the “+ ENLARGE” key or the “- REDUCE” key to select the desired zoom ratio.
* The zoom ratio can also be entered directly using the numeric keys.
4-4
4-3
4. Touch the “END” key.
The touch panel will return to the basic screen and the selected zoom ratio will be displayed.
* Touch the desired paper size key if you want to change the currently selected paper size.
Page 31

Section 4 BASIC OPERATION
3 Standard zoom mode The corresponding zoom ratio will be automatically displayed once the size of the originals to be copied and the desired size of copy paper are selected. * In order to use this mode, it is necessary in advance to select “STANDARD ZOOM” under
“! Zoom mode” on page 8-16.
1. Set the originals.
2. Touch the “ZOOM” key.
The zoom mode set-up screen will appear.
3. Select the size of originals being copied.
If the appropriate size is not displayed, touch the “▼” key until it is displayed.
4. Select the desired size of copy paper.
If the size of copy paper that you want to copy onto is not displayed, touch the “▼” key until
it is displayed.
* Once the desired paper size is selected, the corresponding copy zoom ratio will be
displayed.
5. Touch the “END” key.
The touch panel will return to the basic screen and selected the zoom ratio will be
displayed.
* Touch the desired paper size key if you want to change the currently selected paper size.
4 Fixed-size zoom mode Enlargement/reduction is automatically performed to one of the following pre-set ratios: 25%, 50%, 70%, 75%, 106%, 141%, 200% or 400%. * In order to use this mode, it is necessary in advance to select “Size zoom” under “! Zoom
mode” on page 8-16.
1. Set the originals.
2. Touch the “ZOOM” key.
The zoom mode set-up screen will appear.
3. Touch the key that corresponds to the desired ratio.
The selected ratio key will be highlighted.
4. Touch the “END” key.
The touch panel will return to the basic screen and the selected zoom ratio will be displayed.
* Touch the desired paper size key if you want to change the currently selected paper size.
4-5
4-4
Page 32

Section 4 BASIC OPERATION
5 XY zoom mode It is possible to set the zoom ratio for the length and the width of the copy independently. Each zoom ratio can be set to any 1% increment between 25% and 400% (between 25% and 200% when using the DF).
1. Set the originals.
2. Touch the “ZOOM” key.
The zoom mode set-up screen will appear.
3. Touch the “XY ZOOM” key.
4. Touch the upper “+” key or “-” key to set the zoom ratio for the length. Once you touch one
of these keys and thereby highlight the length field, the desired zoom ratio can also be
entered directly using the numeric keys.
* Touch the “100%” key if you want to return the zoom ratio to 100%.
5. Touch the lower “+” key or “-” key to set the zoom ratio for the width. Once you touch one
of these keys and thereby highlight the width field, the desired zoom ratio can also be
entered directly using the numeric keys.
* Touch the “100%” key if you want to return the zoom ratio to 100%.
6. Touch the “END” key.
The touch panel will return to the basic screen and the selected zoom ratios for both the
length and width will be displayed.
* Touch the desired paper size key if you want to change the currently selected paper size.
4-6
4-5
(3) Two-sided copying from various originals [Two-sided copy mode]
Two-sided copies can be made from various types of originals, such as two-page [open-face]
originals and one-sided originals.
POINT OF INFORMATION
The paper size that can be used in this mode is limited to sizes between A3 and A5R.
● Two-sided copying from two-sided originals
Two-sided (front and back) originals are used to produce two-sided copies that look the same
as the originals.
Page 33

Section 4 BASIC OPERATION
● Two-sided copying from two-page [open-face] originals Each page of two-page [open-face] originals, such as magazines and books, is copied on separate sides of the copy paper with a single press of the Start key. In this operation it is necessary to specify the binding orientation of the originals:
1 LEFT: The left page of the originals is copied first followed by the right page.
2 RIGHT: The right page of the originals is copied first followed by the left page.
POINT OF INFORMATION
The size of originals that can be used in this mode is limited to A3, A4R and A5R.
● Two-sided copying from one-sided originals The images from one-sided originals are copied onto both sides (front and back) of the copy paper. When there is an odd number of originals, the back side of the last copy will be blank.
* It is also possible to have the image on the back side of the copy rotated 180 degrees.
1 LEFT: The image will be copied in its current direction.
2 TOP: The image will be rotated 180 degrees and copied. Thus, if the finished copies are
1. Set the originals.
2. Touch the “DUPLEX” key.
then bound at the top edge of the copy set, all of the images can be viewed in the
same direction when the pages are opened, just as they are on a wall calendar.
The two-sided copy set-up screen will appear.
* The same screen will also appear if you touch the “DUPLEX” key on the function select
screen.
3. Specify the type of the originals that are being used.
If you selected “DUPLEX”, the touch panel will return to the basic screen.
If you selected “BOOK”, go to the next step.
If you selected “1-SIDED”, go to step 5.
4-7
4-6
Page 34

Section 4 BASIC OPERATION
4. Specify the binding orientation of the originals.
The touch panel will return to the basic screen.
5. Select the direction of copying that you want for the back side of the copies.
The touch panel will return to the basic screen.
(4) Interrupt copying
The interrupt copying function is useful when you want to make copies from new originals
and at different settings when another copying operation is already in progress. If you want to
make copies from originals that were registered using the job reservation function, you can
use the copy modes, etc., that were already selected for that job. Once the interrupt copying
job is finished, the operation that was interrupted will resume at the same settings it was
using before the interruption.
1. Press the Interrupt key. The Interrupt indicator will blink.
4-8
4-7
* If there are any originals that were registered using the job reservation function, “SELECT
INTERRUPT MODE” will be displayed. If you want to make copies from those registered
originals, touch the “PRIORITY OUTPUT” key and go to step 5. If you want to make copies
from different originals, touch the “INTERRUPT COPY” key and go to the next step.
Page 35

Section 4 BASIC OPERATION
2. Wait until “INTERRUPT MODE.” is displayed and the Interrupt indicator lights continuously.
3. Remove the originals that were being copied and put them aside, then set the new originals and perform the desired copy procedure.
4. Once copying is finished, press the Interrupt key once again and replace the newly copied
originals with the ones you removed. Then press the Start key to resume the interrupted
copy job.
5. A list of originals that were registered using the job reservation function will appear. Select
the originals that you want to copy.
* If you want to check the information regarding those originals, touch the “RECALL” key.
6. Touch the “START” key to begin copying the registered originals.
* Once copying of the selected originals is finished, the interrupted copy job will be
resumed automatically,
(5) Rotate copy
When the orientation of the originals is different than that of the paper loaded in the drawers,
the image will be turned 90 degrees counterclockwise for copying. No special setting is
required to use this function.
POINT OF INFORMATION
The size of paper that can be used in this mode is limited to A4, A5 and A6.
(6) Before you make a large number of copies at one time [Test copying]
Use this procedure to carry out a test print and check whether or not the current settings are
appropriate before you make a large number of copies. Even you make a test copy, the full
number of copies that was originally selected will be madeafter that. It is also possible to
change the settings before making the actual copies.
1. Press the Proof Copy key to light the Proof Copy indicator.
4-9
4-8
Page 36

Section 4 BASIC OPERATION
2. Select the desired copy modes and settings on the operation panel.
3. Set the originals that you want to copy and press the Start key. The test copy will be printed
out.
4. Once the test copy has been made, a screen will be displayed that will let you select how
you want the copies to be finished. Change any of the settings as desired.
* If you want to cancel the copy operation, touch the “CANCEL” key.
5. Touch the “END” key to make the full number of copies that you selected.
(7) Recall mode
Once the copy mode is selected, the “RECALL” key will be displayed on the basic screen.
Touch the “RECALL” key if you want to check and/or change any of the current settings.
* Once you are finished checking the settings, touch the “CHECK” key and the touch panel
will return to the basic screen.
* If you want to change any of the settings, touch the corresponding function key on the touch
panel and then touch the “CHANGE” key after that. The function select screen will appear.
Change the desired settings by following the appropriate procedure for that function.
4-10
4-9
(8) Change settings function
The “PAUSE” key will be displayed on the basic screen during copying. Touch the “PAUSE”
key if you want to suspend copying in order to change the number of copies. (Only available
in the Sort mode.)
* If the copier is equipped with the optional Finisher, it is also possible to change the Staple-
Sort mode and the Hole Punch mode settings as well. If the copier is equipped with the
optional Booklet Stitcher, it is the Staple-Sort mode settings that can also be changed.
1. Touch the “PAUSE” key.
The copy operation will be suspended and the change setting screen will appear on the
touch panel.
Page 37

Section 4 BASIC OPERATION
2. Change the number of copies by touching the “+” key or “-” key.
* If the copier is equipped with the optional Finisher, it is also possible to change the
Staple-Sort mode and the Hole Punch mode settings as well. If the copier is equipped
with the optional Booklet Stitcher, it is the Staple-Sort mode settings that can also be
changed.
3. Touch the “END” key to resume copying.
* The copy job will be resumed from the point it was suspended using the newly selected
settings.
(9) Energy-saving (auto preheat) function
This function allows you to save energy by simply pressing the Energy Saver key and shutting down the copier, even though the main switch is still turned ON. When the auto preheat
function is engaged, the Energy Saver indicator will be the only lit indication on the operation
panel.
* To resume copying after the auto preheat function has engaged, press the Energy Saver
key once again. The time for recovery from this energy-saving state is 30 seconds or below.
* It is also possible to set the auto preheat function to engage automatically if the copier is not
used for a certain period of time. (See “7 Auto preheat time” on page 8-11.)
(10) Auto shut-off function
This function automatically turns the main switch OFF (O) if the copier is not used for a
designated period of time (between 15 and back 240 minutes). To make copies again, turn
the main switch ON ( | ).
● More about the auto shut-off function
The auto shut-off function is an energy-saving function that automatically turns the main
switch OFF (O) if a designated amount of time elapses without the copier being used.
Copiers generally spend more time in a standby mode than they do in actual copying operation, and the amount of power consumed in this standby mode is a large part of the overall
power consumption of the copier. Having the copier turned OFF automatically will reduce
unnecessary power consumption while it is in this standby mode, as well as if it is left on at
night, thereby resulting in a reduction in power costs.
* To change the amount of time that will elapse before the auto shut-off function engages, see
“8 Auto shut-off time” on page 8-11. To deactivate the auto shut-off function, see “0 Auto
shut-off ON/OFF” on page 8-11.
4-11
4-10
Page 38

6-1
Page 39

Section 5 OTHER CONVENIENT FUNCTIONS
Section 5 OTHER CONVENIENT FUNCTIONS
(1) Making a margin space in the copies for binding, etc. [Margin mode]
● Left margin
The image of the original will be shifted to the right in order to make a margin for binding on
the left side of the copy paper. The margin width can be set between 6 mm and 18 mm in
1 mm increments.
POINT OF INFORMATION
If you select to make a left margin when you are making two-sided copies, a right margin – of
the same width as you select for the front side – will automatically be set for the back side.
● Top margin The image of the original will be shifted downward in order to make a margin for binding on the top side of the copy paper. The margin width can be set between 6 mm and 18 mm in 1 mm increments.
● Front & back margin When you are making two-sided copies, the margin positions and margin width can be selected separately for the front and back sides of the copies. The margin width can be set between 1 mm and 18 mm in 1 mm increments. * In order to set the front and back margins separately, it is necessary in advance to select
“ON” under “$ Front & back margin key ON/OFF” on page 8-16.
* The margin position that is available for the back side will differ depending upon the margin position that is selected for the front side.
The circle (“❍”) indicates the possible settings.
Back side
Front side
“LEFT M.”
“RIGHT”
“TOP M.”
“LEFT M.” “RIGHT” “TOP M.” “BOTTOM” “NO”
❍
❍
❍
❍
❍
❍
❍
❍❍
“NO MARGIN”
5-1
“BOTTOM”
❍
❍
❍
❍
❍
❍
Page 40

Section 5 OTHER CONVENIENT FUNCTIONS
1. Set the originals.
POINT OF INFORMATION
When you set the originals be sure that their top (or left) side is set towards the rear of the DF
or the platen. If you do not set the originals in the proper direction, the margin may be created
in the wrong location.
2. Touch the “FUNCTION” key.
The function select screen will appear.
3. T ouch the “MARGIN” key . (If that key is not displayed, touch the “▼” key or the “▲” key until
it is displayed.)
The margin copy set-up screen will appear.
If you want to select a left or top margin, go to the next step.
If you want to select both a front and back margin, go to step 6.
4. If you want to change the width of the margin, touch the “+” key or the “-” key until the
desired width is displayed.
The margin width can be set between 6 mm and 18 mm in 1 mm increments.
* The previously selected value is set as the default for the margin width. Change this
setting as desired.
* If you do not want to change the current margin width, go to the next step.
5. Select the margin position that you want by touching either the “LEFT MARG.” or “TOP
MARGIN” key. The touch panel will return to the basic screen.
6. To change the settings for the front and back margins, touch the “CHANGE #” key and go
to the next step.
Otherwise, touch the “F&B MARGIN” key. The touch panel will return to the basic screen.
* The previously selected values are set as the default for the front and back margins.
Change these settings as desired.
5-2
Page 41

Section 5 OTHER CONVENIENT FUNCTIONS
7. Select the margin width that you want for the front side by touching the “+” key or the “-”
key under the “Margin” field until the desired width is displayed.
The margin width can be set between 1 mm and 18 mm in 1 mm increments.
* If you do not want to change the current margin width, go to the next step.
8. Select the margin position that you want for the front side.
The margin position can be set to “LEFT M.”, “RIGHT”, “TOP M.” or “BOTTOM”.
If you do not want to make a margin on the front side, touch the “NO MARGIN” key.
9. Select the margin width that you want for the back side by touching the “+” key or the “-”
key under the “MARGIN W.” field until the desired width is displayed.
The margin width can be set between 1 mm and 18 mm in 1 mm increments.
* If you do not want to change the current margin width, go to the next step.
10. Select the margin position that you want for the back side.
If you do not want to make a margin on the back side, touch the “NO” key. The margin
position that is available for the back side will differ depending upon the margin position
that is selected for the front side.
Once the settings are finished, the touch panel will return to the basic screen and copying
will be possible.
(2) Printing page numbers on the copies [Print page numbers]
This function can be used to assign page numbers in sequence from the top original first
whenever you make copies from multiple originals.
There are three types of numbering styles: “-1-”, “P.1” and “1/5”.
* If you select “1/5”, the actual number of total pages will be displayed in the denominator (in
place of the “5”).
* It is possible to select the location on the copies where you want the page numbers to be
printed. (The arrow in the illustration indicates the direction that the originals are being fed.)
1 LONG EDGE: The page number will be printed in the middle of the long edge of the copy .
2 SHORT EDGE: The page number will be printed in the middle of the short edge of the
copy.
5-3
1. Set the originals.
2. Touch the “FUNCTION” key.
The function select screen will appear.
Page 42

Section 5 OTHER CONVENIENT FUNCTIONS
3. Touch the “PAGE #” key. (If that key is not displayed, touch the “▼” key or the “▲” key until
it is displayed.)
The print page number set-up screen will appear.
4. If you want to change which sheet the page numbering will start from, touch the “+” key or
the “-” key under the “1ST PAGE” field.
You can select the page numbers to start from any sheet between “-10” and “999”.
* It is not possible to select “0”.
POINT OF INFORMATION
• If you enter a minus (-) figure, it will mean that the printing of page numbers will not begin
until that number of originals have been copied. In other words, after the number of originals that is designated (with the minus number) are finished being copied, the page number on the copies that are made from the next original will be shown as page one. For
example, when you want the copies for the third original to be designated as page one,
enter “-2” under the “1ST PAGE” field.
• In order to have the first original designated as a page number other than one, enter the
number (a positive number) that you want to use. For example, when you want the copies
for the first original to be designated as page three, enter “3” under the “1ST PAGE” field.
5. Select the numbering style that you want to use from among “-1-”, “P.1” and “1/5”.
If you selected “-1-” or “P.1”, go to step 8.
If you selected “1/5”, go to the next step.
6. Touch the “+” key or the “-” key under the “LAST PAGE” field in order to enter the total
number of originals being copied. (You can select any number between “1” and “999”.)
* If you want the copier to automatically count the total number of pages when the originals
are scanned and set the number in the “LAST P AGE” field as well, touch the “AUTO” key .
7. Touch the “ENTER” key.
8. Select the location on the copies where you want the page numbers to be printed.
The touch panel will return to the basic screen.
5-4
Page 43

Section 5 OTHER CONVENIENT FUNCTIONS
(3) Copying each side of two-page [open-face] originals onto separate sheets [Page
separation mode]
● Page separation from two-page [open-face] originals Two-page originals, such as magazines and books or the like, are copied onto two separate sheets of paper.
POINT OF INFORMATION
• The size of originals that can be used in this mode is limited to A3, A4R or A5 and the paper
size is normally limited to A4. However , another paper size may be used if you select a copy
magnification ratio that is appropriate to fit that specific size.
• In this operation it is necessary to specify the binding orientation of the originals:
1 LEFT: The left page of the originals is copied first followed by the right page.
2 RIGHT: The right page of the originals is copied first followed by the left page.
● Page separation from two-sided originals
Each side of two-sided originals is copied onto separate sheets of paper.
1. Set the originals.
POINT OF INFORMATION
• When setting a two-page [open-face] original, set it as shown in the illustration.
• Two-sided originals must be copied using the DF.
2. Touch the “FUNCTION” key.
The function select screen will appear.
5-5
3. T ouch the “DUPLEX” key . (If that key is not displayed, touch the “▼” key or the “▲” key until
it is displayed.)
The page separation set-up screen will appear.
Page 44

Section 5 OTHER CONVENIENT FUNCTIONS
4. Specify the type of the originals that are being used by touching either the “DUPLEX” or
“BOOK” key.
If you selected “BOOK”, go to the next step.
If you selected “DUPLEX”, the touch panel will return to the basic screen.
5. Specify the binding orientation of the originals by touching either the “LEFT” or “RIGHT”
key. The touch panel will return to the basic screen.
(4) Erasing the edges around copies from books, etc. [Border erase mode]
● Erasing blemishes from the edges of copies (Sheet)
Use to erase shadows, lines, etc., which occur around the edges of copies made from sheet
originals.
(The a in the illustration indicates the width of the border that will be erased.)
● Erasing blemishes from the edges and middle of copies (Book)
Use for making neat copies from thick books, etc.
(The a in the illustration indicates the width of the border that will be erased.)
● Selecting the area to be erased (Custom)
For making neat, blemish-free copies from originals of non-standard sizes, i.e. sizes other
than A4 etc. (The a in the illustration indicates the width of the border that will be erased)
In this case, however, the size of the originals that you will use must be registered in advance. (See “# Custom border erase size” on page 8-16.)
POINT OF INFORMATION
The illustration indicates how the copies will be finished when the originals are set in the DF .
When setting originals on the platen, the border area will be based on the left rear position of
5-6
Page 45

Section 5 OTHER CONVENIENT FUNCTIONS
1. Set the originals.
* When using a book as the original, set it on the platen as shown in the illustration.
2. Touch the “FUNCTION” key.
The function select screen will appear.
3. Touch the “BORDER” key. (If that key is not displayed, touch the “▼” key or the “▲” key
until it is displayed.)
The border erase set-up screen will appear.
4. If you want to change the width of the border that will be erased under “SHEET” or “BOOK”,
touch the “+” key or the “-” key. The border width can be set to 6 mm, 12 mm or 18 mm.
* In order to use the “CUSTOM” key with non-standard paper sizes, the size of the origi-
nals that you will use must be registered in advance. (See “# Custom border erase size”
on page 8-16.)
5. Specify the type of the originals that are being used by touching either the “SHEET”,
“BOOK” or “CUSTOM” key .
The touch panel will return to the basic screen.
5-7
(5) Adding covers for or insert sheets between copies [Sheet copy mode]
The sheet copy mode has three submodes: cover, insert and chapter.
Page 46

Section 5 OTHER CONVENIENT FUNCTIONS
1 Submodes
● Cover mode Special paper that is set in the stack bypass tray is fed as a front cover, or as both a front and back cover, to the copy sets. With this mode, you can select whether you want both sides or only one side of the front cover to be copied onto, or to have it left completely blank. Select also whether or not you want the back cover to be copied onto as well. * See the following table for the combination of available settings and styles of finished copy sets.
“BACK”
“FRONT”
“2-SIDED”
*1
“FRONT”
*1
“BLANK”
*2
* 1: An example of two-sided copying is illustrated.
* 2: An example of one-sided copying is illustrated.
“FRONT”
“BLANK”
“NO”
● Insert mode Special paper can be inserted at specified locations among copies made from multiple originals. Y ou can also select whether or not you want the insert sheets themselves to be copied onto.
* The drawer in which the insert sheets will be loaded must be selected in advance. (See “% Drawer for insert sheets” on page 8-16.)
* The available settings will differ depending upon the type of originals being used and type of copies that you want to make.
The circle (“❍”) indicates the possible settings.
“FR./BACK COPY” “FRONT COPY” “FR./BACK BLANK”
“1-SIDED”
copy
“DUPLEX”
copy
“SPLIT”
copy
“1-SIDED”
original
“DUPLEX”
original
“1-SIDED”
original
“DUPLEX”
original
❍
❍
❍
❍
❍
❍
❍
❍
❍
❍
5-8
Page 47

Section 5 OTHER CONVENIENT FUNCTIONS
• When copying onto both the front and back side of the insert sheets
* The illustration shows an example of two-sided copying.
• When copying only onto the front side of the insert sheets
* The illustration shows an example of two-sided copying.
• When leaving both the front and back side of the insert sheets blank
* The illustration shows an example of two-sided copying.
● Chapter mode
Special paper can be specified as pages that will designate chapters when you make twosided copies from either one-sided or two-sided originals, and only the front side of these
sheets will be copied onto.
Only the front side of these specified sheets will be copied onto even if the designated page
number is an even number.
5-9
Page 48

Section 5 OTHER CONVENIENT FUNCTIONS
2 Combining modes The available mode combinations will differ depending upon the type of originals being used and type of copies that you want to make. See the following table. The circle (“❍”) indicates the possible combinations.
“1-SIDED”copy
“DUPLEX”
copy
“SPLIT”
copy
“DUPLEX”
original
“BOOK”
original
“1-SIDED”
original
“DUPLEX”
original
“BOOK”
original
“COVER” “INSERT” “CHAPTER”
❍
❍
❍
❍
❍
❍
❍
❍❍
❍
❍
“COVER+
INSERT”
❍
❍
❍
❍
“COVER+
CHAPTER”
“INSERT+
CHAPTER”
“COVER+
INSERT+
CHAPTER”
❍❍ ❍
POINT OF INFORMATION
• If you combine the cover and insert modes when making two-sided copies, the available location for insert sheets may be limited only to even or odd
page numbers depending on the type of cover mode that you select.
• If you combine the insert and chapter modes, the settings you make will affect the same page. It is not possible to specify locations for insert sheets
and chapter pages separately.
3 Making copies with the sheet copy mode
1. Touch the “FUNCTION” key.
The function select screen will appear.
2. T ouch the “INSER T” key . (If that key is not displayed, touch the “▼” key or the “▲” key until
it is displayed.)
The sheet copy mode set-up screen will appear.
3. Select the type of finished copies that you want to make by touching either the “DUPLEX”,
“SPLIT” or “1-SIDED” key.
* If you selected “DUPLEX”, go to the next step.
If you selected “SPLIT”, go to step 6.
If you selected “1-SIDED”, go to step 8.
5-10
Page 49

Section 5 OTHER CONVENIENT FUNCTIONS
4. Specify the type of the originals that are being used by touching either the “DUPLEX”,
“BOOK” or “1-SIDED” key.
* If you selected “DUPLEX”, go to step 8.
If you selected “BOOK”, go to step 7.
If you selected “1-SIDED”, go to the next step.
5. Select the direction of copying that you want for the back side of the copies. Then go to
step 8.
LEFT: The image will be copied in its current direction.
TOP: The image will be rotated 180 degrees and copied. Thus, if the finished copies are
then bound at the top edge of the copy set, all of the images can be viewed in the same
direction when the pages are opened, just as they are on a wall calendar.
6. Specify the type of the originals that are being used by touching either the “DUPLEX” or
“BOOK” key.
* If you selected “DUPLEX”, go to step 8.
If you selected “BOOK”, go to the next step.
7. Specify the binding orientation of the originals. Then go to the next step.
LEFT: The left page of the originals is copied first followed by the right page.
RIGHT: The right page of the originals is copied first followed by the left page.
5-11
* Once the copy mode setting is finished, the touch panel will switch back to the sheet copy
mode set-up screen. Make the settings that you want for the desired mode by following the
appropriate procedure for that mode.
* It is also possible to combine different modes. (See “2 Combining modes” on page 5-10.)
Page 50

Section 5 OTHER CONVENIENT FUNCTIONS
● Cover mode settings
8. Touch the “COVER” key, if you want to use the cover mode. If not, go to step 12.
* The “CHAPTER” key will only be displayed if you are making two-sided copies from one-
sided originals.
9. Select how you want the front cover to be finished by touching either the “DUPLEX”,
“FRONT” (copy only on the front side) or “BLANK” key.
* If you selected “SPLIT” or “1-SIDED” in step 3 as the type of finished copies that you want
to make, “DUPLEX” will not be available for selection.
10. Touch the “BACK” key.
11. Select how you want the back cover to be finished by touching either the “FRONT” (copy
only on the front side), “BLANK” or “NO” (no back cover at all) key.
* If you do not want to use any other modes, go to step 19.
● Insert mode settings
12. Touch the “INSERT” key, if you want to use the insert mode. If not, go to step 14.
13. Select how you want the inserts sheet to be finished by touching either the “FR./BACK
COPY”, “FRONT COPY” or “FR./BACK BLANK” key.
* If you do not want to use any other modes, go to step 15.
● Chapter mode settings
14. Touch the “CHAPTER” key, if you want to use the chapter mode. If not, go to step 12.
Then go to the next step.
● Selecting the location for insert sheets & chapter pages
* First check each of the settings you have made. The specified page locations may be
deleted if any settings are changed after the pages are specified.
15. Touch the “ENTER” key.
The screen that will allow you to specify the desired page location will appear.
5-12
Page 51

Section 5 OTHER CONVENIENT FUNCTIONS
16. Use the numeric keys to enter the page number where you want the insert sheet or
chapter page to be inserted.
17. Touch the “CFM. PG” key.
* If you want to add more than one insert sheet or chapter page, repeat steps 16 and 17.
The screen will show 15 locations at a time. To check your settings for more than 15
locations, touch the “NEXT” key or the “PREVIOUS” key to switch between screens.
* If you want to change any of the specified page numbers, simply touch that page num-
ber directly, and repeat steps 16 and 17.
POINT OF INFORMATION
• If you combine the insert and chapter modes, the settings you make will affect the same
page. It is not possible to specify locations for insert sheets and chapter pages separately.
• If you use the insert mode or chapter mode when making two-sided copies from two-sided
originals, enter the actual page number of the original not the number of the sheet. In other
words, calculate each two-sided original as 2 individual pages when entering the page
number.
18. Once you are finished entering page numbers, touch the “ENTER” key.
* If you want to perform the procedure to register the page numbers over again, touch the
“PAGE ENTRY” key and follow the procedure in steps 16 and 17.
19. Check all of your settings and then touch the “ENTER” key.
The touch panel will return to the basic screen.
5-13
(6) Making handout materials together with Transparencies
[Presentation mode]
This mode combines the transparency + backing sheet mode (see page 5-16) with the
creation of multiple copy sets onto standard paper, and is convenient for preparing materials
for handout during presentations which use transparencies.
● Presentation mode (copying onto the backing sheet)
After copying onto the transparency (with copying onto the backing sheets, see page 5-16),
the same original is copied onto a specified number of sheets of standard paper.
Page separation copying from two-page [open-face] originals can be used in combination
with this mode. (The asterisks in the illustration indicate the transparencies.)
Page 52

Section 5 OTHER CONVENIENT FUNCTIONS
● Presentation mode (leaving the backing sheet blank) After copying onto the transparency (with the backing sheets left blank, see page 5-16), the same original is copied onto a specified number of sheets of standard paper. Page separation copying from two-page [open-face] originals can be used in combination with this mode. (The asterisks in the illustration indicate the transparencies.)
1. Set the transparencies in the stack bypass tray.
POINT OF INFORMATION
• Fan out the transparencies at least once before setting them.
• Up to 25 transparencies can be loaded into the stack bypass tray at one time.
• Make sure that paper of the same size as the transparencies is loaded in one of the drawers
or decks.
2. Set the originals.
3. Touch the “FUNCTION” key.
The function select screen will appear.
4. Touch the “HAND-OUT” key. (If that key is not displayed, touch the “▼” key or the “▲” key
until it is displayed.)
The presentation mode set-up screen will appear.
5-14
Page 53

Section 5 OTHER CONVENIENT FUNCTIONS
5. Touch the “COPIED” key if you want to copy onto the backing sheets, and touch the
“BLANK” key if you want to leave the backing sheets blank.
6. Select the type of finished copies that you want to make by touching either the “DUPLEX”,
“SPLIT” or “1-SIDED” key.
* If you selected “DUPLEX”, go to the next step.
If you selected “SPLIT”, go to step 10.
If you selected “1-SIDED”, the touch panel will return to the basic screen. In this case, go
to step 12.
7. Specify the type of the originals that are being used by touching either the “DUPLEX”,
“BOOK” or “1-SIDED” key.
* If you selected “DUPLEX”, the touch panel will return to the basic screen. In this case, go
to step 12.
If you selected “BOOK”, go to the next step.
If you selected “1-SIDED”, go to step 9.
8. Specify the binding orientation of the originals.
LEFT: The left page of the originals is copied first followed by the right page.
RIGHT: The right page of the originals is copied first followed by the left page.
The touch panel will return to the basic screen. Go to step 12.
5-15
9. Select the direction of copying that you want for the back side of the copies.
LEFT: The image will be copied in its current direction.
TOP: The image will be rotated 180 degrees and copied.
The touch panel will return to the basic screen. Go to step 12.
Page 54

Section 5 OTHER CONVENIENT FUNCTIONS
10. Specify the type of the originals that are being used by touching either the “DUPLEX” or
“BOOK” key.
* If you selected “DUPLEX”, the touch panel will return to the basic screen. In this case,
go to step 12.
If you selected “BOOK”, go to the next step.
11. Specify the binding orientation of the originals.
LEFT: The left page of the originals is copied first followed by the right page.
RIGHT: The right page of the originals is copied first followed by the left page.
The touch panel will return to the basic screen.
12. Use the numeric keys to enter the number of copies per original that you want to make
onto standard paper.
* The copies of the transparencies and their backing sheets will be ejected first, and the
copies made on standard paper will then be ejected afterward.
POINT OF INFORMATION
If the copier is equipped with the optional Finisher, the transparencies and their backing
sheets will first be ejected onto the Non-sort tray, and the standard paper copies will then be
ejected onto the Sort tray. If the copier is equipped with the optional Booklet Stitcher, all
copies will be ejected onto tray 1.
(7) Feeding paper as a backing sheet for transparencies [Transparency + backing sheet
modes]
When 2 or 3 transparencies are stacked on top of one another, static electricity can cause
problems. This mode automatically places a backing sheet between the transparencies
during copying. It is possible to copy onto the backing sheet from the same original as well as
to make multiple copies.
POINT OF INFORMATION
• Transparencies must be fed from the stack bypass tray.
• When you use the transparency + backing sheet mode, copies will be ejected face up. If the
originals are set in the DF, copying will be performed from the last page first after all of the
originals have been stored in memory.
• If the copier is equipped with the optional Finisher, the copies will be ejected face up into the
Sort tray. If the copier is equipped with the optional Booklet Stitcher, all copies will be
ejected onto tray 1.
● Copying onto the backing sheet
The originals will be copied onto the transparencies and then the same originals will be
copied onto the backing sheets as well. (The asterisks in the illustration indicate the transparencies.)
● Leaving the backing sheet blank
The originals will be copied onto the transparencies and the backing sheet will be left blank.
(The asterisks in the illustration indicate the transparencies.)
5-16
Page 55

Section 5 OTHER CONVENIENT FUNCTIONS
1. Set the transparencies in the stack bypass tray.
POINT OF INFORMATION
• Fan out the transparencies at least once before setting them.
• Up to 25 transparencies can be loaded into the stack bypass tray at one time.
• Make sure that paper of the same size as the transparencies is loaded in one of the drawers
or decks.
2. Set the originals.
3. Touch the “FUNCTION” key.
The function select screen will appear.
4. Touch the “TRANS + BACK” key. (If that key is not displayed, touch the “▼” key or the “▲”
key until it is displayed.)
The transparency backing mode set-up screen will appear.
5-17
5. Touch the “COPIED” key if you want to copy onto the backing sheet, and the “BLANK” key
if you do not want to copy onto the backing sheet.
Page 56

Section 5 OTHER CONVENIENT FUNCTIONS
6. Specify the type of the originals that are being used by touching either the “DUPLEX” or
“1-SIDED” key.
The touch panel will return to the basic screen.
(8) Overlaying images [Form overlay]
This mode can be used to read the first original into memory and have its image overlaid onto
copies made from subsequent originals. It is also possible to register and store in memory, in
advance, the images that you want to use as an overlay. The shading level of the overlay
image can be adjusted as well.
* See “(1) Registering an image for form overlay” on page 7-1 for the procedure to register
images.
1. Touch the “FUNCTION” key.
The function select screen will appear.
2. Touch the “OVERLAY” key. (If that key is not displayed, touch the “▼” key or the “▲” key
until it is displayed.)
The form overlay mode set-up screen will appear.
3. Touch the key that corresponds to the level of shading that you want to use for the overlay
image.
The shading level can be set to any 10% increment between 10% and 100%.
4. If you want to use a previously registered image, select the “LOADING FORM” check box
and touch the “ENTER” key.
If you want to scan in a new image, make sure that the check box remains unchecked.
* If you left the check box unselected, go to the next step.
To select a previously registered image, go to step 6.
5. Set the original that you want to use as an overlay and press the Start key. Then go to
step 7.
5-18
Page 57

Section 5 OTHER CONVENIENT FUNCTIONS
6. A list of registered images will appear. Select the image and touch the “ENTER” key.
* If the image that you want to use is not displayed, touch the “▼” key or the “▲” key until
it is displayed.
7. Set the originals that you want to copy and press the Start key.
Copying will begin.
(9) Copying the images from either two or four originals onto a single copy sheet
[Combine copy]
This mode can be used to reduce the images from either 2 or 4 separate originals and
combine them onto a single copy.
The borderline of each original can also be indicated with a dotted line, a solid line or registration marks.
POINT OF INFORMATION
Both the originals and the copy paper must be of standard paper sizes.
1 Combination styles
● 2 in 1
Use this mode to copy two originals onto one sheet. This mode can also be used together
with the two-sided copy mode to copy four originals onto one two-sided copy.
(When setting originals on the platen, set them in the normal first-second order.)
* The actual “2-IN-1” mode that you should use depends on the orientation in which the
originals are set.
5-19
● 4 in 1
Use this mode to copy four originals onto one sheet. This mode can also be used together
with the two-sided copy mode to copy eight originals onto one two-sided copy.
(When setting originals on the platen, set them in the normal first-through-fourth order.)
* The actual “4-IN-1” mode that you should use depends on the orientation in which the
originals are set.
Page 58

Section 5 OTHER CONVENIENT FUNCTIONS
2 Borderline indication A DOTTED
The borderline of the originals will be indicated by a dotted line.
B SOLID
The borderline of the originals will be indicated by a solid line.
C CROPMRK
The borderline of the originals will be indicated by registration marks.
1. Touch the “FUNCTION” key.
The function select screen will appear.
2. Touch the “MERGE COPY” key. (If that key is not displayed, touch the “▼” key or the “▲”
key until it is displayed.)
The combine originals mode set-up screen will appear.
11
1
11
22
2
22
33
3
33
44
4
44
3. Select the combination style that you want to use by touching the “2-IN-1” key or the “4-IN1” key.
POINT OF INFORMATION
• The mode that you should use depends on the orientation in which the originals are set:
Depending upon the key that was touched during selection of the combination style in the
panel at left, the originals must be set as shown to the illustrations below.
If you selected “1” or “4”…
If you selected “2” or “3”…
4. Select the type of borderline that you want by touching either the “DOTTED”, “SOLID” or
“CROPMRK” key. If you do not want a borderline on the copies, touch the “NONE” key.
5. Specify the type of the originals that are being used by touching either the “DUPLEX” or
“1-SIDED” key.
* If you selected “DUPLEX”, go to the next step.
If you selected “1-SIDED”, the touch panel will return to the basic screen. In this case, go
to step 7.
5-20
Page 59

Section 5 OTHER CONVENIENT FUNCTIONS
6. Select the type of finished copies that you want to make by touching either the “DUPLEX”
or “1-SIDED” key. The touch panel will return to the basic screen.
* When selecting “DUPLEX” copies, choose between the left “DUPLEX” key for normal
copying (like in a bound book) and the right “DUPLEX” key for rotating the copying direction on the back side of the copies (like on a calendar).
7. Set the originals.
* When setting originals on the platen, make sure that you set them in the correct order.
(See page 5-19.)
8. Touch the paper size key that corresponds to the paper that you want to copy onto.
9. Press the Start key.
(10) Making a booklet (sheet originals) [Booklet copy]
This mode can be used to copy one-sided or two-sided originals onto two-page [open-face],
two-sided copies in such a way that the finished copies can be stacked and folded into a
booklet format.
POINT OF INFORMATION
The size of originals that can be used in this mode is limited to A4 and the paper size is
limited to A3 or A4R.
1 Right-side binding orientation
The order of copying will be performed so that the stacked and folded pages of the
finished copies will read from right to left.
5-21
2 Left-side binding orientation
The order of copying will be performed so that the stacked and folded pages of the
finished copies will read from left to right.
Page 60

Section 5 OTHER CONVENIENT FUNCTIONS
1. Touch the “FUNCTION” key.
The function select screen will appear.
2. Touch the “BOOKLET” key. (If that key is not displayed, touch the “▼” key or the “▲” key
until it is displayed.)
The booklet mode set-up screen will appear.
3. Specify the type of the originals that are being used by touching either the “DUPLEX” or
“1-SIDED” key.
4. Select the binding orientation that you want for the finished copies by touching either the
“LEFT” or “RIGHT” key.
* If the copier is equipped with the optional Booklet Stitcher and more than one set of
copies is to be stapled, select the finishing settings that you want to use as well.
5. Set the originals.
* When setting the originals on the platen, start with the first page.
6. Press the Start key.
(11) Making a booklet (two-page [open-face] originals) [Booklet + cover copy mode]
This mode can be used to have covers, either blank or with an image copied onto the front
cover, included on the copy sets so that they can be bound in a booklet format.
POINT OF INFORMATION
The size of originals and the copy paper that can be used in this mode is limited to A3 or A4R.
5-22
Page 61

Section 5 OTHER CONVENIENT FUNCTIONS
● Copy onto the cover
If the original that will be copied onto the front cover is scanned in first, the paper onto which
it is copied will be in the front cover position after the copies are finished and folded in the
center.
● Do not copy onto the cover
When the finished copies are folded in the center, both the front and back covers will be
blank.
1. Touch the “FUNCTION” key.
The function select screen will appear.
2. Touch the “BOOK-BOOK” key. (If that key is not displayed, touch the “▼” key or the “▲”
key until it is displayed.)
The Book-Book mode set-up screen will appear.
3. Select the binding orientation that you want for the finished copies by touching either the
“LEFT” or “RIGHT” key.
5-23
4. Select whether or not you want to copy onto the front cover.
* If the copier is equipped with the optional Booklet Stitcher, select the finishing settings
that you want to use as well.
Page 62

Section 5 OTHER CONVENIENT FUNCTIONS
5. Set the original in a spread out position.
* The originals can also be set in the DF. Be sure to set the original that will be copied onto
the front cover first.
6. Press the Start key. The original will be scanned into memory.
* If you set the first original on the platen, go to the next step.
* If you use the DF, all of the originals will be scanned and copying will be carried out
automatically.
7. Once the first original is completely scanned, set the next original and touch
the “CONTINUE” key.
* Repeat this operation for all of the originals.
8. When all of the originals are completely scanned, touch the “TO PRINT” key. Copying will
begin. After copying is finished, the touch panel will return to the basic screen.
(12) Copying and binding into a booklet (sheet originals) [Binding mode]
This mode can be used to copy one-sided or two-sided originals onto two-page [open-face],
two-sided copies, to add a cover sheet and then staple the arranged copies into a booklet
format such as with a weekly magazine or a pamphlet.
POINT OF INFORMATION
• To use this mode, it is necessary to select the drawer or deck from which the cover sheet
will be fed. (See “^ Drawer for cover sheets” on page 8-16.)
• The size of originals that can be used in this mode is limited to A4 and the paper size is
limited to A3 or A4R.
• To use this function, the copier must be equipped with the optional Booklet Stitcher.
• When you want to copy onto the front and the back of the cover sheet…
The first page of the originals is copied onto the front of the front cover and the second page
onto the back (inside) of the front cover. Copies are then made so that the content can be
read sequentially with the pages spread open.
109
2
1
4
3
6
5
87
• When you want to copy only onto the front of the cover sheet…
The first page of the originals is copied onto the front of the front cover and the second page
onto the front of the page that comes after the cover sheet. Copies are then made so that
the content can be read sequentially with the pages spread open.
98
1
3
2
5
4
76
5-24
Page 63

Section 5 OTHER CONVENIENT FUNCTIONS
• When you do not want to copy onto the cover sheet…
The first page of the originals is copied onto the front of the page that comes after the cover
sheet and the second page onto the back of that page. Copies are then made so that the
content can be read sequentially with the pages spread open.
87
65
2
1
4
3
1 Right-side binding orientation
The order of copying will be performed so that the stacked and folded pages of the
finished copies will read from right to left.
2 Left-side binding orientation
The order of copying will be performed so that the stacked and folded pages of the
finished copies will read from left to right.
1. Touch the “FUNCTION” key.
The function select screen will appear.
2. T ouch the “STITCHING” key . (If that key is not displayed, touch the “▼” key or the “▲” key
until it is displayed.)
The binding mode set-up screen will appear.
3. Select the front cover copy mode that you want to use by touching either the “DUPLEX”,
“FRONT” or “BLANK” key.
5-25
4. Specify the type of the originals that are being used by touching either the “DUPLEX” or
“1-SIDED” key.
Page 64

Section 5 OTHER CONVENIENT FUNCTIONS
5. Select the binding orientation that you want for the finished copies by touching either the
“LEFT” or “RIGHT” key.
The finishing set-up screen will appear.
6. Set the number of copies that you want to make by touching the “+” key or the “-” key.
7. If you want to bind (staple) the finished copy sets, touch the “STAPLE SORT” key.
8. Once you are finished setting the number of copies and selecting the stapling settings that
you want, touch the “ENTER” key.
9. Set the originals.
* When setting the originals on the platen, start with the first page.
10. Press the Start key.
(13) Inverting black and white [Invert copy mode]
The black and white areas of the image are inverted (reversed) on the copy.
* When multiple inverted copies are made, “PLEASE WAIT. NOW ADDING TONER.” may
appear in the message display.
1. Set the originals.
2. Touch the “FUNCTION” key.
The function select screen will appear.
3. T ouch the “INVERT” key . (If that key is not displayed, touch the “▼” key or the “▲” key until
it is displayed.)
The touch panel will return to the basic screen.
(14) Making mirror-image copies [Mirror image mode]
This mode can be used to make mirror-image copies.
1. Set the originals.
5-26
Page 65

Section 5 OTHER CONVENIENT FUNCTIONS
2. Touch the “FUNCTION” key.
The function select screen will appear.
3. Touch the “MIRROR” key. (If that key is not displayed, touch the “▼” key or the “▲” key
until it is displayed.)
The touch panel will return to the basic screen.
(15) Automated sorting [Sort copy]
Since copying is performed only after scanning multiple originals into memory, sorting of the
required number of copy sets is possible without the optional Finisher or the Booklet Stitcher.
POINT OF INFORMATION (Rotate sort copy)
If “ON” is selected under “& Rotate-sort” on page 8-16 and the size of the copy paper is
A4, the orientation of each ejected copy set will be shifted in order to make it easy to sort the
copies. However, in order to use this setting, there must be A4 size paper loaded both vertically and horizontally in the drawers and/or decks.
1. Set the originals.
2. Press the Sort-Group key to light the Sort indicator.
3. Press the Start key.
* If you set the originals in the DF , scanning will start and copying carried out automatically .
* If you set the first original on the platen, “CONTINUE SCANNING DOCUMENT?” will be
displayed.
4. Set the next original and touch the “CONTINUE” key.
* Repeat this operation for all of the originals.
5. When all of the originals are completely scanned, touch the “TO PRINT” key.
Copying will be performed one set at a time.
5-27
(16) Memorizing frequency used settings [Program mode]
Up to eight combinations of copy mode settings and functions displayed on the operation
panel can be registered as a single program.
1 Registering various settings as an single program
1. Select the copy mode settings and functions that you want to register on the operation
panel and return to the basic screen.
2. Touch the “SPECIAL” key.
The management mode select screen will appear.
3. Touch the “REGISTER” key under “PROGRAM”.
Page 66

Section 5 OTHER CONVENIENT FUNCTIONS
4. Touch the program number (“1” to “8”) that you want to register the settings under.
* If you also want to register a name for that program, touch the “NAME REGISTRATION”
key. (See page 8-29 for the procedure on entering the name.)
5. Touch the “END” key.
The selected copy settings and functions will appear. If you want to check more specific
settings for each copy mode, touch the related function key. Once you are finished checking the settings, touch the “CHECK” key.
6. Touch the “REGISTER” key for final registration of the settings.
The touch panel will return to the basic screen. Copying is now possible using the settings
that are registered under that program number.
2 Copying with a registered program
1. Press the Program key.
The program select screen will appear.
* If “OFF THE PLATEN” is selected under “9 Job programming” on page 8-16 and there
are settings registered under program 1, those copy functions will be automatically displayed. In this case, go to step 4.
* If “REGULAR” is selected under “9 Job programming” on page 8-16, you can select the
program you want from among those registered. In this case, go to the next step.
2. Touch the number that corresponds to the program that you want to use.
3. The copy functions and settings registered under the selected program will be displayed.
Touch the “COPY” key.
The touch panel will return to the basic screen.
4. Set the originals and press the Start key to start copying with the displayed functions and
settings.
5-28
Page 67

6-1
Page 68

Section 6 ADVANCED COPY MODES
Section 6 ADVANCED COPY MODES
(1) Scheduling one copy job during copying of another [Job reservation]
Copy jobs can be scheduled even while another copy job is in progress. Up to 9 different jobs
can be registered (up to 4 of those from your computer). It is also possible to change which
jobs are scheduled and in which order they will be carried out.
1
2
43
● The job reservation screen
1 Job icons: The indicates jobs scheduled from the copier and the indicates jobs
scheduled from your computer.
2 Job number numbers: A job number is assigned (up to 99) to each job in order of registra-
tion. Even if the order is altered or a job is deleted, the job numbers will not change.
Copying will be performed in order, starting the topmost job in the display downward.
3 No. of copies: Indicates the number of originals in the copy job.
4 No. of originals: Indicates the number of copies that will be made.
1 Adding a job
1. Press the Add Job key. A list of the currently reserved jobs will appear. If “ADDITION OF
JOB IS POSSIBLE” appears in the message display, additional jobs can be scheduled.
* To stop job reservation, touch either the “END” or “BACK” key.
2. Touch the “ADD” key.
3. Select the settings and functions that you want to use for that copy job and press the Start
key. Scanning of the originals will start.
4. When all of the originals have been completely scanned, the touch panel will return to the
screen for step 2 .
5. Touch the “END” key. Copying will begin in the order that the job was reserved, once the
previously reserved copy job is finished.
6-2
6-1
Page 69

Section 6 ADVANCED COPY MODES
2 Modifying the settings for a reserved job The finishing settings for a reserved job (the number of copies and the Sortering, Staple and/ or Hole Punch modes) can be changed.
1. Press the Add Job key.
A list of the currently reserved jobs will appear.
2. Select the job that you want to change the settings for.
3. Touch the “MODIFY” key.
4. If you want to change the number of copies, touch the “+” key or the “-” key to select the
desired number.
* If you want to change the finishing settings, touch the “SORT” key to select the desired
mode.
* If the copier is equipped with the optional Finisher, it is also possible to change the
Staple-Sort mode and the Hole Punch mode settings as well. If the copier is equipped
with the optional Booklet Stitcher, it is the Staple-Sort mode settings that can also be
changed.
5. Once you have finished all the desired settings, touch the “END” key. The touch panel will
return to the basic screen.
3 Deleting a reserved job
1. Press the Add Job key.
A list of the currently reserved jobs will appear.
2. Select the job that you want to delete.
3. Touch the “RECALL” key. The details of the settings for that job will be displayed.
Make sure that the displayed copy job is indeed the one that you want to delete.
6-3
6-2
Page 70

Section 6 ADVANCED COPY MODES
4. Touch the “DELETE” key.
5. Touch the “DELETE” key once again. The touch panel will return to the screen for step 2.
* To cancel the deletion operation, touch the “CANCEL” key.
6. Touch the “END” key.
The touch panel will return to the basic screen.
4 Changing the order of reserved jobs Although all of the copy jobs will normally be carried out in the order that they were reserved, that order can be changed after reservation.
1. Press the Add Job key.
A list of the currently reserved jobs will appear.
2. Select the job for which you want to change the order.
3. Change the order by touching the “Q DOWN” key or the “q UP” key.
* Copying will be performed in order, starting the topmost job in the display downward.
4. Touch the “END” key.
The touch panel will return to the basic screen.
(2) Copying various originals in one batch [Job build function]
The job build function enables you to scan different sets of originals into memory at different
times and then copy them all at one time. A large number of originals or originals of different
types can be copied at one time by scanning all of the originals of the same size or type as an
individual job and then storing each of those jobs.
Depending on the type of originals or the way that copies are to be finished, you can select
from among 9 different modes.
* The instructions for the job build function can be displayed on the touch panel. To access
them, touch the “?” key.
6-4
6-3
1 Memory copying from the DF or platen
● Large number of originals
A large number of originals, even that which exceeds the capacity of the DF, can be scanned
into memory by using this function. It is also possible to set originals on the platen in the
middle of the operation and have them scanned as well.
● Uniform copy size [Auto size]
Originals of different sizes will be reduced/enlarged as appropriate in order to copy them all
onto a single size of copy paper.
● Continuous manual scanning [Choose size]
When the originals are set on the platen, all of the originals will be scanned into memory first
and then the copies will be made at one time. It is also possible to set originals in the DF in
the middle of the operation and have them scanned as well.
Page 71

Section 6 ADVANCED COPY MODES
1. Touch the Job Build key.
The job build select screen will appear.
2. Make sure that the “MEMORY COPY FROM DF AND PLATEN” key is highlighted. If it is
not, touch that key until it is highlighted.
3. Select the desired function by touching either the “LARGE # OF ORIGINALS”, “AUTO
SIZE” or “CHOOSE SIZE” key.
4. Specify the type of the originals that are being used by touching either the “2-SIDED
ORIG.” or “1-SIDED ORIG.” key.
5. Select how you want the copies to be finished by touching either the “2-SIDED COPY” or
“1-SIDED COPY” key.
6. The start scanning screen will appear.
* Select the size of paper that you want to copy onto.
* The auto magnification selection mode is the default setting in the initial mode. When
copying onto custom paper sizes or with a custom zoom ratio, press the Manual key until
“1:1” appears on the copy magnification ratio display.
6-5
6-4
Page 72

Section 6 ADVANCED COPY MODES
* If you want to change the magnification ratio, touch the “+” key or the “-” key at the right of
the copy magnification ratio display to select the desired ratio. If you want to change the
zoom mode, such as selecting the standard zoom or XY zoom mode, touch the “ZOOM”
key and follow the instructions from page 4-4.
* The settings for the zoom mode can be changed for each job.
* If you want to change the setting for the border erase mode, touch the “+” key or the “-” key
at the right of the border width display to select the desired width. The border width can be
set to 6 mm, 12 mm or 18 mm.
* In this setting, only sheet originals can be selected for use in the border erase mode.
* The settings for the border erase mode can be changed for each job.
* If you touch the “FUNCTION” key, the following copy functions can be selected.
• Margin mode: Touch the “MARGIN” key and follow the procedure from step 4 on page 5-2.
• Combined copy mode: Touch the “MERGE COPY” key and follow the procedure from step
3 on page 5-20.
• Print page numbers function: Touch the “PAGE #” key and follow the procedure from step 4
on page 5-4.
7. Set the originals.
8. Press the Start key.
9. If you want to scan in more originals, touch the “CONTINUE” key and repeat the procedure
from step 6.
* Once all of the originals have been completely scanned, go to step 10.
* To delete the last set of the originals that you scanned, touch the “CLEAR LAST JOB”
key.
* If you want to make a test copy, touch the “TEST PRINT” key.
Once the test copy has been made, the touch panel will return to the screen for step 9.
10. Touch the “TO PRINT” key.
6-6
6-5
11. Select how you want the copies to be finished.
* If you want to change the Sorting mode, touch the “SORT” key to highlight the desired
mode (Sort or Group).
* If the copier is equipped with the optional Finisher, it is also possible to change the
Staple-Sort mode and the Hole Punch mode settings.
* If the copier is equipped with the optional Booklet Stitcher, it is the Staple-Sort mode
settings that can also be changed.
12. Set the number of copies that you want to make by touching the “+” key or the “-” key. This
number can also be entered directly with the numeric keys.
13. Touch the “END” key. Copying will begin.
Page 73

Section 6 ADVANCED COPY MODES
2 Two-sided copies from a mixture of one-sided and two-sided originals
● Making copies like the originals [Print as originals] By specifying whether each set of originals is either one-sided or two-sided, each set will be scanned and all of the one-sided originals will be made into one-sided copies while the twosided originals will be made into two-sided copies just like the corresponding originals.
● Two-sided copies from all types of originals [Duplex All Originals] By specifying whether each set of originals is either one-sided or two-sided, each set will be scanned and all of the originals will be made into two-sided copies without any blank pages.
● Copying onto the front side of specified pages [Chapterize] By scanning in each chapter separately, the front side of the first page of each chapter will always be copied onto.
1. Touch the Job Build key.
The job build select screen will appear.
2. Touch the “2-SIDED COPY” key.
3. Select the desired function by touching either the “PRINT AS ORIGINALS”, “DUPLEX ALL
ORIGINALS” or “CHAPTERIZE 1/2 SIDED ORGNLS.” key.
6-7
6-6
Page 74

Section 6 ADVANCED COPY MODES
4. Specify the type of the originals that are being used by touching either the “2-SIDED
ORIG.” or “1-SIDED ORIG.” key.
5. The start scanning screen will appear.
* The auto magnification selection mode is the default setting in the initial mode. When
copying onto custom paper sizes or with a custom zoom ratio, press the Manual key until
“1:1” appears on the copy magnification ratio display.
* If you want to change the magnification ratio, touch the “+” key or the “-” key at the right of
the copy magnification ratio display to select the desired ratio. If you want to change the
zoom mode, such as selecting the standard zoom or XY zoom mode, touch the “ZOOM”
key and follow the instructions from page 4-4.
* The settings for the zoom mode can be changed for each job.
* If you want to change the setting for the border erase mode, touch the “+” key or the “-” key
at the right of the border width display to select the desired width. The border width can be
set to 6 mm, 12 mm or 18 mm.
* In this setting, only sheet originals can be selected for use in the border erase mode.
* The settings for the border erase mode can be changed for each job.
* If you touch the “FUNCTION” key, the following copy functions can be selected.
• Margin mode: Touch the “MARGIN” key and follow the procedure from step 3 on page 5-2.
• Combined copy mode: Touch the “MERGE COPY” key and follow the procedure from
step 3 on page 5-20.
• Print page numbers function: Touch the “PAGE #” key and follow the procedure from step
4 on page 5-4.
6-8
6-7
6. Set the originals.
* The originals that may be used for each individual batch of scanning is limited to the type
selected in step 4 and all of the originals for that batch must be of the same type. If you
want to scan in another type of original, it must be done in a different batch.
7. Press the Start key.
Page 75

Section 6 ADVANCED COPY MODES
8. If you want to scan in more originals, touch the “CONTINUE” key and repeating the procedure from step 4.
* Once all of the originals have been completely scanned, go to step 9.
* To delete the last set of the originals that you scanned, touch the “CLEAR LAST JOB”
key.
* If you want to make a test copy, touch the “TEST PRINT” key.
Once the test copy has been made, the touch panel will return to the screen for step 8.
9. Touch the “TO PRINT” key.
10. Select how you want the copies to be finished.
* If you want to change the Sorting mode, touch the “SORT” key to highlight the desired
mode (Sort or Group).
* If the copier is equipped with the optional Finisher, it is also possible to change the
Staple-Sort mode and the Hole Punch mode settings.
* If the copier is equipped with the optional Booklet Stitcher, it is the Staple-Sort mode
settings that can also be changed.
11. Set the number of copies that you want to make by touching the “+” key or the “-” key. This
number can also be entered directly with the numeric keys.
12. Touch the “END” key. Copying will begin.
3 Batch copy from the platen
● Sheet originals only
Sheet originals or the like which cannot be set in the DF will be scanned into memory first and
then the copies will be made at one time. This mode is convenient for Sort copying of a large
number of just such originals.
● Two-page [open-face] originals
When copying a large number of two-page [open-face] originals, like books and magazines,
the originals will be scanned into memory first for batch copying. This mode is convenient for
Sort copying of a large number of just such originals.
● Sheet & book originals
Both sheet and two-page [open-face] originals can be scanned into memory together for
batch copying. This mode is convenient for Sort copying of a large number of just such
originals.
1. Touch the Job Build key.
The job build select screen will appear.
2. Touch the “BATCH COPY FROM PLATEN” key.
3. Specify the type of the originals that are being used by touching either the “SHEET
ORIGINALS”, “BOOK ORIGINALS” or “SHEET & BOOK ORIGINALS” key.
6-9
6-8
Page 76

Section 6 ADVANCED COPY MODES
4. Select how you want the copies to be finished by touching either the “2-SIDED COPY” or
“1-SIDED COPY” key.
* If you selected “SHEET & BOOK ORIGINALS” in step 3, go to the next step. If you
selected “BOOK ORIGINALS”, go to step 6. If you selected “SHEET ORIGINALS”, go to
step 7.
5. Specify the type of the originals that are being used by touching either the “SHEET ORIGINAL” or “BOOK ORIGINAL” key.
* If you selected “SHEET ORIGINAL”, go to step 7. If you selected “BOOK ORIGINAl”, go
to next step.
6. Specify the binding orientation of the originals.
7. The start scanning screen will appear.
* The auto magnification selection mode is the default setting in the initial mode. When
copying onto custom paper sizes or with a custom zoom ratio, press the Manual key until
“1:1” appears on the copy magnification ratio display.
6-9
6-10
* If you want to change the magnification ratio, touch the “+” key or the “-” key at the right of
the copy magnification ratio display to select the desired ratio. If you want to change the
zoom mode, such as selecting the standard zoom or XY zoom mode, touch the “ZOOM”
key and follow the instructions from page 4-4.
* The setting of the zoom mode can be changed by each job.
Page 77

Section 6 ADVANCED COPY MODES
* If you want to change the setting for the border erase mode, touch the “+” key or the “-” key
at the right of the border width display to select the desired width. The border width can be
set to 6 mm, 12 mm or 18 mm.
* In this setting, only sheet originals can be selected for use in the border erase mode.
* The settings for the border erase mode can be changed for each job.
* If you touch the “FUNCTION” key, the following copy functions can be selected.
• Margin mode: Touch the “MARGIN” key and follow the procedure from step 3 on
page 5-2.
• Combined copy mode: Touch the “MERGE COPY” key and follow the procedure from
step 3 on page 5-20.
• Print page numbers function: Touch the “PAGE #” key and follow the procedure from step
4 on page 5-4.
8. Set the originals.
* Be sure to set the type of originals selected in steps 3 and 5.
9. Press the Start key.
10. If you want to scan in more originals, touch the “CONTINUE” key.
* If you selected “SHEET & BOOK ORIGINALS” in step 3, continue scanning by repeat-
ing the procedure from step 5.
If you selected “BOOK ORIGINALS”, continue scanning by repeating the procedure
from step 6.
If you selected “SHEET ORIGINALS”, continue scanning by repeating the procedure
from step 7.
* Once all of the originals have been completely scanned, go to step 11.
* To delete the last set of the originals that you scanned, touch the “CLEAR LAST JOB”
key.
* If you want to make a test copy, touch the “TEST PRINT” key.
Once the test copy has been made, the touch panel will return to the screen for step 10.
11. Touch the “TO PRINT” key.
12. Select how you want the copies to be finished.
* If you want to change the Sorting mode, touch the “SORT” key to highlight the desired
mode (Sort or Group).
* If the copier is equipped with the optional Finisher, it is also possible to change the
Staple-Sort mode and the Hole Punch mode settings.
* If the copier is equipped with the optional Booklet Stitcher, it is the Staple-Sort mode
settings that can also be changed.
13. Set the number of copies that you want to make by touch the “+” key or the “-” key. This
number can also be entered directly with the numeric keys.
14. Touch the “END” key. Copying will begin.
6-10
6-11
Page 78

7-1
Page 79

Section 7 DOCUMENT MANAGEMENT FUNCTIONS
Section 7 DOCUMENT MANAGEMENT FUNCTIONS
(1) Registering an image for form overlay
It is possible to register and store in the copier’s memory, in advance, images that you want
to use as an overlay in the form overlay mode (see page 5-18). This is especially convenient,
for example, for registering images such as those that designate confidential documents, so
that everyone can use them. Up to 100 such images can be registered in this copier.
* It is possible to delete at one time all of the images registered for form overlay. (See “1
Reset box (delete all)” on page 8-23.)
* It is also possible to print out a list of all of the registered images. (See “4 Document list” on
page 8-23.)
1 Registering an image
1. Press the Doc. Mgmt. key.
The document management screen will appear.
2. Touch the “OVERLAY FORM STORAGE” key.
3. Touch the “REGISTER” key.
4. Enter the name that you want to register for that image.
(See page 8-29 for the procedure on entering the name.)
7-1
5. Set the originals.
6. Make sure that “SET ORIGINAL, PRESS START KEY.” is displayed.
* Make sure that “AUTO” is displayed under “ORIGINAL”.
* If you want to change the size of the copy paper, touch the “PAPER” key and select the
size of paper that you want.
7. Press the Start key.
Page 80

Section 7 DOCUMENT MANAGEMENT FUNCTIONS
8. Once scanning of the original is finished, a message that asks you whether or not you want
to continue registering other images will appear.
Once you are finished registering images, touch the “END” key. The touch panel will return
to the basic screen.
If you want to register other images, touch the “CONTINUE” key and repeat steps 4 - 7.
2 Checking registered images Follow the procedure below when you want to check the original size of registered images and the date that they were registered, as well as when you want to print out the actual image for verification purposes.
1. Press the Doc. Mgmt. key.
The document management screen will appear.
2. Touch the “OVERLAY FORM STORAGE” key.
A list of registered images will appear.
3. If you want to check the information regarding a specific image or to print it out, select the
desired image and touch the “RECALL” key.
* If the image that you want to check is not displayed, touch the “▼” key or the “▲” key until
it is displayed.
4. Information about that image will be displayed. Once you are finished checking that information, touch the “END” key.
* If you want to print out the image, touch the “FORM PRINT” key. Printing will begin and,
once it is finished, the touch panel will return to the screen for step 4.
5. Touch the “END” key. The touch panel will return to the screen for step 3.
Once you are finished checking information, touch the “END” key. The touch panel will
return to the basic screen.
If you want to check the information for other images, repeat steps 3 and 4.
3 Deleting an image Follow the procedure below when you want to delete from memory an image that you no longer need.
1. Press the Doc. Mgmt. key.
The document management screen will appear.
2. Touch the “OVERLAY FROM STOREGE” key.
A list of registered images will appear.
7-2
Page 81

Section 7 DOCUMENT MANAGEMENT FUNCTIONS
3. Select the image that you want to delete and touch the “DELETE” key.
* If the image that you want to delete is not displayed, touch the “▼” key or the “▲” key until
it is displayed.
4. If you are certain that you want to delete that image, touch the “DELETE” key once again.
The touch panel will return to the screen for step 3.
* If you do not want to delete that image, touch the “CANCEL” key.
5. If you want to delete other images, repeat steps 3 and 4. Once you are finished deleting
images, touch the “END” key. The touch panel will return to the basic screen.
4 Modifying information for an image Follow the procedure below when you want to change the registered name of an image or change the order in which the image names are displayed.
1. Press the Doc. Mgmt. key.
The document management screen will appear.
2. Touch the “OVERLAY FROM STORAGE” key.
A list of registered images will appear.
3. Touch the “MODIFY” key.
4. Select the image that corresponds to the information that you want to modify.
* If the image that you want to modify the information for is not displayed, touch the “▼” key
or the “▲” key until it is displayed.
7-3
5. If you want to change the order in which the image name is displayed, touch the “q UP”
key or the “QDOWN” key until that name is in the position that you want.
* If you want to change the name of the image, touch the “RENAME” key. (See page 8-29
for the procedure on entering the name.) Once you are finished changing the name, the
touch panel will return to the basic screen.
6. Once you are finished modifying information, touch the “END” key. The touch panel will
return to the basic screen.
Page 82

Section 7 DOCUMENT MANAGEMENT FUNCTIONS
(2) Repeat copying
It is possible to make additional copies from the same originals, using the same copy settings
but without the need to rescan the originals, as long as copying is started before the auto
clear function engages.
* It is also possible to disable repeat copying capabilities. (See “* Repeat copying” on page
8-16.)
1. Once copying is finished, touch the “MODIFY” key.
* You can also press the Doc. Mgmt. key and then touch the “RETRY COPY” key. In this
case , if the “RETRY COPY” key is not displayed, then the auto clear function has already engaged or the Reset key was pressed and, thus, the copy settings are no longer
in memory.
2. Change any copy settings that you want, such as the number of copies to be made, etc.
3. Touch the “START” key.
Copying will begin. Once copying is finished, the touch panel will return to the basic screen.
(3) Quick copying
If the copier is equipped with the optional Print/Scan System that allows you to send data
from your computer, that data is stored in the quick-print memory of the copier. Thus, it is
possible to reprint that same print job by selecting the corresponding data directly in the
copier.
* Only the 20 most recent print jobs will be retained in quick-print memory.
IMPORTANT!
Be aware that all data stored in quick-print memory will be lost whenever the main switch is
turned OFF ( O ).
1 Printing out data Follow the procedure below when you want to print out the same print job one more time.
1. Press the Doc. Mgmt. key.
The document management screen will appear.
7-4
Page 83

Section 7 DOCUMENT MANAGEMENT FUNCTIONS
2. Touch the “QUICK PRINT” key.
3. Select the print job that you want to print out.
* If the print job that you want to print out is not displayed, touch the “▼” key or the “▲” key
until it is displayed.
4. Touch the “ENTER” key.
5. Change any copy settings that you want, such as the number of copies to be made, etc.
6. Touch the “START” key.
Copying will begin. Once copying is finished, the touch panel will return to the basic screen.
2 Checking data for a print job
Follow the procedure below when you want to check certain information that corresponds
to a specific print job.
1. Press the Doc. Mgmt. key.
The document management screen will appear.
2. Touch the “QUICK PRINT” key.
(If the “Quick Print” key is not displayed, there is no longer data for print jobs in memory.)
7-5
3. Select the print job that you want to check.
* If the print job that you want to check is not displayed, touch the “▼” key or the “▲” key
until it is displayed.
4. Touch the “RECALL” key.
The copy size and number of copies will be displayed.
Page 84

Section 7 DOCUMENT MANAGEMENT FUNCTIONS
5. Once you are finished checking the information, touch the “END” key.
The touch panel will return to the screen for step 3.
* If there is further information available for that print job, the “MORE” key will be displayed.
If you touch this key in order to check that information, touch the “CHECK” key once you
are finished. The touch panel will return to the screen for step 3.
6. If you want to check the information for other print jobs, repeat steps 3 - 5. Once you are
finished checking information, press the Reset key. The touch panel will return to the basic
screen.
3 Deleting data for a print job Follow the procedure below when you want to delete the data for a print job that you no longer need.
1. Press the Doc. Mgmt. key.
The document management screen will appear.
2. Touch the “QUICK PRINT” key.
(If the “QUICK PRINT” key is not displayed, there is no longer data for print jobs in memory.)
3. Select the print job that you want to delete.
* If the print job that you want to delete is not displayed, touch the “▼” key or the “▲” key
until it is displayed.
4. Touch the “DELETE” key.
5. If you are certain that you want to delete that data, touch the “DELETE” key once again.
The touch panel will return to the screen for step 3.
* If you do not want to delete that data, touch the “CANCEL” key.
6. If you want to delete other print jobs, repeat steps 3 - 5. Once you are finished deleting
print jobs, press the Reset key. The touch panel will return to the basic screen.
(4) Shared data box
If you register data that will be shared by all users in the shared data box, it will be possible
for each user to print out that data at their own convenience. This is useful, for example, for
registering business forms and the like that are frequently used my many people. The data
that you register here will be stored permanently until the procedure to delete it is performed.
* It is possible to delete at one time all of the data registered in the shared data box. (See “1
Reset box (delete all)” on page 8-23.)
* It is also possible to print out a list of all of the registered data. (See “4 Document list” on
page 8-23.)
7-6
Page 85

Section 7 DOCUMENT MANAGEMENT FUNCTIONS
1 Registering shared data Originals can be registered both from your computer as well as using the copier itself. Follow the procedure below when you want to use the copier to store the original.
1. Press the Doc. Mgmt. key.
The document management screen will appear.
2. Touch the “STORED JOB BOX” key.
3. Touch the “REGISTER” key.
4. Enter the name that you want to register for that data.
(See page 8-29 for the procedure on entering the name.)
5. Set the originals.
6. Make sure that “SET ORIGINAL. PRESS START KEY.” is displayed.
* Make sure that “AUTO” is displayed under “ORIGINAL”.
* If you want to change the size of the copy paper, touch the “PAPER” key and select the
size of paper that you want.
7. Press the Start key. Scanning of the originals will begin.
8. Once scanning of the original is finished, a message that asks you whether or not you want
to continue registering other data will appear.
Once you are finished registering data, touch the “END” key. The touch panel will return to
the basic screen.
If you want to register other data, touch the “CONTINUE” key and repeat steps 5 - 7.
7-7
2 Printing out shared data Follow the procedure below when you want to print out data that you have registered in the shared data box.
1. Press the Doc. Mgmt. key.
The document management screen will appear.
2. Touch the “STORED JOB BOX” key.
3. Touch the “STORAGE” key.
Page 86

Section 7 DOCUMENT MANAGEMENT FUNCTIONS
4. Select the data that you want to print out.
* If the data that you want to print out is not displayed, touch the “▼” key or the “▲” key until
it is displayed.
5. Touch the “ENTER” key.
* If the data was registered from your computer : Go to the next step.
If the data was registered from the copier : Go to step 7.
6. If you want to change the copy mode or copy function, touch the “PRINT AS DRIVER
SETTING” key and go to the next step. If you only want to change how the copies will be
finished, touch the “AS ORIGINAL JOB” key and go to step 8.
7. Select the copy mode and function that you want to use and press the Start key. Copying
will begin.
* If you touch the “FUNCTION” key, you can select from among the two-sided copy mode,
the margin mode, the print page numbers function, the form overlay mode, the sheet
copy mode and the booklet + cover copy mode. Refer to the corresponding procedure in
Section 4 or 5 for the mode and function that you want to use.
8. Change how the copies will be finished, such as the number of copies to be made, etc.,
then touch the “START” key. Copying will begin.
3 Checking shared data Follow the procedure below when you want to check certain information for registered originals, such as the size of the originals and the number of copies that was registered, as well as when you want to print out the first page of the originals for verification purposes.
1. Press the Doc. Mgmt. key.
The document management screen will appear.
2. Touch the “STORED JOB BOX” key.
3. Touch the “STORAGE” key.
7-8
Page 87

Section 7 DOCUMENT MANAGEMENT FUNCTIONS
4. Select the shared data that you want to check.
* If the data that you want to check is not displayed, touch the “▼” key or the “▲” key until
it is displayed.
5. Touch the “RECALL” key.
Information about that data will be displayed. Once you are finished checking that information, press the Reset key. The touch panel will return to the basic screen.
* If there is further information available for that data, the “MORE” key will be displayed. If
you touch this key in order to check that information, touch the “CHECK” key, and then
press the Reset key, once you are finished. The touch panel will return to the basic
screen.
* If you only want to print out the first page of the originals, touch the “HEAD PRINT” key.
Once printing is finished, the touch panel will return to the screen that was displayed before
printing began. Once you are finished checking information, press the Reset key. The touch
panel will return to the basic screen.
6. If you want to check the information for other shared data, touch the “END” key and then,
in the next screen, touch the “BACK” key and repeat steps 4 and 5.
4 Deleting shared data Follow the procedure below when you want to delete shared data that you no longer need.
1. Press the Doc. Mgmt. key.
The document management screen will appear.
2. Touch the “STORED JOB BOX” key.
3. Touch the “STORAGE” key.
7-9
4. Select the shared data that you want to delete.
* If the data that you want to delete is not displayed, touch the “▼” key or the “▲” key until
it is displayed.
5. Touch the “DELETE” key.
Page 88

Section 7 DOCUMENT MANAGEMENT FUNCTIONS
6. If you are certain that you want to delete that data, touch the “DELETE” key once again.
The touch panel will return to the screen for step 4.
* If you do not want to delete that data, touch the “CANCEL” key.
7. If you want to delete other shared data, repeat steps 4 - 6. Once you are finished deleting
data, press the Reset key. The touch panel will return to the basic screen.
5 Modifying information for shared data Follow the procedure below when you want to change the registered name of certain data or change the order in which the names for the shared data are displayed.
1. Press the Doc. Mgmt. key.
The document management screen will appear.
2. Touch the “STORED JOB BOX” key.
3. Touch the “STORAGE” key.
4. Touch the “MODIFY” key.
5. Select the data that corresponds to the information that you want to modify.
* If the data that you want to modify the information for is not displayed, touch the “▼” key
or the “▲” key until it is displayed.
6. If you want to change the order in which the name for the shared data is displayed, touch
the “q UP” key or the “Q DOWN” key until that name is in the position that you want.
* If you want to change the name of the data, touch the “RENAME” key. (See page 8-29 for
the procedure on entering the name.) Once you are finished changing the name, the
touch panel will return to the basic screen.
7. Once you are finished modifying information, touch the “END” key and then press the
Reset key. The touch panel will return to the basic screen.
(5) Synergy print boxes
If you store multiple sets of originals in a synergy print box, you can print out up to 10 of these
sets at one time. Up to 100 sets of originals can be registered in each synergy print box at
one time, and it is possible to register a total combination of 100 synergy print boxes and
virtual mailboxes (see page 7-17).
* Each synergy print box can have its own name and password for heightened security. It is
also possible to delete at one time all of the data registered in any one box. (See “2 Box
name & password / Clear data in box” on page 8-23.)
* It is possible as well to delete at one time all of the data registered in all of the synergy print
boxes. (See “1 Reset box (delete all)” on page 8-23.)
7-10
Page 89

Section 7 DOCUMENT MANAGEMENT FUNCTIONS
* It is also possible to print out a list of all of the registered information for each synergy print
box. (See “4 Document list” on page 8-23.)
IMPORTANT!
You can additionally select the length of time that you want to elapse before each job file in a
synergy print box is automatically deleted. It is possible to set this time to any number of days
between 1 and 7. (See “3 Box default” on page 8-23.)
1 Registering originals in a synergy print box Originals can be registered in a synergy print box both from your computer as well as using the copier itself. Follow the procedure below when you want to use the copier to store the original in a synergy print box.
1. Press the Doc. Mgmt. key.
The document management screen will appear.
2. Touch the “PRIVATE PRINT BOX” key.
3. Touch the “REGISTER” key.
The available synergy print boxes will be displayed in blocks of 10.
4. Select the box that you want to register the originals in.
* The example in the illustration shows that 40 synergy print boxes, from no. 61 to no. 100,
are available. If you want to select a box number other than those currently displayed,
touch the key on the touch panel that corresponds to the block of ten boxes which contains that number.
5. Touch the “ENTER” key.
7-11
6. Enter the name that you want to register for those originals.
(See page 8-29 for the procedure on entering the name.)
Page 90

Section 7 DOCUMENT MANAGEMENT FUNCTIONS
7. Set the originals.
8. Make sure that “SET ORIGINAL. PRESS START KEY.” is displayed.
* Make sure that “AUTO” is displayed under “ORIGINAL”.
* If you want to change the size of the copy paper, touch the “PAPER” key and select the
size of paper that you want.
9. Press the Start key. Scanning of the originals will begin.
10. Once scanning is finished, touch the “END” key. The touch panel will return to the basic
screen.
To continue registering originals, set the new originals and touch the “CONTINUE” key.
2 Printing out more than one set of originals from a synergy print box
1. Press the Doc. Mgmt. key.
The document management screen will appear.
2. Touch the “PRIVATE PRINT BOX” key.
3. Touch the “STORAGE” key.
The available synergy print boxes will be displayed in blocks of 10.
4. Select the box that contains the corresponding originals.
* The example in the illustration shows that 40 synergy print boxes, from no. 61 to no. 100,
are available. If you want to select a box number other than those currently displayed,
touch the key on the touch panel that corresponds to the block of ten boxes which contains that number.
5. Touch the “ENTER” key.
6. If a password was registered for the selected box, the password input screen will appear.
Enter the registered password (8 digits or less) and touch the “END” key.
If there was no password registered for that box, go directly to the next step.
7-12
Page 91

Section 7 DOCUMENT MANAGEMENT FUNCTIONS
7. Select the originals that you want to print out. (You can select up to 10 sets of originals at
one time.)
* If you are going to select more than one set of originals, it is only possible to select
originals of the same size at one time.
* If any original that you want to print out is not displayed, touch the “▼” key or the “▲” key
until it is displayed.
8. Touch the “ENTER” key.
* If you selected one set of originals that was registered from your computer : Go to the
next step.
If you selected one set of originals that was registered from the copier : Go to step 10.
If you selected more than one set of originals: Go to step 10.
9. If you want to change the copy mode or copy function, touch the “AS PRESENT
SETTING” key and go to the next step. If you only want to change how the copies will be
finished, touch the “AS ORIGINAL JOB” key and go to step 11.
10. Select the copy mode and function that you want to use and press the Start key. Copying
will begin.
* If you touch the “FUNCTION” key, you can select from among the two-sided copy mode,
the margin mode, the print page numbers function, the form overlay mode, the sheet
copy mode and the booklet + cover copy mode. Refer to the corresponding procedure in
Section 4 or 5 for the mode and function that you want to use.
11. Change how the copies will be finished, such as the number of copies to be made, etc.,
then touch the “START” key. Copying will begin.
7-13
3 Checking originals in a synergy print box Follow the procedure below when you want to check certain information for originals registered in a synergy print box, such as the size of the originals and the number of copies that was registered, as well as when you want to print out the first page of the originals for verification purposes.
1. Follow steps 1 - 6 on page 7-12.
Page 92

Section 7 DOCUMENT MANAGEMENT FUNCTIONS
2. Select the originals that you want to check. (You can select up to 10 sets of originals at one
time.)
* If any original that you want to check is not displayed, touch the “▼” key or the “▲” key
until it is displayed.
3. Touch the “RECALL” key.
Information about that originals will be displayed.
* If you only want to print out the first page of the originals, touch the “HEAD PRINT” key.
Once printing is finished, the touch panel will return to the screen that was displayed before
printing began.
* If there is further information available for that data, the “MORE” key will be displayed. If you
touch this key in order to check that information, touch the “CHECK” key once you are
finished. The touch panel will return to the screen for step 2. In this case, go to step 5.
* If you selected more than one set of originals, touch the “▼” key or the “▲” key to display
the information about the other originals.
4. Touch the “BACK” key. The touch panel will return to the screen for step 2.
5. If you want to check the information for other originals, repeat steps 2 - 4. Once you are
finished checking information, press the Reset key. The touch panel will return to the basic
screen.
4 Deleting originals from a synergy print box Follow the procedure below when you want to delete originals that you no longer need from a synergy print box.
1. Follow steps 1 - 6 on page 7-12.
2. Select the originals that you want to delete. (You can select up to 10 sets of originals at one
time.)
* If any original that you want to delete is not displayed, touch the “▼” key or the “▲” key
until it is displayed.
3. Touch the “DELETE” key.
7-14
Page 93

Section 7 DOCUMENT MANAGEMENT FUNCTIONS
4. If you are certain that you want to delete those originals, touch the “DELETE” key once
again. The touch panel will return to the screen for step 2.
* If you do not want to delete those originals, touch the “CANCEL” key.
5. If you want to delete other originals, repeat steps 2 - 4. Once you are finished deleting
originals, press the Reset key. The touch panel will return to the basic screen.
5 Changing the order of printing Follow the procedure below when you want to change the order that selected originals will be printed out.
1. Follow steps 1 - 6 on page 7-12.
2. Select the originals that you want to print out. (You can select up to 10 sets of originals at
one time.)
* If any original that you want to print out is not displayed, touch the “▼” key or the “▲” key
until it is displayed.
3. Touch the “ORDER CHANGE” key.
A list of the originals you selected will appear.
4. Select the original for which you want to change the order of printing and touch the “q UP”
key or the “Q DOWN” key until that original is in the position that you want.
5. Touch the “ENTER” key.
* Once you are finished changing the order of printing, press the Reset key. The touch
panel will return to the basic screen.
7-15
6 Modifying information for a registered synergy print box Follow the procedure below when you want to change the password for synergy print box, change the name of an original registered in that box or change the order in which the originals in that box are displayed.
1. Follow steps 1 - 6 on page 7-12.
2. Touch the “MODIFY” key.
Page 94

Section 7 DOCUMENT MANAGEMENT FUNCTIONS
3. If you want to change the password for that synergy print box, touch the “PASSWORD”
key.
If you do not want to change the password, go to step 6.
4. Use the numeric keys to enter the new password. (Max. 8 digits)
5. Touch the “END” key. The touch panel will return to the basic screen.
6. If you want to change the name of a set of originals, select the corresponding originals and
touch the “RENAME” key.
If you do not want to change the name, go to step 8.
* If the name that you want to change is not displayed, touch the “▼” key or the “▲” key
until it is displayed.
7. Enter the new name that you want to register for those originals.
(See page 8-9 for the procedure on entering the name.)
Once you are finished changing the name, the touch panel will return to the basic screen.
8. If you want to change the order in which the name of those originals are displayed, touch
the “q UP” key or the “Q DOWN” key until that name is in the position that you want.
9. Touch the “END” key and then press the Reset key. The touch panel will return to the basic
screen.
7-16
Page 95

Section 7 DOCUMENT MANAGEMENT FUNCTIONS
(6) Virtual mailboxes
If the copier is equipped with the optional Print/Scan System, you can create virtual mailboxes in the copier's memory. Each mailbox can be assigned to an individual user and, if
they store their originals in their own box, they can print out that data in a single operation at
the copier. Up to 100 sets of originals can be registered in each virtual mailbox at one time.
* It is possible to register a total combination of 100 virtual mailboxes and synergy print boxes
(see page 7-10), however, you must select in advance the total number of virtual mailboxes
that you will use. (See “3 Box default” on page 8-23.)
* Each virtual mailbox can have its own name and password for heightened security. It is also
possible to delete at one time all of the data registered in any one box. (See “2 Box name
& password / Clear data in box” on page 8-23.)
* It is possible as well to delete at one time all of the data registered in all of the virtual
mailboxes. (See “1 Reset box (delete all)” on page 8-23.)
* It is also possible to print out a list of all of the registered information for each virtual mail-
box. (See “4 Document list” on page 8-23.)
IMPORTANT!
You can additionally select the length of time that you want to elapse before each job file in a
virtual mailbox is automatically deleted. It is possible to set this time to any number of days
between 1 and 7. (See “3 Box default” on page 8-23.)
1 Printing out all of the originals in a virtual mailbox Follow the procedure below when you want to print out all of the originals that you have registered in a virtual mailbox.
1. Press the Doc. Mgmt. key.
The document management screen will appear.
2. Touch the “VIRTUAL MAILBOX” key.
3. Touch the “STORAGE” key.
The available virtual mailboxes will be displayed in blocks of 10.
7-17
4. Select the box that contains the corresponding originals.
* The example in the illustration shows that 60 virtual mailboxes, from no. 1 to no. 60, are
available. If you want to select a box number other than those currently displayed, touch
the key on the touch panel that corresponds to the block of ten boxes which contains that
number.
5. Touch the “ENTER” key.
Page 96

Section 7 DOCUMENT MANAGEMENT FUNCTIONS
6. If a password was registered for the selected box, the password input screen will appear.
Enter the registered password (8 digits or less).
If there was no password registered for that box, go directly to the next step.
7. If the password you entered matches the registered one, a list of the originals stored in that
virtual mailbox will appear. Touch the “START” key. Copying will begin.
* If you want to stop print out for the set of originals that are being processed at the mo-
ment or cancel print out completely, press the Stop/Clear key. Then, if you want to stop
printing completely, touch the “STOP” key. If you want to continue printing from the next
set of originals, touch the “CONTINUE FROM NEXT JOB” key.
2 Changing the password
1. Follow steps 1 - 6 on page 7-17.
2. Touch the “PASSWORD” key.
3. Use the numeric keys to enter the new password. (Max. 8 digits)
4. Touch the “END” key. The touch panel will return to the basic screen.
3 Deleting data from a virtual mailbox Any data stored in a virtual mailbox will be automatically deleted once it has been there for one week. However, if you want to force-delete all of the data in any virtual mailbox before that time, follow the procedure below.
1. Follow steps 1 - 6 on page 7-17.
2. Touch the “DELETE” key.
3. If you are certain that you want to delete those originals, touch the “DELETE” key once
again. The touch panel will return to the screen for step 2.
* If you do not want to delete those originals, touch the “CANCEL” key.
7-18
Page 97

8-1
Page 98

Section 8 COPIER MANAGEMENT
Section 8 COPIER MANAGEMENT
(1) Copy management
You can set 4-digit department code numbers for up to 1,000 departments in order to manage the total number of copies made by each department. It is also possible to limit the
number of copies that can be made by each department.
1 The copy management procedures and settings
Procedure or setting Page
● Registering new
department codes
● Deleting department
codes
Description
Manage use of the copier by assigning 4-digit department codes to each department in your
organization, and set limits for the number of copies that can be made by each department. Up
to 1,000 department codes can be registered. Copy limits can be set in units of 1,000 sheets,
up to a maximum of 999,000. Entering “0” enables unlimited copying.
When a department reaches its limit, the copier will not make any more copies under that
department code.
Follow this procedure to delete registered department codes.
8-2
8-3
● Changing limits
Follow this procedure to change the limit for the number of copies that can be made by one or
more departments, without need to delete and re-register the department codes.
8-4
● Clearing copy counts
Follow this procedure to clear all the copy counts for all of the department codes at one time.
Copy counts cannot be cleared for individual departments.
8-5
● Checking copy counts
Follow this procedure to check copy totals. It is possible to view the total number of copies
made on the machine, the number of copies made for each paper size and the number of
copies made by each department.
8-5
● Printing out the copy
management report
● Turning copy management
ON/OFF
8-1
Follow this procedure to print out the number of copies made each department in report form.
8-6
Turn copy management ON in order to apply the management settings that you registered. Turn
it OFF when those settings are not required.
8-6
2 How to enter the copy management select mode
1. Touch the “SPECIAL” key.
The management mode select screen will appear.
Page 99

Section 8 COPIER MANAGEMENT
2. Touch the “MANAGEMENT” key.
3. Use the numeric keys to enter the management pin code “6200”.
If the pin code you entered matches the registered one, the screen will change to the copy
management mode set-up screen. See “3 How to register the various management settings” in order to make the desired settings.
* You can change the 4-digit management pin code as desired. (See “9 Management pin
code change” on page 8-11.)
3 How to register the various management settings
● Registering new department codes
1. Enter the copy management select mode. (See page 8-1.)
2. Touch the “SET CODE” key.
3. Touch the “REGISTER” key.
4. Use the numeric keys to enter the department code (4-digit) that you want to register.
5. Touch the “REGISTER” key.
* If that department code has already been registered, “ID-CODE IS ALREADY IN USE.”
will appear in the message display. Press the “RE-ENTER” key and enter another department code.
8-2
Page 100

Section 8 COPIER MANAGEMENT
6. Use the numeric keys to enter the limit for the number of copies that can be made by that
department. The limit can be set in units of 1,000 sheets, up to a maximum of 999,000.
* Enter “0” to enable unlimited copying.
* If you want to clear the entered department code and enter a new code number, touch
the “CANCEL” key.
7. Touch the “REGISTER” key. The touch panel will return to the screen for step 4.
* To register another department code, repeat steps 4 - 7.
8. Touch the “END” key.
The touch panel will return to the screen for step 3.
9. Touch the “END” key.
The touch panel will return to the copy management mode set-up screen.
10. Touch the “END” key.
The touch panel will return to the basic screen.
● Deleting department codes
1. Enter the copy management select mode. (See page 8-1.)
2. Touch the “SET CODE” key.
3. Touch the “DELETE” key.
8-3
4. Touch the department code that you want to delete. [It is possible to select more than one
code.] (If the code you want is not displayed, touch the “▼” key or the “▲” key until it is
displayed.)
5. Once you are finished deleting department codes, touch the “END” key.
The touch panel will return to the screen for step 3.
 Loading...