

Kyocera KM-4850W User Manual
Operation Guide
Please read the Operation Guide before using the copier.
Keep it in the designated location for easy reference.

We have determined as a participating company in the International
Energy Star Program that this product is compliant with the standards
laid out in the International Energy Star Program.
About the International Energy Star Program
International Energy Star Program has as its basic goals the
promotion of efficient energy use and the reduction of the
environmental pollution that accompanies energy consumption by
promoting the manufacture and sale of products that fulfill program
standards.
International Energy Star Program standards require that copies
come equipped with a “Low Power Mode” where energy consumption
is reduced after a certain amount of time elapses since the device
was last used, as well as an “Off Mode” where the device
automatically turns itself off after there is no activity within a set
amount of time. When the copier includes printer and fax functions,
the printer and fax must enter a “Low Power Mode” where power
consumption is automatically reduced after a certain amount of time
elapses since they were last used, and they must also support a
“Sleep Mode” where power consumption is reduced to a minimum
when there is no activity within a set amount of time.
This product is equipped with the following features as a result of its
compliance with International Energy Star Program standards.
● Low Power Mode
The device automatically enters “Low Power Mode” when 15 minutes
have passed since the device was last used. The amount of time of
no activity that must pass before “Low Power Mode” is activated may
be lengthened. See “Energy Saver Function” for more information.
● Off Mode
The device automatically enters “Off Mode” when 90 minutes have
passed since the device was last used. The amount of time of no
activity that must pass before “Off Mode” is activated may be
lengthened. For more information see “Auto Shutoff Function”.
All rights reserved. No part of this material may be
reproduced or transmitted in any form or by any means,
electronic or mechanical, including photocopying, recording
or by any information storage and retrieval system, without
permission in writing from the Publisher.
Legal Restriction On Copying
• It may be prohibited to copy copyrighted material without
permission of the copyright owner.
• It is prohibited under any circumstances to copy domestic
or foreign currencies.
• Copying other items may be prohibited.
NOTICE
This Operation Guide contains information that corresponds
to using both the inch and metric versions of this machine.
Since the messages and terminology on those respective
operation panels differs between these two versions, for
purposes of clarification and easier understanding we have
listed the message displays and operation panels used in
BOTH types of machine. However, in the main text of this
guide, when the difference in a name or message is only
one of upper- and lowercase spelling, we have listed the
information as it specifically pertains to the inch version of
this machine. When there is even a slight difference in the
message, key/indicator name or other specifications, we
have listed the information for the inch version followed, in
brackets, by the corresponding information for the metric
version.
● Sleep Mode (If the copier has printer and/or facsimile function)
The device automatically enters “Sleep Mode” when 90 minutes have
passed since the device was last used. The amount of time of no
activity that must pass before “Sleep Mode” is activated may be
lengthened. For more information see “Auto Shutoff Function”.
● Paper Recycling
The Energy Star Program encourages the use of environmentally
friendly recycled paper. Your sales or service representative can
provide information about recommended paper types.
Please read the Operation Guide before using the copier. Keep it in the designated location for easy
reference.
The sections of this handbook and parts of the copier marked with symbols are safety warnings meant to
protect the user, other individuals and surrounding objects, and ensure correct and safe usage of the copier.
The symbols and their meanings are indicated below.
DANGER: Indicates that serious injury or even death will very possibly result from insufficient
attention to or incorrect compliance with the related points.
WARNING: Indicates that serious injury or even death may result from insufficient attention to or
incorrect compliance with the related points.
CAUTION: Indicates that personal injury or mechanical damage may result from insufficient attention to or incorrect compliance with the related points.
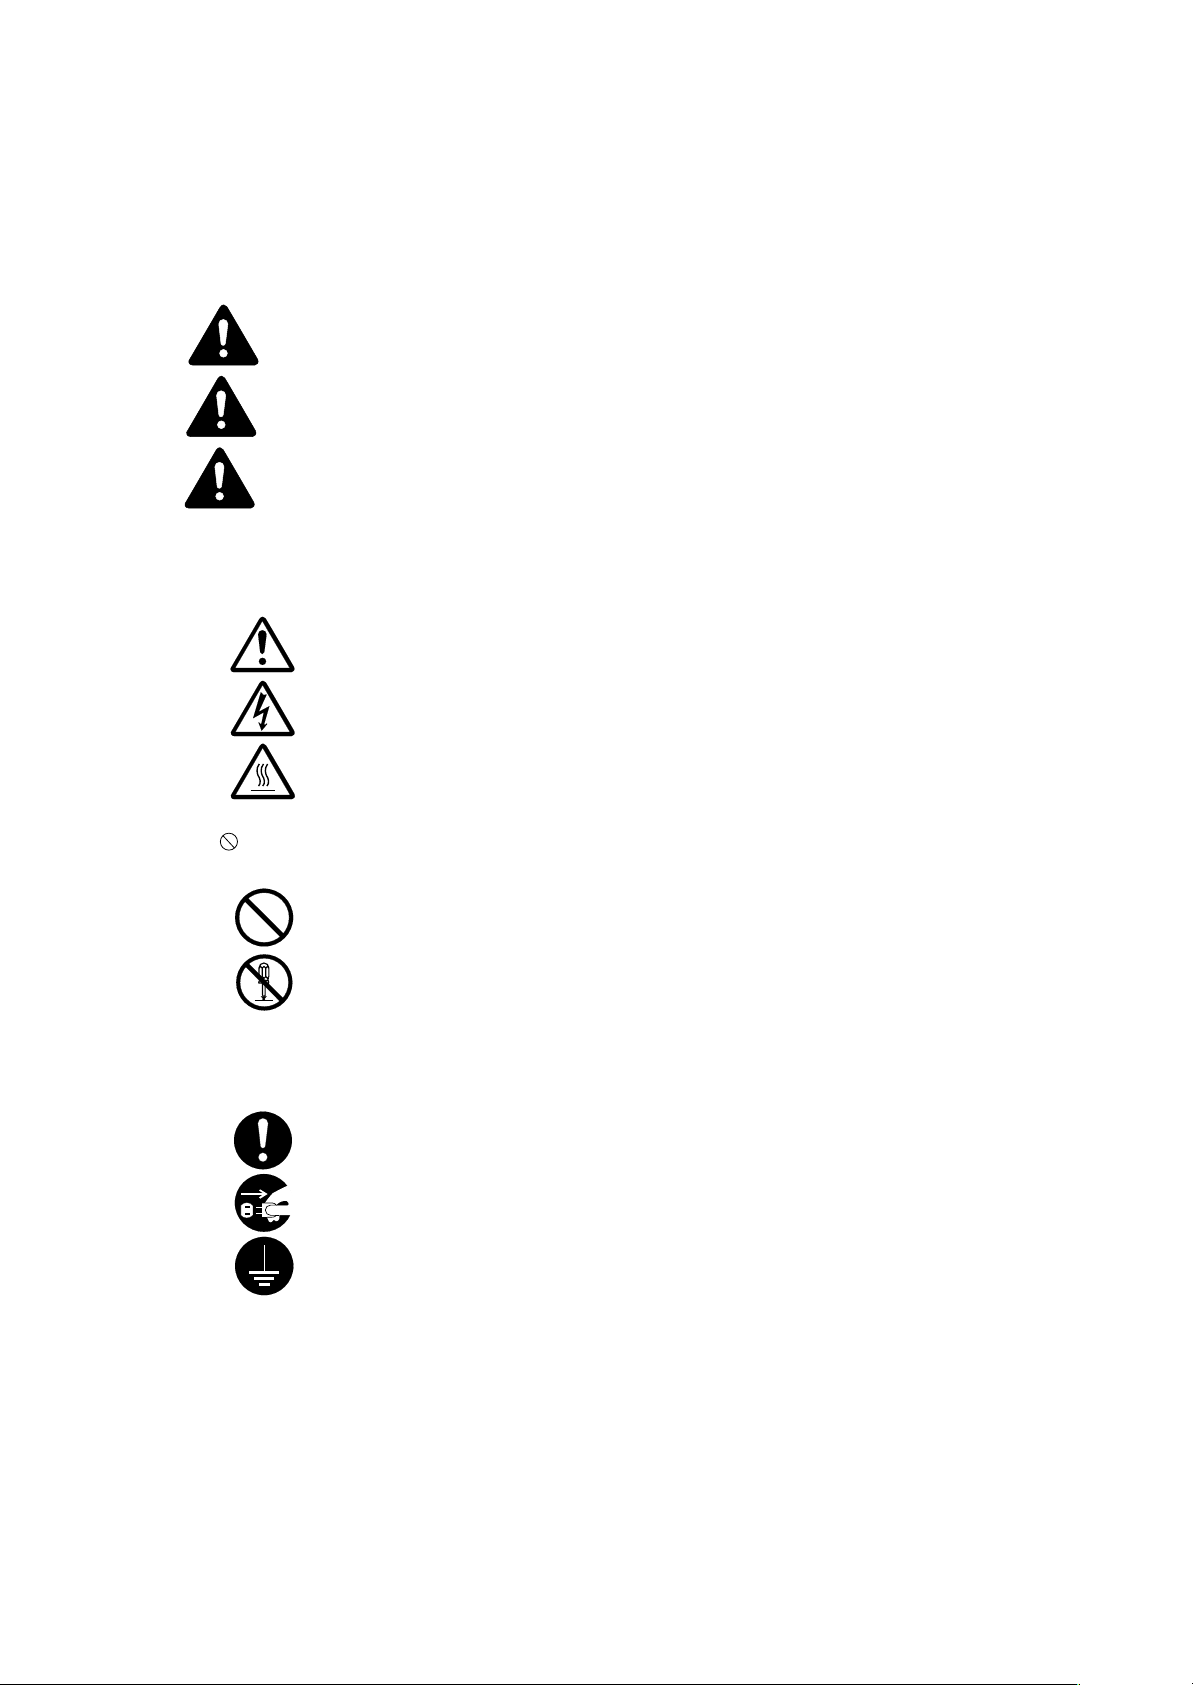
Symbols
The m symbol indicates that the related section includes safety warnings. Specific points of attention are
indicated inside the symbol.
.................... [General warning]
.................... [Warning of danger of electrical shock]
.................... [Warning of high temperature]
The symbol indicates that the related section includes information on prohibited actions. Specifics of the
prohibited action are indicated inside the symbol.
.................... [Warning of prohibited action]
.................... [Disassembly prohibited]
The ● symbol indicates that the related section includes information on actions which must be performed.
Specifics of the required action are indicated inside the symbol.
.................... [Alert of required action]
.................... [Remove the power plug from the outlet]
.................... [Always connect the copier to an outlet with a ground connection]
Please contact your service representative to order a replacement if the safety warnings in the handbook are
illegible or if the handbook itself is missing. (fee required)

Contents
CHAPTER 1 IMPORTANT! PLEASE READ FIRST. ........
CAUTION LABELS ..............................................................1-1
INSTALLATION PRECAUTIONS ........................................ 1-2
PRECAUTIONS FOR USE .................................................. 1-3
1-1
CHAPTER 2 NAMES OF PARTS ............................ 2-1
(1) Main body ............................................................................. 2-1
(2) Operation panel .................................................................... 2-4
(3) Message display ................................................................... 2-6
CHAPTER 3 PREPARATIONS ................................3-1
1. Originals .....................................................................3-1
(1) Type of originals .............................................................. 3-1
(2) Setting the Original Loop Guide ...................................... 3-2
(3) Setting the Original Holders ............................................ 3-2
(4) How to Set an Original .................................................... 3-2
(5) How to Use the Carrier Sheet (option) ............................ 3-3
(6) How to Use the Original Tray (option) ............................. 3-4
2. Paper ..........................................................................3-5
(1) Paper Types .................................................................... 3-5
(2) How to Set Paper Roll ..................................................... 3-6
(3) Dew prevention heater .................................................... 3-7
(4) How to Use the Copy Tray Support Plate........................ 3-8
CHAPTER 4 BASIC COPYING ...............................4-1
1. Before starting copying ...............................................4-1
(1) Initial state ....................................................................... 4-1
(2) When the Energy Saver indicator is lit ............................ 4-1
(3) When using a key counter (option) .................................. 4-1
2. Basic Copying............................................................. 4-2
3. Copy Modes ............................................................... 4-4
(1) APS mode ....................................................................... 4-4
(2) AMS mode ....................................................................... 4-4
(3) Manual mode ................................................................... 4-4
4. Paper Material Selection ............................................ 4-5
5. Paper Roll Cut Length Selection ................................ 4-6
(1) Synchronized cut ............................................................. 4-6
(2) Standard cut .................................................................... 4-6
(3) Numeric key input ............................................................ 4-7
6. Bypass Copy .............................................................. 4-8
7. Canceling Copying ..................................................... 4-9
CHAPTER 5 FUNCTIONAL COPYING ................... 5-1
1. Zoom mode ................................................................ 5-1
(1) Standard zoom ................................................................ 5-1
(2) User setting zoom ........................................................... 5-3
(3) XY zoom .......................................................................... 5-3
(4) Zoom ............................................................................... 5-4
2. Editing Functions ........................................................5-5
(1) Image shift .......................................................................5-5
(2) Margin copy ..................................................................... 5-7
● Leading edge margin ................................................... 5-7
● Trailing edge margin .................................................... 5-7
● Whole sheet print .........................................................5-7
(3) Border Erase mode ......................................................... 5-9
(4) Mirror mode ................................................................... 5-10
(5) Rotation mode ............................................................... 5-11
3. Sort/Group copy ....................................................... 5-12
(1) Sort copy ....................................................................... 5-12
(2) Group copy ....................................................................5-13
CHAPTER 6 CONVENIENT FUNCTIONS .............. 6-1
1. Adjustment Functions .................................................6-1
(1) Inclination adjustment ...................................................... 6-1
(2) Copy size fine adjustment ............................................... 6-2
(3) Fixing Temperature Fine Adjustment ............................... 6-3
2. Repeat Copy Function ................................................6-4
(1) How to make a repeat copy ............................................. 6-4
(2) Repeat copy after sort/group ...........................................6-4
(3) Deleting Image Data ........................................................ 6-5
3. Preview Copy ............................................................. 6-6
● Preview image .................................................................. 6-6
● Preview contrast ............................................................... 6-6
4. Job Reserve Function................................................. 6-7
(1) Reserving a job ............................................................... 6-7
(2) Canceling job reserve ...................................................... 6-8
5. Program Function .......................................................6-9
(1) Registering a program ..................................................... 6-9
(2) Program Recall .............................................................. 6-10
6. Interrupt Copy ........................................................... 6-11
7. Auto Clear Function ..................................................6-12
8. Energy Saver Function .............................................6-12
9. Auto Shut-off Function ..............................................6-12
CHAPTER 7 MANAGEMENT AND SETTING ........ 7-1
1. List of Default Setting ................................................. 7-1
(1) Machine default ............................................................... 7-1
(2) Copy default .................................................................... 7-4
2. Setting Method of Default Setting ...............................7-8
(1) Setting method for user ................................................... 7-8
(2) Setting method for manager ............................................ 7-9
(3) Setting of each item ....................................................... 7-10
3. Language Switching .................................................7-24
CHAPTER 8 TROUBLESHOOTING .......................8-1
1. Messages during Copying ..........................................8-1
2. Replenishing the Toner ...............................................8-3
3. Replacing the Waste Toner Tank ................................8-5
4. Countermeasures against Memory Overflow .............8-6
5. Countermeasures against Call for service Message ..8-8
6. When Paper or an Original Jams ...............................8-9
(1) Jam location display ........................................................ 8-9
(2) Cautions .......................................................................... 8-9
(3) Removal procedure ......................................................... 8-9
7. Troubleshooting ........................................................8-14
CHAPTER 9 MAINTENANCE AND MANAGEMENT ......
1. Cleaning the Machine .................................................9-1
2. Specifications ............................................................. 9-2
9-1
i
● USING THE ADVANCED FEATURES OF THIS COPIER
■ Copier features
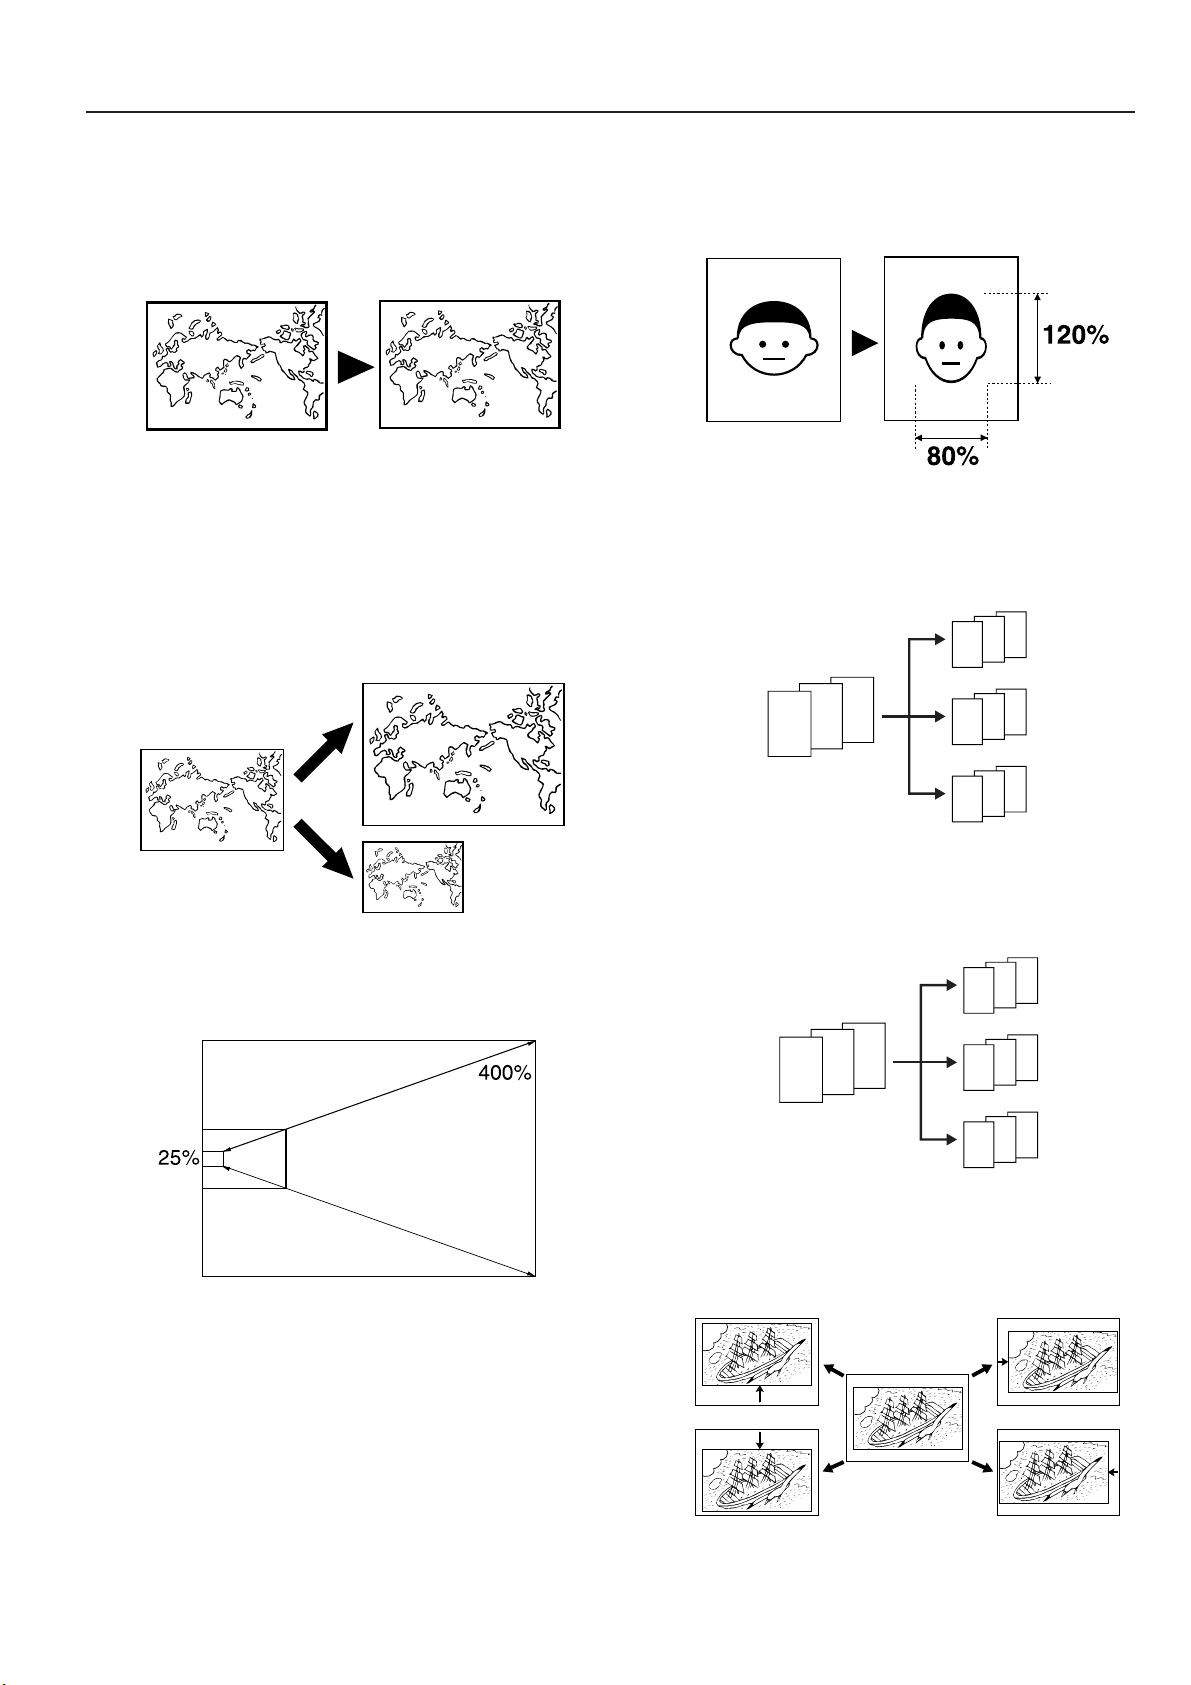
<Auto Paper Selection mode> (Page 4-2)
1
To make the machine select paper automatically.
A variety of enlargement/reduction functions
2
<Auto Zoom mode>(Page 4-4)
To enlarge/reduce copies to a specified paper size.
<Independent Zoom mode>(Page 5-3)
To enlarge/reduce copies to separate lengthwise and widthwise
ratios.
<Sort copy>(Page 5-12)
3
To copy multiple originals to multiple collated sets.
3
2
1
1
2
3
3
2
1
<Numeric key/zoom key input>(Page 5-4)
To enlarge/reduce copies in 1% or 0.1% increments.
<Preset R/E mode>(Page 5-1)
To enlarge/reduce copies to preset ratios.
1
<Group copy>(Page 5-13)
4
To make multiple copies grouped by original.
3
2
1
<Image Shift mode>(Page 5-5)
5
To shift the image up, down, to the right or to the left.
3
2
1
1
1
2
2
2
3
3
3
ii
● USING THE ADVANCED FEATURES OF THIS COPIER
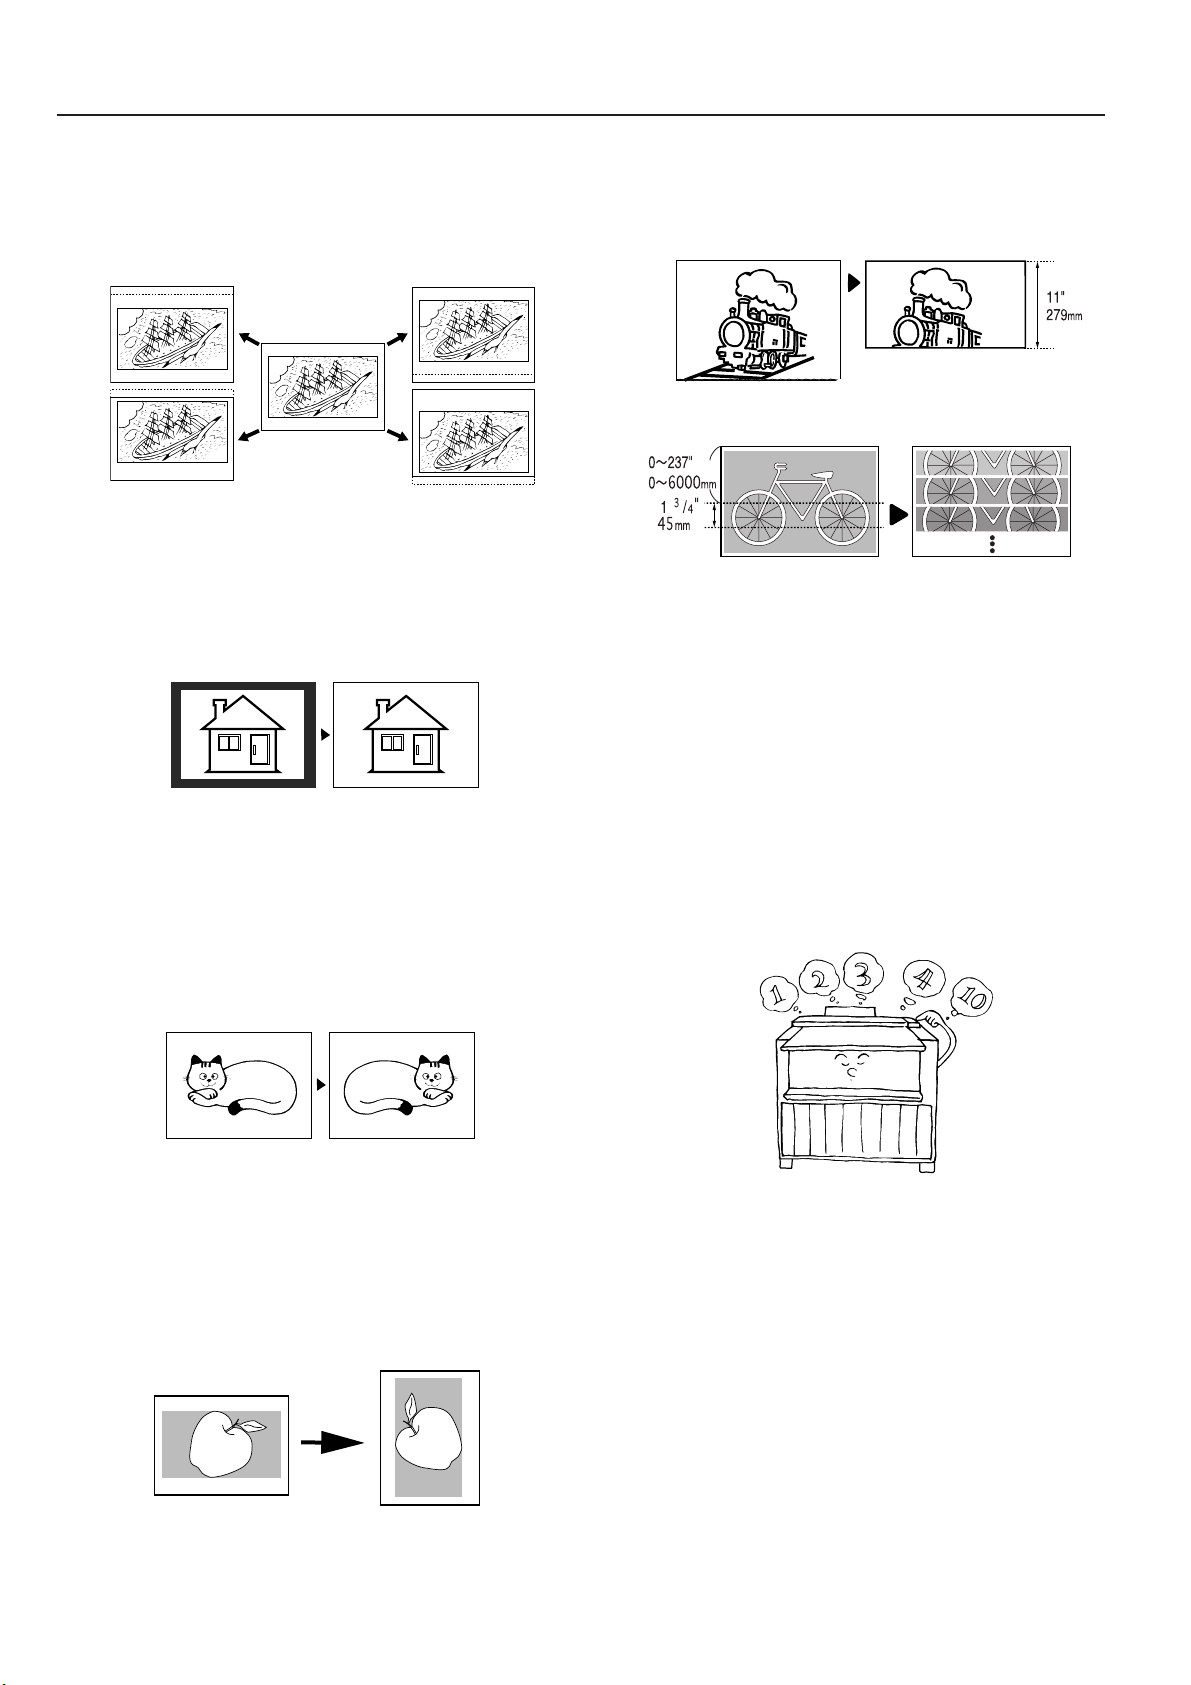
<Margin Copy mode>(Page 5-7)
6
To make margins at the leading or trailing edge in copies. Also to
cut margins.
<Border Erase mode>(Page 5-9)
7
To make neat copies without blemishes around edges.
<Preview Copy mode>(Page 6-6)
10
To make a sample copy to verify the contrast.
<Repeat Copy function>(Page 6-4)
11
To make repeated copies after making one copy.
<Job Reserve function>(Page 6-7)
12
To reserve an additional copy job while a copy job is being run.
<Mirror mode>(Page 5-10)
8
To make mirror-image copies.
<Rotation mode>(Page 5-11)
9
To rotate images by 90˚
<Program function>(Page 6-9)
13
To register frequently used settings.
iii
● USING THE ADVANCED FEATURES OF THIS COPIER
■ Setting/adjustment features
<Fixing temperature adjustment>(Page 7-2)
14
To set the fixing temperature based on the paper material and
the installation environment of the machine.
<Fixing temperature fine adjustment>(Page 6-3)
15
To make temporarily fine adjustments for fixing temperature.
<Copy size adjustment>(Page 7-2)
16
To adjust the copy size based on the paper material and the
installation environment of the machine.
<Copy size fine adjustment>(Page 6-2)
17
To make temporarily fine adjustments for copy size.
<Inclination adjustment>(Page 6-1)
18
To correct the inclination between 1.5˚ to the left and 1.5˚ to the
right.
<Key counter>(Page 4-1)
21
To count the number of output sheets.
<Carrier sheet>(Page 3-3)
22
To protect an original when it is fed.
■ Options
<Roll unit>(Page 3-6)
19
To add a paper source.
<Original tray>(Page 3-4)
20
To collect originals ejected from the rear of the machine.
<Expansion memory>
23
To add DIMM (128 MB, 256 MB or 512 MB) into up to 2 slots.
<Printer/scanner controller>
24
To use this machine as a printer or a scanner.
iv
CHAPTER 1 IMPORTANT! PLEASE READ
FIRST.
CAUTION LABELS
Caution labels have been attached to the copier at the following locations for safety purposes.
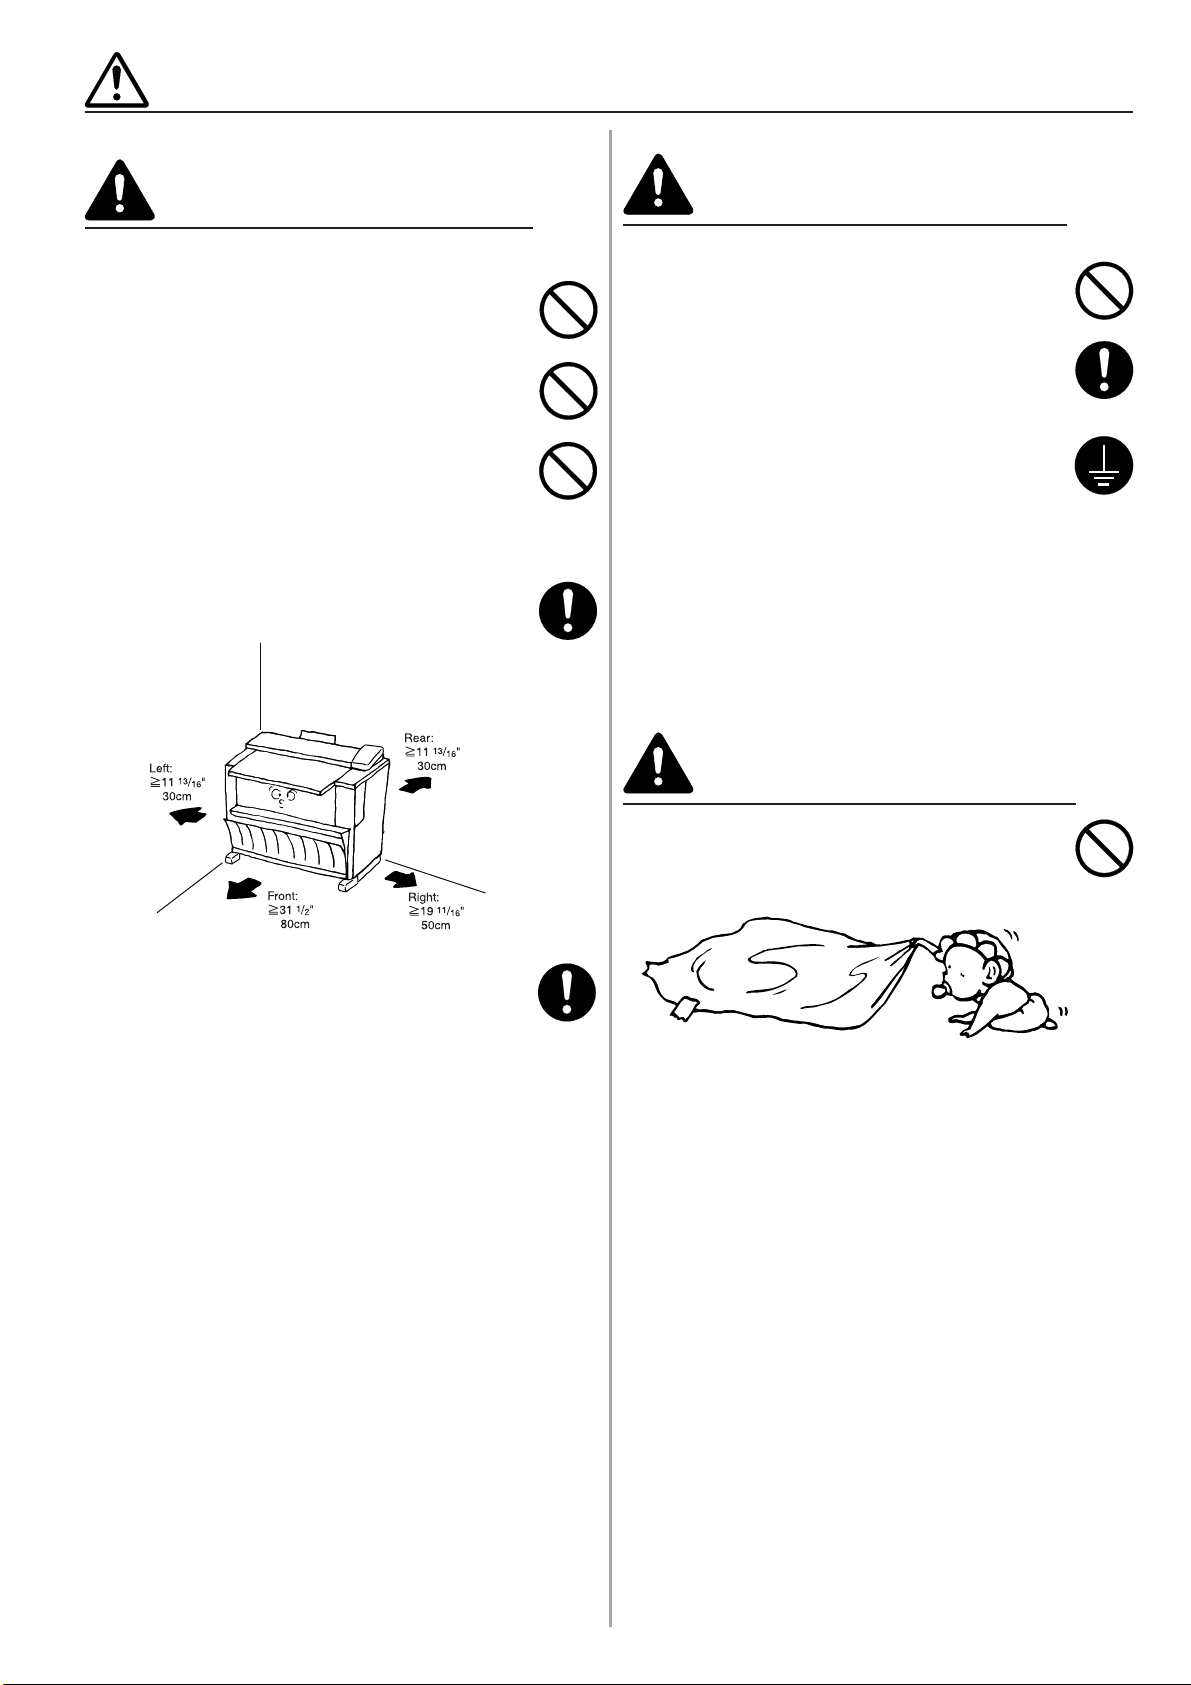
BE SUFFICIENTLY CAREFUL to avoid fire or electric shock when removing a paper jam.
Label 1
High temperature inside. Do not touch parts in
this area, because there is a
danger of getting burned...................................
Label 2, 3
High temperature inside. Do not touch parts in
this area, because there is a
danger of getting burned...................................
Label 4, 5
High voltage inside. NEVER touch parts in this
area, because there is a danger of electric shock.
...........................................................................
NOTE: DO NOT remove these labels.
1-1
INSTALLATION PRECAUTIONS
■ Environment
CAUTION
• Avoid placing the copier on or in locations which are
unstable or not level. Such locations may cause the
copier to fall down or fall over. This type of situation
presents a danger of personal injury or damage to the
copier. .........................................................................
• Avoid locations with humidity or dust and dirt. If dust or
dirt become attached to the power plug, clean the plug
to avoid the danger of fire or electrical shock. ............
• Avoid locations near radiators, heaters, or other heat
sources, or locations near flammable items, to avoid
the danger of fire. ........................................................
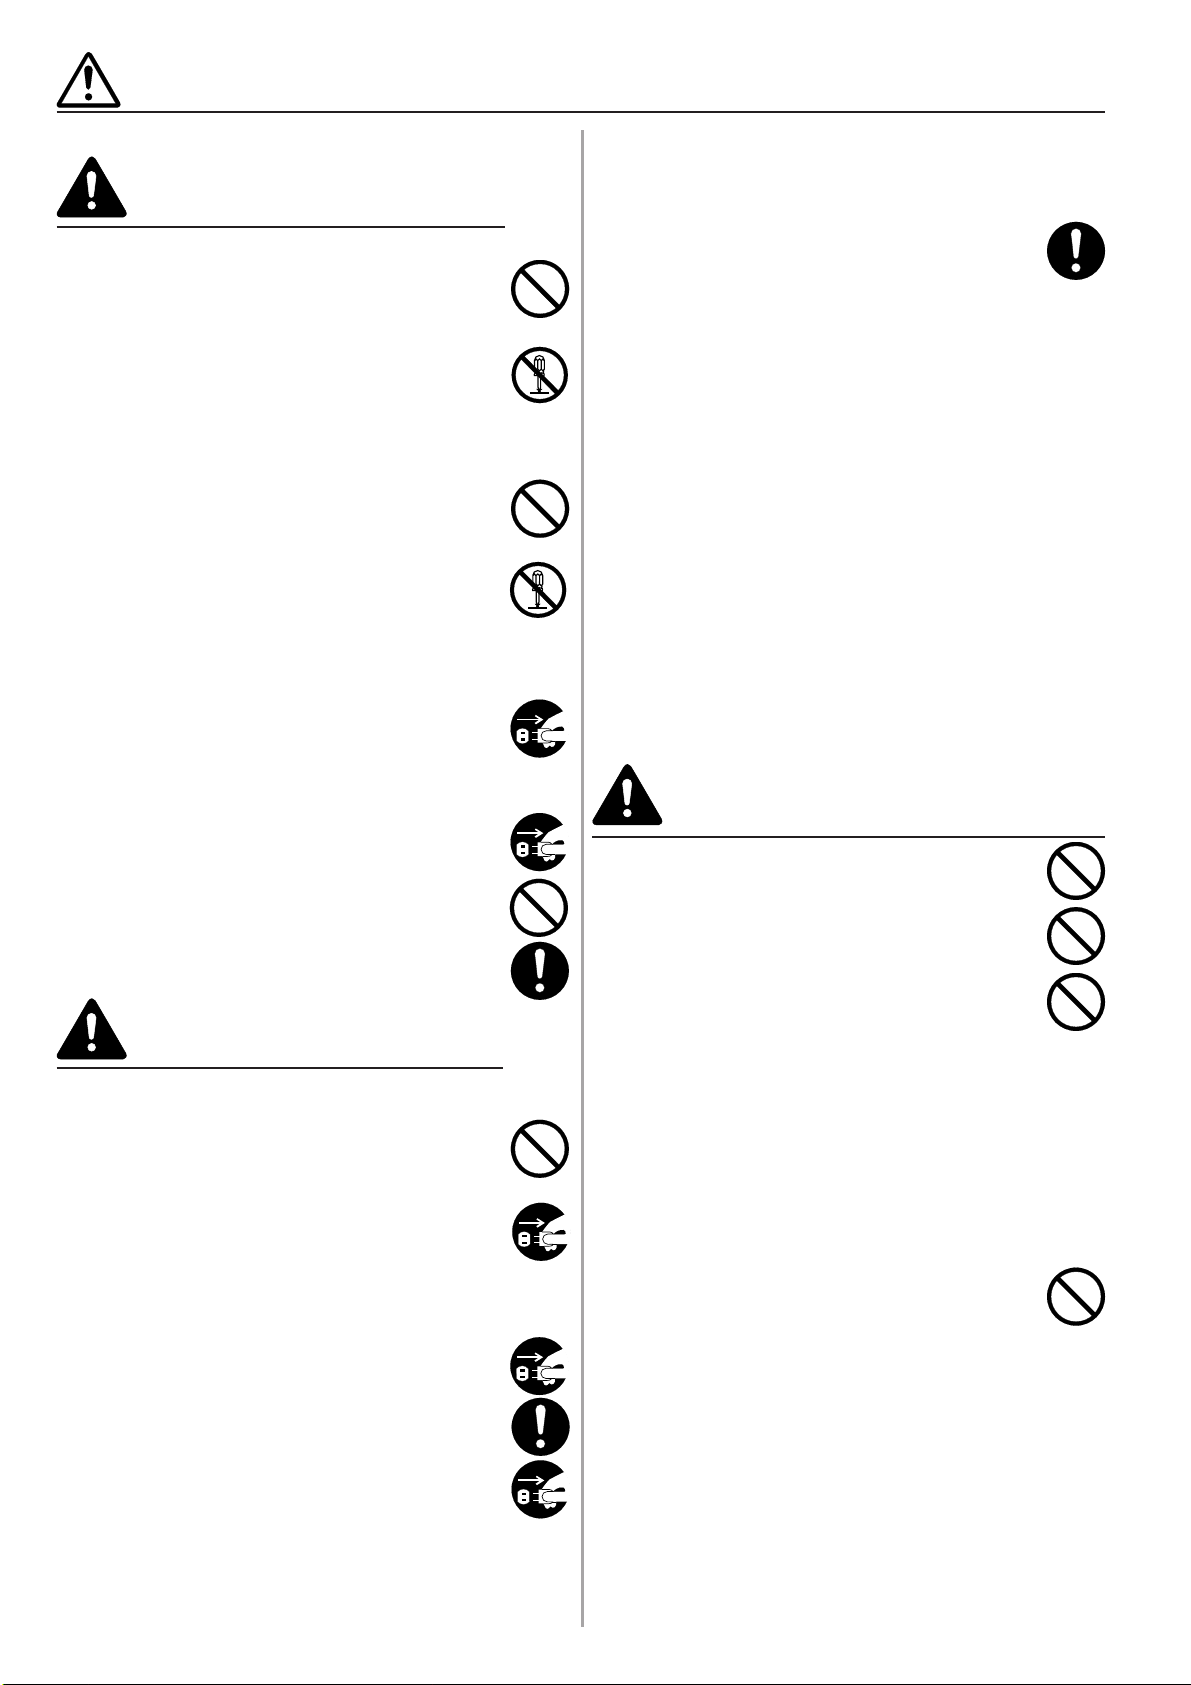
• To keep the copier cool and facilitate changing of
parts and maintenance, allow access space as shown
below.
Leave adequate space, especially around the left
right and rear covers, to allow air to be properly
ventilated out of the copier. ...................................
■ Power supply/Grounding the copier
• DO NOT use a power supply with a voltage other than
that specified. Avoid multiple connections in the same
outlet. These types of situations present a danger of
fire or electrical shock. ...............................................
• Plug the power cord securely into the outlet. If metallic
objects come in contact with the prongs on the plug, it
may cause a fire or electric shock. .............................
• Always connect the copier to an outlet with a ground
connection to avoid the danger of fire or electrical shock
in case of an electric short. If an earth connection is
not possible, contact your service representative. .....
Other precautions
• Connect the power plug to the closest outlet possible to
the copier.
• The power supply cord is used as the main disconnect
device. Ensure that the socket/outlet is located/installed
near the equipment and is easily accessible.
WARNING
• Always use the caster stoppers to stabilize the copier
once it is in place to keep it from moving and/or falling
over and causing injury...............................................
Other precautions
• Adverse environmental conditions may affect the safe
operation and performance of the copier. Install in an
air-conditioned room (recommended room temperature:
around 68°F[20°C], humidity: around 65%RH) and avoid
the following locations when selecting a site for the
copier.
. Avoid locations near a window or with exposure to
direct sunlight.
. Avoid locations with vibrations.
. Avoid locations with drastic temperature fluctuations.
. Avoid locations with direct exposure to hot or cold air.
. Avoid poorly ventilated locations.
■ Handling of plastic bags
WARNING
• Keep the plastic bags that are used with the copier away
from children. The plastic may cling to their nose and
mouth causing suffocation..........................................
• If the floor is delicate against casters, when this product
is moved after installation, the floor material may be
damaged.
• During copying, some ozone is released, but the amount
does not cause any ill effect to one's health. If, however,
the copier is used over a long period of time in a poorly
ventilated room or when making an extremely large
number of copies, the smell may become unpleasant.
To maintain the appropriate environment for copy work,
it is suggested that the room be properly ventilated.
1-2
PRECAUTIONS FOR USE
■ Cautions when using the copier
WARNING
• DO NOT place metallic objects or containers with water
(flower vases, flower pots, cups, etc.) on or near the
copier. This type of situation presents a danger of fire
or electrical shock should they fall inside. ...................
• DO NOT remove any of the covers from the copier as
there is a danger of electrical shock from high voltage
parts inside the copier. ................................................
• DO NOT damage, break or attempt to repair the power
cord. DO NOT place heavy objects on the cord, pull it,
bend it unnecessarily or cause any other type of damage.
These types of situations present a danger of fire or
electrical shock. ..........................................................
• NEVER attempt to repair or disassemble the copier or
its parts as there is a danger of fire, electrical shock or
damage to the laser. ...................................................
• If the copier becomes excessively hot, smoke appears
from the copier, there is an odd smell, or any other
abnormal situation occurs, there is a danger of fire or
electrical shock. Turn the main switch OFF (O)
immediately, remove the power plug from the outlet and
contact your service representative. ...........................
• If anything harmful (paper clips, water, other fluids, etc.)
falls into the copier, turn the main switch OFF (O)
immediately. Next, remove the power plug from the
outlet to avoid the danger of fire or electrical shock. Then
contact your service representative. ...........................
• DO NOT remove or connect the power plug with wet
hands, as there is a danger of electrical shock. ..........
• ALWAYS contact your service representative for
maintenance or repair of internal parts. ......................
CAUTION
• DO NOT pull the power cord when removing it from the
outlet. If the power cord is pulled, the wires may become
broken and there is a danger of fire or electrical shock.
(ALWAYS grasp the power plug when removing the
power cord from the outlet.) ........................................
• ALWAYS remove the power plug from the outlet when
moving the copier. If the power cord is damaged, there
is a danger of fire or electrical shock. .........................
• If the copier will not be used for a short period of time
(overnight, etc.), turn the main switch OFF (O).
If it will not be used for an extended period of time
(vacations, etc.), remove the power plug from the outlet
for safety purposes during the time the copier is not in
use. .............................................................................
• When moving the copier, turn the leveler bolts to keep
them away from the floor. ...........................................
For safety purposes, ALWAYS remove the power plug
•
from the outlet when performing cleaning operations. ..
• If dust accumulates within the copier, there is a danger
of fire or other trouble. It is therefore recommended that
you consult with your service representative in regard
to cleaning of internal parts. This is particularly effective
if accomplished prior to seasons of high humidity.
Consult with your service representative in regard to
the cost of cleaning the internal parts of the copier. ...
Other precautions
• DO NOT place heavy objects on the copier or cause
other damage to the copier.
• DO NOT open the front cover, turn off the main switch,
or pull out the power plug during copying.
• When lifting or moving the copier, contact your service
representative.
• Do not touch electrical parts, such as connectors or
printed circuit boards. They could be damaged by static
electricity.
• DO NOT attempt to perform any operations not
explained in this handbook.
• CAUTION : Use of controls or adjustments or
performance of procedures other than those specified
herein may result in hazardous radiation exposure.
■ Cautions when handling
consumables
CAUTION
• DO NOT attempt to incinerate the toner bottles or the
waste toner tank. Dangerous sparks may cause burns.
• Keep the toner bottles and the waste toner tank out of
the reach of children. ..................................................
• If toner happens to spill from the toner bottles or the
waste toner tank, avoid inhalation and ingestion, as well
as contact with your eyes and skin. ............................
.
If you do happen to inhale toner, move to a place with
fresh air and gargle thoroughly with a large amount of
water. If coughing develops, contact a physician.
.
If you do happen to ingest toner, rinse your mouth out
with water and drink 1 or 2 cups of water to dilute the
contents of your stomach. If necessary, contact a
physician.
.
If you do happen to get toner in your eyes, flush them
thoroughly with water. If there is any remaining
tenderness, contact a physician.
.
If toner does happen to get on your skin, wash with
soap and water.
• DO NOT attempt to force open or destroy the toner
bottles or the waste toner tank. ...................................
Other precautions
• After use, ALWAYS dispose of the toner bottles and the
waste toner tank in accordance with Federal, State and
Local rules and regulations.
• Store all consumables in a cool, dark location.
• If you will not be using the copier for a prolonged period
of time, remove all paper from the roll unit and seal in
its original packaging.
1-3
CHAPTER 2 NAMES OF PARTS
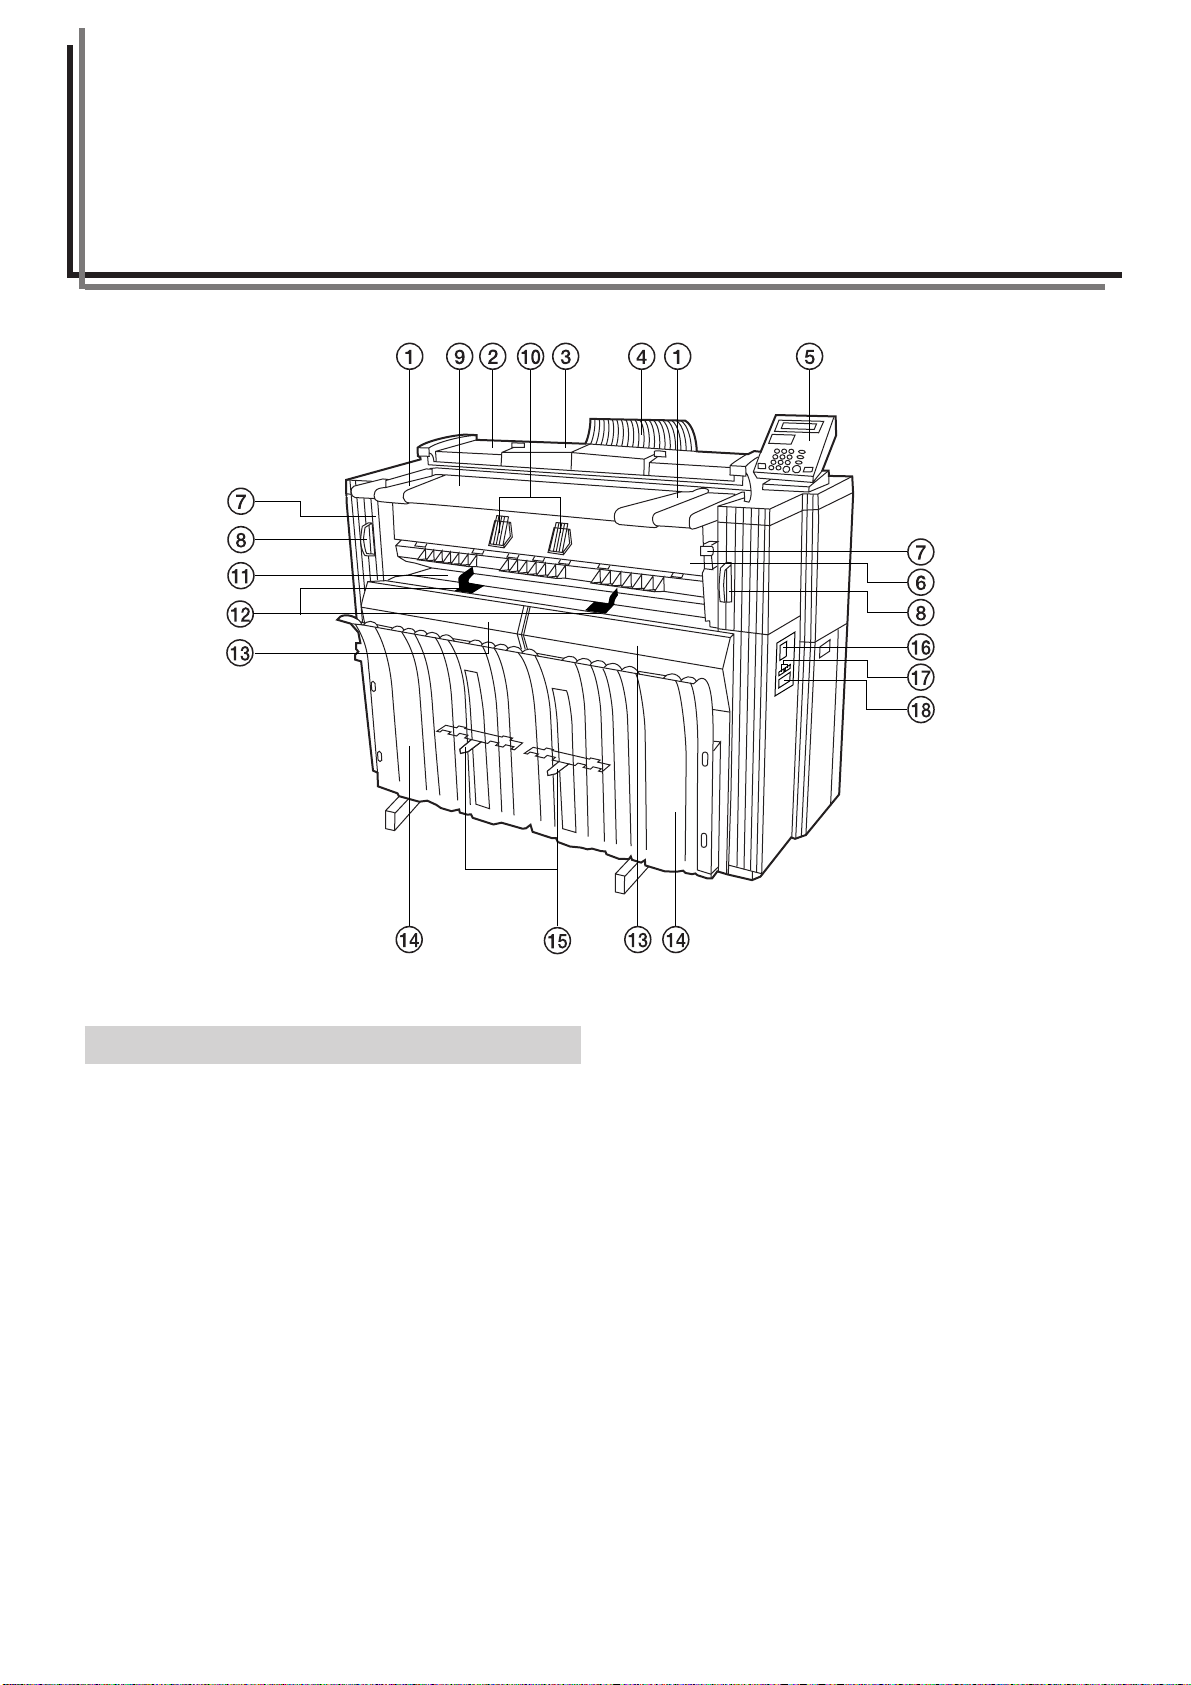
(1) Main body
1 Original guide
2 Original cover
3 Original leading edge cover
Open to set an original with precision.
4 Original loop guide
5 Operation panel
6 Ejection cover
Open in the case of a paper jam.
7 Ejection release lever
Operate this lever in the case of a paper jam.
8 Main body release lever
Operate this lever in the case of a paper jam.
9 Original table
0 Original holders
A long rolled original can be set.
! Bypass table
@ Bypass guide
# Front cover
Open to set paper roll or in the case of a paper jam.
$ Copy tray
Copies are delivered here.
% Copy tray support plate
Set in accordance with the paper size for copying.
^ Main power switch
& T otal counter
This indicates the paper output length.
* Key counter insert slot
When a key counter (option) is installed, set the key counter here.
2-1

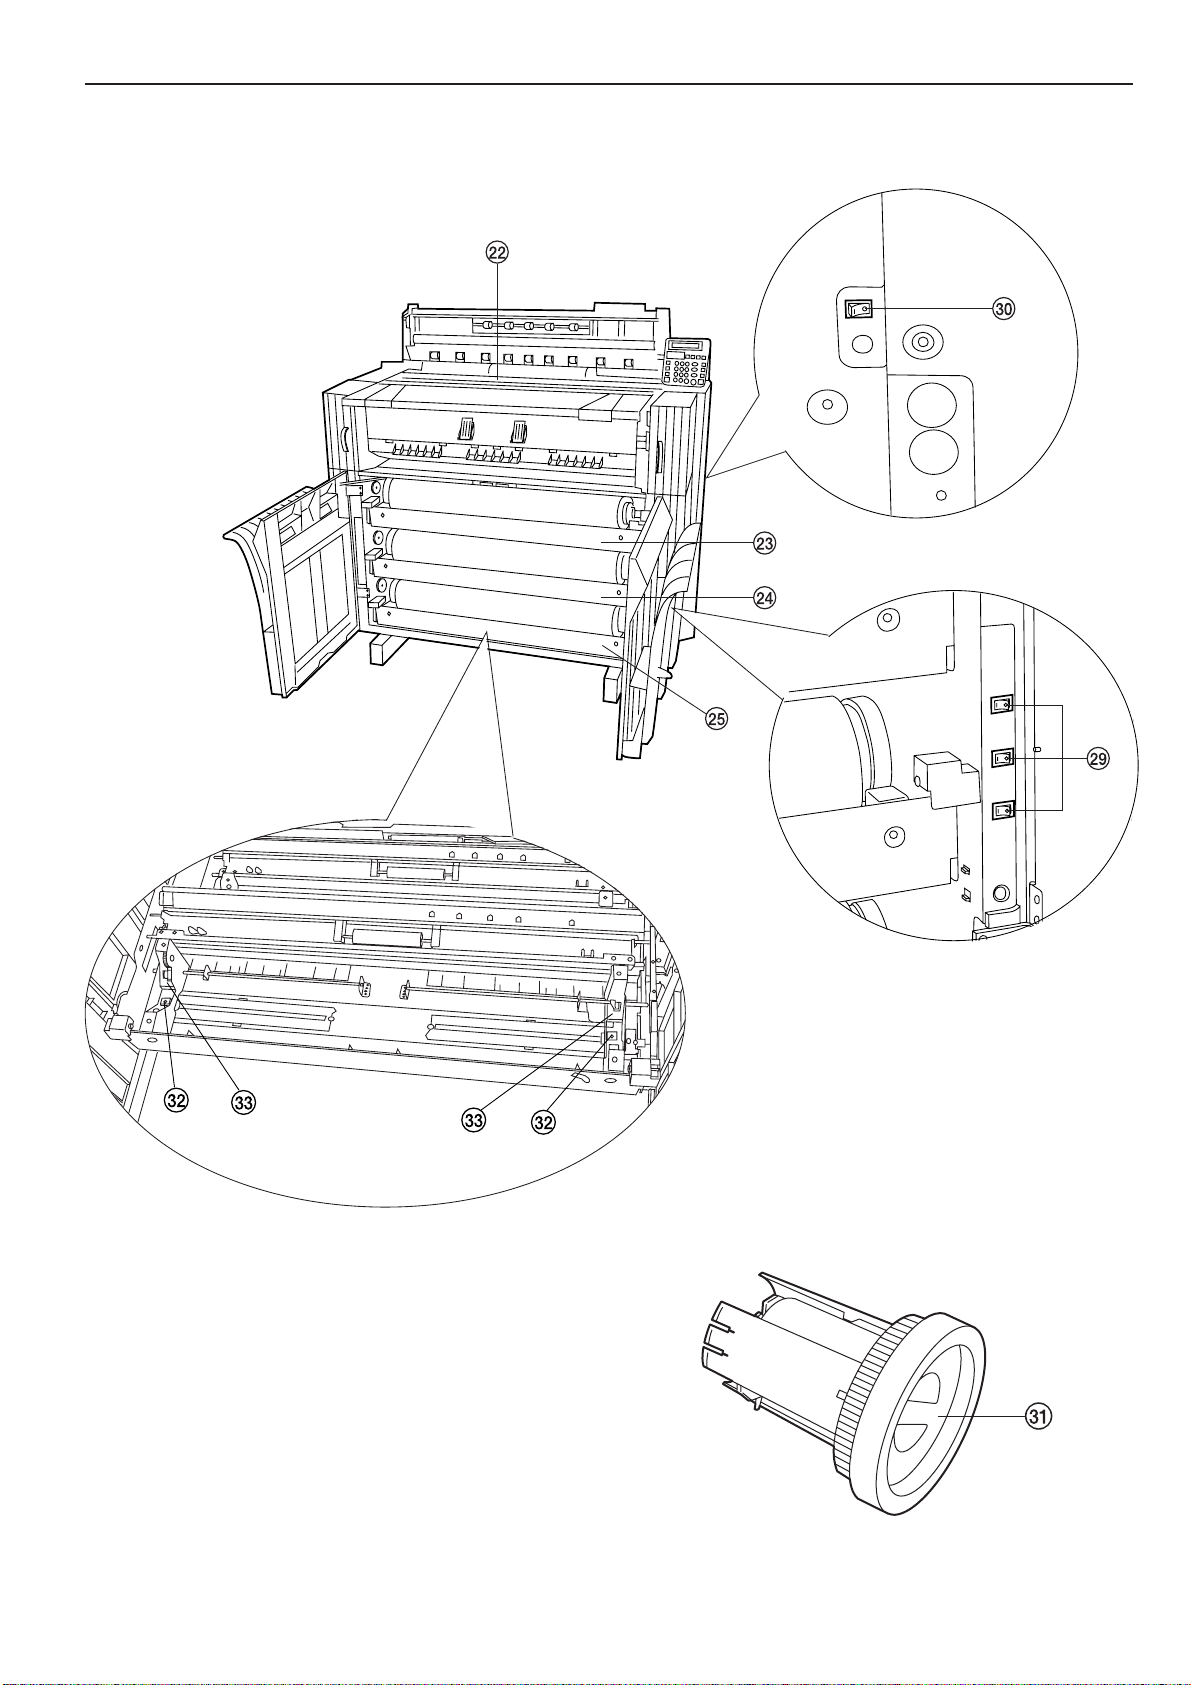
CHAPTER 2 NAMES OF PARTS
( Right cover
Open to replace the waste toner tank.
) Toner replenishing slot
Open to add toner.
⁄ Toner replenishing slot screw
Turn to open the toner replenishing slot.
¤ Contact glass (Originals are scanned here.)
‹ Roll unit (paper source 1: option)
› Roll unit (paper source 2)
fi Roll unit (paper source 3)
fl Instruction handbook box
Keep the instruction handbook here.
‡ Waste toner tank
— Paper transport knob
Operate this knob in the case of a paper jam.
· Dew prevention heater switches
Switches for paper sources 1, 2, and 3 from the top.
‚ Main heater switch
If this switch is turned off, the dew prevention heaters will be turned
off even if the de w prevention heater switches inside the front cover
are on.
ΠFlanges
Set these on both sides of paper roll.
„ Release levers
´ Flange guides
2-2
CHAPTER 2 NAMES OF PARTS
2-3
CHAPTER 2 NAMES OF PARTS
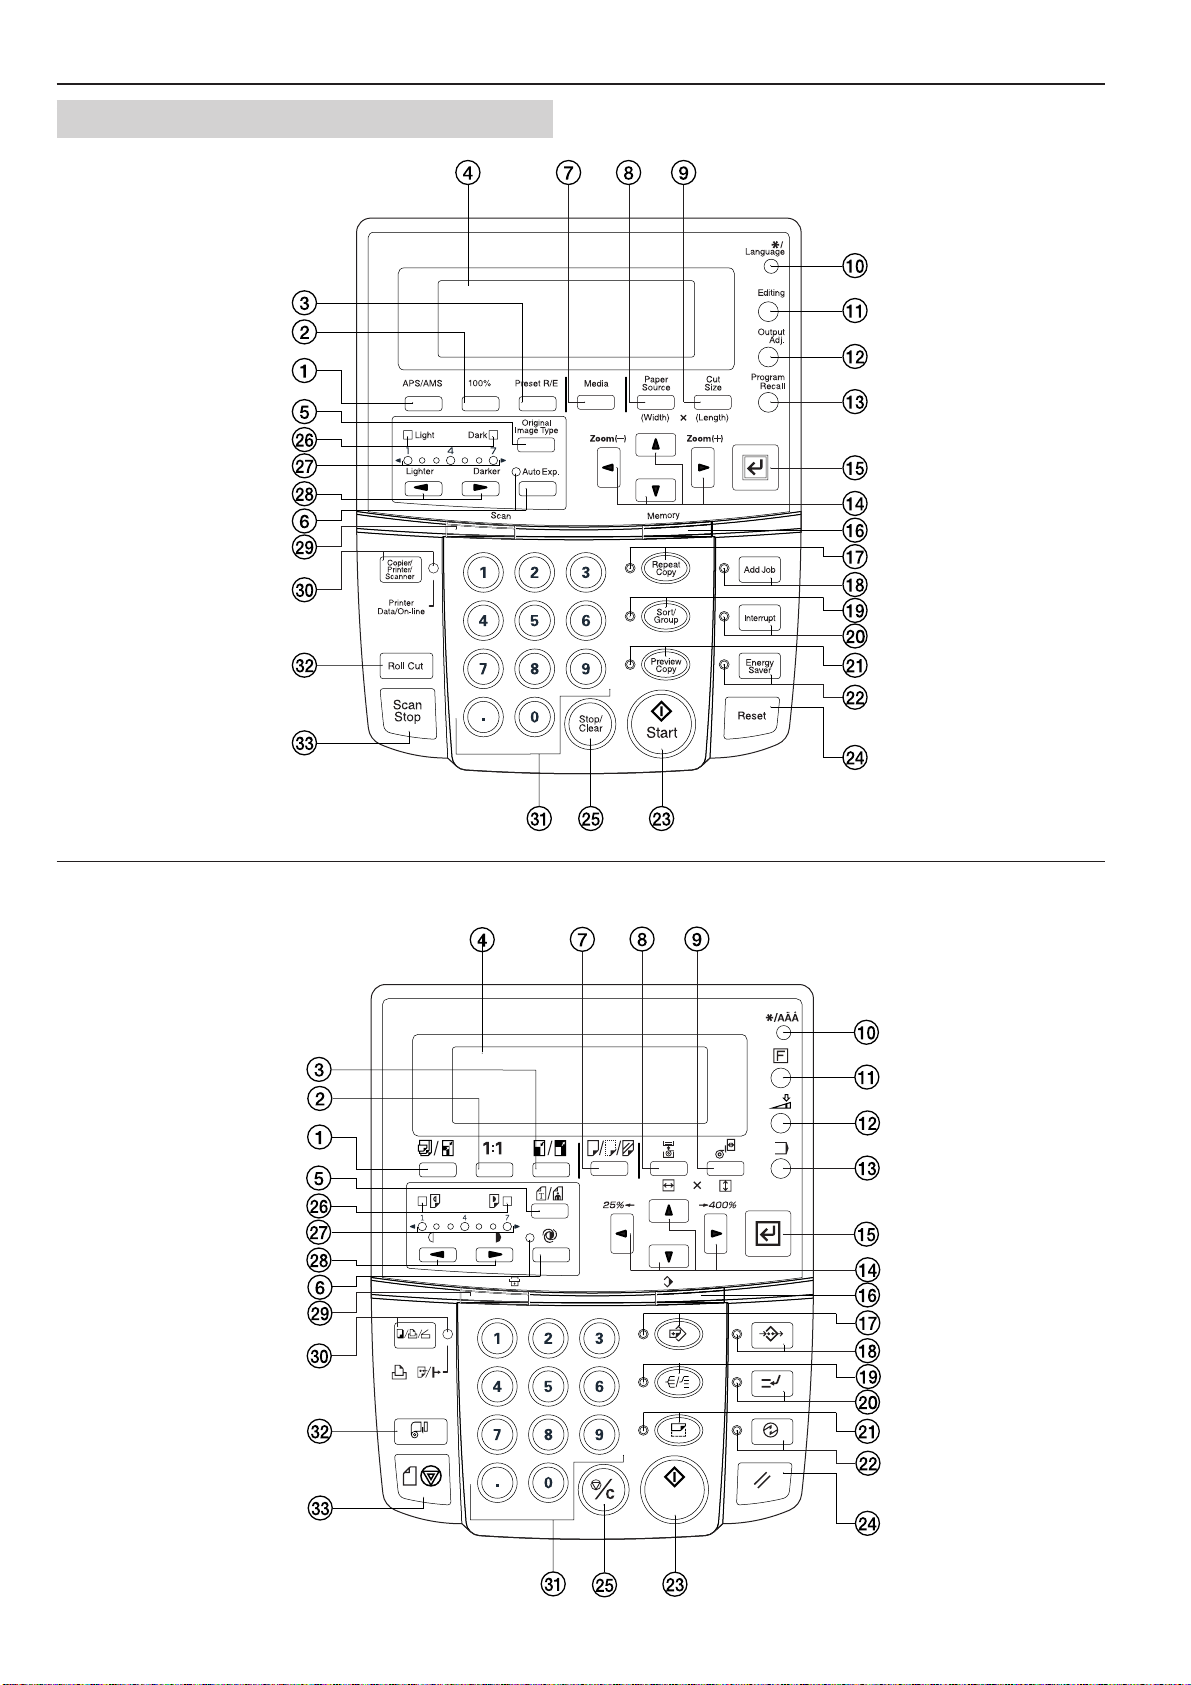
(2) Operation panel
Inch
Metric
2-4

CHAPTER 2 NAMES OF PARTS
1 APS/AMS key
(Press this key to switch between the auto paper selection mode
and the auto zoom mode. Page 4-4)
2 100% key
(Press this key to set the magnification ratio to 100% for copying.)
3 Preset R/E key
(Press this key to change the magnification ratio for copying. Page
5-1)
4 Message display
(Copy conditions and errors such as a paper jam are displayed
here.
NOTE: When using the copier at a low temperature of lower than
41°F [5°C], the display may not be clearly seen. In this case,
adjust the contrast using “5 Display contrast” of the default
setting. Page 7-1)
5 Original Image Type key
(Press this key to select an original type from normal original, text,
and photo. Proper image processing based on the original type will
be performed. Page 4-2)
6 Auto Exp. key/indicator
(Press this key to set the exposure automatically. Page 4-3)
7 Media key
(Press this key to select a paper material from bond paper, vellum,
film, and custom. Page 4-2, 4-5)
8 Paper Source key
(Press this key to select a paper source from paper source 1
(option), paper source 2, paper source 3, and bypass. Page 4-2)
9 Cut Size key
(Press this key to select the cut size from the three types:
synchronized cut, standard size cut, and numeric key input
(custom size). Page 4-2, 4-6)
0 */Language key
(Press this key to register a default setting or a program or to
change the language.)
! Editing key
(Press this key to use an editing function such as image shift,
margin copy, border erase, mirror, and image rotation. Page 5-5)
@ Output Adj. key
(Press this key to use inclination adjustment, copy size fine
adjustment or fixing temperature fine adjustment. Page 6-1)
# Program Recall key
(Press this key to recall a registered program. Page 6-10)
$ ▲▼O P(cursor) keys
(Use these keys to select a choice in various setting modes. Also
use these keys to change the magnification ratio.)
% OK key
(Use to confirm the setting in various setting modes.)
^ Memory indicator
(Indicates the status of use of image memory.
Lit: Image has been stored in memory.
Off: No image is stored in memory.
Blinking: Image is being stored in memory.)
& Repeat copy key/indicator
(Press this key to make repeated copies. Page 6-4)
* Add job key/indicator
(Press this key to use the job reserve function. Page 6-7)
( Sort/Group key/indicator
(Press this key to select sort or group copy. The Sort/Group
indicator will light up. Page 5-12)
) Interrupt key/indicator
(Press this key to interrupt copying. The Interrupt indicator will light
up. Page 6-11)
⁄ Preview Copy key/indicator
(Press this key to make a sample copy. The Preview Copy
indicator will light up. Page 6-6)
¤ Energy Saver key/indicator
(Press this key to enter or exit the energy saver mode. The Energy
Saver indicator will light up. Page 4-1)
‹ Start key
(Press this key to start scanning or output.)
› Reset key
(Press this key to cancel the preset functions. Image data stored in
the image memory will also be cleared.)
fi Stop/Clear key
(Press this key to clear the number of copies or to stop copying in
progress.)
fl Light/Dark indicators
(Indicate the status of the manual exposure mode.
Light indicator is lit: standard light mode
Dark indicator is lit: standard dark mode
Page 4-3)
‡ Copy contrast indicators
(Indicate the copy contrast in the manual exposure mode. Left
indicators indicate lighter exposure levels and right indicators
indicate darker exposure levels.)
— Copy contrast keys
(Press to adjust the copy contrast in the manual exposure mode.
Page 4-3)
· Scan indicator
(Indicates the status of scanning of originals.)
Lit: Scanning is possible.
Off: Scanning is impossible.
Blinking: An original is being scanned.)
‚ Copier/Printer/Scanner key/indicator
(Press this key to switch to the printer or scanner mode when an
optional interface unit is installed. The indicator will light up.)
ΠNumeric keys
(Press these keys to enter the number of copies or other numerical
values.)
„ Roll Cut key
(Press this key when a new paper roll is set. Also press to cut
paper roll by force during output and to cancel copying. Page 4-2,
4-6)
´ Scan stop key
(Press this key to stop immediately transfer of originals. Page 4-9)
2-5
CHAPTER 2 NAMES OF PARTS
● Auto roll over function
If paper of the same size is set in multiple paper sources, when paper
runs out in a paper source during copying, another paper source will
be automatically selected and copying will continue. If an optional roll
unit is installed, the unit can also be used for this function similarly to
the standard roll units.
* This function can be enabled or disabled by using “$ Auto roll over”
of the default setting. (Page 7-3)
● Auto clear function
When one minute elapses after a copy run is complete, the machine
will automatically return to the initial settings.
* This function can be enabled or disabled by using “7 Auto Clear
Timer [Auto clear time]”. (Page 7-2)
* The time for this function can be set by using “9 Timer set”. (Page
7-2)
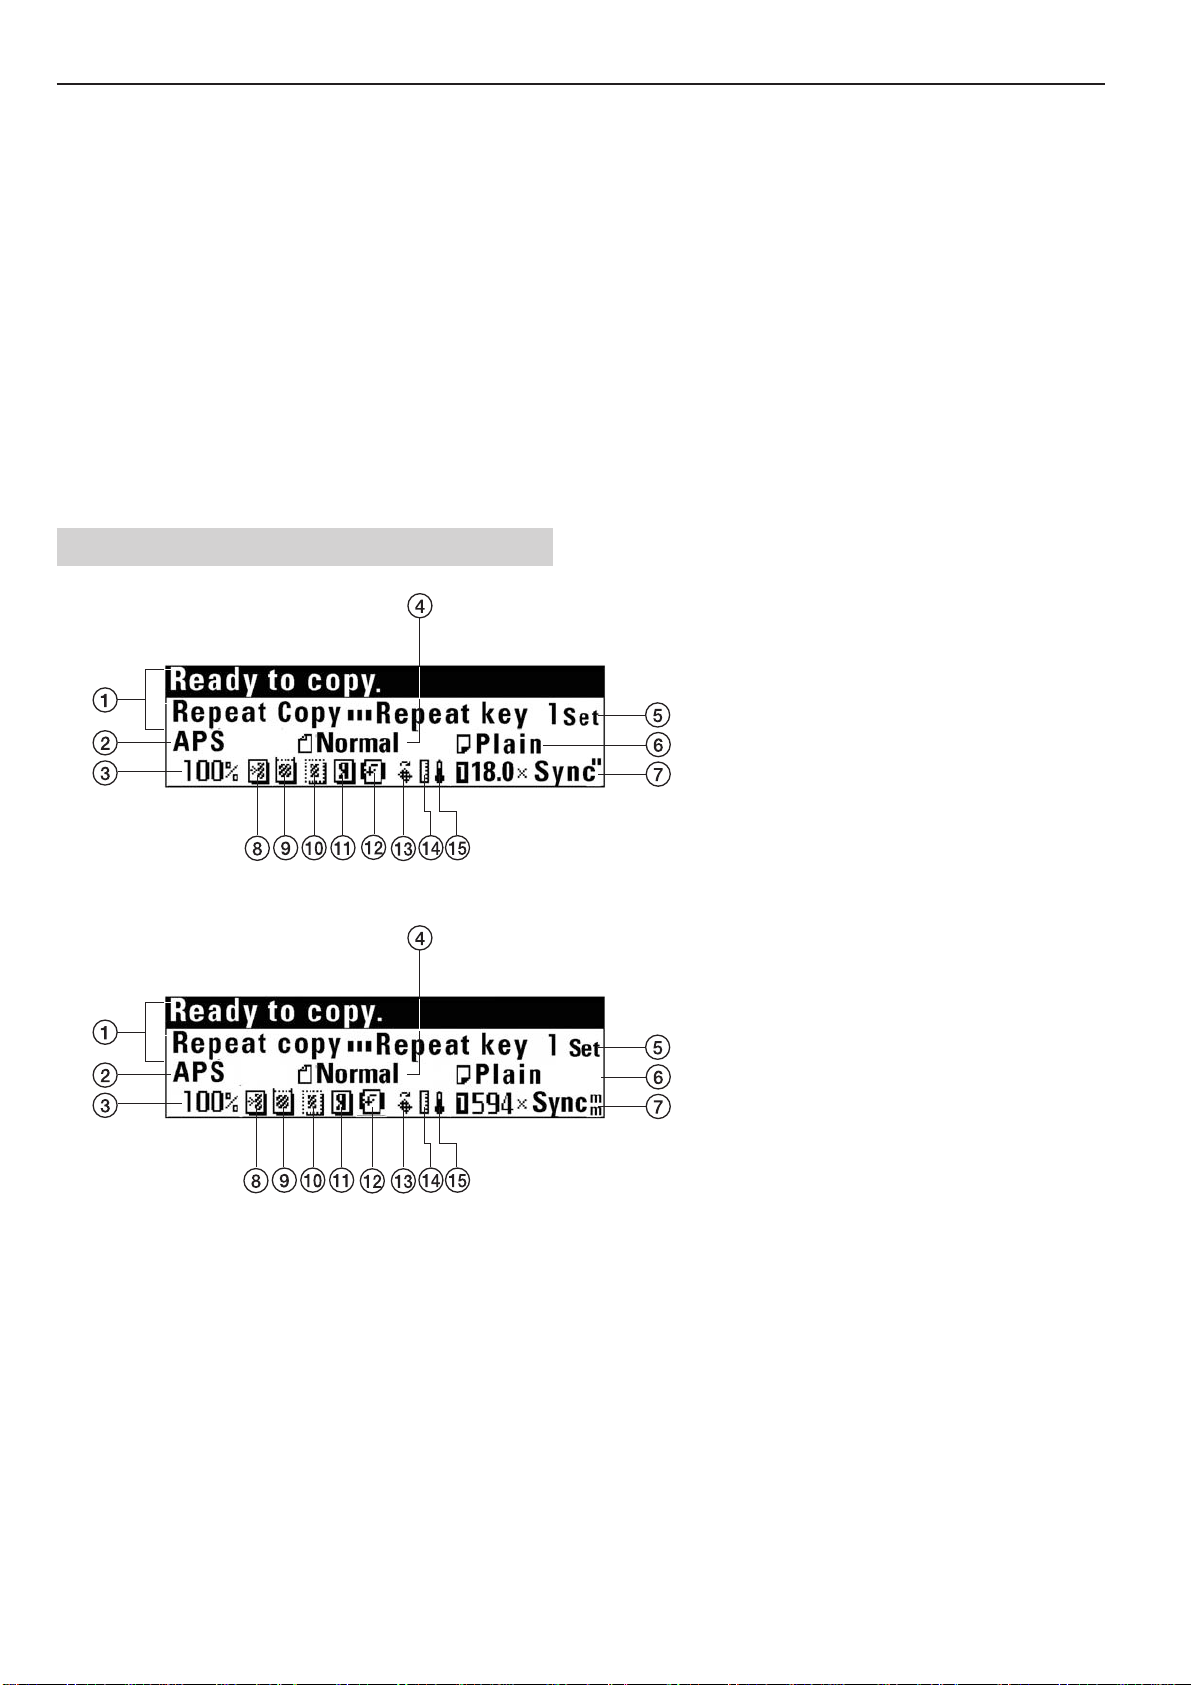
(3) Message display
(Inch)
(Metric)
1 Indicates the status of the machine and copying.
2 Indicates the copy mode.
“APS”: Auto paper selection mode
“AMS”: Auto zoom mode
3 Indicates the magnification ratio.
4 Indicates the type of originals.
“Normal”, “Text/Line” or “Photo”
5 Indicates the number of copies.
6 Indicates the paper material.
“Plain”, “Vellum “, “Film” or “Custom”
7 Indicates the paper size and paper sources.
● Currently set copier features and adjustment features
8 Image shift setting
9 Margin copy setting
0 Border erase setting
! Mirror setting
@ Image rotation setting
# Inclination adjustment
$ Copy size fine adjustment
% Fixing temperature fine adjustment
2-6
CHAPTER 3 PREPARATIONS
1. Originals
(1) Type of originals
Note the following restrictions on the originals that can be used in this
machine.
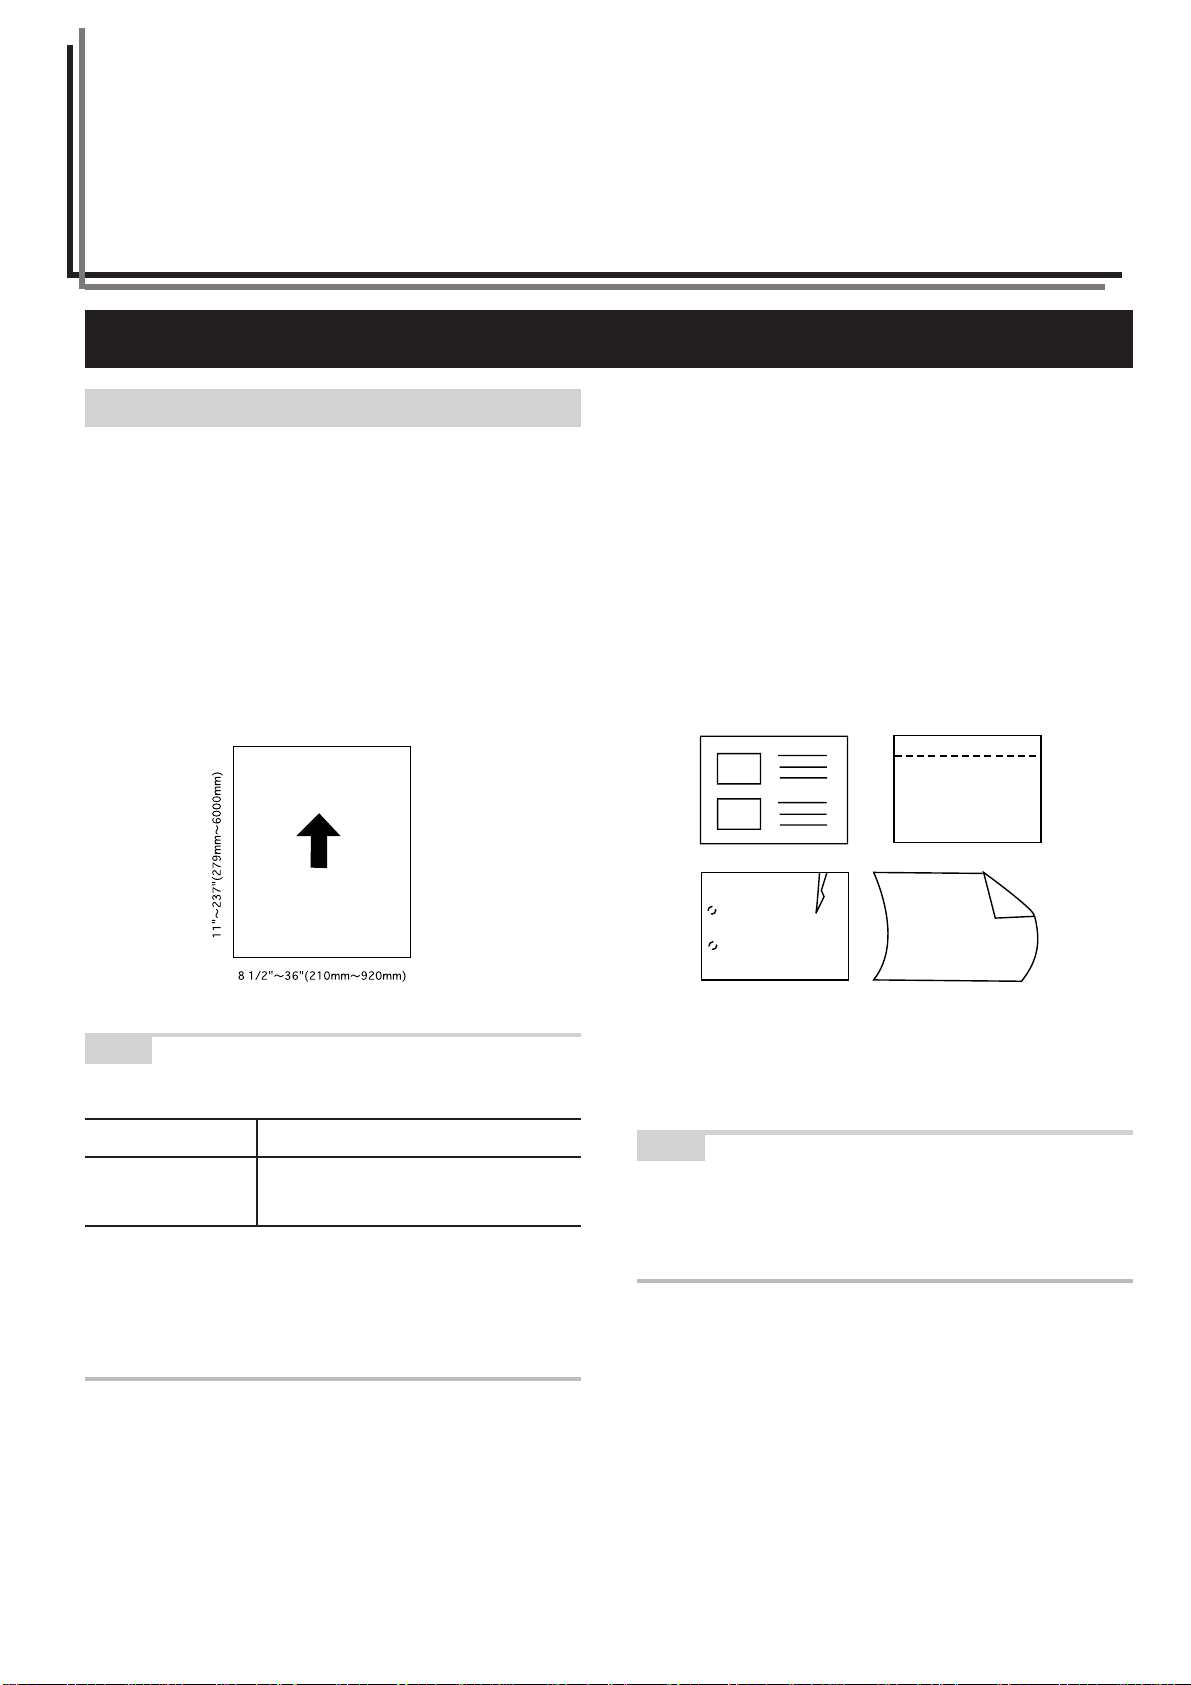
● Acceptable originals
• Only sheet type originals can be used.
• Original sizes in standard sizes are 8 1/2" x 11" to 36" x 48" [A4
portrait to A0]
• Original thickness is 64 to 80 g/m2.
• Original length is 11" to 237" [279 to 6000 mm].
• Original width is 8 1/2" to 36" [210 to 920 mm].
● Carrier sheet (option)
Use the carrier sheet when copying from the following types of
originals. It is also recommended for use with any other delicate or
important originals or when making multiple copies from the same
originals. For explanation on how to use the carrier sheet, see
“(5)Carrier Sheet (option)”. (Page 3-3)
• Thin, flimsy or fragile originals
• Carbon paper
• Originals with severe wrinkles or folds
• Originals with punch holes or perforations
• Originals with other paper, etc., pasted on it
• Piled originals
NOTE
• Number of originals that can be scanned for sort copying (for
reference)
Memory compression setting Number of originals that can be scanned (36" x 48" [A0])
High-compression Approx. 8 sheets
Standard-compression Approx. 2 sheets
The number of originals above is a value for reference in case of
standard memory capacity (128 MB). The value varies with the
original feed conditions and the type of originals.
• The compression ratio of image data in memory can be changed by
using “( Memory compress” of the default setting. If “Lowcompression” is selected, addition of memory is needed.
NOTE
• When copying a film type original repeatedly, be sure to use the
carrier sheet to prevent soil due to static electricity.
• When copying an original on which text has been written in pencil, it is
recommended to use the carrier sheet to prevent soil of the original.
3-1
CHAPTER 3 PREPARATIONS
● Do not use the following originals.
• Originals of sizes other than the sizes described as acceptable
originals
• Originals with staples or clips
• Wet originals or originals with adhesive tape, or glue
• Originals with uneven thickness
• Original wet with ink or correction fluid
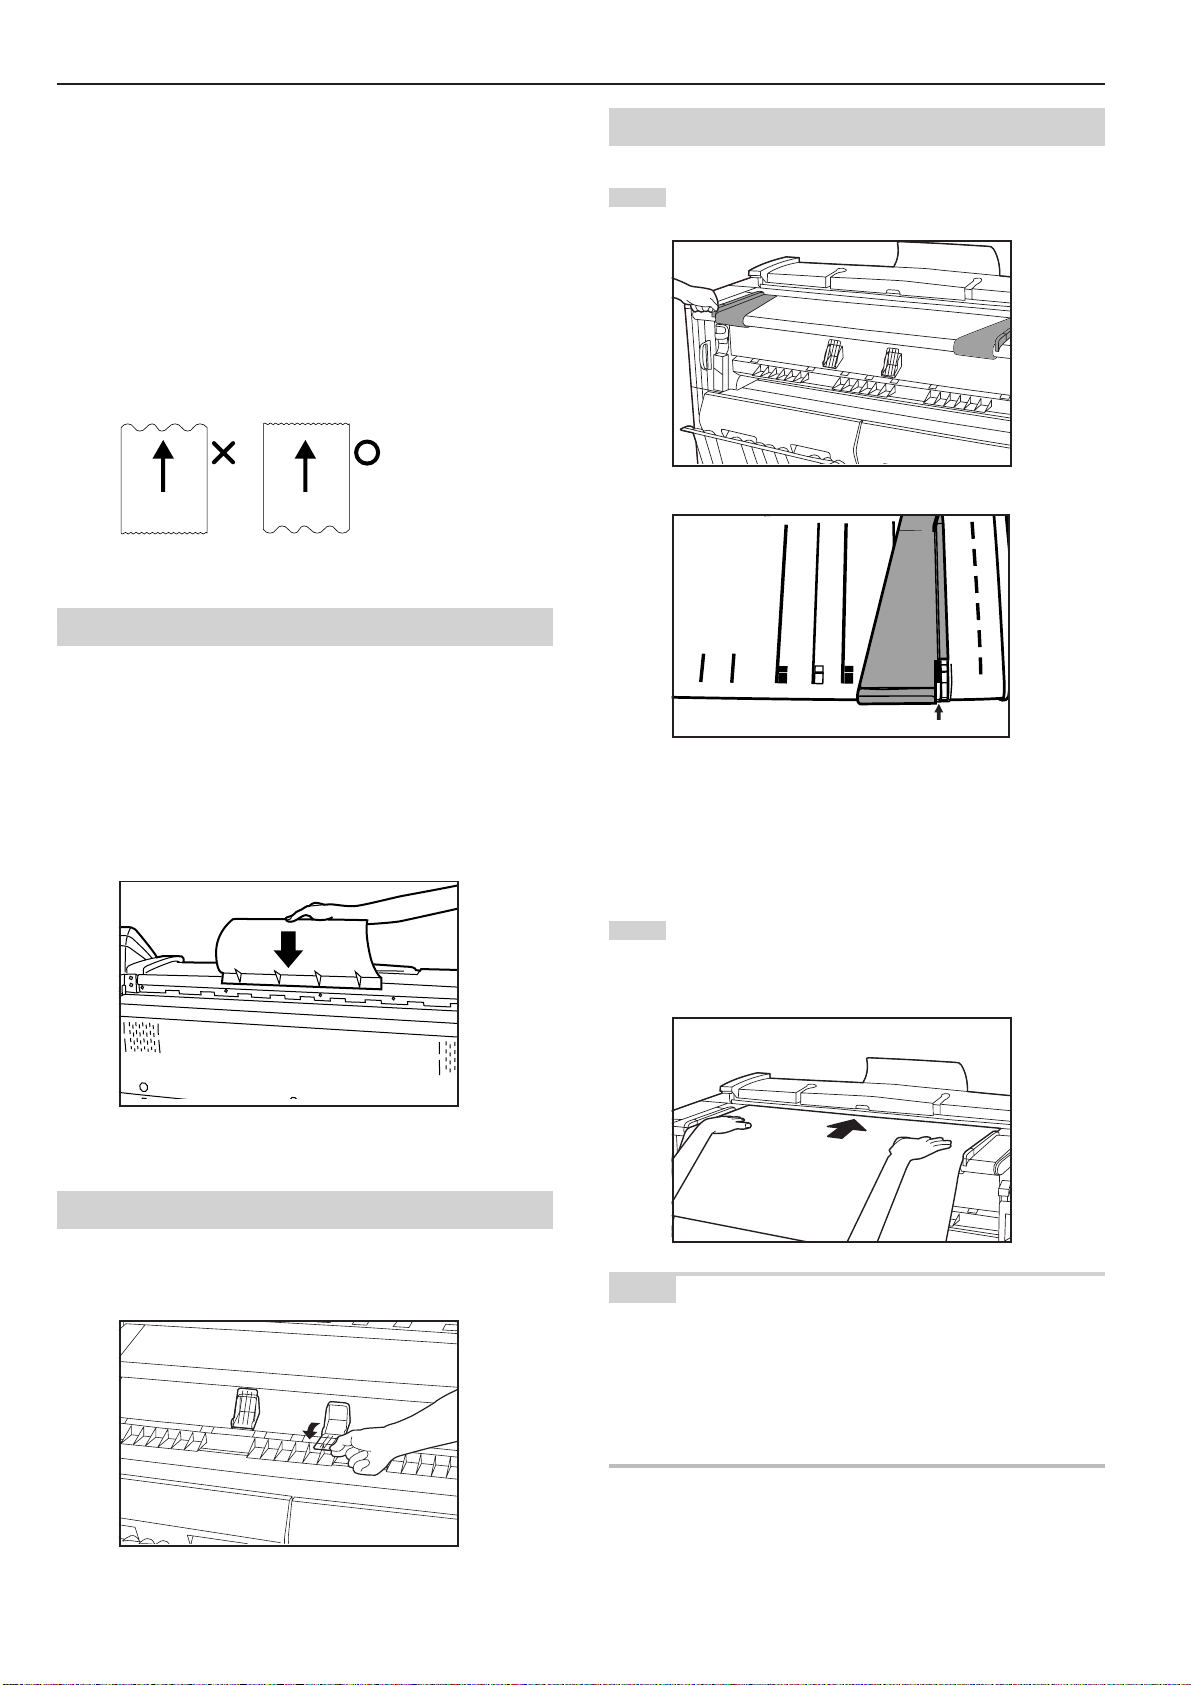
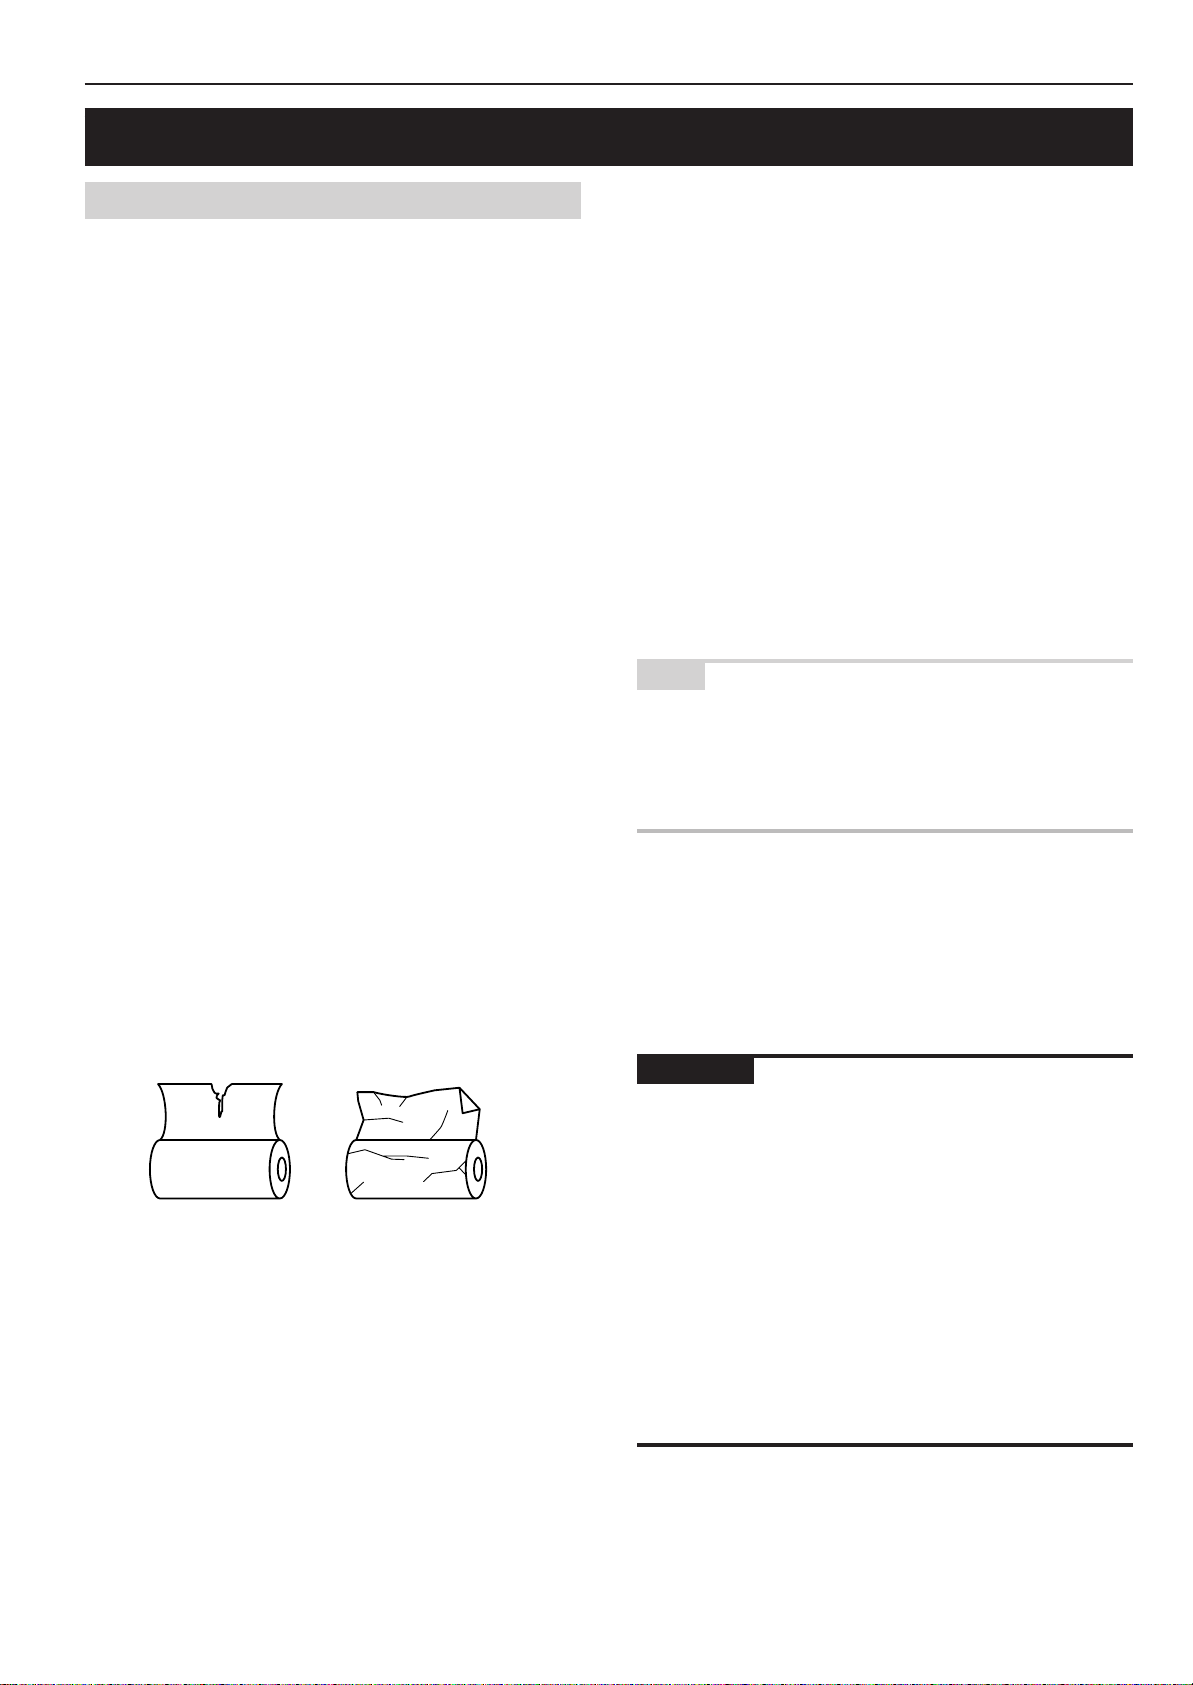
For originals processed around the edges, the leading and trailing
edges are wavy. Images in these areas may be isolated or missing. In
this case, set the original so that the edge that is less wavy is placed
as the leading edge.
(2) Setting the Original Loop Guide
The original loop guide returns the originals ejected to the rear of the
machine toward the front side.
* When using an original tray (option) or a carrier sheet (option) and
when “6 Orig.eject direct” of the default setting is set to “Discharge
to front”[Output to front], remove the original loop guide.
(4) How to Set an Original
Adjust both the original guides to the original size indications
1
on the original table.
Set the guide on the rear side of the machine.
(3) Setting the Original Holders
When copying a long rolled original, open the original holders on both
sides and use them.
Set an original face down. When automatic start is activated
2
or you press the Start key, scanning of the original will start.
Release the original when scanning starts.
NOTE
• When using an original of which the leading edge is easily curled,
the leading edge may be broken. Take care when using such
original.
• The method of starting copying varies with the “@ Method copy
start” of the default setting. (Page 7-5)
• To scan an original with precision, open the original leading edge cover
and place the original. See “● Setting the original with precision” .
3-2
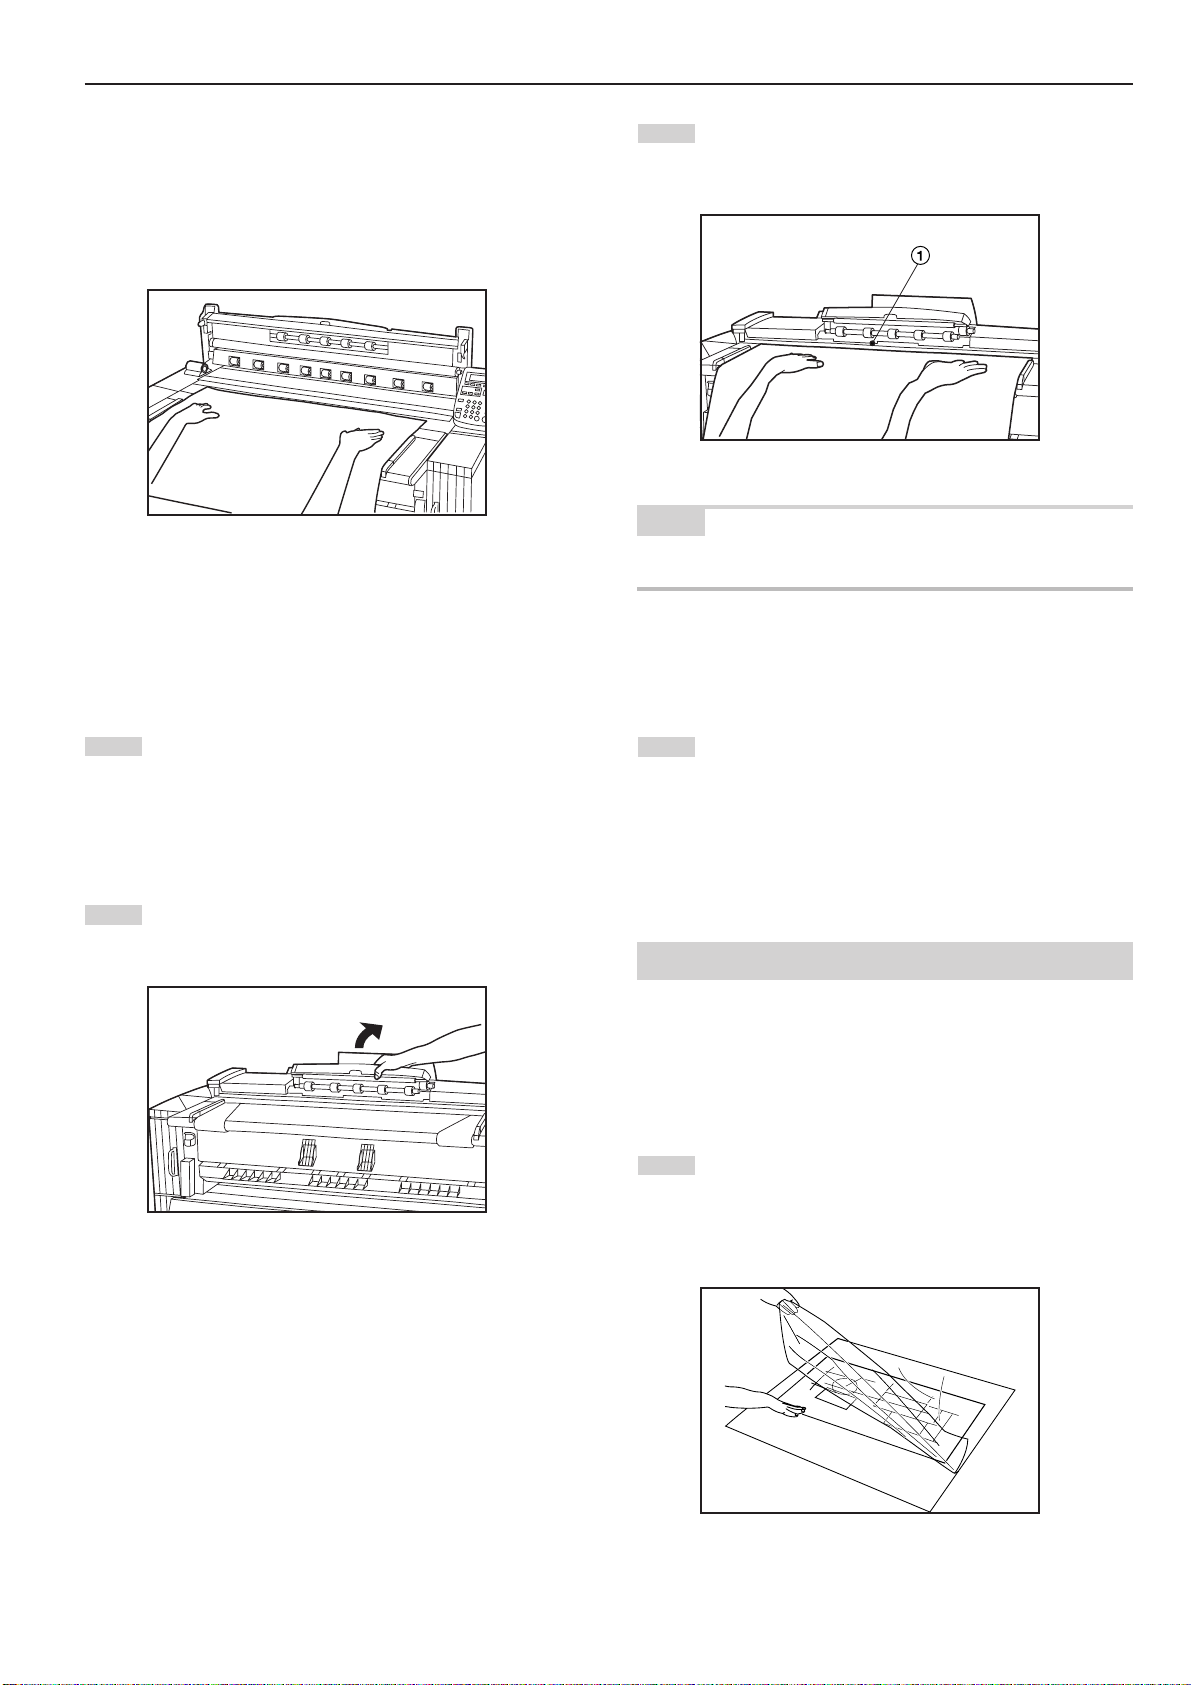
CHAPTER 3 PREPARATIONS
● When the original is curled:
Open the original cover and set the original a little shifted from the
position indicated by the original size indication toward the rear side
(roller position at the rear side).
* When closing the original cover, grasp it with both hands and close it
securely until it clicks.
● Setting the original with precision
When copying a long original particularly, set the original as follows.
Place the original face down and put the leading edge of the
3
original securely to the leading edge guide 1.
NOTE
• If the leading edge of the original is bulged at the leading edge guide,
the original may be fed obliquely. Take care in setting the original.
Adjust both the original guides to the original size indications
1
on the original table.
Open the original leading edge cover.
2
Close the original leading edge cover. Press the Start key to
4
start copying.
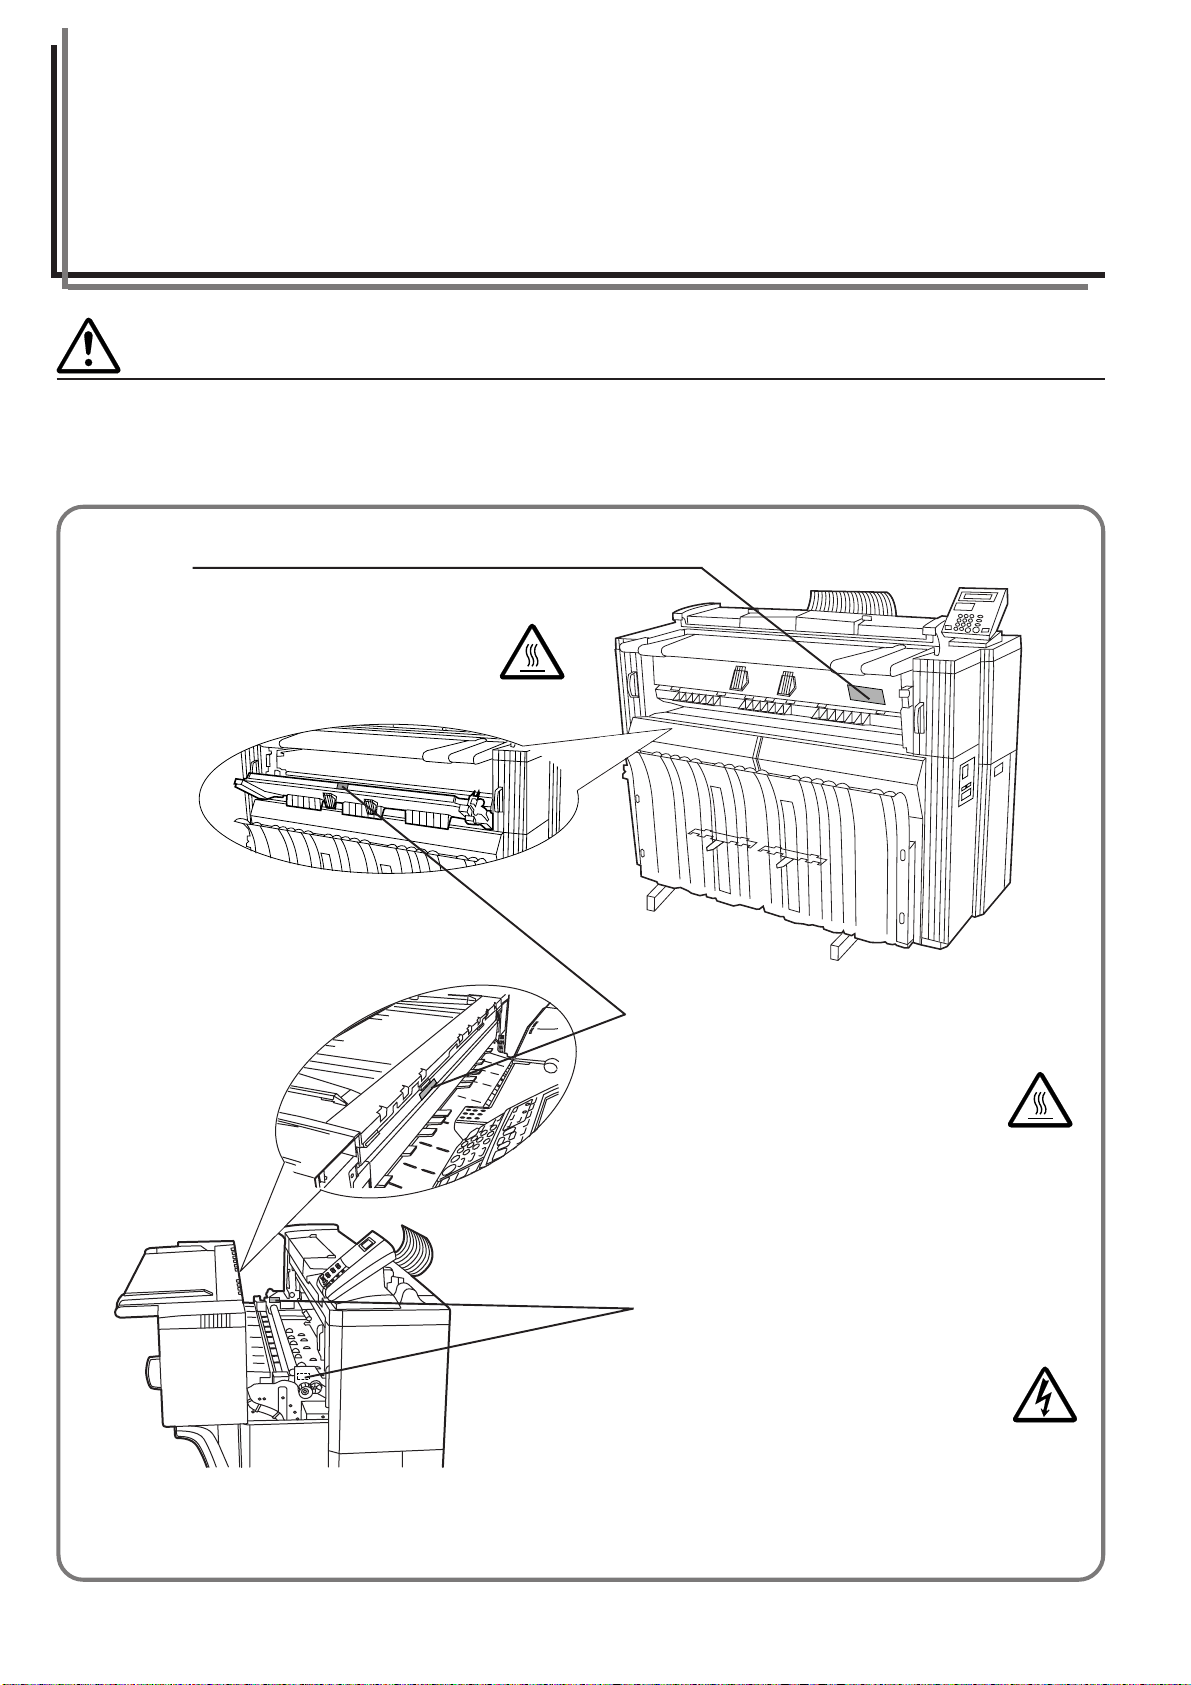
(5) How to Use the Carrier Sheet (option)
When using originals described in “Carrier sheet (option)”, use this
carrier sheet. (Page 3-1)
Carrier sheet sizes: 36" x 48", 24" x 36" (A0, A1, A2)
Open the carrier sheet by lifting up the transparent side and
1
place the original face up between the two sheets. Set the
original aligning it with the folding portion of the carrier sheet.
3-3
CHAPTER 3 PREPARATIONS
Set the original face down by placing the folding portion of
2
the carrier sheet first.
IMPORTANT
• When using the carrier sheet, set the “6 Orig.eject direct” of the
default setting (page 7-1) to “Discharge to back” [“Output to back”]. If
“Discharge to front” [“Output to front”] is set, the original may be
damaged.
• If synchronized cut is used in 100% copying, paper will be cut in length
of the carrier sheet.
NOTE
• When using the carrier sheet, set the original tray horizontally.
If the original tray is set horizontally, only one original can be stored.
(6) How to Use the Original Tray (option)
This tray will store up to 20 originals of 36" x 48" [A1] size.
3-4
2. Paper
CHAPTER 3 PREPARATIONS
(1) Paper Types
Note the following restrictions on paper that can be used in this
machine.
● Acceptable paper
1. Paper source 1 (option), paper source 2, and paper source 3
• Paper roll width: 17" to 36" [210 to 920 mm]
• Paper roll outer diameter: 6 3/4" [180 mm] or less
• Paper roll inner diameter: 3" [76 mm (75.2 to 77.2 mm)]
• Acceptable paper roll types
Plain paper (64 to 80 g/m
Vellum
Film
2. Bypass
Paper sizes (standard paper): 8 1/2" x 11" to 36" x 48" [A4 portrait
Paper width: 17" to 36" [210 to 920 mm]
Paper length: 11" to 48" [297 to 1189 mm]
Acceptable paper materials
Plain paper (64 to 80 g/m2)
Vellum
Film
2
)
to A0]
● Automatic paper width detection
If the paper roll that has been set is of a standard size, the paper
width will be automatically detected. The following sizes can be
detected.
Metric machine
<A sizes>
A0: 841 mm
A1: 594 mm
A2: 420 mm
A3: 297 mm
A4: 210 mm
<B sizes>
B1: 728 mm
B2: 515 mm
B3: 364 mm
B4: 257 mm
NOTE
• Automatic detection will not function for the bypass.
• Paper width of non-standard sizes can be registered. See “1 Paper
width adjustment” of the default setting. (Page 7-1)
• For switching of standard size (architecture/engineering [A sizes/ B
sizes]), select in “# Standard size set” of the default setting.
(Page 7-3)
Inch machine
<Architecture>
36"
30"
24"
18"
15"
12"
<Engineering>
34"
30"
22"
17"
15"
11"
● Unacceptable paper
• Paper other than the paper described in “● Acceptable paper”
• Paper with staples, etc.
• If paper is wrinkled, folded or broken, pull the paper roll until the
problem disappears and cut the paper before using it.
● Storage of paper
If the machine is not used for an extended period time, remove the
paper roll and return it to its original package and reseal it.
IMPORTANT
• Vellum
Since vellum is very susceptible to environment, when it is not used,
put it in a plastic bag and seal it.
• When using vellum at a high humidity or at a low temperature,
vellum will become fragile, resulting in wrinkles of copies or missing
of images. If images are not properly copied, perform the following
procedure.
* When using cut vellum:
Change the orientation of paper (portrait or landscape).
* When using vellum roll:
Pull out the paper roll by length of approximately one turn and cut the
paper before using it.
• When using paper roll with adhesive substance, remove the
adhesive substance or pull out the paper roll until the attached
adhesive substance is not seen and then cut the paper before using
it.
3-5
CHAPTER 3 PREPARATIONS
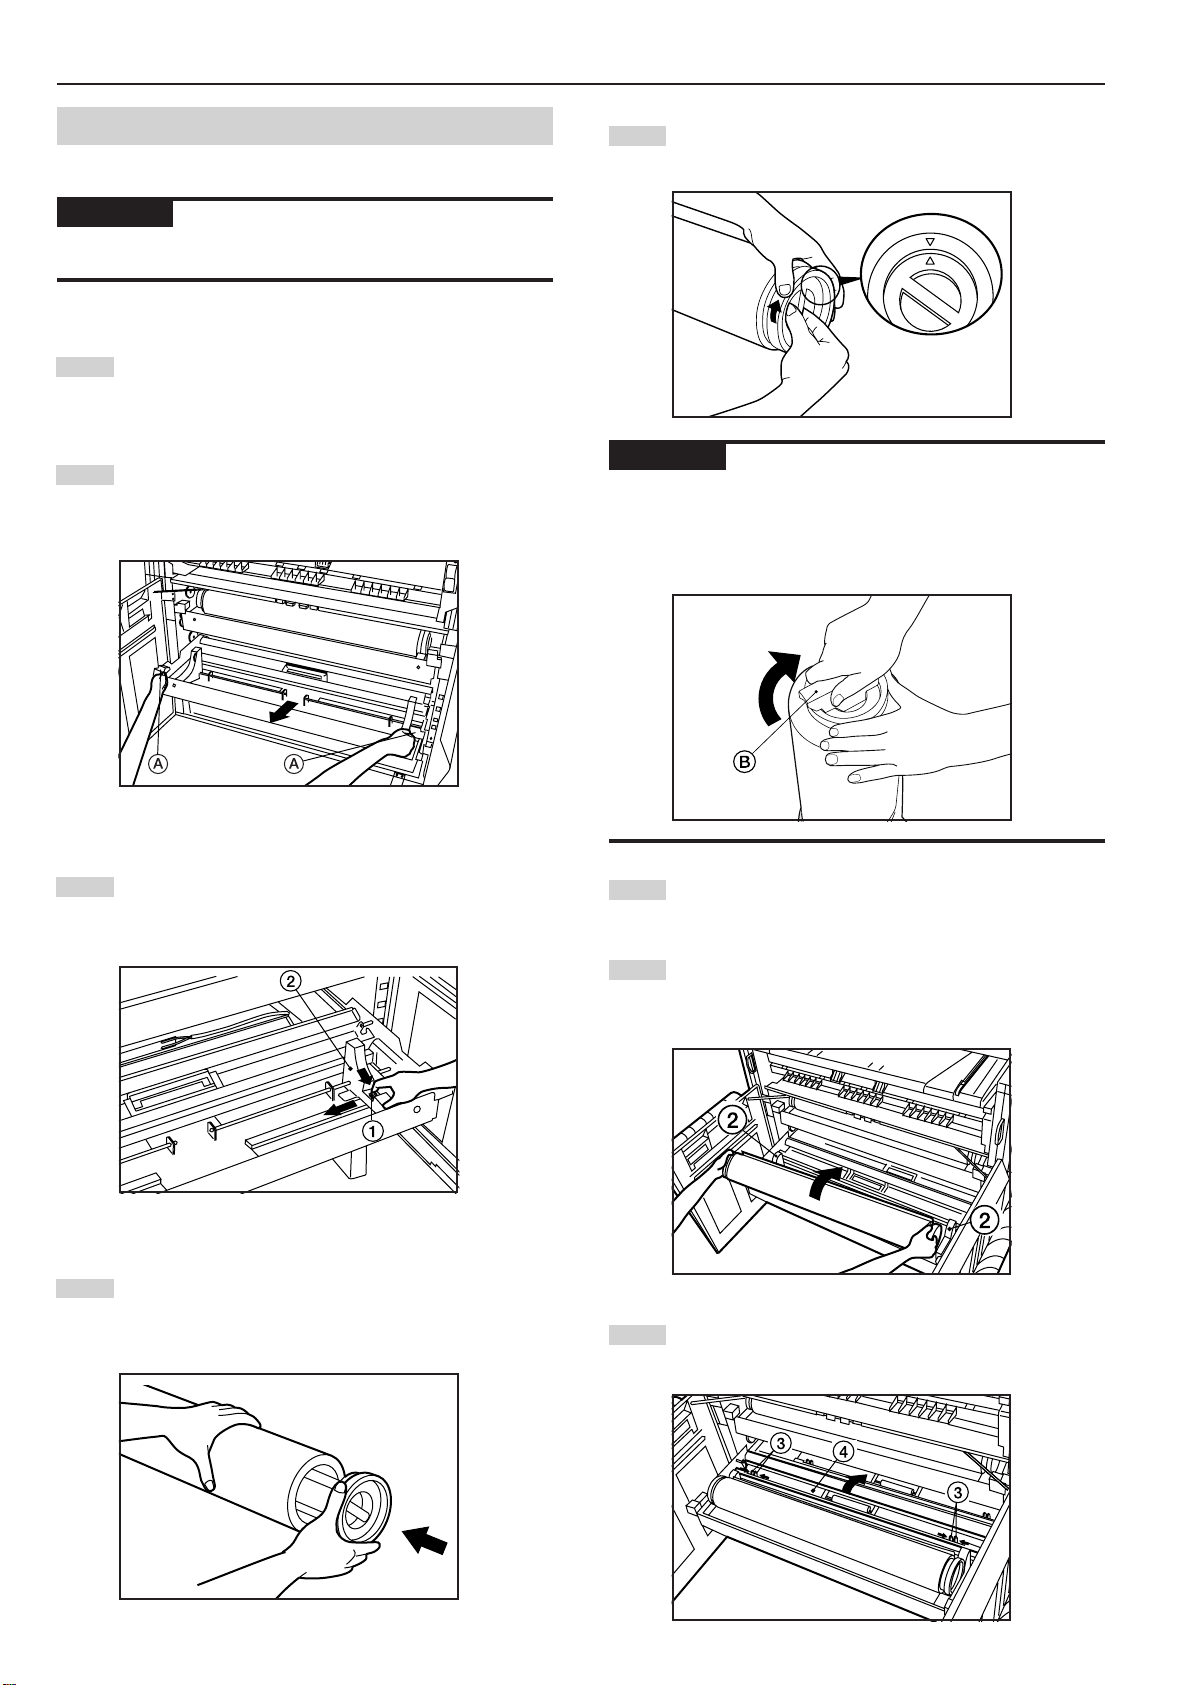
(2) How to Set Paper Roll
Use the same procedure when replacing paper roll.
IMPORTANT
• When replacing paper roll, turn the flanges on both sides to rewind the
paper.
Open the front cover until it locks.
1
Grasp the roll unit handles A to release the lock and pull out
2
the roll unit until it stops.
Grasp the flange and turn its lever in the direction indicated
5
by the arrow to align the inside and outside m marks on the
flange. The flange will be secured to the paper roll.
IMPORTANT
• If the lever of the flange is not easily turned, set the supplied flange
handle B and turn the flange handle in the direction indicated by
the arrow to align the inside and outside m marks on the flange.
* Also if the lever of the flange is not easily turned when the flange is
removed, use the flange handle.
Lift up the release levers 1 and adjust flange guides 2 on
3
both sides to the paper size.
Insert a supplied flange into the core of new roll.
4
Secure the other flange to the paper roll similarly.
6
Set the paper roll in the roll unit by aligning it with the flange
7
guides 2.
After setting the paper roll, check that the flange tray is not
moved.
Grasp both paper roll insertion latches 3 and open the
8
paper roll insertion cover 4.
3-6
CHAPTER 3 PREPARATIONS
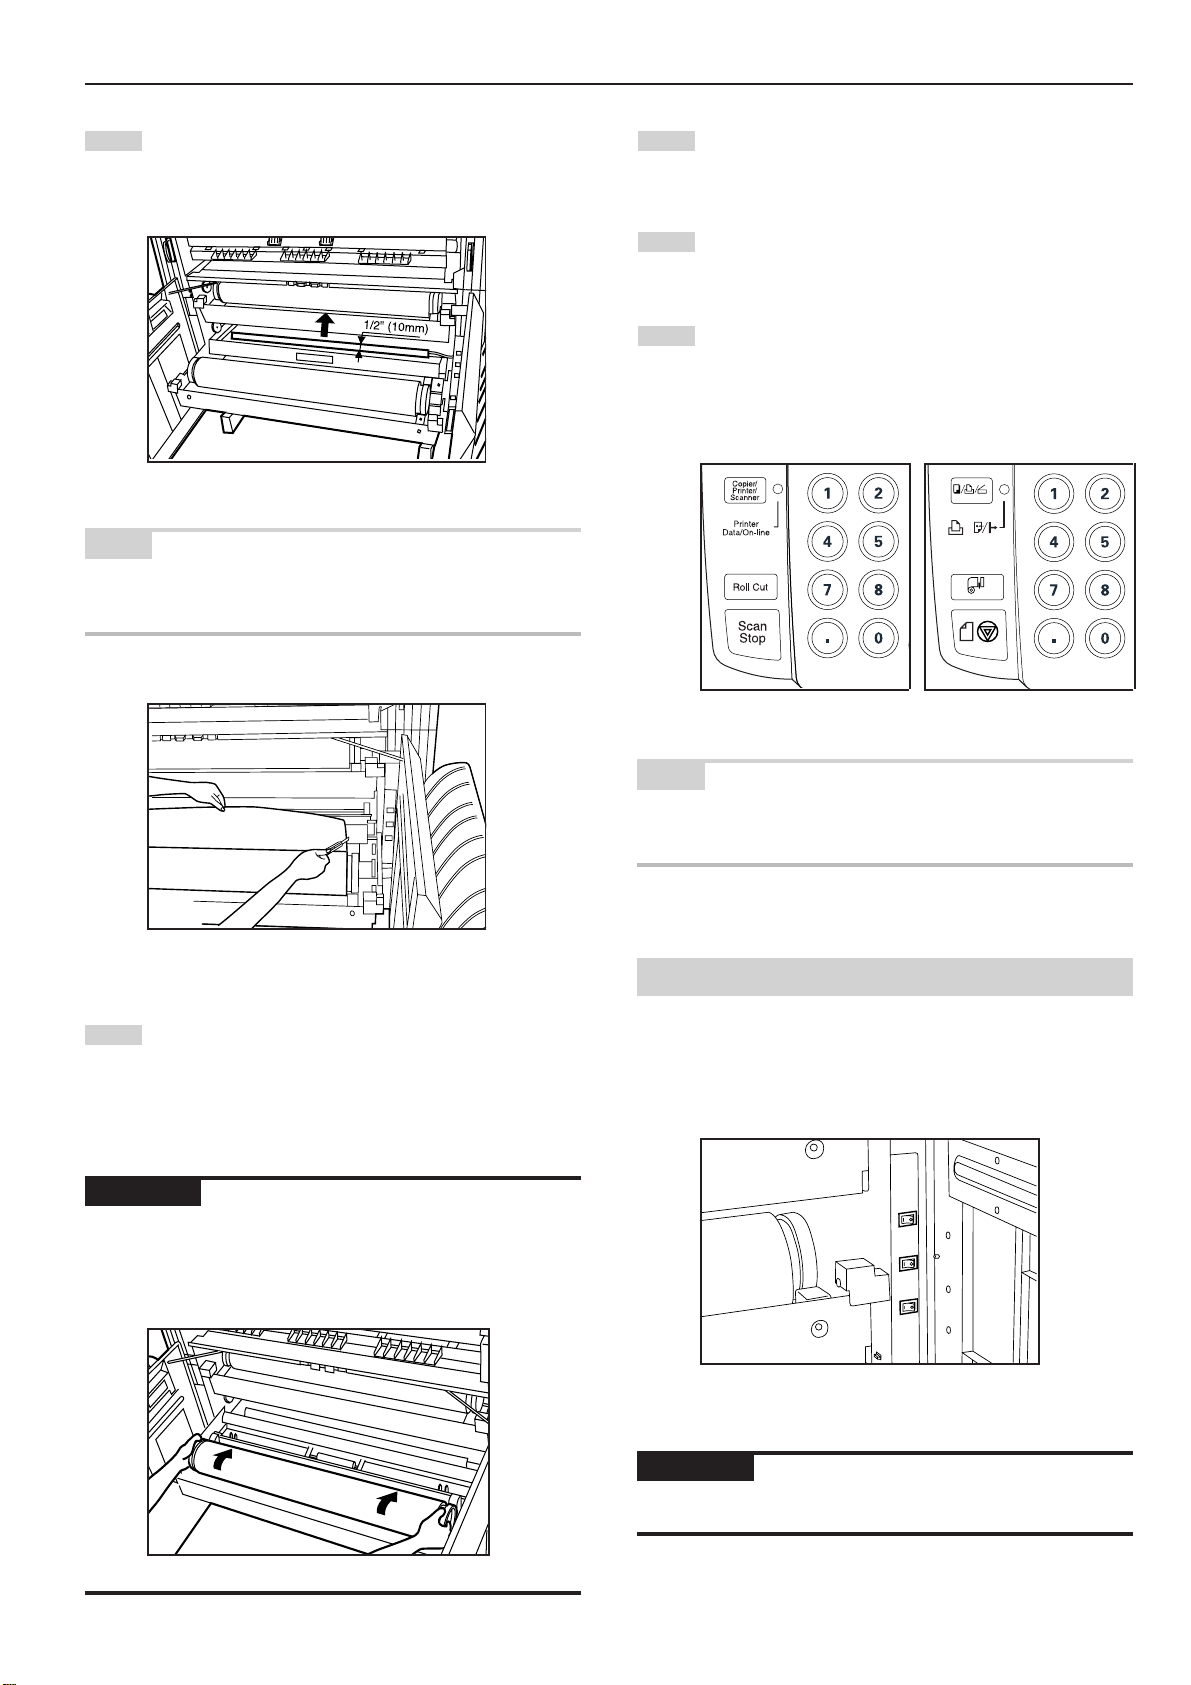
Insert the leading edge of the paper roll under the transport
9 11
guide plate and put out the edge from the guide plate by
approximately 1/2" [10 mm] as shown in the illustration.
NOTE
• If the leading edge of paper roll is folded or broken, cut the edge
using a cutter or the like.
Insert the roll unit securely into the main body of the
machine.
Close the front cover.
12
To align the leading edge of the paper roll, press the Paper
13
Cut key. The leading edge of the paper roll will be ejected
from the copy eject slot.
(Inch)
(Metric)
Grasp the paper roll insertion latches and close the paper roll
10
insertion cover securely.
IMPORTANT
• If the paper roll that has been set is slackened, grasp the flange and
wind the paper roll to remove the slack. If not, paper may be fed
obliquely.
NOTE
• Paper is normally cut in length of 11" [279 mm]. If the temperature in
the machine is lower than 15˚C, however, vellum will be cut in length
of 31" [800 mm].
(3) Dew prevention heater
If the humidity is high (more than 70%RH) or drastic temperature
change occurs, turn on ( ❘ ) the dew prevention heater switch when
using the machine. Even if the main power switch is off(O), the dew
prevention heater switch can be on ( ❘ ).
IMPORTANT
• When using vellum or film, be sure to turn off(O)the dew prevention
heater switch. If not, paper may be wrinkled or curled.
3-7
CHAPTER 3 PREPARATIONS
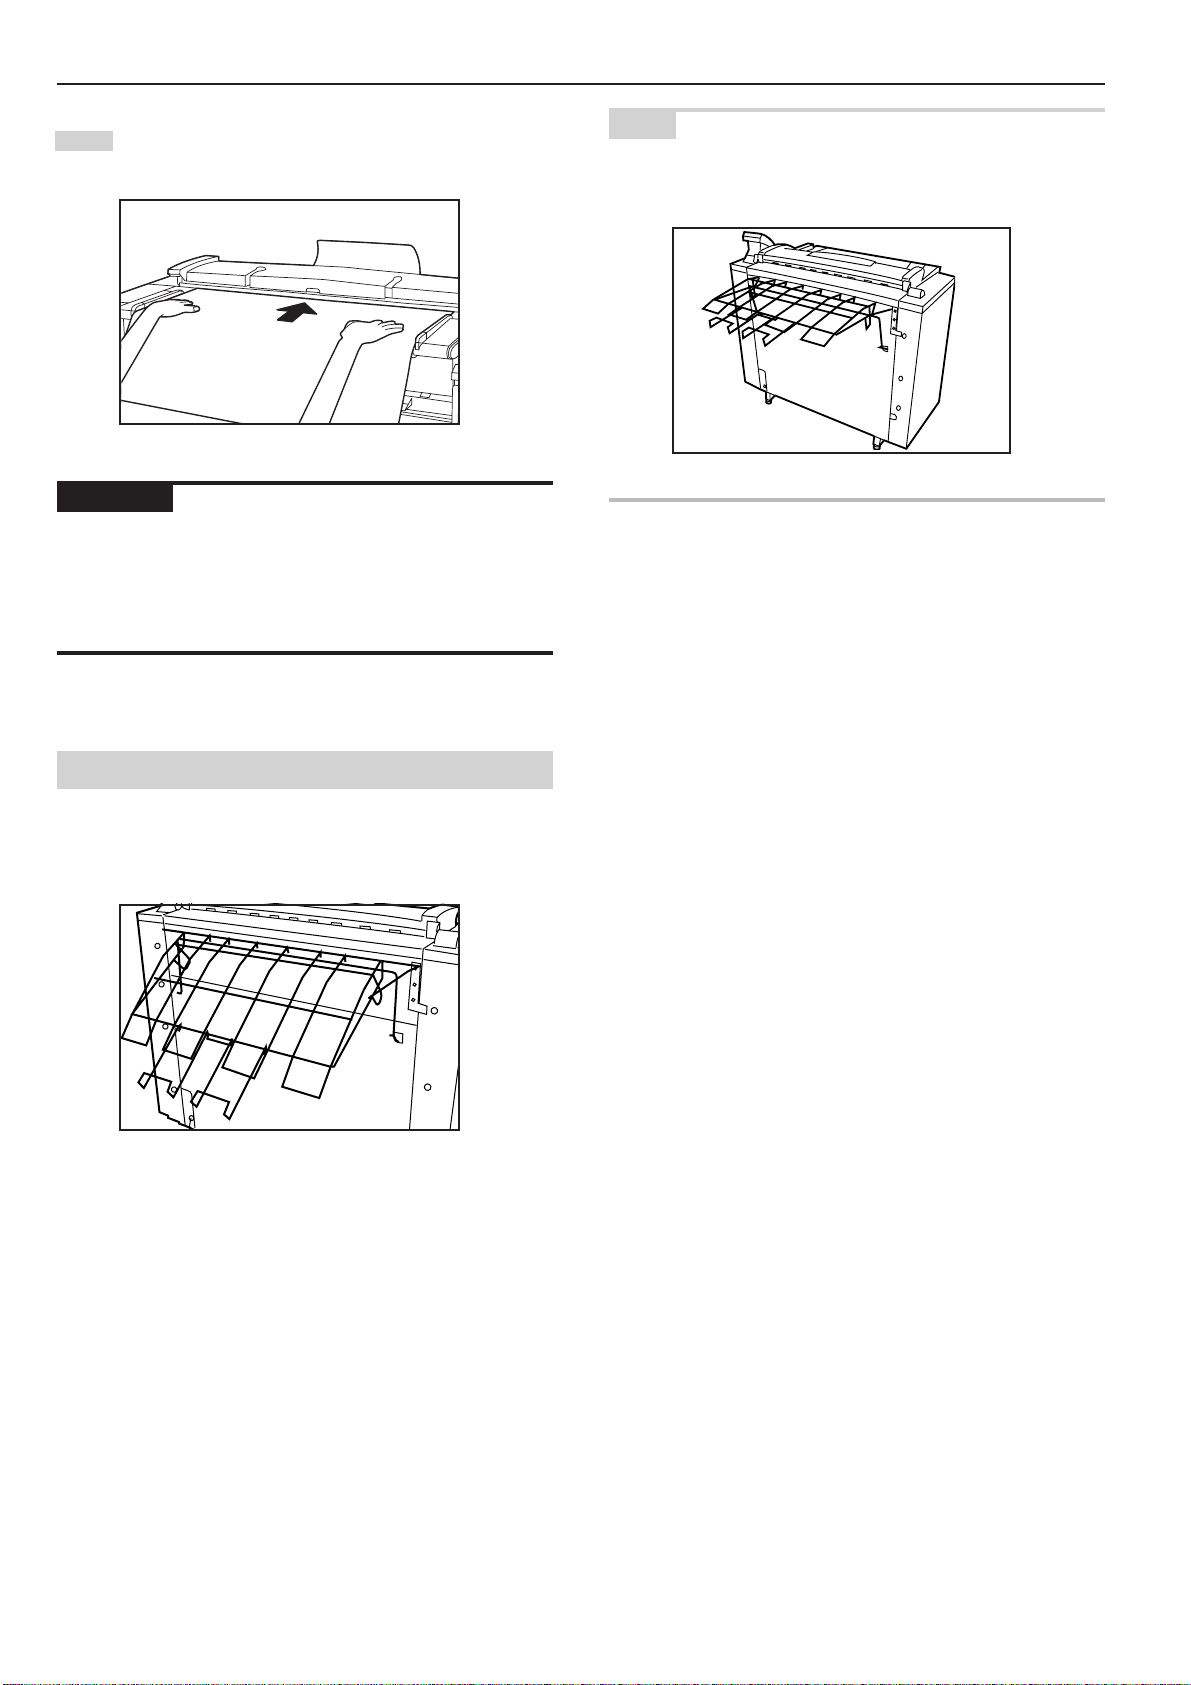
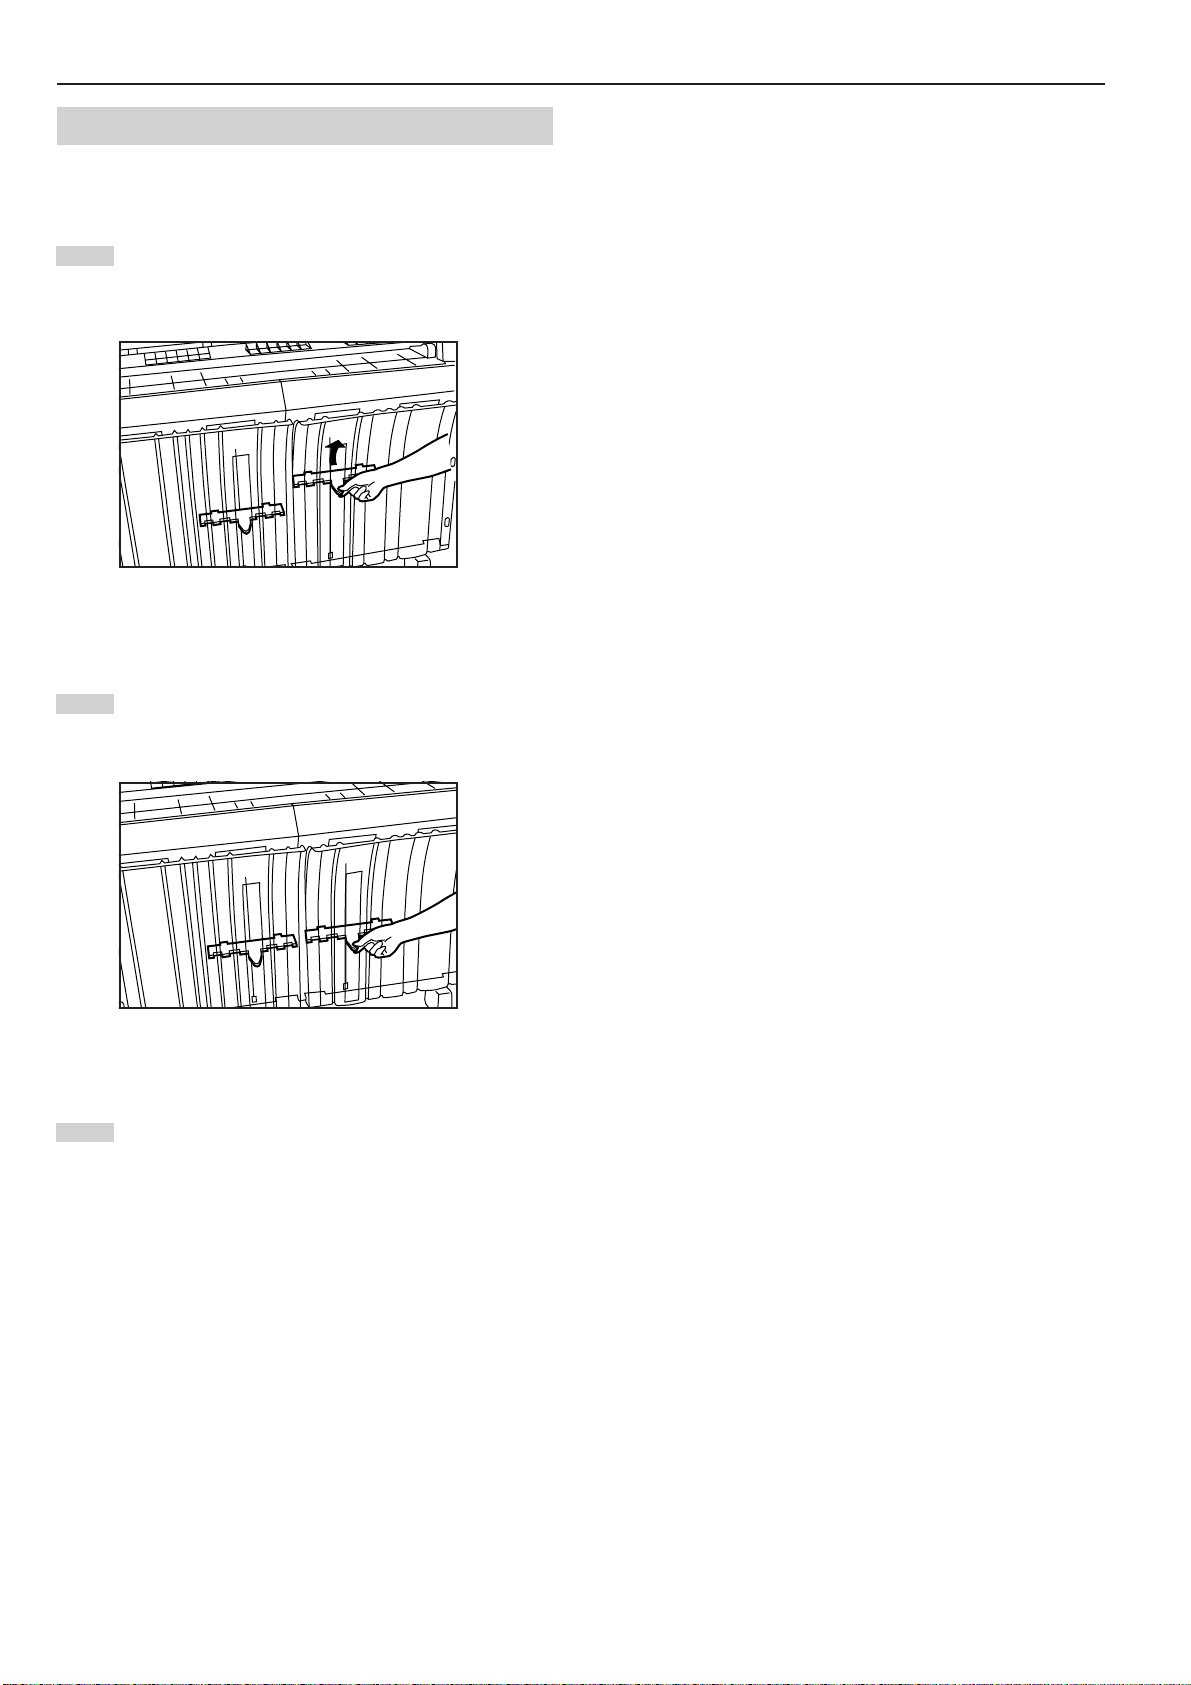
(4) How to Use the Copy Tray Support Plate
Set the copy tray support plate based on the paper to be used for
copying.
Incline a copy tray support plate up and slide it to the size
1
indication on the size label of the copy tray.
After setting the copy tray support plate to the desired size,
2
return it to a horizontal state.
Set the other copy tray support plate to the same height in
3
the same procedure.
Depending on the paper to be used and the environment, the
support plate may not be contained at the position of the size
label. In this case, adjust the position of the copy tray support
plate upward or downward.
3-8
CHAPTER 4 BASIC COPYING
1. Before starting copying
(1) Initial state
When the main power switch of this machine is turned on ( ❘ ) (and
warm up is complete, the machine is ready to copy. This state is
called initial state and the screen displayed in this state is called basic
screen.
The machine also enters the initial state when the auto clear function
is activated or the Reset key is pressed.
Be sure to ensure that the machine is in the initial state before
copying.
When the auto clear function is activated, however, the exposure
display will not return to the initial setting.
(Inch)
(Metric)
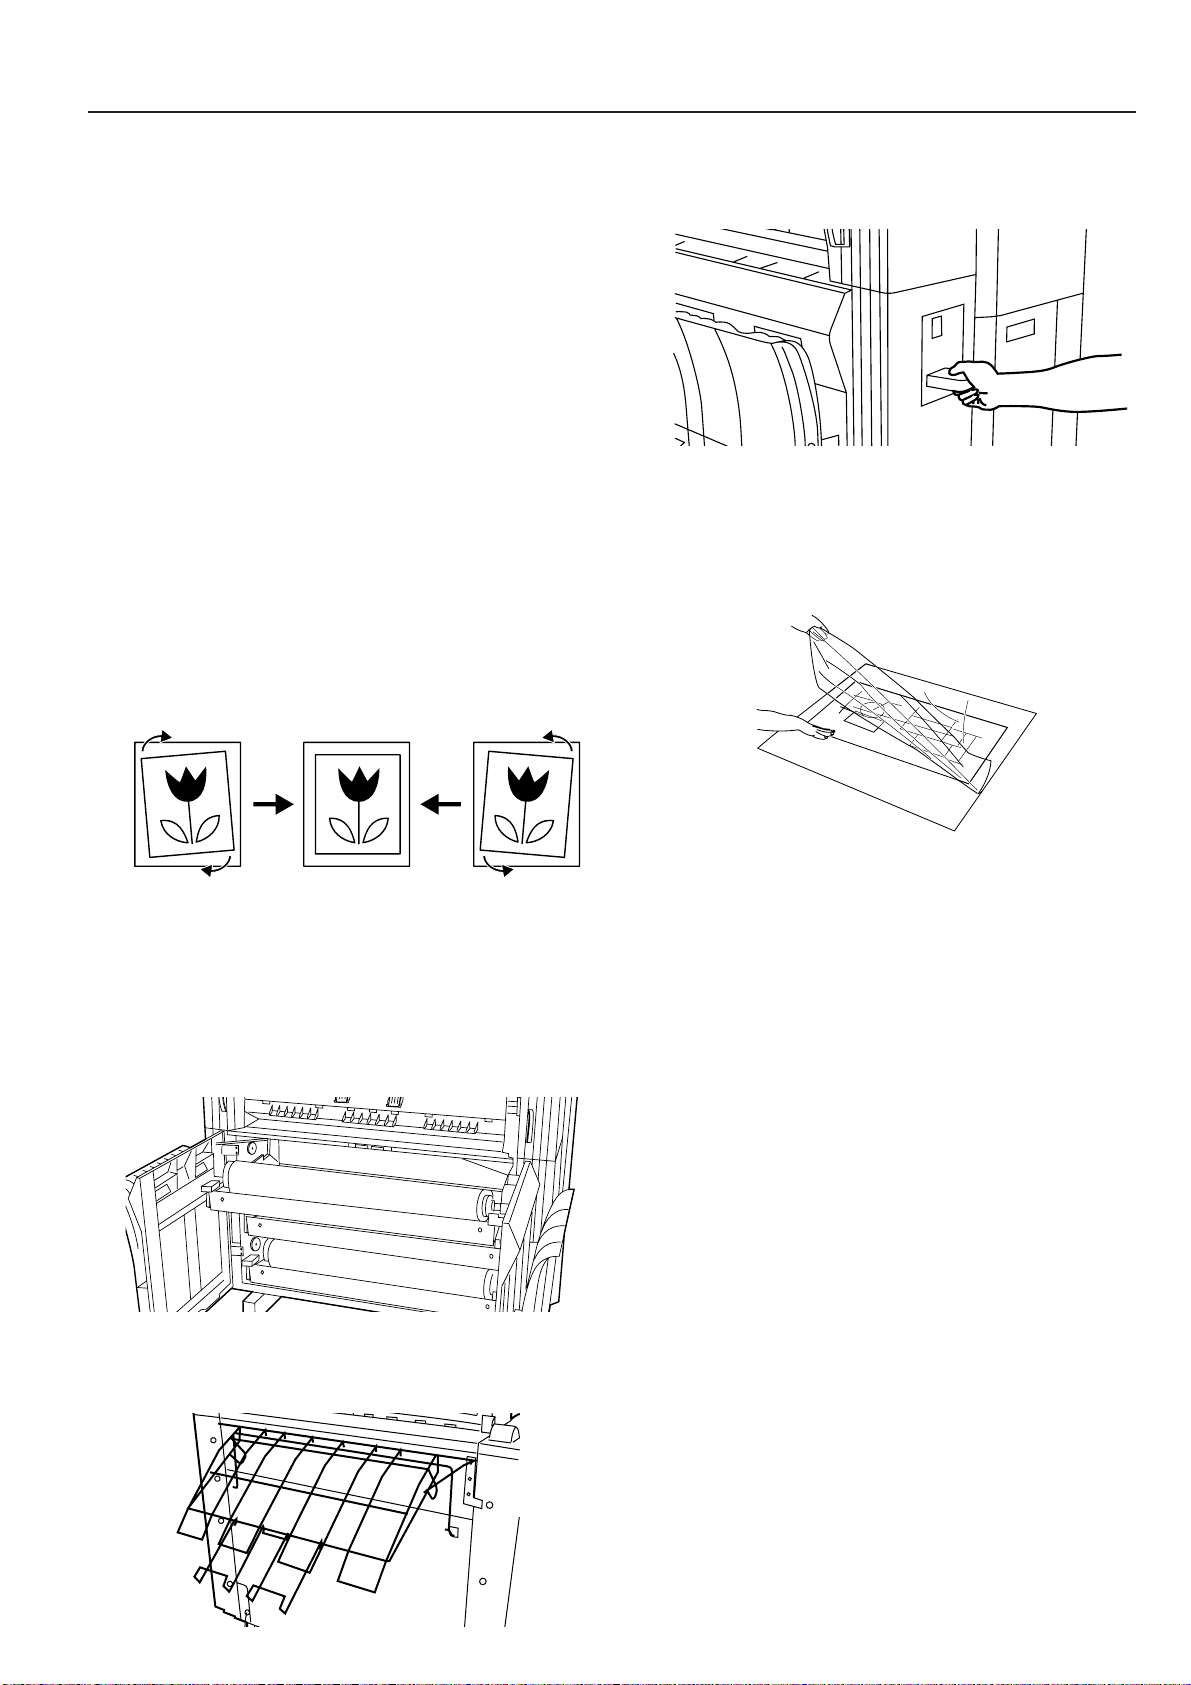
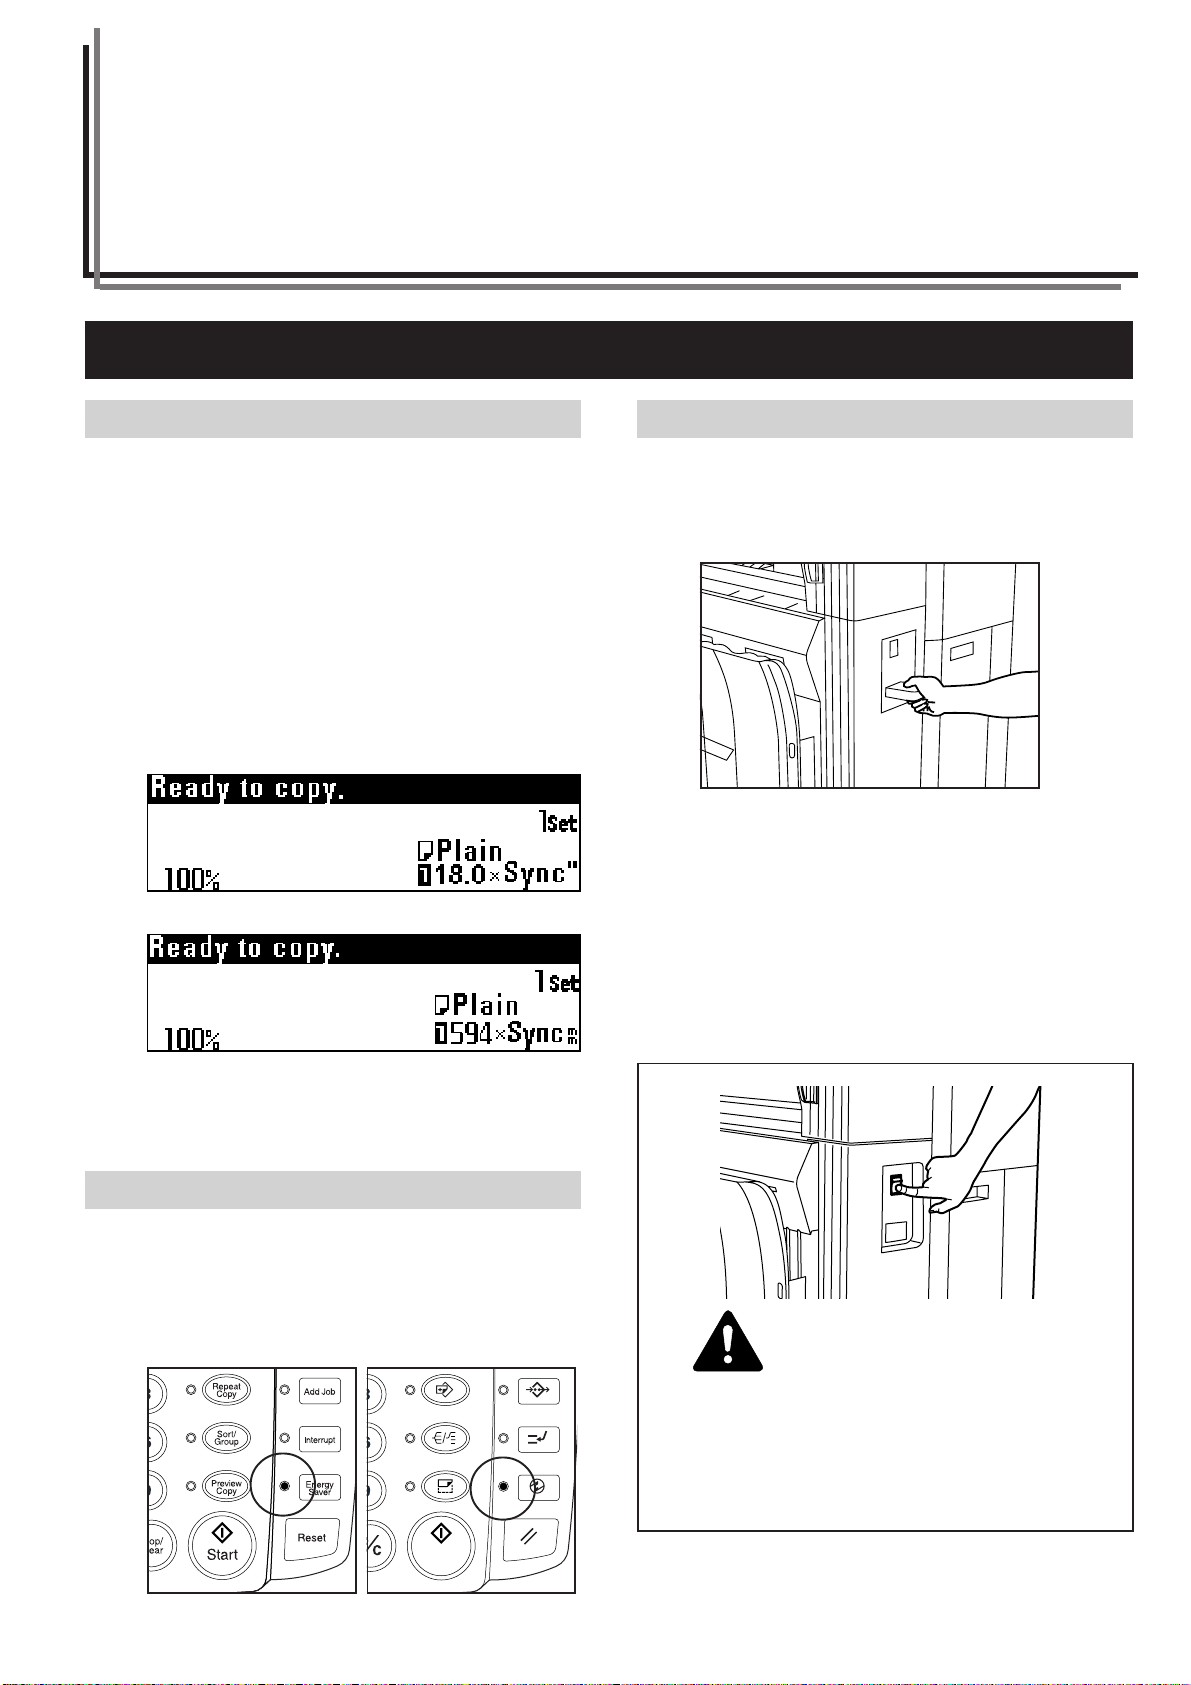
(3) When using a key counter (option)
If the message “Insert key counter.” appears, a key counter must be
set in this machine.
Insert the key counter all the way into the key counter insert slot
located on the right of the main body.
(2) When the Energy Saver indicator is lit
When the Energy Saver indicator is lit and other indicators are off on
the operation panel, the machine is in the energy saver mode. When
the Energy Saver key is pressed, warm up will start.
(Inch)
(Metric)
CAUTION
If the copier will not be used for a short period of time
(overnight, etc.), turn the main switch OFF (O). If it will not be
used for an extended period of time (vacations, etc.), remove
the power plug from the outlet for safety purposes during the
time the copier is not in use.
4-1
CHAPTER 4 BASIC COPYING
2. Basic Copying
1 4
1. Turn the main power switch on.
Tur n the main power switch on( ❘ ). The machine will warm up for
approximately 360 seconds.
When the message “Ready to scan.” appears in the message display,
scanning of originals or copy function setting can be performed.
When “Ready to copy.” appears, copying can be performed.
* When turning on and off the main power switch repeatedly, be sure
to turn on and off at an interval of more than 1 second. If the interval
is less than 1 second, the machine may not start normally.
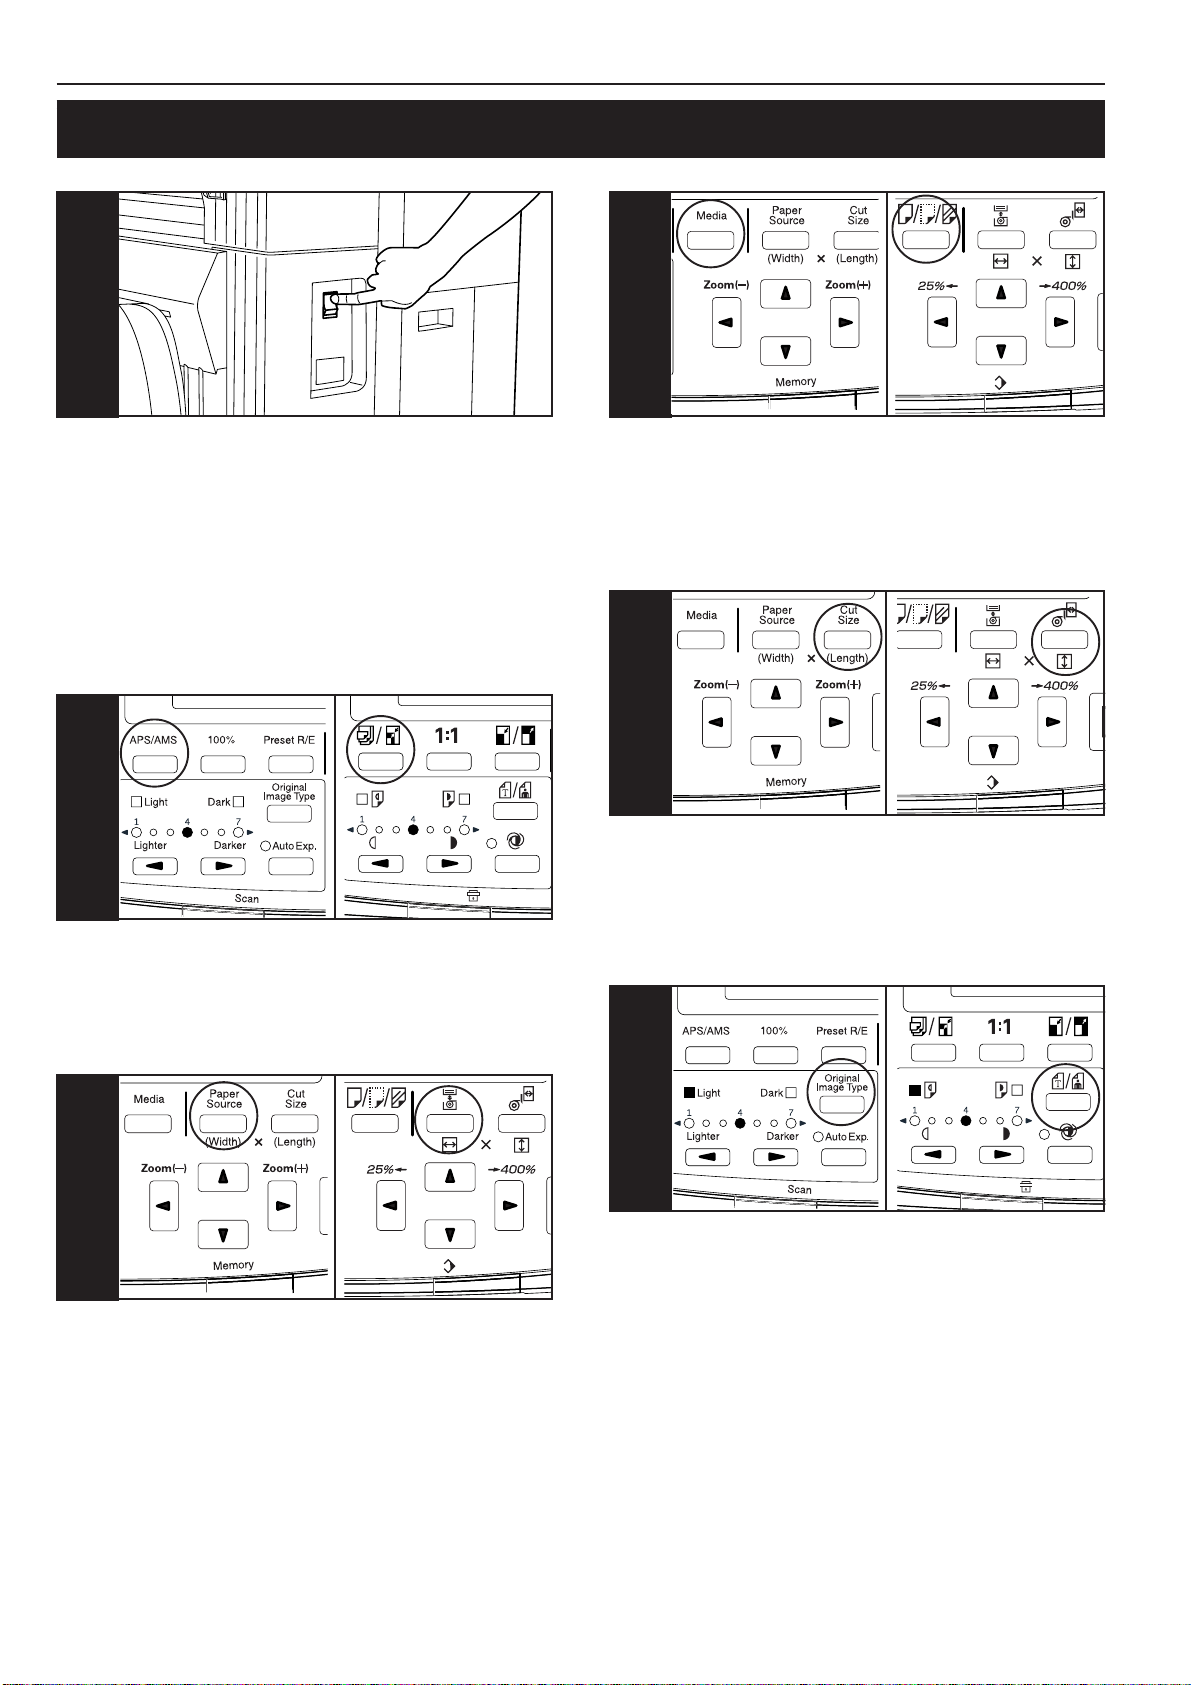
2
2. Select the desired copy mode. (Page 4-4)
Press the APS/AMS key to select the APS mode or the AMS mode.
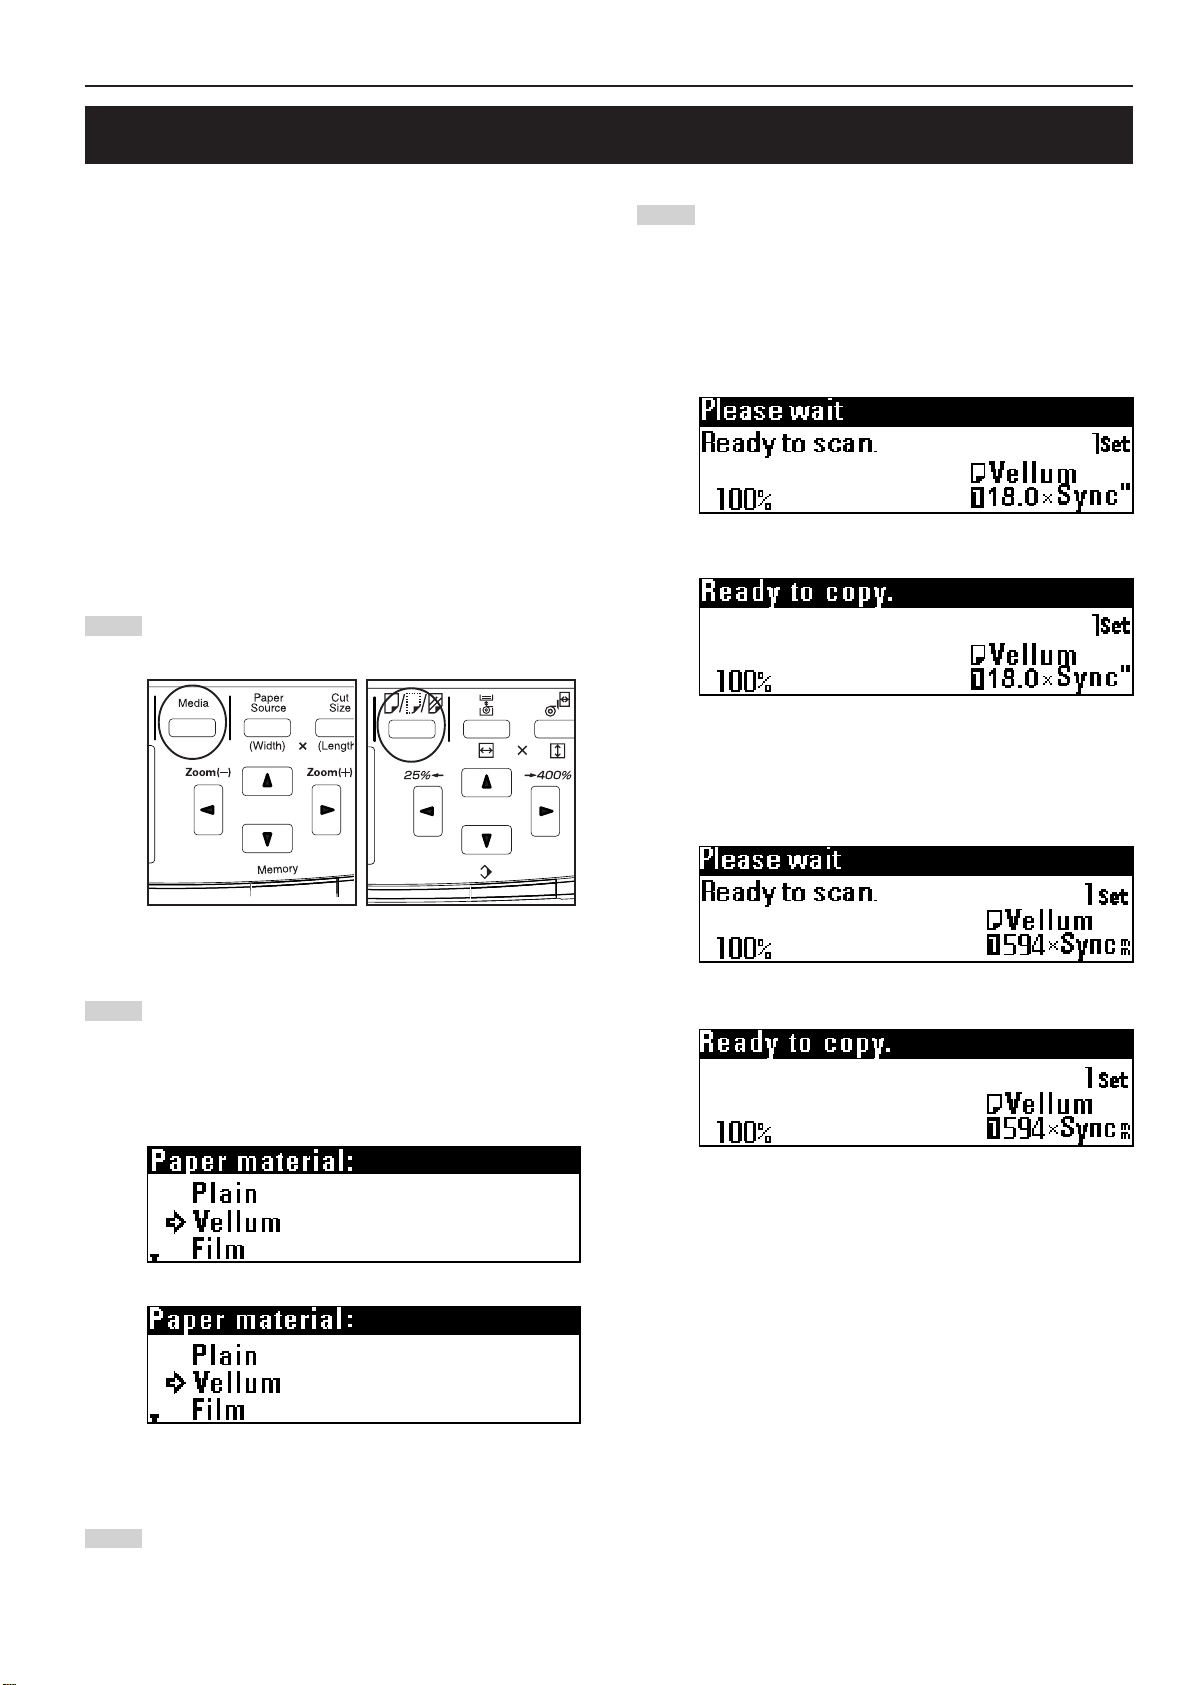
4. Select the paper material. (Page 4-5)
Press the Media key to select the desired paper material. The paper
material can be selected from “Plain”, “Vellum”, “Film”, and “Custom”.
5
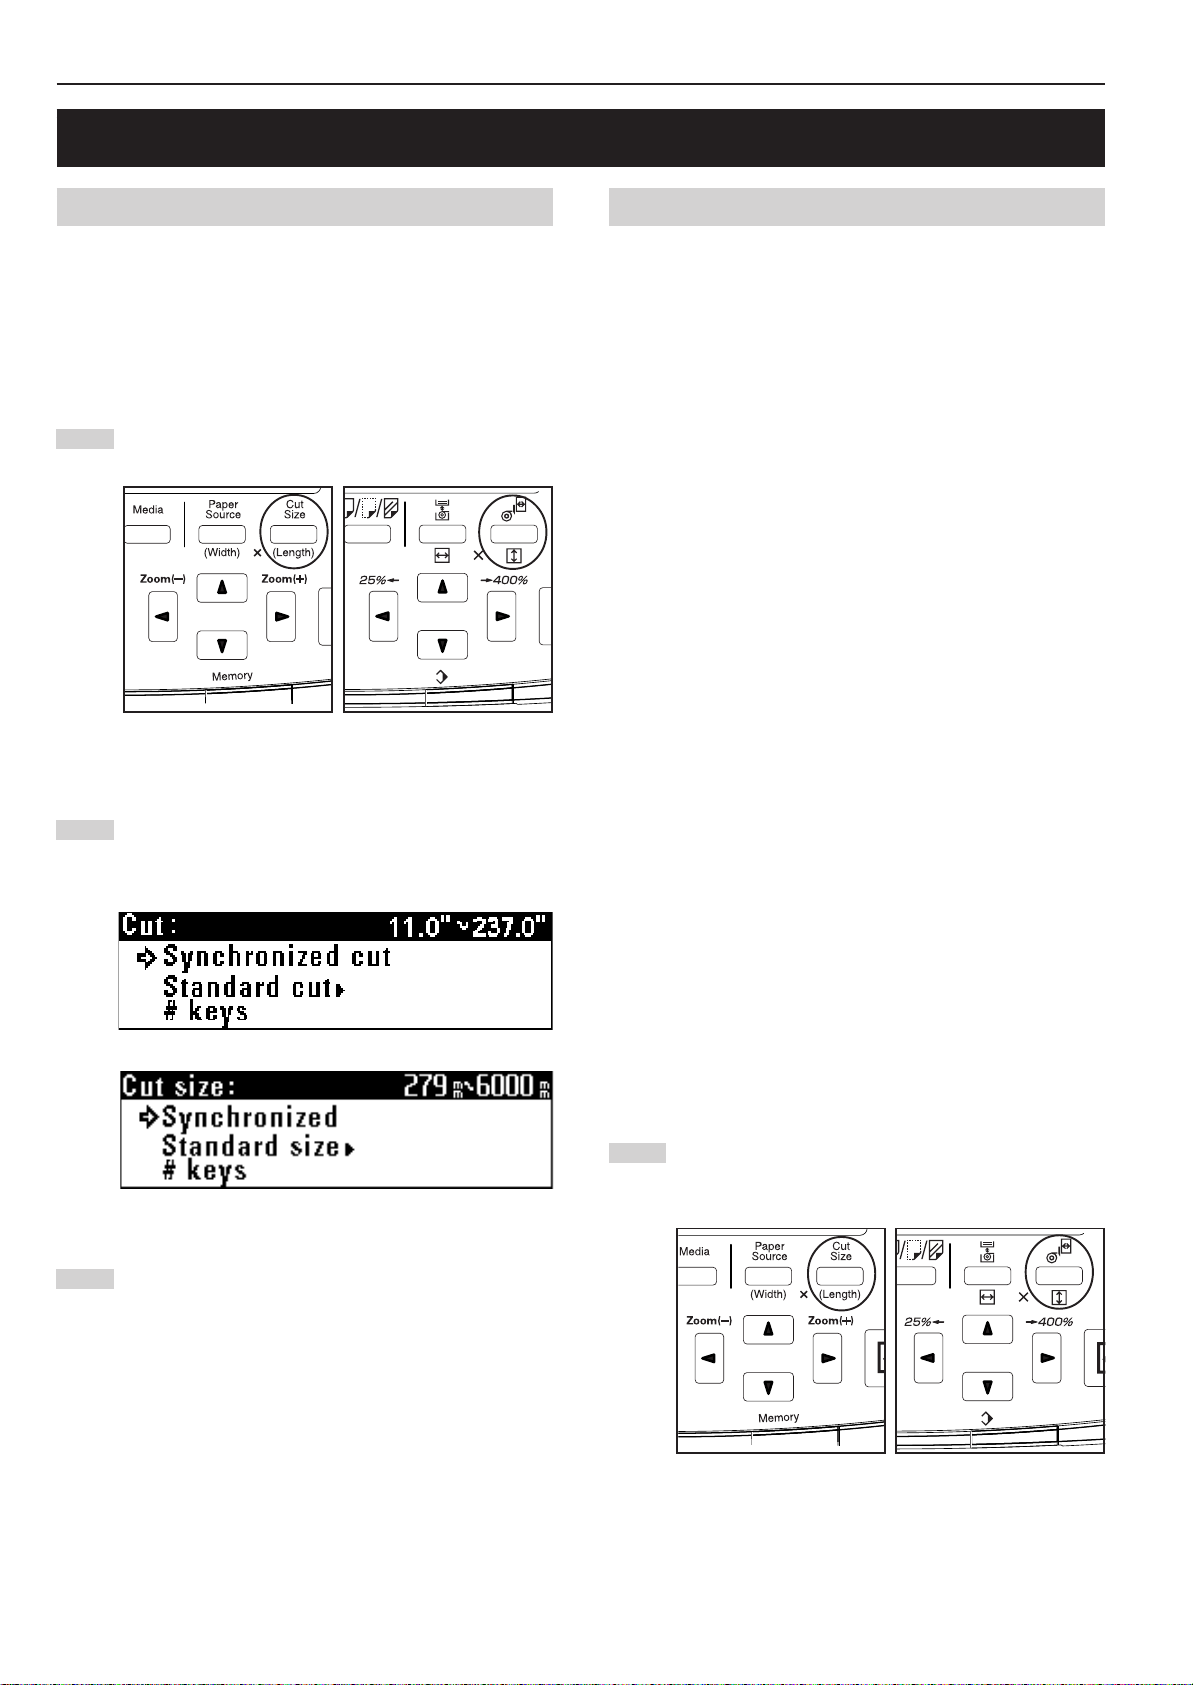
5. Select the cut length. (Page 4-6)
Press the Cut Size key to select the desired cut method. The method
can be selected from “Synchronized cut” [“Synchronized”], “Standard
cut” [“Standard size”], and “# keys”.
3
3. Select the desired paper source.
Press the Paper Source key to select the desired paper source.
A number indicating a paper source will be displayed in the message
display.
When the bypass is selected, the margin copy, border erase, APS,
and AMS functions cannot be used.
6
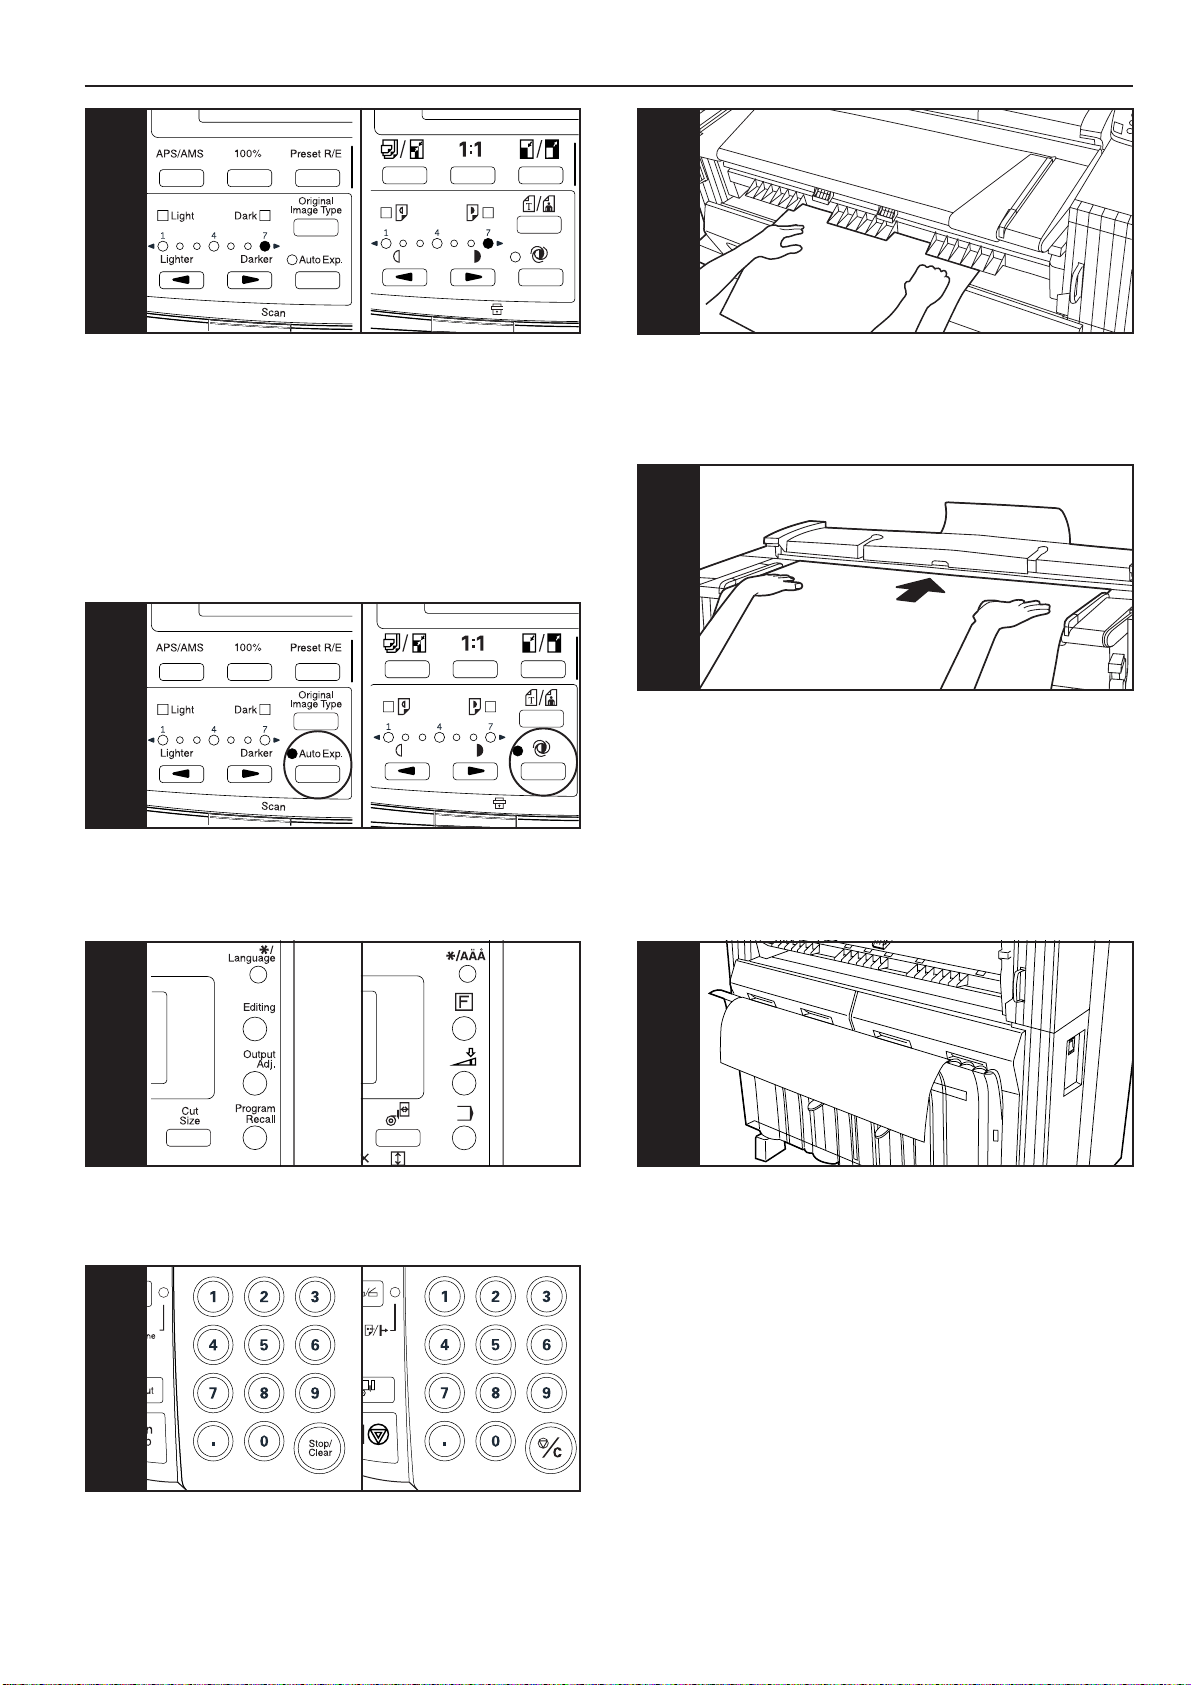
6. Select the original contrast.
Press the Original Image Type key. Press the tor ▲▼ key to select the
type of the original. To return to the basic screen, press the OK key.
“Normal original”: Standard originals such as drawings and newspa-
pers. When using the carrier sheet, select this
mode.
“Text/Line”: Select this mode when using originals containing both text
and line drawing.
“Photo”: Select this mode when using originals such as photos and
posters.
4-2
CHAPTER 4 BASIC COPYING
107-1
7-1. Select the copy contrast.
When adjusting manually the copy contrast, press the copy contrast
keys. Right copy contrast indicators indicate darker exposure levels.
To make the copy contrast darker than “7” when “Normal original” has
been selected, press the right copy contrast key. The Dark indicator
will light up and “1” will light up. The exposure level can be darkened
up to “7”.
7-2
7-2. When adjusting the copy contrast automatically, press the Auto
Exp. key. The Auto Exp. indicator will light up.
10. Set the paper. (Page 4-8)
Set the paper only when using the bypass.
11
11. Set the original. (Page 3-2)
When the original is set, copying will start automatically.
* Depending on the setting of “@ Method copy start” of the default
setting, the Start key must be pressed for starting copying.
(Page 7-5)
8
8. Set the desired functions.
Set the desired functions referring to the description of each function.
9
9. Set the number of copies to be made.
Use the numeric keys to enter the desired number of copies from 1 to
99. The initial setting of the number of copies is 1.
12
12. After copying
The copy will be ejected to the copy tray.
The capacity of the copy tray: 20 sheets (24" x 36", A1
[room temperature and
humidity] )
15 sheets (36"x 48", A0
[room temperature and
humidity] )
1 sheet (other sizes, Vellum and Film)
4-3
CHAPTER 4 BASIC COPYING
3. Copy Modes
This machine provides three copy modes: “APS”, “AMS”, and
“Manual”. The copy mode selected in the initial state can be changed
using “0 Auto select set” of the default setting. (Page 7-5)
(Inch)
(Metric)
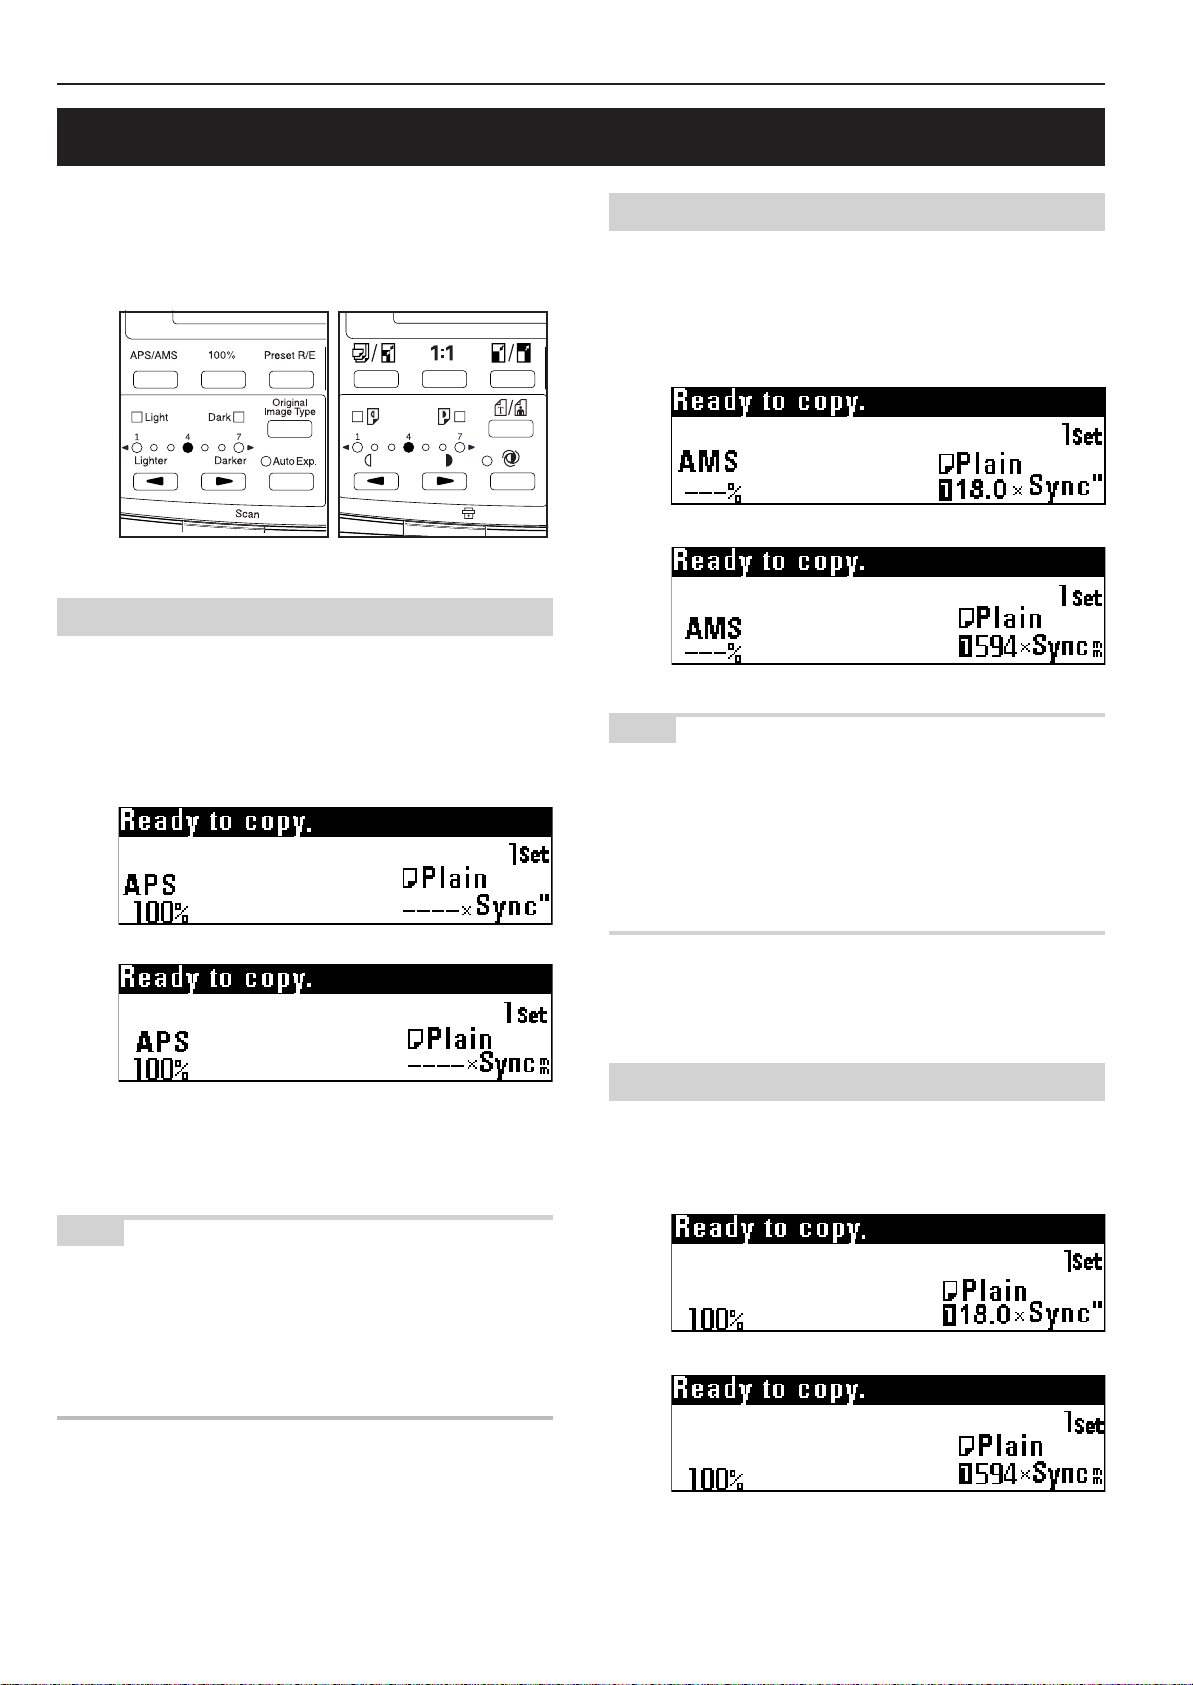
(1) APS mode
When an original is set, a paper source of the size specified based on
the original size and the magnification ratio will be automatically
selected. To select the APS mode, press the APS/AMS key to display
“APS”.
(Inch)
(Metric)
(2) AMS mode
When an original is set, the magnification ratio will be automatically
set based on the selected paper size. To select the AMS mode, press
the APS/AMS key to display “AMS”.
(Inch)
(Metric)
NOTE
• If the bypass is selected, the magnification ratio will be 100%.
• If “1 Auto rotation mode [Auto rotation]” of the default setting has
been set to "OFF", the magnification ratio will be automatically set
based on the width of the original and the width of the selected
paper size.
• If “1 Auto rotation mode [Auto rotation]” of the default setting has
set been to “ON”, when the orientation of the original is different
from that of the paper, the image will be automatically rotated
counterclockwise by 90 degrees and copied.
NOTE
• The bypass cannot be selected automatically.
• To press the Paper Source key to enter the AMS mode when the
APS mode has been set, set the “! AMS mode” of the default
setting to “ON”. (Page 7-5)
• If “1 Auto rotation mode [Auto rotation]” of the default setting has
been set to “ON”, when the orientation of the original is different from
that of the paper, the image will be automatically rotated
counterclockwise by 90 degrees and copied.
4-4
(3) Manual mode
A paper source and a magnification ratio are selected manually for
copying.
(Inch)
(Metric)
4. Paper Material Selection
CHAPTER 4 BASIC COPYING
If the Media key is pressed, the paper material to be used can be
selected from “Plain”, “Vellum ”, “Film”, and “Custom ”. If the paper
material is selected, fixing temperature and copy size will be
automatically adjusted.
If “Custom” is selected, paper material, fixing temperature, and copy
size that have been set by using “@ Custom media type
[Custom.pap.material]” of the default setting will be selected.
(Page 7-3)
If “2 Media Type [Paper working]” of the default setting is set to “ON”,
the paper material installed in each paper source can be registered. If
the Paper Source key is pressed to select a paper source, the paper
material setting will be automatically changed. See “2 Media Type
[Paper working]” and “3 Media type setting [Paper material
adjustment]” of the default setting. (Page 7-1)
Press the Media key.
1
(Inch)
(Metric)
Check that the selected paper material is displayed in the
4
message display.
When the paper material is changed, wait until the fixing
temperature is stabilized. Scanning of an original, however,
can be performed.
(Inch)
➔
Press the ▼ or ▲ key to select the paper material to be
2
used.
Select the material from “Plain”, “Vellum”, “Film”, and
“Custom”.
(Inch)
(Metric)
(Metric)
➔
Press the OK key.
3
4-5
CHAPTER 4 BASIC COPYING
5. Paper Roll Cut Length Selection
(1) Synchronized cut
Paper is cut based on the length of the original and the magnification
ratio.
The minimum cut length by synchronized cut is 11" [279 mm]. Even if
the copy image length is less than 11" [279 mm] due to reduction, a
blank area will be added in the trailing edge of the paper and paper
will be cut in length of 11" [279 mm].
Press the Cut Size key.
1
(Inch)
(Metric)
(2) Standard cut
Paper is cut in length of standard size or in a length that has been
registered. The following lengths can be selected.
● Cut size (inch machine)
(Architecture) (Engineering)
48" 44"
42" 42"
36" 34"
24" 22"
21" 21"
18" 17"
12" 11"
User 1 (40") User 1 (40")
User 2 (80") User 2 (80")
● Cut size (metric machine)
(A sizes) (B sizes)
1189 mm 1030 mm
841 mm 728 mm
594 mm 515 mm
420 mm 364 mm
297 mm User 1
User 1
(1000 mm at default setting)
User 2
(2000 mm at default setting)
(1000 mm at default setting)
User 2
(2000 mm at default setting)
Ensure that “Synchronized cut” [“Synchronized”] is selected.
2
(Inch)
(Metric)
Press the OK key.
3
The machine will return to the basic screen.
* Architecture or Engineering for inch machine and A sizes or B sizes
for metric machine can be selected using “# Standard size set”.
(Page 7-3)
For user 1 and user 2, any cut size can be registered. See “4 Cut
size register”. (Page 7-4)
Press the Cut Size key.
1
(Inch)
(Metric)
4-6
 Loading...