

Page 1
INSTRUCTION HANDBOOK
Please read the instruction handbook before using the copier. Keep it
close to the copier for easy reference.
Page 2

As an ENERGY STAR Partner, KYOCERA MITA CORPORATION
has determined that this product meets the ENERGY STAR
guidelines for energy efficiency.
The ENERGY STAR program is an energy reduction plan introduced
by the United States Environmental Protection Agency in response to
environmental issues and for the purpose of advancing the
development and utilization of more energy efficient office equipment.
* ENERGY STAR is a U.S. registered mark.
<Attention>
This instruction handbook is for the KM-4230 (42 ppm) and KM-5230
(52 ppm). The instruction is described based on the 42 ppm copier.
Specific matters for 52 ppm copier are covered on page 99 and thereafter.
All rights reserved. No part of this material may be reproduced or transmitted
in any form or by any means, electronic or mechanical, including
photocopying, recording or by any information storage and retrieval system,
without permission in writing from the Publisher.
Legal Restriction On Copying
• It may be prohibited to copy copyrighted material without permission of the
copyright owner.
• It is prohibited under any circumstances to copy domestic or foreign
currencies.
• Copying other items may be prohibited.
The Auto-Shut-off time setting becomes 15 to 120 minutes in the areas
corresponding to the Swiss Energy 2000 program.
Page 3
Please read the instruction handbook before using the copier.
Keep it close to the copier for easy reference.
The sections of this handbook and parts of the copier marked with symbols are safety
warnings meant to protect the user, other individuals and surrounding objects, and
ensure correct and safe usage of the copier. The symbols and their meanings are
indicated below.
DANGER: Indicates that serious injury or even death will very possibly result from
insufficient attention to or incorrect compliance with the related points.
WARNING: Indicates that serious injury or even death may result from insufficient
attention to or incorrect compliance with the related points.
CAUTION: Indicates that personal injury or mechanical damage may result from
insufficient attention to or incorrect compliance with the related points.
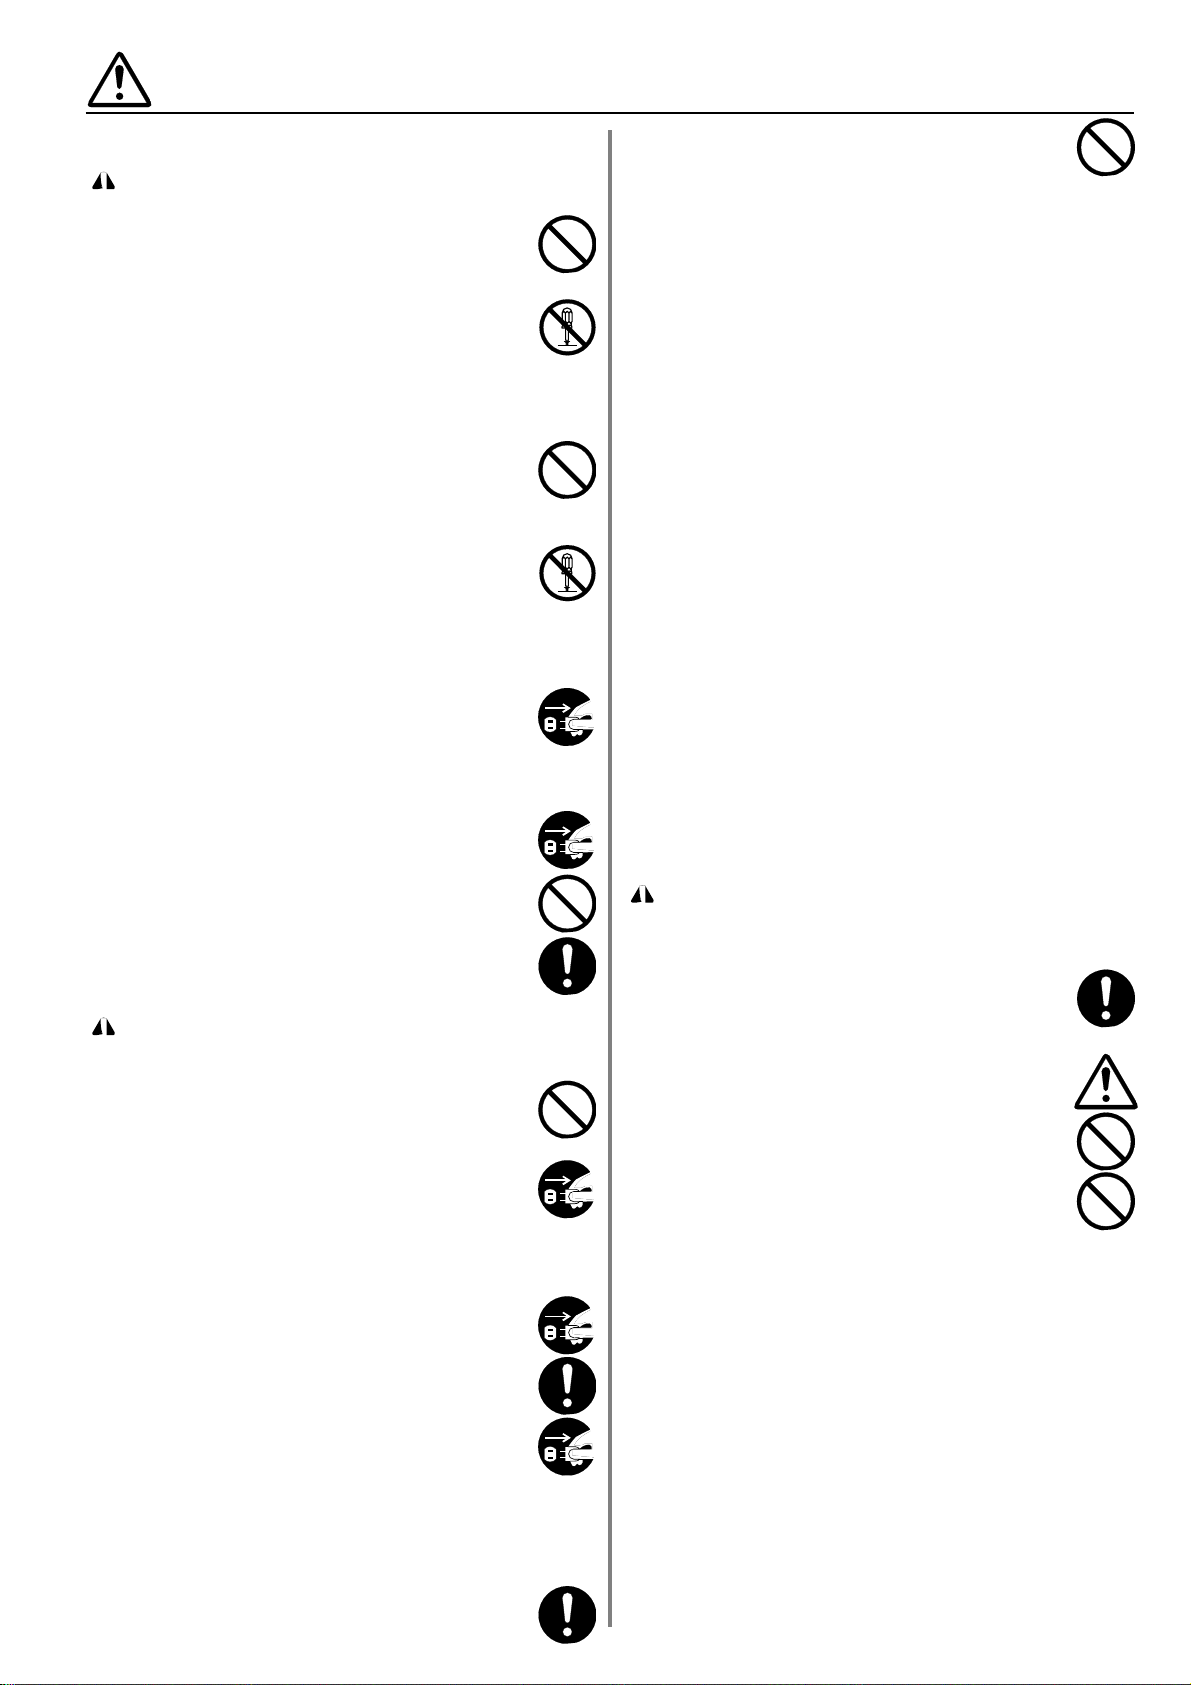
Symbols
The symbol indicates that the related section includes safety warnings. Specific
points of attention are indicated inside the symbol.
...........[General warning]
...........[Warning of danger of electrical shock]
...........[Warning of high temperature]
The symbol indicates that the related section includes information on prohibited
actions. Specifics of the prohibited action are indicated inside the symbol.
...........[Warning of prohibited action]
...........[Disassembly prohibited]
The
●symbol indicates that the related section includes information on actions which
must be performed. Specifics of the required action are indicated inside the symbol.
...........[Alert of required action]
...........[Remove the power plug from the outlet]
...........[Always connect the copier to an outlet with a ground connection]
Please contact your service representative to order a replacement if the safety warnings
in the handbook are illegible or if the handbook itself is missing. (fee required)
Page 4

Page 5

1
CONTENTS
CAUTION LABELS.......................................................................2
INSTALLATION PRECAUTIONS.................................................3
PRECAUTIONS FOR USE............................................................4
● MAKING FULL USE OF THE MACHINE’S ADVANCED
FUNCTIONS......................................................................................5
NAMES OF PARTS...............................................................................7
(1) Main body.........................................................................................8
(2) Operation panel................................................................................9
(3) Basic screen on the touch panel ....................................................10
PREPARATIONS ................................................................................11
(1) How to load paper ..........................................................................11
1 Loading paper into the drawers.................................................11
2 Loading paper into the deck......................................................12
3 Loading paper into the stack bypass tray..................................12
SETTING ORIGINALS ........................................................................15
1 Setting original(s) in the DF.......................................................15
2 Setting original(s) on the platen ................................................16
BASIC OPERATION ..........................................................................17
● Basic copying procedure ............................................................17
FUNCTIONS........................................................................................19
(1) Enlargement/reduction ...................................................................19
1 Auto magnification selection mode............................................19
2 Zoom copy mode.......................................................................19
3 Size zoom mode........................................................................19
4 Standard zoom mode ................................................................20
5 XY Zoom mode..........................................................................20
(2) Copy quality selection ....................................................................21
(3) Interrupt copying.............................................................................21
(4) Duplex copying from various originals [Duplex copy].....................22
(5) Making a margin space for binding [Margin mode].........................24
(6) Printing page numbers to copy [Print page numbers] ....................26
(7) Copying two-page originals as separate pages [Split copy]...........27
(8) Making copies with clean edges [Border erase].............................28
(9) Making covers or insert sheets among the copies
[Sheet insertion copy] .....................................................................29
1 Submodes .................................................................................29
2 Combination of modes...............................................................31
3 How to make copies in the sheet insertion mode ......................32
(10) Making copies onto transparencies [Presentation mode].............34
(11) Feeding a paper as a transparency + backing sheet mount
[Transparency backing mode]......................................................36
(12) Making image overlay [Form overlay]...........................................37
(13) One copy from two or four originals [Merge copy]........................38
(14) Booklet from book originals [Booklet + cover copy mode]............39
(15) Weekly magazine from duplex/one-sided originals
[Booklet copy]...............................................................................40
(16) Copying and stitching into booklet (sheet originals)
[Stitching mode]............................................................................41
(17) Inverting black and white [Invert copy] .........................................43
(18) Making mirror image copies [Mirror image copy]..........................44
(19) Sorting automatically [Sort copy]..................................................44
(20) Memorizing frequency used settings [Program mode].................45
1 How to register settings...........................................................45
2 Calling up a program...............................................................46
(21) Recall mode..................................................................................46
(22) Setting change function................................................................47
(23) Rotate copy ..................................................................................48
(24) Energy saver function...................................................................48
(25) Auto shut-off function....................................................................48
APPLICABLE COPY MODES.............................................................49
(1) Reserving another copy while copying is performed [Add Job]......49
1 Add job ......................................................................................49
2 Changing the setting contents of the add job ...........................50
3 Clearing the add job ..................................................................51
4 Changing the add job order .......................................................51
(2) Copying various originals at a time [Job build function]..................52
1 Memory copy from DF and platen .............................................52
● Large quantity of originals...........................................................52
● Auto size.....................................................................................52
● Choose size................................................................................52
2 Duplex copies from one-sided and duplex mixed originals .......55
● Finishing like originals [Print as original].....................................55
● Duplex copies from all originals [Duplex all originals] ................55
● Copying desired page on the front side [Chapterize]..................55
3 Batch copy from platen..............................................................57
● Only sheet originals ....................................................................57
● Only book originals .....................................................................57
● Sheet & book originals................................................................57
COPIER MANAGEMENT....................................................................61
(1) Copy management.........................................................................61
1 About the copy management mode...........................................61
2 How to make settings in the copy management mode..............61
3 How to make the various settings..............................................62
● Registering new ID-codes...........................................................62
● Deleting ID-codes .......................................................................63
● Altering limits .............................................................................64
● Clearing copy counts ..................................................................64
● Viewing copy counts...................................................................65
● Printing of copy management report...........................................65
● Turning copy management ON/OFF ..........................................66
4 Making copies when copier is in copy management mode .......66
(2) Week timer .....................................................................................67
1 About the timer function.............................................................67
2 How to make settings in the timer mode ...................................67
3 How to make settings for the various functions .........................68
● Setting the time...........................................................................68
● Programming the week timer......................................................68
● Cancelling the timer function ......................................................69
● Turning the timer ON/OFF .........................................................70
4 Making copies after copier has been stopped by timer .............70
(3) The default settings........................................................................70
● Copy default setting.......................................................................71
● How to make settings in the copy default setting mode..............72
1 EXPOSURE MODE...................................................................72
2 EXPOSURE STEPS..................................................................72
3 TONER ECONOMY MODE.......................................................72
4 AUTO EXPOSURE ADJUSTMENT ..........................................73
5 MANUAL EXPOSURE ADJUSTMENT......................................73
6 QUALITY ...................................................................................73
7 OUTPUT FORM ........................................................................73
8 PAPER SELECTION .................................................................73
9 JOB PROGRAMMING...............................................................73
0 DEFAULT DRAWER .................................................................74
! ZOOM MODE ............................................................................74
@ SET COPY LIMIT WITH #-KEYS ..............................................74
# CUSTOM SIZE FOR BORDER ERASE....................................74
$ F&B P. MARGIN........................................................................74
% DRAWER FOR INSERT SHEET...............................................75
^ DRAWER FOR COVER SHEET/STITCH .................................75
& ROTATE SORT .........................................................................75
* CREATE SHORTCUT (#1, #2) .................................................75
( CREATE USER CHOICE #1 - #5..............................................75
● How to finish the copy default setting .........................................75
● Machine default setting .................................................................76
● How to set the machine default setting mode.............................77
1 UN-FIXED SIZE FROM BYPASS..............................................77
2 AUTOMATIC DRAWER SWITCHING.......................................78
3 PAPER SIZE .............................................................................78
4 SPECIAL PAPER ......................................................................78
5 APS FOR SPECIAL PAPER .....................................................79
6 KEY SOUND ON/OFF...............................................................79
7 AUTO PREHEAT TIME .............................................................79
8 AUTO SHUT-OFF TIME............................................................79
9 CHANGE MANAGEMENT CODE WITH #-KEYS .....................79
0 AUTO SHUT-OFF......................................................................80
● How to finish the machine default setting ...................................80
(4) LANGUAGE OF TOUCH PANEL...................................................80
OPTIONAL EQUIPMENT....................................................................81
(1) a. Finisher.......................................................................................81
b. Booklet stitcher...........................................................................81
(2) Key counter ....................................................................................82
(3) I/F kit...............................................................................................82
(4) Memory copy board........................................................................82
MESSAGES.........................................................................................83
● When the messages below are displayed: .................................83
REPLACING THE TONER CARTRIDGE............................................85
WHEN PAPER MISFEEDS.................................................................86
(1) Misfeed location indicators.............................................................86
(2) Cautions .........................................................................................86
(3) Removal procedures ......................................................................87
TROUBLESHOOTING ........................................................................95
CLEANING THE COPIER...................................................................97
SPECIFICATIONS...............................................................................98
ABOUT 52 PPM COPIER....................................................................99
Page 6
2
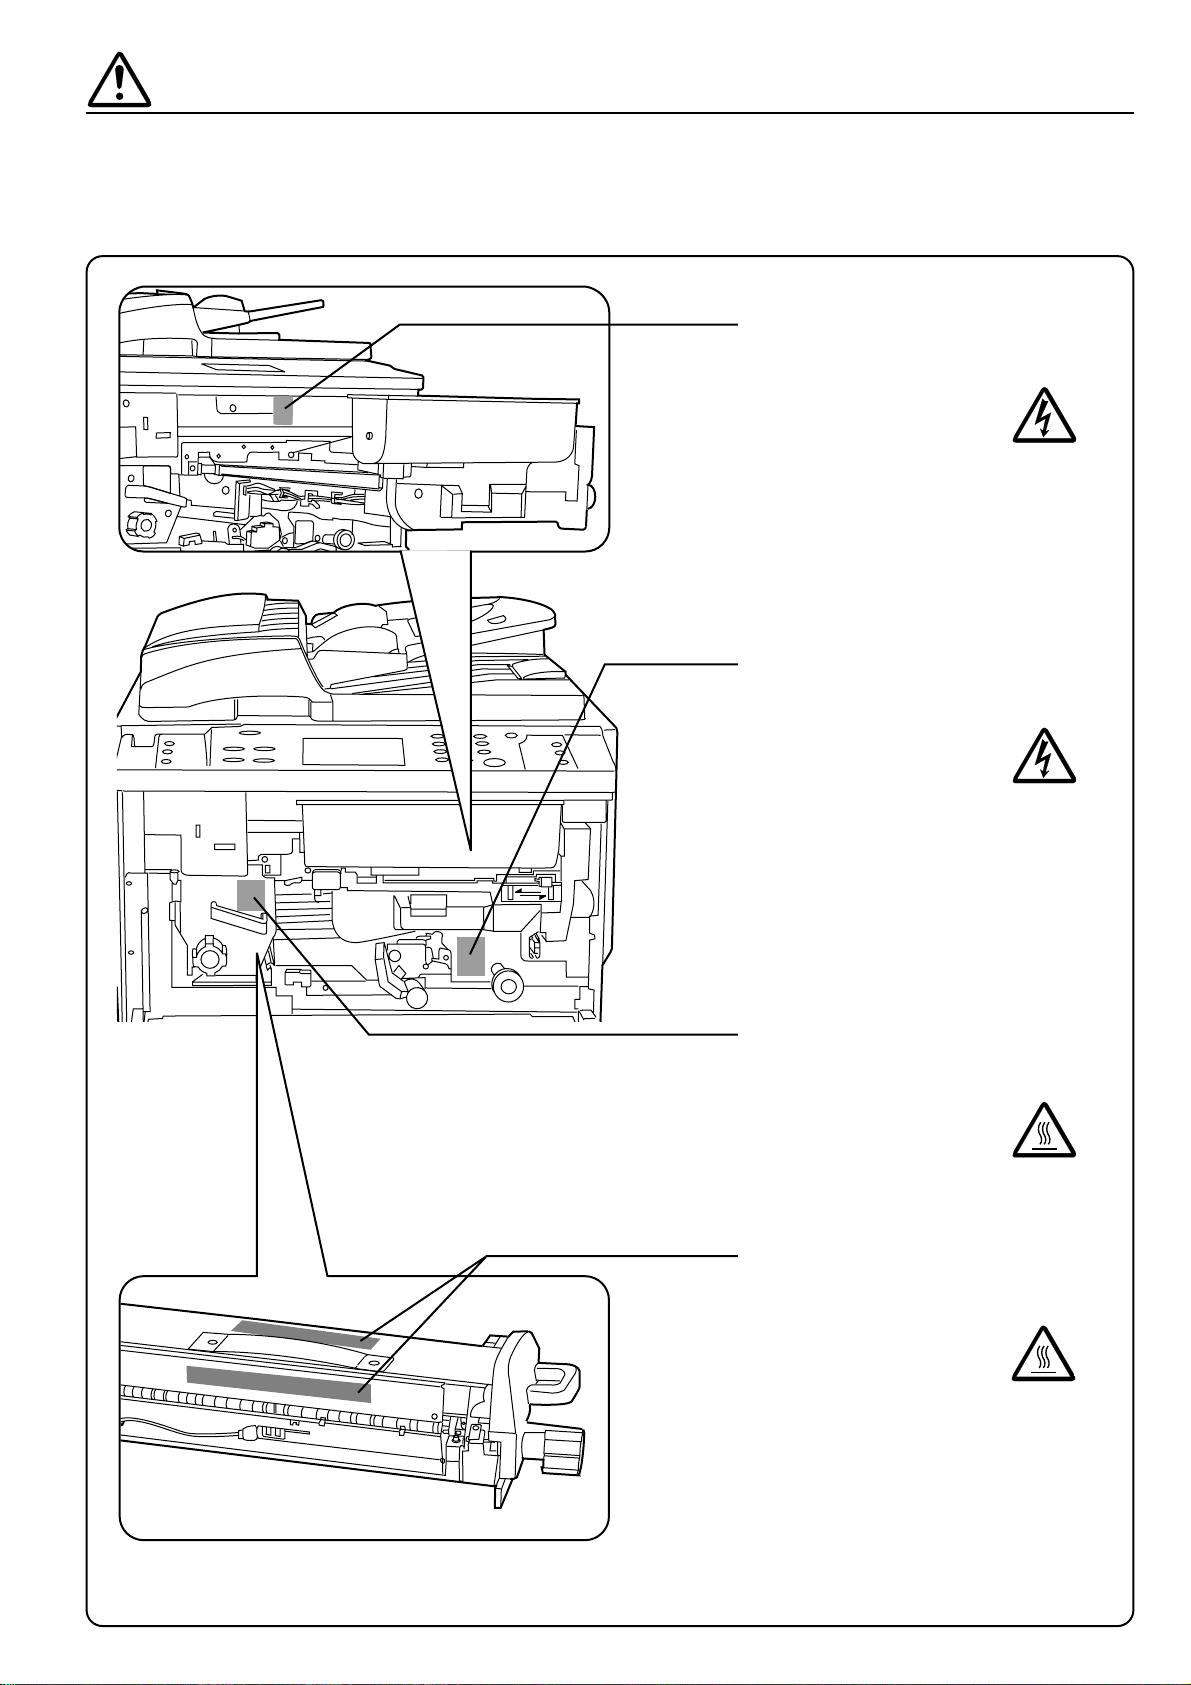
CAUTION LABELS
Caution labels have been attached to the copier at the following locations for safety
purposes. BE SUFFICIENTLY CAREFUL to avoid fire or electric shock when
removing a paper jam or when replacing toner.
Label 4, 5
High temperature inside. Do not
touch parts in this area, because
there is a danger of getting
burned. ........................................
Label 3
High temperature inside. Do not
touch parts in this area, because
there is a danger of getting
burned. ........................................
Label 1
High voltage inside. NEVER
touch parts in this area, because
there is a danger of electric
shock. .........................................
NOTE: DO NOT remove these labels.
Label 2
High voltage inside. NEVER
touch parts in this area, because
there is a danger of electric
shock. .........................................
Page 7
3
INSTALLATION PRECAUTIONS
■ Environment
CAUTION
• Avoid placing the copier on or in locations which are
unstable or not level. Such locations may cause the
copier to fall down or fall over. This type of situation
presents a danger of personal injury or damage to the
copier.............................................................................
• Avoid locations with humidity or dust and dirt. If dust
or dirt become attached to the power plug, clean the
plug to avoid the danger of fire or electrical shock. .......
• Avoid locations near radiators, heaters, or other heat
sources, or locations near flammable items, to avoid
the danger of fire............................................................
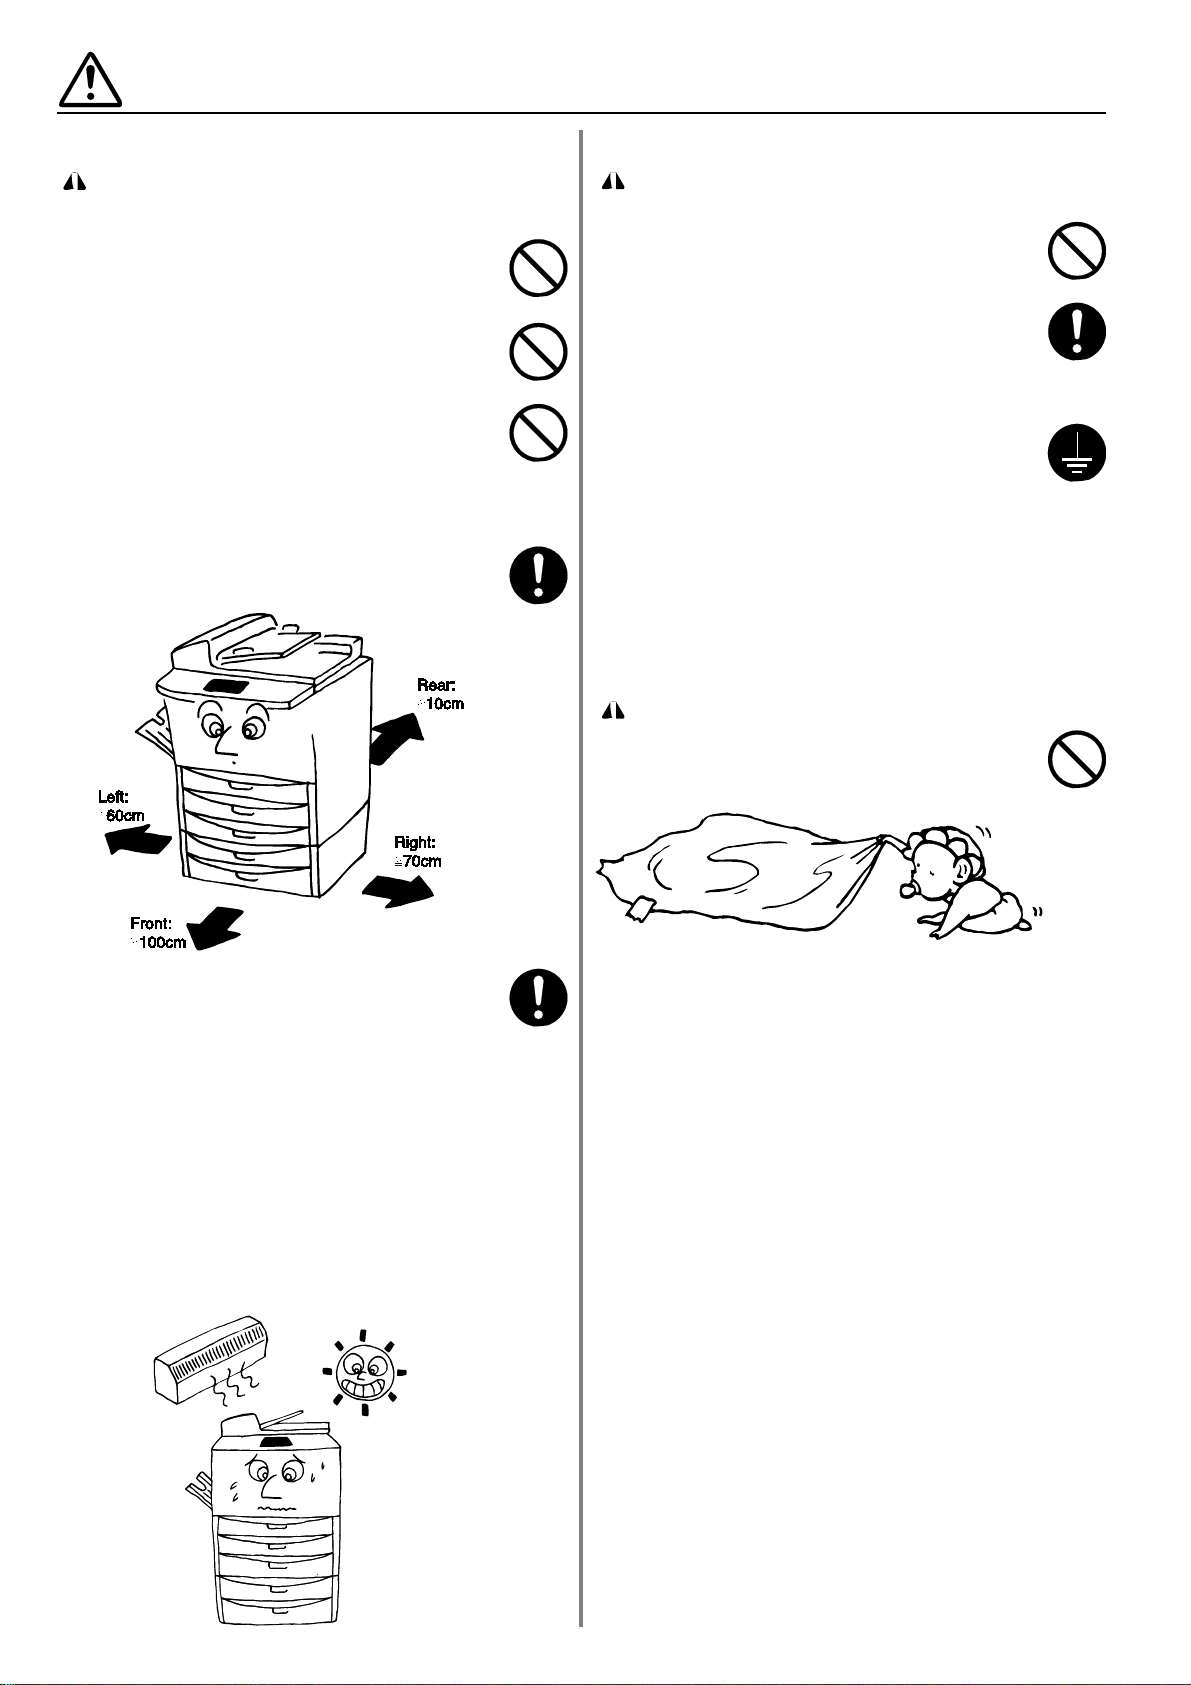
• To keep the copier cool and facilitate changing of parts
and maintenance, allow access space as shown
below.
Leave adequate space, especially around the left
cover, to allow air to be properly ventilated out of the
copier. ...........................................................................
• Always use the caster stoppers to stabilize the copier
once it is in place to keep it from moving and/or falling
over and causing injury..................................................
Other precautions
• Adverse environmental conditions may affect the safe
operation and performance of the copier. Install in an
air-conditioned room (recommended room
temperature: around 20°C, humidity: around 65%RH)
and avoid the following locations when selecting a site
for the copier.
.
Avoid locations near a window or with exposure to
direct sunlight.
.
Avoid locations with vibrations.
.
Avoid locations with drastic temperature fluctuations.
.
Avoid locations with direct exposure to hot or cold air.
.
Avoid poorly ventilated locations.
■ Power supply/Grounding the copier
WARNING
• DO NOT use a power supply with a voltage other than
that specified. Avoid multiple connections in the same
outlet. These types of situations present a danger of
fire or electrical shock....................................................
• Plug the power cord securely into the outlet. If metallic
objects come in contact with the prongs on the plug, it
may cause a fire or electric shock.................................
• Always connect the copier to an outlet with a ground
connection to avoid the danger of fire or electrical
shock in case of an electric short. If an earth
connection is not possible, contact your service
representative. ..............................................................
Other precautions
• Connect the power plug to the closest outlet possible
to the copier.
■ Handling of plastic bags
WARNING
• Keep the plastic bags that are used with the copier
away from children. The plastic may cling to their
nose and mouth causing suffocation.............................
Page 8
4
PRECAUTIONS FOR USE
■ Cautions when using the copier
WARNING
• DO NOT place metallic objects or containers with
water (flower vases, flower pots, cups, etc.) on or near
the copier. This type of situation presents a danger of
fire or electrical shock should they fall inside.................
• DO NOT remove any of the covers from the copier as
there is a danger of electrical shock from high voltage
parts inside the copier....................................................
• DO NOT damage, break or attempt to repair the power
cord. DO NOT place heavy objects on the cord, pull it,
bend it unnecessarily or cause any other type of
damage.
These types of situations present a danger of fire or
electrical shock..............................................................
• NEVER attempt to repair or disassemble the copier or
its parts as there is a danger of fire, electrical shock or
damage to the laser. If the laser beam escapes, there
is a danger of it causing blindness.................................
• If the copier becomes excessively hot, smoke appears
from the copier, there is an odd smell, or any other
abnormal situation occurs, there is a danger of fire or
electrical shock. Turn the main switch OFF (O)
immediately, remove the power plug from the outlet
and contact your service representative........................
• If anything harmful (paper clips, water, other fluids,
etc.) falls into the copier, turn the main switch OFF (O)
immediately. Next, remove the power plug from the
outlet to avoid the danger of fire or electrical shock.
Then contact your service representative. ....................
• DO NOT remove or connect the power plug with wet
hands, as there is a danger of electrical shock. ............
• ALWAYS contact your service representative for
maintenance or repair of internal parts..........................
CAUTION
• DO NOT pull the power cord when removing it from
the outlet. If the power cord is pulled, the wires may
become broken and there is a danger of fire or
electrical shock. (ALWAYS grasp the power plug
when removing the power cord from the outlet.) ...........
• ALWAYS remove the power plug from the outlet when
moving the copier. If the power cord is damaged,
there is a danger of fire or electrical shock....................
• If the copier will not be used for a short period of time
(overnight, etc.), turn the main switch OFF (O).
If it will not be used for an extended period of time
(vacations, etc.), remove the power plug from the
outlet for safety purposes during the time the copier is
not in use. .....................................................................
• ALWAYS hold the designated parts only when lifting or
moving the copier. .........................................................
• For safety purposes, ALWAYS remove the power plug
from the outlet when performing cleaning operations....
• If dust accumulates within the copier, there is a danger
of fire or other trouble. It is therefore recommended
that you consult with your service representative in
regard to cleaning of internal parts. This is particularly
effective if accomplished prior to seasons of high
humidity. Consult with your service representative in
regard to the cost of cleaning the internal parts of the
copier.............................................................................
• DO NOT leave the document feeder open as there is a
danger of personal injury...............................................
Other precautions
• DO NOT place heavy objects on the copier or cause
other damage to the copier.
• DO NOT open the front cover, turn off the main switch,
or pull out the power plug during copying.
• During copying, some ozone is released, but the
amount does not cause any ill effect to one's health. If,
however, the copier is used over a long period of time
in a poorly ventilated room or when making an
extremely large number of copies, the smell may
become unpleasant. To maintain the appropriate
environment for copy work, it is suggested that the
room be properly ventilated.
• When lifting or moving the copier, contact your service
representative.
• DO NOT touch electrical parts, such as connectors or
printed circuit boards. They could be damaged by
static electricity.
• DO NOT attempt to perform any operations not
explained in this handbook.
• CAUTION: Use of controls or adjustments or
performance of procedures other than those specified
herein may result in hazardous radiation exposure.
■ Cautions when handling
consumables
CAUTION
• Avoid inhalation, ingestion, skin or eye contact. If
ingestion occurs, dilute stomach contents thoroughly
with water and seek medical treatment. If skin contact
occurs, wash with soap and water. If contact with eyes
occurs, flush thoroughly with water and seek medical
treatment........................................................................
• Prolonged inhalation of excessive dusts may cause
lung damage. Use of this product, as intended, does
not result in inhalation of excessive dusts. ...................
• Keep away from children...............................................
• Do not incinerate toner and toner containers.
Dangerous sparks may cause burn...............................
Other precautions
• Always read the safety instructions which are included
in the box or printed on the container when handling
consumables.
• Dispose of the toner or toner containers in accordance
with Federal, State and Local rules and regulations.
• Store consumables in a cool, dark location.
• If the copier will not be used for an extended period of
time, remove the paper from the cassette, return it to
its original package and reseal it.
Page 9
5
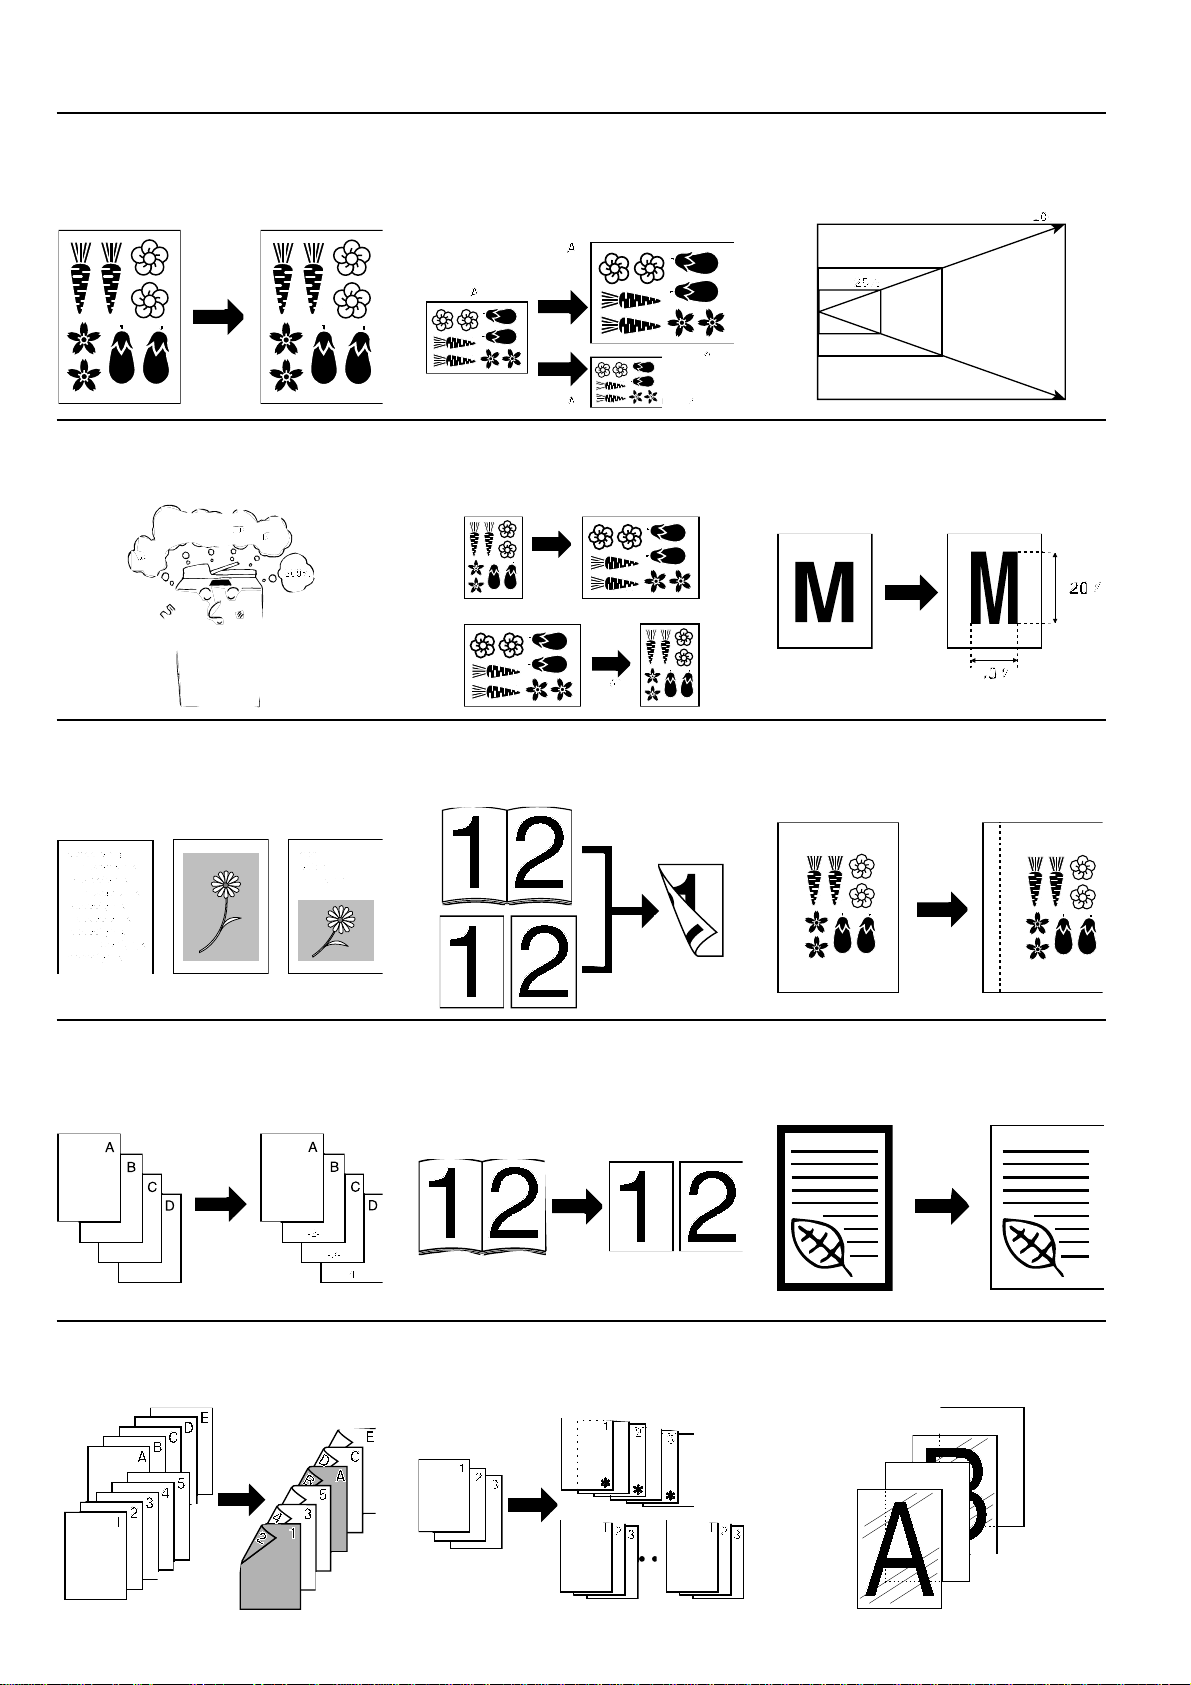
● MAKING FULL USE OF THE MACHINE'S ADVANCED FUNCTIONS
Making the machine automatically
select paper of the same size as the
original
<Auto paper selection mode>
(page 17)
Various functions for making
enlarged and reduced copies
■ Enlarging/reducing copies to a
specified drawer size
<Auto magnification selection
mode> (page 19)
■ Enlarging/reducing copies to any desired
size in the range
25-400% <Zoom copy mode > (page 19)
■ Selecting the zoom ratio by one-touch key
<Size zoom mode> (page 19)
■ Enlarging/reducing copies to specify sizes
of the original and paper
<Standard zoom mode> (page 20)
■ Enlarging/reducing length and width
separately
<XY zoom mode> (page 20)
Making clear reproductions of
photographs
<Copy quality selection> (page 21)
Copying to front and back of the
paper from various originals
<Duplex copy> (page 22)
Making a margin in the copies, for
binding, etc.
<Margin mode> (page 24)
Printing page numbers on copies
<Print page numbers> (page 26)
Copying two-pages originals onto
separate sheets
<Split copy > (page 27)
Making copies with clean edges
<Border erase> (page 28)
Making covers or insert sheets
among the copies
<Sheet insertion copy> (page 29)
Making documents with
transparencies
<Presentation mode> (page 34)
Feeding a paper as a transparency +
backing sheet mount
<Transparency backing mode>
(page 36)
1
543
876
11109
2
Page 10
A full range of optional
equipment is available
■ Finisher (page 81)
6
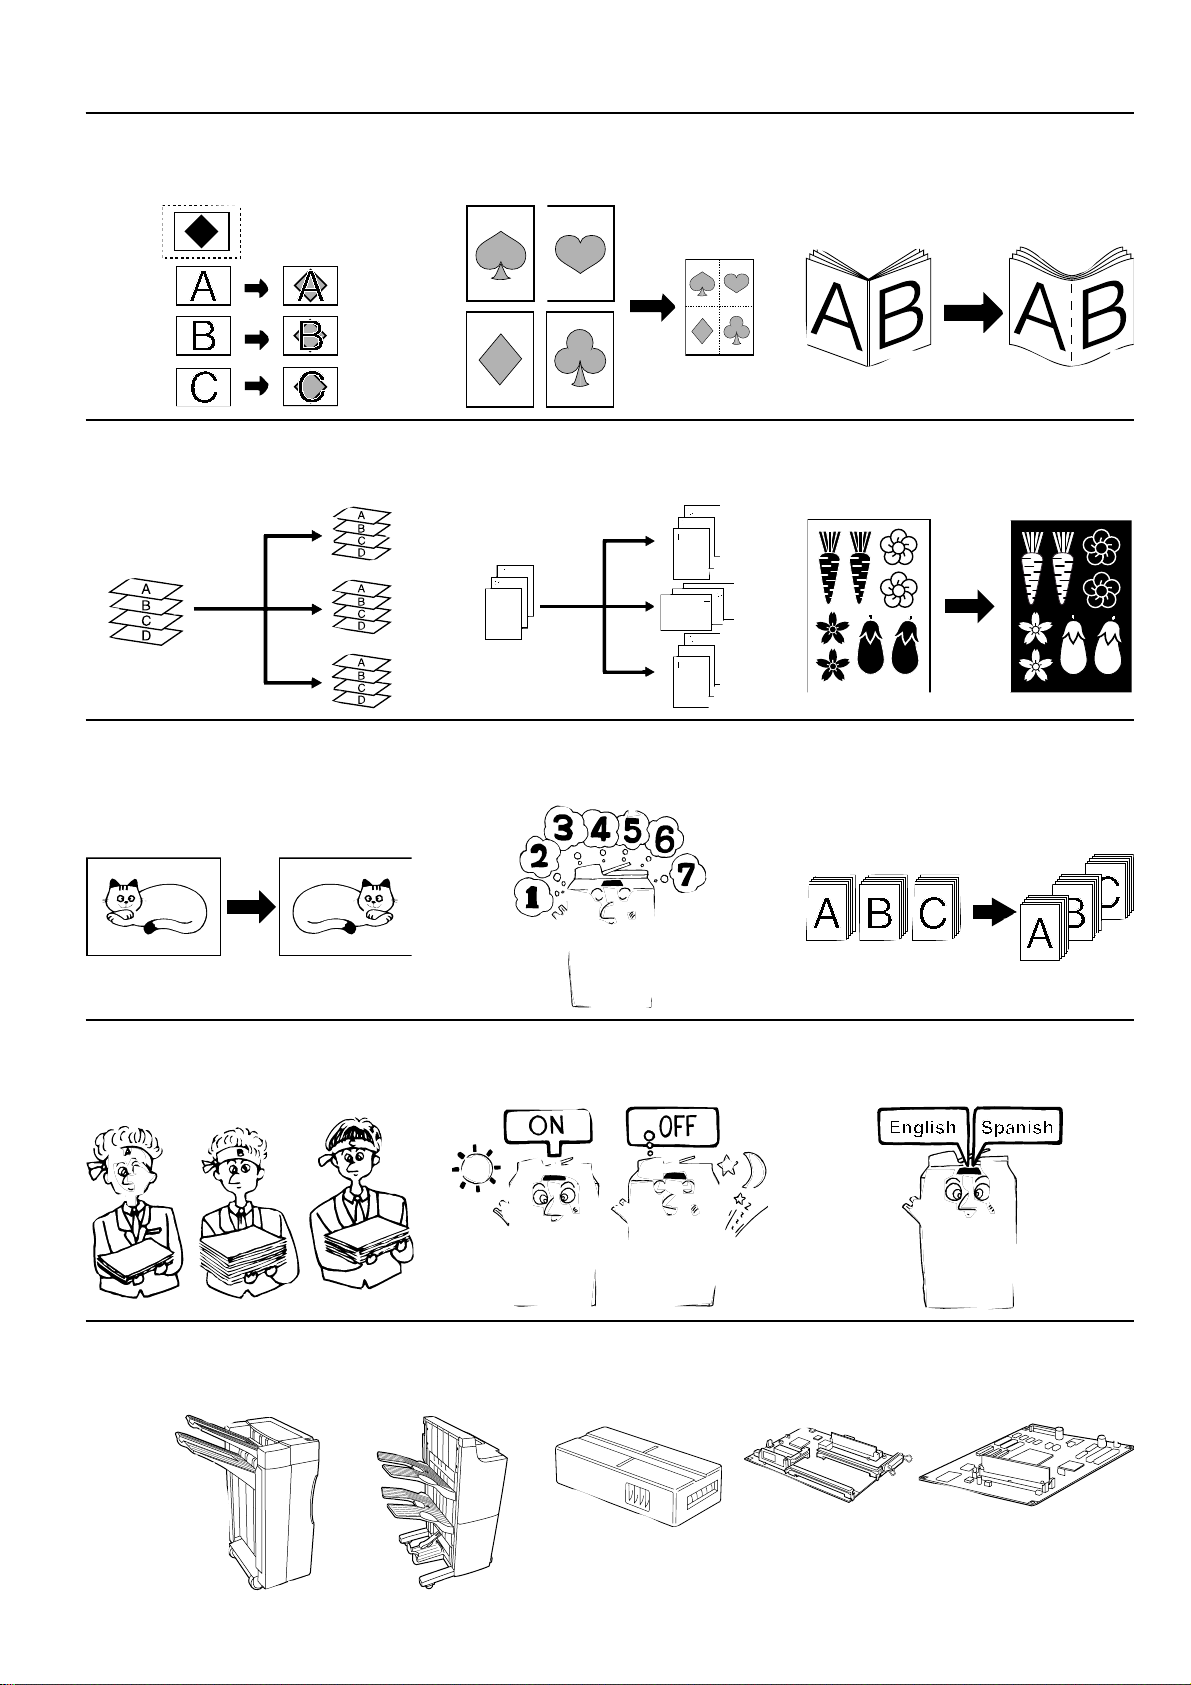
Making image overlay
<Form overlay> (page 37)
Making one copy from two or four
originals
<Merge copy> (page 38)
Making booklet from book originals
<Booklet + cover copy mode>
(page 39)
<Stitching mode>
(page 41)
Sorting automatically
<Sort copy> (page 44)
Changing the direction of the sheets
for easy sorting
<Rotate sort copy> (page 44)
Inverting black and white
<Invert copy> (page 43)
Making mirror image copies
<Mirror image copy> (page 44)
Memorizing frequently used settings
<Program mode> (page 45)
Copying various originals at a time
<Job build function> (page 52)
Managing the number of copies
made by different departments, with
ID-code
<Copy management mode>
(page 61)
Turning main switch ON/OFF
automatically
<Week timer> (page 67)
Changing the language used for
messages
<Language selection function>
(page 80)
232221
201918
171615
141312
24
■ Key counter
(page 82)
■ I/F kit (page 82) ■ Memory copy board
(page 82)
● MAKING FULL USE OF THE MACHINE'S ADVANCED FUNCTIONS
■ Booklet stitcher
(page 81)
Page 11
7
NAMES OF PARTS
Page 12

8
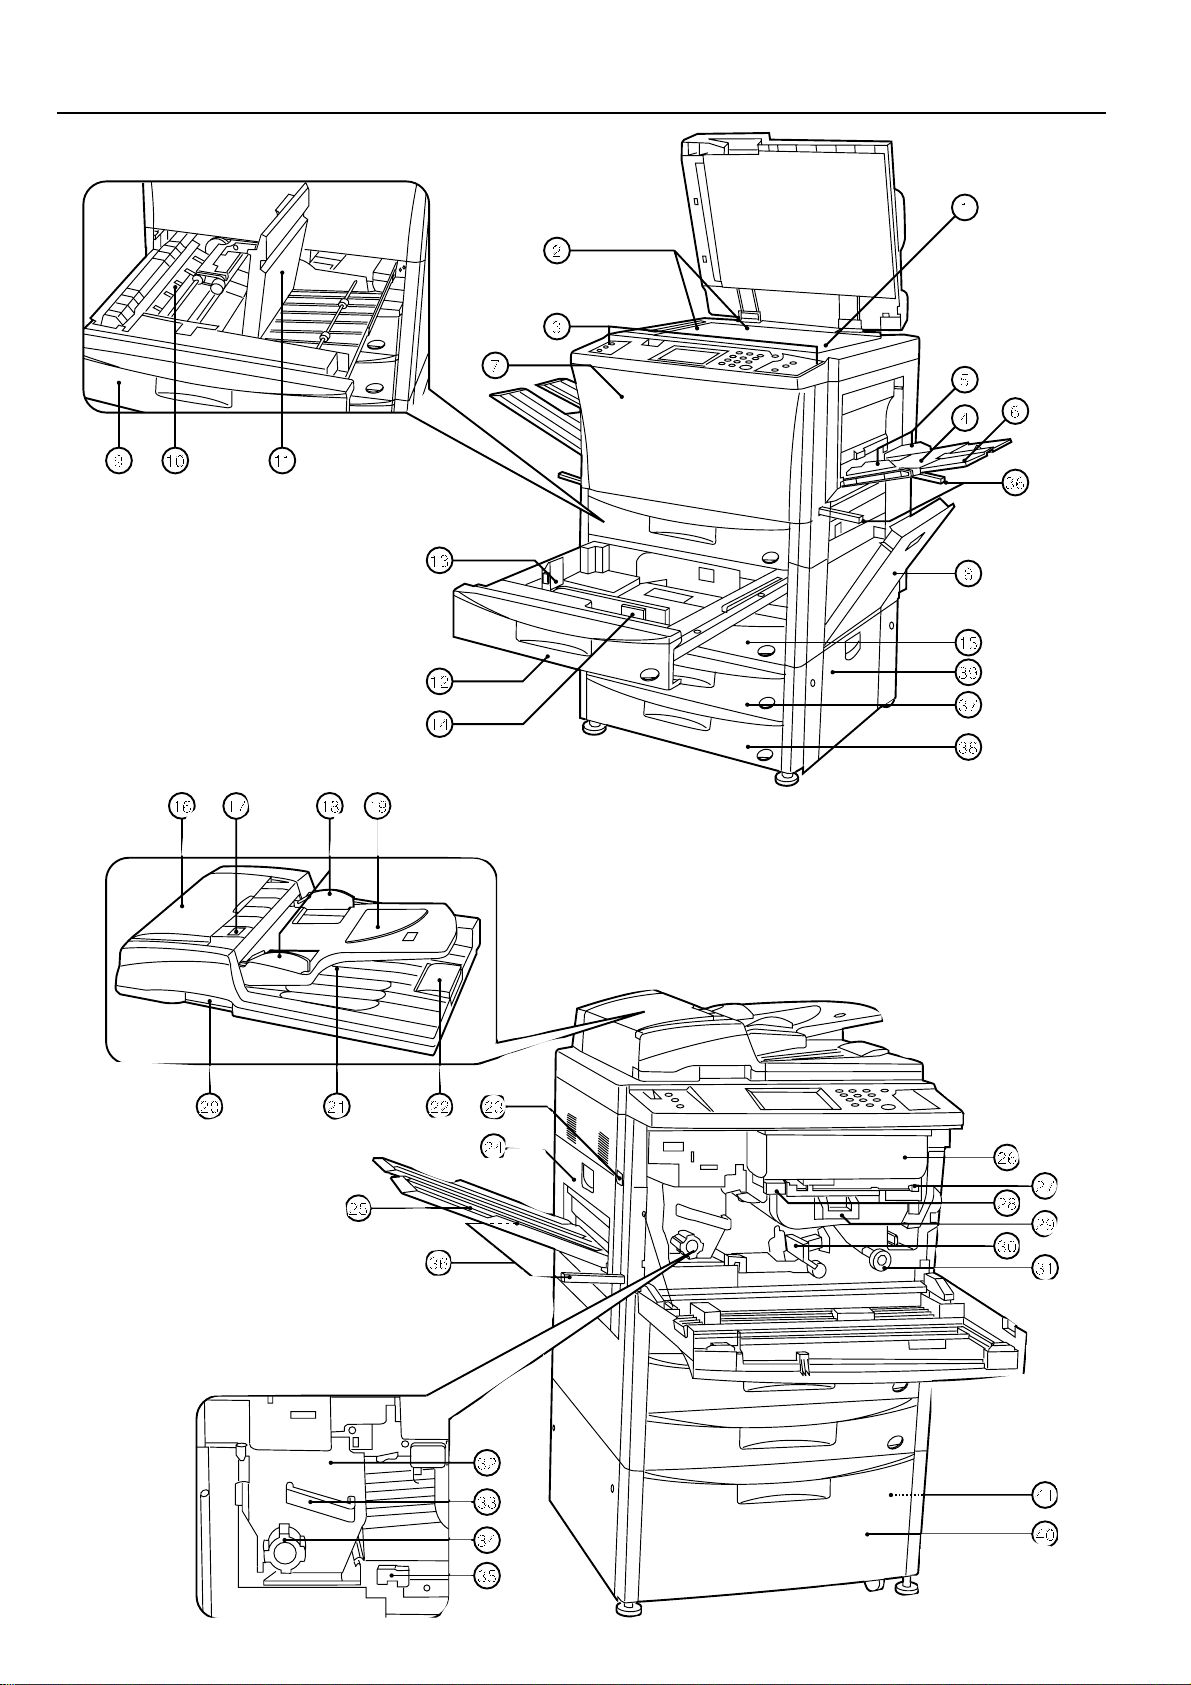
(1) Main body
1 Platen
(Set a book original or the like that cannot be set in the DF
on this.)
2 Original size indicator lines
(Be sure to align the original with these when setting the
original on the platen.)
3 Operation panel
(Operate to copy here.)
4 Stack bypass tray
(Load paper here when copying onto small-size paper or
colored paper.)
5 Insert guides
(Be sure to match the paper size when loading paper on the
stack bypass tray.)
6 Support guide
(Pull out when copying onto A4 (vertical) or larger paper.
7 Front cover
(Open to replace a toner cartridge or for misfeed removal.)
8 Right cover
(Open when paper misfeed occurs in the paper feed
section.)
9 Duplex unit
0 Re-feeding section
(Open when paper misfeed occurs in the duplex unit.)
! Duplex cover
(Open when paper misfeed occurs in the duplex unit.)
@ Drawer 1
(Holds up to 550 sheets of standard paper.)
# Length adjustment lever
$ Width adjustment lever
% Drawer 2
(Holds up to 550 sheets of standard paper.)
^ DF original reversing cover
(Open when paper misfeeds in DF section.)
& Original set indicator
(The original condition is displayed.
Green lights: The original is set. Copying will begin by
pressing the Start key.
Green blinks: The original is not set securely. Reset the
original.
Red blinks: Originals are misfed. Remove all misfed
originals in accordance with page 93.)
* Original insertion guide
(Set to match the size of the original when setting in the
DF.)
( Original table
(Set the DF original on this table.)
) DF opening/closing lever
(Hold when opening and closing the DF.)
⁄ Original ejection cover
(The copied originals are stored here.)
¤ Paper ejection guide
(Open when setting an original of B4 or larger in the DF.)
‹ Main switch
(Turn ON ( | ) before starting machine.)
› Left cover
(Open when paper misfeed occurs in the fixing unit or
ejection section.)
fi Copy tray
(Completed copies will be ejected here.)
fl Toner cartridge
‡ Toner cartridge release lever
(Operate when replace a toner cartridge.)
° Paper transfer section release button
· Paper transfer section handle
‚ Paper transfer section release lever
(Operate when paper misfeed occurs in the paper transfer
section.)
ΠPaper feed section knob
(Operate to remove paper misfed in paper feed section.)
„ Fixing unit
´ Fixing unit handle
(Pull out the fixing unit to remove paper misfed in fixing unit
by handling this.)
‰ Fixing knob
(Operate to remove paper misfed in fixing unit.)
ˇ Fixing unit release lever
(Operate to open/close fixing unit.)
Á Handles for transport
(Pull out to be handle. They are located in four positions.)
<In case of using drawer-type paper feed desk>
¨ Drawer 3
(Holds up to 550 sheets of standard paper.)
ˆ Drawer 4
(Holds up to 550 sheets of standard paper.)
Ø Desk right cover
(Open when paper misfeed occurs.)
<In case of using deck-type paper feed desk>
∏ Paper feed deck
(Holds up to 3,000 sheets of standard paper.)
Å Right deck cover
(Open when paper misfeed occurs.)
NAMES OF PARTS
Page 13

& Start key
* Start indicator
(When this lights green, the copier is ready to copy.)
( Reset key (See "● Initial mode")
) Auto selection key (page 16)
⁄ Auto selection indicator
(Lights when auto selection mode is selected.)
¤ Energy Saver key (page 48)
‹ Energy Saver indicator
(Lights when the copier is in the rest state because it is in
the preheat time or week timer is operative.)
› Interrupt key (page 21)
fi Interrupt indicator
(Lights when interrupt mode is selected.)
● Initial mode (at the end of warm-up or when the Reset key
is pressed)
In the initial mode, the copying mode set is the "auto paper
selection mode" that paper of the same size as the original is
selected automatically, the number of copies set is "1", and
"manual exposure mode" is set for copy exposure.
* It is also possible to set auto exposure mode in the initial
mode. (See page 72, "1 EXPOSURE MODE".)
● Auto clear function
About 90 seconds after copying stops, the copier will
automatically return to the same settings as those after warm
up. (However, the exposure mode will not change.) Copying
can be performed continuously in the same settings of copy
mode, number of copies, and exposure if copying is started
before the auto clear function operates.
● Automatic drawer switching function
If two drawers contain the same size of paper and the paper in
one drawer runs out during copying, this function switches to
feeding paper from the other drawer.
* The automatic drawer switching function can be disabled.
(See page 78, "2 AUTOMATIC DRAWER SWITCHING")
(2) Operation panel
1 Punch mode key (page 81)
(Press to punch with the optional finisher.)
2 Punch mode indicators
3 Staple sort mode key (page 81)
(Press to select the stapling position with the optional
finisher.)
4 Staple sort mode indicators
5 Sorter mode key (page 44)
(Press to select the sorter mode.)
6 Sort mode indicator
7 Group mode indicator
8 Brightness adjustment control
(Use to adjust the brightness of the touch panel.)
9 Data indicator
(This indicator lights, and blinks while the optional printer
function is being used.)
0 Program key
(Press to use the job programming.)
! Manual key
(Press to make copying of same ratio, regardless of the
original size.)
@ Add job key (page 49)
# Copier/Printer switching key
(Press when switching the copy mode and printer mode, if
optional I/F kit is installed.)
$ Touch panel
(Number of copies, machine status, operations, etc., appear
on this panel. By gently touching these keys, items, settings,
and so on can be selected. Do not press on the keys with
wooden, metal or other hard objects, and do not prick them
with pointed objects. In this handbook, touch key names are
indicated by quotation marks.)
% Numeric keys
(Press to set the number of copies and enter the value.)
^ Stop/Clear key
(Press to stop copying or to change the number of copies to
be made.)
9
NAMES OF PARTS
Page 14
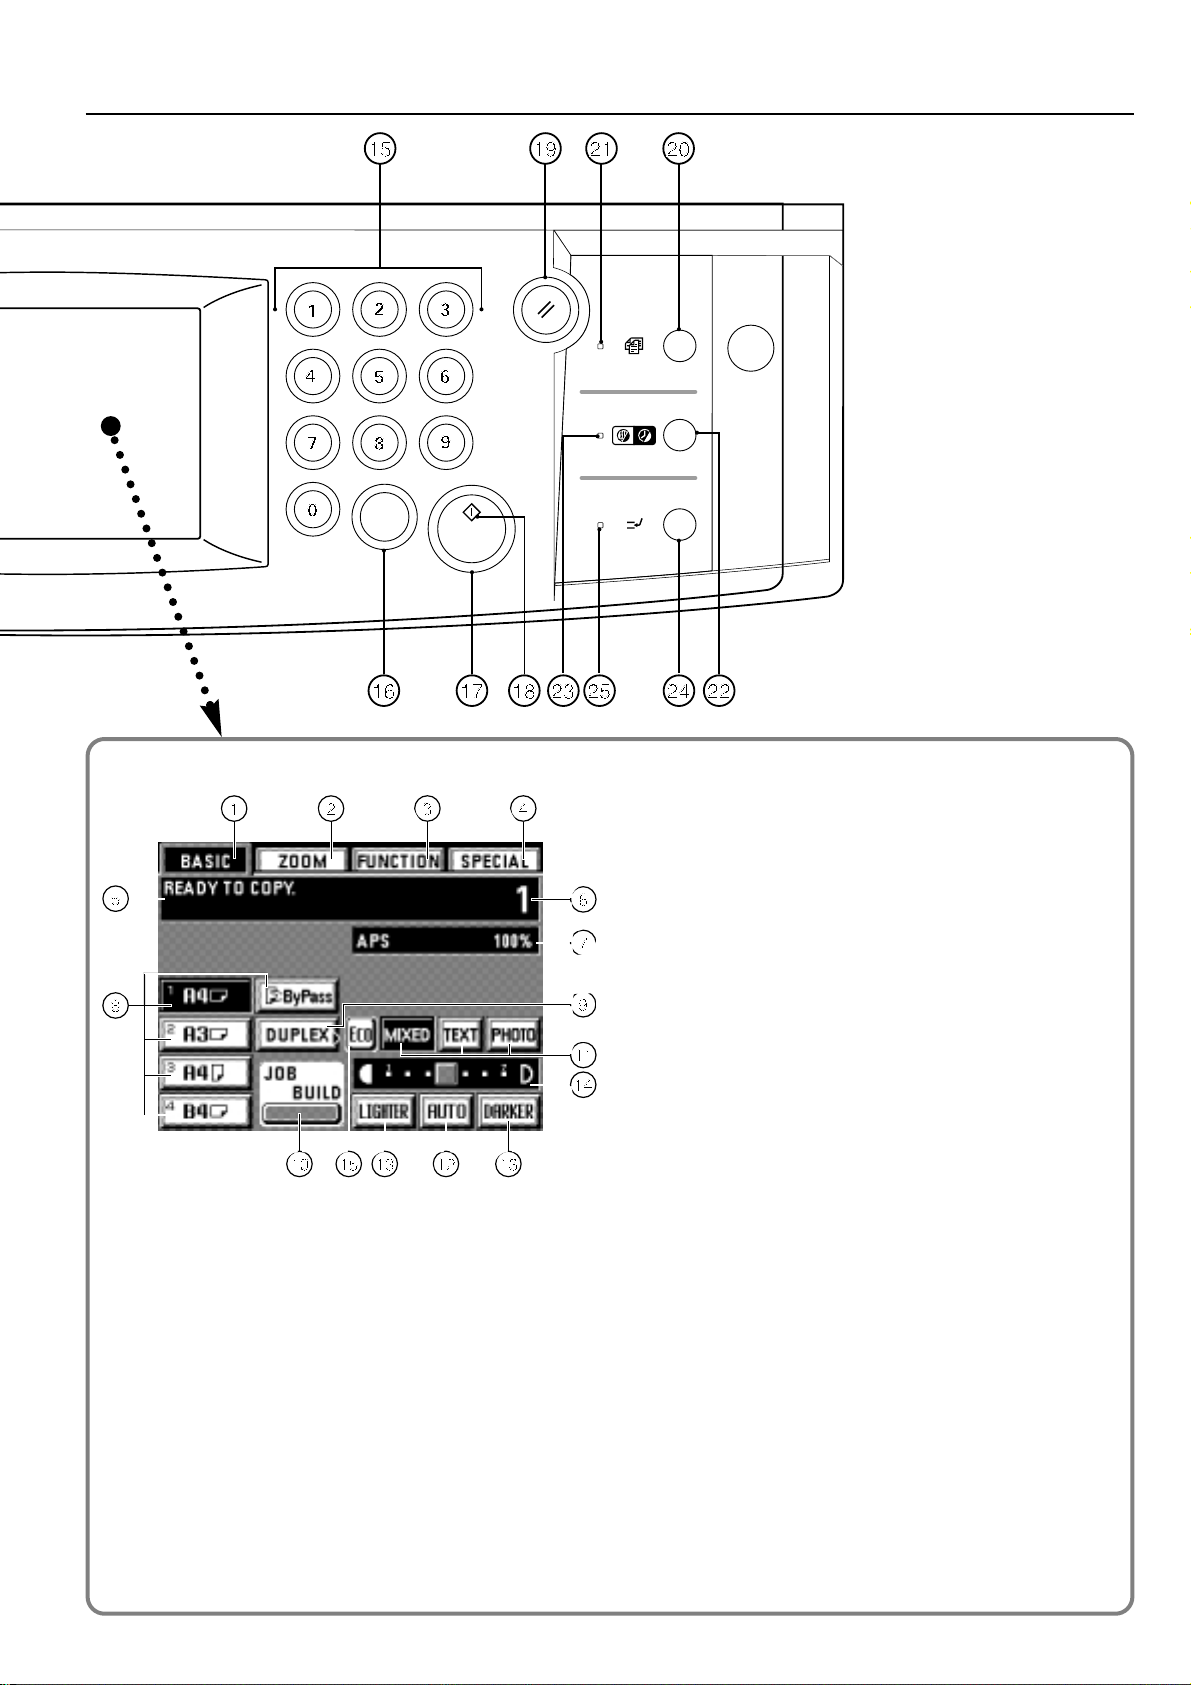
1 "BASIC" key
(Touch to return to the basic screen.)
2 "ZOOM" key
(Touch to change the copy zoom ratio. Page 19)
3 "FUNCTION" key
(Touch to select the copy function. Function selection
screen will appear.)
4 "SPECIAL" [Management mode] key
(Touch to alter the language used for the messages or set
the week timer, etc. Management mode setting screen will
appear.)
5 Message display
(Displaying messages on how to operate the machine and
indications of the machine's status.)
6 Copy number display
(At start and end of copying, displaying the number of
copies set. During copying, displaying the number of copies
completed.)
7 Copy mode/zoom ratio display
(The selected copy mode and copy zoom ratio will appear.)
8 Paper size keys/indicators
(The paper size set in each of the drawers will appear.
Also, touch this key to select the paper feed drawer. The
selected drawer will be highlighted.)
9 "DUPLEX" key
(Touch to set the duplex copying. The duplex copy setting
screen will appear. Page 22)
0 "JOB BUILD" key
(Touch to use the job build function. The setting screen will
appear. Page 52)
! Copy quality mode selection keys
(Touch to select the "MIXED", "TEXT" and "PHOTO"
modes according to the type of originals. The highlighted
key is the mode being selected at present. Page 21)
@ "AUTO" [Auto/manual exposure selection] key
(Touch to switch the auto exposure mode and manual
exposure mode. When it is highlighted, auto exposure
mode is operating. In the manual exposure mode, the scale
will appear on the display.)
# Copy exposure mode keys
(Touch to adjust copy mode manually.)
$ Copy exposure scale
(Appears in the manual exposure mode. Move the
exposure scale to the right to make copies darker, and
move it to left to make copies lighter. 7 or 13 exposure
levels can be set. See page 72, "2 EXPOSURE STEPS".)
% "Eco" key
Touch to enter the toner economy mode. When this key is
highlighted, the exposure level will become low and toner
consumption will be reduced. Use this mode for trial printing
or the like that does not require high quality printing.
10
(3) Basic screen on the touch panel
NAMES OF PARTS
Page 15
(1) How to load paper
In the drawer-type paper feed desk, paper can be loaded at a total 5 points-- the 4
drawers and the stack bypass tray. In the deck-type paper feed desk, paper can be
loaded at a total 4 points-- the 2 drawers, the deck and stack bypass tray.
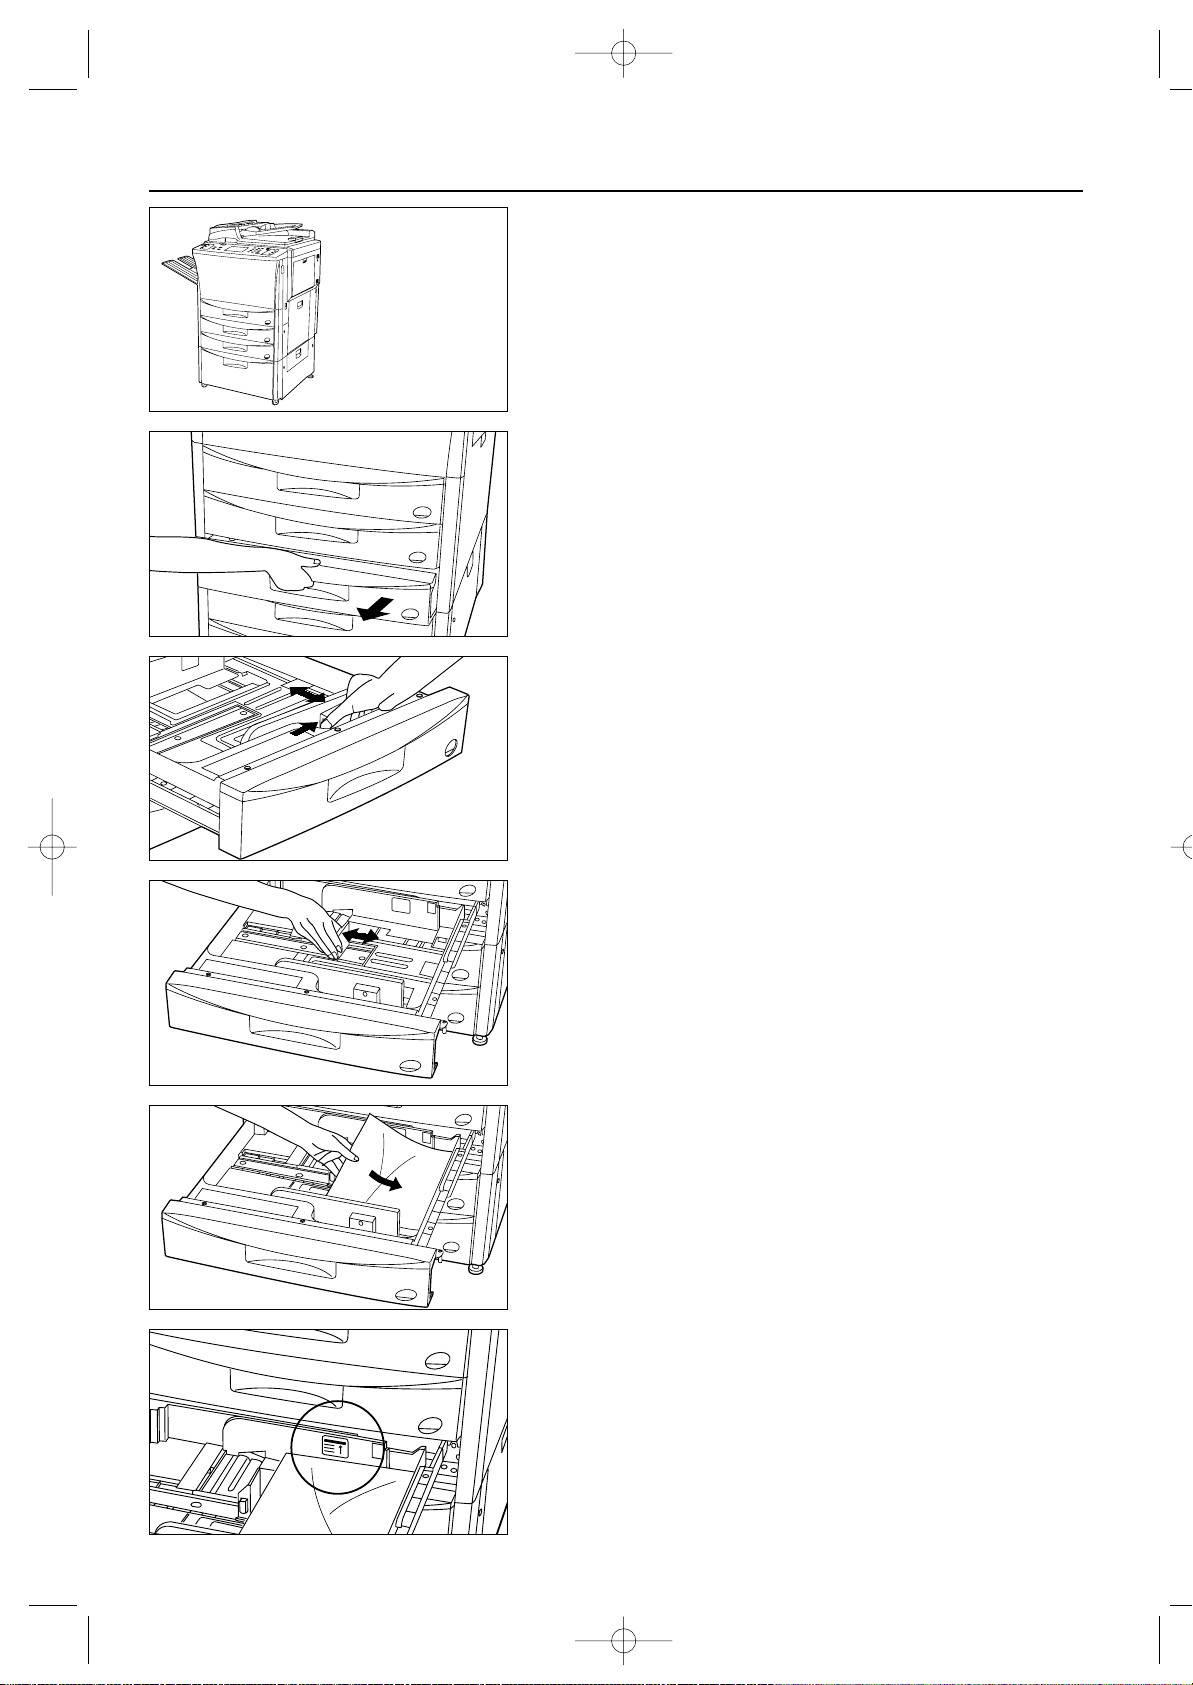
1 Loading paper into the drawers
Paper can be loaded into the drawers at the front of the copier. Each drawer holds
up to 550 sheets of standard (80 g/m2) or colored paper.
The drawer can be set to hold paper of any desired size from A3 to A5R.
11
PREPARATIONS
1. Pull the drawer out toward you as far as it will go.
* Not to pull more than one drawer out at the same time.
2. Turn the width adjustment lever to align the width guide with the paper's width.
3. Turn the length adjustment lever to align the length guide with the paper's length.
* A sticker indicates how high paper can be loaded. Do not exceed the limits on the
sticker.
* When loading paper into the drawer, make sure the copy side is facing downward.
(The copy side is the side facing upward when the package is opened.)
4. Set the paper against the right-hand wall of the drawer, and position the paper
so that it is aligned with the correct size indicator lines (marked on the bottom of
the drawer) for its size.
03/2AC-E/11-18.q 2/18/00 10:57 Page 11
Page 16
12
PREPARATIONS
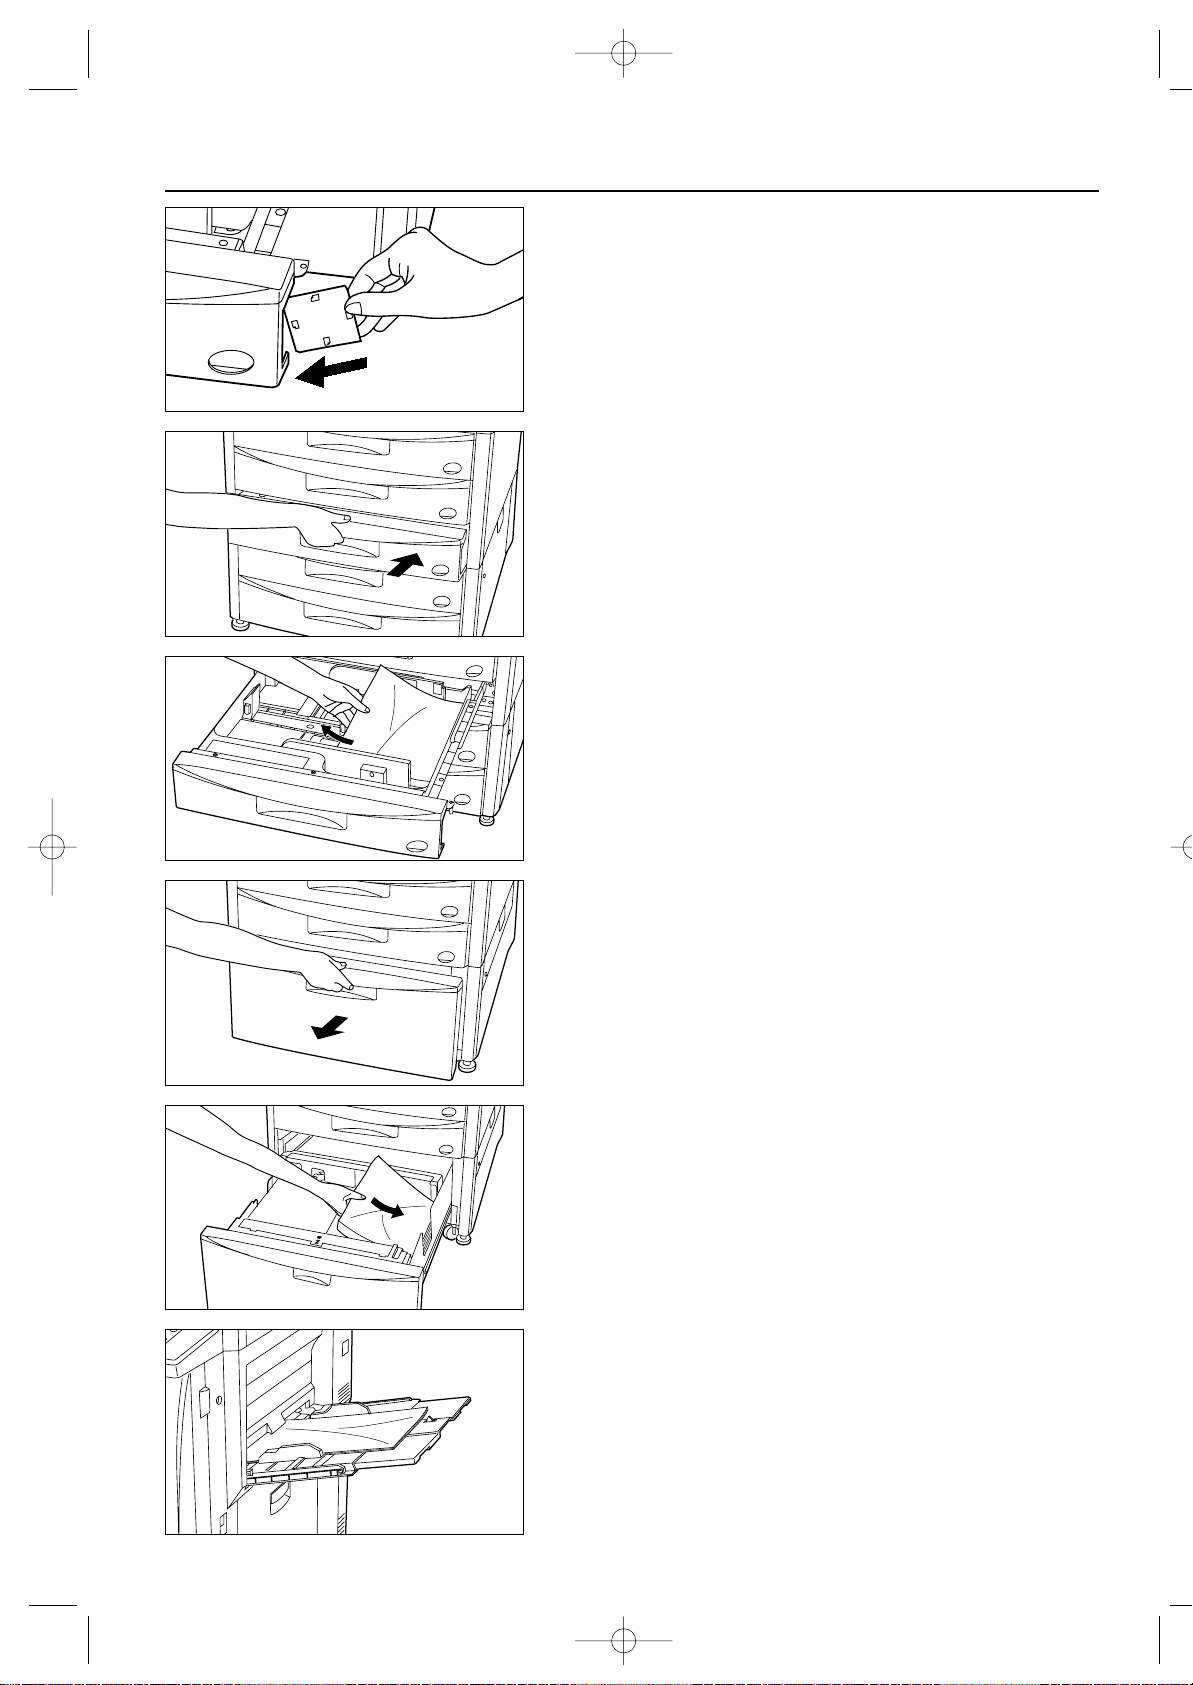
* Set a paper size label sheet in the front of the drawer to see the paper size.
5. Gently push the drawer back in.
* Set the paper size referring "3 PAPER SIZE" on page 78.
2 Loading paper into the deck
For the deck, A4 sheets of standard paper (80 g/m2) can be loaded in two rows. Up
to the 1,500 sheets each, and therefore 3,000 sheets can be loaded.
1. Pull out the deck out toward you as far as it will go.
2. Load the paper in two rows.
* A sticker indicates how high paper can be loaded. Do not exceed the limits on
the sticker.
* When loading paper into the deck, make sure the copy side is facing
downward. (The copy side is the side facing upward when the package is
opened.)
3. Gently push the deck back in.
* When the copier is out of use for a prolonged period of time, remove the paper
from the drawer(s), put it into its original packaging, and seal it, to protect it
against moisture.
3 Loading paper into the stack bypass tray
The stack bypass can hold up to 100 sheets of standard paper (80 g/m
2
) at a time.
The paper can be any size from A3 to A6R, Folio. When copying onto special
paper, always use this tray to feed the paper.
* When using custom size paper, paper size can be specified. Set the paper size in
accordance with the following procedure in the "● How to set the custom sizes"
on page 77.
03/2AC-E/11-18.q 2/18/00 10:57 Page 12
A5
A
3
A4
A4
Page 17
* The types of special paper and the number of sheets which can be loaded in this
tray are:
• Tracing paper: 1 sheet
• Transparencies: 25 sheets (When set transparency, fan transparencies before
setting them.)
• Letterheads: 100 sheets
• Colored paper: 100 sheets
• Standard paper (120 g/m2, 160 g/m2): 25 sheets
* When copying onto tracing paper or transparencies, set the original on the platen.
13
PREPARATIONS
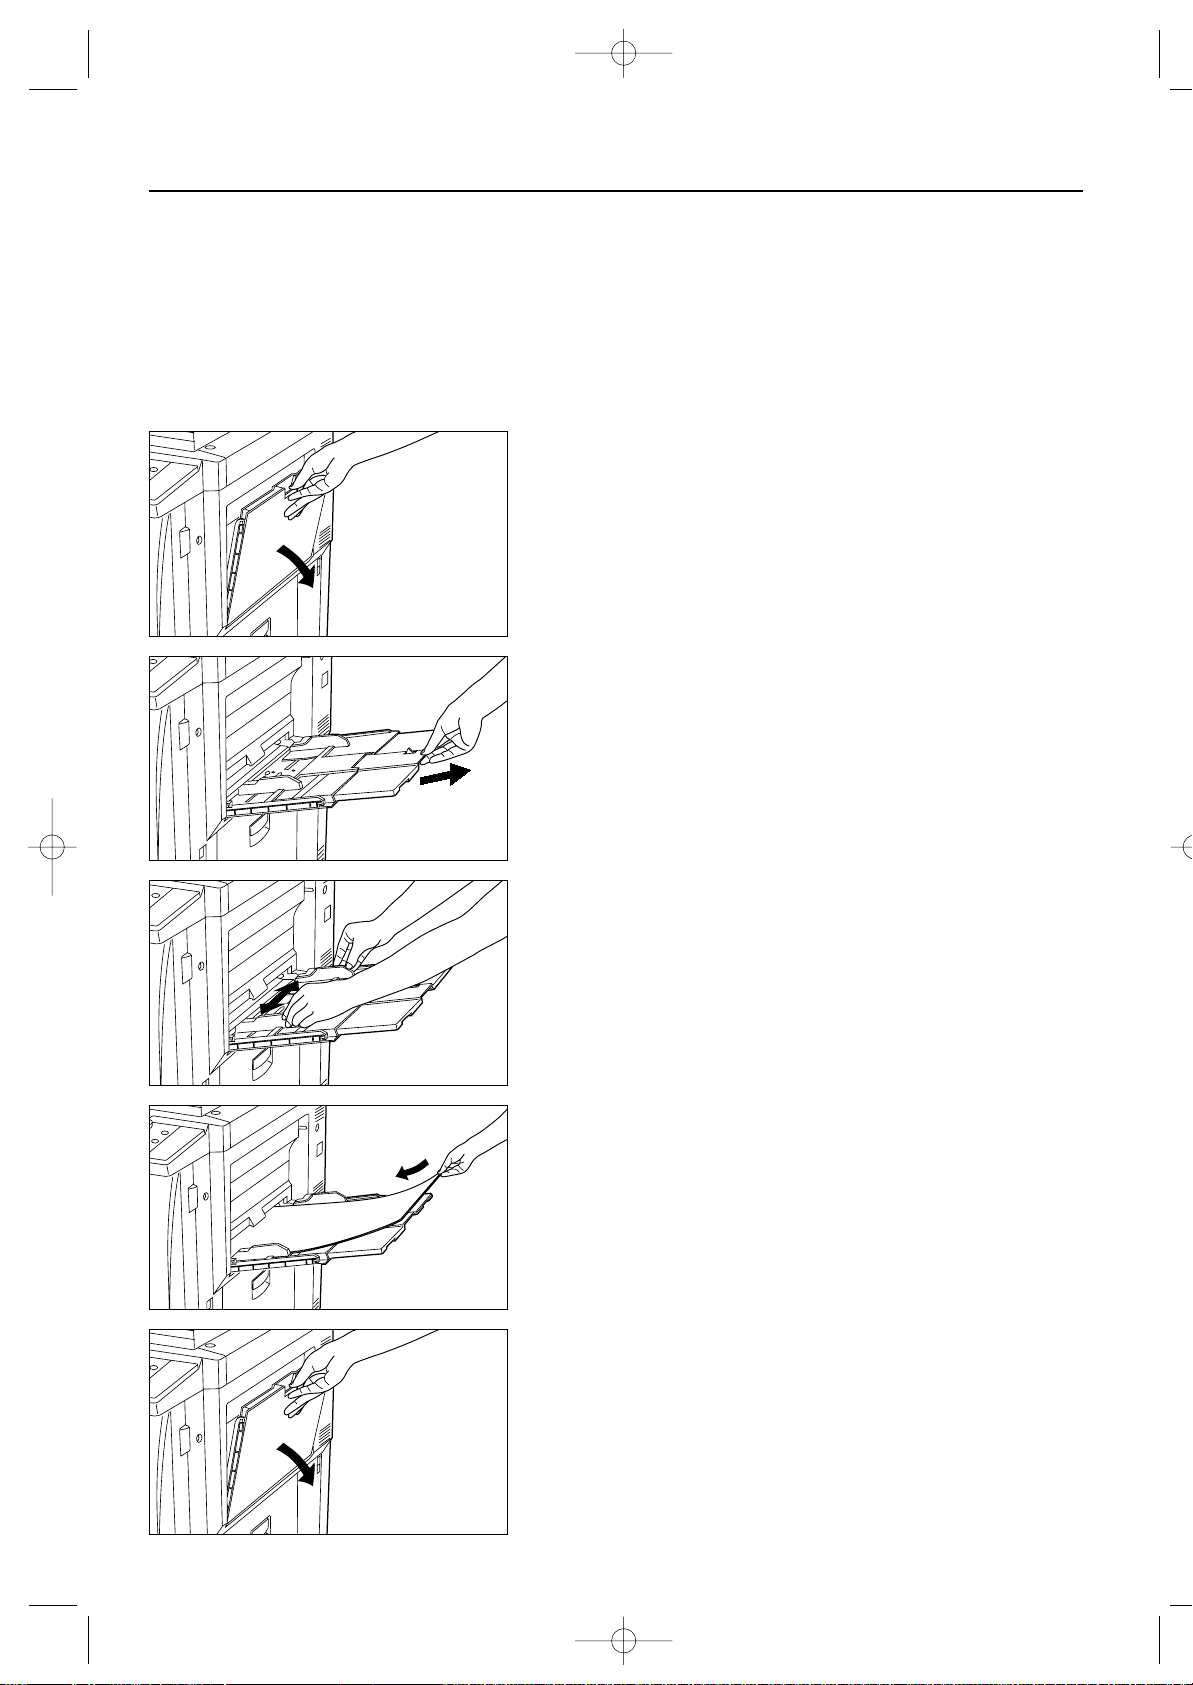
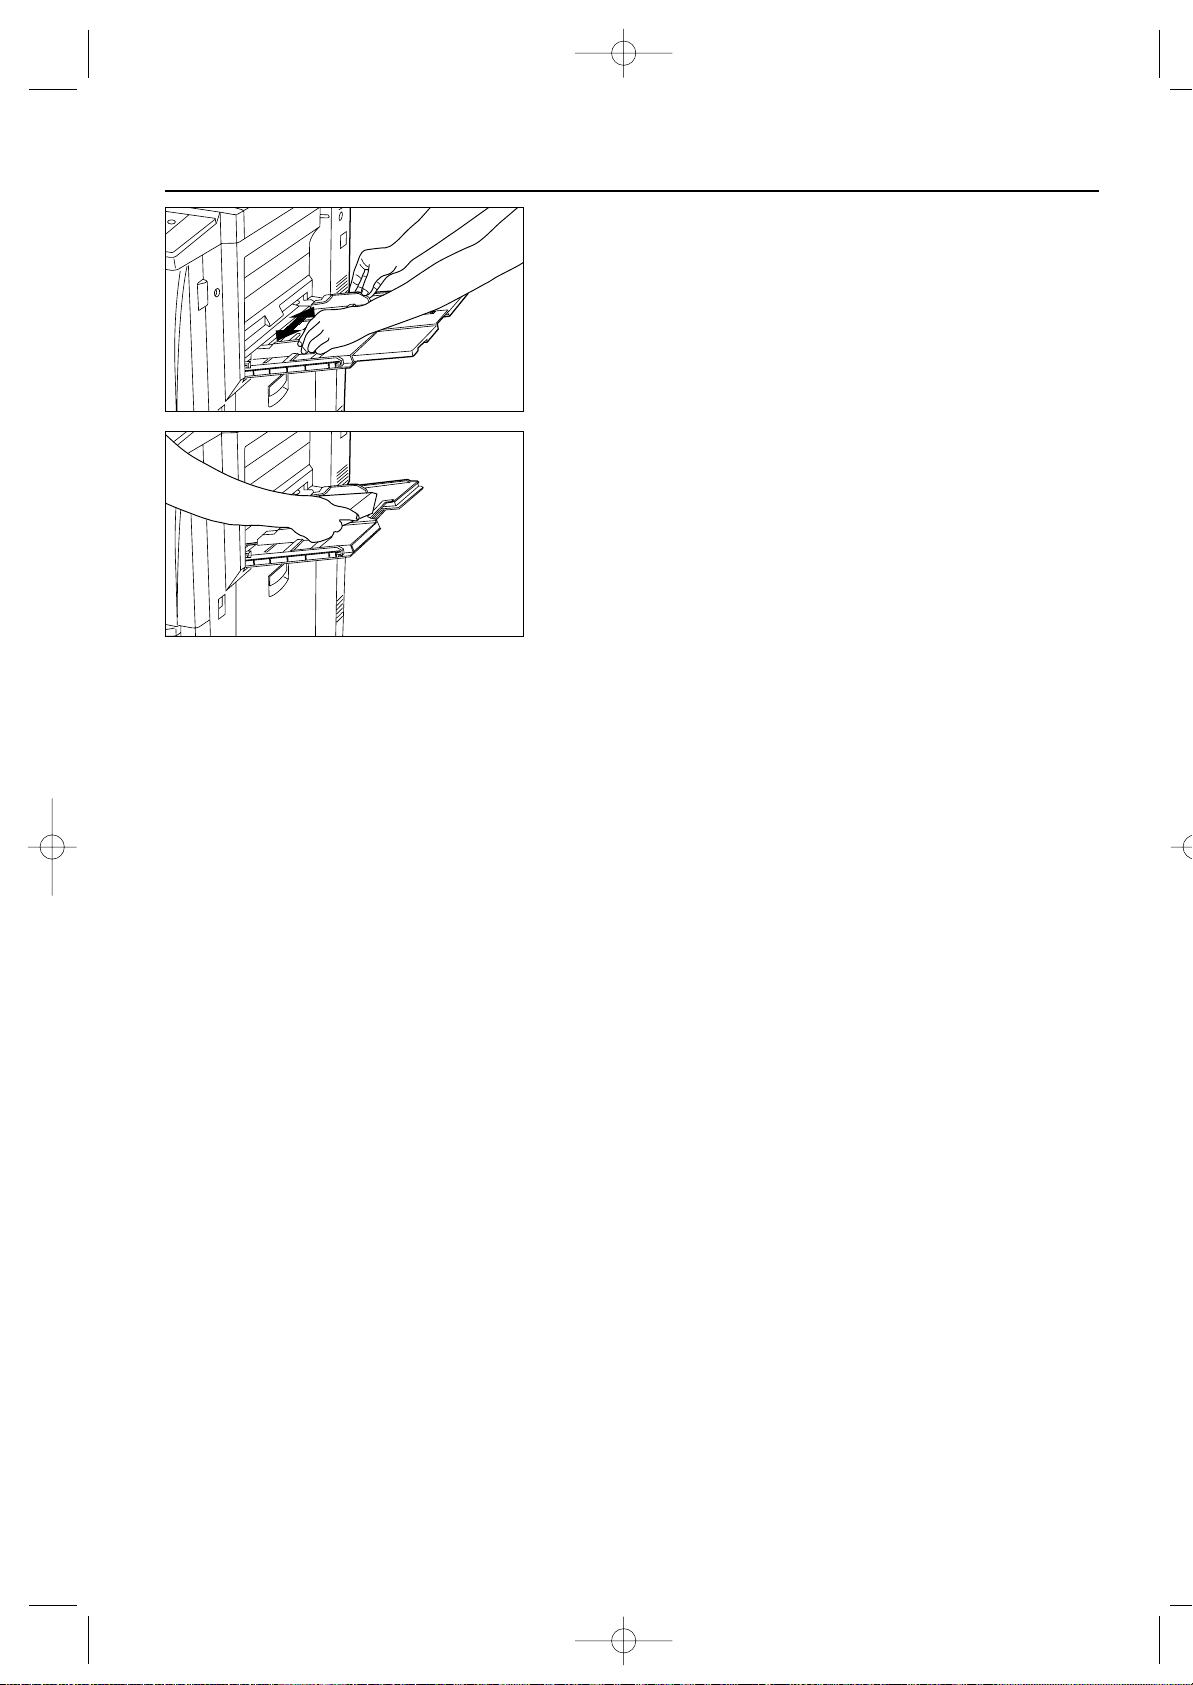
1. Open the stack bypass tray.
* To load A4 (vertical) or larger size paper, pull out the support guide.
2. Adjust the insert guides to fit the size of the paper to be loaded.
3. Insert the paper all the way in, along the guides, as far as it will go.
* When loading paper into the multi-bypass, make sure the copy side is facing
upward. (The copy side is the side facing upward when the package is
opened.)
● Setting the envelops in the stack bypass tray
When using the optional printer function, the envelops can be set in the stack
bypass tray.
The types of the envelop can be used are COM-10, Monarch, DL and C5, and up
to 10 envelops can be set at a time.
1. Open the stack bypass tray.
03/2AC-E/11-18.q 2/18/00 10:57 Page 13
Page 18
14
PREPARATIONS
2. Align the insert guides with the envelop size.
3. Open the envelops and set the side to be printed face up, and set the opening
part of the envelop in the right side and insert them until stop aligning with the
insert guide.
* Incorrect setting may cause paper misfeed, printing in the different direction or
printing on the different side.
* Set the envelop size in accordance with the following procedure in the "● How
to set the custom sizes" on page 77.
03/2AC-E/11-18.q 2/18/00 10:57 Page 14
Page 19
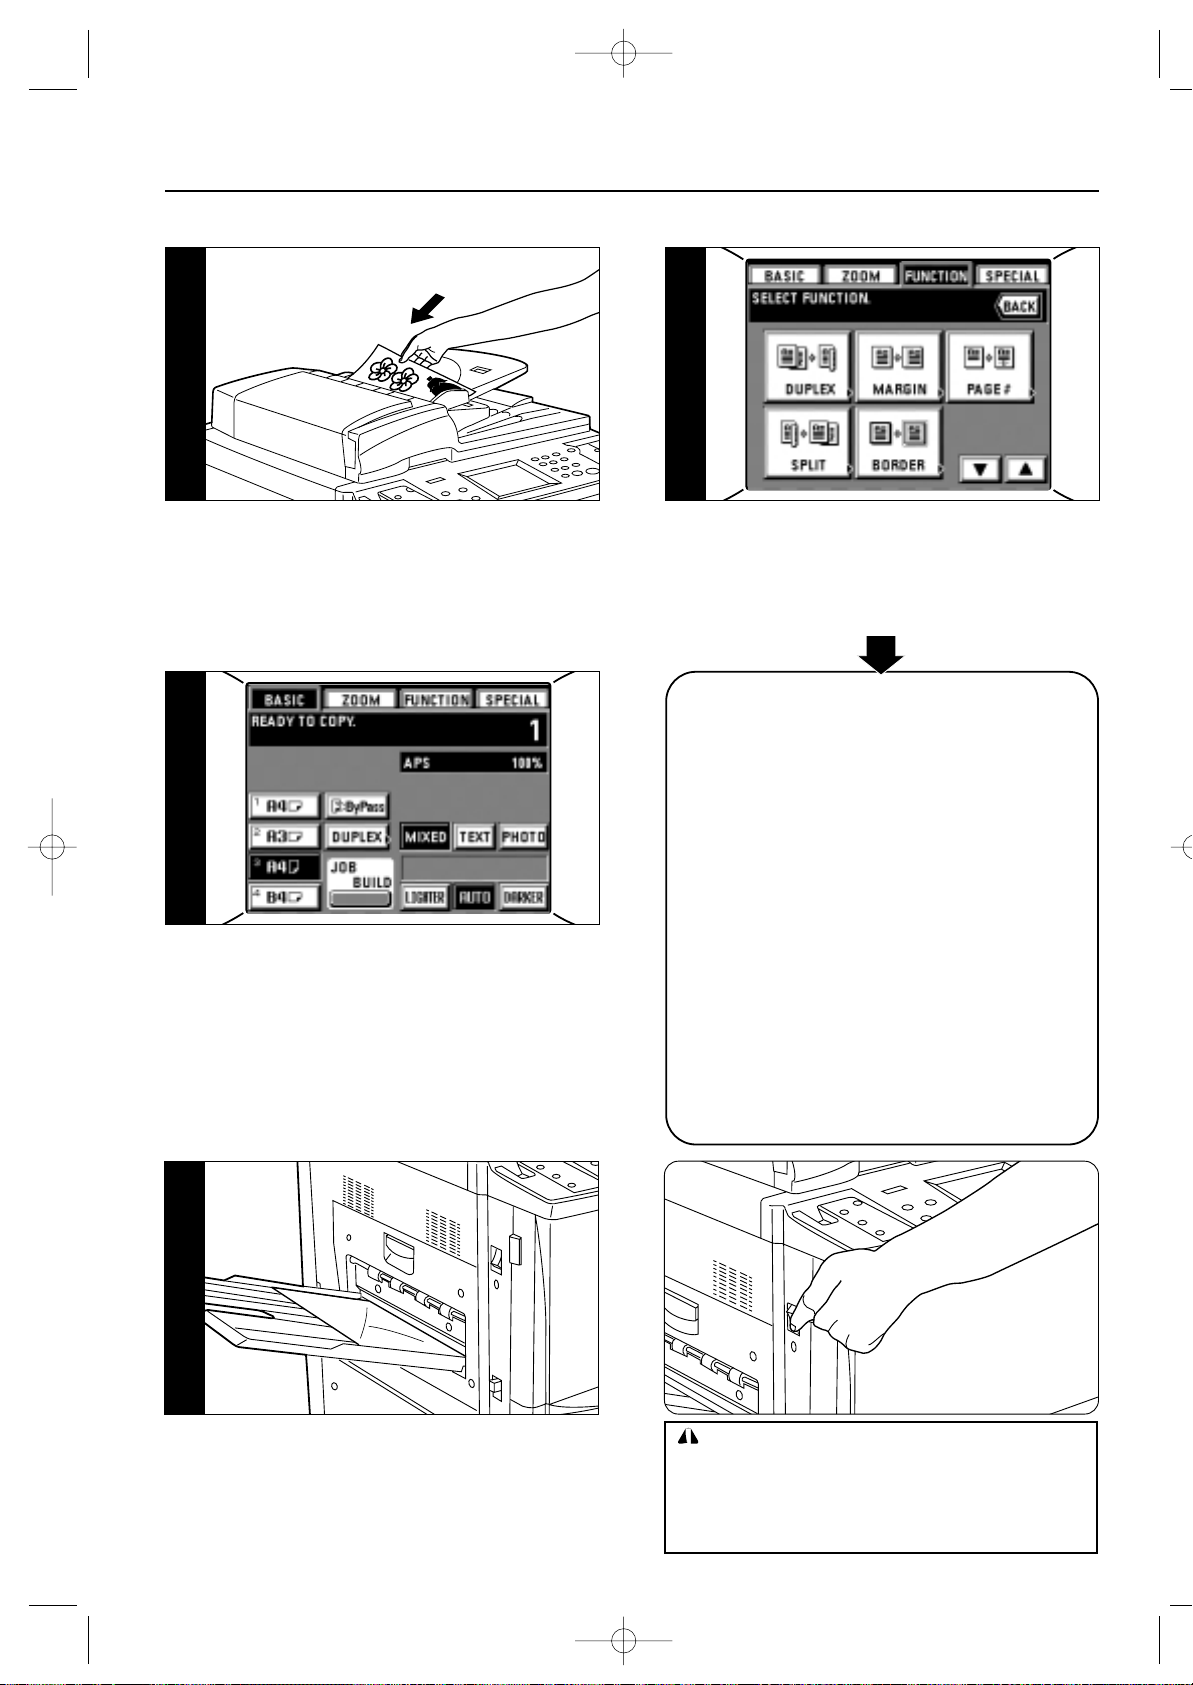
1 Setting original(s) in the DF
The copier is equipped with the DF (document feeder).
Multiple sheet originals loaded into the DF automatically fed one by one. The DF
automatically turns over duplex originals for copying on the reverse side.
15
SETTING ORIGINALS
Originals that can be loaded in the DF
• Sheets originals
• Thickness: One-sided originals: between 35 g/m2- 160 g/m
2
Duplex originals: between 50 g/m2- 120 g/m
2
• Size: Max. A3 to Min. A5 (vertical)
• Capacity: 70 sheets (A4 or smaller size, 80 g/m2)
50 sheets (B4 or larger size, 80 g/m2)
(However, 50 sheets when using auto selection mode)
Notes
Do not use originals of the kinds listed below.
When using perforated sheets or sheets with punch holes, do not insert the end
with the perforations or holes first.
• Transparencies
• Carbon paper, crumpled originals, those with strong folds or soft originals such as
vinyl
• Originals which are not rectangular, wet originals, sheets with adhesive tape or
glue
• Original with clips or staples (To use such originals, remove clips or staples and
straighten the crumpled or folded originals before setting them.)
• Clipping or sheets with very slippery surfaces
• Originals with wet correcting fluid
• Originals with folds (When such originals must be used, smooth out the folded
portion before setting them.)
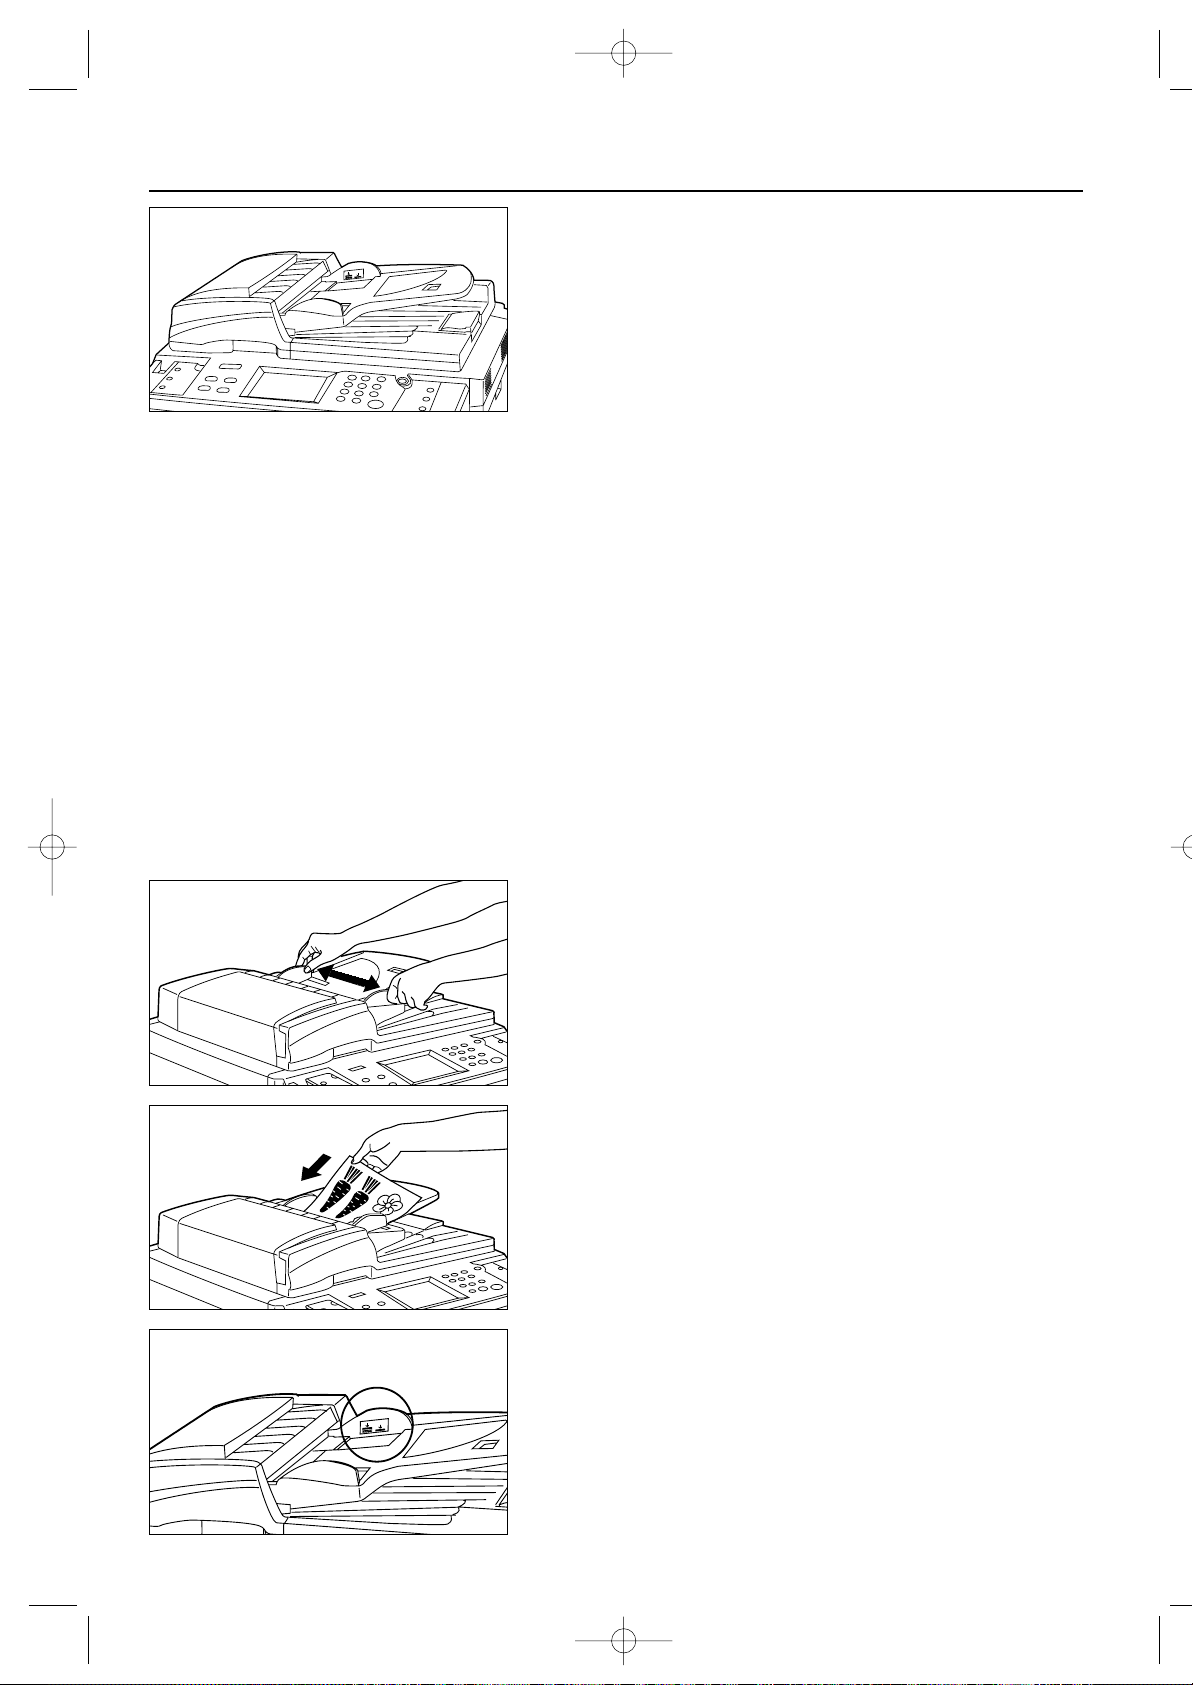
1. Adjust the original insert guides to fit the size of the original.
* Check if any ejected originals are left on the original ejection cover before
setting the originals. If any originals are left on the original ejection cover,
original misfeeds may occur.
2. Arrange the originals in order and set them face up (front face up for duplex
originals) on the original table. The original set indicator lights green. If the
indicator does not light, reset the originals.
* The originals must not exceed the scale pasted on the rear original insert guide. If
excessive originals are set, the original misfeeds may occur.
03/2AC-E/11-18.q 2/18/00 10:57 Page 15
Page 20
16
SETTING ORIGINALS
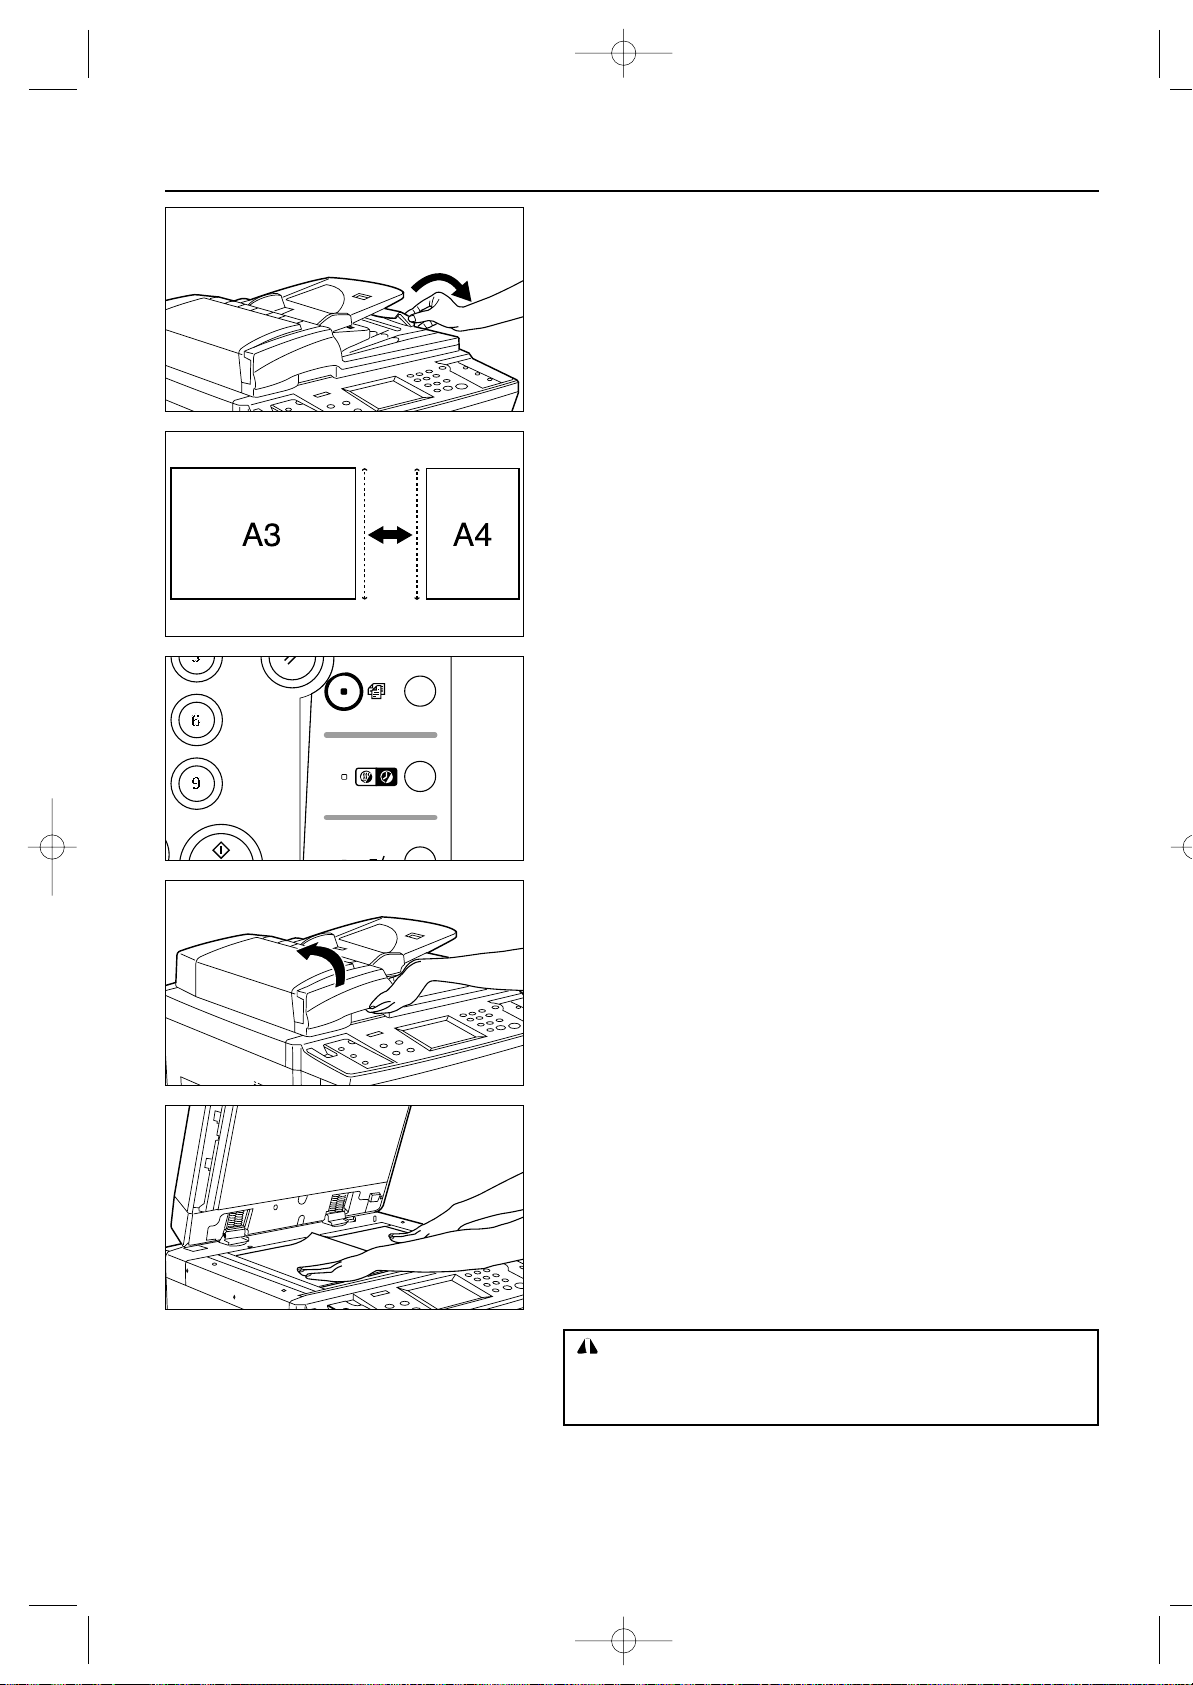
* When setting A3, Folio and B4 originals, open the ejection guide to avoid originals
from dropping.
* When copying duplex originals, originals will be ejected temporarily from the DF
original reversing cover for reversing. Do not touch the originals at this time. If the
originals are pulled out by force, the original misfeeds may occur.
● Auto selection mode
The size of each originals is detected to copy to the paper of the same size as each
original.
* Up to 50 sheets can be loaded in DF in this mode.
* A3 and A4 originals can be set in this mode and only the originals of the same
size in width can be used.
• How to set auto selection mode
Press the auto selection key on the operation panel to light the auto selection
indicator.
2 Setting original(s) on the platen
For original(s) that cannot be set in the DF, such as a book and magazine, open
the DF main body to set the original on the platen.
1. Hold the DF opening/closing lever to open the DF.
* When opening the DF, check if no original is on the original table and original
ejection cover. Otherwise, it may fall down when the DF is opened.
2. Set the original(s).
Face down the originals on the platen and align them with original size indicator.
3. Hold the DF opening/closing lever to close the DF.
* At this time, avoid pressing the platen excessively. The platen may be broken.
CAUTION
DO NOT leave the document feeder open as there is a danger of
personal injury.
03/2AC-E/11-18.q 2/18/00 10:57 Page 16
Page 21
17
BASIC OPERATION
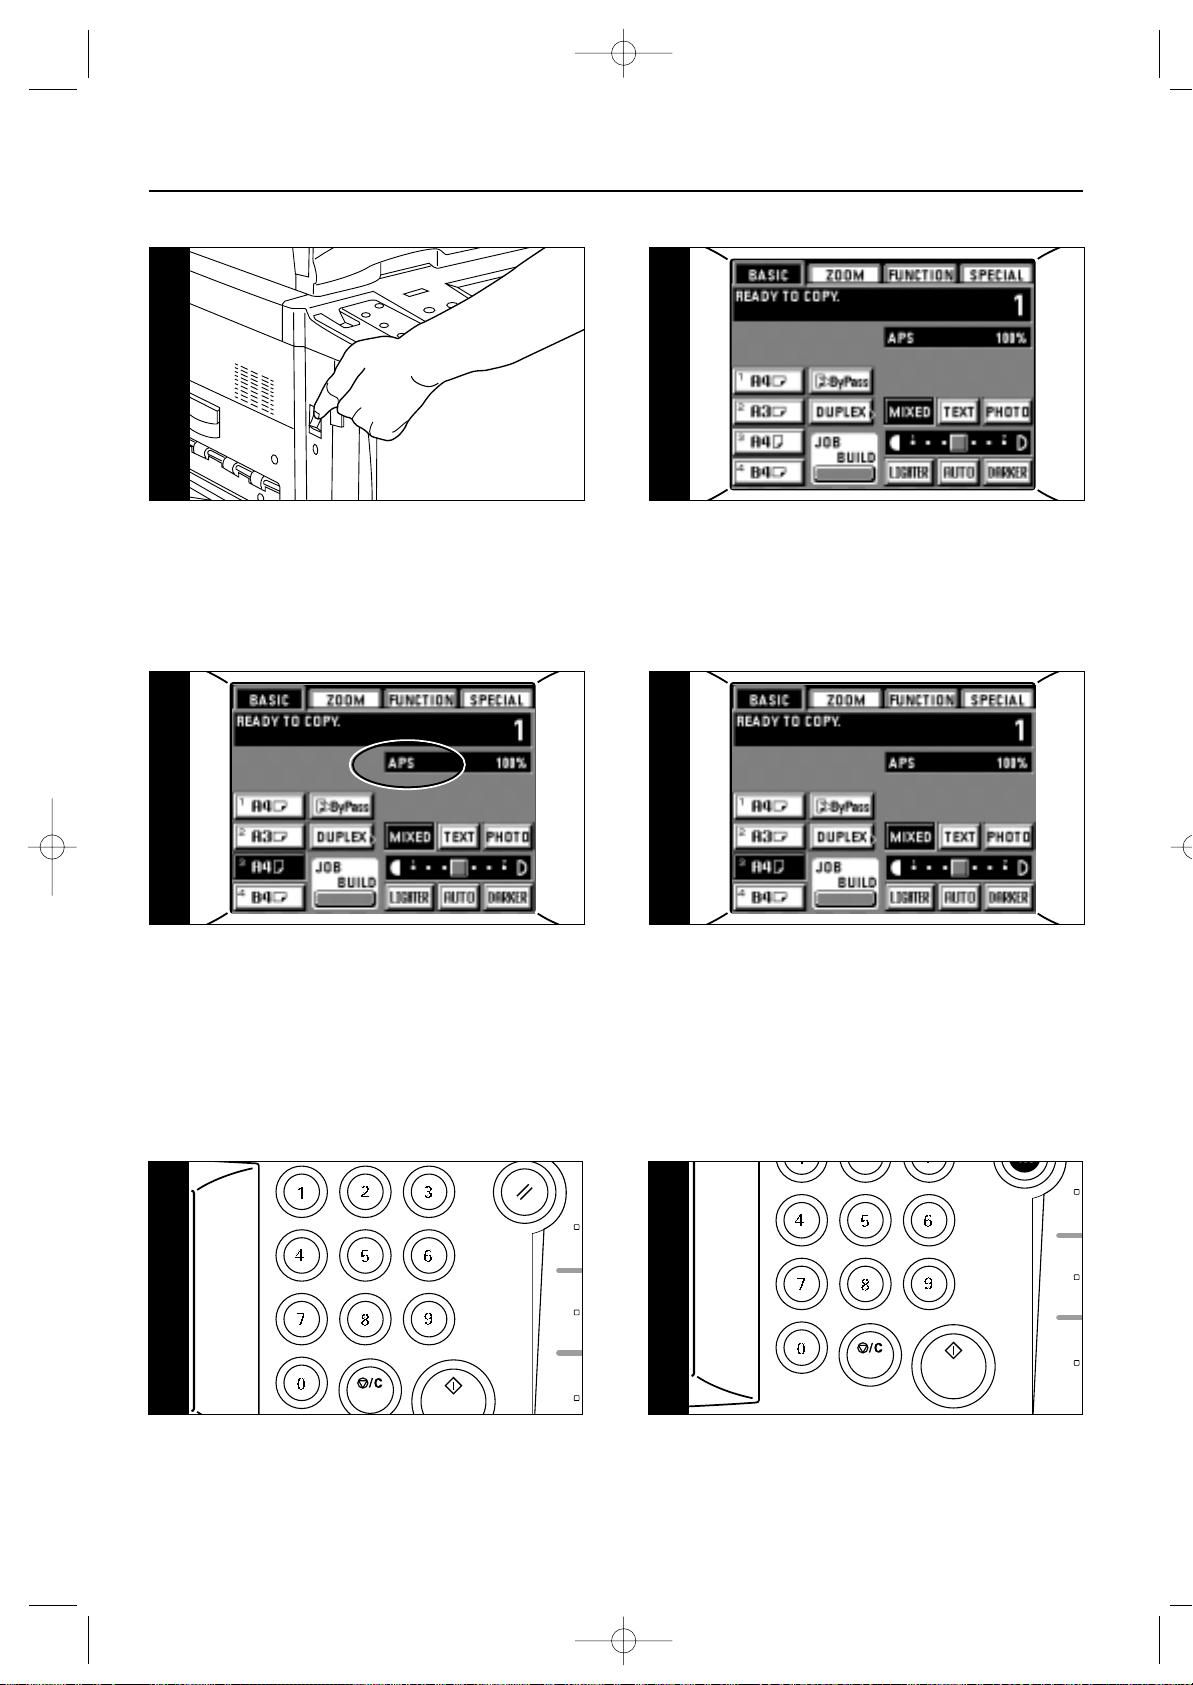
1. Turn the main switch ON ( ❘ ).
● Basic copying procedure
11
2. Warm-up
At the end of warm-up, "READY TO COPY." will be displayed.
* Set originals and press the Start key while the copier is still
warming up. Copying will begin as soon as warm-up finished.
* When using Job build function (page 52) or Job priority function
(page 49), read-in of the originals can be begin while the copier is
warming up.
22
5. Setting the paper size
When "APS" appears, paper of the same size as the original is
automatically selected. To copy the original's image onto a different
size of paper, without changing the size of the image, touch the
paper size key for the desired size of paper, and press the Manual
key. To make copies of the same size as the originals with images
of the same size, no special settings are required.
55
6. Copy exposure adjustment
In the initial mode, the exposure adjustment scale is displayed on
the touch panel, the manual exposure mode is set. Exposure will
be adjusted with the exposure adjustment key ("DARKER" key or
"LIGHTER" key). By moving the cursor on the exposure indicator to
the right, copies become darker and by moving it to the left, copies
become lighter. The exposure scale displayed on the basic screen
consists of 7 and 13 levels, but if the key is further continuously
touched, the copy exposure can be adjusted in 13 and 25 levels.
* When the overall copy is too dark/light, exposure can be adjusted.
(page 73, "5 MANUAL EXPOSURE ADJUSTMENT")
* The exposure adjustment level can be selected from 7 or 13
levels. (page 72, "2 EXPOSURE STEPS")
66
--11
7. Setting the number of copies
Use the numeric keys to enter the desired number of copies. The
entered number will appear in the copy number display on the
touch panel. Up to 999 copies can be set.
* It is possible to lower the limit on the number of copies that can
be set. (page 74, "@ SET COPY LIMIT WITH #-KEYS.")
77
8. Start copying
Press the Start key. If "READY TO COPY." is displayed on the
touch panel, copying will be possible.
88
03/2AC-E/11-18.q 2/18/00 10:57 Page 17
Page 22
18
BASIC OPERATION
3. Setting originals
Set originals in the DF or on the Platen (page 15, page 16).
33
4. Setting of functions
Set use of the copier's various functions.
* The function frequently used can be displayed on the basic
screen as a shortcut key (page 75, "* CREATE SHORTCUT #1,
#2"), and also, it can be displayed on the initial screen by
touching the "FUNCTION" key. (page 75, "( CREATE USER
CHOICE #1 - #5")
44
When the "AUTO" key will be highlighted on the touch panel, and
the auto exposure mode will be set. The optimum exposure can be
detected in the auto exposure mode.
* When the overall exposure is too light/dark, exposure can be
adjusted. (page 73, "3 AUTO EXPOSURE ADJUSTMENT")
* To select the manual exposure mode, touch the “Auto” key. The
exposure adjustment scale will appear.
* The initial mode for the exposure adjustment can be changed to
the manual exposure mode. (page 72, "1 EXPOSURE MODE")
66
--22
9. End of copying
Finished copies are deposited in the copy tray.
* The copies may be ejected faced up and faced down, depending
on the copy mode.
* Up to 250 sheets can be loaded.
99
CAUTION
If the copier will not be used for a short period of time
(overnight, etc.), turn the main switch OFF (O). If it will
not be used for an extended period of time (vacations,
etc.), remove the power plug from the outlet for safety
purposes during the time the copier is not in use.
■ Various functions:
• Enlargement/reduction (page 19)
• Clear reproduction of photographs (page 21)
• Interrupting copy (page 21)
• Duplex copying from various originals (page 22)
• Making a margin space for binding, etc. (page 24)
• Printing page numbers on copies (page 26)
•
Copying two-page originals onto separate sheets (page 27)
• Neat copying of thick books (page 28)
•
Making covers or insert sheets among the copies (page 29)
• Feeding a paper as a transparency + backing sheet
mount (page 36)
• Image overlay (page 37)
• Making one copy from two or four originals (page 38)
• Making booklet from book originals (page 39)
• Making weekly magazine from duplex/one-sided
originals (page 40)
• Inverting black and white (page 43)
• Making mirror image copies (page 44)
• Sorting automatically (page 44)
• Memorizing frequent used settings (page 45)
03/2AC-E/11-18.q 2/18/00 10:57 Page 18
Page 23
(1) Enlargement/reduction
1 Auto magnification selection mode
Enlargement/reduction is executed automatically according to the paper size set.
1. Set the original(s).
The size of the original will be automatically sensed and displayed as the paper size.
19
FUNCTIONS
2. Set the paper size by touching the paper size key for the desired paper size.
The zoom ratio will be displayed.
* Copying will begin when the Start key is pressed.
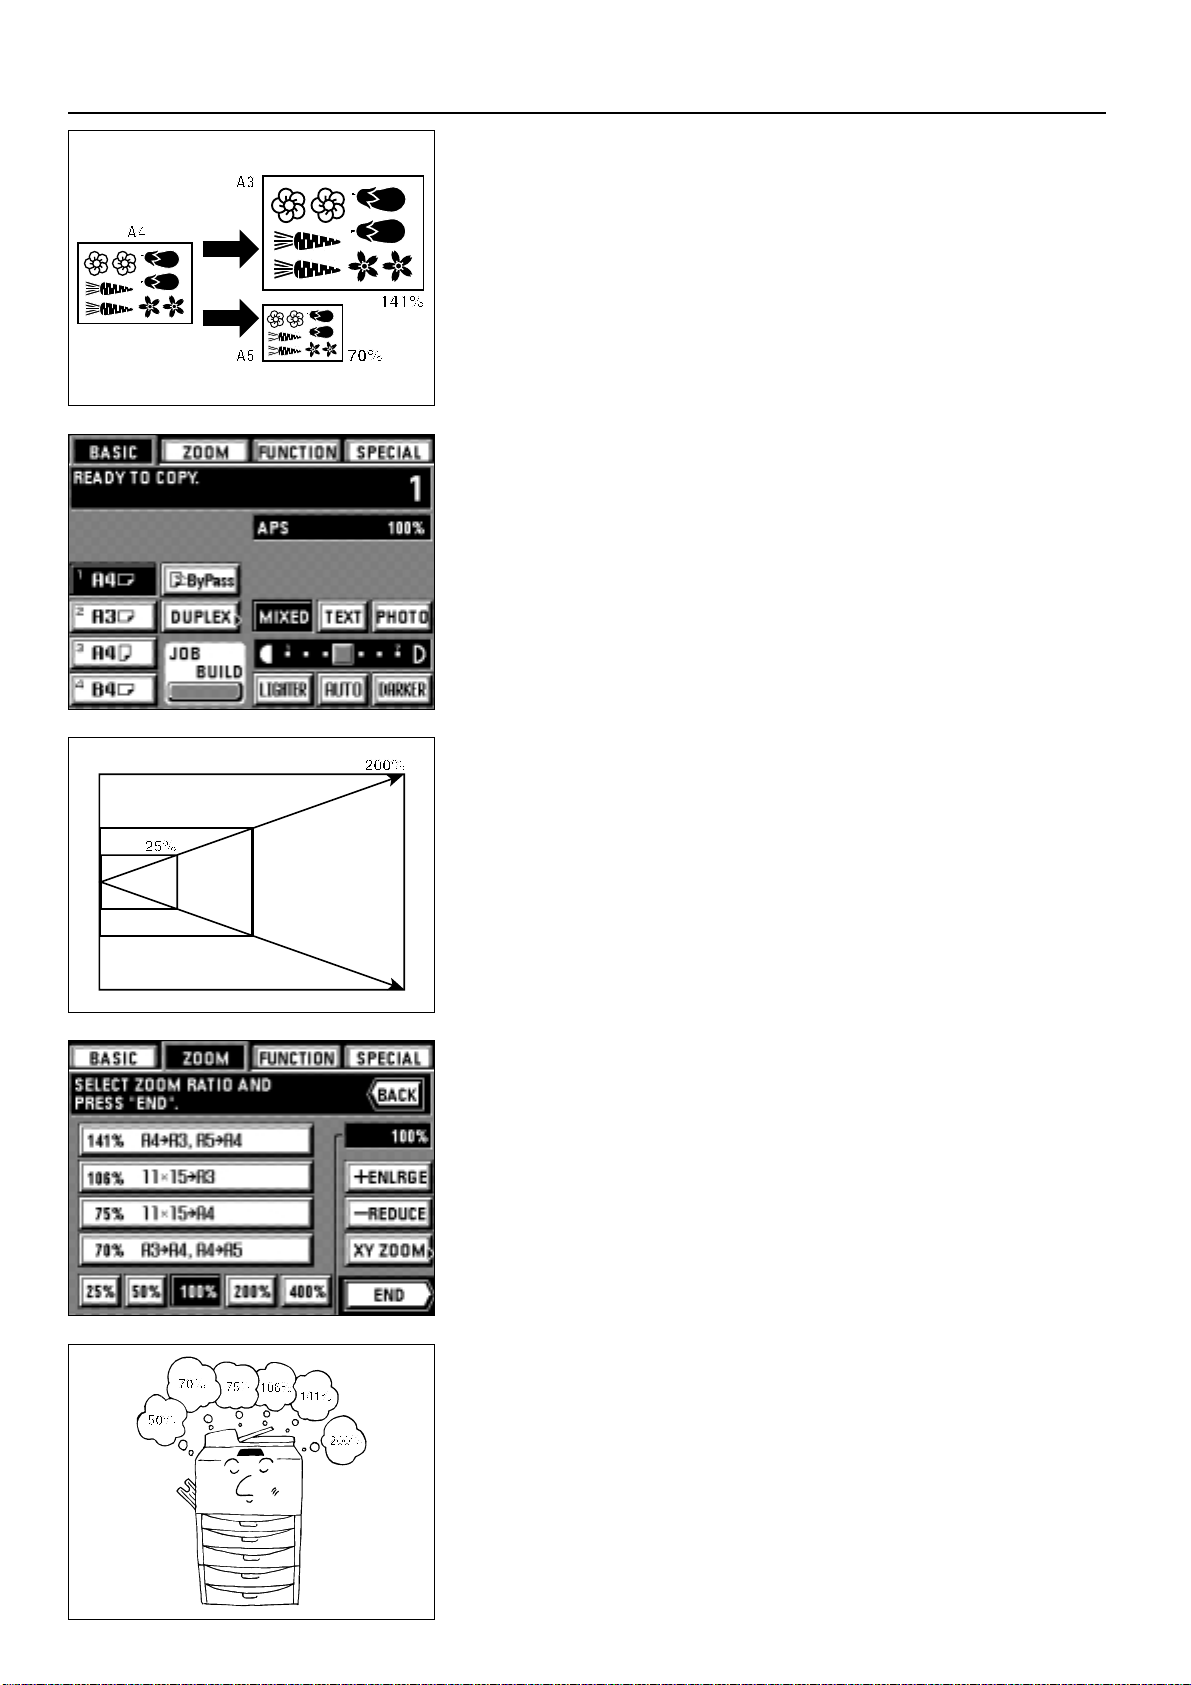
2 Zoom copy mode
The zoom ratio can be set to any value from 25 to 400% in 1% increments.
* If original(s) are set in the DF, the zoom ratio can be set to any value from 25 to 200%.
* The left illustration displays the finishing of the copies when originals are set in the DF.
When setting originals on the platen, copying will be performed based on the left rear
position.
1. Set the original(s).
2. Touch the "ZOOM" key.
The zoom mode setting screen will appear.
3. Touch the "+ ENLRGE" or "- REDUCE" key to set the desired zoom ratio.
* The zoom ratio can also be entered using the numeric keys.
4. Touch the "END" key.
The touch panel will return to the basic screen and the zoom ratio will be displayed.
* Press the desired paper size key when changing the paper size.
3 Size zoom mode
Enlarges/reduces to one of the following pre-set ratios:
25, 50, 70, 75, 106, 141, 200, 400.
* To use this mode, it's necessary to select "SIZE ZOOM" for "! ZOOM MODE" on
page 74.
1. Set the original(s).
2. Touch the "ZOOM" key.
The zoom mode setting screen will appear.
Page 24
20
FUNCTIONS
3. Touch the key for the desired ratio.
The ratio selected will be highlighted.
4. Touch the "END" key.
The touch panel will return to the basic screen and the zoom ratio will be displayed.
* Touch the desired paper size key to change the paper size.
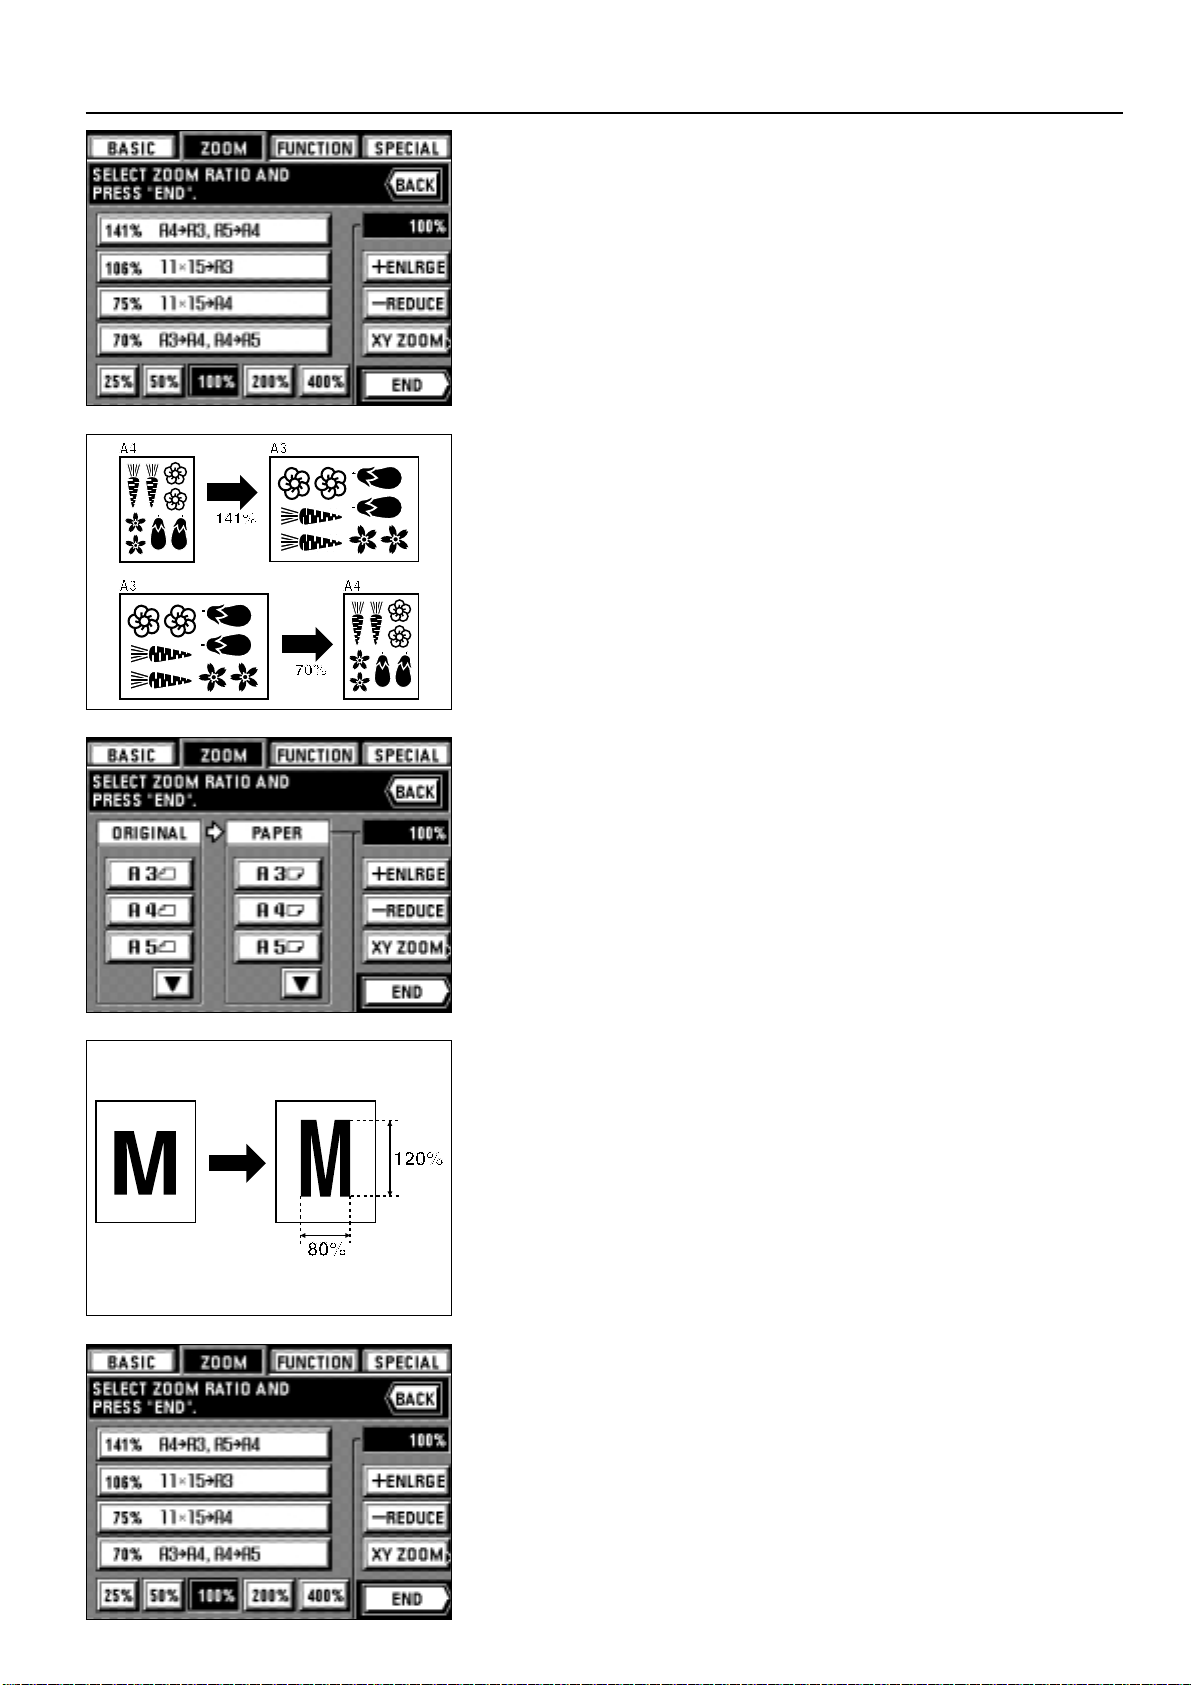
4 Standard zoom mode
The zoom ratio will be displayed automatically when the size of the original and the size
of the paper required are set.
* To use this mode, it's necessary to select "STANDARD ZOOM" for "! ZOOM MODE"
on page 74.
1. Set the original(s).
2. Touch the "ZOOM" key.
The zoom mode setting screen will appear.
3. Set the size of original.
If the original size is not displayed, touch the "▼" key to display.
4. Set the paper size.
If the paper size is not displayed, touch the "▼" key to display.
* If the paper size is selected, the copy zoom ratio will be displayed.
5. Touch the "END" key.
The touch panel will return to the basic screen and the zoom ratio will be displayed.
* Press the desired paper size key when changing the paper size.
5 XY Zoom mode
It is possible to change the zoom ratio of the length and the width of the copy separately.
The zoom ratio can be set to any value from 25 to 400% (in case of DF originals: from 25
to 200%) in 1% increments.
1. Set the original(s).
2. Touch the "ZOOM" key.
The zoom mode setting screen will appear.
3. Touch the "XY ZOOM" key.
Page 25
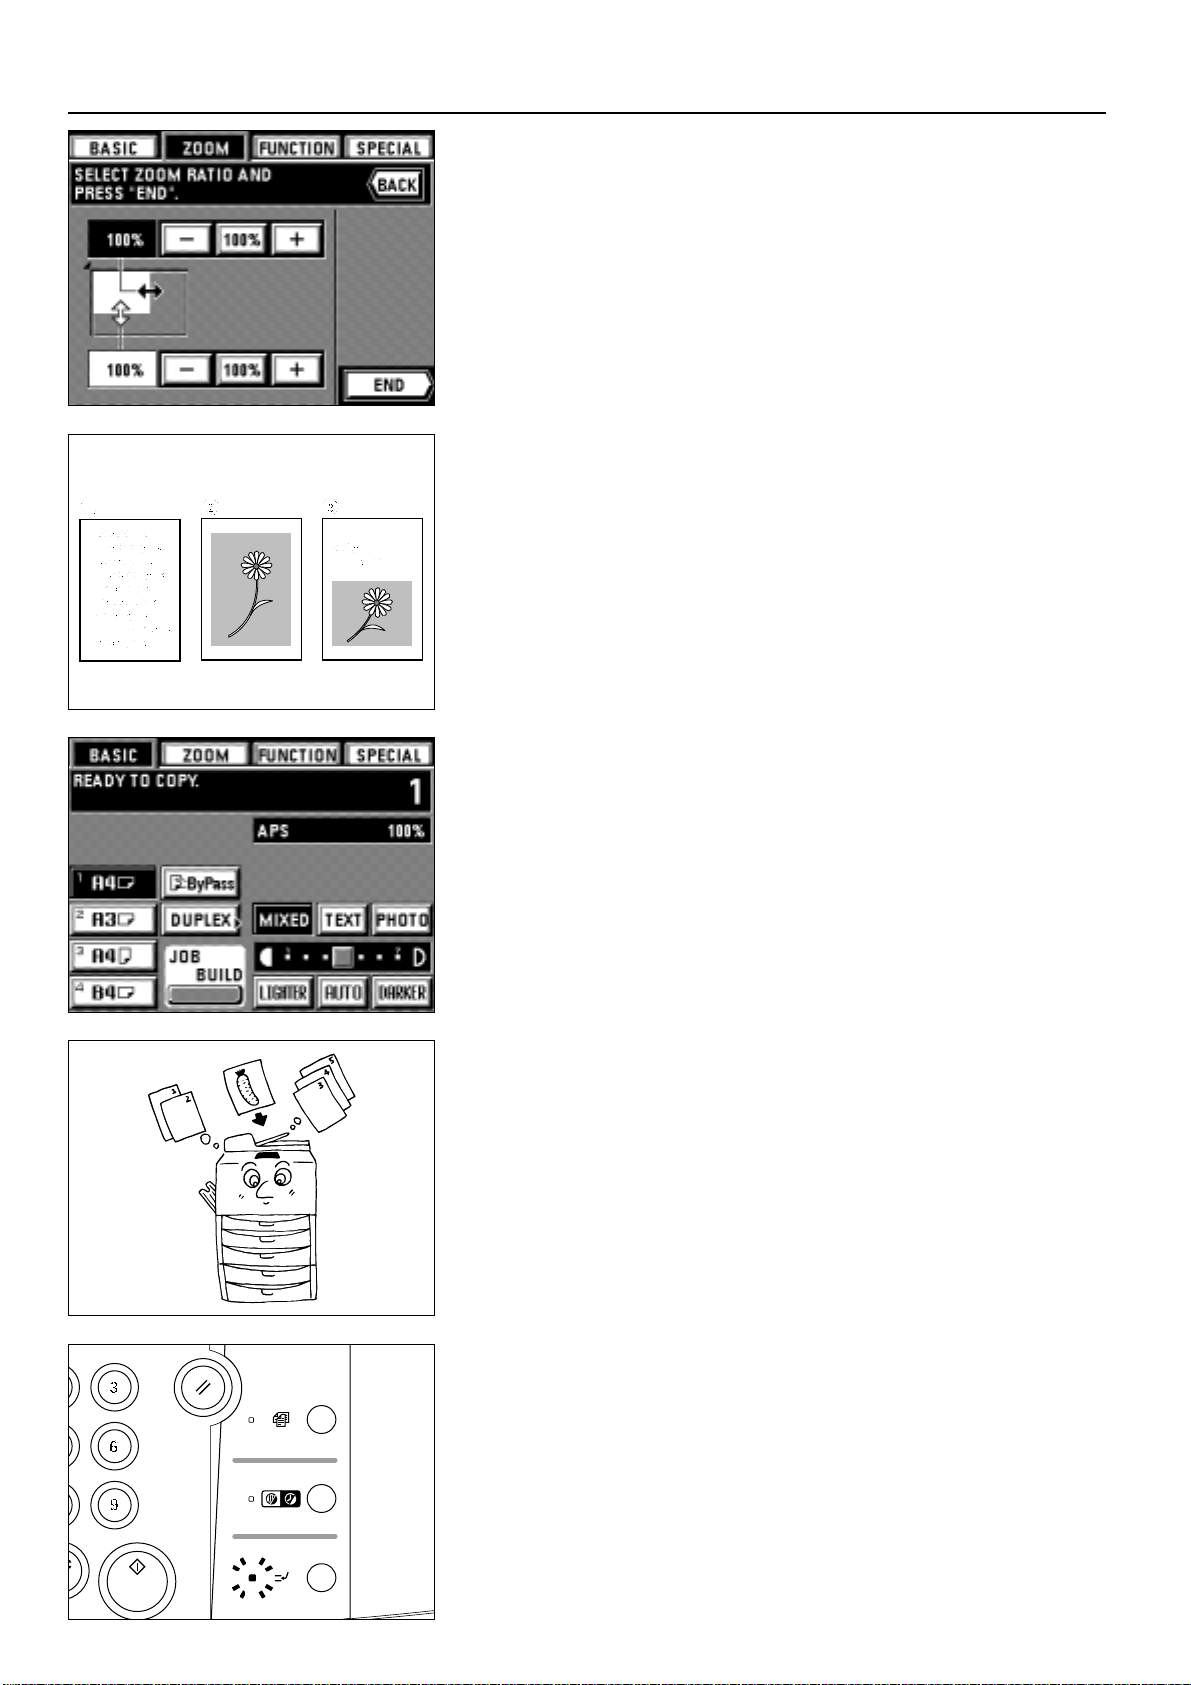
4. Set the zoom ratio of the length (X) by touching the upper "+" key or "-" key. After
highlighting, the zoom ratio can also be entered using the numeric keys.
* The zoom ratio returns to 100% by touching the "100%" key.
5. Set the zoom ratio of width (Y) by touching the lower "+" key or "-" key. After
highlighting, the zoom ratio can also be entered using the numeric keys.
* The zoom ratio returns to 100% by touching the "100%" key.
6. Touch the "END" key.
The touch panel will return to the basic screen, and the zoom ratios of the length and
width will be displayed.
* Touch the desired paper size key to change the paper size.
21
FUNCTIONS
(2) Copy quality selection
Depending on the original, one of the following three types of copy quality can be
selected.
1 Text: For originals consisting primarily of text
2 Photo: For originals consisting primarily of photos and other half-tone images
3 Mixed: For originals with both text and photos
* The initial value of copy quality mode can be selected. (See page 73, "6 QUALITY")
1. Highlighted the "TEXT", "PHOTO", or "MIXED" key by touching one of them.
(3) Interrupt copying
If other originals are to be copied in the different setting during the copying operation,
interruption copy is useful. Interrupted copying operation can be resumed in the same
setting as before interrupted after finishing interrupting copy operation.
* This mode cannot be used if the transparency mode or presentation mode has been
selected.
1. Press the interrupt key. The interrupt indicator will blink. Wait a while until
"INTERRUPT MODE." is displayed and the interrupt indicator light.
Page 26
22
FUNCTIONS
2. Remove the present original(s), and put it/them aside.
3. Set the new original(s) and execute copying.
4. When copying ends, press the interrupt copy key again, and replace the newly copied
original(s) with the one(s) removed. Then press the Start key. The interrupted copying
will be resumed.
(4) Duplex copying from various originals [Duplex copy]
Duplex copy is available from various originals, such as two-page originals and onesided original.
* The paper sizes that can be used are A3 to A5R.
● Duplex copying from duplex originals
Duplex (back and front) original is copied on both sides in the same manner.
● Duplex copying from a book original
Two-page originals of a magazine or a book are copied on both
sides of paper by a single Start key operation.
The binding direction of the originals can also be selected.
1 "LEFT": Two-page originals are copied from the right side.
2 "RIGHT": Two-page originals are copied from the left side.
* The original size used in this mode is limited to A3, A4 (vertical) or A5 (vertical).
● Duplex copying from one-sided original
One-sided original is copied on both sides (back and front). When the originals are odd,
the back side of the last page becomes a blank.
Page 27
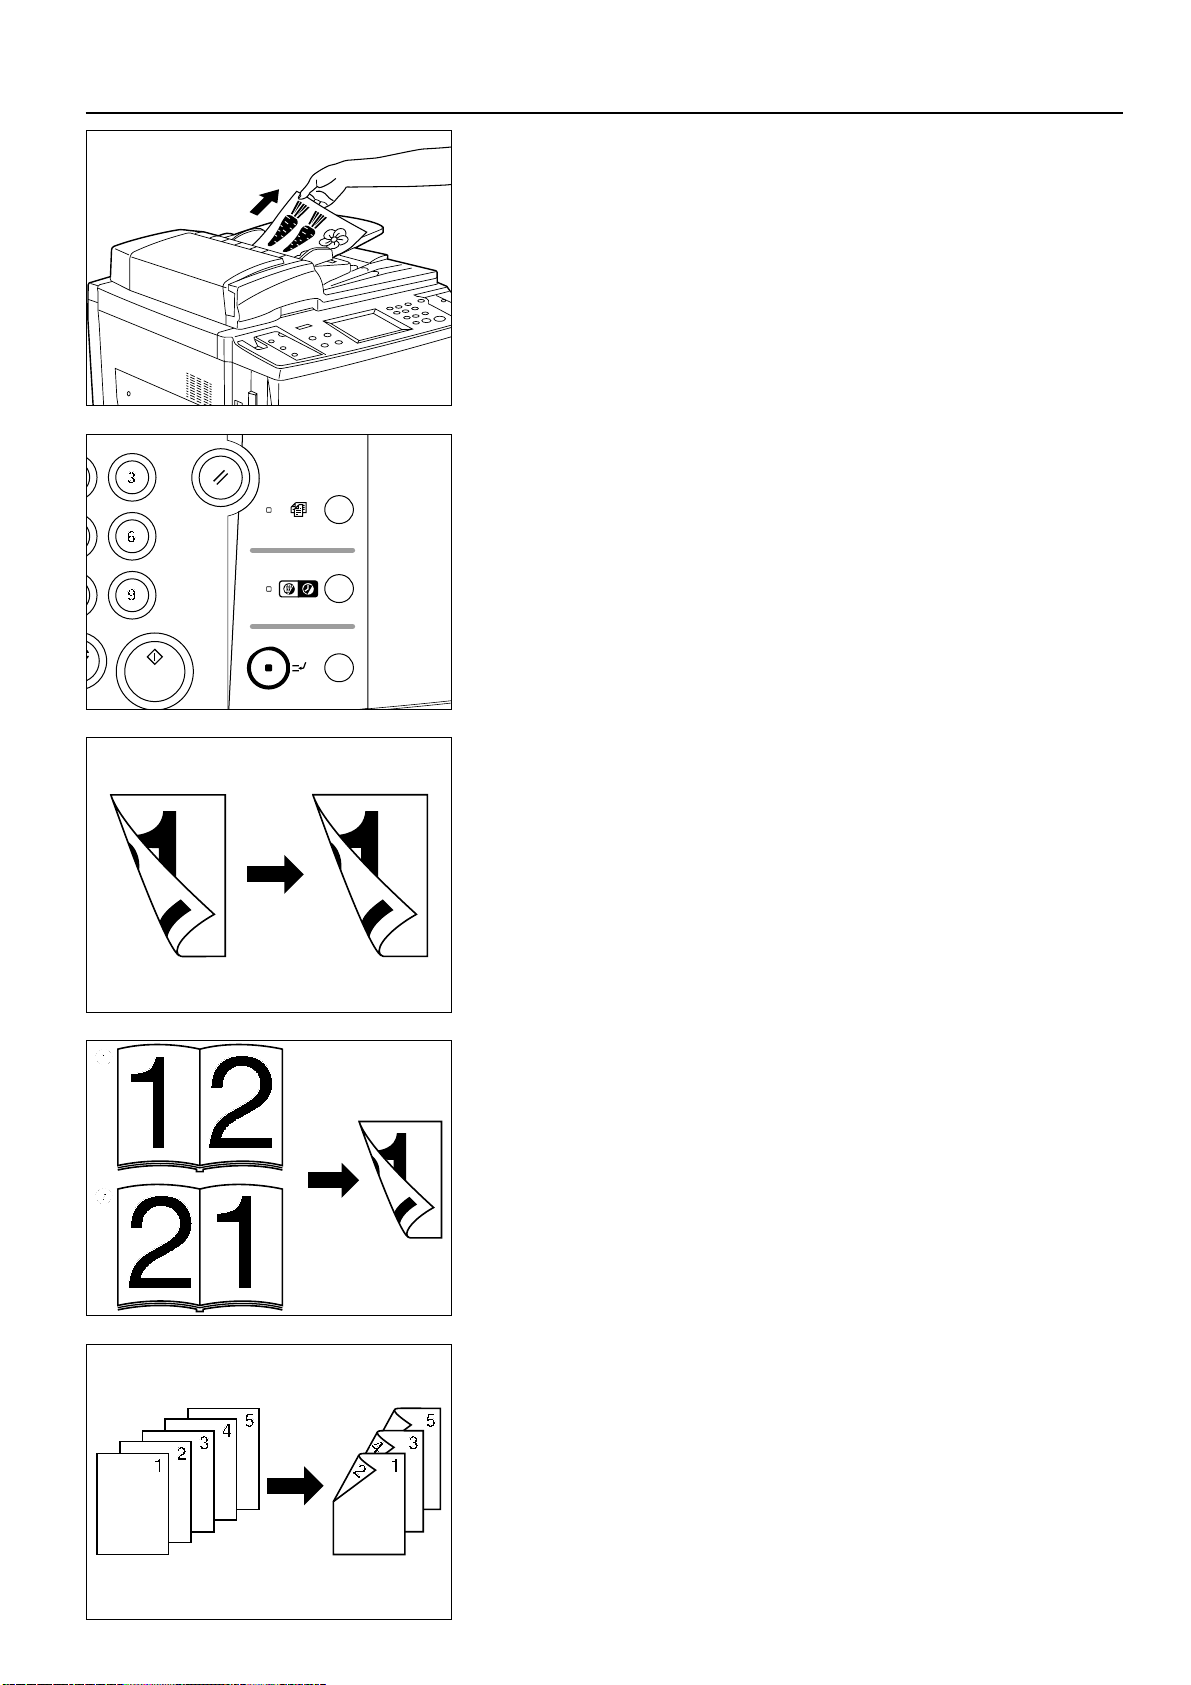
* An original can also be copied by rotating the back side copy 180 degrees.
1 "LEFT": The back side is copied in the same direction as it is.
2 "TOP": The back side is copied by rotating 180 degrees. Each two-page original is
to be copied in the same direction by binding the finished copy in the top side.
23
FUNCTIONS
1. Set the original(s).
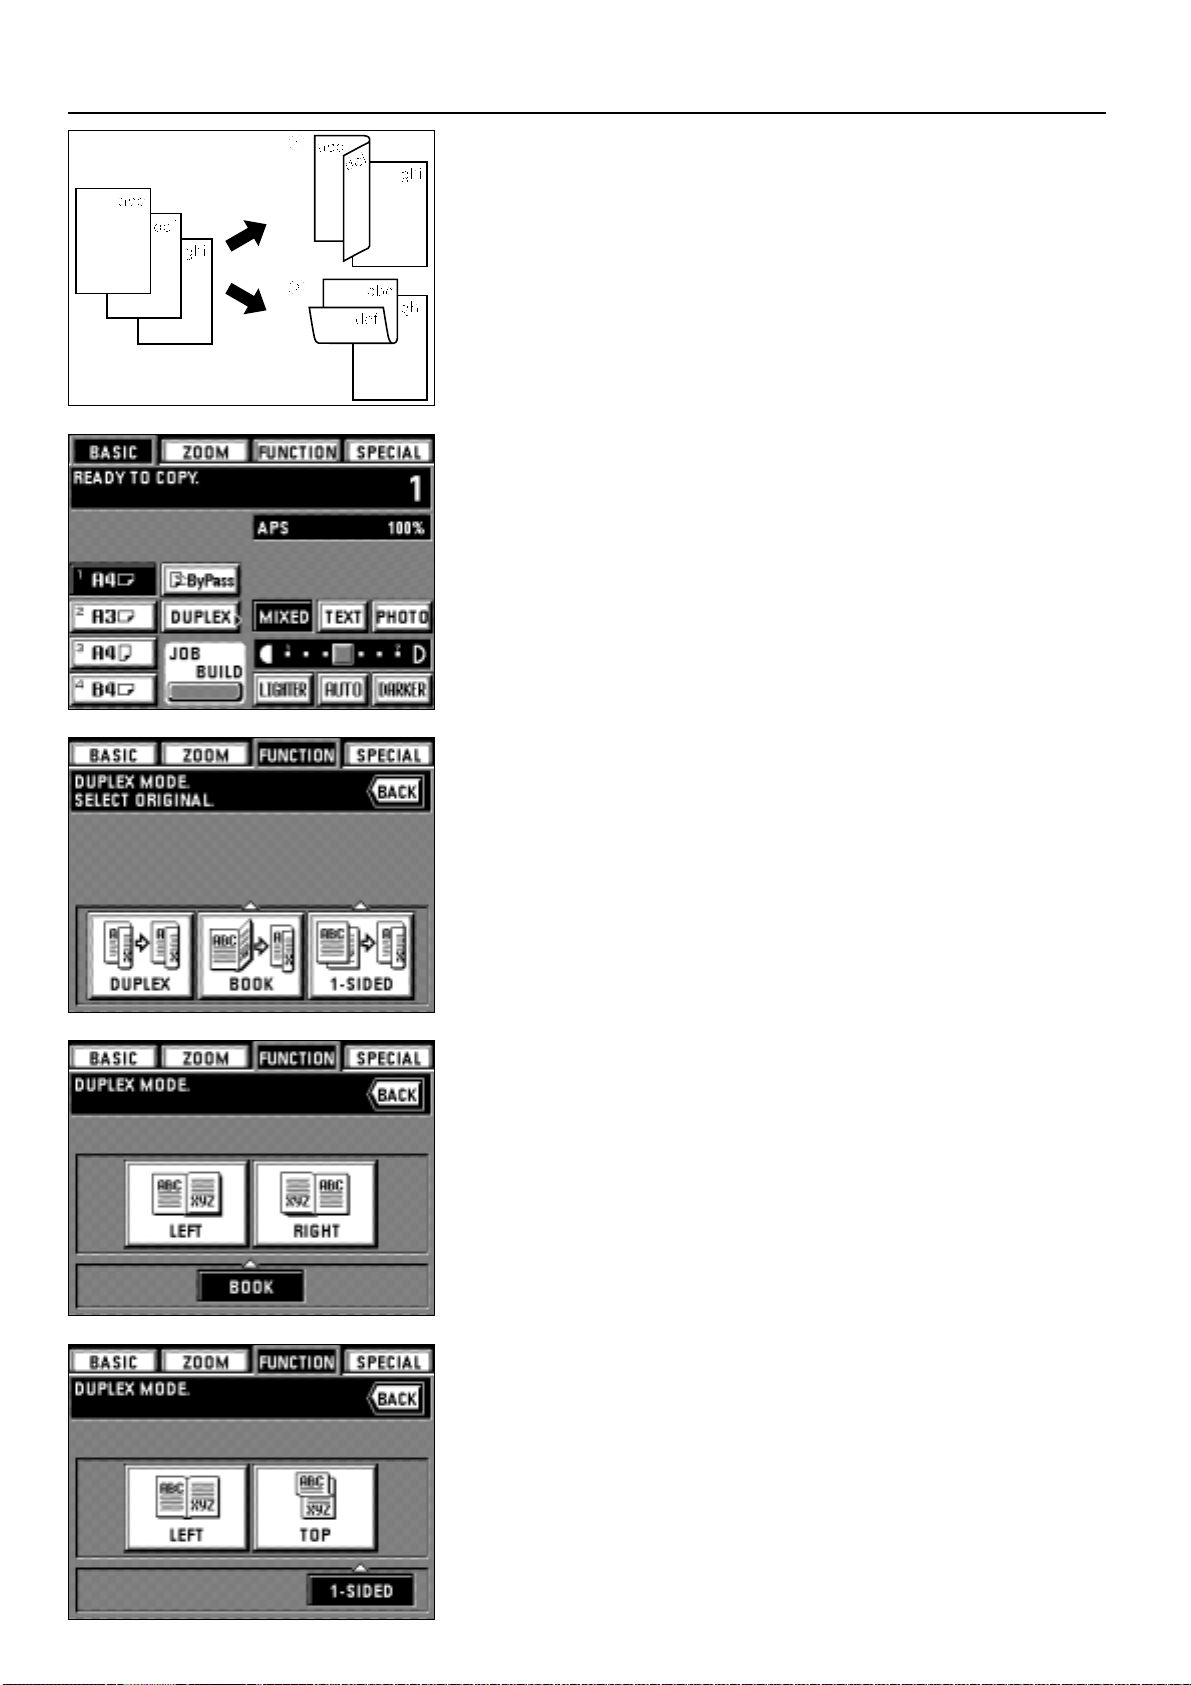
2. Touch the "DUPLEX" key.
The duplex copy setting screen will appear.
* Also, same screen will appear by touching "DUPLEX" key on the function selection
screen.
3. Select the type of originals.
If "DUPLEX" is selected, the touch panel will return to the basic screen.
If "BOOK" is selected, go to next step.
If "1-SIDED" is selected, go to step 5.
4. Select the binding direction of the original.
The touch panel will return to the basic screen.
5. Select the copying direction of back side.
The touch panel will return to the basic screen.
Page 28
24
FUNCTIONS
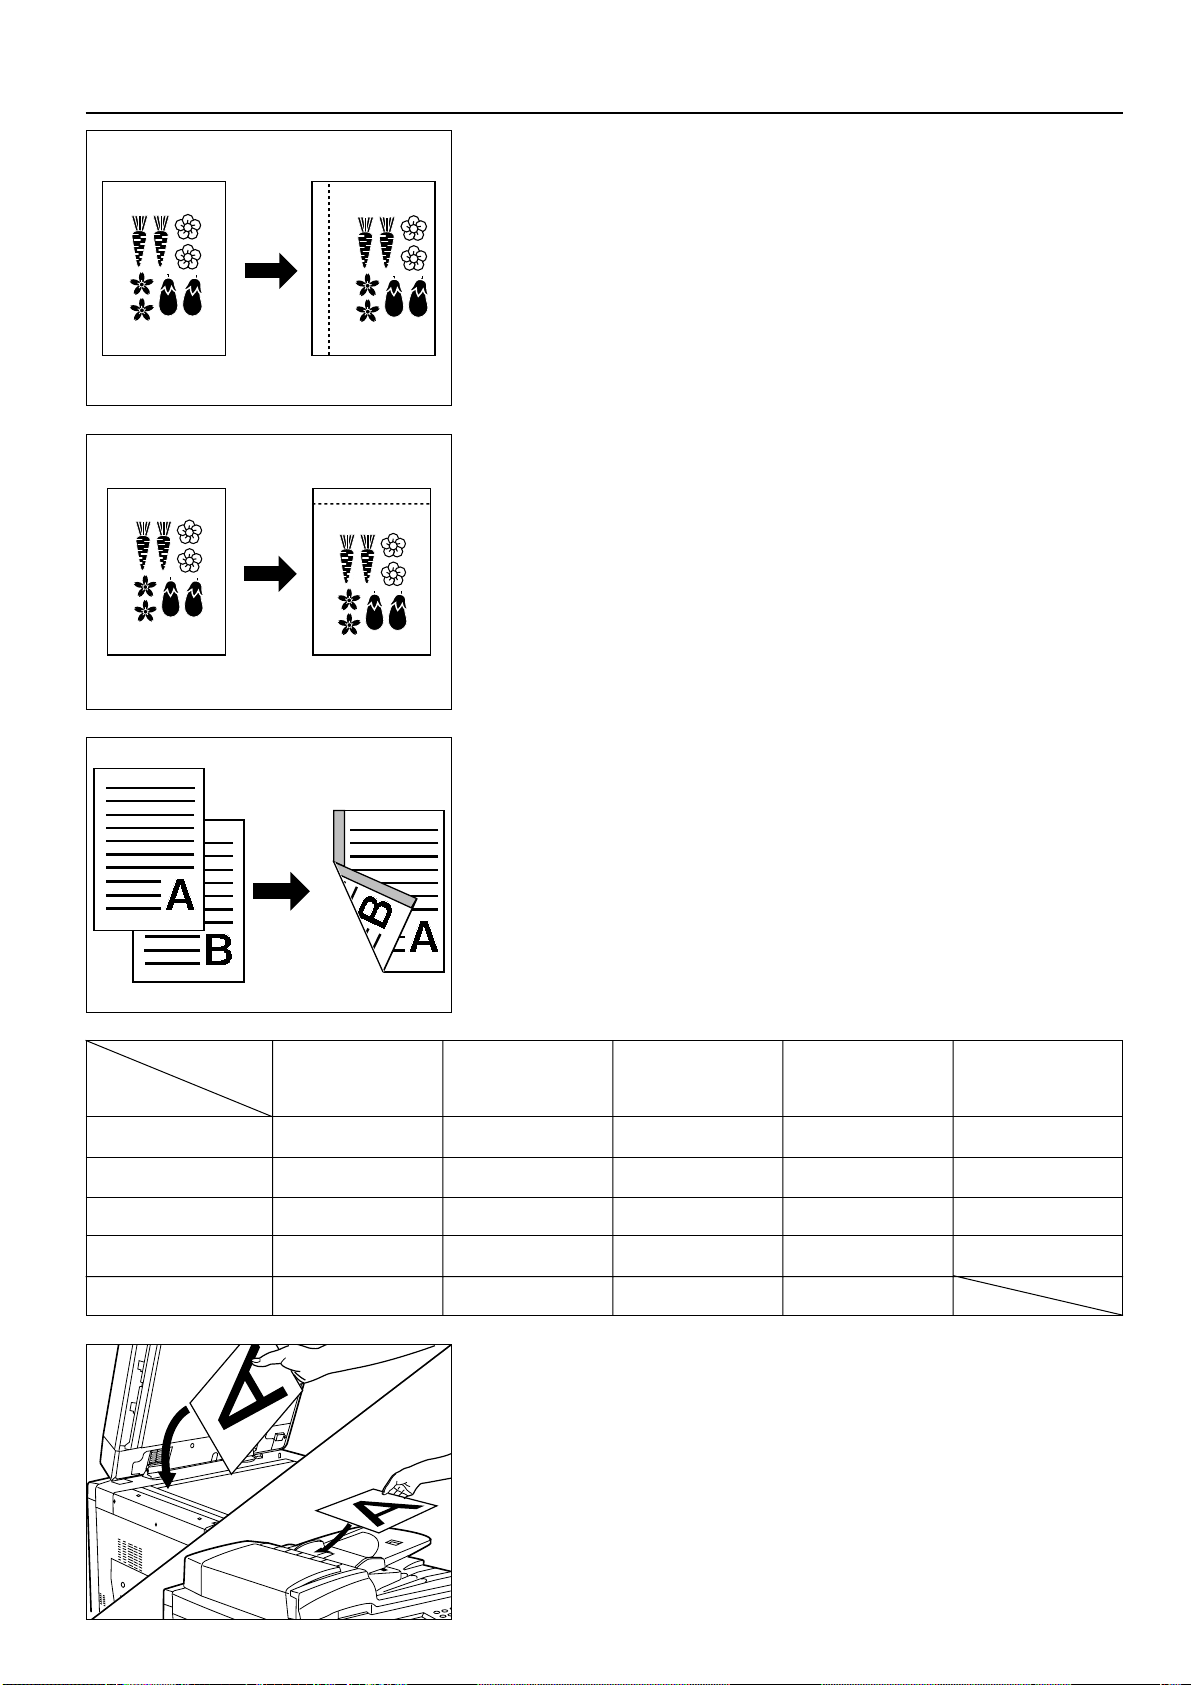
(5) Making a margin space for binding [Margin mode]
● Left margin
The image of the original is shifted rightward to make a margin for binding on the left side
of the paper between 6 mm and 18 mm in 1 mm increments.
* If the left margin is set for the duplex copy setting, the right margin of the same width as
on the front side is set automatically on the back side.
● Top margin
The image of the original is shifted downward to make a margin for binding on the top
side of the paper between 6 mm and 18 mm in 1 mm increments.
● Front & back page margin
When duplex copies are made, margin positions and margin width can be selected
separately for the front and back sides. A binding margin space is made on each copy
between 1 mm and 18 mm in 1 mm increments.
* When the front & back page margin is set, "ON" must be selected for "$ F&B P.
MARGIN" on page 74.
* The margin position set on the back side will be changed, depending on the position of
the margin set on the front side.
A circle ("❍") indicates that the setting is possible.
1. Set the original(s).
* Set the originals so that the top (left) side of the original is at the rear side in the DF
or on the platen. Setting them in the wrong direction may cause the failure of making
margin in the correct position.
2. Touch the "FUNCTION" key.
The function selection screen will appear.
"LEFT M."
❍❍ ❍
Back side
Front side
"LEFT M." "RIGHT" "TOP M." "BOTTOM" "NO"
"RIGHT"
❍❍ ❍
"TOP M."
❍❍❍
"BOTTOM"
❍❍❍
"NO MARGIN"
❍❍❍❍
Page 29
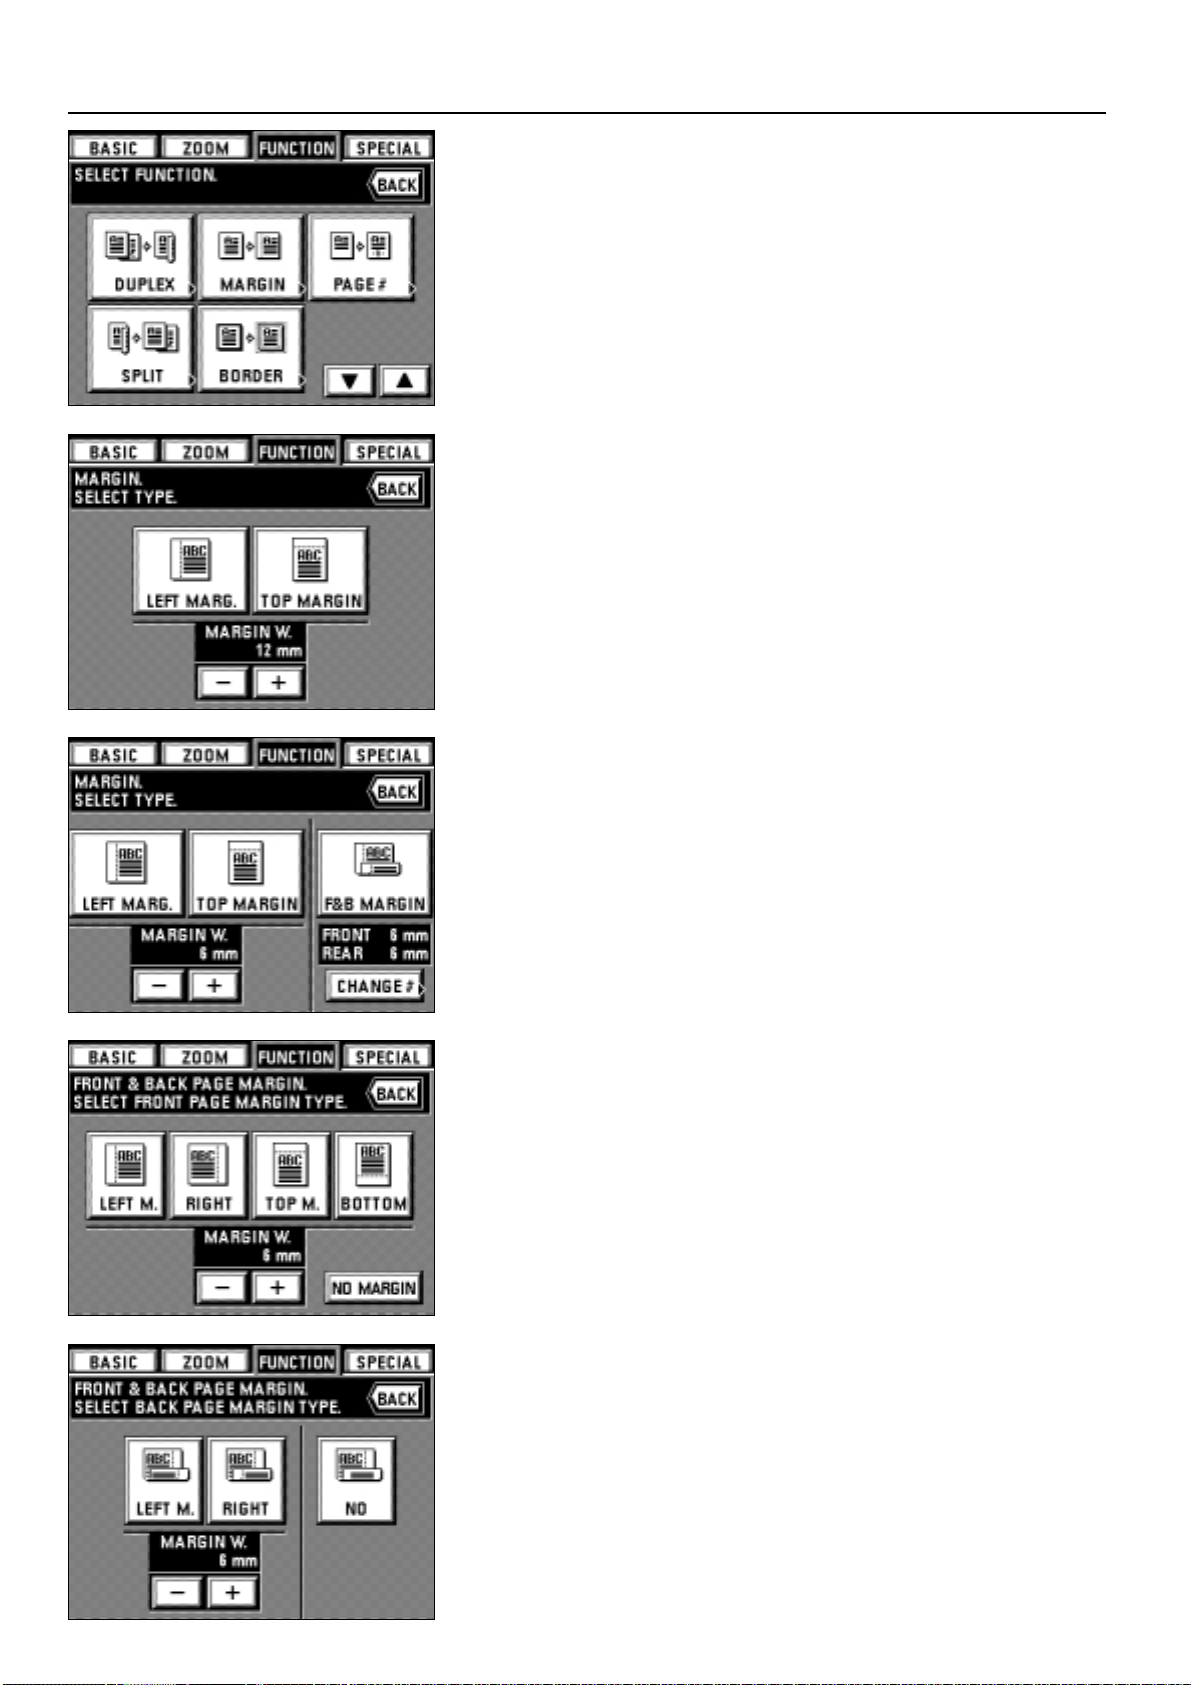
3. Touch the "MARGIN" key. If it is not displayed, touch the "▼" key or "▲" key to be
displayed.
The margin copy setting screen will appear.
When setting "LEFT MARG." or "TOP MARGIN", go to next step. To set "F&B
MARGIN", go to step 6.
25
FUNCTIONS
4. When changing the margin width setting, touch the key "+" or "-" under the margin
width display to select the margin width.
The margin width can be set between 6 mm and 18 mm in 1 mm increments.
* The previous figure is set as initial value for the margin width. Change it as needed.
* If the margin width setting is not changed, go to next step.
5. Select the margin position by touching the "LEFT MARG." key or "TOP MARGIN" key.
The touch panel will return to the basic screen.
6. To change the contents in which the front & back page margin is set, touch the
"CHANGE #" key and go to next step.
Otherwise, touch the "F&B MARGIN" key. The touch panel will return to the basic
screen.
* The previous figure is set as initial value for the front & back page margin. Change it
as needed.
7. Select the margin width on the front side by touching the "+" key or "-" key under the
margin width display.
The margin width can be set between 1 mm and 18 mm in 1 mm increments.
* When the margin width setting is not changed, go to next step.
8. Select the margin position on the front side. This position can be selected from among
"LEFT M.", "RIGHT", "TOP M." and "BOTTOM".
When no margin is made on the front side, touch the "NO MARGIN" key.
9. Select the margin width on the back side by touching the "+" key or "-" key under the
margin width display.
The margin width can be set between 1 mm and 18 mm in 1 mm increments.
* When the margin width setting is not changed, go to next step.
10. Select the margin position on the back side.
If no margin is made on the back side, touch the "NO" key. The back side margin
position will be changed, depending on the front side margin position.
When the setting is completed, the touch panel will return to the basic screen, and
copying will be possible.
Page 30
26
FUNCTIONS
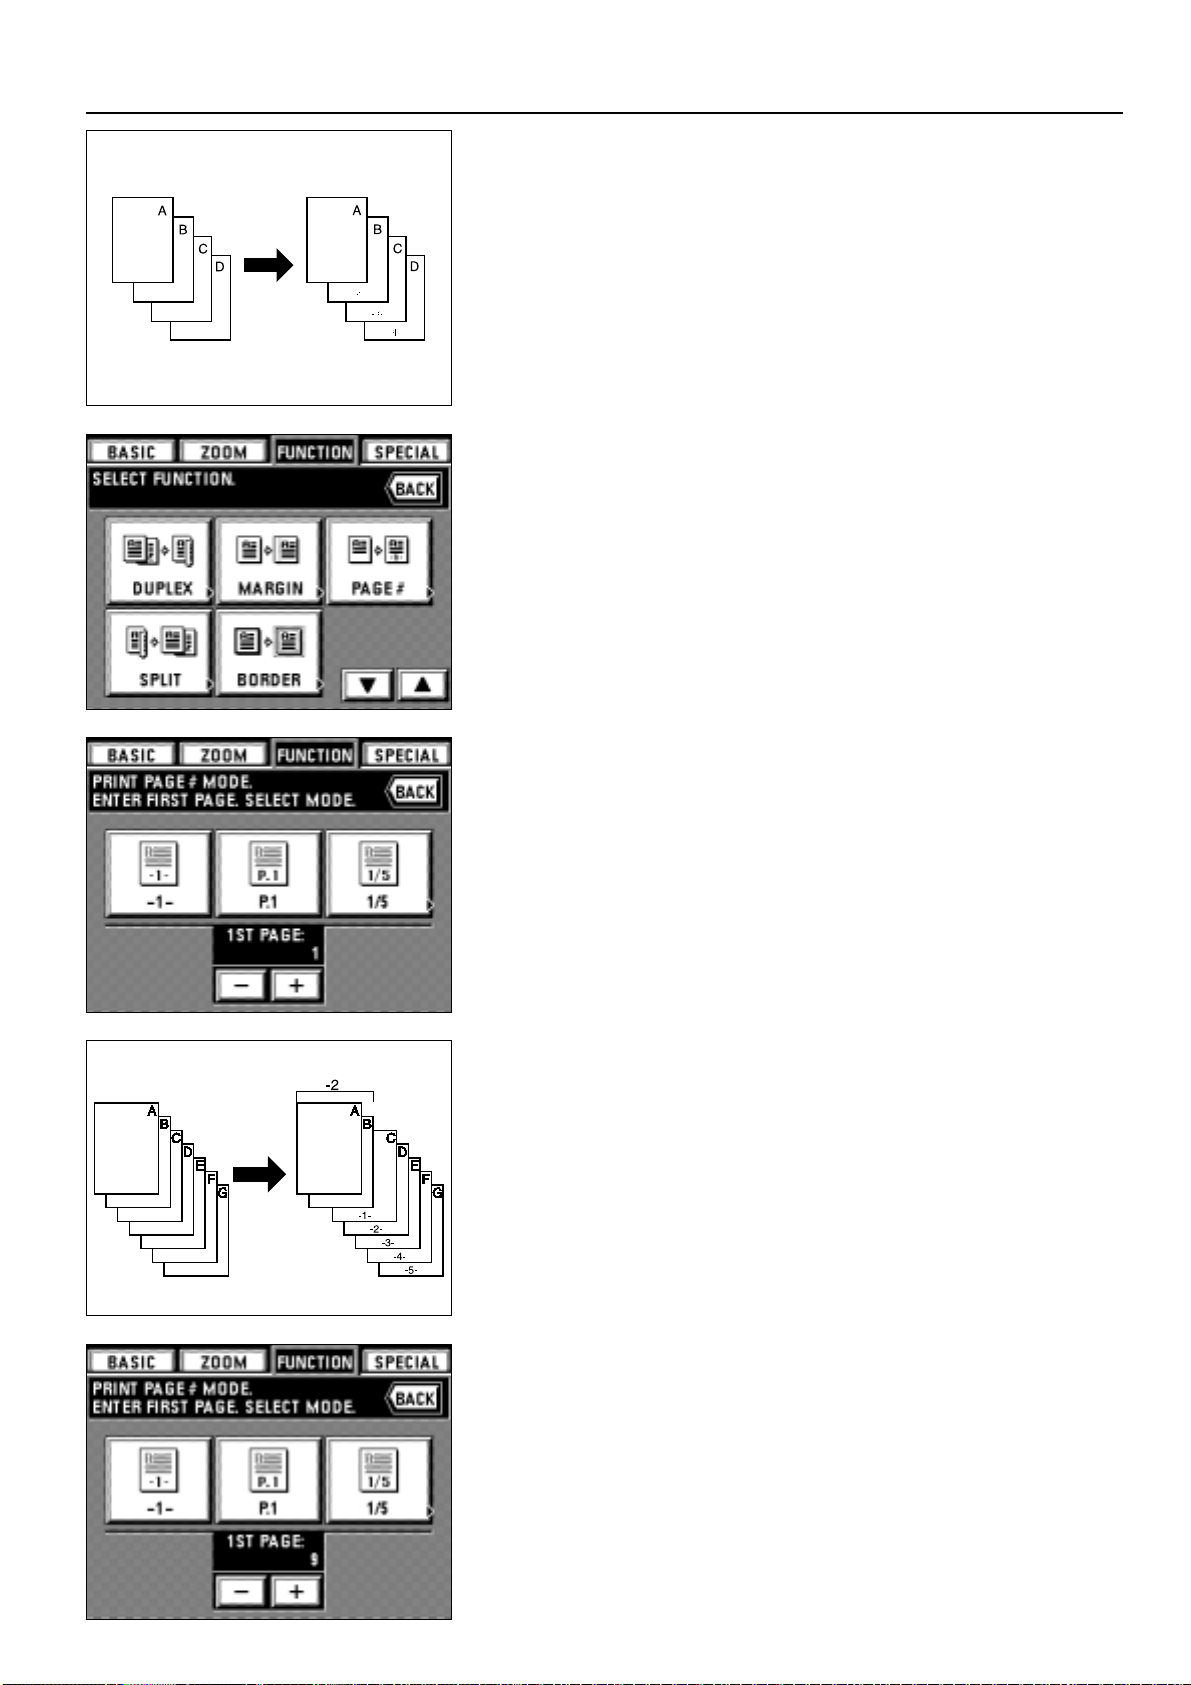
(6) Printing page numbers to copy [Print page numbers]
When copies are made from multiple originals, it is possible to assign page numbers in
sequence from top of original.
There are three types of page styles: "-1-", "P.1" and "1/5". Page number will be printed
in the center lower part.
* When "1/5" is selected, the total page numbers are printed in the denominator.
1. Set the original(s).
2. Touch the "FUNCTION" key.
The function selection screen will appear.
3. Touch the "PAGE #" key. If it is not displayed, touch the "▼" key or "▲" key to be
displayed.
The page print number setting screen will appear.
4. Change the page from which the print is started by touching the "+" key or the "-" key.
The starting page to be printed can be set between pages "-10" and "999".
* "0" cannot be set.
* When minus (-) figure is entered, its page number will not be printed.
After minus numbers copying are completed, the printing is started from the 1st page.
For example, when the printing is started from the third page original, set "-2".
5. Select the printing style from among "-1-", "P. 1" and "1/5".
When "-1-" or "P. 1" is selected as a page printing style, the touch panel will return to
the basic screen.
If "1/5" is selected, go to next step.
Page 31

6. Set the last page number by touching the "+" key or "-" key on the right side. It can be
set between pages "1" and "999".
* The page number is counted while reading the originals, and the final page is set
automatically by touching the "AUTO" key.
7. Touch the "ENTER" key.
The touch panel will return to the basic screen.
27
FUNCTIONS
(7) Copying two-page originals as separate pages [Split copy]
● Split copies from book originals
Two-page originals of a magazine and book or the like are copied onto two separate
sheets of paper.
* The available size of originals is limited to A3, A4 (vertical) or A5 (vertical), and paper
size is limited to A4. The paper size can be changed to make zoom copy to its size.
* The binding direction of the originals can be selected.
1 "LEFT": Two-page originals are copied from the right side.
2 "RIGHT": Two-page originals are copied from the left side.
● Split copies from duplex originals
Duplex originals are copied onto two separate sheets of paper.
1. Set the original(s).
* When setting a book original, set as illustrated.
* Duplex originals must be set in the DF.
2. Touch the "FUNCTION" key.
The function selection screen will appear.
3. Touch the "SPLIT" key. If it is not displayed, touch the "▼" key or "▲" key to be
displayed.
The split copy setting screen will appear.
Page 32

28
FUNCTIONS
4. Select the type of originals by touching the "DUPLEX" key or "BOOK" key.
If "BOOK" is selected as the type of originals, go to next step.
If "DUPLEX" is selected, the touch panel will return to the basic screen.
5. Select the binding direction by touching the "LEFT" key or "RIGHT" key.
The touch panel will return to the basic screen.
(8) Making copies with clean edges [Border erase]
● Erasing blemishes from edges of copies (Sheet)
Use to erase shadows, lines, etc., which occur around the edges of copies made from
sheet originals. (a is the width of erasing border)
● Erasing blemishes from edges and middle of copies made from books (Book)
Use to make neat copies from thick books. (a is the width of erasing border)
● Selecting the erasing parts (Custom)
For making neat, blemish-free copies from originals of non-standard sizes, i.e. sizes
other than A4 or B4 etc. (a is the area of erasing border)
However, the size of the original must be registered in advance. (page 74, "# CUSTOM
SIZE FOR BORDER ERASE.")
* The left illustration displays the finishing of the copies when originals are set in the DF.
When setting originals on the platen, copying will be performed based on the left rear
position.
Page 33

1. Set the original(s).
* In the case of Book erase, set as illustrated.
2. Touch the "FUNCTION" key.
The function selection screen will appear.
29
FUNCTIONS
3. Touch the "BORDER" key. If it is not displayed, touch the "▼" key or "▲" key to be
displayed.
The border erase setting screen will appear.
4. When changing the border erasing width with "SHEET" or "BOOK", touch the "+" key
or "-" key. The width can be selected from among 6, 12 and 18 mm.
* The size of original of the custom size for border erase must be registered in
advance. (page 74, "# CUSTOM SIZE FOR BORDER ERASE.")
5. Select the type of originals by touching the "SHEET" key, "BOOK" key or "CUSTOM"
key.
The touch panel will return to the basic screen.
(9) Making covers or insert sheets among the copies [Sheet insertion copy]
The sheet insertion mode has three submodes: cover, insert and chapter.
1 Submodes
● Cover mode
Certain sheets of paper in the stack bypass tray are made into front or back covers.
Duplex copying, one-sided copying or blank can be selected for the front cover. Whether
copying onto the back cover or not, and no back cover can be selected for the back
cover.
* See the following table for the combination of settings and finishing.
Page 34

30
FUNCTIONS
● Insert mode
Insert sheets can be inserted at specified place(s) among the copies of multiple sheet
originals. The insert sheets themselves can also be copied onto.
* Insert sheets must be set beforehand which of these is to be used. (page 75,
"% DRAWER FOR INSERT SHEETS")
* Settings which can be selected are different, depending on the settings of original and
finishing of copying paper.
A circle ("❍") indicates that the setting is possible.
❍❍
"SPLIT"
copy
"DUPLEX"
original
❍❍❍
"1-SIDED"
original
❍❍❍
"DUPLEX"
copy
"DUPLEX"
original
❍❍
"1-SIDED"
copy
"1-SIDED"
original
"FR./BACK BLANK""FRONT COPY""FR./BACK COPY"
7
5
6
3
4
1
2
5
6
3
4
1
2
5
6
3
4
1
2
5
4
3
2
1
4
3
2
1
2
1
1
5
4
3
4
3
2
2
1
1
5
4
3
4
3
2
Page 35

• When copying on the front/back side of the insert sheets
* An example of duplex copying is illustrated.
31
FUNCTIONS
• When copying on the front side only of the insert sheets
* An example of duplex copying is illustrated.
• When not copying on the front/back side of the insert sheets
* An example of duplex copying is illustrated.
● Chapter mode
Sheets of paper can be specified as chapter pages that will be copied onto the front only,
when duplex copies are made from one-sided or duplex originals.
Specified pages are copied onto the front only even if original page number specified is
even.
2 Combination of modes
The combination of the modes can be differentiated, depending on the type of copying;
one-sided, duplex or split copying.
See the table in the following page.
A circle ("❍") indicates that the combination is possible.
* When the cover and insert modes are combined with duplex copying, the inserting
positions for insert sheets may be limited to even or odd pages only, depending on the
cover submode.
* When the insert mode and chapter mode are combined, the function works on the
same page. Thus, it is impossible to specify the inserting page of insertion paper and
chapter specified page individually.
Page 36

32
FUNCTIONS
3. Select the finishing of copying by touching the "DUPLEX" key, "SPLIT" key or "1-
SIDED" key.
* If "DUPLEX" is selected, go to next step.
If "SPLIT" is selected, go to step 6.
If "1-SIDED" is selected, go to step 8.
3 How to make copies in the sheet insertion mode
1. Touch the "FUNCTION" key.
The function selection screen will appear.
2. Touch the "INSERT" key. If it is not displayed, touch "▼" or "▲" key to be displayed.
The copy mode setting screen will appear.
4. Specify the type of original, by touching the "DUPLEX", "BOOK" or "1-SIDED" key.
* If "DUPLEX" is selected, go to step 8.
If "BOOK" is selected, go to step 7.
If "1-SIDED" is selected, go to next step.
"COVER +
INSERT +
CHAPTER"
"INSERT +
CHAPTER"
"COVER +
CHAPTER"
"COVER +
INSERT"
"CHAPTER""INSERT""COVER"
"1-SIDED" copy
"DUPLEX"
original
"BOOK"
original
"1-SIDED"
original
"DUPLEX"
original
"BOOK"
original
"DUPLEX"
copy
"SPLIT"
copy
❍
❍
❍
❍
❍
❍
❍
❍ ❍❍❍❍
❍
❍
❍❍
❍❍
Page 37

5. Select the copying direction of the back side.
"LEFT": The back side is copied in the same direction as it is.
"TOP": The back side is copied by turning 180 degrees. Each two-page original is to
be copied in the same direction by binding the finished copies in the upper part.
Go to step 8.
33
FUNCTIONS
6. Specify the type of original, by touching the "DUPLEX" or "BOOK" key.
* If "DUPLEX" is selected, go to step 8.
If "BOOK" is selected, go to next step.
7. Select the binding direction of book originals.
"LEFT": Two-page originals are copied from right side.
"RIGHT": Two-page originals are copied from left side.
Go to next step.
* When copy mode setting is completed, the display will change to the sheet insertion
mode setting screen. Set each mode in accordance with the following procedure.
* Each mode on the display can be combined. (page 31, "2 Combinations of modes")
● Cover mode settings
8. Touch the "COVER" key.
9. Select the cover setting by touching the "2-SIDED" key, the "FRONT" key (copy only
on the front side) or the "BLANK" key.
* If "SPLIT" or "1-SIDED" was selected for finishing of copying in step 3, "2-SIDED"
cannot be selected in this procedure.
10. Touch the "BACK" key.
11. Select the back cover setting by touching the "FRONT" key (copy only on the front
side), "BLANK" key or "NO" key (no back cover is attached).
* When other modes are not set, go to step 19.
● Insert mode settings
12. Touch the "INSERT" key.
13. Specify the type of insert sheet, by touching the "FR./BACK COPY", "FRONT COPY"
or "FR./BACK BLANK" key.
* If either of the other modes is not selected, go to step 15.
● Chapter mode settings
14. Touch the "CHAPTER" key.
Go to next step.
Page 38

34
FUNCTIONS
18. Touch the "ENTER" key after entering page numbers.
* Re-enter the page by touching the "PAGE ENTRY" key.
Follow the procedure in steps 16 and 17 to change the page.
19. Check all settings and touch the "ENTER" key.
The touch panel will return to the basic screen.
(10) Making copies onto transparencies [Presentation mode]
Multiple copies can be performed on standard paper while the transparency backing
mode (page 36) is set.
This mode is convenient for preparation of materials using transparencies.
● Presentation mode (copying onto the backing sheet)
After copying onto transparencies (with copying onto the backing sheets, page 36), the
same original is copied onto a specified number of sheets of standard paper.
Split copy of book original can be used in combination. (* indicates transparency)
● Presentation mode (leaving the backing sheet blank)
After copying onto transparencies (with backing sheets left blank, page 36), the same
original is copied onto a specified number of sheets of standard paper.
Split copy of book original can be used in combination. (* indicates transparency.)
● Insert sheets/Chapter page specification
* Check each of the settings. The page specification may be cancelled if the setting is
changed after the page was specified.
15. Touch the "ENTER" key.
The screen for specifying the pages will appear.
16. Enter the page numbers to be specified to sheets/chapter pages using the numeric
keys.
17. Touch the "Cfm. Pg" key.
* When multiple pages are entered, repeat steps 16 and 17. The screen will be
changed in 15 pages increments. When checking, touch the "NEXT" key or
"PREVIOUS" key to change the screen.
* When changing the specified page, touch the display for the page to be changed
directly, and repeat steps 16 and 17.
* When the insert mode and chapter mode are combined, the function works on the
same page. Thus, it is impossible to specify the page individually.
* When using the insert mode / chapter mode in duplex copy (duplex copy from
duplex originals), enter the page number of originals, not the number of originals.
Accordingly, calculate one duplex original as 2 pages to enter the page number.
Page 39

1. Set the transparencies in the stack bypass tray.
* Fan the transparencies before setting them.
* Up to 25 transparencies can be loaded into the tray at a time.
* Check if the paper of the same size as the transparencies has been set.
35
FUNCTIONS
2. Set the original(s).
3. Touch the "FUNCTION" key.
The function selection screen will appear.
4. Touch the "HAND-OUT" key. If it is not displayed, touch "▼" or "▲" key to be
displayed.
The presentation mode setting screen will appear.
5. Touch the "COPIED" key to copy onto backing sheet, and touch the "BLANK" key not
to copy.
6. Specify the finishing of copy, by touching "DUPLEX", "SPLIT" or "1-SIDED" key.
* If "DUPLEX" or "SPLIT" is selected, go to next step.
If "1-SIDED" is selected, the basic screen will appear. Go to step 9.
7. Specify the type of original, by touching "DUPLEX", "BOOK" or "1-SIDED" key.
* If "DUPLEX" or "1-SIDED" is selected, go to step 9.
If "BOOK" is selected, go to next step.
* If "SPLIT" is selected in step 6, "1-SIDED" key will not appear.
Page 40

36
FUNCTIONS
8. Select the binding direction of the original.
"LEFT": Two-page originals are copied from right side.
"RIGHT": Two-page originals are copied from left side.
The touch panel will return to the basic screen.
9. Enter the desired number of copies for the standard paper using the numeric keys.
* For copies, at first, transparencies and backing sheets will be ejected, and then each
standard paper will be ejected.
* When an optional finisher is equipped, transparencies and backing sheets will be first
ejected to the sub tray, then standard paper will be ejected one by one to the main
tray. If a booklet stitcher is installed, all copies will be ejected to tray 1.
(11) Feeding a paper as a transparency + backing sheet mount
[Transparency backing mode]
When 2 or 3 transparencies are piled on top of one another, static electricity can cause
problems. This mode automatically place a backing sheet between the transparencies
during copying. Copying onto the backing sheet from the same original and multiple
copies are possible.
* Transparencies must be fed via the stack bypass tray.
* When the transparency backing mode is used, the copies are ejected faced up. If
originals are set in the DF, copying will be performed from the last page after they have
been stored in memory once.
* If an optional finisher is equipped, the copies will be ejected face up into the sub tray. If
a booklet stitcher is installed, copies will be ejected to tray 1.
● Copying onto the backing sheet
After originals are copied onto the transparencies, the same originals will be copied onto
the backing sheets as well. (* indicates transparency.)
● Leaving the backing sheet blank
Leaves the backing sheet blank after copying original onto the transparencies.
(* indicates transparency.)
1. Set the transparencies in the stack bypass tray.
* Fan the transparencies before setting them.
* Up to 25 transparencies can be loaded into the tray at a time.
* Make sure that paper of the same size as the transparencies has been set.
2. Set the original(s).
3. Touch the "FUNCTION" key.
The function selection screen will appear.
4. Touch the "PRESENTATN" key. If it is not displayed, touch "▼" or "▲" key to be
displayed.
The transparency backing mode setting screen will appear.
Page 41

5. Touch the "COPIED" key to copy onto backing sheet, and touch the "BLANK" key not
to copy.
37
FUNCTIONS
6. Specify the type of original, by touching "DUPLEX" or "1-SIDED" key.
The touch panel will return to the basic screen.
(12) Making image overlay [Form overlay]
This mode can be used to read the first original into memory and have its image overlaid
onto copies made from subsequent originals. The exposure of overlaid image can be
adjusted.
1. Touch the "FUNCTION" key.
The function selection screen will appear.
2. Touch the "OVERLAY" key. If it is not displayed, touch the "▼" key or "▲" key to be
displayed.
The overlay mode setting screen will appear.
3. Select the copy exposure for an original to be overlaid and touch the "ENTER" key.
The exposure level can be selected from among 10 steps from 10% to 100%.
The touch panel will return to the basic screen.
4. Set the original(s).
* If originals are set in the DF, set the image overlay original as 1st sheet.
* If originals are set on the platen, set the image overlay original.
Page 42

38
FUNCTIONS
5. Press the Start key.
* If originals are set in the DF, all originals are read one by one and copying are
performed. Go to step 7.
* If an original is set on the platen, go to next step.
6. When scanning of the image overlay original has been finished, replace it with the
first-page original and press the Start key. Copying will start.
* If more originals are to be copied, set another original in the same manner, and press
the Start key.
7. When all originals has been completely copied, press the Reset key.
The touch panel will return to the basic screen.
(13) One copy from two or four originals [Merge copy]
2 or 4 originals can be merged into a single copy. The borderline of each original can
also be delimited with a solid line, dotted line and crop mark.
* Original size and paper size must be the standard size.
● 2-IN-1
Use this mode to copy two originals onto one sheet. Can be used in conjunction with a
duplex copy mode to copy four originals onto one sheet.
(When setting an original on the platen, execute steps 1 and 2 in this order.)
● 4-IN-1
Use this mode to copy four originals onto one sheet. Can be used in conjunction with
duplex copy mode to copy eight originals onto one sheet.
(When setting an original on the platen, execute steps 1, 2, 3 and 4 in this order.)
* In "4-IN-1" mode, mode to be selected is changed, depending on the direction of setting
originals.
1. Touch the "FUNCTION" key.
The function selection screen will appear.
2. Touch the "MERGE COPY" key. If it is not displayed, touch "▼" or "▲" key to be
displayed.
The merge copy mode setting screen will appear.
3. Touch the "2-IN-1" key or the "4-IN-1" key.
* In "4-IN-1" mode, mode to be selected is changed, depending on the direction of
setting originals. When the original is set vertically, touch the left "4-IN-1" key, and
when the original is set horizontally, touch the right "4-IN-1" key.
4. Select the type of borderline by touching the "NONE" key, "DOTTED" key, "SOLID"
key or "CROPMRK" key.
Page 43

5. Specify the type of original, by touching "DUPLEX" or "1-SIDED" key.
39
FUNCTIONS
6. Specify the finishing of copy, by touching "DUPLEX" or "1-SIDED" key. For duplex
copy mode, left copy (left "DUPLEX" key) or top copy (right "DUPLEX" key) can be
selected for copying direction on the back side.
The touch panel will return to the basic screen.
7. Set the original(s).
* When an original is set on the platen, check the position of finishing image before
setting.
8. Press the Start key.
* When using the DF, have originals read and copied one at a time.
* If setting originals on the platen, go to next step.
9. When finishing the reading of originals, set the next original, then touch the
"CONTINUE" key.
* Repeat this operation for all the originals.
10. When all originals are read completely, touch the "TO PRINT" key. Copying will
begin. When the copying is completed, the touch panel will return to the basic
screen.
(14) Booklet from book originals [Booklet + cover copy mode]
This mode can be used to include covers, either blank or with an image copied onto the
front cover, with the output when carrying out booklet copying.
* Original size and paper size must be A3 or A4 (vertical).
● Cover
When the original to be copied onto the front cover is read first, the paper onto which it is
copied will come out in the front cover position after the copies are finished and folded in
the center.
● No cover
When the finished copies are folded in the center, both the front and back covers come
out blank.
1. Touch the "FUNCTION" key.
The function selection screen will appear.
2. Touch the "BOOK-BOOK" key. If it is not displayed, touch "▼" or "▲" key to be
displayed.
The Book-Book mode setting screen will appear.
Page 44

40
FUNCTIONS
3. Specify the binding orientation, by touching "LEFT" or "RIGHT" key.
4. Specify whether or not to copy onto front cover.
* If an optional booklet stitcher is installed, specify the finishing setting.
5. Set the original spread.
* One-sided originals can also be set in the DF. Set the cover of original to the first
page.
6. Press the Start key. Then, originals can be read in.
* When setting originals on the platen, go to next step.
* When setting originals in the DF, all the originals can be read- in, and copying will be
performed.
7. When finishing read-in of the originals, set the next original and touch the
"CONTINUE" key.
* Repeat this operation for all the originals.
8. After all originals have been read, touch the "TO PRINT" key. Copying will begin. After
finishing copying, the touch panel will return to the basic screen.
(15) Weekly magazine from duplex/one-sided originals [Booklet copy]
This mode can be used to copy one-sided / duplex originals onto two-page, duplex
copies in such a way that the finished copies can be stacked and folded into a booklet
format.
* Originals must be A4 (horizontal), and paper size must be A3 or A4 (vertical).
* The number of originals should be a multiple of four, otherwise the last page(s) of the
copies will come out blank.
1 If "RIGHT" is selected as the page sequence
Copying will be performed so that the stacked and folded pages of the finished copies
read from right to left.
2 If "LEFT" is selected as the page sequence
Copying will be performed so that the stacked and folded pages of the finished copies
read form left to right.
Page 45

1. Touch the "FUNCTION" key.
The function selection screen will appear.
2. Touch the "BOOKLET" key. If it is not displayed, touch "▼" or "▲" key to be displayed.
The Booklet mode setting screen will appear.
41
FUNCTIONS
3. Select the type of originals. "DUPLEX" or "1-SIDED" can be selected.
4. Specify the binding orientation, by touching the "LEFT" or "RIGHT" key.
* If an optional booklet stitcher is installed, specify the finishing setting.
5. Set the original(s).
* When setting original on the platen, start with the first page.
6. Press the Start key.
* When using the DF, have originals read and copied one at a time.
* If setting originals on the platen, go to next step.
7. Set the original and touch the "CONTINUE" key after it has been read.
* Repeat this operation for all the originals.
8. After all originals have been read, touch the "TO PRINT" key. Copying will begin. After
finishing copying, the touch panel will return to the basic screen.
(16) Copying and stitching into booklet (sheet originals) [Stitching mode]
This mode can be used to copy duplex or one sided originals into duplex copies with two
pages on each side and to staple the copies arranged in order of page into a booklet
with a cover such as a weekly magazine or a pamphlet.
* The original size is limited to A4 (horizontal), and the copy size is limited to A3 and A4
(vertical).
* To use this function, an optional booklet stitcher must be installed.
Page 46

42
FUNCTIONS
• When copying originals onto the front and the rear of the cover:
The first page of the originals is copied onto the front of the front cover and the second
page is copied onto the rear of the front cover. Then copies are made so that the copies
can be read sequentially with the pages spread.
• When copying an original only onto the front of the cover:
The first page of the originals is copied onto the front of the front cover and the second
page is copied onto the page that follows the cover. Then copies are made so that the
copies can be read sequentially with the pages spread.
• When not copying an original onto the front of the cover:
The first page of the originals is copied onto the page that follows the cover and the
second page is copied onto the page that follows the sheet of the first page. Then copies
are made so that the copies can be read sequentially with the pages spread.
11
In case of right stitching:
Copies will be made so that the finished copies are arranged from the right to the left
when the copies are folded.
22
In case of left stitching:
Copies will be made so that the finished copies are arranged from the left to the right
when the copies are folded.
1. Touch the "FUNCTION" key.
The function selection screen will appear.
2. Touch the "STITCHING" key. If the "STITCHING" key is not displayed, touch the "▼"
key or the "▲" key to display it.
The stitching mode setting screen will appear.
3. Select the type of cover. "COPY: F/R", "COPY: FRONT" or "COPY: F/BLANK: R" can
be selected.
109
2
1
4
3
6
5
98
1
3
2
5
4
87
2
1
4
3
87
76
65
Page 47

4. Select the type of originals. "DUPLEX" or "1-SIDED" can be selected.
43
FUNCTIONS
5. Select the binding orientation by touching the "LEFT" key or the "RIGHT" key.
The finishing setting screen will appear.
6. Set the number of copies by touching the "+" key or the "-" key.
7. To staple (booklet stitching), touch the "STAPLE SORT" key.
8. When settings of the number of copies and stapling (booklet stitching) are complete,
touch the "END" key.
9. Set the original(s).
* When setting the original on the platen, start with the first page.
10. Press the Start key.
* When using the DF, scanning of originals will be carried out one at a time and then
copying and stitching will be carried out.
* When using the platen, go to the next step.
11. When scanning of the original is complete, set the next original and touch the
"CONTINUE" key.
* Repeat this step until all originals have been scanned.
12. After all originals have been scanned, touch the "TO PRINT" key. Copying will begin.
After copying is completed, the touch panel will return to the basic screen.
(17) Inverting black and white [Invert copy]
Black and white of the image are inverted (reversed) for copying.
* If multiple inverted copies are performed, "PLEASE WAIT. NOW ADDING TONER."
may appear.
Page 48

44
FUNCTIONS
1. Set the original(s).
2. Touch the "FUNCTION" key.
The function selection screen will appear.
3. Touch the "INVERT" key. If it is not displayed, touch "▼" or "▲" key to be displayed.
The touch panel will return to the basic screen.
(18) Making mirror image copies [Mirror image copy]
This mode can make mirror image copies.
1. Set the original(s).
2. Touch the "FUNCTION" key.
The function selection screen will appear.
3. Touch the "MIRROR" key. If it is not displayed, touch "▼" or "▲" key to be displayed.
The touch panel will return to the basic screen.
(19) Sorting automatically [Sort copy]
Since copying is performed after memorizing multiple originals, sorting of required sets
can be performed without an optional finisher.
* If "ON" is set in "& ROTATE SORT" on page 75, and the paper size is A4, the direction
of each copy is changed, thus making it easy to sort the copies. When this setting is
used, the paper with the size of A4 must be set in the direction of both length and width.
Page 49

1. Set the original(s).
2. Press the Sorter mode key.
Sorter mode will be set.
3. Press the Start key.
* When setting the original in the DF, read-in will be started, and copying will be
performed.
* When setting the original on the platen, "CONTINUE SCANNING DOCUMENT?" will
be displayed. Go to next step.
45
FUNCTIONS
4. Set the next original and touch the "CONTINUE" key.
* Repeat this operation for all the originals.
5. After all originals have been read, touch the "TO PRINT" key.
Copying will be performed one by one.
(20) Memorizing frequency used settings [Program mode]
Up to seven combinations of copy modes and functions displays on the operation panel
can be registered.
1 How to register settings
1. Set the desired copy modes to be memorized on the operation panel and return to the
basic screen.
2. Touch the "SPECIAL" key.
The management mode setting screen will appear.
3. Touch the "REGISTER" key for the program.
4. Touch the number ("1" to "7") to be registered.
The preset function will appear.
* The detailed setting will be displayed by touching each key. Touch the "CHECK" key
to return to the previous screen.
Page 50

46
FUNCTIONS
5. Touch the "REGISTER" key.
The touch panel will return to the basic screen. The copying is possible with the
registered program.
2 Calling up a program
1. Press the Program key.
The program setting screen will appear.
* If "OFF THE PLATEN" is selected for the "9 JOB PROGRAMMING" on page 73,
function registered in "1" will be automatically called in the basic screen by pressing
the program key. Copying can be performed in the function registered in "1".
* When using the function of other than program number "1" while the "OFF THE
PLATEN" is selected for the "9 JOB PROGRAMMING" on page 73, touch the
"COPY" key for the program in the management mode setting screen. Go to next
step.
2. Touch the number ("1" to "7") of the program to be used. Registered copy functions
will appear on the screen.
* Program number key displayed in gray cannot be selected since it is not registered.
* The detailed setting will be displayed by touching each keys. Touch the "CHECK"
key to return to the previous screen.
3. Touch the "COPY" key.
The touch panel will return to the basic screen.
* After returning to the basic screen, set an original and press the Start key to start
copying with the registered function in the program number.
(21) Recall mode
If the copy mode is set, the "RECALL" key will be displayed on the basic screen.
After copy mode setting, setting details can be checked and modified by touching the
"RECALL" key.
Page 51

* After checking, touch the "CHECK" key, the touch panel will return to the basic screen.
* When the setting contents are changed, touch the "CHANGE" key after pressing any
one of the function keys. The function selection screen will appear. Reset the copy
mode in accordance with the procedure of each function.
47
FUNCTIONS
(22) Setting change function
The "PAUSE" key will be displayed on the basic screen while copying is performed. If the
"PAUSE" key is touched, copying operation will be suspended to change the number of
copies.
* If an optional finisher has been installed, the staple sort mode and the punch mode can
also be adjusted. When using a booklet stitcher, the staple sort mode can be adjusted.
1. Touch the "PAUSE" key.
Copying operation is suspended and the setting change screen will appear on the
touch panel.
2. Change the number of copies by touching the "+" key or "-" key.
* If an optional finisher has been installed, the staple sort mode and the punch mode can
be adjusted. Touch each key and make the desired setting be highlighted. Also when
using a booklet stitcher, the staple sort mode can be adjusted.
3. Touch the "END" key.
Copying will be restarted.
* Copying operation is carried out in the setting changed from resuming point.
Page 52

48
FUNCTIONS
(23) Rotate copy
Even when the direction of originals are different from that of paper in the drawer, the
image will be turned 90 degrees counterclockwise for copying. For this function, no
setting is required.
* The paper size available for rotate copy is limited to A4, A5 and A6.
* If the automatic drawer switching function is "ON", copying will be continued with the
same size of paper as original in a different direction when the paper of the same
direction runs out during copying. (page 78, "2 AUTOMATIC DRAWER SWITCHING")
(24) Energy saver function
This function turns the machine off to save energy by pressing the energy saver key,
while leaving the main switch turned ON. When this function is activated, the energy
saver indicator is the only lit indicator on the operation panel.
* To resume copying after the energy saver function has been activated, press the
energy saver key again. The time for recovery from the energy saver function is about
30 seconds.
* An auto energy saver function which actuates the energy saver function automatically,
can be set to trigger after no copying has been done for a certain period (page 79, "7
AUTO PREHEAT TIME").
(25) Auto shut-off function
This function automatically turns the main switch OFF(O) if no copying operation is
performed for a certain period (15-240 minutes). To make copies again, turn the main
switch ON ( | ).
● Auto shut-off function
The auto shut-off function is a power saving function which automatically turns OFF(O)
the main switch when a certain time elapses without copying operation.
Copiers are generally in the standby mode longer time than in copying operation, and
power consumption in the standby mode occupies the large part of the consumption.
Automatic turning OFF of the copier reduces unnecessary power consumption in the
standby mode and at night where the copier is left on, resulting in reduction in power
rate.
* For the change of time until the auto shut off function, see the "8 AUTO SHUT-OFF
TIME" on page 79, and to cancel the auto shut-off function, see the "0 AUTO SHUTOFF" on page 80.
* If the auto shut-off function operates when the week timer (page 67) is set or an
optional I/F kit is equipped, the machine will be in the rest state leaving the main switch
ON ( | ). Press the energy saver key to perform copying.
Page 53

49
APPLICABLE COPY MODES
(1) Reserving another copy while copying is performed [Add Job]
While copying is performed, another copying can be reserved. Up to 4 jobs can be
reserved at a time. Also, the reserved jobs and the order of the copying can be changed.
* When this copy mode is used, the optional memory copy board is required.
2. Touch the "ADD" key.
3. Referring to page 19 and subsequent pages, set the function to be reserved and press
the Start key. The originals will be started to be read.
4. After all the original has been read, the touch panel will return to the step 2 screen.
5. Touch the "END" key. Copying will begin in the order of reservation when the copying
of previously reserved job is completed.
● Introduction of the add job screen
1 Job number key: The serial number is assigned until 99 in the
order of registration. Even when the order is altered and the job
is cleared, no number is changed. Copying operation is carried
out from the job displayed in the upper part.
2 The number of originals is displayed.
3 The number of copies is displayed.
4 The job reservation time is displayed.
5 Residual memory: The data volume of originals stored in
memory is displayed.
* The form overlay mode cannot be used in the add job function.
1 Add job
1. Press the Add job key.
The reserved job will appear.
If the message "ADDITION OF JOB IS POSSIBLE." is displayed, the job can be
reserved.
* To stop job reservation, touch the "END" or "BACK" key.
Page 54

50
APPLICABLE COPY MODES
2 Changing the setting contents of the add job
The setting of finishing for the reserved job (number of copies and sorter mode) can be
changed.
1. Press the Add job key.
The reserved job will appear.
2. Select the job to be changed.
3. Touch the "MODIFY" key.
4. When changing the number of copies, touch the "+" key or "-" key for setting.
* Change the setting of finishing.
Press the "SORT" key to select the mode.
* If an optional finisher has been installed, the staple sort mode and the punch mode can
be adjusted. When using the booklet stitcher, the staple sort mode can be adjusted.
5. After all the settings has been completed, touch the "END" key. The touch panel will
return to the basic screen.
Page 55

3 Clearing the add job
1. Press the add job key.
The reserved job will appear.
51
APPLICABLE COPY MODES
2. Select the job to be deleted.
3. Touch the "RECALL" key. The detailed setting is displayed.
Make sure that it is a job to be cleared.
4. Touch the "DELETE" key.
The display will return to the screen in step 2.
5. Touch the "DELETE" key.
* To cancel "DELETE", touch the "CANCEL" key.
6. Touch the "END" key.
The touch panel will return to the basic screen.
4 Changing the add job order
Although job will be copied in the order of reservation, the order can be changed after
the reservation.
1. Press the Add job key.
The reserved job will appear.
2. Select a desired job to be changed the order.
3. Change the order by touching the "▲ UP" key or "▼ DOWN" key.
* Copying operation is carried out from job displayed upper side to lower.
Page 56

52
APPLICABLE COPY MODES
4. Touch the "END" key.
The touch panel will return to the basic screen.
(2) Copying various originals at a time [Job build function]
Job build functions enable to read the originals separately in several times and copy
them at a time. The originals of the large number or different types can be copied at a
time by reading those of the same size or the same type as one job and storing each job.
9 modes can be selected depending on the type of originals or the finishing copying
mode.
* The instruction of job build function will be displayed on the touch panel. Touch the "?"
key.
1 Memory copy from DF and platen
● Large quantity of originals
Large quantity of originals, exceeding capacity of setting in the DF at a time, can be
stored in memory by using this function. The originals can be read by setting on the
platen in the middle.
● Auto size
Different sizes of originals will be reduced/enlarged to be copied on the desired same
size sheets of paper.
● Choose size
When an original is set on the platen, all originals will be stored in memory once, then,
copied at a time. The originals can be set in the DF in the middle.
1. Touch the "JOB BUILD" key.
The job build function selection screen will appear.
2. Check if the "MEMORY COPY FROM DF AND PLATEN" key is highlighted. If not,
touch it to highlight.
3. Select the function by touching the "LARGE # OF ORIGINALS" key, "AUTO SIZE" key
or "CHOOSE SIZE" key.
Page 57

4. Select the type of originals by touching the "2-SIDED ORIG." key or "1-SIDED ORIG."
key.
53
APPLICABLE COPY MODES
5. Select the finishing of copy by touching the "2-SIDED COPY" key or "1-SIDED COPY"
key.
6. The read-in starting screen will appear.
* Select the size of paper to be copied.
* The auto magnification selection mode has been set for the initial mode. When setting
the custom paper size or the custom zoom ratio, touch the manual key until "1:1" is
displayed on the zoom ratio display.
* When changing the zoom ratio, touch the "+" key or "-" key on the right side of the
zoom ratio display. When setting the zoom mode, such as standard zoom or XY zoom,
touch the "ZOOM" key and follow the instruction on page 19 and after.
* The setting of the zoom mode can be changed by each job.
Page 58

54
APPLICABLE COPY MODES
* When setting the border erase mode, touch the "+" key or "-" key on the right side of
the display of the width of erasing border to set the width of erasing border. The width
can be selected from 6, 12 and 18 mm.
* The border erase mode in this setting is effective only for the sheet originals.
* The setting of the border erase mode can be changed by each job.
* If the "FUNCTION" key is touched, the following copy functions can be set.
• Margin mode: Touch the "MARGIN" key and follow step 4 and after on page 25.
• Merge copy: Touch the "MERGE COPY" key and follow step 3 and after on page 38.
• Page number printing: Touch the "PAGE #" key and follow step 4 and after on
page 26.
7. Set the original(s).
8. Press the Start key.
9. When continuing to read originals, touch the "CONTINUE" key to repeat from step 7.
* When all originals has been read completely, go to step 11.
* To clear the last page of originals read, touch the "CLEAR LAST JOB" key.
* Print the test print by touching the "TEST PRINT" key.
When the test print is completed, the display will return to the screen in step 10.
10. Touch the "TO PRINT" key.
11. Set the setting of the finishing.
* Changing the sorter mode by touching the "SORT" key to highlight the mode.
* If an optional finisher is equipped, the setting of staple sort mode and punch MODE
can be changed in the same manner as with sorter mode setting.
* If an optional booklet stitcher has been installed, the staple sort mode setting can
be adjusted in the similar way to the sorter mode.
Page 59

12. Set the number of copies by touch the "+" key or "-" key. The number can also be
entered with the numeric keys.
13. Touch the "END" key. Copying will begin.
55
APPLICABLE COPY MODES
2 Duplex copies from one-sided and duplex mixed originals
● Finishing like originals [Print as original]
One-sided originals and duplex originals are set and read by each; one-sided originals
are copied as one-sided, and duplex originals are copied as duplex copies to finish same
as originals.
● Duplex copies from all originals [Duplex all originals]
One-sided originals and duplex originals are set and read by each, and all originals are
finished as duplex copies without making blank pages.
● Copying desired page on the front side [Chapterize]
The first page of each chapter can be copied onto the front side by setting the originals
to be read by chapter.
1. Touch the "JOB BUILD" key.
The job build function selection screen will appear.
2. Touch the "2-SIDED COPY" key.
3. Select the function by touching the "PRINT AS ORIGINALS" key, "DUPLEX ALL
ORIGINALS" key or "CHAPTERIZE 1/2 SIDED ORGNLS" key.
4. Select the type of originals by touching the "2-SIDED ORIG." key or "1-SIDED ORIG."
key.
Page 60

56
APPLICABLE COPY MODES
5. The read-in starting screen will appear.
* The auto magnification selection mode has been set for the initial mode. When
setting the custom paper size or the custom zoom ratio, touch the manual key until
"1:1" is displayed on the zoom ratio display.
* When changing the zoom ratio, touch the "+" key or "-" key on the right side of the
zoom ratio display. When setting the zoom mode, such as standard zoom or XY zoom,
touch the "ZOOM" key and follow the instruction on page 19 and after.
* The setting of the zoom mode can be changed by each job.
* When setting the border erase mode, touch the "+" key or "-" key on the right side of
the display of the width of erasing border to set the width of erasing border. The width
can be selected from 6, 12 and 18 mm.
* The border erase mode in this setting is effective only for the sheet originals.
* The setting of the border erase mode can be changed by each job.
* If the "FUNCTION" key is touched, the following copy functions can be set.
• Margin mode: Touch the "MARGIN" key and follow step 4 and after on page 25.
• Merge copy: Touch the "MERGE COPY" key and follow step 3 and after on page 38.
• Page number printing: Touch the "PAGE #" key and follow step 4 and after on
page 26.
6. Set the original(s).
* The originals can be set within the one job is limited to the originals selected in step
4, and the one type of originals. If the type of original is changed, it must be stored in
memory in another job.
7. Press the Start key.
Page 61

8. Continue reading originals by touching the "CONTINUE" key to repeat key operation
from step 4.
* When all originals has been read completely, go to step 11.
* Touch the "CLEAR LAST JOB" key to clear the last page of read originals.
* Print the test print by touching the "TEST PRINT" key. When the test print is
completed, the display will return to the screen in step 8.
9. Touch the "TO PRINT" key.
57
APPLICABLE COPY MODES
10. Set the setting of the finishing.
* Touch the "SORT" key to change the sorter mode (sort copying or group copying).
* If an optional finisher is equipped, the setting of staple sort mode and punch mode
can be changed in the same manner as with sorter mode setting.
* If an optional booklet stitcher has been installed, the staple sort mode setting can
be adjusted in the similar way to the sorter mode.
11. Set the number of copies by touching the "+" key or "-" key. This number can also be
entered with numeric keys.
12. Touch the "END" key. Copying will begin.
3 Batch copy from platen
● Only sheet originals
Sheet originals or the like that cannot be set in the DF are stored in memory once to
copy at a time.
This mode is convenient for sort-copying of originals in large quantity.
● Only book originals
When copying book originals continuously, these originals are stored in memory once for
batch copying. This mode is convenient for use in sort-copying of originals in large
quantity.
● Sheet & book originals
All sheet and book originals are stored in memory once for batch copying. This mode is
convenient for use in sort-copying originals in large quantity.
1. Touch the "JOB BUILD" key.
The job build function selection screen will appear.
A
B
C
D
Page 62

58
APPLICABLE COPY MODES
2. Touch the "BATCH COPY FROM PLATEN" key.
3. Select the type of originals by touching the "SHEET ORIGINALS" key, "BOOK
ORIGINALS" key or "SHEET & BOOK ORIGINALS" key.
4. Select the finishing of copies by touching the "2-SIDED COPY" key or "1-SIDED
COPY" key.
* If the "SHEET & BOOK ORIGINALS" key has been touched in step 3, go to next
step. If the "BOOK ORIGINALS" key has been touched, go to step 6. If the "SHEET
ORIGINALS" has been touched, go to step 7.
5. Select the type of originals to be read by touching the "SHEET ORIGINAL" key or
"BOOK ORIGINAL" key.
* If the "SHEET ORIGINAL" key is touched, go to step 7. If the "BOOK ORIGINAL" key
is touched, go to next step.
6. Select the binding direction of the book original.
7. The read-in starting screen will appear.
* The auto magnification selection mode has been set for the initial mode. When
setting the custom paper size or the custom zoom ratio, touch the manual key until
"1:1" is displayed on the zoom ratio display.
Page 63

* When changing the zoom ratio, touch the "+" key or "-" key on the right side of the
zoom ratio display. When setting the zoom mode, such as standard zoom or XY zoom,
touch the "ZOOM" key and follow the instruction on page 19 and after.
* The setting of the zoom mode can be changed by each job.
59
APPLICABLE COPY MODES
* When setting the border erase mode, touch the "+" key or "-" key on the right side of
the display of the width of erasing border to set the width of erasing border. The width
can be selected from 6, 12 and 18 mm.
* The border erase mode in this setting is effective only for the sheet originals.
* The setting of the border erase mode can be changed by each job.
* If the "FUNCTION" key is touched, the following copy functions can be set.
• Margin mode: Touch the "MARGIN" key and follow step 4 and after on page 25.
• Merge copy: Touch the "MERGE COPY" key and follow step 3 and after on page 38.
• Page number printing: Touch the "PAGE #" key and follow step 4 and after on
page 26.
8. Set the original(s).
* Set the original selected in steps 3 or 5.
9. Press the Start key.
10. When continuing to read originals, touch the "CONTINUE" key.
* If "SHEET & BOOK ORIGINALS" is selected in step 3 to continue reading, repeat
from step 5.
If "SHEET ORIGINALS" is selected to continue reading, repeat from step 6.
If "BOOK ORIGINALS" is selected to continue reading, repeat from step 7.
* When all originals has been read completely, go to step 11.
* Touch the "CLEAR LAST JOB" key to clear the last page of read-in original.
* To print the test print, touch the "TEST PRINT" key. When the printing is completed,
the display will return to the screen in step 10.
11. Touch the "TO PRINT" key.
Page 64

60
APPLICABLE COPY MODES
12. Set the setting of the finishing.
* When changing the sorter mode, touch the "SORT" key to select the mode.
* If an optional finisher is equipped, the settings of staple sort mode and punch mode
can be set in the same manner as with sorter mode setting.
* If an optional booklet stitcher has been installed, the staple sort mode setting can
be adjusted in the similar way to the sorter mode.
13. Set the number of copies by touch the key "+" or "-". This number can also be
entered with numeric keys.
14. Touch the "END" key. Copying will begin.
Page 65

(1) Copy management
Set 4-digit ID-code (management code) numbers for up to 1000 departments, and
manage the total number of copies made by each department.
Limits for the number of copies to be made by each department can be set.
61
COPIER MANAGEMENT
2 How to make settings in the copy management mode
1. Touch the "SPECIAL" key.
The management mode selection screen will appear.
1 About the copy management mode
Copy management mode Copy management mode content Page
● Registering new ID-
codes
Manage use of the copier by assigning 4-digit ID-codes to the departments in your
organization, and limits for the number of copies to be made by each. ID-codes for up to
1000 departments can be registered. Limits are set in units of 1,000 sheets, up to a
maximum of 250,000. Entering "0" enables unlimited copying.
When a department reaches its limit, the copier will not make any more copies for it.
62
● Deleting ID-codes
Use this to delete registered ID-codes.
63
● Altering limits
Use this to alter limits for the copies to be made by each department, without need to
delete and re-register ID-codes.
64
● Clearing copy counts
Use this to clear all the copy counts for the various departments at one go after a suitable
period of time. Individual copy counts cannot be cleared, however.
64
● Viewing copy counts
Use this to view the number of copies. The total number of copies can be viewed, as well
as paper size and ID-code.
65
● Printing copy
management report
Use this to print out the number of copies made as report by ID-code.
65
● Turning copy
management ON/OFF
Turn copy management on when required (to apply the settings made). Turn it off when
not required.
66
Page 66

62
COPIER MANAGEMENT
2. Touch the "MANAGEMENT" key.
3. Enter the 4-digit management code "4200" with the numeric keys.
* If the management code matches the registered code, the display changes to the
copy management mode setting screen. See "3 How to make the various settings"
to make settings.
* The 4-digit management code can be changed. (page 79, "9 CHANGE
MANAGEMENT CODE WITH #-KEYS")
3 How to make the various settings
● Registering new ID-codes
1. Set the copy management mode. (page 61)
2. Touch the "SET CODE" key.
3. Touch the "REGISTER" key.
4. Enter the ID-code (4-digit) with the numeric keys.
5. Touch the "REGISTER" key.
* If the ID-code has already been registered, the massage "ID-CODE IS ALREADY IN
USE." is displayed. Press the "RE-ENTER" key and enter another ID-code.
Page 67

6. Enter the limit for the number of copies that can be made using the numeric keys. The
limit is set in units of 1000's of sheets, up to a maximum of 250,000.
* Entering "0" enables unlimited copying.
* If "CANCEL" key is touched, the registered ID-code is cleared and a new ID-code
can be entered.
63
COPIER MANAGEMENT
7. Touch the "REGISTER" key. The display will return to the screen in step 4.
* To register another ID-code, repeat steps 4 to 7.
8. Touch the "END" key.
The display will return to the screen in step 3.
9. Touch the "END" key.
The display will return to the copy management mode setting screen.
10. Touch the "END" key.
The touch panel will return to the basic screen.
● Deleting ID-codes
1. Set the copy management mode. (page 61)
2. Touch the "SET CODE" key.
3. Touch the "DELETE" key.
4. Touch the ID-code to be deleted directly. (Plural codes are possible.)
If it is not displayed, scroll the "▼" or "▲" key to be displayed.
5. To finish deleting, touch the "END" key.
The display will return to the screen in step 3.
6. Touch the "END" key.
The display will return to the copy management mode setting screen.
7. Touch the "END" key.
The touch panel will return to the basic screen.
Page 68

64
COPIER MANAGEMENT
● Altering limits
1. Set the copy management mode. (page 61)
2. Touch the "SET CODE" key.
3. Touch the "CORRECTION" key.
4. Touch the ID-code to be altered. If it is not displayed, touch the "▼" or "▲" key to be
displayed.
5. Use the numeric keys to alter the limit. Limits are set in units of 1,000 sheets, up to a
maximum of 250,000.
* Entering "0" enables unlimiting copying.
6. Touch the "REGISTER" key.
The display will return to the screen in step 4.
* To alter the copy limit(s) of (an)other department(s), repeat steps 4 to 6.
7. Touch the "END" key.
The display will return to the screen in step 3.
8. Touch the "END" key.
The display will return to the copy management mode setting screen.
9. Touch the "END" key.
The touch panel will return to the basic screen.
● Clearing copy counts
1. Set the copy management mode. (page 61)
2. Touch the "SET CODE" key.
Page 69

3. Touch the "CLEAR" key.
4. To clear copy counts, touch the "YES" key.
The display will return to the screen in step 3.
5. Touch the "END" key.
The display will return to the copy management mode setting screen.
6. Touch the "END" key.
The touch panel will return to the basic screen.
65
COPIER MANAGEMENT
● Viewing copy counts
1. Set the copy management mode. (page 61)
2. Touch the "REFERENCE" key.
Total number of copies, and total number of copies of each paper size, will be
displayed.
3. To view numbers of copies made by individual departments, touch the "ID-CODE"
key.
If the ID-code is not displayed, touch the "▼" and "▲" keys to be displayed.
4. Once viewing the copy counts is finished, touch the "END" key.
The display will return to the copy management mode setting screen.
5. Touch the "END" key.
The touch panel will return to the basic screen.
● Printing of copy management report
1. Set the copy management mode. (page 61)
2. Check if A4 paper is loaded. If not, add paper.
Page 70

66
COPIER MANAGEMENT
3. Touch the "PRINT MANAGEMENT LIST" key.
Printing will begin.
4. After finishing printing, the touch panel will return to the screen in step 3.
5. Touch the "END" key.
The touch panel will return to the basic screen.
● Turning copy management ON/OFF
1. Set the copy management mode. (page 61)
2. To turn copy management on, touch the "❑ ON" key.
* To set also the management mode for the printer (optional), check "❑ PRINTER".
The setting is also needed in the personal computer. For the setting method, see the
online manual for the printer.
* To turn it off, touch the "❑ OFF" key.
3. Touch the "END" key.
The touch panel will return to the basic screen.
4 Making copies when copier is in copy management mode
When the copier is in the copy management mode, "ENTER 4-DIGIT ID-CODE WITH #KEYS." will appear on the touch panel.
1. Enter the ID-code for your department with the numeric keys.
2. If "READY TO COPY." will appear, carry out copying with the usual procedure.
* When copying is finished, press the Energy saver key. If the auto clear function
operates, the display will return to the previous screen.
Page 71

67
COPIER MANAGEMENT
(2) Week timer
ON (operative)/OFF (rest) is switched automatically at specified time in the day of the
week from Monday to Sunday. Set the copier to come on and warm up ready for the start
of work in the morning, and set it to be switched off automatically in the evening in case
no-one remembers to switch it off.
* When using the week timer, do not remove the power plug from its power source and
be sure to leave the main switch ON ( ❘ ).
2 How to make settings in the timer mode
1. Touch the "SPECIAL" key.
The management mode selection screen will appear.
2. Touch the "WEEK TIMER" key.
1 About the timer function
Timer mode Timer mode content Page
● Setting the time
Set the day of the week and the present time. Unless set correctly, the timer will not
triggered operations at the expected time.
68
● Programming the week
timer
Set the times at which the copier is to switch ON and OFF on each day of the week. Then
leave the main switch ON ( ❘ ). The copier will switch ON/OFF at the times set on each
day of the week.
68
● Cancelling the timer
function
When the copier is to be out of use for a whole day (holiday, etc.), set "Cancelling the
timer function" in advance for the day in question. The copier will remain OFF the whole
of the day set. On the same day of the following week, the timer will resume switching the
copier on/off at the times originally set.
69
● Turning the timer
ON/OFF
If times are set using the "Setting the timer", either switch the timer ON to actuate it, or
turn it OFF when/if it is not required.
70
Page 72

68
COPIER MANAGEMENT
3. Enter the management code "4200" with the numeric keys.
* If the management code matches the registered code, the display changes to the
week timer mode setting screen. See "3 How to make the various settings" to make
settings.
* This 4-digit management code can be changed. (page 79, "9 CHANGE
MANAGEMENT CODE WITH #-KEYS")
3 How to make settings for the various functions
● Setting the time
1. Set the timer mode. (page 67)
2. Touch the "TIMER SET" key.
3. Set the day of the week, the hour and the minutes, by touching the "+" key or "-" key.
* Enter time on the 24-hour clock.
4. Touch the "ENTER" key.
The display will return to the week timer mode setting screen.
5. Touch the "END" key.
The touch panel will return to the basic screen.
● Programming the week timer
1. Set the timer mode. (page 67)
2. Touch the "WEEK TIMER" key.
3. Touch the desired day of the week to be set.
Page 73

4. Set the starting time, hour and minutes by touching the "+" key or "-" key.
5. Touch the "OFF" key.
6. Set the finishing time, hour and minutes by touching the "+" key or "-" key.
69
COPIER MANAGEMENT
7. Touch the "ENTER" key.
The display will return to the screen in step 3.
* To set times for other days of the week, repeat step 3 to 7.
8. When the setting is finished, touch the "ENTER" key.
The display will return to the week timer mode setting screen.
9. Touch the "END" key.
The touch panel will return to the basic screen.
● Cancelling the timer function
1. Set the timer mode. (page 67)
2. Touch the "CANCEL" key.
3. Touch the desired day of the week to be cancelled.
"CANCEL" will be highlighted.
* Multiple days can be set.
* Touch that day again to cancel a interrupting timer. "CANCEL" will disappear and the
set time will be displayed.
4. When setting is finished, touch the "ENTER" key.
The display will return to the timer mode setting screen.
5. Touch the "END" key.
The touch panel will return to the basic screen.
Page 74

70
COPIER MANAGEMENT
● Turning the timer ON/OFF
1. Set the timer mode. (page 67)
2. To switch the timer ON, touch the "❑ ON" key.
* To switch it off, touch the "❑ OFF" key.
3. Touch the "END" key.
The touch panel will return to the basic screen.
4 Making copies after copier has been stopped by timer
When the energy saver indicator lights up and all the other displays on the operation
panel go out, the week timer has operated. When this happens, carry out the following
procedure in order to make copies.
1. Press the energy saver key. The energy saver indicator will blink.
* Warm-up has begun. Wait a while.
* Another way to start warm-up is to turn the main switch OFF (O), then ON ( ❘ ) again.
2. When warm-up is over, make copies with the usual procedure.
3. When copying is finished, press the Energy saver key again. The energy saver
indicator will light continuously, and the machine will be stopped.
(3) The default settings
The state the copier is in at end of warm-up and when the Reset key is pressed is called
the "initial mode". The functions and values that are automatically pre-set for the initial
mode are called the "default settings". "COPY DEFAULT" and "MACHINE DEFAULT"
can be selected in the default setting. They can be changed as desired to suit the
copying operations to be performed.
Page 75

71
COPIER MANAGEMENT
● Copy default setting
Copy default setting Content of copy default setting Page
1 EXPOSURE MODE
This is the copy exposure selection mode. Auto (auto exposure mode) or manual
(manual exposure mode) can be selected.
72
2 EXPOSURE STEPS
7 or 13 exposure levels can be set for the manual exposure mode.
72
4 AUTO EXPOSURE
ADJUSTMENT
If the overall exposure in the auto exposure mode is too light/dark, use this to
adjust it.
73
5 MANUAL EXPOSURE
ADJUSTMENT
If the overall exposure in the manual exposure mode is too light/dark, use this to
adjust it. It can be set separately for each mode; "TEXT", "PHOTO" and "MIXED".
73
6 QUALITY
Initial value for the copy quality mode can be selected.
73
8 PAPER SELECTION
Select whether paper of the same size as the original is selected automatically
when it is set, or whether the size of the paper is selected manually.
73
9 JOB PROGRAMMING
"REGULAR" or "OFF THE PLATEN" can be selected for the program mode setting.
"REGULAR": Any of the program number "1" to "7" can be selected by touching the
program key.
"OFF THE PLATEN": The content of program "1" can be accessed automatically by
touching program key. Copying is possible as it is.
73
0 DEFAULT DRAWER
A frequently-used drawer can be selected automatically. When the Reset key is
pressed without setting an original, etc., the specified drawer can be selected.
* The stack bypass tray can not be set as a default drawer.
74
! ZOOM MODE
The size zoom mode (page 19) or the standard zoom mode (page 20) can be
selected for enlarge/reduced copying (zoom mode).
74
@ SET COPY LIMIT WITH #-
KEYS
The pre-set limit on the number of copies that can be set for one copying operation
is 999, but the limit can be lowered.
74
# CUSTOM SIZE FOR BORDER
ERASE
Set the sizes of the originals for "CUSTOM SIZE" of border erase modes (page 28).
Borders outside the defined area will be erased.
74
$ F&B P. MARGIN
Whether the Front & back page margin can be selected or not can be set on page
24.
74
% DRAWER FOR INSERT
SHEET
The drawer of the insert sheets to be set can be selected in the insert mode (page
30).
75
& ROTATE SORT
Set the normal sort copy or rotate sort copy by touching the sort key. The direction
of each paper can be changed in the rotate sort copy so that it makes easier to sort
the copies.
* This setting is not displayed when the copier is equipped with the optional finisher.
75
3 TONER ECONOMY MODE
Select the initial toner economy mode which will be set when power is turned on.
The toner economy mode can also be turned off.
72
^ DRAWER FOR COVER
SHEET/STITCH
The drawer of the cover stock to be set can be selected in the stitching mode
(page 45).
* This setting appears if an optional booklet stitcher is installed.
75
7 OUTPUT FORM
Set the initial sort mode which will be set when power is turned on.
73
Page 76

72
COPIER MANAGEMENT
● How to make settings in the copy default setting mode
1. Touch the "SPECIAL" key.
The management mode selection screen will appear.
2. Touch the "COPY DEFAULT" key.
3. Enter the management code "4200" with the numeric keys.
* If the management code matches the registered code, the screen changes to the
copy default setting mode screen. See the followings to set each mode.
* 4-digit management code can be changed. (9 "CHANGE MANAGEMENT CODE
WITH #-KEYS", page 79)
1 EXPOSURE MODE
1. Touch the "AUTO" key or "MANUAL" key for the "EXPOSURE MODE".
2 EXPOSURE STEPS
1. Touch the "7 STEPS" key or "13 STEPS" key for the "EXPOSURE STEPS".
3 TONER ECONOMY MODE
1. Touch the "CHANGE" key for the " TONER ECONOMY MODE ".
2. Touch the "ON" key or the "OFF" key for the " TONER ECO MODE ".
3. Touch the "ON" key or the "OFF" key for the "ECONOMY/DEFAULT".
4. Touch the "END" key.
* When setting other modes continuously, see the setting of each mode. When finishing
the setting, finish the copy default setting in accordance with the "● How to finish the
copy default setting" on page 75.
Copy default setting Content of copy default setting Page
* CREATE SHORTCUT (#1, #2)
The frequently-used function keys can be displayed on the basic screen. This
makes easier to select the frequently-used function.
75
( CREATE USER CHOICE
#1 - #5
The frequently-used function will be displayed soon after touching the "FUNCTION"
key if it is set in this mode, so that it makes easier to set the functions. Up to five
functions can be set.
75
Page 77

4 AUTO EXPOSURE ADJUSTMENT
1. Touch the "CHANGE" key for the "AUTO EXPOSURE ADJUSTMENT".
2. Touch the "LIGHTER" key or the "DARKER" key to move the cursor on the exposure
scale. Move the cursor to the right to make copies darker, and to the left to make
copies lighter.
3. Touch the "END" key.
73
COPIER MANAGEMENT
5 MANUAL EXPOSURE ADJUSTMENT
1. Touch the "CHANGE" key for the "MANUAL EXPOSURE ADJUSTMENT".
2. Touch the "LIGHTER" key or "DARKER" key in each mode to move the cursor on the
exposure scale. Move right to make copies darker, and to left to make copies lighter.
3. When finishing the exposure setting in each mode, touch the "END" key.
6 QUALITY
1. Touch the "MIXED" key, "TEXT" key or "PHOTO" key for the "QUALITY".
* When setting other modes continuously, see the setting of each mode. When finishing
the setting, finish the copy default setting in accordance with the "● How to finish the
copy default setting" on page 75.
7 OUTPUT FORM
1. Touch the " SORT:ON" key or the "SORT:OFF" key for the "OUTPUT FORM".
8 PAPER SELECTION
1. Touch the "AUTO" key or "MANUAL" key for the "PAPER SELECTION".
9 JOB PROGRAMMING
1. Touch the "REGULAR" key or "OFF THE PLATEN" key for the "JOB
PROGRAMMING".
* When setting other modes continuously, see the setting of each mode. When finishing
the setting, finish the copy default setting in accordance with the "● How to finish the
copy default setting" on page 75.
Page 78

74
COPIER MANAGEMENT
0 DEFAULT DRAWER
1. Touch the "CHANGE" key for the "DEFAULT DRAWER".
2. Touch the drawer to be the default drawer directly.
The display will return to the copy default setting screen.
! ZOOM MODE
1. Touch the "SIZE ZOOM" key or "STANDARD ZOOM" key for the "ZOOM MODE".
* When setting other modes continuously, see the setting of each mode. When finishing
the setting, finish the copy default setting in accordance with the "● How to finish the
copy default setting" on page 75.
@ SET COPY LIMIT WITH #-KEYS
1. Touch the "CHANGE" key for the "SET COPY LIMIT WITH #-KEYS.".
2. Enter the number of copies to be changed using the numeric keys.
3. Touch the "CHANGE" key.
# CUSTOM SIZE FOR BORDER ERASE
1. Touch the "CHANGE" key for the "CUSTOM SIZE FOR BORDER ERASE.".
2. Touch the upper "+" key or "-" key to set the paper size of width. It can be set from
94 mm to 214 mm in 8 mm increments.
3. Touch the lower "+" key or "-" key to set the paper size of length as well. It can be set
from 60 mm to 296 mm in 4 mm increments.
4. Touch the "END" key.
The display will return to the copy default setting screen.
$ F&B P. MARGIN
1. Touch the "ON" key or "OFF" key for the "F&B P. MARGIN".
* When setting other modes continuously, see the setting of each mode. When finishing
the setting, finish the copy default setting in accordance with the "● How to finish the
copy default setting" on page 75.
Page 79

% DRAWER FOR INSERT SHEET
1. Touch the "CHANGE" key for the "DRAWER FOR INSERT SHEETS".
2. Select the drawer or stack bypass tray to set the insert sheets.
The display will return to the copy default setting screen.
^ DRAWER FOR COVER SHEET/STITCH.
1. Touch the "CHANGE" key for the "DRAWER FOR COVER SHEET/STITCH".
2. Select the drawer or the bypass of the cover stock to be set.
The display will return to the copy default setting screen.
75
COPIER MANAGEMENT
& ROTATE SORT
1. Touch the "ON" key or "OFF" key for the "ROTATE SORT".
* When setting other modes continuously, see the setting of each mode. When finishing
the setting, finish the copy default setting in accordance with the "● How to finish the
copy default setting" on page 75.
* CREATE SHORTCUT (#1, #2)
1. Touch the "CHANGE" key for the "CREATE SHORTCUT #1" or "CREATE
SHORTCUT #2".
2. Touch the key of the function to be shortcut.
The display will return to the copy default setting screen.
* When setting other modes continuously, see the setting of each mode. When finishing
the setting, finish the copy default setting in accordance with the "● How to finish the
copy default setting" on page 75.
( CREATE USER CHOICE #1 - #5
1. Touch the "CHANGE" key for the "CREATE USER CHOICE #1 - #5".
2. Touch the key of the function to be displayed on the first page of the function setting
screen.
The display will return to the copy default setting screen.
* When setting other modes continuously, see the setting of each mode. When finishing
the setting, finish the copy default setting in accordance with the "● How to finish the
copy default setting" on page 75.
● How to finish the copy default setting
1. When finishing each setting, touch the "END" key for the copy default setting screen.
The display will return to the management mode selection screen.
Page 80

76
COPIER MANAGEMENT
2. Touch the "BASIC" key.
The touch panel will return to the basic screen.
7 AUTO PREHEAT TIME
A certain length of time during which copying ends and the energy saver function
(page 48) is actuated automatically can be set. Set this time from 5 to 45 minutes in
increments of 5 minutes. The initial setting time is 15 minutes.
79
8 AUTO SHUT-OFF TIME
If the copier is not used for a certain length of time, the auto shut-off function (page
48) automatically switches off the power. Set this time from 15 to 240 minutes in
increments of 15 minutes.
The auto shut off function can be turned off as well. ("0 AUTO SHUT-OFF")
The initial setting time is 60 minutes.
* It is recommended to extend time for starting auto shut-off when the copier is
used frequently, and shorten when it is not used frequently.
79
9 CHANGE MANAGEMENT
CODE WITH #-KEYS
The management code to enter each management mode such as week timer mode
(page 67) and copy management mode (page 61) can be changed.
* If management code is changed, keep a note of the new one. If you forget it,
enter the management code "6482".
79
0 AUTO SHUT-OFF
Whether turning the "AUTO SHUT-OFF" ON or OFF, which automatically turns off
main switch if copying is not performed for a certain period of time, can be set.
* If auto shut-off interferes with your copying operations, turn this function off
(setting of not functioned). It is recommended to extend the time for starting auto
shut-off before turning it off (setting of not functioned).
80
Page
6 KEY SOUND ON/OFF
A "beep" sounds when touching the touch panel can be turned off.
79
● Machine default setting
Machine default setting Content of machine default setting
1 UN-FIXED SIZE FROM
BYPASS
Select whether unfixed size paper is used or not in the stack bypass tray. Touch
the "ON" key to set the custom size paper. (page 77)
Touch the "OFF" key to detect the standard size paper automatically.
77
2 AUTOMATIC DRAWER
SWITCHING
Whether the automatic drawer switching function (page 9) is used or not can be
selected.
78
3 PAPER SIZE
The paper size displayed on the touch panel can be changed.
78
4 SPECIAL PAPER
Paper size key for a drawer with special paper such as coloured paper or recycled
paper can be marked with an asterisk (*) on the basic screen.
78
5 APS FOR SPECIAL PAPER
Whether paper in the drawer set for the "4 SPECIAL PAPER" on page 78 is used
or not for the auto paper selection mode or automatic drawer switching function
(page 9) can be selected.
79
Page 81

● How to set the machine default setting mode
1. Touch the "SPECIAL" key.
The management mode selection screen will appear.
77
COPIER MANAGEMENT
2. Touch the "MACHINE DEFAULT" key.
3. Enter the management code "4200" with the numeric keys.
* The display will return to the machine default setting screen if the management code
matches the registered code.
See the followings to make the settings of each mode.
* The 4-digit management code can be changed. (page 79, "9 CHANGE
MANAGEMENT CODE WITH #-KEYS")
1 UN-FIXED SIZE FROM BYPASS
1. Touch the "ON" key or "OFF" key for the "UN-FIXED SIZE FROM BYPASS".
* When setting other modes continuously, see the setting of each mode. When finishing
the setting, finish the machine default setting in accordance with the "● How to finish
the machine default setting" on page 80.
● How to set the custom sizes
When loading paper of other than the standard size (custom size), such as A4, in the
stack bypass tray, set the paper size in accordance with the following procedure.
* When using this setting, "ON " must be selected for the above "1 UN-FIXED SIZE
FROM BYPASS".
1. Set the paper in the stack bypass tray (page 12) and touch the " ByPass" key.
2. Select the paper set in the stack bypass tray by touching the "STANDARD SIZES" key
or "CUSTOM SIZES" key.
* If the "STANDARD SIZES" key is touched, go to step 5.
If the "CUSTOM SIZES" key is touched, go to next step.
Page 82

78
COPIER MANAGEMENT
3. Set the width of paper size by touching the upper "+" or "-" key. The size can be set
between 162 mm and 242 mm in increments of 1mm.
4. Set the length of paper size by touching the lower "+" or "-" key. The size can be set
between 98 mm and 162 mm in increments of 1mm.
5. Touch the "END" key.
The touch panel will return to the basic screen. Copying will be possible.
* When the paper size is set for the "CUSTOM SIZE", "------" is displayed on the
" ByPass" key on the basic screen.
2 AUTOMATIC DRAWER SWITCHING
1. Touch the "ON" key or "OFF" key of the "AUTOMATIC DRAWER SWITCHING".
3 PAPER SIZE
1. Display the desired drawer paper size from the "PAPER SIZE (1ST TO 4TH PAPER
SOURCE)".
2. Touch the "CHANGE" key.
3. Touch the desired size of paper to be loaded to the drawer.
The display will return to the machine default setting screen.
* To set new paper size for another drawer, repeat from steps 2.
* When setting other modes continuously, see the setting of each mode. When finishing
the setting, finish the machine default setting in accordance with the "● How to finish
the machine default setting" on page 80.
4 SPECIAL PAPER
1. Touch the "CHANGE" key for the "SPECIAL PAPER".
2. Touch the drawer to be loaded with special paper. An asterisk * will appear in the
display.
* Touch the same drawer again to delete the asterisk.
* Asterisk can be added to the displays for 2 or more drawers.
3. Touch the "End" key.
The display will return to the machine default setting screen.
* When setting other modes continuously, see the setting of each mode. When finishing
the setting, finish the machine default setting in accordance with the "● How to finish
the machine default setting" on page 80.
Page 83

5 APS FOR SPECIAL PAPER
1. Touch the "ON" key or "OFF" key for the "APS FOR SPECIAL PAPER".
79
COPIER MANAGEMENT
6 KEY SOUND ON/OFF
1. Touch the "ON" key or "OFF" key for the "KEY SOUND ON/OFF".
* When setting other modes continuously, see the setting of each mode. When finishing
the setting, finish the machine default setting in accordance with the "● How to finish
the machine default setting" on page 80.
7 AUTO PREHEAT TIME
1. Touch the "+" key or "-" key for the "AUTO PREHEAT TIME" to change the displayed
time.
8 AUTO SHUT-OFF TIME
1. Touch the "+" key or "-" key for the "AUTO SHUT-OFF TIME" to change the displayed
time.
9 CHANGE MANAGEMENT CODE WITH #-KEYS
1. Touch the "CHANGE" key for the "CHANGE MANAGEMENT CODE WITH #-KEYS".
2. Enter the management code to be changed (4-digit) using the numeric keys.
3. Touch the "CHANGE" key.
* When setting other modes continuously, see the setting of each mode. When finishing
the setting, finish the machine default setting in accordance with the "● How to finish
the machine default setting" on page 80.
Page 84

80
COPIER MANAGEMENT
0 AUTO SHUT-OFF
1. Touch the "ON" key or "OFF" key for the "AUTO SHUT-OFF".
* When setting other modes continuously, see the setting of each mode. When finishing
the setting, finish the machine default setting in accordance with the "● How to finish
the machine default setting" on page 80.
● How to finish the machine default setting
1. When finishing each setting, touch the "END" key for the machine default setting
screen.
The display will return to the management mode selection screen.
2. Touch the "BASIC" key.
The touch panel will return to the basic screen.
(4) LANGUAGE OF TOUCH PANEL
Select the language to be used on the touch panel, not only English, but German,
French, Italian and Spanish.
1. Touch the "SPECIAL" key.
The management mode selection screen will appear.
2. Touch the "LANGUAGE" key.
Selectable languages will be displayed.
3. Touch the language to be displayed.
* The language will be changed, and the touch panel will return to the basic screen.
Page 85

(1) a. Finisher
The finisher stores the large quantity of copies, and sorts the multiple sets by shifting the
output position after completing each set. Stapling the numbering copies or punching
holes is possible.
For details, see the finisher's instruction handbook.
81
OPTIONAL EQUIPMENT
b. Booklet stitcher
The booklet stitcher stores a large number of copies, and sorts multiple sets by shifting
the output position after completing each set. Stapling copies arranged in the order of
page and stitching them are also possible.
For details, see the stitcher's instruction handbook.
● Selecting the sorter mode
Select the sorter mode, by touching the sorter mode key. When neither the sort mode
nor the group mode indicator is lit, the copier is in the non-sort mode.
* The non-sort mode must be set when copies are made onto transparencies or other
special paper.
● Selecting the staple mode
Select the stapling position by touching the staple mode key. Three different positions
can be stapled.
● Setting the punch mode
Touch the punch mode key to select the type of punch mode.
* The punch position may be shifted slightly. This may happen particularly when the
paper feed drawer is changed in such cases as the automatic drawer switching function
or sheet insertion copy mode is activated.
* The punch mode cannot be set with the optional booklet stitcher.
* The finisher can be stored in two places; the main tray or sub tray. The tray to be stored will be changed, depending on how the original is set
and finishing is set. See the following table.
Platen
Copies ejected FACE-UP
into the SUB TRAY
DF
Copies ejected FACE-DOWN
into the MAIN TRAY
FROM PAGE 1 forwarded
Copies ejected FACE-DOWN
into the SUB TRAY
FROM PAGE 1 forwarded
Mode
Original set
Group modeSort mode
Non-sort mode
Punching off Punching on
Copies ejected FACE-UP
into the SUB TRAY
FROM THE LAST PAGE
Page 86

Platen Ejected face up to tray 1
DF
Ejected to tray 3
Ejected from the first page
face down to tray 1
Ejected from the first page
face down to tray 1
Mode
Original set
Booklet stitching
Non-sort mode Sort mode
Group mode
82
OPTIONAL EQUIPMENT
(2) Key counter
The key counter determines the number of copies that have been made. It is useful for
centralized management of the total number of copies made by different departments, or
by the company as a whole, etc.
● Setting the key counter
Insert the key counter securely into the key counter opening.
* When the key counter function is used, copies cannot be made unless the key counter
is inserted into the copier. If the key counter is not securely inserted into its opening, the
message "INSERT KEY COUNTER." will appear.
(3) I/F kit
The copier can be used as a printer if an I/F kit is equipped. For details, see the printer's
instruction handbook.
(4) Memory copy board
The originals can be read into memory and copied in various ways if the memory board
is equipped. See the "(1) Reserving another copy while copying is performed [Add Job]"
on page 49.
* One additional memory (16 MB, 32 MB) in the memory board can be installed.
* The booklet stitcher is equipped with three storage locations: trays 1, 2, and 3. The tray to be ejected and the ejection method vary with the
original setting method and the finishing setting. See the following table.
Page 87

83
MESSAGES
Action PageMessage
The cover displayed is open. Close it/them securely.
___
"CLOSE xxx COVER."
There is no paper in the drawer displayed. Load paper of size indicated.
11
"ADD PAPER IN DRAWER."
One of the drawers is not closed properly. Pull it out, and push it back in all the
way.
12
"CLOSE PAPER DRAWER."
The drawer currently in use is out of order and cannot be used for the moment.
Contact your service representative as soon as possible. Continue copying using
another drawer.
___
"PAPER DRAWER IS OUT OF ORDER.
SELECT OTHER PAPER DRAWER."
There is no paper of the appropriate size for the mode which has been set. Check
the paper.
___
"CHECK PAPER SIZE."
The orientations of the original(s) and the paper selected are different. Change
the orientation of the original(s). If the Start key is pressed without changing the
orientation of the original(s), same-size copying will be performed.
___
"REPOSITION ORIGINAL OR SELECT
OTHER PAPER DRAWER."
Original(s) has not been fed correctly during feeding into the DF. Remove all
originals and set them again.
___
"RESET ALL ORIGINALS IN FEEDER
AND PRESS PRINT KEY."
"RESET ORIGINALS IN INITIAL
ORDER."
An original is misfed inside of the DF. Remove the misfed original following the
procedure, remaining the main switch ON ( | ).
The fixing unit is not set securely. Open the front cover and the left cover and
push the fixing unit securely into its original position.
93
92
"REMOVE ORIGINAL FROM FEEDER."
"FIXING UNIT INCORRECTLY SET.
PUSH IT UNTIL IT STOPS."
Duplex copying cannot be performed on small size paper like A5 or custom size.
Change the paper size.
___
"CANNOT DUPLEX COPY ON THIS
PAPER SIZE."
Duplex unit has not been set correctly. Set it securely.
___
"INSTALL DUPLEX UNIT."
Problem in the duplex unit. Duplex copying is not possible. Contact your service
representative as soon as possible.
___
"DUPLEX UNIT IS OUT OF ORDER.
1-SIDED COPYING IS POSSIBLE."
There is not enough toner in the copier. Replace the toner cartridge immediately
as only one copy at a time can be made.
85
"READY TO COPY.
ADD TONER TO RESUME COPYING"
● When the messages below are displayed:
When any of the messages below appear on the touch panel, take the action indicated.
There is not enough toner in the copier to make copies. Replace the toner
cartridge immediately.
85
"ADD TONER TO RESUME COPYING."
Page 88

84
MESSAGES
Action PageMessage
Open and close the front cover. If this message does not disappear, make a note
of the "C" and numbers appearing with it, turn the main switch OFF (O), and
contact your service representative.
___
"CALL FOR SERVICE."
Periodic maintenance is necessary to keep your copier in good condition. Contact
your service representative as soon as possible.
___
"TIME FOR MAINTENANCE"
Memory is full. Select if print till the last page which has just read or clear all of the
data which has already been read. Copying or reading of another original cannot
be performed until one of these is selected.
___
"MEMORY FULL."
The defaulted paper size is not the same as the paper in the drawer. Change the
paper size by using the default setting. Copying with the wrong default setting
may lead to the paper misfeeds.
78
"PAPER IN DRAWER NOT REGISTERED
SIZE. CHECK PAPER IN DRAWER."
If paper is misfed, the copier will stop, and the location of the misfeed will be
displayed in the message display. Remove the misfed paper with the main switch
ON ( ❘ ) in accordance with the procedure.
86
"PAPER MISFEED."
The finisher (optional) is not installed correctly. Install it securely.
___
"FINISHER IS OUT OF ORDER.
DETACH FINISHER."
Unfinished copies were ejected into the tray of finisher (optional) due to the
problem happened during copying. Check and remove those copies.
___
"CHECK PAPER IN FINISHER.
INCOMPLETE COPIES INSIDE."
Copier is inoperable due to the problem of the finisher (optional). Contact your
service representative.
___
"FINISHER IS OUT OF ORDER. DETACH
FINISHER."
The number of sheets in the finisher (optional) exceeds the capacity. Remove
them.
___
"INSTALL FINISHER."
Paper is misfed inside of the finisher (optional). See the finisher's instruction
handbook to remove paper.
___
"CLOSE COVER OF FINISHER."
"CHECK PAPER IN FINISHER.
INCOMPLETE COPIES INSIDE."
There are no staples in the indicated location of the finisher (optional). See the
finisher's instruction handbook to load staples.
___
"STAPLER EMPTY. (FRONT)
ADD STAPLES."
"STAPLER EMPTY. (REAR)
ADD STAPLES."
Stapling and punching cannot be operated with small size paper like A5. See the
finisher's instruction handbook.
___
"CANNOT STAPLE THIS PAPER SIZE."
"CANNOT PUNCH THIS PAPER SIZE."
The punch waste tank of finisher (optional) is full of punch waste. See the
finisher's instruction handbook to remove the punch waste.
___
"PUNCH HOLE CONTAINER FULL."
"CANNOT STAPLE.
##:MAX. (STAPLE)"
Stapling cannot be operated since the number of copies in the staple sort mode
has exceeded its maximum capacity. Press the Start key and cancel the staple
sort mode to restart copying operation.
___
Page 89

Replace the toner cartridge only when "ADD TONER TO RESUME COPYING" is
displayed.
* Touch the "?" key to display the toner cartridge replacement procedure on the
touch panel.
85
REPLACING THE TONER CARTRIDGE
1. Open the front cover. Turn the toner cartridge release lever leftward as far as it
will go. The old cartridge will be released.
2. Raise the old cartridge up slightly and pull it out towards you.
3. Hold the new cartridge horizontally, and shake it up and down 3-5 times, turning
it over each time.
4. Similarly, shake the new cartridge from side to side 5-7 times, turning it over
each time.
5. Fit the new cartridge into the copier to align the 2 arrows on new toner cartridge
and the 2 marks on the cartridge port.
6. Tip the cartridge release lever to the right. The new cartridge will be clamped.
* Check that the 2 marks on the front of the toner cartridge are aligned with the 2
marks on the cartridge port.
7. Close the front cover.
CAUTION
Do not incinerate toner and toner containers. Dangerous sparks may
cause burn.
Page 90

86
WHEN PAPER MISFEEDS
If a paper misfeed occurs, copying will stop. A misfeed message will
appear on the touch panel as well as misfeed locations are indicated.
Remove the misfed paper referring to page 87, "(3) Remove
procedures" with the main switch ON ( | ).
(1) Misfeed location indicators
1 Misfeed in paper feed section (page 87)
2 Misfeed in paper transfer section (page 89)
3 Misfeed in fixing unit/ejection section (page 91)
4 Misfeed in duplex unit (page 92)
5 Misfeed in DF (page 93)
6 Misfeed in finisher (optional) (page 94)
(2) Cautions * Do not reuse misfed paper.
* If paper gets torn during removal, be sure to remove any loose
scraps from inside the copier, or they could cause further misfeeds
later.
* After removal of misfed paper, warm-up will begin, the misfeed
message will disappear, and the copier will return to the same
settings as before the misfeed.
* Even if a misfeed occurs in the finisher, do not reset the misfed copy
into the tray, as it will be automatically copied again.
WARNING
High voltage is present in the charger section. Take
sufficient care when working in this area, as there is a
danger of electrical shock.
CAUTION
The copier's fixing unit is extremely hot. Take sufficient
care when working in this area, as there is a danger of
getting burned.
● Touch the "?" key to
display the misfed paper
removal procedure on the
touch panel.
Page 91

(3) Removal procedures 1 Misfeed in paper feed section
● Misfeed in drawer
If "MISFEED IN PAPER DRAWER. REMOVE PAPER." and the misfeed location
indicator shown in the illustration appear, misfeed has occurred in the drawer.
87
WHEN PAPER MISFEEDS
1. Pull out the drawer currently being used (drawer indicated in the misfeed location
indicator).
2. Remove the misfed paper without tearing it.
* If the paper does tear, remove any scraps of torn paper from inside the copier.
3. Push the drawer back in firmly.
● Misfeed in right cover
If "PAPER MISFEED. OPEN RIGHT COVER." appears, misfeed has occurred in
the right cover.
1. Open the right cover.
2. Remove the misfed paper without tearing it.
* If the paper does tear, remove any scraps of torn paper from inside the copier.
3. Close the right cover.
Page 92

88
WHEN PAPER MISFEEDS
● Misfeed in stack bypass tray
If "PAPER MISFEED IN STACK BYPASS. REMOVE PAPER." appears, misfeed
has occurred in the stack bypass tray.
1. Remove all the paper remaining in the stack bypass tray.
* If the paper is difficult to remove, do not try to pull it out by force in accordance
with the instructions on page 89, "2 Misfeed in paper transfer section".
2. Check that the paper misfeed message has disappeared from the touch panel.
Then, re-load the paper into the stack bypass tray.
● Paper misfeed in desk right cover
If "PAPER MISFEED. OPEN RIGHT COVER." and the misfeed location indicator
shown in the illustration appear, misfeed has occurred in the desk right cover.
* They will appear only when using the drawer-type paper feed desk.
1. Open the desk right cover.
2. Remove the misfed paper without tearing it.
* If the paper does tear, remove any scraps of torn paper from inside the copier.
3. Close the desk right cover.
● Misfeed in deck
If "MISFEED IN PAPER DRAWER. REMOVE PAPER." and the misfeed location
indicator shown in the illustration appear, misfeed has occurred in the deck.
* It is displayed only when using the deck-type paper desk.
Page 93

1. Pull out the deck of paper desk.
89
WHEN PAPER MISFEEDS
2. Remove the misfed paper without tearing it.
3. Push the deck all the way back in.
● Paper misfeed in right deck cover
If "PAPER MISFEED. OPEN RIGHT COVER PAPER DECK." and the misfeed
location indicator shown in the illustration appear, misfeed has occurred in the right
deck cover.
* It is displayed only when using the deck-type paper desk.
1. Open the right deck cover.
2. Remove the misfed paper without tearing it.
* If the paper does tear, remove any scraps of torn paper from inside the copier.
3. Close the right deck cover.
2 Misfeed in paper transfer section
If "PAPER MISFEED. OPEN FRONT COVER." and the misfeed location indicator
shown in the illustration appear, misfeed occur in the paper transfer section.
Page 94

90
WHEN PAPER MISFEEDS
1. Open the front cover.
2. Tip the paper transfer section release lever to the right.
3. Turn the paper feed section knob in the direction of the arrow, to make the
misfed paper emerge.
4. Remove the misfed paper without tearing it.
* If the paper does tear, remove any scraps of torn paper from inside the copier.
* If the misfed paper can be removed up to this point, go to step 8. If not, go to
next step.
5. Press the paper transfer section release button to pull out the transfer section.
Caution: The drum (green) is highly sensitive to light and dirt. Be careful not to
expose it to strong light such as room lighting or not to touch the drum with
hands. Return the transfer section to the original position securely immediately
after removing misfed paper.
6. Remove the misfed paper without tearing it, lifting the transfer cover a in the
direction of the arrow (left).
Return the transfer cover to the original position.
WARNING
High voltage is present in the charger section. Take sufficient care
when working in this area, as there is a danger of electrical shock.
Page 95

7. Return the transfer section slowly to the original position turning the transfer
section safety release plate b in the direction of the arrow.
8. Tip the paper transfer section release lever to its original position.
9. Close the front cover.
91
WHEN PAPER MISFEEDS
3 Misfeed in fixing unit/ejection section
If "PAPER MISFEED. OPEN FRONT COVER." and the misfeed location indicator
shown in the illustration appear, misfeed has occurred in the fixing unit/ejection
section.
1. Open the front cover.
2. Turn the fixing knob in the direction of the arrow, to eject the misfed paper.
The paper will be ejected to the ejection section. Remove the paper.
3. If the paper is not ejected, take out the copy tray.
* If the finisher is fitted to the copier, detach it from it.
4. Open the left cover. If misfed paper is visible, remove it.
* If the misfed paper is not visible, turn the fixing knob to make the misfed paper
emerge.
WARNING
High voltage is present in the charger section. Take sufficient care
when working in this area, as there is a danger of electrical shock.
Page 96

92
WHEN PAPER MISFEEDS
5. Lift the fixing unit release lever in the direction of the arrow to unlock the unit and
pull the unit out toward you as far as it will go.
6. Open the fixing cover c and remove misfed paper, if there is any, from inside.
7. Close the fixing cover c as before.
8. Slide the fixing unit carefully back into its original position securely lifting the
fixing unit release lever in the direction of arrow.
9. Close the left cover and attach the copy tray.
* If the finisher is fitted to the copier, return it to its original position.
10. Close the front cover.
4 Misfeed in duplex unit
If "PAPER JAM IN DUPLEX UNIT. OPEN DUPLEX UNIT DRAWER." appears,
misfeed has occurred in the duplex unit.
If this message appears, carry out the procedure below, starting at step 2.
* If "OPEN LEFT COVER." appears, carry out the procedure below, starting at step
1.
1. Remove the copy tray, open the left cover, and remove the misfed paper. (page
91)
* After the paper is removed, close the left cover and return the copy tray to their
original position. If the misfed paper is not there, go to next step.
2. Pull the duplex unit out toward you as far as it will go.
CAUTION
The copier's fixing unit is extremely hot. Take sufficient care when
working in this area, as there is a danger of getting burned.
Page 97

3. If the misfed paper is in the re-feeding section, remove it.
93
WHEN PAPER MISFEEDS
4. Lift up the duplex cover.
5. If the misfed paper is under the cover, remove it.
Close the cover and go to step 8.
* If the misfed paper has not been removed in steps 1 to 5, it will be under the
reversing cover. Carry out next steps.
6. Unscrew the two reversing cover screws d located on the left side of the duplex
unit. The reversing cover e will open out downwards.
7. Remove the misfed paper without tearing it.
Close the reversing cover and fix it with the 2 reversing cover screws.
* If the paper does tear, remove any scraps of torn paper from inside the copier.
8. Push the duplex unit back in all the way.
5 Misfeed in DF
If "MISFEED IN FEEDER. REMOVE ORIGINAL(S)." appears, misfeed has
occurred in the DF.
1. Remove the originals from the original table. If the original set indicator go out,
copying can be resume. Reset the originals.
* When the original is difficult to remove, or if the original set indicator continues
to blink red even after the originals are removed, go to next step.
2. Remove the originals which have been ejected onto the original cover.
Page 98

94
WHEN PAPER MISFEEDS
3. Open the DF original reversing cover.
* To open the DF original reversing cover, hold the cover by the center knob.
4. Remove any misfed originals without tearing.
5. Remove the misfed originals by opening the transfer cover f if it is cannot be
removed in step 4.
6. Turn the original misfed release dial g and move the original to the position
where it can be easily removed, and remove the misfed originals.
7. Close the transfer cover f as it was if the misfed originals can be removed.
8. Close the DF original reversing cover. Hold the center knob to close it securely.
Original set indicator goes out. Reset the original and resume copying.
6 Misfeed in finisher (optional)
If "MISFEED IN FINISHER. REMOVE PAPER." and the misfeed location indicator
shown in the illustration appear, misfeed has occurred in the finisher.
See the finisher's instruction handbook to remove paper.
Page 99

95
TROUBLESHOOTING
Trouble Checks Action Page
If trouble occurs, carry out the applicable checks and action given below.
If the trouble persists, contact your service representative.
Nothing lights on
operation panel when
main switch is turned
ON ( ❘ ).
Is the power plug connected to an AC
outlet?
Connect the plug to an AC outlet.
----------
No copies come out
when the Start key is
pressed.
Has a message appeared in the touch
panel's message display?
Read the message, and take action in
accordance with it.
83
Copies come out blank. Are the originals set correctly ?
Set originals face up in the DF and set
them correctly.
When originals are set on the platen,
face them down and align them with
original size indicator lines.
15, 16
Copies come out too
light.
Is the copier in the auto exposure
mode?
Adjust exposure settings in the "AUTO
EXPOSURE ADJUSTMENT".
73
Is the copier in the manual exposure
mode?
Adjust the exposure to the correct
degree using the manual exposure
adjustment keys.
17
To adjust the overall exposure,
perform "MANUAL EXPOSURE
ADJUSTMENT".
73
Is Added toner massage displayed? Replace the toner cartridge.
85
Is paper damp or wet?
Replace the paper with new paper.
11
Page 100

96
TROUBLESHOOTING
Trouble Checks Action Page
Copies come out too
dark.
Is the copier in the auto exposure
mode?
Adjust exposure settings in the "AUTO
EXPOSURE ADJUSTMENT".
73
Is the copier in the manual exposure
mode?
Adjust the exposure to the correct
degree using the manual exposure
adjustment keys.
17
To adjust the overall exposure,
perform "MANUAL EXPOSURE
ADJUSTMENT".
73
Drawer cannot be
closed.
Was more than one drawer pulled
open at one time?
Pull open the drawer that is closed,
and close it together with the drawer
that could not be closed.
----------
Copies are dirty.
Is the platen, the slit glass or the
original cover dirty?
Clean the platen, the slit glass and/or
the original cover.
97
Copy image is askew. Are the originals set correctly?
When originals are set in the DF, align
them with the original insertion guide
securely.
When originals are set on the platen,
align their edges with the correct
original size indicator lines for their
size.
15, 16
Paper keeps being
misfed.
Is the paper set correctly in the
drawers?
Set paper correctly.
11
Is paper curled, folded over or
wrinkled?
Replace the paper with new paper.
11
Is there any misfed paper or loose
scraps of paper remaining inside the
copier?
Carry out the appropriate procedure to
remove the paper.
86
Black lines appear on
the copy.
Is the slit glass dirty? Clean the slit glass.
97
Copied paper may curl badly and it
may cause paper misfeeds depending
on the type of paper and keeping
state.
Remove the paper from drawer and
turn it over and reset.
11
 Loading...