

Page 1
Printing System
KM-4230/KM-5230
Operation Guide
<Drivers Information>
Included printer drivers
J
Chapter 1 Priner Driver for Windows
Chapter 2 Printer Driver for Macintosh
Page 2
Included printer drivers
1. Procedure for Installing and Printing with a Printer Driver
The following printer drivers are included with this product.
* Each type of printer driver has a version appropriate to a specific model of copy machine. Be sure to choose the driver that is appropriate for your
copier.
Driver type
KX driver
Macintosh PPD file
■ When using KPDL in Windows, set “Page Description Language” to the KPDL. Refer to “1-10 Device Settings Tab” on pages 1-15 and 1-16.
By attaching optional equipment it is possible to easily extend printer
functionality. This driver will enable you to use such compound printer
functions to their fullest.
A PPD (PostScript Printer Description) file is included for use with
this product. Use “LaserWriter 8” as the printer driver for your Mac
OS.
Description
Compatible OS
Windows 95/98
Windows NT4.0
Windows 2000
Windows Me
Macintosh OS 7.61 -
9.1
Page 3
1. Printer Driver for Windows
1. Printer Driver for Windows
The following section explains the functions of the KX driver. It is assumed that the printer driver has already been installed on your computer.
* For a detailed description of how to install the printer driver, refer to the Printing System (J) Handbook.
* The following procedure is explained as though it is being carried out in Windows 98. If you are using another operating system, use this
procedure simply as reference.
1-1 Screen that Appears when the CD-ROM is Inserted
This section explains the screen that appears when the enclosed Install CD-ROM is inserted into the CD-ROM drive.
AA
A
AA
BB
B
BB
CC
C
CC
DD
D
DD
EE
E
EE
AA
A: [Install Drivers]
AA
Click to start installation of the printer driver. Follow the instructions displayed on the screen to install the printer driver.
BB
B: [Driver Tools]
BB
Click to display a menu including uninstallation of the printer driver.
[Remove Drivers] ...................... Starts the uninstaller of the printer driver.
[Make Driver Disk] ..................... Copies the installer program to a floppy disk. Use of this floppy disk allows you to install the printer
driver without the need of the installer CD-ROM.
CC
C: [Networking]
CC
Click to display the KM-NET VIEWER’s installation menu. Follow the instructions displayed on the screen to install the KM-NET VIEWER.
DD
D: [Documentation]
DD
Click to display the manual (PDF file) supplied with the printer driver. To open this PDF manual, Adobe Acrobat Reader 4.0 (developed to
view PDF files) is required, so make sure that Adobe Acrobat Reader 4.0 is installed before opening the manual.
[Install Adobe Acrobat Reader] ... Installs Adobe Acrobat Reader.
[Operation Manuals] ................. Displays the manuals (PDF) of the printer and printer driver. They explain the installation procedure
of the printer driver and operation procedure of the printer.
[Release Notes], [Readme] ....... This file contains information which is not explained in the manuals. Please read this file before using
[Programming Manuals] ...........Displays the manuals (PDF files) for the PRESCRIBE commands.
EE
E: [Select Language]
EE
Select the user interface language.
the printer driver.
1-1
Page 4
1. Printer Driver for Windows
■ Uninstalling the Printer Driver
An uninstallation program is contained in the supplied CD-ROM.
Start Windows.
1
Insert the printer driver installer CD-ROM into the CD-ROM drive on your computer.
2
The window shown on the right will appear.
Click [Driver Tools]. A menu will appear, so click [Remove Drivers].
3
The [Printer Deleter] dialog box will appear.
Clicking “+” mark will display printer drivers installed on the computer and Windows
registries in a hierarchical (tree) structure.
Select the printer you are using, then select [Actions] – [Delete].
The selected printer driver will be removed.
4
* The selected printer driver can also be removed by pressing the [Del] key, instead
of selecting [Actions] – [Delete].
1-2
Page 5
1. Printer Driver for Windows
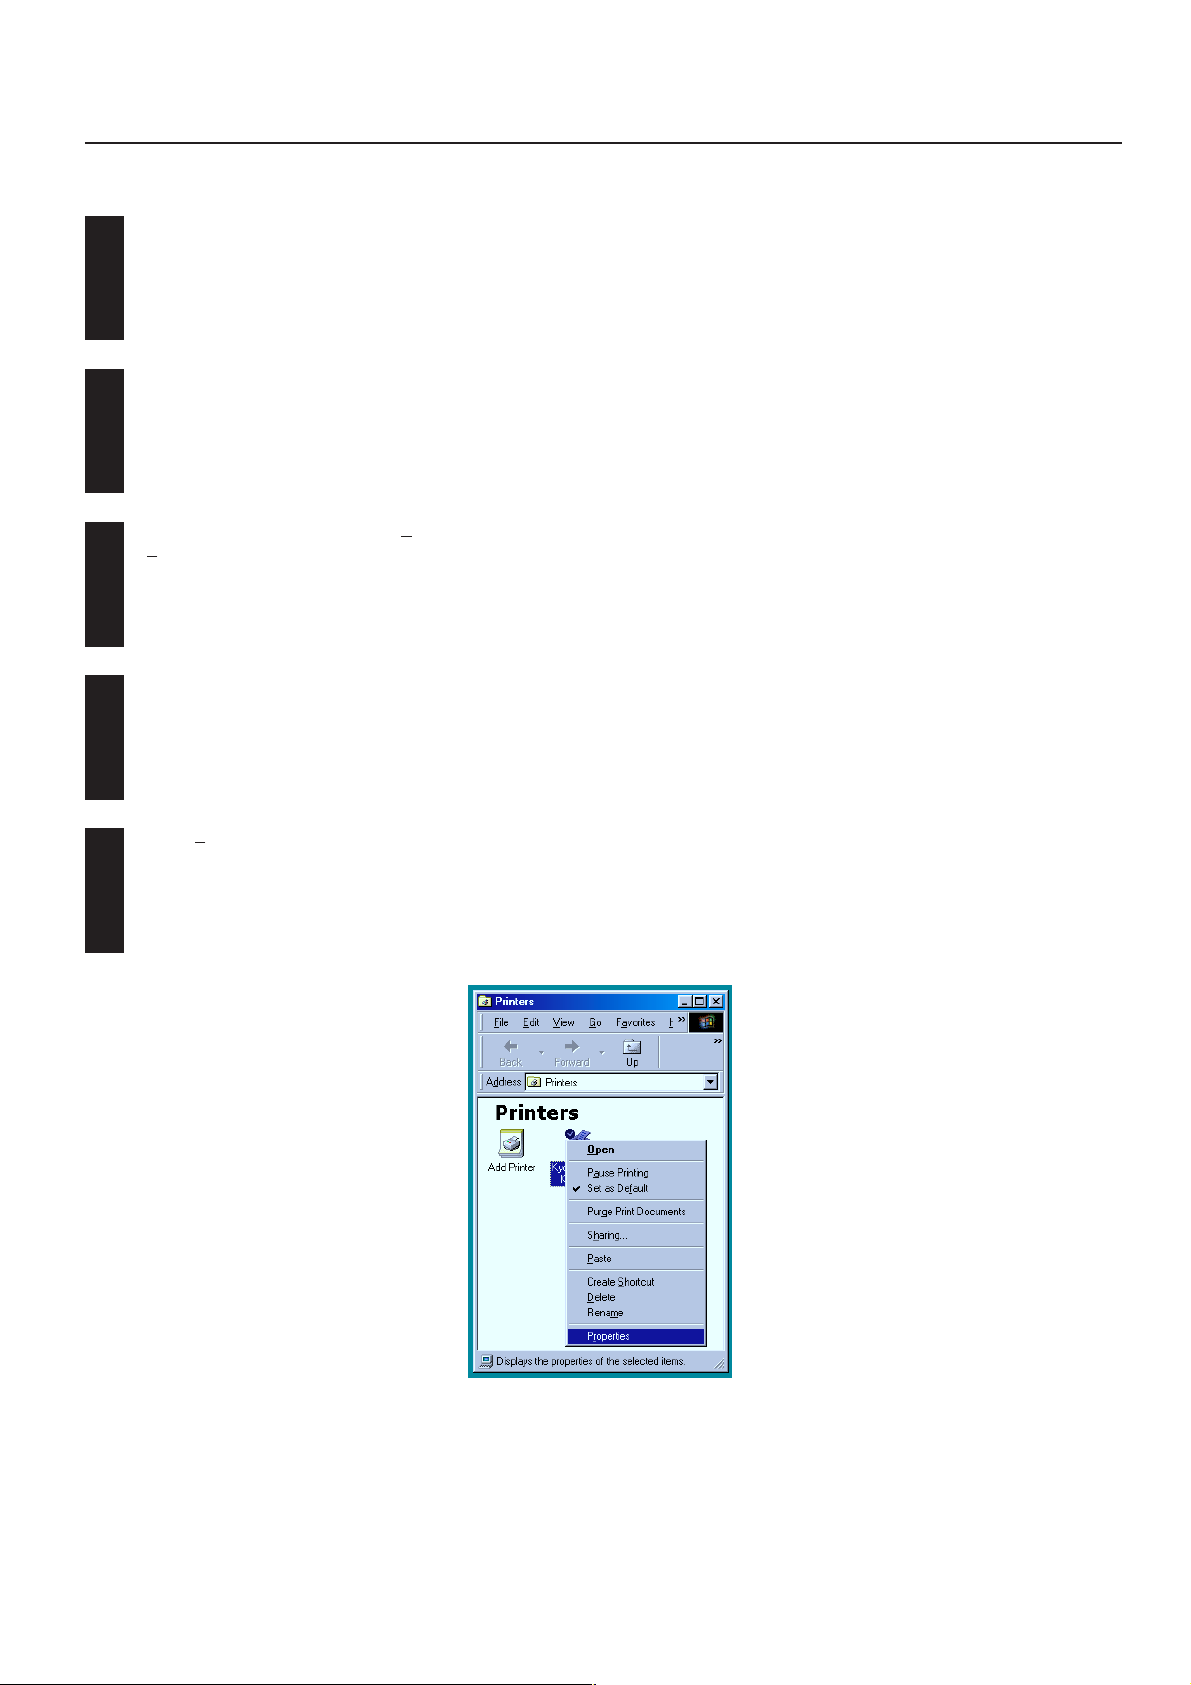
1-2 Opening the Properties Window
Start Windows.
1
Click on [Start] on the task bar.
2
The Start menu will appear.
Use the mouse to point to [Settings (S)]. A submenu will appear, so click on [Printer
(P)].
3
The [Properties] folder will open.
Use the mouse to point to the icon that indicates the printer you are using, then click
it with the right button of the mouse.
4
A pop-up menu will appear.
Select [Properties] from the menu.
5
The Properties window will appear.
1-3
Page 6
1. Printer Driver for Windows
1-3 Description of the Properties Window
EE
AA
A
AA
FF
F
FF
E
EE
GG
G
GG
DD
D
CC
C
BB
B
BB
AA
A: [Tabs]
AA
Click a tab to display the corresponding tab page.
BB
B:[OK]
BB
Click to save the changes and close the Properties window.
CC
C: [Cancel]
CC
Click to close the Properties window without saving the changes.
DD
D: [Apply]
DD
Click to apply the changes and keep the Properties window open.
EE
E: [Box]
EE
The currently set values are displayed. To change a value, click inside the box. The value will be highlighted, allowing you to enter a
character string or numeric value directly.
FF
F: [Arrow button [▼]]
FF
Click to display a drop-down list.
GG
G: [Drop-down list]
GG
Displays a list of information. To display the list, click the ▼ button.
CC
DD
1-4
Page 7
1. Printer Driver for Windows
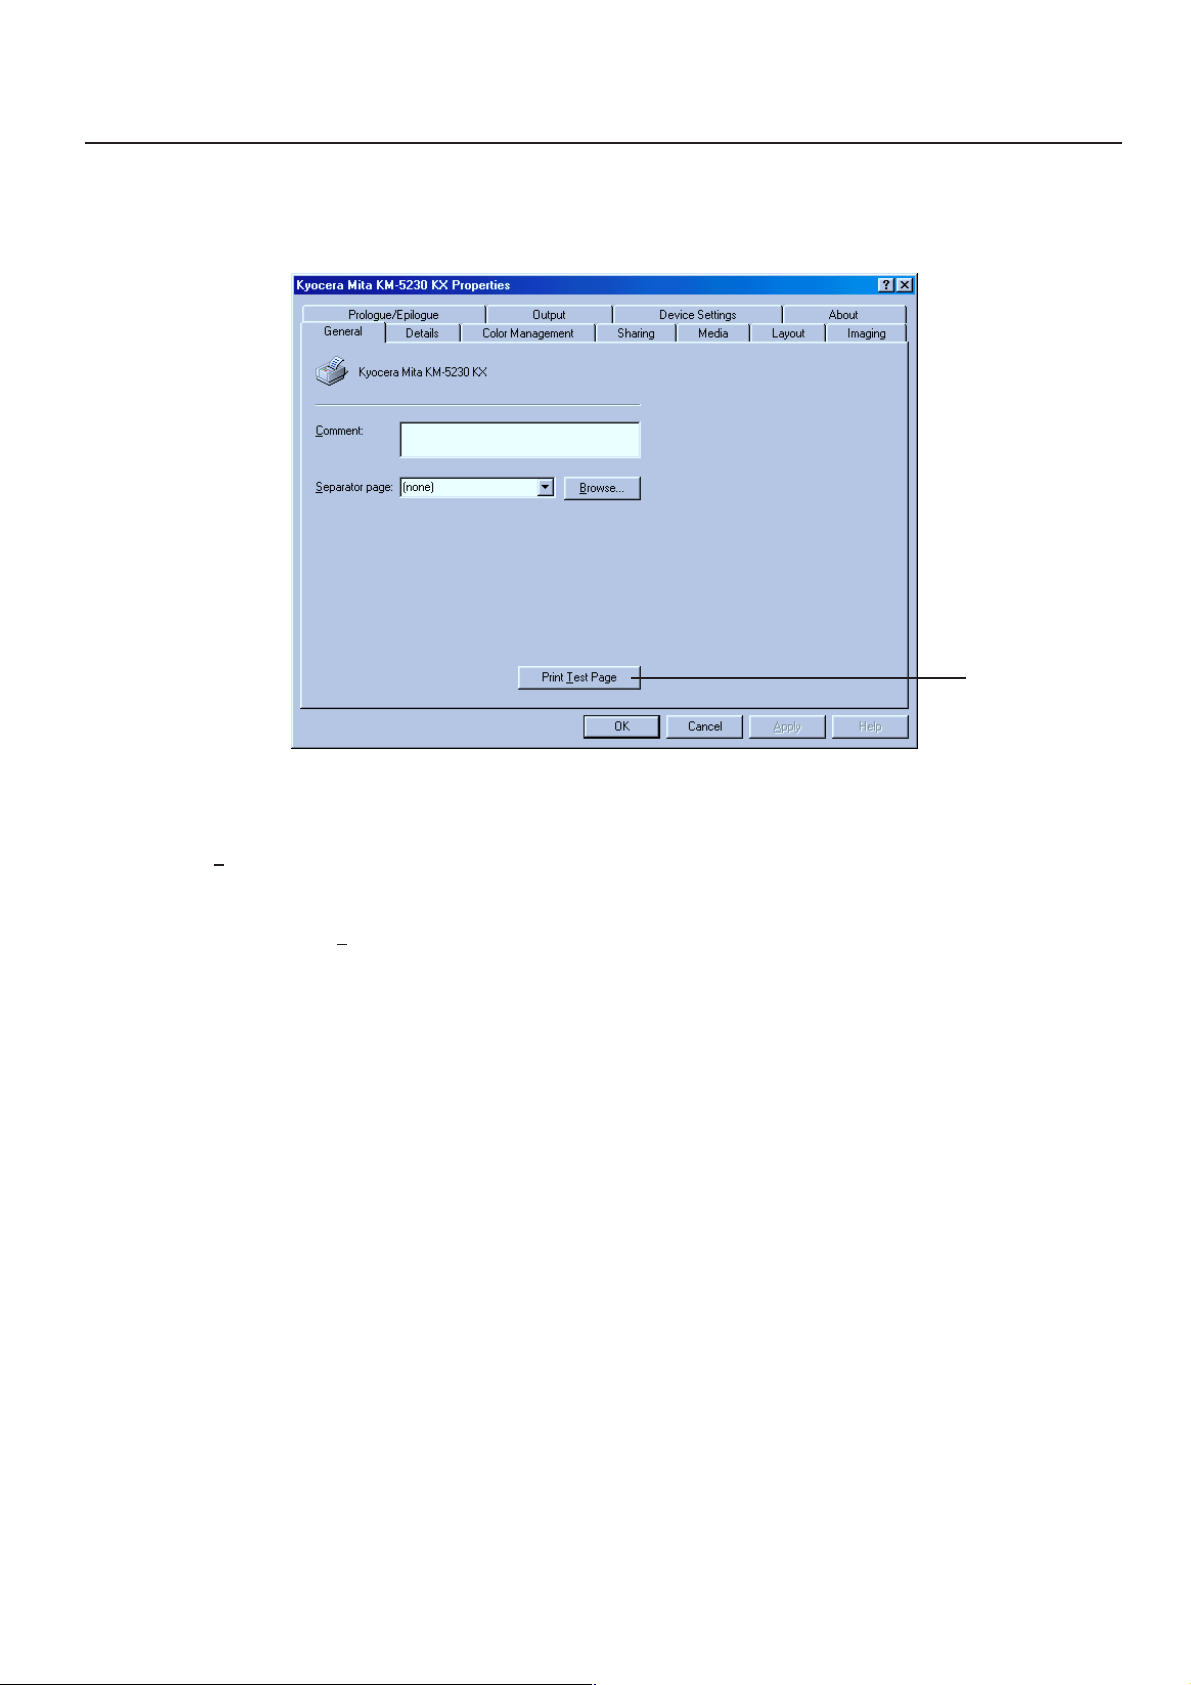
1-4 General Tab
AA
A
AA
AA
A: [Print Test Page] button
AA
Click to make a test print.
* When departmental management code is set at the machine, you must set [Management Code] in [Job] tab in order to enable
test print with [Print Test Page] button.
1-5
Page 8
1. Printer Driver for Windows
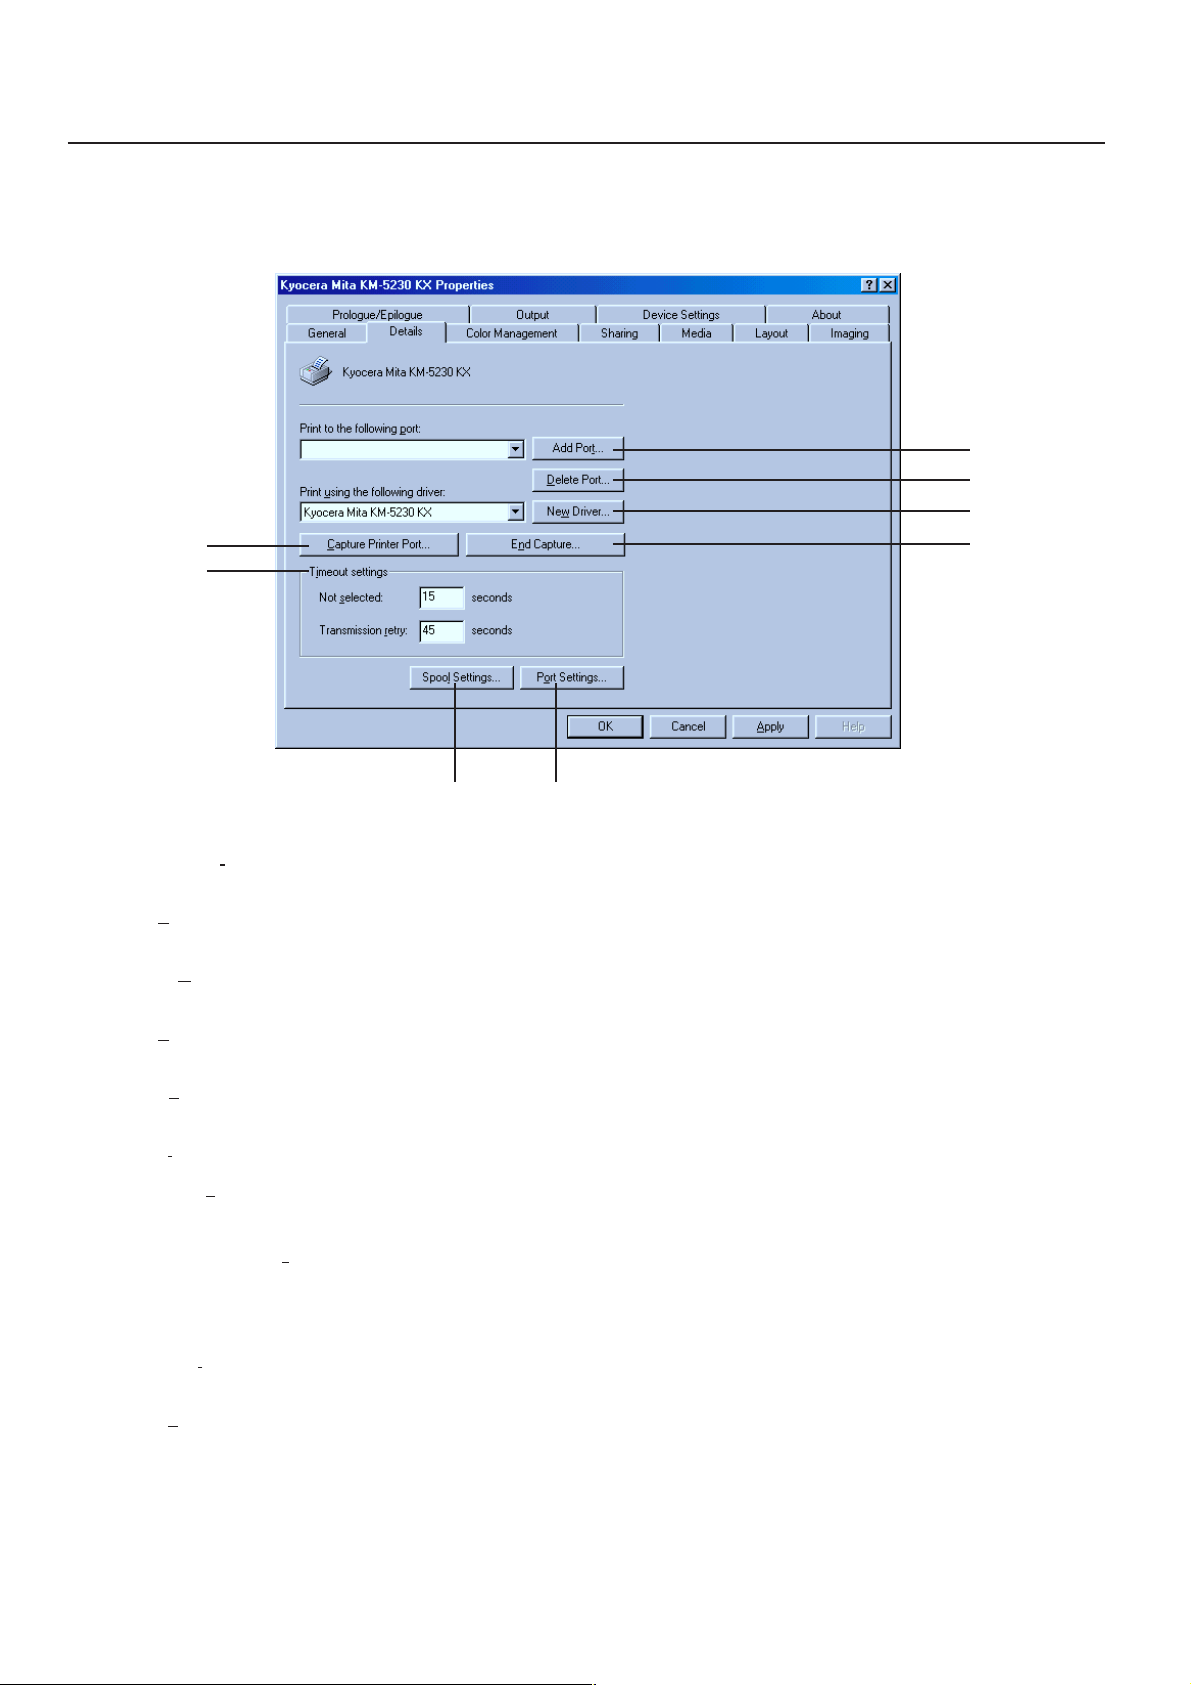
1-5 Details Tab
DD
D
DD
FF
F
FF
AA
A
AA
BB
B
BB
CC
C
CC
EE
E
EE
GG
G
GG
AA
A:[Add Port...] button
AA
Click this to add a port or specify a network path.
BB
B:[Delete Port...] button
BB
Click this to delete a port from the list of available ports.
CC
C:[New Driver...] button
CC
Click this to update or change your printer driver.
DD
D:[Capture Print Port…] button
DD
Click to assign a printer port to the network drive.
EE
E:[End Capture…] button
EE
Click to cancel the printer port assigned to the network drive.
FF
F:[Timeout Settings]
FF
Allows you to make a print timeout setting.
[Not selected:] ........................... Set the period of time to be waited until the printer is set in online. The allowed range is from 0 to 999,
[Transmission retry:] ................ Set the period of time (in seconds) to be waited until the printer is ready for printing. The allowed
GG
G: [Spool Settings…] button
GG
Click to allow the program to specify how documents are to be sent to the printer.
and the default is 15 (seconds). If the printer is not set in online within the specified period of time, an
error message will appear.
range is from 0 to 999, and the default is 45 (seconds). If the printer is not ready for printing within the
specified period of time, an error message will appear. If this error occurs when printing large-size
documents, increase the value.
HH
H
HH
HH
H:[Port Settings…] button
HH
Click to change the printer port.
1-6
Page 9
1. Printer Driver for Windows
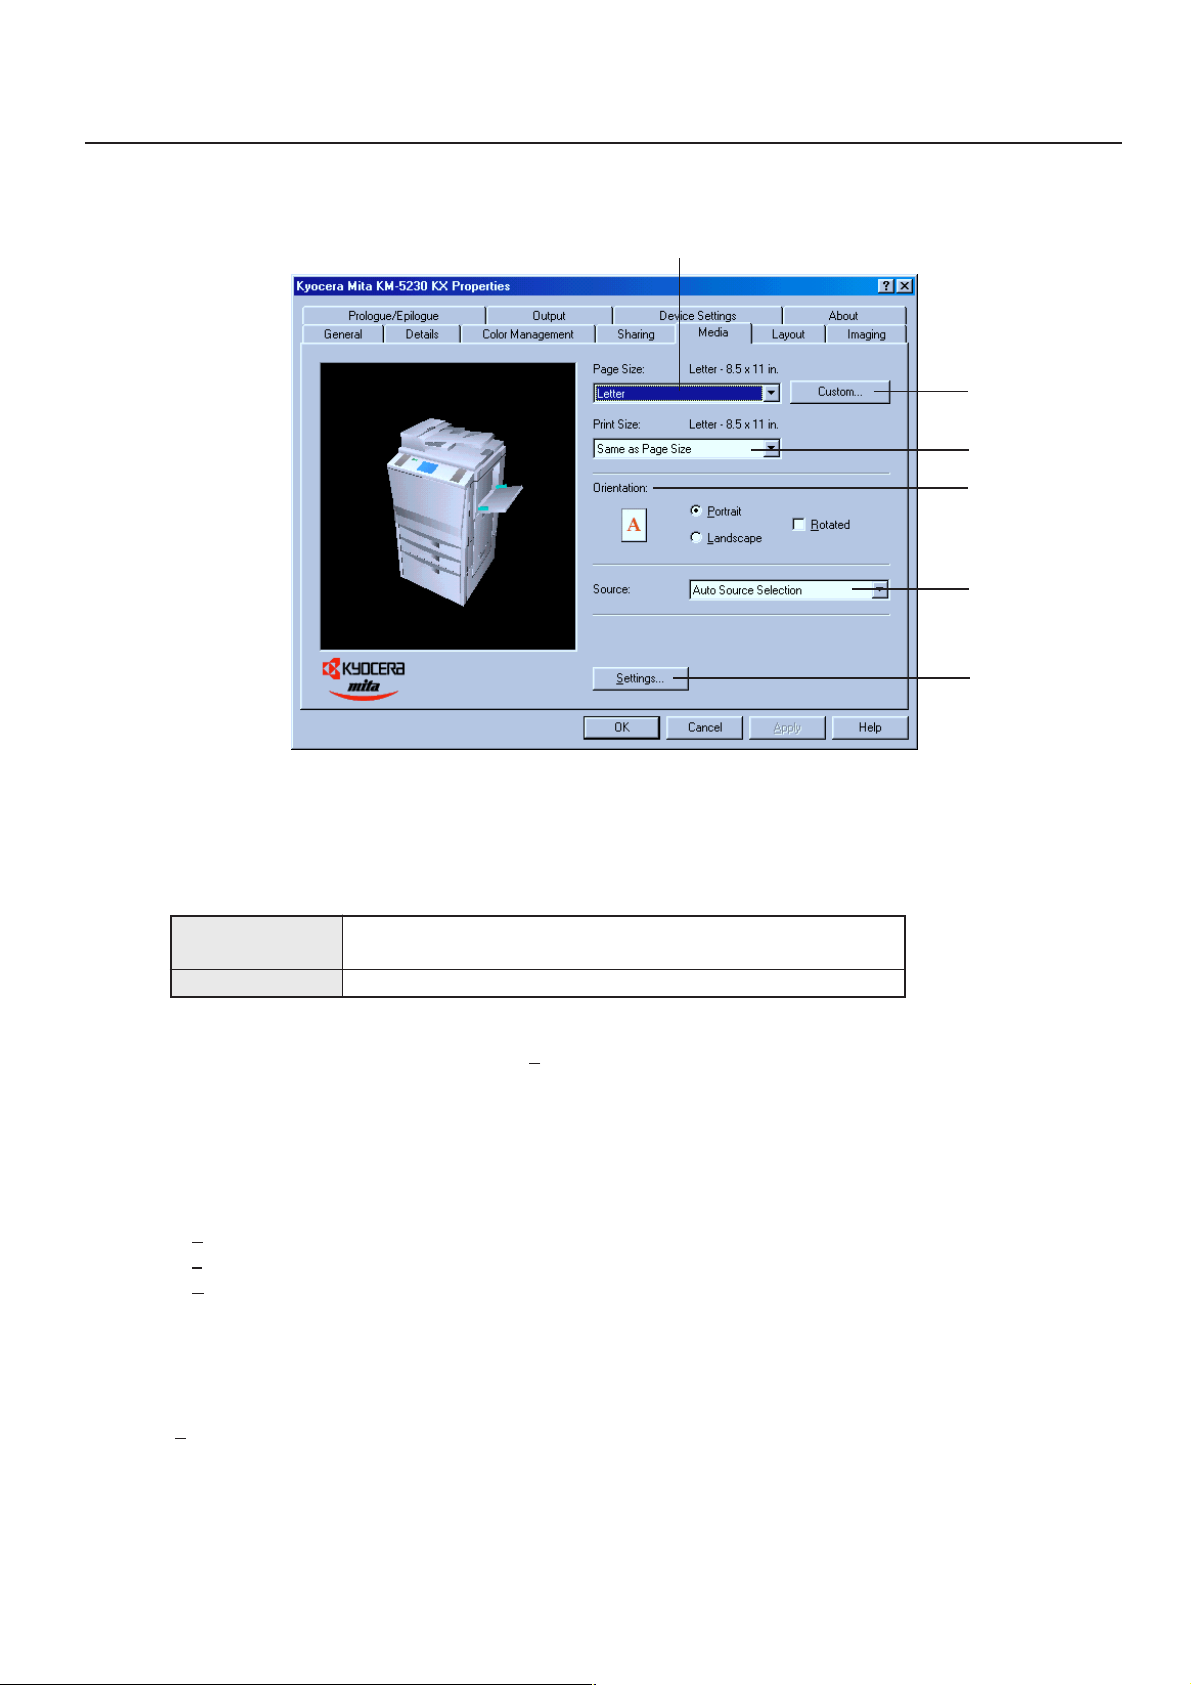
1-6 Media Tab
AA
A
AA
BB
B
BB
CC
C
CC
DD
D
DD
EE
E
EE
FF
F
FF
AA
A: [Page Size:]
AA
Select the size of standard-size paper sheet or envelope.
The following standard-size paper sheets and envelopes can be used with this printer:
Standard-size paper
sheet
Envelope
BB
B: [Custom…] button
BB
This button is effective if [Custom] is selected from [Paper Size:]. Click this button when you want to print on nonstandard-size paper. The
[Custom Paper Size] dialog box will appear.
CC
C: [Print Size:]
CC
Allows you to select the size of the printed image. The image size will be enlarged or reduced according to difference in the setting made
here and in the “Page Size” field.
DD
D: [Orientation:]
DD
Select the print orientation from the following:
[Portrait] .....................................Prints lengthwise.
[Landscape] ...............................Prints widthwise.
[Rotated] .................................... Selecting this option prints upside down.
EE
E: [Source:]
EE
You can select the source of paper feed according to the desired tray. Selection is possible from among the following items. If you select
“Auto Source Selection”, the printer will automatically choose the tray that contains the most appropriate paper for the job. The factory
default setting is “Auto Source Selection”.
FF
F:[Settings…] button
FF
To add the cover or to insert backing sheets from a tray when printing, click this button. The [Advanced Media Setting] dialog box will
appear.
Letter (8 1/2" x 11"), Legal (8 1/2" x 14"), Ledger (11" x 17"),
Statement (5 1/2" x 8 1/2"), A3, A4, A5, JIS B4, JIS B5, and Folio
COM-10, Monarch, DL and C5
1-7
Page 10
1. Printer Driver for Windows
■ Setting a custom paper size
Perform the following procedure in order to register a custom size when you want to print onto a non-standard size of paper. The information
registered here will be displayed under the “Page Size” setting in the Media Tab as well as in the Paper Size setting of your application.
If you want to register a new custom paper size, click on the “Add” button. The “Edit
Paper Size” dialog box will appear.
1
If you want to change a previously registered paper size, click on the registered size
to select it and then click on the “Edit” button.
If you want to delete a registered paper size, click on the desired size to select it and
then click on the “Remove” button.
Type into the “Name” field the name you want to use for this custom size of paper.
* It is the name that you register here that will actually be displayed under the “Page
2
Size” setting.
Select the desired unit of measurement in the “Units” block and the desired
dimensions of the paper in the “Size” block.
3
<Available settings>
Units: “Inches” or “Millimeters”
Height: 5.83 - 17.00 [Inches]
Width: 3.88 - 11.69 [Inches]
Click on the “OK” button. The “Custom Paper Sizes” dialog box will appear once
again.
4
148.0 - 431.8 [Millimeters]
98.5 - 297.0 [Millimeters]
Click on the “OK” button.
5
1-8
Page 11
1. Printer Driver for Windows
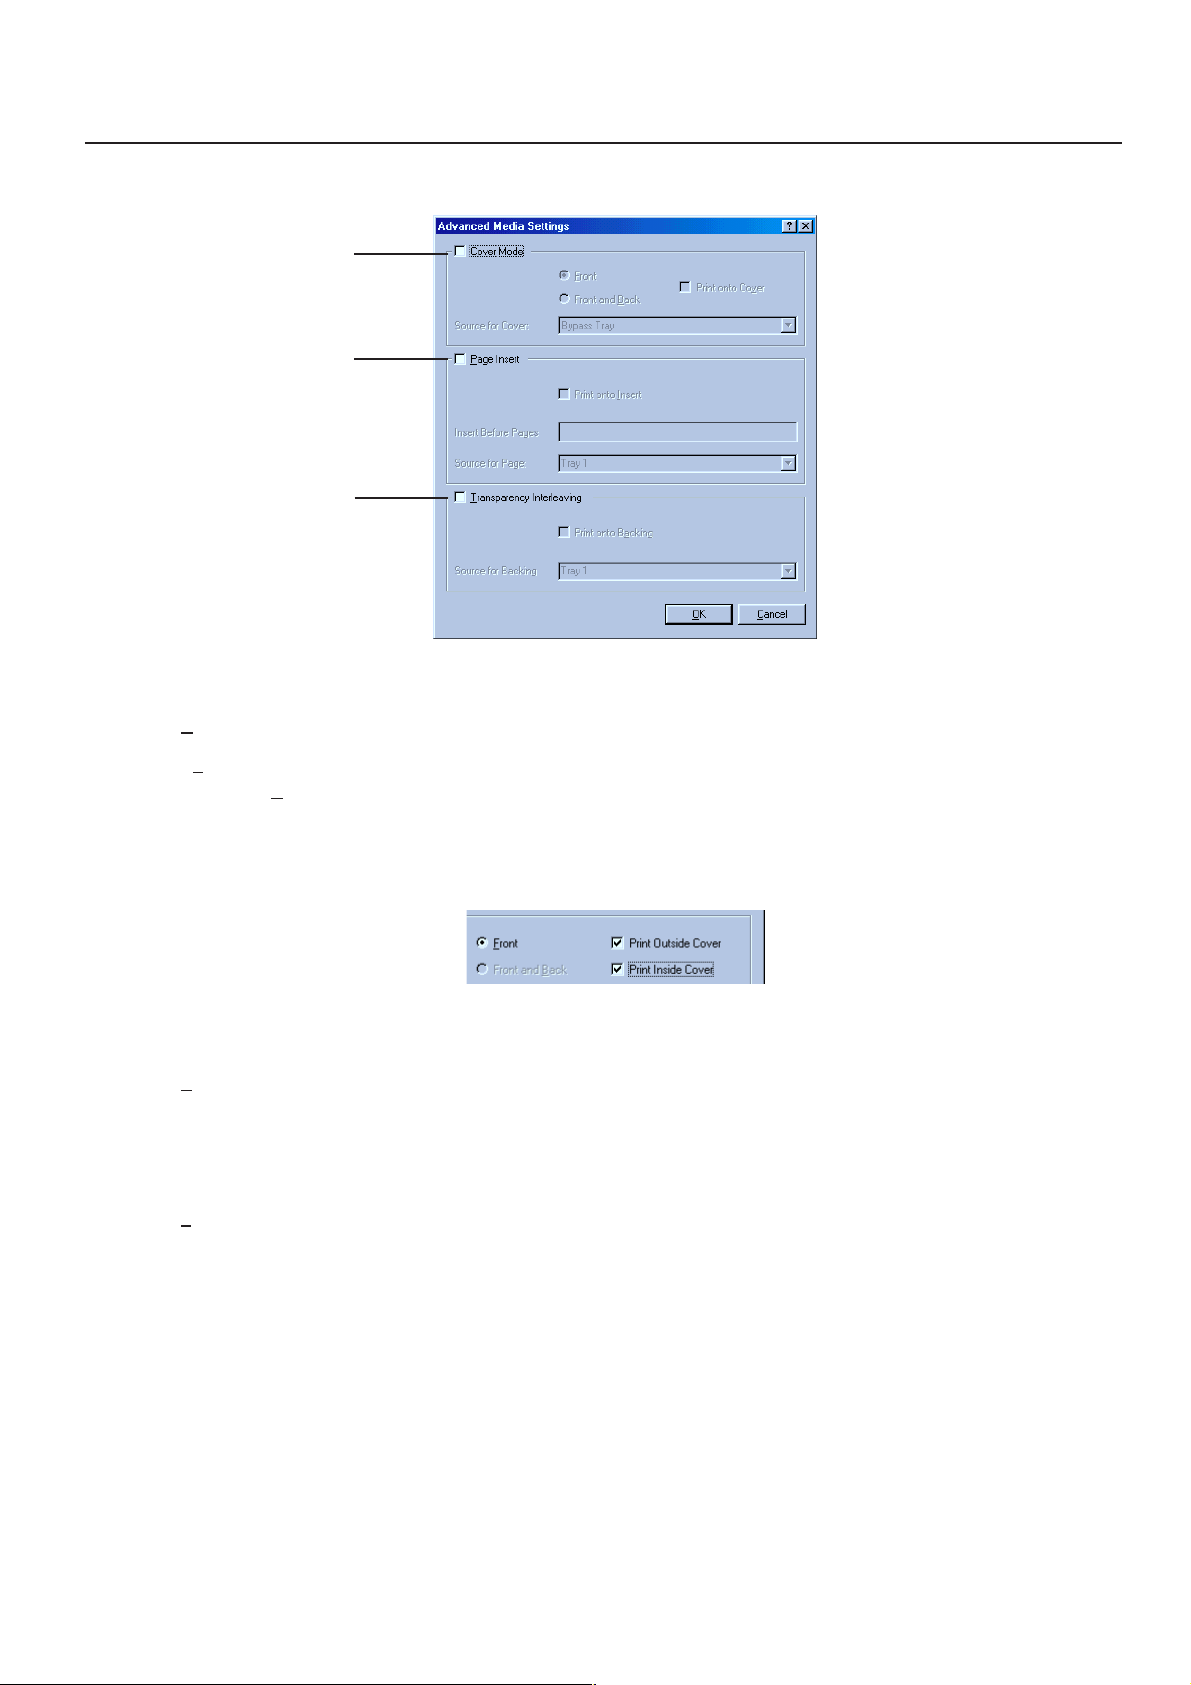
1-6-1 Advanced Media Settings
AA
A
AA
BB
B
BB
CC
C
CC
AA
A:[Cover Mode]
AA
Allows you to add a cover page (front or back cover page). The paper for the cover page will be fed from the manual feed tray.
Front ...........................................Feeds a paper from the manual feed tray and attaches it as the front cover.
Front and Back ..........................Feeds papers from the manual feed tray and attaches them as the front and back cover.
[Print onto Cover] .....................To print the first page data on the cover, select this.
If this item is not checked, the cover will be blank.
If [Booklet Mode:] in 1-7 Layout Tab is checked, the screen will be displayed as shown below.
Check a side to be printed on the cover.
If both sides are checked, both sides of the cover will be printed on.
BB
B:[Page Insert]
BB
Allows you to Insert a page at the specified page number. Select the source tray and page number where you want to insert.
[Print onto Insert] ......................Feeds a paper from the manual feed tray and attaches it as the front cover.
[Insert Before Pages] ................Specify the page number of the document where the paper is to be inserted.
[Source for Page:] .....................Select the tray where the paper to be inserted is stored.
CC
C:[Transparency Interleaving]
CC
Allows you to feed backing sheets from the specified tray and add them to OHP sheets fed from the manual feed tray.
[Print onto Backing] .................. Select this option when you also want to print on the backing sheets.
[Source for Backing] ................. From the list, select the tray where the backing sheets are stored.
1-9
Page 12

1. Printer Driver for Windows
1-7 Layout Tab
AA
A
AA
BB
B
BB
CC
C
CC
DD
D
DD
EE
E
EE
FF
F
FF
AA
A: [Pages per Sheet:]
AA
Allows you to print reduced images of multiple (1, 2, 4, 6, 9, 16 or 25) pages onto a single sheet of paper. This function is called “N-Up”
printing (where “N” equals the number of image pages). Reduction of the images is calculated automatically so that all of the selected
pages fit onto the single sheet of paper. The factory default setting is “1” (one page to each sheet of paper).
Example: With 2-Up printing
Prints reduced images of 2 full pages onto a single sheet of paper.
BB
B: [Print Borders]
BB
Prints border lines between the different images when the “Pages per Sheet” function is selected.
CC
C: [Layout:]
CC
Specifies the order of display of the images when the “Pages per Sheet” function is selected.
DD
D: [Scaling (20 - 500%):]
DD
Allows enlargement or reduction of the image size.
The image size will normally be enlarged or reduced according to the difference in the setting made in the “Page Size” and “Print Size”
fields. If you then change the setting here, the actual magnification will be based on the original settings and the image may be even
further enlarged or reduced.
EE
E: [Print on Both Sides [Duplex]:]
EE
Select this checkbox by clicking on it and putting a check mark in the box in order to perform Duplex (2-sided) printing. You can then select
the desired image direction for each side of the paper.
[Flip on Long Edge] .................. Select this option when making duplex prints in order to have the image on the two sides of the paper
printed in the same direction as each other, as though the paper was turned over along its longer
edge.
[Flip on Short Edge] .................. Select this option when making duplex prints in order to have the image on the two sides of the paper
printed in the opposite direction from each other, as though the paper was turned over along its
shorter edge.
FF
F: [Booklet Mode:]
FF
Prints open-face and on both sides. By placing the printed pages on top of one another and folding them, the pages will be formed like a
magazine or pamphlet.
1-10
Page 13

1. Printer Driver for Windows
1-8 Imaging Tab
AA
A
AA
BB
B
BB
CC
C
CC
AA
A: [Print Quality:]
AA
Selects the quality at which printing will be accomplished.
[High Quality] ............................Enables printing at the highest quality possible for the printer being used.
[Draft] ......................................... Saves on toner use. use this setting when quality printing is not needed such as with test prints.
[Custom...] ................................. Allows you to perform settings related to the quality of printing. Select “Custom” and then click on the
“…” button to the right of that field in order to access the “Print Quality Settings” dialog box. For more
detailed information on making settings in this dialog box, refer to “1-8-1 Print Quality Settings dialog
box” on page 1-12.
BB
B: [Grayscale Adjustment:]
BB
Adjusts the brightness and contrast of the printed image. The factory default for both settings is “0”.
[Brightness] ...............................Adjusts the brightness of the image. When you want to print the image brighter than the actual
[Contrast] ...................................Adjusts the contrast of the image. When you want to print at a sharper image contrast, drag the slider
CC
C: [TrueType Fonts:]
CC
Selects the method of printing with fonts. The factory default setting is “Download TrueType fonts as outline”.
[Download TrueType fonts as outline] .... TrueType fonts will be downloaded to the printer as outline fonts for printing.
[Download TrueType fonts as bitmap] .... TrueType fonts will be downloaded to the printer as bitmap fonts for printing.
original, drag the slider towards the plus “+” sign, or type in a positive number directly into the field at
the right of the slider bar. Conversely, when you want to print the image darker than the actual
original, drag the slider towards the minus “-” sign, or type in a negative number directly into that field.
towards the plus “+” sign, or type in the desired value (a positive number) directly into the field at the
right of the slider bar. Conversely, when you want to print at a softer image contrast, drag the slider
towards the minus “-” sign, or type in a negative number directly into that field.
1-11
Page 14

1. Printer Driver for Windows
1-8-1 Print Quality Settings
■ [EcoPrint]
Saves on toner use. Use this setting when quality printing is not needed such as with test prints.
1-12
Page 15

1. Printer Driver for Windows
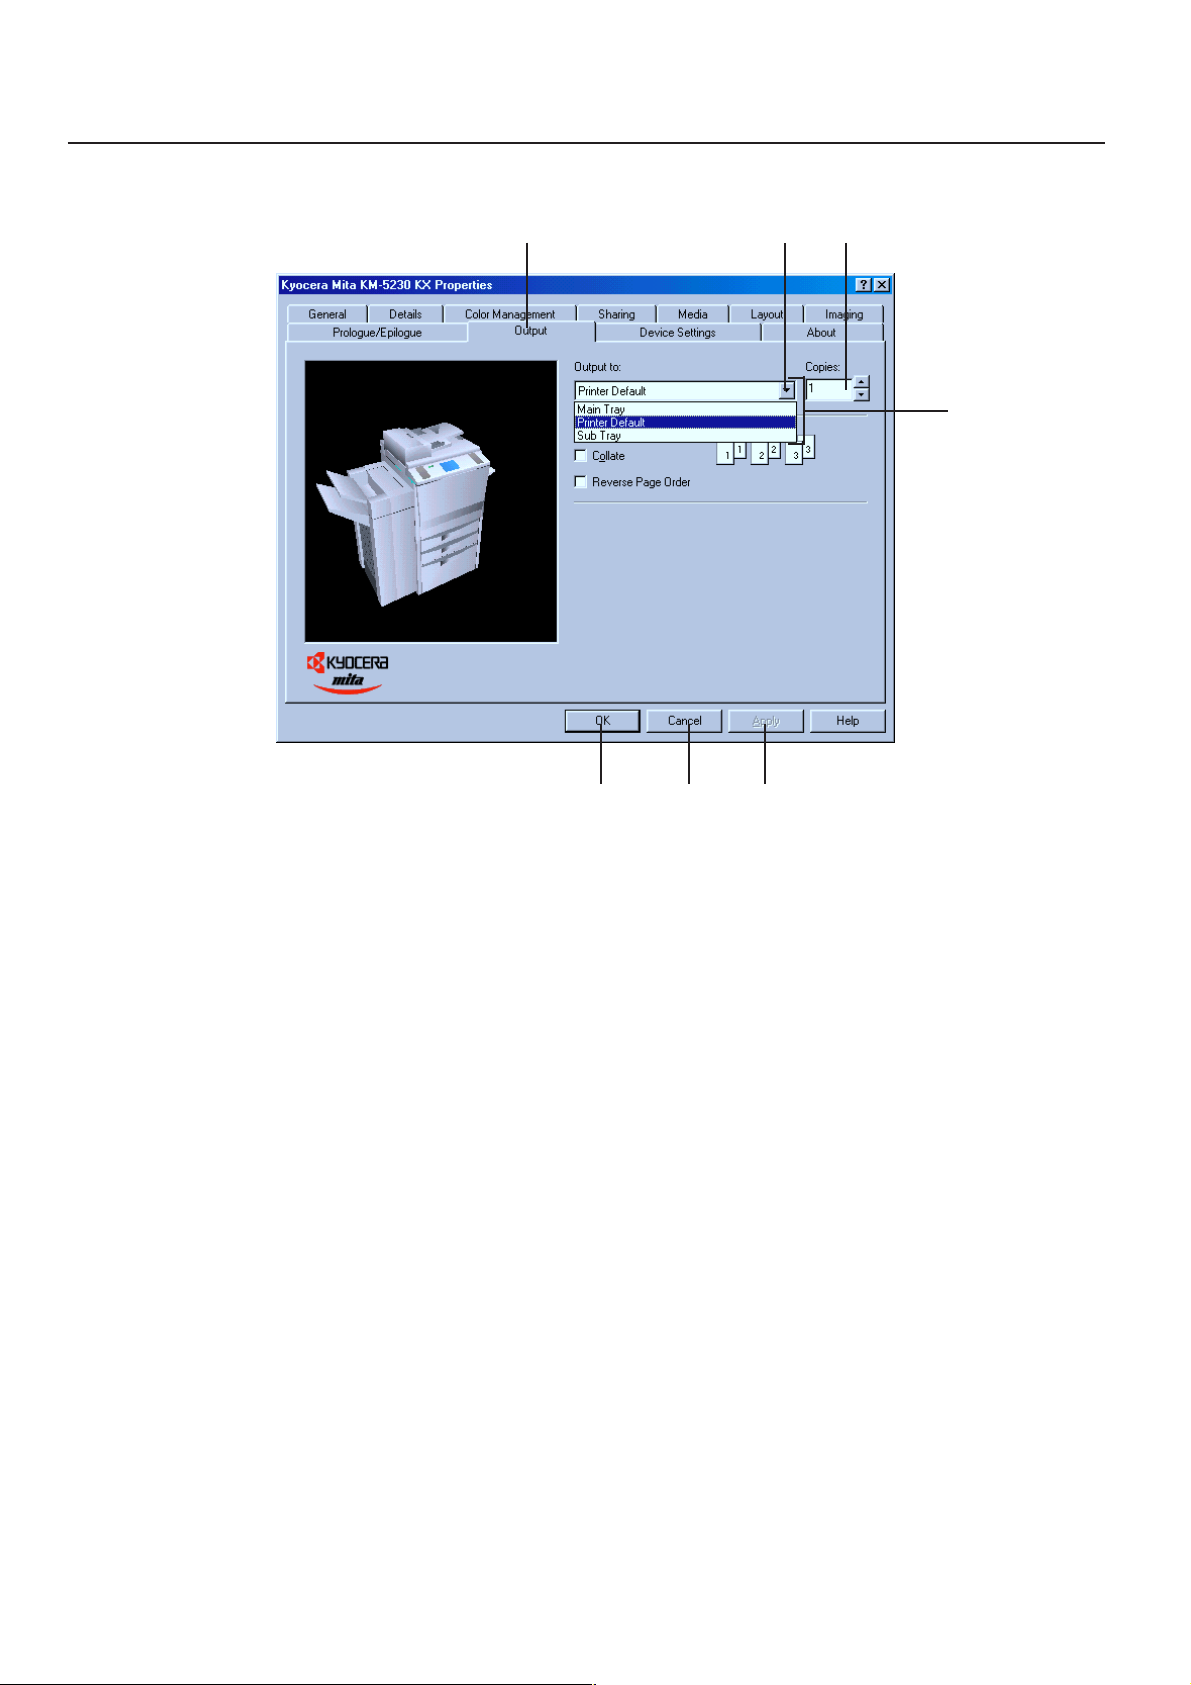
1-9 Output Tab
AA
A
AA
BB
B
BB
CC
C
CC
DD
D
DD
EE
E
EE
AA
A: [Output to:]
AA
Specifies the location of ejection of printed copies.
Selection is possible when the optional Job Separator and or Finisher are installed.
[Main Tray on the Printer] ......... Copies will be ejected onto the Inner tray.
[Main Tray] .................................Copies will be ejected into the optional Finisher main tray.
[Sub Tray] ..................................Copies will be ejected into the optional Finisher sub tray.
<CAUTION>
To specify an optional finisher or booklet stitcher as the output destination, install the optional equipment to your printer and then set it
in [Device Options:] of the "1-10 Device Setting Tab."
BB
B: [Copies:]
BB
Specifies the number of prints to be made. Select between 1 and 999 copies by clicking on the arrows at the right of the field or by typing
the desired number directly into the field. The factory default setting is “1”.
CC
C:[Collate]
CC
When you are printing more than one copy of one or more pages, it is possible to sort the printed copy sets.
Example: If the “Collate” option is selected, it is possible to print out 2 sets of the same copies.
1-13
Page 16

1. Printer Driver for Windows
DD
D: [Staple]
DD
If the optional finisher is installed, this attribute allows you to staple your document in one of four ways: Front, Center, Back or saddle
stitch.
This item can be set only if [Main Tray] is selected in [Output to:] and [Collate] is turned on.
* All staple options are disabled when Transparency is selected.
*[Staple] allows only originals size of Ledger, Legal, letter, A3, A4, B4 JIS and B5 JIS. If these papers are not selected, the staple mode
will be grayed.
* It Group sort is selected, the staple mode should be OFF and grayed.
EE
E:[Punch]
EE
f the optional finisher and punch unit are installed, this attribute allows you to punch holes on the on the long edge or short edge of the
document you can choose are of the following options.
*[Punch] allows only originals sizes of Ledger, Legal, Letter, A3, A4, B4 JIS and B5 JIS. If these papers are not selected, the staple mode
will be grayed.
* This item can be set only if [Main Tray] or [Sub Tray] is selected in [Output to:] and if [Device Options:] of the device setting tab is set to
the finisher and the punch unit.
1-14
Page 17

1. Printer Driver for Windows
1-10 Device Settings Tab
AA
A
AA
BB
B
BB
CC
C
CC
DD
D
DD
AA
A: [Device Options:]
AA
Select and installed options here. Once you have completed the setting for each option, the functions of that option will be available for
use.
BB
B: [Memory:]
BB
Specifies the amount of memory installed in the printer. If you make a mistake in the setting here, it is possible that printing will not be
accomplished properly.
CC
C:[User...] button
CC
Click on this button when you want to register a user and/or department name. The [User Settings] dialog box will appear. It is also
possible to select the “GDI compatible mode” from that dialog box.
DD
D:[Administrator…] button
DD
Click on this button when Copy Management is Turned ON in the printer. The [Administrator Settings] dialog box will appear.
1-15
Page 18

1. Printer Driver for Windows
1-10-1 User Settings
■ [Identification]
Register the desired user and/or department name.
■ [Page Description Language]
The emulation modes that can be used with this product will be displayed in the dropdown list. If multiple modes are displayed, it is
possible to select the desired mode.
When using the KPDL emulation, select the KPDL.
■ [GDI compatible mode]
Select this mode in order to accomplish printing that is more accurate to the data shown on your monitor. Select this mode if text
corruption, etc., does happen to occur or if the image is in any other way not printed correctly.
1-10-2 Administrator Settings
■ [Job Accounting]
This setting is used when Copy Management is turned ON in the printer. If the Management code that you enter in the “Management
Code” field here and that registered in the printer itself do not match, printing will not be possible.
* If Copy Management is turned ON and this setting does not match the setting made in the printer itself, it will not be possible to make
test prints. Thus, when you install the printer driver, you will need to check the Copy Management settings and make a test print AFTER
the installation procedure is complete.
* When Copy Management is turned ON, even if you send a print command with a DOS “COPY” command, printing will not be possible
if you do not use a printer driver.
■ [Set Password]
Click on this button if you want to add a password to this setting. The [Set Password] dialog box will appear.
* If, for any reason, you lose reference to this password, you will not be able to change the Management Code. Therefore, you should
exercise DUE CAUTION in the management of the password that you register here.
1-16
Page 19

1. Printer Driver for Windows
1-11 Prologue/Epilogue Tab
■ Disable Feature
Make sure there is NO check mark in this checkbox if you want to use the printer’s overlay function. The overlay function will allow you to
have selected macro data printed out on top of your documents.
■ Add
Click on this button when you want to add the data of the file that is selected in the displayed list.
■ Remove
Click on this button when you want to delete the selected file from the list.
■ Edit
Click on this button when you want to edit the contents of the selected file.
Insertion Point:
By REMOVING the check mark from the checkbox next to “Disable Feature”, select a registered file from the list and click on the “Add”
button, the following settings will become available.
■ None “Unassigned”
Print without using registered files.
■ Beginning of the Print Job
The data for the selected file will be transmitted once, and embedded at the beginning of the print job data.
■ End of the Print Job
The data for the selected file will be transmitted once, and embedded at the end of the print job data.
■ Start of the Page
In the case of a multiple-page print job, the data for the selected file will be transmitted (embedded) at the beginning of the data for each
page.
■ End of the Page
In the case of a multiple-page print job, the data for the selected file will be transmitted (embedded) at the end of the data for each page.
■ Pages
When “Start of the Page” or “End of the Page” are selected, designate the desired page number here.
1-17
Page 20

2. Printer Driver for Macintosh
2. Printer Driver for Macintosh
When using unit as a network printer, it is possible to print PostScript files from a Macintosh Computer. This section contains explanations
regarding the procedure to install the Macintosh PPD files and select this printer, as well as explanation about the computer environment
required to run the installed files.
Attention (Macintosh)
*When management code is set in Copier of use, it cannot be printed.
2-1 Required computer environment
*OS: Macintosh OS 7.61 - 9.1
*CPU: Minimum Power PC
*RAM: Minimum 24MB
*Free hard disk space: Minimum 10MB
*CD-ROM drive: 1 drive
2-2 Installing the PPD files
This section explains the screen that appears when the CD-ROM supplied with the printing system (J) is inserted into the CD-ROM drive.
*All the screens to use for explanation are samples, and a screen may be different by a version of utilized software to some extent.
AA
A
CC
C
CC
AA
BB
B
BB
AA
A: [Drivers]
AA
The installer by country and by language is supplied in this folder.
BB
B: [Welcome.pdf]
BB
Kyocera Mita Digital Library screen will appear.
Click the available model on screen. The online manual (PDF File) will appear.
Installation and operation procedure for printer driver is explained in online manual.
It is necessary to install the Adobe Acrobat Reader in advance to appear the online manual.
CC
C: [ACRO_V4]
CC
The installer of Adobe Acrobat Reader is supplied in Folder.
DD
D: [README]
DD
This file contains information which is not explained in the manuals. Please read this file before using the printer driver.
Start up your Macintosh computer.
Insert the CD-ROM disk that is included with this product into a CD-ROM drive.
1
*If there is starting other program, please be finished.
* Screens are things of Mac OS 8.6.
DD
D
DD
Double-Click on the icon for the CD-ROM disk.
The content of CD-ROM will be displayed.
2
2-1
Page 21

2. Printer Driver for Macintosh
The installer by country and by language is supplied in “Driver” Folder.
3
Double-Click the available driver installer to start. The installation screen will appear.
Click on “Continue”.
4
The notice for installation will appear. Read the notice, and click “Continue”.
5
Select the available model, and click on “Install”. Installation is started.
6
Installation was finished. Click on “Quit” to finish the installation completely.
7
Access the Apple Menu at the far left of the Menu of Bar and select Chooser.
The Chooser will appear.
8
Click once on the LaserWriter 8 icon.
2-2
Page 22

2. Printer Driver for Macintosh
Select the “KC1xxxxxx” in the Select a PostScript Printer field.
Click on the [Create] button.
9
(“xxxx” is the MAC address. Refer to the Mac address in a PDF Manual of the
networkboard for more detailed information.)
Select the “A copy machine product name of use” PPD files in the displayed list
and Click on [Select]. (This is prevent the application from selecting another PPD file.)
10
*There may be times when necessary files are not copied to an appointed directory,
depending on the OS version. When selecting PPD files in printer setting procedure,
if you are unable to find “A copy machine product name of use” PPD files in the list of
choice, then stop the setup and follow below procedure.
1. From the menu bar select [File] - [Find] and enter [ “A copy machine product name
of use” PPD files ] and click [find] button.
2. When [“A copy machine product name of use” PPD files ] is displayed, move the
file under [System Folder] - [Extensions] - [Printer Descriptions].
3. Then go back to “step 6 (page 2-2)” and rest of the procedure.
A dialog box for selecting the appropriate options will appear.
Select the option that are currently installed in or on your printer.
11
Once you’re finished with the settings, click on [OK], the chooser will be displayed
again.
12
Verify that “KC1xxxxxx” is highlighted in the Select A PostScript Printer filed and
close the chooser.
13
2-3
Page 23

2. Printer Driver for Macintosh
2-3 General Dialog Box
*The actual layout of each dialog box and the available option and settings may differ somewhat depending upon the application and version of
LaserWriter that you are using.
GG
G
GG
AA
A
AA
BB
B
BB
CC
C
CC
EE
E
EE
FF
F
FF
DD
D
DD
AA
A: [Printer:]
AA
Selects the desktop printer to be used for printing your document.
BB
B: [Additional printer options:]
BB
Selects additional printer options.
CC
C: [Copies:]
CC
Type the desired number of prints to be made (or the number of files to be saved to disk) directly into this field.
Select a number between 1 - 999.
DD
D: [Collated]
DD
To print your document in the proper sequence, click this checkbox to select it. This option is useful when printing multiple copies.
EE
E: [Pages:]
EE
To print all of the pages in a file, select the All radio button. To print only certain pages, type in from what page (in the From filed) to what
page (in the To field) you want to print.
FF
F: [Paper Source:]
FF
To have the paper to be printed onto selected automatically from among all of the available drawer, select the All radio button. To select a
specific drawer, select the desired drawer from that drop-down list.
GG
G: [Destination:]
GG
Enable selection of whether to print the present files at the printer or save the date to disk as a file.
2-4
Page 24

2. Printer Driver for Macintosh
2-4 Background Printing Dialog Box
*The actual layout of each dialog box and the available option and settings may differ somewhat depending upon the application and verxion of
LaserWriter that you are using.
AA
A
AA
BB
B
BB
AA
A: [Print in:]
AA
Foreground (no spool file): To wait for the document to finish printing before you can use your computer, click this button. Your document
may be sent to the printer faster when this button is selected.
Background:When this button is selected, you can continue to use your computer while a document prints.
BB
B: [Print time:]
BB
Urgent: To place your document in the printer queue in front of jobs marked Normal, click this button.
Normal: when this button is selected, your document will be placed in the printer queue in the order it was received.
Print at: To specify a date and time when your document should print, click this button.
Put Document on Hold: To Leave your document in the printer queue but don’t print it, click this button.
2-5
Page 25

2. Printer Driver for Macintosh
2-5 Color Matching Dialog Box
AA
A
AA
BB
B
BB
CC
C
CC
AA
A: [Print color:]
AA
Sets a document for printing in black and white, in color or shades of gray, using ColorSync color matching or PostScript color matching.
BB
B: [Intent:]
BB
Maps the color of an image to the color range of the printer. Not available because Color Sync Color Matching or PostScript Color
Matching is not chosen in the Print pop-up menu.
CC
C: [Printer Profile:]
CC
Sets a document to be printed using the color characteristics of a specific printer. Not available because Color Matching or PostScript
Color Matching or PostScript Color Matching is not chosen in the print pop-up menu.
2-6
Page 26

2. Printer Driver for Macintosh
2-6 Cover Page Dialog Box
AA
A
AA
BB
B
BB
AA
A: [Print Cover Page:]
AA
Enables selection of whether a cover page will be added before or after the documents, or not at all.
BB
B: [Cover Page Paper Source:]
BB
Allows you to add a cover page (front or back cover page.) The paper for the cover page will be fed from the manual feed tray.
2-7
Page 27

2. Printer Driver for Macintosh
2-7 Font Settings Dialog Box
AA
A
AA
BB
B
BB
AA
A: [Font Documentation]
AA
When this checkbox is selected, font keys are annotated in the Postscript output.
BB
B: [Font Downloading]
BB
Preferred Format: Type 1 fonts will be preferred over TrueType fonts. If a TrueType option is selected, TrueType fonts are Preferred over
Type 1 fonts.
Always download needed fonts: When this checkbox is selected, fonts in the printer are ignored.
Never generate Type 42 format: When this checkbox is selected, type 42 fonts will not be generated.
2-8
Page 28

2. Printer Driver for Macintosh
2-8 Job Logging Dialog Box
AA
A
AA
BB
B
BB
CC
C
CC
AA
A: [If there is a Post Script™ error:]
AA
Select the following buttons Whether or not to have an error report printed out, or have the content of the error displayed on the screen
whenever a printing error occurs.
BB
B: [Job Documentation]
BB
Generate Job Copy: When this check box is selected, a job copy is generated.
Generate Job Log: When this check box is selected, a font log is generated.
CC
C: [Job Documentation Folder:]
CC
[Change...] button: Click this button to select a destination folder for font logs and job copies.
2-9
Page 29

2. Printer Driver for Macintosh
2-9 Layout Dialog Box
AA
A
AA
BB
B
BB
CC
C
CC
DD
D
DD
AA
A: [Pages per sheet:]
AA
Sets the number of pages to be printed on each sheet of paper.
BB
B: [Layout direction:]
BB
A button of either is clicked, and a layout direction is decided. If right button is selected, the pages are laid out from right to left.
CC
C: [Border:]
CC
Sets the type of line to appear around the page.
DD
D: [Print on Both sides]
DD
When this checkbox is selected, the printer will print on both sides of the paper.
[Binding]
Enable selection of the desired the binding orientation. If left button is selected, the binding orientation is along the side of the paper.
2-10
Page 30

2. Printer Driver for Macintosh
2-10 Save as File Dialog Box
AA
A
AA
BB
B
BB
CC
C
CC
DD
D
DD
AA
A: [Format:]
AA
Use this pop-up menu to select the file format that you want the new file to have.
BB
B: [PostScrpt Level:]
BB
Level 1 Compatible: When this button is selected, the PostScript file that contains a description of your document will be compatible with
level 1 PostScript printers.
Level 2 and Level 3: To create a PostScript file of your document compatible with level 2 and 3 PostScript printers, click this button.
CC
C: [Data Format:]
CC
ASCII: When this button is selected, your document will be saved as an ASCII or text file.
Binary: When this button is selected, your document will be saved in binary format. Binary files are typically smaller in size than ASCII
files.
DD
D: [Font inclusion:]
DD
Sets the fonts to be included in the file.
2-11
Page 31

2. Printer Driver for Macintosh
2-11 Printer Specific Options Dialog Box
(The following information and functions are applicable for printer firmware version 1.85 or later.)
AA
A
AA
BB
B
BB
CC
C
CC
DD
D
DD
EE
E
EE
FF
F
FF
GG
G
GG
AA
A: [Resolution:]
AA
The default setting is "600 dpi" and this setting is not adjustable.
BB
B: [Management Code:]
BB
This setting is used when Copy Management is turned ON in the copier. The default setting is "Off".
If Copy Management is turned ON, select a Management code between "0000" and "0030" (or between "0000000" and "0000030", as
appropriate).
* If Copy Management is turned ON, cover pages will not be printed out even if "Cover Page" is selected under "Print Cover Page".
HH
H
HH
CC
C: [Sort:]
CC
Select to have the designated number of copy sets printed.
[Non Sort] ....................................Select to have the designated number of copies printed without collating them.
[Sort] ...........................................Select to have the designated number of copy sets printed.
[Group] ........................................ Select to have the designated number of copies made from each page of the documents and ejected
into the optional Finisher. If the optional Finisher is not installed, the operation will be carried out in
the same manner as the "Non Sort" setting.
DD
D: [Staple:]
DD
If the optional Finisher is installed, displays the presently selected staple option. Select from among the available stapling positions:
"Front", "Center", "Rear" and "Booklet Stitch".
* Available stapling positions may differ depending upong the model of Finisher that is installed.
* Only Ledger, Legal, Letter, A3, A4, B4 (JIS) and B5 (JIS) size paper can be used with the staple function.
* If the stapling position is not as expected when copies are being fed width-wise ( ), be sure to select "On" for the "180 Rotate"
setting(see H :180 Rotate).
EE
E: [Punch:]
EE
If the optional Finisher is installed, displays the presently selected hole punch option. Select from among the available stapling positions:
"2 holes", "3 holes" and "4 holes".
* Available hole punch options may differ depending upon the settings made under "Installable Options" (see page 2-3).
* Only Ledger, Legal, Letter, Statement, Folio, A3, A4, A5, B4 (JIS) and B5 (JIS) size paper can be used with the hole punch function.
* If the hole punch position is not as expected when copies are being fed width-wise ( ), be sure to select "On" for the "180 Rotate"
setting(see H :180 Rotate).
FF
F: [Paper Destination:]
FF
The default setting is "Auto" (the location of document ejection will be automatically determined according to the print settings) and this
setting is not adjustable.
GG
G: [Booklet:]
GG
This setting selects the Booklet layout option. The default setting is "Off".
The Booklet layout option enables you to print open-face and duplex (2-sided) copies so that when all of the finished copies are stacked
together and folded they can be handled as a book, magazine, pamphlet or the like.
To use the Booklet layout option, select from among the available styles: "Left Bind" and "Right Bind".
* Only B5, A4 and Letter size documents and only B4, A3 and Ledger size paper can be used with the booklet option.
HH
H: [180 Rotate:]
HH
This setting allows you to have the printed image rotated upside-down.
2-12
Page 32

2. Printer Driver for Macintosh
2-12 Page Setup dialog Dialog Box
Settings for paper size, page layout, magnification ratio and print direction (orientation) are performed in the Page Setup dialog box. To display the
Page Setup dialog box, select Page Setup… in the File menu of the corresponding application.
* The actual layout of each dialog box and the available options and settings may differ somewhat depending upon the application and the version of
LaserWriter that you are using.
*For the user using Mac OS 7.6.1, we strongly recommend that you update the LaerWriter8.3.2 to Laser Writer 8.5.1.
AA
A
AA
BB
B
BB
CC
DD
C
D
CC
DD
AA
A: [Format for:]
AA
Use this pop-up menu to select the Printer that you want to use.
BB
B: [Paper:]
BB
Select in this pop-up list the desired paper size. Choose from among Letter, Legal, Folio, Statement, A3, A4,
B4-JIS, A5, B5-JIS and Envelopes (Monarch, Com-10, DL, C5)
* ALWAYS use the multi-bypass to feed the following sizes:Envelopes (Monarch, Com-10, DL, C5)
CC
C: [Orientation:]
CC
Enable selection of the desired print direction.
DD
D: [Scale:]
DD
Type the desired magnification ratio directly into this field. Select a ratio between 25% - 400%.
2-13
Page 33

2. Printer Driver for Macintosh
2-13 PostScript Dialog Box
* The actual layout of each dialog box and the available options and settings may differ somewhat depending upon the application and the version of
LaserWriter that you are using.
AA
A
AA
BB
B
BB
AA
A: [Visual Effects:]
AA
Visual effects such as horizontal and vertical flip and image inverting can be selected here. Place
a check in the check box next to the desired visual effects to select that effect.
BB
B: [Image & Text:]
BB
Place a check in the check box next to the desired printing options to select that option.
2-14
Page 34

2. Printer Driver for Macintosh
2-14 Custom paper sizes Dialog Box
When a paper sizes is selected in “Custom paper sizes” Dialog Box , the paper size can be set as desired.
*The actual layout of each dialog box and the available options and settings may differ somewhat depending upon the application and the version of
LaserWriter that you are using.
CC
C
CC
DD
D
DD
EE
E
EE
BB
B
AA
A
AA
AA
A: [Paper sized display]
AA
To display the paper size and page orientation selected for printing your document, click here.
BB
B: [List display]
BB
This list display all available custom page sizes.
CC
C: [New] button
CC
To create a new custom page size, click this button.
DD
D: [Edit] button
DD
To edit the selected custom page size, click this button.
EE
E: [Delete] button
EE
To delete the selected custom page size, click this button.
*The acceptable paper width is between 98.4 mm - 297 mm (metric) or 3.88 “- 11.69” (inches). The acceptable paper length is between
148 mm 431.8 mm (metric) or 5.83” - 17.00” (inches).
BB
2-15
 Loading...