

Page 1
Operation Guide <Functions Edition>
Click on the button to jump to the desired section.
Using the Scanner Function
Sending Scanned Image Data to Your Computer
Sending Scanned Image Data by Email
Using TWAIN Capabilities
Adding File Information to Scanned Image Data
Page 2
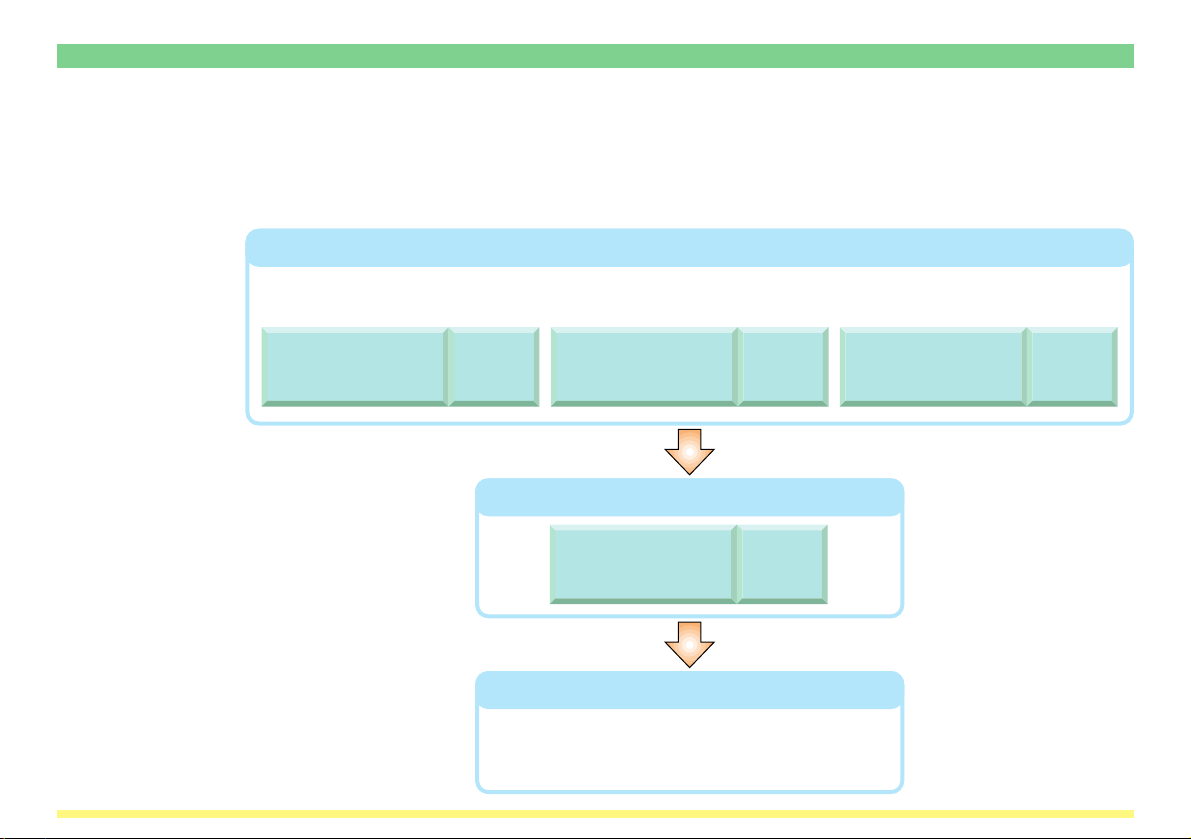
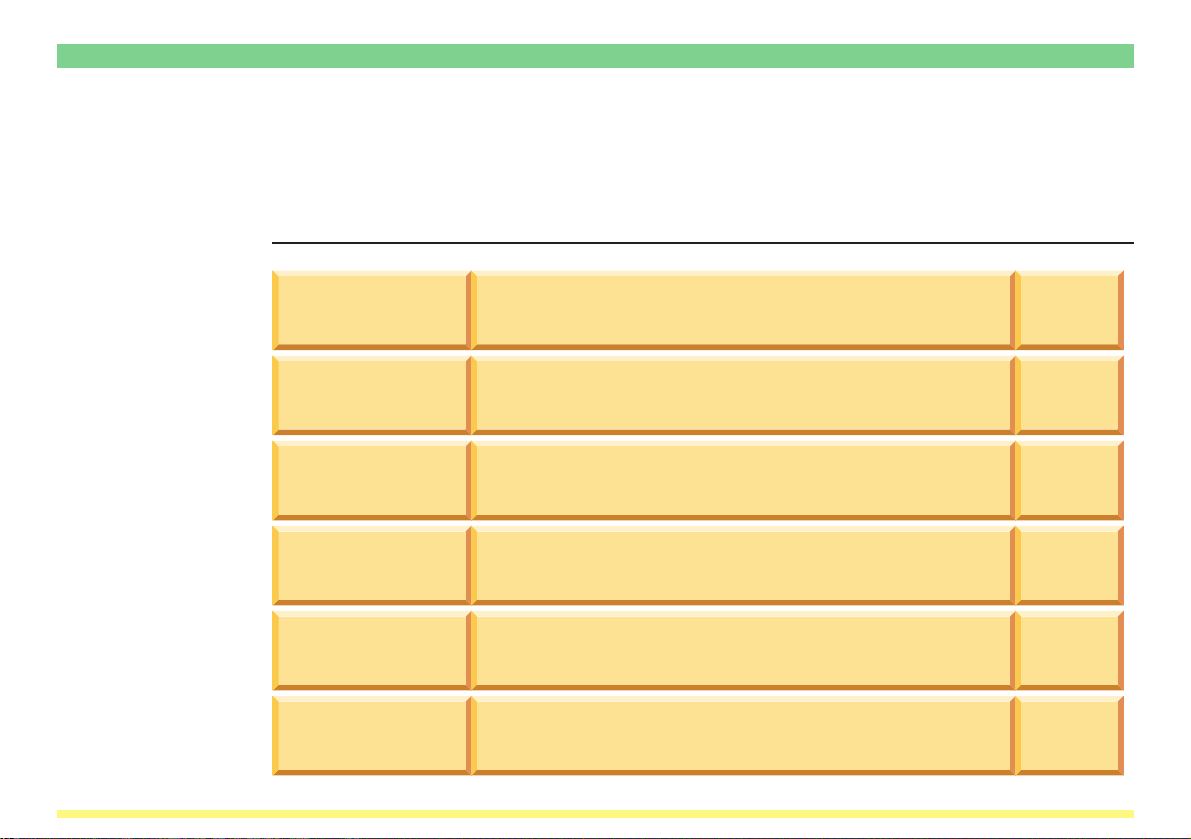
Sending Scanned Image Data to Your Computer (Scan to PC)
Create a destination folder in your computer and you can have scanned image data sent directly to that
folder. The flowchart below shows a simple illustration of the steps required up to transmission of the data to
the computer.
For a more detailed explanation of each step, refer to the indicated reference page.
Click on the reference page will take you directly to that page.
Making basic settings
In order to use the Scan to PC function it is necessary to utilize the included utilities and make network
settings and register such information as the sender and destination addresses.
Settings and registration using Address
Editor
See page
3-26
Settings and registration using Address
Book
See page
3-71
Creating destination folders
Scanner File Utility
See page
3-4
Sending scanned image data
Use the scanner to designate a destination and
have scanned image data sent directly to that
location.
i
Settings and registration using an Internet
Web browser
* Network settings as well
as the sender and
destination address
registration procedures
can be accomplished at
the scanner itself. For
information on these
procedures, refer to the
<Setup Edition> of this
Operation Guide.
See page
2-1
Page 3
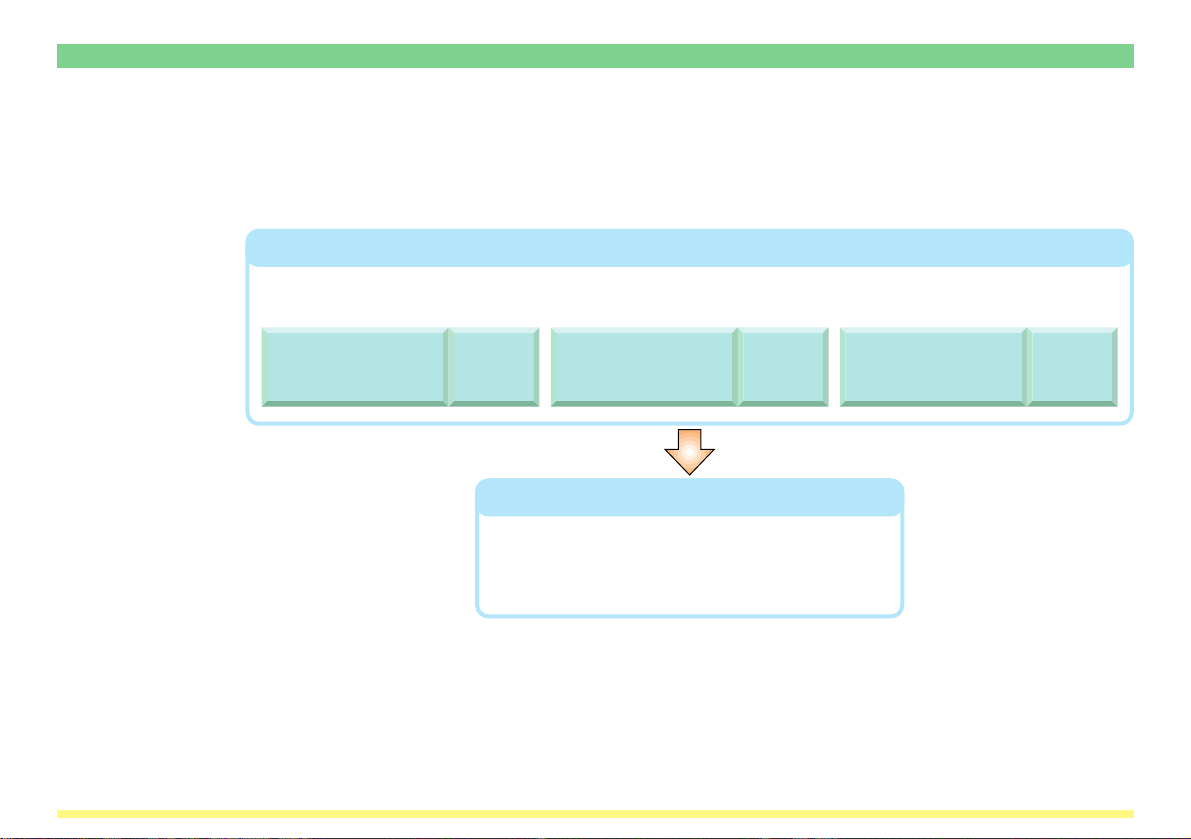
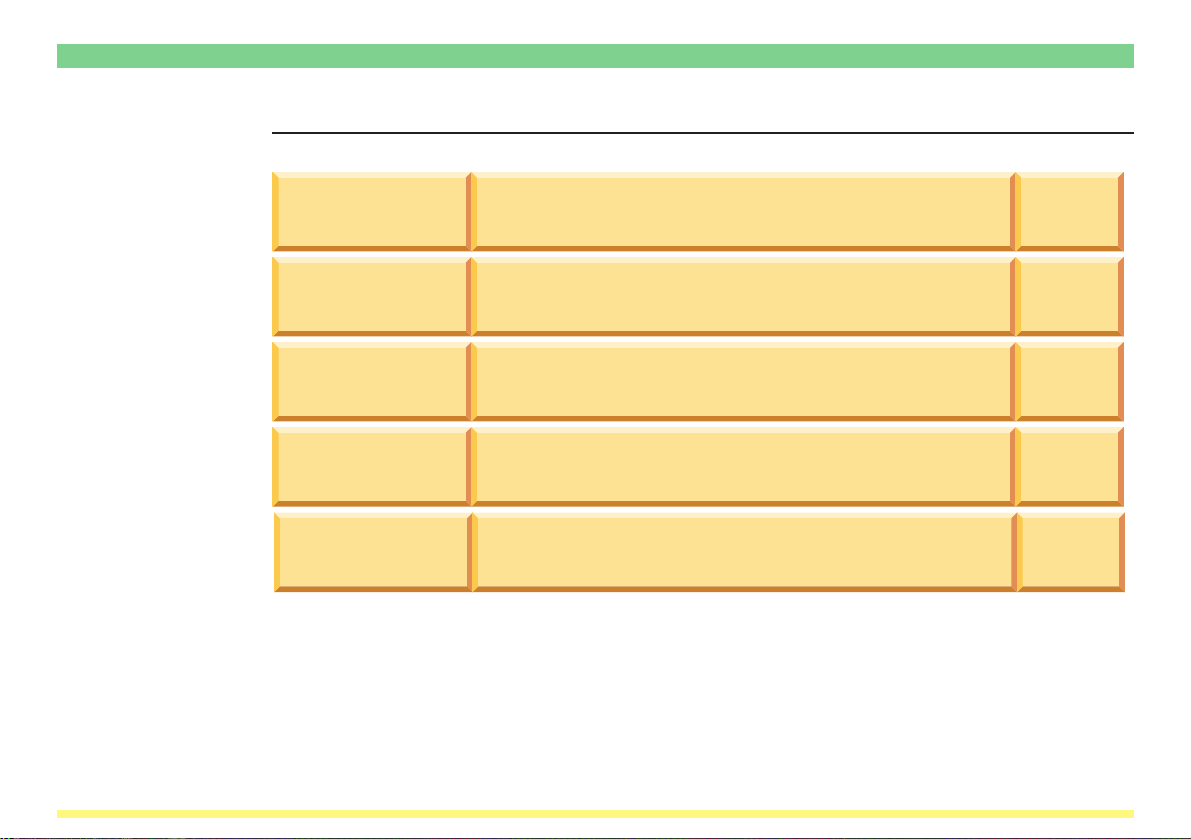
Sending Scanned Image Data by Email (Send E-mail)
Have scanned image data sent directly by email to a registered email address. The flowchart below shows a
simple illustration of the steps required up to transmission of the email message.
For a more detailed explanation of each step, refer to the indicated reference page.
Click on the reference page will take you directly to that page.
Making basic settings
In order to use the Send E-mail function it is necessary to utilize the included utilities and make network
settings and register such information as the sender and destination addresses.
Settings and registration using Address
Editor
See page
3-26
Settings and registration using Address
Book
See page
3-71
Sending scanned image data
Use the scanner to designate a destination and
have scanned image data sent directly to that
location.
ii
Settings and registration using an Internet
Web browser
* Network settings as well
as the sender and
destination address
registration procedures
can be accomplished at
the scanner itself. For
information on these
procedures, refer to the
<Setup Edition> of this
Operation Guide.
See page
2-1
Page 4
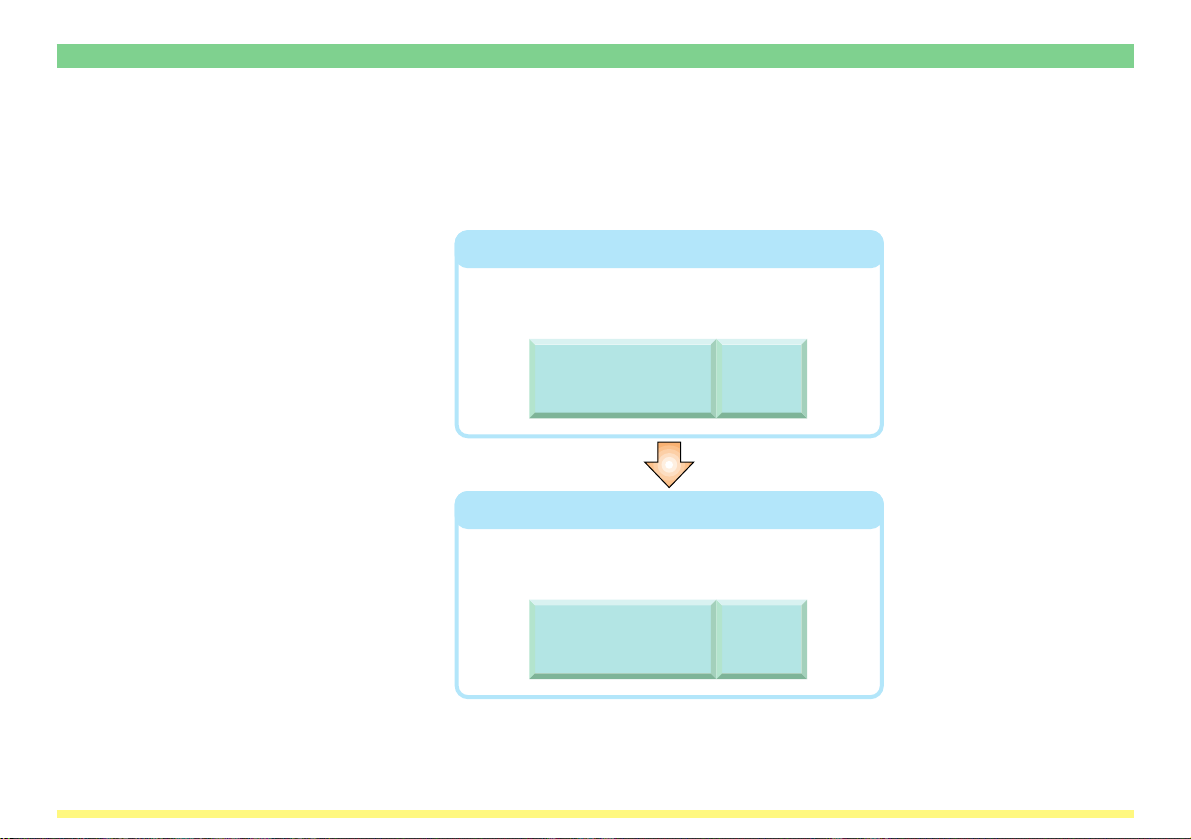
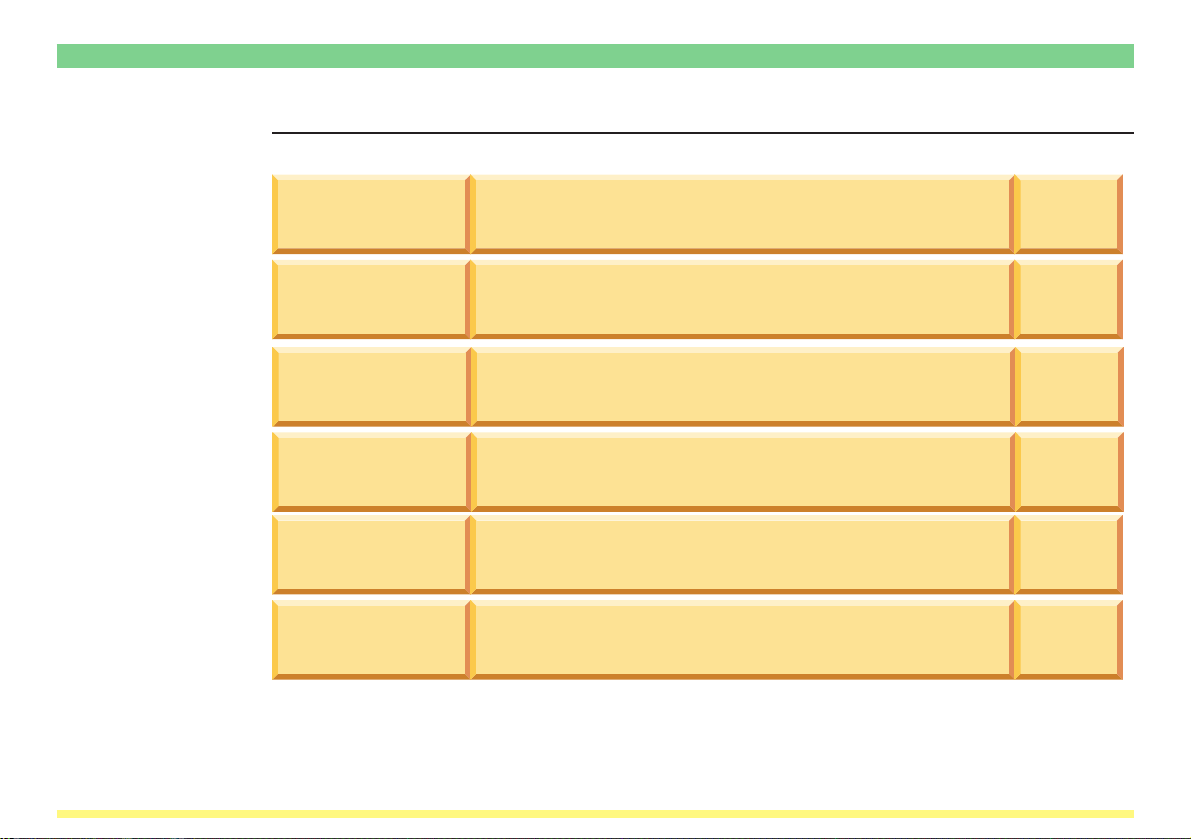
Using TWAIN Capabilities (TWAIN)
Use scanner image data in TWAIN-compatible applications. The flowchart below shows a simple illustration
of the steps required up to scanning of the data using the TWAIN source.
For a more detailed explanation of each step, refer to the indicated reference page.
Click on the reference page will take you directly to that page.
Making basic settings
In order to use the TWAIN source it is necessary
to make certain scanner-related settings.
Settings related to
the TWAIN source
See page
3-103
Starting the scanning operation
Use the TWAIN source to initiate the scanning
operation.
Scanning with
the TWAIN source
iii
See page
3-108
Page 5

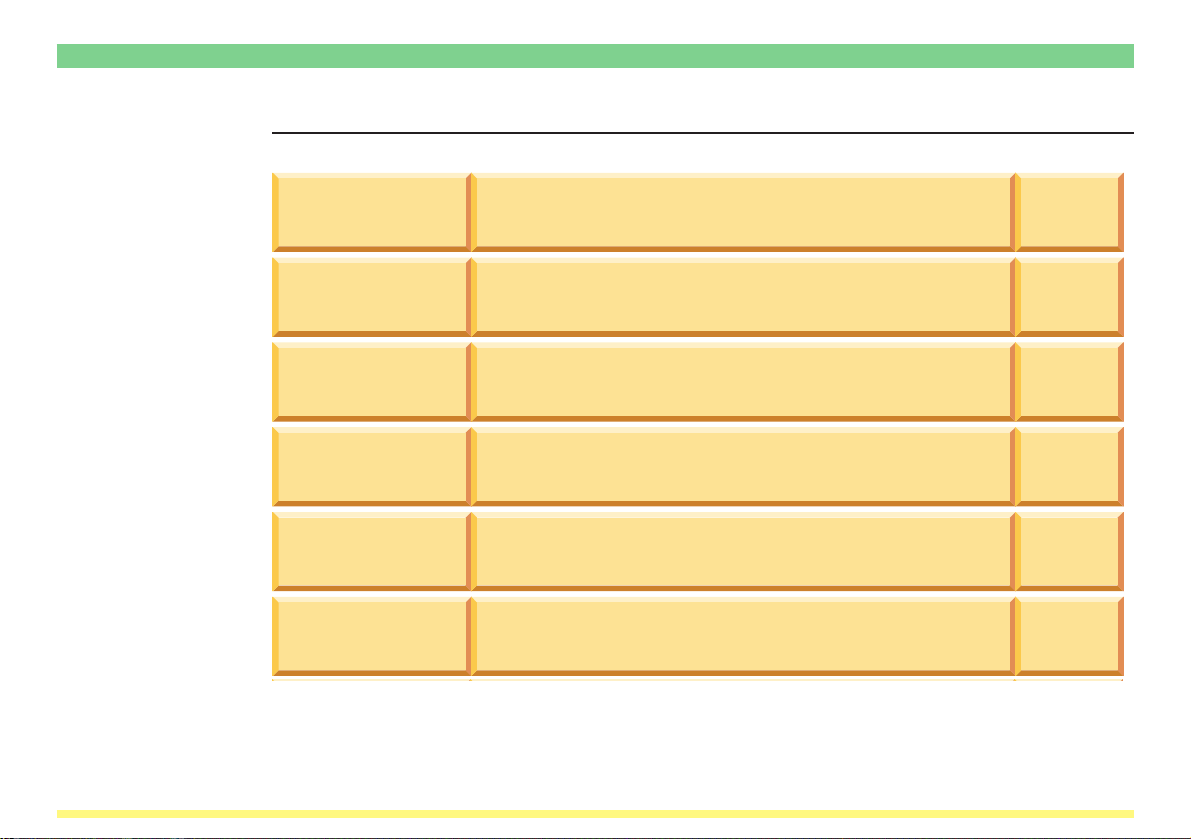
Adding File Information to Scanned Image Data
You can make settings related to the addition of file information (keywords) which helps you search your
computer for specific scanned images, or have that information saved as a csv file along with the scanned
image data. By including such file information along with your scanned image data, it will be an easy task to
locate any specific file among any number of others by simply searching for the added information.
* This function is not available by KM-C830/830D.
Making Basic Settings
If you intend to use the Database Connection function, it will be necessary to use the DB Assistant software to
register various settings, certain information related to the computer it is installed on, as well as other information.
Then, in order to connect the DB Assistant with the scanner, you will need to use a Web browser or the scanner s
operation panel to enter the IP address or host name of the computer the DB Assistant is installed on.
Settings and registration using the DB
Assistant software
Designating the Destination
Adding File Information to Scanned Image Data
The scanner s operation panel is used to designate the
destination where the scanned data will be saved and
send that data.
iv
See page
3-119
Settings using the
Scanner File Utility
Settings using
a Web browser
See page
3-4
See page
2-1
* You can also use the
scanner s operation panel to
make network settings,
designate the location to
save the data, and register
your (the sender s) name.
* When you add file
information (keywords) and
then search for the
corresponding information
under that same item, use
PaperPort, the software that
is bundled with this product.
Page 6

Trademark Information
• Microsoft, Windows, Windows NT and Internet Explorer are registered trademarks of Microsoft Corporation of America and other countries.
• Windows Me and Windows XP is a trademark of Microsoft Corporation.
• Ethernet is a registered trademark of Xerox Corporation.
• IBM and IBM PC/AT are trademarks of International Business Machines Corporation of America.
• Adobe and Acrobat are registered trademarks of Adobe Systems Incorporated.
• PaperPort is a registered trademark of ScanSoft Inc. of America and other countries.
All other company and product names contained in this Instruction Handbook are trademarks or registered
trademarks of their respective companies. The designations ™ and ® will not be used in this handbook.
v
Page 7

Contents
Section 1 What is the Network Scanning System? ..................................................... 1-1
Sending Scanned Image Data to Your Computer (Scan to PC) .................................. i
Sending Scanned Image Data by Email (Send E-mail)............................................... ii
Using TWAIN Capabilities (TWAIN)............................................................................. iii
Adding File Information to Scanned Image Data......................................................... iv
Trademark Information ................................................................................................ v
Contents ...................................................................................................................... vi
1-1 Outline .................................................................................................................. 1-2
1-2 Using the [Software Library] CD-ROM ................................................................. 1-3
1-2-1 Contents of the CD-ROM ........................................................................ 1-4
(1) Scanner Utilities.............................................................................. 1-5
(2) TWAIN Source................................................................................ 1-6
1-2-2 On-Line Manual ...................................................................................... 1-7
vi
Page 8

1-3 Using the Scanner Function ................................................................................. 1-8
1-3-1 Basic Settings ......................................................................................... 1-13
(1) Original size selection (“Select original size”) ................................. 1-13
(2) Image transmission size selection (“Select sending size”) ............. 1-14
(3) Scanning resolution selection (“Scanning resolution”) ................... 1-14
(4) Original orientation selection (“Orig. set direction”) ........................ 1-15
(5) Image file format selection (“File type”) .......................................... 1-15
1-3-2 Image Quality Settings ............................................................................ 1-16
(1) Scanning density adjustment (“Scanning density”) ........................ 1-16
(2) Image Quality selection (“Original image quality”) .......................... 1-16
(3) JPEG quality selection (“JPEG level set”) ...................................... 1-16
(4) Color mode selection (“Color mode”) ............................................. 1-17
(5) B & W mode selection (“B & W setting”) ........................................ 1-17
1-3-3 Other settings.......................................................................................... 1-18
(1) Original type mode (“Original type”) ............................................... 1-18
(2) Border erase mode (“Erase”).......................................................... 1-19
(3) Output by page function (“One page per file”) ................................ 1-19
(4) Continuous scanning function (“Continuous scanning”) ................. 1-20
(5) Filing mode (“Auto selection”)......................................................... 1-20
(6) Default file name (“File name input”) .............................................. 1-21
(7) Full scanning (“Border erase mode”) .............................................. 1-22
(8) Centering (“Centering/Image shift mode”) ...................................... 1-23
1-3-4 “Uncompress scanning” setting .............................................................. 1-24
1-3-5 “Continuous sending” setting .................................................................. 1-26
1-3-6 “Priority "Input file name"” setting............................................................ 1-29
1-3-7 “Selec. of senders (users)” setting .......................................................... 1-33
vii
Page 9

Section 2 Making Settings from a Web Browser ......................................................... 2-1
2-1 WebPage Functions ............................................................................................. 2-2
2-2 Index of Objectives ............................................................................................... 2-3
2-3 Cautions ............................................................................................................... 2-4
2-3-1 If you are having trouble connecting to the scanner
from a Web browser… ............................................................................ 2-4
2-3-2 If a message appears which informs you that you can not connect,
such as “Could not open Internet Site XXXXX”... ................................... 2-4
2-3-3 If “Cannot Find Page” appears… ............................................................ 2-4
2-3-4 If a message appears which informs you that access is not allowed,
such as “xxx Access is not allowed”........................................................ 2-4
2-4 Using the WebPage Functions Interface .............................................................. 2-5
2-5 The Home Page ................................................................................................... 2-7
2-5-1 The Top Frame........................................................................................ 2-8
2-5-2 The Menu Frame .................................................................................... 2-9
2-5-3 The Main Frame...................................................................................... 2-10
2-6 System Setting ..................................................................................................... 2-11
2-6-1 Setting Conditions ................................................................................... 2-11
2-6-2 System Basic Setting .............................................................................. 2-12
2-6-3 Scanner Setting ...................................................................................... 2-21
2-6-4 Sender List .............................................................................................. 2-23
viii
Page 10

2-6-5 Reset....................................................................................................... 2-27
2-7 Scan to PC Setting ............................................................................................... 2-28
2-7-1 Destination List ....................................................................................... 2-28
2-8 Send E-mail Setting.............................................................................................. 2-35
2-8-1 E-mail Basic Setting ................................................................................ 2-35
2-8-2 Destination List ....................................................................................... 2-38
ix
Page 11

“No”Section 3 Additional Utilities ................................................................................. 3-1
3-1 What Utilities are Included with this Product? ...................................................... 3-2
3-2 Scanner File Utility ............................................................................................... 3-4
3-2-1 What is the Scanner File Utility? ............................................................. 3-4
(1) Preparations ................................................................................... 3-4
(2) Operation Flow ............................................................................... 3-5
3-2-2 Computer Environment ........................................................................... 3-6
3-2-3 Installation and Uninstallation ................................................................. 3-7
(1) Installing the Scanner File Utility .................................................... 3-7
(2) Uninstalling the Scanner File Utility ................................................ 3-8
3-2-4 Initial Dialogue Box for the Scanner File Utility ....................................... 3-9
(1) Accessing the Initial Dialogue Box for the Scanner File Utility ....... 3-9
(2) Contents of the Initial Dialogue Box for the Scanner File Utility ..... 3-10
3-2-5 Destination Folders for Scanned Data .................................................... 3-12
(1) The Setup Dialogue Box................................................................. 3-12
(2) Designating a New Destination Folder for
Receiving Scanned Data ................................................................ 3-15
(3) Changing Settings for a Registered Destination Folder ................. 3-19
(4) Removing a Destination Folder Designation .................................. 3-22
x
Page 12

3-2-6 Saving Scanned Data as a File............................................................... 3-23
(1) Outline of the Procedure................................................................. 3-23
(2) The File Name ................................................................................ 3-24
(3) The Image Data .............................................................................. 3-25
(4) If an Error Occurs when Writing Data to the Hard Disk… .............. 3-25
xi
Page 13

3-3 Address Editor ...................................................................................................... 3-26
3-3-1 The Address Editor ................................................................................. 3-26
3-3-2 Computer Environment ........................................................................... 3-26
3-3-3 Installation and Uninstallation ................................................................. 3-27
(1) Installing the Address Editor ........................................................... 3-27
(2) Uninstalling the Address Editor....................................................... 3-28
3-3-4 Running Address Editor .......................................................................... 3-29
3-3-5 Editing Data Selection screen ................................................................. 3-31
(1) Scanner address settings ............................................................... 3-32
3-3-6 Scanner Search ...................................................................................... 3-34
3-3-7 Password Entry (when connected to the scanner) ................................. 3-36
3-3-8 System Setting ........................................................................................ 3-37
(1) System Basic Setting...................................................................... 3-37
(2) Default Setting ................................................................................ 3-46
(3) Sender (User) List .......................................................................... 3-48
(4) Registering and editing user information ........................................ 3-50
xii
Page 14

3-3-9 Send E-mail Setting ................................................................................ 3-52
(1) E-mail Basic Setting ....................................................................... 3-52
(2) Destination List (E-mail) ................................................................. 3-54
(3) Registering and Editing Destination Information
(Send E-mail function) .................................................................... 3-54
(4) Registering and Editing Destination Group Information ................. 3-57
3-3-10 Scan to PC Setting.................................................................................. 3-59
(1) Destination List (PC)....................................................................... 3-59
(2) Registering and Editing Destination Information
(Scan to PC function) ..................................................................... 3-61
(3) Registering and editing destination computer group information ... 3-62
3-3-11 Tool Bar ................................................................................................... 3-64
3-3-12 Importing Data from Address Editor ....................................................... 3-65
(1) Importing Address Data into the Sender (User) List and Destination List
(for the Send E-mail and Scan to PC functions) ............................. 3-65
(2) Making the corresponding field settings ......................................... 3-67
(3) Checking Information to be Imported ............................................. 3-68
3-3-13 Address Editor Version Information......................................................... 3-70
xiii
Page 15

3-4 Address Book ....................................................................................................... 3-71
3-4-1 About the Address Book ......................................................................... 3-71
3-4-2 Computer Environment ........................................................................... 3-72
3-4-3 Installation and Uninstallation ................................................................. 3-73
(1) Installing the Address Book ............................................................ 3-73
(2) Uninstalling the Address Book........................................................ 3-74
3-4-4 Initial Dialogue Box for the Address Book............................................... 3-75
(1) Accessing the Initial Dialogue Box for the Address Book ............... 3-75
(2) Contents of the initial dialogue box for the Address Book .............. 3-76
3-4-5 Destination List Settings ......................................................................... 3-77
(1) Contents of the Address Book Dialogue Box ................................. 3-77
(2) Destination List for the Send E-mail function.................................. 3-79
(3) Registering and editing destination information for
the Send E-mail function ................................................................ 3-81
(4) Registering and editing destination group information
for the Send E-mail function ........................................................... 3-83
(5) Adding destinations to or deleting destinations from
a destination group for the Send E-mail function............................ 3-85
(6) Destination List for the Scan to PC function ................................... 3-87
(7) Registering and editing destination information for
the Scan to PC function .................................................................. 3-89
(8) Registering and editing destination group information for
the Scan to PC function .................................................................. 3-91
xiv
Page 16

(9) Registering or changing password of a destination group for
the Scan to PC function .................................................................. 3-93
(10) Adding destinations to or deleting destinations from a
destination group for the Scan to PC function ................................ 3-94
3-4-6 Importing an Address Data File .............................................................. 3-96
(1) Importing from Address Book ......................................................... 3-96
(2) Importing a csv file ......................................................................... 3-98
xv
Page 17

3-5 TWAIN Source...................................................................................................... 3-103
3-5-1 TWAIN source......................................................................................... 3-103
3-5-2 Computer Environment ........................................................................... 3-104
3-5-3 Installing the TWAIN source .................................................................... 3-105
3-5-4 Uninstalling the TWAIN source ............................................................... 3-106
3-5-5 Image Data ............................................................................................. 3-107
3-5-6 Scanning an Image ................................................................................. 3-108
(1) Starting the scanning operation at your computer .......................... 3-108
(2) Starting the scanning operation at the scanner .............................. 3-108
3-5-7 Main Dialogue Box .................................................................................. 3-109
3-5-8 Changing the Scanner’s IP Address ....................................................... 3-113
3-5-9 Copy Management Setting ..................................................................... 3-115
3-5-10 Color Profiles .......................................................................................... 3-116
3-5-11 If You Can’t Connect to the Scanner ....................................................... 3-117
3-5-12 Maximam image size .............................................................................. 3-118
xvi
Page 18

3-6 DB Assistant......................................................................................................... 3-119
3-6-1 What is the DB Assistant? ...................................................................... 3-119
(1) Preparations ................................................................................... 3-120
(2) Operation Flow ............................................................................... 3-121
3-6-2 Computer Environment ........................................................................... 3-122
3-6-3 Installation and Uninstallation ................................................................. 3-123
(1) Installing the DB Assistant .............................................................. 3-123
(2) Uninstalling the DB Assistant ......................................................... 3-124
3-6-4 Dialogue Boxes in the DB Assistant ........................................................ 3-125
(1) Accessing the Setup Dialogue Box ................................................ 3-125
(2) Contents of the Initial Dialogue Box ............................................... 3-126
(3) The Setup Dialogue Box................................................................. 3-127
3-6-5 Setting Up the PDF Keyword Assist Option ............................................ 3-128
Supplemental: Making Settings related to
the ‘Access according to sender name’ option ........................................ 3-136
Appendix A Error Codes ............................................................................................. A-1
xvii
Page 19

Section
1
What is the Network Scanning System?
Page 1-1
Page 20

1-1 Outline
This Network Scanning System enables multiple computers to share the use of a scanner that is connected
to their network. A Scanner Interface Card, Software Library CD-ROM and a TWAIN-compatible application
CD-ROM are included as accessories with this product. The Scanner Interface Card should be installed in
the scanner itself and the Software Library CD-ROM is for use in the computer(s).
Refer to the User’s Guide included on the TWAIN-compatible application CD-ROM for information regarding
to how to use the TWAIN-compatible application.
This On-Line Manual contains explanations regarding the functions of the utility programs that are included
on the Software Library CD-ROM (Scanner File Utility, Address Editor, Address Book,DB Assistant and
TWAIN Source) as well as the procedures for making scanner-related settings from a Web browser.
For more information on using the scanner itself, refer to the Scanner Set-up Edition of the Operation Guide
for your scanner.
Page 1-2
Page 21

1-2 Using the [Software Library] CD-ROM
Included on the [SoftwareLibrary] CD-ROM is the 5 other scanner utilities (Scanner File Utility, Address
Editor, Address Book,DB Assistant and TWAIN source) as well as an On-Line Manual. In order to use this
Network Scanning System, it will be necessary for you to install the TWAIN source and other scanner
utilities from the CD-ROM onto an appropriate computer.
The following describes the procedure to access the Main Menu on the [SoftwareLibrary] CD-ROM.
* The actual screen will differ depending upon the model of your scanner.
1. Run Windows. Quit all other applications that may be open.
2. Insert the CD-ROM that is included with the scanner into the CD-ROM drive of your computer.
3. Licence Agreement will be displayed. If you agree with the conditions contained there in, click on
[Accept]. If this screen does not appear after you insert the CD-ROM, open the CD-ROM window to
access its contents and double-click on the [setup.exe] file.
Page 1-3
Page 22

1-2 Using the [Software Library] CD-ROM
1-2-1 Contents of the CD-ROM
Click on [Scanner Utilities] in the Main Menu.
The contents of the Scanner Utilities CD-ROM that you can access are displayed as selectable items in the
Main Menu screen.
Page 1-4
Page 23

1-2 Using the [Software Library] CD-ROM
The following offers a basic outline of each of these available items. Click on the desired item to access it.
(1) Scanner Utilities
• Address Editor
This item installs the “Address Editor” in the computer. Using this utility enables you to register or edit the
contents of the scanner’s Address Book (shared Address Book). This utility is used by the administrator in
order to manage that Address Book. If there are multiple scanners accessing the Address Editor, the same
destination list can be easily registered into all of these scanners. Network settings as well as scanner
default settings can also be made using the Address Editor utility. This utility should be installed in one
computer on the same network as the scanner. (Refer to page 3-26.)
• Scanner File Utility
This item installs the “Scanner File Utility” in the computer. Using this utility enables you to have scanned
image data sent from the scanner to a network computer, with the resulting file then compressed and
saved into the designated folder on that computer. If there are going to be multiple destination computers
designated for reception of such data, this utility should be installed in each of those computer. (Refer to
page 3-4.)
• Address Book
This item installs the “Address Book” in the computer. Using this utility enables you to create and use your
own personal destination list. By selecting the [Private book] tab on the scanner’s operation panel, the
personal Address Book that you are allowed to use will be displayed and you will be able to select the
desired destinations from that data. This utility should be installed in each computer on the same network
that will use the scanner. (Refer to page 3-71.)
• DB Assistant
This item installs the “DB Assistant” in your computer. Using this utility enables you to add file information
as keywords to scanned image data files which can then be used when searching for that file. If you use
the DB Assistant to register the folder which was designated using the Scanner File Utility and select
“Database Connection” in the scanner’s operation panel, you can connect to your computer from the
scanner and verify the contents of the designated folder directly from the scanner’s operation panel. This
utility should be installed in only one computer. (Refer to page 3-119.)
Page 1-5
Page 24

1-2 Using the [Software Library] CD-ROM
(2) TWAIN Source
This item installs the “TWAIN Source” in the computer. Once this driver is installed, you will be able to
operate the scanner and use the scanned image data right away using a TWAIN-compatible application on
the computer in which the TWAIN source is installed. If there are going to be multiple computers using this
capability, the TWAIN source should be installed in each of those computers. (Refer to page 3-99.)
Page 1-6
Page 25

1-2 Using the [Software Library] CD-ROM
1-2-2 On-Line Manual
The On-Line Manual that is on this [Document Library] CD-ROM is prepared in a PDF (Portable Description
File) format and can only be viewed using the Adobe Acrobat Reader application.
Thus, prior to reading the On-Line Manual, you will first need to install Adobe Acrobat Reader on your
computer.
IMPORTANT! Adobe Acrobat Reader should be used in accordance with the contract conditions
set forth by Adobe Systems Incorporated.
Page 1-7
Page 26
1-3 Using the Scanner Function
The following gives an explanation of the scanning functions of your copier. Make the appropriate settings
according to your scanning needs.
For more detailed information regarding the setting procedures for the functions in each different scanner,
refer to the <Setup Edition> of your Operation Guide.
Basic settings
Select original size
Input size
Select sending
size
Scanning
resolution
Orig. set direction
File type
Selects the available original sizes (scanning area).
Selects the desired scanning area based on the entered
original size.
Selects the available image transmission sizes (size of
the transmitted image).
Sets the desired level of fineness (resolution) at which
the original will be scanned.
Specifies the position of the top edge of the original once
the original is set.
Sets the desired format of the image file.
Page 1-8
See page
1-13
See page
1-13
See page
1-14
See page
1-14
See page
1-15
See page
1-15
Page 27
1-3 Using the Scanner Function
Image quality settings
Scanning density
Original image
quality
JPEG level set
Color Mode
B & W Mode Sets the desired Black & White mode.
Adjusts the density of the scanned image to a desired
value.
Sets the appropriate image quality mode in order to have
the image processed according to the specific type of
original being scanned.
Sets the desired JPEG quality level.
Sets the desired color mode.
See page
1-16
See page
1-16
See page
1-16
See page
1-17
See page
1-17
Page 1-9
Page 28
1-3 Using the Scanner Function
Other settings
Original type
Erase
Output by page
Continuous
scanning
Auto selection
File name input
With this mode, the two facing pages of an open-faced original such as a magazine, book or the like, as well as the two
sides of a 2-sided original, can each be scanned separately.
With this mode, you can erase the dark shadows and lines
that appear when scanning originals such as books,
magazines, etc.
With this mode, the original is scanned and a file is created
and sent for each individual page of the scanned original.
After scanning one original, other originals can be scanned
under the same job.
With this mode, originals of different sizes can be set and
scanned together.
Designate the file name.
See page
1-18
See page
1-19
See page
1-19
See page
1-20
See page
1-20
See page
1-21
Page 1-10
Page 29
1-3 Using the Scanner Function
Other settings
Full scanning
Centering
Uncompress
Scanning
Continuous
sending
Priority
"Input file name"
Selec. of
senders (users)
With this mode, you can scan the entire area of
the selected original size as an image.
With this mode, you can center the image on the scan paper
when you scan onto a peper size that is larger than of
the original.
You can select whether to perform compression or not
when scanning image data.
You can select whether to perform
continuous scanning or not.
You can select whether to perform Priority Input
file name or not.
Perform "senders (users)" setting in advance.
See page
1-22
See page
1-23
See page
1-24
See page
1-26
See page
1-29
See page
1-33
Page 1-11
Page 30
1-3 Using the Scanner Function
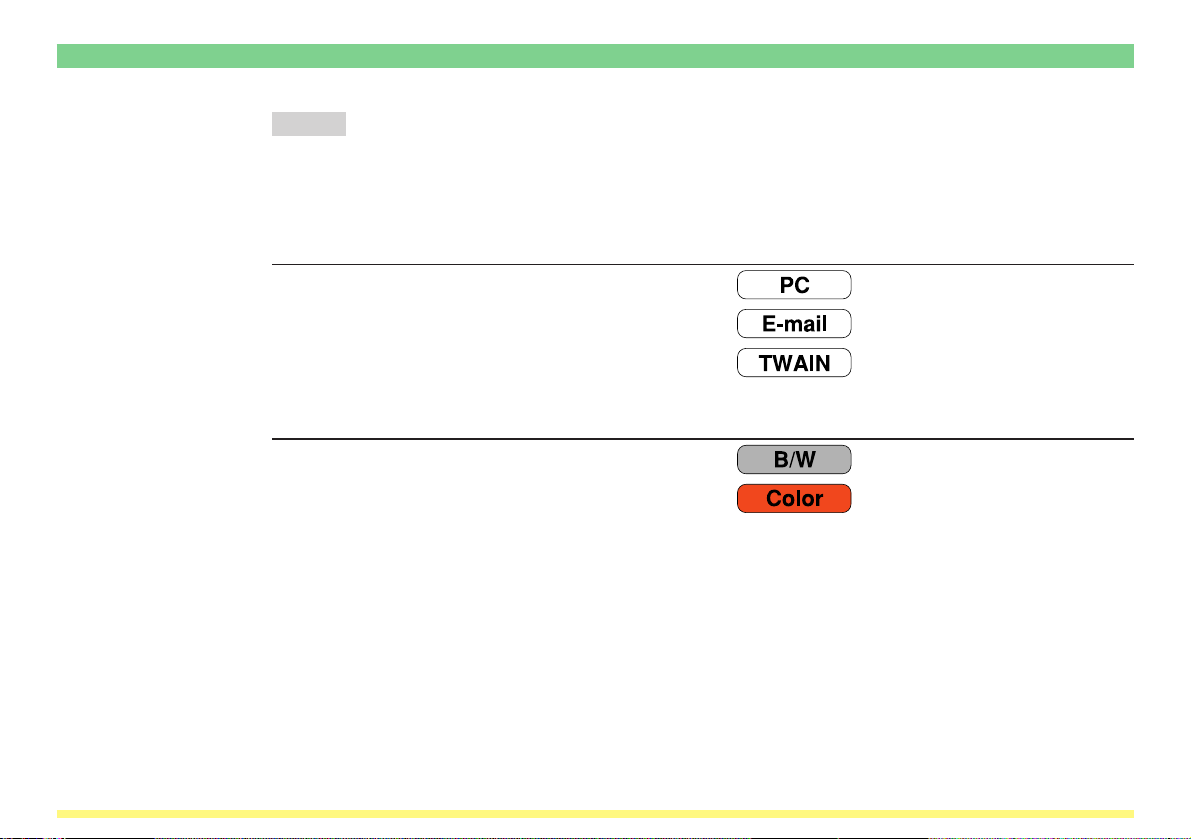
Note Available function symbols
Some functions can or can not be used depending on the transmission mode that is selected or
the type of copier in use. The following symbols indicate the transmission modes and types of
copiers under which that particular function can be used.
Transmission mode symbols
Send to PC .....................................................................
Send E-Mail ....................................................................
TWAIN (the Waiting Scan checkbox is selected) ..........
Symbols for functions that are only available in monochrome or color copiers.
For monochrome copiers only ........................................
For color copiers (color & monochrome) only .................
Page 1-12
Page 31

1-3 Using the Scanner Function
1-3-1 Basic Settings
(1) Original size selection
(“Select original size”)
The original sizes (scanning area) available for selection are as follows.
• Inch specifications: Auto, 11" x 17", Computer Form (11" x 15"), 8-1/2" x 14", 8-1/2" x 11" and
5-1/2" x 8-1/2"
* A4 is also available in monochrome copiers.
• Metric specifications: Auto, A3, Computer Form (11" x 15"), B4, Folio, A4, B5, A5 and B6
* 11" x 8-1/2" is also available in monochrome copiers.
* Factory default setting: Auto
• Custom original size (“Input size”)
Align the original with the left-rear portion of the platen and select the desired scanning area.
Acceptable scanning area ..... Length: 2" – 11-5/8", 50 mm – 297 mm
Width: 2" – 17", 50 mm – 432 mm
Width: 2" – 17", 50 mm – 420 mm (for KM-C830/830D)
* The original size cannot be entered manually when using an optional Document Processor.
Page 1-13
Page 32

1-3 Using the Scanner Function
(2) Image transmission size selection
(“Select sending size”)
The image transmission sizes (size of the transmitted image) available for selection are as follows.
• Inch specifications: Auto, 11" x 17", 8-1/2" x 14", 8-1/2" x 11" and 5-1/2" x 8-1/2"
* A4 is also available in monochrome copiers.
• Metric specifications: Auto, A3, B4, Folio, A4, B5, A5 and B6
* Factory default setting: Auto
* 11" x 8-1/2" is also available in monochrome copiers.
* This setting is not available when the original size is custom selected.
* When you select a scanning resolution of 600 dpi, color scanner is not possible to select an image
transmission size larger than the original size.
* This function is only available with scanners that possess a touch panel.
(3) Scanning resolution selection
(“Scanning resolution”)
Sets the desired level of fineness (resolution) at which the original will be scanned. The higher the resolution
value is, the finer the image will be. In this case, however, the size of the resulting file (data volume) will
become larger and the scanning time will be increased.
•“600 dpi”, “400 dpi”, “300 dpi” or “200 dpi”
* The image resolution that is generally used for viewing on computer screens is 96 dpi for a Windows
environment and between 150 dpi and 600 dpi for printing.
* A high scanning resolution needs to be selected when enlarging or printing an image.
Page 1-14
Page 33

1-3 Using the Scanner Function
(4) Original orientation selection
(“Orig. set direction”)
Specifies the position of the top edge of the original once the original is set.
•“Back Edge” or “Left top corner”
* If the original set direction is not selected, the scanning may not be performed correctly.
* This function is only available with scanners that possess a touch panel.
(5) Image file format selection (“File type”)
Sets the desired format of the image file.
Monochrome copiers “Black & White” ..... TIFF, PDF
“Full Color” .............................................. JPEG, PDF, TIFF
“Gray” ...................................................... JPEG, PDF, TIFF
“A.C.S” (Auto Color System) ................... JPEG, PDF, TIFF
* The original is scanned and a file is created and sent for each individual page of the scanned original when
you set JPEG format.
Page 1-15
Page 34

1-3 Using the Scanner Function
1-3-2 Image Quality Settings
(1) Scanning density adjustment
(“Scanning density”)
Adjusts the density of the scanned image to a desired value. (This setting will also affect the density of the
machine’s copier functions.)
•“Original Image Type” (manual switching)
(2) Image quality selection
(“Original image quality”)
Sets the appropriate image quality mode in order to have the image processed according to the specific
type of original being scanned.
Photo mode ........................... Select this mode when the original contains mostly photographs.
* This setting is not available in the Send E-mail function.
Text+Photo mode .................. Select this mode when the original contains a mixture of both text and
photographs.
Text mode ............................. Select this mode when the original contains mostly text.
OCR mode ............................ Select this mode when creating image data that will be used with OCR (Optical
Character Recognition) software for converting the characters into text data.
(3) JPEG quality selection (“JPEG level set”)
Sets the desired JPEG quality level.
1 .......... “Low” 4
2 5 ......... “High”
3 .......... “Middle”
The higher the image quality is, the larger the resulting file size (data volume) will become. Be sure to select
the file type when you set the JPEG quality level.
Page 1-16
Page 35

1-3 Using the Scanner Function
(4) Color mode selection
(“Color mode”)
Sets the desired color mode.
•“A.C.S” (Auto Color System) ... Automatically determines whether the original is a black and white or a
•“Full Color” .............................. Performs full color scanning.
•“Black & White” ....................... Performs monochrome scanning.*
*1: When a function other than those bearing the symbol [B/W] has been selected for the transmission
mode, scanning will be performed in grayscale.
(5) B & W mode selection
(“B & W setting”)
Sets the desired B & W mode.
If you select “B & W”, the file size will be smaller than the others.
If you select “Gray scale”, the originals shading will be retained.
* This function is only available with scanners that possess a touch panel.
color original and selects the appropriate mode for scanning.
1
Page 1-17
Page 36

1-3 Using the Scanner Function
1-3-3 Other settings
(1) Original type mode
(“Original type”)
With this mode, the two facing pages of an open-faced original such as a magazine, book or the like, as well
as the two sides of a 2-sided original, can each be scanned separately. You can select the binding method
when using a monochrome copier.
“1 side” ..... Select this setting when you want to scan only one side of the original.
“2 side” ..... Select this setting when you want to scan the front and back sides of two-sided originals as
separate images.
•“Left/Right”•“To p ”
* When using originals where the top and bottom are reverse on the front and back sides
(“To p”), the image for the back side of the original will be rotated by 180 degrees before
scanning.
* An optional Document Processor is required for page separation of 2-sided originals.
* When setting the original, make sure that the positioning of the top edge is correct.
“Book” ...... Select this setting when you want to scan the two facing pages of an open-faced original such
as a magazine, book or the like into separate page data.
• Binding direction: Select here the direction that the book-type original is opened. For example,
if “Left” is selected, the left page will be scanned first and then the right page.
•“Right”•“Left”
* Set book-type originals with their top edge towards the rear of the scanner.
* When using book-type originals, only 11" x 8-1/2", 11" x 17"R, B5R, B4, A5R, A4R
and A3 size originals and 8-1/2" x 5-1/2", 11" x 8-1/2", B6, B5, A4 and A5
transmission sizes can be used with the page separation mode.
Page 1-18
Page 37

1-3 Using the Scanner Function
(2) Border erase mode (“Erase”)
With this mode, you can erase the dark shadows and lines that appear when scanning originals such as
books, magazines, etc.
•“Sheet Erase” ......... Select this setting when you want to erase the surrounding border of the original.
Border
•“Book Erase” .......... Select this setting when you want to erase the surrounding border as well as the
center line of the original.
Border Center
* It is possible for you to select the size of the border that will be erased.
(3) Output by page function (“One page per file”)
With this mode, the original is scanned and a file is created and sent for each individual page of the scanned
original.
If this function is set to “off” when scanning multiple originals, all of the originals will be scanned and saved
into a single file.
Page 1-19
Page 38

1-3 Using the Scanner Function
(4) Continuous scanning function
(“Continuous scanning”)
After scanning one original, other originals can be scanned under the same job. When this function is turned
ON, each time an original is scanned a screen will appear to ask you whether to continue scanning other
originals or not.
* This function can be used when the “Waiting Scan” checkbox is selected for scanning an image using a
TWAIN compatible application.
(5) Filing mode (“Auto selection”)
With this mode, originals of different sizes can be set and scanned together during continuous scanning
(refer to “(4) Continuous scanning function” above) from an optional Document Processor. The following
combinations of original sizes can be used in this mode.
• 11" x 17" and 8-1/2" x 11"
• 8-1/2" x 14" and 8-1/2" x 11"
• A3 and A4
• B4 and B5
<Example>
Page 1-20
Page 39

1-3 Using the Scanner Function
(6) Default file name (“File name input”)
In the initial mode, the default file name will be set automatically. Change the file name manually as
necessary.
* When the “Priority "Input file name"” setting is turned ON (page 1-29), the “File name Input” key will be
moved from the “Edit” Tab to the “Basic” Tab. (In its place, the “Original type” key will be moved to the
“Edit” Tab.) When you touch that “File name Input” key, a screen which allows you to enter a desired file
name will appear instead of the screen above.
* This function is only available with scanners that possess a touch panel.
Page 1-21
Page 40

1-3 Using the Scanner Function
(7) Full scanning
(“Border erase modes”)
With this mode, you can scan the entire area of the selected original size as image when this function is set
to “ON”. You can scan the original to one size smaller when this function is set to “OFF”. If you scan the
original that is filled its corner with the contents, a photo and so on, this function is set to “ON”.
If this function is set to “ON” in the initial mode, all of the originals will be scanned with “Full scanning”.
* Factory default setting: OFF
* If this function is set to custom original size (type) under “No default setting, original size entering” ,
original will always be scanned with “Full scanning”.
* The margin (blank) space may appear slightly even if “Full scanning” is set to “ON”.
* This function is only available with scanners that possess a touch panel.
Scanning
area
Full scanning “OFF”
Page 1-22
Scanning
area
Full scanning “ON”
Page 41

1-3 Using the Scanner Function
Centering “ON”
Scanning
area
Scanning
area
Scanning
area
Centering “OFF”
(8) Centering
(“Centering/Image shift mode”)
When the ratio for the length and width of the scan image does not fit, it may cause the margin being
enlarged. With this mode, you can center the image on the scanning image when this function is set to
“ON”. If this function is set to set to “ON” in the initial mode, all of the originals to be scanned will be
centered on scanning image.
* Factory default setting: OFF
* “Centering” setting is available by KM-3035/4035/5035/4530/5530/6330/7530/C850/C850D/C2630/
C2630D.
• When the transmitting size that the ratio of the original size and length/width is different is
selected.
Page 1-23
Page 42

1-3 Using the Scanner Function
1-3-4 “Uncompress scanning” setting
This scanner uses MMR compression when scanning image data. In this case, when compressing the dots
(especially the closely spaced dots which make up the more dense areas of, for example, photographs in
printed material, and can be seen when looking closely with a magnifying glass) such as in photographs and
grayscale images, the resulting data volume may actually be greater than before it was compressed. You
can select whether or not to have compression performed automatically in cases such as these when the
compressed data is greater that the original data.
* “Uncompress scanning” setting is available by KM-3035/4035/5035/4530/5530/6330/7530/C850/C850D/
C2630/C2630D.
<Making the setting>
1. Press the default (*) key on the scanner's operation panel and then access the System Basic screen on
the touch panel. Refer to “(3) Making settings from the touch panel” on page 2-2 of the Set-Up Edition
of your Operation Guide for the procedure on accessing the System Basic screen.
2. Use the “▲” and “▼” cursor keys to select “Uncompress scanning” and then touch the “Change #” key.
The Change Settings screen will appear.
Page 1-24
Page 43

1-3 Using the Scanner Function
3. To stop compression in cases when the volume of the compressed data will end up being greater that
the original data, touch the “On” key. To have compression carried out regardless of the data volume,
touch the “Off” key. Touch the “Close” key to register the change to that setting.
* The factory default setting is “On”.
* Some application software does not allow the use of compressed and non-compressed files in the same
folder. Select “Off” for this setting when using such software.
Page 1-25
Page 44

1-3 Using the Scanner Function
1-3-5 “Continuous sending” setting
If the “Continuous sending” setting is turned ON when you use the Send to PC or Send E-mail functions to
send scanned image files, the touch panel will return to the initial screen for that function (“Ready to scan.”
is displayed) with the same transmission settings that were used for the previous operation (user,
destination, etc.). In this case, it is not necessary to make any changes in order to send other image files
using the same settings.
* When the “Continuous sending” setting is turned ON, be sure to touch the “Cancel” key in the Scan to PC
or Send E-mail screen that appears once you finish the scanning procedure. If you do not touch the
“Cancel” key, that screen will not go out and it will not be possible to use the Copier, Printer and Fax
functions of this machine. Since others may need to use the machine besides yourself, please be sure to
touch the “Cancel” key when you are finished.
* If “Permit file overwrite” is selected in the computer’s Scanner File Utility when you are using the Scan to
PC function, previous files saved to that computer may be overwritten if a duplicate file name is use. Be
aware of this fact when designating file names for transmission, especially when the “Continuous sending”
setting is turned ON.
* This function is only available with scanners that possess a touch panel.
<Making the setting>
1 . Press the default (*) key on the scanner’s operation panel and then access the System Basic screen on
the touch panel. Refer to “(3) Making settings from the touch panel” on page 2-2 of the Set-Up Edition of
your Operation Guide for the procedure on accessing the System Basic screen.
2 . Use the “▲” and “▼” cursor keys to select “Continuous sending” and then touch the “Change #” key. The
Change Settings screen will appear.
Page 1-26
Page 45

1-3 Using the Scanner Function
3 . To select the Continuous Sending function as the default and, thereby, enable multiple scanning
operations at the same settings, select “On”. To have the touch panel return to the default scanner
settings after each scanning operation, select “Off”. Touch the “Close” key to register the change to that
setting.
* The factory default setting for inch specification scanners is “Off” while for metric specification
scanners it is “On”.
<Switching between standard transmission and Continuous Sending >
1 . Access the Scan to PC or Send E-mail screen, as appropriate, (“Ready to scan.” is displayed). The
following explains a scanning procedure using the Send to PC function.
Refer to “(3) Scanning under the Scan to PC and Send E-mail functions” on page 3-1 of the Set-Up
Edition of your Operation Guide for the procedure on accessing the Scan to PC and Send E-mail
screens.
Page 1-27
Page 46

1-3 Using the Scanner Function
2.“Scan to PC-Sending” will be displayed on the left side of the Scan to PC screen shown in step 1. This
indicates that you are using the standard transmission mode. To switch to the Continuous Sending
function, touch the “Contin. TX to” key.
3.“Scan to PC-Continuous TX” will now be displayed on the left side of the Scan to PC screen. This
indicates that you are now using the Continuous Sending function. To switch back to standard
transmission, touch the “Sending to” key.
Page 1-28
Page 47

1-3 Using the Scanner Function
1-3-6 “Priority "Input file name"” setting
If the “Priority "Input file name"” setting is turned ON, the “File name Input” key will be moved from the “Edit”
Tab to the “Basic” Tab for easier access in the Scan to PC and Send E-mail screens (“Ready to scan.” is
displayed). (In its place, the “Original type” key will be moved to the “Edit” Tab.) This setting is convenient if
you often need to change the file name for transmission.
* If you turn the “Priority "Input file name"” setting ON and you touch the “File name Input” key in the “Basic”
Tab, you can more easily skip the step in which you must select automatic or manual entry of the file name
and directly access the screen that allows you to enter the desired file name. (See page 1-21.)
* This function is only available with scanners that possess a touch panel.
<Making the default setting>
1 . Press the default (*) key on the scanner’s operation panel and then access the System Basic screen on
the touch panel. Refer to “(3) Making settings from the touch panel” on page 2-2 of the Set-Up Edition of
your Operation Guide for the procedure on accessing the System Basic screen.
2 . Use the “▲” and “▼” cursor keys to select “Priority "Input file name"” and then touch the “Change #” key.
The Change Settings screen will appear.
Page 1-29
Page 48

1-3 Using the Scanner Function
3 . To move the “File name Input” key from the “Edit” Tab to the “Basic” Tab, select “On”. To keep the “File
name Input” key in the “Edit” Tab, select “Off”. Touch the “Close” key to register the change to that
setting.
* The factory default setting for inch specification scanners is “Off” while for metric specification
scanners it is “On”.
<Using the scanner with the “Priority "Input file name"” setting turned ON>
1 . Access the Scan to PC or Send E-mail screen, as appropriate, (“Ready to scan.” is displayed). The
following explains a scanning procedure using the Send to PC function.
Refer to “(3) Scanning under the Scan to PC and Send E-mail functions” on page 3-1 of the Set-Up
Edition of your Operation Guide for the procedure on accessing the Scan to PC and Send E-mail
screens.
Page 1-30
Page 49

1-3 Using the Scanner Function
2 . If the “Priority "Input file name"” setting is turned ON, the “File name Input” key will be displayed in the
“Basic” Tab. Touch that key when you want to manually enter the file name. The File Name Input screen
that allows to enter the file name will appear.
* When the “Priority "Input file name"” setting is turned ON, the step in which you must select automatic
or manual entry of the file name will be skipped over.
Page 1-31
Page 50

1-3 Using the Scanner Function
3 . Enter the desired file name and touch the “Complete” key. The touch panel will return to the Scan to PC
or Send E-mail screen, as appropriate.
Page 1-32
Page 51

1-3 Using the Scanner Function
1-3-7 “Selec. of senders (users)” setting
Normally, when using the scanner you must first perform the procedure to select the user. However, the
“Selec. of senders (users)” setting is convenient when scanner use is restricted to certain users because, if
you register a user under User Number 001 and then turn this setting ON, you can skip that selection
procedure and use the scanner right away.
* If the “Selec. of senders (users)” setting is turned ON but User Number 001 is not registered, an error
message will appear and scanning will not be possible.
* This function is only available with scanners that possess a touch panel.
<Making the default setting>
1 . Press the default (*) key on the scanner's operation panel and then access the System Basic screen on
the touch panel. Refer to “(3) Making settings from the touch panel” on page 2-2 of the Set-Up Edition of
your Operation Guide for the procedure on accessing the System Basic screen.
2 . Use the “▲” and “▼” cursor keys to select “Selec. of senders (users)” and then touch the “Change #”
key. The Change Settings screen will appear.
Page 1-33
Page 52

1-3 Using the Scanner Function
3 . To skip the user selection step, select “On”. To require a user to be selected for each operation, select
“Off”. Touch the “Close” key to register the change to that setting.
* The factory default setting for inch specification scanners is “Off” while for metric specification
scanners it is “On”.
Page 1-34
Page 53

Section
2
Making Settings from a Web Browser
Page 2-1
Page 54

2-1 WebPage Functions
The WebPage Functions interface enables the management of certain scanner functions using standard
Internet Web browser software. Performing such tasks as changing network settings and basic scanner
settings, in addition to performing settings related to email and data transmission to a computer and the like,
can be easily accomplished over the network.
IMPORTANT! Cautions before use…
• The Internet Web browser software must be installed in your computer in advance. It is
recommended that you use version 4.0 or later of either Netscape Navigator or Internet Explorer.
• In order to use WebPage Functions, the TCP/IP address of the Scanner Interface Card must be
registered in advance. (Refer to page 2-13.)
Page 2-2
Page 55

2-2 Index of Objectives
The following table lists, by objective, the different settings that are possible using the WebPage Functions
interface. Use this table as a reference index when making the corresponding settings.
Make networkrelated settings
Set the administration password
Change scanningrelated default settings for the scanner
Register the
transmitting site’s
email address
Register the
destination
computer
Register the
destination site’s
email address
Contains explanations on the network-related settings
for the Scanner Interface Card.
Contains explanations on the administration password
that must be entered whenever you access the WebPage
Functions interface.
Contains explanations on settings for scanning images,
such as the type of originals and the scanning resolution.
Contains explanations on registering the transmitting
site’s email address for sending email (scanned data)
from the scanner to the computer.
Contains explanations on registering the destination
computer for sending data from the scanner to the
computer.
Contains explanations on registering the destination site’s
email address for sending email (scanned data) from the
scanner to the computer.
See page
2-12
See page
2-15
See page
2-21
See page
2-23
See page
2-28
See page
2-38
Page 2-3
Page 56

2-3 Cautions
2-3-1 If you are having trouble connecting to the scanner from a Web browser…
If you are trying to make settings related to the Scanner interface Card or to utilities in the scanner itself
from a Web browser and those settings are not being applied properly regardless of the fact that the
network settings in the scanner itself are correct, turn the power to the scanner off and then back on again.
The Scanner Interface Card will then reboot. This will take a few minutes, so please wait until the reboot is
completed.
2-3-2 If a message appears which informs you that you can not connect, such as
“Could not open Internet Site XXXXX”...
Check the following point:
• Is the initial mode screen (“Ready to copy.”) displayed on the scanner?
2-3-3 If “Cannot Find Page” appears…
Check the following point:
• Is the scanner fully up and running?
2-3-4 If a message appears which informs you that access is not allowed, such as “xxx
Access is not allowed”...
Check the following point:
• Is another operation in progress on the copier-scanner?
→ If the initial mode screen is NOT displayed, return to that mode screen.
→ If NOT, wait for awhile before trying to connect again.
→ Confirm that the operation is completed and that the message display has returned to the Select
Scanner Function screen, and then attempt the desired scanning operation again.
Page 2-4
Page 57

2-4 Using the WebPage Functions Interface
1. Start up your Internet Web browser software.
2. Type the IP address or host name of the Scanner Interface Card into the address field.
3. Press the Enter key on your computer keyboard.
4. The home page for WebPage Functions will appear.
*The acual windows will differ depending upon the mdel of your scanner.
Page 2-5
Page 58

2-4 Using the WebPage Functions Interface
5. If the administration password has been registered, the following dialogue box will appear when you
click on one of the setting links in the menu frame, such as System Basic Setting. In this case, type in
the correct password and click on the OK button.
Page 2-6
Page 59

2-5 The Home Page
The home page is constructed of 3 different frames.
• The top frame ..................... Displays the IP address of the Scanner Interface Card and the status of the
scanner. (Refer to page 2-8.)
The top frame
The menu frame
• The menu frame ................. Allows selection of various settings related to the Scanner Interface Card and
the scanner itself. (Refer to page 2-9.)
• The main frame ..................Displays system information in regard to the scanner. (Refer to page 2-10.)
Page 2-7
The main frame
Page 60

2-5 The Home Page
2-5-1 The Top Frame
The top frame shows the IP address of the Scanner Interface Card and the status of the scanner.
<IP Address>
• Displays the IP address that is registered for the Scanner Interface Card.
<Scanner Status>
• If the scanner is in a “Ready” state, “● OK” will be displayed under Scanner Status.
• If the scanner is not “Ready”, “● OTHER” will be displayed.
* To check the status of the scanner when “O OTHER” is displayed, look under Scanner Status
Information.
* The scanner status will be checked and updated every minute.
Page 2-8
Page 61

2-5 The Home Page
2-5-2 The Menu Frame
The menu frame allows selection of various settings related to the Scanner Interface Card and the scanner
itself.
* You can select each item in the menu frame one after another. However, if you happen to select an item in
the middle of setting that same item, the information that you have already entered will be deleted.
• Home
Select Home when you want to return to the home page while you are accessing the Scanner Interface
Card with your Internet Web browser software.
• System Setting
This item consists of 3 settings which can be performed in relation to the Scanner Interface Card.
• System Basic Setting ............... For making network-related settings.
• Scanner Default Setting ........... For making the default settings for the main functions of the scanner.
• Sender (User) List .................... For registering the list of those users who will be allowed to use the
• Reset .......................................... For resetting networking of the Scanner Interface Card only or all
• Send E-mail Setting
This item consists of 2 basic settings which can be performed in relation to sending email (scanned data).
• E-mail Basic Setting ................. For making basic settings related to sending email (scanned data)
• Destination List (E-mail) .......... For registering destination email addresses
network scanning functions (Send E-mail and Send to PC).
network settings to Factory default.
• Scan to PC Setting
Select when you want to make settings related to sending files to the computer where they will be saved.
• Destination List (PC) ................ This item allows you to register destination computers, etc.
Page 2-9
Page 62

2-5 The Home Page
2-5-3 The Main Frame
The main frame displays system information in regard to the scanner. Selecting the language that you want
to use is also accomplished here.
* The registered default values will be displayed during start up of WebPage Functions.
• Scanner Status Information
When “● OTHER” is displayed under Scanner Status on the home page, click on the Refresh button at
the bottom of the screen and the status of the scanner will be displayed here. When “● OK” is displayed
under Scanner Status, “Ready to Scan” will be displayed here.
<Scanner Status>
The following 6 status indications can be received from the scanner: “Ready to Scan”, “Using Scanner”,
“Paper Misfeed in Feeder”, “System Error”, “Processing” and “Energy Save Mode”
• Ethernet Address
Displays the MAC (Medium Access Control) address of the Scanner Interface Card.
• Scanner Firmware
Displays the firmware version of the scanner.
• Network Firmware
Displays the firmware version of the Scanner Interface Card.
• Color Profile(only available color scanners)
Displays the file name of the standard color profile.
• Language
You can select the language that you want to use in WebPage Functions.
Page 2-10
Page 63

2-6 System Setting
Settings for the Scanner Interface Card are performed under the System Setting items. The settings for
each item can only be changed when the scanner is in the “Ready” state.
2-6-1 Setting Conditions
It is necessary for you to enter the administrator’s password in order to access the settings related to either
the Scanner Interface Card or to the scanner itself.
• The administration password can be changed through the Administrator item under System Basic
Setting. There is no password registered in the factory default settings for the Scanner Interface Card.
Page 2-11
Page 64

2-6 System Setting
2-6-2 System Basic Setting
You can make network and administrator-related settings for the Scanner Interface Card here.
Select “SMTP Authentication” to set the SMTP Authentication.(Refer to page 2-17)
Select “IP Filter” to set the IP Filter.(Refer to page 2-19)
IMPORTANT! BE SURE to click on the Registration button after you have completed the desired
settings.
Page 2-12
Page 65

2-6 System Setting
[Set up] - [Network]
• Host Name
Register the host name of the scanner (up to 32 single-byte characters) in this field.
• IP Address
Register the IP address of the Scanner Interface Card in this field in the following form:
XXX.XXX.XXX.XXX
• Subnet Mask
Register the subnet mask of the Scanner Interface Card in this field in the following form:
XXX.XXX.XXX.XXX
• Default Gateway
Register the default gateway of the Scanner Interface Card in this field in the following form:
XXX.XXX.XXX.XXX
• DHCP/BOOTP
The DHCP and BOOTP can be set to either “ENABLE” or “DISABLE”. The factory default setting is
“ENABLE”.
• RARP
The RARP can be set to either “ENABLE” or “DISABLE”. The factory default setting is “ENABLE”.
• ARP/PING
The ARP/PING can be set to either “ENABLE” or “DISABLE”. The factory default setting is “ENABLE”.
Page 2-13
Page 66

2-6 System Setting
• DNS Server (Pri.)
When a Host Name is used for transmitting data under an environment that uses a DNS server, register
the IP address of the primary DNS server in this field in the following form: XXX.XXX.XXX.XXX
• DNS Server (Sec.)
Register the IP address of the secondary DNS server in this field in the following form:
XXX.XXX.XXX.XXX
• DNS Domain Name
Register the domain name (up to 254 characters) in this field.
• WINS Server (Pri.)
When WINS (Windows Internet Name Service) is used to resolve the IP address using the name of the
computer, register the IP address of the primary WINS server in this field in the following form:
XXX.XXX.XXX.XXX
• WINS Server (Sec.)
Register the IP address of the secondary WINS server in this field in the following form: XXX.XXX.XXX.XXX
• Scope ID
Register the Scope ID in this field.
• SMTP Server Name
Register the IP address of the SMTP server in this field in the following form: XXX.XXX.XXX.XXX or
type the host name of the SMTP Server (up to 32 single-byte characters) in this field.
• SMTP Port No.
Register the SMTP port number in this field. The port number of the factory default is 25.
Page 2-14
Page 67

2-6 System Setting
• Registration button
Click on this button to have all of the selected settings registered in the Scanner Interface Card.
• Reset button
Click on this button to return all of the settings back to their factory default values.
• DB Assistant
Type the IP address or the host name of the PC which DB Assistant is installed (up to 32 single-byte
characters) in this field.
IMPORTANT! If you go to another screen without clicking on the Registration button, any settings
[Set up]-[Administrator]
• E-mail address
Type the e-mail address of the administrator here. File, such as Log file of the scanner and error report will
be sent to “E-mail address of the Administrator” as E-mail.
• Change password
If you want to change the administration password, select “Ye s ”. If you do NOT want to change it, select
“No”.
that have not been properly registered will be deleted and, therefore, will NOT be
registered in the Scanner Interface Card.
• Old password
If a password is currently registered, type that password into this filed.
Page 2-15
Page 68

2-6 System Setting
• New Password
If you want to change the administration password, type a new password into this field (up to 8
characters).
* The password that you register here is NOT related to the 4-number password that is required in order to
access the Network screen in the scanner itself.
• Confirm new password
Type the same password as you did in the New Password field in here.
* This procedure is necessary in order to ensure that the password was entered correctly.
• Registration button
Once you type the new administration password into both the New Password and Confirm new
password fields and then click on this button, the new password will be registered in the Scanner
Interface Card.
* If you leave the Confirm new password field blank, or the password that you typed into that field does
not match the password that you typed into the Change admin password field, an error message will
be displayed.
IMPORTANT! BE SURE to click on the Registration button after you set or change the password.
• Firmware Updates
Unauthorizede firmware updates present a potenially serious security threat. Someone could
unintentionally or maliciously render the networking inperable by updating the network component with
modified or incorrect firmware . the scanner network utilities provide security measures to prevent
unauthorized firmeware updates. If you allow “Update”, select “Yes”. If you do NOT allow it, select “NO”.
Page 2-16
Page 69

2-6 System Setting
[SMTP Authentication]
The authentication entries on the SMTP page are used to supply credentials when the SMTP server
requires authentication for sending e-mail. If the SMTP server is off-site, such as at an ISP, it will almost
certainly require authentication for sending e-mail.
IMPORTANT! Even when the SMTP server is on-site, authentication may be essential for
To supply authentication credentials to the SMTP server:
* Once the setting for SMTP Authentication (for Administrator) is performed in this field, you can perform it
for each user (up to 40 users). (Refer to page 2-26.)
1. Open the scanner Home page by entering the scanner’s IP address in the web browser.
2. Select the System Basic Setting on the menu frame.
3. Select the [SMTP Authentication] on the main frame.
preventing the SMTP server from becoming an open mail relay. The following
discussion relates to Microsoft Exchange, but is generally applicable to other SMTP
servers as well.
Page 2-17
Page 70

2-6 System Setting
4. “Enable” Authenticaton.
5. Enter “Login Account Name” to use for “SMTP Authentication”.
6. If you want to enter the new administration password or change the registered administration password,
select “Yes ”. If you do NOT want to change it, select “No” and then, go directly to Step 9.
7. Type the new administration password into “New Password field”.
8. Confirm new password. Type the same password as you typed under the “New Password field” in step 6.
9. Click the Registration button to register the new settings.
Page 2-18
Page 71

2-6 System Setting
[IP-Filters]
This scanner offers the capability to filter IP raffic by source address, allowing only authorized addresses
access to specific protocols. For example, an IP filter could be set for HTTP/ Address Editor so only
specific addresses could access the scanner Home pages and Address Editor.
Filtering up to 4 IP address ranges is available for each of the following protocols:
HTTP / Address Editor, TELNET, AdminManager, TWAIN, NETWORK FAX (Only a model for Fax option installation)
IP Filters may be configured using Address Editor or the scanner Home pages. The procedure below
describes using a web browser for configuration.
1. Open the scanner Home page by entering the scanner’s IP address in the web browser.
2. Select the System Basic Setting on the menu frame.
3. Select the [IP-Filters] on the main frame.
Page 2-19
Page 72

2-6 System Setting
4. To enable filtering on any protocol, click the checkbox next to protocol name.
5. Enter up to four IP address ranges that will be allowed. to allow a single IP address, enter the Starting
Address Only.
6. Click the Registration button to register the new settings.
The configuration shown in the figure below allows only. IP address 10.10.10.1 - 50 and IP address
10.10.10.125 to access the scanner Home pages and Address Editor.
Page 2-20
Page 73

2-6 System Setting
2-6-3 Scanner Setting
Default settings related to scanning in images at the scanner are performed under this item.
You can also make settings related to certain scanning conditions and the default file name (for saving
scanned data).
Page 2-21
Page 74

2-6 System Setting
• Orig. Image Quarity (Only available in selecting monochrome)
You can select from among the following 4 original types in order to suit the originals that are actually
being scanned: Photo, Text, Text+Photo and OCR
• Resolution
You can select from among the following 4 scanning resolutions: 600 dpi, 400 dpi, 300 dpi and 200 dpi
• File Type
Sets the file format in which scanned data will be saved: TIFF, PDF and JPEG (Only available in Color
Copiers)
• JPEG Quality (Only available in Color Copiers)
Sets the JPEG Quality.
1 (Low) / 2 / 3 (Middle) / 4 / 5 (Hight)
• Output Color Type
Sets the output Color Type.
RGB / sRGB
• Multiple scanning
You can select whether to perform continuous scanning or not.
Yes/No
• File Name
Sets the file name (up to 16 single-byte characters) for saving scanned data.
Page 2-22
Page 75

2-6 System Setting
2-6-4 Sender List
You can register the list of those users who will be allowed to use the network scanning functions (Send
E-mail and Send to PC).
• Sender (User) List
Click on this item when you want to access the Sender (User) List screen where you can register, confirm
and edit information for up to 40 (No. 001 – 020 and No. 021 – 040) users.
* If a registration name has already been registered for any number, it will be displayed in the
corresponding text box.
If you click on the number for which you want to register or edit the related information, the Sender (User)
Setting screen will appear and you will be able to perform the desired settings.
IMPORTANT! BE SURE to click on the Registration button after you have completed the desired
settings in the Sender (User) List.
Page 2-23
Page 76

2-6 System Setting
• Sender (User) Setting
• Registration Number
The number that was selected in the Sender (User) List will be displayed here. This is merely information
in order to remind you which number from the list it is that you are registering or editing information for and
this number cannot be edited itself.
• Registration Name
Type the desired registration name into this field. The name registered here will be displayed in the sender
table and in the scanner’s operation panel.
* The registration name can be up to 16 single-byte characters in length.
Page 2-24
Page 77

2-6 System Setting
• E-mail address
The email address of the user can be up to 64 single-byte characters in length.
• Address of PC with “Address Book” installed
Type the host name or IP address of the computer that contains this user’s personal Address Book into
this field.
• Save number
Type the “save number” that corresponds to the destination computer that will be used under the Scan to
PC function into this field.
* It is possible to designate a “save number” between 001 and 100.
• Signature
Type the data (personal information) that will be transmitted with the email message into this field.
• Change password
If you want to change the administration password, select “Ye s ”. If you do NOT want to change it, select
“No”.
• Old password
If a password is currently registered, type that password into this filed.
• New Password
If you want to change the administration password, type a new password into this field (up to 8
characters).
* The password that you register here is NOT related to the 4-number password that is required in order to
access the Network screen in the scanner itself.
• Confirm new password
Type the same password as you did in the New Password field in here.
* This procedure is necessary in order to ensure that the password was entered correctly.
Page 2-25
Page 78

2-6 System Setting
• SMTP Authentication
Enter Login Account Name to use for User’s SMTP Authentication.
In order to set the SMTP Authentication for each user, the setting for SMTP Authentication must be
performed under System Basic setting in advance. (Refer to page 2-17)
• Change Password
If you want to change the User’s SMTP Authentication password, select Yes. If you do NOT want to
change it, select No.
• New Password
If you want to change the password to use for Use’s SMTP Authentication, type a new password into this
field (up to 8 characters).
• Confirm new password
Type the same password as you did in the New Password field in here.
* This procedure is necessary in order to ensure that the password was entered correctly.
• Registration button
Click on this button to have all the selected settings registered in the scanner. If you move to the next page
without clicking on the Registration button, any settings that have not been properly registered will be
deleted.
• Reset button
Click on this button to return all of the settings back to their factory default values.
• Delete button
Click on this button to delete the displayed user.
Page 2-26
Page 79

2-6 System Setting
2-6-5 Reset
If you click on any Reset button, a coresonding confirmation windows, will restart the scanner board or
returned its settings to their factory default values.
• Restart Networking Only
Restarts the scanning operation.
• Set All Network Settings to Factory default
Initializes all previous settings and returns them to their factory default values.
Page 2-27
Page 80

2-7 Scan to PC Setting
You can send scanned image files to a folder on a computer that was designated in advance, when you use
the Scanner Interface Card. This items explains how to register the destination computer.
* Refer to pages 2-35 through 2-44 for an explanation on the functions of the Send E-mail Settings.
2-7-1 Destination List
• Destination List (PC)
Click on this item when you want to access the destination address registration screen where you can
register, confirm and edit information for up to 20 (No. 001 to No. 100) destination computers.
* If a registration name has already been registered for any number, it will be displayed in the
corresponding text box.
If you click on the number for which you want to register the destination computer, the Destination PC
screen will appear.
• No.
The registration number is displayed here. Click on the number for which you want to register or edit
information in order to access the corresponding Destination Registration (PC) screen.
Page 2-28
Page 81

2-7 Scan to PC Setting
• Class
The registration type (single or group) is displayed here.
: Displayed for group registration
: Displayed for single registration
• Registration Name
The registered name is displayed here.
IMPORTANT! BE SURE to click on the Registration button after you have completed the desired
settings for the destination PC.
Page 2-29
Page 82

2-7 Scan to PC Setting
• Destination Registration (PC)
You can select the registration type (single registration or group registration).
If you click on the Single Regist. or the Group Regist. button, the corresponding Registration and Editing
screen will appear.
Page 2-30
Page 83

2-7 Scan to PC Setting
• Destination Registration (PC) [Single Registration]
You will be able to register and edit registration names, destination computers and destination “save
numbers” for each folder.
• Registration Number
The number that you selected from the Destination List will be displayed here. This is merely information
in order to remind you which number from the list it is that you are registering or editing information for and
this number cannot be edited itself.
• Registration Name
Type the desired registration name (name of the destination party) into this field. The name registered here
will be displayed in the destination computer table and in the scanner’s operation panel.
* The registration name can be up to 16 single-byte characters in length.
Page 2-31
Page 84

2-7 Scan to PC Setting
• Destination PC
Enter the destination computer’s IP address or host name into this field. If you enter both, the IP address
will normally be accessed prior to the host name.
* The host name can be up to 32 single-byte characters in length.
• Save Number
If you want to designate multiple destination folders in a single computer, enter the corresponding “save
number” of each folder.
* You can designate up to 100 (save numbers “1” to “100”) folders per computer.
• Registration button
Click on this button to have all of the selected settings registered in the scanner. If you move to the next
page without clicking on the Registration button, any settings that have not been properly registered will
be deleted.
• Reset button
Click on this button to return all of the settings back to their factory default values.
• Delete button
Click on this button to delete the displayed destination.
Page 2-32
Page 85

2-7 Scan to PC Setting
• Destination Group Registration (PC)
You will be able to register and edit information for groups of destination computers.
Choose the destinations that you want to register as a group and click on the checkbox next to the desired
number. Type the registration name and password for that group and click on the Registration button to
complete the registration of the destination group.
Page 2-33
Page 86

2-7 Scan to PC Setting
• Registration Number
The number that you selected from the Destination List will be displayed here. This is merely information
in order to remind you which number from the list it is that you are registering or editing information for and
this number cannot be edited itself.
• Change Group Password
Register the group password into this field.
If you want to change the password, select “Ye s ”. If you do NOT want to change it, select “No”.
• New Password
If you want to change the password number, type a new number into this field (up to 8 digits).
• Confirm new password
Type the same password as you did in the New Password field in here.
* This procedure is necessary in order to ensure that the password was entered correctly.
• Registration button
Click on this button to have all the selected settings registered in the scanner. If you move to the next page
without clicking on the Registration button, any settings that have not been properly registered will be
deleted.
• Reset button
Click on this button to return all of the settings back to their factory default values.
• Delete button
Click on this button to delete the displayed group.
Page 2-34
Page 87

2-8 Send E-mail Setting
The following explains the various settings for sending scanned images by email to a computer.
2-8-1 E-mail Basic Setting
Make basic settings related to sending email (scanned data) here.
IMPORTANT! BE SURE to click on the Registration button after you have completed the desired
settings.
1
2
Page 2-35
Page 88

2-8 Send E-mail Setting
• Item
1. Transmission Domain Setting .... Select from among Non-restricted sending, Permitted destination
* If you select Non-restricted sending, there will be no restriction under the Send E-mail function in
regard to the destination domain, and the information registered in the domain data field will be
ignored.
* If you select Permitted destination domain names, sending email via the Send E-mail function will
only be permitted only to the addresses that have a domain matching one of the registered domains.
* If you select Restricted destination domain names, sending email via the Send E-mail function will
NOT be permitted to the addresses that have a domain matching one of the registered domains.
2. Domain Data .............................. Register the domain information here.
* Each domain must be separated by a return and can be up to 500 single-byte characters in length.
* Up to 10 domains can be registered.
* By using an asterisk (*), you can designate a full range of domains in a single entry.
Example: *.co.jp
• Data Size
Designate the maximum image data size for each email sent under the Send E-mail function. Available
settings are: Non-restricted, High (2048 KB), Mid. (1024 KB) and Low (512 KB)
• Subject
Type the subject of the email message (up to 32 single-byte characters) into this field.
domain names, and Restricted destination domain names.
• Body
Type the text (content) of the email message into this field (up to 500 single-byte characters).
Page 2-36
Page 89

2-8 Send E-mail Setting
• Character Code
Designate the character code that will be used in the email message. You can select from among the
following character codes: US-ASCII (English), Shift-JIS (Japanese) and ISO-8859-1 (West Europe)
• Registration button
Click on this button to have all the selected settings registered in the scanner. If you move to the next page
without clicking on the Registration button, any settings that have not been properly registered will be
deleted.
• Reset button
Click on this button to return all of the settings back to their factory default values.
Page 2-37
Page 90

2-8 Send E-mail Setting
2-8-2 Destination List
• Destination List (E-mail)
Click on this item when you want to access the destination address registration screen where you can
register, confirm and edit information for up to 100 (No. 001 to No. 100) destination addresses.
* If a registration name has already been registered for any number, it will be displayed in the
corresponding text box.
If you click on the number for which you want to register the destination address, the Destination
Registration (E-mail) screen will appear.
Page 2-38
Page 91

2-8 Send E-mail Setting
• No.
The registration number is displayed here. Click on the number for which you want to register or edit
information in order to access the corresponding Destination Registration (E-mail) screen.
• Class
The registration type (single or group) is displayed here.
: Displayed for group registration
: Displayed for single registration
• Registration Name
The registered name is displayed here.
IMPORTANT! BE SURE to click on the Registration button after you have completed the desired
settings.
Page 2-39
Page 92

2-8 Send E-mail Setting
• Destination Registration (E-mail)
You can select the registration type (single registration or group registration).
If you click on the Single Regist. or the Group Regist. button, the corresponding Registration and Editing
screen will appear.
Page 2-40
Page 93

2-8 Send E-mail Setting
• Destination Registration (Single)
You will be able to register and edit registration names and destination email addresses for each number.
Page 2-41
Page 94

2-8 Send E-mail Setting
• Registration Number
The number that you selected from the Destination Address List will be displayed here. This is merely
information in order to remind you which number from the list it is that you are registering or editing
information for and this number cannot be edited itself.
• Registration Name
Type the desired registration name (name of the destination party) into this field. The name registered
here will be displayed in the destination list (E-mail) and in the scanner’s operation panel.
* The registration name can be up to 16 characters in length.
• E-mail address
Enter the destination’s email address into this field.
• Registration button
Click on this button to have all of the selected information registered in the scanner. If you do not click on
the Registration button, any information that has not been properly registered will be deleted.
• Reset button
Click on this button to return all of the settings back to their factory default values.
• Delete button
Click on this button to delete the displayed destination.
Page 2-42
Page 95

2-8 Send E-mail Setting
• Destination Group Registration (E-mail)
You will be able to register and edit information for destination groups (E-mail).
Choose the destinations that you want to register as a group and click on the check box next to the
number. Type the registration name and click on the Registration button to complete the registration of
the destination group.
Page 2-43
Page 96

2-8 Send E-mail Setting
• Registration Number
The number that you selected from the Destination List will be displayed here. This is merely information
in order to remind you which number from the list it is that you are registering or editing information for and
this number cannot be edited itself.
• Registration button
Click on this button to have all the selected settings registered in the scanner. If you move to the next page
without clicking on the Registration button, any settings that have not been properly registered will be
deleted.
• Reset button
Click on this button to return all of the settings back to their factory default values.
• Delete button
Click on this button to delete the displayed group.
Page 2-44
Page 97

Section
3
Additional Utilities
Page 3-1
Page 98

3-1 What Utilities are Included with this Product?
Scanner File Utility
The Scanner File Utility is used for sending graphic image
data that is prepared by the scanner to a designated folder
on a computer. This utility is also responsible for saving the
received data in that computer.
Address Book
The Address Book is the address directory utility that is
installed in your computer. Using this utility enables you to
create and use your own personal destination list. By
selecting the [Private book] Tab on the scanner’s operation
panel, the personal Address Book that you are allowed to
use will be displayed and you will be able to select the
desired destinations from that data.
Address Editor
The Address Editor is a utility tool that enables you to
register or edit the contents of the scanner’s Address Book
(the Shared Address Book). This utility should used by the
administrator when managing information in the Address
Book, etc. If there are multiple scanners accessing the
Address Editor, the same destination list can be easily
registered into all of these scanners.
TWAIN source
The TWAIN source is used for controlling the scanning
operation with a TWAIN-compatible application and having
that scanned image displayed in that application. The
scanned data can then be edited and/or saved in your
computer using that application.
Page 3-2
Page 99

3-1 What Utilities are Included with this Product?
DB Assistant
By adding file information to the scanned image data file,
the DB Assistant function lets you search for the corresponding file on your computer, or easily manage those
files.
This function include the PDF Keyword Assist option with
which you can add file information as keywords to the
scanned image data file, and the Database Assist option
with which you can save the file information as a separate
csv file.
The PDF Keyword Assist option also allows you to view on
the operation panel an index of the folder for saving data
which was designated in your computer.
Page 3-3
Page 100

3-2 Scanner File Utility
3-2-1 What is the Scanner File Utility?
The Scanner File Utility is used to receive graphic image data from a scanner into a computer. This utility
also compresses and saves the received data in the corresponding computer. Once the Scanner File Utility
is installed and the computer booted up again, the utility will also be started up automatically. In this case,
an icon that indicates the status of the Scanner File Utility will be displayed in the Windows Task Bar and the
utility will remain in a waiting state for data to be sent from the scanner. Other than installation of the utility,
the only operation necessary at the computer is to register in advance the desired destination folder and
folder password. After that, you only need to perform the appropriate procedure at the scanner and the
scanned image data will be saved into the designated folder.
* In order to use the Scanner File Utility, it is necessary for you to use the Address Editor, Address Book or
WebPage Functions and register in the scanner, in advance, the information regarding the destination
computer and designated folder.
(1) Preparations
First, perform the following set-up procedure in order to use the Scanner File Utility.
1. Install the Scanner File Utility into the desired computer. (Refer to page 3-7.)
2. Run the Scanner File Utility and register the folder into which you want the scanned data to be saved.
(Refer to page 3-11.)
3. Use the Address Editor, Address Book or a Web browser to register the IP address of the destination
computer, and the corresponding registration name and “save number”.
* Be sure to enter the same number as the “save number” (1 – 100) that you registered in the Save
Number field of the Scanner File Utility.
Page 3-4
 Loading...