

Page 1

1815
Advanced Operation Guide
Page 2

Caution
No liability is assumed for any damage caused by improper installation.
Notice
The information in this guide is subject to change without notification. Additional pages may be
inserted in future editions. The user is asked to excuse any technical inaccuracies or
typographical errors in the present edition.
No responsibility is assumed if accidents occur while the user is following the instructions in this
manual. No responsibility is assumed for defects in the printer’s firmware (contents of its
read-only memory).
This guide, any copyrightable subject matter sold or provided with or in connection with the sale
of the machine, are protected by copyright. All rights are reserved the prior written consent of
Kyocera Mita Corporation is prohibited. Any copies made of all or part of this manual, any
copyrightable subject must contain the same copyright notice as the material from which the
copying is done.
Regarding Tradenames
PRESCRIBE is a registered trademark of Kyocera Corporation. KPDL and KIR (Kyocera Image
Refinement) are trademarks of Kyocera Corporation.
Diablo 630 is a product of Xerox Corporation. IBM Proprinter X24E is a product of International
Business Machines Corporation. Epson LQ-850 is a product of Seiko Epson Corporation.
Hewlett-Packard, PCL, and PJL are registered trademarks of Hewlett-Packard Company.
Centronics is a trade name of Centronics Data Computer Corp. PostScript is a registered
trademark of Adobe Systems Incorporated. Macintosh is a registered trademark of Apple
computer, Inc. Microsoft, Windows, and Windows NT are registered trademarks of Microsoft
Corporation. PowerPC is a trademark of International Business Machines Corporation.
ENERGY STAR is a U.S. registered mark. All other brand and product names are registered
trademarks or trademarks of their respective companies.
GPL
This product contains GPL (www.fsf.org/copyleft/gpl.html) software as part of its firmware. For
information on availability of the source code, see the Kyocera Mita dealer from which you
purchased this product.
Legal Restriction On Copying
• It may be prohibited to copy copyrighted material without permission of the copyright owner.
• It is prohibited under any circumstances to copy domestic or foreign currencies.
• Copying other items may be prohibited.
i
Page 3

Introduction to the Operation Guide
This guide has following chapters:
1 Copying Functions
Explains the copying functions of this machine.
2 Scanning Functions
Explains the scanning functions of this machine.
3 Printer Settings
Explains the printing functions of this machine.
4 Operation Status
Explains the procedure for verifying the operating status of this machine.
5 System Settings
Explains general system settings.
6 Using COMMAND CENTER
Explains how to use COMMAND CENTER to verify the operating status of the machine.
Appendix
This appendix includes a chart which shows the available combinations of functions and
settings.
ii
Page 4

Guides included
The following guides are included with this machine. Refer to the guide that corresponds to your
particular objective.
Basic Operation Guide
The Basic Operation Guide contains explanations on the initial installation and set-up of this
machine, the procedure to connect it to a computer, and the basic procedures for using this
machine as a copier, printer, and scanner as well for resolving problems if trouble occurs.
Advanced Operation Guide (This guide)
This Advanced Operation Guide contains explanations on copier, printer, and scanner functions
as well as default settings adjusted on this machine. This guide is stored in the CD-ROM as PDF
document.
KX Printer Driver Operation Guide
Describes how to install and set the printer driver. This guide is stored in the CD-ROM as PDF
document.
PRESCRIBE Technical Reference
PRESCRIBE is the native language of the Kyocera Mita printers. This Technical Reference
contains the information about how the printing is performed using the PRESCRIBE commands
as well as the font and emulation description. This guide is stored in the CD-ROM as PDF
document.
PRESCRIBE Command Reference
Gives a detailed explanation of the PRESCRIBE command syntax and parameters with the aid
of print examples. This guide is stored in the CD-ROM as PDF document.
KM-NET for Clients Operation Guide
KM-NET for Clients is a network printing utility intended to monitor and configure the printing
system. This guide describes how to install and operate KM-NET for Clients. This guide is stored
in the CD-ROM as PDF document (at [CD-ROM drive]:\Document\Utility\Clients\ClientsE.pdf).
KM-NET Direct Printing Operation Guide
KM-NET for Direct Printing is a utility that allows you to directly print PDF files without starting
Adobe Acrobat by directly sending a PDF file through the Windows spooler. This guide
describes how to install and operate KM-NET for Direct Printing. This guide is stored in the
CD-ROM as PDF document (at [CD-ROM drive]:\Document\Utility\D_Printing\
DirectPrintingE.pdf).
KM-NET for Accounting Operation Guide
KM-NET for Accounting is a utility that supports department management. This guide describes
how to install and operate KM-NET for Accounting. This guide is stored in the CD-ROM as PDF
document (at [CD-ROM drive]:\Document\Utility\Accounting\AccountingE.pdf).
iii
Page 5
Conventions
This manual uses the following conventions:
1
2
3
4
1Bold indicates key names.
2 Courier indicates content of the message display.
3Caution and Note contain important information aside from the text.
4 Italic refers to another page or other guide.
iv
Page 6

Contents
1 Copying Functions ........................................................................................ 1-1
Selecting the Source of Paper Feed ........................................................................................1-2
Selecting a Cassette ...........................................................................................................1-2
Selecting the MP Tray ........................................................................................................1-2
Select the Original Size for Copying ........................................................................................1-4
Setting Others for Original Size ..........................................................................................1-5
Selecting Original Quality Mode ...............................................................................................1-6
Adjusting Copy Exposure .........................................................................................................1-7
Setting the Number of Copies ..................................................................................................1-8
Zoom Copying ..........................................................................................................................1-9
Auto Zoom ..........................................................................................................................1-9
Standard Zoom .................................................................................................................1-10
Zoom Entry .......................................................................................................................1-11
Selecting Original Placement .................................................................................................1-12
Using Collate Mode ................................................................................................................1-13
Using Combine Mode .............................................................................................................1-14
Using the Document Processor with Combine Mode .......................................................1-17
Using the Platen with Combine Mode ..............................................................................1-18
Continuous Copying ...............................................................................................................1-19
Selecting Continuous Copying .........................................................................................1-19
Using Continuous Copying ...............................................................................................1-19
Turning EcoPrint On and Off ..................................................................................................1-21
Entering the Name of Copying Jobs ......................................................................................1-22
Reporting the End of Copying ................................................................................................1-24
2 Scanning Functions ....................................................................................... 2-1
Using the Scanning Function ...................................................................................................2-2
Scanning Documents ...............................................................................................................2-3
Entering the E-mail Address Using the Operation Panel ....................................................2-3
Changing the E-mail Address .............................................................................................2-4
Deleting the E-mail Address ...............................................................................................2-5
Selecting Color Scan Mode ......................................................................................................2-6
Selecting the Original Quality for Scanning ..............................................................................2-7
Selecting the Scanning Resolution ..........................................................................................2-8
Adjusting the Exposure for Scanning .......................................................................................2-9
Select the Original Size for Scanning .....................................................................................2-10
Select the Send Size ..............................................................................................................2-11
Zoom Scanning ......................................................................................................................2-12
Auto Zoom ........................................................................................................................2-12
Selecting the Original Placement for Scanning ......................................................................2-13
Continuous Scanning .............................................................................................................2-14
Using Continuous Scanning .............................................................................................2-14
Selecting the Image File Format ............................................................................................2-16
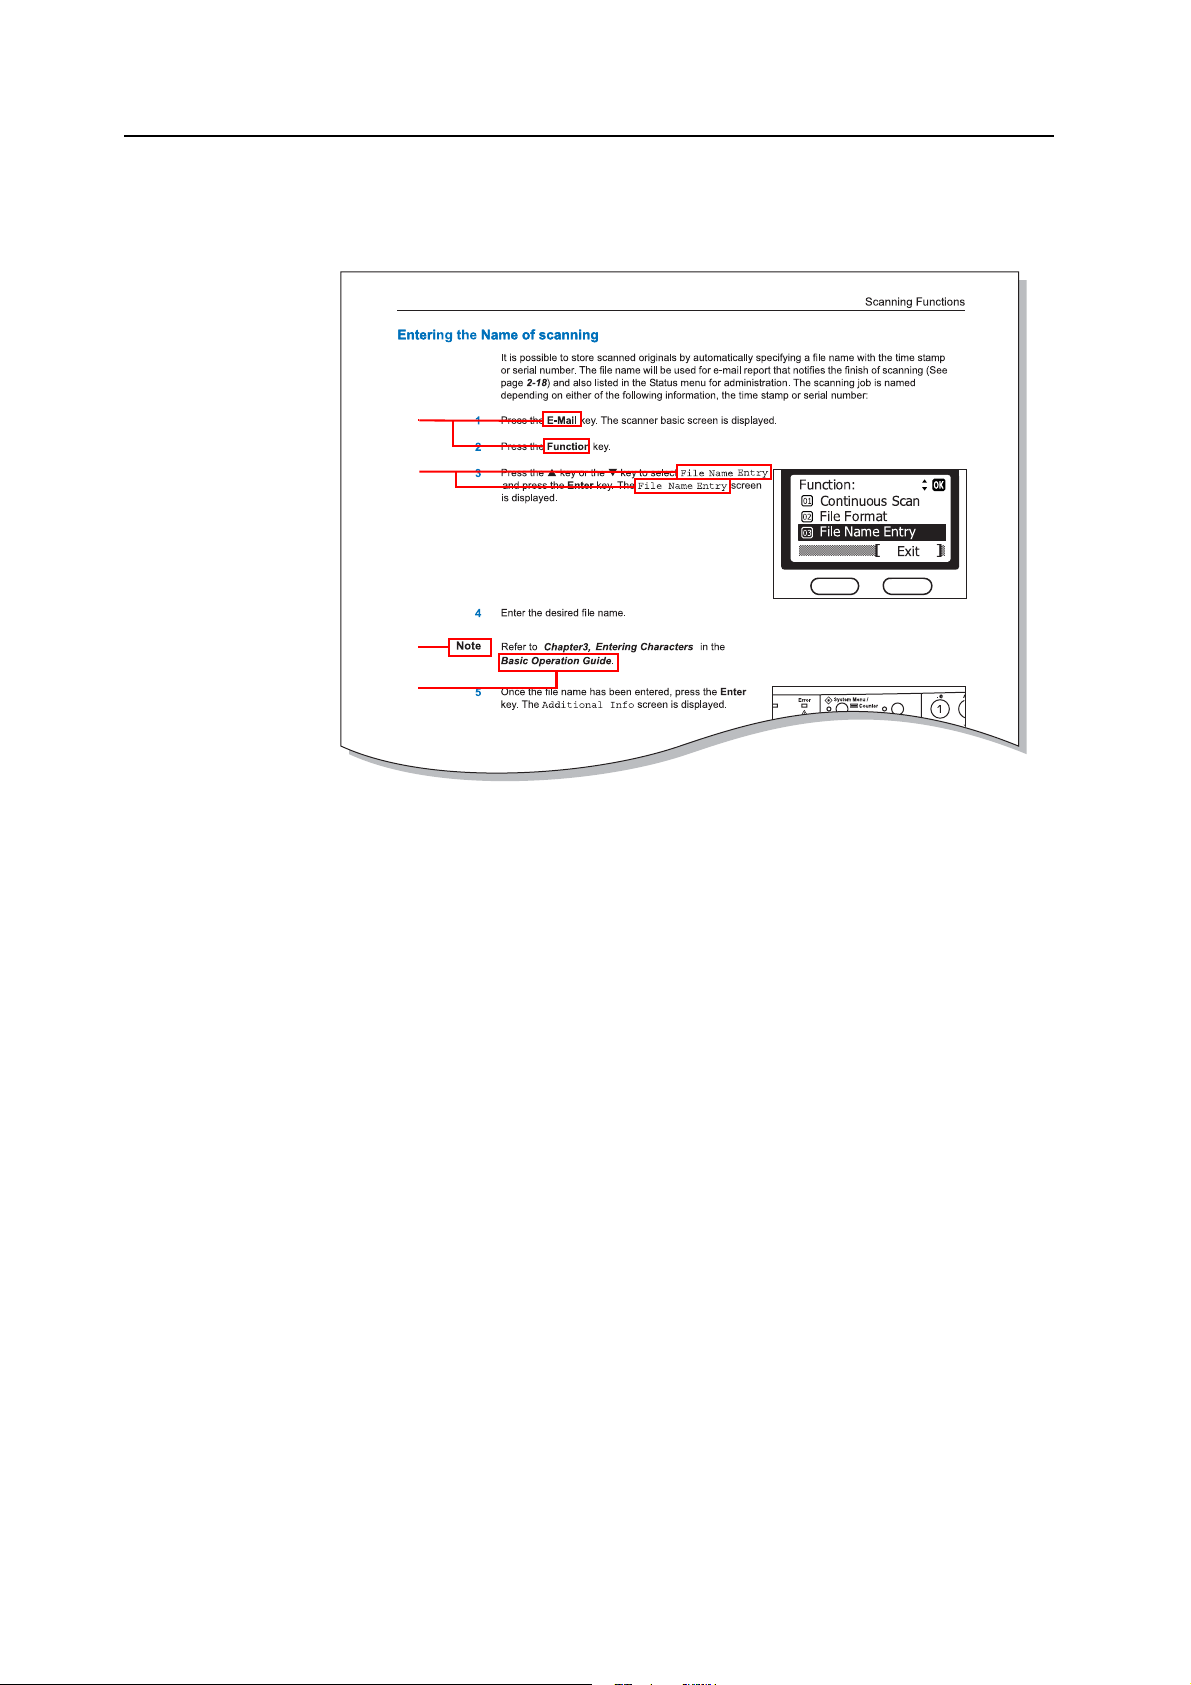
Entering the Name of Scan Job .............................................................................................2-18
File Name for Scan Data ..................................................................................................2-19
Entering the Subject and Body Message of E-Mail ................................................................2-20
Reporting the End of Scanning ..............................................................................................2-21
3 Printer Settings .............................................................................................. 3-1
Using the Machine as a Network Printer ..................................................................................3-2
Parallel Setting .........................................................................................................................3-3
v
Page 7

Network Settings ..................................................................................................................... 3-4
AppleTalk Setting ............................................................................................................... 3-4
TCP/IP Setting ................................................................................................................... 3-5
DHCP Setting .................................................................................................................... 3-6
IP Address Setting .............................................................................................................3-6
Subnet Mask Setting .......................................................................................................... 3-7
Default Gateway Setting .................................................................................................... 3-8
Setting the Emulation Mode .................................................................................................... 3-9
COMMAND CENTER .............................................................................................................3-11
4 Operation Status ............................................................................................ 4-1
Icons ........................................................................................................................................ 4-2
Checking Jobs Status .............................................................................................................. 4-3
Verifying Job Log ..................................................................................................................... 4-5
Pausing Jobs ........................................................................................................................... 4-7
Canceling Jobs During Pausing ......................................................................................... 4-7
Resuming Jobs ..................................................................................................................4-8
Canceling Jobs ........................................................................................................................ 4-9
Verifying Scanner Status ........................................................................................................4-11
Verifying Printer Status .......................................................................................................... 4-12
Verifying the Toner Status ...................................................................................................... 4-13
Verifying Settings for the Cassettes and MP Tray ................................................................. 4-14
Printing Reports ..................................................................................................................... 4-15
Procedure to Print Reports .............................................................................................. 4-15
Sample Reports ............................................................................................................... 4-17
Verifying Total Number of Prints and Scans .......................................................................... 4-21
5 System Settings ............................................................................................. 5-1
Adjusting the Contrast of Message Display ............................................................................. 5-2
Message Language ................................................................................................................. 5-3
Default Operation Mode .......................................................................................................... 5-4
Unit of Measurement ............................................................................................................... 5-5
Adjusting Copy Exposure ........................................................................................................5-6
Turning Scan Noise Reduction On and Off ............................................................................. 5-8
Photo Processing Method ....................................................................................................... 5-9
Resetting Toner Status .......................................................................................................... 5-10
Changing Function Defaults ...................................................................................................5-11
Registering Destination E-mail Addresses ............................................................................ 5-13
Restarting the Machine .......................................................................................................... 5-15
Adjusting Alarms .................................................................................................................... 5-16
Date and Time ....................................................................................................................... 5-19
Date Format ........................................................................................................................... 5-21
Time Zone ............................................................................................................................. 5-22
Summer Time ........................................................................................................................ 5-23
Auto Panel Reset ................................................................................................................... 5-24
Enabling Auto Panel Reset .............................................................................................. 5-24
Reset Timer ..................................................................................................................... 5-25
Low Power Timer ................................................................................................................... 5-26
Auto Sleep Timer ................................................................................................................... 5-27
Enabling Auto Sleep ........................................................................................................ 5-27
Sleep Timer ...................................................................................................................... 5-28
Auto Error Clear ..................................................................................................................... 5-29
Enabling Auto Error Clear ................................................................................................ 5-29
Error Clear Time .............................................................................................................. 5-30
Registering Custom Original Size .......................................................................................... 5-31
Registering Custom Paper Size ............................................................................................ 5-33
Default Original Size .............................................................................................................. 5-35
vi
Page 8

Selecting Paper Size and Media Type ...................................................................................5-36
Cassettes ..........................................................................................................................5-36
MP Tray ............................................................................................................................5-38
Registering Custom Media Type ............................................................................................5-40
Selecting the Paper Feed Source ..........................................................................................5-42
Selecting the APS (Auto Paper Selection) Media Type .........................................................5-43
Printing the Service Pages .....................................................................................................5-44
6 Using COMMAND CENTER ........................................................................... 6-1
System Requirements ..............................................................................................................6-2
Accessing COMMAND CENTER .............................................................................................6-3
COMMNAD CENTER Pages ..............................................................................................6-4
Start Page ................................................................................................................................6-5
Start > Start Page ...............................................................................................................6-5
Start > Status Pages ...........................................................................................................6-6
Start > Information > About Page .......................................................................................6-6
Start > Links Page ..............................................................................................................6-6
Basic Page ...............................................................................................................................6-7
Basic > Security > Account Setup Page .............................................................................6-7
Basic > Security > Device Page .........................................................................................6-7
Basic > Network Page ........................................................................................................6-8
Basic > Time Page .............................................................................................................6-8
Basic > Reset Page ............................................................................................................6-9
Basic > Device Defaults Page ............................................................................................6-9
Printer Page ...........................................................................................................................6-10
Printer > Defaults > System Page ....................................................................................6-10
Printer > Media Input Page ...............................................................................................6-10
Scanner Page ........................................................................................................................6-11
Scanner> Defaults > Settings Page .................................................................................6-11
Scanner> One Touch Keys > One Touch keys Page .......................................................6-11
Advanced Page ......................................................................................................................6-12
Advanced > Protocols > TCP/IP > General ......................................................................6-12
Advanced > Protocols > TCP/IP > IP Filters ....................................................................6-12
Advanced > Protocols > TCP/IP > Logical Printers ..........................................................6-12
Advanced > Protocols > IPP .............................................................................................6-13
Advanced > Protocols > AppleTalk ...................................................................................6-13
Advanced > Protocols > NetBEUI ....................................................................................6-13
Advanced > Management/E-mail > SMTP .......................................................................6-14
Advanced > Management/E-mail > SNMP .......................................................................6-14
Troubleshooting ......................................................................................................................6-16
Appendix ......................................................................................................Appendix-1
Paper Selection ...........................................................................................................Appendix-2
General Guidelines ................................................................................................Appendix-2
Selecting the Right Paper ......................................................................................Appendix-2
Special Paper ........................................................................................................Appendix-5
Media Type ............................................................................................................Appendix-8
Specifications ..............................................................................................................Appendix-9
Main Body ..............................................................................................................Appendix-9
Copying Functions ...............................................................................................Appendix-10
Printing Functions ................................................................................................Appendix-10
Scanning Functions .............................................................................................Appendix-10
Document Processor (Option) .............................................................................Appendix-11
Paper Feeder (Option) .........................................................................................Appendix-11
Environmental Specifications ...............................................................................Appendix-11
Function Combination Tables ....................................................................................Appendix-12
Glossary ....................................................................................................................Appendix-14
vii
Page 9

viii
Page 10

1 Copying Functions
This chapter explains the following topics:
• Selecting the Source of Paper Feed
• Select the Original Size for Copying
• Selecting Original Quality Mode
• Adjusting Copy Exposure
• Setting the Number of Copies
• Zoom Copying
• Selecting Original Placement
• Using Collate Mode
• Using Combine Mode
• Continuous Copying
• Turning EcoPrint On and Off
• Entering the Name of Copying Jobs
• Reporting the End of Copying
1-1
Page 11
Copying Functions
Selecting the Source of Paper Feed
Perform the following procedure to select the desired source for paper feed.
Mode Description
Auto Automatically selects and feeds paper from either the cassette or the
Cassette1 Feeds paper from cassette 1.
Cassette2 Feeds paper from cassette 2. Cassette 2 is an optional accessory. If
MP Tray Feeds paper from the MP tray. The paper size and type must be
Notes • For more information on registering the paper size in the cassette(s), refer to Default Original
Size on page 5-35.
• For information of the specifications of the paper used with this machine, refer to Paper
Selection on page 2 of the Appendix.
Selecting a Cassette
Press the Copy key. The copy basic screen is displayed.
1
MP tray, whichever holds the paper size to be copied or printed onto.
it is not installed, it will not be available for selection.
registered in advance.
Press the Paper select key.
2
Press the S key or the T key to select the required
3
cassette and press the Enter key. The message
display shows Completed and returns to the copy
basic screen.
Selecting the MP Tray
Press the Copy key. The copy basic screen is displayed.
1
Press the Paper select key.
2
Press the S key or the T key to select MP Tray and
3
press the Enter key. The MP Tray Size screen is
displayed.
Paper Select:
A 4 Plain
*
A 5 Plain
MP Tray
Cancel
Paper Select:
A 4 Plain
*
A 5 Plain
MP Tray
Cancel
1-2
Page 12
Press the S key or the T key to select the paper size
4
required and press the Enter key. The MP Tray Type
screen is displayed.
Note If the paper size is not shown in the MP Tray Size
screen, select Others and press the Enter key. The
Others screen is displayed and other sizes are
available for selection.
MP Tray Size:
Letter
*
Legal
Statement
Cancel
MP Tray Size:
Folio
Oficio II
Others
Cancel
Copying Functions
Press the S key or the T key to select the media type
5
required and press the Enter key. The message
display shows Completed and returns to the copy
basic screen.
Others:
Executive
*
ISO B5
16K
Cancel
MP Tray Type:
*
Plain
*
Transparency
Rough
Cancel
1-3
Page 13
Copying Functions
Select the Original Size for Copying
Perform the following procedure to select the size of the original for copying.
The original sizes available for copying are as follows:
Letter, Legal, Statement, A4, A5, A6, B5, B6, Folio, Oficio II, Executive,
ISO B5, 16K, Envelope #10, Envelope #9, Envelope Monarch, Envelope #6,
Envelope C5, Envelope DL, Hagaki, Oufukuhagaki, Youkei 2, Youkei 4, and
Custom
Note It is necessary to register a custom original size in advance in order to select the Custom setting.
For more information on the custom original size, refer to Registering Custom Original Size on
page 5-31.
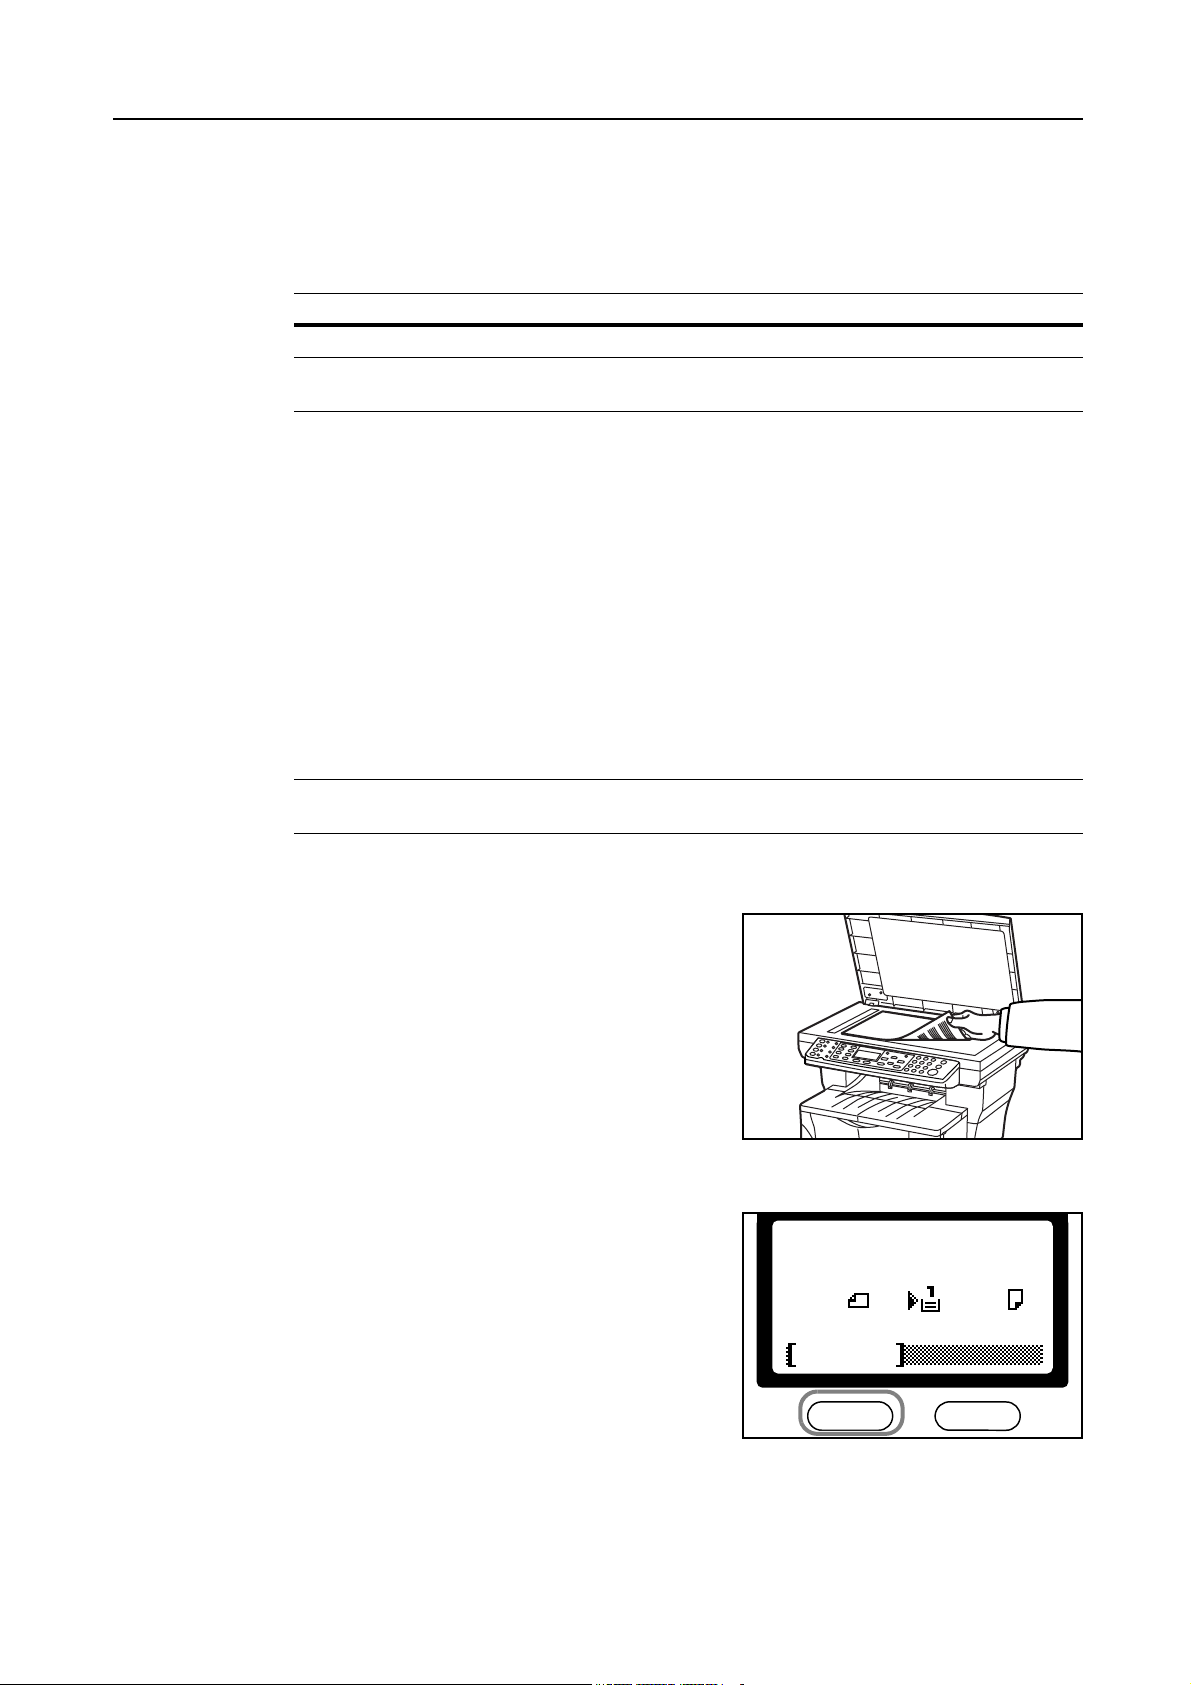
Set the original.
1
Press the Copy key. The copy basic screen is displayed.
2
Press the Original size key.
3
Press the S key or the T key to select the size of the
4
original.
Original Size:
*
*
Letter
Legal
Statement
Cancel
Press the Enter key. The message display shows Completed and returns to the copy basic
5
screen.
1-4
Page 14
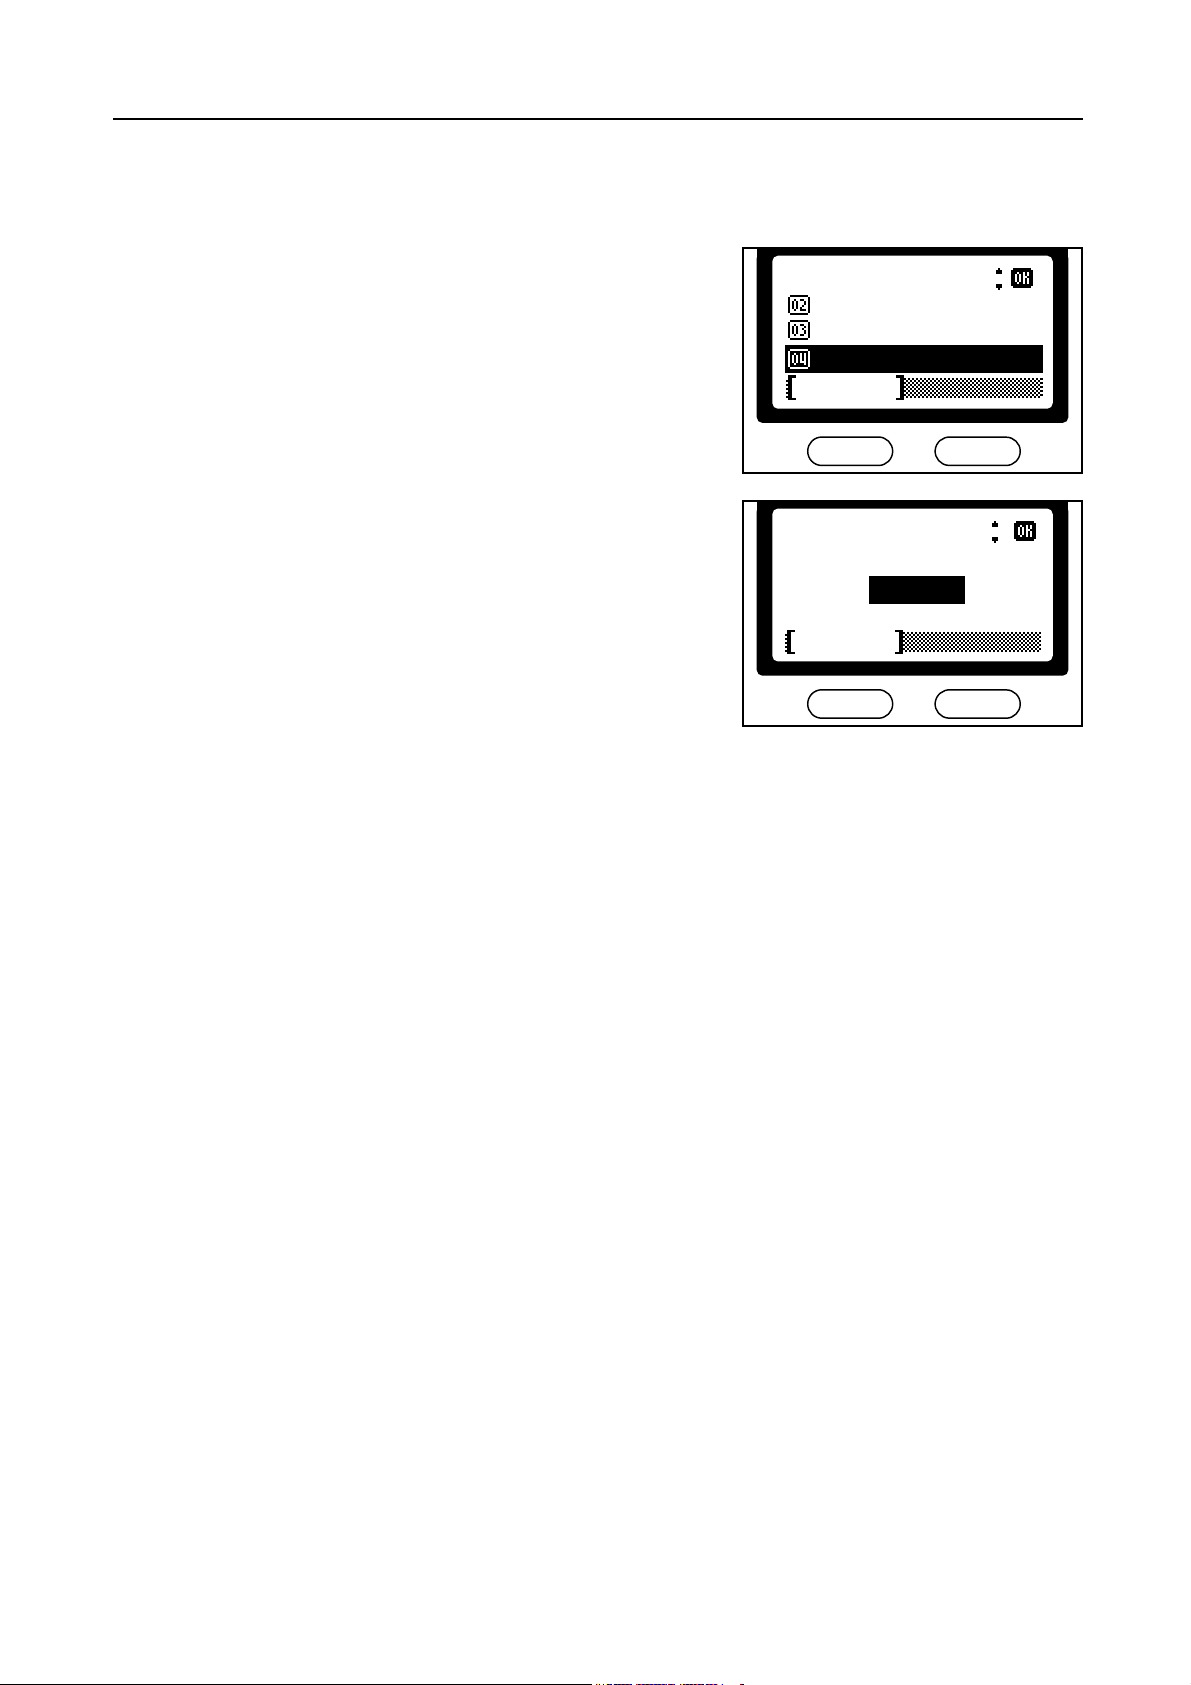
Setting Others for Original Size
If the size of the original is not shown in the display, select the Others setting above.
Press the Enter key.
1
Press the S key or the T key to select the size of the
2
original and press the Enter key. The message display
shows Completed and returns to the copy basic
screen.
Original Size:
Folio
Oficio II
Others
Cancel
Others:
Executive
*
ISO B5
16K
Cancel
Copying Functions
1-5
Page 15
Copying Functions
Selecting Original Quality Mode
The original quality mode selects the copy quality according to the type of originals.
Mode Description
Text+Photo Select this mode when the original contains a mixture of both text
Photo Select this mode when the original contains mostly photographs
Text Select this mode when the original contains mostly text.
Press the Copy key. The copy basic screen is displayed.
1
Press the Original Quality key.
2
Press the S key or the T key to select the desired
3
mode and press the Enter key. The message display
shows Completed and returns to the copy basic
screen.
and photographs.
taken by camera.
Original Quality:
*
Text+Photo
Photo
Text
Cancel
1-6
Page 16
Adjusting Copy Exposure
This section explains how to make adjustments to the exposure mode. The default exposure is
Manual.
Mode Description
Auto The machine automatically selects the optimal exposure setting for
Manual The copy exposure setting is selected manually. There are 7
Press the Copy key. The copy basic screen is displayed.
1
Press the Exposure key.
2
Press the S key or the T key to select Manual and
3
press the Enter key.
If you selected Manual, the Manual screen is
displayed. Proceed to the next step.
If you selected Auto, the message display shows
Completed and returns to the copy basic screen.
the original being copied.
exposure levels available.
Exposure:
Auto
*
*
Manual
Cancel
Copying Functions
Press the S key or the T key to adjust the value for
4
the exposure as desired. Press the Enter key. The
message display shows Completed and returns to the
copy basic screen.
Manual:
Lighter -2
*
Lighter -1
Normal
Cancel
1-7
Page 17
Copying Functions
Setting the Number of Copies
Perform the following procedure to set the number of copies to be made. The number of copies can
be up to 999.
Notes • To avoid paper jam or damage to the machine, do not leave more than approximately 30 sheets
of standard paper (80 g/m2) or one sheet of special paper in the face-up tray.
• To avoid paper jam or damage to the machine, do not leave more than approximately 150
sheets of standard paper (80 g/m
Set the original.
1
Press the Copy key. The copy basic screen is displayed.
2
Use the numeric keys to change the number of copies
3
to be made.
2
) in the output tray.
Ready to copy.
*
A 4
100%
Zoom
Set: 1
A 4
Notes • To cancel the number of copies entered, press the Stop/Clear key. The display will be set to 1.
• If you attempt to enter more than 999, the number of copies will automatically be set to 999.
1-8
Page 18
Zoom Copying
Copying Functions
This section explains how to make copies in an enlarged or reduced size. The following modes are
available for zooming.
Mode Description
100% Makes copies of the same size as the original.
Auto Adjusts the zoom ratio so that the copied image fits onto the
selected copy size.
Standard Zoom Makes copies at one of the fixed zoom ratios. The following
ratios are available:
200 %
141 % (A5 >> A4)
129 % (Statement >> Letter)
115 % ( B 5 > > A 4 )
100 %
90 % (Folio >> A4)
86 % (A4 >> B5)
78 % (Legal >> Letter)
70 % (A4 >> A5)
64 % (Letter >> Statement)
50 %
Zoom Entry Sets the zoom ratio between 50 % and 200 % in 1 %
increment.
Auto Zoom
Set the original.
1
Press the Copy key. The copy basic screen is displayed.
2
Press the left select key.
3
Ready to copy.
*
A 4
100%
Zoom
Set: 1
A 4
1-9
Page 19

Copying Functions
4
Standard Zoom
1
2
Press the S key or the T key to select either 100% or
Auto and press the Enter key. The message display
shows Completed and returns to the copy basic
screen. The original is copied fitting on the selected
paper size.
Perform steps 1 to 3 in the Auto Zoom section.
Press the S key or the T key to select Standard
Zoom and press the Enter key. The Standard Zoom
screen is displayed.
Zoom:
100%*
*
Auto
Standard Zoom
Cancel
Zoom:
100%
*
*
Auto
Standard Zoom
Cancel
Press the S key or the T key to select the zoom ratio.
3
Press the Enter key. The message display shows
Completed and returns to the copy basic screen. The
original is copied using the selected zoom ratio.
Standard Zoom:
*200%
*
141% A5 >> A4
129% STMT >> LTR
Cancel
1-10
Page 20
Zoom Entry
Perform steps 1 to 3 in the Auto Zoom section.
1
Press the S key or the T key to select Zoom Entry.
2
Press the Enter key. The Zoom Entry screen is
displayed.
Press the S key or the T key to change ratio in 1 %
3
increments. Press the Enter key. The message display
shows Completed and returns to the copy basic
screen.
Zoom:
Auto
*
Standard Zoom
Zoom Entry
Cancel
Zoom Entry:
*
(50
Cancel
Copying Functions
~ 200)
150 %
1-11
Page 21
Copying Functions
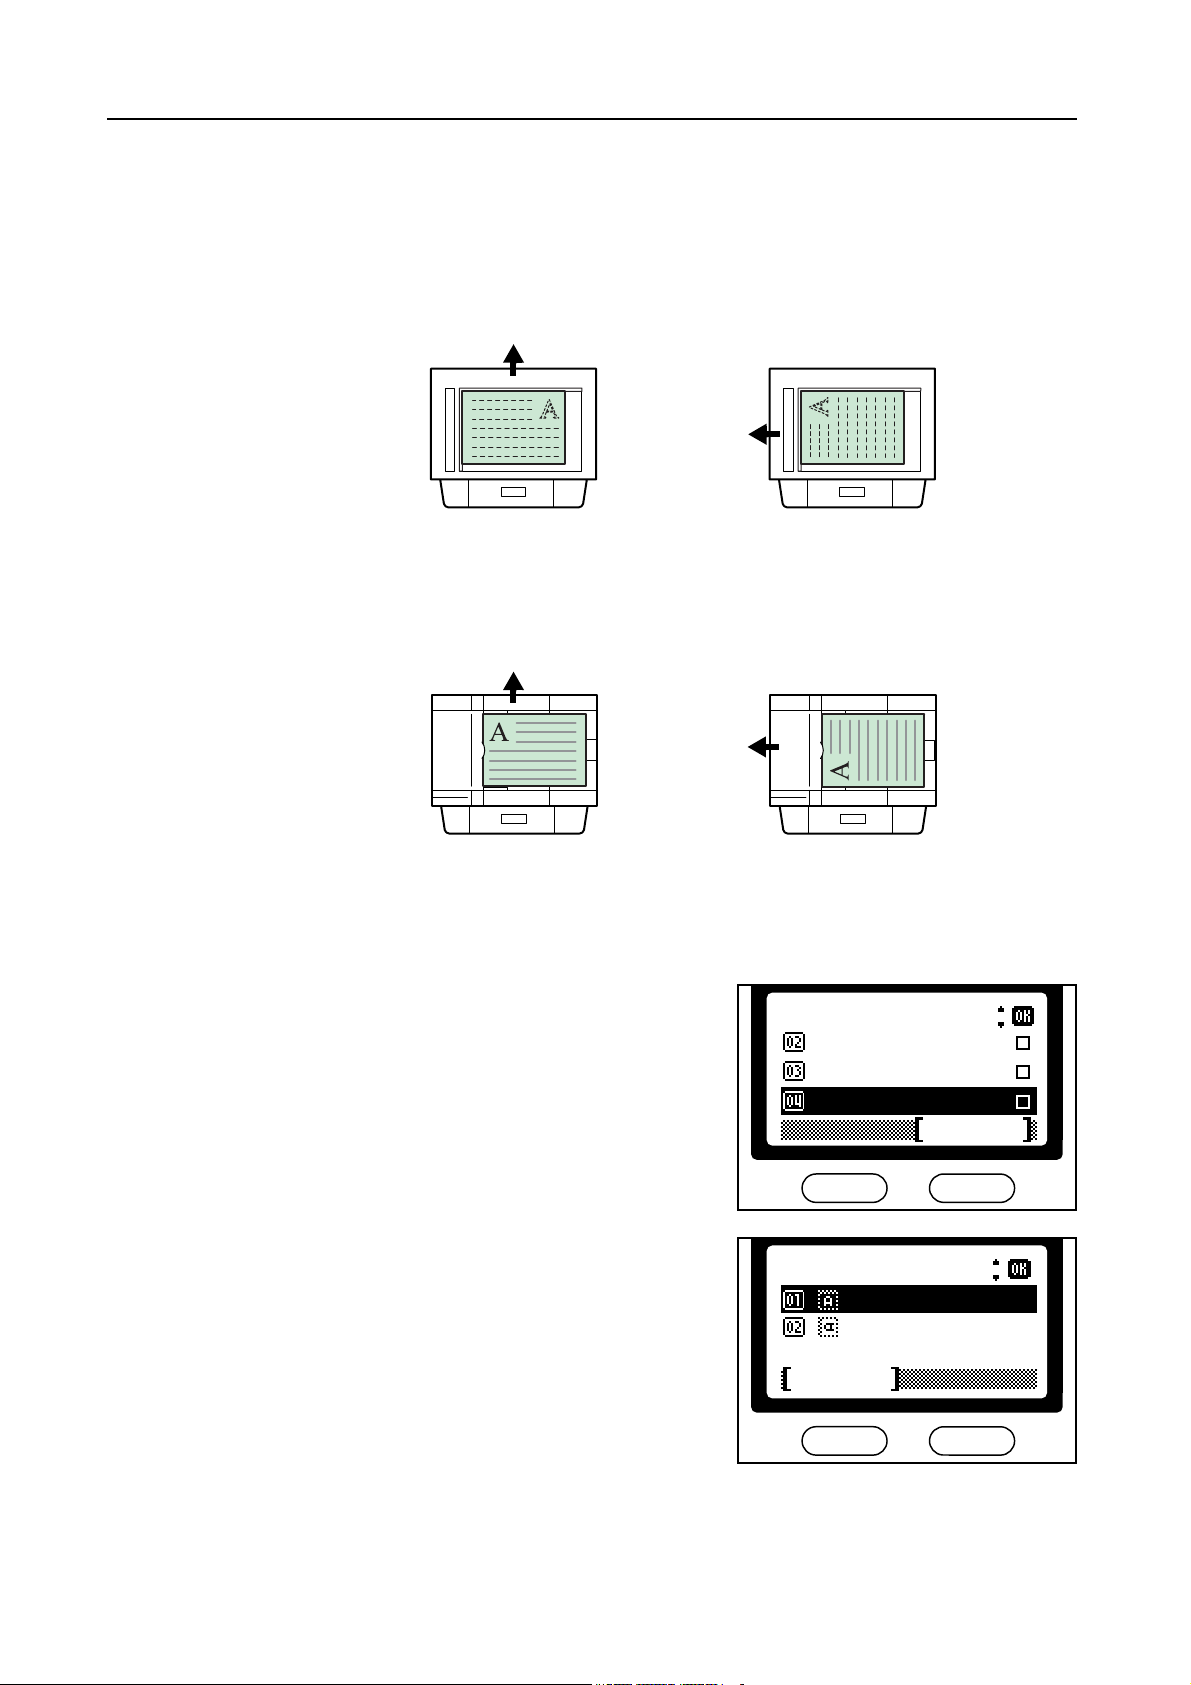
Selecting Original Placement
Perform the following procedure to select the direction that the original is copied.
Using the Platen
Using the Document Processor
Top Edge to Rear Top Edge to Left
Rear
Left
Top Edge to Rear Top Edge to Left
Rear
Press the Copy key. The copy basic screen is displayed.
1
Press the Function key.
2
Press the S key or the T key to select Orig.
3
Placement and press the Enter key. The Orig.
Placement screen is displayed.
Press the S key or the T key to select either Top
4
Edge to Rear or Top Edge to Left and press the
Enter key. The message display shows Completed
and returns to the Function screen.
Left
Function:
*Combine
Collate
Orig. Placement
Orig. Placement:
Top Edge to Rear
*
Top Edge to Left
Exit
1-12
Cancel
Press the right select key. The message display returns to the copy basic screen.
5
Page 22
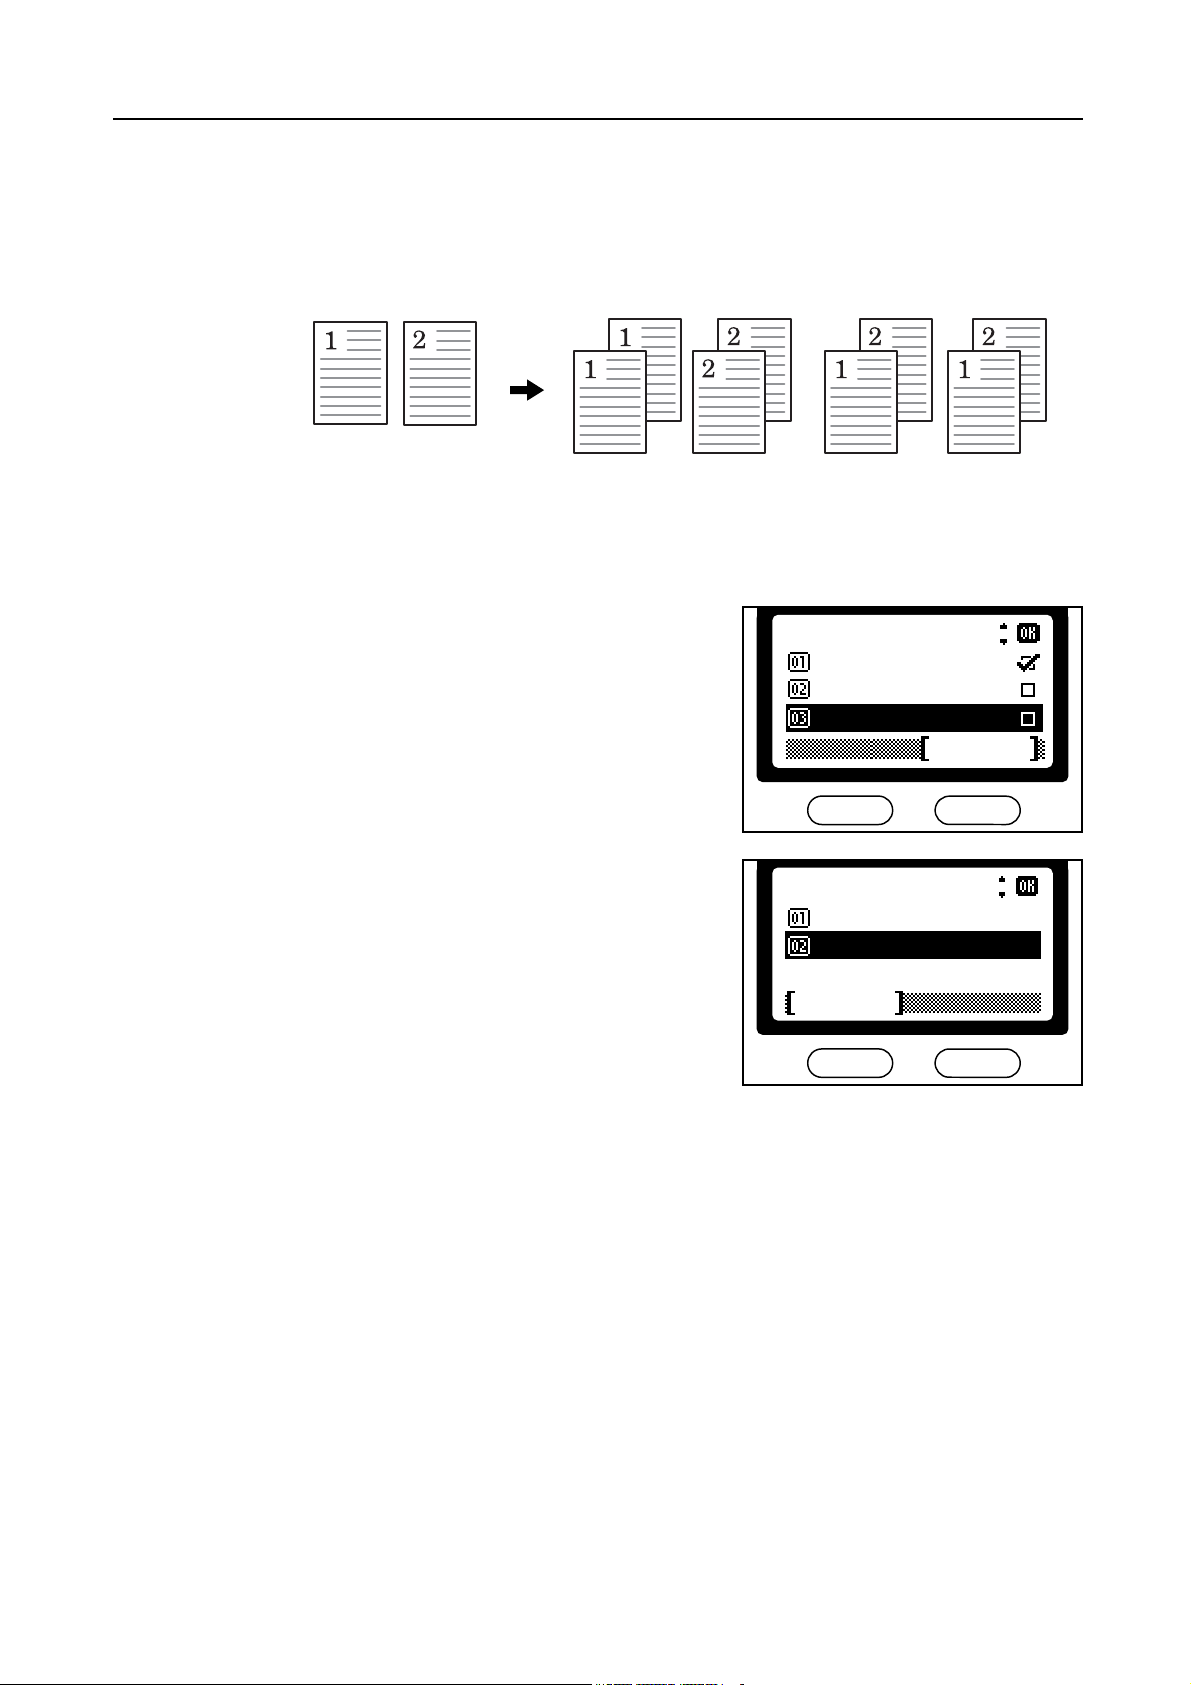
Using Collate Mode
Multiple originals can be scanned into memory in a single operation and the desired number of copy
sets created.
Press the Copy key. The copy basic screen is displayed.
1
Press the Function key.
2
Press the S key or the T key to select Collate and
3
press the Enter key. The Collate screen is
displayed.
Original Collate: OnCollate: Off
Function:
Zoom
*
Combine
Collate
Copying Functions
Exit
Press the S key or the T key to select either On or
4
Off and press the Enter key. The message display
shows Completed and returns to the Function
screen.
Collate:
*
Off
*
On
Cancel
Press the right select key. The message display returns to the copy basic screen.
5
1-13
Page 23
Copying Functions
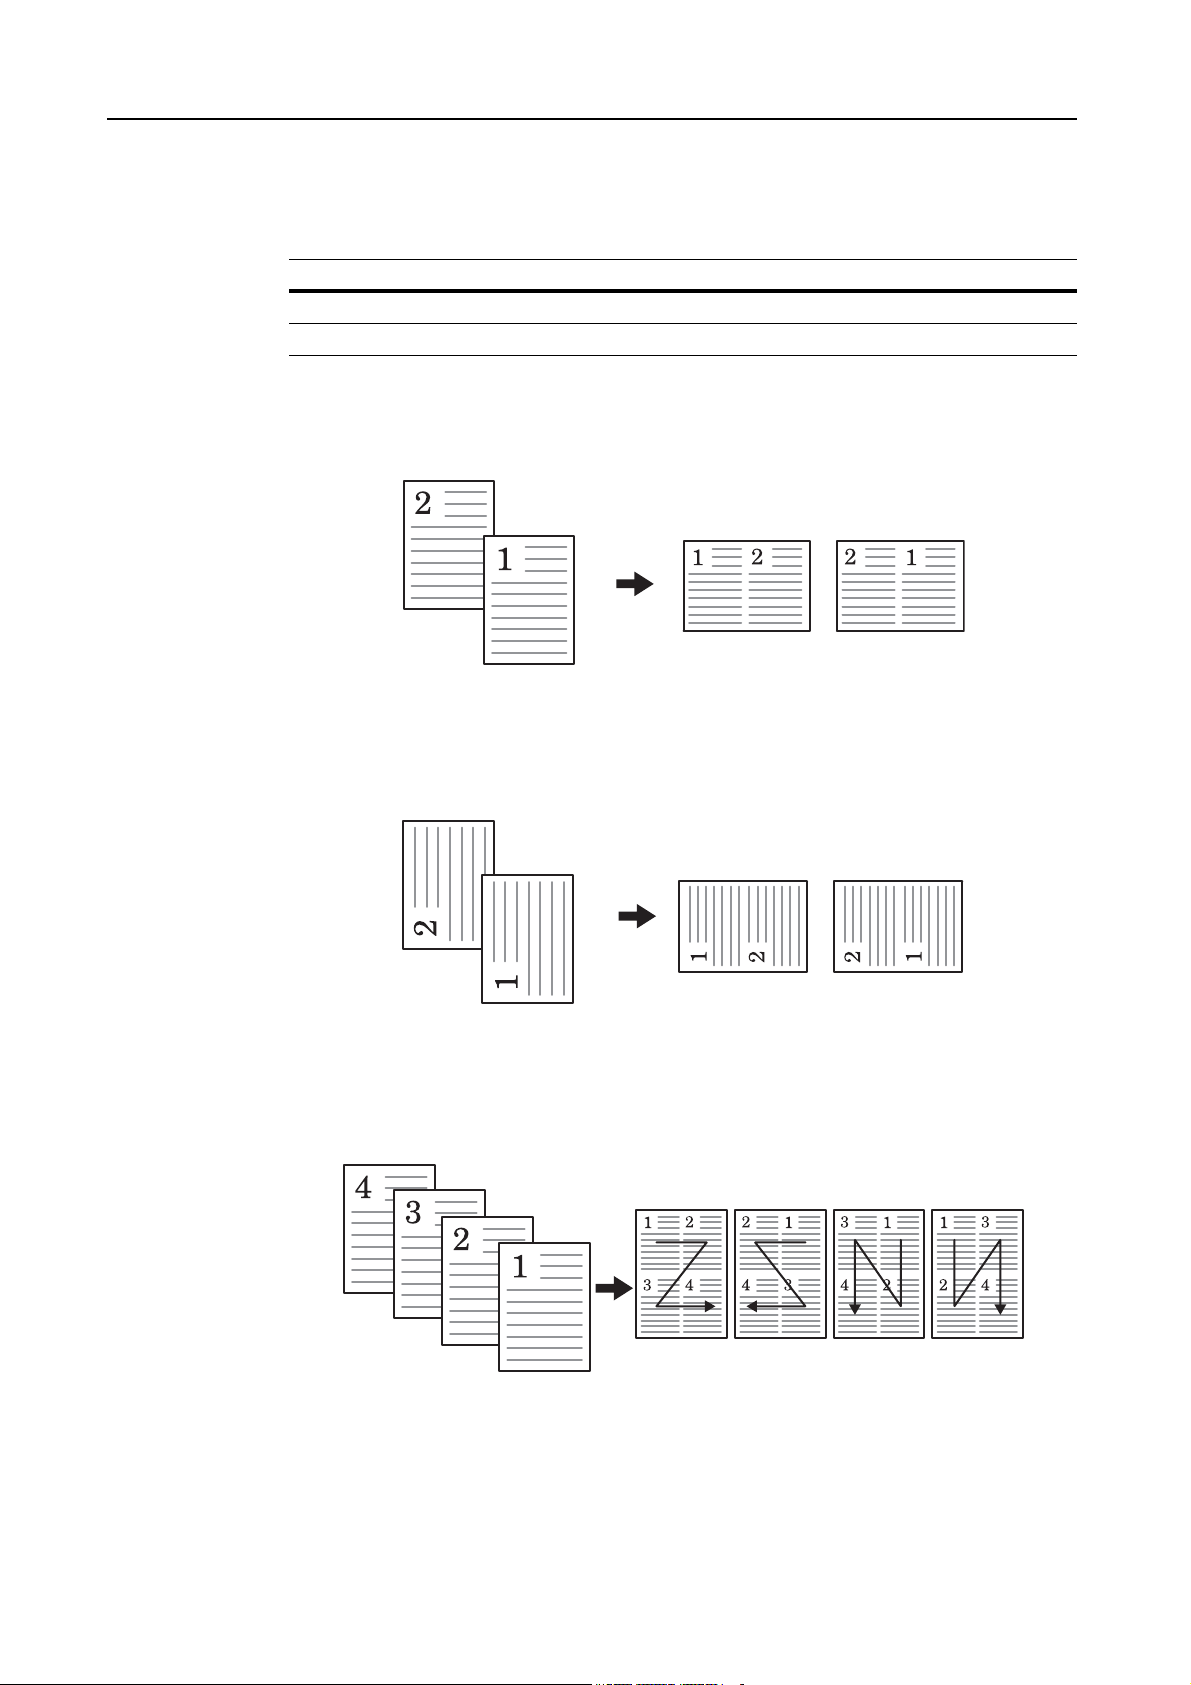
Using Combine Mode
The images from either 2 or 4 originals can be reduced and combined onto a single copy. The
borderline of each original can also be marked with a solid line or a dotted line.
Mode Description
2 in 1 Copies two originals onto one sheet.
4 in 1 Copies four originals onto one sheet.
2 in 1 > Top Edge to Rear
Original Copied Image
2 in 1 > Top Edge to Left
Original Copied Image
4 in 1 > Top Edge to Rear
Left to Right/
Top to Bottom
Left to Right/
Top to Bottom
Right to Left
Right to Left
1-14
Original Copied image
Left to
Right to
Bottom
Right to
Left to
Bottom
To p to
Bottom to
Left
Top t o
Bottom to
Right
Page 24
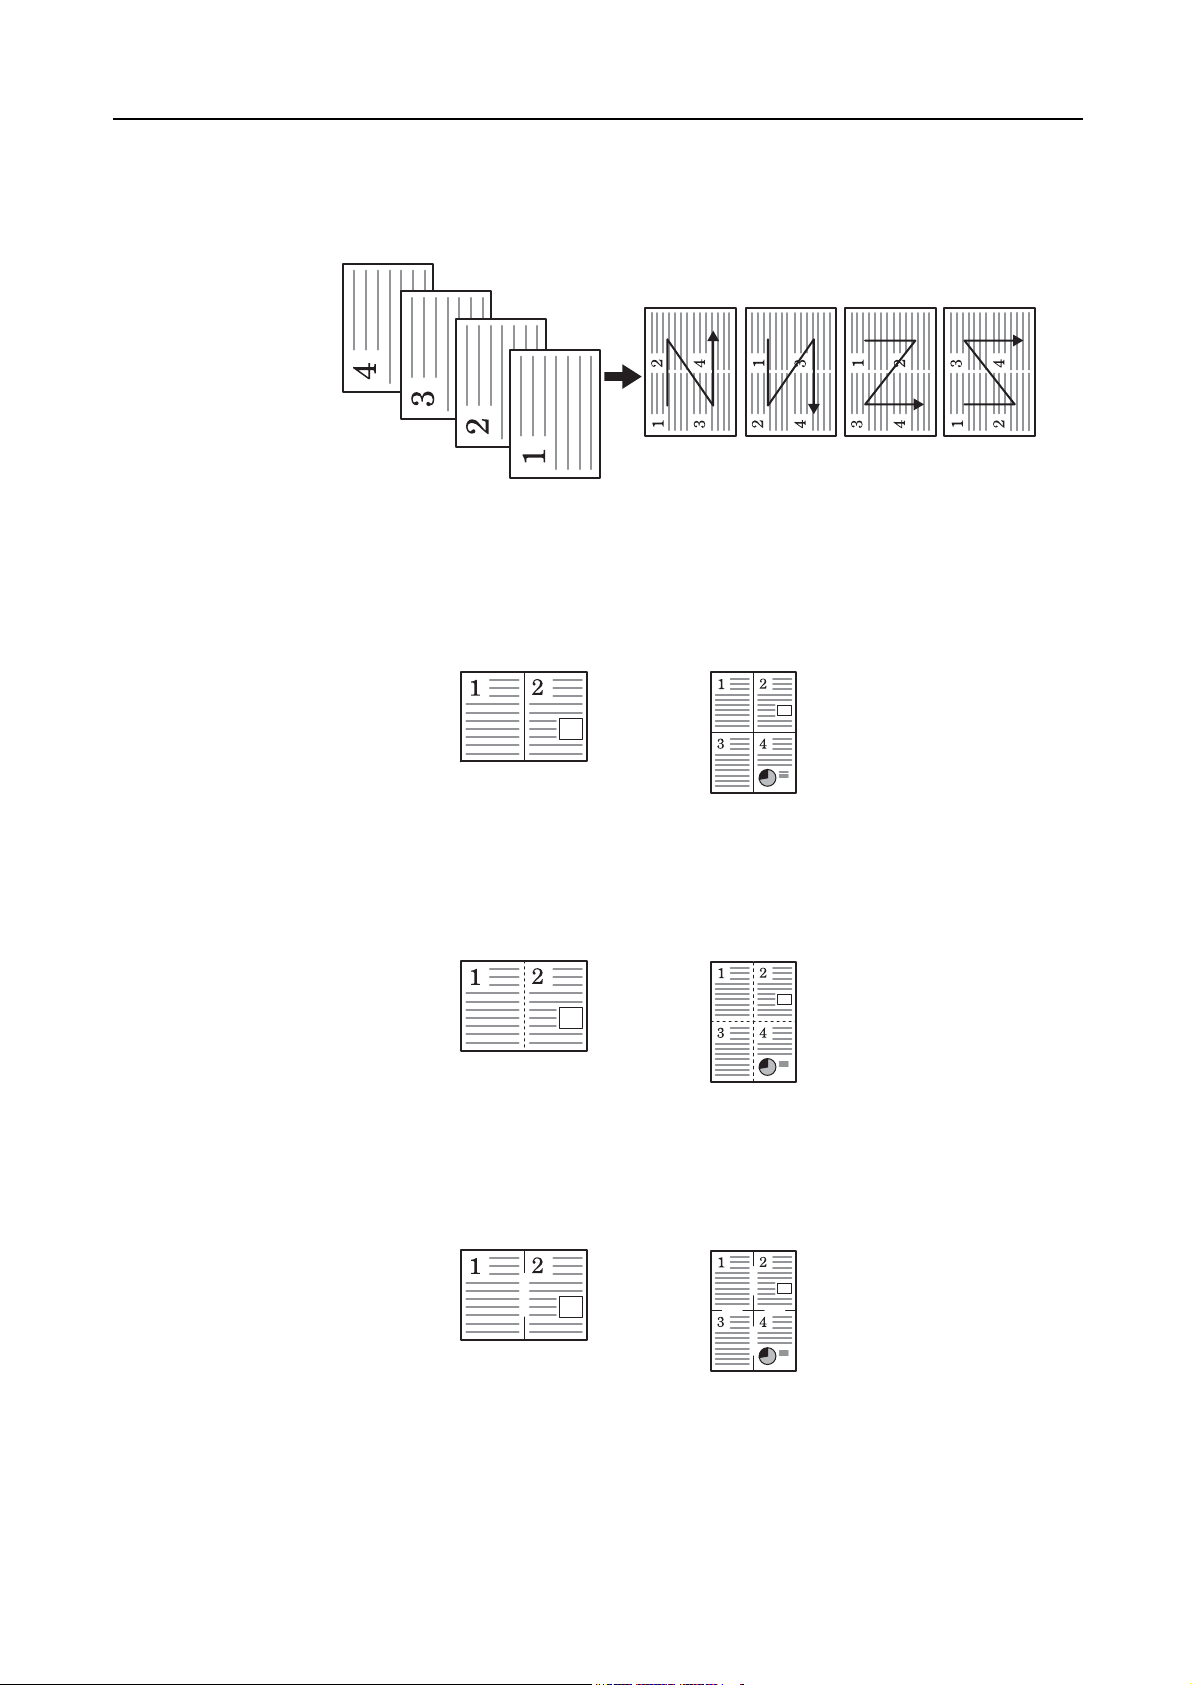
4 in 1 > Top Edge to Left
Original Copied Image
Copying Functions
Left to
Right to
Bottom
The following illustrations indicate the effects of each borderline setting
Solid Line
Copied Image
2 in 1
Right to
Left to
Bottom
4 in 1
Top to
Bottom to
Left
Top to
Bottom to
Right
Dotted Line
Positioning Mark
Copied Image
4 in 12 in 1
Copied Image
4 in 12 in 1
Note The size of both the originals and the copy paper must be a standard size.
1-15
Page 25
Copying Functions
1
2
3
4
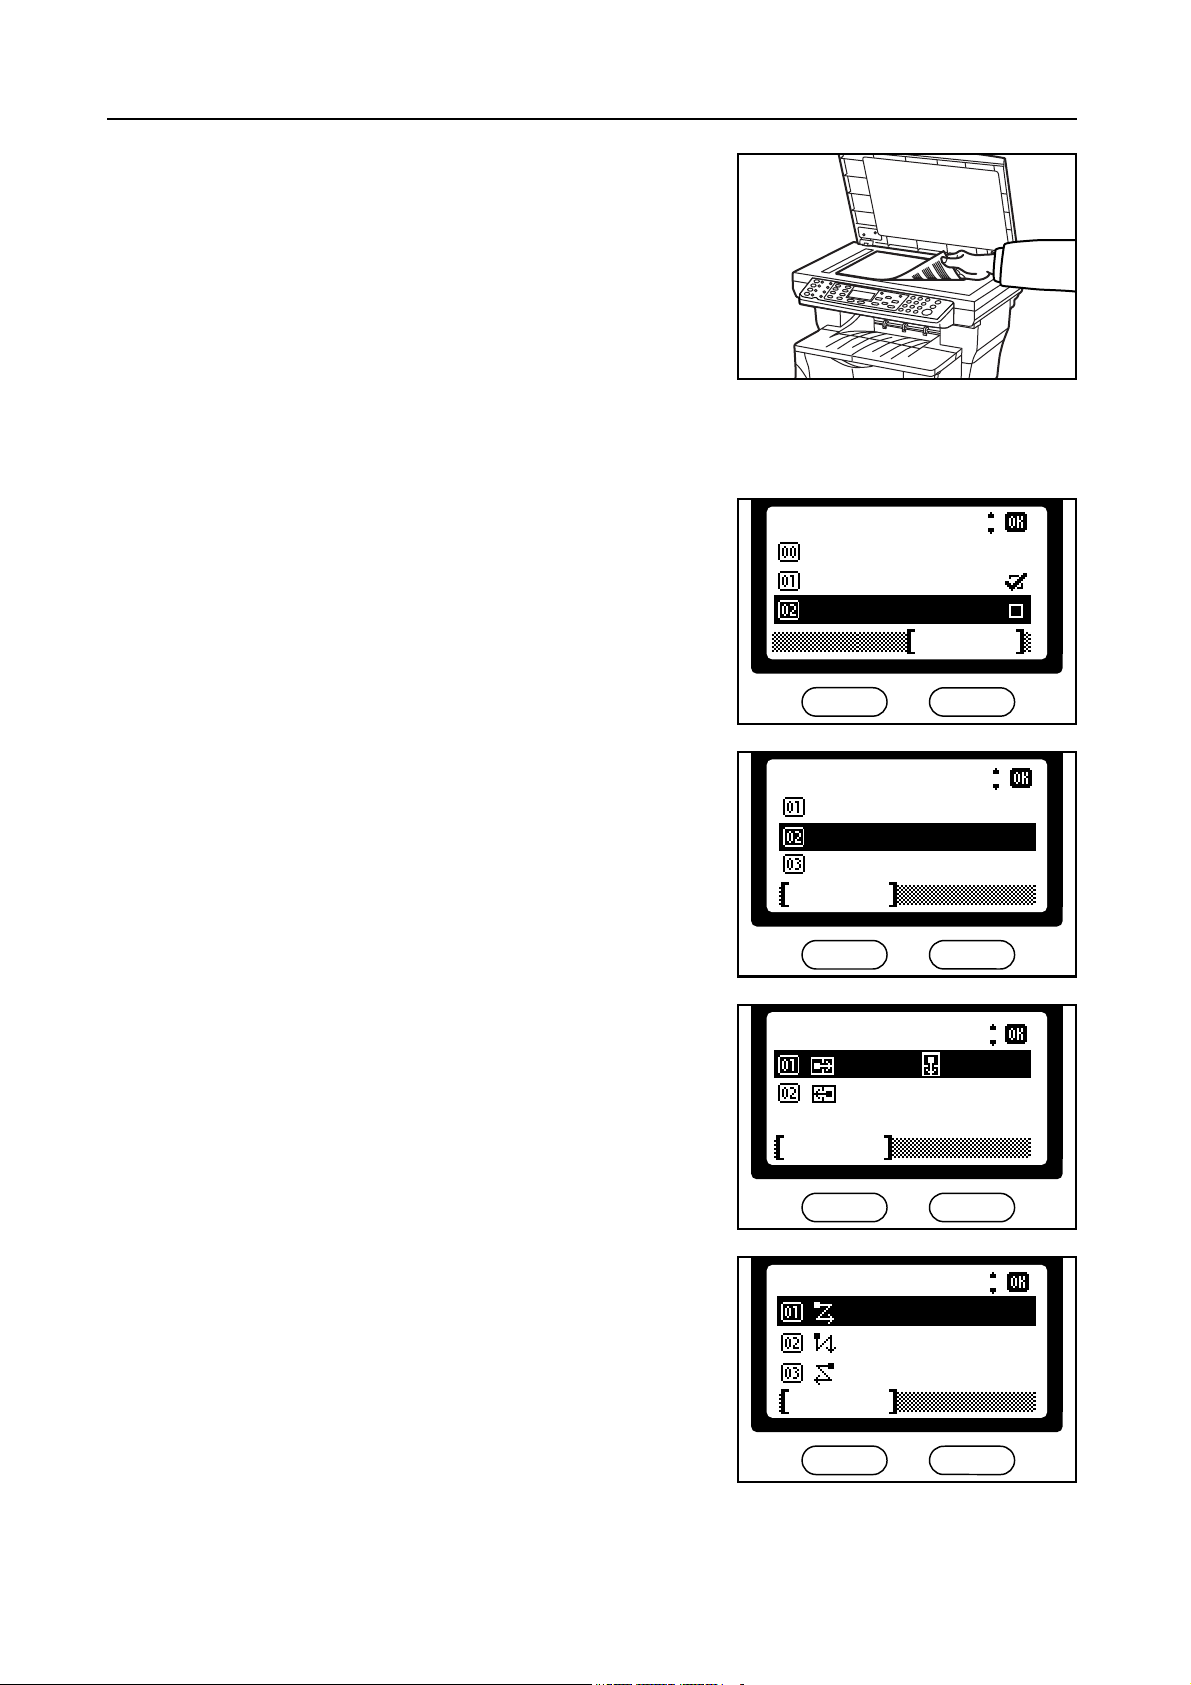
Set the original.
Press the Copy key. The copy basic screen is displayed.
Press the Function key.
Press the S key or the T key to select Combine and
press the Enter key. The Combine screen is
displayed.
Function:
Exit
*
Zoom
Combine
Exit
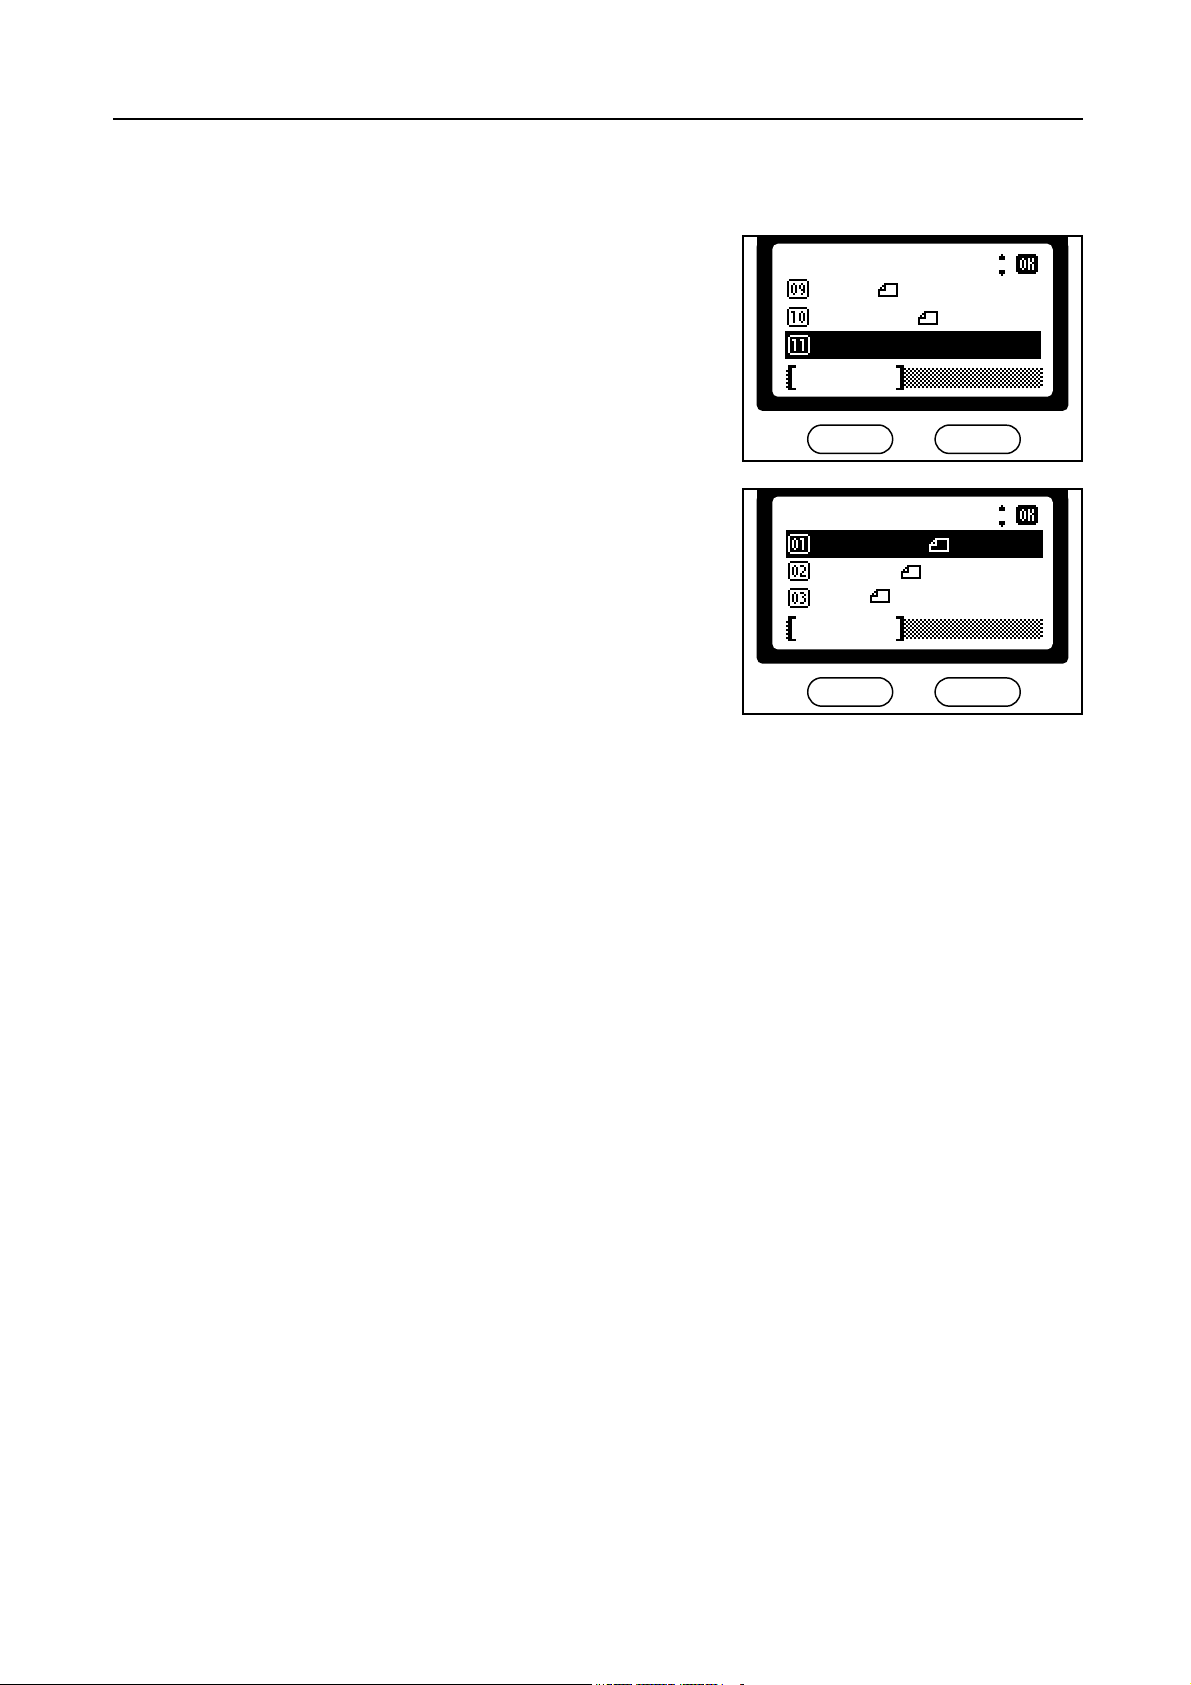
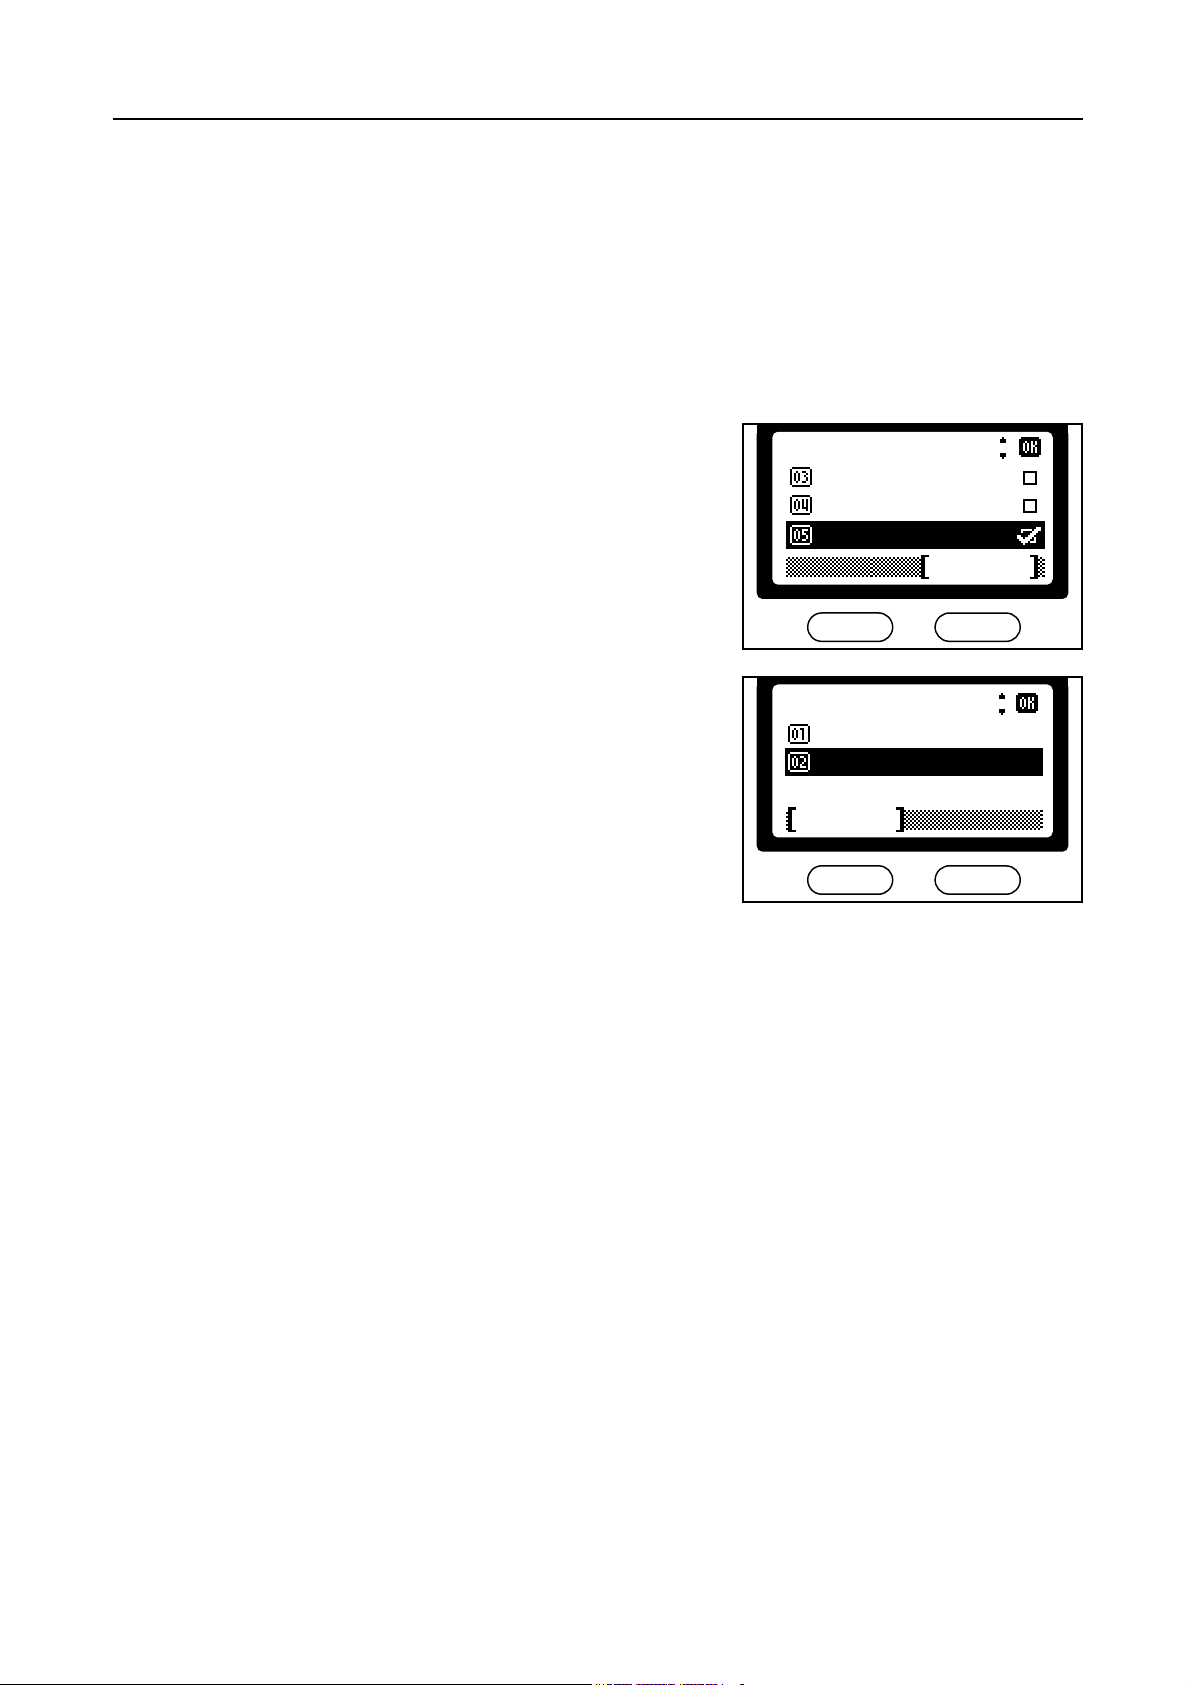
Press the S key or the T key to select either 2 in 1 or
5
4 in 1 and press the Enter key. The Layout screen is
displayed.
Press the S key or the T key to select the direction of
6
the layout and press the Enter key. The Border Line
screen is displayed.
Combine:
*
None
*
2in1
4in1
Cancel
Layout:
*
*
R to L
Cancel
Layout:
L to R to B
T to B to R
R to L to B
Cancel
T to BL to R
1-16
Page 26
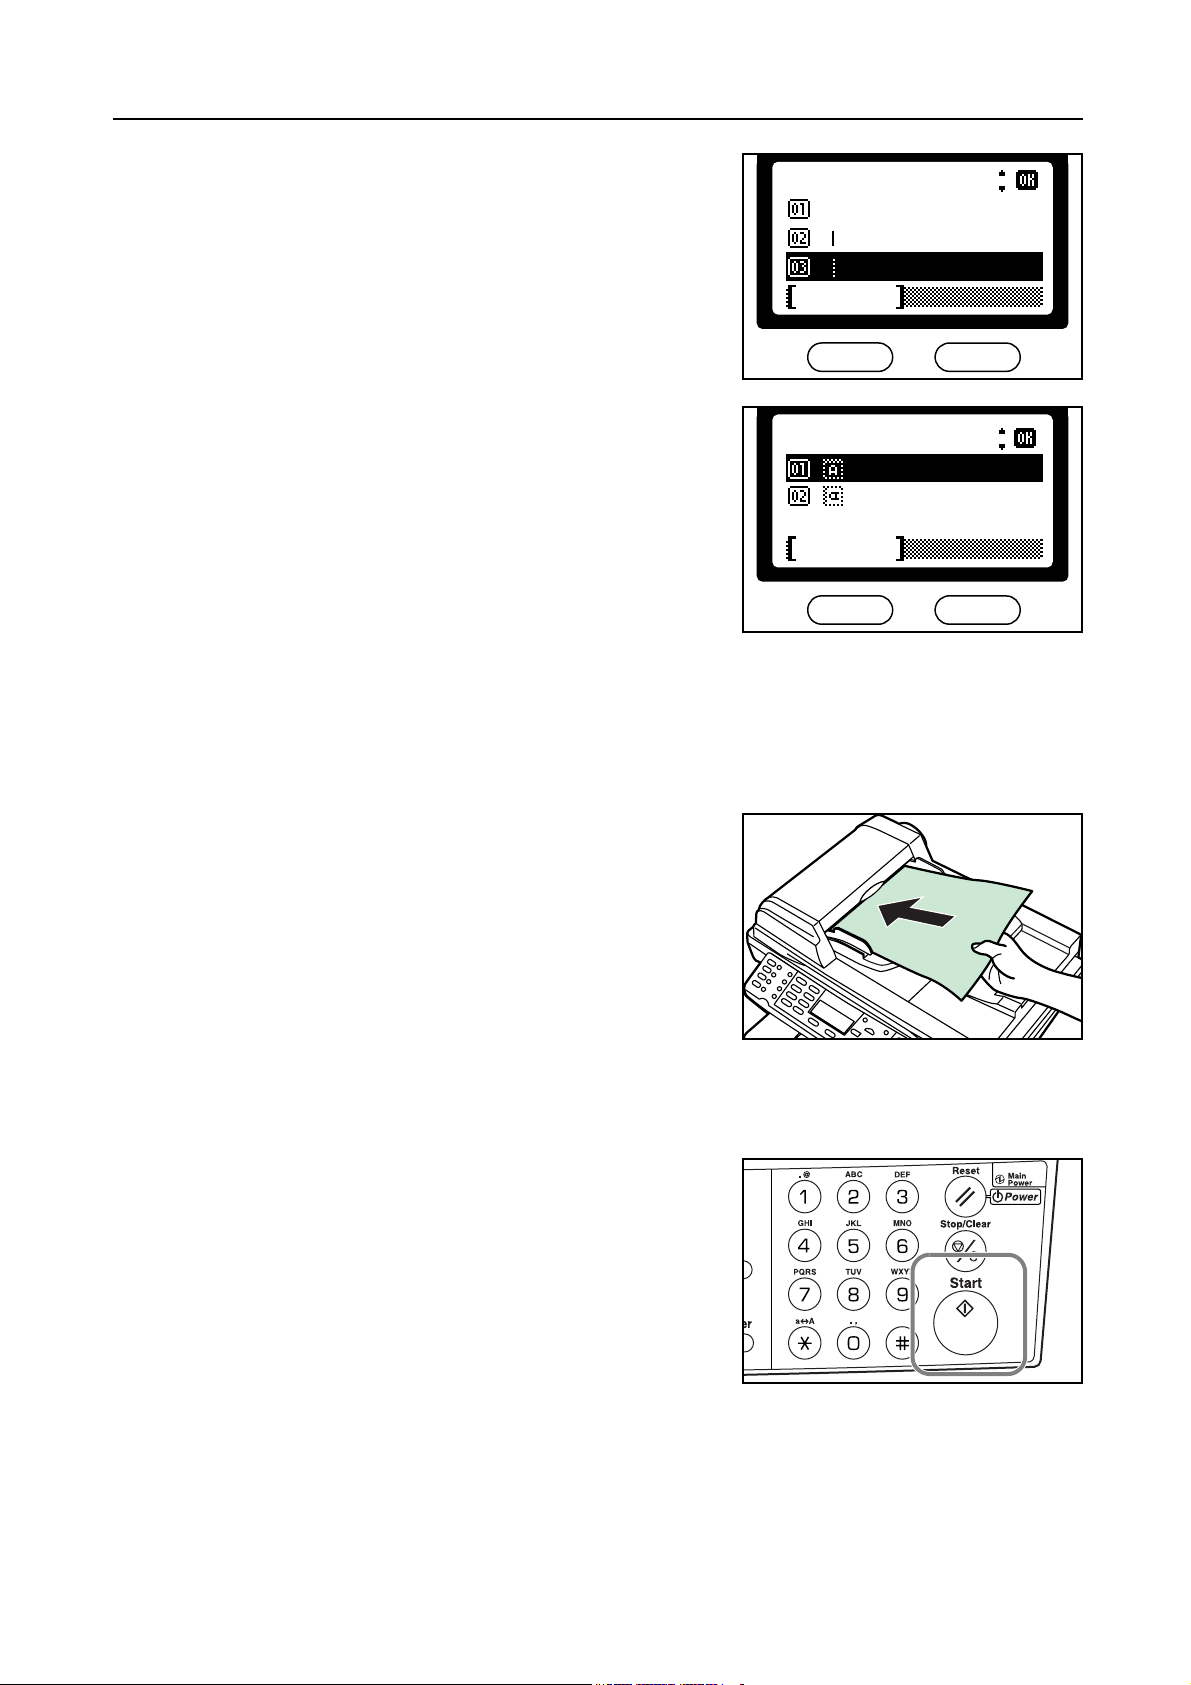
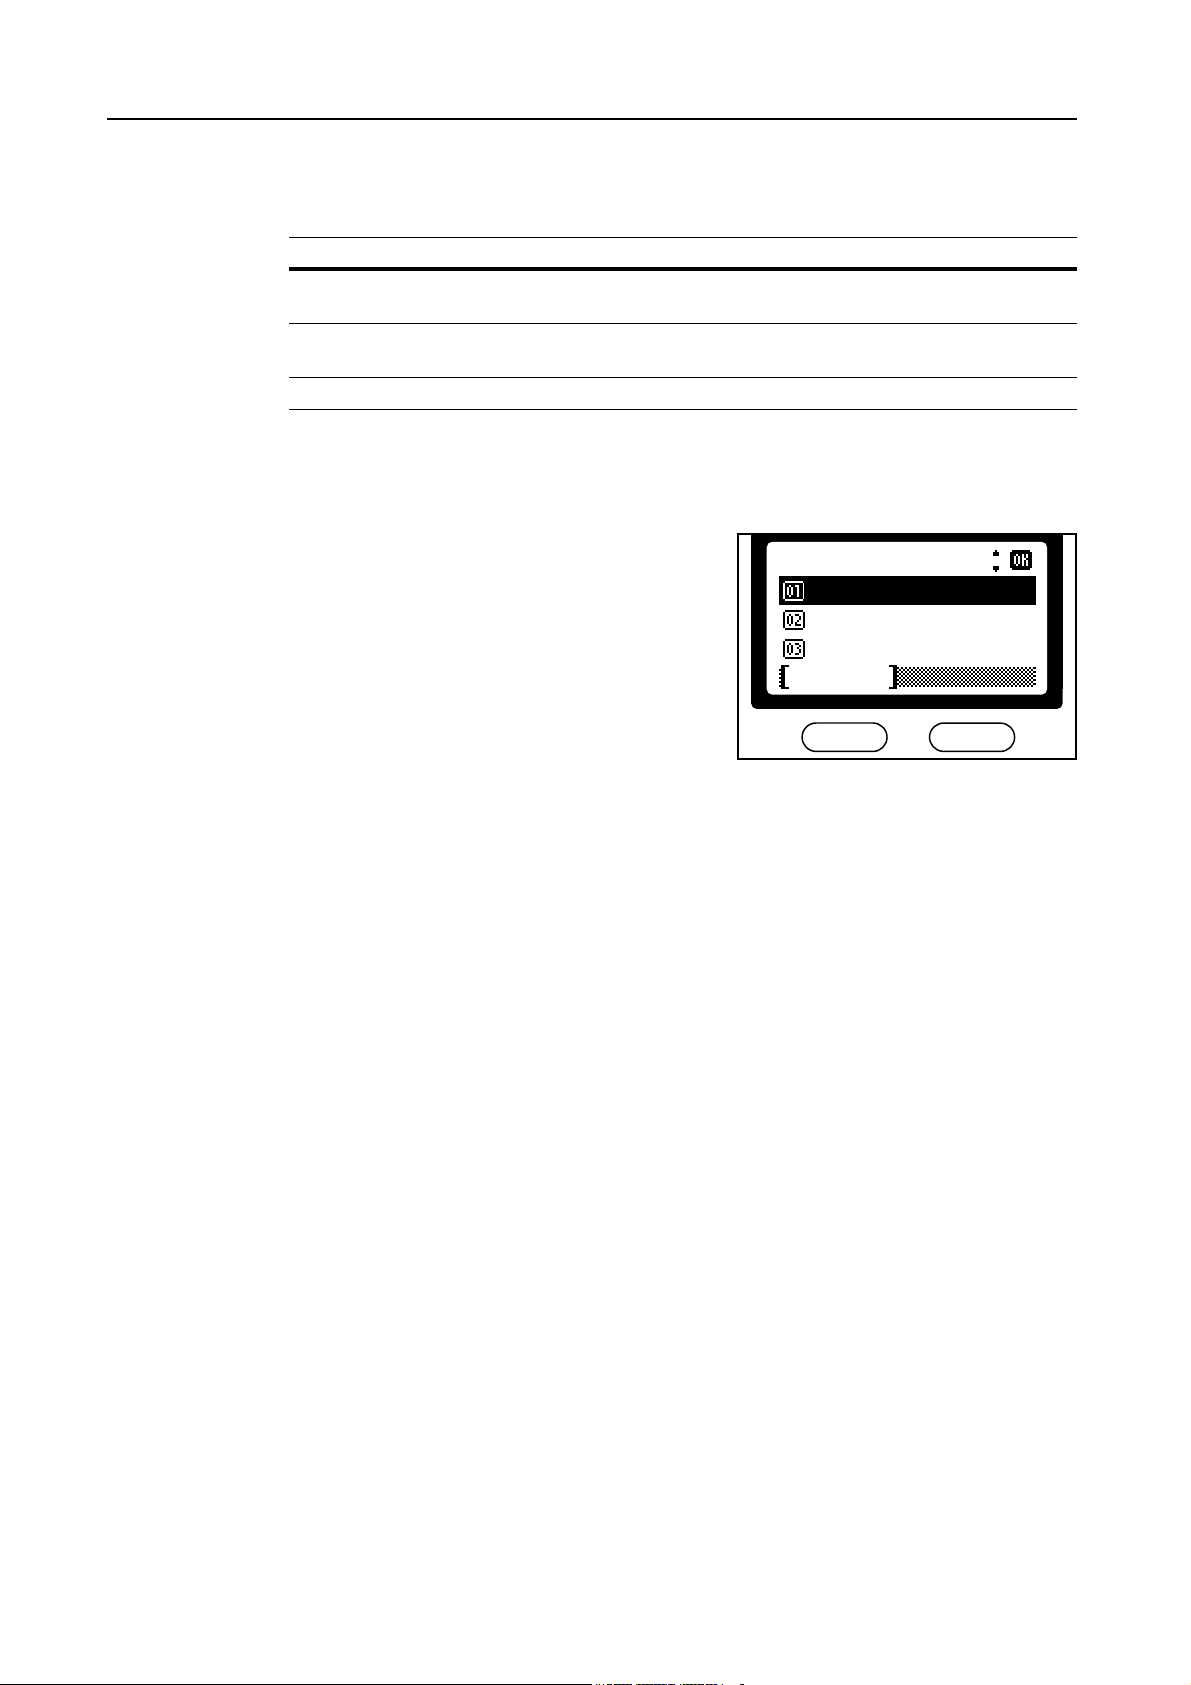
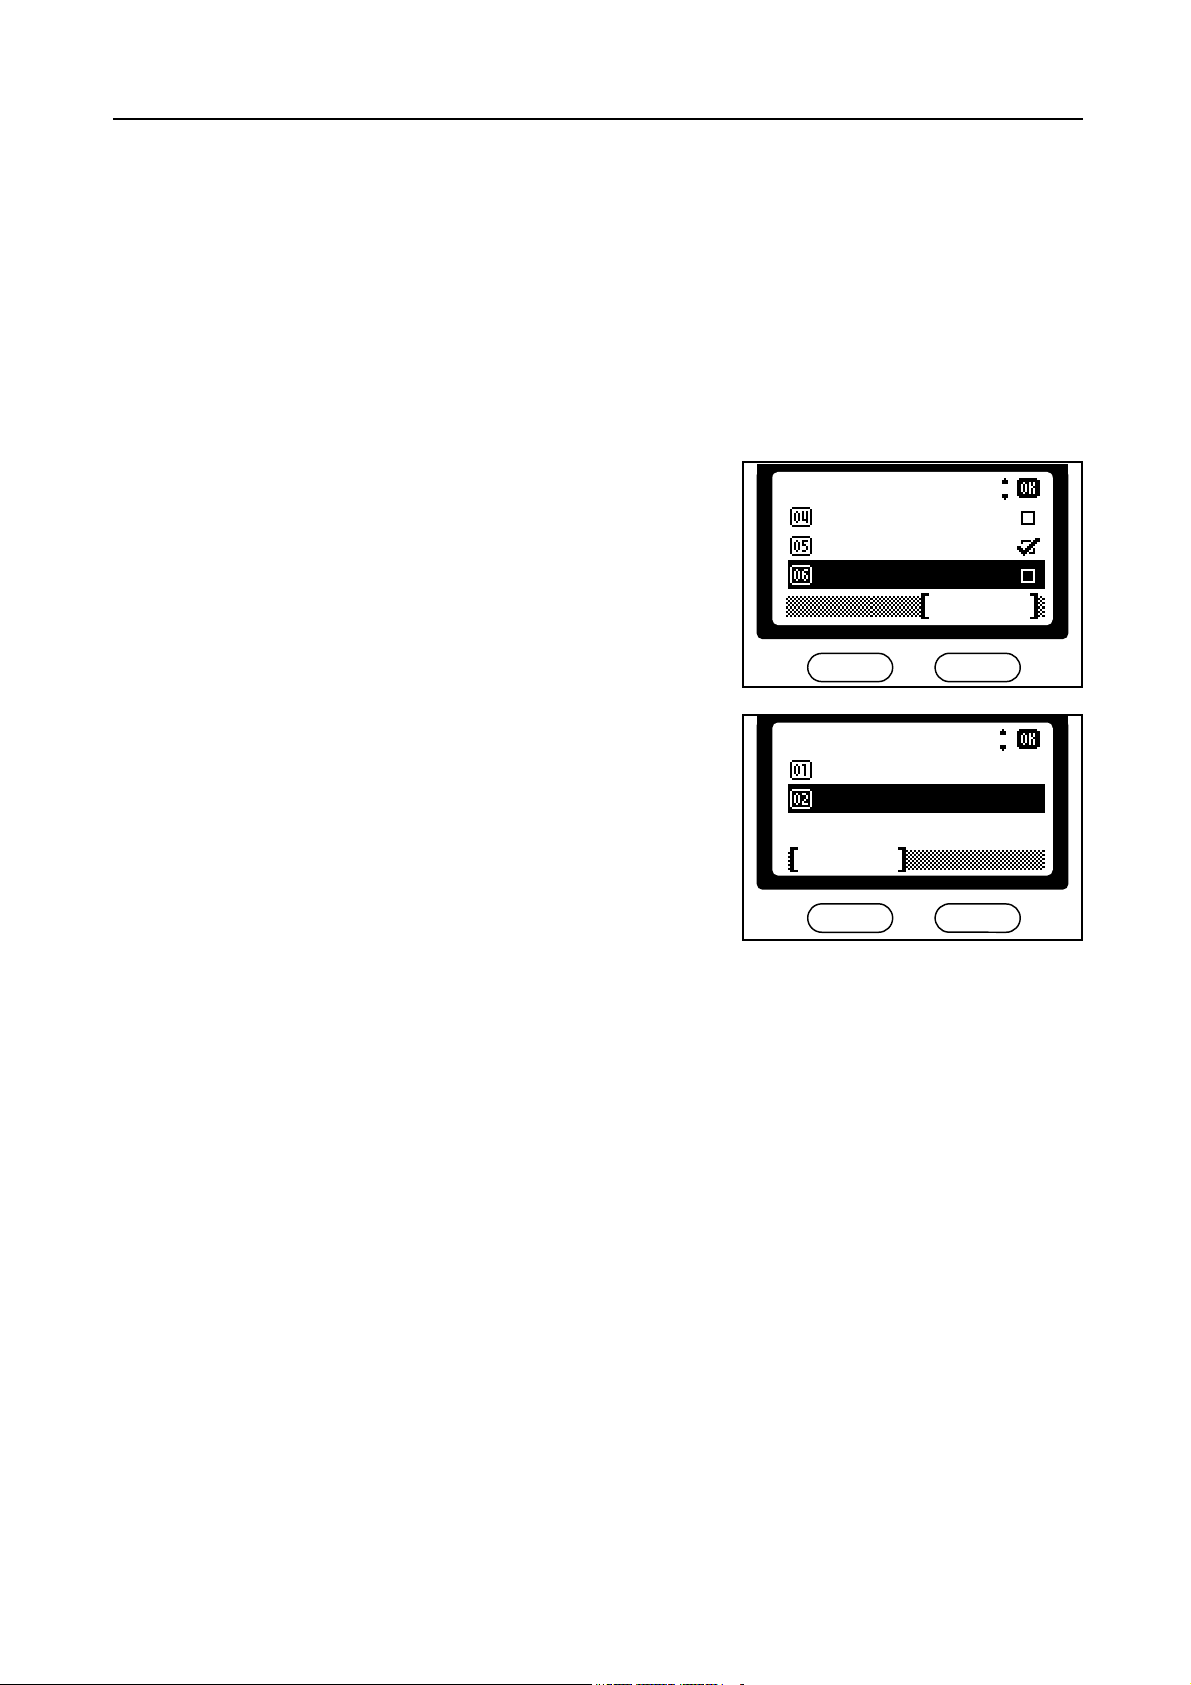
Press the S key or the T key to select the type of the
7
borderline and press the Enter key. The Orig.
Placement screen is displayed.
Border Line:
*
*
Cancel
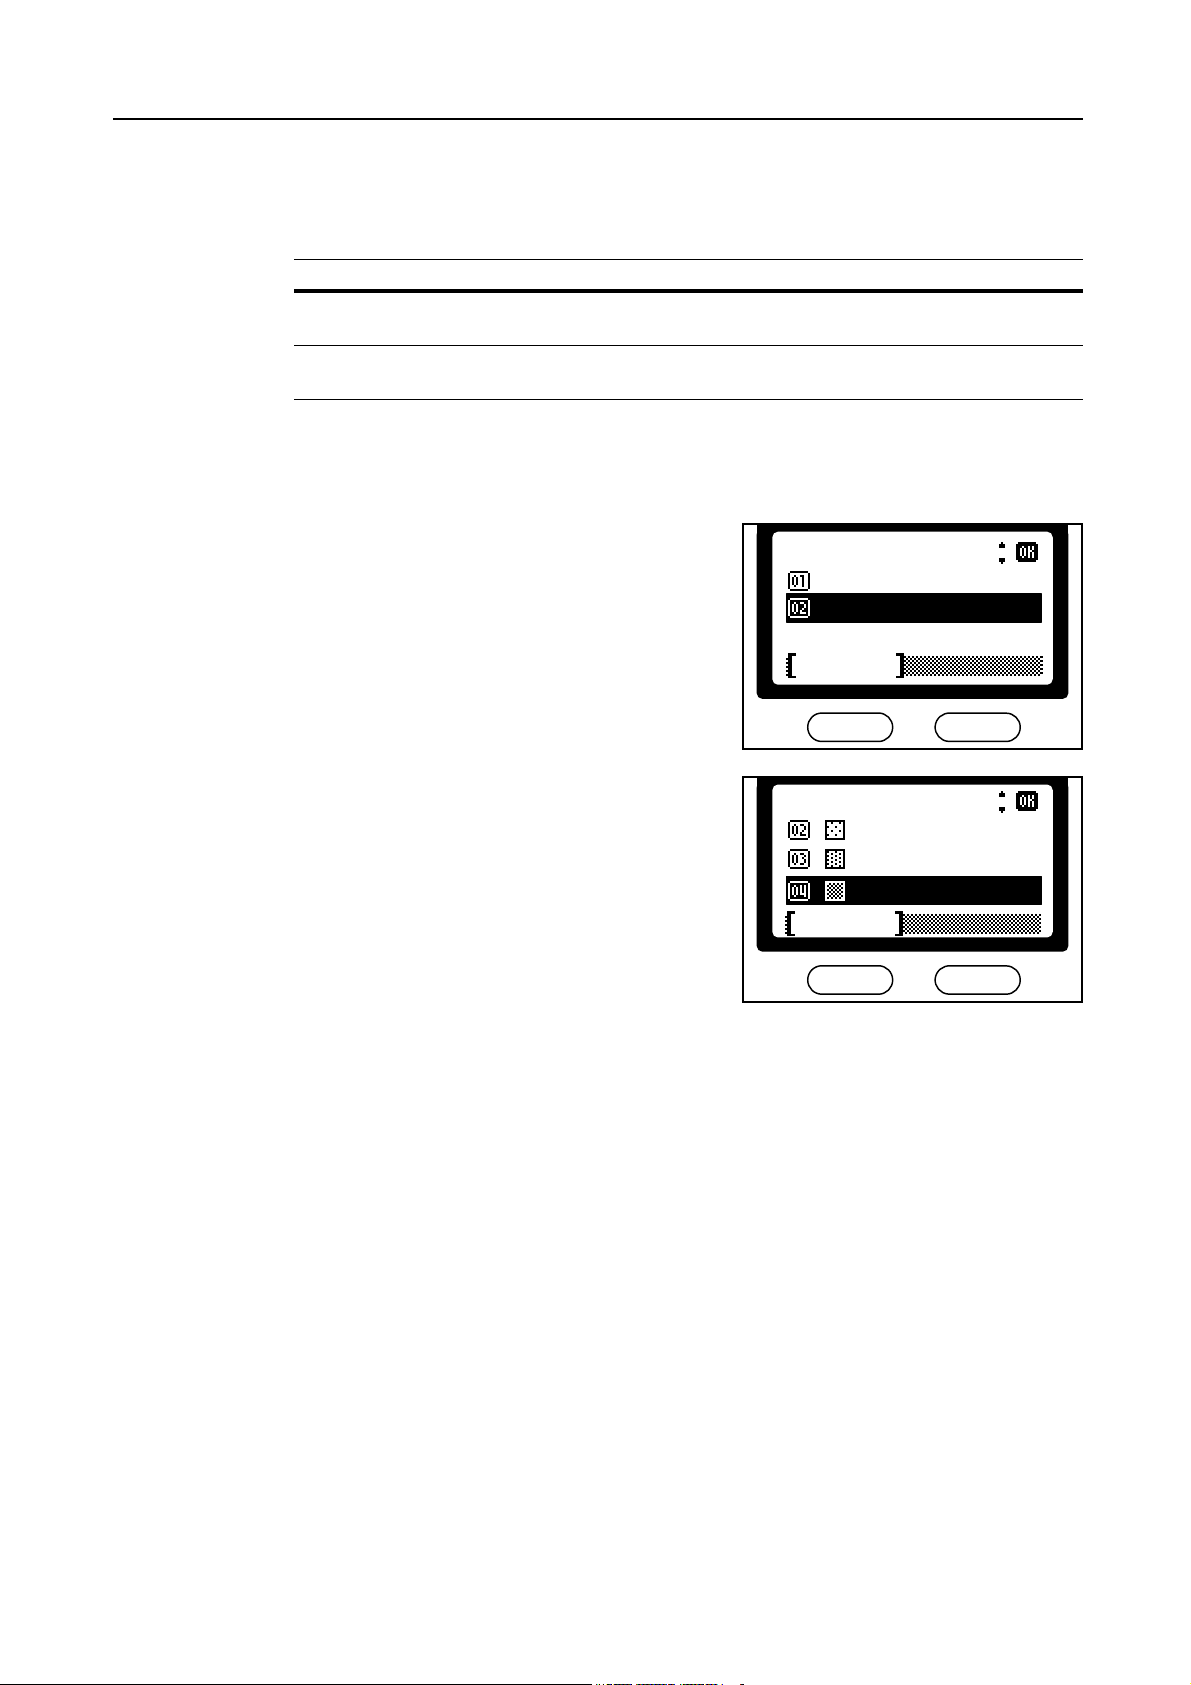
Press the S key or the T key to select the original
8
placement and press the Enter key. The message
display shows Completed and returns to the
Function screen.
Orig. Placement:
*
Cancel
Press the right select key. The message display returns to the copy basic screen.
9
Copying Functions
None
Solid Line
Dotted Line
Top Edge to Rear
Top Edge to Left
Using the Document Processor with Combine Mode
The following explains how to make copies with the combine modes when the document processor
is installed.
Set the originals in the document processor.
1
Press the Copy key. The copy basic screen is displayed.
2
Select the combine mode. For more information, refer to page 1-14.
3
Press the Start key. The originals are scanned
4
automatically and copying in the combine mode will
begin.
1-17
Page 27
Copying Functions
Using the Platen with Combine Mode
The following explains how to make copies with the combine modes when the document processor
is not installed.
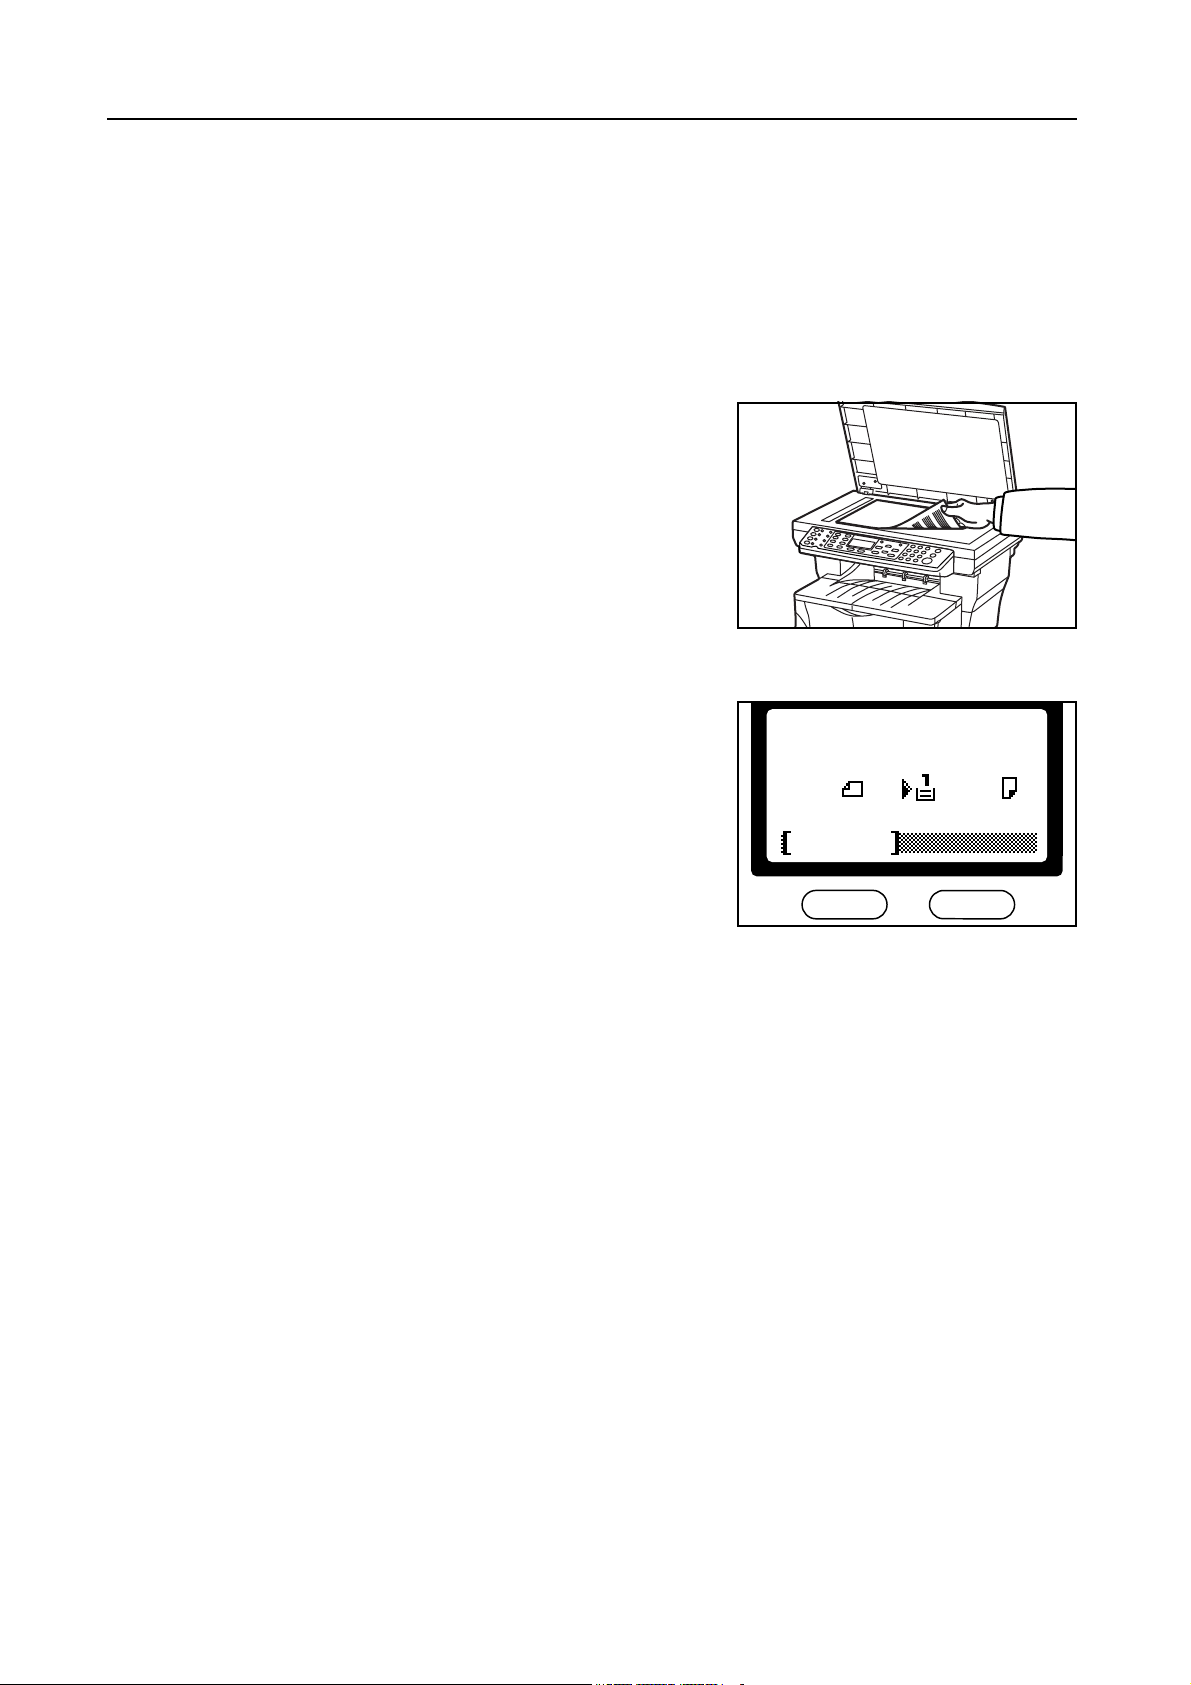
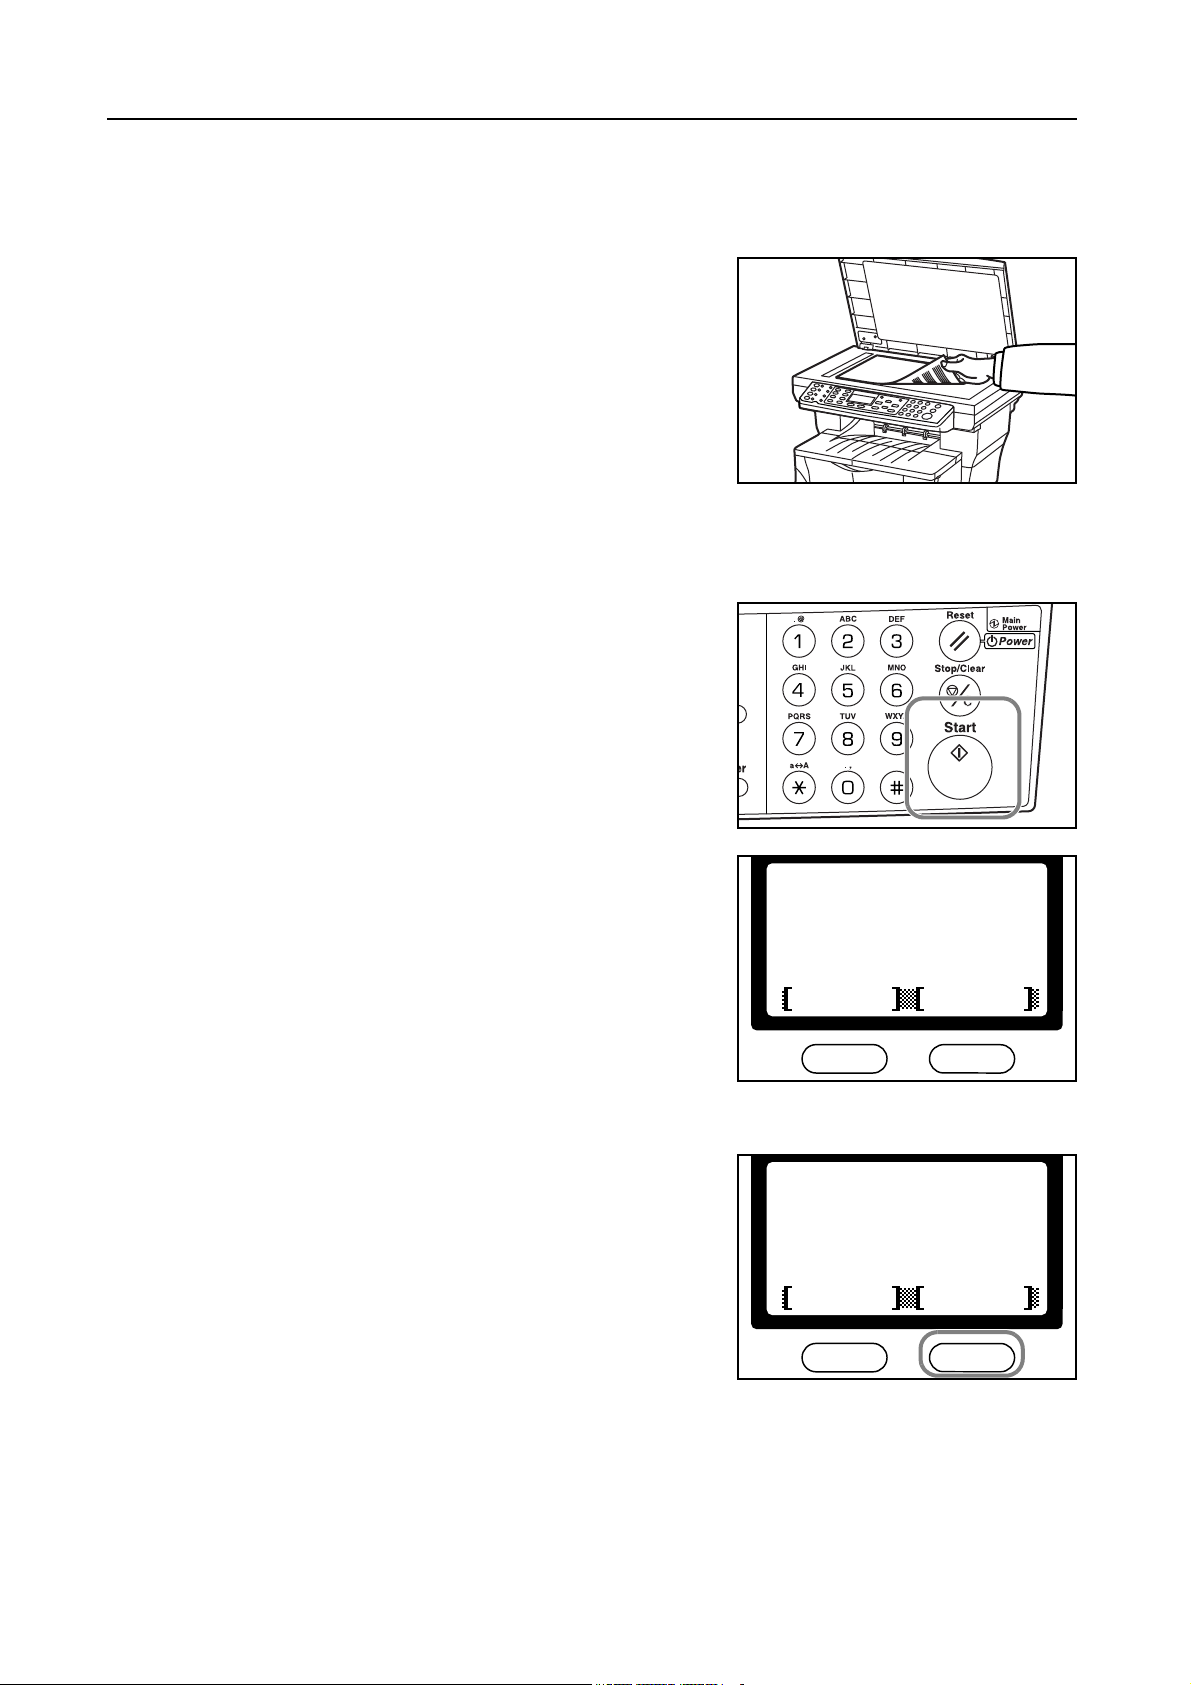
Set the first original to be copied.
1
Press the Copy key. The copy basic screen is displayed.
2
Select the combine mode. For more information, refer to page 1-14.
3
Press the Start key. The original is scanned.
4
Once the scanning operation is completed, Set
5
original and press Start key is displayed.
Position the next original on the Platen ready for
scanning and press the Start key. The next original is
scanned.
Repeat step 5 until all the originals have been scanned.
6
When all the originals have been scanned, press the
7
right select key. Accepted will appear and copying
commences.
Set original
*
and press Start key.
Job No.:
123
Page:
Cancel
End Scan
Set original
*
and press Start key.
Job No.:
123
Page:
Cancel
End Scan
1
6
1-18
Page 28
Continuous Copying
Use Continuous Copying to scan originals into memory in individual sections.The machine then
groups the sections together to form a single job. The copies are then produced in one batch, as a
single job.
Selecting Continuous Copying
Perform the following procedure to turn continuous copying on.
Press the Copy key. The copy basic screen is displayed.
1
Press the Function key.
2
Press the S key or the T key to select Continuous
3
Scan and press the Enter key. The Continuous
Scan screen is displayed.
Function:
Orig. Placement
*
EcoPrint
Continuous Scan
Copying Functions
Exit
Press the S key or the T key to select On and press
4
the Enter key. The message display shows
Completed and returns to the Function screen.
Press the right select key. The message display returns to the copy basic screen. To start
5
continuous copying, refer to the section which follows.
Using Continuous Copying
Perform the following procedure to use continuous copying.
Note The maximum number of originals to scan depends on the available memory in the machine.
Number of scannable originals (Letter, 5 %, Text+Photo mode) are as follows:
• 96 MB (standard): Approximately 70 sheets
• 128 MB: Approximately 115 sheets
• 192 MB: Approximately 380 sheets
• 320 MB: Approximately 535 sheets
Continuous Scan:
*
Off
*
On
Cancel
1-19
Page 29

Copying Functions
1
2
3
Set the original.
Press the Copy key. The copy basic screen is displayed.
Press the Start key. The first original is scanned.
Once the scanning operation is completed, Set
4
original and press Start key is displayed.
Position the next original on the platen and press the
Start key. The next original is scanned.
Repeat step 4 until all originals have been scanned.
5
When all originals have been scanned, press the right
6
Select key. Accepted will appear and copying
commences.
Set original
*
and press Start key.
Job No.:
123
Page:
Cancel
End Scan
Set original
*
and press Start key.
Job No.:
123
Page:
Cancel
End Scan
1
6
1-20
Page 30
Turning EcoPrint On and Off
EcoPrint enables the machine to consume less toner for a page to save your printing costs. When
EcoPrint mode setting is On, the printing image becomes lighter, but readable.The EcoPrint setting
has no effect on the print speed.
Note Images will be printed lighter than normal.
Press the Copy key. The copy basic screen is displayed.
1
Press the Function key.
2
Press the S key or the T key to select EcoPrint and
3
press the Enter key. The EcoPint screen is
displayed.
Press the S key or the T key to select On and press
4
the Enter key. The message display shows
Completed and returns to the Function screen.
Function:
Collate
*
Orig. Placement
EcoPrint
EcoPrint:
*
Off
On
Copying Functions
Exit
Cancel
Press the right select key. The message display returns to the copy basic screen.
5
1-21
Page 31

Copying Functions
Entering the Name of Copying Jobs
The file name is used for e-mail report that notifies the finish of copying (Refer to page 1-24) and
also listed in the Status menu for administration. The copying job is named depending on the time
stamp or job number.
Press the Copy key. The copy basic screen is displayed.
1
Press the Function key.
2
Press the S key or the T key to select File Name
3
Entry. Press the Enter key. The File Name Entry
screen is displayed.
Enter the desired file name using the keypad. Press
4
the Enter key. The Additional Info screen is
displayed.
Function:
EcoPrint
*
Continuous Scan
File Name Entry
File Name Entry:
doc
Exit
Notes • The factory default setting for the file name is doc.
• The file name can be between one and 30 characters long. Refer to Chapter 3 in Basic
Operation Guide, Character Entry.
Press the S key or the T key to select the information
5
that is added to the file name. Refer to the following
table for more information.
Cancel
Additional Info.:
None
*
Date and Time
*
Job No.
Cancel
ABC
Text
1-22
Page 32

Copying Functions
Selected Item File Name Example Description
Date and Time doc102720041456 Adds the date and time to the
File Name. The example shows
how a copying job created at
14:56 on October 27, 2004
would be named. The display
sequence of Month, Day, Year
can be changed, refer to
page 5-21.
Job No. doc0586 A job number is added to the file
name.
Press the Enter key. The message display shows Completed and returns to the Function
6
screen.
Press the right select key. The message display returns to the copy basic screen.
7
Select copying the originals. After copying is done, the copying job is stored as a file name. The file
8
name can be monitored in the Status menu. Refer to Checking Jobs Status on page 4-3.
1-23
Page 33

Copying Functions
Reporting the End of Copying
This function notifies you by e-mail when copying has been finished.
Note In order to use this function, you must perform the appropriate e-mail settings in advance.
The following is an example of the information that is sent by e-mail.
To: h_pttr@owl-net.net
Subject: 1234 event mail
Job No. : 2
Result : OK
End Time : 04/15/2004 14:56
File Name : doc041520041456
Job Type : Copy
------------------------------------------------
1234
[00:c0:ee:d0:01:14]
------------------------------------------------
Press the Copy key. The copy basic screen is displayed.
1
Press the Function key.
2
Press the S key or the T key to select Job End
3
Report and press the Enter key. The Job End
Report screen is displayed.
Press the S key or the T key to select On. Press the
4
Enter key.
Function:
Continuous Scan
*
File Name Entry
Job End Report
Job End Report:
*Off
*
On
Cancel
Exit
1-24
Page 34

Enter the e-mail address to which you want the report
5
to be sent for detail on entering characters. Refer to
Chapter 3 in Basic Operation Guide, Character
Entry.
Press the Enter key. The message display shows
Completed and returns to the Function screen.
Press the right select key. The message display returns to the copy basic screen.
6
Address Entry:
Cancel
Copying Functions
ABC
Text
1-25
Page 35

Copying Functions
1-26
Page 36

2 Scanning Functions
This chapter explains the following topics:
• Using the Scanning Function
• Scanning Documents
• Selecting Color Scan Mode
• Select the Original Size for Scanning
• Selecting the Scanning Resolution
• Adjusting the Exposure for Scanning
• Select the Original Size for Scanning
• Select the Send Size
• Zoom Scanning
• Selecting the Original Placement for Scanning
• Continuous Scanning
• Selecting the Image File Format
• Entering the Name of Scan Job
• Entering the Subject and Body Message of E-Mail
• Reporting the End of Scanning
2-1
Page 37

Scanning Functions
Using the Scanning Function
This machine sends a scanned image as an attached file in an e-mail message. In order to send
e-mail from this machine, it is necessary to register sender and destination (recipient) addresses on
the network.
Notes • Attaching scanned image of a large size to e-mail will result in increased network traffic and
longer transmission time.
• A network environment in which this machine can connect to a mail server is required in order
to use the e-mail function. It is recommended that the machine be used in an environment
wherein it can connect to the mail server at any time over a LAN (Local Area Network).
• If there is a limit to the size of e-mail sent, for example with mail servers for such entities as
ISPs (Internet Service Providers) and hosting services, depending upon the size of each e-mail
item, there may be cases where transmission of a particular e-mail will not be possible.
• Only one destination is possible with this machine.
To use the scanner function, take the following steps:
• Perform the settings including e-mail setting in the machine.
• Use COMMAND CENTER, which is the internal HTML web page (Refer to Using COMMAND
CENTER on page 6-1), to register the IP address, the host name of the SMTP server, and the
recipient.
• Register the destination e-mail address on the one-touch keys.
2-2
Page 38

Scanning Documents
Perform the following procedure in order to use this machine to scan documents.
Press the E-Mail key. The scanner basic screen is displayed.
1
Press the one-touch key on which the destination
2
e-mail address is registered. The e-mail address is
displayed.
Note To cancel the e-mail address, press the W key.
Program the settings as required to use additional functions which are explained on pages 2-6 to
3
2-20.
Press the Start key. The Scanning screen is
4
displayed and the scanning will begin.
Scanning Functions
Ready to send.
Dest.
:h_pttr@owl-net.net
Left On
SubjectPlacemnt
:1
If Continuous Scan was selected, the message Set
5
original and press Start key displays when
scanning is completed. Refer to Continuous
Scanning on page 2-14.
To scan another original, position the next original and
change the settings as required. Press the Start key.
When all the originals have been scanned, press the
right select key.
Notes • The Sender of the e-mail will be listed as the information that is registered under the Sender
Address setting in COMMAND CENTER (the internal HTML page).
• A default subject and body message for e-mail can be selected in advance by using
COMMAND CENTER.
Entering the E-mail Address Using the Operation Panel
Perform the following procedure to enter the destination of the e-mail address from the operation
panel.
Press the E-Mail key. The scanner basic screen is displayed.
1
Set original
*
and press Start key.
Job No.:
123
Page:
Cancel
End Scan
6
2-3
Page 39

Scanning Functions
2
3
4
Press the W key. The Destination screen is
displayed.
Press the S key or the T key to select E-mail and
press the Enter key. The Address Entry screen is
displayed.
Enter the new e-mail address.
Destination:
Dest. Confirm.
E-mail
Cancel
Address Entry:
Press the Enter key. The message display shows Completed and returns to the scanner basic
5
screen.
Changing the E-mail Address
With the corresponding destination e-mail address
1
selected, press the W key. The Destination screen
is displayed.
Press the S key or the T key to select Dest.
2
Confirm and press the Enter key. The Dest.
Confirm screen is displayed.
Cancel
Destination:
Dest. Confirm.
E-mail
ABC
Text
2-4
Cancel
Page 40

Scanning Functions
Press the Enter key. The Address Entry screen is
3
displayed.
Dest. Confirm.:
:h_pttr@owl-net.net
*
DeleteCancel
Enter the new e-mail address.
4
Address Entry:
h_pttr@owl-net.net
Cancel
Press the Enter key. The message display shows Completed and returns to the scanner basic
5
screen.
ABC
Text
Deleting the E-mail Address
Perform the following procedure to delete the destination of the e-mail address from the operation
panel.
Refer to steps 1 through 2 of Changing the E-mail Address to access the Dest. Confirm
1
screen.
Press the right select key. Delete. Are you sure?
2
will appear.
To delete the e-mail address, press the left select key.
3
The message display shows Deleted and returns to
the Dest. Confirm screen.
Dest. Confirm.:
:h_pttr@owl-net.net
*
DeleteCancel
Delete
Are you sure?
NoYes
Press the E-Mail key. The message display returns to the scanner basic screen.
4
2-5
Page 41

Scanning Functions
Selecting Color Scan Mode
The following color modes are available for scanning:
Mode Description
Full Color The original will be scanned in full color. The scanning
Grayscale The shading of the original will be reproduced. The scanning
Monochrome The original will be scanned in monochrome. The resulting file
Press the E-Mail key. The scanner basic screen is displayed.
1
Press the Scan Color Select key.
2
Press the S key or the T key to select the desired
3
mode and press the Enter key. The message display
shows Completed and returns to the scanner basic
screen.
exposure will be set to Manual.
exposure will be set to Manual.
size for the scan data will be smaller in comparison with the
other color modes.
ScanColor Select:
Full Color
*
Grayscale
*
Monochrome
Cancel
Press the Start key to start scanning. When scanning is completed, the machine automatically
4
sends e-mail to the destination e-mail address. The scanned image is attached with the e-mail.
2-6
Page 42

Selecting the Original Quality for Scanning
The original quality mode is used to optimize scanning quality according to the type of originals.
This mode will be available when you have selected monochrome in the color scan mode.
Mode Description
Text+Photo Select this mode when the original contains a mixture of both
text and photographs.
Photo Select this mode when the original mostly contains
photographs. To send photo images with a 200 dpi resolution
for smoother images by e-mail, it is recommended to use Full
Color or Grayscale mode.
Text Select this mode when the original mostly contains text.
OCR This mode will be available when you have selected
monochrome in the Scan Color mode. Use this mode if the
image data is to be converted into text using OCR (Optical
Character Recognition) software.
Press the E-Mail key. The scanner basic screen is displayed.
1
Press the Original Quality key.
2
Scanning Functions
Press the S key or the T key to select the desired
3
mode and press the Enter key.
The message display shows Completed and returns
to the scanner basic screen.
Original Quality:
*
Text+Photo
Photo
Text
Cancel
2-7
Page 43

Scanning Functions
Selecting the Scanning Resolution
Perform the following procedure to set the desired level of resolution at which the original is
scanned. The higher the resolution value is, the finer the image will be. In this case, however, the
size of the resulting file will become larger and the scanning time will be increased.
Note The maximum resolution using full color or gray scale modes is 300 dpi. To scan in full color or gray
scale with 400 dpi or 600 dpi resolution, optional expansion memory is required. Refer to Chapter 5,
Expansion Memory in Basic Operation Guide.
Press the E-Mail key. The scanner basic screen is displayed.
1
Press the Scan Resolution key.
2
Press the S key or the T key to select the desired
3
scanning resolution and press the Enter key. The
message display shows Completed and returns to the
scanner basic screen.
Scan Resolution:
*
200x200dpi
*
300x300dpi
400x400dpi
Cancel
2-8
Page 44

Adjusting the Exposure for Scanning
This section explains how to make adjustments to the exposure mode. The default exposure is
Manual.
Mode Description
Auto Use this mode to enable the machine to automatically select the
Manual Use this mode to adjust the scan exposure manually. There are
Press the E-Mail key. The scanner basic screen is displayed.
1
Press the Exposure key.
2
Press the S key or the T key to select manual and
3
press the Enter key.
If you selected Manual, the Manual screen is
displayed. Proceed to the next step.
If you selected Auto, the message display shows
Completed and returns to the scanner basic screen.
Scanning Functions
optimal exposure setting for the original. This mode will be available
when you have selected Monochrome in the Scan Color mode.
seven exposure levels available.
Exposure:
Auto
*
*
Manual
Cancel
Press the S key or the T key to adjust the value for
4
the exposure as desired and press the Enter key. The
massage display shows Completed and returns to the
scanner basic screen.
Manual:
Lighter -2
*
Lighter -1
Normal
Cancel
2-9
Page 45

Scanning Functions
Select the Original Size for Scanning
The original size defines the area to be scanned and must be identical with the physical size of the
original. The following original sizes are available:
Letter, Legal, Statement, A4, A5, A6, B5, B6, Folio, OficioII, Executive
ISO B5, 16K, Envelope #10, Envelope #9, Envelope Monarch, Envelope #6,
Envelope C5, Envelope DL, Hagaki, Oufukuhagaki, Youkei 2, Youkei 4, and
Custom
Press the E-Mail key. The scanner basic screen is displayed.
1
Press the Original size key.
2
Press the S key or the T key to select the desired
3
original size and press the Enter key. The message
display shows Completed and returns to the scanner
basic screen. Setting others for original size for
scanning. If the size of the original is not shown in the
display.
Original Size:
Letter
*
*
Legal
Statement
Cancel
If the Original Size required is not shown, select the
4
Others setting and press the Enter key. Press S or
T key to select the Original Size required and press
the Enter key.
A Completed message displays and the Scanner
Basic screen returns.
Original Size:
Folio
*
Oficio II
Others
Cancel
Note The Others selection offers further size options such as postcard, envelope and registered custom
sizes.
2-10
Page 46

Select the Send Size
The send size defines the size of the image attached and received as e-mail. The following send
sizes are available:
Same as Original, Letter, Legal, Statement, A4, A5, A6, B5, B6, Folio,
OficioII, Executive, ISO B5, 16K, Envelope #10, Envelope #9, Envelope
Monarch, Envelope #6, Envelope C5, Envelope DL, Hagaki, Oufukuhagaki,
Youkei 2, Youkei 4, and Custom
Note When Full Color or Grayscale is selected, the images are sent in the same size as their
originals.
Press the E-Mail key. The scanner basic screen is displayed.
1
Press the Function key.
2
Press the S key or the T key to select Send Size
3
and press the Enter key. The Send Size screen is
displayed.
Function:
*
Exit
Send Size
Zoom
Scanning Functions
Exit
Press the S key or the T key to select the desired
4
send size and press the Enter key. The message
display shows Completed and returns to the
Function screen is displayed.
If the Send Size required is not shown, select Others
5
and press the Enter key.
Press S or Tkey to select the size required and press
the Enter key. A Completed message displays to the
Function screen returns.
Send Size:
Same as Original
*
Letter
Legal
Cancel
Send Size:
Folio
*
Oficio II
Others
Cancel
2-11
Page 47

Scanning Functions
Zoom Scanning
Auto Zoom
1
This section explains how to scan documents to an enlarged or reduced size. The following modes
are available for zooming.
Mode Description
100% Scan documents at the same size as the original.
Auto Adjusts the zoom ratio so that the scanned image fits onto the
selected send size.
Set the original.
Press the E-Mail key. The scanner basic screen is displayed.
2
Press the Function key.
3
Press the S key or the T key to select Zoom and
4
press the Enter key. The Zoom screen is displayed.
Press the S key or the T key to select Auto and
5
press the Enter key. The message display shows
Completed and returns to the Function screen. The
original is scanned so that it fits onto the selected send
size.
Function:
*
Exit
Send Size
Zoom
Zoom:
100%*
*
Auto
Cancel
Exit
2-12
Page 48

Selecting the Original Placement for Scanning
Perform the following procedure to select the placement that the original is scanned.
Using the Platen
Top Edge to Rear Top Edge to Left
Rear
Using the Document Processor
Top Edge to Rear Top Edge to Left
Rear
Scanning Functions
Left
Press the E-Mail key. The scanner basic screen is displayed.
1
Press the left select key.
2
Press the S key or the T key to select the original
3
placement and press the Enter key. The message
display shows Completed and returns to the scanner
basic screen.
Left
Ready to send.
Dest.
:h_pttr@owl-net.net
Left Off
SubjectPlacemnt
Orig. Placement:
Top Edge to Rear
*
Top Edge to Left
Cancel
:1
2-13
Page 49

Scanning Functions
Continuous Scanning
Use Continuous Scan to scan originals into memory in individual sections which may require
different settings. The machine then groups the sections together to form a single job.
Press the E-Mail key. The scanner basic screen is displayed.
1
Press the Function key.
2
Press the S key or the T key to select Continuous
3
Scan and press the Enter key. The Continuous
Scan screen is displayed.
Press the S key or the T key to select On and press
4
the Enter key. The message display shows
Completed and returns to the Function screen is
displayed.
Function:
Zoom
*
Orig. Placement
Continuous Scan
Continuous Scan:
*
Off
*
On
Exit
Press the right select key. The message display returns to the scanner basic screen.
5
Using Continuous Scanning
Set the original.
1
Press the E-Mail key. The scanner basic screen is displayed.
2
Enter the e-mail address of the intended recipient from the one-touch key or the Destination key.
3
Program the settings as required to use additional functions which are explained on pages 2-7 to
4
2-12.
Cancel
2-14
Page 50

Press the Start key. The first original is scanned.
5
Once the scanning operation is completed, Set
6
original and press Start key is displayed.
Position the next original on the platen and press the
Start key. The next original is scanned.
Repeat step 6 until all originals have been scanned.
7
Scanning Functions
Set original
*
and press Start key.
Job No.:
123
Page:
Cancel
End Scan
1
When all originals have been scanned, press the right
8
select key. The message display shows Accepted
and returns to the scanner basic screen.
Set original
*
and press Start key.
Job No.:
123
Page:
Cancel
End Scan
6
2-15
Page 51

Scanning Functions
Selecting the Image File Format
Use the following procedure to select the File Format for the saved imaged. The image file formats
available will differ depending upon the Scan Color setting. The following indicates the file formats
that are selectable under each setting.
Color Scan Mode Selectable File Formats Compression Level
Full Color PDF, JPEG 5
Grayscale PDF, JPEG 5
Monochrome PDF, TIFF None
Note When JPEG is selected, the Original Placement setting will become invalid. Refer to page 2-13.
Press the E-Mail key. The scanner basic screen is displayed.
1
Press the Function key.
2
Press the S key or the T key to select File Format
3
and press the Enter key. The File Format screen is
displayed.
Function:
Orig. Placement
*
Continuous Scan
File Format
Exit
Press the S key or the T key to select the desired file format and press the Enter key. The Image
4
Quality screen is displayed.
In case of the monochrome mode, PDF and TIFF are
available for file format.
File Format:
*
PDF*
JPEG
Cancel
Note If Full Color or Grayscale has been selected under Selecting Color Scan Mode on page 2-6,
the Image Quality screen is displayed.
Press the S key or the T key to select the desired
5
image quality level and press the Enter key. The
message display returns to the Function screen is
displayed.
Image Quality:
1 Low(High Comp)
*
*
2
3 Normal
Cancel
2-16
Note The higher the image quality is, the larger the resulting file size will be.
Page 52

Scanning Functions
Press the right select key. The message display returns to the scanner basic screen.
6
Press the Start key to start scanning. When scanning is completed, the machine automatically
7
sends e-mail to the destination e-mail address. The scanned image is attached with the e-mail.
2-17
Page 53

Scanning Functions
Entering the Name of Scan Job
The scanning job is named depending the time stamp or serial number. Settings for name will be
applied to all scan jobs. The default file name is doc.
Press the E-Mail key. The scanner basic screen is displayed.
1
Press the Function key.
2
Press the S key or the T key to select File Name
3
Entry and press the Enter key. The File Name
Entry screen is displayed.
Enter the desired file name.
4
Function:
Continuous Scan
*
File Format
File Name Entry
File Name Entry:
doc
Exit
ABC
Cancel
Notes • The factory default setting for the file name is doc. Use COMMAND CENTER if you want to
change the default file name.
• The file name can be between one and 30 characters long. Refer to Chapter 3 in Basic
Operation Guide, Character Entry.
Once the file name has been entered, press the Enter key. The Additional Info screen is
5
displayed.
Press the S key or the T key to select the information
6
that will be added to the file name and press the Enter
key. The message display shows Completed and
returns to the Function screen is displayed.
Additional Info.:
*
None
*
Date and Time
Text
Job No.
Cancel
2-18
Press the right select key. The message display returns to the scanner basic screen.
7
Page 54

File Name for Scan Data
File names for scan data will be added automatically either in accordance with certain rules or
according to the corresponding setting. Refer to the following table for more information.
Selected Item File Name Example Description
None doc.pdf Select this item if you do not want to add
Date and Time doc102720041456.tiff
Job No. doc0030.tiff
† Adds consecutive numbers to each file name in the order that they were scanned. This is dis-
further information to the default file name.
Adds the date to the default file name. For
(for JPEG format,
doc102720041456_01.
†
)
tiff
example, the scanning job stored at 14:56 on
October 27, 2004, will be named as follows.
The display sequence of Year, Month, and
Day can be changed, refer to page 5-21.
Adds the job number to the default file name.
(for JPEG format,
doc0030_01.tiff
†
This is displayed as a four-digit numbers
)
between 0001 and 9999.
played as a three-digit numbers between 001 and 999.
Scanning Functions
2-19
Page 55

Scanning Functions
Entering the Subject and Body Message of E-Mail
The subject and body message of e-mail to which the scanned image is attached can be edited
according to the preference. Change the subject and the message manually as necessary. On is
displayed on the scanner basic screen when any characters are entered in the Subject or the
Message, and Off is displayed when nothing is entered.
Press the E-Mail key. The scanner basic screen is displayed.
1
Press the right select key. The Subject Entry
2
screen is displayed.
Enter the desired subject (60 characters maximum).
3
Ready to send.
Dest.
:h_pttr@owl-net.net
Left Off
SubjectPlacemnt
Subject Entry:
*
:1
ABC
Cancel Text
Once the subject has been entered, press the Enter key. The Message Entry screen is displayed.
4
Enter the desired message (60 characters maximum).
5
Message Entry:
*
ABC
Cancel
Once the message has been entered, press the Enter key. The message display shows
6
Completed and returns to the scanner basic screen.
Text
2-20
Page 56

Reporting the End of Scanning
This function notifies you by e-mail when scanning has been finished. Perform the following
procedure to have a report sent to selected e-mail address which notifies you when scanned data
has been attached to and sent by e-mail.
Press the E-Mail key. The scanner basic screen is displayed.
1
Press the Function key.
2
Press the S key or the T key to select Job End
3
Report and press the Enter key. The Job End
Report screen is displayed.
Press the S key or the T key to select On and press
4
the Enter key. The Address Entry screen is
displayed.
Scanning Functions
Function:
File Name Entry
*
Subject Entry
Job End Report
Job End Report:
Off
*
On
*
Exit
Cancel
Enter the e-mail address to which you want the report
5
to be sent (126 characters maximum).
Address Entry:
Cancel
Press the Enter key. The message display shows Completed and returns to the Function
6
screen.
ABC
Text
2-21
Page 57

Scanning Functions
2-22
Page 58

3 Printer Settings
This chapter explains the procedures to make the various settings that are required in
order to use the printer functions of the machine.
The settings that are required to use the machine as a network printer can be made from
either the operation panel or using COMMAND CENTER.
The procedures in this chapter specifically explain how to make the corresponding
settings from the operation panel.
This chapter explains the following topics:
• Using the Machine as a Network Printer
• Parallel Setting
• Network Settings
• Setting the Emulation Mode
• COMMAND CENTER
Note
For the procedures to make settings using COMMAND CENTER, refer to Using COMMAND
CENTER on page 6-1.
3-1
Page 59

Printer Settings
Using the Machine as a Network Printer
The procedure to use this machine as a network printer is accomplished in accordance with the
following flow.
Enter IP addresses, etc. for a network connection
(Refer to Chapter3, Connecting the Cables in Basic Operation Guide)
Perform the following procedures on the operation panel or COMMAND CENTER (Refer to Using
COMMAND CENTER on page 6-1.)
• Make the network settings (page 3-4)
• Select the emulation mode (page 3-9)
• Set the number of prints and select the original placement
• Select the original quality mode
• Register the paper sizes for the cassette(s) and MP tray
(Refer to KX Printer Driver Guide).
È
Connect the network cable
È
È
Install and set-up the printer driver
È
Print out from the application
3-2
Page 60

Parallel Setting
Note Use a parallel printer cable that complies with the IEEE1284 standard.
1
2
Printer Settings
The parallel interface supports a bi-directional/high-speed mode according to IEEE standards. Four
modes are available.
Item Description
Auto (default) The machine automatically changes its communication mode to the
one the host computer is currently using. Ordinarily, you should leave
this setting unchanged.
Normal The machine uses the standard communication method prescribed for
Centronics interfaces.
High speed This mode enables faster data transmission between the machine and
the host computer. (Select this mode if printing problems occur when
the machine is connected to a workstation.)
Nibble(high) High speed data communication is used in compliance with the IEEE
1284 standard.
Press the System Menu/Counter key. The System Menu/Count screen is displayed.
Press the S key or the T key to select System
Setting and press the Enter key. The System
Setting screen is displayed.
Sys. Menu/Count.:
Report
*
Counter
System Setting
Exit
Press the S key or the T key to select Parallel
3
Setting and press the Enter key. The Parallel
Setting screen is displayed.
Press the S key or the T key to select the desired
4
parallel interface mode setting and press the Enter
key. The message display shows Completed and
returns to the System Setting screen.
System Setting:
Back
*
Network Setting
Parallel Setting
Parallel Setting:
*
*
Auto
Normal
High Speed
Cancel
Exit
3-3
Page 61

Printer Settings
Network Settings
Notes • Be sure to get the approval of your network administrator and be prepared with the appropriate
Network settings must be accomplished in order to enable network printing as well as to send
e-mail. This section explains the settings required in order to use the network functions of this
machine.
information before you attempt to set the IP address.
• Always restart this machine after you have completed these network settings in order to
properly register the content of those settings in the machine. Refer to Restarting the
Machine on page 5-15.
Network settings are accomplished in accordance with the following flow.
Start
È
AppleTalk (On/Off)
È
TCP/IP (On/Off)
È DHCP Off
DHCP (On/Off) IP Address Entry
È
Subnet Mask Address Entry
DHCP On È
Default Gateway Address Entry
È
Restart (Refer to Restarting the Machine on page 5-15.)
È
End
AppleTalk Setting
1
2
3
Turn this setting On when this machine is connected to an Apple Macintosh computer.
Press the System Menu/Counter key. The System Menu/Count screen is displayed.
Press the S key or the T key to select System
Setting and press the Enter key. The System
Setting screen is displayed.
Sys. Menu/Count.:
Report
*
Counter
System Setting
Exit
Press the S key or the T key to select Network
Setting and press the Enter key. The Network
Setting screen is displayed.
System Setting:
Back
*
Network Setting
Parallel Setting
Exit
3-4
Page 62

TCP/IP Setting
Press the S key or the T key to select AppleTalk
4
Set and press the Enter key. The AppleTalk Set
screen is displayed.
If you want to use AppleTalk, select On and press the
5
Enter key. The message display shows Completed
and returns to the Network Setting screen.
Printer Settings
Network Setting:
Back
AppleTalk Set.
TCP/IP Setting
AppleTalk Set.:
Off*
*
On
Cancel
Exit
Turn this setting On when this machine is connected to a Windows network, etc., using TCP/IP.
Refer to steps 1 through 3 of AppleTalk Setting to access the Network Setting screen.
1
Note If you are performing this setting immediately after having made the AppleTalk setting, the Network
Setting screen will already be displayed.
Press the S key or the T key to select TCP/IP
2
Setting and press the Enter key. The TCP/IP
Setting screen is displayed.
Network Setting:
Back
*
AppleTalk Set.
TCP/IP Setting
Exit
Press the S key or the T key to select TCP/IP and
3
press the Enter key. The TCP/IP screen is displayed.
TCP/IP Setting:
Back
*
TCP/IP
DHCP
Exit
3-5
Page 63

Printer Settings
DHCP Setting
To use TCP/IP, select On and press the Enter key. The
4
message display shows Completed and returns to the
TCP/IP Setting screen.
TCP/IP:
Off
*
*
On
Cancel
DHCP (Dynamic Host Configuration Protocol) provides a mechanism for delivering IP configuration
parameters, including IP address, Subnet Mask, etc. to devices on an IP network. DHCP alleviates
the administrative burden of managing individual IP addresses.
Turn this setting On when DHCP is to be used.
Access the TCP/IP Setting screen.
1
Press the S key or the T key to select DHCP and
2
press the Enter key. The DHCP screen is displayed.
TCP/IP Setting:
Back
*
TCP/IP
DHCP
Exit
3
IP Address Setting
Notes • The IP address that should be registered here will differ depending upon your network
1
2
To use DHCP, select On and press the Enter key. The message display shows Completed and
returns to the TCP/IP Setting screen.
Perform the following procedure to register the IP address.
environment. Check with your network administrator before performing this setting.
• If you use the following procedure to manually register the IP address, be sure to turn the
DHCP setting Off and the TCP/IP setting On.
Access the TCP/IP Setting screen.
Press the S key or the T key to select IP Address
and press the Enter key. The IP Address screen is
displayed.
TCP/IP Setting:
*
TCP/IP
DHCP
IP Address
Exit
3-6
Page 64

Use the keypad to enter the IP address. Enter the first
3
segment of the IP address.
Press the X key and enter second segment of the IP
4
address.
Continue the same procedure for the remaining
5
segments of IP address. Once the IP address has
been entered, press the Enter key. The message
display shows Completed and returns to the TCP/IP
Setting screen.
IP Address:
0. 0. 0. 0
Cancel
IP Address:
10. 0. 0. 0
Cancel
IP Address:
IP Address:
168. 0. 010.
168. 0. 12310.
Printer Settings
Note If you make an error in entering a portion of the IP address, press the W key to return to the previous
Subnet Mask Setting
1
2
Cancel
Cancel
block of digits and reenter the correct number.
Specifies the Subnet Mask configured on the printing system network component. If the printing
system does not automatically assign a usable default value and the first number in the IP address
above is from 192 to 254, then use 255.255.255.0 as the Subnet Mask.
Perform the following procedure to register the Subnet Mask address.
If you are not sure of the appropriate Subnet Mask address, contact your network administrator.
Access the TCP/IP Setting screen.
Press the S key or the T key to select Subnet Mask
and press the Enter key. The Subnet Mask screen is
displayed.
TCP/IP Setting:
DHCP
IP Address
Subnet Mask
Exit
Enter the Subnet Mask address in the same manner as you did for the IP address in steps 3 through
3
5 of IP Address Setting.
3-7
Page 65

Printer Settings
Default Gateway Setting
Perform the following procedure to register the Default Gateway address. If you are not sure of the
appropriate Default Gateway address, contact your network administrator.
Access the TCP/IP Setting screen.
1
Press the S key or the T key to select Default
2
Gateway and press the Enter key. The Default
Gateway screen is displayed.
Enter the Default Gateway address in the same manner as you did for the IP address in steps 3
3
through 5 of IP Address Setting.
TCP/IP Setting:
*
IP Address
Subnet Mask
Default Gateway
Exit
3-8
Page 66

Setting the Emulation Mode
This section explains the procedure to select the emulation mode.
Available emulations are: Line Printer, IBM Proprinter, DIABLO 630, EPSON LQ-850, PCL6, KPDL,
and KPDL (AUTO).
If KPDL (AUTO) emulation is selected, the machine will automatically switch from KPDL to a
alternative emulation mode in accordance with the data to be printed. If KPDL emulation is selected,
you can select whether or not to have a report printed out automatically whenever a KPDL error
occurs during printing.
Press the System Menu/Counter key. The System Menu/Count screen is displayed.
1
Press the S key or the T key to select Printer
2
Setting and press the Enter key. The Printer
Setting screen is displayed.
Printer Settings
Sys. Menu/Count.:
*
Common Setting
Copy Setting
Printer Setting
Exit
Press the S key or the T key to select Emulation
3
and press the Enter key. The Emulation screen is
displayed.
Printer Setting:
Back
*
Emulation
Exit
Press the S key or the T key to select the desired
4
emulation mode, and press the Enter key.
Emulation:
*
PCL6
*
*
KPDL
KPDL(Auto)
Cancel
If you selected Line Printer, IBM Proprinter, DIABLO 630, EPSON LQ-850, or PCL6, the
5
message display shows Completed and returns to the Printer Setting screen.
If you selected KPDL, the KPDL Err Rep screen is
6
displayed. Select whether or not a report is to be
printed out upon a KPDL error.
KPDL Error Rep.:
Off
On
*
Cancel
3-9
Page 67

Printer Settings
Press the S key or the T key to select either On or Off and press the Enter key. The message
7
display shows Completed and returns to the Printer Setting screen.
If you selected KPDL(AUTO), the Alt. Emulation
8
screen is displayed.
The asterisk (*) indicates the currently selected
alternative emulation mode.
Press the S key or the T key to select the desired
alternative mode, and press the Enter key. The KPDL
Err Rep screen is displayed.
In the same manner as you did in step 6, select whether or not a report is to be printed out upon a
9
KPDL error, and press the Enter key.
The message display shows Completed and returns to the Printer Setting screen.
10
Alt. Emulation:
*
DIABLO 630
*
EPSON LQ-850
PCL6*
Cancel
3-10
Page 68

COMMAND CENTER
The following table indicates the settings made using COMMAND CENTER. For more details using
COMMAND CENTER, refer to Printer Page under Using COMMAND CENTER on page 6-10.
Item Description
Printer>Defaults:System
Page
Form Feed Timeout Adjusts the timeout time, absence of data for which causes a form
Copies Sets the number of copies to print.
Page Orientation Switches between portrait and landscape page orientation.
KIR Mode Switches KIR smoothing On and Off.
EcoPrint Switches EcoPrint On and Off to reduce the amount of toner and save
Resolution Changes the printing resolution to either 300 dpi, 600 dpi, or Fast
Printer>Defaults:Media
Input Page
Default Determines the default tray to feed paper from.
Tray Displays the trays, including those provided as optional equipment.
Size Sets the paper size for the input tray (cassettes).
Type Sets the media type for the input tray (cassettes).
Printer Settings
The System page includes settings that apply to the printing function
of the device, such as Default Print Resolution and Copy Count.
feed. The default setting is 30 seconds.
on printing costs. The default setting is Off.
1200. The default setting is Fast 1200.
The Media Input page enables you to configure input tray (cassettes)
by type and size. You can load different paper in the input trays and
select to print on a specified type or paper size in the printer driver
software.
3-11
Page 69

Printer Settings
3-12
Page 70

4 Operation Status
This chapter contains explanations on the aspects of this machine for which the current
operation status can be verified.
This chapter explains the following topics:
•Icons
• Checking Jobs Status
• Verifying Job Log
• Pausing Jobs
• Canceling Jobs
• Verifying Scanner Status
• Verifying Printer Status
• Verifying the Toner Status
• Verifying Settings for the Cassettes and MP Tray
• Printing Reports
• Verifying Total Number of Prints and Scans
Note
Some of the procedures above can also be accomplished using COMMAND CENTER. For those
procedures available using COMMAND CENTER, refer to Using COMMAND CENTER on
page 6-1.
4-1
Page 71

Operation Status
Icons
A number of icons are displayed on the Status screen that is explained in this section. The following
explains the meaning of those icons.
Meaning of the icons
Copy job
Print job
Send job
Report print job
The job is being processed.
Processing of the job has been paused.
The job has been successfully completed.
The job could not be successfully completed or the job has been canceled.
4-2
Page 72

Checking Jobs Status
Perform the following procedure to verify the status of both print jobs and scan jobs.
Note All information on the status of print jobs and scan jobs are deleted when the machine is turned off.
Press the Status/Job Cancel key. The Status Menu screen is displayed.
1
Press the S key or the T key to select Print Job
2
Status and press the Enter key. The Print Job
Status screen, which shows a list of jobs being
processed, will be displayed.
Example If the job list is not displayed in the Print Job
Status screen, there are no jobs currently processed.
Press the right select key.
Operation Status
Status Menu:
Print Job Status
*
Send Job Status
Print Job Log
Pause
Print Job Status:
Press the S key or the T key to select the job whose
3
status you want to check and press the Enter key. The
Detail screen is displayed.
Check the displayed information for that job. You can
4
also switch the screen to display other information for
that print job by pressing the S key or the T key.
Print Job Status:
0008
*
0009
0010
Copy-A
Copy-B
Doc-1
Cancel
0009
Detail:
Status:
Processing
MenuCancel
Menu
1/ 5
4-3
Page 73

Operation Status
Examples The following shows the available job status information
Print Job Send Job
0009
Status:
Detail:
**
Processing
0009
Detail:
Start Time:
04/15/2004 12:30
0009
Detail:
File Name:
Copy-B
0009
Detail:
Job Type:
Copy
1/ 5
2/ 5
3/ 5
4/ 5
0012
Status:
Detail:
**
Processing
0012
Detail:
Start Time:
04/15/2004 12:30
0012
Detail:
File Name:
Scan-A
0012
Detail:
Job Type:
E-mail
1/ 6
2/ 6
3/ 6
4/ 6
0009
*
5
0/ 5
Detail:
Page
Copy
0012
5/ 5Page and Copy:
0012
1
Detail:
*
Page
Detail:
*
h_pttr@owl-net.net
Once you have finished verifying the information for that job, press the Enter key. The message
5
display returns to the Print Job Status screen.
Note If you want to verify the status of another print job, repeat steps 3 through 5.
5/ 6Page:
6/ 6Destination:
4-4
Page 74

Verifying Job Log
Perform the following procedure to verify the history of both print jobs and scan jobs.
Note All information on the history of print jobs and scan jobs are deleted when the machine is turned off.
Press the Status/Job Cancel key. The Status Menu screen is displayed.
1
Press the S key or the T key to select Print Job
2
Log and press the Enter key. The Print Job Log
screen, which shows a log of previous jobs, will be
displayed.
Example If the job log is not displayed in the Print Job Log
screen, there is no available information on job history.
Press the right select key.
Status Menu:
Print Job Status
*
Send Job Status
Print Job Log
Pause
Print Job Log:
Operation Status
Press the S key or the T key to select the job whose
3
status you want to check and press the Enter key. The
Detail screen is displayed.
Check the displayed information for that job. You can
4
also switch the screen to display other job log
information for that print job by pressing the S key or
the T key.
Print Job Log:
0006
*
0006
Copy-1
Detail:
Result:
OK
Menu
Menu
1/ 5
4-5
Page 75

Operation Status
Examples The following shows the available job log information.
Print Log Send Log
0006
Result:
Detail:
**
OK
0006
Detail:
End Time:
04/15/2004 12:31
0006
Detail:
File Name:
Copy-1
0006
Detail:
Job Type:
Copy
1/ 5
2/ 5
3/ 5
4/ 5
0003
Result:
Detail:
**
OK
0003
Detail:
End Time:
04/15/2004 13:10
0003
Detail:
File Name:
Scan-1
0003
Detail:
Job Type:
E-mail
1/ 6
2/ 6
3/ 6
4/ 6
0006
*
5
5/ 5
Detail:
Page
Copy
0003
5/ 5Page and Copy:
0003
*
5
*
Detail:
5/ 6Page:
Page
Detail:
6/ 6Destination:
h_pttr@owl-net.net
Once you have finished verifying the information for that log, press the Enter key. The message
5
display returns to the Print Job Log screen.
Note If you want to verify the history log for another print job, repeat steps 3 through 5.
4-6
Page 76

Pausing Jobs
Note When you want to stop the copying jobs, press the Stop/Clear key. All jobs are stopped and the
1
2
Notes • Processing of the jobs are paused as long as the Pausing Job List screen is displayed.
Operation Status
You can temporarily pause the processing of the jobs. You can also cancel jobs while processing is
paused.
Perform the following procedure to temporarily pause all jobs.
Pausing Job List screen is displayed.
Press the Status/Job Cancel key. The Status menu screen is displayed.
Press the left select key. The Pausing Job List
screen, which shows a list of the jobs being processed,
is displayed.
Status Menu:
Print Job Status
*
Send Job Status
Print Job Log
Pause
• To resume processing of the jobs, refer to Resuming Jobs on page 4-8. To cancel a job, refer
to Canceling Jobs During Pausing on page 4-7.
Canceling Jobs During Pausing
Perform the following procedure to cancel any jobs while processing of the jobs has been paused.
Press the S key or the T key to select the job to
1
cancel. Press the left select key. The message display
indicated Cancel Job. Are you sure? is
displayed.
Press the left select key.
2
Pausing Job List:
0008
0009
0010
Copy-A
Copy-B
Doc-1
Cancel Resume
Cancel Job.
*
Are you sure?
9
NoYes
Note If you do not want to cancel that job, press the right select key. The message display returns to the
Pausing Job List screen.
4-7
Page 77

Operation Status
Notes • If you want to cancel another job, repeat steps 1 through 4.
Canceling appears in the message display and the
3
process to cancel the job will begin.
The message display returns to the Pausing Job
4
List screen and the canceled job is deleted from the
list of jobs being processed.
Canceling.
Pausing Job List:
0008
0010
0011
Copy-A
Doc-1
Report-a
Cancel Resume
• The jobs can also be canceled from the Print Job Status or Send Job Status screen.
For more information, refer to Canceling Jobs on page 4-9.
Resuming Jobs
To resume processing of the jobs, press the right
select key. The Status menu screen is displayed and
processing of the jobs are resumed.
Pausing Job List:
0008
0010
0011
Copy-A
Doc-1
Report-a
Cancel Resume
4-8
Page 78

Canceling Jobs
Note The following procedure will explain specifically how to cancel print jobs. The procedure is the same
1
2
Example If all jobs have already been processed, no jobs will be
Operation Status
Perform the following procedure to cancel both print jobs and scan jobs that have not yet been
processed.
for canceling scan jobs. To cancel scan jobs, select Send Job Status instead of Print Job
Status.
Press the Status/Job Cancel key. The Status Menu screen is displayed.
Press the S key or the T key to select Print Job
Status and press the Enter key. The Print Job
Status screen, which shows a list of jobs being
processed, will be displayed.
Status Menu:
Print Job Status
*
Send Job Status
Print Job Log
Pause
shown in the list. Press the right select key.
Print Job Status:
Press the S key or the T key to select the job that you
3
want to cancel and press the left select key. Are you
sure? is displayed.
To cancel that job, press the left select key.
4
Canceling appears in the message display and the
5
process to cancel the job will begin.
Print Job Status:
0008
*
0009
0010
Copy-A
Copy-B
Doc-1
Cancel
Canceling.
MenuCancel
Menu
4-9
Page 79

Operation Status
Note If you want to cancel another job, repeat steps 3 through 6.
The message display returns to the Print Job
6
Status screen and the canceled job is deleted from
the list of jobs being processed.
Print Job Status:
0008
0010
0011
Copy-A
Doc-1
Report-a
Cancel
Menu
4-10
Page 80

Verifying Scanner Status
Perform the following procedure to verify the current status of scanning operations on this machine.
Press the Status/Job Cancel key. The Status Menu screen is displayed.
1
Press the S key or the T key to select Scanner and
2
press the Enter key. The Scanner status screen is
displayed. Check the status of scanning operations.
The machine is ready to scan.
Status Menu:
*
Print Job Log
Send Job Log
Scanner
Pause
Scanner:
Ready.
Operation Status
The machine is currently scanning.
Scanner:
Scanning.
The machine is preparing to scan.
Scanner:
Please wait.
Once you have finished verifying the status of scanning operations, press the Enter key. The
3
message display returns to the Status Menu screen.
4-11
Page 81

Operation Status
Verifying Printer Status
Perform the following procedure to verify the current status of printing operations on this machine.
Press the Status/Job Cancel key. The Status Menu screen is displayed.
1
Press the S key or the T key to select Printer and
2
press the Enter key. The Printer status screen is
displayed. Check the status of printing operations.
The machine is ready to print.
Status Menu:
Send Job Log
Scanner
Printer
Pause
Printer:
Ready.
The machine is currently printing.
Printer:
Printing
The machine is preparing to print.
Printer:
Please wait.
Once you have finished verifying the status of printing operations, press the Enter key. The
3
message display returns to the Status Menu screen.
4-12
Page 82

Verifying the Toner Status
The amount of remaining toner is indicated with a 10-level indicator scale. Use this scale as a guide
to determine when to replace the toner container.
Press the Status/Job Cancel key. The Status Menu screen is displayed.
1
Press the S key or the T key to select Toner
2
Status and press the Enter key. The Toner Status
screen, which shows the amount of remaining toner,
will be displayed.
The toner container is empty.
Operation Status
Status Menu:
Scanner
Printer
Toner Status
Pause
Toner Status:
100%0%
The toner container is low on toner.
Toner Status:
The toner container is full.
Toner Status:
0% 100%
Once you have finished verifying the amount of remaining toner, press the Enter key. The message
3
display returns to the Status Menu screen.
100%0%
4-13
Page 83

Operation Status
Verifying Settings for the Cassettes and MP Tray
Perform the following procedure to verify the current settings (paper size and type) for the cassettes
and the MP tray.
Note The information for cassette 2 will only be displayed when cassette 2 is installed in your machine.
Press the Status/Job Cancel key. The Status Menu screen is displayed.
1
Press the S key or the T key to select Paper Input
2
and press the Enter key. The Paper Input screen is
displayed.
Verify the paper size and type settings currently
3
selected for cassette 1. You can also switch the screen
to display the settings for cassette 2 and the MP tray
by pressing the S key or the T key.
Status Menu:
Printer
Toner Status
Paper Input
Pause
Paper Input:
Cassette1: 1/ 3
A 4
Empty
Plain
Once you have finished verifying the settings, press the Enter key. The message display returns to
4
the Status Menu screen.
4-14
Page 84

Printing Reports
Perform the following procedure to print out a report of the settings currently registered in this
machine. The following shows the reports that are available for printing.
Report Name Description Report
Menu Map The machine prints a full list of menu selection system – Menu Map.
Status Page You can check the machine’s current status, including available
Font List To help you decide in selecting a font, you can print out lists of the
Procedure to Print Reports
Press the System Menu/Counter key. The Sys. Menu/Count screen is displayed.
1
Press the S key or the T key to select Report and
2
press the Enter key. The Report screen is displayed.
Operation Status
Sample
4-17
Note that menus shown in the list may vary depending on which
optional units installed in the machine.
4-18
memory space and option settings by printing a status page.
4-20
internal fonts or the optional fonts including downloaded fonts.
Sys. Menu/Count.:
Report
Counter
System Setting
Exit
Press the S key or the T key to select Report
3
Print and press the Enter key. The Report Print
screen is displayed.
Press the S key or the T key to select the report that
4
you want to print out and press the Enter key. Are
you sure? is displayed.
Report:
Back
Report Print
Exit
Report Print:
Back
Menu Map
Status Page
Exit
4-15
Page 85

Operation Status
Press the left select key.
5
Print
Are you sure?
Status Page
Accepted is displayed and printing of the report will
6
begin. After the report is printed, the message display
returns to the Report Print screen.
Yes
Accepted.
No
4-16
Page 86

Sample Reports
Operation Status
Menu Map
Menu Map
MFP
4-17
Page 87

Operation Status
Status Page
The numbers in the following diagram refer the items explained below the diagram. The items and
values on the status page may vary depending on the machine’s firmware version.
10
11
1
7
2
8
3
4
9
5
6
4-18
Page 88

Operation Status
1 Paper Handing — This item shows the current paper size and media type settings that have
been made for the cassette(s) and MP tray.
2 Copying — This item shows the current quality and continuous copy settings that have been
made in relation to the copying functions of this machine.
3 Printing — This item shows the current resolution, ecoprint, and KIR mode settings that have
been made in relation to the printing functions of this machine.
4 Scanner — This item shows the current file name, file format, resolution, and quality mode
settings that have been made in relation to the scanning functions of this machine.
5 Hardware Setting — This item shows the current sleep mode and form feed time out settings
that have been made in this machine.
6 Options Status — This item shows the options installed in the machine.
7Memory — This item shows:
• Standard memory in the machine
• Option memory slot status machine in kirobytes
• Total memory in the machine
8 Network status — This item shows TCP/IP, the IP address, subnet mask address, default
gateway address, DHCP, appletalk, and printer name for the network interface in the machine.
9Emulation — This item shows all available emulations of the machine. The PCL6 emulation is
set as default when the machine is shipped from the factory.
10 Total Printed Page/Total Scanned Page — This item shows the total number of prints and
scans made.
11 Tone r Gauge — This item shows the amount of remaining toner.
4-19
Page 89

Operation Status
Font Lists
Internal Scalable and Bitmapped Fonts List
Font Name Scalable/Bitmap Password Selection [FSET] Font ID
Internal Scalable and Bitmapped Fonts List
Font Name Scalable/Bitmap Password Selection [FSET] Font ID
PRESCRIBE
PRESCRIBE
4-20
Page 90

Verifying Total Number of Prints and Scans
Perform the following procedure to verify the total number of printouts and scans on this machine.
Press the System Menu/Counter key. The Sys.
1
Menu/Count screen is displayed.
Press the S key or the T key to select Counter and
2
press the Enter key. The Counter screen is
displayed.
Operation Status
Sys. Menu/Count.:
Report
Counter
System Setting
Exit
To check the total number of printouts made, press the
3
S key or the T key to select Printed Pages and
press the Enter key. To check the total number of
scans made, press the S key or the T key to select
Scanned Pages and press the Enter key. The
corresponding Total Counter screen is displayed.
Once you have finished verifying the total count, press
4
the Enter key. The message display returns to the
Counter screen.
Counter:
Back
Printed Pages
Scanned Pages
Exit
Printed Pages:
123
Scanned Pages:
225
4-21
Page 91

Operation Status
4-22
Page 92

5 System Settings
This chapter explains the procedures to make the various settings that are required in
relation to the overall operation of this machine.
This chapter explains the following topics:
• Adjusting the Contrast of Message Display
• Message Language
• Default Operation Mode
• Unit of Measurement
• Adjusting Copy Exposure
• Turning Scan Noise Reduction On and Off
• Photo Processing Method
• Resetting Toner Status
• Changing Function Defaults
• Registering Destination E-mail Addresses
• Restarting the Machine
• Adjusting Alarms
• Date and Time
• Date Format
• Time Zone
• Summer Time
• Auto Panel Reset
• Low Power Timer
• Auto Sleep Timer
•Auto Error Clear
• Registering Custom Original Size
• Registering Custom Paper Size
• Default Original Size
• Selecting Paper Size and Media Type
• Registering Custom Media Type
• Selecting the Paper Feed Source
• Selecting the APS (Auto Paper Selection) Media Type
• Printing the Service Pages
Note
Some of the procedures above can also be accomplished using COMMAND CENTER. For those
procedures available using COMMAND CENTER, refer to Using COMMAND CENTER on
page 6-1.
5-1
Page 93

System Settings
Adjusting the Contrast of Message Display
Perform the following procedure to adjust the contrast of the message display to any one of the 7
available levels.
Available Settings Contrast
Darker -3
Darker -2
Darker -1
Normal
Lighter +1
Lighter +2
Lighter +3
Press the System Menu/Counter key. The Sys. Menu/Count screen is displayed.
1
Press the S key or the T key to select Adjust and
2
press the Enter key. The Adjust screen is displayed.
Darker
K
K
Normal
L
L
Brighter
Sys. Menu/Count.:
Counter
System Setting
Adjust
Exit
Press the S key or the T key to select LCD
3
Contrast and press the Enter key. The LCD
Contrast screen is displayed.
Press the S key or the T key to select the desired
4
contrast and press the Enter key. The message
display shows Completed and returns to the Adjust
screen.
Adjust:
Copy Expo. Adj.
Scan Noise Redu.
LCD Contrast
LCD Contrast:
Darker -1
*
Normal
Lighter +1
Cancel
Exit
5-2
Page 94

Message Language
You can select the language of the messages display by following the procedure given below. You
can optionally download messages in other languages. Contact your dealer for information.
The following languages are available for selection:
English, Français, Deutsch, Italiano, Nederlands, Español, Português, and the
downloaded languages.
Press the System Menu/Counter key. The Sys. Menu/Count screen is displayed.
1
Press the S key or the T key to select Common
2
Setting and press the Enter key. The Common
Setting screen is displayed.
Press the S key or the T key to select Language and
3
press the Enter key. The Language screen is
displayed.
System Settings
Sys. Menu/Count.:
Adjust
Date/Timer Set.
Common Setting
Exit
Common Setting:
Back
Language
Default Operat.
Exit
Press the S key or the T key to the language (for
4
example, French) to be used in the message display
and press the Enter key.
The message display shows Termiré and returns to
5
the Param. commun screen. The message display
changes to the selected language.
Language:
*English
Français
Deutsch
Cancel
Param. commun:
Arrière
Langue
Fonction/défaut
Quitter
5-3
Page 95

System Settings
Default Operation Mode
Perform the following procedure to set whether the display that appears after power is turned on to
the machine will be the one for the copy operation mode, for the scanner operation mode or for the
status operation mode.
Press the System Menu/Counter key. The Sys. Menu/Count screen is displayed.
1
Press the S key or the T key to select Common
2
Setting and press the Enter key. The Common
Setting screen is displayed.
Press the S key or the T key to select Default
3
Orerat and press the Enter key. The Default
Operat screen is displayed.
Sys. Menu/Count.:
Adjust
Date/Timer Set.
Common Setting
Exit
Common Setting:
Back
Language
Default Operat.
Exit
Press the S key or the T key to select the desired
4
default operation mode and press the Enter key. The
message display shows Completed and returns to the
Common Setting screen.
Default Operat.:
Copy
*
E-mail
Status
Cancel
5-4
Page 96

Unit of Measurement
Perform the following procedure to change the unit of measurement that will be used in the custom
original size and custom paper size settings.
Press the System Menu/Counter key. The Sys. Menu/Count screen is displayed.
1
Press the S key or the T key to select Common
2
Setting and press the Enter key. The Common
Setting screen is displayed.
Press the S key or the T key to select Measurement
3
and press the Enter key. The Measurement screen is
displayed.
System Settings
Sys. Menu/Count.:
Adjust
Date/Timer Set.
Common Setting
Exit
Common Setting:
One Touch Keys
Toner Setting
Measurement
Exit
Press the S key or the T key to select either Inch or
4
mm and press the Enter key. The message display
shows Completed and returns to the Common
Setting screen.
Measurement:
*
Inch
mm
Cancel
5-5
Page 97

System Settings
Adjusting Copy Exposure
Perform the following procedure to adjust the copy exposure for each original quality mode (Auto
Mode, Text + Photo Mode, Text Mode and Photo Mode) to any one of the 7 available levels.
Available Settings Exposure
Lighter -3
Lighter -2
Lighter -1
Normal
Darker +1
Darker +2
Darker +3
Press the System Menu/Counter key. The Sys. Menu/Count screen is displayed.
1
Press the S key or the T key to select Adjust and
2
press the Enter key. The Adjust screen is displayed.
Brighter
K
K
Normal
L
L
Darker
Sys. Menu/Count.:
Counter
System Setting
Adjust
Exit
Press the S key or the T key to select Copy Expo.
3
Adj and press the Enter key. The Copy Expo. Adj
screen is displayed.
Press the S key or the T key to select the original
4
quality mode whose copy exposure you want to adjust
and press the Enter key.
Adjust:
Back
Copy Expo. Adj.
Scan Noise Redu.
Exit
Copy Expo. Adj.:
Back
Auto Exposure
Text+Photo
Exit
5-6
Page 98

Press the S key or the T key to adjust the copy
5
exposure and press the Enter key. The message
display shows Completed and returns to the Copy
Expo. Adj screen.
System Settings
Text+Photo:
Lighter -3
Lighter -2
Lighter -1
Cancel
5-7
Page 99

System Settings
Turning Scan Noise Reduction On and Off
Use the following procedure to enable scan noise reduction to reduce the appearance of black lines
which can appear on copy and scan jobs when using the document processor.
Press the System Menu/Counter key. The Sys. Menu/Count screen is displayed.
1
Press the S key or the T key to select Adjust and
2
press the Enter key. The Adjust screen is displayed.
Press the S key or the T key to select Scan Noise
3
Reduc and press the Enter key. The Scan Noise
Reduc screen is displayed.
Sys. Menu/Count.:
Counter
System Setting
Adjust
Exit
Adjust:
Back
Copy Expo. Adj.
Scan Noise Redu.
Exit
Press the S key or the T key to select either On or
4
Off. Press the Enter key. The message display shows
Completed and returns to the Adjust screen.
Scan Noise Redu.:
Off
*
On
Cancel
5-8
Page 100

Photo Processing Method
Use the following procedure to select the method for processing copies of photographs.
Item Description
Error diffusion This is the standard method that should be used and is the
Dithering Use this method for originals containing mainly photos. When
Press the System Menu/Counter key. The Sys. Menu/Count screen is displayed.
1
Press the S key or the T key to select Copy
2
Setting and press the Enter key. The Copy
Setting screen is displayed.
System Settings
factory default setting. Copies are clearer if using originals with
both text and photos.
using the scanning or printing functions, image processing is
accomplished using the Dithering setting.
Sys. Menu/Count.:
Date/Timer Set.
Common Setting
Copy Setting
Exit
Press the S key or the T key to select Photo
3
Processing and press the Enter key. The Photo
Processing screen is displayed.
Press the S key or the T key to select the desired
4
processing method and press the Enter key. The
message display shows Completed and returns to the
Copy Setting screen.
Copy Setting:
Back
APS Media Type
Photo Processing
Photo Processing:
Error diffusion
*
Dithering
Cancel
Exit
5-9
 Loading...