

Page 1

INSTRUCTION HANDBOOK
<Set-up Edition>
ALWAYS read this Instruction Handbook thoroughly before use. After reading, maintain it in good condition
and keep it together with the Instruction Handbook for your copier.
Page 2

Trademark Information
• PRESCRIBE is a registered trademark of Kyocera Corporation.
• PRESCRIBE 2e and KPDL2 are trademarks of Kyocera Corporation.
• MS-DOS, Windows and Windows NT are trademarks of Microsoft Corporation.
• PCL and PJL are registered trademarks of Hewlett-Packard Company.
• PostScript is a registered trademark of Adobe Systems Incorporated.
• Ethernet is a registered trademark of Xerox Corporation.
• Novell and NetWare are registered trademarks of Novell, Inc.
• Centronics is a trademark of Centronics Data Computer Corporation.
• IBM and IBM PC-AT are trademarks of International Business Machines Corporation.
• PowerPC is a trademark of International Business Machines Corporation of America and other corporations.
• TrueType and Macintosh are registered trademarks of Apple Computer, Inc.
• AppleTalk is a trademark of Apple Computer, Inc.
• This product was developed using Tornado, the real-time operating system (ROTS) general development environment from
Wind River Systems, Inc.
• This printer uses PeerlessPrintXL, a PCL compatibility system developed by Peerless Group, to emulate the HP LaserJet Printer
Control Language (PCL6). PeerlessPrintXL is a trademark of Peerless Group (Redondo Beach, CA 90278, U.S.A.).
•
All other company and product names contained in this Instruction Handbook are trademarks or registered trademarks of their
respective companies. The designations ™ and ® will not be used in this handbook.
Contains UFST™ and MicroType® from Agfa Corporation.
All rights reserved. No part of this material may be reproduced or transmitted in any form or by any means, electronic or
mechanical, including photocopying, recording or by any information storage and retrieval system, without permission in writing
from the Publisher.
Legal Restriction On Copying
• It may be prohibited to copy copyrighted material without permission of the copyright owner.
• It is prohibited under any circumstances to copy domestic or foreign currencies.
• Copying other items may be prohibited.
i
Page 3

IBM PROGRAM LICENSE AGREEMENT
THE DEVICE YOU HAVE PURCHASED CONTAINS ONE OR MORE SOFTWARE PROGRAMS (“PROGRAMS”) WHICH BELONG
TO INTERNATIONAL BUSINESS MACHINES CORPORATION (“IBM”). THIS DOCUMENT DEFINES THE TERMS AND CONDITIONS
UNDER WHICH THE SOFTWARE IS BEING LICENSED TO YOU BY IBM. IF YOU DO NOT AGREE WITH THE TERMS AND
CONDITIONS OF THIS LICENSE, THEN WITHIN 14 DAYS AFTER YOUR ACQUISITION OF THE DEVICE YOU MAY RETURN
THE DEVICE FOR A FULL REFUND. IF YOU DO NOT SO RETURN THE DEVICE WITHIN THE 14 DAYS, THEN YOU WILL BE
ASSUMED TO HAVE AGREED TO THESE TERMS AND CONDITIONS.
The Programs are licensed not sold. IBM, or the applicable IBM country organization, grants you a license for the Programs only in
the country where you acquired the Programs. You obtain no rights other than those granted you under this license.
The term “Programs“ means the original and all whole or partial copies of it, including modified copies or portions merged into other
programs. IBM retains title to the Programs. IBM owns, or has licensed from the owner, copyrights in the Programs.
1 . License
Under this license, you may use the Programs only with the device on which they are installed and transfer possession of the
Programs and the device to another party. If you transfer the Programs, you must transfer a copy of this license and any other
documentation to the other party. Your license is then terminated. The other party agrees to these terms and conditions by its first use
of the Program.
You may not:
1) use, copy, modify, merge, or transfer copies of the Program except as provided in this license;
2) reverse assemble or reverse compile the Program; or
3) sublicense, rent, lease, or assign the Program.
2. Limited Warranty
The Programs are provided “AS IS.”
THERE ARE NO OTHER WARRANTIES COVERING THE PROGRAMS (OR CONDITIONS), EXPRESS OR IMPLIED, INCLUDING,
BUT NOT LIMITED TO, THE IMPLIED WARRANTIES OF MERCHANTABILITY AND FITNESS FOR A PARTICULAR PURPOSE.
Some jurisdictions do not allow the exclusion of implied warranties, so the above exclusion may not apply to you.
SUPPLEMENT TO AGREEMENT FOR SOFTWARE BUNDLING AND DISTRIBUTION FOR ALDC
3. Limitation of Remedies
IBM’s entire liability under this license is the following;
1) For any claim (including fundamental breach), in any form, related in any way to this license, IBM’s liability will
be for actual damages only and will be limited to the greater of ;
a) the equivalent of U.S.$25,000 in your local currency; or
b) IBM’s then generally available license fee for the Program
This limitation will not apply to claims for bodily injury or damages to real or tangible personal property for which IBM is legally liable.
IBM will not be liable for any lost profits, lost savings, or any incidental damages or other economic consequential damages, even if
IBM, or its authorized supplier, has been advised of the possibility of such damages. IBM will not be liable for any damages claimed
by you based on any third party claim. This limitation of remedies also applies to any developer of Programs supplied to IBM. IBM’s
and the developer’s limitations of remedies are not cumulative. Such developer is an intended beneficiary of this Section. Some
jurisdictions do not allow these limitations or exclusions, so they may not apply to you.
4. General
You may terminate your license at any time. IBM may terminate your license if you fail to comply with the terms and conditions of this
license. In either event, you must destroy all your copies of the Program. You are responsible for payment of any taxes, including
personal property taxes, resulting from this license. Neither party may bring an action, regardless of form, more than two years after
the cause of action arose. If you acquired the Program in the United States, this license is governed by the laws of the State of New
York. If you acquired the Program in Canada, this license is governed by the laws of the Province of Ontario. Otherwise, this license
is governed by the laws of the country in which you acquired the Program.
ii
Page 4

Typeface Trademark Acknowledgement
All resident fonts in this printer are licensed from Agfa Corporation.
Helvetica, Palatino and Times are registered trademarks of Linotype-Hell AG.
ITC Avant Garde Gothic, ITC Bookman, ITC ZapfChancery and ITC Zapf Dingbats are registered trademarks of International
Type-face Corporation.
Agfa Japan License Agreement
1. “Software” shall mean the digitally encoded, machine readable, scalable outline data as encoded in a special format as well as
the UFST Software.
2. You agree to accept a non-exclusive license to use the Software to reproduce and display weights, styles and versions of
letters, numerals, characters and symbols (“Typefaces”) solely for your own customary business. Agfa Japan retains all rights,
title and interest to the Software and Typefaces and no rights are granted to you other than a License to use the Software on
the terms ex-pressly set forth in this Agreement.
3. To protect proprietary rights of Agfa Japan, you agree to maintain the Software and other proprietary information concerning
the Typefaces in strict confidence and to establish reasonable procedures regulating access to and use of the Software and
Typefaces.
4. You agree not to duplicate or copy the Software or Typefaces, except that you may make one backup copy.
5. This License shall continue until the last use of the Software and Typefaces, unless sooner terminated. This License may be
terminated by Agfa Japan if you fail to comply with the terms of this License and such failure is not remedied within thirty (30)
days after notice from Agfa Japan. When this License expires or is terminated, you shall either return to Agfa Japan or destroy
all copies of the Software and Typefaces and documentation as requested.
6. You agree that you will not modify, alter, disassemble, decrypt, reverse engineer or decompile the Software.
7. Agfa Japan warrants that for ninety (90) days after delivery, the Software will perform in accordance with Agfa Japanpublished specifications. Agfa Japan does not warrant that the Software is free from all bugs, errors and omissions. THE
PARTIES AGREE THAT ALL OTHER WARRANTIES, EXPRESSED OR IMPLIED, INCLUDING WARRANTIES OF FITNESS
FOR A PARTICULAR PURPOSE AND MERCHANTABILITY, ARE EXCLUDED.
8. Your exclusive remedy and the sole liability of Agfa Japan in connection with the Software and Typefaces is repair or replacement of defective parts, upon their return to Agfa Japan. IN NO EVENT WILL AGFA JAPAN BE LIABLE FOR LOST PROFITS,
LOST DATA, OR ANY OTHER INCIDENTAL OR CONSEQUENTIAL DAMAGES, OR ANY DAMAGES CAUSED BY ABUSE
OR MISAPPLICATION OF THE SOFTWARE AND TYPE-FACES.
9. New York, U.S.A. law governs this Agreement.
10. You shall not sublicense, sell, lease, or otherwise transfer the Software and/or Typefaces without the prior written consent of
Agfa Japan.
11. Use, duplication or disclosure by the Government is subject to restrictions as set forth in the Rights in Technical Data and
Computer Software clause at FAR 252-227-7013, subdivision (b)(3)(ii) or subparagraph (c)(1)(ii), as appropriate. Further use,
duplication or disclosure is subject to restrictions applicable to restricted rights software as set forth in FAR 52.227-19 (c)(2).
12. YOU ACKNOWLEDGE THAT YOU HAVE READ THIS AGREEMENT, UNDERSTAND IT, AND AGREE TO BE BOUND BY
ITS TERMS AND CONDITIONS. NEITHER PARTY SHALL BE BOUND BY ANY STATEMENT OR REPRESENTATION NOT
CONTAINED IN THIS AGREEMENT. NO CHANGE IN THIS AGREEMENT IS EFFECTIVE UNLESS WRITTEN AND SIGNED
BY PROPERLY AUTHORIZED REPRESENTATIVES OF EACH PARTY.
iii
Page 5

About this Instruction Handbook
This Instruction Handbook <Set-up Edition> is meant to be read when the Printer Board is installed in your copier and the copier is
to be used mainly as a local printer. It contains explanations on set-up procedures for using the copier as a printer.
As the required set-up and configurations for the printer may differ depending upon the environment in use in the connected
computer, please read those sections related to your specific computer environment and perform the appropriate set-up and
configuration explained there.
This handbook should also be read and used together with the On-Line Manual that is on the included CD-ROM. That On-Line
Manual contains explanations on printing, performing certain settings and configurations, and the procedures required at your
computer.
About the On-Line Manual
The On-Line Manual for this Instruction Handbook is a PDF (Portable Document Format) file and is located on the CD-ROM that is
included with this product. The Adobe Acrobat Reader software is required in order to access the On-Line Manual. The installer for
Adobe Acrobat Reader is also included on the CD-ROM so the software can be installed onto your hard disk from there.
iv
Page 6
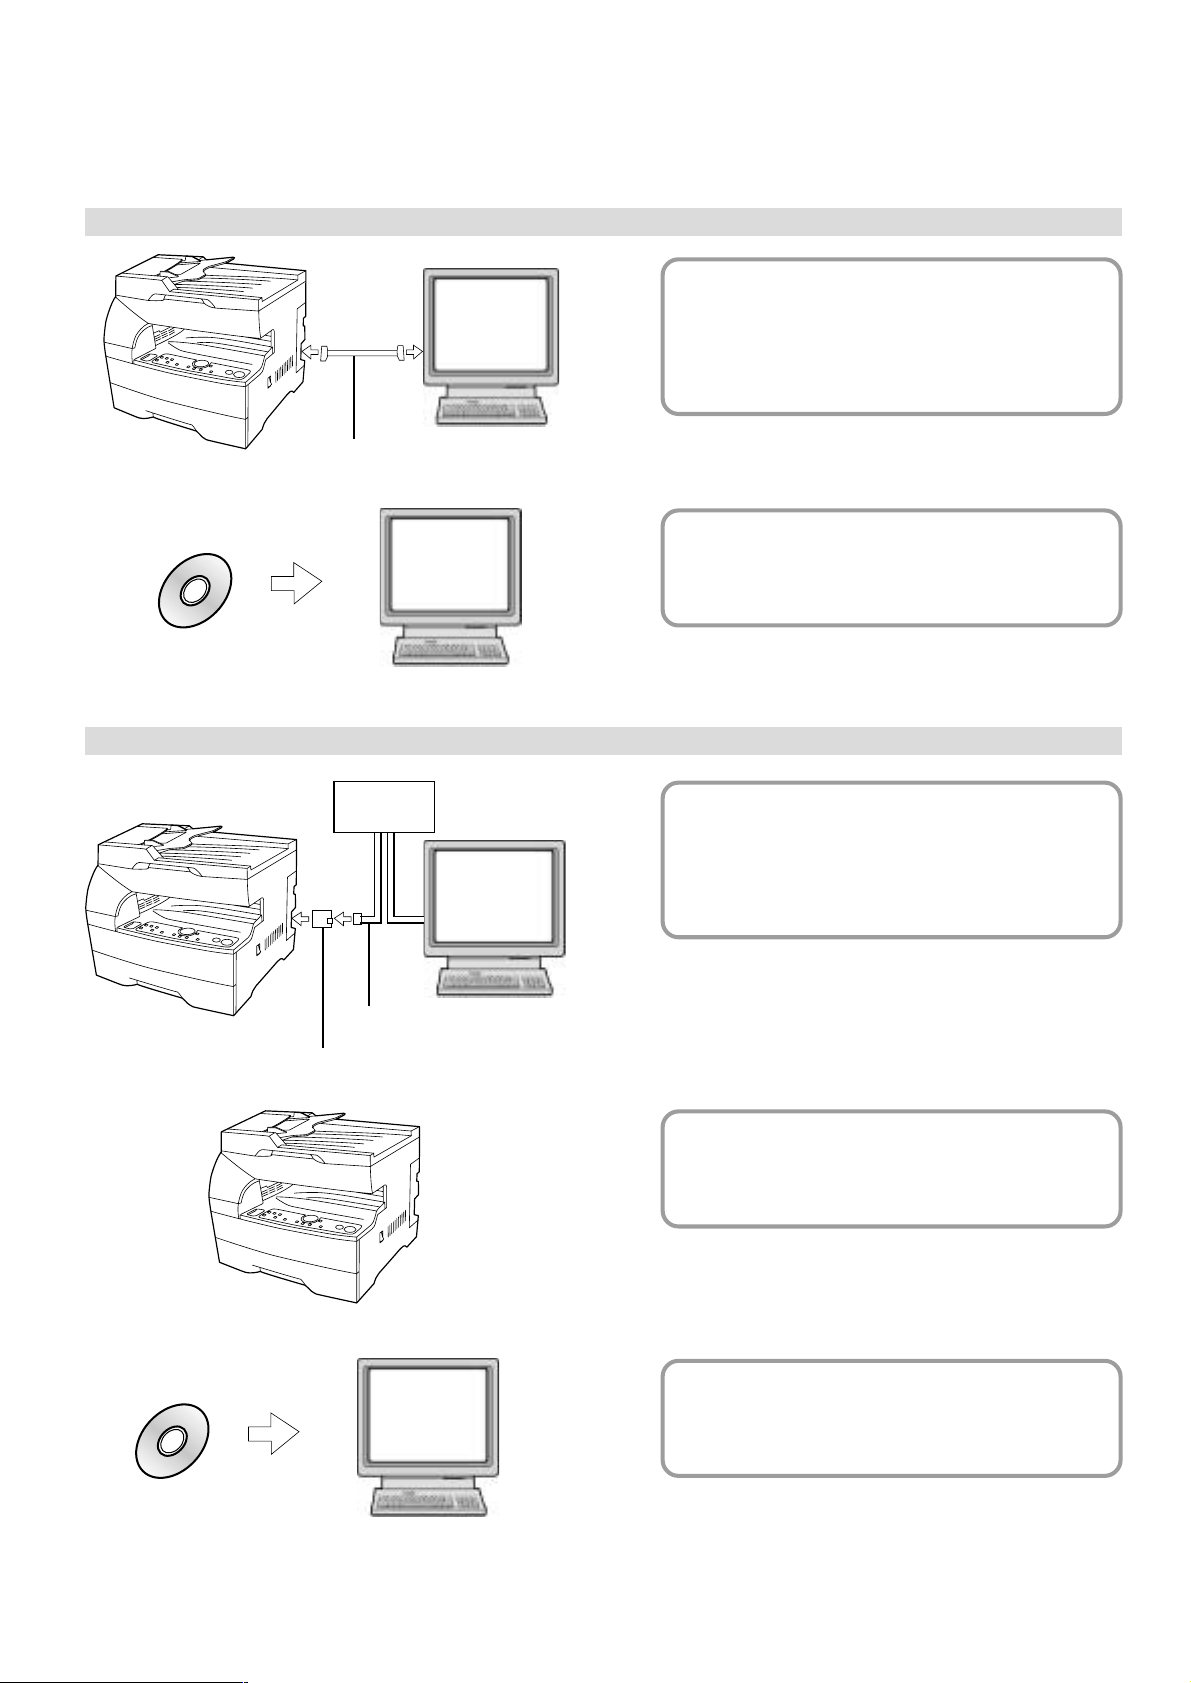
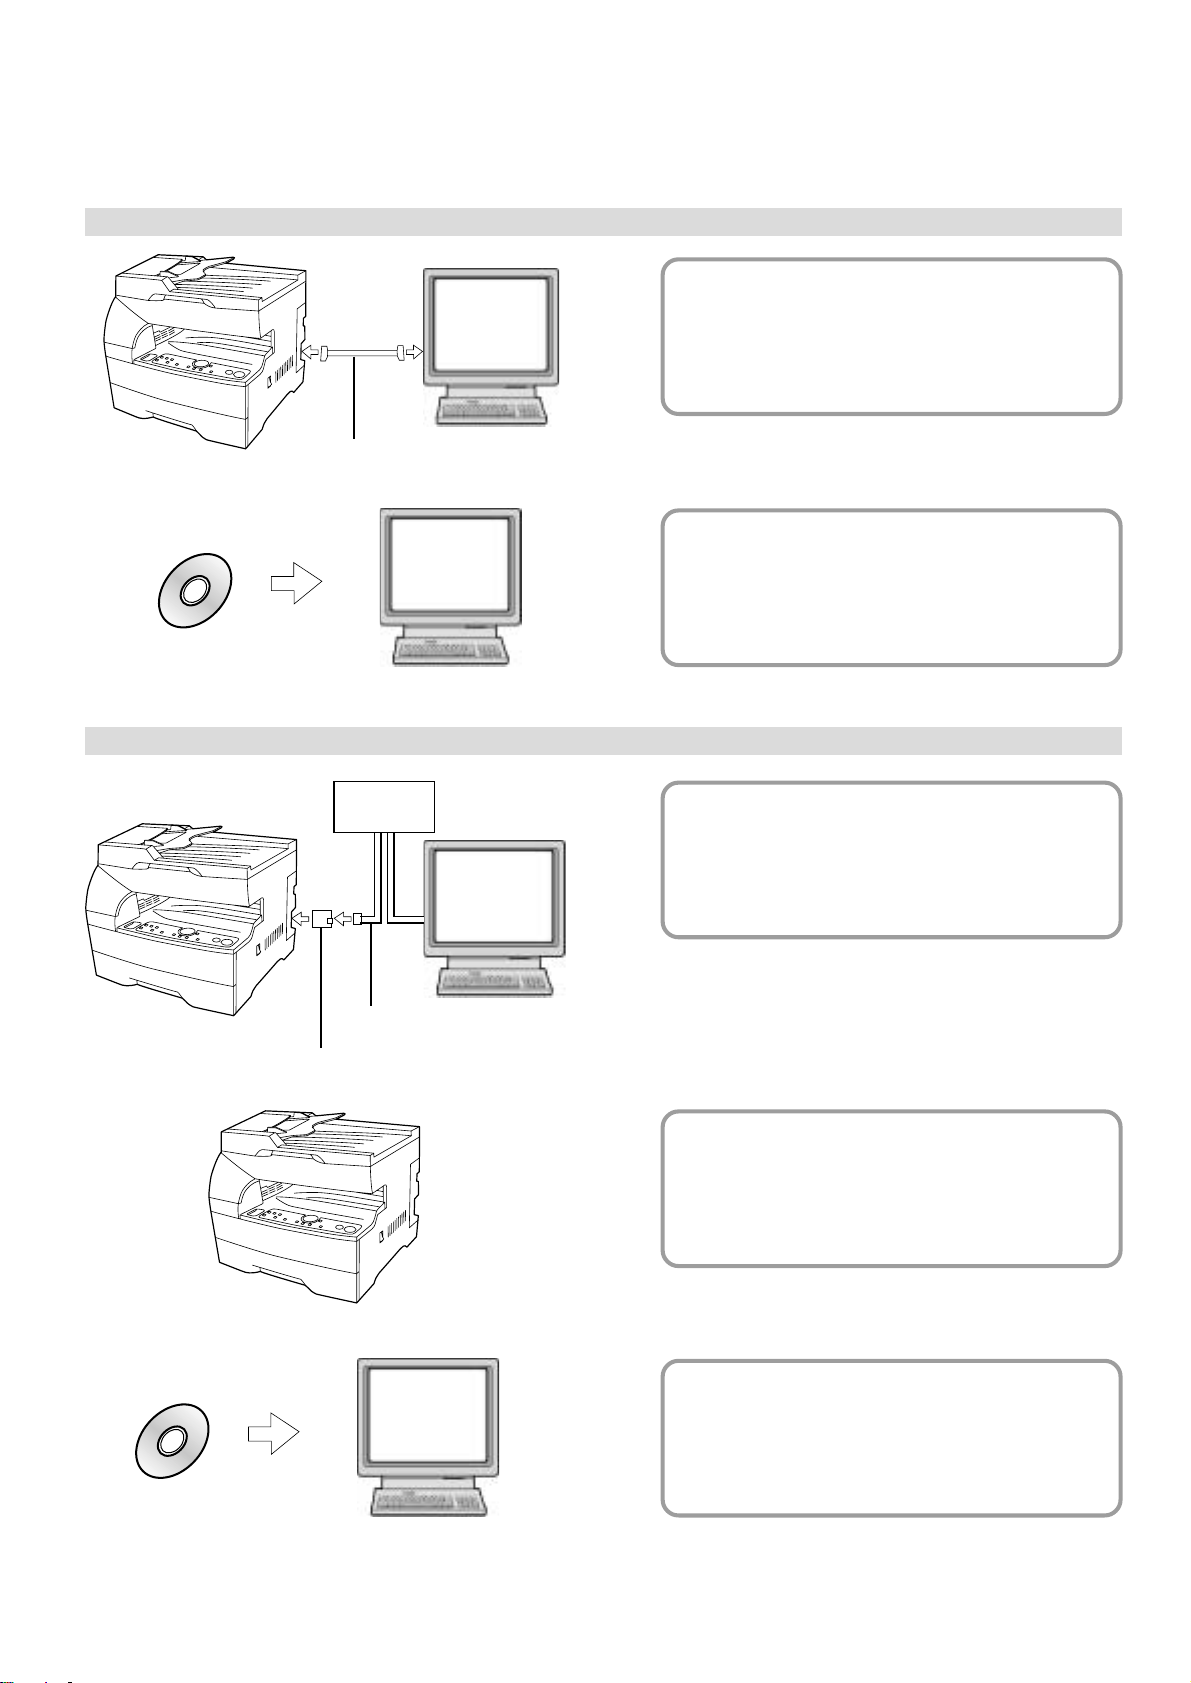
Getting connected
When connecting the printer directly to your computer (with a parallel cable) ...
1 Connecting the printer directly to
PC
your computer with a parallel
cable ......................................
Parallel cable
2 Installing the printer driver into your
PC
computer... Refer to the On-Line Manual
CD-ROM
When connecting the printer to a network (the optional Network Card must be installed)…
<Example connection>
Hub
1 Connecting a network cable
(100Base-TX, 10Base-T, etc.)
PC
to the printer ..........................
Page 3
Page 3
Network Card (option)
CD-ROM
Network cable
PC
2 Performing network (TCP/IP)
settings at the printer .............
Page 4
3 Installing the printer driver into your
computer... Refer to the On-Line Manual
v
Page 7

Table of contents
1. Preparations ............................................................................................................. 1
1-1 Accessories ................................................................................................................................................1
1-2 Required items ...........................................................................................................................................1
1-3 Name of parts (main body) .........................................................................................................................1
1-4 Name of parts (operation panel) ................................................................................................................2
2. Set-up ........................................................................................................................ 3
2-1 Connecting the printer cable ...................................................................................................................... 3
2-2 Installing the software ................................................................................................................................3
2-3 Network (TCP/IP) settings ..........................................................................................................................4
3. Troubleshooting........................................................................................................ 5
3-1 Canceling printing ......................................................................................................................................5
3-2 When an error code or error messages appears… ....................................................................................6
3-3 Basic troubleshooting chart ........................................................................................................................8
4. Specifications ...........................................................................................................9
Page 8
1. Preparations
1-1 Accessories
• 1 CD-ROM
• This Instruction Handbook
1-2 Required items
• Parallel cable
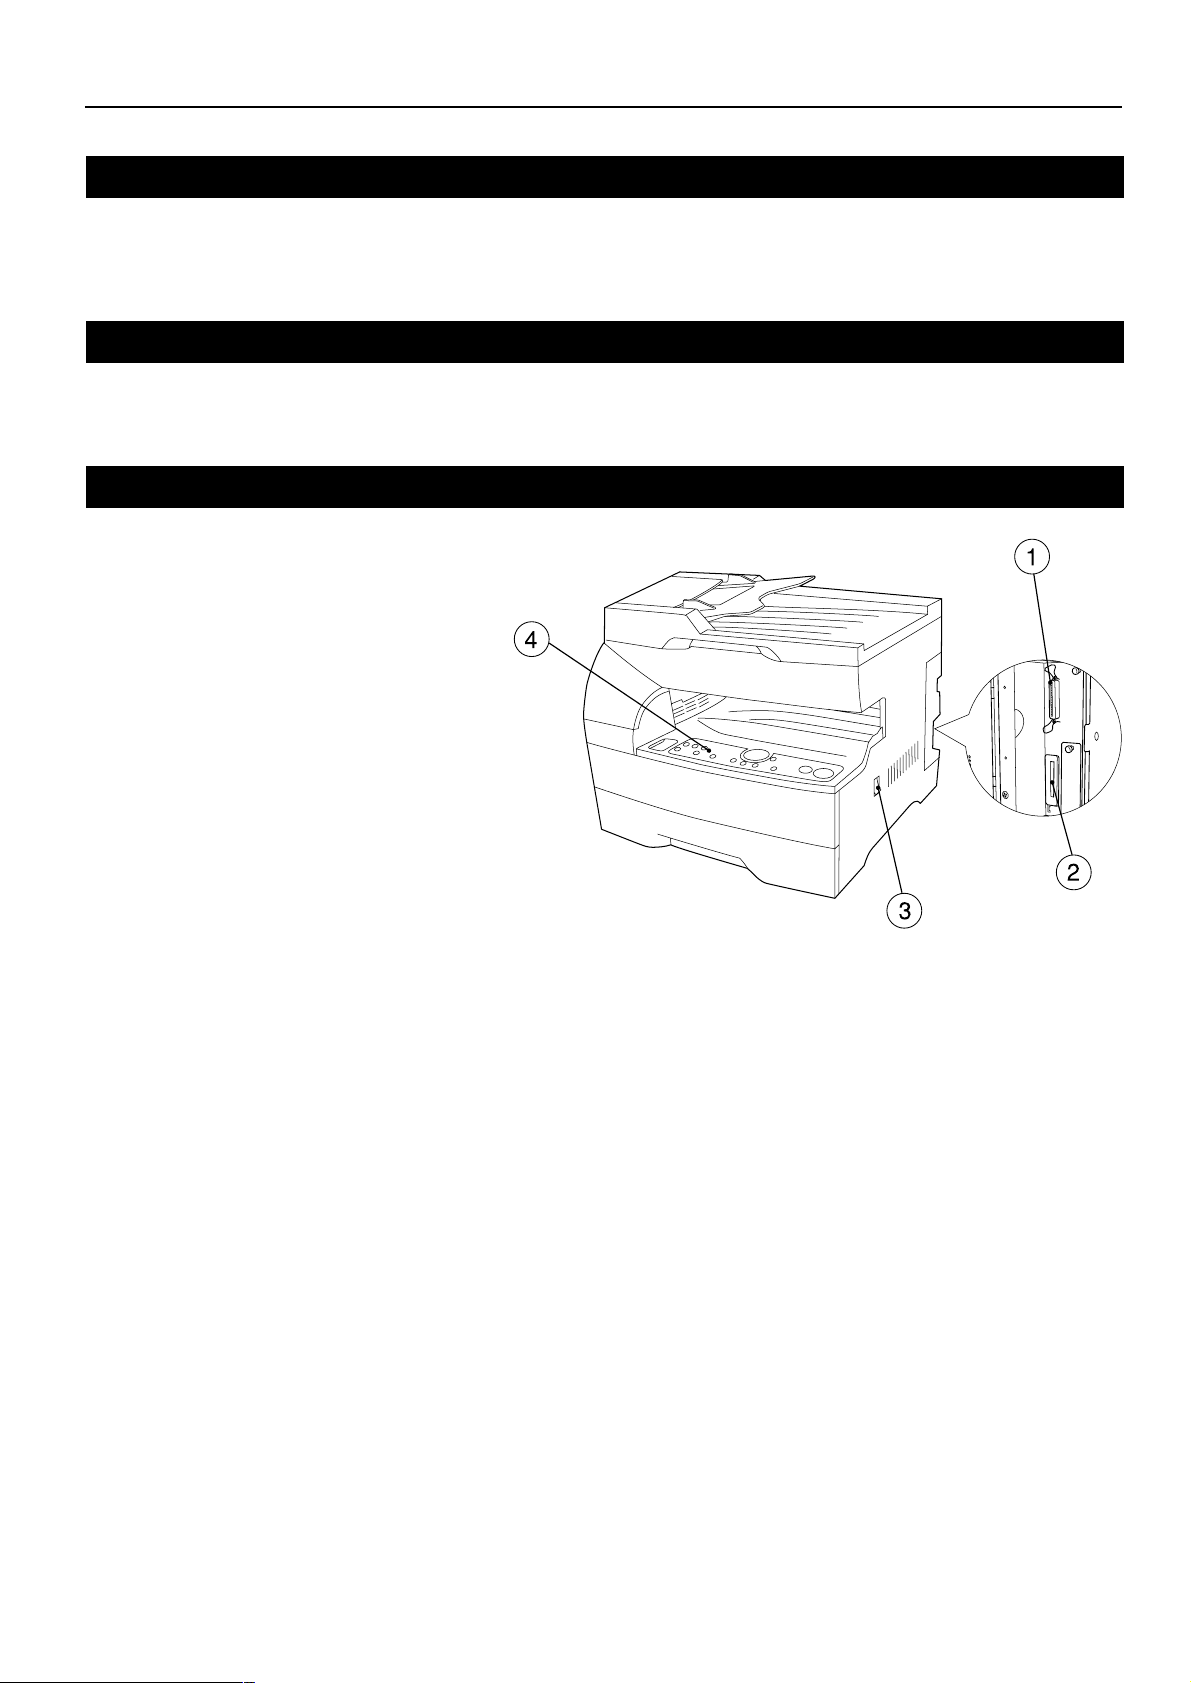
1-3 Name of parts (main body)
1 Parallel interface connector
Connect a bi-directional parallel cable here.
2 Memory Card slot
Insert the optional Memory Card here.
3 Main switch
Turn this switch ON ( | ) first, prior to using the printer.
Always turn this switch OFF (O) when connecting the
printer cable, etc.
4 Operation panel
Use when performing settings, etc., at the printer itself.
1
Page 9

1. Preparations
1-4 Name of parts (operation panel)
Inch specifications
8 7
2 in 1
Sort
Lighter
4 in 1
Metric specifications
12
12
34
AutoExp.
Text &Photo
Photo
Tex t
Darker
Memory
Overflow/
Data Error
Paper Select
Add
Toner
Number of
Copies(
8 7
Stop/
Reset
Cancel
-
)
Zoom
(-)
Zoom
Input/Enter
Zoom
Data/
On-line
Printer
Number of
+
)
Copies(
(+)
200%
MAX.
129%
100%
Full Size
78%
50%
MIN.
Size Select
6 5 4 3 2 1
MAX.
200%
141%
100%
70%
50%
A5 A
1:1
A4 A
MIN.
4
5
/
C
A
Start
Go
1 Start [GO] key
Press this key when you want to restart printing, as well as when
you want to initiate the operation for form feed. This key is also
used to switch the printer on- and off-line. When the printer is online, the Data On-line indicator will be lit.
2 Stop/Reset [CANCEL] key
Press this key when you want to stop printing, when you want to
cancel a setting midway through it, or when you want to clear an
error message.
3 Printer key
Press this key when you want to switch to the printer mode.
4 Number of Copies/Zoom(+) key
Press this key when you want to scroll down among the various
functions, settings, etc.
5 Zoom Input/Enter key
Press this key when you want to register a setting.
6 Number of Copies/Zoom(–) key
Press this key when you want to scroll up among the various
functions, settings, etc.
7 Copy quality/magnification display
Indicates the status of the printer as well as other settings. “P00”
will be displayed when the machine is in the printer mode.
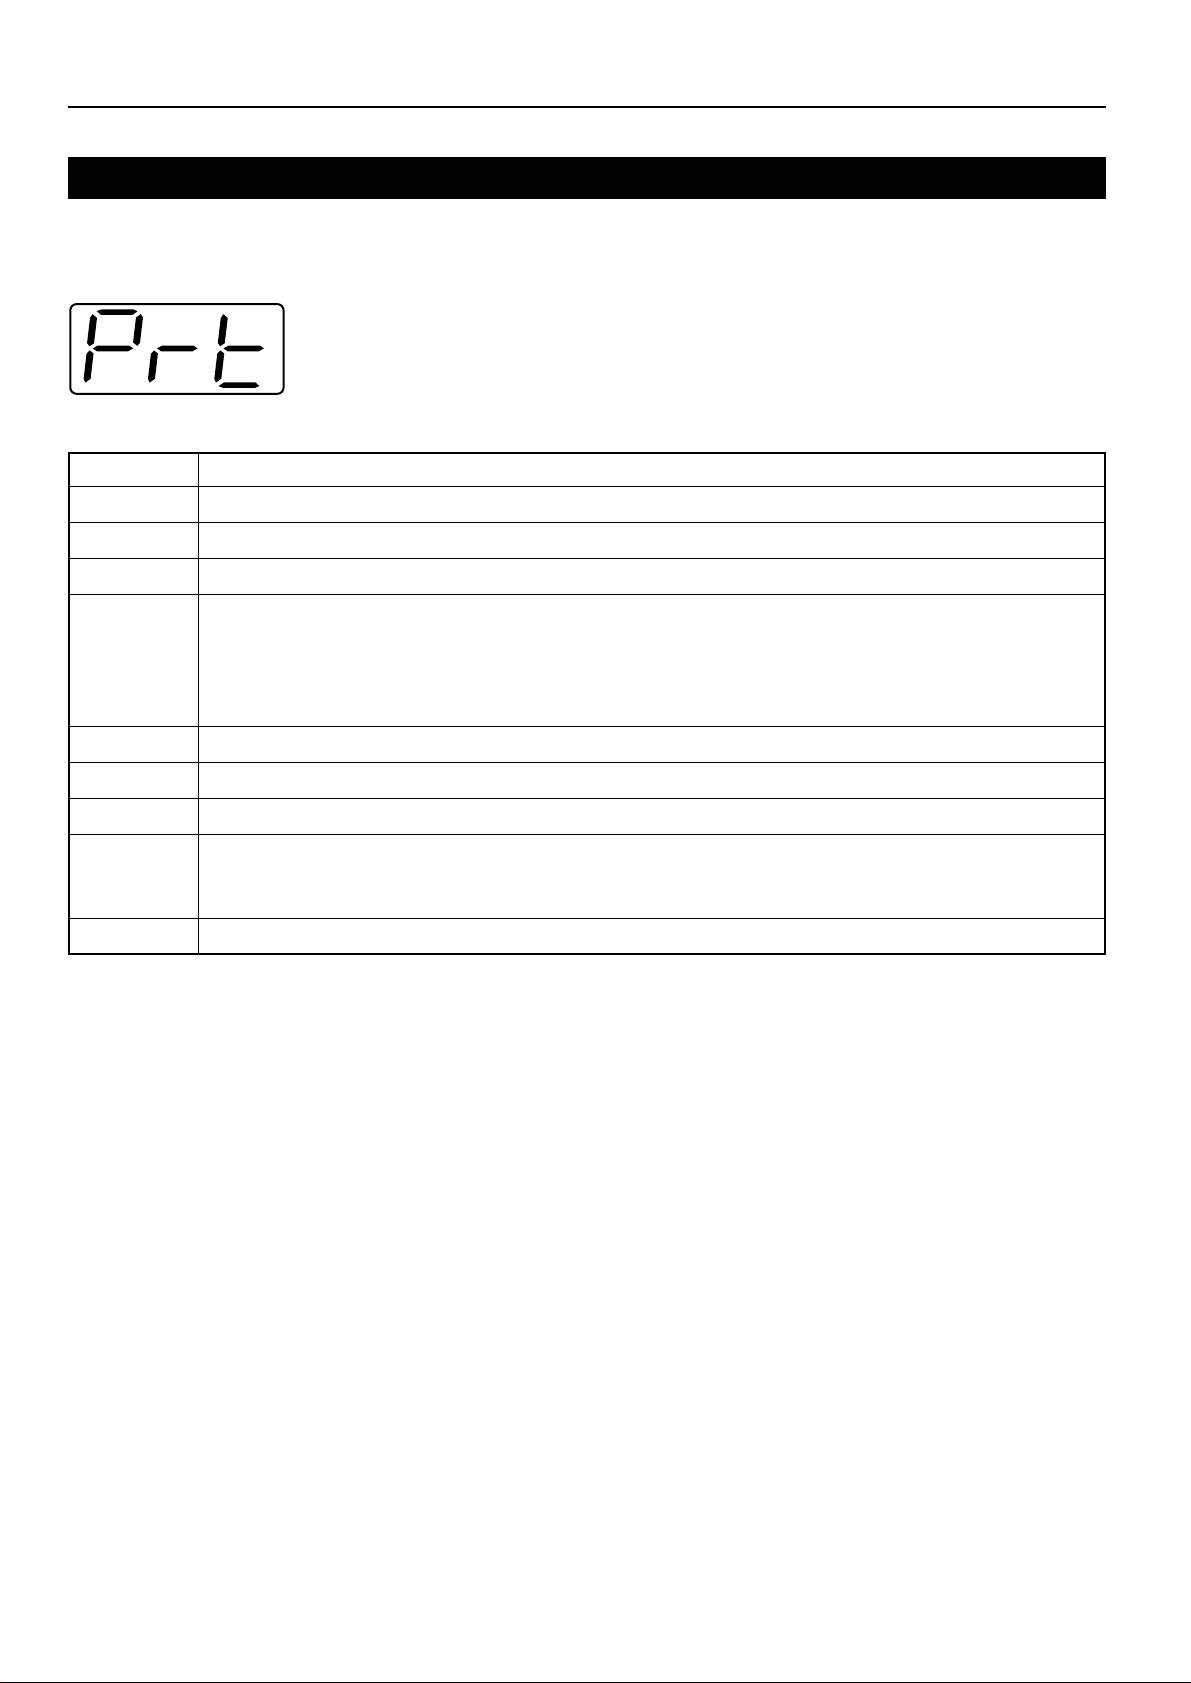
8 Memory Overflow/Data Error indicator
Flashes when a printing error has occurred. In this case, “Prt” and
“E##” will alternately flash as well in the copy quality/magnification
display. Press the Printer key and check the cause of the error.
For more detailed information, refer to “3-2 When an error code
or error messages appears…” on page 6.
6 5 4 3 2 1
● The copy quality/magnification display in the printer mode
To enter the printer mode, press the Printer key. The indications
that appear in the copy quality/magnification display when the
machine is in the printer mode are explained in the table below.
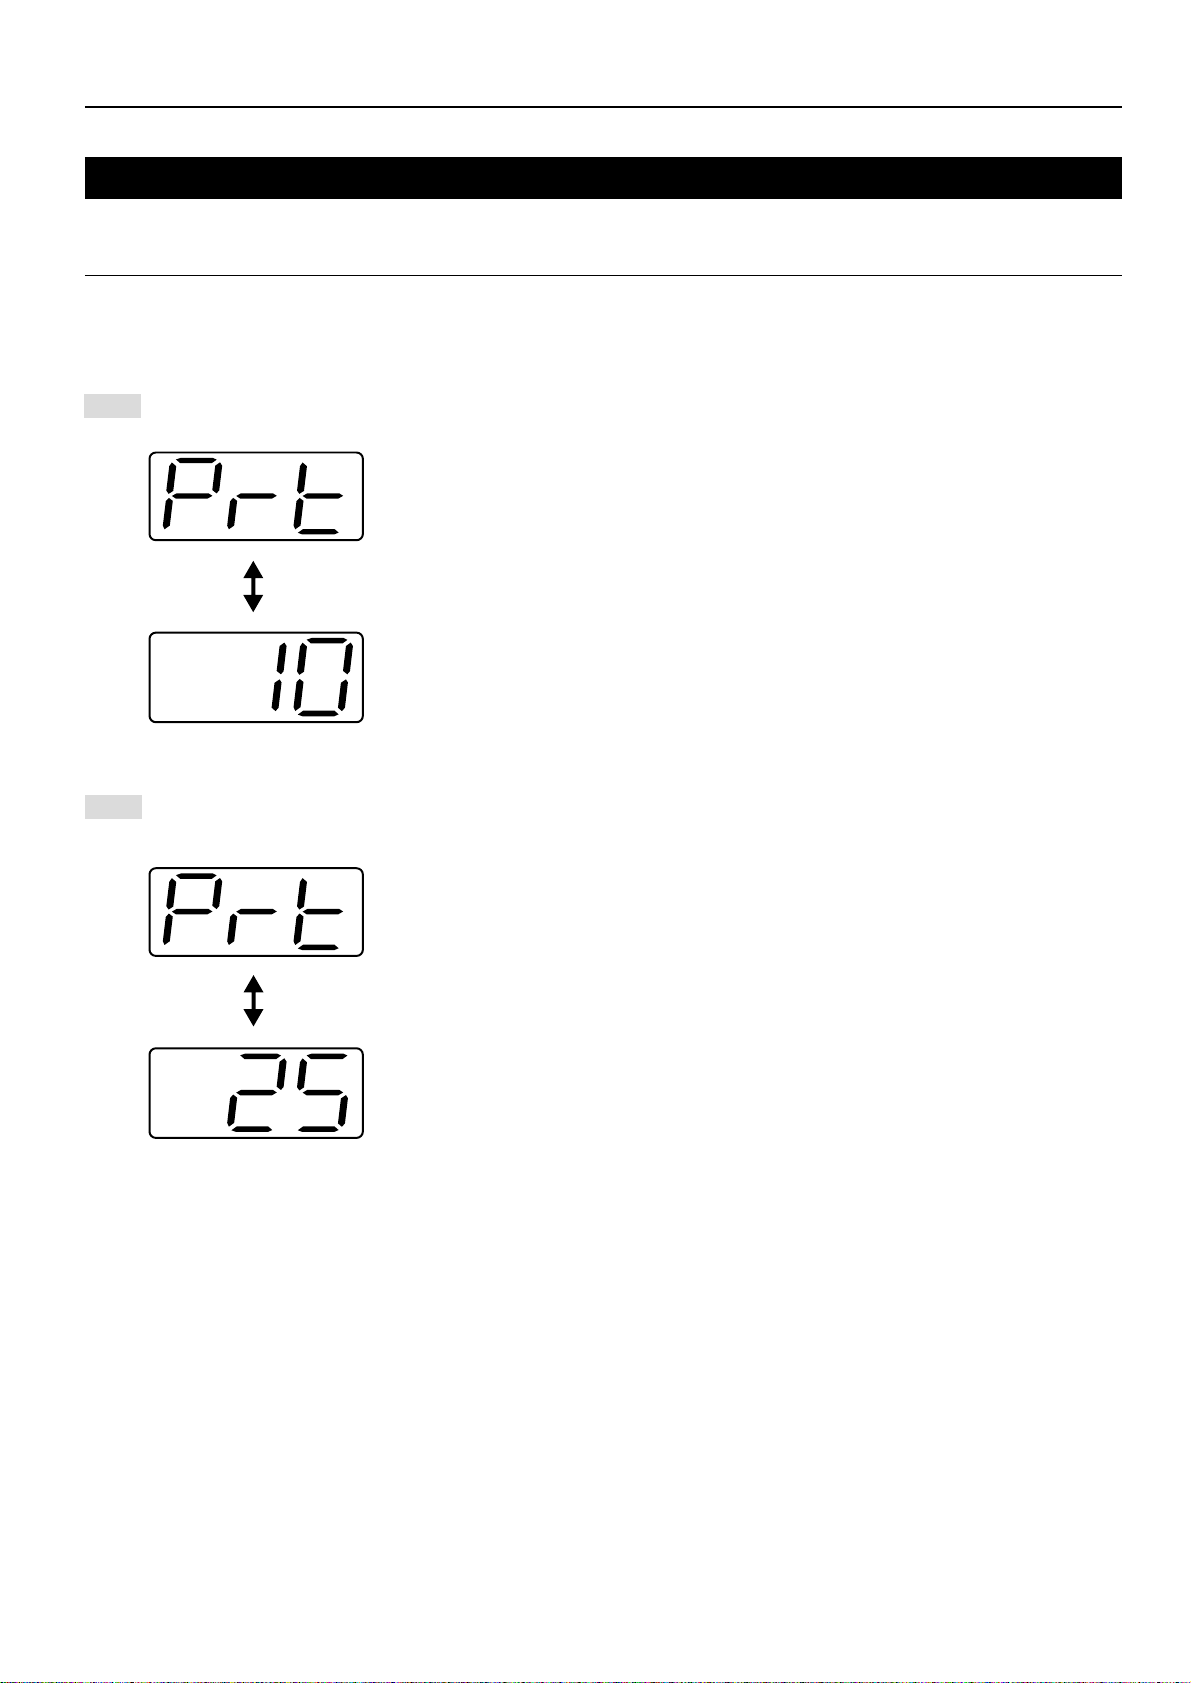
Indication
P00
P##
Prt
E##
Prt
##
This is the initial display when the machine is in the
printer mode.
Indicates the menu number of printer-related settings.
The actual menu number of the selected setting will be
displayed in place of the ##. For more detailed
information, refer to the On-Line Manual.
“Prt” and “E##” will alternately flash when a printer error
occurs. (The corresponding error number will be
displayed in place of the ##.) For more detailed
information, refer to “3-2 When an error code or error
messages appears…” on page 6.
"Prt" and a 2-digit number will alternately flash to
indicate the current status of the printer. The meaning
of the flashing numbers is as follows:
01: The printer is in the middle of a self test. This will
appear when the main switch is turned ON ( | ) as
well as when the printer is reset.
02: The printer is in the process of changing settings.
Wait until it has completed the operation.
10: The printer is in the middle of processing data.
15: The printer is waiting for data.
20: A form feed time-out has occurred.
25: The printer is in the process of canceling data.
Meaning
2
Page 10
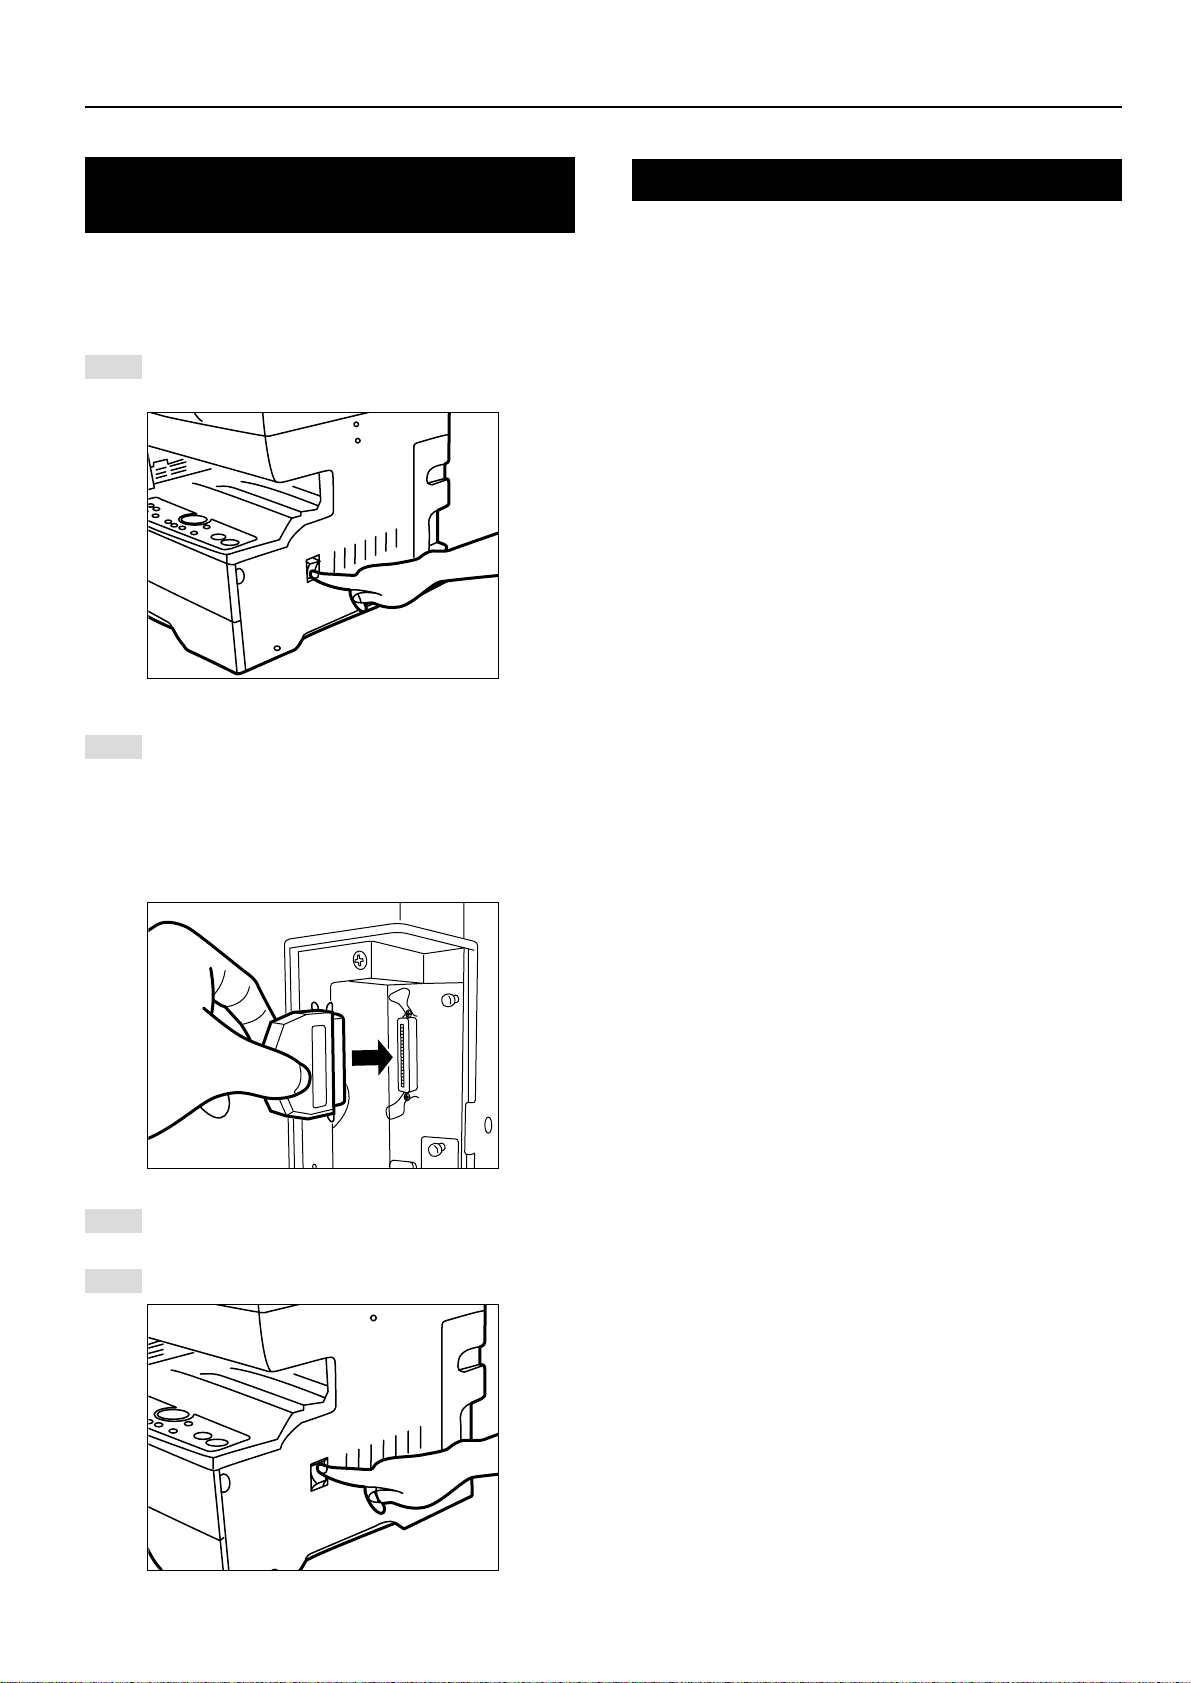
2. Set-up
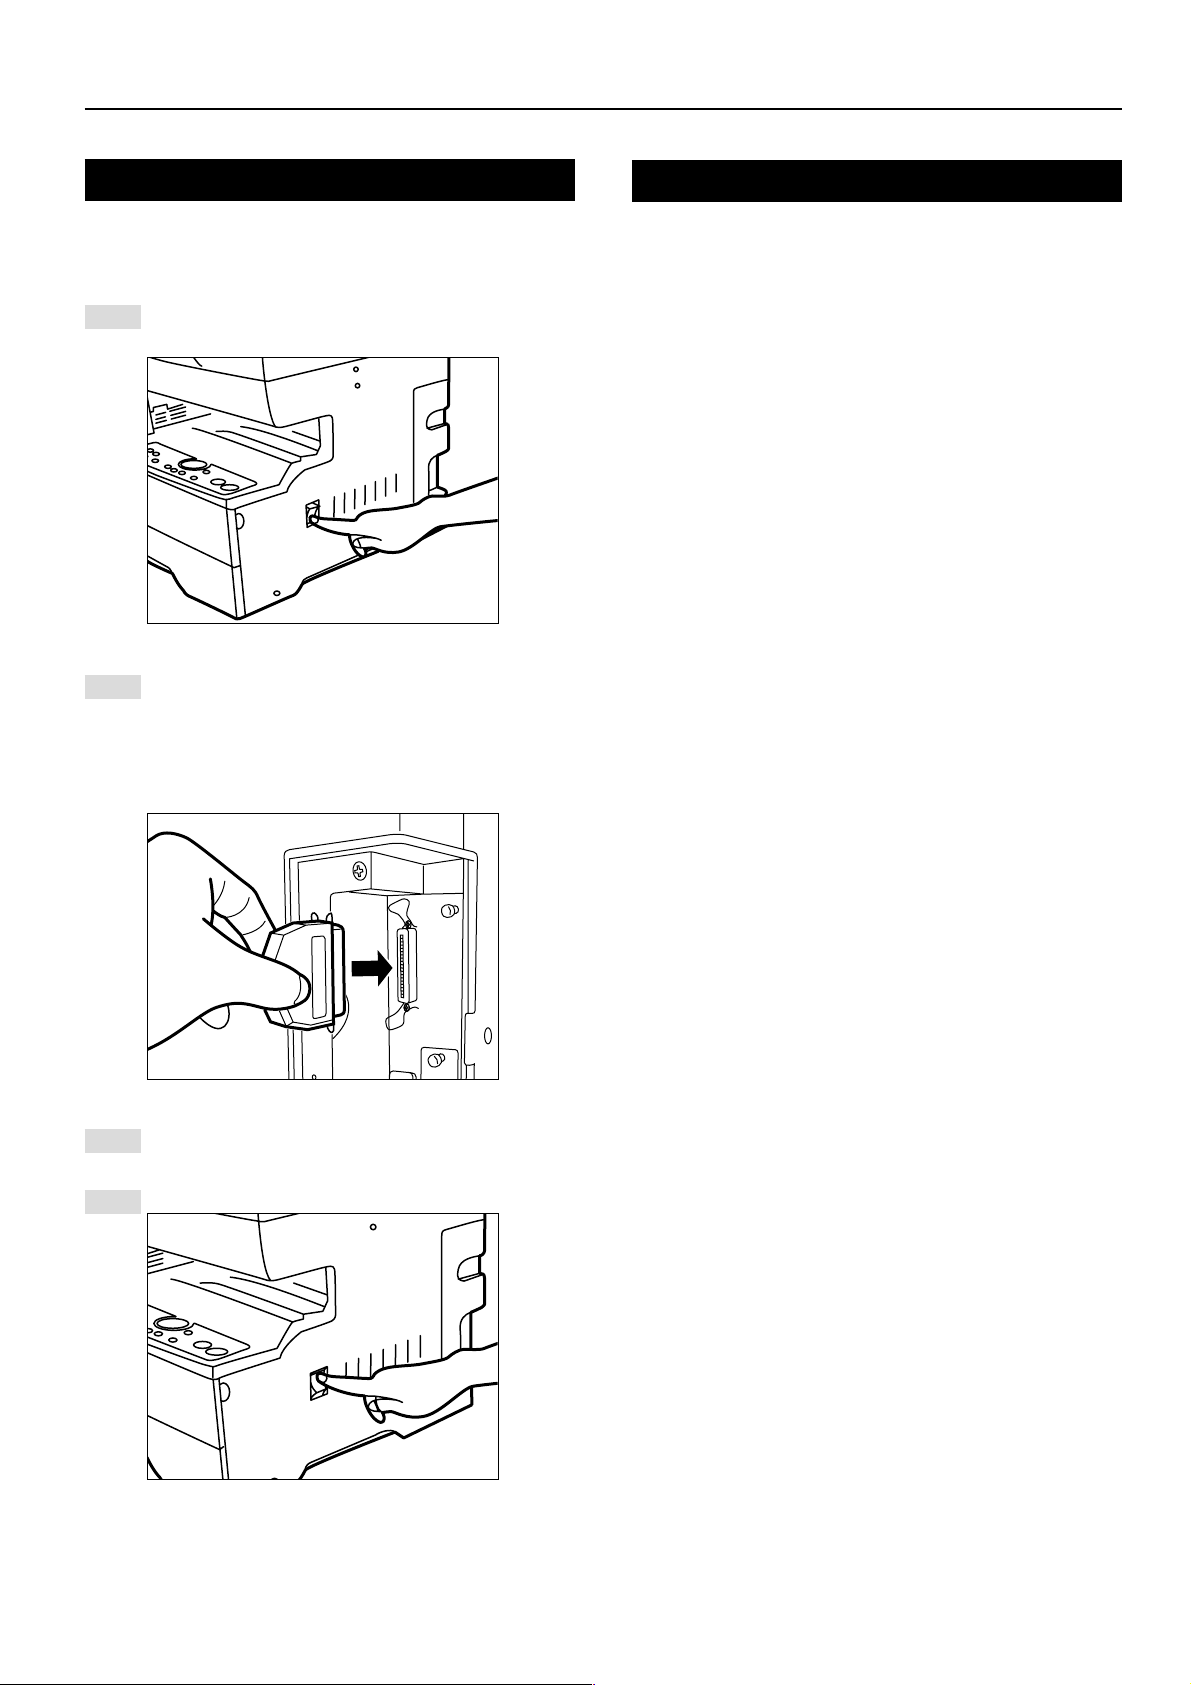
2-1 Connecting the printer cable
CAUTION: ALWAYS turn the main switch to the printer OFF (O)
1
2
BEFORE connecting the printer cable.
Turn the main switch located on the right side of the printer
OFF (O) and then turn the power off to your computer as
well.
Remove the cover lacted at the back of the right side of the
printer, and connect the printer cable to the parallel interface
connector.
* If the optional Network Card is installed in the printer,
connect the printer cable (100BASE-TX, etc.) and perform
the appropriate network settings. Refer to “2-3 Network
(TCP/IP) settings” on page 4.
2-2 Installing the software
Perform the following procedure to install into your computer the
printer driver and other software that is appropriate to the operating
system in use in that computer. For information on installing the
required software, refer to the On-Line Manual that is located on the
CD-ROM that is included with this product.
Connect the other end of the printer cable to the parallel
3
interface connector on your computer.
Turn the main switch to the printer back ON ( | ).
4
3
Page 11
2. Set-up
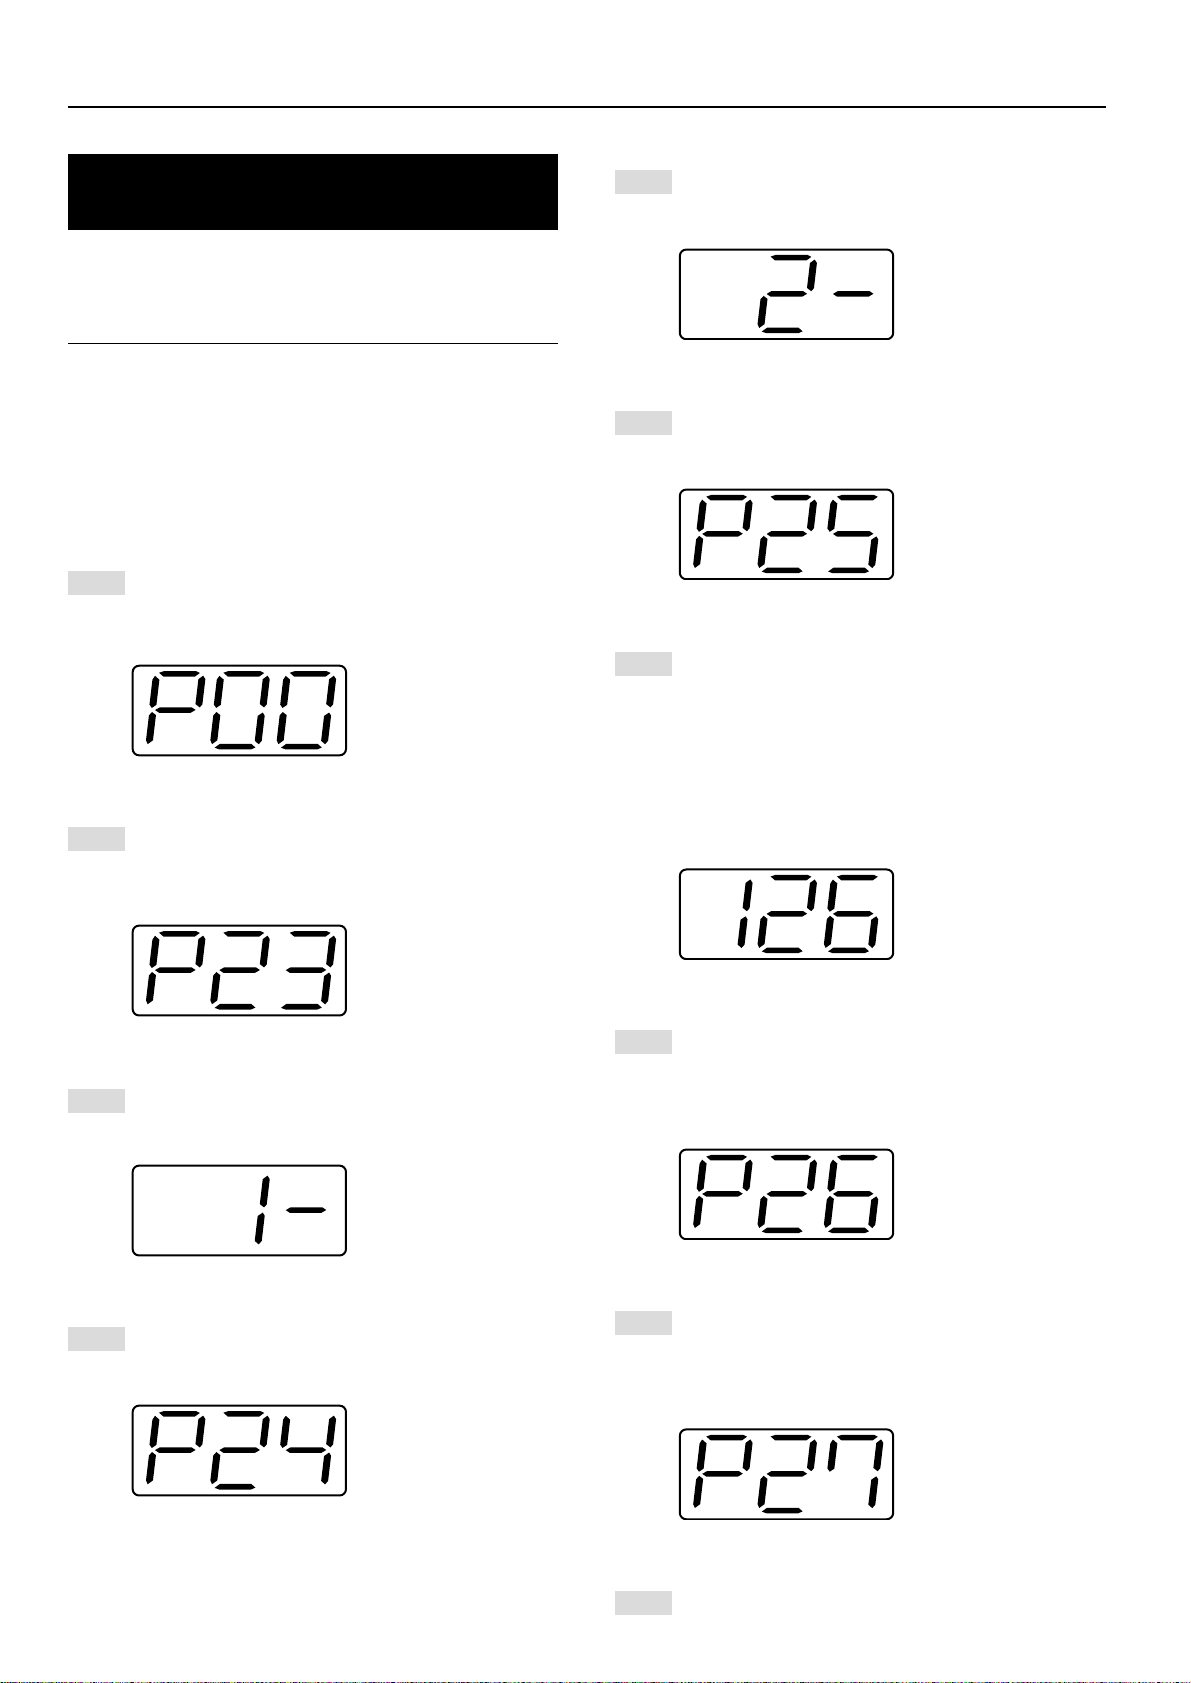
2-3 Network (TCP/IP) settings
When the optional Network Card is installed and this machine is to
be used as a network printer, it is necessary to set the corresponding
IP address for the printer.
Notes
• The IP address that should be registered here will differ depending
upon your network environment. Check with your network
administrator BEFORE performing this setting.
• If you are using a DHCP server to automatically configure the IP
address, this setting will not be necessary because DHCP server
configuration is already enabled as the factory default setting.
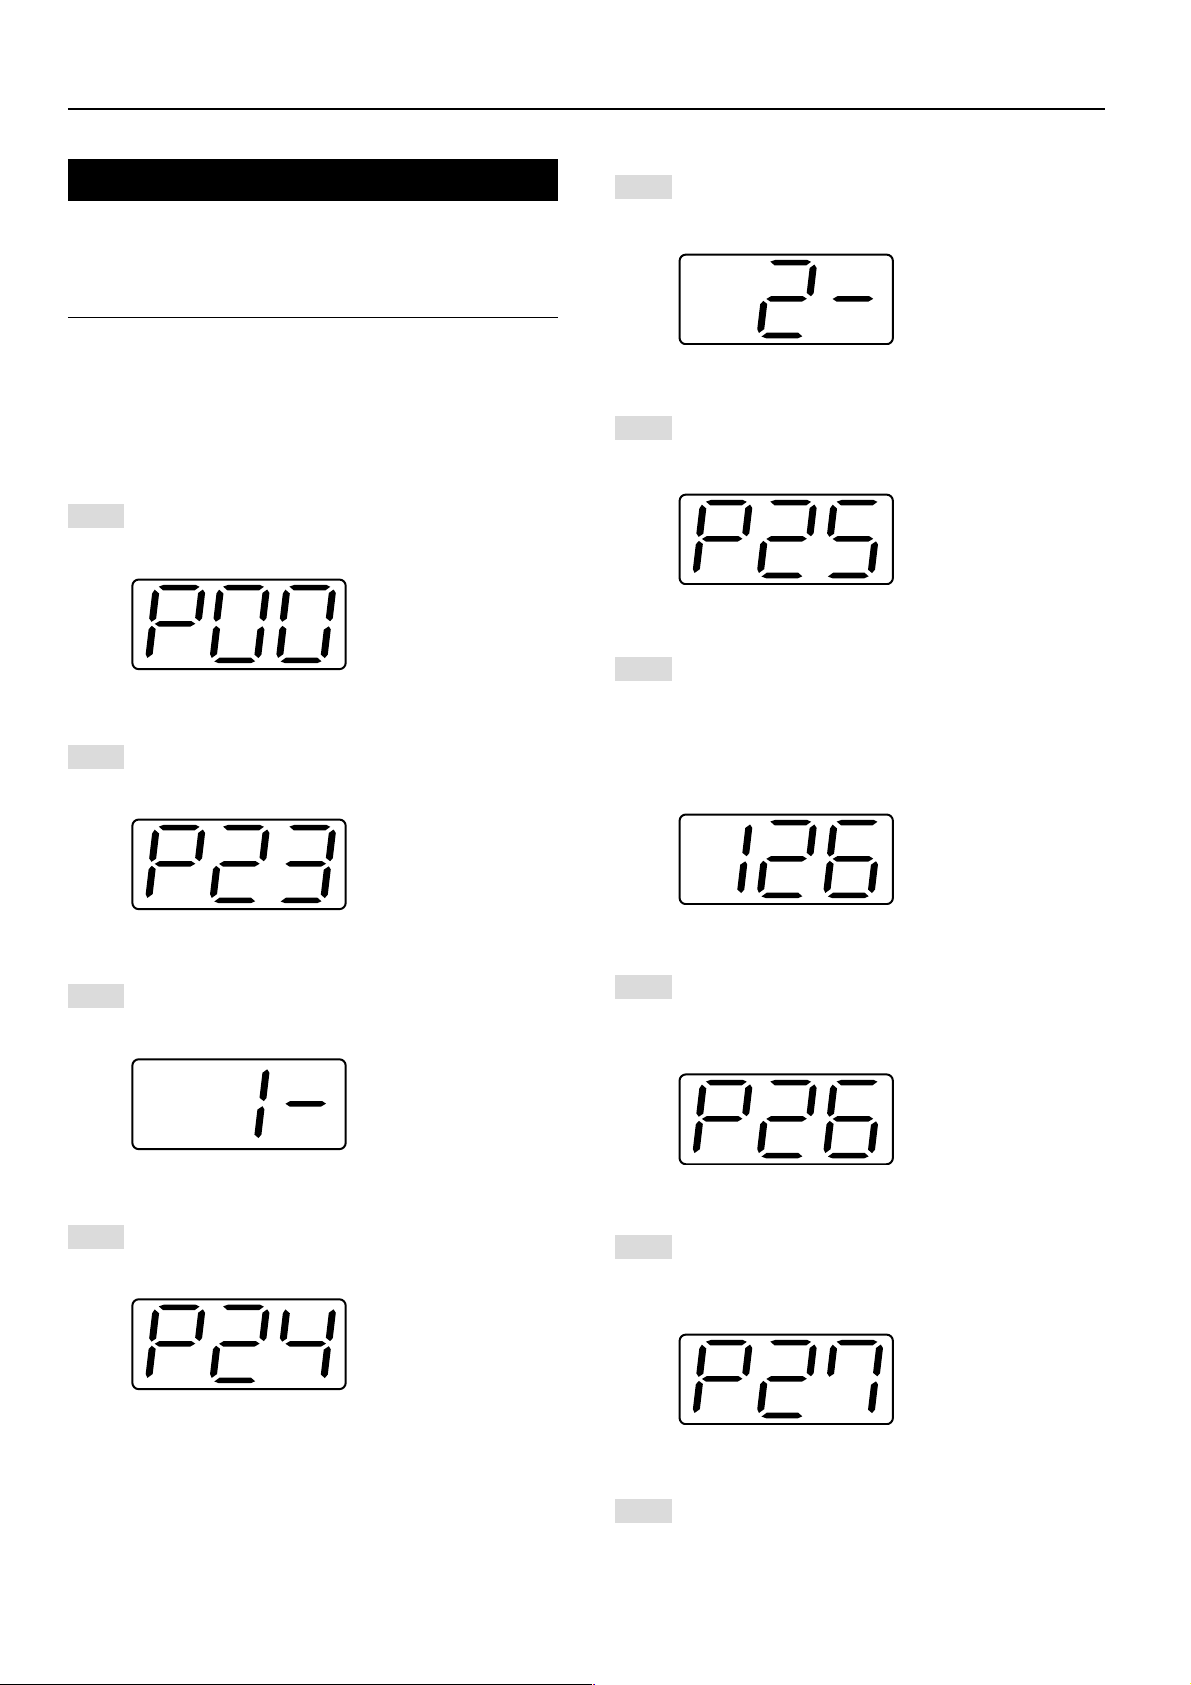
* To cancel the setting midway through it, press the Stop/Reset key.
Press the Printer key. The machine will switch to the printer
1
mode and “P00” will appear in the copy quality/magnification
display.
Use the (+) and (–) keys to select “23” and then press the
Enter key. The display will change to “P23” (the TCP/IP ON/
2
OFF setting).
Use the (+) and (–) keys to select “2” (Off) and then press
5
the Enter key. The selected setting will flash twice and will
then be registered.
Use the (+) and (–) keys to select “25” and then press the
6
Enter key. The display will change to “P25” (the IP address
setting).
The (+) and (–) keys will be used to select the 12-digit IP
7
address in blocks of 3 digits each:
First, enter the appropriate 3 digits for the first block and
then press the Enter key. Repeat this same procedure for
the 3 remaining blocks of the address (4 blocks in all). Once
the Enter key is pressed for the final 3-digit block, the
display will flash twice and the IP address will be registered.
Use the (+) and (–) keys to select “1” (On) and then press
3
the Enter key. The selected setting will flash twice and will
then be registered.
Use the (+) and (–) keys to select “24” and then press the
Enter key. The display will change to “P24” (the DHCP ON/
4
OFF setting).
Use the (+) and (–) keys to select “26” and then press the
8
Enter key. The display will change to “P26” (the Subnet
Mask setting). Enter the 12-digit Subnet Mask using the
same procedure that you did for entering the IP address.
Use the (+) and (–) keys to select “27” and then press the
9
Enter key. The display will change to “P27” (the Gateway
address setting). Enter the 12-digit Gateway address using
the same procedure that you did for entering the IP address.
Once you are finished making all of the network settings,
10
press the Printer key. The machine will switch back to the
copier mode.
4
Page 12

3. Troubleshooting
3-1 Canceling printing
Perform the following procedure when you want to stop printing or you want to clear data.
IMPORTANT!
• By performing this operation you will be canceling ALL print jobs that are currently waiting in the printer’s memory to be printed.
• Always cancel the print job at your computer first. If the print job is not canceled in your computer, the data will be sent once again to the printer.
Press the Printer key. The machine will switch to the printer
1
mode.
Press the Stop/Reset key. Printing will be canceled.
2
5
Page 13
3. Troubleshooting
3-2 When an error code or error messages appears…
If an error code appear on the operation panel, first check the following tables for cause of the trouble and then perform the corresponding
procedure. For more detailed information, refer to the Instruction Handbook for your copier as well as the Instruction Handbook for any optional
equipment that is installed in your machine.
Error Indications in this printer
If “Prt” is displayed and the Memory Overflow/Data Error indicator flashes while the machine is in the copier mode,
an error has occurred with the printer functions of this machine. Press the Printer key and check the cause of the
error. Refer to the following tables for the corresponding error code and appropriate correction procedure.
Error code
E01
E02
E03
E04
E05
E06
E07
E25
E30
Procedure
A paper jam has occurred. Remove the jammed paper.
The drawer has run out of paper or a paper jam has occurred. Add paper or remove the jammed paper, as appropriate.
One or both drawers are not set properly in the printer. Insert both drawers securely.
The size of paper selected for printing does not match the size of paper in the drawer. Replace the paper in the drawer with
that of the correct size.
*If you want to force-print onto the current size of paper, press the Start [GO] key. If you want to switch to and print from a
different drawer, press the Paper Select key until the desired drawer is selected. If you want to cancel the printing operation
completely, press the Stop/Reset key.
The drawer has run out of paper. Add paper.
One of the covers is open. Close the covers securely.
Differ from actual size. Check drawer sizesetting.
The amount of paper stacked in the Inner tray has exceeded the acceptable capacity. Remove all paper from the Inner tray
and then press the Start [GO] key to continue printing.
*If you want to cancel the printing operation completely, press the Stop/Reset key.
Trouble has occurred within the printer. Contact your service representative or an authorized service center.
6
Page 14
3. Troubleshooting
Error code
E60
E70
E71
E72
E73
E80
E82
Procedure
A read- or write-error has occurred on the RAM disk. Press the Start [GO] key to erase the error indication.
A read- or write-error has occurred in the Memory Card. Press the Start [GO] key to erase the error indication.
The Memory Card was removed during operation under the menu for printer-related settings. Reinsert the Memory Card.
*BE SURE to turn the main switch OFF (O) BEFORE inserting the Memory Card.
The Memory Card could not be detected during an operation in which the printer was reading data from that card. Reinsert
the Memory Card.
*BE SURE to turn the main switch OFF (O) BEFORE inserting the Memory Card.
Initialization of the Memory Card currently inserted is necessary.
A data overrun error has occurred due to insufficient memory.
• If you want to force-continue the print job, press the Start [GO] key. If you want to cancel the printing operation completely,
press the Stop/Reset key.
• If “Auto Continue” (menu: P74) is turned “On” (setting: 1), the printing operation will be restarted automatically after the
amount of time specified there.
• Once this error message is displayed, “Page Protect” (menu: P42) will be turned “On” (setting: 1) automatically.
The current print job could not be completed due to insufficient memory in the printer.
• If you are using a RAM disk, reduce the size of the RAM disk. If this error occurs often, it is recommended that you install
additional memory into the printer. For more detailed information on adding memory, contact your service representative or
an authorized service center.
• If you want to force-continue the print job, press the Start [GO] key. The data that has already been processed will be printed
out and the remaining portion of the print job will be printed onto the following page.
• If “Auto Continue” (menu: P74) is turned “On” (setting: 1), the printing operation will be restarted automatically after the
amount of time specified there.
E83
EF1
EF2
The selected interface is currently in use. Wait for a while and then attempt the operation again.
An error has been detected during operation. Turn the main switch to the printer OFF (O) and then back ON ( | ) again. If the
same error message remains, contact your service representative or an authorized service center.
An error has been detected during operation. Turn the main switch to the printer OFF (O) and then back ON ( | ) again. If the
same error message remains, contact your service representative or an authorized service center.
7
Page 15
3. Troubleshooting
3-3 Basic troubleshooting chart
If you experience trouble while you are using this machine as a printer, refer to the table below to perform minor adjustments. If trouble persists,
contact your service representative or an authorized service center.
* For information in regard to general mechanical trouble with the machine, refer to the Instruction Handbook for your copier.
Problem
Nothing is printed out
Text is not printed correctly
Print out is not correct
Check point
Is the power cord loose?
Is the power ON ( | ) to the printer?
Is the printer cable appropriate and
is it connected properly?
Did you connect the printer cable
AFTER you turned the power to the
printer ON?
Is the printer off-line? (Is the Data
On-line indicator out?)
Is the printer cable appropriate and
is it connected properly?
Is the setting configuration in your
computer correct?
Procedure
Connect the power cord securely to a power
source.
Turn the main switch to the printer ON ( | ).
Be sure to use a compliant printer cable and
make sure it is connected properly.
Connect the printer cable BEFORE you turn
the power to the printer ON.
Perform the appropriate procedure to light
the Data On-line indicator and put the printer
on-line.
1 Press the Printer key. The machine will
switch to the printer mode.
2 Press the Start [GO] key.
3 The Data On-line indicator will light.
Be sure to use a compliant printer cable and
make sure it is connected properly.
Confirm the settings in the printer driver as
well as in the software application in use.
Reference page
—
3
3
—
2
3
—
8
Page 16

4. Specifications
CPU ................................................................... PowerPC 405 (200MHz)
Printing Speed ................................................... 15, 18 ppm copier: 18 pages/min (A4 [8 1/2" x 11"])
Printing Resolution .............................................With smoothing OFF: 600 dpi x 600 dpi
Maximum Printing Size ...................................... Legal (8 1/2" x 14"). Folio
RAM Memory Capacity ...................................... Installed: 8 MB
Interface ............................................................. One parallel interface (IEEE 1284 compliant)
Installed Fonts .................................................... 80
* Specifications are subject to change without notice.
With smoothing ON: interpolated 2400 dpi x 600 dpi
Maximum: 136 MB (with an additional 128 MB of optional memory installed)
9
Page 17
MANUEL D’INSTRUCTIONS
<Édition Installation>
TOUJOURS lire entièrement ce Manuel d'Instructions avant d'utiliser l'appareil. Après l'avoir lu,
conservez ce manuel dans de bonnes conditions avec le Manuel d'Instructions de votre copieur.
Page 18

Informations concernant les marques déposées
• PRESCRIBE est une marque déposée de Kyocera Corporation.
• PRESCRIBE 2e et KPDL2 sont des marques de fabrique de Kyocera Corporation.
• MS-DOS, Windows et Windows NT sont des marques de fabrique de Microsoft Corporation.
• PCL et PJL sont des marques déposées de Hewlett-Packard Company.
• PostScript est une marque déposée d'Adobe Systems Incorporated.
• Ethernet est une marque déposée de Xerox Corporation.
• Novell et NetWare sont des marques déposées de Novell, Inc.
• Centronics est une marque de fabrique de Centronics Data Computer Corporation.
• IBM et IBM PC-AT sont des marques de fabrique d'International Business Machines Corporation.
• PowerPC est une marque de fabrique d'International Business Machines Corporation of America et d'autres sociétés.
• TrueType et Macintosh sont des marques déposées d'Apple Computer, Inc.
• AppleTalk est une marque de fabrique d'Apple Computer, Inc.
• Ce produit a été développé en utilisant Tornado, l'environnement de développement général de systèmes d'exploitation en temps
réel (ROTS) de Wind River Systems, Inc.
• Cette imprimante utilise PeerlessPrintXL, un système compatible PCL développé par Peerless Group, pour émuler le langage de
contrôle d'imprimante HP LaserJet (PCL6). PeerlessPrintXL est une marque de fabrique de Peerless Group (Redondo Beach,
CA 90278, Etats-Unis d'Amérique).
•
Tous les autres noms de sociétés ou produits contenus dans ce manuel d’instructions sont des marques de fabrique ou marques
déposées de leurs compagnies respectives. Les indications ™ et ® ne seront pas utilisées dans ce manuel.
Contient UFST™ et MicroType
®
d'Agfa Corporation.
Tous droits réservés. Aucune partie de ce document ne peut être reproduite ou transmise sous quelque forme ou par quelque
moyen que ce soit, électronique ou mécanique, tel que par photocopie, enregistrement ou par un système quelconque de
stockage et de rappel des informations, sans l'autorisation écrite de l'éditeur.
Limitations légales relatives à la copie
• Il peut être interdit de copier des documents protégés par des droits d'auteur sans l'autorisation préalable du propriétaire des
droits d'auteur.
• Il est absolument interdit de copier des billets de banque nationaux ou étrangers.
• La copie d'autres articles peut être interdite.
i
Page 19

IBM PROGRAM LICENSE AGREEMENT
Les instructions suivantes sont volontairement fournies en anglais.
THE DEVICE YOU HAVE PURCHASED CONTAINS ONE OR MORE SOFTWARE PROGRAMS (“PROGRAMS”) WHICH BELONG
TO INTERNATIONAL BUSINESS MACHINES CORPORATION (“IBM”). THIS DOCUMENT DEFINES THE TERMS AND CONDITIONS
UNDER WHICH THE SOFTWARE IS BEING LICENSED TO YOU BY IBM. IF YOU DO NOT AGREE WITH THE TERMS AND
CONDITIONS OF THIS LICENSE, THEN WITHIN 14 DAYS AFTER YOUR ACQUISITION OF THE DEVICE YOU MAY RETURN THE
DEVICE FOR A FULL REFUND. IF YOU DO NOT SO RETURN THE DEVICE WITHIN THE 14 DAYS, THEN YOU WILL BE ASSUMED
TO HAVE AGREED TO THESE TERMS AND CONDITIONS.
The Programs are licensed not sold. IBM, or the applicable IBM country organization, grants you a license for the Programs only in
the country where you acquired the Programs. You obtain no rights other than those granted you under this license.
The term “Programs“ means the original and all whole or partial copies of it, including modified copies or portions merged into other
programs. IBM retains title to the Programs. IBM owns, or has licensed from the owner, copyrights in the Programs.
1 . License
Under this license, you may use the Programs only with the device on which they are installed and transfer possession of the
Programs and the device to another party. If you transfer the Programs, you must transfer a copy of this license and any other
documentation to the other party. Your license is then terminated. The other party agrees to these terms and conditions by its first use
of the Program.
You may not:
1) use, copy, modify, merge, or transfer copies of the Program except as provided in this license;
2) reverse assemble or reverse compile the Program; or
3) sublicense, rent, lease, or assign the Program.
2. Limited Warranty
The Programs are provided “AS IS.”
THERE ARE NO OTHER WARRANTIES COVERING THE PROGRAMS (OR CONDITIONS), EXPRESS OR IMPLIED, INCLUDING,
BUT NOT LIMITED TO, THE IMPLIED WARRANTIES OF MERCHANTABILITY AND FITNESS FOR A PARTICULAR PURPOSE.
Some jurisdictions do not allow the exclusion of implied warranties, so the above exclusion may not apply to you.
SUPPLEMENT TO AGREEMENT FOR SOFTWARE BUNDLING AND DISTRIBUTION FOR ALDC
3. Limitation of Remedies
IBM’s entire liability under this license is the following;
1) For any claim (including fundamental breach), in any form, related in any way to this license, IBM’s liability will
be for actual damages only and will be limited to the greater of ;
a) the equivalent of U.S.$25,000 in your local currency; or
b) IBM’s then generally available license fee for the Program
This limitation will not apply to claims for bodily injury or damages to real or tangible personal property for which IBM is legally liable.
IBM will not be liable for any lost profits, lost savings, or any incidental damages or other economic consequential damages, even if
IBM, or its authorized supplier, has been advised of the possibility of such damages. IBM will not be liable for any damages claimed
by you based on any third party claim. This limitation of remedies also applies to any developer of Programs supplied to IBM. IBM’s
and the developer’s limitations of remedies are not cumulative. Such developer is an intended beneficiary of this Section. Some
jurisdictions do not allow these limitations or exclusions, so they may not apply to you.
4. General
You may terminate your license at any time. IBM may terminate your license if you fail to comply with the terms and conditions of this
license. In either event, you must destroy all your copies of the Program. You are responsible for payment of any taxes, including
personal property taxes, resulting from this license. Neither party may bring an action, regardless of form, more than two years after
the cause of action arose. If you acquired the Program in the United States, this license is governed by the laws of the State of New
York. If you acquired the Program in Canada, this license is governed by the laws of the Province of Ontario. Otherwise, this license
is governed by the laws of the country in which you acquired the Program.
ii
Page 20

Reconnaissance des marques déposées des caractères
Toutes les polices de caractères résidentes de cette imprimante sont concédées sous licence par Agfa Corporation.
Helvetica, Palatino et Times sont des marques déposées de Linotype-Hell AG.
ITC Avant Garde Gothic, ITC Bookman, ITC ZapfChancery et ITC Zapf Dingbats sont des marques déposées d'International
Type-face Corporation.
Agfa Japan License Agreement
Les instructions suivantes sont volontairement fournies en anglais.
1. “Software” shall mean the digitally encoded, machine readable, scalable outline data as encoded in a special format as well as
the UFST Software.
2. You agree to accept a non-exclusive license to use the Software to reproduce and display weights, styles and versions of
letters, numerals, characters and symbols (“Typefaces”) solely for your own customary business. Agfa Japan retains all rights,
title and interest to the Software and Typefaces and no rights are granted to you other than a License to use the Software on
the terms ex-pressly set forth in this Agreement.
3. To protect proprietary rights of Agfa Japan, you agree to maintain the Software and other proprietary information concerning
the Typefaces in strict confidence and to establish reasonable procedures regulating access to and use of the Software and
Typefaces.
4. You agree not to duplicate or copy the Software or Typefaces, except that you may make one backup copy.
5. This License shall continue until the last use of the Software and Typefaces, unless sooner terminated. This License may be
terminated by Agfa Japan if you fail to comply with the terms of this License and such failure is not remedied within thirty (30)
days after notice from Agfa Japan. When this License expires or is terminated, you shall either return to Agfa Japan or destroy
all copies of the Software and Typefaces and documentation as requested.
6. You agree that you will not modify, alter, disassemble, decrypt, reverse engineer or decompile the Software.
7. Agfa Japan warrants that for ninety (90) days after delivery, the Software will perform in accordance with Agfa Japan-published
specifications. Agfa Japan does not warrant that the Software is free from all bugs, errors and omissions. THE PARTIES
AGREE THAT ALL OTHER WARRANTIES, EXPRESSED OR IMPLIED, INCLUDING WARRANTIES OF FITNESS FOR A
PARTICULAR PURPOSE AND MERCHANTABILITY, ARE EXCLUDED.
8. Your exclusive remedy and the sole liability of Agfa Japan in connection with the Software and Typefaces is repair or replacement of defective parts, upon their return to Agfa Japan. IN NO EVENT WILL AGFA JAPAN BE LIABLE FOR LOST PROFITS,
LOST DATA, OR ANY OTHER INCIDENTAL OR CONSEQUENTIAL DAMAGES, OR ANY DAMAGES CAUSED BY ABUSE
OR MISAPPLICATION OF THE SOFTWARE AND TYPE-FACES.
9. New York, U.S.A. law governs this Agreement.
10. You shall not sublicense, sell, lease, or otherwise transfer the Software and/or Typefaces without the prior written consent of
Agfa Japan.
11. Use, duplication or disclosure by the Government is subject to restrictions as set forth in the Rights in Technical Data and
Computer Software clause at FAR 252-227-7013, subdivision (b)(3)(ii) or subparagraph (c)(1)(ii), as appropriate. Further use,
duplication or disclosure is subject to restrictions applicable to restricted rights software as set forth in FAR 52.227-19 (c)(2).
12. YOU ACKNOWLEDGE THAT YOU HAVE READ THIS AGREEMENT, UNDERSTAND IT, AND AGREE TO BE BOUND BY ITS
TERMS AND CONDITIONS. NEITHER PARTY SHALL BE BOUND BY ANY STATEMENT OR REPRESENTATION NOT
CONTAINED IN THIS AGREEMENT. NO CHANGE IN THIS AGREEMENT IS EFFECTIVE UNLESS WRITTEN AND SIGNED
BY PROPERLY AUTHORIZED REPRESENTATIVES OF EACH PARTY.
iii
Page 21

Au sujet de ce manuel d'instructions
Ce manuel d'instructions <Set-up Edition> doit être lu lorsque la plaquette d'imprimante est installée dans votre copieur et que
celui-ci sera utilisé principalement comme imprimante locale. Il contient des explications concernant les procédures d'installation
pour utiliser le copieur comme imprimante. Le réglage des paramètres et la configuration de l’imprimante étant différents selon la
configuration matérielle utilisée par l’ordinateur connecté à l’appareil, veuillez lire les sections se rapportant spécifiquement à votre
configuration matérielle et effectuer les réglages et la configuration décrits dans ces sections.
Ce manuel doit également être lu et utilisé conjointement avec le manuel d’assistance en ligne correspondant des CD-ROM
fournis. Ce manuel d’assistance en ligne contient des explications concernant l’imprimante, certains réglages et configurations,
ainsi que les procédures devant être effectuées sur votre ordinateur.
Au sujet du manuel d'assistance en ligne
Le manuel d’assistance en ligne de ce manuel d’instructions est enregistré sous forme de fichier PDF (Portable Document
Format) et se trouve dans le CD-ROM fourni avec ce produit. Le logiciel Adobe Acrobat Reader est nécessaire pour avoir accès
au manuel d’assistance en ligne. L’installateur d’Adobe Acrobat Reader est également fourni dans le CD-ROM permettant ainsi
d’installer le logiciel sur votre disque dur.
iv
Page 22
Les connexions
Pour raccorder directement l’imprimante à votre ordinateur (avec un câble parallèle)…
1 Raccorder directement l’imprimante
PC
à votre ordinateur avec un
câble parallèle .......................
Câble parallèle
2 Installation du pilote d’imprimante dans
PC
votre ordinateur ..... Consultez le manuel
d’assistance interactif
CD-ROM
Pour raccorder l’imprimante à un réseau (la carte de réseau en option doit être installée)…
<Exemple de connexion>
Noyau
1 Raccorder un câble de réseau
(100Base-TX, 10Base-T, etc.) à
PC
l’imprimante ...........................
Page 3
Page 3
Carte de réseau (option)
CD-ROM
Câble de réseau
PC
2 Réglages de réseau
(protocole TCP/IP) fonctionnant
dans l’imprimante ..................
Page 4
3 Installation du pilote d’imprimante dans
votre ordinateur ..... Consultez le manuel
d’assistance interactif
v
Page 23

Table des matières
1. Préparatifs................................................................................................................. 1
1-1 Accessoires ................................................................................................................................................1
1-2 Pièces nécessaires .................................................................................................................................... 1
1-3 Nomenclature (corps principal) .................................................................................................................. 1
1-4 Nomenclature (panneau de commande) ....................................................................................................2
2. Installation ................................................................................................................ 3
2-1 Raccordement du câble d’imprimante ........................................................................................................3
2-2 Installation du logiciel .................................................................................................................................3
2-3 Réglages de réseau (protocole TCP/IP) .................................................................................................... 4
3. Dépannage ................................................................................................................ 5
3-1 Annuler une impression.............................................................................................................................. 5
3-2 Lorsqu’un code d’erreur ou un message d’erreur apparaît….....................................................................6
3-3 Tableau de dépannage de base .................................................................................................................8
4. Spécifications ...........................................................................................................9
Page 24

1. Préparatifs
1-1 Accessoires
• 1 CD-ROM
• Ce manuel d’instructions
1-2 Pièces nécessaires
• Câble parallèle
1-3 Nomenclature (corps principal)
1 Connecteur d’interface parallèle
Raccorder ici un câble parallèle bidirectionnel.
2 Compartiment pour carte de mémoire
Insérer ici la carte de mémoire en option.
3 Interrupteur principal
Mettre d’abord cet interrupteur sur marche ( | ), avant
d’utiliser l’imprimante. Toujours mettre cet interrupteur
sur arrêt (O) lors du raccordement du câble
d’imprimante, etc.
4 Panneau de commande
Utiliser ce panneau pour effectuer les réglages, etc., sur
l’imprimante même.
1
Page 25
1. Préparatifs
1-4 Nomenclature (panneau de commande)
Spécifications en pouces
8 7
AutoExp.
Text &Photo
2 in 1
Photo
Sort
Lighter
4 in 1
Tex t
Darker
Spécifications métriques
12
12
34
Memory
Overflow/
Data Error
Add
Toner
Paper Select
Number of
-
)
Copies(
Zoom
(-)
Zoom
Input/Enter
6 5 4 3 2 1
8 7
Zoom
Data/
On-line
Printer
Number of
+
)
Copies(
(+)
200%
MAX.
129%
100%
Full Size
78%
50%
MIN.
Size Select
MAX.
200%
141%
A5 A
1:1
100%
70%
A4 A
50%
MIN.
Stop/
Reset
Cancel
/
C
Start
Go
A
4
5
6 5 4 3 2 1
1 Touche Start [GO] (démarrage [ACTION])
Appuyer sur cette touche pour redémarrer l’impression ainsi que
pour engager l’opération d’alimentation de formulaire. Cette
touche peut également être utilisée pour mettre l’imprimante en et
hors ligne. L’indicateur de données en ligne sera allumé lorsque
l’imprimante est en ligne.
2 Touche Stop/Reset [CANCEL] (Arrêt/Réinitialisation [ANNULATION])
Appuyer sur cette touche pour arrêter l’impression, pour annuler
un réglage en cours de procédure ou pour faire disparaître un
message d’erreur.
3 Touche Printer (imprimante)
Appuyer sur cette touche pour commuter au mode d’imprimante.
4 Touche Number of Copies/Zoom(+) (Nombre de copies/Zoom(+))
Appuyer sur cette touche pour faire défiler vers le haut les
diverses fonctions, réglages, etc.
5 Touche Zoom Input/Enter (Entrée de zoom/Validation)
Appuyer sur cette touche pour enregistrer un réglage.
6 Touche Number of Copies/Zoom(–) (Nombre de copies/Zoom(–))
Appuyer sur cette touche pour faire défiler vers le bas les diverses
fonctions, réglages, etc.
7 Affichage de qualité de copie/taux de reproduction
Indique l’état de l’imprimante ainsi que d’autres réglages. “P00”
sera affiché lorsque l’appareil est en mode d’imprimante.
8 Indicateur Memory Overflow/Data Error (saturation de mémoire /
erreur de données)
Clignote lorsqu’une erreur survient pendant l’impression. Dans un
tel cas, “Prt” et “E##” clignoteront également en alternance sur
l’affichage de qualité de copie/taux de reproduction. Appuyer sur
la touche Printer (imprimante) et vérifier quelle est la cause de
l’erreur. Pour plus de détails, voir “3-2 Lorsqu’un code d’erreur ou
un message d’erreur apparaît…” à la page 6.
● Affichage de qualité de copie/taux de reproduction en mode
d’imprimante
Pour entrer en mode d’imprimante, appuyer sur la touche Printer
(imprimante). Les indications apparaissant sur l’affichage de
qualité de copie/taux de reproduction lorsque l’appareil est en
mode d’imprimante sont décrites dans le tableau ci-dessous.
Indication
P00
Ceci est l’affichage initial lorsque l’appareil est en mode
Signification
d’imprimante.
P##
Indique le numéro de menu des réglages se rapportant
à l’imprimante. Le numéro de menu du réglage
actuellement sélectionné sera affiché à la place des
symboles ##. Pour plus de détails, consulter le manuel
d’assistance interactif.
Prt
“Prt” et “E##” clignoteront en alternance lorsqu’une erreur
survient pendant l’impression. (Le numéro d’erreur
correspondant sera affiché à la place des symboles ##.)
E##
Pour plus de détails, voir “3-2 Lorsqu’un code d’erreur ou
un message d’erreur apparaît…” à la page 6.
Prt
“Prt” et un numéro à 2 chiffres clignoteront en
alternance pour indiquer l’état actuel de l’imprimante.
La signification des chiffres clignotant est comme suit:
01: L’imprimante est entrain d’effectuer un auto-
##
diagnostic. Ceci apparaîtra lorsque l’interrupteur
principal est mis sur marche ( | ) ainsi que lorsque
l’imprimante est remise à zéro.
02: L’imprimante est entrain de modifier les réglages.
Attendre la fin de l’opération.
10: L’imprimante est entrain de traiter des données.
15: L’imprimante est en attente de données.
20: Un temps d’arrêt est survenu durant l’alimentation
de formulaires.
25: L’imprimante est entrain d’annuler des données.
2
Page 26
2. Installation
2-1 Raccordement du câble
d’imprimante
ATTENTION: TOUJOURS mettre l’interrupteur principal de
1
2
l’imprimante sur arrêt (O) AVANT de raccorder le câble
d’imprimante.
Mettez l’interrupteur principal situé sur le côté droit de
l’imprimante sur arrêt (O) puis mettez également votre
ordinateur hors tension.
Retirer le panneau situé à l’arrière du côté droit de
l’imprimante et connecter le câble d’imprimante au
connecteur d’interface parallèle.
* Si la carte de réseau en option est installée dans
l’imprimante, connecter le câble d’imprimante (100BASETX, etc.) et effectuer les réglages de réseau adéquats.
Voir “2-3 Réglages de réseau (protocole TCP/IP)” à la
page 4.
2-2 Installation du logiciel
Effectuez la procédure suivante pour installer, sur votre ordinateur, le
pilote d’imprimante et autres logiciels nécessaires pour le système
d’exploitation utilisé par cet ordinateur. Pour plus de détails
concernant l’installation des logiciels nécessaires, consulter le
manuel d’assistance interactif se trouvant dans le CD-ROM fourni
avec ce produit.
Connecter l’autre extrémité du câble d’imprimante au
3
connecteur d’interface parallèle de votre ordinateur.
Remettre l’interrupteur principal de l’imprimante sur
4
marche ( | ).
3
Page 27
2. Installation
2-3 Réglages de réseau
(protocole TCP/IP)
Lorsque la carte de réseau en option est installée et que cet appareil
doit être utilisé comme imprimante de réseau, l’adresse de protocole
IP correspondante doit être réglée pour l’imprimante.
Remarques
• L’adresse de protocole IP devant être enregistrée ici varie selon le
contexte de réseau. Consultez votre administrateur de réseau
AVANT d’effectuer ce réglage.
• Lorsqu’un serveur DHCP est utilisé et effectue automatiquement la
configuration de l’adresse de protocole IP, ce réglage ne sera pas
nécessaire car la configuration par serveur DHCP est déjà activée
comme réglage par défaut en usine.
* Pour annuler la procédure en cours, appuyer sur la touche Stop/
Reset [CANCEL] (Arrêt/Réinitialisation [ANNULATION]).
Appuyer sur la touche Printer (imprimante). L’appareil
commutera automatiquement au mode d’imprimante et
1
“P00” apparaîtra automatiquement sur l’affichage de qualité
de copie/taux de reproduction.
Sélectionner “23” en utilisant les touches (+) et (–), puis
2
appuyer sur la touche Enter (validation). L’affichage
indiquera alors “P23” (réglage de marche/arrêt du protocole
TCP/IP).
Sélectionner “2” (Inactif) en utilisant les touches (+) et (–),
5
puis appuyer sur la touche Enter (validation). Le réglage
sélectionné clignotera deux fois puis sera enregistré.
Sélectionner “25” en utilisant les touches (+) et (–), puis
6
appuyer sur la touche Enter (validation). L’affichage
indiquera alors “P25” (réglage de l’adresse de protocole IP).
Les touches (+) et (–) seront utilisées pour sélectionner
7
l’adresse IP composée de 12 chiffres en blocs de 3 chiffres
chacun :
Tout d’abord, entrer les 3 chiffres du premier groupe et
appuyer sur la touche Enter (validation). Répéter cette
procédure pour les 3 groupes restants de l’adresse (pour un
total de 4 groupes). Une fois la touche Enter (validation)
pressée pour le dernier groupe de 3 chiffres, l’affichage
clignotera deux fois et l’adresse de protocole IP sera
enregistrée.
Sélectionner “26” en utilisant les touches (+) et (–), puis
8
appuyer sur la touche Enter (validation). L’affichage
Sélectionner “1” (Actif) en utilisant les touches (+) et (–),
3
puis appuyer sur la touche Enter (validation). Le réglage
sélectionné clignotera deux fois puis sera enregistré.
Sélectionner “24” en utilisant les touches (+) et (–), puis
4
appuyer sur la touche Enter (validation). L’affichage
indiquera alors “P24” (réglage de marche/arrêt de DHCP).
indiquera alors “P26” (réglage de masque de sous-réseau).
Entrer les 12 chiffres du masque de sous-réseau en suivant
la même procédure que pour l’adresse de protocole IP.
Sélectionner “27” en utilisant les touches (+) et (–), puis
9
appuyer sur la touche Enter (validation). L’affichage
indiquera alors “P27” (réglage de l’adresse de passerelle).
Entrer les 12 chiffres de l’adresse de passerelle en suivant
la même procédure que pour l’adresse de protocole IP.
Une fois tous les réglages de réseau terminés, appuyer sur
10
la touche Printer (imprimante). L’appareil commutera de
nouveau au mode de copieur.
4
Page 28
3. Dépannage
3-1 Annuler une impression
Effectuer la procédure suivante pour arrêter l’impression ou pour annuler des données.
IMPORTANT!
• En effectuant cette procédure, vous effacerez TOUS les travaux d’impression étant actuellement en attente d’impression dans la mémoire de
l’imprimante.
• Annulez toujours d’abord l’impression sur votre ordinateur. Si l’impression n’est pas annulée sur votre ordinateur, les données seront envoyées
de nouveau dans l’imprimante.
Appuyer sur la touche Printer (imprimante). L’appareil
1
commutera au mode d’imprimante.
Appuyer sur la touche Stop/Reset [CANCEL]
2
(Arrêt/Réinitialisation [ANNULATION]). L’impression sera
annulée.
5
Page 29

3. Dépannage
3-2 Lorsqu’un code d’erreur ou un message d’erreur apparaît…
Lorsqu’un code ou un message d’erreur apparaît sur le panneau de commande, consultez tout d’abord les tableaux ci-dessous afin de déterminer
la cause du problème. Pour plus de détails, consultez le manuel d’instructions de votre copieur ainsi que les manuels d’instructions des
accessoires en option étant fixés sur votre appareil.
Indications d'erreur dans cette imprimante
Si “Prt” est affiché et que l’indicateur Memory Overflow/Data Error (saturation de mémoire/erreur de données)
clignote lorsque l’appareil est en mode de copieur, cela signifie qu’une erreur est survenue dans les fonctions
d’imprimante de l’appareil. Appuyer sur la touche Printer (imprimante) et déterminer la cause de l’erreur. Reportezvous aux tableaux ci-dessous pour le code d’erreur correspondant et effectuez la procédure de correction
adéquate.
Code d’erreur
E01
E02
E03
E04
E05
E06
E07
E25
E30
Procédure
Il y a un bourrage de papier. Retirer le papier coincé.
Le papier du tiroir est épuisé ou un bourrage de papier est survenu. Ajouter du papier ou retirer le papier coincé, selon le
besoin.
Un des tiroirs ou les deux tiroirs ne sont pas mis en place correctement. Insérer les deux tiroirs correctement.
Le format du papier sélectionné pour l’impression ne correspond pas au format du papier mis en place dans le tiroir.
Remplacer le papier du tiroir par du papier du format correct.
*Pour imposer l’impression sur le format de papier actuel, appuyer sur la touche Start [GO] (démarrage [ACTION]). Pour
sélectionner un autre tiroir et effectuer l’impression depuis ce tiroir, appuyer sur la touche de sélection de papier jusqu’à ce
que le tiroir désiré soit sélectionné. Pour annuler toute l’opération d’impression, appuyer sur la touche Stop/Reset [CANCEL]
(Arrêt/Réinitialisation [ANNULATION]).
Le papier du tiroir est épuisé. Ajouter du papier.
L’un des panneaux est ouvert. Refermer correctement les panneaux.
Diffère de la taille réelle. Vérifiez le réglage de la taille du tiroir.
La quantité de papier mis en place dans le plateau interne dépasse la contenance autorisée. Retirer tout le papier du plateau
interne et puis appuyer sur la touche Start [GO] (démarrage [ACTION]) pour continuer l’impression.
* Pour annuler toute l’opération d’impression, appuyer sur la touche Stop/Reset [CANCEL] (Arrêt/Réinitialisation [ANNULATION]).
Un problème est survenu à l’intérieur de l’imprimante. Adressez-vous à votre centre de service ou un centre de service
agréé.
6
Page 30
3. Dépannage
Code d’erreur
E60
E70
E71
E72
E73
E80
E82
Procédure
Une erreur de lecture ou écriture est survenue dans le disque RAM. Appuyer sur la touche Start [GO] (démarrage [ACTION])
pour faire disparaître l’indication d’erreur.
Une erreur de lecture ou écriture est survenue dans la carte de mémoire. Appuyer sur la touche Start [GO] (démarrage
[ACTION]) pour faire disparaître l’indication d’erreur.
La carte de mémoire a été retirée lors d’une opération dans le menu des réglages se rapportant à l’imprimante. Réinsérer la
carte de mémoire.
* TOUJOURS mettre l’interrupteur principal sur arrêt (O) AVANT d’insérer la carte de mémoire.
La carte de mémoire n’a pas pu être détectée lors d’une opération pendant laquelle l’imprimante devait lire des données de
cette carte. Réinsérer la carte de mémoire.
* TOUJOURS mettre l’interrupteur principal sur arrêt (O) AVANT d’insérer la carte de mémoire.
L’initialisation de la carte de mémoire actuellement insérée doit être effectuée.
Une erreur de dépassement de données est survenue car la mémoire ne suffit pas.
• Pour imposer l’impression, appuyer sur la touche Start [GO] (démarrage [ACTION]). Pour annuler toute l’opération
d’impression, appuyer sur la touche Stop/Reset [CANCEL] (Arrêt/Réinitialisation [ANNULATION]).
• Si la “Continuation automatique” (menu: P74) est réglée sur “Actif” (réglage: 1), l’opération d’impression sera
automatiquement redémarrée après le laps de temps spécifié pour ce réglage.
• Lorsque ce message d’erreur apparaît, la “Protection de page” (menu: P42) sera automatiquement mise sur “Actif” (réglage: 1).
Le travail d’impression en cours n’a pas pu être terminé car la mémoire de l’imprimante n’est pas suffisante.
• Si vous utilisez un disque RAM, diminuez le volume du disque RAM. Si cette erreur survient souvent, nous vous conseillons
d’installer plus de mémoire dans l’imprimante. Pour plus de détails concernant l’ajout de mémoire, adressez-vous à votre
centre de service ou un centre de service agréé.
• Pour imposer l’impression, appuyer sur la touche Start [GO] (démarrage [ACTION]). Les données ayant déjà été traitées
seront imprimées et le reste du travail d’impression sera imprimé sur la page suivante.
• Si la “Continuation automatique” (menu: P74) est réglée sur “Actif” (réglage: 1), l’opération d’impression sera
automatiquement redémarrée après le laps de temps spécifié pour ce réglage.
E83
EF1
EF2
L’interface sélectionnée est actuellement occupée. Attendre un moment puis tenter de nouveau l’opération.
Une erreur a été détectée pendant l’opération. Mettre l’interrupteur principal de l’imprimante sur arrêt (O) puis de nouveau
sur marche ( | ). Si le message d’erreur ne disparaît pas, adressez-vous à votre centre de service ou un centre de service
agréé.
Une erreur a été détectée pendant l’opération. Mettre l’interrupteur principal de l’imprimante sur arrêt (O) puis de nouveau
sur marche ( | ). Si le message d’erreur ne disparaît pas, adressez-vous à votre centre de service ou un centre de service
agréé.
7
Page 31

3. Dépannage
3-3 Tableau de dépannage de base
En cas de problème survenant lors de l’utilisation de cet appareil comme imprimante, consultez le tableau ci-dessous pour effectuer des réglages
mineurs. Si le problème ne disparaît pas, adressez-vous à votre centre de service ou un centre de service agréé.
* Pour plus de détails concernant les problèmes mécaniques d’ordre général pouvant survenir dans votre appareil, consultez le manuel
d’instructions de votre copieur.
Problème
Rien n’est imprimé
Le texte n’est pas imprimé
correctement
Point à vérifier
Le cordon d’alimentation est-il
lâche?
L’imprimante est-elle sous
tension ( | )?
Le câble d’imprimante est-il un câble
adéquat et est-il raccordé
correctement?
Avez-vous connecté le câble
d’imprimante APRÈS avoir mis
l’imprimante sous tension?
L’imprimante est-elle hors ligne?
(L’indicateur de données en ligne
est-il éteint?)
Le câble d’imprimante est-il un câble
adéquat et est-il raccordé
correctement?
Procédure
Branchez correctement le cordon
d’alimentation sur une prise de secteur.
Mettez l’interrupteur principal de
l’imprimante sur marche ( | ).
Utilisez toujours un câble d’imprimante
adéquat et veillez à le raccorder
correctement.
Connectez le câble d’imprimante AVANT de
mettre l’imprimante sous tension.
Effectuer la procédure nécessaire pour que
l’indicateur en ligne s’allume et connecter
l’imprimante.
1 Appuyer sur la touche Printer (imprimante).
L’appareil commutera au mode
d’imprimante.
2 Appuyer sur la touche Start [GO]
(démarrage [ACTION]).
3 L’indicateur de données en ligne
s’allumera.
Utilisez toujours un câble d’imprimante
adéquat et veillez à le raccorder
correctement.
Page de référence
—
3
3
—
2
3
L’impression n’est pas correcte
La configuration des paramètres de
votre ordinateur est-elle correcte?
Vérifier les paramètres du pilote
d’imprimante et du logiciel utilisé. Raccorder
le câble d’imprimante correctement.
—
8
Page 32

4. Spécifications
Processeur central ......................................... PowerPC 405 (200 MHz)
Vitesse d’impression ......................................
Résolution d’impression ................................. Lorsque le lissage est désactivé: 600 ppp x 600 ppp
Format d’impression maximal ........................ Legal (8 1/2" x 14"). Folio
Capacité de mémoire RAM ............................ Installée: 8 Mo
Interface ......................................................... Une interface parallèle (de standard IEEE 1284)
Polices installées............................................ 80
* Les spécifications peuvent faire l’objet de modifications sans préavis.
Copieur 15, 18 ppm:
Lorsque le lissage est activé: 2400 ppp x 600 ppp avec interpolation
Maximale: 136 Mo (avec 128 Mo supplémentaires de mémoire en option installés)
18 pages/min (A4 [8 1/2" x 11"])
9
Page 33

MANUAL DE INSTRUCCIONES
<Edición para instalación>
Lea COMPLETAMENTE este manual de instrucciones antes de utilizar este aparato. Una vez leído,
mantenga en buen estado y guárdelo junto con el manual de instrucciones de su copiadora.
Page 34

Información sobre las marcas
• PRESCRIBE es una marca comercial registrada de Kyocera Corporation.
• PRESCRIBE 2e y KPDL2 son marcas comerciales de Kyocera Corporation.
• MS-DOS, Windows y Windows NT son marcas comerciales de Microsoft Corporation.
• PCL y PJL son marcas comerciales registradas de Hewlett-Packard Company.
• PostScript es una marca comercial registrada de Adobe Systems Incorporated.
• Ethernet es una marca comercial registrada de Xerox Corporation.
• Novell y NetWare son marcas comerciales registradas de Novell, Inc.
• Centronics es una marca comercial de Centronics Data Computer Corporation.
• IBM e IBM PC-AT son macas comerciales de International Business Machines Corporation.
• PowerPC es una marca comercial de International Business Machines Corporation de América y de otras empresas.
• TrueType y Macintosh son marcas comerciales registradas de Apple Computer, Inc.
• AppleTalk es una marca comercial de Apple Computer, Inc.
• Este producto se desarrolló utilizando el sistema Tornado, el entorno de desarrollo general de sistema operativo en tiempo real
(ROTS) de Wind River Systems, Inc.
• Esta impresora utiliza PeerlessPrintXL, un sistema compatible con PCL desarrollado por Peerless Group, para emular el
Lenguaje de Control (PCL6) de la impresora HP LaserJet. PeerlessPrintXL es una marca comercial de Peerless Group
(Redondo Beach, CA 90278, U.S.A.).
•
Contiene UFST™ y MicroType® de Agfa Corporation.
Todos los demás nombres de empresas y productos mencionados en este manual de instrucciones son marcas comerciales o
marcas registradas de sus respectivas empresas. Por lo tanto no emplearemos las denominaciones ™ y
manual.
®
a lo largo de este
Todos los derechos reservados. Ninguna parte de este material puede reproducirse o transmitirse de ninguna forma o por ningún
medio, electrónico o mecánico, incluyendo el fotocopiado, grabación o en un sistema de memorización y recuperación de la
información, sin permiso por escrito del propietario de los derechos de autor.
Limitación legal sobre el copiado
• Puede estar prohibido la copia del material protegido por los derechos de autor, si no se ha recibido el permiso del propietario
de los derechos de autor.
• Está prohibido en todo caso la copia de billetes nacionales o extranjeros.
• Puede estar prohibida la copia de otros elementos.
i
Page 35

IBM PROGRAM LICENSE AGREEMENT
Las siguientes declaraciones se han proporcionado en inglés intencionadamente.
THE DEVICE YOU HAVE PURCHASED CONTAINS ONE OR MORE SOFTWARE PROGRAMS (“PROGRAMS”) WHICH BELONG
TO INTERNATIONAL BUSINESS MACHINES CORPORATION (“IBM”). THIS DOCUMENT DEFINES THE TERMS AND CONDITIONS
UNDER WHICH THE SOFTWARE IS BEING LICENSED TO YOU BY IBM. IF YOU DO NOT AGREE WITH THE TERMS AND
CONDITIONS OF THIS LICENSE, THEN WITHIN 14 DAYS AFTER YOUR ACQUISITION OF THE DEVICE YOU MAY RETURN THE
DEVICE FOR A FULL REFUND. IF YOU DO NOT SO RETURN THE DEVICE WITHIN THE 14 DAYS, THEN YOU WILL BE ASSUMED
TO HAVE AGREED TO THESE TERMS AND CONDITIONS.
The Programs are licensed not sold. IBM, or the applicable IBM country organization, grants you a license for the Programs only in
the country where you acquired the Programs. You obtain no rights other than those granted you under this license.
The term “Programs“ means the original and all whole or partial copies of it, including modified copies or portions merged into other
programs. IBM retains title to the Programs. IBM owns, or has licensed from the owner, copyrights in the Programs.
1 . License
Under this license, you may use the Programs only with the device on which they are installed and transfer possession of the
Programs and the device to another party. If you transfer the Programs, you must transfer a copy of this license and any other
documentation to the other party. Your license is then terminated. The other party agrees to these terms and conditions by its first use
of the Program.
You may not:
1) use, copy, modify, merge, or transfer copies of the Program except as provided in this license;
2) reverse assemble or reverse compile the Program; or
3) sublicense, rent, lease, or assign the Program.
2. Limited Warranty
The Programs are provided “AS IS.”
THERE ARE NO OTHER WARRANTIES COVERING THE PROGRAMS (OR CONDITIONS), EXPRESS OR IMPLIED, INCLUDING,
BUT NOT LIMITED TO, THE IMPLIED WARRANTIES OF MERCHANTABILITY AND FITNESS FOR A PARTICULAR PURPOSE.
Some jurisdictions do not allow the exclusion of implied warranties, so the above exclusion may not apply to you.
SUPPLEMENT TO AGREEMENT FOR SOFTWARE BUNDLING AND DISTRIBUTION FOR ALDC
3. Limitation of Remedies
IBM’s entire liability under this license is the following;
1) For any claim (including fundamental breach), in any form, related in any way to this license, IBM’s liability will
be for actual damages only and will be limited to the greater of ;
a) the equivalent of U.S.$25,000 in your local currency; or
b) IBM’s then generally available license fee for the Program
This limitation will not apply to claims for bodily injury or damages to real or tangible personal property for which IBM is legally liable.
IBM will not be liable for any lost profits, lost savings, or any incidental damages or other economic consequential damages, even if
IBM, or its authorized supplier, has been advised of the possibility of such damages. IBM will not be liable for any damages claimed
by you based on any third party claim. This limitation of remedies also applies to any developer of Programs supplied to IBM. IBM’s
and the developer’s limitations of remedies are not cumulative. Such developer is an intended beneficiary of this Section. Some
jurisdictions do not allow these limitations or exclusions, so they may not apply to you.
4. General
You may terminate your license at any time. IBM may terminate your license if you fail to comply with the terms and conditions of this
license. In either event, you must destroy all your copies of the Program. You are responsible for payment of any taxes, including
personal property taxes, resulting from this license. Neither party may bring an action, regardless of form, more than two years after
the cause of action arose. If you acquired the Program in the United States, this license is governed by the laws of the State of New
York. If you acquired the Program in Canada, this license is governed by the laws of the Province of Ontario. Otherwise, this license
is governed by the laws of the country in which you acquired the Program.
ii
Page 36

Reconocimiento de marca de los Tipos de caracteres
Todas las fuentes residentes en esta impresora han sido concedidas bajo licencia por Agfa Corporation.
Helvetica, Palatino y Times son marcas comerciales registradas de Linotype-Hell AG.
ITC Avant Garde Gothic, ITC Bookman, ITC ZapfChancery y ITC Zapf Dingbats son marcas comerciales registradas de
International Type-face Corporation.
Agfa Japan License Agreement
Las siguientes declaraciones se han proporcionado en inglés intencionadamente.
1. “Software” shall mean the digitally encoded, machine readable, scalable outline data as encoded in a special format as well as
the UFST Software.
2. You agree to accept a non-exclusive license to use the Software to reproduce and display weights, styles and versions of
letters, numerals, characters and symbols (“Typefaces”) solely for your own customary business. Agfa Japan retains all rights,
title and interest to the Software and Typefaces and no rights are granted to you other than a License to use the Software on
the terms ex-pressly set forth in this Agreement.
3. To protect proprietary rights of Agfa Japan, you agree to maintain the Software and other proprietary information concerning
the Typefaces in strict confidence and to establish reasonable procedures regulating access to and use of the Software and
Typefaces.
4. You agree not to duplicate or copy the Software or Typefaces, except that you may make one backup copy.
5. This License shall continue until the last use of the Software and Typefaces, unless sooner terminated. This License may be
terminated by Agfa Japan if you fail to comply with the terms of this License and such failure is not remedied within thirty (30)
days after notice from Agfa Japan. When this License expires or is terminated, you shall either return to Agfa Japan or destroy
all copies of the Software and Typefaces and documentation as requested.
6. You agree that you will not modify, alter, disassemble, decrypt, reverse engineer or decompile the Software.
7. Agfa Japan warrants that for ninety (90) days after delivery, the Software will perform in accordance with Agfa Japan-published
specifications. Agfa Japan does not warrant that the Software is free from all bugs, errors and omissions. THE PARTIES
AGREE THAT ALL OTHER WARRANTIES, EXPRESSED OR IMPLIED, INCLUDING WARRANTIES OF FITNESS FOR A
PARTICULAR PURPOSE AND MERCHANTABILITY, ARE EXCLUDED.
8. Your exclusive remedy and the sole liability of Agfa Japan in connection with the Software and Typefaces is repair or replacement of defective parts, upon their return to Agfa Japan. IN NO EVENT WILL AGFA JAPAN BE LIABLE FOR LOST PROFITS,
LOST DATA, OR ANY OTHER INCIDENTAL OR CONSEQUENTIAL DAMAGES, OR ANY DAMAGES CAUSED BY ABUSE
OR MISAPPLICATION OF THE SOFTWARE AND TYPE-FACES.
9. New York, U.S.A. law governs this Agreement.
10. You shall not sublicense, sell, lease, or otherwise transfer the Software and/or Typefaces without the prior written consent of
Agfa Japan.
11. Use, duplication or disclosure by the Government is subject to restrictions as set forth in the Rights in Technical Data and
Computer Software clause at FAR 252-227-7013, subdivision (b)(3)(ii) or subparagraph (c)(1)(ii), as appropriate. Further use,
duplication or disclosure is subject to restrictions applicable to restricted rights software as set forth in FAR 52.227-19 (c)(2).
12. YOU ACKNOWLEDGE THAT YOU HAVE READ THIS AGREEMENT, UNDERSTAND IT, AND AGREE TO BE BOUND BY ITS
TERMS AND CONDITIONS. NEITHER PARTY SHALL BE BOUND BY ANY STATEMENT OR REPRESENTATION NOT
CONTAINED IN THIS AGREEMENT. NO CHANGE IN THIS AGREEMENT IS EFFECTIVE UNLESS WRITTEN AND SIGNED
BY PROPERLY AUTHORIZED REPRESENTATIVES OF EACH PARTY.
iii
Page 37

Acerca del manual de instrucciones
Este manual de instrucciones <Edición de instalación> debe leerse cuando se instale la tarjeta de impresora en su copiadora y se
utilice la copiadora fundamentalmente como impresora local. El manual incluye descripciones sobre los procedimientos de
instalación para el uso de la copiadora como impresora. Ya que los ajustes y configuraciones de la impresora pueden variar
dependiendo del sistema y programas utilizados en su ordenador conectado, lea las secciones correspondientes a su ordenador
específico y realice los ajustes y configuraciones descritos en ellas.
Este manual también debe leerse y utilizarse junto con el manual en línea que está en el CD-ROM incluido. Este manual en línea
describe la impresión, realización de determinados ajustes y configuraciones y los procedimientos necesarios en su ordenador.
Acerca del manual en línea
El manual en línea para este manual de instrucciones es un archivo PDF (Portable Document Format o formato de documentos
portátil) y está ubicado en el CD-ROM incluido con este producto. Es necesario disponer del programa Adobe Acrobat Reader
para tener acceso al manual en línea. El instalador para el Adobe Acrobat Reader también está incluido en el CD-ROM y éste
permite instalar el programa en su disco duro.
iv
Page 38

Conexión
Cuando conecte la impresora directamente a su computadora (con un cable paralelo)…
1 Conexión de la impresora
Computadora
directamente a su computadora
con el cable paralelo..........
Cable paralelo
2 Instalación del controlador de
Computadora
impresora en su computadora ...............
......... Consulte el manual en línea
CD-ROM
CD-ROM
Cuando conecte la impresora a una red (deberá instalarse la tarjeta de red opcional)…
<Ejemplo de conexión>
Conexión de
terminales
1 Conexión de un cable de red
(100Base-TX, 10Base-T, etc.) a la
Computadora
impresora...........................
Página 3
Página 3
Tarjeta de red (opcional)
CD-ROM
Cable de red
Computadora
2 Realización de los ajustes de red
(TCP/IP) en la impresora ...
Página 4
3 Instalación del controlador de
impresora en su computadora ...............
......... Consulte el manual en línea
v
Page 39

Indice
1. Preparación............................................................................................................... 1
2. Instalación................................................................................................................. 3
3. Localización de averías ........................................................................................... 5
1-1 Accesorios .................................................................................................................................................. 1
1-2 Items requeridos ........................................................................................................................................ 1
1-3 Nombres de las piezas (cuerpo principal) ..................................................................................................1
1-4 Nombres de las piezas (tablero de controles) ............................................................................................ 2
2-1 Conexión del cable de impresora ............................................................................................................... 3
2-2 Instalación de los programas ..................................................................................................................... 3
2-3 Ajustes de red (TCP/IP) ............................................................................................................................. 4
3-1 Cancelación de la impresión ......................................................................................................................5
3-2 Cuando aparece un código de error o un mensaje de error… ................................................................... 6
3-3 Cuadro de localización de averías básicas ................................................................................................8
4. Especificaciones ...................................................................................................... 9
Page 40

1. Preparación
1-1 Accesorios
• 1 CD-ROM
• Este manual de instrucciones
1-2 Items requeridos
• Cable paralelo
1-3 Nombres de las piezas (cuerpo principal)
1 Conector de interface en paralelo
Conecte un cable paralelo bidireccional aquí.
2 Ranura para tarjeta de memoria
Inserte aquí la tarjeta de memoria opcional.
3 Interruptor principal
Primero conecte ( | ) este interruptor antes de utilizar la
impresora. Desconecte (O) siempre este interruptor
cuando conecte el cable de impresora, etc.
4 Tablero de controles
Utilice para hacer ajustes, etc., en la impresora en sí.
1
Page 41

1. Preparación
1-4 Nombres de las piezas (tablero de controles)
Especificaciones de pulgadas
8 7
AutoExp.
Text &Photo
2 in 1
Photo
Sort
Lighter
4 in 1
Tex t
Darker
Especificaciones métricas
12
12
34
Memory
Overflow/
Data Error
Add
Toner
Paper Select
Number of
-
)
Copies(
Zoom
(-)
Zoom
Input/Enter
6 5 4 3 2 1
8 7
Zoom
Data/
On-line
Printer
Number of
+
)
Copies(
(+)
200%
MAX.
129%
100%
Full Size
78%
50%
MIN.
Size Select
MAX.
200%
141%
A5 A
1:1
100%
70%
A4 A
50%
MIN.
Stop/
Reset
Cancel
/
C
Start
Go
A
4
5
6 5 4 3 2 1
1 Tecla Start [GO] (inicio [GO])
Pulse esta tecla cuando desea continuar con la impresora o
cuando desea inicializar la operación para la alimentación de
formularios continuos. También se utiliza esta tecla para
conmutar la impresora en línea y fuera de línea. Cuando la
impresora está en línea se encenderá el indicador de datos en
línea.
2 Tecla Stop/Reset [CANCEL] ([CANCEL] y detención/puesta a cero)
Pulse esta tecla cuando desea dejar de imprimir, cuando desea
cancelar un ajuste en el medio de la impresión o cuando desea
cancelar un mensaje de error.
3 Tecla Printer (impresión)
Pulse esta tecla cuando desea cambiar al modo de impresora.
4 Tecla Number of Copies/Zoom(+) (número de copias/zoom(+))
Pulse esta tecla cuando desea que suban las distintas funciones,
ajustes, etc.
5 Tecla Zoom Input/Enter (zoom y entrada/aceptar)
Pulse esta tecla cuando desea registrar un ajuste.
6 Tecla Number of Copies/Zoom(–) (número de copias/zoom(–))
Pulse esta tecla cuando desea que bajen las distintas funciones,
ajustes, etc.
7 Indicación de calidad/cambio de tamaño de la copia
Indica el estado de la impresora y los demás ajustes. Aparece
“P00” cuando la máquina está en el modo de impresora.
8 Indicador Memory Overflow/Data Error (sobrellenado de
memoria/error de datos)
Destella cuando se produce un error de impresión. En este caso
también destellan alternadamente “Prt” y “E##” en la indicación de
calidad/cambio de tamaño de la copia. Pulse la tecla Printer
(impresión) y compruebe la causa del error. Para más detalles,
consulte “3-2 Cuando aparece un código de error o un mensaje
de error…” en la página 6.
2
● La indicación de calidad/cambio de tamaño de la copia en el
modo de impresora
Para entrar en el modo de impresora, pulse la tecla Printer
(impresión). Las indicaciones que aparecen en la indicación de
calidad/cambio de tamaño de la copia cuando la máquina está
en el modo de impresora se detalla en el cuadro a continuación.
Indicación
P00
Es la indicación inicial cuando la máquina está en el
Significado
modo de impresora.
P##
Indica el número de menú de los ajustes relacionados
con la impresora. El número de menú en sí del ajuste
seleccionado aparecerá en lugar de ##. Para más
detalles, consulte el manual en línea.
Prt
Destellan alternadamente “Prt” y “E##” cuando se
produce un error de impresión. (El correspondiente
número de error aparece en lugar de ##.) Para más
detalles, consulte “3-2 Cuando aparece un código de
E##
error o un mensaje de error…” en la página 6.
Destellan alternadamente “Prt” y un número de 2 cifras
Prt
para indicar el estado actual de la impresora. El
significado de los números que destellan es el siguiente:
01: La impresora está en el medio de una
##
autocomprobación. Aparece cuando se
conecta ( | ) el interruptor principal y cuando se
reinicializa la impresora.
02: La impresora está cambiando los ajustes. Espere
hasta que se complete el cambio.
10: La impresora está procesando los datos.
15: La impresora está esperando la entrada de datos.
20: Se acabó el tiempo de espera de la alimentación
de formularios.
25: La impresora está cancelando datos.
Page 42

2. Instalación
2-1 Conexión del cable de
impresora
PRECAUCION: Desconecte (O) SIEMPRE el interruptor principal de
1
2
la impresora ANTES de conectar el cable de
impresora.
Desconecte (O) la impresora principal en el lado derecho de
la impresora y desconecte también la computadora.
Quite la tapa colocada en la parte trasera del lado derecho
de la impresora y conecte el cable de la impresora al
conector de interface en paralelo.
* Si se ha instalado la tarjeta de red en la impresora,
conecte el cable de impresora (100BASE-TX, etc.) y
realice los ajustes apropiados para la red. Consulte “2-3
Ajuste de red (TCP/IP)” en la página 4.
2-2 Instalación de los programas
Realice el siguiente procedimiento para instalar en su computadora
el controlador de impresora y otros programas apropiados al sistema
operativo de esa computadora. Para más detalles sobre la
instalación del programa necesario, consulte el manual en línea en el
CD-ROM incluido con este producto.
Conecte la otra punta del cable de impresora en el conector
3
de interface de su computadora.
Vuelva a conectar ( | ) el interruptor principal de la
4
impresora.
3
Page 43

2. Instalación
2-3 Ajustes de red (TCP/IP)
Cuando se ha instalado la tarjeta de red opcional y se va a utilizar
esta máquina como impresora de red, es necesario seleccionar la
correspondiente dirección IP para la impresora.
Notas
• La dirección IP a registrar aquí será diferente según la
configuración de red. Confirme con su administrador de red
ANTES de hacer este ajuste.
• Si está utilizando un servidor DHCP para configurar
automáticamente la dirección IP, este ajuste no será necesario
porque la configuración del servidor DHCP ya fue activada como
ajuste por omisión de fábrica.
* Para cancelar el ajuste en el medio, pulse la tecla Stop/Reset
[CANCEL] ([CANCEL] y detención/puesta a cero).
Pulse la tecla Printer (impresión). La máquina cambia al
1
modo de impresora y aparece “P00” en la indicación de
calidad/cambio de tamaño de la copia.
Utilice las teclas (+) y (–) para seleccionar “23”, y pulse la
2
tecla Enter (entrada). La indicación cambia a “P23” (el
ajuste de conexión/desconexión de TCP/IP).
Utilice las teclas (+) y (–) para seleccionar “2” (No) y pulse la
5
tecla Enter (entrada). El ajuste seleccionado destella dos
veces y queda registrado.
Utilice las teclas (+) y (–) para seleccionar “25”, y pulse la
6
tecla Enter (entrada). La indicación cambia a “P25” (el
ajuste de dirección IP).
Las teclas (+) y (–) se utilizan para seleccionar la dirección
7
IP de 12 dígitos en bloques de 3 dígitos cada uno:
Entre primero las 3 cifras apropiadas para el primer bloque
y pulse la tecla Enter (entrada). Repita este mismo
procedimiento para los restantes 3 bloques de la dirección
(4 bloques en total). Cuando se ha pulsado la tecla Enter
(entrada) para el último bloque de 3 cifras, la indicación
destella dos veces y queda registrada la dirección IP.
Utilice las teclas (+) y (–) para seleccionar “1” (Sí) y pulse la
3
tecla Enter (entrada). El ajuste seleccionado destella dos
veces y queda registrado.
Utilice las teclas (+) y (–) para seleccionar “24”, y pulse la
4
tecla Enter (entrada). La indicación cambia a “P24” (el
ajuste de conexión/desconexión de DHCP).
Utilice las teclas (+) y (–) para seleccionar “26”, y pulse la
8
tecla Enter (entrada). La indicación cambia a “P26” (el
ajuste de máscara de subred). Entre la máscara de subred
de 12 cifras utilizando el mismo procedimiento que para
entrar la dirección IP.
Utilice las teclas (+) y (–) para seleccionar “27”, y pulse la
9
tecla Enter (entrada). La indicación cambia a “P27” (el
ajuste de dirección Gateway). Entre la dirección Gateway de
12 cifras utilizando el mismo procedimiento que para entrar
la dirección IP.
Una vez terminados todos los ajustes de red, pulse la tecla
10
Printer (impresión). La máquina vuelve a cambiar al modo
de copiadora.
4
Page 44

3. Localización de averías
3-1 Cancelación de la impresión
Realice el mismo procedimiento para parar la impresión o cuando desea cancelar los datos.
¡IMPORTANTE!
• Con esta operación se cancelan TODOS los trabajos de impresión en espera para su impresión en la memoria de la impresora.
• Cancele siempre el trabajo de impresión primero en su computadora. Si no se ha cancelado el trabajo de impresión en su computadora, los
datos vuelven a enviarse a la impresora.
Pulse la tecla Printer (impresión). La máquina cambia al
1
modo de impresora.
Pulse la tecla Stop/Reset [CANCEL] ([CANCEL] y
2
detención/puesta a cero). Se cancela la impresión.
5
Page 45

3. Localización de averías
3-2 Cuando aparece un código de error o un mensaje de error…
Si aparece un código o mensaje de error en el panel de controles, confirme primero en los siguientes cuadros la causa del problema y realice el
correspondiente procedimiento. Para más detalles, consulte el manual de instrucciones de su copiadora y el manual de instrucciones de cualquier
equipo opcional instalado en su máquina.
Indicaciones de error de esta impresora
Si aparece “Prt” y destella el indicador Memory Overflow/Data Error (sobrellenado de memoria/error de datos)
cuando la máquina está en el modo de copiadora, se produjo un error en las funciones de esta máquina. Pulse la
tecla Printer (impresión) y confirme la causa del error. Consulte los siguientes cuadros para el correspondiente
código de error y el procedimiento de corrección apropiado.
Código de error
E01
E02
E03
E04
E05
E06
E07
E25
E30
Procedimiento
Se produjo un atasco de papel. Retire el papel atascado.
El cajón se quedó sin papel o se produjo un atasco de papel. Añada papel o retire el papel atascado, según corresponda.
Uno o ambos cajones no están bien colocados en la impresora. Coloque bien ambos cajones.
El tamaño del papel seleccionado para impresión no coincide con el tamaño de papel en el cajón. Cambie el papel en el
cajón por el del tamaño correcto.
* Si desea forzar la impresión en el tamaño de papel colocado, pulse la tecla Start [GO] (inicio [GO]). Si desea cambiar la
impresión al papel en el otro cajón, pulse la tecla de selección de papel hasta que se seleccione el cajón deseado. Si desea
cancelar completamente la impresión, pulse la tecla Stop/Reset [CANCEL] ([CANCEL] y detención/puesta a cero).
El cajón está sin papel. Añada papel.
Una de las cubiertas está abierta. Cierre firmemente las cubiertas.
Difiere del tamaño real. Compruebe el ajuste de tamaño del trazador.
La cantidad de papel acumulado en la bandeja interior superó la capacidad aceptable. Retire todas las hojas de la bandeja
interior y pulse la tecla Start [GO] (inicio [GO]) para continuar la impresión.
* Si desea cancelar completamente la impresión, pulse la tecla Stop/Reset [CANCEL] ([CANCEL] y detención/puesta a cero).
Se produjo un problema dentro de la impresora. Llame a su técnico de servicio o un centro de servicio autorizado.
6
Page 46

3. Localización de averías
Código de error
E60
E70
E71
E72
E73
E80
E82
Procedimiento
Se produjo un error de lectura o escritura en el disco RAM. Pulse la tecla Start [GO] (inicio [GO]) para borrar la indicación de error.
Se produjo un error de lectura o escritura en la tarjeta de memoria. Pulse la tecla Start [GO] (inicio [GO]) para borrar la
indicación de error.
Se retiró la tarjeta de memoria durante el funcionamiento en los ajustes del menú relacionados con la impresora. Vuelva a
colocar la tarjeta de memoria.
* CERCIORESE de desconectar (O) el interruptor principal ANTES de colocar la tarjeta de memoria.
No pudo detectarse la tarjeta de memoria durante la operación por la que la impresora estaba leyendo los datos de la
tarjeta. Vuelva a colocar la tarjeta de memoria.
* CERCIORESE de desconectar (O) el interruptor principal ANTES de colocar la tarjeta de memoria.
Inicialización de la tarjeta de memoria colocada, si fuera necesario.
Se produjo un error de exceso debido a que no hay suficiente memoria.
• Si desea forzar la continuación del trabajo de impresión, pulse la tecla Start [GO] (inicio [GO]). Si desea cancelar
completamente la impresión, pulse la tecla Stop/Reset [CANCEL] ([CANCEL] y detención/puesta a cero).
• Si se activa la “Continuación automática” (menú: P74) (ajuste: 1 [Sí]), la impresión continuará automáticamente después de
transcurrir el tiempo especificado ahí.
• Cuando aparece este mensaje de error, se activará automáticamente la “Protección de página” (menú: P42) (ajuste: 1 [Sí]).
No pudo terminar el trabajo de impresión actual porque no hay suficiente memoria en la impresora.
• Si está utilizando un disco RAM, reduzca el tamaño del disco RAM. Si este error aparece frecuentemente, se recomienda
instalar memoria adicional en la impresora. Para más detalles sobre la instalación de memoria adicional, llame a su técnico
de servicio o un centro de servicio autorizado.
• Si desea forzar la continuación del trabajo de impresión, pulse la tecla Start [GO] (inicio [GO]). Los datos ya procesados se
imprimirán y la parte remanente del trabajo de impresión se imprimirá en la siguiente página.
• Si se activa la “Continuación automática” (menú: P74) (ajuste: 1 [Sí]), la impresión continuará automáticamente después de
transcurrir el tiempo especificado ahí.
E83
EF1
EF2
El interfaz seleccionado está en uso. Espere y trate nuevamente.
Se detectó un error durante el funcionamiento. Desconecte (O) el interruptor principal de la impresora y vuelva a conectar ( | )
nuevamente. Si continua el mismo mensaje de error, llame a su técnico de servicio o un centro de servicio autorizado.
Se detectó un error durante el funcionamiento. Desconecte (O) el interruptor principal de la impresora y vuelva a conectar ( | )
nuevamente. Si continua el mismo mensaje de error, llame a su técnico de servicio o un centro de servicio autorizado.
7
Page 47

3. Localización de averías
3-3 Cuadro de localización de averías básicas
Si tiene problemas durante el uso este aparato como impresora, consulte el siguiente cuadro para realizar ajustes básicos. Si el problema no
desaparece, llame a su técnico de servicio o centro de servicio autorizado.
* Para información sobre averías generales mecánicas en su aparato, consulte el manual de instrucciones de su copiadora.
Problema
No se imprime nada
El texto no se imprime
correctamente
Punto a inspeccionar
¿El cable eléctrico está mal
enchufado?
¿La alimentación de la impresora
está conectada ( | )?
¿El cable de impresora es el
correcto y está bien conectado?
¿Se conectó el cable de impresora
DESPUES de conectar la
alimentación de la impresora?
¿La impresora está fuera de línea?
(¿El indicador de datos en línea está
apagado?)
¿El cable de impresora es el
correcto y está bien conectado?
Procedimiento
Enchufe firmemente el cable eléctrico en el
tomacorriente.
Conecte ( | ) el interruptor principal de la
impresora.
Compruebe que se utiliza un cable de
impresora correcto y compruebe que está
bien conectado.
Conecte el cable de impresora ANTES de
conectar la alimentación de la impresora.
Realice el procedimiento apropiado para
que se encienda el indicador de datos en
línea y ponga la impresora en línea.
1 Pulse la tecla Printer (impresión). La
máquina cambia al modo de impresora.
2 Pulse la tecla Start [GO] (inicio [GO]).
3 Se enciende el indicador de datos en
línea.
Compruebe que se utiliza un cable de
impresora correcto y compruebe que está
bien conectado.
Página de referencia
—
3
3
—
2
3
La impresión no se hace
correctamente
¿Los ajustes de configuración en su
computadora son los correctos?
Confirme los ajustes en el controlador de
impresora y en el programa utilizado en la
computadora.
—
8
Page 48

4. Especificaciones
CPU ................................................................... PowerPC 405 (200MHz)
Velocidad de impresión ......................................Copiadora de 15, 18 ppm: 18 hojas/min. (A4 [8 1/2" x 11"])
Resolución de impresión .................................... Con suavización DESACTIVADA: 600 dpi x 600 dpi
Máximo tamaño de impresión ............................Legal (8 1/2" x 14"). Folio
Capacidad de memoria RAM .............................Instalado: 8 MB
Interface ............................................................. Una interface en paralelo (cumple con IEEE 1284)
Tipos instalados ................................................. 80
* Las especificaciones están sujetas a cambios sin previo aviso.
Con suavización ACTIVADA: interpolado 2400 dpi x 600 dpi
Máximo: 136 MB (con una memoria adicional de 128 MB opcional instalada)
9
Page 49

INSTRUCTION HANDBOOK
<Functions Edition>
Introduction
Chapter 1 Printer-related operation
■ 1. Printer Settings
■ 2. Memory Card / RAM Disk
Chapter 2 Software-related operation
■ 1. Procedure for Installing and Printing
with a Printer Driver
■ 2. Windows KX Driver
■ 3. Printer Driver for Macintosh
Page 50

Introduction
About this On-Line Manual
This On-Line Manual is included with your Printing System (M) and should be read in combination with the Instruction Handbook
<Set-Up Edition> for that product.
This manual contains information on making settings in your printer, as well as on installing and setting the printing properties for the
corresponding Printer Drivers.
The explanations in this manual were written with the assumption that the user has a basic understanding of how to work in Microsoft
Windows. For further information on using Windows, refer to your Microsoft Windows manual.
Trademark Information
• PRESCRIBE is a registered trademark of Kyocera Corporation.
• PRESCRIBE 2e and KPDL2 are trademarks of Kyocera Corporation.
• Microsoft, MS-DOS, Windows and WindowsNT are registered trademarks of Microsoft Corporation of America and other countries.
• WINDOWS ME is a trademark of Microsoft Corporation.
• PCL and PJL are registered trademarks of Hewlett-Packard Company.
• PostScript is a registered trademark of Adobe Systems Incorporated.
• Ethernet is a registered trademark of Xerox Corporation.
• Novell and NetWare are registered trademarks of Novell, Inc.
• Centronics is a trademark of Centronics Data Computer Corporation.
• IBM and IBM PC-AT are trademarks of International Business Machines Corporation.
• PowerPC is a trademark of International Business Machines Corporation of America and other corporations.
• TrueType and Macintosh are registered trademarks of Apple Computer, Inc.
• AppleTalk is a trademark of Apple Computer, Inc.
• This product was developed using Tornado, the real-time operating system (ROTS) general development environment from Wind
River Systems, Inc.
• This printer uses PeerlessPrintXL, a PCL compatibility system developed by Peerless Group, to emulate the HP LaserJet Printer
Control Language (PCL6). PeerlessPrintXL is a trademark of Peerless Group (Redondo Beach, CA 90278, U.S.A.).
• Contains UFSTTM and MicroType® from Agfa Corporation.
All other company and product names contained in this Instruction Handbook are trademarks or registered trademarks of their
respective companies. The designations ™ and ® will not be used in this handbook.
All rights reserved. No part of this material may be reproduced or transmitted in any form or by any means, electronic or
mechanical, including photocopying, recording or by any information storage and retrieval system, without permission in
writing from the Publisher.
Legal Restriction On Copying
• It may be prohibited to copy copyrighted material without permission of the copyright owner.
• It is prohibited under any circumstances to copy domestic or foreign currencies.
• Copying other items may be prohibited.
i
Page 51

IBM PROGRAM LICENSE AGREEMENT
THE DEVICE YOU HAVE PURCHASED CONTAINS ONE OR MORE SOFTWARE PROGRAMS (“PROGRAMS”) WHICH BELONG
TO INTERNATIONAL BUSINESS MACHINES CORPORATION (“IBM”). THIS DOCUMENT DEFINES THE TERMS AND CONDITIONS
UNDER WHICH THE SOFTWARE IS BEING LICENSED TO YOU BY IBM. IF YOU DO NOT AGREE WITH THE TERMS AND
CONDITIONS OF THIS LICENSE, THEN WITHIN 14 DAYS AFTER YOUR ACQUISITION OF THE DEVICE YOU MAY RETURN THE
DEVICE FOR A FULL REFUND. IF YOU DO NOT SO RETURN THE DEVICE WITHIN THE 14 DAYS, THEN YOU WILL BE ASSUMED
TO HAVE AGREED TO THESE TERMS AND CONDITIONS.
The Programs are licensed not sold. IBM, or the applicable IBM country organization, grants you a license for the Programs only in
the country where you acquired the Programs. You obtain no rights other than those granted you under this license.
The term “Programs” means the original and all whole or partial copies of it, including modified copies or portions merged into other
programs. IBM retains title to the Programs. IBM owns, or has licensed from the owner, copyrights in the Programs.
1. License
Under this license, you may use the Programs only with the device on which they are installed and transfer possession of the
Programs and the device to another party. If you transfer the Programs, you must transfer a copy of this license and any other
documentation to the other party. Your license is then terminated. The other party agrees to these terms and conditions by its first use
of the Program.
You may not:
1) use, copy, modify, merge, or transfer copies of the Program except as provided in this license;
2) reverse assemble or reverse compile the Program; or
3) sublicense, rent, lease, or assign the Program.
2. Limited Warranty
The Programs are provided “AS IS.”
THERE ARE NO OTHER WARRANTIES COVERING THE PROGRAMS (OR CONDITIONS), EXPRESS OR IMPLIED, INCLUDING,
BUT NOT LIMITED TO, THE IMPLIED WARRANTIES OF MERCHANTABILITY AND FITNESS FOR A PARTICULAR PURPOSE.
Some jurisdictions do not allow the exclusion of implied warranties, so the above exclusion may not apply to you.
SUPPLEMENT TO AGREEMENT FOR SOFTWARE BUNDLING AND DISTRIBUTION FOR ALDC
3. Limitation of Remedies
IBM’s entire liability under this license is the following;
1) For any claim (including fundamental breach), in any form, related in any way to this license, IBM’s liability will be for
actual damages only and will be limited to the greater of ;
a) the equivalent of U.S.$25,000 in your local currency; or
b) IBM’s then generally available license fee for the Program
This limitation will not apply to claims for bodily injury or damages to real or tangible personal property for which IBM is legally liable.
IBM will not be liable for any lost profits, lost savings, or any incidental damages or other economic consequential damages, even if
IBM, or its authorized supplier, has been advised of the possibility of such damages. IBM will not be liable for any damages claimed
by you based on any third party claim. This limitation of remedies also applies to any developer of Programs supplied to IBM. IBM's
and the developer’s limitations of remedies are not cumulative. Such developer is an intended beneficiary of this Section. Some
jurisdictions do not allow these limitations or exclusions, so they may not apply to you.
4. General
You may terminate your license at any time. IBM may terminate your license if you fail to comply with the terms and conditions of this
license. In either event, you must destroy all your copies of the Program. You are responsible for payment of any taxes, including
personal property taxes, resulting from this license. Neither party may bring an action, regardless of form, more than two years after
the cause of action arose. If you acquired the Program in the United States, this license is governed by the laws of the State of New
York. If you acquired the Program in Canada, this license is governed by the laws of the Province of Ontario. Otherwise, this license
is governed by the laws of the country in which you acquired the Program.
ii
Page 52

Typeface Trademark Acknowledgement
All resident fonts in this printer are licensed from Agfa Corporation.
Helvetica, Palatino and Times are registered trademarks of Linotype-Hell AG.
ITC Avant Garde Gothic, ITC Bookman, ITC ZapfChancery and ITC Zapf Dingbats are registered trademarks of International
Typeface
Corporation.
Agfa Japan License Agreement
1. “Software” shall mean the digitally encoded, machine readable, scalable outline data as encoded in a special format as well as
the UFST Software.
2. You agree to accept a non-exclusive license to use the Software to reproduce and display weights, styles and versions of
letters, numerals, characters and symbols (“Typefaces”) solely for your own customary business. Agfa Japan retains all rights,
title and interest to the Software and Typefaces and no rights are granted to you other than a License to use the Software on
the terms expressly set forth in this Agreement.
3. To protect proprietary rights of Agfa Japan, you agree to maintain the Software and other proprietary information concerning
the Typefaces in strict confidence and to establish reasonable procedures regulating access to and use of the Software and
Typefaces.
4. You agree not to duplicate or copy the Software or Typefaces, except that you may make one backup copy.
5. This License shall continue until the last use of the Software and Typefaces, unless sooner terminated. This License may be
terminated by Agfa Japan if you fail to comply with the terms of this License and such failure is not remedied within thirty (30)
days after notice from Agfa Japan. When this License expires or is terminated, you shall either return to Agfa Japan or destroy
all copies of the Software and Typefaces and documentation as requested.
6. You agree that you will not modify, alter, disassemble, decrypt, reverse engineer or decompile the Software.
7. Agfa Japan warrants that for ninety (90) days after delivery, the Software will perform in accordance with Agfa Japan-published
specifications. Agfa Japan does not warrant that the Software is free from all bugs, errors and omissions. THE PARTIES
AGREE THAT ALL OTHER WARRANTIES, EXPRESSED OR IMPLIED, INCLUDING WARRANTIES OF FITNESS FOR A
PARTICULAR PURPOSE AND MERCHANTABILITY, ARE EXCLUDED.
8. Your exclusive remedy and the sole liability of Agfa Japan in connection with the Software and Typefaces is repair or
replacement of defective parts, upon their return to Agfa Japan. IN NO EVENT WILL AGFA JAPAN BE LIABLE FOR LOST
PROFITS, LOST DATA, OR ANY OTHER INCIDENTAL OR CONSEQUENTIAL DAMAGES, OR ANY DAMAGES CAUSED BY
ABUSE OR MISAPPLICATION OF THE SOFTWARE AND TYPEFACES.
9. New York, U.S.A. law governs this Agreement.
10. You shall not sublicense, sell, lease, or otherwise transfer the Software and/or Typefaces without the prior written consent of
Agfa Japan.
11. Use, duplication or disclosure by the Government is subject to restrictions as set forth in the Rights in Technical Data and
Computer Software clause at FAR 252-227-7013, subdivision (b)(3)(ii) or subparagraph (c)(1)(ii), as appropriate. Further use,
duplication or disclosure is subject to restrictions applicable to restricted rights software as set forth in FAR 52.227-19 (c)(2).
12. YOU ACKNOWLEDGE THAT YOU HAVE READ THIS AGREEMENT, UNDERSTAND IT, AND AGREE TO BE BOUND BY ITS
TERMS AND CONDITIONS. NEITHER PARTY SHALL BE BOUND BY ANY STATEMENT OR REPRESENTATION NOT
CONTAINED IN THIS AGREEMENT. NO CHANGE IN THIS AGREEMENT IS EFFECTIVE UNLESS WRITTEN AND SIGNED
BY PROPERLY AUTHORIZED REPRESENTATIVES OF EACH PARTY.
iii
Page 53

1. Printer Settings
1. Printer Settings
IMPORTANT!
All setting items and the selection of their actual settings are accomplished in this machine based on a maximum 3-digit entry system.
Refer to “1-2 List of settings” on page 1-3 for information regarding the various items as well as their corresponding menu numbers and
available settings.
1-1 Procedure for making settings
Press the Printer key. The machine will switch to the printer mode and “P00” will
appear in the copy quality/magnification display.
1
Use the “(+)” and “(-)” keys to scroll through the menu numbers one number at a
time. (Any menu number that does not have a corresponding setting item will be
2
skipped and the next viable menu number that DOES have an available setting will
be displayed.)
Select the desired setting.
3
Note
Settings are normally changed by using the “(+)” and “(-)” keys to select a value, or
by typing in the desired value directly. Press the Enter key when you are finished in
order to register the selected setting.
When typing in a network address, press the Enter key after each block of 3 digits.
<Inch version> <Metric version>
Press the Printer key again to switch back to the copier mode.
4
1-1
Page 54

1. Printer Settings
■ Operation keys
<Inch version>
Printer KeyCopy quality/magnification display
Zoom (-) key Zoom (+) key
Stop/Reset (Cancel) key
Start (Go) keyEnter key
<Metric version>
Printer KeyCopy quality/magnification display
Zoom (-) key Zoom (+) key
Stop/Reset (Cancel) key
Start (Go) keyEnter key
1-2
Page 55

1. Printer Settings
1-2 List of settings
Menu
number
P11
P20
P21
P22
P23
P24
Item
Printer Status Page print out
Prints out a list of such items as the current printer
default settings and memory volume, etc.
Parallel TX/RX mode
Sets the transmission and reception mode when the
printer is connected to your computer with a parallel
interface.
NetWare ON/OFF
NetWare frame type
Sets the NetWare frame type.
TCP/IP ON/OFF
DHCP ON/OFF
Available settings
– – –
(1) Auto
(2) Normal
(3) High Speed
(4) Nibble (high)
(1) On
(2) Off
(1) Auto
(2) 802.3
(3) Ethernet II
(4) 802.2
(5) 802.3 SNAP
(1) On
(2) Off
(1) On
(2) Off
Remarks
Print out will begin as soon as the
corresponding menu number is
displayed and the Enter key pressed.
Available only when the Network
Card is installed.
Available only when the Network
Card is installed.
Available only when the Network
Card is installed.
Available only when the Network
Card is installed.
P25
P26
P27
P28
P29
P30
IP address
Subnet Mask
Gateway address
EtherTalk ON/OFF
Network Card Status Page print out ON/OFF
Sets whether a Status Page regarding conditions in
the Network Card will be printed out as well when
the standard Status Page for the printer (menu: P11)
or that for use by your service representative (menu:
P76) are printed out. A more detailed Status Page is
printed out together with the “Service Rep Status
Page print out” setting (menu: P76).
Emulation protocol (parallel interface)
Sets the emulation protocol that will be used.
Enter the address.
Enter the address.
Enter the address.
(1) On
(2) Off
(1) On
(2) Off
(1) Line Printer
(2) IBM Proprinter
(3) DIABLO 630
(4) EPSON LQ-850
(5) PCL 6
(6) KPDL
(7) KPDL (AUTO)
Available only when the Network
Card is installed.
Available only when the Network
Card is installed.
Available only when the Network
Card is installed.
Available only when the Network
Card is installed.
Available only when the Network
Card is installed.
1-3
Page 56

1. Printer Settings
Menu
number
P31
P32
P35
P37
Item
KPDL Error Report print out ON/OFF
Sets whether an Error Report will be automatically
printed out whenever a KPDL error occurs.
Auto emulation switching (parallel interface)
Sets the back-up emulation that, depending upon
the type of data received, may be switched to for
printing out when “KPDL (AUTO)” (setting: 7) is
selected under the “Emulation protocol” setting
(menu: P30).
Emulation protocol (network interface)
Sets the emulation protocol that will be used.
Auto emulation switching (network interface)
Sets the back-up emulation that, depending upon
the type of data received, may be switched to for
printing out when “KPDL(AUTO)” (setting: 7) is
selected under the “Emulation protocol” setting
(menu: P35)
Available settings
(1) On
(2) Off
(1) Line Printer
(2) IBM Proprinter
(3) DIABLO 630
(4) EPSON LQ-850
(5) PCL 6
(1) Line Printer
(2) IBM Proprinter
(3) DIABLO 630
(4) EPSON LQ-850
(5) PCL 6
(6) KPDL
(7) KPDL (AUTO)
(1) Line Printer
(2) IBM Proprinter
(3) DIABLO 630
(4) EPSON LQ-850
(5) PCL 6
Remarks
Available only when the Network
Card is installed.
Available only when the Network
Card is installed.
P40
P42
P43
P44
P45
P46
Number of copies
Page Protect
If “AUTO” (setting: 1) is selected here, the machine
will monitor the data and, if necessary, will automatically turn Page Protect ON. If a “Print overrun” error
(error code: E80) does happen to occur even then,
the machine will automatically change the Page
Protect setting to “ON” (setting: 2).
Line Feed (LF) handling (parallel interface)
Line Feed (LF) handling (network interface)
Carriage Return (CR) handling (parallel interface)
Carriage Return (CR) handling (network interface)
001 - 999
(1) Auto
(2) On
(1) LF only
(2) CR and LF
(3) Ignore LF
(1) LF only
(2) CR and LF
(3) Ignore LF
(1) CR only
(2) CR and LF
(3) Ignore CR
(1) CR only
(2) CR and LF
(3) Ignore CR
Available only when the Network
Card is installed.
Available only when the Network
Card is installed.
1-4
Page 57

1. Printer Settings
Menu
number
P47
P48
P49
P50
P51
P52
P55
Item
Wide A4 ON/OFF
Increases the printing area on A4 size paper.
Printing orientation (parallel interface)
Printing orientation (network interface)
Smoothing ON/OFF
Allows a printing resolution of an interpolated 2400
dpi x 600 dpi through the smoothing process.
EcoPrint ON/OFF
Allows printing in a toner-saving mode. This mode is
especially suited for test pages, etc., where high
printing quality is not required.
Printing resolution
RAM disk ON/OFF
Available settings
(1) On
(2) Off
(1) Portrait
(2) Landscape
(1) Portrait
(2) Landscape
(1) On
(2) Off
(1) On
(2) Off
(1) 300 dpi
(2) 600 dpi
(1) On
(2) Off
Remarks
Available only when the Network
Card is installed.
At least 16 MB of additional memory
(option) must be installed.
P56
P62
P70
RAM disk size
Sets the amount of memory that will be used as a
RAM disk. The maximum size that can be selected
is the total amount of memory installed minus the
amount used by the system (9 MB).
Bypass mode
If “First” (setting: 2) is selected here and there is
paper set in the Multi-Bypass, paper feed will be
accomplished from the Multi-Bypass.
Force-print time-out
If “000” seconds is selected here, successive pages
will not be printed until they are manually forceprinted (by pressing the Start (Go) key in the printer
mode).
01 - 99 (MBytes)
(1) Cassette
(2) First
000 - 495 (sec.)
1-5
Page 58

1. Printer Settings
Menu
number
P71
P72
P73
Item
Receive dump mode
The data that the printer receives for debugging
programs and files is turned into hexadecimal code
and printed out. If “OK” (setting: 1) is selected here,
this receive dump mode will be activated. The
receive dump mode will be canceled under the
following circumstances:
• The Start (Go) key is pressed in the printer mode.
• A force-print time-out occurs.
Printer reset
Resets the Printer Board only even without turning
the power to the machine OFF.
Resource protect mode
Protects the resource data of fonts and macros
downloaded through PCL6 and, even if the emulation protocol is switched, the PCL resource will be
saved in the printer’s memor y. If “Permanent”
(setting: 2) is selected here, temporary resources
will not be saved. If, however, “Permanent/Temporary” (setting: 3) is selected, temporary resources
will also be saved.
Permanent/Temporary
Available settings
(1) OK
(1) OK
(1) Off
(2) Permanent
(3) Permanent/Temporary
Remarks
At least 16 MB of additional memory
(option) must be installed.
P74
P75
P76
Auto Continue ON/OFF
If one of the following error messages appears and
“On” has been selected here, the error state will be
released and the printing operation will be restarted
automatically after a specified amount of time.
“Memory overflow (error code : E70)”
“Print overrun (error code : E80)”
Recovery time for Auto Continue
Sets the amount of time before Auto Continue
engages when “On” (setting: 1) is selected under the
“Auto Continue ON/OFF” setting (menu: P74). If
“000” seconds is selected here, Auto Continue will
engage immediately after the error.
Service Rep Status Page print out
Prints out a Status Page for use by your service
representative.
(1) On
(2) Off
000 - 495 (sec.)
– – –
Print out will begin as soon as the
corresponding menu number is
displayed and the Enter key pressed.
1-6
Page 59

2. Memory Card / RAM Disk
2. Memory Card / RAM Disk
2-1 Memory Card
This machine comes equipped with a slot for inserting a Memory Card.
Use a Memory Card that contains fonts in order to print with fonts other than those already installed in the machine, or use the card to
save and then read print data.
Inserting the Memory Card
Insert the Memory Card into the slot carefully with the front of the card facing the rear of the machine.
IMPORTANT!
BE SURE to turn the main switch OFF (O) BEFORE inserting or removing the Memory Card.
* The Memory Card is managed through printer control commands received from your computer . Refer to “2-3 Printer control commands” on
page 2-2.
2-2 RAM Disk
In this machine, it is possible to create a RAM Disk, or a portion of memory that is used as a virtual disk. By creating a RAM Disk of a
desired size from among the total memory in the printer, it is possible to perform electronic sorting (which shortens the overall time
required for printing) as well as to save data to and retrieve data from that disk very quickly.
Additional memory (option) must be installed before a RAM Disk can be created.
IMPORTANT!
The RAM Disk is created from that portion of the printer’s memory that is normally available to the user. Thus, if the size of the RAM disk
created is too large, printing speed may actually be decreased or the machine may run out of available memory.
WARNING: Resetting the printer or turning the main switch OFF (O) will erase all data written to the RAM Disk.
The factory default setting for the RAM Disk is “OFF” . In order to create a RAM Disk it is necessary to change the setting on the operation
panel of the copier itself. Refer to “1. Printer Settings” on page 1-1, as appropriate to your machine, for information on the appropriate
procedure.
* The RAM Disk can be used for saving and reading print data.
* Saving and reading data on the RAM Disk is managed through printer control commands received from your computer. Refer to “2-3
Printer control commands” on page 2-2.
2-1
Page 60

2. Memory Card / RAM Disk
2-3 Printer control commands
It is possible to issue simple commands to the Memory Card and RAM Disk from the MS-DOS Prompt in Windows.
2-3-1 Using printer control commands
A printer control command line includes “!R!” (Command operation start), as well the actual commands and parameters that are to be
implemented and that are entered after that.
The basic configuration of a printer control command line is as follows:
[Example] To delete the print data entitled “SAMPLE.txt” from the Memory Card
ECHO !R! RWER D,A,2,“SAMPLE.txt”; EXIT;>LPT1
AB C D E F
A: DOS command
B: Command operation start
C: Command (“RWER D” is the command to delete data)
D: Parameters (“A” refers to the Memory Card, “2” refers to the type of data [in this case print data] and “SAMPLE.txt” is the name of the
corresponding partition)
E: Command operation end
F: Printer connection port (Network: “PRN”, Local: “LPT1”, etc.)
CAUTIONS
• When issuing DOS commands in the Japanese input mode, ALWAYS use JIS ASCII (JIS C6220) characters. Kanji Code and Kanji Half-
Space Code input will not work.
• Enter all commands in uppercase (capital) letters.
• Be sure to enter a semi-colon (;) at the end of each standard command [shown as “C” in the example above] (or after the corresponding
parameter, if included), and separate each individual parameter with a comma (,).
• Be sure to enter a space before and after the “!R!” command, as well as before “EXIT;”.
2-2
Page 61

2. Memory Card / RAM Disk
2-3-2 Formatting the Memory Card
Perform the following procedure when you want to initialize the Memory Card from your computer.
IMPORTANT!
WARNING;: Initializing the Memory Card will erase all data in the card. Make sure that you want to initialize that Memory Card before
starting the procedure.
Procedure
1 Insert the Memory Card that you want to initialize into the Memory Card slot.
2 Open an MS-DOS Prompt in Windows.
3 Type in the command to format the Memory Card and then press the ENTER key.
C:\WINDOWS>ECHO !R! RWER F,A; EXIT;>LPT1
4 Once the Memory Card is formatted, the “FORMAT INFORMATION” report will be printed out.
2-3-3 Writing print data
Perform the following procedure when you want to write print data to a Memory Card or RAM Disk from your computer.
* Verify beforehand that the Memory Card is in a write-enabled state and that the RAM Disk is turned ON.
Procedure
1 Open an MS-DOS Prompt in Windows.
2 Type in the command to write data and then press the ENTER key.
[Example] To write the print data entitled “SAMPLE.txt” to a Memory Card
* To write the data to a RAM Disk, simply change the “A” parameter to “0”.
C:\WINDOWS>ECHO !R! RWER W,A,2,“SAMPLE.txt”;>LPT1_
3 Send the print data from your computer.
C:\WINDOWS>COPY /b SAMPLE.txt LPT1
4 Once the print data is sent, the next command can be sent.
C:\WINDOWS>ECHO !R! WRED; EXIT;>LPT1_
5 Print out the Partition List to verify whether or not the data was written properly.
* Refer to “2-3-7 Printing out the Partition List” for information on printing that list.
2-3
Page 62

2. Memory Card / RAM Disk
2-3-4 Writing font data
Perform the following procedure when you want to write font data to a Memory Card or RAM Disk from your computer. At the same time
as the font data is written to disk, it will be sent to the printer as well.
* Verify beforehand that the Memory Card is in a write-enabled state and that the RAM Disk is turned ON.
* Only TrueType fonts can be written to the Memory Card or RAM Disk.
Procedure
1 Open an MS-DOS Prompt in Windows.
2 Type in the command to write data and then press the ENTER key.
[Example] To write the font data entitled “FONT1” to a Memory Card
C:\WINDOWS>ECHO !R! RWER S,A,0,”FONT1”,”FONT”,45040;>LPT1
12 3 4 5
NOTES
The parameters contained within the command line are as follows:
1: “A” refers to the Memory Card and “0” refers to the RAM Disk
2: “0” refers to a TrueType font, “1” refers to a Japanese TrueType font, “2” refers to a Japanese TrueType Collection font
3: File name
4: Font name
5: Font data length (binary data bytes)
3 Send the font data from your computer.
C:\WINDOWS>COPY /b FONT1 LPT1_
4 Once the font data is sent, the next command can be sent.
C:\WINDOWS>ECHO !R! WRED; EXIT;>LPT1_
5 Print out the Partition List to verify whether or not the data was written properly.
* Refer to “2-3-7 Printing out the Partition List” for information on printing that list.
2-4
Page 63

2. Memory Card / RAM Disk
2-3-5 Reading print data
Perform the following procedure when you want to read print data that has been saved on a Memory Card or RAM Disk.
* Verify beforehand that the Memory Card is in a write-enabled state and that the RAM Disk is turned ON.
* To v erify saved data and the corresponding partition name, it is helpful to print out the Partition List. Ref er to “2-3-7 Printing out the Partition
List” for information on printing that list.
Procedure
1 Open an MS-DOS Prompt in Windows.
2 Type in the command to read data and then press the ENTER key.
[Example] To read the print data entitled “SAMPLE.txt” from a Memory Card
* To read the data from a RAM Disk, simply change the “A” parameter to “0”.
C:\WINDOWS>ECHO !R! RWER R,A,2,“SAMPLE.txt”; EXIT;>LPT1
3 Print out of the corresponding data will begin.
2-3-6 Deleting print data or font data
Perform the following procedure when you want to delete print data or font data that has been saved on a Memory Card or RAM Disk.
* Verify beforehand that the Memory Card or RAM Disk contains the data that you want to delete.
* To v erify saved data and the corresponding partition name, it is helpful to print out the Partition List. Ref er to “2-3-7 Printing out the Partition
List” for information on printing that list.
Procedure
1 Open an MS-DOS Prompt in Windows.
2 Type in the command to delete data and then press the ENTER key.
[Example] To delete the print data entitled “SAMPLE.txt” from a Memory Card
* To delete the data from a RAM Disk, simply change the “A” parameter to “0”.
* To delete font data, simply change the “2” parameter to “1”.
C:\WINDOWS>ECHO !R! RWER D,A,2,“SAMPLE.txt”; EXIT;>LPT1
3 Deletion of the corresponding data will begin.
4 Print out the Partition List to verify whether or not the data was deleted properly.
2-5
Page 64

2. Memory Card / RAM Disk
2-3-7 Printing out the Partition List
Perform the following procedure when you want to print out the Partition List in order to verify the print data and font data that has been
saved on a Memory Card or RAM Disk.
Procedure
1 Open an MS-DOS Prompt in Windows.
2 Type in the command to print out the Partition List and then press the ENTER key.
[Example] To print out the Partition List for a Memory Card
* To print out the Partition List for a RAM Disk, simply change the “A” parameter to “0”. If you do not include this parameter, both
Partition Lists will be printed out.
C:\WINDOWS>ECHO !R! RWER L,A; EXIT;>LPT1_
3 Print out of the Partition List will begin.
2-3-8 Auto Partition List print out ON/OFF
It is possible to have a Partition List printed out automatically any time data is written to a Memory Card or RAM Disk. Perform the
following procedure when you want to change the setting for automatic print out.
Procedure
1 Open an MS-DOS Prompt in Windows.
2 Type in the command to have the Partition List printed out automatically and then press the ENTER key.
[Example] To turn Auto Partition List print out ON
* To tur n Auto Partition List print out OFF, simply change the “E” parameter to “D”.
C:\WINDOWS>ECHO !R! RWER I,E; EXIT;>LPT1_
2-6
Page 65

1.
Procedure for Installing and Printing with a Printer Driver
1. Procedure for Installing and Printing with a Printer Driver
1-1 Included printer drivers
The following printer drivers are included with this product.
* Each type of printer driver has a version appropriate to a specific model of copy machine. Be sure to choose the driver that is appropriate for your
copier.
Driver type
KX driver
Macintosh PPD file
Note
■ When using KPDL in Windows, set “Page Description Language” to the KPDL. See “2-6 Device Setting Tab” in Page 2-9 and 2-10.
By attaching optional equipment it is possible to easily extend printer
functionality. This driver will enable you to use such compound printer
functions to their fullest.
A PPD (PostScript Printer Description) file is included for use with
this product. Use “LaserWriter 8” as the printer driver for your Mac
OS.
Description
Compatible OS
Windows 95/98
Windows NT4.0
Windows 2000
Windows Me
Macintosh System
7.61 - 9.1
1-1
Page 66

1. Procedure for Installing and Printing with a Printer Driver
1-2 System Conditions
●Windows 95
IBM PC / AT or compatible
System
requirements
Recomended
requirements
●Windows 98
System
requirements
Recomended
requirements
CPU
RAM
HDD
CPU
RAM
HDD
CPU
RAM
HDD
CPU
RAM
HDD
i486SX 25 MHz or more
8 MB or more
10 MB or more
Pentium 90 MHz or more
16 MB or more
10 MB or more
IBM PC / AT or compatible
i486DX 66 MHz or more
16 MB or more
10 MB or more
Pentium 90 MHz or more
32 MB or more
10 MB or more
●Windows NT 4.0
System
requirements
Recomended
requirements
●Windows 2000
System
requirements
Recomended
requirements
●Windows Me
CPU
RAM
HDD
CPU
RAM
HDD
CPU
RAM
HDD
CPU
RAM
HDD
IBM PC / AT or compatible
i486SX 25 MHz or more
16 MB or more
10 MB or more
Pentium 90 MHz or more
32 MB or more
10 MB or more
IBM PC / AT or compatible
Pentium 133 MHz or more
64 MB or more
10 MB or more
Pentium 133 MHz or more
64 MB or more
10 MB or more
System
requirements
Recomended
requirements
CPU
RAM
HDD
CPU
RAM
HDD
IBM PC / AT or compatible
Pentium 150 MHz or more
64 MB or more
10 MB or more
Pentium 200 MHz or more
64 MB or more
10 MB or more
1-2
Page 67

1. Procedure for Installing and Printing with a Printer Driver
1-3 Screen that Appears when the CD-ROM is Inserted
This section explains the screen that appears when the CD-ROM supplied with the Printing System is inserted into the CD-ROM drive.
■ Install Drivers
Click to start installation of the printer driver. Follow the instructions displayed on the screen to install the printer driver.
■ Driver Tools
Click to display a menu including uninstallation of the printer driver.
[Remove Drivers] ...................... Starts the uninstaller of the printer driver.
[Make Driver Disk] ..................... Copies the installer program to a floppy disk. Use of this floppy disk allows you to install the printer
driver without the need of the installer CD-ROM.
* Driver for Macintosh cannot be made.
■ Network
Click to display the KM-NET VIEWR’s installation menu. Follow the instructions displayed on the screen to install the KM-NET VIEWER.
■ Documentation
Click to display the manual (PDF) supplied with the printer driver. To open this PDF manual, Adobe Acrobat Reader (developed to view
PDF files) is required, so make sure that Adobe Acrobat Reader is installed before opening the manual.
[Install Acrobat Reader]............ Installs Adobe Acrobat Reader.
[User’s manual] ......................... Displays the manuals (PDF) of the printer and printer driver. They explain the installation procedure
of the printer driver and operation procedure of the printer.
[Release Notes], [Read me] ......This file contains information which is not explained in the manuals. Please read this file before using
[Programming Manuals] ...........Displays the manuals (PDF) of the PRESCRIBE.
the printer driver.
1-3
Page 68

1. Procedure for Installing and Printing with a Printer Driver
1-4 Installing the Printer Driver (Windows)
Install the printer driver as follows:
* The printer can be connected to the computer by one of the following two methods: local or network. If you want to connect them through network,
refer to the operation manual of the operating system (OS).
* DO NOT use Plug&Play when installing the printer driver. Depending upon the printer you are using, the printer driver may not be installed correctly.
ALWAYS use the menu of the CD-ROM that is included with this product to install the printer driver.
* The screens shown in the following explanation are those displayed when installing the printer driver for Windows 95/98.
Start Windows.
1
* If any applications are currently running, exit them.
Insert the CD-ROM supplied with the printer into the CD-ROM drive.
2
A start window will appear.
Click Install Driver in the lower left corner of the window.
3
* If the start window does not appear even if the CD-ROM is inserted, double-click
My Computer on the desktop, then double-click the CD-ROM icon.
The Set-up Wizard window will appear, so click Next.
4
A list of printer models will appear.
Select the printer you are using, then click Next.
5
The language to be used can be selected. Select the desired language from the box,
then click Next.
6
1-4
Page 69

1. Procedure for Installing and Printing with a Printer Driver
Select the driver type.
7
From the list, select the type of driver to be installed, then click Next.
* Refer to “1-1 Included printer Drivers” on page 1-1 for information regarding each
printer driver.
All available options will be displayed. Select the items that you want to install and
then click on the [Next] button.
8
Select the connection type: Local or Network.
9
• Local: The printer is connected directly to the parallel port.
• Network: The printer is connected to the printer via network (using a network interface).
* If Local is selected, proceed to step 11. If Network is selected, proceed to step 10.
Enter the network queue name or the path for the network queue in the box.
10
To select another network queue name, press Browse.
If you are going to use a local port for the network queue, click the check box displayed below, then proceed to step 11.
Otherwise, proceed to step 12.
1-5
Page 70
1. Procedure for Installing and Printing with a Printer Driver
Select a printer port. From the list, select the desired port, then click Next.
11
* Normally, set to LPT1.
* When installing the printer driver for Windows NT, the Add LPR Port button will
appear below the box, so press the button to set the desired LPR printer.
A name can be assigned to your printer.
Specify a new name or select the desired name from the list, then click Next.
12
Specify whether this printer is to be used as the default printer.
Click Yes if so, or click No if not.
13
The settings you have made so far will appear. If they are correct, click Next.
Installation of the printer driver will start.
14
To exit installation, click Finish.
* If you want to add another printer driver, click Add Printer and then repeat the same
15
procedure.
Installation of the printer driver is now complete.
1-6
Page 71

1. Procedure for Installing and Printing with a Printer Driver
1-5 Uninstalling the Printer Driver
This section explains how to uninstall the printer driver.
Use of the uninstaller supplied with the printer driver allows you not only to uninstall the printer driver, but also uninstall the printer driver
related files and Windows registries.
* Never delate Windows registries which do not relate to the printer to be uninstalled Since Windows registries are deeply involved in the
operation of the computer, the computer may malfunction if wrong registries are delated.
Start Windows.
1
Insert the printer driver installer CD-ROM into the CD-ROM drive on your computer.
2
The window shown on the right will appear.
Click on [Driver Tools] and then on [Remove Drivers] from the subsequent menu.
The [Printer Deleter] dialog box will appear.
3
Clicking “+” mark will display printer drivers installed on the computer and Windows
registries in a hierarchical (tree) structure.
Select the printer you are using, then select [Actions]-[Delete].
The selected printer driver will be removed.
4
* The selected printer driver can also be removeed by pressing the [Del] key, instead
of selecting [Action]-[Delete].
1-7
Page 72

1. Procedure for Installing and Printing with a Printer Driver
1-6 Printing
The following is an example procedure for printing using a printer driver under the conditions and environment noted below.
• OS : Windows 95
• Printer driver : KX Driver
• Application : Wordpad
If you use a system or driver other than that noted above, use the following procedure simply as a reference tool. It is additionally recommended that you read the section corresponding to your operation system as it will contain further explanations specifically regard that OS
and other related drivers.
● Making the printer driver settings in Windows
Click on [Start] on the Task Bar.
1
The Start menu will appear.
Use the mouse to point to [Settings] and click on [Printers] in the corresponding
submenu.
2
The [Printers] folder will open.
Use the right mouse button to click on the icon for this printer. A pop-up menu will be
displayed.
3
Select [Properties] from that menu.
The Properties window will appear.
Click on the [Device Settings] Tab.
4
“Device Options” setting
5
Select and installed options here. Once you have completed the setting for each
option, the functions of that option will be available for use.
Once you have completed these settings, click on [OK].
1-8
Page 73

1. Procedure for Installing and Printing with a Printer Driver
● Printing from the application
Use the application that you want to use to open the document that you want to print.
6
Select [Print] in the [File] menu.
7
The [Print] dialogue box will appear.
Select the desired number of copies that you want to make and which pages are to be
printed.
8
Select this printer in the [Name] field.
Click on [Properties].
The Properties window will appear.
Click on the [Media] Tab and select the desired paper size, cassette, etc.
9
Click on the [Layout] or [Output] tab select the desired function(s).
10
Click on [OK]. You will be returned to the [Print] dialogue box. Click on [OK] once
again. Printing will begin.
11
1-9
Page 74

2. Windows KX Driver
The following section explains the functions of the KX driver.
* The following procedure is explained as though it is being carried out in Windows 98. If you
are using another operating system, use this procedure simply as reference.
* Depending upon version upgrades of the printer driver, the screenshots shown here may
differ somewhat from that of the actual printer driver.
* Refer to the Instruction Manual for Windows regarding items that are not explained in this
Instruction Handbook.
2-1 Making printing and property settings
Start up Windows.
1
Click on [Start] in the Task Bar.
The [Start] menu will be displayed.
2
Use the mouse to point to [Settings] and click on [Printers] in the submenu that is
displayed. The [Printers] folder will open.
3
Use the right mouse button to click on the icon for this printer. A pop-up menu will be
displayed.
4
Select [Properties] from the menu.
The Properties window will open.
2-1
Page 75

2. Windows KX Driver
2-2 Media Tab
■ Paper Size:
Allows you to select a standard size of paper or an envelope size.
The following sizes of paper or envelope can be used with this printer.
Standard-size paper
sheet
Envelope
■ Custom...
Click on this button when you want to print onto a non-standard size of paper. The “Custom Paper Size” dialog box will appear. Refer to “22-1 Custom Paper Size dialog box” on page 2-3 for more detailed information.
■ Print Size:
Allows you to select the size of the printed image. The image size will be enlarged or reduced according to difference in the setting made
here and in the “Page Size” field.
■ Orientation:
Sets the orientation of printing.
[Portrait] .....................................The image will be printed vertically.
[Landscape] ...............................The image will be printed horizontally.
[Rotated] .................................... Select this checkbox by clicking on it and putting a check mark in the box in order to have the image
■ Source:
You can select the source of paper feed according to the desired tray. Selection is possible from among the following items. If you select
“Auto Source Selection”, the printer will automatically choose the tray that contains the most appropriate paper for the job. The factory
default setting is “Auto Source Selection”.
Tr ay Auto Source Selection, Tray 1, Tray 2, Bypass Tray
* Tray 2 is available only when the Option Cassette is installed.
Letter (8-1/2" x 11"), Legal (8-1/2" x 14"), Statement (5-1/2" x 8-1/2"), A4, A5,
A6, JIS B5, JIS B6 and Folio
COM-10, Monarch, DL and C5
printed upside-down.
2-2
Page 76

2. Windows KX Driver
2-2-1 Custom Paper Size dialog box
■ Setting a custom paper size
Perform the following procedure in order to register a custom size when you want to print onto a non-standard size of paper. The information registered here will be displayed under the “Page Size” setting in the Media Tab as well as in the Paper Size setting of your application.
If you want to register a new custom paper size, click on the “Add” button. The “Edit Paper Size” dialog box will appear.
If you want to change a previously registered paper size, click on the registered size
to select it and then click on the “Edit” button.
1
If you want to delete a registered paper size, click on the desired size to select it and
then click on the “Remove” button.
Type into the “Name” field the name you want to use for this custom size of paper.
* It is the name that you register here that will actually be displayed under the “Page
Size” setting.
Select the desired unit of measurement in the “Units” block and the desired
2
dimensions of the paper in the “Size” block.
<Available settings>
3
Units: “Inches” or “Millimeters”
Height: 5.83 - 14.00 [Inches]
Width: 3.88 - 8.50 [Inches]
Click on the “OK” button. The “Custom Paper Sizes” dialog box will appear once again.
Click on the “OK” button.
4
148.1 - 355.6 [Millimeters]
98.5 - 215.9 [Millimeters]
5
2-3
Page 77

2. Windows KX Driver
2-3 Layout Tab
■ Pages per Sheet:
Allows you to print reduced images of multiple (1, 2, 4, 6, 9, 16 or 25) pages onto a single sheet of paper. This function is called “N-Up”
printing (where “N” equals the number of image pages). Reduction of the images is calculated automatically so that all of the selected
pages fit onto the single sheet of paper. The factory default setting is “1” (one page to each sheet of paper).
Example: With 2-Up printing
Prints reduced images of 2 full pages onto a single sheet of paper.
■ Print Borders
Prints border lines between the different images when the “Pages per Sheet” function is selected.
■ Layout
Specifies the order of display of the images when the “Pages per Sheet” function is selected.
■ Scaling
Allows enlargement or reduction of the image size.
Note
The image size will normally be enlarged or reduced according to the difference in the setting made in the “Page Size” and “Print Size”
fields. If you then change the setting here, the actual magnification will be based on the original settings and the image may be even
further enlarged or reduced.
2-4
Page 78

2. Windows KX Driver
2-4 Imaging Tab
■ Print Quality
Selects the quality at which printing will be accomplished.
[High Quality] ............................ Enables printing at the highest quality possible for the printer being used.
[Draft] ......................................... Saves on toner use. use this setting when quality printing is not needed such as with test prints.
[Custom...] ................................. Allows you to perform settings related to the quality of printing. Select “Custom” and then click on the
■ Grayscale Adjustment
Adjusts the brightness and contrast of the printed image. The factory default for both settings is “0”.
[Brightness] ...............................Adjusts the brightness of the image. When you want to print the image brighter than the actual
[Contrast] ...................................Adjusts the contrast of the image. When you want to print at a sharper image contrast, drag the slider
■ TrueType Fonts
Selects the method of printing with fonts. The factory default setting is “Download TrueType fonts as outline”.
“…” button to the right of that field in order to access the “Print Quality Settings” dialog box. For more
detailed information on making settings in this dialog box, refer to “2-4-1 Print Quality Settings dialog
box” on page 2-5.
original, drag the slider towards the plus “+” sign, or type in a positive number directly into the field at
the right of the slider bar. Conversely, when you want to print the image darker than the actual
original, drag the slider towards the minus “-” sign, or type in a negative number directly into that field.
towards the plus “+” sign, or type in the desired value (a positive number) directly into the field at the
right of the slider bar. Conversely, when you want to print at a softer image contrast, drag the slider
towards the minus “-” sign, or type in a negative number directly into that field.
[Download TrueType fonts as outline] ..... TrueType fonts will be downloaded to the printer as outline fonts for printing.
[Download TrueType fonts as bitmap] ..... TrueType fonts will be downloaded to the printer as bitmap fonts for printing.
2-5
Page 79

2. Windows KX Driver
2-4-1 Print Quality Settings dialog box
■ Resolution
Specifies the printing resolution (number of dots per inch) to be used when printing. Select between “600 dpi” and “300 dpi”.
■ Kyocera Image Refinement
Turning this setting “On” allows the jaggies that appear around the edge of text and graphics to be evened out through the smoothing
process.
■ EcoPrint
Saves on toner use. use this setting when quality printing is not needed such as with test prints.
2-6
Page 80

2. Windows KX Driver
2-5 Output Tab
■ Copies
Specifies the number of prints to be made. Select between 1 and 999 copies by clicking on the arrows at the right of the field or by typing
the desired number directly into the field. The factory default setting is “1”.
■ Collate
When you are printing more than one copy of one or more pages, it is
possible to sort the printed copy sets.
*It is necessary to create a RAM disk. (Refer to “RAM disk” on page 2-8)
Example: If the “Collate” option is selected, it is possible to print out
2 sets of the same copies.
2-7
Page 81

2. Windows KX Driver
2-6 Device Settings Tab
■ Device Options
Select and installed options here. Once you have completed the setting for each option, the functions of that option will be available for
use.
● Optional Paper Feeder
Perform this setting according to the installed Option Cassette.
● RAM Disk
Perform this setting when you want to create a RAM disk. Refer to “Chapter 1, 2-2 RAM Disk” on page 2-1 for more detailed information
on creating a RAM disk.
* In order to create a RAM disk, it is necessary to increase the memory capacity of your printer. After increasing memory, perform the
setting here according to the “Memory” setting below.
■ Memory
Specifies the amount of memory installed in the printer. If you make a mistake in the setting here, it is possible that printing will not be
accomplished properly.
■ RAM Disk
Specifies the amount of memory to be used for the RAM disk. This setting will only be available when you have selected “RAM Disk” in the
“Device Options” list.
■ User…
Click on this button when you want to register a user and/or department name. The [User Settings] dialog box will appear. It is also
possible to select the “GDI compatible mode” from that dialog box. Refer to “2-6-1 User Settings” on page 2-9 for more detailed information.
2-8
Page 82

2. Windows KX Driver
2-6-1 User Settings
■ Identitication
Register the desired user and/or department name.
■ Page Description Language
The emulation modes that can be used with this product will be displayed in the dropdown list. If multiple modes are displayed, it is
possible to select the desired mode.
When using the KPDL emulation, select the KPDL.
* the “Settings...” button can be when selecting KPDL. Paticular function of Post Script Printer is available for KPDL dialogue that is
appered by selecting the “Settings...” button.
■ GDI compatible mode
Select this mode in order to accomplish printing that is more accurate to the data shown on your monitor. Select this mode if text
corruption, etc., does happen to occur or if the image is in any other way not printed correctly.
2-9
Page 83

2. Windows KX Driver
2-7 Prologue/Epilogue Tab
■ Disable Feature
Make sure there is NO check mark in this checkbox if you want to use the printer’s overlay function. The overlay function will allow you to
have selected macro data printed out on top of your documents.
■ Add
Click on this button when you want to add the data of the file that is selected in the displayed list.
■ Remove
Click on this button when you want to delete the selected file from the list.
■ Edit
Click on this button when you want to edit the contents of the selected file.
Insertion point:
By REMOVING the check mark from the checkbox next to [Disable Feature], select a registered file from the list and click on the [Add]
button, the following settings will become available.
■ None [Unassigned]
Print without using registered files.
■ Beginning of the Print Job
The data for the selected file will be transmitted once, and embedded at the beginning of the print job data.
■ End of the Print Job
The data for the selected file will be transmitted once, and embedded at the end of the print job data.
■ Start of the Page
In the case of a multiple-page print job, the data for the selected file will be transmitted (embedded) at the beginning of the data for each
page.
■ End of the Page
In the case of a multiple-page print job, the data for the selected file will be transmitted (embedded) at the end of the data for each page.
■ Pages
When [Start of the Page] or [End of the Page] are selected, designate the desired page number here.
2-10
Page 84

3. Printer Driver for Macintosh
3. Printer Driver for Macintosh
When using unit as a network printer, it is possible to print PostScript files from a Macintosh Computer. This section contains explanations
regarding the procedure to install the Macintosh PPD files and select this printer, as well as explanation about the computer environment required
to run the installed files.
Attention (Macintosh)
* When using the Printer driver, change the emulation setting KPDL or KPDL (AUTO).
3-1 Required computer environment
OS: Between system 7.61 and 9.1
CPU: Minimum Power PC
RAM: Minimum 24 MB
Free hard disk space: Minimum 10 MB
CD-ROM drive: 1 drive
3-2 Installing the PPD files
This section explains the screen that appears when the CD-ROM supplied with the Printing System (M) is inserted into the CD-ROM drive.
* All the screens to use for explanation are samples, and a screen may be different by a version of utilized software to some extent.
B
D
A: [Install Drivers]
The installer by country and by language is supplied in this folder.
B: [ACRO_V4]
The installer of Adobe Acrobat Reader is supplied in folder.
C: [README]
This file contains information which is not explained in the manuals. Please read this file before using the printer driver.
A
C
D: [Welcome.pdf]
Kyocera Mita Digital Library screen will appear. Click the available model on screen. The online manual (PDF File) will appear.
Installation and operation procedure for printer driver is explained in online manual.
It is necessary to install the Adobe Acrobat Reader in advance to appear the online manual.
Start up your Macintosh computer.
Insert the CD-ROM disk that is included with this product into a CD-ROM drive.
1
*If there is starting other program, please be finished.
*Screens are things of Mac OS 8.1.
3-1
Page 85

3. Printer Driver for Macintosh
Double-Click on the icon for the CD-ROM disk.
The content of the CD-ROM will be displayed.
2
The installer by country and by language is supplied in “Driver” folder.
Double-Click the available driver installer to start. The installation screen will
3
appear.
Click on “Continue”.
4
A The notice for installation will appear.
Read the notice, and click “Continue”.
5
Select the available model, and click on “Install”. Installation is started.
6
Installation was finished. Click on “Quit” to finish the installation completely.
7
3-2
Page 86

3. Printer Driver for Macintosh
Access the Apple Menu at the far left of the Menu of Bar and select Chooser.
The Chooser will appear.
8
Click once on the LaserWriter 8 icon.
Select the name of this printer in the [Select a PostScript Printer] list and then click on
the [Create] button.
9
* The name of this printer can be verified by printing out a Status Page from the
printer’s operation panel.
A dialog box for selecting the appropriate options will appear.
Select the option that are currently installed in or on your printer.
10
Once you’re finished with the settings, click on [OK], the chooser will be displayed
again.
11
Make sure that the name of this printer is selected (highlighted) in the “Select a
PostScript Printer” list and close the Chooser.
12
3-3
Page 87

3. Printer Driver for Macintosh
3-3 General Dialog Box
*The actual layout of each dialog box and the available option and settings may differ somewhat depending upon the application and version of
LaserWriter that you are using.
■ Printer:
Selects the desktop printer to be used for printing your document.
■ Copies:
Type the desired number of prints to be made (or the number of files to be saved to disk) directly into this field.
Select a number between 1 - 999.
■ Pages:
To print all of the pages in a file, select the All radio button. To print only certain pages, type in from what page (in the From filed) to what
page (in the To field) you want to print.
■ Paper Source:
Select the desired location of paper feed from the dropdown list. The factory default setting is “Auto Select”.
* It is necessary to perform the settings under “Page Policy” on page 3-6 BEFORE making settings here. If you want to select the source
of paper feed according to the tray, make sure that “Cassette Base” is selected there. If you select “Auto Select” here, be sure that the
“Page Policy” setting is set to “Auto Size Select” or there is a possibility that printing will be accomplished onto paper that is difference
the expected.
3-4
Page 88

3. Printer Driver for Macintosh
3-4 Layout Dialog Box
■ Pages per sheet:
Sets the number of pages to be printed on each sheet of paper.
■ Layout Direction:
A button of either is clicked, and a layout direction is decided. If right button is selected, the pages are laid out from right to left.
■ Border:
Sets the type of line to appear around the page.
3-5
Page 89

3. Printer Driver for Macintosh
3-5 Printer Specific Options
■ Resolution:
Specifies the printing resolution (number of dots per inch) to be used when printing. Select between “600 dpi” and “300 dpi”. The factory
default setting is “600 dpi”.
■ Smoothing:
Turning this setting “On” allows the jaggies that appear around the edge of text and graphics to be evened out through the smoothing
process.
■ PagePolicy:
Perform this setting in conjunction with the settings to be made under “Paper source” on page 3-4.
[Auto Size Select] ...................... Select this setting when you want to select “Auto Select” under “Paper source”.
[Cassette Base] ......................... Select this setting when you want to select the source of paper feed according to the tray under
“Paper source”.
* If you are going to select “Auto Select” under “Paper source”, be sure to select “Auto Size Select” here or there is a possibility that
printing will be accomplished onto paper that is difference the expected.
■ Sort:
Allows you to select whether to sort the copies in the case of multiple copy.
[Off] ........................................... Does not sor t.
[On] ............................................ Prints in the order of 1st, 2nd, 3rd copies and so on.
* It is necessary to create a RAM disk. (Refer to step 10 on page 3-3.)
3-6
Page 90

3. Printer Driver for Macintosh
3-6 Page Setup dialog Dialog Box
Settings for paper size, page layout, magnification ratio and print direction (orientation) are performed in the Page Setup dialog box. To display the
Page Setup dialog box, select Page Setup… in the File menu of the corresponding application.
* The actual layout of each dialog box and the available options and settings may differ somewhat depending upon the application and the version of
LaserWriter that you are using.
* For the user using Mac OS 7.6.1, we strongly recommend that you update the LaserWriter8.3.2 to Laser Writer 8.5.1.
■ Format for:
Use this pop-up menu to select the Printer that you want to use.
■ Paper:
Select in this pop-up list the desired paper size. Choose from among Letter, Legal, Folio, Statement, A4, Custom,
A5, A6, B5(JIS),B6(JIS) and Envelopes (Monarch, Com 10, DL, C5)
* ALWAYS use the multi-bypass to feed the following sizes:A6,B5(JIS),B6(JIS),Envelopes (Monarch, Com 10, DL, C5)
■ Orientation:
Enable selection of the desired print direction.
■ Scale:
Type the desired magnification ratio directly into this field. Select a ratio between 25% - 400%.
3-7
Page 91

3. Printer Driver for Macintosh
3-7 PostScript Dialog Box
The actual layout of each dialog box and the available options and settings may differ somewhat depending upon the application and the version of
LaserWriter that you are using.
■ Visual Effects:
Visual effects such as horizontal and vertical flip and image inverting can be selected here. Place
a check in the check box next to the desired visual effects to select that effect.
■ Image & Text:
Place a check in the check box next to the desired printing options to select that option.
3-8
Page 92

3. Printer Driver for Macintosh
3-8 Custom paper sizes Dialog Box
When a paper sizes is selected in “Custom paper sizes” Dialog Box , the paper size can be set as desired.
* The actual layout of each dialog box and the available options and settings may differ somewhat depending upon the application and the version of
LaserWriter that you are using.
■ New button
To create a new custom page size, click this button.
* The acceptable paper width is between 9.81 - 21.59 cm (metric) or 3.86”- 8.5” (inches). The acceptable paper length is between 14.82
- 35.56 cm (metric) or 5.83” - 14” (inches).
■ Edit button
To edit the selected custom page size, click this button.
■ Delete button
To delete the selected custom page size, click this button.
3-9
 Loading...