

Page 1
Page 2

LegalNotes
Unauthorizedreproductionofallorpartofthisguideisprohibited.
Theinformationinthisguideissubjecttochangeforimprovementwithoutnotice.
Wecannotbeheldliableforanyproblemsarisingfromtheuseofthisproduct,regardlessoftheinformationherein.
RegardingTrademarks
•MicrosoftWindowsisaregisteredtrademarkofMicrosoftCorporationintheU.S.and/orothercountries.KPDLisa
trademarkofKyoceraCorporation.PCLisatrademarkofHewlett-PackardCompany.TrueTypeisaregistered
trademarkofAppleComputer,Inc.
•Allotherbrandandproductnameshereinareregisteredtrademarksortrademarksoftheirrespectivecompanies.
ExamplesoftheoperationsgiveninthisguidesupporttheWindowsXPprintingenvironment.Essentiallythesame
operationsareusedforMicrosoftWindowsVista,WindowsServer2008andWindows2000environments.
UserInterfacescreencapturesshowninthisguidemaydifferdependingonyourprintingdevice.
ModelssupportedbytheKXprinterdriver
FS-C5100DN
FS-C5200DN
FS-C5300DN
FS-C5400DN
Copyright©2009KYOCERAMITACorporation
Allrightsreserved.
Page 3

TableofContents
Chapter1Installation
Chapter2DeviceSettings
PreparingtoInstalltheDriver........................................................................................................1-1
UtilitiesInstallation........................................................................................................................1-2
UpgradingDriverComponents......................................................................................................1-2
ExpressInstallation.......................................................................................................................1-2
InstallingonWindowsVistaandWindowsXP.........................................................................1-2
CustomInstallation.......................................................................................................................1-4
InstallingonWindowsVistaandWindowsXPwithaUSBConnection...................................1-4
InstallingonWindowsVistaandWindowsXPwithaNetworkConnection.............................1-5
OptionalPrinterComponents........................................................................................................1-7
InstallingOptionalPrinterComponents...................................................................................1-7
InstallingthePrinterWizard..........................................................................................................1-7
InstallingonWindowsVista.....................................................................................................1-7
InstallingonWindowsXPandWindows2000.........................................................................1-8
AccessingtheDeviceSettingsTab...............................................................................................2-1
DeviceOptions..............................................................................................................................2-2
SettingDeviceOptions............................................................................................................2-2
AutoConfigure..............................................................................................................................2-2
EnablingAutoConfiguration....................................................................................................2-2
Memory.........................................................................................................................................2-3
SettingtheMemory.................................................................................................................2-3
RAMDisk......................................................................................................................................2-3
SettingRAMDisk....................................................................................................................2-3
AdministratorSettings...................................................................................................................2-4
JobAccounting........................................................................................................................2-4
ShowQuickPrintTab..............................................................................................................2-5
ColorPageCount....................................................................................................................2-5
Black&WhiteMode................................................................................................................2-6
AdministratorPassword..........................................................................................................2-6
SNMP......................................................................................................................................2-6
UserSettings................................................................................................................................2-8
Identification............................................................................................................................2-8
Units........................................................................................................................................2-8
LanguagePreference..............................................................................................................2-8
PDL(PageDescriptionLanguage)...............................................................................................2-9
PDLOptions............................................................................................................................2-9
WindowsVistaXPSDriver....................................................................................................2-12
CompatibilitySettings.................................................................................................................2-13
MediaSourceEnumeration...................................................................................................2-13
IgnoreApplicationCollation...................................................................................................2-13
CombineSourceandMediaTypeLists.................................................................................2-14
Chapter3QuickPrint
KXDRIVER
i
Page 4

Chapter4Basic
QuickPrintOptions.......................................................................................................................3-1
SpecifyingPrintOptions..........................................................................................................3-1
ColorMode..............................................................................................................................3-2
Collation..................................................................................................................................3-2
DuplexPrinting........................................................................................................................3-2
MultiplePagesperSheet........................................................................................................3-3
ProfileOptions..............................................................................................................................3-3
SelectingProfiles.....................................................................................................................3-3
SavingaProfile.......................................................................................................................3-3
EditingaProfile.......................................................................................................................3-4
DeletingaProfile.....................................................................................................................3-4
ImportingaProfile...................................................................................................................3-4
ExportingaProfile...................................................................................................................3-5
PrinterDriverSettingsAccess.......................................................................................................4-1
ChangingtheDefaultDriverSettings............................................................................................4-1
BasicPaperSettings.....................................................................................................................4-2
SourceandMediaTypes..............................................................................................................4-2
PrintSizeandPageSize...............................................................................................................4-3
CreatingaCustomPageSize.......................................................................................................4-3
PrintingwithCustomSizePages.............................................................................................4-3
DuplexPrinting..............................................................................................................................4-4
PrintinginDuplexMode..........................................................................................................4-4
Collation........................................................................................................................................4-5
PrintingCollatedDocuments...................................................................................................4-5
PrintinginColor,Black&WhiteandEcoPrint...............................................................................4-5
KyoceraLogo................................................................................................................................4-5
DisplayingVersionInformation................................................................................................4-6
DisplayingPlug-inInformation.................................................................................................4-6
Chapter5Layout
Chapter6Imaging
Booklet..........................................................................................................................................5-1
PrintingaBooklet....................................................................................................................5-1
MultiplePagesperSheet..............................................................................................................5-2
PrintingMultiplePagesperSheet...........................................................................................5-2
Poster............................................................................................................................................5-2
PrintingaPoster......................................................................................................................5-3
Scaling..........................................................................................................................................5-3
Gutter............................................................................................................................................5-4
PrintQualityandEcoPrint.............................................................................................................6-1
SelectingPrintQuality.............................................................................................................6-2
Trapping........................................................................................................................................6-2
Fonts.............................................................................................................................................6-2
FontSettings...........................................................................................................................6-3
SelectingFontSettings............................................................................................................6-3
FontSubstitution.....................................................................................................................6-3
DisablingDeviceFonts............................................................................................................6-4
Graphics........................................................................................................................................6-4
PatternScaling........................................................................................................................6-4
InversionSettings....................................................................................................................6-5
OptimizationSettings..............................................................................................................6-5
CIEOptimization.....................................................................................................................6-5
ii
UserGuide
Page 5

Chapter7Publishing
Chapter8Job
ColorMode...................................................................................................................................6-5
PrinterProfile................................................................................................................................6-6
ColorCorrection............................................................................................................................6-6
SettingaDefaultColorProfileinWindowsXP........................................................................6-7
SettingaDefaultColorProfileinWindowsVista.....................................................................6-7
AdjustingColor..............................................................................................................................6-8
AdjustingHSL(Hue,Saturation,Lightness)............................................................................6-9
AdjustingRGB(Red,Green,Blue)..........................................................................................6-9
AdjustingGrayscale......................................................................................................................6-9
TextandGraphicsEffects...........................................................................................................6-10
CoverMode..................................................................................................................................7-1
PrintingCovers........................................................................................................................7-1
CoverModeOptions................................................................................................................7-2
ChoosingCoverMedia............................................................................................................7-5
PageInsert....................................................................................................................................7-5
PrintingPageInserts...............................................................................................................7-5
PageInsertionOptions............................................................................................................7-6
TransparencyInterleaving............................................................................................................7-6
InterleavingTransparencies....................................................................................................7-7
JobStorage(e-MPS)....................................................................................................................8-1
JobStorage(e-MPS)options..................................................................................................8-2
QuickCopy(FS-C5300DN,FS-C5400DN)...................................................................................8-2
PrintingaQuickCopyJob.......................................................................................................8-2
ReprintingaQuickCopyJob(FS-C5300DN)..........................................................................8-3
ReprintingaQuickCopyJob(FS-C5400DN)..........................................................................8-3
ProofandHold..............................................................................................................................8-4
PrintingaProofandHoldJob..................................................................................................8-4
PrintingProofandHoldCopies(FS-C5100DN,FS-C5200DN,FS-C5300DN).......................8-4
PrintingProofandHoldCopies(FS-C5400DN)......................................................................8-5
PrivatePrint..................................................................................................................................8-5
StoringaPrivatePrintJob.......................................................................................................8-6
PrintingaPrivatePrintJob(FS-C5100DN,FS-C5200DN,FS-C5300DN)..............................8-6
PrintingaPrivatePrintJob(FS-C5400DN).............................................................................8-6
JobStorage(FS-C5300,FS-C5400).............................................................................................8-7
StoringaJobStorageJob.......................................................................................................8-7
PrintingaJobStorageJob(FS-C5300DN).............................................................................8-8
PrintingaJobStorageJob(FS-C5400DN).............................................................................8-8
DeletingaJobStorage(e-MPS)Job(FS-C5100DN,FS-C5200DN,FS-C5300DN).....................8-9
DeletingaJobStorage(e-MPS)Job(FS-C5400DN)....................................................................8-9
JobName....................................................................................................................................8-10
Don’tUseApplicationName..................................................................................................8-10
OverwriteJobName..............................................................................................................8-10
SelectingaJobName...........................................................................................................8-10
Chapter9Advanced
KXDRIVER
Prologue/Epilogue.........................................................................................................................9-1
SelectingaPrologue/EpilogueFile..........................................................................................9-1
EditingaPrologue/EpilogueFile.............................................................................................9-2
DeletingaPrologue/EpilogueFile...........................................................................................9-2
AssigningaPrologue/EpilogueFile.........................................................................................9-2
UnassigningaPrologue/EpilogueFile.....................................................................................9-2
iii
Page 6

SpecifyingtheInsertionPoint..................................................................................................9-2
Watermark....................................................................................................................................9-3
AddingorEditingaWatermark................................................................................................9-3
PageSelectionforWatermark.................................................................................................9-4
ColorOptimizer.............................................................................................................................9-5
OptimizingRGBColorforPrinting...........................................................................................9-5
ConfiguringStatusMonitor............................................................................................................9-6
SettingStatusMonitorPreferences.........................................................................................9-7
EMFSpooling...............................................................................................................................9-8
EnablingClientProfile...................................................................................................................9-8
Chapter10Profiles
SavingaProfile...........................................................................................................................10-1
EditingaProfile...........................................................................................................................10-2
DeletingaProfile.........................................................................................................................10-2
ImportingaProfile.......................................................................................................................10-2
ExportingaProfile.......................................................................................................................10-3
Glossary...................................................................................................................................................................v
iv
UserGuide
Page 7

PreparingtoInstalltheDriver
1Installation
Aprinterdriverisanapplicationthatmanagescommunicationbetweenaprinter
andyourcomputer.Onceinstalled,theprinterdriversettingsmustbe
configuredintheprinterPropertiesandPrintingPreferences.
ThesefeaturesareavailableintheInstallationprocess:
ExpressInstallationonpage1-2
CustomInstallationonpage1-4
InstallingOptionalPrinterComponentsonpage1-7
InstallingthePrinterWizardonpage1-7
Note:InWindowsVista,WindowsXP,andWindows2000,youmustbe
loggedinwithadministratorrightstoinstalltheprinterdriver.Ifyouconnecta
USB(UniversalSerialBus)cablebeforeprinterdriverinstallation,itisstrongly
recommendedthatyoucanceltheFoundNewHardwareWizardandinstallthe
softwarethroughtheProductLibraryCDmenu.BrowsingtheCDand
installingeachdriverseparatelyisnotrecommended.
Thissectiondescribestheinitialstepstotakebeforeyouinstalltheprinter
driver,andbasedonyouroperatingsystem,thenextprocedureyoucanfollow.
Turnonthecomputerandtheprinter.IfyouhaveaUSBconnection,the
1
WindowsFoundNewHardwareWizardappears.ClickCancel.
InserttheProductLibraryCDintotheCDdrive.
2
Aftertheinstallationwizardbegins,theMainMenuappears.
Note:IftheProductLibraryfailstostartafterinsertingtheProductLibrary
CDintotheCDdrive,useWindowsExplorertolocateSetup.exeonthelocal
driveanddouble-clicktoopen.
ClickViewLicenseAgreementtoreadthelicenseagreement.
3
ClickAccepttoproceed.
4
Tobegintheinstallation,clickInstallSoftware.
5
Note:IftheWindowsSecuritywarningdialogboxappearsatanypoint
duringtheinstallationprocess,clickInstallthisdriversoftwareanyway.
TheInstallerwizardappears.
6
KXDRIVER
1-1
Page 8

Installation
Theinstallationdiffersbasedonyouroperatingsystemandconnectionmethod.
Selectyouroperatingsystemandconnectionmethodfromthefollowinglistand
proceedtothereferencepagetocontinuetheinstallation.
ExpressInstallation
InstallingonWindowsVistaandWindowsXPonpage1-2
CustomInstallation
InstallingonWindowsVistaandWindowsXPwithaUSBConnectiononpage
1-4
InstallingonWindowsVistaandWindowsXPwithaNetworkConnectionon
page1-5
Note:KPrintinstallsaclientportmonitorthatletsWindowsTCP/IPprintfrom
anynetworkcardconnectedtoaprintingsystem.KPrintsupportsLPRandIPP
printing.FortheKPrintInstallationinstructions,refertoyourProductLibrary
CD.KPrintusesastand-aloneinstaller.
UtilitiesInstallation
OntheInstallationMethodscreen,clickUtilitiestoinstallprinterutilities.You
canalsoselectutilitiestoinstallduringtheCustomInstallationprocedure.
UpgradingDriverComponents
ExpressInstallation
Iftheinstallationwizarddetectsolderdrivercomponents,theSoftware
ComponentUpgradepageappears.
Choosethecomponenttoupgrade.ClickNext.
1
Confirmyourupgradesettings.Tostarttheupgrade,clickUpgrade.
2
Whentheupgradecompletes,clickNext.TheInstallationMethodpage
3
appears.
ExpressmodeappliestodriverinstallationforaUSBornetworkconnection
only.Theinstallationwizarddiscoversprintersthatareturnedon,and
connectedbyUSBandnetworkcable.InCustomMode,youareabletoselect
theinstallationpackagesandspecifytheport.
InstallingonWindowsVistaandWindowsXP
Thissectiondescribestheexpressinstallationprocedureofthedriversoftware
onWindowsVistaandWindowsXP.
EnsurethatyourprinterandcomputerareturnedonandconnectedbyUSBor
1
networkcable.
Note:IftheFoundNewHardwareWizarddialogboxappearsduringthe
installationprocess,clickCancel.IftheHardwareInstallationwarningdialog
boxappears,clickContinueAnyway.
1-2
UserGuide
Page 9

OntheInstallationMethodpage,clickExpressMode.
2
TheDiscoverPrintingSystempageopenstosearchforyourprinter.If
3
Discoverdoesnotfindyourprintingsystem,amessageappears.Removeand
reinserttheUSBornetworkcable,andensureitisconnectedproperly.Click
Refreshtoretrythediscovery.Ifthesystemstillcannotfindyourprinter,contact
yoursystemadministrator.
IfDiscoveryfindsyourprinter,clicktheprinternametoselectit.
SelectUsehostnameforportnametouseahostnamefortheStandard
4
TCP/IPport.IftheinstallationwizardstilldisplaystheIPaddress,contactyour
systemadministrator.(NotavailablewithaUSBconnection.)
ClickInformationifyouwanttoopenadialogboxwithdetailsaboutIP
5
Address,HostName,PrinterModel,Contact,Location,andSerialNumber.
ClickOK.ClickNext.(NotavailablewithaUSBconnection.)
OnthePrinterSettingspage,youcanassignanametotheprintingsystem.
6
Youcanalsochoosetosharethisprinterwithothersorsetthisprinterasthe
defaultprinter.Makeyourselections,andthenclickNext.
Installation
OntheConfirmSettingspage,clickInstallifthesettingsarecorrect.Click
7
Backtocorrectthesettings.
TheInstallationCompletedpageappearsdisplayingthefollowingdriver
8
options.
Printatestpage
Thisselectionverifiesaconnectionwiththeprinterandcreatesaprintoutof
theinstalleddrivercomponents.
ShowQuickPrintTab
Thisselectionletsyoudefinebasicprintoptionsintogroupprofilesthatcan
beaccessedeasily.TheShowQuickPrinttaboptionalsoappearsinthe
AdministratorSettingsintheDeviceSettingstab.
EnableStatusMonitor
TheStatusMonitordisplayssystemstatusmessagesonyourcomputer
screenduringprintingtasks.TheStatusMonitorbuttonappearsonthe
Advancedtab.
DeviceSettings
SelectDeviceSettingstoopentheDeviceSettingstabwhereyoucan
chooseinstalledoptionsforyourprintingsystem.(InWindowsVista,orwith
aUSBconnection,theDeviceSettingscheckboxisnotdisplayed).
Whentheinstallationcompletessuccessfully,clickFinishtoexittheinstallation
wizardandreturntotheProductLibraryCDmenu.
Softwareinstallationfailuresgeneratethefollowingmessage:
Oneormoresoftwareinstallationshavefailed.
ClickFinish,andretrytheinstallation.Ifthesamemessageappearsagain,
contactyoursystemadministrator.
KXDRIVER
1-3
Page 10

Installation
Theinstallationoftheprinterisnowcomplete.Ifprompted,restartyour
computer.
CustomInstallation
CustomModeisanoptiontoinstallutilities.Youcanspecifytheprinterport,
fonts,andtheutilitiesyouwanttoinstall.
PrinterdriversthatshipwithWindowsoperatingsystemsarecalledminidrivers.
TheminidriverisavailableseparatelyforPCLandKPDLandprovidesbasic
supportforyourprinter.Minidriverfunctionalityisnotdocumentedinthisuser
guide.
InstallingonWindowsVistaandWindowsXPwithaUSB Connection
Thissectiondescribesthecustominstallationprocedureofthedriversoftware
onWindowsVistaandWindowsXPusingaUSBconnection.
Ensurethatyourprinterandcomputerareturnedonandconnectedusinga
1
USBcable.
Note:IftheFoundNewHardwareWizarddialogboxappearsduringthe
installationprocess,clickCancel.IftheHardwareInstallationwarningdialog
boxappears,clickContinueAnyway.
OntheInstallationMethodpage,selectCustomMode.
2
TheDiscoverPrintingSystempageappearsdisplayingDiscoverselected.
3
Youcanusethisoption,ortheCustomselectoption.
WiththeDiscoveroption,youcanletthesystemfindallthedevicesavailable
fordriverinstallation.Ifyouusethisoption,proceedtostep4.
WiththeCustomselectoption,youcanchoosetheprintingsystemandprinter
porttoinstall.Proceedtostep6.
IfDiscoverdoesnotfindyourprintingsystem,amessageappears.Ensurethat
yourprinterisproperlyconnectedbythecorrectcableandisturnedon,and
thenclosethemessagebox.RemoveandreinserttheUSBcabletoyour
computerandretrythediscovery.Contactyoursystemadministratorifthe
systemcannotfindyourprinter.
IfDiscoverfindsoneormoreUSBprintingsystems,selectyourmodelfromthe
4
list.ClickNext.
OntheCustomInstallationpage,selectthedriverandsoftwarepackagesyou
5
wanttoinstallfromtheDriverandUtilitytabs,andclearthosenotintendedfor
installation.ClickNext.Proceedtostep10.
OnthePrintingSystempage,selectyourmodel,andthenclickNext.
6
OnthePrinterPortpage,selecttheportconnectedtoyourprintingsystem.
7
1-4
UserGuide
Page 11

OntheCustomInstallationpage,selectthedriverandsoftwarepackagesyou
8
wanttoinstallfromtheDriverandUtilitytabs,andclearthosenotintendedfor
installation.ClickNext.
OnthePrinterSettingspage,youcanassignanamefortheprintingsystem.
9
ThisnameappearsinWindowsPrintersandFaxesandinthePrintdialogbox
inapplications.Youcanalsochoosetosharethisprinterwithothersorsetthis
printerasthedefaultprinter.Makeyourselections,andthenclickNext.
OntheConfirmSettingspage,clickInstallifthesettingsarecorrect.Click
10
Backtocorrectthesettings.
TheInstallationCompletedpageappearsdisplayingtheinstallationdetails.
11
Printatestpage
Thisselectionverifiesaconnectionwiththeprinterandcreatesaprintoutof
theinstalleddrivercomponents.
ShowQuickPrintTab
Thisselectionletsyoudefinebasicprintoptionsintogroupprofilesthatcan
beaccessedeasily.TheShowQuickPrinttaboptionalsoappearsinthe
AdministratorSettingsintheDeviceSettingstab.
EnableStatusMonitor
TheStatusMonitordisplayssystemstatusmessagesonyourcomputer
screenduringprintingtasks.TheStatusMonitorbuttonappearsonthe
Advancedtab.
DeviceSettings
SelectDeviceSettingstoopentheDeviceSettingstabwhereyoucan
chooseinstalledoptionsforyourprintingsystem.(InWindowsVista,orwith
aUSBconnection,theDeviceSettingscheckboxisnotdisplayed).
Whentheinstallationcompletessuccessfully,clickFinishtoexittheinstallation
wizardandreturntotheProductLibraryCDmenu.
Softwareinstallationfailuresgeneratethefollowingmessage:
Installation
Oneormoresoftwareinstallationshavefailed.
ClickFinish,andretrytheinstallation.Ifthesamemessageappearsagain,
contactyoursystemadministrator.
Theinstallationoftheprinterisnowcomplete.Ifprompted,restartyour
computer.
InstallingonWindowsVistaandWindowsXPwithaNetwork Connection
Thissectiondescribesthecustominstallationprocedureofthedriversoftware
onWindowsVistaandWindowsXPusingaNetworkconnection.
Ensurethatyourprinterandcomputerareconnectedtoanetwork.
1
OntheInstallationMethodpage,selectCustomMode.
2
TheDiscoverPrintingSystempageappearsdisplayingDiscoverselected.
3
ForanExpressInstallation,youcanletDiscoverfindyourprintingsystem,
KXDRIVER
1-5
Page 12

Installation
andproceedwiththestepsinExpressInstallation.Otherwise,youcanchoose
Customselect,andclickNexttocontinuewithacustominstallation.
OnthePrintingSystempage,selectthemodel,andthenclickNext.
4
OnthePrinterPortpage,selecttheportconnectedtoyourprintingsystem,or
5
addaportconnectedtoyoursystembyclickingAddPort.ClickNext.
OntheCustomInstallationpage,selectthedriverandsoftwarepackagesyou
6
wanttoinstallfromtheDriverandUtilitytabs,andclearthosenotintendedfor
installation.ClickNext.
OnthePrinterSettingspage,youcanassignanamefortheprintingsystem.
7
ThisnameappearsinWindowsPrintersandFaxesandinthePrintdialogbox
inapplications.Youcanalsochoosetosharethisprinterwithothersorsetthis
printerasthedefaultprinter.Makeyourselections,andthenclickNext.
OntheConfirmSettingspage,clickInstallifthesettingsarecorrect.Click
8
Backtocorrectthesettings.
TheInstallationCompletedpageappearsdisplayingtheinstallationdetails.
9
Printatestpage
Thisselectionverifiesaconnectionwiththeprinterandcreatesaprintoutof
theinstalleddrivercomponents.
ShowQuickPrintTab
Thisselectionletsyoudefinebasicprintoptionsintogroupprofilesthatcan
beaccessedeasily.TheShowQuickPrinttaboptionalsoappearsinthe
AdministratorSettingsintheDeviceSettingstab.
EnableStatusMonitor
TheStatusMonitordisplayssystemstatusmessagesonyourcomputer
screenduringprintingtasks.TheStatusMonitorbuttonappearsonthe
Advancedtab.
DeviceSettings
SelectDeviceSettingstoopentheDeviceSettingstabwhereyoucan
chooseinstalledoptionsforyourprintingsystem.(InWindowsVista,orwith
aUSBconnection,theDeviceSettingscheckboxisnotdisplayed).
Whentheinstallationcompletessuccessfully,clickFinishtoexittheinstallation
wizardandreturntotheProductLibraryCDmenu.
Softwareinstallationfailuresgeneratethefollowingmessage:
Oneormoresoftwareinstallationshavefailed.
ClickFinish,andretrytheinstallation.Ifthesamemessageappearsagain,
contactyoursystemadministrator.
Theinstallationoftheprinterisnowcomplete.Ifprompted,restartyour
computer.
1-6
UserGuide
Page 13

OptionalPrinterComponents
Youcanexpandthefunctionalityofyourprinterdriverbyinstallingoptional
componentsfromtheProductLibraryCD>AdvancedToolsmenu.
InstallingOptionalPrinterComponents
OntheProductLibraryCDmenu,selectAdvancedTools.
1
OntheAdvancedToolspage,selectOptionalPrinterComponents.
2
Selectaprinter,andclickNexttoinstalloptionalcomponents.
3
OnallSelectpages,chooseyourcomponents,andclickNext.
4
OntheConfirmSettingspage,ifthedisplayedsettingsarecorrect,click
5
Install.ClickBacktocorrectanysettings.
ThePrinterComponentsInstallationCompletedpageappears.ClickFinish.
6
Whenyouhavecompletedinstallingprintersandoptionalcomponents,if
prompted,restartyourcomputer.
Installation
InstallingthePrinterWizard
TheAddPrinterWizarddisplaysaseriesofscreensthatguideyouthrough
printerinstallation.Youarepromptedtomakeinstallationchoicesoneach
screen.
InstallingonWindowsVista
ThissectiondescribeshowtoinstallaprinterdriverusingtheAddPrinter
WizardinWindowsVista.
ClicktheStarticonintheWindowstaskbaratthebottomofthescreen.
1
IntheStartwindow,clickControlPanel.
2
IntheControlPanel,clickPrinter.
3
InthePrinterswindowtoolbar,clickAddaprinter.
4
TheAddPrinterWizardappears.Thewizardprovidesyouwithstepbystep
5
driverinstallationinstructions.ClickeitherAddalocalprinterorAdda
network,wirelessorBluetoothprinter.Followtheinstructionsoneachpage,
thenclickNexttoproceedtothenextpage.
Note:IftheWindowsSecuritywarningdialogboxappears,clickInstallthis
driversoftwareanyway.
Thelastpageofthewizardappearswithamessagethatyou’vesuccessfully
6
addedtheprinteryouselected.Installationoftheprinterdriverisnowcomplete.
KXDRIVER
1-7
Page 14

Installation
ClickPrintatestpageifyouwanttoproducesampleprintoutputfromthe
newlyinstalledprinter.ToclosetheAddPrinterWizard,clickFinish.
InstallingonWindowsXPandWindows2000
ThissectiondescribeshowtoinstallaprinterdriverusingtheAddPrinter
WizardonWindowsXPandWindows2000.
ClickStartintheWindowstaskbar,andclickControlPanel.
1
ClickPrintersandFaxestoopenthePrintersandFaxeswindow.
2
ClickAddaprinterinthewindowareaontheleft.
3
Note:TheAddPrinterWizardcanalsobestartedbyclickingAddprinterin
theFilemenuofthePrintersandFaxeswindow.
TheAddPrinterWizardappears.Thewizardprovidesyouwithstepbystep
4
driverinstallationinstructions.Followtheinstructionsoneachpage,andthen
clickNexttoproceedtothenextpage.
Note:IftheFoundNewHardwareWizardpageappears,clickCancel.Ifthe
HardwareInstallationwarningdialogboxappears,clickContinueAnyway.
WhentheCompletingtheAddPrinterWizardpageappears,installationof
5
theprinterdriverisnowcomplete.ToclosetheAddPrinterWizard,clickFinish.
Ifprompted,restartyourcomputer.
1-8
UserGuide
Page 15
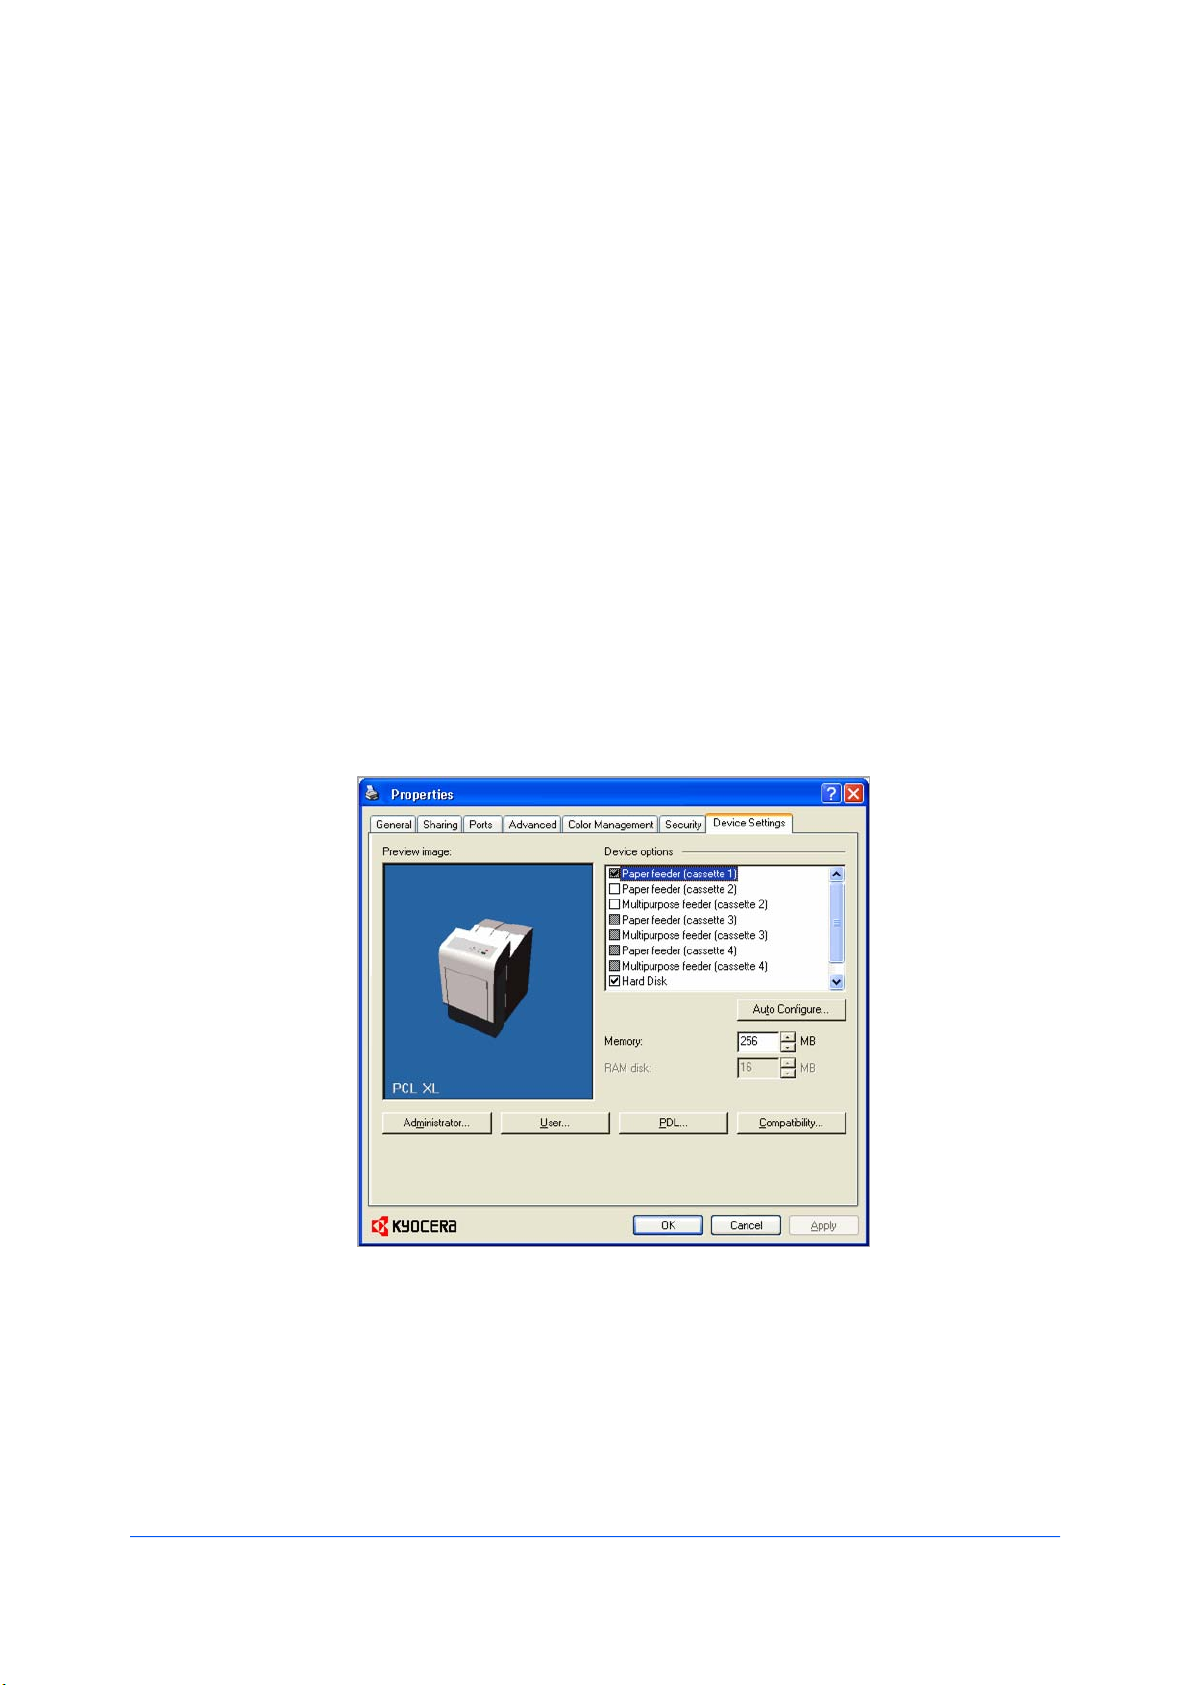
2DeviceSettings
DeviceSettingstabletsyouselectinstalledprintingsystemoptionssothe
associatedfeaturescanbeusedwiththeprinterdriver.Youcanalsomatchthe
memorysettinginthedriverwiththememoryinstalledinyourprintingsystem,
whichletsthedrivermanagefontdownloadsmoreefficiently.Administrator,
User,PDL(PageDescriptionLanguage),andCompatibilitysettingscanalsobe
selected.
ThesefeaturesareavailableintheDeviceSettingstab:
DeviceOptionsonpage2-2
AutoConfigureonpage2-2
Memoryonpage2-3
AdministratorSettingsonpage2-4
UserSettingsonpage2-8
PDL(PageDescriptionLanguage)onpage2-9
CompatibilitySettingsonpage2-13
AccessingtheDeviceSettingsTab
TheDeviceSettingstabcanbeaccessedfromthePrinters(WindowsVista),
orPrintersandFaxes(WindowsXP)folder.
ClickStart,thenclickControlPanelanddouble-clickPrinters(Windows
1
Vista),orPrintersandFaxes(WindowsXP).
Right-clicktheprintericon,andclickProperties.
2
KXDRIVER
2-1
Page 16

DeviceSettings
ClicktheDeviceSettingstab.
3
DeviceOptions
Optionaldevicesextendthecapabilitiesofyourprintingsystemforsourceand
jobstorage.
Inaclient/serverenvironment,thisfeatureisunavailabletoaclientloggedinas
arestricteduser.
SettingDeviceOptions
Youcansettheprinterdrivertomatchtheoptionaldevicesinstalledonyour
printingsystem.
InthePrinterPropertiesdialogbox,clicktheDeviceSettingstab.
1
InDeviceSettings>Deviceoptions,selectthecheckboxesforallinstalled
2
devices.
AutoConfigure
AutoConfiguredetectsthedevicesinstalledontheprintingsystemifitis
connectedoveranetwork.Whenyourcomputerisconnectedtotheprinting
systemthroughaTCP/IPport,theAutoConfigurebuttonappearsinthe
DeviceSettingstab.AutoConfigureupdatestheDeviceoptionslistand
previewimagestokeeptheprinterdriverconsistentwiththeprintingsystem
configuration.
NotallinstalleddevicesaredetectedbyusingAutoConfigure.Before
selectingOKintheDeviceSettingstab,checkthesettingstomakesurethat
theyarecorrect.
Note:ThedefaultsettingforWindowsXPServicePack2isfortheWindows
FirewalltobesettoOn.Thesettingcanbechangedtoallowcommunication
betweentheprintingsystemandyourcomputer.IntheWindowsSecurity
Alertdialogbox,clickUnblock.
SilentAutoConfigure
SilentAutoConfigurecheckstheprintingsystemevery10minutesfor
changesinoptionaldevicesormemory.Whenachangeisdetected,thedriver
isautomaticallyupdatedwiththenewsettings.SilentAutoConfigureis
availableonlyforWindowsVistaOSforprintingsystemsconnectedtoa
network.
Inaclient/serverenvironment,thisfeatureisunavailabletoaclientloggedinas
arestricteduser.
EnablingAutoConfiguration
TheAutoConfigurebuttoncanbeusedtodetectallavailabledeviceoptions
whentheprintingsystemisconnectedtoanetworkthroughaTCP/IPport.
Verifythatalloptionaldevicesareattachedtotheprintingsystem,andthatitis
1
turnedonandreadytoprint.
IntheDeviceSettingstab,clickAutoConfigure.
2
2-2
UserGuide
Page 17

DeviceSettings
InWindows2000andWindowsXP,thedriversettingsareupdated
immediately.
InWindowsVista,theAutoConfiguredialogboxopens.SelectfromAuto
configureoptions:
AutoConfigureNow
Clickthebuttonatanytimetoretrievethecurrentsettingsfromtheprinting
system.Itisrecommendedtodothiswhenthedriverisfirstinstalledand
whenSilentautoconfigurationisturnedoff.
Silentautoconfiguration
Selecttoletthedriverchecktheprintingsystemevery10minutesforany
changesinoptionaldevicesormemory.Whenachangeisdetected,the
driverisautomaticallyupdatedwiththenewsettings.
Memory
Memoryistheamountofstandardandoptionalmemoryinstalledintheprinting
system.Tomaximizethedownloadingofprintingsystemfonts,thedrivermust
besettomatchthetotalprintingsystemmemory.
SettingtheMemory
Bydefault,theMemorysettingmatchesthestandardmemoryintheprinting
system.Ifoptionalmemoryisinstalled,setthememoryintheprinterdriverto
matchthetotalamountofmemory.
InstalloptionalDIMMmemoryintheprintingsystem.
1
InDeviceSettings,attheMemorytextbox,selecttheamountoftotalinstalled
2
memorybyclickingtheupanddownarrowsuntilthetextboxshowsthecorrect
numberofmegabytes(MB).
YoucanusetheAutoConfigurefeaturetoobtainmemoryinformationfromthe
printingsystem.
RAMDisk
Ifaharddiskisnotinstalled,theRAMdiskfunctionsasavirtualharddisk,
savingprintrequestsintotheprintingsystem’smemory.BecausetheRAMdisk
isvolatilememory,alldatasenttotheprintingsystemislostwhenthepoweris
turnedoff.
Note:Whenaharddiskisinstalled,theRAMdiskfeatureisinactive.
SelectingIgnoreapplicationcollationintheCompatibilitySettingsdialog
boxletsthedrivercontrolcollation.RAMdiskcanthenincreasetheprintspeed
ofcollatedmultiplecopiesbysendingtheprintjobjustonce.
Inaclient/serverenvironment,thisfeatureisunavailabletoaclientloggedinas
arestricteduser.
SettingRAMDisk
Ifaharddiskisnotinstalled,youcansettheRAMdisktosaveprintrequests
intotheprintingsystem’smemory.
InDeviceSettings,intheDeviceoptionslist,selectRAMdisk.
1
KXDRIVER
2-3
Page 18

DeviceSettings
AdministratorSettings
AttheRAMdisktextbox,typeorselectthesizeoftheRAMdiskbyclickingthe
2
upanddownarrowsuntilthetextboxshowsthecorrectnumberofmegabytes
(MB).
Attheprintingsystem'soperationpanel,turnonRAMdiskandsetitssize.
3
ThemaximumRAMdisksizedependsontheamountofinstalledmemory.
AdministratorSettingsletsyouspecifyJobaccountingIDs,displaythe
QuickPrinttab,selectSNMPsettings,andsetapasswordtocontrolaccess.
Inaclient/serverenvironment,thisfeatureisunavailabletoaclientloggedinas
arestricteduser.
JobAccounting
Jobaccountinggivesanadministratorcontrolusageofaprintingsystem.With
Jobaccounting,youcanassignaccountIDs(identificationnumbers)tousers
ordepartments,aspecificaccountID,ormakeaccountIDinputmandatoryfor
printing.AfteraccountIDsarecreated,youcanviewfromtheprintingsystem
operationpanelthenumberofcopiesassociatedwithaspecificIDaswellas
limitthenumberofcopiesforindividualIDs.AccountIDscanbeupto8digits.
Note:JobaccountingmustbesettoOnattheprintingsystem.Amaximum
of100accountIDscanbeassignedattheprintingsystemandstoredinthe
printerdriver.
JobAccountingOptions
Jobaccountingsupportsthefollowingoptions:
UsespecificaccountID
SelectthisoptiontotracktheprintjobsofauserorgroupwithanaccountID.
ItwillsendtheaccountIDwitheachprintjob.Anadministratorcanrestricta
userorgroupfromchangingtheiraccountIDbyusingthePassword
protectadministratorsettingsintheAdministratorSettingsdialogbox.
PromptforaccountID
SelectthisoptiontotracktheprintjobsofauserorgroupwithanaccountID
aswellaspromptforanaccountID.Atthetimeaprintjobissent,theuser
willbepromptedtoenteraJobAccountingID.
PromptforaccountIDandvalidate
SelectthisoptiontopromptforanaccountIDthatissavedinthedriver.
Whensendingaprintjob,typeanaccountIDwhenprompted,thenclickOK
toprint.TheaccountIDisvalidatedagainsttheaccountIDlist.Iftyped
incorrectly,youwillbepromptedtotypeitagain.
DisplayaccountIDlist
SelectthisoptiontodisplaytheaccountIDlistatthetimeofprinting.The
printjobcanbeassignedtoauserorgroup.TheaccountIDlistisstoredin
thedriverandmorethanoneIDmustbeestablishedforthelisttoappear.
AccountIDList
SelectthisoptiontodisplaytheaccountIDtomanagetheAccountIDlist.
Add,editordeleteaccountIDsfromtheliststoredinthedriver.AccountIDs
descriptionsmatchtheuserorgroupwithanaccountID.AfteranaccountID
2-4
UserGuide
Page 19

listiscreated,thelistcanbeexportedasagroupbysavingitasatextfile
(.CSV).ToimportanaccountIDlist,browseforanexistinglistandopenit.
PrintingwithJobAccounting
AfteraccountIDsareassignedandJobaccountingissettoOnattheprinting
system,thenumberofpagesprintedisaddedtotheselectedaccountIDtotal.
IntheDeviceSettingstab,clickAdministrator.
1
IntheAdministratorSettingsdialogbox,selectJobaccounting.
2
SelectaJobaccountingoption:
3
UsespecificaccountID
PromptforaccountID
PromptforaccountIDandvalidate
DisplayaccountIDlist
SelectAccountIDListtocreateandmanageaccountIDlists.
4
DeviceSettings
ClickOKinalldialogboxes.
5
Printthedocumentfromtheapplication.
6
Forsomeoptions,whenthePrintOptionsdialogboxappears,typeorselect
7
anaccountID,andclickOK.
ShowQuickPrintTab
ThisoptionletsyoucontrolthedisplayoftheQuickPrinttab.Youcandefine
basicprintoptionsintogroupprofilesthatcanbeaccessedquicklyandeasily.
•WithaclearedShowQuickPrinttabcheckbox,thetabdoesnotappearin
thePrintingPreferencesdialogbox.
•WithaselectedShowQuickPrinttabcheckbox,thetabappearsinthe
PrintingPreferencesdialogbox.WhenyouselecttheShowQuickPrint
tabcheckbox,youcanalsoaccesstheothertwocheckboxes,Hideother
tabs,andSetQuickPrinttabasdefault.
•SelectingHideothertabsdisplaysonlytheQuickPrinttabtotheuser.
•SelectingSetQuickPrinttabasdefaultopenstothistabwhenyou
accessPrintingPreferences.
ColorPageCount
Colorpagecountrecordscolorandblackandwhitepagesineachprintjob.
Thistrackingfeaturecanbeusedbybillingoraccountingapplications.Optional
thirdpartyaccountingsoftwarecanreadandprocesstheprintinformation
embeddedineachpage.
Ittracksoutputusingthefollowingmethod:
•Apagewithanycoloriscountedasacolorpage.
•Apagewithblackonlyiscountedasablackandwhitepage.
KXDRIVER
2-5
Page 20

DeviceSettings
•Ablankpageiscountedasablackandwhitepage.
AccessingColorPageCount
Colorpagecountrecordsthenumberofcolorandblackandwhitepagesin
eachprintjob.Itembedsthecountinformationinthedocument.
IntheDeviceSettingstab,clickAdministrator.
1
SelectColorpagecount.
2
Black&WhiteMode
Black&Whitemodedisablesallcolorsettingsinthedriver’sImagingtaband
printswithblacktoneronly.
Toenablethisfeature,openDeviceSettingsandclickAdministrator>Black
&Whitemode.
AdministratorPassword
YoucansetPasswordprotectadministratorsettingsintheAdministrator
Settingsdialogboxtopreventunauthorizedchangesinthisdialogbox.When
selected,thissettingwillpromptyoutoenterapasswordandconfirmthe
password.ThispasswordprotectionblocksaccesstotheJobaccounting,
SNMPSettings,ShowQuickPrinttab,andBlack&Whitemodesettings.
SettingtheAdministratorPassword
InDeviceSettings>AdministratorSettings,selectPasswordprotect
1
administratorsettings.
InthePassworddialogbox,enterapassword,usingatleast4andnomore
2
than16characters.ReenterthepasswordinConfirmpasswordandclickOK.
ClearingtheAdministratorPassword
IntheDeviceSettingstab,clickAdministrator.
1
IntheEnterPassworddialogbox,typethepasswordandclickOK.
2
IntheAdministratorSettingsdialogbox,clearthePasswordprotect
3
administratorsettingscheckbox.
ClickOK.
4
SNMP
SimpleNetworkManagementProtocol(SNMP)isasetofrulesthatgovernthe
managementofnetworkdevices,suchasprintingsystems.SNMPsettings
determinethelevelofsecuritywhenusingtheAutoConfigurefeature,and
preventunauthorizedprintingtotheSNMPv3printingsystem.SNMPsettings
mustbesetintheprinterdriverandintheprintingsystem’sCommandCenter.
ThefollowingSNMPoptionsareavailable:
SNMPv1/v2c
2-6
UserGuide
Page 21

ThisoptionensuressuccessfulAutoConfigurecommunicationusingRead
communitynameandWritecommunityname.
SNMPv3
ThisoptionensuressecureAutoConfigurecommunicationusingauser
nameandpassword.Authenticationandprivacyoptionsareavailableby
selectingSettings.
Applytoothermodels
SelectfromthelistofinstalledprintingsystemstoapplytheselectedSNMP
settings.
SNMPv3Options
YoucanselectSNMPv3optionsforsecurecommunicationwiththeprinting
system.
Authentication
Thisoptionprovidesanalgorithmtocheckthatatransferredfilehasarrived
intact.MessageDigest5(MD5)andSecureHashAlgorithm1(SHA1)are
hashalgorithmsusedtoauthenticatepacketdata.
MD5
Thisoptionprovidesacryptographichashfunctionwitha128–bithash
value.ItaddssecurityandprotectionagainstGatewayLoadBalancing
Protocol(GLBP)-spoofingsoftware.
SHA1
Thisoptionproducesamessagedigestthatis160bitslong.SHA1isthe
successortoMD5.
Privacy
Thisoptionusesencryptionforsecurecommunication.Itisavailableafter
youselecttheAuthenticationoption.Youmayselectoneprivacyoption.
(IB-23doesnotsupportAESencryptedcommunication.)
DES
ThisoptionusestheDataEncryptionStandardforencryption.DESturns
cleartextintociphertextviaanencryptionalgorithm.Itencryptsanddecrypts
datausing8-byteblocksanda56-bitkey.
AES
ThisoptionusestheAdvancedEncryptionStandardforencryption.AESisa
symmetricblockcipherthatcanprocessdatablocksof128bits,usingcipher
keyswithlengthsof128,192,and256bits.ItismoresecurethanDES.
DeviceSettings
SelectingSNMPSettings
SNMPsettingsinthedrivermustbesettomatchthesettingsintheprinting
system’sCommandCenter.
InDeviceSettings>Administrator,clickSNMPSettings.
1
SelectSNMPv1/v2corSNMPv3.
2
ForSNMPv1/v2c,typetheReadcommunitynameandWritecommunity
name,upto32characters,andclickOK.
ForSNMPv3,typeaUsernameupto32characters,andaPasswordfrom
8to32characters.
TosetauthenticationandprivacyoptionsforSNMPv3,clickSettings.
3
KXDRIVER
2-7
Page 22

DeviceSettings
IntheSNMPv3dialogbox,selectfromtheavailableoptions.
4
ClickOKintheSNMPv3dialogbox.
5
Optional:YoucanclickApplytoothermodelsandselectfromavailable
6
models.TheSNMPsettingsareappliedtoallselectedmodels.
UserSettings
UserSettingsletsyouspecifyuseranddepartmentnames,selectthedefault
unitofmeasure,andchangethedriverdisplaylanguage.
Inaclient/serverenvironment,thisfeatureisunavailabletoaclientloggedinas
arestricteduser.
Identification
IdentificationletsyouidentifyyourprintjobwithaUsernameand
Departmentname,upto31characters.TheUsernamecanbeusedtoidentify
aprintjobstoredontheharddisk.
SettingUserIdentification
YoucantypeUsernameandDepartmentinformationtobeusedwiththeJob
Storage(e-MPS)feature.
InDeviceSettings>User,typeyourpreferrednameintheUsernametext
1
box.
TypeyourdepartmentorgroupnameinDepartmenttextbox.
2
Youcantypeupto31charactersintheUsernameandDepartmenttext
boxes.
Units
YoucansetInchesorMillimetersastheunitofmeasurement.Thisisusedfor
thefollowingsettings:
•CustompagesizesettinginthePageSizesdialogboxintheBasictab.
•SpacingsettingintheWatermarkAddandEditdialogboxesinthe
Advancedtab.
•PostersettingsandGuttersettingsintheLayouttab.
SelectingaUnitofMeasurement
Youcanselectaunitfordisplayingmeasurementsintheuserinterface.
IntheDeviceSettingstab,clickUser.
1
SelectInchesorMillimeters.
2
LanguagePreference
TheLanguagepreferenceoptionspecifiestheuserinterfacelanguageofthe
DeviceSettingstabofPrinterPropertiesandalltabsofPrinting
Preferences.
2-8
UserGuide
Page 23

PDL(PageDescriptionLanguage)
DeviceSettings
Availablelanguagesvarydependingonyourlocaleandyourcomputersettings.
SettingLanguagePreference
Youcanselectauserinterfacelanguage.
InDeviceSettings>User,selectthedesiredlanguagefromtheSelect
1
languagelist.
ClickOKintheUserSettingsandPropertiesdialogboxes.
2
APageDescriptionLanguage(PDL)specifiesthecontentsandlayoutofa
printedpage.IntheDeviceSettingstab,youcanchoosefromPCLXL,
(PrinterCommandLanguageXL),PCL5c,KPDL(anemulationofPostScript
printing),orPDF(PortableDocumentFormat).Ifyourapplicationsupportsthe
XMLPrintSpecification,thenprintingcanbeperformedbyinstallingtheXPS
driver.WiththeXPSdriver,theonlyPDLoptionisXPS.Theprinterdefaultis
PCLXL,whichissuitableformostprintingpurposes.AfteryouselectaPDL,
theselectionappearsinthelowercornerofthePreviewimage.
InGDIcompatiblemode,vectorgraphicsarerasterizedforprintingasbitmap
images.UsetheGDIcompatiblemodeoptiontoimprovetheoutputqualityof
thegraphiccreatedbytheapplication.
Note:ToaddPDFtothelistofPDLchoices,youmustinstalltheOutputto
PDFplug-in.
Inaclient/serverenvironment,thisfeatureisunavailabletoaclientloggedinas
arestricteduser.
PDLOptions
ThePDLoptions,availableinthePDLSettingsdialogbox,areaccessedin
DeviceSettings.
PCLXL
ThemostrecentversionofHPPCLandPCL6.ThisPDLincludesPCL5c
features.PCLXLlacksbackwardcompatibilitywithearlierPCLversions,
thoughitisenhancedoverPCL5cintheseareas:
•Reducedfilesize
•Betterprintspeed
•Fasterreturntoapplication
PCL5c
•FullycompatiblewithearlierPCLversions
•Bidirectionalcommunicationsupport
•WideselectionoffontsforusewithMicrosoftWindowsapplications
•Complexgraphicsmightnotprintaswell
KPDL
KPDLisusedwhenprintingfromapplicationsthatsupportPostScript2or3.
•AnemulationofPostScriptprinting
KXDRIVER
2-9
Page 24

DeviceSettings
•Stronggraphicsreproduction
•PrintspeedsmaybeslowerthanPCL5c
•RequiresmoreprintingsystemmemorythanPCL5c
•EnablesnativeTrueTypefontdownloading
•SupportsmostGraphicssettingsoptions
PDF
OutputtoPDFisaplug-inthatletsyouprintorsavedocumentsfrommultiple
sourcestoAdobePortableDocumentFormat(PDF).ThePDFformatis
independentoftheoperatingsystemandapplicationsoftwareusedtocreate
documents.
Note:WithPDFselectedasthePDL,onlyalimitedsetofdriveroptionsis
available.
•UseasanalternativetoexistingcommercialapplicationsforcreatingPDF
documents.
•DocumentssavedasPDFretaintheiroriginalappearance,andcanbe
viewedandprintedwiththefreeAdobeReaderonWindows,MacOS,and
UNIXplatforms.
•WithPDFselectedasthePDL,onlyalimitedsetofdriveroptionsisavailable.
SelectingPDLOptions
YoucanselectapagedescriptionlanguagefromPDLoptions.
InDeviceSettings>PDL,selectthedesiredPagedescriptionlanguagefrom
1
theSelectPDLlist.
SelecttheGDIcompatiblemodeoptiontoimprovetheoutputqualityof
2
graphicscreatedbyyourapplication.
SettingsisavailablewhenthePDLissettoKPDLorPDF.
3
IfyouselectKPDLasthePDL,youcanclickSettingstoopentheKPDL
Settingsdialogbox.SelecttheAllowdatapassthroughcheckboxto
reduceerrorswhenprintingcomplexjobsfromapplicationsthatuse
PostScriptformatting.
NotethatifyouselectAllowdatapassthrough,EMFspoolingisnot
availableintheAdvancedtab.
IfyouselectPDFasthePDL,youcanclickSettingstoopenthePDF
Settingsdialogbox.
ClickOKinthePDLSettingsdialogbox.
4
PDFOptions
YoucanselectPDFoptionsifyouhaveinstalledtheOutputtoPDFplug-in.
ThePDFSettingsdialogboxcontainsthefollowingoptions:
PDFSettings
Embedfonts
2-10
UserGuide
Page 25

DeviceSettings
ThisoptionensuresthatdocumentfontsappearaccuratelyinthePDFfileon
screen.Thisoptionensuresaccuratereproductionbutsignificantlyincreases
thefilesize.
Compressdata
ThisoptionenablesflatcompressionforthegeneratedPDFdocument.This
optionsignificantlyreducesthefilesize.Additionalcompressionoptionsare
availablewithinAdobeAcrobat.
Security
ThisoptionappliesencryptiontothePDFdocument.ClickSettingsfor
additionalSecuritysettings.Seethenextsectionfordetails.
Printandsave
ThisoptionletsyouprintandsaveadocumentasaPDFfile.ClickSettings
foradditionalPrintandsavesettings.
SecuritySettings
Thisoptionletsyouselectanencryptionlevelandcreatepasswordsforthe
generatedPDFfile.
Thefollowingsecurityoptionsareavailable:
Encryption
Encryptionprovidespasswordprotectionsothatadocumentcannotbe
openedoralteredbyunauthorizedusers.
40-bit
ThisencryptionoptionprovideslowlevelsecurityforaPDFdocument.Itis
supportedforearlierversionsofAdobeAcrobatandAdobeReader3.0-4.x.
128-bit
ThisencryptionoptionprovideshighlevelsecurityforaPDFdocument.Itis
supportedforAdobeAcrobatandAdobeReader5.0orlater.
Passwords
Selectpasswordsforchangingsecuritysettingsandforopeninga
document.Passwordsaresupportedupto16charactersinlength.
Requirepasswordtochangesecuritysettings
TypeanOwnerpassword.WithinAdobeAcrobat,thispasswordisrequired
tochangethedocumentrestrictionsintheFiles>Properties>Security
section.
Requirepasswordtoopendocument
TypeaUserpassword.Theuserpasswordmustbeenteredatthetimethe
PDFdocumentisopened.Thispasswordmustbedifferentfromtheowner
password.
PrintandSaveSettings
ThisoptionletsyouprintandsaveadocumentasaPDFfile.
Savetofileonly
APDFfileiscreatedandsavedlocally.
Savetofileandprint
APDFfileiscreated,savedlocally,andsenttoprint.
Afteryouselectbetweenthesetwooptions,youcanchoosethefollowing
option:
Automaticallysavetodefaultfile
KXDRIVER
2-11
Page 26

DeviceSettings
APDFfilecanbesavedautomaticallyasadefaultfiletobeusedagain.
Youcanthenselectfromthefollowingoptions:
Replacedefaultfilename
Thisoptionletsyourenamethedefaultfilename.
Usedefaultfilename+dateandtime
Thisoptionletsyouusethedefaultnameandaddadateandtimestamp
eachtimethedocumentissaved.
Defaultfiledirectory
ThisoptionletsyoubrowsetoalocationtosaveyourPDF.
PrintingandSavingtoPDF
YoucanprintadocumentandsaveittoAdobePDF,ifyouhaveinstalledthe
OutputtoPDFplug-in.
OpenthePrintersfolder.
1
Right-clickonthedesiredprintingsystemmodel.
2
ClickProperties,thenclicktheDeviceSettingstab.
3
ClickPDL.
4
InthePDLSettingsdialogbox,intheSelectPDLlist,selectPDF.
5
ClickSettings.
6
InthePDFSettingsdialogbox,selectPrintandsave.
7
ClickSettings,andselectfromprintandsaveoptions.SeethePDFOptions
8
topicfordetails.
ClickOKinalldialogboxes.
9
Openandprintthedocument.
10
NameandsavethePDFfile.
11
WindowsVistaXPSDriver
TheXMLPaperSpecification(XPS)Pagedescriptionlanguageprovidesthe
mostefficientmethodfordisplaying,processing,andprintingdocuments.As
bothaPDLandadocumentformat,XPSrequirescompatibleprinterhardware
andsoftwarewrittenfortheWindowsPresentationFoundation(WPF)
architecture.PCLandKPDLarenotcompatiblewithanXPSenvironment.
Therefore,anXPSdriversupportsasinglePDLsetting,XPS.TheXPSdriver
canbeinstalledfromtheProductLibraryCD.IntheInstallationMethod
menu,clickCustomMode,andontheCustomInstallationscreen,selectKX
XPSDRIVER.
GDIcompatiblemode,PDF,andFontsarenotavailableintheXPSdriver.
2-12
UserGuide
Page 27

CompatibilitySettings
DeviceSettings
ToviewaprinttofileXPSdocument,downloadandinstalltheMicrosoftXPS
Viewer.
CompatibilitySettingsletsyouspecifymediasourcevalues,overridethe
application'sCollatesetting,andcombinetheSourceandMediatypelistsin
theBasictab.
Inaclient/serverenvironment,thisfeatureisunavailabletoaclientloggedinas
arestricteduser.
MediaSourceEnumeration
Mediasourceenumerationsupportscompatibilityformediasourcevalues
uniquetotheprinterdriver,suchasthoseforcassettesorfeeders.Yournewly
installedprinterdrivermaintainsidenticalmediasourcesupportwiththedriverit
replaces,whetherforthisdriveroronefromanothermanufacturer.Ifmedia
sourcemacrosexistfortheolderdriver,thenthealignmentofmediasource
valuesmaintainssupportwithouttheneedtochangethemacros.
SettingMediaSources
UsetheDriverInfoutility(\Utility\DriverInfo\DrvInfo.exe),availableonthe
ProductLibraryCD,tocomparethesourcevaluesforallinstalleddrivers.
Ifthevaluesforagivenmediasourcedifferbetweenprinterdrivers,youcan
reassignanenumeratedvaluetocreateamatchbetweenthedrivers.
IntheDeviceSettingstab,selectCompatibility.
1
FromtheMediasourceenumerationlist,selectthepapersupplymethod.The
2
currentvalueislistedintheEnumeratedvaluebox.
TypeanEnumeratedvalueforthemediasource,andclickApply.Toalign
3
settingswithadifferentdriver,thisvalueshouldalignwiththoseintheother
driver.
YoucanrestorealltheoptionsinCompatibilitySettingstothedefaultby
clickingReset.
IgnoreApplicationCollation
ThisoptionbypassestheCollatesettinginsoftwareapplications,andgives
prioritytotheprinterdriversetting.
•Withthecheckboxselected,theprinterdriverCollatesettingisused.
•Withthecheckboxcleared,theapplicationCollatesettingisused.
SelectingPrinterDriverCollation
Youcanignorethecollationsettingintheapplicationandusetheprinterdriver
collationsetting.
IntheDeviceSettingstab,selectCompatibility.
1
SelectIgnoreapplicationcollation.
2
KXDRIVER
2-13
Page 28

DeviceSettings
YoucanrestorealltheoptionsinCompatibilitySettingstothedefaultby
clickingReset.
CombineSourceandMediaTypeLists
Youcanchangethedriver'sBasictabsothatMediatypeandSourceare
combinedintoonelist,labeledSource.Inthecombinedlist,Mediatypesare
listedfirst,followedbycassettesandMPtray.
CreatingaCombinedSourceList
YoucancombinetheSourceandMediatypelistsintheBasictab,tomake
oneSourcelist.
IntheDeviceSettingstab,selectCompatibility.
1
SelectCombinesourceandmediatypelists.
2
YoucanrestorealltheoptionsinCompatibilitySettingstothedefaultby
clickingReset.
2-14
UserGuide
Page 29

3QuickPrint
IntheQuickPrinttab,youcanapplybasicprintsettingstoprintjobs.Any
QuickPrintsettingscanbesavedasagroup,calledaprofile,andappliedto
anyprintjob.Profilessupportcommonprintingtasks.
TheAdministratorcansettheviewoftheQuickPrinttabthroughthe
Installationprocess,orAdministratorSettingsinProperties.
ThesefeaturesareavailableintheQuickPrinttab:
QuickPrintOptionsonpage3-1
ProfileOptionsonpage3-3
QuickPrintOptions
KXDRIVER
YoucansetoneormoreprintoptionsontheQuickPrinttab.Youcanalso
selectfromprofilesthathavebeensetwithpredefinedoptionsforfrequentlyrun
printjobs.
SpecifyingPrintOptions
TheuppersectionoftheQuickPrinttabhasseveraliconsthatrepresentthe
mostcommonoptionsforprintjobs.ClickontheQuickPrinticonsandcheck
boxestochangesettingsfortheprintjob.Someoftheseoptionsalsoappearon
theBasic,Layout,andImagingtabs.Thelasttabyoumadeyourselectionis
thedisplayyouseeontheotherrelatedtabs.
Orientation
Thisiconchangesbetweenportraitandlandscapeprintingformats.If
needed,checkRotatedtochangetheorientationoftheprintedpageby180
degrees.
3-1
Page 30

QuickPrint
ColorMode
Thisiconchangesbetweencolorandblack&whiteprinting.Ifdesired,check
EcoPrinttomaketextandgraphicsappearlighterintheprintedjob.
EcoPrintdoesnotincreaseprintspeed.
Collate
Thisiconchangestheorderingoftheprintedpages.Thepageordering
sequencecaneitherbe123,123,123,or111,222,333,andsoon.Youcan
alsoReversetheorderoftheprintedpagesbyselectingthisoption.
(ReverseisavailablewhenPrinterdefaultisnotselectedunder
DestinationintheBasictab.ReversecanbedisabledinDeviceSettings
>CompatibilitySettings.)
Printonbothsides
Thisiconchangesbetweenduplexprintingforflippingonthelongedge,
duplexprintingforflippingontheshortedge,orfornotusingduplexprinting.
Multiplepagespersheet
ThisiconchangesbetweenOff,2,and4andforthenumberofsheets
printedononepage.Formorethan4sheetsperpage,definethesesettings
inLayout>Multiplepagespersheet.
AnybasicprintoptionscanbeResettothedefaultvaluesintheQuickPrint
tab.Thisbuttononlyappearswhenitisaccessedfromanapplication’sPrint
dialogbox.
ThefollowingsectionsdescribesomeoftheQuickPrinttaboptionsinmore
detail.ColormodecanalsobefoundintheBasicandImagingtabs,Collate
andDuplexprintingintheBasictabandMultiplepagespersheetinthe
Layouttab.TheProfilesoptionsisaccessedfromPrintingPreferences.
ColorMode
Colormodeletsyouchoosefull-colorprinting(CMYK)orprintingwithblack
toneronly.Whentheselectionappearsincolor,allcolorsettingsinthedriver
areenabled.ColorcannotbechosenifBlack&WhiteisselectedintheDevice
Settings>AdministratorSettings>Black&Whitemode.
Collation
Collatespecifiestheorderinwhichthepagesofamultiplecopyjobareprinted.
WithCollateselected,thefirsttimetheprintjobissenttotheprintingsystem
thedataisrenderedaspageimagesintheprintingsystem'smemory.The
remainingjobcopiesareprintedfromthestoreddata.Thisavoidstheextra
processinginvolvedinsendingeverycopyfromthecomputertotheprinting
system.
WithCollateselected,thedriverprintsthecompletejobsetbyset.WithCollate
cleared,itprintseachpagebyset.Forexample,withCollateselected,three
copiesofafive-pagedocumentoutputsaspagesonethroughfivein
succession,threetimes.
DuplexPrinting
Duplexprintingisprintingonbothsidesofeachpage.SelectPrintonboth
sidestostartduplexprinting.Ifitisnotselected,thentheprinterprintsononly
onesideofeachpage.Theprintersystemcontainsaduplexunitthatturnsthe
paperovertoallowprintingonthereverseside.Printonbothsidesmustbe
selectedtoprintonbothsidesofthecoverandinsertpages.
Fliponlongedge
3-2
UserGuide
Page 31

QuickPrint
Turnthelongedgeofthepagetoviewthecontent,likethepagesofabook
boundattheside.
Fliponshortedge
Turntheshortedgeofthepagetoviewthecontent,likeatabletboundatthe
top.
MultiplePagesperSheet
Multiplepagespersheetprintsseveralpagesonasinglesheetofpaperfor
thepurposeofreviewingthedocumentandconservingpaper.Thereadabilityof
themultiplepagesdecreasesasthenumberofpagespersheetisincreased.
YoucansetthearrangementofthepagesfromtheLayouttabaswellasprint
bordersaroundeachofthepages.
ProfileOptions
IntheProfilessection,youcanselectfromavailableprofilestoprintajob.You
canselectfrompredefinedprofiles,oryoucancreateyourownprofile,and
importprofiles.Youcanalsorearrangetheiconsandeditanddeleteprofiles.
SelectingProfiles
TheProfilesbuttonatthebottomoftheQuickPrinttabalwaysincludesa
FactoryDefaultprofilethatreturnsthedriveroptionstotheirdefaultsettings.
TheprofilescanincludeCommonProfiles,whichareinstalledasoptional
componentsthroughthePrinterInstallationWizard,andanycustomprofiles
created.FactoryDefaultandadministratorprofilescannotbemodified.
ClickProfiles.
1
IntheProfilesdialogbox,selectaprofile.
2
ClickApply.
3
Thesidepaneldisplaystheoptionsforthatprofile.IfanyoftheQuickPrint
optionsarenotrepresentedinthepredefinedprofile,theQuickPrinticonwill
beunavailable.
ClickOK.
4
SavingaProfile
TheSavebuttonletsyoucreateyourownprofiles.Youcanselecttheprinting
optionsyouwantinthedriver,thensavethedriversettingsincludingyour
customizationsasaprofile.Youcanthenusethatprofiletoprintthesametype
ofprintjobagainwithouthavingtoreselectallthesettings.InPrinting
Preferences,theProfilebuttonappearsatthebottomofallthetabs.
SettheprintingoptionsyouwantforyourprintjobbyopeningPrinting
1
Preferencesandselectingallyourdriversettings.
ClickProfiles>Save.
2
Toidentifytheprofile,typeaName,selectanIcon,andtypeaDescription.
3
KXDRIVER
3-3
Page 32

QuickPrint
ClickOKtosavetheprofile.
4
ThenewlyaddedprofileappearsintheProfilesdialogbox.
ClickApplytoactivatetheselectedprofiletothecurrentprintjob,orclickOKto
5
savetheprofile.
Note:Toresettheprinterdrivertodefaultsettings,selecttheFactoryDefault
profile,andclickApply.Thisclearsthesettingsofaselectedprofile.
EditingaProfile
TheEditbuttonletsyoumakechangestoanexistingprofile.TheFactory
Defaultprofilecannotbeedited.
ClickProfiles.
1
IntheSelectprofilesection,highlighttheprofiletobeedited,andclickEdit.
2
Anyofthethreeoptionscanbeedited:name,iconanddescription.ClickOKto
3
savetheeditedchanges.
ThenewlyeditedprofileappearsintheProfilesdialogbox.
ClickApplytoactivatetheselectedprofiletothecurrentprintjob,orclickOKto
4
savetheprofile.
DeletingaProfile
TheDeletebuttonletsyouremoveanexistingprofile.TheFactoryDefault
profilecannotbedeleted.
ClickProfiles.
1
IntheSelectprofilesection,highlighttheprofiletobedeleted,andclick
2
Delete.
Amessageappearsconfirmingtheremovaloftheprofile.ClickYestoremove.
3
ClickOKtoclosetheProfiledialogbox.
4
ImportingaProfile
TheImportbuttonletsyouimportacopyofaprofilefromotherprinterdrivers
intoyourprinterdriver.
ClickProfiles>Import.
1
Browsefortheexistingprofile(.KXP),selectit,andclickOpen.
2
Amessageappearsifanyoftheprofilesettingsintheimportedfilearenot
availableintheexistingdriver.SelectYes,toimporttheprofile,orNo,tocancel
theimport.
3-4
UserGuide
Page 33

IfyouselectedYesinthepreviousstep,thenewlyimportedfileappearsinthe
3
Profiledialogbox.
ClickApplytoactivatetheselectedprofiletothecurrentprintjob,orclickOKto
4
savetheprofile.
ExportingaProfile
TheExportbuttonletsyouexportacopyofaprofilefromyourprinterdriverfor
useinotherprinterdrivers.TheFactoryDefaultprofilecannotbeexported.
ClickProfiles.
1
IntheSelectprofilesection,highlighttheprofiletobeexported,andclick
2
Export.
TheExportProfiledialogboxappears.Nameandsavetheprofile.
3
ClickOKtoclosetheProfilesdialogbox.
4
QuickPrint
KXDRIVER
3-5
Page 34

4Basic
IntheBasictab,youcanspecifythemostcommonlyusedprinterdriver
settings.
ThesefeaturesareavailableintheBasictab:
PrinterDriverSettingsAccessonpage4-1
ChangingtheDefaultDriverSettingsonpage4-1
CreatingaCustomPageSizeonpage4-3
PrintinginDuplexModeonpage4-4
PrintingCollatedDocumentsonpage4-5
PrinterDriverSettingsAccess
TheprinterdriversoftwarecanbeaccessedfromthePrintdialogboxofan
application,orfromStart.Ifaccessedfromanapplication,thenchangesmade
todriversettingsremainineffectuntiltheapplicationends.Ifaccessedfrom
Start,changesaremaintainedasthedefaultprintersettings.
ChangingtheDefaultDriverSettings
TheResetbuttonisonlyavailablewhenyouaccessPreferencesor
PropertiesfromthePrintdialogboxofanapplication.Defaultdriversettings
applytoprintingjobsinitiatedfromanyapplication,buttheyareoverriddenby
settingchangesmadewithineachapplication.
ClickStart,thenclickControlPanelanddouble-clickPrinters(Windows
1
Vista),orPrintersandFaxes(WindowsXP).
4-1
UserGuide
Page 35

BasicPaperSettings
Right-clickonyourprintingsystemicon.
2
ClickPrintingPreferences.
3
TheBasictabcontainsseveralsettingsforbasicprintingtasks.
Printsize
Thissettingsetsthesizeoftheareathattheprinterprintsto,regardlessof
theactualpapersizethatisusedbytheprintingsystem.
Source
Thissettingspecifiesthecassetteortraythattheprintingsystemdraws
paperfrom.Unlessyouareusingacustompapertype,youcanleaveitset
toAutosourceselection.
Mediatype
ThissettingselectstheSourcebasedonthetypesofmediathatare
specifiedintheprintingsystem.Ingeneral,youcanleaveitsetto
Unspecified.
Destination
Thissettingspecifieswhichoutputtrayisusedfortheprintjoboutput.
Orientation
Thissettingspecifiesthepaperorientationoftheprintjob.IfRotatedis
selected,theprintjoborientationisrotated180degrees.
Copies
Thissettingspecifiesthenumberofcopiestoprint.Forcollatingmultiple
copies,selectCollate.
Printonbothsides
Thissettingenablesduplexprinting.
Color
Thissettingspecifiesfull-colorprinting,printingwithblacktoneronly,andthe
optionalEcoPrintmode.
Basic
SourceandMediaTypes
KXDRIVER
Note:Someapplicationsmayoverrideprintsettingsmadeinthedriver.
Usuallytheapplicationcanbesettofollowthesettings.InMicrosoftWord
2007,ensurethatDefaulttrayinOptionsissettoUseprintersettings.
IntheBasictab,Sourcespecifieswhichtrayorcassettetheprinterusesfora
printingjob.ThedefaultisAutosourceselection,whichinstructstheprinterto
searchforthemediarequestedbytheapplicationortheprinterdriver.Ifthe
selectedtrayorcassetteemptiesduringaprintjob,thentheprintersearchesfor
anothersource,andcontinuesthejob.
Mediatypeinstructstheprintertosearchforthetypeofpaperormediathatis
requestedbytheapplicationortheprinterdriver.Thechoicesshownmay
changedependingontheselectioninSource.IfAutomediaselectionis
selected,thentheprintersearchesforanothertrayorcassetteusingthesame
media.
4-2
Page 36

Basic
TransparenciesmustbeprintedusingtheMPtray,andlabelsandenvelopes
requiretheMPtray.Ensurethepaperisproperlyloadedbyfollowingthe
instructionsoutlinedintheprintingsystem'sOperationGuide.
Note:SourceandMediatypeareseparateitemsinthedialogbox,butcan
becombinedusingtheCombinesourceandmediatypelistssettingin
CompatibilitySettings.Iftheyarecombined,Mediatypeisnotavailableon
theBasictab.Tochangethissetting,openDevicesettings>Compatibility
SettingsandcleartheCombinesourceandmediatypelistsselection.
PrintSizeandPageSize
PrintSizecontrolstheoutputpagesizeofthedocument.Tousethissetting,
ensurethatthePageSizesettingmatchesthepagesizesettinginyour
application.IfthePrintSizeisdifferentfromthepagesizeinyourapplication,
theneachpagewillbeenlargedorreducedtomatchthePrintSize.The
percentagevalueshowninbracketsindicatesthesizeofthePrintSizesetting
relativetothePageSizesetting.IfthePageSizedoesnotmatchthepagesize
settingintheapplication(thesizeoftheoriginal),then,inmostcases,thePrint
Sizeisignoredandthedocumentprintsoutbasedonitsoriginalsize.
CreatingaCustomPageSize
Tousecustompagesizes,theymustbecreatedandaddedtothePrintsize
list.Thedriversupportsamaximumoftwentycustomsizes.
IntheBasictab,clickPageSizes.
1
ClickNew.
2
AdefaultcustomnameappearsintheNamebox.Typeanameforyourcustom
3
pagesize.
Typeorselectvaluesfortheheightandwidth.Iftheheightorwidthvalue
4
exceedstheallowablelimit,itautomaticallyadjuststothelimitafterApplyor
OKisclicked.
Whendone,clickApply.
5
ThecustompagesizeappearsinthePrintsizelist,whichisusedforenlarging
andreducingthesizesofprints.
TodeleteacustompagesizefromthePageSizesdialogbox,selectthename
ofthecustompagesizeandclickDelete.
PrintingwithCustomSizePages
Youcanprintoncustom-sizedpages(orothermediasuchastransparencies)
byperformingthesesteps:
Inyourapplication,selectPrintfromtheFilemenu.
1
InthePrintdialogbox,clickProperties.
2
4-3
UserGuide
Page 37

Basic
IntheBasictab,selectthenameofyourcustompagesizeinthePrintSizelist.
3
FromtheSourcelist,selecttheMPtrayforthecustompagesize.ClickOKto
4
returntothePrintdialogbox.ClickOKtostartprinting.
DuplexPrinting
Duplexprintingisprintingonbothsidesofeachpage.SelectPrintonboth
sidestostartduplexprinting.Ifitisnotselected,thentheprinterprintsononly
onesideofeachpage.Theprintersystemcontainsaduplexunitthatturnsthe
paperovertoallowprintingonthereverseside.Printonbothsidesmustbe
selectedtoprintonbothsidesofthecoverandinsertpages.
Fliponlongedge
Turnthelongedgeofthepagetoviewthecontent,likethepagesofabook
boundattheside.
Fliponshortedge
Turntheshortedgeofthepagetoviewthecontent,likeatabletboundatthe
top.
Fliponlongedge
Fliponshortedge
PrintinginDuplexMode
IntheBasictab,selectPrintonbothsides.
1
KXDRIVER
4-4
Page 38

Basic
SelecteitherFliponlongedgeorFliponshortedge.
2
Collation
Collatespecifiestheorderinwhichthepagesofamultiplecopyjobareprinted.
WithCollateselected,thefirsttimetheprintjobissenttotheprintingsystem
thedataisrenderedaspageimagesintheprintingsystem'smemory.The
remainingjobcopiesareprintedfromthestoreddata.Thisavoidstheextra
processinginvolvedinsendingeverycopyfromthecomputertotheprinting
system.
WithCollateselected,thedriverprintsthecompletejobsetbyset.WithCollate
cleared,itprintseachpagebyset.Forexample,withCollateselected,three
copiesofafive-pagedocumentoutputsaspagesonethroughfivein
succession,threetimes.
PrintingCollatedDocuments
Whenprintingmultiplecopiesofamultipagedocument,theprintercan
assemblethepagesofeachcopyinnumericalorder.
Inyourapplication,openthePrintdialogboxandclickProperties.
1
IntheBasictab,selecttheCollatecheckbox.
2
TypeorselectthenumberofcompletesetsintheCopiesbox.Whenprinting
3
usingthecollateoption,specifythenumberofcopiestoprint.Thedocument
pagecountmustnotexceedtheprintertraycapacity.
ClickOKtoreturntothePrintdialogbox,andclickOKtobeginprinting.
4
PrintinginColor,Black&WhiteandEcoPrint
TheoptionsinColorletyouchoosefull-colorprintingorprintingwithblacktoner
onlyandEcoPrint,whichmakestextappearlighter.Thefollowingcolormodes
areavailable:
Color(CMYK)
Thismodeprintsfullfour-colortextandgraphics.
Black&White
Thismodeprintswithblacktoneronly,constrainingallcolorsettings.
EcoPrintmakestheentireimage,textandgraphics,appearlighterinthe
printedjob.EcoPrintdoesnotincreaseprintspeed.
Color,Black&WhiteandEcoPrintalsoappearintheQuickPrinttabandin
theImagingtab.ChangesinQuickPrint,Basic,orImagingtabsarereflected
intheotherdialogbox.
SelectbetweenColor(CMYK)orBlack&Whiteforyourprintingjob.EcoPrint
isoptional.
KyoceraLogo
4-5
TheKyoceralogoappearsatthebottomofeverydrivertab.Clickthelogoto
opentheAboutdialogboxthatdisplaysthedriverversionnumberanddriver
plug-ininformation.
UserGuide
Page 39

DisplayingVersionInformation
ClickVersiontoviewthefollowingdriverinformation:
•FileName
•Version
•Description
•Date
•Manufacturer
•Comments
Toviewcopyrightinformation,clickLegalNotices.
ClickOKtoclosethedriverinformationdialogboxes.
DisplayingPlug-inInformation
ClickPlug-intoviewthefollowingplug-ininformation:
•Module
•Description
•Version
Basic
RemovingaPlug-in
Youcanremoveaninstalledplug-infromthedriver.Whenremoved,theplug-in
featureswillnotappearinthedriverinterface.
ClickStart,thenclickControlPanelanddouble-clickPrinters(Windows
1
Vista),orPrintersandFaxes(WindowsXP).
Right-clickthedesiredprintericon.
2
SelectProperties.
3
SelecttheDeviceSettingstab.
4
ClicktheKyoceralogotoopentheAboutdialogbox.
5
ClickPlug-intoopenthePlug-inInformationdialogbox.
6
Selectaplug-inmodulefromthelistandclickDelete,thenYes.
7
ClickOKinalldialogboxes.
8
Note:ToremovetheOutputtoPDFmodule,PDFmustnotbeselectedin
thePDLSettingsdialogbox.
KXDRIVER
4-6
Page 40

5Layout
TheLayouttabisusedtoarrangedocumentdataonprintedpageswithout
affectingtheoriginaldocument.
ThesefeaturesareavailableintheLayouttab:
PrintingaBookletonpage5-1
PrintingMultiplePagesperSheetonpage5-2
PrintingaPosteronpage5-3
Scalingonpage5-3
Booklet
Bookletprintsatwo-pagelayoutonbothsidesofeachsheetofpaper.Youcan
foldandbindthebookletinthecenter.Foldedbookletsarehalfthesizeofthe
selectedpaper.Forexample,ifyouselectLetterinBasic>Paper>Printsize,
theprintedoutputcanbefoldedintoa5.5x8.5inch-sizebooklet.
WhenBookletisselected,otheroptionssuchasMultiplepagespersheet,
Poster,andScalingareunavailable.
Adifferentpapersourcecanbeselectedforthebookletcover.Toincludea
coveronthebooklet,selectthePublishingtab,thenselectCovermode.
PrintingaBooklet
Bookletprintingrequiresthatyouchooseleftedgebindingorrightedgebinding
asinthefollowing:
IntheLayouttab,selectBooklet,andoneofthetwobindingoptions.
1
5-1
UserGuide
Page 41

MultiplePagesperSheet
LeftEdgeBinding
Thisselectionprintstextthatreadsfromlefttoright.
RightEdgeBinding
Thisselectionprintstextthatreadsfromrighttoleft.
ClickOKtoreturntothePrintdialogbox.
2
ClickOKtobeginprinting.
3
Multiplepagespersheetprintsseveralpagesonasinglesheetofpaperfor
thepurposeofreviewingthedocumentandconservingpaper.Thereadabilityof
themultiplepagesdecreasesasthenumberofpagespersheetisincreased.
YoucansetthearrangementofthepagesfromtheLayouttabaswellasprint
bordersaroundeachofthepages.
PrintingMultiplePagesperSheet
Thissectiondescribesselectingandprintinganarrangementofpagesona
singlesheetofpaper.
Layout
IntheLayouttab,selectMultiplePagespersheet.
1
InPagespersheet,selectthenumberofpagestoprintoneachsheetofpaper.
2
Ifyouwanttoprintaborderaroundeachpage,selectPrintborders.
3
IntheLayoutlist,selectthehorizontaldirectionthepagesshouldflow.
4
ClickOKtoreturntothePrintdialogbox.
5
ClickOKtobeginprinting.
6
Poster
UsePostertoprintadocumenttoasizethatislargerthanthepaperyour
printercansupport.Youcanprintaposter,orbanner,upto25timeslargerthan
theoriginaldocument.Segmentsoftheposterdocumentareprintedonseveral
sheetsofpaperandwiththeassistanceofpostersettings,youcanreassemble
thesheetseasilytocreateaposter.
UseSheetsperpagetoselectthepostersizeinrelationtotheoriginal
documentsize.Eachoptionshowsthenumberofsheetstobeprintedandthe
maximumpostersize.
Note:TheSheetsperpagedisplaystheunitofmeasurementininchesor
millimeters.TochangetheUnitssetting,openthePrintersandFaxesfolder,
right-clickyourprinter.ClickProperties>DeviceSettings>User.
UsePosterSettingstoselectoptions,inanycombinationtomakeiteasierto
createaposter.Theseoptionsprintvisualcuesonthepostersheetsthat
providehelpincroppingandassemblingthepages.
KXDRIVER
5-2
Page 42

Layout
Overlapedges
Thisselectionduplicatestheedgesofdocumentdataonadjoiningsheets.
Posterappearanceisimprovedwhentheedgesoverlapslightly.Selectthe
checkbox,thentypeorselectavaluebetween0.00and1.20inches(0.0
and30.4mm).Thisoptionreducesthefinalpostersizeslightly.
Printcropmarks
Thisselectionprintsaborderattheedgesofeachpostersheet.Youcan
cropeachsheetontheborderbeforeassemblingthesheets.Thisoption
ensuresthatdataonadjoiningsheetsmatchesprecisely.
Printassemblymarks
Thisselectionprintsnumbersattheedgesofeachsheet,matchingnumbers
onadjoiningsheets.Assembleeachsheetedgetothesamenumberededge
onanothersheet.
UsePrintformattoprintaproofsheet,alongwiththeposter,toguideyouin
assemblingtheprintedpostersheets.
Posterpages
Thisselectionprintsallofthesheetstobeassembledasaposter.
Proofsheet
Thisselectionprintsalltheposterpagesononesheetwithmarkingsthat
displaythesheetassembly.
Posterpagesandproofsheet
Thisselectionprintsallpostersheetsandaone-pageproofsheet.
PrintingaPoster
Toprintaposterorbanner,followthesesteps:
IntheLayouttab,selectPoster.
1
InSheetsperpage,selectthepostersize.Eachoptiondescribesthenumber
2
ofsheetsittakestorepresentonefinishedposterpage.
ClickPosterSettingstoselectoptionsinanycombination.Theseoptions
3
ensureapreciseassemblyofthepagestocreatetheposter.
InPrintformat,selectoneoftheoptionsforafinishedprintformat.
4
ClickOKtoreturntothePrintdialogbox.
5
ClickOKtobeginprinting.
6
Scaling
UseScalingtoincreaseordecreasethetextandgraphicsonapage.Youcan
alsoselectaguttersettingthatenlargesthemarginstoaccommodateaneasier
assemblyofthepagesintoabooklet.ScalingisnotavailablewhenBooklet,
PosterorMultiplepagespersheetisselected.
IntheLayouttab,underScaling,typeorselectapercentagebetween20to
500.Scalingadjustsproportionatelytheheightandwidthofthepage.Alower
percentagereducesthepageandahigherpercentageenlargesthepage.
5-3
UserGuide
Page 43

Layout
Gutter
Aguttercreatesadditionalblankspaceontheleftsideandatthetopofthe
sheet.Itisoftenusedforbinding,holepunchorstaplingtomakeaprintjob
easiertoread.IncreasingthemeasurementsinGutterincreasesthemargins
aroundyourtextandgraphicsontheleftside,ortopoftheprintedsheet.This
createsalargermarginspacebyshiftingtheprintableareatotheright,ordown
asmuchasoneinch(25.4mm).
IntheLayouttab,clickGutter.
1
IntheGutterwidthoptions,typeavaluebetween.20to1.00inches(5.0to
2
25.4mm).
Longedge(left)
Thisselectionmodifiestheoutsidemarginontheleft-sideofthepage.
Shortedge(top)
Thisselectionmodifiestheoutsidemarginonthetop-edgeofthepage.
Note:AvailabilityofGuttersettingsvariesdependingonOrientationand
DuplexmodesettingsintheBasictab.
Iftextextendstooclosetotheedgeofthepage,selectReduceimagetofit.
3
Thetextappearsslightlyreducedandawayfromtheedgeofthepage.Iftext
doesnotextendbeyondthepagewhenthegutterincreases,clearReduce
imagetofit.
ClickOKtosaveguttersettings,thenclickOKagaintoreturntothePrintdialog
4
box.
ClickOKtobeginprinting.
5
KXDRIVER
5-4
Page 44

6Imaging
IntheImagingtab,youcanmanageprintqualityandcolorsettings.
ThesefeaturesareavailableintheImagingtab:
SelectingPrintQualityonpage6-2
Fontsonpage6-2
Graphicsonpage6-4
ColorModeonpage6-5
PrinterProfileonpage6-6
AdjustingColoronpage6-8
AdjustingGrayscaleonpage6-9
PrintQualityandEcoPrint
6-1
Printqualitysetstheresolutionfortheprintjob.Resolutionisameasurement,
indotsperlinearinch(dpi),thatdescribesthesharpnessandclarityofprinted
textandimages.SelectHighqualityorCustomfromthePrintqualitylist.
EcoPrintmakestheentireimage,textandgraphics,appearlighterinthe
printedjob.EcoPrintdoesnotincreaseprintspeed.FromthePrintqualitylist,
selectCustom,thenclickEcoPrinttoopenthedialogbox.IntheEcoPrint
dialogbox,selectOn.
UserGuide
Page 45

Imaging
SelectingPrintQuality
IntheImagingtab,selectaPrintqualityfromthelist.Thenumberof
selectionsinPrintqualitydependsonthenumberofresolutionssupportedby
theprintingsystem.
Highquality
Selectthissettingtoprintatthehighestprintingsystemresolution.
Custom
CustomletsyouchooseasettingforEcoPrint.SelectingCustomwithout
EcoPrintresultsinadefaultsettingtothehighestprintingsystemresolution.
Trapping
Incolorprinting,colorinksortonersareappliedseparatelytoapage.Acolor
imagehasitscomponentcolorsappliedincolorseparationsofcyan,magenta,
yellowandblack.Thesecolorseparationsmustbealigned(registered)
preciselytoproduceaqualityfullcolorimage.Duringprinting,thepaperor
mediatypemayshiftslightly.Whiletheshiftmightbeverysmall,thegaps
betweenthecolorsintheimagecanbenoticeable.Colortrappingcorrectsitby
overlappingcolorsslightlysothatminoralignmentissuesarecorrected.
Tousetrappinginadocument,selectavaluefortheprintoverlappixelwidth:
Light,0.5pixeltrapping;Medium,1pixeltrapping;Heavy,1.5pixelstrapping;
VeryHeavy,2pixelstrapping.
Iftrappingdoesnotcorrectthemisalignmentissue,contactyourlocalKyocera
servicedealer.
Note:TrappingisnotavailablewhenthePDLissettoPCL5corPDF.
Fonts
Acomputerfontisadatafilecontainingasetofglyphs(visualrepresentations
oftextualelements),characters,orsymbols.Commontermsforfontsare:
Bitmapfontsdefineeachcharacterasapatternofpixels(thesmallest
resolvablerectangularareasofanimage).Suchfontsarenoteasilyscalable
anddistortwhenreducedorenlarged.
Outlinefonts,incontrasttobitmapfonts,aredefinedasasetof
mathematicallinesandcurves.Anoutlinefontismoreeasilyscalable
(designedtodisplayandprintclearlyatanypointsize)thanabitmapfont.
Nativefontsarethebasicororiginalfontsinstalledwiththecomputer
operatingsystem.TrueTypefontsarethenativefontsusedbyMicrosoft
Windows.
TrueTypefontsareatypeofscalableoutlinefonts.TrueTypehaslongbeen
themostcommonformatforfontsonMicrosoftWindows.
Systemfontsaretheprimaryfontsusedbytheoperatingsystem.Theyare
typicallyaccessedthroughanapplicationinterfaceorthroughacommonfont
dialogbox.
Devicefontsarestoredeitherpermanentlyortemporarilyintheprinting
systemmemory.
KXDRIVER
6-2
Page 46

Imaging
FontSettings
TheFontssettingsdialogboxletsyouspecifyhowTrueTypefontsaresentto
theprintingsystem.Thechosenmethodaffectsthespeedandqualityofthe
printjob:
Downloadasoutlines
Thismethodisbestsuitedforlargedocumentsorprintjobsusingmultiple
fontsandfontsizes.Printspeedsarefasterbecauseoftheoptimization
featuresinthissetting.Therepetitionofsimilarfontdatasenttotheprinting
systemisreduced,therebyincreasingtheprintspeed.Printspeedisnot
increasedwhenusingAsianfontssuchasJapanese,Chinese,andKorean,
becauseofthelargeamountoffontinformationusedfortheseparticular
fonts.
Allownativedownload
Thismethodimprovestextqualityandincreasesprintspeedbyconverting
TrueTypefontstoAdobeType42fontformat.Thisfeatureisavailablewhen
KPDLisselected.
Downloadasbitmaps
Downloadingfontsasbitmapsprovidesmoredetail,howeveritcreateslarge
filesizes.Thisisbestsuitedforprintjobswithuser-definedfonts,verysmall
fonts(pointsize1-4),orAsianfonts.
Substitutewithdevicefonts
Systemfontsanddevicefontsareautomaticallymatchedbasedontypeface
name.Thisfunctionincreasesprintspeedandefficiency.Itisusefulfor
changingafontusedthroughoutalargedocument,byreplacingtheoldfont
withthedesiredfont.
Note:GDIcompatiblemodedoesnotsupportSubstitutewithdevice
fonts.
SelectingFontSettings
ClickFontstoopentheFontSettingsdialogbox.
1
SelectoneofthemethodsforsendingTrueTypefonts,andthenclickOK.
2
FontSubstitution
Fontsubstitutionistheprocessofusingonefontinplaceofanotherwhenthe
intendedfontisnotavailabletoaprintingsystem.Fontsubstitutionmaybe
criticalforoutputofdocumentstoprintingsystemsthatarenotwellsupported
byalargefontinventory.
IntheImagingtab,clickFonts>Substitutewithdevicefonts>Fontsto
opentheFontSubstitutiondialogbox.
TheSystemfontslistshowsthefontsinstalledonyourcomputer.The
Availabledevicefontslistshowstheprintingsystem.Selectthesystemfont,
andthentheavailabledevicefonttobesubstituted.ClickOKtosaveyour
settings.Ifthedevicefontdoesnothavesimilarfontcharacteristicstothe
systemfont,characterspacinginthedocumentmayappearincorrect.
6-3
UserGuide
Page 47

Imaging
DisablingDeviceFonts
Insomecases,theprintingsystemsubstitutesfontsevenifyousendthe
TrueTypefontsasoutlinefontsorbitmapimages.SelectDisabledevicefonts
topreventsubstitutionofdevicefontsforTrueTypefonts.
Thisoptionalsoimprovesportabilityofprintabledata.(Ifcleared,devicefonts
maynotmatchwhensenttoadifferentprintingsystem.)
SomeAdobeapplicationshavedevicefontlimitations.Toovercomethese
limitations,selectDisabledevicefonts.Devicefontsarenormallyvisibleinthe
applicationfontlistsasprintericonsnexttothefontname,unlessthereare
equivalentsystemfonts,inwhichcasethe“TT”TrueTypeiconremains.
IntheImagingtab,clickFontstoopentheFontssettingsdialogbox,and
selecttheDisabledevicefontscheckbox.
Graphics
Graphicsarepictorialrepresentationsofinformation.Graphicscanbefunctional
(charts,diagrams)orartistic(drawings,photographs).GraphicsSettingslet
youselectpatternscaling,inversion,optimization,andCIEoptionsforyour
printedgraphics.
Note:SomeoptionsareavailableonlywhenaspecificPDLisselected.
IntheImagingtab,clickGraphicstoopentheGraphicsSettingsdialogbox.
1
Inthedialogbox,selectfromPatternscaling,Inversionoptions,
2
Optimization,andCIEoption,andthenclickOKtosaveyourselections.
PatternScaling
Patternscalingisafeaturethatcanhelpimprovevisualcompatibilitybetween
screenandprintoutput.Graphicsobjects,suchasashapeorapath,often
includepatternsandfillsthatarecomposedofcollectionsofprinteddots.A
patternisaplannedorrandomrepetitionofcolors,shapes,lines,values,and
texturestocreateavisualarrangement.Afillistheapplicationofacoloror
grayscaletoagraphicsobject.Ifprintedpatternsandfillsdonotmatchthe
appearanceofthatonthescreen,usePatternscalingtoselectadifferent
densityofprinteddots.
Auto(defaultsetting)
Thissettingprintspatternsandfillstomatchtheon-screenappearance.
Coarse
Thissettingprintspatternsandfillswiththefewestnumberoflines,patterns,
ordots.CoarseisthesameasAutowhenPCLXLorPCL5cisselectedin
DeviceSettings>PDL>SelectPDL.
Medium
Thissettingprintspatternsandfillswithagreaternumberoflines,patterns
ordotsthantheCoarsesetting.MediumisthesameasAutowhenKPDLis
selectedinDeviceSettings>PDL>SelectPDL.
Fine
Thissettingprintspatternsandfillswiththegreatestnumberoflines,
patterns,ordots.Printedpatternsandfillsmayappearmoredensethanthe
on-screenappearance.
KXDRIVER
6-4
Page 48

Imaging
InversionSettings
Inversionistheoppositeofthenormalorder,arrangement,orpositionofan
imageorprintedcontent.
IntheImagingtab,clickGraphicstoopentheGraphicssettingsdialogbox
andaccesstheInversionoptions.ThesettingsareavailablewhenKPDLis
selectedinDeviceSettings>PDL>SelectPDL.
Reverseimage
Thissettingprintsimageslikeaphotonegative,reversingblackandwhite
areasoftheimage.
Mirrorprint
Thissettingprintsthepagecontentbackwards,asitwouldappearinamirror
image.
OptimizationSettings
Optimizationisaprocessormethodologyofimprovingaprintingsystem's
functionoreffectiveness.
IntheImagingtabclickGraphicstoopentheGraphicssettingsdialogbox
andaccesstheOptimizationsettings.ThesettingsareavailablewhenKPDLor
XPSisselectedinDeviceSettings>PDL>SelectPDL.
Fastprinting
Thissettingincreasesprintspeedanddecreasesspoolsize.Itdelivers
imagesinbinaryformat.Itcanbeusedformosteverydayprintingneeds.
Documentportability
ThissettingcreatesaPostScriptfileinASCIItextencoding.Unlikethebinary
formatcreatedinFastprinting,theASCIItextcreatedwiththisselection
canbeedited.
CIEOptimization
CIEoptimizationbypassesthenormalprocedureofprocessingeveryaspectof
theCIEcolorspaceusedinapplicationssuchasAdobeAcrobatand
Photoshop.Thisfeatureincreasesprintspeedfordocumentsprintedfromthese
applicationsbyoptimizingCIEdata.Ithasnoeffectonprintjobsthatdonotuse
CIEdata.CIEoptimizationshouldbeselectedforspeednotaccuracy,so
printedoutputmaybedifferentfromappearanceonthescreen.
IntheImagingtab,clickGraphicstoopentheGraphicssettingsdialogbox
andaccesstheCIEoptimizationcheckbox.CIEoptimizationisavailable
whenKPDLisselectedinDeviceSettings>PDL>SelectPDL.
Note:IfyouareusingtheKyoceraXPSdriverfortheWindowsVista
operatingsystem,CIEoptimizationisunavailable.
ColorMode
TheoptionsinColormodeletyouchoosefull-colorprintingorprintingwith
blacktoneronly.
Thefollowingcolormodesareavailable:
Color(CMYK)
Thismodeprintsfullfour-colortextandgraphics.
Black&White
6-5
UserGuide
Page 49

Imaging
Usethismodetoprintwithblackonly,constrainingallcolorsettings.Click
AdjustmenttochangetheAdjustmentsettings.
PrinterProfile
Printerprofileletsyouoptimizethecolorrenderingofphotosandgraphics.
ThisfeatureisavailablewhenColor(CMYK)isselectedastheColormode.
Thefollowingprinterprofilesareavailable:
Printersettings
Thisoptionusestheprintersettingsonly.
TextandGraphics
Thisoptionisforprintingdocumentsthatcontainmanygraphs,chartsor
drawings.
TextandPhotos
Thisoptionisforprintingdocumentswithmanyphotographicimages.
Vividcolors
Thisoptionincreasesthecolorsaturationofgraphicsandphotos.
Publications
Thisoptionisforprintingamixofgraphicsand/orphotos.Selectthisoption
toprintclosetothecolorshadeofthescreen.
Lineart
Thisoptionisforprintingfiguresorgraphicsdrawnwithlines.Selectthis
optiontoprintcoloredlineswithpuresimplecolor.
Advanced
Thisoptionachievesgreaterconsistencyincolorreproductionamong
variousdevices.Itcompensatesforthedifferentcolorspacesofcolor
printingsystems.Selectingandapplyingasetofprofilesiscalledacolor
profile.
ColorCorrection
InPrinterprofile,theAdvancedoptionprovidessomemethodsforcontrolling
howtheprinterprocessescolormatching.
FromPrinterprofile,selectAdvanced.TheColorCorrectiondialogbox
1
appearswiththefollowingoptions:
None(applicationcorrected)
Withthisoption,colordataprocesseswithoutapplyingtheadjustments
containedintheprintingsystem'sinternalcolorlookuptables.Inksimulation
willnotbeexecuted.Thisisusefuliftheapplicationprovidesitsowncolor
correction.
ICM(systemcorrected)
Thisoptionspecifiescolorrenderingintheprintjobtomakeitasclosetothe
originalaspossible.ICMtechnologyreliesuponassociatinganoutput
devicelikeaprintingsystemwithaColorProfile.AnICMProfileforaprinting
systemcontainsinformationaboutrenderingaccuratecolorinformationfor
thatdevice.ThesettingsforICMmustbesetintheColorManagementtabin
theprintingsystemProperties.
KXDRIVER
6-6
Page 50

Imaging
IfyouselecttheNone(applicationcorrected)option,clickOKtoclosethe
ColorCorrectiondialogbox.
IfyouselecttheICM(systemcorrected)option,clickICMSettings,and
proceedtostep2.
IntheICMSettingsdialogbox,selectaRenderingintentoption,thenclickOK
2
tosavetheselection.
Optimizeforexactcolor(Colorimetric)
Thisoptionisformatchingcolorspreciselyinallprintjobs,suchascolorsin
acorporatelogo.
Optimizeforcolorcontrast(bestforimages)
Thisoptionoptimizesforcolorcontrastbyadjustingcontrasttopreserve
detailthroughoutthetonalrange.Selectitforimagesorscanned
photographscontainingmanycolorsorshadesofcolor.
Optimizeforcolorsaturation(bestforgraphs)
Thisoptionoptimizesforcolorsaturationbyadjustinghuetopreservethe
vividnessofpurecolors.Selectforgraphsorchartscontainingsolidcolors.
ClickOKagaintoclosetheColorCorrectiondialogbox.
3
SettingaDefaultColorProfileinWindowsXP
WhenusingtheICM(systemcorrected)featureintheColorCorrectiondialog
box,youcansetacolorprofileforyourprintingsystem.
OpenthePrintersandFaxesfolder.
1
Right-clickonthedesiredcolorprinter.
2
SelectProperties.
3
SelecttheColorManagementtab.
4
ClickAdd.
5
IntheAddProfileAssociationdialogbox,selectacolorprofilefromthelist
6
andclickAdd.
IntheColorManagementtab,selectManual.
7
SelectthedesiredcolorprofilefromthelistandclickSetasDefault.
8
ClickOK.
9
SettingaDefaultColorProfileinWindowsVista
WhenusingtheICM(systemcorrected)featureintheColorCorrectiondialog
box,youcansetacolorprofileforyourprintingsystem.
OpenthePrintersfolder.
1
6-7
UserGuide
Page 51

Right-clickonthedesiredcolorprinter.
2
SelectProperties.
3
SelecttheColorManagementtab.
4
ClickColorManagementtoopentheColorManagementdialogbox.
5
SelecttheDevicestab.
6
IntheDeviceslist,selectthedesiredcolorprinter.
7
SelectUsemysettingsforthisdevice.
8
IntheProfileselectionlist,selectManual.
9
ClickAdd,toopentheAssociateColorProfiledialogbox.
10
Imaging
AdjustingColor
SelectanICCprofile,orclickBrowsetofindaprofile,andclickOK.Theprofile
11
isaddedtotheProfilesassociatedwiththisdevicelist.
SelectthedesiredcolorprofileandclickSetasDefaultProfile.
12
ClickClose.
13
ColorAdjustmentenablesyoutocustomizethetwocolorspacesinthedriver
andsaveuptothreecustomgroups.Colorspacechangescanbemadetored,
green,blue(RGB)levelsortohue,saturationandlightness(HSL).
InColormode,selectColor(CMYK).
1
IntheImagingtab,intheAdjustmentlist,selectCustom1,Custom2,or
2
Custom3,ifyouhavealreadydefinedcolorsettings.Ifyouhavenotdefined
colorsettings,selectEdittoopentheAdjustmentSettingsdialogbox.
FromtheCustomColorAdjustmentlist,selectCustom1,Custom2,or
3
Custom3.
ToopentheCustomColorAdjustmentdialogbox,clickSettings.
4
SelectHSL(hue,saturation,lightness)orRGB(red,green,blue)toworkwith
5
asthecolorspace.
Clickthearrowbuttonsbeneaththephotographtoselectoneofthreedifferent
6
images.Differentcolorsareemphasizedineachofthephotographstoaidinthe
coloradjustmentprocess.
KXDRIVER
6-8
Page 52

Imaging
AdjustingHSL(Hue,Saturation,Lightness)
HSLcontrolsadjustthefullspectrum,brightness,contrast,andvividnessofthe
color.
UnderSelectcolorspace,selectHSL(hue,saturation,lightness).
1
Adjustthedistributionandbalanceofhues.
2
Forcoordinatedhueadjustment,fromtheModifylistselectMaster.Dragthe
Hueslidertotherightorlefttoincreaseordecreasethevaluebetween-180
and+180.
Forspecifichueadjustment,fromtheModifylistselectRed,Yellow,Green,
Cyan,Blue,orMagenta.DragtheHueslidertotherightorlefttoincreaseor
decreasethevaluebetween-10and+10.
Theuppercolorbarindicatestheadjustmentmadewhenthesliderisdragged,
oravalueistypedinthebox.Thehorizontalbracketsaroundtheuppercolor
barshowtherangeofthecolorbaraffectedbytheadjustment.
ThelowercolorbarprovidesareferencepointtothecolorbaraboveitforHue
Adjustment.
DrageachslidertoadjusttheSaturation,LightnessandContrastbetween
3
-10and+10.Youcanalsotypevaluesintheboxes.
IfyouwanttoreturnallHSLsettingstozero,clickReset.
4
ClickOKtosavethenewHSLsettings.
5
AdjustingRGB(Red,Green,Blue)
RGBadjustsonlytherelativevaluesofthecolorsred,green,andblue.
UnderSelectcolorspace,selectRGB.
1
Undereachbar,dragtheslidertoadjusttherelativevaluesofRed,Green,and
2
Bluebetween-10and+10.Youcanalsotypevaluesintheboxes.
IfyouwanttoreturnallRGBsettingstozero,clickReset.
3
ClickOKtosavethenewRGBsettings.
4
AdjustingGrayscale
TheAdjustmentsettingschangetheBrightnessandContrastofgraphics.
Thesesettingsareusefulifgraphicimagesareprintingtoolight,toogray,ortoo
dark.Textremainsunaffected.
IntheImagingtab,inColormode,selectBlack&White.
1
IntheAdjustmentlist,selectCustom.
2
ApreviewimageintheAdjustmentSettingsdialogboxillustratesany
brightnessandcontrastchanges.
6-9
UserGuide
Page 53

TextandGraphicsEffects
DragtheBrightnesssliderrighttolighten,orlefttodarkenthegraphicimages
3
oftheprintjob.
Youcanalsochangebrightnessbyenteringanumericvalueinthetextboxat
theright.Thebrightestsettingis+100;thedarkestis-100.Zeroisthedefault
mid-levelsetting.Adjustingbrightnessisusefulwhengraphicimagesare
printingtoodarkortoolight.
DragtheContrastsliderrightorlefttoincreaseordecreaseproportionoflight
4
todarkinthegraphicimagesoftheprintjob.
Ahighcontrastsettingdecreasesthegrayscalespectrum,makinglightgrays
lighteranddarkgraysdarker.Alowcontrastsettingincreasesthegrayscale
spectrum,makinglightgraysdarkeranddarkgrayslighter.
Youcanalsochangecontrastbyenteringanumericvalueinthetextboxatthe
right.Thehighestcontrastsettingis+100;thelowestis-100.Zeroisthedefault
mid-levelsetting.Adjustingcontrastisusefulifgraphicimagesareprintingtoo
gray,ortooblackandwhite.
Printtextasblack
Thisoptionprintsallcolortextasblack.Itproducesfasterprintingofcolor
printjobsbyreducingtheamountofdatasenttotheprinter.InBlack&White
printing,itincreasesthedetailforlight-coloredtextprinted.Whitetextand
imagecolorsareunaffected.AvailablewithalloftheColormodeoptions.
Continuoustone
Imagesarerepresentedbyaseriesofevenlygraduatedtones,asina
photograph.Color(CMYK)mustbeselectedastheColormode.
Printgraphicsasblack
Thisoptionprintsallcolorgraphicsandtextwithblack,ratherthan
grayscale.ThisfeatureisimplementedforCADapplications.Black&White
mustbeselectedastheColormode.
Imaging
KXDRIVER
6-10
Page 54

7Publishing
InthePublishingtab,youcancreatecovers,inserts,andaddtransparencies
foraprintjob.
ThesefeaturesareavailableinthePublishingtab:
PrintingCoversonpage7-1
ChoosingCoverMediaonpage7-5
PrintingPageInsertsonpage7-5
InterleavingTransparenciesonpage7-7
CoverMode
Covermodeisafeatureforaddingcoverpagesforthefrontandbackofyour
document.Youcanprintoncoverpagesofadifferentweightorcolorthanthe
maindocument.Thesourceofthecoverpaperisspecifiedbyadjustingthe
MediaforcoversettingsinthePublishingtab.
PrintonbothsidesmustbeselectedintheBasictabinordertoprintusingthe
FrontinsideorBackoutsideoptions.
AlthoughCovermodeandPageinsertmaybeusedsimultaneously,they
cannotbeusedwithTransparencyinterleaving.
PrintingCovers
InthePublishingtab,selectCovermode.
1
7-1
UserGuide
Page 55

SelectFront,Frontandback,orthePrintontooptionstospecifywhattypeof
2
coverstoprint.
SelecttheMediaforcovertospecifywhattypeofpaperorothermediatouse
3
forthecovers.
CoverModeOptions
CheckBoxSelectionCoverInsertionType
FrontInsertsablankfrontcover.
FrontPrintsontheoutsidesurfaceofthe
Frontoutside
frontcover.
Publishing
FrontPrintsontheinsidesurfaceofthefront
Frontinside
KXDRIVER
cover.
—continued
7-2
Page 56

Publishing
CheckBoxSelectionCoverInsertionType
Front
Printsontheoutsideandinside
surfacesofthefrontcover.
Frontoutside
Frontinside
Frontandback
Frontandback
Frontoutside
Insertsblankfrontandbackcovers.
Printsontheoutsidesurfaceofthe
frontcoverandinsertsablankback
cover.
Frontandback
Printsontheinsidesurfaceofthefront
coverandinsertsablankbackcover.
Frontinside
—continued
7-3
UserGuide
Page 57

CheckBoxSelectionCoverInsertionType
Frontandback
Printsonbothsidesofthefrontcover
andinsertsablankbackcover.
Frontoutside
Frontinside
Publishing
Frontandback
Backinside
Frontandback
Backoutside
Printsontheinsidesurfaceofthe
backcoverandinsertsablankfront
cover.
Printsontheoutsidesurfaceofthe
backcoverandinsertsablankfront
cover.
Frontandback
Printsonbothsidesofthebackcover
andinsertsablankfrontcover.
Backinside
Backoutside
—continued
KXDRIVER
7-4
Page 58

Publishing
CheckBoxSelectionCoverInsertionType
Frontandback
Frontoutside
Frontinside
Backinside
Backoutside
Printsonbothsidesofthefrontand
backcovers.
ChoosingCoverMedia
IntheMediaforcoverlist,selectthemediatypeorsourcecassetteforthefront
1
andbackcovers.
Whenyouchoosethemediatype,asourcecassettematchingthatmediatype
isautomaticallyselected.
ClickOKtoreturntothePrintdialogbox.
2
ClickOKtostartprinting.
3
PageInsert
APageinsertisapreprintedpageorapageofadifferentpapertypethatis
insertedatspecifiedpointsinaprintjob.Theinsertedpagecanalsobeprinted
onduringtheprintjob.Bothsidesofthepageinsertcanbeprintedonbyusing
theduplexunit.
AlthoughthePageinsertandCovermodeoptionscanbeusedtogether,
neitherofthemcanbeusedwithTransparencyinterleaving.
PrintingPageInserts
Thereareseveralwaystoarrangepageinserts:youcanprintonone,both,or
neitherside.SelectthePageinsertcheckbox.Selecttheoptioncorresponding
toyourdesiredpagearrangement.Toprintonboththefrontandbackofthe
insertedpage,selectthePrintontofrontandPrintontobackcheckboxes.
7-5
UserGuide
Page 59

PageInsertionOptions
CheckBoxSelectionPageInsertionType
PageinsertInsertsablankpage.
PageinsertPrintsonthefrontsideoftheinserted
Printontofront
page.
Publishing
PageinsertPrintsonthebacksideoftheinserted
Printontoback
Pageinsert
Printontofront
Printontoback
page.
Printsonbothsidesoftheinserted
page.
TransparencyInterleaving
KXDRIVER
Transparencyinterleavinginsertsabackingsheetbetweenprinted
transparencies.Thebackingsheet,alsoknownasaninterleaf,helpskeep
transparenciescleanandpreventsthemfromclingingtogether.Thisfeatureis
7-6
Page 60

Publishing
onlyavailablewhenprintingontransparenciessuppliedfromtheMPtray.You
canprintthesamecontentonthebackingpagesasonthetransparencies.
TransparencyinterleavingcannotbeusedtogetherwithCovermodeorPage
insert.
InterleavingTransparencies
IntheBasictab,intheMediatypelist,selectTransparency.IftheSourceand
1
Mediatypelistshavebeencombined(byaselectionintheDeviceSettings
tab,intheCompatibilitySettingsdialogbox),Mediatypedoesnotappear.
Instead,intheSourcelistselectAuto(Transparency).
ClickthePublishingtab.
2
InthePublishingtab,selecttheTransparencyinterleavingcheckbox.To
3
printthetransparencycontentontheinsertedpagesaswell,selectthePrint
ontobackingcheckbox.
IntheMediaforbackinglist,selecttheMediatypeofthebackingsheetorthe
4
Sourcepapercassette.WhenyouchoosetheMediatype,theSource
cassettewherethatmediaisloadedisautomaticallyselected.
ClickOKtobeginprinting.
5
Theprintingsystem'soperationpanelpromptsyoutoloadtransparenciesinto
theMPtray,and,ifnecessary,loadbackingpaperintotheselectedcassette.
7-7
UserGuide
Page 61

8Job
TheJobtabisusedtostoreprintjobsinthememoryinstalledintheprinting
system.YoucanalsoselectaJobnametousewithJobstoragefeatures.You
canusethistabtosetorchangethedefaultsettingsthatapplywhenyouprinta
documentfromaMicrosoftWindowsapplication.
ThesefeaturesareavailableintheJobtab:
QuickCopy(FS-C5300DN,FS-C5400DN)onpage8-2
ProofandHoldonpage8-4
PrivatePrintonpage8-5
JobStorage(FS-C5300,FS-C5400)onpage8-7
JobNameonpage8-10
JobStorage(e-MPS)
KXDRIVER
Jobstorage(e-MPS)offersasetofoptionsforsavingprintjobsinprinting
systemmemory,sothatyoucanprintorreprintthemlater.Printjobscaneasily
bereprintedlaterusingtheprintingsystem’soperationpanel,andprintingof
sensitivedocumentscanberestrictedtoapprovedusers.
E-MPSisamultitiersolutionthatprovidesadvancedprintmanagement,directly
fromthedesktop.Bystoringajobintheprintingsystem,youcanprintitfrom
theoperationpanelwithoutsendingitagainfromthecomputer.
TousetheJobstorage(e-MPS)features,youcansetaUsernameinthe
UserSettingsdialogbox,availableintheDeviceSettingstab.Ifanameisnot
set,thentheusernameoftheconnectedPCisused.
8-1
Page 62

Job
JobStorage(e-MPS)options
StorageAccesscodeWhenjobisWhenjobisOperation
locationrequiredprinteddeletedfrompanele-MPS
memorylocation
QuickcopyHarddiskNoWhensentWhenprintingJobBox/
fromthesystemisQuickCopy
computerturnedoffor
Harddiskis
full
ProofandholdHarddiskorNoOnecopywhenWhenprintingJobBox/
RAMdiskjobissent;systemisQuickCopy
remainingturnedoff
copieslater
PrivateprintHarddiskorYesWhenaccessWhenprintingJobBox/
RAMdiskcodeisenteredsystemisPrivate/Stored
atoperationturnedoffor
panelafterprinting
JobstorageHarddiskOptionalWhenprintedWhenmanuallyJobBox/
fromoperationdeletedPrivate/Stored
panel
QuickCopy(FS-C5300DN,FS-C5400DN)
QuickcopyisaJobstorage(e-MPS)optionthatprintsallcopiesofaprintjob
andstoresthejobtemporarilyontheHarddiskforreprintinglater.Thisfeature
isavailablewhenaHarddiskisinstalledandselectedintheDeviceSettings
tab.
Quickcopyisusefulforprintingthejobagainlaterinthedaywhenyouneed
additionalcopiesatshortnotice.Youcansetthenumberofadditionalcopies,
andprintthejobfromtheprintingsystem’soperationpanelwithoutsendingthe
jobagainfromthecomputer.
ThenumberofQuickcopyorProofandholdjobsthatcanbestoredissetat
theprintingsystem’soperationpanel,toamaximumof50jobs.Whenthe
designatednumberofjobsisreached,olderjobsarereplacedbynewjobs.All
QuickcopyjobsarestoredintheHarddiskafterprintingbutaredeletedwhen
theprintingsystemisturnedoff.Youcanmanuallydeleteajobattheoperation
panel.
Warning:AprintjobcanreplaceajobintheHarddiskhavingthesameUser
nameandJobname.Topreventthis,selectUsejobname+dateandtime
underOverwritejobname.
PrintingaQuickCopyJob
WithaHarddiskinstalled,Quickcopyletsyouprintadocumentandsaveitin
theprintingsystemuntilthejobismanuallydeletedortheprintingsystemis
turnedoff.
IntheJobtab,selectJobstorage(e-MPS).
1
SelectQuickcopy,andthenclickOKinbothdialogboxestoprint.
2
Forexample,useQuickcopywhenyouprintcopiesforameetinglaterinthe
day.Ifyoulearnatthelastminutethatadditionalcopiesareneeded,youcan
8-2
UserGuide
Page 63

printthemquicklyusingtheprintingsystem'soperationpanelwithoutsending
thejobagainfromyourcomputer.
ReprintingaQuickCopyJob(FS-C5300DN)
YoucanreprintaQuickcopyjobfromtheprintingsystem’soperationpanel
withoutsendingthejobagainfromyourcomputer.
Attheprintingsystem'soperationpanel,presstheMenukey.
1
PresstheupordownarrowsuntilJobBoxappearsonthemessagedisplay,
2
thenpresstherightarrow.
PresstheupordownarrowsuntilQuickCopyappearsonthemessage
3
display,thenpresstheOKkey.
PresstheupordownarrowsuntilthedesiredUsernameappearsonthe
4
messagedisplay,thenpresstheOKkey.
PresstheupordownarrowsuntilthedesiredJobnameappearsonthe
5
messagedisplay,thenpresstheOKkey.
Job
Presstheupordownarrowstoselectthenumberofcopiestobeprinted.You
6
canselectfrom1to999copies.
PresstheOKkeytoprint.
7
ReprintingaQuickCopyJob(FS-C5400DN)
YoucanreprintaQuickcopyjobfromtheprintingsystem’soperationpanel
withoutsendingthejobagainfromyourcomputer.
Attheprintingsystem'soperationpanel,presstheMenukey.
1
PresstheupordownarrowsuntilJobBoxappearsonthemessagedisplay,
2
thenpresstheOKkey.
PresstheupordownarrowsuntilQuickCopyappearsonthemessage
3
display,thenpresstheOKkey.
PresstheupordownarrowsuntilthedesiredUsernameappearsonthe
4
messagedisplay,thenpresstheOKkey.
PresstheupordownarrowsuntilthedesiredJobnameappearsonthe
5
messagedisplay,thenpresstheOKkey.
Presstheupordownarrowstoselectthenumberofcopiestobeprinted.You
6
canselectfrom1to999copies.
PresstheOKkey,thenpressYestoprint.
7
KXDRIVER
8-3
Page 64

Job
ProofandHold
ProofandholdisaJobstorage(e-MPS)optionthatprintsonecopyofaprint
jobsothatyoucanproofitbeforeprintingtheremainingcopies.Thisfeatureis
availablewhenaHarddiskisinstalledintheprintingsystem,orRAMdisk
enabled,andselectedintheDeviceSettingstab.
Aftertheproofcopyisprintedandchecked,remainingcopiescanbeprinted
fromtheprintingsystem’soperationpanelwithoutsendingthejobagainfrom
thecomputer.Ifdesired,youcanchangethenumberofcopiesprinted.
Note:ProofandholdisnotavailableforsomeapplicationssuchasMicrosoft
Excel.
ThenumberofProofandholdorQuickcopyjobsthatcanbestoredissetat
theprintingsystem’soperationpanel,toamaximumof50jobs.Whenthe
designatednumberofjobsisreached,olderjobsarereplacedbynewjobs.All
ProofandholdjobsarestoredintheHarddiskafterprintingbutaredeleted
whentheprintingsystemisturnedoff.Youcanmanuallydeleteajobatthe
operationpanel.
Warning:AprintjobcanreplaceajobintheHarddiskhavingthesameUser
nameandJobname.Topreventthis,selectUsejobname+dateandtime
underOverwritejobname.
PrintingaProofandHoldJob
Proofandholdletsyouprintonecopyofamulticopyjobtoproofbefore
printingtheremainingcopies.ThejobisstoredintheHarddiskorRAMdisk
memoryuntiltheprintingsystemisturnedofforthejobismanuallydeleted.
IntheBasictab,selectthenumberofcopiestobeprinted.
1
OpentheJobtab.
2
ClickJobstorage(e-MPS).
3
ClickProofandhold,andclickOK.
4
PrintingProofandHoldCopies(FS-C5100DN,FS-C5200DN, FS-C5300DN)
YoucanprinttheremainingProofandholdcopiesfromtheprintingsystem’s
operationpanelwithoutsendingthejobagainfromyourcomputer.
Attheprintingsystem'soperationpanel,presstheMenukey.
1
PresstheupordownarrowsuntilJobBoxappearsonthemessagedisplay,
2
thenpresstherightarrow.
PresstheupordownarrowsuntilQuickCopyappearsonthemessage
3
display,thenpresstheOKkey.
PresstheupordownarrowsuntilthedesiredUsernameappearsonthe
4
messagedisplay,thenpresstheOKkey.
8-4
UserGuide
Page 65

PresstheupordownarrowsuntilthedesiredJobnameappearsonthe
5
messagedisplay,thenpresstheOKkey.
Presstheupordownarrowstoselectthenumberofcopiestobeprinted.You
6
canselectfrom1to999copies.
PresstheOKkeytoprint.
7
PrintingProofandHoldCopies(FS-C5400DN)
YoucanprinttheremainingProofandholdcopiesfromtheprintingsystem’s
operationpanelwithoutsendingthejobagainfromyourcomputer.
Attheprintingsystem'soperationpanel,presstheMenukey.
1
PresstheupordownarrowsuntilJobBoxappearsonthemessagedisplay,
2
thenpresstheOKkey.
PresstheupordownarrowsuntilQuickCopyappearsonthemessage
3
display,thenpresstheOKkey.
Job
PrivatePrint
PresstheupordownarrowsuntilthedesiredUsernameappearsonthe
4
messagedisplay,thenpresstheOKkey.
PresstheupordownarrowsuntilthedesiredJobnameappearsonthe
5
messagedisplay,thenpresstheOKkey.
Presstheupordownarrowstoselectthenumberofcopiestobeprinted.You
6
canselectfrom1to999copies.
PresstheOKkey,thenpressYestoprint.
7
PrivateprintjobsaresavedontheHarddiskorRAMdiskforprintinguntila
four-digitAccesscodeisentered.WhentheHarddiskreachesmaximum
capacityandanewjobissenttobestored,theoldeststoredjobisreplacedby
thenewjob.Privateprintjobsaredeletedwhentheprintingsystemisresetor
poweredoff.Ifyoudonotwantthejobdeleted,selecttheJobstoragefeature.
Whensendingasensitivedocumenttotheprintingsystem,ausermusttypea
four-digitAccesscode,whichisattachedtotheprintjobalongwiththeJob
nameandUsername.ThejobisnotprinteduntilauserenterstheAccess
codeattheprintingsystem’soperationpanel.Afterthejobisprinted,itis
removedfromprintingsystemmemory.
ThenumberofPrivateprintjobsthatcanbestoredislimitedonlybythe
storagecapacityoftheHarddisk.Youcanmanuallydeleteajobatthe
operationpanel.
Warning:AprintjobcanreplaceajobintheHarddiskhavingthesameUser
nameandJobname.Topreventthis,selectUsejobname+dateandtime
underOverwritejobname.
KXDRIVER
8-5
Page 66

Job
StoringaPrivatePrintJob
Privateprintletsyoustoreadocumenttemporarilyinprintingsystemmemory
withoutprinting,andprotectitwithanAccesscode.Thejobisstoredonthe
Harddiskuntilitisprintedormanuallydeleted.ThejobisstoredinRAMdisk
memoryuntilitisprintedortheprintingsystemisturnedoff.
IntheJobtab,selectJobstorage(e-MPS).
1
SelectPrivateprint.
2
IntheAccesscodebox,typefournumbersifyouwanttorestrictaccessto
3
yourdocument.
ClickOK.
4
PrintingaPrivatePrintJob(FS-C5100DN,FS-C5200DN, FS-C5300DN)
YoucanprintaPrivateprintjobfromtheprintingsystem’soperationpanel
withoutsendingthejobagainfromyourcomputer.Thetopicisprintedand
immediatelydeletedfromtheharddiskorRAMdiskmemory.
Attheprintingsystem'soperationpanel,presstheMenukey.
1
PresstheupordownarrowsuntilJobBoxappearsonthemessagedisplay,
2
thenpresstherightarrow.
PresstheupordownarrowsuntilPrivate/Storedappearsonthemessage
3
display,thenpresstheOKkey.
PresstheupordownarrowsuntilthedesiredUsernameappearsonthe
4
messagedisplay,thenpresstheOKkey.
PresstheupordownarrowsuntilthedesiredJobnameappearsonthe
5
messagedisplay,thenpresstheOKkey.
Usetheupandrightarrowstoenterthe4–digitaccesscode,thenpresstheOK
6
key.
Presstheupordownarrowstoselectthenumberofcopiestobeprinted.You
7
canselectfrom1to999copies.
PresstheOKkeytoprint.
8
PrintingaPrivatePrintJob(FS-C5400DN)
YoucanprintaPrivateprintjobfromtheprintingsystem’soperationpanel
withoutsendingthejobagainfromyourcomputer.Thetopicisprintedand
immediatelydeletedfromtheharddiskorRAMdiskmemory.
Attheprintingsystem'soperationpanel,presstheMenukey.
1
8-6
UserGuide
Page 67

PresstheupordownarrowsuntilJobBoxappearsonthemessagedisplay,
2
thenpresstheOKkey.
PresstheupordownarrowsuntilPrivate/Storedappearsonthemessage
3
display,thenpresstheOKkey.
PresstheupordownarrowsuntilthedesiredUsernameappearsonthe
4
messagedisplay,thenpresstheOKkey.
PresstheupordownarrowsuntilthedesiredJobnameappearsonthe
5
messagedisplay,thenpresstheOKkey.
UsetheupordownarrowsandtheOKkeytoenterthe4–digitaccesscode,
6
thenpressEnter.
Presstheupordownarrowstoselectthenumberofcopiestobeprinted.You
7
canselectfrom1to999copies.
PresstheOKkey,thenpressYestoprint.
8
Job
JobStorage(FS-C5300,FS-C5400)
JobstorageisaJobstorage(e-MPS)optionthatletsyoustoreaprintjob
permanentlyintheHarddiskforprintinglater.Youalsohavetheoptionof
protectingtheprintjobfromunauthorizedprintingbyusinganAccesscode.
ThisfeatureisavailablewhenaHarddiskisinstalledandselectedinthe
DeviceSettingstab.
Jobstorageisusefulforjobsthatneedtobeavailableforprintingatanytime,
eveniftheprintingsystemhasbeenturnedoffandturnedonagain.Job
storagejobscanonlyberemovedmanuallyfromprintingsystemmemory.
Ifdesired,youcanattachafour-digitAccesscodetoaJobstoragejob,so
thatyoucanprintajobwithoutanyoneelseseeingit,orrestrictprintingto
approvedusers.Whentheaccesscodeisused,thejobisnotprinteduntila
userprintsitattheprintingsystem’soperationpanel.Afterthejobisprinted,it
remainsinprintingsystemmemory.
ThenumberofJobstoragejobsthatcanbestoredislimitedonlybythe
storagecapacityoftheHarddisk.Youcanmanuallydeleteajobatthe
operationpanel.
Warning:AprintjobcanreplaceajobintheHarddiskhavingthesameUser
nameandJobname.Topreventthis,selectUsejobname+dateandtime
underOverwritejobname.
StoringaJobStorageJob
Jobstorageletsyoustoreadocumentpermanentlyinprintingsystemmemory
withoutprinting,andgivesyoutheoptiontoprotectitwithanAccesscode.
Thisjobremainsontheharddiskuntilitismanuallydeleted.
IntheJobtab,selectJobstorage(e-MPS).
1
SelectJobstorage.
2
KXDRIVER
8-7
Page 68

Job
Ifyouwanttorestrictaccesstoyourdocument,selectAccessCodeandtype
3
fournumbersinthebox
ClickOKinbothdialogboxestoprint.
4
PrintingaJobStorageJob(FS-C5300DN)
YoucanprintaJobstoragejobfromtheprintingsystem’soperationpanel
withoutsendingthejobagainfromyourcomputer.
Attheprintingsystem'soperationpanel,presstheMenukey.
1
PresstheupordownarrowsuntilJobBoxappearsonthemessagedisplay,
2
thenpresstherightarrow.
PresstheupordownarrowsuntilPrivate/Storedappearsonthemessage
3
display,thenpresstheOKkey.
PresstheupordownarrowsuntilthedesiredUsernameappearsonthe
4
messagedisplay,thenpresstheOKkey.
PresstheupordownarrowsuntilthedesiredJobnameappearsonthe
5
messagedisplay,thenpresstheOKkey.
Ifanaccesscodewasset,usetheupandrightarrowstoenterthe4–digit
6
accesscode,thenpresstheOKkey.
Presstheupordownarrowstoselectthenumberofcopiestobeprinted.You
7
canselectfrom1to999copies.
PresstheOKkeytoprint.
8
PrintingaJobStorageJob(FS-C5400DN)
YoucanprintaJobstoragejobfromtheprintingsystem’soperationpanel
withoutsendingthejobagainfromyourcomputer.
Attheprintingsystem'soperationpanel,presstheMenukey.
1
PresstheupordownarrowsuntilJobBoxappearsonthemessagedisplay,
2
thenpresstheOKkey.
PresstheupordownarrowsuntilPrivate/Storedappearsonthemessage
3
display,thenpresstheOKkey.
PresstheupordownarrowsuntilthedesiredUsernameappearsonthe
4
messagedisplay,thenpresstheOKkey.
PresstheupordownarrowsuntilthedesiredJobnameappearsonthe
5
messagedisplay,thenpresstheOKkey.
8-8
UserGuide
Page 69

Ifanaccesscodewasset,usetheupordownarrowsandtheOKkeytoenter
6
the4–digitaccesscode,thenpressEnter.
Presstheupordownarrowstoselectthenumberofcopiestobeprinted.You
7
canselectfrom1to999copies.
PresstheOKkey,thenpressYestoprint.
8
DeletingaJobStorage(e-MPS)Job(FS-C5100DN,FS-C5200DN, FS-C5300DN)
Anyprintjobstoredinprintingsystemmemory(Harddisk)canbedeleted
manuallyattheprintingsystem’soperationpanel.
Attheprintingsystem'soperationpanel,presstheMenukey.
1
PresstheupordownarrowsuntilJobBoxappearsonthemessagedisplay,
2
thenpresstherightarrow.
PresstheupordownarrowsuntilQuickCopy(forQuickcopyorProofand
3
holdjobs)orPrivate/Stored(forPrivateprintorJobstoragejobs)appears
onthemessagedisplay,thenpresstheOKkey.
Job
PresstheupordownarrowsuntilthedesiredUsernameappearsonthe
4
messagedisplay,thenpresstheOKkey.
PresstheupordownarrowsuntilthedesiredJobnameappearsonthe
5
messagedisplay.
Ifanaccesscodewasset,usethearrowkeysandOKkeytoenterthe4-digit
6
accesscode,thenpresstheOKkey.
PressthedownarrowuntilDeleteappears.
7
PressOKtodeletethejob.
8
DeletingaJobStorage(e-MPS)Job(FS-C5400DN)
Anyprintjobstoredinprintingsystemmemory(Harddisk)canbedeleted
manuallyattheprintingsystem’soperationpanel.
Attheprintingsystem'soperationpanel,presstheMenukey.
1
PresstheupordownarrowsuntilJobBoxappearsonthemessagedisplay,
2
thenpresstheOKbutton.
PresstheupordownarrowsuntilQuickCopy(forQuickcopyorProofand
3
holdjobs)orPrivate/Stored(forPrivateprintorJobstoragejobs)appears
onthemessagedisplay,thenpresstheOKkey.
KXDRIVER
8-9
Page 70

Job
PresstheupordownarrowsuntilthedesiredUsernameappearsonthe
4
messagedisplay,thenpresstheOKkey.
PresstheupordownarrowsuntilthedesiredJobnameappearsonthe
5
messagedisplay.
PressDelete.
6
Ifanaccesscodewasset,usethearrowkeysandOKkeytoenterthe4-digit
7
accesscode,thenpressEnter.
PressYestodeletethejob.
8
JobName
AJobnameisauniqueidentifierforeachprintjob.Ithelpsyoufindandprint
yourjobfromtheprintingsystem’soperationpanel.Whenyousendaprintjob
usingoneoftheJobstorage(e-MPS)options,youcanassignacustomname
tothejoborusethenameoftheapplicationfile.
ForMicrosoftWordandPowerPoint,youcanchoosetoincludeoromitthe
applicationnamefromtheapplicationdefinedJobname.Youcanalsoensure
thatjobsinprintingsystemmemoryarenotreplacedbynewjobshavingthe
sameJobname.
Don’tUseApplicationName
Don’tuseapplicationnameisanoptiontoremovetheapplicationnamefrom
thejobnameintheoperationpanelmessageandinjobstoragefeatures.By
selectingDon'tuseapplicationname,thefilenameyouchooseappears
clearlyinthejoblist.ThisfeatureisapplicableonlywhenprintingfromMicrosoft
WordorPowerPoint.
OverwriteJobName
Overwritejobnameisanoptiontoensurethatasavedprintjobisnotreplaced
inprintingsystemmemorybyanewjobhavingthesameJobname.Ifauser
sendstwoprintjobswiththesameUsernameandJobname,thesecondjob
replacesthefirstjobwithoutanyprompt.Topreventthis,Overwritejobname
canautomaticallychangetheJobnamebyaddingthedateandtimethejobis
sent.Thisfeaturealsohelpsyoutotrackwhenprintjobsweresentfromthe
computer.
TheselectedoptionappliestoaJobnamewitheitherApplicationdefinedor
Customselected.Overwritejobnameoptionsinclude:
Replaceexistingfile
Thisoptionletsthecurrentprintjobreplaceanexistingjobinprintingsystem
memory,ifajobwiththesameUsernameandJobnameexists.
Usejobname+dateandtime
ThisoptionaddsthecurrentdateandtimetotheendoftheJobname,inthe
format:mmddyyhhmmss.
SelectingaJobName
YoumustselectaJobnametousewithJobstorage(e-MPS)features,sothat
youcanfindyourjobinjoblistsontheprintingsystem’soperationpanel.The
8-10
UserGuide
Page 71

selectedJobnameissavedwiththeprintjobwhenthejobissenttoprinting
systemmemory.
IntheJobtab,selectJobstorage(e-MPS).
1
UnderJobname,selectaname:
2
Applicationdefined
ThisoptionusesthenameoftheapplicationdocumentastheJobname.
ForMicrosoftWordorPowerPointdocuments,selectingDon’tuse
applicationnameremovesthenameoftheapplicationsothatonlythe
documentnameappearsastheJobname.
Custom
Thisoptionusesauniquenameforeachjob.Typeanameinthebox,upto
79characters.
SelectanOverwritejobnameoptionincaseajobalreadyexistsinprinting
3
systemmemorywiththesameJobname:
Replaceexistingfile
IfajobwiththesameUsernameandJobnameexists,thecurrentprintjob
replacesanexistingjobinprintingsystemmemory.
Usejobname+dateandtime
AddsthecurrentdateandtimetotheendoftheJobname,intheformat:
mmddyyhhmmss
Job
KXDRIVER
8-11
Page 72

9Advanced
IntheAdvancedtab,youcanchoosespecialfeaturesthatextendthe
capabilitiesoftheprintingsystem.
ThesefeaturesareavailableintheAdvancedtab:
Prologue/Epilogueonpage9-1
Watermarkonpage9-3
ColorOptimizeronpage9-5
ConfiguringStatusMonitoronpage9-6
EMFSpoolingonpage9-8
EnablingClientProfileonpage9-8
Prologue/Epilogue
ThePrologue/Epiloguefeatureenablesausertoinsertacommandfileatthe
beginningofaprintjoborattheend.Thecommandfile,preparedinatext
editor,utilizesprogrammingcommandsfromtheprinterresidentPRESCRIBE
language.TheProductLibraryCDincludesaPRESCRIBEcommand
languagereferenceguide.Acommandfileisasetofinstructionstheprinting
systeminterpretstoproduceagivenoutput.Forexample,a
Prologue/Epiloguecommandfilemaycontainamacrothatplacesagraphic
objectsuchasalogoatthetopofaletterheaddocument.
SelectingaPrologue/EpilogueFile
APrologue/Epiloguefilemustbeavailableonyoursystembeforeitcanbe
addedtoaprintjob.Tocreatethisfile,useatexteditorlikeWindowsNotepad.
9-1
UserGuide
Page 73

InthePrologue/Epiloguedialogbox,selectaPrologue/Epiloguefiletoinsert
intotheprintjob.(Ifnofilenamesarevisibleinthelist,youmustclickAddto
browseforfilesonyourcomputerornetworktoaddtothelist.)Afterthefileis
selected,insertionpointoptionswillbeenabled.
EditingaPrologue/EpilogueFile
InthePrologue/Epiloguedialogbox,selectacommandfilenamefromthelist,
1
andthenclickEdit.MicrosoftNotepadopensforeditingthetextfile.
Makeyourchangestothefile.
2
Savethefile,andexitMicrosoftNotepad.
3
Note:Editingandsavingacommandfileoverwritesthecontentsofthe
existinglocalornetworkfile.
DeletingaPrologue/EpilogueFile
InthePrologue/Epiloguedialogbox,selectaPrologue/Epiloguefilename
1
fromthelist,andthenclickDelete.
Advanced
Inthedeleteconfirmationbox,clickYestoaccept.
2
Note:Onlythefilenameisremovedfromthecommandfilelist.Thefileitself
isnotdeleted,butremainsonthenetworkorlocalcomputer.
AssigningaPrologue/EpilogueFile
InthePrologue/Epiloguedialogbox,selectaPrologue/Epiloguefilename
1
fromthelist.
UnderInsertionPoint,selectaplacetoinsertthePrologue/Epiloguefile.
2
UnassigningaPrologue/EpilogueFile
WhenyoudesignateaPrologue/Epiloguefileasunassigned,youare
removingitfromtheprintjob.Itremainsinthelist.Unassignedselectionsare
usefulwhenthelistcontainsseveralPrologue/Epiloguefiles,andyouwantto
usesomebutnotothers.
InthePrologue/Epiloguedialogbox,selectaPrologue/Epiloguefilename
1
fromthelist.
UnderInsertionPoint,selectUnassigned.
2
SpecifyingtheInsertionPoint
Theinsertionpointisthelocationintheprintjobwheretheselected
Prologue/Epiloguefileisprocessedbytheprintingsystem.Eachfileinthelist
canbeassignedtooneinsertionpoint.WithaPrologue/Epiloguefileselected
inthelist,chooseoneinsertionpointoption:
Unassigned
KXDRIVER
9-2
Page 74

Advanced
ThisoptiondoesnotinserttheselectedPrologue/Epiloguefileintotheprint
job.Thisisusefulifthelistcontainsseveralfiles,andyouwanttoinsert
somebutnotothers.
Beginningoftheprintjob
Endoftheprintjob
TheStartofthepageandEndofthepageinsertionpointoptionsare
availableonlywhenPCL5cisselectedasthePageDescriptionLanguage
(PDL).
Startofthepage
Endofthepage
WithStartofthepageorEndofthepageselected,chooseoneofthe
followingpageoptions:
Onlyonoddpages
Onlyonevenpages
Pages
Thisoptioninsertsthefileintospecifiedpages.Inthetextbox,type
individualpagenumbersseparatedbycommas,orapagerangeseparated
byahyphen.
IfthePagesoptionisselectedandyouclickOKwithoutenteringany
numbers,youarepromptedtospecifypagenumbers.
Watermark
Awatermarkisarecognizableimageorpatternthatcanbeplacedonapageor
throughoutadocument.Youcanchooseoneofthestandardwatermarksor
createyourowntext.Thepreviewareaattheleftofthedialogboxshowshow
thewatermarkappearsonapage.Thisisusefulformakingadjustmentstothe
appearanceandlocationofthewatermark.
AddingorEditingaWatermark
Youcancreateanewwatermarkthatdisplaysyourchosentext.Anywatermark
canbeedited,thoughalimitednumberofoptionscanbechangedfordefault
watermarks.
IntheAdvancedtab,clickWatermark.
1
IntheWatermarkdialogbox,clickAddtocreateauserdefinedwatermark;or
2
underSelectwatermark,selectadefaultorcustomwatermarkandclickEdit.
UnderWatermarkname,typeaname,upto39characters.Adefault
3
watermarkcannotberenamed.
UnderWatermarktext,typeyourpreferredtext.Thisoptionisnotavailable
4
wheneditingadefaultwatermark.
Selectthedesiredfont,style,size,andcountofthetext.
5
Selectthecolorofthewatermarkfromthelistofdefaultcolors.Forcustom
6
colors,selectCustom,andclickthebuttontoopentheColordialogbox.Click
9-3
UserGuide
Page 75

oneoftheBasiccolorsandclickOK,orclickDefineCustomColorstoopen
andselectfromthecolorspectrumpanel.
SelectthePositionofthewatermarkwithoneofthefollowingoptions.
7
Centered[default]
Thisoptionplacesthecenterofthewatermarktextinthecenterofthepage.
Userdefined
Thisoptionletsyoumanipulatethexandycoordinateboxestomovethe
textaroundthepage.
Youcanalsochangethepositionbyclickingthepositionbuttonatthebottomof
thepreviewarea.Clickandholdasyoudragthepointertomovethewatermark
image.
SelecttheAngleofthewatermarkwithoneofthefollowingoptions.
8
Diagonal[default]
Thisoptionplacesthewatermarktextatthedefaultangleonthepage.
Userdefined
Thisoptionletsyoutypeadegreevaluefortheangle.Anangleismeasured
indegrees,from0to360.
Youcanalsochangetheanglebyclickingtheanglebuttonatthebottomofthe
previewarea.Clickandholdasyoudragthepointertomovethewatermark
image
Advanced
TheRotatearoundcentercheckboxatthebottomfarrightofthedialogbox
9
determinesthemethodofrotationforthewatermark.YoumustselectUser
definedinbothPositionandAngletoenablethisoption.SelectRotate
aroundcentertopositionthewatermarktextwiththecenterofthetextasits
axis,andclearittopositionthewatermarktextwiththeleftendofthetextasits
axis.
Inalldialogboxes,clickOK.
10
PageSelectionforWatermark
ThePageSelectionoptionforWatermarkenablesyoutochoosethelocation
forwatermarksinyourdocument.
IntheAdvancedtab,clickWatermark.
1
IntheWatermarkdialogbox,underSelectwatermark,chooseadefaultor
2
customwatermarktoprint.
UnderPageselection,choosepagesforprintingthewatermark:
3
Allpages
Thisoptionprintsthewatermarkoneachdocumentpage.
Firstpageonly
Thisoptionprintsthewatermarkonthefirstdocumentpage.
Allpagesexceptfirstpage
KXDRIVER
9-4
Page 76

Advanced
Thisoptionprintsthewatermarkonallpagesafterthefirstpage.
Onlyonspecifiedpages
Thisoptionprintsthewatermarkonpagenumberstypedinthebox.
Printontofrontoutsidecover
Thisoptionprintsthewatermarkonthefrontcover.Itisavailablewhen
CovermodeisselectedinthePublishingtab.IfCovermodeandFront
outsidearebothselectedinthePublishingtab,Printontofrontoutside
coverisselectedautomatically.
Inalldialogboxes,clickOK.
4
ColorOptimizer
ColorOptimizerisaplug-infeaturethatletsyoumatchasinglecolor
accuratelyinaprintjob.Toinstallthisoptionalcomponent,seetheInstallation
chapter.Usethisfeaturetoprintadocumentthatcontainsonlyonecolor
besidesblack,suchasaletterheadorcompanylogo.Thecolorshouldbesolid
andconsistent,withnoshading.ColorOptimizerwillnotworkinadocument
withmultiplecolorsorphotographs.
IntheColorOptimizerdialogbox,aneyedroppertoolcanbedraggedintothe
on-screendocumenttoselectthecolor,orRGBvaluescanbeenteredifyou
knowthem.AprintedColorOptimizerTableletsyousee121colorvariations
onpaperandselectthedesiredvariation.HueandLightnesssettingsare
adjustedinthedriveraccordingtotheselectedvariation.
Youcanspecifyuptothreecustomsettingsthatcorrespondtothecustom
settingsintheImaging>Adjustmentfeature.YoucanalsoselectaPrinter
profileoption.
Wheninstalled,theColorOptimizerbuttonappearsintheAdvancedtab.The
ColorOptimizerbuttonwillnotappearintheuserinterfacewhenPDFisthe
selectedPDLorBlack&WhitemodeisselectedintheAdministrator
Settingsdialogbox.ColorOptimizerisunavailableforthefollowingsettings:
•Black&WhiteintheImaging,Basic,orQuickPrinttab.
•Inaclient/serverenvironment.
OptimizingRGBColorforPrinting
YoucanuseColorOptimizertomatchasinglecoloraccuratelyinaprintjob.
OptionsselectedintheColorOptimizerdialogboxarealsosavedinImaging
>Adjustment.Atanytime,youcanclicktheInfoiconintheColorOptimizer
dialogboxforinstructions.
Openthedocumentcontainingthedesiredcolor.
1
Fromtheapplication'sFilemenu,clickPrint,thenclickPreferencesor
2
PropertiestoopenthePropertiesdialogbox.
ClicktheAdvancedtab,andclickColorOptimizer.
3
IntheColorOptimizerdialogbox,underColoradjustment,selectCustom1,
4
Custom2,orCustom3.
9-5
UserGuide
Page 77

Selectacolorbyoneofthefollowingmethods:Clickanddragtheeyedropper
5
toolanywhereonthescreentoselectthedesiredcolor.IfyouknowtheRGB
valuesofthecolor,typethevaluesintotheRGBboxes,orclicktheupordown
arrowbuttonstoadjustthevalues.
Thecolorappearsinthecolorpreviewbox.
Clicktheprintericontoprintaone-pagetabledisplayingvariationsofthe
6
selectedcolor.FromtheprintedColorOptimizerTable,selectthedesired
variation.
IntheColorOptimizerdialogbox,typethenumberoftheselectedvariation
7
(1–121)inthespinboxnexttothecolorpreviewbox,orclicktheupordown
arrowbuttonstoselectthenumber.
UnderPrinterprofile,selectfromavailableoptions.
8
Ifdesired,typeadescriptionofthecustomsettingintheDescriptionbox,upto
9
30characters.ThedescriptiononlyappearsintheColorOptimizerdialogbox.
ClickOKorApplytosavethesettings.
10
Advanced
ConfiguringStatusMonitor
TheStatusMonitordisplaysprintingsystemstatusmessagesinthelowerright
cornerofthewindowduringprinting.YoucanstartaStatusMonitorforeach
supportedprintingsystem.MorethanoneStatusMonitorcanbedisplayedat
onetime.
IntheAdvancedtab,clickStatusMonitor.
1
IfyouwanttheStatusMonitorimagetoappearduringaprintjob,intheStatus
2
Monitordialogbox,selecttheStatusMonitorcheckbox.
ToviewtheprintjobstatuswithoutchangingtheStatusMonitorsetting,click
3
OpenStatusMonitor.
TheStatusMonitorimageappearsinthelowerrightcornerofyourcomputer
screen.
MovethepointerovertheStatusMonitorimagetodisplayballoon-stylestatus
4
messagescontaininginformationaboutprintingsystemactivityandtheprinter
port.
Todisplayalistofoptions,right-clicktheStatusMonitoriconinthesystem
5
tray.
•Hide/Show
SwitchbetweenhidingandshowingtheStatusMonitorimage.
Note:YoucanalsohidetheStatusMonitorimagebyright-clickingonthe
image,thenclickingHidetheStatusMonitor,orlettheStatusMonitor
closeonitsownafter5minutesifthereisnoprintingactivity.
KXDRIVER
9-6
Page 78

Advanced
•Configure
ToopenawebbrowsertodisplayaprinterWebpage,clickConfigure.
Note:IfyourprinterisconnectedwithaUSBcable,thisfeaturecannotbe
used.Makesettingsusingtheoperationpaneloftheprintingsystem.
•Preferences
ToopenadialogboxwithoptionsforStatusMonitorsoundnotificationand
appearancechoices,clickPreferences.
•www.kyoceramita.com
ToopenaWebbrowsertotheKyoceraMitahomepage,click
www.kyoceramita.com.
•Exit
ToclosetheStatusMonitor,clickExit.
SettingStatusMonitorPreferences
Youcanconfigureprintingsystemalertswithaccompanyingsoundorspeechin
theStatusMonitorPreferencesdialogbox.Youcanalsochangethe
appearanceoftheStatusMonitorimage.
Right-clicktheStatusMonitoriconinthesystemtray.
1
ClickPreferences.
2
ClicktheSoundNotificationtab.
3
ClicktheEnablesEventNotificationcheckbox.
4
SelectaneventforaStatusMonitoralert.
5
•Coveropen
•Paperjam
•Addpaper
•Sleep
•Addtoner
•Tonerlow
•Notconnected
•Printing
•Printingcompleted
IntheSoundNotificationtabyoucanalsoaddsoundorspeechtoyour
6
chosenalert.
Toaddasoundfile:
CleartheUseTexttospeechcheckbox.
Thesoundfiletextboxbecomesavailable.Typethelocationofasoundfile
(.wav),orbrowsetofindafilelocatedonyourcomputer.
Toaddspeech:
9-7
UserGuide
Page 79

SelectUseTexttospeech.
Typeyourpreferredtextinthetextbox.TheMicrosoftTexttoSpeechutility
readsyourtypedtextandplaysitbackinaspokenvoice.
Tochangethesize,placement,andtransparencyoftheStatusMonitorimage,
7
clicktheAppearancetab.
Enlargewindow
SelecttodoublethesizeoftheStatusMonitorimageandtextballoons.
Alwaysontop
SelecttomaketheStatusMonitoralwaysappearontopofotheropen
windows.
Transparency
ThisoptionadjuststheStatusMonitortoletavariableamountof
backgroundshowthroughtheimage.Typeavaluefromzerotofiftyinthe
box.Highervaluescreategreatertransparency.Azerovaluecreatesa
completelyopaqueimage.
InthePreferencesdialogbox,clickApplytosaveyoursettings,clickOKto
8
saveyoursettingsandclosethedialogbox,orclickCanceltoclosethedialog
boxwithoutsavinganysettings.
Advanced
EMFSpooling
EnablingClientProfile
EMF(EnhancedMetaFile)isaspoolfileformatusedinprintingbytheMicrosoft
Windowsoperatingsystem.Whenaprintjobissentfromanapplication,itis
transferredtothespoolfile.Theapplicationwritestoandtheprinterdriverreads
fromthespoolfilesimultaneously.Formultipleorlargedocuments,thisquickly
returnsapplicationcontroltotheuserwhiletheprinterisstillprintingthe
document.
ToprintwithEMFspooling,intheAdvancedtabselecttheEMFSpooling
checkbox.Continuetheprintingprocessasusual.
Note:EMFspoolingisnotavailablewhenAllowdatapassthroughis
selectedintheKPDLSettingsdialogbox.
Clientprofilereferstoprofilesettingssavedonaserverandaccessedbyclients
inaclient/serverenvironment.ThisfeatureintheAdvancedtabenablesan
administratortocontrolanddistributeprofilesonaserver.Youwouldstillhave
thechoicetouseyourlocalprofilesortheserverprofiles.
CleartheEnableclientprofilecheckboxtoselectprofilesfromtheserver
toapplytoprintjobscreatedbythedriver.Serverprofilesareread-only.
SelecttheEnableclientprofilecheckboxforusingcustomprofileslocally
inthedriver.
KXDRIVER
9-8
Page 80

10Profiles
InProfiles,youcansaveprinterdriversettingsasaprofile.Youcanselect
multipleoptionsintheQuickPrinttabandPrintingPreferences,savethemto
aprofile,anduseallofthematoncewhenyouapplytheprofile.Amaximumof
26profilescanbeestablishedinonedriver,includingtheFactoryDefault
profile.DeviceoptionssettingsmadeintheDeviceSettingstabcannotbe
savedtoaprofile.
ThesefeaturesareavailableintheProfilesdialogbox:
SavingaProfileonpage10-1
EditingaProfileonpage10-2
DeletingaProfileonpage10-2
ImportingaProfileonpage10-2
ExportingaProfileonpage10-3
SavingaProfile
10-1
TheSavebuttonletsyoucreateyourownprofiles.Youcanselecttheprinting
optionsyouwantinthedriver,thensavethedriversettingsincludingyour
customizationsasaprofile.Youcanthenusethatprofiletoprintthesametype
ofprintjobagainwithouthavingtoreselectallthesettings.InPrinting
Preferences,theProfilebuttonappearsatthebottomofallthetabs.
SettheprintingoptionsyouwantforyourprintjobbyopeningPrinting
1
Preferencesandselectingallyourdriversettings.
ClickProfiles>Save.
2
Toidentifytheprofile,typeaName,selectanIcon,andtypeaDescription.
3
UserGuide
Page 81

EditingaProfile
ClickOKtosavetheprofile.
4
ThenewlyaddedprofileappearsintheProfilesdialogbox.
ClickApplytoactivatetheselectedprofiletothecurrentprintjob,orclickOKto
5
savetheprofile.
Note:Toresettheprinterdrivertodefaultsettings,selecttheFactoryDefault
profile,andclickApply.Thisclearsthesettingsofaselectedprofile.
TheEditbuttonletsyoumakechangestoanexistingprofile.TheFactory
Defaultprofilecannotbeedited.
ClickProfiles.
1
IntheSelectprofilesection,highlighttheprofiletobeedited,andclickEdit.
2
Anyofthethreeoptionscanbeedited:name,iconanddescription.ClickOKto
3
savetheeditedchanges.
ThenewlyeditedprofileappearsintheProfilesdialogbox.
Profiles
DeletingaProfile
ImportingaProfile
ClickApplytoactivatetheselectedprofiletothecurrentprintjob,orclickOKto
4
savetheprofile.
TheDeletebuttonletsyouremoveanexistingprofile.TheFactoryDefault
profilecannotbedeleted.
ClickProfiles.
1
IntheSelectprofilesection,highlighttheprofiletobedeleted,andclick
2
Delete.
Amessageappearsconfirmingtheremovaloftheprofile.ClickYestoremove.
3
ClickOKtoclosetheProfiledialogbox.
4
TheImportbuttonletsyouimportacopyofaprofilefromotherprinterdrivers
intoyourprinterdriver.
ClickProfiles>Import.
1
Browsefortheexistingprofile(.KXP),selectit,andclickOpen.
2
Amessageappearsifanyoftheprofilesettingsintheimportedfilearenot
availableintheexistingdriver.SelectYes,toimporttheprofile,orNo,tocancel
theimport.
KXDRIVER
10-2
Page 82

Profiles
ExportingaProfile
IfyouselectedYesinthepreviousstep,thenewlyimportedfileappearsinthe
3
Profiledialogbox.
ClickApplytoactivatetheselectedprofiletothecurrentprintjob,orclickOKto
4
savetheprofile.
TheExportbuttonletsyouexportacopyofaprofilefromyourprinterdriverfor
useinotherprinterdrivers.TheFactoryDefaultprofilecannotbeexported.
ClickProfiles.
1
IntheSelectprofilesection,highlighttheprofiletobeexported,andclick
2
Export.
TheExportProfiledialogboxappears.Nameandsavetheprofile.
3
ClickOKtoclosetheProfilesdialogbox.
4
10-3
UserGuide
Page 83

Glossary
A
B
C
AccesscodeAfour-digitcodethatyoumustenterattheprintingsystem’s
operationpaneltoprintaPrivatePrintjob.Anaccesscodecanalsobeusedwiththe
Jobstoragefeature.
AutoconfigureDevicesettingsfeaturethatqueriesaprintingsystemthroughthe
networkandautomaticallyretrievessettingsforoptionaldevicesandmemory.Driver
settingswillbeupdatedwithinformationreceivedfromthephysicalprintingsystem.
InstalleddeviceswillbedisplayedinthePreviewimage.
Black&whiteWiththisoptionselected,theprintercreatesdocumentswithblack
toneronly.ThisfeatureisavailableintheImaging,QuickPrint,andBasictabs.
BookletLayoutfeaturethatprintsamulti-pagedocumentinabookletformatby
usingaduplexunit.Twopagesareprintedoneachsideofasheettocreatea
documentthatcanbereadlikeabook.Forsomemodels,finishingdevicesare
availabletofoldandstaplebooklets.
CassetteAremovableplastictraythatholdsasupplyofpaperforinputtothe
printer.
ColoroptimizerAdvancedtabplug-infeaturethataccuratelymatchesasingle
colorinaprintjob.Thedocumentsforprintingcancontainonlyonecolorbesides
black,suchasaletterheadoracompanylogo.ColorOptimizerdoesnotworkfora
documentwithmultiplecolorsorphotographs.
ColorpagecountAutomaticallytalliesthenumberofcolorandblackandwhite
pagesineachprintjobforbillingoraccountingpurposes.
ContinuoustoneImagingfeaturethatrepresentsimages,orphotographsina
seriesofevenlygraduatedtones.
D
E
F
Don’tuseapplicationnameDon’tuseapplicationnameisanoptiontoshorten
theapplicationdefinedjobnameforjobscreatedinMicrosoftWordorPowerPoint.
Thefilenamewillappearclearlyinthejoblist.
EcoPrintImagingfeaturethatchangestonersaturation,makingtheentireimage,
textandgraphics,appearlighterintheprintedjob.Theactualamountoftonerused
dependsontheprintingsystemmodeandthetypeofdataprinted(text,graphics,or
both).EcoPrintdoesnotincreaseprintspeed.Thisfeatureisalsoavailableinthe
QuickPrintandBasictabs
e-MPSJobstorage(e-MPS)isasetofoptionsforsavingprintjobsinprinting
systemmemory,sothatyoucanprintorreprintthemlater.Printjobscaneasilybe
reprintedlaterfromtheprintingsystem’soperationpanel,andprintingofsensitive
documentscanberestrictedtoapprovedusers.
FastprintingPrintingmodethatdecreasesspoolsizeandincreasesprintspeed.
KXDRIVER
v
Page 84

G
GDIcompatiblemodeApagedescriptionlanguageoptionthataccurately
reproduceswhatisviewedonthescreenusingtheMicrosoftGraphicalDevice
Interface(GDI)componenttorenderthedocument.Itgeneratesdatainaraster
printingformat,creatingalargerprintablefile.
GutterBlankspaceontheleftsideortopofaprintedpagethatcanbeincreased
byscalingdowntextandgraphics.Thissupportsstaplingandholepunching.When
usedwithDuplexprinting,theenlargedblankspacelinesupevenlyonbothsidesof
thesheet.Thelargerblankspaceiscreatedbyshiftingtheprintableareatotheright
ordownasmuchasoneinch(25.4mm).
J
M
O
P
JobaccountingAnaccountingsystemthatrecordsandcontrolsthenumberof
pagesprintedbyeachaccountID.AccountIDscanbeassignedattheprintingsystem
andstoredinthedriver.AfteraccountIDsareassigned,youcanusetheJob
accountingoptiontoprintintheJobaccountingmode.
JobstorageJoboptionthatstoresaprintjobpermanentlyonaharddiskfor
printinglater.Youalsohavetheoptionofprotectingtheprintjobfromunauthorized
printingbyusinganaccesscode.Thisfeatureisavailablewhenaharddiskisinstalled
andselectedintheDeviceSettingstab.
MPtraySourcetrayusedforlabels,transparencies,envelopes,andcustom
printingmedia.
OperationpanelThekeysanddisplayontheprintingsystem.Usetheoperation
paneltosetoptionssuchasmediatypeandEcoPrint,andtoprintjobsstoredonthe
harddisk.
PDFTheAdobeportabledocumentformat(PDF)isindependentoftheapplication
software,hardware,andoperatingsystemusedtocreatedocuments,andalsoofthe
outputdeviceonwhichtheyaredisplayedorprinted.
PDLPageDescriptionLanguage.Thisisthelanguageusedbyyourcomputerto
telltheprintingdevicehowtoprintadocument.Availabilityofsomeprintingoptions
dependsontheselectedPDL.
Plug-inAnaccessoryprogramthatintegrateswiththeprinterdrivertoenhanceor
extendthedriver'scapabilities.
PosterLayoutfeatureforprintingadocumentinalargersizethanthemaximum
supportedbytheprintersothecumulativesheetscanbeassembledasaposter.Use
thisfeaturetoprintadocumentinalarge,eye-catchingposterformat,upto25times
largerthantheoriginaldocumentsize.
PRESCRIBEAninternalprinterlanguagethatembedscommandsintospecified
locationsinaprintjob.
PrintgraphicsasblackThisoptionprintsallcolorgraphicsandtextwithblack,
ratherthangrayscale.ThisfeatureisintendedforCADapplications.
PrinttextasblackPrintsallcolortextasblack.Itproducesfasterprintingofcolor
printjobsbyreducingtheamountofdatasenttotheprinter.Inblackandwhite
printing,itincreasesthedetailforlight-coloredtextprinted.Whitetextandimage
colorsareunaffected.
vi
UserGuide
Page 85

PrivateprintJoboptionthatsavesprintjobsontheharddiskforprintinguntila
four-digitaccesscodeisentered.Privateprintjobsaredeletedwhentheprinting
systemisresetorturnedoff.
ProfileAsetofuserdefineddriversettingsthataresavedasagroup.Oncesaved,
youcanselectaprofilebynameandapplyitssettingstoaprintjobwithoutselecting
eachfeatureindividually.
Prologue/EpilogueAdvancedfeaturethatallowsyoutoinsertamacrointo
specificlocationsintheprintjob.Anadvancedusermaychoosetousethisfeatureto
embedaPRESCRIBEcommandthatwillcallamacrotooverlayPRESCRIBEform
dataoragraphicobject,suchasalogoorasignature,ataspecificpointintheprint
job.
ProofandholdJoboptionthatprintsonecopyofaprintjobsothatyoucanproof
itbeforeprintingtheremainingcopies.Thisfeatureisavailablewhenaharddiskis
installedandselectedintheDeviceSettingstab.Aftertheproofcopyisprintedand
checked,remainingcopiescanbeprintedfromtheprintingsystem’soperationpanel
withoutsendingthejobagainfromthecomputer.
Q
R
S
T
QuickcopyJoboptionthatprintsallcopiesofaprintjobandstoresthejob
temporarilyonaharddiskforreprintinglater.Thisfeatureisavailablewhenahard
diskisinstalledandselectedintheDeviceSettingstab.
RAMdiskAfeaturethatletsyousetupanareawithintheprintingsystemmemory
asavirtualharddiskforfasterprinting.RAMdiskisnotanattacheddevice,butan
allocationofexistingprintingsystemmemory.RAMdiskistemporary.Alldatasentto
RAMdiskmemorywillbelostwhentheprintingsystemisresetorpoweredoff.
SNMPSimpleNetworkManagementProtocol.ThestandardTCP/IPprotocolfor
managingIPnetworkdevices,includingprintingdevices.SNMPsettingsdetermine
thelevelofsecuritywhenusingtheAutoConfigurefeature,andpreventunauthorized
printingtotheSNMPv3printingdevice.SNMPsettingsmustbesetinthe
AdministratorsettingsintheDeviceSettingstab,andintheprintingsystem’s
CommandCenter.
StatusmonitorOptionalfeaturethatdisplaysprintingsystemstatusmessagesin
thelowerrightcornerofthewindowduringprinting.Youcancustomizethe
appearanceoftheStatusmonitor,anddeterminewhatmessagesaredisplayedand
howbyselectingpreferencesandnotifications.
TransparencyAclearplasticpage-sizedsheetusedasaprintingmedium.
TransparencyinterleavingPublishingfeaturethatinsertsabackingsheet
betweenprintedtransparencies.Thebackingsheet,alsoknownasaninterleaf,helps
keeptransparenciescleanandpreventsthemfromclingingtogether.
W
KXDRIVER
WatermarkTheWatermarkfeatureisavailableintheAdvancedtab.Awatermark
isarecognizableimageorpatternthatcanbeplacedonapageorthroughouta
document.Youcanchooseoneofthestandardwatermarksorcreateyourowntext.
vii
Page 86

KYOCERA MITA AMERICA, INC.
Headquarters:
225 Sand Road
Fairfield, New Jersey 07004-0008
Telephone: (973) 808-8444
Fax: (973) 882-6000
New York Branch:
1410 Broadway, 23rd Floor
New York, NY 10018
Telephone: (917) 286-5400
Fax: (917) 286-5402
Northeastern Region:
225 Sand Road
Fairfield, New Jersey 07004-0008
Telephone: (973) 808-8444
Fax: (973) 882-4401
Midwestern Region:
201 Hansen Court, Ste 119
Wood Dale, Illinois 60191
Telephone: (630) 238-9982
Fax: (630) 238-9487
Southeastern Region:
1500 Oakbrook Drive
Norcross, Georgia 30093
Telephone: (770) 729-9786
Fax: (770) 729-9873
Southwestern Region:
2825 West Story Road
Irving, Texas 75038-5299
Telephone: (972) 550-8987
Fax: (972) 252-9786
National Operation Center &
National Training Center:
2825 West Story Road
Irving, Texas 75038-5299
Telephone: (972) 659-0055
Fax: (972) 570-5816
Latin America Division:
8240 NW 52nd
Terrace Dawson Building, Suite 108
Miami, Florida 33166-7766
Telephone: (305) 421-6640
Fax: (305) 421-6666
Western Region:
14101 Alton Parkway
Irvine, CA 92618-7006
Telephone: (949) 457-9000
Fax: (949) 457-9119
KYOCERA MITA CANADA, LTD.
6120 Kestrel Road, Mississauga,
Ontario L5T 1S8, Canada
Telephone: (905) 670-4425
Fax: (905) 670-8116
KYOCERA MITA AMERICA MEXICO, S.A. DE C.V.
Av. 16 de Septiembre #407
Col. Santa Inés
Azcapotzalco México,
D.F. 02130, México
Telephone: (55) 5383-2741
Fax: (55) 5383-7804
Page 87

KYOCERA MITA EUROPE B.V.
Hacksteen 40, 2132 MS Hoofddorp
The Netherlands
Telephone: +31.20.654.0000
Home page: http://www.kyoceramita-europe.com
Email: Info@kyoceramita-europe.com
Kyocera Mita Nederland B.V.
Beechavenue 25, 1119RA Schiphol-Rijk
The Netherlands
Telephone: +31.20.58.77.200
Kyocera Mita (UK) LTD
8 Beacontree Plaza
Gillette Way Reading Berks RG2 0BS
U.K.
Telephone: +44.1189.311.500
Kyocera Mita Italia S.p.A.
Via G. Verdi, 89/91, 20063 Cernusco s/N
Milano, Italy
Telephone: +39.02.92179.1
S.A. Kyocera Mita Belgium N.V.
Hermesstraat 8A, 1930 Zaventem
Belgium
Telephone: +32.2.720.9270
Kyocera Mita (Schweiz)
Hohlstrasse 614, 8048 Zürich
Switzerland
Telephone: +41.1.908.4949
Kyocera Mita Deutschland GMBH
Otto-Hahn-Str. 12, D-40670 Meerbusch,
Germany
Telephone: +49.2159.918.0
Kyocera Mita GMBH Austria
Eduard-Kittenberger-Gasse 95,
1230 Wein
Austria
Telephone: +43.1.86338.210
Kyocera Mita Svenska AB
Esbogatan 16B 164 75 Kista
Sweden
Telephone: +46.8.546.55000
Kyocera Mita Norge
Postboks 150 Oppsal, NO 0619 Oslo
Olaf Helsetsvei 6, NO 0694 Oslo,
Norway
Telephone: +47.22.62.73.00
Kyocera Mita France S.A.
Parc Les Algorithmes Saint Aubin
91194 GIF-SUR-YVETTE
France
Telephone: +33.1.6985.2600
Kyocera Mita España, S.A.
Edificio Kyocera, Avda de Manacor No. 2
28290 Las Matas (Madrid)
Spain
Telephone: +34.91.631.8392
Kyocera Mita Finland OY
Atomitie 5C, 00370 Helsinki
Finland
Telephone: +358.9.4780.5200
Kyocera Mita Danmark A/S
Ejby Industrivej 1, DK-2600 Glostrup
Denmark
Telephone: +45.5687.1100
Kyocera Mita Portugal, IDA.
Rua do Centro Cultural, 41 (Alvalade) 1700-106
Lisbon,
Portugal
Telephone: +351.21.842.9100
Kyocera Mita South Africa (PTY) LTD.
527 Kyalami Boulevard
Kyalami Business Park Midrand
South Africa
Telephone: +27.(0) 11.540.2600
Page 88

KYOCERA MITA Corporation
Headquarters:
2-28, 1-chome, Tamatsukuri, Chuo-ku
Osaka 540-8585, Japan
Telephone: (06) 6764-3555
http://www.kyoceramita.com
Kyocera Mita Australia Pty, LTD.
Level 3, 6-10 Talavera Road, North Ryde,
N.S.W. 2113 Australia
Telephone: (02) 9888.9999
Kyocera Mita New Zealand LTD.
1-3 Parkhead Place, Albany
P.O. BOX 302 125 NHPC
Auckland, New Zealand
Telephone: (09) 415.4517
Kyocera Mita (Thailand) Corp., LTD.
9/209 Ratchada-Prachachem Road
Bang Sue, Bangkok 10800, Thailand
Telephone: (02) 586.0320
Kyocera Mita Singapore PTE, LTD.
121 Genting Lane, 3rd Level
Singapore 349572
Telephone: 67418733
Kyocera Mita Hong Kong, LTD.
11/F., Mita Centre
552-566, Castle Peak Road
Tsuen Wan, New Territories,
Hong Kong
Telephone: 24297422
Kyocera Mita Taiwan Corporation
7F-1~2, No. 41, Lane 221, Gangchi Rd.
Neihu District, Taipei, Taiwan, 114, R.O.C.
Telephone: (02) 87511560
Page 89

Rev. 090309
 Loading...