

Kyocera FS5800C User Manual

Contents
FS-5800C
User’s Manual
COLOUR LASER PRINTER

Thank you for purchasing the Kyocera FS-5800C Colour Laser Printer.
Notice
NO LIABILITY IS ASSUMED FOR ANY DAMAGE CAUSED BY IMPROPER INSTALLATION.
The information in this manual is subject to change without notification. Additional pages may be inserted in future
editions. The user is asked to excuse any technical inaccuracies or typographical errors in the present edition.
SOFTWARE USED WITH THIS PRINTER MUST SUPPORT THE PRINTER’S NATIVE MODE OR ONE OF ITS
EMULATION MODES. The printer is factory set to emulate the PCL 5C. The emulation mode can be changed by
following the procedures described in Using the Printer.
No responsibility is assumed if accidents occur while the user is following the instructions in this manual. No
responsibility is assumed for defects in the printer’s firmware (contents of its read-only memory).
This manual, any copyrightable subject matter sold or provided with or in connection with the sale of the printer,
are protected by copyright. All rights are reserved. Copying or other reproduction of all or part of this manual, any
copyrightable subject matter without the prior written consent of the copyright holder is prohibited. Any copies
made of all or part of this manual, any copyrightable subject must contain the same copyright notice as the material
from which the copying is done.
© Copyright 1998 by Kyocera Corporation and KYUSHU MATSUSHITA ELETRIC CO., LTD. All rights reserved.
(Revision 1.0. April 1998)
Regarding Tradenames
KPDL is a trademark of Kyocera Corporation.
HP Color LaserJet 5 is a product of Hewlett-Packard Company. Hewlett-Packard, PCL, and PJL are registered
trademarks of Hewlett-Packard Company. Centronics is a trade name of Centronics Data Computer Corp. Microsoft
and Windows are registered trademarks of Microsoft Corporation in the United States and/or other countries.
Pentium is a registered trademark of Intel Corporation. PostScript is a registered trademark of Adobe Systems
Incorporated. Macintosh is a registered trademark of Apple computer, Inc. Adobe and Acrobat are trademarks of
Adobe Systems Incorporated which may be registered in certain jurisdictions
Typeface Trademark Acknowledgement
All resident fonts in this printer are licensed from Bitstream Inc., Cambridge, Massachusetts, U.S.A.
Dutch801, Swiss742, Incised901, ZapfCalligraphic801, ZapfHumanist601, OriginalGaramond, and Chianti are
trademarks of Bitstream Inc.
Century Schoolbook, Stymie, and Cooper-Black are trademarks of Kingsley-ATF Type Corporation.
ITC AvantGarde, ITC Benguiat, ITC Bookman, ITC Souvenir, ITC ZapfChancery, and ITC ZapfDingbats are
registered trademarks of International Type-face Corporation.
Revue is a trademark of Esselte Pendaflex Corporation in the U.S., Letraset Canada Ltd. in Canada, and Esselte
Letraset Ltd. elsewhere.
Bitstream Sublicense Agreement
FONTWARE/TrueDoc developed by BITSTREAM INC. is provided as part of this Printer by KYOCERA
CORPORATION under license. KYOCERA, as a Licensee of BITSTREAM, grants you, the Sublicensee, nonexclusive right to use FONTWARE/TrueDoc installed in this Printer, if you agree to and at all times comply with the
following items:
1. Ownership
As the Sublicensee, you own the Printer in which FONTWARE/TrueDoc is originally installed, but BITSTREAM
retains title to and ownership in the software program of FONTWARE/TrueDoc. The Sublicense is not a sale of the
original software program of FONTWARE/TrueDoc or any portion or copy of it.
i

2. Copy Restrictions
FONTWARE/TrueDoc is copyrighted. Unauthorized copying of FONTWARE/TrueDoc even if modified, merged, or
included with other software, is expressly forbidden. You may be held legally responsible for any copyright infringement.
3. Unauthorized Use
FONTWARE/TrueDoc may not be removed, disclosed and transferred to any third party for any length of time
without the prior written consent of KYOCERA or BITSTREAM. Also, you may not modify, adapt, translate, reverse
engineer, decompile, or create derivative works based on FONTWARE/TrueDoc.
4. Term
This agreement should remain in full force and effect forever thereby allowing the Sublicensee to use the
FONTWARE/TrueDoc forever unless the Sublicensee violates the terms of paragraphs 2. or 3. above. In the event of
such violation, this agreement will terminate automatically without notice from KYOCERA. Upon termination, you
should destroy FONTWARE/TrueDoc and all copies of them, in part and in whole, including modified copies, if any.
Important note on the interface connectors
Be sure to turn off printer power before connecting or disconnecting an interface cable* to the printer. For protection
against static discharge which may be applied to the printer’s internal electronics through the interface
connector(s), keep any interface connector which is not in use capped using the protective cap supplied.
* A shielded interface cable must be used.
Safety information
Laser safety
This printer is certified as a Class 1 laser product under the U.S. Department of Health and Human Services
(DHHS) Radiation Performance Standard according to Radiation Control for Health and Safety Act of 1968. This
means that the printer does not produce hazardous laser radiation. Since radiation emitted inside the printer is
completely confined within protective housings and external covers, the laser beam cannot escape from the printer
during any phase of user operation.
Laser notice
This printer is certified in the U.S. to conform to the requirements of DHHS 21 CFR Subchapter for Class I (1) laser
products, and elsewhere is certified as a Class I laser product conforming to the requirements of IEC 825.
CAUTION Invisible laser radiation when open. AVOID DIRECT EXPOSURE TO BEAM.
Use of controls or adjustments or performance of procedures other than those specified herein may result in
hazardous radiation exposure.
CDRH regulations
The Center of Devices and Radiological Health (CDRH) of the U.S. Food and Drug Administration implemented
regulations for laser products on August 2, 1976. These regulations apply to laser products manufactured after
August 1, 1976. Compliance is mandatory for products marketed in the United States. A label indicating compliance
with the CDRH regulations must be attached to laser products marketed in the United States.
Ozone concentration
The printer generates ozone gas (O3) which may concentrate in the place of installation and cause an unpleasant
smell. To minimize concentration of ozone gas to less than 0.1 ppm, we recommend you not to install the printer in a
confined area where ventilation is blocked.
ii

IMPORTANT SAFEGUARDS
1. Read all of these instructions and save these instructions for later use.
2. Unplug this product from the wall outlet before cleaning.
3. Do not use this product near water.
4. Do not place this product on an unstable cart, stand, or table. The product may fall, causing serious damage to
the product.
5. Slots and openings in the cabinet and the back are provided for ventilation to ensure reliable operation of the
product and to protect it from overheating, these openings must not be blocked or covered. The openings should
never be blocked by placing the product on a bed, sofa, rug, or other similar surface. This product should never
be placed near or over a radiator or heat register. This product should not be placed in a built-in installation
unless proper ventilation is provided.
6. This product is equipped with a 3-wire grounding type plug, a plug having a third (grounding) pin. This plug will
only fit into a grounding-type power outlet. This is a safety feature. If you are unable to insert the plug into the
outlet, contact your electrician to replace your obsolete outlet. Do not defeat the purpose of the grounding-type
plug.
7. Do not allow anything to rest on the power cord. Do not locate this product where persons will walk on the cord.
8. If an extension cord is used with this product, make sure that the total of the ampere ratings on the products
plugged into the extension cord do not exceed the extension cord ampere rating.
9. Never push objects of any kind into this product through cabinet slots as they may touch dangerous voltage
points or short out parts that could result in a risk of fire or electric shock. Never spill liquid of any kind on the
product.
10.Except as explained elsewhere in User’s Manual, do not attempt to service this product yourself. Removing
covers may expose you to dangerous voltage points or other risks. Refer all servicing in those compartments to
service personnel.
11. Unplug this product from the wall outlet and refer servicing to qualified service personnel under the following
conditions:
A – When the power cord or plug is damaged or frayed.
B – If liquid has been spilled into the product.
C – If the product has been exposed to rain or water.
D – If the product does not operate normally when the operating instructions are followed. Adjust only those
controls that are covered by the operating instructions since improper adjustment of other controls may result in
damage and will often require extensive work by a qualified technician to restore the product to normal
operation.
E – If the product has been dropped or the cabinet has been damaged.
iii

CE Marking Directive
according to Council Directive 89/336/EEC and 73/23/EEC
Manufacturer’s name: Kyocera Corporation, Printer Division
Manufacturer’s address: 2-14-9 Tamagawadai, Setagaya Ward, Tokyo 158-8610, Japan
declares that the product
Product name: Colour Laser Printer
Model number: FS-5800C (as tested with enhancement optional units: PF-80 and HD-2C)
conforms to the following product specifications.
EN 55 022:1994 (Class B)
EN 61 000-3-2:1995 (Class A)
EN 61 000-3-3:1995
EN 50 082-1:1992
IEC 801-2:1991 (contact: level 2, air discharge: level 3)
IEC 801-3:1984 (level 2)
IEC 801-4:1988 (power lines: level 2, signal lines: level 2)
EN 60 950:1992+A1+A2+A3
EN 60 825-1:1994
The manufacturer and its merchandising companies retain the following technical documentation in anticipation of
the inspection that may be conducted by the authorities concerned.
User’s instruction that conforms to the applicable specifications
Technical drawings
Descriptions of the procedures that guarantee the conformity
Other technical information
KYOCERA ELECTRONICS EUROPE GmbH
Mollsfeld 12
40670 Meerbusch, Germany
Phone: +49 21 59 918 0
Fax: +49 21 59 918 100
ISO 7779
Maschinenlärminformationsverordnung 3. GSGV, 18.01.1991: Der höchste Schalldruckpegel beträgt 70 dB(A) oder
weniger gemäß ISO 7779.
iv

Declaration of Conformity (Australia)
Manufacturer’s name: Kyocera Corporation, Printer Division
Manufacturer’s address: 2-14-9 Tamagawadai, Setagaya Ward, Tokyo 158-8610, Japan
declares that the product
Product name: Colour Page Printer
Model number: FS-5800C (tested with PF-80 and the HD-2C)
Conforms to the following product specifications.
AS/NZS 3548: 1995 (EN 55 022:1994 Class B)
IEC60950 (EN 60 950:1992+A1+A2+A3)
IEC60825 (EN 60 825:1994)
Description of device:
The model FS-5800C utilizes plain paper, laser, dry toner etc. The printer can be equipped with several
enhancement optional unit[s] such as the harddisk unit HD-2C.
The manufacturer and its merchandising companies retain the following technical documentation in anticipation of
the inspection that may be conducted by the authorities concerned.
User’s instruction that conforms to the applicable specifications
Technical drawings
Descriptions of the procedures that guarantee the conformity
Other technical information
KYOCERA ELECTRONICS AUSTRALIA PTY., LTD
Unit 8, 43-45 Herbert Street, Artarmon NSW 2064, Australia
Phone: +61 2-9-906-8075
Fax: +61 2-9-906-8153
Disclaimer
We shall have no liability or responsibility to customers or any other person or entity with respect to any liability,
loss or damage caused or alleged to be caused directly or indirectly by equipment sold or furnished by us, including
but not limited to, any interruption of service, loss of business or anticipatory profits, or consequential damages
resulting from the use or operation of the equipment or software.
v

ENERGY STAR
This printer is equipped with a sleep timer function that conforms with the standards of the ENERGY STAR
Program. This function makes it possible to reduce the amount of electrical power consumed by the printer. For
maximum power savings, turn off the printer’s power supply when not using the printer for extended periods of
time.
Initial settings of the sleep timer function and power saved using the sleep timer function (Values in
brackets are ENERGY STAR program guide lines.):
Initial sleep mode setting Power consumption during
60 minutes (60 minutes) 45 W (45 W)
SM
As an ENERGY STAR Partner, Kyocera Corporation has determined that this product
meets the ENERGY STAR guidelines for energy efficiency.
The basic objective of the ENERGY STAR Program is to reduce environmental
pollution by encouraging the manufacture and sale of equipment that uses energy
more efficiently.
sleep mode
vi

Chapter 1
Before Y ou
Start
Chapter 2
Setup
Contents
Cautions.......................................................................................... 1
Features .......................................................................................... 3
System Requirements ................................................................... 4
PC .....................................................................................................................4
Interface ............................................................................................................4
Minimum Space Requirements..................................................... 5
Power Source ................................................................................. 5
Unpacking....................................................................................... 6
Part Names ..................................................................................... 7
Control Panel Overview................................................................. 8
Setting Up the Printer .................................................................. 12
Preparing the Imaging Unit.............................................................................12
Setting Up the Output Tray..............................................................................13
Installing the Toner Developers.......................................................................14
Loading Media.............................................................................. 16
Loading Paper or Transparencies in the Media Cassette...............................16
Loading Media in the Multi-purpose Tray........................................................19
Connecting the Printer to a Computer....................................... 23
Using a Parallel Interface Cable .....................................................................24
Connecting the Serial Interface ......................................................................25
Installing the Harddisk Option.........................................................................25
Power On ...................................................................................... 25
Printing a Status Page From the Printer Control Panel............ 26
Installing the Driver Software ..................................................... 27
Installing the Printer Driver for Windows 3.1 ..................................................27
Installing the Printer Driver for Windows 95 ...................................................28
Setting the Colour Density.......................................................... 31
Chapter 3
Using the
Printer
Mode Selection............................................................................. 35
Navigating through the menus........................................................................37
Outline for Menus............................................................................................38
Other menus (Others).....................................................................................48
Memory Cards ................................................................................................51
Setting the Sleep Timer ..................................................................................56
Resource Protection .......................................................................................56
Displaying the Printer Driver Window........................................ 58
Details Tab ......................................................................................................60
Paper Tab........................................................................................................61
Colour T ab.......................................................................................................62
Options T ab.....................................................................................................66
Setup T ab........................................................................................................67
vii

Contents
Chapter 4
Care and
Maintenance
Appendix
Cleaning........................................................................................ 69
User Replaceable Components .................................................. 73
Clearing a Jam ............................................................................. 75
Troubleshooting........................................................................... 87
Error Messages............................................................................ 95
Printer Panel Message ...................................................................................95
Repacking................................................................................... 101
Specifications............................................................................. 110
Printer ...........................................................................................................110
Media ............................................................................................................111
Margins and Print Area .................................................................................112
Software........................................................................................................115
Bidirectional Parallel Interface ......................................................................116
viii
For Your Safety
General
Warning
To prevent fire or shock hazard, do not expose this product to rain or any type of moisture.
Caution
Do not open covers and do not attempt to repair the unit yourself. Refer servicing to qualified personnel.
Po wer Source
W arning
• The power source voltage of this unit is listed on the nameplate. Only plug the unit into an outlet with
the proper voltage.
• When you operate this equipment, the outlet should be near the equipment and accessible.
• To ensure safe operation the AC cord supplied must be inserted into standard three-prong AC outlet
which is effectively grounded (earthed) through the normal wiring.
• The fact that the equipment operates satisfactorily does not imply that the power point is grounded
(earthed) and that the installation is completely safe. For your safety, if in any doubt about the
effective grounding (earthing) of the power point, consult a qualified electrician.
• If the plug cannot be inserted into the AC outlet, contact a licensed electrician to replace the outlet
with a properly grounded (earthed) one. Do not defeat the purpose of the grounding (earthing) plug
(e.g. using a conversion plug).
Laser Safety
Caution
This printer utilizes a laser. Use of controls or adjustments or performance of procedures other than
those specified herein may result in hazardous radiation exposure.
Ozone Release
W arning
Make sure that the printer is installed in a well ventilated room so as not to increase density of ozone in
the air. Since ozone is heavier than air, it is recommended that air at floor level be ventilated.
ix

For Your Safety
Moving the Unit
The printer weighs approximately 48 kg (105.8 lbs.). It must be handled by two people. Turn the power off and
remove the power cord when handling the unit.
x
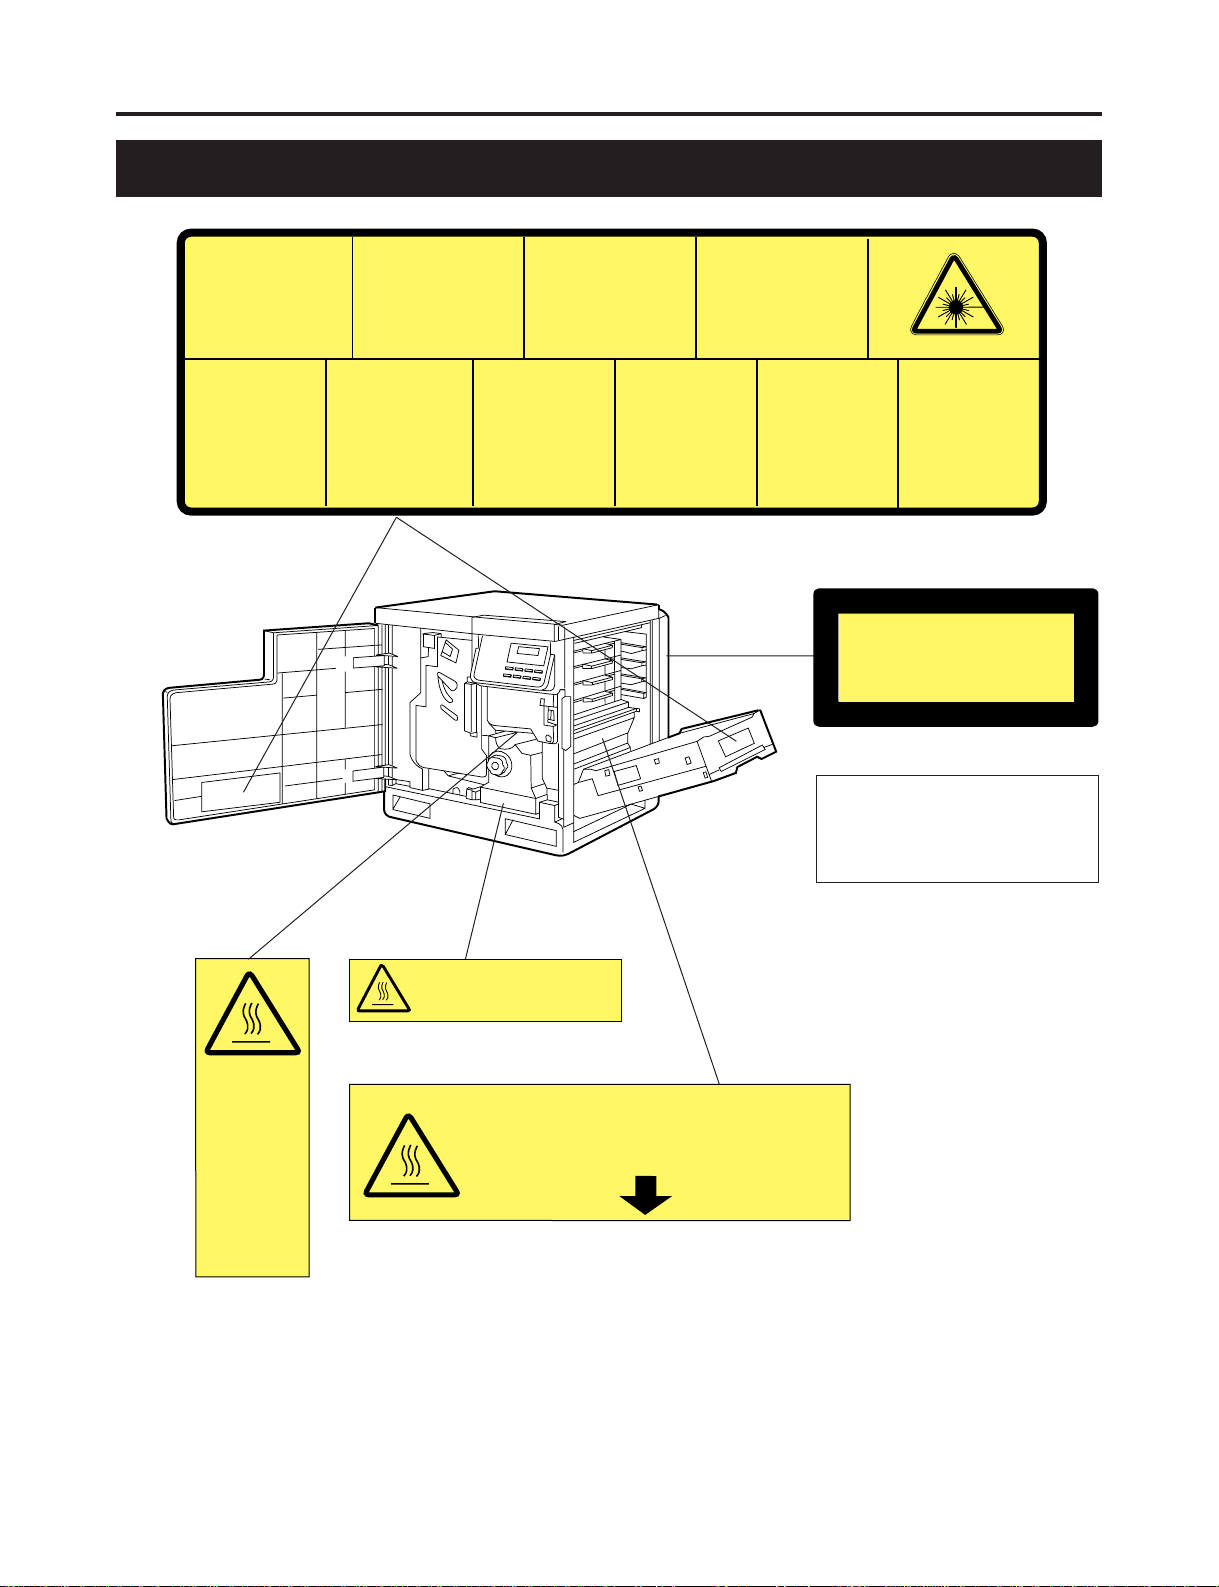
Caution Labels
CLASS
KLASSE
CLASSE
CLASE
1 LASER PRODUCT
1 LASER PRODUKT
1 LASER PRODUIT
1 LÁSER PRODUCTO
For Y our Safety
DANGER:
Invisible laser radiation
when open and interlock
defeated.
AVOID DIRECT
EXPOSURE TO BEAM.
PELIGRO:
Cuando se abre y se
invalida el bloqueo, se
producen radiaciones
invisibles de láser.
EVÍTESE LA
EXPOSICIÓN
A TALES RAYOS.
CAUTION:
Invisible laser radiation
when open and
interlocks defeated.
AVOID EXPOSURE
TO BEAM.
VARNING:
Osynlig laserstrålning när denna
del är öppnad och
spärrar är
urkopplade.
STRÅLEN
ÄR FARLIG.
VORSICHT:
Unsichtbare Laserstrahlung,
wenn Abdeckung geöffnet
und Sicherheitsverriegelung
überbrückt.
NICHT DEM STRAHL
AUSSETZEN.
VARO!:
Näkymätöntä
avattaessa ja
suojalukitus
ohitettaessa olet
alttiina lasersäteilylle.
ÄLÄ KATSO
SÄTEESEEN.
ATTENTION:
Rayonnement laser invisible
dangereux en cas
d'ouverture et lorsque
la sécurité est neutralisée.
EXPOSITION DANGEREUSE
AU FAISCEAU.
VARNING:
Osynlig laserstrålning
när denna del är
öppnad och spärren är
urkopplad.
BETRAKTA EJ
STRÅLEN.
ADVARSEL:
Usynlig laserstråling
ved åbning når
sikkerhedsafbrydere
er ude af funktion.
UNDGÅ
UDSÆTTELSE FOR
STRÅLING.
(220-240 VAC equipment)
Laser diode properties
Laser output : 5 mW max
Wavelength : 780 nm
Emission duration: Continuous
ADVARSEL:
Usynlig laserstråling
når deksel åpnes og
sikkerhedslas brytes.
UNNGÅ
EKSPONERING
FOR STRÅLEN.
CAUTION:
HOT SURFACE
INSIDE
ATTENTION:
SURFACE
CHAUDE
CI-INTERIEUR
VORSICHT:
HEISSE FLÄCHE
INTERN
ATENCION:
SUPERFICIE
CALIENTE
EN EL INTERNO
CAUTION:
HOT SURFACE INSIDE
CAUTION:HOT SURFACE BELOW
ATTENTION:SURFACE CHAUDE CI-DESSOUS
VORSICHT:HEIßE OBERFLÄCHE DARUNTER
ATENCION:SUPERFICIE CALIENTE ABAJO
xi
For Your Safety
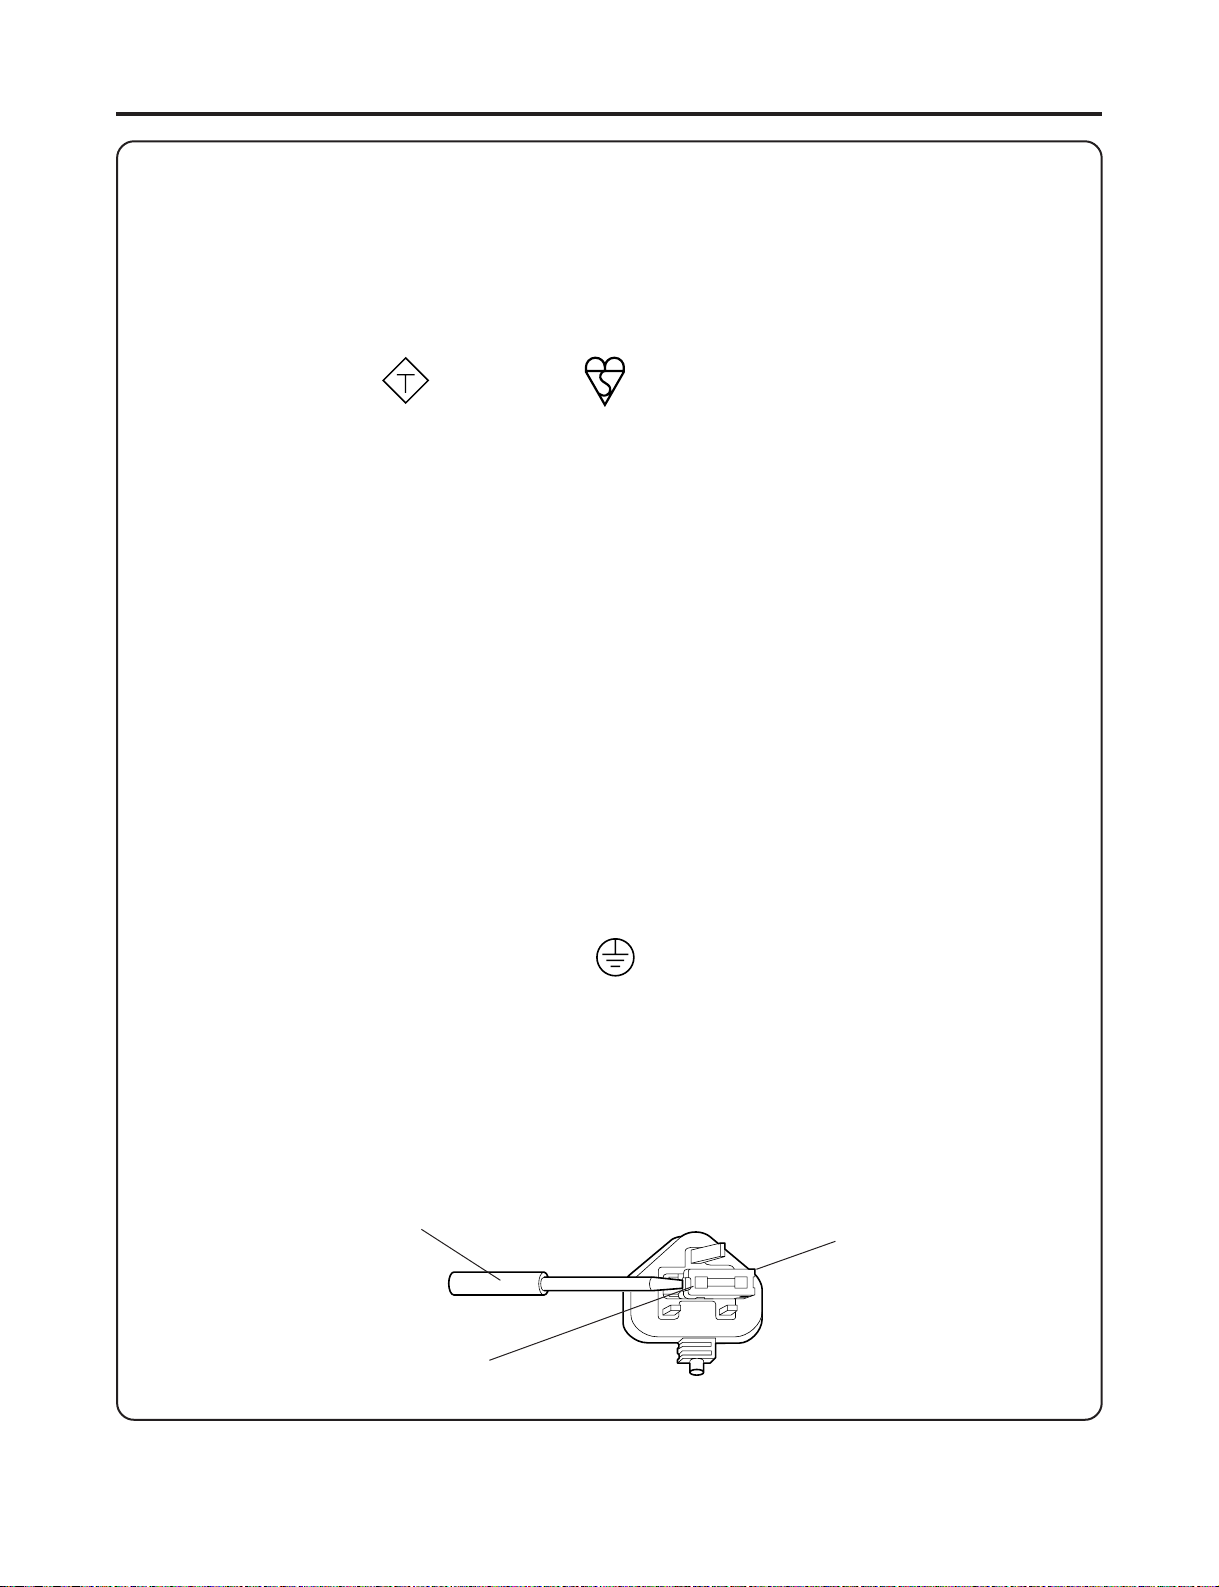
FOR USERS IN U.K.
IMPORTANT:
FOR YOUR SAFETY PLEASE READ THE FOLLOWING TEXT CAREFULLY
This printer is supplied with a moulded three pin mains plug each for your safety and convenience. A 13
amp fuse is fitted in this plug. Should the fuse need to be replaced please ensure that the replacement
fuse has a rating of 13 amps and that it is approved by ASTA or BSI to BS 1362.
Check for the ASTA mark
If the plug contains a removable fuse cover you must ensure that it is refitted when the fuse is replaced.
If you lose the fuse cover the plug must not be used until a replacement cover is obtained.
A replacement fuse cover can be purchased from your local dealer.
IF THE FITTED MOULDED PLUG IS UNSUITABLE FOR THE SOCKET OUTLET IN YOUR HOME
THEN THE FUSE SHOULD BE REMOVED AND THE PLUG CUT OFF AND DISPOSED OF SAFELY.
THERE IS A DANGER OF SEVERE ELECTRICAL SHOCK IF THE CUT OFF PLUG IS INSERTED
INTO ANY 13 AMP SOCKET.
If a new plug is to be fitted please observe the wiring code as shown below.
If in any doubt please consult a qualified electrician.
WARNING: THIS APPLIANCE MUST BE EARTHED.
IMPORTANT: The wires in this mains lead are coloured in accordance with the following code.
Green-and-Yellow: Earth Blue: Neutral Brown: Live
As the colours of the wire in the mains lead of this appliance may not correspond with the coloured
markings identifying the terminals in your plug, proceed as follows.
The wire which is coloured GREEN-AND-YELLOW must be connected to the terminal in the plug which
is marked with the letter E or by the Earth symbol , or coloured GREEN or GREEN-ANDYELLOW.
or the BSI mark on the body of the fuse.
ASA
The wire which is coloured BLUE must be connected to the terminal in the plug which is marked with
the letter N or coloured BLACK.
The wire which is coloured BROWN must be connected to the terminal in the plug which is marked with
the letter L or coloured RED.
How to replace the fuse: Open the fuse compartment with a screwdriver and replace the fuse.
SCREWDRIVER
LN
FUSE
FUSE COVER
xii
Before You Start
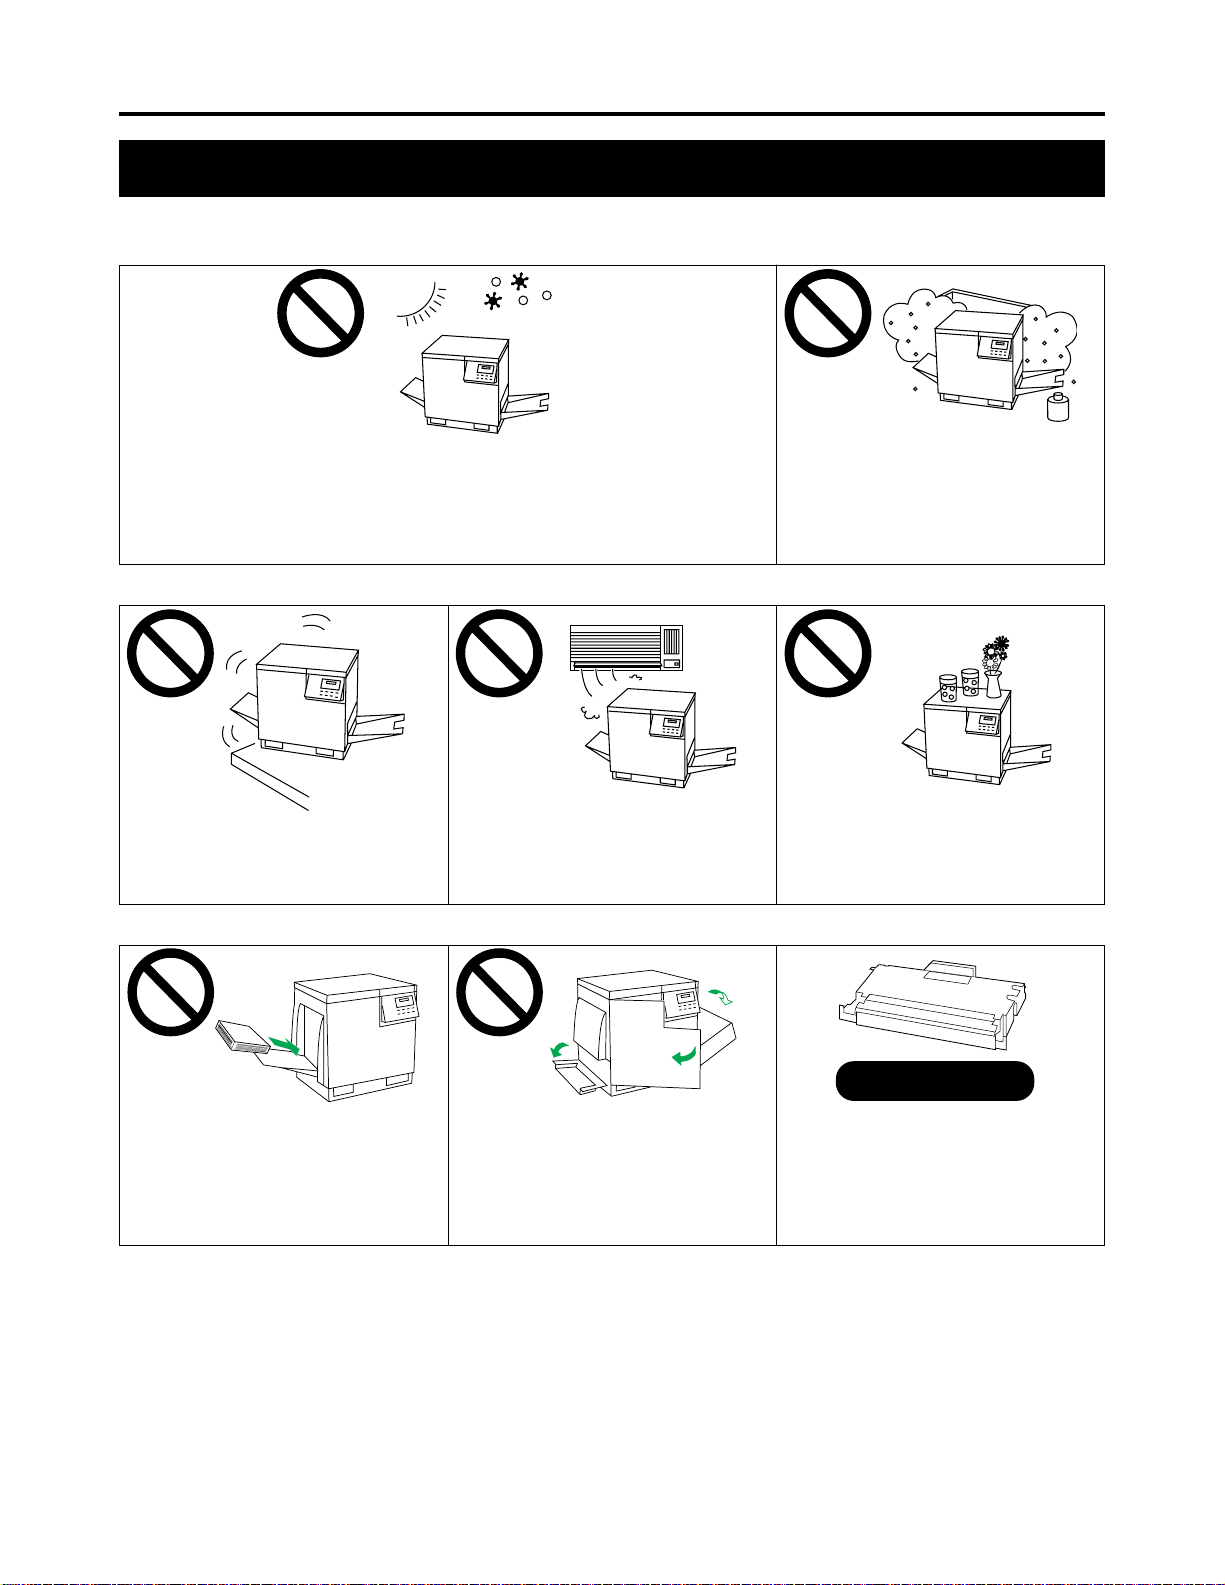
Cautions
To avoid machine malfunction, do not use the equipment under the following conditions:
• Direct exposure to sunlight
• Extremely high or low temperature [temperature range: 10˚C to 32.5˚C
(50˚F to 90.5˚F)]
• Extremely high or low humidity (humidity range: 20% to 80% RH)
• Condensation due to rapid change of temperature
• Unstable or unlevel surfaces • Directly in front of air
conditioning vents
• Areas of poor ventilation
• Areas of high dust or chemical
fume concentration (solvent etc.)
• Liquids near the equipment
• Too much media which exceeds
the limit mark on the guide of
the tray.
• Front/right/left covers opened
while the printer is operating. It
may cause a media jam.
Genuine or Original
• We strongly recommend to use
only the original Kyocera toner
developer. Use of Kyocera toner
developer assures the intended
long term reliability of the printer.
1
Before Y ou Start
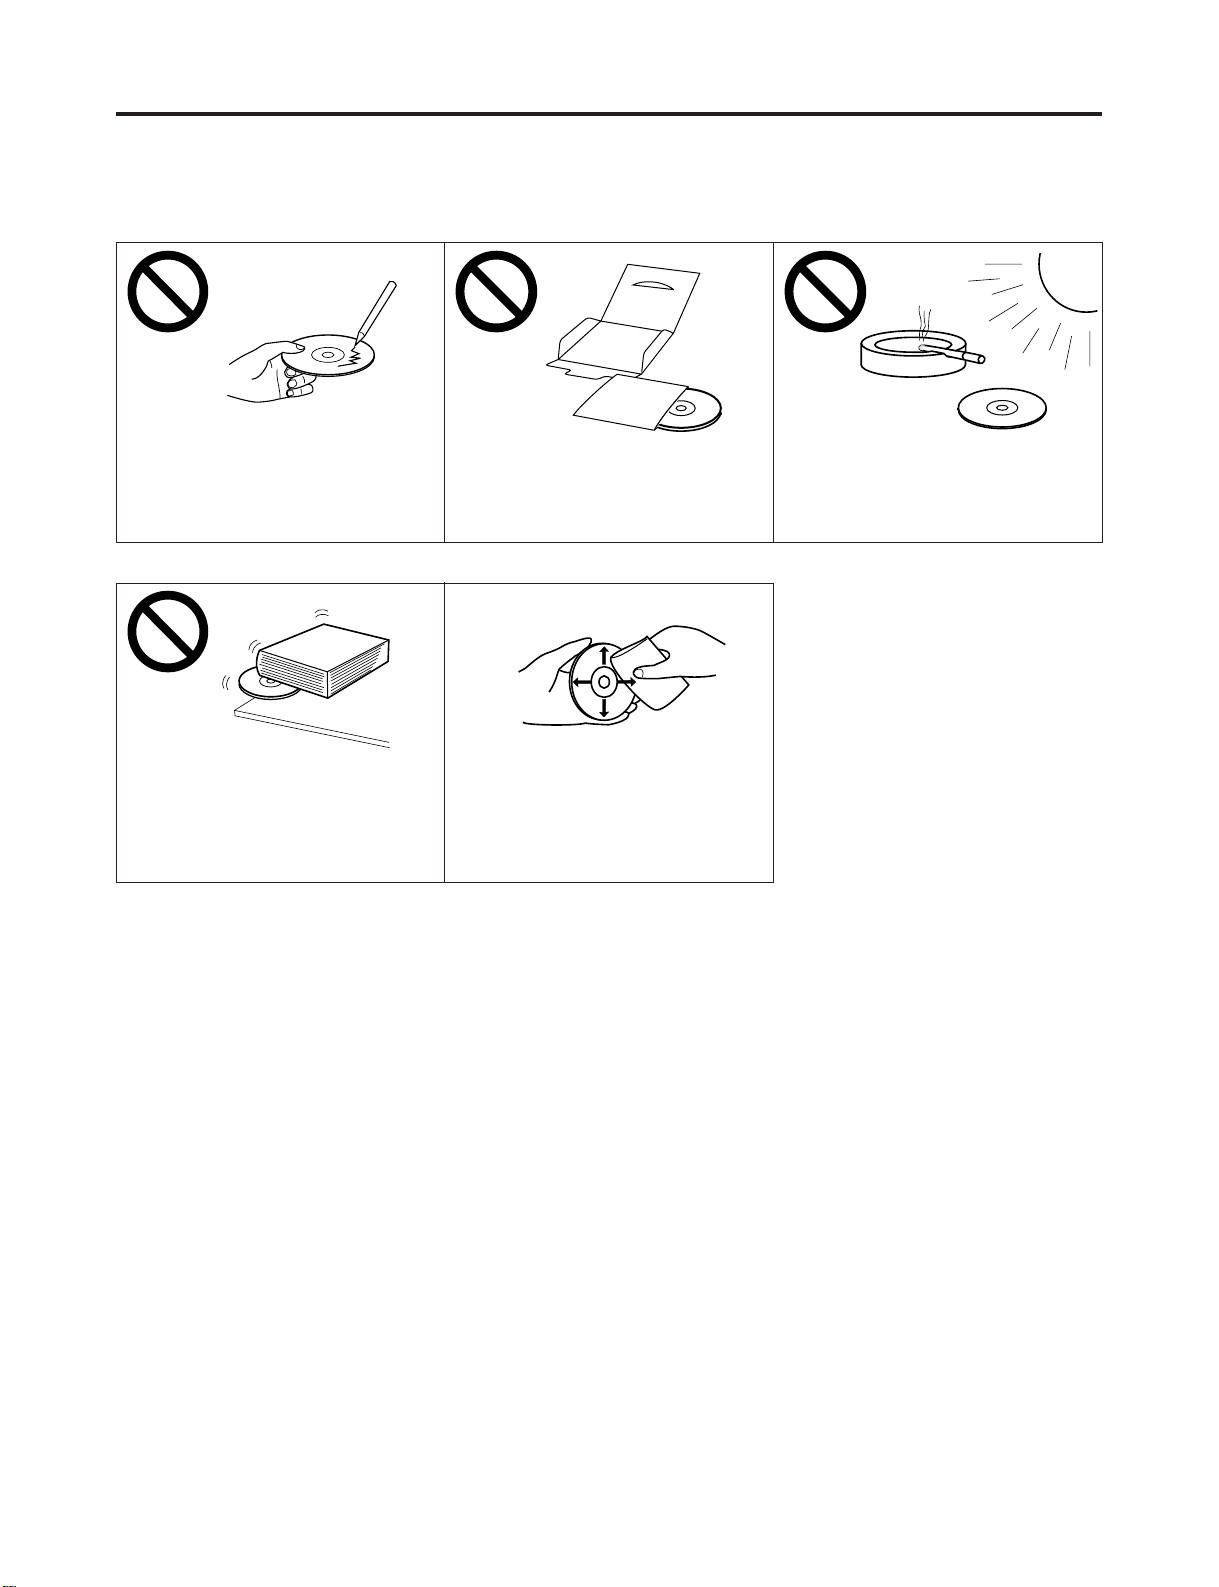
■ CD-ROM
To prevent the CD-ROM from accidental damages:
• Do not touch or write on the
surface of the disc.
• Do not place heavy objects on the
disc.
• Do not leave the disc out of the
protective case.
• To clean the disc, hold the disc
by its edges and wipe it from the
center to the edges with a dry,
soft cloth.
• Do not leave the disc in direct
sunlight or near heat sources.
■ Static Electricity Damage
To prevent static electricity damage to any of the following components, touch a grounded metal surface, such as the
printer’s bare metal frame prior to touching the component.
• The interface connectors: Parallel and optional network card
• Electrical components, connectors inside the printer and any components on the optional boards (RAM expansion
board, network interface board, etc.)
• The connector pins on the optional paper feeder for the printer
■ Interface Cable
Always use a shielded interface cable. Use of an unshielded cable can result in radio interference with data.
■ Waste Disposal Method
Waste material may be dumped or incinerated under conditions which meet the applicable environmental
regulations.
2

Features
Before You Start
The FS-5800C Colour Laser Printer provides fast, high-quality colour printing on plain
paper, plus the ease of operation and high performance you expect from a laser printer.
Some of its features include:
■ High quality
Resolution
Maximum 1200 dpi*
(*KPDL emulation only, with SIMM options installed)
■ High speed
Continuous printing on various sizes of paper
Full-colour mode: Maximum 3.5 ppm (pages per minute)
Monochrome mode: Maximum 14 ppm
■ Easy operation
Printer driver
Easily print full-colour documents.
3

Before Y ou Start
System Requirements
PC
To operate the FS-5800C effectively, refer to the following:
CPU: More than Pentium
Operating System: Windows 3.1
RAM: 16 MB or more (More than 32 MB is recommended.)
Free disk space: 100 MB or more
Virtual memory: 16 MB or more (More than 32 MB is recommended.)
Display: Video card that can display more than 256 colours.
Drive: CD-ROM drive
*1
Microsoft® Windows® operating system Version 3.1 (hereafter Windows 3.1)
*2
Microsoft® Windows® 95 operating system (hereafter Windows 95)
*3
Microsoft® Windows® NT 3.51/4.0 operating system (hereafter Windows NT)
(133 MHz or faster CPU is recommended.)
(A video card that can display more than 32,000 colours is
recommended.)
*1
/ Windows 95*2 / Windows NT
*3
Interface
■ Parallel interface requirement
Based on the IEEE1284 standard(An ECP compatible paral-
Interface
■ Network interface requirements
Manufacturer Model Applicable country
HBM HB-7SNMP Available in UK and France
Ethernet DPI EcoLAN 2000E Available in USA and Japan
SEH IC59-ETHER-KYO2 Other countries
Token Ring SEH IC69-Token-KYO2 All countries
See your nearest dealer of the manufacturer for availability.
lel port is recommended for Windows 95. To turn on the ECP
mode, use the computer’s BIOS setup. Refer to the computer’s manual for details.)
4
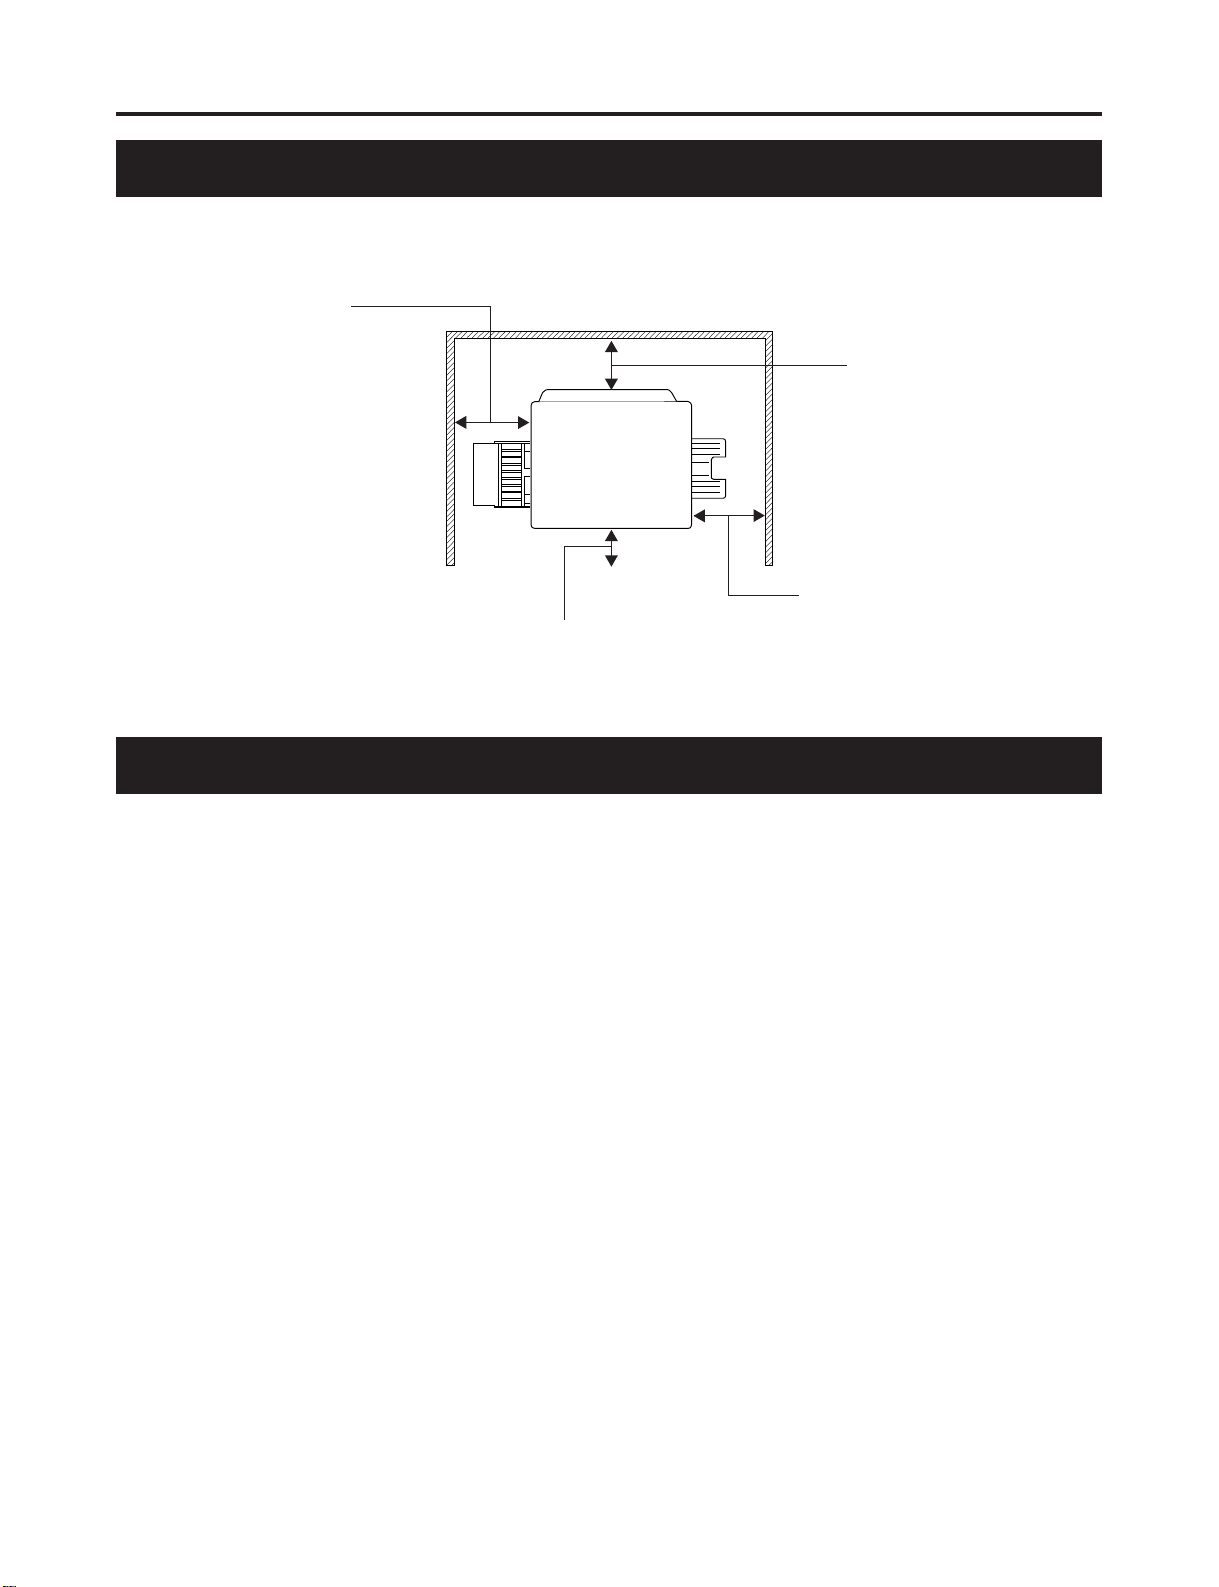
Minimum Space Requirements
Before You Start
45 cm (17.7”)
Multi-Purpose Tray
Opening Space
Po wer Source
Rear
35 cm (13.8”)
Controller Board
Opening Space
Left
60 cm (23.6”)
Front cover opening space
• The voltage level of the power source must not vary more than ±10% from the voltage
level marked on the nameplate (located on the back of the unit).
• Do not use an extension cord.
• Do not use a line conditioner, transient suppressor or surge protector as it may cause a
machine error.
Right
50 cm (19.7”)
Media tray Opening
Space
5
Before Y ou Start
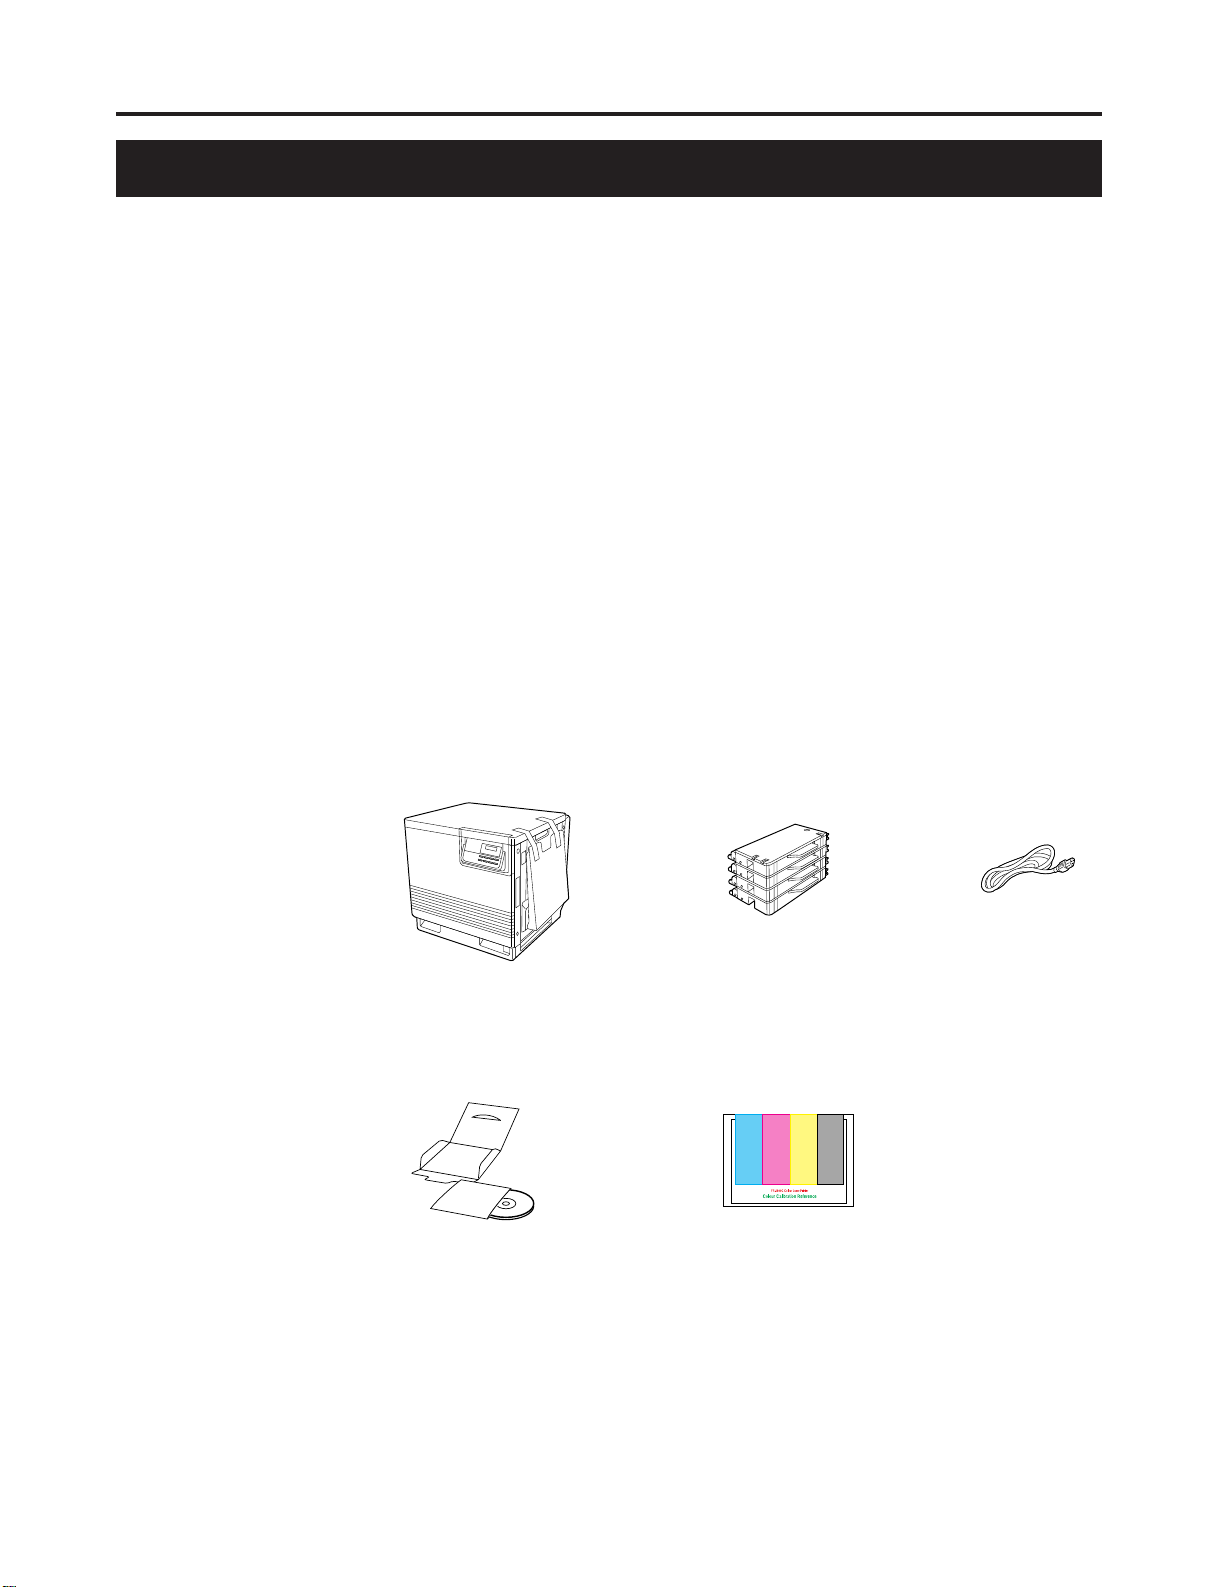
Unpacking
Make sure that all of the items shown below were provided and have not been damaged.
Report damage or shortages to the reseller from which the unit was purchased.
Note:
Save the original carton and packing materials for future shipping and transporting of
the unit. They have been specifically designed to protect the equipment during
shipment.
1. Printer (Colour imaging unit, Fuser kit, Paper cassette and Output tray are
included.)
2. Toner developers (black, cyan, magenta, and yellow)
3. Power cord
4. Kyocera Digital Library (Manuals, drivers, utilities) CD-ROM
5. Colour Calibration Reference card
123
4
5
6

Part Names
■ Front side view
Before You Start
Operation panel
Right side cover
Output tray
Media cassette
( ☞ P. 16)
■ Rear side view
Front cover
Network interface card slot
Fuser
( ☞ P. 80)
Imaging unit
( ☞ P. 12)
Serial interface connector
( ☞ P. 25)
Multi-purpose (MP) tray
( ☞ P. 20)
Power switch
( ☞ P. 25)
AC inlet
( ☞ P. 24)
Parallel interface
connector
( ☞ P. 24)
Harddisk access indicator
Memory card connector
( ☞ P. 51)
Left side cover ( ☞ P. 19)
[Media thickness switch*
( ☞ P. 19)
*Accessible by opening
the left side cover
7
Before Y ou Start
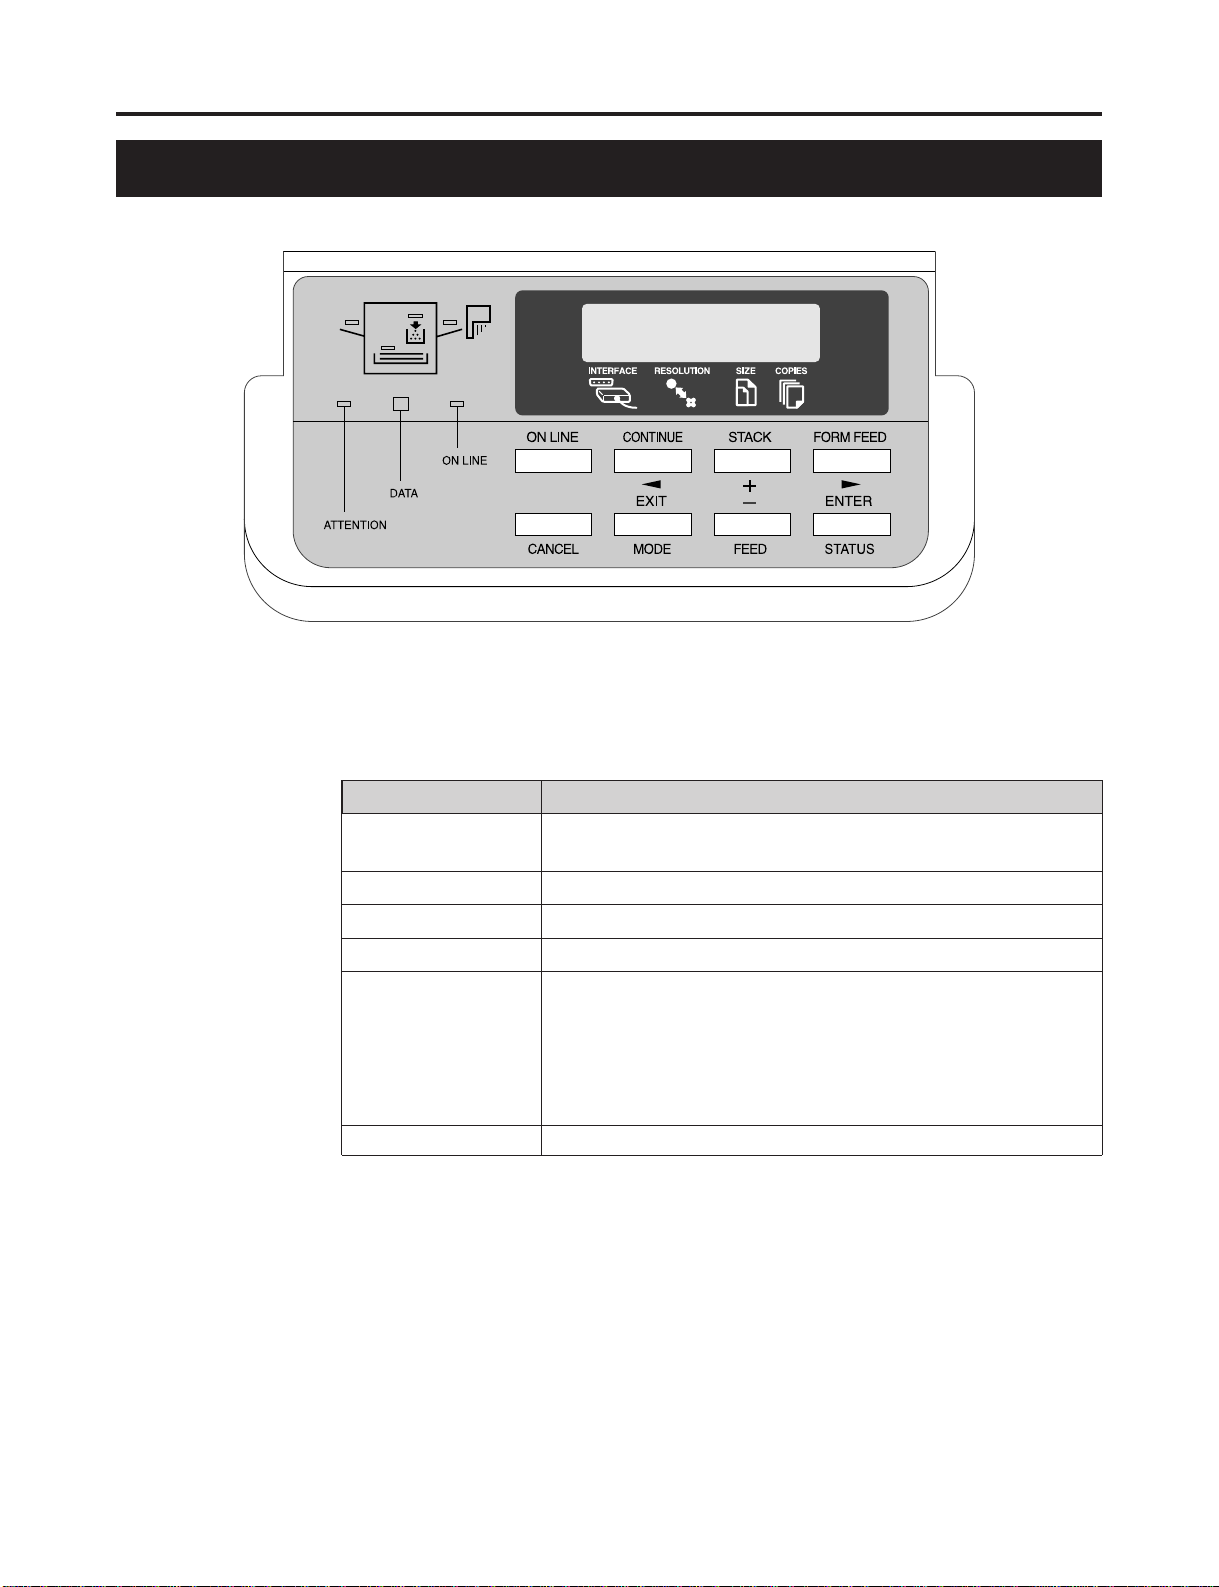
Control Panel Overview
Ready
PAR 600 A4 001
Message Display
The message display displays the printer’s operational mode. Messages which are
displayed and their meanings are given in the table below.
Message Meaning
Self test The printer is self-testing after power-up and is not ready to
print.
Please wait The printer is warming up and is not ready to print.
Ready The printer is ready to print.
Processing The printer is processing print data or in the middle of printing.
Waiting The last page remains unprinted. The printer waits awhile and
eventually generates a form feed allowing the last page to be
printed. (The length of time depends on the form feed timeout
setting.) The printing will begin immediately when the Form
Feed key is pressed. If a memory card is being used this can indicate the printer is waiting for data to be written (☞ P. 51).
FormFeed TimeOut An automatic form feed has been generated.
8
Interface Indicator
The interface indicator indicates the interface over which data is currently being received
or was last received. The current interface is indicated by one of the following messages:
Display Description
PAR Parallel interface
SER Serial interface
OPT Optional interface (if a network interface card is installed)
Note:
The display will blink while the printer is receiving data and continue blinking until
the interface is released, even after data transmission is finished.
Resolution Indicator
This shows the current printing resolution in either 1200 or 600 dpi (dot-per-inch).
Before You Start
Paper Size Indicator
This indicator indicates the paper size of the cassette currently selected. The following
abbreviations are used to indicate the paper sizes:
Indicator Paper Size
A4 ISO A4 (21 × 29.7 cm)
EX Executive (7-1/4 × 10-1/2 inches)
B5 JIS B5 (18.2 × 25.7 cm)
LT Letter (8-1/2 × 11 inches)
LG Legal (8-1/2 × 14 inches)
b5 ISO B5 (17.6 × 25.0 cm)
Copy Indicator
This indicator indicates the number of copies to print from 001 to 999. This number is
reduced as printing proceeds.
9

Before Y ou Start
Symbolic Indicator
This printer icon includes the indicators which show the following information regarding
the printer’s paper and toner status.
Face-down indicator This indicates when printed pages are delivered to the output
Toner indicator This indicates the status of toner supply in either colour of
Cassette feed This indicates paper is being fed from the media cassette.
indicator When flashing, it indicates that there is no media in the
Name Description
tray in the face-down stack (correct order). The pages are delivered in the reverse order when this indicator is not lit. If flashing, it indicates that paper is jammed on the output tray.
cyan, magenta, yellow, or black. The toner supply is normal
when this indicator is off. If flashing, the toner supply is dwindling. If this is lit, it indicates that the printer is out of toner
and not operative until the appropriate toner cartridge is replaced (☞ P. 73).
cassette or that media is jammed in the media cassette.
Multi-purpose feed Indicates when media is fed from the multi-purpose feed tray.
indicator If this is flashing, it indicates that there is no media in the tray
or that media is jammed on the multi-purpose tray.
ON LINE indicator When lit, it indicates that the printer is on-line (The printer
prints received data). When this is off, the printer is offline
(The printer stores but does not print received data).
ON LINE
DATA indicator This indicator flashes when data is arriving at the printer’s in-
terface. When lit continuously, it indicates that data is being
processed for printing (or that data is being written to the
memory card).
DATA
ATTENTION indicator This indicator indicates a problem that may be resolved by the
user is taking place. When flashing, it indicates that the printer needs maintenance (☞ P. 73). When lit, it indicates that the
printer cannot print due to an error.
ATTENTION
10

Control Keys
Before You Start
Key Function
ON LINE This key toggles the printer on-line and off-line.
CANCEL This key cancels the data processed in the printer during print-
ing. When the printer is in a mode selection sequence (See
MODE key below), pressing this key abandons mode selection
in course.
STACK/+ • This key selects whether to output media face-down (printed
side down) or face-up (printed side up).
• During a mode selection sequence, this key is used to select
menus and change setting values.
FEED/- • This key selects the paper feed cassette or multi-purpose tray
as the paper source. It can also select an optional feeder if
one is installed.
• During a mode selection sequence, this key is used to select
menus and change setting values.
CONTINUE/ • In normal operating mode, this key forcibly cancels errors
and resumes printing when printing is halted due to errors
such as memory overflow.
• This key functions as the
sequence: It moves the selection upward in the menu hierarchy or moves the cursor left.
EXIT/MODE This key is used to start and end a mode selection sequence.
(☞ P. 35)
FORM FEED/ • In normal operating mode, this key is used to forcibly form-
feed when a print timeout occurs.
• This key functions as the
sequence: It moves the selection downward in the menu hierarchy or moves the cursor right.
ENTER/STATUS • In normal operating mode, this key prints a status page.
• During a mode selection sequence, this key confirms the setting made in the mode selection.
key during a mode selection
key during a mode selection
Notes
• Menus set using these keys are enabled only for the interface currently indicated on
the message display.
• Settings made from the control panel may be automatically switched to different
settings by application software being used.
11
Setup
Setting Up the Printer
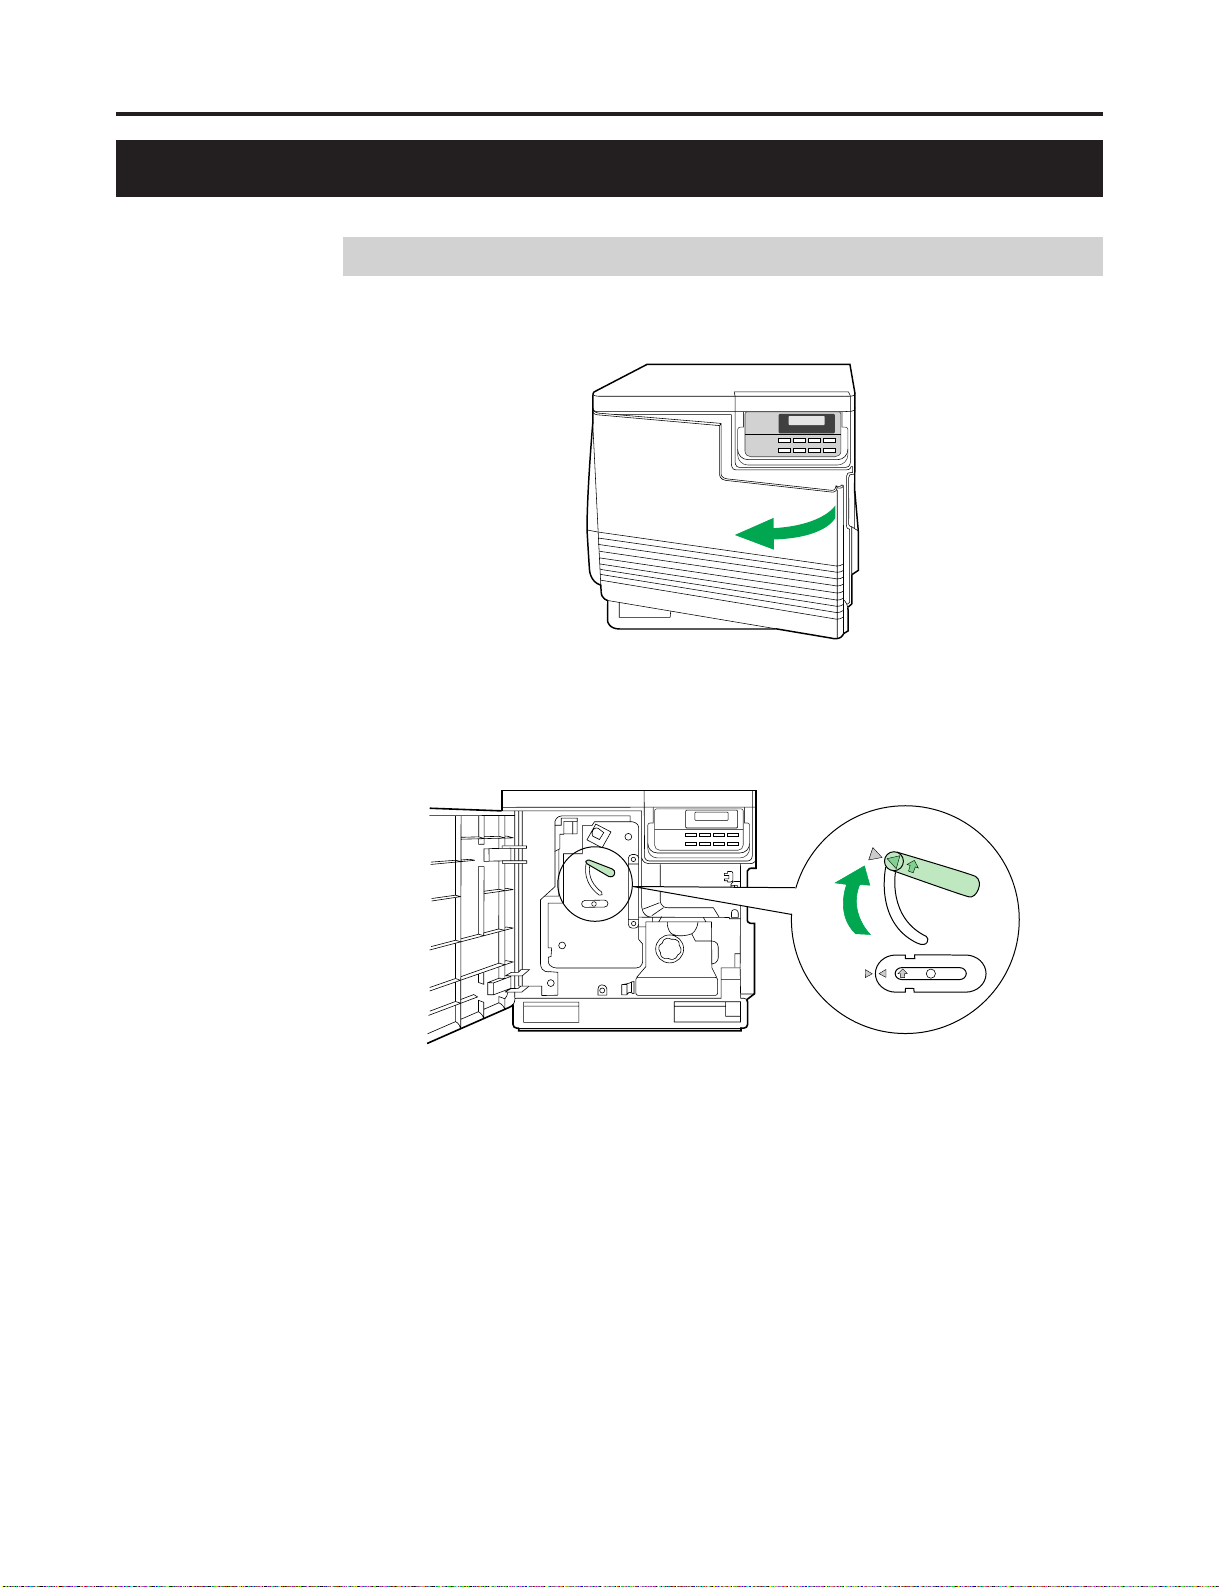
Preparing the Imaging Unit
1
Open the front cover.
Turn the upper green lever clockwise until it stops and the arrows
2
are aligned. (This tightens the internal belts to ready the unit for
printing.)
Close the front cover.
3
12
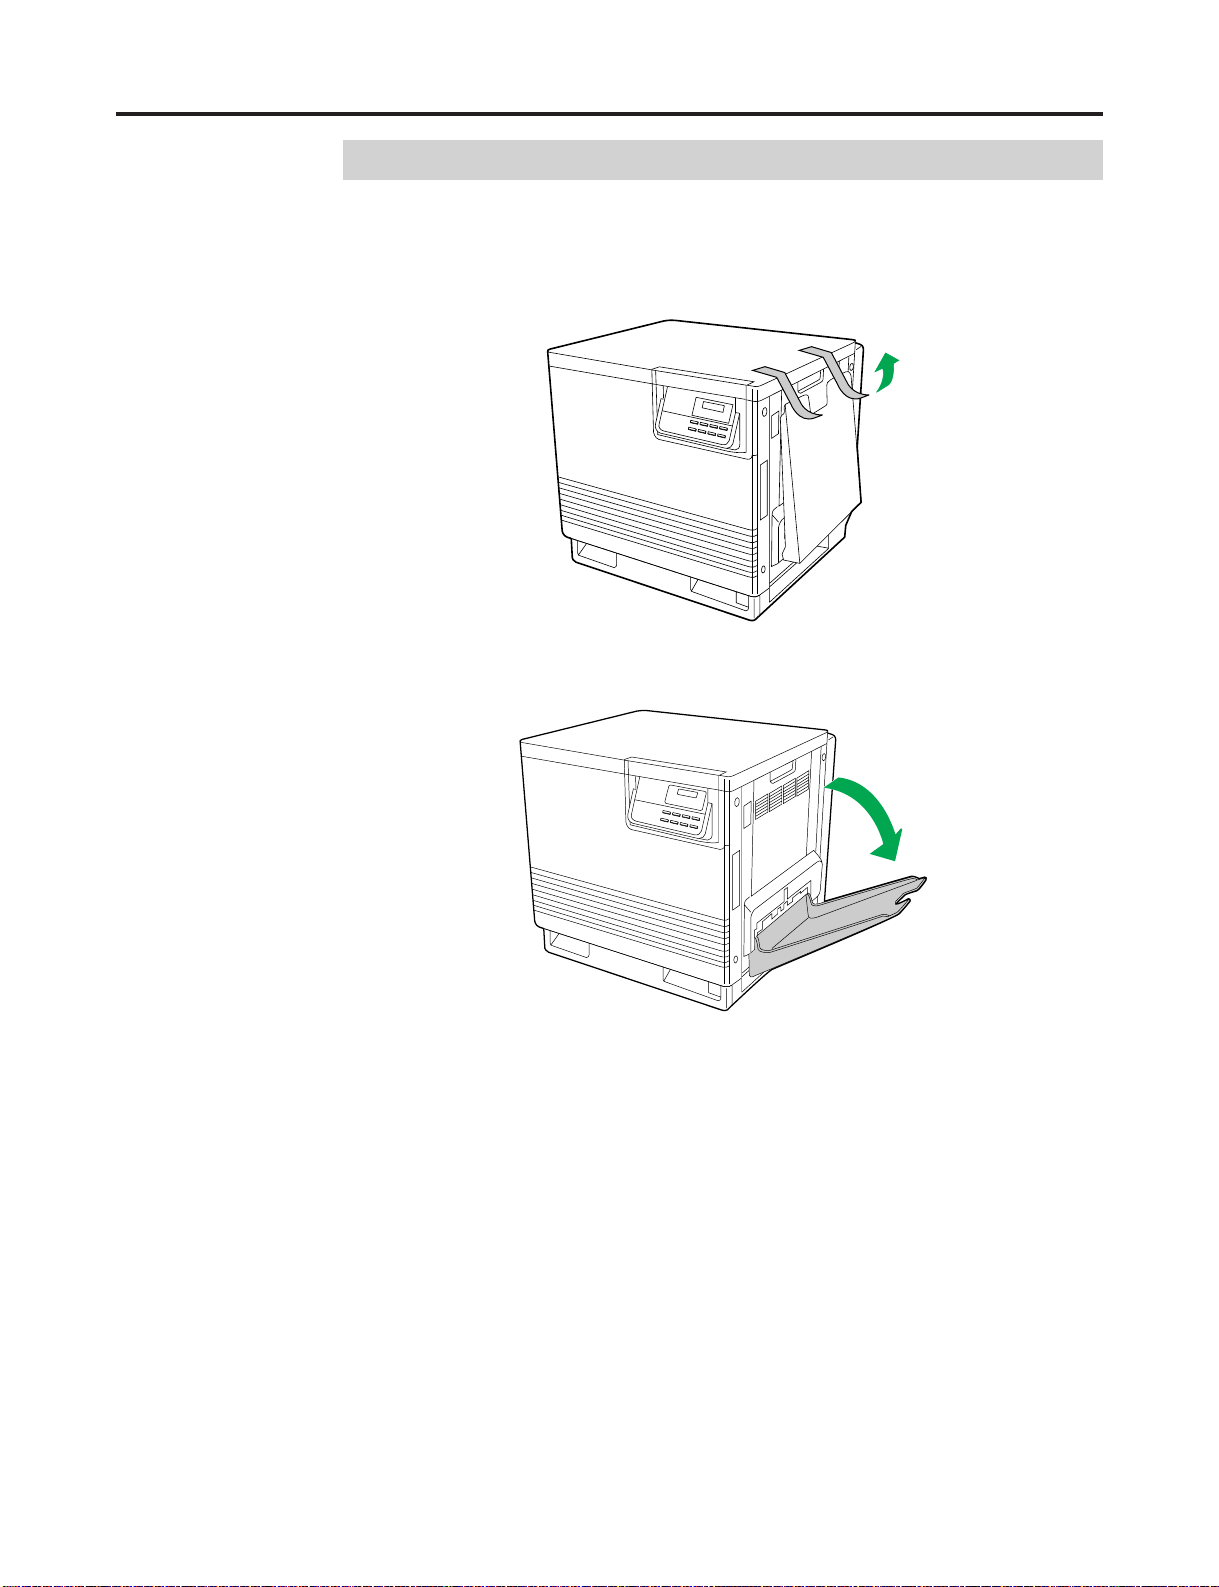
Setting Up the Output Tray
Remove the adhesive tape that holds the output tray against the
1
printer.
Setup
Lower the tray to the operating position.
2
13

Setup
Installing the Toner Developers
Note:
The toner developers that are shipped with the printer are starter developers. They
are installed in exactly the same manner as the optional developers; the only
difference is that the starter developers have less toner. (The page life expectancy is
3,000 pages, which is based on a 5% image area.)
Remove the packaging from the toner developer.
1
Remove the shipping cover from the developer.
2
Caution:
To avoid possible toner spillage, do not tilt developer.
Note:
Save all packing material for shipping purpose.
Open the right side cover.
3
Caution:
Do not leave the right side cover open for more than 1 minute; the imaging unit will
be exposed to light and could be damaged.
14
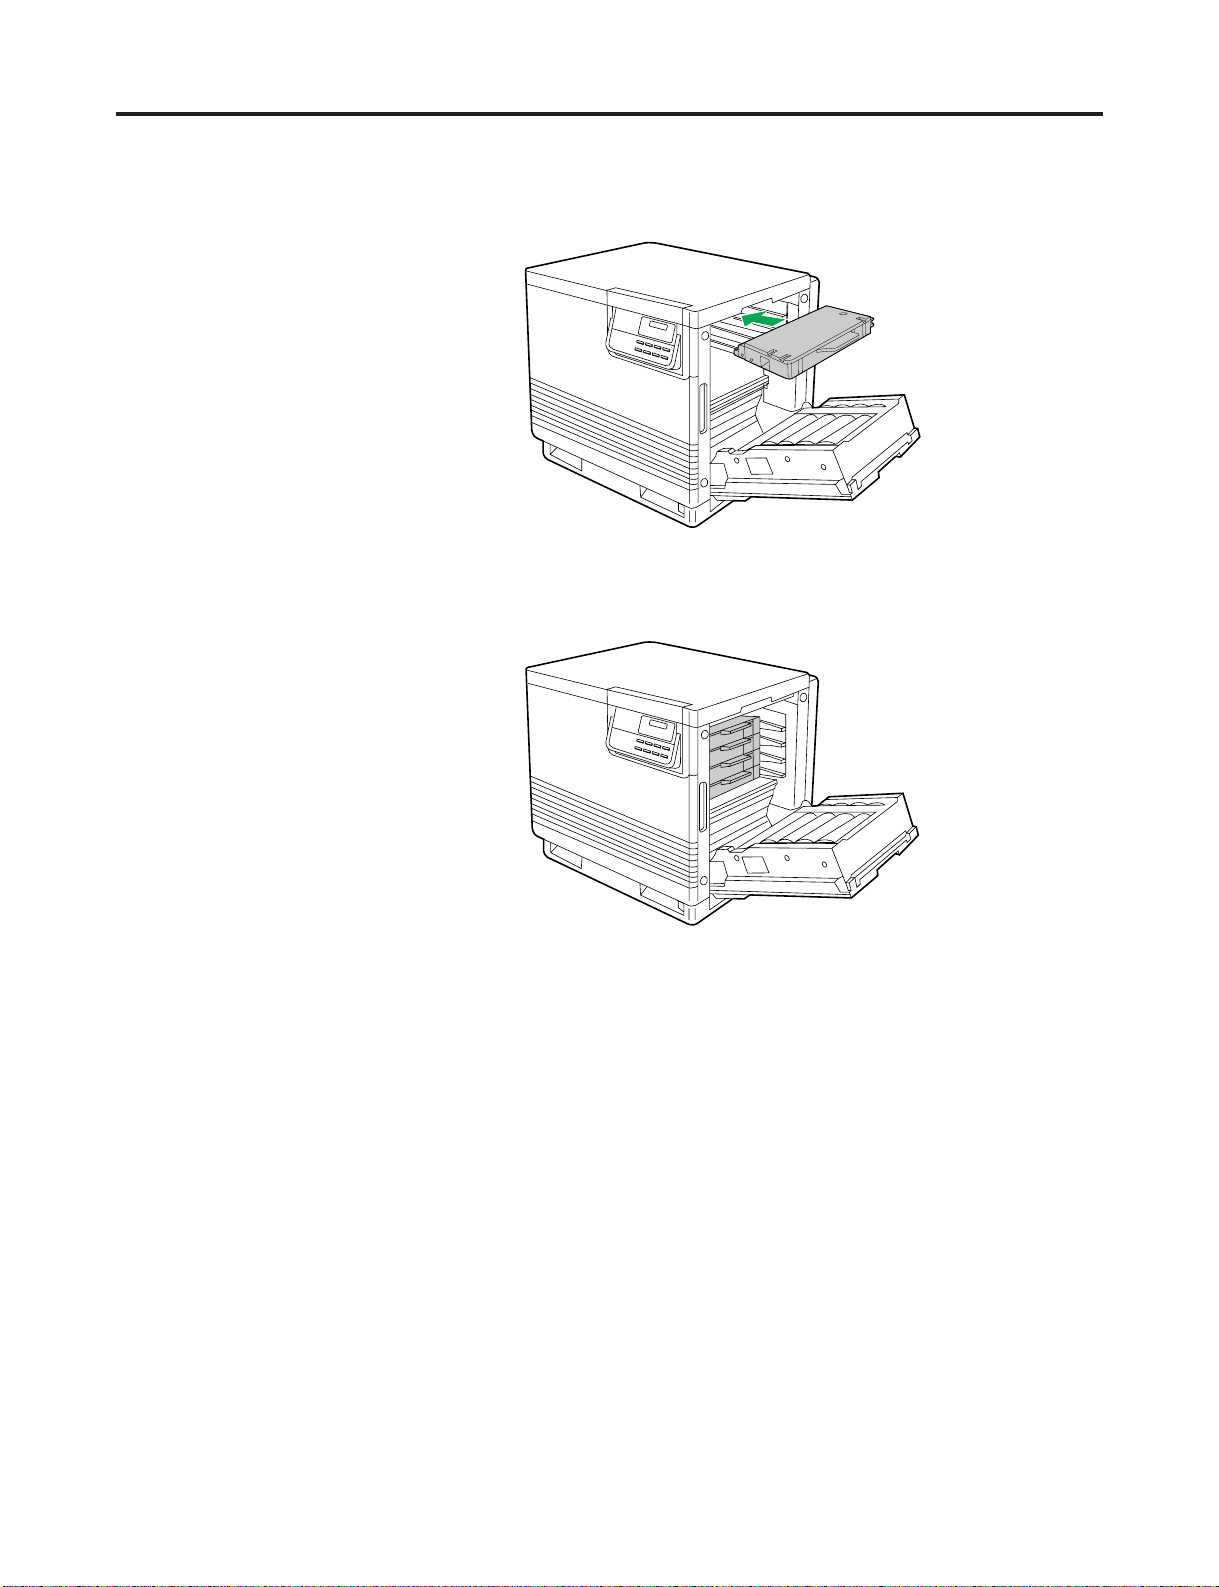
Insert the toner developer in the appropriately labeled slot.
4
From top to bottom, the order of the colour toner developers is BLACK, CYAN,
MAGENTA, YELLOW.
Repeat steps 1, 2 and 4 for each toner developer.
5
When you have installed all the toner developers, go to step 6.
Setup
Close the right side cover.
6
15
Setup
Loading Media
Loading Paper or Transparencies in the Media
Cassette
The printer is shipped with a media cassette (either Letter paper or A4 paper) installed.
The printer can also use five different trays as options:
Cassette Size
A4 Paper 210 mm × 297 mm
A4 Transparency 210 mm × 297 mm
Letter Paper 8.5" × 11"
Letter Transparency 8.5" × 11"
Legal Paper 8.5" × 14"
Notes:
• Make sure that you load the correct media. Each tray is designed and labeled for
only paper or transparency. If you load the incorrect media type in a tray, it may
cause a jam.
• If you have the Paper Feeder PF-80 installed:
– If you wish to use the automatic cassette-switching feature (a large print job, for
example), make sure that all cassettes in the printer are the same media type
(paper only) and size.
– The transparency cassette should only be inserted in the upper or middle cassette
slots.
Note:
The printer does not automatically switch cassettes if the media type of the cassette is
Transparency.
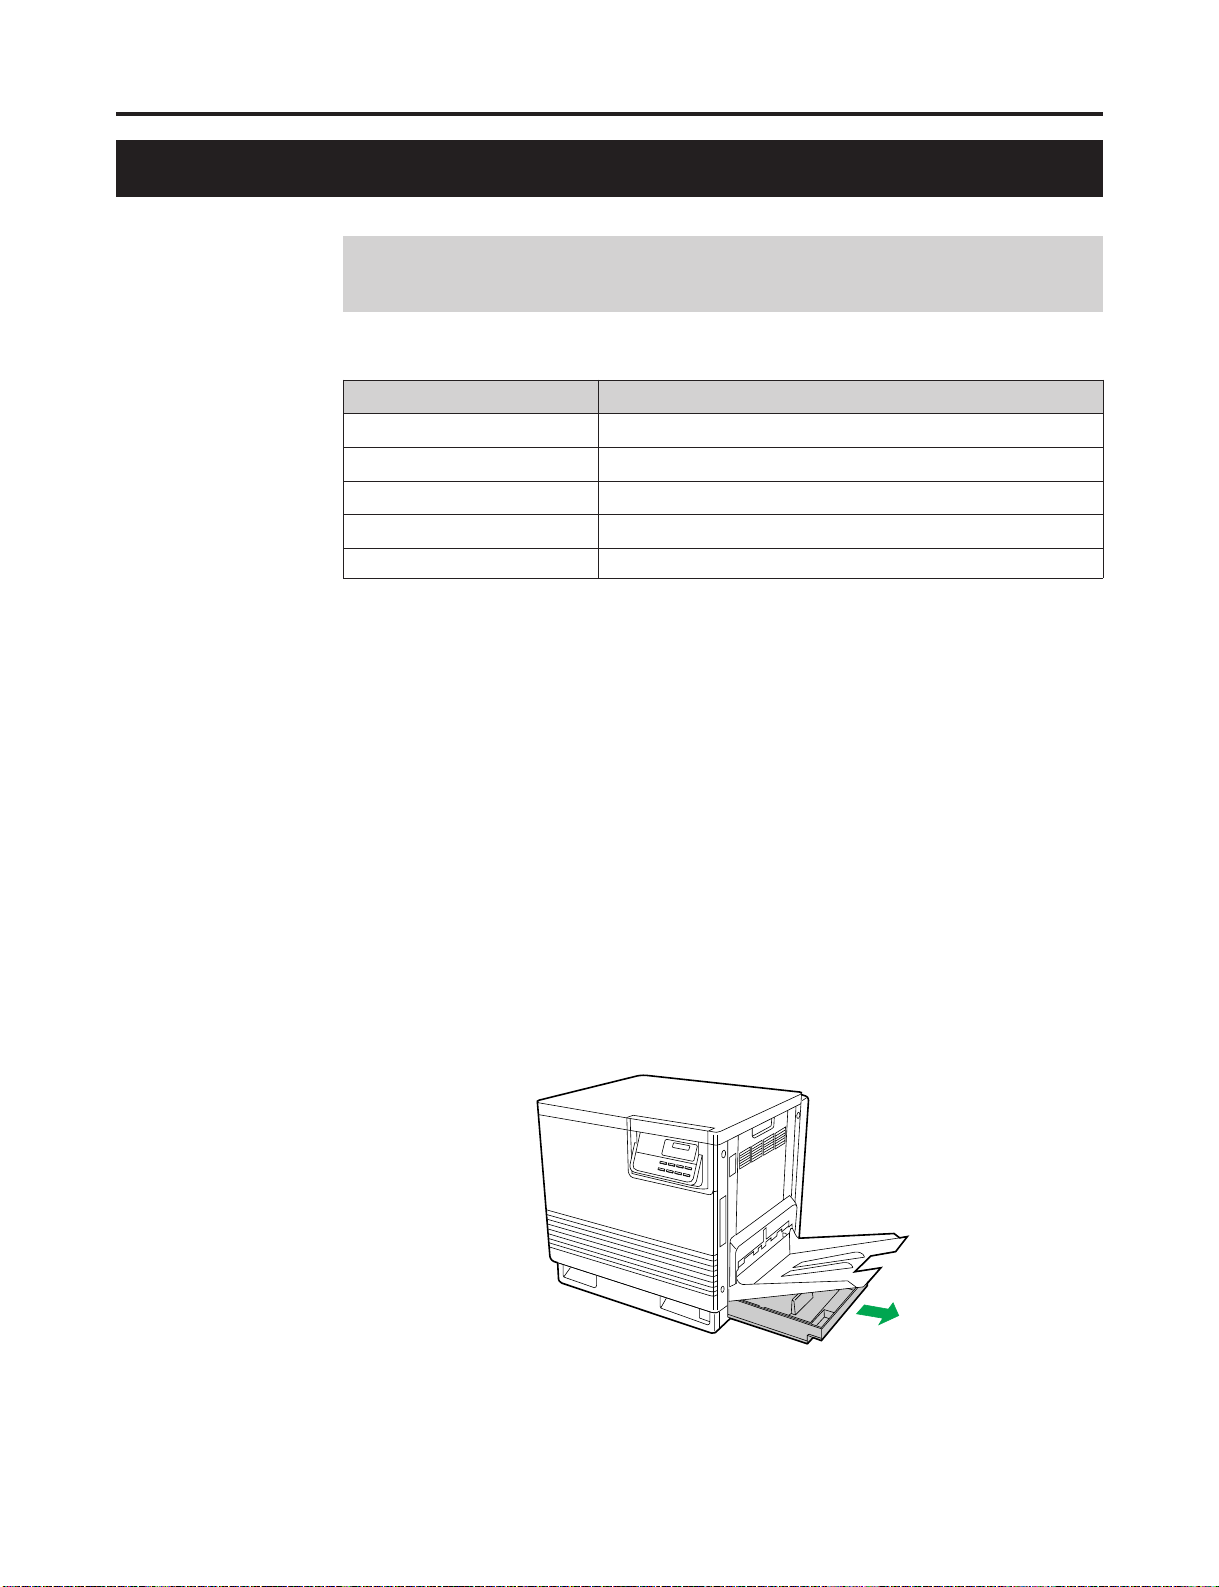
Pull the media cassette out of the printer.
1
Remove all packaging materials from inside the media cassette;
2
refer to the instruction sheet attached to the cassette.
16
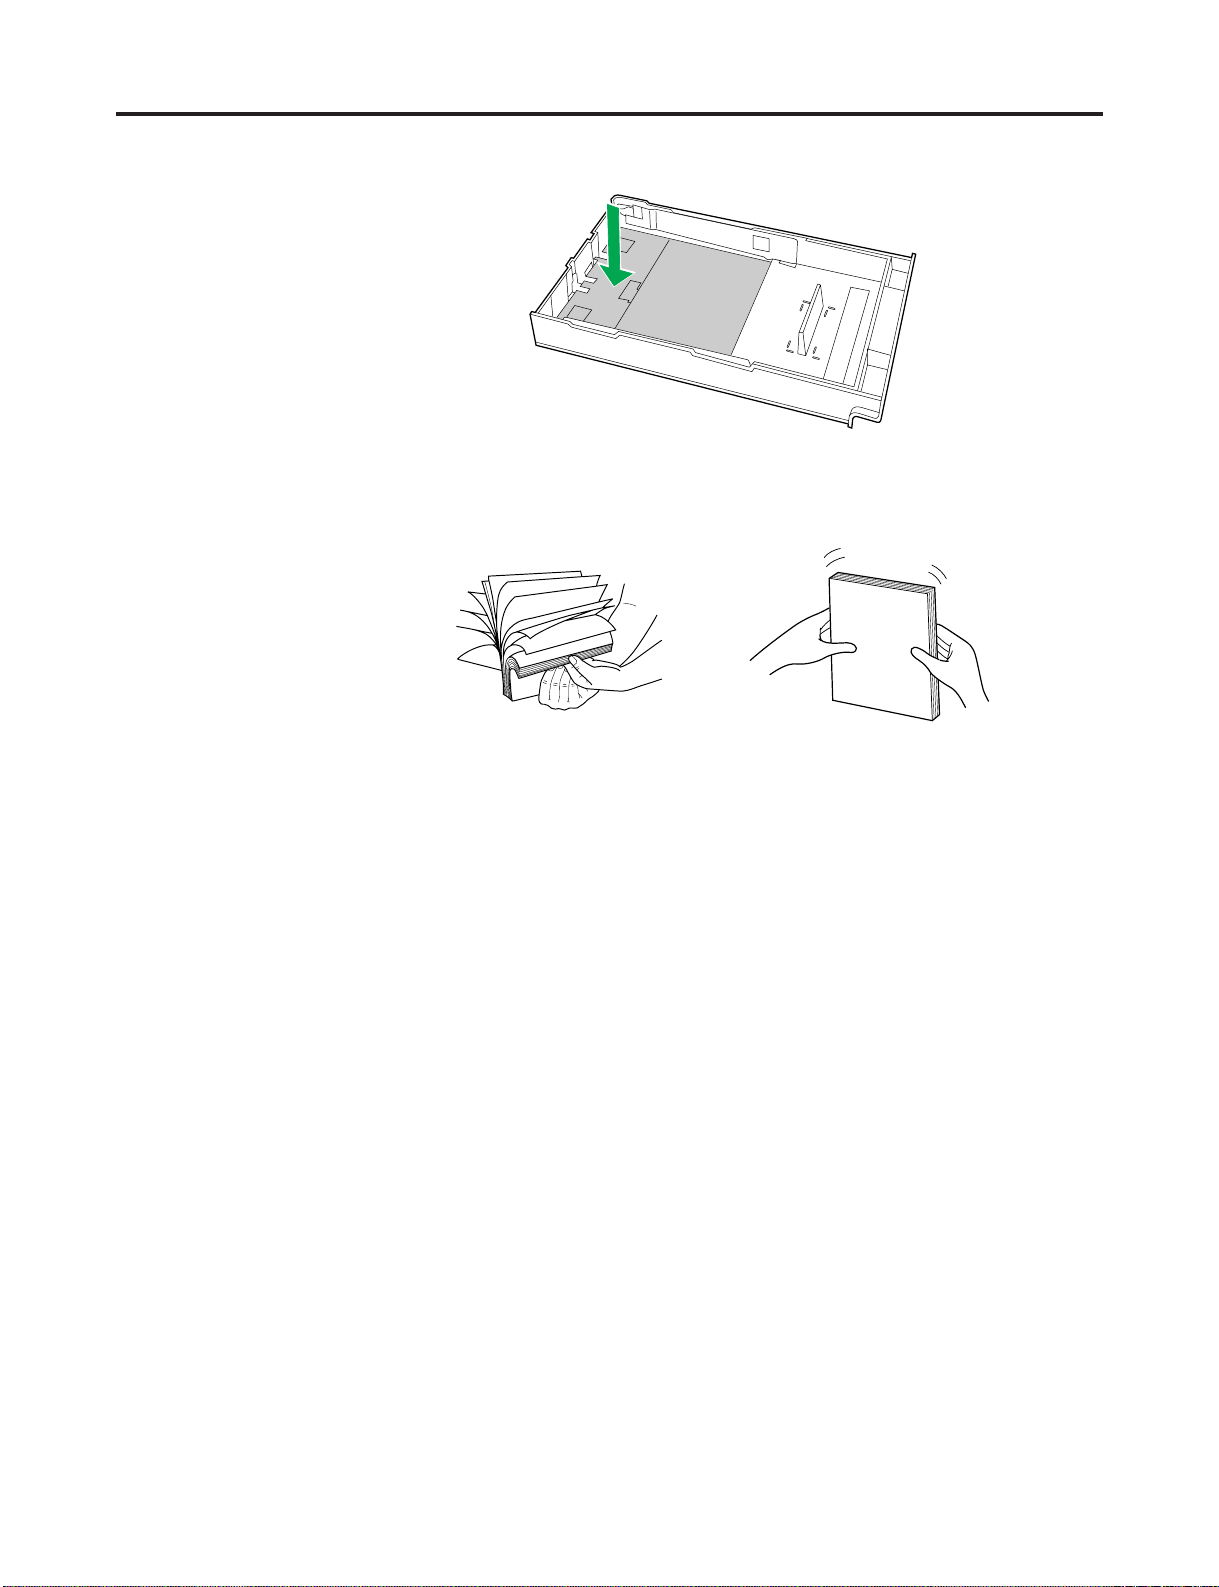
Push down on the metal plate until it clicks, locking it in place.
3
Fan the media (paper/transparencies), then tap it on a level surface
4
to avoid media jams or skewed printing.
Setup
Notes:
• To optimize your printer’s performance, always use clean, unused media.
• Be careful not to leave fingerprints on the media, which can result in a smudged
print.
• Reusing media that has been fed through the printer once (for example, after jams)
can reduce the life of the consumables and paper path components.
• The recommended transparency is 3M CG3700. If the print quality is poor, print on
the other side.
17
 Loading...