

Page 1

20. HIGH-SPEED TIRE
20-0
20
__________________________________________________________________________________
__________________________________________________________________________________
__________________________________________________________________________________
__________________________________________________________________________________
__________________________________________________________________________________
HIGH-SPEED TIRE (TUBELESS TIRE)
__________________________________________________________________________________
HIGH-SPEED TIRE CONSTRUCTION & FEATURES ------------ 20- 2
HIGH-SPEED TIRE MAINTENANCE PRECAUTIONS ----------- 20- 4
HIGH-SPEED TIRE REMOVAL/INSTALLATION ---------------- 20- 5
HIGH-SPEED TIRE REPAIR------------------------------------------ 20-16
20
Page 2
20. HIGH-SPEED TIRE
20-1
HIGH-SPEED TIRE CONSTRUCTION & FEATURES
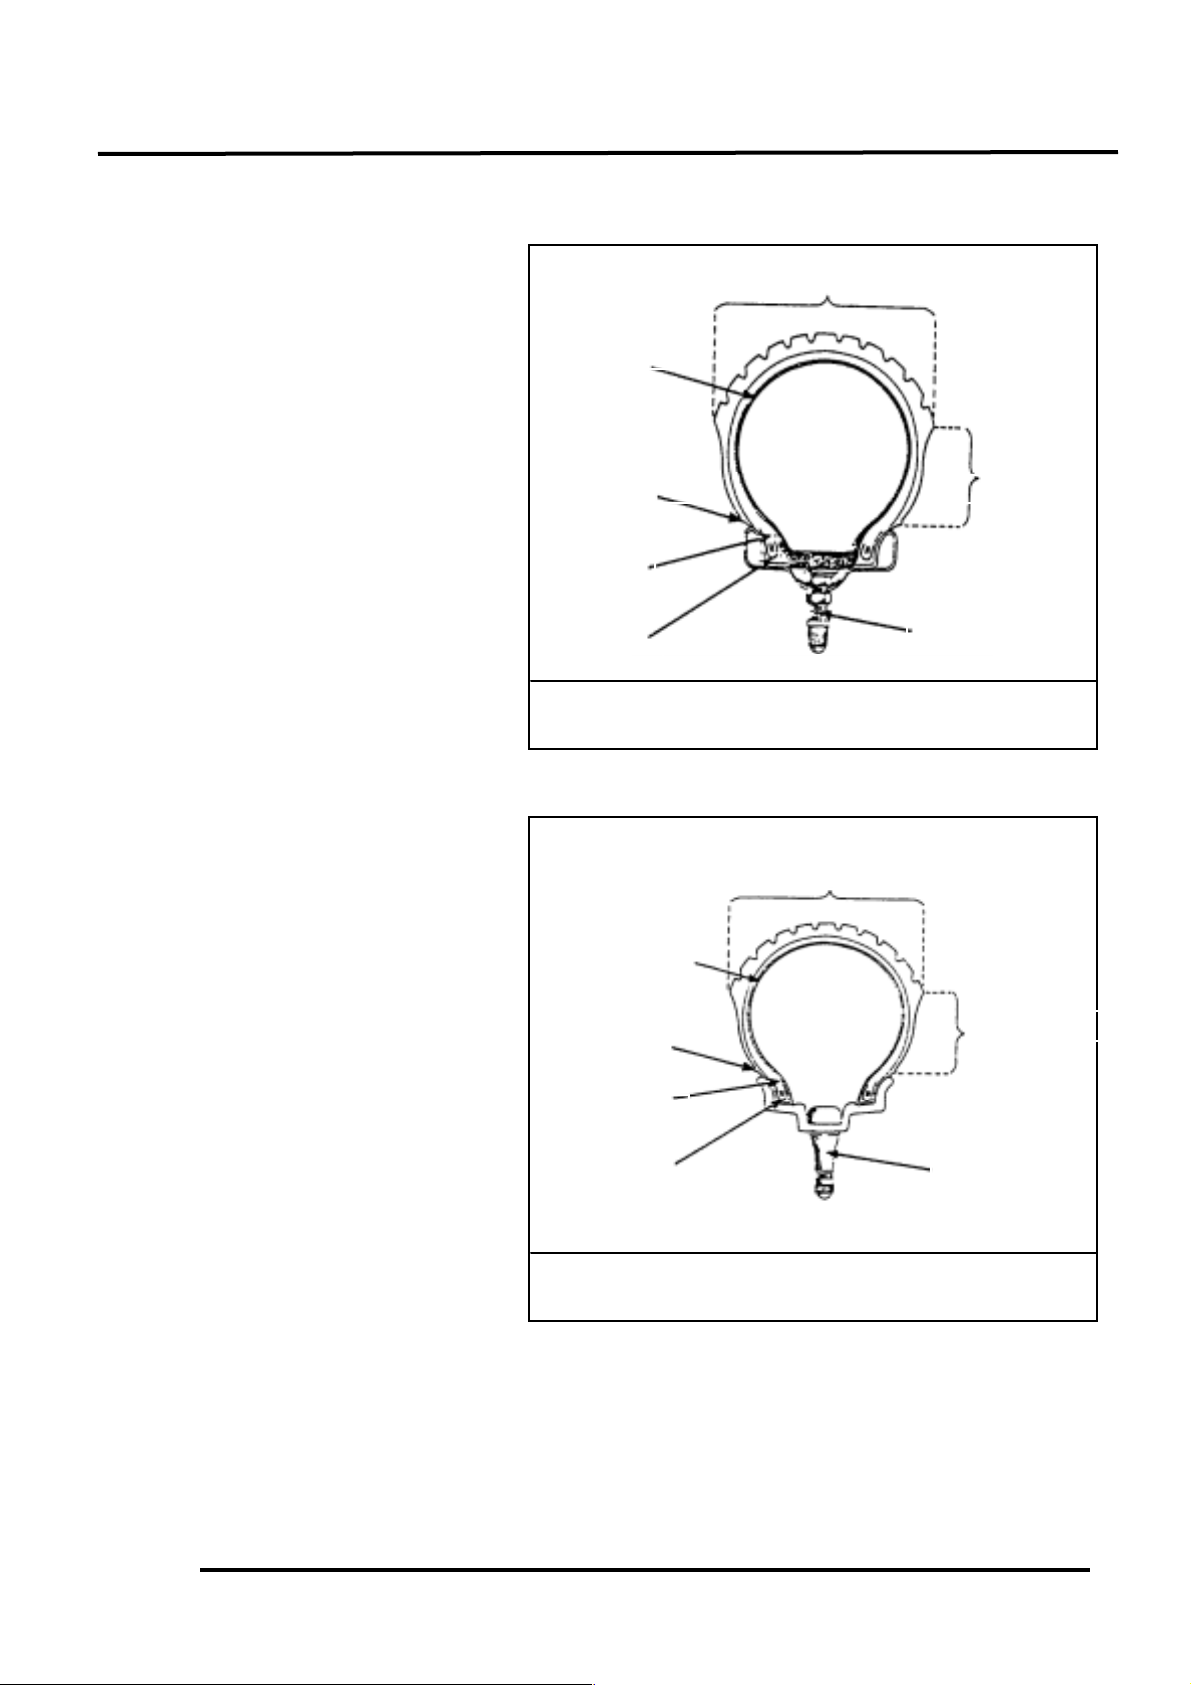
CONSTRUCTION
INNER LINER
A layer of rubber (inner liner) which
replaces the inner tube is stuck to the
inside wall of the high-speed tire. The
inner liner is made of thick rubber, a
material that high-pressure air can not
pass through. The liner can not be
lengthened like other inner tubes, so
when nails are inserted into the tire,
breaks will not be enlarged because
the nails are suppressed to avoid air
leaks. When tire break occurs, the
inserted nails will spring out to make
the tire run under low pressure. It is
very dangerous because the tire
temperature will raise highly to make
tire wobble during riding. Therefore,
riders must be very careful to check
tire pressure and inserted nails before
riding at high-speed.
•Tire pressure
•Tire deformation and damage
•Tire groove depth and abnormal
wear
Tire Depth: Front : 0.8mm
Rear : 0.8mm
•Imbedded metals, stones, or other
foreign matters
The bead base where tire and rim
contact is wrapped by rubber fabrics
called tire bead in order to reinforce
its function. The fabrics is specially
adopted for the high-speed tire to
keep its air density because air can
not pass through this material. Also,
the fabrics can keep the tire from
damage when the tire falls off, and
protect tire from damage due to
friction of wheel rim while riding.
Inner Tube
Tire Bead
Tube Valve
Tube Tire
Tread
Tire Flange
Circle Boundary
Tire Shoulder
Circle Boundary
Tire Flange
Tubeless Tire
Inner Liner
Tire Bead
Tread
Tire Valve
Tire Shoulder
Page 3
20. HIGH-SPEED TIRE
20-2
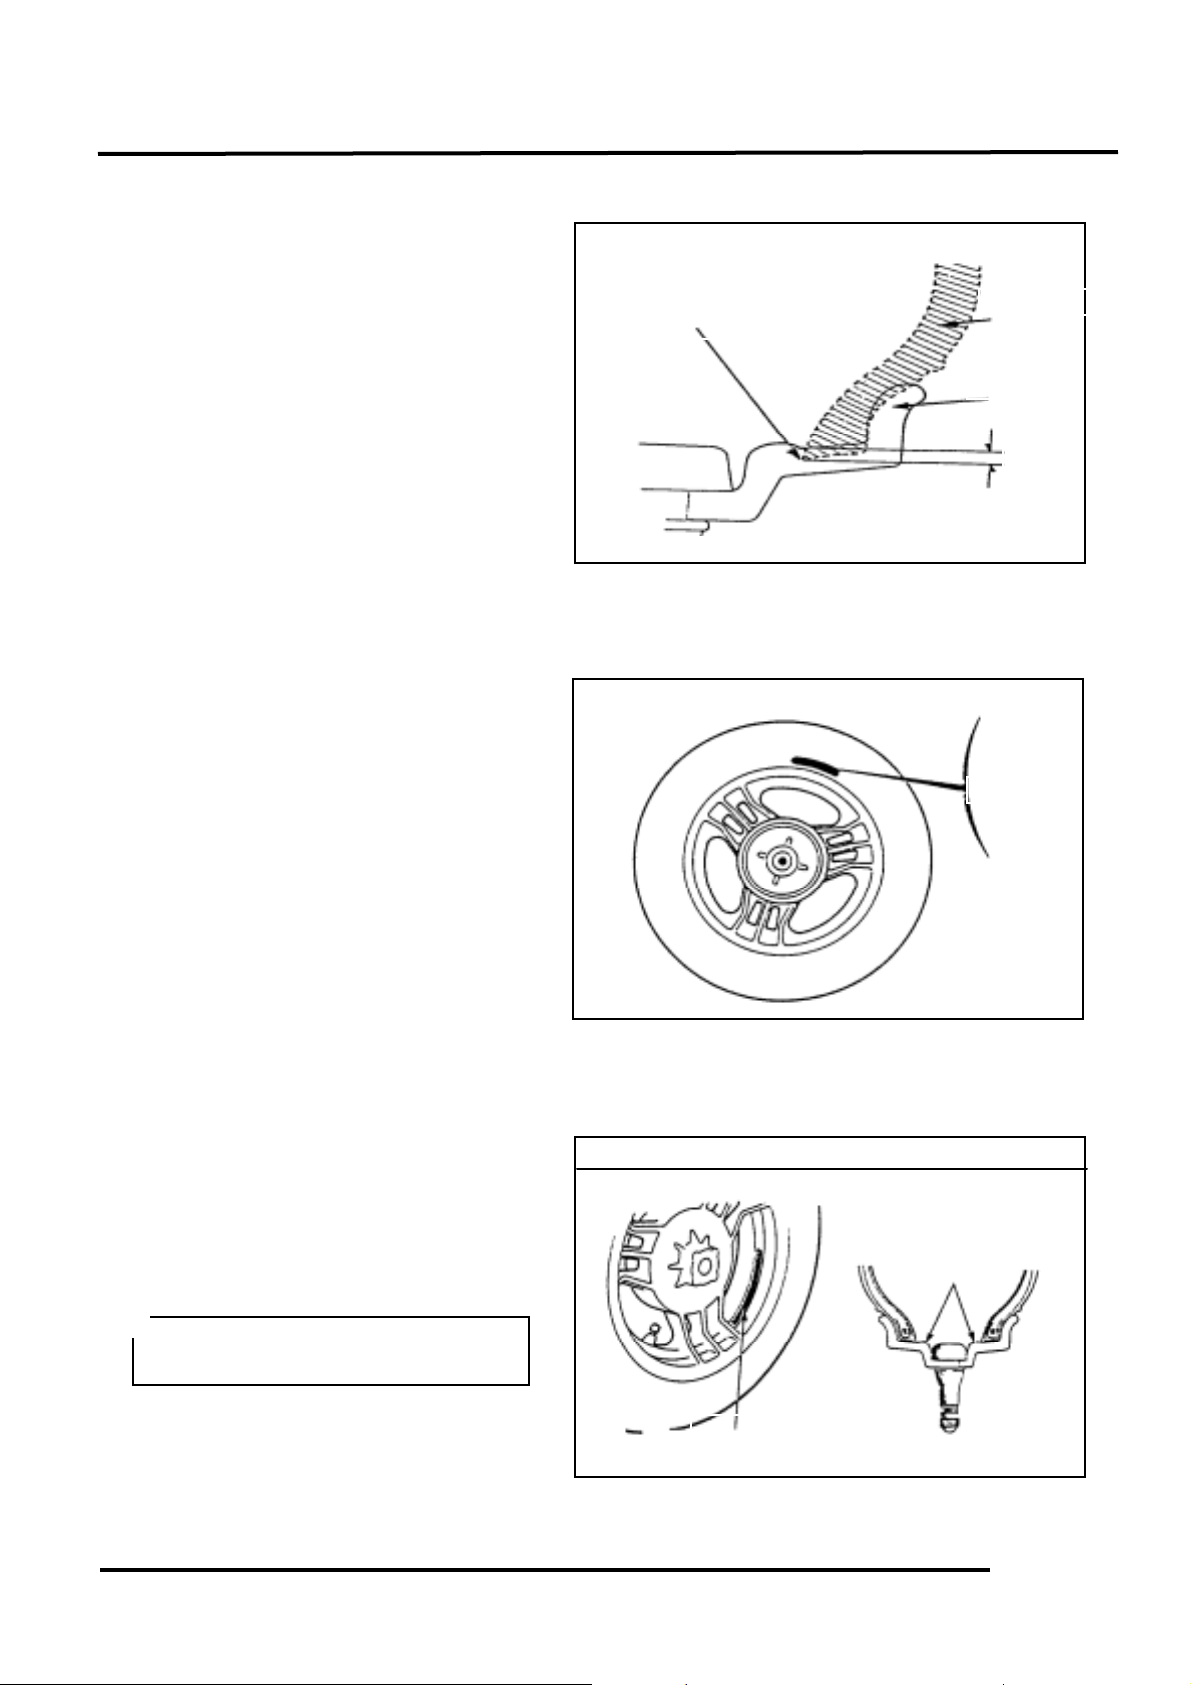
TIRE FLANGE BEVEL ANGEL
If the tire flange radius is smaller than the
wheel rim radius, the tire and wheel can be
locked tightly. Take the advantage of tire
bead bevel angle to enlarge tire bead so
that the tire and rim can combine with
each other precisely. Consequently, it
can prevent air leaks and tire will not fall
off the rim when tire break or low
pressure occurs.
METHOD TO IDENTIFY A HIGHSPEED TIRE
For distinguishing a high-speed tire from a
tube-tire, the word “TUBELESS” is
stamped on the side wall of the highspeed tire. A tire without this word
cannot be used as a high-speed tire.
RIM USED FOR HIGH-SPEED TIRE
For the purpose of preventing tire from
falling off the wheel rim while driving,
there are special requirements on the size,
shape and pressure density of rim used
for high-speed tire. It is necessary to use
special rims.
Refer to the Figure shown for distinction.
Air leaks occur easily when the wheel rim
is deformed. Avoid driving on rugged road
and crashing against stones.
When replacing the high-speed tire, also
replace the valve as a set.
• When replacing the high-speed tire,
use a tire of the same specification.
*
Rim Used for High-speed Tire
Tire flange bevel angle is
larger than rim bevel angle
Tire Shape
TUBELESS
Rim Shape
Locked
Mark of
TUBELESS
Rim Valve
Page 4
20. HIGH-SPEED TIRE
20-3
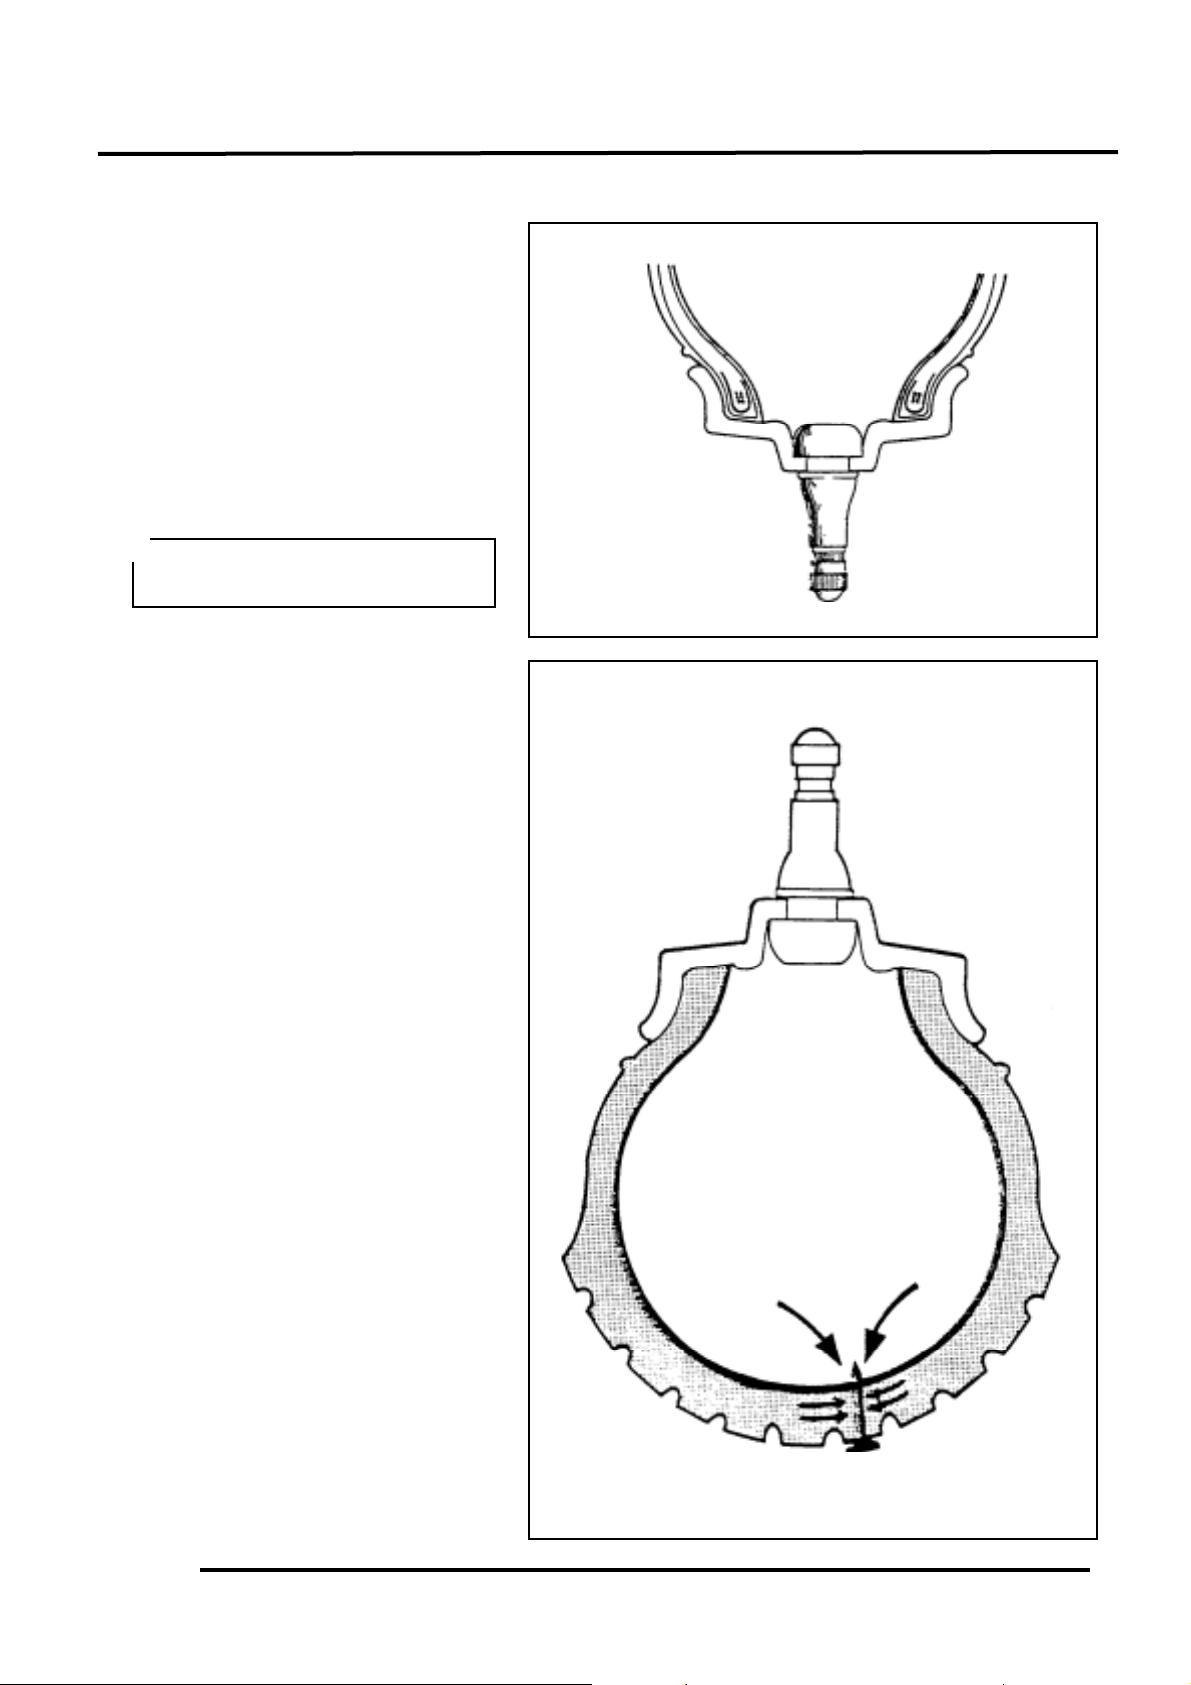
RIM VALVE USED FOR HIGHSPEED TIRE
Air-tight valve is specially designed
for rim valve of a high-speed tire.
AIR-TIGHT VALVE
A rubber of special shape is used to
cover around the valve hole. The
spring of rubber can prevent air leaks.
Install the valve from the inner side of
the rim and then pull it out through
the rim valve hole with a special tool.
HIGH-SPEED TIRE FEATURES
•Air will not release quickly when a
nail is inserted into the tire. It is the
same as the tube-tire that tire break
may occur to a high-speed tire when
nails or other objects are inserted
into it. However, when a nail is
inserted into a high-speed tire,
external rubber and internal anti-leak
rubber will grip the nail tightly to
prevent air leaks. If the nail is deeply
inserted, air will not release quickly
to avoid sudden slipping of steering
handlebar.
•EXCELLENT COOLING
PERFORMANCE
Because the high-speed tire is
tubeless, the air within the tire will
contact the rim directly. Heat
produced during driving can be
dissipated through the rim. Heat
affects the rubber greatly and if the
tire temperature is not high, the tire
service life can be prolonged .
• Use only the KYMCO
recommended air-tight valve.
*
There is no air leak when a nail is
inserted into the tire.
Page 5
20. HIGH-SPEED TIRE
20-4
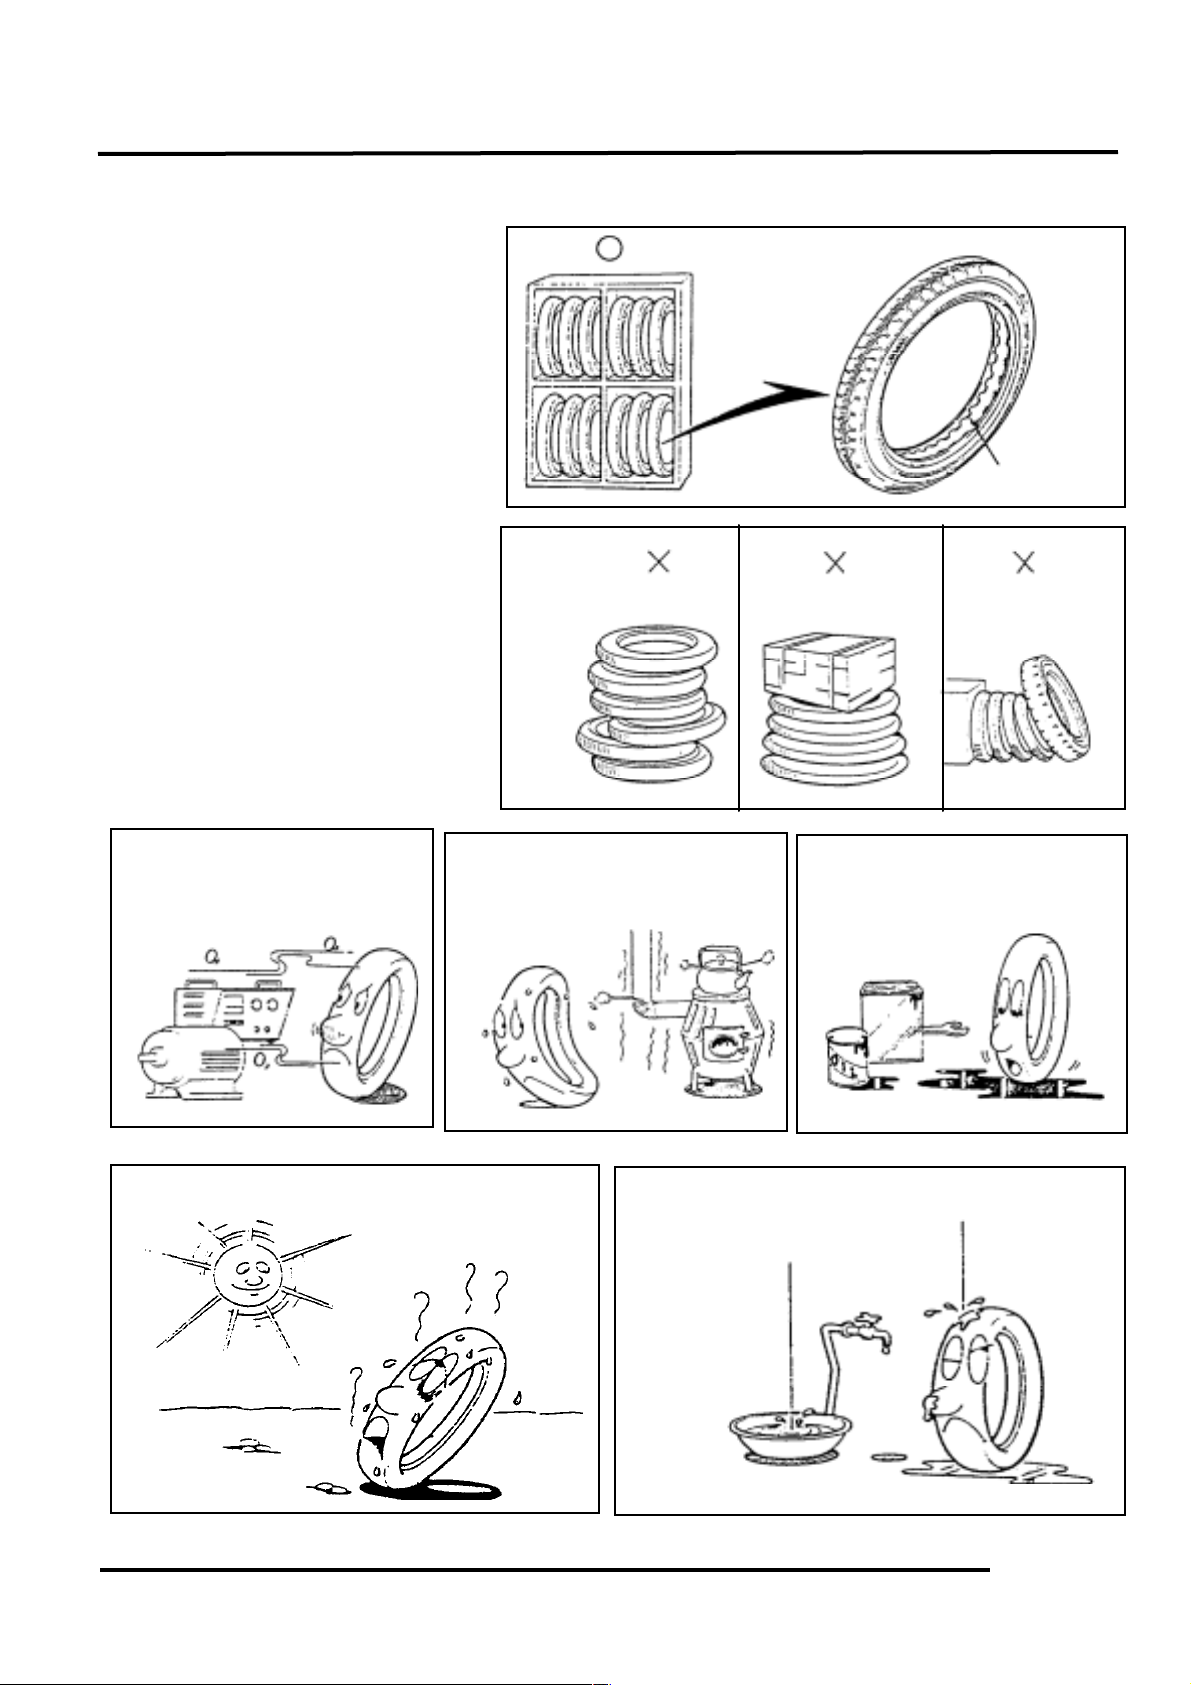
PRECAUTIONS FOR HIGH SPEED
TIRE STORAGE
STORAGE METHODS
If the space within the tire bead of a
high-speed tire is narrower than the
width of its rim, it is hard to install
the tire to the rim and pump air into
the tire. Therefore, it is better to put
cardboard within the tire bead and
put tires in order.
Tires deform easily if they are piled
horizontally. Avoid doing so.
As to the reused tires, the structure
of the rim remains the same. Install
the valve cap when the tire pressure
is lowered to 1/2 of the specified
pressure.
PLACE FOR STORAGE
The place used for storage should
avoid the following conditions:
A place where produces
ozone (a place near motors
or chargers)
A place with oils or
lubricants (especially in
service working area)
A place where produces
heat (a place near stoves
or steam pipes)
Cardboard
A place with high moisture
A place with direct sunshine
Page 6
20. HIGH-SPEED TIRE
20-5
HIGH-SPEED TIRE
REMOVAL/INSTALLATION
In comparison with the tube-tire, the
following points must be noticed
when removing and installing a highspeed tire.
•When removing the high-speed tire,
avoid damaging the tire bead (special
plastic seat), tire liner (internal antileak material) and rim flange (bead
base).
•Apply vegetable soapy water to the
contact area between the tire bead
and rim, and use a tire iron for
installation.
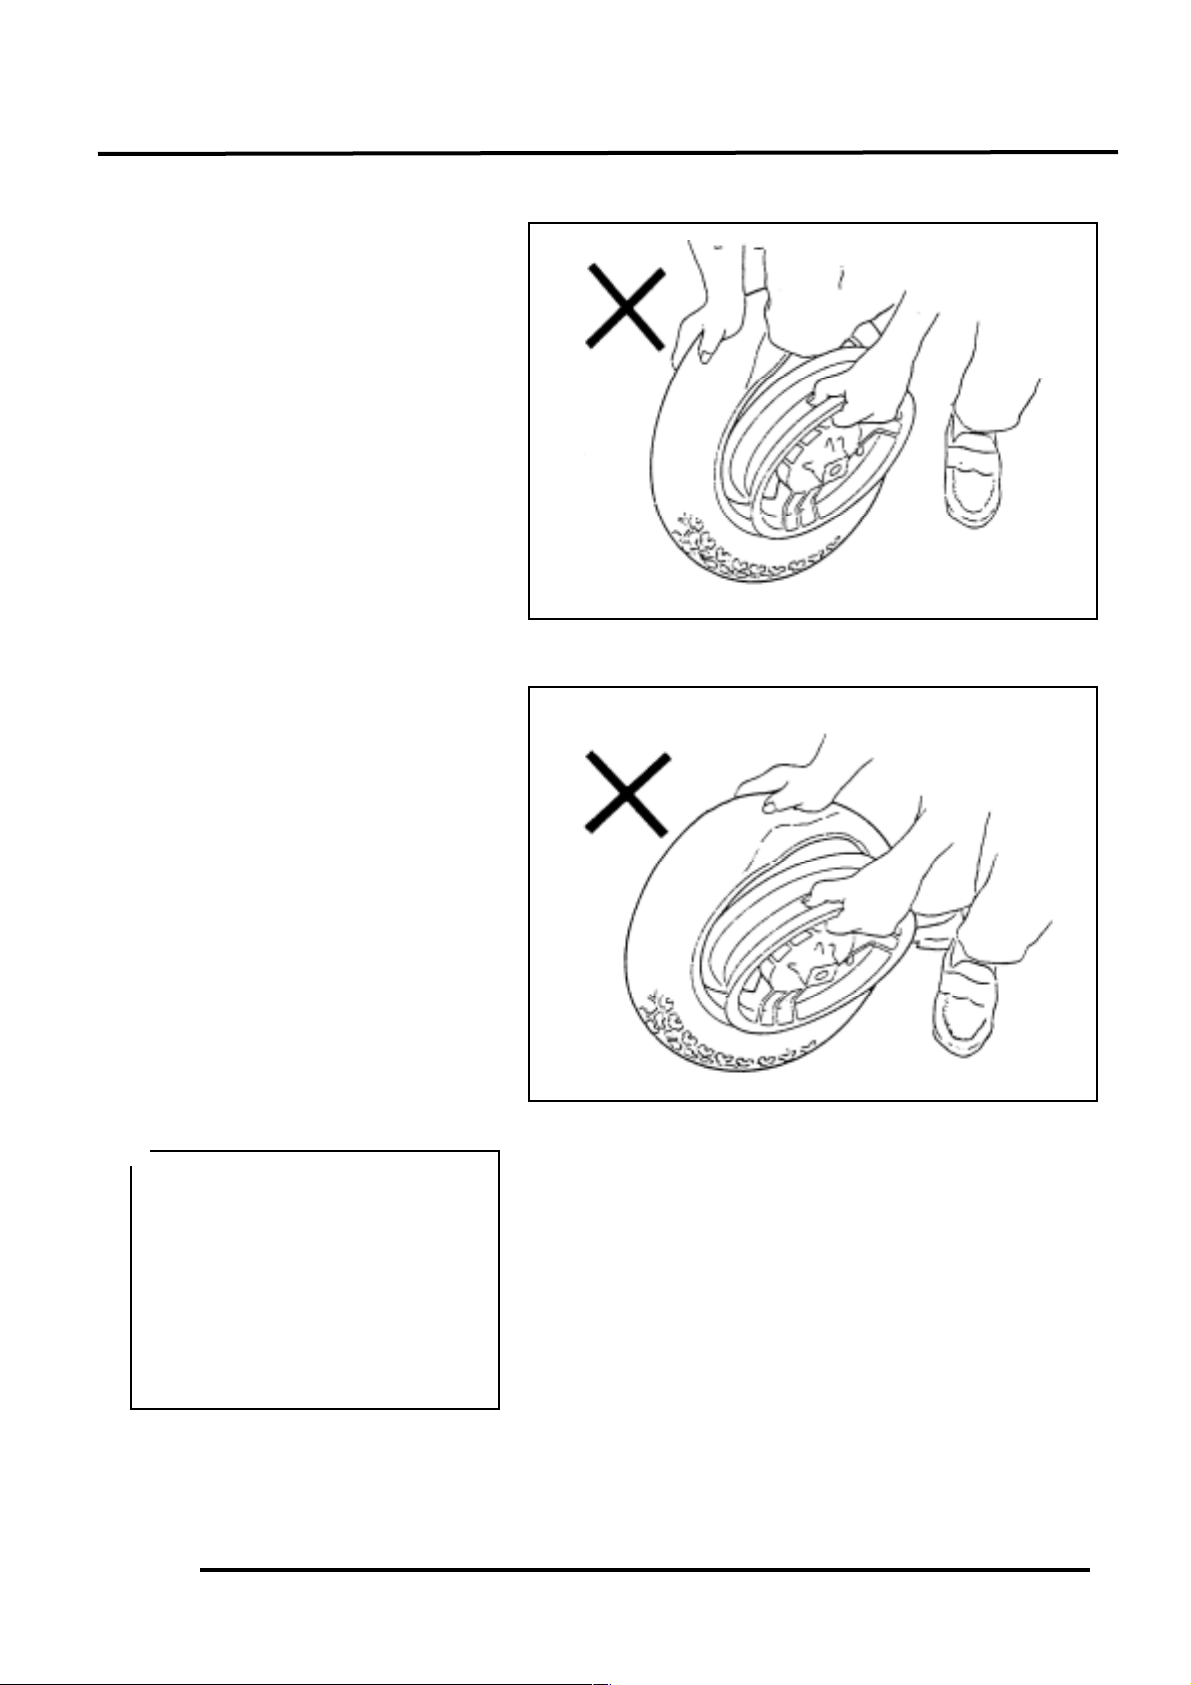
•It will cause tire deformation when
removing the tire forcedly as the
figure shown. Be sure to remove the
tire following the instructions given
in the manual.
•The tight joint of tire and rim can
prevent air leaks. As long as the rim
is deformed, air leaks will occur
easily. Therefore, do not remove or
install the tire forcedly. Use special
tools and rim protector for servicing.
Frequently check if there is any
deformed part and do not use tools
of poor quality.
•Rust and rubber materials on bead
base are the main cause of air leaks.
Remove them thoroughly.
•Be sure to remove and install the tire
following the procedures provided in
the manual.
• When removing or installing a
high-speed tire, do not damage
the axle bearing. Draw or pull the
rubber on the rim lower part.
• It is difficult to remove a tire
when the rim valve is pressed by
tire flange. In this situation, do
not remove it forcedly because
the rim valve hole will be
damaged.
*
Page 7

20. HIGH-SPEED TIRE
20-6
TOOLS & PARTS REQUIRED
FOR SERVICING
Tire iron
Wheel rim protector
Knife
Water pan and probe
Vegetable soapy water
Pressure gauge
Valve core assembly tool
Valve assembly tool
Rim valve used for high-
speed tire
Valve core
11 High-speed tire
High-speed tire
Model: KYMCO DINK50
Tire size: 110/70-12 (Front)
130/70-12 (Rear)
Make sure to use KYMCOrecommend high-speed tire and
rim valve.
Page 8

20. HIGH-SPEED TIRE
20-7
REMOVAL METHODS
Use the valve core assembly
tool to take the valve core out and
bleed air from the tire.
If there is no special tool to
pry off the tire bead, use your feet
to do this as the figure shown.
After the tire bead is separated
from the rim and before removing
the tire, press the tire bead at the
back of the valve into the rim
groove completely, Then push the
tire to the same side.
When removing the valve core, be
careful that the high tire pressure
may force out the valve core.
*
It is easier to remove the tire when
it is pushed to the same side of
rim.
*
•Don‘t step on the wheel rim and
spoke wire.
•Before installing the tire, make
sure that the rim and axle bearing
are not damaged. Be careful during
installation.
*
Rim Center
Page 9

20. HIGH-SPEED TIRE
20-8
Apply vegetable soapy water to
the area between the rim and tire
and install the rim protector at the
rim side. Then insert the tire iron to
pry off the tire bead from the rim.
At this time, the tire bead at the
back side of the valve is in the rim
groove completely. After making
sure the above mentioned is done,
remove the tire by following the
sequence of 1234.
Insert the second tire iron
30_ 50mm from the first one.
Then separate the tire bead from
the rim.
It is the same as . Use the
first tire iron to pry off tire bead
from the rim, then use the second
one to pry off another part of the
tire rim from the rim (distance:
30_ 50mm) slowly.
Do not use a tool other than the
tire iron for motorcycle tire
removal. Use the wheel rim
protector for removal.
*
If you want to separate the tire
bead from the rim only by one tire
iron, the tire bead will be deformed
due to using too much force. The
rim will also be damaged seriously.
Avoid this way of removal.
*
Page 10

20. HIGH-SPEED TIRE
20-9
The procedure is the same as
and . If 1/3 of the tire bead is
separated from the rim, the whole
tire is easily taken off.
When 1/2 of the tire bead is pried
off the rim, the tire will be easily
removed by using only one tire
iron.
The bead at the back side can be
pried off in the same procedures
described in _ .
Page 11

20. HIGH-SPEED TIRE
20-10
Take out the rim from the tire.
Check the rim valve for damage.
Replace any faulty parts.
RIM VALVE REMOVAL
Cut the rim valve from it bottom.
RIM VALVE INSTALLATION
Apply vegetable soapy water to
facilitate the installation of rim valve.
Apply after other foreign objects are
removed.
• Apply around the valve when
installation.
• Apply to the tire bead while
assembling the tire and rim.
Apply vegetable soapy water to the
inner side of rim valve and then use a
special tool to pull the valve out.
When the tire is replaced, replace
the valve as a set.
*
Be careful not to damage the rim
valve hole.
*
Do not use oil or gasoline. Use
vegetable soapy water only.
*
Page 12

20. HIGH-SPEED TIRE
20-11
RIM AND TIRE INSPECTION
RIM INSPECTION
Check the rim and remove rust and
rubber materials from the rim.
Air leak will be caused by rim
deformation or cracks.
When the tire or rim has cracks, do
not repair them and immediately
replace with a new one.
THE DEPTH AND WIDTH OF
TIRE SCAR IS OVER 0.5MM AND
1.0MM
TIRE INSPECTION
The tire cannot be repaired and must
be replaced with a new one under the
following conditions.
•Tire crack or break is caused by a
foreign object of 6mm outer radius.
•The layer of tire-contact part falls
off.
•Worn tire tread.
•Worn tire bead.
•Broken tire bead stiffener or other
bead damage.
•Broken fabrics.
•Deflection caused by dragging force.
•Rubber cutting damage.
•Abnormal internal anti-leak rubber.
•Side wall breaks or damage.
•Tire tread depth is under 0.8mm
INSTALLATION
Before installation, check the tire
inside for damage.
Apply vegetable soapy water to the
right and left sides of tire bead. Keep
the tire upright and start to install the
tire from the back of the rim valve
according to the order of 1234.
Then, push the tire into the rim by
hand to the part where hands can
reach in.
When the tire is deformed, repair
and correct the deformed part by
hand.
*
Page 13

20. HIGH-SPEED TIRE
20-12
Put the wheel horizontally and put
the rim protector on the rim. Use 2
tire irons to install the tire bead into
the rim slowly (30_ 50mm).
Use 2 tire irons to install the tire bead
for the last 50_ 60mm part. By
this way, one side of the tire bead is
installed.
The installation of the other side of
tire bead should be started from the
opposite side of the tire valve
according to the order of 1234.
Page 14

20. HIGH-SPEED TIRE
20-13
Install the rim protector and insert 2
tire irons at an interval of 30mm to
install the tire bead into the rim.
Press to hold the installed part of tire
bead by knees.
After 1/2 of tire bead is installed,
insert 2 tire irons at an interval of
30_ 40mm to finish the installation
in order.
The pulled-out tire iron should be
inserted beside the other tire iron
which hasn‘t been pulled out.
After 2/3 of the tire bead is installed
into the rim, make sure if the installed
tire bead is completely inserted into
the rim groove.
• Both tire irons should be pulled
out at the same time.
• The already installed part should
be pressed.
*
If the tire bead is not completely
inserted into the rim groove, it will
be more difficult to install the rest
part of the tire bead. Moreover,
the rim bead is easily damaged.
*
Page 15

20. HIGH-SPEED TIRE
20-14
If 50_ 60mm of the tire bead is not
installed, use 2 tire irons to install the
rest part of tire bead.
Use the valve core installer to install
the valve core.
Apply vegetable soapy water to both
sides of the tire bead.
Page 16

20. HIGH-SPEED TIRE
20-15
In order to ensure that the tire and the
rim are well combined, raise the wheel
and rotate it. Press around the tire by
hand for several times to see if the tire
is perfectly combined with the rim.
Pump the tire up to the specified tire
pressure. If there is air leak between
tire bead and rim after pumping, turn
the valve down and press the upper
side of the tire with hand to rotate the
tire and pump the air in.
After pumping with specified air
pressure, make sure if the tire bead is
well installed into the rim.
Page 17

20. HIGH-SPEED TIRE
20-16
HIGH-SPEED TIRE REPAIR
Repair the tire using the repair methods and
repair agents recommended by the
manufacturers.
REPAIR PROCEDURES
First remove the tire from the wheel.
Find the crack and mark it.
Take out foreign objects and check if the
tire can be repaired.
Tire repair
Repair methods are divided into external
and internal repairs.
Perform the external repair first and then
the internal repair.
When repair agent is used, follow the
instructions provided by the manufacturer.
Remove dust and dirt from the tire bead.
Clean out the tire inside. Recheck the
repaired portion and make sure there is no
other damage.
Install the tire and wheel rim.
• Check the rim valve when removing
the tire and wheel rim.
• The gum on the repaired portion
may not completely stick to the
tire within 24 hours after repair, be
careful to control the driving speed
for safety.
*
 Loading...