

Page 1

Kurzweil Troubadór
Musician’s Guide
©1999 All rights reserved. Kurzweil is a product line of Young Chang Co.; Kurzweil and Troubad—r
are trademarks of Young Chang Co. All other products and brand names are trademarks or registered
trademarks of their respective companies. Product features and speciÞcations are subject to change
without notice.
Part Number: 910347 Rev. A
Page 2
The lightning flash with the arrowhead symbol,
CAUTION
RISK OF ELECTRIC SHOCK
DO NOT OPEN
CAUTION: TO REDUCE THE RISK OF ELECTRIC SHOCK,
DO NOT REMOVE THE COVER
NO USER SERVICEABLE PARTS INSIDE
REFER SERVICING TO QUALIFIED SERVICE PERSONNEL
within an equilateral triangle, is intended to alert
the user to the presence of uninsulated
"dangerous voltage" within the product's
enclosure that may be of sufficient magnitude
to constitute a risk of electric shock to persons.
The exclamation point within an equilateral
triangle is intended to alert the user to the
presence of important operating and
maintenance (servicing) instructions in the
literature accompanying the product.
IMPORTANT SAFETY & INSTALLATION INSTRUCTIONS
INSTRUCTIONS PERTAINING TO THE RISK OF FIRE, ELECTRIC SHOCK, OR INJURY TO PERSONS
WARNING: When using electric products, basic precautions should
always be followed, including the following:
1. Read all of the Safety and Installation Instructions and Explanation
of Graphic Symbols before using the product.
2. This product must be grounded. If it should malfunction or break
down, grounding provides a path of least resistance for electric
current to reduce the risk of electric shock. This product is equipped
with a power supply cord having an equipment-grounding
conductor and a grounding plug. The plug must be plugged into an
appropriate outlet which is properly installed and grounded in
accordance with all local codes and ordinances.
DANGER: Improper connection of the equipment-grounding
conductor can result in a risk of electric shock. Do not modify the
plug provided with the product - if it will not fit the outlet, have a
proper outlet installed by a qualified electrician. Do not use an
adaptor which defeats the function of the equipment-grounding
conductor. If you are in doubt as to whether the product is properly
grounded, check with a qualified serviceman or electrician.
3. WARNING: This product is equipped with an AC input voltage
selector. The voltage selector has been factory set for the mains
supply voltage in the country where this unit was sold. Changing
the voltage selector may require the use of a diff erent power supply
cord or attachment plug, or both. To reduce the risk of fire or electric
shock, refer servicing to qualified maintenance personnel.
4. Do not use this product near water - for example, near a bathtub,
washbowl, kitchen sink, in a wet basement, or near a swimming
pool, or the like.
5. This product should only be used with a stand or cart that is
recommended by the manufacturer.
6. This product, either alone or in combination with an amplifier and
speakers or headphones, may be capable of producing sound
levels that could cause permanent hearing loss. Do not oper ate for
a long period of time at a high volume level or at a level that is
uncomfortable. If you experience any hearing loss or ringing in the
ears, you should consult an audiologist.
7. The product should be located so that its location or position does
not interfere with its proper ventilation.
8. The product should be located away from heat sources such as
radiators, heat registers, or other products that produce heat.
9. The product should be connected to a power supply only of the type
described in the operating instructions or as marked on the product.
10. This product may be equipped with a polarized line plug (one blade
wider than the other). This is a safety feature. If you are unable to
insert the plug into the outlet, contact an electrician to replace your
obsolete outlet. Do not defeat the safety purpose of the plug.
11. The power supply cord of the product should be unplugged from the
outlet when left unused for a long period of time. When unplugging
the power supply cord, do not pull on the cord, but grasp it by the
plug.
12. Care should be taken so that objects do not fall and liquids are not
spilled into the enclosure through openings.
13. The product should be serviced by qualified service personnel
when:
A. The power supply cord or the plug has been damaged;
B. Objects have f allen, or liquid has been spilled into the product;
C. The product has been exposed to rain;
D. The product does not appear to be operating normally or
exhibits a marked change in performance;
E. The product has been dropped, or the enclosure damaged.
14. Do not attempt to service the product beyond that described in the
user maintenance instructions. All other servicing should be
referred to qualified service personnel.
15. WARNING: Do not place objects on the product’s power supply
cord, or place the product in a position where anyone could trip
over, walk on, or roll anything over cords of any type. Do not allow
the product to rest on or be installed over cords of any type.
Improper installations of this type create the possibility of a fire
hazard and/or personal injury.
RADIO AND TELEVISION INTERFERENCE
WARNING: Changes or modifications to this instrument not expressly
approved by Young Chang could void your authority to operate the
instrument.
IMPORTANT: When connecting this product to accessories and/or other
equipment use only high quality shielded cables.
NOTE: This instrument has been tested and found to comply with the
limits for a Class B digital device, pursuant to Part 15 of the FCC Rules.
These limits are designed to provide reasonable protection against
harmful interference in a residential installation. This instrument
generates, uses, and can radiate radio frequency energy and, if not
installed and used in accordance with the instructions, may cause
harmful interference to radio communications. However, there is no
guarantee that interference will not occur in a particular installation. If
this instrument does cause harmful interference to radio or television
reception, which can be determined by turning the instrument off and on,
the user is encouraged to try to correct the interference by one or more
of the following measures:
SA VE THESE INSTRUCTIONS
ii
• Reorient or relocate the receiving antenna.
• Increase the separation between the instrument and the receiver.
• Connect the instrument into an outlet on a circuit other than the one
to which the receiver is connected.
• If necessary consult your dealer or an experienced radio/television
technician for additional suggestions.
NOTICE
This apparatus does not exceed the Class B limits for radio noise
emissions from digital apparatus set out in the Radio Interference
Regulations of the Canadian Department of Communications.
AVIS
Le present appareil numerique n’emet pas de bruits radioelectriques
depassant les limites applicables aux appareils numeriques de la
class B prescrites dans le Reglement sur le brouillage radioelectrique
edicte par le ministere des Communications du Canada.
Page 3

Young Chang Distributors
Contact the nearest Young Chang ofÞce listed below to locate your local Young Chang/ Kurzweil representative.
Young Chang America, Inc.
P.O. Box 99995
Lakewood, WA 98499-0995
Tel: (253) 589-3200
Fax: (253) 984-0245
Young Chang Co.
178-55 Gajwa-Dong
Seo-Ku, Inchon, Korea 404-714
Tel: 011-82-32-570-1380
Fax: 011-82-32-570-1218
Young Chang Akki Europe GmbH
Industriering 45
D-41751 Viersen
Germany
Tel: 011-49-2162-4491
Fax: 011-49-2162-41744
Young Chang Canada Corp.
250 Shields Court, Unit #11
Markham, Ontario L3R 9W7
Tel: (905) 948-8052
Fax: (905) 948-8172
iii
Page 4

Credits
Project Manager
Contributing Editors
Graphic Designers
Contributing Authors
Deirdre Hall
Rick Cohen, Deirdre Hall
Dave Morrell, Steve Lee, Mark Avenmarg
Deirdre Hall, Debbie Fieldman
Author, Editor, Publisher
Mark Avenmarg
iv
Page 5

Contents
Young Chang Distributors ............................................................................................................................................... iii
The Kurzweil Troubadór
Introduction .........................................................................................................................................................................1
In This Manual..............................................................................................................................................................1
Setting Up.............................................................................................................................................................................2
Assembling the Stand (Optional) ..............................................................................................................................2
Connecting the Pedals.................................................................................................................................................3
Connecting the Power Cable......................................................................................................................................3
Setting Up the Music Rack..........................................................................................................................................3
Connecting Audio Cables (Optional)........................................................................................................................4
Playing Through the Troubad—rÕs Speakers .....................................................................................................4
Playing the Troubad—r Through a Sound System............................................................................................4
Connecting Headphones (Optional) .........................................................................................................................5
Connecting MIDI Cables (Optional) .........................................................................................................................5
Controlling Other Instruments ...........................................................................................................................5
Using a Computer.................................................................................................................................................6
Turning On the Troubad—r..........................................................................................................................................6
Playing the Troubad—r ........................................................................................................................................................7
The Keyboard And Pedals..........................................................................................................................................7
The Control Panel ........................................................................................................................................................7
The Function Button.............................................................................................................................................8
Master Volume..............................................................................................................................................................8
The Demonstration Song ............................................................................................................................................8
Selecting Sounds ..........................................................................................................................................................8
Reverb and Chorus ......................................................................................................................................................8
More Features ......................................................................................................................................................................9
Playing Duets................................................................................................................................................................9
Recording A Song.........................................................................................................................................................9
Using the Function Button..........................................................................................................................................9
Playing the Demo.......................................................................................................................................................10
Tuning ..........................................................................................................................................................................10
Duet Mode ..................................................................................................................................................................10
Transposition ..............................................................................................................................................................10
Velocity Sensitivity..................................................................................................................................................... 11
MIDI Channel .............................................................................................................................................................12
Local Control ..............................................................................................................................................................13
Stereo/Monaural........................................................................................................................................................13
Connecting the Teaching Lab (Optional).......................................................................................................................14
Additional Information ....................................................................................................................................................14
Service..........................................................................................................................................................................14
Caring For Your Instrument .....................................................................................................................................14
SpeciÞcations ..............................................................................................................................................................15
Physical.................................................................................................................................................................15
Audio....................................................................................................................................................................15
Power Supply ......................................................................................................................................................15
MIDI Implementation Chart............................................................................................................................................16
Index ......................................................................................................................I
Page 6

Page 7

The Kurzweil Troubadór
Introduction
Thanks for buying a Kurzweil Troubad—r, an easy-to-use and affordable instrument providing
the high-quality sound of Kurzweil technology. The Troubad—r digitally reproduces the Þnest
detail of several musical instrument sounds: grand piano, electric piano, strings, and pipe organ.
With the touch of a button, you can add effects like reverberation (which makes the Troubad—r
sound like itÕs in a large room) and chorus (which makes the sound ÒthickerÓ or Òfuller,Ó as if
you were hearing more notes).
ThereÕs a duet feature that makes it easy for two people to play at the same time (see page 9).
ThereÕs also a recorder that lets you record a song, then play it back and play along with it (also
on page 9).
The Kurzweil Troubadór
Introduction
The Troubad—r is MIDI-compatible, so you can use it to control other instruments, or use it with
a computer-based sequencing or composition program (see page 5).
There are audio inputs and outputs on the rear panel of the Troubad—r, enabling you to play
another instrument through the Troubad—rÕs speakers, or to play the Troubad—r through a stereo
or sound system.
With its interface to the Kurzweil KCL-16 Teaching Lab, the Troubad—r is an excellent choice for
musical education settings. The teaching lab enables an instructor to monitor multiple
Troubad—rs, and communicate with students individually.
In This Manual
There are four main sections to the remainder of this manual:
¥ Setting Up . . . . . . . . . . . . . . . . . . . . . . . . . . . . . . . . . . . . . . . . . . . . .2
¥ Playing the Troubad—r . . . . . . . . . . . . . . . . . . . . . . . . . . . . . . . . . . .7
¥ More Features . . . . . . . . . . . . . . . . . . . . . . . . . . . . . . . . . . . . . . . . . .9
¥ Additional Information . . . . . . . . . . . . . . . . . . . . . . . . . . . . . . . . .14
Setting Up tells you everything you need to know to get ready to play your Troubad—r:
assembling the stand, connecting cables, turning the Troubad—r on, and making sure that
everything works.
Playing the Troubad—r describes the basic performance features of the Troubad—r: adjusting the
volume, changing sounds, and adding effects like reverb and chorus.
In More Features , youÕll learn about performance features like duet mode, recording, and MIDIÑ
as well as general functions like tuning and transposition.
Additional Information contains useful facts about service and maintenance, as well as product
speciÞcations.
1
Page 8
The Kurzweil Troubadór
Setting Up
Setting Up
Assembling the Stand (Optional)
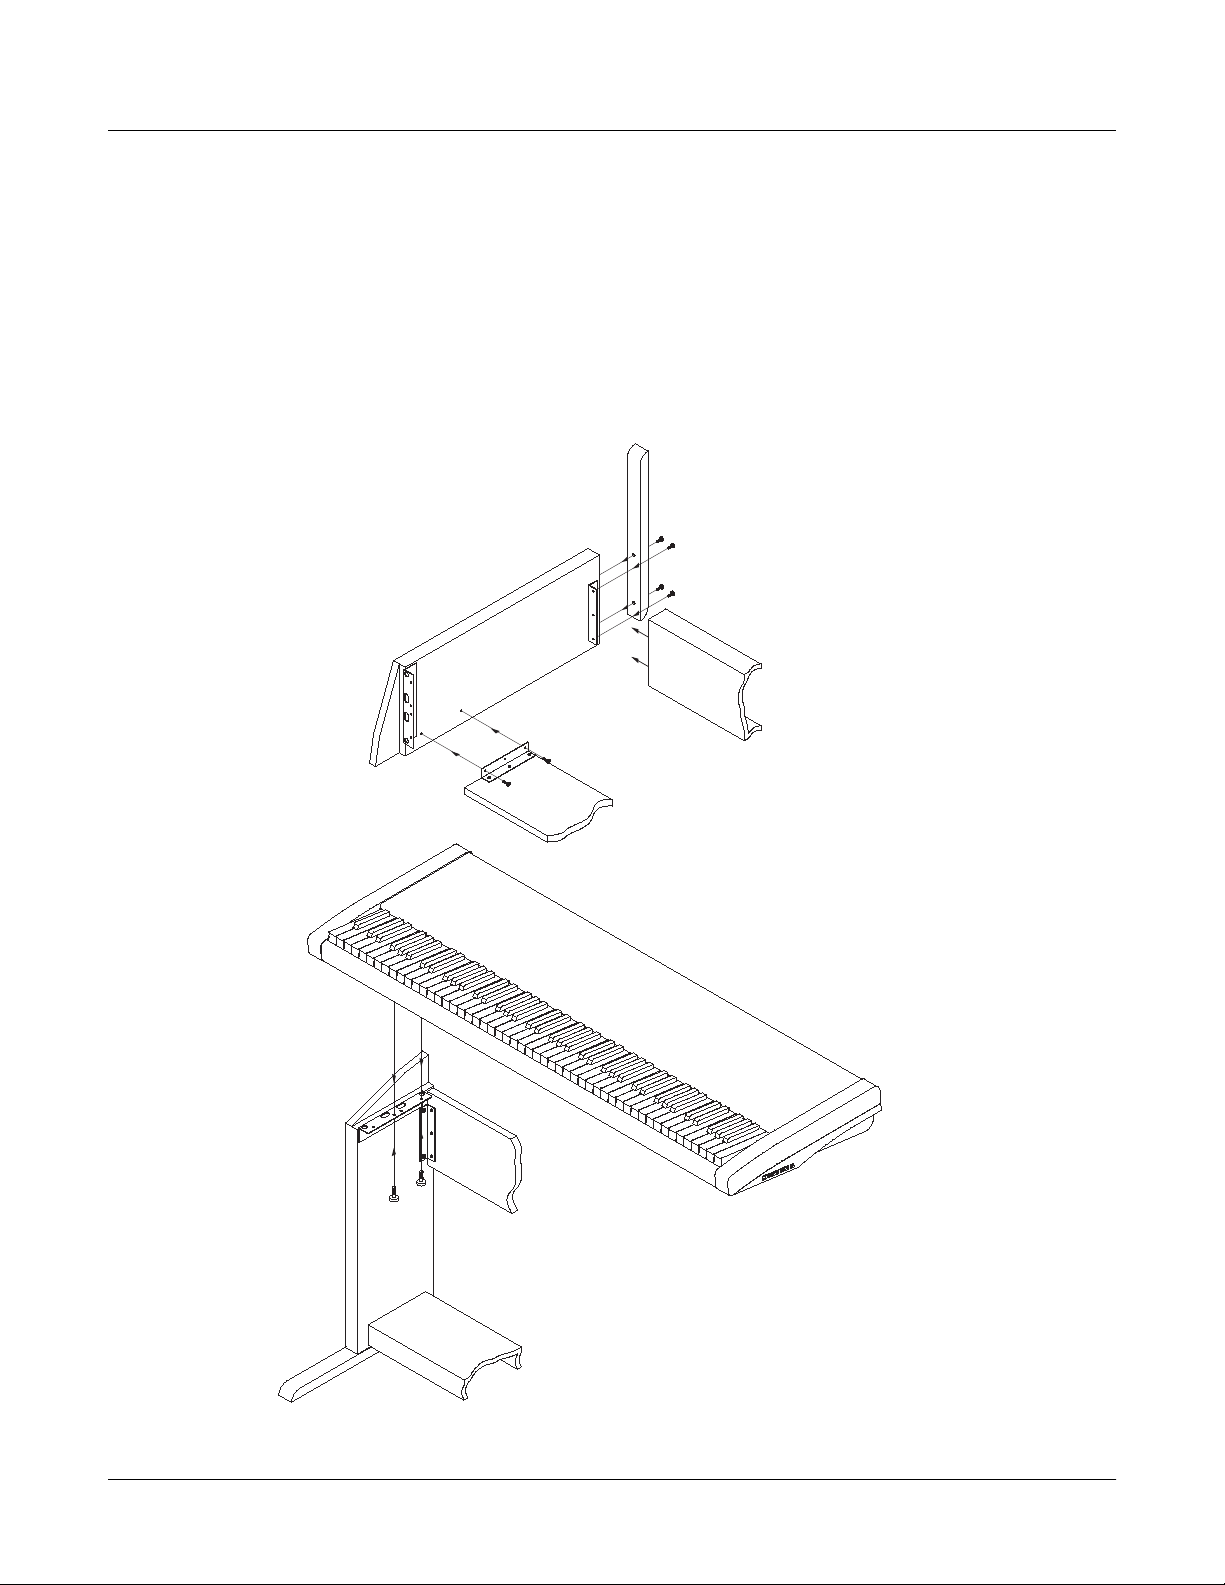
If youÕve purchased the optional stand for your Troubad—r, youÕll need to assemble it, as shown
in Figure 1. YouÕll need a #2 (medium) Phillips screwdriver. If you donÕt have the stand, you can
skip this section.
Step 1:
With the leg standing on end,
align the two holes in the foot
with the two pilot holes in the
bottom of the leg. Use two
M5 x 50 mm wood screws to
attach the foor to the leg.
Repeat this for the other leg.
Step 2:
Step 3:
With the leg still standing on end
place the pedal crossmember
(with pedals up) onto the bracket near
the foot. Put two M6 machine screws
through the bracket and into the
threaded inserts on the underside of
the pedal crossmember. Repeat this
for the other leg.
Align the bracket on the upper crossmember
up with the two threaded inserts. When properly
aligned, the top edge of the upper crossmember
should be approximatly level with the top bracket.
Put two M6 machine screws through the bracket
and into the threaded inserts in the leg. Repeat
this for the other leg.
Step 4:
Place the Troubadór onto the
two horizontal metal brackets near
the top of the legs. Have someone
hold the unit in place while you
insert two thumbscrews through the
bracket and into the two threaded
holes in the bottom of the keyboard
sheet metal. Repeat for other leg.
Figure 1 Assembling the Troubadór stand
2
Page 9

Place your Troubad—r on its stand, or on a Þrm level surface. Leave enough room to reach
behind the instrument to connect cables. At the least, youÕll need to connect the power cable.
Depending on how youÕll be using your Troubad—r, you may also need to connect audio and
MIDI cables. LetÕs start with the power connection.
Connecting the Pedals
The crossmember for the Troubad—rÕs optional stand includes with a pair of pedals: sustain and
soft. They connect to the Troubad—r with a cable. Connect the 1/4-inch plug on the end of this
cable into the Pedals jack on the Troubad—rÕs rear panel (see Figure 2 on page 3). See The
Keyboard And Pedals on page 7 to learn how the pedals work.
If you donÕt have the optional Troubad—r stand, you can get a two-pedal box (KFP-2S) from your
Kurzweil/Young Chang dealer, and connect it the same way.
The Kurzweil Troubadór
Setting Up
Figure 2 Troubadór Rear Panel
Connecting the Power Cable
The Troubad—r operates on 13.5-volt DC power, and comes with a DC power adaptor for
connection to an AC outlet. If youÕre uncertain about your local AC voltage level, or if you plan
to visit or move to another country, contact your local Young Chang/Kurzweil dealer.
Warning : Make sure the DC power adaptor is labeled PP135-17 . Using any other power adaptor can
damage your Troubad—r or seriously degrade its performance.
The power switch is at the left end of the control panel. Make sure itÕs in the off position before
connecting the power adaptor (the circle indicates Off, and the line indicates On). Plug one end
of the power adaptor into an AC outlet and plug the other end into the Power jack on the rear
panel of the Troubad—r (see Figure 2).
Setting Up the Music Rack
The detachable two-piece music rack is handy for practice or performance, but is easily
disassembled for when youÕre moving the instrument.
1. Place the metal base of the rack between the speakers on the Troubad—rÕs front panel, with
the grooved part of the rack toward you. The magnets on the bottom of the rack hold it in
place.
2. Fit the plastic rack into the slot on the top of the base.
3
Page 10

The Kurzweil Troubadór
Setting Up
Connecting Audio Cables (Optional)
You can skip this part unless youÕll be doing one or both of the following things:
¥ Playing an instrument or stereo through the Troubad—rÕs speakers
¥ Playing the Troubad—r through a stereo or other sound system
Playing Through the Troubadór’ s Speakers
The Troubad—r can receive line-level audio input from a CD player, tape deck, or other external
sound source. YouÕll need two audio cables, one for the left side, and one for the right. Each
cable should have an RCA connector on one end. The other end of each cable should have
connectors that match the output jacks of your instrument or stereo equipment.
Warning : The Troubad—r has no control over the volume of sounds that it receives at its Audio In jacks. If
you want to change the volume of these external sounds, adjust the volume of the instrument or sound
system thatÕs sending the sounds to the Troubad—r.
1. Turn the Troubad—rÕs power off.
2. Plug the RCA ends of each cable into the Audio In jacks (Left and Right) on the
Troubad—rÕs rear panel (see the diagram below).
3. Plug the other end of each cable into the output jacks of your instrument or stereo
equipment. Make sure to match the left and right sides.
4. Turn the Troubad—rÕs power on.
Now when you play your instrument or stereo equipment, its audio output plays through the
Troubad—rÕs speakers.
Playing the Troubadór Through a Sound System
You can send the Troubad—rÕs line-level audio output to a PA system, tape deck, home stereo, or
other external device. YouÕll need two audio cables, one for the left side, and one for the right.
Each cable should have an RCA connector on one end. The other end of each cable should have
connectors that match the input jacks of your stereo or sound system.
Plug the RCA ends of each cable into the Audio Out jacks (Left and Right) on the Troubad—rÕs
rear panel. Plug the other end of each cable into the input jacks of your stereo or sound system.
Make sure to match the left and right sides.
Note : For best results, use either the Troubad—rÕs speakers exclusively, or an external sound system
exclusively. The sound wonÕt be as clear if part of the Troubad—rÕs output is going through one of its own
speakers and the other part of the sound is going through an external system.
4
Page 11

Connecting Headphones (Optional)
You can connect headphones to the Troubad—r, enabling you to play without disturbing those
around you. The 1/4-inch Headphone jack is at the front left corner of the instrument. If you
connect a pair of headphones, the Troubad—rÕs speakers are shut off, but the audio output still
goes to the Audio Out jacks.
Headphone jack
The Kurzweil Troubadór
Setting Up
Figure 3 Location of Headphone jack
Connecting MIDI Cables (Optional)
You can skip this part unless youÕre going to be doing one or both of the following things:
¥ Using the Troubad—r to control another MIDI device (or vice versa)
¥ Using a computer to record and/or play back music
MIDI stands for Musical Instrument Digital Interface. ItÕs how computers and musical
instruments communicate with each other. MIDI consists of a set of computer instructions that
all MIDI instruments interpret in the same way. The Troubad—r sends the following information
using MIDI: playing notes, pressing the sustain or soft pedal, selecting reverb or chorus, and
selecting sounds.
When two or more instruments or devices are using MIDI to communicate with each other, one
instrumentÑcalled the masterÑsends MIDI information, and the othersÑthe slavesÑreceive
and respond to it. Any MIDI instrument can be a master or a slave, depending on how you want
to use it.
Controlling Other Instruments
LetÕs take a simple example: using your Troubad—r to control a second Troubad—r. Your
instrument will be the master (sending MIDI information), and the second Troubad—r will be the
slave (receiving MIDI information).
YouÕll need at least one standard Þve-pin MIDI cable, available at any music store. Connect one
end of the MIDI cable to the MIDI Out port on the rear panel of your Troubad—r. Connect the
other end of the cable to the MIDI In port of the second Troubad—r. Now, as long as both
Troubad—rs are using the same MIDI channel, everything you play on your Troubad—r will also
play on the slave Troubad—r. See MIDI Channel on page 12 to learn how to choose the MIDI
channel.
If you want, you can connect a second MIDI cable from the MIDI Out port of the slave to the
MIDI In port of the master. With the cables connected this way, either instrument can be the
master or the slave.
5
Page 12

The Kurzweil Troubadór
Setting Up
If the slave instrument has line-level audio outputs, you can connect those outputs to the
Troubad—rÕs Audio In jacks to play the slave instrument through the Troubad—r.
Using a Computer
People often use instruments like the Troubad—r with personal computers. There are many
software packages available that enable you to record or compose music, then play it back.
One of the most common types of music software is called sequencing software, which lets you
record music much as you would with a tape recorder. ItÕs easy to set things up so that you can
play the Troubad—r and have a computer record all the information. Then the computer can play
the music back through the Troubad—r.
For a setup like this, both the Troubad—r and the computer have to be able to be both the master
and the slave at different timesÑso youÕll need two MIDI cables. Take the Þrst MIDI cable, and
connect one end to the Troubad—rÕs MIDI Out port, and the other end to the computerÕs MIDI In
port. Connect one end of the second MIDI cable to the Troubad—rÕs MIDI In port, and the other
end to the computerÕs MIDI Out port. Now both the Troubad—r and the computer can send
MIDI data to each other, and receive MIDI data from each other.
Make sure the Troubad—r and the computer use the same MIDI channel (see
Channel on page 12 to learn how to set the Troubad—rÕs MIDI channel).
Turning On the Troubadór
Click the power switch to the on position. You should see two red lights (LEDs, or light-emitting
diodes) on the front panel. You can now begin playing your Troubad—r. If you canÕt hear the
instrument, try adjusting the Master Volume slider until the volume is at a comfortable level. If
youÕre using audio cables and a stereo or sound system, check your audio cable connections,
and the volume settings on the stereo or sound system.
If you still canÕt hear anything, turn the instrument off, then on again. If this doesnÕt work, call
your Young Chang/Kurzweil dealer.
MIDI
6
Page 13

Playing the Troubadór
The Keyboard And Pedals
The Troubad—r features an 88-key weighted-action keyboard with velocity-sensitive keys. The
weighted keys give a piano-like feel to the action, while the velocity sensitivity affects the
dynamic response of the Troubad—rÑin other words, the Troubad—r gets louder as you play
harder. See Velocity Sensitivity on page 11 if you want to adjust the Troubad—rÕs velocity
sensitivity.
Note : The Pipe Organ sound is not velocity-sensitive, since acoustic pipe organs arenÕt
velocity-sensitive either.
The Troubad—r has a pedal box with two pedals like those on many pianos. The right pedal is a
Sustain pedal, and the left pedal is a Soft pedal. Plug the cable on the pedal box into the Pedals
jack on the rear panel of the Troubad—r.
The Kurzweil Troubadór
Playing the Troubadór
Sustain
Soft
Press the right pedal to hold the notes that youÕre playing, even after you release
the keys. Without the sustain pedal on, notes fade to silence (decay) much faster.
Press the left pedal to get a softer, muted tone from the Troubad—r.
The Control Panel
Everything you need to control the Troubad—r during performance is right on the front panel,
above the keys. There are three main sections to the control panel. See Figure 4 for the location of
each section.
Reverb and Chorus buttons
Figure 4 Troubadór Control Panel
Digital Reverb & Effects
Sound Selection buttons
Record and Play buttons
Contains the Master Volume slider, as well as buttons for turning
on the Troubad—rÕs effects (reverb and chorus)
Function buttonMaster Volume slider
Sound Select
Recorder
Four buttons for selecting the Troubad—rÕs sound: Grand Piano,
Electric Piano, Strings, or Pipe Organ.
There are two buttons in this section, one to start and stop
recording a song, and one to start and stop playback of the
recorded song.
7
Page 14

The Kurzweil Troubadór
Playing the Troubadór
The Function Button
The Function button is a special button that you can use for operations like tuning and
transposing. Pressing the Function button makes the other buttons do something different when
you press them. See Using the Function Button on page 9 for more information.
Master V olume
Move the Master Volume slider to change the Troubad—rÕs volumeÑall the way to the right is
maximum, and all the way to the left is off.
The Master Volume slider controls the volume of the Troubad—rÕs speakers, as well as the
volume at the Audio Out jacks and the Headphone jack.
Caution : Decrease the Troubad—rÕs volume before plugging in your headphones or connecting the Audio
Out jacks.
Warning : The Troubad—r has no control over the volume of sounds that it receives at its Audio In jacks. If
you want to change the volume of these external sounds, adjust the volume of the instrument or sound
system thatÕs sending the sounds to the Troubad—r.
The Demonstration Song
The Troubad—r comes with a demonstration song (a recording technically known as a sequence )
that shows the Troubad—rÕs sounds and effects. To play the demo, Þrst press the Function button
(see Figure 4). When you press the button, the LED above it lights.
Now press the Play button (in the Recorder section of the control panel), and the demo begins.
Note that the LED above the Play button is lit, and the LED above the Function button has gone
out.
The demo lasts about two minutes, and stops automatically when itÕs Þnished. To stop the demo
before it Þnishes, press the Play button. The demo stops and the LED goes out.
Selecting Sounds
When you turn on your Troubad—r, it starts up with the Grand Piano sound. You can change a
sound at any time by pressing one of the Sound Select buttons (see Figure 4.). If youÕre holding
a note or a chord when you change sounds, the notes youÕre holding continue to play the old
sound, but the next notes you play use the new sound.
You can change the sound while youÕre playing a song. The song continues playing, using the
new sound.
Reverb and Chorus
The Troubad—r offers reverb and chorus effects. When you turn on your Troubad—r, the reverb
effect is on, and the chorus effect is off.
Change the effects by pressing the Reverb and/or Chorus button. When an effect is on, the LED
above the effectÕs button is lit.
8
Page 15

More Features
Playing Duets
Often when two people are playing on one piano, the notes are too low for one person and too
high for the other. The Troubad—r has a duet mode that lets both of you play more comfortably.
To use duet mode, Þrst press the Function button. Notice that the LED above the Function
button lights. Next, press the Record button. The LED above the Function button goes out.
Play the keyboard, and youÕll notice that the notes are different. The bottom half of the keyboard
(up to the E above Middle C) gets transposed up two octaves, and the top half of the keyboard
(down to the F above Middle C) gets transposed down two octaves.
All the notes from the left half of the keyboard go to the left speaker (to the Left Audio Out), and
all the notes from the right half of the keyboard go to the right speaker (to the Right Audio Out).
To get back to normal playing mode, press the Function button, then the Record button. The
Troubad—r always starts up in normal playing mode, even if it was in duet mode when you
turned it off.
The Kurzweil Troubadór
More Features
Recording A Song
The Troubad—r can store one song (a digital recording of the notes you play on the keyboard),
which you can play back, either for listening or to play along. The recorder is easy to use.
To begin recording a song, press the Record button. The LED above the button lights, indicating
that the Troubad—r is ready to record. Start playing, and the Troubad—r starts recording every
note you play. The Troubad—r also records changes in sounds, changes in the volume of your
playing, and changes in the effects, and information from the pedals.
To stop recording, press the Record button again. Its LED goes out. To play the song, press the
Play button. The LED above the button lights. Press the Play button again if you want to stop
the song before it Þnishes. During the playback of a song, you can change the sounds or effects.
This does not affect the changes in sounds or effects that youÕve recorded into the song.
When youÕre recording a song, itÕs a good idea to select a sound before you start playing notes.
This ensures that your songs always start with the right sound.
The Troubad—r can store only one song. When you record a new song, the new one replaces the
old one. When you turn off your Troubad—r, the Recorder memory is erased.
Using the Function Button
The Function button puts the Troubad—r temporarily into a special function mode, which adds
the following operations to the other buttons on the control panels:
¥ Demo song start and stop
¥ Tuning in one-cent (100ths of a semitone) increments
¥ Duet mode
¥ Transposition by semitone increments
¥ Velocity sensitivity adjustment
¥ MIDI channel assignment
¥ Local control on and off
¥ Stereo/Monaural
9
Page 16

The Kurzweil Troubadór
More Features
For all of these operations, youÕll start by pressing the Function button. Then youÕll press one of
the other control-panel buttons, or one of the Troubad—rÕs keys, to execute the operation.
Playing the Demo
Press Function, then Play. Press Play again to stop the demo. The LED above the Play button
remains on while the demo is playing. See The Demonstration Song on page 8 for more
information.
Tuning
Because your Troubad—r is a digital synthesizer, it will never go out of tune. If youÕre playing
with other musicians, however, the Troubad—r may sound out of tune relative to their
instruments. ItÕs easy to tune the Troubad—r to other instruments.
1. Press Function. The LED lights.
2. Press either Reverb or Chorus. This resets the Troubad—r to standard tuning
(A 4 = 440 Hz). The LED above the Function button goes out brießy, then relights. This is
tuning mode. The LED above the Function button blinks slowly to remind you that youÕre
in tuning mode.
3. Press Reverb to lower the pitch of the Troubad—r one cent, or press Chorus to raise it one
cent. A cent is 1/100th of a semitone (a semitone is the interval between one note and its
neighborÑfor example, from C to C
While youÕre tuning the Troubad—r, you can play the keyboard to check the change in
pitch.
4. Press Function again to exit tuning mode.
There are two ways to revert to standard tuning:
¥ Turn off the Troubad—r, then turn it on again. The Troubad—r always starts up at standard
tuning.
¥ Make sure the LED above the Function button is off (you may have to press Function once
if the LED is on or blinking). Press Function to light the LED, then press either Reverb or
Chorus to reset the tuning. Press Function again to exit tuning mode.
Duet Mode
You can split the keyboard into two regions that make it easier to play duets. See Playing
Duets on page 9 for a complete description.
Transposition
Transposing a piece of music means to play it in a different key. Accompanists often transpose
music to match the vocal ranges of singers. Transposing isnÕt easy, however. Learning to play a
piece of music in a different key can be almost like learning the piece all over again.
#
). You can raise or lower the pitch by up to 50 cents.
10
The Troubad—r makes it easy to play in different keys. Instead of transposing by playing
different notes, you can transpose the Troubad—r itself, so that when you play a note, the
Troubad—r automatically adjusts its pitch by the right amount.
For example, if you transpose the Troubad—r up four semitones, striking C 4 (Middle C) on the
Troubad—rÕs keyboard plays E 4, which is four semitones up from C 4.
Page 17

The Kurzweil Troubadór
More Features
1. Press Function. The LED lights.
2. Play any white key within the octave above or below Middle C, as shown in the shaded
region in Figure 5 (you wonÕt hear any sound). This transposes the Troubad—r so that the
note you played now plays at Middle C. All the other notes are transposed accordingly.
The LED above the Function button goes out, and the Troubad—r returns to normal
playing mode.
Figure 5 Keys for Setting Transposition
For example, suppose that in step 2 you play F 4, the F above Middle C. This transposes the
Troubad—r up Þve semitones (thereÕs an interval of Þve semitones between C 4 and F 4). Every
note gets transposed up Þve semitones, so if you play E 4, for example, youÕll hear A 4.
Transposition affects all notes that the Troubad—r produces, whether you play notes from the
keyboard, or play back a song. All notes sent to the MIDI Out port are also transposed.
Note: When you transpose the Troubad—r, some of the notes at the high or low end of the keyboard will
not sound. This is normal.
There are two ways to reset the transposition to normal:
¥ Turn off the Troubad—r, then turn it on again. The Troubad—r always starts up without
transposition.
¥ Press the Function button, then play Middle C.
Velocity Sensitivity
On a piano, the harder you play the keys, the louder the resulting note. This is true for the
Troubad—r as well, but you can also adjust how the Troubad—r responds to your playing, by
changing the velocity sensitivity.
1. Press Function. The LED lights.
2. Play any of the seven black keys shown in Figure 6 (you wonÕt hear any sound). Each key
corresponds to a velocity sensitivity level. The lowest key sets the velocity sensitivity to
Level 1, and the highest key sets it to Level 7. The LED above the Function button goes
out when you play a key, and the Troubad—r returns to normal playing mode.
11
Page 18

The Kurzweil Troubadór
More Features
Figure 6 Keys for Setting Velocity Sensitivity
At Level 1, thereÕs a wide range between soft and loud notes, and you have to play quite hard to
get loud notes. At Level 7, thereÕs less of a difference between soft and loud notes, and itÕs easier
to play loud notes. Level 4, the middle level, is the most like an acoustic piano. When you turn
on the Troubad—r, it always resets to Level 4.
Beginning musicians may Þnd it easier to play at higher levels of velocity sensitivity, while
advanced musicians, with a more developed sense of touch, may enjoy using lower levels.
1 2 3 4 5 6 7
C4
MIDI Channel
MIDIÑwhich stands for Musical Instrument Digital InterfaceÑrepresents music the way
computers do: as bits of information. Different bits represent different parts of the music: the
notes, how loud to play them, whether they should be sustained, and other characteristics. All of
this information gets transmitted as electrical signals that pass through the MIDI cables
connecting the master and slave instruments.
MIDI uses channels to carry this musical informationÑsimilar to the way that different TV
programs are broadcast on different TV channels. If youÕre using your Troubad—r with another
MIDI instrument, or with a personal computer, they need to use the same MIDI channel to
communicate with each other. If your Troubad—r is the master, and itÕs sending its MIDI
information on Channel 1, then the slave instruments must also be set to Channel 1. Likewise, if
the Troubad—r is the slave, it must be set to the same MIDI channel as the master. See Connecting
MIDI Cables (Optional) on page 5 for more information about MIDI masters and MIDI slaves.
There are 16 MIDI channels. When you turn on your Troubad—r, it always resets itself to use
MIDI Channel 1. You can change the MIDI channel to anything from 1 to 16, depending on your
requirements.
1. Press Function. The LED lights.
2. Play any of the 16 white keys shown in Figure 7 (you wonÕt hear any sound). These keys
correspond to the 16 MIDI channels. The LED above the Function button goes out when
you play a key, and the Troubad—r returns to normal playing mode.
C1 C4C3C2
12
12345678109
11 12 13 14 15 16
Figure 7 Keys for Setting MIDI Channel
Page 19

Local Control
Local control is the technical name for playing the Troubad—r directly from its own keyboard.
When you play the Troubad—r, what youÕre actually doing is sending MIDI information from the
keyboard to the sound-producing internal circuitry. This MIDI information also goes to the
MIDI Out port on the rear panel.
You might not always want to play the Troubad—r directly from its keyboard, however. You
might want to play it from a computer sequencer, for example. In this case, you might want to
turn local control off, so that playing the Troubad—rÕs keyboard doesnÕt create any sound,
although it still sends MIDI information to the MIDI Out port.
1. Press Function. The LED lights.
2. Play D 6 (two octaves up from the D above Middle C). You wonÕt hear any sound when
you play the key, but youÕll see the LED above the Function button go out. This turns local
control off; playing the keyboard wonÕt make any sound. The LED above the Function
button goes out when you play a key, and the Troubad—r returns to normal playing mode.
There are two ways to turn local control back on:
¥ Turn off the Troubad—r, then turn it on again.
¥ Press the Function button, then play C 6.
The Kurzweil Troubadór
More Features
Stereo/Monaural
When you turn on your Troubad—r, it always sets itself to play in stereo, which means that the
audio output is split into two parts. One part goes to the left speaker (or to the Left Audio Out
jack), and the other part goes to the right speaker (or to the Right Audio Out jack).
Playing the Troubad—r in stereo results in a more realistic sound. There may be times, however,
when you donÕt want the Troubad—rÕs sound to be separated into left and right parts. For
example, when playing the Troubad—r through a sound system, you might want to use only one
audio cable from the Troubad—r.
You can set the Troubad—r to play in monaural (mono), in which case, the audio output doesnÕt
get separated, and all of the audio output goes to both the left and right speakers (and to both
the Left and Right Audio Out jacks).
1. Press Function. The LED lights.
2. Play G 6 (two octaves up from the F above Middle C). This switches the Troubad—r to
monaural. The LED goes out.
There are two ways to reset the Troubad—r to play in stereo:
¥ Turn off the Troubad—r, then turn it on again.
¥ Press the Function button, then play F 6.
13
Page 20

The Kurzweil Troubadór
Connecting the Teaching Lab (Optional)
Connecting the Teaching Lab (Optional)
If you plan to use the Troubad—r with the optional KCL-16 Teaching Lab, read this section to
learn how to connect the cables properly. Please see the Teaching Lab documentation for
operational instructions.
Microphone volume
Microphone jack
Headphone jack
Modular jack
Figure 8 Teaching Lab Interface (Troubadór bottom panel)
1. Connect one end of the ßat cable (like a telephone cable) that came with the Teaching Lab
into the Modular Jack on the Troubad—rÕs bottom panel (see Figure 8).
2. Connect the other end of the ßat cable into the appropriate jack on the Teaching Lab unit,
according to the Teaching Lab instructions.
3. Connect the microphone on the Teaching-Lab headset into the Microphone jack on the
Troubad—rÕs bottom panel.
4. Connect the headphone cable on the Teaching-Lab headset into the Headphone jack on
the Troubad—rÕs bottom panel.
With these connections in place, you should be able to use the Teaching Lab. If you have
problems, please see the Teaching Lab documentation for further information.
Disconnect the Teaching-Lab headset from the Microphone and Headphone jacks to disable the
Teaching Lab interface and return to normal operational mode.
Front of Troubadór
Additional Information
Service
The Troubad—r contains no user-serviceable parts. If you encounter any problems, contact your
local Young Chang/Kurzweil dealer.
Caring For Your Instrument
Clean the exterior surfaces of your Troubad—r with a soft dry cloth. To clean the keys and
enclosure, use a soft damp cloth (not wet) and a mixture of gentle soap (or detergent) and water.
Do not use aerosol sprays on or near the instrument, and never use solvents like benzene or
alcohol, which can damage the Þnish on parts of your Troubad—r.
Warning: Never take your Troubad—r apart. The parts inside are not user-serviceable. Opening your
Troubad—r could result in injury or electrocution.
14
Page 21

Specifications
Physical
Height (on stand) 31.0 in 79.0 cm
Depth 17.75 in 43.0 cm
Length 51.75 in 131.0 cm
Weight (Troubadór) 56.0 lb 25.0 kg
Weight (stand) 43.0 lb 20.0 kg
Weight (total) 99.0 lb 45.0 kg
Audio
20-Watt AmpliÞcation (2 x10 Watts)
Two 4.5-inch (110 mm) woofer/midrange speakers
Two 2.5-inch (60 mm) cone tweeters
The Kurzweil Troubadór
Additional Information
Power Supply
AC Adaptor 13.5 Volts DC, 1.7 Amps
Power Consumption 1 Amp nominal
Model Number PP135-17
15
Page 22

The Kurzweil Troubadór
MIDI Implementation Chart
MIDI Implementation Chart
Model: Troubadór
Manufacturer: Date: 11/30/99
Young Chang Version 1.0
Digital Piano
Function Transmitted Recognized Remarks
Basic Channel
Mode
Note Number
Velocity
After T ouch
Pitch Bender X X
Program Change
System Exclusive X X
System Common
System Real Time
Aux Messages
Notes * 0 = None 3 = Chorus 6 = Symphonic
Default 1 1
Changed 1–16 1–16
Default X X Always in Mode 3
Messages X X
Altered X X
0–127 0–127
True Voice 12–108 12–108 Key range C 0 – C 8
Note ON O O
Note OFF X X
KeysXX
Channels X X
7 X O Volume
64 O O Sustain pedal
66 X O Sostenuto pedal
67 O O Soft pedal
80 O O Left split point
81 O O Left split program
83 O O* Effect select
O O 0–75
True # 0–75 0–75
Song Pos. X X
Song Sel. X X
TuneXX
Clock X X
Messages X X
Local Control X X
All Notes Off O O
Active Sense X X
Reset X X
1 = Room 4 = Room, Chorus 7 = Room, Symphonic
2 = Stage 5 = Stage, Chorus 8 = Stage, Symphonic
Mode 1: Omni On, Poly Mode 2: Omni Off, Mono O = yes
Mode 3: Omni Off, Poly Mode 4: Omni Off, Mono X =no
16
Page 23

Kurzweil Troubador Musician’s Guide
Index
Index
A
assembling the music rack 3
assembling the optional stand 2
audio cables, connecting 4
audio speciÞcations 15
C
cables (audio), connecting 4
cables (MIDI), connecting 5
cables (power), connecting 3
care and maintenance 14
channel (MIDI), selecting 12
chorus 7, 8
connecting audio cables 4
connecting headphones 5
connecting MIDI cables 5
connecting the power cable 3
connecting the sustain and soft pedals 3
control panel 7
controlling other instruments via MIDI 5
D
demonstration song 8
disabling the keyboard 13
duets 9
E
enabling the keyboard 13
L
local control 13
M
maintenance and care 14
master volume 8
MIDI
connecting cables 5
controlling other instruments 5
implementation chart 16
selecting the channel 12
using a computer 6
monaural output 13
music rack, assembling 3
P
pedals 7
pedals (sustain and soft), connecting 3
physical speciÞcations 15
Play button 9
playing duets 9
playing in different keys 10
playing louder and softer 11
playing the demonstration song 10
playing the Troubad—r 7
power cable, connecting 3
power speciÞcations 15
R
Record button 9
Recorder 7
recording a song 9
reverb 7, 8
F
four hands 9
front panel 7
Function button 8, 9
H
headphones, connecting 5
I
implementation chart, MIDI 16
introduction 1
K
keyboard 7
keyboard, enabling and disabling 13
S
selecting sounds 7, 8
selecting the MIDI channel 12
service 14
setting up 2
setting up the music rack 3
soft pedal 3, 7
song (demonstration), playing 8, 10
songs, recording 9
sound selection 7, 8
special functions 8, 9
speciÞcations 15
stand (optional), assembly 2
stereo output 13
sustain pedal 3, 7
I
Page 24

Kurzweil Troubador Musician’s Guide
Index
T
Teaching Lab 14
transposition 10
tuning 10
turning on the Troubad—r 6
U
using a computer and MIDI 6
using the buttons 7
V
velocity sensitivity 11
volume, master 8
Y
Young Chang Distributors iii
II
 Loading...