

Page 1
10107 South Tacoma Way, Suite A-3 Lakewood, WA 98499
Tel:(253)589-3580 Fax:(253)589-3585
AND Music Corporation
178-353 Gajwa-dong, Seo-gu, Incheon, KOREA
Tel:82-32-580-1500 Fax:82-32-584-4863
2006. 3. 15 Rev.A
Page 2
Page 3

Page 4

RE-220
Digital Piano
Owner’s Manual
www.ycpiano.co.kr
www.kurzweilmusicsystems.com
Table of Contents
Important Safety & Installation
Instructions
Important Safety Instructions
The Front Panel of the RE-220
Introduction
The Features of the RE-220
Setting up the Instrument
Listen to the Demo Songs
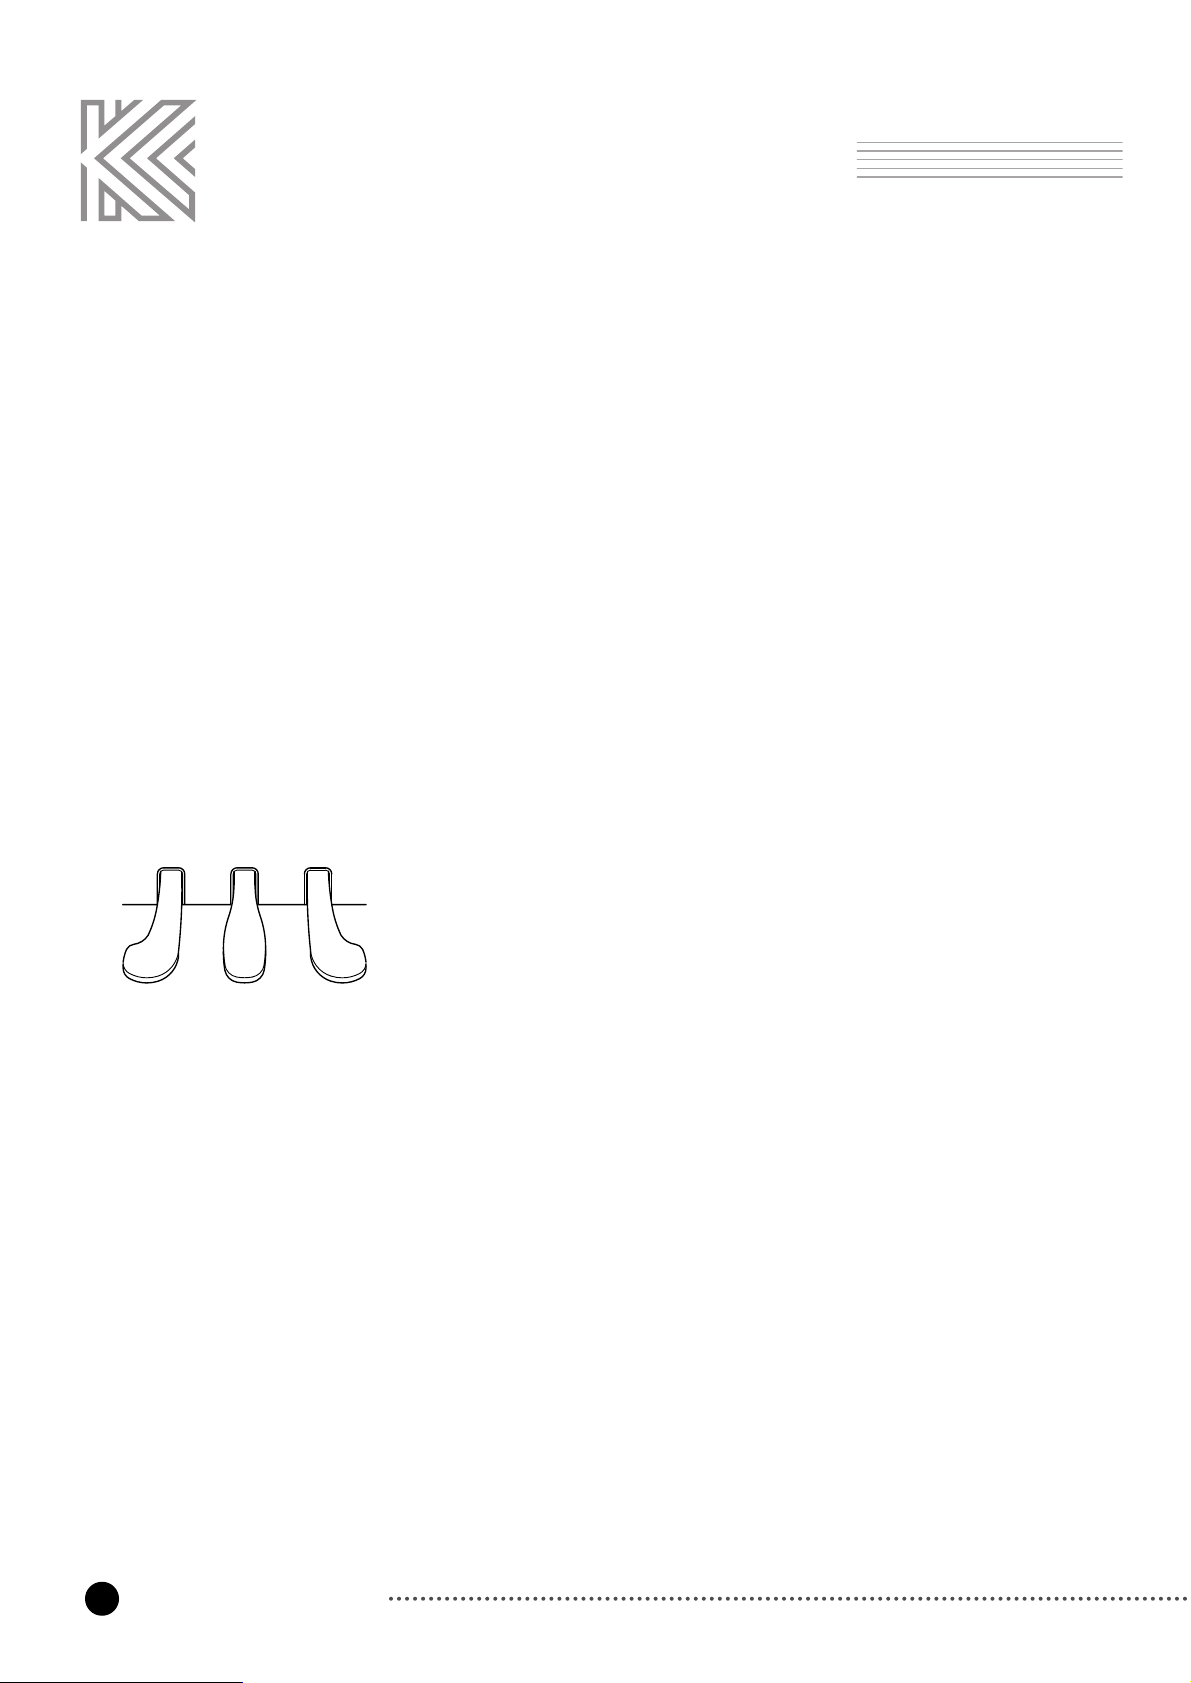
The Keyboard and Pedals
The Keyboard
The Pedals
Sound Select
Variation
List of Preset Sounds and Their Variations
Drum and Percussion Key Assignments
Drum Kit Maps
Sound Expression by Pedals
Layering Sounds
Left Split
Activate Left Split
Split Point
Custom
Digital Reverb & Effects
Volume
Bass and Treble
Reverb and Effect
Reverb/Effect Wet/Dry Mix
Recorder
Song
Track
Record
Play/Stop
Start Control
Display while playing and recording
Metronome
Adjusting Tempo
Adjusting the time signature
Tap Tempo
Options
Demo
MIDI/Preference
Transpose
MIDI
MIDI Connection
MIDI Channels
MIDI Messages
Miscellaneous
Bottom Panel
Rear Panel
Appendix
Specifications
List of Sounds and Pedal Assignments
Piano Demo Song List
MIDI Implementation Chart
4
5
6
8
8
9
12
14
14
14
15
15
16
16
17
18
19
20
20
20
21
22
20
22
23
24
26
26
26
26
27
27
28
29
29
29
29
30
30
30
38
39
39
40
41
44
44
44
45
45
46
47
48
Page 5

The lightning flash with the arrowhead symbol, within an equilateral triangle, is intended to
alert the user to the presence of uninsulated “dangerous voltage” within the product’s
enclosure that may be of sufficient magnitude to constitute a risk of electric shock to
persons.
The exclamation point within an equilateral triangle is intended to alert the user to the
presence of important operating and maintenance (servicing) instructions in the literature
accompanying the product.
IMPORTANT SAFETY & INSTALLATION INSTRUCTIONS
INSTRUCTIONS PERTAINING TO THE RISK OF FIRE, ELECTRIC SHOCK, OR INJURY TO PERSONS
RADIO AND TELEVISION INTERFERENCE
SAVE THESE INSTRUCTIONS
WARNING
: When using electric products, basic precautions should always be
followed, including the following:
1. Read all of the Safety and Installation Instructions and Explanation of
Graphic Symbols before using the product.
2. This product must be grounded. If it should malfunction or break down,
grounding provides a path of least resistance for electric current to reduce
the risk of electric shock. This product is equipped with a power supply cord
having an equipment-grounding conductor and a grounding plug. The plug
must be plugged into an appropriate outlet which is properly installed and
grounded in accordance with all local codes and ordinances.
DANGER
: Improper connection of the equipment-grounding conductor
can result in a risk of electric shock. Do not modify the plug provided with
the product-if it will not fit the outlet, have a proper outlet installed by a
qualified electrician. Do not use an adaptor which defeats the function of the
equipment-grounding conductor. If you are in doubt as to whether the
product is properly grounded, check with a qualified serviceman or electrician.
3. Do not use this product near water-for example, near a bathtub, washbowl,
kitchen sink, in a wet basement, or near a swimming pool, or the like.
4. This product should only be used with a stand or cart that is recommended
by the manufacturer.
5. This product, either alone or in combination with an amplifier and speakers
or headphones, may be capable of producing sound levels that could cause
permanent hearing loss. Do not operate for a long priod of time at a high
volume level or at a level that is uncomfortable. If you experience any
hearing loss or ringing in the ears, you should consult an audiologist.
6. The product should be located so that its location or position does not
interfere with its proper ventilation.
7. This product should be located away from heat sources such as radiators,
heat registers, or other products that produce heat.
8. This product should be connected to a power supply only of the type
described in the operating instructions or as marked on the product.
9. This product may be equipped with a polarized line plug (one blade wider
than be other). This is a safety feature. If you are unable to insert the plug
into the outlet, contact an electrician to replace your obsolete outlet. Do not
defeat the safety purpose of the plug.
10. The power supply cord of the product should be unplugged from the outlet
when left unused for a long period of time. When unplugging the power
supply cord, do not pull on the cord, but grasp it by the plug.
11. Care should be taken so that objects do not fall and liquids are not spilled
into the enclosure through openings.
12. The product should be serviced by qualified service personnel when:
A. The power supply cord or the plug has been damaged;
B. Objects have fallen, or liquid has been spilled into the product;
C. The product has been exposed to rain;
D. The product does not appear to be operating normally or exhibits a
marked change in performance;
E. The product has been dropped, or the enclosure damaged.
13. Do not attempt to service the product beyond that described in the user
maintenance instructions. All other servicing should be referred to qualified
service personnel.
14.
WARNING
: Do not place objects on the product’s power supply cord, or
place the product in a position where anyone could trip over, walk on, or roll
anything over cords of any type. Do not allow the product to rest on or be
installed over cords of any type. Improper installations of this type create the
possibility of a fire hazard and/or personal injury.
WARNING
: Changes or modifications to this instrument not expressly
approved by KURZWEIL could void your authority to operate the instrument.
IMPORTANT
: When connecting this product to accessories and/or other
equipment use only high quality shielded cables.
NOTE
: This instrument has been tested and found to comply with the limits for
a Class B digital device, pursuant to Part 15 of the FCC Rules. These limits are
designed to provide reasonable protection against harmful interference in a
residential installation. This instrument generates, uses, and can radiate radio
frequency energy and, if not installed and used in accordance with the
instructions, may cause harmful interference to radio communications. However,
there is no guarantee that interference will not occur in a particular installation.
If this instrument does cause harmful interference to radio or television
reception, which can be determined by turning the instrument off and on, the
user is encouraged to try to correct the interference by one or more of the
following measures:
Reorient or relocate the receiving antenna.
Increase the separation between the instrument and the receiver.
Connect the instrument into an outlet on a circuit other than the one to which
the receiver is connected.
If necessary consult your dealer or an experienced radio/television
technician for additional suggestions.
NOTICE
This apparatus does not exceed the Class B limits for radio noise emissions
from digital apparatus set out in the Radio Interference Regulations of the
Canadian Department of Communications.
AVIS
Le present appareil numerique n’emet pas de bruits radioelectriques depassant
les limites applicables aux appareils numeriques de la class B prescrites dans le
Reglement sur le brouillage radioelectrique edicte par le ministere des
Communications du Canada.
Page 6
IMPORTANT SAFETY INSTRUCTIONS
1. Read these instructions.
2. Keep these instructions.
3. Heed all warnings.
4. Follow all instructions.
5. Do not use this apparatus near water.
6. Clean only with dry cloth.
7. Do not block any of the ventilation openings. Install in accordance with the manufacturer’s instructions.
8. Do not install near any heat sources such as radiators, heat registers, stoves, or other apparatus (including amplifiers) that produce
heat.
9. Do not defeat the safety purpose of the polarized or grounding-type plug. A polarized plug has two blades with one wider than the
other. A grounding type plug has two blades and a third grounding prong. The wide blade or the third prong are provided for your
safety. If the provided plug does not fit into your outlet, consult an electrician for replacement of the obsolete outlet.
10. Protect the power cord from being walked on or pinched, particularly at plugs, convenience receptacles, and the point where they
exit from the apparatus.
11. Only use attachments / accessories specified by the manufacturer.
12. Use only with a cart, stand, tripod, bracket, or table specified by the manufacturer, or sold with the
apparatus. When a cart is used, use caution when moving the cart / apparatus combination to avoid
injury from tip-over.
13. Unplug this apparatus during lightning storms or when unused for long periods of time.
14. Refer all servicing to qualified service personnel. Servicing is required when the apparatus has been damaged in any way, such as
power-supply cord or plug is damaged, liquid has been spilled or objects have fallen into the apparatus, the apparatus has been
exposed to rain or moisture, does not operate normally, or has been dropped.
WARNING
: To reduce the risk of fire or electric shock, do not expose this apparatus to rain or moisture. Do not expose this equipment
to dripping or splashing and ensure that no objects filled with liquids, such as vases, are placed on the equipment.
To completely disconnect this equipment from the AC Mains, disconnect the power supply cord plug from the AC receptacle.
To reduce the danger of explosion if the lithium battery is incorrectly replaced, replace only with the same or equivalent type.
Page 7

6
The Front Panel of the RE-220
The Front Panel
Digital Reverb & Effects
Tailor the overall sound of the RE-220
See pages 22~25
Recorder
Record and play back multi-track songs
See pages 26~28
Display
View current tempo and settings
See page 29
Page 8
7
The Front Panel
Left Split
Divide the keyboard into two different sounds
See pages 20~21
Sound Select
Enliven your music with stunningly realistic sounds
See pages 15~17
Options
Tailor the response of the instrument, store your favorite panel settings and
play Demo songs
See pages 30~38
Page 9

8
Introduction
Introduction
Welcome to the world of the KURZWEIL RE-220 Digital Piano.
The RE-220 gives you easy access to KURZWEIL's high-quality sound technology. Authentic
digital representations of musical instrument sounds are the starting points. The RE-220
reproduces the finest details of the original sounds; you'll even hear differences in tone as you
play from bass to treble, and from soft and loud, just as in the original instruments.
The Features of the RE-220
■ 88 notes, Hammer type keys
■ Three Pedals
■ 7 different levels of keyboard touch sensitivity
■ 37 Preset Sounds (including Triple-Strike Stereo Piano Sample and Take 6 voices)
■ Real-time Sound Expression
■ Sound Layering with Volume Balance.
■ Left Key Split
■ Transpose, Detune
■ 3 Reverbs and 3 Effects (Chorus 1, 2 and Flanger )
■ 60 Watt Sound System with Bass and Treble control
■ 3 x 7-Segments Display
■ 2 songs, 2 tracks Recorder
■ Metronome
■ Tap tempo
■ 50 Piano Demo Songs
■ 20 Preset Demo Songs
■ Line In / Out
■ MIDI In / Out
■ 2 Headphone Jacks
Page 10
9
Setting up the Instrument
Setting up the Instrument
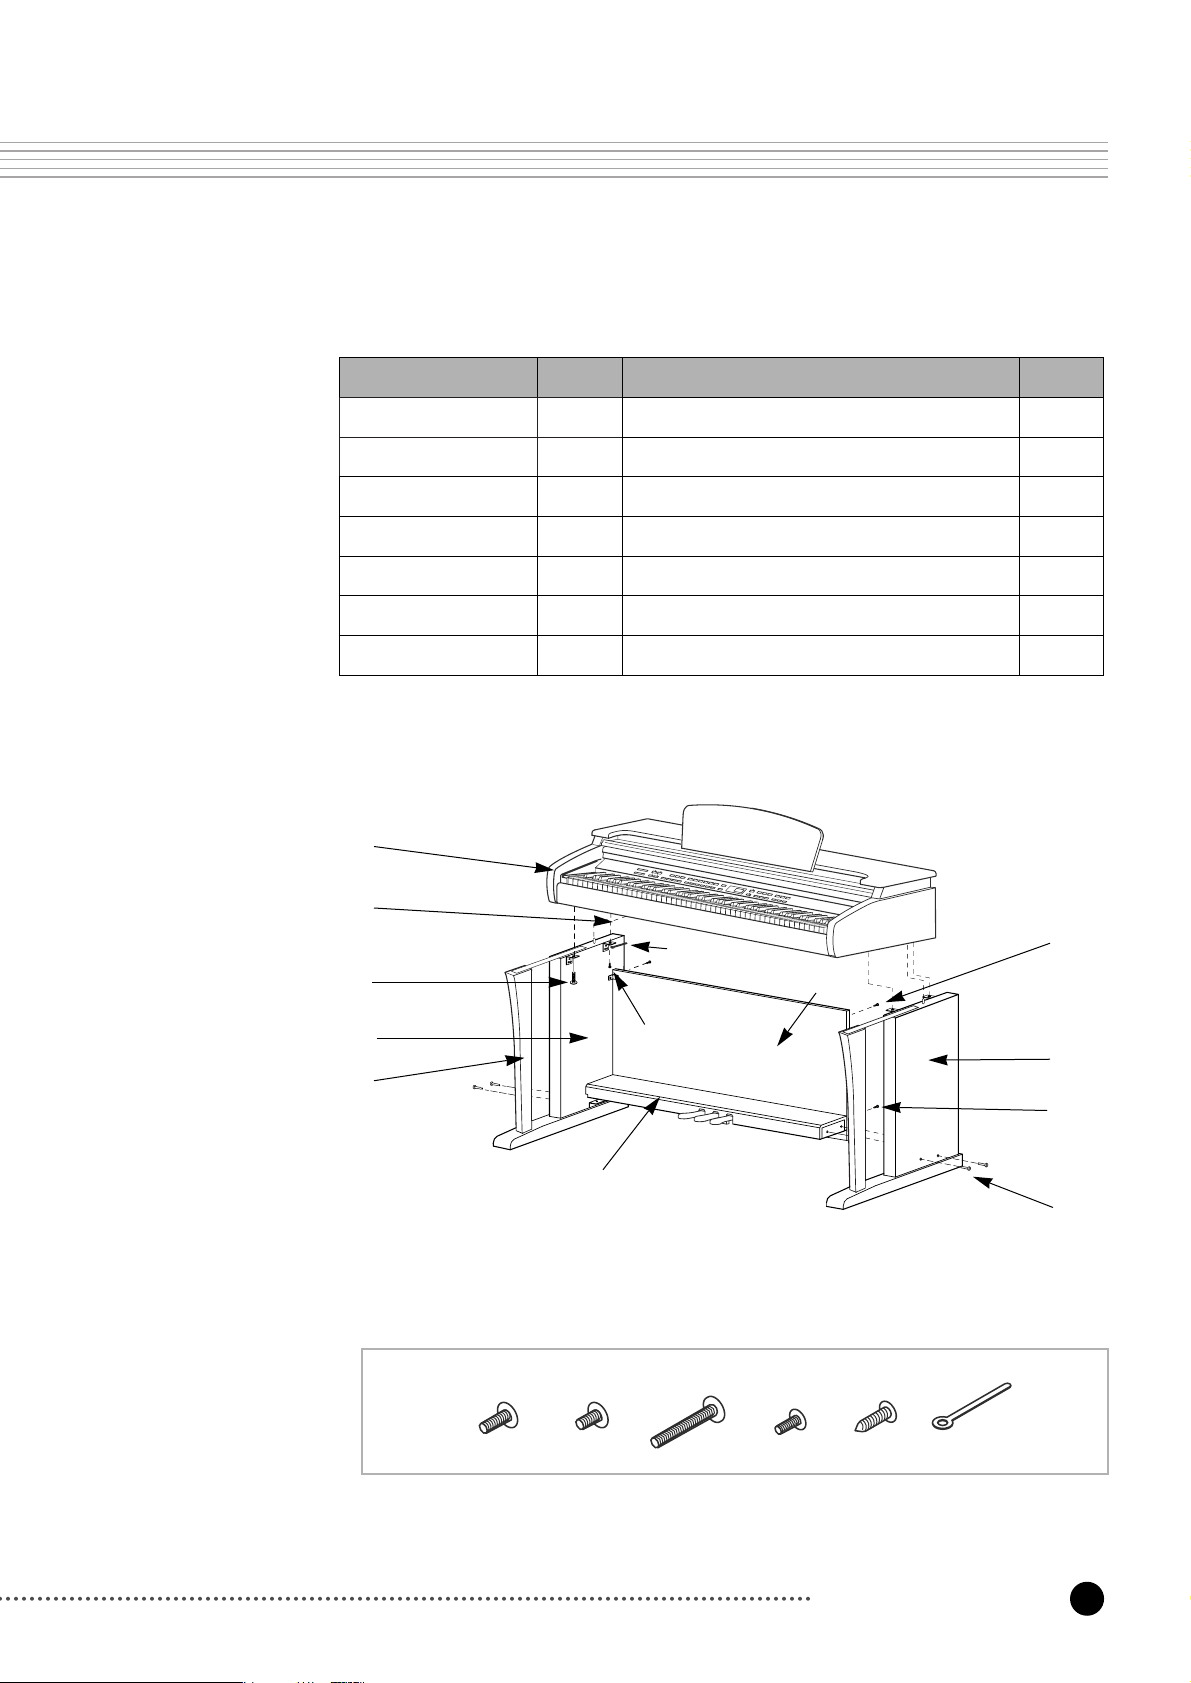
Check that all of the following items are present.
Item No. Item
①
Keyboard
1EA
②
Side Panel (Left)
1EA
No.
⑧
Screws for Side Panel and Keyborad (Rear)
⑨
Screws for Side Panel and Keyboard (Front)
2EA
2EA
③
Side Panel (Right)
1EA
⑩
Screws for Side Panel and Pedal Box
4EA
④
Pedal Box
1EA
⑪
Screws for Rear Panel and Side Panel
2EA
⑤
Rear Panel
1EA
⑫
Screws for Rear Panel and Pedal Box
4EA
⑥
Support Leg
2EA
⑬
Cable Clamps
1EA
⑦ Headphone Hanger
1EA
⑧⑨ ⑩ ⑪
⑫⑬
①
⑦
⑤
⑥
⑨
⑧
⑬
②
④
⑪
⑫
③
⑩
Page 11
10
Setting up the Instrument
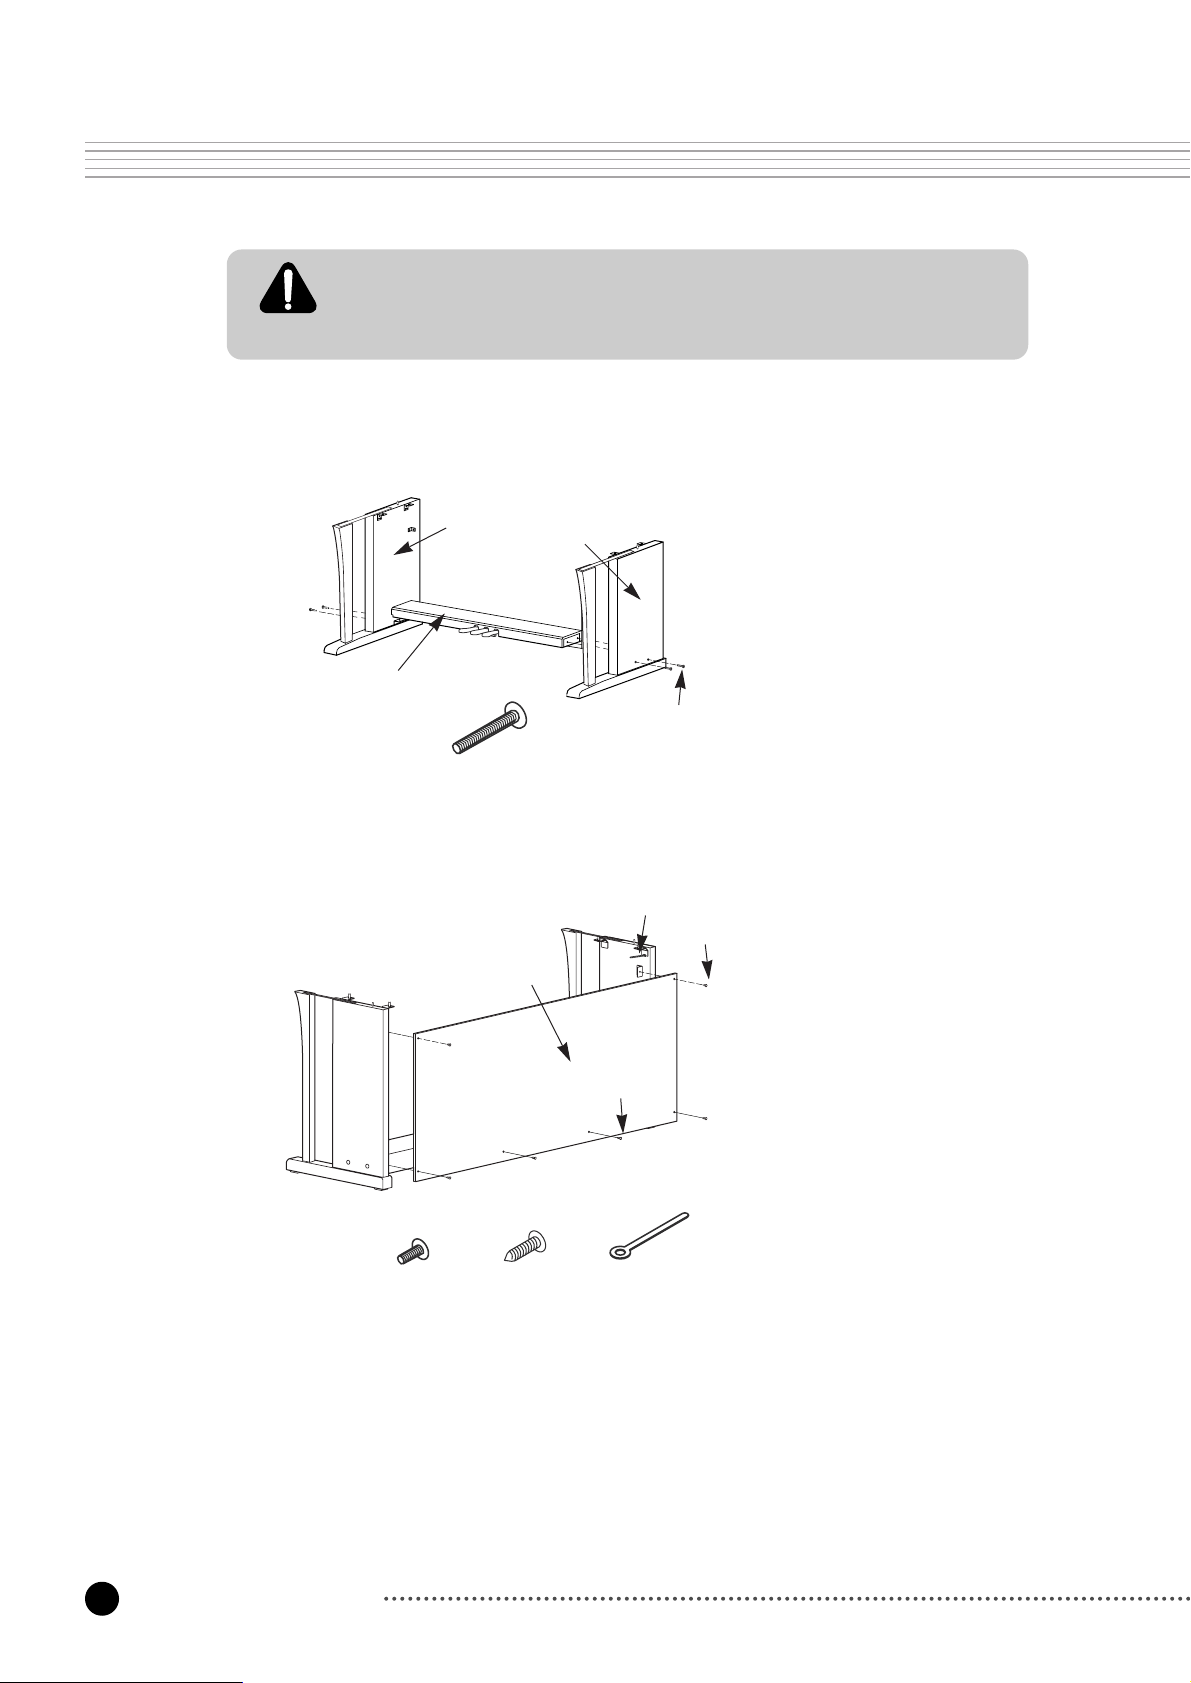
We do not recommend attempting to assemble the RE-220 alone. The job can be easily
accomplished, however, only two people.
Use only the screws provided or replacements of exactly the specified size. Using
screws of the wrong size can result in damage to the instrument and personal injury.
Side Panel and Pedal Box Assembly
1. Place the the pedal box ④ on the left side
panel ② and then use two screws ⑧ to
fasten the left side panel.
2. Place the the pedal box ④ on the right side
panel ③ and then use two screws ⑧ to
fasten the right side panel.
3. You can find the pedal cable in the pedal box
④. Untie and straighten out the cable attached
to the bottom of the pedal box.
Rear Panel Assembly
1. Fit the rear panel ⑤ into the holes of the side
panel brackets and then use two screws ⑪
to fasten the top of the rear panel.
2. Use four screws ⑫to fasten the bottom of
the rear panel.
3. Use the cable clamp to take up any slack in
the pedal cable.
②
③
④
⑩
⑩
⑪
⑫⑬
⑤
⑬
⑪
⑫
Page 12

11
Setting up the Instrument
Keyboard Assembly
1. Place the keyboard on the stand so that the wood pegs on the top of the side panel are fit
into the holes on the bottom of the keyboard.
2. Use two screws ⑧ and two screws ⑨ to fasten the bottom of the keyboard.
3. Insert the pedal cable connector into the pedal jack located on the bottome of the keyboard.
4. Rotate the pedal adjuster until it comes in firm contact with the floor surface. If the adjuster
is not in firm contact with the floor, the pedal will wobble and cause malfunctions.
5. Install the headphone hanger as shown in the figure below.
Screws ⑧to fasten the
keyboard with side panel
Screws ⑨to fasten the keyboard
with side panel & Leg
Be sure that the connector is inserted in the correct orientation.
Make sure that the cable clamp fastens to the pedal cable.
Pedal cable jack
Headphones jack
⑧⑨
Pedal adjuster
Page 13
12
Setting up the Instrument
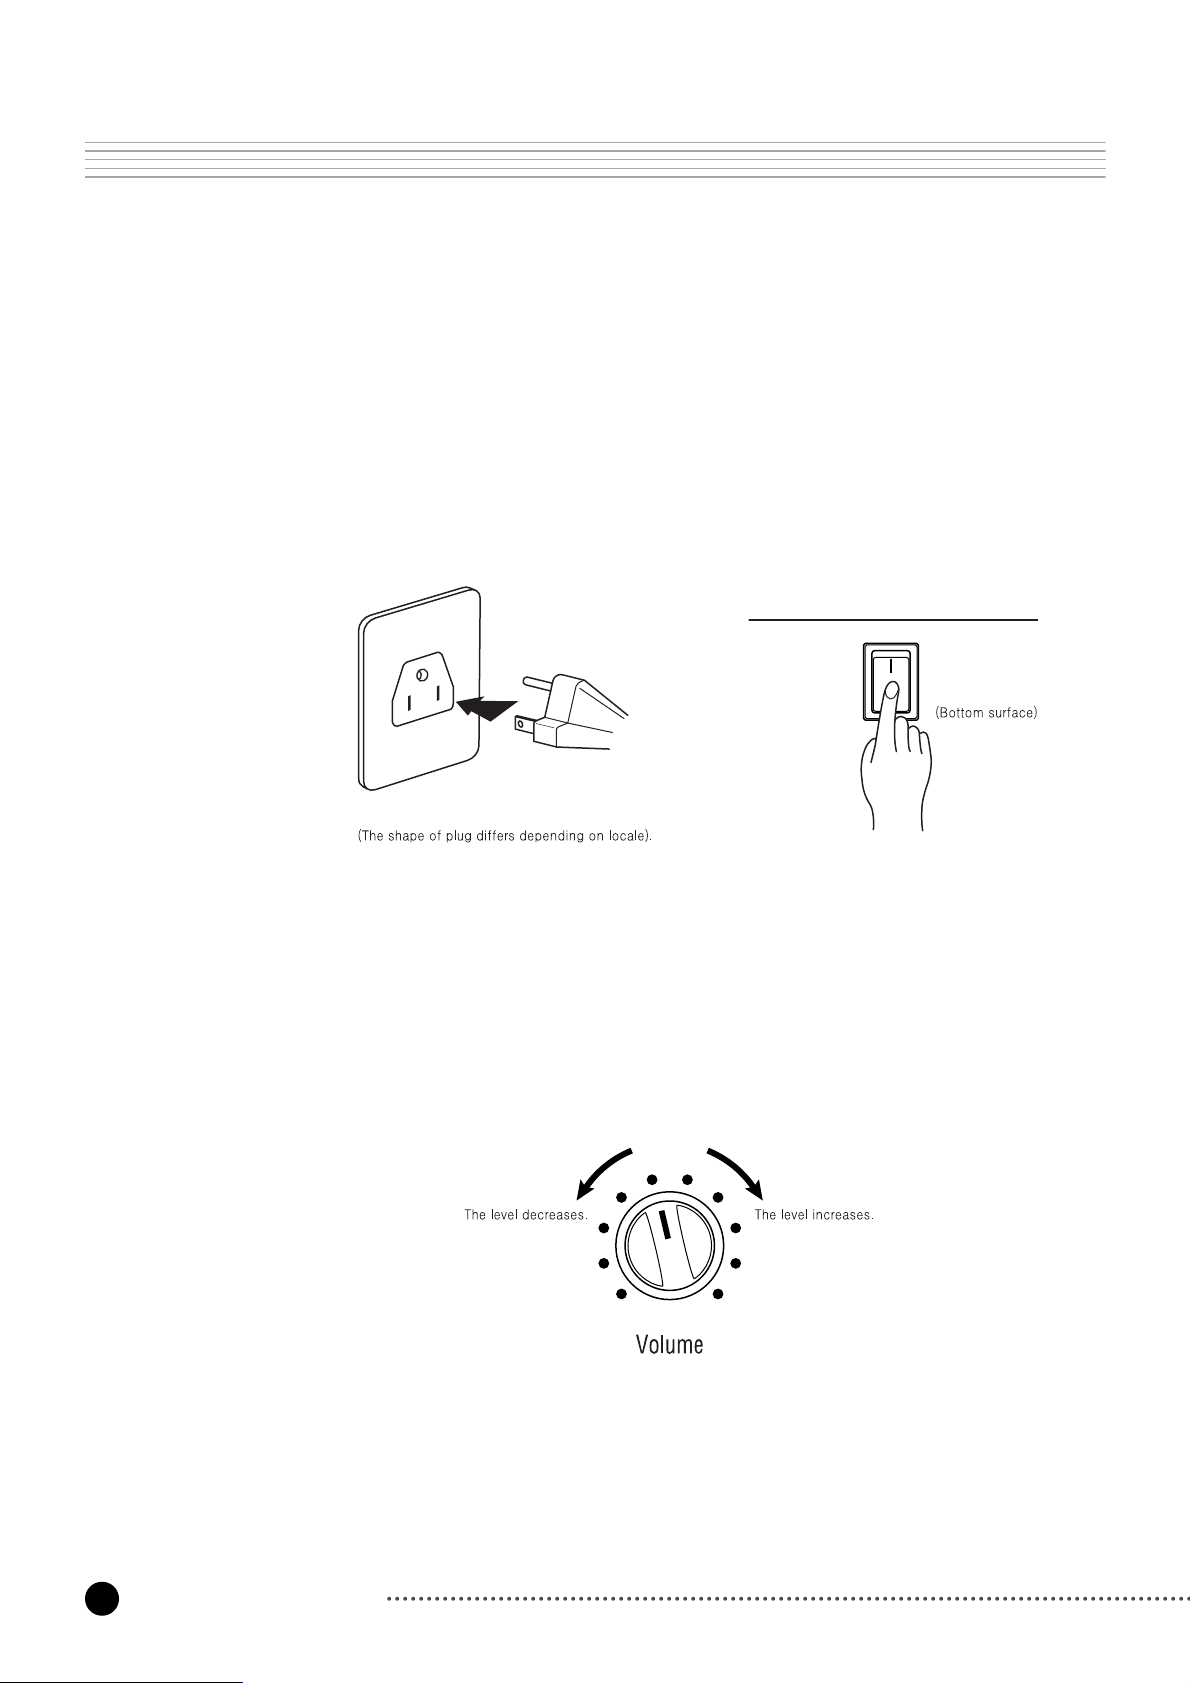
Turning on the Instrument (Power)
The RE-220 operates on AC power. A power cord is included with the instrument to connect it
to an AC Outlet. Before connecting the power cord, be sure that the power switch, located
under the left-hand end of the keyboard, is off. Then plug the power cord into an AC outlet.
Once the power cord is connected, you can turn the power switch on.
After the power switch is turned on, it will take about 2 seconds before the front panel lights
up. An additional 3 seconds is needed before it is ready to play.
Setting the Volume
To be sure that you can hear the instrument, move the Volume knob (on the left end of the
front panel) to the middle of its range. This should provide a reasonably comfortable level of
volume, which you can adjust if you wish the sound to be louder or softer.
Page 14
13
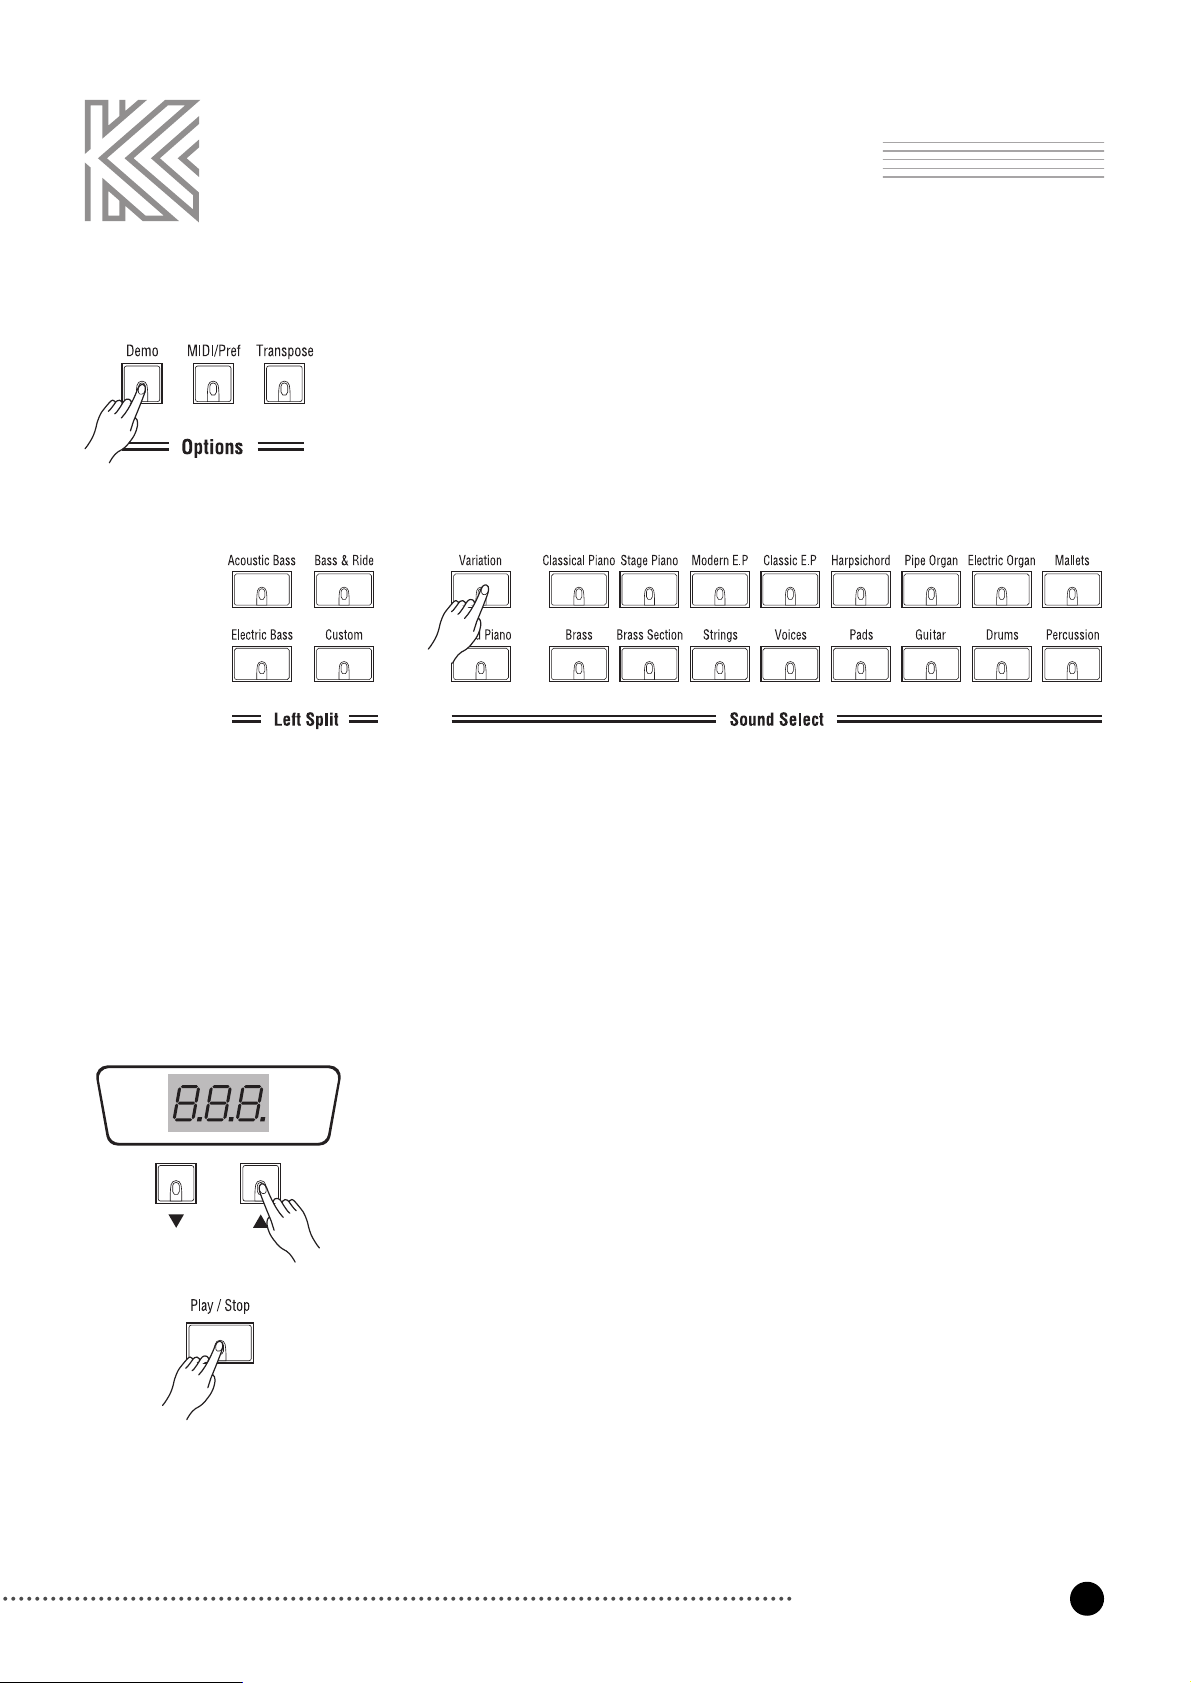
Listen to the Demo Songs
Listen to the Demo Songs
The RE-220 contains a number of built-in demonstrations to acquaint you with
the sound and capabilities it possesses. To access these demonstrations, press the
Demo
button, which is located near the right end of the front panel controls, in
the Options section. The button lights up to show that the RE-220 is in the
demonstration mode.
To listen to the demo songs for the preset sounds
Press any button where the light rotates in the Sound Select or Left Split section
to hear a demonstration of the sound. The
Variation
button plays all demo
songs for preset sounds in a loop. To stop playing a song, press the currently
selected button. The button lights resume their blinking pattern.
To listen to the Piano Demo Songs
There are 50 piano demo songs available. The number on the display indicates
the current song number, which ranges from 1 to 50. Select a song by pressing
the
Up/Down
button. Press the
Play/Stop
button to hear the song. The
Recorder
button plays all Piano demo songs in a loop. To stop playing a song,
press the
Play/Stop
button. The button lights resume their blinking pattern.
To exit demonstration mode, press the
Demo
button again.
Page 15
14
The Keyboard and Pedals
The Keyboard and Pedals
The keyboard of the RE-220 consists of 88 weighted keys with an action designed to simulate
the feel of an acoustic piano. Just as with an acoustic piano, the harder you press the keys of
the RE-220 (more precisely, the faster you strike them), the louder and brighter the resulting
sound is. In technical terms, this is called "Velocity-Sensitive". It makes the RE-220 a truly
expressive instrument. See “Keyboard Touch” parameter at page 35 for information on
adjusting the velocity-sensitive to suit your preference (NOTE: The organ and harpsichord
sounds purposely aren't velocity-sensitive, in order to be more realistic; real organ and
harpsichords aren't velocity-sensitive.)
The Keyboard
In addition to the expressiveness offered by the keyboard, there are three pedals
that provide you with further control over the sounds of the RE-220. These
pedals have the same function as those on a grand piano, which are, from left to
right:
SOFT
The soft pedal reduces the volume while the pedal is pressed.
The soft pedal will not affect notes that are already playing
when it is pressed.
SOSTENUTO
If you play a note on the keyboard and press the sostenuto
pedal while the notes are held, those notes will sustain as long
as you hold the pedal. But all sebsequently played notes will
not be sustained.
SUSTAIN
The sustain pedal (rightmost pedal) functions in the same way
as the damper pedal of an acoustic piano. When the sustain
pedal is pressed, notes continue to play after their keys have
been released. Releasing the pedal will silence the sustained
notes.
The Pedals
SOFT SOSTENUTO SUSTAIN
Page 16
15
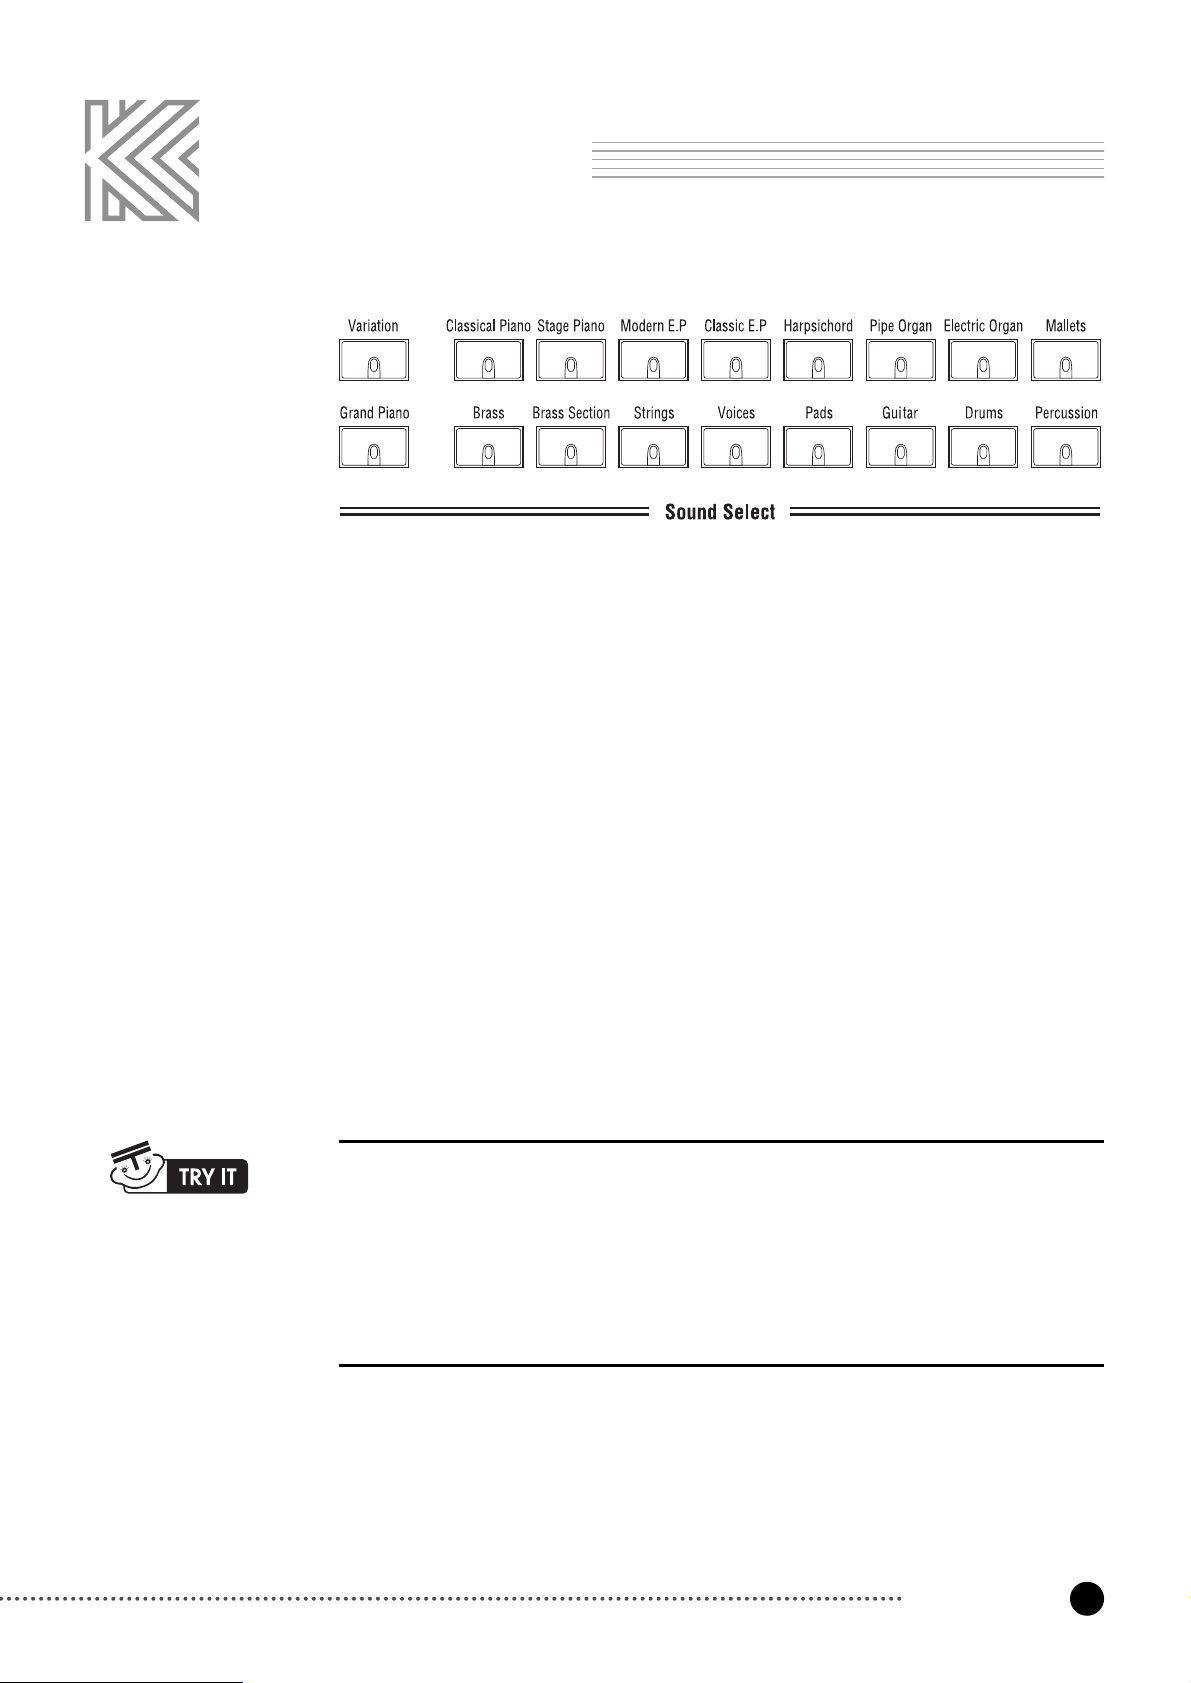
Sound Select
Sound Select
Each Sound Button actually can select two different sounds. To access the second sound, press
the
Variation
button; the light in the Variation button will illuminate, indicating that now the
second sound for the active sound button is selected. Pressing the Variation button again will
select the original sound.
Each of the Sound Select buttons "remembers" whether or not
Variation
was On the last time
that sound was selected; so if you select the variation for a particular sound, then select a
different sound button, then return to the first sound, the variation will automatically be
selected again (This variation memory is reset when you execute Hard Reset in the RE-220.)
1. Press the Pipe Organ button. Play a few notes on the keyboard.
2. Press the Variation button. Notice that the button illuminates. Play a few notes
again to hear the difference in the sound.
3. Press the Electric Organ button. Notice that the Variation button is no longer
illuminated. Play a few notes.
4. Press the Pipe Organ again. Notice that the Variation button re-illuminates. Play a
few notes to hear the sound.
Variation
The Sound Select portion of the front panel contains buttons used for selecting the individual
sounds available on the RE-220 Digital Piano. You select a sound by pressing the
corresponding button; the light in the button illuminates to show you which sound is selected.
There are 17 Sound Select buttons. On power-up, the Grand Piano is selected.
Page 17

16
Sound Select
List Of Preset Sounds And Their Variations
Category Main Variation
Grand Piano Stereo Grand Concert Piano
Classical Piano Warm Piano Dynamic Piano
Stage Piano Hard Rock Piano Ragtime Piano
Modern E.P. Digital E Grand '90's FM E.P.
Classic E.P. Rhodes E.P. Wurlitzer E.P.
Harpsichord Harpsichord Modern Harpsichord
Pipe Organ Pipe Organ Uptown Gospel
Electric Organ Prog Rocker's B3 Grungy Overdrive
Mallets Woody Marimba Vibraphone
Brass Tenor Saxophone Trombone/Trumpet
Brass Section Williams Brass Split Section
Strings Slow/Fast Strings Lyrical Strings
Voices Scatman Cathedral Vox
Pads Rez Aah Pad Poseidon
Guitar Acoustic Guitar Chorus Electric Guitar
Drums Studio Drum 1+ 2 Electro Kit
Percussion Virtuoso Percussion Drum and Bells
Bass (Left Split) Acoustic Bass
Bass & Ride Cymbal
Electric Bass
Drums Sounds are assigned to various keys across the keyboard. The following page shows
pictures that represent several types of drum mapping to keys.
There are three drum maps in the RE-220. With three alternative assignments of drum sound,
you can choose any one that is easiest for you to play. Especially, if you're playing sequences
that are recorded according to General MIDI (GM) specifications, you can quickly configure
the RE-220 to play the correct GM sounds when you play back your sequences.
As a default, drum map is set to
1 Normal
. To change it, refer to page 36.
Drum Key Assignments
Page 18

17
Drum Sound Maps
Drum Sound Maps
Page 19

18
Sound Expression by Pedals
There are three pedals in the RE-220 which are basically used as soft, sostenuto, and sustain
pedals like an acoustic piano. The RE-220 has a variety of preset sounds that are different from
an acoustic piano in method of generating sound. They all have their own methods to modulate
their sounds.
For example, brass instruments can have vibrato or crescendo controlled by the player's breath,
and percussion instruments have different timbre depending on the striking location. These
musical expressions are assigned to the three pedals according to characteristics of each
instrument.
For example, when you play the Brass sound, pushing the soft pedal adds vibrato. When you
play the Electric Organs sound, the rotary effect is activated by the soft pedal. These kinds of
expression will help players perform even more realistically.
See page 46 for lists of sound expression assigned to the pedals for all sounds.
Sound Expression by Pedals
Page 20

19
Layering Sounds
Layering Sounds
For even more variety and richness of sound, you can layer two sounds across the keyboard -
that is, each key of the keyboard will play two different sounds at the same time. The result is
similar to having two different sections of an orchestra play the same notes.
To select the two sounds that you wish to layer, press and hold one Sound Select button and
then press another. The buttons for both sounds will illuminate. If a sound variation was
remembered for either of the sounds, it will be used in the layer. If the variation was enabled
for the first sound selected, the Variation button will be lit.
Layering is reset to OFF when the power to the RE-220 is turned on.
Adjusting The Volume Balance In A Layer
You can adjust the balance between the two sounds in a layer, while creating the layer, by
making the second sound softer. To do this, press and hold the button for the first sound, and
press the button for the second sound repeatedly; each press of the second button will lower
the volume of that sound by a small amount.
For example, if you layer Grand Piano and Strings (in that order), you can make the Strings
softer in relation to the Grand piano. If you wish the Strings to be louder in relation to the
Grand piano, then select the Strings first, and lower the volume of the Grand piano.
Some Examples of Layering Sounds
Two favorite sounds for use in layered combination are Piano and Pads. Other combinations
such as Piano and Strings, Guitar and Strings, and Voices and Pads provide rich layered
sounds.
1. Press and Hold the Grand Piano button, making sure Variation is OFF.
2. While holding the Grand Piano button, press the Pads button twice. This layers the
Grand Piano with Pads, and lowers the volume of the latter slightly.
3. Release both buttons and play some notes or chords to hear both sounds.
Page 21

20
Left Split
The buttons in the Left Split section of the panel allow you to "split" the keyboard into two
parts. Splits are an easy way to make one performer sound like two. When you play the
keyboard, your right hand plays one sound and your left hand plays another.
Activate Left Split
Just press any button in the Left Split Section, then Split will be active. Now, the right-hand
part of the keyboard plays whatever sound is currently selected in the Sound Select section; the
left-hand part plays a bass or a custom sound, selected by pressing one of the Left Split
buttons.
Press the active Left Split button a second time to cancel a split. The left split is reset to OFF
when power to the RE-220 is turned on.
Split Point
The split point is the point on the keyboard where the left sound and right sound meet.
The default split point set at the factory is F#3.
See page 31 for instructions to change the split point.
Octave Shift
In setting up a left split, you may wish to make the right or left sound higher or lower -
especially if you use a Custom left split to play duets at the keyboard (e.g., piano on the left
and strings on the right). The RE-220 gives you the ability to shift the octave in which each
part sounds. The default left and right shift are 1 and -1, respectively.
See page 31 for instructions to change the Left Octave Shift and Right Octave Shift.
Left Sustain
When using the Left Split Sound, most music and playing styles require the sustain pedal to be
ignored for the left half of the split. Should you wish to have sustain pedal affect the left sound
(for example, in a Custom split), you can turn sustain on.
See page 31 for details on how to change the Left Sustain On/Off.
Left Split
Page 22

21
Left Split
Custom
You can optionally select any available sound to be the left sound.
To accomplish this, press and hold the
Custom
button. Then, the current custom sound starts
to blink. Now press the desired Sound Select button that you wish to play on the left split keys.
Once you select a custom split sound, release the
Custom
button. Then, the custom split sound
button stop blinking.
The variation button also works for Custom sounds, so that you can select any of the 34
available sounds as a Custom left split sound. The custom sound is saved in the battery-backed
memory. If the
Custom
button is selected later, the same variation sound will be used.
1. Press the Brass Section button
2. Press and hold the Custom button. The current Custom sound button starts to blink.
3. Press the Strings button, while continuing to hold the Custom button.
4. Release the Custom button. The current Custom sound button stops blinking.
5. Play the keyboard. Notice that Strings is the left sound and Brass Section is the
right sound.
Page 23

22
Reverb & Effects
Digital Reverb & Effects
The Digital Reverb & Effects section of the panel contains controls that affect the sound of the
instrument as a whole.
Volume
The Volume Knob controls the overall volume (loudness) of the RE-220 Digital Piano. Rotate
it to the right to increase the volume, and to the left to decrease the volume; when rotated all the
way to the left, it silences the instrument.
The Volume Knob affects not only the volume produced by the internal sound system, but also
volume produced by equipment connected to the Headphones and Audio Out Jacks.
Bass and Treble
The Treble and Bass knobs are tone controls, allowing you to adjust the tonal balance of the
overall sound to your liking. Bass controls low frequencies, and Treble controls high
frequencies.
When the controls are centered, they have no effect on the sound. Rotating the Bass knob to
the right boosts bass frequencies; rotating it to the left cuts bass frequencies. The Treble knob
operates in the same way on treble frequencies.
The Bass and Treble knobs affect the sound produced by the internal speakers, the Headphone
jack and both Audio In and Out jacks.
CAUTION
Turn the Volume down before connecting headphones or using the Audio jacks.
CAUTION
Volume affects the volume of the sound coming in from the Audio In jacks.
Page 24

23
Reverb & Effects
Reverb and Effects
For a heightened sense of sonic realism, the RE-220 Digital Piano provides you with two
independent types of digital signal processing: reverb and effects.
Reverb
Reverb, or reverbration, occurs naturally when sound undergoes multiple reflection off the
walls of an enclosed space. These reflections blend together into a "wash" of sound that add
warmth and ambience to music.
There are three types of Reverb. Pressing the
Reverb
button will cycle among different room
sizes, indicated by the lights above the button. If no light illuminates, it means reverb is off.
■ Room : The intimacy of a chamber-music room.
■ Stage : The ambience of a performance stage.
■ Hall : The spacious atmosphere of a concert hall.
Effects
The effects, which you select by pressing the
Effects
button, are as follows:
■ Chorus 1 : The effect of many instruments playing together instead of one.
■ Chorus 2 : The effect of even more instruments than Chorus 1.
■ Flanger : The effect that many people refer to as a "whooshing" sound, or a sound
similar to a jet plane flying overhead.
Each of the Sound Select buttons can remember its own reverb and effect settings, just as it
can remember the status of the Variation button. So you can give each sound a different
combination of reverb and effect, which will be recalled whenever you press that Sound Select
button.
These settings are reset to factory defaults when you execute Hard Reset.
Page 25

24
Reverb / Effects Wet / Dry Mix
Reverb / Effects Wet / Dry Mix
The amount of reverb or effects for the current sound can be controlled.
Press and Hold the
Reverb
button for about a second. Then, the
Reverb
Button
and current sound button starts to blink. Also the display shows how much the
reverb is mixed as a percentage, while changing in the reverb Wet/Dry mix
mode.
Press the
Up/Down
button under the display to change the amount of reverb,
which ranges from 0 to 100. Higher numbers give the sound more reverb
(making it "wetter"). When it set to 0, the sound completely dry.
To exit wet/dry mix mode, just press the
Reverb
button again.
Layer and Split Wet/Dry Mix
If the left split is active or layered sound is enabled, you can separately control the
wet/dry mix amount. If wet/Dry mix mode is entered in this case, the main sound
button in the Sound Select region blinks first.
If you press layered sound button or split sound button, the blink switches to the
pressed button and the display shows the wet/dry mix amount of the layered or
split sound.
So, you can control the overall sound as desired by mixing individual wet/dry
amounts for main, layered, and split sounds.
Page 26

25
Reverb / Effects Wet / Dry Mix
1. Press the Grand Piano button
2. Press the Bass & Ride button to activate left split.
3. To enter wet/dry mix mode, press and hold the Reverb Button for a second. Then
the Reverb button and the Grand Piano button will start to blink. Now it’s OK to
release the Reverb Button.
4. Press the Up or Down button until the display shows 50 (50% wet/dry mix)
5. Press the Bass & Ride button. Then the Bass & Ride button starts to blink and the
display shows the current split sound wet/dry mix.
6. Press the Up or Down button until the display shows 8 (8% wet/dry mix)
7. To exit wet/dry mix mode, press the Reverb button.
8. Now you can play a fairly wet piano sound with a relatively dry bass & ride cymbal
sound.
Page 27

26
Recorder
Recorder
The Recorder records and plays back your musical performances, like a tape
recorder, but with several advantages:
■ You can change the tempo without affecting the pitch. This lets you record
difficult passages slowly, for example, and play them back at the desired
speed.
■ You can record using one sound and later replace it with another.
Song Use the two
Song
buttons to select a song for recording or playback (only one can
be selected at a time). Each song can be as long as 10,000 notes.
Track Each song consists of up to two tracks, which can be selected or silenced using
the two
Track
buttons. Once a track has been recorded on, the track button
illuminates to show that it contains data.
Mute / Unmute tracks
When a song is recording, playing, or stopped, use the
Track
buttons to turn
playback of individual tracks off (unlit) or on (lit).
Select the recording track
When you press the
Record
button to record a track, the next empty track is
automatically selected for you. But, you can press a
Track
button to determine
which track you wish to record. This lets you record over a previous track, for
example. The track that is being recorded has a blinking button. That track cannot
be turned off during recording. When a track is recorded, the sound that was used
during recording is remembered with the track.
Record Pressing the
Record
button while a song is stopped will put the song in record-
ready mode and the
Record
button blinks. Select the track on which to record as
described in the discussion of the
Track
buttons. Press the
Record
button again to
cancel recording.
Once you start recording by pressing the
Play/Stop
button or using ‘Key Start’ or
‘Pedal Start’ (described below) the
Record
button stays lit continuously. Press the
Play/Stop
button to stop recording.
If the memory becomes full during recording. “Ful” will appear on the display
and recording will automatically stop. (All Recorded data up to that point will
be saved.)
Page 28

27
Record
Erasing A Track
To erase a track on which something is recorded, you simply record "nothing" over it; that is,
you select the track for recording, start and stop the Recorder, but don't play any notes or touch
any controllers while recording. This erases the entire track.
Changing Sound on a Track
After a song is recorded with one sound on a track, you can replace it with another. This gives
a chance to listen to your playing with different instruments. Select a song with recorded data,
and press the
Record
button to enter record-ready mode. Then, a track button blinks with the
Record
button. If it’s not the
Track
button which has the sound you want to replace with new
sound, press the other
Track
button. Now it’s ready to change the sound on a track. Press the
button in the Sound Select portion to choose the sound you want, and press the
Record
button
again to exit record-ready mode. Be cautious not to press the
Play/Stop
button, which erases
the recorded data. Press the
Play/Stop
button to listen to the song played with the new sound.
Changing Tempo on a Song
You can change tempo to play the song that you recorded faster or slower without affecting
the pitch. Select a song with recorded data, and press the
Record
button to enter record-ready
moode. Now, change tempo by pressing the
Up/Down
button (or tapping the
Tap/Tempo
button). Then, press the Record button again to exit record-ready mode. Be cautious not to
press the
Play/Stop
button, which erases the recorded data. Press the
Play/Stop
button to listen
to the song played with different tempo.
Play/Stop
Press the
Play/Stop
button to start playback or recording, or to stop it.
If you press the
Play/Stop
button when the Recorder is in Record mode, then recording begins
on the specified track (the one with the blinking button), while the other active track plays
back (if its button is lit).
Pressing the
Play/Stop
button again while recording or playback is going on will stop the
recording or playback.
Start Control
When a song is in record-ready mode for recording, you can start recording by striking any
key on the keyboard (Key Start) or pressing the left pedal (Pedal Start). This is a very
convenient way to start recording. Especially, 'Key start' can help avoid the case where it's
difficult to synchronize the first recorded note with the first beat when one starts recording by
pressing the
Play/Stop
button.
Page 29

28
Display while playing and recording
Display while playing and recording
While recording and playing a song, the display shows the current measure of
the selected song and the
Tap/Tempo
button blinks at every beat. (At the first
beat, the green LED blinks) For example, if the time signature (described in the
Metronome section below) is set to 4, the displayed measure increases whenever
4 beats are counted.
Prepare for Recording
1. Select an empty Song by pressing either
Song
button (No track buttons are lit).
2. Before you begin to record, select the sound you want to record in the Sound
Select Section. Layered or Split Sounds also can be recorded on the same
track. Make any other desired settings (Reverb & Effects, Tempo, etc.) as well.
3. Press the
Record
button to enter Record-ready mode. The
Record
button and
the
Track 1
button will blink, and track 1 is automatically selected. If you want to
record on track 2, just press the
Track 2
button.
Start Recording
4. Just start playing any key on the keyboard; recording automatically starts (Key
Start). Or you can start recording by pressing the
Play/Stop
button or the left
pedal (Pedal Start).
5. When you finish playing a song on the track, press the
Play/Stop
button. Then,
recording stops.
6. OK. To listen to the recorded song, just press the
Play/Stop
button.
Additional Recording
7. If you want to record additional notes on track 2, press the
Record
button again
when the song is stopped. Then the
Track 2
button will be automatically selected
and blink. If you press the
Track 1
button, then you can re-record on track 1.
8. Repeat steps 4 - 5. You can record notes on track 2, while listening to the track 1
sounds.
9. Now, you can listen to both tracks by pressing the
Play/Stop
button.
Page 30

29
Metronome
Metronome
Pressing the Metronome button allows you to hear the tempo of a song. It can be used as a
stand-alone metronome that is convenient for practicing. When the button is pressed, the light
goes on and the metronome starts; press it again to turn it off.
Adjusting Tempo
The tempo of the metronome or song record playback can be set from 20 to 300
beats per minutes by using the
Up/Down
button under the display. The default
tempo is 120.
Adjusting the time signature
The time signature (Beat) of metronome or songs can be selected from 2
to 6 beats. Press and Hold the
Metronome
button, which will to blink.
You can set the beat to 0, 2, 3, 4, 5 or 6 by pressing the
Up/Down
buttons. When you set beats other than 0, the first beat is distinguished
by a triangle sound. '0' beat is internally set to 4 beat but plays the same
metronome sound for all beats. The default beat is 0.
After setting the beat, press the
Metronome
button again to exit the time
signature select mode.
Tap tempo
The
Tap/Tempo
button allows entering tempo data by repeatedly pressing the
Tap/Tempo
button. The device will average your tapping speed and the
calculated tempo will be set in the metronome and songs. It's convenient to set a
tempo that you are thinking of without guessing the tempo.
1. Press the Metronome button to turn it on.
2. Press Up/Down button to adjust the desired tempo.
3. Press and hold the metronome button, then the display shows the current beat.
4. Select any beat you want by pressing the up/down button.
5. Exit by pressing the metronome button again.
Page 31

Demo
You can listen to the demo songs by pressing this button. Refer to Page 13 for
the details on how to listen to demo songs.
MIDI/Preference
This button gives you entry to a mode where you can access and alter MIDI
settings, as well as a variety of other settings that affect the RE-220 as a whole.
To enter MIDI/Preference Edit Mode, press the
MIDI/Pref
Button, which will
start to blink. To exit MIDI/Preference Edit Mode, press the button again. While
in MIDI/Preference Edit Mode, you can change settings by pressing the button
to which each specific setting is assigned. The following illustration shows
which buttons correspond to each setting:
How to change settings
Buttons that have a setting get illuminated. While pressing the button, the name
of its setting is shown on the display as an abbreviation, and when it's released,
the current value of its setting is shown.
Pressing any illuminated button selects the corresponding setting, then the
selected button blinks to indicate that it's the currently selected setting. To
change the value of the selected setting, press the
Up/Down
button.
The settings can be categorized into several groups.
30
Options
Options
Sequencer
Parameters
Split
Parameters
Misc. Parameters
MIDI Parameters
Page 32

31
Split Parameters
Split Parameters
Left Octave Shift
In setting up a left split, you may wish to make the right or left sound higher or
lower - especially if you use a Custom left split to play duets at the keyboard.
The RE-220 gives you the ability to shift the octave in which each part sounds.
The display shows the current transposition of the left sound; the default value is
1
(octave).
Right Octave Shift
The Right Octave Shift works just the same as the Left Octave Shift, except that
it affects the sounds in the right position of a split. The default value is
-
1
(octave).
Split Point
The Split point is the point on the keyboard where the left sound and right sound
meet. The display shows the current split point range from A0to C8. To change
it, press the
Up/Down
button or any key on the keyboard while pressing and
holding the Split Point button. The latter would give you a more convenient way
to set the split point. The default value is
F#3
.
Left Sustain
Left sustain determines if the sustain pedal is ignored or recognized on the left
sound. The default value is
OFF
.
Page 33

32
MIDI Parameters
MIDI Parameters
Layer Sustain
Layer sustain determines if the sustain pedal is igonred or recognized on the
layered sound. The default value is ON.
Local Control
Local Control is the connection between the keyboard of the RE-220 and the
internal sound-producing circuitry of the instrument. Normally, Local Control is
ON
; in fact, every time you power-up the RE-220, it automatically sets to Local
Control ON, so you can play the keyboard and hear the sounds of the instrument.
But, there are reasons for setting Local Control to
OFF
-especially when MIDI
Out of the RE-220 is connected to feed back to the instrument's MIDI In port.
One example of this is when using an external sequencer whose MIDI In port is
connected to MIDI Out of the RE-220, and whose MIDI Out port is connected
to MIDI In. In such a case, you can eliminate the doubling of notes by setting
Local Control to
OFF
.
MIDI Channel Disable
You can disable response to any MIDI channel that you want. Disabling a
channel causes the RE-220 to ignore incoming MIDI information on that
channel. This is useful if you have an external MIDI tone generator, and wish to
dedicate one or more MIDI channels to the tone generator.
To disable a MIDI channel, first press the
UP/DOWN
button one or more times to
select a channel from 1 to 16. To change ON/OFF status for that channel, press
and hold the MIDI Channel Disable button, then press the
UP/DOWN
button.
When a channel is disabled (OFF), a small dot appears on the first Letter of the
display. The default is ON for allchannels.
Transmit MIDI Channel
This parameter enables you to specify the channel on which the RE-220
transmits MIDI Data. The channel can be set to OFF, and 1 to 16. If it is set to
OFF, MIDI messages are not transmitted.
The default transmit MIDI Channel is 1.
If the transmit MIDI channel is set to values other than OFF or 1, the
recorder of RE-220 will not work.
Page 34

33
MIDI Parameters
Program Change ON/OFF
Ordinarily, when you press a Sound Select button, the instrument transmits the
corresponding program change message. And, when the instrument receives a
program change message from external MIDI devices, it responds to it by
changing the sound.
You can disable this function with this setting so that the RE-220 doesn't send or
receive program change messages. The default is ON.
General MIDI
General MIDI (GM) allows sequencer (recorder) data from different sources to
be played back with predictable results by standardizing the sounds that
Program Change messages select, channel (10) for drum and percussion sounds,
and the "mapping" of those sounds across the keyboard. The RE-220 partially
implements General MIDI by re-mapping the RE-220 program list fit to the GM
program list. However, the RE-220 does not include the complete GM sound
set. If a sound is selected that does not exist on the RE-220, you will not hear
anything.
When you set the RE-220 to General MIDI ON, program changes received from
the MIDI In port will select the appropriate internal sounds. In addition, the RE-
220 assigns the General MIDI Drum Kit to channel 10 and disables external
program changes for that channel. The front panel is not affected. The RE-220
can set General MIDI to ON/OFF by responding to an external system exclusive
message to turn General MIDI ON and OFF.
General MIDI is set to
OFF
every time power to the RE-220 is turned on.
System Exclusive Dump
(Song Data)
Both song’s data saved in the RE-220 can be transmitted to the MIDI Out port in
the form of System Exclusive Data. When this button is pressed and released, 'Y'
'?' is shown on the display. If you press the Upbutton, Song Data Dump is
executed.
The transmitted Data can be usually saved in software sequencers which support
System Exclusive Data Send/Receive. Conversely, the saved song data in the
sequencer can be transmitted back and saved into the RE-220.
System Exclusive Dump
(MIDI/Pref Data, Program Effects Data)
All data about RE-220 settings, for example, parameters in the MIDI/Pref Menu
and Program Effects can be transmitted to MIDI Out port in the form of System
Exclusive Data. When this button is pressed and released, 'Y' '?' is shown on the
Page 35

34
MIDI Parameters
Sequencer Parameters
Metronome Volume
Change this setting to adjust the metronome volume. The range of setting is
from 0 to 8. The default value is
6
.
Transmit Sequencer Data
When Transmit Sequencer Data is ON, the data from the Recorder are
transmitted out the MIDI Out port. When it is
OFF
, the data are used to play the
internal sound only. The default is
OFF
.
The MIDI channels are used by the sequencer as follows:
Channel Description
1 Track 1 main sound
2 Track 2 main sound
5 Track 1 layered sound
6 Track 2 layered sound
9 Track 1 split sound
10 Track 2 split sound
display. If you press the Upbutton, Song Data Dump is executed.
The transmitted Data can be usually saved in software sequencers to support
System Exclusive Data Send/Receive. Conversely, the saved data in the
sequencer can be transmitted back and saved into the RE-220. This function will
be useful when you want to set aside current settings before executing Hard
Reset.
Panic
(All Sound Off, Reset All Controllers)
When this button is pressed and released, 'Y' '?' is shown on the display. If you
press the Up button, the Panic function is executed. The button sends All Sound
Off message and Reset All Controllers messages on all MIDI channels - both the
RE-220 sound engine and its MIDI Out port.
Page 36

35
Misc. Parameters
Miscellaneous Parameters
Global Effect
This parameter determines if the reverb and effects are set by each sound’s own
settings or by the front panel. When it is
OFF
, the reverb and effect are changed by
the selected sound’s own reverb and effect settings when the player selects a new
sound. In contrast, when it is ON, the reverb and effect don’t change when a new
sound is selected, but they are globally under the control of front panel. That is, the
reverb and effect can be changed by pressing the reverb or effect button, as a result,
every selected sound have the same reverb and effects. The default value is
OFF
.
Keyboard Touch
You can adjust the touch sensitivity of the entire keyboard - how the dynamics of
the sounds respond to key velocity. There are seven possible values:
Tuning
You can tune the RE-220 pitch up or down in one-cent increments. This can be
useful if you are playing along with a recording, or playing with other instruments
that can't be easily retuned. The default value is
0 cents
.
Intonation
Most modern Western music uses what is known as equal temperament. This
means that the interval between each semitone of the 12-tone octave is precisely
the same as every other interval. Many different intonation systems have
evolved over the centuries, however, and the RE-220 supplies you with 6
different intonation tables to choose from.
Touch Description
1. Linear
2. Light 1
3. Light 2
4. Light 3
5. Hard 1
6. Hard 2
7. Hard 3
The Standard value, Unaltered level of keyboard sensitivity
For players who have a light touch-that is, you can play more lightly and still
get the same attack-velocity values.
Light 1
is a bit more sensitive than
Linear
,
and
Light 3
is the most sensitive.
For players who have a heavier touch-that is, you can play harder and still get
the same attack-velocity values.
Hard 1
is less sensitive that Linear, and
Hard 3
is the least sensitive.
Key touch Table
Page 37

36
Misc. Parameters
By changing the value for this parameter, you select from among the intonation
tables stored in the RE-220. Each of these tables defines different intervals
between each of the semitones in a single octave.
Intonation Key
This sets the base note from which the currently selected intonation table
calculates its intervals.
This setting is effective for intonations other than the Equal temperament. The
available values of the Intonation Key are
C, C#, D, D#, E, F, F#, G, G#, A, A#,
and B. The default is C.
Drum Re-Map
Determines the layout of the instruments in drum programs. There are three
possible values. See the page 17 for the drum kit maps.
1. Normal Default value. No remapping of drum instruments
2. PC2ReMap Assigns many instruments to different note numbers.
3. GMRemap Remaps drum instruments according to the General MIDI
layout
Intonation Description
1. Equal
2. Classic Just
3. Just b7th
4. Pythagorean
5. Mean Tone
6. Werkmeister
No detuning of any interval.
Tunings are defined bassed on the ratios of the frequencies in the Major triad
(For example, C:E:G). The original tuning of Classical European music.
Similar to Classic Just, but with be Dominatant 7th flatted an additional 15
cents.
This scale was designed by Pythagoras, a Greek Mathematician. It’s based on
the interval of a perfect 5th. The 3rd sounds quite out of tune, but the 4th and
5th are perfectly tuned.
This scale is an improved version of the Phthagorean to make the 3rd in tune.
Named for its inventor, Andreas Werkmeister. It’s fairly close to equal
temperament, and was developed to enable transposition with less dissonance.
Page 38

37
Misc. Parameters
Available Memory
Not editable. Display the amount of memory (RAM) available for storing song
MIDI data. The size is approximately
238
Kilobytes for units with no songs saved.
SW Version
Not Editable. Identifies the software installed in the instrument.
Hard Reset
Not a parameter but a prompt to execute a hard reset. When this button is
pressed, 'Y ?' is shown on the display. If you press the Upbutton, a hard reset is
executed. Then, all memory (including User songs and MIDI/Preference
settings) will be erased, and the original factory setting is restored.
Page 39

38
Transpose
Transpose
Transpose allows you to play the keyboard in one key and have the notes sound in another
key. This is useful when accompanying singing, if the key of the written music is too high or
too low for the singer, or when playing music written for a transposing instrument, such as a
clarinet.
To change the transposition, press the
Transpose
button. Then the button will
blink, and the current transposition value is shown on the display. Press the
Up/Down
button to set a desired transposition while playing the keyboard. To
exit transposition setting mode, press the Transpose button again. While the
keyboard is transposed, the
Transpose
button will remain lit. The transpose
range is -12semitones (down one octave) to +12semitones (up one octave).
Page 40

39
MIDI Connection
"MIDI" stands for "Musical Instrument Digital Interface." It is an international standard that
allows electronic musical instruments to communicate with each other, using a simple cable
connection. It ensures that the RE-220 will remain compatible with the instruments of today
and tomorrow.
MIDI Connection
On the rear panel are two MIDI ports:
MIDI In receives MIDI messages
from
other equipment.
MIDI Out sends MIDI messages toother equipment.
MIDI cables provide the connection between the MIDI ports of one piece of equipment and
those of another. To keep things simple, there are only two valid MIDI connections: Out to In,
In to Out.
The simplest use of MIDI is to play two instruments at a time from the keyboard of one of
them. This is known as a "Master-Slave" connection. Use a MIDI cable to connect the MIDI
Out port of the "Master" (the instrument whose keyboard you'll play) to the MIDI In port of
the "Slave".
If you connect In to Out, rather than Out to In, the other instrument becomes the Master. And
if you use two cables, connecting In to Out, Out to In, you can use either instrument as the
Master.
You probably will want to use the RE-220 as your master keyboard. It is important to explain
that what is sent over the MIDI cables is information (data), not sound. In fact, the usefulness
of master-slave setup lies in having each instrument produce a different sound, resulting in a
layering of sounds that expands on the layering that is possible with the RE-220 itself.
The slave can be a MIDI organ, portable keyboard, synthesizer, tone module, drum machine,
or effects device. If it doesn't have built-in amplification and speakers, connect its audio output
to the RE-220 Audio In jacks on the RE-220 rear panel.
MIDI
Page 41

40
MIDI Channels
Another application of MIDI is in using a sequencer to record and play back your
performance. The Recorder on the RE-220 is actually a sequencer, but some advanced users
may wish to connect an external sequencer as well, to make use of features that go beyond
what the built-in Recorder provides. An external sequencer can be a special hardware unit
designed for that purpose, or it can be a PC running special sequencing software. In either use,
the MIDI connections are the same - Out to In, In to Out.
MIDI Channels
For MIDI to control several instruments, each playing a different part at the same time, it relies
on different
channels
. MIDI channels are like TV channels: an instrument has to be "tuned" to
the correct one or it won't receive what is being transmitted. There are 16 channels available,
and each one can transmit any number of notes to any number of instruments, over the same
MIDI cable.
The RE-220 can transmit messages on any MIDI channel, which can be set in the MIDI/Pref
menu. And, it can receive MIDI message on any MIDI channel between 1 and 16, if the
channel is not "Disabled", which can be changed in the MIDI/Pref menu.
Page 42

41
MIDI Messages
MIDI Messages
The MIDI messages that the RE-220 transmits and recognizes fall into several categories, as
outlined in the MIDI Implementation Chart on page 48. This section explains those messages
and how to use them.
Note On and Note Off
When you play a key on the RE-220, it sends a MIDI message that says a note has begun, what
MIDI channel it's on, what note it is, and the velocity with which the key was pressed. When
you release a key, a similar message is sent saying that a note has ended, on which channel,
what note, and the velocity with which the key was released.
Control Change
Control Change is the largest category of MIDI messages. The RE-220 has an extensive
controller implementation, to help you alter your performances and sounds flexibly as you
play or in your recorded sequences. The following discussion elaborates on each of these
messages.
Mod Wheel (CC# 1, 33)
The RE-220 recognizes Mod Wheel messages, which affect the sound of different programs
in different ways. Controller 1 can be used by itself, or if a finer degree of control is
desired, controller 33 can be used in the conjunction with it.
Volume (CC# 7, 39)
The RE-220 recognizes Volume messages, which control the overall volume of the sound
on the MIDI channel on which they are sent. Controller 7 can be used by itself, or if a finer
degree of control is desired, controller 39 can be used in the conjunction with it.
Pan (CC# 10, 42)
The RE-220 recognizes Pan messages, which control the location in the stereo field of the
sound on the MIDI channel on which they are sent. Controller 10 can be used by itself (a
value of 0 is hard left, 64 is centered, and 127 is hard right), or if a finer degree of control is
desired, controller 42 can be used in the conjunction with it.
Page 43

42
MIDI Messages
Expression (CC# 11, 43)
The RE-220 recognizes Expression messages, which also regulate the volume of the sound
on the MIDI channel on which they are sent between a minimum of 0 and a maximum of
the current Volume setting. Controller 11 can be used by itself, or if a finer degree of
control is desired, controller 43 can be used in the conjunction with it.
Sustain, Sostenuto, and Soft Pedals (CC #64, 66, 67)
The right, center, and left pedals transmit MIDI controller message 64 (Sustain), 66
(Sostenuto), 67 (Soft), respectively. The RE-220 also recognizes these messages. A value of
0 is OFF, and a value of 127 is ON.
Often, these pedals affect timbre or modulation of each internal program (sound) of the RE-
220. Refer page 18 for explanation and page 46 for Tables.
Reverb and Effects (CC #89, #90, #91, #93)
The RE-220 recognizes Reverb and Effects type select. CC #90, CC#89 messages
correspond to select reverb and effects type, respectively. Type number of reverb and effect
are listed in the table below. CC #91 and CC#93 adjust the amount of reverb or effects
wet/dry mix.
All Sound Off, Reset All Controllers (CC#120, #121)
The RE-220 recognizes the All Sound Off message (CC #120) which silences the
instrument, and the Reset All Controllers message (CC #121) which resets all controllers to
their default values. Also, it transmits both All Sound Off and Reset All Controllers when
the RE-220 executes the Panic function in the MIDI/Pref Menu (see page 33).
Reverb Type CC #90 Value
No Effect
Room
Stage
Hall
0
2
4
7
Effects Type CC #89 Value
No Effect
Chorus 1
Chorus 2
Flanger
0
1
2
3
Page 44

43
MIDI Messages
Program Change
Selecting a sound causes the RE-220 to transmit a Program Change message, unless
transmission of program messages has been disabled (see Page 33). Similarly, the RE-220
recognizes these messages, unless the reception has been disabled. Refer to page 46 for
Program Numbers of the RE-220 sounds.
General MIDI On / Off Message
The RE-220 recognizes the General MIDI On/Off messages received at the MIDI In port, and
transmits the messages when GM On/Off parameter in the MIDI/Pref menu is changed. The
form of General MIDI On/Off messages is as follows
GM On
F0 7E nn 09 01 F7
nn = device ID ( 00 - 7F; 7F = Broadcast)
GM Off
F0 7E nn 09 02 F7
nn = device ID ( 00 - 7F; 7F = Broadcast)
** GM On/Off messages are System Exclusive Messages.
Page 45

44
Miscellaneous
Miscellaneous
Bottom Panel
Headphone Jacks
A headphone jack allows private practice. Plugging in a pair headphones turns off the speakers.
You can also insert a "dummy" stereo headphone adapter. This is useful if you want to mute the
internal speaker system while using a more powerful external amplification system connected to
the Audio Out Jack. There are two identical headphone jacks on the RE-220.
Rear
Panel
MIDI Ports
The functions of the two MIDI ports are discussed on page 39.
Audio In Jack
The audio input jack allows you to play a tape or CD player, or to have an external MIDI tone
module connected to the RE-220 audio system. The connector is a 1/4" stereo TRS (Tip-Ring-
Sleeve), with the Left channel connected to Tip and the Right channel connected to Ring. It is best
to use a tone module, tape or CD player that has its own output volume control. The RE-220's
volume and tone controls also affect the signal coming from the audio in jack, but the reverb and
effects settings do not.
Audio Out Jack
The audio output jack is used to boost the sound level coming from the piano by connecting it to
external amplifier and speaker systems. It can also be connected to an audio recorder to preserve
your performance. The connector is a 1/4" stereo TRS (Tip-Ring-Sleeve), with the Left channel
connected to Tip and the Right channel connected to Ring.
Page 46

45
Appendix
Appendix
Specification
Physical
Audio
Electrical
Environmental
Height
Depth
Length
Weight
35 inch
19.7 inch
54.3 inch
125 lbs.
60 Watt Amplification
4 Speakers
Audio Outputs
Audio Inputs
Headphone Output
2 x 30 Watts RMS Per Channel
2 x 6.5 inch (16.5 cm) woofer
2 x 2 inch (5 cm) tweeter
Impedance : 100Ω source
Level : nominal 1.0V RMS
Impedance : 10K Load
Level : nominal 1.0V RMS
Impedance : 47Ω source
Level : nominal 1.0V RMS
89 cm
50 cm
138 cm
57 kg
Safe Voltage Range
Safe Frequency Range
Power Consumption
90 Volts ~ 264 Volts
47 ~ 63Hz
25 Watts nominal (Piano sound at normal volume)
Operating Temperature
Storage Temperature
Operating Humidity
Storage Humidity
5 to 40℃
-25 to +85℃
5 to 95% (non ~ condensing)
5 to 95% (non ~ condensing)
(40 to 104 ℉)
(-13 to 185 ℉)
Page 47

46
List of Sounds and Pedal Assignment
List of Sounds and Pedal Assignments
Category Number Name Soft Pedal Sostenuto Pedal
(left) (Center)
Grand Piano
0
Stereo Grand Soft Sostenuto
1 Concert Piano Soft Sostenuto
Classical Piano
2 Warm Piano Soft Sostenuto
3 Dynamic Piano Soft Sostenuto
Stage Piano
4 Hard Rock Piano Soft Sostenuto
5 Ragtime Piano Soft Sostenuto
Modern E.P
6 Digital E Grand Tremolo Sostenuto
7 '90's FM E.P. Timbre Sostenuto
Classic E.P
8 Rhodes E.P. Tremolo Sostenuto
9 Wurlitzer E.P. Tremolo Sostenuto
Harpsichord
10 Harpsichord Add Octave Sostenuto
11 Modern Harpsichord Brightness Pitch Detune
Pipe Organ
12 Pipe Organ None Sostenuto
13 Uptown Gospel Rotary Speaker Effect Sostenuto
Electric Organ
14 Prog Rocker's B3 Rotary Speaker Effect Sostenuto
15 Grungy Overdrive Rotary Speaker Effect Sostenuto
Mallets
16 Woody Marimba Timbre 1 Timbre 2
17 Vibraphone Tremolo Timbre
Brass
18 Tenor Saxophone Vibrato Timbre
19 Trombone/Trumpet Swell Envelope Vibrato
Brass Section
20 Williams Brass Swell Envelope Vibrato
21 Split Section Swell Envelope Solo/Ensemble
(Trombone, Sax/Trumpet)
Strings
22 Slow/Fast Strings Slow/Fast Switch Sostenuto
23 Lyrical Strings Timbre Sostenuto
Voices
24 Scatman Sweel Envelope Sostenuto
25 Cathedral Vox Timbre Sostenuto
Pads
26 Rez Aah Pad Timbre Sostenuto
27 Poseidon Timbre Sostenuto
Guitar
28 Acoustic Guitar Vibrato 12 Strings Effect
29 Chorus Electric Guitar Vibrato Sostenuto
Drums
30 Studio Drum 1+ 2 Timbre Brightness
31 Electro Kit Timbre Brightness
Percussion
32 Virtuoso Percussion Mute Sounds Sostenuto
33 Drum and Bells None Sostenuto
Bass(Left Split)
34 Acoustic Bass None None
35 Bass & Ride Cymbal None None
36 Electric Bass None Slap Bass
Page 48

47
Piano Demo Song List
Piano Demo Song List
Number
Song Name Composer
1 Prelude I BWV 846 J. S. Bach
2 Invention NO. 4 J. S. Bach
3 Invention NO. 8 J. S. Bach
4 Prelude II BWV 847 J. S. Bach
5 ARIA Goldenberg-Variationen BWV 988 J. S. Bach
6 Fuga II (A3 VOCI) J. S. Bach
7 Sonatine Op. 36 No. 4 M. Clementi
8 Klavierstück K. 15v W. A. Mozart
9 Piano Sonata K. 333 1st mov. W. A. Mozart
10 Rondo in D-dur K. 485 W. A. Mozart
11 Piano Sonata K. 331 Rondo Turkish March W. A. Mozart
12 Piano Sonata K. 545 1st mov. W. A. Mozart
13 Minuett in G L. V. Beethoven
14 Bagatelle No. 25 Für Elise L. V. Beethoven
15 Sonatine Op. 55 No. 1 Fr. Kuhlau
16 March Militaire Op. 51 No. 1 F. P. Schubert
17 Moments Musicaux 3. F. P. Schubert
18 Impromptu Op. 90 No. 2 F. P. Schubert
19 Impromptu Op. 90 No. 4 F. P. Schubert
20 La chevaleresque J. F. Burgmüler
21 Without word song Op. 38 No. 2 J. L. F. Mendelssohn
22 Venetianisches Gondellied J. L. F. Mendelssohn
23 Sostenuto F. F. Chopin
24 Valse KK IVb-11 F. F. Chopin
25 5 Mazurkas I Op. 7 No. 1 F. F. Chopin
26 Valse Op. 69. NO. 2 F. F. Chopin
27 Grande Valse Brillante Op. 18 F. F. Chopin
28 Valse Op. 64 No. 2 F. F. Chopin
29 Nocturn Op. 9 No. 2 F. F. Chopin
30 Valse Op. 64 No. 1 F. F. Chopin
31 Preludes in D♭Major Op. 28 No. 15 F. F. Chopin
32 Fantaisie-Impromptu Op. 68 F. F. Chopin
33 Träumerei R. Schumann
34 Frölicher Landmann Op. 68-10 R. Schumann
35 Von fremden Ländern und Menschen Op. 15 R. Schumann
36 Liebesträume Nr. 3 F. Liszt
37 Dolly’s Dreaming And Awakening T. Oesten
38 Frühlingsstimmen Op. 410 J. Strauss
39 The Swan Saint-Seans
40 Blumenlied G. Lange
41 Valsette F. Borowski
42 Old French Air P. I. Tchaikovsky
43 Mazurka P. I. Tchaikovsky
44 Polka P. I. Tchaikovsky
45 Barcarolle P. I. Tchaikovsky
46 Humoreska A. Dvorak
47 Suit ‘Peer Gynt’ Op. 46-3 Anitras Tanz E. Grieg
48 Suite Bergamasque Prelude C. A. Debussy
49 Reverie C. A. Debussy
50 Arabesque I C. A. Debussy
Page 49

48
MIDI Implementation Chart
MIDI Implementation Chart
Basic Channel
Mode
Note Number
Velocity
After Touch
Pitch Bender
Control Change
Program Change
System Exclusive
System Common
System Real Time
Aux Messages
Notes
Default
Changed
Default
Messages
Altered
0 - 127
True Voice
Note ON
Note OFF
Keys
Channels
1
6
7
10
11
64
66
67
89
90
91
93
120
121
True #
Song Pos.
Song Sel.
Tune
Clock
Messages
Local Control
All Notes Off
Active Sense
Reset
1
1
Multi *
Any
X
0 - 127
1 - 128
O
O
X
X
X
X
X
X
X
X
O
O
O
O
O
O
O
O
O
O ** 0 - 33
34 - 36
O 0 - 33
34 - 36
O
X
X
X
X
O
O
O
X
X
1
16
Multi *
Mode 1 & 3
key range
1 - 128
O
O
X
O
O
O
O
O
O
O
O
O
O
O
O
O
O
O
O
O ** 0 - 33
34 - 36
O 0 - 33
34 - 36
O
X
X
X
X
O
O
O
X
X
memorized
memorized
C 0 - C 8
Mod Wheel
Data Entry
Volume
Pan
Expression
Sustain Pedal
Sostenuto Pedal
Soft Pedal
Effects Select
Reverb Select
Reverb Wet/Dry
Effects Wet/Dry
All Sound Off
Reset All Controllers
Function Transmitted Recognized Remarks
* Use Multi mode to assign different programs to each MIDI channel
** Can be disabled
Mode 1 : Omni On, Poly Mode 2 : Omni On, Mono
Mode 3 : Omni Off, Poly Mode 4 : Omni Off, Mono
O = Yes
X = No
Manufacturer : KURZWEIL
Model : RE-220 Digital Piano
Date : 6/7/2005
Version 1.1
Page 50

49
Notes
Notes
Page 51

50
Notes
Notes
Page 52

www.ycpiano.co.kr
www.kurzweilmusicsystems.com
 Loading...