

Page 1

10107 South Tacoma Way, Suite A-3 Lakewood, WA 98499
Tel:(253)589-3580 Fax:(253)589-3585
AND Music Corporation
178-353 Gajwa-dong, Seo-gu, Incheon, KOREA
Tel:82-32-580-1500 Fax:82-32-584-4863
2006. 3. 10 Rev.A
Page 2

Page 3

Page 4

RE-110
Digital Piano
Owner’s Manual
www.ycpiano.co.kr
www.kurzweilmusicsystems.com
Table of Contents
Important Safety & Installation
Instructions
Important Safety Instructions
The Panel of the RE-110
Introduction
The Features of the RE-110
Setting up the Instrument
VOICE Button
Main Voice
Reverb & Chorus
Demo Song
SPLIT Button
Split Point
Lower Voice
Upper Voice
Lower Octave Shift
Upper Octave Shift
4-Hand Setup
FUNCTION Button
Touch
Tune
Transpose
MIDI Receive and Transmit Channel
Local Control
Reset
Pedals
Sustain Pedal
Sostenuto Pedal
Soft Pedal
MIDI
MIDI Connection
MIDI Channels
Miscellaneous
Headphone
Audio In Jack
Audio Out Jack
MIDI Implementation Chart
Appendix
Specifications
Quick Operation Guide
4
5
6
7
8
12
13
14
15
15
15
16
16
16
17
17
18
19
20
20
21
21
21
22
23
24
24
24
25
26
27
Page 5

The lightning flash with the arrowhead symbol, within an equilateral triangle, is intended to
alert the user to the presence of uninsulated “dangerous voltage” within the product’s
enclosure that may be of sufficient magnitude to constitute a risk of electric shock to
persons.
The exclamation point within an equilateral triangle is intended to alert the user to the
presence of important operating and maintenance (servicing) instructions in the literature
accompanying the product.
IMPORTANT SAFETY & INSTALLATION INSTRUCTIONS
INSTRUCTIONS PERTAINING TO THE RISK OF FIRE, ELECTRIC SHOCK, OR INJURY TO PERSONS
RADIO AND TELEVISION INTERFERENCE
SAVE THESE INSTRUCTIONS
WARNING
: When using electric products, basic precautions should always be
followed, including the following:
1. Read all of the Safety and Installation Instructions and Explanation of
Graphic Symbols before using the product.
2. Do not use this product near water-for example, near a bathtub, washbowl,
kitchen sink, in a wet basement, or near a swimming pool, or the like.
3. This product should only be used with a stand or cart that is recommended
by the manufacturer.
4. This product, either alone or in combination with an amplifier and speakers
or headphones, may be capable of producing sound levels that could cause
permanent hearing loss. Do not operate for a long priod of time at a high
volume level or at a level that is uncomfortable. If you experience any
hearing loss or ringing in the ears, you should consult an audiologist.
5. The product should be located so that its location or position does not
interfere with its proper ventilation.
6. This product should be located away from heat sources such as radiators,
heat registers, or other products that produce heat.
7. This product should be connected to a power supply only of the type
described in the operating instructions or as marked on the product.
8. This product may be equipped with a polarized line plug (one blade wider
than be other). This is a safety feature. If you are unable to insert the plug
into the outlet, contact an electrician to replace your obsolete outlet. Do not
defeat the safety purpose of the plug.
9. The power supply cord of the product should be unplugged from the outlet
when left unused for a long period of time. When unplugging the power
supply cord, do not pull on the cord, but grasp it by the plug.
10. Care should be taken so that objects do not fall and liquids are not spilled
into the enclosure through openings.
11. The product should be serviced by qualified service personnel when:
A. The power supply cord or the plug has been damaged;
B. Objects have fallen, or liquid has been spilled into the product;
C. The product has been exposed to rain;
D. The product does not appear to be operating normally or exhibits a
marked change in performance;
E. The product has been dropped, or the enclosure damaged.
12. Do not attempt to service the product beyond that described in the user
maintenance instructions. All other servicing should be referred to qualified
service personnel.
13.
WARNING
: Do not place objects on the product’s power supply cord, or
place the product in a position where anyone could trip over, walk on, or roll
anything over cords of any type. Do not allow the product to rest on or be
installed over cords of any type. Improper installations of this type create
the possibility of a fire hazard and/or personal injury.
WARNING
: Changes or modifications to this instrument not expressly
approved by KURZWEIL could void your authority to operate the instrument.
IMPORTANT
: When connecting this product to accessories and/or other
equipment use only high quality shielded cables.
NOTE
: This instrument has been tested and found to comply with the limits for
a Class B digital device, pursuant to Part 15 of the FCC Rules. These limits are
designed to provide reasonable protection against harmful interference in a
residential installation. This instrument generates, uses, and can radiate radio
frequency energy and, if not installed and used in accordance with the
instructions, may cause harmful interference to radio communications. However,
there is no guarantee that interference will not occur in a particular installation.
If this instrument does cause harmful interference to radio or television
reception, which can be determined by turning the instrument off and on, the
user is encouraged to try to correct the interference by one or more of the
following measures:
Reorient or relocate the receiving antenna.
Increase the separation between the instrument and the receiver.
Connect the instrument into an outlet on a circuit other than the one to which
the receiver is connected.
If necessary consult your dealer or an experienced radio/television
technician for additional suggestions.
NOTICE
This apparatus does not exceed the Class B limits for radio noise emissions
from digital apparatus set out in the Radio Interference Regulations of the
Canadian Department of Communications.
AVIS
Le present appareil numerique n’emet pas de bruits radioelectriques depassant
les limites applicables aux appareils numeriques de la class B prescrites dans le
Reglement sur le brouillage radioelectrique edicte par le ministere des
Communications du Canada.
Page 6

IMPORTANT SAFETY INSTRUCTIONS
1. Read these instructions.
2. Keep these instructions.
3. Heed all warnings.
4. Follow all instructions.
5. Do not use this apparatus near water.
6. Clean only with dry cloth.
7. Do not block any of the ventilation openings. Install in accordance with the manufacturer’s instructions.
8. Do not install near any heat sources such as radiators, heat registers, stoves, or other apparatus (including amplifiers) that produce
heat.
9. Do not defeat the safety purpose of the polarized or grounding-type plug. A polarized plug has two blades with one wider than the
other. A grounding type plug has two blades and a third grounding prong. The wide blade or the third prong are provided for your
safety. If the provided plug does not fit into your outlet, consult an electrician for replacement of the obsolete outlet.
10. Protect the power cord from being walked on or pinched, particularly at plugs, convenience receptacles, and the point where they
exit from the apparatus.
11. Only use attachments / accessories specified by the manufacturer.
12. Use only with a cart, stand, tripod, bracket, or table specified by the manufacturer, or sold with the
apparatus. When a cart is used, use caution when moving the cart / apparatus combination to avoid
injury from tip-over.
13. Unplug this apparatus during lightning storms or when unused for long periods of time.
14. Refer all servicing to qualified service personnel. Servicing is required when the apparatus has been damaged in any way, such as
power-supply cord or plug is damaged, liquid has been spilled or objects have fallen into the apparatus, the apparatus has been
exposed to rain or moisture, does not operate normally, or has been dropped.
15. Allow adequate ventilation for the power adapter. Do not hide it under a carpet or behind a curtain or place it in an enclosed space
where heat buildup can occur.
WARNING
: To reduce the risk of fire or electric shock, do not expose this apparatus to rain or moisture. Do not expose this equipment
to dripping or splashing and ensure that no objects filled with liquids, such as vases, are placed on the equipment.
To completely disconnect this equipment from the AC Mains, disconnect the power supply cord plug from the AC receptacle.
To reduce the danger of explosion if the lithium battery is incorrectly replaced, replace only with the same or equivalent type.
Page 7
6
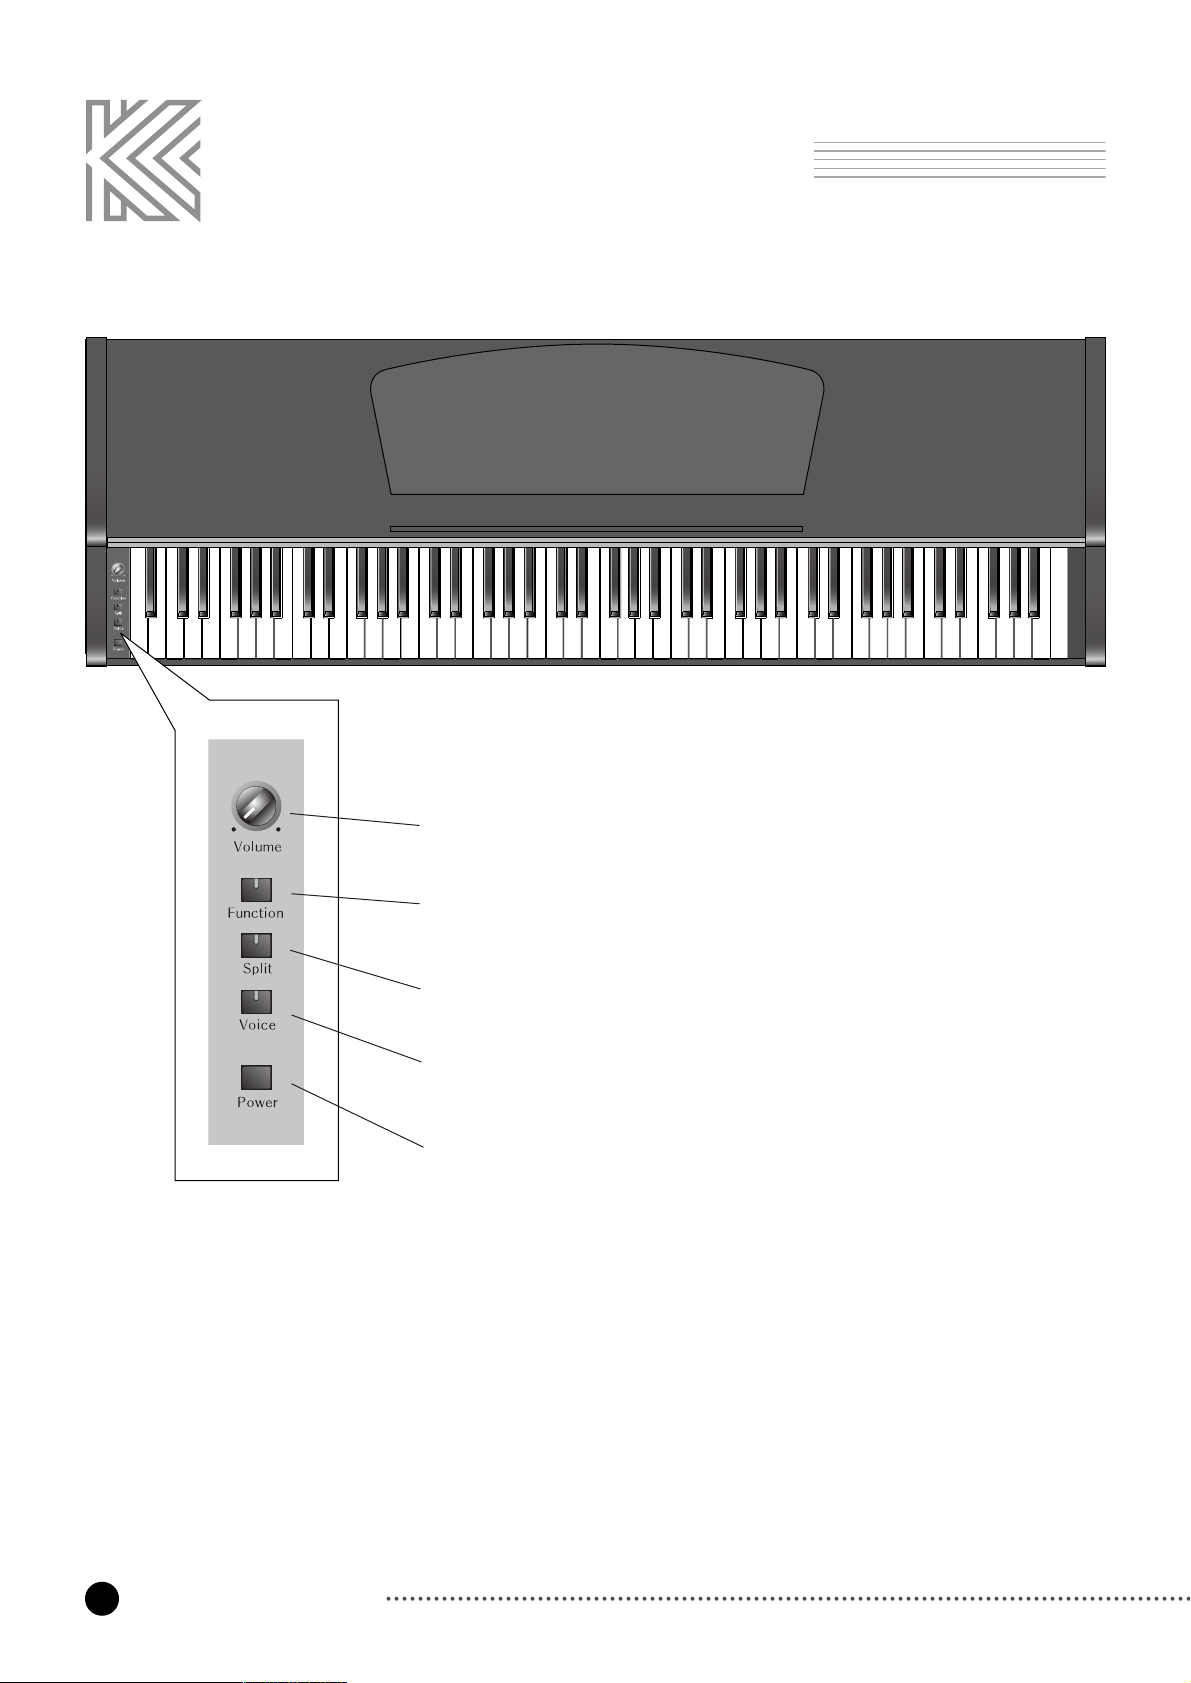
The Panel of the RE-110
The Panel of the RE-110
Volume
Adjust the volume level using this control
Function
Modify parameters of Touch, Tune, Transpose and MIDI channel
Split
Divide the keyboad into two different sounds
Voice
Select voices from 10 primary sounds and more, select various reverb effects
Power
Turn the power On or Off
Page 8

7
Introduction
Introduction
Welcome to the world of the KURZWEIL RE-110 Digital Piano.
The RE-110 gives you easy access to KURZWEIL's high-quality sound technology. Authentic
digital representations of musical instrument sounds are the starting points. The RE-110
reproduces the finest details of the original sounds; you'll even hear differences in tone as you
play from bass to treble and from soft and loud, just as in the original instruments.
The Feature of the RE-110
■ 88 Notes, Hammer type keys
■ 3 Pedals
■ 5 Different levels of keyboard
sensitivity
■ 32 Preset voices
■ Transpose, Tune
■ 4 Reverbs, 1 Chorus effect
■ Split keyboard mode
■ 5 Demo songs
■ Line In/Out
■ MIDI In/Out
■ 2 Headphone jacks
■ 25 Watt Stereo sound system
Page 9
8
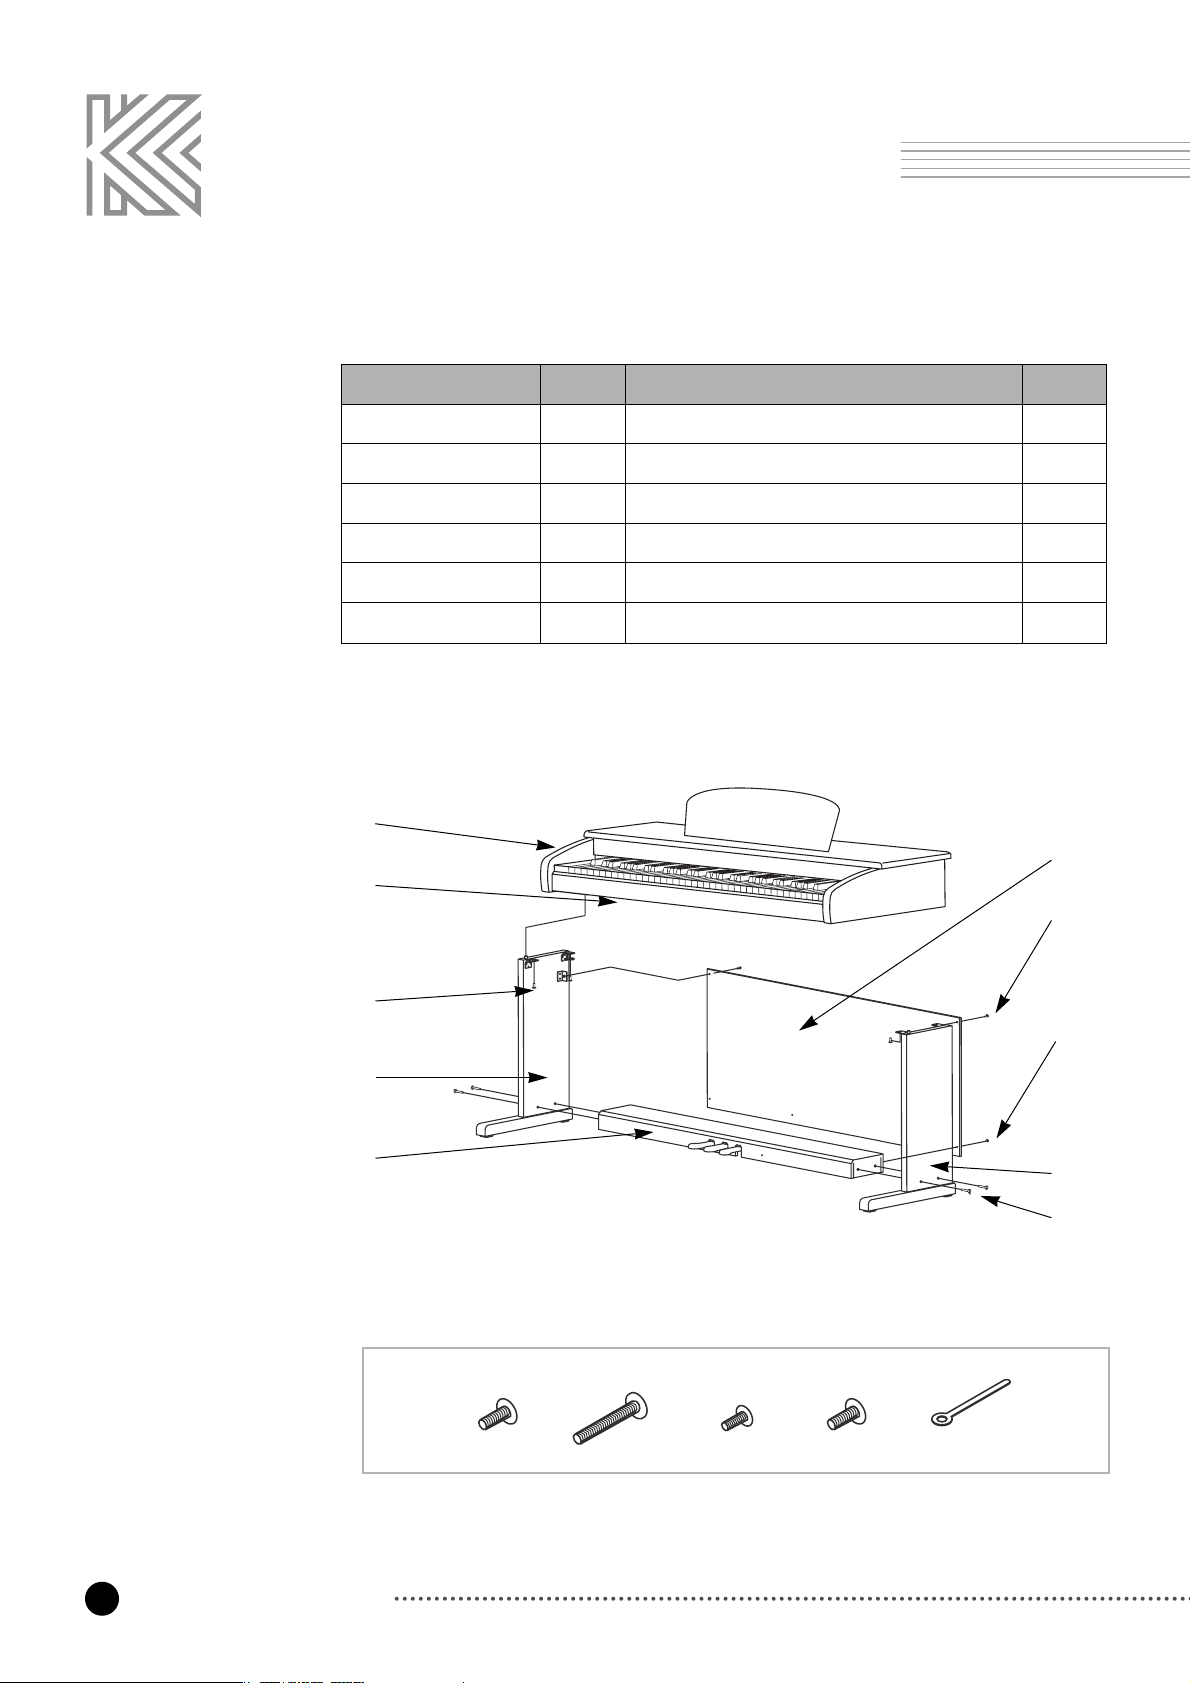
Setting up the Instrument
Item No. Item
①
Keyboard
1EA
②
Side Panel (Left)
1EA
No.
⑦
Screws for Side Panel and Keyboard
⑧
Screws for Side Panel and Pedal Box
4EA
4EA
③
Side Panel (Right)
1EA
⑨
Screws for Rear Panel
2EA
④
Pedal Box
1EA
⑩
Screws for Rear Panel and pedal Box
4EA
⑤
Rear Panel
1EA
⑪
Cable Clamp
1EA
⑥
Headphone Hanger
1EA
Check that all of the following items are present.
①
⑥
⑤
⑦
②
④
⑨
⑩
③
⑧
⑦⑧ ⑨⑩⑪
Setting up the Instrument
Page 10
9
Setting up the Instrument
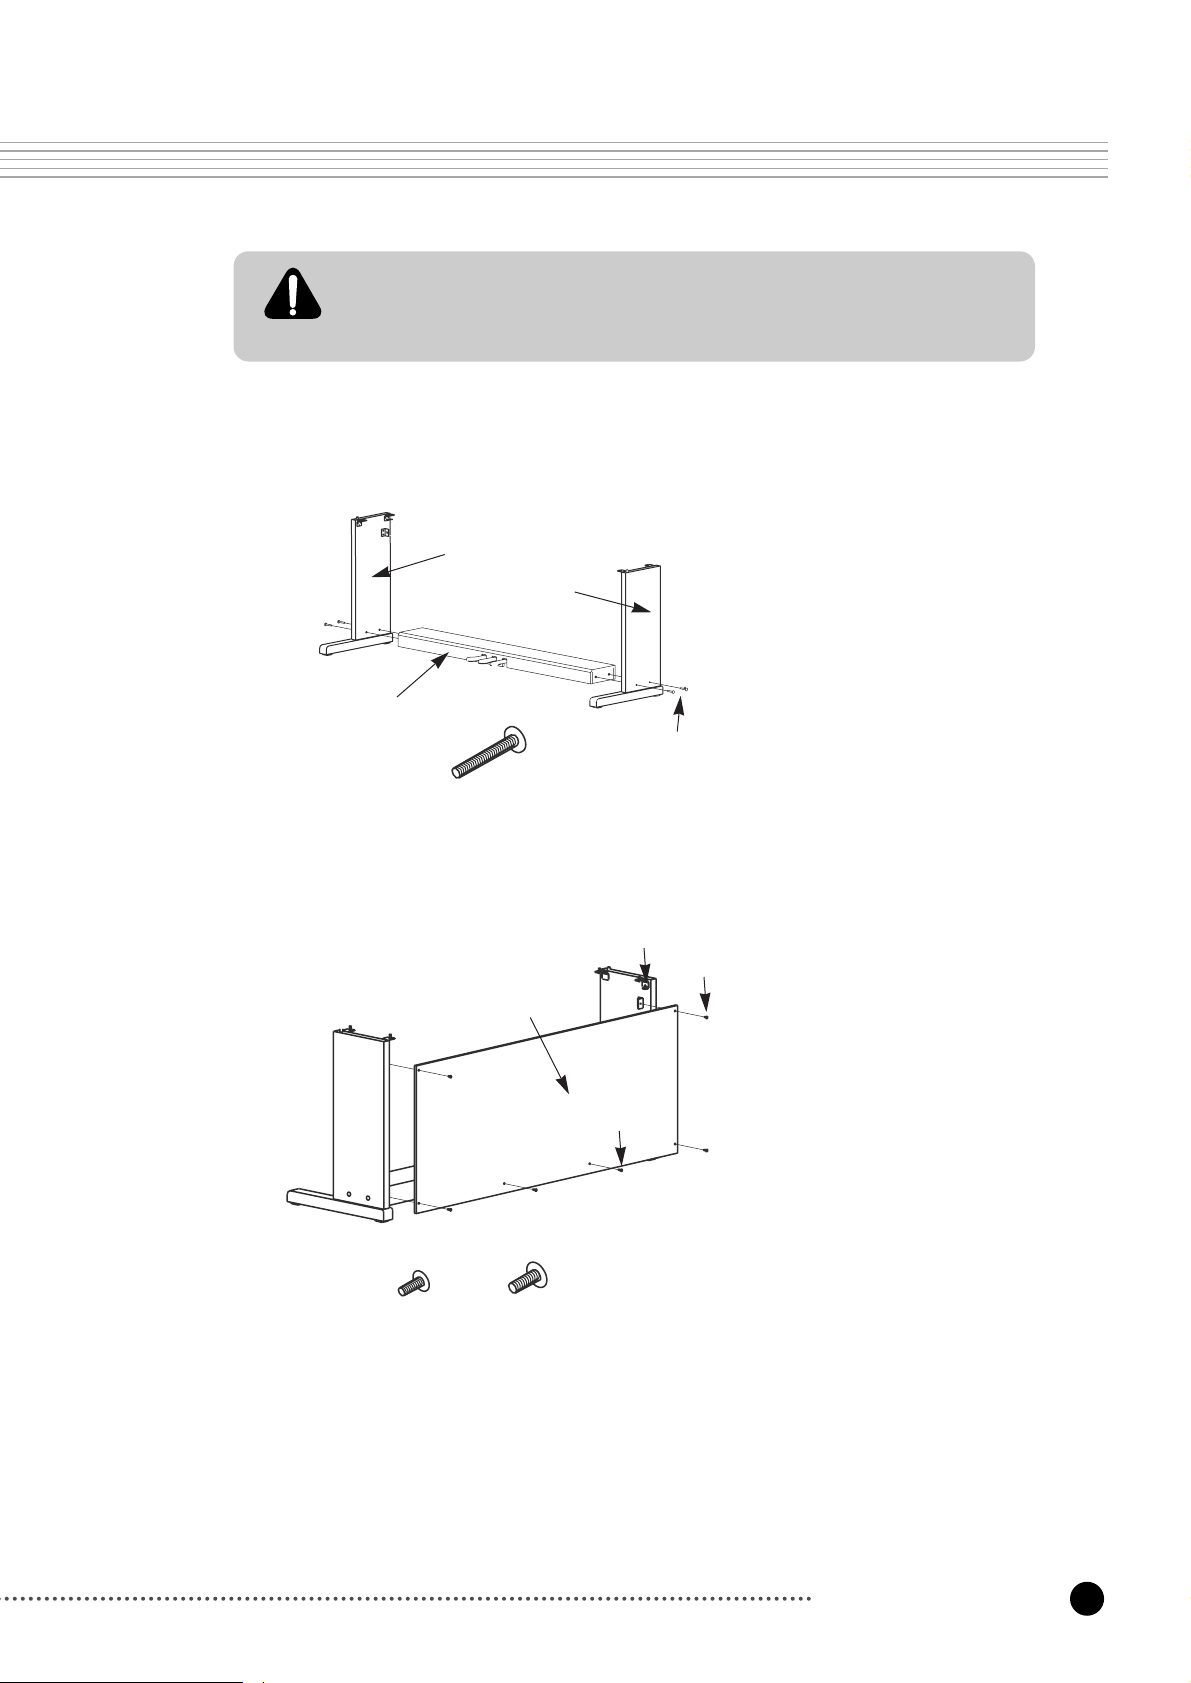
Side Panel and Pedal Box assembly
We do not recommend attemting to assemble the RE-110 alone. The job can be easily
accomplished, however, with only two people.
Use only the screws provided or replacement of exactly the specified size. Using
screws of the wrong size can result in demage to the instrument and personal injury.
1. Place the pedal box ④ on the side panel ③
and then use ⑧ screws to fasten the side
panel.
2. Place the Pedal Box ④ on the side panel ②
and then use ⑧ screws to fasten the side
panel.
3. You can find the pedal cable in the pedal box
④. Untie and straighten out the cable attached
to the bottom of the pedal box.
②
③
④
⑧
Rear Panel assembly
1. Fit into the holes ⑨ in the side panel
brackets and then use the screw ⑨ to fasten
the rear panel.
2. Use the screw ⑩ to fasten the bottom of the
rear panel.
⑨⑩
⑤
⑨
⑨
⑩
⑧
Page 11

10
Setting up the Instrument
Attach the Keyboard
1. Place the keyboard on the stand so that the wood pegs on the bottom of the keyboard fit into the
holes in the side panel brackets.
2. Fasten the keyboard to the side panel using screw numer ⑦.
3. Insert the pedal cable connector into the pedal jack located on the bottom of the keyboard.
4. Rotate the pedal adjuster until it comes in firm contact with the floor surface. If the adjuster is not
in firm contact with the floor, the pedal will wobble and cause malfunctions.
5. Install the headphone hanger as shown in the figure.
Screws to fasten
the keyboard with
side panel
Pedal cable jack
Headphones jack
⑦
25mm
Pedal adjuster
Be sure that the connector is inserted in the correct orientation.
Make sure that the cable clamp fastens to the pedal cable.
Page 12

11
Setting up the Instrument
Turning on the Instrument (Power)
The RE-110 operates on AC adapter power. A power cord is included with the AC adapter to
connect it to an AC outlet. Before connecting the power cord, be sure that the power switch,
located left side of the keyboard, is off. First plug the adapter's small, round plug in the
matching jack in the back of the piano. Then plug the power cord into an AC outlet. Once the
power cord is connected, you can turn the power switch on.
Setting the Volume
To be sure that you can hear the instrument, turn the Volume knob (on the upper side of the
left panel) to the middle of its range. This should be a reasonably comfortable level of volume
which you can adjust if you wish the sound to be louder or softer.
Page 13

12
Voice Button
VOICE Button
To select one of the 10 primary voices, hold down the
Voice
button then press and release a
keyboard key between C1 and A1. Then release the
Voice
button. For example, to select
Digital E. Piano, hold down
Voice
, press and release the E1 key, then release
Voice
. Now
when you play the keys you should hear the Digital E. Piano voice.
To select any of the 32 available voices, hold down the
Voice
button then "enter" the voice's
number (1~32) by pressing the number keys (C2~A2) then press the "Enter" key (A#2), then
release
Voice
. For example, to select Voice #23 (Ballad Organ 1), hold down
Voice
, press
and release D2 (2), press and release D#2 (3), press and release A#3 (Enter), then release
Voice
. For voice numbers between 1 and 9, you need only press one number key.
If you get confused, just release the
Voice
button for a second then try again from the
beginning.
For your reference, below is a list of the available voices, their number, and for the primary
voices, their key.
MAIN VOICE
No Key Voice No Key Voice
1 C1
Grand Piano 1 (Deflult)
17
Tremolo Digital E. Piano
2
Grand Piano 2
18
Stereo Hard E. Piano
3 C#1
Stage Piano 1
19 E1
Digital E. Piano
4
Stage Piano 2
20 G#1
Digital E. Piano + Strings Pad
5
Bright Piano
21 F1
Rock Organ 1
6
Sustain Piano
22
Rock Organ 2
7 D1
Stage Piano + Strings
23
Ballad Organ 1
8
Piano + Strings Pad
24
Ballad Organ 2
9
Tack Piano
25 F#1
Perc Organ
10
Tight E. Grand
26
Organ + Piano
11
Bright E. Grand
27 G1
Fast Strings 1
12
Warm E. Grand
28
Fast Strings 2
13
Classic E. Grand
29
Touch Strings
14
Digital E. Grand
30 A1
Stereo Slow Strings
15 D#1
Dyno E. Piano
31
Stereo Slow Strings Pad
16
Hard Dyno E. Piano
32
Slow Digital Pad
Please refer to the Voice Button section of the Quick Operation Guide on page 27 while
reading the following sections.
Page 14

13
Voice Button
REVERB & CHORUS
Reverb
"Wet/dry mix" is a term that describes how loud the effect sound (wet sound = reverberation
or chorus) is compared to the direct sound (dry sound = played notes). A ratio of 10% for
example will be mostly direct sound with very little effect sound. A ratio of 50% will be about
half and half while 90% will be nearly all effect sound.
Adjust the reverb wet/dry amount for the selected reverb type by pressing one of the C4 ~ A#4
keys while holding down the
Voice
button. The wet/dry mix range is from 0 to 100%. The
default reverb type and wet/dry amount are Room and 10% respectively.
Reverb Wet/Dry Mix
Key Reverb Wet/Dry
C4
0
C#4
10 (Default)
D4
20
D#4
30
E4
40
F4
50
F#4
60
G4
70
G#4
80
A4
90
A#4
100
Key Chorus Wet/Dry
C5
0 (Default)
C#5
10
D5
20
D#5
30
E5
40
F5
50
F#5
60
G5
70
G#5
80
A5
90
A#5
100
While holding down the
Voice
button, press one of
the C3 ~ E3 keys to select a reverb type. If you
select Effect Off (E3 key), both reverb and chorus
will be turned off.
Key Reverb Type
C3
Room (with Chours)(Default)
C#3
Stage
(with Chours)
D3
Hall
(with Chours)
D#3
Large Hall (with Chours)
E3
Effect Off
Page 15

14
Voice Button
While holding down the
Voice
button, press one of the C5 ~ A#5 keys to select the chorus
wet/dry amount. The default wet/dry amount for chorus is 0%. If you select Effect Off for the
reverb type, then the chorus effect will also be turned off and you will only hear the direct
sound.
Chorus Wet/Dry Mix
Key Demo Song
C6
Demo 1 Witches Dance Macdowell
C#6
Demo 2 Arabesque Debussy
D6
Demo 3 French Suite No 5 Bach
D#6
Demo 4 Capriccio in B Op76 No 2 Brahms
E6
Demo 5 Oriental Granados
F6
Repeat All (Demo 1 ~ Demo 5)
While holding down the
Voice
button, press one of the C6 ~ F6 keys to select and play a
demo song. If you want all demo songs to be played in a loop, press the F6 key. While playing
the demo, the
Voice
LED is blinking. To stop the demo song playback, press the
Voice
button again.
DEMO SONG
Page 16

15
Split Button
SPLIT Button
Press the
Split
button to activate split mode. The
Split
button indicator will light.
Splits are an easy way to make one performer sound like two. When you play the keyboard,
your right hand plays one voice and your left hand plays another. To exit split mode, press the
Voice
button.
While holding down the
Split
and
Function
buttons simultaneously, press any key of the
keyboard to set the split point. The split point is the point on the keyboard where the left sound
and right sound meet. The default split point set at the factory is F#3.
SPLIT POINT
The Lower Voice is the Left Sound as described above. To select one of the 10 primary voices
as the lower voice, hold down the
Split
button then press and release a keyboard key between
C1 and A1. To select any of 32 available voices as the lower voice, hold down the
Split
button then "enter" the voice's number (1~32) by pressing the number keys (C2~A2) then
press the "Enter" key (A#2), then release
Split
. See Page 12 for the voice list.
LOWER VOICE
The upper voice in Split Mode is the same as the main voice. It's not necessary to select the
upper voice separately.
UPPER VOICE
Page 17

16
Split Button
You can shift the left sound pitch up one or two
octaves if you wish. To do this, press and hold the
Split
button then press C#3 for a one octave shift,
D3 for two octaves, or C3 to restore normal pitch.
LOWER OCTAVE SHIFT
You can shift the right sound pitch down one or two
octaves if you wish. To do this, press and hold the
Split
button then press F#3 for a one octave shift,
F3 for two octaves, or G3 to restore normal pitch.
UPPER OCTAVE SHIFT
Key Lower Octave
C3 0 (Default)
C#3 +1
D3 +2
The 4-hand setup makes it easy to set the Split Point
and Octave Shifts for 2-person (4-hand) playing. To
enable 4-Hand Setup, press and hold
Split
then
press and release the C4 (Middle C) key. This will
set the upper and lower voice, the split point, and
octave shifts as shown below. If any of these
defaults are not suitable, they can be changed using
the methods described earlier.
4-HAND SETUP
Key 4-Hand Setup
C4
Lower Voice Grand Piano 1
Upper Voice Grand Piano 1
Split Point C4
Lower Octave +2
Upper Octave -2
Key Upper Octave
F3 -2
F#3 -1
G3 0 (Default)
Page 18

17
Function Button
You can adjust the touch sensitivity of the entire keyboard - how the dynamics of the sounds
respond to key velocity.
While holding down the
Function
button, press one of the C1 ~ E1 keys to select the touch
sensitivity.
TOUCH
Key Touch
C1
Light 1
C#1
Light 2
D1
Normal (Default)
For players who have a light touch-that is, you can play
more lightly and still get the same attack velocity values.
Light 2 is a bit more sensitive than Normal, Light 1 is the
most sensitive.
The standard value
D#1
Hard 1
E1
Hard 2
For players who have a heavier touch-that is, you can play
harder and still get the same attack velocity values. Hard 1
is less sensitive than Normal, Hard 2 is the least sensitive.
You can finely tune the pitch of the RE-110 up or
down. This function is useful when you play the
RE-110 along with other instruments that can't be
easily retuned.
While holding down the
Function
button, press the
C#2 or D#2 key to adjust the pitch by steps of 1
cent. The C2 or E2 key adjust the pitch in steps of 5
cents. The tuning range is 64 cents flat to 64 cents
sharp.
TUNE
FUNCTION Button
Key Tune Value
C2 -5 (Step)
C#2 -1 (Step)
D2 0 (440Hz-Default)
D#2 +1 (Step)
E2 +5 (Step)
Page 19

18
Function Button
Transpose allows you to play the keyboard in one key and have the notes sound in another
key. This is useful when accompanying singing, if the key of the written music is too high or
too low for the singer, or when playing music written for a transposing instrument, such as a
clarinet. The transpose function makes it possible to shift the pitch of the entire keyboard up or
down in semitone intervals up to six semitones.
While holding down the
Function
button, press one of the F#2 ~ F#3 keys to set the desired
amount of transposition.
TRANSPOSE
Key Transpose Value
F#2 -6
Key Transpose Value
C#3 +1
G2 -5 D3 +2
G#2 -4 D#3 +3
A2 -3 E3 +4
A#2 -2 F3 +5
B2 -1 F#3 +6
C3 0 (Default)
Page 20

19
Function Button
Key Receive Channel
C4 Ch 1 (Default)
C#4 Ch 2
D4 Ch 3
D#4 Ch 4
E4 Ch 5
F4 Ch 6
F#4 Ch 7
G4 Ch 8
G#4 Ch 9
A4 Ch 10
A#4 Ch 11
B4 Ch 12
C5 Ch 13
C#5 Ch 14
D5 Ch 15
D#5 Ch 16
Key Transmit Channel
C6 Ch 1 (Default)
C#6 Ch 2
D6 Ch 3
D#6 Ch 4
E6 Ch 5
F6 Ch 6
F#6 Ch 7
G6 Ch 8
G#6 Ch 9
A6 Ch 10
A#6 Ch 11
B6 Ch 12
C7 Ch 13
C#7 Ch 14
D7 Ch 15
D#7 Ch 16
The MIDI channels of the receiving and transmitting equipment must be matched for proper
data transfer. This function enables you to specify the channel on which the RE-110 transmit
and receives MIDI data.
While holding down the
Function
button, press one of the C4 ~ D#5 keys to set the desired
MIDI receive channel. And press one of the C6 ~ D#7 keys to set the desired MIDI transmit
channel. See Page 22 for more about your RE-110's MIDI features.
Notes transmited are the actual keyboard keys pressed irrespective of splitting, transposition,
and octave shift. Notes recieved are treated just like keypresses and may be modified by the
current split, transpose, and octave shift settings.
Program Changes recieved will only affect the current Upper Voice if the keyboard split is
active.
MIDI RECEIVE AND TRANSMIT CHANNEL
Page 21

20
Function Button
Local Control is the connection between the keyboard of the RE-110 and the internal soundproducing circuitry of the instrument. Normally, Local Control is ON; in fact, every time you
power-up the RE-110, it automatically sets to Local Control ON, so you can play the keyboard
and hear the sounds of the instrument. But, there are reasons for setting Local Control to OFF
especially when MIDI Out of the RE-110 is connected to feed back to the instrument's MIDI
In port. One example of this is when using an external sequencer whose MIDI In port is
connected to MIDI Out of the RE-110 and whose MIDI Out port is connected to MIDI In of
the RE-110. In such a case, you can eliminate the
doubling of notes by setting Local Control to OFF.
While holding down the
Function
button, press
the key G7 or A7 to set Local Control. See Page
22 for more about your RE-110's MIDI features
LOCAL CONTROL
RESET
Key Reset Value
C8
Voice
Reverb Type
Reverb Wet/Dry
Chorus Wet/Dry
Upper Voice
Lower Voice
Split Point
Upper Octave
Lower Octave
Touch
Tune
Transpose
MIDI Receive Channel
MIDI Transmit Channel
Local Control
Grand Piano 1
Room
10
0
Grand Piano 1
Fast Strings 1
F#3
0
0
Normal
0 (440Hz)
0
1
1
On
Key Local Control
G7 ON(Default)
A7 OFF
Since the RE-110 does not have a display, it is hard to know the current settings. If you get
confused or want to restore the default settings, just hold down the
Function
button then press
and release the C8 key. After doing this, all of the settings will be reset as the table below.
Page 22

21
Pedals
SUSTAIN PEDAL
The sustain pedal (rightmost pedal) functions in the same way as the damper
pedal of an acoustic piano. When the sustain pedal is pressed, notes
continue to play after their keys have been released. Releasing the pedal will
silence the sustained notes.
SOSTENUTO PEDAL
If you play a note on the keyboard and press the sostenuto pedal while the
notes are held, those notes will still sustain as long as you hold the pedal.
But all subsequently played notes will not be sustained.
SOFT PEDAL
The soft pedal reduces the volume while the pedal is pressed. The soft pedal
will not affect notes that are already playing when it pressed.
Soft Sostenuto Sustain
PEDALS
Page 23

22
MIIDI
"MIDI" stands for "Musical Instrument Digital Interface." It is an international standard that
allows electronic musical instruments to communicate with each other, using a simple cable
connection. It ensures that the RE-110 will remain compatible with the instruments of today
and tomorrow.
MIDI Connection
On the rear panel are two MIDI ports:
MIDI In receives MIDI messages
from
other equipment.
MIDI Out sends MIDI messages toother equipment.
MIDI cables provide the connection between the MIDI ports of one piece of equipment and
those of another. To keep things simple, there are only two valid MIDI connections: Out to In,
In to Out.
The simplest use of MIDI is to play two instruments at a time from the keyboard of one of
them. This is known as a "Master-Slave" connection. Use a MIDI cable to connect the MIDI
Out port of the "Master" (the instrument whose keyboard you'll play) to the MIDI In port of
the "Slave".
If you connect In to Out, rather than Out to In, the other instrument becomes the Master. And
if you use two cables, connecting In to Out, Out to In, you can use either instrument as the
Master.
You probably will want to use the RE-110 as your master keyboard. It is important to explain
that what is sent over the MIDI cables is information (data), not sound. In fact, the usefulness
of the master-slave setup lies in having each instrument produce a different sound, resulting in
a layering of sounds that expands on the layering that is possible with the RE-110 itself.
The slave can be a MIDI organ, portable keyboard, synthesizer, tone module, drum machine,
or effects device. If it doesn't have built-in amplification and speakers, connect its audio output
to the RE-110 Audio In jacks on the RE-110 rear panel.
MIDI
Page 24

23
MIIDI
Another application of MIDI is in using a sequencer to record and play back your
performance. An external sequencer can be a special hardware unit designed for that purpose,
or it can be a PC running special sequencing software. In either use, the MIDI connections are
the same - Out to In, In to Out.
MIDI Channels
For MIDI to control several instruments, each playing a different part at the same time, it relies
on different
channels
. MIDI channels are like TV channels: an instrument has to be "tuned" to
the correct one or it won't receive what is being transmitted. There are 16 channels available,
and each one can transmit any number of notes to any number of instruments, over the same
MIDI cable.
Page 25

24
Miscellaneous
Miscellaneous
HEADPHONES
A headphone jack allows private practice. Plugging in a
pair headphones turns off the speakers. You can also
insert a "dummy" stereo headphone adapter. This is
useful if you want to mute the internal speaker system
while using a more powerful external amplification
system connected to Audio out jack. There are two
identical headphone jacks on the RE-110.
AUDIO IN JACK
The Audio In jacks allow you to play along with a tape, CD player or to have an external tone
module connected to the RE-110 audio system. It is best to use a tone module, tape or CD
player that has its own output volume control because the volume control of the RE-110 does
not affect the signal coming from the Audio In jacks.
AUDIO OUT JACK
The Audio Out jack is used to boost the sound level coming from the piano by hooking it to
external amplifier and speaker systems. It can also be connected to an audio recorder to
preserve your performance. The RE-110's volume control also affects the signal at the Audio
Out jacks. If you wish to silence the RE-110's speakers while using the Audio Out jacks, plug
a pair of headphones into either Headphone jack.
Page 26

25
MIDI Implementation Chart
Basic Channel
Mode
Note Number
Velocity
After Touch
Pitch Bender
Control Change
Program Change
System Exclusive
System Common
System Real Time
Aux Messages
Notes
Default
Changed
Default
Messages
Altered
Key range
True Voice
Note ON
Note OFF
Keys
Channels
0, 32
1
6
7
10
11
64
66
67
83
91
93
120
121
True #
Song Pos.
Song Sel.
Tune
Clock
Messages
Local Control
All Notes Off
Active Sense
Reset
1
1-16
Any
X
0 - 127
0 - 127
O
O
X
X
X
X
X
X
X
X
X
O
O
O
X
O
O
X
X
O 1 - 32
O 0 - 31
X
X
X
X
X
X
X
O
X
X
1
1-16
Poly
Mode 3
12 - 108
12 - 108
O
O
X
X
X
X
O
X
O
X
X
O
O
O
O
O
O
X
O
O 1 - 32
O 0 - 31
X
X
X
X
X
X
X
O
X
X
Bank Select
Mod Wheel
Data Entry
Volume
Pan
Expression
Sustain Pedal
Sostenuto Pedal
Soft Pedal
Reverb Select
Reverb Wet/Dry
Chorus Wet/Dry
All Sound Off
Reset All Controllers
Function Transmitted Recognized Remarks
Mode 1 : Omni On, Poly Mode 2 : Omni On, Mono
Mode 3 : Omni Off, Poly Mode 4 : Omni Off, Mono
O = Yes
X = No
Manufacturer : KURZWEIL
Model : RE-110 Digital Piano
Date : 2/1/2006
Version 1.0
MIDI Implementation Chart
Page 27

26
Appendix
Appendix
Specification
Physical
Audio
Electrical
Environmental
Height
Depth
Length
Weight
32.3 inch
16.5 inch
54.3 inch
112 lbs
25 Watt Amplification
2 Speakers
Audio Outputs
Audio Inputs
Headphone Output
2 x 12.5 Watts RMS Per Channel
4 x 6 inch (10cm x 15cm) Oval Type
Impedance : 1KΩ source
Level : nominal 0.5V RMS
Impedance : 50K Load
Level : nominal 0.5V RMS
Impedance : 47Ω source
Level : nominal 0.5V RMS
82 cm
42 cm
138 cm
51 kg
Safe Voltage Range
Safe Frequency Range
Power Consumption
90~125 Volts or 190~250 Volts depending on adapter
47 ~ 63Hz
20 Watts nominal (Piano sound at normal volume)
Operating Temperature
Storage Temperature
Operating Humidity
Storage Humidity
5 to 40℃
-25 to +85℃
5 to 95% (non ~ condensing)
5 to 95% (non ~ condensing)
(40 to 104 ℉)
(-13 to 185 ℉)
Page 28

27
Quick Operation Guide
Quick Operation Guide
While holding down the
Voice, Split
or
Function
button, press the keys shown below to select voices, split
voices or functions.
Page 29

28
Notes
Notes
Page 30

29
Notes
Notes
Page 31

30
Notes
Notes
Page 32

www.ycpiano.co.kr
www.kurzweilmusicsystems.com
 Loading...