

Page 1

Installing Kurzweil K2600 ROM Options
Thank you for buying a ROM option for your K2600. This document shows you how to install
any of the ROM option kits into any K2600 instrument, whether it’s a keyboard model or a rackmount model.
What’s In This Document
• Option Kits and Part Numbers . . . . . . . . . . . . . . . . . . . . . . . . . . . . . . . . . . . . 1
• System Requirements . . . . . . . . . . . . . . . . . . . . . . . . . . . . . . . . . . . . . . . . . . . .2
• Contents of the Kits . . . . . . . . . . . . . . . . . . . . . . . . . . . . . . . . . . . . . . . . . . . . . . 3
• Tools and Materials Required for Installation . . . . . . . . . . . . . . . . . . . . . . . .3
• Important! Before You Install… . . . . . . . . . . . . . . . . . . . . . . . . . . . . . . . . . . . . 3
• Caution! Protection from Static Electricity. . . . . . . . . . . . . . . . . . . . . . . . . . .4
• Installing the Daughter Board . . . . . . . . . . . . . . . . . . . . . . . . . . . . . . . . . . . . . 4
• Installing ROM Option Cards (Keyboard or Rack-Mount Models) . . . . . . 6
• Installing Object Files . . . . . . . . . . . . . . . . . . . . . . . . . . . . . . . . . . . . . . . . . . . .8
• Object file lists (Table 1). . . . . . . . . . . . . . . . . . . . . . . . . . . . . . . . . . . . . . . . . . 13
Option Kits and Part Numbers
• RMB-26 ROM Option Daughter Board (required for any option card)
• RMB1-26 Orchestral ROM Option Card
• RMB2-26 Contemporary ROM Option Card
• RMB3-26 Stereo Dynamic (SD) Piano ROM Option Card
• RMB4-26 Vintage EPs ROM Option Card
• RMB5-26 General MIDI ROM Option Card
Part No. 910336, Rev. E
Page 2

•
Installing Kurzweil K2600 ROM Options
System Requirements
System Requirements
Daughter Board
You can install ROM options (also called sound options or soundblocks) in any K2600. The only
requirement is that your K2600 has a ROM option daughter board (RMB-26) already installed. If
you’re installing your first ROM option, you probably don’t have the daughter board. You must
install a daughter board before you can install any ROM option. Daughter board kits are
available from your Kurzweil dealer. Instructions for installing the daughter board begin on
page 4.
Once the daughter board is in place, you can install one or more of the ROM option cards. Each
of the ROM option cards has a pair of female connectors that fit into corresponding male
connectors on the daughter board. The daughter board is clearly labeled to identify which
option goes into which pair of connectors. Instructions for installing option cards begin on
page 6.
If you are installing ROM 5 (GM)
The ROM 5 option gives your K2600 a great-sounding General MIDI (GM) sound set. To achieve
its high level of sonic realism, ROM 5 works in conjunction with the Orchestral ROM. Therefore,
you must have both options installed in order to use ROM 5 for GM.
Also, note that ROM 5 fits in the same daughter board location used by ROM 4. You can have
either ROM 5 or ROM 4 installed at this location, but not both at the same time.
Operating System Requirements
Your option kit comes with a set of floppy disks that includes disks for current OS software.
If you’re installing:
• SD Piano , you must have v3.01 or later of the operating system (OS) software.
• Vintage EPs option requires v3.10 or later.
The General MIDI (GM) ROM option requires v4.0 or later.
The Orchestral (ROM 1) or Contemporary (ROM 2) options don’t require OS updates. The
current version is available at no cost, however, at www.kurzweilmusicsystems.com.
Install ALL of your Object Files
After you install your option, you’ll need to reinstall the base objects (program files and such)
that correspond to your current OS, as well as the objects for all installed ROM options. The base
objects file is on a floppy disk that came with your K2600 (or with the most recent OS that
you’ve installed). If you don’t have this floppy, you can get the appropriate object files from our
website.
The Best of VAST sound set requires that you have both Orchestral and Contemporary ROMs
installed. The objects included with Best of VAST also include the objects for these ROM
options, so you do not need to install the Orchestral and Contemporary objects separately.
The Best of VAST sound set also requires v4.0 or later of the K2600 operating system.
2
Page 3

Installing Kurzweil K2600 ROM Options
Contents of the Kits
Daughter Board Kit (RMB-26)
• ROM Option Daughter Board
• Foam retention block to keep the daughter board in place
Sound Option Card Kits (RMB1-26 through RMB5-26)
• Sound Option Card
• One or more floppy disks containing ROM program objects, and in some cases, operating
system software, demo songs, and/or custom programs for loading into RAM
Tools and Materials Required for Installation
• #2 Phillips screwdriver
• Two thick foam pads (keyboard models only)
• The floppy disks that came with your new ROM option kit(s)
• If you already have one or more ROM options installed, you may also need one or more of
the floppy disks that came with those option kits (the disks contain objects that you’ll need
to reinstall in your K2600). If you don’t have the disks, you can download the object files
you need from the “downloads” area of our website:
Contents of the Kits
http://www.kurzweilmusicsystems.com/html/downloads.html
• If your K2600 has the sampling feature, you’ll need the floppy disk containing the
Live-mode objects. Again, you can download the object files from our website.
If you’re not sure which floppy disks or files you need, don’t worry. There is a table at the end of
this document that list the files you need for any installation. For tips about keeping track of the
files you need, see Organizing the Object Files on page 9.
Important! Before You Install…
…you must back up any user-defined objects that you want to keep: programs, setups, samples,
studios, FX presets, songs, intonation tables, velocity maps—in other words, anything stored in
RAM. All of these user-defined objects will be deleted from your K2600 when you do the hard
reset at the end of the installation procedure.
The easiest way to do this is to make an “Everything” backup; this stores the entire contents of
the K2600’s RAM to a single file. You can then reinstall everything in one operation, without
having to keep track of individual objects.
Once you begin the installation, you can’t go back and do the backup. So if you want to save
your RAM objects, do it before you begin the option installation.
3
Page 4

Installing Kurzweil K2600 ROM Options
Caution! Protection from Static Electricity
Making an “Everything” Backup
1. Press Disk to enter Disk mode.
2. Use the Alpha Wheel to select a destination for the backup: either Floppy or the SCSI ID of
a hard disk.
3. Press Save . The Save dialog appears, prompting you to select which range of object IDs to
save.
4. Use the Alpha Wheel or Down cursor button to select Everything .
5. Press the OK soft button.
6. Name the file, using the Left / Right cursor buttons along with the Alpha Wheel or
alphanumeric buttonpad.
7. Press OK .
Caution! Protection from Static Electricity
The K2600 and ROM options are sensitive to static electricity. You can seriously damage them if
there’s a “spark” between you and any of the circuit boards or option cards. It’s important that
you discharge all residual static electricity from your body before beginning the installation. You
should also work on surfaces that won’t generate static electricity—for example, don’t stand (or
put the K2600) on a rug or carpet.
1. Before handling any of the components you’re going to install, touch the outer casing of
the K2600 (or any conductive object). The casing of the 2600 is isolated from the circuitry,
so a spark between you and the casing will not damage anything.
2. Remove the option from its static-protective bag. Hold the option in one hand and then
firmly grasp the K2600 casing again with your other hand. Repeat this step for each option
that you install.
Installing the Daughter Board
If you’ve previously installed a ROM option in your K2600, the daughter board is already in
place. In this case, proceed to the next section, Installing ROM Option Cards (Keyboard or Rack-
Mount Models) .
If this is your first ROM option installation, follow the directions below for installing the
daughter board. There’s one subsection for installing in keyboard models, and another for
installing in rack-mount K2600s.
Daughter Board Installation for Keyboard Models
Warning: The K2600 and ROM options are sensitive to static electricity. Before handling the
daughter board, please follow the instructions above for protection from static electricity.
4
Page 5
Installing Kurzweil K2600 ROM Options
Installing the Daughter Board
1. Unplug all external wires, cables, and connectors from the K2600 and turn it so the
keyboard faces you.
2. Turn the K2600 upside down by lifting the front edge and rotating it away from you. Rest
the front panel on two three-inch thick foam pads (or similar soft items like pillows).
These pads will prevent damage to the K2600’s sliders and Alpha Wheel.
3. Using a #2 Phillips screwdriver, remove the eight screws attaching the access panel. Set
the access panel and screws aside for reassembly.
4. Remove the adhesive strip backing from the thick piece of foam supplied in the RMB-26
kit (the thin piece is for installation in rack-mount models, and you won’t need it). Attach
the foam over the cross-hatched area on the access panel.
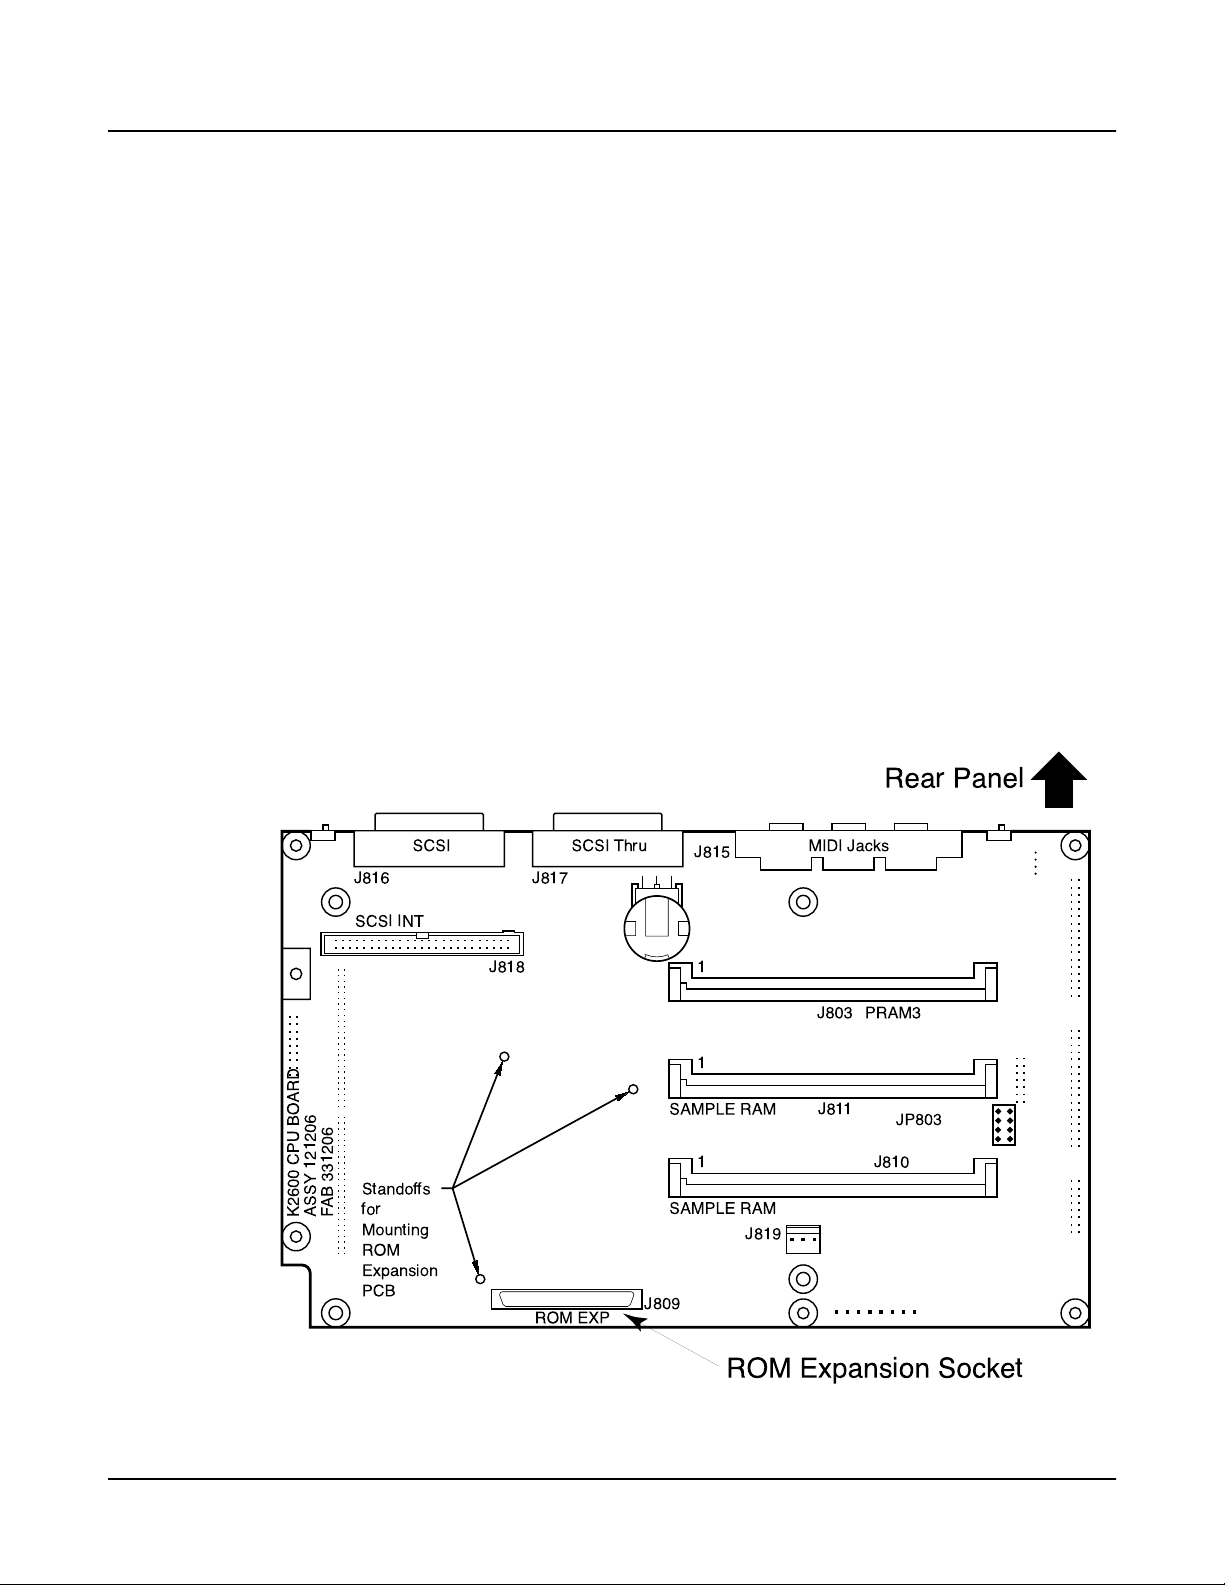
5. Locate Connector J809 (labeled ROM EXP) and the three standoffs (white plastic pins that
stick straight up) on the CPU board. See Figure 1.
6. Align the ROM option daughter board so that Connector J1201 on the daughter board
lines up with Connector J809 on the CPU board. The three holes in the daughter board
should line up with the standoffs on the CPU board.
7. Press down on the ROM Option Daughter Board to attach it to the connector and
standoffs on the CPU board. The board will snap into place on the three standoffs.
8. Turn to page 6, and proceed with the instructions for installing ROM option cards.
Rear Panel
ASSY 121206
K2600 CPU BOARD
FAB 331206
SCSI
J816
SCSI INT
J818
Standoffs
for
Mounting
ROM
Expansion
PCB
SCSI Thru
J817
ROM EXP
J815
1
1
SAMPLE RAM
1
SAMPLE RAM
J809
J819
MIDI Jacks
PRAM3
J803
J811
JP803
J810
Figure 1 K2600 CPU Board
ROM Expansion Socket
5
Page 6

Installing Kurzweil K2600 ROM Options
Installing ROM Option Cards (Keyboard or Rack-Mount Models)
Daughter Board Installation for Rack-Mount Models
Warning: The K2600 and ROM options are sensitive to static electricity. Before handling the
daughter board, please follow the instructions on page 4 for protection from static electricity.
1. Unplug all external wires, cables, and connectors from the K2600R and turn it upside
down.
2. Locate the access panel on the bottom side of the unit. Using a #2 Phillips screwdriver,
remove the six screws attaching the access panel. Set the access panel and screws aside for
reassembly.
3. Remove the adhesive strip backing from the thin piece of foam supplied in the RMB-26 kit
(the thick piece is for installation in keyboard models, and you won’t need it). Attach the
foam over the cross-hatched area on the access panel.
4. Locate Connector J809 (labeled ROM EXP) and the three standoffs (white plastic pins that
stick straight up) on the CPU board. See Figure 1.
5. Align the ROM option daughter board so that Connector J1201 on the daughter board
lines up with Connector J809 on the CPU board. The three holes in the daughter board
should line up with the standoffs on the CPU board.
6. Press down on the ROM Option Daughter Board to attach it to the connector and
standoffs on the CPU board. The board will snap into place on the three standoffs.
7. Proceed with the following instructions for installing ROM option cards.
Installing ROM Option Cards
If you haven’t already installed the ROM option daughter board (RMB-26), turn to the section
called Installing the Daughter Board (page 4), and follow those instructions. Then return here to
proceed with the installation of your ROM option(s).
Warning: The K2600 and ROM options are sensitive to static electricity. Before handling any
option card, please follow the instructions on page 4 for protection from static electricity.
1. On the daughter board, locate the connector for the ROM option card you are installing.
You can install either ROM 4 (Vintage EPs) or ROM 5 (General MIDI) in the ROM 4 slot.
As shown in Figure 2, the connectors are labeled as follows:
• ORCHESTRAL ROM BLOCK A
• CONTEMPORARY ROM BLOCK B
• ROM 3
• ROM 4
Notice that the connectors for the Orchestral ROM option and the Contemporary ROM
option are spaced farther apart than those for ROM 3 and ROM 4. That’s because the cards
for the Orchestral ROM option and the Contemporary ROM option are rectangular, while
the cards for ROM 3, ROM 4, and ROM 5 are smaller, and square in shape.
(Keyboard or Rack-Mount Models)
Caution : The option cards are “keyed” so that you can’t insert an option card into the wrong
pair of connectors—you couldn’t accidentally put the Orchestral ROM option into the
connectors for the Contemporary ROM option, for example. It is possible, however, to insert an
option card with the wrong orientation, which could damage the card. To prevent this, both the
daughter board and the option cards are marked with arrows. Make sure that the arrow on each
option card points in the same direction as the corresponding arrow on the daughter board.
6
Page 7

Installing Kurzweil K2600 ROM Options
Installing ROM Option Cards (Keyboard or Rack-Mount Models)
Figure 2 shows how you would insert the SD Piano ROM option card into the ROM 3
connectors (the procedure is similar for all the option cards). In the figure, you’re looking at the
top of the option card; the connectors are on the underside. After making sure the arrows point
in the same direction, align the connectors on the option card with those on the daughter board.
Keeping the card as level as possible, press the card into the connectors on the daughter board. It
should be relatively easy to press the card into place (about the same amount of pressure it takes
to eject a disk from the K2600’s floppy drive). If the card doesn’t pop into place easily, check the
connectors on the daughter board to make sure there aren’t any bent pins.
ROM 3ROM 4
WHEN INSTALLED
EXPANSION PCB
THE ARROW ON
DIRECTION AS
POINT IN SAME
CONTEMPORARY ROM
BLOCK B
ORCHESTRAL ROM
BLOCK A
Connector to ROM EXP connector on CPU board
ARROW MUST
SD Piano ROM Option card
Figure 2 Daughter board, showing connectors for options
2. Replace the access panel and loosely install the screws, starting with those closest to the
hinge (back) of the access panel. When the screws are loosely in place, tighten them all,
then turn the K2600 right side up. This completes the “hardware” portion of the
installation.
3. Reconnect the power cable. The next part of the installation is to install the object files, as
described in the following section.
7
Page 8

Installing Kurzweil K2600 ROM Options
Installing Object Files
Installing Object Files
Object files organize raw samples and other data into the programs that you use during normal
operations. There’s a file containing “base objects”: all the standard factory program
information. There’s also a separate object file for each option that you’ve installed. You’ll need
to reinstall the base objects first, then install the object file for each of the options installed in
your K2600.
Some of the ROM options may also require an operating system update, as shown below. For
these, we recommend that you install the operating system files first.
ROM Option Minimum K2600 OS Level
SD Piano (ROM 3) 3.01
Vintage EPs (ROM 4) 3.10
General MIDI (ROM 5) 4.0
For all the factory programs (both the standard factory programs numbered from 1 to 199 and
the factory programs for the options) to be available, you must reinstall the base objects,
followed by the objects for all of your options. For example, if you installed the Contemporary
ROM option last year, and you’ve just installed the Orchestral ROM option, you must install the
base objects file, then install the object files for the Contemporary option and the Orchestral
option—you can’t simply install the object files for the Orchestral option alone.
How to Interpret the Filenames
If you look at the table at the end of this document, you’ll see lists of filenames that look
something like this: OBJKB300.K26
The name of each object file has four parts:
• Prefix : three or four characters that identify the type of the file. In our example above, OBJK
identifies the file as an obj ect file for the K 2600. Operating system files have the prefix K26 .
• Category : identifies what kind of object file it is. The example at the top of this section
indicates a b ase objects file.
• Version : three digits that indicate the version of the object file. The version of the
example is 3 . 00 . Operating system files have a one-character suffix to the version,
identifying the two parts of the entire set of operating system data.
• Extension : three characters following a dot, and identifying the file type to the K2600. Object
files (including those containing programs, songs—all the objects you can save with the
K2600) have the extension K26 . Operating system files have the extension KOS .
Throughout this document, we use placeholders to represent the version numbers in filenames.
Instead of using specific version numbers, we use nnn to represent any version of a file—as
expressed in the description of filename prefixes, above.
8
Page 9

Organizing the Object Files
We strongly recommend that you get the object files for your options in order before you begin
installing them. Otherwise it’s easy to lose track of what you’ve installed and what you haven’t.
If you install an object file more than once, things will still work, but you might not have enough
ROM space for all the object files, in which case you’ll have to start over and install all the object
files again. If you forget to install an object file, you’ll definitely have to start over and install all
the object files again.
The table beginning on page 13 lists all the possible combinations of options, and the
corresponding object files to install for each combination of options. To determine which files
you need to install, go to the table and look in the "Option name" (first) column. Find the entry
that matches the options that you now have in your instrument (that is, after installing any new
options). Then look in the second column to find the object files that you’ll need to install.
For example, if you have the sampling feature, the Orchestral ROM option, and have just
installed the Contemporary ROM option, you’ll need to install the base-objects file (remember to
install it before the other object files). After that, you’ll need to install the Orchestral,
Contemporary, and Live-mode object files (the Live-mode object file is for the sampling feature).
The third column of the table gives the names of the object files as they appear in the K2600
display.
If you have a hard disk connected to your K2600, we recommend putting all the required object
files into a single directory that contains no other files. This will make it easier to keep track of
things as you progress. If you don’t have a hard disk, organize your floppy disks in the order in
which you want to install the objects.
Installing Kurzweil K2600 ROM Options
Installing Object Files
Note : If you have a partitioned disk drive, all of these files need to be in the first partition (that’s
the only partition visible to the boot loader).
In either case, it’s a good idea to refer to Table 1 while installing object files, checking off each file
as you install it. Don’t forget to load the files in the order you see listed under the "Files to
install" column.
Using the Boot Loader to Install the Files
The boot loader is the special utility that enables you to install ROM option objects into the
K2600’s flash ROM (unlike Disk mode, which loads objects into RAM).
1. Turn your K2600 off, if it isn’t off already.
2. Turn it on again, and watch the display carefully. When you see
release the Exit button. This runs the boot loader. You’ll see the main Boot Loader page: By
default, the option called Install|System is selected.
------|K2600|Boot|Loader|vn.nn||||-----||||||||||||||||||||||||||||||||||||||||
|||Install|System|||||Hard|Reset||||||||
|||Install|Objects||||Run|Diags|||||||||
|||Run|System|||||||||Fixed|Diags|||||||
||||||||||||||||||||||||||||||||||||||||
||||||||||||||||||||||||||||||||||||||||
||||||||||||||||||||||||||||||||||||OK||
Please|wait
, press and
9
Page 10

Installing Kurzweil K2600 ROM Options
Installing Object Files
3. If you’re installing new operating system software (which is required for some options),
press OK to begin the procedure. If you’re not installing new operating system software,
skip to Step 11.
Bear in mind that you may have to install new operating software. For example, if your
operating system software is earlier than version 3.01, and you’re installing the Stereo
Dynamic Piano ROM option, you must install operating system version 3.01 or later (if
you don’t, the SD Piano option won’t work). Whichever option you’re installing, we
recommend that you install the most recent operating system software, but that’s up to
you, as long as you have the right base objects file. If you’re on line, be sure to check our
website for the most recent versions of both operating system software and object files.
The address is on page 3.
When you press OK, the Drive Selection page appears:
||||||||||||||||||||||||||||||||||||||||
||||||||||||||||||||||||||||||||||||||||
|||||Device|to|install|from:||floppy||||
||||||||||||||||||||||||||||||||||||||||
|||||||SCSI|ID|of|this|unit:||N/A|||||||
||||||||||||||||||||||||||||||||||||||||
||||||||||||||||||||||||||||||||||||||||
|||||||||||||||||||||||||||Cancel||OK|||
4. By default, the K2600’s floppy drive is selected. If you’re going to install from floppy
disks, insert the disk containing Part A of the operating system (K26VnnnA.KOS) into the
floppy drive, then press OK. If you’re going to install from a hard disk, use the Alpha
Wheel to select the SCSI ID of the disk from which you’re going to install, then press OK.
In either case, the File Selection page appears:
||||||||||||||||||||||||||||||||||||||||
||||||||||||||||||||||||||||||||||||||||
||||||||||||||||||||||||||||||||||||||||
||File|to|install:|||K26VnnnA.KOS|1408K|
|||||||||||||||||||||RESOURCE.FRK|<DIR>|
|||||||||||||||||||||THEVOL|1|||||<DIR>|
||||||||||||||||||||||||||||||||||||||||
|||||||NewDrv||Root||Parent|Cancel||OK||
Note: In most cases, you can use the Plus/Minus buttons or the Up/Down cursor buttons
instead of the Alpha Wheel.
5. If necessary, use the Alpha Wheel to select the operating system file (K26VnnnA.KOS). If
you’re installing from a hard disk, you may need to use the Parent or Root soft button to
navigate to the directory where the file is stored. If you need to select a different drive,
press the NewDrv soft button, which returns you to the Drive Selection page.
When you’ve selected the operating system file, press OK. This displays a confirmation
page, which states that the K2600 is ready to install the selected file (including pathname)
from the selected drive.
10
Page 11

Installing Kurzweil K2600 ROM Options
Installing Object Files
6. Check to make sure you’ve selected the right file, then press OK. This begins the actual
installation of the file. The display indicates that the K2600 is checking the file; again, it
shows the selected file and selected drive. A “thermometer” bar appears on the top line of
the display, indicating the progress of the installation. After a short while, the display
indicates that the K2600 is installing the selected file. The installation takes a few minutes.
7. When the installation of Part A is finished, the display returns to the main Boot Loader
page, with the Run|System option selected. Use the Alpha Wheel to select
Install|System again (for Part B), and press OK.
8. If you’re installing from floppy disks, eject the Part A diskette from the floppy drive, and
insert the diskette containing Part B of the operating system (K26VnnnB.KOS), then press
OK. If you’re installing from a hard disk, just press OK.
9. Select the Part B file (K26VnnnB.KOS), and press OK. The confirmation page appears.
10. Check that you’ve selected the right file, press OK, and wait for the main Boot Loader
page to reappear (this takes a bit less time than the installation of Part A). When the main
Boot Loader page reappears, you’re ready to begin installing the object files.
11. Select the Install|Objects option, and press OK. The Drive Selection page appears
(as shown in Step 3 on page 9).
12. If you’re going to install objects from floppy disks, insert the disk containing the K2600’s
base objects into the floppy drive. If necessary, use the Alpha Wheel to select floppy, then
press OK.
If you’re going to install from a hard disk, select the SCSI ID of the disk from which you’re
going to install, then press OK. In either case, the File Selection page appears. It’s similar
to the File Selection page shown in Step 4 on page 10, with one difference: when you’re
installing objects, the second line of this page shows the amount of ROM available for the
installation of additional objects.
Remember, you must install the base-objects file before you install any of the object files for the
ROM options (and the object file for Live mode, if you have the sampling feature).
13. Select the base-objects file (OBJKBnnn.K26). If you’re installing from a hard disk, you may
need to use the Parent or Root soft button to navigate to the directory where the file is
stored. If you need to select a different drive, press the NewDrv soft button, which returns
you to the Drive Selection page.
When you’ve selected the base-objects file, press OK. This displays a confirmation page,
which states that the K2600 is ready to install the selected file (including pathname) from
the selected drive.
14. Check to make sure you’ve selected the right file, then press OK. This begins the actual
installation of the file. The display indicates that the K2600 is checking the file; again, it
shows the selected file and selected drive. A “thermometer” bar appears on the top line of
the display, indicating the progress of the installation. After a short while, the display
indicates that the K2600 is installing the selected file. The installation takes a few minutes.
When it’s finished, the Drive Selection page reappears.
15. If you’re installing from floppy disks, insert the next disk, then press OK. If you’re
installing from a hard disk, select the SCSI ID of the hard disk, then press OK. In either
case, the File Selection page appears.
16. Select the next object file to install, then press OK. Again, we recommend that you use the
file list in Table 1 to keep track of the files you’ve installed.
11
Page 12

Installing Kurzweil K2600 ROM Options
Sound Check
17. Check the confirmation page to make sure you’ve selected the right file, then press OK.
When the installation is finished, the Drive Selection page reappears.
18. Repeat Steps 15–17 for each of the remaining files in your list (inserting disks as necessary
if you’re installing from floppy disks).
19. When all the files are installed, press Done. The K2600 displays the message
Finishing|installation|of|ROM|objects. When the installation is complete, the
main Boot Loader page reappears.
20. Select the Hard|Reset option, then press OK (a hard reset is necessary to reinitialize all
objects). You’ll see a warning reminding you that a hard reset will delete all user RAM (all
of the objects that you’ve created). Press the Up and Down cursor buttons at the same
time to execute the hard reset. You’ll see a message informing you that user RAM has been
erased. Press any button, and you’ll return to the main Boot Loader page. Select the
Run|System option, then press OK. After a few system checks, the K2600 will return to
Program mode.
Caution: Be sure to do the hard reset! It ensures that all the ROM objects are available and
ready to play.
Congratulations! Your option installation is complete.
Sound Check
Reconnect your K2600 to your audio system, or plug in a set of headphones. Check your audio
levels. Scroll through the program banks to find the new programs. Play a few of the programs
to make sure that everything is working properly. The programs are in the following locations:
Base ROM Sounds 001–199
Orchestral option 900–999
Contemporary option 800–899
SD Piano option 720–729
Live mode 740–749
Vintage EPs 600–699
General MIDI 500–635 (1–128 in GM Mode)
12
Page 13

Installing Kurzweil K2600 ROM Options
Option name Files to install Filenames Comments
Orchestral
(RMB1-26)
Contemporary
(RMB2-26)
SD Piano
(RMB3-26)
Vintage EPs
(RMB4-26)
Orchestral and
General MIDI
Orchestral and
Contemporary
Orchestral and
Contemporary
w/ Best of VAST
Orchestral and
SD-Piano
Orchestral and
Vintage EPs
Base objects OBJKBnnn.K26 Use the version that corresponds to your operating system version
Orchestral objects OBJKOnnn.K26
Live-mode objects OBJKLnnn.K26 Only needed if sampling option is installed.
Base objects OBJKBnnn.K26 Use the version that corresponds to your operating system version
Contemporary objects OBJKCnnn.K26
Live-mode objects OBJKLnnn.K26 Only needed if sampling option is installed.
Operating System, Part A K26VnnnA.KOS v3.01 or later required
Operating System, Part B K26VnnnB.KOS v3.01 or later required
Base objects OBJKBnnn.K26 Use the version that corresponds to your operating system version
SD Piano objects OBJSDnnn.K26
Live-mode objects OBJKLnnn.K26 Only needed if sampling option is installed.
Operating System, Part A K26VnnnA.KOS v3.10 or later required
Operating System, Part B K26VnnnB.KOS v3.10 or later required
Base objects OBJBnnn.K26 Use the version that corresponds to your operating system version
Vintage EPs objects OBJEPnnn.K26
Live-mode objects OBJKLnnn.K26 Only needed if sampling option is installed.
Operating System, Part A K26VnnnA.KOS v4 or later required
Operating System, Part B K26VnnnB.KOS v4 or later required
Base objects OBJKBnnn.K26 Use the version that corresponds to your operating system version
Orchestral objects OBJKOnnn.K26
General MIDI objects OBJGMnnn.K26
Live-mode objects OBJKLnnn.K26 Only needed if sampling option is installed.
Base objects OBJKBnnn.K26 Use the version that corresponds to your operating system version
Orchestral objects OBJKOnnn.K26
Contemporary objects OBJKCnnn.K26
Live-mode objects OBJKLnnn.K26 Only needed if sampling option is installed.
Operating System, Part A K26VnnnA.KOS v4 or later required
Operating System, Part B K26VnnnB.KOS v4 or later required
Base objects, Part A OBJB400A.K26
Base objects, Part B OBJB400B.K26
Live-mode objects OBJKLnnn.K26 Only needed if sampling option is installed.
Operating System, Part A K26VnnnA.KOS v3.01 or later required
Operating System, Part B K26VnnnB.KOS v3.01 or later required
Base objects OBJKBnnn.K26 Use the version that corresponds to your operating system version
Orchestral objects OBJKOnnn.K26
SD Piano objects OBJSDnnn.K26
Live-mode objects OBJKLnnn.K26 Only needed if sampling option is installed.
Operating System, Part A K26VnnnA.KOS v3.10 or later required
Operating System, Part B K26VnnnB.KOS v3.10 or later required
Base objects OBJKBnnn.K26 Use the version that corresponds to your operating system version
Orchestral objects OBJKOnnn.K26
Vintage EPs objects OBJEPnnn.K26
Live-mode objects OBJKLnnn.K26 Only needed if sampling option is installed.
Best of VAST objects include Orchestral & Contemporary objects.
Sound Check
Table 1 Operating System and Object Files for all ROM Option Configurations
13
Page 14

Installing Kurzweil K2600 ROM Options
Sound Check
Option name Files to install Filenames Comments
Operating System, Part A K26VnnnA.KOS v3.01 or later required
Operating System, Part B K26VnnnB.KOS v3.01 or later required
Contemporary and
SD Piano
Contemporary and
Vintage EPs
SD Piano and
Vintage EPs
Orchestral,
Contemporary, and
General MIDI
w/ Best of VAST
Orchestral,
Contemporary, and
General MIDI
Orchestral,
Contemporary, and
SD Piano
Orchestral,
Contemporary, and
SD Piano
w/ Best of VAST
Base objects OBJKBnnn.K26 Use the version that corresponds to your operating system version
Contemporary objects OBJKCnnn.K26
SD Piano objects OBJSDnnn.K26
Live-mode objects OBJKLnnn.K26 Only needed if sampling option is installed.
Operating System, Part A K26VnnnA.KOS v3.10 or later required
Operating System, Part B K26VnnnB.KOS v3.10 or later required
Base objects OBJKBnnn.K26 Use the version that corresponds to your operating system version
Contemporary objects OBJKCnnn.K26
Vintage EPs objects OBJEPnnn.K26
Live-mode objects OBJKLnnn.K26 Only needed if sampling option is installed.
Operating System, Part A K26VnnnA.KOS v3.10 or later required
Operating System, Part B K26VnnnB.KOS v3.10 or later required
Base objects OBJKBnnn.K26 Use the version that corresponds to your operating system version
SD Piano objects OBJSDnnn.K26
Vintage EPs objects OBJEPnnn.K26
Live-mode objects OBJKLnnn.K26 Only needed if sampling option is installed.
Operating System, Part A K26VnnnA.KOS v4 or later required
Operating System, Part B K26VnnnB.KOS v4 or later required
Base objects, Part A OBJB400A.K26
Base objects, Part B OBJB400B.K26
General MIDI objects OBJGMnnn.K26
Live-mode objects OBJKLnnn.K26 Only needed if sampling option is installed.
Operating System, Part A K26VnnnA.KOS v4 or later required
Operating System, Part B K26VnnnB.KOS v4 or later required
Base objects OBJKBnnn.K26 Use the version that corresponds to your operating system version
Orchestral objects OBJKOnnn.K26
Contemporary objects OBJKCnnn.K26
General MIDI objects OBJGMnnn.K26
Live-mode objects OBJKLnnn.K26 Only needed if sampling option is installed.
Operating System, Part A K26VnnnA.KOS v3.01 or later required
Operating System, Part B K26VnnnB.KOS v3.01 or later required
Base objects OBJKBnnn.K26 Use the version that corresponds to your operating system version
Orchestral objects OBJKOnnn.K26
Contemporary objects OBJKCnnn.K26
SD Piano objects OBJSDnnn.K26
Live-mode objects OBJKLnnn.K26 Only needed if sampling option is installed.
Operating System, Part A K26VnnnA.KOS v4 or later required
Operating System, Part B K26VnnnB.KOS v4 or later required
Base objects, Part A OBJB400A.K26
Base objects, Part B OBJB400B.K26
SD Piano objects OBJSDnnn.K26
Live-mode objects OBJKLnnn.K26 Only needed if sampling option is installed.
Best of VAST objects include Orchestral & Contemporary objects.
Best of VAST objects include Orchestral & Contemporary objects.
Table 1 Operating System and Object Files for all ROM Option Configurations
14
Page 15

Installing Kurzweil K2600 ROM Options
Option name Files to install Filenames Comments
Operating System, Part A K26VnnnA.KOS v4 or later required
Orchestral,
Contemporary, and
Vintage EPs
w/ Best of VAST
Orchestral,
Contemporary, and
Vintage EPs
Orchestral, SD
Piano, and Vintage
EPs
Orchestral, SD
Piano, and General
MIDI
Contemporary, SD
Piano, and Vintage
EPs
Orchestral,
Contemporary, SD
Piano, and Vintage
EPs
w/ Best of VAST
Operating System, Part B K26VnnnB.KOS v4 or later required
Base objects, Part A OBJB400A.K26
Base objects, Part B OBJB400B.K26
Vintage EPs objects OBJEPnnn.K26
Live-mode objects OBJKLnnn.K26 Only needed if sampling option is installed.
Operating System, Part A K26VnnnA.KOS v3.10 or later required
Operating System, Part B K26VnnnB.KOS v3.10 or later required
Base objects OBJKBnnn.K26 Use the version that corresponds to your operating system version
Orchestral objects OBJKOnnn.K26
Contemporary objects OBJKCnnn.K26
Vintage EPs objects OBJEPnnn.K26
Live-mode objects OBJKLnnn.K26 Only needed if sampling option is installed.
Operating System, Part A K26VnnnA.KOS v3.10 or later required
Operating System, Part B K26VnnnB.KOS v3.10 or later required
Base objects OBJKBnnn.K26 Use the version that corresponds to your operating system version
Orchestral objects OBJKOnnn.K26
SD Piano objects OBJSDnnn.K26
Vintage EPs objects OBJEPnnn.K26
Live-mode objects OBJKLnnn.K26 Only needed if sampling option is installed.
Operating System, Part A K26VnnnA.KOS v4 or later required
Operating System, Part B K26VnnnB.KOS v4 or later required
Base objects OBJKBnnn.K26 Use the version that corresponds to your operating system version
Orchestral objects OBJKOnnn.K26
SD Piano objects OBJSDnnn.K26
General MIDI objects OBJGMnnn.K26
Live-mode objects OBJKLnnn.K26 Only needed if sampling option is installed.
Operating System, Part A K26VnnnA.KOS v3.10 or later required
Operating System, Part B K26VnnnB.KOS v3.10 or later required
Base objects OBJKBnnn.K26 Use the version that corresponds to your operating system version
Contemporary objects OBJKCnnn.K26
SD Piano objects OBJSDnnn.K26
Vintage EPs objects OBJEPnnn.K26
Live-mode objects OBJKLnnn.K26 Only needed if sampling option is installed.
Operating System, Part A K26VnnnA.KOS v4 or later required
Operating System, Part B K26VnnnB.KOS v4 or later required
Base objects, Part A OBJB400A.K26
Base objects, Part B OBJB400B.K26
SD Piano objects OBJSDnnn.K26
Vintage EPs objects OBJEPnnn.K26
Live-mode objects OBJKLnnn.K26 Only needed if sampling option is installed.
Best of VAST objects include Orchestral & Contemporary objects.
Best of VAST objects include Orchestral & Contemporary objects.
Sound Check
Table 1 Operating System and Object Files for all ROM Option Configurations
15
Page 16

Installing Kurzweil K2600 ROM Options
Sound Check
Option name Files to install Filenames Comments
Operating System, Part A K26VnnnA.KOS v3.10 or later required
Operating System, Part B K26VnnnB.KOS v3.10 or later required
Orchestral,
Contemporary, SD
Piano, and Vintage
EPs
Orchestral,
Contemporary, SD
Piano, and General
MIDI
Orchestral,
Contemporary, SD
Piano, and General
MIDI
w/ Best of VAST
Base objects OBJKBnnn.K26 Use the version that corresponds to your operating system version
Orchestral objects OBJKOnnn.K26
Contemporary objects OBJKCnnn.K26
SD Piano objects OBJSDnnn.K26
Vintage EPs objects OBJEPnnn.K26
Live-mode objects OBJKLnnn.K26 Only needed if sampling option is installed.
Operating System, Part A K26VnnnA.KOS v4 or later required
Operating System, Part B K26VnnnB.KOS v4 or later required
Base objects OBJKBnnn.K26 Use the version that corresponds to your operating system version
Orchestral objects OBJKOnnn.K26
Contemporary objects OBJKCnnn.K26
SD Piano objects OBJSDnnn.K26
General MIDI objects OBJGMnnn.K26
Live-mode objects OBJKLnnn.K26 Only needed if sampling option is installed.
Operating System, Part A K26VnnnA.KOS v4 or later required
Operating System, Part B K26VnnnB.KOS v4 or later required
Base objects, Part A OBJB400A.K26
Base objects, Part B OBJB400B.K26
SD Piano objects OBJSDnnn.K26
General MIDI objects OBJGMnnn.K26
Live-mode objects OBJKLnnn.K26 Only needed if sampling option is installed.
Best of VAST objects include Orchestral & Contemporary objects.
Table 1 Operating System and Object Files for all ROM Option Configurations
16
 Loading...