

Page 1

E
xpression
M
ate
U
ser’s Guide
©1999 All rights reserved. Kurzweil is a product line of Young Chang Co.; V. A. S. T. is a registered trademark,
and Kurzweil, ExpressionMate, MIDIScope, K2500, and K2000 are trademarks of Young Chang Co. All other
products and brand names are trademarks or registered trademarks of their respective companies. Product
features and speciÞcations are subject to change without notice.
Part Number: 910308 Rev. B
i
Page 2

IMPORTANT SAFETY & INSTALLATION INSTRUCTIONS
INSTRUCTIONS PERTAINING TO THE RISK OF FIRE, ELECTRIC SHOCK, OR
WARNING
1. Read all of the Safety and Installation Instructions before using the product.
2. Do not use this product near water — for example, near a bathtub, washbowl, kitchen sink, in a
wet basement, near a swimming pool, or the like.
3. This product, in combination with external equipment that is connected to an amplifier and speakers or headphones, may be capable of producing sound levels that could cause permanent hearing
loss. Do not operate for a long period of time at a high volume level or at a level that is uncomfortable.
If you experience any hearing loss or ringing in the ears, consult an audiologist.
4. Place the product so that its location or position does not interfere with its proper ventilation.
5. Keep the product away from heat sources such as radiators, heat registers, or other products that
produce heat.
6. Connect the product to a power supply only of the type described in the operating instructions or
as marked on the product.
7. If the product will be unused for a long time, unplug the power supply cord from the outlet. When
unplugging the power supply cord, do not pull on the cord, but grasp it by the plug.
8. Make sure that objects do not fall and that liquids do not spill into the enclosure through openings.
9. This product is equipped with a polarized line plug (one blade wider than the other). This is a safety
feature. If you are unable to insert the plug into the outlet, contact an electrician to replace your obsolete outlet. Do not defeat the safety purpose of the plug.
10. This product should be serviced by qualified service personnel when:
11. Do not try to service the product beyond what is described in the user maintenance instructions.
Refer all other servicing to qualified service personnel.
12.
position where anyone could trip over, walk on, or roll anything over cords of any type. Do not let the
product rest on or be installed over cords of any type. Improper installations of this type create the
possibility of a fire hazard and/or personal injury.
WARNING:
could void your authority to operate the instrument.
IMPORTANT:
quality shielded cables.
NOTE:
vice, pursuant to Part 15 of the FCC Rules. These limits are designed to provide reasonable protection against harmful interference in a residential installation. This instrument generates, uses, and
can radiate radio frequency energy and, if not installed and used in accordance with the instructions,
may cause harmful interference to radio communications. However, there is no guarantee that interference will not occur in a particular installation. If this instrument does cause harmful interference to
radio or television reception, which can be determined by turning the instrument off and on, the user
is encouraged to try to correct the interference by one or more of the following measures:
• Reorient or relocate the receiving antenna.
• Increase the separation between the instrument and the receiver.
• Connect the instrument to an outlet on a circuit other than the one to which the receiver is
connected.
• If necessary, consult your dealer or an experienced radio/television technician for additional
suggestions.
NOTICE
This apparatus does not exceed the Class B limits for radio noise emissions from digital apparatus
set out in the Radio Interference Regulations of the Canadian Department of Communications.
AVIS
Le present appareil numerique n’emet pas de bruits radioelectriques depassant les limites applicables aux appareils numeriques de la class B prescrites dans le Reglement sur le brouillage radioelectrique edicte par le ministere des Communications du Canada.
- When using electric products, always follow basic precautions, including the following:
A. The power supply cord or the plug has been damaged; or
B. Objects have fallen, or liquid has been spilled into the product; or
C. The product has been exposed to rain; or
D. The product does not appear to be operating normally or exhibits a marked change in perfor-
mance; or
E. The product has been dropped, or the enclosure damaged.
WARNING
- Do not place objects on the product's power supply cord, or place the product in a
RADIO AND TELEVISION INTERFERENCE
Changes or modifications to this instrument not expressly approved by Young Chang
When connecting this product to accessories and/or other equipment use only high
This instrument has been tested and found to comply with the limits for a Class B digital de-
INJURY TO PERSONS
SAVE THESE INSTRUCTIONS
ii
Page 3

Contents
Young Chang Distributors.....................................................................ix
1: Introducing the ExpressionMate......................................1
Welcome!................................................................................................1
ExpressionMate Overview......................................................................1
The Ribbon......................................................................................1
Other Cool Stuff..............................................................................1
The Arpeggiator...............................................................................2
MIDI Merging.................................................................................2
K2000 and K2500 Users .................................................................2
How to Use This Book....................................................................2
2: Getting Started................................................................... 3
Unpacking the Unit.................................................................................3
Quick Start..............................................................................................3
Placement and Connections....................................................................5
Placing the ExpressionMate............................................................5
On a Flat Surface......................................................................5
On a Microphone Stand with the Bracket................................5
Placing and Connecting the Ribbon Controller...............................6
The Rear Panel ................................................................................7
Power Switch............................................................................7
Breath Jack...............................................................................7
SP1/CC Jack.............................................................................7
SP2 Jack ...................................................................................7
MIDI Ports................................................................................7
Power Jack................................................................................7
Connecting Pedals...........................................................................8
A Special Note About Switch Pedals.......................................8
Connecting a Breath Controller.......................................................8
Connecting the ExpressionMate to Your MIDI Gear......................9
Basic MIDI Hookup.................................................................9
Connecting Two MIDI Devices.............................................10
Connecting Several MIDI Devices ........................................10
Connecting the Power Supply.......................................................11
Powering Up.........................................................................................11
Setting the MIDI Channels...................................................................11
User Interface Basics............................................................................12
The Front Panel .............................................................................12
The Display ............................................................................12
Data Knob, - and + Buttons....................................................12
Cursor Buttons........................................................................13
Exit Button .............................................................................13
Store Button............................................................................13
iii
Page 4

Contents
Learn Button...........................................................................13
Controller Button....................................................................13
Arpeggiator Button.................................................................13
Global Button.........................................................................14
SW1 and SW2........................................................................14
Panic Button...........................................................................14
Front Panel LEDs...................................................................14
Setups....................................................................................................15
Selecting Setups.............................................................................16
Basic Selection.......................................................................16
Using Setup Lists ...................................................................16
Changing Setups with MIDI ..................................................17
Playing Setups...............................................................................17
Basic Technique.....................................................................17
Touching The Ribbon At More Than One Point....................18
Getting Back to Play Mode...................................................................19
Troubleshooting....................................................................................20
But It Still Doesn’t Work .......................................................20
3: Editing and Creating Setups .......................................... 21
The Controller Editor............................................................................21
Getting Around.....................................................................................22
Jump Selection .......................................................................23
Intuitive Entry ........................................................................23
Changing the Current Zone...........................................................24
Compare ........................................................................................24
Setting a Zone’s MIDI Channel............................................................24
Stacking Zones ..............................................................................25
Ribbon Configuration Parameters ........................................................25
Split ........................................................................................26
Mode.......................................................................................27
Spring (Sprg)..........................................................................27
Controller Editing.................................................................................28
Continuous Controllers ..........................................................30
Switch Controllers..................................................................31
Virtual Controllers..................................................................31
Continuous Controller Parameters........................................................32
Destination (Dest)..........................................................................33
Curve (Curv)..................................................................................33
Curve Amount (CrvAm)................................................................33
Scale (Scal)....................................................................................34
Offset (Offs) ..................................................................................35
Resolution (Res)............................................................................37
Entry (Entr) and Exit Values.........................................................37
iv
Page 5

Contents
Entry Value ............................................................................37
Exit Value...............................................................................38
Ribbon Assignment Parameters............................................................38
AuxD......................................................................................39
Breath (BRTH) Parameters...................................................................39
Continuous Control Pedal (CCPD) Parameters....................................40
Switch Controller Parameters...............................................................40
Switch Type (Type).......................................................................40
On Destination (On D), Off Destination (Off D) ..........................41
On Value (On V)...........................................................................41
Off Value (Off V)..........................................................................42
Entry (Entr) and Exit States...........................................................42
Switch Pedal (SP) Parameters ..............................................................42
Panel Switch (SW) Parameters.............................................................43
Virtual Controllers................................................................................43
Fixed Controller (FIX) Parameters.......................................................43
MIDI Remap Controller (MAP) Parameters ........................................44
Note Processing Parameters .................................................................45
Note Velocity Features...........................................................45
Continuous Controller Note Parameters ................................46
ROM Scales...................................................................................47
About The Harmonic Scale....................................................47
About The Arpeggiator Latch Scales.....................................47
The MIDI Destination List ...................................................................48
Special Function Controllers ................................................................52
Pitch Bend (PBend+).....................................................................52
Reverse Pitch Bend (PBend-)........................................................52
Pitch Bend Up or Down (PBend / and PBend\) ............................53
Channel Pressure (ChnPrs)............................................................53
Program Change (PrgChg)............................................................53
Zone Transpose (ZnXpos).............................................................54
Note Controller Destinations
(13Note, 37Note, SclLen, Note #).................................................54
Controller 40 (13Note / Note #) and
Switch or Fixed Controllers ...................................................55
Note Offset (NotOfs).....................................................................55
Note Velocity (NotVel).................................................................55
Note Switch (NoteSw)...................................................................56
Arpeggiator Controllers.................................................................56
MIDI Message Strings (MMsg1–6) ..............................................56
Controller Order....................................................................................56
Saving Your Work and Exiting ............................................................57
Naming, Storing, and Exiting...............................................................57
The Store Button............................................................................57
v
Page 6

Contents
The Exit Button .............................................................................58
Editing Hints and Suggestions..............................................................59
Do These Parameters Always Mean Something? .........................59
Do I Need All Those Controllers?.................................................59
Assigning a Message to Multiple Controllers...............................60
4: The Arpeggiator...............................................................61
Arpeggiator Quick Start........................................................................61
The Arpeggiator Editor.........................................................................61
Arpeggiator parameters ........................................................................62
Real Time Control of Arpeggiator Parameters..............................63
Tempo (Tempo).............................................................................63
Key range (Low Key, High Key) ..................................................64
Enable Switch (Enable Sw)...........................................................64
Note Source (Note Src) .................................................................64
Beats (Beats)..................................................................................65
Note Duration (Note Dur) .............................................................65
Latch Mode (LatchMode)..............................................................66
Latch Modes that use controller #49:.....................................67
Latch Modes that do not use controller #49:..........................67
Latch Modes that Resync the Clock:......................................67
Latch Modes that do not Resync the Clock: ..........................67
Ctlr#49 and Latch Modes.......................................................68
Note Order (NoteOrder) ................................................................71
Shift Amount (Shift Amt)..............................................................72
Shift Limit (ShiftLimt)..................................................................72
Limit Option (Limit Opt)...............................................................72
Glissando (Glissando) ...................................................................73
Note Velocity (Note Vel) ..............................................................73
Rhythm Select (RhythmSel)..........................................................74
Transpose (Transpose)...................................................................74
5: Global Functions.............................................................75
Getting Around.....................................................................................76
Global Parameter Set............................................................................76
Contrast..........................................................................................77
Drum Sync.....................................................................................77
RBN Dir.........................................................................................78
MIDI Merging...............................................................................79
MainMrgTo and Aux MrgTo.................................................79
MainMgOpt and AuxMrgOpt ................................................80
A Word About SysEx and Merging.......................................80
Merge Unprocessed (MergUnPro) ................................................81
Arp Clock ......................................................................................81
vi
Page 7

Contents
Send Clock (Send Clks).................................................................81
Program Change Parameters .........................................................81
Ext PgmCh .............................................................................81
Pgm BkLSB, Pgm BkMSB....................................................82
ZxNotesIn...............................................................................82
ZxMCtlsIn..............................................................................82
SYS EX ID....................................................................................82
SysEx Ers.......................................................................................83
Exiting Global Edit Mode .............................................................83
Other Global Objects............................................................................83
User Scales............................................................................................83
User Rhythms .......................................................................................84
Entering the Rhythm Editor ...................................................86
Setup Lists ...........................................................................................87
Setup Map.............................................................................................88
Saving and Reloading Setups ...............................................................88
Saving Setups (SysEx Dumps)......................................................89
Cancelling a SysEx Dump......................................................90
Loading Factory Setups.................................................................90
Loading User Setups......................................................................91
MIDIScope ...........................................................................................92
MIDIScope: Overview...........................................................92
MIDIScope: Detailed Operation & Screens...........................93
Exiting a Global Editor or Utility..................................................96
6: Messages, Troubleshooting, and Diagnostics .............97
Warning and Error Messages................................................................97
Low Battery...................................................................................97
Memory Failure.............................................................................97
Diagnostics ...........................................................................................98
Before You Begin..........................................................................98
Entering Diagnostics .....................................................................98
User Controls Diagnostic ..............................................................99
Buttons Test............................................................................99
Spinknob Test.......................................................................100
SP1/CC Test (CC Pedal or Switch Pedal)............................100
SP2 Test (Switch Pedal Only)..............................................101
Breath Controller Test..........................................................102
Ribbon Test ..........................................................................102
MIDI Test....................................................................................103
Battery Replacement...........................................................................105
Before You Begin........................................................................105
Opening the Unit .........................................................................105
Removing the Cover....................................................................106
vii
Page 8

Contents
Replacing the Battery..................................................................106
Replacing the Cover....................................................................107
Powering Up................................................................................107
A: Sending MIDI Messages............................................... 109
Special Function Bytes................................................................111
Data Format Codes......................................................................112
Using the MIDI String Editor......................................................112
B: ExpressionMate ROM Setups...................................... 115
Editing Program Change Messages....................................................116
Programming Conventions for Setups................................................117
Setup Descriptions..............................................................................118
viii
Page 9

Young Chang Distributors
Contact the nearest Young Chang ofÞce listed below to locate
your local Young Chang/ Kurzweil representative.
Young Chang America, Inc.
P.O. Box 99995
Lakewood, WA 98499-0995
Tel: (253) 589-3200
Fax: (253) 984-0245
Young Chang Co.
Kang Nam P.O.Box 998
Seoul, Korea
Tel: 011-82-2-3451-3500
Fax: 011-82-2-3451-3599
Young Chang Akki Europe GmbH
Industriering 45
D-41751 Viersen
Germany
Tel: 011-49-2162-4491
Fax: 011-49-2162-41744
Contents
Young Chang Canada Corp.
250 Shields Court, Unit 11
Markham, ONT L3R 9W7
Tel: (905) 948-8052
Fax: (905) 948-8172
ix
Page 10

Contents
x
Page 11

Introducing the ExpressionMate
ExpressionMate Overview
Chapter 1
Introducing the ExpressionMate
Welcome!
Congratulations, and thank you for purchasing a Kurzweil/
Young Chang ExpressionMate. YouÕve got your hands on a
powerful and fun MIDI controller, arpeggiator, and MIDI merger.
This manual will get you started with your new instrument.
YouÕll deÞnitely want to keep the manual handy as you become
an advanced user, too.
ExpressionMate Overview
The ExpressionMate lets you be more expressive with your MIDI
instruments, in live performances and in the studio.
The Ribbon
For starters, the ExpressionMate has a MIDI Ribbon controller.
You may already own MIDI instruments that have wheels,
joysticks, and pedals. These let you add lots of expressive touches
to your sounds, including vibrato, volume swells, and pitch
bends, to name a few.
The ExpressionMateÕs Ribbon lets you do all of that, plus has its
own unique abilities. For instance, you can create realistic pitch
bends when imitating instruments like trombone or violin,
because the Ribbon resembles a slide or a string. The Ribbon is
also great when you want to ÒjumpÓ to a certain point, rather
than moving a wheel or pedal through its entire range. You can
even use the Ribbon to play notes on your instrument.
Other Cool Stuff
The ExpressionMate has other controls too, including jacks for
pedals and a breath controller. The ExpressionMate can also
change incoming MIDI Controller messages into different kinds
of Controller messages. It even has ÒvirtualÓ controllers that send
MIDI messages automatically.
1
Page 12

Introducing the ExpressionMate
ExpressionMate Overview
The Arpeggiator
If you miss having an arpeggiator on your MIDI instrument,
youÕll have a blast with the ExpressionMateÕs Arpeggiator. It can
turn MIDI notes into simple broken chords, wild rhythmic
patterns, and anything in between.
MIDI Merging
The ExpressionMate has two MIDI interfaces. You can use these
to merge two incoming streams of MIDI data with the data
generated in the ExpressionMate. For example, you could
connect two keyboards to the ExpressionMate, play notes on
either keyboard while using the ExpressionMateÕs Ribbon, and
send all the information into a sequencer or a MIDI sound
module.
K2000 and K2500 Users
K2000 users can create 5 Zone Setups with an ExpressionMate or
use the ExpressionMate to add Setup features previously
available only to K2500 users, such as velocity remapping and
note mapping. K2500 users will be interested to learn that the
ability to play notes from the ribbon is more versatile on the
ExpressionMate.
How to Use This Book
The ExpressionMate
and running quickly. If you know MIDI already, and you know
pretty much what you want to do with the ExpressionMate, read
Quick Start on page 3. If you need some more help on using the
ExpressionMateÕs many advanced features, you should read all
of Chapter 2 and Chapter 3. The remaining two chapters deal
with some global functions, plus advanced troubleshooting and
diagnostics.
Also, donÕt forget to check our web site:
http://www.youngchang.com/kurzweil
for any late-breaking information on the ExpressionMate and
other Kurzweil products.
Above all, have fun, and make lots of great music with your
ExpressionMate!
UserÕs Guide
is designed to help you get up
2
Page 13

Chapter 2
Getting Started
This chapter will help you hook up your ExpressionMate and
learn its basic functions.
Unpacking the Unit
The box that your ExpressionMate ships in contains the
following:
The ExpressionMate
•
•
Ribbon controller
UserÕs Guide
•
AC adapter
•
•
Microphone stand mounting bracket
Adhesive-backed foam strip
•
•
Hook-and-loop fastener (three pads)
Getting Started
Quick Start
Be sure to keep the box and packing materials, in case you need
to ship the unit for any reason.
Quick Start
We recommend that you read through this whole chapter at some
point. However, if you want to start exploring your new
instrument right away, follow these steps:
1. Carefully remove all the contents of the box.
2. Place the ExpressionMate and the Ribbon controller on a
table or other ßat, stable surface. Plug the RibbonÕs cable into
the ÒControllerÓ jack on the ExpressionMateÕs right end.
3. Plug one end of a MIDI cable into the ExpressionMateÕs rearpanel ÒMain OutÓ port. Plug the other end of the cable into
the MIDI In port of the device or instrument that you want to
3
Page 14

Getting Started
Quick Start
play. Then plug one end of a second MIDI cable into the
ExpressionMateÕs rear-panel ÒMain InÓ port. Finally, plug the
other end into your instrumentÕs MIDI Out port.
4. Use the AC adapter to plug the ExpressionMate into an
electrical outlet. Then press the rear-panel power switch to
turn the ExpressionMate on. DonÕt be alarmed if you see
ßashing LEDs when you turn the ExpressionMate on, they
just indicate that the Arpeggiator is active on the current
Setup.
5. Turn the receiving MIDI instrument on, make sure that itÕs in
Multi Mode, and make sure that there are programs on MIDI
channels 1 through 3. If your instrument doesnÕt have a Multi
Mode, set it to receive on channel 1.
6. If you are using a MIDI instrument as both the controller and
the sound source (that is, you are not sending the
ExpressionMateÕs output to an external sound module), turn
Local Control Off on your keyboard. Otherwise you will get
double note events on some Setups.
7. Set your MIDI instrument to General MIDI (GM) mode. If
your instrument is not GM compatible, some of the Setups
will call up ÒrandomÓ programs on channels 1 Ð 3. In this
case, you may want to turn off the receiving of program
changes on those channels.
8. Start playing! Touch the Ribbon and buttons while you play
some notes on your MIDI instrument.
To try different Setups, turn the data knob or press the - and +
buttons on the front panel. A complete list of the Setups starts
on page 115 of this manual. For starters, check out Setup 3,
ÒBig Strum.Ó Play a chord on your MIDI instrument, then run
your Þnger up and down the ribbon to hear the effect. You do
not need to hold the notes on the keyboard. They are
remembered until you strike a new chord. Simply strike a
chord, play the ribbon, then strike another chord and play the
ribbon again.
For more in-depth instructions on setting up and using the
ExpressionMate, keep reading this chapter.
4
Page 15
Getting Started
Placement and Connections
Placement and Connections
Placing the ExpressionMate
On a Flat Surface
You can place the ExpressionMate on a table, an equipment rack,
or on any keyboard with a ßat, open area on its front panel (such
as a PC88 or a K2000 keyboard).
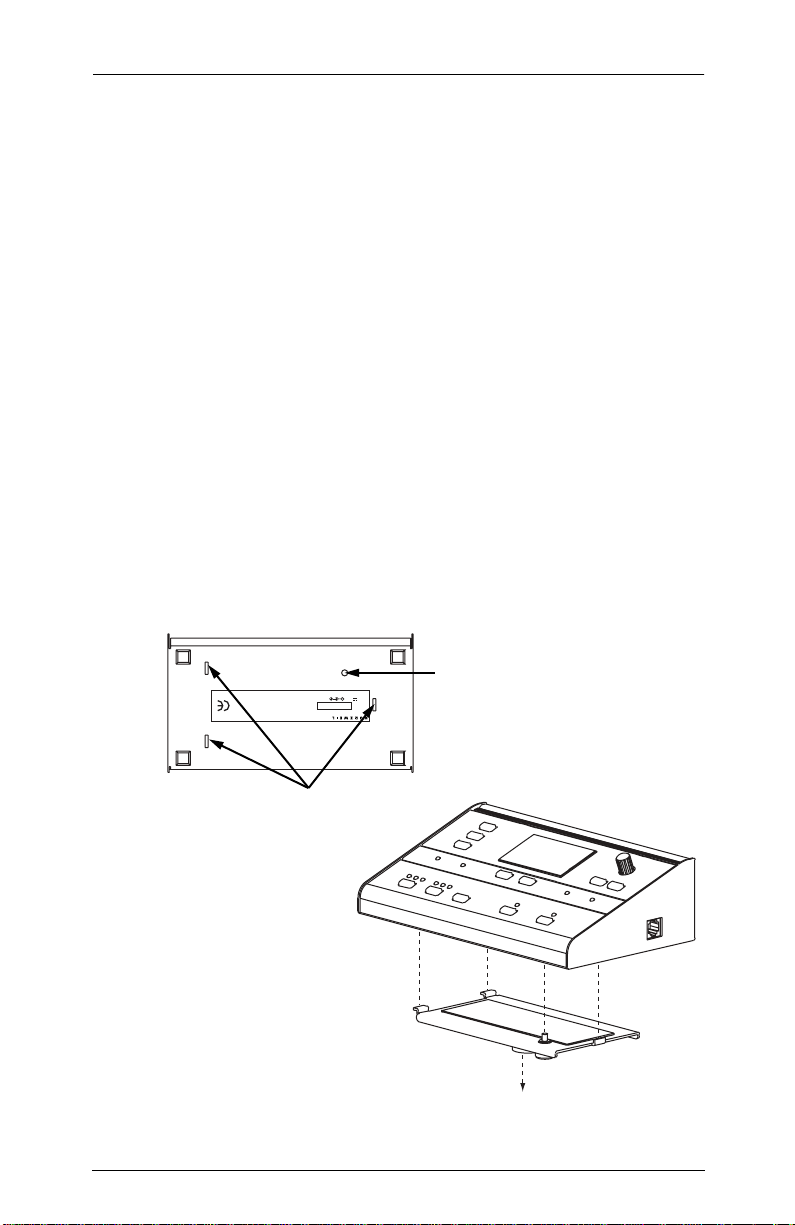
On a Microphone Stand with the Bracket
The ExpressionMate includes a bracket for mounting the unit on
top of a microphone stand. Follow these steps to use the bracket:
1. Screw the bracket onto the top of the mic stand.
2. Fit the ExpressionMateÕs left bracket holes onto the bracketÕs
two left-hand tabs. Then lower the right end onto the
remaining tab.
3. Tighten the bracketÕs thumb screw so that it holds the
ExpressionMate Þrmly in place on the bracket.
Screw Hole
ExpressionMate
MADE IN KOREA
12VDC
0.4A
SERIAL #
Product of: Young Chang Co., Ltd.
CAUSE UNDESIRED OPERATION.
RECEIVED, INCLUDING INTERFERENCE THAT MAY
(2) THIS DEVICE MUST ACCEPT ANY INTERFERENCE
MAY NOT CAUSE HARMFUL INTERFERENCE, AND
FOLLOWING TWO CONDITIONS: (1) THIS DEVICE
FCC RULES. OPERATION IS SUBJECT TO THE
THIS DEVICE COMPLIES WITH PART 15 OF THE
Mounting Holes
Attach Bracket to Top of Mic Stand
Figure 2-1. Mounting Bracket assembly.
5
Page 16
Getting Started
Placement and Connections
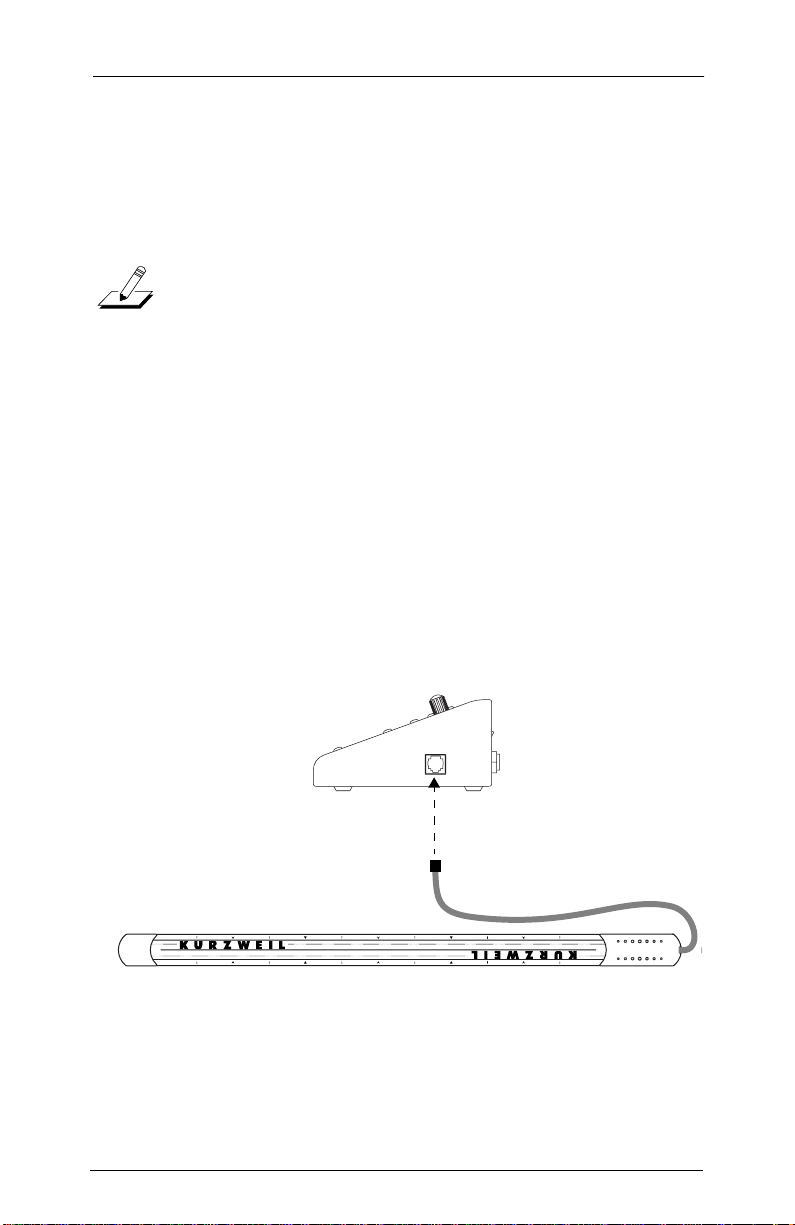
Placing and Connecting the Ribbon Controller
The Ribbon controller can rest on any ßat surface, but you may
Þnd it easiest to play if itÕs right in front of you. If your keyboard
has enough space on its front panel, you can place the Ribbon just
above the keys.
Note:
By default, the Ribbon sends higher values toward its
right end (the end with the cable). If you want the
cable on the left, and you still want the same response,
read ÒRBN DirÓ on page 78.
You can use the included adhesive-backed foam strip (which
attaches to the bottom of the ribbon), or the hook-and-loop
fastener pads to hold the Ribbon in place. However, donÕt attach
these to surfaces that become damaged easily, such as painted or
Þnished wooden surfaces. Also, we suggest that you attach the
hook half of the hook-and-loop pads to the bottom of the ribbon
and the loop (softer) half to the mounting surface. This will
prevent small mammals from becoming stuck to your keyboard.
When the Ribbon is where you want it, plug the unconnected end
of the cable into the ÒControllerÓ jack on the ExpressionMateÕs
right side.
ontroller
C
Figure 2-2. Connecting the Ribbon.
6
Page 17
Getting Started
Placement and Connections
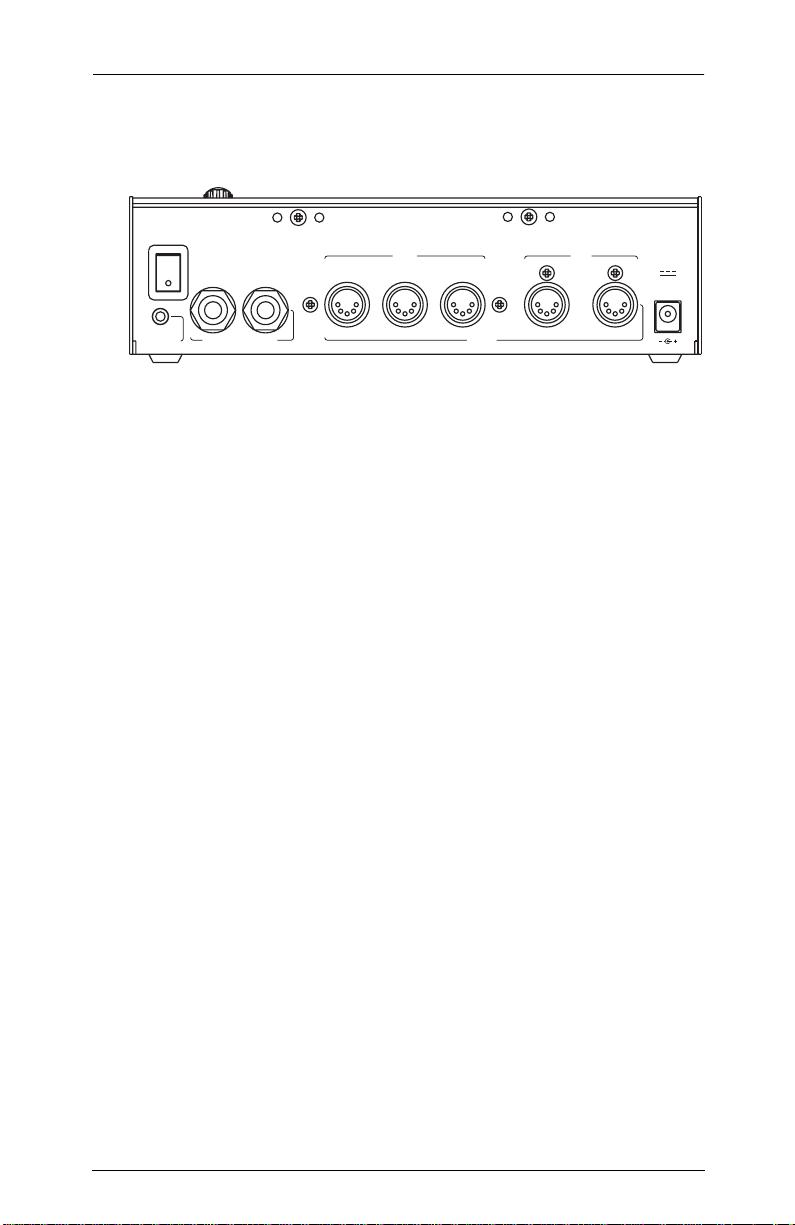
The Rear Panel
Here are brief descriptions of the rear panel connectors.
M
1 / CC
SP
B
reath witch / CC Pedals
S
SP
2
ain
In
Thru
Out In
MIDI
Power Switch
Press this to turn the ExpressionMate on or off.
Breath Jack
Plug a breath controller into this jack.
SP1/CC Jack
Connect either a CC (continuous control) pedal or a switch pedal
to this jack.
A
ux
Out
12VDC
0.4A
SP2 Jack
Plug a switch pedal into this jack.
MIDI Ports
Use these ports to connect the ExpressionMate to other MIDI
devices or instruments.
Power Jack
Plug the included AC adapter into this jack.
7
Page 18

Getting Started
Placement and Connections
Connecting Pedals
The ExpressionMate has two rear-panel jacks for connecting
pedal controllers. You can connect a switch pedal to SP2, and
either a switch pedal or a CC (continuous control) pedal to SP1/
CC. To work correctly, the CC pedal must be one that uses a 10K
linear potentiometer.
A Special Note About Switch Pedals
The ExpressionMate works with both normally-open switch
pedals, and normally-closed pedals (such as those made by
Roland, Yamaha, and other Japanese manufacturers). If a pedal is
plugged in when you turn the power on, the ExpressionMate
detects which kind of pedal it is.
If you hold down a switch pedal while the ExpressionMate
powers up, you will reverse the ExpressionMateÕs response to the
pedal. In other words, you might end up sustaining notes when
your foot is
Therefore, you should avoid touching the pedals until the startup
screen disappears.
off
the pedal, instead of when you push down.
1 / CC
SP
witch / CC Pedals
S
SP
2
Turning the power off and back on again will set the pedals back
to normal, as long as you donÕt touch them.
Connecting a Breath Controller
If you have a Yamaha or equivalent breath controller, connect it to
the rear-panel Breath jack.
B
reath
8
Page 19
Getting Started
Placement and Connections
Connecting the ExpressionMate to Your MIDI Gear
There are lots of ways to connect the ExpressionMate to your
MIDI devices. WeÕve chosen to show two simple, effective
conÞgurations that should give you ideas for your own MIDI
studio or rig. You can use the conÞgurations as printed, or
modify them for your own needs. (If you play MIDI guitar or
some other instrument besides the keyboard, donÕt be offended.
Just use your axe as the master controller.)
M
ain
In
Thru
Out In
MIDI
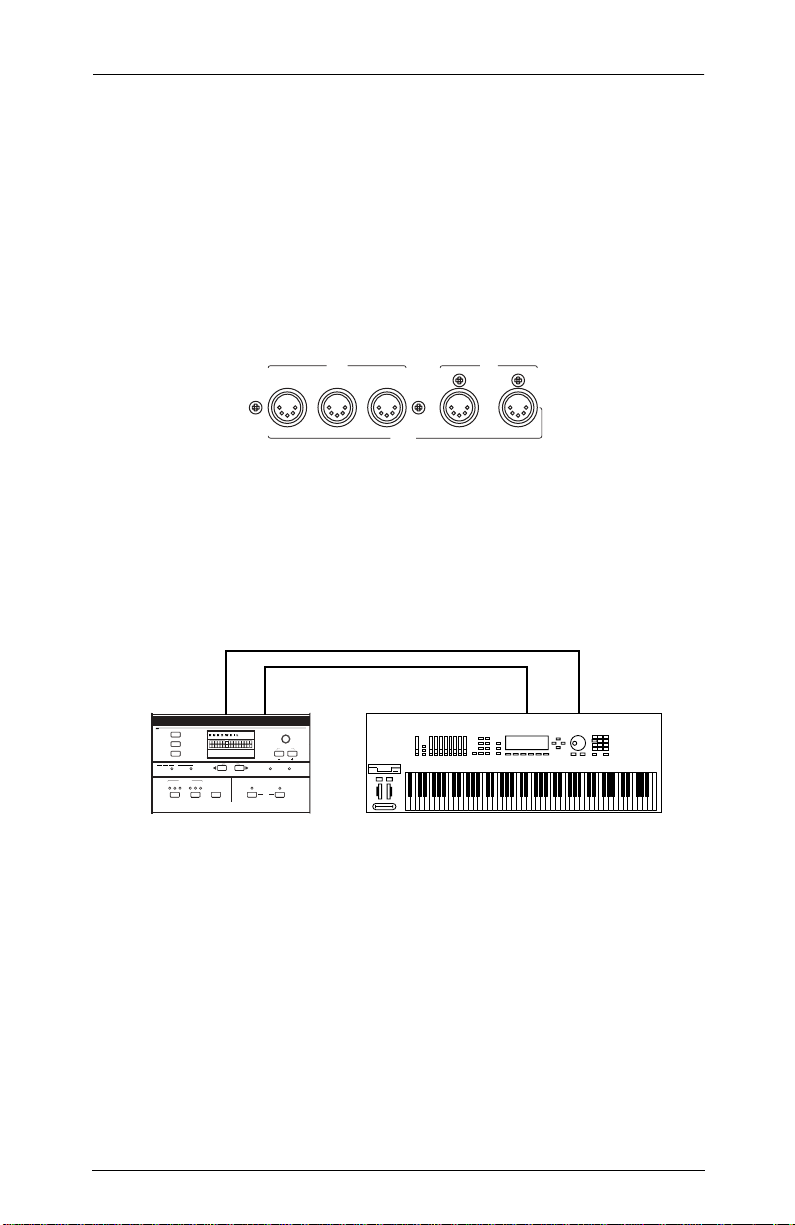
Basic MIDI Hookup
Connect the ExpressionMateÕs Main Out jack to the MIDI In jack
of the device that you want to control (such as a keyboard, sound
module, or computer). Then connect the other deviceÕs MIDI Out
jack to the ExpressionMateÕs Main In jack. Turn Local Control Off
on your keyboard.
A
ux
Out
Main Out
xit
E
S
tore
earn
L
3
1
Sections
Section
C
onfiguration
ibbon
R
Z
onesEdit
12
13 23
ontroller
C
A
rpeggiator
Compare
G
Main In Out In
Jump Value
ate
xpression
EM
lobal
istLtep
Jump Param
xternal
nternal
I E
S
MIDI
Panic
SW
1
SW
2
ExpressionMate MIDI Keyboard
Figure 2-3. Connecting the ExpressionMate to one MIDI device.
9
Page 20
Getting Started
Placement and Connections
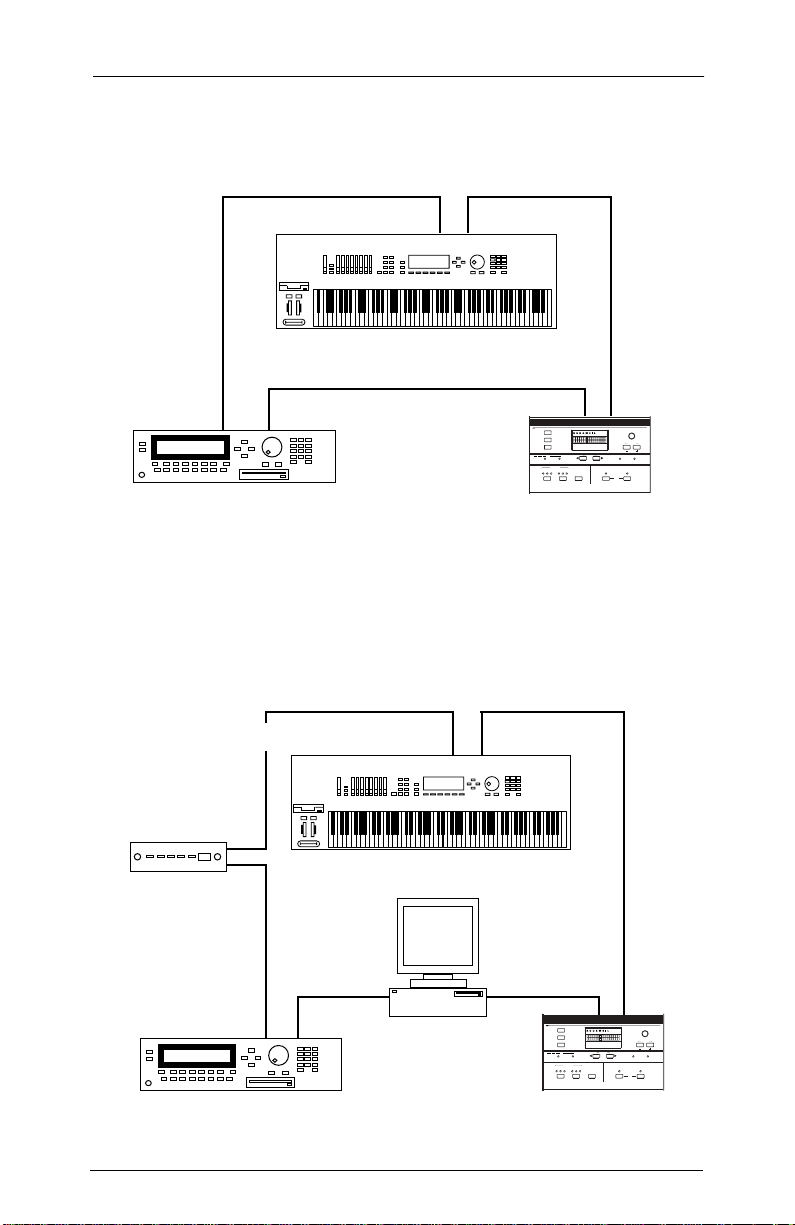
Connecting Two MIDI Devices
You can connect a master controller, a MIDI sound module, and
the ExpressionMate as shown here.
Out
3
Sections
E
xit
S
tore
earn
L
C
ibbon
R
12
C
ontroller
Main
1
Section
onfiguration
Z
onesEdit
13 23
A
rpeggiator
Out
Compare
G
lobal
xpression
EM
Jump Param
istLtep
Main
In
Jump Value
ate
xternal
nternal
I E
S
MIDI
Panic
SW
1
SW
2
Thru
In
Master Controller
In
ExpressionMateModule
Figure 2-4. Connecting the ExpressionMate to two MIDI devices.
Connecting Several MIDI Devices
You might have sound modules and a computer with a MIDI
interface. HereÕs one arrangement that lets you play everything
in your studio from a master controller and the ExpressionMate.
Etc.
In
Out
Thru
In
Master Controller
Module B
InOut
Thru
In
Computer
3
ExpressionMateModule A
Figure 2-5. Connecting the ExpressionMate to several MIDI devices.
10
E
xit
S
tore
earn
L
Sections
ibbon
R
1
Section
C
onfiguration
12
C
ontroller
Main
Out
Z
onesEdit
13 23
A
rpeggiator
Main
In
Jump Value
ate
xpression
EM
Jump Param
xternal
nternal
I E
istLtep
S
MIDI
Compare
Panic
G
lobal
SW
1
SW
2
Page 21

Getting Started
Setting the MIDI Channels
Connecting the Power Supply
Use the included AC adapter to plug the ExpressionMate into an
electrical outlet.
Powering Up
Once you have everything hooked up properly, press the power
switch to turn the ExpressionMate on. The screen will display a
message similar to this one for four seconds:
ExpressionMate
P1=V P2=O C=RBBN
HereÕs what the bottom line means:
• P1 is Pedal 1. It will equal V if a CC Pedal is plugged into the
SP1/CC jack, O if a normally-open switch pedal is plugged
in, or C if a normally closed switch pedal is plugged in. If
nothing is plugged in, V will be displayed.
• P2 is Pedal 2. It will equal O if a normally open switch pedal
is plugged into the SP2 jack, or C if a normally closed
(Roland type) pedal is plugged in. If nothing is plugged in, O
will be displayed.
• C is the controller plugged into the Controller jack on the right
side of the unit. It will always read RBBN, unless Kurzweil
introduces other controller types in the future. If nothing is
plugged in, RBBN will also be displayed.
If you see a different message, such as ÒLow BatteryÓ or
ÒMemory FailureÓ, refer to Chapter 6 for more information.
Setting the MIDI Channels
Every Setup has three Zones that send out MIDI information
when you play the Ribbon or use the Panel Switches and pedals.
In many of the Factory Setups, each Zone is set to a separate
MIDI channel. To take advantage of all three Zones, make sure
that the receiving instrument is in ÒMulti Mode,Ó (which is the
default mode for most modern instruments) and that there are
programs on channels 1 through 3. You can choose any programs
you want of course, but you might have more fun if each channel
plays a different sound.
11
Page 22
Getting Started
User Interface Basics
If you have two or more instruments, you can set each one to
receive on its own channel, so that each ExpressionMate Zone
controls a different instrument. You can also set several
instruments to the same channel, so that a single Zone can control
multiple programs on different instruments.
If the receiving instrument can only play on one MIDI channel at
a time, set it to receive on channel 1, 2, or 3.
User Interface Basics
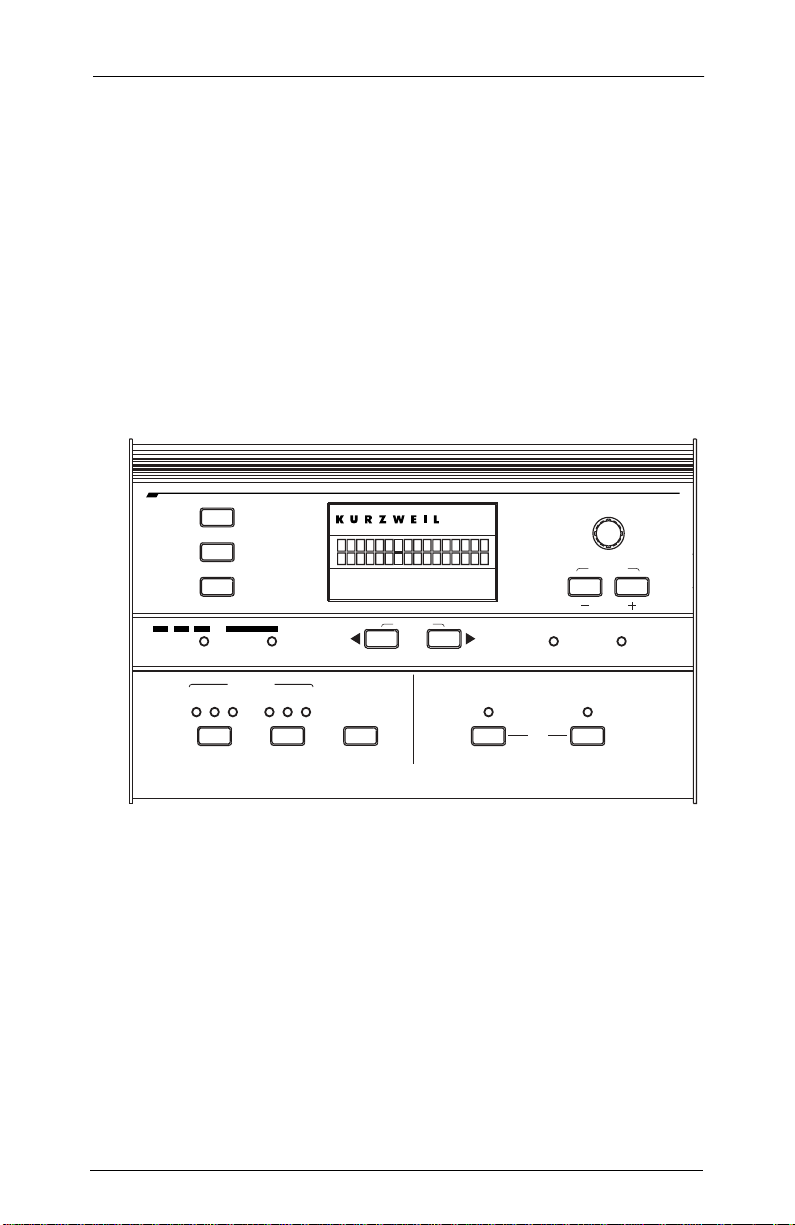
The Front Panel
E
xit
S
tore
earn
L
xpression
EM
ate
Jump Value
Compare
G
lobal
Jump Param
ist
L
tep
S
SW
1
Panic
nternal
I E
MIDI
SW
2
3
Sections
R
ibbon
C
onfiguration
12
C
ontroller
1
Section
Z
onesEdit
13 23
A
rpeggiator
The Display
The display shows you what Setup youÕre playing, what
parameter youÕre editing, or what options you can choose during
certain tasks. It displays other information too.
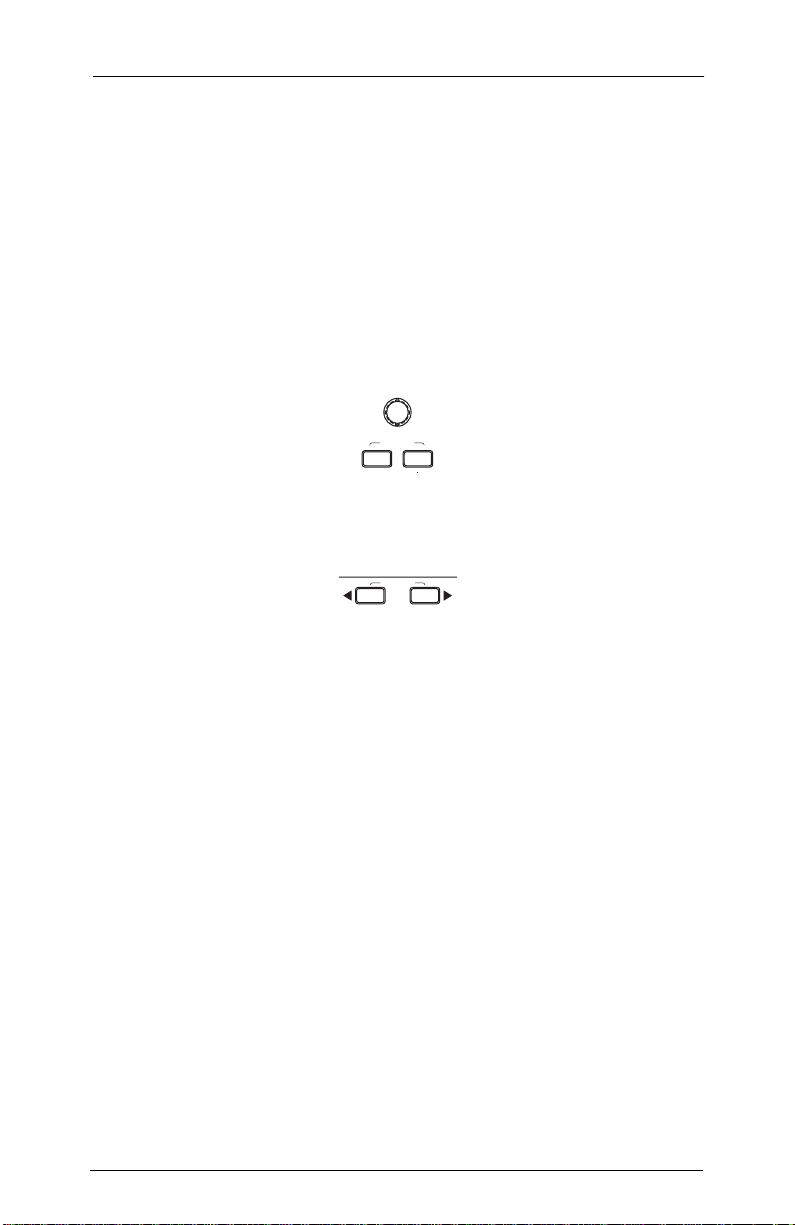
Data Knob, - and + Buttons
Use these to scroll through Setups in Play mode, and to change
values when you edit Setups.
12
xternal
Page 23

Getting Started
User Interface Basics
Cursor Buttons
The cursor buttons (< and >) just below the display let you
choose Setups from Setup Lists. While editing Setups, you can
press these buttons simultaneously to jump to the next group of
parameters.
The cursor buttons also function as ÒsoftÓ buttons. Options like
Yes, No, OK, and Reload will appear above the buttons at certain
times, like when loading and saving Setups. When this happens,
press the cursor button thatÕs under the option you want.
Exit Button
When youÕre editing the ExpressionMate parameters, you can
press the Exit button to leave the editor and return to Play mode.
Store Button
When youÕre editing Setups, you can press Store at any time to
name and save the Setup youÕre working on. If youÕre in Play
mode, pressing Store lets you rename or move the current Setup.
See page 57 for more information on naming and saving Setups.
See page 89 for more information on SysEx dumps.
Learn Button
The Learn button lets you perform ÒIntuitive Entry,Ó which
speeds up certain editing tasks. See page 23 for details on using
Intuitive Entry and the Learn button.
Controller Button
Pressing this button takes you into the Controllers Editor, where
you change how the Ribbon, pedals, buttons, and breath
controller behave in the current Setup.
Arpeggiator Button
Pressing this button takes you into the Arpeggiator Editor, where
you deÞne how the Arpeggiator will play in the current Setup.
13
Page 24

Getting Started
User Interface Basics
Global Button
While in Play mode, pressing this button brings up the Global
Select screen. You can then edit Global parameters (which affect
all Setups) or perform several utilities. While editing a Setup, the
Global button works as a Compare button, letting you switch
between the original, unedited Setup and the newly-edited
Setup.
SW1 and SW2
These are the two panel switches. You can use them to start and
stop the Arpeggiator, play notes, send program changes, or to do
other things.
Panic Button
When you press SW1 and SW2 simultaneously, they act as a
Panic button, which clears up stuck notes, reinitializes the
arpeggiators, and resets the Ribbon and other controllers. The
ÒInternalÓ LED will light for about 5 seconds (or until you release
the buttons) and the ExpressionMate will send the following
messages:
• All Notes Off, All Sound Off, and Reset All Controllers
messages on each channel of the Main Out port, then the
same for Aux Out port.
• Note Off messages for every note of every channel of the
Main Out port, then the same for the Aux Out port.
Front Panel LEDs
Every time you choose a new Setup, youÕll see the various LEDs
on the front of the unit lighting up. Here is a description of each:
• The ÒInternalÓ LED lights up when the ExpressionMate
generates MIDI messages. This can happen when you play
the Ribbon, buttons, pedals, or the Breath controller, or when
you send Entry and Exit values by changing Setups.
• The ÒExternalÓ LED shows that the ExpressionMate is
receiving MIDI messages at either of its two MIDI In ports,
Main or Aux. It should light up when you send external
controllers, or notes to the Arpeggiator.
• The Ò3 SectionsÓ and Ò1 SectionÓ LEDs show whether the
Ribbon is conÞgured as one or three sections.
14
Page 25

Getting Started
Setups
• The Zone LEDs above the Controller button light when you
press the button to enter the Controller Editor. They show
which one of the ExpressionMateÕs three Controller Zones
youÕre working with. (Some edit parameters affect all three
Zones, in which case all three LEDs will light up.)
• The Zone LEDs above the Arpeggiator button light when you
press the button to enter the Arpeggiator Editor. They show
which one of the ExpressionMateÕs three Arpeggiators youÕre
working with. (Some edit parameters affect all three
Arpeggiators, in which case all three LEDs will light up.)
These LEDs also ÒwinkÓ for each beat if that zoneÕs
Arpeggiator is active.
• The SW1 and SW2 LEDs light whenever you press the
buttons to turn them on. If a buttonÕs mode is Toggle, the
LED will stay lighted until you press the button again to turn
it off. If the buttonÕs mode is Momentary, the LED will stay
lighted until you release the button.
Note that the LED will only show the buttonÕs mode, Toggle
or Momentary, for Zone 1 of the current Setup.
Setups
With the ExpressionMate, you play what are called Setups. Each
Setup contains information that tells the Ribbon, buttons, pedals,
breath controller, and Arpeggiator how to behave.
The ExpressionMate comes with several Factory Setups that you
can use right away. Factory Setups are stored permanently in
ROM (Read-Only Memory) so you never have to worry about
losing them.
Setups that you create and save are User Setups. These are stored
in battery-backed memory, so they wonÕt be erased when you
turn the ExpressionMate off. When youÕre ready to create your
own User Setups, read Chapter 3.
Note: A memory failure or a drained battery can erase User
Setups, so you should back them up regularly. See
page 89 for steps on doing this.
15
Page 26
Getting Started
Setups
Selecting Setups
Basic Selection
After the ExpressionMate starts up for the Þrst time, youÕll see a
screen such as this:
SU 3
Big Strum
This is the main ÒPlay modeÓ screen. At the top-left is the number
of the currently selected Setup. Below that is the Setup name. You
use the data knob and the - and + buttons to change Setups.
Jump Value
Using Setup Lists
Pressing the < or > buttons lets you choose a Setup from one of
three Setup Lists.
Jump Param
ist
L
tep
S
If you press either button while in Play mode, the screen will
change to this:
SU 3 LS1 STEP1
Big Strum |
The top line now shows the Setup number on the left, followed
by the current List and the current Step within that List. Press the
< and > buttons together to go to the next List, and press either <
or > to change the current Step.
Setup Lists let you organize Setups so that theyÕre easier to Þnd
during live performances. For instance, if you use the same Þve
Setups every time you play out, you could create a list containing
those Þve Setups. (See page 87 for steps on doing this.)
Moving the data knob or pressing the - and + buttons takes you
out of the Setup Lists.
16
Page 27

Getting Started
Setups
Changing Setups with MIDI
You can use MIDI program changes to select the ExpressionMate
Setups. When you send a program change, the Play mode screen
will show the program change number in the upper-right hand
corner:
SU 3 MIDI123
Big Strum |
To be able to change Setups with program changes, you need to
set the Ext PgmCh parameter in the Global Menu to a speciÞc
MIDI channel, and then send your program changes on that
channel. For more on receiving MIDI program changes, see
ÒProgram Change ParametersÓ on page 81 and ÒSetup MapÓ on
page 88.
Playing Setups
As you go through the Factory Setups, try out the Ribbon and the
front-panel buttons to hear what they do. Many of the Factory
Setups were programmed to send modulation and Pitch Bend
messages, among others. Depending on how your MIDI
instrument is conÞgured, you may hear changes in pitch,
brightness, or volume.
Basic Tec hnique
There is no correct way to play the ExpressionMate, but youÕll
probably Þnd yourself playing your instrument with one hand,
and playing the ExpressionMate with the other.
If you have connected pedals or a Breath controller, youÕll have
some other controls too. You can also use the ExpressionMate
with a sequencer to control tracks during playback or while
recording.
Refer to the list of Setups near the end of this manual to see how
the buttons and Ribbon function in each setup.
17
Page 28
Getting Started
Setups
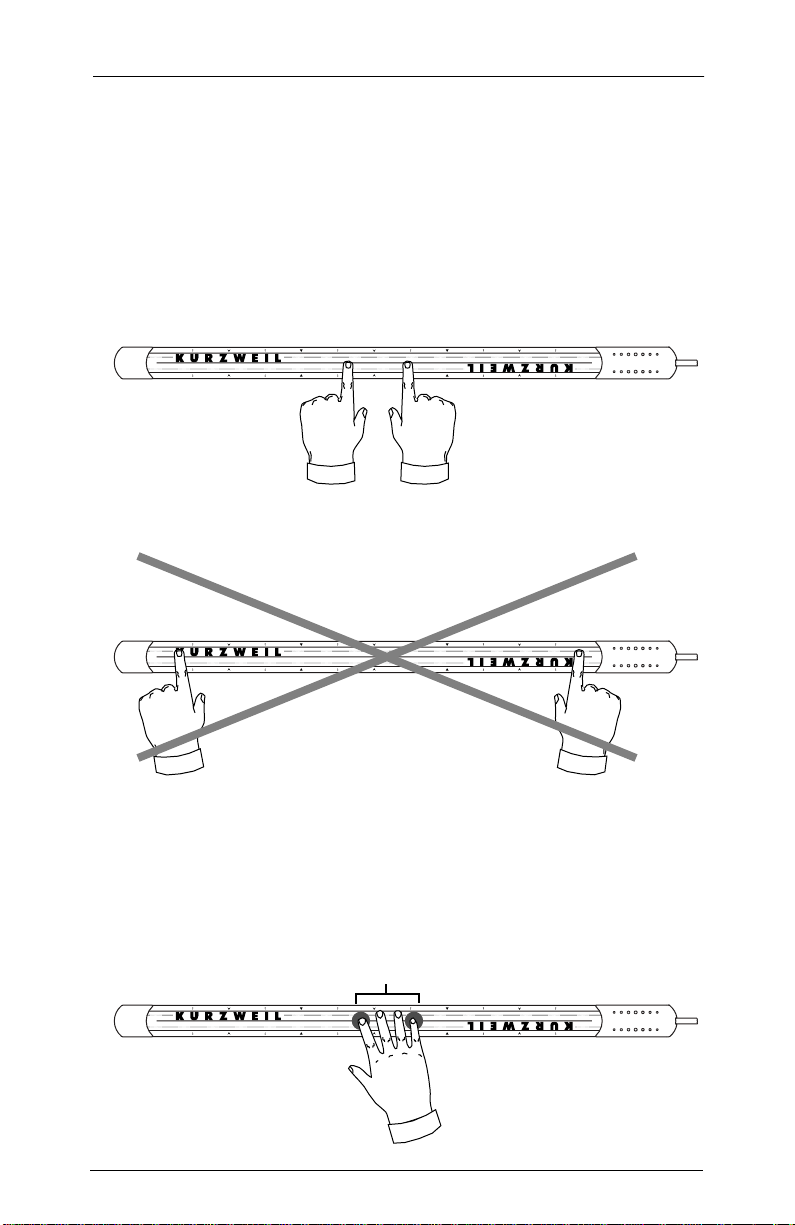
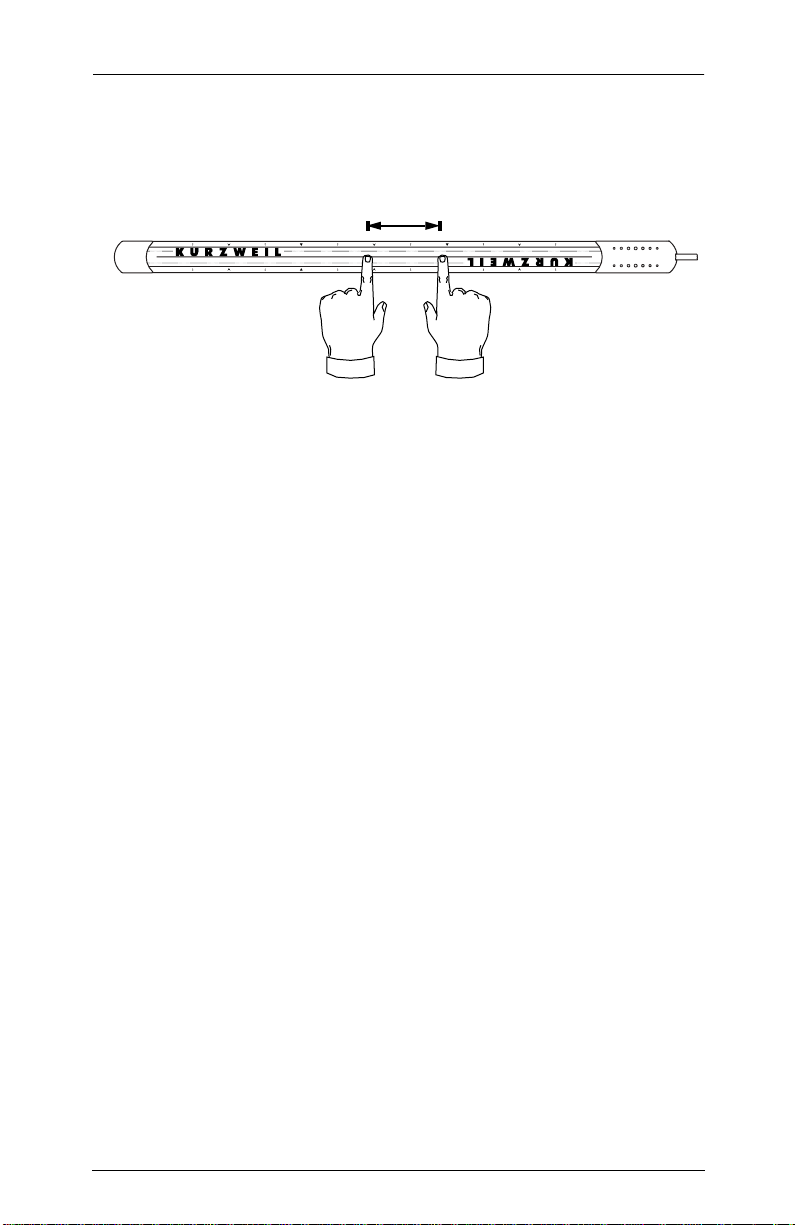
Touching The Ribbon At More Than One Point
You can touch the Ribbon in two or more places at once.
However, there are a few things to realize when you do this:
1. When the Ribbon is in single-section mode, play only in one
of the three marked smaller sections at any time. In other
words, if you press down on the left end and slide up and
down the entire Ribbon with the other hand, the Ribbon
wonÕt respond correctly.
Right
Wrong
2. When there are three or more points of contact, any points in
the center will have no effect on the RibbonÕs output. For
instance, if you touch the Ribbon with the Þrst, second, third,
and fourth Þngers on one hand, only the Þrst and fourth
Þngers will have any effect.
Only Outside Points
of Contact Respond
18
Page 29
Getting Started
Getting Back to Play Mode
3. The two outside points of contact should be less than about 5
inches apart. If your Þngers are more than 5 inches apart, the
other two sections wonÕt work properly.
5” or less
Getting Back to Play Mode
If while exploring you get lost in the ExpressionMateÕs editing
menus, press the Exit button several times to get back to Play
mode. If youÕre really stuck, you can always turn the
ExpressionMate off and back on again (though you might lose
changes you made to the current setup).
19
Page 30

Getting Started
Troubleshooting
Troubleshooting
If youÕre not getting sound from your instrument, or if the
ExpressionMate doesnÕt seem to be doing anything, try the
following:
Problem Solution
No sound from the
receiving instrument(s).
Ribbon, pedals, or breath
controller behave
strangely or don’t respond
at all.
Sound comes out of
receiving devices, b ut they
don’t respond to the
ExpressionMate.
W arning message (such as
“Replace Battery!” or
“Memory Failure”)
appears on startup.
But It
If you connected everything properly and went through all of the
Troubleshooting steps, but things still arenÕt working right, donÕt
panic. Your MIDI instrument may be conÞgured in such a way
that the ExpressionMate does unpredictable things to it, or has no
effect at all. Read Chapters 3 and 4 to learn how to change the
ExpressionMateÕs settings so that your instrument responds
exactly as you choose.
Still
Doesn’t Work
Make sure that the ExpressionMate, the other
instruments, and your mixer and speakers or
headphones are all plugged in and turned on.
Check the volume on the receiving instrument and
on your mixer or speakers.
Check that the Ribbon, pedals, and breath
controller are all connected properly. Make sure
that the Ribbon’s cable comes out of the right end
as you face it. If pedals are plugged in, don’t press
on them while the startup screen is displayed.
Make sure that you’ve connected the
ExpressionMate’s Main MIDI Out to the MIDI In
port on the first receiving device in the chain, and
that this device is set to receive on MIDI channels
1 through 3 (or channel 1 only). If the problem
continues, try a new MIDI cable.
See Chapter 6 for steps on clearing up the
problem.
You can also use the built-in diagnostic software to check you
pedals, breath controller, and ribbon for proper operation. See
Chapter 6.
20
Page 31

Editing and Creating Setups
The Controller Editor
Chapter 3
Editing and Creating Setups
ItÕs possible that many of the Factory Setups will suit your needs
perfectly. However, you might want to customize some Setups, or
you may have a MIDI instrument that only responds to certain
messages. Therefore, you can edit every parameter of the
ExpressionMateÕs Setups by using two editors: The Controller
Editor and the Arpeggiator Editor. The Controller Editor section
starts below; the Arpeggiator Editor section starts in the
Arpeggiator chapter, on page 61.
The Controller Editor
While in Play mode, press the Controller button at the left of the
front panel. This brings you into the Controller Editor, where you
conÞgure the Ribbon, buttons, and other controllers for the
current Setup.
Z
onesEdit
12
13 23
C
ontroller
A
rpeggiator
The Controller Editor parameters deÞne what each of a SetupÕs
Zones sends to the two MIDI Out ports, and to the Arpeggiator.
They also determine how the ExpressionMate responds to
devices connected to the MIDI In ports.
21
Page 32

Editing and Creating Setups
Getting Around
Parameters
MIDI Channel MIDI Chan None, Mn 1–16, Aux 1–16
Ribbon
configuration
parameters
Controller
assignment
parameters
Controller Editor
Names
RBN Split, RBN Mode,
RBN Sprg
RBN (or RBN1, 2, &3),
BRTH, CCPD, SP1&2,
SW1&2, FIX1, 2, &3,
MAP1, 2, &3, Hi/Lo
Key Range, ZnXpos,
NtVl curve, CCnote
scales, ZnNoteMap
Values
(see page 25)
(see pages 28-56)
Getting Around
The upper line shows the Setup number and the current Zone. It
also shows the parameter number (left of the :) and value number
for those who really like numbers. The bottom line shows the
parameter name and value name or number for the rest of us. An
underline below the bottom lineÕs : signals that the parameter has
the same value in all zones.
Setup
Number
Param:Value
Number
Zone
SU 1 1:1|||Z1|
MIDI Chan:Mn 1|
|||
Parameter
Name
Value Name or
Number
The cursor buttons (< and >) below the display select parameters.
To change the value of a parameter, use the data knob or the - and
+ buttons on the front panel. If you hold a button down, it keeps
scrolling. Each controller has several parameters, so even
scrolling can get pretty tedious. For example, if you are looking at
RBN and you want to get to BRTH, you have to scroll through all
of the RBN parameters Þrst. Therefore, you have two other
options: Jump selection and Intuitive Entry.
22
Page 33

Editing and Creating Setups
Getting Around
Jump Selection
Jump selection moves you to the Þrst parameter for each
controller. For instance, if you are working on RBN parameters,
as shown here:
SU 1 15:40 Z1
RBN| Scale:100|
and you want to check the BRTH parameters, press both cursor
buttons (< and >) and youÕll get the Þrst parameter for BRTH:
SU 1 47:2 Z1
BRTH|Dest:Breath
Press both cursor buttons again to go to the control pedal
parameters and so forth to visit each controller. You can use a
similar method to change values: press the - and + buttons
simultaneously to change a value by large increments, such as 32
or 100.
While youÕre in the Controller Editor, you can also press and hold
the Controller button then press the Global button to jump to the
Fixed and Map controllers as well as note processing feature,
ribbon scale select, the note map, and MIDI channel parameters.
Intuitive Entry
Intuitive Entry gives you an even quicker way to enter values.
When youÕre in the Controller Editor, press and hold the
Controller button, then move the physical controller that you
want to adjust. The display will change to show the controller
youÕve selected and its initial parameter (ÒDestÓ or ÒTypeÓ). You
can choose other parameters for that controller by using the <
and > buttons.
Once youÕve selected a parameter, you can change its value by
holding the Learn button and moving the controller.
xit
E
S
tore
earn
L
23
Page 34

Editing and Creating Setups
Setting a Zone’s MIDI Channel
Changing the Current Zone
While in the Controller Editor, press the Controller button (at the
lower left of the front panel) to move among the three Zones,
each having its own Controller Editor parameters. The LEDs
above the Controller button will light to show which Zone youÕre
on. (Some parameters, such as RBN Split, affect all three Zones at
once, in which case all three LEDs will light up.)
You can easily set a parameterÕs value the same in all 3 zones
without having to visit each separately. Simply set the value
desired in one of the zones (doesnÕt matter which one) then hold
Learn then press Store to copy the last changed value to the other
2 zones. Be sure to press and hold Learn Þrst.
Compare
While youÕre in the Controller Editor, the Global button acts as a
Compare button. Press it at any time to temporarily revert to the
unedited Setup. The Zone LEDs will ßash to show that the
original parameters are in effect. Parameters can still be selected
for review while comparing but they cannot be changed. Push
Global again to return to the edited Setup, and the ßashing will
stop.
12
C
ontroller
Z
onesEdit
13 23
A
rpeggiator
Compare
G
lobal
Setting a Zone’s MIDI Channel
The MIDI Chan parameter (#1 located just before RBN Split)
deÞnes the MIDI transmit channel for the currently selected
Zone. You can set it to any of the 16 MIDI channels on either the
Main Out or Aux Out port. You can also set it to None, which is a
handy way to keep a Zone from sending anything. All of the
ZoneÕs other parameters will stay intact, so you can switch the
Zone on and off using the MIDI Chan parameter.
Normally, you will want each Zone on a separate MIDI channel.
This is necessary if you want to control different programs on the
same MIDI instrument. For instance, if you use multiple Zones to
send program changes, and all the Zones have the same MIDI
channel (and Destination), there will be conßicts: no MIDI device,
including the ExpressionMate, can respond correctly to two or
24
Page 35

Editing and Creating Setups
Ribbon Configuration Parameters
more different simultaneous Program Change commands on one
channel. The result will be that only one Program Change will be
recognized.
If the MIDI Chan parameter of a zone is set to -NONE-, none of
the controls are processed for that zone, including those that send
to special destinations that don't involve MIDI. So, for example,
you can't set the MIDI Chan for Zone 3 to -NONE- and then use
notes from, say, a ribbon in that zone as the source for an
arpeggiator. If you really want to use control values in a zone but
don't want to send any MIDI from it, consider directing the
output to the Aux port or to an unused channel.
Stacking Zones
There will be times when ÒstackingÓ Zones on the same MIDI
channel will come in handy. Suppose you want to send two
different MIDI Controllers to the same program on your synth. In
this case, you can assign two Zones to the same channel, but with
different controller assignments.
HereÕs one example: say your synth uses Modulation (01) to open
a Þlter, and Data (06) messages to increase the ÞlterÕs resonance.
If you want to do both at the same time, you could use a single
CC pedal to send both messages. First, assign the CC pedal in
Zone 1 to ModWhl, and in Zone 2 to Data. Then assign both
Zones to the same MIDI channel. Now moving the CC pedal
opens or closes the Þlter and adds or removes resonance.
Keep in mind that the Factory Default settings will look at MIDI
notes coming in on Main MIDI channel 1 and process them
through the each zoneÕs parameters. This will double or triple the
number of notes going to your MIDI out channel. The most
versatile way to prevent this is to set the Low Key range to a note
that is higher than the High Key range (for example, NtLowKey:
C3 and NtHighKey: C2). You can also set the Global MergUnPro
to Neither (see page 81), which will affect all of your Setups,
disabling the Note processing features in the controller editor.
Ribbon Configuration Parameters
These parameters tell the Ribbon how to respond when you
touch it. When the Ribbon is in single-section mode, there are
three parameters for conÞguring the Ribbon: Rbn Split, Rbn
25
Page 36

Editing and Creating Setups
Ribbon Configuration Parameters
Mode, and Rbn Sprg. In three section mode, there are seven
parameters in all (the RBN Split parameter, plus a Mode and Sprg
parameter for each section).
The Ribbon ConÞguration parameters deÞne how the section
responds to Þnger position.
PARAMETER RANGE OF VALUES DEFAULT
SPLIT One Section/Three Sections One Section
MODE Relative/Absolute Absolute
SPRING 0–127, None None
Split
This selects a one- or three-section conÞguration of the Ribbon.
You can use the Ribbon as one controller, or divide it up into
three smaller sections, each with its own controller assignments.
Along the edges of the Ribbon are several white arrows; these
arrows divide the Ribbon into sections, point to each sectionÕs
center, and show smaller divisions within the sections. The
arrows are especially helpful when Split is set to Three-Sections,
though theyÕre also handy when using the Ribbon as a singlesection controller.
The Þgure below assumes that the Global RBN Dir parameter is
set to Right, meaning that values get higher toward the end with
the cable. To learn how to change this parameter, see ÒRBN DirÓ
on page 78.
Section 1 Section 2 Section 3
Figure 3-1. Ribbon sections.
Note that you can set one group of parameters for the Ribbon in
single-section mode, and different parameters for three-section
mode. Both sets of parameters will be there when you save the
Setup, but only one set of parameters will take effect at a time. In
other words, if the Ribbon is in single-section mode, youÕll be
using only the single-section parameters.
26
Page 37

Editing and Creating Setups
Ribbon Configuration Parameters
Mode
Each Ribbon section can interpret your ÞngerÕs position as a
relative or an absolute value.
Relative means that the RibbonÕs travel will begin from wherever
you put your Þnger. Therefore, if you set the Ribbon to bend
pitch, and Mode is Relative, putting your Þnger on the Ribbon
will mark a starting place. Subsequently moving your Þnger left
or right will bend pitch relative to your initial Þnger position, until
you lift your Þnger away. You can press down at any other place
on the Ribbon, and get the same results by moving your Þnger
the same distance.
Setting Mode to Absolute means that the RibbonÕs travel will
start from its center, no matter where you put your Þnger. Every
point on the Ribbon marks a set value, and putting your Þnger at
various points on the Ribbon will give you the same values each
time. For example, if a RibbonÕs Destination is Volume and Mode
is Absolute, pressing on the left-most end of the Ribbon will
always set the ZoneÕs volume to the same value.
Spring (Sprg)
You can set each Ribbon to have a Spring, so that when you lift
your Þnger, the Ribbon returns to a speciÞed value automatically.
The value you set for Spring deÞnes the Òcenter,Ó or starting
point of travel, for each section on the Ribbon. You can choose
any point between 0 and 127. A value of 64 puts the center
physically in the middle of each Ribbon section. Values of 0 or
127 place the center at the sectionÕs extreme left or extreme right,
respectively.
If Mode is Relative, the Ribbon will return to the point where you
initially placed your Þnger. If Mode is Absolute, the Ribbon will
return to its center.
When Spring is ÒNoneÓ, the Ribbon will ÒfreezeÓ when you lift
your Þnger. If you then leave the Setup, the Ribbon remembers its
current position; when you select a new Setup, the RibbonÕs
travel will begin where you last pressed down. If you want to
avoid being surprised by unexpected controller values (such as
unruly pitch changes), go to the RBN Entry parameter, and select
an entry value other than ÒNoneÓ for each Ribbon section.
27
Page 38

Editing and Creating Setups
Controller Editing
Controller Editing
Controller editing lets you create custom ExpressionMate Setups
for use in your MIDI studio or on stage. In this section, weÕll talk
about two different types of ÒcontrollersÓ as they apply to the
ExpressionMate.
One is the physical controllers: the Ribbon, buttons, pedals, and
breath controller that you move with your Þngers, feet, or breath.
The other is MIDI Controllers, which are the MIDI commands
that the ExpressionMate sends. For our purposes, ÒMIDI
ControllersÓ includes the complete set of Controllers deÞned by
the MIDI SpeciÞcation, as well as pitch bend, aftertouch, and a
few other useful MIDI commands. To avoid confusion, weÕll refer
to the ExpressionMateÕs physical controllers with a lower-case
ÒcÓ, and MIDI Controllers with an upper-case ÒCÓ.
You can assign any physical controller, in any Zone, to transmit
any MIDI Controller. You can also adjust each controller in each
Zone, just like the parameters on many synths and samplers.
The ExpressionMateÕs physical controllers include:
• the Ribbon, which you can deÞne as a one- or three-section
controller.
• the two Panel Switches, SW 1 and SW 2.
• the Breath jack, which accepts a Yamaha (or equivalent)
breath controller.
• the two Pedal jacks, SP 1/CC and SP 2 (SP 1/CC accepts
either a switch pedal or a continuous control pedal).
There are also two sets of ÒvirtualÓ controllers, which behave
much like physical controllers. These are:
• Fixed controllers, FIX1, FIX2, and FIX3, which automatically
send values when you select Setups.
• MIDI Remap controllers, MAP1, MAP2, and MAP3, which
can take incoming MIDI Controllers and change them into
other MIDI Controllers.
28
Page 39

Editing and Creating Setups
Controller Editing
The pictures and tables that follow give an overview of the
controllers and their parameters.
xit
E
S
3
Sections
tore
earn
L
ibbon
R
1
C
onfiguration
12
C
ontroller
1 / CCSP2
Section
Z
onesEdit
13 23
A
rpeggiator
SP
xpression
EM
Jump Param
ist
L
S
Compare
G
lobal
Panel Switches
M
ain
In
Thru
ate
tep
SW
Out In
1
Panic
Jump Value
nternal
I E
MIDI
SW
2
A
ux
xternal
Out
12VDC
0.4A
B
reath witch / CC Pedals
S
MIDI
Pedal jacks
Breath controller jack
Ribbon controller
Figure 3-2. The ExpressionMate physical controllers.
29
Page 40

Editing and Creating Setups
Controller Editing
Continuous Controllers
Physical
Controller
Ribbon controller RBN (in single-
Breath controller BRTH (same as Ribbon, except no
Controller
Editor Name
section mode)
or RBN1,
RBN2, and
RBN3 (in threesection mode)
Parameter:Values
Destination: None, 0–127
Aux Destination: None, 0–39,
43–127
Curve: 0 – 12
(see picture for shapes)
Curve Amount: 0 – 8
Scale: -300% to 300%
Offset: -127 to 127
Resolution: 7-Bit, 14-Bit
Entry Value: None, 0–127,
Current
Exit Value: None, 0–127
Aux Destination)
CC Pedal CCPD (same as Ribbon, except no
Aux Destination)
30
Page 41

Switch Controllers
Editing and Creating Setups
Controller Editing
Physical
Controller
Switch Pedals 1 & 2 SP1, SP2 Type: Toggle, Momentary
Panel Switches 1 & 2 SW1, SW2 (same as Pedals)
Controller
Editor Name
Parameter:Values
Destination: None, 0–40, 43–127
On Value: None, 0–127, Current
Off Value: None, 0–127
Entry Value: None, Off, On,
Current
Exit Value: None, Off, On
Virtual Controllers
Virtual
Controller
Fixed controllers FIX1, FIX2,
Controller
Editor Name
FIX3
Parameter:Values
Destination: None, 0–40, 43-127
Entry Value: None, 0–127
MIDI Remap
controllers
MAP1, MAP2,
MAP3
Exit Value: None, 0–127
Destination: None, 0–39, 43-127
Source: None, 0–32, 64–119,
PBend, ChnPrs
Curve: 0 – 12
(see picture for shapes)
Curve Amount: 0 – 8
Scale: -300% to 300%
Offset: -127 to 127
Entry Value: None, 0–127
Exit Value: None, 0–127
31
Page 42

Editing and Creating Setups
Continuous Controller Parameters
After youÕve selected which Zone and which controller to work
with, use the Destination parameter to choose what this
controller will do. Some of the controllers have default settings
that are pre-programmed in some of the Factory Setups (of
course, you can change them). You can select from the entire list
of numbered MIDI controllers, as well as other MIDI commands
and some ÒSpecial Functions.Ó To move through the list, use the
data knob and the - and + buttons, or hold the Learn button and
move any continuous controller.
Continuous Controller Parameters
The continuous (physical) controllers are those that have a range of values:
the Ribbon, the continuous control pedal, and the breath controller. As the
table on page 30 shows, all of them use mostly the same parameters. Each
parameterÕs function is described below.
The illustration below shows the processing order that the
ExpressionMate uses to create Continuous Controller messages
from your input.
Input from Ribbon, CC pedal, and Breath controller
32
Zone
Curve
Scale
Offset
Destination
MIDI Output
Page 43

Editing and Creating Setups
Continuous Controller Parameters
Destination (Dest)
Use this parameter to choose a Destination from the MIDI
Destination List (see page 48). The Destination tells the physical
controller what MIDI Controller to send. Such messages include
Modulation (01) and Volume (07), plus others. The
ExpressionMate also has some ÒSpecial FunctionÓ Controllers,
which can send MIDI notes, control the arpeggiator, and do some
other things.
Curve (Curv)
This lets you taper the controller response. The default setting is
Linear, which means that it follows a straight line as you move
the controller.
Curve Amount (CrvAm)
Enter a value from 0 through 8 to specify how pronounced you
want the curve to be.
33
Page 44

Editing and Creating Setups
Continuous Controller Parameters
0 Linear 1 Expand 2 Compress (Cmpres)
Curve Examples
(Amount = 3)
(XFade)
6 Reverse Linear
(RevLin)
9 Reverse CrossFade
(RevXfd)
4 CrossSwell
(XSwell)
7 Reverse Expand
(RevExp)
10 Reverse CrossSwell
(RevXsw)
5 Bump3 CrossFade
8 Reverse Compress
(RevCmp)
11 Reverse Bump
(RevBmp)
Scale (Scal)
Scale lets you amplify or diminish the action of the controller. No
change is 100%. Higher values will make the controller more
sensitive, and lower values will make it less so. Setting the scale
to a negative number makes the controller action work in reverse.
You can use a controller to crossfade between two Zones by
setting the scaling for one Zone positive and the other negative.
(Or you could accomplish the same thing by having one zone set
34
Page 45

Editing and Creating Setups
Continuous Controller Parameters
to a normal curve and the other zone set to the corresponding
reverse curve- itÕs up to you!)
Maximum scale values are +300% and -300%.
The picture below shows what happens when you change Scale.
Note that Scale is the only parameter changed in this example;
the other parameters are set to their defaults (Offset = 0 and
Curve = none).
127
Scale: 200%
MIDI Controller reaches
maximum on medium
controller value
Scale: 100%
64
Controller Output
As you increase the
controller input, MIDI
Controller increases
proportionally
Scale: 50%
MIDI Controller never
0
64
127
reaches maximum, even
on maximum controller
value
Controller Input
Offset (Offs)
This adds or subtracts a constant to the scaled controller, and at
the same time sets minimum or maximum values. If the offset is
25, the minimum value of the controller will be 25. If it is -25 (and
scale is 100%) the Þrst one-Þfth of the controllerÕs movement (25/
127 = about 1/5) will send value of 0, and the maximum value of
the controller will be 102 (= 127-25). The maximum values for
Offset are ±127.
You can think of Scale as being a proportional change to the
Controller, while Offset is an up or down shift. The picture below
shows the effects of Offset. Note that Offset is the only parameter
35
Page 46

Editing and Creating Setups
Continuous Controller Parameters
changed in this example; the other parameters are set to their
defaults (Scale = 100% and Curve = none).
127
64
Controller Output
0 127
64
Offset: +64
Low controller values
produce medium MIDI
Controller and greater
Offset: 0
No Offset is applied to
controller
Offset: -64
Low controller values
result in MIDI Controller
of 0; maximum MIDI
Controller reduced
Controller Input
Offset and Scale work together. If scaling takes the controller out
of the ballpark Ñ for example, you want to set it to 300% but that
puts all of the controllerÕs readings at their maximum values Ñ
using a negative offset, say around -60, still lets you send
different values, though your curve will be a lot steeper than
normal.
If you use a negative scaling, then you must use an offset, or all of
your Controller messages will end up as zeroes. So to get true
inverse scaling (that is, minus 100%) with the full range of values,
you must set Offset to 127 and Scale to -100%. Doing so produces
a slope like this (which is identical to the Reverse Linear curve):
Controller Output
36
127
64
0
64
127
Controller Input
Page 47

Editing and Creating Setups
Continuous Controller Parameters
Resolution (Res)
Resolution lets you Òsmooth outÓ continuous controller response
on some instruments.
Setting Resolution to 7-Bit will cause the controller to send only
MSB (Most SigniÞcant Byte) messages. This means that the
controller will transmit up to 128 different values, which is what
many instruments expect.
A setting of 14-Bit will send both MSB and LSB (Least SigniÞcant
Byte) Controllers, meaning that the controller can potentially
transmit up to 16,384 (128x128) values. On some instruments, this
gives you Þner control over parameters like Pitch Bend and
Modulation, thus making things like pitch bends and volume
swells sound smoother. If your instrument doesnÕt use the LSB
Controller messages, it will just ignore them, and youÕll hear no
difference with 14-Bit resolution. Most of the time, however,
youÕll be better off if you donÕt use 14-bit resolution, since it can
use quite a bit of your bandwidth and sequencer memory.
Entry (Entr) and Exit Values
Entry Value
Entry Value lets you specify an initial value for a controller that
will be sent whenever you select that Setup. LetÕs say that you
assigned the CC pedalÕs Destination to ModWhl in Zone 1. If you
want to make sure that all of the modulation in Zone 1 is turned
off when you select the Setup, set the CC pedalÕs Entry Value to 0.
Entry Values ignore the current position of the physical controller
when the Setup is selected. In fact, if the physical controller is
above or below the Entry Value when the Setup is selected
(which it often is), moving the controller will have no effect until
it passes through its Entry Value. In the modulation example,
moving the CC pedal wonÕt turn on any modulation until you
push it all the way down, and then up again.
An Entry Value of None is quite different from a value of Ò0Ó.
ÒNoneÓ means that there will be no initial controller command
when you select the Setup, and moving the physical controller
will have an immediate effect. (The position of the physical
controller when the Setup is Þrst selected, however, is still
37
Page 48

Editing and Creating Setups
Ribbon Assignment Parameters
ignored.) It also means that when you select the Setup, the
controllerÕs value will initially be the same as it was in the last
Setup.
Current means that the current position of the control is sent
even though it has not changed. This may be needed as an entry
value if, for example, the previous setup sent the physical
controller to a different MIDI controller than the current setup.
Exit Value
Exit Value tells the ExpressionMate to send a value for that
controller whenever you leave the Setup. It can be very useful
when a controller is doing something special to the sound which
you donÕt want to continue after you leave the Setup. For
example, if you want to make sure a ZoneÕs pitch returns to
normal whenever you leave a Setup, you would give an Exit
Value of 64 to any controller whose Destination is PBend+. Again,
ÒNoneÓ means that no command is sent.
Ribbon Assignment Parameters
This section explains how to change which messages the Ribbon
sends. To change how the Ribbon responds to Þnger movement,
see ÒController EditingÓ on page 28.
The Ribbon assignment parameters let you deÞne controller
assignments for the Ribbon controller. Each Ribbon section
senses movement when you press on it and move your Þnger left
or right. This creates numerous possibilities for controlling pitch,
volume, panning, crossfades between zones, and other uses you
might imagine.
As we mentioned earlier, the Ribbon can be used as a single long
controller, or it can be divided into three separate sections, each
with its own controller assignments. These sections and their
centers are indicated by the smaller arrows above the strip. There
are also arrows directly in the center to give you a visual
indication of the center point when you are using the Ribbon as
one long strip.
Look over the various parameters. Since all the continuous
controllers work in a similar way, CCPD and BRTH have most of
the same parameters.
38
Page 49

Editing and Creating Setups
Breath (BRTH) Parameters
AuxD
There is one exception: the Ribbon has an Auxiliary Destination
(AuxD) letting you send a total of two controller messages from
each Ribbon section in each Zone. AuxD takes effect whenever
you move away from the initial point of contact on the Ribbon.
AuxD will always spring to a value of 64; when it is active, it is
controlled by Curves, Entry, and Exit values. You must scale it to
send something like modulation from 0 to 127 from the Þrst point
where you place your Þnger.
Note: AuxD is only meaningful when the normal
destination is one of those that plays notes (40-42).
See the description of the Note Controllers on page 54
for more information on playing notes from the ribbon
and continuous controllers.
PARAMETER RANGE OF VALUES DEFAULT
DESTINATION MIDI Destination List None
AUX DESTINATION 0–39,43–127, None None
CURVE Curve List (See Text) None
CURVE AMOUNT 0–8 0
SCALE -300% to +300% +100%
OFFSET -127 to +127 0
RESOLUTION 7-Bit, 14-Bit 7-Bit
ENTRY VALUE None, 0–127, Current None
EXIT VALUE None, 0–127 None
Breath (BRTH) Parameters
You can plug a breath controller into the rear-panel Breath jack. If
youÕre not familiar with breath controllers, they usually resemble
the headsets worn by telephone operators. Blowing into the
controllerÕs mouthpiece sends Controller data. You can imitate
ßutes, saxophones, and other wind or brass instruments more
easily this way, because youÕre using your breath pressure to
control the sound.
39
Page 50

Editing and Creating Setups
Continuous Control Pedal (CCPD) Parameters
Remember that you donÕt have to send just Breath (02) messages
with a breath controller. The ExpressionMate lets you send any of
the available Controllers in the Destination list.
PARAMETER RANGE OF VALUES DEFAULT
DESTINATION MIDI Destination List Breath
CURVE Curve List (See Text) None
CURVE AMOUNT 0–8 0
SCALE -300% to +300% +100%
OFFSET -127 to +127 0
RESOLUTION 7-Bit, 14-Bit 7-Bit
ENTRY VALUE None, 0–127, Current None
EXIT VALUE None, 0–127 None
Continuous Control Pedal (CCPD) Parameters
The rear-panel ÒSP1/CCÓ jack lets you connect a CC (Continuous
Control) pedal.
PARAMETER RANGE OF VALUES DEFAULT
DESTINATION MIDI Destination List None
CURVE Curve List (See Text) None
CURVE AMOUNT 0–8 0
SCALE -300% to +300% 100%
OFFSET -127 to +127 0
RESOLUTION 7-Bit, 14-Bit 7-Bit
ENTRY VALUE None, 0–127, Current None
EXIT VALUE None, 0–127 None
Switch Controller Parameters
Switch (physical) controllers have only two states: on and off. The
the ExpressionMateÔs switch controllers are:
• Panel Switches 1 and 2 (SW1 and SW2)
• Switch Pedals 1 and 2 (SP 1 and SP 2)
Switch T ype (T ype)
The parameters for switch controllers are slightly different from
those for continuous controllers. The Þrst parameter is Switch
Type (Type). The choices are Momentary in which a switchÕs
action lasts only as long as you are pressing it, and Toggle, in
which the switchÕs action lasts until you press it again. The
Momentary mode works best for functions like sustain or
40
Page 51

Editing and Creating Setups
Switch Controller Parameters
portamento, while the Toggle mode works best for functions like
turning the Arpeggiator on and off.
The LED above each Panel Switch shows that switchÕs state. In
Momentary mode, an LED lights only as long as you are holding
the switch. In Toggle mode, the light stays on until you press the
Panel Switch again. Keep in mind that one Panel Switch can do
something different in each Zone, and since thereÕs only one light
per switch, the light only shows the switchÕs state for Zone 1.
However, when you press the Panel Switch, it executes its
assignments for all Zones that use the switch.
On Destination (On D), Off Destination (Off D)
On Destination and Off Destination determine what message
will be sent when you turn a switch on or off, respectively. The
list of available Destinations on page 48 is almost the same as for
the continuous controllers, and can be accessed the same way.
ItÕs typical to set the same Destination for both, so that you can
turn a Controller on or off. You could also send two different
messages. For example, you could set Switch Type to momentary,
On Destination to a Bank Select Controller (BkSelM or BkSelL)
and Off Destination to Program Change. Then you can use a
switch or a pedal to call up a program on another instrument that
uses Bank Select to access more than 128 programs.
On Destination and Off Destination can also be set to Ònone,Ó so
that pressing on the switch has no effect at all in a Zone.
On V alue (On V)
On Value sets the value of the Controller when you turn the
switch on. For some functions the On Value should be 127. For
example, the default On Destination for SP1 is Controller #64 Ñ
Sustain Ñ with an On Value of 127. In other cases, you might
want a different On Value. For instance, you could use a button
or pedal as a ÒsoftÓ switch to lower a soundÕs volume only partway. In this case, you might set the On Destination to Volume (07)
and the On Value to 50.
41
Page 52

Editing and Creating Setups
Switch Pedal (SP) Parameters
Off V alue (Off V)
Off Value is the value of the Controller when you turn the switch
off. The default value is 0. Continuing the Òsoft switchÓ example
above, letÕs say you want to bring the Zone up to full volume
when you release the switch. Set the Off Destination to Volume
(07) and set the Off Value to 127.
Entry (Entr) and Exit States
Entry State can send an initial value for the switch when you
select the Setup. There are four choices: None (no change), Off
(the Off Value), On (the On Value), and Current. Current sends
the current state of the switch without changing it. It is different
than None, which speciÞes that nothing is to be sent on entry and
exit.
If a Panel SwitchÕs Entry State is ÒOn,Ó the switch will light as
soon as you select the Setup.
Exit State can send a value for the switch when you leave a
Setup. The choices On, Off, and None are available. This is very
useful for turning off Sustain when changing Setups, so you can
avoid ÒstuckÓ notes.
Switch Pedal (SP) Parameters
On the back of the instrument, there are two jacks for switch
pedals.
PARAMETER RANGE OF VALUES DEFAULT
SWITCH TYPE Momentary, Toggle Moment
ON/OFF DESTINATION MIDI Destination List SP1: Sustain
SP2: SostPd
ON VALUE 0–127 127
OFF VALUE 0–127 0
ENTRY VALUE None, On, Off, Current None
EXIT VALUE None, On, Off None
42
Page 53

Editing and Creating Setups
Fixed Controller (FIX) Parameters
Panel Switch (SW) Parameters
The ExpressionMate has two Panel Switches on the right side of
the unit. Each of these functions exactly like the switch pedals;
you can choose between momentary and toggle switches, and set
on and off values for each one.
PARAMETER RANGE OF VALUES DEFAULT
SWITCH TYPE Momentary, Toggle Moment
ON/OFF DESTINATION MIDI Destination List SW1: ARP1
SW2: ARP2
ON VALUE 0–127 127
OFF VALUE 0–127 0
ENTRY VALUE None, On, Off, Current None
EXIT VALUE None, On, Off None
Virtual Controllers
Every Zone has six ÒvirtualÓ controllers; that is, they arenÕt
physical controllers like Mod Wheels or buttons, but they can act
in very similar ways. The ExpressionMateÕs virtual controllers
are:
• Fixed Controllers (FIX1, FIX2, and FIX3)
• MIDI Remap Controllers (MAP1, MAP2, and MAP3)
Fixed Controller (FIX) Parameters
The Fixed controllers each send a Þxed value automatically,
whenever you choose a new Setup. Though you can do this with
any controller (by setting Entry and Exit values), you may prefer
to use the Fixed Controllers instead, leaving the Ribbon and other
controllers free for more complex uses.
Note that with the Fixed controllers, the Entry and Exit Values
determine the On and Off Values. Also note that when you
choose a Setup, the ExpressionMate sends FIX1 Þrst, then FIX2,
then FIX3. This is especially useful for sending Bank Select and
Program Change messages when selecting a Setup. (For an
example of how to do this, see the discussion of the PrgChg
Special Function on page 53.)
43
Page 54

Editing and Creating Setups
MIDI Remap Controller (MAP) Parameters
PARAMETER RANGE OF VALUES DEFAULT
DESTINATION 0–40, 43–127 None
ENTRY VALUE None, 0–127 None
EXIT VALUE None, 0–127 None
MIDI Remap Controller (MAP) Parameters
The ExpressionMate includes three MIDI Remap Controllers.
These take incoming MIDI data, such as Modulation messages,
and turn the data into some other Controller message.
For instance, your MIDI keyboard might transmit only
Modulation (01) and Channel Pressure (Aftertouch) messages.
You might want to control the volume on a sound module, but
that device wonÕt change Mod Wheel or Channel Pressure
messages into Volume (07). In this case, you could set MAP1Õs
Source to ModWhl, and its Destination to Volume. Now the
ExpressionMate will change incoming Mod Wheel messages to
Volume messages. There are lots of other possibilities too.
The Source parameter lets you choose many of the Controllers
found in the Destination list (see page 48). The Special Functions
(33-63) and MIDI Controllers 120Ð127 arenÕt available as sources.
This is because most of the Special Functions are only found on
the ExpressionMate, and because remapping Controllers 120-127
(which send messages like ÒOmni OffÓ and ÒAll Notes OffÓ) isnÕt
useful. However, you can set Source to Pitch Bend (128) and
Channel Pressure (129), because you may want to remap these
Controllers.
One more thing: you can use a remap controller as a Þxed
controller by assigning None as the Source.
PARAMETER RANGE OF VALUES DEFAULT
DESTINATION 0–39, 43–127 None
SOURCE MIDI Destination List None
(with exceptions) plus
PBend and ChnPrs
CURVE Curve List (See Text) Linear
CURVE AMOUNT 0–8 0
OFFSET -127 to +127 0
SCALE -300 to +300 100
ENTRY VALUE None, 0–127 None
EXIT VALUE None, 0–127 None
44
Page 55

Editing and Creating Setups
Note Processing Parameters
Note Processing Parameters
Controller parameters 124Ð134 allow you to set note values, note
velocity values, and how notes will be played by physical
controllers.
PARAMETER RANGE OF VALUES
124 Note Low Key (NtLowKey) C-1 – G9
125 Note High Key (NtHighKey) C-1 – G9
126 Note Transpose (Nt Xpose) -64 – 63, Ctlr #39
127 Note Velocity Curve (NtVl Curv) Curve List (See Text)
128 Note Vel. Curve Amount (NtVlCrvAm) 0–8
129 Note Velocity Scale (NtVlScale) -300 – 300
130 Note Velocity Offset (NtVlOffst) -127 – 127
131 CC Note Scale (CCNoteScl) ROM scales (described in follow-
ing section), Arp latch, 8 User,
Ctlr #46
132 CC Note Velocity (CCNoteVel) 0-127, Ctlr #44
133 CC Note Transpose (CCNoteXpo) -64 - +63, Ctlr #43
134 Zone Note Map (Note Map) Off, Linear, Inverse, Constant, 1-
of-2, 2-of-2, 1-of-3, 2-of-3, 3-of-3,
1-of-4, 2-of-4, 3-of-4, 4-of-4
The Keyrange parameters (NtLowKey, NtHighKey) let you set
the key range that will be processed by the Controller Editor
functions. Notes below or above the keyrange will not be audible,
and will not be sent to the Arpeggiator. It is also possible to set
the Note Low Key to a value above the Note High Key. This can
be used to block the merging of unprocessed notes when more
than one Arpeggiator Zone is using the same note source. For
more on this read the Note Source section in the Arpeggiator
chapter, and the MergeUnPro section in the Global Functions
chapter.
Note Transpose (Nt Xpose) allows you to transpose a ZoneÕs note
output up or down a little more than 3 octaves. A value of zero is
the original pitch.
Note Velocity Features
The next group of parameters Ð Note Velocity Curve (NtVl
Curv), Note Velocity Curve Amount (NtVlCrvAm), Note
Velocity Scale (NtVlScale), and Note Velocity Offset (NtVlOffst)
45
Page 56

Editing and Creating Setups
Note Processing Parameters
Ð affect note velocity. The curves used are the same as Ribbon,
Breath, CCPD, and Remap Controllers. This allows you to switch
sounds by how hard you press the keys or tailor the ÒfeelÕ of a
controller to a sound module, so the sound responds well to your
playing style. You can reverse the velocity so that when you play
harder the notes are quieter or to limit the ranges so that when
you play softly a sound from one Zone is heard and when you
play harder a sound from another Zone is heard. See page 33 for
detailed description of how the curve parameters work.
Continuous Controller Note Parameters
These parameters are used to set how controllers 40, 41, and 42
play notes from a physical controller. Continuous Controller
Note Scale (CCNoteScl) assigns the scale that will be played. You
can set it to one of the 17 ROM scales or the 8 User scales. The list
of ROM scales is on page 47.
Continuous Controller Note Velocity (CCNoteVel) sets the note
velocity at which the CC note will play. You can set it from 0-127
or use controller 44 to change it in real time.
Continuous Controller Note Transpose (CCNoteXpo) transposes
CC notes up or down 3 octaves. This parameter works in
conjunction with controller 43 Note Offset (see page 55).
Remember that the 13 Note controller (40) and Scale length
controller (42) center around C4 while controller 41, 37 Note,
centers on C3. If you create a User scale, the starting pitch can be
any note within a 2 octave range. With controller 40 and 42,
however, it will always be between C4 and C6; in 37 Note the
scale will be between C3 and C5 (when the Note Transpose is set
at 0).
Zone Note Map (ZnNoteMap) allows you to change the way
notes are sent from the ExpressionMate. The Default is Linear,
which plays notes from low to high as a keyboard would
normally play. Inverse (Invrse) will play the notes opposite of the
Linear setting, so high notes will play from the left to low notes
on the right. Constant (Const) will play one note; set the note
with the Zone Transpose. The next 10 values are alternating Note
maps and these can be used in a variety of ways. If you have two
of the same sound module you can double your polyphony by
setting one Zone to send 1 of 2 to one module and another Zone
to send 2 of 2 to the other module. The Þrst Zone will Play C, skip
C# then play D then skip D# and so on. Zone 2 will skip C play
46
Page 57

Editing and Creating Setups
Note Processing Parameters
C# and so on. The rest of the maps work in the same fashion but
will skip two or three notes respectively. You can also use this to
add rhythmic holes in arpeggiations or play alternate sounds
from one key to the next. When set to Off, no notes will be sent.
Note that this will disable the ability for a Zone to send notes to
the arpeggiator.
ROM Scales
CCNoteScl allows you to choose from the following scales:
Chromatic (Chrom)
Major (Major)
Minor (Minor)
Melodic Minor (MelMin)
Harmonic Minor (HarMin)
Major Pentatonic (MjPent)
Minor Pentatonic (MnPent)
Expand Pentatonic 1(ExPnt1)
Expand Pentatonic 2(ExPnt2)
Blues (Blues)
Whole Tone (WholeT)
(W/HDim)
(H/WDim)
Harmonic (Harmon) see description that follows
Arpeggiator Latch Ascending (ArLchA)
see description that follows
Arpeggiator Latch Played (ArLchP) see description that follows
About The Harmonic Scale
The Harmonic Scale is a 14-note scale that spans 4 octaves and
contains those equal-tempered notes that most closely match the
Þrst 16 harmonics of the root pitch. After running past the 14
notes, the scale repeats at octave intervals. This scale sounds
great when setting a ribbon to play notes with -None- for the aux
destination (so it'll strum), holding the sustain pedal down, and
wailing away on the ribbon. Set another ribbon section to send to
CC note transpose (dest #43, NotOfs) so the scale can be
transposed.
About The Arpeggiator Latch Scales
These allow you to play unsorted, latched arpeggiator notes.
When Note Order is set to -None-, notes held in the arpeggiator
47
Page 58

Editing and Creating Setups
The MIDI Destination List
are copied to two scale tables, one in ascending pitch order
(ArLchA) and the other in as played order (ArLchP). The copying
takes place every arpeggiator clock beat rather than at the rate
you play the notes.
The MIDI Destination List
Here are the Destinations, or ÒtargetsÓ for each controller, in
scrolling order.
MIDI
Controller
Destination
Number
None Off No value is sent
0 BkSelM Bank Select MSB – sends a
1 ModWhl Sends Modulation (Mod Wheel)
2 Breath Default assignment for breath
3 MIDI 03 MIDI Controller #3
4 Foot Sends Foot controller messages
5 PortTm This changes portamento time on
6 Data Some instruments use this as the
7 Volume MIDI Volume
Function in a Typical
Instrument (e.g., K2500)
Controller 0 Bank Select message
messages
controller
some monophonic sounds (if
portamento is turned on)
default destination for a Data slider,
and respond with changes in
brightness or effects levels
8 Balanc MIDI Balance
9 MIDI 09 MIDI Controller #9
10 Pan MIDI Pan
11 Expres MIDI Expression – a “subset” of
MIDI Volume
48
Page 59

Editing and Creating Setups
The MIDI Destination List
MIDI
Controller
Destination
Number
12, 13 FXCtl1 and
FXCtl2
14, 15 MIDI 14 and 15MIDI Controllers #14 and #15
16-19 GPCtl 1–4 General-purpose Controllers 1–4
20–31 MIDI 20–31 MIDI Controllers #20–31
32 BkSelL Bank Select LSB – sends a Controller
Special Function Controllers
This shaded section lists the ExpressionMate’s Special Functions. Note that
these do not appear when you choose a Source for one of the MIDI Remap
(MAP) Controllers. For full descriptions of these Special Functions, see page
52.
33 PBend+ Normal Pitch Bend
34 PBend- Reverse Pitch Bend
35 PBend / Pitch Bend up only
Function in a Typical
Instrument (e.g., K2500)
Control effects depth on some
devices
32 Bank Select message
36 PBend\ Pitch Bend down only
37 ChnPrs Sends Channel Pressure (also called
Mono Pressure and Aftertouch)
38 PrgChg MIDI Program Change
39 ZnXpos Zone transposition
40 13Note or
Note #
41 37Note Sends one of 37 notes
42 SclLen Sends as many notes as are in current
43 NotOfs Offsets the Note Controllers from C4
44 NotVel Sets key velocity for Note Controllers
Sends one of 13 notes for a
continuous controller or a specific
note for a switch controller
scale (selected with parameter 131:
CCNoteScl)
49
Page 60

Editing and Creating Setups
The MIDI Destination List
MIDI
Controller
Destination
Number
45 NoteSw Enables or disables the Note
46 NotScl Controls parameter 131 CCNoteScl
47 ArXpos Arpeggiator transpose. Controls
48 Arp On Controls Arpeggiator parameter 4
49 Latch Arpeggiator Latch Controller
50 Gliss Arpeggiator Glissando Controller
51 Tempo Arpeggiator Tempo Controller
52 Beats Arpeggiator Clocks/Beat Controller
53 NotDur Arpeggiator Note Duration Controller
54 ShfAmt Arpeggiator Shift Amount Controller
55 ShfLmt Arpeggiator Shift Limit Controller
Function in a Typical
Instrument (e.g., K2500)
Controllers
parameter 16 transpose in
Arpeggiator editor.
Enable Sw.
56 ArpVel Arpeggiator Note Velocity Controller
57-62 Strng1-Strng6 For sending arbitrary MIDI strings
(MMsg1–MMsg6)
63 TTempo K2500 T ap Tempo
64 Sustan MIDI Sustain – holds notes that you
play, like a piano’s sustain pedal does
65 PortSw Enables portamento on some
monophonic sounds
66 SostPd Holds notes that are currently
down, but not notes played
subsequently
67 SoftPd On some synths lowers the volume
by a pre-set amount and may
soften the timbre as well
68 Legato Forces mono playback
50
Page 61

Editing and Creating Setups
The MIDI Destination List
MIDI
Controller
Destination
Number
69 FrezPd Envelopes freeze at current state
70 SndVar Sound variation
71 Timbre Timbre
72 RelTim Release time
73 AtkTim Attack time
74 Bright Brightness
75-79 SCtl 6–10 Sound Controllers #6–10
80-83 GPCtl 5–8 General purpose Controllers #5–8
84 PortCt Portamento control
85–90 MIDI 85–90 MIDI Controls #85–90
91 FX1 Dp Controls wet/dry mix of FX1
92 FX2 Dp Controls wet/dry mix of FX2
93 FX3 Dp Controls wet/dry mix of FX3
Function in a Typical
Instrument (e.g., K2500)
94 FX4 Dp Controls wet/dry mix of FX4
95 FX5 Dp Controls wet/dry mix of FX5
96 Data+ Data Increment
97 Data- Data Decrement
98 NRPLSB NRPN (Non-Registered Parameter
Number) LSB
99 NRPMSB NRPN (Non-Registered Parameter
Number) MSB
100 RP LSB RPN (Registered Parameter Number)
LSB
101 RP MSB RPN (Registered Parameter Number)
MSB
102–119 MIDI 102–119 MIDI Controls #102–119
51
Page 62

Editing and Creating Setups
Special Function Controllers
MIDI
Controller
Destination
Number
120 SndOff Sends “All Sound Off” message
121 CtlOff Resets all controllers
122 LocCtl Sends “Local Control On” or “Local
123 AllOff Sends “All Notes Off” message
124, 125 OniOff Sends “Omni Off” message
125 OmniOn Sends “Omni On” message
126 MonoOn Sends “Mono On’ message
127 PolyOn Sends “Poly On” message
Function in a Typical
Instrument (e.g., K2500)
Control Off” message
Special Function Controllers
This section describes the Special Function Controllers listed on
page 49, and gives some examples of how to use them. Most of
these control internal functions of the ExpressionMate as
described (and thus do not send any MIDI) but a few allow
sending other kinds of MIDI messages that are not true ÒControl
ChangeÓ messages.
Pitch Bend (PBend+)
This sends pitch bend messages, which let you raise or lower the
pitches of notes. Values above 64 will raise a noteÕs pitch, while
values below 64 will lower the pitch.
Keep in mind with all the pitch bend controllers, you must set the
bend range on the receiving instrument, not on the
ExpressionMate.
Reverse Pitch Bend (PBend-)
PBend- does the same thing as PBend+, but works in reverse.
Values above 64 will lower a noteÕs pitch, while values below 64
will raise the pitch.
52
Page 63

Editing and Creating Setups
Special Function Controllers
Pitch Bend Up or Down (PBend / and PBend\)
PBend/ and PBend\ will only raise or lower a noteÕs pitch,
respectively. A value of 0 equals no change in pitch, while 127 is
full pitch bend. You may Þnd that PBend/ and PBend\ make it
easier to bend notes with controllers that have no obvious center,
like breath controllers and CC pedals.
Channel Pressure (ChnPrs)
This sends Channel Pressure (also called Mono Pressure or
Aftertouch). Many keyboards and sound modules will respond
to Channel Pressure by adding vibrato or another effect to the
sound.
Program Change (PrgChg)
This sends a MIDI Program Change, letting you use the Ribbon
or another controller to change programs on the receiving
instrument. You can also use Fixed controllers to link the Setup
with a particular program on your synth, so that choosing the
Setup on the ExpressionMate brings up the same sound every
time.
On some synths, you actually have to send two messages to call
up a program. First you send a Bank Select message (Controller 0
or Controller 32), followed by a Program Change. For instance,
say you want to call up program 17 in set1, bank 2 on an
instrument that uses Controllers 0 and 32 to select banks. You
could set the Fixed controllers as shown below:
CONTROLLER DESTINATION ENTRY VALUE
FIX 1 BkSelM 1
FIX 2 BkSelL 2
FIX 3 PrgChg 17
When you select the Setup in Play mode, the ExpressionMate will
send the Bank Select messages, followed by the Program Change.
Not all instruments respond as described above. Read your
instrumentÕs manual to Þnd out which Bank Select and Program
Change methods it uses.
53
Page 64

Editing and Creating Setups
Special Function Controllers
Zone T ranspose (ZnXpos)
Zone Transpose (ZnXpos) transposes the Zone. No transposition
is a value of 64. To transpose up or down an octave, add or
subtract 12 to 64. All of the ExpressionMateÕs transpose
controllers work in a similar way.
Note Controller Destinations (13Note, 37Note, SclLen, Note #)
These Controller destinations, 40Ð42, let a Controller send a range
of notes (13Note and 37Note), a user-deÞned number of notes
(SclLen), or a single note (Note #).
Try setting the RibbonÕs Destination to any of these Controllers,
then create atonal music or Òpercussion jamsÓ by randomly
touching different points on the Ribbon. If you have a stage
lighting system that uses MIDI notes to turn lights on and off,
you can use the Ribbon or another controller to ÒplayÓ your
lights in time with the music, creating a killer stage show.
You can also use scales other than the default chromatic scale.
You can even program your own scales (see page 83 for
information on the Scale Editor) or use notes latched into the
Arpeggiator as a temporary scale.
SclLen will play as many notes as are in the current scale; note
lengths on the ribbon are determined by the scale selected with
parameter 131: CCNoteScl. If youÕre using a User scale, then the
length is determined by the Notes/Octave parameter in the scale
editor. SclLen will only play the number of notes in the scale and
the Þrst note determined by the scaleÕs Octave Size. The
untransposed root pitch for SclLen is C4.
The quickest way to the Scale Editor from the Controller Editor,
by the way, is to hold down the Learn button, then press Global.
Here are the normal, untransposed ranges for 13Note and
37Note:
CONTROLLER MIDI NOTES UNTRANSPOSED PITCHES
13Note 60–72 C4–C5
37Note 48–84 C3–C6
54
Page 65

Editing and Creating Setups
Special Function Controllers
Controller 40 (13Note / Note #) and Switch or Fixed Controllers
You can send Controller 40 from a Switch or Fixed Controller, in
which case its name is Note # (instead of 13Note). The On value
is the note on and the Off value is the note off. To avoid
unpredictable results, you should set the On value and the Off
value to the same note number.
Velocity is determined by the CCNoteVel parameter or the
NotVel controller. The value of CCNoteVel will be used until a
NotBel controller is sent.
Note Offset (NotOfs)
This offsets the pitches of all Note Controllers in a Zone. A value
of 64 sets the Controller to its normal range. If you want to shift
the pitch up one octave (12 semitones) send a NotOfs value of 76
(= 64 + 12). To transpose down one octave, send a value of 52 (=
64-12).
HereÕs a more detailed example. Say youÕve set the RibbonÕs
Destination in Zone 1 to 13Note, but you want the notes to start
on F4 and continue up to F5. In Zone 1, set SW1Õs On and Off
Destinations to NotOfs, its On Value to 69, its Off Value to 64, and
its Mode to Toggle. Now pressing SW1 will send the NotOfs
value, and 13Note will send MIDI notes 65-77 (F4ÐF5). The
button will stay on so that you can use two hands to play notes.
When you turn the button off, 13Note moves back down to its
normal range (C4ÐC5).
Note Velocity (NotVel)
NotVel sets the key velocity for all Note Controllers in a Zone.
For instance, you might be using the Ribbon in Zone 1 to play
notes, but you need the notes to play more loudly or softly in
certain sections of a tune. You could set NotVel as the On and Off
Destinations for a Panel Switch. You could then set the switchÕs
On Value to 127 (full velocity), and its Off Value to something like
50 or 60. That way, you can switch between two dynamic levels.
If you want to vary the velocities as you play, try this: Go to Zone
1, and set Rbn Split to 3-SECT. Next, set Rbn 1Õs Destination to a
Note Controller, and Rbn 2Õs Destination to NotVel. Then you can
play notes with one hand, and change velocities with the other. If
55
Page 66

Editing and Creating Setups
Controller Order
you prefer to free up both hands for playing notes, you can assign
NotVel as a Destination for the CC pedal or breath controller in
Zone 1.
If a sound doesnÕt change at all when you send NotVel messages,
make sure that the sound youÕre using responds to velocity. Most
piano and other acoustic instrument sounds should respond by
getting louder or softer. On some instruments, sounds that
imitate synths and organs are programmed to ignore velocity, so
you may need to edit those sounds, if possible.
Note Switch (NoteSw)
NoteSw turns all Note Controllers in a Zone on or off. HereÕs an
example: Go to Zone 1, and set a controllerÕs Destination to
13Note. Then assign SW2Õs On and Off Destinations to NoteSw,
its On Value to 127, its Off Value to 0, and its Mode to Toggle.
Now you can use that switch to enable or disable the playing of
notes from the controller. This parameter does not affect the
ribbon, which is always enabled, because touching the ribbon
does that.
Arpeggiator Controllers
These Destinations control the Arpeggiator parameters: off/on,
latch, glissando, tempo, clocks/beat, note duration, shift amount,
shift limit, transpose, and note velocity. See Chapter 4.
MIDI Message Strings (MMsg1–6)
See page 109 for information about these parameters.
Controller Order
The ExpressionMate sends Controller messages in speciÞc
orders. The Fixed controllers are sent FIX1 Þrst, FIX2 second, and
FIX3 third. All Controller values, including Entry Values, are sent
from Zones 1, 2, and 3, in that order. You canÕt change this, but
you can take advantage of it, as shown in the Program Change
example on page 53.
56
Page 67

Editing and Creating Setups
Naming, Storing, and Exiting
Saving Your Work and Exiting
If you want to save the changes you made in the Controller
Editor, or exit the editor entirely, read the section below. If you
want to continue to the Arpeggiator Editor instead, read the next
section.
A quick shortcut for updating within an editor is to press the
Store button twice. Alternatively, you can press Store, then the
right cursor button (>) to save the changes youÕve made to a new
location.
Naming, Storing, and Exiting
Once youÕre done using the Controller Editor or Arpeggiator
Editor, you can name and store your changes as a User Setup.
You can also exit without saving changes.
The Store Button
xit
E
S
tore
earn
L
If you want to name and store your work without leaving the
editor, press Store, and youÕll see this screen:
SU 3: Rename?
Big Strum |OK
Note: You can also name and save Setups from Play mode,
by pressing the Store button, to bring up name and
store dialogs. Press the Store button after reviewing
and/or changing each screen.
If you want to rename the Setup, use the < and > buttons to move
the cursor, and the data knob or - and + buttons to enter a name
of up to 12 characters. While naming, you can use the following
buttons for editing the name at the cursor position:
Controller swap upper/lower case
Arpeggiator insert a blank character
Global delete character
57
Page 68

Editing and Creating Setups
Naming, Storing, and Exiting
When youÕre done, press Store again or move the cursor right
until it reaches OK. YouÕll then see a screen similar to this:
SU 3: Store At?
Big|Strum *|OK
Now you can renumber the Setup, or replace it in its current
location. A star (*) next to the Setup number means that thereÕs a
User Setup in that location. Pressing Exit will cancel and return
you to the editing page you were on. Press OK (>) or Store to
save the Setup. When youÕre done, youÕll return to the editing
page that you were on.
The Exit Button
xit
E
S
tore
earn
L
If you want to leave the editor, press Exit, and youÕll return to
Play mode. If you edited the Setup without saving the changes,
there will be a star (*) next to the Setup name:
SU |3
Big Strum |||*
The star means that youÕre still using the edited Setup, giving
you a chance to play it and decide whether to keep the changes.
To erase any edits youÕve made, hold down the Learn button,
then press Exit again (while continuing to press Learn).
Otherwise, if you try to choose a new Setup, you will be asked if
you want to name and save the edited Setup Þrst:
SAVE CHANGES?
NO |||||| YES
Press Yes (>) to rename it and save it to a new location, or press
No (<) if you donÕt want to save it. Press Exit to cancel the new
Setup selection and keep playing the edited Setup. Press the
Controller or Arpeggiator buttons if you want to do some more
editing.
You can reload and send all the Entry values by pressing and
holding Store then pressing Exit. The ExpressionMate will reload
and send the setting from the last time you saved; it will not
reload the ROM Setup.
58
Page 69

Editing and Creating Setups
Editing Hints and Suggestions
Editing Hints and Suggestions
Do These Parameters Always Mean Something?
Be careful not to set up parameters that will do crazy things.
When in doubt, leave things off, or at the factory default settings.
On some of the higher-numbered MIDI controllers and Special
Function controllers, the On and/or Off values donÕt have any
meaning, because the controllers have very limited functionality.
The following list shows these. Ò>0Ó means you can use any
value thatÕs greater than zero. Ò=0Ó means the value should be 0.
ÒxÓ means you can use any value. ÒÖÓ means that you must use a
speciÞc value:
MIDI Controller On Value Off V alue
120 All Sound Off xx
121 Reset All Controllers xx
122 Local Control >0 =0
123 All Notes Off xx
124 Omni mode Off xx
125 Omni mode On xx
126 Mono mode On* Ö x
127 Poly mode On xx
* The On Value, in some synths, speciÞes the number of MIDI channels
to respond to, with one voice on each.
Do I Need All Those Controllers?
You donÕt have to plug in a physical controller to take advantage
of it. Even if a physical controller isnÕt there, you can use its
parameters to create additional ÒFixedÓ controllers.
If you want to send commands that you know wonÕt change
while youÕre playing, assign Destinations and Entry and Exit
values to physical controllers that arenÕt in use. When you choose
59
Page 70

Editing and Creating Setups
Editing Hints and Suggestions
the Setup, the ExpressionMate will send those values as if the
controller was in fact plugged in. (If the commands must go out
in a speciÞc order, read ÒController OrderÓ on page 56.)
Assigning a Message to Multiple Controllers
Sometimes you will want to assign the same Controller number
to more than one physical controller. For example, you might
want to control modulation depth with either the Ribbon or a CC
pedal. You can assign a particular MIDI message to as many
controllers as you want. (You can also assign multiple messages
to one physical controller. See ÒStacking ZonesÓ on page 25.)
60
Page 71

The Arpeggiator
The Arpeggiator Editor
Chapter 4
The Arpeggiator
The ExpressionMateÕs Arpeggiator is a powerful tool for spicing
up your performances. The Arpeggiator creates arpeggio
patterns based on notes that youÕve played. By using the many
options of the Arpeggiator, and taking advantage of the fact that
you can arpeggiate separately on the ExpressionMateÕs three
zones, the possibilities are uncountable. You can use it with a
sequencer, or you can use it completely live. The
ExpressionMateÕs Arpeggiator is also fully interactive; you can
choose how you want it to respond to the notes that you play.
Arpeggiator Quick Start
1. Start with one of the Factory Default Setups.
2. Double press the cursor buttons (one or more times) to jump to
Arpeggiator parameter 4 ÒEnable SWÓ. Turn the data knob to set
this On.
3. Press the Arpeggiator button one or more times until the Ò1Ó light
above the Arpeggiator button comes on. Notice also ÒZ1Ó on the
top line of the display indicates the current zone.
4. Play a chord on your MIDI instrument and listen to the ArpeggiatorÕs effect.
5. Press the right cursor button until the screen displays parameter
15 ÒRhythm SelectÓ. Scroll through the list of rhythms and choose
one youÕd like to try.
6. Now go to the Shift Amount parameter (#10) and listen to its
effect on your arpeggiations. Try changing the Shift Limit parameter and listen to its effect on the Shift Amount.
7. Finally, read the rest of this chapter to Þnd out just how amazing
the Arpeggiator really is.
The Arpeggiator Editor
Pressing the Arpeggiator button at the left of the front panel
brings you into the Arpeggiator Editor. Its parameters are shown
in the chart that follows.
61
Page 72

The Arpeggiator
Arpeggiator parameters
Arpeggiator parameters
Parameter Values
Tempo Ctrl51, 30 to 600BPM
Low and High
Key Range
Enable Switch Ctrl48, Off, On
Note source In arp Zone 1 - MidiZ1, MidiZ2, MidiZ3, CCNot1,
Beats Ctrl52, 1-Clk, 1/32T, 1/32, 1/16T, 1/16, 1/8T, 1/8, 1/4T,
Note Duration Ctrl53, 3% to 400%
Latch Mode Keys1, Keys2, OverPlay, Arpeggiation, Add, Auto1, Auto2,
Note Order Played, Reverse, Invert, Played and Reverse, Played and
Shift Amount Ctlr54, -12 to 12
C-1 to G#9
CCNot2, CCNot3, ArpOZ2, ArpOZ3.
In arp Zone 2 - MidiZ1, MidiZ2, MidiZ3, CCNot1,
CCNot2, CCNot3, ArpOZ1, ArpOZ3.
In arp Zone 3 - MidiZ1, MidiZ2, MidiZ3, CCNot1,
CCNot2, CCNot3, ArpOZ1, ArpOZ2.
1/4, 1/2T, 1/2, 1/1T, 1/1
Auto3, Auto4, Toggle, Key Transpose 1, Key Transpose 2,
Key Transpose 3, Key Transpose 4.
Invert, Up, Do wn, Up and Do wn, Up and Down+, Random
Note, Random Order, Random Walk, Fractal Walk, Bin
W alk, All, None.
Shift Limit Ctlr55, 0 to 88
Limit Option Stop, Reset, Unipolar, Bipolar, Floating Reset, Floating
Unipolar, Floating Bipolar.
Glissando Ctlr50, Off, On
Note Velocity Ctlr56, 1 to 127, Played, Last.
Rhythm Select None, Funk 1, Funk 2, Rave 1, Rave 2, Dance 1, Dance 2,
Beladi, Maqsum, User 1 to 64.
Transpose Ctlr47, -64 to 64
62
Page 73

The Arpeggiator
Arpeggiator parameters
Real Time Control of Arpeggiator Parameters
If you look at the chart above, you will see that many of the
parameters can be set to a controller number, allowing you to
change the value of the parameter in real time. These controller
numbers (47-56) correspond to some of the special function
controllers listed on the chart on page 48.
It is important to understand that these controllers are internal
functions only - you must assign these functions to one of the
ExpressionMateÕs physical Controllers (e.g., ribbon or pedal). The
ExpressionMate will not respond to these controller numbers
sent from an external source.
These controller numbers are Òhard wiredÓ to a speciÞc function.
If you assign a function to a Controller, and move that Controller,
it will immediately affect the speciÞc parameter. In other words,
you do not need to assign an Arpeggiator parameter to its
speciÞc controller number in order for that parameter to respond
to the controller. For example, If you assign Tempo to the ribbon,
pressing the ribbon will immediately change the tempo - you do
not need to assign the Tempo parameter to Ctlr #51.
So why do we give you the ability to assign a parameter to a
controller number? This allows you to have the Controller
determine the value of Tempo as soon as the Setup is called up. If
you have set an Entry value for that controller, it will be sent
when you call up the Setup. If there is no entry value, then the
last known value (or Exit Value from the previous Setup) will be
used.
There is one special exception to this feature of the controllers
being Òhard wiredÓ, and that is the Note Velocity parameter. If
Note Velocity is set to a value of 0-127 or Ctlr #56, it will respond
to real time control. But if it is set to Played or Last, it will NOT
respond to real time control.
Tempo (Tempo)
Sets the Tempo for all three Zones. You can also change the
Tempo using Ctlr51.
63
Page 74

The Arpeggiator
Arpeggiator parameters
Key range (Low Key, High Key)
The low and high key determine the note range the Arpeggiator
will see. You can set it so that one area of the keyboard will
arpeggiate notes while the other will play normally. You can split
the keyboard so each area arpeggiates one zone.
One thing to understand is that transposing the notes within a
zone will affect how the key range parameters in the Arpeggiator
function. Here is an example:
Start with Factory Setup 1, ABS Bend. Press the Arpeggiator
button and scroll to the Key Range parameters, setting Low Key
to C4 and High Key to C5. Now turn the SW2 button On. Play
your keyboard and you will notice that the keys between C4 and
C5 arpeggiate, while any other keys just play a single note.
Now press The Controllers buttons until the Zone 2 LED is lit.
Scroll to parameter 1, MIDI Channel and set it to Mn2. Make sure
that channel 2 on your sound source has a valid program
assigned. Now when you play the keyboard between C4 and C5,
you hear the zone 1 arpeggiating while zone 2 plays single notes.
Next press the Controllers button until Zone 1 is highlighted and
scroll to parameter 126 Nt Xpos. Set it to -7. Now if you play the
keyboard, you will see that Zone 1 arpeggiates From G4 to G5
AND the pitch has been transferred down so that Zone 1 plays a
5th down in pitch from Zone 2.
Finally, press the Arpeggiator button and scroll to parameter 16
Transpose and set it to 7. Note the pitches of Zone 1 have been
transposed back so that they are the same as Zone 2, but the
arpeggiation still happens between G4 and G5.
Enable Switch (Enable Sw)
Turns on the Arpeggiator. It can also be turned on by Ctlr48.
Note Source (Note Src)
This determines where the Arpeggiator gets its note input from.
Each Zone can see notes from any of the three Controller Zones
note output, CC Notes or from another Arpeggiator Zone
(Cascading Zones). The ExpressionMate cannot send notes from
an arpeggiator Zone to itself nor can it see notes sent from the
64
Page 75

The Arpeggiator
Arpeggiator parameters
panel switches or switch pedals. When cascading Zones, keep in
mind the Note Duration of your Master Zone will have a great
effect on the Cascaded Zones.
Another thing to note, if you have all three arpeggiator Zones set
to MIDIZn1, not only will the ExpressionMate Arpeggiate the
notes in Zones 2 and 3 it will play them normally if the
MergUnPro parameter is set to Notes. This may not be what you
want, however. To prevent this from happening set the Note Low
Key to a value above the Note High Key in the Controller Editor.
For more info on why this happens see the section on the
MergUnPro parameter on page 81.
Keep in mind you might have to do some transposition in the
Arpeggiator to put things just where you want them. This is
because the Arpeggiator sees the incoming notes after the
ExpressionMateÕs note processing in the Controller section, so
remember that key ranges and transposition in the Controller
Editor affect the ArpeggiatorÕs note input.
Beats (Beats)
Sets the beat division the arpeggiation will be in. This ranges
from whole notes to 1 clock pulse. If you send Ctrl52, you can set
the ExpressionMate to arpeggiate in-between what is selectable
in the Beats window, i.e., just a little longer that a 1/4 note. When
a User Rhythm is selected the beats setting has no effect.
Note Duration (Note Dur)
This sets the length of time a note will sustain. You can set it to
sustain up to 400% of beat value so if your Arpeggiator is playing
1/4 notes, each 1/4 note will sustain for four beats. This can have
a dramatic effect when cascading the Zones. If you are using a
User Rhythm then Note Duration scales durations set in the
Rhythm Editor keeping the character of the Rhythm.
You can also use Ctlr53. A value of 32 is 100% if not using a
rhythm, or no change from programmed durations if using a
rhythm. Higher values lengthen the durations while lower values
shorten them.
65
Page 76

The Arpeggiator
Arpeggiator parameters
Latch Mode (LatchMode)
Latch Mode tells the Arpeggiator which of notes that you play
should arpeggiate.
There are two main features of each Latch Mode. The Þrst is
whether or not it uses controller #49. Some Latch Modes will start
arpeggiating as soon as you press the keys, while others will only
start arpeggiating when you send controller #49 (the Latch
controller) with an On value, and then will stop arpeggiating if
you turn that controller Off. You can then assign controller 49 to a
switch pedal or button in a Setup to Latch and Unlatch notes for
the arpeggiator. (Most of the Factory Setups have Pedal 2 and
SW2 assigned to controller 49. In addition, MAP1 remaps
incoming sustain messages to latch, so you can use the sustain
pedal on your keyboard to latch.)
The second main feature is whether or not the arpeggiator will
resync the clock when you Þrst strike a key. If the Latch Mode
does resync the clock, then the arpeggiating will start the
moment you strike a key and any subsequent keys will be
arpeggiated in time with the clock. But once all keys are let up (or
the latch controller is turned off), then the clock wonÕt start again
until the next key is pressed. But if the Latch Mode does NOT
resync the clock, then the clock begins when you select the Setup
and is always running whether or not you are playing any keys.
Therefore, if you strike the key between the clock pulses, the
ExpressionMate will wait until the next clock pulse to start
arpeggiating the note. This allows you to play the keys less
accurately but still have the notes triggered exactly in time.
One important thing to note: If you have the Arp Clock
parameter in the Global Parameters menu set to an external
clock, the all Latch Mode parameters will sync to that clock and
will therefore the modes which normally resync on key start will
NOT resync.
It is possible to Latch up to 16 notes. Once you start arpeggiating,
each note you play is added to an internal list which the
ExpressionMate remembers. In some latch modes, they will be
removed from the list when you let go of the key, and in others,
they will remain part of the list as long as the latch controller is
turned On. If you play more than 16 notes, any extra notes will
simply be ignored. If you press the same key more than once,
each key press is remembered as a separate event in the list and
66
Page 77

The Arpeggiator
Arpeggiator parameters
will be included in the arpeggiation parameter. Keep in mind that
the Arpeggiator parameters may generate more than 16 different
notes, based on the setting of the Shift and/or Glissando
parameters. The 16 note limit applies to the actual notes that you
play.
Latch Modes that use controller #49:
• Keys1*
• Keys2*
• Overplay
• Arpeggiation
• Add
• Auto3
• Auto4
• Toggle*
• KeyXp1 - KeyXp4
* These modes can also be used without the Latch Controller
Latch Modes that do not use controller #49:
• Auto1
• Auto2
Latch Modes that Resync the Clock:
• Keys1
• Overplay
• Arpeggiation
• Add
• Auto1
• Auto4
• Toggle
• KeyXp3
• KeyXp4
Latch Modes that do not Resync the Clock:
• Keys2
• Auto2
• Auto3
• KeyXp1
• KeyXp2
67
Page 78

The Arpeggiator
Arpeggiator parameters
Ctlr#49 and Latch Modes
As explained in the preceding section, to Latch is basically to
grab notes for the Arpeggiator. This section explains how Latch
controller #49 affects the different Latch Modes.
Keys1 - This latch mode can be used with or without the latch
controller (#49). If the latch controller is turned off, then it works
very simply. If you press one or more keys, they will be
arpeggiated. As long as a key is held, it will be included in the
arpeggio. Once you let go of the key, it is no longer arpeggiated.
This means you can play a four note chord and have all four
notes arpeggiated, then let go of one key, it will drop out of the
arpeggio but the remaining three notes will continue to
arpeggiate. If you let go of all keys, then the clock is resynced as
soon as you press a new key.
If you use Ctlr #49 with this mode, then the following applies:
Any keys that you are holding when Ctlr #49 is turned On will
continue to arpeggiate when you let go of the keys. If you then
turn Ctlr #49 Off (after having let go of the keys), all arpeggiation
stops. This feature allows you to start arpeggiating by playing a
chord, step on a pedal assigned to Latch, then let go of the keys
and get ready to play a new chord, then let go of the pedal and
play the new chord to start a new arpeggio. (This assumes the
pedal is set to be a Momentary switch instead of Toggle.)
Any notes played after the Ctlr #49 is turned On will play
normally and not be arpeggiated. This means that if you turn the
latch On before playing any notes, you wonÕt hear any
arpeggiation. This also allows you to start a chord arpeggiating,
turn on the latch, then play a melodic line on top of the arpeggio.
Another feature of this mode is that the note order is reset to the
Þrst note when Ctlr #49 is turned Off. So again, using our
example of a momentary pedal being set to Latch, you can hold a
chord, and then press and release the pedal. Each time you let go
of the pedal, the pattern of the notes will begin from the Þrst note
in the pattern. If you are using one of the Preset or User Rhythms,
this allows you to change the order of notes within the rhythm.
68
Page 79

The Arpeggiator
Arpeggiator parameters
Ctlr#49 Off->On while keys are held then releasing the keys:
This will arpeggiate the pattern being played up to 16 notes.
Keep in mind, you can hear a lot more than 16 depending on how
the Arpeggiator is set, but its pattern is built from those 16 notes.
As long as Ctlr#49 is on added notes you play will sound
normally and will not be arpeggiated. When Ctlr#49 is turned
On->Off and you are not playing any keys, the pattern stops. If
you hold keys down and turn off Ctlr#49 the notes you are
playing will begin to arpeggiated.
Ctlr#49 Off->On while keys are played and held:
Play a chord and turn on and off Ctlr#49 without releasing the
keys. Each time you turn Ctlr#49 on and off, upon the release of
Ctlr#49, the Arpeggiator resets the note order to the Þrst note
seen. This allows you to change the order of the notes within the
rhythm being arpeggiated.
Keys 2 - Works the same way as Keys1 except the clock is never
resynced.
OverPlay - This mode requires Ctlr #49 in order to hear the
arpeggiation. When you play notes with Ctlr #49 turned Off, they
sound normal and are not arpeggiated. When you turn Ctlr #49
On, the clock is resynced, and any notes currently being held will
be arpeggiated. Any notes played after Ctlr #49 is turned On will
be played normally and will not be arpeggiated, allowing you to
Òplay overÓ the arpeggio. This Overplay feature is very similar to
the Keys 1 and Keys 2 modes - the difference is that notes played
when Ctlr #49 is Off are not arpeggiated whereas in the Keys
modes, they are.
Arpeggiation - No sound is heard until the Ctlr#49 is turned on.
Once Ctlr#49 is on any keys held will begin to arpeggiate and the
clock is resynced. Added notes will join the arpeggiation but will
not latch into the pattern. When you release the added notes they
will no longer play in the arpeggiation.
Add - Notes Þrst played sound normal. Notes held when Ctlr#49
is turned on will begin to arpeggiate. Added notes will be added
and latched into the arpeggiation up to 16 notes. Turn off Ctlr#49
to stop the arpeggiation.
69
Page 80

The Arpeggiator
Arpeggiator parameters
Auto1 - The Þrst notes you play resync the clock. As long as one
key is held, up to 16 notes can be arpeggiated. When you release
all keys the arpeggiation stops. The next key played will then
resync the clock. Ctlr#49 has no effect on Auto1.
Auto2 - is the same as Auto1 except the clock is never resynced.
Auto3 - The clock is never resynced in this mode. Any keys
played are arpeggiated and continue to arpeggiate even when
keys are released. Look mom no hands. Those keys will sound
until the next note, or group of notes up to 16, are played. Once
the new group is played, they begin to arpeggiate. Ctlr#49 must
be turned Off to stop the arpeggiation.
Auto4 - Same as Auto3 except the clock is resynced when a note
is played. Ctlr#49 stops the arpeggiation.
Toggle - When you strike a note it arpeggiates even if the key is
not being held. To stop the arpeggiation play the same note
again. Each note is its own on/off switch to the arpeggiator. You
can arpeggiate up to 16 notes. Ctrl#49 will resync the clock. If a
Latch controller is connected and assigned, turning it off will also
stop notes that have been toggled on.
KeyXp1 - KeyXp means Key Transpose. If you play a chord and
turn on Ctlr #49, the intervals between the notes are remembered
by the arpeggiator. The Þrst key you played becomes the root;
when you play a different note, the Arpeggiator will transpose
the intervals to the new root.
For example, play a C major chord making sure you play the C
Þrst; keep in mind you wonÕt hear anything. Turn on Ctlr #49 as
you hold the C E and G and you will hear the arpeggiation. Now
release the keys and keep Ctlr#49 on. Play a G note a fourth
below the C. The ExpressionMate will begin arpeggiating G B D
and stop when the key G is released. To enter a new set of notes,
turn off Ctlr#49 and play a new chord and turn Ctlr#49 on again.
KeyXP2 - The clock is never resynced and the notes arpeggiate
like Auto3. Turn off latch to stop arpeggiation.
KeyXP3 - Like KeyXP1 but the clock is resynced like Keys1.
KeyXp4 - Like KeyXP2 but the clock is resynced like Keys1.
70
Page 81

The Arpeggiator
Arpeggiator parameters
Note Order (NoteOrder)
Note Order tells the ExpressionMate what order it will
arpeggiate notes.
Played (Played): Notes play out same order as played in.
Reverse (Revrse): Notes play out reverse of order played in.
Invert (Invert): First note played sets Òreference pitch.Ó
Subsequent notes play out ÒmirroredÓ around the reference. For
example, playing a C major triad (C, E, and G) will give you the C
chord plus the A ßat and F below the C.
Play and Reverse (Ply&Rv): As played and reverse orders
alternate.
Play and Invert (Ply&Iv): As played and inverted pitches
alternate.
Up (Up): Upwards arpeggiation.
Down (Down): Downwards arpeggiation.
Up and down (Up&Dn): Upwards and downwards arpeggiation
with no repeat of top and bottom notes.
Up and Down Plus (Up&Dn+): Upwards and downwards
arpeggiation with repeat of top and bottom notes.
Random Note (RndNot): Any latched note may be played out
with equal probability.
Random Order (RndOrd): No note will be replayed until a cycle
completes. A ÒcycleÓ is after N notes are played (N=number
latched). If you are using a shift of an octave then it will play the
notes in the Þrst octave in a random order then play the new
random pattern in the second octave.
Random Walk (RndWlk): Random direction and step from last
note played, with uniform distribution of step size. Bounces at
highest and lowest note latched. The cycle ends when a low
bounce has followed a high bounce.
Fractal Walk (FrcWlk): Random direction and step from last note
played, with short steps more likely.
71
Page 82

The Arpeggiator
Arpeggiator parameters
Binary Walk (BinWlk): Random direction from last note played.
Step is always 1.
All: Plays all notes simultaneously on each beat, up to a
maximum of 6 notes. Be careful, since this can overrun maximum
MIDI speed, slowing everything down.
None: Notes in the list are not played. Typically used in
conjunction with the Arpeggiator scale selection for playing notes
on the ribbon.
When set to none you can use the CC Note scales ArLchP and
ArLchA to set a temporary scale of the notes latched in the
Arpeggiator. This can be used to create strumming type effects or
to feed this zone to another Arpeggiator zone to add rhythmic
elements to CC notes that relate to what you are playing on your
keyboard.
Shift Amount (Shift Amt)
This sets the amount the Arpeggiator will transpose the pitch of
its pattern. Set to 0 it will arpeggiate only the pitches you play.
You can set it over a range of plus or minus one octave.
The Shift Amount is added after each cycle (that is, each full run
through the speciÞed note order) completes. If the Shift Amount
is set to a value higher than the Shift Limit and the Limit Option
is set to Stop then the ExpressionMate will arpeggiate the notes
played at the original pitch and stop.
Shift Limit (ShiftLimt)
The brakes for the shift amount. It tells you how far from the
original note the arpeggiator will play. When the limit is reached
the limit option comes into play.
Limit Option (Limit Opt)
Stop: If this option is set to Stop, then once the Shift limit is
reached the Arpeggiation stops.
Reset: When the Limit is reached, the Arpeggiation goes back to
the original pitch and plays the pattern again.
72
Page 83

The Arpeggiator
Arpeggiator parameters
Unipolar (UniPlr): Unipolar plays the pattern up to the limit and
then turns around and plays it the from the Limit to the original
note using the same interval. This pattern will repeat until you
stop.
Bipolar (BiPlr): is similar to UniPolar. It goes from the original
pitch to the limit and back to the original pitch, but here it will
continue past the original pitch until it reaches the limit in the
opposite direction and then cycle back to the original pitch.
Float Reset (FltRes): Adds a bit of apparent randomness to the
process. "Flt" stands for Float, and it means that when the
Arpeggiator reaches the Shift Limit, it doesn't necessarily reset to
the original pitch. Instead, it looks at the Þrst note that would
exceed the Shift Limit, and calculates the interval between it and
the Shift Limit. It then starts the cycle over again, but instead of
starting with the Þrst original pitch, it transposes that pitch by the
interval it just calculated and continues from there.
The range of "Float" is bound with in the shift limit. The
ExpressionMate will cycle from the original pitch once the Float
has hit the Shift Limit.
Float Unipolar (FltUni): Applies the "Float" to the Unipolar
option.
Float Bipolar (FltBip): Applies the "Float" to the Bipolar option.
Glissando (Glissando)
When the Glissando is turned on either in the Editor or by
Ctlr#50 it will play notes chromatically from the original pitch to
the limit. The limit option will affect the order of the notes. Try
using ÒPlayedÓ for the arpeggiated note velocities when using
Glissando.
Note Velocity (Note Vel)
This sets the volume of the notes being played by the arpeggiator.
Played will arpeggiate the notes at the velocity played on your
controller, Last will play the Arpeggiator at the velocity of the last
key struck. You can also control volume using Ctlr56.
73
Page 84

The Arpeggiator
Arpeggiator parameters
Rhythm Select (RhythmSel)
This selects one of the 8 ROM Rhythms or one of the 64 User
Rhythms. You can also set this parameter to -None-.
The ROM Rhythms are:
Funk 1
Funk 2
Rave 1
Rave 2
Dance1
Dance2
Beladi
Maqsum
User Rhythms 1 Ð 8 are copies of the ROM Rhythms that you can
use as starting points for your own creations. See page 84 for
information on using the Rhythm Editor to do this.
The quickest way to the Rhythm Editor from the Arpeggiator, by
the way, is to hold down the Learn button, then press Global.
Transpose (Transpose)
This transposition is for the Arpeggiator only. You can play in a
group of notes and have the Arpeggiator play its arpeggiation an
interval higher or lower than the notes it receives from the
Controller editor. It can be adjusted real time with Ctlr47.
74
Page 85

Global Functions
Chapter 5
Global Functions
Besides the parameters for each Setup, there are numerous
parameters that affect all Setups. They are divided into two
groups:
• Global Objects Ð These include Global Parameters, User Scales,
User Rhythms, Setup Lists, Setup Map, and MIDI Messages.
• Global Utilities Ð These include commands for reloading
factory Setups, saving Setups with MIDI System Exclusive
dumps (commonly called SysEx dumps), and MIDIScope¨.
Refer to the chart below whenever you need to Þnd a Global
function.
Setup Select Mode
(Press Global Button)
Global Select
Edit Utility
Select
Parameters
Scales
Rhythms
Setup Lists
Setup Map
MIDI Msgs
Edit
Select
Load
Save
MIDIScope
Execute
75
Page 86

Global Functions
Getting Around
Getting Around
You use the < and > buttons to scroll through parameter lists, and
to choose options from some menus. You use the data knob and
the - and + buttons to change or enter values. In some cases, you
can also hold the Learn button, and enter values using the Ribbon
or another continuous controller. Changes to Global parameters
take effect immediately; you donÕt have to save them.
Global Parameter Set
Z
onesEdit
12
C
While in Play mode, press the Global button, and youÕll see this
screen:
-GLOBAL SELECTEDIT UTILITY
Press Edit (<) then press Select (<) to scroll through the list of
objects. When ÒEDIT Globl ParmsÓ appears on the top line of the
display, press Edit (>) to begin editing Global parameters. The
Þrst parameter is Contrast, as shown here:
ontroller
13 23
A
rpeggiator
Compare
G
lobal
GLOBAL 1:25
CONTRAST :25
The table below summarizes the Global parameters:
Parameter Range of Values
Contrast 0Ð64
Drum Sync Off, 5 to 50 milliseconds
RBN Dir Left, Right
MainMrgTo Off, Main, Aux
MainMgOpt Neithr, SysEx, RealTm,All
Aux MrgTo Off, Main, Aux
AuxMrgOpt Neithr, SysEx, RealTm,All
MergUnPro Notes, Cntrls, Both, Neithr
Arp Clock Int, Main, Aux
76
Page 87

Global Functions
Global Parameter Set
Parameter Range of Values
Send Clks Off, Main, Aux
Ext PgmCh None, Main1-16, Aux1-16
Pgm BkLSB 0Ð127, Ignore
Pgm BkMSB 0Ð127, Ignore
ZxNotesIn Off, M1-16, X1-16
ZxMCtlsIn Off, M1-16, X1-16
SYS EX ID 0Ð127, none
SysEx Ers 0-255
Contrast
This sets the LCD contrast. The range of values is 0Ð64, with 0
lightest and 64 darkest. The default value is 25.
Drum Sync
Pedal 1 can be connected to a drum trigger or a footswitch and
either can be used to control the tempo of the internal arpeggiator
clock. The ExpressionMate automatically detects which kind of
sensor by the kind of 1/4" plug used.
If you use a mono plug (just tip and sleeve), a normally-open
switch pedal is assumed to be connected to it. The trigger point is
a transition from open to closed (pedal downstroke). Note that
normal Pedal 1 functions are still available even when triggering
the arpeggiator.
If you use a stereo plug (tip, ring, and sleeve), then an analog
drum trigger is assumed connected between the tip (+) and
sleeve (-) with the ring open-circuited. A positive pulse greater
than 1.5 volts and wider than 2 milliseconds to the tip will trigger.
Note that most independent drum trigger units are probably
equipped with a mono plug. So to work with the
ExpressionMate, a 2X1/4" mono female to 1/4" stereo male Yadapter will be needed and the trigger should be plugged into
the Left (tip) member of the Y.
77
Page 88

Global Functions
Global Parameter Set
The ÒDrum SyncÓ parameter has a range of 5-50ms and OFF. To
use drum sync, select a value other than OFF (10-20ms is a good
start), set the Arp Clock (Global Parameter 8) to Int., and plug a
sensor or pedal into Pedal 1 as described above. As long as there
are no trigger events, the internal clock will run just as before
with its tempo set by Arpeggiator parameter 1 and values sent to
destination #53.
Once two trigger events closer together than 2.5 quarter-note
beats are seen, the tempo will change to track the trigger events.
If there is a pause in the triggers greater than 2.5 beats, the
tracking stops until another pair of events is seen. Convergence
to the tap tempo is fairly rapid - the maximum adjustment per
trigger is 50% either way.
The ÒDrum SyncÓ parameter value actually controls the duration
of a Òdead timeÓ after each trigger. During the dead time, another
trigger cannot be recognized. This can be used to eliminate
double-triggering due to noise and echoes when using the drum
trigger.
RBN Dir
You can set the RibbonÕs direction to Right or Left. If the direction
is Right, you send higher Controller values toward the Right end
of the Ribbon (the end with the cable). If the direction is Left, you
send higher Controller values toward the left end of the Ribbon.
WeÕve assumed that you will place the Ribbon so that as you face
it, its cable comes out of the right end. However, you can turn the
Ribbon the other way, in which case you may want to set RBN
Dir to Left.
78
Page 89

Section 1 Section 2 Section 3
0 127
RBN Dir = Right
Section 3 Section 2 Section 1
Global Functions
Global Parameter Set
127
RBN Dir = Left
Figure 5-1. RBN Dir settings.
0
MIDI Merging
If you look at the back of the ExpressionMate, youÕll see that it
has two MIDI interfaces: the Main interface and the Aux
interface. Each interface lets you send incoming data to either
MIDI Out port, along with any internal messages that you
generate with ExpressionMate Setups.
There are lots of uses for this; for instance, you might want to
send several sets of messages to an instrument with only one
MIDI In port. You could also send messages from different
instruments to just one track on a sequencer. There are other
possibilities too.
The ExpressionMate can merge all kinds of MIDI messages,
including Realtime messages and SysEx.
MainMrgTo and Aux MrgTo
The MainMrgTo and Aux MrgTo parameters tell the
ExpressionMate where to send messages that it receives at the
Main In port or Aux In port, respectively. You have three choices
for each:
• Choosing Off disables merging for the input. The
ExpressionMate will respond to messages received at the
79
Page 90

Global Functions
Global Parameter Set
MIDI In port, but wonÕt send them directly to either MIDI
Out port. (There are exceptions: see the MergUnPro,
ZxNotesIn, and ZxCtlsIn parameters below.)
• Choosing Main will take all of the messages coming to the
interfaceÕs MIDI In port, and send them to the Main Out port.
• Choosing Aux will take all of the messages coming to the
interfaceÕs MIDI In port, and send them to the Aux Out port.
HereÕs one example: say you have a keyboard connected to Main
In, and MIDI drums connected to Aux In. You want play from
both instruments, merge all the notes with the ExpressionMate
messages, and send everything to a MIDI sound module thatÕs
connected to Main Out. Set both MainMrgTo and Aux MrgTo to
Main. Now the ExpressionMate sends all external and internal
MIDI data to the Main Out port, which in turn sends everything
to the module.
MainMgOpt and AuxMrgOpt
These parameters let you choose whether the Main and Aux
interfaces will merge Realtime messages (Clock, Start, Continue,
Stop, Active Sensing, Reset) and SysEx. There are four choices:
• Neithr prevents the interface from merging both Realtime
and SysEx messages.
• SysEx allows the interface to merge SysEx messages.
• RealTm allows the interface to merge Realtime messages.
• All lets the interface merge all MIDI messages.
Remember that these options act only on merging; MIDI clock
data still passes through to the Arpeggiator, and SysEx is still
recognized when you reload Setups.
A Word About SysEx and Merging
Long SysEx messages (those longer than 250 bytes or so) cannot
be merged simultaneously. Also, while a SysEx message is being
merged into an output, other ExpressionMate messages are
blocked at that output. For SysEx messages under 250 bytes, you
probably wonÕt notice this.
80
Page 91

Global Functions
Global Parameter Set
Merge Unprocessed (MergUnPro)
MergUnPro lets you choose what to do with notes that are
intercepted by the Arpeggiator and/or note processor. When you
merge notes and/or controllers, both the processed and the
unprocessed notes will be output. When you do not merge, only
the processed notes are sent to the output.
You can merge notes, controllers, both or neither. The default is
Notes which lets you take full advantage of the ExpressionMateÕs
velocity curves and note mapping features. Keep in mind that if
you are remapping pitch bend to another controller and the
MergUnPro is set to Cntrls or Both, the pitch bend will be sent as
well as the remapped controller.
Arp Clock
This is where you set the source of the ArpeggiatorÕs clock. It can
receive the clock over the Main or Aux MIDI In; the default is the
ExpressionMateÕs internal clock.
Send Clock (Send Clks)
Use this option to send the ExpressionMateÕs internal tempo
clock (at 24 clocks per beat) to either the Main or Aux Out. The
default is Off, which is generally a good setting, since sending
clocks can use up almost 10% of MIDIÕs bandwidth.
Program Change Parameters
You can change Setups by sending Program Change messages
from an external device, such as a sequencer or keyboard. Several
parameters determine how the ExpressionMate will respond to
these program changes.
Ext PgmCh
This option determines whether the ExpressionMate will
respond to external Program Change messages, and on which
channel (Main 1-16 or Aux 1-16). The available values are None,
Main1-16, and Aux1-16.
81
Page 92

Global Functions
Global Parameter Set
Pgm BkLSB, Pgm BkMSB
Pgm BkLSB and Pgm BkMSB tell the ExpressionMate how to
respond to MIDI Bank Select messages. Each may have a value of
0Ð127 or Ignore.
• When both are set to Ignore, the ExpressionMate will
respond to program changes from 0 to 127, on the channel
speciÞed by Ext PgmChg.
• When Pgm BkLSB is set to Ignore but Pgm BkMSB is set to a
number, Þrst send a Controller 0 message with the same
value as Pgm BkMSB. Then send the program change.
• When both Pgm BkLSB and Pgm BkMSB are set to values,
Þrst send a Controller 0 message with the same value as Pgm
BkMSB, and a Controller 32 message with the same value as
Pgm BkLSB. Then send the program change.
In most cases you will want both of these parameters set to
Ignore.
ZxNotesIn
These parameters set the channel on which the zone receives
MIDI note information.
ZxMCtlsIn
These parameters set the channel on which the zone receives
MIDI controller information. This must be set to a channel to use
the ExpressionMateÕs controller remapping features.
SYS EX ID
This sets the SysEx Device ID for the ExpressionMate. The range
of values is 0Ð127, or none.
You must set the Device ID of the ExpressionMate to the same
number both when dumping and reloading Setups. The same is
true when sending Setups from one ExpressionMate to another:
they must have the same Device ID.
You can sometimes avoid problems by setting the Device ID to
127. In MIDI-speak, this means Òbroadcast to all units,Ó so any
ExpressionMate on the MIDI cable will receive the Setup data.
(You might not want to do this if you have multiple
ExpressionMates that you want to keep different from each
other.)
82
Page 93

Global Functions
SysEx Ers
This parameter is set to zero on power-up and is incremented
whenever a SyxEx message is rejected because of a checksum
error. You can manually edit the value back to zero at any time.
Check the value of this parameter after a SysEx load to verify that
all data was received correctly.
Exiting Global Edit Mode
You can leave Global Edit mode at any time by pressing the Exit
button. This returns you to the Global Select menu where you can
select a different object to edit. Press Exit again to return to Play
Mode. Changes to Global parameters take effect immediately, so
you donÕt need to save them.
Other Global Objects
These include the User Scales, User Rhythms, Setup Lists, Setup
Map, and MIDI Messages. MIDI Messages are discussed in
Appendix A. The remaining Global Objects are described in this
chapter.
User Scales
User Scales
The ExpressionMate offers you 8 user-editable scales in addition
to the 16 standard scales described on page 47.
To enter the Scale Editor from Play mode, press the Global
button, then press Edit (<) followed by Select (<) to scroll
through the list of objects. When ÒEDIT ScalesÓ appears on the
top line of the display, press Edit (>). Press the left cursor (<) to
select the scale you want to edit and then press the right cursor
(>) to begin editing that scale. Remember that the scales, like all
of the global parameters and tables, are edited ÒliveÓ. This means
that the changes you make will take effect immediately.
When you enter a scale you will see
Notes/Octave= 7
PREV NEXT
Use the left and right Cursor buttons to move though the editor,
using the +/- buttons, the Spin knob, or Intuitive entry to change
the values.
83
Page 94

Global Functions
User Rhythms
The Notes/Octave parameter sets the number of notes in the
scale. You can choose from 1 to 16. As examples, 12 could be a
chromatic scale, 5 a pentatonic, and 7 a major or minor scale.
Octave size determines the transposition of the scale. Technically
this is the transposition, in semitones, that is added after all of the
notes in an octave are used. Typically it is 12 but can be from 0 to
24. For example, if you use a scale that is three notes long and set
the Octave size to 7 with CC Note Ctlr#41 37Note, the Þrst three
notes will be at the bottom end of the ribbon. As you slide your
Þnger along the ribbon, every three notes will transpose up the
Þfth. So if the scale is playing C E G, the next three notes would
be G A D followed by D F A and so on up to 37 notes.
The next window is one of the 16 Step windows.
Step |1 Intvl| 0
PREV NEXT
The top left tells you what step you are editing and the top right
tells you the interval you have chosen. You can select from 0 to
24; two octaves, in other words. With no transposition, 0 is C4. 1
would be the half step above that, C#4. Intervals can be put in
any order in the I6 steps. For example, a major scale would have
the values:
0, 2, 4, 5, 7, 9, 11
Press Exit and the display goes back to the CC Note scale select
screen. Press Exit again or the Global button to return to the
Global edit select screen and one more time to the Setup select
screen.
To hear changes to a Scale you are editing, setup a RBN section to
one of the CCNote controllers and Select the CCnote User scale
you want to work with. You can exit to the Globals or use the
Shortcut to the Scale Editor from the Controller Editor (press
Learn and then the Global button to enter the Scale Editor; press
the global button to exit back to the Controller Editor; Press Exit
to go back to Play Mode).
User Rhythms
In addition to the eight ROM Rhythms provided with the
ExpressionMate, you can also create your own User Rhythms to
use with the Arpeggiator. For your convenience, User Rhythms 1
Ð 8 are copies of the ROM Rhythms. ThereÕs a complete list of
these rhythms on page 74.
84
Page 95

Global Functions
User Rhythms
An ExpressionMate Rhythm has a Beat Value parameter, Number
of Steps parameter, and up to 16 steps, each consisting of a
Length and a Duration.
The Beat Value speciÞes how many clocks constitute a beat.
Possible values are 1 - 96. The standard value of 24 displays as
"1/4" and other "round" values display as other musically
meaningful time values including dotted durations and triplet
(T) durations. Odd clock values, like 15, are displayed as "15Clk".
The Number of Steps speciÞes how many of the following steps
constitute a rhythm cycle. From 1 to 16 may be speciÞed. Set this
Þrst before editing the steps because steps beyond the speciÞed
number are hidden by the editor.
When you select a step for editing, the screen shows 4 things
about the step:
1. The step number, "Stp XX"
2. The cumulative total beats from step 1 up to and including this
step, "Tot=xx.xx"
3. The length of this step in beats, "X.XX".
4. The duration of notes started by this step, also in beats, "X.XX".
Length speciÞes how long before the next step starts. Duration
speciÞes how long notes begun when this step starts will sound
and can be either shorter or longer the length of the step.
Both length and duration are stored as a number of clocks, from 1
to 96. The length and duration display is in terms of beats to
reduce the amount of mental arithmetic one must do. Thus if the
Beat Value is 24 and a step's length is 12, then that step's length
will be displayed as 0.50.
The "Tot=XX.XX" display lets you know how many beats have
been "accounted for" up through this step. If you want 4 beats per
rhythm cycle for example and you've speciÞed 8 steps, then the
"Tot=" Þeld should show "4.00" when the 8th step is displaying
for the rhythm's timing to be correct. Nothing enforces this rule
however so it is easy to get some very whacky sounding
rhythms.
Note that the Beat Value DOES NOT inßuence the sound in any
way. If you change it, you will not hear an effect. All the Beat
Value does is to help display the length and duration of steps in a
more meaningful way. So if you want to make a given rhythm go
85
Page 96

Global Functions
User Rhythms
double-time, for example, Þrst change the Beat Value to half its
original value (likely to 1/8 from 1/4), then re-edit each step to
restore the original length and duration.
Entering the Rhythm Editor
To enter the Rhythm Editor from Play mode, press the Global
button, then press Edit (<). Press Select (<) several times to scroll
through the list of objects. When ÒEDIT RhythmsÓ appears on the
top line of the display, press Edit (>), then press the Select and
Edit buttons again to begin editing the desired rhythm.
The ExpressionMate will brießy display:
Global = Toggle
Length/Duration
This is a reminder that the Global button toggles between editing
a stepÕs length or duration.
The Þrst window is:
Beat Value 1/4
PREV NEXT
You can adjust this with +/ - or the spin knob. The cursor buttons
will take you though the other windows.
The Beat Value only affects how your rhythms are displayed, it
makes no change in how your rhythm will sound. The Default is
1/4, meaning a value of 1.00 is equal to one quarter note. If the
Beat value was set to 1Clk then 1.00 would be equal to one clock
pulse.
The next window is:
# of Steps 4
PREV NEXT
This is where you enter the # of steps for your rhythm; you can
have up to 16.
The next window is:
Stp 1 Net = 1.00
L=1.00 D=0.75
Stp tells you what step of the rhythm you are editing.
86
Page 97

Global Functions
Setup Lists
Net tells you the total length of time your rhythm takes up to the
step you are editing. In this example we are looking at step 1
which has a length value of 1.00 so that is the Net. If Steps 2 and 3
had length values of 0.50 then the Net in Step 3 would be 2.00.
L= displays the length of time the rhythm will wait before
playing the next step.
D= tells you the duration of that stepÕs note. It can be up to 4
times the Length.
Example
Beats: 1/4
# of steps: 3
Step 1: L= 0.25 D= 0.03
Step 2: L= 0.25 D= 0.50
Step 3: L= 0.50 D= 0.25
Step 1 will play a staccato 16th note.
Step 2 will play a 16th note with a duration that holds the length
of an 1/8th note.
Step 3 will play a 1/8th note with the duration of a 1/16th note.
Both steps 2 and 3 will stop their notes at the same time.
Ctlr53 scales the rhythm duration from 3% to 400% of the D
values. A value of 32 plays the duration speciÞed in the rhythm
editor. If you increase the value above 32, the ExpressionMate
will scale each duration for each step, keeping the character of the
rhythm. The maximum duration of any note after scaling,
however, is 255 clocks.
Setup Lists
To edit the Setup Lists from Play mode, press the Global button,
then press Edit (<) followed by Select (<) to scroll through the list
of objects. When ÒEDIT Setup ListsÓ appears on the top line of
the display, press Edit (>). As we mentioned in Chapter 2, Setup
Lists are a way to organize Setups so that theyÕre easier to Þnd
during live performances. Choosing this command lets you edit
87
Page 98

Global Functions
Setup Map
these lists so that they contain the Setups you want. There are
three lists containing 16 Setups each, for a total of 48 Setups.
SETUP LIST 1:12
3 Mono-Poly Sw
The top line shows which Setup List youÕre editing, followed by
the Step within that list. The bottom line shows which Setup is in
the current Step. Press the < and > buttons together to choose
which list to edit. Press either the < or > button to scroll through
the 16 Steps in each list. Use the data knob and -/+ buttons to
change the Setup in each Step.
Setup Map
The Setup Map routes incoming MIDI program changes to
ExpressionMate Setups. To edit the Setup Map from Play mode,
press the Global button, then press Edit (<) followed by Select
(<) to scroll through the list of objects. When ÒEDIT Setup MapÓ
appears on the top line of the display, press Edit (>).
MIDI PROG CH 111
48 Iceblink
Each of the 128 possible program changes (0-127) has an
associated ExpressionMate Setup number, or None. To access
them using an external MIDI device, you send program changes
to the port, channel, and program bank set in Global Parameters.
With Setup Map, you can synchronize the ExpressionMateÕs
Setups with sound setups on a synthesizer, then use an external
program change command to call up the appropriate
ExpressionMate Setup when you select a sound on your
synthesizer.
Also, some older instruments canÕt send enough program change
commands for you to access all the Setups in the ExpressionMate.
For instance, your keyboard might only transmit program
changes 0 through 63. If you want to use that keyboard to call up
Setup 64, assign the Setup to MIDI PROG CH 63 or lower:
MIDI PROG CH 63
64 SlowDrive
Note that the ExpressionMate will respond to program changes
only when youÕre in Play mode.
Saving and Reloading Setups
Global Utilities let you load and save Setups and view MIDI
operation with MIDIScope (described on page 92). Loading
88
Page 99

Global Functions
Saving and Reloading Setups
SysEx (e.g., Setups youÕve saved to another MIDI device) does
not require a special a Global Utility. For your convenience,
however, weÕve included the procedure in this section.
Saving Setups (SysEx Dumps)
Even though ExpressionMateÕs memory is battery-backed, itÕs
still a good idea to regularly save the Setups that you edit and
create. You may also need to free up memory for creating and
storing more Setups.
You can use SysEx (System Exclusive) dumps to save Setups to
an external storage device, such as another ExpressionMate or a
sequencer that can record SysEx messages. You can then recall
the Setups at a later time.
Make sure that ExpressionMateÕs Main MIDI Out is connected to
the storage deviceÕs MIDI In. Also, if dumping from one
ExpressionMate to another ExpressionMate, check that the SysEx
ID is set correctly for both devices (see ÒSYS EX IDÓ on page 82
for details on doing this). Regardless of the device you are
dumping to, however, make note of the ExpressionMateÕs SysEx
ID, because you will need it when you reload the SysEx. The
default SysEx ID is 1.
Each Setup uses a separate SysEx message, so that each message
is as short as possible.
To save Setups as system-exclusive messages, press the Global
button when in Play mode. First youÕll see this screen:
-GLOBAL SELECTEDIT UTILITY
Then press Utility, followed by Select to scroll through the list of
the ExpressionMateÕs utilities. When Save Setups is displayed on
the top line, press Execute.
You will be presented a screen such as the following:
-SYSEX SAVE SEL*Globl, SU XX-YY
The bottom line shows the objects currently selected for saving. If
there is an asterisk (*) beside ÒGloblÓ then the globals have been
selected. Sysex dumps of the globals include all global
parameters and everything else that may be edited with the
global editors including Scales, Rhythms, Setup Lists, the Setup
Map, and MMsg strings.
89
Page 100

Global Functions
Saving and Reloading Setups
The number range, ÒXX-YYÓ speciÞes which Setups have been
selected to save. The left and right buttons move the cursor to any
of these 3 Þelds and the Þeld's value may be changed with the
spinknob and inc/dec buttons in the usual way.
To save just a single Setup, set both XX and YY to that number. To
not save any Setups at all (for example to save just the globals),
make the range backward, i.e., Ò20-10Ó.
When the cursor runs off the screen to the right or the Store
button is pressed, system-exclusive messages are sent out the
Main MIDI port and a progress screen is displayed. The data is
broken up into messages of 32 memory bytes each sent at about
half MIDI speed so as to not overload sequencers, mergers, etc.,
that may be in the system. Speed is about 1 Setup per second.
When the save is completed, you are returned to Play mode.
Cancelling a SysEx Dump
If you need to cancel the dump for some reason, press Exit.
Dumping will stop after the current Setup is dumped, and you
will return to the SysEx Select Setups screen.
Loading Factory Setups
You may selectively reload Factory Setups from the
ExpressionMateÕs ROM. To start, press the Global button when in
Play mode to see this screen:
-GLOBAL SELECTEDIT UTILITY
Then press Utility, followed by Select to scroll through the list of
the ExpressionMateÕs Global Utilities. When Load Setups is
displayed on the top line, press Execute.
A screen such as the following will be displayed:
-RELOAD SELECT*Globl,|SU||1-64
Notice that this screen is similar to that for SysEx Save. The
selection procedure is the same for either operation. See ÒSaving
Setups (SysEx Dumps)Ó on page 89 for details on using this
screen to specify what you want to reload.
90
 Loading...