

Page 1
Page 2

Page 3
Page 4
Page 5

1. Layering Two Sounds .........
Chapter 4 Selecting Sounds ...............
1. Selecting Sounds ...............
Chapter 5 Layering ............................
Chapter 6 Splitting .............................
12
12
14
14
1. Splitting the Keyboard ........
15
15
Recording a Performance ....
Chapter 10 Recording ........................
Chapter 11 Demo Songs .....................
Listening to Demo Songs ......
21
21
22
22
23
23
23
24
24
24
26
26
26
26
26
Chapter 16 Specifications ....................
28
Chapter 7 Functions ..........................
17
1. Function Mode ...................
17
2. Selecting a Function ...........
17
Chapter 9 Rhythm List ....................
20
Chapter 15 Demo Song List ................
27
Contents
Main Features ..........................
Main Buttons ............................
1. Piano Assembly ...................
2. Applying Power ....................
3. Setting the Volume .............
Chapter 2 Main Features ...................
Chapter 1 Front Panel ........................
Chapter 3 Piano Assembly .................
6
6
7
7
8
8
11
11
Chapter 12 Pedals .................................
1. Pedals ..................................
2. Using the Pedals ................
Chapter 13 MIDI ....................................
1. MIDI Channel ......................
2. Connecting to a Computer
1. Using Headphones ............
2. Aux In ..................................
3. Aux Out ...............................
Chapter 14 Connection ........................
4. MP3 Aux In .........................
Chapter 8 Rhythm ..............................
18
1. Selecting a Rhythm .............
18
Page 6
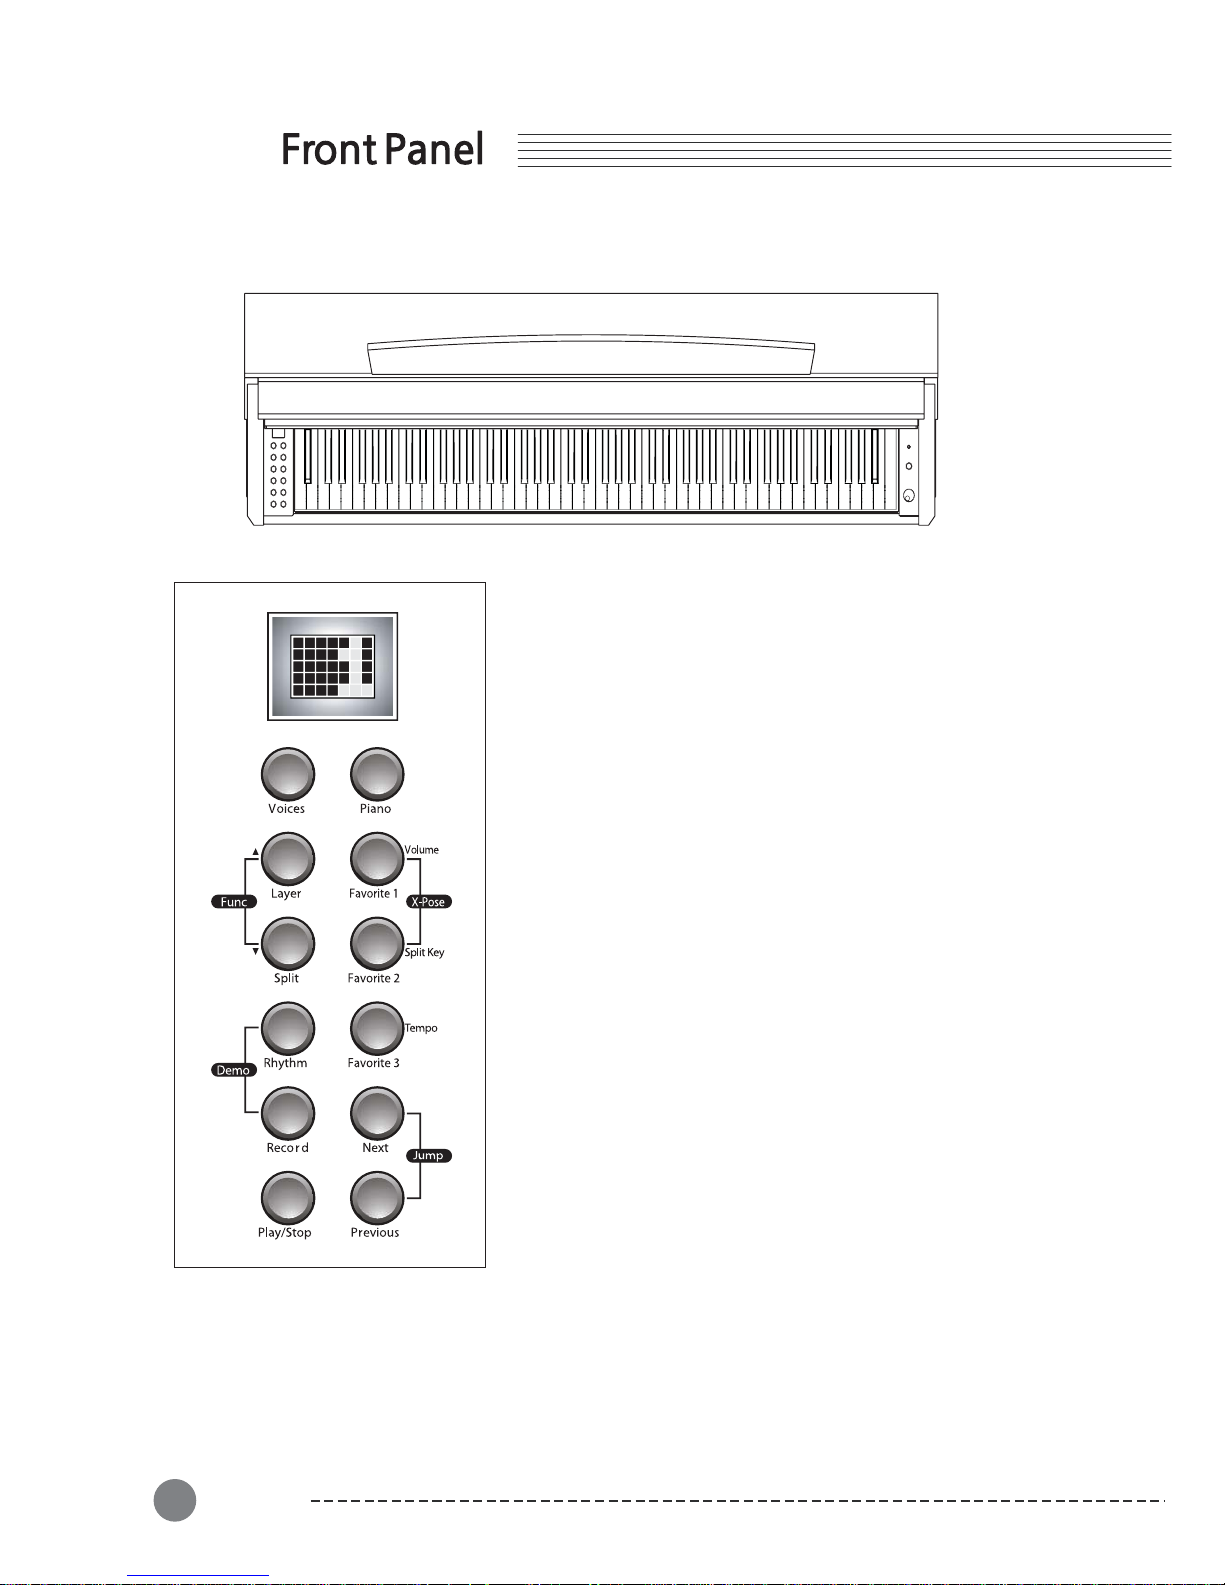
Chapter 1
Main Buttons
(1) Voice button
Select among the 20 voices with the [Voices] button.
Piano
(4) Rhythm button
Select among the 29 rhythms with the [Rhythm] button.
(5) Layer button
You can layer two voices and play them simultaneously to
create a thicker and richer sound.
(6) Split button
For playing different voices on the left-hand and right-hand
section of the keyboard.
(7) Demo Songs
Select among the 50 demonstration songs.
(8) Function button
You may set functions like Tune, Tempo, Metronome, etc.
(9) Record button
For recording your keyboard performance.
(10) Play/Stop button
These control playback of or stop the demonstration songs
and your recorded songs.
(2) button
Always selects "1 GRAND PIANO" sound.
(3) Favorite 1,2,3 buttons
Provides quick access to 3 user selected or modified voices.
(11) Next button
Select the next higher Voice, Rhythm, or Demo Song, etc.
(12) Previous button
Select the next lower Voice, Rhythm, or Demo Song, etc.
8
FrontPanel
6
Page 7

■
USB MIDI
■
■
■
■
■
■
■
■
■
■
■
88 note fully weighted Graded Hammer action keyboard
3Pedals(Sustain,Sostenuto,Soft)
10 Touch sensitivity settings
Stereo Audio Input, Output
2Headphonejacks
5x7 Dot scrolling matrix LED
20 Voices
Layer, Split mode
Transpose, Tune functions
MP3 Aux In
Recording function
Thank you for purchasing the KURZWEIL's Digital Piano. We recommend that you
read this manual carefully so that you can fully take advantage of the advanced
and convenient functions of the KURZWEIL's Digital Piano.
Main Features
Chapter 2
Main Features
7
■
29 Rhythm patterns
Page 8

①
1
EA
⑥
EA
②
1
EA
⑦
4
EA
③
1
EA
⑧
4
EA
④
1
EA
EA
6
7
8 9
10
⑨
4
4
Chapter 3
8
Piano Assembly
8
Check that all of the following items are present.
Keyboard
Side panel of stand (Left)
Side panel of stand (Right)
Pedal box
Screws for side panel and keyboard (25mm)
Screws for side panel and pedal box (25mm)
Screws for side panel and rear panel
Screws for rear panel
Please check the quantity of related part number.
Part Name Part Name
Q'ty Q'ty
2
⑤
1
EA
EA
Rear panel
Cord holder
10
2
1
5
4
6
3
7
8
9
Page 9
④
2
4
8
7
3
9
Chapter 3
Piano Assembly
9
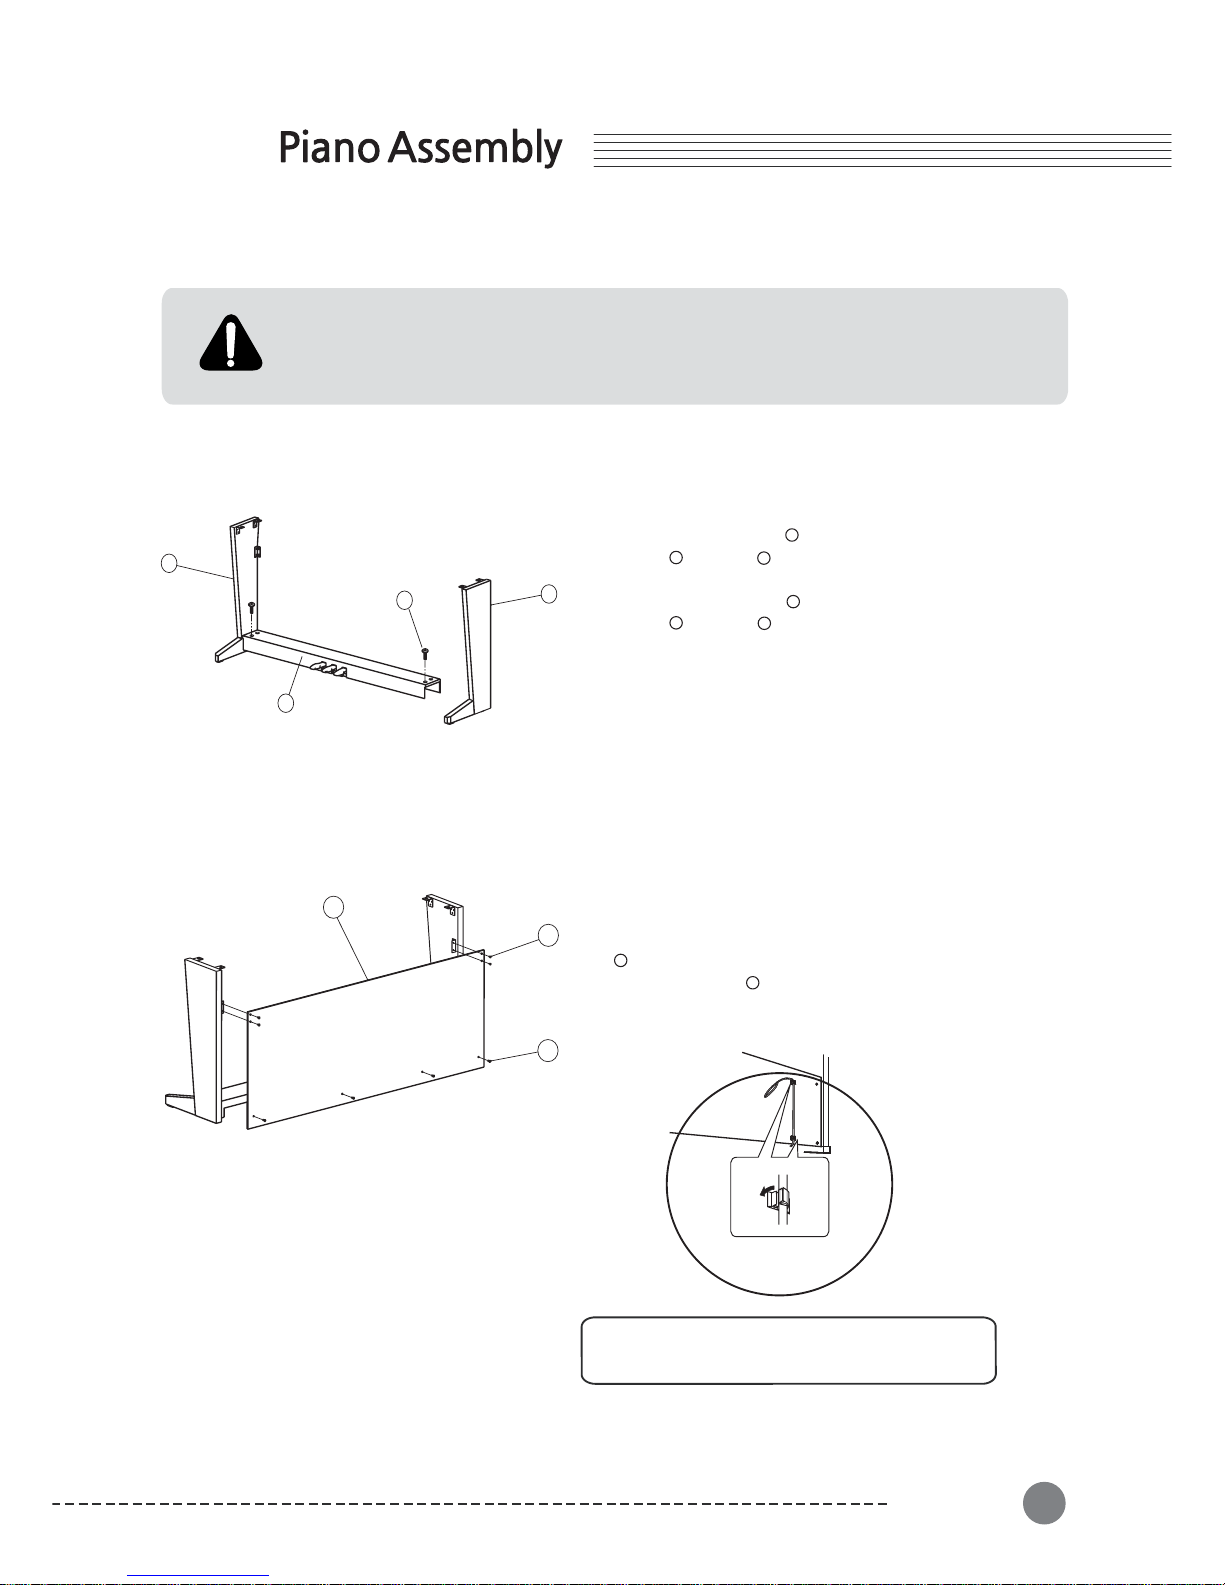
-Assemblyshouldbecarriedoutbyatleasttwopersons.
-Assemblethestandonahardandflatfloorwithamplespace.
-Besuretousetheincludedscrews,andinsertscrewsofthecorrectsizeinthecorrect
hole locations. Use of incorrect screws can damage the product.
1. Stand Assembly
Attach the pedal cord holders to the rear panel
as shown, then clip the cord into the holders
1) Side Panel and Pedal Box assembly
2) Rear Panel assembly
1. Place the pedal box on the left side
panel and use screws to fasten
the side panel.
2. Place the pedal box on the right side
panel and use screws to fasten
the side panel.
3. You can find the pedal cable in the
pedal box . Untie and straighten out
the bundled pedal cable.
4
7
1. Fit into the rear panel's hole in the side
panel brackets and then use the screws
to fasten the rear panel.
2. Use the screws to fasten the bottom
of the rear panel.
2
4
3
7
5
8
9
Page 10
8
Piano Assembly
10
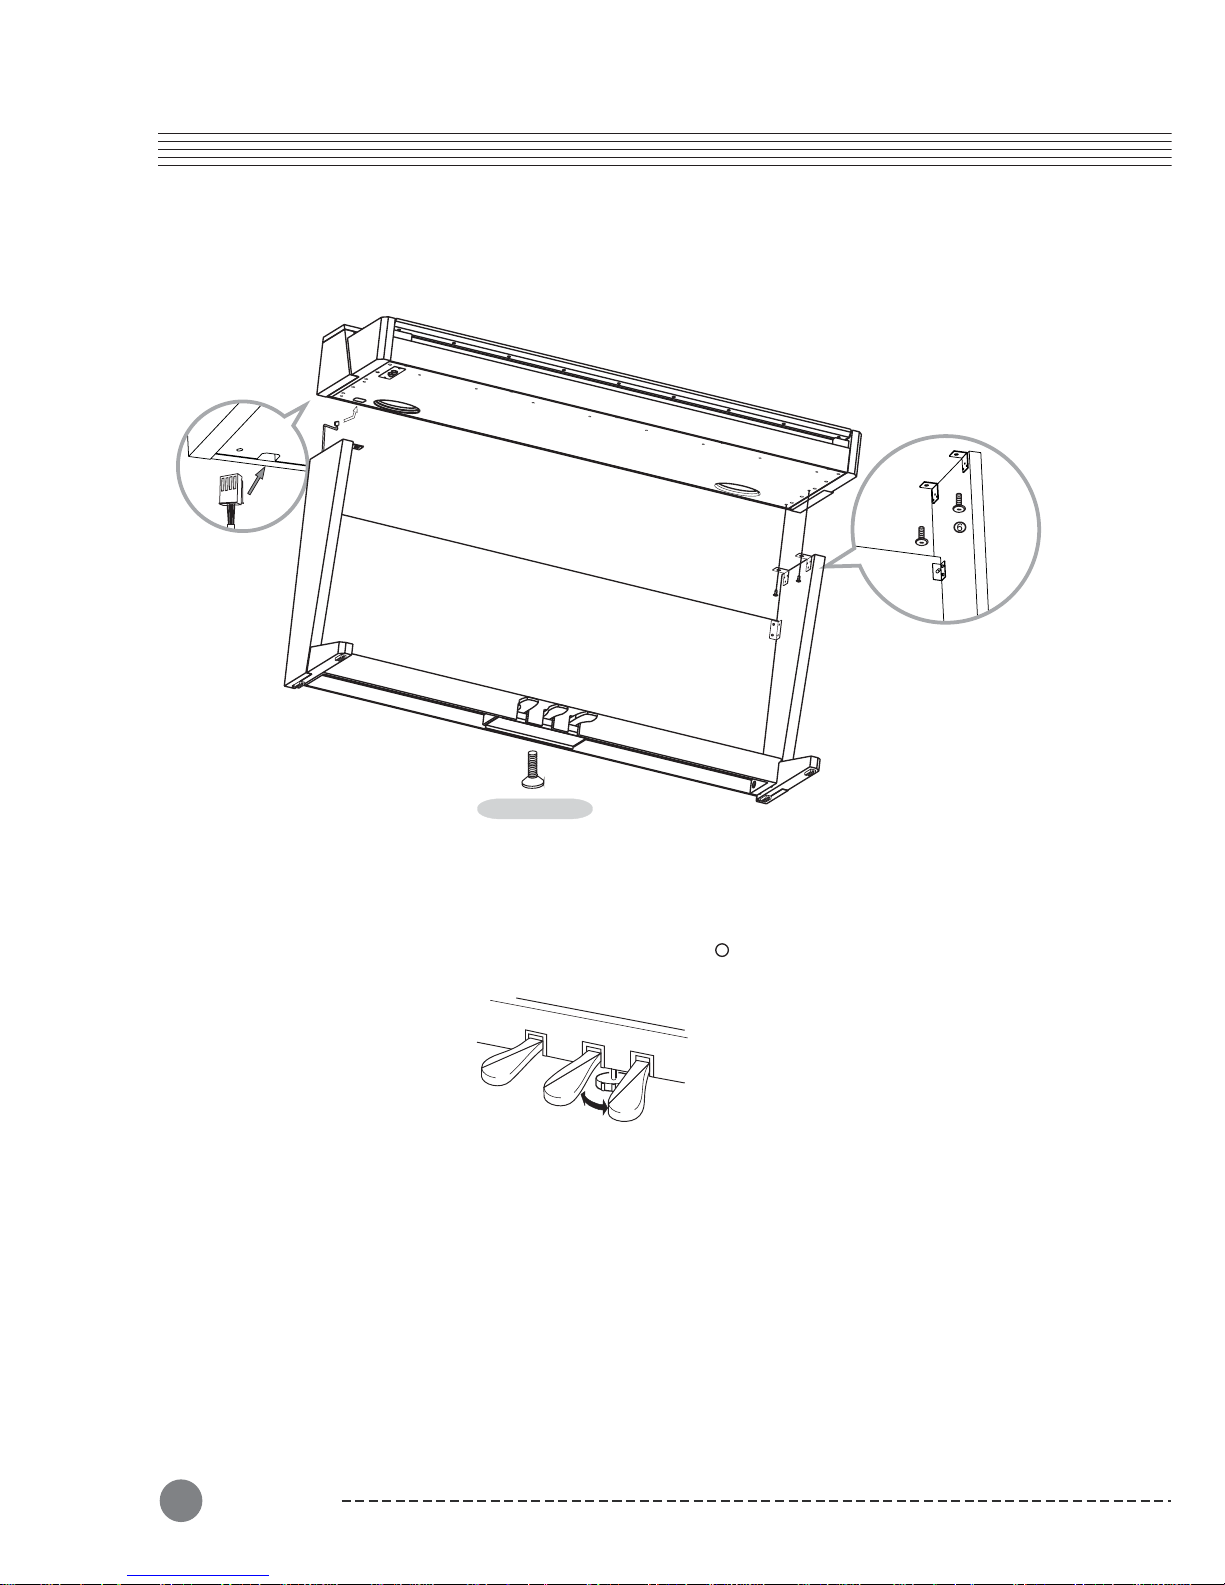
3) Mounting the keyboard
1. Place the keyboard on the stand and fit into the holes in the side panel brackets.
2. Fasten the keyboard to the side panel using screws .
3. Insert the pedal cable plug into the pedal jack located on the bottom of the keyboard.
4. Rotate the pedal adjuster until it comes in firm contact with the floor surface.
If the adjuster is not in firm contact with the floor, the pedals will wobble and may
malfunction.
6
Insert the pedal
cord plug to the
pedal jack from
the rear.
Pedal Adjuster
Page 11

Power
2. Applying Power
1) Connecting the power cord
3) Turn the power on
First insert the plug of the AC power cord into the AC connector on the Adaptor, then plug
the other end of the cord into the proper AC outlet on the wall. In some areas a plug adaptor may be provided to match the pin configuration of the AC wall outlets in your area.
Press the power switch located on the right of the front panel to turn the power on. The
display located in the center of the front panel should light with various patterns and after a
short time display "GRAND PIANO".
Even when the instrument is turned off, AC power is still flowing to the adapter at a minimum
level. When you are not using the instrument for a long time or during electrical storms,
unplug the AC power cord from the wall outlet.
CAUTION
2) Plug the thin DC power cord into the DC Power Jack on the back of the piano.
3. Setting the Volume
To adjust the volume, use the [Volume] knob located at the right of
front panel. Play the keyboard while you adjust the knob to a comfortable
and realistic volume.
Adjusting the [Volume] knob also affects the output level of the Phones
jacks and the output level of the Audio Out jacks.
NOTE
Power
11
Page 12

Chapter 4
8
Selecting Sounds
12
1. Selecting Sounds
There are two ways of selecting one of the 20 voices :
with the [Voices] button and the piano keys.
1) Press the [Voice] button.
Then use the [Next] or [Previous] button to select
different voices in sequence.
2) Press and hold the [Voice] button.
Then press and release any keys between A0 and E2.
Release the [Voice] button.
Please refer to the table on the next page which
contains the list of all available voices and their
assigned keys.
If you want to play the Grand Piano voice immediately,
press the [Piano] button to set current voice to "1
GRAND PIANO".
Regardless of the method you use, notice that the
voice number and name scrolls across the display
followed by the voice number again.
You need not wait for the scrolling to finish before
making another selection.
If you hold down the [Next] or [Previous] buttons, the
voice numbers will begin to change quickly after a short
delay.
If you press the [Next] and [Previous] together, it will
skip to the first voice in the next category of voices.
To save a voice for quick selection, hold down any of
the [Favorite 1], [Favorite 2] or [Favorite 3] buttons for
2seconds.
Your new voice will be saved and can be recalled at
any time by pressing the same Favorite button again.
For example, if you choose the [Favorite 1], then "F1"
will be displayed.
Page 13

Selecting Sounds
13
No.
Keys
1
2
3
4
5
6
7
8
9
1
0
11
1
2
1
3
1
4
1
5
1
6
1
7
1
8
1
9
2
0
Voice
Grand Piano
Jazz Piano
Piano + Str
Stevie's EP
Classic DX
FM E.Piano
Harpsichord
Sweet Organ
Pipe Stops
Tenor Sax
Flute
Oboe
Horns + Str
Adagio Str
Full Choir
Acoustic Guitar
Nylon Guitar
Marimba
Solid Kit
Percussion
A
0
A
#
0
B
0
C
1
C
#
1
D
1
D
#
1
E
1
F
1
F
#
1
G
1
G
#
1
A
1
A
#
1
B
1
C2
C#2
D
2
D
#
2
E
2
2. List of Voices
The voices with name consisting of two different instruments with "+" between them such as "3 Piano
+Str"or"13Horn+Str"arepresetlayeredcombinationoftwovoices.
Page 14

1. Layering Two Sounds
Chapter 5
8
Layering
14
This function lets you layer and play two different
sounds at the same time. You can layer voices of two
different voices in the same category, and create a
composite voice of greater richness and texture.
Alternatively, hold the [Layer] button down and press
akeytodirectlyselectalayervoicewhiletheLEDis
blinking.
This parameter determines the relative volumes of the
Primary and Secondary Sounds - it can be set to any
number between -9 and 9. By default, the Layer Volume
is set to -3, which results in the secondary sound being
alittlesofterthantheprimarysound.
When set to a positive number, the volume for the
Secondary Sound is increased while the volume for the
Primary Sound is decreased - doing the opposite has
the opposite effect on the relative volumes of the layers
This parameter determines the transposition of the
Secondary Sound relative to that of the Primary Sound
-itcanbesetto-24,-12,0,12,and24.
In layer mode, press the [X-Pose] button, then press
the [Previous] or [Next] buttons to adjust the Layer
Transposition.
Select the first voice in the usual way with the [Voices]
button, the [Next] or the [Previous] button.
Or, directly select a voice by holding the [Voices] button
down and pressing a key assigned to the desired voice.
Please refer to the voice list on page 13.
Then press the [Layer] button and use the [Next] or
the [Previous] button to select a voice to be layered
with the first one.
The default layer voice is "14 Adagio Str".
If you want, use the [Volume] button to adjust the
volume balance between two voices in layer mode.
Setting the Layer Volume
Layer Transposition
Page 15

1. Splitting the Keyboard
Chapter 6
Splitting
15
Split mode enables you to play two different voices on
the keyboard - one with the left hand and another with
the right hand. For example, you can play a bass part
using the Bass voice with the left hand and a melody
voice with the right hand.
Select the first voice in the usual way with the [Voices]
button, the [Next] or the [Previous] button.
Or, directly select a voice by holding the [Voices] button
down and pressing a key assigned to the desired voice.
Please refer to the voice list on page 13.
Then press the [Split] button and use the [Next] or
the [Previous] button to select a split voice.
Alternatively, hold the [Split] button down and press
akeytodirectlyselectasplitvoicewhiletheLEDis
blinking.
The default split voice is "4 Stevie's EP".
By default the split point is just above F#3.
To change the split point, use the [Split Key] special
button.
While the keyboard is split, press the [Split Key] button
and the LED will first display "F#3" which is the default.
To change, press the [Next] or [Previous] button until
the display shows the desired split point.
The [Jump] button pair will reset the split point back
to "F#3".
Split point
Page 16

Setting the Split Volume
Split Transpose
If you want, use the [Volume] button to adjust the
volume balance of the two voices in split mode.
First press the [Volume] button and the LED will display
"0" by default, which means the bass voice and the
treble voice are at the same volume level.
Use the [Next] button and the [Previous] button to
adjust the relative volume level. Press the [Jump]
button pair to reset the volume balance to "0".
The range for the volume balance is between -9 and 9.
Negative digits make the bass voice relatively louder,
while positive digits make the treble voice relatively louder
The lower voice can be transposed. In split mode, press
the [X-Pose] button pair and the LED will first display "0".
Then use the [Next] button and [Previous] button to
transpose the lower voice by octaves (12 semitone is an
octave).
The [Jump] button pair will reset the transposition.
The range for transposition is from 2 octaves down to
2octavesup(-24to24semitones).
8
Splitting
16
Page 17

1. Function Mode
1) Transpose
2) Effect Level
3) Touch Sensitivity
4) Fine Tuning
5) MIDI Channel
6) Metronome
7) Local Control
8) Version
Hard Reset9)
2. Selecting a Function
Chapter 7
Functions
17
To go to Function Mode, press the [Func] button pair (press [Layer] and [Split] button together).
The display will show "0 TRANSPOSE" which indicates the transpose setting. The number displayed
is the current setting of the parameter. To change the parameter setting, use the [Next] button
and the [Previous] button. Press the [Layer] or [Split] button to move to the next or the previous
parameter. When you want to quit Function Mode, press the [Voices] or [Piano] button.
Page 18

1) Transpose
8
Functions
18
You can use the Transpose parameter to
transpose the entire keyboard in semitone
intervals. The range is between -24 to 24.
The [Jump] button pair will reset the
transposition to 0.
2) Effect Level
You can adjust the intensity of the
reverbration or other effect used by each
voice. Normal is 20% but that can be
adjusted by using the [Next] and [Previous]
buttons. The range is from 0%(no effect) to
100%(maximum effect). The [Jump] button
pair will restore the normal setting of 20%.
3) Touch Sensitivity
You can adjust how the keyboard responds
to your playing. The default is Linear which
offers the greatest dynamic range.
Linear Greatest dynamic range,
best compromise for all
instruments.
Light 1, 2, 3 Progressively lighter touch
is needed for loud dynamics.
Hard 1, 2, 3 Progressively lighter touch
is needed for loud dynamics
Piano Best for Piano dynamics.
Easy Light, easy touch for young-
er player.
GM Receive Use this when playing
General MIDI songs.
4) Fine Tuning
You can finely tune the pitch up or down by
1cent(1/100semitone)steps.Thisfunction
is useful when you play or record with
another instrument that is slightly out of
tune or can't be easily retuned. The default
setting is "0" (A4=440Hz). The range is -100
(1 semitone flat) to 100 (1 semitone sharp).
5) MIDI Channel
You can select a MIDI Channel from 1~9 or
11~15 for MIDI output and recorder.
Channel 10 used for playing rhythm patterns
and channel 16 is for the metronome.
6) Metronome
There are three settings for the internal
metronome. The "On" value plays when
you are performing or recording. The "Rec"
value plays only when you are recording.
The "Off" value turns off the metronome.
7) Local Control
You can set Local Control on or off here.
Local Control is the connection between
keyboard and internal sound producing
circuitry (engine). When Local Control is
set to On, the keyboard delivers your
performance information to the sound
engine, so you can hear the sounds you
play. At the same time, the M-1 transmits
MIDI information via its USB port.
There are, however, cases you need to set
Local Control to Off. When using the M-1
with an external MIDI sequencer or
computer via MIDI, the M-1 may play the
same note twice-once by the direct sound
engine connection and once by the "echo"
through the sequencer and coming back.
You can eliminate the echoing of notes by
setting Local Control to Off which interrupts
the direct connection. The default setting
is "On".
8) Version
You can find the software version information
with this function.
The format is : "OS:1.00.441M Obj:0.00.5" on
LED. The display will scroll to show all of the
infomation. The "OS" is current OS version
and "Obj" is current sound object version.
9) Hard Reset
This function will initialize the keyboard and
erase its memory. The LED will display
"Hard Reset?" Press the [Next] button and
the LED will display "Confirm?" Press the
[Next] button again to confirm and excute
the hard reset. The M-1 will then erase its
memory, restore the factory settings, and
reboot.
Page 19

1. Selecting a Rhythm
Chapter8
This instrument features a variety of rhythmic backing patterns (called "rhythms") in a variety of
different musical genres including pop, jazz and many others.
To select a rhythm, press the [Rhythm] button.
The LED will display the currently selected preset
rhythm pattern number.
Choose different preset patterns with the [Next] and
[Previous] buttons.
Alternatively, hold the [Rhythm] button down and
press a key to directly select a rhythm while the LED
is blinking.
Pressing the [Play/Stop] button will start the rhythm
pattern playback. Pressing the same button again will
stop the playback.
Change the rhythm tempo by pressing the [Tempo]
button. The [Next] and [Previous] buttons will speed
up or slow down the tempo.
The [Jump] button pair will restore the default tempo
(120 beats/minute).
Use the [Volume] button then the [Previous] and
[Next] buttons to adjust the volume level of the rhythm.
The range is from the 1 to 9 and the default is 9 (max).
Rhythm
19
Page 20

No.
Key
Rhythm Pattern
Ballad 1
Ballad 2
Ballad 3
Country 1
Country 2
Country 3
Jazz 1
Jazz 2
Jazz 3
Latin 1
Latin 2
Latin 3
Pop 1
Pop 2
Pop 3
R&B / Dance 1
R&B / Dance 2
R&B / Dance 3
Rock 1
Rock 2
Rock 3
World 1
World 2
World 3
No.
Key
Metro MP 1/4nt
Metro MP 1/8nt
Metro MP 1/16nt
Metro MP 3/4
Metro MP 6/8
NoDrumSong
User Song 1
User Song 2
User Song 3
21
22
23
24
1
2
3
4
5
6
7
8
9
10
11
12
13
14
15
16
17
18
19
20
25
26
27
28
29
30
31
32
33
34
User Song 4
A0
A#0
B0
C1
C#1
D1
D#1
E1
F1
G1
G#1
A1
B1
C2
C#2
D2
D#2
E2
F2
G2
G#2
A#1
F#1
F#2
A2
B2
C3
C#3
D3
D#3
E3
F3
A#2
F#3
Rhythm Pattern
8
Rhythm
20
Chapter 9
Page 21

You can record and playback your performance much like a tape recorder.
This function can greatly enhance your composition and performance results.
1. Recording a Performance
Chapter 10
1) Press the [Rhythm] button then select a rhythm
using the [Next] and [Previous] buttons or the
"[Rhythm] button + key" method.
If you do not want to record with a rhythm, select
No. 30 "NoDrumSong" as the rhythm (see page 20).
2) Press the [Record] button. The display will scroll
"BEGIN RECORDING".
3) Then press the [Play/Stop] button. The selected
rhythm will begin playing and the recording will
begin immediately. Or, if the metronome is enabled,
aleadincountofonemeasurewillbeheardbefore
recording begins.
4) Play your performance then press the [Play/Stop]
again to stop recording.
5) Now the display will scroll "PRESS RECORD TO
SAVE AS U1". You can use the [Next] or [Preious]
buttons to select the User Recording (from U1 to
U4) to store the recorded song into.
Then, press the [Record] button to store the song,
or any other button to exit the recording.
6) To delete recorded songs, execute "Hard Reset" in
the Function Mode.
2. Notes about Recording
You can easily replace all or part of a saved User Song.
First, select the User Song (U1 to U4) that you'd like to modify.
1) To record over your song from the beginning:
Press the [Record] button and then the [Play/Stop] button.
Your new performance will replace the existing one from the beginning until you press the
[Play/Stop] button.
2) To replace only part of your song:
Press the [Play/Stop] button and listen to your song.
When you come to the part you want to replace, Press the [Record] button and play your new
part. The M-1 will continue to erase all the notes that were present in the song until you press
the [Play/Stop] button again to exit recording.
Recording
21
Page 22

1) Press the [Demo] button to enter the demo mode.
(Press the [Record] and [Play/Stop] buttons at the same
time to access the demo song)
To select a demo song, press the
3) Press the [Play/Stop] button to start playback.
1) Off : Demo songs only play once.
2) On : Repeat playing of all songs.
The LED display will show the name and number of the
demo song currently playing.
2) [Next] or [Previous]
value button. (Refer to the demo song list on page 27.
4) Alternatively, you can select a song by pressing a key,
then playback will start immediately.
5) Press the [Play/Stop] button again to stop playback.
You can set a playback mode such as Off or On for demo
repeat. Press the [Jump] button pair while playing a demo
song.
1. Listening to Demo Songs
Chapter 11
8
Demo Songs
22
Page 23

1. Pedals
This piano has three foot pedals : damper(sustain) pedal (right), sostenuto pedal (center)
and soft pedal (left) that produce a range of expressive effects similar to those produced
by the pedals of an acoustic piano.
2. Using the Pedals
Soft
Sostenuto
Sustain
1) Sustain pedal
2) Sostenuto pedal
3) Soft pedal
The sustain pedal functions in the same way as a damper
pedal on an acoustic piano. When the damper pedal is
pressed, notes sustain longer. Releasing the pedal immediately stops any sustained notes.
If you play a note or chord on the keyboard and press the
sostenuto pedal while the notes are held, those notes will
sustain as long as you hold the pedal (as if the damper
pedal had been pressed) but all subsequently played notes
will not be sustained. This makes it possible to sustain a
chord, for example, while other notes are played "staccato".
The soft pedal reduces the volume and slightly changes
the timbre of notes played while the pedal is pressed. The
soft pedal will not affect notes that are already playing
when it is pressed.
When you press the sustain
pedal here, the notes you
play before you release the
pedal sustain loger.
Chapter 12
NOTE
If the pedal doesn't work, make sure that the pedal
cord is properly plugged into the main unit (see page 10).
Also, avoid pressing any pedals while the piano booting.
When you press the sostenuto
pedal here while holding the
note, the note will sustain as
long as hold the pedal.
Pedals
23
Page 24

Chapter 13
MIDI is acronym for Musical Instrument Digital Interface, which is an industry standard
protocol for electronic instruments to communicate with each other.
1. MIDI Channel
AMIDIcablecantransmitmultiplechannelsofperformancedatawhichissimilarto
TV channels. Each channel can be assigned its own voice. Typical MIDI instruments
can play up to 16 channels at the same time which is equivalent to 16 soloists.
If you want to use your piano and record your performances with a computer, a
sequencer program must be installed on your computer.
NOTE
2. Connecting to a Computer
The instrument can be connected to the computer via a USB cable (AB type USB cable
of less than 3 meters).
Connect the USB cable to the USB Type B terminal of the instrument, then to the USB
Type A terminal of the computer.
8
MIDI
24
Page 25

MIDI
25
Manufacturer:
Young Chang
Digital Piano
0-19 0-19
Date : 2/15/2013
Version 1.0
ID : 18
*Kurzweilmanufacturer'sIDis07.
Page 26

1. Using Headphones
Connect a pair of headphones to one of the phones jacks. Two phones jacks are provided.
You can connect two sets of standard stereo headphones. (If you are using one pair headphones, you can plug them into either of these jacks).
2. (Audio In Aux In)
You can connect the output jacks of an external device (such as CD player, tone generator)
to the instrument's Aux In jacks, letting you hear the sound of that device through the built
in speakers of the instrument.
3. Audio Out (Aux Out)
You can connect a stereo system to amplify the instrument's sound by using the Aux Out
jacks. When the instrument's sound is output to an external device, first turn on the power
to the instrument, then to the external device. Reverse this order when you turn the power
off.
4. MP3 Aux In
You can connect the output jack of an MP3 player or smart phone to the instrument's MP3
Aux In jack on the right side of the front panel.
Bottom surface
Standard stereo
phone plug
Chapter 14
CAUTION
Do not use headphones at a high volume
for an extended time. Doing so many
cause hearing loss.
8
Connection
26
Page 27

Chapter 15
Demo Song List
27
ARIA Goldenberg-Var iationen BMW 988
Klavierstuck K. 15v
Minuette in G
Without words son g Op .3 8 No.2
Reverie
Fryhlingsstimmen Op.410
Liebestraume Nr.3
Fro li cher Landmann Op.68-10
Traumerei
Von fremden L an dern und Menschen Op.1
,
Page 28

Chapter 16
8
Specifications
28
Keyboard
Finish
Simulated Rosewood or White
Cabinet
Pattern type
Tone Gen.
Kurzweil V.A.S.T
Polyphony
64 Voices
Sounds
20 Programs
Rhythm
29 Patterns
Play Mode
Layer, Split
Touch
10 Sensitivity levels
Demo Songs
50 Piano Masterpieces
Sequencer
1Tracks,4Songs
Pedals
3(Sustain,Soft,Sostenuto)
Display
5x7Dotscrolling marix LED
Others
Volume, Tune, Transpose, Metronome
Connectors
MP3 Aux In, Audio In/Out, USB Slave
Audio Power
15W x 2, 8 Ohms
Speakers
4.5" x 2 full-range (Oval type)
Dimensions
1408 x 414 x 838 (W x D X H)
88 note fully weighted Graded Hammer action (A0 ~ C8)
Weight
Keyboard : 28.4Kg, Stand : 20.25Kg
Page 29

Page 30

Page 31

Page 32

 Loading...