

Page 1
www.krups.com
Page 2
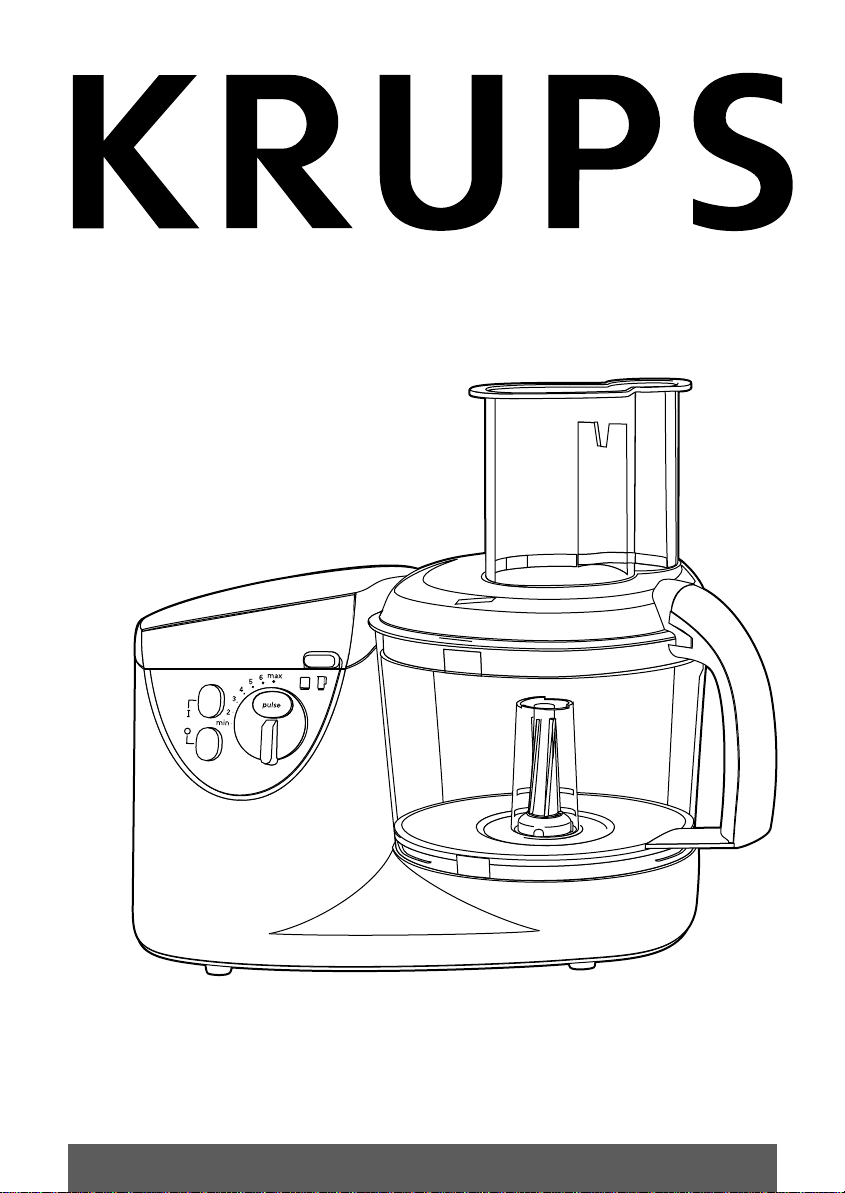
a
a1
a2
a4
a5
a8
a9
a7
a6
a3
b
c
b1
c1
b2
b3
c2
Page 3
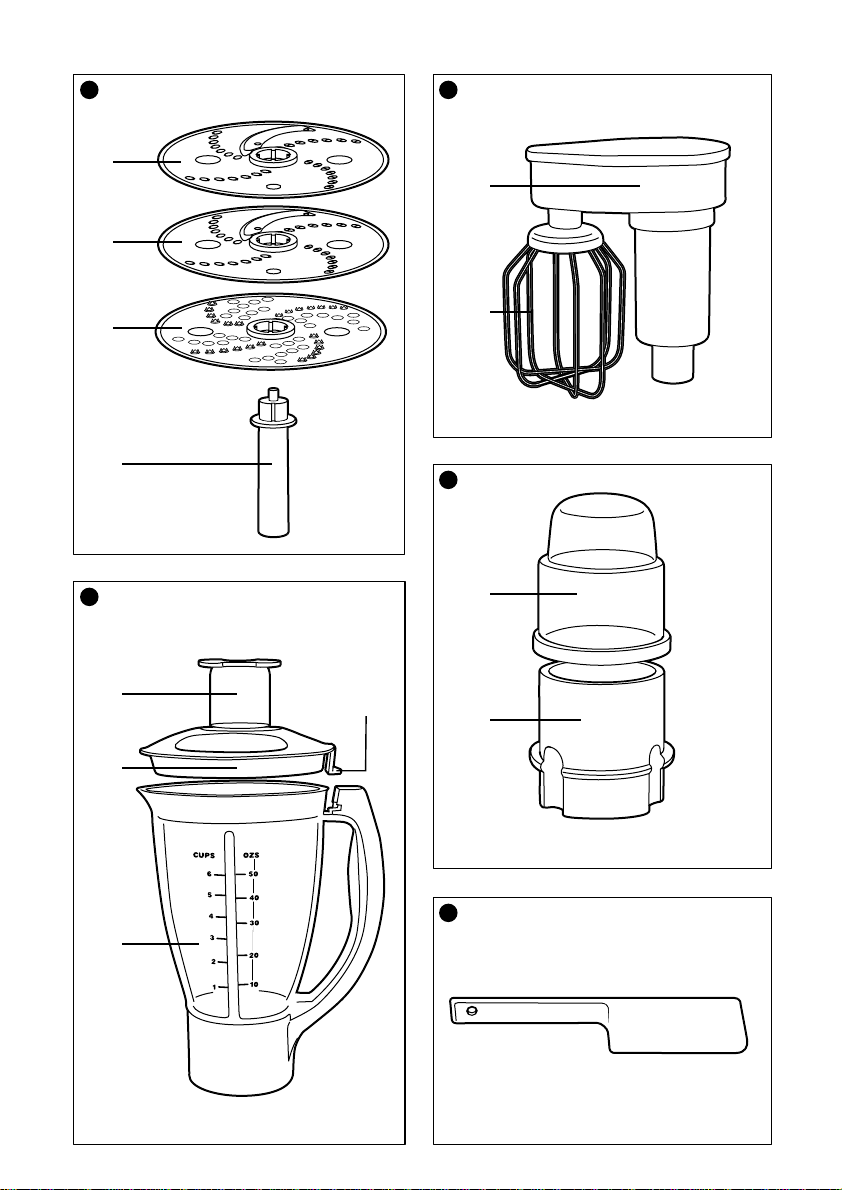
d
e
A
D
e1
C
H
G
d1
g
g1 g4
g2
e2
f
f1
f2
g3
h
Page 4

4
Page 5

Variomix 3000 Premium GRB2
Deutsch 6
English 14
Français 22
Italiano 30
5
Page 6

Deutsch
Beschreibung
a Grundgerät
a1 Abdeckung des oberen Antriebs
a2 oberer Antrieb
a3 unterer Antrieb
a4 Verriegelungsschlitz für den
Arbeitsgefäß-Deckel
a5 Entriegelungstaste der Abdeckung
a6 Geschwindigkeitswähler
a7 Pulse-Taste
a8 Start-Taste
a9 Stop-Taste
b Arbeitsgefäß
b1 Stopfer mit Dosierskala
b2 Deckel mit Einfüllschacht
b3 Schüssel
JE NACH MODELL
c Werkzeuge
c 1 Universalmesser
c2 Kunststoff-Kneter
d Schnitzelscheiben
Scheiben :
A feine Raffelscheibe
D feine Schneidscheibe
C grobe Raffelscheibe
H grobe Schneidscheibe
G Reiben Parmesan, Kokosnuß
d1 Antriebshülse
e Schlagwerkzeug
e1 Antriebsteil mit Getriebe
e2 Schlagbesen
f Zerkleinerer
f1 Zerkleinererdeckel
f2 Zerkleinerergefäß
g Mixbecher
g1 Stopfer mit Dosierskala
g2 Mixbecherdeckel
g3 Mixbecher
g4 Einrastschlitz
h Spatel
6
Sicherheitshinweise
•Lesen Sie die Bedienungsanleitung vor
Inbetriebnahme aufmerksam durch.
Nicht bestimmungsgemäßer Gebrauch
setzt die Verantwortlichkeit von KRUPS
außer Kraft.
•Gerät immer aus der Reichweite von
Kindern halten.
•Stellen Sie sicher, daß die auf dem
Typenschild angegebene Spannung der Ihres
Stromnetzes entspricht. Bei falschen
Anschluß erlischt die Garantie.
•Handhaben Sie das Messer und die
Schneidscheiben vorsichtig: Sie sind sehr
scharf.
•Nehmen Sie immer zuerst das Messer aus
dem Arbeitsbehälter, bevor Sie diesen
entleeren.
•Niemals sich bewegende Teile berühren,
weder mit den Händen noch mit
irgendwelchen Gegenständen.
•Deckel erst nach Stillstand der rotierenden
Werkzeuge abnehmen.
•Zum Nachschieben von Nahrungsmitteln in
den Einfüllschacht, nie die Finger,
Besteckteile oder andere Gegenstände
benutzen. Stets den Stopfer verwenden.
•Nehmen Sie das Gerät nie leer in Betrieb.
•Jeder Eingriff, außer Reinigung und Pflege
des Gerätes, muß vom KRUPS-Kundendienst
durchgeführt werden.
•Benutzen Sie das Gerät nicht, wenn das
Kabel oder der Stecker Ihres Gerätes
beschädigt sind.
•Falls das Stromkabel oder der Netzstecker
Ihres Gerätes defekt sind, nehmen Sie es auf
keinen Fall in Betrieb, sondern lassen Sie
diese Teile durch den KRUPS Kundendienst
oder KRUPS Vertragskundendienste
(Adressen siehe Serviceheft) auswechseln.
•Kabel nicht in Reichweite von Kindern
herunterhängen lassen.
•Motorblock, Kabel und Stecker nie ins
Wasser oder andere Flüssigkeiten
eintauchen.
•Netzkabel niemals in die Nähe oder in
Kontakt mit den heißen Teilen Ihres Gerätes
oder anderer Hitzequellen oder scharfer
Kanten bringen.
Page 7

•Verwenden Sie zu Ihrer eigenen Sicherheit
keine anderen Zubehör- oder Ersatzteile
außer KRUPS-Teilen, die auf ihr Gerät
angepaßt sind.
•Ziehen Sie nach jedem Gebrauch und vor
jeder Reinigung stets den Netzstecker.
•Ihr Gerät darf nur für Haushaltszwecke und
in geschlossenen Räumen verwendet
werden.
•Benutzung des oberen Antriebs: Falls Sie,
während der Benutzung des Mixbechers (g)
oder des Zerkleinerers (f), das Arbeitsgefäß
(b) auf dem unteren Antrieb stehen lassen,
muß der Arbeitsbehälter-Deckel (b2)
entriegelt sein.
•Öffnung der Abdeckung des oberen
Antriebs (a1): Stellen Sie sicher, daß das
Arbeitsgefäß (b) entriegelt ist, bevor Sie die
Abdeckung des oberen Antriebs (a1) öffnen.
Vor dem ersten Gebrauch
• Stellen Sie den Motorblock auf eine stabile,
saubere und trockene Unterlage.
•Reinigen Sie alle Zubehörteile in warmem
Spülmittelwasser um Fertigungsrückstände
zu entfernen.
•Vorsicht, das Universalmesser ist sehr scharf.
Die Schutzkappe über dem Messer
abnehmen, Messer mit einer Hand am
Kunststoffteil festhalten und mit einer
Spülbürste mit der anderen Hand vorsichtig
reinigen. Die Schutzkappe wieder aufsetzen.
Das Grundgerät sowie das Getriebeteil des
Schlagwerkzeuges nie ins Wasser tauchen,
nur feucht abwischen.
Inbetriebnahme
•Netzstecker einstecken.
•Pulse-Taste (Intervallbetrieb): Bei Druck
auf die Pulse-Taste (a7) läuft das Gerät nur
solange Sie die Taste gedrückt halten. Um
das erreichte Ergebnis für bestimmte
Zubereitungen besser kontrollieren zu
können, drücken Sie die Pulse-Taste
mehrmals kurz hintereinander.
•Dauerbetrieb: Drücken Sie auf die obere
Taste (a8).
•Aus: Drücken Sie auf die untere Taste (a9).
•Geschwindigkeitswähler (a6): Zum
Einstellen der angegebenen Geschwindigkeit
oder um die Geschwindigkeit während der
Zubereitung zu verändern.
•Benutzung des unteren Antriebs (a3):
Die Abdeckung (a1) des oberen Antriebs
muß verriegelt sein.
Funktionen
MISCHEN/ MIXEN/ ZERKLEINERN/ KNETEN
großer Mengen
Je nach Zutatenart können Sie in dem
Arbeitsgefäß (b) bis zu 1,5 kg verarbeiten.
ZUBEHÖRTEILE:
. Arbeitsgefäß (b)
. Werkzeug (c)
- Universalmesser (c1) zum Mixen und
Zerkleinern (vor jedem Gebrauch
Messerabdeckung entfernen, nach dem
Gebrauch wieder aufstecken)
- Kunststoff-Kneter (c2) zum Kneten und
Mischen
MONTAGE DER ZUBEHÖRTEILE
•Stellen Sie sicher, daß die Abdeckung des
oberen Antriebs geschlossen ist (a1).
•Stellen Sie das Arbeitsgefäß (b3) auf den
unteren Antrieb des Motorblocks.
Arbeitsgefäß am Griff drehen bis es
einrastet.
•Stecken Sie das Universalmesser (c1) oder
den Kunststoff-Kneter (c2) auf die Achse des
Arbeitsgefäßes.
•Geben Sie die Lebensmittel in das
Arbeitsgefäß.
•Setzen Sie den Deckel (b2) auf das
Arbeitsgefäß und drehen Sie ihn, bis er
einrastet (hörbares „Klick“). Das Gerät läßt
sich nur einschalten, wenn der Deckel
richtig in dem Verriegelungsschlitz (a4)
eingerastet ist.
GEBRAUCH UND HINWEISE
Mixen
•Stellen Sie den Geschwindigkeitswähler (a6)
auf Position max und schalten Sie das Gerät
durch Drücken der Taste (a8) ein.
7
Page 8

Sie können in 20 Sek. bis zu 0,9 l Eintöpfe,
Suppen, Kompott mixen.
Zerkleinern
•Stellen Sie den Geschwindigkeitswähler (a6)
auf Position max und schalten Sie das Gerät
durch Drücken der Taste (a8) ein oder
benutzen Sie, für eine bessere Kontrolle des
Ergebnisses, die Pulse-Taste (a7).
In 15 bis 30 Sek. können Sie bis zu 600 g
Lebensmittel zerkleinern:
- harte Lebensmittel wie Käse, Trockenfrüchte,
bestimmte Gemüse (Karotten, Sellerie)
- weiche Lebensmittel wie Obst, Gemüse
(Zwiebeln, Spinat)
- rohes oder gekochtes Fleisch (ohne Knochen
und Sehnen, in Würfel geschnitten)
- rohen oder gekochten Fisch
Kneten/Mischen
•Stellen Sie den Geschwindigkeitswähler (a6)
auf Position 4 und schalten Sie das Gerät
durch Drücken der Taste (a8) ein. Erhöhen
Sie die Geschwindigkeit während der
Verarbeitung langsam. Schalten Sie das
Gerät ab, sobald sich bei Hefeteig ein
Teigkloß gebildet hat.
Sie können:
- bis zu 1,2 kg schwere Teige (Mürbeteig,
Brotteig) in etwa 40 s. kneten (*)
- bis zu 0,9 l flüssige Teige (Pfannkuchenteig,
Waffelteig) in 1-1 1/2 Min. rühren
- bis 1,5 kg leichten Teig (Rührkuchen) in 1 1/2
bis 3 1/2 Min. zubereiten
(*)Sollte das Kneten eines Teiges länger als
40 s. dauern, kneten Sie in mehreren
Durchgängen von je 40s.
HOMOGENISIEREN/ MISCHEN/ sehr Fein
MIXEN
Je nach Lebensmittel können Sie bis zu 1,5 l
verarbeiten.
ZUBEHÖRTEILE:
. Mixbecher (g)
MONTAGE DER ZUBEHÖRTEILE
•Drücken Sie auf die Öffnungstaste (a5) der
Abdeckung des oberen Antriebs (a1) und
klappen Sie die Abdeckung auf.
•Geben Sie die Lebensmittel in den
Mixbecher (g3) und verriegeln Sie den
Mixbecherdeckel (g2) auf dem Becher. Der
Verriegelungsnocken des Deckels rastet
dabei in den Einrastschlitz (g4) ein.
•Setzen Sie den verschlossenen Mixbecher (g)
auf den oberen Antrieb (a2) des
Motorblocks (Markierung 1 muß sich vor der
Markierung ∆ am Motorblock befinden) und
verriegeln Sie ihn durch Drehung des
Mixbechergriffs (Markierung 2 ist vor
Markierung ∆ am Motorblock).
GEBRAUCH UND HINWEISE
•Füllen Sie den Mixbecher niemals mit
kochenden Flüssigkeiten!
•Stellen Sie den Geschwindigkeitswähler (a6)
auf Position max und schalten Sie das Gerät
durch Drücken der Taste (a8) ein oder
benutzen Sie für eine bessere Kontrolle des
Ergebnisses die Pulse-Taste (a7).
Wenn der Deckel fehlt oder nicht richtig
verriegelt ist, kann der Mixbecher nicht
aufgesetzt werden und die Küchenmaschine arbeitet nicht. Sobald der
Mixbecher mit dem Deckel auf dem
Motorblock verriegelt ist, läßt sich der Deckel
nicht mehr abnehmen.
Sie können während der Zubereitung weitere
Zutaten durch die Nachfüllöffnung im Deckel
hinzufügen.
Entnehmen Sie hierzu den Stopfer.
Sie können:
- bis zu 1,5 l Suppe, Eintopf, Kompott, MilchShake, Cocktail mixen
- alle flüssigen Teige (Crepes, Pfannkuchen,
Ausbackteige etc.) mischen
SCHLAGEN/ EMULGIEREN/ QUIRLEN
ZUBEHÖRTEILE:
. Arbeitsgefäß (b)
. Schlagbesen (e)
MONTAGE DER ZUBEHÖRTEILE
•Stellen Sie sicher, daß die Abdeckung des
oberen Antriebs geschlossen ist (a1).
•Stellen Sie das Arbeitsgefäß (b3) auf den
unteren Antrieb des Motorblocks.
Arbeitsgefäß am Griff drehen bis es
einrastet.
8
Page 9

•Stecken Sie den Schlagbesen (e) auf die
Achse des Arbeitsgefäßes.
•Geben Sie die Lebensmittel in das Gefäß.
•Setzen Sie den Deckel (b2) auf das
Arbeitsgefäß und drehen Sie ihn, bis er
einrastet (hörbares „Klick“). Das Gerät läßt
sich nur einschalten, wenn der Deckel
richtig in dem Verriegelungsschlitz (a4)
eingerastet ist.
GEBRAUCH UND HINWEISE
•Stellen Sie den Geschwindigkeitswähler (a6)
auf Position 3 und schalten Sie das Gerät
durch Drücken der Taste (a8) ein. Erhöhen
Sie die Geschwindigkeit während der
Verarbeitung.
•Benutzen Sie den Schlagbesen niemals zum
Kneten schwerer Teige oder zum Rühren
leichter Teige.
Sie können Mayonnaise, Saucen, Eischnee (1
bis 7 Eiweiß), Baiser, Schlagsahne (max. 0,5 l)
zubereiten.
RAFFELN/SCHNEIDEN
Je nach Lebensmittel können Sie mit der
Schnitzeleinrichtung bis zu 1 kg verarbeiten.
ZUBEHÖRTEILE:
. Arbeitsgefäß (b)
. Arbeitsscheibe (A/D/C/H/G)
. Antriebshülse (d1)
MONTAGE DER ZUBEHÖRTEILE
•Stellen Sie sicher, daß die Abdeckung des
oberen Antriebs geschlossen ist (a1).
•Stellen Sie das Arbeitsgefäß (b3) auf den
unteren Antrieb des Motorblocks.
Arbeitsgefäß am Griff drehen, bis es
einrastet.
•Stecken Sie die Antriebshülse (d1) von unten
in die Öffnung der gewünschten
Arbeitsscheibe (gewünschte Seite nach
oben) und drehen Sie sie bis zur
Verriegelung.
•Setzen Sie die Hülse mit Scheibe auf die
Achse des Arbeitsgefäßes.
•Setzen Sie den Deckel (b2) auf das
Arbeitsgefäß und drehen Sie ihn, bis er
einrastet (hörbares „Klick“). Das Gerät läßt
sich nur einschalten, wenn der Deckel richtig
in dem Verriegelungsschlitz (a4) eingerastet
ist.
GEBRAUCH UND HINWEISE
•Führen Sie die Lebensmittel durch den
Füllschacht (b2) im Deckel ein und schieben
Sie mit dem Stopfer leicht nach (b1).
•Stellen Sie den Geschwindigkeitswähler (a6)
auf Position 3 und schalten Sie das Gerät
durch Drücken der Taste (a8) ein. Sie können
die Geschwindigkeit bis zu max erhöhen.
•Benutzen Sie die Schnitzelscheiben zum:
. Grob schneiden (H): Kartoffeln, Zwiebeln
. Fein schneiden (D): Gurken, Rote Beete,
Äpfel, Möhren, Kohl...
. Grob raffeln (C): Knollensellerie,
Kartoffeln,...
. Fein raffeln (A): Möhren, Käse
. Reiben (G): Parmesan, Kokosnuß
Sehr feines HACKEN KLEINER MENGEN
Je nach Lebensmittel können Sie mit dem
Zerkleinerer bis zu 100g zerkleinern.
ZUBEHÖRTEILE:
. Zerkleinerer (f)
MONTAGE DER ZUBEHÖRTEILE
•Drücken Sie auf die Entriegelungstaste (a5)
und klappen Sie die Abdeckung des oberen
Antriebes (a1) hoch.
•Geben Sie die Lebensmittel in das
Zerkleinerergefäß (f2) und verriegeln Sie den
Zerkleinerdeckel (f1) auf dem Gefäß.
•Setzen Sie den Zerkleinerer (f) auf den
oberen Antrieb des Motorblocks (a2) und
drehen Sie ihn, bis er verriegelt ist .
GEBRAUCH UND HINWEISE
•Stellen Sie den Geschwindigkeitswähler (a6)
auf Position max und schalten sie das Gerät
mit Taste (a8) ein oder benutzen Sie für eine
bessere Kontrolle des Ergebnisses die PulseTaste (a7).
Sie können:
- in wenigen Sekunden Knoblauch, Kräuter,
Petersilie, Trockenfrüchte, Nüsse, Brot,
Zwieback, Schinken hacken. Max. Menge für
Trockenfrüchte (Mandeln, Nüsse): 80 g.
- Brei/Püree für Babys herstellen (max: 100g)
Dieser Zerkleinerer ist nicht für harte
Lebensmittel, wie zum Beispiel Kaffeebohnen,
geeignet.
9
Page 10

Reinigung
•Ziehen Sie den Netzstecker.
•Nehmen Sie das Arbeitsgefäß ab, indem Sie
es, umgekehrt wie bei der Montage, drehen.
•Für eine leichtere Reinigung spülen Sie die
Zubehörteile sofort nach dem Gebrauch
unter fließendem Wasser ab. Das
Getriebeteil des Schlagbesens nie ins Wasser
tauchen, sondern nur feucht abwischen. Zur
leichteren Reinigung können Sie den
Schlagbesen aus dem Getriebeteil
herausziehen.
•Spülen und trocken Sie die Zubehörteile
gründlich ab (außer dem Getriebeteil des
Schlagbesens können alle Teile auch in der
Spülmaschine gereinigt werden).
• Füllen Sie den Mixbecher mit heißem
Wasser, dem einige Tropfen flüssiger Seife
beigegeben sind und verriegeln Sie den
Deckel. Drücken Sie einige Male die Pulse
Taste. Stecken Sie das Gerät aus, spülen Sie
den Mixbecher unter fließendem Wasser ab
und lassen Sie ihn trocknen.
•Falls die Zubehörteile durch Lebensmittel
(Karotten, Orangen) verfärbt sind, wischen
Sie sie mit einem in Speiseöl getränkten Tuch
ab, bevor Sie sie wie gewohnt reinigen.
•Tauchen Sie den Motorblock nie ins Wasser
und spülen Sie ihn nie unter fließendem
Wasser ab. Wischen Sie ihn nur mit einem
feuchten Tuch ab.
Aufbewahrung
Ihre Küchenmaschine ist ausgestattet mit:
- einer Kabelaufwicklung unter dem Boden,
um die gewünschte Kabellänge einzustellen
und das Netzkabel aufzubewahren.
Falls Ihr Gerät nicht
funktioniert
Vergewissern Sie sich
- daß der Stecker eingesteckt ist
- daß die Zubehörteile korrekt auf dem
Motorblock verriegelt sind
- daß die Deckel korrekt verriegelt sind
- daß bei Verwendung des Arbeitsgefäßes die
Abdeckung des oberen Antriebs gut
verschlossen ist.
10
Ihr Gerät funktioniert immer noch nicht?
Wenden Sie sich an einen KRUPS
Kundendienst (s. Liste im Heft Service KRUPS).
Sonderzubehör
Im Fachhandel oder bei dem KRUPSKundendienst können Sie folgende
Schnitzelscheiben erhalten:
Art. 5 933 005: Reibscheibe (für Kokosnuß,
Parmesan, Reibekuchen)
Art. 5 933 006: Pommes Frites-Scheibe
Art. 5 966 866 : Gewurzmühle
Art. 5 971 807: Zitruspresse
Rezept-Beispiele
CAFÉ FRAPPÉ (MILCH-SHAKE MIT KAFFEE)
500 ml kalte fettarme Milch
6 TL löslicher Kaffee
6 TL Zucker
6 Eiswürfel
•Geben Sie alle Zutaten in den Mixbecher.
Arbeiten Sie auf höchster
Geschwindigkeitsstufe. Mixen Sie 25 Sek.
GAZPACHO (KALTE GEMÜSESUPPE)
Für 4-6 Personen
1/2 Salatgurke (280 g)
2 Tomaten (400 g)
1/2 grüne Paprikaschote
1 kleine Zwiebel
2 Knoblauchzehen
20 g trockenes Brot
1 TL Weinessig
einige Tropfen Tabasco (wahlweise)
2 EL Olivenöl
1/2 Zitrone
Salz, Pfeffer
•Die Paprikaschote putzen, die Gurke, die
Zwiebel und die Knoblauchzehen schälen;
die Tomaten enthäuten und entkernen. Alles
in Stücke schneiden und in eine Schüssel
geben; 400 ml eiskaltes Wasser, den Essig,
Tabasco, Salz und Pfeffer hinzufügen.
Page 11

•Im Mixbecher das Brot 10 Sek. bei Geschwindigkeitsstufe max hacken, dann den
Inhalt der Schüssel eingießen und mischen,
bis eine völlig glatte Masse entsteht (50
Sek.). In eine Suppenschüssel gießen, das
Olivenöl und 1 EL Zitronensaft dazugießen.
Mischen, abschmecken und kalt stellen.
GURKE MIT JOGHURT
Für 4 Personen
1 Salatgurke
1 TL Essig
1 bis 2 EL Olivenöl
125 g Joghurt
frischgehackte Minze
Salz, Pfeffer
•Schnitzeleinsatz Feinschneiden (Scheibe D)
einlegen. Die Gurke schälen und das weiche
Gurkeninnere entfernen. Senkrecht in den
Einfüllstutzen stellen und bei
Geschwindigkeitsstufe max in Scheiben
schneiden.
•Mit einer Joghurt-Vinaigrette würzen. Mit
Kräutern bestreuen.
•Als festtägliche Vorspeise statt Joghurt
Creme fraiche und statt Minze Dill
verwenden; zu in Zitrone mariniertem
Räucherfisch mit Dill reichen (Lachs,
Heilbutt).
Rohkost-Teller:
•Gemüse je nach Jahreszeit zusammenstellen
und mit einer Vinaigrettesauce oder mit
Kräuterquark anrichten.
Griechischer Salat:
•Gurke, Tomaten, Zwiebel und Paprika mit
dem Schnitzeleinsatz Grobschneiden
(Scheibe H) bearbeiten, Vinaigrette mit
Olivenöl, Feta (frischer Schafskäse) und
Oliven zugeben.
SELLERIESALAT MIT ÄPFELN UND WALNÜSSEN
Für 4 Personen
1/2 Stangensellerie (200 g nach dem Putzen)
2 Granny Smith-Äpfel
1/2 Zitrone
50 g Walnußkerne
1 Eigelb
1 TL Senf
100 ml Sonnenblumenöl
2 Petersilienzweige
Salz, Pfeffer
•Die Äpfel schälen und in Achtel schneiden.
Den Schnitzeleinsatz mit Scheibe H
aufsetzen und Geschwindigkeitsstufe 6
einstellen, die Apfelstücke senkrecht in den
Einfüllstutzen des Gerätedeckels setzen und
kleinschneiden. Sofort mit Zitronensaft
beträufeln, damit sie nicht braun werden.
•Den Sellerie putzen und in längliche Stücke
schneiden. Senkrecht in den Einfüllstutzen
des Gerätedeckels setzen und
kleinschneiden.
•Eine Mayonnaise zubereiten: Eigelb, Senf, 1
EL Öl, Salz und Pfeffer in die Arbeitsschüssel
geben, Emulgierscheibe einsetzen und bei
Geschwindigkeitsstufe 4 verrühren. Wenn
die Mayonnaise beginnt anzusetzen, nach
und nach das restliche Öl hinzufügen und
dabei die Geschwindigkeit max einstellen.
Abschließend 2 EL Wasser unterziehen.
•Die Mayonnaise in eine Schüssel gießen,
Sellerie, Äpfel und Nüsse hineingeben und
vorsichtig vermischen. Gekühlt servieren.
STEAK TARTAR
Für 4 Personen
600 g mageres Fleisch
4 frische Eier
4 Schalotten oder Frühlingszwiebeln
4 EL Kapern
1 kleiner Bund Petersilie
Senf, Ketchup, Worcesterhire Soße
Salz, Pfeffer, Tabasco zum Würzen am Tisch
•Kurz vor dem Servieren das Fleisch in Würfel
schneiden, in das mit dem Messer bestückte
Arbeitsgefäß geben und das Fleisch in
Geschwindigkeit max für 15 bis 20 Sek.
hacken. Am Ende noch einige Male die
Pulse-Taste betätigen.
•4 kleine flache Hacksteaks formen und jedes
in die Mitte eines Tellers setzen. Auf jedes
Steak einen Eidotter in einer halben
Eierschale setzen.
11
Page 12

•Die Schalotten und danach die Petersilie
hacken. Schalotten, Petersilie und Kapern in
kleinen Häufchen im Kreis um das Hacksteak
anordnen. Jeder würzt am Tisch nach
eigenem Geschmack mit den
bereitgestellten Gewürzen.
Beilagen: Pommes Frites, Sautierte Kartoffeln,
grüner Salat, Linsensalat, Kartoffelsalat o.ä.
HACKSTEAKS MIT SENF
Für 4 Personen
2 Schalotten
4 Zweige Petersilie
600 g Steakfleisch
3 EL Senf
1 Ei
Salz, Pfeffer
1 EL Mehl
•Schalotten putzen. Petersilie waschen und
abtrocknen. In das mit dem Messer
bestückte Arbeitsgefäß geben und in
Geschwindigkeit max hacken. Das in Würfel
geschnittene Fleisch hinzufügen und
nochmals 15 bis 20 Sek. hacken. Senf, Ei,
Salz und Pfeffer hinzufügen und in einigen
Intervallen untermischen. 4 Steaks formen
und die Oberfläche leicht mehlieren. In einer
Pfanne mit etwas Fett braten.
Variationen:
Hacksteaks mit Paprika: Mischen Sie 600 g
Hackfleisch mit 1 gehackten und glasig
gebratenen Zwiebel sowie 1 EL Paprika, 1 EL
gehackte Petersilie, 1 Ei, Majoran, Salz und
Pfeffer.
Hacksteaks Marokko: Mischen Sie 600 g
Rind- oder Lammhackfleisch mit 1 kleinen
Zwiebel, 1 Knoblauchzehe, 20 Blättern
frischem Koriander, 8 Minzeblättern, 1 TL rasal-hanout, 1 TL Kreuzkümmel, Salz, Pfeffer
und 1 Ei. Formen Sie Fleischklößchen um
Grillspieße herum und braten oder grillen Sie
sie.
Hamburger: Braten Sie ein Hacksteak.
Erhitzen Sie kleine runde Brötchen für 5 Min.
im Backofen, schneiden Sie sie quer durch
und bestreichen Sie die beiden Hälften mit
Mayonnaise. Legen Sie auf die untere Hälfte
geschnittenen Salatblätter, Käse,
Gewürzgurke, gehackte Zwiebel, Ketchup,
das Steak, Käse, Gewürzgurke und
Tomatenscheiben. Klappen Sie das Brötchen
zu und legen Sie es nochmals 2 Min. in den
Backofen.
WEISSBROT
Für 2 Brote oder 12 Brötchen
500 g Weizenmehl
1 TL Salz
20 g Hefe
290-300 ml lauwarmes Wasser (32 °C)
•Die Hefe in 3 EL lauwarmen Wasser
auflösen. Den Kneter aufsetzen und Mehl,
Hefe und Salz (die Hefe darf auf keinen Fall
direkt mit dem Salz in Kontakt kommen) in
die Arbeitsschüssel geben.
Geschwindigkeitsstufe 3 einstellen und 4
mal in Intervallen (Pulse) kneten, dann das
restliche Wasser durch den Einfüllschacht
eingießen, während das Gerät arbeitet, und
20 Sek. kneten. Die Geschwindigkeit auf
Stufe max erhöhen und 1 Min. weiter
kneten, bis der Teig glatt und geschmeidig
ist. Der Teig bildet recht schnell eine Kugel;
im Verlauf des Knetens das Gerät zweimal
abschalten und die Kugel mit der Hand flach
drücken; wieder einschalten.
•Den Teig 15 Min. auf einer mehlbestäubten
Arbeitsfläche ruhen lassen, dann rasch mit
der Hand flach drücken und in die
gewünschte Form bringen: 2 Brote oder 12
Brötchen. Auf ein mit Mehl bestäubtes
Backblech legen und mit einem sauberen
Tuch abdecken. 40 bis 50 Min. an einem
warmen Ort bei 22 °C bis 25°C aufgehen
lassen, bis der Teig sein Volumen verdoppelt
hat. Den Ofen auf 240 °C vorheizen. Den
Teig mit einer Klinge einschneiden und dann
25 bis 30 Min. backen (die Brötchen nur 20
Min.). Stellen Sie ein Glas Wasser mit in den
Ofen, durch die Feuchtigkeit erhalten Sie
eine schöne Kruste.
•Brötchen: Den Teig in eigroße Stücke teilen,
jeden Teigklumpen flachdrücken. Die vier
Seiten des Teigs zur Mitte hin einschlagen,
wie bei einem Briefumschlag. Die Klumpen
wenden und mit eingemehlten Handflächen
rollen, damit sie eine regelmäßige Form
erhalten.
12
Page 13

FRÜCHTEKUCHEN
Für 6-8 Personen
90 g Rosinen, 50 g Korinthen
50 g Zitronat und Orangeat
125 g weiche Butter
100 g Zucker
3 Eier
1 Tütchen Vanillinzucker
250 g gesiebtes Mehl
1 Tütchen Backpulver
5 EL Milch
•Den Ofen auf 180 °C vorheizen. Eine
Kastenform (24 x 10 x 7 cm) einbuttern und
mit Mehl bestäuben. Orangeat und Zitronat,
mit den Korinthen, Rosinen und 1 EL Mehl in
eine Schüssel geben, mischen und zur Seite
stellen.
•Kneter (ersatzweise Metallmesser) einsetzen,
Butter, Zucker und Vanillinzucker in die
Arbeitsschüssel geben und 20 Sek. bei
Geschwindigkeitsstufe 3 mixen. Während
das Gerät weiter arbeitet, ein Ei nach dem
andern, anschließend die Milch durch den
Einfüllschacht zugeben. Das Gerät
ausschalten und das Mehl zusammen mit
dem Backpulver eingeben.
Geschwindigkeitsstufe 2 wählen und weiter
arbeiten lassen, bis ein homogener Teig
entsteht.
•Die Früchte zunächst in einzelnen
Intervallen, dann in 10 Sek. bei
Geschwindigkeitsstufe 5 nur Intervalle
einarbeiten. Den Teig in die Form geben und
den Kuchen 1 Std. 15 Min. backen. Auf ein
Kuchengitter stürzen und abkühlen lassen.
Die Rosinen eventuell in ein wenig Rum
einweichen.
•Die Zwiebel schälen und die Pfefferschote
putzen, beides in Stücke schneiden. Den
Koriander waschen und die Blätter
abzupfen. Das Metallmesser aufsetzen und
alles in die Arbeitsschüssel geben.
Geschwindigkeitsstufe max einstellen und
30 Sek. hacken.
•Die Haut und den Kern der Avocados
entfernen. Die Tomate schälen und
entkernen, in Stücke schneiden und mit dem
Avocadofruchtfleisch sowie dem Zitronensaft
in die Schüssel dazugeben. Salzen, Pfeffern
und 30 Sek. hacken. Nach der Hälfte der Zeit
das Gerät abschalten und mit dem Teigspatel
die Masse in die Mitte schieben.
Guacamole wird in seinem Ursprungsland mit
Maisfladen gereicht. Sie finden sie in
Feinkostgeschäften. Sie können aber auch
Toastbrot oder rohes Gemüse nehmen.
GUACAMOLE
Für 4-6 Personen
1 kleine Zwiebel
1 Tomate
1 kleine Pefferschote
2 reife Avocados
1 EL Zitronensaft
2 frische Korianderzweige (25 Blätter)
ersatzweise etwas gemahlenen Koriander
Salz, Pfeffer
13
Page 14

English
Description
a Main unit
a1 upper drive cover
a2 upper drive
a3 lower drive
a4 locking slot for the mixer bowl lid
a5 release key for the cover
a6 speed selector
a7 pulse key
a8 start key
a9 stop key
b Mixer bowl
b1 pusher with measuring scale
b2 lid with filling shaft
b3 bowl
ACCORDING TO MODEL
c Tools
c1 universal knife
c2 plastic kneader
d Cutting disks
A fine grating / D fine cutting
C coarse grating / H coarse cutting
G grating : Parmesan cheese, coconut
d1 drive casing
e Beating tools
e1 drive unit
e2 whisk
f Chopper
f1 chopper lid
f2 chopper bowl
g Blender
g1 pusher with measuring scale
g2 blender lid
g3 blender
g4 lid fastening slot
h Spatula
Safety Precautions
•Carefully read the Instructions for Use
before operating the machine. Improper
use will invalidate any responsibility on
the part of KRUPS.
•Always keep the appliance out of the
reach of children.
•Make certain that the voltage stated on the
rating plate of the appliance corresponds
with that of your mains supply. The
guarantee becomes void if incorrectly
connected.
•The knife and cutting disks are extremely
sharp and must be handled with great care.
•Always remove the knife from the mixer
bowl before emptying it.
•Never touch moving parts, either with the
hands or with any object at all.
•Do not take off the lid before all rotating
parts have come to rest.
•Never use your fingers, cutlery or any other
object to push foodstuffs into the filling
shaft. Use only the pusher for this purpose.
•Never operate the appliance when it is
empty.
•All work on the appliance, other than
cleaning and general maintenance, must be
carried out by the KRUPS Customer Service.
•Never use the appliance if the flex or its
connector to the appliance is at all damaged
•If the mains lead or the plug are damaged,
do not use your appliance. In order to avoid
any accident, they must be replaced by an
approved KRUPS Centre (see list in the
leaflet «KRUPS Service»).
•Do not allow the flex to hang down within
the reach of children.
•Never dip the motor unit, the flex or the
connector into water or into any other
liquid.
•Never place the flex in the vicinity of, or
bring it into contact with, hot parts of the
appliance or any other source of heat, or any
sharp edges or corners.
•For your own safety, do not use any
attachments or spare parts other than those
from KRUPS, which are specifically designed
to suit your appliance.
•Pull out the mains plug after each time the
appliance is used and before any cleaning
operation.
14
Page 15

• Your appliance may be used only indoors
and for household purposes.
Before first use
• Place the motor unit on a flat, clean and dry
surface.
• Clean all the accessories in warm washing-
up water to remove any possible
manufacturing residues.
• Take great care with the universal knife,
which is very sharp. Remove the protective
cap from the knife, hold the knife by the
plastic portion in one hand and use a
washing-up brush in the other hand to
carefully clean the cutting blade. Then put
the protective cap back on.
• Never dip the main unit or the beating tools
drive unit into water – just wipe them down
with a moist cloth.
Using the appliance
• Plug in at the mains.
• Pulse key (intermittent action): By
pressing the pulse key (a7) the appliance will
run only as long as the key is kept
depressed. In order to check the results
during certain preparations, press the pulse
key momentarily several times one after
another.
• Continuous operation: Press the upper key
(a8).
• Off: Press the lower key (a9).
• Speed selector (a6): For setting the stated
operating speed or for changing the speed
during a work operation.
• Using the lower drive (a3): The cover for
the upper drive (a1) must be securely locked.
• Using the upper drive: If, when you are
using the blender (g) or the chopper (f), the
mixer bowl (b) is left standing on the lower
drive, the mixer bowl lid (b2) must be
unlocked.
• Opening the cover of the upper drive
(a1): Make sure that the mixer bowl (b) is
unlocked before you open the cover of the
upper drive (a1).
Functions
MIXING, CHOPPING AND KNEADING IN
LARGE QUANTITIES
Dependant upon he nature of the ingredients,
you can process up to 1.5 kg of material in
the mixer bowl (b).
ACCESSORIES:
. mixer bowl (b)
. tools (c) :
- universal knife (c1) for mixing and chopping
(remove the knife blade cover each time it is
used and return it after use)
- plastic kneader (c2) for kneading and mixing
MOUNTING THE ACCESSORIES
• Make sure that the upper drive cover is
closed (a1).
• Place the mixer bowl (b3) on the lower drive
of the motor unit and turn the bowl by the
handle until it engages.
• Push the universal knife (c1) or the plastic
kneader (c2) onto the spindle of the mixer
bowl.
• Put the foodstuffs into the mixer bowl.
• Place the lid (b2) onto the mixer bowl and
turn it until it engages with an audible click.
The appliance can only be switched on when
the lid has been securely engaged in the
locking slot (a4).
USAGE AND GUIDANCE
Mixing
• Set the speed selector (a6) to the max
position and switch the appliance on by
pressing the key (a8).
You can mix up to 0.9 l of stews, soups or
stewed fruits in about 20 seconds.
Chopping
• To switch on, either set the speed selector
(a6) to the max position and then press the
key (a8), or, so as to better control the
results, use the pulse key (a7).
You can chop up to 600g of foodstuffs in 15
to 30 seconds:
- hard materials such as cheese, dried fruits
and certain vegetables such as carrots and
celeriac or celery
- soft materials such as fruit and vegetables
including onions and spinach
15
Page 16

- raw or cooked meats without bones or
sinews and cut into cubes
- raw or cooked fish
Kneading and mixing
•To switch on, set the speed selector (a6) to
position 4 and switch the appliance on by
pressing the key (a8). Increase the speed
slowly during the processing operation.
Switch the appliance off as soon as a clump
of dough has been formed.
You can:
- knead up to 1.2 kg of heavy dough (short
pastry or bread dough) in about 40 s.(*).
- mix up to 0.9 l of batter for pancakes or
waffles in 1 to 1 1/2 minutes
- prepare 1.5 kg of light dough (madeira type)
in 1 1/2 to 3 1/2 minutes
(*) : If the kneading of a dough requires more
than 40 s., then do it in several goes of 40 s.
each.
HOMOGENISING, MIXING AND VERY FINE
MIXING
Dependant upon the foodstuff, you can
process up to 1.5 litre.
ACCESSORIES:
. Blender (g)
MOUNTING THE ACCESSORIES
•Press the release key (a5) for the upper drive
cover (a1) and open the cover.
•Put the foodstuff into the blender (g3) and
lock the blender lid (g2) onto the blender.
The spur on the lid sticks out of the locking
slot (g4) on the goblet handle.
•Locate the securely-closed blender (g) on the
upper drive (a2) of the motor block,
whereby the mark 1 must be positioned in
front of the mark ∆ on the motor block.
Then secure it by turning the blender handle
so that mark 2 is in front of mark ∆ on the
motor block.
USAGE AND GUIDANCE
•Never fill the blender with boiling
liquids.
•To switch on the appliance, either set the
speed selector (a6) to the max position and
then press the key (a8), or, to better control
the results, press the pulse key (a7).
If the lid is not or is badly positioned the
blender can not be locked into place on
the food processor and will not work.
Once the blender goblet and it’s lid are locked
into place on the motor unit, the lid cannot be
removed.
You can, however, add further quantities of
the ingredients through the opening in the lid
by first removing the pusher.
You can:
- mix up to 1.5 l of soup, stew, stewed fruits,
milk-shakes or cocktails
- mix all or any batters for crepes, pancakes or
similar
BEATING, EMULSIFYING AND WHISKING
ACCESSORIES:
. mixer bowl (b)
. whisk (e)
MOUNTING THE ACCESSORIES
• Make sure that the upper drive cover is
properly closed (a1).
• Place the mixer bowl (b3) on the lower drive
of the motor unit and turn the mixer bowl
by the handle until it engages fully.
• Push the whisk (e) onto the spindle of the
mixer bowl.
• Fill the foodstuffs into the mixer bowl.
• Put the lid (b2) onto the mixer bowl and turn
it until it engages with a audible click. The
appliance can only be switched on when the
lid is properly engaged in the locking slot
(a4).
USAGE AND GUIDANCE
• Set the speed selector (a6) to position 3 and
switch on the appliance by pressing the key
(a8). Increase the speed during the
processing operation.
• Never use the whisk for kneading heavy
doughs or for mixing light doughs.
You can prepare mayonnaise, sauces, 1 to 7
beaten egg-whites, meringues and up to 0.5 l
of whipped cream.
16
Page 17

GRATING AND SLICING
Dependant upon the foodstuff to be
processed, you can deal with up to 1 kg of
material.
ACCESSORIES:
. mixer bowl (b)
. disks (A/D/C/H/G)
. drive casing (d1)
MOUNTING THE ACCESSORIES
• Make sure that the upper drive cover is
closed (a1).
• Place the mixer bowl (b3) on the lower drive
of the motor unit and turn it by the handle
until it engages.
• Push the drive casing (d1) from below into
the desired working disk, the required
surface being on top, and turn it to the
locked position.
• Locate the casing together with the disk on
the spindle of the mixer bowl.
• Place the lid (b2) onto the mixer bowl and
turn it until it engages with an audible click.
The appliance can only be switched on when
the lid has been securely engaged in the
locking slot (a4).
USAGE AND GUIDANCE
• Put the foodstuff into the mixer bowl
through the filling shaft (b2) in the lid and
press down lightly with the pusher (b1).
• Set the speed selector (a6) to position 3 and
switch on the appliance by pressing the key
(a8). You can increase the speed up to max.
• Use the work-disks as follows:
. Coarse slicing (H): potatoes, onions
. Fine slicing (D): cucumbers, beetroot, apples,
carrots, cabbage, etc.
. Coarse grating (C): celeriac, potatoes, etc.
. Fine grating (A): carrots, cheese
. Grating (G): Parmesan cheese, coconut
VERY FINE CHOPPING OF SMALL
QUANTITIES
Dependant upon the foodstuff, you can
finely-chop up to 100 g material.
ACCESSORY USED:
. Chopper (f)
MOUNTING THE ACCESSORY
• Press the release key (a5) and raise the upper
drive cover (a1).
• Put the foodstuff into the chopper bowl (f2)
and lock the chopper lid (f1) onto the bowl.
• Locate the chopper (f) on the upper drive of
the motor unit (a2) and turn it until it locks
into position.
USAGE AND GUIDANCE
• To switch on the appliance, either set the
speed selector (a6) to the max position and
then press the key (a8), or, to better control
the results, press the pulse key (a7).
You can:
- chop garlic, herbs, parsley, dried fruits, nuts,
bread, rusks and ham in a few seconds. The
maximum quantity for almonds, other nuts
and dried fruits is 80g
- prepare mashed and puréed baby-foods up
to 100g
This chopper is not suitable for hard
foodstuffs such as coffee beans.
Cleaning
• Pull out the plug at the mains.
• Remove the mixer bowl, turning it in the
opposite direction from that for mounting it.
• For a quick clean, swill the accessories
immediately after use under running water.
Never dip the drive section of the whisk into
water – just wipe it down with a moist cloth.
For easier cleaning, the whisk can be pulled
out of the drive section.
• Wash and thoroughly dry the accessories, all
of which are suitable for the dishwasher
except the drive section of the whisk.
• Pour some hot water containing a few drops
of liquid soap into the mixer bowl. Close
the lid. Operate in short bursts by pressing
the pulse key several times. Unplug the
appliance. Rinse the bowl under running
water and leave to dry.
• If the accessories become discoloured due to
certain foodstuffs, such as carrots or
oranges, just wipe them down with a cloth
soaked in edible oil before cleaning as usual.
17
Page 18

•Never dip the motor unit into water or swill
it under the tap. Just wipe it down with a
moist cloth.
Storage
Your kitchen machine is furnished with a flex
storage arrangement beneath the base for
adjusting the length of the flex and for storing
it when not in use.
If your appliance fails to
function
Make sure that:
- the mains plug is inserted
- the accessories are correctly secured on the
motor unit
- the lids are properly secured
- if the mixer bowl is being used, the upper
drive cover is properly closed.
If your appliance still does not function,
get in touch with the KRUPS Customer Service
(see the list in the KRUPS Service brochure).
Special Accessories
The following special accessories can be
obtained either from a specialist supplier or
from the KRUPS Customer Service
Department.
Item 5 933 005: special grating disk for
coconut, Parmesan cheese
Item 5 933 006: special disk for chips and
French fries
Item 5 966 866 : Herb mill
Item 5 971 807 Juice extractor
Recipes
CAFÉ FRAPPÉ OR COFFEE MILK-SHAKE
1/2 litre cold low-fat milk
6 teaspoons instant coffee
6 teaspoons sugar
6 ice cubes
•Put all the ingredients into the blender.
Select speed maxi. Mix for 25 seconds.
GAZPACHO (COLD VEGETABLE SOUP)
for 4 to 6 persons
1/2 a cucumber (280 g)
2 tomatoes (400 g)
1/2 a green pepper
1 small onion
2 cloves of garlic
20 g dry white bread
1 teaspoon wine vinegar
a few drops of Tabasco sauce to taste
2 tablespoons olive oil
1/2 a lemon
salt and pepper
• Clean the half green pepper, peel the
cucumber, onion and cloves of garlic,
remove the tomato skins and pips. Cut them
all into pieces and put them into a dish. Now
add 400 ml of ice-cold water, the vinegar,
Tabasco, salt and pepper.
• Chop the bread for 10 seconds at speed
maxi using the blender attachment. Then
add the contents of the dish and mix to a
completely smooth mass (50 seconds).
• Now pour the whole into a soup tureen, add
the olive oil and a teaspoonful of lemon
juice, mix thoroughly, season to taste and
store in a cool place.
CUCUMBER YOGHURT
for 4 persons
1 cucumber
1 teaspoon vinegar
1 to 2 tablespoons olive oil
125 g yoghurt
freshly-chopped mint
salt and pepper
• Insert the fine slicing disk (D). Peel the
cucumber and remove the soft centre by
rotating a knife round the pips. Put the
cucumber vertically in the filling shaft and
cut it into slices at speed maxi. Dress it with
a yoghurt vinaigrette, season it and then
sprinkle herbs onto it.
For special occasions, use fresh cream instead
of yoghurt and dill instead of mint. Serve with
smoked fish (salmon or halibut) marinated in
lemon juice and dill.
18
Page 19

Raw vegetable Salad:
• Prepare a mixture of vegetables in season
and add either a vinaigrette or a soft white
cheese and herbs.
Greek salad:
• Cut cucumber, tomato, onion and red or
green pepper in slices using the coarse
slicing disk. Dress with an olive oil vinaigrette
and serve with fresh feta (sheep‘s milk
cheese) and olives.
WALDORF SALAD
for 4 persons
1/2 a bunch of celery (200 g after cleaning)
2 Granny Smith apples
1/2 a lemon
50 g walnuts
1 egg yolk
1 teaspoon prepared mustard
100 ml sunflower oil
2 sprigs of parsley chopped
salt and pepper
• Peel the apples and cut each into eight
pieces. Insert the coarse slicing disk. Put the
apple pieces vertically into the filling shaft
and slice at speed 6. Sprinkle the apple
straight away with lemon juice to prevent
discoloration.
• Clean the celery, cut it into suitable lengths,
place them upright in the filling shaft and
then slice them.
• Prepare a mayonnaise as follows: Insert the
whisk or the emulsifying disk in the
appliance, and put in the egg yolk, mustard,
1 tablespoon of sunflower oil together with
salt and pepper. Mix at speed 4. When the
mixture is smooth and even, add the rest of
the oil a little at a time through the filling
shaft whilst increasing the speed gradually
up to level maxi.
• Finally add 2 tablespoons of water.
• Pour the mayonnaise into a salad bowl, add
the celery, apples, chopped parsley and
walnuts. Then stir carefully and serve very
cool.
STEAK TARTARE
for 4 persons
600g lean meat
4 fresh eggs
4 shallots or spring onions
4 tablespoons of caper
a small bunch of parsley
mustard, ketchup, Worcester sauce, salt,
pepper and Tabasco for seasoning at table
• Just before serving, cut the meat into cubes,
put them into the mixer bowl with the knife
fitted and chop them at speed maxi for 15
to 20 seconds. Finish off by using the pulse
key a few times.
• Form the meat into 4 small flat steaks and
place each in the middle of a plate. Then
place a half eggshell containing an egg-yolk
on each steak.
• Chop first the shallots and then the parsley.
Arrange the shallots, parsley and capers in
small heaps around the steaks. Each person
seasons his own steak at table from the
ready-placed garnishes.
• Side dishes: French fries, sautéed potatoes,
green salad, lentil salad, potato and
mayonnaise salad, etc.
RISSOLES WITH MUSTARD
for 4 persons
2 shallots
4 sprigs of parsley
600g steak
3 tablespoons of mustard
1 egg
salt and pepper
1 tablespoon of flour
• Clean the shallots, wash and dry the parsley.
Put them all into the mixer bowl fitted with
the knife and chop at speed maxi. Add the
cubed meat and chop at the same speed for
a further 15 to 20 seconds. Now add the
mustard, egg, salt and pepper and mix
intermittently until even. Form the mass into
4 steaks, coat them lightly with flour and fry
them on both sides in a little oil.
19
Page 20

Variations:
Rissoles with paprika: Mix 600g minced
meat with one chopped and lightly-fried
onion together with 1 tablespoon paprika, 1
tablespoon chopped parsley, 1 egg, marjoram,
salt and pepper.
Rissoles “marocco”: Mix together 600g
minced beef or lamb, 1 small onion, 1 clove of
garlic, 20 fresh coriander leaves, 8 mint
leaves, 1 tablespoon ras-al-hanout, 1
tablespoon crushed cumin seed, salt, pepper
and 1 egg. Form the mass into meat balls on
spits and grill or barbecue them.
Hamburger: Fry a rissole. Warm a small
bread roll for 5 minutes in the oven, cut it
across and spread mayonnaise on both halves.
On the bottom half put shredded lettuce
leaves, cheese, cucumber or gherkin, chopped
onion, ketchup, the prepared rissole, cheese,
cucumber and sliced tomato. Now put on the
top half and return to the oven for a further 2
minutes.
WHITE BREAD
for 2 loaves or 12 little rolls
500 g wheat flour
1 teaspoon salt
20g yeast
290-300 ml lukewarm water (32°C)
•Dissolve the yeast in 3 tablespoons of
lukewarm water. Install the kneader and put
the flour, yeast and salt (Do not under any
circumstances allow the salt to come into
contact with the yeast) into the mixer bowl.
Knead in 6 goes using the pulse function at
speed 3 and then pour in the remaining
water through the filling shaft whilst the
appliance is still working, after which
continue to knead for a further 20 seconds.
Now increase the speed to level maxi and
knead for about a further minute, until the
dough is smooth and easily workable. The
dough quickly forms a ball and during the
kneading process the appliance should be
switched off twice and the ball pressed flat
with the hand before switching on again.
•Allow the dough to rest for 15 minutes on a
work surface sprinkled with flour and then
quickly press it flat with the hand and shape
it as required into 2 loaves or 12 little rolls.
Put these on a flour-besprinkled baking plate
and cover with a clean cloth. Let them rise in
a warm place (22°-25°C) for 40 to 50
minutes until they have doubled in size.
Preheat the oven to 240°C. Make incisions
in the dough with a knife blade and then
bake the rolls for 20 minutes or loaves for
25 to 30 minutes. If you also put a glass of
water in the oven, the moisture will produce
a nice crust.
• When making little rolls, cut the dough into
lumps as large as an egg and press each one
flat. Turn in the four edges of the dough,
rather like the back of an envelope.
• Then turn them over and roll them with the
flat of the hand dipped in flour, to give them
a good shape.
FRUIT CAKE
for 6 to 8 persons
90g raisins
50g currants
50g candied peel
125g soft butter
100g sugar
3 eggs
vanilla sugar
250g sieved flour
baking powder
5 tablespoons milk
• Preheat the oven to 180°C. Grease a baking
tin (24 x 10 x 7 cm) with butter and sprinkle
it with flour. Mix the raisins, currants,
candied peel and 1 tablespoonful of flour
together in a bowl and put to one side.
• Using the kneader, mix the butter, sugar and
vanilla sugar in the mixer bowl at speed 3
for 20 seconds. While the processor
continues to mix, break the eggs one after
another into the filler shaft, followed by the
milk. Then switch off the machine and add
the flour and baking powder. Now continue
mixing at speed 2 until an even dough has
been produced.
• Add the various fruits in small quantities at
speed 2 and then raise the speed to level 5
and mix in short bursts for 10 seconds using
the pulse function. Put the dough into the
baking tin and bake for 1 1/4 hours. Then
turn out the cake onto a wire rack and allow
it to cool down completely before cutting it.
20
Page 21

• If you wish, the raisins can be soaked in rum
before being used.
GUACAMOLE
for 4 to 6 persons
1 small onion
1 tomato
1 small hot chilli pepper
2 ripe avocados
1 tablespoon lemon juice
2 sprigs of fresh coriander (25 leaves) or a
good pinch of ground coriander
salt and pepper
• Peel the onion, clean the chilli and cut them
both into pieces. Wash the coriander sprigs
and pull off the leaves. Chop these items in
the mixer bowl at speed maxi for 30
seconds.
• Remove the skins and stones of the
avocados. Peel the tomatoes and remove the
pips, cut them into pieces and add them,
together with the avocado flesh and the
lemon juice, to the items in the mixer bowl.
Now add salt and pepper and chop for 15
seconds. Push the mass to the centre of the
bowl with the spatula and then chop for a
further 15 seconds.
Guacamole is traditionally served with small,
flat sweet-corn cakes, obtainable in specialist
food-shops. However, it can also be served
with small pieces of toast or with raw
vegetables.
21
Page 22

Français
Description
a Bloc moteur
a1 capot de sortie haute
a2 sortie haute
a3 sortie basse
a4 fente de verrouillage du couvercle
a5 touche d’ouverture du capot
a6 sélecteur de vitesse
a7 touche pulse (marche intermittente)
a8 bouton marche
a9 bouton arrêt
b Ensemble bol
b1 poussoir doseur
b2 couvercle à cheminée
b3 bol
SELON MODÈLE
c Couteaux
c1 couteau métal
c2 pétrin plastique
d Coupe - légumes
Disques :
A râpé fin / D tranches fines
C râpé épais / H tranches épaisses
G râpé noix de coco, parmesan
d1 tube d’entraînement
e Batteur
e1 boîtier d’entraînement
e2 fouet
f Mini-hachoir
f1 couvercle
f2 bol
g Bol mixer
g1 bouchon doseur
g2 couvercle
g3 bol
g4 fente de verrouillage du couvercle
h Spatule
Conseils de sécurité
•Lisez attentivement le mode d’emploi
avant la première utilisation de votre
appareil. Une utilisation non conforme
au mode d’emploi dégagerait KRUPS de
toute responsabilité.
•Placez toujours l’appareil hors de portée
des enfants.
•Vérifiez que la tension de votre appareil
corresponde à celle de votre installation
électrique. Toute erreur de branchement
annule la garantie.
•Manipulez le couteau et les lames avec
précaution: ils sont extrêmement coupants.
•Vous devez obligatoirement retirer le
couteau (c) avant de vider le bol de son
contenu.
•Ne touchez jamais les pièces en mouvement.
•Utilisez toujours le poussoir pour guider les
aliments dans la cheminée, jamais les doigts,
ni une fourchette, une cuillère, un couteau
ou tout autre objet.
•Ne faites pas fonctionner votre appareil à
vide ou si vous constatez une anomalie
(câble endommagé, etc.). Dans ce cas,
adressez-vous à un Centre Service Agréé
KRUPS (voir liste dans le livret « KRUPS
Service »).
•Toute intervention autre que le nettoyage et
l’entretien usuel doit être effectuée par un
Centre de Service Agréé KRUPS.
•Si le câble d’alimentation ou la fiche sont
endommagés, n'utilisez pas votre appareil.
Afin d'éviter tout danger, faites-les obligatoirement remplacer par un centre service
agréé KRUPS (voir liste dans le livret «KRUPS
Service»).
•Ne laissez pas pendre le câble d’alimentation
à portée de mains des enfants.
•Ne mettez pas l’appareil, le câble d’alimentation ou la fiche dans l’eau, ou tout autre
liquide.
•Le câble d’alimentation ne doit jamais être à
proximité ou en contact avec les parties
chaudes de votre appareil ou près d’une
source de chaleur ou sur un angle vif.
•Pour votre sécurité, n’utilisez que des
accessoires et pièces détachées KRUPS,
adaptés à votre appareil.
22
Page 23

•Débranchez toujours l’appareil dès que vous
cessez de l’utiliser et lorsque vous le
nettoyez.
•Votre appareil est uniquement à usage
domestique et à l’intérieur de la maison.
Avant la première utilisation
• Placez le bloc moteur sur une surface plane,
propre et sèche.
•Avant la première utilisation de votre robot,
nettoyez l’ensemble des accessoires pour
enlever les résidus de production éventuels.
•Manipulez toujours le couteau métal avec
précaution, il est extrêmement coupant.
Nettoyez le couteau à l’aide d’un chiffon
humide, après avoir retiré la protection
plastique. Par sécurité, tenez toujours le
couteau par sa partie plastique.
•Après nettoyage, replacez la capsule
protectrice sur le couteau. Ne mettez jamais
le bloc moteur ou le batteur sous l’eau.
Nettoyez-les avec un chiffon humide.
Mise en service
•Branchez votre appareil.
•Pulse (marche intermittente): Votre robot
fonctionne quand vous appuyez sur la
touche (a7), et s’arrête lorsque vous cessez
d’appuyer. Cette fonction vous permet un
meilleur contrôle du résultat de certaines de
vos préparations.
•Marche continue: Appuyez sur le bouton
a8 (haut).
•Arrêt: Appuyez sur le bouton a9 (bas).
•Sélecteur de vitesses (a6) : Sélectionnez la
vitesse indiquée ou faites-la varier en cours
de préparation.
•Utilisation de sortie basse (a3): le capot
de sortie haute (a1) doit être verrouillé.
•Utilisation de sortie haute: Lors de
l’utilisation du bol mixer (g) ou du minihachoir (f), assurez-vous que le couvercle
(b2) du bol (b) est déverrouillé.
•Ouverture du capot de sortie haute (a1):
assurez- vous que l’ensemble bol (b) est
déverrouillé avant d’ouvrir le capot de sortie
haute (a1).
MELANGER/ MIXER/ HACHER/ PETRIR de
grandes quantités
Selon la nature des aliments le bol (b) vous
permet de traiter jusqu’à 1500g.
ACCESSOIRES UTILISÉS:
. ensemble bol (b)
. couteaux (c) :
- couteau métal (c1) pour mixer ou hacher
(ôtez la protection plastique avant l’utilisation et remettez-la en place après chaque
utilisation)
- pétrin plastique (c2) pour pétrir ou mélanger
MONTAGE DES ACCESSOIRES
•Vérifiez la fermeture du capot de sortie
haute (a1).
•Positionnez le bol (b3) sur le bloc moteur
sortie basse (a3). Tournez-le à l’aide de sa
poignée jusqu’en position de verrouillage.
•Emboîtez le couteau métal (c1) ou le pétrin
plastique (c2) sur l’axe du grand bol.
•Mettez les aliments dans le bol.
•Placez le couvercle (b2) sur le bol, puis
tournez-le jusqu’en position de verrouillage
(clic audible). L’ergot du couvercle vient en
butée au fond de la fente de verrouillage
(a4).
MISE EN MARCHE ET CONSEILS
Mixer
•Réglez la vitesse (a6) sur la position max, et
appuyez sur le bouton (a8) pour mettre en
marche.
Vous pouvez mixer jusqu’à 0.9 litre de
potages, soupes, compotes en 20 s.
Hacher
•Réglez la vitesse (a6) sur la position max, et
appuyez sur le bouton (a8) pour mettre en
marche, ou pour un meilleur contrôle du
hachage, utilisez la touche pulse (a7).
En 15 à 30 s, vous pouvez hacher jusqu’à
600 g d’aliments:
- des produits durs: fromage, fruits secs
(noisettes), certains légumes (carottes,
céleri...)
- des produits tendres: certains légumes
(oignons, épinards...)
- des viandes crues ou cuites (désossées,
dénervées, et coupées en dés)
- des poissons crus ou cuits
23
Page 24

Pétrir/ mélanger
•Réglez la vitesse (a6) sur la position 4 puis,
appuyez sur le bouton (a8) pour mettre en
marche et augmenter progressivement la
vitesse jusqu’à la position max.
Vous pouvez:
- Pétrir jusqu’à 1.2 kg de pâte lourde (sablée,
brisée, à pain) en 40 s environ (*).
- Mélanger jusqu’à 0.9 litre de pâte à crêpes,
à gaufres, etc. en 1 min à 1 min 30.
- Mélanger 1.5 kg de pâte légère (biscuit,
quatre-quarts) en 1 min 30 à 3 min 30.
(*) : Si la réalisation de votre pâte nécessite
plus de 40 s de pétrissage, procédez en
plusieurs cycles de 40 s.
HOMOGENEISER/ MELANGER/ MIXER très
finement
Selon la nature des aliments le bol mixer (g)
vous permet de traiter jusqu’à 1.5L.
ACCESSOIRE UTILISÉ :
. bol mixer (g)
MONTAGE DES ACCESSOIRES
•Appuyez sur la touche d’ouverture (a5) et
relevez le capot de sortie haute (a1).
•Mettez les aliments dans le bol mixer (g3),
puis verrouillez le couvercle (g2) sur le bol.
L’ergot du couvercle vient en butée sur la
fente de verrouillage (g4) de la poignée du
bol.
•Placez le bol mixer (g) sur le bloc moteur
sortie haute (a2) (repère 1 aligné avec le
symbole ∆ du bloc moteur) et tournez-le à
l’aide de sa poignée jusqu’en position de
verrouillage (repère 2 aligné avec le symbole
∆ du bloc moteur).
MISE EN MARCHE ET CONSEILS
•Ne remplissez jamais le bol mixer avec
un liquide bouillant.
•Réglez la vitesse (a6) sur la position max et
appuyez sur le bouton (a8) pour mettre en
marche ou, pour un meilleur contrôle du
mixage, utilisez la touche Pulse (a7).
S’il y a absence du couvercle ou si celui-ci
est mal positionné, le bol mixer ne peut
être mis en place et le robot ne fonctionne pas. Dès que le bol mixer équipé de
son couvercle est verrouillé sur le bloc moteur,
on ne peut plus ôter le couvercle.
24
Vous pouvez ajouter des aliments par l’orifice
du bouchon doseur (g1) en cours de préparation.
Vous pouvez:
- préparer jusqu’à 1.5 litre de potage finement
mixé, de velouté, de crème, de compote, de
milk-shake, de cocktail
- mélanger toutes les pâtes fluides (crêpes,
beignets, clafoutis, far)
BATTRE/ EMULSIONNER/ FOUETTER
ACCESSOIRES UTILISÉS:
. ensemble bol (b)
. batteur (e)
MONTAGE DES ACCESSOIRES
•Vérifiez la fermeture du capot de sortie
haute (a1).
•Positionnez le bol (b3) sur le bloc moteur
sortie basse (a3). Tournez-le à l’aide de sa
poignée jusqu’en position de verrouillage.
•Emboîtez le batteur (e) sur l’axe du grand
bol.
•Mettez les aliments dans le bol.
•Placez le couvercle (b2) sur le bol, puis
tournez-le jusqu’en position de verrouillage
(clic audible). L’ergot du couvercle vient en
butée au fond de la fente de verrouillage
(a4).
MISE EN MARCHE ET CONSEILS
•Réglez la vitesse (a6) sur la position 3, puis
appuyez sur le bouton (a8) pour mettre en
marche, et augmenter progressivement la
vitesse jusqu’en position max.
•N’utilisez jamais ce batteur pour pétrir des
pâtes lourdes ou mélanger des pâtes légères.
Vous pouvez préparer: mayonnaise, aïoli,
sauces, blancs en neige, meringues (1 à 7
oeufs), crème fouettée, chantilly (jusqu’à 0.5
litre).
•Pour nettoyer votre fouet (e2) vous pouvez
le désassembler du boîtier d’entraînement
(e1).
•Ne mettez pas le boîtier d’entraînement (e1)
dans l’eau ni sous l’eau courante. Essuyez-le
avec une éponge humide.
Page 25

RAPER/ TRANCHER
Selon la nature des aliments le coupe-légumes
(d) vous permet de traiter jusqu’à 1 kg.
ACCESSOIRES UTILISÉS:
. ensemble bol (b)
. disques coupe-légume (A/D/C/H/G)
. tube d’entraînement (d1)
MONTAGE DES ACCESSOIRES
•Vérifiez la fermeture du capot de sortie
haute (a1).
•Positionnez le bol (b3) sur le bloc moteur
sortie basse (a3). Tournez-le à l’aide de sa
poignée jusqu’en position de verrouillage.
•Introduisez l’embout du tube (d1) dans le
trou du disque choisi (partie tranchante vers
le haut) et tournez jusqu’en position de
verrouillage.
•Placez l’ensemble (d1+disque) sur l’axe
central du grand bol.
•Placez le couvercle (b2) sur le bol, puis
tournez-le jusqu’en position de verrouillage
(clic audible). L’ergot du couvercle vient en
butée au fond de la fente de verrouillage
(a4).
MISE EN MARCHE ET CONSEILS
•Introduisez les aliments dans la cheminée et
guidez-les à l’aide du poussoir (b1).
•Réglez la vitesse (a6) sur la position 3, puis
appuyez sur le bouton (a8) pour mettre en
marche. Vous pouvez augmenter la vitesse
jusqu’en position max.
•Vous pouvez préparer avec le disque:
. tranché épais (H): pommes de terre,
oignons...
. tranché fin (D): concombres, betteraves,
pommes, carottes, choux...
. râpé épais (C): céleri rave, pommes de
terre...
. râpé fin (A): carottes râpées, fromage...
. râpé (G) : parmesan, noix de coco
HACHER très finement DES PETITES
QUANTITES
Selon la nature des aliments, le mini-hachoir
(f) vous permet de traiter jusqu’à 100 g.
ACCESSOIRE UTILISÉ :
. Mini-hachoir (f)
MONTAGE DES ACCESSOIRES
•Appuyez sur la touche d’ouverture (a5) et
relevez le capot de sortie haute (a1).
•Mettez les aliments dans le bol (f2), puis
verrouillez le couvercle (f1) sur le bol (f2).
•Posez le mini-hachoir (f) sur le bloc moteur
sortie haute (a2), et tournez jusqu’en
position de verrouillage.
MISE EN MARCHE ET CONSEILS
•Réglez la vitesse en position max (a6) et
appuyer sur le bouton (a8) pour mettre en
marche ou pour un meilleur contrôle du
hachage, utilisez la touche pulse (a7).
Vous pouvez :
- Hacher en quelques secondes : gousses d’ail,
fines herbes, persil, fruits secs, pain, biscottes pour chapelure, jambon. Quantité maximum fruits secs (noisettes, amandes, ...) :
80 g
- Préparer des purées pour bébé.
Ce mini-hachoir n’est pas prévu pour des
produits durs comme le café.
Nettoyage
•Débranchez l’appareil.
•Retirez le bol en déverrouillant dans le sens
inverse du montage.
•Pour un nettoyage plus facile, rincez
rapidement les accessoires après leur
utilisation.
•Lavez et essuyez les accessoires (ils passent
au lave-vaisselle sauf le boîtier d’entraînement du batteur).
• Versez de l’eau chaude additionnée de
quelques gouttes de savon liquide dans le
bol mixer. Fermez le couvercle. Donnez
quelques impulsions en appuyant sur la
touche pulse. Débranchez l’appareil. Rincez
le bol sous l’eau courante et laissez-le sécher.
•En cas de coloration de vos accessoires par
des aliments (carottes, oranges ...) frottez-les
avec un chiffon imbibé d’huile alimentaire,
puis procédez au nettoyage habituel.
•Ne mettez pas le bloc moteur (a) dans l’eau
ni sous l’eau courante. Essuyez-le avec une
éponge humide.
25
Page 26

Rangement
Votre robot est muni :
- d’un enrouleur placé sous le bloc moteur,
pour ranger et régler la longueur du câble
d’alimentation comme vous le désirez.
Si votre appareil ne fonctionne
pas, que faire ?
Vérifiez :
- le branchement
- que les accessoires sont correctement
verrouillés sur le bloc moteur
- que les couvercles sont correctement
verrouillés
- avec l’utilisation de l’ensemble bol, que le
capot de sortie haute (a1) est bien fermé
Si votre appareil ne fonctionne toujours
pas ? Adressez-vous à un centre service agréé
KRUPS (voir liste dans le livret «KRUPS
Service»).
Accessoires
Vous pouvez acheter auprès de votre revendeur habituel ou d’un Centre Service agréé
KRUPS, les lames référencées ci-dessous.
5 933 005 : Râpé noix de coco, parmesan
(Reibekuchen)
5 933 006 : Coupe-frites
5 966 866 : Broyeur
5 971 807 : Presse-agrumes
Recettes
MILKSHAKE AU CAFÉ OU CAFÉ FRAPPÉ
1/2 l de lait écrémé froid
6 cuillères à café de café soluble
6 cuillères à café de sucre
6 glaçons
•Mettez tous les ingrédients dans le blender.
Réglez le robot à la vitesse maximum. Mixez
25 s.
26
GASPACHO
Pour 4 à 6 personnes
1/2 concombre (280 g)
2 tomates (400 g)
1/2 poivron vert
1 petit oignon doux
2 gousses d’ail
20 g de mie de pain rassis
1 cuil. à café de vinaigre de vin
quelques gouttes de tabasco (facultatif)
2 cuil. à soupe d’huile d’olive
1/2 citron
Sel et poivre
•Epluchez le concombre, pelez et épépinez
les tomates, épluchez le poivron, l’oignon et
les gousses d’ail. Coupez ces ingrédients en
morceaux et mettez-les dans un saladier,
ajoutez 4 dl d’eau très froide, le vinaigre, le
tabasco, du sel et du poivre.
•Dans le bol mixer hachez la mie de pain 10
sec. à la vitesse max, puis versez le contenu
du saladier et mixez pour obtenir une
préparation très lisse (50 sec.). Versez-la
dans une soupière, ajoutez l’huile d’olive et
1 cuillerée à soupe de jus de citron. Mélangez, vérifiez l’assaisonnement et mettez au
réfrigérateur.
CONCOMBRE AU YAOURT
pour 4 personnes
1 concombre
1 cuil. à café de vinaigre
1 à 2 cuil. à soupe d’huile d’olive
125 g de yaourt
Menthe fraîche ciselée
Sel et poivre
•Installez la lame tranché fin disque D. Placez
le concombre épluché (Eliminez la partie
centrale pépineuse avec le couteau économe
en effectuant un mouvement de rotation
autour des graines) debout dans la cheminée
et coupez-le en rondelles à la vitesse max.
Assaisonnez-le de la vinaigrette au yaourt.
Parsemez de fines herbes.
Pour une entrée de fête remplacez le yaourt
par de la crème, la menthe par de l’aneth et
servez avec du poisson fumé (saumon, flétan)
mariné au citron et à l’aneth.
Page 27

Assiette de crudités :
•composez un assortiment suivant la saison et
assaisonnez de vinaigrette ou de fromage
blanc aux herbes.
Salade grecque :
•concombre, tomates, oignon et poivron
tranchés avec la lame tranché épais,
assaisonnés de vinaigrette à l’huile d’olive et
accompagnés de féta (fromage de brebis
frais) et d’olives.
SALADE DE CÉLERI AUX POMMES ET AUX NOIX
pour 4 personnes
1/2 céleri-branche (200 g épluchés)
2 pommes granny smith
1/2 citron
50 g de cerneaux de noix
1 jaune d’œuf
1 cuil. à café de moutarde blanche
1 dl d’huile de tournesol
2 brins de persil
Sel et poivre
•Pelez les pommes et coupez-les en huit.
Equipez le robot du disque H sélectionnez la
vitesse 6. Mettez les morceaux de pommes
debout dans la cheminée du couvercle et
tranchez-les. Arrosez aussitôt les lamelles de
jus de citron pour éviter qu’elles ne noircissent.
•Epluchez le céleri et coupez les branches en
tronçons. Mettez-les debout dans la
cheminée du couvercle et tranchez-les.
•Préparez une mayonnaise: mettez le jaune
d’œuf, la moutarde, 1 cuillerée à soupe
d’huile, du sel et du poivre dans le bol muni
du disque émulsionneur. Mélangez à la
vitesse 4 puis quand la mayonnaise a
commencé a prendre, ajoutez le reste d’huile
peu à peu en augmentant à la vitesse max.
A la fin incorporez 2 cuillerées à soupe
d’eau.
•Versez la préparation dans un saladier
ajoutez le céleri les pommes et les noix.
Mélangez délicatement et servez très frais.
STEAK TARTARE
pour 4 personnes
600 g de steak bien maigre
4 œufs très frais
4 échalotes ou petits oignons blancs
4 cuil. à soupe de câpres
1 petit bouquet de persil
Sur la table:
moutarde blanche, ketchup, Worcestershire
sauce, tabasco, sel, poivre, huile de tournesol
ou arachide
•Juste avant de servir coupez la viande en
morceaux, mettez ceux-ci dans le bol muni
du couteau métal, réglez la vitesse max et
hachez la viande pendant 15 à 20 secondes,
puis terminez par impulsions.
•Formez ensuite 4 boules aplaties que vous
déposez au centre de chaque assiette.
Hachez les échalotes, puis le persil. Sur
chaque boule de viande déposez une demicoquille d’œuf avec un jaune d’œuf cru.
•Autour de la viande alternez des petits tas
de persil, échalotes et câpres. Chaque
convive fera l’assaisonnement de son choix
avec les ingrédients présentés sur la table.
•Accompagnez de frites ou de pommes de
terre sautées, d’une salade verte, salade de
lentilles, de haricots blancs ou salade de
pommes de terre.
STEAKS HACHÉS À LA MOUTARDE
pour 4 personnes
2 échalotes
4 brins de persil
600 g de macreuse (ou steak)
3 cuil. à soupe de moutarde blanche
1 œuf
Sel et poivre
1 cuil. à soupe de farine
•Pelez les échalotes, lavez et séchez le persil.
Mettez-les dans le bol du robot muni du
couteau métal et hachez-les à la vitesse max.
Ajoutez la viande coupée en morceaux et
hachez-la à la même vitesse pendant 15 à
20 secondes. Incorporez la moutarde, l’œuf,
du sel et du poivre, mélangez par impulsions. Façonnez 4 steaks et farinez-les
légèrement. Faites-les cuire à la poêle dans
un mélange beurre et huile.
27
Page 28

Au paprika : à 600 g de viande hachée
ajoutez 1 bel oignon haché, revenu au beurre
avec 1 cuil. à soupe de paprika et 1 cuil. à
soupe de persil haché.
. Ajoutez 1 œuf, marjolaine, sel et poivre.
À la marocaine : mélangez 600 g de viande
hachée (bœuf ou agneau) avec: 1 petit
oignon, 1 gousse d’ail, 20 feuilles de coriandre fraîche, 8 feuilles de menthe (hachées); 1
pincée de piment, 1 cuil. à café de ras-elhanout, 1 cuil. à café de cumin pilé, sel, poivre
et 1 œuf.
. Formez des boulettes que vous alignez sur
des brochettes, faites cuire au gril ou au
barbecue.
À l’américaine : faites cuire un steak haché à
la poêle. Faites chauffer un petit pain rond 5
minutes au four. Puis enduisez les deux
morceaux, de mayonnaise. Sur le talon mettez
dans cet ordre: laitue ciselée, fromage,
cornichons doux hachés, oignons hachés,
ketchup, steak, fromage, cornichons et
rondelles de tomate. Refermez le sandwich et
repassez au four 2 minutes.
PAIN BLANC
pour 1 pain ou 6 petits pains
250 g de farine type 55
1/2 cuil. à café de sel
1 sachet de levure de boulangerie sèche, type
Briochin
160 g d’eau tiède (32°C)
•Dans le bol muni du pétrin plastique, mettez
la farine, la levure et le sel (la levure ne doit
jamais être en contact avec le sel). Réglez la
vitesse sur 3 et donnez 4 impulsions puis en
faisant fonctionner l’appareil, versez l’eau
par la cheminée et pétrissez 20 secondes.
Augmentez la vitesse à max et travaillez
encore 1 minute 15 jusqu’à ce que la pâte
soit lisse et élastique. La pâte forme une
boule rapidement; en cours de pétrissage
arrêtez l’appareil 2 fois et aplatissez la boule
avec la main; puis remettez en marche.
•Laissez la pâte reposer 15 minutes sur un
plan de travail fariné, puis aplatissez-la
rapidement à la main et façonnez-la dans la
forme choisie: 1 pain ou 6 petits pains.
Rangez-les sur une tôle farinée, couvrez d’un
linge propre et laissez lever 40 à 50 minutes
dans un endroit tiède (22 à 25°C). La pâte
28
doit doubler de volume, pas plus. Préchauffez le four à 240°C (Th 8). Pratiquez des
incisions sur le pain avec une lame de rasoir,
puis faites-le cuire 25 à 30 minutes (20 mn
pour les petits pains). Pour faciliter la
formation de la croûte, mettez un verre
d’eau dans le four.
•Pour faire des petits pains, coupez la pâte en
morceaux de la taille d’un gros œuf,
aplatissez chaque pâton. Rabattez les 4
côtés de la pâte vers le milieu, comme une
enveloppe. Retournez les boules, faites-les
tourner sous vos doigts pour leur donner
une forme régulière.
•A la fin du pétrissage incorporez à la pâte
des cerneaux de noix grossièrement hachés,
ou des olives concassées. Avant la cuisson
badigeonnez d’eau les petits pains et
parsemez-les de graines de pavot ou de
cumin.
CAKE AUX FRUITS
pour 6 à 8 personnes
90 g de raisins blonds
50 g de raisins de Corinthe
50 g de citron, orange
et cédrat confits
125 g de beurre ramolli, 100 g de sucre
3 œufs, 1 sachet de sucre vanillé
250 g de farine tamisée, 1 sachet de levure
chimique,
5 cuil. à soupe de lait
•Préchauffez le four à 180°C (Th. 6). Beurrez
et farinez un moule à cake de 24 cm x 10
cm x 7 cm. Mettez les fruits confits dans un
bol avec les raisins de Corinthe, les raisins
blonds et l cuillerée à soupe de farine,
mélangez.
•Dans le bol muni du pétrin (à défaut,
couteau métal), mettez le beurre et les
sucres, mixez 20 sec. à la vitesse 3. Puis en
laissant l’appareil en marche ajoutez par la
cheminée les œufs un à un, puis le lait.
Arrétez l’appareil et versez la farine avec la
levure. Remettez en marche à la vitesse 2
pour obtenir une pâte homogéne.
Page 29

•Incorporez les fruits en mélangeant d’abord
par impulsions puis 10 sec. à la vitesse 5 par
impulsions seulement. Versez la pâte dans le
moule et faites cuire le gâteau pendant 1 h
15 mn. Démoulez sur une grille et laissez
refroidir.
Vous pouvez faire tremper les raisins dans un
peu de rhum.
GUACAMOLE
pour 4 à 6 personnes
1 petit oignon, 1 tomate
1 petit piment fort
2 avocats mûrs
1 cuil. à soupe de jus de citron
2 branches de coriandre fraîche
(25 feuilles)
Sel et poivre
•Epluchez l’oignon et le piment, coupez-les
en morceaux. Lavez et effeuillez la coriandre.
Mettez le tout dans le bol du robot muni du
couteau métal. Sélectionnez la vitesse max
et hachez 30 sec.
•Eliminez la peau et le noyau des avocats.
Pelez et épépinez la tomate, coupez-la en
morceaux que vous ajoutez au contenu du
bol, avec la chair des avocats et le jus de
citron. Salez, poivrez et hachez 30 sec.
Arrétez l’appareil à mi-temps, et avec la
spatule en plastique ramenez la préparation
vers le centre.
Le guacamole s’accompagne traditionnellement de galettes de maïs que vous trouverez
dans les épiceries fines. Vous pouvez le servir
aussi avec des toasts ou des légumes crus.
29
Page 30

Italiano
Descrizione
a Blocco motore
a1 coperchio uscita alta
a2 uscita alta
a3 uscita bassa
a4 scanalatura di chiusura del coperchio
a5 tasto di apertura del coperchio
a6 selettore di velocità
a7 tasto ”Pulse”
a8 tasto ”Avvio”
a9 tasto ”Arresto”
b Gruppo contenitore
b1 pressatore-dosatore
b2 coperchio con imboccatura
b3 contenitore
SECONDO IL MODELLO
c Accessori
c1 coltello universale
c2 Gancio per impastare
d Dischi
A grattugiato fine / D fette fini
C grattugiato spesso / H fette spesse
G grattugiato Parmigiano, noce di
cocco
d1 dispositivo di trascinamento
e Sbattitore
e1 trascinatore
e2 frusta
f Tritatutto
f1 coperchio
f2 contenitore
g Bicchiere frullatore
g1 tappo dosatore
g2 coperchio del bicchiere
g3 bicchiere
g4 scanalatura di chiusura del coperchio
h Spatola
Consigli di sicurezza
•Leggete attentamente le istruzioni per
l’uso prima di utilizzare l’apparecchio.
30
Un utilizzo sbagliato dell’apparecchio
annulla la responsabilità di KRUPS.
•Tenete l’apparecchio sempre fuori della
portata dei bambini.
•AssicurateVi che la tensione indicata sulla
targa del Vostro apparecchio corrisponda a
quella del Vostro impianto elettrico.
Qualsiasi errore di collegamento annulla
la garanzia.
•Il coltello ed i dischi sono affilatissimi.
Manipolateli con precauzione.
•Estraete sempre il coltello del contenitore
prima di svuotarlo
•Non toccate mai le parte in movimento, sia
con le mani, sia con qualsiasi oggetto.
•Non togliete il coperchio prima dell’arresto
completo delle parti in rotazione.
•Non utilizzate mai le mani ne posate o
qualsiasi oggetto per spingere gli alimenti
nell’imboccatura. Utilizzate soltanto
l’apposito pressatore.
•Non avviate mai l’apparecchio a vuoto.
•Ogni intervento sull’apparecchio, eccetto la
pulizia o il mantenimento quotidiano, deve
essere effettuato soltanto da un Centro
Assistenza KRUPS.
•Se il cavo di alimentazione o la spina sono
danneggiati, non utilizzate il Vostro
apparecchio. Per evitare qualsiasi pericolo,
fatteli sostituire soltanto ed unicamente
presso un centro Assistenza autorizzato
KRUPS (vedere elenco nell' opuscolo «KRUPS
Service»).
•Non lasciate pendere il cavo a portata dei
bambini.
•Non immergete mai il blocco motore, il cavo
di alimentazione o la spina nell’acqua o in
qualsiasi liquido.
•Non mettete mai il cavo di alimentazione a
contatto o vicino alle parti riscaldate
dell’apparecchio, nè a qualsiasi fonte di
calore o angoli aguzzi.
•Per la Vostra sicurezza, non utilizzate
accessori o ricambi altri che quelli KRUPS,
specialmente ideati per il Vostro
apparecchio.
•Scollegate sempre il Vostro apparecchio
dopo ogni utilizzo o prima di ogni pulizia
•Il Vostro apparecchio deve essere utilizzato
soltanto per un uso domestico.
Page 31

Al primo utilizzo
Funzioni
• Posizionare il blocco motore su una superficie piana, pulita ed asciutta.
•Pulite tutti gli accessori in acqua calda con
detergente per togliere ogni eventuale
residuo di fabbricazione.
•Manipolate il coltello universale con
precauzione; è affilatissimo. Togliete la
protezione dal coltello, mantenendolo da
una mano dalla parte in plastica, e pulite con
precauzione la lama utilizzando una
spazzala. Rimettete la protezione di plastica.
Non immergete mai il blocco motore
nell’acqua – basta pulirlo con un panno
umido.
Per utilizzare l’apparecchio
•Collegate l’apparecchio.
•Tasto Pulse (funzionamento intermit-
tente): Premendo il tasto Pulse (a7),
l’apparecchio si avvia per tanto tempo
quanto il tasto sta premuto. Per consentirVi
di controllare il risultato di certe
preparazioni, premete con impulsi successivi
il tasto Pulse.
•Funzionamento in continuo: Premete il
tasto alto (a8).
•Arresto : Premete il tasto basso (a9).
•Selettore di velocità (a6): Per selezionare
la velocità corrispondente alla funzione
utilizzata o per cambiare di velocità in corso
di funzionamento.
•Utilizzare l’uscita bassa (a3). Il coperchio
dell’uscita alta (a1) deve essere
correttamente chiuso
•Utilizzare l’uscita alta: Se, mentre
utilizzate il bicchiere frullatore (g) o il
tritatutto (f), il contenitore (b) non è stato
scollegato dall’uscita bassa, il suo coperchio
(b2) non deve essere chiuso.
•Aprire il coperchio dell’uscita alta (a1):
AssicurateVi che il contenitore (b) non sia
chiuso prima di aprire il coperchio dell’uscita
alta (a1).
MESCOLARE, TRITARE ED IMPASTARE
GRANDE QUANTITÀ
Secondo il tipo dell’alimento, potete lavorare
fino ad 1,5 kg di preparato nel contenitore
(b).
ACCESSORI:
. contenitore (b)
. accessori (c) :
- coltello universale (c1) per mescolare e tritare
(togliete la protezione della lama prima di
utilizzare il coltello e rimettetela alla fine
dell’operazione)
- gancio in plastica (c2) per impastare e
mescolare
MONTAGGIO DEGLI ACCESSORI
•AssicurateVi che il coperchio dell’uscita alta
(a1) sia correttamente chiuso.
•Posizionate il contenitore (b3) sull’uscita
bassa del blocco motore e giratelo con
l’impugnatura fino alla posizione di
bloccaggio.
•Premete il coltello universale (c1) o il gancio
per impastare (c2) sull’asta del contenitore.
•Mettete gli ingredienti nel contenitore.
•Posizionate il coperchio (b2) sul contenitore
e giratelo fino alla posizione di bloccaggio
(clic udibile). L’apparecchio può essere
avviato soltanto se il coperchio è stato
correttamente agganciato nella scanalatura
(a4).
CONSIGLI DI UTILIZZO
Mescolare
•Regolate il selettore di velocità (a6) sulla
massima posizione quindi avviate
l’apparecchio premendo il tasto (a8).
Potete mescolare fino a 0,9 l di passati,
minestre o frutta cotta in circa 20 secondi.
Tritare
•Per avviare l’apparecchio, potete regolare il
selettore di velocità (a6) sulla massima
posizione e premere il tasto (a8) o utilizzare il
tasto Pulse (a7) per un maggior controllo del
risultato.
Potete tritare fino a 600g di preparato tra 15
o 30 secondi.
31
Page 32

- alimenti duri come formaggi, frutta secca ed
alcuni legumi come carote o sedano
- alimenti più teneri come frutta, verdura
come cipolla o spinaci
- carne cruda o cotta senza ossa o tendini,
tagliata in dadi
- pesce crudo o cotto
Impastare e mescolare
•Per mettere l’apparecchio in funzione,
regolate il selettore di velocità (a6) sul livello
4 ed avviate l’apparecchio premendo il tasto
(a8). Aumentate progressivamente la velocità
durante la lavorazione. Fermate
l’apparecchio quando la pasta comincia ad
aggregarsi.
Potete:
- impastare fino a 1,2 kg di impasto pesante
(pasta per il pane) in circa 40 s. (*)
- mescolare fino a 1,9 l di preparato per
pancakes o cialde da 1 minuto a 1 minuto e
mezzo
- Preparare 1,5 kg di impasto leggero (tipo
Madeira) da 1 minuto e mezzo a 3 minuti e
mezzo
(*) : Se ci vuole più di 40 s. per la
preparazione dell’impasto, lavoratelo in
successivi periodi di 40 s. ciascuno.
OMOGENEIZZARE, MESCOLARE E TRITARE
MOLTO FINE
A secondo dell’alimento, potete lavorare fino
a 1,5 litro
ACCESSORI:
. Bicchiere frullatore (g)
MONTAGGIO DEGLI ACCESSORI
•Premete il tasto di apertura (a5) del
coperchio dell’uscita alta (a1) ed aprite il
coperchio.
•Mettete gli ingredienti nel bicchiere (g3) e
chiudete il coperchio del bicchiere frullatore
(g2). Il nasello del coperchio viene
posizionato sulla scanalatura di chiusura
(g4).
•Posizionate il bicchiere frullatore chiuso
sull’uscita alta (a2) del blocco motore; il
contrassegno 1 deve corrispondere al
contrassegno ∆ del blocco motore.
•Girate quindi il bicchiere con l’impugnatura
in modo che il contrassegno 2 corrisponda al
contrassegno ∆ del blocco motore.
CONSIGLI DI UTILIZZO
•Non mettete mai liquidi bollenti nel
bicchiere frullatore.
•Potete sia utilizzare il selettore di velocità
(a6) in posizione massimale e premere poi il
tasto (a8), sia utilizzare il tasto Pulse (a7) che
vi consente un maggior controllo del
risultato.
Se il coperchio non c’é o é mal
posizionato, il vaso frullatore non può
essere inserito e il robot non entra in
funzione. Quando il vaso frullatore dotato
del suo coperchio é agganciato al blocco
motore, il coperchio non può essere tolto.
Ma potrete aggiungere altri ingredienti
nell’imboccatura del coperchio estraendo
prima il tappo dosatore.
Potete:
- Mescolare fino a 1,5 l di minestra, frutta
cotta, milk shake o cocktail
- Mescolare gli impasti per crepe, pancake,
ecc.
SBATTERE, EMULSIONARE ED IMPASTARE
ACCESSORI:
. contenitore (b)
. sbattitore (e)
MONTAGGIO DEGLI ACCESSORI
•AssicurateVi che il coperchio dell’uscita alta
sia correttamente chiuso (a1).
•Posizionate il contenitore (b3) sull’uscita
bassa del blocco motore e girate il
contenitore con l’impugnatura fino
all’aggancio completo.
•Posizionate lo sbattitore (e) sull’asta del
contenitore (b).
•Mettete gli ingredienti nel contenitore
•Mettete il coperchio (b2) sul contenitore e
agganciatelo fino al clic udibile.
L’apparecchio non si avvierà se il coperchio
non è correttamente agganciato nella
scanalatura (a4).
32
Page 33

CONSIGLI DI UTILIZZO
•Avviate l’apparecchio regolando il selettore
di velocità (a6) sulla posizione 3 e premendo
il tasto (a8). Aumentate la velocità durante la
lavorazione.
•Non utilizzate mai lo sbattitore per impastare
impasti pesanti o per mescolare impasti
leggeri.
Potete preparare maionese e salse, montare il
bianco delle uova (da 1 a 7 uova), meringhe,
preparare fino a mezzo litro di panna
montata.
GRATTUGIARE E AFFETTARE
A secondo dell’alimento, potete lavorare fino
ad 1 kg di preparato.
ACCESSORI:
. contenitore (b)
. dischi (A/D/C/H/G)
. dispositivo di trascinamento (d1)
MONTAGGIO DEGLI ACCESSORI
•AssicurateVi che il coperchio dell’uscita alta
(a1) sia chiuso.
•Mettete il contenitore (b3) sull’uscita bassa
del blocco motore e giratelo con
l’impugnatura fino all’aggancio.
•Premete, di sotto, il dispositivo di
trascinamento (d1) sul disco desiderato –
con il lato da utilizzare, in alto – e giratelo
fino all’aggancio.
•Posizionate il dispositivo di trascinamento ed
il suo disco sull’asta del contenitore.
•Posizionate il coperchio sul contenitore e
giratelo fino all’aggancio (clic udibile).
L’apparecchio non si avvierà se il coperchio
non è correttamente agganciato nella
scanalatura di sicurezza (a4).
CONSIGLI DI UTILIZZO
•Mettete gli ingredienti nel contenitore
tramite l’imboccatura (b2) del coperchio e
premete leggermente con il pressatoredosatore (b1).
•Avviate l’apparecchio posizionando il
selettore di velocità (a6) sul livello 3 e
premendo il tasto (a8). Potete aumentare la
velocità al suo livello massimo.
•Utilizzate i dischi come segue:
. Fette spesse (H) : patate, cipolle
. Fette fini (D): cetrioli, barbabietole, mele,
carote, cavoli, ecc.
. Grattugiato spesso (C) : sedano, patate, ecc.
. Grattugiato fine (A) : carote, formaggio
. Grattugiare (G) : Parmigiano, noce di cocco
TRITARE MOLTO FINE PICCOLE QUANTITÀ
Secondo l’alimento, potete tritare finemente
fino a 100 g di preparato.
ACCESSORIO UTILIZZATO:
. Tritatutto (f)
MONTAGGIO DELL’ACCESSORIO
•Premete il tasto di apertura (a5) ed alzate il
coperchio dell’uscita alta (a1).
•Mettete gli alimenti nel contenitore del
tritatutto (f2) e chiudete il coperchio del
tritatutto (f1).
•Posizionate il tritatutto (f) sull’uscita alta (a2)
del blocco motore e girate fino alla posizione
di chiusura.
CONSIGLI DI UTILIZZO
•Per avviare l’apparecchio, potete sia regolare
il selettore di velocità (a6) sulla massima
posizione e poi premere il tasto (a8), sia
utilizzare il tasto Pulse (a7) per un miglior
controllo del risultato.
Potete:
- tritare aglio, prezzemolo, frutta secca, noci,
pane, fette biscottate, o prosciutto in
qualche secondo. La quantità massima di
mandole, noci o frutta secca lavorabile è di
80 g
- preparare passati e purè per bimbi fino a
100 g
Il tritatutto non è adatto per gli alimenti duri
come chicchi di caffè.
Pulizia
•Scollegate l’apparecchio.
•Estraete il contenitore, girandolo nel senso
opposto al montaggio.
•Per una pulizia veloce, sciacquate sotto
acqua corrente gli accessori appena
utilizzati.
33
Page 34

•Lavate e asciugate con cura gli accessori, i
quali sono adatti al lavaggio in lavastoviglie.
Non immergete mai il trascinatore dello
sbattitore nell’acqua.
• Versate acqua calda ed alcune gocce di
sapone liquido nel bicchiere frullatore.
Chiudete il coperchio. Premete con impulsi
successivi il tasto Pulse. Scollegate
l’apparecchio. Sciacquate il bicchiere con
acqua corrente e lasciatelo asciugare.
•Se gli accessori si scolorano al contatto di
certi alimenti, come le carote o le arance,
basta strofinarli con un panno umidificato
con olio di cucina, prima di pulirlo
normalmente.
•Non immergete mai il blocco motore
nell’acqua e non passatelo mai sotto l’acqua
corrente. Basto pulirlo con un panno umido.
Sistemazione
Il Vostro apparecchio è dotato di:
- un avvolgicavo sotto la base dell’apparecchio
e per sistemare il cavo dopo l’utilizzo o per
aggiustarne la lunghezza.
Se il Vostro apparecchio non
funziona
AssicurateVi che:
- l’apparecchio sia correttamente collegato
- gli accessori siano correttamente agganciati
al blocco motore
- i coperchi siano correttamente chiusi
- il coperchio dell’uscita alta sia correttamente
chiuso quando utilizzate il gruppo
contenitore
Se il Vostro apparecchio persiste nel non
funzionare, contattate un Centro Assistenza
KRUPS (vedere l’elenco nell’opuscolo KRUPS
Service).
Accessori speciali
I seguenti accessori possono essere acquistati
da un venditore specializzato oppure dal
Centro Assistenza KRUPS.
Articolo 5 933 005: grattugia per Parmigiano
e noci di cocco
Articolo 5 933 006: accessorio taglia patate
per patatine e patatine fritte
34
Articolo 5 966 866 : accessorio per macinare
Articolo 5 971 807: Spremiagrumi
Ricette
CAFFÈ FRAPPÉ
1/2 litro di late scremato
6 cucchiaini di caffè istantaneo
6 cucchiaini di zucchero
6 cubetti di ghiaccio
•Mettete tutti gli ingredienti nel bicchiere
frullatore. Selezionate la velocità massima.
Mescolate per circa 25 secondi.
GAZPACHO (MINESTRA FREDDA DI VERDURA)
Per 4 a 6 persone
1/2 cetriolo (280 g)
2 pomodori (400 g)
1/2 peperone verde
1 piccola cipolla
2 spicchi d’aglio
20 g di pane secco
1 cucchiaino di aceto di vino
qualche goccio di salsa Tabasco (secondo il
Vostro gusto)
2 cucchiai di olio vergine
1/2 limone
sale e pepe
•Lavate il mezzo peperone verde, sbucciate il
cetriolo, la cipolla e gli spicchi d’aglio,
spellate i pomodori e privateli dei semi.
Tagliate il tutto in pezzi, e mettetelo in un
piatto. Aggiungete quindi 400 ml di acqua
ghiacciata, aceto, Tabasco, sale e pepe.
•Sminuzzate il pane nel bicchiere frullatore
utilizzando la velocità massima per circa 10
secondi. Aggiungete quindi il preparato che
avete posto nel piatto, e mescolate fino ad
ottenere un preparato omogeneo (50
secondi). Versatelo allora in una zuppiera,
aggiungete l’olio vergine ed un cucchiaino di
succo di limone, mescolate con cura, condite
secondo il Vostro gusto e conservatelo in un
posto fresco.
•Potete preparare piattini di cetrioli,
pomodori, cipolle, peperoni verdi, erbe
sminuzzate e cubetti di pane da servire con
la minestra.
Page 35

•Si toglie più facilmente la pelle dei pomodori
se sono stati immersi per prima nell’acqua
bollente per circa 20 secondi.
CETRIOLO CON YOGURT
Per 4 persone
1 cetriolo
1 cucchiaino di aceto
1 a 2 cucchiaini di olio vergine
125 g di yogurt
menta fresca sminuzzata poco prima
sale e pepe
•Inserite il disco fette fini. Sbucciate il cetriolo
e togliete il centro più tenero fatto dai semi
utilizzando un coltello. Mettete il cetriolo alla
verticale nell’imboccatura e affettatelo con il
livello max. Incorporatelo in una vinaigrette
allo yogurt, condite e spargete sopra le
erbette.
•Per le occasioni speciali, sostituite lo yogurt
con panna e la menta con aneto. Servite con
pesce affumicato (per esempio salmone)
marinato in un preparato di succo di limone
e d’aneto.
Insalata di verdura cruda
•Preparate un misto di verdura di stagione ed
aggiungete sia una salsa tipo vinaigrette sia
un formaggio fresco ed erbette.
Insalata greca
•Affettate cetrioli, pomodori, cipolle,
peperoni rossi o verdi utilizzando il disco
fette spesse. Condite con una salsa tipo
vinaigrette preparata con olio vergine, servite
con feta fresca (formaggio a base di latte di
pecora) ed olive.
INSALATA WALDORF
Per 4 persone
1/2 gambo di sedano (200 g una volta lavato)
2 mele Granny Smith
1/2 limone
50 g di noci
1 tuorlo
1 cucchiaino di senape
100 ml di olio di girasole
2 mazzetti di prezzemolo tritato
sale e pepe
•Sbucciate le mele e tagliate ciascuna in 8.
Inserite il disco fette spesse. Mettete i pezzi
di mele alla verticale nell’imboccatura e
affettategli alla velocità 6. Spruzzate subito
le mele con succo di limone in modo di
evitare la loro decolorazione.
•Lavate il sedano, tagliatelo in pezzi di
lunghezza facile da lavorare, mettetegli alla
verticale nell’imboccatura ed affettategli.
•Preparare una maionese come segue:
Inserite il disco emulsionatore
nell’apparecchio; mettete il tuorlo, 1
cucchiaino di senape, 1 cucchiaio di olio di
girasole, sale e pepe. Mescolate alla velocità
4. Quando il preparato diventa liscio ed
omogeneo, aggiungete poco a poco il resto
dell’olio nell’imboccatura, aumentando
progressivamente la velocità fino a
raggiungere la velocità più alta. Aggiungete
quindi 2 cucchiaini d’acqua.
•Mettete la maionese un una scodella,
aggiungete il sedano, le mele, il prezzemolo
tritato e le noci. Mescolate quindi con
precauzione e servite molto fresco.
FILETTO ALLA TARTARA
Per 4 persone
600 g di filetto
4 uova fresche
4 scalogne o piccole cipolle
4 cucchiaini di capperi
1 piccolo mazzetto di prezzemolo
senape, ketchup, Worcester Sauce, sale, pepe,
e Tabasco per condire a tavola
•Appena prima di servire, tagliate la carne a
pezzi, mettetegli nel contenitore, dotato del
coltello, e tritate alla velocità più alta per
circa 15 o 20 secondi. Per il termine
dell’operazione, date qualche impulso con il
tasto Pulse.
•Dividete la carne in 4 fini hamburgers e
posizionate ciascuno al centro di un piatto.
Mettete quindi su ogni hamburger un mezzo
guscio contenendo un tuorlo.
•Tritate per prima le scalogne e poi il
prezzemolo. Disponete le scalogne, il
prezzemolo ed i capperi in mazzetti attorno
agli hamburgers. Ognuno potrà condire il
suo filetto con i condimenti preparati e
disposti sulla tavola.
35
Page 36

Contorno: Patatine fritte, patate fritte,
insalata, insalata di lenticchie, patate ed
insalata con maionese, ecc.
CROCCHETTE CON SENAPE
Per 4 persone
2 scalogne
4 mazzetti di prezzemolo
600 g di filetto
3 cucchiai di senape
1 uovo
sale e pepe
1 cucchiaio di farina
•Pulite le scalogne, lavate e asciugate il
prezzemolo. Mettetegli nel contenitore
dotato del coltello, e tritate alla velocità più
alta. Aggiungete la carne tagliata in cubetti
e tritate alla stessa velocità per oltre 15 o 20
secondi. Aggiungete quindi il senape, uovo,
sale pepe e mescolate con intermittenza fino
ad ottenere un preparato fine. Dividete il
preparato in 4 crocchette, cospargeteli
leggermente di farina e friggeteli sul
entrambi i lati con un po’ d’olio.
Variazioni:
Crocchette con paprika :
•Mescolate 600 g di carne macinata con una
cipolla tritata leggermente fritta, un
cucchiaio di paprika, 1 cucchiaio di
prezzemolo tritato, 1 uovo, origano, sale e
pepe.
Frittate «Marocco» :
•Mescolate 600 g di manzo o di montone
tritato, una piccola cipolla, 1 spicchio
d’aglio, 20 foglie di coriandolo fresco, 8
foglie di menta, 1 cucchiaio di ras-al-hanout,
1 cucchiaio di polvere di cumino, sale, pepe
ed 1 uovo. Dividete il preparato in polpette
da cuocere al grill o sul barbecue.
Hamburger :
•Fatte friggere una crocchetta. Riscaldate al
forno un panino rotondo per circa 5 minuti,
tagliatelo ed apritelo in due. Spalmate
maionese su le due metà. Sulla metà
inferiore disponete un foglio di lattuga,
formaggio, cetrioli o cetriolini, cipolle tritate,
ketchup, la crocchetta appena preparata,
formaggio, cetrioli e fette di pomodori.
Richiudete quindi con l’altra metà del panino
e riscaldate l’insieme per altri 2 minuti.
36
PANE BIANCO
Per 2 pagnotte o 12 panini
500 g farina
1 cucchiaino di sale
20 g di lievito
290-300 ml d’acqua tiepida (32°C)
•Dissolvete il lievito in 3 cucchiaini di acqua
tiepida. Inserite il gancio per impastare,
mettete la farina, il lievito ed il sale (non
mettete mai a contatto il sale con il lievito!)
nel contenitore. Impastare in 6 volte
utilizzando la funzione Pulse alla velocità 3,
quindi aggiungete il resto dell’acqua
nell’imboccatura mentre l’apparecchio sta
lavorando e lasciatelo impastare per altri 20
secondi. Aumentate la velocità al livello più
alto, ed impastate per circa 1 minuto, fino
ad ottenere un impasto liscio e facile da
lavorare. Siccome l’impasto forma
rapidamente una palla, dovreste fermare
l’apparecchio due volte durante la
lavorazione per schiacciare l’impasto con la
mano prima di riavviare l’apparecchio.
•Lasciate riposare l’impasto per 15 minuti su
un piano di lavoro cosparso prima di farina,
quindi schiacciatelo velocemente a mano e
formate, come desiderato, le 2 pagnotte o i
12 panini. Disponeteli su una teglia cosparsa
di farina e copriteli con un panno pulito.
Lasciateli lievitare in un posto caldo (22°25°C) per 40 a 50 minuti, il tempo che
raddoppiano di volume. Riscaldate il forno a
240°C. Fatte qualche incisione sul pane con
la lama di un coltello prima di mettere in
forno: 20 minuti per i panini e 25 a 30
minuti per le pagnotte. Il fato di mettere un
bicchiere d’acqua nel forno consente, grazie
all’umidità, di ottenere una bella crosta.
•Per fare i panini, tagliate la pasta in pezzi
tanto grosso quanto un uovo, schiacciateli
uno per uno. Per ogni pezzo, piegate tutti e
quattro angoli, come il verso di una busta.
Rovesciateli ed arrotolateli col palmo della
mano (cosparsa di farina), per dargli una
bella forma.
FRUIT CAKE
Per 6 a 8 persone
90 g di uva passa
50 g di uva sultanina
50 g di scorze candite
Page 37

125 g di burro tenero
100 g di zucchero
3 uova
zucchero vanigliato
250 g di farina setacciata
lievito in polvere
5 cucchiai di latte
•Riscaldate il forno a 180°C. Spalmate una
teglia (24 x 10 x 7 cm) con burro e
cosparsatela di farina. Mescolate l’uva passa,
l’uva sultanina, le scorze candite e 1
abbondante cucchiaio di farina in un
contenitore che terrete a parte.
•Utilizzando il gancio per impastare,
mescolate il burro, lo zucchero, lo zucchero
vanigliato nel contenitore alla velocità 3 per
circa 20 secondi. Mentre l’apparecchio è in
funzione, aggiungete le uova uno per uno,
poi il latte. Fermate l’apparecchio ed
aggiungete la farina ed il lievito. Continuate
di mescolare alla velocità 1 fino ad ottenere
un impasto omogeneo.
•Aggiungete la frutta in piccole quantità alla
velocità 2, quindi aumentate la velocità al
livello 5 e mescolate in successivi periodi di
10 secondi con il tasto Pulse. Mettete
l’impasto nella teglia e mettere in forno per
1 1/4 ora. Rovesciate il cake sopra di un
piatto in metallo e lasciatelo raffreddarsi
completamente prima di tagliarlo.
A secondo del Vostro gusto, potete
immergere l’uva nel rum prima di utilizzarla.
•Spellate gli avocado e togliete i noccioli.
Spellate i pomodori e privateli dai semi,
tagliateli in pezzi ed aggiungeteli, insieme
agli avocado ed al succo di limone nel
contenitore. Aggiungete sale e pepe e tritate
per 15 secondi. Spingete il preparato con la
spatola verso il centro del contenitore e
tritate per altri 15 secondi.
Di solito il Guacamole se serve con piccole
patatine di mais, acquistabili in negozi
alimentari specializzati. Conviene anche con
toast o verdura cruda.
GUACAMOLE
Per 4 a 6 persone
1 piccola cipolla
1 pomodoro
1 peperoncino
2 avocado
1 cucchiaio di succo di limone
2 rametti di coriandolo (25 foglie) o un bel
pizzico di grani di coriandolo
Sale e pepe
•Sbucciate le cipolle, lavate i peperoncini, e
tagliate il tutto in pezzi. Lavate i rametti di
coriandolo strappando le foglie. Tritatele nel
contenitore alla velocità più alta per circa 30
secondi.
37
 Loading...