


INSTALLATION MANUAL
Oletto™ Single Handle
Commercial Style Kitchen Faucet
KPF-2631
www.kraususa.com I Toll Free: 1.800.775.0703 I © 2017 Kraus USA Inc. I REV. November 20, 2017

Congratulations on the purchase of your new Kraus plumbing fixture!
Please keep the box and packaging materials until your product is completely installed. If you have any questions, require technical assistance, or have any problems with your product:
DO NOT RETURN TO STORE
Please contact our Customer Service Team 1-800-775-0703 / customerservice@kraususa.com
Have the model number available, and retain a copy of your receipt with purchase date for reference.
If for any reason this product does not meet your expectations, please be sure to repack this product in the original box and packaging material to avoid damage during transit.
1
Prior to Installation:
•Make sure you have all necessary parts by checking the diagram and parts list. If any part is missing or damaged, please contact Kraus Customer Service at 800- 775-0703 for a replacement
•Turn o the hot and cold water supply at the angle stops and turn on the old faucet to release any built up pressure. Remove existing faucet. Clean sink or countertop to remove any debris, plumber’s putty, or silicone
•Place bucket under angle stops. Turn on to flush any debris prior to installing new plumbing. Shut o angle stops
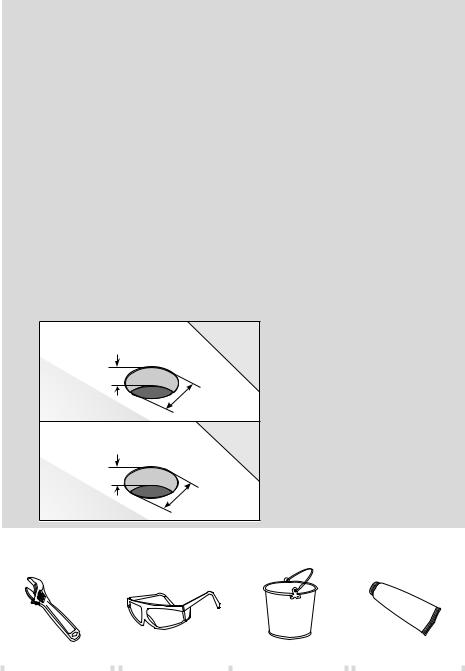
•Pre-drilled hole size requirement: 1-3/8” (min) – 1-1/2” (max)
•Max countertop thickness without deck plate: 1-1/2”
•Max countertop thickness with deck plate: 1”
•1, 2, or 3 hole installation
Without deck plate:
1/16” (1mm) min. 1-1/2” (38 mm) max.
Ø1-3/8” (35 mm) min.
Ø1-1/2” (38 mm) max.
With deck plate:
1/16” (1mm) min. 1” (25.4 mm) max.
Ø1-3/8” (35 mm) min.
Ø1-1/2” (38 mm) max.
Tools you will need:
|
|
|
|
|
|
|
Adjustable Wrench |
|
Safety Goggles |
|
Bucket |
|
Silicone Sealant |
|
|
|
|
|
|
|
2
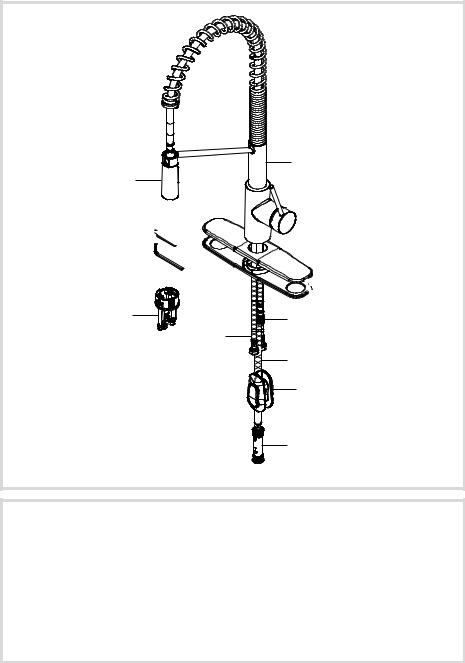
Diagram and Parts List
B
A
I 


 C
C
J |
D |
E
F
G
H
A. Spray Head |
G. Weight |
|
B. Faucet Body |
H. Quick Connect |
|
C. Deck & Putty Plate |
I. Hex Wrench |
|
D. Supply Hose |
i1. |
2.5mm |
E. Hot & Cold Waterlines |
i2. |
4mm |
F. Spray Hose |
J. Base |
|
3

Faucet Dimensions
|
4 1/4" |
|
|
106.5mm |
|
22 1/8” |
562mm |
|
|
7 1/8" |
181mm |
10 1/4" |
|
|
260.5mm |
25mm |
|
|
1" |
|
|
9/16-24UNEF-2B |
|
|
11" |
|
279mm |
|
9 1/4" |
|
233mm |
|
25 |
|
5 |
|
6 |
8 3/4" |
223mm |
|
2 1/2" |
|
62mm |
|
1 3/8" |
|
35mm |
Step 1A: Install base without deck & putty plate
J
Half Moon Locking Nuts
Insert base (J) into sink or countertop with “FR↑NT” facing forward. Tighten screws on base
(J) with 4mm hex wrench (i2) until base is secure on sink or countertop
|
Installer Tip: Rotate the |
|
|
two half-moon shaped |
|
i2 |
locking nuts inward before |
|
inserting base (J) into sink or |
||
|
||
|
countertop |
4
 Loading...