

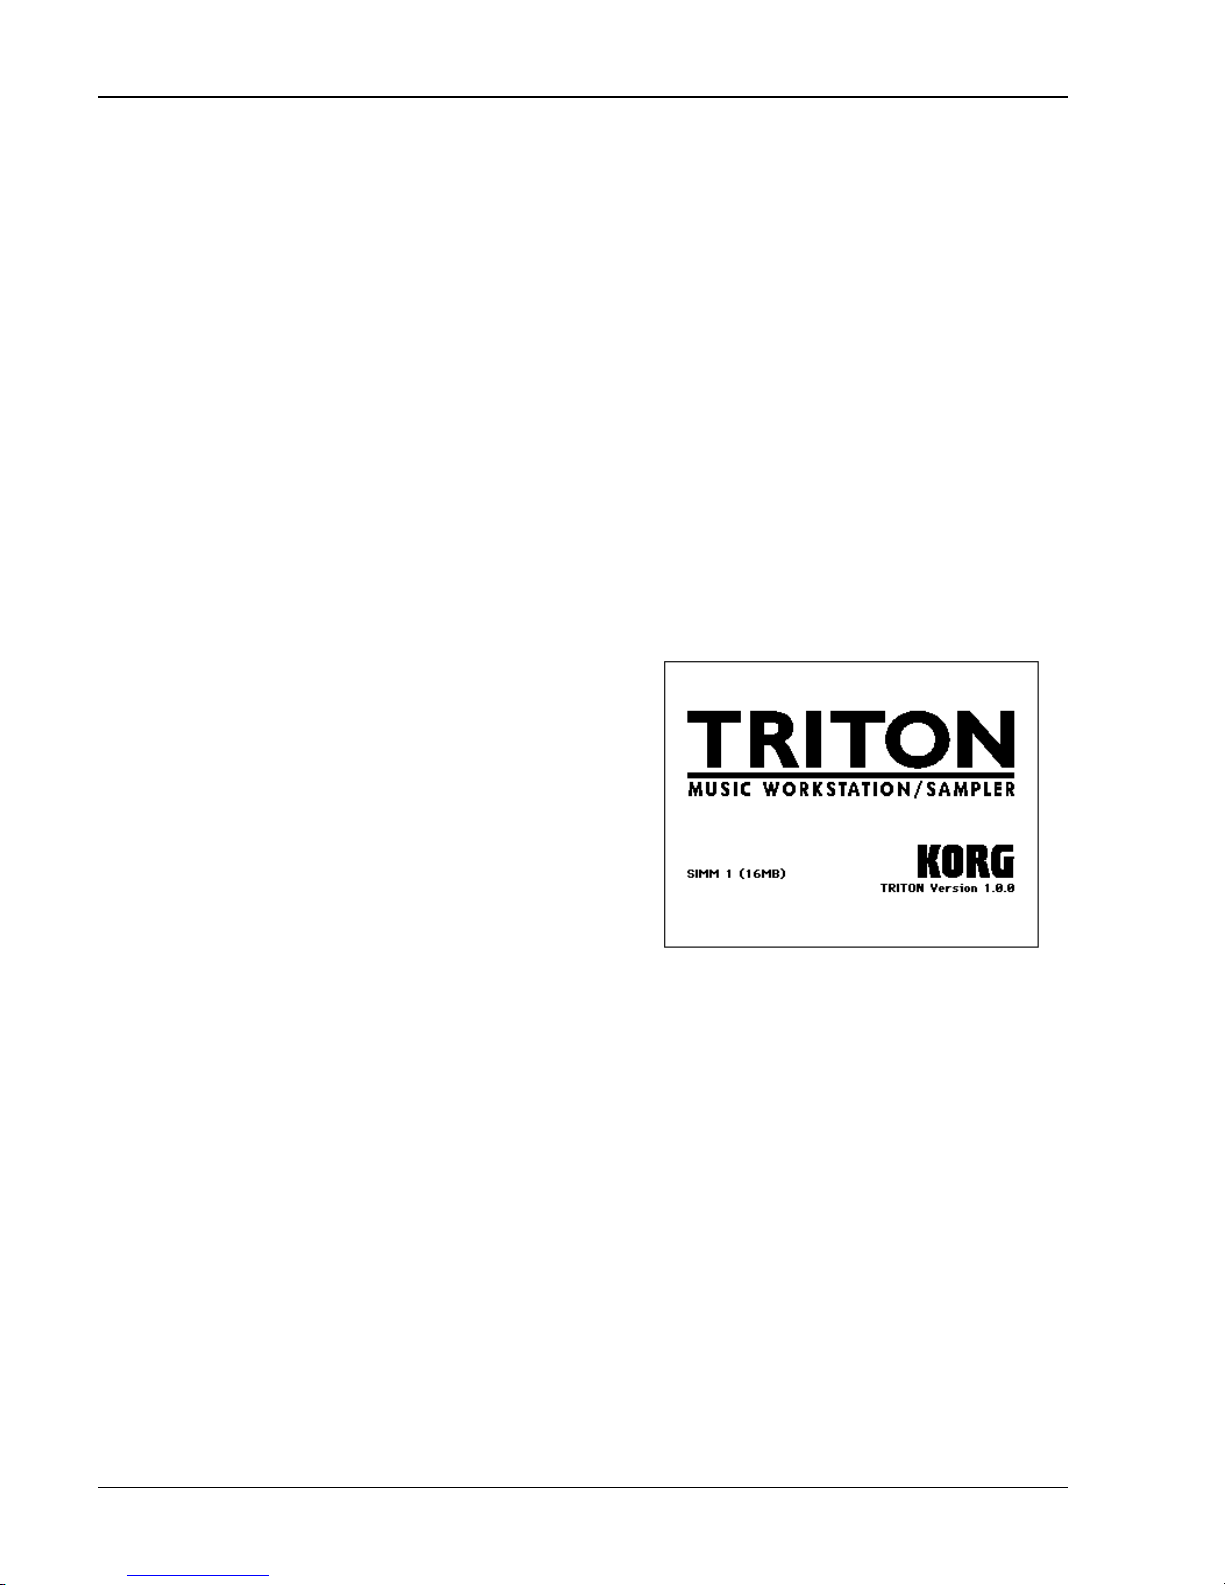
Page 1
User Guide
Page 2

Page 3

eUser Guide
Features and Benefits
"Overview" 5
Connections 8
Disk Mode:
Loading the Preload Disks 9
Playing the Factory Demos
Basic Navigation:
Front Panel Overview, Touchview Graphic Interface 11
Program Mode:
Overview 13
Select-By-Bank, Select-By-Category
Performance Editing, Realtime Controllers
AMS and Effect Dynamic Modulation 18
Very Cool Demo Programs
Arpeggiator Mode:
Overview and Tour in Program mode 21
Combination Mode:
Overview 26
Select By Bank, Select By Category
Working with Combinations, Controllers and The Dual Polyphonic Arpeggiators
Very Cool Demo Combinations
Effects Mode:
Inserts and Masters, EQ 34
Working with the Audio Inputs and Effects
Using the Vocoder Effect 43
Sampling Mode:
Overview 44
One-shot Sampling, Sampling w/ Insert FX
Naming Samples, Converting to Programs 48
Working with Grooves, Loops and Tempo
Sequencer Mode:
Overview, Templates, Preset Patterns, Recording, Play Loops 54
Recording w/ the Arpeggiat or, Solo / Mute
Creating a Cue List / Converting to a Song 59
RPPR ( Realtime Pattern Play Record)
Sequencing w/ Combinations 66
Advanced Arpeggiator Tour 68
Sequencing Using Combis with Arpeggios
Output Routing
Option Boards: EXB-MOSS, EXB-SCSI, EXB-PCM, SIMM modules, User-installation
Additional Information - Owner manual references
Cool Demo Programs and Combinations
2
10
14
16
20
27
28
33
42
45
49
57
63
76
82
84
86
i, ii
Page 4
TRITON Training Guide
TRITON Features and BenefitsTRITON Features and Benefits
FeatureFeature
1024 onboard sounds1024 onboard sounds
512 Programs 512 Programs (including 16 drumkits)
512 Comb512 Combinationsinations
plus 128 open locations for samples and a
full GM level 2 soundset!
Expandable to a total of 1280 Programs Expandable to a total of 1280 Programs (with
EXB-MOSS and a full E Bank/sample
programs)
48 User drumkits available48 User drumkits available
32 MB PCM ROM32 MB PCM ROM
expandable to 64 MB with optional PCM expandable to 64 MB with optional PCM
expansion boardsexpansion boards
Hyper Integrated (HI) synth Hyper Integrated (HI) synth
architecturearchitecture
48 kHz playback48 kHz playback
multimulti-- mode resonant filtersmode resonant filters
AMS modulation and more!AMS modulation and more!
BenefitBenefit
All sounds are in RAM* so you can tweak or
replace them to guarantee that you have the
group of sounds that you want.
Everyone is looking for a large variety of
sounds and TRITON delivers the largest
selection of great Korg sounds ever!
*Except GM
This is a huge memory area, giving the user a
full gamut of imitative and synthetic wave
data. With 425 multisamples and 413
drumsamples.
The TRITON's Hyper Integrated (HI) synth
engine combines PCM ROM, sampling RAM
and optional MOSS synth engines with rich
filters, complex modulation routings and the
most versatile effects system in a synth today.
6262-- note polyphonynote polyphony
Up to 7 effects at a time plus EQ!*Up to 7 effects at a time plus EQ!*
5 Insert Effects with 102 effects5 Insert Effects with 102 effects
2 Master Effects with 89 effects2 Master Effects with 89 effects
Includes 32 dual mono in/out chains!Includes 32 dual mono in/out chains!
33 -- bandband Master EQ Master EQ
Dynamic effectsDynamic effects
Route external audio through effects!Route external audio through effects!
*Up to 14 effects plus EQ if all mono-chained!
TouchView graphic displayTouchView graphic display
Now much faster!Now much faster!
Increased polyphony helps when playing
sustained piano passages, when developing
complex Combinations, and of course helps
when sequencing.
The TRITON offers the most versatile effects
system of any synth on the market. This means
that your Sequences and sounds can have
many “custom” effects per sound, so each
instrument sounds right. The majority of the
effects can be used in any location (Insert or
Master) offering you the most flexibility
possible.
Includes a "way-cool" 16-band Vocoder and
the ability to add FX to a mic or other synth!
This fully graphic touch screen is
revolutionary for a musical instrument and
makes working with the TRITON a dream!
2
Page 5
TRITON Training Guide
FeatureFeature BenefitBenefit
1616-- track sequencertrack sequencer
200,000 events200,000 events
200 Songs200 Songs
20 Cue Lists 20 Cue Lists (100 Songs per Cue)
32 Song Templates 32 Song Templates (16 Preset/16 User)
150 preset drum patterns150 preset drum patterns
Loopable tracksLoopable tracks
192 PPQ resolution192 PPQ resolution
Extensive editing Extensive editing (bar/beat/tick resolution)
SMF compatible SMF compatible (w/direct play from disk)
2 arpeggio patterns per Song2 arpeggio patterns per Song
Automated mixdownAutomated mixdown
Tempo trackTempo track
2 polyphonic arpeggiators2 polyphonic arpeggiators
Expanded from Z1 designExpanded from Z1 design
237 memory locations 237 memory locations (5 preset, 232
programmable)
Up to 12 tones and 48 steps per patternUp to 12 tones and 48 steps per pattern
Normal and Fixed Note/Drum modesNormal and Fixed Note/Drum modes
Syncs to MIDI clock or to internal sequencerSyncs to MIDI clock or to internal sequencer
Programs can uPrograms can use 1 arp pattern, Combis and se 1 arp pattern, Combis and
sequencer can use 2sequencer can use 2
Arp patterns can be recorded to sequencer or Arp patterns can be recorded to sequencer or
to patterns to be used with RPPR functionto patterns to be used with RPPR function
This is a full-function sequencer with
extensive recording, editing and mixing
capabilities. Combined with the TRITON's
awesome multi-effects power this is all the
system a user might need to record “ready-to-
master” music!
Between the loopable tracks and the
i nnovative Cue List the user can work the way
they like, creating their music in short
segments to be chained together, as long linear
performances, or any method in-between.
Song Templates, preset patterns and the
unique RPPR function make it easy to get
started writing a song.
Arpeggiators are "all the rage" these days, and
there is none better than the TRITON's
polyphonic monster.
Use the Arpeggiator to play polyphonic
patterns, dance bass and lead lines, imitative
guitar strumming, or even as a step-grid drum
programming tool.
Combine 2 arpeggio patterns in Combi or
Sequence modes for rich sound possibilities.
Sync to other systems or record patterns
directly into your songs.
SamplingSampling
1616-- bit/48kHz sampling ratebit/48kHz sampling rate
16 MB of RAM standard, expandable to 64 MB 16 MB of RAM standard, expandable to 64 MB
(two 72-pin SIMM slots)
Stereo/mono samplingStereo/mono sampling
Sample through Insert effectsSample through Insert effects
Visual waveform editing Visual waveform editing (w/beat grid)
Extensive editing (truncate, nExtensive editing (truncate, normalize, ormalize,
cut/copy/paste/insert, and more)cut/copy/paste/insert, and more)
Up to 1000 multisamples/4000 samples Up to 1000 multisamples/4000 samples
possible in memorypossible in memory
Loads Korg*, Akai S3000/1000, AIFF and Loads Korg*, Akai S3000/1000, AIFF and
.WAV formats.WAV formats
*except TFD-1 through 4
Many musicians use sampling as an integral
part of their music, lifting phrases and grooves
from records, CD's and sampling libraries.
TRITON offers powerful sampling capabilities
and plenty of memory.
The TouchView interface makes editing a
breeze, with graphic waveform viewing and a
host of other benefits.
It's fast to go from sampling to a Program to
the sequencer so you can grab a sound and
start making music with it right away!
Compatibility with many formats opens up a
world of libraries to the user.
3
Page 6
FeatureFeature BenefitBenefit
TRITON Training Guide
Innovative RPPRInnovative RPPR (Realtime Pattern Play
and Record) functionfunction
Each Song can hold an RPPR setEach Song can hold an RPPR set
Up to 72 Patterns per setUp to 72 Patterns per set
Patterns can play manually, once, or loop Patterns can play manually, once, or loop
endlesslyendlessly
Expressive controllersExpressive controllers
ribbonribbon
44 -- way joystickway joystick
4 assignable knobs4 assignable knobs
2 assignable switches2 assignable switches
assignable value sliderassignable value slider
Assignable pedal and sAssignable pedal and switchwitch
6 outputs6 outputs ww/ easy routing!/ easy routing!
L/R Main outputsL/R Main outputs
4 Individual outputs4 Individual outputs
61/7661/76--note synth and 88note synth and 88 --note note
weighted action models available weighted action models available
w/w/ Velocity and AftertouchVelocity and Aftertouch
RPPR lets you assign musical phrases to be
triggered in realtime from the keyboard. It's
great for live performance and as a musical
way to play parts into the sequencer. And the
RPPR data goes out via MIDI so it can be used
to trigger other external MIDI gear as well!
The TRITON's AMS modulation system takes
full advantage of these many controllers so
you can add plenty of nuance to your
performances and recordings.
The 4 knobs offer two settings - preset and
programmable, so they function as 8 knobs!
Multiple outputs are essential for isolating
different sounds (like drums, or bass) for
critical mixing situations. TRITON can route
any sound to any output or stereo pair, with
any effects routing desired.
Get the keyboard length and feel that you
want!
Extensive expansion possibilitiesExtensive expansion possibilities
(all user-installable!) ::
Optional 6Optional 6 -- voice DSP synth voice DSP synth
engine engine EXBEXB -- MOSS (Z1 board)MOSS (Z1 board)
128 MOSS programs128 MOSS programs
13 digital synthesis and physical modeling 13 digital synthesis and physical modeling
algorithmsalgorithms
66 -- part multipart multi-- timbraltimbral
32 MB of PCM expansion32 MB of PCM expansion
2 slots, each can hold 16 MB of PCM2 slots, each can hold 16 MB of PCM
4 boards available 4 boards available (more coming!):
EXB-PCM01 Pianos/Classic Keyboards
EXB-PCM02 Studio Essentials
EXB-PCM03 Future Loop Construction
EXB-COM04 Dance Extreme
Optional SCSI interfaceOptional SCSI interface
EXBEXB -- SCSISCSI
Highly desirable for sampling users!Highly desirable for sampling users!
You can configure the TRITON to be the
musical tool that you need it to be.
Add the cutting-edge sound of analog and
digital synthesis plus accurate physical models
of brass, reed, electric piano, organ, bowed
and plucked string instruments.
Multiple MOSS timbres in Combinations and
sequences sound amazing!
PCM expansion (along with sampling)
guarantees that the TRITON will always be
able to become the instrument you need simply add they types of sounds you need for
a given project.
Adding SCSI enables the user to load samples
stored on CD-ROM’s and other SCSI media,
and to save their own work to fixed and
removable drives.
4
Page 7

TRITON Training Guide
TRITON TRITON Highlights
Incredible Sound
The next step in workstation evolution, the TRITON delivers the ultimate sonic arsenal
with maximum expressive power and control! TRITON's ground-breaking HI (Hyper
Integrated) synthesis system broadens your sound-creating possibilities with 62 highquality voices! 640 Programs (512 pre-programmed), 512 Combinations, 64 user Drum
Kits (16 preset) and GM level2 support - all created from 32 Mbytes of the highest-
quality 48 kHz samples! TRITON's memory can be easily-expanded to 64 Mbytes, with
user-installable 16 Mbyte PCM expansion boards!
World-Class Effects
An outstanding effect section provides five stereo insert effects with 102 algorithms
available! Up to 5 stereo inserts or 10 mono inserts (by using the mono chain effects)
can be used in a Program, Combination or Song! Process everything through two
master effects with 89 algorithms to choose from, then finish off your mix with a
powerful 3-band EQ! TRITON also gives you easy and flexible routing, and a BPM/Sync
function, included in many of the effect algorithms - for controlling effects in sync to
tempo! Plus, you can process TRITON's two audio inputs through the internal effects,
which happen to include a 16-band Vocoder!
Quick and Powerful Sampling
A full-featured mono / stereo sampler with 48 kHz / 16 bit linear sampling! TRITON
comes standard with 16 Mbytes sample RAM, and is expandable to 64 Mbytes with
user-installable 72-pin SIMM modules! The sample RAM area also lets you load Akai
S1000/3000, AIFF, WAV and Korg samples. Recording and editing your own samples has
never been easier, thanks to TRITON's intuitive user interface!
New Version 2 OS adds Time Slice (works on stereo samples!), Time Stretch and
Crossfade Looping features.
5
Page 8

TRITON Training Guide
Easy and Creative Sequencing
A totally new 16-track sequencer with an awesome 200,000 event capacity gives you
incredible ways to create music in an easy, yet extremely powerful song writing
environment! TRITON's new Cue List, Song Templates, Preset Rhythm Patterns,
independently-loopable tracks and RPPR functions make music production speedier
and easier than ever!
Dual Polyphonic Arpeggiators
Two polyphonic arpeggiators with 237 patterns (232 programmable/ 5 preset) add new
dimension to your Programs, Combinations and Songs! You can even run both
arpeggiators in a Combination or Sequence, and sync to MIDI clock and internal
effects!
Touchview Graphic Interface
This is the best user-interface available! It makes locating, editing and managing your
sounds, samples and songs easier than ever - with the touch of a finger!
Ultimate Control of your sounds
Four realtime knobs, two switches, ribbon controller, slider, velocity and aftertouch
plus pedal inputs - all add up to the ultimate in expressive control of your sounds!
6
Page 9

TRITON Training Guide
User-Installable, Affordable Options
EXB-MOSS: Add Korg's world -famous Z1 DSP technology to the TRITON with the EXB-
MOSS option! Six voices of physical modeled / synthesis sounds adds even more
power to TRITON's HI synthesis system, and you can use up to six MOSS sounds in a
Combination or Sequence!
EXB-PCM: Expand TRITON's PCM memory from 32 Mbytes to 64 Mbytes with 16 Mbyte
expansion boards, including new Program and Combination sounds on disk - for each
EXB-PCM board offered!
EXB-SCSI: Load, save and easily-manage your sounds, samples and sequences in
record-time with the user-installable SCSI board! Supports both removable and fixed
media, as well as CD-ROM.
SIMMS Modules: Two 72-pin SIMM slots let you expand your sample RAM from
standard 16 Mbytes all the way to 64 Mbytes!
Easy-routing Audio Outputs
TRITON features six audio outputs with easy sound and effect routing capabilities!
Great-feeling Keyboard Actions
Available in 61 and 76 key synth actions with velocity and aftertouch (TRITON and
TRITONpro), and 88-key weighted, with velocity and aftertouch (TRITONproX).
7
Page 10
TRITON Training Guide
Start Here
Connections
1. Connect TRITON's L/MONO and R outputs to a stereo monitoring system, or connect headphones to the
headphone jack.
2. Lower the VOLUME fader, then power-up the TRITON. Raise the VOLUME fader and play the keyboard
to set a comfortable monitoring level. The display will indicate the model and software version number,
as well as any installed options. Standard TRITONs will indicate "SIMM Slot1 (16MB)" in the display.
Disk Mode
Loading the Preload Disks
TRITON ships with two floppy disks - TNFD00P and TNFD01P.
Note: The earliest shipments you'll be dealing with include a third disk, TNFD-OOPUS. This disk replaces the
TNFD-OOP and includes the C/D Bank Programs and Combis, so please use that disk!
1. Insert the TNFD00P(US) disk into the disk drive, then press the DISK key.
2. Press the Load tab in the lower left of the display. The contents of the disk will be displayed:
PRELOAD.PCG - the factory Programs, Combinations and Global settings, PRELOAD.SNG - the
factory demo songs, and PRELOAD.KSC, a "script" file that begins the sample loading process.
8
Page 11

TRITON Training Guide
Loading the Factory Demos and Sounds
The following steps show you how to restore the factory preload demo songs, .PCG files and samples.
Note: The following procedure will rewrite the TRITON's internal memory. Make sure to backup your internal
data before proceeding!
1. Press to highlight PRELOAD.SNG :
2. Press the Page menu button Load in the upper right corner of the display.
3. Press Load selected from the popup menu that appears, and a dialog box will appear in the display.
4. Check the boxes Load PRELOAD.PCG too and Load PRELOAD.KSC too. A radio button will indicate
Clear, which means that the sample data you load will overwrite any previously loaded sample datafrom the beginning of the sample memory area. (Note: If you were to select Append, the new samples
would load into the unused portion of sample memory - for now, make sure Clear is selected).
5. Press OK. The factory data will load. When the PRELOAD.KSC file loads, the display will indicate
Where is a GOSPE000.KMP file. At this point, the TRITON is looking for the sample data that the
PRELOAD.KSC script file is pointing to.
6. Eject the TNFD00P(US) disk from the drive and insert the TNFD01P disk, then press once - anywhere
on the display. The display will now recognize the new disk, and the PRELOAD folder will be
highlighted.
9
Page 12
TRITON Training Guide
7. Press Select at the lower-right of the display. All of the sample data in the PRELOAD folder will load.
The display will then indicate "Writing into memory" - the data is loading into the TRITON's flash
memory area.
Tip: The TEMPO LED in the ARPEGGIATOR section of the front panel goes dark while loading, and
begins to flash when the loading process is complete.
Playing the Factory demos
1. Press the SEQ key to enter Sequencer mode, then press the MENU key - the Sequence mode Jump
pages will appear in the display.
2. Press P0: Play / REC, and the display will now indicate the first demo song - S000: Deep Cut.
3. Press the START/STOP key to begin playback of S000: Deep Cut. Take a few minutes to listen to and
enjoy this great demo by Scott Frankfurt! It really shows-off TRITON's new and incredible Sequencer,
internal PCM and effects, as well as the vocal samples you loaded from the factory disks!
4. When the demo ends, press the popup button to the left of S000: Deep Cut. A popup menu appears,
listing all the demo songs you loaded from the PRELOAD.SNG file. For now, press anywhere outside of
this popup menu, or press the EXIT key - to return to the Play page (P0).
Playing the demo Cue list
One of TRITON's greatest features is a totally new way to create songs in Sequencer mode. A Cue list lets
you play back multiple songs in succession, and specify the number of times that each song will be repeated.
You'll learn more about Cue lists in the Sequencing section of this guide - for now let's play the Demo Cue
List:
1. Press the MENU key, and the display will indicate the Jump pages in Sequencer mode.
2. Press P1: Cue List (or press 1 on the keypad). The Cue list window appears, and C00: All Demo
Medley is indicated. Note that all the demo songs are listed as steps in the Cue list - pressing the scroll
bar on the right of the display lets you see and select additional steps / songs in the Cue List. For now,
scroll-up and leave Step01 selected (arrow is highlighted).
3. Press START/STOP. The Cue list will begin playback - all the demo songs will play in succession. When
the Cue list reaches the last step (09), the list will continue to play from step 01. You can press
START/STOP anytime to stop playback of the Cue list.
10
Page 13
Basic Navigation
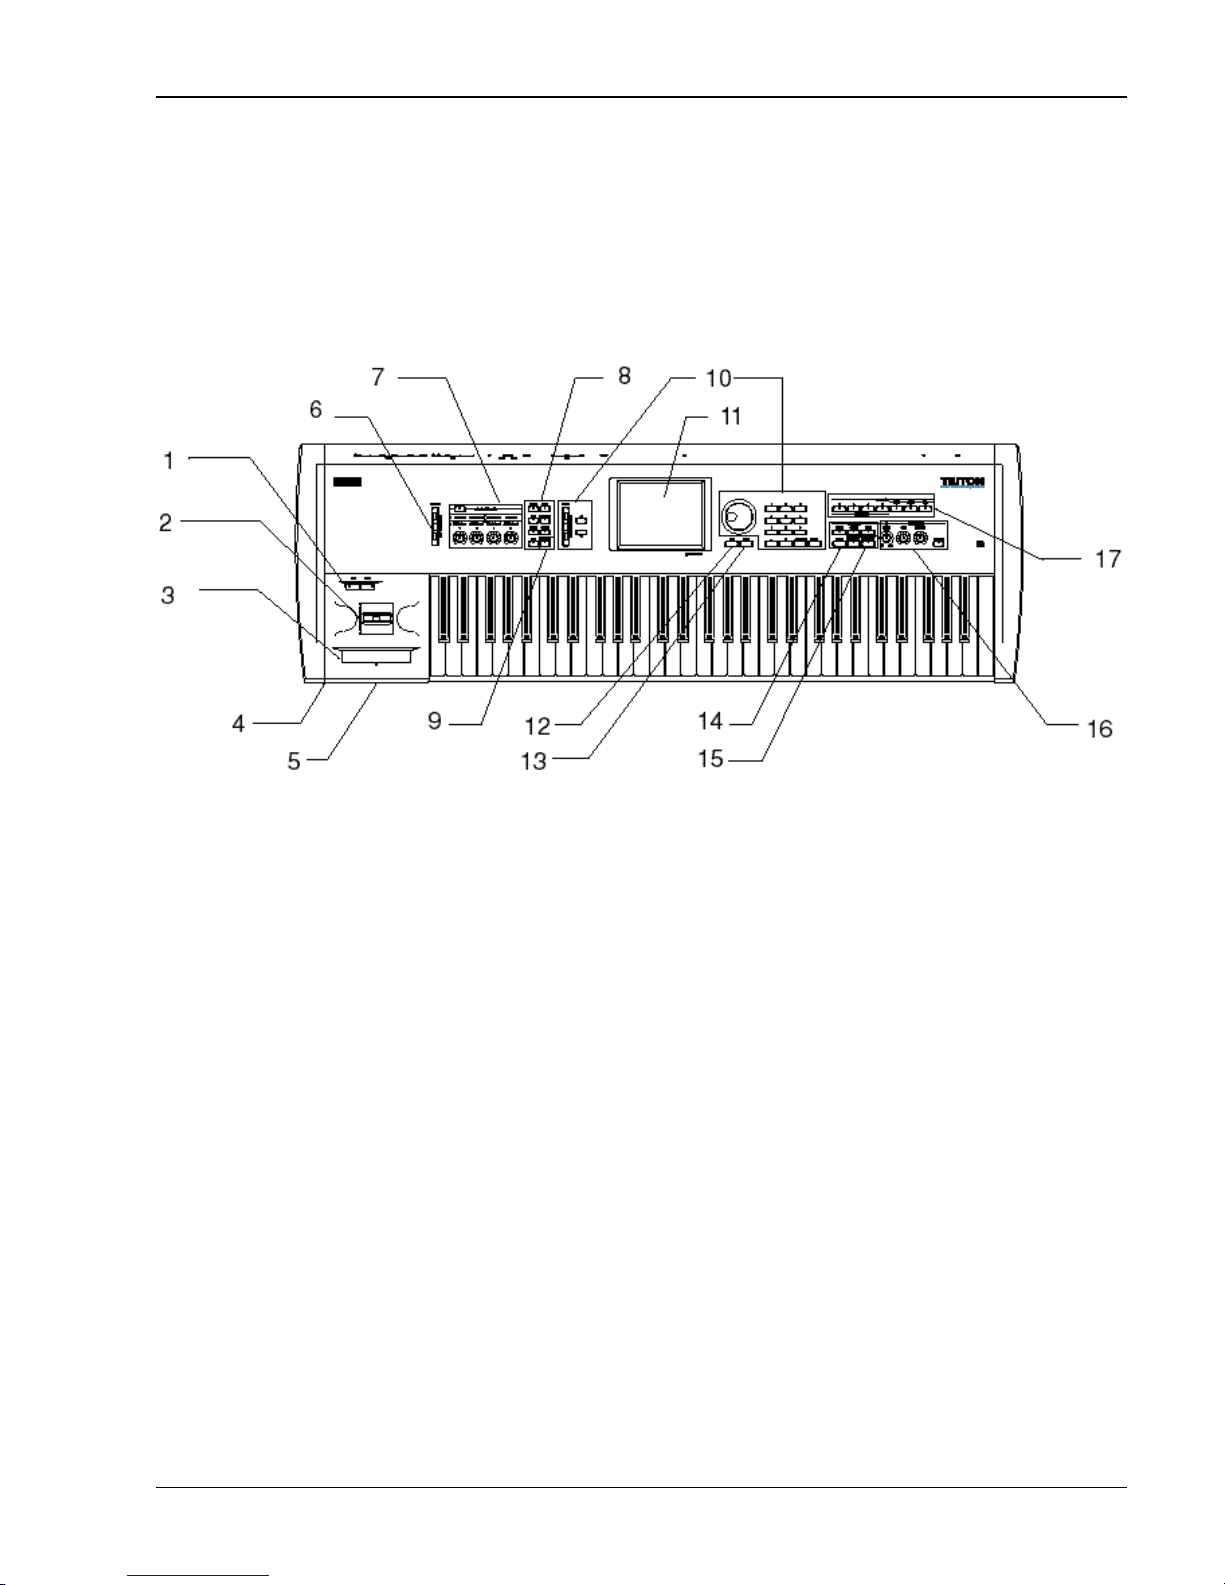
Front Panel Overview
TRITON Training Guide
1> SW1 / 2 2> Joystick 3> Ribbon: These controllers are used to control tone, pitch, volume,
effects, the arpeggiators and more - in realtime, while you play and record.
4> Headphone Jack
5> Disk Drive
6> VOLUME slider: Controls master volume and headphone volume.
7> REALTIME CONTROL Knobs: Four knobs, with two modes of operation - in A mode, filter cutoff,
resonance or hi-pass filter cutoff, filter envelope intensity, and filter/amp envelope release time are
controlled. In B mode (press the REALTIME switch) the four knobs are independently-assignable for
Programs, Combinations and Songs. They can be set to control volume, portamento time, pan, effect send
levels, and a host of other functions.
11
Page 14

TRITON Training Guide
8> Mode keys: Press these keys to enter a desired mode of operation - the LED's for each mode
will light. Seven modes of operation are available
9> COMPARE key: Used to compare an un-edited sound with an edited sound when in Program or
Combination modes, as well as comparing when recording and editing in Sequencer mode.
10> VALUE Slider / keys, DIAL, Numeric keypad,10's HOLD and ENTER keys: These controls are
used to set and modify values. Use the Numeric keypad when you know the value you want to enter, or
when you want to direct-select Programs, Combinations or Songs. The 10's/HOLD key lets you enter values
with a decimal point, or advance Programs and Combinations by 10's. The display will indicate "10's Hold"
when on, and you can press the 55 value key to move from Program A000 to A010, etc. The ENTER key
confirms a value you input on the Numeric keypad. You can also hold down the ENTER key and press a
Numeric key to select page menu commands in the current page.
11> Touchview: A Graphic User - Interface so cool we've devoted a special paragraph about it at the
end of this section!
12> EXIT key: When you are working with pages in a mode, pressing the EXIT key will take you to
the first page of that mode (P0). You can also press the EXIT key to close dialog boxes, popup menus and
page menus.
13> MENU key: Press this key to post a listing of pages in a mode (P0, P1, etc.). The MENU key
makes it easy to "Jump" to a desired page posted in the display. You can also hold down the MENU key and
press a Numeric key to select a page.
14> SEQUENCER keys: The PAUSE, <<REW, FF>> work like tape recorder transport keys. Holding
down the <<REW and FF>> keys will rewind or fast-forward the current song while in playback. The
LOCATE key is used to return a song or Cue list to a specified point, and can also be used as a MIDI "panic"
button for stuck notes.
15> SEQUENCER /SAMPLING keys: The REC/WRITE key is used to put the sequencer in standby mode
as well as "arming" the sampling function. Press this key before pressing the START/STOP key. This key
can also be used to quickly-update (write) an edited Program or Combination, or to update (write) the edited
Global mode. The START/STOP keys initiate recording in sequencer mode, and start / stop song playback.
This key's LED will flash in time with the current tempo. In sampling mode, this key will start / stop sampling.
12
Page 15
TRITON Training Guide
16> ARPEGGIATOR section: This section of the front panel controls the operation of the arpeggiators. It
includes the TEMPO, GATE and VELOCITY knobs and the ARPEGGIATOR ON/OFF key. The TEMPO knob
can also be used to change song tempo.
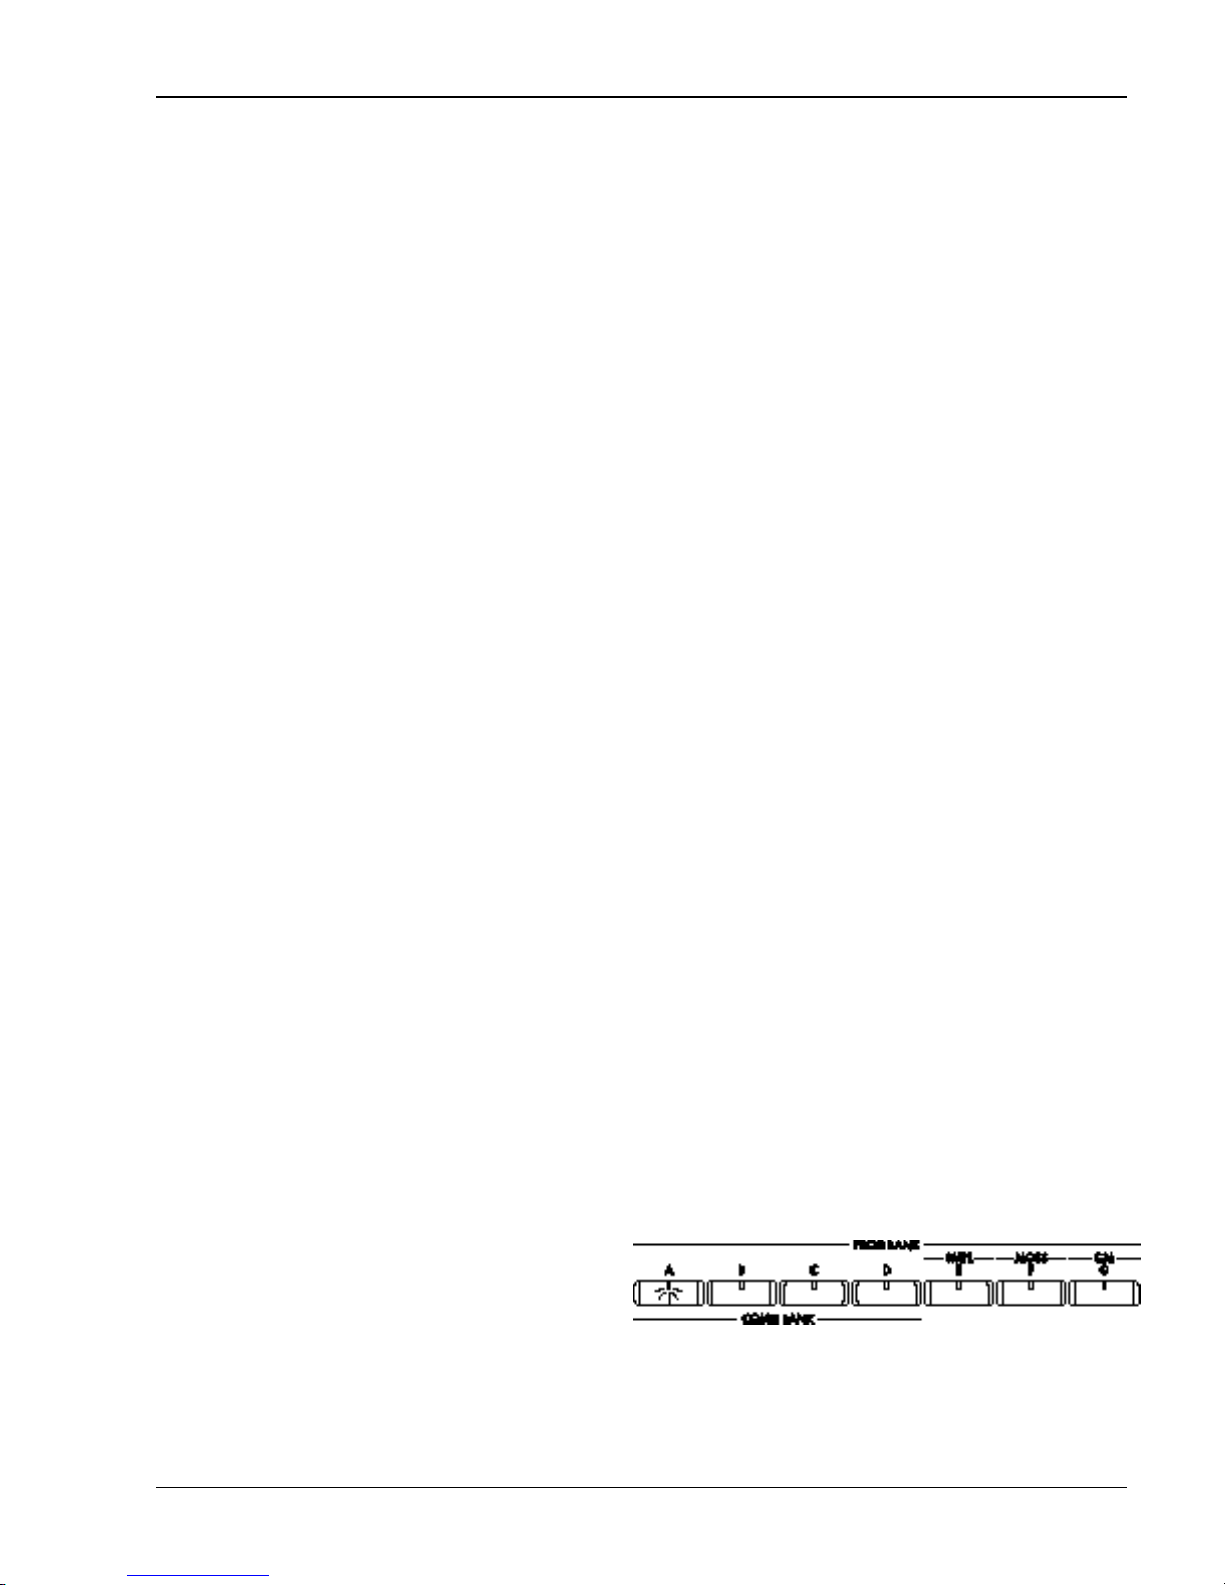
17> BANK keys: In Program mode, use these keys to go to a desired bank (A-E). When the EXB MOSS option is installed, the F bank key accesses the MOSS Programs. The G Bank key selects
the GM variation banks. Repeatedly pressing this key moves between the GM banks (G-9) and (d - GM drum
bank). In Combination mode , the bank keys A-D can be pressed to go any of four Combination banks.
About the Touchview Graphic Interface
This large LCD screen lets you quickly-view and select objects in the display - simply by pressing
them! Objects you'll work with include pages, edit cells, popup buttons and menus, pins, scroll bars,
category buttons, check boxes, radio buttons, tabs, dialog boxes, text edit and toggle buttons, page jump
buttons and more. You'll discover many features and functions of TouchView throughout this guide.
Program Mode
There are 512 Programs in memory (not including the E Bank sample Program locations), plus 256
Programs that are GM level2 - compatible. Programs are organized in banks. The user-installable EXB-PCM
option board adds an additional 128 MOSS Programs in the F bank. Each Program can have up to 5 Insert
effects and 2 Master effects, plus 3-band EQ .
Selecting Programs
1. After you power - up, press the PROG key to the left of the display to enter Program mode.
2. Press the BANK A key - it will light, and the display will indicate the current bank.
There are a number of ways to select Programs: You can use the Bank, Numeric keys and ENTER key to
direct-select a Program, or use the DIAL or 55 66 Value keys to make a selection from within a Bank.
13
Page 16
TRITON Training Guide
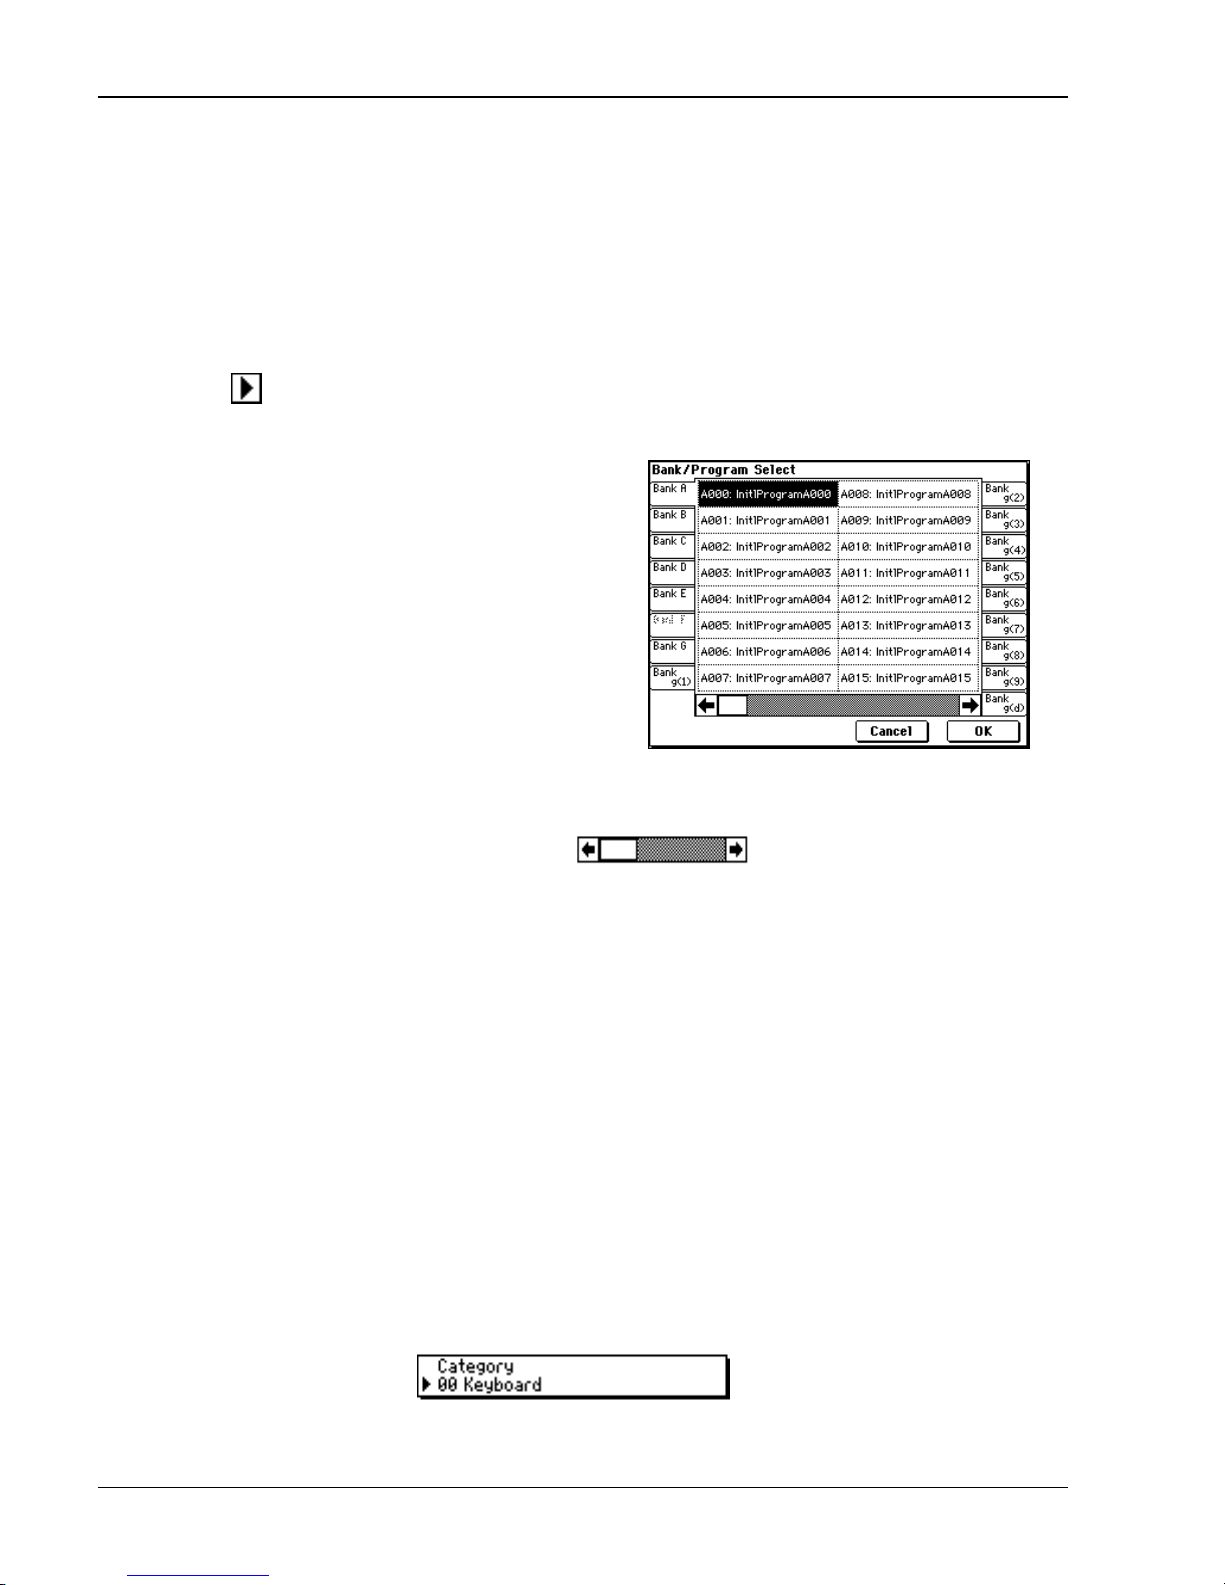
TRITON features two great ways to quickly-locate Programs:
Select-By-Bank
1. Press to highlight the Program name field, press 0, then press the ENTER key on the Numeric keypad
to select Program A000.
2. Press the popup button to the left of the Program name. A popup menu will appear - the center area
shows 16 of the A-bank programs, beginning with A000.
3. You can press to select Programs here, and press and drag the scroll bar to move through the menu
pages, and select more A-bank Programs.
4. To the left and right of the center menu, you'll see the Bank tabs. Pressing these tabs will take you
directly to a desired bank of Programs. Press the Bank B tab, then move the scroll bar to the right, and
select Program B033 Piano Pad. You can play any Programs from this menu, but for now…press the
OK box - this selects the Play page (P0) for Program B033.
Select-By-Category
Here's where Touchview really shines! Select-By-Category lets you manage and select sounds by
instrument - type - making sound navigation easier than ever! Just like folders on a computer desktop, this
feature helps you keep all your sounds organized and easily-accessible!
1. Make sure you are still in Play mode (if not, press the EXIT key). Locate the Category popup button
above the Program name field.
14
Page 17

TRITON Training Guide
2. Press the Category popup button. A new popup menu appears, and because you selected Program
B033 Piano Pad, you can now view, scroll and select any of the Programs in the Keyboard category.
Notice that the categories are listed as tabs on the left and right sides of the center menu.
3. Press the 03 Strings category tab. The center menu now shows all the Programs in the string category,
and here you can view, scroll and press to select related Programs.
4. Check out a few more categories and Programs in the same way.
Tip: You can move any Programs to any category in edit mode, and you can rename the categories to suit
your music applications!
The Menu key and Jump pages
The MENU key displays a list of Jump pages in a selected mode. In each mode, the MENU key lets you go
directly (Jump) to a specific page. For in-depth information on these pages, see the TRITON owner manuals.
Here's a listing of the Program Jump pages:
P0: Play
P1: Edit - Basic
P2: Edit - Pitch
P3: Edit - Filter
P4: Edit - Amp
P5: Edit - Common LFO
P7: Edit - Arpeggiator
P8: Edit - Insert Effect
P9: Edit Master Effect
Tip: You can easily select and move between these Jump pages by pressing Menu and then a number
from 0-9 on the numeric keypad. This way you don't have to touch the screen when you're moving fast!
15
Page 18

TRITON Training Guide
Performance Editing
In addition to the variety of controllers TRITON has to offer, you can do quick and easy edits of main
Program parameters with TouchView! In any Program Play page (P0), you'll see eight Performance Editor
"faders" that function in a + or - direction
Octave: Raises or lowers the octave of the Program.
Pitch Stretching: Simultaneously adjusts the transpose and tune settings - produces a variety of tonal
changes without losing the original tuning of the sound.
OSC Balance: Adjusts the level between oscillators 1 and 2.
Amp Level: Adjusts the volume of the entire Program.
Attack Time: Adjusts the attack time of the filter and amp envelope generators.
Decay Time: Adjusts the decay and slope time of the filter and amp envelope generators.
IFX Balance: Simultaneously adjusts Wet/Dry balance of all insert effects used in the Program.
MFX Balance: Simultaneously adjusts the return levels for master effects 1 and 2.
Check out the Performance Editor:
1. Select Program A001: Acoustic Piano.
2. Play the keyboard, and press the Octave fader (+00). As you restrike the keys, press the 55 and66 value
keys to change octaves. Return the fader value to +00 quickly - by pressing 0, then ENTER with the
Numeric keys.
3. Do the same thing for the Pitch Stretch Performance Editor - note the tonal changes as you increase
and decrease the fader setting. Return the setting to +00.
Tip: Try the Pitch Stretch function with many Programs, including Acoustic Guitar and Bass ! It works best
on imitative, "real" instruments, not synth sounds. Try out the Attack and Decay Time editors, as well as the
IFX and MFX Balance settings.
16
Page 19
TRITON Training Guide
Tip: When you edit a Program with the Performance Editors and want to update the Program quickly -
press the REC/WRITE key. A popup menu prompts you with the famous Korg words: "Are You Sure", and
you can confirm the update by pressing OK. If you want to write your edited Program to another location,
versus overwriting the existing Program, press the Performance Edit page menu command in the upper-right
of the display, press "Write Program", choose the destination bank, category and Program number, then
press "OK" to write the new Program.
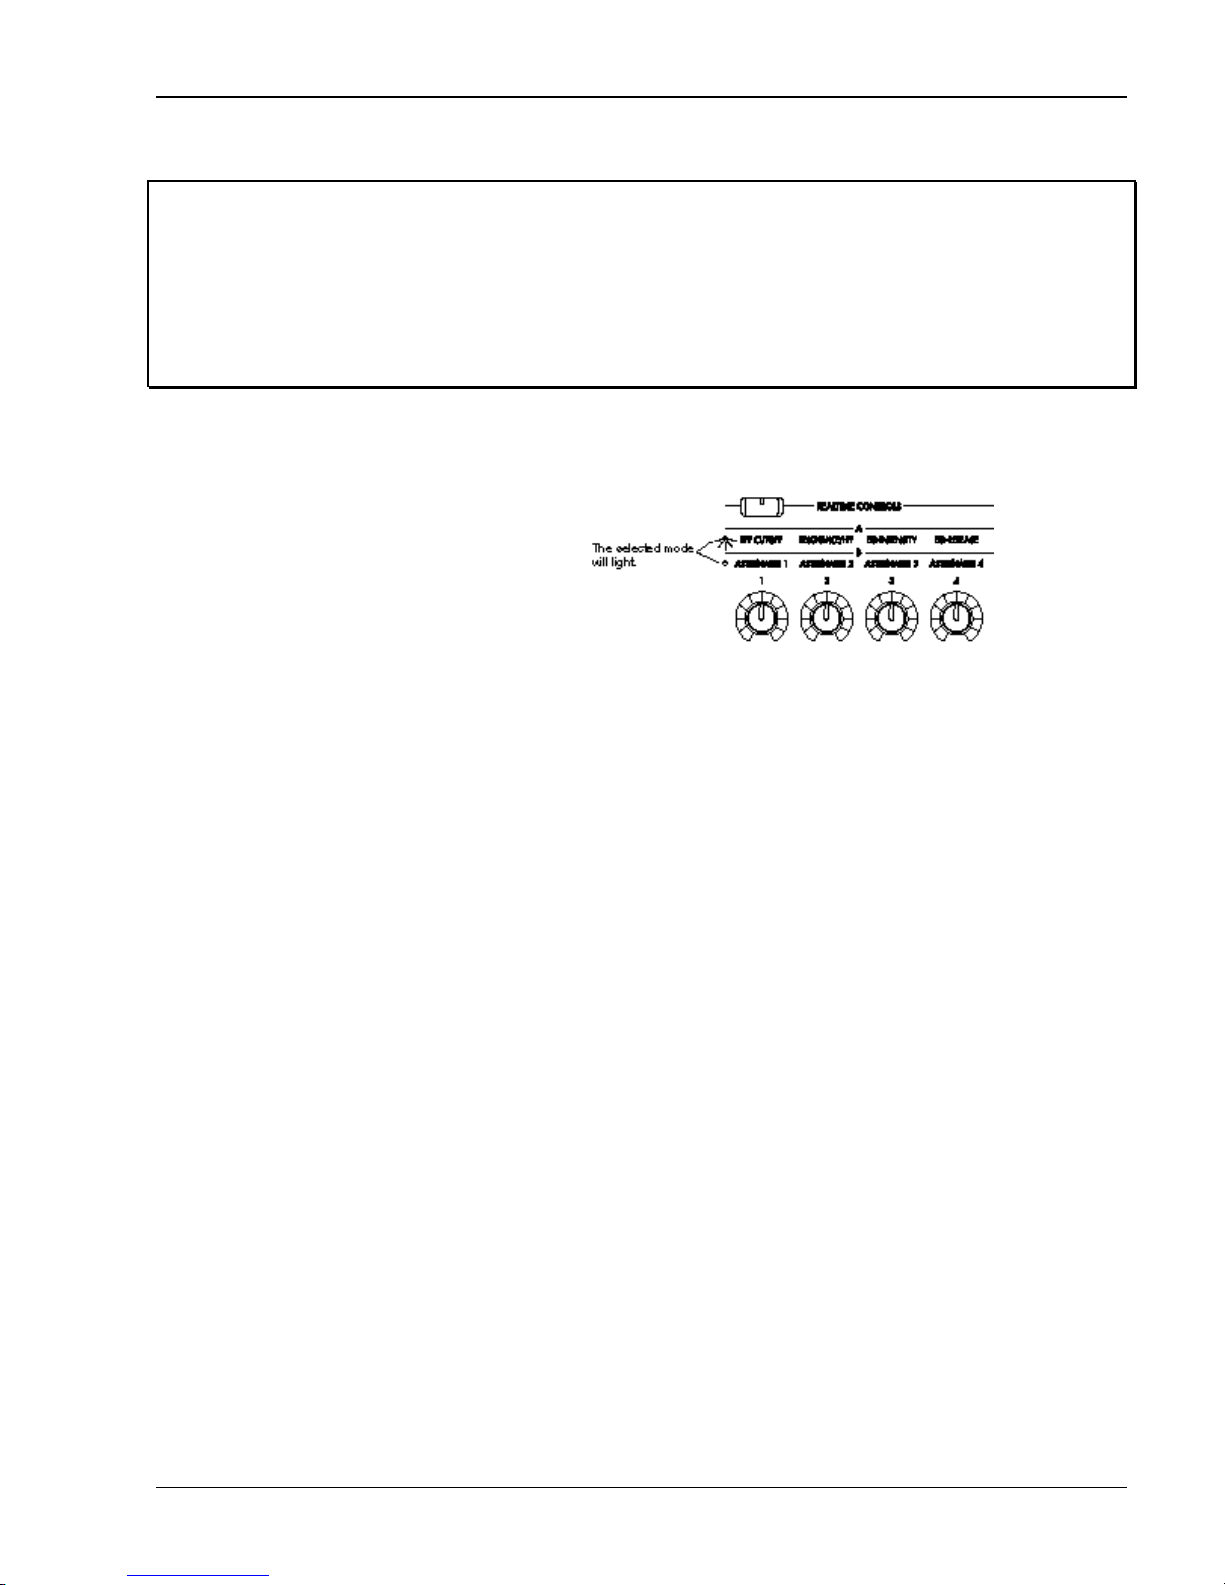
The Real-time Control Knobs
The 4 Real-time Control knobs have 2 mode settings - A and B. You can toggle between each mode by
pressing the REAL-TIME CONTROL key. In A mode, cutoff, resonance, EG intensity and EG release are
controlled for every Program, Combination or Song. When each knob is set to the 12 o'clock position, the
original parameter value for the Program or Combination is recalled. In B mode, the settings of each knob
can be defined for each individual Program, Combination or Song.
AMS and Effect Dynamic Modulation
The Joystick, Ribbon controller, knobs, etc. are all used to control the sound in various ways. This is called
AMS or Alternate Modulation Source. As you play, and even as you record into the internal - or an external
sequencer, AMS can be used in realtime to control the sound. External MIDI data can also control the
TRITON's AMS and effect functions. The Insert and Master effects are controlled by Effect Dynamic
Modulation.
17
Page 20

TRITON Training Guide
Check out AMS and Effect Dynamic Modulation:
Although you haven't been introduced to TRITON's Polyphonic Arpeggiators yet, we'll give you a "sneak
preview" in the next few steps, and you can work with an arpeggiated Program - this will give you a good
idea of how AMS can be used to control the sound:
1. Select Program B044: Auto Pilot. (Press the Bank B key, then enter 44 on the Numeric keypad). Play
notes / chords on the keyboard to hear the sound and trigger the arpeggio pattern.
2. As you sustain notes, move the Joystick toward you (JS-Y).
3. Move your finger from left to right - across the Ribbon.
4. Work with the REALTIME CONTROL knobs. Rotate each knob to control the sound.
Hot -Tip: When you're working with the knobs in A - mode, rotating them back to the 12 o'clock position
will recall the original values for each knob's Program parameters!
Try another Program:
1. Select Program A001: Acoustic Piano.
2. As you play, slowly move your finger left to right on the Ribbon to change the sound.
3. While continuing to hold the new Ribbon position, press SW2 to Lock the current position:
4. Now release your finger from the Ribbon Controller, and as you play, you'll notice that the last position
you held is locked. You increased the cutoff filter (made the sound brighter), and SW2 is set to lock the
Joystick -Y and Ribbon position. Check in the display - you'll see SW2 JS -Y & Ribbon Lock.
5. Press SW2 again to return to the original setting for the Ribbon.
6. Rotate Knob3 to the right - you'll hear the Stereo Chorus effect being increased. Now return Knob3 to
it's 12 o'clock position - to recall the original setting for the knob. Look in the display and locate the MFX1
type (Master effect type). Master effect 1 is set to Stereo Chorus. Now we'll skip ahead a bit, and show
you how Knob3 is set to control Master effect1…
7. Press the MENU key , then press P9: Edit - Master Effect to jump to the Master effect page.
8. Press the MFX1 lower tab. Look at the Src: setting for the Wet / Dry mix of this master effect (bottom-
right of the display). Notice that the source (Src) of modulation is Knob3, with an amount (Amt) of
intensity set to +81.
9. Press the EXIT key. You'll return to the Program Play page (P0).
18
Page 21

TRITON Training Guide
Tip: As you go through the Programs and Combinations in TRITON, make sure to work with the various
controllers! Every Program has many controller functions already programmed, plus you'll find lots more
information on the controllers and AMS and Dynamic Modulation in the TRITON Owner manuals!
Tip: All Program Play pages provide you with quick visual information about SW1 / 2, the real-time Control
knob B-mode functions, and the Insert / Master effects - another great feature of TouchView!
Hot-Tip: Switch 2 is frequently programmed to lock the Joystick -Y and Ribbon positions simultaneously.
When you demo sounds and see this setting for SW2 in the Play page display, try this technique: While
playing, move the Joystick towards you (-Y), and then press SW2 to lock the position. Then continue to play
and work with the Ribbon - tap or slide your finger on it and each new Ribbon position will lock as well!
Hot-Tip: For many synth, pad, motion, bass and lead sounds, moving and locking JS-Y often produces
“syncable” LFO modulation that also will sync with the arpeggiator. After locking JS-Y, use the Switches,
Ribbon, Knobs, and slider to inject magic int o the motion.
Hot-Tip: If you move and adjust PE knobs and want to re-store them to their original or neutral settings:
Re-call the preset by re-selecting the preset sound
Hot-Tip: IN EDIT MODE: press compare twice, and the PE knobs will return to their base settings
regardless of where the knobs are presently set. This also will reset the initial slider and ribbon settings
regardless of their positions.
Tip: Don't forget about TRITON's Aftertouch and Velocity -sensitive keyboards! A host of control functions
can be assigned to these great -feeling keyboards!
About TRITON's Program Edit pages:
There are nine pages in the Program Edit mode. Although some references to these pages can be found in
this guide, including Arpeggiator editing pages and Insert and Master effect pages, you'll find plenty concise
and useful information in the TRITON Owner manuals!
19
Page 22
TRITON Training Guide
Very Cool Programs
The mad scientists, programmers and product guys at Korg now present you with some of our favorite
Programs - from each Category. Although you'll find many more Programs with great sound and controller
functions, these are some of the best! So here you go - a "place to start":
CATEGORY PROGRAMS
KEYBOARD A001, B001, B017, B104
ORGAN A007, A023, A087
BELL / MALLET A015, A063, B063
STRINGS A003, A083,A115, B019, B067, C115
VOCAL / AIRY A011, B027, B091, D027
BRASS A009, B121, C121
WOODWIND A013, B013, C045
GUIT / PLUCKED A005, A101, B005, B069, B083, B085
BASS A006, A022, A038, A054
SLOW SYNTH A008, A088, A104, D014
FAST SYNTH A000, A080, B080, C000
LEAD SYNTH A124, B028, C076
MOTION SYNTH A014, B046, B082, C078
SOUND EFFECT A010, B072, B106
HIT / ARPEGGIO A034, A050, B044
DRUMS A004, B004, C020
Tip: There is a more complete chart at the end of this Guide, listing controllers and other helpful
information.
There's soooooooooo many sounds!
To pick our "Top demo sounds" from the hundreds of great Programs and Combinations in TRITON's
internal memory was a major effort - Korg's fantastic programming team spent unt old hours of painstaking
controller edits and voicing - to get each Program and Combination just right! We at Korg want you to explore
TRITON - you'll find many great sounds from all the categories.
Arpeggiator Mode
In the following section, you'll "tour" a few Programs and their assigned arpeggio patterns, to learn about the
arpeggiator functions, and to hear the diversity of the patterns themselves. You'll find more information on
editing and programming arpeggio patterns in the Advanced Arpeggiator Tour - later in this guide, and in the
TRITON Owner manuals.
20
Page 23
TRITON Training Guide
The TRITON features dual polyphonic arpeggiators, fully-editable and syncable to MIDI clock and the
internal sequencer. There are 237 patterns in memory, including 5 preset and 232 user-patterns. Many of
the user-patterns have been pre-programmed, however you can edit any pattern in memory - even copy a
pre-programmed pattern to a new user location and edit it, or create your own patterns from scratch! You'll
find that Programs and Combinations have arpeggio patterns already assigned to them - some will
trigger as soon as you select the sound and play the keyboard, while other patterns are there, waiting to be
triggered - you simply turn on the ARPEGGIATOR ON/OFF key (lit), and the pattern assigned will trigger
when you play. This is a great way to get an idea of how the Programs and Combinations work in a "song" or
performance application!
Working with the Arpeggiator in Program mode
1. Select Program A001: Acoustic Piano, and play the keyboard - nice piano sample, right?
2. Now press the ARPEGGIATOR ON/OFF key (lit).
3. Play the keyboard again…"instant songwriter"! A pattern has been assigned that will work well with this
Program - a great way to demo the sound in a "song" or performance context!
4. As the pattern plays, notice the TEMPO LED - it's flashing in time with the pattern. Rotate the TEMPO
knob to change the pattern tempo, and note the tempo indicator in the upper-right of the display.
5. Rotate the GATE knob. You'll hear the length of each step in the pattern change from staccato to
sustained.
6. Rotate the VELOCITY knob - you'll hear the loudness level of each step in the pattern change - from
soft to loud.
7. Press the ARPEGGIATOR ON/OFF key (dark) to turn off the arpeggio pattern.
Tip: Any changes you make to the Tempo, Gate and Velocity knobs can be written to update the selected
Program by pressing the REC/WRITE key - a dialog box prompts you with "Update Program". Press "OK" to
re-write the selected Program with the new knob values.
Hot-Tip: Use the GATE knob in conjunction with the REALTIME CONTROL A-mode knob 4 (EG
RELEASE), and use the VELOCITY knob in conjunction with the REALTIME CONTROL A-mode knobs 1-3
21
Page 24

TRITON Training Guide
(CUTOFF, RESONANCE, EG INTENSITY) !!! And don't forget to check out the knobs used in conjunc tion
with many B-mode REALTIME CONTROL functions!!!
Tip: If you want the selected Program to automatically - trigger arpeggio patterns in performance, first
select the Program, then turn ON the Arpeggiator, then press the REC/WRITE key - a dialog box prompts
you with "Update Program". Press "OK" to re-write the Program with the Arpeggiator set to ON. You'll also
need to make sure that the Auto Arpeggiator function is checked in GLOBAL mode (P0).
Try out a different Program / Pattern:
1. Select Program A034 Arp Angeles.
2. Press and hold the low - C (C2 on TRITON) note on the keyboard to trigger the pattern.
3. The tempo for this Program's arpeggio pattern has been set to 148 BPM (upper-right of the display). You
can change the tempo of the pattern with the Tempo knob (in the ARPEGGIATOR section), or press
"148" in the display and use the Numeric keys and ENTER key to set a new tempo value (you can also
use the Dial, Slider or 55 66 Value keys). Try working with the tempo, then set the tempo back to a value
of 148.
4. Play in the upper range of the keyboard while holding C2. The Scan Zone for this Program's arpeggio
pattern has been set to play up to middle - C. Above middle - C, you're free to play the program without
triggering the pattern. You'll see how the Scan Zone is set - later in this guide. The pattern is also set so
that it will only trigger when you play the keyboard - it's not Latched to continue playing when you
release the keys. Stay tuned…we'll cover the Latch function soon…
22
Page 25
TRITON Training Guide
Take a "tour" of Program A034's arpeggio setup:
For now, we'll take you through the Arpeggio tab settings - the "performance edit" functions of an arpeggio
pattern in Program mode. This tab is great to go to when you want to edit the arpeggio pattern "on the fly", in
performance, or simply to try new patterns!
1. Press the Arpeggio tab at the bottom of the display. You'll see that U135 is the arpeggio pattern
assigned to this Program (Pat:> U135 (A/B): Pentatonic).
2. Play and hold down C2 (low-C on TRITON) to hear the pattern - note in the display that the Octave
range has been set to 1 octave. Press the Octave 4 radio button, then play and hold down C2 again -
you'll hear the arpeggio pattern play through a 4-octave range, then continue to loop. The Octave setting
lets you specify the range of octaves for the pattern.
3. Press the Octave 1 radio button again.
4. For this Program, the pattern Reso parameter is set to a16th note. Resolution is the interval between
arpeggiated notes. Press the popup button to the right of Reso, then press to select an 8th note from
the popup menu, and restrike the C2 key to hear the interval change.
5. Re-select the 16th note from the Reso popup menu.
6. Press the check box to the left of Latch, play the C2 key and take your hand off the keyboard. When
Latch is checked, the pattern will continue when you take your hand off the keyboard - when unchecked, the pattern will stop when you release the keyboard.
7. Press to un-check the Latch box.
23
Page 26

TRITON Training Guide
Now to work with another Program / Pattern:
1. Press the name field: 034:Arp Angeles then, using the Numeric keys, press 83. The display will change
to select Program A083: Few Bows Here .
Note: When you change the Program in this way, the Arpeggio tab page remains in the disp lay.
Check out the Sort function
2. Turn on the ARPEGGIATOR (key lit), then, with a light touch, play and hold a C-major (C-E-G) chord in
the middle - range of the keyboard. Note that the Sort checkbox is un-checked. Re-trigger and hold the
same C-major chord, one note at a time. Note that the arpeggio pattern will sound each note in the order
in which you actually played the notes.
3. Press to check the Sort checkbox. Now play and hold the same C-major chord, and you'll hear the
pattern sound the notes in order of pitch, regardless of the order in which you actually play them.
Check out the Key Sync function:
1. Select Program A005: Acoustic Guitar. Note that the ARPEGGIATOR is automatically - ON when this
Program is selected.
2. Play various notes and chords to get and idea of how well the assigned pattern works with this sound.
3. In the Arpeggio tab page, notice that the Key Sync checkbox is checked. When Key Sync is on, each
time you re-trigger the arpeggio pattern it will begin from it's first step (first measure).
4. Press to un-check the Key Sync checkbox, then play notes and chords on the keyboard again. You'll
note that the pattern plays in sync with the tempo (MIDI clock), and that re-triggering the keyboard will
sound arpeggiated notes from some point within the arpeggio cycle, and not from the first step.
Check out the Keyboard function:
1. Select Program A104: Money Pad, then turn the ARPEGGIATOR ON (key lit).
2. Play and hold chords on the keyboard - You'll hear the Program and the arpeggio pattern at the same
time. That's because the Keyboard function is on (checked).
3. Press to un-check the Keyboard checkbox, then play the keyboard again. You'll only hear the
arpeggiator's output, not the sustained notes you're holding on the keyboard.
24
Page 27
TRITON Training Guide
Tip: Whenever you make changes to the functions in the Arpeggio tab page, you are NOT editing the
original arpeggio pattern. Extensive editing and creating of patterns is done in the GLOBAL mode (P6 User
Arpeggio) - overviewed in the Advanced Arpeggiator Tour later in this guide.
Tip: Any changes you make to an arpeggio pattern's functions or tempo in the Arpeggio tab page can be
quickly-saved to the same Program - press the REC/WRITE key, and then press OK to update the Program.
You can also press the Page menu button (upper-right of the display), and enter the destination bank and
number - to write the newly-edited Program and arpeggio functions to a different location.
That's it for now - stay "tuned" for more Arpeggiator tours,
tips and tricks in the Combination and Sequencer sections of
this guide!
25
Page 28
TRITON Training Guide
Combination Mode
In Combination mode, you can layer, split or velocity-switch up to eight Programs. There are 512
Combinations in TRITON's internal memory (4 Banks of 128 each). As in Program mode, Combinations can
be Selected-By-Bank and Selected-By-Category. Two arpeggio patterns can be triggered
simultaneously in a Combination, and AMS / controller functions are also available in this mode. Each
Combination can have up to 5 Insert effects and 2 Master effects, plus stereo3-band EQ. Combinations
can be copied to TRITON's sequencer with, or without their effects, and used to create new songs. If the
EXB-MOSS option board is installed, up to 6 MOSS DSP timbres can be assigned to a Combination.
Selecting Combinations
1. Press the COMBI key to the left of the display to enter Combination mode. COMBINATION P0 Play will
be indicated in the upper-left of the display.
2. Press the BANK A key (if not already selected) - it will light, and the display will indicate the current
bank.
There are a number of ways to select Combinations. You can use the Bank, Numeric and ENTER keys to
direct-select a Combination, or use the DIAL or 55 66 value keys to make a selection from within a Bank.
26
Page 29

TRITON Training Guide
TRITON features two great ways to quickly-locate
Combinations:
Select-By-Bank
1. Select Combination A000: Romance Layers.
2. Press the popup button to the left of the name field. A popup menu will appear - the center area
shows 16 of the A-bank Combinations, beginning with A000. You can press to select Combinations here,
and use the scroll bar to move through the center menu pages and select more A-bank Combinations.
3. To the left of the center menu, you'll see the Bank tabs A - D. Pressing these tabs will take you directly to
a desired bank of Combinations.
4. Press the Bank B tab, then use the scroll bar to view and select Combination B010 5th.Dimension. You
are able to play any Combinations from this popup menu, but for now…press OK - this selects the Play
page (P0) for Combination B010.
Select-By-Category
In the same way as Program mode, Select-By-Category lets you manage and select Combinations by
"instrument family" - making sound navigation easier than ever! This feature helps you keep all your sounds
organized and easily-accessible!
1. Press the EXIT key to make sure you are still in Play mode (P0). Locate the Category popup button
above the Combination name field.
2. Press the Category popup button. A new popup menu appears, and because you selected Combination
B010, you can now view, scroll and select any of the Programs in the Synth category. Notice that the
categories are listed as tabs on the left and right sides of the display:
3. Press the 14 Rhythmi category tab on the right side of the display. The center menu now shows all the
Combinations in the Rhythmic category, and here you can view, scroll and select related Combinations.
4. Check out a few more categories and Combinations in this way.
Tip: You can move any Combinations to any category in edit mode, and you can rename the categories to
suit your music applications! See the TRITON Owner manuals for more information.
27
Page 30

TRITON Training Guide
Working with a Combination
Combinations have been a big part of the Korg sound legacy over the years, and the TRITON offers a huge
palette of Combinations with many new features!
1. Press the EXIT key to go to the Combination Play page, then press BANK key A.
2. With the Numeric keys, press 0, then press the ENTER key to select Combination A000: Romance
Layers.
3. Play the keyboard to get an idea of how great this Combination sounds. Work with the Ribbon and Real-
time Control knobs while you play.
4. Now…press the ARPEGGIATOR ON/OFF key (lit) to turn the Arpeggiator ON.
5. Play again - Welcome to the world of Dual Polyphonic Arpeggiators, running simultaneously - as
part of your Combinations! Take time to enjoy playing and listening to this Combination in a "song
context"- thanks to TRITON's powerful Arpeggiators!
6. Press the ARPEGGIATOR ON/OFF key (dark) to turn off the Arpeggiator.
7. Press the Category popup button above the Combination name field. The currently - selected Keyboard
category's Combinations are displayed, with 16 Category tabs on both sides of the center menu.
8. Press the 12 BassSplits tab, then use the Scroll Bar to move to the second group of 16 Combinations
in this category.
9. Press C097 Bumpin'&Thumpin', then press OK to go to the Combination Play page.
10. Play a note - anywhere on the keyboard. You'll automatically trigger the arpeggio pattern assigned. This
Combination is a Split of two basses and two electric pianos, as indicated by the Category, Bank and
Program fields in each column of timbres. Play in the lower range - up to Middle-C, to hear the bass, and
above Middle-C, play the electric piano timbres.
11. At the bottom of the display, notice the Status for each timbre - in this Combination, five timbres are set
to play INT (internal) Programs, and three timbres are OFF.
12. Keep that "thumpin'" beat goin', and check out the Controllers for this Combination - while you play a
bass line, slide your finger across the Ribbon and work with the Real-time Control knobs while you
play chords in the upper range. Press the Real-time Control key to go to the A -mode controls for the
knobs, and work with the knobs as you play.
13. Press the ARPEGGIATOR ON/OFF key (lit) to turn the Arpeggiator OFF (dark).
28
Page 31

TRITON Training Guide
Tip: Almost all of TRITON's Combinations have arpeggio patterns assigned to them! Some of these
patterns will automatically trigger when you select and play a Combination, while others are accessed simply
by turning on the Arpeggiator after you select a Combination - a great way to try out Combinations in a "song
context"
Tip: In all of the above pages, you can make quick settings for both Arpeggiators. Extensive edits to the
original User - arpeggio patterns themselves can be done in GLOBAL mode P6. You'll learn more about the
Arpeggio Setup and Edit pages in the Advanced Arpeggiator Tour, later in this guide!
Check out a few more great Combinations and features:
1. Press to highlight the Combination name field, and select Combination A052 ***Ice * Rain***. This is an
expressive and evolving Combination that highlights the Dual Polyphonic Arpeggiators, Controllers and
effects! Work with the Real-time Control knobs in both the A and B modes, use the Ribbon, Joystick and
SW1 and 2, and try out the ARPEGGIATOR Gate and Velocity knobs! All this sound from only 3
Programs, with room for 5 more!
2. Select Combination A031 Meteor Shower, and enter the "bizarre"! Sustain chords in different ranges of
the keyboard - have some fun with the Ribbon, Joystick and Real-time Control knobs! The "meteors"
flying in and out are brought to you by the Arpeggiator!
3. Select Combination B102 Knob Mixer Kit, and work with those Real-time Control knobs!
4. Select Combination D067 Bass and LFO-er - check out this funky split with both Arpeggiators kicking in
the low range! Turn off the Arpeggiators, play and hold a low note and pull the Joystick back - LFO's
syncing to the tempo! Turn on the Arpeggiator and pull it all together!
5. Select Combination A036 God's Bathtub. Sustain chords and listen as this incredible Combination
develops! Add more "water" with the Ribbon! Check out the Status field in the display - this one only
uses 2 Programs!
6. Now have some fun: Select Combination A127 One FingerTVShow , and hold down Middle -C!!!!
29
Page 32

TRITON Training Guide
Hot - Tip: TRITON COMBINATIONS RULE !!!!!!!!!!!!!!!!!!!!!!!!!!!!!!!!!!!!!!!!!
Tip: If you want a Combination to automatically - trigger arpeggio patterns in performance, first select the
Combination, then turn ON the Arpeggiator, then press the REC/WRITE key - a popup menu prompts you
with "Update Combination". Press "OK" to re-write the Combination with the Arpeggiator set to ON. You'll
also need to make sure that the Auto Arpeggiator function is check ed in GLOBAL (P0).
Work with the Solo Function:
1. Select Combination B019 Waterboy Split.
2. Play any key to trigger the drum arpeggio pattern, then play in all ranges of the keyboard to get an idea
of how the Combination sounds. (Check out the Controllers while you're at it!)
3. Press the Page menu button in the upper right of the display, then press Solo Selected Timbre from
the popup menu.
4. Press B023 (the Program number) or INT in the Timbre 1 column to Solo the Bass - play in the low
range to hear it.
5. Press A000 (the Program number) or INT in the Timbre 2 column and hold a chord in the upper range to Solo the arpeggiated synth Program.
6. Press A052 (the Program number) or INT in the Timbre 3 column to Solo the drum Program and it's
assigned arpeggio pattern.
7. Press the Page menu button in the upper right of the display, then press Solo Selected Timbre again,
to "toggle" the Solo function on and off.
8. Press to highlight the name field 019 Waterboy Split, then select Combination C013 Lush String Pad.
9. Work with the Solo function on Combination C013 - to solo each of the three timbres. Toggle the Solo
function on and off - to compare each soloed timbre with all the timbres on.
Hot -Tip: The Solo Function works great - to isolate selected timbres and get just the right mix - you can
use it in any Combination edit pages where the individual timbres can be controlled!
30
Page 33

TRITON Training Guide
Quick Tour of the Combination Edit Pages
Now to take a quick look at the edit pages in Combination A086 SciFi Chase Scene. You'll tour the Effect
pages later - in the Insert and Master Effect section of this guide.
14. Select Combination A086 SciFi Chase Scene
15. Press the MENU button, then, in the Jump page, press each of the following:
P1: Edit -Prog / Mixer
This page let's you select timbres ( by - Bank , Category or numerically), and set Pan and Volume levels for
each timbre (Program).
P2: Edit -Trk Param
The MIDI Channel tab in this page covers Status and MIDI Channel for each timbre, plus a new TRITON
feature - a Bank Select (EX2) function that sends Bank and Program changes other than the TRITON's
internal Bank / Program settings (when Status is set to EX2).
The OSC tab provides independent timbre settings for Force OSC mode - PRG, Poly, Mono and Legato,
plus OSC Select settings - both oscillators, oscillator1 or 2, and Portamento time settings - again,
independent for each timbre!
The Pitch tab sets timbre Transpose, Detune and Bend range, and the Other tab provides Delay and Scale
settings.
P3: Edit -MIDI Filter
On this page, you can set data filters for each timbre - in four MIDI tabs. Basic filtering of Program Change,
After Touch, etc. can be found in MIDI tab 1. Filtering of controller data, including Joystick, Ribbon, knobs,
switches, pedals and other controller data is accessed in MIDI tabs 2-4.
31
Page 34

TRITON Training Guide
P4: Edit -Zone / Ctrl
Tabs in this page let you set Key and Velocity zones for each timbre, and if the EXB-MOSS board is
installed, a tab for voice allocation of MOSS timbres is provided. The Controller tab on this page let's you set
assignments for SW1 and SW2, plus Real-time Control knob assignments for B-mode functions.
P7: Edit -Arpeggiator
This page provides settings for Arpeggiator, including timbre assignments, Arpeggiator A and B settings and
Arpeggiator Key / Velocity Zones. You'll tour this page in the Advanced Arpeggiator Tour - later in this guide.
P8: Edit -Insert-FX and P9: Edit -Master FX
These pages relate to the Insert and Master effects and parameters for the Combinations - they'll both be
covered soon -in the Effects section of this guide.
32
Page 35

TRITON Training Guide
Very Cool Combinations
Here’s some great Combinations to demo from each Category. Although you'll find many more Combinations
with great sound and controller functions, these are some of our favorites! So here you go - a "place to start":
CATEGORY COMBINATIONS
KEYBOARD A000, A001, B000, B064, C025
ORGAN A008, A072, B104, C088
BELL / MALLET C060, C108, D012
STRINGS A013, A093, C029, D013
BRASS / REED A011, B059, C027, C091
ORCHESTRAL A002, A018, A114, B050
WORLD A025, A041, B025, C105
GUIT / PLUCKED A007, B087, C103, D039
PADS A010, A122, C058, D074
MOTION A004, A020, A036, A068, B090
SYNTH B010, C005, C069, D021
LEAD SPLIT A014, A126, B126, C078
BASS SPLIT A001, C001, C097, D081
COMPLEX A015, A031, A063, D079
RHYTHMIC A102, B003, B019, B086, C126
DRUMS / HITS A006, B111, D006, D022
Tip: There is a more complete chart at the end of this Guide, listing controllers and other helpful information.
There's soooooooooo many sounds!
KORG's fantastic programming team spent untold hours of painstaking controller edits and voicing - to get
each Program and Combination just right! We at Korg want you to explore TRITON - you'll find many great
sounds in all the categories.
Insert and Master Effects
TRITON features five Insert effects (stereo in / stereo out) and two Master effects (mono in / stereo out), plus
a stereo three-band master EQ. There are a total of 102 different insert effect algorithms and 89 master
effects -all fully - editable and real-time - controllable! TRITON also features easy effects routing, including
the ability to route effected or dry signals to the individual outputs - quickly! Plus, external audio inputs can
use TRITON's effect engine as a 2 -in / 6 -out effect processor!
33
Page 36

TRITON Training Guide
Effect Dynamic Modulation lets you control TRITON's effects in real-time - for performance and sequencing,
and many of the delay and LFO modulation effects feature BPM / MIDI-sync functions for precise control with
tempo!
Highlighting just a few of TRITON's many Effect Features:
Insert Effect Chaining: easily - chain up to 5 stereo or 10 mono-chained effects!
Audio Input Processing: through any of TRITON's powerful effects and EQ for 2 -in / 6 -out
processing!
Powerful Routing: Quick and comprehensive - six outputs give you the flexibility to route
signals any way you want - in seconds!
Insert and Masters: use any master effect as an insert, and any insert (excluding double -
size) as a master!
Superb 3-band EQ: with mid center band control - dynamic, and stereo in /out !
Touchview Interface: gives you the ultimate in ease-of-use when viewing and editing
TRITON effects!
In Program, Combination and Song modes:
All Insert and Master effects are available for processing of internal sounds, and in addition, any external
source (mono or stereo) can be processed through the effects! One of TRITON's main effect features is a
16-band Vocoder, where internal sounds are controlled by an external microphone input, or each other! The
3- band master EQ let's you perform final processing, and features a mid band width (Q) control and all
bands allow for real-time control of gain from knobs, velocity, etc.
In Sampling mode:
Any external source (mono or stereo) can be routed through any of the Insert effects while sampling! The
Master effect and EQ cannot be used in Sampling mode.
Working with TRITON's Effects
Tour of Insert and Master Effects in Program mode:
1. Select Program D071 Rotary Organ. Make sure you are on the Program Play page (MENU > P0).
2. Look in the display - you'll see the Insert (IFX) and Master (MFX) effect assignments for this Program.
3. Press the MENU key, then press P8: Insert Effect.
4. Press the Routing tab (lower - left) to display the effect routing page.
34
Page 37

TRITON Training Guide
5. The insert effect selections are posted in the upper -right of the display. The arrow is pointing to IFX1
because the BUS Select has been set to send the oscillator signal to insert effect 1. In Program D071,
insert effect 1 is a St. Graphic 7 -band EQ, and it is chained to insert effect 2 (IFX2) - this means the
signal passes through IFX1 to IFX2 (Rotary Speaker), as denoted by the arrow in the upper - right and
(Chain) in the display. You can copy and swap insert effects, and write the Program from the page menu
tab.
6. Press the Insert FX tab (bottom). In this page you can select the type of effect, chain, on / off status,
pan, bus and send levels.
Work with an Insert effect:
7. Press the IFX1 tab (bottom). This page lets you edit insert effect 1 parameters. Press the IFX2 tab to
view insert effect 2's edit page (IFX 3 - 5 do not have effects assigned in Program D071). Note the Src:
and Manual Speed Ctrl: parameters in IFX2 - by using knobs 2, 3 and the Joystick +Y position, you
can control the Rotary Speaker effect - take a moment to work with these controllers now .
35
Page 38

TRITON Training Guide
Tip: Controlling the effects in real-time is a great feature! And remember - the changes you make in real-
time can also be recorded to TRITON's internal - or an external sequencer!
More examples of Dynamic Modulation:
8. Press the EXIT key, then select Program B005 Fingertips Guitar (BANK B >5 >ENTER).
9. Press the MENU key, then press P8: Edit - Insert Effect.
10. Press the Routing tab to view the insert effect setup and BUS select - note that all oscillators are bussed
to IFX1 (BUS Select setting and arrow to IFX1). Also note the insert effect names and chaining from
IFX1 >2 >3 (arrows: upper-right).
11. Press the IFX2 tab to view the settings for the Stereo Phaser.
12. Locate the Src: setting for the Wet/Dry mix of this effect - set to the Joystick -Y (JS-Y) at an amount
(Amt) of +53. While you play, move the joystick in the -Y (towards you) position to hear the Stereo
Phaser wet / dry mix being controlled.
13. Press the IFX3 tab, and view the Wet/Dry Src: JS-Y - note that the Joystick -Y controls the wet/dry mix
for IFX2 and IFX3 . Play and use JS-Y to hear both insert effects being Dynamically - controlled.
14. Press to highlight Band 7 (or anywhere on the 16kHz line to it's right). Rotate the DIAL to the right to
increase the 16kHz gain value of +13.0. Now play again, and use JS-Y - you'll hear more of the stereo
graphic EQ effect being applied, especially the 16kHz frequency.
Apply a new Insert effect:
15. Press the Insert FX tab, then press the OFF toggle button in the IFX4 box - it will change to ON.
16. Press the Chain checkbox to the left of IFX3, to chain IFX3 to IFX4.
17. In the IFX4 box on this page, press the popup button to the left of 000: No Effect. A center popup
menu lists 16 available effects from the Filter / Dynamic (noted in the display, upper -right) category.
36
Page 39

TRITON Training Guide
TRITON's effects are grouped by category, and the tabs at the left of the center menu list the
seven available effect categories.
18. From the center menu, press 011: StExciter/Enhncr, then press OK.
19. Play the keyboard to hear the newly - applied insert effect - a stereo exciter / enhancer. Note that there
are now four stereo insert effects in this Program.
20. Press the COMPARE key and play, to compare your new edit with the original effect settings.
21. Press the COMPARE key again, to recall the new edit, then press the IFX4 tab. You'll see this insert
effect's parameters and modulation source settings. Try slight adjustments for the Enhancer Depth and
Emphatic Point, and LEQ / HEQ gain parameters as you play…better yet:
22. Turn on the Arpeggiator (ARPEGGIATOR ON/OFF key) (lit). Now play notes / chord to trigger the
arpeggio pattern assigned to this Program, and work with the effect parameters as the pattern plays -
another great application for the Arpeggiator!
23. Turn off the Arpeggiator (ARPEGGIATOR ON/OFF key) (dark).
Copy an insert effect from another Program:
24. Press the Insert FX tab, then press the Insert FX Page menu button (upper - right of the display).
25. Press Copy Insert Effect.
26. Press the popup button to the left of the Program name in the From: field of the display. You'll see a
center menu, and on each side - Bank tabs.
27. Press the Bank B tab, then press B000: Synth Sweeper, and press OK.
28. In the To: field of the display, you'll copy IFX1 to IFX2: Press the lower IFX1 popup button, then
press IFX2.
29. Press OK - IFX1 (a stereo BPM Delay) from Program B000 will be copied to IFX2 of the current
Program.
Write the edited Program to a new location:
30. Press the Insert FX Page menu button (upper-right corner), then press Write Program.
37
Page 40

TRITON Training Guide
Rename the edited Program, then write it:
31. Press the T Text Edit (T) button to the left of FingertipsGuitar. A text edit window appears. Press the
Clear button - the name field in the upper - left clears. Now press the Shift button, then press each text
box to rename the Program: BOB'S GUITAR., then press OK (if you make a mistake, and want to move
through the new name field and change characters, use the < > arrow boxes and the Delete button,
then re-insert the correct characters).
32. After you press OK, a Write Program dialog box appears. Leave the Category as it is. Press the
popup button to the left of B005 FingertipsGuitar, and a Write Destination menu appears. Note the
Bank tabs to the left of the center menu.
33. Press the Bank E tab, and in the center menu, press E003, then press OK - the dialog box appears
again, with the new destination Program Bank/Number highlight ed.
34. Press OK, then press OK again - when prompted Are you sure? - to write the Program to the new
location.
Note: The E bank is normally reserved for Programs that use new user - samples, as you'll see in
the Sampling and Sequencing section that follows.
Work with the Master Effects:
1. Press the MENU key, then press P9: Edit - Master Effect. Press the Master FX tab in the lower - left of
the display. On this page, you'll see both Master effects (MFX1 and 2), the Send 1 and 2 chain box,
direction, signal and level settings, as well as the Return1 and 2 levels. The 3-band Master EQ Gain
settings are here as well.
38
Page 41

TRITON Training Guide
2. Press the MFX1 tab to view the settings for the Stereo Chorus - the Src of Wet/Dry control is set to
KnobM3. As you play, rotate Knob 3 to hear the wet/dry balance change.
3. Press the MFX2 tab to view the Reverb SmoothHall parameters, and view the Src of Wet/Dry control.
As you play, rotate Knob 4 to increase / decrease the reverb intensity.
Copy a Master effect from a source Program:
4. Press the Master FX tab button, then press the Master FX Page menu button (upper-right). Now press
Copy Master Effect from the popup menu. In the dialog box that appears, you'll see From: (source) and
To: (destination) popup buttons.
5. Press the From: popup button second down in the screen (with the Program name) - note all the
Program bank tabs to the left and right of the center menu. Now press A005: Acoustic Guitar on the
center menu, then press OK. The dialog box returns, with the new source Program highlighted. In the
To: field of this page, the popup buttons allow you to copy one source effect (insert or master) to a
destination effect (insert or master), or you can select All, to copy all Master effects from the selected
source - to the current Program.
6. Press the All checkbox, then press OK, to copy all of Program A005's Master effects to the destination
(current) Program E003.
Note: When selecting effects for Inserts or Masters, effects 000 - 089 can be used. Effects 090 - 102
are double - size effects, and use twice the processing area of other effects. Master effects cannot
use double - size effects.
Working with the Master EQ
The 3- band master EQ is located after the insert and master effects - just before the outputs of the TRITON.
In Program E003's currently - selected (P9 Edit Master Effects) page, you'll see the Master EQ Gain settings
for each of the three bands available.
Work with the gain levels and Update the Program:
1. Press the +03.5 Low EQ "fader", and as you play, rotate the DIAL, or use the 56 value keys to
increase / decrease the Low gain. Do the same for the Mid and High gain settings. When you've set the
desired EQ gain levels, press the REC/WRITE key in the SEQUENCER / SAMPLING section. A dialog
39
Page 42

TRITON Training Guide
box asks if you want to Update Program. Press OK to update the selected Program with the new EQ
gain settings.
Note: In the Master Effects tab page, the L/R signal path is indicated by an arrow, through the Return
1 /2 and EQ gain settings - to the L/ Mono/ R outputs. At the bottom of this page, another arrow
indicates that individual outputs 1-4 are not affected by Return and EQ settings.
Work with the EQ parameters:
2. Press the Master EQ tab button at the bottom of the display. Now you can view and set frequency and
gain settings for the EQ bands, including a "Q" (center bandwidth) setting for the mid EQ. Also note the
Low-Gain and High Gain Mod-Src settings on this page. Press the popup buttons for each of these
parameters - to view the Dynamic Modulation sources available.
Working with the Effects and EQ in Combination mode:
Editing Insert, Master and Master EQ settings in Combination mode is basically the same as in Program
mode, except for a couple very important things: You are working on up to eight timbres, each with
independent control of insert and master effect routing!
Work with a Combination's Insert Effects:
1. Press the COMBI key to enter Combination mode, then select Combination D006 Sonic FX Mixer. This
Combination uses eight timbres, each with independent settings for bussing for insert effects. There are
also two Arpeggiators latched in this Combination, with timbre 1 using Arpeggiator A, and timbre 2 using
Arpeggiator B. All the timbres can be played live - from the keyboard, but only timbres 1 and 2 have
arpeggio patterns linked to them. Let's get back to the Insert effects for this Combination…
40
Page 43

TRITON Training Guide
2. Press the MENU key, then press P8 Edit - Insert Effect, and press the Routing tab. You'll see five
stereo Insert effects, chained, at the upper - right of the display. There are eight columns of timbres 1-8
in the lower field, each with specific routing and send parameters:
Timbre 1 Drums: IFX1 (chained from IFX1 through IFX5, so this timbre uses all the
insert effects.
Timbre 2 Drums: IFX5 (only bussed to IFX5's Stereo Compressor).
Timbre 3 Drums: IFX1 (same bus as timbre 1).
Timbre 4 Drums: Dkit (setting the bus to Dkit "points" this timbre's Program to the
individual drum sound's insert effect busses - set in GLOBAL P5 Drum
Kit - each drum sound can use / or not use a determined insert effect
or be bussed to individual outputs! Plus, with this bus setting, you can
set Send 1 and 2 levels to the Master effects!).
Timbre 5 SE: IFX3 ( No Stereo Graphic EQ (IFX1) or Stereo Compressor (IFX2) for
this timbre - it's bus starts at IFX3 Stereo Phaser, and is chained
through IFX4 and IFX5).
Timbre 6 SE: L / R (no insert effects for this timbre - just Send 1 and 2 level settings
to the Master effects!)
Timbre 7 / 8 SE: IFX3 (both timbres bussed to IFX3 - same as timbre 5).
TRITON makes it easy to route Combination timbres (and Sequencer tracks!)
Copying Insert effects in Combination mode:
Copying Insert effects in Combination mode is the same procedure as in Program mode. See the previous
section "Copy an Insert effect from another Program" to see how this is done.
Note: When selecting effects for Inserts or Masters, effects 000 - 089 can be used. Effects 090 - 102
are double - size effects, and use twice the processing area of other effects. Master effects cannot
use double - size effects.
Tip: For more information on Insert and Master Effects functions and features, see the TRITON Owners
manuals!
41
Page 44

TRITON Training Guide
A Word About Output Bussing
The ability to send oscillators, timbres and tracks to individual outputs has never been easier! As an
example, in Combination mode, just select the bus for each timbre - in the P8: Edit - Insert Effects Routing
page (as viewed in the previous section) to outputs L/R, 1-4, 1/2 or 3/4, patch from the selected output to
your mixer or amplifier, and you're all set! You can even send a timbre through Insert effects before going to
an Individual output - we'll look at that later in this guide.
Working with the Audio Inputs and Effects
On the TRITON's back panel, you'll find two audio inputs, with a LINE / MIC impedance switch and a gain
level control. These inputs can be used to process external signals through the TRITON's internal effects,
and as the source inputs for using the TRITON in Sampling mode.
For the following exercise, you'll need a microphone, cable and a line -matching transformer (lo-hi
impedance transformer) if your microphone is lo-impedance.
Connect the microphone and set the input level :
1. Connect a microphone to the rear panel Input 1 connector and set the MIC / LINE switch to MIC.
2. Press the COMBI key to enter Combination mode, then select Combination A000 Romance Layers.
3. Press the GLOBAL key to enter Global mode, press the MENU key, then press P0: Basic Setup.
4. Press the Audio Input tab.
5. In the Input 1 field, press Pan: L000 and type 64 + ENTER on the numeric keypad to set the pan value
to C064 (center).
6. In Input 1's BUS Select field, press the popup button, and set the BUS to L / R. Then, just below
BUS Select, press the 000 value, and use the DIAL to set the Send 1 (MFX1) level to 100, and the Send
2 (MFX1) level to 040. Now speak into the microphone to hear the signal being processed with the
Master effects (MFX1 and 2). (Master effects from Combination A000). Note that even when the BUS
Select is set to OFF, if the send levels are above 000, the input signal will go direct to the Master effects.
If the send levels are at 000 and the BUS Select is set to L / R, signal will be sent dry - to the L / R
outputs.
7. Press the popup button and select IFX1 from the popup menu. Speak into the mic to hear the signal
being processed by Insert effect 1. Continue to select and try the other IFX busses. To view and edit the
Insert effects, set the audio input BUS Select, press the COMBI key, then press the MENU key. Press
P8: Edit - Insert Effects, then press the Insert Effect tab to view IFX1 -5, and depending on which BUS
Select you've chosen for the audio input signal, press the corresponding IFX tab - to edit the Insert effect
while speaking into the microphone. If you want to edit a Master effect that's processing the audio input
42
Page 45

TRITON Training Guide
signal, from the COMBI MENU key, press P9 - Edit Master Effect, then select the MFX tab you've
bussed the input signal to.
Tip: Always be sure to turn off the audio input (Global, P0, Audio Input Tab) after demoing so you don't
leave the TRITON "open" to someone grabbing that mic and starting to sing "Volare", or rapping badly!
Actually, as you select new Programs/Combinations the mic will go through the current effect and may cause
some undesired results.
Note: When selecting effects for Inserts or Masters, effects 000 - 089 can be used. Effects 090 - 102
are double - size effects, and use twice the processing area of other effects. They are only available
as Insert effects.
Working with the Audio Inputs and Vocoder Effect
The TRITON features a 16 - band Vocoder (Effect # 093). A Vocoder superimposes the timbre of one signal
onto another - it modifies the timbre qualities by dividing the first signal (modulator) by the second signal
(carrier) into a number of frequency bands. The more frequency bands - the greater the definition of the
effect itself. To achieve this "talking instrument" effect in the TRITON, you apply the right channel signal
(Modulator) to the left channel signal (Carrier). In the factory Programs and Combinations where the Vocoder
effect is present, it has been selected as IFX2. When you want to process the signal through the Vocoder,
set the audio input BUS Select to IFX2. In the TRITON factory sounds, there are already two Programs and
one Combination that are setup perfectly to demonstrate the Vocoder…
Work with the Vocoder effect:
1. Press the GLOBAL key to enter Global mode, then, in the Input 1 field, press the Pan: value, and using
the DIAL, set this value to R127.
2. In the BUS Select field of Input 1, press the popup button, and select IFX2 as the Insert effect bus.
3. Press the PROG key to enter Program mode, then select Program E001 Vocoder 1.
4. Speak or sing into the microphone as you play notes / chords on the keyboard - to hear the Vocoder
effect. Rotate Knob2 to control the Noise level - one of the Vocoder effect parameters. Rotate Knob4 to
control the wet / dry Reverb mix for Master effect 1.
5. Press the COMBI key, then select Combination A004 Vocoderhythm. Speak or sing into the
microphone as you play notes / chords on the keyboard. Demonstrate the effect while the Arpeggiators
trigger as you play! Try editing IFX2 (MENU>P8>IFX2) - work with the Modulator High Mix and
Formant Shift values as you play and speak.
43
Page 46

TRITON Training Guide
Sampling Mode
TRITON features 48 kHz 16 - bit linear mono or stereo sampling. TRITON, TRITONpro and TRITONproX
come standard with 16 Mbytes of sample RAM on an internal 72-pin SIMM module, giving you recording time
of almost 3 minutes in mono, and well over 1 minute in stereo. You can easily and affordably expand
TRITON's sample RAM to 64 Mbytes with user - installable and commercially - available SIMMS modules.
There's two internal slots for the SIMMS modules, and they can be configured in the following ways: 2 - 16
Mbyte SIMMS give you 32 Mbytes sample RAM, 1 - 16 Mbyte and 1 - 32 Mbyte SIMMS equals 48 Mbytes
sample RAM, and 2 - 32 Mbyte SIMMS take TRITON to 64 Mbytes sample RAM - this allows total recording
time of well over 11 minutes, giving you four mono samples of almost 3 minutes each, or four stereo samples
of well over 1 minute each.
Just a bit of Korg sampling terminology…
Sample: Data that's recorded or loaded into sample RAM. Samples consist of
waveform data and playback parameters such as Start, and Loop
Start and End addresses. A TRITON, TRITONpro or TRITONproX can
contain a maximum of 4000 samples in internal memory (64 Mbytes).
Multisample: The settings that allow one or more samples to reside in different
areas of the keyboard (1-128 "indexes"). A standard TRITON,
TRITONpro or TRITONproX can hold a maximum of 1000
multisamples in internal memory (64 Mbytes).
Index: A parameter (index #) that specifies the sample, zone, original pitch,
playback pitch and level etc.
More sampling terms to come…for now, let's get started:
44
Page 47

TRITON Training Guide
Recording One -Shot Vocal Samples
Here's a quick and easy way to make a sample - all it takes is a microphone:
1. Clear the TRITON's sample RAM by powering - OFF, then ON (when you get more comfortable with
TRITON you can learn how to erase all samples without powering off). Connect a microphone to the
Input 1 jack on the rear panel, set the MIC / LINE switch to MIC, and set the LEVEL control to the 12
o'clock position.
2. Press the SAMPLING key to enter Sampling mode.
Input Setup Tab:
3. Press the Input Setup tab, then, in the Input 1 field, press the popup button, and set the BUS (IFX)
Select to L / R.
4. Set the Input 1 Pan: value to C064 with the DIAL or Numeric keys.
5. In the Recording Setup field, press the Auto radio button, set the Threshold to -30 dB, then set the
Pre Trigger REC value to 5ms with the DIAL or Numeric keys.
Recording Tab:
6. Press the Recording tab, and make sure that the MS: (multi-sound) is set to 000: New MS___000
(you're already there, if you powered OFF / ON before beginning this section).
7. In the REC Sample Setup field, set the Sample Mode: to L - Mono with the DIAL or Numeric keys.
8. Set the OrigKey: C2 and the TopKey: C2 - you can easily -set these values by pressing to highlight
each Orig and Top key in the display, and while holding the ENTER key, press C2 (low - C) on the
keyboard.
45
Page 48

TRITON Training Guide
Preference Tab:
9. Press the Preference tab and set the Zone Range to 1 key with the DIAL or Numeric keys. This setting
means that each new index you'll be creating in the multi-sample will be a half -step higher.
Recording Tab:
10. Press the Recording tab.
11. Press the REC/WRITE key to "arm" the sampler, and speak into the microphone. If "CLIP" flashes
above the indicators in the Recording Level [dB] field, press the 0.0 "fader" and lower the level
accordingly. If "ADC OVERLOAD" flashes above the indicators, the audio input level on the rear panel
has been set too high - lower it until the "ADC OVERLOAD" indicator no longer flashes.
Record the samples:
12. Press the START/STOP key and say the word "It's". Press START/STOP again to stop sampling, then
press Create (above the Recording Level indicators).
13. Press the START/STOP key and say the word "So". Press START/STOP again to stop sampling, then
press Create (above the Recording Level indicators).
14. Press the START/STOP key and say the word "Easy". Press START/STOP again to stop sampling,
then press Create (above the Recording Level indicators).
15. Press the START/STOP key and say the word "To". Press START/STOP again to stop sampling, then
press Create (above the Recording Level indicators).
16. Press the START/STOP key and say the word "Sample". Press START/STOP again to stop sampling,
then press Create (above the Recording Level indicators ).
17. Press the START/STOP key and say the word "With". Press START/STOP again to stop sampling,
then press Create (above the Recording Level indicators).
18. Press the START/STOP key and say the word "TRITON". Press START/STOP again to stop sampling,
then press Create (above the Recording Level indicators). That's it!
19. Now play the keyboard - play each note (half - step) from C2 (Low-C) up to F#, and you'll hear the
words: "Its So Easy To Sample With TRITON".
Here's what happened:
You just created a new Multisample! You set the Orig and Top keys to the same key, as well as setting the
Zone Range to 1 key, and after you sampled a word and pressed Create, the TRITON automatically set the
Orig and Top keys - 1 key higher than the previous sample, ready for the next sample. When you finished,
your samples were mapped in half - steps across the keyboard! Like we said, it can't get any easier than this!
46
Page 49

TRITON Training Guide
Sampling Through an Insert Effect
You can sample any audio source through any of TRITON's 102 available Insert effec ts!
Let's continue on from the previous steps:
20. Press the Input Setup tab, then, from Input 1's BUS Select popup menu, press IFX1.
21. Press the MENU key, then press P8: Insert Effect.
22. Press the OFF toggle button in the IFX1 box to turn it ON, then make sure 000: No Effect in the IFX1
box is highlighted.
23. With the Numeric keys, press 52, then press the ENTER key, to select Insert effect 052 Reverb Hall.
24. Speak in the microphone to hear the effect being applied. Press the IFX1 tab at the bottom of the display
to view and edit the Reverb Hall parameters to your liking.
25. Press the MENU key, then press P0: Recording.
26. Press the Recording tab, then press the REC/WRITE key to "arm" the sampler. Speak into the
microphone and adjust the Recording Level as needed.
27. Press Create to make a new index in the multisample to hold your upcoming sample.
28. Press the START/STOP key and record something like "Yeah Baby!". Your new sample, recorded with
Insert effect, will playback on key G2 - the next - available index.
Tip: You can record one sample through five insert effects! Or try recording a multi-sample with each
sample bussed to a new Insert effect!
47
Page 50

TRITON Training Guide
Naming Your Samples and Multi-samples
TRITON features the ability to name your samples and multi-samples, and since you can record up to 4000
samples and 1000 multi-samples in internal memory (with 64 Mbytes sample RAM), this feature becomes
pretty important! In the previous steps you recorded one multi-sample containing eight samples, beginning
with sample number 0000.
Rename the Multi-sample:
1. Press the Recording tab, then press the Recording Page menu button at the top -right of the display.
2. From the popup menu, press Rename MS. A dialog box appears - press the Text edit box to the left of
New MS___000, and TRITON's famous "typewriter" appears!
3. Press Clear to clear the name field in the upper - left, then press Shift.
4. Press each Text box to rename the multi-sound "TRIDEMO", then press OK. The dialog box returns -
press OK again, and note the new multi-sample name in the upper -left of the display.
Tip: Just so you know, you can name your individual samples in the same way - just select each of them
from the Sample popup menu in the center area of the display, then follow the same procedure as above,
only select "Rename Sample" from the Recording Page menu command popup. This is a great feature for
saving , loading and organization of samples and multi -samples! And speaking of saving, don't
forget to save your sample data to disk or via SCSI before you power down your TRITON.
Tip: We realize we're "skipping - by" a few terms and parameter descriptions that you've worked with in the
previous steps, but there's so much more to cover on TRITON in this guide - make sure to work with the
TRITON Owner manuals - the sampling sections cover every function in-depth!
48
Page 51

TRITON Training Guide
Converting a Multi-sound to a Program
OK, so you've got a new Multi-sound, and you want to use it in a Program, Combination, or even as a track
in the Sequencer… what to do? Convert it to a Program! TRITON makes it easy!
Using the Multi-sample you just recorded:
1. In the Recording tab page, press the Recording Page menu button (upper -right), then press Convert
MS To Program. A dialog box appears - you could select Use Destination Program Parameters - a
quick way to bring your multi-sample into a "template" Program, with similar parameters to the multisample you recorded, but for now, leave this box un-checked.
2. Press the Text Edit button, and use the "typewriter" as before, to name your new Program.
3. Press the Program popup button, then press the Bank E tab button to the left of the center menu.
4. In the center menu, press E004, then press OK - press OK again when the dialog box returns, and press
OK once again when the Are You Sure? prompt appears - to convert the multi-sound to your new
Program location.
5. Press the PROG key to enter Program mode, then select Program E004. Play the keyboard from C2 -up
to hear the multi-sound. It's new "home" is oscillator 1!!!
Working with Grooves, Loops and Tempo
It can't get any easier than this! TRITON features the quickest ways to sample a rhythmic phrase or loop,
and view and edit your samples! The following section deals with just -that! You can use any available synth,
drum machine, CD Player - anything that's close -at -hand, and that has a source tempo / BPM value that
you know.
Let's get started:
1. Power - OFF / ON the TRITON to clear the sample RAM and reset the sampling parameters (you want
this demo to go as flawlessly as possible, right? When you get more comfortable with TRITON you can
learn how to erase all samples without powering off).
2. Connect your audio source left and right outputs to the TRITON's rear panel Audio Inputs 1 and 2.
3. Set the MIC / LINE switch to LINE, and set the LEVEL control to the 12 o'clock position.
4. Press the SAMPLING key to enter Sampling mode.
5. Press the Input Setup tab, and set the BUS Selects for Input 1 and Input 2 to L / R.
6. In the Recording Setup field of this page, press the Auto radio button, then set the Threshold to 30dB, and the Pre Trigger REC to 005ms.
49
Page 52

TRITON Training Guide
7. Press the Recording tab, and in the REC Sample Setup field, select and set the Sample Mode: to
Stereo.
8. Press the REC/WRITE key to "arm" the sampler.
9. Start playback on your audio source device, and watch the Recording Level indicators in TRITON's
display - if "ADC OVERLOAD" flashes above the indicators, lower the rear panel LEVEL control until
"ADC OVERLOAD" no longer flashes. If "CLIP!" flashes above the indicators, press the Recording
Level "fader", and lower the level until "CLIP!" no longer flashes.
10. Stop playback on your audio source device.
11. Press TRITON's START/STOP key, then start playback on your audio source device. When you have
sampled the desired length of the source material (1 or 2 bars should be plenty), press TRITON's
START/STOP key again - to stop sampling, then stop playback on your audio source device.
12. Play the TRITON's C2 (Low-C) key to playback the new sample - it will loop automatically - don't worry,
we'll fix the loop shortly! For now, notice the MS: 000: New MS___000 -L at the top of the display because you set the Sample Mode to Stereo, TRITON automatically created a stereo multi-sample with
two individual samples in the New Sample field. The "beauty" of this lies in the fact that, when you
convert this multi-sample to a Program, the L / R samples will "find their way" instantly - to oscillators 1
and 2! Cool, huh? Leave these values set as they are for now…
Work with the Sample Edit page:
13. Press the MENU key, then press P1: Sample Edit. Because this is a stereo sample, the waveform
display you see is split horizontally, allowing you to view both the left and right samples at the same time.
14. Press to highlight the Edit Range End: 0000000 parameter, and rotate the DIAL clockwise. You'll see
the entire waveform display being highlighted as you go - when you reach the actual sample end point
and can't rotate the DIAL anymore, press the START/STOP key. You'll hear the sample play back from
start to end, and then stop.
15. Now press the ZOOM 55 66 buttons to zoom - in and out on the sample level (vertical), then press the
ZOOM 33 44 buttons to zoom - in and out on the sample addresses (horizontal). This let's you view a
sample up - close and personal! Plus, it really helps when you need to work with specific areas of the
sample data!
Tip: There's much more to learn about the Sample Edit page functions, including a host of Page command
edits like Truncate, Cut, Clear, Copy, Insert, Mix, Paste, Normalize, Rate Convert , Reverse and more…
Make time to check out the TRITON Owner manuals for more information!
50
Page 53

TRITON Training Guide
Work with the Loop Edit page:
16. Press the MENU key, then press P2: Loop Edit. On this page, you can work with the sample length and
set sampling parameter values. Again, in TRITON's display, you'll see the waveform in stereo. Let's
check out a few more functions…
17. ZOOM 55 and 44 to see the waveform level and sample address data in greater detail, then trigger the
sample from it's Orig key C2.
18. Check out the Start, LoopS (Loop Start), and End points in the lower - left of the display. They're
already set - exactly as the sample was recorded, but you probably need to trim some of the "fat" off the
Loop End point - chances are your loop is not perfect…
19. Press to highlight the End value, then, as you continue to hold C2 and play the loop, rotate the DIAL
counter - clockwise, slowly, and listen as the loop repeats…having trouble?…Never fear - check this out:
20. Press the Page menu button in the upper - right of the display, then press Grid. A dialog box appears Press the On radio button, and for now, leave the Resolution set to a quarter note value. Finally, press
OK.
21. The vertical dotted lines that now appear across your waveform display represent quarter note
divisions. If you sampled a loop of 4 bars, you'll see 16 divisions across the grid. A loop of 2 bars would
be indicated by 8 divisions, etc.
51
Page 54

TRITON Training Guide
22. Press the Grid: 120 BPM value, and set it to your original source device BPM value. Note that if
needed, you can re - adjust the BPM value here to set more accurate references to the divisions on the
waveform display.
Let's fix the loop:
23. Make sure to press and highlight the End value, then rotate the DIAL to the nearest vertical line in the
Grid. You may need to "zoom out" a little using the left arrow (if it isn't grayed out). Depending on where
you want your sample to loop, you might move the End point left or right on the Grid - you might even
want to cut the loop in half, and make what was once a 4 bar loop, a 2 bar loop…Either way, the Grid is
a very cool indicator and a much better way to "see" what you're actually hearing. Work with the End
point and DIAL, and if you need to set a new Start or LoopS point, just highlight those parameters and
use the DIAL to set them accordingly. Once you trigger the loop and like what you see and hear…
24. Press the Page menu button in the upper -right of the display, and press Truncate. A dialog box
appears, indicating some important stuff: Start and End points are posted in the Range field, and radio
buttons let you decide to truncate Front & End points, or Front, or just the End of the loop. Truncating
deletes unwanted sample data that lies outside the loop region areas. For now, leave the parameter set
to Front & End…Another cool feature in this dialog box is the Save to No. (L and R) field - this handy
set of values automatically assigns the data you're about to truncate to a new set of sample numbers,
preserving the original un-truncated samples. There’s many reasons to let the TRITON Save to new
sample locations - maybe you want to do further editing to the original data and use it elsewhere…
There's also an Overwrite checkbox here - and because you're just learning all of this…
25. Go ahead and check the Overwrite checkbox. (you didn't want that original data anyway, did you ?)
26. The display will indicate Truncate - Now Executing, and the job is done! Trigger and hold key C2 and
see for yourself - if everything went as planned, you've got a perfect loop!
Tip: If for some reason, the loop truncating process in Loop Edit is not what you wanted, or if you want to
view the sample data highlighted, and edit it more - precisely, you can go to P1: Sample Edit, and work with
the Start and End Points, Normalize, even set a Volume Ramp - a host of edit functions await you there!
52
Page 55

TRITON Training Guide
Hot -Tip: When checking the timing of a loop in a long phrase it's handy to give the sample more than a
1-step range and play the sample higher than its normal pitch. This fast playback gets you through the
phrase quickly, saving a lot of time!
Hot - Tip: Want to turn a 4 bar Groove into a 2 bar Groove? Go to P2 Loop Edit and set the Grid to
quarter notes to help you get started…Select End and move it backwards to Beat 8 - zoom in to get an
accurate view as desired - set the Grid Resolution finer as desired.
Hot - Tip: If there's a slight "flam" in the End point - even if it's exactly on the Grid line - this might be due
to slight inaccuracies in BPM - sometimes your source tempo is fractional (140.22) and TRITON doesn't
allow for that adjustment…don't worry - just use your eyes and ears to move the end point backwards to
avoid the "bass drum hit" that you so obviously see / hear…Want more help? Check the "Use Zero"
checkbox in P1 or P2 Edit pages to help find the zero crossing point for your edit location!
Tip: There's more sampling "tips and tricks" coming soon - in the aptly - named "Sampling Tips and
Tricks" section - later in this guide!
53
Page 56

TRITON Training Guide
Sequencer Mode
TRITON contains a 16-track, 200,000 event sequencer, with an astonishing capac ity of up to 200 songs!
Each song can be arranged in a Cue List of up to 100 songs, and up to 20 Cue Lists can be created
internally. You can specify the number of times each song will play in a Cue List, and Cue List songs can be
converted into a single song.
There are sixteen different Template Songs in memory - complete with program and effect settings for
various styles of music! That means you can load a Template Song and start making music without the
hassle of assigning tracks and effects ahead of time! Plus, you can create sixteen of your own user templates! There are 150 Preset Patterns in internal memory - ready to use as they are, or editable as tracks
in your songs! These patterns can be used by themselves, or played by the RPPR function in the sequencer.
RPPR (Real-time Pattern Play Record) let's you assign and trigger patterns (preset or user) to notes on the
keyboard - for playback and recording!
TRITON's Dual Polyphonic Arpeggiators can be used for recording and playback in any song, too, and
arpeggiated tracks can even be converted to patterns, and triggered with the RPPR function!
Each song can use five Insert effects and two Master effects with 3 - band EQ, and the effects are realtime controllable - for performance and sequencing!
Samples can be converted into Programs and used in songs, even pitch -adjusted with the BPM Adjust
function - to match the tempo of your sequences!
The new Track Play Loop function let's you loop specific measures - independently for each track!
"Lot's of features ! Where do we start?"
Let's start by getting you in "SEQ mode" right away! In the following exercise, you'll load a Template Song,
complete with Programs and effects, then you'll "Put" one of the Preset Patterns to a track, set a Play Loop,
and rec ord a few new tracks, setting independent Play Loops for each of them as you go. Finally, you'll
create a Cue List, using variations of the original song.
Load a Template Song:
1. Power OFF, then ON, to clear the sequencer memory (when you get more comfortable with TRITON you
can learn how to erase all Songs without powering off).
2. Press the SEQ key to enter Sequencer mode.
3. Press the Page menu button in the upper - right of the display, then press Load Template Song from
the popup menu. A dialog box appears - press the popup button - then use the Scroll Bar to locate
and press P13: Acid Jazz. Press OK, and the Template Song will load.
4. S000: Acid Jazz will be highlighted in the TRITON display.
54
Page 57

TRITON Training Guide
5. Play the keyboard - you'll hear Track 1 and it's assigned Drum Program, "brought to you" by the
Template Song!
6. Below the Song name field, you'll see Track 01: Drums. Press the popup button to the left of this
Track 01: Drums, and a popup menu appears. Now press the Safety Pin in the top -left of this popup
menu - to "lock" the menu, so that you can play tracks from it.
7. Press Track 02: Bass, and play the keyboard. Then press the remaining Tracks 03 - 08, and play the
keyboard to hear each track. When you've auditioned all eight tracks (there's 16 available, but the
template you loaded only has eight tracks set up) press Track 01: Drums again, then press the Safety
Pin to unlock the page.
Select a Preset Pattern and Put it to a track:
8. Press the MENU key, then press P6: Pattern / RPPR. The current song is highlighted at the top of the
display.
9. Press the Pattern: User popup button, then press Preset. Now press the P00: Pop&Ballad
popup button (to the right). A popup menu appears, and in this menu you can scroll to select any of 150
preset patterns in memory.
10. Scroll right until you locate P112 Acid Jazz 4 / Std, then press to select this pattern. Now press the
START/STOP key to hear this 4-bar pattern loop, then press START/STOP to stop playback.
11. Press the Pattern Edit Page menu button in the upper - right of the display, and press Put To Track
from the popup menu. A dialog box appears - make sure that the To: field reads as follows: To:
Track 01 Measure:001, then press OK. You've just Put pattern P112 to Track 1 at Measure 1.
Note the Measure: 005 - the pattern has occupied the first 4 bars of Track 1.
12. Press EXIT. That's all we need - 4 bars…(for future reference, pressing OK repeatedly will Put the
pattern to the track as many times as needed).
55
Page 58

TRITON Training Guide
Note: "Put" pattern to track differs from "Copy" pattern to track in that the only note memory
consumed is for the original pattern length - each time you "Put" a pattern, the sequencer points to
the pattern itself. "Copy" pattern actually copies the note data from the pattern to the track.
13. Press the EXIT key to return to the P0: Play/REC page.
14. Press START/STOP. The pattern will play 4 bars, then stop, and the song will reset to measure 001.
Now to set a Play Loop for Track 1:
15. Let's insert some measures first - press the MENU key, then press P5: Track Edit. Press the Track Edit
Page menu button (upper - right), and press Insert Measure from the popup menu.
16. Press Length: 001, and use the Numeric keys and ENTER key to set the length value to 32, then press
OK. (Because the song is currently only 4 bars long, you need to add some measures in order for the
Play Loop function to work - 32 measures should be plenty, right?)
17. Press the EXIT key to return to the Play / REC page.
18. Press the PlyLoop 1-8 tab at the bottom of the display, then press the Track Play Loop checkbox
below Drums (1st column).
19. In the Drums (Track 1) Loop End Measure field, set the value to 004. Press the START/STOP key, and
the Track 1 will Play Loop continually - so you can rehearse and record additional tracks!
Rehearse and record the Bass track:
20. Press the START/STOP key to stop playback, then press the LOCATE key to reset the sequencer to
measure 001:01.000 (upper - left).
21. Press the Track Select popup button (below the song name field), then press Track02: Bass from
the popup menu. Press START/STOP and rehearse your Bass track a bit…then press START/STOP,
then LOCATE - to stop playback and reset the song to measure 1.
22. Press the REC/WRITE key - you'll hear the metronome and the sequencer is in stand - by mode.
23. Press START/STOP - you'll hear 2 bars of metronome precount before recording begins - record a
Bass track for at least16 bars. If you make a mistake or want to re-record the Bass track, press
STOP/START to stop playback, then press the COMPARE key, and begin again from step 22. You can
use the COMPARE function as many times as needed on the track you're currently working with - until
you're happy with the recording.
24. When you've finished recording the Bass track, press START/STOP to playback the song. Let's say you
really like measures 5-8 of the Bass track:
56
Page 59

TRITON Training Guide
25. Make sure you're still on the PlyLoop 1-8 tab, then press the Track Play Loop checkbox below Bass
(2nd column). In the Bass (Track 2) Loop Start Measure field, set the value to 005, and in the Loop End
Measure for this track, set the value to 008, Press the START/STOP key, and the Track 1 and 2 will
Play Loop continually - each with different Loop Start and End measures! Later on, you can experiment
with the Play Loops - just set the Loop Start and End measures to new values!
Note: Make sure to press the LOCATE key after you've stopped playback - to reset the song to the
1st measure! No need to worry about it when you've just recorded though - the song resets to the first
measure automatically!
Now for something totally outrageous!!!
Ok, you've got a groove going…but wait, there's more! Let's rehearse, then record Track 4 - the Guitar track
- and add a very funky and powerful surprise to the whole "picture":
26. Select Track04 from the Track Select popup menu (see step 21). Play the keyboard to get an idea of
how FUNKY this guitar Program sounds, especially with that fine Delay Insert effect!
27. Now press the ARPEGGIATOR ON/OFF key to turn the Arpeggiator ON (lit).
28. Press START/STOP, and while the Drums and Bass Play Loop, rehearse your new Guitar track with the
Arpeggiator - in sync to the tempo! Hold down notes and chords to hear the arpeggio pattern play…
Is this COOL or WHAT?!?!?!?!?!?
Ready to record the Guitar track?
29. Press START/STOP, then press LOCATE to reset the song to the first measure.
30. Press REC/WRITE, then press START/STOP - after 2 bars of precount - you're recording! Record the
Guitar track for at least 16 bars! Remember, the COMPARE key is always there - waiting to "bail you
out" of a mistake…just stop recording, press COMPARE, and re-record the track until you like it! When
you're finished, press START/STOP, and START/STOP again - to hear your new tracks!
Note: The ARPEGGIATOR ON/OFF key turns off after you've recorded and during playback - that's
because the arpeggio pattern was recorded directly to the track! In fact, you can even OVERDUB
note data and GATE / VELOCITY knob movements on the arpeggiated track - or any other track that's
linked to the Arpeggiator (P7 - Arpeggiator Assign)!!!
57
Page 60

TRITON Training Guide
Record a couple more tracks:
31. First, for the Guitar track - set the Play Loop measures you want (see step 25).
32. Now select Track03 from the Track Select popup menu, and rehearse and record the Electric Piano
track for at least 16 bars! When you're finished recording, press START/STOP.
33. Record a String and / or Lead Synth track - select the tracks, rehearse and record them each for at
least 16 bars!
The Solo / Mute Functions
TRITON features instant track Solo and Muting functions - right at your fingertips, with TouchView!
Let's see how this works with the current song:
1. Press the Prog 1-8 tab in the P0: Play / REC page, then press START/STOP to playback the song
2. While the song plays, press the SOLO OFF button for Track 1 - to solo the Drums. Press it again - to
"toggle" ON/OFF the solo function for this track. You can also press the SOLO buttons for more than one
track - to isolate "sections" while the song plays.
3. Press the Page menu button (upper - right), then press Solo Selected Track from the popup menu.
Now, when you use the SOLO function, only the selected track will be soloed, even if you press another
track's SOLO button. Uncheck the Solo Selected Track function if you want to use SOLO as in step 2
above.
4. To Mute tracks during song playback, press the selected track's MUTE button. It will "toggle" ON /OFF
each time you press it. When you're recording, the selected record track's MUTE button will read REC.
5. After you've tried these functions out, make sure to return each track's SOLO and MUTE buttons to
PLAY status, then press START/STOP to stop playback of the song.
About the Locate Key
You can set a locate point for rehearsal and recording in the Sequencer mode P0 popup menu, or by holding
down the ENTER key and pressing the LOCATE key as the song plays back.
58
Page 61

TRITON Training Guide
Creating a Cue List
This is where everything comes together! You've got a song - or the basis for one, right? You could real-time,
loop, step-time or pattern - record your tracks, cut and paste sections together, overdub, event edit, add
more patterns - traditional songwriting in the "sequencing" environment you're probably used to. Sure, you
can still do all that with TRITON, but now there's a quick, easy and logical way to work with a sequencer:
Introducing the Cue List!
Let's get started…
Create a new song and copy your current song to it:
1. Press to highlight the popup button to the left of S000: Acid Jazz, then press S001: from the popup
menu. A dialog box appears - Create new song this song No. Press OK , S001: NEW SONG will
appear in the display.
2. Press the Page menu button (upper - right), then press Copy From Song from the popup menu. A
dialog box appears, and S000: Acid Jazz is highlighted in the From: field. Press OK to copy All data
from Acid Jazz to the new song location.
3. Repeat steps 1 and 2 above, but this time, Create new song S002, and Copy From S000: Acid Jazz,
as prompted by the dialog box.
59
Page 62

TRITON Training Guide
Now you've got 3 identical songs, and can start to create a Cue List:
First, let's name the songs, beginning with the currently - selected song:
1. Press the Page menu button (upper - right), and select Rename Song from the popup menu.
2. Press the Text Edit box (T), then press Clear. Press Shift, then "type" in the word CHORUS. Press OK
when you've finished - to rename Song 002. (You'll only have to press Shift for this step)
3. Now select Song 001 from the Song Select popup menu, and rename it VERSE in the same way as
step 2.
4. Finally, select Song 000 and rename it INTRO. Now you've got three songs: INTRO, VERSE and
CHORUS.
Tip: In addition to selecting from popup menus, you can select songs and highlighted parameter values
with the Numeric and ENTER keys!
Make changes to the tracks in each song:
1. From the P0: Play / REC page of Song S000: INTRO, press the MENU key, then press P5: Track Edit.
2. Press the Track Edit Page button (upper - right), then press Delete Measure. A popup menu appears set the From Measure: to 009, and the To End of Measure: to 032. Next, press to check the All Tracks
checkbox, then press OK. You've just deleted all tracks from measure 9 -32, leaving just 8 bars for this
"Intro".
3. Now press the EXIT key to return to the P0: Play / REC page.
4. MUTE all tracks except Tracks 3 and 4. Playback the 8 bar intro - you'll hear just Electric Piano and
Guitar.
5. Now select Song S001: VERSE, press the MENU key, then press P5: Track Edit, and follow the same
steps as in step 2 above, to delete measures 9 -32. When you've done that, press the EXIT key to
return to the P0: Play / REC page, and MUTE all tracks except Tracks 1, 2 and 3. For the verse, you'll
hear only Drums, Bass and Electric Piano.
6. Press the PlyLoop 1-8 tab, and set the Bass (track 2) Loop Start Measure to 009, and the Loop End
Measure to 016. You've just set a new Play Loop for the Bass track - in the verse.
7. Select Song S002: CHORUS, and press the MENU key. Press P5: Track Edit, and follow the same
steps as in step 2 above , but this time set the delete measures from 17 -32.
60
Page 63

TRITON Training Guide
8. Now, from the Track Select popup menu (below the song name), select Track02: Bass.
9. Press the Track Edit Page menu button, then press Shift / Erase Note. Set the From Measure: to
001, and the To Measure: to 016.
10. Now, in the Note Range field of this page, press Shift Note and set the value to +003, then press OK.
11. Use the 55 VALUE key to move to the next track, and follow the previous step. Continue to use the 55
VALUE key to move to the rest of the tracks you've recorded on, and repeat step 10 for each track.
You've just transposed the note range of all tracks except Track 1 Drums.
Time to review…
Let's review what's just been done to get to this point:
1. You created a song using the Template Songs and a Preset drum pattern, then recorded additional
tracks and set Play Loops for the tracks.
2. Next, you learned about the Solo / Mute functions.
3. Then you created two new songs, copied the original song to both new locations, and renamed all three
songs INTRO, VERSE and CHORUS. Three identical songs with different names…then you made
changes to each song - muting, transposing, and set a new Play Loop for the Bass track in the verse.
Now to create the Cue List:
1. Press the MENU key, then press P1: Cue List. You'll see that Step 01 in the list already contains what
you need: S000: INTRO. Press to check the Load FX checkbox . Now, when the Cue list plays back, the
Effects from song S000: INTRO will load.
2. Press End, just below the first step in the Cue List, then press Insert. Song S001: VERSE is inserted in
the Cue list as Step 02. In Step 02's Repeat field, press 01, and set the amount of times Step 02 repeats
to 02.
3. Press to highlight the Current Step 02 in the lower -right corner of the display, and press the 5 VALUE
key to change this to 03. Press Insert, then press Step 3's popup button in the Song field, and
select S002: CHORUS for Step 03.
61
Page 64

TRITON Training Guide
4. Finally, in the upper -right area of the display, press the Manu popup button, and set this to Auto, to
use the Master Track - the original tempo of the songs in the Cue List.
5. Press the LOCATE key to reset the Cue List to Step 01, and press START/STOP. Your Cue List will
play until the end of Step 03 and stop.
Tip: You can stop or start Cue List playback from any point within a Step, and you can use the PAUSE,
<<REW and FF>> keys as well! You can also go back to the original songs and make any edits - the
changes you make will be in the Cue List when you playback!
Tip: In the same wa y as Sequence playback, while a Cue List is playing you can play and change any
tracks - live - over the songs in the Cue List - in the Track Select field!
Converting Cue Lists to Songs
Cue Lists can be easily converted to Songs, where you can overdub on existing tracks, lay down new solo
tracks, and edit the song data in many ways! When you convert a Cue List to a song, the Programs, note
and event data, Effects and Tempo changes, as well as Transposed track data, Play Loops and Repeats will
all be converted. There are certain settings that are not converted, including Play / Mute and Solo ON / OFF.
In the case of the previous exercises, the Mute settings would not be converted to a new song during the
process. When you use the Convert to Song function, it's best to keep Mute, Solo and MIDI channel settings
consistent between all songs in the Cue List - you can edit the song after conversion and delete or erase
measures for specific tracks, etc.
Tip: A Cue List must be converted to a song in order to be saved as a Standard MIDI file. All track and
effect settings will be copied to the beginning of the SMF song.
Tip: The "Load FX" function in a Cue List can be set for any step, however there may be a slight delay
between steps, depending on the type of effects that are loaded in a step. Most applications for Cue Lists call
for one set of effects to be loaded only at the first step, as the rest of the steps in the Cue List are based off
of the first step and it's effects.
62
Page 65

TRITON Training Guide
RPPR (Real-time Pattern Play Record)
With TRITON's RPPR function, you can assign a preset or user pattern from a song to each key, and
playback the assigned patterns by pressing keys on the keyboard. Patterns can be assigned to 72 keys (C#2
- C8). You can even record RPPR - triggered patterns to the internal (or external) sequencer!
Before you learn how to work with the RPPR function, let's load one of the factory demo songs:
"FEVER". This song was created almost entirely with RPPR - triggered patterns.
Load "FEVER" from the TNFD-00P(US) factory disk:
1. Insert the TNFD00P(US) disk into the disk drive, then press the DISK key to enter Disk mode.
2. Press the PRELOAD.SNG file in the display, then press Open.
3. Press the FEVER file in the display, then press the Load Page menu button in the upper -right.
4. Press Load Selected from the popup menu. A dialog box appears - Press the Song: popup button,
and select the next - available empty song from the popup menu, then press OK to load "FEVER".
5. Press the SEQ key and make sure you're on the P0: Play / REC page (EXIT>Prog 1-8 tab).
Now to trigger some of the assigned patterns from the keyboard:
6. Notice in the display that the RPPR checkbox is checked (upper - right). This enables the pat terns to be
triggered from selected tracks in this song.
7. Play notes on the keyboard to trigger patterns - hold down groups of keys to hear how RPPR works.
Press key C2 (Low-C) to shutdown the pattern playback.
8. In the Track Select field, make sure that Track01: Drums 1 is selected. Look just to the right of the
Track Select field (below the RPPR checkbox), and you'll see the keys that were assigned to trigger
specific patterns for this track. Press Track01: Drums 1 in the Track Select field, and use the 5
VALUE key to select and view a few more track's RPPR key assignments.
Playback the demo song:
9. Press the START/STOP key to playback "FEVER", and you'll see and hear how all these assigned
patterns can be used to create a song!
63
Page 66

TRITON Training Guide
Now to create a new song using RPPR
In the following exercise, you'll load a Template song, view and work with the RPPR Setup page, and assign
some patterns to be triggered.
Load the Template Song:
1. Press the popup button to the left of the S00X: FEVER song field, and select the next - available
empty song number from the popup menu. Press OK from the Are You Sure? dialog box, to create a
new song.
2. Press the Page menu button upper - right), and select Load Template Song from the popup menu.
Press the popup button and select P14: Hip Hop / Rap from the popup menu, then press OK to load
the Template Song.
Assign patterns to keys and work with the RPPR functions:
3. Press the MENU key, then press P6: Pattern / RPPR. Press the RPPR tab at the bottom of the display
to go to the RPPR Setup page.
4. In the RPPR Setup field, press to highlight the KEY: parameter, then hold down the ENTER key and
press key C#2. Press the Assign checkbox to assign RPPR to this key.
5. Press the Sync: Beat popup button and select Measure from the popup menu.
6. Press the Pattern: popup button and select Preset from the popup menu.
7. Press the name field P00: Pop&Ballad 1 /Std and enter 121 with the Numeric keys , then press the
ENTER key.
8. Play and hold key C#2 to trigger the assigned Pattern 121 HipHop 1 / HipHop. To stop playback of the
pattern, press the C2 key - it's reserved as a Shutdown Key, and patterns can't be assigned to it.
9. Press to highlight the KEY: parameter, then hold down the ENTER key and press key D2. Press the
Assign checkbox to assign RPPR to this key.
10. Press the Sync: Beat popup button and select Measure from the popup menu.
11. Press the Pattern: popup button and select Preset from the popup menu.
12. Press the name field P00: Pop&Ballad 1 /Std and enter 122 with the Numeric keys , then press the
ENTER key.
64
Page 67

TRITON Training Guide
13. Play and hold key D2 to trigger the assigned Pattern 122 HipHop 2 / HipHop. To stop playback of the
pattern, press the C2 key - it's reserved as a Shutdown Key, and patterns can't be assigned to it.
14. Now trigger both keys C#2 and D2 together, and at different times - notice that, no matter how "un funky" you are at triggering - the patterns "lock together" - that's because you set the Sync to Measure,
which synchronizes the patterns based on the pattern that was triggered first!
15. Continue to assign new patterns to adjacent keys as you've learned in the previous steps - set KEY,
Assign, Sync (if desired) and Pattern numbers. You can select from 150 available preset patterns, but
we suggest - to "remain funky" in the HipHop genre, that you select from patterns P123 - P135, as these
are all Hip/Hop patterns.
Tip: For lots more information on RPPR, you know where to go - the famous TRITON Owner manuals!
Recording with RPPR
RPPR can be recorded into the sequencer in real-time - you can trigger the assigned preset or user patterns,
even quantize on input to keep your triggering time perfect! In the following exercise, you'll take the
previously - assigned patterns and record them to the sequencer. Later on, you can create your own Bass,
Organ, etc. patterns and assign / record them and other tracks - simultaneously, using the Multi-record
function!
Set up and record the patterns:
1. Continuing - on from the previous step, press the EXIT key to go to the P0: Play / REC page.
2. Press to check the RPPR checkbox in the upper - right area of the display.
3. Now trigger the same keys you assigned in previous steps - to hear the RPPR patterns.
4. Press the REC/WRITE key, then press START/STOP. You'll hear 2 bars of metronome pre-count before
recording begins.
5. Trigger the assigned patterns in real-time as you record. Bring one pattern in, then add another, etc.
When you're finished, press START/STOP to stop recording. The song will reset to measure 1. Press
START/STOP to playback the song.
Note: If you want to re - record, press START/STOP, LOCATE, then press the COMPARE key, and re record. You can use the COMPARE key as many times as needed on the selected track!
65
Page 68

TRITON Training Guide
Tip: As you work with and learn TRITON's sequencer functions and more about RPPR, you'll discover that
you can select new tracks with different Programs, create patterns based on the Programs in each track, and
Multi-record them to the internal (or external) sequencer with their assigned RPPR patterns! You can
overdub on any recorded tracks, as well as adding real-time solo lines, etc. over the RPPR patterns! The
RPPR patterns are recorded as note data, so you can save your completed songs as TRITON - based
sequences - or as Standard MIDI Files!
Using Combis and the Arpeggiators in a Sequence
Those wild, wacky, luscious, evolving Combinations aren't just for live performance! You can copy them to
TRITON's sequencer, with or without effects, and create songs - easily!
Let's Do It:
1. In the P0: Play /REC page of Sequence mode, press the popup button to the left of the song name
field, and select the next - available empty song. Press OK from the Are You Sure? dialog box - to
create a new song.
2. Press the Page menu button, then select Copy From Combi from the popup menu. A popup menu
appears - using the Numeric keys, enter 67, then press the ENTER key, to select Combination A067
Steely Keys. Then press to check the with Effects checkbox, and press OK.
3. The Combination will be copied to S00X: NEW SONG, and will sound exactly as it does in Combination
Play mode - including ready -to-record, linked Arpeggiators!
4. Press the Preference tab at the lower right of the display, then press to check the Multi REC
checkbox. Press the Prog. 1-8 tab at the lower left of the display.
5. Press REC/WRITE, then press START/STOP, and after 2 bars of metronome pre-count (hang in there -
the tempo's set to 53 BPM!), you can start recording…Get "Steely" with it!!! Press START/STOP when
you've finished recording, then press START/STOP to playback the new song. Remember, if you want to
re -record, just press START/STOP, LOCATE, then COMPARE, and re - record.
66
Page 69

TRITON Training Guide
Add a new solo track to the song:
6. First, take the sequencer out of Multi-record status: Press the Preference tab, then press to un -check
the Multi REC checkbox . Press the Prog. 9-16 tab - you'll record a new track using Track 9).
7. Press to highlight the Track01 field (below the song name field). Press 9 on the Numeric keys, then
press the ENTER key to select Track09.
8. Press the Category box in Track 9's column (left), then press the 05 Brass tab to the left of the center
menu.
9. Select Program A009 Fat Brass from the center menu, then press OK.
Assign an Insert effect to the track:
10. Press the MENU key, then press P7: Insert Effect.
11. Press the Routing 9-16 tab, then press Track 9's BUS Select L/R popup button, and select IFX2
from the popup menu. Play the keyboard to hear the Program and assigned Insert Effect.
12. Press the EXIT key to return to the P0: Play / REC page.
13. Press START/STOP to playback the song, and rehearse the new Brass track. Stop playback when
you've got the new part ready to record and…
14. Press LOCATE to reset to measure 1, then press REC/WRITE, and START/STOP - after 2 bars of precount - Record a burnin' Brass Track (You can do it) !!! When finished, press START/STOP, then
playback your new song!
Tip: Is there more to learn about TRITON's sequencer? You better believe it! What we've shown you in the
Sequencer Mode section of this guide will get you started with your composing, but we've only just begun
(Karen?) to open your mind to TRITON's incredible sequencer! There's a virtual plethora of information in
the TRITON Owner manuals - covering linear, pattern, step, and loop recording, event editing - everything
you need and want from a world -class sequencer like TRITON's!
67
Page 70

TRITON Training Guide
Advanced Arpeggiator Tour
Editing the Arpeggiator in Program mode:
In addition to the functions you learned in the Arpeggiator section of this guide, The Arpeggiator - Edit page
covers a few more functions that pertain to the pattern assigned to the selected Program.
1. Select Program A050 Arp Twins. Note that pattern U079 has been assigned to this Program.
2. Press the MENU key, then press P7: Edit - Arpeggiator. Here again, you'll find the functions we've
covered in the Arpeggio tab page, plus some additional functions that let you customize a pattern for the
selected Program, without disturbing the selected arpeggio pattern's original setting in GLOBAL mode.
The COMPARE key can be used in this page, so you can compare your edits with the original settings.
Check out the Gate function:
1. Press to highlight the Gate: 100% parameter, then, while playing and holding a note / chords on the
keyboard, rotate the DIAL counter-clockwise - to shorten the length of each note in the pattern.
Rotate the DIAL clockwise to increase the note length. A setting of 1%-100% means that all notes
sounded will be played with a specific gate time. You can also control the gate time with the GATE
knob (ARPEGGIATOR section).
2. Rotate the DIAL all the way right - until Step appears in the highlighted Gate area of the display. When
Step is selected, the length of the notes in the pattern will correspond to the individual step settings
that were programmed for the source User pattern - in the GLOBAL User - Arpeggio page. Note that
even when Step is selected, you can use the GATE knob to control the gate time.
Now to work with the Velocity function:
1. Using the same Program, highlight the Velocity: Step parameter, and play and hold a note / chords on
the keyboard. Because this value is set to Step, the individual notes in the pattern will sound with a
velocity level specified in the GLOBAL User - Arpeggio page.
2. Continue holding notes on the keyboard, and rotate the DIAL counter-clockwise, to lower the loudness
level of all the steps in the pattern.
3. Rotate the VELOCITY knob while you play, to control the loudness level of all the steps in the pattern.
68
Page 71

TRITON Training Guide
Adjust the Swing function:
1. Press the COMPARE key (left of the VALUE slider) once. The original settings for all functions in the
pattern will be recalled.
2. Press to highlight the Swing: +000 % parameter in the display.
3. While holding notes on the keyboard, Rotate the DIAL slowly - in both directions - to shift the timing of
the odd-numbered notes in the pattern.
4. Press the COMPARE button once again - to return the Swing setting to +000 %.
5. Press to highlight the Resolution: 16th note parameter in the display, and press the 8
popup menu.
6. Press to highlight the Swing: +000 % parameter, then, as you hold notes on the keyboard, rotate the
DIAL in both directions - slowly - to hear the new Swing settings, based on new timing resolution you set
in step 5 above.
th
note from the
Set the Scan and Velocity Zones for the pattern:
1. Press the COMPARE key to return the Swing setting to a value of +000 %.
2. Press the Scan Zone tab button at the bottom of the display.
3. Press to highlight Top Key: G9 in the display.
4. Hold the ENTER key and touch C4 (middle -C) on the keyboard. This sets the Scan Zone (split point) the notes you play below C4 will trigger the arpeggio pattern, and the notes above C4 will play the
Program sound. (You can also set this value with the DIAL). The keyboard graphic in the display shows
you where the Scan Zone has been set. (The Bottom Key parameter works the same way, but sets the
lower limit for the range of trigger notes).
5. Press to highlight the Bottom Velocity: 001 parameter, and using the DIAL, set this value to 090. (You
can also hold ENTER and strike the keyboard at varied degrees of velocity to set the value - the display
will indicate each new setting. Now, when you play in the lower range of the keyboard, you won't trigger
the arpeggio pattern until you play hard enough to trigger the threshold set by the Bottom Velocity
parameter. (The Top Velocity parameter works the same way, but sets the upper limit of velocity).
69
Page 72

TRITON Training Guide
Tip: If you're working with a Program, Combination or Song, and want to use the assigned arpeggio
pattern in another Program, Combination or Song, select the destination Program, Combination or Song,
then, in the Edit -Arpeggiator page menu command, copy the arpeggiator pattern from the source Program,
Combination or Song to the currently - selected Program, Combination or Song. See the TRITON Owner
manuals for more information.
Editing a User - Arpeggio pattern in Global mode:
Although this guide won't cover all you can learn about editing arpeggio patterns - you can find plenty of
concise and well - written information in the TRITON owner manuals! For now, we'll get you started with a
tour of how a pattern is created and edited…
Work wi th a User - Pattern:
1. Select Program A54: SuperSwitch Bass.
2. Press the ARPEGGIATOR ON/OFF key (lit) to turn on the ARPEGGIATOR.
3. Play and hold one note in the lower range of the keyboard - to hear the arpeggio pattern.
4. Continue to hold the note in the lower range, then add and hold chords in the upper range of the
keyboard. This is an example of a polyphonic arpeggio pattern. Let's see how it was created…
5. Press the GLOBAL key to enter GLOBAL mode, then press the MENU key.
6. Press P6: User Arpeggio. Because you began by selecting Program A54, the assigned arpeggio
pattern for that Program will move to this mode and page.
7. Press the Pattern Setup tab button at the bottom of the display. Here you'll see some familiar functions the same ones you've worked with in earlier steps, and in addition, you'll find some new settings:
Length: Sets the length of the pattern from 1-48 steps. This pattern is set to 32 steps.
Before we go any further in the Pattern Setup tab:
We think you should take a look at the Pattern Edit page…and we'll clue you in on some points that will help
you to understand what the TRITON's polyphonic arpeggiator is all about!
1. Press the Pattern Edit tab button (next to the Pattern Setup tab). This page displays the pattern name
and length, a Step grid and associated parameters for each step.
2. Watch the running 6 cursor across the top of the Step grid (If it's not running, turn ON the
ARPEGGIATOR!) It's speed is relative to the tempo, which in this case is 120 (upper-right of the
display). You can change the tempo with the Numeric keys or with the TEMPO knob, but for now, leave
it at 120.
70
Page 73

TRITON Training Guide
3. On the left side of the display notice the (very tiny) numbers - bottom to top - on the grid (0-9, - and .)
The - and . are symbols for the numbers 10 and 11. All of these characters represent 12 Tones, and this
means Polyphony, brothers and sisters! Up to 12 tones can be entered for each step in the grid.
4. Notice Step 1 - the first column of Tones. There are six squares "climbing" this step's tone "ladder". Why
are they squares? That's because the Gate time of Step 1 has been set to Legato - meaning that the
notes will continue to sound until the same Tone is sounded next, or until the pattern cycles back to the
beginning again. A Legato setting is represented as a "square" on the grid. The "dots" you see in the
other steps simply represent the fact that there are tones in the steps.
5. Play and hold a single note in the lower range of the keyboard, watch the moving cursor in the step grid,
and listen to the pattern as it cycles through the first step - you'll hear the Legato setting.
6. What about those "funky" moments known as rests? Check out the grid - where you don't see tones in a
step, you get rests!
Now to discover why this pattern is sooooooooo funky:
7. Press to highlight the Step No.: > 01 (below the step grid).
8. Rotate the DIAL clockwise - slowly, it will "click" at each step in the grid. Pay attention to the parameters
below each Step No. Here's an overview of what they mean:
Pitch Offset: Sets the pitch for each tone in the grid. The bass melody (Tone 0) plays as programmed
because the Pitch Offset amount is varied for certain steps along the grid. The Pitch Offset parameter can
also be set for two or more tones in a step to play parallel chords.
Gate: Sets the length of each step. You know this from the previous section. Note that if you set the Gate
time to any value other than Step - in the Arpeggio Setup pages of Program, Combination or Song
mode - the Gate parameter setting in this Pattern Edit mode won't function as programmed - those setup
pages we covered earlier will "override" any settings you make in the GLOBAL User - Arpeggio pages,
meaning that you can make Gate time settings, etc. here - as original pattern parameters, then change the
settings in Programs, Combinations or Songs - leaving the original pattern un -edited.
Velocity: Sets the loudness level for each step. A setting of Key means that your playing velocity
controls the level of all the steps in the pattern.
Flam: Sets a "delay" or "skewing" between tones in a step - to create a "strumming" effect. You can set +
values for odd-numbered steps and - values for even-numbered steps to simulate "guitar" chord strumming.
71
Page 74

TRITON Training Guide
Now back to the Pattern Setup Tab:
1. Press the Pattern Setup tab button (lower-left). Let's take a look at these parameters in the display:
Arpeggio Pattern Setup
Arpeggio Tone Mode:
Normal - This is the normal setting for patterns. Pitches for the pattern will be developed and played
according to the note that is pressed.
Fixed Note - Specifies the note number for the selected tone.
In the pattern you're working with, the Tone Mode setting of Normal allows you to sound all the tones
polyphonically - from the keyboard. If the Tone Mode is set to Fixed, and the Fixed Note Mode is
set to Trigger All Tones, playing a single note on the keyboard will sound all the tones in each step.
Note: Fixed note mode requires that you define the pitches for each Tone # and is usually used for
grid-style drum programming. In this way you define Tone 00 as your bass drum, Tone 01 as your
snare etc. We'll take a look at this in a few minutes.
Now to show you just how cool these functions can be:
1. Press the PROG key to exit GLOBAL mode, then Select Program A052 Psycho Kit.
2. Press the ARPEGGIATOR ON/OFF key to turn the Arpeggiator ON.
3. Play and hold any note on the keyboard…
"Wait a minute! What's going on here?"
4. Press the GLOBAL key to enter GLOBAL mode - you'll jump right back to the last Global page you were
working with - User Arpeggio - Pattern Setup tab.
5. Check out the settings - the pattern assigned to Program A052 is U170 Acid Drum, and the Arpeggio
Tone Mode is set to Fixed Note. The Fixed Note Mode is set to Trigger All Tones.
6. Press the Pattern Edit tab to see the Step grid and it's parameters. The pattern tempo is 228 - allowing
for some intricate "jungle" snare rolls.
7. Look at the Step grid - Tones 0,1,10 and 11 (from bottom to top) are placed along the Step grid to create
this very funky pattern, and the blue dots you saw in the previous example are now white dots - this
indicates that the pattern is in Fixed Note mode.
72
Page 75

TRITON Training Guide
"So how do I determine which drum sounds (notes) play a specific tone?"
8. On the Pattern Edit page, press to highlight the Tone No.: >00 parameter (lower-right of the display).
Make sure that this parameter is set to 00 (Tone 0) - if not, press the 6value key, or press the Numeric
key 0, then ENTER to select Tone 00. This is the bottom line in the Step grid (0).
9. Notice that the Fixed Note No. for Tone 0 is set to B2. That's the kick drum you hear when you trigger
the pattern - it's on the Step grid at steps 1, 7, 13, 19 and 21.
10. Press to highlight Fixed Note No.: B2, then press the 5value key once, to change it to C3. Play and hold
a note on the keyboard to hear the new kick drum. You haven't changed the pattern data yet you've only
changed the note number that plays Tone 0 on the Step grid.
11. Hold down the ENTER key and press note B2, or use the 6value key to change the kick drum to B2.
"This is too cool ! So how do I edit the kick drum steps in the pattern?"
12. Press to highlight Step No.: > 01 (left side, below the Step grid). Make sure this parameter is set to 01. If
not, use the 6value key to set it to 01. The vertical line on the left of the Step grid indicates the selected
step number. Also make sure that the Tone No. (right side) is set to 00.
13. Press the 5value key twice - to move to Step No.: 03 (or use the DIAL). The vertical line indicates no
step has been programmed for step number 03.
14. On the Numeric keypad, press 0. A white dot will appear at step 03. Play and hold a note on the
keyboard to hear the new kick drum edit for Tone 0.
15. Continue moving to new step numbers along the grid, then enter more tones for Tone No. 0. If you
decide you don't want a tone at a certain step, just move to that step and press 0, then ENTER on the
Numeric keypad. You'll see the tone (white dot) disappear from the Step Grid - press 0, then ENTER on
the Numeric keypad again - to "toggle" the tones on and off.
"What about editing a simple melody line in an arpeggio pattern?"
16. Press the PROG key to exit GLOBAL mode, then select Program A070 Euro 8va Bass.
17. Press the GLOBAL key to enter GLOBAL mode, press the MENU key, then press P6 User Arpeggio.
18. Press the Pattern Setup tab button and check the Latch box to latch the pattern.
19. Press the Pattern Edit tab button.
20. Turn ON the ARPEGGIATOR and play note C2 (Low-C) on the keyboard to trigger the pattern.
73
Page 76

TRITON Training Guide
21. Press to highlight the Step No. 00, and use the 56value keys or the DIAL to move to the step (s) you
want to edit, then make edits for each step by highlighting and changing the Pitch Offset, Gate,
Velocity and Flam parameters.
22. If you want to add or remove Tones along the Step grid, move to the desired step, then use the
Numeric keys and ENTER key to toggle tones off and on for each step.
Tip: While editing a pattern, check the Latch box in the GLOBAL (P6) Pattern Setup page, to latch the
pattern so that you can continuously - hear the tone and step edits your making - hands-free!
Tip: You'll find lots more information about working with, and editing arpeggio patterns in the TRITON
Owner manuals!
Tips On Using the Arpeggiators in Combination Mode
1. Select and Play Combination C097 Bumpin' & Thumpin'…
"Question: I hear the drum arpeggio pattern, but when I play the keys - no drum
sounds are triggered - what's up with that?
Good Question! Even though you see a drum Program assigned as one of the timbres in this Combination,
it's only assigned to trigger a specific arpeggio pattern, and isn't audible when you touch the keyboard. This
way, you're free to play while the arpeggio pattern provides the rhythm.
Here's why it works this way:
2. Press the MENU key, then press P2: Edit -Trk Param.
3. Press the MIDI Channel tab button (lower-left). Notice the Gch (Global Channel 1) setting for all the
timbres in the Combination - except for Timbre 4 - Drums - it's MIDI channel is set to 2. Also note that
the status for timbres 6,7 and 8 is set to Off - meaning these three timbres won't be heard when you play
the keyboard. Keep this in mind for a moment…
74
Page 77

TRITON Training Guide
4. Press the MENU key, then press P7: Edit - Arpeggiator. Take a close look at timbres 4 and 8. They are
both set to trigger the A Arpeggiator in the Arpeggiator Assign field of the display. None of the other
timbres are assigned to trigger either Arpeggiator A or B. In fact, the B Arpeggiator is un-checked in the
Arpeggiator Run field - only the A Arpeggiator box is checked to run in this Combination.
The A Arpeggiator is being triggered by timbres 4 and 8, and timbre 4 is set to a different MIDI
channel than the other timbres in the Combination. Timbre 8's status is turned Off (it's a "dummy"
timbre). You hear the arpeggio pattern trigger because timbre 8 is assigned to trigger the A
Arpeggiator, and because it's on the Global MIDI channel!
Let's look at another Combination that uses both Arpeggiators in this way:
5. Select Combination A086: SciFi Chase Scene .
6. Play in the range above Middle-C…no arpeggio patterns assigned to this zone …
7. Now play and hold a note (s) in the lower range - both Arpeggiators trigger (unlatched) along with the
motion pad, and you can get "scary" in the upper range…
Now to tour the Arpeggiator Setup and Zoning pages:
8. Press the Arpegg. A tab button at the bottom of the Play page display. You'll see that both Arpeggiat ors
are set to run, and the table to the right shows you which timbres are running the A and B Arpeggiators.
You also see which pattern has been assigned to Arpeggiator A, as well as a group of functions - they'll
be familiar to you - we covered them previ ously in the Arpeggiator section of this guide.
9. Press the Arpegg. B tab button and you'll see the same functions - assigned to work independently for
the pattern assigned to Arpeggiator B.
75
Page 78

TRITON Training Guide
10. Press the MENU key, then press P7: Edit - Arpeggiator. The Setup tab displays the Arpeggiator
Assignments and Run status boxes for each timbre:
11. Press the Arpegg.A tab button in this page. Here again, you can set those familiar functions - tempo, the
pattern assigned, and in addition you'll see settings for Gate (length of pattern steps), Velocity (loudness
of pattern steps), and Swing (timing - shift of odd-numbered notes). Pressing the Arpegg.B tab button
will list the same functions - assigned to work independently for the pattern assigned to Arpeggiator B.
12. Press the Scan Zone tab button (bottom of the display). Here you can set Top and Bottom Key and
Velocity parameters for both Arpeggiators, and graphic displays show you the key and velocity zones.
Now that you understand arps you’re ready for our famous “How to Use Combis in
the Sequencer Tutorial:
Recording Combinations with Arpeggiation - Triton
Preface - In the Triton series workstations, Combinations which contain arpeggio patterns are set up using
two different approaches. As a result, there are two methods outlined in this tutorial to allow full use of all
Combinations in the Triton’s sequencer. Since the setting of arpeggiations vary from Combination to
Combination, this tutorial will teach by example using Factory Combis that exhibit these two different
behaviors. This information can then be applied to other Combinations you wish to use.
Points to remember about Combinations - A Combination is basically an arrangement of up to eight
Programs (singular sounds) that share a MIDI channel. The fact that multiple tracks share the same
channel allows you to hear and play these Programs together as a layer or split or both; as opposed to
hearing programs one at a time as would be the case with a Multi Channel setup. A Multi Channel Setup
would state that each Program had its own MIDI channel, which keeps played information and sound
separate for each Program.
Points to remember about arpeggiators - The Triton has the capability to put up to two arpeggio patterns
into a Combination, and have those Arps only trigger certain tracks. In other words, Arp. A could be
assigned to play only the Program on Track 1 of the Combination. While Arp. B is set to trigger Tracks 3 and
76
Page 79

TRITON Training Guide
6 of a Combination, and so on. Bearing in mind that Combinations all fall on the same MIDI channel, the
question arises…
…How can the Sequencer keep track of these separate assignments and only record
and playback the notes for an intended Track, if all the Tracks are on the same MIDI
channel?
The answer is… it can’t!
So we need to take each part that has a specific arpeggiator (A or B) assigned to it and set that Track/Timbre
to a different MIDI channel from the other arpeggiated part, AND from the non-arpeggiated parts. If there is
one arpeggiator being used you will need two different MIDI channels. If both arpeggiators are being used
you will need three different MIDI channels (assuming that there are also some non-arpeggiated parts as
well).
This brings us to the second part of this “trick” – how can we trigger all the tones at the same time if they’re
on different MIDI channels? The Triton sequencer only allows you to be on one track/MIDI channel at a time.
The answer lies in creating “Dummy Tracks” - a track that is on the same channel as the rest of the
Combination, but is actually turned "Off" under the track's on/off status.
This Dummy Track is assigned to the same Arp. as the track it's going to trigger, but the actual track
containing the Program is set to a Channel other than what the rest of the Combination is set to. So what are
two approaches to Combination/arpeggiator setups that we mentioned earlier? The first is the many
Combinations that have a drum rhythm that plays in the background while you play the keyboard live. These
Combinations have already had the drum part set up on a different MIDI channel from the rest of the sounds,
and already have the Dummy Track created. These are the easiest Combinations to record – simply use
Tutorial 1.
A Combination which keeps all channels the same regardless of Arp. Trigger would require Tutorial 2 to be
followed for correct recording. Examples of these include:
Tutorial 1
Multi Channel Combination -- Using Example Combination A33: "After-T-House"
First, we'll get the Combination into the Sequencer mode:
1. Press the SEQ. button to enter the Sequencer Mode.
2. Touch the arrow on the top right hand side of the screen.
3. Touch "Copy From Combi".
77
Page 80

TRITON Training Guide
4. Using the value wheel, slider or buttons, select the Combination A33: "After-T-House".
5. Touch the box next to "With Effects" so that it is checked.
6. Touch "O.K.". The Combination will load into the first 8 tracks.
Next, we'll prepare to record:
7. Touch the "Pref." Tab at the bottom right hand side of the screen.
8. Touch the box next to "Multi REC" so that it is checked.
9. Press the Arpeggiator "On/Off" button so that it is lit.
Now, record using the normal method:
10. Press the "REC/WRITE" button.
11. Press the "START/STOP" button. You'll get two measures counted in to get ready.
12. Record. When done, press the "START/STOP" button to finish recording, then the "LOCATE" button to
rewind back to the start.
Tutorial 2
Single Channel Combination -- Using Example Combination A28: "Random Blocks"
First, we'll get the Combination into the Sequencer mode:
1. Press the SEQ. button to enter the Sequencer Mode.
2. Touch the arrow on the top right hand side of the screen.
3. Touch "Copy From Combi".
4. Using the value wheel, slider or buttons, select the Combination A28: "Random Blocks".
5. Touch the box next to "With Effects" so that it is checked.
6. Touch "O.K.". The Combination will load into the first 8 tracks.
Next, we'll find out which tracks have the Arp. assigned to them:
7. Press the MENU button.
8. Touch "Arpeggiator" on the screen.
You'll notice that Track 1 is used for Arp. A, and Track 2 is used for Arp. B. in instances where other
Combinations are used, you would want to make note of which Arps. use which Tracks.
Now, that we know which tracks we need to work with, we need to set each arpeggiated part to a separate
MIDI channel from the other tracks:
78
Page 81

TRITON Training Guide
9. Press the MENU button.
10. Touch "Track Param" on the screen.
You will see the Track Status and MIDI channel information for the first 8 tracks, which contains the
Combination. They are numbered 1-8 on a dark blue line in the middle of the screen for reference.
1. Touch the MIDI channel for the track which uses Arp A (In this case, track 1)
2. Using the value wheel, slider or buttons, select MIDI channel 2.
3. Touch the MIDI channel for the track which uses Arp B (In this case, track 2)
4. Using the value wheel, slider or buttons, select MIDI channel 3.
5. Touch the "MIDI CH 9-16" tab on the bottom of the screen.
You are now looking at tracks 9-16… 9 and 10 will be the dummy tracks for 1 and 2. Now we need to set up
the Dummy Tracks to trigger the arpeggiators from MIDI channel 1. First, we'll set up track 9:
6. Touch the MIDI channel for track 9.
7. Using the value wheel, slider or buttons, select MIDI channel 1.
8. Touch the Track Status setting for track 9 ("INT").
9. Using the value wheel, slider or buttons, set the Track Status to "OFF". (We do this so these tracks
don’t sound – we only want them to trigger the desired arp. patterns!)
Now, Track 10:
10. Touch the MIDI channel for track 10.
11. Using the value wheel, slider or buttons, select MIDI channel 1.
12. Touch the Track Status setting for track 10 ("INT").
13. Using the value wheel, slider or buttons, set the Track Status to "OFF".
Almost there… the last thing to do is set up the Dummy tracks to trigger the Arps:
14. Press the MENU button.
15. Touch "Arpeggiator".
16. Touch the "Setup 9-16" tab on the bottom of the screen.
17. Touch the "Arpeggiator Assign" for Track 9 ("OFF").
18. Using the value wheel, slider or buttons, set the "Arpeggiator Assign" for track 9 to "A"
19. Touch the "Arpeggiator Assign" for Track 10 ("OFF").
20. Using the value wheel, slider or buttons, set the "Arpeggiator Assign" for track 10 to "B"
79
Page 82

TRITON Training Guide
Now, we're ready to record:
1. Press the MENU button.
2. Press the EXIT button. This will take you out to the first Sequencer Screen.
3. Touch the "Pref." Tab at the bottom right hand side of the screen.
4. Touch the box next to "Multi REC" so that it is checked.
5. Press the Arpeggiator "On/Off" button so that it is lit.
6. Touch the arrow next to "Track 01".
7. Touch "Track 03". Track 3 is the first track in the Combination that is on Channel 1. Multi-channel
recording must start with MIDI channel 1 to work, so always start recording on whichever is the first track
set to MIDI channel 1.
Now, record using the normal method:
8. Press the "REC/WRITE" button.
9. Press the "START/STOP" button. You'll get two measures counted in to get ready.
10. Record. When done, press the "START/STOP" button to finish recording, then the "LOCATE" to
rewind back to the start.
That’s all there is to it. Once you have finished recording you can undo the status of the Dummy tracks and
reuse them to play regular parts. You could even reassign the Arpeggiators to other tracks using this same
method and record multiple arpeggiated “passes” – just remember to keep the MIDI channels separate from
all other parts!
How to determine which Tutorial to use for a Combination:
1. Press the SEQ. button to enter the Sequencer Mode.
2. Touch the arrow on the top right hand side of the screen.
3. Touch "Copy From Combi".
4. Using the value wheel, slider or buttons, select the Combination you wish to use.
5. Touch "O.K."
6. Press the MENU button.
7. Touch "Track Param."
Look at the MIDI channels for the first 8 tracks. If there is one or more tracks that use a channel other than
1, use Scenario 1. Again, a hidden drum rhythm is a sure sign of type of Combination. If all tracks are on
channel 1, use Scenario 2.
80
Page 83

TRITON Training Guide
This concludes the Advanced Arpeggiator Tour - for more tips and tricks check out
our Web Site at www.korgusa.com: The TRITON Owner manuals are packed with
good information - check 'em out !!!!!!
Output Routing
TRITON provides six audio outputs - L/mono, R, plus 4 individual outputs. Here's a quick way for you to
demonstrate how easy it is to send a song track to an individual output. We'll use the factory demo song
"Deep Cut" as an example:
Demonstrate output routing in Sequencer mode:
1. Insert the TNFD-OOP(US) disk and reload the PRELOAD.SNG file.
2. Press the SEQ key to enter Sequencer mode, then select Song S000: Deep Cut.
3. Start playback of the song, then press the MENU key.
4. Press Edit - Insert Effects in the Jump menu, then press the Routing 9-16 tab.
5. Move the audio cable from the R output jack to the INDIV.1 audio output jack.
6. Set Track 12's (Bass) BUS Select to 1, from the popup menu.
7. Press the Routing Page menu button (upper - right), and select Solo Selected Track. After you've
soloed Track 12, solo Track9 - and other tracks, by pressing their BUS Select settings. Press the Solo
Selected Track from the popup menu again, to uncheck the Solo function.
8. Set Track 9's BUS Select to 1, as well. Then press the EXIT key to go to the P0: Play / REC page, and
"toggle" ON/OFF the SOLO buttons for Track 9 and 12 - to more - effectively demonstrate signals sent to
the INDIV.1 output.
Tip: You can demo TRITON's easy output bussing while playing any Combination - just move the R
output cable to the INDIV.1 output, go to the Edit - Insert Effects page, and set a desired track's BUS
Select to 1. When you play the Combination, you'll hear the timbre isolated at your mixer! Then use the Solo
Selected Timbre function to effectively - hear the isolation between timbres!
Output Routing for Individual Sounds
When it comes to isolating individual drum sounds - or any samples, for that matter - you can do it in
seconds - with TRITON's easy - routing!
81
Page 84

TRITON Training Guide
Copy a preset drum kit to a user drum kit and set a new output bus for a drum
sound:
1. Move the R output cable to the INDIV.1 output jack.
2. Press the PROG key to enter Program mode.
3. Press the Category box, then press the 15 Drums category tab.
4. Press to select A068: HipHop Kit from the center menu, then press OK.
5. Press the GLOBAL key to enter Global mode, then press the MENU key, and select P5: Drum Kit from
the Jump menu. The drum kit used in Program A068 (07 (A/B Hip Hop Kit) is indicated at the top of the
display - it "followed" you here when you selected the Program. At this point you could edit the existing
kit, but there are 48 User kits available, so it's best to copy this kit to a user kit, and then edit the user kit.
(that's right, 48 User Kits!)
6. Press the DrumKit: 07 (A / B) : Hip Hop Kit popup button, then use the Scroll Bar to locate and
select 16 (C) : Drumkit 16 from the popup menu.
7. Press the Page menu button (upper - right), and select Copy Drum Kit from the popup menu. Press
the 00 (A / B : Standard Kit in the From: field, then locate and select 07 (A / B) : Hip Hop Kit from
the popup menu. Press OK.
8. Now go back and press the DrumKit: 07 (A / B) : Hip Hop Kit popup button, and use the Scroll Bar
to locate and select the new user kit: 16 Hip Hop Kit.
9. Press to highlight the KEY: parameter (upper - left), then hold down the ENTER key and press key D2
(the note you press will highlight on the keyboard graphic in the display).
10. Press the Voice Mixer tab at the bottom of the display, and you'll see the Mixer settings for this drum
sound. Notice that the BUS Select is set to IFX2.
11. Press the IFX2 popup button, and select BUS 1 from the popup menu. Now play the keyboard, and
the kick drum sample will be dry and isolated at the INDIV.1 output. (Note that this is a velocity -
switching sample - play harder to hear the High drum sample)
Tip: You can set any drum sound to any output or effect bus in GLOBAL P5 Drum Kit. If you want to
create a User drum kit based off one of the 16 internal preset kits or GM kits, first Copy the preset or GM kit
(choose Copy Drum Kit from the GLOBAL P5 popup menu) to one of the 48 available User kit locations as
above. If you want to copy the Key Setup from one area of the keyboard to another, you can from the Page
menu popup!
82
Page 85

TRITON Training Guide
Tip: You can Rename your new user kit from the Page menu popup in GLOBAL P5. Also remember to
Update your new drum kits and any changes you want to retain in Global mode - just press REC/WRITE and
OK from the dialog box - and don't forget to save your data to disk (or via SCSI to fixed / removable drives
with EXB-SCSI option)!!!
Tip: As you view the functions available in GLOBAL P5 Drum Kit, you'll see many new additions to KORG's
drum kit parameters, like being able to select samples from ROM, RAM, EXB1 / 2, Cutoff and Res onance
settings for each sample, Attack and Decay for each - a host of great ways to control the individual sounds!
User - Installable Option Boards / Memory
There are three types of option boards available for TRITON:
EXB - MOSS A user - installable MOSS tone generator with 13 algorithms, including
physical models and various synthesis methods - algorithms developed first on Korg’s Prophecy, then
expanded to the incredible Z1 DSP Synthesizer and TrinityV3 series! EXB - MOSS adds 6 voices of
polyphony to TRITON’s 62 - voice structure, and all six voices can be used in any F - Bank Program, any
Combination or Song. And best of all the EXB -MOSS is 6-part multitimbral, so you can use more than one
MOSS Program in your Combis and Songs!
TRITON’s huge collection of internal PCM, plus user -sampling, combined with the MOSS tone generator gives you the “best of all worlds” in sound design and performance! MOSS Programs and Combinations and
Songs that use MOSS timbres and tracks can also be arpeggiated - polyphonically - with TRITON’s Dual
Arpeggiators! In addition, the MOSS sounds can all be processed through TRITON’s insert and master
effects!
The MOSS physical models include Standard Analog, Organ, Electric Piano, Reed, Brass, Plucked and
Bowed String, and the synthesis algorithms available and combinable include Ring Modulator, VPM
(Variable Phase Modulation), Resonance, Cross Modulation, Sync Modulation and Comb Filter! A huge
palette of sounds to use by themselves - or layered, split and velocity - switched - in conjunction with
TRITON’s PCM and user - samples!
Tip: When you install the EXB-MOSS and load the included disk file you'll get the following:
128 new MOSS Programs will load into Bank F, complete with Insert and Master effects, full controller
assignments and arpeggio settings
83
Page 86

TRITON Training Guide
64 new Combinations utilizing multiple MOSS Programs will be loaded into the B Bank, followed by 64 more
"regular" Combis.
EXB - SCSI A user - installable SCSI interface board / connector that provides you with
lightning - fast speed for loading and saving user - samples, sounds and songs to removable or fixed media!
EXB - SCSI also gives you access to CD ROM - for loading Akai S1000 / 30000, Korg, AIFF and WAVE
format samples files!
EXB - PCM01, 02, 03, 04. Each of these user - installable boards adds 16 Mbyte of multisamples and
drum samples to TRITON! There are currently four EXB - PCM boards available: EXB-PCM01
(Pianos/Classic Keyboards) gives you an abundance of keyboard - related samples, including stereo pianos
and vintage keyboards. EXB -PCM02 (Studio Essentials) provides many - contemporary / pop samples,
including new stereo strings, brass and gospel choir. EXB-PCM03 (Future Loop Construction) provides
Recycled! (cut-up) drum loops in many style of music, perfect for using in the sequencer with completely
independent control over tempo and pitch. EXB-PCM-04 (Dance Extreme) is a great collection of danceoriented sounds making amazing use of the Triton’s mighty arpeggiators. All expansion boards come with a
factory .PCG disk. There are two slots available for EXB - PCM boards. When both boards are installed,
TRITON’s PCM memory is expanded to a whopping 64 Mbyte!!!
Tip: When you install an EXB-PCM board you'll also get a disk with a .PCG file which contains 128 new
Programs and 128 new Combinations using this new PCM data. These sounds will need to load into either
your C or D Bank, overwriting the data you have there - be sure to backup before you load the new data in!
Each disk contains both a C and D Bank .PCG so you can choose which Bank you want to load the new
sounds into.
SIMM memory modules: Need more sample RAM? Expand the TRITON from it’s standard 16 Mbyte,
up to 64 Mbytes, using commercially - available and user - installable 72-Pin SIMM memory modules!
There are two internal slots available - each can hold a 16 or 32Mbyte SIMM module, and configurations for
both slots include 2-16 Mbyte (for 32 Mbytes total memory), 1-16 and 1-32 Mbyte (for 48 Mbytes total
memory) or 2-32 Mbyte (for the maximum 64 Mbytes of sample memory).
See the TRITON Parameter Guide (pg 238) for information about the type of SIMM modules you can use.
Installing Option Boards / SIMM Modules
Korg has designed the TRITON’s EXB-board and SIMM slots for easy user - installation, and all the
information you’ll need is concisely covered in the TRITON Parameter Guide (pg 238 - 243). There you’ll find
all the help you need, including graphic representations of each procedure - for TRITON, TRITONpro and
TRITONproX.
84
Page 87

TRITON Training Guide
When you first power - up TRITON, the currently - installed expansion boards / memory will be indicated in
the display.
Additional Information - OM References:
Save and Load Procedures
Refer to the TRITON Basic Guide, page 92
Song Play Mode
Refer to the TRITON Basic Guide, page 85
Global Mode
Refer to the TRITON Basic Guide, page 89
MIDI / Host Port and Computer usage
Refer to the TRITON Basic Guide, page 111
85
Page 88

Page 89

TRITON Training Guide
Very Cool TRITON Programs!
Category Program Controllers: Category Program Controllers:
Keyboard A001 Acoustic Piano R K3 ARP Bass A006 Nasty Bass R VEL JS-Y
B001 Attack Piano JS+Y K2-3
A022 Acoustic Bass R K1-4 ARP
B017 Dyno Tine EP JS+Y K2 R
A038 30303 Mega Bass ARP R K1-4
B104 L/R Piano(Knob1) K1 K4
A054 SuperSwitch Bass VEL R K2/ARP
Organ A007 BX3 Velo Switch VEL JS+Y K1 SlowSynth A008 Rez. Down R SW1 JS-Y
A023 M1 Organ R JS+Y SW1/K1
A088 Antartic Wind SW1 SL K3/ARP
A087 Perc Short Delay R JS+Y ARP
A104 Money Pad R JS-Y K1-4
Bell / Mallet A015 Monkey Skulls K1-3 JS-Y ARP
D014 Cinema Pad SL SW1 R
A063 Moving Bellz JS-Y R SL FastSynth A000 Noisy Stabber GK/VK R K1-4
B063 Magical Bells SL R
A080 Cosmic Furnace SL R K3
Strings A003 Legato Strings JS-Y K1 R
B080 Mega Big Synth R VEL K1-4
A083 Few Bows Here VEL K1-2
C000 Techno Phonic ARP R GK/VK
A115 WatcherOfTheSky K3 JS-Y
LeadSynth A124 Espress lead R K-1-4
B019 String Quartet R K1-4 ARP
B028 Glide Lead JS-Y R K1
B067 Solo Violin R-TAP K3 ARP
C076 Sync Kronicity JS-Y SW1 R
C115 Analog Velvet SW1 R K3 MotionSynth A014 Swirling Dreams SW1 SL ARP
Vocal / Airy A011 Fresh Breath JS-Y SW1 K1-4
B046 Dolphin Ride SW1 ARP
B027 Vocalesque SW1 K3-4 SL
B082 Space Pod for 2 VEL K1-4 T
B091 Take Voices VEL K1 R/ARP
C078 Water is Deep K3 HOLD ARP
D027 OohSlow VoicesST R K3
SE A010 Techno Vox Box JS-Y SW1 K1-2
Brass A009 Fat Brass K1-2 R
B072 DJ Touch JS-ALL SW1 K3
B121 Classic Fanfare VEL R K3-4
B106 MotionSoundTrack R JS-Y ARP
C121 Movie Brass R K2 K3-4 Hit /Arp A034 Arp Angeles K2 SW1 K3/VK
Woodwind A013 Sax Ensemble R K3-4
A050 Arp Twins R JS-ALL K1-4
B013 Old Shakuhachi VEL AT K3
B044 Auto Pilot GK K1-2 R
C045 Breathy AltoSax K3 R
Drums A004 Tricky Kit! ARP SW1 VEL
Guit/Plucked A005 Acoustic Guitar JS-Y SW1 K3
B004 Jazz/Brush Kits R ARP K1-2
A101 Nylon Guitar SW1 R ARP
C020 Nasty TRicky Kit ARP R K2-3
B005 FingertipsGuitar JS-Y ARP K3
B069 Strato-Chime K1-4 R
B083 Indian Stars SL K2 SW1
B085 Feedback D. Gtr JS-Y R ARP
Controller Abbreviations: Ribbon- R AudioIn- AUD Note: As you work with these sounds, choose one or two
Jstick- JS Arpeg- ARP of your favorites from each category, then begin preparing your
Switch- SW GateKb- GK demo with the "best-of" sounds. The controllers suggested for
Knob- K VeloKb- VK each sound are o
nly a few of the available AMS and Dynamic
Slider- SL Atouch- AT Modulation sources that have been assigned to each sound.
Tempo- T (LFO) Veloc- VEL Note: ARP = Turn Arpeggiator ON
Page 90

TRITON Training Guide
Very Cool TRITON Combinations!
Category Combination Controllers: Category Combination Controllers:
Keyboard A000 Romance Layers ARP VK R Pads A010 Pad Tropolis R VK
A001 Lonely Moon K2 K1 R
A122 The Toy Box VK R
B000 Famous Layer EP R K3 SW1
C058 Triton Voices R K3
B064 Wide L/R Piano K2-4
D074 SecretGroove Pad SW1 ARP SL
C025 SlowDance Piano SL R
Motion A004 Vocoderhythm AUD R K-1
Organ A008 Knob as Drawbar1 K1-4 JS+Y ARP
A020 Falling Leaves R SL
A072 Rock Organ JS+Y K1-2
A036 Gods Bathtub K2 R SW1
B104 Pipes on Knobs K1-4 SL ARP
A068 Weightless R SW1 K1
C088 ReggaeAlvinBlues R K1-2 SL
B090 Imaginary PizPad K1-4 ARP R
Bell / Mallet C060 Isle Of Indigo K1 VK SL Synth B010 5th Dimension ARP R K2
C108 Bell Animations JS-Y K2 VK
C005 Huge Ober Sweeps R K1-4
D012 Modern Monastery R ARP VK
C069 Analog 101 R JS-Y ARP
Strings A013 Golden Strings R ARP SL
D021 Ravalogue R JS-Y GK
A093 Strings Of Silk ARP SL R Lead Split A014 Leading Lady K2-4 JS+Y
C029 Super Strings R ARP K2
A126 Life Together ARP K1-4 JS-Y
D013 String Concerto R K1 K4
B126 Rock it ship ARP K1-2 JS-Y
Brass / Reed A011 Big Jazz Band SW1 SL K2
C078 Alien Lovers JS-Y VK GK
B059 Fat Horn Section K1-2 R SL Bass Split A001 Lonely Moon VK GK R
C027 Future Brass VK SL R
C001 In The Room R SL VK
C091 Aggessive Horns R SL
C097 Bumpin'&Thumpin' SL R K4
Orchestral A002 Dyn Orchestra 1 R K1 K2
D081 Jungle Split JS-Y ARP R
A018 Rhythms & Bows VEL R K1 Complex A015 Barter Town K1-4 R ARP
A114 Sweet Dyn-Orch R SW1 K2
A031 Meteor Shower R K1-4 JS-Y
B050 Orchestral Brass R JS-Y K2
A063 Melanco R SW1 VK/GK
World A025 World Winds ARP VEL K2
D079 Don'tLandTheShip HOLD R K3
A041 Fisatic Dreams SW1 K3 R Rhythmic A102 The 16th Strummer K1-4 GK VK
B025 Beyond Nepal… K2-3 ARP VK
B003 Formant & Lead R K1-2
C105 World Atmosphere VK K2
B019 Waterboy Split R K3 VK
Guit / Pluck A007 My Baby's Asleep K3 ARP SW1
B086 Moon Jam SW1-2 R
B087 Rock Is King! K1-4 ARP SW1
C126 Vacancy… K1-4 VK
C103 Toro,Toro,Ole!!!! GK R K2 Drums / Hits A006 Ugly Momma D.Kit K1-3 JS-Y ARP
D039 Rich Guitarist ARP SW1 K2
B111 Suspected Hit K1-4 SL ARP
D006 Sonic FX Mixer SW1 JS-Y K3-4
D022 Carnival Parade K1-4 VK
Controller Abbreviations: Ribbon- R AudioIn- AUD Note: As you work with these sounds, choose one or two
Jstick- JS Arpeg- ARP of your favorites from each category, then begin preparing your
Switch- SW GateKb- GK demo with the "best-of" sounds. The controllers suggested for
Knob- K VeloKb- VK each sound are only a few of the available AMS and Dynamic
Slider- SL Atouch- AT Modulation sources that have been assigned to each sound.
Tempo- T (LFO) Veloc- VEL Note: ARP = Turn Arpeggiator ON
Page 91

TRITON Training Guide
 Loading...