

Page 1

1/2
Thank you for purchasing the Korg TM-50TR TUNER/
METRONOME/TONE TRAINER. To help you get the most
out of your new instrument, please read this manual
carefully.
Merci d’avoir choisi le TUNER/METRONOME/TONE
TRAINER TM-50TR de Korg. An de pouvoir exploiter au
mieux toutes les possibilités oertes par l’instrument,
veuillez lire attentivement ce manuel.
Vielen Dank, dass Sie sich für einen TM-50TR TUNER/
METRONOME/TONE TRAINER von Korg entschieden
haben. Bitte lesen Sie sich diese Anleitung vollstädig
durch, um bei der Bedienung alles richtig zu machen.
Gracias por comprar el TUNER/METRONOME/TONE
TRAINER TM-50TR de Korg. Por favor, lea este manual
atentamente y gu delo para futuras consultas.
こ の た び は 、コ ル グ・チ ュ ー ナ ー・メ ト ロ ノ ー ム・ト ー ン・ト
レーナー TM-50TRをお買い上げいただきまして、まこと
にありがとうございます。本製品を末永くご愛用いただく
ためにも、取扱説明書をよくお読みになって、正しい方法
でご使用ください。
コルグ TM-50TR
本保証書は、保証規定により無償修理をお約束するものです。
お 買 い 上 げ 日:
販売店名:
保証書
年 月 日
Precautions
Location
Using the unit in the following locations can result in a malfunction.
•
In direct sunlight
•
Locations of extreme temperature or humidity
•
Excessively dust y or dirty locations
•
Locations of excessive vibration
•
Close to magnetic elds
Power supply
Be sure to turn of f the power when the unit is not in use. Rem ove the
battery in order to prevent it from leaking when the unit is not in use for
extended periods.
Interference with other electrical devices
Radios and televisions placed nearby may experience reception interference. Operate this unit at a suitable distance from radios and televisions.
Handling
To avoid breakage, do not apply excessive force to the switches or controls.
Care
If the exterior becomes dirty, wipe it with a clean, dry cloth. Do not use
liquid cleaners such as benzene or thinner, or cleaning compounds or
ammable polishes.
Keep this manual
After reading this manual, please keep it for later reference.
Keeping foreign matter out of your equipment
Never set any container with liquid in it near this equipment. If liquid gets
into the equipment, it could cause a breakdown, re, or electrical shock.
Be careful not to let metal objects get into the equipment.
THE FCC REGULATION WARNING (for USA)
NOTE: This equipment has been tested and found to comply with the
limits for a Class B digital device, pursuant to Par t 15 of the FCC Rules.
These limits are designed to provide reasonable protection against
harmful interference in a residential installation. This equipment generates, uses, and can radiate radio frequency energy and, if not installed
and used in accordance with the instructions, may cause harmful interference to radio communications. However, there is no guarantee that
interference will not occur in a particular installation. If this equipment
does cause harmful interference to radio or television reception, which
can be determined by turning the equipment o and on, the user is
encouraged to try to correct the interference by one or more of the
following measures:
•
Reorient or relocate the receiving antenna.
•
Increase the separation between the equipment and receiver.
•
Connect the equipment into an outlet on a circuit dierent from
that to which the receiver is connected.
•
Consult the dealer or an experienced radio/TV technician for help.
If items such as cables are included with this equipment, you must use
those included items.
Unauthorized changes or modication to this system can void the user’s authority to operate this equipment.
Notice regarding disposal (EU only)
If this symbol is shown on the product, manual, battery, or package, you must dispose of it in the correct manner to avoid harm
to human health or damage to the environment. Contact your
local administrative body for details on the correct disposal
metho d. If the battery contains heavy metals in excess o f the
regulated amount, a chemical symbol is displayed below the symbol
on the battery or battery package.
This product has been manufac tured according to strict specications
IMPORTANT NOTICE TO CONSUMERS
and voltage requirements that are applicable in the country in which
it is intended that this product should be used. If you have purchased
this product via the internet, through mail order, and/or via a telephone sale, you must verify that this product is intended to be used in
the country in which you reside.
WARNING: Use of this product in any country other than that for which
it is intended could be dangerous and could invalidate the manufacturer’s or distributor’s warrant y.
Please also retain your receipt as proof of purchase otherwise your
product may be disqualied from the manufacturer’s or distributor’s
warranty.
All product names and company names are the trademarks or regis-
*
tered trademarks of their respective owners.
Précautions
Emplacement
L'utilisation de cet instrument dans les endroits suivants peut en
entraîner le mauvais fonctionnement.
•
En plein soleil.
•
Endroits très chauds ou très humides.
•
Endroits sales ou fort poussiéreux.
•
Endroits soumis à de fortes vibrations.
•
A proximité de champs magnétiques.
Alimentation
Lorsque vous n’utilisez pas l’appareil, n’oubliez p as de le me ttre
hors tension. Retirez les piles pour éviter toute fuite lorsque l’appareil ne sera pas utilisé pendant de longues périodes de temps.
Interférences avec d'autres appareils électriques
Les postes de radio et de télévision situés à proximité peuvent par
conséquent sourir d'interférences à la réception. Veuillez dès lors
faire fonctionner cet appareil à une distance raisonnable de postes
de radio et de télévision.
Maniement
Pour éviter de les endommager, manipulez les commandes et les
boutons de cet instrument avec soin.
Entretien
Lorsque l'instrument se salit, nettoyez-le avec un chion propre et
sec. Ne vous servez pas d'agent s de nettoyage liquides tels que du
benzène ou du diluant, voire des produits inammables.
Conservez ce manuel
Après avoir lu ce manuel, veuillez le conserver soigneusement
pour toute référence ultérieure.
Evitez toute intrusion d'objets ou de liquide
Ne placez jamais de récipient contenant du liquide près de l'instrument. Si le liquide se renverse ou coule, il risque de provoquer des
dommages, un court-circuit ou une électrocution. Veillez à ne pas laisser tomber des objets métalliques dans le boîtier (trombones, par ex.).
Note concernant les dispositions (Seulement EU)
Si ce symbole apparait sur le produit, le manuel, les piles
ou les packs de piles, cela signi e que vous devez le recycler d’une manière correcte afi n de prévenir les dommages pour la santé humaine et les dommages potentiels
pour l’environnement. Contactez votre administration locale pour de plus amples renseignements concernant la bonne
méthode de recyclage. Si la pile contient des métaux lourds
au-delà du seuil réglementé, un symbole chimique est a ché
en dessous du symbole de la poubelle barrée d’une croix sur la
pile ou le pack de piles.
REMARQUE IMPORTANTE POUR LES CLIENTS
Ce produit a été fabriqué suivant des spécifi cations sévères et
des besoins en tension applicables dans le pays où ce produit doit
être utilisé. Si vous avez acheté ce produit via l’internet, par vente
par correspondance ou/et vente par téléphone, vous devez véri
er que ce produit est bien utilisable dans le pays où vous résidez.
ATTENTION: L’utilisation de ce produit dans un pays autre que
celui pour lequel il a été conçu peut être dangereuse et annulera
la garantie du fabricant ou du distributeur. Conservez bien votre
récépissé qui est la preuve de votre achat, faute de quoi votre
produit risque de ne plus être couvert par la garantie du fabricant ou du distributeur.
Tous les noms de produits et de sociétés sont des marques
*
commerciales ou déposées de leur détenteur respectif.
Page 2
保証規定
本保証書は、保証期間中に本製品を保証するもので、付属
品類(ヘッドホンなど)は保証の対象になりません。保証
期間内に本製品が故障した場合は、保証規定によって無償
修理いたします。
1.本保証書の有効期間はお買い上げ日より1か年です。
2.次の修理等は保証期間内であっても有償となります。
• 消耗部品(電池、スピーカー、真空管、フェーダーなど)
の交換。
• お取扱い方法が不適当のために生じた故障。
• 天災(火災、浸水等)によって生じた故障。
• 故障の原因が本製品以外の他の機器にある場合。
• 不当な改造、調整、部品交換などにより生じた故障また
は損傷。
• 保証書にお買い上げ日、販売店名が未記入の場合、ま
たは字句が書き替えられている場合。
• 本保証書の提示がない場合。
尚、当社が修理した部分が再度故障した場合は、保証期
間外であっても、修理した日より3か月以内に限り無償
修理いたします。
3.本保証書は日本国内においてのみ有効です。
ThiswarrantyisvalidonlyinJapan.
4.お客様が保証期間中に移転された場合でも、保証は引
き続きお使いいただけます。詳しくは、お客様相談窓
口までお問い合わせください。
5.修理、運送費用が製品の価格より高くなることがあります
ので、あらかじめお客様相談窓口へご相談ください。発送
にかかる費用は、お客様の負担とさせていただきます。
6.修理中の代替品、商品の貸し出し等は、いかなる場合に
おいても一切行っておりません。
本製品の故障、または使用上生じたお客様の直接、間接の
損害につきましては、弊社は一切の責任を負いかねますの
でご了承ください。
本保証書は、保証規定により無償修理をお約束するための
もので、これによりお客様の法律上の権利を制限するもの
ではありません。
(必ずお読みください)
■お願い
1.保証書に販売年月日等の記入がない場合は無効となり
ます。記入できないときは、お買い上げ年月日を証明で
きる領収書等と一緒に保管してください。
2.保証書は再発行致しませんので、紛失しないように大切
に保管してください。
アフターサービス
修理および商品のお取り扱いについてのご質問、ご相談は、
お客様相談窓口へお問い合わせください。
お客様相談窓口
受付時間:月曜~金曜 10:00 ~ 17:00
(祝祭日、窓口休業日を除く)
※PHS等一部の電話ではご利用できません。固定電話
または携帯電話からおかけください。
● サ ー ビ ス・セ ン タ ー:
〒168-0073東京都杉並区下高井戸1-18-162F
安全上のご注意
火災・感 電・人 身 傷害の危険 を防止するには
以 下 の 指 示を 守ってく だ さ い
警告
・ 次のような場 合には、直ちに電 源を切る。
○異物が内部に入ったとき
○製品に異常や故障が生じたとき
修理が必要なときは、コルグお客様相談窓口へ依頼して
ください。
・ 本 製品を 分解したり改 造したりしない。
・
修理、部品の交換などで、取扱説明書に書かれていること
以外は 絶 対にしな い 。
・大音量や不快な程度の音量で長時間使用しない。
大 音量で長時間使用 すると、難聴になる可能性 がありま
す。万一、聴力 低下や耳鳴りを感じたら、専門の医師に相
談してくだ さ い 。
・本製品に異物(燃えやすいもの、硬貨、針金など)を入れ
ない。
・温度が極端に高い場所(直射日光の当たる場所、暖房機器
の近く、発熱する機器の上など)での使用や保管はしない。
・振動の多い場所で使用や保管はしない。
ホコリの 多い場所で使 用 や 保管はし ない。
・
・ 風 呂 場 、シ ャ ワ ー 室 で 使 用 や 保 管 は し な い 。
・雨天時の野外のように、湿気の多い場所や水滴のかかる
場 所 で 、使 用 や 保 管 は し な い 。
・本製品に液体をこぼさない。
・ 濡 れ た 手 で 本 製 品 を 使 用 し な い 。
注意
・ 正常な通気 が妨げられない所に設置して使用する。
・ ラ ジ オ 、テ レ ビ 、電 子 機 器 な ど か ら 十 分 に 離 し て 使 用 す る 。
ラジオやテレビ等に接 近して使用すると、本製品が 雑音を
受 け て 誤 動 作 す る 場 合 が あ り ま す 。 ま た 、ラ ジ オ 、テ レ ビ
等に雑音が入ることがあります。
本製品をテレビ等の横に設置すると、本製品の磁場によっ
てテレビ等の故障の原因になることがあります。
・外装のお手入れは、乾いた柔らかい布を使って軽く拭く。
・長時間使用しないときは、電池の液 漏れを防ぐために電
池を抜く。
・電池や本体は幼児の手の届かないところへ保管する。
・ 電 池 を 過 度 の 熱 源( 日 光 、 火 な ど ) に さ ら さ な い 。
・ボタンやツマミなどに必要以上の力を加えない。
故 障 の 原因になります。
・外装のお手入れに、ベンジンやシンナー系の液体、コンパ
ウンド質、強 燃 性のポリッシャー は使 用しない。
・不安定な場所に置かない。
※すべての製品名および会 社名は、各社の商標または登録商標
です。
この注意事項を無視した取り扱いをすると、
死亡や 重 傷 を 負う可能 性 が ありま す。
この注意事項を無視した取り扱いをすると、
傷害を負う、または物理的損害が発生する可
能 性 が ありま す。
Vorsichtsmaßnahmen
Aufstellungsort
Vermeiden Sie das Aufstellen des Geräts an Orten, an denen.
•
es direkter Sonneneinstrahlung ausgesetzt ist;
•
hohe Feuchtigkeit oder Extremtemperaturen auftreten können;
•
Staub oder Schmutz in großen Mengen vorhanden sind;
•
das Gerät Erschütterungen ausgesetzt sein kann.
•
in der Nähe eines Magnetfeldes.
Stromversorgung
Stellen Sie den Netzschalter auf OFF, wenn das Gerät nicht benutzt wird.
Wenn Sie das Gerät über einen längeren Zeitraum nicht benutzen, nehmen Sie die Batterien heraus, damit sie nicht auslaufen.
Störeinüsse auf andere Elektrogeräte
Dieser kann bei in der Nähe aufgestellten Rundfunkemp-fänger oder
Fernsehgeräten Empfangsstörungen hervorrufen. Betreiben Sie solche
Geräte nur in einem geeigneten Abstand von diesem Erzeugnis.
Bedienung
Vermeiden Sie bei der Bedienung von Schaltern und Reglern unangemessenen Kraftaufwand.
Reinigung
Bei auftretender Verschmutzung können Sie das Gehäuse mit einem
trockenen, sauberen Tuch abwischen. Verwenden Sie keinerlei Flüssigreiniger wie beispielsweise Reinigungsbenzin, Verdünner- oder Spülmittel.
Verwenden Sie niemals brennbare Reiniger.
Bedienungsanleitung
Bewahren Sie diese Bedienungsanleitung gut auf, falls Sie sie später noch
einmal benötigen.
Flüssigkeiten und Fremdkörper
Stellen Sie niemals Behältnisse mit Flüssigkeiten in der Nähe des Geräts
auf. Wenn Flüssigkeit in das Gerät gelangt, können Beschädigung des Geräts, Feuer oder ein elektrischer Schlag die Folge sein. Beachten Sie, dass
keinerlei Fremdkörper in das Gerät gelangen.
Hinweis zur Entsorgung (Nur EU)
Wenn Sie das Symbol mit der „durchgekreuzten Mülltonne“ auf
Ihrem Produkt, der dazugehörigen Bedienungsanleitung, der
Batterie oder der Verpackung sehen, müssen Sie das Produkt in
der vorgeschriebenen Art und Weise entsorgen um Schäden an
der menschlichen Gesundheit und der Umwelt zu vermeiden.
Batterien oder Akkus, die Schadstoffe enthalten, sind auch mit dem
Symbol einer durchgekreuzten Mülltonne gekennzeichnet. In der Nähe
zum Mülltonnensymbol be ndet sich die chemische Bezeichnung des
Schadstoes.
Dieses Produkt wurde unter strenger Beachtung von Spezikationen
und Spannungsanforderungen hergestellt, die im Bestimmungsland
gelten. Wenn Sie dieses Produkt über das Internet, per Postversand
und/oder mit telefonischer Bestellung gekauft haben, müssen Sie bestätigen, dass dieses Produkt für Ihr Wohngebiet ausgelegt ist.
WARNUNG: Verwendung dieses Produkts in einem anderen Land als
dem, für das es bestimmt ist, verwendet wird, kann gefährlich sein und
die Garantie des Herstellers oder Importeurs hinfällig lassen werden.
Bitte bewahren Sie diese Quittung als Kaufbeleg auf, da andernfalls das
Produkt von der Garantie des Herstellers oder Importeurs ausgeschlossen werden kann.
Alle Produkt- und Firmennamen sind Warenzeichen oder eingetrage-
*
ne Warenzeichen der betreenden Eigentümer.
WICHTIGER HINWEIS FÜR KUNDEN
Precauciones
Ubicación
El uso de la unidad en las siguientes ubicaciones puede dar como
resultado un mal funcionamiento:
•
Expuesto a la luz direct a del sol.
•
Zonas de extremada temperatura o humedad.
•
Zonas con exceso de suciedad o polvo.
•
Zonas con excesiva vibración.
•
Cercano a campos magnéticos.
Fuente de alimentación
Apague la unidad cuando no la use la batería. Retire las baterías si
no va a usar la unidad durante un tiempo largo.
Interferencias con otros aparatos
Las radios y televisores situados cerca pueden experimentar interferencias en la recepción. Opere este dispositivo a una distancia
prudencial de radios y televisores.
Manejo
Para evitar una rotura, no aplique excesiva fuerza a los conmutadores o controles.
Cuidado
Si exterior se ensucia, límpiese con un trapo seco. No use líquidos
limpiadores como disolvente, ni compuestos inamables.
Guarde este manual
Después de leer este manual, guárdelo para futuras consultas.
Mantenga los elementos externos alejados del equipo
Nunca coloque ningún recipiente con líquido cerca de este equipo,
podría causar un cortocircuito, fuero o descarga eléctrica. Cuide de
que no caiga ningún objeto metálico dentro del e quipo.
Nota respecto a residuos y deshechos (solo UE)
Si aparece el símbolo del cubo de basura tachado sobre
un producto, su manual de usuario, la batería, o el embalaje de cualquiera de éstos, signi ca que cuando tire dichos artículos a la basura, ha de hacerlo en acuerdo con la
normativa vigente de la Unión Europea para prevenir daños a la salud pública y al medioambiente. Le rogamos que se
ponga en contacto con su o cina o ministerio de medioambiente para más detalles. Si la batería contiene metales pesados por
encima del límite permitido, habrá un símbolo de un material
químico, debajo del símbolo del cubo de basura tachado.
NOTA IMPORTANTE PARA EL CONSUMIDOR
Este producto ha sido fabricado de acuerdo a estrictas especi
caciones y requerimientos de voltaje aplicables en el país para el
cual está destinado. Si ha comprado este producto por internet,
a través de correo, y/o venta telefónica, debe usted veri car que
el uso de este producto está destinado al país en el cual reside.
AVISO: El uso de este producto en un país distinto al cual está
destinado podría resultar peligroso y podría invalidar la garantía
del fabricante o distribuidor. Por favor guarde su recibo como
prueba de compra ya que de otro modo el producto puede verse privado de la garantía del fabricante o distribuidor.
Todos los nombres de productos y compañías son marcas co-
*
merciales o marcas registradas de sus respectivos propietarios.
Page 3
The TM-50TR is equipped with a variety of functions to
h
i
d
g
c
ba
help you practice obtaining a “good sound”.
In addition to the conventional tuner functions (Meter,
Sound Out and Sound Back), the TONE TRAINER function
can be used to measure the stability levels of the pitch,
dynamics and brightness to help you practice producing a
good stable sound.
With the periodic metronome function, the metronome
clicks with each set measure as well as plays a tone with the
set time signature and tempo to help you practice keeping
the rhythm.
Installing batteries
Main Features
Slide the battery
1.
compartment cover
on the back of the
TM-50TR in direction “a” as shown
in the illustration
and lift up the cover
in direction “b.”
Insert the batteries,
2.
making sure to observe the correct polarity.
In order to get accurate readings of the remaining bat-
3.
tery power, please refer to the “Seing the baery type”
section and select the type of baery that’s being used.
If the unit malfunctions try removing and then rein-
stalling the baeries.
When the baeries become depleted, a baery symbol
will appear on the display. When this occurs, it’s time
to replace the baeries.
Setting the battery type
In order to get accurate readings of the remaining baery
power, select the type of baery that’s being used.
When you replace the baeries and turn on the power,
1.
the display will show a screen allowing you to specify
the type of baeries you’re using.
Press the TAP TEMPO buon to select the baery type.
2.
AL: When using alkaline baeries
nH: When using nickel-metal hydride baeries
Press either the TUNER ON button or the METRO-
3.
NOME ON buon.
The setting will be completed, and the TM-50TR will
start up.
Using the stand
You can use the stand provided on the back of the TM-50TR
to tilt it back at an angle for easy viewing.
Parts of the TM-50TR
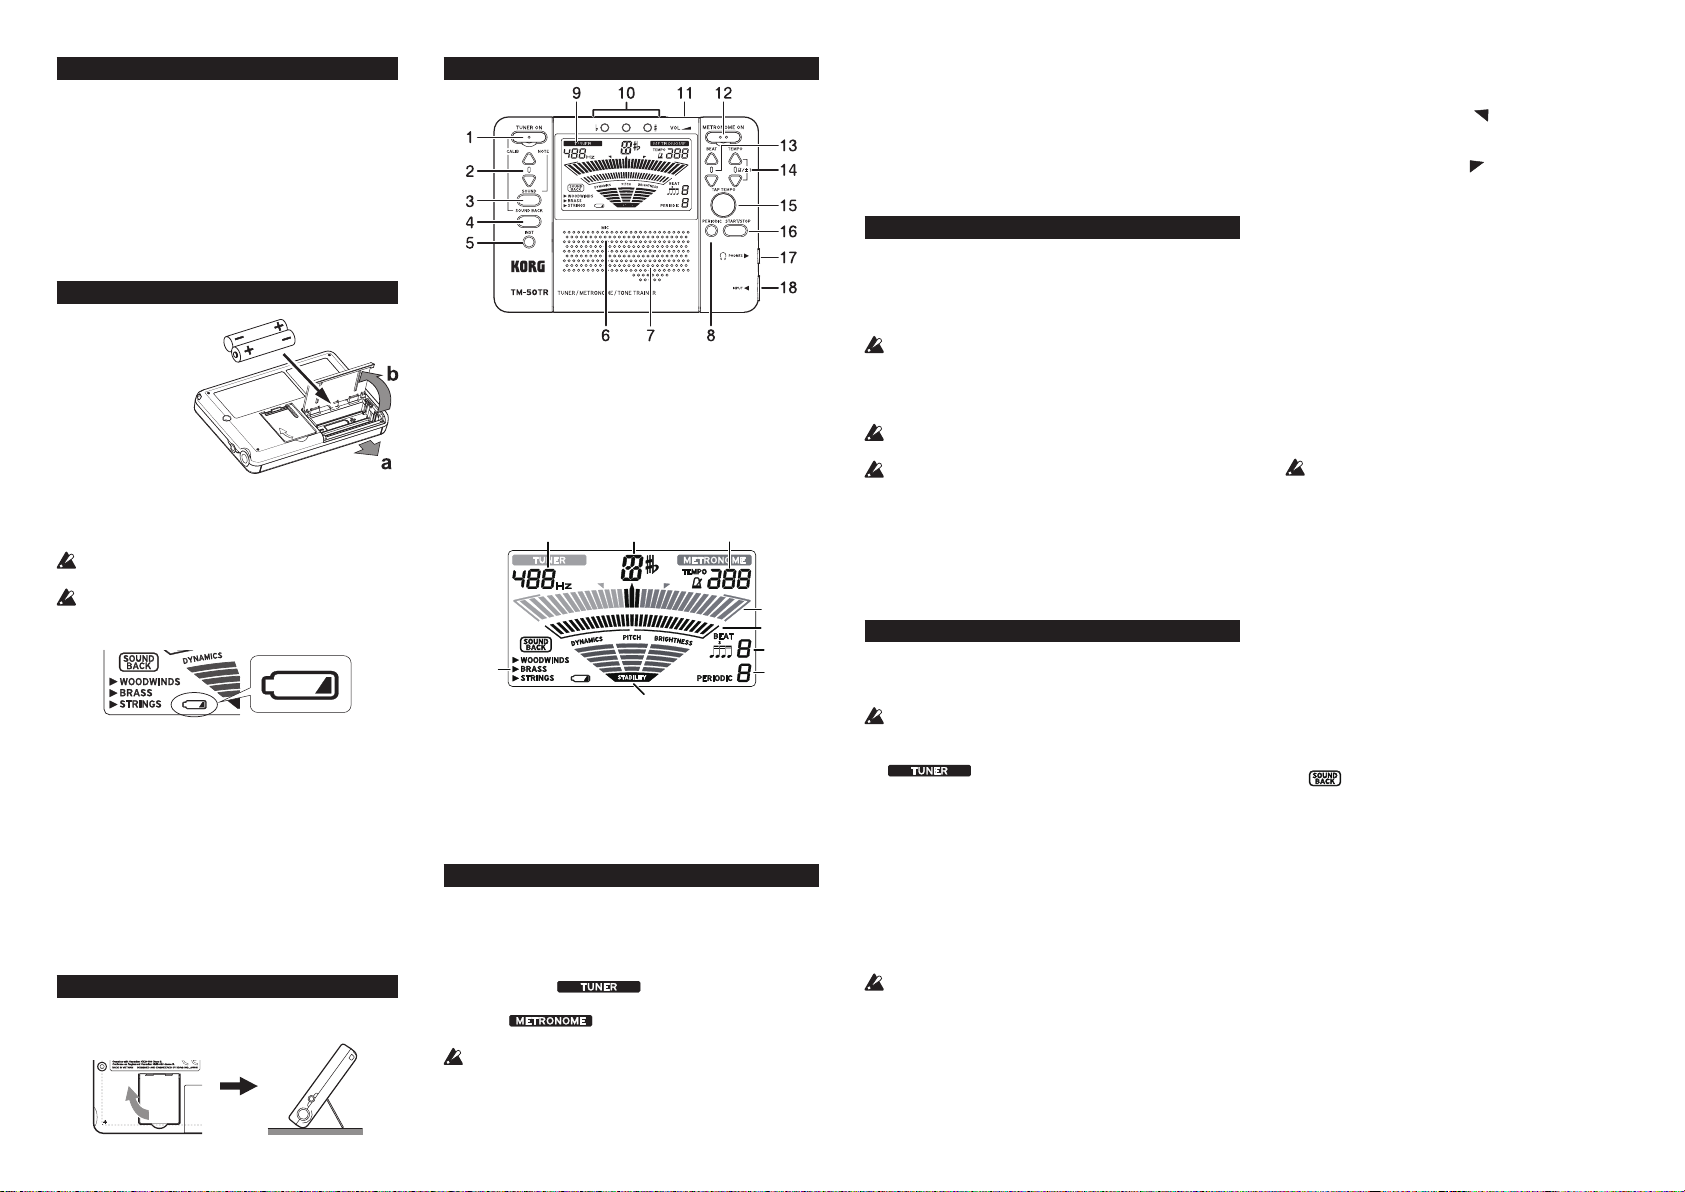
TUNER ON button
1.
SOUND button
3.
INST (instrument group) button
5.
MIC
6.
PERIODIC (periodic metronome) button
8.
Display
9.
VOL (Volume)
11.
BEAT ▲,▼ button
13.
TAP TEMPO button
15.
PHONES jack
17.
a. Calibration (Reference pitch)
b. Note name c. Tempo
d. Instrument group e. PITCH meter
f. DYNAMICS/BRIGHTNESS meter and metronome pendu-
lum
g. BEAT (metronome beat)
h. PERIODIC (periodic metronome)
i. STABILITY (performance stability) meter
CALIB/NOTE ▲,▼ buttons
2.
SOUND BACK button
4.
Speaker
7.
Tuning guide
10.
METRONOME ON button
12.
TEMPO ▲,▼ button
14.
START/STOP button
16.
INPUT jack
18.
e
f
Turning the power on/o
To turn the power on
Press either the TUNER ON button or the METRONOME ON
buon and the power will turn on. Press the buon for the function that you want to use.
When the TUNER ON buon is pressed, the tuner starts in the
Meter mode and “ ” will appear on the display.
When the METRONOME ON buon is pressed, the metronome
starts and “ ” will appear on the display.
The TM-50TR can use the tuner and metronome simultaneously.
The TUNER ON buon and the METRONOME ON buon
are designed lower than other buons so that the power is
not turned on involuntarily when the TM-50TR is placed in
your pocket or in a bag. To turn the device on or o, push in
the power buon.
Turning the tuner o
When the tuner is in use, press the TUNER ON buon to turn o
the power. The tuner will also turn o automatically if it’s not in
use for twenty minutes.
Turning o the metronome
When the metronome is in use, press the METRONOME ON
buon to turn o the power. The metronome will also turn o
automatically if not in use for twenty minutes.
Connections
If you want to connect an instrument, contact mic,
etc.
If you want to tune an instrument with a pickup, such as an electric guitar, connect a cable to your instrument, and plug the cable
into the TM-50TR’s INPUT jack.
The INPUT jack is only for a 1/4” mono cable. Stereo (TRS)
cables cannot be used.
If you want to tune your instrument using the Korg CM-200
CONTACT MICROPHONE (sold separately), plug the contact
mic into the TM-50TR’s INPUT jack.
If a device is not connected to the INPUT jack, tuning will be
performed by the internal mic.
Plucked string instruments such as guitars can be connected
to the INPUT jack for tuning; however, they are not compati-
ble with the TONE TRAINER function.
Connecting headphones
You can connect commercially available headphones with a 1/8"
stereo mini-plug to the PHONES jack. When plugged in, no
sound will be heard from the speaker. Use the volume control to
adjust the volume of the headphones output.
Using the tuner
Tuning while watching the meter (Meter mode)
Connect your instrument cable or contact mic to the TM-
1.
50TR’s INPUT jack.
If a device is not connected to the INPUT jack, tuning will be
performed by the internal mic.
Press the TUNER ON buon.
2.
“ ” will appear at the top of the display and the
calibration (reference pitch) will be displayed below that.
To change the calibration, press the CALIB/NOTE ▲ or ▼
3.
buon.
The calibration value increases and decreases in units of 1 Hz.
By pressing and holding these buons, you can increase or decrease the value continuously. This seing is stored even when
the power is o.
Play a single note on your instrument.
4.
The closest note to the input sound will appear in the center of
the display. Tune your instrument to the correct pitch, so that
the desired note name appears.
If you’re using the internal mic, place your instrument as
close as possible to the mic so that extraneous sound is not
picked up while tuning.
While playing a single note on your instrument, tune the in-
5.
strument so that the center mark of the PITCH meter and the
center indicator of the tuning guide light up.
The left tuning guide indicator will light up if the pitch of your
instrument is at, and the right indicator will light up if the
pitch is sharp.
Tuning to a just major third above or a minor third above
If you want to tune to a just major third above A (0 cent),
tune your instrument so that the note name indicator
shows C♯ and the meter is at “ ”.
If you want to tune to a just minor third above A (0 cent),
tune your instrument so that the note name indicator
shows C and the meter is at “
”.
Tuning to a reference tone (Sound Out mode)
Press the TUNER ON buon.
1.
You will enter the Meter mode.
Press the SOUND buon to select Sound Out mode.
2.
The reference tone is output from the PHONES jack or
speakers. Use the volume control to adjust the output
volume.
Press the CALIB/NOTE ▲ or ▼ buon to select the note.
3.
The output reference tone changes as follows.
♯
C (C3) C
C (C4) ... C (C6) C (C3)...
This seing is stored even when the power is o.
Tune the instrument according to the reference tone.
4.
Press the SOUND button again to return to the Meter
5.
mode.
D E♭ E F F♯ G G♯ A B♭ B
If connected to either the INPUT jack or the PHONES
jack, the PITCH meter is activated.
Tuning using the reference tone and meter
(Sound Back mode)
In Sound Back mode, the tone of the input instrument is
detected, and the closest reference tone is output. This can
be used to check the pitch deviation of the tone that you
output.
This function can be used when you are connected to either
the INPUT jack or the PHONES jack (or both).
Press the TUNER ON buon.
1.
You will enter the Meter mode.
Press the SOUND BACK buon to enter the Sound Back
2.
mode.
In the Sound Back mode, the reference tone that’s closest
to the tone of the input instrument is output. Use the
volume control to adjust the volume.
“
” will appear on the display.
If headphones are connected to the PHONES jack, the
input sound from the internal mic or INPUT jack will be
received and the reference tone will be output from the
headphones.
If nothing is connected to the PHONES jack, the input
sound from the INPUT jack is received and the reference
tone is output from the speakers.
Tune the instrument using the reference tone and meter.
3.
If the SOUND BACK buon is pressed again, you will
4.
return to the Meter mode.
Measuring/displaying performance stability
(TONE TRAINER function)
Press the TUNER ON buon.
1.
You will enter the Meter mode.
Press the INST buon to select the group that the instru-
2.
ment to be measured belongs to.
Each press of the INST buon switches the selected instrument group as follows.
WOODWINDS BRASS STRINGS WOODWINDS ...
Page 4

The STRINGS group applies to bowed stringed instru-
ments such as violins. It is not compatible with plucked
string instruments such as guitars.
Play a long tone of a single pitch.
3.
While the tone is being played, the corresponding infor-
4.
mation appears in the PITCH meter and DYNAMICS/
BRIGHTNESS meter in real time.
PITCH (Pitch): The pitch is indicated by the note name
at the center.
DYNAMICS (Volume): The level in the meter rises
when the volume is high.
BRIGHTNESS (Brightness): The level in the meter rises
when the tone is bright.
After the long tone has been played, the overall stability
5.
levels of the DYNAMICS, PITCH and BRIGHTNESS appear in the STABILITY (performance stability) meter.
High stability: The level in the meter rises.
Low stability: The level in the meter falls.
Using the metronome
Setting the tempo and time signature
Press the METRONOME ON buon.
1.
The pendulum of the metronome appears on the display,
and “ ” appears in the upper-right corner.
Press the TEMPO ▲ or ▼ buon to set the tempo.
2.
Press and hold the TEMPO ▲ and ▼ buons simultaneously for 1 second to switch between Pendulum Step
(pendulum of a mechanical metronome) and Full Step.
If Pendulum Step is selected, “ ” will appear on the display.
After selecting “PENDULUM STEP” or “FULL STEP”,
press the TEMPO ▲, ▼ buons to set the tempo. This
seing is remembered even when the power is o.
If you’ve selected “PENDULUM STEP”
Pressing the TEMPO ▲, ▼ buons will switch the tem-
po successively through the following values. The value
will change continuously if you hold down the buon.
30, 32, 34, 36, 38, 40, 42, 44, 46, 48, 50, 52, 54, 56, 58, 60,
63, 66, 69, 72, 76, 80, 84, 88, 92, 96, 100, 104, 108, 112, 116,
120, 126, 132, 138, 144, 152, 160, 168, 176, 184, 192, 200,
208, 216, 224, 232, 240, 252
If you’ve selected “FULL STEP”
Pressing the TEMPO ▲, ▼ buttons will increment or
decrement the tempo through the range of 30–252 in
steps of one. The value will change continuously if you
hold down the buon.
Press the START/STOP buon to start the metronome.
3.
The metronome pendulum will swing from left to right
according to the tempo and the TAP TEMPO buon will
blink according to the tempo also.
If you want to change the time signature, press the BEAT
4.
▲ or ▼ buons to make your selection.
The time signature will change as follows.
Press the BEAT ▲ or ▼ buons:
... 0 1 ... 9 (9 beats) (Quadruplet without the
center beat) (Quadruplet) (Triplet without
the center beat) (Triplet) (Duplet) 0 ...
Play along with the metronome tempo.
5.
To stop the metronome, press the START/STOP buon.
6.
Using tap tempo
The tap tempo that you input will be displayed as a BPM (Beats
Per Minute) value.
Press the METRONOME ON buon.
1.
The pendulum of the metronome appears on the display, and
“ ” appears in the upper-right corner.
Press the TAP TEMPO buon several times at regular intervals
2.
at the tempo that you want.
The TM-50TR detects the interval used when pressing the button and displays it as a BPM (Beats Per Minute) value, and it
will be set as the tempo.
When the BPM that has been detected by the tap tempo is less
than 30, “Lo” will appear on the display and the tempo will be
set at “30.”
If the BPM detected by the tap tempo exceeds 252, “Hi” will
appear on the display and the tempo will be set at “252.”
Press the START/STOP buon to start the metronome.
3.
The metronome pendulum will swing from left to right ac-
cording to the tempo and the TAP TEMPO buon will blink
accordingly.
The tap tempo can also be input while the metronome is in
use.
Play according to the tempo.
4.
To stop the metronome, press the START/STOP buon.
5.
Practicing with the periodic metronome function
This function produces clicking with each set measure. This is
useful for practicing keeping the rhythm.
When using the periodic metronome function, “0 beat”, “du-
plets”, “triplets”, “triplets without the center beat”, “quadruplets” or “quadruplets without the center beats” cannot be
selected as the time signature.
Press the METRONOME ON buon.
1.
The pendulum of the metronome appears on the display, and
“ ” appears in the upper-right corner.
Use the PERIODIC (periodic metronome) buon to select the
2.
measure where clicking will be produced.
Each press of the PERIODIC buon switches the selected measure as follows.
1 2 3 4 0 1 ...
When the measure is set to “0”, the periodic metronome func-
tion is turned o, and the measure seing and “PERIODIC”
turn o after a few seconds.
Press the START/STOP buon to start the metronome.
3.
Clicking is produced with each set measure.
Example: BEAT (time signature)=4, PERIODIC (measure)=2
To stop the metronome, press the START/STOP buon.
4.
Using the tuner and metronome
simultaneously
The TM-50TR lets you use the tuner and metronome simultaneously.
For more details on tuner and metronome operation, please refer
to the “Using the tuner” and “Using the metronome sections.”
Using the tuner and metronome simultaneously
For example, if you’re playing along with the metronome and
you notice that your instrument is not tuned correctly, you can
leave the metronome running while you tune.
Proceed as follows.
Press the METRONOME ON buon.
1.
Press the START/STOP buon to start the metronome.
2.
If necessary, specify the tempo and time signature etc.
To set the tempo: use the TEMPO ▲, ▼ buons or the TAP
TEMPO buon.
To set the time signature: use the BEAT ▲, ▼ buons.
To set the periodic metronome setting: Use the PERIODIC
(periodic metronome) buon.
When using the tuner and metronome simultaneously, you
can’t select “triplets”, “triplets without the center beat”, “qua-
druplets” or “quadruplets without the center beats” as the
time signature.
Press the TUNER ON buon to enter Meter mode.
3.
The pendulum of the metronome and the tuning meter appear
on the display. The metronome tempo is also indicated by the
blinking of the TAP TEMPO buon.
If you want to tune in Sound Out mode, you should then press
the SOUND buon. To tune in the Sound Back mode, press
the SOUND BACK buon.
Tuning in Meter mode
When you play a single note on your instrument, the display
will show the name of the note that is closest to the pitch that
you played. Tune your instrument while watching the meter
and the tuning guide.
Tuning in Sound Out mode
Tune your instrument to the pitch that you hear.
Tuning in Sound Back mode
Using the tone, tuning meter and tuning guide, adjust your
instrument.
When the tuner and metronome are being used simultane-
ously, the TONE TRAINER function of the tuner cannot be
used.
After tuning is complete, press the TUNER ON button and
4.
METRONOME ON buon respectively to turn o the tuner
and metronome.
Specications
Tuner section
Scale: 12 note equal temperament
Detection range*: C1 (32.70 Hz)–C8 (4186.01 Hz) for a sine-
Reference tone: C3 (130.81 Hz)–C6 (1046.50 Hz) 3 octaves
Tuning modes: Meter mode, Sound Out mode, Sound Back
Calibration range: A4 = 410 Hz–480 Hz (1 Hz step)
Detection accuracy: Beer than ±1 cent
Sound accuracy: Beer than ±1 cent
Metronome section
Tempo range: 30–252 beats per minute (bpm)
Tempo seing: PENDULUM STEP, FULL STEP, TAP TEM-
Time signatures: 0–9 beats, duplets, triplets, triplets without
Tempo accuracy: ±0.3%
Main Specications
Connectors: INPUT jack (1/4"mono), PHONES jack (1/8" ste-
Speaker: Dynamic speaker (ø23 mm)
Power supply: Two AAA baeries (alkaline or nickel-metal hy-
wave
mode, TONE TRAINER function
PO, PERIODIC METRONOME FUNCTION
the center beat, quadruplets, quadruplets
without the center beats
reo mini)
dride baeries)
Baery life: Tuner ...
Approximately 24 hours (A4 continuous
Metronome ...
Approximately 24 hours (tempo 120, four
Using tuner and metronome simultaneous-
Approximately 24 hours (A4 continuous
Dimensions (W x D x H):
111 x 82 x 18 mm / 4.37" x 3.23" x 0.71"
Weight: 108 g / 3.81 oz. (including the provided bat-
Included items: Owner’s manual, two AAA baeries
The calibration and reference tone of the tuner as well as
the tempo, beat, Pendulum Step and Full Step settings
of the metronome are stored even when the power is o.
However when you exchange the baeries, these seings
will return to the following default values.
Default values:
Calibration = 440 Hz, Detection range = A4, Tempo = 120,
Time signature = four beats, Tempo seing type = PENDU-
LUM STEP
* Even if the pitch is within the range of detection, the
TM-50TR may be unable to detect the pitch if the sound
contains numerous overtones (such as the low and high
notes on an acoustic piano) or if the instrument has a
rapid decay.
Specifications and appearance are subject to change
•
without notice for improvement.
input, when using alkaline baeries)
beats, maximum volume, when using alka-
line baeries)
ly...
input, tempo 120, four beats, maximum
volume, when using alkaline baeries)
teries)
Page 5
Caractéristiques principales
h
i
d
g
c
ba
Le TM-50TR propose diverses fonctions vous permettant
de vous entraîner et d’évaluer la qualité des sons que vous
produisez sur votre instrument.
Outre les traditionnelles fonctions d’accordeur (modes Mul-
ti-afficheur, Son et Retour Son), la fonction TONE TRAI-
NER analyse le degré de stabilité de hauteur, de dynamique
(volume) et de clarté des notes jouées, permeant ainsi de
travailler la précision et la stabilité de votre jeu.
Le métronome bat la mesure avec son clic selon les réglages
définis, tandis que la fonction de métronome périodique
produit un clic pendant le nombre déni de mesures, alternant les cycles de mesures baues et de mesures sans clic
pour un entraînement rythmique ecace.
Mise en place des piles
Faites coulisser le
1.
couvercle du compartiment des piles
à l’arrière du TM-
50TR dans le sens
“a” comme indiqué
sur l’image et soulevez le couvercle
dans le sens “b”.
Insérez les piles, en respectant leur polarité.
2.
Pour obtenir des informations précises sur la puissance
3.
restante des piles, reportezvous à la section “Régler le
type de pile” et sélectionnez le type de pile utilisé.
Si l’appareil ne fonctionne pas et si vous ne parvenez
pas à résoudre le problème en le meant plusieurs fois
sous et hors tension, retirez les piles puis réinsérez-les.
Quand les piles sont presque plates, un symbole de pile
apparaît sur l’achage. Remplacez alors les piles aussi
vite que possible.
Régler le type de pile
Pour obtenir des informations précises sur la puissance restante des piles, sélectionnez le type de pile utilisé.
Quand vous remplacez les piles et meez l’appareil sous
1.
tension, un écran s’ache pour que vous puissiez dénir
le type de piles utilisées.
Appuyez sur le bouton TAP TEMPO pour sélectionner
2.
le type de pile.
AL: Pour les piles alcalines
nH: Pour les piles au nickel-métal-hydrure.
Appuyez sur le bouton TUNER ON ou le bouton ME-
3.
TRONOME ON.
La procédure de réglage est terminée et le TM-50TR démarrera.
Vous pouvez placer le TM-50TR en position verticale en dé-
Utiliser le pied
ployant le pied situé à l’arrière de l’appareil.
2/2
Parties du TM-50TR
nome démarre et “ ” s’ache à l’écran.
Le TM-50TR vous permet d’utiliser simultanément l’accordeur et
le métronome.
De manière à ne pas mere involontairement l’appareil sous
tension, une fois le TM-50TR dans votre poche ou un sac, le
bouton TUNER ON et bouton METRONOME ON sont plus
petits que les autres boutons. Pour allumer ou éteindre, ap-
puyez sur le bouton d’alimentation.
Pour mettre l’accordeur hors tension
Pendant le fonctionnement de l’accordeur, appuyez sur le bouton
TUNER ON pour le mere hors tension. L’accordeur se mera
aussi automatiquement hors tension si vous ne l’utilisez pas pen-
dant vingt minutes.
Pour mettre le métronome hors tension
Pendant le fonctionnement du métronome, appuyez sur le bouton
METRONOME ON pour le mere hors tension. Le métronome se
mera aussi automatiquement hors tension si vous ne l’utilisez
pas pendant vingt minutes.
Raccordements
Pour connecter un instrument, un microphone de
contact, etc.
Si vous souhaitez accorder un instrument avec micro, comme une
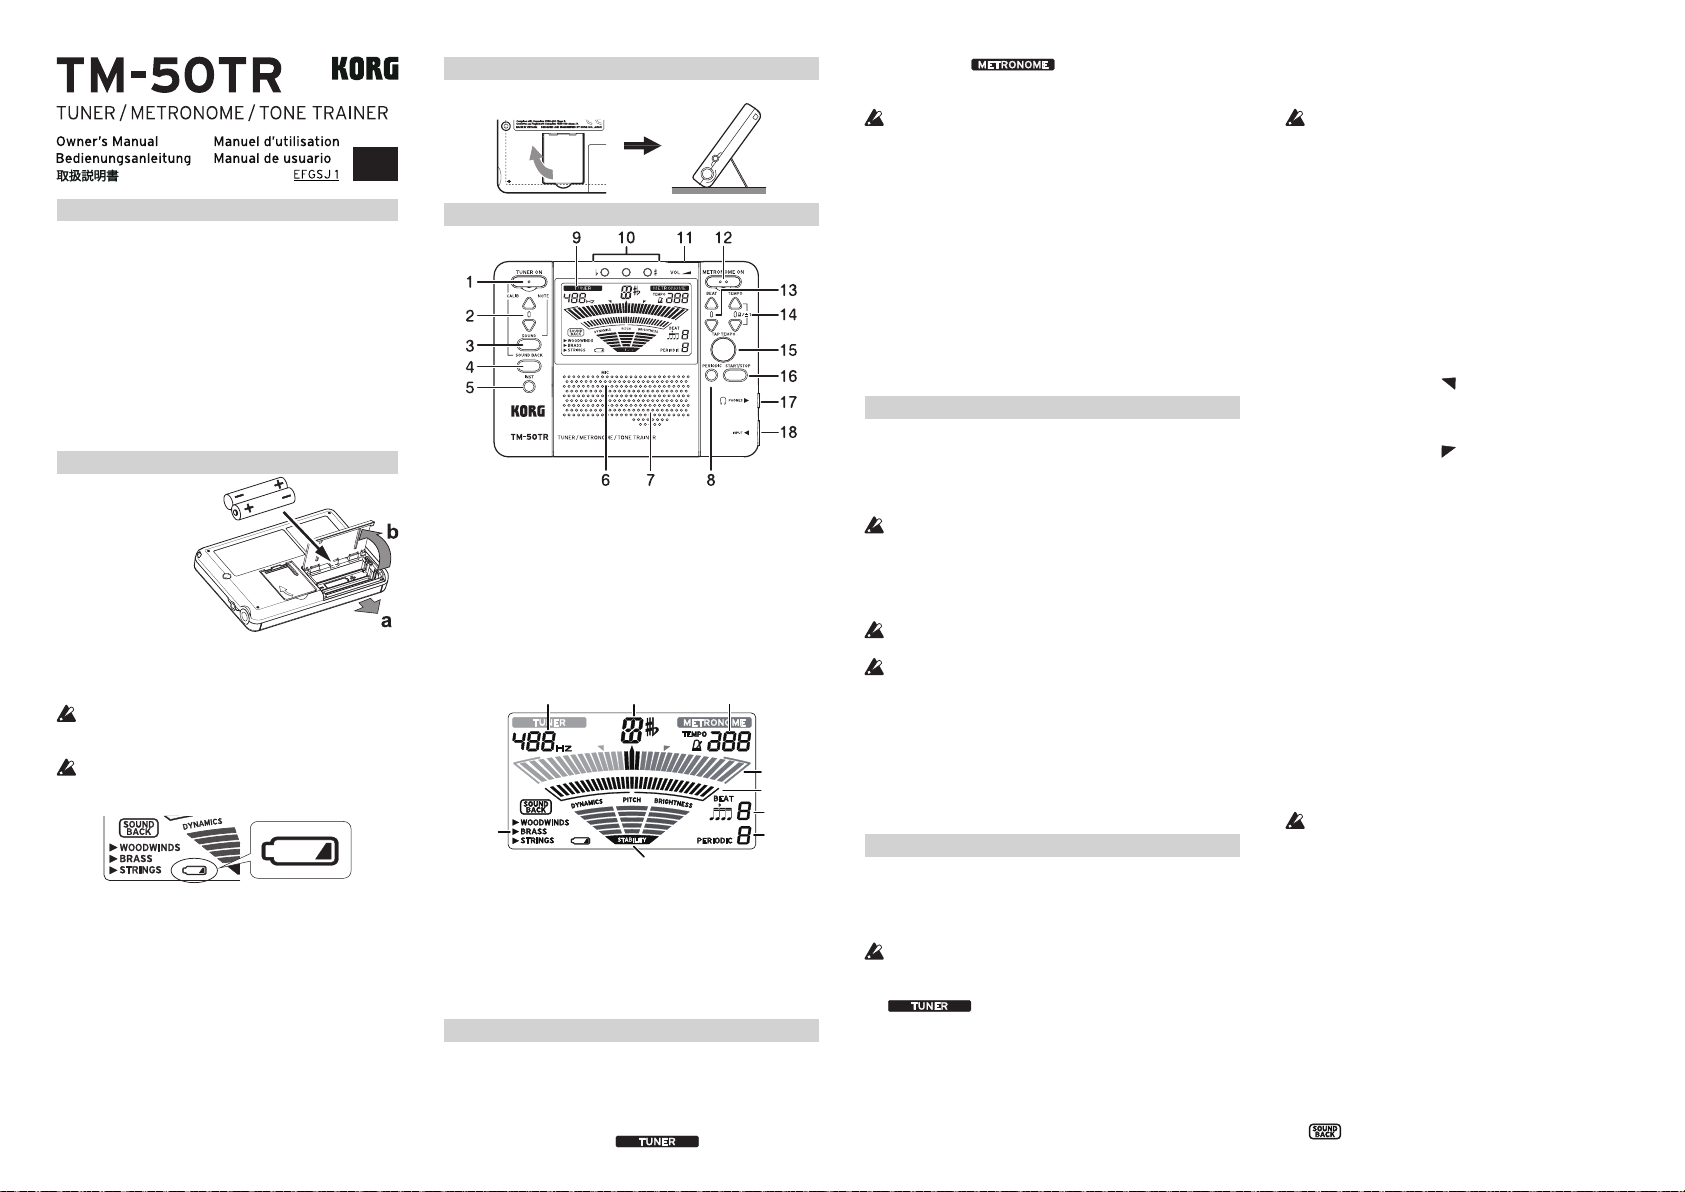
Bouton TUNER ON
1.
Bouton SOUND
3.
Bouton INST (de groupe d’instruments)
5.
Microphone interne
6.
Bouton PERIODIC (de métronome périodique)
8.
Acheur
9.
VOL (Commande de volume)
11.
Bouton METRONOME ON
12.
Boutons BEAT ▲,▼
13.
Bouton TAP TEMPO
15.
Prise de casque PHONES
17.
Boutons CALIB/NOTE ▲,▼
2.
Bouton SOUND BACK
4.
Haut-Parleur
7.
Guide d’accordage
10.
Boutons TEMPO ▲,▼
14.
Bouton START/STOP
16.
Prise INPUT
18.
e
f
guitare électrique, raccordez un câble à votre instrument et branchez le câble sur la prise INPUT du TM-50TR.
La prise INPUT est seulement conçue pour un câble mono-
phonique 1/4". Les câbles stéréo (TRS) ne peuvent pas être
utilisés.
Si vous souhaitez accorder votre instrument avec le MICRO-
PHONE DE CONTACT CM-200 de Korg (disponible en option),
branchez le micro à la prise INPUT du TM-50TR.
Si un périphérique n’est pas connecté à la prise INPUT, l’ac-
cordage s’eectuera par le biais du micro interne.
Les instruments à cordes pincées comme les guitares peuvent
être connectés à la prise INPUT pour l’accordage. La fonction
TONE TRAINER n’est toutefois pas compatible avec ces instru-
ments.
Connexion du casque
Vous pouvez brancher un casque à che stéréo de 3,5mm disponible dans le commerce à la prise PHONES. Lorsque le casque est
branché le son du haut-parleur est coupé. Utilisez la commande
de volume pour régler le volume du casque.
Utilisation de l’accordeur
a. Calibrage (Hauteur de référence)
b. Nom de la note c. Tempo
d. Groupe d’instruments e. Achage PITCH (hauteur)
f. Achage DYNAMICS/BRIGHTNESS (dynamique/clarté) et
balancier de métronome
g. BEAT (battement du métronome)
h. PERIODIC (métronome périodique)
i. Achage STABILITY (stabilité de jeu)
Mise sous/hors tension
Mise sous tension
Appuyez sur le bouton TUNER ON ou METRONOME ON et
l’appareil se mera automatiquement sous tension. Appuyez sur
le bouton correspondant à la fonction voulue.
Après avoir appuyé sur le bouton TUNER ON, l’accordeur démarre en mode Compteur et “ ” s’ache à l’écran.
Après avoir appuyé sur le bouton METRONOME ON, le métro-
Accord tout en regardant le compteur (mode Compteur)
Branchez le câble de votre instrument ou le microphone de
1.
contact sur la prise INPUT du TM-50TR.
Si un périphérique n’est pas connecté à la prise INPUT, l’ac-
cordage s’eectuera par le biais du micro interne.
Appuyez sur le bouton TUNER ON.
2.
“ ” s’achera en haut de l’écran et le calibrage
(note de référence) s’achera en dessous.
Pour changer le calibrage, appuyez sur le bouton CALIB/
3.
NOTE ▲ ou ▼.
La valeur de calibrage augmente et diminue par unité de 1 Hz.
En appuyant et en maintenant ces boutons, vous augmenterez
ou diminuerez de façon ininterrompue les valeurs. Ce réglage
sera enregistré même si l’appareil est mis hors tension.
Jouez une note unique sur votre instrument.
4.
La note se rapprochant le plus du son d’entrée s’achera
au centre de l’écran. Accordez correctement votre instrument de telle manière que la note souhaitée apparaisse.
Si vous utilisez le microphone interne, disposez votre
instrument aussi près que possible du microphone an
que les sons extérieurs ne puissent pas être captés pendant l’accord.
Tout en jouant une note unique sur votre instrument,
5.
accordez-le de sorte que le repère central de l’achage
PITCH et l’indicateur central du guide d’accordage s’al-
lument.
La diode à gauche s’allumera si votre instrument produit
un bémol et celle de droite s’il produit un dièse.
Accord sur une tierce majeure pure ou une tierce mineure pure au-dessus
Si vous souhaitez eectuer l’accord sur une tierce majeure pure au-dessus de A (0 cent), accordez votre instrument de telle façon que l’indicateur de note ache C♯
et le compteur indique “ ”.
Si vous souhaitez effectuer l’accord sur une tierce mineure pure au-dessus de A (0 cent), accordez votre instrument de telle façon que l’indicateur de note ache C
et le compteur indique “ ”.
Accord sur une note de référence (mode Son)
Appuyez sur le bouton TUNER ON.
1.
Vous passerez en mode Compteur.
Appuyez sur le bouton SOUND pour sélectionner le
2.
mode Son.
La note de référence est diusée par les haut-parleurs
ou via la prise PHONES. Utilisez la commande Volume
pour régler le volume de sortie.
Appuyez sur le bouton CALIB/NOTE ▲ ou ▼ pour sé-
3.
lectionner la note.
La note de référence diusée est ainsi modiée.
♯
C (C3) C
C (C4) ... C (C6) C (C3)...
Ce réglage sera enregistré même si l’appareil est mis
hors tension.
Accordez votre instrument en fonction de la note de ré-
4.
férence.
Appuyez de nouveau sur le bouton SOUND pour reve-
5.
nir au mode Compteur.
D E♭ E F F♯ G G♯ A B♭ B
Quand vous connectez un instrument à la prise INPUT
ou à la prise PHONES, l’achage PITCH est activé.
Accorder votre instrument avec la note de
référence et le compteur (mode Retour Son).
En mode Retour Son, l’accordeur détecte la hauteur du
son de l’instrument et produit la note de référence la plus
proche. Cela permet de mesurer la différence de hauteur
avec le son produit par l’accordeur.
Vous pouvez utiliser cee fonction en connectant votre ins-
trument à la prise INPUT ou la prise PHONES (ou les deux).
Appuyez sur le bouton TUNER ON.
1.
Vous passerez en mode Compteur.
Appuyez sur le bouton SOUND BACK pour entrer dans
2.
le mode Retour Son.
Dans ce mode, la note de référence se rapprochant le
plus de la note provenant de l’instrument est diusée.
Utilisez la commande Volume pour régler le volume.
“
” s’achera à l’écran.
Si un casque est connecté à la prise PHONES, le son
Page 6
d’entrée du micro interne ou de la prise INPUT sera reçu
et la note de référence diusée à partir du casque.
Si aucun périphérique n’est connecté à la prise PHONES,
le son d’entrée de la prise INPUT sera reçu et la note de
référence diusée dans les haut-parleurs.
Accordez votre instrument à l’aide de la note de réfé-
3.
rence et du compteur.
Si vous appuyez une nouvelle fois sur le bouton SOUND
4.
BACK, vous reviendrez au mode Compteur.
Mesure/achage de la stabilité de jeu (fonction TONE TRAINER)
Appuyez sur le bouton TUNER ON.
1.
Vous passerez en mode Compteur.
Appuyez sur le bouton INST et sélectionnez le groupe
2.
dont l’instrument à mesurer fait partie.
Chaque pression sur le bouton INST choisit tour à tour
les groupes d’instruments suivants.
WOODWINDS (vents) BRASS (cuivres) STRINGS (cordes)
WOODWINDS(vents) ...
Le groupe STRINGS correspond aux instruments à
cordes joués à l’archet, tels que le violon. Ce groupe
n’est donc pas compatible avec les instruments à cordes
pincées tels que la guitare.
Jouez un long son en maintenant une hauteur continue.
3.
Pendant que vous jouez la note, les achages PITCH et
4.
DYNAMICS/BRIGHTNESS affichent les informations
correspondantes en temps réel.
PITCH (hauteur): Cet affichage indique la hauteur en
achant le nom de la note au centre.
DYNAMICS (volume): Le niveau augmente sur cet
affichage en réponse à une hausse de volume du son
produit.
BRIGHTNESS (clarté): Le niveau augmente sur cet achage en réponse à un son plus clair.
Quand vous avez fini de jouer ce long son, l’affichage
5.
STABILITY (stabilité de jeu) indique vos performances
globales de stabilité de volume (DYNAMICS), de hauteur (PITCH) et de clarté (BRIGHTNESS).
Stabilité élevée: Le niveau monte sur l’achage.
Stabilité basse: Le niveau baisse sur l’achage.
Utilisation du métronome
Réglage du tempo et de la signature rythmique
Appuyez sur le bouton METRONOME ON.
1.
Le balancier du métronome apparaît sur l’afficheur et
“ ” s’ache dans le coin supérieure droit.
Appuyez sur la touche TEMPO▲ou▼pour régler le tempo.
2.
Appuyez et maintenez simultanément les boutons ▲ et
▼ du TEMPO pendant 1 seconde pour alterner entre le
Pas pendulaire (pendule d’un métronome mécanique) et
le Pas complet. Si le Pas pendulaire est sélectionné, “ ”
s’achera à l’écran.
Après avoir sélectionné “PAS PENDULAIRE” ou “PAS
COMPLET”, appuyez sur la bouton TEMPO ▲ ou ▼
pour régler le tempo. Ce réglage reste mémorisé même
après la mise hors tension de l’appareil.
Si vous avez sélectionné “PAS PENDULAIRE”
Appuyez sur les boutons TEMPO ▲ ou ▼ pour dénir
le tempo successivement sur les valeurs suivantes. La
valeur changera continuellement si vous maintenez la
touche.
30, 32, 34, 36, 38, 40, 42, 44, 46, 48, 50, 52, 54, 56, 58, 60, 63, 66, 69,
72, 76, 80, 84, 88, 92, 96, 100, 104, 108, 112, 116, 120, 126, 132, 138,
144, 152, 160, 168, 176, 184, 192, 200, 208, 216, 224, 232, 240, 252
Si vous avez sélectionné “PAS COMPLET”
Appuyez sur les boutons TEMPO▲ou▼pour augmenter ou
réduire le tempo dans une plage de 30 à 252 par pas de un. La
valeur changera continuellement si vous maintenez la touche.
Appuyez sur le bouton START/STOP pour lancer le métronome.
3.
Le pendule du métronome se balancera de gauche à droite
selon le tempo et le bouton TAP TEMPO (Réglage du tempo)
clignotera selon le rythme.
Si vous souhaitez changer la signature rythmique, appuyez
4.
sur la bouton BEAT ▲ ou ▼. La signature rythmique changera
comme suit.
Appuyez sur le bouton BEAT ▲ ou ▼:
... 0 1 ... 9 (9 temps) (quartolet sans temps du milieu) (quartolet) (triolet sans temps du milieu)
(triolet) (duolet) 0 ...
Jouez en suivant le tempo du métronome.
5.
Pour arrêter le métronome, appuyez sur le bouton START/STOP.
6.
Entrée du tempo tap
Le tempo tap entré sera affiché sous la forme d’un nombre de
BPM (baements par minute).
Appuyez sur la bouton METRONOME ON.
1.
Le balancier du métronome apparaît sur l’afficheur et
“ ” s’ache dans le coin supérieure droit.
Appuyez plusieurs fois sur le bouton TAP TEMPO à inter-
2.
valles réguliers.
Le TM-50TR détecte l’intervalle utilisé quand vous appuyez
sur le bouton et l’ache sous forme de temps par minute (BPM)
qui sera déni comme le tempo.
Si le temps détecté par le réglage du tempo est inférieur à 30
temps par minute, “Lo” s’achera à l’écran et le tempo sera
déni sur “30.”
Si le temps détecté par le réglage du tempo est supérieur à 252
temps par minute, “Hi” s’achera à l’écran et le tempo sera
déni sur “252.”
Appuyez sur le bouton START/STOP pour lancer le métronome.
3.
Le pendule du métronome se balancera de gauche à droite
selon le tempo et le bouton TAP TEMPO (Réglage du tempo)
clignotera selon le rythme.
Vous pouvez également utiliser le réglage du tempo si le mé-
tronome est en cours d’utilisation.
Jouez une note conformément au tempo.
4.
Pour arrêter le métronome, appuyez sur le bouton START/ STOP.
5.
Travail avec la fonction de métronome périodique
Cette fonction produit un clic pendant le nombre de mesures
choisi, alternant mesures baues et mesures muees. Cee fonction est très utile pour travailler la précision rythmique.
Pendant l’utilisation de la fonction de métronome périodique,
les options “0 temps”, “duolet”, “triolet”, “triolet sans temps
du milieu”, “quartolet” et “quartolet sans temps du milieu”
ne sont pas disponibles pour le choix de la mesure.
Appuyez sur le bouton METRONOME ON.
1.
Le balancier du métronome apparaît sur l’afficheur et
“ ” s’ache dans le coin supérieure droit.
Le bouton PERIODIC (métronome périodique) permet de choi-
2.
sir le nombre de mesures où le son du métronome est audible.
Chaque pression sur le bouton PERIODIC choisit tour à tour le
nombre suivant de mesures.
1 2 3 4 0 1 ...
Quand ce réglage est sur “0”, la fonction de métronome périodique est désactivée et le réglage de mesure ainsi que “PERIODIC” disparaissent de l’acheur après quelques secondes.
Appuyez sur le bouton START/STOP pour lancer le métronome.
3.
Le métronome produit un clic audible pendant le nombre de
mesures choisi, alternant mesures baues et mesures muees.
Exemple: BEAT (signature rythmique)=4, PERIODIC (mesure)=2
Pour arrêter le métronome, appuyez sur le bouton START/ STOP.
4.
Utilisation simultanée de
l’accordeur et du métronome
Le TM-50TR vous permet d’utiliser simultanément l’accordeur et
le métronome.
Pour les détails sur le fonctionnement de l’accordeur et celui du
métronome, reportezvous à “Utilisation de l’accordeur” et “Utilisation du métronome”.
Utilisation simultanée de l’accordeur et du métronome
Par exemple, si vous jouez en vous accompagnant du métronome
et remarquez que votre instrument n’est pas accordé correctement,
vous pourrez laisser le métronome fonctionner pendant l’accord.
Procédez de la manière suivante.
Appuyez sur le bouton METRONOME ON.
1.
Appuyez sur le bouton START/STOP pour lancer le métronome.
2.
Si nécessaire, spéciez le tempo et la signature rythmique, etc.
Pour régler le tempo: Bouton TEMPO ▲ ou ▼ ou bouton TAP
TEMPO.
Pour régler la signature rythmique: Bouton BEAT ▲ ou ▼.
Pour régler la fonction de métronome périodique: Utilisez le
bouton PERIODIC (de métronome périodique).
Lorsque vous utilisez simultanément l’accordeur et le métro-
nome, vous ne pouvez pas sélectionner “triolets”, “triolets
avec omission du battement du milieu”, “quartolets” ou
“quartolets avec omission des baements du milieu” comme
signature rythmique.
Appuyez sur le bouton TUNER ON pour passer en mode
3.
Compteur.
Le balancier du métronome et l’affichage d’accordage apparaissent sur l’acheur. Le tempo du métronome est aussi indiqué par le clignotement du bouton TAP TEMPO.
Si vous souhaitez effectuer l’accord en mode Son, vous devrez ensuite appuyer sur le bouton SOUND. Pour accorder
votre instrument en mode Retour Son, appuyez sur le bouton
SOUND BACK.
Accord en mode Compteur
Jouez une seule note sur l’instrument à accorder. L’accordeur
ache alors le nom de la note dont la hauteur se rapproche
le plus de celle de la note jouée. Accordez votre instrument
jusqu’à ce que le Accordeur ache la note voulue.
Accord en mode Son
Accordez votre instrument sur la hauteur de la note entendue.
Accord en mode Retour Son
Avec cee note, le compteur et la diode, accordez votre instrument en conséquence.
Quand vous utilisez simultanément l’accordeur et le métronome,
la fonction TONE TRAINER du TM-50TR n’est pas disponible.
Une fois l’instrument accordé, appuyez sur le bouton TUNER
4.
ON et sur le bouton METRONOME ON pour éteindre l’accordeur et le métronome.
Fiche technique
Section accordeur
Gamme: 12 notes tempérament égal
Plage de détection*:
C1 (32,70Hz) à C8 (4186,01Hz) onde sinusoïde
Note de référence:
C3 (130,81Hz) à C6 (1046,50Hz) Trois octaves
Modes d’accord:
Mode Compteur, Mode Son, Mode Retour Son,
fonction TONE TRAINER
Plage de calibrage: A4 = 410 Hz à 480 Hz (par pas de 1 Hz)
Précision de la détection: Supérieure à ±1 centième
Précision du son: Supérieure à ±1 centième
Section métronome
Échelle de tempo: 40 à 208 baements par minute (bpm)
Réglage du tempo:
PAS PENDULAIRE, PAS COMPLET, TEMPO TAP,
fonction de métronome périodique
Signatures rythmiques:
0 à 9 baements, duolet, triolet, triolet sans temps
du milieu, quartolet, quartolet sans temps du milieu
Précision du tempo: ±0,3%
Principales spécications
Prises: Prise INPUT (mono 1/4"), prise PHONES (minijack
stéréo de 3,5mm)
Haut-parleur:
Haut-parleur dynamique (23 mm de diamètre)
Alimentation: Deux piles AAA (piles au alcalines ou
Durée de vie des piles:
Accordeur...
Environ 24 heures (Note A4 en fonctionnement
continu, avec des piles alcalines)
Métronome...
Environ 24 heures (tempo 120, 4 battements, vo-
lume maximal, avec des piles alcalines)
Utilisation simultanée de l’accordeur et du métro-
nome ...
Environ 24 heures (Note A4 en fonctionnement
continu, tempo 120, 4 baements, volume maximal,
avec des piles alcalines)
Dimensions (L x P x H): 111 x 82 x 18 mm
Poids: 108 g (piles comprises)
Accessoires fournis: Manuel d’utilisation, deux piles AAA
Les réglages de calibrage et de hauteur de référence de l’accordeur ainsi que les paramètres de tempo, mesure, de pas
du pendule et de pas complet du métronome sont conservés même après la mise hors tension de l’appareil. Néanmoins, les réglages seront réinitialisés aux valeurs suivantes
si vous remplacez les piles.
Valeurs par défaut:
Calibrage = 440 Hz, note de référence = A4, tempo = 120,
signature rythmique = quatre baements, type de tempo =
PAS PENDULAIRE
* Même si la hauteur du son se trouve à l’intérieur de
la plage de détection, il est possible que le TM-50TR
n’arrive pas à détecter la note si de nombreux sons
harmoniques sont présents (comme des notes basses
ou élevées sur un piano acoustique) ou si le temps d’es-
tompement (decay) de votre instrument est important.
Les caractéristiques et l’aspect du produit sont suscep-
•
tibles d’être modiés sans avis préalable en vue d’une
amélioration.
à l’hydrure métallique de nickel)
Page 7
Die wichtigsten Funktionen
h
i
d
g
c
ba
Der TM-50TR bietet Ihnen diverse Funktionen, die Ihnen
helfen, Ihre Technik und Intonation zu optimieren.
Neben den konventionellen Stimmgerätefunktionen (Stim-
manzeige, Tonausgabe und Sound Back) bietet das Gerät die
TONE TRAINER-Funktion, die in Echeit Höhe, Dynamik
und Klarheit eines gehaltenen Ton misst und analysiert und
Ihnen damit hilft, Ihre Intonation zu verbessern.
Die periodische Metronomfunktion begleitet periodisch
Sequenz von bis zu vier Takten in der eingestellten Taktart.
Hierbei sind über die gewählte Dauer die Klicks abwech-
selnd hörbar und nicht hörbar – eine große Hilfe, um an
Ihrem Timing zu arbeiten.
Einsetzen der Batterien
Schieben Sie den
1.
Batteriefachdackel
auf der Rückseite
des TM-50TR in
Richtung „a“ und
önen Sie die Abdeckung in Richtung
„b“ (siehe nebenstehende Abbildung).
Setzen Sie Batterien
2.
unter Beachtung der richtigen Polung ein.
Um eine korrekte Anzeige der verbleibenden Baeriela-
3.
dung zu gewährleisten, befolgen Sie die Anweisungen im
Abschni „Einstellen des Baerietyps“ auf Seite 88 und
wählen Sie den verwendeten Baerietyp.
Bei Fehlfunktionen entnehmen Sie die Baerien einmal
und seen sie dann neu ein.
Sind die Batterien erschöpft, erscheint im Display ein
Baerie-Symbol. In diesem Fall erseen Sie die Baerien.
Einstellen des Batterietyps
Um eine korrekte Anzeige der verbleibenden Baerieladung
zu gewährleisten, müssen Sie den verwendeten Baerietyp
festlegen.
Nachdem Sie die Baerien ausgetauscht haben und das
1.
Gerät einschalten, können Sie im Display den verwendeten Baerietyp festlegen.
Drücken Sie die TAP TEMPO-Taste, um den verwendeten
2.
Baerietyp auszuwählen.
AL: Alkali-Baerien / nH: Nickel-Metallhydrid-Baerien
Drücken Sie entweder die TUNER ON-Taste oder die
3.
METRONOME ON-Taste.
Die Einstellung ist abgeschlossen und das TM-50TR wird
eingeschaltet.
Verwendung des Ständers
Sie können den an der Rückseite des TM-50TR vorhandenen
Ständer verwenden, um das Gerät zur leichten Betrachtung
zurückzuklappen.
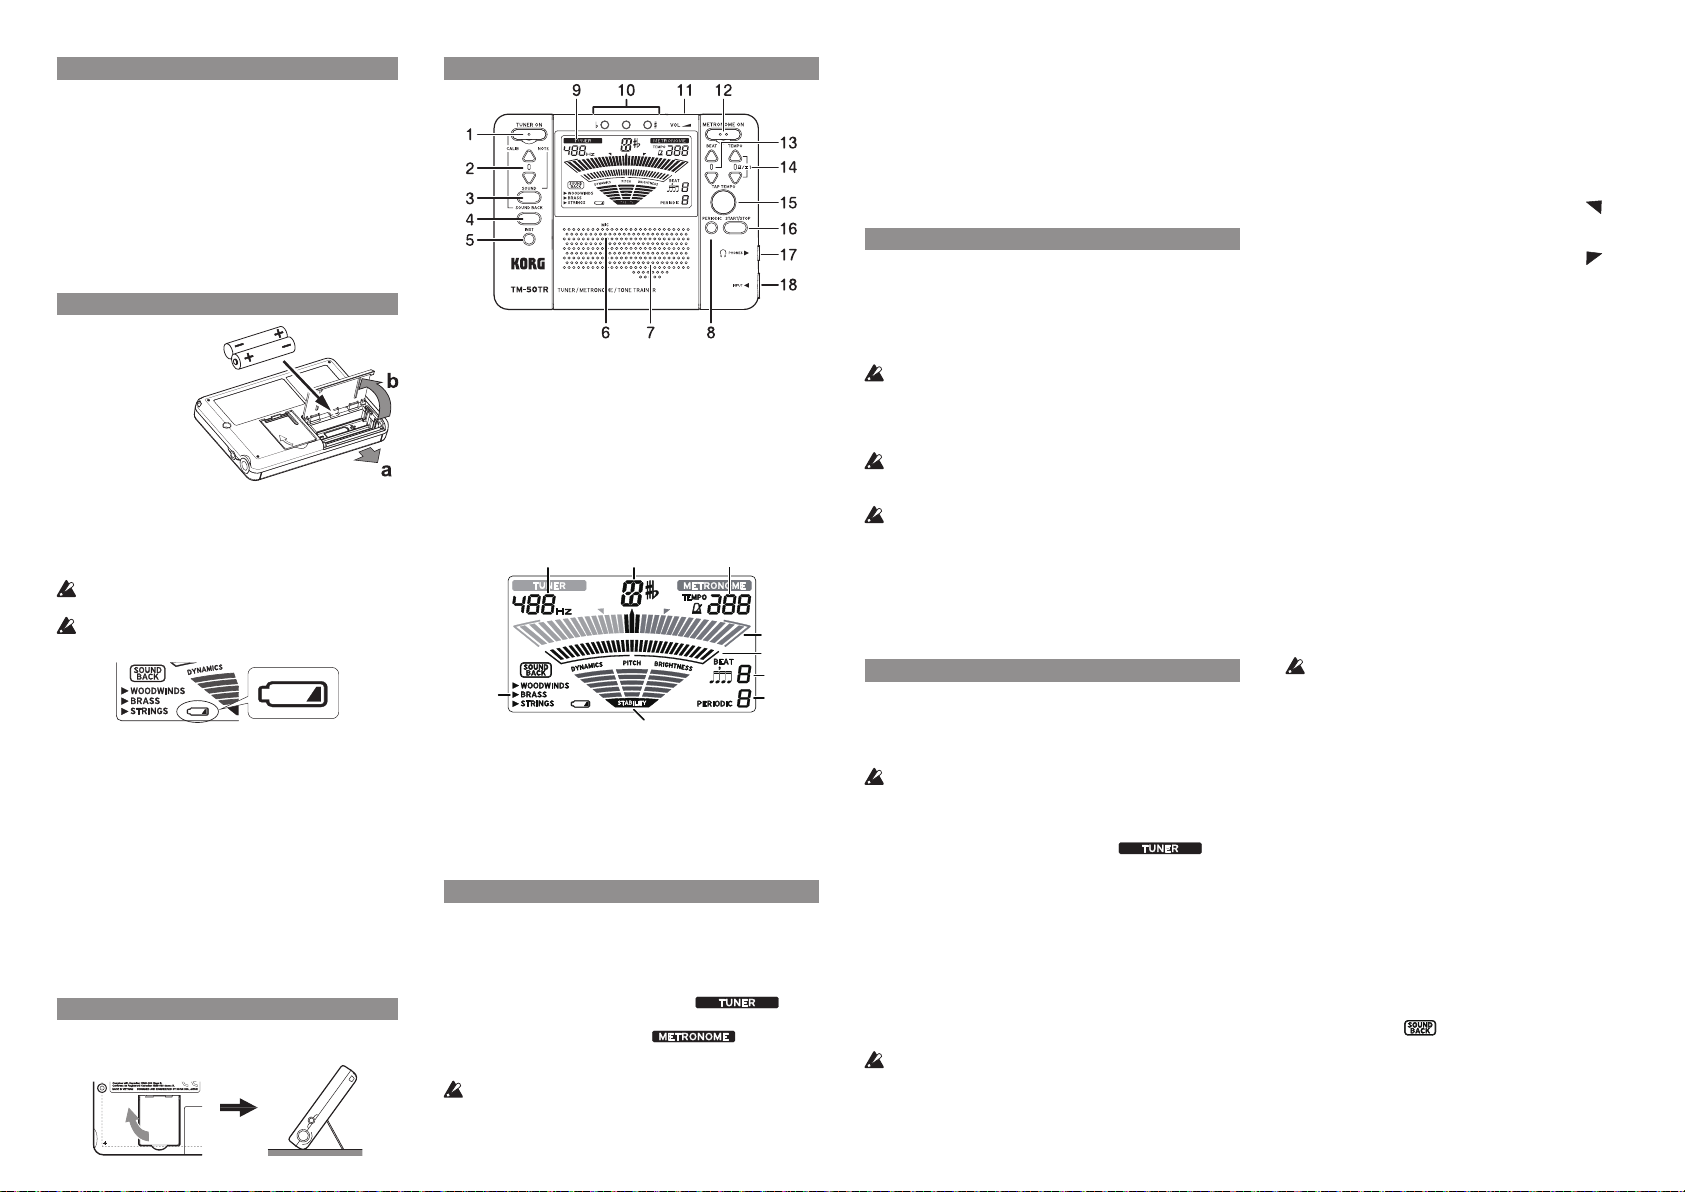
Teile des TM-50TR
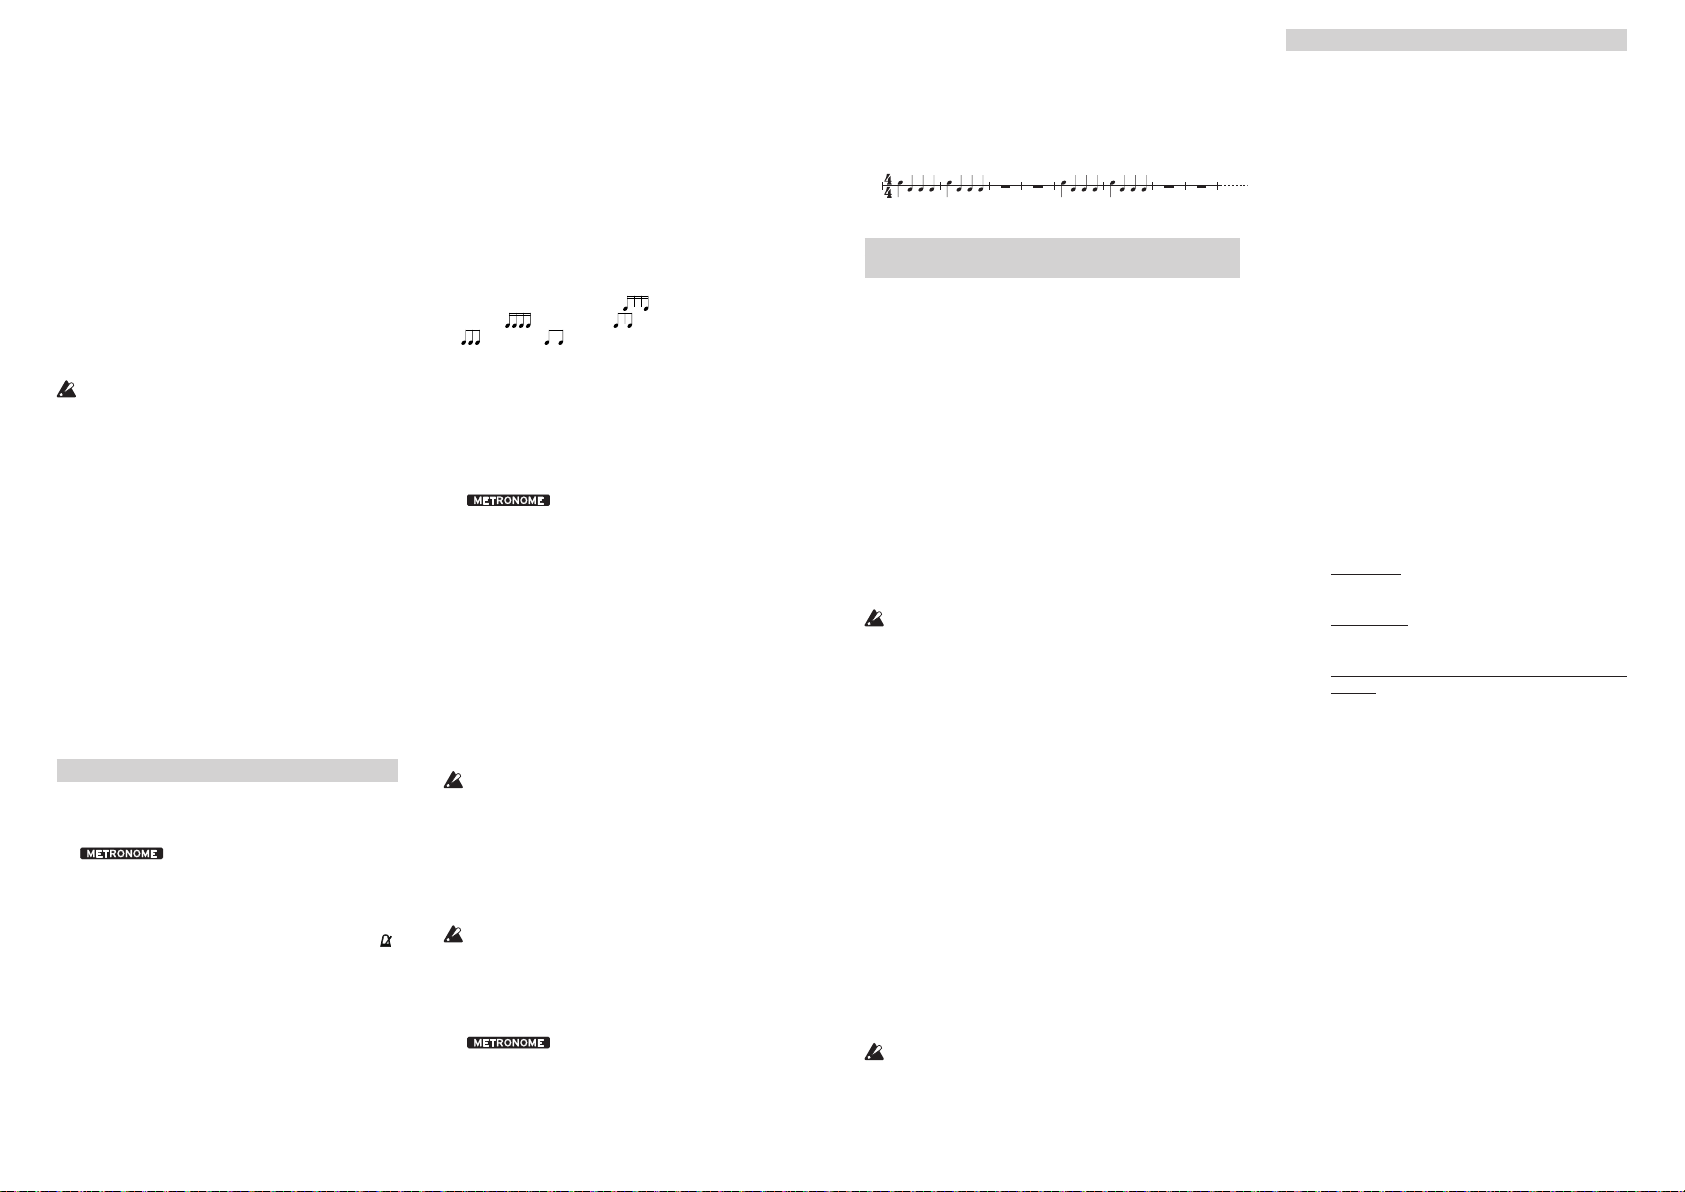
TUNER ON-Taste
1.
SOUND-Taste
3.
INST-Taste (Instrumententyp)
5.
Internes Mikrofon
6.
PERIODIC-Taste (periodisches Metronom)
8.
Display
9.
VOL (Lautstärke)
11.
BEAT ▲, ▼-Tasten
13.
TAP TEMPO-Taste
15.
PHONES-Buchse
17.
a. Kalibrierung (Referenzton)
b. Notenname c. Tempo
d. Instrumententyp e. PITCH-Anzeige
f. DYNAMICS/BRIGHTNESS-Anzeige und Metronompendel
g. BEAT (Metronomtakt)
h. PERIODIC (periodisches Metronom)
i. STABILITY (Anzeige der Beständigkeit des Spiels)
CALIB/NOTE ▲, ▼-Tasten
2.
SOUND BACK-Taste
4.
Lautsprecher
7.
Stimmhilfe
10.
METRONOME ON-Taste
12.
TEMPO ▲, ▼-Tasten
14.
START/STOP-Taste
16.
INPUT-Buchse
18.
e
f
Ein- und Ausschalten
Einschalten des Geräts
Drücken Sie entweder den TUNER ON-Taste oder den METRONOME ON-Taste, und das Gerät wird eingeschaltet. Aktivieren Sie die
gewünschte Funktion durch Drücken der entsprechenden Taste.
Durch Drücken der TUNER ON-Taste aktivieren Sie den Messmodus des Stimmgeräts, und im Display wird „ “ ange-
zeigt. Durch Drücken der METRONOME OM-Taste schalten Sie das
Metronom ein, und im Display wird „ “ angezeigt.
Das TM-50TR erlaubt es Ihnen, Stimmgerät und Metronom gleich-
zeitig zu verwenden.
Der TUNER ON-Taste und der METRONOME ON-Taste
stehen weniger hervor als die anderen Tasten, damit das TM-
50TR nicht unabsichtlich eingeschaltet wird. Drücken Sie zum
Ein- und Ausschalten des Geräts die Einschalaste.
Ausschalten des Stimmgeräts
Wenn das Stimmgerät arbeitet, drücken Sie den TUNER ON-Taste,
um das Stimmgerät auszuschalten. Das Stimmgerät schaltet auch automatisch aus, wenn es zwanzig Minuten lang nicht verwendet wird.
Ausschalten des Metronoms
Wenn das Metronom arbeitet, drücken Sie den METRONOME
ON-Taste, um das Metronom auszuschalten. Das Metronom schaltet
auch automatisch aus, wenn es zwanzig Minuten lang nicht verwen-
det wird.
Anschlüsse
Falls Sie ein Instrument, Kontaktmikrofon usw.
anschließen möchten.
Wenn Sie ein Instrument mit einem Pickup, wie eine elektrische
Gitarre, stimmen wollen dann schließen Sie ein Kabel an Ihr Instrument an und stecken das Kabel in die INPUT-Buchse des TM50TR.
Die INPUT-Buchse ist nur für 1/4-Zoll-Monokabel geeignet.
Stereokabel (TRS) können nicht verwendet werden.
Wenn Sie Ihr Instrument mit einem separat erhältlichen Korg CM-
200 CONTACT MICROPHONE stimmen wollen, schließen Sie es
an der INPUT-Buchse des TM-50TR an.
Wenn das Instrument nicht an die INPUT-Buchse angeschlos-
sen wird, kann es mithilfe des integrierten Mikrofons gestimmt
werden.
Zupnstrumente wie Gitarren können zwar zum Stimmen an
die INPUT-Buchse angeschlossen werden, sind aber mit der
TONE TRAINER-Funktion nicht kompatibel.
Anschluss von Kopfhörern
An die PHONES-Buchse können Sie handelsübliche Kopfhörer
mit 1/8"-Stereo-Miniklinkenbuchse anschließen. Wenn eingesteckt,
kommt kein Ton vom Lautsprecher. Verwenden Sie den Lautstär-
keregler zum Einstellen der Lautstärke der Kopörern.
Verwendung des Stimmgeräts
Stimmen unter Beobachtung der Stimmanzeige
(Messmodus)
Schließen Sie Ihr Instrumentenkabel oder Kontaktmikrofon an
1.
die INPUT-Buchse des TM-50TR an.
Wenn das Instrument nicht an die INPUT-Buchse angeschlos-
sen wird, kann es mithilfe des integrierten Mikrofons gestimmt
werden.
Drücken Sie die TUNER ON-Taste.
2.
Im oberen Teil des Displays erscheint „ “, und
darunter wird die Kalibrierung (Referenzton) angezeigt.
Um die Kalibrierung zu ändern, drücken Sie die Taste CALIB/
3.
NOTE ▲ oder ▼.
Der Kalibrierungswert erhöht oder verringert sich um jeweils 1
Hz. Sie können den Wert fortlaufend erhöhen oder verringern,
indem Sie diese Tasten gedrückt halten. Diese Einstellung bleibt
gespeichert, auch wenn das Gerät ausgeschaltet wird.
Spielen Sie eine einzelne Note auf Ihrem Instrument.
4.
Die Note, die der gespielten Note am nächsten ist, wird in der
Mie des Displays angezeigt. Stimmen Sie das Instrument auf die
korrekte Tonhöhe, so dass der gewünschte Notenname erscheint.
Wenn Sie das interne Mikrofon verwenden, bringen Sie das
Instrument so nahe wie möglich zum Mikrofon, so dass keine
Außengeräusche beim Stimmvorgang eingefangen werden.
Während Sie eine einzelne Note auf Ihrem Instrument spielen,
5.
stimmen Sie das Instrument, bis die mittlere Markierung der
PITCH-Anzeige sowie die mittlere LED der Stimmhilfe auf-
leuchten.
Die linke Stimmanzeige leuchtet auf, wenn die Tonlage
des Instruments Moll ist, und die rechte Anzeige leuchtet
auf, wenn die Tonlage Dur ist.
Stimmen zu einer genauen großen Terz oder einer kleinen Terz nach oben
Wenn Sie eine reine große Terz über A (0 Cent) abstimmen
wollen, stimmen Sie Ihr Instrument so, dass die Notenna-
men-Anzeige C♯ anzeigt und die Stimmanzeige bei „ “ ist.
Wenn Sie eine reine kleine Terz über A (0 Cent) abstimmen
wollen, stimmen Sie Ihr Instrument so, dass die Notennamen-Anzeige C anzeigt und die Stimmanzeige bei „ “ ist.
Stimmen auf einen Referenzton (Ton-Ausgabe-Modus)
Drücken Sie die TUNER ON-Taste.
1.
Sie schalten den Messmodus des Stimmgeräts ein.
Drücken Sie die SOUND-Taste, um den Ton-Ausga-
2.
be-Modus zu wählen.
Der Referenzton wird entweder über die Kopörer (wenn
an die PHONES-Buchse angeschlossen) oder über die
Lautsprecher wiedergegeben. Stellen Sie die Wiedergabelautstärke mithilfe des Lautstärkereglers ein.
Wählen Sie die gewünschte Note mithilfe der Taste CA-
3.
LIB/NOTE ▲ oder ▼.
Der wiedergegebene Referenzton ändert sich nach folgendem Schema:
♯
C (C3) C
C (C4) ... C (C6) C (C3)...
Diese Einstellung bleibt gespeichert, auch wenn das Gerät
ausgeschaltet wird.
Stimmen Sie Ihr Instrument gemäß dem Referenzton.
4.
Drücken Sie die SOUND-Taste erneut, um zum Messmo-
5.
dus zurückzukehren.
D E♭ E F F♯ G G♯ A B♭ B
Wenn Sie das Instrument an die INPUT-Buchse oder die
Kopörer an die PHONES-Buchse anschließen, wird die
PITCH-Anzeige aktiviert.
Stimmen mithilfe des Referenztons und der
Stimmanzeige (Sound Back-Modus)
Im Sound Back-Modus wird die Höhe des auf dem Instrument gespielten Tons ermielt und der nächstliegende Referenzton wiedergegeben. Somit können Sie prüfen, ob die
Höhe des von Ihnen gespielten Tons davon abweicht.
Mithilfe dieser Funktion können Sie Ihr Instrument stimmen,
wenn entweder das Instrument an die INPUT-Buchse oder
die Kopfhörer an die PHONES-Buchse (oder beide) angeschlossen sind.
Drücken Sie die TUNER ON-Taste.
1.
Damit schalten Sie den Messmodus des Stimmgeräts ein.
Drücken Sie die SOUND BACK-Taste, um den Sound
2.
Back-Modus zu aktivieren.
Beim Sound Back-Modus wird der Referenzton wiederge-
geben, der dem gespielten Ton am nächsten kommt. Stellen Sie die Lautstärke mithilfe des Lautstärkereglers ein.
Im Display wird „ “ angezeigt.
Wenn Kopörer an die PHONES-Buchse angeschlossen
sind, wird der gespielte Ton über das integrierte Mikrofon oder über die INPUT-Buchse empfangen und der
Referenzton über die Kopörer wiedergegeben.
Wenn keine Kopfhörer an die PHONES-Buchse an-
geschlossen sind, wird der gespielte Ton über die IN-
PUT-Buchse empfangen und der Referenzton über die
Page 8

Lautsprecher wiedergegeben.
Stimmen Sie Ihr Instrument mithilfe des Referenztons
3.
und der Stimmanzeige.
Wenn Sie die SOUND BACK-Taste erneut drücken, keh-
4.
ren Sie in den Messmodus zurück.
Messen und Anzeigen der Beständigkeit Ihrer Intonation (TONE TRAINER-Funktion)
Drücken Sie die TUNER ON-Taste.
1.
Damit schalten Sie den Messmodus des Stimmgeräts ein.
Drücken Sie die INST-Taste, um den Instrumententyp des
2.
betreenden Instruments auszuwählen.
Mit jedem Druck der INST-Taste schalten Sie zu den un-
ten genannten Instrumententypen weiter.
WOODWINDS (Holzblasinstrumente) BRASS (Blechblasinstrumente) STRINGS (Saiteninstrumente) WOODWINDS
(Holzblasinstrumente) ...
Die Gruppe STRINGS bezieht sich nur auf Streichinstru-
mente wie z. B. Geigen. Sie ist nicht zur Verwendung mit
Zupnstrumenten wie z. B. Gitarren geeignet.
Spielen Sie eine lange, gehaltene Note ohne Vibrato.
3.
Während Sie die Note spielen, zeigen die PITCH-Anzeige
4.
und die DYNAMICS/BRIGHTNESS-Anzeige in Echeit
die entsprechenden Informationen an.
PITCH (Tonhöhe): Die Tonhöhe wird durch den Notennamen in der Mie angezeigt.
DYNAMICS (Lautstärke): Je höher die Lautstärke, desto
höher der Pegel der Anzeige.
BRIGHTNESS (Klarheit): Je klarer der Ton, desto höher
der Pegel der Anzeige.
Nach dem Ausklingen erscheinen die durchschnilichen
5.
Pegel von DYNAMICS, PITCH und BRIGHTNESS in der
STABILITY-Anzeige und informieren Sie über die Sauberkeit Ihrer Intonation.
Hohe Sauberkeit: Der Pegel in der Anzeige steigt.
Niedrige Sauberkeit: Der Pegel in der Anzeige fällt.
Verwenden des Metronoms
Einstellen von Tempo und Taktart
Drücken Sie die METRONOME ON-Taste.
1.
Das Pendel des Metronoms erscheint im Display und
rechts oben wird „ “ angezeigt.
Drücken Sie zum Einstellen des Tempos die Taste TEMPO
2.
▲ oder ▼.
Halten Sie die Tasten TEMPO ▲ und ▼ gleichzeitig 1
Sekunde lang gedrückt, um zwischen Pendel-Metronom-Schri (Pendel wie bei einem mechanischen Metronom) und ganzem Schri umzuschalten.
Wenn Sie Pendel-Metronom-Schritt gewählt haben, erscheint “ ” im Display.
Nachdem Sie „PENDEL-METRONOM SCHRITT“ oder
„GANZER SCHRITT“ gewählt haben, drücken Sie die
Taste TEMPO ▲ oder ▼ zum Einstellen des Tempos.
Diese Einstellung wird auch bewahrt, wenn das Gerät
ausgeschaltet ist.
Wenn Sie „PENDEL-METRONOM SCHRITT“ gewählt haben
Durch Drücken der Taste TEMPO ▲ bzw. ▼ erhöhen
bzw. verringern Sie das Tempo gemäß der folgenden
Tempowerte. Sie können den Wert fortlaufend erhöhen
oder verringern, indem Sie die entsprechende Taste gedrückt halten.
30, 32, 34, 36, 38, 40, 42, 44, 46, 48, 50, 52, 54, 56, 58, 60, 63,
66, 69, 72, 76, 80, 84, 88, 92, 96, 100, 104, 108, 112, 116, 120,
126, 132, 138, 144, 152, 160, 168, 176, 184, 192, 200, 208, 216, 224,
232, 240, 252
Wenn Sie „GANZER SCHRITT“ gewählt haben
Durch Drücken der Taste TEMPO ▲ bzw. ▼ wird das Tempo
auf einer Skala von 30 – 252 um einen Wert erhöht bzw. verringert. Sie können den Wert fortlaufend erhöhen oder verringern,
indem Sie die entsprechende Taste gedrückt halten.
Drücken Sie die START/STOP-Taste zum Starten des Metronoms.
3.
Das Metronompendel schwingt im festgelegten Tempo von links
nach rechts, und die TAP TEMPO-Taste blinkt gemäß dem Takt.
Wenn Sie die Taktart ändern wollen, drücken Sie die Taste BEAT
4.
▲ oder ▼, um die Wahl vorzunehmen.
Die Taktart ändert sich wie folgt.
Drücken Sie die Taste BEAT ▲ oder ▼:
... 0 1 ... 9 (9 Takte) (Quartole ohne die beiden mileren
Taktschläge) (Quartole) (Triole ohne den mileren
Taktschlag) (Triole) (Duole) 0 ...
Spielen Sie zusammen mit dem Metronomtempo.
5.
Zum Stoppen des Metronoms drücken Sie die START/STOP-Taste.
6.
Eingabe des Tap-Tempos
Das eingegebene Tap-Tempo wird als BPM (Taktschläge/Minute)
angezeigt.
Drücken Sie die METRONOME ON-Taste.
1.
Das Pendel des Metronoms erscheint im Display und rechts
oben wird „ “ angezeigt.
Drücken Sie die TAP TEMPO-Taste mehrmals in regelmäßigen
2.
Abständen.
Das TM-50TR erkennt das beim Drücken der Taste verwendete
Intervall und stellt es als Tempo ein. Das Intervall wird als BPM
(Taktschläge pro Minute) angezeigt.
Wenn der von der Tap Tempo-Funktion ermittelte BPM-Wert
weniger als 30 beträgt, wird „Lo“ im Display angezeigt und das
Tempo auf „30“ eingestellt.
Wenn der von der Tap Tempo-Funktion ermittelte BPM-Wert
mehr als 252 beträgt, wird „Hi“ im Display angezeigt und das
Tempo auf „252“ eingestellt.
Drücken Sie die START/STOP-Taste, zum Starten des Metronoms.
3.
Das Metronompendel schwingt im festgelegten Tempo von links
nach rechts, und die TAP TEMPO-Taste blinkt gemäß dem Takt.
Das Tap-Tempo kann eingegeben werden, wenn das Metro-
nom verwendet wird.
Spielen Sie Ihr Instrument gemäß dem Tempo.
4.
Zum Stoppen des Metronoms drücken Sie die START/STOP-Taste.
5.
Üben mit der periodischen Metronomfunktion
Diese Funktion begleitet Sequenzen von einem bis maximal vier
Takten abwechselnd mit und ohne Klicks. Sie ist eine große Hilfe
beim Üben Ihres Timings.
Mit der periodischen Metronomfunktion können Sie „0 Takt“
„Triole“, „Triole ohne den mileren Taktschlag“, „Quartole“,
„Quartole ohne die beiden mittleren Taktschläge“ nicht als
Taktart auswählen.
Drücken Sie die METRONOME ON-Taste.
1.
Das Pendel des Metronoms erscheint im Display und rechts
oben wird „ “ angezeigt.
Mit der PERIODIC-Taste (periodisches Metronom) wählen Sie
2.
die Taktsequenz aus, die abwechselnd mit und ohne Klicks begleitet werden soll.
Mit jedem Druck der PERIODIC-Taste schalten Sie wie folgt zur
nächsten Taktsequenz weiter.
1 2 3 4 0 1 ...
Ist „0“ ausgewählt, wird die periodische Metronomfunktion
deaktiviert und die Anzeigen „BEAT“ und „PERIODIC“ im
Display erlöschen nach einigen Sekunden.
Drücken Sie die START/STOP-Taste, zum Starten des Metronoms.
3.
Der gewählte Taktsequenz wird abwechselnd mit und ohne
Klicks begleitet.
Beispiel: BEAT (Taktart)=4, PERIODIC (Taktsequenz)=2
Zum Stoppen des Metronoms drücken Sie die START/STOP-Taste.
4.
Gleichzeitige Verwendung des
Stimmgeräts und Metronoms
Das TM-50TR erlaubt es Ihnen, Stimmgerät und Metronom gleich-
zeitig zu verwenden.
Einzelheiten zum Stimmgerät-Betrieb und Metronom-Betrieb siehe
„Verwendung des Stimmgeräts“ und „Verwendung des Metronoms“.
Gleichzeitige Verwendung des Stimmgeräts und
Metronoms
Wenn Sie zum Beispiel zum Metronom spielen und feststellen,
dass Ihr Instrument nicht richtig gestimmt ist, können Sie das Met-
ronom weiter laufen lassen, während Sie das Instrument stimmen.
Verfahren Sie wie folgt.
Drücken Sie die METRONOME ONTaste.
1.
Drücken Sie die START/STOP-Taste zum Starten des Metronoms.
2.
Wenn erforderlich, legen Sie Tempo und Taktbezeichnung usw.
fest.
So legen Sie das Tempo fest: Tasten TEMPO ▲ oder ▼, oder
TAP TEMPO-Taste.
So legen Sie die Taktart fest: Tasten BEAT ▲ oder ▼.
Änderung der Metronomeinstellung: Drücken Sie die PERIO-
DIC-Taste (periodisches Metronom)
Bei gleichzeitiger Verwendung von Stimmgerät und Metro-
nom können Sie nicht „Triole“, „Triole ohne den mittleren
Taktschlag“, „Quartole“, „Quartole ohne die beiden mileren
Taktschläge“ als Taktart wählen.
Drücken Sie die Taste TUNER ON zum Einschalten des Mess-
3.
modus.
Das Pendel des Metronoms und die Stimmanzeige erscheinen
im Display. Das Tempo des Metronoms wird zudem durch
Blinken der TAP TEMPO-Taste angezeigt.
Wenn Sie den Ton-Ausgabe-Modus einschalten wollen, müssen
Sie die Taste SOUND drücken. Um zum Sound Back-Modus zu
wechseln, drücken Sie die SOUND BACK-Taste.
Stimmen im Messmodus
Wenn Sie eine einzelne Note auf Ihrem Instrument spielen, zeigt
das Display den Namen der Note, die der gespielten Tonlage
am nächsten liegt. Stimmen Sie Ihr Instrument unter Beobachtung des Messgeräts und der Stimmhilfe.
Stimmen im Ton-Ausgabe-Modus
Stimmen Sie Ihr Instrument auf die gehörte Tonhöhe.
Sound-Back-Modus
Stimmen Sie Ihr Instrument mithilfe des Tons, der Messskala
und der Stimmanzeige.
Wenn Stimmgerät und Metronom gleichzeitig verwendet werden, kann die TONE TRAINER-Funktion nicht genut werden.
Drücken Sie nach dem Stimmen Ihres Instruments die TUNER
4.
ON-Taste bzw. die METRONOME ON-Taste, um das Stimmgerät bzw. das Metronom auszuschalten.
Technische Daten
Stimmgerät-Sektion
Skala: 12 Noten gleichschwebende Stimmung
Erkennungsbereich*:
C1 (32,0 Hz) ~ C8 (4186,01 Hz) für eine Sinuswelle
Referenzton:
C3 (130,81 Hz) ~ C6 (1046,50 Hz) 3 Oktaven
Stimmen-Modi:
Messmodus, Ton-Ausgabe-Modus, Sound-Back-Mo-
dus, TONE TRAINER-Funktion
Kalibrierungsbereich:
A4 = 410 Hz ~ 480 Hz (in 1 Hz-Schrien)
Messgenauigkeit: Besser als ±1 Cent
Klanggenauigkeit: Besser als ±1 Cent
Metronom-Sektion
Tempo-Bereich: 30 ~ 252 Taktschläge/Minute (bpm)
Tempo-Einstellung:
PENDEL-METRONOM SCHRITT, GANZER
SCHRITT, TAP-TEMPOS, periodischen Metronomfunktion
Time signatures:
0–9 beats, duplets, triplets, triplets without the center
beat, quadruplets, quadruplets without the center
beats
Tempo accuracy: ±0.3%
Wichtigste technische Daten
Anschlüsse:
INPUT-Buchse (1/4 Zoll Mono), PHONES-Buchse (1/8"
Stereo Mini-Klinke)
Lautsprecher: Dynamischer Lautsprecher (ø 23 mm)
Stromversorgung: Zwei AAA-Batterien (Alkalibatterien
Baerielebensdauer:
Stimmgerät ...
Ca. 24 Stunden (A4 kontinuierlicher Eingang, bei Ver-
wendung von Alkalibaerien)
Metronom ...
Ca. 24 Stunden (Tempo 120, vier Taktschläge, maximale Lautstärke, bei Verwendung von Alkalibaerien)
Gleichzeitige Verwendung von Stimmgerät und Met-
ronom...
Ca. 24 Stunden (A4 kontinuierlicher Eingang, Tempo
120, vier Taktschläge, maximale Lautstärke, bei Ver-
wendung von Alkalibaerien)
Abmessungen (T x B x H): 111 x 82 x 18 mm
Gewicht: 108 g (mit Baerien)
Lieferumfang:
Bedienungsanleitung, zwei AAA-Baerien
Die Kalibrierung und der Referenzton des Stimmgeräts
sowie die Einstellungen für Tempo, Takt, Pendel-Metronom-Schri und ganzer Schri des Metronoms bleiben gespeichert, auch wenn das Gerät ausgeschaltet wird. Wenn Sie
aber die Baerien erseen, werden diese Einstellungen auf
die folgenden Vorgabewerte zurückgeset.
Vorgabewerte:
Kalibrierung = 440 Hz, Referenzton = A4, Tempo = 120, Taktart = Vier Viertel, Tempoeinstellung = PENDULUM STEP
* Auch wenn die Tonhöhe innerhalb des Erkennungs-
bereichs ist, kann das TM-50TR nicht in der Lage sein,
die Tonhöhe zu erkennen, wenn der Klang zahlreiche
Obertöne (z.B. die niedrigen oder hohen Noten auf ei-
nem akustischen Klavier) hat oder das Instrument sehr
schnelles Abklingen aufweist.
Änderungen der technischen Daten und des Designs
•
ohne vorherige Ankündigung vorbehalten.
oder Nickel-Metallhydrid-Akkus)
Page 9
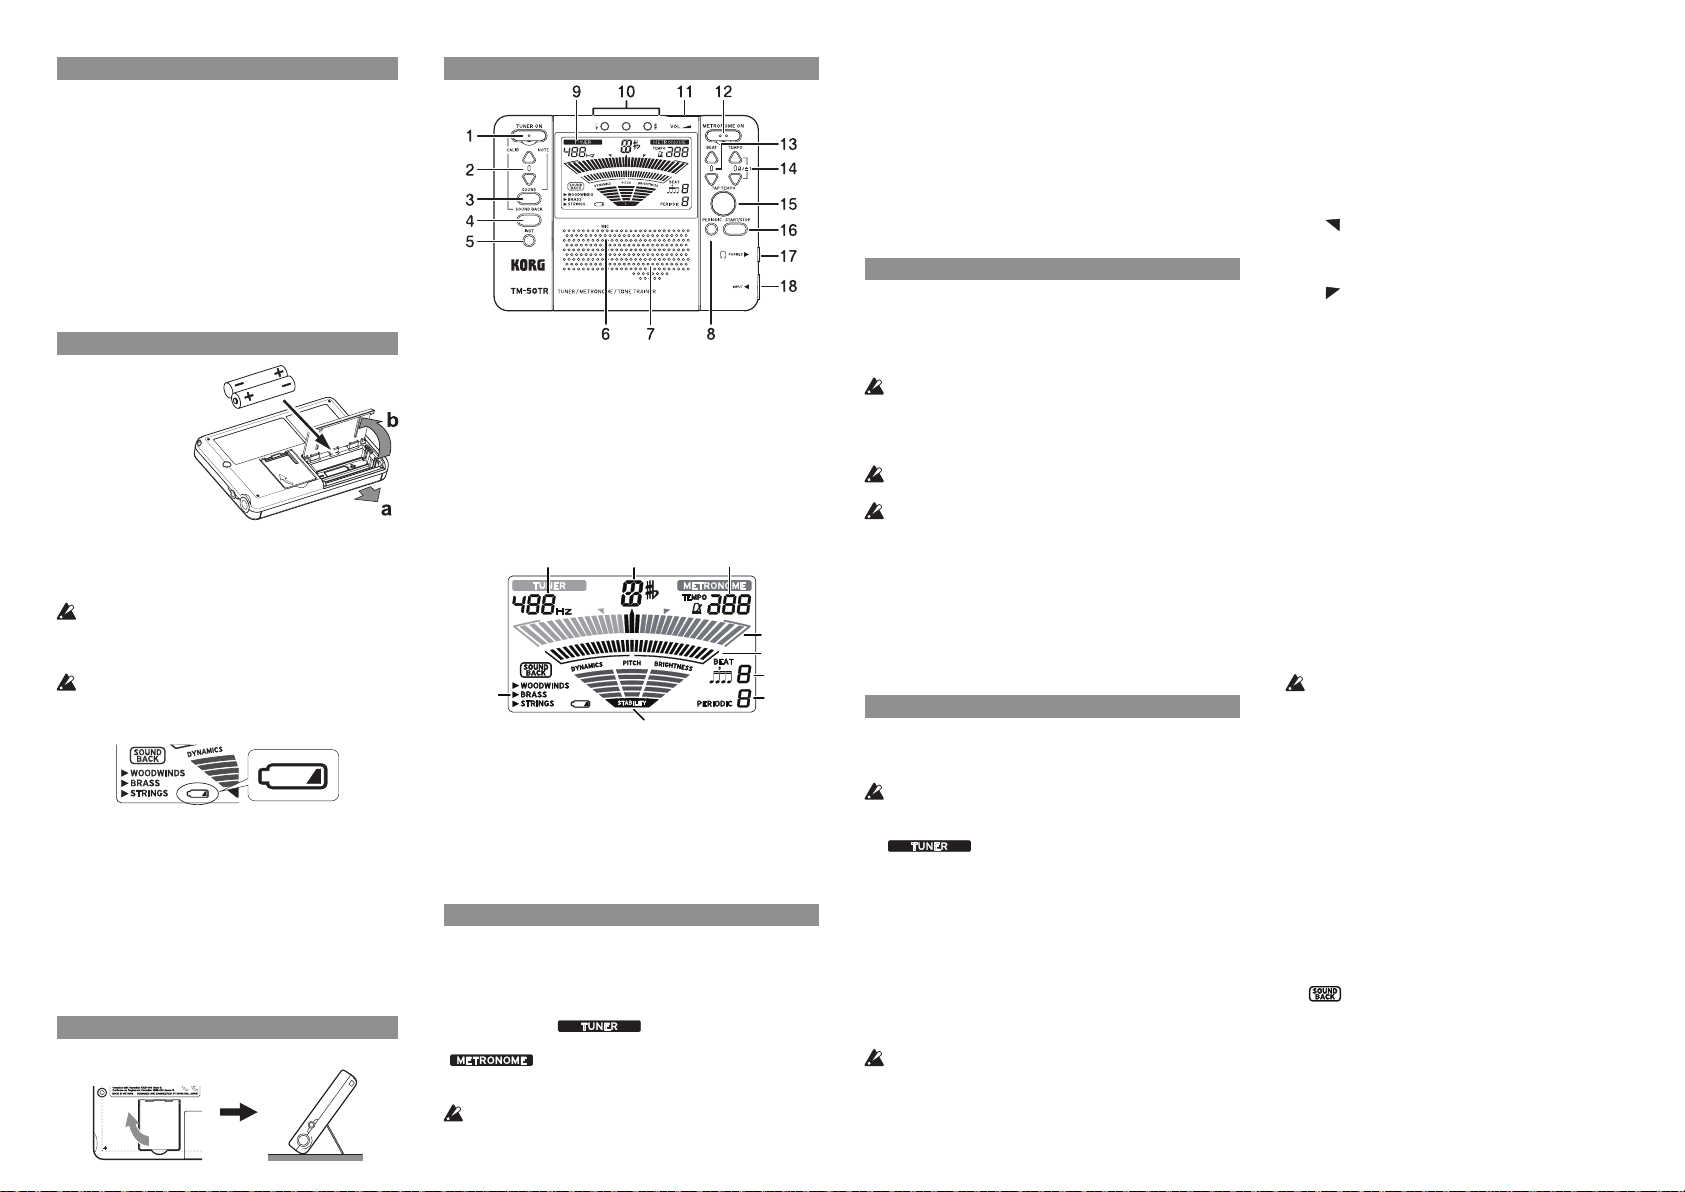
El TM-50TR está equipado con una serie de funciones que
h
i
d
g
c
ba
le ayudarán a practicar para obtener un "buen sonido".
Además de sus funciones convencionales de anador (Me-
didor, Salida de sonido y Regreso de sonido), la función
TONE TRAINER se puede utilizar para medir los niveles
de estabilidad del tono, de la dinámica (volumen) y del
brillo con objeto de ayudarle a practicar para producir un
sonido bueno y estable.
La función de metrónomo produce clics en todos los com-
pases conforme a los ajustes efectuados, mientras que con
la función de metrónomo periódico se producen clics para
el número de compases especicado, sonando y silenciando
alternativamente los clics para ayudarle a practicar el mantenimiento del ritmo.
Instalar las baterías
Deslice la tapa del
1.
compartimento de
las baterías en la
parte posterior del
TM-50TR en la dirección “a”, tal como se
muestra en la ilustración, y eleve la tapa
en la dirección “b.”
Inserte las baterías
2.
y asegúrese de respetar la polaridad correcta.
Para obtener lecturas precisas de la energía restante de
3.
las baterías, consulte “Ajuste del tipo de batería” y seleccione el tipo de batería que se utiliza.
Si la unidad presenta un mal funcionamiento y no se
puede corregir el problema apagándolo y volviéndolo
a encender varias veces, retire las baterías y después
vuelva a instalarlas.
Cuando las baterías se agoten, en la pantalla aparecerá
el símbolo de una batería. Cuando se produzca este
supuesto, por favor instale nuevas baterías tan pronto
como sea posible.
Ajuste del tipo de batería
Para obtener lecturas precisas de la energía restante de las
baterías, seleccione el tipo de batería que se utiliza.
Al sustituir las baterías y activar el equipo, en la visuali-
1.
zación aparecerá una pantalla que le permitirá especicar el tipo de baterías que utiliza.
Pulse el botón TAP TEMPO para seleccionar el tipo de batería.
2.
AL: si se utilizan baterías de alcalinas.
nH: si se utilizan baterías de metal hidruro de níquel.
Pulse el botón START/STOP.
3.
El ajuste nalizará y el TM-50TR se iniciará.
Características generales
Puede usar el TM-50TR en posición vertical abriendo el soporte situado en la parte posterior de la unidad.
Uso del soporte
Partes del TM-50TR
Botón TUNER ON
1.
Botón SOUND
3.
Botón INST (grupo de instrumentos)
5.
Micrófono integrado
6.
Botón PERIODIC (metrónomo periódico)
8.
Pantalla (Display)
9.
VOL (Volumen)
11.
Botones BEAT ▲,▼
13.
Botón TAP TEMPO
15.
Jack PHONES
17.
a. Calibración (Tono de referencia)
b. Nombre de la nota c. Tempo
d. Grupo de instrumentos e. Medidor de tono (PITCH)
f. Medidor de dinámica/brillo (DYNAMICS/BRIGHTNESS) y
péndulo del metrónomo
g. BEAT (tiempo de compás del metrónomo)
h. PERIODIC (metrónomo periódico)
i. Medidor STABILITY (estabilidad de interpretación)
Botones CALIB/NOTE ▲,▼
2.
Botón SOUND BACK
4.
Altavoz (Speaker)
7.
Guía de anación
10.
Botón METRONOME
12.
Botones TEMPO ▲,▼
14.
Botón START/STOP
16.
Jack INPUT
18.
e
f
Activación/desactivación de la alimentación
Para activar la alimentación
Pulse el botón TUNER ON o el botón METRONOME ON y se activará la alimentación. Pulse el botón correspondiente a la función
que desee utilizar.
Al pulsar el botón TUNER ON, el afinador se inicia en el
modo Medidor y “ ” aparecerá en la pantalla. Al
pulsar el botón METRONOME ON, el metrónomo se inicia y
“ ” aparecerá en la pantalla.
El TM-50TR puede utilizar el anador y el metrónomo simultáneamente.
El botón TUNER ON y el botón METRONOME ON se ha
diseñado más bajo que el resto de botones para que la alimentación no se active involuntariamente al colocar el TM-
50TR en el bolsillo o en una bolsa. Para activar o desactivar el
dispositivo, presione el botón de alimentación.
Desactivación del anador
Con el anador encendido, pulse el botón TUNER ON para desactivar la alimentación. El anador también se desactivará automáticamente si no se utiliza durante veinte minutos.
Desactivación del metrónomo
Con el metrónomo encendido, pulse el botón METRONOME ON
para desactivar la alimentación. El metrónomo también se desactivará automáticamente si no se utiliza durante veinte minutos.
Conexiones
Si desea conectar un instrumento o un micrófono
de contacto, etc.
Si desea anar un instrumento con una pastilla, como una guitarra eléctrica, conecte un cable al instrumento y enchufe el cable al
jack INPUT del TM-50TR.
El jack INPUT solo se utiliza para un cable mono de 1/4". Los
cables estéreo (TRS) no se pueden utilizar.
Si desea anar el instrumento utilizando un MICRÓFONO DE
CONTACTO CM-200 de Korg (se vende por separado), enchufe
el micrófono de contacto en el jack INPUT del TM-50TR.
Si no hay ningún dispositivo conectado al jack INPUT, la a-
nación se realizará mediante el micrófono interno.
Los instrumentos de cuerda que se tocan por pulsación, como
por ejemplo las guitarras, se pueden conectar al jack INPUT
para su afinación; sin embargo, no son compatibles con la
función TONE TRAINER.
Conexión de auriculares
Puede conectar al jack PHONES unos auriculares de los disponibles en el mercado que tengan un minijack estéreo de 3,5 mm (/1/8
de pulgada). Una vez enchufado, no se emitirá ningún sonido por
el altavoz. Utilice el control de volumen para ajustar el volumen
de los auriculares.
Uso del anador
Anación mientras se observa el medidor
Conecte el cable del instrumento o el micrófono de contacto al
1.
jack INPUT del TM-50TR.
Si no hay ningún dispositivo conectado al jack INPUT, la a-
nación se realizará mediante el micrófono interno.
Pulse el botón TUNER ON.
2.
“ ” aparecerá en la parte superior de la pantalla
y la calibración (tono de referencia) se mostrará debajo.
Para cambiar la calibración, pulse el botón CALIB/NOTE ▲ o
3.
▼.
El valor de calibración aumenta y disminuye en unidades de
1 Hz. Al pulsar y mantener pulsados estos botones, puede
aumentar o reducir el valor de forma continua. Este ajuste se
almacena aunque la alimentación esté desactivada.
Toque una nota única en su instrumento.
4.
La nota más cercana al sonido de entrada aparecerá en el cen-
tro de la pantalla. Ane el instrumento con el tono correcto,
para que aparezca el nombre de la nota deseada.
Si está usando el micro interno, coloque su instrumento tan
cerca como sea posible de dicho micro, para evitar que ruidos
extraños o de fondo sean captados durante la anación.
Al tocar una única nota en el instrumento, ane el instrumento
5.
de modo que la marca central del medidor de tono (PITCH) y
el indicador central de la guía de anación se iluminen.
El indicador izquierdo de la guía de anación se ilumi-
nará si su instrumento es demasiado grave, y el indica-
dor derecho de la guía de anación se iluminará si su
instrumento es demasiado agudo.
Anación a una tercera mayor justa ascendente o a una
tercera menor ascendente
Si desea anar en una tercera mayor justa ascendente de
A (0 cent), ane el instrumento de forma que el indica-
dor de nombre de nota muestre C♯ y que el medidor esté
en “ ”.
Si desea anar en una tercera menor justa ascendente de
A (0 cent), ane el instrumento de forma que el indicador de nombre de nota muestre C y que el medidor esté
en “ ”.
Anación a un tono de referencia (modo Salida de sonido)
Pulse el botón TUNER ON.
1.
Accederá al modo Medidor.
Pulse el botón SOUND para seleccionar el modo Salida
2.
de sonido.
El tono de referencia se emite desde el jack PHONES o
los altavoces. Utilice el control de volumen para ajustar
el volumen de salida.
Pulse el botón CALIB/NOTE ▲ o ▼ para seleccionar la
3.
nota.
El tono de referencia de salida cambia de la siguiente
forma.
♯
C (C3) C
C (C4) ... C (C6) C (C3)...
Este ajuste se almacena aunque la alimentación esté desactivada.
Ane el instrumento según el tono de referencia.
4.
Pulse de nuevo el botón SOUND para regresar al modo
5.
Medidor.
D E♭ E F F♯ G G♯ A B♭ B
Si está conectado al jack INPUT o al jack PHONES, el
medidor de tono (PITCH) está activado.
Anación utilizando el medidor y el tono de
referencia (modo Regreso de sonido)
En el modo de Regreso de sonido, se detecta el tono del
instrumento de entrada y se emite el tono de referencia más
cercano. Esto se puede utilizar para comprobar la desviación de anación del tono que se está emitiendo.
Esta función se puede utilizar cuando está conectado al jack
INPUT o al jack PHONES (o a ambos).
Pulse el botón TUNER ON.
1.
Accederá al modo Medidor.
Pulse el botón SOUND BACK para acceder al modo Re-
2.
greso de sonido.
En el modo Regreso de sonido, se emite el tono de referencia más cercano al tono del instrumento de entrada.
Utilice el control de volumen para ajustar el volumen.
“
” aparecerá en la pantalla.
Si los auriculares están conectados al jack PHONES, el
sonido de entrada procedente del micrófono interno o
del jack INPUT se recibirá y el tono de referencia se emitirá desde los auriculares.
Si no hay nada conectado al jack PHONES, el sonido de
entrada procedente del jack INPUT se recibe y el tono de
referencia se emite desde los altavoces.
Ane el instrumento utilizando el medidor y el tono de
3.
referencia.
Page 10

Si se vuelve a pulsar el botón SOUND BACK, regresará
4.
al modo Medidor.
Medición/visualización de la estabilidad de
interpretación (función TONE TRAINER)
Pulse el botón TUNER ON.
1.
Accederá al modo Medidor.
Pulse el botón INST para seleccionar el grupo al que per-
2.
tenece que el instrumento que se va a medir.
Con cada pulsación del botón INST, el grupo de instru-
mentos seleccionados cambiará como sigue:
WOODWINDS (viento madera) BRASS (metales)
STRINGS (cuerdas) WOODWINDS (viento madera) ...
El grupo STRINGS se aplica a los instrumentos de cuer-
da tocados con arco, como pueden ser los violines. No
es compatible con los instrumentos de cuerda que se
tocan por pulsación, como pueden ser las guitarras.
Toque una nota larga sostenida sin variar el tono.
3.
Mientras toca y sostiene la nota, en el medidor PITCH
4.
y en el medidor DYNAMICS/BRIGHTNESS aparece la
correspondiente información en tiempo real.
PITCH (Tono): el tono se indica mediante el nombre de
nota en el centro.
DYNAMICS (Volumen): el nivel sube en el medidor a
medida que el volumen se hace más alto.
BRIGHTNESS (Brillo): el nivel sube en el medidor a
medida que el sonido se hace más brillante.
Después de dejar de tocar la nota, en el medidor STABI-
5.
LITY (estabilidad de interpretación) aparecen los niveles
globales de estabilidad de volumen (DYNAMICS), tono
(PITCH) y brillo (BRIGHTNESS).
Alta estabilidad: el nivel sube en el medidor.
Baja estabilidad: el nivel baja en el medidor.
Uso del metrónomo
Ajuste del tempo y de la marca de tiempo
Pulse el botón METRONOME ON.
1.
El péndulo del metrónomo se mostrará en la pantalla y
“ ” aparecerá en la esquina superior derecha.
Pulse el botón TEMPO ▲ o ▼ para denir el tempo.
2.
Pulse y mantenga pulsados los botones TEMPO ▲ y ▼
simultáneamente durante 1 segundo para cambiar entre
Paso de péndulo (péndulo de un metrónomo mecánico)
o Paso completo.
Si se selecciona Paso de péndulo, “ ” aparecerá en la
pantalla.
Tras seleccionar “PASO DE PÉNDULO” o “PASO COMPLETO”, pulse los botones TEMPO ▲, ▼ para denir el
tempo. Este ajuste se recuerda aunque la alimentación
esté desactivada.
Si ha seleccionado “PASO DE PÉNDULO”
Al pulsar los botones TEMPO ▲, ▼, el tempo alternará
sucesivamente entre los valores siguientes. El valor cambiará continuamente si mantiene pulsado el botón.
30, 32, 34, 36, 38, 40, 42, 44, 46, 48, 50, 52, 54, 56, 58, 60,
63, 66, 69, 72, 76, 80, 84, 88, 92, 96, 100, 104, 108, 112, 116,
120, 126, 132, 138, 144, 152, 160, 168, 176, 184, 192, 200,
208, 216, 224, 232, 240, 252
Si ha seleccionado “PASO COMPLETO”
Al pulsar los botones TEMPO ▲, ▼, aumentará o se reducirá
el tempo en la gama de 30–252 en intervalos de uno. El valor
cambiará continuamente si mantiene pulsado el botón.
Pulse el botón START/STOP para iniciar el metrónomo.
3.
El péndulo del metrónomo oscilará de izquierda a derecha
según el tempo y el botón TAP TEMPO parpadeará en función
del tiempo.
Si desea cambiar la marca de tiempo, pulse los botones BEAT
4.
▲ o ▼ para realizar la selección.
La marca de tiempo cambiará de la siguiente forma.
Pulse los botones BEAT ▲ o ▼:
... 0 1 ... 9 (9 tiempos) (Cuatrillo sin el tiempo central)
(Cuatrillo) (Tresillo sin el tiempo central)
(Tresillo) (Dosillo) 0 ...
Toque al ritmo del tempo del metrónomo.
5.
Para detener el metrónomo, pulse el botón START/STOP.
6.
IIntroducción de la marcación del tempo
La marcación del tempo que introduzca se mostrará como un valor BPM (Tiempos por minuto).
Pulse el botón METRONOME ON.
1.
El péndulo del metrónomo se mostrará en la pantalla y
“ ” aparecerá en la esquina superior derecha.
Pulse el botón TAP TEMPO varias veces a intervalos regulares.
2.
El TM-50TR detecta el intervalo utilizado al pulsar el botón, lo
muestra como un valor BPM (Tiempos por minuto) y lo deni-
rá como el tempo.
Cuando el BPM que ha detectado la marcación del tempo es
menor que 30, “Lo” aparecerá en la pantalla y el tempo se denirá en “30”.
Si el BPM detectado por la marcación del tempo supera 252,
“Hi” aparecerá en la pantalla y el tempo se denirá en “252”.
Pulse el botón START/STOP para iniciar el metrónomo.
3.
El péndulo del metrónomo oscilará de izquierda a derecha
según el tempo y el botón TAP TEMPO parpadeará en consecuencia.
La marcación del tempo también se puede introducir con el
metrónomo en uso.
Toque siguiendo el tempo.
4.
Para detener el metrónomo, pulse el botón START/STOP.
5.
Practicar con la función de metrónomo periódico
Esta función produce clics y silencios alternativamente según el
número de compases especicado. Es útil para practicar el mantenimiento del ritmo.
Cuando se utiliza la función de metrónomo periódico, no es
posible seleccionar como marca de tiempo "0 tiempos", "dosillos", "tresillos", "tresillos sin el tiempo central", "cuatrillos" o
"cuatrillos sin los tiempos centrales".
Pulse el botón METRONOME ON.
1.
El péndulo del metrónomo se mostrará en la pantalla y
“ ” aparecerá en la esquina superior derecha.
Utilice el botón PERIODIC (metrónomo periódico) para selec-
2.
cionar el número de compases en los que periódicamente se
producirá el clic.
Con cada pulsación del botón PERIODIC, el número de com-
pases seleccionados cambiará como sigue:
1 2 3 4 0 1 ...
Cuando el número de compases se pone en "0", la función de
metrónomo periódico queda deshabilitada, desactivándose en
unos segundos el ajuste del numero de compases y la función
de metrónomo periódico.
Pulse el botón START/STOP para iniciar el metrónomo.
3.
Se producirán clics y silencios alternativamente según el nú-
mero de compases especicado.
Ejemplo:
BEAT (marca de tiempo)=4, PERIODIC (número de compases)=2
Para detener el metrónomo, pulse el botón START/STOP.
4.
Uso del anador y del
metrónomo simultáneamente
El TM-50TR le permite utilizar el anador y el metrónomo simultáneamente.
Para obtener detalles sobre el funcionamiento del anador y del
metrónomo, consulte las secciones “Uso del anador” y “Uso del
metrónomo”.
Uso del anador y del metrónomo simultáneamente
Por ejemplo, si toca siguiendo el ritmo del metrónomo y nota que
el instrumento no está anado correctamente, puede dejar el metrónomo funcionando mientras realiza la anación.
Realice los pasos siguientes.
Pulse el botón METRONOME ON.
1.
Pulse el botón START/STOP para iniciar el metrónomo.
2.
En caso necesario, especique el tempo, la marca de tiempo, etc.
Para denir el tempo: utilice los botones TEMPO ▲, ▼ o el
botón TAP TEMPO.
Para denir la marca de tiempo: utilice los botones BEAT ▲, ▼.
Para denir el ajuste del metrónomo periódico: utilice el bo-
tón PERIODIC (metrónomo periódico).
Si utiliza el afinador y el metrónomo simultáneamente, no
puede seleccionar “tresillos”, “tresillos sin el tiempo central”,
“cuatrillos” o “cuatrillos sin los tiempos centrales” como la
marca de tiempo.
Pulse el botón TUNER ON para acceder al modo Medidor.
3.
El péndulo del metrónomo y el medidor de anación aparecerán en la pantalla. El tempo del metrónomo también se indica
mediante el parpadeo del botón TAP TEMPO.
Si desea anar en modo Salida de sonido, debería pulsar el botón SOUND. Para anar en el modo Regreso de sonido, pulse
el botón SOUND BACK.
Anación en el modo Medidor
Cuando toca una sola nota en el instrumento, en la pantalla se
muestra el nombre de la nota más cercana al tono que ha toca-
do. Ane el instrumento mientras observa el medidor y la guía
de anación.
Anación en el modo Salida de sonido
Ane el instrumento según el tono que escuche.
Anación en el modo Regreso de sonido
Utilizando el tono, el medidor de anación y la guía de anación, ajuste el instrumento.
Si se utilizan el anador y el metrónomo al mismo tiempo, no
se puede utilizar la función TONE TRAINER del anador.
Una vez nalizada la anación, pulse el botón TUNER ON y el
4.
botón METRONOME ON, respectivamente, para desactivar el
anador y el metrónomo.
Especicaciones
Sección del anador
Temperamento: 12-notas, temperamento igual
Rango de detección*:
C1 (32,70 Hz)–C8 (4186,01 Hz) para una onda suni-
soidal
Tonos de Referencia:
C3 (130,81 Hz)–C6 (1046,50 Hz) 3 octavas
Modos de anación:
Modo Medidor, modo Salida de sonido, modo Re-
greso de sonido, función TONE TRAINER
Intervalo de calibración: A4 = 410 Hz–480 Hz (1 Hz step)
Precisión de medición: Dentro de ±1centésima
Precisión del sonido: Dentro de ±1centésima
Sección del metrónomo
Intervalo de tempo: 30–252 tiempos por minuto (bpm)
Ajuste de tempo:
PASO DE PÉNDULO, PASO COMPLETO, MARCA-
CIÓN DEL TEMPO, función de metrónomo periódico
Marcas de tiempo:
0–9 tiempos, dosillos, tresillos, tresillos sin el tiempo
central, cuatrillos, cuatrillos sin los tiempos centrales
Precisión de tempo: ±0,3%
Especicaciones principales
Conectores:
Jack INPUT (1/4" mono), jack PHONES (minijack
1/8" estéreo)
Altavoz: Altavoz dinámico (23 mm de diámetro)
Alimentación: Dos baterías AAA (baterías de alcali-
Vida útil de las baterías:
Anador...
Aproximadamente 24 horas (entrada continua de
A4, cuando se usan Baterías alcalinas)
Metrónomo...
Aproximadamente 24 horas (tempo: 120, cuatro
tiempos, volumen máximo, cuando se usan Baterías
alcalinas)
Utilizando anador y metrónomo al mismo tiempo...
Aproximadamente 24 horas (entrada continua de
A4, tempo: 120, cuatro tiempos, volumen máximo,
cuando se usan Baterías alcalinas)
Dimensiones (Anch. x Prof. x Alt.): 111 x 82 x 18 mm
Peso: 108 g (incluidas las baterías suministradas)
Elementos incluidos:
Manual de usuario; baterias AAA (x2)
La calibración y el tono de referencia del anador así como
los ajustes de tempo, tiempo, Paso de péndulo y Paso com-
pleto del metrónomo se almacenan aunque la alimentación
esté desactivada. Sin embargo, cuando se cambian las
baterías, estos ajustes regresarán a los valores por defecto
siguientes.
Valores por defecto:
Calibración = 440 Hz, intervalo de detección = A4, tempo
= 120, marca de tiempo = cuatro tiempos, tipo de ajuste de
tempo = PASO DE PÉNDULO
* Aunque el tono se encuentre dentro del intervalo de de-
tección, puede que el TM-50TR no sea capaz de detectar
el tono si el sonido contiene numerosos armónicos superiores (como las notas bajas y altas de un piano acústico) o si el instrumento tiene una desactivación rápida.
Las especicaciones y el aspecto están sujetas a cambios
•
sin previo aviso por mejora.
nas o de níquel-metal hidruro)
Page 11
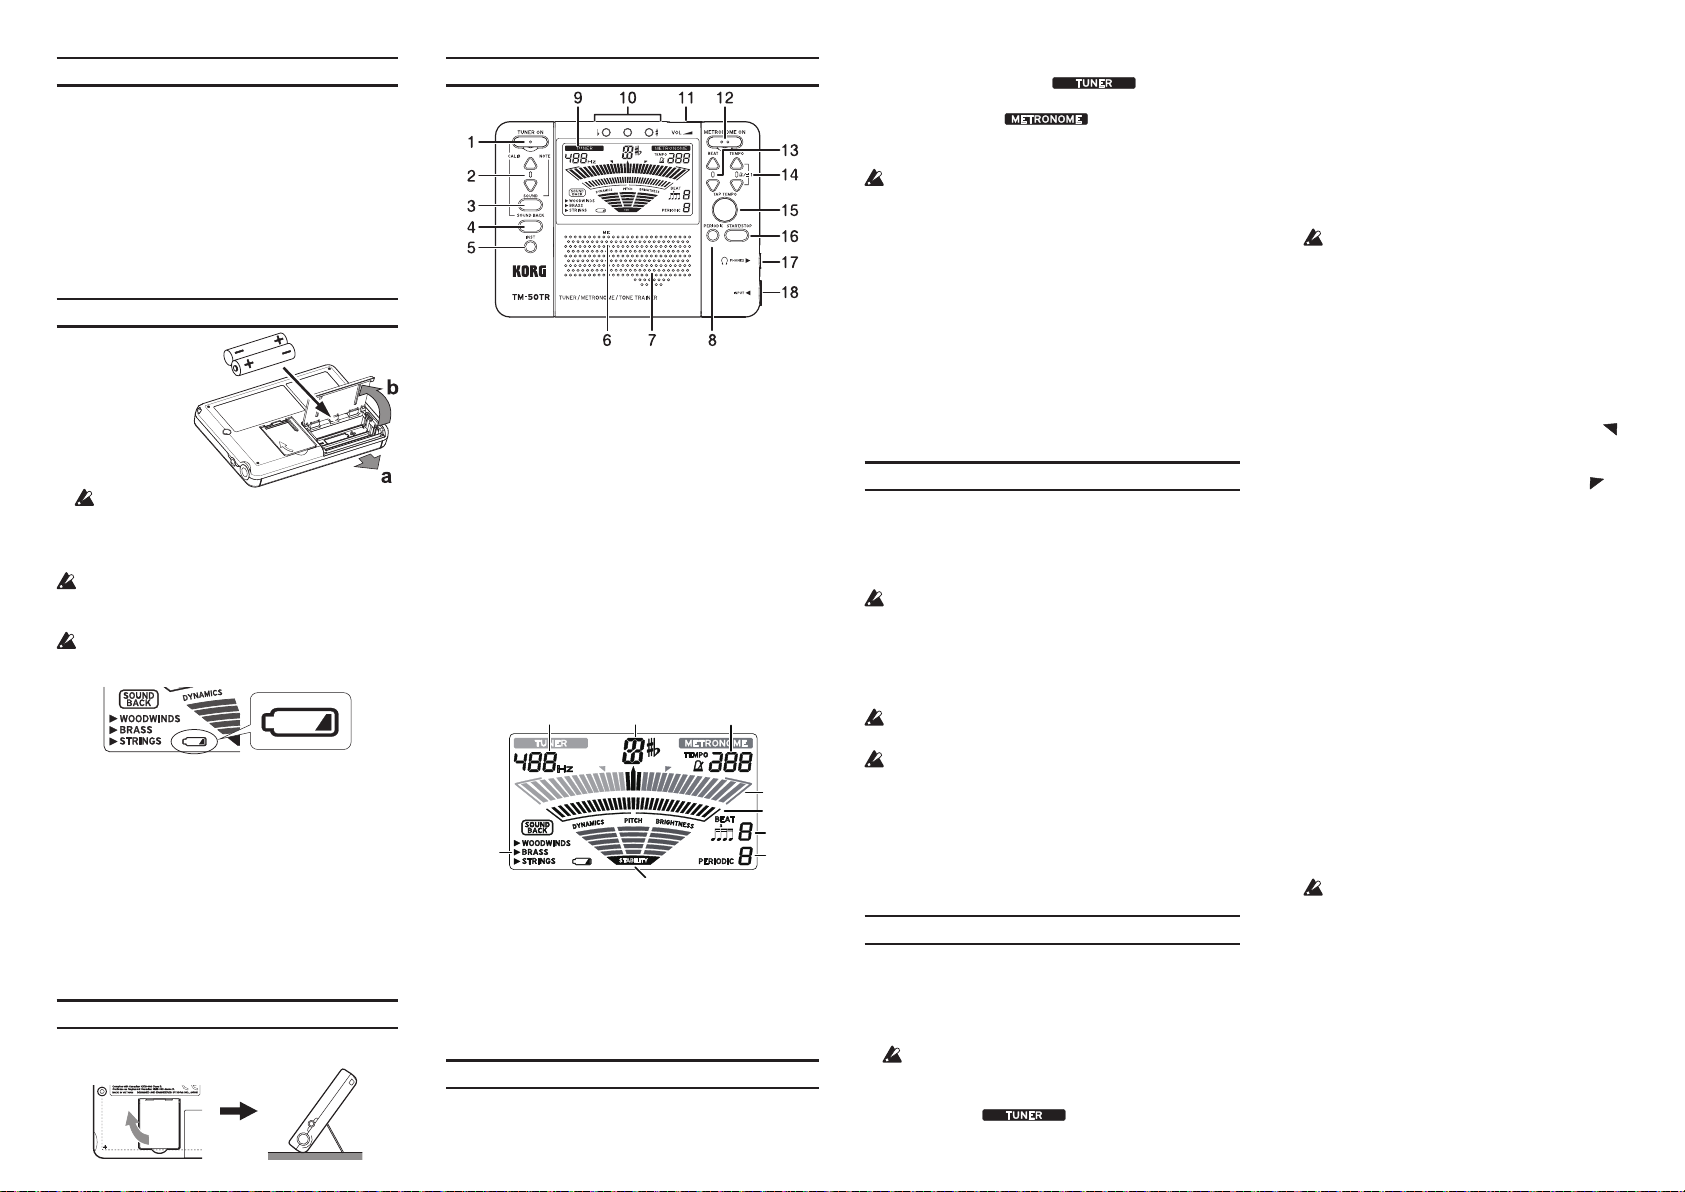
おもな特長
h
i
d
g
c
ba
本機は、「いい音」を得るための練習に役立つさまざまな
機能を搭載しています。
従来のチューナーとしての機能(メーター、サウンド・アウ
ト、サウンド・バック)に加え、ピッチ(音高)、ダイナミク
ス(音量)、ブライトネス(音色の明るさ)の安定度を測定
できますので、安定していい音を出すための練習に役立ち
ます(TONETRAINER機能)。
また、メトロノームは設定した拍子とテンポで音を鳴らす
以外にも、設定した小節数ごとに発音と消音を繰り返させ
ることができますのでリズム・キープの練習に役立ちます
(間欠メトロノーム機能)。
電池の入れ方
本機の裏側にある
1.
電池の蓋を、スラ
イドして(図中 a方
向 ) 、引 き 上 げ ま す
(同 b方向)。
極性に注意して電
2.
池を入れ、蓋を閉め
ます。
付属の電池は動作確認用ですので、通常より寿命が
短い場合があります。
電池の残量を正しく表示するために、「電池の種類の
3.
設定」を参照して、使用する電池の種類を設定します。
誤動作が発生して、電源のオン、オフを何度か行っても
直らない場合は、電池をいったんはずして、再度入れ直
してください。
電池の残量が少なくなると、ディスプレイに電池マー
クが表示されます。そのときは、早めに新しい電池と
交換してください。
電池の種類の設定
電池の残量を正しく表示するため、使用する電池の種類に
合わせて設定をしてください。
電池を入れ替えて電源をオンにすると、ディスプレ
1.
イに電池の種類を設定する画面が表示されます。
TAP TEMPOボタンで電池の種類を選択します。
2.
AL: アルカリ乾電池を使用する場合。
nH: ニッケル水素電池を使用する場合。
TUNER ONボタンまたはMETRONOME ONボタ
3.
ンを押します。
設定が完了し、本機が起動します。
スタンドの使い方
本機の裏側にあるスタンドを使って、本体を立てることが
できます。
各部の名称
TUNE R ONボタンを押すと、チューナーのメーター・モードが
起動します。ディスプレイには“ ”が表示されます。
METRONOMEONボタンを押すと、メトロノームが起動しま
す。ディスプレイには“ ”が表示されます。
本機は、チューナーとメトロノームを同時に動作させることがで
きます。
TUNERONボタンとMETRONOME ONボタンは、ポケッ
トやバッグなどに収納したとき、意図せずにオンにならない
ように、他のボタンより背を低く設計してあります。オンま
たはオフにする場合は、ボタンを少し押し込むように操作し
てください。
チューナーをオフにする
チューナーが動作しているときにTUNE R ONボタンを押すと、
チューナーがオフになります。また、音が20分間入力されなかっ
たときにも、自動的にオフになります。
1. TUNER ON(チューナー電源)ボタン
2. CALIB/NOTE p、q(キャリブレーション/ノートp、q)ボ
タン
3. SOUND(サウンド・アウト)ボタン
4. SOUND BACK(サウンド・バック)ボタン
5. INST(楽器グループ)ボタン
6. M I C( 内 蔵 マ イ ク )
7. スピーカー
8. PERIODIC(間欠メトロノーム)ボタン
9. ディスプレイ(液晶画面)
10. チューニング・ガイド
11. VOL(ボリューム)
12. METRONOME ON(メトロノーム電源)ボタン
13. BEAT p、q(ビートp、q)ボ タ ン
14. TEMPO p、q(テンポp、q)ボ タ ン
15. TAP TEMPO(タップ・テンポ)ボタン
16. START/STOP(スタート/ストップ)ボタン
17. PHONES(ヘッドホン)端子
18. INPUT(インプット)端子
e
f
メトロノームをオフにする
メトロノームが動作しているときにMETRONOMEONボタン
を押すと、メトロノームがオフになります。また、20分間停止状
態が続いたときにも、自動的にオフになります。
接 続
楽器、コンタクト・マイクなどを接続するとき
エレキ・ギターのようにピックアップ付きの楽器をチューニング
するときは、楽器に市販のケーブルを接続し、ケーブルのもう一
方のプラグを本機のINPUT端子に接続します。
接続時はモノラル・プラグを使用してください。IN PUT端子
はモノラル専用ですので、ステレオ・プラグは使用できませ
ん。
別売のコルグCM-200 コンタクト・マイクロフォンを使用して
楽器をチューニングするときは、本機のINPU T端子に接続しま
す。
INPUT端子に何も接続されていないときは、内蔵マイクによ
るチューニングになります。
ギターのような撥弦楽器は、チューニングのためにINPUT端
子に接続することはできますが、TONE TRAINER機能には
対応していません。
ヘッドホンを接続するとき
市販のミニプラグ(φ3.5mm ステレオ)のヘッドホンを、
PHONES端子に接続します。このときスピーカーからは音が出
a. キャリブレーション(基準ピッチ)
b. 音名 c. テンポ
d. 楽器グループ e. PITCH(音高)メーター
f. DYNAMICS(ダイナミクス)/BRIGHTNESS(ブライトネ
ス)メーター、メトロノーム振り子
g. BEAT(メトロノーム拍子)
h. PERIODIC(間欠メトロノーム)
i. STABILITY(演奏安定度)メーター
電源のオンとオフ
電源をオンにする
TUNERONボタンまたはMETRONOME ONボタンを押すと、
電源がオンになります。使用する機能のボタンを押してください。
ません。ヘッドホンの音量は、ボリュームで調整します。
チューナーの操作
メーターを見ながらチューニングする
(メーター・モード)
必要であれば、楽器やコンタクト・マイクなどをINPUT端
1.
子に接続します。
INPUT端子に何も接続されていないと、内蔵マイクによ
るチューニングになります。
TUNER ONボタンを押します。
2.
デ ィ ス プ レ イ に“ ”が表示され、その下にはキャ
リブレーション(基準ピッチ)が表示されます。
キャリブレーションを変更するときは、CALIB/NOTE
3.
p、
q
ボタンを押します。
キャリブレーションの値が1Hz単位で増減します。こ
のボタンを長く押すと、キャリブレーションの値が連続
的に増減します。この設定は、電源をオフにしても記憶
されます。
楽器を単音で鳴らします。
4.
入力した音に一番近い音名が、ディスプレイの中央に表
示されます。合わせたい音名が表示されるように、楽器
を大まかにチューニングします。
内蔵マイクの使用時は、内蔵マイクに楽器をできる
だけ近づけ、チューニング中に余計な音が入らない
ようにしてください。
楽器を単音で鳴らしながら、PITCH(音高)メーター
5.
が中央を示し、チューニング・ガイドの中央のランプ
が点灯するようにチューニングします。
チューニング・ガイドは、楽器の音が低いときは左のラ
ンプが、音が高いときは右のランプが点灯します。
純正の長3度上、短3度上にチューニングする方法
A( 0 cent)の音に対し、純正の長3度上の音にチューニ
ングするときは、音名表示をC♯にし、メーターを“ ”
に合わせます。
A( 0 cent)の音に対し、純正の短3度上の音にチューニ
ングするときは、音名表示をCにし、メーターを“ ”に
合わせます。
基準音を聴きながらチューニングする
(サウンド・アウト・モード)
TUNER ONボタンを押します。
1.
メーター・モードに入ります。
SOUNDボタンを押して、サウンド・アウト・モード
2.
に入ります。
PHONES端子またはスピーカーから基準音が出力され
ます。出力音量はボリュームで調整します。
CALIB/NOTEp、qボタンを押して、合わせたい音
3.
名を選びます。
出力される基準音が以下のように変わります。
C( C 3 )C♯DE♭EFF♯GG♯AB♭B
C( C 4 ) . . . C( C 6 )C(C3)...
この設定は電源をオフにしても記憶されます。
基準音に合わせて、楽器をチューニングします。
4.
もう一度SOUNDボタンを押すと、メーター・モード
5.
に戻ります。
INPUT端子またはPHONES端子いずれかに接続し
ている場合は、PITC H(音高)メーターが動作しま
す。
基準音とメーターを使って、チューニングする
(サウンド・バック・モード)
サウンド・バック・モードは、入力した楽器の音を感知して、
最も近い基準音を出力します。自分が出した音のピッチの
ズレを確認するときなどに使用します。
INPU T端子またはPHONES端子いずれか( または両方)
に接続がある場合に使用できる機能です。
TUNER ONボタンを押します。
1.
メーター・モードに入ります。
SOUND BACKボタンを押して、サウンド・バック・
2.
モードに入ります。
Page 12
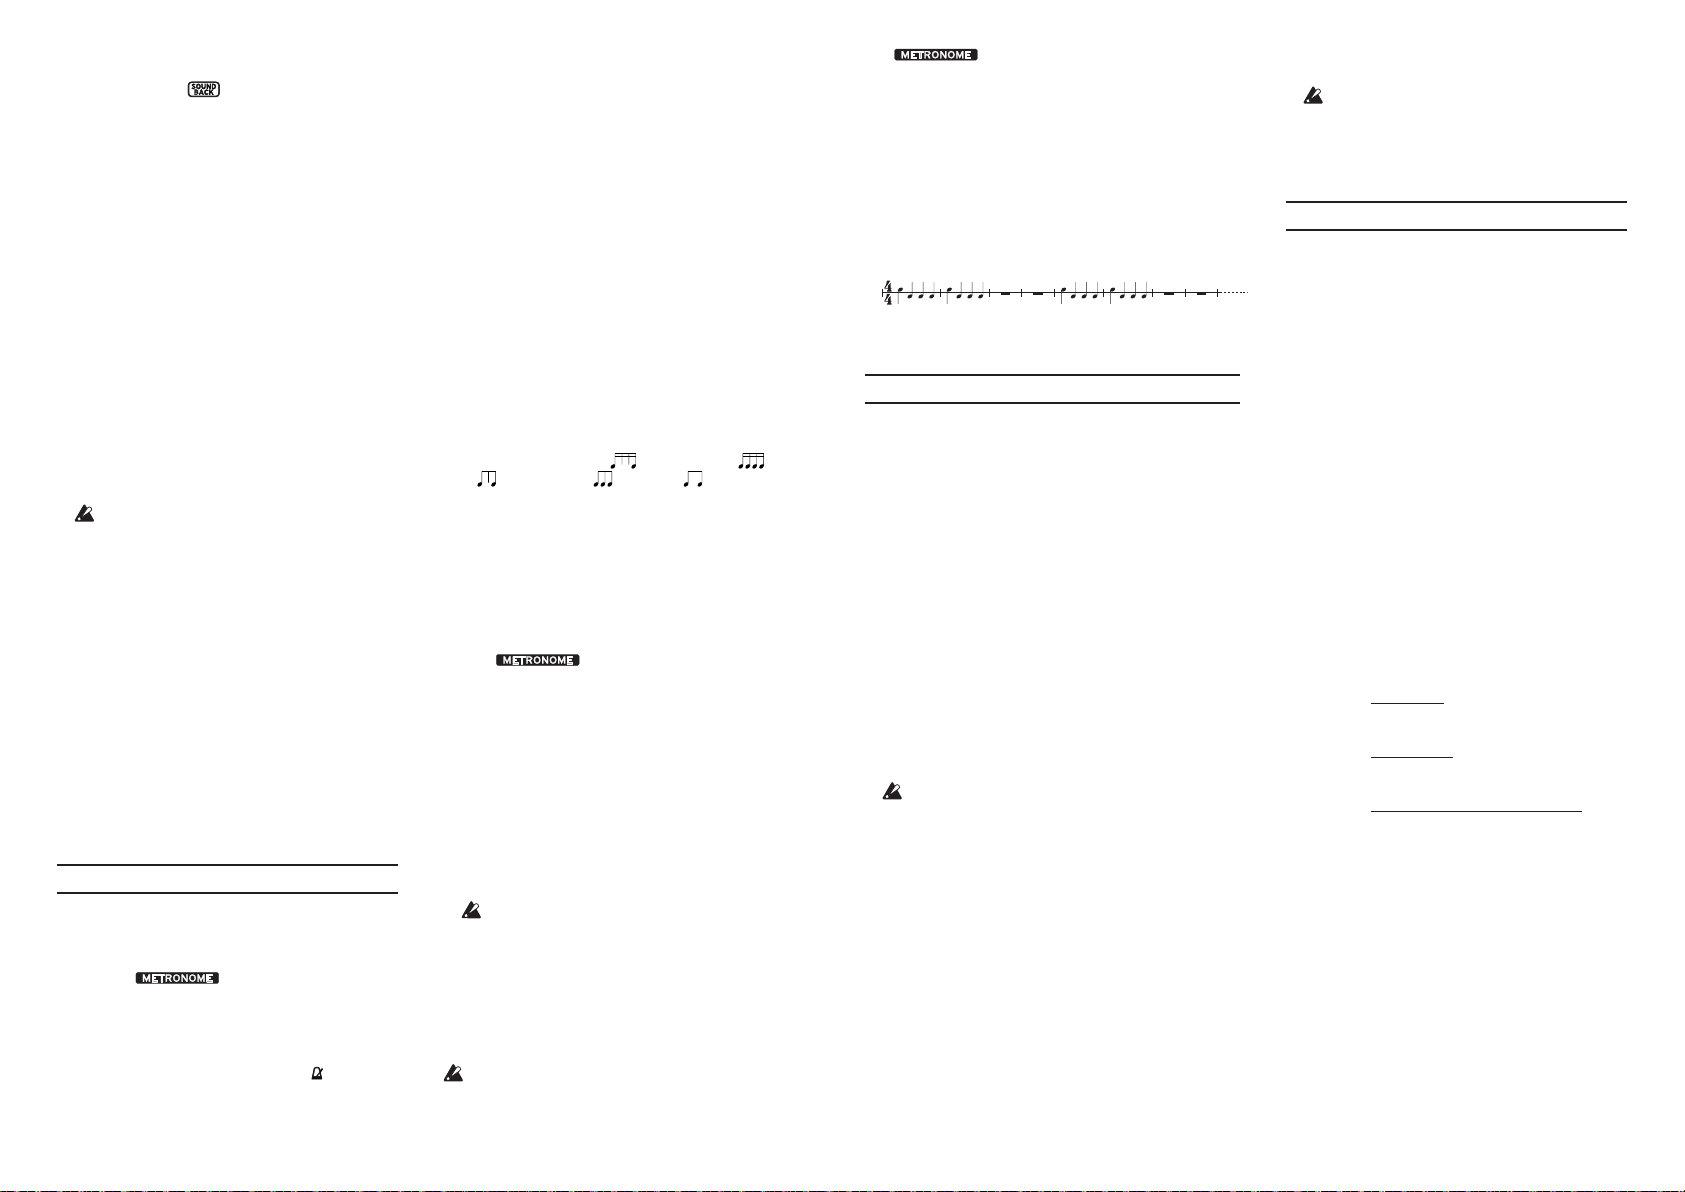
サウンド・バック・モードでは、入力した楽器の音に最も
近い基準音が出力されます。音量はボリュームで調整
します。
デ ィ ス プ レ イ に は“
PH ON ES端子にヘッドホンが接続されている場合は、
内蔵マイクもしくはINPUT端子からの入力音を受け、
ヘッドホンから基準音を出力します。
PHONES端子に接続されていない場合は、INPUT端子
からの入力音を受け、スピーカーから基準音を出力しま
す。
基準音とメーターを使って、楽器をチューニングし
3.
ます。
もう一度SOUND BACKボタンを押すと、メー
4.
ター・モードに戻ります。
”が表示されます。
演奏の安定度( STABILITY)を測定、表示する
(TONE TRAINER機能)
TUNER ONボタンを押します。
1.
メーター・モードに入ります。
測定する楽器が属する楽器グループをINSTボタン
2.
で選択します。
INSTボタンを押すごとに、選択される楽器グループが
以下のように変わります。
WOODWINDS(木管)→BRASS(金管)→STRINGS
(弦)→WOODWINDS(木管)→...
STR IN GS(弦)グループはバイオリンのような擦
弦楽器を対象としています。ギターのような撥弦楽
器には対応していません。
単一のピッチでロング・トーンを演奏します。
3.
演奏中はPITCH(音高)メーター、DYNAMICS(音
4.
量)/BRIGHTNESS(音色の明るさ)メーターにリ
アルタイムにそれぞれの情報が表示されます。
PITCH(音高):中央で音名と同じ音高になります。
DYNAMICS(音量):音量が大きいとメーターのレベ
ルが上がります。
BRIGHTNESS(音色の明るさ):音色が明るくなると
メーターのレベルが上がります。
ロング・トーンの演奏を終了するとSTABILITY(演
5.
奏安定度)メーターにDYNAMICS(音量)、PITCH
(音高)、BRIGHTNESS(音色の明るさ)のそれぞ
れの全体での安定度が表示されます。
安定度が高い:メーターのレベルが上がります。
安 定 度 が 低 い:メーターのレベルが下がります。
メトロノームの操作
テンポ、拍子を設定する
METRONOME ONボタンを押します。
1.
ディスプレイにはメトロノームの振り子が表示され、上
の 方 に は“
TEMPOp、qボタンを押して、テンポを設定します。
2.
TEMPOpとqボタンを2つ同時に約1秒間押し続ける
と、ペンデュラム(機械式メトロノームの振り子)・ス
テップとフル・ステップが交互に替わります。ペンデュ
ラ ム・ス テ ッ プ の と き は デ ィ ス プ レ イ に“
ます。
ペンデュラム・ステップまたはフル・ステップを選んだ
後に、
TEMPO
p、q
”が表示されます。
”が 表 示 さ れ
ボタンを押すと、テンポを設定する
ことができます。この設定は、電源をオフにしても記憶され
ます。
ペンデュラム・ステップのとき
TEMPOp、qボタンを押すと、テンポは以下の値が順に切り
替わります。このスイッチを長く押すと連続的に値が増減し
ます。
30,32,34,36,38,40,42,44,46,48,50,52,54,56,58,
60,63,66,69,72,76,80,84,88,92,96,100,104,108,
112,116, 120,126,132,138, 144, 152, 160, 168,176,
184,192,200,208,216,224,232,240,252
フル・ステップのとき
TEMPOp、qボタンを押すと、テンポの値は30 ~ 252まで1
ずつ増減します。このスイッチを長く押すと連続的に値が増
減します。
START/STOPボタンを押し、メトロノームをスタートさ
3.
せます。
テンポに合わせてメトロノームの振り子が左右に動き、その
動きに合わせてTAPTEMPOボタンが点滅します。
拍子を変更するときは、BEATp、qボタンを押して選択
4.
します。
拍子は以下のようになります。
p
q
、
BEAT
...01...9( 9拍子) ( 4連中抜き) ( 4連符)
(3連中抜き) ( 3 連 符 ) (2連符)0...
テンポに合わせて演奏します。
5.
メトロノームを停止するときは、START/STOPボタンを
6.
押します。
ボタンを押す:
タップ・テンポを入力する
入力したタップ・テンポをBPM(拍/分)で表示します。
METRONOME ONボタンを押します。
1.
ディスプレイにはメトロノームの振り子が表示され、上の方
に は“
TAP TEMPOボタンを一定の間隔で数回押します。
2.
本機では、ボタンが押された間隔をB PMで検知し、テンポと
して設定し、ディスプレイのテンポ表示部に、その数値が表示
されます。
タ ッ プ・テ ン ポ で 検 知 し た BPMが30未満のときは 、デ ィ ス プ
レイに“Lo”と表示され、テンポは“30”に設定されます。
タ ッ プ・テ ン ポ で 検 知 し た B PMが252を超えるときは 、デ ィ ス
プレイに“Hi”と表示され、テンポは“252”に設定されます。
START/STOPボタンを押し、メトロノームをスタートさ
3.
せます。
テンポに合わせてメトロノームの振り子が左右に動き、その
動きに合わせて、TAPTEMPOボタンが点滅します。
タップ・テンポ入力は、メトロノーム動作中も可能です。
テンポに合わせて演奏します。
4.
メトロノームを停止するときは、START/STOPボタンを
5.
押します。
”が表示されます。
間欠メトロノーム機能で練習する
指定した小節数ずつ発音、消音を繰り返します。リズムの練習を
するときに便利な機能です。
間欠メトロノーム機能では、メトロノームの拍子に0拍子、2
連符、3連符、3連中抜き、4連符、4連中抜きを設定できません。
METRONOME ONボタンを押します。
1.
ディスプレイにメトロノームの振り子と右上に
“
PERIODIC(間欠メトロノーム)ボタンでクリック音の発
2.
音、消音を繰り返す小節数を設定します。
PERIODICボタンを押すたびに、小節数が以下のように変わ
ります。
1→2→3→4→0→1→...
小節数が0のとき、間欠メトロノーム機能はオフになり、数秒
後に小節数と“PERIODIC”の表示が消えます。
START/STOPボタンを押し、メトロノームをスタートさ
3.
せます。
指定した小節数ずつ発音、消音を繰り返します。
例:BEAT(拍子)=4、PERIODIC(小節数)=2
メトロノームを停止するときは、START/STOPボタンを
4.
押します。
”が表示されます。
チューナーとメトロノームの同時操作
本機では、チューナーとメトロノームを同時に使用することができ
ます。チューナー、メトロノームの詳しい操作方法は、「チューナー
の操作」、「メトロノームの操作」をそれぞれ参照してください。
チューナーとメトロノームを同時に使う方法
例えば、メトロノームの音に合わせ、リズム・トレーニングをして
いるときに、楽器のチューニングがずれていると感じたときは、
メトロノームはそのまま動かしながら、チューニングすることが
できます。
以下のように本機を操作します。
METRONOME ONボタンを押します。
1.
START/STOPボタンを押して、メトロノームを動かしま
2.
す。
必要であればテンポ、拍子などを設定します。
テンポの設定:TEMPOp、
タン
拍子の設定:BEATp、qボタン
間欠メトロノームの設定:PERIODIC(間欠メトロノーム)ボ
タン
チューナーとメトロノームを同時に使用する場合、メトロ
ノームの拍子に3連符、3連中抜き、4連符、4連中抜きを
設定できません。
TUNER ONボタンを押してメーター・モードに入ります。
3.
ディスプレイには、メトロノームの振り子とチューニング・
メーターが表示されます。このときメトロノームのテンポは、
TAPTEMPOボタンの点滅でも示します。
サウンド・アウト・モードでチューニングするときは、
SOUNDボタンを押します。
サウンド・バック・モードでチューニングするときは、
SOUNDBACKボタンを押します。
メーター・モードのチューニング
楽器を単音で鳴らすと、ディスプレイには入力した音に近い
音名が表示されます。チューニング・メーター、チューニング・
ガイドを見ながら楽器を調整します。
サウンド・アウト・モードのチューニング
音を聞きながら楽器を調整します。
q
ボタン、またはTAP TEMPOボ
サウンド・バック・モードのチューニング
音とチューニング・メーター、チューニング・ガイドを
使って、楽器を調整します。
チューナーとメトロノームを同時に使用する場合、
チューナーのTONETRAINER機能は使えません。
チューニングを終えたら、TUNER ONボタンと
4.
METRONOME ONボタンをそれぞれ押してチュー
ナーとメトロノームをオフにします。
仕 様
チューナー部
音 律: 1 2 平 均 律
測 定 範 囲 *:
基準発振音:
チューニング・モード:
メ
キャリブレーション範囲:A4=410Hz ~ 480Hz(1Hz単位)
測定精度: ±1セント以内
サウンド精度: ±1セント以内
メトロノーム部
テ ン ポ 範 囲:𝅘𝅥=30 ~ 252回/分
テ ン ポ 設 定 方 法: ペ ン デ ュ ラ ム・ス テ ッ プ 、フ ル・ス テ ッ プ 、タ ッ
拍子範囲: 0 ~ 9拍子、2連符、3連符、3連符中抜き、4連符、
テンポ精度: ±0.3%
主要規格
接続端子: INPUT端子(φ6.3mmモノラル標準ジャッ
スピーカー: ダイナミック・スピーカー(φ23mm)
電源: 単4形電池2本(アルカリ乾電池、ニッケル水素
電池寿命: チューナー ...
約
メトロノーム...
約2
チューナー、メトロノーム同時使用時...
約2
外形寸法(W×D×H):111x82x18mm
質量: 108g(電池含む)
付属品: 取扱説明書、動作確認用単4形乾電池(2本)
チューナー部のキャリブレーション、基準発振音、メトロノー
ム部のテンポ、拍子、ペンデュラム/フル・ステップの設定は、電
源をオフにしても記憶されています。ただし、電池を交換した
場合は設定が初期化され、以下の初期値に戻ります。
初期値:
キャリブレーション=440H z、基準発振音= A4、テンポ=120、
拍子=4拍子、テンポ設定=ペンデュラム・ステップ
*測定範囲内の音であっても、倍音を多く含む音色や、減衰の
速い楽器音は、測定できない場合があります。
◦仕様および外観は、改良のため予告無く変更する場合があり
ます。
C1(32.70Hz)~ C8(4186.01Hz)、サイン波時
C3(130.81Hz)~ C6(1046.50Hz)、3オクターブ
ー タ ー・モ ー ド 、サ ウ ン ド ・ ア ウ ト・ モ ー ド 、サ
ウンド・バック・モード、TONETRAINER機能
プ・テンポ、間欠メトロノーム機能
4連符中抜き
ク)、PHONES端子(φ3.5mmステレオミニ
ジャック)
電池)
24時間( A4連続入 力、アルカリ乾電池使用
時)
4時間(テンポ120、4拍子、音量最 大、アル
カリ乾電池使用時)
4時間( A4連続入力、テンポ120、4拍子、音
量最大、アルカリ乾電池使用時)
 Loading...