

Korg SQ-64 OWNER’S MANUAL
SQ-64
POLY SEQUENCER
En
OwnerʼsManual(→p.10)
Fr
Manueldʼutilisation(→p.23)
De
Bedienungsanleitung(→s.36)
Es
ManualdelUsuario(→p.49)
Ja
取扱説明書
(→p.62)
EFGSJ 2

En
Precautions
Location
Using the unit in the following locations can
result in a malfunction.
• In direct sunlight
• Locations of extreme temperature
or humidity
• Excessively dusty or dirty locations
• Locations of excessive vibration
• Close to magnetic fields
Power supply
Please connect the designated AC adapter
to an AC outlet of the correct voltage. Do not
connect it to an AC outlet of voltage other than
that for which your unit is intended.
Interference with other electrical
devices
Radios and televisions placed nearby may
experience reception interference. Operate
this unit at a suitable distance from radios
and televisions.
NOTE: This equipment has been tested and found to comply with the limits for a Class B digital device,
pursuant to Part 15 of the FCC Rules. These limits are designed to provide reasonable protection
against harmful interference in a residential installation. This equipment generates, uses, and can
radiate radio frequency energy and, if not installed and used in accordance with the instructions,
may cause harmful interference to radio communications. However, there is no guarantee that interference will not occur in a particular installation. If this equipment does cause harmful interference
to radio or television reception, which can be determined by turning the equipment off and on,
the user is encouraged to try to correct the interference by one or more of the following measures:
• Reorient or relocate the receiving antenna.
• Increase the separation between the equipment and receiver.
• Connect the equipment into an outlet on a circuit different from that to which the receiver
is connected.
• Consult the dealer or an experienced radio/TV technician for help.
If items such as cables are included with this equipment, you must use those included items.
Unauthorized changes or modification to this system can void the user’s authority to operate
this equipment
THE FCC REGULATION WARNING
.
Handling
To avoid breakage, do not apply excessive force
to the switches or controls.
Care
If the exterior becomes dirty, wipe it with a
clean, dry cloth. Do not use liquid cleaners such
as benzene or thinner, or cleaning compounds
or flammable polishes.
Keep this manual
After reading this manual, please keep it for
later reference.
Keeping foreign matter out of
your equipment
Never set any container with liquid in it
near this equipment. If liquid gets into the
equipment, it could cause a breakdown, fire,
or electrical shock. Be careful not to let metal
objects get into the equipment. If something
does slip into the equipment, unplug the AC
adapter from the wall outlet. Then contact
your nearest KORG dealer or the store where
the equipment was purchased.
(for USA)
Notice regarding disposal (EU only)
When this “crossed-out wheeled bin” symbol is displayed on the product, owner’s
manual, battery, or battery package, it signifies that when you wish to dispose of
this product, manual, package or battery you must do so in an approved manner.
Do not discard this product, manual, package or battery along with ordinary
household waste. Disposing in the correct manner will prevent harm to human
health and potential damage to the environment. Since the correct method of
disposal will depend on the applicable laws and regulations in your locality, please
contact your local administrative body for details. If the battery contains heavy
metals in excess of the regulated amount, a chemical symbol is displayed below
the “crossed-out wheeled bin” symbol on the battery or battery package.
SUPPLIER’S DECLARATION OF CONFORMITY (for USA)
Responsible Party : KORG USA INC.
Address : 316 SOUTH SERVICE ROAD, MELVILLE, NY
Telephone : 1-631-390-6500
Equipment Type : POLY SEQUENCER
Model : SQ-64
This device complies with Part 15 of FCC Rules.
Operation is subject to the following two conditions:
(1) This device may not cause harmful interference,and
(2) this device must accept any interference received,
including interference that may cause undesired operation.
This product has been manufactured according to strict specifications and voltage requirements that are applicable in the country in which it is intended that this product should be
used. If you have purchased this product via the internet, through mail order, and/or via a
telephone sale, you must verify that this product is intended to be used in the country in
which you reside.
WARNING: Use of this product in any country other than that for which it is intended could
be dangerous and could invalidate the manufacturer’s or distributor’s warranty. Please also
retain your receipt as proof of purchase otherwise your product may be disqualified from
the manufacturer’s or distributor’s warranty.
* Apple, iPad, iPhone, and iPod touch are trademarks of Apple Inc., registered in the U.S. and other countries.
* All product names and company names are the trademarks or registered trademarks of their respective owners.
IMPORTANT NOTICE TO CONSUMERS
3

Fr
Précautions
Emplacement
L’utilisation de cet instrument dans les endroits suivants peut en entraîner le mauvais
fonctionnement.
• En plein soleil
• Endroits très chauds ou très humides
• Endroits sales ou fort poussiéreux
• Endroits soumis à de fortes vibrations
• A proximité de champs magnétiques
Alimentation
Branchez l’adaptateur secteur mentionné à une prise secteur de tension appropriée.
Evitez de brancher l’adaptateur à une prise de courant dont la tension ne correspond
pas à celle pour laquelle l’appareil est conçu.
Interférencesavecd’autresappareilsélectriques
Les postes de radio et de télévision situés à proximité peuvent par conséquent souffrir
d’interférences à la réception. Veuillez dès lors faire fonctionner cet appareil à une
distance raisonnable de postes de radio et de télévision.
Maniement
Pour éviter de les endommager, manipulez les commandes et les boutons de cet
instrument avec soin.
Entretien
Lorsque l’instrument se salit, nettoyez-le avec un chiffon propre et sec. Ne vous
servez pas d’agents de nettoyage liquides tels que du benzène ou du diluant, voire
des produits inflammables.
Conservezcemanuel
Après avoir lu ce manuel, veuillez le conserver soigneusement pour toute référence
ultérieure.
Eviteztouteintrusiond’objetsoudeliquide
Ne placez jamais de récipient contenant du liquide près de l’instrument. Si le liquide
se renverse ou coule, il risque de provoquer des dommages, un court-circuit ou une
électrocution. Veillez à ne pas laisser tomber des objets métalliques dans le boîtier
(trombones, par ex.). Si cela se produit, débranchez l’alimentation de la prise de
courant et contactez votre revendeur korg le plus proche ou la surface où vous avez
acheté l’instrument.
Note concernant les dispositions (Seulement EU)
Quand un symbole avec une poubelle barrée d’une croix apparait sur
le produit, le mode d’emploi, les piles ou le pack de piles, cela signifie
que ce produit, manuel ou piles doit être déposé chez un représentant
compétent, et non pas dans une poubelle ou toute autre déchetterie
conventionnelle. Disposer de cette manière, de prévenir les dommages
pour la santé humaine et les dommages potentiels pour l’environnement. La bonne méthode d’élimination dépendra des lois et règlements
applicables dans votre localité, s’il vous plaît, contactez votre organisme
administratif pour plus de détails.
Si la pile contient des métaux lourds au-delà du seuil réglementé, un symbole
chimique est affiché en dessous du symbole de la poubelle barrée d’une croix
sur la pile ou le pack de piles.
REMARQUE IMPORTANTE POUR LES CLIENTS
Ce produit a été fabriqué suivant des spécifications sévères et des besoins en
tension applicables dans le pays où ce produit doit être utilisé.
Si vous avez acheté ce produit via l’internet, par vente par correspondance ou/et
vente par téléphone, vous devez vérifier que ce produit est bien utilisable dans
le pays où vous résidez.
ATTENTION: L’utilisation de ce produit dans un pays autre que celui pour lequel
il a été conçu peut être dangereuse et annulera la garantie du fabricant ou du
distributeur. Conservez bien votre récépissé qui est la preuve de votre achat,
faute de quoi votre produit ne risque de ne plus être couvert par la garantie du
fabricant ou du distributeur.
* Apple, iPad, iPhone et iPod sont des marques de Apple Inc. déposées aux États-Unis et dans
d’autres pays.
* Tous les noms de produits et de sociétés sont des marques commerciales ou déposées de
leur détenteur respectif.
4
De
Vorsichtsmaßnahmen
Aufstellungsort
Vermeiden Sie das Aufstellen des Geräts an Orten, an denen.
• es direkter Sonneneinstrahlung ausgesetzt ist;
• hohe Feuchtigkeit oder Extremtemperaturen auftreten können;
• Staub oder Schmutz in großen Mengen vorhanden sind;
• das Gerät Erschütterungen ausgesetzt sein kann.
• in der Nähe eines Magnetfeldes.
Stromversorgung
Schließen Sie das optionale Netzteil nur an eine geeignete Steckdose an. Verbinden
Sie es niemals mit einer Steckdose einer anderen Spannung.
StöreinflüsseaufandereElektrogeräte
Dieser kann bei in der Nähe aufgestellten Rund-funkempfängern oder Fernsehgeräten
Empfangsstörungen hervorrufen. Betreiben Sie solche Geräte nur in einem geeigneten
Abstand von diesem Erzeugnis.
Bedienung
Vermeiden Sie bei der Bedienung von Schaltern und Reglern unangemessenen
Kraftaufwand.
Reinigung
Bei auftretender Verschmutzung können Sie das Gehäuse mit einem trockenen,
sauberen Tuch abwischen. Verwenden Sie keinerlei Flüssigreiniger wie beispielsweise Reinigungsbenzin, Verdünnungs- oder Spülmittel. Verwenden Sie niemals
brennbare Reiniger.
Bedienungsanleitung
Bewahren Sie diese Bedienungsanleitung gut auf, falls Sie sie später noch einmal
benötigen.
FlüssigkeitenundFremdkörper
Stellen Sie niemals Behältnisse mit Flüssigkeiten in der Nähe des Geräts auf. Wenn
Flüssigkeit in das Gerät gelangt, können Beschädigung des Geräts, Feuer oder ein
elek-trischer Schlag die Folge sein.
Beachten Sie, daß keinerlei Fremdkörper in das Gerät gelangen. Sollte ein Fremdkörper
in das Gerät gelangt sein, so trennen Sie es sofort vom Netz. Wenden Sie sich dann
an Ihren KORG-Fachhändler.
Hinweis zur Entsorgung (Nur EU)
Wenn Sie das Symbol mit der „durchgekreuzten Mülltonne“ auf Ihrem
Produkt, der dazugehörigen Bedienungsanleitung, der Batterie oder dem
Batteriefach sehen, müssen Sie das Produkt in der vorgeschriebenen Art
und Weise entsorgen. Dies bedeutet, dass dieses Produkt mit elektrischen
und elektronischen Komponenten nicht mit dem normalen Hausmüll
entsorgt werden darf. Für Produkte dieser Art existiert ein separates, ge-
setzlich festgelegtes Entsorgungssystem. Gebrauchte elektrische und
elektronische Geräte müssen separat entsorgt werden, um ein umweltge-
rechtes Recycling sicherzustellen. Diese Produkte müssen bei benannten
Sammelstellen abgegeben werden. Die Entsorgung ist für den Endverbraucher
kostenfrei! Bitte erkundigen sie sich bei ihrer zuständigen Behörde, wo sie diese
Produkte zur fachgerechten Entsorgung abgeben können. Falls ihr Produkt mit
Batterien oder Akkumulatoren ausgerüstet ist, müssen sie diese vor Abgabe des
Produktes entfernen und separat entsorgen (siehe oben). Die Abgabe dieses Produktes bei einer zuständigen Stelle hilft ihnen, dass das Produkt umweltgerecht entsorgt
wird. Damit leisten sie persönlich einen nicht unerheblichen Beitrag zum Schutz der
Umwelt und der menschlichen Gesundheit vor möglichen negativen Effekten durch
unsachgemäße Entsorgung von Müll. Batterien oder Akkus, die Schadstoffe enthalten,
sind auch mit dem Symbol einer durchgekreuzten Mülltonne gekennzeichnet. In der
Nähe zum Mülltonnensymbol befindet sich die chemische Bezeichnung des Schadstoffes. Cd oder NiCd steht für Cadmium, Pb für Blei und Hg für Quecksilber.
Dieses Produkt wurde unter strenger Beachtung von Spezifikationen und Spannungsanforderungen hergestellt, die im Bestimmungsland gelten. Wenn Sie
dieses Produkt über das Internet, per Postversand und/oder mit telefonischer
Bestellung gekauft haben, müssen Sie bestätigen, dass dieses Produkt für Ihr
Wohngebiet ausgelegt ist.
WARNUNG: Verwendung dieses Produkts in einem anderen Land als dem, für
das es bestimmt ist, verwendet wird, kann gefährlich sein und die Garantie des
Herstellers oder Importeurs hinfällig lassen werden. Bitte bewahren Sie diese
Quittung als Kaufbeleg auf, da andernfalls das Produkt von der Garantie des
Herstellers oder Importeurs ausgeschlossen werden kann.
* Apple, iPad, iPhone, und iPod touch sind in den USA und anderen Ländern registrierte
Markenzeichen von Apple Inc.
* Alle Produkt- und Firmennamen sind Warenzeichen oder eingetragene Warenzeichen der
betreffenden Eigentümer.
5
WICHTIGER HINWEIS FÜR KUNDEN
Es
Precauciones
Ubicación
El uso de la unidad en las siguientes ubicaciones puede dar como resultado un mal
funcionamiento:
• Expuesto a la luz directa del sol
• Zonas de extremada temperatura o humedad
• Zonas con exceso de suciedad o polvo
• Zonas con excesiva vibración
• Cercano a campos magnéticos
Fuentedealimentación
Por favor, conecte el adaptador de corriente designado a una toma de corriente con
el voltaje adecuado. No lo conecte a una toma de corriente con voltaje diferente al
indicado.
Interferenciasconotrosaparatos
Las radios y televisores situados cerca pueden experimentar interferencias en la
recepción. Opere este dispositivo a una distancia prudencial de radios y televisores.
Manejo
Para evitar una rotura, no aplique excesiva fuerza a los conmutadores o controles.
Cuidado
Si exterior se ensucia, límpiese con un trapo seco. No use líquidos limpiadores como
disolvente, ni compuestos inflamables.
Guardeestemanual
Después de leer este manual, guárdelo para futuras consultas.
Mantengaloselementosexternosalejadosdelequipo
Nunca coloque ningún recipiente con líquido cerca de este equipo, podría causar un
cortocircuito, fuero o descarga eléctrica. Cuide de que no caiga ningún objeto metálico
dentro del equipo. Si cae algo dentro del equipo, desenchufe el adaptador de CA de
la toma de corriente. A continuación, póngase en contacto con el distribuidor KORG
más cercano o con el establecimiento donde compró el producto.
Notarespectoaresiduosydeshechos(soloUE)
Cuando aparezca el símbolo del cubo de basura tachado sobre un
producto, su manual del usuario, la batería, o el embalaje de cualquiera
de éstos, significa que cuando quiere tire dichos artículos a la basura,
ha de hacerlo en acuerdo con la normativa vigente de la Unión Europea.
No debe verter dichos artículos junto con la basura de casa. Verter este
producto de manera adecuada ayudará a evitar daños a su salud públi-
ca y posibles daños al medioambiente. Cada país tiene una normativa
específica acerca de cómo verter productos potencialmente tóxicos,
por tanto le rogamos que se ponga en contacto con su oficina o ministerio de medioambiente para más detalles. Si la batería contiene metales pesados
por encima del límite permitido, habrá un símbolo de un material químico, debajo del símbolo del cubo de basura tachado.
NOTAIMPORTANTEPARAELCONSUMIDOR
Este producto ha sido fabricado de acuerdo a estrictas especificaciones y requerimientos de voltaje aplicables en el país para el cual está destinado. Si ha comprado
este producto por internet, a través de correo, y/o venta telefónica, debe usted
verificar que el uso de este producto está destinado al país en el cual reside.
AVISO: El uso de este producto en un país distinto al cual está destinado podría
resultar peligroso y podría invalidar la garantía del fabricante o distribuidor. Por
favor guarde su recibo como prueba de compra ya que de otro modo el producto
puede verse privado de la garantía del fabricante o distribuidor.
* Apple, iPad, iPhone y iPod touch son marcas comerciales de Apple Inc., registradas en EE.
UU. y en otros países.
* Todos los nombres de productos y compañías son marcas comerciales o marcas registradas
de sus respectivos propietarios.
6
Ja
安全上のご注意
ご使用になる前に必ずお読みください
ここに記載した注意事項は、製品を安全に正しくご使用いただき、あなたや他の方々への危害や
損害を未然に防ぐためのものです。
注意事項は誤った取り扱いで生じる危害や損害の大きさ、または切迫の程度によって、内容を「警
告」、「注意」の2つに分けています。これらは、あなたや他の方々の安全や機器の保全に関わる重要
な内容ですので、よく理解した上で必ずお守りください。
火災・感電・人身障害の危険を防止するには
図記号の例
記 号は、注意(危険、警告を含む)を示しています。記号の中には、具体的な注
意内容が描かれています。左の図は「一般的な注意、警告、危険」を表しています。
記号は、禁止(してはいけないこと)を示しています。記号の中には、具体的な
注意内容が描かれることがあります。左の図は「分解禁 止」を表しています。
記号は、強制(必ず行うこと)を示しています。記号の中には、具体的な注意内容が描
かれ ることがあります。左 の図は「電 源プラグ をコンセントから抜くこと」 を表していま す。
以下の指示を守ってください
警告
この注意事項を無視した取り扱いをすると、死亡や重傷を負う可能性があります。
・ACアダプターのプラグは、必ずAC100Vの電源コンセントに差し込む。
・ACアダプターのプラグにほこりが付着している場合は、ほこりを拭き取る。
感電やショートの恐れがあります。
・本製品はコンセントの近くに設置し、ACアダプターのプラグへ容易に手が届くようにする。
・次のような場合には、直ちに電源を切ってACアダプターのプラグをコンセントから抜く。
○ ACアダプターが破損したとき ○ 異物が内部に入ったとき
○ 製品に異常や故障が生じたとき
修理が必要なときは、お客様相談窓口へ依頼してください。
・本製品を分解したり改造したりしない。
・修理、部品の交換などで、取扱説明書に書かれてること以外は絶対にしない。
・ACアダプターのコードを無理に曲げたり、発熱する機器に近づけない。また、ACアダプター
のコードの上に重いものをのせない。
コードが破損し、感電や火災の原因になります。
・大音量や不快な程度の音量で長時間使用しない。
大音量で長時間使用すると、難聴になる可能性があります。万一、聴力低下や耳鳴りを感じたら、専門
の医師に相談してください。
・本製品に異物(燃えやすいもの、硬貨、針金など)を入れない。
・温度が極端に高い場所(直射日光の当たる場所、暖房機器の近く、発熱する機器の上など)で使
用や保管をしない。
・振動の多い場所で使用や保管をしない。
・ホコリの多い場所で使用や保管をしない。
・風呂場、シャワー室で使用や保管をしない。
・雨天時の野外のように、湿気の多い場所や水滴のかかる場所で、使用や保管をしない。
・本製品の上に、花瓶のような液体が入ったものを置かない。
・本製品に液体をこぼさない。
・濡れた手で本製品を使用しない。
注意
この注意事項を無視した取り扱いをすると、傷害を負う可能性
・正常な通気が妨げられない所に設置して使用する。
・ラジオ、テレビ、電子機器などから十分に離して使用する。
ラジオやテレビ等に接近して使用すると、本製品が雑音を受けて誤動作する場合があります。また、ラ
ジオ、テレビ等に雑音が入ることがあります。
本製品をテレビ等の横に設置すると、本製品の磁場によってテレビ等の故障の原因になることがあり
ます。
・外装のお手入れは、乾いた柔らかい布を使って軽く拭く。
・ACアダプターをコンセントから抜き差しするときは、必ずプラグを持つ。
・長時間使用しないときは、ACアダプターをコンセントから抜く。
・付属のACアダプターは、他の電気機器で使用しない。
付属のACアダプターは本製品専用です。他の機器では使用できません。
・指定のACアダプター以外は使用しない。
・他の電気機器の電源コードと一緒にタコ足配線をしない。
本製品の定格消費電力に合ったコンセントに接続してください。
・スイッチやツマミなどに必要以上の力を加えない。
故障の原因になります。
・外装のお手入れに、ベンジンやシンナー系の液体、コンパウンド質、強燃性のポリッシャーを使
用しない。
・不安定な場所に置かない。
本製品が落下してお客様がけがをしたり、本製品が破損したりする恐れがあります。
・本製品の上に乗ったり、重いものをのせたりしない。
本製品が落下または損傷してお客様がけがをしたり、本製品が破損したりする恐れがあります。
* Apple、iPad、iPhone、iPod touchは、米国および他の国々で登録されたApple Inc.の商標です。
* その他すべての商品名または規格名は関係各社の商標または登録商標です。
7
または物理的損害が発生する可能性があります。

Table of contents
En
Introduction 10
Main Features
Part Name
Connection
Connecting to a computer or MIDI
devices
Connecting the SYNC IN and OUT jacks 11
10
10
11
11
Power On/Off 12
Auto Power Off Feature 12
Projects, tracks, patterns 12
Select a project to play 13
Synchronization of tempo with
external devices
Edit of sequence data
Basic edit operations 13
TEMPO and SWING knobs
Using the (REC) button 13
Using the SHIFT button
13
13
13
14
Sequencer modes 15
Project mode 15
Pattern mode
Chain mode
Gate mode
Pitch mode and keyboard mode
Modulation mode
Loop mode
Control mode
Global mode
15
16
16
17
17
18
18
19
Restoring the Factory settings 22
Specications
22
Table des matière
Fr
Avant-propos
Principales fonctions
Nomenclature
Connexions
Connexion à un ordinateur ou à des
dispositifs MIDI
Connexion aux prises SYNC IN et OUT 24
23
23
23
24
24
Mise sous/hors tension 25
Fonction de coupure automatique de
l’alimentation
25
Projets, pistes et patterns 25
Sélection d’un projet à reproduire 26
Synchronisation du tempo avec les
dispositifs externes
Édition des données de séquence
Opérations d’édition de base 26
Commandes TEMPO et SWING
Utilisation du bouton (REC) 26
Utilisation du bouton SHIFT
26
26
26
27
Modes du séquenceur 28
Mode des projets 28
Mode des patterns
Mode chaîne
Mode gate
Mode pitch et mode clavier
Mode de modulation
Mode boucle
Mode de contrôle
Mode global
28
29
29
30
30
31
31
32
Restauration des paramètres d’usine 35
Fische technique 35
8
Inhaltsübersicht
De
Einleitung
Die wichtigsten Funktionen
Teilname
Anschlüsse
Anschluss an Computer oder MIDIGeräte.
Anschluss der SYNC IN- und OUTBuchsen
36
36
36
37
37
37
Ein-/Ausschalten 38
Energiesparfunktion 38
Projekte, Spuren und Muster 38
Auswahl eines Projekts zur Wiedergabe 39
Synchronisation des Tempos mit
externen Geräten
Bearbeitung von Sequenzdaten
Grundlegende Bearbeitungsfunktionen 39
TEMPO- und SWING-Regler 39
Verwendung der (REC) -Tas te 39
Verwendung der SHIFT-Taste
39
39
40
Sequenzer-Modi 41
Project-Modus 41
Pattern-Modus
Chain-Modus
Gate-Modus
Pitch- und Keyboard-Modus
Modulation-Modus
Loop-Modus
Control-Modus
Global-Modus
41
42
42
43
43
44
44
45
Zurücksetzen auf Werkseinstellungen 48
Technische Daten 48
Contenido
Es
Introducción 49
Funciones principales
Nombre de los componentes
Conexiones
Conexión a un ordenador o a dispositivos
MIDI
Conexión de los jacks SYNC IN y OUT 50
50
50
49
49
Encendido y apagado 51
Función de apagado automático 51
Proyectos, pistas y patrones 51
Seleccionar un proyecto para reproducirlo 52
Sincronización del tempo con
dispositivos externos
Edición de datos de secuencias
Operaciones de edición básicas 52
Mandos TEMPO y SWING
Uso del botón (REC) 52
Uso del botón SHIFT
52
52
52
53
Modos del secuenciador 54
Modo de proyectos 54
Modo de patrones
Modo en cadena
Modo gate (puerta)
Modo pitch (anación) y modo de teclado 56
Modo modulation (modulación) 56
Modo loop (bucle)
Modo de control
Modo global
54
55
55
57
57
58
Restablecimiento de los ajustes de
61
fábrica
Especicaciones
61
Ja
目次
はじめに
主な特長
各部の名称
接続
コンピューター、MIDI機器との接続 63
SYNC IN、OUTの接続
63
62
62
62
63
電源のオン・オフ 64
オート・パワー・オフ機能 64
プロジェクト、トラック、パターン 64
プロジェクトを選んで演奏する 65
テンポと外部機器の同期 65
シーケンス・データの編集(エディット) 65
エディットの基本操作 65
TEMPO、SWINGノブ
(REC)ボタンを使う 65
SHIFTボタンを使う
65
66
シーケンサーの各モード 67
プロジェクト・モード 67
パターン・モード
チェーン・モード
ゲート・モード
ピッチ・モード、キーボード・モード
モジュレーション・モード
ループ・モード
コントロール・モード
グローバル・モード
67
68
68
68
69
70
70
71
工場出荷時の状態に戻す 74
仕様
74
9
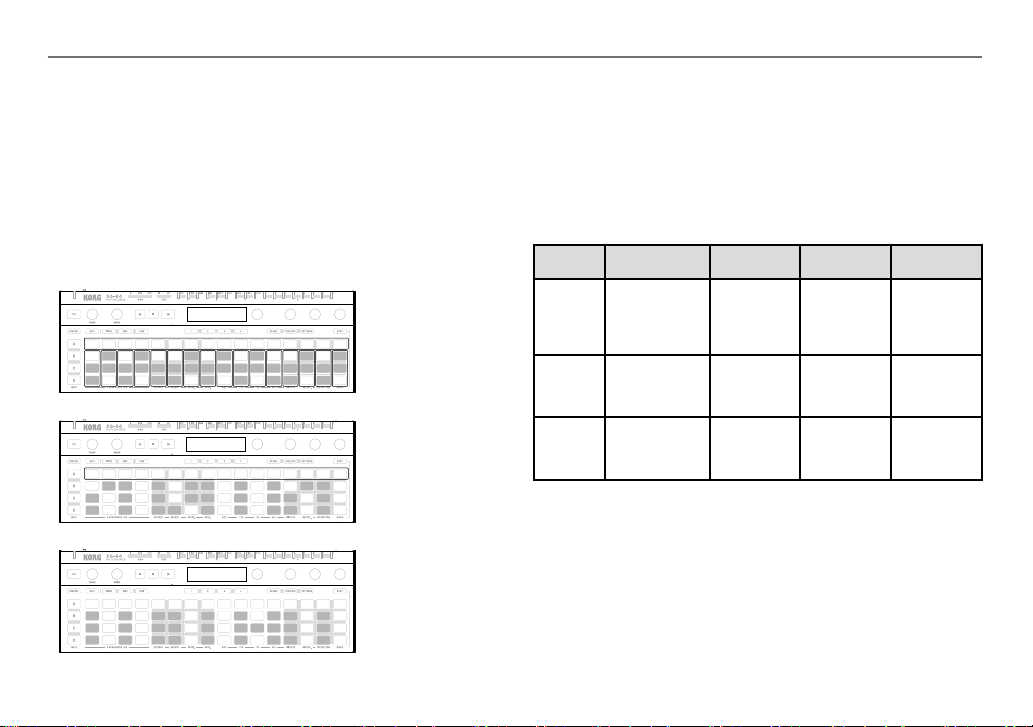
SQ-64 Owner's Manual
1 2 3 4 5 6
21 20
1415 13
19 18 1617
7
812
9 8
10
11
En
Introduction
Thank you for purchasing the KORG SQ-64 Poly Sequencer. To
help you get the most out of your new instrument, please read this
manual carefully.
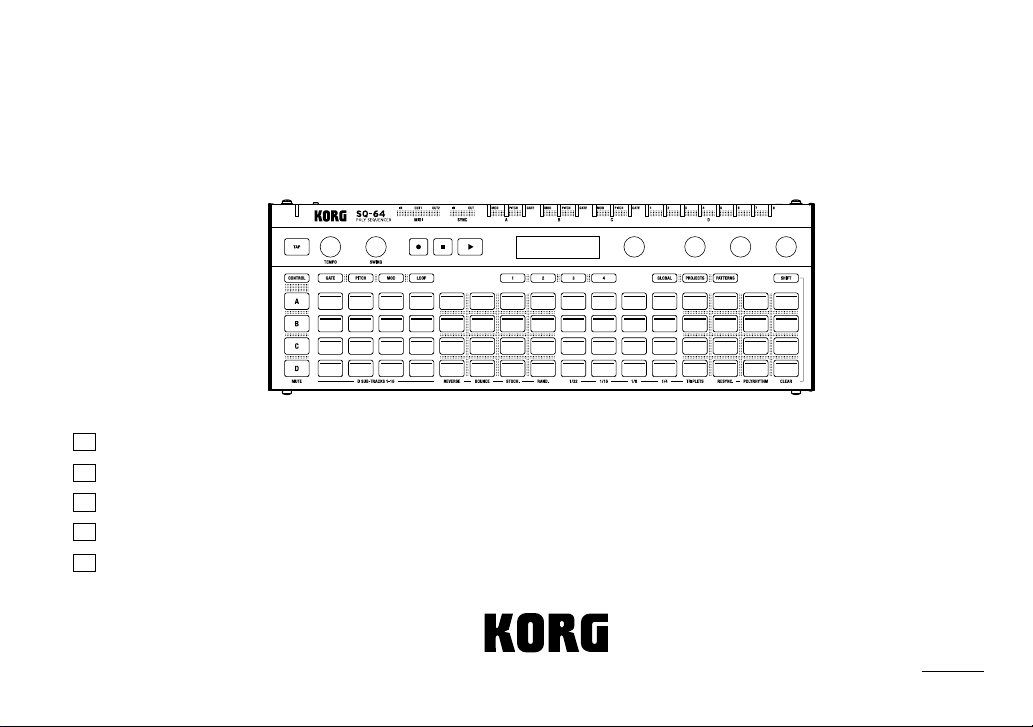
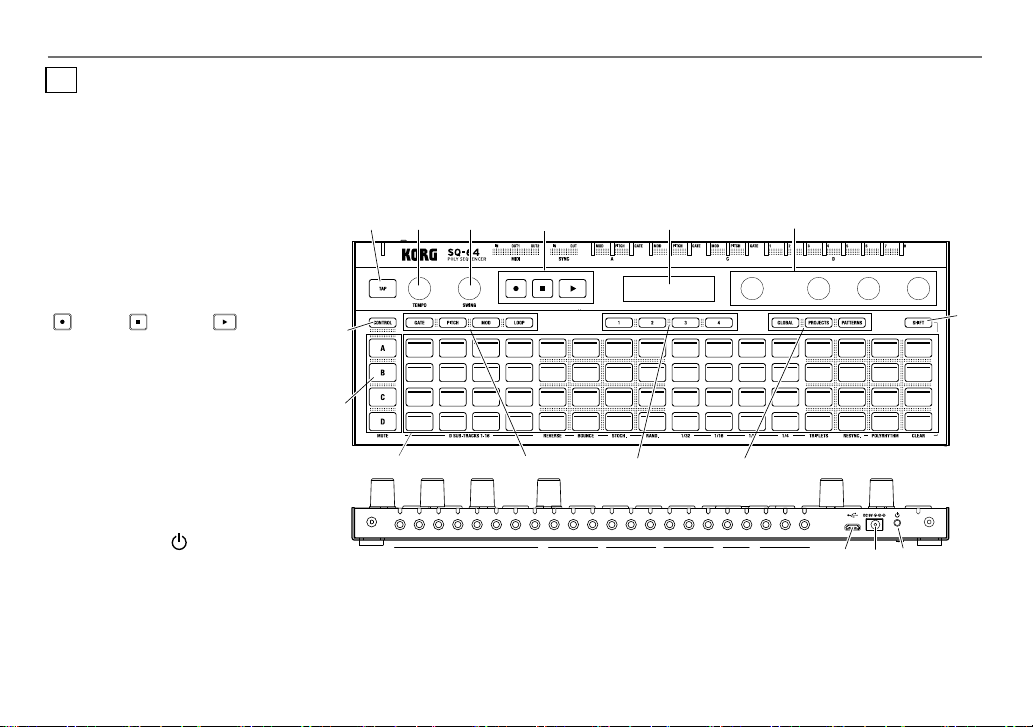
Part Name
1. TAP button
2. TEMPO knob
3. SWING knob
4. Transport Buttons
(REC), (STOP), (PLAY)
5. Display
6. PARAM1 - PARAM4 knob
7. CONTROL button
8. Mode button
(GATE, PITCH, MOD, LOOP, GLOBAL,
PROJECTS, PATTERNS)
9. BAR button 1-4
10. SHIFT button
11. Track button A-D
12. 64 pads
13. (Power) button
14. DC 9V jack
15. USB micro-B connector
16. MIDI IN, OUT1, OUT2 connectors
17. SYNC IN/OUT connectors
18. Track A CV/GATE output jack (MODE, PITCH, GATE)
19. Track B CV/GATE output jack (MODE, PITCH, GATE)
20.
Track C CV/GATE output jack (MODE, PITCH, GATE)
21. Track D output jack (TRIG 1-8)
Main Features
The SQ-64 is a step sequencer with up to 64 steps x 4 tracks, and is
equipped with a wide range of connection jacks that are compatible
with different types of synthesizers and sound sources. Dynamic and
unique performances are possible by switching 64 pads arranged in
a matrix form as well as various sequencer modes.
10
SQ-64 Owner's Manual
Connection
Soundmodule,
Rhythmmachine,etc.
MIDIKeyboard,
Rhythmmachine,
etc.
USBcable
Computer
ACadapter
(soldseparately)
MIDIIN
MIDIIN
MIDIOUT
Groovemachine,
KORGvolcaseries,etc.
SYNC
OUT
SYNC
IN
Connecting to a computer or MIDI devices
To exchange MIDI messages with your computer, connect your
computer to the USB micro-B connector on the SQ-64. To
exchange MIDI messages with an external MIDI device, connect
the device to the MIDI IN, OUT1, OUT2 connectors on the SQ-64.
This unit’s MIDI connectors are 3.5mm TRS mini-phone jacks.
Use a type-A MIDI converter cable in compliance with the MIDI
association TRS adapter standard.
Soundmodule,
Analogsynthesizer,etc.*
CVIN,GATEIN
*Upto3units
SYNCIN
EGTRIGIN
Drumsoundmodule,
Synthesizer(Envelope)
etc.
Connecting the SYNC IN and OUT jacks
Use the SYNC IN and OUT jacks of the SQ-64 when you
synchronize to the output pulses and steps from the audio output
jacks of sources such as the Korg volca series or a DAW. Use a 3.5
mm TS mini-phone cable for connections.
11
SQ-64 Owner's Manual
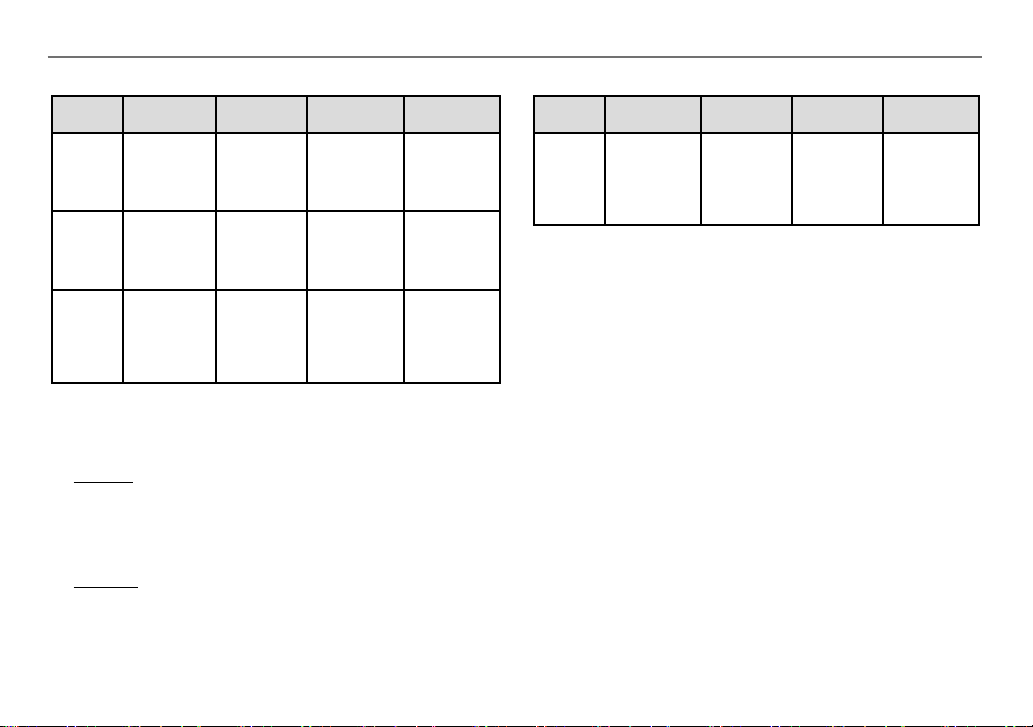
“PROJECT”
C
TRACK
PTN01PTN02PTN
03
Melody
PTN15PTN
16
B
TRACK
PTN01PTN02PTN
03
Melody
PTN15PTN
16
“PATTERN”
A
TRACK
PTN01PTN02PTN
03
Melody
“STEP”
01 02 03 04 16
( )
BARButton2/3/4
PTN15PTN
16
“DSUB-TrackD1”
D
TRACK
PTN01PTN02PTN
03
Drum
PTN15PTN
16
“DSUB-TrackD2”
PTN01PTN02PTN
03
PTN15PTN
16
01 02 03 16(...64)STEPS
“DSUB-TrackD3”
PTN01PTN02PTN
03
PTN15PTN
16
“DSUB-TrackD16”
PTN01PTN02PTN
03
PTN15PTN
16
Power On/Off
1. Connect the SQ-64’s USB micro-B connector to your
computer using a USB cable.
Be sure to use the included USB cable.
TIP
You can use the optional AC adapter for this unit. In this case,
connect the adapter to the DC 9V jack on the rear panel.
2. Connect the SQ-64 with peripheral devices.
3. Press and hold the (Power) button on the rear panel
of the SQ-64. Release the
display indicates “SQ-64”.
4.
When you press the (Power) button while the power is
on, the power is turned off. Before turning off the power, be
sure to save any important data such as edited programs.
Auto Power Off Feature
The SQ-64 features an Auto Power Off feature that can automatically
turn the SQ-64 off after 4 hours have elapsed with no operation of
the knobs, switches, buttons, or keyboard of the SQ-64. By default,
the factory setting for the Auto Power Off is enabled.
The Auto Power Off can be disabled using the steps below.
1. Press the GLOBAL button.
2. Press A-15 of the 64 pads (15th from the left on the Track
A row) to indicate “Auto Power Off” on the display.
3.
Turn the PARAM1 knob to the left to turn off the function.
4. Press the Mode button to save the settings and exit the
global edit mode.
(Power) button when the
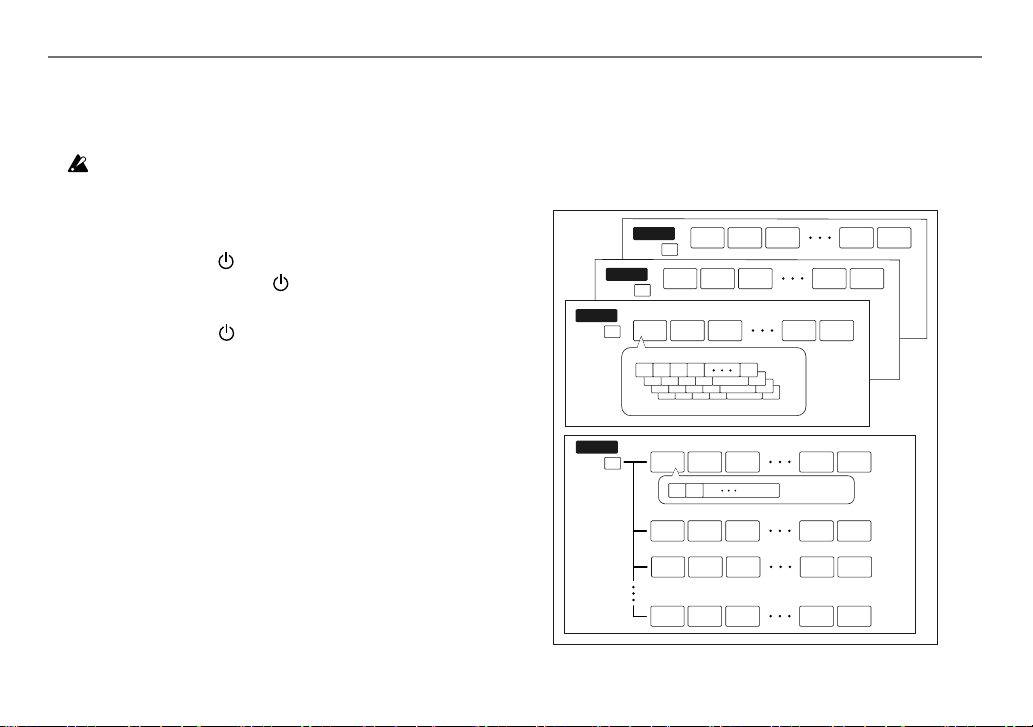
Projects, tracks, patterns
The SQ-64 includes slots for 64 “projects”, all of which are
rewritable. A project consists of three melody tracks (A-C) and
drum track (D). The drum track has 16 sub tracks. Every track
including a sub track has 16 patterns, which consists of data of
up to 64 steps.
12
SQ-64 Owner's Manual
Sub tracks 1 to 8 of drum track D are output from TRIG OUT of the
main unit. Sub tracks 9 to 16 of drum track D output MIDI OUT only.
Select a project to play
1. Press the PROJECTS button to enter the project mode.
2. Select a project using the 64 pads.
3. Press the (PLAY) button to start playing the selected
sequence data. While the sequence is playing, the 64
pads display the entire sequence, and the playing part
lights up white.
Synchronization of tempo with external devices
The SQ-64 can synchronize tempo with external devices by using the
SYNC IN jack, MIDI IN, and USB MIDI IN. The master/slave settings
for synchronization can be congured in the global edit mode.
Edit of sequence data
Sequences are edited in gate mode, pitch mode, and modulation
mode. In those modes, you can select steps to be edited from the
pads and change each parameter. Each track includes up to 64
steps. When you want to edit the 17th and subsequent steps, use
the BAR button 1-4 to go to further pages.
Note Pressing the Track button A-D displays all the 64 steps of the
tracks on the pads. To restore the displays of all tracks, press
the same track button again.
Basic edit operations
From the 64 pads, press a step you want to edit to turn the step
on/off. Turn the PARAM1 to PARAM4 knobs to indicate the
parameter names and values on the display.
Depending on the mode, you can edit different parameters by
turning PARAM1 to PARAM4 while holding down the 64 pads or
the SHIFT button. See the table for each mode for details.
TEMPO and SWING knobs
The TEMPO and SWING knobs enable you to congure the tempo
and swing settings of the entire project when none of the Track
button A-D are selected. When any one of Track button A-D are
selected, each TEMPO knob functions as the clock divider and the
SWING knob can set the independent swing value for each track.
TIP You can roughly adjust the tempo and swing values by rotating
the TEMPO and SWING knobs while holding down the SHIFT
button.
Using the (REC) button
To perform real-time recording of notes, press the (REC)
button while the sequence is playing or in the halting state.
1. While holding down the PITCH button, press track
buttons A to C to enter keyboard mode.
2. When you press the (REC) button; the button ashes,
and the sequencer enters recording standby mode.
3. When you press the (PLAY) button; the (REC)
button switches to ashing, and recording starts.
4. Press the 64 pads to enter notes. Notes can also be
entered from an external MIDI device.
5. When you press the (REC) button again; the button
goes off, and recording ends.
13
SQ-64 Owner's Manual
Using the SHIFT button
In each mode other than keyboard mode or chain mode, you can
use different functions by pressing each pad while holding down
the SHIFT button. (Example: Press Track button D while holding
down the SHIFT button to use the “MUTE” function.)
MUTE
For tracks A to C, select a track to be muted. For track D,
select a drum sub track to be muted from drum sub tracks
of 4 rows x 4 columns.
TIP For track D, pressing track button D mutes all drum sub-tracks.
REVERSE
Reverses the order of the sequence.
BOUNCE
Enables/disables bounce sequencer mode. The sequencer
will replay steps in reverse order after playing the last step.
STOCH.
Enables/disables stochastic sequencer mode. In stochastic
mode, at each sequencer step the next step will be decided
randomly among four choices: one forward, skip one forward,
one backwards, or repeat same step. Each time stochastic mode
is enabled a different probability will be assigned to each choice.
RAND.
Enables or disables random sequencing mode. The
random sequencing mode randomly determines the next
step from all steps in the track.
1/32, 1/16, 1/8, 1/4
Changes the time division of the track.
TRIPLETS
Changes the time division of the track to triplet.
RESYNC.
Forcibly reset the track to its rst step.
POLYRHYTHM
Lets the track play freely, without resynchronizing with the
longest track.
CLEAR
Clears the selected track. To cancel the operation, press
the CLEAR button while holding down the SHIFT button
again before changing the data.
14

SQ-64 Owner's Manual
Sequencer modes
Project mode
Press the PROJECTS button to enter project mode and display the
projects on the 64 pads.
Project load mode
This mode is enabled immediately after you enter project
mode. From the 64 pads, press any pad to load a project.
TIP Pressing the 64 pads while holding down the PROJECTS button
displays the project names.
TIP The pad of the currently selected project lights up.
Project save mode
Turn the PARAM1 knob to select project save mode. (The
current project number lights up.) Press the pad where you
want to save the current project. Then, press the BAR button
1 to save, or press the BAR button 4 to cancel.
Note Before saving, the project name can be changed by using the
PARAM2 and PARAM3 knobs.
Project init mode
Turn the PARAM1 knob to select project init mode. Press
any pad to display the conrmation screen. Press one of
the BAR buttons 1 to 4 to select an operation. Press the
BAR button 1 to initialize the saved project, press the BAR
button 2 to initialize the current project, or press the BAR
button 3 to initialize both. Press the BAR button 4 to cancel
the operation.
Pattern mode
The sequence data stored in each track is called “pattern”. Press
the PATTERNS button to enter pattern mode and display the
available patterns for each track on the 64 pads.
Pattern select mode
This mode is enabled immediately after you enter pattern
mode. Pressing the 64 pads while holding down the
PATTERNS button displays the pattern name.
TIP The pad of the pattern currently selected lights up.
From the 64 pads, press any pad to load a pattern.
TIP Turn the PARAM2 knob to set the timing to move to the selected
pattern.
Pattern copy mode
Turn the PARAM1 knob to select pattern save mode. (The
current pattern number lights up.) Select the pad where
you want to copy the current pattern. Then press the BAR
button 1 to copy, or press the BAR button 4 to cancel.
TIP Pressing any pad while holding down the PATTERNS button
changes the copy source.
Note Before saving, you can change the pattern name by using the
PARAM2 and PARAM3 knobs.
Pattern clear mode
Turn the PARAM1 knob to select pattern clear mode. Press
the pad you want to clear. Then press the BAR button 1 to
clear, or the BAR button 4 to cancel.
TIP You can undo the operation by pressing the same pad again
immediately after initialization.
15
SQ-64 Owner's Manual
Chain mode
Press the PATTERNS button while holding the SHIFT button
to enter the chain mode. Chain mode allows to select multiple
patterns to be played in sequence. Use PARAM1 to set ACTION
(PERFORM/EDIT/DELETE).
Press SHIFT again to exit chain mode.
Chain perform mode
This mode is enabled immediately after you enter chain mode.
The chain of each track is displayed on the pad.
The pad of the pattern that is currently playing lights up.
The pad whose pattern has been registered lights up faintly.
Pressing a pad in a chain will force that pattern to be
loaded next, according to the timing selected via PARAM3.
Pressing the pad while holding down the PATTERNS button
TIP
displays the pattern information.
TIP
Turn the PARAM2 knob to set the timing to move to the next pattern.
Chain edit mode
This mode is used to align patterns to be played back in a chain.
Press the pad on the position to be set to display the screen
for selecting a pattern from 1 to 16 patterns (chain set).
A chain can be inserted by pressing the pad while holding
down the PATTERNS button (Chain insert).
Chain delete mode
Select the pad of a pattern to be deleted.
The pattern is deleted, and the remaining patterns are
shifted to the left.
Gate mode
Press the GATE button to enter gate mode. This mode is used to
set each sequence step to On or Off, and specify the step length
or the playback probability. For steps set to Off (button light off),
no signal is output from the CV/GATE output jack during playback.
Parameters that can be congured in gate mode
■
Operation
PARAM1 PARAM2 PARAM3 PARAM4
option
Operation
Sets the track
by knob
length
(by step) [1-64].
While
Sets the track
holding
length (by beat)
down
[4,8,…,64].
SHIFT
While
Sets the step
holding
length
down 64
[LENGTH
pads
0~100%, TIE ON,
SLIDE 1~100%]*
*: Pressing any of the 64 pads while holding down the GATE button allows you
to set TIE ON.
**:
Example 1: [
cycles, while [
three cycles.
**: Example 2: [PROB 80%] means the step is played back with 80%
probability.
16
Rotates sequence
steps (by step)
[12<, … >12]
Rotates sequence
steps (by beat)
[L64, …CENTER,
…R64]
Sets the offset
of the step
start point
[-50%...+49%]
] means the step is only played on the rst of three
■□□
] means the step is played on the second and third of
□■■
Amount of ll steps
played back in place
of disabled steps
[0%-100%]
Sets either the
probability for that
step to be played,
or an alternation
pattern allowing to
play that step only
every given number
of cycles [ALTERN
■□■ , …, ■□
PROB100%~5%].**
,
■
Sets the CV
interpolation time
when a pitch slide
occurs in tied steps.
[LINEAR, LOG,
EXP].
Sets the slice of the
step to be played
back [1(OFF),
2FLAT-16FLAT,
2DOWN-16DOWN,
2UP-16UP]
SQ-64 Owner's Manual
Pitch mode and keyboard mode
Press the PITCH button to enter pitch mode.
In pitch mode, you can edit the pitch(es) associated with each
step. The pitches are output from the track’s CV/GATE PITCH
output jack and as along with MIDI note messages.
Note Pitch mode is only available for melody tracks A-C.
Select a Track button A-C while holding down the PITCH button to enable
keyboard mode. In keyboard mode, the top row displays the sequence,
and the lower three rows display a keyboard relevant to the selected
scale. The keyboard layouts below can be selected via global mode.
C#
D# c#
C D
c ...
A# B
F F# G G# A A# B c c# d d#
C C# D D# E F F# G G# A A# B c c# d
.. .
c#c d d# c#c d d#f#f
c#c d d# c#c
C#C D D# C#C D D#F#F G G# A BA#E
PATTERN
F GG#A B
E
PATTERN
PATTERN
.
.. . .
.
f#f
g g#
g g#
c d
....
. .
g g#
.. ..
. .
d d#
d#F#
d#
A#
KEYSLAYOUT:
e f f#
ISOLAYOUT:
...
a ba#e
a ba#e
OCTAVESLAYOUT:
17
For sequences with more than 16 steps, the BAR button 1-4 can
be used to select which steps are displayed. Select one or more
steps and press the keyboard to set the pitch(es) for those steps.
Each step can hold up to 8 pitches.
Note When multiple pitches are set for a step, the lowest pitch is
saved as a root.
Note
The action of each knob is the same as those in the pitch mode.
Parameters that can be congured in the pitch mode/keyboard mode
■
Operation
option
Operation by
knob
While holding
down SHIFT
While holding
down 64
pads
PARAM1 PARAM2 PARAM3 PARAM4
Transposes pitches
for the whole
sequence (by note).
Transposes pitches
for the whole
sequence (by
octave).
Set the current steps’
pitch, according to
PARAM2’s selection
(by note).
Switches between
Poly mode and
arpeggiator mode
[MONO, CHORD,
ARP].
Sets the
arpeggiator rate
[1X, 2X, 3X, 4X].
Select the pitch
that you want to
change.
Sets the scale.*
[EQUAL, MAJOR,
MINOR...,MAJ.
PENTA]
Sets the root note
of the scale.
[C, C#, D,...,A#,B]
Transpose the pitch
of the currently
selected step.
Set GATE to ON
automatically
when setting a
pitch on a step.
[ON, OFF]
Sets the octave
for the keyboard
[-2,-1,0,+1,+2].
Cycles through
various pitch
inversions.
* In addition to being applied to the keyboard layout, pitches of the sequence
will be quantized to the selected scale.
Modulation mode
Press the MODULATION button to enter modulation mode.
In modulation mode, you can set a modulation value for each
step. The modulation value for each step is output on the track’s
CV/GATE MOD output and, either as velocity for MIDI note
messages, or as MIDI control change messages (see SHIFTPARAM4 below).
SQ-64 Owner's Manual
Parameters that can be congured in modulation mode
■
Operation
option
Operation by
knob
While holding
down SHIFT
While holding
down 64
pads
PARAM1 PARAM2 PARAM3 PARAM4
Increases/
decreases all
modulation values.
(in units of 0.5)
Increases/
decreases all the
modulation values.
(in units of 10)
Increases/
decreases the
modulation value
for the selected
steps. (in units of
0.5)
Rotates the
modulation values
of the sequence.
(by step)
Rotate the
modulation values
of the sequence
(by beat).
-
Sets the probability
of a random
variation of the
modulation values.
[0%-100%]
Sets the range
of random
modulation value
variations. [0%100%]
Sets the probability
of a random
variation of the
modulation value
for the selected
steps. [0%-100%]
Sets the
interpolation curve
of modulation CV
[NONE, LINEAR,
EXP].
Sets how the
modulation should
be output via MIDI
[ VELO. , CC 0, ... ,
CC 127 ]
Sets the range
of random
modulation value
variations for the
selected steps. [0
to 100%]
Loop mode
Press the LOOP button to enter loop mode.
In this mode two types of loops can be created.
RANGE
Press a step to determine the start step of the loop,
then select the next step while pressing the rst step to
determine the last step of the loop. Double tap any step of
the loop to release the loop.
SELECT
Press any number of steps. The sequence will automatically
start playing only the selected steps. When any step is
released it will be removed from the loop. Double tap any
step of the loop to release the loop.
Parameters that can be congured in loop mode
■
Operation
option
Operation by
knob
PARAM1 PARAM2 PARAM3 PARAM4
Sets the loop
tempo [1/64, ..1/2,
1x, 2x..16x].
Sets the
probability that
the next step in
the loop is chosen
at random. [0100%]
Sets the loop
type [RANGE,
SELECT]
Sets how the
sequence should
resume when the
loop is released.
[IN-PHASE, FREE]
Control mode
Press the CONTROL button to enter control mode.
In control mode the Track button A-D, the 64 pads , and the
PARAM1-PARAM4 knobs act as dedicated MIDI controls.
The BAR button 1-4 can be used to select one of four pages of
assignments for the param knobs. To assign MIDI messages to
buttons and 64 pads, press A-13 to 16, B13 to 16, C13 to 16, and
D13 to 16 of the 64 pads to switch 16 types of control mappings
while pressing the CONTROL button in global mode.
Note The MIDI control message mapping presets can be edited using
an external editor/librarian. See "SQ-64 Editor" (www.korg.
com) for details.
18
SQ-64 Owner's Manual
Global mode
Press the GLOBAL button to enter global mode.
You can change the pages by pressing the GLOBAL button repeatedly or 64 pads directly. Select the page containing a value that you
want to change, and adjust to a desired value using the PARAM1 - PARAM4 knob.
When no tracks are selected
■
Pad position Global parameter name PARAM knob Value (initial value is in boldface) Parameter details, remarks
A-5 CLOCK SOURCE
A-6 SYNC IN MODE
A-7 SYNC OUT MODE
A-9 MIDI RX PROG. CHANGE
A-10 MIDI TX PROG. CHANGE
A-12 MOD DISPLAY
A-13 KEYBOARD LAYOUT
KEYBOARD BEHAVIOR
A-14 DISPLAY BRIGHTNESS
A-15 AUTO-POWER OFF
B-9 MIDI RX TRANSPORT
PARAM1 AUTO, INTERNAL, USB, MIDI
PARAM1
PARAM2 ACTIVE HIGH, ACTIVE LOW
PARAM1
PARAM2 ACTIVE HIGH, ACTIVE LOW
PARAM3 TRANSPORT OFF, TRANSPORT ON
PARAM1 ANY, CH1 - CH16
PARAM2 USB OFF, USB ON
PARAM3 MIDI OFF, MIDI ON
PARAM1 CH1 - CH16
PARAM2 USB OFF, USB ON
PARAM3 MIDI1 OFF, MIDI1 ON
PARAM4 MIDI2 OFF, MIDI2 ON
PARAM1 GATES, VALUES
PARAM1 KEYS, ISO, OCTAVE
PARAM2 TRANSPOSE, OVERRIDE
PARAM1 1..5..10
PARAM1 DISABLE, ENABLE
PARAM2 USB OFF, USB ON
PARAM3 MIDI OFF, MIDI ON
4PPQN, 12PPQN, 24PPQN, 48PPQN
2PPQN, 4PPQN, 12PPQN, 24PPQN, 48PPQN
Set master sequencer clock source.
Set the sync pulse rate.
Set the sync pulse polarity.
Set the sync pulse rate.
Set the sync pulse polarity.
The right channel of the sync connector will be set high when the sequencer is running and
low when stopped.
Set channel on which MIDI program change messages will be received.
Enable/disable reception of MIDI program change messages from USB-MIDI.
Enable/disable reception of MIDI program change messages from MIDI input.
Set channel on which MIDI program change messages will be transmitted.
Enable/disable transmission of MIDI program change messages to USB-MIDI.
Enable/disable transmission of MIDI program change messages to MIDI1 output.
Enable/disable transmission of MIDI program change messages to MIDI2 output.
Set which data should be displayed on steps.
Set keyboard layout for keyboard mode.
Set the behavior for keyboard mode.
Sets the display brightness level.
Enable/disable auto power off feature.
Enable/disable reception of MIDI transport messages via USB-MIDI.
Enable/disable reception of MIDI transport messages via Legacy MIDI.
19
SQ-64 Owner's Manual
Pad position Global parameter name PARAM knob Value (initial value is in boldface) Parameter details, remarks
B-10 MIDI TX TRANSPORT
B-15 USB BUS POWER
C-10 MIDI THRU PARAM1 OFF, ON
When the TRACK button [A] to [C] is pressed
■
Pad position Global parameter name PARAM knob Value (initial value is in boldface) Parameter details, remarks
A-5 GATE CV PARAM1 V-TRIG, S-TRIG*
A-6 PITCH CV PARAM1 Hz/V, 0.26V/oct, 0.32V/oct, 1V/oct, 1.2V/oct
A-7 MOD CV PARAM1 0.00V - 10.00V (5V)
A-9 MIDI RX PARAM1 CH1 - CH16 (A: CH1, B: CH2, C: CH3)
A-10 MIDI TX PARAM1 CH1 - CH16 (A: CH1, B: CH2, C: CH3)
PARAM2 USB OFF, USB ON
PARAM3 MIDI1 OFF, MIDI1 ON
PARAM4 MIDI2 OFF, MIDI2 ON
PARAM1 500mA, 2A
PARAM2 5V, 10V
PARAM2 -1.00V - +1.00V (0V) *0.01V increment
PARAM3 0V : 0 - 127 (C3) * display as "note name" Set the reference note for 0V (*Set by note number)
PARAM4 TEST OUT OFF, TEST OUT 0-127 * display note
PARAM2 -1.00V - +1.00V (0V) *0.01V increment
PARAM4 TEST OUT OFF, TEST OUT 0-127
PARAM2 USB OFF, USB ON
PARAM3 MIDI OFF, MIDI ON
PARAM2 USB OFF, USB ON
PARAM3 MIDI1 OFF, MIDI1 ON
PARAM4 MIDI2 OFF, MIDI2 ON
names
Enable/disable transmission of MIDI transport messages to USB-MIDI.
Enable/disable transmission of MIDI transport messages to MIDI1 output.
Enable/disable transmission of MIDI transport messages to MIDI2 output.
When connecting to a USB 2.0 compliant port, set to "500mA".
Enable/disable MIDI THRU behavior for MIDI2 output. When enabled, the MIDI2 output
becomes a dedicated MIDI THRU port, only relaying all messages received on the MIDI input.
Set the polarity of the gate output.
Set the voltage range for the gate output.
Set the pitch CV output mode.
Set a voltage bias on the pitch CV output.
Enable/disable a test signal on the pitch CV output. When enabled the voltage corresponding
to the specied note will be set on the pitch CV output (*Set by note number).
Set the voltage range for the mod CV output.
Set a voltage bias on the mod CV output.
Enable/disable a test signal on the mod CV output. When enabled the voltage
corresponding to the specied value will be set on the mod CV output.
Set channel on which MIDI messages will be received.
Enable/disable reception of MIDI messages from USB-MIDI.
Enable/disable reception of MIDI messages from MIDI input.
Set channel on which MIDI messages will be transmitted.
Enable/disable transmission of MIDI messages to USB-MIDI.
Enable/disable transmission of MIDI messages to MIDI1 output.
Enable/disable transmission of MIDI messages to MIDI2 output.
* V-TRIG, or voltage trigger, means the signal will be high when active and low when inactive. S-TRIG, or switch trigger, means the signal will be low when active and
20
high when inactive.
SQ-64 Owner's Manual
When the TRACK button [D] is pressed
■
Pad position Global parameter name PARAM knob Value (initial value is in boldface) Parameter details, remarks
A-5 GATE CV PARAM1 ---, V-TRIG, S-TRIG
PARAM2 5V, 10V
A-9 MIDI RX PARAM1 ---, CH1 - CH16 (CH10)
PARAM2 USB OFF, USB ON
PARAM3 MIDI OFF, MIDI ON
A-10 MIDI TX PARAM1 ---, CH1 - CH16 (CH10)
PARAM2 USB OFF, USB ON
PARAM3 MIDI1 OFF, MIDI1 ON
PARAM4 MIDI2 OFF, MIDI2 ON
When the D.SUB-TRACKS button [D1] to [D16] is pressed
■
Pad position Global parameter name PARAM knob Value (initial value is in boldface) Parameter details, remarks
A-5 GATE CV PARAM1 V-TRIG, S-TRIG Set the polarity of the gate output.
A-9 MIDI RX
A-10 MIDI TX
When the CONTROL button is pressed
■
Pad position Global parameter name PARAM knob Value (initial value is in boldface) Parameter details, remarks
A-10 MIDI TX PARAM1 CH1 - CH16
PARAM1 CH1 - CH16 (CH10) Set channel on which MIDI messages will be received.
PARAM2 ANY
PARAM1 CH1 - CH16 (CH10) Set channel on which MIDI messages will be transmitted.
PARAM2
PARAM2 USB OFF, USB ON
PARAM3 MIDI1 OFF, MIDI1 ON
PARAM4 MIDI2 OFF, MIDI2 ON
, 0-127
0-127
Set the polarity of the gate output.
Set the voltage range for the gate output. (D1 - D8 only)
Set channel on which MIDI messages will be received.
Enable/disable reception of MIDI messages from USB-MIDI.
Enable/disable reception of MIDI messages from MIDI input.
Set channel on which MIDI messages will be transmitted.
Enable/disable transmission of MIDI messages to USB-MIDI.
Enable/disable transmission of MIDI messages to MIDI1 output.
Enable/disable transmission of MIDI messages to MIDI2 output.
Set MIDI note to be received (*Set by note number).
Set MIDI note to be transmitted (*Set by note number).
Set channel on which MIDI messages will be transmitted.
Enable/disable transmission of MIDI messages to USB-MIDI.
Enable/disable transmission of MIDI messages to MIDI1 output.
Enable/disable transmission of MIDI messages to MIDI2 output.
21
SQ-64 Owner's Manual
Pad position Global parameter name PARAM knob Value (initial value is in boldface) Parameter details, remarks
A-13 to 16 CONTROL MAPPING 1 to 4 - Mappings can be created using the SQ-64 editor software.
B-13 to 16 CONTROL MAPPING 5 to 8 - Mappings can be created using the SQ-64 editor software.
C-13 to 16
D-13 to 16
CONTROL MAPPING 9 to 12
CONTROL MAPPING 13 to 16
- Mappings can be created using the SQ-64 editor software.
- Mappings can be created using the SQ-64 editor software.
Restoring the Factory settings
You can restore the SQ-64’s preset programs and global settings
to their original factory-set state at any time.
1. Begin with the SQ-64 turned off.
2. While holding down the PROJECTS button, turn the SQ64 on.
3. Use the PARAM 1 knob to choose the settings you wish
to reset (PROJECT, GLOBAL, CONTROL, ALL).
If you select “ALL” and execute, all user programs will be
erased.
4. Press the (REC) button. The display will indicate the
message “Are you sure?”.
5. Turn the PARAM 1 knob to select “YES” , and press the
(REC) button.
The factory-set default data will be reloaded, and the SQ64 will be restored to its factory default state.
Never turn off the SQ-64 while data is loaded. Doing so might
damage the internal data.
Specications
Sequencer:
64 step sequencer with 3 melodic tracks with up to 8 note polyphony, and
16 monophonic rhythmic tracks
Tempo: BPM30.0–300.0
Input jacks:
MIDI IN connector (3.5mm TRS mini-phone jack),
SYNC IN jack (3.5mm TS mini-phone jack, 20V maximum input level)
Output jacks:
MIDI OUT1, 2 connector (3.5mm TRS mini-phone jack),
SYNC OUT jack (3.5mm TS mini-phone jack, 10V maximum input level),
CV GATE output A/B/C jack (3.5mm TS mini-phone jack, 10V maximum
output level),
CV PITCH output A/B/C jack (3.5mm TS mini-phone jack, 10V maximum
output level),
CV MOD output A/B/C jack (3.5mm TS mini-phone jack, 10V maximum
output level),
TRIG output 1–8 jack (3.5mm TS mini-phone jack, 10V maximum output level)
Power: USB bus power, or DC 9V AC Adapter ( , separately sold)
Current Consumption: 500 mA
Dimensions (W x D x H): 341 × 119 × 39 mm / 13.43 × 4.69 × 1.54 inches
Weight: 1.0 kg / 2.20 lbs
Included items: Owner’s Manual, USB cable
Accessories (separately sold):
Patch cables MS-CABLE-18, AC adapter (DC 9V, )
22
SQ-64 Manuel d’utilisation
1 2 3 4 5 6
21 20
1415 13
19 18 1617
7
812
9 8
10
11
Fr
Avant-propos
Merci d’avoir choisi le séquenceur SQ-64 Poly Sequencer de
KORG. An de pouvoir exploiter au mieux toutes les possibilités
offertes par l’instrument, veuillez lire attentivement ce manuel.
Nomenclature
1. Bouton TAP
2. Commande TEMPO
3. Commande SWING
4. Boutons de transport
(REC), (STOP), (PLAY)
5. Afchage
6. Commande PARAM1-PARAM4
7. Bouton CONTROL
8. Bouton Mode
(GATE, PITCH, MOD, LOOP, GLOBAL,
PROJECTS, PATTERNS)
9. Bouton BAR 1-4
10. Bouton SHIFT
11. Bouton Track A-D
12. 64 pads
13. Interrupteur (d’alimentation)
14. Prise DC 9V
15. Connecteur micro-B USB
16. Connecteur MIDI IN, OUT1, OUT2
17. Connecteur SYNC IN/OUT
18. Prise de sortie CV/GATE piste A (MODE, PITCH, GATE)
19. Prise de sortie CV/GATE piste B (MODE, PITCH, GATE)
20. Prise de sortie CV/GATE piste C
21. Prise de sortie piste D (TRIG 1-8)
Principales fonctions
Le SQ-64 est un séquenceur à pas offrant jusqu’à 64 pas x 4 pistes,
équipé d’une large gamme de prises de connexion compatibles avec
divers types de synthétiseurs et de sources sonores. Vous pouvez obtenir
des performances dynamiques et uniques en commutant 64 pads
disposés en forme de matrice et grâce à différents modes de séquenceur.
(MODE, PITCH, GATE)
23
 Loading...