

Page 1
Thank you for purchasing the Korg nanoKONTROL Studio.
In order to use this product in a computer music environment,
you’ll need to adjust the MIDI settings of the host application.
Please follow the directions in the host application’s owner’s man-
このた びは、コルグ nanoKONTROL Studio をお買い上げいただき ま
して、まことにありがとうございます。
本機の機能を使用するには、ご使用になるアプリケーションの設定が必
要です。アプリケーションの取扱説明書を参照し、設定してください。
ual to dine these settings.
Merci d’avoir choisi le nanoKONTROL Studio de Korg.
Pour intégrer ce produit dans un système de production musicale assistée par ordinateur, vous devez régler les paramètres MIDI au sein du
logiciel utilisé. Pour ce faire, suivez les instructions dans la documentation de votre logiciel hôte.
Vielen Dank, dass Sie sich für ein nanoKONTROL Studio von Korg entschieden haben.
Um dieses Produkt in einer Computermusikumgebung zu verwenden, müssen sie die MIDI-Einstellungen der Host-Anwendung anpassen.
Befolgen Sie hierzu bitte die Anweisungen in der Bedienungsanleitung der Host-Anwendung.
Gracias por adquirir el nanoKONTROL Studio de Korg.
Para utilizar este producto en un entorno musical de ordenador, deberá realizar los ajustes de MIDI de la aplicación de host. Siga las indicaciones del manual de usuario de la aplicación de host para denir estos ajustes.
This product has been manufactured according to strict specications and
voltage requirements that are applicable in the country in which it is intended
that this product should be used. If you have purchased this product via the
internet, through mail order, and/or via a telephone sale, you must verify
that this product is intended to be used in the country in which you reside.
WARNING: Use of this product in any country other than that for which it
is intended could be dangerous and could invalidate the manufacturer’s or
distributor’s warranty. Please also retain your receipt as proof of purchase
otherwise your product may be disqualied from the manufacturer’s or
distributor’s warranty.
WICHTIGER HINWEIS FÜR KUNDEN
Dieses Produkt wurde unter strenger Beachtung von Spezikationen und
Spannungsanforderungen hergestellt, die im Bestimmungsland gelten.
Wenn Sie dieses Produkt über das Internet, per Postversand und/oder mit
telefonischer Bestellung gekauft haben, müssen Sie bestätigen, dass dieses
Produkt für Ihr Wohngebiet ausgelegt ist.
IMPORTANT NOTICE TO CONSUMERS
WARNUNG: Verwendung dieses Produkts in einem anderen Land als dem,
für das es bestimmt ist, verwendet wird, kann gefährlich sein und die Garan
tie des Herstellers oder Importeurs hinfällig lassen werden. Bie bewahren
Sie diese Quiung als Kaueleg auf, da andernfalls das Produkt von der
Garantie des Herstellers oder Importeurs ausgeschlossen werden kann.
-
Ce produit a été fabriqué suivant des spécications sévères et des besoins en
tension applicables dans le pays où ce produit doit être utilisé.
Si vous avez acheté ce produit via l’internet, par vente par correspondance
ou/et vente par téléphone, vous devez vérier que ce produit est bien uti
lisable dans le pays où vous résidez.
ATTENTION: L’utilisation de ce produit dans un pays autre que celui pour
lequel il a été conçu peut être dangereuse et annulera la garantie du fabricant
ou du distributeur. Conservez bien votre récépissé qui est la preuve de votre
achat, faute de quoi votre produit ne risque de ne plus être couvert par la
garantie du fabricant ou du distributeur.
Este producto ha sido fabricado de acuerdo a estrictas especicaciones y
requerimientos de voltaje aplicables en el país para el cual está destinado.
Si ha comprado este producto por internet, a través de correo, y/o venta
telefónica, debe usted vericar que el uso de este producto está destinado
al país en el cual reside.
AVISO: El uso de este producto en un país distinto al cual está destinado
podría resultar peligroso y podría invalidar la garantía del fabricante o
distribuidor. Por favor guarde su recibo como prueba de compra ya que de
otro modo el producto puede verse privado de la garantía del fabricante
o distribuidor.
REMARQUE IMPORTANTE POUR LES CLIENTS
NOTA IMPORTANTE PARA EL CONSUMIDOR
Precautions
Location
Using the unit in the following locations can result in a malfunction.
• In direct sunlight
• Locations of extreme temperature or humidity
• Excessively dusty or dirty locations
• Locations of excessive vibration
• Close to magnetic elds
Power supply
Be sure to turn the power switch to OFF when the unit is not in use.Remove the baery
in order to prevent it from leaking when the unit is not in use for extended periods.
Interference with other electrical devices
Radios and televisions placed nearby may experience reception interference. Operate
this unit at a suitable distance from radios and televisions.
Handling
To avoid breakage, do not apply excessive force to the switches or controls.
Care
If the exterior becomes dirty, wipe it with a clean, dry cloth. Do not use liquid cleaners
such as benzene or thinner, or cleaning compounds or ammable polishes.
Keep this manual
After reading this manual, please keep it for later reference.
Keeping foreign matter out of your equipment
Never set any container with liquid in it near this equipment. If liquid gets into the
equipment, it could cause a breakdown, re, or electrical shock. Be careful not to let
metal objects get into the equipment.
THE FCC REGULATION WARNING (for USA)
NOTE: This equipment has been tested and found to comply with the limits for
a Class B digital device, pursuant to Part 15 of the FCC Rules. These limits are
designed to provide reasonable protection against harmful interference in a resi
dential installation. This equipment generates, uses, and can radiate radio frequency
energy and, if not installed and used in accordance with the instructions, may cause
harmful interference to radio communications. However, there is no guarantee that
interference will not occur in a particular installation. If this equipment does cause
harmful interference to radio or television reception, which can be determined
by turning the equipment o and on, the user is encouraged to try to correct the
interference by one or more of the following measures:
• Reorient or relocate the receiving antenna.
• Increase the separation between the equipment and receiver.
• Connect the equipment into an outlet on a circuit dierent from that to which
the receiver is connected.
• Consult the dealer or an experienced radio/TV technician for help.
If items such as cables are included with this equipment, you must use those
included items.
Unauthorized changes or modication to this system can void the user’s authority
to operate this equipment.
This transmier must not be co-located or operated in conjunction with any other
antenna or transmier.
This equipment complies with FCC radiation exposure limits set forth for an uncontrolled environment and meets the FCC radio frequency (RF) Exposure Guideline.
This equipment has very low levels of RF energy that it deemed to comply without
maximum permissive exposure evaluation (MPE).
This device complies with Industry Canada licence - exempt RSS standard(s).
Operation is subject to the following two conditions: (1) this device may not cause
interference, and (2) this device must accept any interference, including interference
that may cause undesired operation of the device.
This equipment complies with IC radiation exposure limits set forth for an uncon
trolled environment and meets RSS-102 of the IC radio frequency (RF) Exposure
rules. This equipment has very low levels of RF energy that it deemed to comply
without maximum permissive exposure evaluation (MPE).
European Union Directives Conformance Statement
Korg Inc. hereby declares that the product meets the requirements
of Directive 1999/5/EC.
You can view the Declaration of Conformity (DoC) to Directive 1999/5/
EC in the Owner’s Manual of this product posted on the Korg website
(www.korg.com).
Notice regarding disposal (EU only)
If the symbol is shown on the product, manual, baery, or package, you
must dispose of it in the correct manner to avoid harm to human health
or damage to the environment. Contact your local administrative body
for details on the correct disposal method. If the baery contains heavy
metals in excess of the regulated amount, a chemical symbol is displayed
below the symbol on the baery or baery package.
Responsible Party : KORG USA INC.
Address : 316 SOUTH SERVICE ROAD, MELVILLE
Telephone : 1-631-390-6500
Equipment Type : MOBILE MIDI CONTROLLER
Model : NANOKTRL-ST
This device complies with Part 15 of FCC Rules. Operation is subject to the fol
lowing two conditions: (1) This device may not cause harmful interference,and (2)
this device
cause undesired operation.
- Apple, iPad, iPhone, Mac, iOS and Mac OS are trademarks of Apple Inc., registered
in the U.S. and other countries.
- Windows 7 and Windows 8 are trademarks of Microsoft Corporation in the U.S. and
other countries.
- Bluetooth is a registered trademark of Bluetooth SIG, Inc.
- All product names and company names are the trademarks or registered trademarks
of their respective owners.
DECLARATION OF CONFORMITY (for USA)
must accept any interference received, including interference that may
-
-
Précautions
Emplacement
-
L’utilisation de cet instrument dans les endroits suivants peut en entraîner le mauvais
fonctionnement.
• En plein soleil
• Endroits très chauds ou très humides
• Endroits sales ou fort poussiéreux
• Endroits soumis à de fortes vibrations
• A proximité de champs magnétiques
Alimentation
Lorsque vous n’utilisez pas l’appareil, n’oubliez pas de le mere hors tension. Retirez
les piles pour éviter toute fuite lorsque l’appareil ne sera pas utilisé pendant de longues
périodes de temps.
Interférences avec d’autres appareils électriques
Les postes de radio et de télévision situés à proximité peuvent par conséquent sourir
d’interférences à la réception. Veuillez dès lors faire fonctionner cet appareil à une
distance raisonnable de postes de radio et de télévision.
Maniement
Pour éviter de les endommager, manipulez les commandes et les boutons de cet
instrument avec soin.
Entretien
Lorsque l’instrument se salit, neoyez-le avec un chion propre et sec. Ne vous servez pas d’agents de neoyage liquides tels que du benzène ou du diluant, voire des
produits inammables.
Cet équipement est conforme aux limites d’exposition aux rayonnements énon-
cées pour un environnement non contrôlé et respecte les règles d’exposition aux
fréquences radioélectriques (RF) CNR-102 de l’IC. Cet équipement émet une
énergie RF très faible qui est considérée conforme sans évaluation de l’exposition
maximale autorisée.
Déclaration de conformité aux directives de l’Union européenne
Korg Inc. déclare par la présente que le produit est conforme aux
exigences de la directive 1999/5/CE.
Vous pouvez consulter la Déclaration de conformité (DoC) à la
directive 1999/5/CE dans le mode d’emploi de ce produit, dispo
nible sur le site Internet de Korg (www.korg.com).
-
Note concernant les dispositions (Seulement EU)
Si ce symbole apparait sur le produit, le manuel, les piles ou les packs de
piles, cela signie que vous devez le recycler d’une manière correcte an
de prévenir les dommages pour la santé humaine et les dommages poten
tiels pour l’environnement. Contactez votre administration locale pour de
plus amples renseignements concernant la bonne méthode de recyclage.
Si la pile contient des métaux lourds au-delà du seuil réglementé, un
symbole chimique est aché en dessous du symbole de la poubelle barrée
d’une croix sur la pile ou le pack de piles.
-
Page 2
安全上のご注意
ここに記載した注意事項は、製品を安全に正しくご使用いただき、あなたや他の
方々への危害や損害を未然に防ぐためのものです。
注意事項は誤った取り扱いで生じる危害や損害の大きさ、または切迫の程度によって、
内容を「警告」「注意」の2つに分けています。これらはあなたや他の方々の安全や機器の
保全に関わる重要な内容ですので、よく理解した上で必ずお守りください。
図記号の例
・ 次のような場合には、直ちに使用を中止する。
修理が必要なときは、コルグお客様相談窓口へ依頼してください。
・ 本製品を分解したり改造したりしない。
・ 修理、部品の交換などで、取扱説明書に書かれてること以外は絶対にしない。
・ 大音量や不快な程度の音量で長時間使用しない。
大音量で長時間使用すると、難聴になる可能性があります。万一、聴力低下や耳
鳴りを感じたら、専門の医師に相談してください。
・ 本製品に異物(燃えやすいもの、硬貨、針金など)を入れない。
・ 温度が極端に高い場所(直射日光の当たる場所、暖房機器の近く、発熱す
る機器の上など)で使用や保管はしない。
・ 振動の多い場所で使用や保管はしない。
・ ホコリの多い場所で使用や保管はしない。
・ 風呂場、シャワー室で使用や保管はしない。
・ 雨天時の野外のように、湿気の多い場所や水滴のかかる場所で、使用や
保管はしない。
・ 本製品の上に、花瓶のような液体が入ったものを置かない。
・ 本製品に液体をこぼさない。
ご使用になる前に必ずお読みください
火災・感電・人身障害の危険を防止するには
記号は、注意(危険、警告を含む)を示しています。記号の中には、具体
的な注意内容が描かれています。左の図は「一般的な注意、警告、危険」を
表しています。
記号は、禁止(してはいけないこと)を示しています。記号の中には、
具体的な注意内容が描かれることがあります。左の図は「分解禁止」を表
しています。
記号は、強制(必ず行うこと)を示しています。記号の中には、具体的
な注意内容が描かれることがあります。左の図は「守らなければならない
こと」を 表しています。
以下の指示を守ってください
警告
○ 異物が内部に入ったとき
○ 製品に異常や故障が生じたとき
この注意事項を無視した取り扱いをすると、死
亡や重傷を負う可能性があります
保証規定(必ずお読みください)
本保証書は、保証期間中に本製品を保証するもので、付属品類(ヘッドホンなど)は
保証の対象になりません。保証期間内に本製品が故障した場合は、保証規定によっ
て無償修理いたします。
1. 本保証書の有効期間はお買い上げ日より1か年です。
2. 次の修理等は保証期間内であっても有償となります。
• 消耗部品(電池、スピーカー、真空管、フェーダーなど)の交換。
• お取扱い方法が不適当のために生じた故障。
• 天 災( 火災、浸水等)によって生じた故障。
• 故障の原因が本製品以外の他の機器にある場合。
• 不当な改造、調整、部品交換などにより生じた故障または損傷。
• 保証書にお買い上げ日、販売店名が未記入の場合、または字句が書き替えられ
ている場合。
• 本保証書の提示がない場合。
尚 、当 社が修理した部分が再度故障した場合は、保証期間外であっても、修理し
た日より3か月以内に限り無償修理いたします。
3. 本保証書は日本国内においてのみ有効です。
This warranty is valid only in Japan.
4. お客様が保証期間中に移転された場合でも、保証は引き続きお使いいただけま
す。詳しくは、お客様相談窓口までお問い合わせください。
修理、運送費用が製品の価格より高くなることがありますので、あらかじめお客様相
5.
談窓口へご相談ください。発送にかかる費用は、お客様の負担とさせていただきます。
6. 修理中の代替品、商品の貸し出し等は、いかなる場合においても一切行っており
ません。
本製品の故障、または使用上生じたお客様の直接、間接の損害につきましては、弊社
は一切の責任を負いかねますのでご了承ください。
本保証書は、保証規定により無償修理をお約束するためのもので、これよりお
客様の法律上の権利を制限するものではありません。
■お願い
1. 保証書に販売年月日等の記入がない場合は無効となります。記入できないとき
は、お買い上げ年月日を証明できる領収書等と一緒に保管してください。
保証書は再発行致しませんので、紛失しないように大切に保管してください。
2.
・ 濡れた手で本製品を使用しない。
注意
・ 正常な通気が妨げられない所に設置して使用する。
・ テレビ、電子機器などから十分に離して使用する。
本製品をテレビ等の横に設置すると、本製品の磁場によってテレビ等の故障の原因
にな るこ とがあります。
・ 外装のお手入れは、乾いた柔らかい布を使って軽く拭く。
・長時間使用しないときは、電池の液漏れを防ぐために電池を抜く。
・電池は幼児の手の届かないところへ保管する。
・電池を過度の熱源(日光、火など)にさらさない。
・ スイッチやツマミなどに必要以上の力を加えない。
故障 の 原 因 に なりま す 。
・ 外装のお手入れに、ベンジンやシンナー系の液体、コンパウンド質、強燃性の
ポリッシャーは使用しない。
・ 不安定な場所に置かない。
本製品が落下してお客様がけがをしたり、本製品が破損する恐れがあります。
・ 本製品の上に乗ったり、重いものをのせたりしない。
本製品が落下または損傷してお客様がけがをしたり、本製品が破損する恐れがあります。
・ 本製品の隙間に指などを入れない。
お客様がけがをしたり、本製品が破損する恐れがあります。
・ 本製品に前後方向から無理な力を加えない。
本製品が落下してお客様がけがをしたり、本製品が破損する恐れがあります。
■ワイヤレス(無線)についての注意事項
本製品の使用周波数は2.4GHz帯です。この周波数帯では、電子レンジなどの産業・科
学・医療用機器のほか、工場の製造ラインなどで使用されている移動体識別用の構内無
線局(免許を要する無線局)や、特定小電力無線局(免許を要しない無線局)、アマチュア
無線局(免許を要する無線局)が運用されています。(以下「他の無線局」と呼ぶ)
他の無線機器との電波干渉を防止するために、下記事項に注意してご使用ください。
1. 本製品を使用する前に、近くで「他の無線局」が運用されていないことを確認してくださ
い。また重大な影響を及ぼす恐れのある場所(医療機器のそば、航空機内など)では使用し
ないでください。
2. 万一、本製品と「他の無線局」の間で電波干渉の事例が発生した場合には、速やかに使用を
停止した上で、混信回避のための処置(例えば使用場所の変更など)を行ってください。
3. 不明な点、その他お困りのことが起きたときは、弊社の「お客様相談窓口」へお問い合わせ
ください。
* Apple、iPad、iPhone、Mac、iOSおよびMac OSは、Apple Inc.の登録商標です。
* Windows 7およびWindows 8は、Microsoft Corporationの登録商標です。
* BluetoothはBluetooth SIG, Inc.の登録商標です。
* すべての製品名および会社名は、各社の商標または登録商標です。
この注意事項を無視した取り扱いをすると、傷害を負う可能性
または物理的損害が発生する可能性があります
保証書
コルグ nanoKONTROL Studio
本保証書は、保証規定により無償修理をお約束するものです。
お買い上げ日 年 月 日
販売店名
アフターサービス
修理および商品のお取り扱いについてのご質問、ご相談は、お客様相談窓口へお問
い合わせください。
お客様相談窓口
受付時間:月曜~金曜 10:00~17:00(祝祭日、窓口休業日を除く)
※PHS等一部の電話ではご利用できません。固定電話または携帯
電話からおかけください。
● サービス・センター: 〒168-0073 東京都杉並区下高井戸1-15-12
Conservez ce manuel
Après avoir lu ce manuel, veuillez le conserver soigneusement pour toute référence
ultérieure.
Evitez toute intrusion d’objets ou de liquide
Ne placez jamais de récipient contenant du liquide près de l’instrument. Si le liquide
se renverse ou coule, il risque de provoquer des dommages, un court-circuit ou une
électrocution. Veillez à ne pas laisser tomber des objets métalliques dans le boîtier
(trombones, par ex.).
Le présent appareil est conforme aux CNR d'Industrie Canada applicables aux
appareils radio exempts de licence. L'exploitation est autorisée aux deux conditions
suivantes : (1) l'appareil ne doit pas produire de brouillage, et (2) l'utilisateur de
l'appareil doit accepter tout brouillage radioélectrique subi, même si le brouillage
est susceptible d'en compromere le fonctionnement.
- Apple, iPad, iPhone, Mac, iOS et Mac OS sont des marques commerciales d’Apple
- Windows 7 et Windows 8 sont des marques commerciales de Microsoft Corporation
- Bluetooth est une marque déposée de Bluetooth SIG, Inc.
- Tous les noms de produits et de sociétés sont des marques commerciales ou déposées
Vorsichtsmaßnahmen
Aufstellungsort
Vermeiden Sie das Aufstellen des Geräts an Orten, an denen.
• es direkter Sonneneinstrahlung ausgeset ist;
• hohe Feuchtigkeit oder Extremtemperaturen auftreten können;
• Staub oder Schmu in großen Mengen vorhanden sind;
• das Gerät Erschüerungen ausgeset sein kann.
• in der Nähe eines Magnetfeldes.
Stromversorgung
Stellen Sie den Neschalter auf OFF, wenn das Gerät nicht benut wird. Wenn Sie das
Gerät über einen längeren Zeitraum nicht benuen, nehmen Sie die Baerien heraus,
damit sie nicht auslaufen.
Störeinflüsse auf andere Elektrogeräte
Dieser kann bei in der Nähe aufgestellten Rundfunkemp-fänger oder Fernsehgeräten
Empfangsstörungen hervorrufen. Betreiben Sie solche Geräte nur in einem geeigneten
Abstand von diesem Erzeugnis.
Bedienung
Vermeiden Sie bei der Bedienung von Schaltern und Reglern unangemessenen
Kraftaufwand.
Reinigung
Bei auftretender Verschmuung können Sie das Gehäuse mit einem trockenen, sauberen Tuch abwischen. Verwenden Sie keinerlei Flüssigreiniger wie beispielsweise Reini-
gungsbenzin, Verdünner- oder Spülmiel. Verwenden Sie niemals brennbare Reiniger.
Bedienungsanleitung
Bewahren Sie diese Bedienungsanleitung gut auf, falls Sie sie später noch einmal
benötigen.
Flüssigkeiten und Fremdkörper
Stellen Sie niemals Behältnisse mit Flüssigkeiten in der Nähe des Geräts auf. Wenn Flüssigkeit in das Gerät gelangt, können Beschädigung des Geräts, Feuer oder ein elek-trischer
Schlag die Folge sein. Beachten Sie, daß keinerlei Fremdkörper in das Gerät gelangen.
Korg Inc. erklärt hiermit, dass dieses Gerät die Anforderungen der
Richtlinie 1999/5/EC erfüllt.
Diese Entsprechungserklärung (DoC) für die 1999/5/EC-Richtlinie nden
Sie in der Bedienungsanleitung dieses Geräts auf der Korg-Webpage
(www.korg.com).
des Schadstoes. Cd oder NiCd steht für Cadmium, Pb für Blei und Hg für Queck
silber.
- Apple, iPad, iPhone, Mac, iOS und Mac OS sind in den USA und anderen Ländern
- Windows 7 und Windows 8 sind in den USA und anderen Ländern eingetragene
- Bluetooth ist ein eingetragenes Markenzeichen der Bluetooth SIG, Inc.
- Alle Produkt- und Firmennamen sind Warenzeichen oder eingetragene Warenzeichen
Precauciones
Ubicación
El uso de la unidad en las siguientes ubicaciones puede dar como resultado un mal
funcionamiento:
• Expuesto a la luz directa del sol
• Zonas de extremada temperatura o humedad
• Zonas con exceso de suciedad o polvo
• Zonas con excesiva vibración
• Cercano a campos magnéticos
Fuente de alimentación
Apague la unidad cuando no la use la batería. Retire las baterías si no va a usar la
unidad durante un tiempo largo.
Interferencias con otros aparatos
Las radios y televisores situados cerca pueden experimentar interferencias en la
recepción. Opere este dispositivo a una distancia prudencial de radios y televisores.
Manejo
Para evitar una rotura, no aplique excesiva fuerza a los conmutadores o controles.
Cuidado
Si exterior se ensucia, límpiese con un trapo seco. No use líquidos limpiadores como
disolvente, ni compuestos inamables.
Guarde este manual
Después de leer este manual, guárdelo para futuras consultas.
Mantenga los elementos externos alejados del equipo
Nunca coloque ningún recipiente con líquido cerca de este equipo, podría causar un
cortocircuito, fuero o descarga eléctrica. Cuide de que no caiga ningún objeto metálico
dentro del equipo.
- Apple, iPad, iPhone, Mac, iOS y Mac OS son marcas comerciales de Apple Inc.,
- Windows 7 y Windows 8 son marcas comerciales de Microsoft Corporation en los
- Bluetooth es una marca registrada de Bluetooth SIG, Inc.
- Todos los nombres de productos y compañías son marcas comerciales o marcas
Inc. enregistrées aux États-Unis et dans d’autres pays.
aux États-Unis et dans d’autres pays.
de leur détenteur respectif.
Entsprechungserklärung für die Richtlinien der europäischen Union
Hinweis zur Entsorgung (Nur EU)
Wenn Sie das Symbol mit der „durchgekreuzten Mülltonne“ auf Ihrem
Produkt, der dazugehörigen Bedienungsanleitung, der Baerie oder der
Verpackung sehen, müssen Sie das Produkt in der vorgeschriebenen Art und
Weise entsorgen um Schäden an der menschlichen Gesundheit und der
Umwelt zu vermeiden. Baerien oder Akkus, die Schadstoe enthalten, sind
auch mit dem Symbol einer durchgekreuzten Mülltonne gekennzeichnet. In
der Nähe zum Mülltonnensymbol bendet sich die chemische Bezeichnung
eingetragene Markenzeichen von Apple Inc.
Markenzeichen von Microsoft.
der betreenden Eigentümer.
Declaración de Conformidad con las Directivas de la Unión Europea
Por la presente, Korg Inc. declara que este producto cumple con los
requisitos de la Directiva 1999/5/EC.
Puede consultar la Declaración de Conformidad (DoC) con la Directiva
1999/5/EC en el Manual del Usuario de este producto, disponible en el
sitio web de Korg (www.korg.com).
Nota respecto a residuos y deshechos (solo UE)
Si aparece el símbolo del cubo de basura tachado sobre un producto, su
manual de usuario, la batería, o el embalaje de cualquiera de éstos, signica
que cuando tire dichos artículos a la basura, ha de hacerlo en acuerdo con la
normativa vigente de la Unión Europea para prevenir daños a la salud pú
blica y al medioambiente. Le rogamos que se ponga en contacto con su ocina o ministerio de medioambiente para más detalles. Si la batería contiene
metales pesados por encima del límite permitido, habrá un símbolo de un
material químico, debajo del símbolo del cubo de basura tachado.
registradas en los EE. UU. y en otros países.
EE. UU. y en otros países.
registradas de sus respectivos propietarios.
-
-
Page 3
Introduction
nanoKONTROL Studio
nanoKONTROL Studio
nanoKONTROL Studio
Using a wireless connection
Thank you for purchasing the Korg nanoKONTROL Studio
Mobile MIDI controller. To ensure trouble-free enjoyment,
carefully read this Quick Start Guide and the Owner’s Manual
and use the product correctly.
For details on using the various functions and on editing the
TIP
MIDI messages that are transmitted, refer to the Owner’s Manual.
Download the Owner’s Manual from the Korg website.
Specications
Wireless method: Bluetooth low energy
Jacks: USB port (micro Type B)
Power supply: USB bus power supply or two AAA batteries
(alkaline or nickel-metal hydride batteries)
Battery service life:
Current consumption: 500 mA or less
Dimensions (W × D × H)
Weight: 459 g/1.01 lbs (excluding batteries)
Included items: Two AAA alkaline batteries, USB cable,
Approx. 10 hours (when using alkaline batteries:
Battery life will vary depending on the batteries
used and on the conditions of use.)
: 278 × 160 × 33 mm/ 10.94” × 6.29” × 1.29”
Quick Start Guide
Operating requirements
Windows (USB connection)
Mac (USB connection)
Mac (wireless connection)
iOS (wireless connection)
nanoKONTROL Studio operation is not guaranteed with all
devices that satisfy these operating requirements.
* For the purpose of improvement, the specications and appearance
are subject to change without notice.
: Microsoft Windows 7 SP1 or later (32 bit/64 bit)
: OS X 10.9 Mavericks or later
: Mac installed with OS X 10.10 Yosemite or later
and compatible with Bluetooth 4.0
: iPhone/iPad installed with iOS 8 or later and
compatible with Bluetooth 4.0
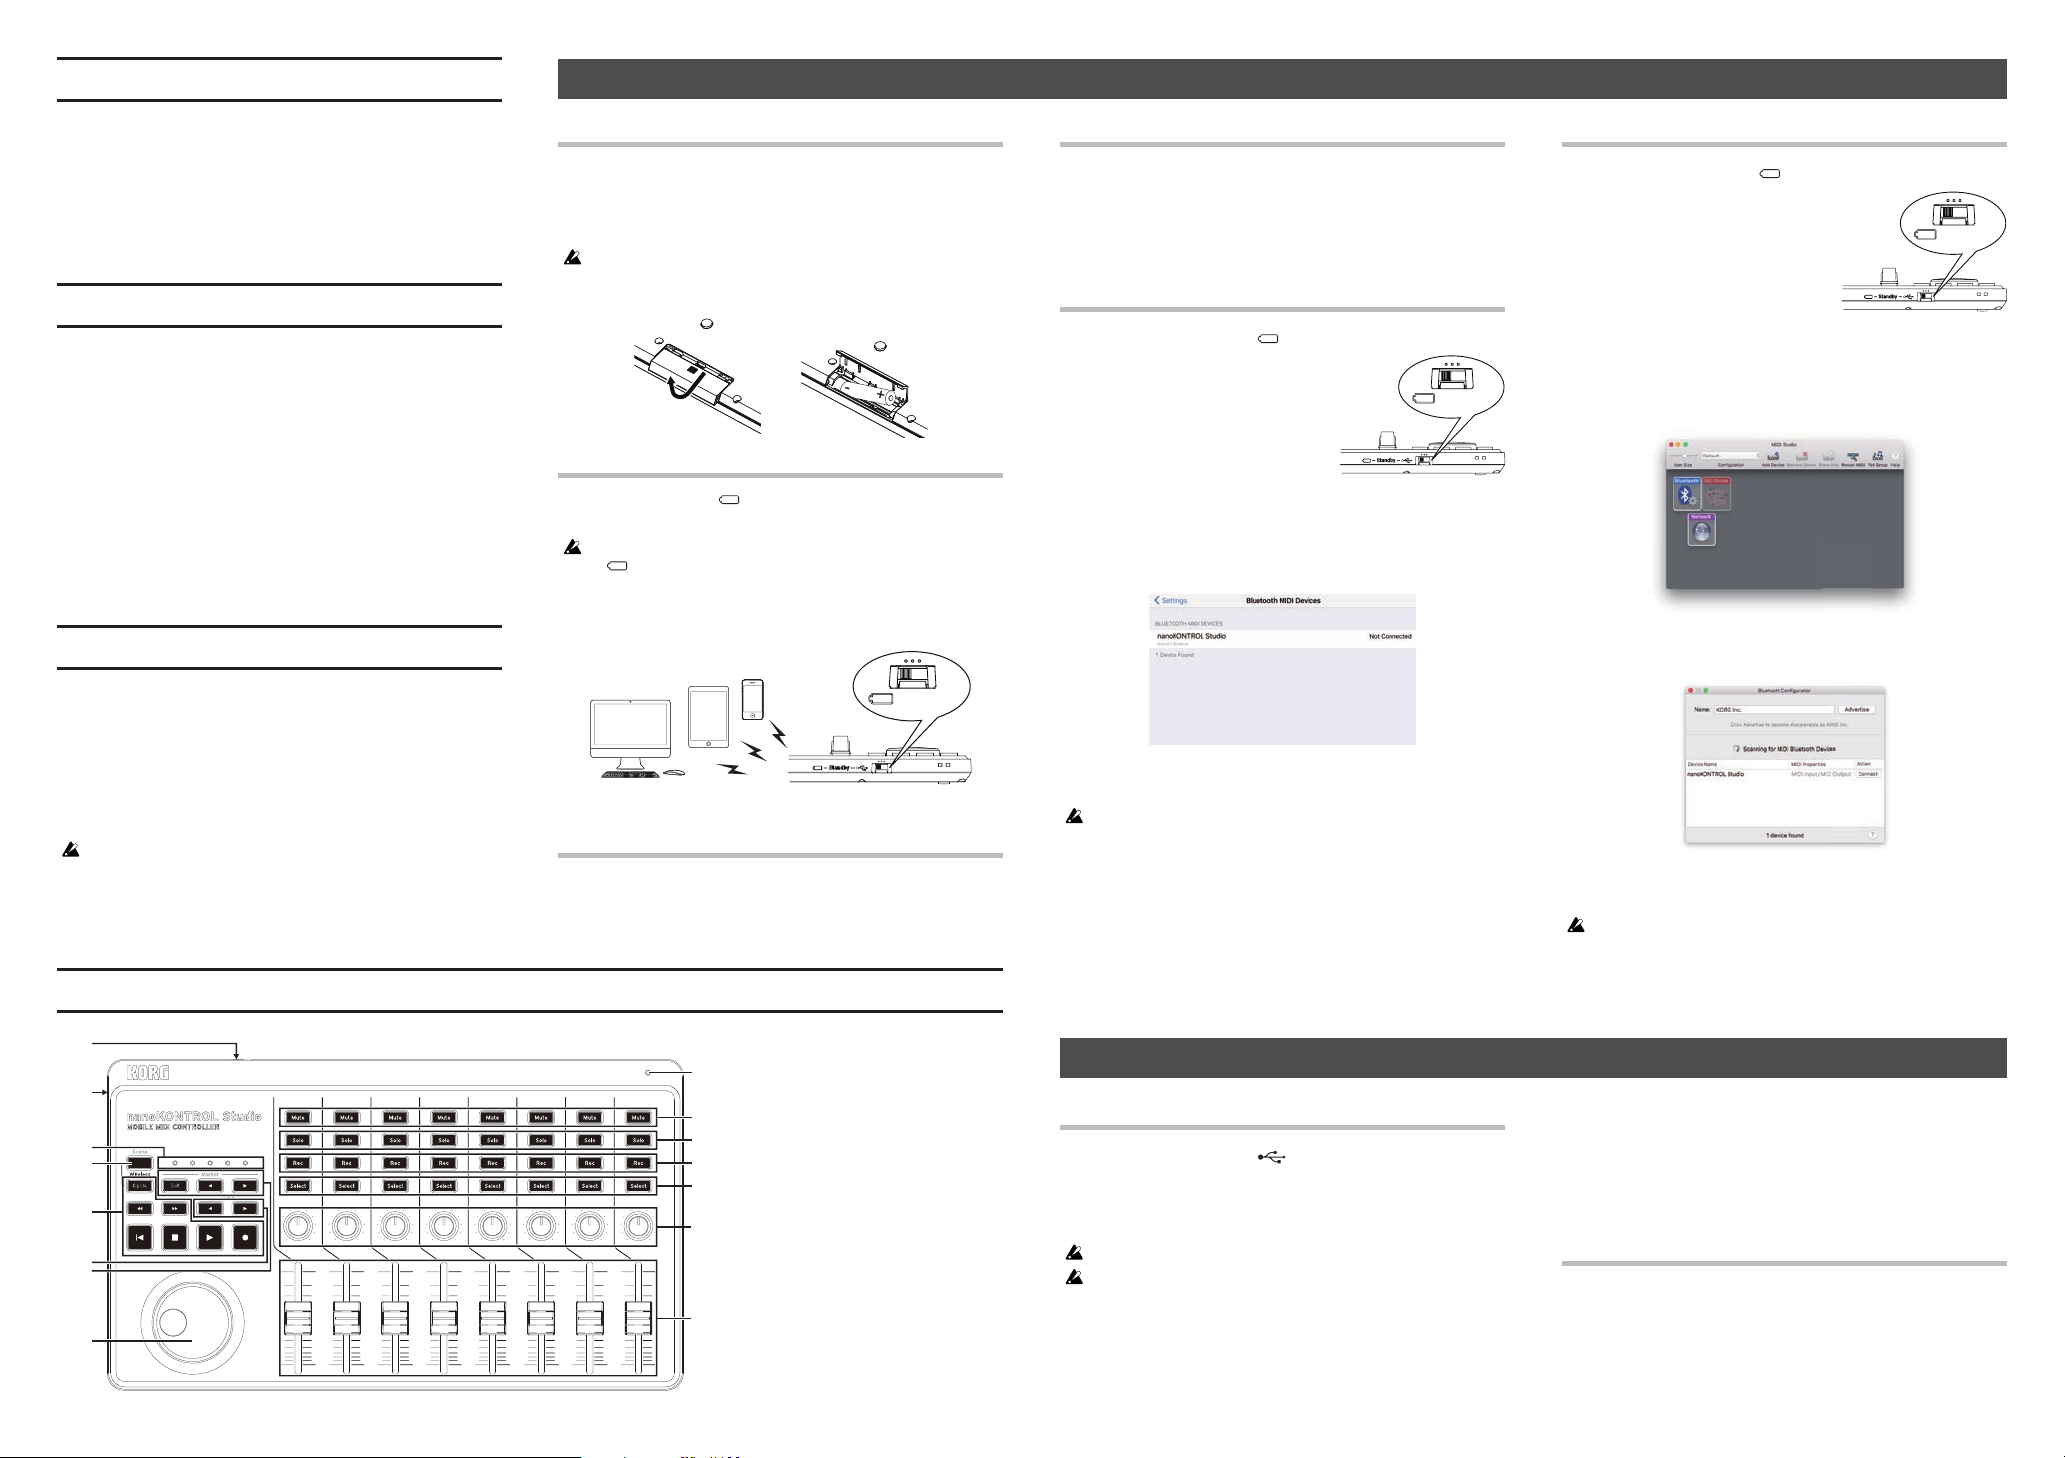
Part names
Installing Batteries
Make sure that the mode switch is set to “Standby”, and then
slide out the battery cover on the rear to open it. Making sure to
observe the correct polarity, insert the batteries, and then close
the battery cover.
If a malfunction occurs that cannot be resolved no matter how
many times the nanoKONTROL Studio is turned o, then on,
remove the batteries, and then install them again.
Turning On the Power
Set the mode switch to “ (Battery)”. The nanoKONTROL Studio
turns on (Battery mode).
When using the nanoKONTROL Studio with the mode switch set
to “
(Battery)”, the batteries will become depleted, even with a
USB connection. In addition, the nanoKONTROL Studio cannot
be used as a USB-MIDI device, even if it is connected to a computer
using a USB cable.
(Battery)
Turning O the Power
Set the mode switch to “Standby”. The nanoKONTROL
Studio and the power LED turn o.
Auto Power-O Function
In Battery mode, the nanoKONTROL Studio is automatically
turned o if no operation is performed for an extended period
of time.
This function can be disabled in KORG KONTROL Editor. For
details, refer to the Owner’s Manual.
Connecting to an iPhone/iPad
1. Set the mode switch to “ (Battery)”.
The nanoKONTROL Studio turns
on, and the power LED blinks to
indicate the connection standby
mode.
In order to make a wireless connection
TIP
with an iPhone/iPad, the iPhone/iPad
must be installed with iOS 8 or later and
be compatible with Bluetooth 4.0.
(Battery)
Connecting to a Mac
1. Set the mode switch to “
The nanoKONTROL Studio turns
on, and the power LED blinks to
indicate the connection standby
mode.
In order to make a wireless connection
TIP
with a Mac, the Mac must be installed
with OS X 10.10 Yosemite or later and be
compatible with Bluetooth 4.0.
2. On the Mac, open “Applications” " “Utilities”, star t “Audio
MIDI Setup”, and then open the “MIDI Studio” window by
selecting “Show MIDI S tudio” from the “Window” menu.
(Battery)
”.
(Battery)
2. On the iPhone/iPad, start an iOS app compatible with Apple
Bluetooth Low Energy MIDI, and then set up the Bluetooth
connection in the app.
3. Double-click the “Bluetooth” icon to open the Bluetooth
Conguration window, and then click the Connect button
for “nanoKONTROL Studio”.
3. When connected, the power LED changes from blinking to
lit.
In order to use the nanoKONTROL Studio functions, settings must
be specied to match your app. Refer to the Owner’s Manual and
specify the settings.
When connected, the power LED changes from blinking to
lit.
In order to use the nanoKONTROL Studio functions, settings must
be specied to match your app. Refer to the Owner’s Manual and
specify the settings.
1
2
3
4
5
6
7
8
9
10
11
12
13
14
15
1. Mode switch
2. USB port
3. Scene LEDs
4. Scene button
5. Transport buttons
6. Track t/u buttons
7. Marker buttons
8. Jog wheel
9. Power LED
10. Mute buttons
11. Solo buttons
12. Rec buttons
13. Select buttons
14. Knobs
15. Sliders
Using a USB connection
Making Connections and Turning On the Power
1. Set the mode switch to “ (USB)”.
2.
Use the included USB cable to connect the nanoKONTROL Studio
to a USB port on your computer. The nanoKONTROL Studio
turns on, and the power LED lights up.
The included USB cable must be used.
In order to use the nanoKONTROL Studio functions, settings must
be specied to match your app. Refer to the Owner’s Manual and
specify the settings.
When you rst connect the nanoKONTROL Studio to your Windows
TIP
computer, a driver will be installed automatically.
With the driver pre-installed with Windows, nanoKONTROL Studio
TIP
cannot be used by multiple applications simultaneously. If you
want to use the nanoKONTROL Studio with multiple applications
simultaneously, you must install the KORG USB-MIDI driver.
Download the KORG USB-MIDI driver f rom the Korg website.
(http://ww w.korg.com/)
Turning O the Power
Set the mode switch to “Standby”. The nanoKONTROL
Studio and the power LED turn o.
Page 4

Introduction
nanoKONTROL Studio
nanoKONTROL Studio
nanoKONTROL Studio
Utilisation d’une connexion sans l
Merci d’avoir choisi le nanoKONTROL Studio Mobile MIDI
controller de Korg. Pour garantir une utilisation sans problème
de cet instrument, veuillez lire attentivement le présent Guide
de prise en main ainsi que le Manuel d’utilisation, et suivre
toutes les consignes d’utilisation du produit.
Pour des détails sur l’utilisation des diverses fonctions de l’instrument
ASTUCE
et sur l’édition des messages MIDI transmis, voyez son Manuel
d’utilisation. Le Manuel d’utilisation peut être téléchargé sur le site
internet de Korg.
Fiche technique
Méthode sans l: Bluetooth Low Energy
Connecteurs: Port USB (de type micro B)
Alimentation: Via le bus USB ou deux piles AAA (alcalines ou
à l’hydrure métallique de nickel)
Autonomie des piles: Environ 10 heures (avec des piles alcalines:
L’autonomie des piles varie selon le type de
piles utili sées et les conditions d’utilisation.)
Consommation électrique
Dimensions (L × P × H)
Poids: 459 g (sans les piles)
Accessoires fournis: Deux piles AAA alcalines fournies, câble USB,
: 500 mA max.
: 278 × 160 × 33 mm
Guide de prise en main
Conguration requise
Mise en place des piles
Vériez que le commutateur de mode est réglé sur “Standby”,
puis glissez le couvercle du compartiment des piles au dos de
l’instrument pour l’ouvrir. Insérez les piles dans le compartiment
en respectant les indications de
polarité, puis refermez le couvercle.
Si une erreur se produit durant le fonctionnement et que cette
erreur ne peut être corrigée en mettant le nanoKONTROL Studio
hors tension puis sous tension, essayez de remédier au problème
en retirant les piles de l’instrument puis en les remettant en place.
Mise sous tension
Réglez le commutateur de mode sur “ ” (piles).
Le nanoKONTROL Studio est mis sous tension (mode piles).
Quand vous utilisez le nanoKONTROL Studio avec son
commutateur de mode sur “
- même dans le cas d’une connexion USB. En outre, le
nanoKONTROL Studio ne peut pas être utilisé comme dispositif
USB MIDI, même s’il est branché à l’ordinateur avec un câble USB.
” (piles), les piles s’usent
Fonction de coupure automatique de
l’alimentation
En mode piles, le nanoKONTROL Studio est automatiquement
mis hors tension quand il reste un certain temps sans être
manipulé.
Cette fonction peut être désactivée dans le KORG KONTROL
Editor. Pour en savoir plus, voyez le Manuel d’utilisation.
Connexion à un iPhone/iPad
1.
Réglez le commutateur de mode
” (piles).
sur “
Le nanoKONTROL Studio est
mis sous tension et son témoin
d’alimentation clignote pour
indiquer que la connexion est en
veille.
Pour pouvoir relier l’instrument à un iPhone/iPad via une connexion
ASTUCE
sans l, il faut que le dispositif en question tourne sous iOS 8 ou une
version plus récente et soit compatible Bluetooth 4.0.
2.
Lancez sur l’iPhone/iPad une application iOS compatible
Apple Bluetooth Low Energy MIDI, puis réglez la connexion
Bluetooth au sein de l’appli.
(Piles)
Connexion à un Mac
1.
Réglez le commutateur de mode
” (piles).
sur “
Le nanoKONTROL Studio est
mis sous tension et son témoin
d’alimentation clignote pour
indiquer que la connexion est en
veille.
Pour pouvoir relier l’instrument à un Mac via une connexion sans l,
ASTUCE
il faut que l’ordinateur en question tourne sous OS X 10.10 Yosemite
ou une version plus récente et soit compatible Bluetooth 4.0.
2.
Ouvrez les dossiers “Applications” " “Utilities” du Mac, lancez
“Audio MIDI Setup” et ouvrez la fenêtre “MIDI Studio” en
sélectionnant “Show MIDI S tudio” sous le menu “ Window”.
3.
Double-cliquez sur l’icône “Bluetooth” pour ouvrir la fenêtre
Bluetooth Conguration, puis cliquez sur le bouton Connect
pour “nanoKONTROL Studio”.
(Piles)
Windows (connexion USB)
Mac (connexion USB)
Mac (connexion sans l)
iOS (connexion sans l)
Même si votre conguration répond aux spécications énoncées ci-dessus,
il peut arriver que le nanoKONTROL Studio ne fonctionne pas.
* Les caractéristiques et l’aspect du produit sont susceptibles d’être
modiés sans avis préalable en vue d’une amélioration.
: Microsoft Windows 7 SP1 ou version ultérieure
(32 bits/64 bits)
: OS X 10.9 Mavericks ou version ultérieure
: Mac tournant sous OS X 10.10 Yosemite ou
version ultérieure et compatible Bluetooth 4.0
: iPhone/iPad tournant sous iOS 8 ou version
ultérieure et compatible Bluetooth 4.0
Commandes de l’instrument
1
2
3
4
5
6
7
8
(Piles)
Mise hors tension
Réglez le commutateur de mode sur “Standby”. Le nanoKONTROL
Studio est mis hors tension et son témoin d’alimentation s’éteint.
1. Commutateur de mode
9
10
11
12
13
14
15
2. Port USB
3. Témoins Scene
4. Boutons Scene
5. Boutons de transport
6. Boutons Track t/
u
7. Boutons Marker
8. Molette
9. Témoin d’alimentation
10. Boutons Mute
11. Boutons Solo
12. Boutons Rec
13. Boutons Select
14. Commandes
15. Curseurs
3.
Une fois la connexion établie, le témoin d’alimentation
cesse de clignoter et reste allumé.
Pour que les fonctions du nanoKONTROL Studio soient
disponibles, vous devez eectuer les réglages ad hoc
conformément à votre application. Eectuez les réglages en vous
reportant au Manuel d’utilisation.
Utilisation d’une connexion USB
Connexions et mise sous tension
1.
Réglez le commutateur de mode sur “ ” (USB).
2.
Raccordez le nanoKONTROL Studio à un port USB de votre
ordinateur avec le câble USB fourni. Le nanoKONTROL
Studio est mis sous tension et son témoin d’alimentation
s’allume.
Utilisez uniquement le câble USB fourni.
Pour que les fonctions du nanoKONTROL Studio soient
disponibles, vous devez eectuer les réglages ad hoc
conformément à votre application. Eectuez les réglages en vous
reportant au Manuel d’utilisation.
La première fois que vous raccordez le nanoKONTROL Studio à
ASTUCE
votre ordinateur Windows, un pilote est automatiquement installé.
Une fois la connexion établie, le témoin d’alimentation
cesse de clignoter et reste allumé.
Pour que les fonctions du nanoKONTROL Studio soient
disponibles, vous devez eectuer les réglages ad hoc
conformément à votre application. Eectuez les réglages en vous
reportant au Manuel d’utilisation.
Le pilote préinstallé dans Windows ne permet pas d’utiliser le
ASTUCE
nanoKONTROL Studio simultanément avec plusieurs applications.
Pour un accès multiple simultané au nanoKONTROL Studio, vous
devez installer le pilote KORG USB-MIDI.
Téléchargez le pilote KORG USB-MIDI sur le site internet de Korg.
(http://ww w.korg.com/)
Mise hors tension
Réglez le commutateur de mode sur “Standby”.
Le nanoKONTROL Studio est mis hors tension et son témoin
d’alimentation s’éteint.
Page 5

Einleitung
nanoKONTROL Studio
nanoKONTROL Studio
nanoKONTROL Studio
Betrieb mit Wireless-Verbindung
Danke, dass Sie sich für einen nanoKONTROL Studio Mobile
MIDI controller von Korg entschieden haben. Lesen Sie diese
Blitzstart sowie die Bedienungsanleitung aufmerksam durch,
um Fehlbedienungen zu vermeiden und möglichst lange
Freude an Ihrem neuen Gerät zu haben.
Hinweise zu den diversen Funktionen sowie zum Bearbeiten von MIDI-
TIPP
Nachrichten nden Sie in der Bedienungsanleitung. Diese können Sie
von der Korg Website herunterladen.
Spezikationen
Wireless Verbindungsart
Anschlüsse: USB-Port (micro Typ B)
Spannungsversorgung: Über USB-Bus oder zwei AAA-Batterien
Batterielebensdauer:
Stromverbrauch: 500 mA oder weniger
Abmessungen (B x T x H) :
Gewicht: 459 g (ohne Batterien)
Im Lieferumfang enthalten
: Bluetooth low energy
(Alkalibatterien oder Nickel-Metallhydridakkus)
Etwa 10 Stunden (bei Verwendung von Alkalibatterien
: Die Batteriebe triebsdauer hängt von der Batterie
sowie den Einsatzbedingungen ab.)
278 × 160 × 33 mm
: Zwei AAA-Alkalibatterien, USB-Kabel, Blitzstart
Betriebsanforderungen
Windows (USB-Anschluss): Microsoft Windows 7 SP1 oder später (32 Bit/64 Bit)
Mac (USB-Anschluss)
Mac (Wireless-Anschluss)
iOS (Wireless-Anschluss)
: OS X 10.9 Mavericks oder später
: Mac mit OS X 10.10 Yosemite oder später sowie
kompatibel mit Bluetooth 4.0
: iPhone/iPad mit iOS 8 oder später sowie
kompatibel mit Bluetooth 4.0
Batterien einsetzen
Achten Sie darauf, dass der Betriebsmodus-Schalter auf „Standby“
steht und schieben Sie den Batteriefachdeckel an der Rückseite
nach außen. Legen Sie die Batterien in der richtigen Polung ein
und schließen Sie den Batteriefachdeckel wieder.
Sollte eine Fehlfunktion auftreten, die auch nach mehrmaligem
Aus- und Einschalten des nanoKONTROL Studio weiterhin auftritt,
entnehmen Sie die Batterien und legen Sie sie erneut ein.
Gerät einschalten
Stellen Sie den Betriebsmodus-Schalter auf „ “ (Batterien). Der
nanoKONTROL Studio
Wenn Sie den nanoKONTROL Studio mi t auf „ “ (Batterien)
gestellten Betriebsmodus-Schalter betreiben, leeren sich die
Batterien auch bei einer USB-Verbindung. Zudem kann der
nanoKONTROL Studio nicht als USB-MIDI-Gerät verwendet
werden, selbst wenn er mit einem USB-Kabel an einen Computer
angeschlossen ist.
schaltet sich ein (Batteriemodus).
(Batterien)
Gerät ausschalten
Stellen Sie den Betriebsmodus-Schalter auf „Standby“.
Der nanoKONTROL Studio schaltet sich aus und die
Betriebsanzeige erlischt.
Energiesparfunktion
Im Batteriemodus schaltet sich der nanoKONTROL Studio
automatisch aus, wenn er über längere Zeit nicht bedient
wurde.
Sie können diese Funktion im KORG KONTROLEditor
deaktivieren. Hinweise hierzu nden Sie in der
Bedienungsanleitung.
Anschluss an ein iPhone/iPad
Anschluss an einen Mac
1. Stellen Sie den Betriebsmodus-Schalter
“ (Batterien).
auf „
Der nanoKONTROL Studio
schaltet sich ein und die blinkende
Betriebsanzeige zeigt den StandbyStatus der Verbindung an.
Für eine Wireless-Verbindung mit einem
TIPP
Mac benötigt dieser OS X 10.10 Yosemite
oder später und muss kompatibel mit Bluetooth 4.0 sein.
2.
Önen Sie in Ihrem Mac „
„Audio MIDI Setup“ und önen Sie das „MIDI Studio“
-Fenster durch Wählen von „Show MIDI Studio“ im Menü
Window“.
„
Applications
“ " „
Utilities“, starten Sie
(Batterien)
1. Stellen Sie den BetriebsmodusSchalter auf „
Der nanoKONTROL Studio
“ (Batterien).
(Batterien)
schaltet sich ein und die blinkende
Betriebsanzeige zeigt den StandbyStatus der Verbindung an.
Für eine Wireless-Verbindung mit einem
TIPP
iPhone/iPad benötigt dieses iOS 8 oder
später und muss kompatibel mit Bluetooth 4.0 sein.
2. Starten Sie auf Ihrem iPhone/iPad eine mit Apple Bluetooth
Low Energy MIDI kompatible iOS-App und bauen Sie die
3. Doppelklicken Sie das „Bluetooth“-Icon, um das Bluetooth
-Kongurationsfenster zu önen und klicken Sie auf den
Connect-Button für „nanoKONTROL Studio“.
Bluetooth Verbindung in der App auf.
Wir geben keine Garantie darauf, dass der nanoKONTROL Studio mit
sämtlichen Geräten funktioniert, die diese Betriebsanforderungen
erfüllen.
* Änderungen an Spezikationen und Design des Geräts im Sinne
einer Verbesserung bleiben vorbehalten.
Bauteile und Bedienelemente
1
2
3
4
5
6
7
8
9
10
11
12
13
14
15
1. Betriebsmodus-Schalter
2. USB-Port
3. Scene-LEDs
4. Scene-Taste
5. Transport-Tasten
6. Track t/u-Tasten
7. Marker-Tasten
8. Handrad
9. Betriebsanzeige
10. Mute-Tas ten
11. Solo-Tast en
12. Rec-Tasten
13. Select-Tasten
14. Regler
15. Schieberegler
3. Wenn die Verbindung steht, hört die Betriebsanzeige auf zu
blinken und leuchtet.
Um die Funktionen des nanoKONTROL Studio zu nutzen, müssen
zuerst die zu Ihrer App passenden Einstellungen vorgenommen
werden. Hinweise hierzu nden Sie in der Bedienungsanleitung.
Betrieb über USB-Anschluss
Anschlüsse vornehmen und Gerät einschalten
1. Stellen Sie den Betriebsmodus-Schalter auf „ “ (USB).
2. Schließen Sie den nanoKONTROL Studio mit dem
beiliegenden USB-Kabel an einen USB-Port Ihres Computers
an. Der nanoKONTROL Studio schaltet sich ein und die
Betriebsanzeige leuchtet.
Verwenden Sie unbedingt das beiliegende USB-Kabel.
Und die Funktionen des nanoKONTROL Studio zu nutzen, müssen
zuerst die zu Ihrer App passenden Einstellungen vorgenommen
werden. Hinweise hierzu nden Sie in der Bedienungsanleitung.
Wenn Sie Ihren nanoKONTROL Studio erstmals an Ihren Windows-
TIPP
Computer anschließen, wird automatisch ein Treiber installiert.
Wenn die Verbindung steht, hört die Betriebsanzeige auf zu
blinken und leuchtet.
Um die Funktionen des nanoKONTROL Studio zu nutzen, müssen
zuerst die zu Ihrer App passenden Einstellungen vorgenommen
werden. Hinweise hierzu nden Sie in der Bedienungsanleitung.
Mit dem von Windows vorinstallierten Treiber kann der
TIPP
nanoKONTROL Studio nicht von mehreren Anwendungen simultan
betrieben werden. Falls Sie den nanoKONTROL Studio mit mehreren
Anwendungen simultan betreiben wollen, müssen Sie den KORG USBMIDI-Treiber installieren.
Den KORG USB-MIDI-Treiber können Sie von der Korg-Website herunterladen.
(http://ww w.korg.com/)
Gerät ausschalten
Stellen Sie den Betriebsmodus-Schalter auf „Standby“.
Der nanoKONTROL Studio schaltet sich aus und die
Betriebsanzeige erlischt.
Page 6

Introducción
nanoKONTROL Studio
nanoKONTROL Studio
nanoKONTROL Studio
Uso de una conexión inalámbrica
Gracias por adquirir el controlador MIDI portátil
nanoKONTROL Studio de Korg. Para disfrutar de él sin
problemas, lea atentamente esta Guía de inicio rápido y el
Manual del usuario y utilice el producto correctamente.
Para más información sobre el uso de las diversas funciones y la
NOTA
edición de los mensajes MIDI que se transmiten, consulte el Manual
del usuario. Puede descargarse el Manual del usuario desde el sitio
web de Korg.
Especicaciones
Método inalámbrico: Bluetooth low energy
Jacks: puerto USB (tipo B micro)
Alimentación: por puerto USB o mediante dos baterías AAA
(alcalinas o híbridas níquel-metal)
Vida útil de las baterías:
Consumo de corriente: 500 mA o menos
Dimensiones (an. x pro. x al.)
Peso: 459 g (excluyendo baterías)
Accesorios incluidos: dos baterías alcalinas AAA, cable USB,
aprox. 10 horas (cuando se utilizan baterías alcalinas:
la duración de las pilas variará en función de las pilas
usadas y de las condiciones de uso.)
: 278 × 160 × 33 mm
Guía de inicio rápido
Requisitos de funcionamiento
Windows (conexión USB)
Mac (conexión USB)
Mac (conexión inalámbrica): Mac con sistema operativo OS X 10.10 Yosemite o
iOS (conexión inalámbrica): iPhone/iPad con sistema operativo iOS 8 o posterior
No está garantizado el funcionamiento del nanoKONTROL Studio
con todos los dispositivos que cumplan estos requisitos de
funcionamiento.
* Con objeto de posibles mejoras, las especicaciones y el diseño
están sujetos a cambios sin previo aviso.
: Microsoft Windows 7 SP1 o posterior
(32 bits/64 bits)
: OS X 10.9 Mavericks o posterior
posterior y compatible con Bluetooth 4.0
y compatible con Bluetooth 4.0
Nombres de las partes
Instalación de las baterías
Asegúrese de que el interruptor de modo está puesto en
(reposo), y a continuación deslice hacia afuera la tapa del
compartimento de las baterías que está en la parte posterior para
abrirla. Introduzca las baterías asegurándose de colocarlas con la
polaridad correcta y después cierre la tapa del compartimento de
las baterías.
Si se produce una anomalía de funcionamiento que no se puede
resolver apagando el nanoKONTROL Studio y volviéndolo a
encender cuantas veces sea necesario, quite las baterías y vuelva a
instalarlas.
“Standby”
Encendido de la alimentación
Ponga el interruptor de modo en “ ” (batería). El nanoKONTROL
se encenderá (modo de bateria).
Studio
Cuando utilice el nanoKONTROL Studio con el interruptor de
modo puesto en “
aunque haya una conexión USB. Además, el nanoKONTROL Studio
no se podrá utilizar como dispositivo USB-MIDI ni aunque esté
conectado a un ordenador mediante un cable USB.
” (batería), las baterías se consumirán incluso
(Batería)
Apagado de la alimentación
Ponga el interruptor de modo en “Standby” (reposo).
El nanoKONTROL Studio y el LED de corriente se apagarán.
Función de apagado automático
En el modo de batería, el nanoKONTROL Studio se apaga
automáticamente si no se lleva a cabo ninguna operación
durante un largo periodo de tiempo.
Esta función se puede desactivar en el Editor KORG KONTROL.
Para más información, consulte el Manual del usuario.
Conexión a un iPhone/iPad
1.
Ponga el interruptor de modo en
” (batería).
“
El nanoKONTROL Studio se
encenderá y el LED de corriente
parpadeará para indicar que está
en espera de conexión.
Para realizar una conexión inalámbrica
NOTA
con un iPhone/iPad, el iPhone/iPad debe tener instalado el sistema
operativo iOS 8 o posterior y ser compatible con Bluetooth 4.0.
2.
En el iPhone/iPad, inicie una app iOS que sea compatible
Apple Bluetooth Low Energy MIDI y a continuación
establezca la conexión Bluetooth en la app.
3.
Una vez conseguida la conexión, el LED de corriente dejará
de parpadear para permanecer encendido jo.
Para utilizar las funciones del nanoKONTROL Studio, es necesario
especicar los ajustes de conguración correspondientes a la app
que se vaya a utilizar. Consulte el Manual del usuario y especique
los ajustes.
(batería)
Conexión a un Mac
1.
Ponga el interruptor de modo en
” (batería)
“
El nanoKONTROL Studio se
encenderá y el LED de corriente
parpadeará para indicar que está
en espera de conexión.
Para realizar una conexión inalámbrica
NOTA
con un Mac, este debe tener instalado el sistema operativo OS X 10.10
Yosemite o posterior y ser compatible con Bluetooth 4.0.
2.
En el Mac, abra “Applications” " “Utilities”, inicie “Audio
MIDI Setup”, y después abra la ventana “MIDI Studio”
seleccionando “Show MIDI Studio” del menú “Window”.
3.
Haga doble clic en el icono “Bluetooth” para abrir la ventana
de Conguración de Bluetooth y después haga clic en el
botón Conectar correspondiente al “nanoKONTROL Studio”.
Una vez conseguida la conexión, el LED de corriente dejará
de parpadear para permanecer encendido jo.
Para utilizar las funciones del nanoKONTROL Studio, es necesario
especicar los ajustes de conguración correspondientes a la app
que vaya a utilizar. Consulte el Manual del usuario y especique los
ajustes.
.
(batería)
1
2
3
4
5
6
7
8
9
10
11
12
13
14
15
1. Interruptor de modo
2. Puerto USB
3. LED de escenas
4. Botón Scene
5. Botones de transposición
6. Botones de pista t/
u
7. Botones Marker
8. Rueda de selección
9. LED de corriente
10. Botones Mute
11. Botones Solo
12. Botones Rec
13. Botones Select
14. Controles giratorios
15. Deslizantes
Uso de una conexión USB
Realización de las conexiones y encendido de
la alimentación
1.
Ponga el interruptor de modo en “ ” (USB).
2.
Utilice el cable USB incluido para conectar el nanoKONTROL
Studio al puerto USB de un ordenador.
Studio se encenderá y se iluminará el LED de corriente.
Debe utilizarse el cable USB incluido.
Para utilizar las funciones del nanoKONTROL Studio, es necesario
especicar los ajustes de conguración correspondientes a la app
que vaya a utilizar. Consulte el Manual del usuario y especique los
ajustes.
Cuando conecte por primera vez el nanoKONTROL Studio
NOTA
a un ordenador Windows, se instará un controlador (driver)
automáticamente en dicho ordenador.
El nanoKONTROL
Con el controlador (driver) que viene preinstalado con Windows, el
NOTA
nanoKONTROL Studio no se puede utilizar con varias aplicaciones
simultáneamente. Si desea utilizar el nanoKONTROL Studio con
varias aplicaciones simultáneamente, deberá instalar el controlador
(driver) KORG USB-MIDI .
Puede descargar el controlador (driver) KORG USB-MIDI desde el sitio
web de Korg: (http://www.korg.com/)
Apagado de la alimentación
Ponga el interruptor de modo en “Standby” (reposo).
El nanoKONTROL Studio y el LED de corriente se apagarán.
Page 7

はじめに
nanoKONTROL Studio
nanoKONTROL Studio
nanoKONTROL Studio
ワイヤレスで使う
こ の た び は、 コ ル グ・ モ バ イ ル MIDI コ ン ト ロ ー ラ ー
nanoKONTROL Studio をお買い上げいただきまして、まこ
とにありがとうございます。本製品を末永くご愛用いただくた
めにも、このクイック・スタート・ガイドと取扱説明書をよく
お読みになって正しい方法でご使用ください。
機能の使い方や、送信する MIDI メッセージの編集方法は、取扱説
TIP
明書を参照してください。取扱説明書は、コルグ・ウェブサイトよ
りダウンロードしてください。
仕様
無線方式 : Bluetooth Low Energy
接続端子 : USB 端子(micro B type)
電源 : USB バス電源方式、または単 4 形電池(アル
カリ乾電池またはニッケル水素電池)2 本
電池寿命 : 約 10 時間(アルカリ乾電池使用時 : 使用電池、
使用状況 により変動します)
消費電流 : 500 mA 以下
(W×D×H)
外形寸法
質量: 459 g(電池含まず)
付属品 : 動作確認用単 4 形アルカリ乾電池× 2、
: 278 x 160 x 33 mm
USB ケーブル、クイック・スタート・ガイド
動作環境
Windows (USB 接続 )
Mac(USB 接続): OS X 10.9 Mavericks 以降
Mac(
ワイヤレス接続
ワイヤレス接続
iOS(
この動作環境を満たす、すべてのデバイスでの動作を保証するもの
ではありません。
※ 仕様および外観は、改良のため予告なく変更することがあります。
:
Microsoft Windows 7 SP1 以降(32bit/64bit)
): OS X 10.10 Yosemite 以降がインストールさ
れ、Bluetooth 4.0 に対応した Mac
): iOS 8 以降がインストールされ、Bluetooth 4.0
に対応した iPhone/iPad
各部の名称
電池の入れ方
モード・スイッチが「Standby」になっていることを確認し、
裏側にある電池カバーをスライドしながら開けます。極性に気
をつけて電池を入れ、電池カバーを閉めます。
誤動作が発生し、電源を何度か入れなおしても改善しないときは、
電池をいったんはずして、入れ直してください。
付属の電池は動作確認用のため、通常より寿命が短いときがありま
す。
電源の入れ方
モード・スイッチを「 (Battery)」に切り替えると電源が入
ります(Battery モード)。
モー ド・ ス イ ッ チ を「 (Battery)」 で 使 用 し て いる と き は、
USB ケーブルが接続されていても電池を消耗します。また、USB
ケーブルでコンピューターと接続しても、USB-MIDI 機器としては
使用できません。
(Battery)
電源の切り方
モード・スイッチを「Standby」に切り替えます。電源が切れ、
パワー LED が消灯します。
オート・パワー・オフ機能
Battery モードでは、長時間操作のない状態が続くと、自動的
に電源が切れます。
この機能は、KORG KONTROL Editorで無効に設定できます。
詳しくは、取扱説明書を参照してください。
iPhone/iPad との接続
モ ー ド ・ ス イ ッ チ を「 (Battery)」
1.
に切り替えます。
電源 が 入り、パワ ー LED が点滅
して接続待ちになります。
iPhone/iPad とワ イヤレ ス 接 続 する
TIP
には、iOS 8 以降がインストールされ
Bluetooth 4.0 に 対 応 し た iPhone/
iPad が必要です。
iPhone/iPad で Bluetooth Low Energy MIDI 対応
2.
iOS アプリケーションを起動し、アプリケーション内で
Bluetooth の接続操作を行います。
接続されると、パワー LED が点滅から点灯に変わります。
3.
nanoKONTROL Studio の機能を使用するには、ご使用のアプリ
ケーションに合わせた設定が必要です。取扱説明書を参照し、設定
してください。
(Battery)
Mac との接続
モ ー ド ・ ス イ ッ チ を「 (Battery)」
1.
に切り替えます。
電源 が 入り、パワ ー LED が点滅
して接続待ちになります。
Mac と ワ イ ヤ レ ス 接 続 す る に は、
TIP
OS X 10.10 Yosemite 以降 が インス
トールされ Bluetooth 4.0 に対応した
Mac が必要です。
Mac 上で「アプリケーション」→「ユーティリティ」→
2.
「Audio MIDI 設定」を起動し、メニューから「ウィンドウ」
→「MIDI スタジオを表示」を選択し、MIDI スタジオ・ウィ
ンドウを開きます。
「Bluetooth」アイコ ンをダブ ル クリックし て Bluetooth
3.
構成のウィンドウを開き、「nanoKONTROL Studio」の
接続ボタンをクリックします。
接続されるとパワー LED が点滅から点灯に変わります。
nanoKONTROL Studio の機能を使用するには、ご使用のアプリ
ケーションに合わせた設定が必要です。取扱説明書を参照し、設定
してください。
(Battery)
1
2
3
4
5
6
7
8
9
10
11
12
13
14
15
1. モード・スイッチ
2. USB 端子
3. シーン LED
4. Scene ボタン
5. トランスポート・ボタン
6. Track t/uボタン
7. Marker ボタン
8. ジョグ・ホイール
9. パワー LED
10. Mute ボタン
11. Solo ボタン
12. Rec ボタン
13. Select ボタン
14. ノブ
15. スライダー
USB 接続で使う
接続と電源の入れ方
モード・スイッチを「 (USB)」に切り替えます。
1.
USB ケーブルで、nanoKONTROL Studio とコンピュー
2.
ターの USB 端子を接続します。電源が入り、パワー LED
が点灯します。
必ず付属の USB ケーブルを使用してください。
nanoKONTROL Studio の機能を使用するには、ご使用のアプリ
ケーションに合わせた設定が必要です。取扱説明書を参照し、設定
してください。
はじめて Windows コンピューターに接続すると、自動的にドライ
TIP
バーがインストールされます。
Windows 内蔵のドライバーは、同時に複数のアプリケーションか
TIP
ら nanoKONTROL Studio を使用できません。KORG USB-MIDI
ドライバーをインストールすると、複数アプリケーションから同時
に使用可能になります。
KORG USB-MIDI ドライバーは、コルグ・ウェブサイトからダウ
ンロードしてください。(http://www.korg.com/)
電源の切り方
モード・スイッチを「Standby」に切り替えます。電源が切れ、
パワー LED が消灯します。
 Loading...