

Page 1
Precautions
Précautions
Vorsichtsmaßnahmen
Location
Using the unit in the following locations can result in a malfunction.
• In direct sunlight
• Locations of extreme temperature or humidity
• Excessively dusty or dirty locations
• Locations of excessive vibration
• Close to magnetic fields
Handling
To avoid breakage, do not apply excessive force to the switches or controls.
Care
If the exterior becomes dirty, wipe it with a clean, dry cloth. Do not use liquid
cleaners such as benzene or thinner, or cleaning compounds or flammable
polishes.
Keep this manual
After reading this manual, please keep it for later reference.
Keeping foreign matter out of your equipment
Never set any container with liquid in it near this equipment. If liquid gets
into the equipment, it could cause a breakdown, fire, or electrical shock. Be
careful not to let metal objects get into the equipment.
THE FCC REGULATION WARNING (for USA)
This equipment has been tested and found to comply with the limits for a
Class B digital device, pursuant to Part 15 of the FCC Rules. These limits
are designed to provide reasonable protection against harmful interference in a residential installation. This equipment generates, uses, and
can radiate radio frequency energy and, if not installed and used in accordance with the instructions, may cause harmful interference to radio
communications. However, there is no guarantee that interference will
not occur in a particular installation. If this equipment does cause harmful interference to radio or television reception, which can be determined
by turning the equipment off and on, the user is encouraged to try to
correct the interference by one or more of the following measures:
• Reorient or relocate the receiving antenna.
• Increase the separation between the equipment and receiver.
• Connect the equipment into an outlet on a circuit different from that to
which the receiver is connected.
• Consult the dealer or an experienced radio/TV technician for help.
Unauthorized changes or modification to this system can void the user’s
authority to operate this equipment.
Notice regarding disposal (EU only)
When this “crossed-out wheeled bin” symbol is displayed on the
product, owner’s manual, battery, or battery package, it signifies
that when you wish to dispose of this product, manual, package or
battery you must do so in an approved manner. Do not discard this
product, manual, package or battery along with ordinary household waste. Disposing in the correct manner will prevent harm to
human health and potential damage to the environment. Since the
correct method of disposal will depend on the applicable laws and
regulations in your locality, please contact your local administrative body
for details. If the battery contains heavy metals in excess of the regulated amount, a chemical symbol is displayed below the “crossed-out
wheeled bin” symbol on the battery or battery package.
IMPORTANT NOTICE TO CONSUMERS
This product has been manufactured according to strict specifications
and voltage requirements that are applicable in the country in which it is
intended that this product should be used. If you have purchased this
product via the internet, through mail order, and/or via a telephone sale,
you must verify that this product is intended to be used in the country in
which you reside.
WARNING: Use of this product in any country other than that for which it
is intended could be dangerous and could invalidate the manufacturer’s
or distributor’s warranty.
Please also retain your receipt as proof of purchase otherwise your product may be disqualified from the manufacturer’s or distributor’s warranty.
- Mac, Mac logo and Mac OS are trademarks of Apple Inc., registered in the
U.S. and other countries.
- Windows XP, Windows Vista and Windows 7 are trademarks of Microsoft
Corporation in the U.S. and other countries.
- All product names and company names are the trademarks or registered
trademarks of their respective owners.
Emplacement
L’utilisation de cet instrument dans les endroits suivants peut en entraîner le
mauvais fonctionnement.
• En plein soleil
• Endroits très chauds ou très humides
• Endroits sales ou fort poussiéreux
• Endroits soumis à de fortes vibrations
•A proximité de champs magnétiques
Maniement
Pour éviter de les endommager, manipulez les commandes et les boutons
de cet instrument avec soin.
Entretien
Lorsque l’instrument se salit, nettoyez-le avec un chiffon propre et sec. Ne
vous servez pas d’agents de nettoyage liquides tels que du benzène ou du
diluant, voire des produits inflammables.
Conservez ce manuel
Après avoir lu ce manuel, veuillez le conserver soigneusement pour toute
référence ultérieure.
Evitez toute intrusion d’objets ou de liquide
Ne placez jamais de récipient contenant du liquide près de l’instrument. Si
le liquide se renverse ou coule, il risque de provoquer des dommages, un
court-circuit ou une électrocution. Veillez à ne pas laisser tomber des objets
métalliques dans le boîtier (trombones, par ex.).
Note concernant les dispositions (Seulement EU)
Quand un symbole avec une poubelle barrée d’une croix apparait
sur le produit, le mode d’emploi, les piles ou le pack de piles, cela
signifie que ce produit, manuel ou piles doit être déposé chez un
représentant compétent, et non pas dans une poubelle ou toute
autre déchetterie conventionnelle. Disposer de cette manière, de
prévenir les dommages pour la santé humaine et les dommages
potentiels pour l'environnement. La bonne méthode d'élimination
dépendra des lois et règlements applicables dans votre localité,
s’il vous plaît, contactez votre organisme administratif pour plus de détails. Si la pile contient des métaux lourds au-delà du seuil réglementé,
un symbole chimique est affiché en dessous du symbole de la poubelle
barrée d’une croix sur la pile ou le pack de piles.
REMARQUE IMPORTANTE POUR LES CLIENTS
Ce produit a été fabriqué suivant des spécifications sévères et des besoins en tension applicables dans le pays où ce produit doit être utilisé.
Si vous avez acheté ce produit via l’internet, par vente par correspondance ou/et vente par téléphone, vous devez vérifier que ce produit est
bien utilisable dans le pays où vous résidez.
ATTENTION: L’utilisation de ce produit dans un pays autre que celui pour
lequel il a été conçu peut être dangereuse et annulera la garantie du
fabricant ou du distributeur. Conservez bien votre récépissé qui est la
preuve de votre achat, faute de quoi votre produit ne risque de ne plus
être couvert par la garantie du fabricant ou du distributeur.
- Mac, Mac logo et Mac OS sont des marques commerciales de Apple Inc.,
déposées aux États-Unis et dans d´autres pays.
- Windows XP, Windows Vista et Windows 7 sont des marques deposees
de Microsoft Corporation aux Etats-Unis et dans d´autres pays.
-Tous les noms de produits et de sociétés sont des marques commerciales
ou déposées de leur détenteur respectif.
Aufstellungsort
Ve rmeiden Sie das Aufstellen des Geräts an Orten, an denen
• es direkter Sonneneinstrahlung ausgesetzt ist;
• hohe Feuchtigkeit oder Extremtemperaturen auftreten können;
• Staub oder Schmutz in großen Mengen vorhanden sind;
• das Gerät Erschütterungen ausgesetzt sein kann.
•in der Nähe eines Magnetfeldes.
Bedienung
Vermeiden Sie bei der Bedienung von Schaltern und Reglern unangemessenen Kraftaufwand.
Reinigung
Bei auftretender Verschmutzung können Sie das Gehäuse mit einem trockenen, sauberen Tuch abwischen. Verwenden Sie keinerlei Flüssigreiniger wie
beispielsweise Reinigungsbenzin, Verdünnungs- oder Spülmittel. Verwenden
Sie niemals brennbare Reiniger.
Bedienungsanleitung
Bewahren Sie diese Bedienungsanleitung gut auf, falls Sie sie später noch
einmal benötigen.
Flüssigkeiten und Fremdkörper
Stellen Sie niemals Behältnisse mit Flüssigkeiten in der Nähe des Geräts
auf. Wenn Flüssigkeit in das Gerät gelangt, können Beschädigung des Geräts, Feuer oder ein elek-trischer Schlag die Folge sein. Beachten Sie, daß
keinerlei Fremdkörper in das Gerät gelangen.
Hinweis zur Entsorgung (Nur EU)
Wenn Sie das Symbol mit der „durchgekreuzten Mülltonne“ auf
Ihrem Produkt, der dazugehörigen Bedienungsanleitung, der Batterie oder dem Batteriefach sehen, müssen Sie das Produkt in
der vorgeschriebenen Art und Weise entsorgen. Dies bedeutet,
dass dieses Produkt mit elektrischen und elektronischen Komponenten nicht mit dem normalen Hausmüll entsorgt werden darf.
Für Produkte dieser Art existiert ein separates, gesetzlich festge-
legtes Entsorgungssystem. Gebrauchte elektrische und elektronische Geräte müssen separat entsorgt werden, um ein umweltgerechtes Recycling sicherzustellen. Diese Produkte müssen bei benannten
Sammelstellen abgegeben werden. Die Entsorgung ist für den Endverbraucher kostenfrei! Bitte erkundigen sie sich bei ihrer zuständigen Behörde, wo sie diese Produkte zur fachgerechten Entsorgung abgeben
können. Falls ihr Produkt mit Batterien oder Akkumulatoren ausgerüstet
ist, müssen sie diese vor Abgabe des Produktes entfernen und separat
entsorgen (siehe oben). Die Abgabe dieses Produktes bei einer zuständigen Stelle hilft ihnen, dass das Produkt umweltgerecht entsorgt wird.
Damit leisten sie persönlich einen nicht unerheblichen Beitrag zum Schutz
der Umwelt und der menschlichen Gesundheit vor möglichen negativen
Effekten durch unsachgemäße Entsorgung von Müll. Batterien oder Akkus, die Schadstoffe enthalten, sind auch mit dem Symbol einer durchgekreuzten Mülltonne gekennzeichnet. In der Nähe zum Mülltonnensymbol befindet sich die chemische Bezeichnung des Schadstoffes.
Cd oder NiCd steht für Cadmium, Pb für Blei und Hg für Quecksilber.
WICHTIGER HINWEIS FÜR KUNDEN
Dieses Produkt wurde unter strenger Beachtung von Spezifikationen und
Spannungsanforderungen hergestellt, die im Bestimmungsland gelten.
Wenn Sie dieses Produkt über das Internet, per Postversand und/oder
mit telefonischer Bestellung gekauft haben, müssen Sie bestätigen, dass
dieses Produkt für Ihr Wohngebiet ausgelegt ist.
WARNUNG: Verwendung dieses Produkts in einem anderen Land als
dem, für das es bestimmt ist, verwendet wird, kann gefährlich sein und
die Garantie des Herstellers oder Importeurs hinfällig lassen werden.
Bitte bewahren Sie diese Quittung als Kaufbeleg auf, da andernfalls das
Produkt von der Garantie des Herstellers oder Importeurs ausgeschlossen werden kann.
- Mac, Mac logo und Mac OS sind in den USA und anderen Ländern eingetragene Warenzeichen der Apple Inc..
-Windows XP, Windows Vista und Windows 7 sind eingetragene Markenzeichen der Microsoft Corporation in den USA und anderen Landern.
-Alle Produkt- und Firmennamen sind Warenzeichen oder eingetragene
Warenzeichen der betreffenden Eigentümer.
Page 2
Precauciones
注意事项
Ubicación
El uso de la unidad en las siguientes ubicaciones puede dar como resultado
un mal funcionamiento:
• Expuesto a la luz directa del sol
• Zonas de extremada temperatura o humedad
• Zonas con exceso de suciedad o polvo
• Zonas con excesiva vibración
• Cercano a campos magnéticos
Manejo
Para evitar una rotura, no aplique excesiva fuerza a los conmutadores o
controles.
Cuidado
Si exterior se ensucia, límpiese con un trapo seco. No use líquidos limpiadores como disolvente, ni compuestos inflamables.
Guarde este manual
Después de leer este manual, guárdelo para futuras consultas.
Mantenga los elementos externos alejados del equipo
Nunca coloque ningún recipiente con líquido cerca de este equipo, podría
causar un cortocircuito, fuero o descarga eléctrica. Cuide de que no caiga
ningún objeto metálico dentro del equipo.
Nota respecto a residuos y deshechos (solo UE)
Cuando aparezca el símbolo del cubo de basura tachado sobre un producto, su manual de usuario, la batería, o el embalaje de cualquiera de
éstos, significa que cuando quiere tire dichos artículos a la basura, ha
de hacerlo en acuerdo con la normativa vigente de la Unión Europea.
No debe verter dichos artículos junto con la basura de casa. Verter este
producto de manera adecuada ayudará a evitar daños a su salud pública y posibles daños al medioambiente. Cada país tiene una normativa
específica acerca de cómo verter productos potencialmente tóxicos, por
tanto le rogamos que se ponga en contacto con su oficina o ministerio
de medioambiente para más detalles. Si la batería contiene metales pesados por encima del límite permitido, habrá un símbolo de un material
químico, debajo del símbolo del cubo de basura tachado.
NOTA IMPORTANTE PARA EL CONSUMIDOR
Este producto ha sido fabricado de acuerdo a estrictas especificaciones
y requerimientos de voltaje aplicables en el país para el cual está destinado. Si ha comprado este producto por internet, a través de correo, y/o
venta telefónica, debe usted verificar que el uso de este producto está
destinado al país en el cual reside. AVISO: El uso de este producto en
un país distinto al cual está destinado podría resultar peligroso y podría
invalidar la garantía del fabricante o distribuidor.
Por favor guarde su recibo como prueba de compra ya que de otro modo el
producto puede verse privado de la garantía del fabricante o distribuidor.
-Mac, Mac logo y Mac OS de Mac son marcas comerciales de Apple Inc.
registradas en los EE.UU. y en otros países.
-Windows XP/Vista/7 son marcas comerciales de Microsoft Corporation
registradas en los EE.UU. y en otros países.
-Todos los nombres de productos y compañías son marcas comerciales o
marcas registradas de sus respectivos propietarios.
地点
在以下地点使用本产品可能会引致故障
• 阳光直接曝晒
• 极端温度或潮湿
• 非常尘埃或肮脏
• 非常震荡
• 靠近磁场
。
操作
为避免损坏,操作或按键时不宜过于用力
。
保养
如果产品外表污脏,可用清洁干燥的布擦拭,请勿使用液体清洁
剂,如苯或其稀释溶液、清洁复合剂或易燃上光剂等
。
用户手册的保存
阅读完本手册后,请妥善保存以作日后参考之用
。
需避免接触的物品
在本产品周围不宜放置液体,如液体渗入产品内可能会导致损坏
起火或触电,同时须保证任何其他金属物体不会进入产品内
、
。
致用户的重要提示
本产品的生产制造均严格按照本产品被指定使用的国家的规格
及电压执行。如你的产品是通过互联网邮购及电话订购的,那
你必须确认所购买的产品是被指定在你所居住的国家使用的
警告:在被指定使用的国家外的其他地方使用本产品可能会导
致危险及无法享受制造商或产品代理商提供的保修
同时,请妥善保存购买本产品时的收据或发票等证明文件,一
。
旦遗失可能会导致制造商及产品代理商无法承认你的产品的保
修资格
。
本用户手册提及的所有产品名称及公司名称均为商标,或已由该
商标持有者注册了的商标
Mac 及 Mac 标志是Apple Inc. 在美国及其他国家注册的商标
。
Windows XP/Vista/7是Microsoft Corporation 在美国及其他国
家注册的商标
。
。
。
Page 3
Introduction
Thank you for purchasing the Korg nanoKONTROL2 slim-line USB
controller. To help you get the most out of your new instrument, please
read this manual carefully.
In order to properly use this product, you’ll need to adjust some
of the settings in the application that you are using. Adjust the
settings as described in the “Settings for using the unit with DAW
software” section in this manual, and in the owner’s manual for
your application.
The Korg Kontrol Editor software allows you to edit MIDI
messages transmitted via each controller on the nanoKONTROL2.
You can download the Parameter Guide and the Korg Kontrol
Editor software from the Korg website.
http://www.korg.co.jp/English/Distributors/ or http://www.korg.com
Getting ready
Connections and power
USB cable
Computer
1. Use a USB cable to connect the nanoKONTROL2 to a USB port on
your computer. The power to the nanoKONTROL2 will turn on
and the power LED will light up.
Never use any USB cable other than the one that’s included.
The nanoKONTROL2 starts in the operation mode that was
selected when the unit was last used. At this time, the transport
button that corresponds to the current operation mode will flash.
(--> “Operation mode”)
When you first connect the nanoKONTROL2 to a computer
running Windows XP/Vista/7, the standard USB-MIDI driver
for your operating system will be installed automatically.
USB connector
nanoKONTROL2
Turning off the power
1. Disconnect the USB cable that’s connected to the nanoKONTROL2
and the computer. The power to the nanoKONTROL2 will turn off
and the power LED will go dark.
Parts and their functions
Function buttons
Five function buttons feature the PREV TRACK, NEXT TRACK,
SET MARKER, PREV MARKER, and NEXT MARKER functions.
Power LED
USB connector
Use a USB cable to connect the
unit to a computer.
Transport buttons
Six transport buttons feature the
CYCLE, REW, FF, STOP, PLAY
and REC functions.
nanoKONTROL2 and driver ports
Driver ports
As shown in the following table, the name of the ports will depend on
which operating system you’re using, and whether or not you’ve
installed the Korg USB-MIDI driver.
OS MIDI IN MIDI OUT
Mac OS X nanoKONTROL2
SLIDER/KNOB
Windows Vista/7 nanoKONTROL2 nanoKONTROL2
Windows XP USB audio device USB audio device
Windows XP/Vista/7 + nanoKONTROL2 1
KORG USB-MIDI Driver SLIDER/KNOB
MIDI IN port
This is where MIDI messages from the nanoKONTROL2’s various
controllers are received. If you want to use the nanoKONTROL2 to
control an application on your computer, then select this port in the
MIDI input settings of your application.
This is also used by the Korg Kontrol Editor to control the
nanoKONTROL2.
MIDI OUT port
This port is used by the DAW software or the Korg Kontrol Editor to
control the nanoKONTROL2.
If you are using Windows XP/Vista/7, the standard USB-MIDI
driver that is automatically installed will not allow you to use the
nanoKONTROL2 with multiple applications simultaneously.
If you want to use the nanoKONTROL2 with multiple applications
simultaneously, you must install the Korg USB-MIDI driver.
You can download the Korg USB-MIDI driver from the Korg
website, and install it as described in the included documentation.
http://www.korg.co.jp/English/Distributors/ or http://www.korg.com
Even if you don't need to use the nanoKONTROL2 with multiple
applications simultaneously, we recommend that you install the
Korg USB-MIDI driver for more stable operation.
nanoKONTROL2 CTRL
nanoKONTROL2 1 CTRL
Operation mode
The nanoKONTROL2 features two operation modes: DAW mode, in
which each controller is set up for a specific DAW controller; and CC
mode, in which Control Change messages are assigned to the unit's
controllers. To engage the desired mode, turn on the unit while
pressing and holding down the button that corresponds to that mode.
Parameter controls
These controls adjust the DAW software parameters.
Settings for using the unit with DAW software
This section describes various settings for several DAW software
programs. For more information, please refer to the Parameter Guide.
For information on detailed settings and operation of various DAW
software, please refer to the corresponding user's guide.
Cubase
1.
While pressing and holding down the SET MARKER and REW
buttons, connect the USB cable from your computer to the
nanoKONTROL2.
2.
Open the “Device setting” window in Cubase, and add “Mackie
Control.”
3.
Select nanoKONTROL2 for the MIDI In/Out ports used by “Mackie
Control.”
Digital Performer
1.
While pressing and holding down the SET MARKER and FF
buttons, connect the USB cable from your computer to the
nanoKONTROL2.
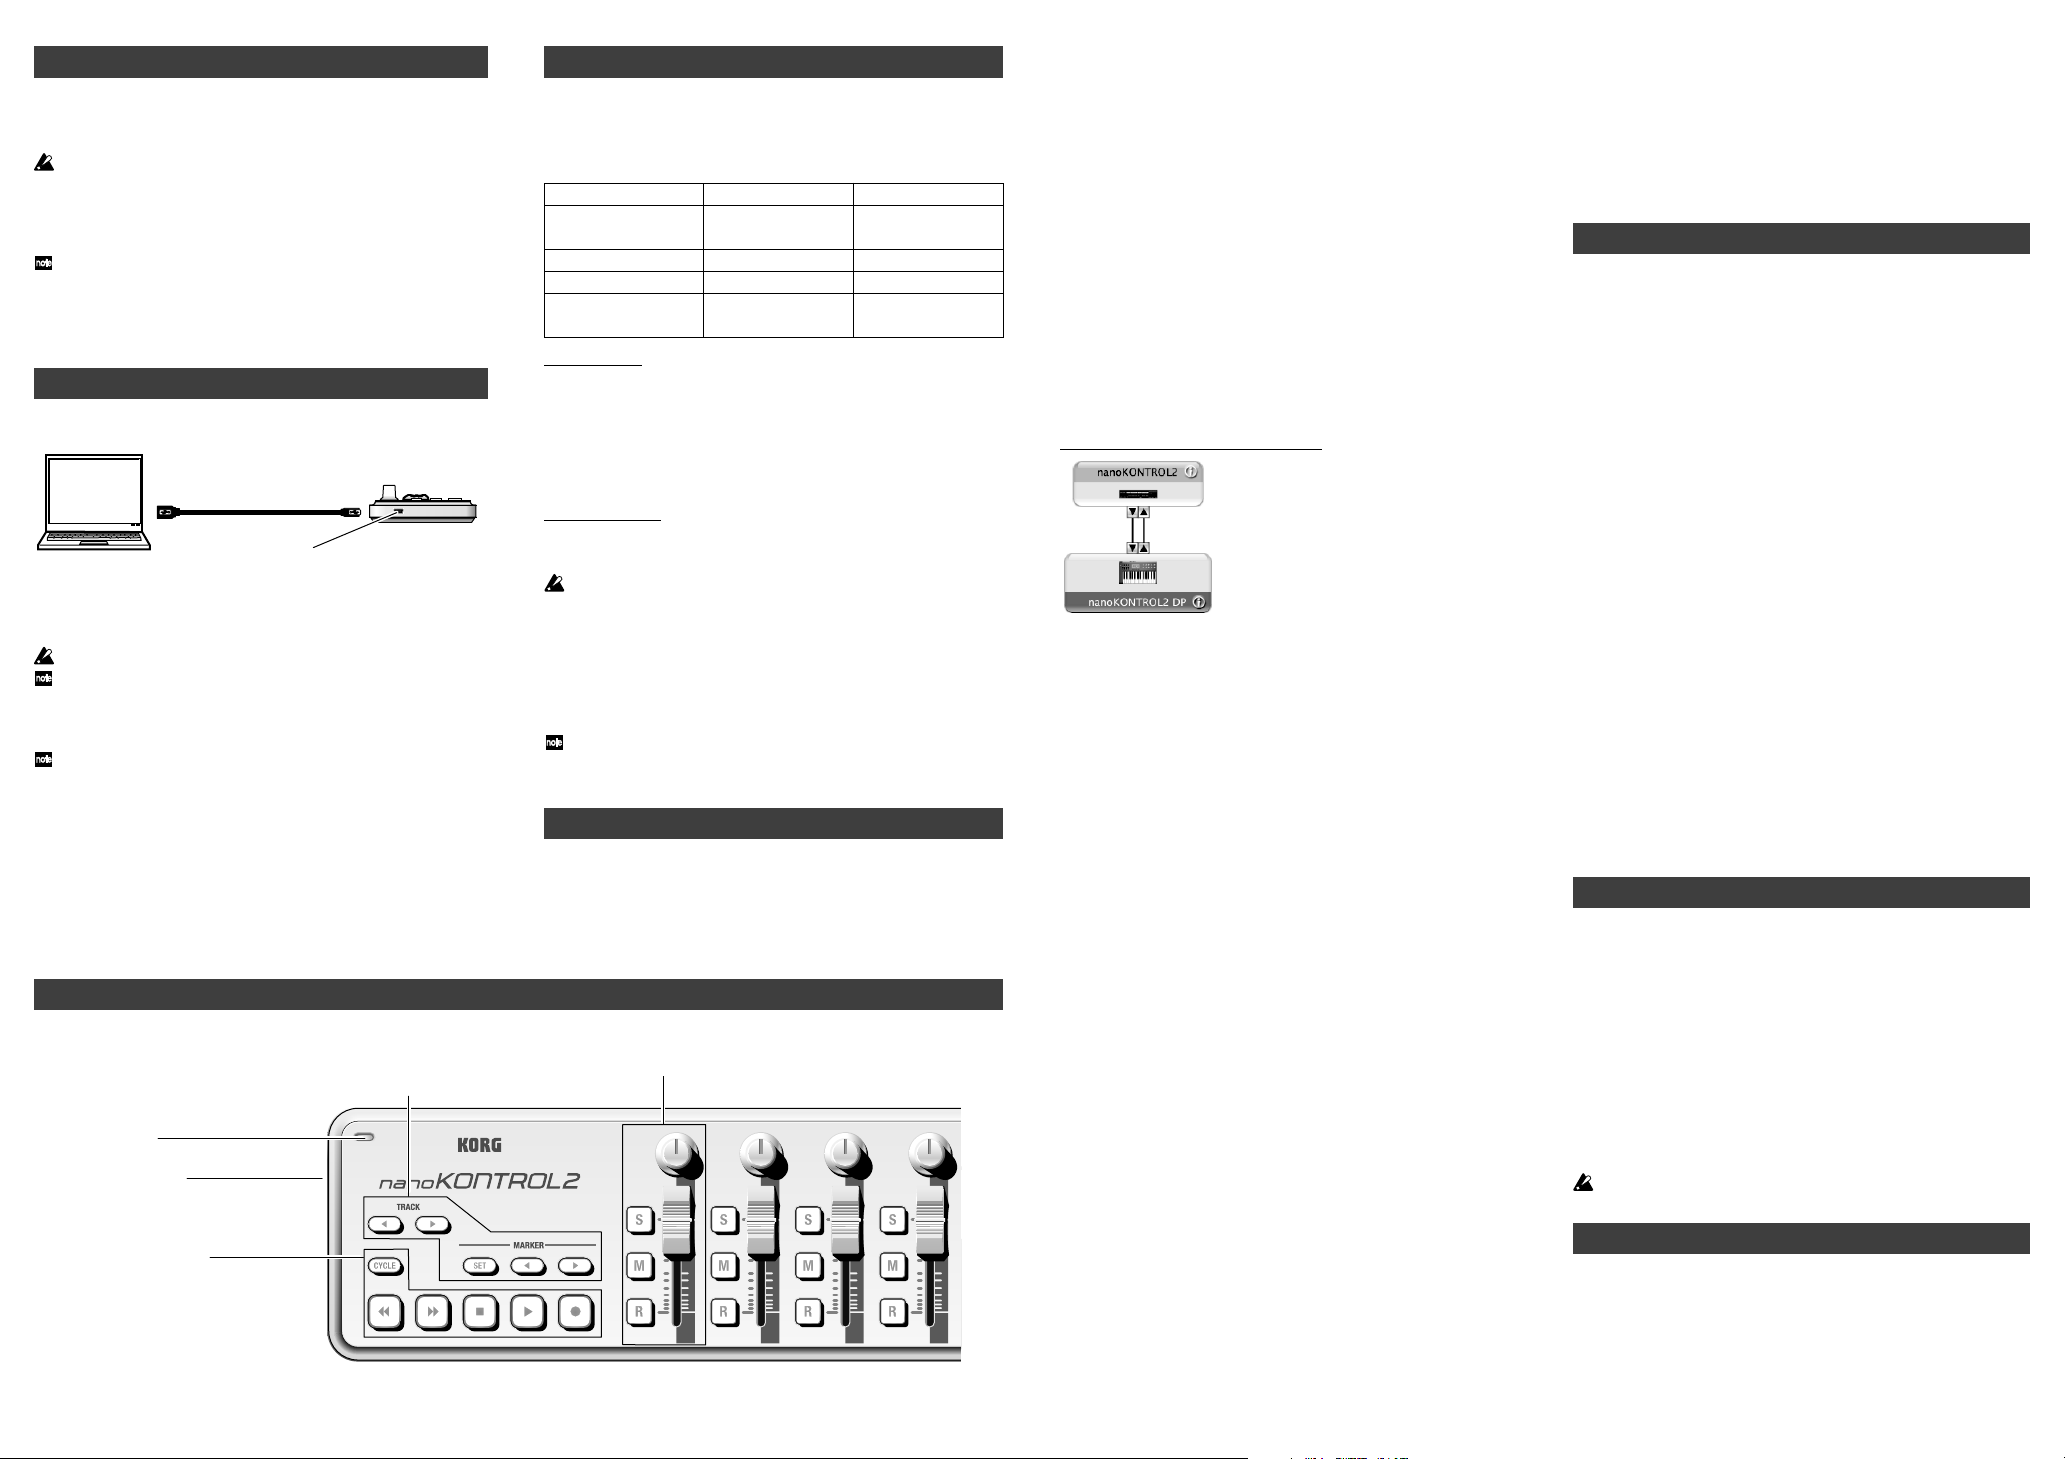
Settings for “Audio MIDI settings”
•From “Audio MIDI setup,” open “MIDI
Device” or “MIDI Studio,” then select
“Add Device.”
• Name the added device. (e.g.,
nanoKONTROL2 DP)
• Connect the added device with the
nanoKONTROL2 as shown on the left.
2.
Open the “Control Surface” window in Digital Performer, then
select “Mackie Control” for “Driver” and “Unit.”
3.
Select the nanoKONTROL2 ports for “MIDI.”
GarageBand/Logic
Download the nanoKONTROL2 Control Surface plug-in for
GarageBand/Logic from the Korg website, and follow the instructions
in the included document to specify the settings.
http://www.korg.co.jp/English/Distributors/ or http://www.korg.com
Live
1.
While pressing and holding down the SET MARKER and STOP
buttons, connect the USB cable from your computer to the
nanoKONTROL2.
2.
Open the “Preferences” window in Live, then select “Mackie
Control” for “Control Surface.”
3.
Select nanoKONTROL2 for the MIDI In/Out ports used by “Mackie
Control.”
Pro To ols
1.
While pressing and holding down the SET MARKER and PLAY
buttons, connect the USB cable from your computer to the
nanoKONTROL2.
2.
Open the “Peripheral” window in ProTools, then select “HUI” for
“Type.”
3.
Select nanoKONTROL2 as the source and destination for “HUI.”
SONAR
1.
While pressing and holding down the SET MARKER and REC
buttons, connect the USB cable from your computer to the
nanoKONTROL2.
2.
Open the “MIDI device” window in SONAR, then select
nanoKONTROL2 for “Input” and “Output.”
3.
Open the “Controllers/Surfaces” window, then select “Mackie
Control” for “Control Surface.”
4.
Select nanoKONTROL2 for the MIDI In/Out ports used.
Other DAW software
1.
While pressing and holding down the SET MARKER and CYCLE
buttons, connect the USB cable from your computer to the
nanoKONTROL2 and engage CC mode.
2.
Set up the application so that it can be controlled by the Control
Change messages transmitted from the nanoKONTROL2. For
information on setting up the application, please refer to the user's
manual for the application.
Troubleshooting
Power does not turn on
• If you’re using a passive (non-powered) USB hub, the
nanoKONTROL2 may fail to power-on because it’s not getting
enough power. If this is so, please connect the nanoKONTROL2 to
a powered USB hub or directly to your computer.
Software does not respond
• Make sure that the nanoKONTROL2 has been detected by the
connected computer.
If you are using Windows XP, go to the Control Panel, open “Sounds,
Speech, and Audio Devices” -> “Sounds and Audio Devices,” and check
the “Hardware” tab page to see if the nanoKONTROL2 is connected.
If you are using Windows Vista/7, go to the Control Panel, open
“Hardware and Sounds” -> “Device Manager,” and check the
“Sound, Video, and Game Controllers” tab to see if the
nanoKONTROL2 is connected.
If you are using Mac OS X, open “Applications” -> “Utilities,” then
start “Audio MIDI Setup.”
On Mac OS X 10.5 or earlier, check the “MIDI Devices” tab.
On Mac OS X 10.6 or later, open and check the “MIDI Studio” window
by selecting “Show MIDI Window” from the “Window” menu.
• Make sure that the nanoKONTROL2 is selected in the MIDI port
settings of the application that you’re using.
• The application that you’re using might not support certain
functions. Please check the owner’s manual of your host application.
• In order to use some of the functions of this product, you’ll need to
adjust some of the settings in the host application that you’re using.
Adjust settings as described in the “Settings for using the unit with
DAW software” section in this manual, and in the owner’s manual
for your application.
Operating requirements
Windows
Computer: Any computer that has a USB port and satisfies
Operating system: Microsoft Windows XP SP3 (32bit) or later,
the requirements for running Microsoft
Windows XP/Vista/7 (a USB chipset made by
the Intel Corporation is recommended)
Microsoft Windows Vista SP2 (32bit, 64bit) or
Windows 7 (32bit, 64bit)
Mac OS X
Computer: Apple Macintosh computer with an Intel or
Operating system: Mac OS X 10.4 or later
nanoKONTROL2 operation is not guaranteed with all computers
that satisfy these system requirements.
PowerPC processor that has a USB port
Specifications
Connectors: USB connector (mini B type)
Power supply: USB bus power mode
Current consumption: 100 mA or less
Dimensions (W x D x H):12.80 x 3.27 x 1.18 inches / 325 x 83 x 30 mm
Weight: 10.34 oz / 293 g
Included items: USB cable, Owner’s manual
* Specifications and appearance are subject to change without notice
for improvement.
Page 4

Introduction
Merci d’avoir choisi la contrôleur USB ultra-mince nanoKONTROL2
de Korg. Afin de pouvoir exploiter au mieux toutes les possibilités
offertes par l’instrument, veuillez lire attentivement ce manuel.
Pour pouvoir utiliser correctement ce produit, il faut effectuer
certains réglages au sein du logiciel que vous utilisez. Effectuez les
réglages en suivant la procédure décrite dans la section “Réglages
pour utiliser le produit avec un logiciel DAW” de ce mode d’emploi
et dans la documentation accompagnant votre logiciel.
Le logiciel “Korg Kontrol Editor” vous permet d’éditer des
messages MIDI transmis par les différentes commandes
physiques du nanoKONTROL2. Vous pouvez télécharger le
Guide des paramètres du logiciel “Korg Kontrol Editor” à partir
du site web Korg.
http://www.korg.co.jp/English/Distributors/ ou http://www.korg.com
Préparations
Connexions et alimentation
Câble USB
Ordinateur
1. Reliez le nanoKONTROL2 à un port USB de votre ordinateur avec
un câble USB. Le nanoKONTROL2 est mis sous tension et son
témoin d’alimentation s’allume.
N’utilisez jamais d’autre adaptateur secteur que câble USB fourni.
Au démarrage, le nanoKONTROL2 active le mode de
fonctionnement en vigueur lors de la dernière utilisation. Le
bouton de transport correspondant au mode en vigueur clignote.
(--> “Mode de fonctionnement”)
La première fois que vous branchez le nanoKONTROL2 à un
ordinateur tournant sous Windows XP/Vista/7, le pilote USB–
MIDI standard de votre système d’exploitation est
automatiquement installé.
Prise USB
nanoKONTROL2
Mise hors tension
1. Débranchez le câble USB reliant le nanoKONTROL2 et l’ordinateur.
Le nanoKONTROL2 est mis hors tension et son témoin
d’alimentation s’éteint.
Description et fonction des éléments
Boutons de fonction
Cinq boutons de fonction proposent les fonctions PREV TRACK,
NEXT TRACK, SET MARKER, PREV MARKER et NEXT MARKER.
Témoin d’alimentation
Prise USB
Utilisez un câble USB pour
brancher le produit à votre
ordinateur.
Boutons de transport
Six boutons de transport proposent
les fonctions CYCLE, REW, FF,
STOP, PLAY et REC.
nanoKONTROL2 et ports du pilote
ports du pilote
Comme le montre le tableau suivant, le nom des ports dépend du
système d’exploitation et du pilote utilisés (standard ou pilote USB–
MIDI Korg).
OS MIDI IN MIDI OUT
Mac OS X nanoKONTROL2
SLIDER/KNOB
Windows Vista/7 nanoKONTROL2 nanoKONTROL2
Windows XP USB audio device USB audio device
Windows XP/Vista/7 + nanoKONTROL2 1
Pilote USB-MIDI KORG SLIDER/KNOB
Port MIDI IN
Les messages MIDI provenant des différents contrôleurs du
nanoKONTROL2 arrivent ici. Si vous voulez utiliser le
nanoKONTROL2 pour piloter un logiciel sur ordinateur, sélectionnez
ce port dans les réglages d’entrée MIDI du logiciel. Il est également
utilisé par le logiciel Korg Kontrol Editor pour piloter le
nanoKONTROL2.
Port MIDI OUT
Ce port est utilisé par le logiciel DAW ou Korg Kontrol Editor pour
piloter le nanoKONTROL2.
Avec Windows XP/Vista/7, le pilote USB–MIDI standard, installé
automatiquement, ne vous permet pas d’utiliser le
nanoKONTROL2 avec plusieurs logiciels simultanément. Si vous
voulez utiliser le nanoKONTROL2 avec plusieurs logiciels
simultanément, installez le pilote USB–MIDI Korg. Téléchargez
le pilote USB–MIDI Korg du site Internet de Korg et installez-le
en suivant les instructions fournies.
http://www.korg.co.jp/English/Distributors/ ou http://www.korg.com
Même si vous n’avez pas besoin d’utiliser le nanoKONTROL2
avec plusieurs logiciels, nous vous recommandons l’installation
du pilote USB–MIDI Korg pour bénéficier d’un fonctionnement
plus stable.
nanoKONTROL2 CTRL
nanoKONTROL2 1 CTRL
Mode de fonctionnement
Le nanoKONTROL2 vous laisse le choix entre deux modes de
fonctionnement: le mode DAW où chaque commande (curseurs,
boutons etc.) est configurée pour une station de travail audio
numérique (logiciel DAW) particulière et le mode CC où des
commandes de contrôle sont assignées aux commandes physiques du
produit. Pour sélectionner le mode, mettez ce produit sous tension en
maintenant le bouton correspondant à ce mode enfoncé.
Pilotage de paramètres
Ces commandes permettent de régler les
paramètres du logiciel DAW.
Réglages pour utiliser le produit avec un logiciel DAW
Cette section décrit les réglages pour plusieurs logiciels DAW. Pour
en savoir davantage, voyez le Guide des paramètres. Pour en savoir
plus sur les réglages précis et le fonctionnement des divers logiciels
DAW, veuillez consulter leur mode d’emploi.
Cubase
1.
Maintenez les boutons SET MARKER et REW enfoncés et branchez
le câble USB de l’ordinateur au nanoKONTROL2.
2.
Ouvrez la fenêtre “Device setting” sous Cubase et ajoutez “Mackie
Control”.
3.
Sélectionnez “nanoKONTROL2” comme ports MIDI In/Out utilisés
par “Mackie Control”.
Digital Performer
1.
Maintenez les boutons SET MARKER et FF enfoncés et branchez le
câble USB de l’ordinateur au nanoKONTROL2.
Réglages de “Configuration audio et MIDI”
• Sous “Configuration audio et MIDI”,
ouvrez “Périphériques MIDI” ou “Studio
MIDI” puis sélectionnez “Ajout périph.”.
Donnez un nom au périphérique (ex:
•
nanoKONTROL2 DP)
• Reliez le périphérique ajouté au
nanoKONTROL2 comme illustré ci-contre.
2.
Ouvrez ensuite la fenêtre “Control Surface” dans Digital Performer
puis sélectionnez “Mackie Control” comme pilote et matériel.
3.
Sélectionnez les ports nanoKONTROL2 pour “MIDI”.
GarageBand/Logic
Téléchargez le plug-in “nanoKONTROL2 Control Surface” pour
GarageBand/Logic à partir du site web Korg et suivez les instructions
données dans le document joint pour effectuer les réglages.
http://www.korg.co.jp/English/Distributors/ ou http://www.korg.com
Live
1.
Maintenez les boutons SET MARKER et STOP enfoncés et branchez
le câble USB de l’ordinateur au nanoKONTROL2.
2.
Ouvrez la fenêtre “Preferences” dans Live puis sélectionnez
“Mackie Control” pour “Control Surface”.
3.
Sélectionnez “nanoKONTROL2” comme ports MIDI In/Out utilisés
par “Mackie Control”.
Pro To ols
1.
Maintenez les boutons SET MARKER et PLAY enfoncés et branchez
le câble USB de l’ordinateur au nanoKONTROL2.
2.
Ouvrez la fenêtre “Peripheral” dans ProTools puis sélectionnez
“HUI” pour “Type”.
3.
Sélectionnez “nanoKONTROL2” comme source et destination pour
“HUI”.
SONAR
1.
Maintenez les boutons SET MARKER et REC enfoncés et branchez
le câble USB de l’ordinateur au nanoKONTROL2.
2.
Ouvrez la fenêtre “MIDI Device” dans SONAR puis sélectionnez
“nanoKONTROL2” pour “Input” et “Output”.
3.
Ouvrez la fenêtre “Controllers/Surfaces” puis sélectionnez “Mackie
Control” pour “Control Surface”.
4.
Sélectionnez “nanoKONTROL2” comme ports MIDI In/Out.
Autres logiciels DAW
1.
Maintenez les boutons SET MARKER et CYCLE enfoncés et
branchez le câble USB de l’ordinateur au nanoKONTROL2 puis
passez en mode CC.
2.
Configurez le logiciel pour qu’il puisse être piloté par des messages
de commandes de contrôle transmis par le nanoKONTROL2. Pour
savoir comment configurer le logiciel, veuillez consulter son mode
d’emploi.
Dépannage
L’instrument ne s’allume pas
•Si vous utilisez un hub USB passif (non alimenté) pour la connexion
à l’ordinateur, le nanoKONTROL2 risque de ne pas s’allumer suite
à une alimentation insuffisante. Dans ce cas, branchez le
nanoKONTROL2 à un hub USB actif ou directement à l’ordinateur.
Le logiciel ne répond pas
•Vérifiez que le nanoKONTROL2 a été détecté par l’ordinateur.
Si vous utilisez Windows XP, allez dans le Panneau de configuration,
ouvrez “Sons, voix et périphériques audio” -> “Sons et périphériques
audio” et cliquez sur l’onglet [Matériel] pour voir si le
nanoKONTROL2 est branché. Si vous utilisez Windows Vista/7,
allez dans le Panneau de configuration, ouvrez “Matériel et audio”> “Gestionnaires de périphériques” et vérifiez l’onglet “Contrôleurs
son, vidéo et jeu” pour voir si le nanoKONTROL2 est branché.
Si vous utilisez Mac OS X, ouvrez “Applications”-> “Utilitaires” et
lancez “Configuration audio et MIDI”.
Sous Mac OS X 10.5 ou un système plus ancien, cliquez sur l’onglet
“Périphériques MIDI”.
Sous Mac OS X 10.6 ou un système plus récent, ouvrez la fenêtre
“Studio MIDI” en choisissant “Afficher la fenêtre MIDI” dans le
menu “Fenêtre”.
•Vérifiez que le nanoKONTROL2 est sélectionné dans les réglages
de port MIDI du logiciel que vous utilisez.
• Le logiciel utilisé peut ne pas reconnaître certaines fonctions. Veuillez
consulter le mode d’emploi de votre logiciel.
• Pour pouvoir utiliser certaines fonctions de ce produit, il faut
effectuer des réglages au sein du logiciel que vous utilisez. Effectuez
les réglages en suivant la procédure décrite dans la section “Réglages
pour utiliser le produit avec un logiciel DAW” de ce mode d’emploi
et dans la documentation accompagnant votre logiciel.
Système requis
Windows
Ordinateur: Ordinateur doté d’une prise USB et pouvant
Système d’exploitation:
tourner sous Microsoft Windows XP/Vista/7
(les puces USB fabriquées par Intel
Corporation sont recommandées)
Microsoft Windows XP SP3 (32 bits) ou plus
récent, Microsoft Windows Vista SP2 (32 bits,
64 bits) ou Windows 7 (32 bits, 64 bits)
Mac OS X
Ordinateur: Ordinateur Apple Macintosh avec processeur
Système d’exploitation:
Le fonctionnement du nanoKONTROL2 n’est pas garanti même
si le système de votre ordinateur correspond au système requis.
Intel ou PowerPC doté d’une prise USB et
tournant sous Mac OS X
Mac OS X 10.4 voire plus récent
Fiche technique
Prises: Prise USB (type B mini)
Alimentation: Bus USB auto-alimenté
Consommation: 100 mA ou moins
Dimensions (L x P x H): 325 x 83 x 30 mm
Poids: 293 g
Accessoires inclus: Câble USB, Manuel d’utilisation
* Les caractéristiques et l’aspect du produit sont susceptibles d’être
modifiés sans avis préalable en vue d’une amélioration.
Page 5

Vorweg
Vielen Dank für Ihre Entscheidung zu einem ultrakompakten
nanoKONTROL2 USB-Tastatur von Korg. Bitte lesen Sie sich diese
Anleitung vollständig durch, um bei der Bedienung alles richtig zu
machen.
Die Nutzung dieses Produkts erfordert bestimmte Einstellungen
im von Ihnen verwendeten Programm. Nehmen Sie die unter
„Einstellungen für die Verwendung mit einem DAW-Programm“
erwähnten Einstellungen vor. Siehe außerdem die
Bedienungsanleitung des betreffenden Programms.
Mit der „Korg Kontrol Editor“ Software können Sie den
Bedienelementen des nanoKONTROL2 die gewünschten MIDIBefehle zuordnen. Sowohl „Korg Kontrol Editor“ als auch das
Parameterhandbuch stehen auf der Korg-Webpage zum
Download bereit.
http://www.korg.co.jp/English/Distributors/ oder http://
www.korg.com
Vorbereitungen
Anschlüsse und Stromversorgung
USB-Kabel
Computer
1. Über diesen Port können Sie das nanoKEY2 mit Hilfe eines USBKabels mit einem USB-Port Ihres Computers verbinden. Das
nanoKONTROL2 wird eingeschaltet und die Netzanzeige leuchtet.
Es darf ausschließlich das beiliegende USB-Kabel gebraucht
werden.
Der nanoKONTROL2 wechselt beim Hochfahren wieder in den
zuletzt verwendeten Modus. Der jenem Modus zugeordnete
Transporttaster fängt dann an zu blinken. (--> „Bedienungsmodus“)
Wenn Sie das nanoKONTROL2 das erste Mal an Ihren Windows
XP/Vista/7-Computer anschließen, wird automatisch der USB–
MIDI-Standardtreiber für das verwendete Betriebssystem
installiert.
USB-Anschluss
nanoKONTROL2
Ausschalten
1. Lösen Sie die USB-Verbindung des nanoKONTROL2 mit dem
Computer. Das nanoKONTROL2 wird ausgeschaltet und die
Netzanzeige erlischt.
Bedienelemente und Funktionen
Funktionstaster
Mit den fünf Funktionstastern können folgende Funktionen bedient
werden: PREV TRACK, NEXT TRACK, SET MARKER, PREV MARKER
und NEXT MARKER.
Netzanzeige
USB-Port
Für die Verbindung mit dem
Computer benötigen Sie ein
USB-Kabel.
Transporttaster
Mit den sechs Transporttastern
können folgende Funktionen
bedient werden: CYCLE, REW,
FF, STOP, PLAY und REC.
nanoKONTROL2 und Treiberports
Treiberports
Das nanoKONTROL2 bietet einen emulierten MIDI IN- und einen
emulierten MIDI OUT-Port.
Wie Sie in der nachstehenden Tabelle sehen, richten sich die
Portbezeichnungen nach dem verwendeten Betriebssystem und der
eventuellen Anwesenheit des Korg USB–MIDI-Treibers.
Betriebssystem MIDI IN MIDI OUT
Mac OS X nanoKONTROL2
SLIDER/KNOB
Windows Vista/7 nanoKONTROL2 nanoKONTROL2
Windows XP USB audio device USB audio device
Windows XP/Vista/7 + nanoKONTROL2 1
USB–MIDI-Treiber von KORG
SLIDER/KNOB
MIDI IN-Port
Über diesen Port werden die vom nanoKONTROL2 gesendeten MIDIBefehle empfangen. Um mit dem nanoKONTROL2 ein bestimmtes
Programm anzusteuern, müssen Sie in jenem Programm diesen
Eingangsport wählen. Über diesen Port steuert der „Korg Kontrol
Editor“ außerdem den nanoKONTROL2.
MIDI OUT-Port
Über diesen Port steuert die DAW-Software bzw. „Korg Kontrol
Editor“ den nanoKONTROL2 an.
Wenn Sie mit einem Windows XP/Vista/7-Rechner arbeiten, wird
ein USB–MIDI-Standardtreiber installiert, der die Verwendung des
nanoKONTROL2 mit nur jeweils einem Programm erlaubt.
Wenn Sie das nanoKONTROL2 für die Simultansteuerung
mehrerer Programme verwenden möchten, müssen Sie folglich
den Korg USB–MIDI-Treiber installieren.
Besagten USB–MIDI-Treiber können Sie sich von der KorgWebpage herunterladen. Bitte befolgen Sie die beiliegenden
Installationshinweise.
http://www.korg.co.jp/English/Distributors/ oder http://
www.korg.com
Selbst wenn Sie das nanoKONTROL2 nicht mit mehreren
Programmen gleichzeitig verwenden möchten, raten wir zur
Installation des USB–MIDI-Treibers von Korg.
nanoKONTROL2 CTRL
nanoKONTROL2 1 CTRL
Bedienungsmodus
Der nanoKONTROL2 bietet zwei Betriebsarten: Den DAW-Modus, in
dem jedes Bedienelement einem bestimmten DAW-Parameter
zugeordnet ist und den CC-Modus, in dem das Gerät MIDISteuerbefehle sendet. Um den gewünschten Modus zu wählen, müssen
Sie den Taster jenes Modus’ gedrückt halten, während Sie das Gerät
einschalten.
Parameterbedienelemente
Mit diesen Bedienelementen können die Parameter
der DAW-Software angesteuert werden.
Einstellungen für die Verwendung mit einem
DAW-Programm
Hier erfahren Sie, welche Einstellungen für verschiedene DAWProgramme notwendig sind. Weitere Informationen hierzu finden Sie
im Parameterhandbuch. Wie die Parameter des DAW-Programms
angesteuert werden können, entnehmen Sie bitte der betreffenden
Anleitung.
Cubase
1.
Halten Sie den SET MARKER- und REW-Taster gedrückt, während
Sie das USB-Kabel an Ihren Computer und den nanoKONTROL2
anschließen.
2.
Öffnen Sie das „Device Setting“-Fenster von Cubase und fügen Sie
„Mackie Control“ hinzu.
3.
Wählen Sie den nanoKONTROL2 für die MIDI IN/OUT-Ports von
„Mackie Control“.
Digital Performer
1.
Halten Sie den SET MARKER- und FF-Taster gedrückt, während
Sie das USB-Kabel an Ihren Computer und den nanoKONTROL2
anschließen.
Einstellungen für „Audio-MIDI-Konfiguration“
•Wählen Sie unter „Audio-MIDIKonfiguration“ entweder „MIDI-Geräte“
oder „MIDI-Studio“ und dort dann „Gerät
hinzufügen“.
Geben Sie dem neuen Gerät einen Namen. (z.B.
•
„nanoKONTROL2 DP“)
•Verbinden Sie das neue Gerät wie links
gezeigt mit dem nanoKONTROL2.
2.
Öffnen Sie das „Control Surface“-Fenster von Digital Performer
und wählen Sie als Treiber und Gerät „Mackie Control“.
3.
Wählen Sie die nanoKONTROL2-Ports für „MIDI“.
GarageBand/Logic
Laden Sie sich das „nanoKONTROL2 Control Surface“ Plug-In für
GarageBand/Logic von der Korg-Website herunter und befolgen Sie
alle in der Dokumentation erwähnten Hinweise.
http://www.korg.co.jp/English/Distributors/ oder http://www.korg.com
Live
1.
Halten Sie den SET MARKER- und STOP-Taster gedrückt, während
Sie das USB-Kabel an Ihren Computer und den nanoKONTROL2
anschließen.
2.
Öffnen Sie das „Preferences“-Fenster von Live und wählen Sie als
„Control Surface“ den „Mackie Control“-Eintrag.
3.
Wählen Sie den nanoKONTROL2 für die MIDI IN/OUT-Ports von
„Mackie Control“.
Pro To ols
1.
Halten Sie den SET MARKER- und PLAY-Taster gedrückt, während
Sie das USB-Kabel an Ihren Computer und den nanoKONTROL2
anschließen.
2.
Öffnen Sie das „Peripheral“-Fenster von ProTools und wählen Sie
als „Type“ den „HUI“-Eintrag.
3.
Wählen Sie den nanoKONTROL2 als Quelle und Ziel für „HUI“.
SONAR
1.
Halten Sie den SET MARKER- und REC-Taster gedrückt, während
Sie das USB-Kabel an Ihren Computer und den nanoKONTROL2
anschließen.
2.
Öffnen Sie das „MIDI Device“-Fenster von SONAR und wählen
Sie den nanoKONTROL2 für „Input“ und „Output“.
3.
Öffnen Sie das „Controllers/Surfaces“-Fenster und wählen Sie als
„Control Surface“ den „Mackie Control“-Eintrag.
4.
Wählen Sie den nanoKONTROL2 für die MIDI IN/OUT-Ports.
Andere DAW-Programme
1.
Halten Sie den SET MARKER- und CYCLE-Taster gedrückt, während
Sie das USB-Kabel an Ihren Computer und den nanoKONTROL2
anschließen. Wechseln Sie anschließend in den CC-Modus.
2.
Sorgen Sie innerhalb des Programms dafür, dass es die
Steuerbefehle des nanoKONTROL2 erwartungsgemäß ausführt.
Weitere Hinweise finden Sie bei Bedarf in der Bedienungsanleitung
des Programms.
Fehlersuche
Das Gerät kann nicht eingeschaltet werden
•Wenn Sie den nanoKONTROL2 an einen passiven USB (d.h. ohne
eigene Stromversorgung) angeschlossen haben, ist die Strommenge
eventuell zu gering. Verbinden Sie den nanoKONTROL2 dann mit
einem aktiven USB-Hub oder direkt mit Ihrem Computer.
Die Software reagiert nicht
• Schauen Sie nach, ob das nanoKONTROL2 vom Computer erkannt
wird. Unter Windows XP: Wählen Sie „Systemsteuerung“, öffnen
Sie „Sounds, Sprache und Audiogeräte“-> „Sounds und
Audiogeräte“ und klicken Sie auf den [Hardware]-Reiter, um zu
überprüfen, ob das nanoKONTROL2 erkannt wird. Unter Windows
Vista/7: Wählen Sie „Systemsteuerung“, „Hardware und Sounds“> „Gerätemanager“ und überprüfen Sie die Einstellungen von
„Audio-, Video- und Gamecontroller“, um zu ermitteln, ob das
nanoKONTROL2 angemeldet ist.
Unter Mac OS X: Öffnen Sie „Programme“-> „Dienstprogramme“
und starten Sie [Audio-MIDI-Konfiguration]. Unter Mac OS X 10.5
und älter: Klicken Sie auf den [MIDI-Geräte]-Reiter. Unter Mac OS
X 10.6 oder neuer: Öffnen Sie das „MIDI Studio“-Fenster, indem Sie
im „Fenster“-Menü [MIDI-Fenster einblenden] wählen.
• Schauen Sie nach, ob das nanoKONTROL2 überhaupt als MIDIEingangsport für das verwendete Programm gewählt wurde.
Vielleicht unterstützt das verwendete Programm die betreffende
•
Funktion nicht. Siehe die Bedienungsanleitung des Host-Programms.
•
Die Nutzung dieses Produkts erfordert bestimmte Einstellungen im
von Ihnen verwendeten Programm. Nehmen Sie die unter
„Einstellungen für die Verwendung mit einem DAW-Programm“
erwähnten Einstellungen vor. Siehe außerdem die Bedienungsanleitung
des betreffenden Programms.
Systemanforderungen
Windows
Computer: Computer mit einem USB-Port, der von Microsoft
Betriebssystem: Microsoft Windows XP SP3 (32 Bit) oder neuer,
Windows XP/Vista/7 angesprochen werden kann
(die Verwendung eines USB-Chipsatzes der Intel
Corporation wird empfohlen)
Microsoft Windows Vista SP2 (32 Bit, 64 Bit) oder
Windows 7 (32 Bit, 64 Bit)
Mac OS X
Computer: Apple Macintosh-Computer mit Intel- oder
Betriebssystem: Mac OS X 10.4 oder neuer
Selbst wenn Ihr Computer diese Anforderungen erfüllt, kann
nicht garantiert werden, dass das nanoKONTROL2 funktioniert.
PowerPC-Prozessor und einem USB-Port, der von
Mac OS X angesprochen werden kann.
Technische Daten
Anschlüsse: USB-Port (Typ „B“)
Stromversorgung: USB-Bus-Strom
Leistungsaufnahme: 100 mA oder weniger
Abmessungen (B x T x H): 325 x 83 x 30 mm
Gewicht: 293 g
Lieferumfang: USB-Kabel, Bedienungsanleitung
* Änderungen der technischen Daten und des Designs ohne vorherige
Ankündigung vorbehalten.
Page 6

Introducción
Gracias por comprar el controlador extraplano USB Korg
nanoKONTROL2. Por favor, lea este manual atentamente y guárdelo
para futuras consultas.
Para utilizar correctamente este producto, deberá definir alguno
de los ajustes en la aplicación que utilice. Defina los ajustes de la
forma descrita en la sección “Ajustes para utilizar la unidad con
el software DAW” de este manual y en el manual del usuario de
su aplicación.
El software Korg Kontrol Editor permite editar los mensajes MIDI
transmitidos desde cada controlador del nanoKONTROL2. Puede
descargar la Guía de Parámetros y el software Korg Kontrol
Editor desde el sitio web de Korg.
http://www.korg.co.jp/English/Distributors/ o http://www.korg.com
Procedimientos Iniciales
Conexiones y alimentación
USB cable
Ordenador
1. Conecte el nanoKONTROL2 a su ordenador con un cable USB. El
nanoKONTROL2 se enciende y también se enciende el LED.
Nunca utilice un cable USB distinto del que se ha incluido.
El nanoKONTROL2 se inicia en el modo operativo seleccionado
cuando se utilizó la unidad por última vez. En este momento,
parpadeará el botón de transporte correspondiente al modo
operativo actual. (--> “Modo operativo”)
La primera vez que conecte el nanoKONTROL2 a su ordenador
Windows XP/Vista/7, se instalará Automáticamente el
controlador estándar USB-MIDI para su sistema operativo.
USB conector
nanoKONTROL2
Apagado
1. Desconecte el cable USB que conecta el nanoKONTROL2 y el
ordenador. El nanoKONTROL2 se apaga y también se apaga el
LED.
Partes y sus funciones
Botones de función
Cinco botones de función correspondientes a las funciones
PREV TRACK, NEXT TRACK, SET MARKER, PREV MARKER
y NEXT MARKER.
LED de encendido
USB conector
Utilice un cable USB para conectar
la unidad a un ordenador.
Botones de transporte
Seis botones de transporte
correspondientes a las funciones
CYCLE, REW, FF, STOP, PLAY
y REC.
nanoKONTROL2 y puertos de controlador
Puertos del Controlador
Como se muestra en la siguiente tabla, el nombre de los puertos
dependerá del sistema operativo que está utilizando, y si no ha
instalado el controlador Korg USB-MIDI.
Sistema operativo MIDI IN MIDI OUT
Mac OS X nanoKONTROL2 nanoKONTROL2 CTRL
SLIDER/KNOB
Windows Vista/7 nanoKONTROL2 nanoKONTROL2
Windows XP Disp. USB audio Disp. USB audio
Windows XP/Vista/7 + nanoKONTROL2 1
KORG USB-MIDI Driver SLIDER/KNOB
Puerto MIDI IN
Aquí se reciben los mensajes MIDI de los controladores del
nanoKONTROL2. Si desea usar el nanoKONTROL2 para controlar
una aplicación de su ordenador, Seleccione este puerto en los Ajustes
MIDI In de su aplicación. Este puerto también es usado por el Software
Korg Kontrol Editor para controlar al nanoKONTROL2.
Puerto MIDI OUT
Este puerto lo utiliza el software DAW o el Korg Kontrol Editor para
controlar el nanoKONTROL2.
Si está usando Microsoft Windows XP/Vista/7, el controlador
USB-MIDI que se instala no le permitirá usar el nanoKONTROL2
con varias aplicaciones a la vez. Si desea usar el nanoKONTROL2
con varias aplicaciones a la vez, es necesario que instale el
controlador Korg USB-MIDI. Descargue el controlador Korg USBMIDI de la Página Web de Korg, e instálelo siguiendo las
instrucciones.
http://www.korg.co.jp/English/Distributors/ o http://www.korg.com
Aún en el caso de que no necesite usar el nanoKONTROL2 con
varias aplicaciones a la vez, le recomendamos que instale el
controlador Korg USB-MIDI para un funcionamiento más estable.
nanoKONTROL2 1 CTRL
Modo operativo
El nanoKONTROL2 presenta dos modos operativos: El modo DAW,
en el que cada controlador se configura para un controlador DAW
específico; y el modo CC, en el que los mensajes de Cambio de Control
se asignan a los controladores de la unidad. Para activar el modo
deseado, active la unidad mientras mantiene pulsado el botón
correspondiente a dicho modo.
Controles de parámetro
Estos controles ajustan los parámetros del software DAW.
Ajustes para utilizar la unidad con el software DAW
Esta sección describe diversos ajustes para varios programas del
software DAW. Para más información, consulte la Guía de Parámetros.
Para más información acerca de los ajustes detallados y el
funcionamiento del distinto software DAW, consulte el manual del
usuario correspondiente.
Cubase
1.
Mientras mantiene pulsados los botones SET MARKER y REW,
conecte el cable USB desde su ordenador al nanoKONTROL2.
2.
Abra la ventana “Device setting” en Cubase y añada “Mackie
Control”.
3.
Seleccione nanoKONTROL2 como puertos MIDI In/Out utilizados
por “Mackie Control”.
Digital Performer
1.
Mientras mantiene pulsados los botones SET MARKER y FF,
conecte el cable USB desde su ordenador al nanoKONTROL2.
Ajustes para “Configuración de Audio MIDI”
• Desde “Configuración de Audio MIDI”,
abra “Dispositivo MIDI” o “Estudio MIDI”
y seleccione “Añadir dispositivo”.
• Dele un nombre al dispositivo añadido.
(p.ej., nanoKONTROL2 DP)
• Conecte el dispositivo añadido con el
nanoKONTROL2, tal como se muestra a
la izquierda.
2.
Abra la ventana “Control Surface” de Digital Performer y seleccione
“Mackie Control” para “Driver” y “Unit”.
3.
Seleccione los puertos nanoKONTROL2 para “MIDI”.
GarageBand/Logic
Descargue el plug-in nanoKONTROL2 Control Surface para
GarageBand/Logic desde el sitio web de Korg y siga las instrucciones
en el documento incluido para especificar los ajustes.
http://www.korg.co.jp/English/Distributors/ o http://www.korg.com
Live
1.
Mientras mantiene pulsados los botones SET MARKER y STOP,
conecte el cable USB desde su ordenador al nanoKONTROL2.
2.
Abra la ventana “Preferences” en “Live”, y luego seleccione
“Mackie Control” para “Control Surface”.
3.
Seleccione nanoKONTROL2 como puertos MIDI In/Out utilizados
por “Mackie Control”.
Pro To ols
1.
Mientras mantiene pulsados los botones SET MARKER y PLAY,
conecte el cable USB desde su ordenador al nanoKONTROL2.
2.
Abra la ventana “Peripheral” en “ProTools”, y luego seleccione
“HUI” para “Type”.
3.
Seleccione nanoKONTROL2 como origen y destino para “HUI”.
SONAR
1.
Mientras mantiene pulsados los botones SET MARKER y REC,
conecte el cable USB desde su ordenador al nanoKONTROL2.
2.
Abra la ventana “MIDI device” en SONAR, y luego seleccione
“nanoKONTROL2” para “Input” y “Output”.
3.
Abra la ventana “Controllers/Surfaces” y luego seleccione “Mackie
Control” para “Control Surface”.
4.
Seleccione nanoKONTROL2 como puertos MIDI In/Out utilizados.
Otro software DAW
1.
Mientras mantiene pulsados los botones SET MARKER y CYCLE,
conecte el cable USB desde su ordenador al nanoKONTROL2 y
active el modo CC.
2.
Configure la aplicación para que puedan controlarla los mensajes
de Cambio de Control transmitidos desde el nanoKONTROL2. Para
más información acerca de la configuración de la aplicación,
consulte el manual de usuario de la misma.
Solución de Problemas
La unidad no se enciende
•Si está usando un Hub USB pasivo (sin alimentación independiente),
es posible que el nanoKONTROL2 no se encienda. Si ocurre esto
conecte el nanoKONTROL2 a un Hub USB con alimentación
independiente o directamente a su ordenador.
El Software no responde
• Asegúrese que nanoKONTROL2 ha sido detectado por el ordenador.
En Windows XP, vaya a Panel de Control, Dispositivos de Sonido y
Audio y compruebe la Pestaña “Hardware”.
En Windows Vista/7, vaya a Panel de Control, abra Hardware y
Sonidos, ver Hardware y Dispositivos y compruebe Controladores
de Sonido, vídeo y juegos.
En Mac OS X, abra Aplicaciones, Utilidades, Ajustes de Audio y
MIDI e inicie “Audio MIDI Setup.”
En Mac OS X 10.5 o anterior, compruebe la pestaña “MIDI Devices”.
En Mac OS X 10.6 o posterior, abra y compruebe “MIDI Studio”
seleccionando “Show MIDI Window” en el menú de ventana
“Window”.
• Asegúrese que nanoKONTROL2 está Seleccionado como puerto
MIDI de la aplicación que está usando.
• Es posible que la aplicación que use no soporte una función
específica. Por favor, consulte la documentación de su aplicación
Software.
• Para utilizar algunas de las funciones de este producto, deberá
ajustar algunos de los ajustes de la aplicación host que utilice. Defina
los ajustes de la forma descrita en la sección “Ajustes para utilizar
la unidad con el software DAW” de este manual y en el manual del
usuario para su aplicación.
Requisitos de funcionamiento
Windows
Ordenador: El ordenador debe disponer de un puerto USB y
Sistema operativo: Microsoft Windows XP SP3 (32bit) o posterior, o
cumplir con los requisitos para utilizar Microsoft
Windows XP/Vista/7 (se recomienda un chipset
USB fabricado por Intel Corporation)
Microsoft Windows Vista SP2 (32bit, 64bit) o
Windows 7 (32bit, 64bit)
Mac OS X
Ordenador: Apple Macintosh con procesador Intel o
Sistema operativo: Mac OS X 10.4 o posterior
No se garantiza el funcionamiento del teclado con todos los
ordenadores que cumplen estos requisitos del sistema.
PowerPC con puerto USB y que cumpla los
requerimientos de Mac OS X
Especificaciones
Conectores: conector USB (tipo mini B)
Alimentación: USB bus
Consumo eléctrico: 100 mA o menos
Dimensiones(Anch. x Prof. x Alt.): 325 x 83 x 30 mm
Peso: 293 g
Elementos incluidos: USB cable, Manual de usuario
* Las especificaciones y el aspecto están sujetas a cambios sin previo
aviso por mejora.
Page 7

 Loading...