

Page 1

1
Page 2

OWNER’S MANUAL (p.4–27)
MANUEL D’UTILISATION (p.28–51)
BEDIENUNGSANLEITUNG (p.52–75)
Page 3

Precautions
Location
Using the unit in the following locations can result in a
malfunction.
• In direct sunlight
• Locations of extreme temperature or humidity
• Excessively dusty or dirty locations
• Locations of excessive vibration
• Close to magnetic fields
Power supply
Please connect the designated AC adapter to an AC outlet of the correct voltage. Do not connect it to an AC outlet of voltage other than that for which your unit is intended.
Interference with other electrical devices
Radios and televisions placed nearby may experience reception interference. Operate this unit at a suitable distance from radios and televisions.
Handling
To avoid breakage, do not apply excessive force to the
switches or controls.
Care
If the exterior becomes dirty, wipe it with a clean, dry
cloth. Do not use liquid cleaners such as benzene or thinner, or cleaning compounds or flammable polishes.
Keep this manual
After reading this manual, please keep it for later reference.
Keeping foreign matter out of your equipment
Never set any container with liquid in it near this equipment. If liquid gets into the equipment, it could cause a
breakdown, fire, or electrical shock.
Be careful not to let metal objects get into the equipment.
If something does slip into the equipment, unplug the
AC adapter from the wall outlet. Then contact your
nearest Korg dealer or the store where the equipment
was purchased.
THE FCC REGULATION WARNING (for U.S.A.)
This equipment has been tested and found to comply
with the limits for a Class B digital device, pursuant to
Part 15 of the FCC Rules. These limits are designed to
provide reasonable protection against harmful interference in a residential installation. This equipment generates, uses, and can radiate radio frequency energy and, if
not installed and used in accordance with the instructions, may cause harmful interference to radio communications. However, there is no guarantee that interference will not occur in a particular installation. If this
equipment does cause harmful interference to radio or
television reception, which can be determined by turning the equipment off and on, the user is encouraged to
try to correct the interference by one or more of the following measures:
• Reorient or relocate the receiving antenna.
• Increase the separation between the equipment and
• Connect the equipment into an outlet on a circuit dif-
• Consult the dealer or an experienced radio/TV tech-
Unauthorized changes or modification to this system
can void the user’s authority to operate this equipment.
CE mark for European Harmonized Standards
CE mark which is attached to our company’s products of
AC mains operated apparatus until December 31, 1996
means it conforms to EMC Directive (89/336/EEC) and
CE mark Directive (93/68/EEC).
And, CE mark which is attached after January 1, 1997
means it conforms to EMC Directive (89/336/EEC), CE
mark Directive (93/68/EEC) and Low Voltage Directive
(73/23/EEC).
Also, CE mark which is attached to our company’s products of Battery operated apparatus means it conforms to
EMC Directive (89/336/EEC) and CE mark Directive
(93/68/EEC).
* Company names, product names, and names of formats etc. are the trademarks or registered trademarks of
their respective owners.
receiver.
ferent from that to which the receiver is connected.
nician for help.
Page 4

Introduction
Thank you for purchasing the KP3 KAOSS
PAD dynamic effect/sampler. For troublefree enjoyment of the KP3’s fullest potential, please read this manual carefully and
use the KP3 only as directed.
Overview
The KP3 features Korg's KAOSS technology, allowing the X-Y touch pad to control
multiple effect parameters in realtime.
Simply touch, tap and/or rub your finger
across the surface of the touch pad. A protective sheet to preserve the touch pad surface is included.
Internally, the KP3 holds 128 effect programs, ranging from delays and filters to
vocoders and even synthesizers. Pad Motion, Hold and Mute features add even
more versatility to the touch pad control.
Your eight favorite programs can be modified and saved to the Program Memory
buttons for quick access.
Our new FX Release function can automatically provide a delay effect when you
remove your hand from the touch pad,
making it easier to perform smooth transitions during a performance.
In addition, the KP3 is also a sophisticated
sampler. Both Mic and Line inputs are provided, allowing you to sample from a variety of audio sources. Resampling allows
you to record the output of the KP3 itself,
as well as to sample incoming signals
through the onboard effects. Both Loop
and One -Shot samples can be recorded
and played from the Sample Bank buttons.
Sample editing tools provide automatic
sample slicing, and the start point of the
loop can be manually adjusted to keep
your samples in sync.
Auto-BPM detect, MIDI Clock and Tap
Tempo keep sample playback speed and
tempo-based effects moving together.
Samples and setting can be saved to Secure
Digital (SD) cards, or saved to a computer
via USB and reloaded quickly. Enjoy your
new KP3!
5
Page 5
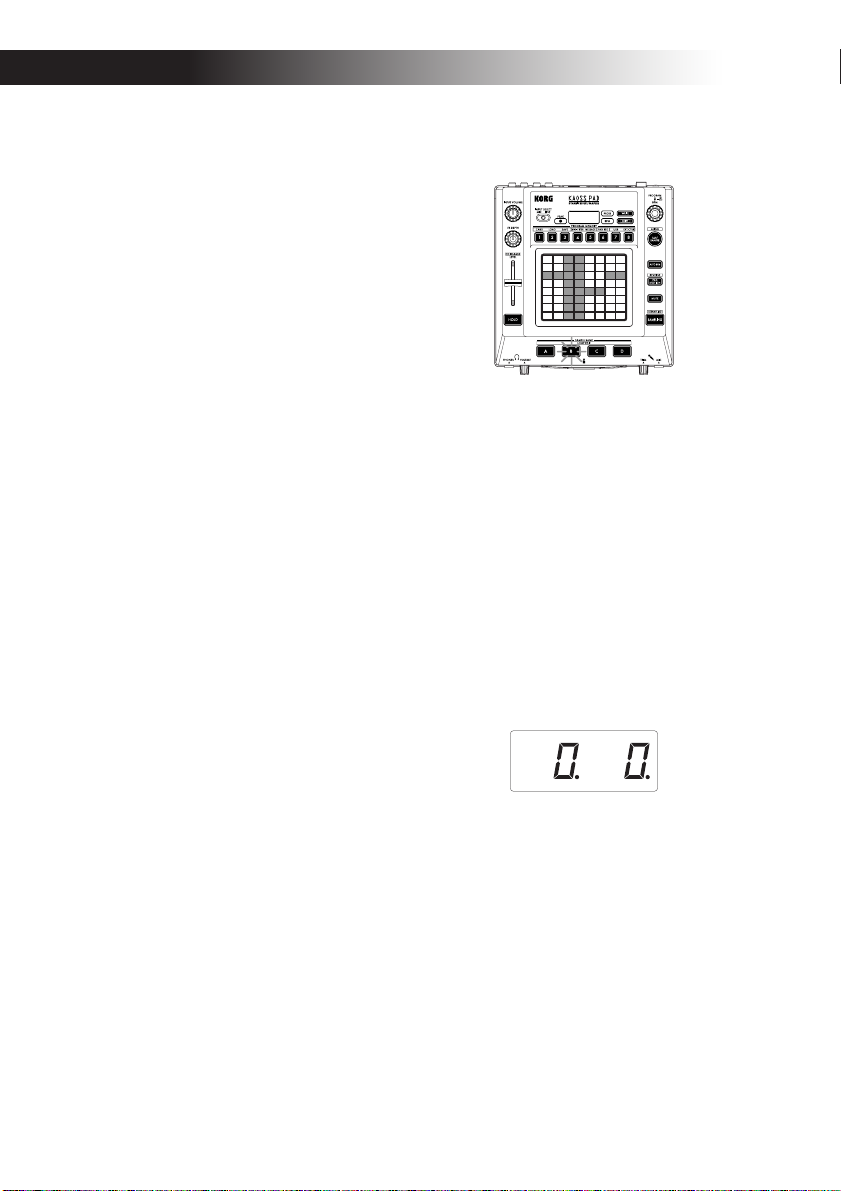
Parts of the KP3 and
their functions
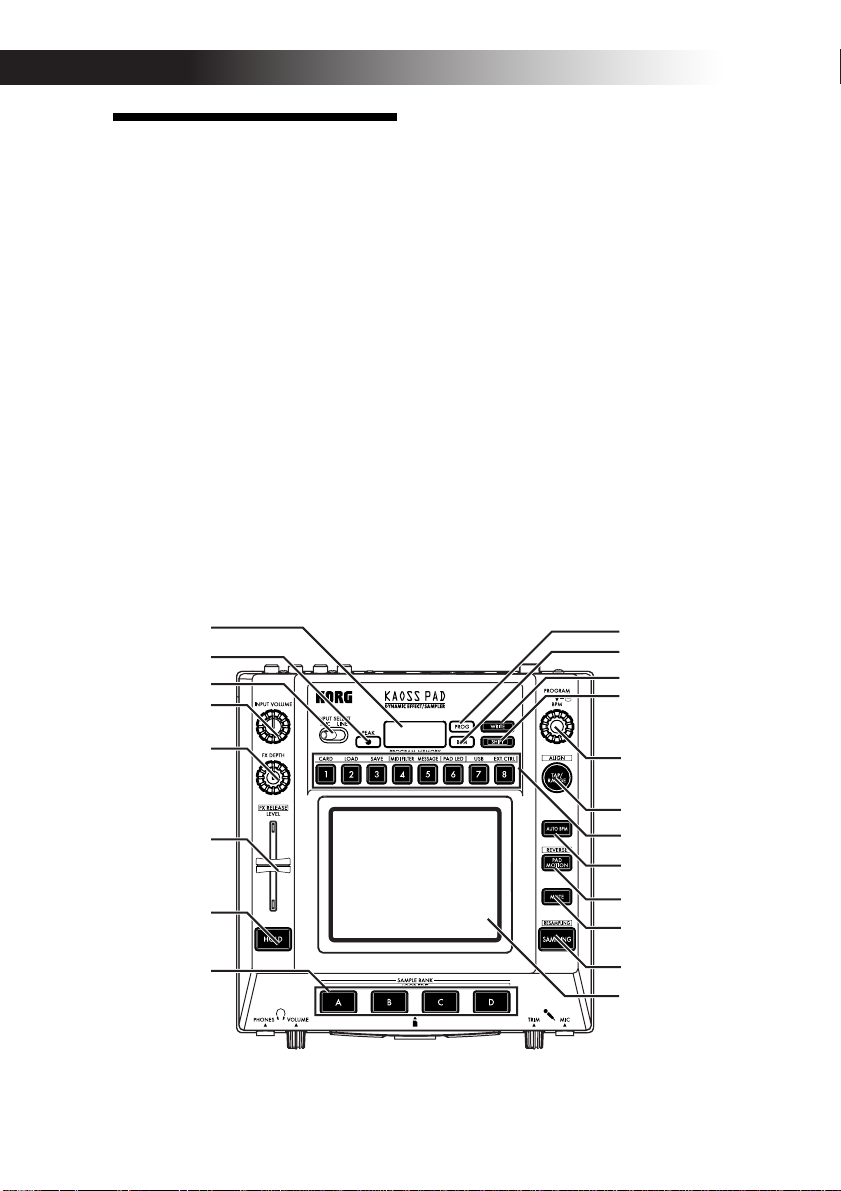
Top panel
1. Display
2. [PEAK] indicator
3. [INPUT SELECT] switch
4. [INPUT VOLUME] knob
5. [FX DEPTH] knob
6. LEVEL slider
(Sample Bank playback level—see page 14)
7. [HOLD] button
8. [SAMPLE BANK] buttons
9. [PROG] indicator
10. [BPM] indicator
(Blinks when a BPM program is selected.)
11. [WRITE] button
12. [SHIFT] button
13. [PROGRAM/BPM] knob
14. [TAP/RANGE] button
15. [PROGRAM MEMORY 1–8] buttons
16. [AUTO BPM] button
17. [PAD MOTION] button
18. [MUTE] button
19. [SAMPLING] button
20. Touch pad
Care of the touch pad
Never press the touch pad with excessive
force, or place heavy objects on it. It may
crack or break if handleufroughly. Press
the touch pad only with your finger, since
rubbing or pressing the touch pad with a
sharp object will scratch it. To clean the
touch pad, wipe it lightly with a soft dry
cloth. Do not use solvents such as thinner,
since this may cause deformation.
1
2
3
4
5
9
10
11
12
13
14
6
15
16
7
17
18
8
19
20
6
Page 6
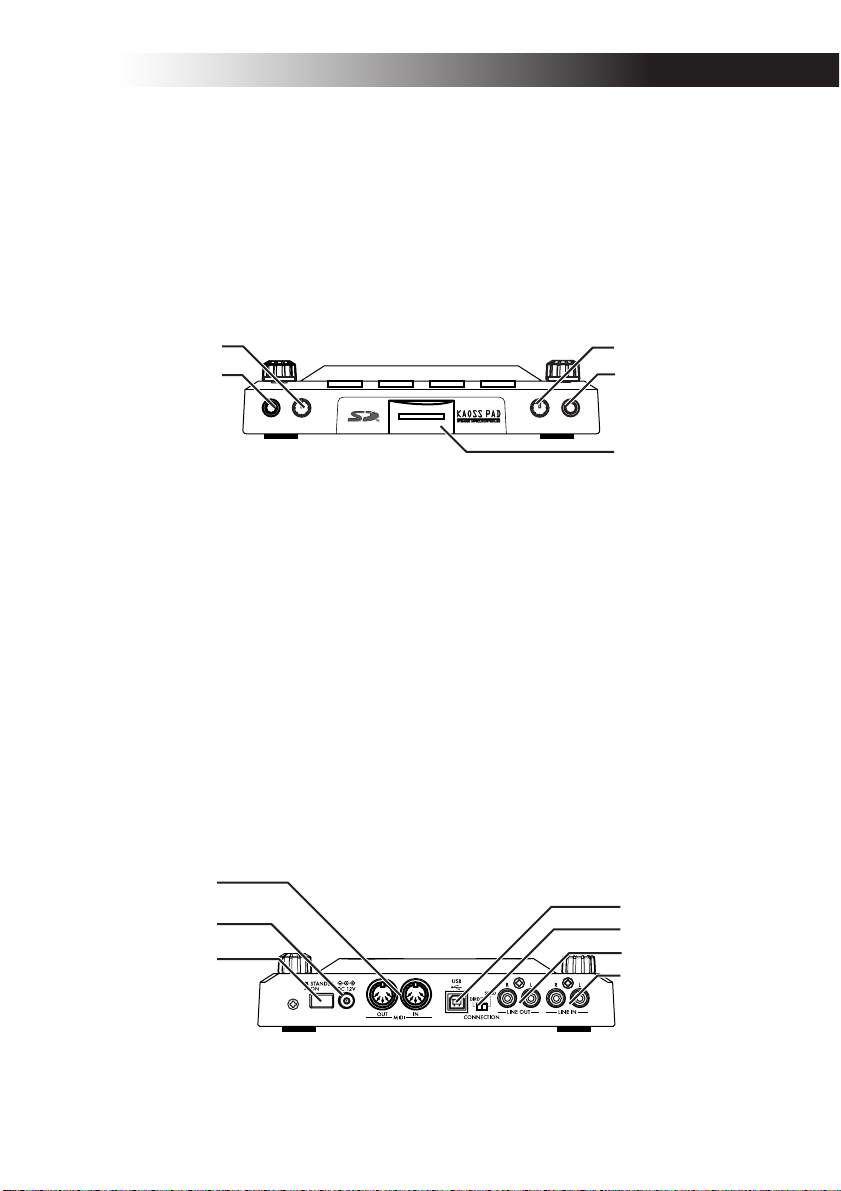
Front panel
1. [PHONES VOLUME] knob
2. [PHONES] output jack
3. [MIC TRIM] knob
4. [MIC] input jack
5. SD Card Slot
The KP3 must be turned off before you insert or remove the SD card!
1
2
Rear panel
1. [MIDI IN], [MIDI OUT] connectors
2. DC 12V jack
3. [POWER] switch
4. [USB] jack
5. [CONNECTION] switch
6. [LINE OUT] jacks
7. [LINE IN] jacks
1
2
3
3
4
5
4
5
6
7
7
Page 7
Connections
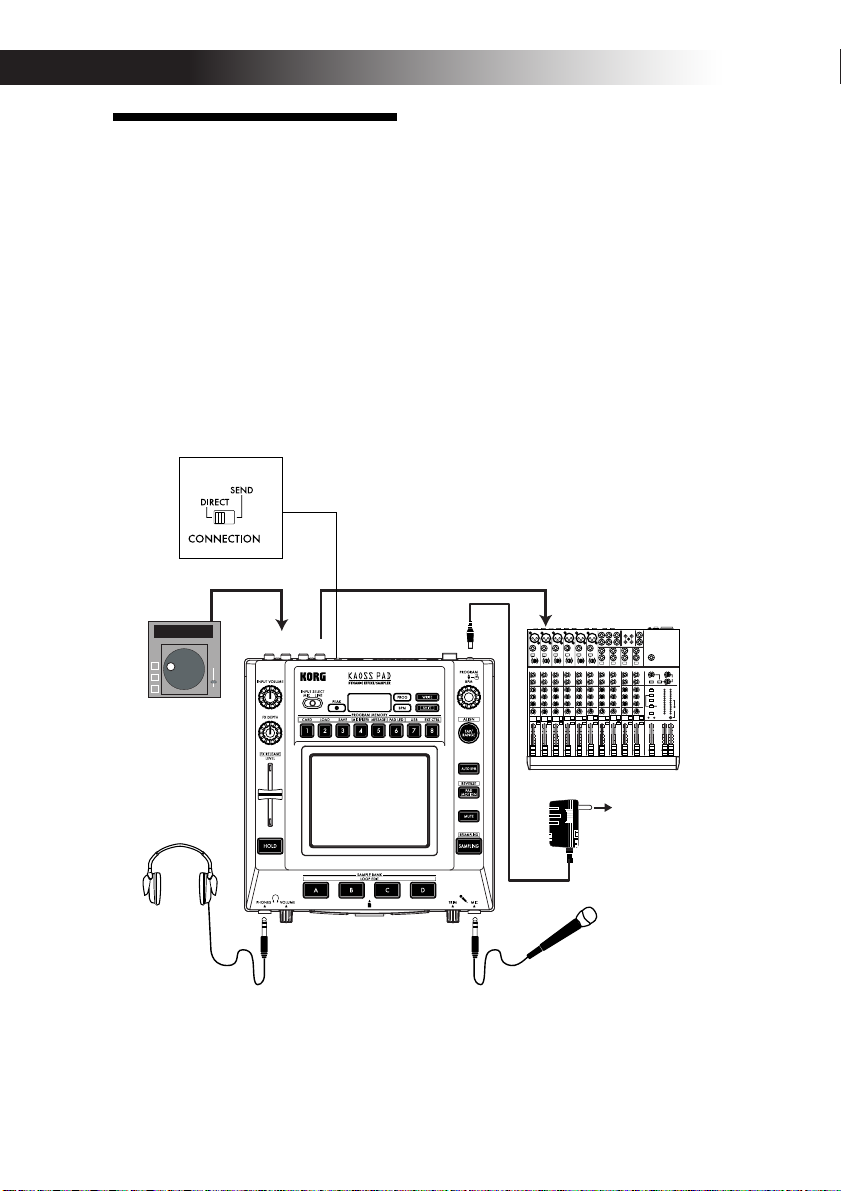
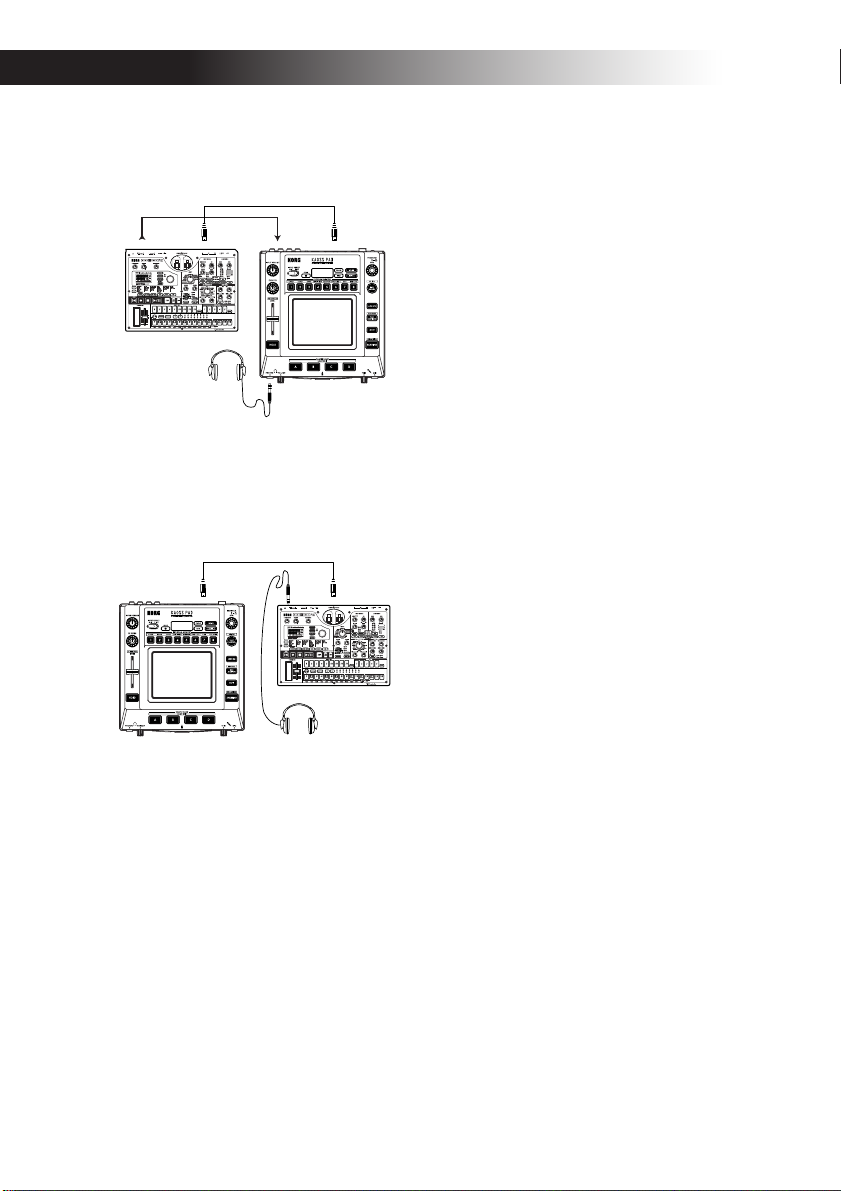
Basic connections
In the example shown below, the KP3 is
being used “in-line” between the audio
source and the mixer inputs. In this case,
effects can be applied to the incoming audio signal, and the incoming audio signal
can be sampled. In this type of application,
the CONNECTION switch on the rear
panel should be set to DIRECT. The KP3
has line and mic input jacks. Use the jacks
that are appropriate for your situation.
LINE IN
CD PLAYER
LINE OUT DC12V
MIXER, DJ MIXER
AC
AC ADAPTER
8
Page 8
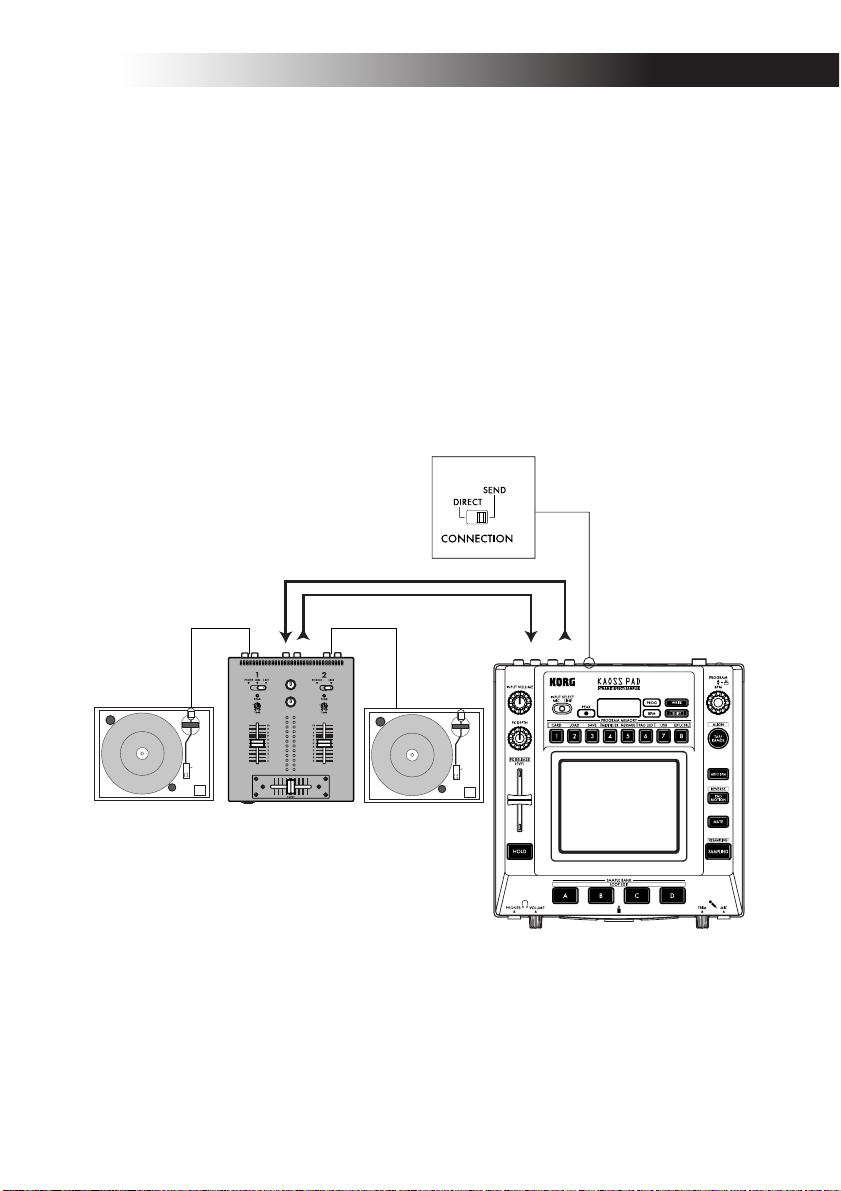
DJ mixer connections
The KP3 can also be used as an external
effect processor by connecting it to the effect send and return jacks on a DJ (or other
style) mixer. This allows the KP3 effects to
be applied to any audio signal connected
to the mixer. For this type of application,
the CONNECTION switch on the rear
panel should be set to SEND. With this
setting, the output from the KP3 will contain only the processed signal, and will not
include the original signal being sent to the
KP3's inputs. Use the send level and return
level controls of your mixer to adjust the
depth of the effect.
TURNTABLE
RETURN
SEND
LINE OUT
LINE IN
TURNTABLEDJ MIXER
9
Page 9

Operation
Using the power switch
1. Connect the KP3 to your other equipment as shown in the diagrams on the preceding pages, and connect the AC adapter
to an electrical outlet.
NOTE Never use any AC adapter other than the
included one.
2. Press the Power switch to turn the KP3
on. The display will light.
To turn the KP3 off, press the Power switch
once again to return it to the standby position.
Selecting the audio input
1. Use the Input Select switch to choose
which of the KP3's input jacks will be used.
MIC: The effect will be applied to the mic
input.
LINE: The effect will be applied to the line
inputs.
Adjusting the volume
1. Use the Input Volume knob to adjust the
input level. The Peak indicator will light in
either green, orange, or red to indicate the
level of the incoming signal. Adjust the Input Volume so that the peak indicator does
not light red.
2. If you are using the mic jack, adjust the
MIC Trim knob as appropriate for the sensitivity of the mic, so that the sound is not
distorted.
3. If you are listening through headphones, use the Phones Volume knob to
adjust the headphone level.
Selecting a program
Programs can be selected three ways.
1. If the display is currently showing a
program number, you can select a program
by turning the Program Knob. If the display is showing the current BPM, press the
PROGRAM/BPM knob to switch to the
program display.
10
The BPM indicator will blink if you select a
program that synchronizes to the BPM.
2. If you hold down the SHIFT button as
you rotate the PROGRAM/BPM knob,
you will advance to the first program in
each category, rather than having to scroll
through all 128 programs. Once you have
selected the correct category, release the
SHIFT button and use the PROGRAM/
BPM button to select the program from
within that category.
3. Finally, your eight favorite programs
can be selected by simply pressing one of
the PROGRAM MEMORY buttons. (Refer
to page 9).
The PROGRAM/BPM knob is a continuous knob. When you’ve reached the last
program number, you’ll wrap around to
the beginning of the list.
Controlling the effect depth
1. If the CONNECTION switch on the rear
panel is set to DIRECT, use the FX/DEPTH
knob to adjust the depth of the effect. Turning the knob to the right will increase the
effect depth.
2. If the CONNECTION switch on the rear
panel is set to SEND, you will need to use
the effect send and return levels on your
mixer to control the effect depth.
Hold
If you press the HOLD button as your finger is on the touch pad, you can take your
finger away and the effect will continue as
if your finger was still on the touch pad
and at the same location as when you
pressed the HOLD button. The pad LEDs
will remain lit at that position.
Page 10

Mute function
Holding down the MUTE button will momentarily cut the input signal, but the effected signal will continue to play.
Transformer effect
By rapidly tapping the MUTE button, you
can create rhythmic effects from a continuous audio input, as in the “transformer”
technique used by DJs.
FX RELEASE
What is FX RELEASE?
Making the transition from a very hardedge effect back to the original unaffected
signal can often times be very abrupt or
sudden. With FX RELEASE, the moment
you take your hand off the touch pad (i.e.,
the moment you turn off the effect), a delay effect synchronized to the current BPM
will be applied, and will then gradually diminish. This lets you smoothly and musically transition from a aggressive effect
such as Distortion or Decimator back to
the “thru” state.
Saving the FX RELEASE setting
You can save a different FX RELEASE setting for each program.
1. To adjust the depth of the FX RELEASE
effect for the currently selected program,
hold down the SHIFT button and use the
FX RELEASE slider.
2. Press the WRITE button.
The WRITE button and PROGRAM
MEMORY button will blink. The SHIFT
button will be lit, and will operate as an
EXIT button.
3. Press the WRITE button once again.
The program will be written, and the KP3
will return to normal operation.
NOTE If you’ve selected an effect program that already uses delay, the FX Release function will not be
used, but the delay sound within that effect program
will remain the moment you take your finger off the
touch pad, producing a similar effect.
Pad Motion
Pad Motion allows you to record and playback the motion of your finger on the
touch pad. This allows you to accurately
reproduce the same complicated movements over and over again. In addition, the
pad LEDs will provide a visual indication
of the movement.
You can even save pad motion recording
as part of the Program Memory. (➝p.9)
Recording a pad motion
Hold down the PAD MOTION button. As
soon as your finger hits the touch pad, the
PAD MOTION button will begin blinking,
indicating that the pad motion is being recorded. To stop recording, release the PAD
MOTION button, and pad motion playback will begin. Pad motion is only recorded a few seconds, so if the Pad Motion
button stops blinking and is lit red, pad
motion recording has stopped, and pad
motion playback will begin immediately.
To stop the pad motion playback, touch
the PAD MOTION button once again. the
button will go dark (unlit).
NOTE When you begin recording, the previouslyrecorded motion will be overwritten.
Playing back a pad motion
Press the PAD MOTION button; the button
will light, and the pad motion will begin
playing as a loop.
The pad LEDs will show the recorded
movement. When you press the PAD MOTION button once again, the button will go
dark and playback will stop.
Reverse playback
If you hold down the SHIFT button and
press the PAD MOTION (REVERSE) button, the pad motion will play back in reverse. You can repeat this operation to alternate between “reverse playback” ➝
“forward playback” ➝ “reverse playback.”
11
Page 11
Saving a pad motion
To save the pad motion you've just recorded, write (or re-write) the current program into Program Memory (➝p.13)
Specifying the BPM
What is BPM?
BPM (Beats Per Minute) is the tempo of the
song expressed as the number of beats
(quarter notes) that occur in one minute. A
higher BPM value means a faster tempo.
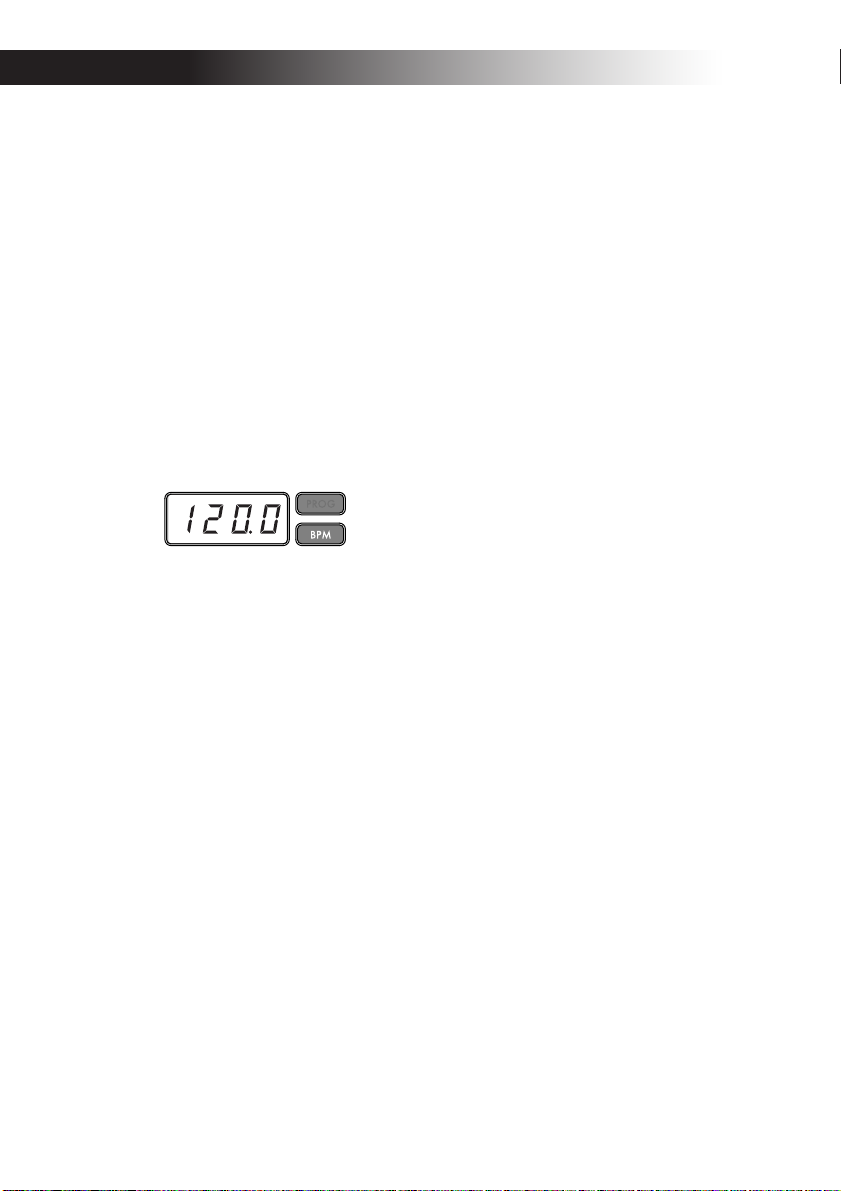
Viewing the BPM
When you turn on the KP3, the BPM will
be set to 120.0 .
If the display shows the current program,
press the PROGRAM/BPM knob to switch
to the BPM display.
NOTE If the clock is set to external synchronization, "Ext" will be shown in the display, and you
won't be able to specify the BPM value.
Manually setting the BPM
1. If the display shows the current program, press the PROGRAM/BPM knob to
switch to the BPM display.
2. Use the PROGRAM/BPM knob to adjust the BPM value in steps of 0.1. By turning the PROGRAM/BPM knob while
holding down the SHIFT button, you can
adjust the integer portion of the value in
steps of 1.
NOTE The Auto BPM is automatically turned off.
Using Tap Tempo to set the BPM
If you’re not certain of the BPM value of a
song, you can set the BPM by pressing the
TAP/RANGE button in rhythm with the
beat of the song.
1. Press the TAP/RANGE button three or
more times in rhythm with the beat of the
song. The KP3 will detect the interval at
which you press the button, the corresponding BPM value will appear in the
display, and that BPM value will be set.
12
Auto BPM detection
The KP3 can set the BPM value automatically by detecting the beat of the song. If
the song's BPM changes, the KP3's BPM
value will change in sync.
1. Press the AUTO BPM button to turn on
Auto BPM detection.
2. The AUTO BPM button will light, and
the BPM of the incoming audio source will
be detected automatically.
If the KP3 is unable to detect the BPM
Press the TAP/RANGE button several
times in time with the beat of the song; the
KP3 will automatically detect the BPM using the beat you manually tapped as a
guideline.
Because of the way that the Auto BPM
function operates, it may erroneously detect a value that is 1/2 or 2/3 of the correct
BPM value, or small deviations may arise.
In such cases, you can use the TAP/
RANGE button to make compensations. If
you press the TAP/RANGE button while
Auto BPM detection is active, the value
you specify by tapping will become the
center value of the BPM range.
NOTE It’s not possible to detect the BPM value
from music that does not have a clear sense of beat.
The detectable BPM range is from 80 to 160.
Specifying the beginning of the measure
While Auto BPM detection can accurately
capture the tempo, you can manually reset
which beat will be considered the start of
the measure. Hold down the SHIFT button
and press the TAP/RANGE (ALIGN) button; that moment will be specified as the
beginning of a measure. The button will
blink green at the beginning of the beat.
(This is fixed for 4/4; green› red ›red> red)
NOTE This setting will also re-align the beginning
of each sample.
Turning off Auto BPM
Press the AUTO BPM button to make the
button go dark. The Auto BPM function
will turn off, and the current BPM value
will be fixed.
Page 12

MIDI Sync function
The BPM of the KP3 can be set to follow
MIDI Time Clock messages from an external MIDI device. Connect the MIDI OUT
connector of an external MIDI device (such
as a sequencer set to transmit MIDI time
clock messages) to the MIDI IN connector
of the KP3.
NOTE This function will not synchronize sequence data with the KP3’s rhythm pattern programs. If you want to synchronize sequenced data
and the KP3's internal rhythm patterns, you will
either have to insert a Touch Pad On message into
the beginning of each measure of your sequence
data, or touch the touch pad at the beginning of each
KP3 phrase to start the pattern.
NOTE If you want the KP3 to receive Timing
Clock and Touch Pad On messages, go to MIDI Setting (➝ p.20), and make “Changing the MIDI message filter settings” (➝ p.21) so that these messages
will be received.
NOTE You can not use the Tap Tempo or Auto
BPM functions while the KP3 is receiving Timing
Clock from an external MIDI device
Storing settings to a
PROGRAM MEMORY
The PROGRAM MEMORY buttons allow
you to save and instantly recall your eight
favorite KP3 programs and settings.
The following data will be stored:
•Effect program
• FX/DEPTH knob setting
• Pad motion
• The on/off status of the HOLD button
and its position (coordinates)
Saving
1. Press the WRITE button.
The PROGRAM MEMORY buttons and
the WRITE button will blink.
2. Press the PROGRAM MEMORY button
where you want the settings to be stored.
The button you pressed will blink, the display will indicate “WRT,” and the settings
will be written. When writing is complete,
the KP3 will return to its normal state.
Recalling
1. Press one of the PROGRAM MEMORY
buttons (1–8); the settings stored in that
memory location will be recalled.
Sampling
The KP3 can record both looped phrases
and one shot samples from an external
source. The KP3 can also resample; allowing you to sample external audio sources
through the internal effects, or capture the
entire output of the KP3 as a new sample.
Loop samples can be up to four measures
(16 beats) long, at the current BPM when
you begin recording. (for example, at a
tempo of 140, 16 beats would be approximately 7 seconds).
If the tempo value is 73 or lower, the maximum of beats that can be sampled is 8. If
the tempo value is 39 or lower, the maximum of beats that can be sampled is 4.
For a loop sample you can specify a beat
length of 16, 8, 4, 2, or 1.
When a loop sample is created, it will begin playing as soon as it is done being recorded (the corresponding SAMPLE
BANK button will be lit orange.)
Sampling
1. Press the SAMPLING button.
In this sample-ready mode, the SAMPLE
BANK buttons will blink red, and the display will indicate “[16]” (the default value
is 16 beats). To exit without sampling,
press the SHIFT button.
NOTE The Auto BPM is automatically turned off.
2. Use the PROGRAM/BPM knob to
specify the length of sampling (in beats).
The display will switch between [16], [8],
[4], [2], or [1] accordingly.
3. When you are ready to record, press one
of the blinking SAMPLE BANK buttons A, B, C, or D. The selected SAMPLE BANK
button will blink green, the display will indicate “REC,” and sampling will begin.
The PROGRAM MEMORY buttons will
consecutively blink to indicate the beat
you’re recording.
13
Page 13
4. If you want to record a one-shot sample,
press the same SAMPLE BANK button before reaching the specified BEAT. Sampling will end, and a one-shot sample will
be created. The SAMPLE BANK button
used for recording will light red. It will be
easier to record a one-shot sample if you
specify a longer setting such as “16.”
5. If the specified BEAT time elapses before
you press the SAMPLE BANK button,
sampling will end, and a loop sample will
be created. The KP3 will automatically
switch to playback, and the SAMPLE
BANK button will light orange.
NOTE The data that had been in the selected
SAMPLE BANK button will be overwritten.
Playing back samples
The SAMPLE BANK buttons will light
green if they contain a loop sample or red
if they contain a one-shot sample. Keys
that contain no sample data will be dark.
When you press a button that contains a
loop sample, loop playback will start. The
button will be lit orange during playback.
Press the button once again to stop playback.
When you press a button that contains a
one-shot sample, the button will momentarily go dark and the one-shot sample will
play.
NOTE If a sample effect is selected for the program,
playback will begin when you touch the touch pad
after selecting a SAMPLE BANK button.
3. Touch the pad to adjust the playback
level of the sample for that bank.
Editing playback settings for
loop samples
To edit the playback settings for a loop
sample, hold down the SHIFT button and
press a SAMPLE BANK button that contains a loop sample.
NOTE If you press a SAMPLE BANK button that
contains a one-shot sample, you won’t be able to edit
settings other than the level.
Start Point setting
1. The SHIFT button will be lit and the
specified SAMPLE BANK button will
change to blinking green.
The display will show the loop start point
setting.
Sample playback levels
If you want to adjust the sample playback
volume for all banks, use the level slider.
Adjusting the level of an individual
sample bank
1. Hold down the SHIFT button and press
the desired SAMPLE BANK button; the
button will blink green.
2. The pad LEDs corresponding to the selected bank (i.e., located above the button)
will display a bar graph, and LEDs above
the remaining banks will indicate their respective level points.
14
2. Use the PROGRAM/BPM knob to adjust the start point in steps of 1/32nd of a
beat, over a range of ± 1 beat.
Slice setting
Loop samples can be sliced into equal
parts. You can select whether each sliced
part will play or not play. Sliced parts that
do not play are skipped, so the overall
length of the loop will be made shorter.
This allows you to create a variety of new
rhythmic figures and loops from the same
original data. For example by playing only
the first two beats and last two beats of a
Page 14

four-measure sample to create a one-measure loop.
1. The SHIFT button will light and the
specified SAMPLE BANK button will
blink green.
2. All eight PROGRAM MEMORY buttons
will light (by default).
By pressing the corresponding button you
can turn on or off each sample slice.
Resampling
By resampling, you can create a sample
that combines multiple existing samples,
or create a new sample from an existing
sample processed by an effect. You can
resample to create both loop and one-shot
samples. Remember that with resampling,
the output of the KP3 is being recorded, so
all of the effects created using the touch
pad will be recorded as part of the sample
data.
1. Hold down the SHIFT button and press
the SAMPLING button.
2. The SAMPLE BANK buttons will blink
orange, and the KP3 will be in the recordready mode.
3. From here, follow the same instructions
for loop and one shot sampling in the previous section.
NOTE When you press a SAMPLE BANK button,
the playback of the data assigned to that BANK button will stop and will be overwritten.
Function settings
By holding down the SHIFT button and
press one of the PROGRAM MEMORY 1–
8 buttons you can execute various functions such as formatting a card or saving/
loading samples. Use the following procedure to access any of the Function settings
and to edit their various parameters.
1. Hold down the SHIFT button and press
one of the PROGRAM MEMORY buttons
1–8.
2. Use the PROGRAM/BPM knob to select
a sub-parameter.
3. Press the PROGRAM/BPM knob to
view the value options for that parameter.
4. Use the PROGRAM/BPM knob to select
a value.
5. Press the TAP/RANGE button (lit orange) to return to the parameter list. Repeat steps 2–5 to edit additional parameters.
6. At this point, you can either press the
WRITE button (blinking) to save the
changes you have made, or you can press
the SHIFT button to exit without saving.
NOTE While the TAP/RANGE button is lit orange, you can press the TAP/RANGE button to return to the preceding page.
About each function
[1] CARD
Info: Displays the total capacity of the
SD card.
Free: Displays the remaining capacity of
the SD card.
Form: Formats the SD card.
[2] LOAD
Loads data from the SD card into the KP3.
[3] SAVE
Saves data from the KP3 to the SD card.
[4] MIDI FILTER
Specifies the MIDI clock setting and MIDI
message filtering.
[5] MESSAGE
Specifies the channel on which MIDI messages will be transmitted/received, and
15
Page 15

assigns a control change to each controller.
You can specify note numbers for the
SAMPLE BANK buttons.
GLCH (Global channel)
SAMPA, B, C, D (Sample Bank buttons)
PAD X, PAD Y, PAD T (Pad Touch)
FX.DP (FX Depth knob)
SLDR (Level/FX RELEASE Slider)
HOLD (HOLD button)
[6] PAD LED
Prog: This turns on/off the function that
displays the program name in the touch
pad LED when a program change occurs.
ILLU: This specifies the illumination
shown in the pad LED when a certain time
has elapsed since you took your hand off
the touch pad.
“oFF”: Illumination will be off.
“ChAr”: A text string will be scrolled. You
can use the included editor software to
edit this text string.
“TYP.1–8”: Illumination in a variety of patterns will be displayed.
“TYP.C”: Illumination patterns TYP.1
through TYP.8 will be switched automatically.
NOTE Illumination will not operate if Hold is active, nor when you're making function settings.
Scrl: Specifies the speed at which the text
will scroll.
This setting determines the speed at which
the pad LED will scroll.
You can choose Slow, Mid, or Fast speeds.
NOTE You can't change the speed of the illumination display.
[7] USB
You can connect the KP3 to your computer
and read/write the contents of the inserted
card via USB. For details, refer to “Connecting a computer.”
[8] EXT.CTRL
This lets you use the KP3 as a MIDI controller. The effects will not function in this
mode.
The KP3 will transmit the MIDI messages
you assigned to each controller using the
included PC editor. For the touch pad, you
16
can choose from eight different MIDI message assign map patterns.
You can assign MIDI messages to the following controllers: PROGRAM/BPM
knob, PROGRAM MEMORY 1–8,
SAMPLE BANK A–D, FX DEPTH, LEVEL
SLIDER, PAD (X, Y, TOUCH), and HOLD.
NOTE Use the SHIFT button to exit EXT.CTRL.
Page 16
SD card
You can use an SD card to save or load data
to and from the KP3’s internal memory.
You can also load samples (WAV files or
AIFF files) created on a computer into the
KP3 by using a card.
NOTE Before you can use the SD card, you must
format it on the KP3. Don’t use your computer or
digital camera to format (initialize) a card you plan
to use with the KP3. If the card was formatted on a
different device, it may not work correctly with the
KP3.
NOTE The KP3 must be turned off before you insert or remove the card.
NOTE The SD card is not included. It must be
purchased separately.
NOTE The KP3 supports SD cards with a power
supply voltage of 2.7–3.6V and capacities of 16
MB–2 GB, and SD card with ID.
SD card handling
• The SD card may be hot immediately following
use. Power-off the KP3 and wait for the card to cool
before removing it.
• SD cards are precision parts. Do not bend them,
drop them, or subject them to physical shock.
• Avoid using or storing SD cards in locations of
extremely high or low temperature such as in direct
sunlight, a closed automobile, or near a heater, or in
locations of high humidity or excessive dust.
• Avoid using or storing SD cards in locations
where they may be subject to strong static electricity
or electrical noise.
• Do not allow dirt or foreign matter to adhere to the
contacts of an SD card. If the contacts should become soiled, gently wipe them off using a dry cloth.
• When you are not using an SD card, keep it in the
protective case that was included with the card to
prevent it from being damaged by static electricity.
• Do not leave an SD card where it is accessible by
infants or children who might place it in their
mouth and swallow it.
• Carefully read and observe the owner’s manual
included with your SD card.
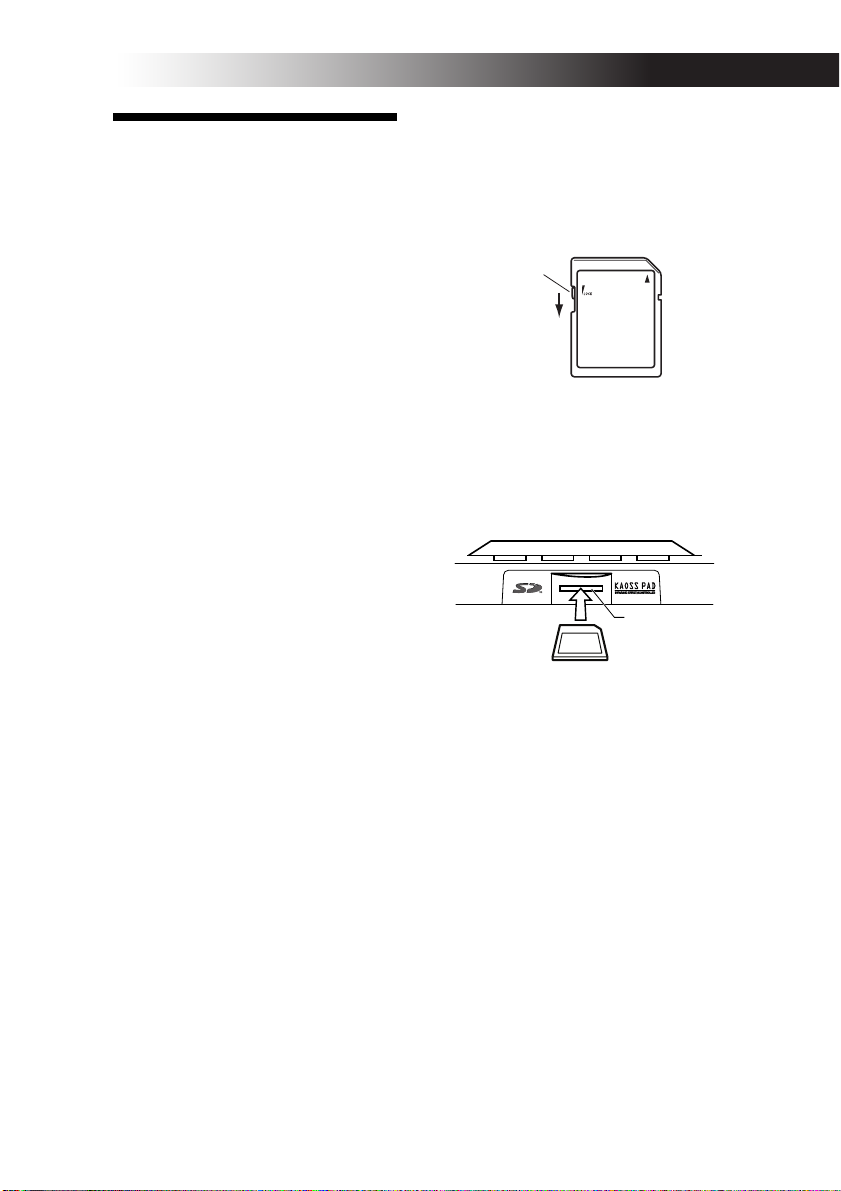
About the write protect setting of an SD
card
SD cards have a write protect switch that
prevents the data from being overwritten
accidentally and lost. If you set the card’s
switch to the protected setting, it will be
impossible to write or erase data on the
card, or to format it. If you need to save
edited data on the card, move the switch
back to its original unprotected setting.
Write protect
switch
Protected
Inserting/exchanging cards
Inserting a card
Insert the card, making sure that it is oriented correctly. The gold contacts should
be facing down, and the angled corner to
your right.
SD Card Slot
SD Card
Removing a card
Press the card inward and release it, and
the card will pop out.
NOTE Before you can use an SD card, you must
format it on the KP3. The card may not work if it
was formatted on another device.
17
Page 17

Using SD memory cards
Checking the total capacity of
the card
1. Hold down the SHIFT button and press
the PROGRAM MEMORY 1 (CARD) button.
2. Use the PROGRAM/BPM knob to select
“InFo” (card capacity).
3. Press the PROGRAM/BPM knob to
view the total capacity of the card.
Press the TAP/RANGE button (lit orange)
to return select another parameter, press
the SHIFT button to return to normal operation.
Checking the remaining capacity
of the card
1. Hold down the SHIFT button and press
the PROGRAM MEMORY 1 (CARD) button.
2. Use the PROGRAM/BPM knob to select
“FrEE” (remaining card capacity).
3. Press the PROGRAM/BPM knob to
view the remaining capacity of the card.
Press the TAP/RANGE button (lit orange)
to return select another parameter, press
the SHIFT button to return to normal operation.
Formatting the card
1. Hold down the SHIFT button and press
the PROGRAM MEMORY 1 button.
2. Use the PROGRAM/BPM knob to select
“ForM.”
18
3. Press the PROGRAM/BPM knob; the
display will indicate “NO.”
4.
Use the [PROGRAM/BPM] knob to select
“yes” and press the PROGRAM/BPM knob
to format the card. When formatting is complete, the display will indicate “End.
Press the TAP/RANGE button (lit orange)
to return select another parameter, press
the SHIFT button to return to normal operation.
NOTE The entire contents of the card will be lost
when you format it. If the KP3 was unable to format
the card, the display will indicate “Err” (Error).
NOTE Don’t use your computer or digital camera
to format (initialize) a card you plan to use with the
KP3. You must use the KP3 to perform the formatting operation. If the card was formatted on a different device, it may not work correctly with the KP3.
”
Saving to card
You can save sample data, program
memory, global settings, or all settings to
the card.
1.
Hold down the SHIFT button and press
the PROGRAM MEMORY 3 (SAVE) button.
2. Use the PROGRAM/BPM knob to select
the type of data you want to save.
“SMP.A” – “SMP.D”: Sample data
“ProG”: Contents of program memory
“ALL”: All files
“GLOb”: Global setting file
3. Press the PROGRAM/BPM knob; the
file numbers available for saving will appear; 00–99 for each of the sample bank
buttons, 00–09 for all other data types.
Use the PROGRAM/BPM knob to select
the number you want to save.
“-01-”: The selected file number is empty.
“[01]”: The selected file number (in this
case, “01”) already contains data, and will
be replaced (overwritten) with the data
you are saving now.
“[-]”: There is an identically-named file or
folder that cannot be written.
4. Press the PROGRAM/BPM knob, then
use the PROGRAM/BPM knob to select
“yes,” and press the PROGRAM/BPM
knob to execute the Save operation. When
saving is complete, the display will indi-
Page 18

cate “End.”
Press the SHIFT button to return to normal
operation.
NOTE You won’t be able to save if the SD card is
protected.
Never turn off the power or remove the SD card
while saving or formatting. Doing so may render
the SD card unusable.
Loading from card
Here’s how to load previously-saved data
from the card.
1. Hold down the SHIFT button and press
the PROGRAM MEMORY 2 (LOAD) button.
2. Use the PROGRAM/BPM knob to select
the type of data that you want to load.
“SMP.A”–”SMP.D”: Sample data
“Snd.A”–”Snd.D”: WAVE, AIFF
“ProG”: Contents of program memory
“ALL”: All files
“GLOb”: Global setting file
3. Turn the PROGRAM/BPM knob to see
the file numbers that are available for loading; 00–99 for each of the sample bank buttons, 00–09 for all other data types.
Use the PROGRAM/BPM knob to select
the file number you want to load.
If you’re loading a WAVE file or AIFF file,
select the desired file.
NOTE In the case of WAVE files or AIFF files, the
KP3 will recognize only file names consisting of a
two-digit number plus filename extension, such as
“00.wav” or “99.aif”. If both .wav and .aiff files
with the same two-digit number exist, the WAVE
file will take priority.
NOTE WAVE files and AIFF files will be loaded as
loop samples. You can resample a loop sample and
capture it as a one-shot sample by stopping the recording before it stops automatically. Then you can
save the one-shot loop as a KP3 sample and always
use it as a one-shot.
4. Use the PROGRAM/BPM knob to select
“yes.” Press the PROGRAM/BPM knob to
load the data. When loading is completed,
the display will indicate “End.”
Press the SHIFT button to return to normal
operation.
MIDI functions
What is MIDI?
MIDI stands for Musical Instrument Digital Interface, and is a world-wide standard
for exchanging a variety of performancerelated information between electronic
musical instruments and computers.
About the MIDI implementation chart
The owner’s manual of each MIDI device
includes a “MIDI implementation chart.”
This chart lets you check the types of MIDI
message that can be transmitted or received. When you use two (or more) MIDI
devices together, compare their MIDI
implementation charts to see which types
of MIDI message they are able to transmit
and receive between themselves.
* Details on the MIDI functionality are provided in
the separate MIDI implementation. To obtain the
MIDI implementation, please contact Korg distributor.
MIDI connections
Commercially available MIDI cables are
used to transmit and receive MIDI messages. Connect these cables between the
MIDI connectors of the KP3 and the MIDI
connectors of the external MIDI device
with which you want to transfer data.
MIDI IN connector: This connector receives MIDI messages from another MIDI
device. Connect it to the MIDI OUT connector of the external device.
MIDI OUT connector: This connector
transmits messages from the KP3. Connect
it to the MIDI IN connector of the external
device.
NOTE If you connect the USB connector to your
computer and install the USB MIDI driver, the
USB connection will transmit and receive the same
MIDI messages as the MIDI connectors.
19
Page 19
Using the KP3 as an effect processor
under MIDI control
LINE IN MIDI INMIDI OUTOUTPUT
KORG ELECTRIBE MX
Using the KP3 as a MIDI controller
(EXT CTRL mode)
MIDI INMIDI OUT
KORG ELECTRIBE MX
MIDI settings
In addition to using the KP3 as an effect
processor, you can transmit MIDI messages from the KP3 to use it as a realtime
controller for a synthesizer or other external MIDI device.
You can also connect the KP3 to a MIDI sequencer, and record the MIDI messages
that are transmitted when you operate the
touch pad. By playing back the recorded
MIDI messages you can reproduce your
touch pad operations.
Changing the MIDI channel
1. Hold down the SHIFT button and press
the PROGRAM MEMORY 5 (MESSAGE)
button.
2. Use the PROGRAM/BPM knob to
choose “GL.Ch” and then press the PROGRAM/BPM knob. The currently-specified MIDI channel is shown.
3. Use the PROGRAM/BPM knob to
change the MIDI channel.
4. Press the TAP/RANGE button (lit orange) to return to the MESSAGE parameter list.
5. At this point, you can either press the
WRITE button (blinking) to save the
changes you have made, or you can press
the SHIFT button to exit without saving.
About MIDI channels
In order to independently transmit information to multiple MIDI devices over a
single MIDI cable, MIDI uses sixteen channels (1–16). If the transmitting device is set
to MIDI channel “1,” the MIDI messages
will not be received unless the receiving
device is also set to MIDI channel “1.”
Changing the control change
numbers or note numbers
1. Hold down the SHIFT button and press
the PROGRAM MEMORY 5 (MESSAGE)
button.
2. Use the PROGRAM/BPM knob to select
the controller whose setting you want to
change.
Pad X, Pad Y, PAD touch, Fx Depth, slider,
HOLD, and MUTE transmit/receive control change messages. The Sample A–D
pads transmit/receive note messages.
3. Use the PROGRAM/BPM knob to select
a control change number or note number
in a range of 0–127.
If you select a control number that has already been assigned to another controller,
the decimal point will light. If you assign
this value, the corresponding controller
will transmit and receive the same control
change messages as the other controller.
20
Page 20

4. Press the TAP/RANGE button (lit orange) to return to the MESSAGE parameter list.
5. At this point, you can either press the
WRITE button (blinking) to save the
changes you have made, or you can press
the SHIFT button to exit without saving.
Changing the MIDI message
filter settings
1. Hold down the SHIFT button and press
the PROGRAM MEMORY 4 (MIDI FILTER) button.
The display will show the messages to be
filtered.
2. Use the PROGRAM/BPM knob to select
the message you want to filter.
You can specify filter settings for CLOCK,
ProG, CC, and SYS.E transmission and reception.
3. Use the PROGRAM/BPM knob to enable or disable transmission/reception.
Choose either diS (disable) or EnA (enable). For the Clock setting, choose Int, Ext,
Auto.
NOTE If Clock is set to “Ext” and clock data is received via both MIDI and USB, the data from the
USB connection will take priority.
4. To save your settings, press the WRITE
button. If you decide not to save your settings, press the SHIFT button.
5. Press the TAP/RANGE button (lit orange) to return to the MESSAGE parameter list.
6. At this point, you can either press the
WRITE button (blinking) to save the
changes you have made, or you can press
the SHIFT button to exit without saving.
To save your edited settings
Press the WRITE button to save the MIDI
settings you edited. If you press the SHIFT
button, you will return to normal operation without saving.
NOTE If you turn off the power without saving
your settings, they will revert to the previous state.
Messages transmitted and received
With the factory settings (except for EXT CTRL*), the KP3 can transmit and receive the following MIDI messages.
Data transmitted/received
Touch pad X-axis Control change (#12)
Touch pad Y-axis Control change (#13)
Touch pad on/off Control change (#92)
LEVEL Slider Control change (#93)
FX DEPTH knob Control change (#94)
HOLD button Control change (#95)
SAMPLE BANK A button note on/off (#36)
SAMPLE BANK B button note on/off (#37)
SAMPLE BANK C button note on/off (#38)
SAMPLE BANK D button note on/off (#39)
PROGRAM/BPM knob Program change (0–127)
* For details on the messages when the KP3 is in EXT CTRL mode, refer to the manual for the KP3 Editor provided in the CD-ROM.
MIDI message transmitted/received
Timing clock
(Factory setting)
21
Page 21

Sharing data with your
KP3 and computer
The KP3 is equipped with a USB connector, and by connecting it directly to your
computer you can transfer sample data
and settings files saved on the card into
your computer for backup.
The USB connection allows you to use the
KP3 as a USB-MIDI device that transmits
and receives MIDI messages without having to connect the MIDI cables.
NOTE When you’re in USB mode, you can press
the SHIFT button to return to normal operation. If
you press the SHIFT button while the KP3 is communicating with your computer, a warning will appear and you won’t be able to exit USB mode.
Connecting the USB connector
If you connect the KP3’s USB connector directly to your computer, you’ll be able to
use your computer to manage the data on
the card that’s currently in the KP3’s card
slot.
Follow the procedure for the operating
system of your computer.
Windows XP users
NOTE Before you continue, power-on your com-
puter and start up the operating system.
1. Use a USB cable to connect the KP3 to
your computer.
Plug the connector of the USB connected to
your computer into the KP3’s USB connector.
Make sure that the connector is oriented
correctly, and insert it as far as it will go.
NOTE When you connect the KP3 for the first
time, the standard Windows device driver will be
installed automatically.
2. The drive name of the card in the card
slot will appear on your computer.
3. Hold down the SHIFT button and press
the PROGRAM MEMORY 7 (USB) button.
The display will indicate “USB.”
The contents of the KP3’s card won’t be
visible from your computer until you execute “USB Storage Mode.”
22
From this point until you’ve completed
step 5, you must not disconnect the USB
cable, remove the card from the slot, or
switch the power of your computer on or
off. Doing so may damage the data.
4. To view the contents of the KP3’s card,
open the drive that was added to your
computer in step 2.
Copy the desired data onto your computer.
You can also copy data from your computer onto the card.
5. Exit USB mode.
In Explorer or My Computer, right-click
the “Removable Disk” icon and choose
“Remove.” Then press the KP3’s SHIFT
button to exit USB mode.
NOTE When you’re ready to disconnect the KP3
from your computer, you must first exit USB mode
and then disconnect the USB cable.
Macintosh users (Mac OS9.0.4 or later,
OSX 10.3.9 or later)
1. Use a USB cable to connect the KP3 to
your computer.
Plug the USB connector into the KP3’s USB
connector. Make sure that the connector is
oriented correctly, and insert it as far as it
will go.
If you’re using Mac OS9, a message indicating that “The necessary driver is not
available” will appear, but you should
simply close the dialog box without installing the driver.
2. Hold down the SHIFT button and press
the PROGRAM MEMORY 7 (USB) button.
The display will indicate “USB.”
3. The drive name of the card in the card
slot will appear on your computer.
While this screen is shown, you must not
disconnect the USB cable, remove the card
from the slot, or switch the power of your
computer on or off. Doing so may damage
the data.
4. To view the contents of the KP3’s card,
open the drive that was added to your
computer in step 2.
Copy the desired data onto your computer.
You can also copy data from your computer onto the card.
Page 22

5. When you’re ready to disconnect the
KP3, drag the drive from the desktop into
the Trash.
Then press the KP3’s SHIFT button to exit
USB mode.
NOTE When you’re ready to disconnect the KP3
from your computer, you must first exit USB mode
and then disconnect the USB cable.
About the contents of the card
The following files and folders will be created in the root directory of the card.
Files you can save
SAMPLE Data
GLOBAL Data 0–9.KPG
PROGRAM Memory Set 0–9.KPP
All Data 0–9.KPA
Files you can load
SAMPLE Data: 00-99.KPS
00-99.WAV
GLOBAL Data: 0–9.KPG
PROGRAM Memory Set : 0–9.KPP
All Data: 0–9.KPA
NOTE If an All data file named “0.KPA” exists on
the card, this file will automatically be loaded when
you start up the KP3.
NOTE The WAVE or AIFF files that can be loaded
are 8/16/24-bit linear PCM Mono/Stereo files. If the
data has a bit depth other than 16 it will be truncated to 16-bit data starting from the most significant bits, and if the bit depth is less the data will be
packed with zeros. Place the files in the root directory of the card. WAVE or AIFF files whose sampling frequency is other than 48 kHz will play back
at a different pitch than on your computer. If you
want the pitch to be correct, use the included PC
editor software to convert your audio file into KP3
format.
NOTE WAVE and AIFF files do not contain data
that the KP3 needs in order to play back the sample,
so they will be loaded with settings of Tempo = 120
and Beat = 16. If the actual data is shorter than this,
the missing region will be handled as silence.
00–99.KPS
00–99.AIF
23
Page 23

Software Installation
Installing the software
Contents of the CD-ROM
The included CD-ROM contains the following.
❒ Editor software
❒ KORG USB-MIDI driver
❒ KP3 Editor owner’s manual (PDF)
❒ Software license agreement (PDF)
Please note before use
• All copyrights to the software associated with this product is the property of
Korg Corporation.
• The license agreement for the software
associated with this product is included
separately. You must read this license
agreement before you install the software.
Your installation of the software will be
taken as indicating your acceptance of this
license agreement.
Operating requirements
KORG USB-MIDI driver
Windows XP
Supported operating systems
Microsoft Windows XP Home Edition/
Professional Edition Service Pack 2 or later
Compatible computers (MIDI driver for the
x64 Edition is a Beta version)
Compatible computers
A computer that meets the operating requirements for Microsoft Windows XP and
is equipped with a USB port. (An Intel
CPU is recommended.)
Mac OS X
Supported operating systems
Mac OS X 10.3.9 or later
Compatible computers
An Apple Macintosh computer that meets
the operating requirements for Mac OS X
and is equipped with a USB port
KP3 Editor
Windows XP
Supported operating systems
Microsoft Windows XP Home Edition/
Professional Edition Service Pack 2 or later
Compatible computers
A computer that meets the operating requirements for Microsoft Windows XP and
is equipped with a USB port
Mac OS X
Supported operating systems
Mac OS X 10.3.9 or later
Compatible computers
A computer that meets the operating requirements for Mac OS X and is equipped
with a USB port
Installing the KORG USBMIDI driver and editor
software for Windows XP
NOTE You must have Administrator user privileges in order to install or uninstall software in
Windows XP. For details, consult your system administrator.
NOTE Before you connect the KP3 to your computer via USB, you must use the KP3 application
installer to install KORG USB-MIDI Driver Tools.
KP3 Application Installer
The KP3 Application Installer automatically installs the KORG USB-MIDI Driver
Tools and Sample Librarian/MIDI Editor
software into your computer.
1. Insert the included CD-ROM into your
computer’s CD-ROM.
Normally, “KP3 Application Installer” will
start up automatically.
If your computer is set so that the installer
does not start up automatically, navigate to the
CD-ROM and double-click “KorgSetup.exe.”
2. Follow the on-screen directions to install the KORG USB-MIDI Driver Tools
and KP3 Editor software.
NOTE You must install KORG USB-MIDI
Driver Tools if you want to use Sample Librarian/
MIDI Editor via a USB port.
24
Page 24

3. When you’ve installed all of the software you selected, exit the installer.
4. If necessary, install the KORG USBMIDI driver.
For details on the installation procedure,
refer to “Installing the KORG USB-MIDI
driver” below.
Installing the KORG USB-MIDI
driver
In order to use Sample Librarian/MIDI
Editor via a USB connection, you must install the “KORG USB-MIDI driver” in your
computer.
You’ll use KORG USB-MIDI Driver Tools
to install the KORG USB-MIDI driver.
1. Before you proceed, finish installing
KORG USB-MIDI Driver Tools into your
computer.
2. Connect a USB cable between your
computer’s USB port and the KP3’s USB
port. Then power-on the KP3.
When your computer detects that the KP3
is connected, the standard Windows driver
will be installed automatically. (This is not
the KORG USB-MIDI driver.)
NOTE The driver must be installed separately for
each USB port. If you want to connect the KP3 to a
USB port that’s different than the one you used
when installing the KORG USB-MIDI driver,
you’ll have to reinstall the KORG USB-MIDI
driver again for that port.
3. From the taskbar, click [Start] ➝ [All
Programs] ➝ [KORG] ➝ [KORG USBMIDI Driver Tools] ➝ [Install KORG USBMIDI device].
The setup utility will start up.
4. Follow the on-screen directions to install the KORG USB-MIDI driver.
During the installation, you may see a dialog box warning you that “... has not
passed Windows logo testing.” Simply
click [Continue] to proceed.
NOTE If you’re unable to install, it may be that
your computer is set to block installation of drivers
that do not have a digital signature. Check the settings of your computer as described in “Unblocking
installation of unsigned drivers” .
5. When you’ve finished installing the
KORG USB-MIDI driver, exit the installer.
If you are asked whether you want to restart your computer now, choose [Yes] to
restart the computer.
For details on installing, setting-up, or
uninstalling the KORG USB-MIDI driver,
refer to the installation manual (HTML).
To view the installation manual, click the
taskbar [Start] button and choose [All Programs] ➝ [KORG] ➝ [KORG USB-MIDI
Driver Tools] ➝ [Installation Manual].
The KP3 and MIDI driver ports
PAD port
MIDI messages from the KP3 (controller
data etc.) are received by your computer
application via this port.
CTRL port
MIDI messages are transmitted from your
computer to the KP3 via this port.
Setting up KP3 Editor
For details on setting-up and using KP3
Editor, refer to the “KP3 Editor owner’s
manual.”
Unblocking installation of
unsigned drivers
If your computer is set to block installation
of unsigned drivers, you won’t be able to
install the KORG USB-MIDI driver. Proceed as follows to change the setting so
that the driver can be installed.
1. From the task bar, click [Start] ➝ [Con-
trol Panel] to open the Control Panel.
2. In the Control Panel, double-click [System], and then click the [Hardware] tab.
3. In the “Driver” area, click [Driver Signing Options].
25
Page 25

4. In the “What action do you want Windows to take?” choose [Ignore] or [Warn],
and then click [OK].
If necessary, return this setting to its previous state when you’ve finished installing
the KORG USB-MIDI driver.
Installing the KORG MIDI
driver and editor software
for Mac OS X
Installing the software
Here’s how to start up the individual installers for the KORG USB-MIDI or KP3
Editor software and install them separately.
1. Insert the included CD-ROM into your
computer’s CD-ROM drive.
2. In the CD-ROM, double-click the installer (.pkg) of the desired software to
start up the installer.
The installers are located in the following
folders.
• KORG USB-MIDI driver
“KORG USB-MIDI DRIVER” folder ➝
KORG USB-MIDI DRIVER.pkg
• KP3 Editor
“KP3 Editor” folder ➝ KP3 Editor.pkg
3. Follow the on-screen directions to install the KORG USB-MIDI driver or the
KP3 Editor software.
NOTE You must install the KORG USB-MIDI
driver into your computer if you want to use KP3
Editor via a USB port.
4. When you’ve installed the software, exit
the installer.
The KP3 and MIDI driver ports
PAD port
MIDI messages from the KP3 (controller
data etc.) are received by your computer
application via this port.
CTRL port
MIDI messages are transmitted from your
computer to the KP3 via this port.
26
Setting up Sample Librarian/
MIDI Editor
For details on setting-up and using Sample
Librarian/MIDI Editor, refer to the “KP3
Editor owner’s manual.”
Page 26

Specifications
Number of programs: 128
Input: Mic input jack / monaural phone jack
Output: Line output jacks / RCA phono jacks
MIDI: IN, OUT
USB: Type B
Power supply: DC 12V 700mA
Included items: AC adapter, touch pad protective sheet
Weight: 1.3 kg / 2.87 lbs.
Dimensions: 210(W) X 226 (D) X 49 (H) mm / 8.27"(W) X 8.90"(D) X 1.93"(H)
* Appearance and specifications are subject to change without notice.
Line input jacks / RCA phono jacks
Headphone jack / stereo phone jack
27
Page 27

Précautions
Emplacement
L’utilisation de cet instrument dans les endroits suivants
peut en entraîner le mauvais fonctionnement.
• En plein soleil
• Endroits très chauds ou très humides
• Endroits sales ou fort poussiéreux
• Endroits soumis à de fortes vibrations
• A proximité de champs magnétiques
Alimentation
Branchez l’adaptateur secteur fourni à une prise secteur
de tension appropriée. Evitez de brancher l’adaptateur à
une prise de courant dont la tension ne correspond pas à
celle pour laquelle l'appareil est conçu.
Interférences avec d’autres appareils
électriques
Les postes de radio et de télévision situés à proximité
peuvent par conséquent souffrir d’interférences à la réception. Veuillez dès lors faire fonctionner cet appareil à
une distance raisonnable de postes de radio et de télévision.
Maniement
Pour éviter de les endommager, manipulez les commandes et les boutons de cet instrument avec soin.
Entretien
Lorsque l’instrument se salit, nettoyez-le avec un chiffon
propre et sec. Ne vous servez pas d’agents de nettoyage
liquides tels que du benzène ou du diluant, voire des
produits inflammables.
Marque CE pour les normes européennes
harmonisées
La marque CE apposée sur tous les produits de notre
firme fonctionnant sur secteur jusqu'au 31 décembre
1996 signifie que ces appareils répondent à la Directive
EMC (89/336/EEC) et à la Directive concernant la marque CE (93/68/EEC).
La marque CE apposée après le 1 janvier 1997 signifie
que ces appareils sont conformes à la Directive EMC
(89/336/EEC), à la Directive concernant la marque CE
(93/68/EEC) ainsi qu'à la Directive Basse Tension (73/
23/EEC).
La marque CE apposée sur tous les produits de notre
firme fonctionnant sur piles signifie que ces appareils répondent à la Directive EMC (89/336/EEC) et à la Directive concernant la marque CE (93/68/EEC).
* Les noms de sociétés, noms de produits et noms de formats,
etc. dans ce manuel sont des marques de fabrique ou des
mar-ques déposées de leurs propriétaires respectifs.
Conservez ce manuel
Après avoir lu ce manuel, veuillez le conserver soigneusement pour toute référence ultérieure.
Evitez toute intrusion d’objets ou de liquide
Ne placez jamais de récipient contenant du liquide près
de l’instrument. Si le liquide se renverse ou coule, il risque de provoquer des dommages, un court-circuit ou
une électrocution.
Veillez à ne pas laisser tomber des objets métalliques
dans le boîtier (trombones, par ex.). Si cela se produit,
débranchez l’alimentation de la prise de courant et contactez votre revendeur korg le plus proche ou la surface
où vous avez acheté l’instrument.
Page 28

Introduction
Merci d’avoir fait l’acquisition du contrôleur
d’effets dynamique/échantillonneur KP3
KAOSS PAD. Afin de pouvoir l’apprécier longtemps, sans problèmes, et tirer le meilleur parti
de toutes ses possibilités, nous vous conseillons
de lire attentivement le présent manuel et d’utiliser le KP3 seulement de la manière indiquée.
Description générale
Le KP3 utilise la technologie KAOSS de Korg
qui permet de contrôler en temps réel à l’aide
du pavé tactile X-Y de nombreux paramètres
d’effets. Il suffit pour cela de poser son doigt
sur le pavé tactile, de taper dessus ou frotter.
Une feuille destinée à protéger la surface du
pavé tactile est fournie avec l’appareil.
Le KP3 propose 128 programmes d’effets, allant des delays et filtres aux vocodeurs et même
aux synthétiseurs. Les fonctions Pad Motion,
Hold et Mute ajoutent encore plus de versatilité au fonctionnement du pavé tactile. Vos huit
programmes favoris peuvent être modifiés et
stockés sous les touches Program Memory pour
un accès rapide.
Notre nouvelle fonction FX Release peut automatiquement produire un effet de delay quand
vous retirez votre main du pavé tactile, facilitant ainsi les transitions en douceur pendant
que vous jouez.
De plus, le KP3 est aussi un échantillonneur
sophistiqué. Des entrées de micro et de ligne
sont fournies, vous permettant d’échantillonner
à partir d’un large éventail de sources audio.
Le rééchantillonnage vous permet d’enregistrer la sortie du KP3 lui-même, ainsi que
d’échantillonner les signaux entrants, via les
effets intégrés. Aussi bien des boucles que des
échantillons one shot peuvent être enregistrés
et reproduits grâce aux touches Sample Bank.
Des outils d’édition d’échantillons autorisent
un découpage automatique des échantillons et
le point de début de la boucle peut être manuellement ajusté pour maintenir synchronisés vos
échantillons. Les effets rythmiques basés sur le
tempo et la vitesse de reproduction de l’échantillon peuvent être synchronisés grâce aux fonctions Auto-BPM detect, MIDI Clock et Tap
Tempo. Les échantillons et les réglages peuvent
être sauvegardés dans une carte Secure Digital (SD) ou dans un ordinateur via une liaison
USB et chargés de nouveau. Amusez-vous bien
avec votre nouveau KP3 !
29
Page 29

Eléments du KP3 et leurs
fonctions
Panneau supérieur
1. Affichage
2. Témoin [PEAK] (Crête)
3. Commutateur [INPUT SELECT] (sélecteur
d’entrée)
4. Bouton [INPUT VOLUME] (volume entrant)
5. Bouton [FX DEPTH] (Profondeur de l’effet)
6. Potentiomètre [LEVEL] (niveau de lecture
des échantillons de Sample Bank – voir page 38)
7. Touche [HOLD] (maintien)
8. Touches [SAMPLE BANK]
9. Témoin [PROG]
10. Témoin [BPM] (clignote quand un programme BPM est sélectionné.)
11. Touche [WRITE]
12. Touche [SHIFT]
13. Bouton [PROGRAM/BPM]
14. Touche [TAP/RANGE]
15. Touches [PROGRAM MEMORY 1-8] (mé-
moires de programmes)
16. Touche [AUTO BPM]
17. Touche [PAD MOTION] (déplacement sur
le pad)
18. Touche [MUTE] (coupure du son)
19. Touche [SAMPLING] (échantillonnage)
20. Pavé tactile
Manipulations du pavé tactile
Ne jamais appuyer trop fort sur le pavé tactile ni placer d’objet lourd dessus. Des gestes trop
brutaux pourraient en effet endommager le
pavé tactile ou provoquer des fissures. Ne jamais frotter ou appuyer sur le pavé tactile avec
un objet pointu car vous risqueriez de le rayer:
utilisez uniquement votre doigt pour le faire
fonctionner.
Si le pavé tactile doit être nettoyé, essuyez-le
simplement avec un chiffon doux et sec. L’utilisation de solvants comme du diluant risque
en effet de déformer sa surface.
30
1
2
3
4
5
9
10
11
12
13
14
6
15
16
7
17
18
8
19
20
Page 30

Panneau avant
1. Bouton [PHONES VOLUME] (volume du
casque d’écoute)
2. Prise de sortie [PHONES] (prise pour casque
d’écoute)
3. Bouton [MIC TRIM] (épuration des sons)
4. Prise d’entrée [MIC] (prise pour micro)
5. Fente pour carte SD
Vous devez éteindre le KP3 avant d’insérer ou
de retirer la carte SD !
1
2
Panneau arrière
1. Bornes [MIDI IN], [MIDI OUT]
2. Prise DC 12V
3. Interrupteur d’alimentation [POWER]
4. Prise [USB]
5. Commutateur [CONNECTION]
6. Prises [LINE OUT] (sortie de ligne)
7. Prises [LINE IN] (entrée de ligne)
1
2
3
3
4
5
4
5
6
7
31
Page 31

Liaisons
Liaisons de base
Dans l’exemple ci-dessous, le KP3 est utilisé “en
ligne” entre la source audio et les entrées de
mixage. Dans ce cas, les effets peuvent être
appliqués au signal audio entrant, et ce dernier
peut être échantillonné. Dans ce type d’application, le commutateur CONNECTION du
panneau arrière doit être réglé sur DIRECT. Le
KP3 est muni d’entrées de ligne et micro. Utilisez celles qui conviennent le mieux à la situation souhaitée.
32
LECTEUR CD
LINE IN
LINE OUT DC12V
MÉLANGEUR, MÉLANGEUR DJ
SECTEUR
ADAPTATEUR SECTEUR
Page 32

Liaisons d’un mélangeur DJ
Vous pouvez également utiliser le KP3 comme
processeur d’effets externe en le raccordant aux
bornes d’envoi et de retour d’effets du mélangeur DJ, etc. Les effets du KP3 peuvent ainsi être
appliqués à tout signal audio reçu par le mélangeur DJ. Pour ce type d’application, le commutateur CONNECTION du panneau arrière
doit être réglé sur SEND. Avec ce réglage, le
signal diffusé par les bornes de sortie du KP3
ne comprendra que le son traité par le KP3 et
pas le son original qui lui avait été envoyé.
Utilisez les commandes de niveau d’envoi et
de retour de votre mélangeur pour régler la
profondeur de l’effet.
TOURNE-DISQUE
RETURN
SEND
LINE OUT
LINE IN
TOURNE-DISQUE MÉLANGEUR DJ
33
Page 33

Fonctionnement
Mise sous tension
1. Raccordez le KP3 à vos autres appareils
comme illustré sur les schémas des pages précédentes, puis branchez l’adaptateur secteur
sur une prise de courant.
REMARQUE
fourni.
2. Appuyez sur l’interrupteur d’alimentation
pour mettre le KP3 sous tension. L’afficheur
s’allumera.
Pour mettre l’appareil hors tension, appuyez
de nouveau sur l’interrupteur d’alimentation.
Utilisez uniquement l’adaptateur
Sélection de l’entrée audio
1. Utilisez le commutateur INPUT SELECT
pour sélectionner les entrée du KP3 que vous
souhaitez utiliser.
’effet sera appliqué à l’entrée de micro.
MIC: L
LINE: L’effet sera appliqué aux entrées de li-
gne.
Réglage du volume
1. Utilisez le bouton INPUT VOLUME pour
régler le niveau d’entrée. Le témoin de crête
s’allumera en vert, orange ou rouge pour indiquer le niveau du signal entrant. Réglez le
bouton INPUT VOLUME de telle sorte que le
témoin ne s’allume pas en rouge.
2. En cas d’utilisation de la prise pour micro,
réglez le bouton MIC TRIM en fonction de la
sensibilité de votre micro, afin d’éviter toute
distorsion sonore.
3. En cas d’écoute au casque, réglez le niveau
à l’aide du bouton PHONES VOLUME.
Sélection d’un programme
Les programmes peuvent être sélectionnés de
trois façons différentes.
1. Si l’afficheur indique un numéro de programme, vous pouvez sélectionner un autre
programme en tournant le bouton PROGRAM.
Si l’afficheur indique le BPM actuel, appuyez
sur le bouton PROGRAM/BPM pour passer à
l’affichage du programme.
34
Le témoin BPM clignotera si vous sélectionnez
un programme synchronisé avec avec le BPM.
2. Si vous tournez le bouton PROGRAM/
BPM en maintenant la touche SHIFT enfoncée,
vous pourrez passer au premier programme de
chaque catégorie sans avoir à faire défiler l’ensemble des 128 programmes. Une fois que vous
aurez sélectionné la catégorie correcte, relâchez
la pression sur la touche SHIFT et utilisez le
bouton PROGRAM/BPM pour sélectionner le
programme souhaité à l’intérieur de cette catégorie.
3. Finalement, vos huit programmes favoris
peuvent être sélectionnés par une simple pression sur une des touches PROGRAM MEMORY. (Voir page 36.)
Le bouton PROGRAM/BPM est un bouton à
action continue. Quand vous aurez atteint le dernier numéro de programme, le défilement reprendra à partir du premier programme de la liste.
Contrôle de la profondeur de
l’effet
1. Si le commutateur CONNECTION du panneau arrière est réglé sur DIRECT, utilisez le
bouton FX DEPTH pour régler la profondeur
de l’effet. Tournez le bouton vers la droite pour
augmenter la profondeur de l’effet.
2. Si le commutateur CONNECTION du panneau arrière est réglé sur SEND, vous devrez
utiliser les niveaux d’envoi et de retour d’effet
sur votre mélangeur pour contrôler la profondeur de l’effet.
Maintien de l’effet
Si vous appuyez sur la touche HOLD pendant
l’utilisation du pavé tactile, vous pourrez retirer
votre doigt de la surface du pavé tactile. Le KP3
conservera le son de l’effet tel qu’il était juste
avant que vous ne retiriez votre doigt du pan-
Page 34

neau. Les LED du pavé tactile resteront allumées dans cette position.
Fonction de coupure de son
En maintenant enfoncée la touche MUTE, vous
couperez momentanément le signal d’entrée,
mais le signal affecté continuera à être joué.
Effet Transformer
En tapant rapidement sur la touche MUTE,
vous pourrez créer des rythmes à partir d’un
son d’entrée soutenu, comme dans la technique
de DJ connue sous le nom de “transformer”.
FX RELEASE
Qu’est-ce que FX RELEASE ?
Effectuer une transition d’un effet très dur au
signal d’origine non traité peut souvent être très
abrupt et surprendre. Avec FX RELEASE, au
moment où vous retirez votre main du pavé
tactile (c’est-à-dire, quand vous désactivez l’effet), un delay calé sur le BPM actuel sera appliqué et diminuera progressivement. Cela vous
permettra d’effectuer une transition en douceur
et agréable à l’oreille d’un effet agressif comme Distortion ou Decimator vers l’état d’origine.
Sauvegarde du réglage FX
RELEASE
Vous pouvez enregistrer un réglage FX RELEASE différent pour chaque programme.
1. Pour ajuster la profondeur de l’effet FX
RELEASE pour le programme actuellement
sélectionné, utilisez le potentiomètre FX RELEASE tout en maintenant la touche SHIFT
enfoncée.
2. Appuyez sur la touche WRITE.
La touche WRITE et la touche PROGRAM
MEMORY clignoteront. La touche SHIFT s’allumera et fonctionnera comme touche EXIT.
3. Appuyez de nouveau sur la touche WRITE.
Le programme sera enregistré et le KP3 reviendra à son fonctionnement normal.
REMARQUE Si vous avez sélectionné un programme d’effet qui utilise déjà le delay, la fonction FX
RELEASE ne sera pas activée mais le son de delay à
l’intérieur de ce programme d’effet continuera après
que vous aurez retiré votre doigt du pavé tactile, produisant un effet similaire.
Pad Motion
La fonction Pad Motion vous permet d’enregistrer et de reproduire les déplacements de votre doigt sur le pavé tactile. Vous pouvez ainsi reproduire précisément une même série de
mouvements complexes autant de fois que
vous le souhaitez. De plus, les LED du pavé
tactile permettent un contrôle visuel des mouvements.
Vous pouvez même sauvegarder les mouvements ainsi enregistrés dans la mémoire de
programme. (Voir p.37)
Enregistrement d’un
mouvement
Maintenez enfoncée la touche PAD MOTION.
Dès que votre doigt entrera en contact avec le
pavé tactile, la touche PAD MOTION commencera à clignoter, indiquant que le mouvement
est en train d’être enregistré. Pour arrêter l’enregistrement, relâchez la pression sur la touche
PAD MOTION. La reproduction du mouvement enregistré commencera. Le mouvement
est seulement enregistré pendant quelques
secondes, par conséquent, si la touche PAD
MOTION s’arrête de clignoter et s’allume en
rouge, l’enregistrement du mouvement est
terminé et sa reproduction commencera immédiatement. Pour arrêter la reproduction du
mouvement, appuyez de nouveau sur la touche PAD MOTION. La touche s’éteindra.
REMARQUE Quand vous lancez un nouvel enregistrement, le précédent est écrasé par réécriture.
Reproduction d’un mouvement
Appuyez sur la touche PAD MOTION. La touche s’allumera et le mouvement sera reproduit
en boucle.
Les LED du pavé tactile indiqueront le mouvement enregistré. Si vous appuyez de nouveau
sur la touche PAD MOTION, la touche s’éteindra et la reproduction s’arrêtera.
Reproduction en sens inverse
Si vous appuyez sur la touche PAD MOTION
(REVERSE) en maintenant la touche SHIFT
enfoncée, le mouvement sera reproduit à l’envers. Vous pouvez répéter cette opération pour
alterner entre: “reproduction vers l’arrière” ➝
35
Page 35

“reproduction vers l’avant” ➝ “reproduction
vers l’arrière”.
Sauvegarde d’un mouvement
Pour sauvegarder le mouvement que vous
venez d’enregistrer, stockez le programme
actuel dans la mémoire de programme (Voir
p.37.)
Réglage du BPM
Qu’est-ce que le BPM ?
BPM (Beats Per Minute) est le tempo du morceau exprimé sous la forme du nombre de
temps (noires) par minute. Plus la valeur du
BPM est élevée, plus le tempo est rapide.
Affichage du BPM
Quand vous mettez le KP3 sous tension, le BPM
est réglé sur 120.0. Si l’afficheur indique le
numéro du programme actuellement sélectionné, appuyez sur le bouton PROGRAM/BPM
pour passer à l’affichage du BPM.
REMARQUE Si l’horloge est réglée sur la synchronisation externe, “Ext” sera affiché et vous ne pourrez pas spécifier la valeur du BPM.
Réglage manuel du BPM
1. Si l’afficheur indique le numéro du programme actuellement sélectionné, appuyez sur
le bouton PROGRAM/BPM pour passer à l’affichage du BPM.
2. Utilisez le bouton PROGRAM/BPM pour
régler la valeur du BPM par incréments de 0.1.
En tournant le bouton PROGRAM/BPM tout
en maintenant la touche SHIFT enfoncée, vous
pourrez régler la partie entière de la valeur par
incréments de 1.
REMARQUE la fonction Auto BPM est automatiquement désactivée.
Utilisation de Tap Tempo pour
régler le BPM
Si vous ne connaissez pas la valeur du BPM
pour un morceau particulier, vous pouvez régler le BPM en appuyant sur la touche TAP/
36
RANGE et en suivant le temps du morceau.
1. Appuyez trois fois ou plus sur la touche
TAP/RANGE en suivant le temps du morceau.
Le KP3 détectera l’intervalle auquel vous tapez
sur la touche. La valeur correspondante du
BPM sera affichée et enregistrée.
Fonction AUTO BPM
Le KP3 peut régler automatiquement la valeur
du BPM en identifiant le temps du morceau. Si
le BPM du morceau change, le BPM du KP3
changera de manière synchronisée.
1. Appuyez sur la touche AUTO BPM pour
activer la détection automatique de BPM.
2. La touche AUTO BPM s’allumera et le BPM
de l’entrée audio sera automatiquement détecté.
Si le KP3 n’arrive pas à détecter le BPM
Appuyez plusieurs fois sur la touche TAP/
RANGE en suivant le temps du morceau. Le
KP3 détectera automatiquement le BPM en
utilisant les battements de votre doigt.
Les modalités de fonctionnement d’AUTO
BPM rendent possible la détection par erreur
d’une valeur représentant 1/2 ou 1/3 de celle
du BPM correct, ou bien de légères déviations
peuvent survenir. Dans ce cas, vous pouvez
utiliser la touche TAP/RANGE pour effectuer
des corrections. Si vous appuyez sur la touche
TAP/RANGE alors que AUTO BPM est activé, la valeur spécifiée en tapant manuellement
deviendra la valeur centrale d’une gamme de
valeurs de BPM.
REMARQUE Il n’est pas possible de détecter
la valeur de BPM d’un morceau dont les temps
ne sont pas prononcés. La gamme de BPM
identifiables est comprise entre 80 et 160.
Spécification du début d’une mesure
Bien que la détection AUTO BPM puisse capturer précisément le tempo, vous pouvez également préciser le temps sur lequel la mesure
commencera. Appuyez sur le bouton TAP/
RANGE (ALIGN) tout en maintenant la touche
SHIFT enfoncée. Ce moment sera spécifié comme le début de la mesure. La touche s’allumera
en vert au début du temps. (La séquence est
fixée pour 4/4 : vert ➝ rouge ➝ rouge ➝ rou-
ge)
Page 36

REMARQUE Ce réglage réalignera également le
début de chaque échantillon.
Désactivation d’AUTO BPM
Appuyez sur la touche AUTO BPM de telle
façon qu’elle s’éteigne. La fonction AUTO BPM
sera désactivée et la valeur actuelle du BPM sera
utilisée.
Fonction de synchronisation
MIDI (MIDI Sync)
Il est possible de spécifier le BPM du KP3 pour
qu’il suive les messages MIDI Time Clock provenant d’un appareil MIDI externe. Raccordez
la borne [MIDI OUT] de l’appareil MIDI externe (comme un séquenceur réglé pour transmettre des messages MIDI Time Clock) à la borne
[MIDI IN] du KP3.
REMARQUE Cette fonction ne synchronise pas des
séquences de données avec les programmes de motifs
rythmiques du KP3. Pour une synchronisation avec
des séquences de données, vous devrez soit insérer un
message d’activation du pavé tactile (Touch Pad On)
au début de chacune des mesures de vos séquences de
données, soit toucher le panneau tactile au début de
chacune des phrases du KP3 pour lancer le motif.
REMARQUE Pour que le KP3 puisse recevoir des
messages de synchronisation et d’activation du pavé
tactile, consultez “Réglages MIDI” (voir p.45) et effectuez les “Réglages des filtres de messages MIDI”
(voir p.46).
REMARQUE Vous ne pouvez pas utiliser les fonctions Tap Tempo ou Auto BPM lorsque le KP3 reçoit
des messages de synchronisation d’un appareil MIDI
externe.
Sauvegarde des réglages dans
une mémoire de programme
Les touches PROGRAM MEMORY (mémoires
de programmes) vous permettent de sauvegarder et reproduire instantanément huit de vos
programmes favoris sur votre KP3.
Les données suivantes peuvent être
mémorisées :
- Programme d’effet
- Réglage du bouton FX/DEPTH
- Mouvements Pad Motion
- Etat activé/désactivé de la touche HOLD et
sa position (coordonnées)
Enregistrement
1. Appuyez sur la touche WRITE.
Les touches PROGRAM MEMORY et WRITE
clignoteront.
2. Appuyez sur la touche PROGRAM MEMORY sous laquelle vous souhaitez enregistrer les
réglages.
La touche sur laquelle vous appuierez clignotera, l’afficheur indiquera “WRT” et les réglages seront enregistrés. Quand le stockage aura
été effectué, le KP3 reviendra à son mode de
fonctionnement normal.
Rappel des réglages
1. Appuyez sur une des touches PROGRAM
MEMORY 1~8 pour rappeler les réglages mémorisés sous cette touche.
Échantillonnage
Le KP3 peut enregistrer aussi bien des boucles
que des échantillons one shot d’une source
externe.
Le KP3 peut également rééchantillonner, vous
autorisant ainsi à échantillonner des sources
audio externes auxquelles auront été appliqués
des effets internes, ou à capturer la sortie entière du KP3 sous forme de nouvel échantillon.
Les boucles peuvent faire jusqu’à quatre mesures (16 temps), avec le BPM effectif au début
de l’enregistrement. (Par exemple, à un tempo
de 140, 16 battements correspondraient à environ 7 secondes.)
Si la valeur du tempo est de 73 ou moins, le
nombre maximal de temps pouvant être échantillonnés sera de 8. Si la valeur du tempo est de
39 ou moins, le nombre maximal de temps
pouvant être échantillonnés sera de 4.
Pour une boucle, vous pouvez spécifier une
longueur de temps de 16, 8, 4, 2 ou 1.
Quand une boucle est créée, elle commence à
être reproduite dès la fin de l’enregistrement (la
touche SAMPLE BANK correspondante s’allume en orange).
Échantillonnage
1. Appuyez sur la touche SAMPLING. Dans
ce mode d’attente d’enregistrement, les touches
SAMPLE BANK s’allumeront en rouge et l’af-
37
Page 37

ficheur indiquera “[16]” (la valeur par défaut
est 16 temps). Pour sortir de ce mode sans
échantillonner, appuyez sur la touche SHIFT.
REMARQUE la fonction AUTO BPM est automatiquement désactivée.
2. Utilisez le bouton PROGRAM/BPM pour
spécifier la longueur de l’échantillon (en temps).
L’affichage commutera entre [16], [8], [4], [2] ou
[1] en fonction de ce réglage.
3. Quand vous êtes prêt à enregistrer, appuyez
sur une des touches clignotantes SAMPLE
BANK A, B, C ou D. La touche SAMPLE BANK
sélectionnée clignotera en vert, l’afficheur indiquera “REC” et l’échantillonnage commencera.
Les touches PROGRAM MEMORY clignoteront successivement pour indiquer le temps
enregistré.
4. Si vous souhaitez enregistrer un échantillon
one shot, appuyez sur la même touche SAMPLE BANK avant que le temps spécifié soit
atteint. L’échantillonnage s’arrêtera et un échantillon one shot sera créé. La touche SAMPLE
BANK utilisée pour l’enregistrement s’allumera
en rouge. Il sera facile d’enregistrer un échantillon one shot si vous spécifiez un réglage plus
long comme “16”.
5. Si le temps spécifié se termine avant que
vous n’ayez appuyé sur la touche SAMPLE
BANK, l’échantillon s’arrêtera et une boucle
sera créée. Le KP3 passera automatiquement
en mode de lecture et la touche SAMPLE
BANK s’allumera en orange.
REMARQUE Les données qui se trouvaient sous la
touche SAMPLE BANK seront écrasées par
réécriture.
un échantillon one shot, la touche s’éteint
momentanément et l’échantillon one shot est
reproduit.
REMARQUE Si un effet échantillonné est sélectionné pour le programme, la reproduction commencera quand vous toucherez le pavé tactile après avoir
sélectionné une touche SAMPLE BANK.
Niveaux de lecture des
échantillons
Si vous souhaitez régler le volume de lecture
des échantillons pour l’ensemble des banques,
utilisez le potentiomètre LEVEL.
Réglage du niveau pour une seule banque
d’échantillons
1. Appuyez sur la touche SAMPLE BANK
souhaitée en maintenant la pression sur la touche SHIFT. La touche clignotera en vert.
2. Les LED du pavé tactile correspondant à la
banque sélectionnée (c’est-à-dire, situées audessus de la touche) s’afficheront sous forme
de bargraph, et les LED situées au-dessus des
autres banques indiqueront leurs niveaux respectifs.
3. Effleurez le pavé tactile pour régler le niveau
de reproduction de l’échantillon pour cette
banque.
Reproduction des échantillons
Les touches SAMPLE BANK s’allumeront en
vert si elles contiennent une boucle ou en rouge
si elles contiennent un échantillon one shot. Les
touches sans données d’échantillons resteront
éteintes. Si vous appuyez sur une touche contenant une boucle, la reproduction de la boucle commencera. La touche s’allumera en orange pendant la reproduction. Appuyez de nouveau sur la touche pour arrêter la lecture.
Quand vous appuyez sur une touche contenant
38
Édition des réglages de
reproduction pour les boucles
Pour éditer les réglages de reproduction pour
une boucle, appuyez sur une touche SAMPLE
BANK contenant une boucle, en maintenant la
pression sur la touche SHIFT.
REMARQUE Si vous appuyez sur une touche
SAMPLE BANK contenant un échantillon one shot,
vous ne pourrez pas éditer d’autres paramètres que le
niveau.
Page 38

Réglage du point de début
1. La touche SHIFT s’allumera et la touche
SAMPLE BANK spécifiée clignotera en vert.
L’afficheur indiquera le réglage du point de
début de la boucle.
2. Utilisez le bouton PROGRAM/BPM pour
régler le point de début par incréments de 1/
ème
de temps, sur une plage de ± 1 temps.
32
Réglage du découpage
Les boucles peuvent être découpées en parties
égales. Vous pouvez décider si chacune de ces
parties sera reproduite ou non. Les parties
découpées qui ne sont pas reproduites sont
contournées de telle façon que la longueur
totale de la boucle sera raccourcie. Cela vous
permet de créer de nouveaux motifs rythmiques et boucles variés à partir des mêmes données d’origine. Par exemple, en jouant seulement les deux premiers et les deux derniers
temps d’un échantillon de quatre mesures, vous
pourrez créer une boucle d’une mesure.
1. La touche SHIFT s’allumera et la touche
SAMPLE BANK spécifiée clignotera en vert.
2. Toutes les huit touches PROGRAM MEMORY s’allumeront (par défaut).
En appuyant sur la touche correspondante,
vous pourrez activer ou désactiver chaque
partie d’un d’échantillon.
Rééchantillonnage
En utilisant cette fonction, vous pouvez créer
un échantillon combinant plusieurs échantillons préalablement enregistrés ou créer un
nouvel échantillon à partir d’un échantillon
modifié par un effet. Vous pouvez même rééchantillonner pour créer des boucles ou des
échantillons one shot. N’oubliez pas qu’avec le
rééchantillonage, la sortie du KP3 est enregistrée, et que par conséquent tous les effets créés
à l’aide du pavé tactile sont intégrés aux données de l’échantillon.
1. Appuyez sur la touche SAMPLING tout en
maintenant la touche SHIFT enfoncée.
2. Les touches SAMPLE BANK clignoteront
en orange et le KP3 passera en mode d’attente d’enregistrement.
3. Suivez alors les instructions pour l’enregistrement de boucles et d’échantillons one shot
au chapitre précédent.
REMARQUE Quand vous appuyez sur une touche
SAMPLE BANK, la reproduction des données assignées à cette touche s’arrête et les données sont écrasées par réécriture.
39
Page 39

Réglage des fonctions
Si vous appuyez sur une des touches PROGRAM MEMORY 1~8, tout en maintenant la
touche SHIFT enfoncée, vous pouvez exécuter
plusieurs fonctions variées comme le formatage
d’une carte ou l’enregistrement/rappel
d’échantillons. Utilisez la procédure suivante
pour accéder au réglage des fonctions et éditer leurs divers paramètres.
1. Appuyez sur une des touches PROGRAM
MEMORY 1~8, tout en maintenant la touche
SHIFT enfoncée.
2. Utilisez le bouton PROGRAM/BPM pour
sélectionner un sous-paramètre.
3. Appuyez sur le bouton PROGRAM/BPM
pour afficher les valeurs disponibles pour ce
paramètre.
4. Utilisez le bouton PROGRAM/BPM pour
sélectionner une valeur.
5. Appuyez sur la touche TAP/RANGE (allumée en orange) pour revenir à la liste des paramètres. Répétez les étapes 2~5 pour éditer les
paramètres supplémentaires.
6. Vous pourrez alors appuyer sur la touche
WRITE (clignotante) pour sauvegarder les réglages effectués, ou appuyer sur la touche
SHIFT pour quitter les réglages sans les sauvegarder.
REMARQUE Quand la touche TAP/RANGE est
allumée en orange, vous pouvez appuyer dessus pour
revenir à la page précédente.
A propos de chaque fonction
[1] CARD
Info: Affiche la capacité totale de la carte SD.
Free: Affiche la capacité restante de la carte SD.
Form: Formate la carte SD.
[2] LOAD
Charge les données de la carte SD dans le KP3.
[3] SAVE
Sauvegarde les données du KP3 dans la carte
SD.
[4] MIDI FILTER
Spécifie les réglages d’horloge MIDI et le filtrage des messages MIDI.
[5] MESSAGE
Spécifie le canal sur lequel les messages MIDI
seront transmis/reçus, et assigne un changement de commande à chaque contrôleur. Vous
pouvez spécifier les numéros de note pour les
touches SAMPLE BANK.
GLCH (canal global)
SAMPA, B, C, D (touches SAMPLE BANK)
PAD X, PAD Y, PAD T (pavé tactile)
FX.DP (bouton FX Depth)
SLDR (potentiomètre LEVEL/FX RELEASE)
HOLD (touche HOLD)
[6] PAD LED
Prog: Ce paramètre active/désactive la fonction qui affiche le nom du programme avec les
LED du pavé tactile quand un changement de
programme survient.
ILLU: Ce paramètre spécifie le motif lumineux
affiché par les LED du pavé tactile quand un
certain temps a passé après que vous ayez
enlevé votre doigt de la surface du pavé tactile.
"oFF" Pas d'affichage lumineux.
"ChAr" Un texte défilera. Vous pourrez utiliser le logiciel d'édition inclus pour éditer ce
texte.
"TYP.1~8" Des motifs lumineux variés seront
affichés.
"TYP.C" Les motifs lumineux TYP.1 à TYP.8
seront automatiquement affichés en alternance.
REMARQUE L'illumination du pavé tactile ne
fonctionnera pas si HOLD est activé ou si vous effectuez des réglages de fonctions.
Scrl: Spécifie la vitesse de défilement du texte.
Ce réglage déterminer à quelle vitesse les diodes du pavé tactile produiront le défilement.
Vous avez le choix entre Slow (lent), Mid
(moyen), or Fast (rapide).
REMARQUE Vous ne pouvez pas changer la vitesse
d'affichage des motifs lumineux.
[7] USB
Vous pouvez raccorder le KP3 à votre ordinateur et lire/écrire le contenu de la carte insérée
via une liaison USB. Pour les détails, reportezvous à “Raccordement à un ordinateur”.
40
Page 40

[8] EXT.CTRL
Cette fonction vous permet d’utiliser le KP3
comme contrôleur MIDI. Les effets ne fonctionneront pas dans ce mode.
Le KP3 transmettra les messages MIDI assignés
à chaque contrôleur en utilisant l’éditeur PC
inclus. Pour le pavé tactile, vous pouvez choisir
entre huit groupes d’assignation de messages
MIDI différents.
Vous pouvez assigner des messages MIDI aux
contrôleurs suivants : bouton PROGRAM/
BPM, touches PROGRAM MEMORY 1~8,
SAMPLE BANK A~D, FX DEPTH, potentiomètre LEVEL, PAD (X, Y, TOUCH) et HOLD.
REMARQUE Utilisez la touche SHIFT pour quitter EXT.CTRL
Carte SD
Vous pouvez utiliser une carte SD pour sauvegarder ou charger des données dans et depuis
la mémoire interne du KP3. Vous pouvez aussi
charger des échantillons (fichiers WAV ou AIFF)
créés sur un ordinateur, dans le KP3, en utilisant une carte.
REMARQUE Avant d’utiliser la carte SD, vous
devez la formater dans le KP3. N’utilisez pas votre
ordinateur ou un appareil photo numérique pour formater (initialiser) une carte que vous envisagez d’utiliser avec le KP3. Si la carte a été formatée avec un
autre appareil, elle ne fonctionnera pas correctement
avec le KP3.
REMARQUE Le KP3 doit être éteint avant que vous
insériez ou retiriez la carte.
REMARQUE La carte SD n’est pas fournie avec le
KP3. Elle doit être acquise séparément.
REMARQUE Le KP3 accepte des cartes SD avec
une tension de 2,7~3,6 Volts et une capacité comprise
entre 16 Mo et 2 Go, et les cartes SD avec ID.
Manipulation des cartes SD
- La carte SD peut être chaude immédiatement
après son utilisation. Mettez le KP3 hors tension et attendez que la carte refroidisse avant
de l’enlever.
- Une carte SD est un équipement de précision.
Ne la pliez pas, ne la laissez pas tomber et ne
la soumettez pas à des chocs physiques.
- Évitez d’utiliser ou de stocker des cartes SD
dans des endroits extrêmement chauds ou
froids, directement exposées aux rayons du
soleil, dans une voiture fermée, à proximité
d’une source de chaleur, ou dans des endroits
très humides ou poussiéreux.
- Évitez d’utiliser ou de stocker des cartes SD
dans des endroits où elles risquent d’être exposées à des niveaux élevés d’électricité statique
ou de bruit électrique.
- Ne laissez pas de la poussière ou des matières étrangères adhérer aux contacts d’une carte
SD. Si les contacts sont sales, essuyez-les légèrement avec un chiffon sec.
- Quand vous n’utilisez pas une carte SD, remettez-la dans son étui protecteur fourni avec
la carte pour éviter qu’elle ne soit endommagée par l’électricité statique.
41
Page 41

- Ne laissez pas une carte SD à portée de main
des jeunes enfants qui pourraient la mettre dans
leur bouche et l’avaler.
- Veuillez lire soigneusement et observer les
consignes du mode d’emploi fourni avec votre carte SD.
A propos de la protection d’écriture sur
une carte SD
Les cartes SD ont un taquet de protection qui
empêche l’effacement accidentel des données.
Si vous mettez le taquet sur la position de protection, il sera impossible d’écrire ou d’effacer
des données sur la carte ou de la formater. Si
vous devez sauvegarder sur la carte des données éditées, remettez le taquet sur sa position
d’origine sans protection.
Taquet de protection d’écriture
Protégé
Insertion/échange de cartes
Insertion d’une carte
Insérez la carte en vous assurant qu’elle est bien
orientée. Les contacts dorés doivent être tournés
vers le bas et le coin en biais vers la droite.
Utilisation des cartes de
mémoire SD
Vérification de la capacité
totale de la carte
1. Appuyez sur la touche PROGRAM MEMORY 1 (CARD) tout en maintenant la touche
SHIFT enfoncée.
2. Utilisez le bouton PROGRAM/BPM pour
sélectionner “InFo” (capacité de la carte).
3. Appuyez sur le bouton PROGRAM/BPM
pour afficher la capacité totale de la carte.
Appuyez sur la touche TAP/RANGE (allumée
en orange) pour revenir à la sélection d’un autre
paramètre ou appuyez sur la touche SHIFT
pour revenir au mode de fonctionnement normal.
Vérification de la capacité
restante de la carte
1. Appuyez sur la touche PROGRAM MEMORY 1 (CARD) tout en maintenant la touche
SHIFT enfoncée.
2. Utilisez le bouton PROGRAM/BPM pour
sélectionner “FrEE” (capacité restante de la
carte).
Fente d’insertion
de carte SD
Carte SD
Retrait d’une carte
Appuyez sur la carte vers l’intérieur, puis relâchez la pression et la carte sera éjectée.
REMARQUE Avant d’utiliser une carte SD,
n’oubliez pas de la formater dans le PK3. La carte
risque de ne pas fonctionner si elle a été formatée dans
un autre appareil.
42
3. Appuyez sur le bouton PROGRAM/BPM
pour afficher la capacité restante de la carte.
Appuyez sur la touche TAP/RANGE (allumée
en orange) pour revenir à la sélection d’un autre
paramètre ou appuyez sur la touche SHIFT
pour revenir au mode de fonctionnement normal.
Formatage de la carte
1. Appuyez sur la touche PROGRAM MEMORY 1 (CARD) tout en maintenant la touche
SHIFT enfoncée.
2. Utilisez le bouton PROGRAM/BPM pour
sélectionner “ForM” (formatage de la carte).
Page 42

3. Appuyez sur le bouton PROGRAM/BPM
pour afficher “NO”.
4. Utilisez le bouton PROGRAM/BPM pour
sélectionner “yes” et appuyez de nouveau sur
le bouton PROGRAM/BPM pour formater la
carte. Lorsque le formatage est terminé, l’afficheur indiquera “End”.
Appuyez sur la touche TAP/RANGE (allumée
en orange) pour revenir à la sélection d’un autre
paramètre ou appuyez sur la touche SHIFT
pour revenir au mode de fonctionnement normal.
REMARQUE Tout le contenu de la carte sera perdu
quand vous l’aurez formatée. Si le KP3 n’arrive pas
à lire la carte, l’afficheur indiquera “Err” (erreur).
REMARQUE N’utilisez pas votre ordinateur ou un
appareil photo numérique pour formater (initialiser)
une carte que vous envisagez d’utiliser avec le KP3.
Vous devez utiliser le PK3 pour effectuer le formatage. Si la carte a été formatée avec un autre appareil,
elle ne fonctionnera pas correctement avec le KP3.
Sauvegarde sur une carte
Vous pouvez sauvegarder sur une carte des
données d’échantillonnage, le contenu des
mémoires de programmes, des réglages globaux ou l’ensemble des réglages.
1. Appuyez sur la touche PROGRAM MEMORY 3 (SAVE) tout en maintenant la touche
SHIFT enfoncée.
2. Utilisez le bouton PROGRAM/BPM pour
sélectionner le type de données que vous souhaitez sauvegarder.
“SMP.A”~“SMP.D” : données d’échantillonnage
“ProG” : contenu des mémoires de programmes
“ALL” : tous les fichiers
“GLOb” : fichier de réglages globaux
3. Appuyez sur le bouton PROGRAM/BPM.
Les numéros de fichiers disponibles pour l’enregistrement apparaîtront : 00~99 pour chacune
des touches SAMPLE BANK, 00~09 pour tous
les autres types de données.
Utilisez le bouton PROGRAM/BPM pour sé-
lectionner le numéro.
“-01-” : Le numéro de fichier sélectionné est
vide.
“ [01]” : Le numéro de fichier sélectionné (dans
ce cas “01”) contient déjà des données qui seront remplacées (écrasées par réécriture) par les
données que vous enregistrez maintenant.
“ [-]” : Il existe déjà un fichier ou dossier du
même nom qui ne pas être remplacé.
4. Appuyez sur le bouton PROGRAM/BPM,
utilisez ce même bouton pour sélectionner
“yes”, puis appuyez de nouveau sur le bouton
PROGRAM/BPM pour sauvegarder les données. Lorsque la sauvegarde est terminée, l’afficheur indique “End”.
Appuyez sur la touche SHIFT pour revenir au
mode de fonctionnement normal.
REMARQUE Vous ne pourrez pas sauvegarder des données si la carte SD est protégée.
Ne mettez jamais l’appareil sous tension et
n’enlevez pas la carte SD pendant la sauvegarde
ou le formatage. Vous risqueriez de rendre la
carte inutilisable.
Chargement des données de la
carte
Veuillez utiliser la procédure suivante pour
charger des données auparavant sauvegardées
dans la carte.
1. Appuyez sur la touche PROGRAM MEMORY 2 (LOAD) tout en maintenant la touche
SHIFT enfoncée.
2. Utilisez le bouton PROGRAM/BPM pour
sélectionner le type de données que vous souhaitez charger.
“SMP.A”~“SMP.D” : données d’échantillonnage
“Snd.A”~“Snd.D” : WAVE, AIFF
“ProG” : contenu des mémoires de programmes
“ALL” : tous les fichiers
“GLOb” : fichier de réglages globaux
3. Tournez le bouton PROGRAM/BPM pour
afficher les numéros de fichiers pouvant être
chargés à partir de la carte : 00~99 pour chacune
des touches SAMPLE BANK, 00~09 pour tous
les autres types de données.
Utilisez le bouton PROGRAM/BPM pour sé-
43
Page 43

lectionner le numéro du fichier que vous souhaitez charger.
Si vous chargez un fichier WAVE ou AIFF, sélectionnez le fichier souhaité.
REMARQUE Dans le cas des fichiers WAVE ou
AIFF, le KP3 reconnaîtra seulement les noms
de fichiers constitués d’un numéro à deux
chiffres plus une extension de fichier, comme
“00.wav” ou “99.aif”. Si des fichiers .wav et .aiff
dont le nom comporte les mêmes deux chiffres
coexistent dans la carte, le fichier WAVE prendra la priorité.
REMARQUE Les fichiers WAVE et AIFF seront
chargés comme boucles. Vous pourrez
rééchantillonner ces boucles et les capturer comme
échantillons one shot en arrêtant l’enregistrement
avant l’arrêt automatique. Vous pourrez alors les
sauvegarder comme échantillons KP3 et les utiliser
comme échantillons one shot.
4. Utilisez le bouton PROGRAM/BPM pour
sélectionner “yes”, puis appuyez de nouveau
sur le bouton PROGRAM/BPM pour sauvegarder les données. Lorsque le chargement est
terminé, l’afficheur indiquera “End”.
Appuyez sur la touche SHIFT pour revenir au
mode de fonctionnement normal.
Fonctions MIDI
Qu’est-ce que le système MIDI ?
Le terme MIDI vient de l’anglais Musical Instrument Digital Interface (interface numérique
pour instruments de musique) et il s’agit d’une
norme internationale permettant l’échange
d’informations variées liées à l’interaction entre
des instruments de musique électroniques et
des ordinateurs.
A propos du tableau d’implémentation
MIDI
Le manuel d’utilisation de chaque appareil
MIDI comprend un “Tableau d’implémentation
MIDI.”
Ce tableau permet de vérifier les types de
messages MIDI pouvant être transmis ou reçus.
Lorsque vous raccordez deux appareils MIDI
(ou plus), comparez leurs tableaux d’implémentation MIDI pour voir quels types de
messages MIDI ils peuvent transmettre et recevoir entre eux.
* Vous trouverez de plus amples détails sur les fonctions MIDI dans la brochure d’implémentation
MIDI. Pour obtenir ce document, veuillez contacter
votre revendeur Korg.
Liaisons MIDI
Des câbles MIDI disponibles dans le commerce
sont utilisés pour transmettre et recevoir des
messages MIDI. Raccordez ces câbles entre les
bornes MIDI du KP3 et les bornes MIDI de l’appareil MIDI externe avec lequel vous souhaitez échanger des données.
Borne MIDI IN : Cette borne permet de recevoir des messages MIDI provenant d’un autre
appareil MIDI. Pour ce faire, raccordez-la à la
borne MIDI OUT du dispositif externe.
Borne MIDI OUT : Cette borne permet de
transmettre des messages provenant du KP3.
Pour ce faire, raccordez-la à la borne MIDI IN
du dispositif externe.
REMARQUE Si vous raccordez le KP3 via une
liaison USB à votre ordinateur et installez le pilote
USB MIDI, la liaison USB transmettra et recevra les
mêmes messages MIDI que les ports MIDI.
44
Page 44

Utilisation du KP3 comme processeur
d’effets contrôlé par MIDI
LINE IN MIDI INMIDI OUTOUTPUT
KORG ELECTRIBE MX
Utilisation du KP3 comme contrôleur
MIDI (mode EXT CTRL)
MIDI INMIDI OUT
KORG ELECTRIBE MX
Réglages MIDI
Le KP3 n’est pas qu’un simple processeur d’effets. Il permet également de transmettre des
messages MIDI, ce qui fait de lui un contrôleur
en temps réel pour synthétiseur ou autre appareil MIDI externe.
Vous pouvez également raccorder le KP3 à un
séquenceur MIDI et enregistrer les messages
MIDI transmis lorsque vous touchez le pavé
tactile. La reproduction des messages MIDI
enregistrés permet ainsi de reproduire les opérations effectuées sur le pavé tactile.
Configuration du canal MIDI
1. Appuyez sur la touche PROGRAM MEMORY 5 (MESSAGE) tout en maintenant la touche
SHIFT enfoncée.
2. Utilisez le bouton PROGRAM/BPM pour
sélectionner “GL.Ch”, puis appuyez sur le
bouton PROGRAM/BPM. Le canal MIDI actuellement spécifié sera affiché.
3. Utilisez le bouton PROGRAM/BPM pour
changer le canal MIDI.
4. Appuyez sur la touche TAP/RANGE (allumée en orange) pour revenir à la liste des paramètres MESSAGE.
5. Vous pourrez alors appuyer sur la touche
WRITE (clignotante) pour sauvegarder les réglages effectués, ou appuyer sur la touche
SHIFT pour quitter les réglages sans les sauvegarder.
A propos des canaux MIDI
Afin de pouvoir transmettre indépendamment
des informations à plusieurs appareils MIDI,
par le biais d’un seul câble MIDI, le système
MIDI utilise seize canaux (1~16). Si l’appareil
de transmission est réglé sur le canal MIDI “1”,
les messages MIDI ne seront reçus que si l’appareil récepteur est également réglé sur le canal MIDI “1”.
Changement des numéros
Control change ou des numéros
de notes
1. Appuyez sur la touche PROGRAM MEMORY 5 (MESSAGE) tout en maintenant la touche
SHIFT enfoncée.
2. Utilisez le bouton PROGRAM/BPM pour
sélectionner le contrôleur dont vous souhaitez
changer le réglage.
Pad X, Pad Y, PAD Touch, FX Depth, slider,
HOLD et MUTE transmettent/reçoivent des
messages Control change. Les touches Sample
A~D transmettent/reçoivent des messages de
notes.
3. Utilisez le bouton PROGRAM/BPM pour
sélectionner un numéro Control change ou un
numéro de note dans une plage de 0~127.
Si vous avez sélectionné un numéro Control
change déjà assigné à un autre contrôleur, le
45
Page 45

point décimal s’allumera. Si vous assignez cette
valeur, le contrôleur correspondant transmettra
et recevra les mêmes messages Control change que l’autre contrôleur.
4. Appuyez sur la touche TAP/RANGE (allumée en orange) pour revenir à la liste des paramètres MESSAGE.
5. Vous pourrez alors appuyer sur la touche
WRITE (clignotante) pour sauvegarder les
changements effectués, ou appuyer sur la touche SHIFT pour quitter les réglages sans les
sauvegarder.
Réglages des filtres de
messages MIDI
1. Appuyez sur la touche PROGRAM MEMORY 4 (MIDI FILTER) tout en maintenant la touche SHIFT enfoncée. L’afficheur indiquera les
messages à filtrer
2. Utilisez le bouton PROGRAM/BPM pour
sélectionner le message que vous souhaitez
filtrer.
Vous pouvez sélectionner des réglages de filtre pour la transmission et la réception de
CLOCK, ProG, CC et SYS.E.
3. Utilisez le bouton PROGRAM/BPM pour
activer ou désactiver la transmission/réception.
Sélectionnez diS (désactiver) ou EnA (activer).
Pour les réglages CLOCK, sélectionnez Int, Ext
ou Auto.
REMARQUE Si CLOCK est réglé sur “Ext” et les
données d’horloge sont reçues via MIDI et USB, les
données de la liaison USB prendront la priorité.
4. Pour sauvegarder vos réglages, appuyez sur
la touche WRITE. Si vous décidez de ne pas
sauvegarder vos réglages, appuyez sur la touche SHIFT.
5. Appuyez sur la touche TAP/RANGE (allumée en orange) pour revenir à la liste des paramètres MESSAGE.
6. Vous pourrez alors appuyer sur la touche
WRITE (clignotante) pour sauvegarder les réglages effectués, ou appuyer sur la touche
SHIFT pour quitter les réglages sans les sauvegarder.
Pour sauvegarder vos réglages édités
Appuyez sur la touche WRITE pour sauvegarder les réglages MIDI que vous avez édités. Si
vous appuyez sur la touche SHIFT, vous reviendrez au fonctionnement normal sans sauvegarder vos réglages.
REMARQUE Si vous mettez l’appareil hors tension
sans sauvegarder vos réglages, ils reviendront à leur
état précédent.
Messages pouvant être transmis ou reçus
Avec les réglages d’usine (sauf pour EXT CTRL*), le KP3 peut transmettre et recevoir les messages
MIDI suivants.
Données transmises/reçues Messages MIDI transmis/reçus (réglages d’usine)
Axe X du pavé tactile Control change (#12)
Axe Y du pavé tactile Control change (#13)
Activation/désactivation du pavé tactile Control change (#92)
Potentiomètre LEVEL Control change (#93)
Bouton FX DEPTH Control change (#94)
Touche HOLD Control change (#95)
Touche SAMPLE BANK A Note on/off (#36)
Touche SAMPLE BANK B Note on/off (#37)
Touche SAMPLE BANK C Note on/off (#38)
Touche SAMPLE BANK D Note on/off (#39)
Bouton PROGRAM/BPM Program change (0~127)
Timing clock
* Pour les détails sur les messages quand le KP3 est en mode EXT CTRL, reportez-vous au mode d’emploi de KP3
editor dans le CD-ROM fourni.
46
Page 46

Partage des données entre
le KP3 et un ordinateur
Le KP3 est muni d’une prise USB. En la raccordant directement à un ordinateur, vous pouvez
transférer des données d’échantillons et des
fichiers de réglage enregistrés dans la carte pour
sauvegarde dans l’ordinateur.
La liaison USB vous permet d'utiliser le KP3
comme appareil USB-MIDI pouvant transmettre et recevoir des messages MIDI sans que vous
ayez à effectuer une liaison à l'aide de cordons
MIDI.
REMARQUE Lorsque vous êtes en mode USB, vous
pouvez appuyer sur la touche SHIFT pour revenir au
mode de fonctionnement normal. Si vous appuyez sur
SHIFT alors que le KP3 est en train de communiquer
avec votre ordinateur, un message d’avertissement
apparaîtra et vous ne pourrez pas sortir du mode
USB.
Raccordement à la prise USB
Si vous raccordez directement la prise USB du
KP3 à un ordinateur, vous pourrez utiliser ce
dernier pour gérer les données présentes dans
la carte actuellement insérée dans la fente du
KP3.
Veuillez suivre la procédure correspondant au
système d’exploitation de votre ordinateur.
Utilisateurs de Windows XP
REMARQUE Avant de continuer, mettez votre or-
dinateur sous tension et lancez le système.
1. Utilisez un cordon USB pour raccorder le
KP3 à votre ordinateur.
Branchez la fiche du cordon USB raccordé à
votre ordinateur sur la prise USB du KP3.
Assurez-vous que la fiche est correctement
orientée et insérez-la complètement.
Quand vous raccordez pour la première fois le
KP3, le pilote d'appareil Windows standard est
automatiquement installé..
2. Le nom de la carte insérée dans la fente
apparaîtra sur l’écran de votre ordinateur.
3. Appuyez sur la touche PROGRAM MEMORY 7 (USB) tout en maintenant la touche SHIFT
enfoncée. L’afficheur indiquera “USB”.
Le contenu de la carte du KP3 ne sera pas visible sur votre ordinateur tant que vous n’aurez
pas exécuté “USB Storage Mode”.
A partir de ce moment et jusqu’à ce que vous
ayez terminé l’étape 5, vous ne devrez pas
débrancher le cordon USB, ni enlever la carte
de la fente ni mettre votre ordinateur sous/hors
tension. Vous risqueriez ainsi d’endommager
les données.
4. Pour examiner le contenu de la carte KP3,
ouvrez le disque ajouté à votre ordinateur à
l’étape 2.
Copiez les données souhaitées dans votre ordinateur. Vous pouvez également copier les
données de votre ordinateur dans la carte.
5. Quittez le mode USB.
Dans Explorer ou Mon ordinateur, cliquez avec
le bouton droit de la souris sur l’icône “Disque
amovible” et choisissez “Enlever”. Puis, appuyez sur la touche SHIFT du KP3 pour quitter le mode USB.
REMARQUE Quand vous êtes prêt à débrancher le
KP3 de l’ordinateur, vous devez commencer par quitter le mode USB, puis débrancher le cordon USB.
Utilisateurs de Macintosh (Mac OS9.0.4
ou plus récent, OSX 10.3.9 ou plus récent)
1. Utilisez un cordon USB pour raccorder le
KP3 à votre ordinateur.
Branchez la fiche du cordon USB sur la prise
USB du KP3.
Assurez-vous que la fiche est correctement
orientée et insérez-la complètement.
Si vous utilisez Mac OS9, un message indiquant
que “Le pilote requis n’est pas disponible” sera
affiché, mais vous pourrez simplement fermer
la boîte de dialogue sans installer le pilote.
2. Appuyez sur la touche PROGRAM MEMORY 7 (USB) tout en maintenant la touche SHIFT
enfoncée. L’afficheur indiquera “USB”.
3. Le nom de la carte insérée dans la fente
apparaîtra sur l’écran de votre ordinateur.
Tant que le nom est affiché, vous ne devrez pas
débrancher le cordon USB, ni enlever la carte
de la fente ni mettre votre ordinateur sous/hors
tension. Vous risqueriez d’endommager les
données.
4. Pour examiner le contenu de la carte KP3,
ouvrez le disque ajouté à votre ordinateur à
l’étape 2.
47
Page 47

Copiez les données souhaitées dans votre ordinateur. Vous pouvez aussi copier des données
de votre ordinateur dans la carte.
5. Quand vous êtes prêt à débrancher le KP3,
glissez-déposez l’icône du disque dans la corbeille.
Appuyez ensuite sur la touche SHIFT du KP3
pour quitter le mode USB.
REMARQUE Quand vous êtes prêt à débrancher le
KP3, vous devez quitter le mode USB avant de débrancher le cordon USB.
A propos du contenu de la carte
Les fichiers et dossiers suivants seront créés
dans le répertoire racine de la carte.
Fichiers que vous pouvez sauvegarder
Données SAMPLE 00~99.KPS
Données GLOBAL 0~9.KPG
Réglages PROGRAM MEMORY 0~9.KPP
Toutes données 0~9.KPA
Fichiers que vous pouvez charger
Données SAMPLE 00~99.KPS
00~99.WAV
00~99.AIF
Données GLOBAL 0~9.KPG
Réglages PROGRAM MEMORY 0~9.KPP
Toutes données 0~9.KPA
REMARQUE Si un fichier Toutes données nommé
“0.KPA” existe dans la carte, ce fichier sera automatiquement chargé au démarrage du KP3.
REMARQUE Les fichiers WAVE ou AIFF que vous
pouvez charger sont des fichiers PCM Mono/Stéréo
de 8/16/24 bits. Si le codage est différent de 16 bits, les
données seront tronquées à 16 bits à partir des bits les
plus significatifs, et s’il est inférieur à 16 bits, les
données seront complétées par des zéros. Déposez les
fichiers dans le répertoire racine de la carte. Les fichiers WAVE ou AIFF dont la fréquence d’échantillonnage est différente de 48 kHz seront reproduits
à une hauteur différente que sur votre ordinateur. Si
vous souhaitez que la hauteur soit correcte, utilisez le
logiciel PC editor fourni pour convertir votre fichier
audio dans le format KP3.
REMARQUE Les fichiers WAVE et AIFF ne contiennent pas de données dont le KP3 a besoin pour
reproduire l’échantillon, aussi ils seront chargés avec
les réglages Tempo = 120 et Beat = 16. Si les données
actuelles sont plus courtes, la zone manquante sera
traitée comme un silence.
Installation des logiciels
Installation des logiciels du CDROM
Contenu du CD-ROM
Le CD-ROM inclus contient les éléments suivants.
• Logiciel Editor/Librarian
• Pilote KORG USB-MIDI
• Mode d’emploi d’Editor/Librarian (PDF)
• Accord de licence pour les logiciels (PDF)
Veuillez lire avant utilisation
• Les droits d’auteur pour tous les logiciels
concernant ce produit appartiennent à Korg
Corporation.
• L’accord de licence pour les logiciels concernant ce produit est fourni séparément. Vous
devez lire cet accord de licence avant d’installer
le logiciel. Votre installation du logiciel sera
considérée comme votre acceptation de l’accord.
Conditions requises pour le
fonctionnement
Pilote KORG USB-MIDI
Windows XP
Systèmes d’exploitation supportés
Microsoft Windows XP Home Edition/Professional Edition / x64 Edition Service Pack 2 ou
plus récent (le pilote MIDI pour x64 Edition est
une version Beta)
Ordinateurs compatibles
Un ordinateur avec un port USB, conforme aux
exigences de fonctionnement pour Microsoft
Windows XP (un processeur Intel est recommandé)
Mac OS X
Systèmes d’exploitation supportés
Mac OS X 10.3.9 ou plus récent
Ordinateurs compatibles
Un ordinateur Apple Macintosh avec un port
USB conforme aux exigences de fonctionnement de Mac OS X
48
Page 48

KP3 Editor pour KP3
Windows XP
Systèmes d’exploitation supportés
Microsoft Windows XP Home Edition/Professional Edition Service Pack 2 ou plus récent
Ordinateurs compatibles
Un ordinateur avec un port USB, conforme aux
exigences de fonctionnement pour Microsoft
Windows XP
Mac OS X
Systèmes d’exploitation supportés
Mac OS X 10.3.9 ou plus récent
Ordinateurs compatibles
Un ordinateur Apple Macintosh avec un port
USB conforme aux exigences de fonctionnement de Mac OS X
Installation du pilote KORG
USB-MIDI et du logiciel
d’édition pour Windows XP
REMARQUE L’installation ou la désinstallation
d’un pilote sous Windows XP nécessite des privilèges
d’administrateur. Pour les détails, adressez-vous à
votre administrateur de système.
REMARQUE Avant de raccorder le KP3 à votre
ordinateur via une liaison USB, vous devez utiliser
l’installateur d’application du KP3 pour installer les
outils du pilote KORG USB-MIDI.
Installateur d’application du
KP3
L’installateur d’application du KP3 installera
automatiquement les outils du pilote KORG
USB-MIDI et le logiciel KP3 Editor dans votre
ordinateur.
1. Insérez le CD-ROM inclus dans le lecteur de
CD-ROM de votre ordinateur.
Normalement, “KP3 Application Installer” sera
automatiquement lancé.
Si, en raison des réglages de votre ordinateur,
l’installateur n’est pas automatiquement lancé, double-cliquez sur “KorgSetup.exe” dans
le CD-ROM.
2. Suivez les instructions affichées à l’écran
pour installer les outils du pilote KORG USBMIDI et le logiciel KP3 Editor.
REMARQUE Vous devez installer les outils du pilote KORG USB-MIDI si vous souhaitez utiliser
KP3 Editor via une liaison USB.
3. Quand toutes les applications ont été installées, quittez l’installateur.
4. Si nécessaire, installez le pilote KORG USBMIDI.
Pour les détails sur la procédure d’installation,
reportez-vous à “Installation du pilote KORG
USB-MIDI” ci-dessous.
Installation du pilote KORG
USB-MIDI
Vous devez installer “KORG USB-MIDI Driver” dans votre ordinateur si vous souhaitez
utiliser KP3 Editor via une liaison USB.
Vo us utiliserez les outils du pilote KORG USBMIDI pour installer le pilote KORG USB-MIDI.
1. Avant de continuer, finissez d’installer les
outils du pilote KORG USB-MIDI dans votre
ordinateur.
2. Utilisez un câble USB pour relier le port USB
de votre ordinateur au port USB du KP3. Puis,
mettez le KP3 sous tension.
L’ordinateur détectera le branchement du KP3
et le pilote standard Windows sera alors automatiquement installé. (Il ne s’agit pas du pilote
KORG USB-MIDI.)
REMARQUE Le pilote doit être installé pour
chacun des ports USB. Si vous reliez le KP3 à
un port USB autre que le port sur lequel il était
branché au moment de l’installation du pilote KORG USB-MIDI, vous devrez réinstaller le
pilote KORG USB-MIDI pour ce port.
3. Dans la barre des tâches, choisissez [Démarrer] ➝ [Tous programmes] ➝ [KORG] ➝
[Outils du pilote KORG USB-MIDI] ➝ [Installer
appareil KORG USB-MIDI].
L’utilitaire de configuration sera lancé.
4. Suivez les instructions affichées à l’écran
pour installer le pilote KORG USB-MIDI.
Durant l’installation, il est possible qu’une boîte
de dialogue vous avertissant que “...has not
passed Windows logo testing.” apparaisse.
Cliquez simplement sur [Continuer].
REMARQUE Si l’installation s’avère impossible, il est possible que votre ordinateur ait été
configuré pour refuser l’installation de pilotes
49
Page 49

sans signature numérique. Vérifiez les réglages
de votre ordinateur comme indiqué dans “Déblocage de l’installation de pilotes non assignés”.
5. Quand vous avez terminé l’installation du
pilote KORG USB-MIDI, quittez l’installateur.
Si un message vous demande si vous souhaitez redémarrer maintenant votre ordinateur,
cliquez sur “Oui” pour redémarrer.
Pour les détails sur l’installation, le réglage ou
la désinstallation du pilote KORG USB-MIDI,
reportez-vous au manuel d’installation
(HTML).
Pour lire le manuel d’installation, cliquez sur
[Démarrer] dans la barre des tâches et choisissez [Tous programmes] ➝ [KORG] ➝ [Outils
du pilote KORG USB-MIDI] ➝ [Manuel d’installation].
KP3 et ports du pilote MIDI
Port PAD
Les messages MIDI du KP3 (données du contrôleur, etc.) sont reçues par l’application de
votre ordinateur via ce port.
Port CTRL
Les messages MIDI sont transmis de votre
ordinateur au KP3 via ce port.
Réglage de KP3 Editor
Pour les détails sur le réglage et l’utilisation de
KP3 Editor, reportez-vous au “Mode d’emploi
de KP3 Editor”.
Déblocage de l’installation de
pilotes non assignés
Si votre ordinateur a été configuré pour refuser l’installation de pilotes non assignés, vous
ne pourrez pas installer le pilote KORG USBMIDI. Procédez comme suit pour changer le
réglage afin que le pilote puisse être installé.
1. Cliquez sur [Démarrer] ➝ [Panneau de
configuration] dans la barre des tâches pour
ouvrir le Panneau de configuration.
2. Dans le Panneau de configuration, doublecliquez sur [Système], puis cliquez sur l’onglet
[Matériel].
3. Dans la zone “Pilotes”, cliquez sur [Signature du pilote].
4. Dans “Que voulez-vous faire ?”, choisissez
[Ignorer] ou [Avertir], et cliquez sur [OK].Vous
pourrez si nécessaire restaurer le réglage d’origine après avoir installé le pilote KORG USBMIDI.
Installation du pilote KORG
USB-MIDI et du logiciel
d’édition pour Mac OS X
Installation des applications
Vous pouvez lancer les installateurs individuels
pour le pilote KORG USB-MIDI et le logiciel
KP3 Editor et installer séparément ces applications.
1. Insérez le CD-ROM inclus dans le lecteur de
CD-ROM de votre ordinateur.
2. Dans le CD-ROM, double-cliquez sur l’installateur (.pkg) correspondant à l’application
souhaitée pour lancer l’installateur.
Les installateurs sont situés dans les dossiers
suivants.
50
Page 50

• Pilote KORG USB-MIDI
Dossier “KORG USB-MIDI DRIVER” ➝ KORG
USB-MIDI DRIVER.pkg
•KP3 Editor
Dossier “KP3 Editor” ➝ KP3 Editor.pkg
3. Suivez les instructions affichées à l’écran
pour installer le pilote KORG USB-MIDI ou le
logiciel KP3 Editor.
REMARQUE Vous devez installer le pilote KORG
USB-MIDI dans votre ordinateur si vous souhaitez
utiliser KP3 Editor via une liaison USB.
4. Quand l’application sélectionnée a été installée, quittez l’installateur.
KP3 et ports du pilote MIDI
Port PAD
Les messages MIDI du KP3 (données du contrôleur, etc.) sont reçus par l’application de votre
ordinateur via ce port.
Port CTRL
Les messages MIDI sont transmis de votre
ordinateur au KP3 via ce port.
Réglage de KP3 Editor
Pour les détails sur le réglage et l’utilisation de
KP3 Editor, reportez-vous au “Mode d’emploi
de KP3 Editor”.
Spécifications
Nombre de programmes : 128
Entrées : Prise Mic / jack 1/4" mono, entrées ligne / prises Cinch
Sorties : Sorties ligne / prises Cinch, prise de casque stéréo / jack 1/4" stéréo
MIDI : IN, OUT
USB : type B
Alimentation : DC 12V, 700 mA
Accessoires inclus : Adaptateur secteur, feuille de protection pour pavé tactile
Poids : 1,3 kg
Dimensions : 210 (L) X 226 (P) X 49 (H) mm
* L’apparence et les spécifications techniques peuvent être sujettes à modifications sans avis préalable,
51
Page 51

Vorsichtsmaßnahmen
Aufstellungsort
Vermeiden Sie das Aufstellen des Geräts an Orten, an
denen
• es direkter Sonneneinstrahlung ausgesetzt ist;
• hohe Feuchtigkeit oder Extremtemperaturen auftre-
ten können;
• Staub oder Schmutz in großen Mengen vorhanden
sind;
• das Gerät Erschütterungen ausgesetzt sein kann.
• in der Nähe eines Magnetfeldes.
Stromversorgung
Schließen Sie das beiliegende Netzteil nur an eine geeignete Steckdose an. Verbinden Sie es niemals mit einer
Steckdose einer anderen Spannung.
Störeinflüsse auf andere Elektrogeräte
Dieser kann bei in der Nähe aufgestellten Rundfunkempfängern oder Fernsehgeräten Empfangsstörungen hervorrufen. Betreiben Sie solche Geräte nur in einem geeigneten Abstand von diesem Erzeugnis.
Bedienung
Vermeiden Sie bei der Bedienung von Schaltern und
Reglern unangemessenen Kraftaufwand.
Reinigung
Bei auftretender Verschmutzung können Sie das Gehäuse mit einem trockenen, sauberen Tuch abwischen. Verwenden Sie keinerlei Flüssigreiniger wie beispielsweise
Reinigungsbenzin, Verdünnungs- oder Spülmittel. Verwenden Sie niemals brennbare Reiniger.
Vor dem 31.12.1996 vergebene CE-Zeichen auf unseren
Das CE-Zeichen
netzgespeisten Geräten zeigen an, daß diese Geräte gemäß der EMC-Richtlinie (89/336/EWG) und der CERichtlinie (93/68/EWG) der EU arbeiten.
Nach dem 01.01.1997 vergebene CE-Zeichen auf unseren netzgespeisten Geräten zeigen an, daß diese Geräte
gemäß der EMC-Richtlinie (89/336/EWG), der CERichtlinie (93/68/EWG) und der Niederspannungsstromrichtlinie (73/23/EWG) der EU arbeiten.
Die CE-Zeichen auf unseren batteriegespeisten Geräten
zeigen an, daß diese Geräte gemäß der EMC-Richtlinie
(89/336/EWG) und der CE-Richtlinie (93/68/EWG) der
EU arbeiten.
*Die übrigen in dieser Bedienungsanleitung erwähnten Fir-
men-, Produkt-, Formatnamen usw. sind Warenzeichen
oder eingetra-gene Warenzeichen der rechtlichen Eigentümer und werden ausdrücklich anerkannt.
Bedienungsanleitung
Bewahren Sie diese Bedienungsanleitung gut auf, falls
Sie sie später noch einmal benötigen.
Flüssigkeiten und Fremdkörper
Stellen Sie niemals Behältnisse mit Flüssigkeiten in der
Nähe des Geräts auf. Wenn Flüssigkeit in das Gerät gelangt, können Beschädigung des Geräts, Feuer oder ein
elek-trischer Schlag die Folge sein.
Beachten Sie, daß keinerlei Fremdkörper in das Gerät
gelangen. Sollte ein Fremdkörper in das Gerät gelangt
sein, so trennen Sie es sofort vom Netz. Wenden Sie sich
dann an Ihren KORG-Fachhändler.
Page 52

Einleitung
Vielen Dank, dass Sie sich für den KP3
KAOSS PAD dynamischen Effekt/Sampler
entschieden haben. Um den störungsfreien
Betrieb und optimale Ausnutzung des KP3 sicherzustellen, lesen Sie sich das Handbuch
sorgfältig durch, und verwenden Sie den KP3
wie vorgesehen.
Übersicht
Der KP3 bietete Korgs KAOSS-Technologie,
die es dem X-Y-Touch-Pad erlaubt, mehrere
Effektparamater in Echtzeit zu steuern. Berühren, klopfen und/oder reiben Sie Ihren
Finger über das Touch-Pad oder tippen Sie
leicht auf dessen Oberfläche. Eine Schutzfolie
zum Schutz der Touch-Pad-Oberfläche wird
mitgeliefert
Intern enthält der KP3 128 Effektprogramme,
die von Delays und Filtern bis zu Vocodern
und sogar Synthesizern reichen. Die Merkmale Pad Motion, Hold und Mute geben der
Touch-Pad-Steuerung noch mehr Vielseitigkeit. Ihre acht bevorzugten Programme können modifiziert und für schnellen Zugriff unter den Programmspeichertasten gespeichert
werden.
Loops kann manuell eingestellt werden, um
die Samples synchronisiert zu halten.
Auto-BPM Detect, MIDI Clock und Tap Tempo sorgen dafür, dass die Sample-Wiedergabegeschwindigkeit und tempo-basierte Effekte zusammen bewegt werden. Samples und
Einstellungen können auf Secure Digital (SD)
Karten gespeichert werden oder über USB auf
einem Computer gespeichert und schnell neu
geladen werden. Genießen Sie Ihren neuen
KP3!
Unsere neue FX-Release-Funktion kann automatisch einen Delay-Effekt erzeugen, wenn
Sie Ihre Hand vom Touch-Pad nehmen, wodurch es leichter wird, um glatte Übergänge
beim Spiel zu erzielen.
Außerdem ist der KP3 ein leistungsstarker
Sampler. Sowohl Mic- als auch Line-Eingänge
sind vorhanden und erlauben das Sampling
von einer Reihe von Audioquellen. Resampling erlaubt Aufnahme des Ausgangs vom
KP3 selber, ebenso wie das Sampling von ankommenden Signalen über die Onboard-Effekte. Sowohl Loop- als auch One-Shot-Samples können aufgenommen und von den
Sample-Bank-Tasten abgespielt werden. Die
Sample-Editing-Tools bieten automatisches
Sample-Slicing, und der Startpunkt eines
53
Page 53

Teile des KP3 und ihre
Funktionen
Oberseite
1. Display
2. [PEAK]-Anzeige
3. [INPUT SELECT]-Wahlschalter
4. [INPUT VOLUME]-Knopf
5. [FX DEPTH]-Knopf
6. LEVEL-Schieberegler
(Sample Bank Wiedergabepegel—siehe Seite62)
7. [HOLD]-Taste
8. [SAMPLE BANK]-Tasten
9. [PROG]-Anzeige
10. [BPM]-Anzeige
(Blinkt, wenn ein Taktzahl-Programm gewählt ist.)
11. [WRITE]-Taste
12. [SHIFT]-Taste
13. [PROGRAM/BPM]-Knopf
14. [TAP/RANGE]-Taste
15. [PROGRAM MEMORY 1~8]-Tasten
16. [AUTO BPM]-Taste
17. [PAD MOTION]-Taste
18. [MUTE]-Taste
19. [SAMPLING]-Taste
20. Touch-Pad
Umgang mit dem Touch-Pad
Setzen Sie das Touch-Pad keinen starken Belastungen aus und stellen Sie keine schweren
Gegenstände darauf ab. Bei grober Behandlung kann es beschädigt oder unbrauchbar
werden. Drücken Sie Touch-Pad nur mit dem
Finger; beim Reiben oder Drücken mit spitzen Gegenständen zerkratzen Sie die Oberfläche. Verwenden Sie zur Reinigung des TouchPads ein trockenes, weiches Tuch. Verwenden
Sie keine Lösungsmittel wie Terpentin, da dadurch Verformungen entstehen können.
54
1
2
3
4
5
9
10
11
12
13
14
6
15
16
7
17
18
8
19
20
Page 54

Vorderseite
1. [PHONES VOLUME]-Knopf
2. [PHONES]-Ausgang
3. [MIC TRIM]-Knopf
4. [MIC]-Eingangsbuchse
5. SD-Kartensteckplatz
Das KP3 muss vor dem Einsetzen oder Abziehen der SD-karte ausgeschaltet werden!
1
2
Rückseite
1. [MIDI IN]-, [MIDI OUT]-Anschluss
2. DC 12V-Buchse
3. [POWER]-Schalter
4. [USB]-Buchse
5. [CONNECTION]-Schalter
6. [LINE OUT]-Buchsen
7. [LINE IN]-Buchsen
1
2
3
3
4
5
4
5
6
7
55
Page 55

Anschlüsse
Grundlegende Anschlüsse
Im unten gezeigten Beispiel wird der KP3 „inline“ zwischen der Audioquelle und den Mixer-Eingängen eingesetzt. In diesem Fall können Effekte an das eingehende Audiosignal
angelegt werden, und das eingehende Audiosignal wird gesampelt. Bei dieser Anwendungsweise muss der CONNECTION-Schalter an der Rückseite auf DIRECT gestellt sein.
Der KP3 hat Line- und Mic-Eingangsbuchsen.
Verwenden Sie die für die Situation geeigneten Buchsen.
56
CD PLAYER
LINE IN
LINE OUT DC12V
MIXER, DJ MIXER
AC
AC ADAPTER
Page 56

DJ-Mischpult-Anschlüsse
Der KP3 kann auch als externer Effektprozessor eingesetzt werden, indem er an die EffectSend- und Return-Buchsen eines DJ- (oder
anderen) Mischpults angesetzt wird. Diese
erlaubt das Anlegen der KP3-Effekte an jedes
am Mischpult angeschlossene Audiosignal.
Für diese Anwendungsweise muss der CONNECTION-Schalter an der Rückseite auf
SEND gestellt sein. Bei dieser Einstellung enthält der Ausgang vom KP3 nur das bearbeitete Signal und enthält nicht das an den Eingängen des KP3 angelegte Originalsignal. Verwenden Sie die Send-Level und Return-Level-Regler am Mischpult, um die Effekttiefe
einzustellen.
TURNTABLE
RETURN
SEND
LINE OUT
LINE IN
TURNTABLEDJ MIXER
57
Page 57

Betrieb
Verwendung des
Netzschalters
1. Schließen Sie den KP3 an Ihre anderen Geräte an, wie in der Abbildung gezeigt auf den
Vorseiten gezeigt, und schließen dann das
Netzteil an eine Steckdose an.
HINWEIS: Es darf ausschließlich das beiliegende
Netzteil gebraucht werden.
2. Drücken Sie den Netzschalter, um den KP3
einzuschalten. Das Display leuchtet auf. Zum
Ausschalten des KP3 drücken Sie den Netzschalter erneut, um auf Standby zurückzuschalten.
Wählen des Audio-Eingangs
1. Verwenden Sie den Eingangswahlschalter
zum Wählen, welche der Eingangsbuchsen
des KP3 verwendet werden soll.
MIC: Der Effekt wird nur auf den Mic-Eingang angewendet.
LINE: Der Effekt wird nur auf die Line-Eingänge angewendet.
Anpassen der Lautstärke
1. Passen Sie mit dem Eingangslautstärkeregler den Eingangspegel an. Die Spitzenanzeige
leuchtet entweder in Grün, Orange oder Rot
an, um den Pegel des anliegenden Signals anzuzeigen. Passen Sie die Eingangslautstärke
so an, dass der Spitzenanzeiger sich nicht im
roten Bereich befindet.
2. Wenn Sie die Mic-Buchse verwenden, stellen Sie den MIC-Trim-Knopf entsprechend
der Empfindlichkeit des Mikrofons ein, so
dass der Klang nicht verzerrt ist.
3. Wenn Sie über Kopfhörer hören, passen Sie
mit dem Kopfhörerlautstärke-Knopf die
Kopfhörer-Lautstärke an.
Auswählen von Programmen
Programme können auf drei Arten gewählt
werden.
1. Wenn das Display momentan eine Programmnummer zeigt, können Sie ein Programm durch Drehen des Programm-Knop-
58
fes wählen. Wenn das Display die aktuelle
Taktzahl (BPM) zeigt, drücken Sie den PROGRAM/BPM-Knopf zum Umschalten auf
Programmanzeige.
Die BPM-Anzeige blinkt, wenn Sie ein Programm wählen, das zur Taktzahl synchronisiert wird.
2. Wenn Sie die SHIFT-Taste gedrückt halten,
während Sie den PROGRAM/BPM-Knopf
drehen, schalten Sie zum ersten Programm in
jeder Kategorie weiter, anstelle durch alle 128
Programme scrollen zu müssen. Wenn Sie die
richtige Kategorie gewählt haben, lassen Sie
die SHIFT-Taste los und verwenden die PROGRAM/BPM-Taste zum Wählen des Programm innerhalb dieser Kategorie.
3. Schließlich können Ihre acht bevorzugten
Programme durch einfaches Drücken einer
der PROGRAM MEMORY-Tasten gewählt
werden. (S. 63).
Der PROGRAM/BPM-Knopf arbeitet auf
kontinuierliche Weise. Wenn Sie die letzte
Programmnummer erreicht haben, wird zum
Anfang der Liste zurückgeschaltet.
Steuerung der Effekt-Tiefe
1. Wenn der CONNECTION-Schalter an der
Rückseite auf DIRECT gestellt ist, stellen Sie
die Effekt-Tiefe mit dem FX/DEPTH-Knopf
ein. Wenn Sie den Regler ganz nach rechts
stellen, wird die Effekt-Tiefe gesteigert.
2.
Wenn der CONNECTION-Schalter an der
Rückseite auf SEND gestellt ist, müssen Sie die
Effect-Send- und Return-Pegel an Ihrem Mischpult zur Steuerung der Effekt-Tiefe verwenden.
Hold
Wenn Sie die HOLD-Taste drücken, während
Ihr Finger auf dem Touch-Pad ist, können Sie
den Finger wegnehmen, und der Effekt wird
fortgesetzt, als sei der Finger immer noch an
der gleichen Stelle auf dem Touch-Pad wie
Page 58

beim Drücken der HOLD-Taste. Die PadLEDs leuchten in dieser Position weiter.
Mute-Funktion
Wenn Sie die MUTE-Taste gedrückt halten,
wird das Eingangssignal momentan unterbrochen, aber das betreffende Signal spielt
weiter.
Transformer-Effekt
Durch schnelles Antippen der MUTE-Taste
können Sie rhythmische Effekte von einem
kontinuierlichen Audioeingang erzeugen,
wie in der „Transformer“-Technik, wie sie
von DJs eingesetzt wird.
FX RELEASE
Was ist FX RELEASE?
Den Übergang von einem sehr hartkantigen
Effekt zum ursprünglichen, nichtbeeinflussten Signal herzustellen, kann häufig zu abrupten oder plötzlichen Wirkungen führen.
Mit FX RELEASE wird in dem Moment, wo
Sie die Hand vom Touch-Pad nehmen (d.h. in
dem Moment, wo Sie den Effekt ausschalten),
ein mit der aktuellen Taktzahl synchronisierter Delay-Effekt angelegt, der dann langsam
abklingt. Dies erlaubt einen glatten und musikalischen Übergang von einem aggressiven
Effekt wie Distortion oder Decimator zurück
zum „thru"-Zustand.
Speichern der Einstellung von FX
RELEASE
Sie können eine unterschiedliche Einstellung
von FX RELEASE für jedes Programm speichern.
1. Zum Einstellen der Tiefe des FX RELEASEEffekts für das aktuell gewählte Programm
halten Sie die SHIFT-Taste gedrückt und verwenden den FX RELEASE-Schieberegler.
2. Drücken Sie die WRITE-Taste. Die WRITETaste und die PROGRAM MEMORY-Taste
blinken. Die SHIFT-Taste leuchtet und fungiert als EXIT-Taste.
3. Drücken Sie die WRITE-Taste erneut. Das
Programm wird geschrieben, und der KP3
schaltet auf normalen Betrieb zurück.
HINWEIS: Wenn Sie ein Effektprogramm gewählt haben, das bereits Delay verwendet, wird die
FX Rlease-Funktion nicht verwendet, aber der
Delay-Sound innerhalb des Effektprogramms verbleibt an dem Moment, wo Sie Ihren Finger vom
Touch-Pad nehmen und produziert einen ähnlichen Effekt.
Pad Motion (Pad-Bewegung)
Pad Motion erlaubt Ihnen, Abfolgen von Fingerbewegungen auf dem Touch-Pad zu erfassen. Dadurch können Sie die gleichen komplizierten Bewegungen so oft wie gewünscht
genau wiederholen. Außerdem bieten die
Pad-LEDs eine Sichtanzeige der Bewegung.
Sie könnnen sogar Pad Motion-Aufnahme als
Teil des Programmspeichers speichern. (S. 61)
Eine Pad Motion aufnehmen
Die PAD MOTION-Taste gedrückt halten. Sobald Ihr Finger auf dem Touch-Pad ist, beginnt die PAD MOTION-Taste zu blinken
und zeigt an, dass die Pad-Bewegung aufgezeichnet wird. Zum Stoppen der Aufnahme
lassen Sie die Taste PAD MOTION los, und
die Motion-Wiedergabe beginnt. Pad Motion
wird nur einige Sekunden lang aufgezeichnet, so dass wenn die Pad Motion-Taste zu
blinken aufhört und stetig rot leuchtet, die
Aufnahme gestoppt hat und die Wiedergabe
sofort beginnt. Zum Stoppen der Pad-Motion-Wiedergabe berühren Sie die Taste PAD
MOTION erneut. Die Taste erlischt (unbeleuchtet).
HINWEIS:
die vorher aufgezeichnete Motion überschrieben.
Wiedergabe einer Pad Motion
Drücken Sie die Taste PAD MOTION; die Taste leuchtet auf, und die Pad Motion beginnt
als Loop zu spielen. Die Pad-LEDs zeigen die
aufgenommene Bewegung an. Wenn Sie die
Taste PAD MOTION erneut drücken, erlischt
die Taste, und die Wiedergabe stoppt.
Reverse-Wiedergabe
Wenn Sie die SHIFT-Taste gedrückt halten
und die Taste PAD MOTION (REVERSE)
drücken, wird Pad Motion in Reverse-Richtung abgespielt. Sie können diesen Vorgang
wiederholen, um zwischen folgenden Einstellungen umzuschalten:
Wenn Sie die Aufnahme begiinnen, wird
59
Page 59

„Reverse-Wiedergabe“ ➝ „Vorwärts-Wiedergabe“ ➝ „Reverse-Wiedergabe“ .
Speichern einer Pad Motion
Zum Speichern der gerade aufgezeichneten
Pad Motion schreiben (oder überschreiben)
des aktuellen Programms in den Programmspeicher (->S. 61)
Festlegen der Taktzahl (BPM)
Was bedeutet BPM?
Die Taktzahl (BPM, Beats per Minute) drückt
das Tempo eines Stücks als Anzahl der Taktschläge (Viertelnoten) pro Minute aus. Je höher der BPM-Wert, desto schneller das Tempo.
Betrachten der Taktzahl
Beim Einschalten des KP3 ist die Taktzahl auf
120,0 eingestellt.
Wenn das Display das aktuelle Programm
zeigt, drücken Sie den PROGRAM/BPMKnopf zum Umschalten auf BPM-Anzeige.
HINWEIS: Wenn der Taktgeber auf externe Synchronisation gestellt ist, erscheint „Ext“ im Display, und Sie können nicht den Taktzahl-Wert festlegen.
Manuelles Festlegen der
Taktzahl (BPM)
1. Wenn das Display das aktuelle Programm
zeigt, drücken Sie den PROGRAM/BPMKnopf zum Umschalten auf BPM-Anzeige.
2. Stellen Sie mit dem PROGRAM/BPMKnopf den BPM-Wert in Schritten von 0, 1 ein.
Durch Drehen des PROGRAM/BPM-Knopfes bei gleichzeitigem Gedrückthalten der
SHIFT-Taste können Sie den Integer-Teil des
Werts in Schritten von 1 einstellen.
HINWEIS: Die Funktion Auto BPM wird automatisch ausgeschaltet.
Verwendung von Tap Tempo
zum Festlegen der Taktzahl
Wenn Sie die Taktzahl eines Stücks nicht kennen, können Sie die Taktzahl durch Drücken
60
der TAP/RANGE-Taste im Rhythmus mit
dem Takt eines Stücks einstellen.
1. Drücken Sie die TAP/RANGE-Taste dreimal oder öfter im Rhythmus mit dem Takt eines Stücks. Der KP3 erkennt den Intervall, in
dem die Taste get wird, der entsprechende
Taktzahlwert erscheint im Display, und dieser
Taktzahlwert wird eingestellt.
Automatische TaktzahlErkennung
Der KP3 kann den Taktzahlwert automatisch
durch Erkennung des Takts des Stücks einstellen. Wenn die Taktzahl sich ändert, ändert
sich der Taktzahlwert des KP3 synchron damit.
1. Drücken Sie die Taste AUTO BPM, um die
automatische Taktzahlerkennung einzuschalten.
2. Die Taste AUTO BPM leuchtet auf, und die
Taktzahl der anliegenden Audioquelle wird
automatisch ermittelt.
Wenn der KP3 nicht die Taktzahl
ermitteln kann
Drücken Sie die TAP/RANGE-Taste mehrmals entsprechend dem Takt des Stücks; der
KP3 ermittelt automatisch die Taktzahl mit
dem manuell eingetrommelten Takt als Richtlinie.
Aufgrund der Weise, wie die automatische
Taktzahl-Funktion arbeitet, kann fälschlich
ein Wert ermittelt werden, der 1/2 oder 2/3
des korrekten Taktzahlwerts ist, oder es können kleine Abweichungen auftreten. In solchen Fällen können Sie die Taste TAP/RANGE verwenden, um Korrekturen vorzunehmen. Wenn Sie die Taste TAP/RANGE drükken, während die automatisch Taktzahl-Erkennung aktiv ist, wird der durch Antrommeln festgelegte Wert der Mittenwert des
Taktzahlbereichs.
HINWEIS: Es ist nicht möglich, den TaktzahlWert von Musik zu ermitteln, die keinen deutlichen Takt aufweist. Der Taktzahl-Erkennungsbereich beträgt 80 bis 160.
Festlegen des Anfangs des Taktes
Während Auto-BPM-Erkennung automatisch
das Tempo erfassen kann, können Sie manu-
Page 60

ell zurücksetzen, welcher Taktschlag als Start
des Taktes gezählt wird. Halten Sie die
SHIFT-Taste gedrückt und drücken Sie die
TAP/RANGE (ALIGN)-Taste; dieser Moment wird als Anfang eines Taktes festgelegt.
Die Taste blinkt in Grün am Anfang des Taktschlags. (Dies ist für 4/4 festgelegt; Grün>
Rot> Rot> Rot)
HINWEIS: Diese Einstellung richtet auch den
Anfang jedes Samples neu aus.
Ausschalten von Auto BPM
Drücken Sie die Taste AUTO BPM, so dass die
Taste erlischt. Die Funktion AUTO BPM
schaltet aus, und der aktuelle Taktzahl-Wert
wird festgelegt.
MIDI Sync-Funktion
Die Taktzahl des KP3 kann über MIDI ClockMeldungen von einem externen MIDI-Gerät
synchronisiert werden. Verbinden Sie den
[MIDI OUT]-Anschluss des externen MIDI-Geräts (wie auf Senden von MIDI-Zeittaktmeldungen eingestelltem Sequenzer) mit dem
[MIDI IN]-Eingang des KP3.
HINWEIS: Diese Funktion synchronisiert nicht
Sequenzdaten mit den Rhythmusmusterprogramen des KP3. Wenn Sie Sequenzdaten und die
internen Rhythmusmuster des KP3 synchronisieren wollen, müssen Sie entweder eine Touch-PadMeldung jedem Wert in Ihren Sequenzdaten eine
voranstellen, oder zu Beginn des Satzes das TouchPad des KP3 berühren, um die Satzstruktur zu
aktivieren.
HINWEIS: Wenn Sie mit dem KP3 Timing Clockund „Touch Pad On“ -Meldungen empfangen
möchten, wechseln Sie in den MIDI-Einstellungen
(S. 69), und nehmen Sie die erforderlichen Einstellungen wie unter „Filtereinstellungen für MIDIMeldungen“ (S. 70) beschrieben vor.
HINWEIS: Sie können nicht die Funktionen Tap
Tempo oder Auto BPM verwenden, während der
KP3 Timing Clock von einem externen MIDI-Gerät empfängt.
Speichern von Einstellungen
in einem PROGRAM
MEMORY
Die Tasten PROGRAM MEMORY erlauben
es, Ihre acht bevorzugten Programme und
Einstellungen im KP3 zu speichern und jederzeit abzurufen.
Die folgenden Daten werden
gespeichert:
• Effektprogramm
• Einstellung des FX/DEPTH-Knopfes
• Pad Motion (Pad-Bewegung)
• Der Ein/Aus-Status der [HOLD]-Taste und
ihre Position (Koordinaten)
Speichern
1. Drücken Sie die WRITE-Taste. Die Tasten
PROGRAM MEMORY und die Taste WRITE
blinken.
2. Drücken Sie die PROGRAM MEMORY-Taste, unter der Sie die Einstellungen speichern
wollen. Die gedrückte Taste blinkt, das Display zeigt „WRT“ an, und die Einstellungen
werden in den Speicher geschrieben. Wenn
der Schreibvorgang beendet ist, schaltet der
KP3 auf normalen Status zurück.
Abrufen
1. Drücken Sie eine der Tasten PROGRAM
MEMORY 1-8; die an dieserm Speicherplatz
abgelegten Einstellungen werden abgerufen.
Sampling
Der KP3 kann sowohl Loop-Phrases als auch
One-Shot-Samples von einer externen Quelle
aufnehmen. Der KP3 kann auch Resampling
ausführen; dadurch können Sie externe Audioquellen durch die internen Effekte samplen oder den gesamten Ausgang vom KP3 als
neues Sample festhalten.
Loop-Samples können bis zu vier Takte (16
Taktschläge) lang sein, bei der aktuellen Taktzahl wenn Sie die Aufnahme beginnen (bei einem Tempo von 140 würden 16 Taktschläge
z.B. 7 Sekunden sein).
Bei einem Tempowert von 73 oder weniger ist
die maximale Zahl von Taktschlägen, die gesampelt werden kann, 8. Bei einem Tempowert von 39 oder weniger ist die maximale
Zahl von Taktschlägen, die gesampelt werden kann, 4. Bei einem Loop-Sample können
Sie eine Taktschlaglänge von 16, 8, 4, 2 oder 1
festlegen.
61
Page 61

Wenn ein Loop-Sample erzeugt wird, beginnt
es zu spielen, sobald es aufgenommen ist (die
entsprechende Taste SAMPLE BANK leuchtet orangefarben).
Sampling
1. Drücken Sie die Taste SAMPLING. In diesem Samplingbereit-Modus blinken die Tasten SAMPLE BANK rot, und das Display
zeigt „[16]“ an (der Vorgabewert ist 16 Taktschläge). Zum Beenden ohne Sampling drükken Sie die SHIFT-Taste.
HINWEIS: Die automatische Taktzahlfunktion
wird automatisch ausgeschaltet.
2. Verwenden Sie den PROGRAM/BPMKnopf zum Festlegen der Samplinglänge (in
Taktschlägen). Das Display schaltet entsprechend zwischen [16], [8], [4], [2] oder [1] um.
3. Wenn Sie aufnahmebereit sind, drücken Sie
dine der blinkenden SAMPLE BANK-Tasten
— A, B, C oder D. Die gewählte SAMPLE
BANK-Taste blinkt grün, das Display zeigt
„REC“ an, und das Sampling beginnt.
Die Tasten PROGRAM MEMORY blinken
aufeinanderfolgend, um den aufgenommenen Taktschlag anzuzeigen.
4. Wenn Sie ein One-Shot-Sample aufnehmen
wollen, drücken Sie die gleiche SAMPLE
BANK-Taste, bevor der festgelegte BEAT erreicht ist. Das Sampling endet, und ein OneShot-Sample wird erzeugt. Die zur Aufnahme verwendete SAMPLE BANK-Taste leuchtet rot. Es ist leichter, ein One-Shot-Sample
aufzuzeichnen, wenn Sie eine längere Einstellung wie „16“ festlegen.
5. Wenn eine festgelegte BEAT-Zeit vergeht,
bevor Sie die SAMPLE BANK-Taste drücken,
endet das Sampling, und ein Loop-Sample
wird erzeugt. Der KP3 schaltet automatisch
auf Wiedergabe, und die SAMPLE BANK-Taste leuchtet orangefarben auf.
HINWEIS: Die vorher in der gewählten SAMPLE
BANK-Taste vorhendenen Daten werden überschrieben.
Wiedergabe von Samples
Die SAMPLE BANK-Tasten leuchten grün,
wenn sie ein Loop-Sample enthalten oder rot,
62
wenn sie ein One-Shot-Sample enthalten. Tasten, die keine Sample-Daten enthalten, bleiben dunkel. Wenn Sie eine Taste drücken, die
ein Loop-Sample enthält, startet die LoopWiedergabe. Die Taste leuchtet bei der Wiedergabe orangefarben. Drücken Sie die Taste
erneut, um die Wiedergabe zu stoppen.
Wenn Sie eine Taste drücken, die ein OneShot-Sample enthält, erlischt die Taste momentan, und das One-Shot-Sample spielt ab.
HINWEIS: Wenn ein Sample-Effekt für das Programm gewählt ist, beginnt die Wiedergabe, wenn
Sie das Touch-Pad nach dem Wählen einer
SAMPLE BANK-Taste berühren.
Sample-Wiedergabepegel
Wenn Sie die Sample-Wiedergabelautstärke
für alle Banken einstellen wollen, verwenden
Sie den den Pegel-Schieberegler.
Einstellen des Pegels für eine einzelne
Sample Bank
1. Halten Sie die SHIFT-Taste gedrückt und
drücken Sie die gewünschte SAMPLE
BANK-Taste; die Taste blinkt grün.
2. Die Pad-LEDs entsprechend zur gewählten
Bank (d.h. über der Taste) zeigen eine Balkengrafik an, und die LEDs über den restlichen
Banken zeigen ihre jeweiligen Pegelpunkte
an.
3. Berühren Sie das Pad zum Einstellen des
Wiedergabepegels des Samples der Bank.
Bearbeiten von
Wiedergabeeinstellungn für
Loop-Samples
Zum Bearbeiten der Wiedergabe-Einstellungen für ein Loop-Sample halten Sie die
SHIFT-Taste get und drücken eine SAMPLE
Page 62

BANK-Taste, die ein Loop-Sample wird enthält.
HINWEIS: Wenn Sie eine SAMPLE BANK-Taste
drücken, die ein One-Shot-Sample enthält, können
Sie nicht in der Lage sein, andere Einstellungen als
den Pegel zu bearbeiten.
Startpunkt-Einstellung
1. Die SHIFT-Taste leuchtet, und die festgelegte SAMPLE BANK-Taste wechselt auf grünes Blinken um. Das Display zeigt die LoopStartpunkt-Einstellung an.
2. Stellen Sie mit dem PROGRAM/BPMKnopf den Startpunkt in Schritten von 1/32
eines Taktschlags über einen Bereich von 1
Taktschlag ein.
Slice-Einstellung
Loop-Samples können in gleiche Teile zerschnitten werden. Sie können wählen, ob jeder abgeschnittene Part spielen soll oder
nicht. Abgeschnittene Parts, die nicht abgespielt werden, werden übersprungen, so dass
in diesem Fall die Gesamtlänge des Loops abnimmt. Dies erlaubt es Ihnen, eine Reihe neuer rhythmischer Figuren und Loops aus den
gleichen Originaldaten zu erzeugen. Zum
Beispiel durch Spielen von nur den ersten
zwei und den letzten zwei Taktschlägen eines
Samples aus vier Takten kann ein Loop mit
einem Takt erzeugt werden.
1. Die SHIFT-Taste leuchtet, und die festgelegte SAMPLE BANK-Taste wechselt auf grünes Blinken um.
2. Alle acht bevorzugten PROGRAM MEMORY-Tasten leuchten (als Vorgabe). Durch
Drücken der entsprechenden Taste können
Sie jede Sample-Slice ein- und ausschalten.
können Resampling ausführen, um sowohl
Loop- und als auch One-Shot-Samples erzeugen. Beachten Sie, dass beim Resampling der
Ausgang vom KP3 aufgenommen wird, also
alle mit dem Touch-Pad erzeugen Effekte
werden als Teil der Sample-Daten aufgenommen.
1. Halten Sie die SHIFT-Taste gedrückt und
drücken Sie die SAMPLING-Taste.
2. Die SAMPLE BANK-Tasten blinken orangefarben, und der KP3 ist im Aufnahmebereit-Modus.
3. Von hier ab folgen Sie den gleichen Anweisungen für Loop- und One-Shot-Sampling
wie im vorhergehenden Abschnitt.
HINWEIS: Wenn Sie eine SAMPLE BANK-Taste
drücken, stoppt die Wiedergabe der zu dieser
BANK-Taste zugewiesenen Daten, und sie werden
überschrieben.
Resampling
Mit Resampling können Sie ein Sample erzeugen, das mehrere vorhandene Samples
kombiniert, oder ein neues Sample von einem
mit Effekt bearbeiteten Sample erzeugen. Sie
63
Page 63

Funktionseinstellungen
Wenn die SHIFT-Taste gedrückt gehalten
wird und eine der Tasten PROGRAM MEMORY 1–8 gedrückt wird, können Sie verschiedene Funktionen ausführen, wie Formatieren einer Karte oder Speichern/Laden von
Samples. Verfahren Sie wie folgt, und auf
Funktionseinstellungen zuzugreifen und ihre
verschiedenen Parameter zu bearbeiten.
1. Halten Sie die SHIFT-Taste gedrückt und
drücken Sie eine der Tasten PROGRAM MEMORY 1–8.
2. Wählen Sie mit dem PROGRAM/BPMKnopf ein Zusatzparameter aus.
3. Drücken Sie den PROGRAM/BPM-Knopf
zum Betrachten der Wertoptionen für den Parameter.
4. Wählen Sie mit dem PROGRAM/BPMKnopf einen Wert aus.
5. Drücken Sie die Taste TAP/RANGE (leuchtet orangefarben), um zur Parameterliste zurückzuschalten. Wiederholen Sie Schritt 2-5,
um weitere Parameter zu bearbeiten.
6. An dieser Stelle können Sie entweder die
WRITE-Taste (blinkt) drücken, um die vorgenommenen Änderungen zu speichern, oder
Sie können die SHIFT-Taste drücken, um den
Vo rgang ohne Speichern zu beenden.
HINWEIS: Während die TAP/RANGE-Taste
orangefarben leuchtet, können Sie die TAP/RANGE-Taste drücken, um zur Vorseite zurückzuschalten.
Über die einzelnen Funktionen
[1] CARD
Info: Zeigt die Gesamtkapazität der SD-Karte
an.
Free: Zeigt die Restkapazität der SD-Karte an.
Form: Formatiert die SD-Karte.
[2] LOAD
Lädt Daten von der SD-Karte in den KP3.
[3] SAVE
Speichert Daten vom KP3 auf die SD-Karte.
[4] MIDI FILTER
Legt die MIDI-Clock-Einstellung und MIDI-
64
Meldung-Filterung fest.
[5] MESSAGE
Legt den Kanal fest, auf dem MIDI-Meldungen gesendet/empfangen werden, und weist
eine Steueränderung zu jedem Controller zu.
Sie können Notennummern für die SAMPLE
BANK-Tasten festlegen.
GLCH (Globaler Kanal)
SAMPA, B, C, D (Sample Bank-Tasten)
PAD X, PAD Y, PAD T (Pad-Touch)
FX.DP (FX-Tiefe-Knopf)
SLDR (Pegel/FX RELEASE-Schieberegler)
HOLD (HOLD-Taste)
[6] PAD LED
Prog: Schaltet die Funktion ein/aus, die den
Programmnamen im Touch-Pad-LED anzeigt, wenn eine Programmnamenänderung
auftritt.
ILLU: Legt die Beleuchtung in der Pad-LED
fest, wenn eine bestimmte Zeit vergangen ist,
seit Sie die Hand vom Touch-Pad genommen
haben.
„oFF“ Die Beleuchtung ist ausgeschaltet.
„ChAr“ Eine Zeichenfolge wird durchgescrollt. Sie können jetzt mit der mitgelieferten
Editor-Software die Textfolge bearbeiten.
„TYP.1–8“ Die Beleuchtung geschieht in einer Reihe verschiedener Muster.
„TYP.C“ Die Beleuchtungsmuster TYP.1
bis TYP.8 werden automatisch umgeschaltet.
HINWEIS: Die Beleuchtung arbeitet nicht, wenn
„Hold“ aktiv ist oder wenn Sie Funktionseinstellungen vornehmen.
Scrl: Legt die Geschwindigkeit fest, mit der
der Text durchscrollt.
Die Einstellung bestimmt die Geschwindigkeit, mit der die Pad-LED durchscrollt.
Sie können zwischen den Geschwindigkeiten
Langsam, Mittel oder Schnell wählen.
HINWEIS: Sie können nicht das Tempo der
Beleuchtungsanzeige ändern.
[7] USB
Sie können den KP3 an Ihren Computer anschließen und die Inhalte der eingesetzten
Karte über USB lesen/schreiben. Einzelheiten
siehe „Anschließen eines Computers".
[8] EXT.CTRL
Page 64

Dies erlaubt es Ihnen, den KP3 als MIDI-Controller einzusetzen. Die Effekte arbeiten nicht
in diesem Modus.
Der KP3 sendet die MIDI-Meldungen, die Sie
jedem Controller mit dem mitgelieferten PCEditor zugewiesen haben. Beim Touch-Pad
können Sie unter acht verschiedenen Zuweisungsmustern für MIDI-Meldungen wählen.
Sie können MIDI-Meldungen zu den folgenden Controllern zuweisen: PROGRAM/
BPM-Knopf, PROGRAM MEMORY 1–8,
SAMPLE BANK A–D, FX DEPTH, LEVEL
SLIDER, PAD (X, Y, TOUCH) und HOLD.
HINWEIS: Verwenden Sie die SHIFT-Taste zum
Beenden von EXT.CTRL.
SD-Karte
Sie können ein SD-Karte zum Speichern oder
Laden von Daten in den bzw. aus dem internen Speichern des KP3 verwenden. Sie können auch Samples (WAV-Dateien oder AIFFDateien), die auf einem Computer erstellt
wurden, in den KP3 laden.
HINWEIS: Bevor Sie die SD-Karte verwenden
können, müssen Sie sie auf dem KP3 formatieren.
Verwenden Sie den Computer oder die digitale
Kamera nicht zum Formatieren (Initialisieren) einer Karte, die Sie mit dem KP3 verwenden wollen.
Wenn die Karte auf einem anderen Gerät formatiert wurde, kann sie möglicherweise nicht richtig
mit dem KP3 arbeiten.
HINWEIS: Der KP3 muss vor dem Einsetzen
oder Abziehen der SD-Karte ausgeschaltet werden.
HINWEIS: Die SD-Karte wird nicht mitgeliefert.
Sie muss getrennt gekauft werden.
HINWEIS: Der KP3 unterstützt SD-Karten mit
einer Betriebsspannung von 2,7–3,6 V und Kapazitäten von 16 MB–2 GB, sowie SD-Karten mit
ID.
Umgang mit SD-Karten
. Die SD-Karte kann unmittelbar nach dem
Gebrauch heiß sein. Schalten Sie den KP3 aus
und warten Sie mit dem Abziehen, bis sich
die Karte abkühlt.
. SD-Karten sind Präzisionsteile. Sie dürfen
nicht verbogen, fallengelassen oder starken
Stößen ausgesetzt werden.
. Verwenden oder lagern Sie SD-Karten nicht
an sehr heißen oder sehr kalten Orten wie im
direkten Sonnenlicht, in geschlossenen Autos,
in der Nähe von Heizkörpern oder an Orten
mit sehr hoher Luftfeuchtigkeit oder sehr viel
Staub.
. Verwenden oder lagern Sie SD-Karten nicht
an Orten, wo sie starker statischer Elektrizität
oder elektromagnetischen Störungen ausgesetzt sind.
. Lassen Sie nicht Schmutz oder Fremdkörper
an den Kontakten einer SD-Karte anhaften.
Wenn die Kontakte verschmutzt werden, wischen Sie sie vorsichtig mit einem trockenen
Lappen ab.
. Wenn Sie die SD-Karte nicht verwenden, las-
65
Page 65

sen Sie sie in der mitgelieferten Schutzhülle,
um sie vor Beschädigung durch statische
Elektrizität zu schützen.
. Lassen Sie eine SD-Karte nicht an einem Ort,
wo sie für kleine Kinder erreichbar ist, die sie
möglicherweise in den Mund stecken und
verschlucken könnten.
. Lesen Sie die mitgelieferte Bedienungsanleitung Ihrer SD-Karte sorgfältig durch.
Über die Schreibschutz-Einstellung
einer SD-Karte
SD-Karten haben einen Schreibschutzschalter, der versehentliches Überschreiben der
Daten verhindert. Wenn Sie den Kartenschalter auf Geschützt-Stellung stellen, wird das
Schreiben oder Löschen von Daten auf der
Karte, ebenso wie das Formatieren unmöglich. Wenn Sie den Kartenschalter auf Geschützt-Stellung stellen, wird das Schreiben
oder Löschen von Daten auf der Karte, ebenso wie das Formatieren, verhindert.
Schreibschutzschalter
Geschützt
Einsetzen/Wechseln von Karten
Einsetzen einer Karte
Setzen Sie die Karte ein und stellen sicher,
dass sie richtig ausgerichtet ist. Die Goldkontakte müssen nach unten weisen, und die abgewinkelte Ecke nach rechts.
Abnehmen einer Karte
Drücken Sie die Karte nach innen und lassen
Sie sie los, und die Karte springt heraus.
HINWEIS:
können, müssen Sie sie auf dem KP3 formatieren.
Wenn die Karte auf einem anderen Gerät formatiert
wurde, kann sie möglicherweise nicht arbeiten.
Bevor Sie eine SD-Karte verwenden
Verwendung von SDSpeicherkarten
Prüfen der Gesamtkapazität
der Karte
1. Halten Sie die SHIFT-Taste gedrückt und
drücken Sie die Taste PROGRAM MEMORY
1 (CARD).
2. Wählen Sie mit dem PROGRAM/BPMKnopf „InFo“ (Kartenkapazität).
3. Drücken Sie den PROGRAM/BPM-Knopf
zum Betrachten der Gesamtkapazität der
Karte. Drücken Sie die Taste TAP/RANGE
(leuchtet orangefarben), um zur Wahl eines
anderen Parameters zu gehen, und drücken
Sie die SHIFT-Taste, um zum Normalbetrieb
zurückzugehen.
Prüfen der Restkapazität der
Karte
1. Halten Sie die SHIFT-Taste gedrückt und
drücken Sie die Taste PROGRAM MEMORY
1 (CARD).
2. Wählen Sie mit dem PROGRAM/BPMKnopf „FrEE“ (restliche Kartenkapazität).
66
SD-Karte
SD-Kartensteckplatz
3. Drücken Sie den PROGRAM/BPM-Knopf
zum Betrachten der Restkapazität der Karte.
Drücken Sie die Taste TAP/RANGE (leuchtet
orangefarben), um zur Wahl eines anderen
Parameters zu gehen, und drücken Sie die
SHIFT-Taste, um zum Normalbetrieb zurückzugehen.
Page 66

Formatieren der Karte
1. Halten Sie die SHIFT-Taste gedrückt und
drücken Sie die Taste PROGRAM MEMORY
1.
2. Wählen Sie mit dem PROGRAM/BPMKnopf „ForM".
3. Drücken Sie den [PROGRAM/BPM]Knopf; das Display zeigt „NO“ an.
4. Wählen Sie mit dem [PROGRAM/BPM]Knopf „yes“ und drücken den PROGRAM/
BPM-Knopf zum Formatieren der Karte.
Wenn die Formatierung beendet ist, zeigt das
Display „End“ an.
Drücken Sie die Taste TAP/RANGE (leuchtet
orangefarben), um zur Wahl eines anderen
Parameters zu gehen, und drücken Sie die
SHIFT-Taste, um zum Normalbetrieb zurückzugehen.
HINWEIS: Der gesamte Inhalt der Karte geht
beim Formatieren verloren. Wenn der KP3 nicht in
der Lage war, die Karte zu formatieren, zeigt das
Display „Err“ (Error) an.
HINWEIS: Verwenden Sie den Computer oder die
digitale Kamera nicht zum Formatieren (Initialisieren) einer Karte, die Sie mit dem KP3 verwenden wollen. Sie müssen den KP3 zum Formatieren
verwenden. Wenn die Karte auf einem anderen Gerät formatiert wurde, kann sie möglicherweise
nicht richtig mit dem KP3 arbeiten.
Speichern auf Karte
Sie können Sample-Daten, Programmspeicher, globale Einstellungen oder alle Einstellungen auf Karte speichern.
1. Halten Sie die SHIFT-Taste gedrückt und
drücken Sie die Taste PROGRAM MEMORY
3 (SAVE).
2. Wählen Sie mit dem PROGRAM/BPMKnopf den zu speichernden Datentyp.
"SMP.A“ – “ SMP.D”: Sample-Daten
"ProG": Inhalte des Programmspeichers
"ALL": Alle Dateien
"GLOb": Globaleinstellung-Datei
3. Drücken Sie den PROGRAM/BPM-Knopf;
die zum Speichern verfügbaren Dateinummern
erscheinen; 00–99 für jede der Sample Bank-Tasten, 00–09 für alle anderen Datentypen.
Wählen Sie mit dem PROGRAM/BPM-Knopf
die zu Speichern gewünschte Nummer.
„-01-“: Die gewählte Dateinummer ist leer.
„[01] “: Die gewählte Dateinummer (in diesem Fall „01“) enthält bereits Daten und wird
mit den jetzt gespeicherten Daten ersetzt
(überschrieben).
„[-] “: Es gibt eine identisch benannte Datei
oder einen Ordner, der nicht beschrieben werden kann.
4. Drücken Sie den PROGRAM/BPM-Knopf,
und verwenden Sie dann den PROGRAM/
BPM-Knopf zum Wählen von „yes“ und
drücken Sie den PROGRAM/BPM-Knof zum
Ausführen des Speichervorgangs. Wenn der
Speichervorgang beendet ist, zeigt das Display „End“ an.
Drücken Sie die SHIFT-Taste, um zum Normalbetrieb zurückzuschalten.
HINWEIS: Sie können nicht speichern, wenn die
SD-Karte nicht geschützt ist. Schalten Sie niemals
den Strom aus oder entfernen Sie die SD-Karte
während des Speicherns oder Formatierens. Dadurch kann die SD-Karte unbrauchbar werden.
Laden von der Karte
So laden Sie die vorher gespeicherten Daten
von der Karte.
1. Halten Sie die SHIFT-Taste gedrückt und
drücken Sie die Taste PROGRAM MEMORY
2 (LOAD).
2. Wählen Sie mit dem PROGRAM/BPMKnopf den zu laden gewünschten Datentyp.
„SMP.A“-„SMP.D“: Sample-Daten
„Snd.A“-“ Snd.D“: WAVE, AIFF
„ProG“: Inhalte des Programmspeichers
„ALL“: Alle Dateien
„GLOb“: Globaleinstellung-Datei
3. Drehen Sie den PROGRAM/BPM-Knopf,
um die Dateinummern zu sehen, die zum Laden zur Verfügung stehen; 00–99 für jede der
Sample Bank-Tasten, 00–09 für alle anderen
Datentypen.
Wählen Sie mit dem PROGRAM/BPMKnopf die zu Laden gewünschte Dateinummer.
67
Page 67

Wenn Sie eine WAVE-Datei oder AIFF-Datei
laden, wählen Sie die gewünschte Datei.
HINWEIS: Bei WAVE-Dateien oder AIFF-Dateien erkennt der KP3 nur die Dateinamen, die aus
zweistelligen Zahlen plus Dateierweiterung bestehen, wie „00.wav“ oder „99.aif”. Wenn .wav- und
.aiff-Dateien mit gleichen zweistelligen Nummern
vorhanden sind, hat die WAVE-Datei Priorität.
HINWEIS: WAVE-Dateien und AIFF-Dateien
werden als Loop-Samples geladen. Sie können ein
Loop-Sample resampeln und als One-Shot-Sample
aufnehmen, indem Sie die Aufnahme stoppen, bevor sie automatisch stoppt. Sie können dann den
One-Shot-Loop als KP3-Sample speichern und
immer als One-Shot-Sample verwenden.
4. Wählen Sie mit dem PROGRAM/BPMKnopf „yes". Drücken Sie den PROGRAM/
BPM-Knopf zum Laden der Daten. Wenn der
Ladevorgang beendet ist, zeigt das Display
„End“ an.
Drücken Sie die SHIFT-Taste, um zum Normalbetrieb zurückzuschalten.
MIDI-Funktionen
Was bedeutet MIDI?
MIDI steht für „Musical Instrument Digital
Interface“ (Digitale Schnittstelle für Musikinstrumente) und ist ein weltweit verbreiteter
Standard für den Austausch von leistungsbezogener Information zwischen elektronischen Musikinstrumenten und Computern.
Informationen zur MIDIImplementierungstabelle
Im Benutzerhandbuch von MIDI-Geräten ist
stets eine “ MIDI-Implementierungstabelle“
enthalten.
Diese Tabelle erlaubt es Ihnen, die Typen von
MIDI-Meldungen zu prüfen, die gesendet
und empfangen werden können.
Wenn Sie zwei (oder mehr) MIDI-Geräte miteinander verbinden, können Sie anhand der
Implementierungstabellen überprüfen, welche Typen von MIDI-Meldungen unter den
Geräten ausgetauscht werden können.
* Einzelheiten zur MIDI-Funktionalität sind im
separaten Dokument zur MIDI-Implementierung
vorhanden. Zum Erhalt der MIDI-Implementation wenden Sie sich an Ihren Korg-Fachhändler.
MIDI-Anschlüsse
Im Fachhandel erhältliche MIDI-Kabel dienen zum Senden und Empfangen von MIDIMeldungen. Verbinden Sie mit diesen Kabeln
die MIDI-Anschlüsse am KP3 mit den MIDIAnschlüssen des externen MIDI-Geräts, mit
dem Daten ausgetauscht werden sollen.
MIDI IN-Anschluss: Dieser Anschluss empfängt MIDI-Meldungen von einem anderen
MIDI-Gerät. Verbinden Sie ihn mit dem MIDI
OUT-Anschluss des externen Geräts.
MIDI OUT-Anschluss: Dieser Anschluss gibt
die Meldungen vom KP3 aus. Verbinden Sie
ihn mit dem MIDI IN-Anschluss des externen
Geräts.
HINWEIS: Wenn den USB-Stecker an Ihren
Computer anschließen und den USB MIDI-Treiber
installieren, werden die gleichen MIDI-Meldungen über die USB-Verbindung gesendet und empfangen wie über die MIDI-Stecker.
68
Page 68

Verwendung des KP3 als
Effektprozessor unter MIDI-Steuerung
LINE IN MIDI INMIDI OUTOUTPUT
KORG ELECTRIBE MX
Verwendung des KP3 als MIDIController (EXT CTRL-Modus)
MIDI INMIDI OUT
KORG ELECTRIBE MX
MIDI-Einstellungen
Außer als Effektgerät können Sie den KP3
auch zum Senden von MIDI-Meldungen vom
KP3 zur Verwendung als Echtzeit-Controller
für einen Synthesizer oder ein anderes externes MIDI-Gerät verwenden.
Sie können auch den KP3 an einen MIDI-Sequenzer anschließen und die MIDI-Meldungen aufnehmen, die beim Bedienen des
Touch-Pads ausgegeben werden. Durch Wiedergabe der aufgenommenen MIDI-Meldungen können Sie Ihre Touch-Pad-Bedienung
reproduzieren.
Ändern des MIDI-Kanals
1. Halten Sie die SHIFT-Taste gedrückt und
drücken Sie die Taste PROGRAM MEMORY
5 (MESSAGE).
2. Wählen Sie mit dem PROGRAM/BPMKnopf „GL.Ch“ und drücken den PROGRAM/BPM-Knopf. Der aktuell festgelegte
MIDI-Kanal wird gezeigt.
3. Ändern Sie mit dem PROGRAM/BPMKnopf den MIDI-Kanal.
4. Drücken Sie die Taste TAP/RANGE (leuchtet orangefargen), um zur MESSAGE-Parameterliste zurückzuschalten.
5. An dieser Stelle können Sie entweder die
WRITE-Taste (blinkt) drücken, um die vorgenommenen Änderungen zu speichern, oder
Sie können die SHIFT-Taste drücken, um den
Vo rgang ohne Speichern zu beenden.
Informationen zu MIDI-Kanälen
Um Information getrennt zu mehreren MIDIGeräten über ein einziges MIDI-Kabel zu
übertragen, verwendet MIDI 16 Kanäle (1–
16). Wenn das Gerät, das die Daten versendet,
auf MIDI-Kanal „1“ gesetzt ist, werden die
MIDI-Meldungen nicht empfangen, sofern
das empfangende Gerät nicht ebenfalls auf
MIDI-Kanal „1“ gesetzt ist.
Ändern der
Steueränderungsnummern oder
Notennummern
1. Halten Sie die SHIFT-Taste gedrückt und
drücken Sie die Taste PROGRAM MEMORY
5 (MESSAGE).
2. Wählen Sie mit dem PROGRAM/BPMKnopf den Controller, dessen Einstellung gespeichert werden soll.
Pad X, Pad Y, PAD Touch, Fx Depth, Slider,
HOLD und MUTE senden/empfangen Steueränderungsmeldungen. Die Sample A–D
Pads senden/empfangen Notenmeldungen.
3. Stellen Sie mit dem PROGRAM/BPMKnopf eine Steueränderungsnummer oder
Notennummer in einem Bereich von 0–127
ein.
Wenn Sie eine Steuernummer wählen, die bereits zu einem anderen Controller zugewiesen ist, leuchtet der Dezimalpunkt. Wenn Sie
diesen Wert zuweisen, sendet und empfängt
der entsprechende Controller die gleichen
Steueränderungsmeldungen wie der andere
Controller.
4. Drücken Sie die Taste TAP/RANGE (leuchtet orangefarben), um zur MESSAGE-Para-
69
Page 69

meterliste zurückzuschalten.
5. An dieser Stelle können Sie entweder die
WRITE-Taste (blinkt) drücken, um die vorgenommenen Änderungen zu speichern, oder Sie
können die SHIFT-Taste drücken, um den Vorgang ohne Speichern zu beenden.
Anpassen der MIDIMeldungsfilter-Einstellungen
1. Halten Sie die SHIFT-Taste gedrückt und
drücken Sie die Taste PROGRAM MEMORY
4 (MIDI FILTER).
Das Display zeigt die zu filternden Meldungen.
2. Wählen Sie mit dem PROGRAM/BPMKnopf die zu filternde Meldung.
Sie können die Filter-Einstellungen für
CLOCK, ProG, CC und SYS.E Senden und
Empfangen einstellen.
3. Stellen Sie mit dem PROGRAM/BPMKnopf die Aktivierung oder Deaktivierung
von Senden/Empfangen ein.
Wählen Sie entweder „diS“ (deaktivieren)
oder „EnA“ (aktivieren). Für die Clock-Einstellung wählen Sie Int, Ext, Auto.
HINWEIS: Wenn Clock auf „Ext“ gestellt ist und
Clock-Daten über sowohl MIDI als auch USB
empfangen werden, haben die Daten vom USBAnschluss Priorität.
4. Zum Speichern Ihrer Einstellungen drükken Sie die WRITE-Taste. Wenn Sie sich entscheiden, die Einstellungen nicht zu speichern, drücken Sie die SHIFT-Taste.
5. Drücken Sie die Taste TAP/RANGE (leuchtet orangefarben), um zur MESSAGE-Parameterliste zurückzuschalten.
6. An dieser Stelle können Sie entweder die
WRITE-Taste (blinkt) drücken, um die vorgenommenen Änderungen zu speichern, oder
Sie können die SHIFT-Taste drücken, um den
Vo rgang ohne Speichern zu beenden.
Zum Speichern Ihrer bearbeiteten
Einstellungen
Drücken Sie die WRITE-Taste erneut, um die
bearbeiteten MIDI-Einstellungen zu speichern. Wenn Sie die SHIFT-Taste drücken,
wird ohne Speichern auf Normalbetrieb zurückgeschaltet.
HINWEIS: Wenn Sie das Gerät ausschalten, ohne
Ihre Einstellungen zu speichern, werden diese auf
den vorherigen Zustand zurückgesetzt.
Gesendete und empfangene Meldungen
Mit den werkseitigen Einstellungen (ausgenommen EXT CTRL*) kann der KP3 die folgenden
MIDI-Meldungen senden und empfangen.
Gesendete/empfangene Daten gesendete/empfangene MIDI-Meldung
Touch-Pad X-Achse Steueränderung (Nr. 12)
Touch-Pad Y-Achse Steueränderung (Nr. 13)
Touch-Pad Ein/Aus Steueränderung (Nr. 92)
LEVEL-Schieberegler Steueränderung (Nr. 93)
FX DEPTH-Knopf Steueränderung (Nr. 94)
HOLD-Taste Steueränderung (Nr. 95)
SAMPLE BANK A-Taste Note ein/aus (Nr. 36)
SAMPLE BANK B-Taste Note ein/aus (Nr. 37)
SAMPLE BANK C-Taste Note ein/aus (Nr. 38)
SAMPLE BANK D-Taste Note ein/aus (Nr. 39)
PROGRAM/BPM-Knopf Programmwechsel (0–127)
Timing Clock
* Einzelheiten über die Meldungen wenn der KP3 im EXT CTRL-Modus ist, siehe Anleitung für KP3 Editor auf der mitgelieferten CD-ROM.
70
(werkseitige Einstellung)
Page 70

Datenaustausch zwischen
KP3 und Computer
Der KP3 ist mit einem USB-Anschluss ausgestattet, und durch direkten Anschluss an Ihren
Computer können Sie auf der Karte gespeicherte Sample-Daten und Einstellungsdateien als
Backup in den Computer übertragen.
Die USB-Verbindung erlaubt es, den KP3 als
USB-MIDI-Gerät zu verwenden, das MIDIMeldungen sendet und empfängt, ohne die
MIDI-Kabel anschließen zu müssen.
HINWEIS: Wenn Sie im USB-Modus sind, können Sie die SHIFT-Taste drücken, um auf Normalbetrieb zurückzuschalten. Wenn Sie die SHIFTTaste drücken, während der KP3 mit Ihrem Computer kommuniziert, erscheint eine Warnung, und
Sie können den USB-Modus nicht verlassen.
Verbindung über USB-Anschluss
Wenn Sie den USB-Anschluss des KP3 direkt
mit Ihrem Computer verbinden, können Sie
Ihren Computer zur Verwaltung der Karte
verwenden, die momentan im Kartensteckplatz des KP3 ist.
Führen Sie das Verfahren entsprechend dem
Betriebssystem des Computers aus.
Anwender von Windows XP
HINWEIS: Bevor Sie fortfahren, schalten Sie den
Computer ein und starten das Betriebssystem.
1. Verwenden Sie ein USB-Kabel zum Ver
den des KP3 mit Ihrem Computer.
Stecken Sie den Stecker des USB-Kabels vom
Computer in den USB-Anschluss des KP3.
Stellen Sie sicher, dass der Stecker richtig ausgerichtet ist, und stecken ihn vollständig ein.
Wenn Sie den KP3 zum ersten Mal anschließen, wird der standardmäßige WindowsTreiber automatisch installiert.
2. Der Laufwerkname der Karte im Kartensteckplatz erscheint im Computer.
3.
Halten Sie die SHIFT-Taste gedrückt und
drücken Sie die Taste PROGRAM MEMORY 7
(USB).
Im Display erscheint „USB".
Die Inhalte der Karte des KP3 sind nicht vom
Computer aus sichtbar, bevor Sie „USB Storage Mode“ ausführen.
Von diesem Punkt bis Sie Schritt 5 ausgeführt
haben, dürfen Sie nicht das USB-Kabel abtren-
bin-
nen, die Karte aus dem Steckplatz nehmen oder
Ihren Computer ein- oder ausschalten. Dadurch können die Daten beschädigt werden.
4.
Zum Betrachten der Inhalte der KP3-Karte
öffnen Sie das Laufwerk, das dem Computer in
Schritt 2 hinzugefügt wurde.
Kopieren Sie die gewünschten Daten in Ihren
Computer.
Computer auf die Karte kopieren.
5. Verlassen Sie den USB-Modus.
In Explorer oder Arbeitsplatz rechtsklicken
Sie auf das Symbol „Wechseldatenträger“
und wählen „Entfernen“ Dann drücken Sie
die SHIFT-Taste des KP3, um den USB-Modus zu verlassen.
HINWEIS: Wenn Sie bereit sind den KP3 von
Ihrem Computer abzutrennen, müssen Sie zuerst
den USB-Modus beenden und dann das USB-Kabel abziehen.
Sie können auch Daten von Ihrem
Anwender von Macintosh (Mac
OS9.0.4 oder höher, OSX 10.3.9 oder
höher)
1. Verwenden Sie ein USB-Kabel zum Verbinden des KP3 mit Ihrem Computer.
Stecken Sie den Stecker des USB-Kabels in
den USB-Anschluss des KP3. Stellen Sie sicher, dass der Stecker richtig ausgerichtet ist,
und stecken ihn vollständig ein.
Wenn Sie Mac OS9 verwenden, erscheint eine
Meldung, die anzeigt „Der erforderliche Treiber ist nicht verfügbar“, aber sie sollten einfach dieses Dialogfeld schließen, ohne den
Treiber zu installieren.
2.
Halten Sie die SHIFT-Taste gedrückt und
drücken Sie die Taste PROGRAM MEMORY 7
(USB).
Im Display erscheint „USB“.
3. Der Laufwerkname der Karte im Kartensteckplatz erscheint im Computer.
Während dieser Bildschirm erscheint, dürfen
Sie nicht das USB-Kabel, die Karte aus dem
Steckplatz nehmen oder Ihren Computer einoder ausschalten. Dadurch können die Daten
beschädigt werden.
4. Zum Betrachten der Inhalte der KP3-Karte
öffnen Sie das Laufwerk, das dem Computer
in Schritt 2 hinzugefügt wurde.
Kopieren Sie die gewünschten Daten in Ihren
Computer. Sie können auch Daten von Ihrem
Computer auf die Karte kopieren.
71
Page 71

5. Wenn Sie bereit sind, den KP3 von Ihrem
Computer abzutrennen, ziehen Sie das Laufwerksymbol vom Desktop in den Mülleimer.
Dann drücken Sie die SHIFT-Taste des KP3,
um den USB-Modus zu verlassen.
HINWEIS: Wenn Sie bereit sind den KP3 von
Ihrem Computer abzutrennen, müssen Sie zuerst
den USB-Modus beenden und dann das USB-Kabel abziehen.
Über die Inhalte der Karte
Die folgenden Dateien und Ordner werden
im Grundverzeichnis der Karte angelegt.
Dateien, die Sie speichern können
Sample-Daten 00–99.KPS
GLOBAL-Daten 0–9.KPG
PROGRAM Memory-Satz 0–9.KPP
Alle Daten 0–9.KPA
Dateien, die Sie laden können
SAMPLE-Daten: 00–99.KPS
GLOBAL-Daten: 0–9.KPG
PROGRAM Memory-Satz: 0–9.KPP
Alle Daten: 0–9.KPA
HINWEIS: Wemm eome Datei des Typs Alle Daten mit dem Namen „0.KPA“ auf der Karte vorhanden ist, wird diese Datei automatisch beim
Starten des KP3 geladen.
HINWEIS:
laden werden können, sind 8/16/24-Bit lineare PCM
Mono/Stereo-Dateien. Wenn die Daten eine andere
Bittiefe als 16 haben, werden sie auf 16-Bit-Daten
abgekürzt, beginnend mit den wichtigsten Bits, und
wenn die Bittiefe geringer ist, werden die Daten mit
Nullen aufgefüllt. Legen Sie die Dateien im Grundverzeichnis der Karte ab. WAVE- oder AIFF-Dateien mit einer anderen Samplingfrequenz als 48 kHz
werden in einer anderen Tonlage als auf dem Computer abgespielt. Wenn Sie die korrekte Tonlage
wünschen, verwenden Sie die mitgelieferte PC Editor-Software zum Umwandeln Ihrer Audiodatei in
das KP3-Format.
HINWEIS: WAVE- und AIFF-Dateien enthalten
nicht die Daten, die der KP3 zur Wiedergabe des
Sample benötigt, so dass sie mit den Einstellungen
Tempo = 120 und Beat = 16 geladen werden müssen. Wenn die tatsächlichen Daten kürzer als dies
sind, wird die fehlende Region als Stille behandelt.
Die WAVE- oder AIFF-Dateien die ge-
00–99.WAV
00–99.AIF
Software-Installation
Installieren der Software
Inhalt der CD-ROM
Die beigefügte CD-ROM enthält Folgendes:
❍ KP3 Editor-Software
❍ KORG USB-MIDI-Treiber
❍ KP3 Editor-Bedienungsanleitung (PDF)
❍ Software-Lizenzvereinbarung (PDF)
Bitte Folgendes vor der Verwendung
beachten
. Alle Urheberrechte für die Software, die zu
diesem Produkt gehört, sind Eigentum der
Korg Corporation.
. Die Lizenzvereinbarung für die zu diesem
Produkt gehörende Software ist separat beigelegt. Sie müssen diese Lizenzvereinbarung
vor der Installation der Software durchlesen.
Mit der Installation der Software drücken Sie
aus, dass Sie diese Lizenzvereinbarung akzeptieren.
Betriebsanforderungen
KORG USB-MIDI-Treiber
Windows XP
Unterstützte Betriebssysteme
Microsoft Windows XP Home Edition/Professional/x64 Edition Service Pack 2 (MIDITreiber für die x64 Edition ist eine Beta-Version)
Kompatible Computer
Ein Computer mit einem USB-Port, der die
Betriebsanforderungen von Microsoft Windows XP erfüllt. (Eine Intel-CPU wird empfohlen.)
Mac OS X
Unterstützte Betriebssysteme
Mac OS X 10.3.9 oder höher
Kompatible Computer
Ein Apple Macintosh-Computer mit einem
USB-Port, der den Betriebsanforderungen
von Mac OS X entspricht.
HINWEIS: Einzelheiten zum MIDI-Treiber für
Macintosh-Computer mit Intel-Prozessoren erfahren Sie bei Ihrem Korg-Fachhändler.
72
Page 72

KP3 Editor
Windows XP
Unterstützte Betriebssysteme
Microsoft Windows XP Home Edition/Professional Edition Service Pack 2 oder höher
Kompatible Computer
Ein Computer mit einem USB-Port, der die
Betriebsanforderungen von Microsoft Windows XP erfüllt.
Mac OS X
Unterstützte Betriebssysteme
Mac OS X 10.3.9 oder höher
Kompatible Computer
Ein Computer mit einem USB-Port, der den
Betriebsanforderungen von Mac OS X entspricht.
Installieren des KORG USBMIDI Treiber und der EditorSoftware für Windows XP
HINWEIS: Sie müssen Administratorrechte haben, um Software in Windows XP zu installieren
oder zu deinstallieren. Einzelheiten erfahren Sie
bei Ihrem Systemadministrator.
HINWEIS: Bevor Sie den KP3 an Ihren Computer über USB anschließen, müssen Sie mit dem
KP3 Anwendungsinstaller die KORG USB-MIDI
Driver Tools installieren.
KP3-Anwendungsinstaller
Der KP3-Anwendungsinstaller installiert die
KORG USB-MIDI Driver Tools und die KP3
Editor-Software automatisch in Ihrem Computer.
1. Legen Sie die beigefügte CD-ROM in das
CD-ROM-Laufwerk Ihres Computers ein.
Im Normalfall startet der „KP3 Application
Installer“ automatisch.
Wenn aufgrund der Einstellungen Ihres Computers der Installer nicht automatisch startet,
gehen Sie zur CD-ROM und doppelklicken
Sie auf „KorgSetup.exe“.
2. Folgen Sie den Bildschirmanweisungen zur
Installation der KORG USB-MIDI Driver
Tools und KP3 Editor-Software.
HINWEIS: Sie müssen die KORG USB-MIDI
Driver Tools installieren, wenn Sie KP3 Editor
über USB installieren wollen.
3. Wenn Sie die gesamte gewählte Software
installiert haben, beenden Sie den Installer.
4. Wenn erforderlich installieren Sie den
KORG USB-MIDI-Treiber.
Einzelheiten zur Installation siehe „Installieren des KORG USB-MIDI-Treibers“ unten.
Installieren des KORG USBMIDI-Treibers
Um den KP3 Editor über USB zu installieren,
müssen Sie den „KORG USB-MIDI-Treiber“
in Ihrem Computer installieren.
Sie verwenden die KORG USB-MIDI Driver
Tools zur Installation des KORG USB-MIDITreibers.
1. Bevor Sie fortfahren, stellen Sie die Installation von KORG USB-MIDI Driver Tools in Ihrem Computer fertig.
2. Schließen Sie ein USB-Kabel zwischen dem
USB-Port des Computers und dem USB-Port
des KP3 an. Dann schalten Sie den KP3 ein.
Wenn Ihr Computer erkennt, dass der KP3
angeschlossen ist, wird der standardmäßige
Windows-Treiber automatisch installiert.
(Dies ist nicht der KORG USB-MIDI-Treiber.)
HINWEIS: Der Treiber muss für jeden USB-Port
separat installiert werden. Wenn Sie den KP3 an
einem anderen USB-Port anschließen als dem
Port, den Sie für die Installation des KORG USBMIDI-Treibers für Windows XP verwendet haben,
müssen Sie den KORG USB-MIDI-Treiber für
diesen Port auf gleiche Weise wieder installieren.
3. Klicken Sie auf der Taskleiste auf [Start] ➝
[All Programs] ➝ [KORG] ->[KORG USB
MIDI Driver Tools] ➝ [Install KORG USBMI-
DI device].
Die Setup-Utility startet.
4. Folgen Sie den Bildschirmanweisungen zur
Installation des KORG USB-MIDI-Treibers.
Während des Installationsvorgangs kann eine
Warn-Dialogfeld erscheinen, das anzeigt,
dass „...der Treiber nicht der Windows-LogoPrüfung unterzogen wurde". Klicken Sie einfach auf [Continue] zum Fortfahren.
HINWEIS: Wenn Sie die Installation nicht ausführen können, kann es sein, dass Ihr Computer so
eingestellt ist, dass er Installation von Treibern
73
Page 73

ohne digitale Signatur blockiert. Prüfen Sie die
Einstellungen Ihres Computers wie in „Freigeben
der Installation von nichtsignierten Treiber“ beschrieben.
5. Wenn Sie die Installation des KORG USBMIDI-Treibers fertiggestellt haben, beenden
Sie den Installer.
Wenn Sie gefragt werden, ob Sie Ihren Computer neu starten wollen, wählen Sie [Yes],
um den Computer neu zu starten.
Einzelheiten zu Installation, Setup oder Deinstallation des KORG USB-MIDI-Treibers siehe Installationsanleitung (HTML).
Zum Betrachten der Installationsanleitung
klicken Sie auf der Taskleiste auf [Start] und
wählen [All Programs] ➝ [KORG] ➝ [KORG
USB MIDI Driver Tools] ➝ [Installation Manual].
Die KP3- und MIDI-TreiberPorts
PAD-Port
MIDI-Meldungen vom KP3 (Controller-Daten usw.) werden von Ihrer Computeranwendung über diesen Port empfangen.
CTRL-Port
MIDI-Meldungen werden von Ihrem Computer zum KP3 über diesen Port übertragen.
3. Im Bereich „Treiber“ klicken Sie auf [Driver
Signing Options].
4. In „Wie soll Windows vorgehen?“ wählen
Sie [Ignore] oder [Warn] und klicken dann auf
[OK].
Falls erforderlich, stellen Sie diese Einstellung
auf die vorherige Einstellung zurück, nachdem der KORG USB-MIDI-Treiber installiert
ist.
Einrichten von KP3 Editor
Einzelheiten zu Setup und Verwendung von
KP3 Editor siehe „KP3 Editor Bedienungsanleitung“.
Freigeben der Installation von
nichtsignierten Treibern
Wenn Ihr Computer so eingestellt ist, dass die
Installation von nicht digital signierten Treiber blockiert wird, können Sie den KORG
USB-MIDI Treiber nicht installieren. Verfahren Sie wie folgt, um die Einstellung so zu ändern, dass der Treiber installiert werden
kann.
1. Klicken Sie über die Taskleiste auf [Start] ➝
[Control Panel] zum Öffnen der Systemsteuerung.
2. In der Systemsteuerung doppelklicken Sie
auf [System] und klicken dann auf das Register [Hardware].
74
Installieren des KORG USBMIDI Treiber und der EditorSoftware für Windows Mac
OS X
Installieren der Software
So starten Sie die einzelnen Installer für
KORG USB-MIDI oder KP3 Editor-Software
und installieren sie separat.
1 Legen Sie die beigefügte CD-ROM in das
CD-ROM-Laufwerk Ihres Computers ein.
2 Doppelklicken Sie auf der CD-ROM den Installer (.pgk) der gewünschten Software zjm
Starten des Installers. Die Installer befinden
sich in den folgenden Ordnern.
Page 74

• KORG USB-MIDI-Treiber
Ordner „KORG USB-MIDI DRIVER“ ➝
KORG USB-MIDI DRIVER.pkg
• KP3 Editor
Ordner „KP3 Editor“ ➝ Editor.pkg
3. Folgen Sie den Bildschirmanweisungen zur
Installation des KORG USB-MIDI-Treibers
oder der KP3 Editor-Software.
HINWEIS: Sie dürfen den KORG USB-MIDITr eiber nicht in Ihrem Computer installieren,
wenn Sie KP3 Editor über USB installieren wollen.
4. Wenn Sie die Software installiert haben, beenden Sie den Installer.
Die KP3- und MIDI-TreiberPorts
PAD-Port
MIDI-Meldungen vom KP3 (Controller-Daten usw.) werden von Ihrer Computeranwendung über diesen Port empfangen.
CTRL-Port
MIDI-Meldungen werden von Ihrem Computer zum KP3 über diesen Port übertragen.
Einrichten von KP3 Editor
Einzelheiten zu Setup und Verwendung von
KP3 Editor siehe „KP3 Editor Bedienungsanleitung“.
Technische Daten
Anzahl der Programme: 128
Eingang: Mikrofon-Eingangsbuchse / Mono-Klinkenbuchse
Line-Eingangsbuchsen / RCA-Klinkenbuchsen
Ausgang: Line-Ausgangsbuchsen / RCA-Klinkenbuchsen
Kopfhörerbuchse / Stereo-Klinkenbuchse
MIDI: IN, OUT
USB: Typ B
Stromversorgung: DC 12 V, 700 mA
Lieferumfang: Netzteil, Schutzfolie für Touch-Pad
Gewicht: 1,3 kg
Abmessungen: 210(B) X 226 (T) X 49 (H) mm
* Die Abmessungen und die Spezifikationen können ohne vorherige Ankündigung geändert werden.
75
Page 75

1
IMPORTANT NOTICE TO CONSUMERS
This product has been manufactured according to strict specifications and
voltage requirements that are applicable in the country in which it is
intended that this product should be used. If you have purchased this
product via the internet, through mail order, and/or via a telephone sale, you
must verify that this product is intended to be used in the country in which
you reside.
WARNING: Use of this product in any country other than that for which it is
intended could be dangerous and could invalidate the manufacturer’s or
distributor’s warranty.
Please also retain your receipt as proof of purchase otherwise your product
may be disqualified from the manufacturer’s or distributor’s warranty.
REMARQUE IMPORTANTE POUR LES CLIENTS
Ce produit a été fabriqué suivant des spécifications sévères et des besoins
en tension applicables dans le pays où ce produit doit être utilisé. Si vous
avez acheté ce produit via l’internet, par vente par correspondance ou/et
vente par téléphone, vous devez vérifier que ce produit est bien utilisable
dans le pays où vous résidez.
ATTENTION: L’utilisation de ce produit dans un pays autre que celui pour
lequel il a été conçu peut être dangereuse et annulera la garantie du
fabricant ou du distributeur. Conservez bien votre récépissé qui est la
preuve de votre achat, faute de quoi votre produit ne risque de ne plus être
couvert par la garantie du fabricant ou du distributeur.
2006 KORG INC.
WICHTIGER HINWEIS FÜR KUNDEN
Dieses Produkt wurde unter strenger Beachtung von Spezifikationen und
Spannungsanforderungen hergestellt, die im Bestimmungsland gelten.
Wenn Sie dieses Produkt über das Internet, per Postversand und/oder mit
telefonischer Bestellung gekauft haben, müssen Sie bestätigen, dass dieses
Produkt für Ihr Wohngebiet ausgelegt ist.
WARNUNG: Verwendung dieses Produkts in einem anderen Land als dem,
für das es bestimmt ist, verwendet wird, kann gefährlich sein und die
Garantie des Herstellers oder Importeurs hinfällig lassen werden. Bitte
bewahren Sie diese Quittung als Kaufbeleg auf, da andernfalls das Produkt
von der Garantie des Herstellers oder Importeurs ausgeschlossen werden
kann.
4015-2 Yanokuchi, Inagi-city, Tokyo 206-0812 Japan
 Loading...