

Page 1
1
Page 2

IMPORTANT SAFETY INSTRUCTIONS
• Read these instructions.
•Keep these instructions.
• Heed all warnings.
•Follow all instructions.
• Do not use this apparatus near water.
• Mains powered apparatus shall not be exposed to dripping or
splashing and that no objects filled with liquids, such as vases,
shall be placed on the apparatus.
• Clean only with dry cloth.
• Do not block any ventilation openings. Install in accordance
with the manufacturer's instructions.
• Do not install near any heat sources such as radiators, heat
registers, stoves, or other apparatus (including amplifiers) that
produce heat.
• Do not defeat the safety purpose of the polarized or groundingtype plug. A polarized plug has two blades with one wider than
the other. A grounding type plug has two blades and a third
grounding prong. The wide blade or the third prong are
provided for your safety. If the provided plug does not fit into
your outlet, consult an electrician for replacement of the
obsolete outlet. (for USA and Canada)
• Protect the power cord from being walked on or pinched
particularly at plugs, convenience receptacles, and the point
where they exit from the apparatus.
• Only use attachments/accessories specified by the
manufacturer.
• Unplug this apparatus during lightning storms or when unused
for long periods of time.
•Turning off the power switch does not completely isolate this
product from the power line so remove the plug from the
socket if not using it for extended periods of time.
• Install this product near the wall socket and keep the power
plug easily accessible.
•WARNING—This apparatus shall be connected to a mains
socket outlet with a protective earthing connection.
• Refer all servicing to qualified service personnel. Servicing is
required when the apparatus has been damaged in any way,
such as power-supply cord or plug is damaged, liquid has
been spilled or objects have fallen into the apparatus, the
apparatus has been exposed to rain or moisture, does not
operate normally, or has been dropped.
• Do not install this equipment on the far position from wall outlet
and/or convenience receptacle.
• Do not install this equipment in a confined space such as a
box for the conveyance or similar unit.
• Excessive sound pressure from earphones and headphones
can cause hearing loss.
• Use only with the cart, stand, tripod, bracket, or table specified
by the manufacturer, or sold with the apparatus. When a cart is
used, use caution when moving the cart/apparatus
combination to avoid injury from tip-over.
The lightning flash with arrowhead symbol
within an equilateral triangle, is intended to
alert the user to the presence of uninsulated
“dangerous voltage” within the product's
enclosure that may be of sufficient
magnitude to constitute a risk of electric
shock to persons.
The exclamation point within an equilateral
triangle is intended to alert the user to the
presence of important operating and
maintenance (servicing) instructions in the
literature accompanying the product.
THE FCC REGULATION WARNING (for USA)
This equipment has been tested and found to comply with the
limits for a Class B digital device, pursuant to Part 15 of the FCC
Rules. These limits are designed to provide reasonable
protection against harmful interference in a residential
installation. This equipment generates, uses, and can radiate
radio frequency energy and, if not installed and used in
accordance with the instructions, may cause harmful interference
to radio communications. However, there is no guarantee that
interference will not occur in a particular installation. If this
equipment does cause harmful interference to radio or television
reception, which can be determined by turning the equipment off
and on, the user is encouraged to try to correct the interference
by one or more of the following measures:
• Reorient or relocate the receiving antenna.
• Increase the separation between the equipment and receiver.
• Connect the equipment into an outlet on a circuit different from
that to which the receiver is connected.
• Consult the dealer or an experienced radio/TV technician for
help.
Unauthorized changes or modification to this system can void
the user’s authority to operate this equipment.
Notice regarding disposal (for EU)
If this “crossed-out wheeled bin” symbol is shown on
the product or in the operating manual, you must
dispose of the product in an appropriate way. Do not
dispose of this product along with your household trash.
By disposing of this product correctly, you can avoid
environmental harm or health risk. The correct method of
disposal will depend on your locality, so please contact the
appropriate local authorities for details.
* Company names, product names, and names of formats etc.
are the trademarks or registered trademarks of their respective
owners.
2
Page 3

Table of Contents
1. Introduction........................................................... 4
Parts and their functions ............................................................................ 4
2. Getting ready ........................................................ 7
Connections ............................................................................................. 7
Tur ning the power on ................................................................................ 8
Tur ning the power off................................................................................ 8
3. Using the mixer ..................................................... 9
Basic operation ........................................................................................ 9
Monitoring............................................................................................... 9
Equalizer ............................................................................................... 10
4. Using the KAOSS PAD.......................................... 11
Applying the KAOSS PAD effect to the channel ......................................... 11
Operating the touch pad ......................................................................... 11
Selecting an effect program..................................................................... 11
Using the PROGRAM MEMORY buttons ................................................... 11
Setting the BPM ...................................................................................... 12
Restoring the factory settings ................................................................... 12
5. Appendix ............................................................ 13
Troubleshooting ...................................................................................... 13
Adjusting the crossfader.......................................................................... 13
Specifications ......................................................................................... 14
3
Page 4
1. Introduction
Thank you for purchasing the Korg KM-402/KM-202 DYNAMIC DJ MIXER.
To ensure full enjoyment of your new purchase, please read this owner’s manual carefully and use
the product as directed.
Parts and their functions
Top panel
14
1
2
4
5
6
7
8
9
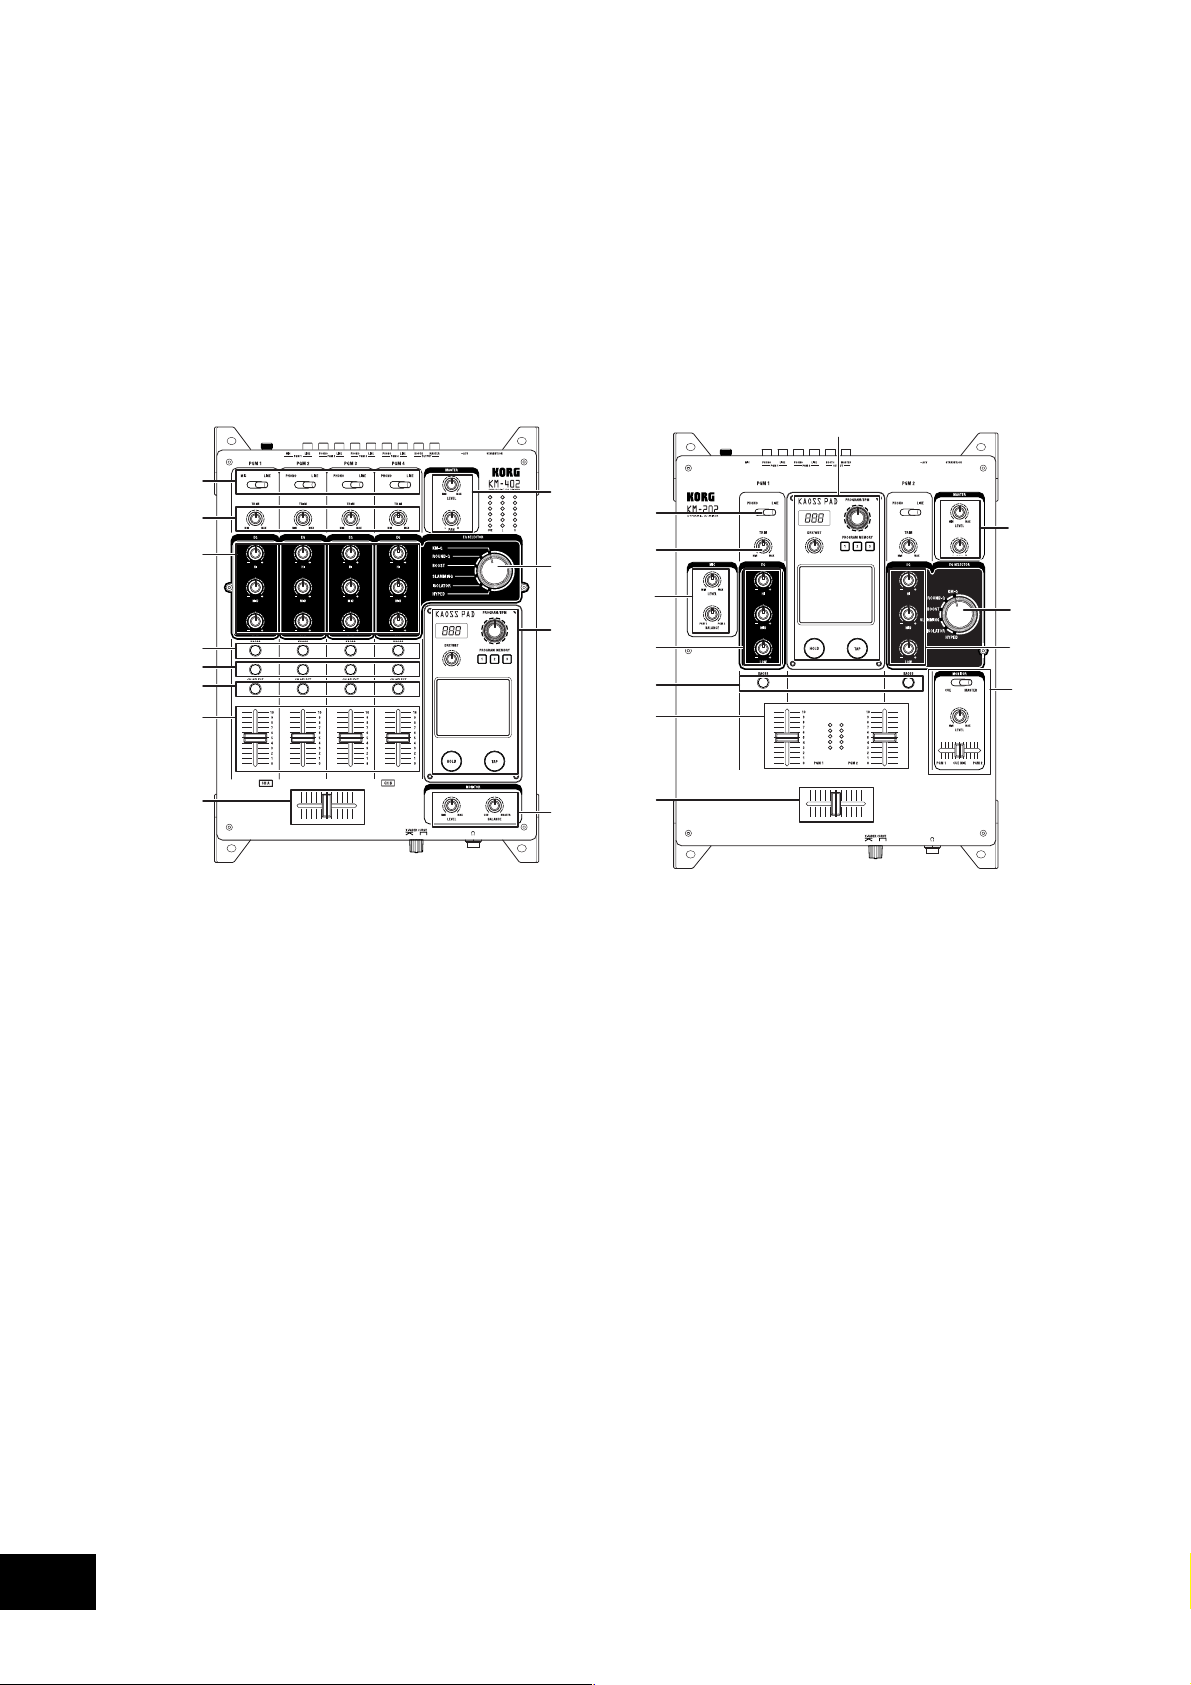
1. INPUT SELECT switches
These select the input jacks that will be assigned to the corresponding mixer channel.
2. TRIM knobs
These adjust the level of the audio signal connected to the input jacks.
3. EQ SELECTOR knob
This selects the type of EQ. By switching the type, you can vary the tonal change produced by
adjusting the EQ knobs for the HI, MID, and LOW bands.
10
3
14
11
1
2
13
44
5
8
9
10
3
12
4. EQ knobs
The HI, MID, and LOW knobs control the tone by adjusting the corresponding frequency bands.
5. KAOSS buttons
These buttons can assign the mixer channel to the built-in KAOSS PAD effects. The effect is
applied to the mixer channel when the button is lit. When you press the button once again, the
button will go dark and the effect will be off.
6. (KM-402 only) CUE buttons
These buttons send the pre-fader sound of the mixer channel to the CUE bus. By setting the
MONITOR BALANCE knob toward CUE, you can monitor the sound of the CUE bus through
your headphones.
7. (KM-402 only) CH SELECT buttons
These assign the mixer channels to either channel A (green) or channel B (red) of the crossfader.
Each time you press a button, it will alternate between green ➝ red ➝ dark. If a mixer channel
is not assigned to either channel A or channel B (i.e., if its LED is dark), the sound of that mixer
channel will not pass through the crossfader.
4
Page 5
8. Channel faders
These adjust the level of each mixer channel. Use them to adjust the volume balance between
channels.
9. Crossfader
You can use the crossfader to switch between two program sources, or to crossfade between
them for DJ-style performances.
(For the KM-402) This will crossfade between the audio signals assigned to channel A and
channel B by the CH SELECT buttons.
(For the KM-202) This will crossfade between PGM1 and PGM2.
10. MASTER LEVEL knob, MASTER PAN knob
These adjust the output level from the MASTER OUT jacks. Use the MASTER PAN knob to
adjust the L/R balance of the sound.
11. (KM-402 only) MONITOR BALANCE knob, MONITOR LEVEL knob
MONITOR BALANCE knob: If you turn this toward CUE, your headphones will monitor the
sound sent from each channel to the CUE bus. If you turn this toward MASTER, your headphones will monitor the sound sent from the MASTER OUT jacks.
MONITOR LEVEL knob: This adjusts the volume output from the headphone jack.
12. (KM-202 only) CUE/MASTER select switch, CUE MIX fader, MONITOR LEVEL knob
CUE/MASTER select switch: If this is in the CUE position, your headphones will monitor the
sound of the CUE bus. If this is in the MASTER position, your headphones will monitor the
same sound as the MASTER OUT jacks.
CUE MIX fader: This adjusts the volume balance of the CUE bus between PGM1 and PGM2.
MONITOR LEVEL knob: This adjusts the volume that is output from the headphone jack.
13. (KM-202 only) MIC LEVEL knob, MIC BALANCE knob
MIC LEVEL knob: This adjusts the input level from the MIC jack.
MIC BALANCE knob: This adjusts the balance of the MIC jack signal between PGM1 and
PGM2.
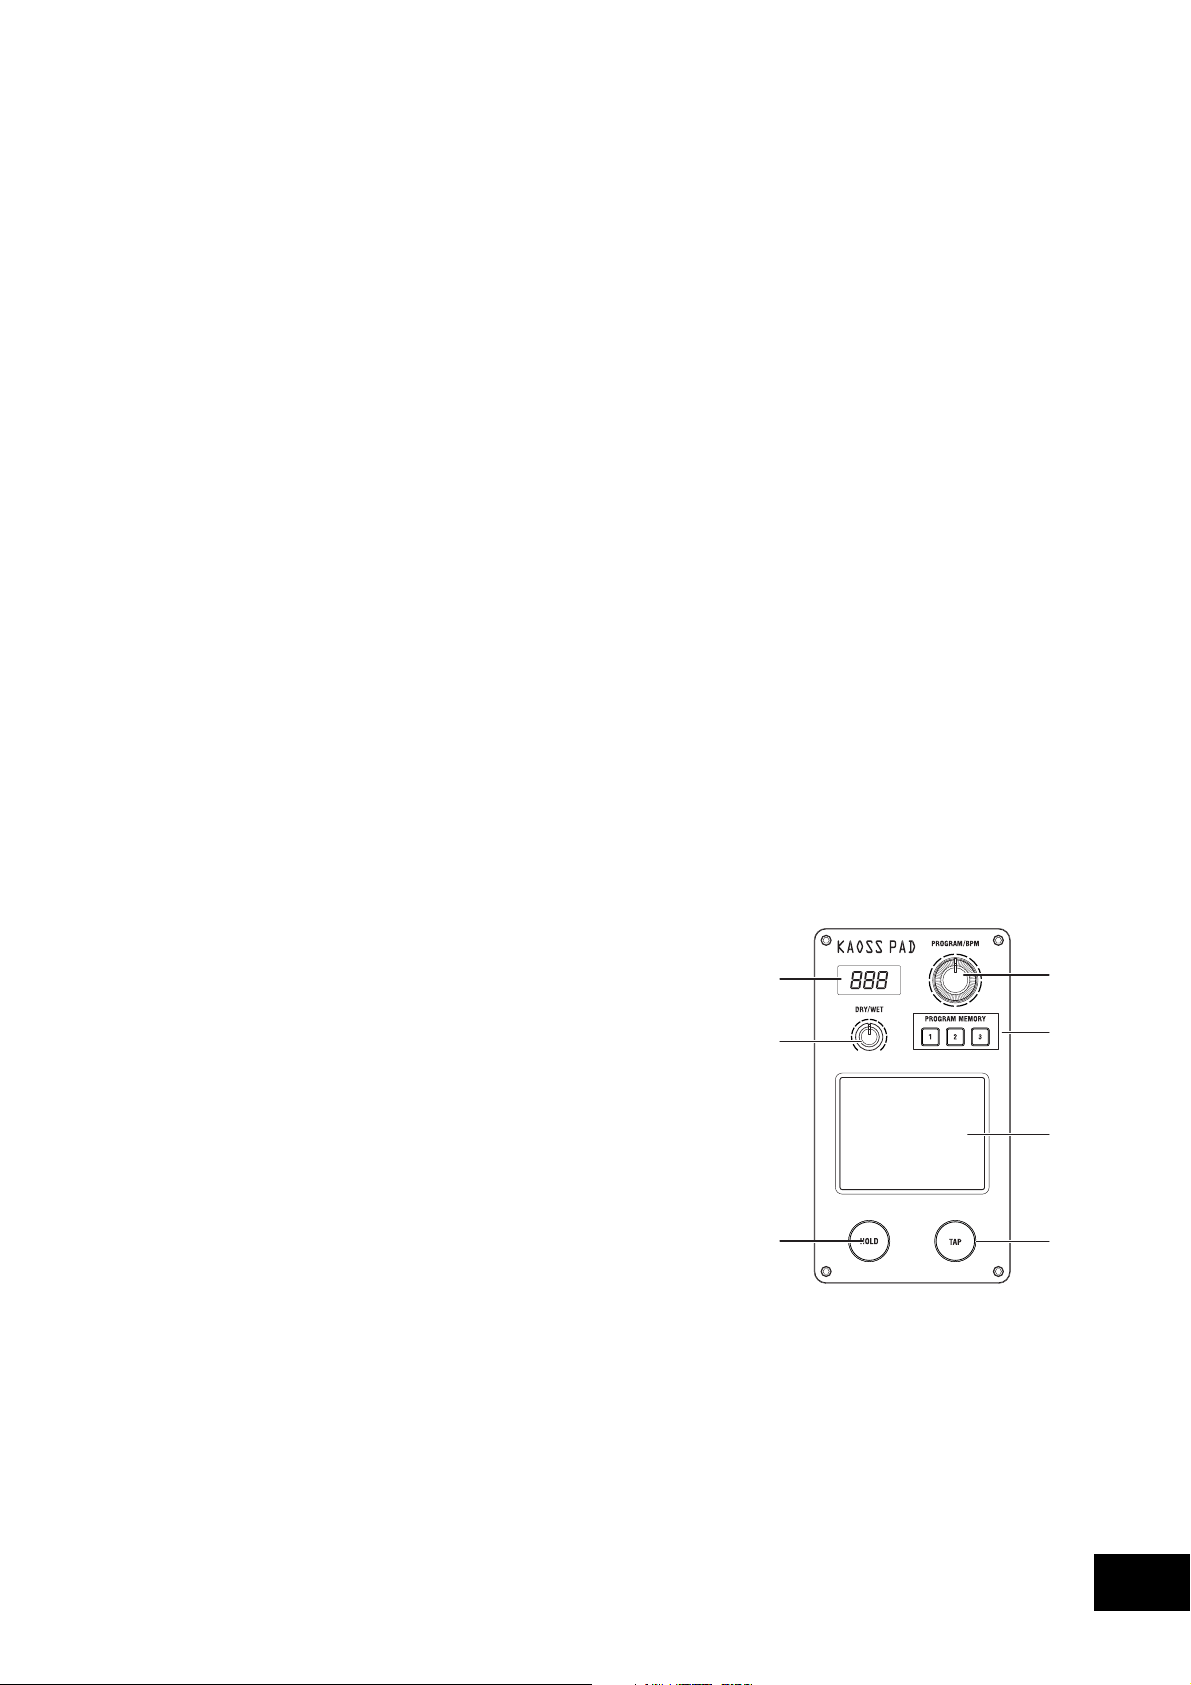
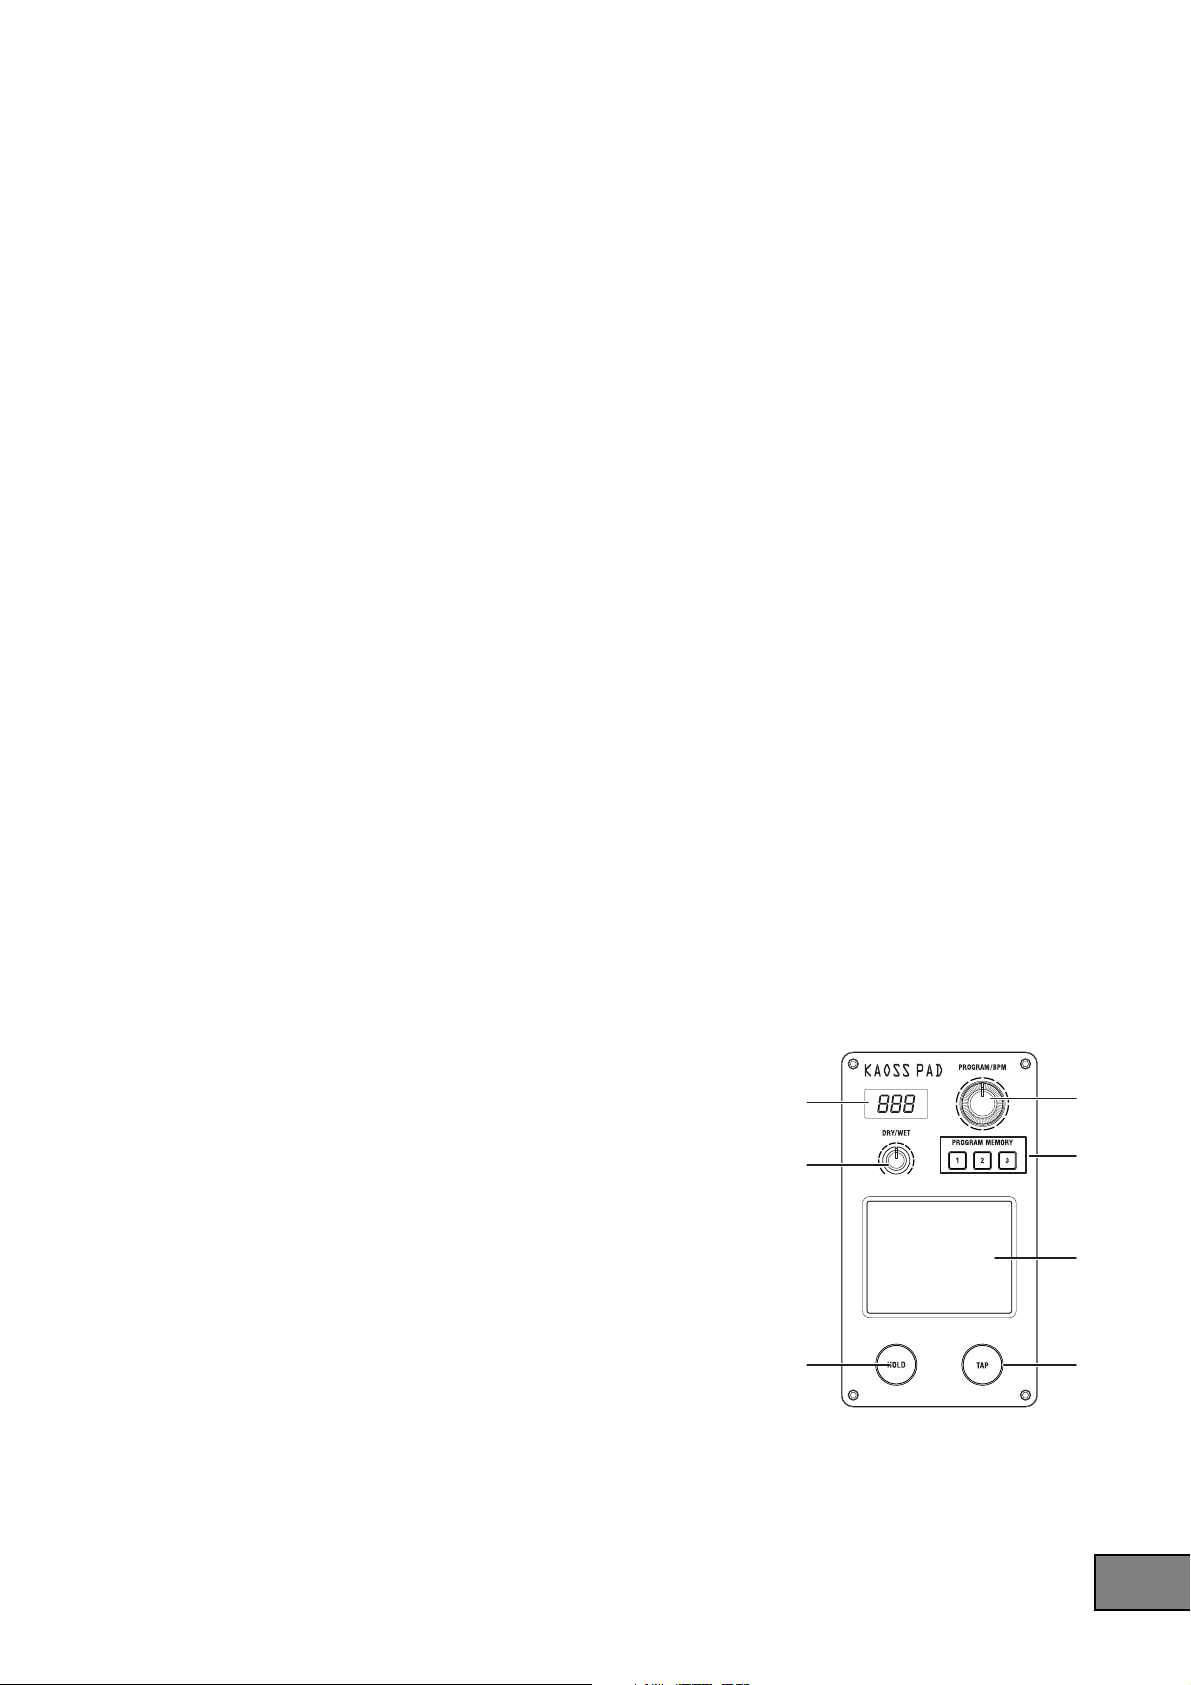
14. KAOSS PAD section
15. Display
This display shows the KAOSS PAD’s effect program
number, and the BPM.
15
16. DRY/WET knob
This adjusts the depth of the effect.
16
17. PROGRAM/BPM knob
Use this to select an effect program for the KAOSS PAD,
or to specify the BPM.
18. PROGRAM MEMORY buttons
You can store an effect program number in each of the
three Program Memory buttons, and then press one of
the buttons to instantly recall the stored program.
20
19. TOUCH PAD
This X/Y KAOSS pad can control two different parameters at once; one using the X-axis, and
one using the Y-axis—for inspired realtime control.
17
18
19
21
20. PAD HOLD button
The Hold feature memorizes the current position of your finger on the pad, so that you can
take your finger from the pad, and the effect will remain unchanged. Use this button to switch
the Hold feature on and off.
21. TAP button
You can specify the BPM value by pressing this button at the desired interval.
5
Page 6
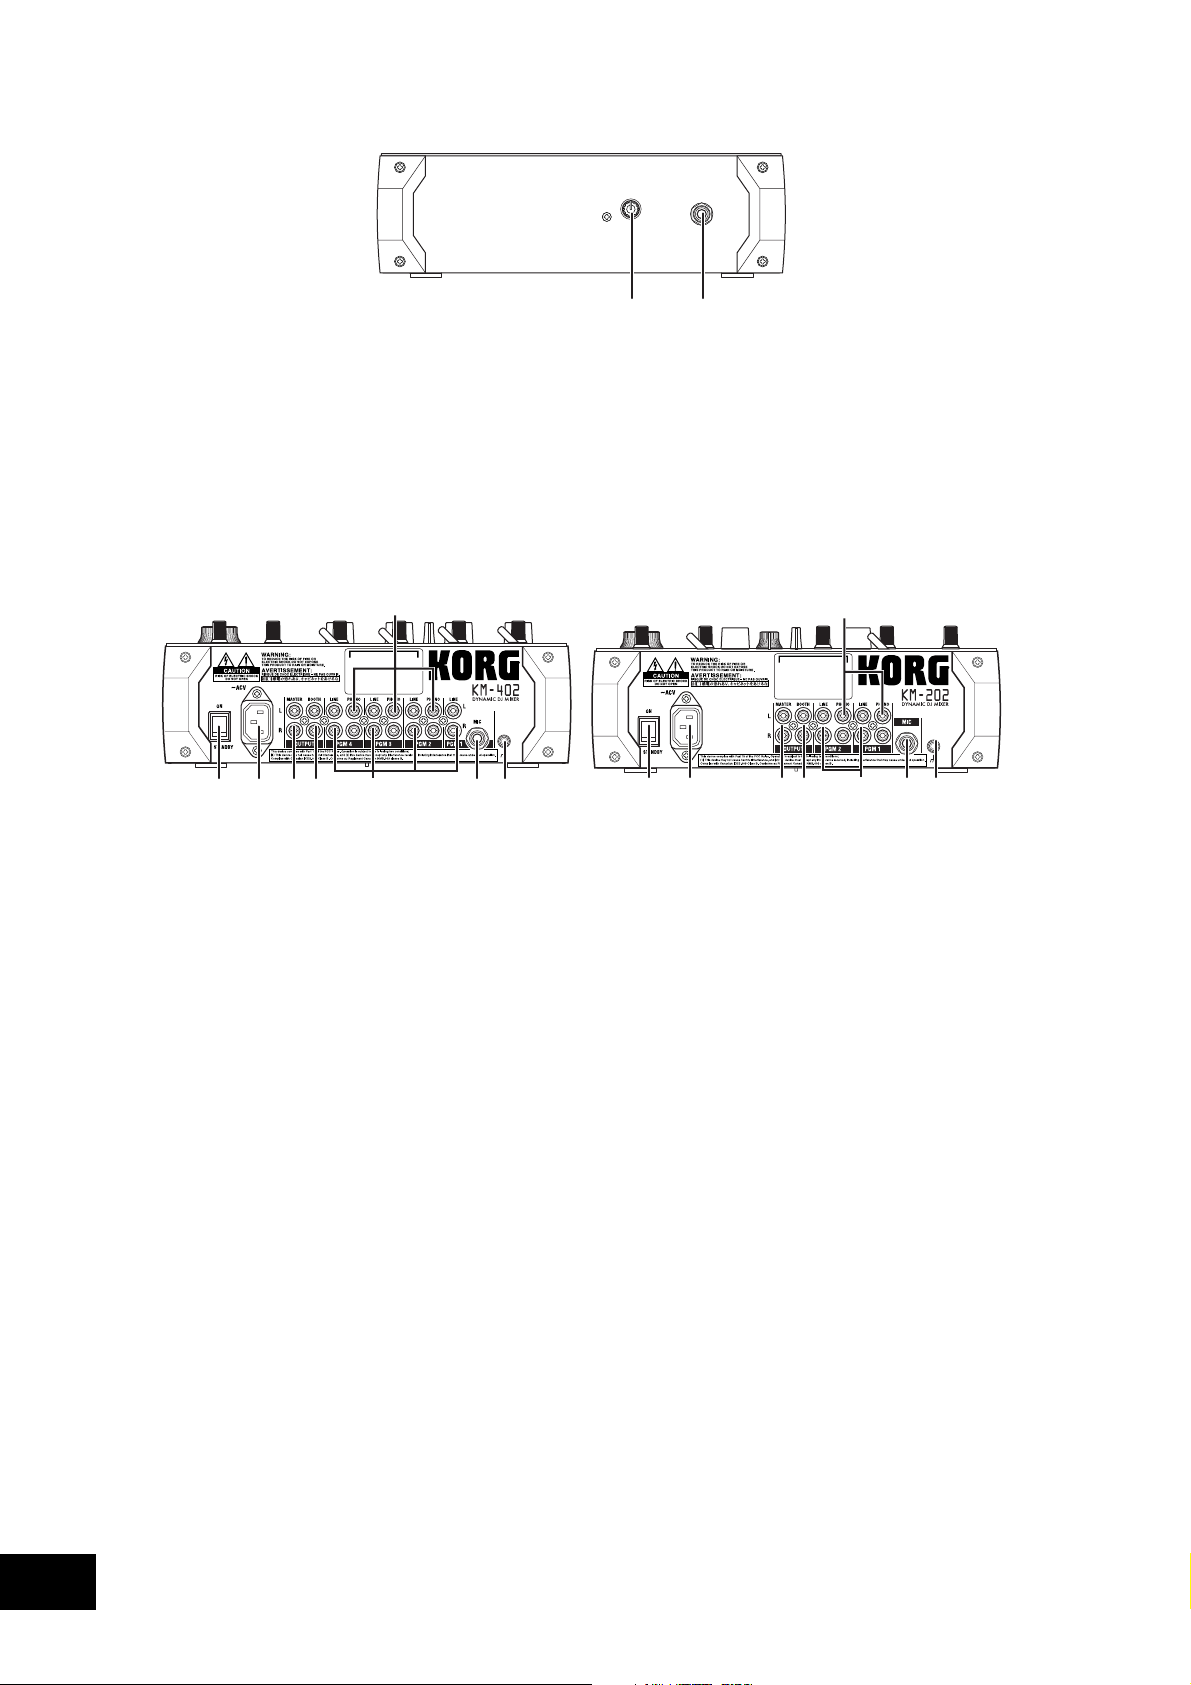
Front panel
12
1. X-FADER CURVE knob
This specifies the curve of the crossfader. Turn this knob to the right produces a “switch” effect,
turn the knob to the left produces a smoother transition. Please refer to the appendix for directions on how to change the crossfader settings.
2. Headphone jack
Rear panel
7
1234 6
1. Power switch
Turns the power on/off.
2. Power inlet
Connect the included power cable to this connector.
3. MASTER OUT jacks
These output the master bus’ audio signal. They are RCA-type output jacks.
4. BOOTH OUT jacks
These output the same audio signal as the MASTER OUT jacks. However, their volume is not
affected by the MASTER LEVEL knob. They are RCA-type output jacks.
5. INPUT (LINE) jacks
You can connect line level equipment to these jacks. They are RCA-type input jacks.
58
12 34 6
7
58
6. MIC jack
You can connect a mic to this jack. This is a 1/4" phone-type unbalanced input jack.
7. INPUT (PHONO) jacks
You can connect turntables to these jacks. They are RCA-type input jacks.
8. GND terminal
This is a grounding terminal for connecting your turntables. If you use the PHONO jacks, you
must connect the ground wire(s) of your turntable(s) to this GND terminal.
6
Page 7
2. Getting ready
Before you connect your equipment, you must turn off the power switches and disconnect the power
cables from the outlet.
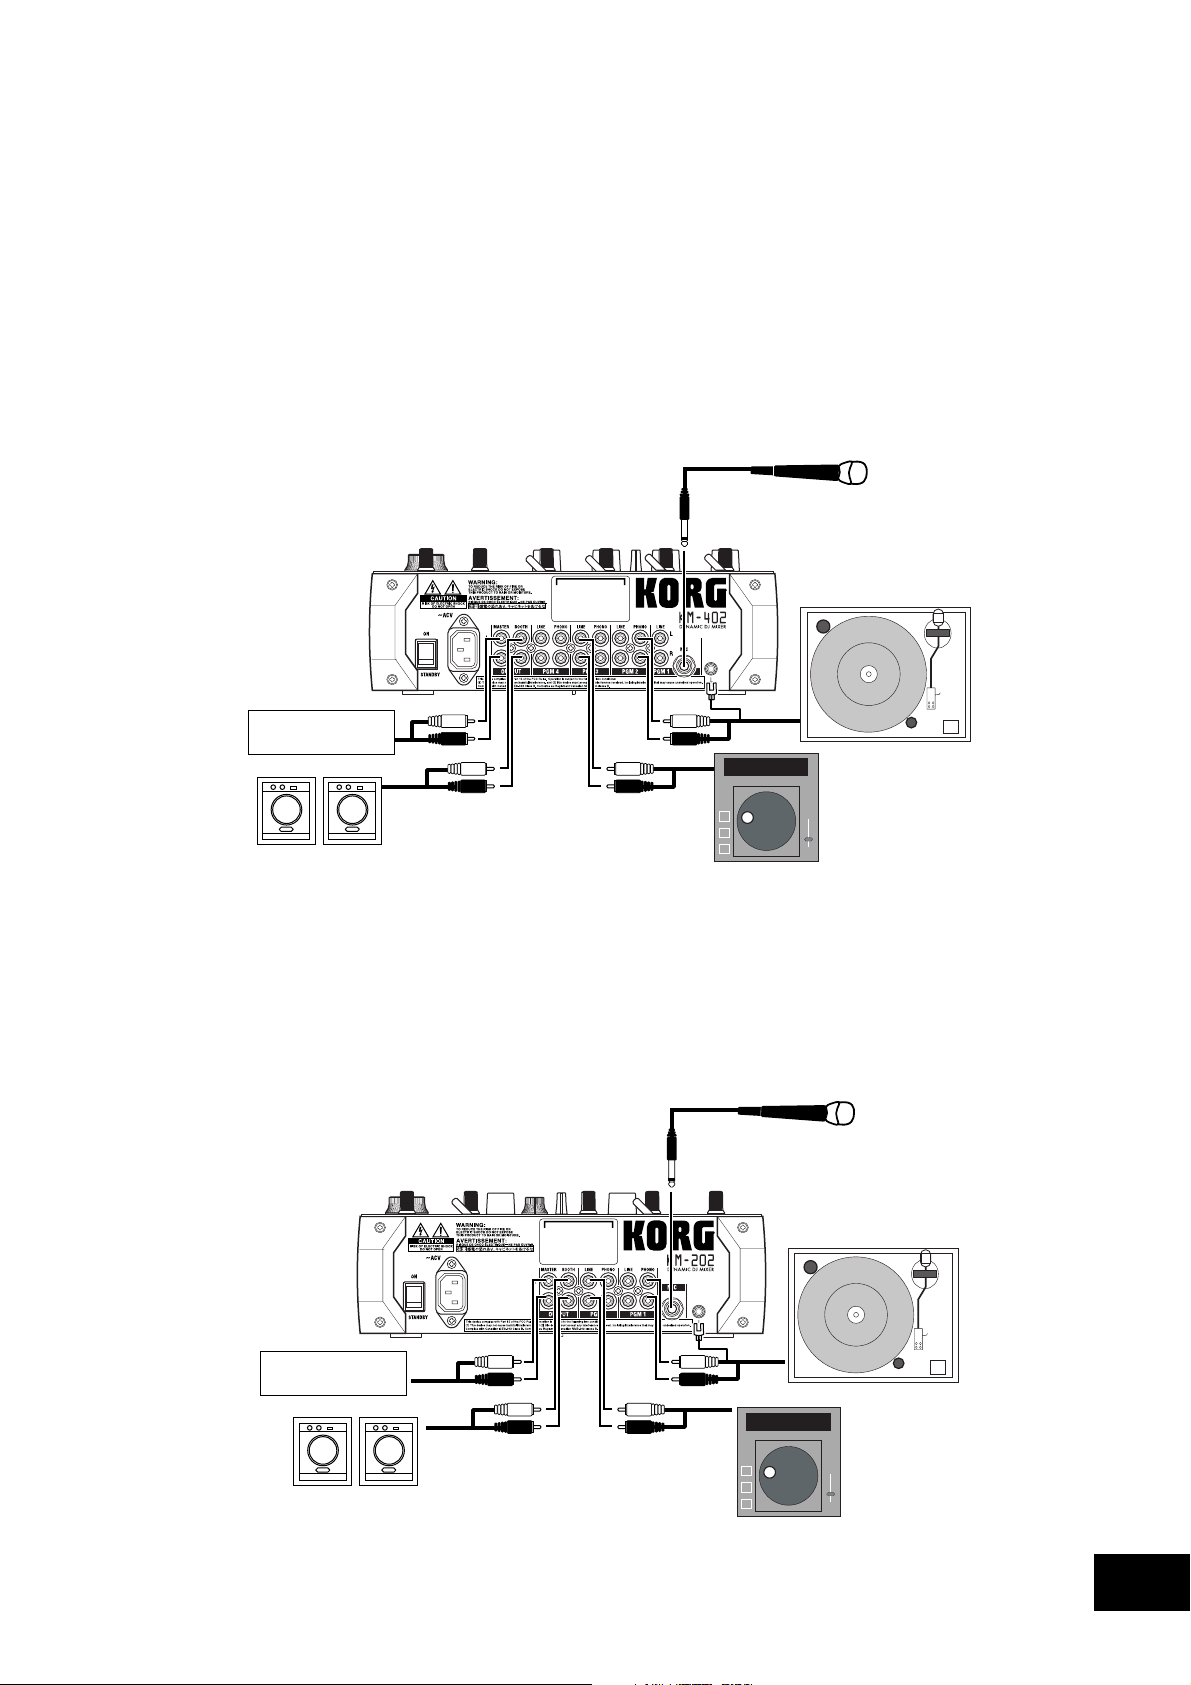
Connections
Use the jacks that are appropriate for the equipment you’re connecting.
KM-402
PA Mixer
TURNTABLE
KM-202
CD PLAYER
PA Mixer
TURNTABLE
CD PLAYER
7
Page 8

Turning the power on
When powering-on this Mixer, you must observe the following procedure.
1. Connect the power cable.
Connect the included power cable to the power inlet.
2. Power-on the external devices connected to the mixer’s input jacks.
3. Turn down all of the Mixer’s channel faders and the MASTER VOLUME knob.
4. Turn on the power switch located on the rear panel of the mixer.
Power-on the equipment connected to the MASTER OUT jacks, such as your monitor amp.
Turning the power off
1. Turn down all of the Mixer’s channel faders and the MASTER VOLUME knob.
2. Turn off the power of your monitor amp or other equipment connected to the MASTER OUT
jacks.
3. Turn off the power switch located on the rear panel of the Mixer.
8
Page 9
3. Using the mixer
Basic operation
Selecting the inputs
Use the top panel INPUT SELECT switch to select the desired inputs.
Adjusting the input levels
Use the TRIM knobs to adjust the input level of each mixer channel.
Adjust the TRIM knob so that the level indicator lights yellow with the channel fader at the maximum position, and when the level from the source is being input at its maximum level.
For the KM-202
Use the MIC LEVEL knob to adjust the input level of the mic connected to the MIC jack. Use
the MIC BALANCE knob to adjust the level balance that is sent to mixer channels PGM1 and
PGM2.
Mixing the sound
Use the channel faders to adjust the volume level of each mixer channel.
Using the crossfader
The audio mixed by the crossfader is output to the master bus or the FX bus.
Use the front panel X-FADER CURVE knob to adjust the curve (response) of the crossfader.
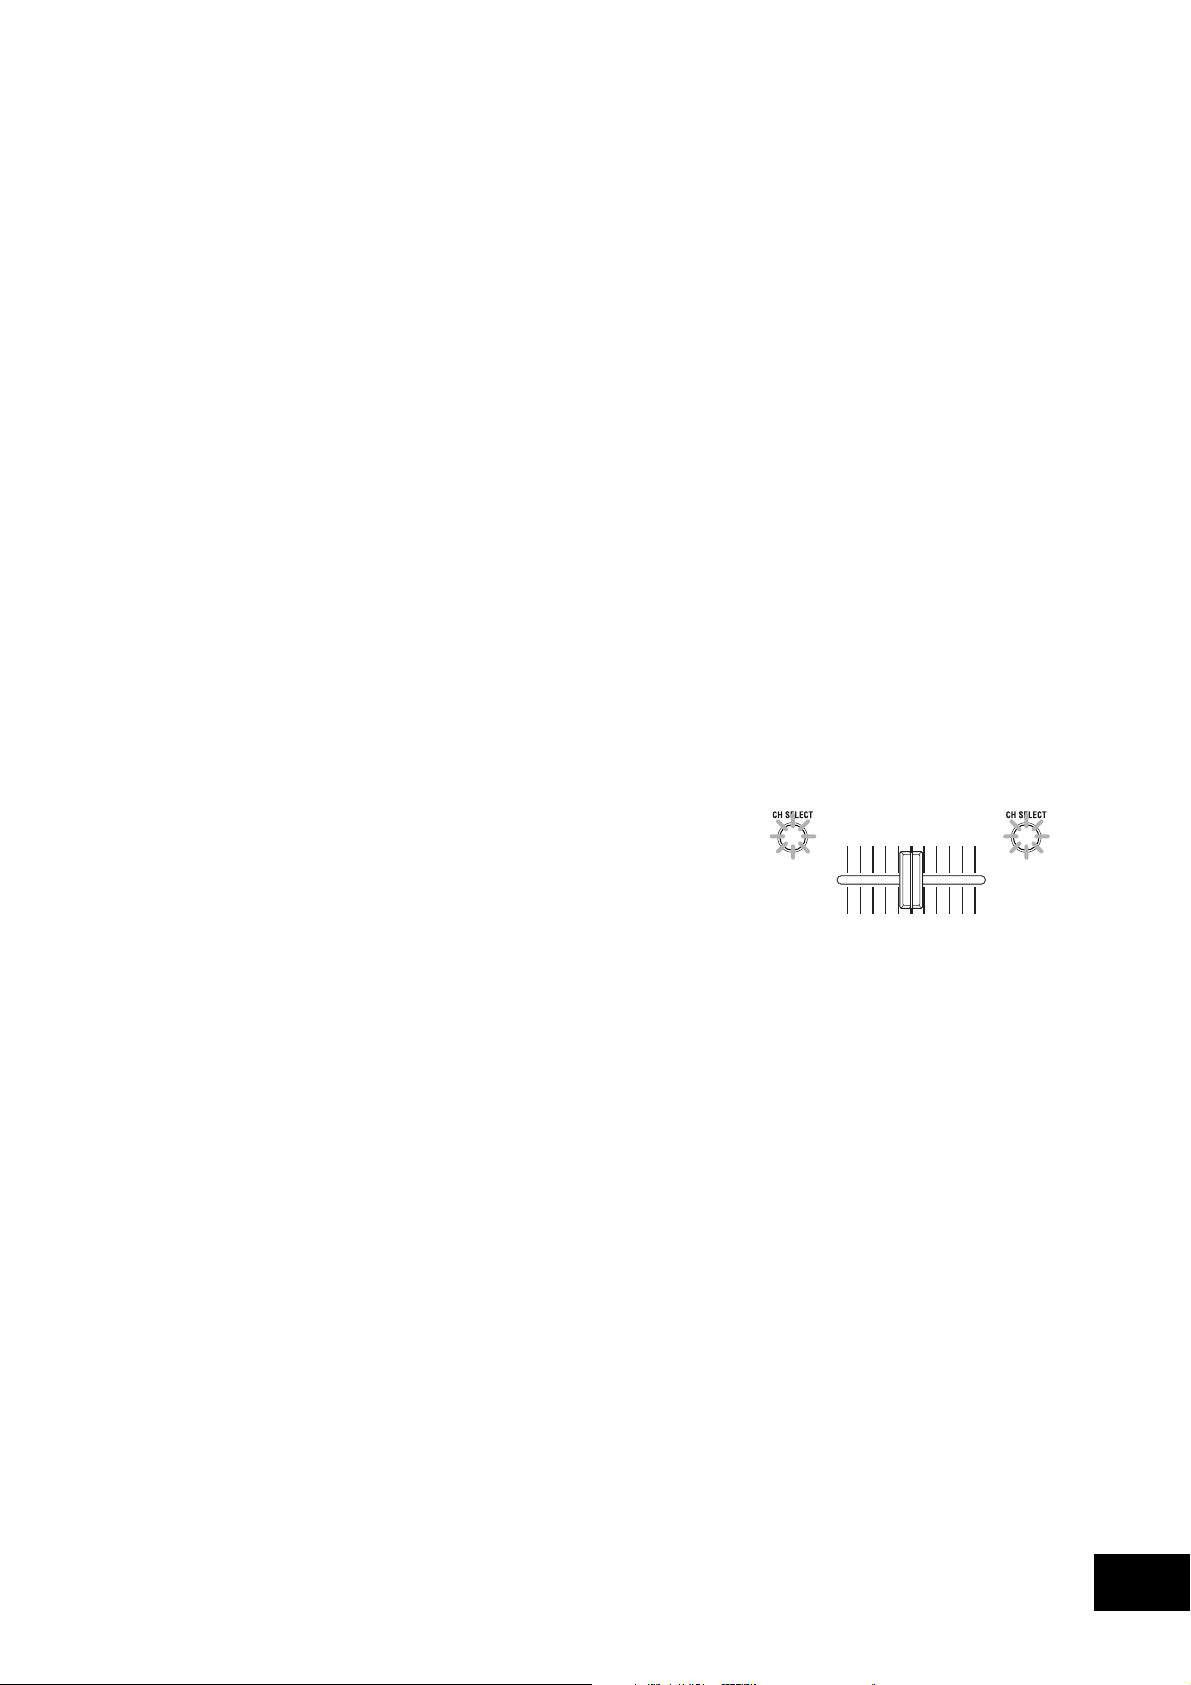
For the KM-402
Use the CH SELECT button to assign the corresponding
mixer channel to one of the two crossfader channels (A
or B).
Each time you press a CH SELECT button, it will alternate between channel A (lit green) ➝ channel B (lit red),
and➝ unselected (dark).
For the KM-202
The crossfader will crossfade between PGM1 and PGM2.
lit green lit red
Adjusting the master level
Use the MASTER LEVEL knob to adjust the overall volume level being sent from the MASTER OUT
jacks.
Monitoring
Connect your headphones to the headphone so that you can monitor the audio inputs or the sound
you’re mixing.
CUE
This is a function that lets you monitor (hear through headphones) the sound at a point before
the channel faders, separately from the sound that is output from the MASTER OUT jacks,
giving you a way to check the sound or “cue up” material while you’re performing. The sound
of the CUE bus can be monitored through headphones. This means that with the faders lowered, you can use headphones to check the audio input and EQ settings, and then when you’re
satisfied, raise the channel fader so that the desired sound will be sent from the master outputs.
9
Page 10
Monitoring via CUE
For the KM-402
1. Press the CUE button of the mixer channel you want to monitor.
2. Use the MONITOR BALANCE knob to adjust the volume balance between the master output
sound and the CUE bus sound.
Use the MONITOR LEVEL knob to adjust the overall volume.
For the KM-202
1. Use the CUE/MONITOR select switch to select CUE.
2. Use the CUE MIX fader to adjust the volume balance between PGM1 and PGM2. Use the
MONITOR LEVEL knob to adjust the overall volume.
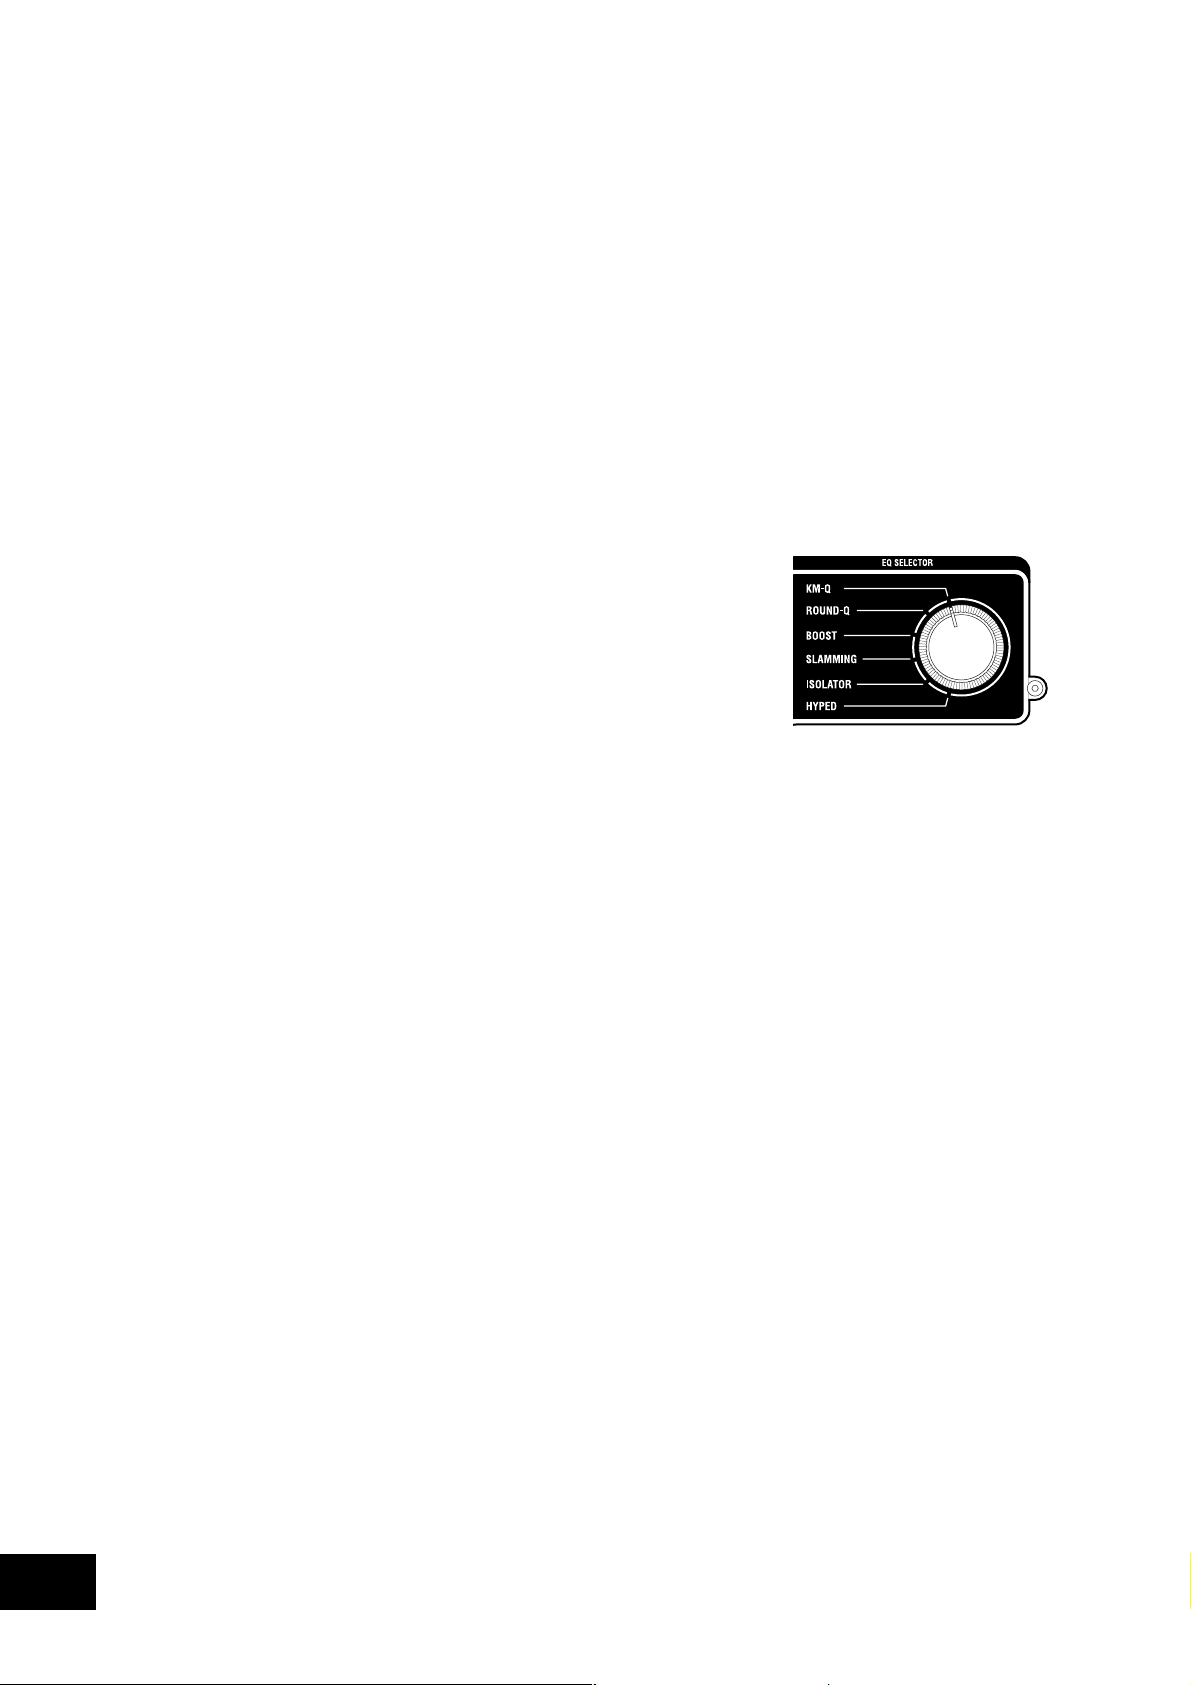
Equalizer
Using the equalizer to adjust the sound
You can use the equalizer (EQ) to cut or boost the low, mid or high
frequency range as a creative sound-shaping tool.
1. Use the EQ SELECT knob to select the desired equalizer
type.
2. Control the EQ that you selected as the EQ type.
Use the HI/MID/LO knobs of each channel to modify the
tone as desired.
EQ type list
KM-Q
This is an equalizer that has been improved on the basis of opinions from numerous wellknown artists who are devoted users of the first-generation KAOSS mixer.
HI: -25dB–+15dB MID: -25dB–+15dB LO: -25dB–+15dB
ROUND-Q
This is an all-around EQ that is a good choice for all styles of music.
HI: -28dB–+12dB MID: -28dB–+12dB LO: -28dB–+12dB
BOOST
This is effective when used as a booster. The mid- and high-frequency ranges of change are
broad, letting you create powerful sounds.
HI: -20dB–+18dB MID: -12dB–+12dB LO: -20dB–+18dB
SLAMMING
In order to aggressively modify the mid-range sound, the HI is set to a frequency range that is
lower than normal and the MID to a range that is higher than normal. LO uses a special curve
that changes gently in the “+” direction and steeply in the “-” direction, letting you apply high
expressive equalization.
HI: -30dB–+6dB MID: -30dB–+6dB LO: -60dB–+6dB
ISOLATOR
This uses a trapezoidal curve, and applies equally to the sound within each frequency band. It
can be used as an isolator that completely cuts the sound, and is able to instantly cut the sound
of a specific part.
HI: -∞dB–+9dB MID: -∞dB–+9dB LO: -∞dB–+9dB
10
HYPED
This EQ has a gradual curve. It is useful for modifying the atmosphere of the entire song, as
well as for tonal adjustments.
HI: -∞dB–+9dB MID: -∞dB–+9dB LO: -∞dB–+9dB
Page 11

4. Using the KAOSS PAD
Applying the KAOSS PAD effect to the channel
Press the KAOSS button of the mixer channel to make it light, the KAOSS PAD effect will be applied
to the sound from that mixer channel.
SOLO effect
If you press and hold the KAOSS button (for approximately two seconds), the KAOSS button you
pressed will blink, and the effect will be applied only to that Channel (KM-402) or PGM (KM-202).
Operating the touch pad
Control the effect by using your finger to rub or tap the touch pad.
Hold
If you press the HOLD button the HOLD indicator will light; in this state, you can take your finger off
the touch pad, and the sound of the effect immediately prior to that moment will be maintained.
Selecting an effect program
Turn the PROGRAM/VALUE knob to select an effect program 00–99. Use the DRY/WET knob to
adjust the depth of the effect.
Turning FX RELEASE on/off
1. While holding down the PROGRAM MEMORY 2 button, press the TAP key.
2. Use the PROGRAM/BPM knob to select “r.On” (FX RELEASE on) or “r.Of” (FX RELEASE off).
3. Once again, hold down the PROGRAM MEMORY 2 button and press the TAP key; you will return to the program selection state.
Alternatively, you will return to the program selection state if you don’t perform any setting
operation for three seconds.
What is FX RELEASE?
This produces a delay effect synchronized to the current BPM /tempo, and will begin the instant you release your hand from the touch pad (i.e., the instant you turn off the effect), and
then decay gradually.
Using the PROGRAM MEMORY buttons
Each of the PROGRAM MEMORY buttons can memorize an effect program, the HOLD button’s on/
off status, and the position of the touch pad when HOLD is active.
By pressing a PROGRAM MEMORY button, you can instantly recall the memorized state.
To store the current settings to a PROGRAM MEMORY button
1. Before you continue, select the program that you want to memorize.
If you want to memorize the Hold status, press the HOLD button to turn the Hold function on.
The position at which you last touched the touch panel will be memorized.
2. While holding down the PROGRAM MEMORY button in which you want to memorize the
current state, press the HOLD button; the current state will be memorized in the PROGRAM
MEMORY button you’re pressing.
11
Page 12

Setting the BPM
1. When you press the TAP button, the currently-specified BPM value is shown in the display.
2. If you press the TAP button several times in rhythm with the song tempo, the corresponding
BPM value will be detected, and the appropriate BPM value will be specified.
3. When the BPM value is displayed, you can turn the PROGRAM/BPM knob to modify the BPM
value.
4. If you hold down the TAP button, you will switch from the BPM setting back to the program
selection.
Alternatively, you will return to the program selection state if you don’t perform any setting
operation for five seconds.
Restoring the factory settings
To r estore the factory settings, set the EQ SELECTOR knob to the “KM-Q” position, and then turn on
the power while holding down the TAP button and the PROGRAM MEMORY 1 button. All settings
of the KAOSS PAD will be restored to their factory-set state.
12
Page 13

5. Appendix
Troubleshooting
Power does not turn on
• Is the power cable connected to a functioning electrical outlet?
• Is the rear panel power switch turned on?
No sound
• Is the KM-402/KM-202 powered-on? Are the connected devices powered-on?
•Are the channel faders or the MASTER LEVEL knob turned down?
• Is the volume level of the channel turned down?
• Is the TRIM knob raised to an appropriate level?
• After connecting your audio source to the input jacks, did you select it for the corresponding
mixer channel?
Set the INPUT SELECT switch appropriately for each mixer channel.
• Make sure that audio is being input.
Use the level meter to verify that audio is being received into each mixer channel.
Too much noise or distortion
• The sound will distort if the TRIM knob is set too high, and there will be more noise if the
TRIM knob is set too low.
To obtain the ideal setting, set the TRIM knob as high as possible without allowing the level
meter to light red at the maximum level. If the indicator lights red, the signal will clip, distorting the sound.
• Could you be using the KAOSS PAD function?
Some of the KAOSS PAD effects intentionally add distortion or noise. Check whether noise or
distortion are still present even when you’re not using an effect.
• If the sound is distorting at the EQ, make the following adjustment.
Adjust the gain value of the EQ.
Adjusting the crossfader
You can adjust the left and right transition points of the crossfader.
The Left setting determines where on the crossfader’s travel Channel B (KM-402) or PGM 2 (KM-202)
will completely cease to sound. Likewise, the Right setting determines where on the crossfader's
travel CH A (KM-402) or PGM A (KM-202) will cease to sound.
Perform this adjustment if the sound does not transition correctly at the edge of the fader, or if you
want to shorten the fader stroke. Remember, the X-fader curve knob on the front panel will affect how
you perceive these settings.
1. Turn off the power.
2. Set the EQ SELECTOR knob to the “KM-Q” position, and then turn on the power while holding down the PROGRAM MEMORY 3 button and the TAP button.
The display will indicate “AdJ”, indicating that you’re in Crossfader Adjust mode.
3. Move the crossfader to the point at which you want it to begin taking effect.
When you move the fader to the left side, the display will indicate “L**”. When you move the
fader to the right side, the display will indicate “r**”. Each “**” can be adjusted in a range of
00–50.
Note: In some cases, the display may indicate “01” or “02” when the fader is all the way to one side.
4. At the point that you want to assign as the left and right edge, press the TAP button.
The decimal point for the “L.” or “r.” in the display will light, and the setting will be assigned
at that point. Repeat this step for the opposite side of the crossfader. (You can’t assign a point
that is shown as “--”.)
13
Page 14

5. When you’ve specified the left and right points, hold down the HOLD button and press the
PROGRAM MEMORY 3 button.
The display will blink “SET”, and the settings will be stored. When the settings have been
stored, the display will indicate “End”.
6. To finish the setting, turn off the power, and then turn the power on again in the normal way.
Note: If you initialize the KAOSS PAD function to the factory-set state, the crossfader adjustment setting will
also be initialized.
Specifications
Power supply: AC Local Voltage
Power consumption: KM-402: 23W
KM-202: 20W (120V), 17W (220–230V)
Dimensions: 288mm (W) 384mm (D) 107mm (H) / 11.34" (W) 15.12" (D) 4.21" (H)
Weight: 5.0kg / 11.02lbs.
Frequency response: 20 Hz–20 kHz ±1.0 dB (Typ.)(LINE)
S/N: 90 dB @IHF-A (Typ.)(LINE)
INPUT (LINE)
Connectors: RCA jacks L/R
Input impedance: 10 kΩ
Nominal level: 0 dBu
PHONO
Connectors: RCA jacks
Input impedance: 40 kΩ
PHONO RIAA compliant
MIC INPUT
Connectors: 1/4" mono phone jack
Input impedance: 50 kΩ
Nominal level: -50 dBu
MASTER OUTPUT L/R
Connector: RCA jacks L/R
Nominal level: 0 dBu
Load impedance: greater than 10 kΩ
BOOTH OUTPUT L/R
Connector: RCA jacks L/R
Nominal level: 0 dBu
Load impedance: greater than 10 kΩ
PHONES OUTPUT
Connector: 1/4" stereo phone jack
Output impedance: 32 Ω
Maximum level: 80 mW + 80 mW @32 Ω
Included items
Power cable
Owner’s manual
* Appearance and specifications of this product are subject to change without notice.
14
Page 15

INFORMATIONS IMPORTANTES DE SECURITE
• Lisez attentivement ces instructions.
•Veuillez conserver ces instructions.
• Observez tous les avertissements.
• Suivez toutes les consignes à la lettre.
• N’utilisez jamais cet appareil dans un endroit humide ni à proximité
d’eau.
•L’appareil alimenté par courant électrique ne peut pas être exposé
à des éclaboussures; évite en outre de placer des récipients
contenant des liquides, comme un vase (ou un verre de bière), sur
l’appareil.
• Nettoyez uniquement l’appareil avec un chiffon doux et sec.
• Ne bloquez jamais les orifices de ventilation de l’appareil et
installez-le toujours conformément aux instructions du fabricant.
• N’installez jamais l’appareil à proximité d’une source de chaleur,
telle que des radiateurs, poêles ou tout autre dispositif (y compris
des amplificateurs) générant de la chaleur.
• N’essayez jamais de contourner le dispositif de sécurité d’une prise
de type polarisée ou d’une prise de terre. Une prise dite polarisée
dispose de deux broches, dont l’une est plus large que l’autre. Une
prise de terre comporte trois broches, dont une de mise à la terre.
Cette broche plus large ou broche de mise à la terre vise à assurer
votre sécurité. Si la fiche du cordon d’alimentation ne correspond
pas au type de prise de courant de votre région, faites remplacer la
prise obsolète par un électricien qualifié (pour les Etats-Unis et le
Canada).
• Placez toujours le cordon d’alimentation de sorte qu’on ne risque
pas de marcher dessus ni de le pincer. Cette précaution vise tout
spécialement la fiche du cordon et sa sortie de l’appareil.
• Utilisez exclusivement les fixations/accessoires préconisés par le
fabricant.
• S’il y a risque d’orage ou que vous ne comptez pas utiliser
l’appareil pendant une période prolongée, débranchez-le du
secteur.
• La mise sur OFF de l’interrupteur d’alimentation n’isole pas
totalement ce produit de la ligne secteur; aussi, retirez la fiche de la
prise s’il doit rester inutilisé pendant une période prolongée.
• Installez ce produit près de la prise électrique murale et gardez un
accès facile à la prise électrique et au cordon d’alimentation.
•ATTENTION: Cet appareil doit absolument être connecté à une
prise électrique reliée à la terre.
• Confiez tout travail de réparation uniquement à un S.A.V. qualifié.
Faites appel au S.A.V. si l’appareil a subi tout endommagement,
comme par exemple si sa fiche secteur ou son cordon
d’alimentation sont endommagés, si de l’eau ou des objets ont
pénétré à l’intérieur de l’appareil, si celui-ci a été exposé à la pluie
ou à la moisissure, s’il est tombé ou présente tout signe de
dysfonctionnement.
• N’utilisez jamais d’allonge trop longue avec cet appareil et ne
l’alimentez jamais via les prises secteur équipant d’autres
dispositifs.
• N’installez jamais cet appareil dans un endroit confiné comme une
caisse de transport ou tout autre récipient similaire.
• Des niveaux d’écoute trop importants lors de l’utilisation d’un
casque ou d’écouteurs peuvent entraîner des pertes d’audition.
• Utilisez l’appareil uniquement avec le chariot, stand, trépied,
fixation ou table spécifiés par le fabricant ou fourni avec l’appareil.
Si vous avez placé l’appareil sur un chariot, soyez très prudent
quand vous déplacez le chariot, afin d’éviter une chute et des
blessures.
d'habitation, aussi veuillez contacter les autorités locales concernées
pour les détails.
* Les noms de sociétés, noms de produits et noms de formats, etc.
dans ce manuel sont des marques de fabrique ou des mar-ques
déposées de leurs propriétaires respectifs.
L’éclair dans le triangle est un symbole destiné à
attirer l’attention de l’utilisateur sur la présence de
parties non isolées et de “tension dangereuse” à
l’intérieur de l’appareil, qui posent des risques
d’électrocution pour l’utilisateur.
Le point d’exclamation dans un triangle est un
symbole destiné à attirer l’attention de l’utilisateur
sur des sections de ce manuel contenant des
informations importantes, liées à l’utilisation et à
l’entretien de ce produit.
Notice concernant l'élimination du produit
(UE seulement)
Si ce symbole “Poubelle barrée” est imprimé sur le produit
ou dans le manuel de l’utilisateur, vous devez vous
débarrasser du produit de la manière appropriée. Ne jetez
pas ce produit avec vos ordures ménagères. En vous
débarrassant correctement du produit, vous préviendrez les
dommages environnementaux et les risques sanitaires. La
méthode correcte d'élimination dépendra de votre lieu
15
Page 16

Sommaire
1. Introduction .................................................. 17
2. Préparatifs.................................................... 20
3. Utilisation du mélangeur ............................... 22
4. Utilisation du KAOSS PAD ............................. 24
Eléments et leurs fonctions........................................................... 17
Raccordements........................................................................... 20
Mise sous tension ....................................................................... 21
Mise hors tension ....................................................................... 21
Fonctionnement de base ............................................................. 22
Contrôle du son ......................................................................... 22
Égaliseur ................................................................................... 23
Application de l’effet KAOSS PAD au canal ................................. 24
Fonctionnement du pavé tactile.................................................... 24
Sélection d’un programme d’effet ................................................ 24
Utilisation des touches PROGRAM MEMORY................................ 24
Réglage du BPM......................................................................... 25
Restauration des réglages d’usine ................................................ 25
5. Appendice .................................................... 26
Guide de dépannage ................................................................. 26
Réglage du crossfader ................................................................ 26
Spécifications............................................................................. 27
16
Page 17

1. Introduction
Merci d’avoir fait l’acquisition du Korg KM-402/KM-202 DYNAMIC DJ MIXER. Afin de pouvoir
tirer le meilleur parti de toutes ses possibilités, nous vous conseillons de lire attentivement le présent manuel et d’utiliser le produit seulement de la manière indiquée.
Eléments et leurs fonctions
Panneau supérieur
14
1
2
4
5
6
7
8
9
1. Commutateurs INPUT SELECT
Utilisez ces commutateurs pour sélectionner les prises d’entrée qui seront assignées au canal
de mixeur correspondant.
2. Boutons TRIM
Utilisez ces boutons pour régler le niveau du signal audio reçu par les prises d’entrée.
3. Bouton EQ SELECTOR
Utilisez ce bouton pour sélectionner le type d’égaliseur. Commuter le type d’égaliseur permet
de modifier le caractère tonal quand vous réglez chacun des boutons EQ correspondant aux
plages HI, MID et LOW.
4. Boutons EQ
Les boutons HI, MID et LOW permettent de contrôler le caractère tonal en réglant les plages
de fréquences correspondantes.
5. Touches KAOSS
Utilisez ces touches pour assigner le canal de mixeur aux effets du KAOSS PAD intégré. L’effet est appliqué au canal de mixeur quand la touche est allumée. Si vous appuyez de nouveau
sur la touche, elle s’éteindra et l’effet sera désactivé.
6. (KM-402 seulement) Touches CUE
Utilisez ces touches pour envoyer le son pré-fader du canal de mixeur au bus CUE. En réglant
le bouton MONITOR BALANCE vers CUE, vous pouvez contrôler le son du bus CUE via un
casque.
7. (KM-402 seulement) Touches CH SELECT
Utilisez ces touches pour assigner les canaux de mixeur au canal A (vert) ou au canal B (rouge)
du crossfader. Chaque fois que vous appuyez sur une touche, elle changera alternativement
de vert ➝ rouge ➝ éteint. Si un canal de mixeur n’est assigné à aucun des canaux A ou B (c’est-
à-dire, si la DEL correspondante est éteinte), le son de ce canal de mixeur ne passera pas par le
crossfader.
10
3
14
11
1
2
13
44
5
8
9
10
3
12
17
Page 18

18
8. Faders de canal
Utilisez ces faders pour régler le niveau de chaque canal de mixeur et la balance du volume
entre les canaux.
9. Crossfader
Utilisez le crossfader pour commuter entre deux sources de programme, ou pour effectuer
une transition de l’une à l’autre pour un effet de style DJ.
(Pour le KM-402) La transition se fera entre les signaux audio assignés au canal A et au canal B
avec les touches CH SELECT.
(Pour le KM-202) La transition se fera entre PGM1 et PGM2.
10. Bouton MASTER LEVEL, bouton MASTER PAN
Utilisez ces boutons pour régler le niveau de sortie des prises MASTER OUT. Utilisez le bouton MASTER PAN pour régler la balance L/R (gauche/droite) du son.
11. (KM-402 seulement) Bouton MONITOR BALANCE, bouton MONITOR LEVEL
Bouton MONITOR BALANCE: Si vous tournez ce bouton vers CUE, votre casque reproduira le son provenant de chaque canal vers le bus CUE. Si vous le tournez vers MASTER,
votre casque reproduira le son provenant des prises MASTER OUT.
Bouton MONITOR LEVEL: Utilisez ce bouton pour régler le volume de sortie de la prise de
casque.
12. (KM-202 seulement) Sélecteur CUE/MASTER, fader CUE MIX, bouton MONITOR LEVEL
Sélecteur CUE/MASTER: Si ce sélecteur est dans la position CUE, votre casque reproduira le
son du bus CUE. S’il est dans la position MASTER, votre casque reproduira le même son que
celui des prises MASTER OUT.
Fader CUE MIX: Utilisez ce fader pour régler la balance du volume du bus CUE entre PGM1
et PGM2.
Bouton MONITOR LEVEL: Utilisez ce bouton pour régler le volume de la prise de casque.
13. (KM-202 seulement) Bouton MIC LEVEL, bouton MIC BALANCE
Bouton MIC LEVEL: Utilisez ce bouton pour régler le niveau d’entrée de la prise MIC.
Bouton MIC BALANCE: Utilisez ce bouton pour régler la balance du signal de la prise MIC
entre PGM1 et PGM2.
14. Section KAOSS PAD
15. Afficheur
L’afficheur indique le numéro de programme d’effet du
KAOSS PAD, et le BPM.
16. Bouton DRY/WET
15
Utilisez ce bouton pour régler l’intensité de l’effet.
17. Bouton PROGRAM/BPM
16
Utilisez ce bouton pour sélectionner un programme d’effet pour le KAOSS PAD, ou pour spécifier le BPM.
18. Touches PROGRAM MEMORY
Vous pouvez stocker un numéro de programme d’effet
sous chacune des trois touches Program Memory, puis
appuyer sur une des touches pour rappeler instantanément le programme stocké.
20
19. TOUCH PAD
Ce pavé tactile X/Y KAOSS peut contrôler simultanément
deux paramètres différents; l’un en utilisant l’axe X et l’autre en utilisant l’axe Y pour un
contrôle artistique en temps réel.
20. Touche PAD HOLD
La fonction Hold mémorise la position actuelle de votre doigt sur le pavé tactile. Quand vous
retirez votre doigt de la surface du pavé tactile, l’effet reste dans l’état dans lequel il était
quand vous aviez touché précédemment le pavé tactile. Utilisez cette touche pour activer et
désactiver la fonction Hold.
21. Touche TAP
Vous pouvez spécifier la valeur de BPM en appuyant sur cette touche à l’intervalle souhaité.
17
18
19
21
Page 19

Panneau avant
12
1. Bouton X-FADER CURVE
Utilisez ce bouton pour spécifier la forme de courbe du crossfader. Tournez ce bouton vers la
droite pour produire un effet de “déclenchement”, tournez-le vers la gauche pour produire
une transition douce. Veuillez vous reporter à l’appendice pour les directives sur la façon de
changer les réglages de crossfader.
2. Prise de casqu
Panneau arrière
7
1234 6
1. Commutateur de mise sous/hors tension
Utilisez ce commutateur pour mettre l’appareil sous/hors tension.
2. Prise d’alimentation
Branchez sur cette prise le cordon d’alimentation fourni.
3. Prises MASTER OUT
Ces prises fournissent le signal audio du bus maître. Ce sont des prises de sortie de type RCA.
4. Prises BOOTH OUT
Ces prises fournissent le même signal audio que les prises MASTER OUT. Néanmoins, leur
volume n’est pas affecté par le bouton MASTER LEVEL. Ce sont des prises de sortie de type
RCA.
5. Prises INPUT (LINE)
Vous pouvez raccorder à ces prises du matériel de niveau ligne. Ce sont des prises d’entrée de
type RCA.
6. Prise MIC
Vous pouvez raccorder à cette prise un micro. C’est un jack TRS 6,35.
7. Prises INPUT (PHONO)
Vous pouvez raccorder à ces prises des platines tourne-disques. Ce sont des prises d’entrée de
type RCA.
8. Borne GND
Il s’agit d’une borne de mise à la terre pour les platines tourne-disques. Si vous utilisez les
prises PHONO, vous devez raccorder le(s) fil(s) de terre de votre/vos platine(s) tourne-disques à cette borne GND.
58
12 34 6
7
58
19
Page 20

2. Préparatifs
Avant de raccorder votre équipement, vous devez mettre les appareils hors tension et débrancher
les cordons d’alimentation du secteur.
Raccordements
Utilisez les prises appropriées pour les appareils que vous raccordez.
KM-402
PA Mixer
TURNTABLE
KM-202
PA Mixer
CD PLAYER
TURNTABLE
CD PLAYER
20
Page 21

Mise sous tension
Quand vous mettez ce mélangeur sous tension, vous devez observer la procédure suivante.
1. Raccordez le cordon d’alimentation.
Branchez le cordon d’alimentation fourni sur une prise secteur.
2. Mettez sous tension tous les appareils externes raccordés aux prises d’entrée du mélangeur.
3. Mettez en position basse tous les faders de canaux du mélangeur et le bouton MASTER VOLUME.
4. Mettez le mélangeur sous tension avec le commutateur de mise sous/hors tension situé sur le
panneau arrière du mélangeur.
Mettez sous tension les appareils raccordées aux prises MASTER OUT, comme votre amplificateur de contrôle.
Mise hors tension
1. Mettez en position basse tous les faders de canaux du mélangeur et le bouton MASTER VOLUME.
2. Mettez hors tension votre amplificateur de contrôle ou tout autre appareil raccordé aux prises
MASTER OUT.
3. Mettez le mélangeur hors tension avec le commutateur de mise sous/hors tension situé sur le
panneau arrière du mélangeur.
21
Page 22

3. Utilisation du mélangeur
Fonctionnement de base
Sélection des entrées
Utilisez le commutateur INPUT SELECT du panneau supérieur pour sélectionner les entrées souhaitées.
Réglage des niveaux d’entrée
Utilisez les boutons TRIM pour régler le niveau d’entrée de chaque canal de mixeur.
Réglez le bouton TRIM de telle manière que l’indicateur de niveau s’allume en jaune avec le fader de
canal en position maximale, et quand la source est à son niveau maximal.
Pour le KM-202
Utilisez le bouton MIC LEVEL pour régler le niveau d’entrée du micro raccordé à la prise
MIC. Utilisez le bouton MIC BALANCE pour régler le niveau de la balance pour les canaux
de mixeur PGM1 et PGM2.
Mélange du son
Utilisez les faders de canaux pour régler le volume de chaque canal de mixeur.
Utilisation du crossfader
Le signal audio mélangé par le crossfader est transmis au bus maître ou au bus FX.
Utilisez le bouton X-FADER CURVE du panneau avant pour régler la courbe (réponse) du crossfader.
Pour le KM-402
Utilisez la touche CH SELECT pour assigner le canal de mixeur correspondant à l’un des
deux canaux crossfader (A ou B).
Chaque fois que vous appuyez sur une touche
CH SELECT, son statut alternera entre canal A (allumé en vert) ➝ canal B (allumé en rouge) ➝ pas
de canal sélectionné (éteint).
Pour le KM-202
Le crossfader commutera PGM1 et PGM2.
allumé en vert allumé en rouge
Réglage du niveau maître
Utilisez le bouton MASTER LEVEL pour régler le volume d’ensemble transmis par les prises MASTER
OUT.
Contrôle du son
Branchez votre casque sur la prise de casque afin de contrôler les entrées audio ou le son mélangé.
CUE
Cette fonction vous permet de contrôler le son en l’écoutant au casque, avant qu’il n’arrive
aux faders de canaux, et séparément du son transmis par les prises MASTER OUT. Vous pouvez ainsi vérifier le son pendant que vous jouez. Le son du bus CUE peut être contrôlé via le
casque. Cela veut dire qu’avec les faders en position basse, vous pouvez utiliser le casque
pour vérifier l’entrée audio et les réglages d’égaliseur puis, quand vous êtes satisfait, les pousser
vers le haut afin que le son souhaité soit transmis depuis les sorties maître.
22
Page 23

Contrôle via CUE
Pour le KM-402
1. Appuyez sur la touche CUE du canal de mixeur que vous souhaitez contrôler.
2. Utilisez le bouton MONITOR BALANCE pour régler la balance du volume entre le son de la
sortie maître et celui du bus CUE.
Utilisez le bouton MONITOR LEVEL pour régler le volume d’ensemble.
Pour le KM-202
1. Utilisez le sélecteur CUE/MONITOR pour sélectionner CUE.
2. Utilisez le fader CUE MIX pour régler la balance du volume entre PGM1 et PGM2. Utilisez le
bouton MONITOR LEVEL pour régler le son d’ensemble.
Égaliseur
Utilisation de l’égaliseur pour régler le son
Vous pouvez utiliser l’égaliseur (EQ) pour couper ou renforcer les
plages de fréquences basses, moyennes ou hautes comme un outil
créatif de formation du son.
1. Utilisez le sélecteur EQ SELECT pour sélectionner le type
d’égaliseur souhaité.
2. Contrôlez l’égaliseur sélectionné.
Utilisez les boutons HI/MID/LO de chaque canal pour obtenir le caractère tonal souhaité.
Liste des types d’égaliseur
KM-Q
Il s’agit d’un égaliseur amélioré à partir des conseils de nombreux artistes renommés, utilisateurs fidèles du mélangeur KAOSS de la première génération.
HI: -25dB~+15dB MID: -25dB~+15dB LO: -25dB~+15dB
ROUND-Q
Il s’agit d’un égaliseur polyvalent approprié à tous les styles de musique.
HI: -28dB~+12dB MID: -28dB~+12dB LO: -28dB~+12dB
BOOST
Cet égaliseur est efficace quand il est utilisé comme booster. La plage de changement étendue
dans les fréquences moyennes et hautes vous permet de créer des sons puissants.
HI: -20dB~+18dB MID: -12dB~+12dB LO: -20dB~+18dB
SLAMMING
Pour modifier agressivement le son de la plage des fréquences moyennes, HI est réglé sur une
plage de fréquences inférieure à la normale et MID sur une plage supérieure. LO utilise une
courbe spéciale qui change en douceur dans le sens “+” et rapidement dans le sens “-”, vous
permettant ainsi d’appliquer une égalisation très expressive.
HI: -30dB~+6dB MID: -30dB~+6dB LO: -60dB~+6dB
ISOLATOR
Cet égaliseur utilise une courbe trapézoïdale et agit également sur le son de chaque plage de
fréquences. Il peut être utilisé comme filtre, coupant complètement le son, instantanément
pour un passage spécifique.
HI: -∞dB–+9dB MID: -∞dB–+9dB LO: -∞dB–+9dB
HYPED
Cet égaliseur utilise une courbe progressive. Il est utile pour modifier l’atmosphère d’un morceau entier, ainsi que son caractère tonal.
HI: -∞dB~+9dB MID: -∞dB~+9dB LO: -∞dB~+9dB
23
Page 24

4. Utilisation du KAOSS PAD
Application de l’effet KAOSS PAD au canal
Appuyez sur la touche KAOSS du canal de mixeur pour l’allumer et l’effet KAOSS PAD sera appliqué au son de ce canal de mixeur.
Effet SOLO
Si vous appuyez sur une touche KAOSS et la maintenez enfoncée (pendant environ deux secondes).
La touche KAOSS que vous avez enfoncée clignotera et l’effet sera appliqué seulement à ce canal
(KM-402) ou PGM (KM-202).
Fonctionnement du pavé tactile
Contrôlez l’effet en frottant la surface du pavé tactile du bout du doigt ou en la tapotant.
Maintien de l’effet
Si vous appuyez sur la touche HOLD, l’indicateur HOLD s’allumera. Dans cet état, vous pourrez
retirer votre doigt de la surface du pavé tactile et le son de l’effet sera maintenu.
Sélection d’un programme d’effet
Tournez le bouton PROGRAM/VALUE pour sélectionner un programme d’effet 00-99. Utilisez le
bouton DRY/WET pour régler l’intensité de l’effet.
Activation/désactivation de FX RELEASE
1. Tout en maintenant la touche PROGRAM MEMORY 2 enfoncée, appuyez sur la touche TAP.
2. Utilisez le bouton PROGRAM/BPM pour sélectionner “r.On” (FX RELEASE activé) ou “r.Of”
(FX RELEASE désactivé).
3. Appuyez de nouveau sur la touche TAP tout en maintenant la touche PROGRAM MEMORY
2 enfoncée. Vous reviendrez au statut de sélection de programme.
Alternativement, vous reviendrez au statut de sélection de programme si vous n’effectuez
aucun réglage pendant trois secondes.
Qu’est-ce que FX RELEASE ?
Au moment où vous retirez votre main du pavé tactile (c’est-à-dire, quand vous désactivez
l’effet), un delay calé sur le BPM/tempo actuel sera appliqué et diminuera progressivement.
Utilisation des touches PROGRAM MEMORY
Chacune des touches PROGRAM MEMORY peut mémoriser un programme d’effet, le statut activé/désactivé de la touche HOLD et la position sur le pavé tactile quand HOLD est activé.
En appuyant sur une touche PROGRAM MEMORY, vous pouvez instantanément restaurer l’état
mémorisé.
Pour enregistrer les réglages actuels sous une touche PROGRAM MEMORY
1. Avant de continuer, sélectionnez le programme que vous souhaitez mémoriser.
Si vous souhaitez enregistrer le statut Hold, appuyez sur la touche HOLD pour activer la
fonction Hold.
La dernière position de votre doigt sur le pavé tactile sera enregistrée.
24
2. Tout en maintenant enfoncée la touche PROGRAM MEMORY sous laquelle vous souhaitez enregistrer l’état actuel, appuyez sur la touche HOLD. L’état actuel sera enregistré sous la touche
PROGRAM MEMORY sur laquelle vous appuyez.
Page 25

Réglage du BPM
1. Quand vous appuyez sur la touche TAP, la valeur de BPM actuellement spécifiée est affichée.
2. Si vous appuyez plusieurs fois sur la touche TAP en suivant le temps du morceau, la valeur
correspondante du BPM sera détectée et la valeur de BPM appropriée sera spécifiée.
3. Quand la valeur de BPM est affichée, vous pouvez tourner le bouton PROGRAM/BPM pour
modifier la valeur de BPM.
4. Si vous maintenez la touche TAP enfoncée, vous pourrez revenir du réglage de BPM à la sélection de programme.
Alternativement, vous reviendrez à la sélection de programme si vous n’effectuez aucun réglage pendant cinq secondes.
Restauration des réglages d’usine
Pour restaurer les réglages d’usine, réglez le bouton EQ SELECTOR sur la position “KM-Q”, puis
mettez l’appareil sous tension tout en maintenant la toucheTAP et la touche PROGRAM MEMORY
1 enfoncées. Tous les réglages du KAOSS PAD seront réinitialisés à leur valeur d’usine.
25
Page 26

5. Appendice
Guide de dépannage
L’appareil ne peut pas être mis sous tension
• Le cordon d’alimentation est-il branché sur une prise secteur ?
•
Le commutateur de mise sous/hors tension du panneau arrière est-il sur la position correcte ?
Pas de son
• Le KM-402/KM-202 est-il sous tension ? Les appareils raccordés sont-ils sous tension ?
• Les faders de canaux ou le bouton MASTER LEVEL sont-ils en position basse ?
• Le volume du canal est-il baissé ?
• Le bouton TRIM est-il réglé à un niveau approprié ?
• Après le raccordement de la source audio aux prises d’entrée, l’avez-vous sélectionnée pour le
canal de mixeur correspondant ?
Réglez le commutateur INPUT SELECT de manière appropriée pour chaque canal de mixeur.
• Assurez-vous que le signal audio est bien reçu.
Utilisez le vumètre pour vérifier que le signal audio est bien reçu dans chaque canal de mixeur.
Trop de bruit ou de distorsion
• Le son sera déformé si le bouton TRIM est réglé sur une position trop haute, et il y aura plus
de bruit s’il est réglé sur une position trop basse.
Pour obtenir le réglage idéal, réglez le bouton TRIM sur la position la plus haute possible sans
que le voyant s’allume en rouge au niveau maximum. Si le voyant s’allume en rouge, le signal
sera coupé, déformant le son.
• Utilisez-vous la fonction KAOSS PAD ?
Certains des effets KAOSS PAD ajoutent intentionnellement de la distorsion ou du bruit. Vérifiez s’il reste de la distorsion ou du bruit quand vous n’utilisez pas d’effet.
• Si le son est déformé au niveau de l’égaliseur, effectuez le réglage suivant.
Réglez la valeur de gain de l’égaliseur.
Réglage du crossfader
Vous pouvez régler les points de transition gauche et droit du crossfader.
Le réglage Left (gauche) détermine à quel point de la course du crossfader Channel B (KM-402) ou
PGM 2 (KM-202) cessera complètement de produire un son. De même, Le réglage Right (droite)
détermine à quel point de la course du crossfader CH A (KM-402) ou PGM A (KM-202) cessera
complètement de produire un son.
Effectuez ce réglage si la transition du son ne s’effectue pas correctement à l’extrémité du fader, ou si
vous souhaitez raccourcir la course du fader. N’oubliez pas que le bouton X-FADER CURVE sur le
panneau avant n’aura pas d’influence sur la façon dont vous percevez ces réglages.
1. Mettez l’appareil hors tension
2. Réglez le bouton EQ SELECTOR sur la position “KM-Q”, puis mettez l’appareil sous tension
tout en maintenant la touche PROGRAM MEMORY 3 et la toucheTAP enfoncées.
L’afficheur indiquera “AdJ”, vous signalant ainsi que vous êtes en mode Crossfader Adjust
(réglage de crossfader).
3. Déplacez le crossfader sur le point à partir duquel vous souhaitez qu’il soit activé.
Quand vous déplacez le fader vers la gauche, l’afficheur indique “L**”. Quand vous déplacez
le fader vers la droite, l’afficheur indique “r**”. Chaque valeur “**” peut être réglée sur une
plage de 00 à 50.
Remarque: Dans certains cas, l’afficheur peut indiquer “01” ou “02” quand le fader est complètement poussé
vers un côté.
26
Page 27

4. Quand vous atteignez le point que vous souhaitez assigner comme bord gauche ou droit,
appuyez sur la touche TAP.
La décimale pour “L.” ou “r.” affichée s’allumera et le point sera assigné. Répétez cette opération pour le bord opposé du crossfader. (Vous ne pouvez pas assigner un point indiqué sous la
forme “--”.)
5. Quand vous avez spécifié les points gauche et droit, appuyez sur la touche MEMORY
PROGRAM 3 tout en maintenant la touche HOLD enfoncée.
L’indication “SET” clignotera sur l’afficheur et les réglages seront enregistrés. Une fois les
réglages enregistrés, “End” sera affiché.
6. Pour terminer le réglage, mettez l’appareil hors tension, puis mettez-le de nouveau sous tension de la manière normale.
Remarque: Si vous réinitialisez la fonction KAOSS PAD à ses réglages d’usine, le réglage du crossfader sera
lui aussi réinitialisé.
Spécifications
Alimentation: Courant secteur
Consommation: KM-402: 23W
KM-202: 20W (120V), 17W (220~230V)
Dimensions: 288mm (L) 384mm (P) 107mm (H)
Poids: 5,0 kg
Réponse en fréquence: 20 Hz~20 kHz ±1,0 dB (Typ.)(LINE)
Signal/Bruit: 90 dB @IHF-A (Typ.)(LINE)
INPUT (LINE)
Prises: Prises RCA L/R
Impédance d’entrée: 10 kΩ
Niveau nominal: 0 dBu
PHONO
Prises: Prises RCA
Impédance d’entrée: 40 kΩ
Conforme PHONO RIAA
MIC INPUT
Prise: Jack 6,35 mono
Impédance d’entrée: 50 kΩ
Niveau nominal: -50 dBu
MASTER OUTPUT L/R
Prises: Prises RCA L/R
Niveau nominal: 0 dBu
Impédance de charge: supérieure à 10 kΩ
BOOTH OUTPUT L/R
Prises: Prises RCA L/R
Niveau nominal: 0 dBu
Impédance de charge: supérieure à 10 kΩ
PHONES OUTPUT
Prise: Jack 6,35 stéréo
Impédance de sortie: 32Ω
Niveau maximal: 80 mW + 80 mW @32Ω
Accessoires inclus
Cordon d’alimentation
Manuel de l’utilisateur
* L’apparence et les spécifications techniques peuvent être sujettes à modifications sans avis préalable.
27
Page 28

WICHTIGE SICHERHEITSHINWEISE
• Bitte lesen Sie sich alle Bedienhinweise durch.
•Bewahren Sie diese Bedienhinweise auf.
• Beachten Sie alle Warnungen.
• Befolgen Sie alle Instruktionen.
•Verwenden Sie dieses Gerät niemals in der Nähe von Wasser.
• Ein netzgespeistes Gerät darf niemals Regen- oder Wassertropfen
ausgesetzt werden. Außerdem darf man keine Flüssigkeitsbehälter
wie Vasen usw. darauf stellen.
• Reinigen Sie es ausschließlich mit einem trockenen Tuch.
•Versperren Sie niemals die Lüftungsschlitze und stellen Sie das
Gerät nur an Orten auf, die vom Hersteller ausdrücklich empfohlen
werden.
• Stellen Sie das Gerät niemals in die Nähe einer Wärmequelle, z.B.
eines Heizkörpers, Ofens oder eines anderen Wärme erzeugenden
Gerätes (darunter auch Endstufen).
•Versuchen Sie niemals, die polarisierte Leitung bzw. Erde
hochzulegen oder zu umgehen. Ein polarisierter Stecker ist mit
zwei flachen Stiften unterschiedlicher Breite versehen. Ein Stecker
mit Erdung weist zwei Stifte und eine Erdungsbuchse auf. Wenn
der beiliegende Stecker nicht in Ihre Steckdose passt, sollten Sie
einen Elektriker bitten, die Steckdose zu erneuern (für die USA und
Kanada).
• Sorgen Sie dafür, dass man weder über das Netzkabel stolpern
kann, noch dass es in unmittelbarer Nähe einer Steckdose,
darunter auch Zusatzsteckdosen anderer Geräte, abgeklemmt
wird. Auch am Austritt aus dem Gerät darf das Netzkabel auf
keinen Fall gequetscht werden.
•Verwenden Sie nur Halterungen/Zubehör, die/das vom Hersteller
ausdrücklich empfohlen werden/wird.
• Im Falle eines Gewitters bzw. wenn Sie das Gerät längere Zeit nicht
verwenden möchten, lösen Sie bitte den Netzanschluss.
• Durch Ausschalten des Hauptschalters wird dieses Erzeugnis nicht
vollständig vom Netz getrennt. Ziehen Sie deshalb den Stecker des
Netzkabels aus der Steckdose, wenn Sie das Erzeugnis längere
Zeit nicht verwenden.
• Stellen Sie diesen Verstärker in der Nähe einer Wand
Schutzkontaktdose auf und achten Sie auf die freie Zugänglichkeit
des Netzanschlusskabels.
•Warnhinweis: Dieser Verstärker darf nur an Steckdosen mit
Schutzleiter (Erdung) betrieben werden.
• Überlassen Sie alle Wartungsarbeiten einem erfahrenen
Wartungstechniker. Wartungsarbeiten oder Reparaturen sind
erforderlich, wenn das Netzkabel oder der Stecker beschädigt ist,
wenn Flüssigkeit oder andere Gegenstände in das Geräteinnere
gefallen sind, wenn das Gerät im Regen gestanden hat, sich nicht
erwartungsgemäß verhält oder wenn es gefallen ist.
• Stellen Sie das Gerät niemals unmittelbar neben die Steckdose
und/oder Erweiterungssteckdose eines anderen Geräts.
• Stellen Sie das Gerät während des Betriebes niemals in einen
Türschrank oder den Lieferkarton.
• Hohe Schallpegel bei Verwendung eines großen oder kleinen
Kopfhörers können Hörschäden verursachen.
• Stellen Sie das Gerät nur auf einen Wagen, Ständer, Stative,
Halterungen oder Tische, die vom Hersteller ausdrücklich
empfohlen werden oder eventuell zum Lieferumfang gehören.
Seien Sie beim Verschieben eines geeigneten Wagens vorsichtig,
damit weder er, noch das Gerät selbst umkippt bzw. hinfällt und Sie
eventuell verletzt.
Gesundheitsgefahren. Die geltenden Vorschriften für richtige
Entsorgung sind je nach Bestimmungsland unterschiedlich. Bitte
informieren Sie sich bei der zuständigen Behörde über die bei
Ihnen geltenden Vorschriften zur Entsorgung.
* Die ubrigen in dieser Bedienungsanleitung erwahnten
Firmen-, Produkt-, Formatnamen usw. sind Warenzeichen
oder eingetra-gene Warenzeichen der rechtlichen
Eigentumer und werden ausdrucklich anerkannt.
Der als Pfeil dargestellte Blitz in einem
Dreieck weist den Anwender auf nicht
isolierte, „gefährliche Spannungen“ im
Geräteinneren hin, die so stark sein
können, dass sie einen Stromschlag
verursachen.
Das Ausrufezeichen in einem Dreieck weist
den Anwender darauf hin, dass zum
Lieferumfang des Gerätes wichtige Bedienund Wartungshinweise (eventuell
Reparaturhinweise) gehören.
Hinweis zur Entsorgung (nur EU)
Wenn dieses „durch gestrichener Müllkübel“ Symbol
auf dem Produkt oder in der Bedienungsanleitung
erscheint, müssen Sie dieses Produkt sachgemäß
als Sondermüll entsorgen. Entsorgen Sie dieses
Produkt nicht im Haushaltsmüll. Durch richtige
Entsorgung verhindern Sie Umwelt- oder
28
Page 29

Inhalt
1. Einleitung ........................................................... 30
Teile und ihre Funktionen........................................................................................... 30
2. Vorbereitung....................................................... 33
Anschlüsse ............................................................................................................... 33
Einschalten des Geräts .............................................................................................. 34
Ausschalten des Geräts ............................................................................................. 34
3. Verwendung des Mischpults................................. 35
Hauptbedienungsfunktionen ...................................................................................... 35
Mithören.................................................................................................................. 35
Equalizer ................................................................................................................. 36
4. Verwendung des KAOSS PAD .............................. 37
Anlegen des KAOSS-PAD-Effekts an den Kanal .......................................................... 37
Bedienung des Touchpads ......................................................................................... 37
Auswählen eines Effektprogramms ............................................................................. 37
Verwendung der PROGRAM-MEMORY-Tasten ............................................................ 37
Festlegen der Taktzahl (BPM) ..................................................................................... 38
Wiederherstellung der werkseitigen Einstellungen ....................................................... 38
5. Anhang .............................................................. 39
Fehlersuche .............................................................................................................. 39
Justierung des Crossfaders ........................................................................................ 39
Technische Daten ...................................................................................................... 41
29
Page 30

1. Einleitung
Vielen Dank für Ihre Entscheidung zum Kauf des DYNAMIC DJ MIXER KM-402/KM-202 von Korg!
Lesen Sie diese Bedienungsanleitung bitte sorgfältig durch, um den vollen Leistungsumfang Ihres
neuen Geräts genießen zu können, und verwenden Sie das Produkt in der vorgeschriebenen Weise.
Teile und ihre Funktionen
Oberseite
14
30
1
2
4
5
6
7
8
9
1. INPUT-SELECT-Schalter
Diese Schalter dienen zur Auswahl der Eingangsbuchsen, die den entsprechenden Mischpultkanälen zugewiesen werden.
2. TRIM-Knöpfe
Mithilfe dieser Knöpfe wird der Pegel des von den Eingangsbuchsen kommenden Audiosignals
eingestellt.
3. EQ-SELECTOR-Knopf
Mit diesem Knopf wird der Equalizer-Typ ausgewählt. Durch Umschalten des Typs können
Sie die tonalen Änderungen variieren, die durch die Justierung der EQ-Knöpfe für die Bänder
HI, MID und LOW erzeugt werden.
4. EQ-(Equalizer-)Knöpfe
Die Knöpfe HI, MID und LOW dienen zur Steuerung des Tons durch Justierung der entsprechenden Frequenzbänder.
5. KAOSS-Tasten
Mittels dieser Tasten kann der Mischpultkanal den eingebauten KAOSS-PAD-Effekten zugewiesen werden. Wenn die Taste leuchtet, ist der Effekt an den Mischpultkanal angelegt. Wenn
Sie die Taste erneut drücken, erlischt ihre Beleuchtung und der Effekt ist ausgeschaltet.
6. CUE-Tasten (nur beim KM-402)
Mittels dieser Tasten wird der Vor-Fader-Sound des Mischpultkanals zum CUE-Bus gesendet. Durch Einstellung des MONITOR-BALANCE-Knopfs in Richtung CUE können Sie den
Sound vom CUE-Bus über Ihre Kopfhörer mithören.
7. CH-SELECT-Tasten (nur beim KM-402)
Diese Tasten dienen der Zuweisung der Mischpultkanäle zum Kanal A (grün) oder zum Kanal B (rot) des Crossfaders.
Bei jedem Drücken einer Taste wechselt sie in der Reihenfolge grün ➝ rot ➝ dunkel. Wenn ein
Mischpultkanal weder dem Kanal A noch dem Kanal B zugewiesen ist (d.h. wenn seine LED
nicht leuchtet), wird der Sound dieses Mischpultkanals nicht durch den Crossfader geleitet.
10
3
14
11
1
2
13
44
5
8
9
10
3
12
Page 31
15
16
18
19
21
17
20
8. Kanal-Fader
Diese dienen zum Justieren der einzelnen Mischpultkanalpegel. Verwenden Sie zum Justieren
der Lautstärkebalance zwischen den Kanälen.
9. Crossfader
Den Crossfader können Sie zum Umschalten zwischen zwei Programmquellen oder zum Überblenden zwischen diesen bei DJ-Style-Performances verwenden.
Beim KM-402 dient er zum Überblenden zwischen den mittels der CH-SELECT-Knöpfe Kanal
A und Kanal B zugewiesenen Audiosignalen.
Beim KM-202 dient er zum Überblenden zwischen PGM1 und PGM2.
10. MASTER-LEVEL-Knopf und MASTER-PAN-Knopf
Dienen zum Justieren des Ausgangspegels der MASTER-OUT-Buchsen. Verwenden Sie den
MASTER-PAN-Knopf zum Justieren der L/R-Sound-Balance.
11. (Nur beim KM-402) MONITOR-BALANCE-Knopf und MONITOR-LEVEL-Knopf
MONITOR-BALANCE-Knopf: Wenn Sie diesen in Richtung CUE drehen, kann im Kopfhörer der von den einzelnen Kanälen an den CUE-Bus gesendete Sound mitgehört werden. Wenn
Sie ihn in Richtung MASTER drehen, kann im Kopfhörer der von den MASTER-OUT-Buchsen abgegebene Sound mitgehört werden.
MONITOR-LEVEL-Knopf: Mit diesem Knopf wird die Ausgangslautstärke der Kopfhörerbuchse justiert.
12. (Nur beim KM-202) CUE/MASTER-Wahlschalter, CUE-MIX-Fader, MONITOR-LEVEL-Knopf
CUE/MASTER-Wahlschalter: Wenn dieser in der CUE-Stellung ist, kann im Kopfhörer der
Sound des CUE-Busses mitgehört werden. Wenn dieser in der MASTER-Stellung ist, kann im
Kopfhörer der gleiche Sound wie der an den MASTER-OUT-Buchsen mitgehört werden.
CUE-MIX-Fader: Mit diesem Knopf wird die Lautstärkebalance des CUE-Busses zwischen
PGM1 und PGM2 justiert.
MONITOR-LEVEL-Knopf: Mit diesem Knopf wird die Ausgangslautstärke der Kopfhörerbuchse geregelt.
13. (Nur beim KM-202) MIC-LEVEL-Knopf und MIC-BALANCE-Knopf
MIC-LEVEL-Knopf: Mit diesem Knopf wird die Eingangslautstärke der MIC-Buchse justiert.
MIC-BALANCE-Knopf: Mit diesem Knopf wird die Balance des MIC-Buchsen-Signals zwi-
schen PGM1 und PGM2 geregelt.
14. KAOSS-PAD-Feld
15. Display
Auf diesem Display werden die Effektprogrammnummer des KAOSS PAD und die Taktzahl
(BPM) angezeigt.
16. DRY/WET-Knopf
Dient zur Einstellung der Effetktiefe.
17. PROGRAM/BPM-Knopf
Verwenden Sie diesen zur Auswahl eines Effektprogramms
für das KAOSS PAD oder zur Festlegung der Taktzahl
(BPM).
18. PROGRAM-MEMORY-Tasten
Sie können auf jeder der drei Program-Memory-Tasten ein
Effektprogramm speichern und dann eine der Tasten drükken, um das gespeicherte Programm direkt aufzurufen.
19. TOUCHPAD
Mit diesem X/Y-KAOSS-Pad können zwei verschiedene Parameter auf einmal gesteuert werden: Der eine unter Verwendung der X-Achse und der andere unter Verwendung der Y-Achse—zur spontanen
Echtzeitsteuerung.
20. PAD-HOLD-Taste
Durch die Hold-(„Halt“-)Funktion wird die derzeitige Position Ihres Fingers auf dem Pad
gespeichert, so das Sie den Finger vom Pad nehmen können und der Effekt dann unverändert
bleibt. Verwenden Sie diese Taste, um die Hold-Funktion ein- bzw. auszuschalten.
31
Page 32

21. TAP-Taste
Durch Drücken dieser Taste im gewünschten Intervall können Sie den Taktzahl-(BPM-)Wert
festlegen.
Vorderseite
12
1. X-FADER-CURVE-Knopf
Dient zur Festlegung der Crossfader-(Überblend-)Kurve. Wenn Sie diesen Knopf nach rechts
drehen, erzeugen Sie einen „Schalt“-Effekt; wenn Sie ihn dagegen nach links drehen, erhalten
Sie einen sanfteren Übergang. Anweisungen zur Änderung der Crossfader-Einstellungen finden Sie im Anhang.
2. Kopfhörerbuchse
Rückseite
32
7
1234 6
1. Netzschalter
Schaltet die Stromversorgung ein/aus.
2. Stromeingang
Schließen Sie das mitgelieferte Netzkabel an diesem Anschluss an.
3. MASTER-OUT-Buchsen
An diesen Buchsen wird das Audiosignal des Masterbusses ausgegeben. Es handelt sich um
RCA-Ausgangsbuchsen.
4. BOOTH-OUT-Buchsen
Diese Buchsen geben das gleiche Audiosignal wie die MASTER-OUT-Buchsen aus. Ihre Lautstärke wird jedoch nicht durch den MASTER-LEVEL-Knopf beeinflusst. Es handelt sich um
RCA-Ausgangsbuchsen.
5. INPUT-(LINE-)Buchsen
An diesen Buchsen können Sie Line-Pegel-Geräte anschließen. Es handelt sich um RCA-Eingangsbuchsen.
6. MIC-Buchse
An diesen Eingang können Sie ein Mikrofon anschließen. Dies ist eine unsymmetrische 1/4Zoll-Klinken-Eingangsbuchse.
7. INPUT-(PHONO-)Buchsen
An diesen Buchsen können Sie Plattenspieler anschließen. Es handelt sich um RCA-Eingangsbuchsen.
8. GND-Klemme
Hierbei handelt es sich um eine Masseklemme zum Anschluss Ihrer Plattenspieler. Falls Sie
die PHONO-Buchsen verwenden, müssen Sie das/die Massekabel ihres/ihrer Plattenspieler
an dieser GND-Klemme anschließen.
58
12 34 6
7
58
Page 33

2. Vorbereitung
Vor dem Anschließen Ihrer Geräte müssen Sie die Netzschalter ausschalten und die Netzkabel von
den Netzsteckdosen abziehen.
Anschlüsse
Verwenden Sie die für Ihre anzuschließenden Geräte geeigneten Buchsen.
KM-402
PA Mixer
TURNTABLE
KM-202
CD PLAYER
PA Mixer
TURNTABLE
CD PLAYER
33
Page 34

Einschalten des Geräts
Beim Einschalten dieses Mischpults müssen Sie sich an die folgende Vorgehensweise halten.
1. Stecken Sie das Netzkabel ein.
Schließen Sie das mitgelieferte Netzkabel am Netzeingang an.
2. Schalten Sie die an den Eingangsbuchsen des Mischpults angeschlossenen externen Geräte ein.
3. Drehen Sie alle Kanal-Fader des Mischpults und den MASTER-VOLUME-Knopf herunter.
4. Schalten Sie den Netzschalter an der Rückseite des Mischpults ein.
Schalten Sie die an den MASTER-OUT-Buchsen angeschlossenen Geräte, z.B. ihren Monitorverstärker, ein.
Ausschalten des Geräts
1. Drehen Sie alle Kanal-Fader des Mischpults und den MASTER-VOLUME-Knopf herunter.
2. Schalten Sie das an den MASTER-OUT-Buchsen angeschlossene Gerät, z.B. Ihren Monitorverstärker, aus.
3. Schalten Sie den Netzschalter an der Rückseite des Mischpults aus.
34
Page 35

3. Verwendung des Mischpults
Hauptbedienungsfunktionen
Auswahl der Eingänge
Wählen Sie mit dem INPUT-SELECT-Schalter auf der Oberseite die gewünschten Eingänge.
Einstellen der Eingangspegel
Stellen Sie mittels der TRIM-Knöpfe die Eingangspegel der einzelnen Mischpultkanäle ein.
Stellen Sie den TRIM-Knopf so ein, das die Pegelanzeige gelb leuchtet, während der Kanal-Fader
sich in der äußersten Stellung befindet und der Pegel der Eingangsquelle am höchsten ist.
Beim KM-202
Verwenden Sie zum Einstellen des Eingangspegels des an der MIC-Buchse angeschlossenen
Mikrofons den MIC-LEVEL-Knopf. Verwenden Sie den MIC-BALANCE-Knopf zur Anpassung der Pegel-Balance, die an die Mischpultkanäle PGM1 und PGM2 gesendet wird.
Mischen des Sounds
Verwenden Sie die Kanal-Fader zur Einstellung der Lautstärkepegel der einzelnen Mischpultkanäle.
Ver wendung des Crossfaders
Der vom Crossfader gemischte Ton wird an den Masterbus oder an den FX-Bus ausgegeben.
Verwenden Sie zum Justieren der Kurve (Frequenzgang) des Crossfaders den X-FADER-CURVEKnopf.
Beim KM-402
Verwenden Sie die CH-SELECT-Taste zur Zuweisung des entsprechenden Mischpultkanals
an einen der beiden Crossfader-Kanäle (A oder B).
Bei jedem Drücken der CH-SELECT-Taste wechselt diese in der Reihenfolge Kanal A (grün leuchtend) ➞ Kanal B (rot leuchtend) ➞ keine Auswahl
(nicht leuchtend).
Beim KM-202
Der Crossfader dient zum Überblenden zwischen PGM1 und PGM2.
grün leuchtend rot leuchtend
Einstellung des Masterpegels
Verwenden Sie den MASTER-LEVEL-Knopf, um die Gesamtlautstärke an den MASTER-OUT-Buchsen einzustellen.
Mithören
Schließen Sie Ihren Kopfhörer am Kopfhöreranschluss an, um die Audioeingänge oder den von
Ihnen gemischten Sound mithören zu können.
CUE
Mittels dieser Funktion können Sie den Sound an einem Punkt vor dem Kanal-Fadern überwachen (über Kopfhörer mithören), d.h. getrennt vom Sound, der an den MASTER-OUTBuchsen ausgegeben wird, und damit haben Sie die Möglichkeit, während einer Performance
den Sound zu überprüfen oder Material „aufzurufen“. Der Sound des CUE-Busses kann über
Kopfhörer mitgehört werden. D.h., Sie können bei niedriger Einstellung der Fader die Kopfhörer zur Überprüfung des Audioeingangs und der EQ-Einstellungen verwenden und, wenn
Sie damit zufrieden sind, den Kanal-Fader höher einstellen, so dass der gewünschte Sound an
den Master-Ausgängen ausgegeben wird.
35
Page 36

Mithören über CUE
Beim KM-402
1. Drücken Sie die CUE-Taste des Mischpultkanals, den Sie mithören möchten.
2. Verwenden Sie zum Justieren der Lautstärkebalance zwischen dem Master-Ausgangssound
und dem CUE-Bus-Sound den MONITOR-BALANCE-Knopf.
Verwenden Sie den MONITOR-LEVEL-Knopf, um die Gesamtlautstärke zu justieren.
Beim KM-202
1. Verwenden Sie zur Auswahl von CUE den CUE/MONITOR-Wahlschalter.
2. Verwenden Sie den CUE-MIX-Fader zum Justieren der Lautstärkebalance zwischen PGM1 und
PGM2. Verwenden Sie den MONITOR-LEVEL-Knopf, um die Gesamtlautstärke einzustellen.
Equalizer
Verwendung des Equalizers zum Anpassen des Sounds
Sie können den Equalizer (EQ) durch Abschneiden oder Anheben
des Nieder-, Mitten- oder Hochfrequenzbereichs als kreatives
Sound-Shaping-Tool verwenden.
1. Verwenden Sie den EQ-SELECT-Knopf zur Auswahl des
gewünschten Equalizertyps.
2. Regeln Sie den Equalizer, den Sie als EQ-Typ ausgewählt
haben.
Verwenden Sie zum Modifizieren des Tons in der gewünschten Weise die HI/MID/LO-Knöpfe des jeweiligen Kanals.
EQ-Typenliste
KM-Q
Dies ist ein Equalizer, der auf Grund der Ansichten zahlreicher prominenter Künstler verbessert
wurde, die zu den treuesten Anwendern des KAOSS-Mischpults der ersten Generation gehören.
HI: -25 dB – +15 dB MID: -25 dB – +15 dB LO: -25dB – +15dB
ROUND-Q
Dies ist ein Allround-Equalizer, der eine gute Wahl für alle Musikstile darstellt.
HI: -28 dB – +12 dB MID: -28 dB – +12 dB LO: -28dB – +12dB
BOOST
Dieser ist wirkungsvoll, wenn er als Booster eingesetzt wird. Die Mitten- und Hochfrequenzänderungsbereiche sind weit und ermöglichen dadurch die Schaffung kraftvoller Sounds.
HI: -20 dB – +18 dB MID: -12 dB – +12 dB LO: -20dB – +18dB
SLAMMING
Um den Mittenbereichs-Sound stark zu modifizieren, ist HI auf einen Frequenzbereich eingestellt, der niedriger als normal ist, und MID auf einen Bereich, der höher als normal ist. Bei LO
wird eine Spezialkurve verwendet, die sich in der „+“-Richtung sanft und in der „-“-Richtung
steil verändert und Ihnen damit die Möglichkeit hoch expressiver Equalizer-Effekte eröffnet.
HI: -30 dB – +6 dB MID: -30 dB – +6 dB LO: -60dB – +6dB
36
ISOLATOR
Bei diesem wird eine trapezoide Kurve verwendet; er wird in gleicher Weise auf den Sound der einzelnen Frequenzbänder angelegt. Er kann als Isolator verwendet werden, der den Sound vollständig
abschneidet, und er kann den Sound eines besonderen Teils ohne Verzögerung abschneiden.
HI: -∞ dB – +9 dB MID: -∞ dB – +9 dB LO: -∞ dB – +9 dB
HYPED
Dieser Equalizer hat eine Stufenkurve. Mit ihm kann die Atmosphäre des gesamten Songs
verändert werden, und auch für Tonanpassungen ist er nützlich.
HI: -∞ dB – +9 dB MID: -∞ dB – +9 dB LO: -∞ dB – +9 dB
Page 37

4. Verwendung des KAOSS PAD
Anlegen des KAOSS-PAD-Effekts an den Kanal
Drücken Sie die KAOSS-Taste des Mischpultkanals, so dass sie aufleuchtet: Der KAOSS-PAD-Effekt
wird jetzt an den Sound des betreffenden Mischpultkanals angelegt.
SOLO-Effekt
Wenn Sie die KAOSS-Taste ca. zwei Sekunden lang gedrückt halten, blinkt diese KAOSS-Taste. Der
Effekt wird dann allein an den betreffenden Kanal (KM-402) bzw. PGM (KM-202) angelegt.
Bedienung des Touchpads
Steuern Sie den Effekt, indem Sie das Touchpad mit dem Finger reiben oder mit dem Finger auf es
klopfen.
Hold
Wenn Sie die HOLD-Taste drücken, leuchtet die HOLD-Anzeige auf. Wenn Sie in diesem Zustand
den Finger vom Touchpad nehmen, bleibt der Sound des unmittelbar vorangegangenen Effekts erhalten.
Auswählen eines Effektprogramms
Drehen Sie den PROGRAM/VALUE–Knopf, um ein Effektprogramm zwischen 00 und 99 auszuwählen. Verwenden Sie den DRY/WET-Knopf zum Justieren der Tiefe des Effekts.
Ein- und Ausschalten von FX RELEASE
1. Drücken Sie die TAP-Taste, während Sie die Taste PROGRAM MEMORY 2 gedrückt halten.
2. Wählen Sie mit dem PROGRAM/BPM-Knopf „r.On“ (FX RELEASE ein) oder „r.Of“ (FX RELEASE aus).
3. Halten Sie die Taste PROGRAM MEMORY 2 nochmals gedrückt und drücken Sie zugleich die
TAP-Taste. Damit kehren Sie zum Programmwahlstatus zurück.
Alternativ dazu kehren Sie auch dann zum Programmwahlstatus zurück, wenn Sie drei Sekunden lang keinerlei Einstellungen vornehmen.
Was ist FX RELEASE?
Durch FX RELEASE wird ein mit der aktuellen Taktzahl (BPM) / mit dem aktuellen Tempo
synchronisierter Delay-Effekt erzeugt. Der Effekt setzt in dem Moment ein, in dem Sie die
Hand vom Touchpad nehmen (d.h. in dem Moment, in dem Sie den Effekt ausschalten) und
klingt anschließend allmählich ab.
Verwendung der PROGRAM-MEMORY-Tasten
Mit jeder der PROGRAM-MEMORY-Tasten kann ein Effektprogramm, der Ein/Aus-Status der
HOLD-Taste und, sofern HOLD aktiviert ist, die Touchpad-Position gespeichert werden.
Durch Drücken der PROGRAM-MEMORY-Taste können Sie den gespeicherten Status unmittelbar
abrufen.
Speichern der aktuellen Einstellungen auf einer PROGRAM-MEMORY-Taste
1. Wählen Sie, bevor Sie fortfahren, das Programm aus, das Sie speichern wollen.
Falls Sie den Hold-Status speichern möchten, drücken Sie die HOLD-Taste, um die HoldFunktion einzuschalten.
Die Position, an der Sie das Touchpanel zuletzt berührt haben, wird gespeichert.
37
Page 38

2. Drücken Sie die HOLD-Taste, während Sie die PROGRAM-MEMORY-Taste gedrückt halten,
auf der Sie den aktuellen Status speichern möchten. Der aktuelle Status wird jetzt auf der gedrückt gehaltenen PROGRAM-MEMORY-Taste gespeichert.
Festlegen der Taktzahl (BPM)
1. Wenn Sie die TAP-Taste drücken, wird die aktuelle Taktzahl-(BPM-)Einstellung auf dem Display angezeigt.
2. Wenn Sie die TAP-Taste mehrmals im Rhythmus des Song-Tempos drücken, wird der entsprechende Taktzahlwert ermittelt und der angemessene Taktzahlwert angegeben.
3. Während der Taktzahlwert angezeigt wird, können Sie den PROGRAM/BPM-Knopf drehen,
um ihn zu ändern.
4. Wenn Sie die TAP-Taste gedrückt halten, schalten Sie von der Taktzahl-Einstellung zur
Programmwahl zurück.
Alternativ dazu kehren Sie auch dann zum Programmwahlstatus zurück, wenn Sie fünf Sekunden lang keinerlei Einstellungen vornehmen.
Wiederherstellung der werkseitigen Einstellungen
Stellen Sie zur Wiederherstellung der werkseitigen Einstellungen den EQ-SELECTOR-Knopf in die
„KM-Q“-Position und schalten Sie das Gerät anschließend ein, während Sie die TAP-Taste und die
PROGRAM-MEMORY-1-Taste gedrückt halten. Alle Einstellungen des KAOSS PAD werden so auf
den werkseitig eingestellten Zustand zurückgesetzt.
38
Page 39

5. Anhang
Fehlersuche
Gerät lässt sich nicht einschalten
• Ist das Netzkabel an eine funktionierende Stromsteckdose angeschlossen?
• Ist der Netzschalter an der Rückseite eingeschaltet?
Kein Ton
• Ist das KM-402/KM-202 eingeschaltet? Sind die angeschlossenen Geräte eingeschaltet?
• Sind die Kanal-Fader oder ist der MONITOR-LEVEL-Knopf heruntergedreht?
• Ist der Lautstärkepegel des Kanals heruntergedreht?
• Ist der TRIM-Knopf auf den richtigen Pegel angehoben?
• Haben Sie Ihre Audioquelle nach deren Anschluss an den Eingangsbuchsen für den entsprechenden Mischpultkanal ausgewählt?
Stellen Sie den INPUT-SELECT-Schalter für jeden Mischpultkanal richtig ein.
•Vergewissern Sie sich, dass Audiosignale eingehen.
Verwenden Sie den Pegelmesser zur Überprüfung, ob Audiosignale in jedem Mischpultkanal
eingehen.
Zu starkes Rauschen oder Verzerrung
• Der Sound wird verzerrt, wenn der TRIM-Knopf zu hoch eingestellt ist, und ein stärkeres
Rauschen tritt auf, wenn er zu niedrig eingestellt ist.
Stellen Sie, um die ideale Einstellung zu erzielen, den TRIM-Knopf so hoch wie möglich ein,
ohne dass die Pegelanzeige jedoch beim Erreichen des Maximalpegels rot aufleuchtet. Wenn
die Anzeige rot aufleuchtet, wird das Signal übersteuert und der Sound verzerrt.
•Verwenden Sie gerade die KAOSS-PAD-Funktion?
Durch manche der KAOSS-PAD-Effekte werden absichtlich Verzerrung oder Rauschen hinzu-
gefügt. Überprüfen Sie, ob es noch immer zu Rauschen oder Verzerrungen kommt, wenn Sie
keinen Effekt verwenden.
•Wenn der Klang beim Equalizer verzerrt ist, nehmen Sie folgende Justierung vor.
Justieren Sie den Gain-Wert des Equalizers.
Justierung des Crossfaders
Sie können den linken und den rechten Übergangspunkt des Crossfaders justieren.
Durch die Left-Einstellung wird festgelegt, an welchem Punkt des Wegs des Crossfaders Channel B
(KM-402) bzw. PGM 2 (KM-202) keinerlei Klang mehr abgibt. Durch die Right-Einstellung wird
hingegen festgelegt, an welchem Punkt des Wegs des Crossfaders CH A (KM-402) bzw. PGM A
(KM-202) keinerlei Klang mehr abgibt.
Nehmen Sie diese Justierung vor, wenn der Sound-Übergang an der Fader-Schwelle nicht korrekt
erfolgt oder wenn Sie den Überblendweg verkürzen möchten. Bedenken Sie bitte, dass sich die Stellung des X-Fader-CURVE-Knopfes an der Vorderseite auf den wahrgenommenen Effekt dieser Einstellungen auswirkt.
1. Schalten Sie das Gerät aus.
2. Stellen Sie den EQ-SELECTOR-Knopf in die „KM-Q“-Position und schalten Sie das Gerät anschließend ein, während Sie die PROGRAM-MEMORY-3-Taste und die TAP-Taste gedrückt
halten.
Auf dem Display wird jetzt „AdJ“ angezeigt, was bedeutet, dass Sie sich jetzt im CrossfaderAdjust-Modus (Crossfader-Justiermodus) befinden.
39
Page 40

3. Bewegen Sie den Crossfader an den Punkt, an dem Sie ihn wirksam werden lassen möchten.
Wenn Sie den Fader nach links bewegen, erscheint auf dem Display „L**“. Wenn Sie den
Fader nach rechts bewegen, erscheint auf dem Display „r**“. Jedes „**“ kann innerhalb eines
Bereichs von 00 bis 50 justiert werden.
Hinweis: In einigen Fällen, und zwar wenn der Fader sich gänzlich auf einer Seite befindet, kann es sein,
dass auf dem Display „01“ oder „02“ angezeigt wird.
4. Drücken Sie an dem Punkt, den Sie als linke und rechte Schwelle zuweisen möchten, die TAPTaste.
Der Dezimalpunkt für das „L.“ oder das „r.“ leuchtet auf dem Display auf und die Einstellung wird an jenem Punkt zugewiesen. Wiederholen Sie diesen Schritt für die entgegengesetzte Seite des Crossfaders. (Ein als „--“ angezeigter Punkt kann nicht zugewiesen werden.)
5. Halten Sie, nachdem Sie den rechten und den linken Punkt festgelegt haben, die HOLD-Taste
gedrückt und drücken Sie die PROGRAM-MEMORY-3-Taste.
Auf dem Display blinkt „SET“ und die Einstellungen werden gespeichert. Wenn der Speichervorgang für die Einstellungen abgeschlossen ist, wird auf dem Display „End“ angezeigt.
6. Schalten Sie das Gerät aus, um die Einstellung abzuschließen, und schalten Sie das Gerät dann
in der normalen Weise wieder ein.
Hinweis: Wenn Sie die KAOSS-PAD-Funktion auf den werkseitig eingestellten Zustand initialisieren, wird
auch die Crossfader-Justiereinstellung initialisiert.
40
Page 41

Technische Daten
Stromversorgung: Wechselstrom, örtliche Spannung
Leistungsaufnahme: KM-402: 23 W
Abmessungen: 288 mm (W) 384 mm (T) 107 mm (H)
Gewicht: 5,0 kg
Frequenzgang: 20 Hz–20 kHz ± 1,0 dB (Typ.)(LINE)
Signal-/Rauschabstand: 90 dB @ IHF-A (Typ.)(LINE)
INPUT (LINE)
Anschlüsse: RCA-Buchsen L/R
Eingangsimpedanz: 10 kΩ
Nennpegel: 0 dBu
PHONO
Anschlüsse: RCA-Buchsen
Eingangsimpedanz: 40 kΩ
MIC INPUT
Anschlüsse: 1/4-Zoll- Mono-Klinkenbuchse
Eingangsimpedanz: 50 kΩ
Nennpegel: -50 dBu
MASTER OUTPUT L/R
Anschluss: RCA-Buchsen L/R
Nennpegel: 0 dBu
Lastimpedanz: höher als 10 kΩ
KM-202: 20 W (120 V), 17 W (220–230 V)
PHONO RIAA-konform
BOOTH OUTPUT L/R
Anschluss: RCA-Buchsen L/R
Nennpegel: 0 dBu
Lastimpedanz: höher als 10 kΩ
PHONES OUTPUT
Anschluss: 1/4-Zoll-Stereoklinkenbuchse
Ausgangsimpedanz: 32 Ω
Maximaler Pegel: 80 mW + 80 mW @ 32 Ω
Im Lieferumfang inbegriffen
Netzkabel
Bedienungsanleitung
* Änderungen des Designs und der technischen Daten ohne Vorankündigung bleiben vorbehalten.
41
Page 42

EFFECT PROGRAM LIST
Program Name X AXIS Y AXIS Fx Release BPM Sync
00 LPF(Low Pass Filter) Cutoff Frequency Resonance
01 HPF(High Pass Filter) Cutoff Frequency Resonance
02 BPF+(Band Pass Filter+) Cutoff Frequency Resonance
03 72dB/oct LPF Cutoff Frequency Resonance
04 LPF & Delay Delay Time LPF Cutoff & Resonance
05 HPF & Delay Delay Time HPF Cutoff & Resonance
06 BPF+ & Delay Delay Time BPF Cutoff & Resonance
07 LPF & Reverb Reverb Depth LPF Cutoff & Resonance
08 HPF & Reverb Reverb Depth HPF Cutoff & Resonance
09 BPF+&Reverb Reverb Depth BPF Cutoff & Resonance
10 Morphing Filter LPF - BPF+ - HPF Cutoff & Resonance
11 Radio Filter Band Width Noise Level
12 Radio Isolator Mid+Low - Mid - Mid+Hi Level & Drive
13 Isolator Low - Mid - Hi Level & Drive
14 Isolator & Distortion Low - Mid - Hi Distortion
15 Isolator & Delay Low - Mid - Hi Delay Depth
16 Jet(Manual Flanger) Delay Time Feedback
17 Manual Phaser Frequency Resonance
18 Talk Filter 1st Formant 2nd Formant
19 Digi Talk 1st Formant 2nd Formant
20 Ring Mod & HPF Ring Mod Frequency HPF Cutoff & Resonance
21 Pitch Shifter & HPF Pitch Shift HPF Cutoff & Resonance
22 Mid Pitch Shifter Pitch Shift
Mix Balance(Original - Mix - Pitch Shift)
.
23 Pitch Shifter & Delay Pitch Shift Delay Depth
24 Broken Modulation Frequency Depth
25 Fuzz Distortion Low Boost - Low Cut Distortion
26 Decimator Sampling Frequency Sampling Bit
27 Decimator & HPF Decimator Frequency & Bit HPF Cutoff & Resonance
28 LFO LPF LFO Speed Resonance
29 LFO HPF LFO Speed Resonance
30 LFO BPF+ LFO Speed Resonance
31 LFO HPF+ & Delay Delay Time HPF Level, Delay Depth
32 Infinite LFO HPF+ LFO Speed Resonance
33 Random LFO LPF LFO Speed LFO Depth
34 Random LFO HPF+ LFO Speed LFO Depth
35 Flanger LFO Speed Feedback
36 Deep Flanger LFO Speed Feedback
37 Mid Flanger LFO Speed Feedback
38 Flanger & LPF Flanger LFO Speed LPF Cutoff & Resonance
39 Flanger & Delay Delay Time Flanger Feedback, Delay Depth
40 Infinite LFO Flanger LFO Speed Feedback
41 Phaser LFO Speed Resonance
42 Mid Phaser LFO Speed Resonance
43 Phaser & Delay Delay Time Phaser Resonance, Delay Depth
44 Step Phaser Frequency Resonance
45 Auto Pan LFO Speed Mono Mix - Auto Pan
46 Mid Auto Pan LFO Speed LFO Depth
47 Slicer LFO Speed LFO Depth
48 Mid Slicer LFO Speed LFO Depth
49 Slicer & LPF Slicer LFO Speed LPF Cutoff & Resonance
Program Name X AXIS Y AXIS Fx Release BPM Sync
50 Slicer & HPF Slicer LFO Speed HPF Cutoff & Resonance
51 Delay Delay Time Delay Depth
52 Smooth Delay Delay Time Delay Depth
53 Low Cut Delay Delay Time Delay Depth
54 Ping Pong Delay Delay Time Delay Depth
55 LCR Delay Delay Time Delay Depth
56 3 band Delay Low - Mid - Hi Delay Depth
57 Multi Tap Delay Delay Tone Delay Depth
58 BPF Time Slide Delay Time BPF Frequency
59 Reverse Delay & HPF Delay Time HPF Cutoff & Resonance
60 Reverse Delay Mix Delay Time Delay Depth
61 Gate Reverb & Delay Delay Time Delay Depth, Reverb Depth
62 Delay & Reverb Delay Time Delay Depth, Reverb Depth
63 Tape Echo Delay Time Delay Depth
64 Dub Echo Delay Time Delay Tone
65 Feedback Echo Delay Time Delay Depth
66 Reverb Reverb Time Reverb Depth
67 Reverb 2 Reverb Time Reverb Depth
68 Spring Reverb Reverb Time Reverb Depth
69 Gate Reverb Gate Time Reverb Depth
70 Reverse Gate Reverb Gate Time Reverb Depth
71 3 band Gate Reverb Low - Mid - Hi Reverb Depth
72 Grain Shifter Cycle Speed Length
73 Mid Grain Shifter Cycle Speed Length
74 Mid Grain Shifter+ Cycle Speed Length
75 Grain&HPF Grain Cycle Speed & Length HPF Cutoff & Resonance
76 Grain&HPF+ Grain Speed HPF Cutoff & Resonance
77 Looper’ Forward/Reverse Looper Beat Reverse - Forward(Cross Fade)
78 Vinyl Looper’ Looper Beat Reverse - Forward (Pitch)
79 Rewind Spin Looper’ Looper Beat Rewind Spin - Forward
80 Looper’ & LPF Looper Beat LPF Cutoff & Resonance
81 Looper’ & HPF Looper Beat HPF Cutoff & Resonance
82 Looper’ & Flanger Looper Beat Flanger Feedback
83 Looper’ & Pitch Shifter Looper Beat Pitch Shift
84 Looper’ & Decimator Looper Beat Decimator Frequency & Bit
85 Looper’, Isolator & HPF Looper Beat HPF Cutoff & Resonance
86 Looper’ & Isolator+ Looper Beat Low - Mid - Hi
87 Bass Looper’ Looper Beat Reverse - Forward(Cross Fade)
88 Looper’ & Oscillator Looper Beat Oscillator Pitch, etc.
89 Looper’ & Noise Looper Beat Noise Level, etc.
90 Unison Saw Bass Synth Pitch HPF Cutoff & Resonance
91 Unison Squ Bass Synth Pitch HPF Cutoff & Resonance
92 Unison Saw Synth Synth Pitch HPF Cutoff & Resonance
93 Unison Squ Synth Synth Pitch HPF Cutoff & Resonance
94 Metalic Synth Synth Pitch, BPF Cutoff etc... LFO Speed etc...
95 Siren LFO Speed etc... LFO Intensity
96 LFO Sin Synth Pitch, LFO Speed HPF Cutoff & Resonance
97 LFO Squ Synth Pitch, LFO Speed HPF Cutoff & Resonance
98 Noise Noise Tone Noise Level
99 Synth & Looper’ Synth Tone Looper Off - Looper On (Beat)
55
Page 43

BLOCK DIAGRAM
Hi Mid Lo
Hi Mid Lo
Hi Mid Lo
Hi Mid Lo
PAN
Only one position
MIC
LINE
PGM1
PHONO
LINE
PGM2
PHONO
LINE
PGM3
PHONO
LINE
PGM4
MIC AMP
SELECT
TRIM
SELECT
TRIM
SELECT
TRIM
SELECT
TRIM
Channel
Fader
CUE
Channel
Fader
CUE
Channel
Fader
CUE
Channel
Fader
CUE
A/D 3Band EQ
A/D 3Band EQ
A/D 3Band EQ
A/D
3Band EQ
FX
Dry/Wet
CH SELECT
X-Fader
FX
Dry/Wet
CH SELECT
X-Fader
X-Fader
FX
Dry/Wet
CH SELECT
X-Fader
FX
Dry/Wet
CH SELECT
X-Fader
FX
FX
FX
FX
FX
Dry/Wet
BALANCE
LEVEL
LEVEL
Meter
Lch/Rch
D/A
D/A
Meter
CUE
L
BOOTH
MONITOR
X-FADER CURVE
Phono
EQ
Phono
EQ
Phono
EQ
R
L
R
L
R
MASTER
KM-402
SCHÉMA TECHNIQUE
56
Page 44

Hi Mid Lo
A/D 3Band EQ
Hi Mid Lo
A/D 3Band EQ
Only one position
MIC
MIC AMP
LEVEL
FX
FX
FX
Dry/Wet
BALANCE
BALANCE
Meter
Meter
X-FADER CURVE
PHONO
LINE
PGM1
SELECT
TRIM
Phono
EQ
PHONO
LINE
PGM2
SELECT
TRIM
Phono
EQ
PAN
BALANCE
LEVEL
D/A
MONITOR
L
R
Channel
Fader
FX
Dry/Wet
X-Fader
Channel
Fader
FX
Dry/Wet
LEVEL
D/A
L
BOOTH
R
L
R
MASTER
BLOCKDIAGRAMM
KM-202
57
Page 45

58
Page 46

IMPORTANT NOTICE TO CONSUMERS
This product has been manufactured according to strict specifications and voltage requirements that are applicable in the country in which it is intended that this product
should be used. If you have purchased this product via the internet, through mail order,
and/or via a telephone sale, you must verify that this product is intended to be used in
the country in which you reside.
WARNING: Use of this product in any country other than that for which it is intended
could be dangerous and could invalidate the manufacturer’s or distributor’s warranty.
Please also retain your receipt as proof of purchase otherwise your product may be
disqualified from the manufacturer’s or distributor’s warranty.
REMARQUE IMPORTANTE POUR LES CLIENTS
Ce produit a été fabriqué suivant des spécifications sévères et des besoins en tension
applicables dans le pays où ce produit doit être utilisé. Si vous avez acheté ce produit
via l’internet, par vente par correspondance ou/et vente par téléphone, vous devez
vérifier que ce produit est bien utilisable dans le pays où vous résidez.
ATTENTION: L’utilisation de ce produit dans un pays autre que celui pour lequel il a
été conçu peut être dangereuse et annulera la garantie du fabricant ou du distributeur.
Conservez bien votre récépissé qui est la preuve de votre achat, faute de quoi votre
produit ne risque de ne plus être couvert par la garantie du fabricant ou du distributeur.
WICHTIGER HINWEIS FÜR KUNDEN
Dieses Produkt wurde unter strenger Beachtung von Spezifikationen und Spannungsanforderungen hergestellt, die im Bestimmungsland gelten. Wenn Sie dieses Produkt
über das Internet, per Postversand und/oder mit telefonischer Bestellung gekauft haben, müssen Sie bestätigen, dass dieses Produkt für Ihr Wohngebiet ausgelegt ist.
WARNUNG: Verwendung dieses Produkts in einem anderen Land als dem, für das es
bestimmt ist, verwendet wird, kann gefährlich sein und die Garantie des Herstellers
oder Importeurs hinfällig lassen werden. Bitte bewahren Sie diese Quittung als Kaufbeleg auf, da andernfalls das Produkt von der Garantie des Herstellers oder Importeurs ausgeschlossen werden kann.
2007 KORG INC.
4015-2 Yanokuchi, Inagi-city, Tokyo 206-0812 Japan
1
 Loading...