

Page 1
1
EXBP-MP3
Pa1X MP3 Expansion Board
Thank you for purchasing the EXBP-MP3 MP3 Expansion Board for the Korg Pa1X Professional Arrangers! This user-installable card will let your Pa1X and Pa1X Pro play and record
MP3 files, allowing for easy music data exchange with an y personal computer or stand-alone
MP3 player. Please see the User’s Manual for more information on how to use it.
Please note Korg is not responsible for any damage or injury caused by incorrect installation of this card by unauthorized personnel.
Félicitations et merci d’avoir choisi la carte d’expansion EXBP-MP3 pour les arrangeurs professionnels de la série Pa1X Korg. Cette carte, que l’utilisateur peut directement installer, permet de
reproduire et d’enregistrer des fichiers MP3 : ainsi, vous pourrez échanger des données musicales
avec n’importe quel micro-ordinateur ou reproducteur MP3. En ce qui concerne les informations
relatives à l’usage de cette carte, voir le mode d’emploi.
Attention : Korg décline toutes responsabilités envers des dommages aux choses ou aux personnes provoqués par l’installation de la carte
par du personnel non agréé.
Vielen Dank, dass Sie sich für eine EXBP-MP3 MP3 Erweiterungsplatine für Ihren Professional Arranger Pa1X von Korg entschieden
haben! Mit dieser vom An w ender einbaubaren Platine können Sie mit Ihrem Pa1X oder P a1X Pro MP3-Dateien abspielen und aufnehmen,
was den Austausch von Songs mit einem Computer oder MP3-Player erlaubt. Die Funktionen und Bedienvorgänge werden in der Bedienungsanleitung vorgestellt.
Korg haftet nicht für Schäden oder Verletzungen, die sich aus dem unsachgemäßen Einbau dieser Platine ergeben können.
Grazie per avere acquistato la scheda di espansione EXBP-MP3 per gli arranger professionali della serie Pa1X di Korg. Questa scheda, installabile
dall’utente, permette di suonare e registrare file MP3, in modo da consentire lo scambio di dati musicali con qualsiasi personal computer e lettore
MP3. Vi preghiamo di consultare il Manuale di istruzioni per informazioni sull’uso di questa scheda.
Attenzione: Korg non si assume responsabilità per danni a cose o persone causati dall’installazione della scheda da parte di personale
non autorizzato.
Precautions - Précautions - Warnhinweise - Precauzioni
• Installation of the card is done at the user’s own risk. Korg will assume no responsibility for any damage or injury resulting from its
improper installation or use.
• Be sure to disconnect the instrument from the AC plug, before opening it.
• To prevent your body’s static electricity from damaging the board’s c omponents, touch an unpainted metallic component before proceeding with the installation.
• L’installation de la carte est aux risques de l’utilisateur. Korg décline toutes responsabilités envers tous dommages ou blessures provoqués par une
installation ou une utilisation incorrectes.
• Avant d’ouvrir l'instrument, enlevez la fiche du Pa1X de la prise secteur.
• Avant de procéder à l'installation, touchez un élément métallique non peint, afin de décharger l'éventuelle électricité statique dont vous êtes porteur, car celle-ci est en mesure d'endommager les composants de la carte.
• Die Installation der Karte erfolgt auf eigene Gefahr des Benutzers. Korg übernimmt keine Haftung für eventuelle Personen- oder Sachschäden aufgrund von unsachgemäßer Installation bzw. Gebrauch.
• Vor dem Öffnen des Instruments lösen Sie bitte den Netzstecker.
• Um eine Beschädigung der Bauteile des Boards durch die statische Elektrizität Ihres Körpers zu vermeiden, sollten Sie ein unlackiertes
Metallteil berühren, bevor Sie mit der Installation beginnen.
• L’installazione della scheda va eseguita sotto la responsabilità dell’utente. Korg non si assume alcuna responsabilità per eventuali danni a cose o
persone derivanti dalla non corretta installazione o dall’uso errato della scheda.
• Scollegate la spina dalla presa di corrente prima di aprire lo strumento.
• Per evitare che l’elettricità statica del vostro corpo danneggi i componenti della scheda, toccate un elemento metallico non verniciato prima di
procedere con l’installazione.
Page 2
2
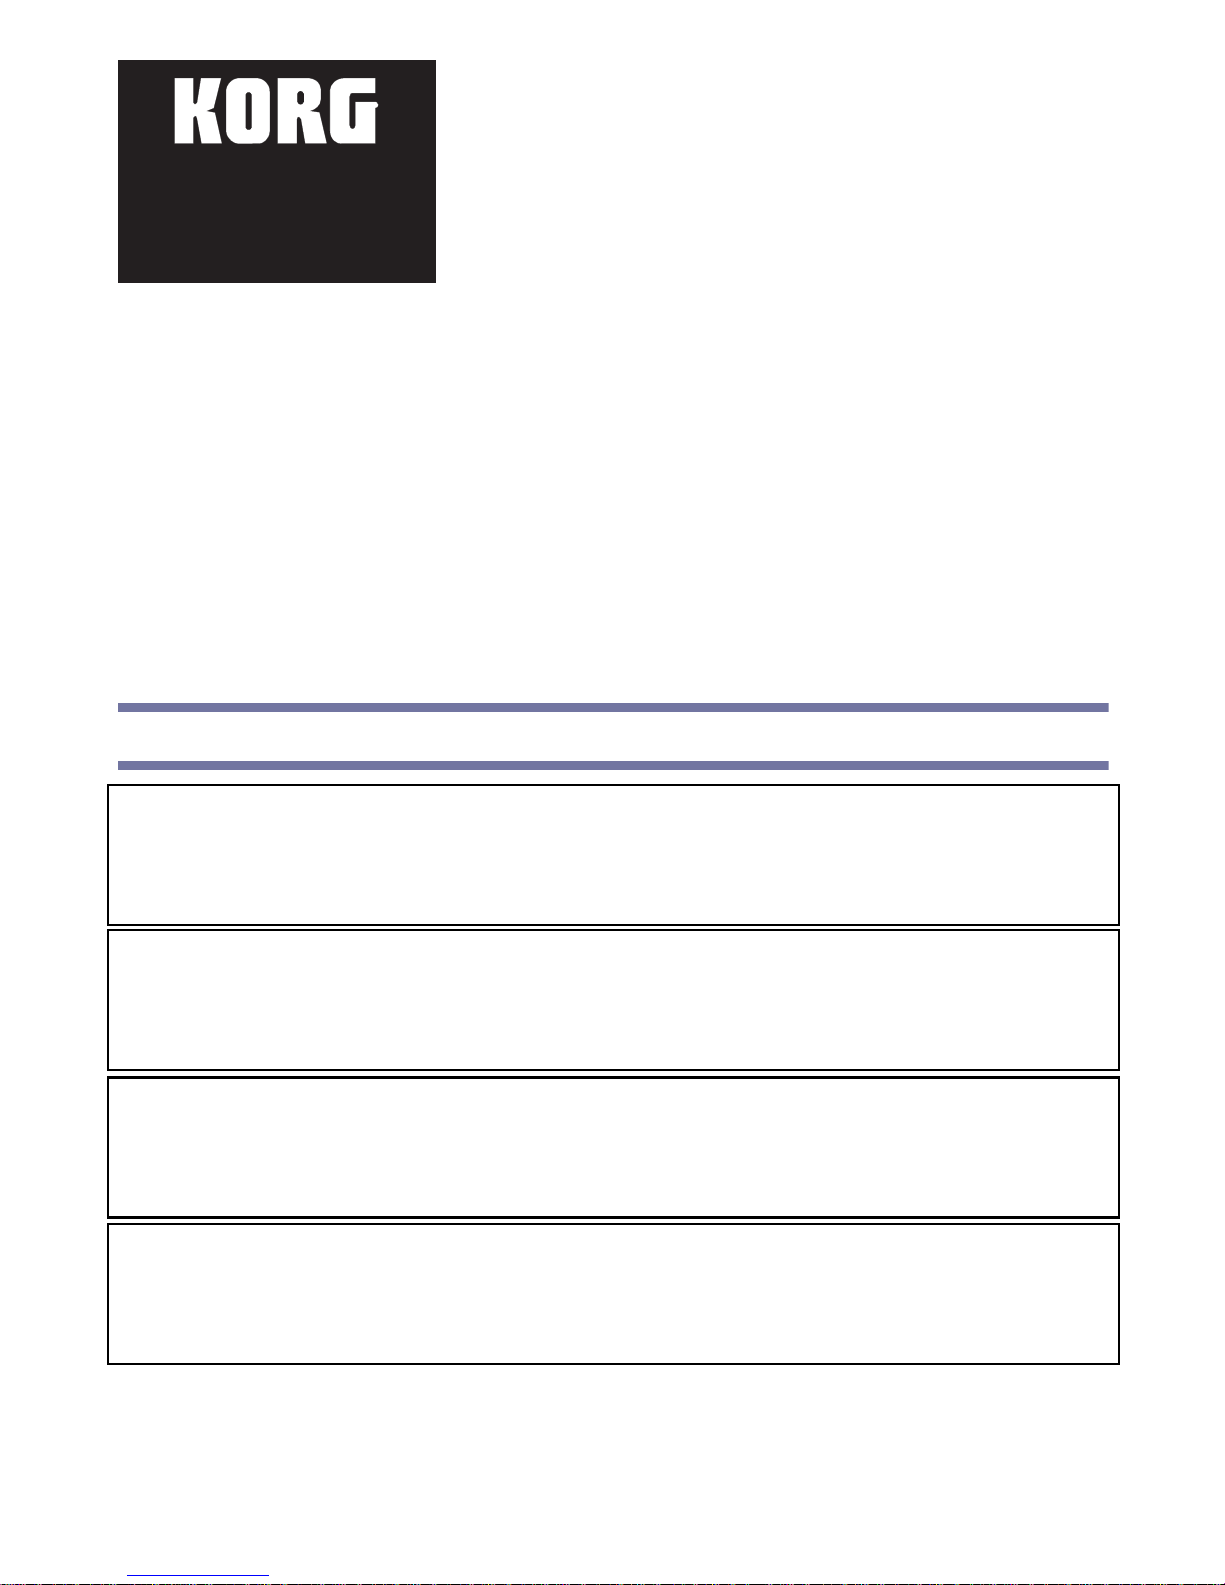
Part listing - Liste des pièces - Teileliste - Elenco delle parti
Before beginning with the installation, please
be sure all the following parts are included
with your kit. Some parts are needed only
when installing the board on a particular
model, but not on others. In addition, you
will need a cross-point screwdriver (Pa1X/
Pa1X Pro) and a 5.5mm hexagon wrench or a
pair of pliers (Pa1X Pro) (not supplied).
Avant de procéder à l'installation, vérifiez de
posséder tous les éléments listés ci-dessous. Certaines pièces sont nécessaires uniquement pour
l'installation sur certains modèles, tandis
qu’elles ne le sont pas pour d’autres. Pour le
montage, se munir d'un tournevis cruciforme
(Pa1X/Pa1X Pro) et d’une clé à six pans de
5.5mm ou d’une pince (PaX Pro) (non fournis).
Versichern Sie sich vor Beginn der Installation, dass alle nachfolgend aufgeführten Teile
vorhanden sind. Einige Teile werden bei
Installation in bestimmten Modellen benötigt, während sie in anderen nicht benötigt
werden. Für die Montage sind ein Kreuzschlitzschraubenzieher (Pa1X/Pa1X Pro) und ein 5,5mm-Inbusschlüssel oder eine Zange erforderlich (Pa1X Pro) (nicht im Lieferumfang enthalten).
Prima di iniziare l’installazione, assicuratevi di essere in possesso delle parti elencate. Alcune delle parti sono necessarie solo per l’installazione
della scheda su un particolare modello, ma non sugli altri. Per il montaggio sono richiesti un cacciavite a croce (Pa1X/Pa1X Pro) ed una chiave a
bussola esagonale da 5,5mm o un paio di pinze (Pa1X Pro) (non forniti).
Note:
The checkmark means the part is needed for the corresponding instrument.
Note : La coche indique que la pièce est nécessaire pour l’instrument correspondant.
Anmerkung:
Das Häkchen zeigt an, dass dieses Teil für das jeweilige Instrument benötigt wird.
Nota: Il segno di spunta indica che la parte è necessaria per lo strumento corrispondente.
Part name / Nom des pièces / Namen der Teile / Nome delle parti Pa1X Pro Pa1X
A Self-locking nuts / Ecrous / Klemschrauben / Dadi autobloccanti M3 √× 2
B Plastic spacers / Entretoises en plastique / Plastikdistanzstücke / Distanziali in plastica √× 4
C MP3 card / Carte MP3 / MP3-Karte / Scheda MP3 √√× 1
DM3×6 screws / Vis M3×6 / Schrauben M3×6 / Viti M3×6 √× 2
A
B
C
D
Page 3
3
Installation - Installation - Installation- Installazione
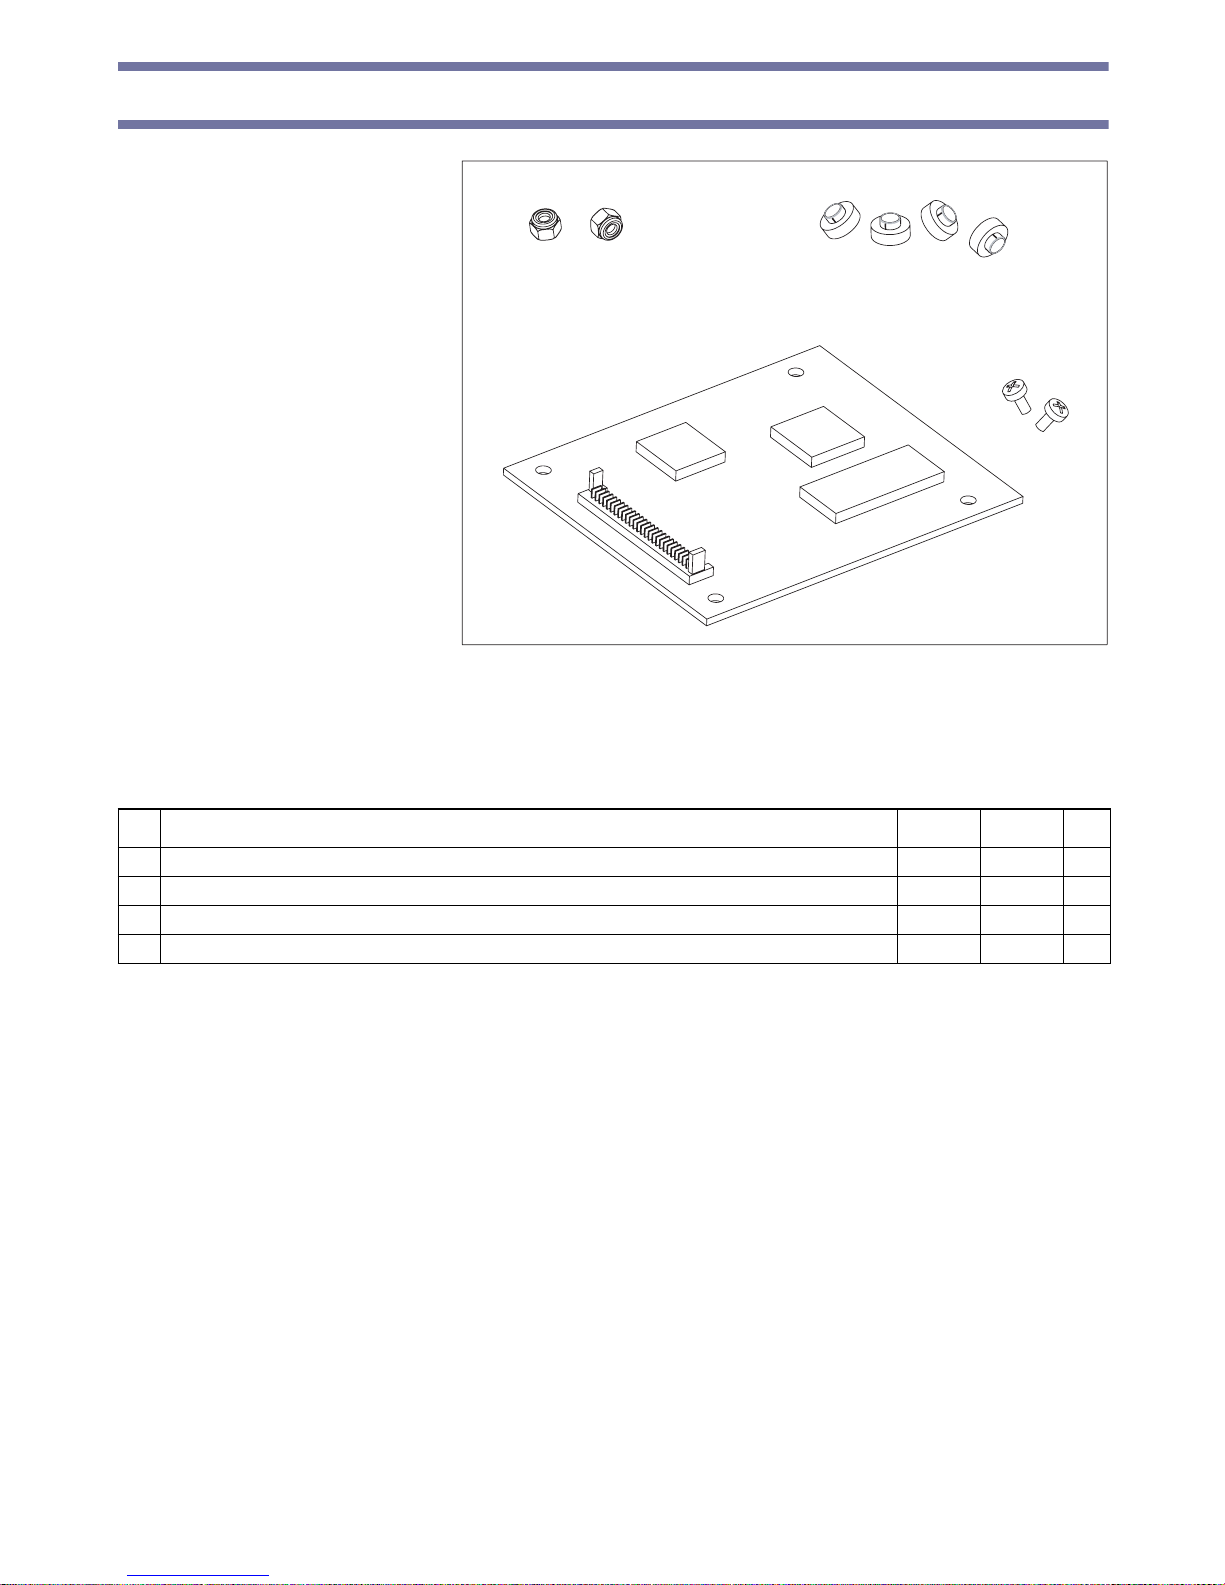
Pa1X Pro
1.
Turn the instrument upside down, and
remove the seven screws (a), to open the
cover (b) and gain access to the option
compartment.
Note:
Block any possible access to the
inside of the instrument during installation to prevent any items from falling
inside. In the event something does fall
into the instrument, please immediately
contact your nearest Service Center.
Tournez l’instrument et enlevez les sept vis
(a) pour ouvrir le capot (b) et accéder au coffret des options.
Note : Pendant l’installation, procédez de manière à empêcher l’accès à l’interne de l’instrument afin d’éviter que des objets ne tombent à
l’intérieur. Si par malheur quelque chose tombe dans l’instrument, adressez-vous immédiatement au Service d’Assistance Agréé Korg le
plus proche.
Drehen Sie das Instrument mit der Unterseite nach oben und lösen Sie die sieben Schrauben (a), um den Deckel (b) zu öffnen und
Zugang zum Optionsfach zu erhalten.
Anmerkung:
Sorgen Sie dafür, dass während der Installation nichts ins Innere des Instruments fallen kann. Sollte dies dennoch pas-
sieren, wenden Sie sich bitte umgehend an das nächste Korg Kundendienstzentrum.
Ruotate lo strumento, e rimuovete le sette viti (a) per aprire il coperchio (b) e accedere al vano opzioni.
Nota: Impedite ogni possibile accesso all’interno dello strumento, per evitare che degli oggetti possano cadervi dentro. Nel caso questo
dovesse accadere, rivolgetevi immediatamente al più vicino Centro di Assistenza.
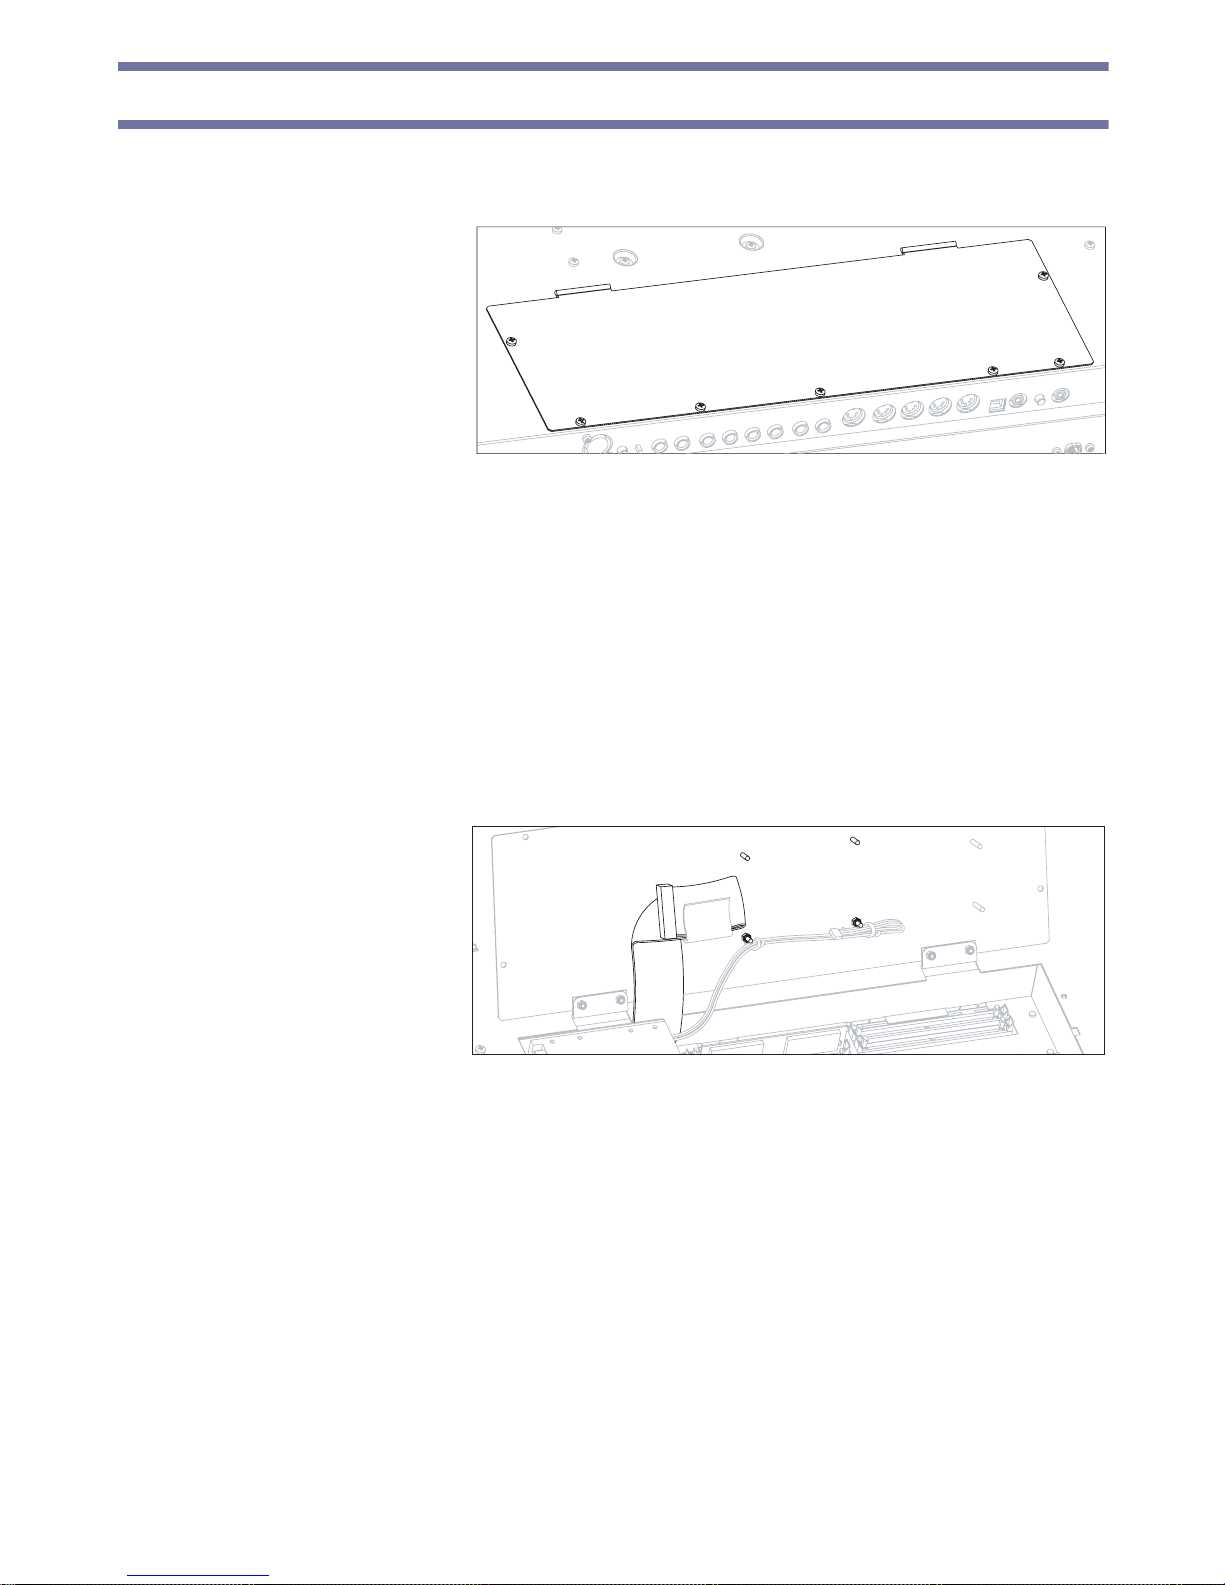
2.
As you face the option compartment
opening, locate the area reserved for the
MP3 board, i.e., the one with the four
small vertical columns, the MP3 audio
cable (c) and the video cable (d). Please
note how the video cable (d) is fastened
by two clamps (f) to two columns, by
means of two self-locking nuts (A).
Remove both nuts (A), taking care not
to remove the two clamps from their
position, and unfasten the audio cable
(c) from the clamp (e).
Positionnez-vous devant le coffret des options et repérez la zone réservée à la carte MP3, identifiée par la présence des quatre ergots verticaux, du câble audio de la carte MP3 (c) et du câble vidéo (d). Observez attentivement le câble vidéo (d) : il est fixé à deux des ergots au
moyen de deux fixations (f), à leur tour fixées au moyen de deux écrous auto-bloquants (A). Enlevez les deux écrous (A) en procédant très
attentivement : vous ne devez pas déplacer les deux fixations de leur position originale. Maintenant, libérez le câble audio (c) de sa fixation
(e).
Stellen Sie sich vor das Optionsfach und suchen Sie den Installationsort des MP3-Boards. Dieser weist vier vertikale Röhren, ein MP3
Audio- (c) sowie ein Videokabel (d) auf. Das Videokabel (d) ist mit zwei Klemmen (f) an zwei Röhren befestigt. Dafür werden zwei
Klemmschrauben (A) verwendet. Lösen Sie beide Schrauben (A), aber lassen Sie die Klemmen, wo sie sind. Lösen Sie hingegen das
Audiokabel (c) von seiner Klemme (e).
Ponendovi di fronte al vano opzioni, individuate la zona riservata alla scheda MP3, contraddistinta dalla presenza dei quattro speroni
verticali, del cavo audio della scheda MP3 (c), e del cavo video (d). Osservate come il cavo video (d) sia fissato a due degli speroni mediante
i due fermi (f), a loro volta fissati mediante due dadi autobloccanti (A). Rimuovete i due dadi (A), assicurandovi di non spostare i due
fermi dalla posizione originale. Liberate infine il cavo audio (c) dal fermo (e).
b
a
a
a
a
a
a
a
A+f
A+f
c
d
e
Page 4

4
3.
Insert the four plastic spacers (B) into the
corresponding columns on the option
compartment cover, as shown in the diagram. Please be sure to lay the flat size of
the spacers onto the option compartment
cover, and to keep both clamps (f ) under
the spacers (B), as shown in the following
diagram.
Enfilez les quatre entretoises en plastique (B)
dans les ergots du capot du coffret des
options, comme illustré ci-contre ; installez
les entretoises avec leur partie platte tournée vers le plan du capot. Procédez de manière à ce que les deux fixations (f) soient positionnées en dessous des entretoises (B), comme illustré plus bas.
Schieben Sie die vier Plastik-Abstandhalter (B) in die entsprechenden Röhren des Optionsfaches (siehe Abbildung). Die flache Seite
der Abstandhalter muss zur Blende des Optionsfaches zeigen. Die beiden Klemmen (f) müssen sich unter den Abstandhaltern (B)
befinden, wie im folgenden Abbildung gezeigt.
Infilate i quattro distanziali in plastica (B) negli speroni del coperchio del vano opzioni, come indicati in figura; i distanziali vanno rivolti con la
parte piatta verso il piano del coperchio. Fate in modo che i due fermi (f) si trovino sotto i distanziali (B), come mostrato nell’immagine successiva.
4.
Insert the MP3 board (C) over the four
spacers, with the components on the
upper side (as shown in the diagram).
Secure it to the spacers by using the four
self-locking nuts (A). Connect the terminal lug of the cable (c) to the corresponding connector on the MP3 board, by
folding the cable as shown in the diagram.
Insérez la carte MP3 (C) sur les quatre
entretoises, avec les composants électroniques tournés vers le haut (comme illustré cicontre). Fixez la carte aux entretoises à l’aide des écrous auto-bloquants (A). Reliez la prise du câble (c) au connecteur correspondant situé sur la
carte MP3, en pliant le câble comme illustré ci-contre.
Legen Sie das MP3-Board (C) über die vier Abstandhalter. Die Komponenten der Platine müssen nach oben zeigen (siehe Abbildung). Arretieren Sie die Platine mit den vier Klemmschrauben (A). Verbinden Sie die Anschlussleiste des Kabels (c) mit dem
Anschluss des MP3-Boards. Das Kabel muss wie in der Abbildung gezeigt gefaltet werden.
Inserite la scheda MP3 (C) sopra i quattro distanziali, con i componenti elettronici rivolti verso l’alto (come mostrato in figura). Fissate la scheda
ai distanziali mediante i quattro dadi autobloccanti (A). Collegate il terminale del cavo (c) al connettore corrispondente nella scheda MP3, piegando il cavo come mostrato in figura.
5.
Close and secure the compartment cover by reversing the procedure described in step 1.
Refermez le capot du coffret des options et serrez toutes les vis, en procédant dans l’ordre inverse des instructions détaillées au poste 1.
Schließen Sie den Deckel des Optionsfaches, indem Sie die in Punkt 1 angegebenen Arbeitsschritte in umgekehrter Reihenfolge ausführen. Ziehen Sie die Schrauben an.
Chiudete il coperchio del vano opzioni, e stringete tutte le viti, seguendo l’ordine inverso rispetto alle istruzioni contenute al passo 1.
B
B
B
B
f
f
c
A
AA
A
C
Page 5

5
Pa1X
1.
Tur n the instrument upside down, and
remove the eight screws (a), to open the
cover (b) and gain access to the option
compartment.
Note:
Block any possible access to the
inside of the instrument (for example,
the openings of the nearby RAM expansion slots) during installation to prevent
any items from falling inside. In the
event something does fall into the
instrument, please immediately contact
your nearest Service Center.
Tournez l’instrument et enlevez les huit
vis (a) pour ouvrir le capot (b) et accéder
au coffret des options.
Note : Pendant l’installation, procédez de
manière à empêcher l’accès à l’interne de
l’instrument (par exemple l’accès aux
fentes des cartes d’extension RAM qui
sont très proches) afin d’éviter que des
objets ne tombent à l’intérieur. Si par
malheur quelque chose tombe dans l’instrument, adressez-vous immédiatement au Service d’Assistance Agréé Korg le plus proche.
Drehen Sie das Instrument mit der Unterseite nach oben und lösen Sie die acht Schrauben (a), um Zugang zum Optionsfach zu
erhalten.
Anmerkung:
Sorgen Sie dafür, dass während der Installation nichts ins Innere des Instruments fallen kann (z.B. in die Öffnungen der
RAM-Steckplätze). Sollte dies dennoch passieren, wenden Sie sich bitte umgehend an die nächste Korg-Kundendienststelle.
Ruotate lo strumento, e rimuovete le otto viti (a) per aprire il coperchio (b) e accedere al vano opzioni.
Nota: Impedite ogni possibile accesso all’interno dello strumento (per esempio le aperture delle vicine slot di espansione RAM), per evitare
che degli oggetti possano cadervi dentro. Nel caso questo dovesse accadere, rivolgetevi immediatamente al più vicino Centro di Assistenza.
2.
As you face the option compartment
opening, locate the area reserved for the
MP3 board, i.e., the one with the four
small vertical spacers, the MP3 audio
cable (c) and the video cable (d). Please
note how the video cable (d) is fastened
by two clamps (f) to two of the spacers,
by means of two M3 screws (D).
Remove both screws (D), taking care
not to remove the two clamps from their
position, and unfasten the audio cable
(c) from the clamp (e).
Positionnez-vous devant le coffret des
options et repérez la zone réservée à la
carte MP3, identifiée par la présence des
quatre ergots verticaux, du câble audio de
la carte MP3 (c) et du câble vidéo (d).
Observez attentivement le câble vidéo
(d) : il est fixé à deux des ergots au moyen
de deux fixations (f), à leur tour fixées au
moyen de deux vis M3 (D). Enlevez les
deux vis (D) en procédant très
attentivement : vous ne devez pas déplacer les deux fixations de leur position originale. Maintenant, libérez le câble audio (c) de sa fixation
(e).
b
a
a
a
a
a
a
a
a
D+f
D+f
e
c
d
Page 6

6
Stellen Sie sich vor die Öffnung des Optionsfachs und suchen Sie den Installationsort des MP3-Boards. Dieser weist vier vertikale
Röhren, ein MP3 Audio- (c) sowie ein Videokabel (d) auf. Das Videokabel (d) ist mit zwei Klemmen (f) an zwei Röhren befestigt.
Dafür werden zwei M3-Schrauben (D) verwendet. Lösen Sie beide Schrauben (D), aber lassen Sie die Klemmen, wo sie sind. Lösen
Sie hingegen das Audiokabel (c) von seiner Klemme (e).
Ponendovi di fronte al vano opzioni, individuate la zona riservata alla scheda MP3, contraddistinta dalla presenza dei quattro speroni
verticali, del cavo audio della scheda MP3 (c), e del cavo video (d). Osservate come il cavo video (d) sia fissato a due degli speroni mediante
i due fermi (f), a loro volta fissati mediante due viti M3 (D). Rimuovete le due viti (D), assicurandovi di non spostare i due fermi dalla
posizione originale. Liberate infine il cavo audio (c) dal fermo (e).
3.
Insert the MP3 board (C) over the four
spacers, with the components on the
upper side (as shown in the diagram).
Secure it to the spacers by using the four
M3 screws (D). Connect the terminal lug
of the cable (c) to the corresponding connector on the MP3 board, by folding the
cable as shown in the diagram.
Insérez la carte MP3 (C) sur les quatre
entretoises, avec les composants électroniques tournés vers le haut (comme illustré cicontre). Fixez la carte aux entretoises à
l’aide des quatre vis M3 (D). Reliez le terminal du câble (c) au connecteur correspondant situé sur la carte MP3, en pliant le
câble comme illustré ci-contre.
Legen Sie das MP3-Board (C) über die
vier Abstandhalter. Die Komponenten
der Platine müssen nach oben zeigen
(siehe Abbildung). Arretieren Sie die
Platine mit den vier M3-Schrauben (D).
Verbinden Sie die Anschlussleiste des
Kabels (c) mit dem Anschluss des MP3-Boards. Das Kabel muss wie in der Abbildung gezeigt gefaltet werden.
Inserite la scheda MP3 (C) sopra i quattro distanziali, con i componenti elettronici rivolti verso l’alto (come mostrato in figura). Fissate la scheda
ai distanziali mediante le quattro viti M3 (D). Collegate il terminale del cavo (c) al connettore corrispondente nella scheda MP3, piegando il cavo
come mostrato in figura.
4.
Close and secure the compartment cover by reversing the procedure described in step 1.
Refermez le capot du coffret des options et serrez toutes les vis, en procédant dans l’ordre inverse des instructions détaillées au paragraphe 1.
Schließen Sie den Deckel des Optionsfaches, indem Sie die in Punkt 1 angegebenen Arbeitsschritte in umgekehrter Reihenfolge ausführen. Ziehen Sie die Schrauben an.
Chiudete il coperchio del vano opzioni, e stringete tutte le viti, seguendo l’ordine inverso rispetto alle istruzioni contenute al passo 1.
D
D
c
D
D
C
Page 7

7
Notes - Notes - Anmerkungen - Note
Operating system version - Version du système opérationnel - Version des
Betriebssystems - Versione del sistema operativo
• To use the EXBP-MP3, your Pa1X must be fitted with Operating System 1.51 or higher.
Vous devez installer la version 1.51 ou supérieure du système opérationnel pour pouvoir utiliser la carte EXBP-MP3.
Die EXBP-MP3 kann nur angespr ochen wer den, wenn Ihr Pa1X die Systemversion 1.51 oder neuer enthält. Diese m uss also installiert
werden.
Per utilizzare la scheda EXBP-MP3, occorre installare il sistema operativo versione 1.51 o superiore.
Audio outputs - Sorties audio - Audio-Ausgänge - Uscite audio
• After installing the EXBP-MP3 board, the audio output level (both on the OUTPUT connectors and the internal speakers) is
increased of about 3dB. Readjust the master volume accordingly.
Après l’installation de la carte EXBP-MP3, le niveau du volume en sortie (bornes OUTPUT et diffuseurs intégrés) augmente d’environ
3dB. Réglez Master Volume en fonction de cette augmentation.
Nach dem Einbau einer EXBP-MP3 liegt der Ausgangspegel der OUTPUT-Buchsen und internen Lautsprecher 3dB höher. Ändern
Sie bei Bedarf die Gesamtlautstärke.
Dopo l’installazione della scheda EXBP-MP3, il livello di uscita (sia dei connettori OUTPUT che dei diffusori integrati) aumenta di circa
3dB. Regolate di conseguenza il Master Volume.
• Audio generated by the MP3 board is only output on the Left+Right analog outputs. It cannot be routed to the digital output.
Le signal audio généré par la carte MP3 est adressé exclusivement aux sorties analogiques Left+Right et non pas à la sortie numérique.
Die Audiodaten des MP3-Boards werden nur über die Left+Right Analog-Ausgänge ausgegeben. Die Digital-Ausgabe funktioniert
hier nicht.
Il segnale audio generato dalla scheda MP3 viene inviato esclusivamente alle uscite analogiche Left+Right, e non all’uscita digitale.
Playback - Reproduction - Wiedergabe - Riproduzione
• MP3 files recorded with lower sampling rates may not sound very good. This is an unavoidable problem with MP3 files.
Le signal audio généré par la carte MP3 est adressé exclusivement aux sorties analogiques et non pas à la sortie numérique.
MP3-Dateien mit einer niedrigen Sampling-Frequenz klingen eventuell enttäuschend. Das liegt dann aber an den betreffenden MP3Dateien.
I file MP3 registrati con una bassa frequenza di campionamento potrebbero non suonare al meglio. Si tratta di un problema insito nella
natura stessa dei file MP3.
• You can assign an MP3 file to both sequencers, but starting one stops the other (if it is playing).
Vous pouvez affecter un fichier MP3 aux deux séquenceurs, mais vous ne pouvez en reproduire qu’un seul à la fois : en effet, dès que l’un
d’eux débute, l’autre s’arrête.
Man kann zwar beiden Sequenzern eine MP3-Datei zuordnen, jedoch hält die eine Datei an, sobald Sie die andere starten (sofern
bereits eine läuft).
Potete assegnare un file MP3 ad entrambi i sequencer, ma all’avvio di uno dei due l’altro si fermerebbe.
• When reading MP3 files from a data CD, and the CD has been automatically paused for having been inactive for some time, starting
playback may require some seconds, because the CD has to start spinning again.
Lors de la lecture de fichiers MP3 depuis un CD de données et que le CD est en pause suite à une certaine période d’inactivité, lors du redémarrage, il se peut que la reproduction soit légèrement retardée de quelques secondes pour concéder au CD le temps de redémarrer.
Wenn Sie MP3-Dateien einer CD lesen und der Zugriff auf die CD schon etwas länger zurückliegt, kann es u.U. eine Weile dauern,
bevor das CD-Laufwerk wieder auf Touren ist.
Quando si leggono file MP3 da un CD dati, e il CD è andato in pausa dopo un certo periodo di inattività, il riavvio della riproduzione
potrebbe richiedere alcuni secondi, per consentire al CD di ripartire.
Page 8

8
Recording- Enregistrement - Aufnahme - Registrazione
• You can record as an MP3 file everything you play with the Pa1X, including your vocals (in other words, you can record your whole
performance). However, you cannot record MP3 files or convert Audio CD Tracks.
Vous pouvez enregistrer sous format de fichier MP3 tout ce que vous jouez sur le Pa1X, y compris l'entrée microphonique (pratiquement,
vous pouvez enregistrer tout ce que vous jouez ou chantez). Vous ne pouvez pas enregistrer des fichiers MP3 ou les pistes d'un CD audio.
Neu angelegte MP3-Dateien können alle Signale enthalten, die das Pa1X ausgibt, darunter auch Ihren Gesang (Sie können also wirklich alles aufnehmen). Nur MP3-Dateien selbst und Titel einer Audio-CD lassen sich auf diesem Wege nicht aufnehmen.
È possibile registrare come file MP3 tutto ciò che si suona con la Pa1X, compreso l’ingresso microfonico (in altre parole, si può registrare
tutto ciò che si suona e si canta). Non è però possibile registrare file MP3 o tracce di un CD audio.
• You can listen to Audio CD tracks during MP3 recording, but they will not be recorded.
Vous pouvez reproduire les pistes d’un CD audio même pendant l’enregistrement d’un MP3, mais vous ne pouvez pas les enregistrer.
Während der MP3-Aufnahme kann man zwar eine CD abspielen, jedoch werden ihre Signale nicht aufgenommen.
È possibile ascoltare tracce di un CD audio durante la registrazione di un MP3, ma non è possibile registrarle.
Hard disk - Disque dur - Festplatte - Disco rigido
• To record MP3 files, your Pa1X must be fitted with a hard disk.
Pour pouvoir enregistrer des fichiers MP3, votre Pa1X doit être doté de disque dur.
MP3-Dateien können nur aufgenommen werden, wenn Ihr Pa1X eine Festplatte enthält.
Per registrare file MP3, la Pa1X deve essere dotata di disco rigido.
• It is not advisable to fill the hard disk too much during recording. Filling the hard disk may cause troubles with the recorded file.
On recommande de ne pas remplir excessivement la mémoire du disque dur pendant l'enregistrement. Le remplissage excessif du disque
dur peut provoquer des problèmes aux fichiers en phase d'enregistrement.
Nehmen Sie nach Möglichkeit keine extrem langen Stücke auf. Wenn die Kapazität der Festplatte nämlich fast erschöpft ist, könnte
die dabei angelegte Datei beschädigt werden.
È raccomandabile non riempire eccessivamente il disco rigido durante la registrazione. Riempire il disco rigido potrebbe causare problemi
al file in registrazione.
• Regular care is recommended with your hard disk. Defrag menting and repairing can be made with any PC utility, while the Pa1X is
connected via USB.
On conseille de procéder régulièrement à l'entretien du disque dur. Vous pouvez effectuer la défragmentation ou la réparation à l'aide
d'utilitaires pour PC pendant que votre Pa1X est branché via USB.
Am besten säubern Sie die Festplatte in regelmäßigen Zeitabständen, indem Sie sie mit einem PC-Programm defragmentieren und
bei Bedarf reparieren. Hierfür muss das Pa1X an den USB-Port des Computers angeschlossen werden.
È consigliabile procedere alla regolare manutenzione del disco rigido. È possibile eseguire la deframmentazione o la riparazione mediante
apposite utilità per PC, mentre la Pa1X è collegata via USB.
© 2004 Korg Italy SpA
 Loading...