

Page 1
Thank you purchasing the Korg
ELECTRIBE·S ES-1. In order to
enjoy long and trouble-free use,
please read this manual carefully
and use the instrument correctly.
E 3
Page 2

To ensure long, trouble-free operation, please read this manual carefully.
Precautions
Location
Using the unit in the following locations can result in a malfunction.
• In direct sunlight
• Locations of extreme temperature or humidity
• Excessively dusty or dirty locations
• Locations where excessive vibration exists
Power supply
Please connect the designated AC adaptor to an AC outlet of the corr ect voltage. Do not connect it to
an AC outlet of voltage other than that for which your unit is intended.
Interference with other electrical devices
This product contains a microcomputer. Radios and televisions placed nearby may cause reception
interference. Operate this unit at a suitable distance from radios and televisions.
Handling
To avoid breakage, do not apply excessive force to the switches or controls.
Care
If the exterior becomes dirty, wipe it with a clean, dry cloth. Do not use liquid cleaners such as benzene or thinner, cleaning compounds or flammable polishes.
Keep this manual
After reading this manual, please keep it for later reference.
Keeping foreign matter out of your equipment
• Never set any container with liquid in it near this equipment. If liquid gets into the equipment, it
could cause a breakdown, fire, or electrical shock.
• Be careful not to let metal objects get into the equipment. If something does slip into the equipment, unplug the AC adaptor from the wall outlet. Then contact your nearest Korg dealer or the
store where the equipment was purchased.
THE FCC REGULATION WARNING (for U.S.A.)
This equipment has been tested and found to comply with the limits for a Class B digital device, pursuant to Part 15 of the FCC
Rules. These limits are designed to provide reasonable protection against harmful interference in a residential installation. This
equipment generates, uses, and can radiate radio frequency energy and, if not installed and used in accordance with the instructions, may cause harmful interference to radio communications. However , there is no guarantee that interference will not occur in
a particular installation. If this equipment does cause harmful interference to radio or television reception, which can be determined by turning the equipment off and on, the user is encouraged to try to correct the interference by one or more of the
following measures:
• Reorient or relocate the receiving antenna.
• Increase the separation between the equipment and receiver.
• Connect the equipment into an outlet on a circuit different from that to which the receiver is connected.
• Consult the dealer or an experienced radio/TV technician for help.
Unauthorized changes or modification to this system can void the user’s authority to operate this equipment.
CE mark for European Harmonized Standards
CE mark which is attached to our company’s products of AC mains operated apparatus until December 31, 1996 means it conforms to EMC Directive (89/336/EEC) and CE mark Directive (93/68/EEC). And, CE mark which is attached after January 1, 1997
means it conforms to EMC Directive (89/336/EEC), CE mark Directive (93/68/EEC) and Low Voltage Directive (73/23/EEC).
Also, CE mark which is attached to our company’s products of Battery operated apparatus means it conforms to EMC Directive
(89/336/EEC) and CE mark Directive (93/68/EEC).
Concerning data
In rare cases, incorrect operation may cause the contents of memory to be lost. Please save important
data on separately sold SmartMediaTM cards or on a data filer (storage device). Korg Corporation can
accept no responsibility for any damages resulting from loss of data.
2
Page 3

Contents
1. Introduction............................................................................. 6
Main features ................................................................................................................ 6
The data you create on the ES-1............................................................................................................... 6
Make connections and play!........................................................................................ 7
Example connections ................................................................................................................................ 7
Preparing to play ........................................................................................................................................ 7
2. Front and rear panel ............................................................... 8
Common section ...........................................................................................................8
Effect section ................................................................................................................ 9
Part Edit section ........................................................................................................... 9
Part Select section ......................................................................................................10
Sequence Control section ..........................................................................................10
Step Key section......................................................................................................... 11
Connector section ...................................................................................................... 12
3. Basic operation (Quick Start) .............................................. 13
Conceptual diagram of the ES-1 ............................................................................... 13
Listening to a Song .................................................................................................... 13
Listening to a Pattern..................................................................................................14
Listening to a Sample .................................................................................................14
Trying out the functions............................................................................................. 15
Changing the tempo of a song or pattern.............................................................................................. 15
• Using the dial to change the tempo...................................................................................................15
• Using the Tap Tempo key to change the tempo................................................................................ 15
Striking keys to play Parts .......................................................................................................................15
Modifying (editing) the sound ................................................................................................................. 16
Editing the effect and delay settings...................................................................................................... 16
Striking the part keys along with a song or pattern .............................................................................16
Editing the sound of a part, effect, or delay while hearing a song or pattern .................................... 17
Modifying (editing) a rhythm pattern...................................................................................................... 18
• Using the step keys to edit the rhythm (Step Recording) ..................................................................18
• Using the part keys to edit the rhythm (Realtime Recording)........................................................... 19
Saving a pattern you create (Write) ........................................................................................................ 20
Using a Motion Sequence ....................................................................................................................... 21
Connecting various sources to the audio inputs..................................................................................22
Let’s record a sample............................................................................................................................... 23
About the Slice function.......................................................................................................................24
About the Resample function ............................................................................................................. 24
Assigning a sample sound to a sample part ......................................................................................... 24
Playing with Pattern Set .......................................................................................................................... 25
Using the ES-1 as a tone generator module .......................................................................................... 25
Synchronizing with an EA-1 or ER-1 ...................................................................................................... 26
4. Sample mode .........................................................................27
Recording a sample ....................................................................................................27
Selecting a sample ......................................................................................................27
Playing a sample .........................................................................................................27
Modifying a sample .................................................................................................... 27
Specifying the start location ......................................................................................28
Specifying the end location........................................................................................28
Specifying the fade-out length .................................................................................. 28
3
Page 4

Directly sampling the sound of the ES-1 (Resampling).......................................... 28
Resampling from the beginning of a pattern or song........................................................................... 28
Resampling from the middle of a pattern or song ................................................................................ 29
Resampling just one note of a part ........................................................................................................ 29
Slice ............................................................................................................................. 30
Creating a slice sample (Time Slice) ...................................................................................................... 30
Tips for achieving good results with Time Slice ................................................................................... 31
Other functions for editing a sample........................................................................ 31
Normalize .................................................................................................................................................. 31
Truncate .................................................................................................................................................... 31
Deleting a sample ........................................................................................................32
(Delete Sample)........................................................................................................... 32
Checking the remaining amount of sampling area (Memory) .................................32
Saving a sample (WRITE) ...........................................................................................32
5. Pattern mode..........................................................................33
Selecting a pattern ......................................................................................................33
Setting the playback tempo........................................................................................33
• Using the dial to change the tempo ..................................................................................................... 33
• Using the Tap Tempo key to change the tempo .................................................................................. 33
Playing a pattern (Pattern Play)..................................................................................33
The timing at which patterns will change .............................................................................................. 33
Playing from the beginning of a pattern (Reset & Play) ....................................................................... 33
About the tempo when the pattern is changed ......................................................................................33
Selecting parts ......................................................................................................................................... 34
The Part Mute function ............................................................................................................................ 34
The Part Solo function ............................................................................................................................. 34
Creating a pattern........................................................................................................35
Assigning a sample ..................................................................................................................................35
Editing the sound of a part.......................................................................................................................35
Editing effect and delay ........................................................................................................................... 36
EFFECT.............................................................................................................................................. 36
DELAY ................................................................................................................................................ 38
Length, Scale/Beat settings .................................................................................................................... 38
Setting the Length .............................................................................................................................. 39
Setting the Scale/Beat ........................................................................................................................ 39
Swing settings .......................................................................................................................................... 39
Setting the Roll Type ................................................................................................................................ 40
Creating a Rhythm Pattern .......................................................................................................................40
• Using the step keys (Step Recording).............................................................................................. 40
• Using the part keys (Realtime Recording)........................................................................................ 40
Adding accents to the rhythm pattern (Accent) .................................................................................... 40
Motion sequence .........................................................................................................41
Playing a motion sequence ..................................................................................................................... 41
Recording a motion sequence ................................................................................................................ 41
Playing an effect motion sequence ........................................................................................................ 41
Recording an effect motion sequence ................................................................................................... 41
Playing a delay motion sequence............................................................................................................42
Recording a delay motion sequence...................................................................................................... 42
Checking motion data.............................................................................................................................. 42
Convenient functions for editing patterns ............................................................... 43
Erasing rhythm pattern data from a part.................................................................................................43
• Erasing data during playback or recording (Erase) ...........................................................................43
• Erasing all data from a part (Clear Part) .......................................................................................... 43
Copying a part (Copy Part).......................................................................................................................43
Data Copy within a pattern .......................................................................................................................44
Erasing part, effect, or delay motion sequence data (Clear Motion) ................................................... 44
4
Page 5

Editing motion sequence data .................................................................................. 45
Selecting a motion sequence.................................................................................................................. 45
Editing the parameter values of a motion sequence .............................................................................45
Pattern Set....................................................................................................................46
Using Pattern Set to perform (P attern Set Play) .................................................................................... 46
Registering a pattern for Pattern Set...................................................................................................... 46
Saving a pattern (WRITE)........................................................................................... 47
6. Song mode ............................................................................ 48
Selecting a song ......................................................................................................... 48
Setting the playback tempo........................................................................................48
• Using the dial to set the tempo............................................................................................................. 48
• Using the tap tempo key to set the tempo........................................................................................... 48
Playing a song (Song Play).........................................................................................48
Fast-forward or rewind a song................................................................................................................ 48
Switching songs....................................................................................................................................... 48
Playing from the beginning of a position or song (Reset & Play) ....................................................... 48
Creating a song ...........................................................................................................49
Creating a song from scratch ................................................................................................................. 49
Erasing song data (Clear Song) ......................................................................................................... 49
Specifying a pattern for each position .................................................................................................49
Editing a song .......................................................................................................................................... 50
Inserting a pattern at a specified position (Insert Pattern).................................................................. 50
Deleting a pattern from a specified position (Delete Pattern) ............................................................. 50
Changing the pattern for a specific position ........................................................................................50
Recording performances or knob movements into a song (Event Recording) ................................... 51
Deleting event data from a song......................................................................................................... 51
Checking for song event data ............................................................................................................. 51
Saving a song (WRITE) ...............................................................................................52
7. Global mode .......................................................................... 53
Metronome settings ....................................................................................................53
Synchronizing the ES-1 with external MIDI devices (MIDI Clock) .......................... 53
Synchronizing the ES-1 to a master external MIDI device (Ext) .......................................................... 53
Synchronizing an external MIDI device to the ES-1 as master (int) .................................................... 54
MIDI channel settings (MIDI ch) .................................................................................54
Setting the MIDI note number for each part (Note No.)............................................54
Setting the audio in mode (Audio In Mode)...............................................................54
TM
Using SmartMedia
Formatting Smart Media (Format) .......................................................................................................... 55
Saving data to SmartMedia (Save) ......................................................................................................... 55
Loading all data from SmartMedia to the ES-1 (All Load) .................................................................... 55
Loading only a single sample from SmartMedia (Sample Load) ......................................................... 56
............................................................................................................................................................................
55
Memory Protect (Protect)........................................................................................... 56
Saving your changes in Global mode (WRITE)........................................................ 56
8. Appendices ........................................................................... 57
About MIDI....................................................................................................................57
Troubleshooting...........................................................................................................58
Error messages ...........................................................................................................59
Specifications ............................................................................................................. 59
Index .............................................................................................................................60
Pattern Name List ........................................................................................................62
Sample Name List........................................................................................................62
Song Name List ...........................................................................................................62
MIDI Implementation Chart .........................................................................................63
5
Page 6

1. Introduction
○○○○○○○○○○○○○○○○○○○○○○○○○○○○○○○○○○○○○○○○○
1. Introduction
Thank you for purchasing the ELECTRIBE•S (also referred to as the ES-1).
The ES-1 is an easy to use and unique rhythm production sampler that uses DSP synthesis
technology to allow anyone from beginners to professionals to create truly original music.
Y ou can assign sampled sounds to parts, use the panel knobs and keys to process the sound
intuitively, and use these sounds to easily create rhythm patterns.
The ES-1 is the ideal tool for any musician, DJ, sound cr eator , or DTM user who wants more
originality in their musical creations.
Main features
• A r hythm pr oduction sampler in which samples recor ded by the user can be assigned to
ten sample parts (including one Slice Sample part). The sound of each part can be processed as desired.
• Up to 150 sounds (100 monaural, 50 stereo) sampled by the user can be saved in internal
memory (to a maximum total of 95 seconds of monaural sampling).
• Parts (created by editing samples) can be combined with rhythms to create patterns, letting you use the ES-1 as a totally new type of rhythm machine.
• Up to 128 patterns (maximum of 64 steps) can be created using the Sample data and
stored in internal memory.
• The ES-1 provides a Motion Sequence function that can record and loop knob move-
ments, and can be recorded for each part of each pattern.
• The sixteen step keys (grid) provide the ideal way to step-record rhythm patterns. It’s
also easy to record in realtime.
• Since sounds and rhythm patterns can be modified instantly, you can use these changes
as part of your performance expression.
• By combining multiple patterns and adding event data such as knob movements, you
can create and save up to sixteen songs.
• Eleven types of effects and delay are provided.
• The Pattern Set play function lets you register 64 different patterns to the 16 step keys,
and successively select and play them.
• T ap T empo and MIDI Clock can be used to synchr onize the performance with an external
sequencer, turntable, etc.
• The ES-1 can be controlled from an external sequencer or keyboard as a MIDI sound
module.
• Sample sounds, patterns, and songs you create can be stored on SmartMediaTM.
• W A VE files or AIFF files you created on a computer etc. can be loaded and used as samples.
The data you create on the ES-1
The samples, patterns, and songs you create (edit) on the ES-1 will return to their previous
state if you re-select them or turn off the power before performing the Write operation.
If you wish to save recorded samples or edited patterns, songs, or global data, you must be
sure to perform the Write operation. Be aware that once the Write operation has been performed, it is no longer possible to return the sample, song, and pattern data to their factory
settings. If you do not want to loose the factory preset patterns and songs, purchase an
appropriate SmartMediaTM card and use the Save operation to make a backup.
6
Page 7
○○○○○○○○○○○○○○○○○○○○○○○○○○○○○○○○○○○○○○○○○
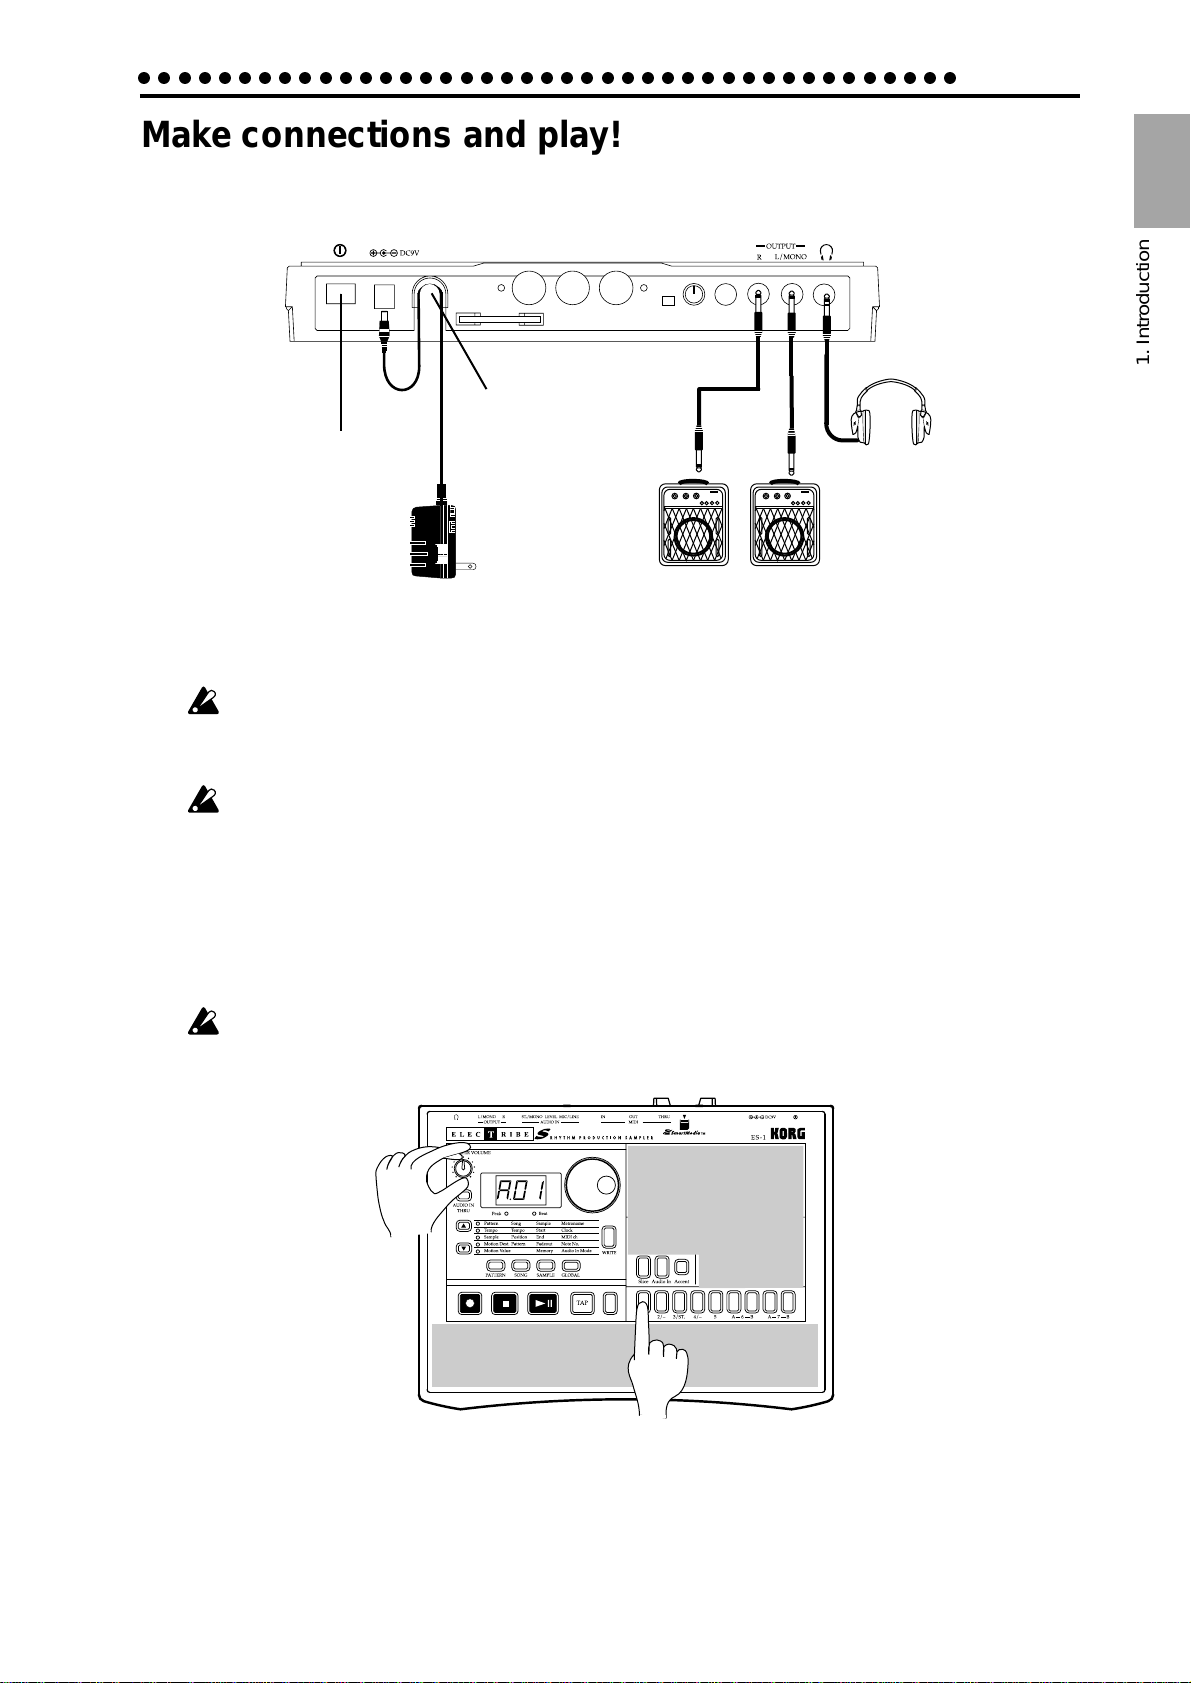
Make connections and play!
Example connections
Adapter cable holder
Power switch
AC Local Voltage
1. Introduction
1. Introduction
Preparing to play
Be sure to turn off the power before making connections. Careless operation may damage your
speaker system or cause malfunctions.
1. Connect the included AC adapter to the DC 9V jack, and plug the adapter into an AC outlet.
As shown in the above diagram, hook the AC adapter cable around the adapter cable holder. When
removing the cable from the holder, do not use excessive force.
2. Connect one end of your audio cables to the line out jacks of the ES-1 (L/MONO, R), and connect
the other end to your mixer or powered monitor speakers (amplified speakers) etc. If you will be
listening in mono, use the L/MONO jack. To take full advantage of the ES-1's sound quality, we
recommend that you listen in stereo.
3. If you will be using headphones, connect them to the headphone jack.
The output from the line out jacks will not be switched off even if headphones are plugged in.
Master volume
Part keys
4. When you have finished making connections, turn on the power. Slightly raise the master volume
of the ES-1, and strike the part keys (1...7B, Slice) to check whether connections have been made
correctly. Use the master volume of the ES-1 and the gain and fader controls of your mixer or
powered monitor system to adjust the volume to an appropriate level.
7
Page 8
2. Front and rear panel
○○○○○○○○○○○○○○○○○○○○○○○○○○○○○○○○○○○○○
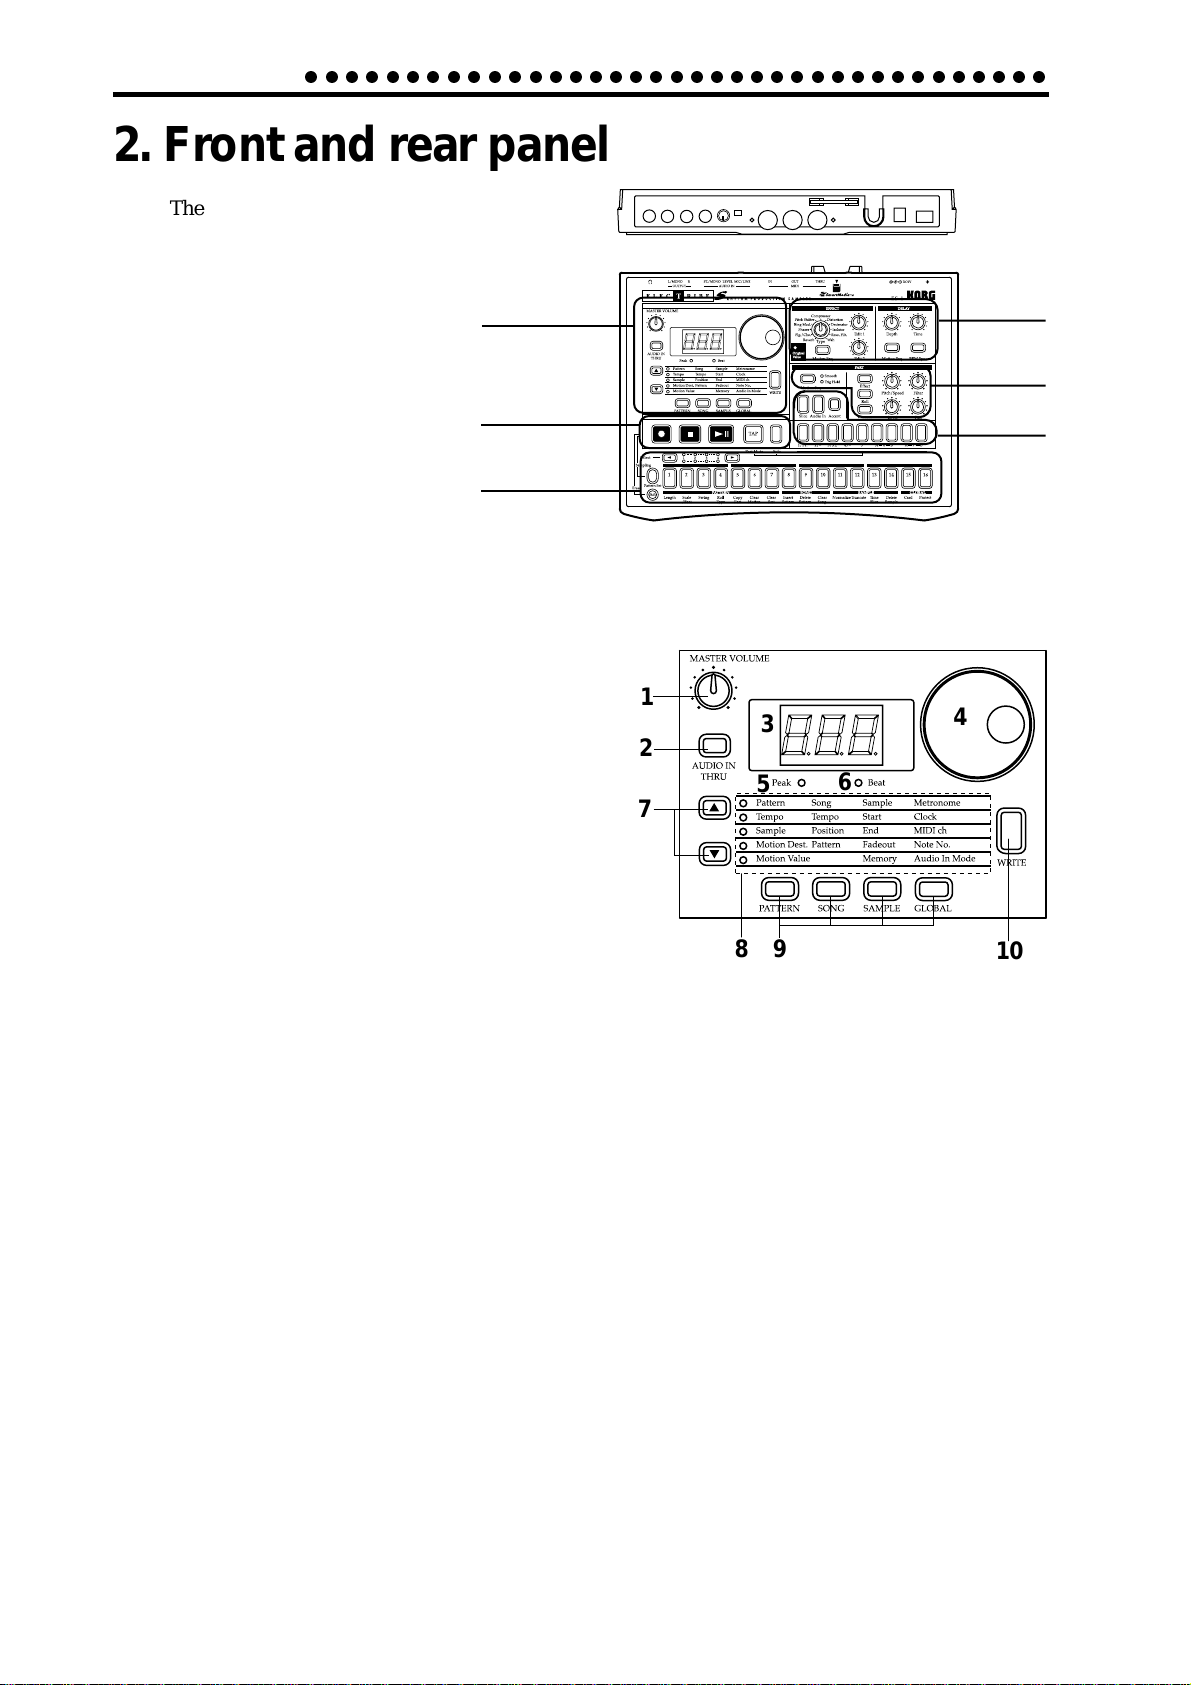
2. Front and rear panel
The controls and other parts of the ES-1 each
fall into one of six groups:
Common section
Sequence
control section
Step key section
Common section
1. MASTER VOLUME
This knob adjusts the volume that is output from
the line out jacks and the headphone jacks.
2. AUDIO IN THRU
This key sends the external output directly to the
line out jacks and headphone jack.
When this key is on, the Pan, Level, Filter, Effect,
and Roll of the Audio In part will have no effect.
Connector section
Effects
section
Part edit
section
Part select
section
1
3
4
2
5
6
7
3. Display
This shows the value of the currently selected parameter, and various messages.
4. Dial
Use this to modify the value shown in the display.
5. Peak LED
This indicates the peak level for the input signal from the audio in jacks. Adjust the
output level of your external device so that the LED lights only at the maximum level.
6. Beat LED
This will blink at quarter-note intervals to indicate the tempo.
7. [▲][▼] (cursor keys)
In each mode, use these keys to select parameters from the matrix shown in the display.
8. Matrix
The parameters that will appear in the display are listed here for each mode. Use the
cursor keys to make the desired parameter select LED light.
9. Mode keys
Use these keys to move to the desired mode: Pattern, Song, Sample, or Global. During playback you can move to Global mode, but not to Sample mode.
89
10
10. WRITE (WRITE key)
This key is used to save the contents that you modified in Pattern, Song, Sample, and
Global mode, to save Pattern Set data, and to save sample data that you sampled.
8
Page 9
○○○○○○○○○○○○○○○○○○○○○○○○○○○○○○○○○○○○○
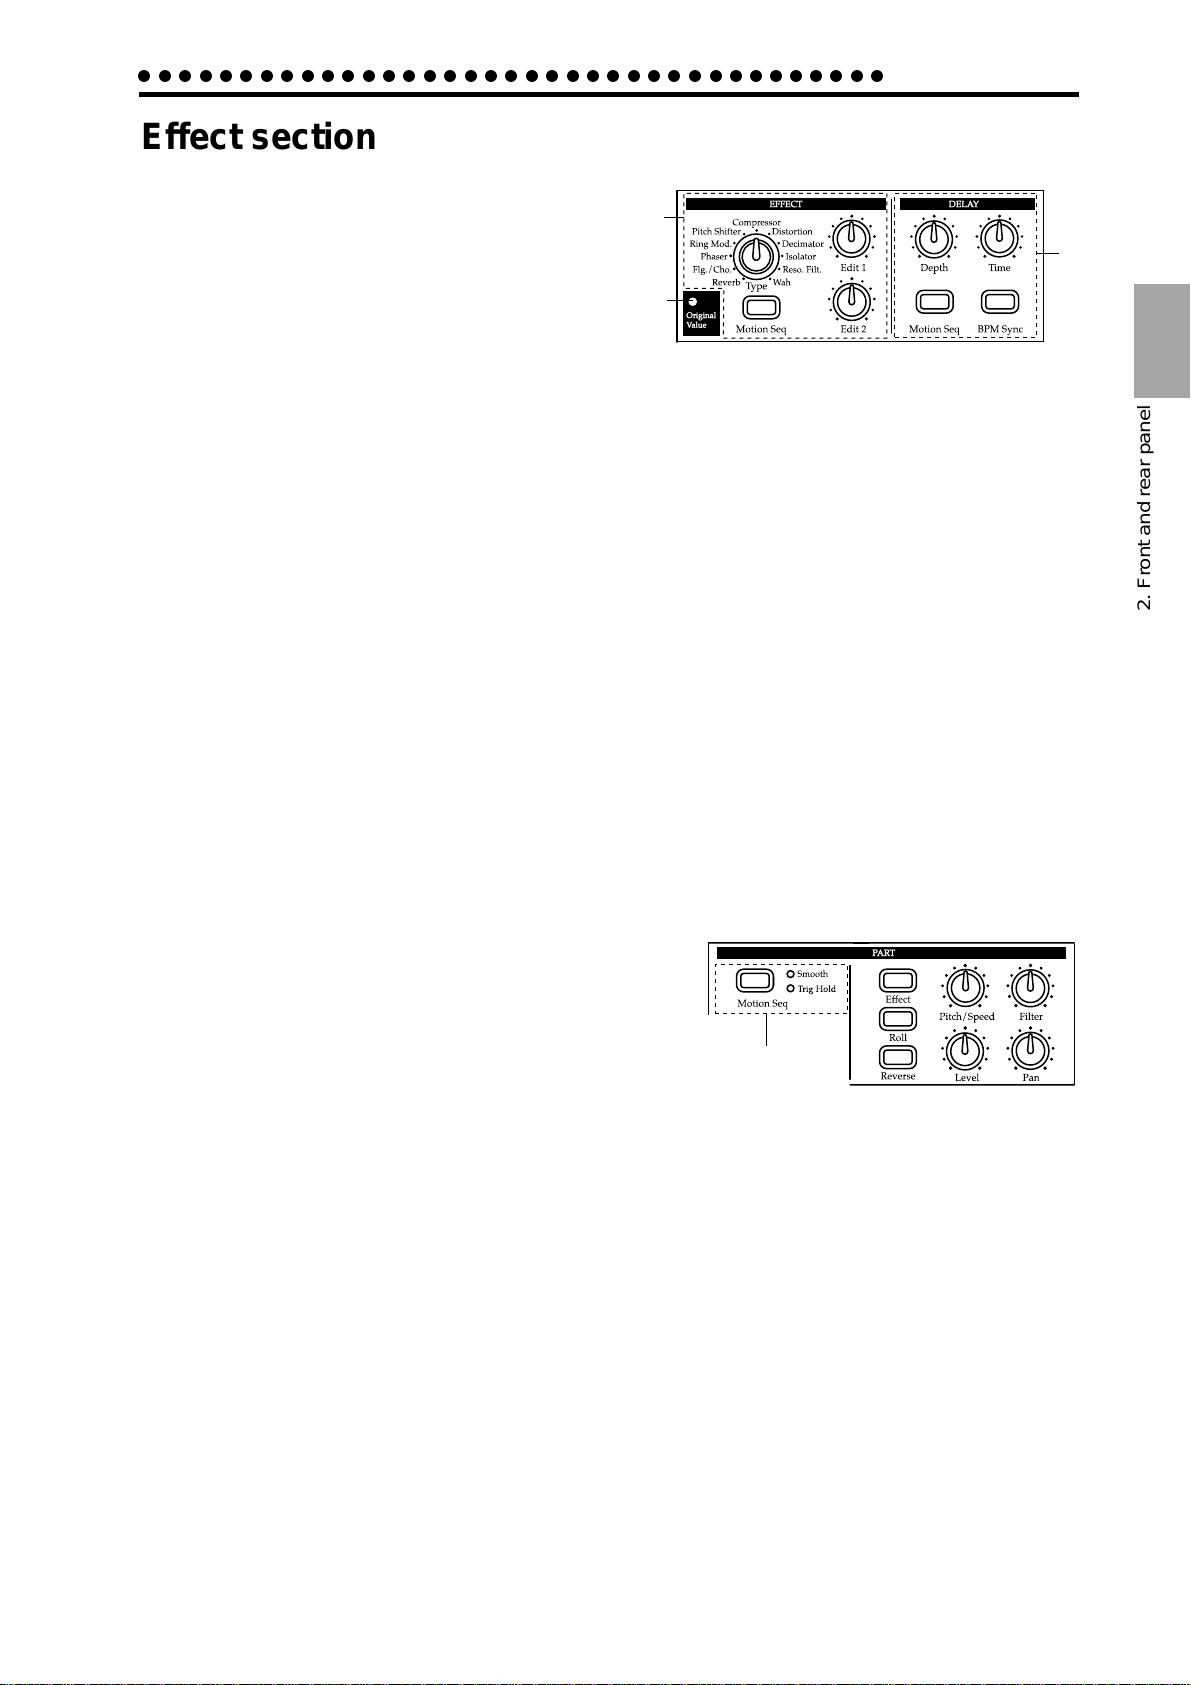
Effect section
1. EFFECT
Here you can select the effect type, and control
the effect.
• Type: Select the effect type.
• Edit 1: Adjust the effect. The result will
differ depending on the type of effect.
• Edit 2: Adjust the effect. The result will
differ depending on the type of effect.
• Motion Seq (motion sequence): This lets you record and play back movements of
the Edit 1 and Edit 2 knobs. Each time you press this key, the setting
will alternate between on (lit) and off (dark).
2. Original Value (LED)
This will light when the knob etc. that you are currently moving arrives at the same
position as the original value of the sound in the pattern.
1
2
2. Front and rear panel
3
3. DELAY
Here you can control the delay effect.
• Depth (delay depth): Adjust the depth of the delay.
• Time (delay time): Adjust the delay time.
• Motion Seq (motion sequence): This lets you record and play back movements of
the Depth and Time knobs. Each time you press this key, the setting
will alternate between on (lit) and off (dark).
• BPM Sync:
This selects whether the delay time will automatically be matched to
the tempo. Pressing this key will alternate between on (lit) and off (dark).
Part Edit section
1. Motion Seq (motion sequence)
This key lets you record and play back knob movements for each part. Each time you press this key,
the setting will alternate between on (Smooth lit),
on (Trig Hold lit), and off (dark)
2. Effect
For each part, this key switches the effect on (lit) or off (dark).
3. Roll
For each part, this key switches the roll effect (successive strikes) on (lit) or off (dark).
2. Front and rear panel
2
5
6
3
1
4
7
8
4. Reverse
For each part, this key turns reverse playback on (lit) or off (dark).
5. Pitch/Speed
This knob adjusts the pitch of the sample. For the Audio In part, it sets the gate time
(duration of the sound).
6. Filter
This knob adjusts the cutoff frequency of the low pass filter.
7. Level
This knob adjusts the level. For the Accent part, it adjusts the accent level.
8. Pan (panpot)
This knob sets the stereo location of the sound.
9
Page 10
2. Front and rear panel
○○○○○○○○○○○○○○○○○○○○○○○○○○○○○○○○○○○○○
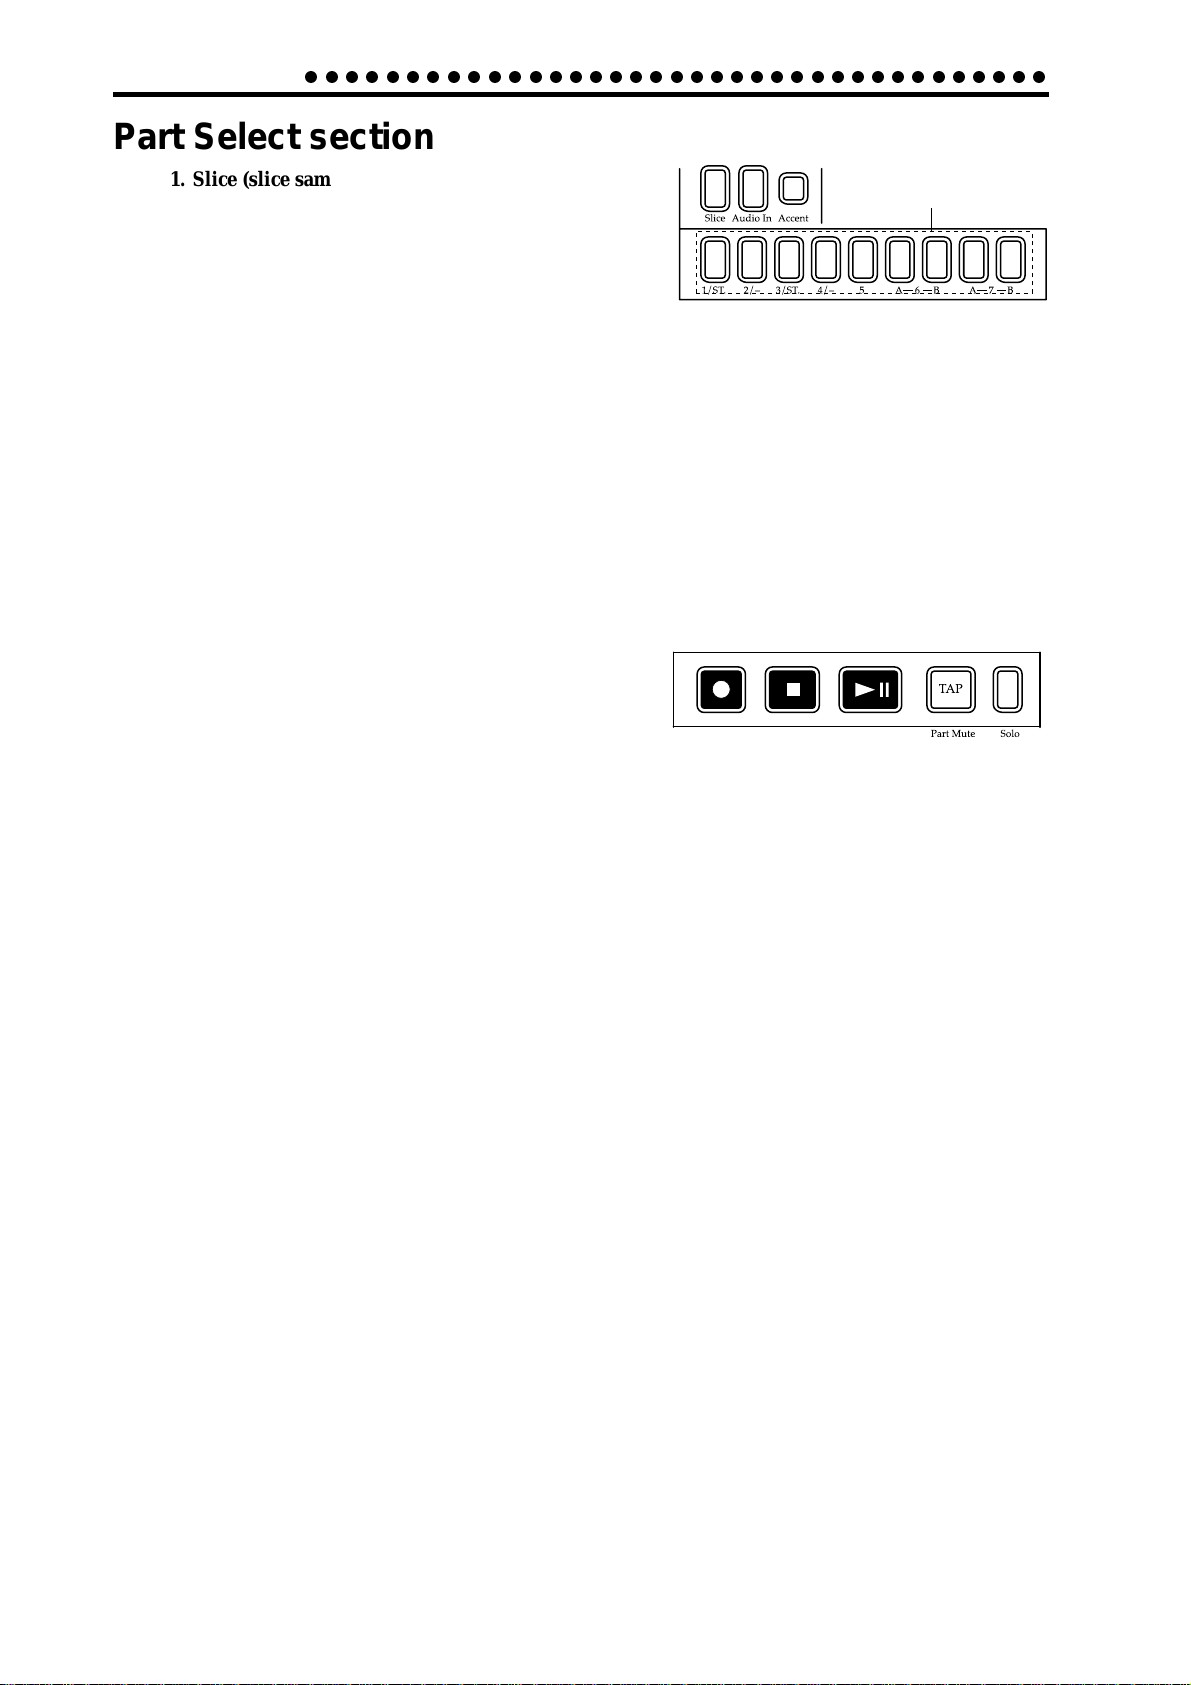
Part Select section
1. Slice (slice sample part key)
This key selects the Slice Sample part. You can press
this key to hear the assigned slice sample.
2. Audio In (audio in part key)
This key selects the Audio In part. You can press this
key to hear the external input sound.
3. Accent (accent part key)
This key selects the Accent part.
4. 1—5, 6A-6B, 7A-7B (sample part keys)
These keys select sample parts. When you press one of these keys, you will hear the
sample that is assigned to the corresponding part.
Sequence Control section
1. Rec key
This key records rhythms or knob movements. If you
press this key during recording, recording will be
halted, and playback will continue. By holding down
the Pattern Set key and pressing the Rec key , you can
sample the sound of the external input or the sound
that is playing.
3
2
1
12 3
4
4
5
2. Stop/Cancel key
This key stops pattern playback, song playback, sampling, or sample playback, and is
also used to halt execution of an operation.
3. Play/Pause key
This key starts/pauses playback of a pattern or song, and plays samples.
4. TAP/Part Mute key
Use this key to enter a tap tempo. During playback, you can hold down this key and
press a Part key to mute the specified part.
5. Solo key
During playback, you can hold down this key and press one or more Part keys to
playback the specified part(s).
10
Page 11
○○○○○○○○○○○○○○○○○○○○○○○○○○○○○○○○○○○○○
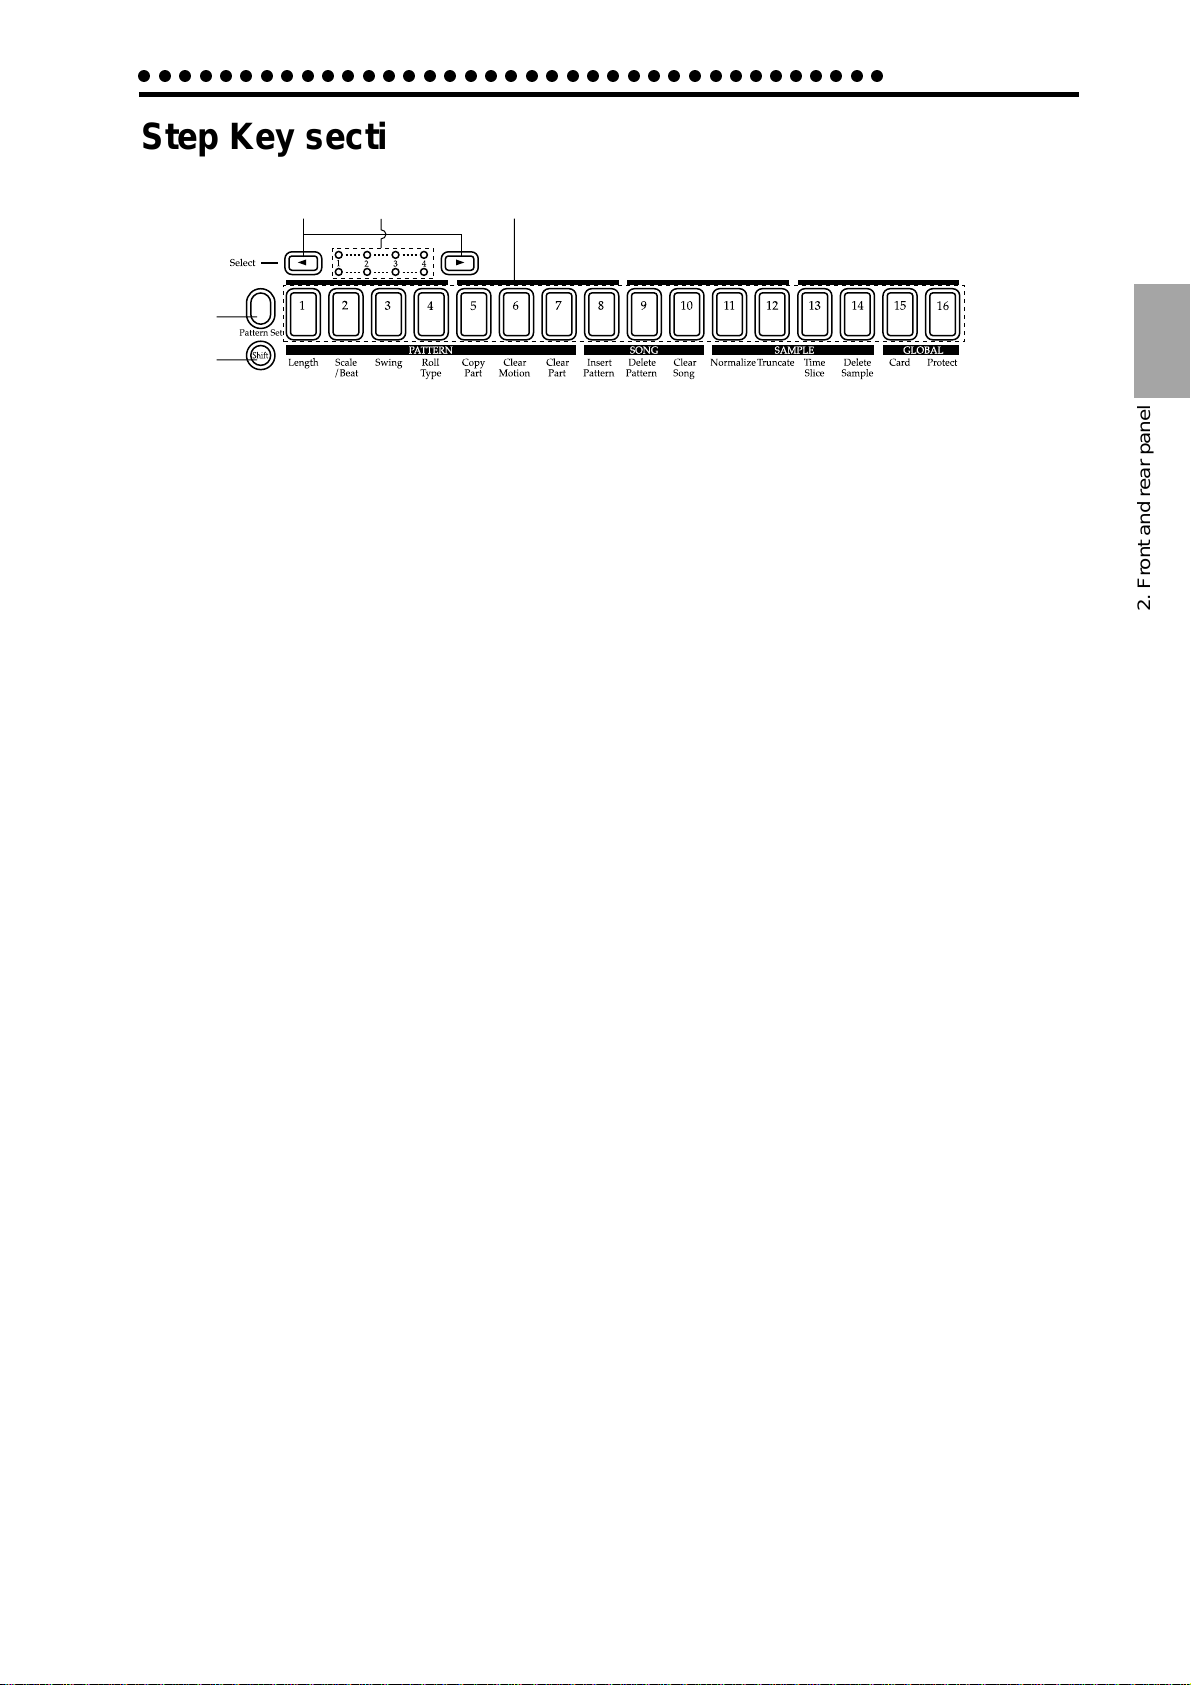
Step Key section
2. Front and rear panel
1
2
3
4
5
1. Select key
By pressing these keys to turn the Select LEDs on or off, you can use the sixteen step
keys for up to 64 steps.In Song mode, these keys function as rewind and fast-forward
keys. When the Pattern Set function is on, they are used to switch Pattern Set groups.
2. Select LEDs
The upper row of LEDs (green) indicates the location (length 1...4) within the pattern
of the currently-playing rhythm pattern.
The lower row of LEDs (red) indicates the location (length 1...4) of the rhythm pattern
indicated by the step keys. When the Pattern Set key is on, these LEDs indicate the
pattern set group.
3. Step keys 1...16
Use these keys to modify and audition the rhythm pattern of each part. When the
Pattern Set function is on, use these keys to select patterns that have previously been
asigned to these keys.
2. Front and rear panel
4. Pattern Set key
By holding down this key and pressing one of the step keys, you can switch to the
pattern that you registered for that key.
If you hold down this key and press the Rec key, the ES-1 will enter sampling-ready
mode. If a pattern or song is playing back, sampling will begin immediately.
5. Shift key
This key is used in conjunction with other keys. When held down, it gives an additional function to another key.
Shift + Play/Pause key: Playback from the beginning of the pattern.
Shift + Rec key: During playback, erase triggers from the pattern.
Shift + Part keys: Select a part without sounding it.
Shift + Step keys: Execute the function shown below each step key.
Shift + dial: Switch the units that are displayed during tempo editing or sample
editing.
Shift + pattern set key: The Pattern Set function will be held (maintained).
For other Shift key combinations, refer to the explanation of each parameter.
11
Page 12
2. Front and rear panel
○○○○○○○○○○○○○○○○○○○○○○○○○○○○○○○○○○○○○
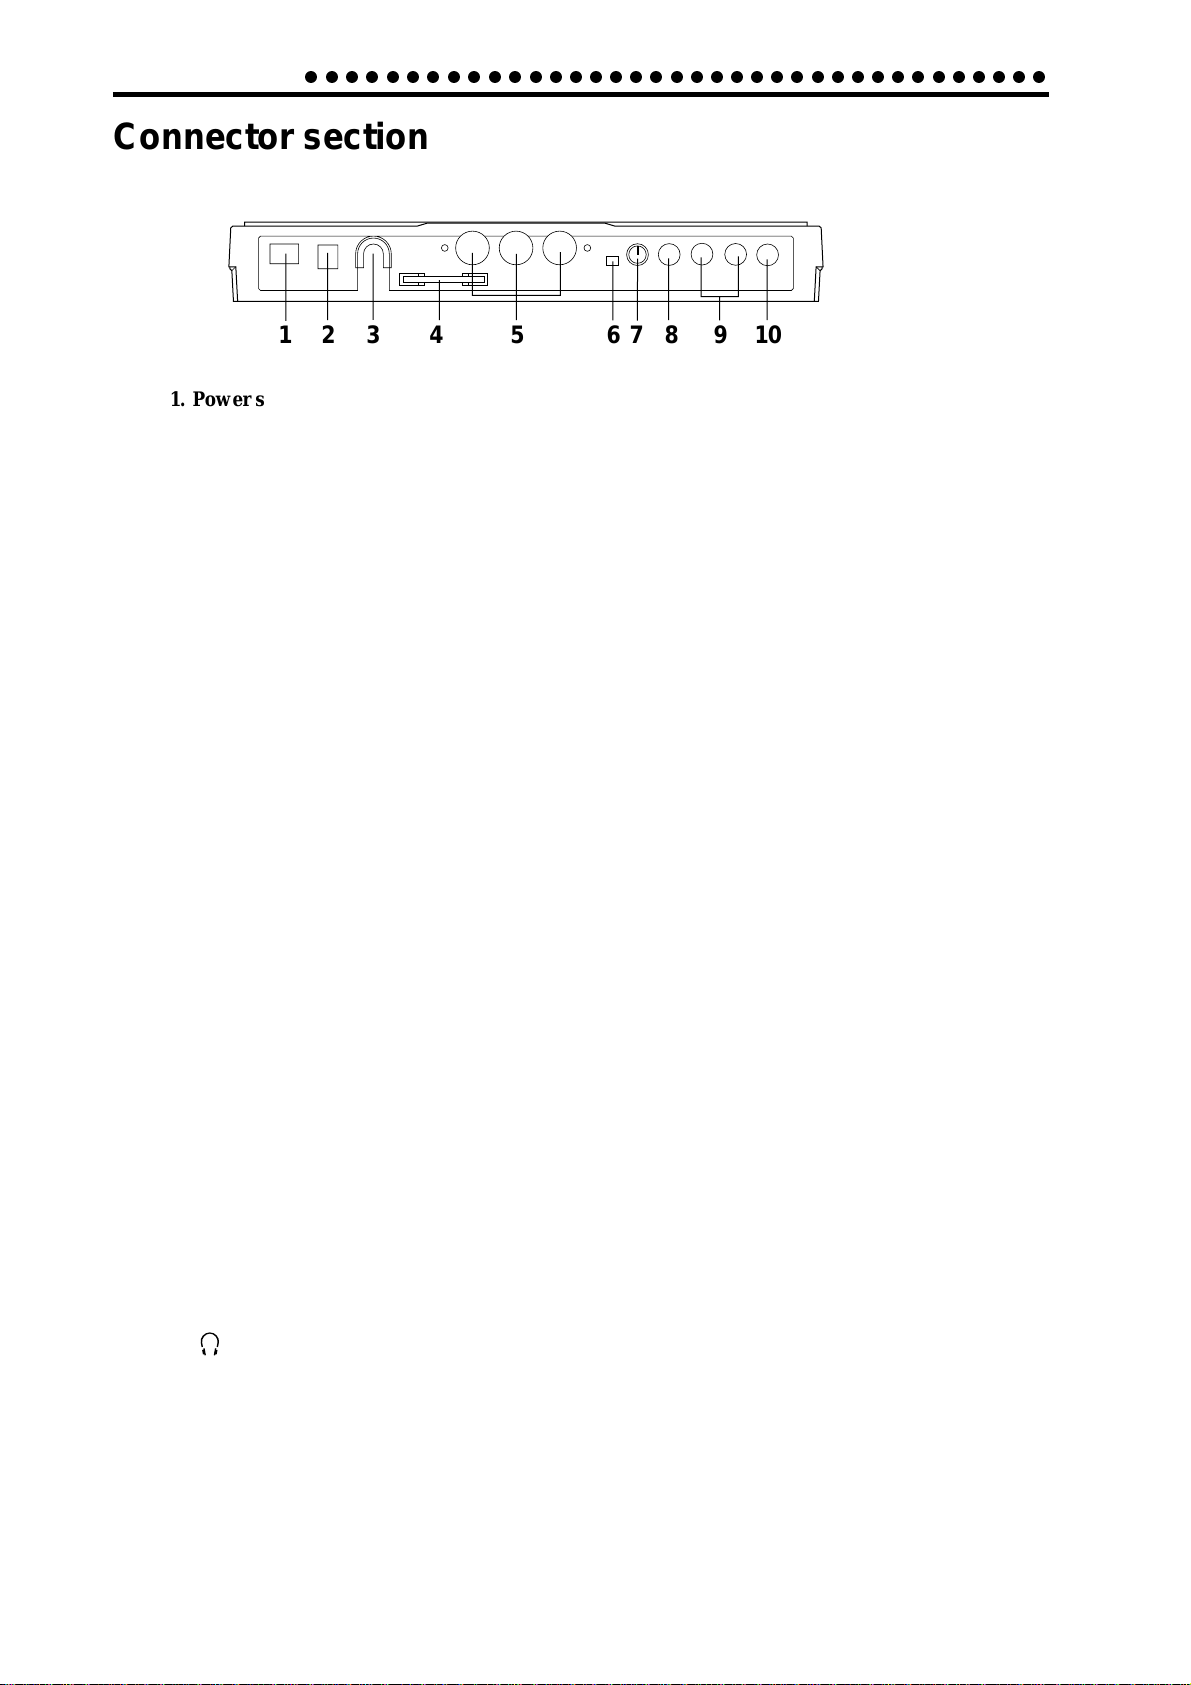
Connector section
1 23 4 5 678910
1. Power switch
This switch turns the power on/off. Each time you press it, the power will alternate
between on or off.
2. DC 9V
Connect the included AC adapter here.
3. Adapter cable holder
Hook the adapter cable around this so that it will not be disconnected accidentally.
4. SmartMediaTM slot
A SmartMediaTM card can be inserted into this slot. Use this when you wish to save or
load ES-1 data.
5. MIDI connectors
IN MIDI data is received at this connector to control the ES-1 from an external
MIDI device or to receive a data dump.
OUT MIDI data is transmitted from this connector to control an external MIDI de
vice or to transmit a data dump.
THRU MIDI data received at the MIDI IN connector is r e-transmitted without change
from this connector. This is used to "daisy-chain" multiple MIDI devices.
6. MIC/LINE (gain select switch)
This switches the input gain of the audio input. When a mic is connected, set this to
the MIC position. Otherwise, set this to the LINE position.
7. LEVEL (input level)
This adjusts the input level of the audio input.
8. ST./MONO (audio in jack)
This jack is used for the audio in part. The sound that is input here will be used as the
sound of the Audio In part select key. If the input source is stereo, use a ster eo phone
jack to make connections.
9. L/MONO, R (line output) jacks
Connect your audio cables from these jacks to your mixer or powered monitor system
(powered speakers) etc. If you wish to make monaural connections, connect the L/
MONO jack.
12
10. (headphone jack)
A set of stereo headphones fitted with a stereo 1/4” jack plug can be connected here.
Page 13
○○○○○○○○○○○○○○○○○○○○○○○○○○○○○○○○○○
3. Basic operation (Quick Start)
3. Basic operation (Quick Start)
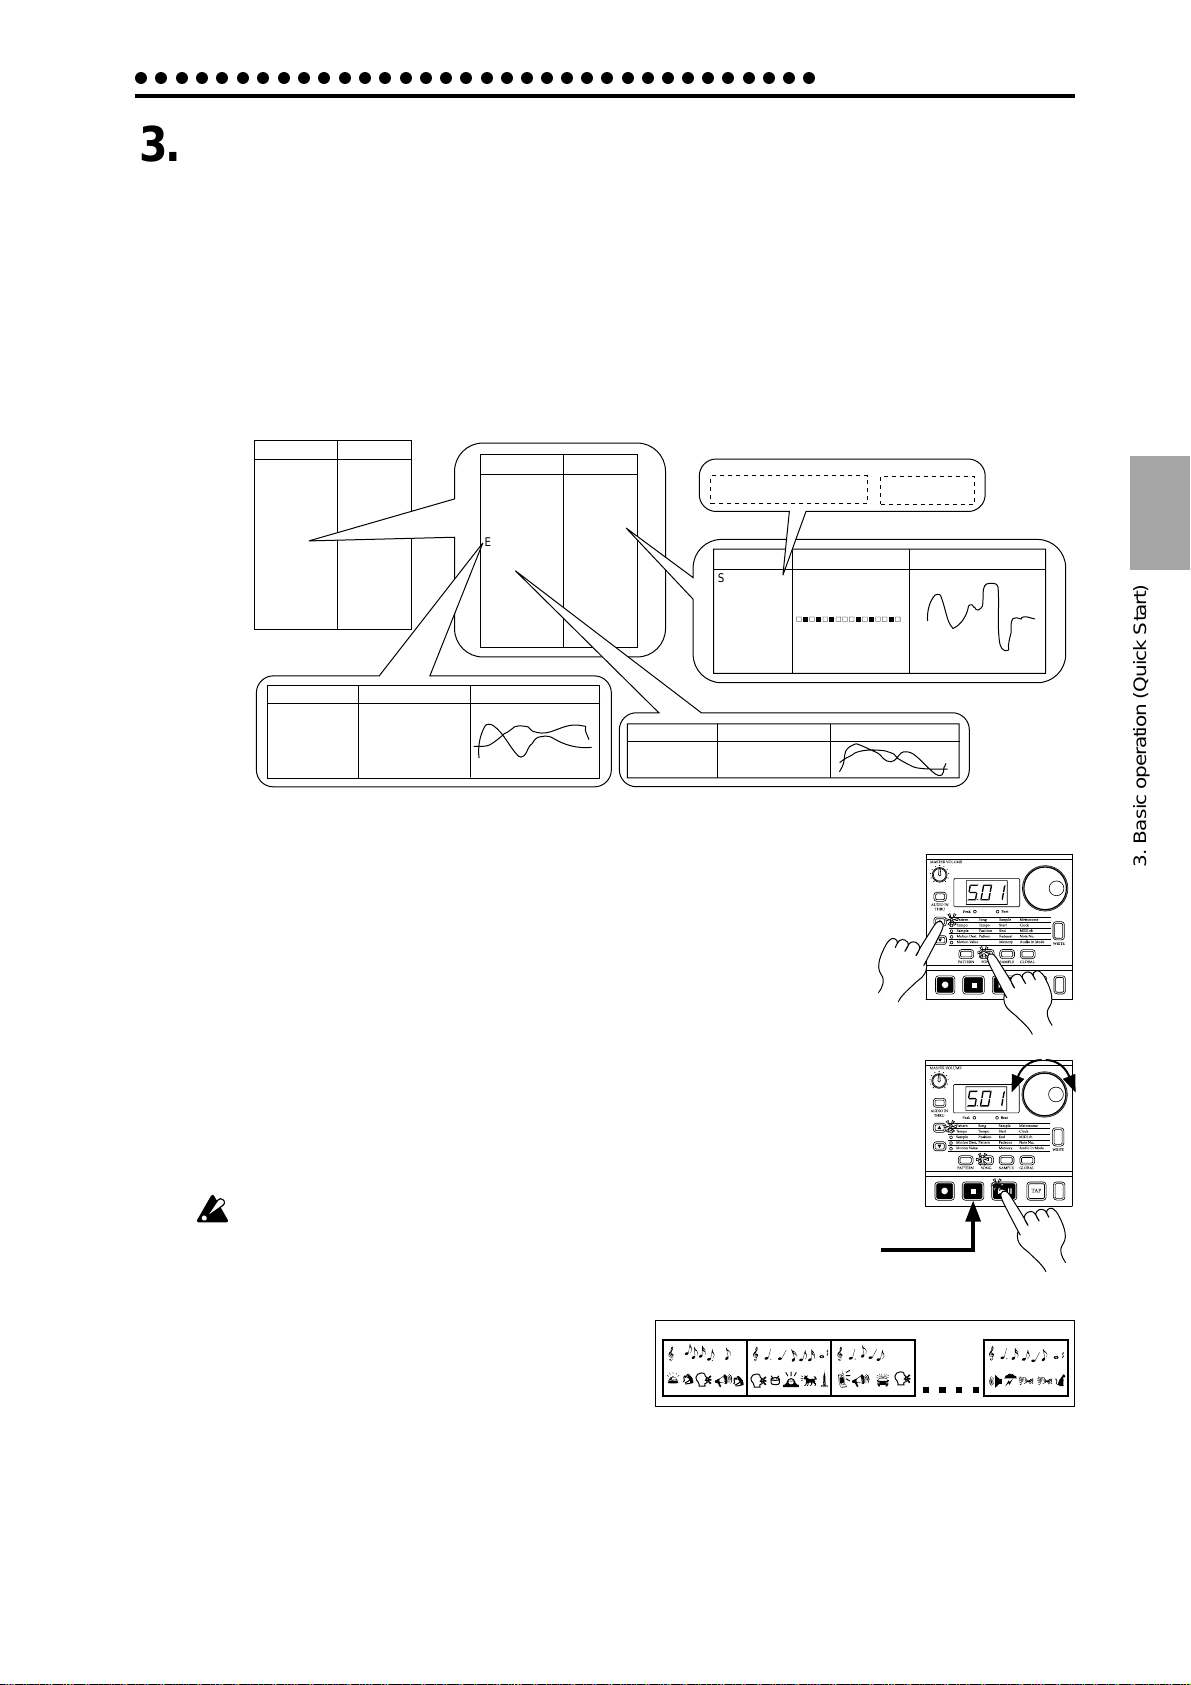
Conceptual diagram of the ES-1
On the ES-1, a song consists mainly of a sequence of patterns (each with parts to which
samples have been assigned, and effect and delay settings) plus event data (☞p.51 “Re-
cording performances and knob movements in a song (Event Recording)”).
Structure of Song
Songs: S01...S16
Pattern order
Effect
Reverb
Flg./Cho.
·
·
Wah
Event data
A03
Part Solo
B53
Part Mute
B07
Part T rigger
A06
·
A52
·
B17
·
·
·
·
End
Type Parameter Motion sequence
Edit 1
Edit 2
Patterns: A01...D64
Pattern data
Tempo
Length
Beat/Scale
Effect
Delay
Part data
Sample 1
Sample 2
Sample 3
Sample 4
Sample 5
Sample 6A
Sample 6B
Sample 7A
Sample 7B
Slice Sample
Audio In
Accent
Type
Normal
BPM Sync
Sample(Total max 95 sec.)
Mono
00. 01. 02. 03.
05. 06. 07.
Part
Parameter
Sample No.
Effect On/Off
Pitch/Speed
Filter
·
Pan
Level
Delay
Parameter
Delay Depth
Delay Time
l l
04.
l l
08. · · ·
Rhythm pattern
Stereo
l l
00.S 01.S
02.S 03.S· · ·
Motion sequence
Motion sequence
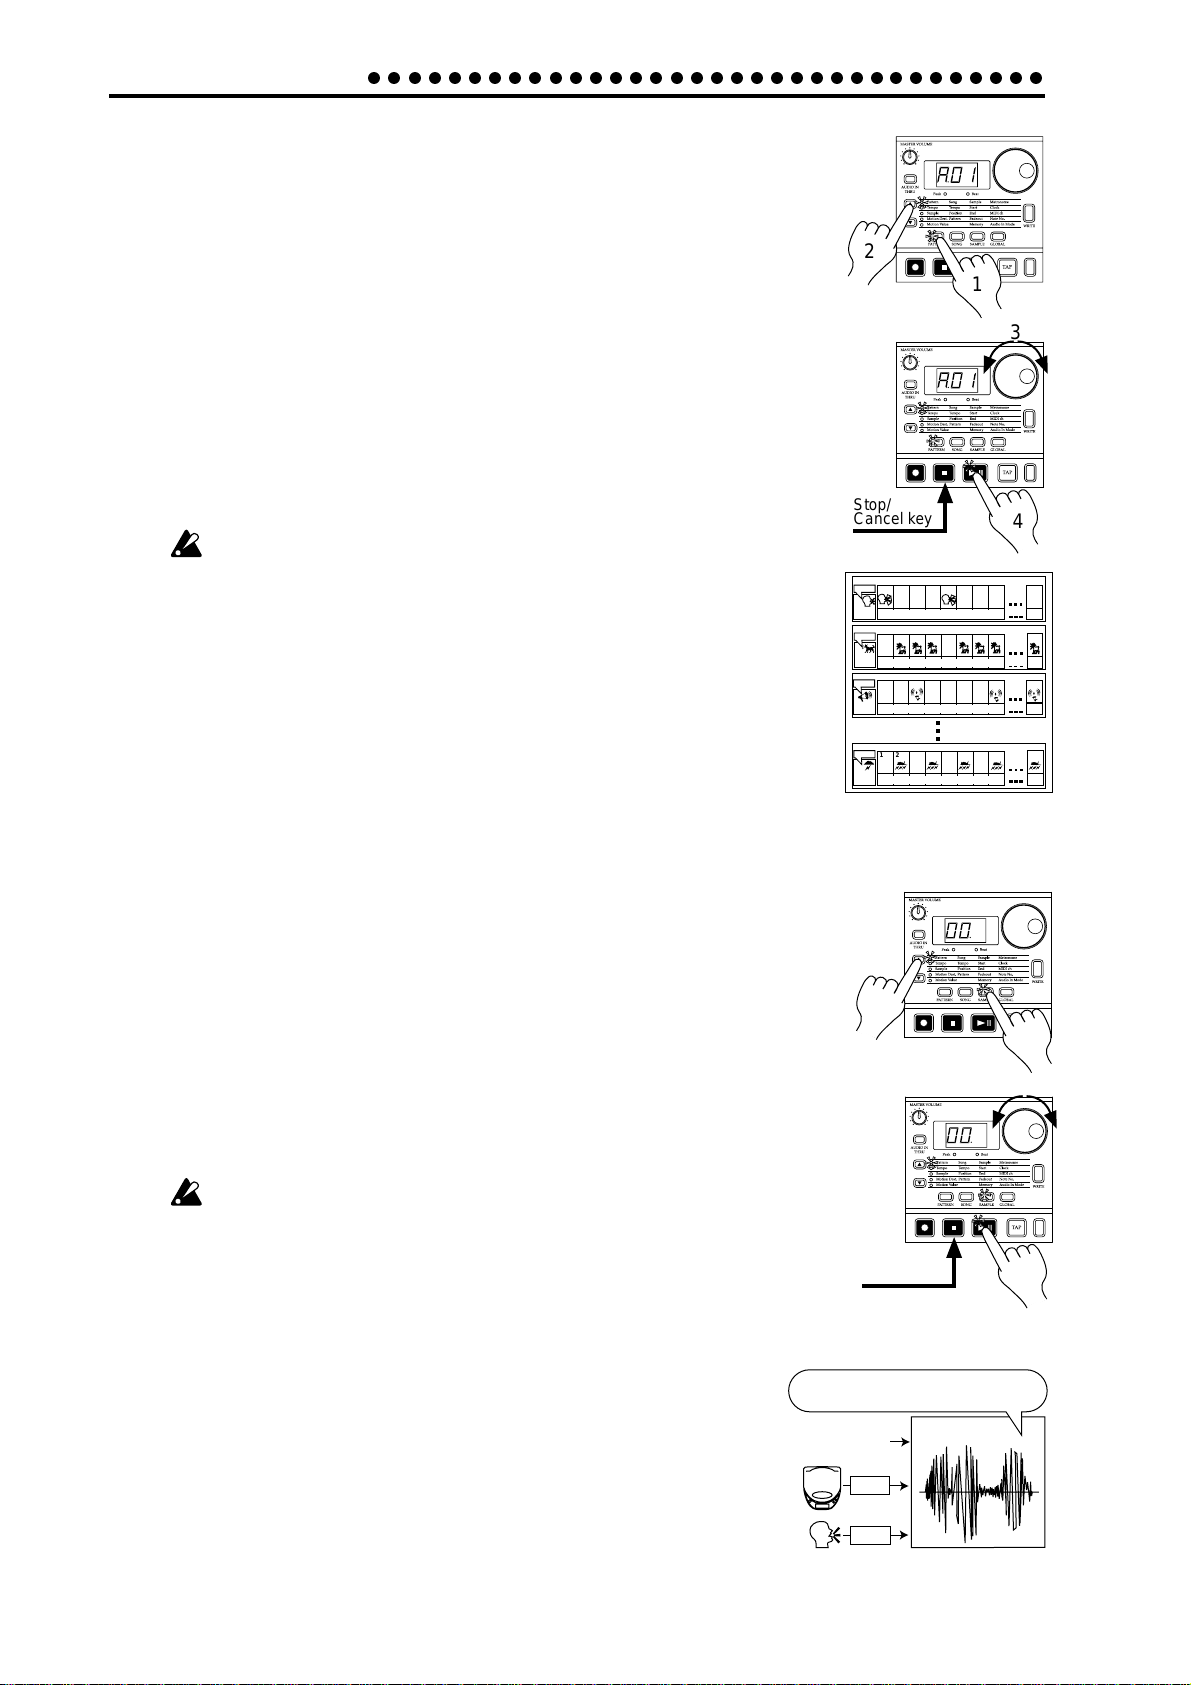
Listening to a Song
1. Press the Song Mode key to enter Song mode (the key will light).
2. Use the cursor [▲][▼] keys to make the parameter select LED indicate
Song (the top LED).
3. Rotate the dial to select the desired song (S01...S16).
4. Press the Play/Pause key to playback the song (the key will light). When
the song ends, playback will stop automatically (the key will go dark).
T o pause during playback, press the Play/Pause key (the key will blink). To
resume playback, press the Play/Pause key once again (the key will light).
To stop playback, press the Stop/Cancel key.
It is not possible to change songs during playback.
What is a Song?
On the ES-1, a song is musical data consisting of Patterns
arranged in the desired playback order. The ES-1 lets you
create and store up to sixteen songs. In each song you can
arrange up to 256 patterns, and rhythm and knob movements can also be recorded in addition to the playback.
(☞p.48 "Song mode.")
Song
Pattern(A03)
Pattern(B01)
Stop/
Cancel key
Pattern(A01)
3. Basic operation (Quick Start)
2
1
3
4
Pattern(A02)
13
Page 14
3. Basic operation (Quick Start)
○○○○○○○○○○○○○○○○○○○○○○○○○○○○○○○○○○
Listening to a Pattern
1. Press the Pattern mode key to enter Pattern mode (the key will light).
2. Use the cursor [▲][▼] keys to make the parameter select LEDs indicate
Pattern (top).
3. Rotate the dial to select the desired pattern (A01...A64, b01...b64).
2
1
4. Press the Play/Pause key to playback the pattern (the key will light). When
pattern playback ends, the pattern will return to the beginning, and continue playing repeatedly.
T o pause during playback, pr ess the Play/Pause key (the key will blink). To
resume playback, press the Play/Pause key once again (the key will light).
To stop playback, press the Stop/Cancel key.
You can rotate the dial to select patterns regardless of playback status.
When you change patterns during playback, the change will actually occur at the end of each pattern. (☞p.33 "The timing at which patterns will
change.")
What is a Pattern?
A pattern is a unit of musical data consisting of sounds arranged in a rhythm. On the ES1 you can create and save 128 patterns.
Each pattern consists of eleven parts (☞p.15). In addition to the sounds of each part, you
can also record rhythms and knob movements (☞p.33 "Pattern mode").
Listening to a Sample
1. Press the Sample Mode key to enter Sample mode (the key will light).
2. Use the cursor keys [▲][▼] to make the parameter select LED indicate
Sample (top).
Stop/
Cancel key
Pattern
Part
EDIT
1 2 3 4 5 6 7 8
Sample
(05.)
-------Motion sequence data-- ---
Part
EDIT
1 2 3 4
Sample
(11.)
-------Motion sequence data-- ---
Part
EDIT
1 2 3 4
Sample
-------Motion sequence data-- ---
(01.S)
Part
EDIT
1 2 3 4
Sample
-------Motion sequence data-- ---
(90.)
5 6 7 8
5 6 7 8
5 6 7 8 64
3
4
64
64
64
3. Rotate the dial to select the sample number. Samples with only a number
such as “00.” are monaural sounds; samples with an “S” after the number are stereo sounds; and samples with an “
l l
” after the number are slice
sample sounds (☞p.24, 30).
4. To hear the sample sound, press the Play/Pause key or a sample part key
1—7B.
To stop playback before it has finished, press the Stop/Cancel key.
If you press the Play/P ause key during playback, the sample will play fr om
its beginning.
In Song mode or Pattern mode, you can hear a sample by pressing the part
key to which the sample has been assigned. (☞p.15 “Pressing keys to hear
the sound of a Part”)
What is a Sample?
A “Sample” is a sound that has been recorded, or a sound that has been
recorded and then processed. A sample can be assigned to each Part
(☞p.15). The ES-1 lets you create and save up to 150 samples (100 monaural, 50 stereo), as long as the maximum sampling area of 95 seconds is not
exceeded. A stereo sample will occupy twice the sampling ar ea of a monaural sample.
CD, etc.
Voice, etc.
EDIT
ES-1 Parts,
Patterns, Songs
2
Stop/
Cancel key
Start, End, Fadeout
Normalize, T runcate
Sample 00.
LINE
MIC
1
3
4
14
Page 15
○○○○○○○○○○○○○○○○○○○○○○○○○○○○○○○○○○
Part
1 2 3 4
5 6 7 8 64
Sample
(90.)
EDIT
----------Motion sequence data------ ---
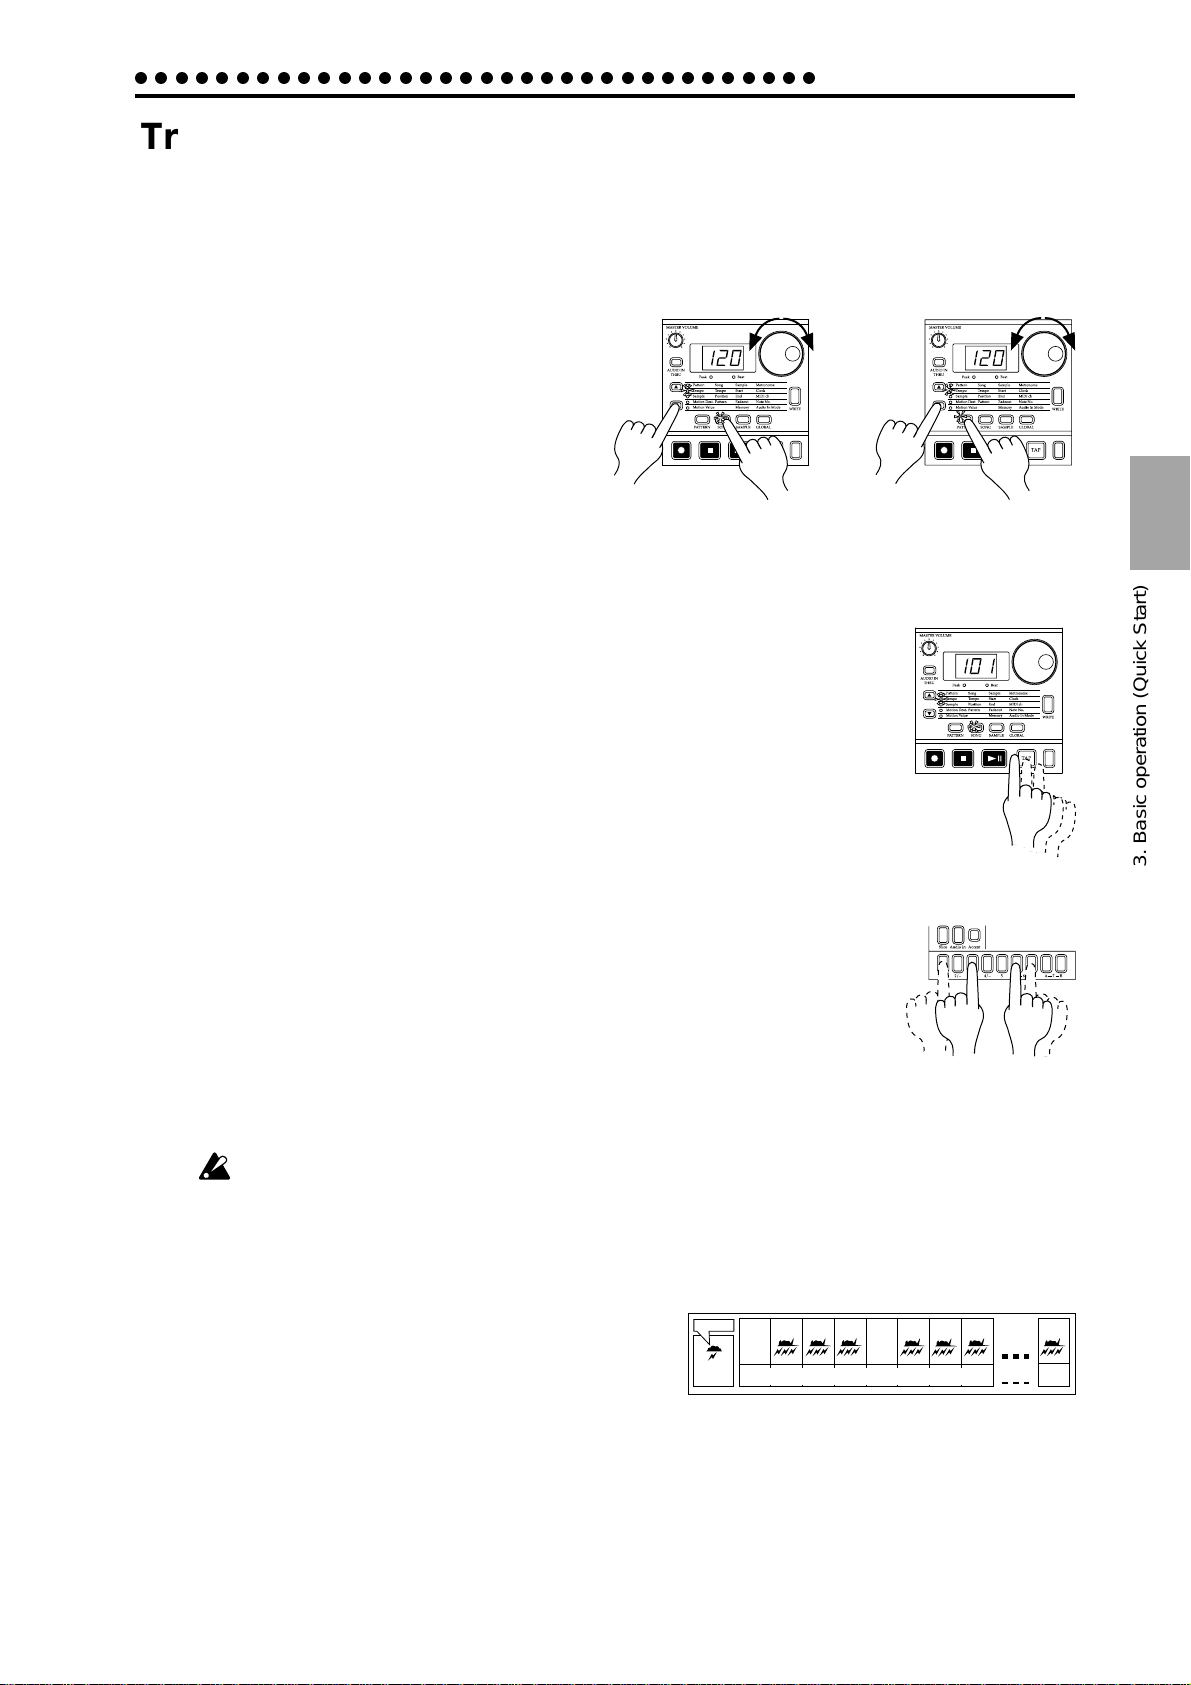
Trying out the functions
Changing the tempo of a song or pattern
The tempo that you change here will return to the original tempo when you stop
playback and switch to a different pattern or song.
3. Basic operation (Quick Start)
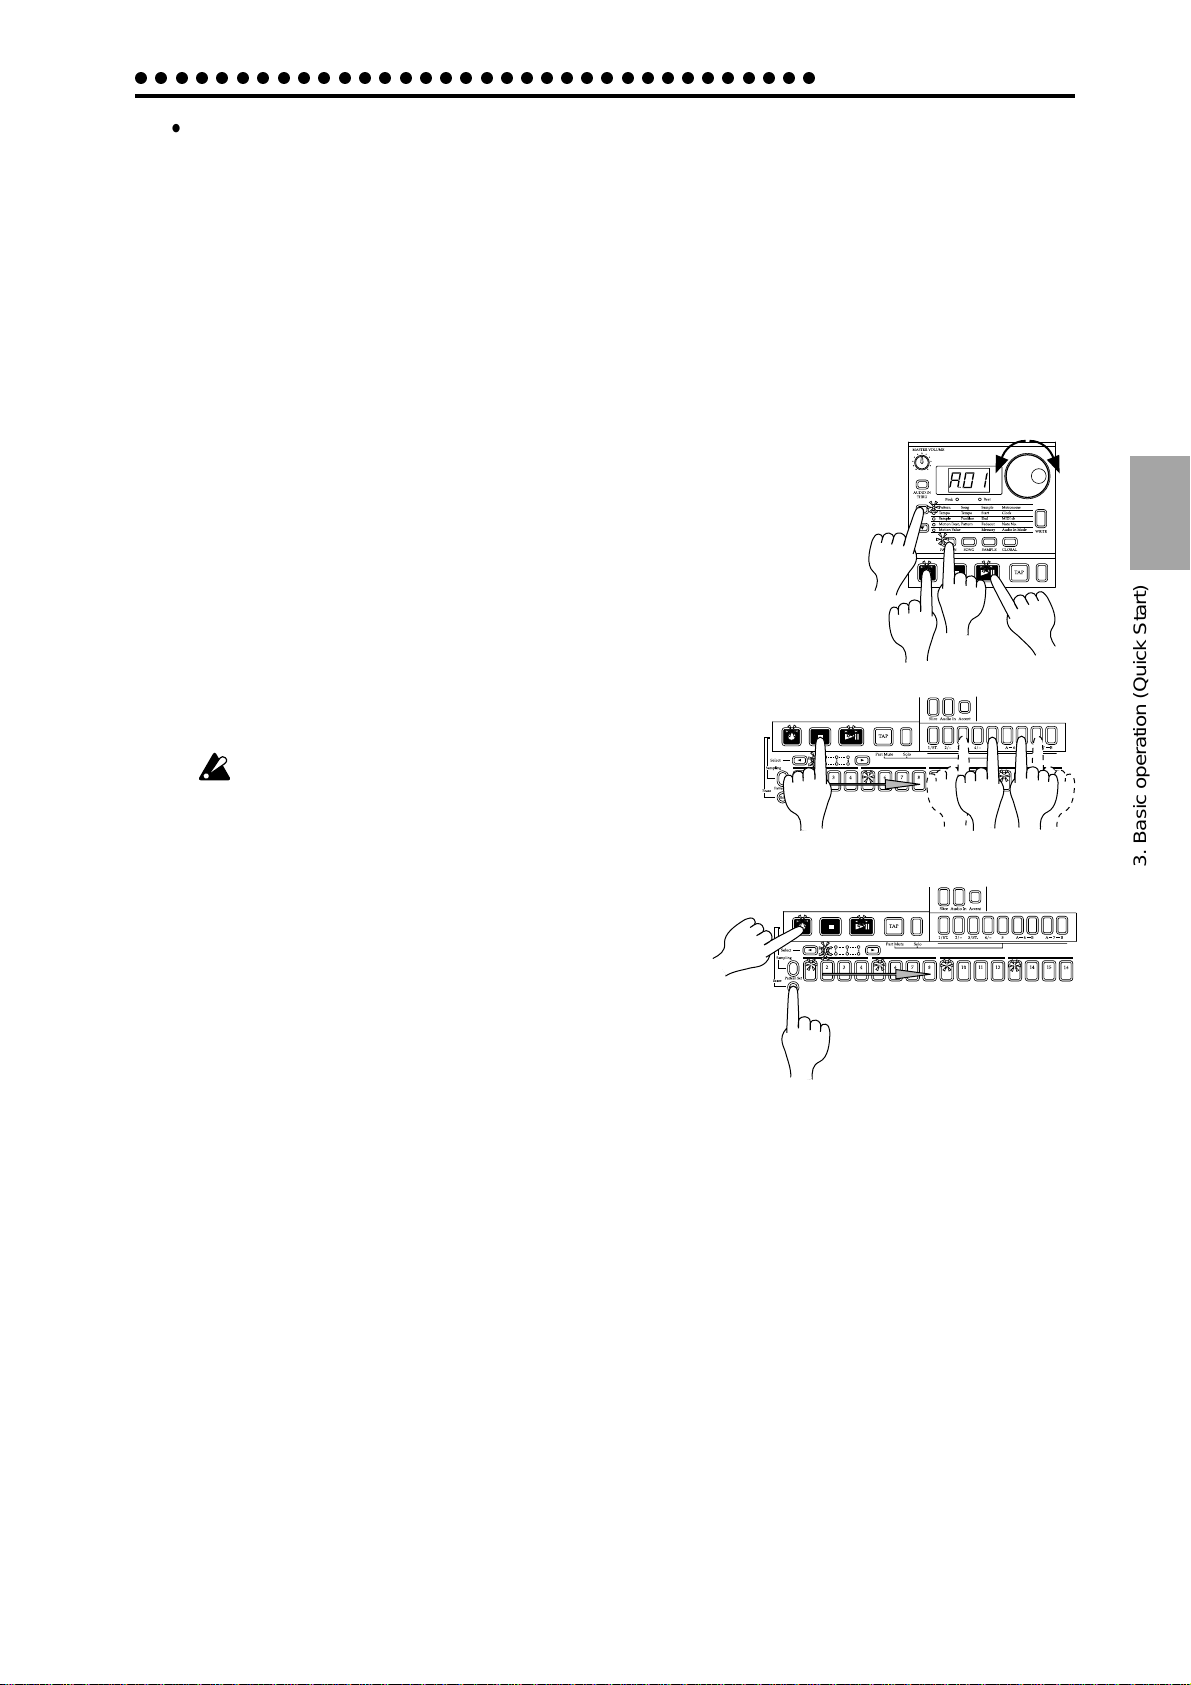
• Using the dial to change the tempo
Change the tempo of
a song
1. Press the Mode key to enter Song mode or
Pattern mode.
2. Use the cursor [▲][▼] keys to set the parameter select LED to Tempo.
3. Rotate the dial to change the tempo.
2
1
4. If you wish to adjust the tempo in more detail, you can hold down the Shift
key and rotate the dial to modify the decimal portion of the value.
• Using the Tap Tempo key to change the tempo
While a song or pattern is playing, press the T ap key thr ee times or more at the
desired tempo. The ES-1 will detect the interval at which you pressed the Tap
key, and will set the tempo accordingly. The tempo can also be changed in this
way even if the ES-1 is not currently playing a song or pattern.
Use the cursor [▲][▼] keys to make the parameter select LEDs indicate Tempo,
and the tempo you modified will appear in the display.
Striking keys to play Parts
3
Change the tempo of
a pattern
3
2
1
Three times
or more
3. Basic operation (Quick Start)
By striking the part keys, you can play the corresponding sounds.
The audio-in parts will sound when an audio signal is connected to the
audio input jacks. (☞p.22, "Connecting various sources to the audio inputs.") However even if sound is being input, it will not be heard if Audio
In Thru is turned on.
The sound of a part consists of an assigned sample that has been modified
or processed, and will differ for each pattern. Rotate the dial to select various patterns, and listen to the wide variety of sounds.
Pressing the Accent Part key will not cause the Accent part to sound. If the sample
assigned to sample part 1 or 3 is stereo, sample parts 2 or 4 will not sound. It is not
possible to play both sample parts 6A and 6B simultaneously, or both 7A and 7B
simultaneously . It is not possible to play a part to which a sample of “oFF” is assigned.
What is a Part?
A Part is the smallest unit that makes up a Pattern, and consists
of a sound and the timing (rhythm pattern) at which it is played,
effect on/off settings, and motion sequence data. There are a
total of twelve parts, as follows. (☞p.33 “Pattern mode”)
• Sample parts (1—5, 6A-6B, 7A-B): A sample sound and a
rhythm pattern.
• Slice Sample part: A sample sound and a rhythm pattern.
• Audio In part: A rhythm pattern for the external input.
• Accent part: A rhythm pattern that specifies the points of emphasis (accents) for the entire pattern.
The sound can be modified independently for each part, and the rhythm pattern, effect on/off settings,
and motion sequence etc. are also stored individually for each part (☞p.35 “Editing the sound of a part”).
15
Page 16
3. Basic operation (Quick Start)
2
1
2
2
1
2
○○○○○○○○○○○○○○○○○○○○○○○○○○○○○○○○○○
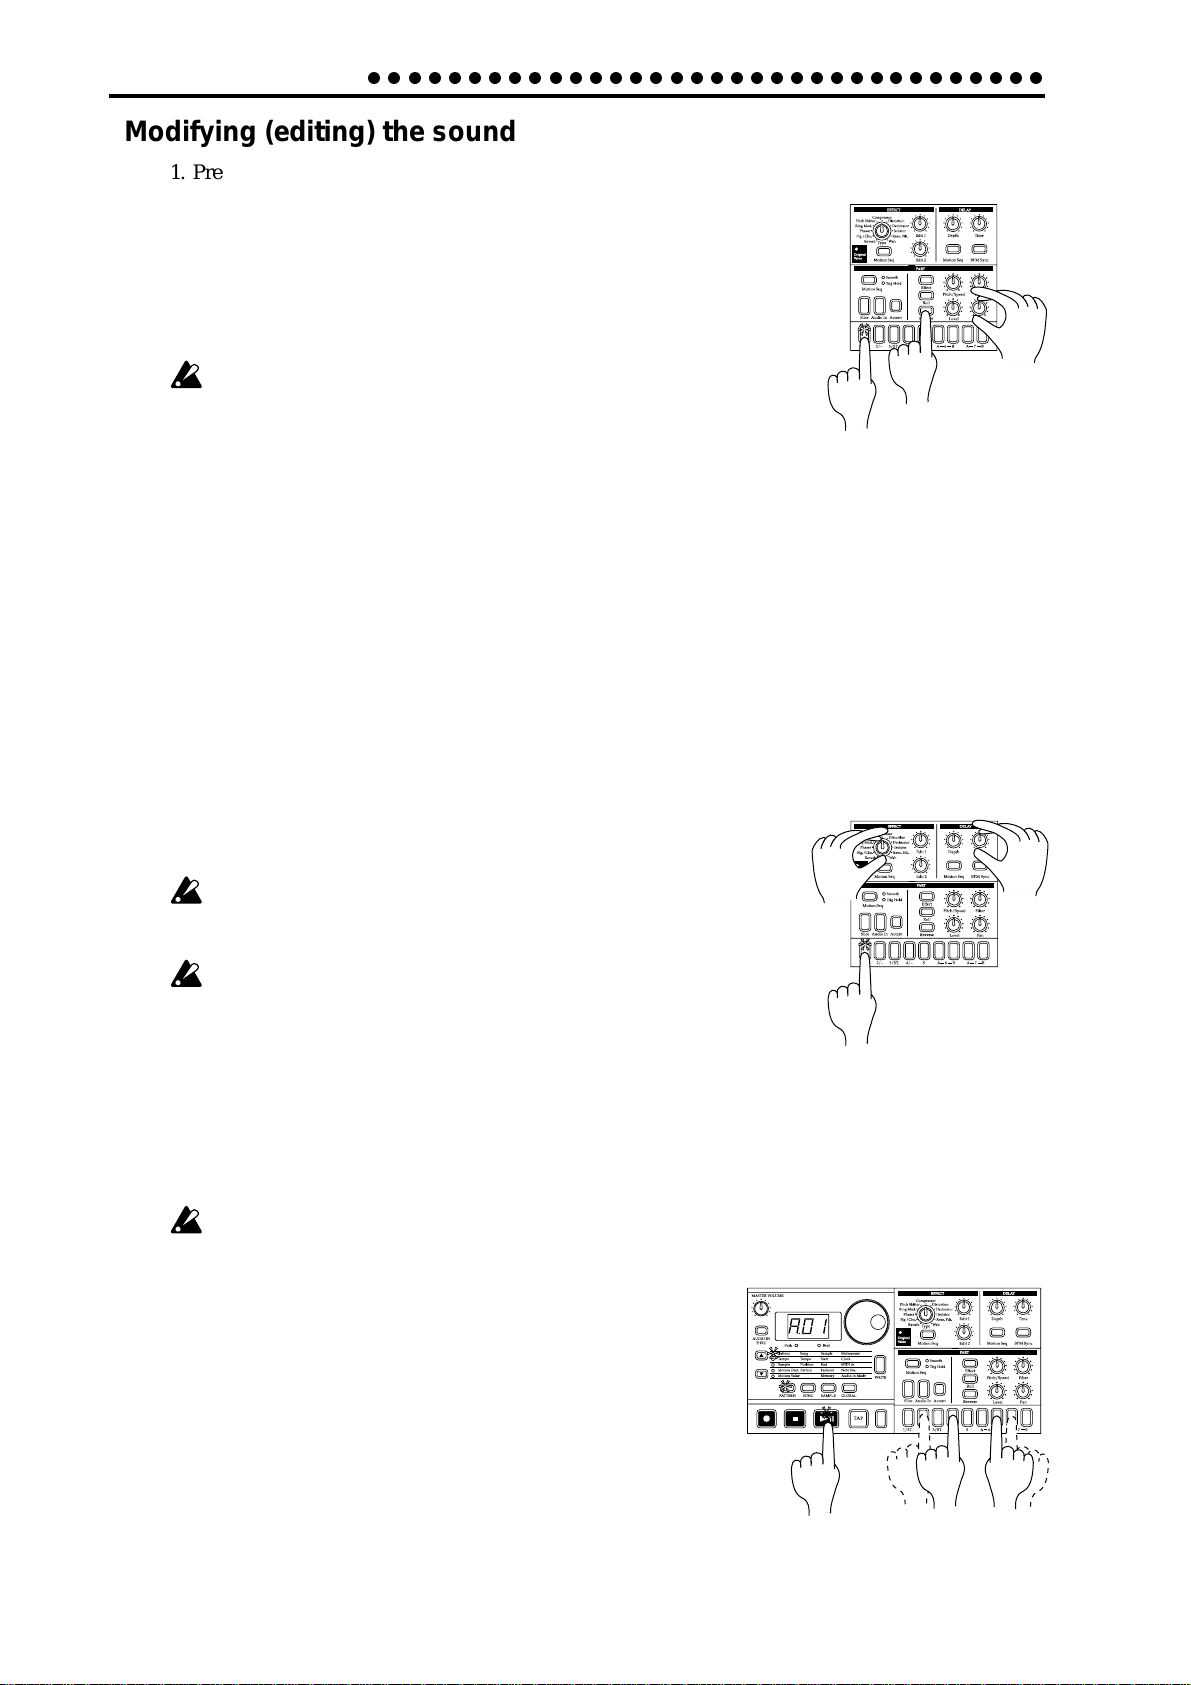
Modifying (editing) the sound
1. Press a part key to select the part that you wish to edit.
2. Use the knobs and keys of the Part Edit section to edit the sound. The
Original Value LED will light to indicate the position of the knobs
and keys for the original settings of the sound.
The pattern sound that you modified here can be saved by the Write
operation (☞p.20 "Saving a pattern you create").
The knobs that are effective will depend on the pattern.
If a motion sequence is controlling a knob, it may be difficult to edit
the sound as you intend. If so, turn the motion sequence off while
you are editing (☞p.41 "Motion sequences").
What is the Part Edit section?
This is the section where the parameters assigned to the panel knobs and keys work together to edit the
sound of each part. (☞p.35 "Editing the sound of a part.") The knobs that are valid for each part are as
follows.
• Sample parts, Slice sample part : Pitch/Speed, Filter, Pan, Level, Effect, Roll, Reverse
• Audio In part : Pitch/Speed (functions as gate time), Filter, Pan, Level
• Accent part : Level
Editing the effect and delay settings
1. Press a part key to select a part for which changes in the effect can be easily heard.
2. Use the knobs and keys of the effect section to edit the effect. The original position of
the effect knobs and keys is shown by the Original Value LED.
If you wish to save the pattern effect settings that you edit here, use the
Write procedure (☞p.20 “Saving a pattern you create (Write)”)
If the Effect key is off (dark), press the eff ect key to turn the effect on
(lit). The delay will always be on, regardless of the on/off setting of
the Effect key.
The result of turning the knobs will depend on the effect type.
If a motion sequence is operating on a knob and you are unable to
edit the sound as you wish, turn off the motion sequence while you
edit the sound (☞p.41).
Striking the part keys along with a song or pattern
1. In Song mode or Pattern mode, press the Play/Pause key to begin playback.
2. As you listen to the song or pattern, strike the part keys to play along.
If a stereo sample is assigned to part 1 or 3, pressing the part 2 or 4 key will not
produce sound.
1
22
16
Page 17
○○○○○○○○○○○○○○○○○○○○○○○○○○○○○○○○○○
3. Basic operation (Quick Start)
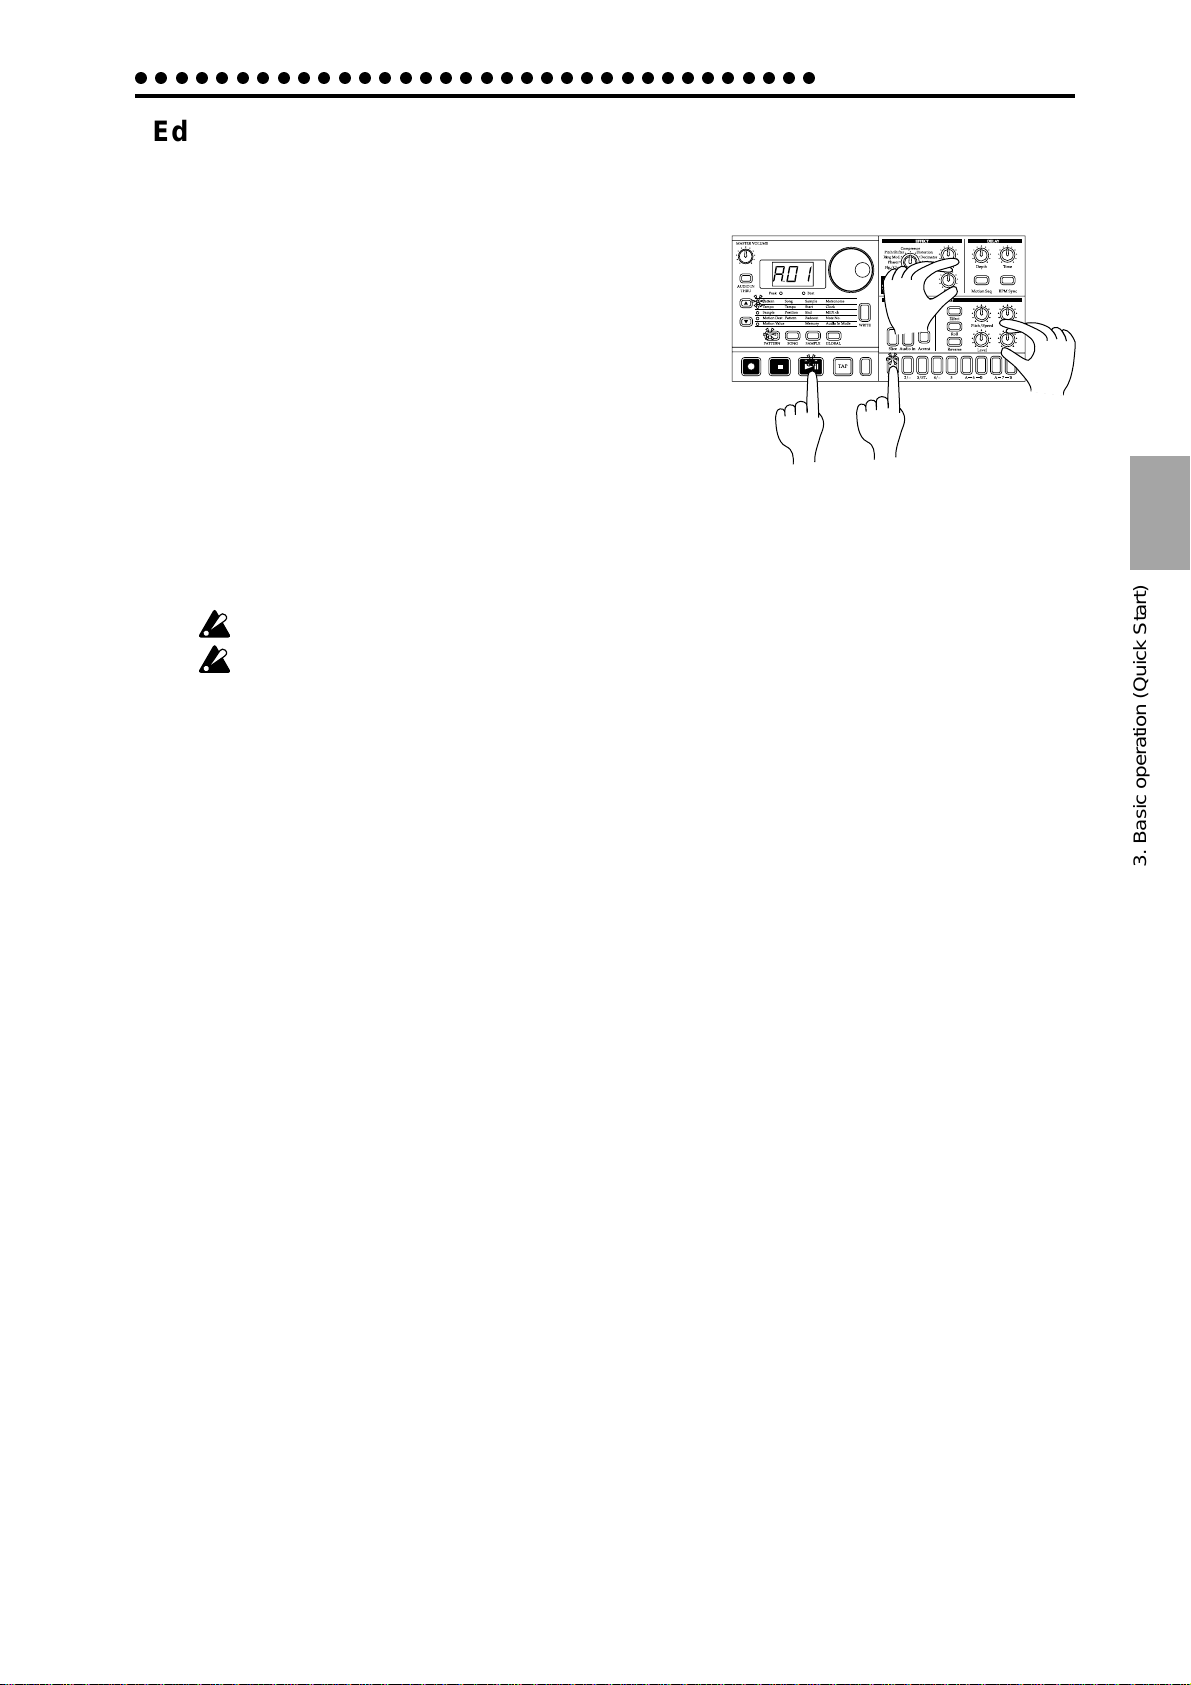
Editing the sound of a part, effect, or delay while hearing a song or pattern
1. In either Song mode or Pattern mode, press the Play/
Pause key to begin playback.
2. Press a part key (the key will light) to select the part that
you wish to edit.
3
3. Use the knobs or keys of the Part Edit section or Effect
section to edit the sound. As you operate the knobs or
keys, the sounds or effects being played will change.
You can press another part key to edit another part.
The settings of the Effect section are shared by all parts.
If you wish to save the pattern sound settings that you edit here, use the W rite procedure
(☞p.20 “Saving a pattern you create (Write)”)
If you re-select the pattern or turn off the power without performing the Write procedure, the sound will return to its un-edited state.
If a stereo sample is assigned to sample part 1 or 3, sample parts 2 or 4 will not sound.
While a Song is playing, it is not possible to write edits made to the part sound, effect,
or delay. It is only possible to write edits made to the part sound while a Pattern is
playing.
1
2
3
3. Basic operation (Quick Start)
17
Page 18

3. Basic operation (Quick Start)
○○○○○○○○○○○○○○○○○○○○○○○○○○○○○○○○○○
Modifying (editing) a rhythm pattern
What is a Rhythm Pattern?
A Rhythm Pattern is a sequence of rhythms (i.e., the timing at which a sound is heard) for an individual
part. You can use the sixteen step keys to modify the rhythm pattern of each part. A rhythm pattern can
also be recorded as you listen to the playback (realtime input). (☞p.27 "Creating a Rhythm Pattern.")
Rhythm pattern
TimeTiming of sounds
Trigger
Off2Off
On
1
On
3
4
• Using the step keys to edit the rhythm (Step Recording)
1. Press the Pattern mode key (the key will light).
Use the cursor [▲][▼] keys to set the parameter select LED to Pattern.
2. Rotate the dial to select the pattern that you wish to edit.
3. Press a part key (the key will light) to select the part that you
wish to edit.
Off7Off
Off
Off
On
5
8
6
9
Off11Off12Off
On
10
Off15Off
On
13
14
16
2
4. The step keys will light to indicate the rhythm of the selected
part. Y ou can pr ess the step keys to modify the rhythm pattern.
Each time you press a key, it will alternate between on (lit) and
1
1
off (dark).
Y ou can also playback the pattern while you select dif ferent parts
and press the step keys to turn each step on or off.
In the case of a pattern with a length of 2 or greater, you can use
4
the Select keys to move the select LED in the lower line (red) in
order to change the step location that is shown by the step keys.
Length
1
2
3
4
Select
LED display
Area shown by the step keys
For 16(
x 16), 32( x 16)
Steps 1...16
Steps 17...32
Steps 33...48
Steps 49...64
For tri(3 x 12), tr2(3 x 12)
Steps 1...12
Steps 13...24
Steps 25..36
Steps 37...48
If you wish to save the completed pattern, press the WRITE key. (☞p.20 "Saving a pattern that you create.")
3
4
18
If the Pattern Set key is on, the step keys will not display the rhythm pattern.
What is Length?
In this context, "Length" refers to the length of the
rhythm pattern.
The "Length" of the pattern will be either 16 steps or 12
steps, depending on the Scale and Beat settings of the
pattern. A rhythm pattern in triple meter will be shown
in triplets. Depending on the Length and Beat settings,
a single pattern can have up to 64 steps. (☞p.38 "Length
and Scale/Beat settings.")
Scale/Beat
display
X 16
( )
16
( )
X 16
32
X 12
)
(
tri
X 12
( )
tr2
Note value of
each step key
16th note
32nd note
8th note (triplet)
16th note (triplet)
Pattern Length (number of steps)
=1 =2 =3 =4
16 32 48 64
16 32 48 64
12 24 36 48
12 24 36 48
Page 19
○○○○○○○○○○○○○○○○○○○○○○○○○○○○○○○○○○
3. Basic operation (Quick Start)
• Using the part keys to edit the rhythm (Realtime Recording)
If you wish to hear the metronome while you record, r efer to p.53 "Metronome settings."
1. Press the Pattern Mode key (the key will light). Use the cursor [▲][▼] keys to make
the parameter select LED indicate Pattern.
2. Rotate the dial to select the pattern that you wish to edit.
3. Press the Rec key to enter record-ready mode (the Rec key will light, and the Play/
Pause key will blink).
4. Press the Play/Pause key to start the pattern (the Play/Pause key
will light).
5. Strike the part keys at the desired rhythm. The pattern will continue
playing back repeatedly, so you can continue recording additional
material as long as the Rec key remains lit.
2
6. Press the Stop/Cancel key to stop recording. (The Rec key
and Play/Pause key will go dark.) You can also press the
Rec key without pressing the Stop/Cancel key, to stop recording but continue playback. (The Rec key will go dark,
and the Play/Pause key will be lit.)
If you wish to save the pattern that you created, press the
WRITE key. (☞ "Saving a pattern that you create," below.)
The time that an audio part is heard (i.e., the gate time) is
determined not by how long you continue pressing the ke y ,
but by the Pitch/Speed value (☞p.22 "Connecting various
sources to the audio inputs").
Erase
If you accidentally input a wrong note, you can hold
down the Shift key and Rec key while the pattern continues playing to erase the rhythm pattern for the currently selected part (i.e., the part whose part key is lit).
1
1
3,6
6
4
5
5
3. Basic operation (Quick Start)
19
Page 20
3. Basic operation (Quick Start)
○○○○○○○○○○○○○○○○○○○○○○○○○○○○○○○○○○
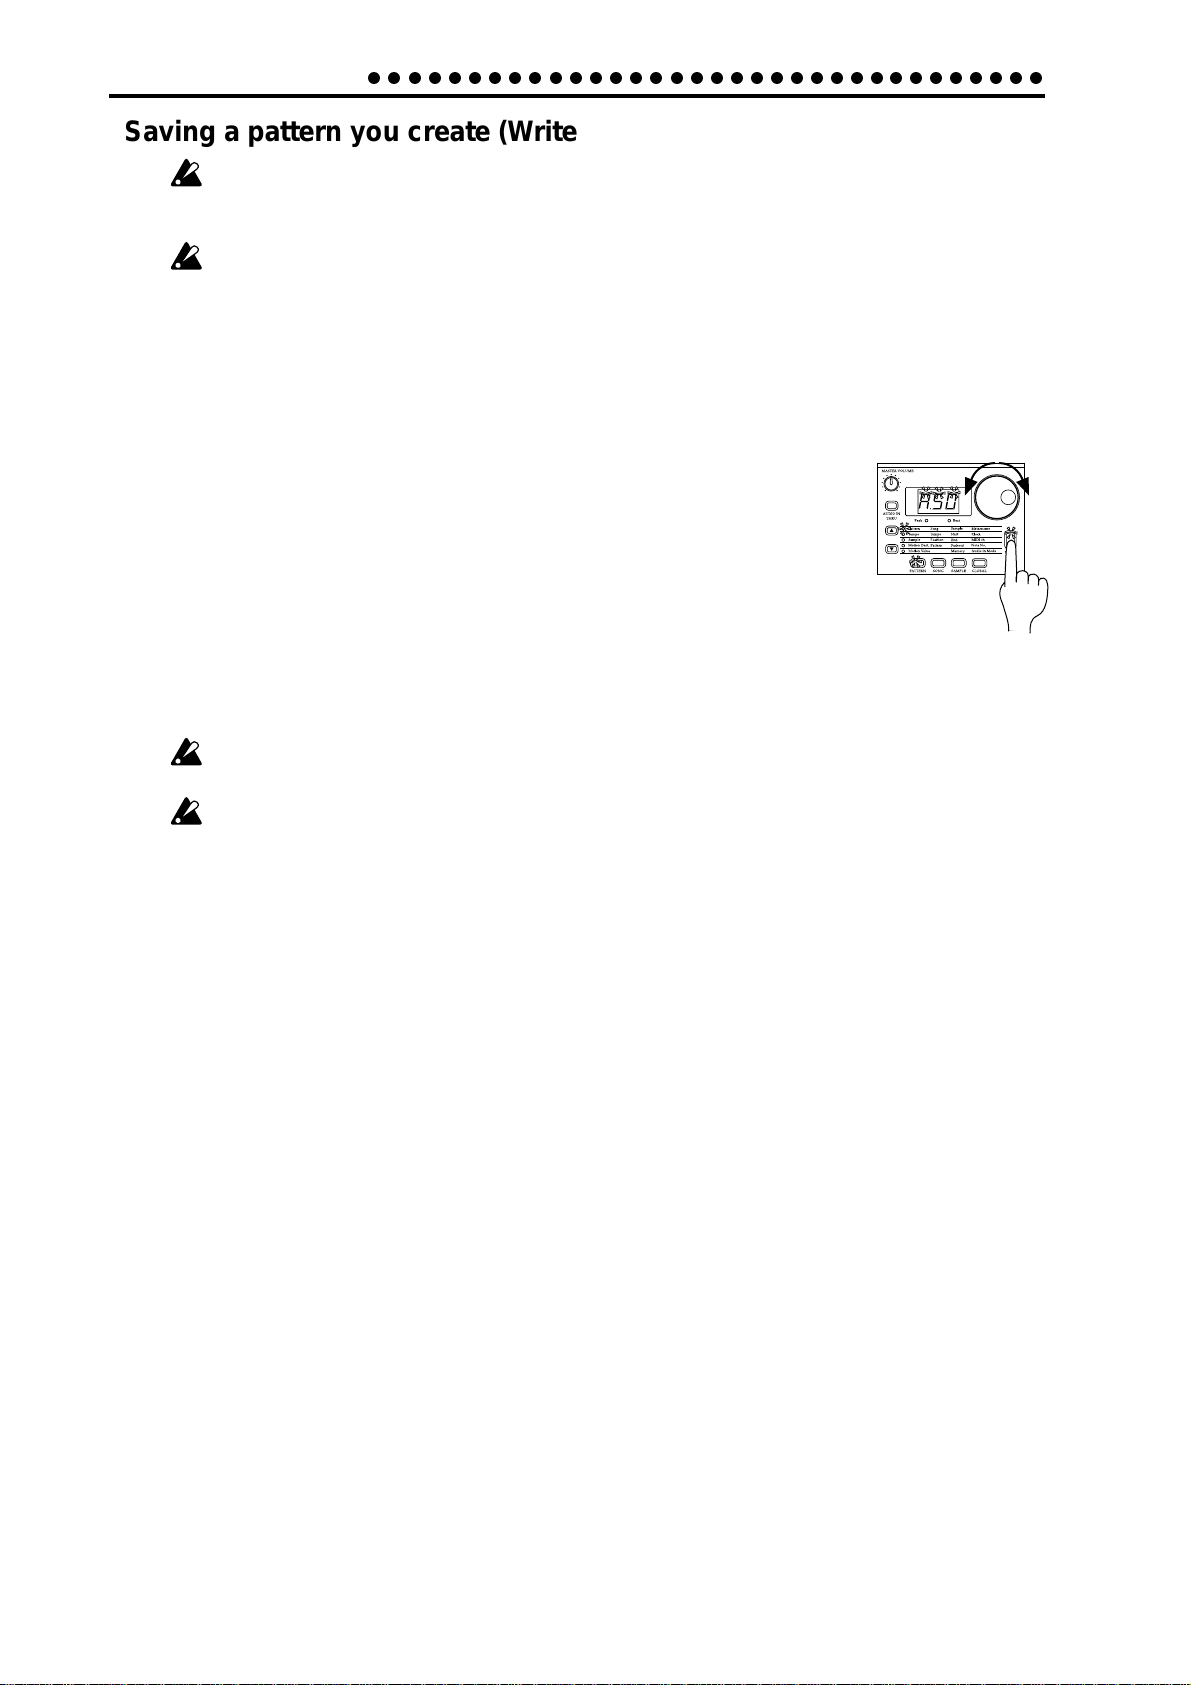
Saving a pattern you create (Write)
Once the factory preset patterns are rewritten, it is not possible to restore them to
their original state. If you do not want to loose the factory preset patterns, pur chase a
SmartMedia
With the factory settings, memory protect will be on, and it will not be possible to save
data. Before you save data, you must turn off the Memory Protect settings in Global
mode. (☞p.56 "Protect settings.")
Please be aware that when you save data, the pattern in the save destination will be
overwritten.
1. Edit a pattern as described in "Modifying the sound" or "Modifying (editing) a rhythm
pattern."
TM
card and save the data (☞p.55) to create a backup.
2. Press the WRITE key once (the key will blink). The display will blink to
indicate the pattern number.
3. Rotate the dial to select the pattern number in which the data will be
saved (i.e., the "save destination").
4. Press the WRITE key once again to begin saving the data. While the data
is being saved, the key will blink. When saving is complete, the key will
go dark.
If you decide to cancel, press the Stop/Cancel key. If you do not wish to save the pattern
you created, simply select a different pattern without performing the Write operation.
Never turn off the power while data is being saved to memory (i.e., while the WRITE
key is lit). Doing so may damage the data.
It is not possible to Write during playback or recording.
3
2,4
20
Page 21

○○○○○○○○○○○○○○○○○○○○○○○○○○○○○○○○○○
3. Basic operation (Quick Start)
Using a Motion Sequence
What is a Motion Sequence?
Changes that you make to the parameters of each part using the knobs and keys can be recorded and
looped. These are called Motion Sequences.
A Motion Sequence lets you recor d either Pitch/Speed, Filter, Level, or Pan, and Effect, Roll and Reverse
individually for each part. An Effect Motion Sequence and Delay Motion Sequence can be recorded individually for each pattern. (☞p.41 “Motion Sequence”)
Motion sequences for Effect, Roll, Reverse, and the Accent part will always occur in Trig Hold mode.
The following knobs and keys are valid for each part.
• Sample parts, Slice sample part : Pitch/Speed, Filter , P an, Level, Effect, Roll, Rever se
• Audio In part : Pitch/Speed (functions as gate time), Filter, Pan, Level
• Accent part : Level
As an example, here's how to record the Pitch/Speed parameter in a motion sequence.
1. In Pattern mode, select the pattern that you wish to edit.
2. Press the appropriate part key to select the part that you
wish to edit.
3. Press the Motion Sequence key to select either Smooth or
Trig Hold.
1
4. Press the Rec key to enter record-ready mode (the Rec key
will light, and the Play/Pause key will blink).
3
5. Press the Play/Pause key to start the pattern (the Rec key
and Play/Pause key will light).
4
5
2
6. Move the Pitch/Speed knob to create various changes
while the pattern makes one cycle (16 steps x length, or 12 steps x length).
7. After the pattern has completed one cycle after you began moving the knob, the Rec
key will automatically go dark and you will return to Play mode so that you can listen
to the motion sequence that you just recorded.
After pressing the Stop/Cancel key to stop playback, perform step numbers 2 and following for "Saving a pattern that you create" to save the pattern that contains the motion
sequence you just recorded.
There are two types of motion sequence (Smooth and Trig Hold). During playback,
switch between these to hear the difference. (☞p.41 "Playing a motion sequence.")
T o edit a motion sequence after it has been r ecorded, use the Pattern mode Motion Dest.
or Motion Value functions (☞p.45 “Editing motion sequence data”).
In the case of a Part, the motion sequence will be v alid for only one of the knobs Pitch/
Speed, Filter, Level, or Pan. If you attempt to record a motion sequence using two
knobs for the same part, the effect of the first knob or ke y will disappear (☞p.41 “Re-
cording a motion sequence”).
6
3. Basic operation (Quick Start)
On/off settings for Effect, Roll, and Reverse will apply simultaneously.
21
Page 22

3. Basic operation (Quick Start)
○○○○○○○○○○○○○○○○○○○○○○○○○○○○○○○○○○
Connecting various sources to the audio inputs
Let's try connecting various types of audio devices (radio, MD or CD player or tone
generator) to the audio input jacks.
Try out various types of sounds or music. Depending on the content,
you may discover unexpectedly interesting results.
1. Connect an audio device to the audio in jack (AUDIO IN). Set the
MIC/LINE gain select switch appropriately for the level of the connected device. The jack is a stereo phone plug. If necessary, use an
adapter plug appropriate for the connected device. To switch between monaural and stereo, change the Global mode Audio In Mode
setting (☞p.54).
2. Adjust the output level of the external device so that the peak LED
does not light even when the connected device is producing its
maximum output level. When making this adjustment, turn on the
Audio In Thru key (the key will light) so you can hear the input
sound without having to press the part key.
3. Select the pattern or song for which you wish to adjust the volume
of the external input sound, and press the Play/Pause button to
begin playback.
4. In the connection section, rotate the LEVEL knob to set the appropriate balance with the volumes of the other parts.
LINE
MIC
4
1
Input from
a CD or MD, etc.
Peak LED
2
2
3
The input sound will be heard while you press the Audio In part key. The Audio In parts
that are recorded in a pattern or song do not produce the sound that was being input
when the parts were being recorded; they simply allow the sound that is r eceived in the
audio input at that moment to be heard from when the trigger is turned on, for the
duration set by the Pitch/Speed knob.
Sound input from Audio In
Pitch/
Speed
Trigger On
Pitch/
Speed
Time
Trigger On
Pitch/
Speed
Trigger On
If you wish to strike Audio In keys to hear the sound, you must turn off the Audio In
Thru key (the key will be dark).
If the input gain setting is excessive, the sound may be distorted.
If you use a monaural cable to make connections, be sure to set the Audio In Mode
switch to the monaural “L” position. If you use a stereo cable, be sure to set the switch
to the stereo “St” position (☞p.54).
Sound heard from Audio In (line output)
Trigger On
Trigger On
Trigger On
Time
22
Page 23

○○○○○○○○○○○○○○○○○○○○○○○○○○○○○○○○○○
3. Basic operation (Quick Start)
Let’s record a sample
The ES-1 makes it very easy for you to record a sample. Sampled sounds (samples) can
be easily assigned to the parts of each pattern. The sampling area of internal memory
can hold a maximum of 95 seconds, with up 150 samples (100 monaural, 50 stereo).
If the factory preloaded samples are rewritten or erased, they cannot be restored to
their original state. If you do not want to lose the factory preloaded samples, pur chase
a SmartMedia
If you run out of memory while sampling, sampling will stop automatically. Before you
start sampling, use the Sample mode Memory function (☞p.32) to check the remain-
ing amount of sampling time.
Here’s how to sample the output of an audio device (e.g., MD or CD).
1. Press the Sample mode key (the key will light).Use the cursor keys
[▲][▼] to make the parameter select LED indicate Sample.
2. Connect the audio device that you wish to sample to the audio in
jack (AUDIO IN). The jack is a stereo phone jack, but you may also
use a monaural phone plug if desired. Use the Global mode Audio
In Mode setting to switch between monaural and stereo (☞p.54).
3. In the connection section, set the MIC/LINE gain select switch to
the LINE position.
TM
card and perform the Save operation (☞p.55) to make a backup.
LINE
3
5
MIC
Input from
a CD or MD, etc.
2
4. Turn on the Audio In Thru key (the key will light) so that you can
hear the input sound.
5. Either by adjusting the output level of the external device or by
rotating the LEVEL knob, adjust the output level of the connected
4
device so that the peak LED does not light even when the maximum output level is reached.
1
6. Hold down the Pattern Set key , and press the Rec key to enter sampling-ready mode. (The Rec key will light, and the Pattern Set key
and Play/Pause key will blink.)
7. Rotate the dial to set the sampling mode either to stereo “StE” or
monaural “nno.”
8. Press the Play/Pause key to begin sampling at the desired moment.
(The Rec key, Pattern Set key, and Play/Pause key will light.)
6
9. When you press the Stop/Cancel key , sampling will end. (The Rec
key, Pattern Set key, and Play/Pause key will go dark.)
After sampling, the display will indicate “- -.” (or in the case of stereo, “- -.S”) to indicate that a new sample has been recorded.
By pressing the Play/Pause key you can hear the recorded sample.
If you wish to save the sample you recorded here, you can perform the Write operation
(☞p.32 “Saving a sample (WRITE)”). If you do not wish to save the sample you recorded, simply switch samples or record another sample without performing the Write
operation.
3. Basic operation (Quick Start)
1
7
9
8
There are other ways in which you can recor d a sample, or modify the sound of a sample
after recording it. For details refer to p.27 “Sample mode.”
23
Page 24

3. Basic operation (Quick Start)
1,4
3
2,5
About the Slice function
○○○○○○○○○○○○○○○○○○○○○○○○○○○○○○○○○○
The sound of a saved sample can be automatically
divided (“time-sliced”) at intervals of the time axis.
A sample sound pr ocessed this way is called a Slice
Sample.
Slice samples are indicated by a “
l l
” following the
sample number in the display . (For example, “01.
Sample sound
Boom, clatter, crack, slap ...
Boom
l l
”
Time slice
clatter
crack
clatter slap
means that a slice sample has been saved in 01.) Only
a slice sample can be assigned to the Slice Sample
part. For details refer to p.30 “Slice.”
About the Resample function
Part sounds, patterns, and songs that you create on the ES-1 can themselves be sampled
to create a new sample sound. This procedure is called Resampling.
This allows sample sounds processed by effects and delay to be used as a new sample,
letting you create samples that have even greater tonal variation. For details refer to p.28
“Directly sampling the sound of the ES-1 (Resampling).”
Assigning a sample sound to a sample part
Here’s how to assign a sample (“02.” in this example) to the sample part of a pattern.
In this example, we will assign the sample to Sample Part 1 of Pattern A10.
crack
1. Enter Pattern mode and select Pattern A10. (☞“Listening to patterns.”)
2. Press the Sample Part 1 key to select Sample Part 1.
3. Use the cursor keys [▲][▼] to make the parameter select LED indicate
Sample.
4. Rotate the dial to select the desired sample sound. For this example,
select sample number “02.”
5. When you press the Sample Part 1 key, you will hear sample “02.”
Start the pattern. The sound of Sample Part 1 has been changed to the
sampled sound.
By doing this, you can change the sample assigned to a part simply by
selecting a sample and pressing the Sample Part key to which you want to assign that
sample.
If you wish to save the pattern of the part you just changed, use the W rite operation (p.20
“Saving a pattern you create (W rite).” If you do not wish to save it, simply select a differ ent pattern.
If the factory preset patterns or songs are rewritten or erased, they cannot be restored
to their original state. If you do not want to lose the factory preset patterns or songs,
purchase a SmartMedia card and perform the Sa ve operation (☞p.55) to make a backup.
24
Page 25

○○○○○○○○○○○○○○○○○○○○○○○○○○○○○○○○○○
Playing with Pattern Set
What is Pattern Set?
Pattern Set is a function that lets you register a favorite pattern to each of the sixteen step keys, and use the
step keys to switch patterns. You can use this function to play a performance simply by selecting patterns
one after the other
3. Basic operation (Quick Start)
When you hold down the Pattern Set key (the key will blink) and press
Pattern Set 1
one of the sixteen step keys, the pattern registered for that key will be
selected. At this time you can use the Select keys to change the pattern
set group indicated by the red select LEDs (lower line) 1...4, to use 16 x 4
(total of 64) pattern sets.
If during playback you hold down the Pattern Set key and press another
Pattern Set 3
step key, the pattern registered for that key will begin playing when the
currently-playing pattern finishes playing. (☞p.46 "Pattern Set.")
If you hold down the Shift key and press the Pattern Set key, the Pattern
Set function will be held. (The Pattern Set key will blink.)
To defeat this "hold" condition, press the Pattern Set key once again.
Y ou can register new pattern sets. (☞p.46, "Registering a pattern for Pat-
Hold down the Shift key
and press the Pattern Set key
to hold the Pattern Set function.
tern Set.")
If you switch patterns during playback, the change will occur when
each pattern finishes playing. (☞p.33 "The timing at which patterns will changed.")
Using the ES-1 as a tone generator module
Read this section when you wish to use the ES-1 with other connected MIDI equipment.
Use a MIDI cable to connect the MIDI OUT connector of your MIDI keyboard etc. to the
MIDI IN connector of the ES-1.
3. Basic operation (Quick Start)
1. Press the Global mode key to enter Global mode.
2. Use the cursor [▲][▼] keys to make the parameter select
LEDs indicate MIDI ch.
3. Set the channel of the transmitting device to match the
channel of the ES-1. (☞p.54 "MIDI channel settings.")
4. Use the cursor [▲][▼] keys to make the parameter select
LEDs indicate Note No. (☞p.54 "Setting the MIDI note
number for each part.")
5. Press the desired part key, and the note number for that
part will appear in the display.
When you transmit the corresponding note from the transmitting device, the sound of that part will be played.
For details on the ES-1's MIDI functionality , refer to p.57
"About MIDI."
If you wish to save Global mode settings, y ou must per form the Write operation (☞p.56 “Saving Global mode
settings (WRITE)”).
MIDI cable
MIDI keyboard etc.
Set the MIDI channel
3
2
1
Check the Part Note Number
MIDI IN
MIDI OUT
4
5
25
Page 26

3. Basic operation (Quick Start)
○○○○○○○○○○○○○○○○○○○○○○○○○○○○○○○○○○
Synchronizing with an EA-1 or ER-1
By synchronizing the ES-1 with other ELECTRIBE models such as the EA-1
or ER-1, you can obtain an even wider range of expressive possibilities. Her e
we will explain how you can make the EA-1 and ER-1 play back in synchronization with the tempo of the ES-1.
Use MIDI cables to connect the MIDI OUT connector of
the ES-1 to the MIDI IN connector of the EA-1, and the
MIDI THRU connector of the EA-1 to the MIDI IN connector of the ER-1. Also connect the line out jacks of the
ES-1 and ER-1, and the part out jacks of the EA-1, to your
mixer or powered monitors (speakers with built-in amp).
1. Press the Global mode key to enter Global mode.
2. Use the cursor keys [▲][▼] to make the parameter select LED indicate Clock.
3. Set the ES-1 to “Int” and the EA-1 and ER-1 to “E t”
(☞p.38 “Synchronizing the ES-1 with an external MIDI
device”).
4. Press the Play/Pause key of the ES-1 to start the pattern or song (the Play/Pause key will light). The EA-1
and ER-1 will play the pattern or song in synchronization with the tempo of the ES-1.
MIDI OUT
MIDI cable
MIDI IN
MIDI THRU
MIDI cable
Powered monitor
MIDI IN
Powered monitor
3
2
2
1
3
1
2
4
If you want the ES-1 to play the identically-numbered pattern in synchronization, make
the following settings.
• Set the ES-1 to “int” (master), and the EA-1 and ER-1 to “E t” (slave).
• Select the same MIDI channel for the ES-1, EA-1, and ER-1. (For example, select “01”
for all three.)
• On the EA-1 and ER-1, set the MIDI Filter parameter “P” to “O.” (☞ the EA-1 and ER-
1 owner’s manuals.)
• On the ES-1, set the MIDI Note Number parameter to C-1—A-1 or A8—G9 so that no
conflict occurs. (☞p.54 “MIDI note number settings for each part (Note No.)”).
*This will prevent the EA-1 and ER-1 from being sounded unintentionally when note-
on messages are transmitted.
3
1
26
Another easy way to obtain synchronized playback is to connect the ES-1 to a sequencer
or synthesizer that can transmit and receive MIDI Clock messages.
Page 27

○○○○○○○○○○○○○○○○○○○○○○○○○○○○○○○○○○○○○○○○○○○○○○○○
4. Sample mode
4. Sample mode
In this mode you can record a new sample, or modify or delete
samples.
Press the SAMPLE mode key to enter sample mode.
Sample mode
Sampling area = total 95 seconds
Monaural samples 00....99.
(Slice samples displayed as 00.
Stereo samples 00.S...49.S
Assign to each part
Edit in Pattern mode
Pitch/Speed, Filter, Level, Pan
l l
)
Write
Edit in
Sample mode
Normalize,
Truncate,
Time Slice,
Start, End,
Fadeout
Selecting a sample
Sample 00.
Use the cursor keys to make the parameter select LED indicate
Sample. Rotate the dial to select one of the 150 samples from
“00.” (displayed as “00.ll” if sliced) to “99.” (displayed as “99.r”
if sliced) or from “00.S” to “49.S.” Samples from “00.” to “99.”
are monaural samples, and will be displayed as “00.ll” if sliced.
Samples from “00.S” to “49.S” are stereo samples.
It is not possible to select a sample that has not been
saved. If no samples exists in the ES-1’s sampling area,
the display will indicate “- -.-”
(ll)
...99.
00.S...49.S
Playing a sample
If you press the Play/Pause key or a sample part key 1—7B, the
sample will be played back. A slice sample can also be played
by pressing the Slice Sample part key.
In the case of a slice sample, the step keys will light to indicate
steps where there is sound, and you can press these keys to
play the sample sound at the corresponding location.
Even if the sample has been sliced, it will be play ed as a
single sample if you press a sample part key 1—7B.
(ll)
Recording a sample
The ES-1 lets you connect an audio device (e.g., CD or MD) or
mic and record various sounds to use as samples. A maximum
of 95 seconds can be sampled and kept in internal memory.
If the factory preloaded samples are rewritten or erased,
they cannot be restored to their original state. If you do
not want to lose the factory preloaded samples, purchase
a SmartMedia card and perform the Save operation
(☞p.55) to make a backup.
If you run out of memory while sampling, sampling will
stop automatically. Before you start sampling, use the
Sample mode Memory function (☞p.32) to check the remaining amount of sampling time.
Stereo samples occupy twice as much memory . The a vailable time for sampling will be one half of the time displayed in Memory (☞p.32).
Connect an audio device (e.g., CD or MD) or mic to the Audio
In jack. If you connect a line-level device such as a CD or MD,
set the MIC/LINE select switch to the LINE position. If you
connect a mic, set the switch to the MIC position.
For details on the sampling procedure, refer to 3. Basic operation (Quick Start), p.23 “Recording a sample.”
Modifying a sample
The knobs and keys of the Part Edit section and Effect section
can be used to modify the sound while you are in Sample mode
as well. (☞p.33 “Pattern mode”)
The knobs and key on/off status in Sample mode is not
saved when you perform the Write operation.
The Roll key has no effect in Sample mode.
4. Sample mode
27
Page 28

○○○○○○○○○○○○○○○○○○○○○○○○○○○○○○○○○○○○○○○○○○○○○○○○
4. Sample mode
Specifying the start location
Start 0...3145727
The highest place (underlined) will not be displayed.
Use the cursor keys to make the parameter select LED indicate
Start. Rotate the dial to change the start location. The display
will indicate the lower three places, but you can see the next
higher three places by pressing the Shift key.
As you make adjustments, press the Play/Pause key to hear
the difference caused by changing the actual start location.
The Start value will always be less than the End value.
Start
Fadeout
End
0
Directly sampling the sound
of the ES-1
The sound being played back by the ES-1 can be sampled directly. This is called “resampling.” By resampling, you can create a sample that combines multiple samples, or use the sound
of effects applied to an existing sample as a new sample.
If you have modified the Start, End, or Fade-out v alues in
Sample mode, or have e x ecuted Normalize, T runcate, or
Time Slice, you will not be able to Resample in Pattern
mode until you write the sample or select another sample
to discard the changes.
A newly sampled sample is displayed as “- -.” (or “- -.S”
for a stereo) in Sample mode.
If you sample again without saving the sample, the pre vious sample data will be lost.
A sample cannot be used in Pattern mode unless it has
been saved.
It is not possible to record a motion sequence and a
sample at the same time.
Resampling from the beginning of
(Resampling)
Specifying the end location
End 0...3145727
The highest place (underlined) will not be displayed.
Use the cursor keys to make the parameter select LED indicate
End. Rotate the dial to change the end location. The display
will indicate the lower three places, but you can see the next
higher three places by pressing the Shift key.
As you make adjustments, press the Play/Pause key to hear
the difference caused by changing the actual end location.
End cannot be set to a value greater than the length of
the sample.
Specifying the fade-out length
Fadeout 0...3145728
The highest place (underlined) will not be displayed.
Use the cursor keys to make the parameter select LED indicate
Fadeout. Rotate the dial to change the fade-out location. The
display will indicate the lower three places, but you can see the
next higher three places by pressing the Shift key.
As you make adjustments, press the Play/Pause key to hear
the difference caused by changing the actual fade-out location.
The sample may sound slightly different each time it is played.
• The fade-out start location may drift during playback.
• The playback start location may drift during reverse play-
back. In particular, the sample may not play if the distance
between the start and end is 40 or less.
a pattern or song
1. Make sure that you are in Pattern mode or Song mode.
2. Press the Stop/Cancel key to stop playback.
3. Hold down the Pattern Set key and press the Rec key to enter
sampling-ready mode (the Rec key will light, and the Pattern
Set key and Play/Pause key will blink). The display will blink
to indicate the sampling method (monaural/stereo).
4. Rotate the dial to select monaural (“nno”) or stereo (“StE”).
5. When you press the Play/Pause key, the pattern or song will
begin playing, and at the same time sampling will begin. (The
Pattern Set key and the Play/Pause key will light.)
6. When you press the Stop/Cancel key, the pattern or song
playback will stop, and sampling will also stop. (The Pattern
Set key, Rec key, and Play/Pause key will go dark.)
Alternatively if you press the Rec key without pressing the
Stop/Cancel key, sampling will stop but playback will continue. (The Pattern Set key and Rec key will go dark, and the
Play/Pause key will be lit.)
To cancel sampling-ready mode, press the Stop/Cancel key.
4
1
3
5
2
28
Page 29

○○○○○○○○○○○○○○○○○○○○○○○○○○○○○○○○○○○○○○○○○○○○○○○○
4. Sample mode
When you turn on the power (i.e., in the default state),
sampling will be monaural.
If you press the Play/P ause k ey during resampling, sampling will continue but the pattern or song playback will
be paused.
Resampling from the middle of a pattern or song
1. Make sure that you are in Pattern mode or Song mode.
2. Press the Stop/Cancel key to stop playback.
3. Press the Play/Pause key to begin playback of the pattern or
song. (The Play/Pause key will light.)
4. At the instant that you wish to begin sampling, press the Rec
key while holding down the Pattern Set key . (The Pattern Set
key, Rec key, and the Play/Pause key will light.)
5. If you press the Stop/Cancel key, sampling will stop. (The
Pattern Set key, Rec key, and Play/Pause key will go dark.)
Alternatively if you press the Rec key without pressing the
Stop/Cancel key, sampling will stop but playback will continue. (The Pattern Set key and Rec key will go dark, and the
Play/Pause key will be lit.)
Resampling just one note of a part
1. Make sure that you are in Pattern mode, Song mode, or
Sample mode.
2. Press the Stop/Cancel key to stop playback.
3. Hold down the Pattern Set key and press the Rec key to enter
sampling-ready mode. (The Rec key will light, and the Pattern Set key and Play/Pause key will blink). The display will
blink to indicate the sampling method (monaural/stereo).
4. Rotate the dial to select monaural (“nno”) or stereo (“StE”).
5. Press the key for the part that you wish to sample. The part
you pressed will sound, and at the same time, sampling will
begin. (The Pattern Set key , Rec key, and Play/Pause key will
light.)
6. Press the Stop/Cancel key when you want to stop sampling.
(The Pattern Set key, Rec key, and Play/Pause key will go
dark.)
If you wish to cancel sampling-ready mode, press the Stop/
Cancel key before you start sampling.
4
1
4
The sampling method (monaural/stereo) will be as specified by the setting described earlier in “Resampling from
the beginning of a pattern or song.”
If you press the Play/P ause k ey during resampling, sampling will continue but the pattern or song playback will
be paused.
3
5
1
3
2,6
5
4. Sample mode
29
Page 30

○○○○○○○○○○○○○○○○○○○○○○○○○○○○○○○○○○○○○○○○○○○○○○○○
4. Sample mode
Slice
Slice is a function that can be used to cut up a phrase into smaller
elements so you can:
• change the tempo of its playback without affecting pitch
• change the rhythm pattern by turning on and off different
sliced samples
• affect each sample (using a motion sequence) to change its
pitch, forward/backward playback, effect on/off and filter
setting for new, creative possibilities
Slice works best on samples that have a clearly defined attack,
such as rhythm phrases, to divide them into separate notes. For
example if you had a rhythm phrase containing kick, snare
drum, and hi-hat, you could detect the attack of each element,
and slice the phrase into individual notes. Once this is done,
you are able to deal with each step key to which a sliced sample
is assigned individually, giving you amazing new control over
the playback of the phrase.
A sample that has been divided in this way is called a Slice
sample.
A slice sample can be used only by the Slice Sample part. Unlike sample parts 1—7B, individual notes are assigned to each
step in Pattern mode. If a note does not exist, there will be no
sound.
If you select a slice sample in Sample mode, step keys at which
a note exists will light to indicate the way in which the slice
sample has been divided.
You can also press a step key that is lit to hear the sound.
Creating a slice sample (Time Slice)
It is not possible to slice a stereo sample.
1. Use the dial to select a monaural sample that you wish to
slice.
2. Hold down the Shift key, and press step key 13 (Time Slice).
(Key 13 will light, and the Slice sample part key will blink.)
3. If you press the Slice sample part key , the tempo of the sample
will automatically be calculated and shown in the display,
and the sample will be played repeatedly in time with the
tempo. If the Global mode Metronome setting is on, the metronome sound will also play.
4. Use the dial to adjust the tempo. You can also use T ap Tempo
to adjust the tempo. Make adjustments so that the transitions
occur in a natural-sounding way.
The pitch and tempo of the playing sample will not change.
5. Press the Slice sample part key once again. Playback will stop,
and the step keys at each note interval will light. The display
will indicate the sensitivity at which slices will be detected. If
you press a step key that is lit, you will hear the sound.
6. If you use the dial to change the sensitivity, the sample will
be divided in a different way. The resolution value is within
0r—9r, 0—9. Lower values will result in a gr eater sensitivity,
allowing finer slices to be detected. When you choose a resolution value number which includes the letter "r", each slice
will have an extended release "tail" to help sliced patterns
play better at slower tempos.
When you change the sensitivity , a certain amount of time
may be required for the sample to be re-divided.
Depending on the volume or type of the sample, there
may be cases in which changing the sensitivity will not
change how the sample is divided.
7. Press the Slice sample part key once again to complete the
Slice procedure. (The Slice sample part key will go dark.)
If you decide to cancel mid-way through the procedure, press
the Stop/Cancel key.
A slice sample is indicated by a “
l l
” after the sample number.
The slice sample will be divided into either 1, 2, 4, 8, 16, 32, 48,
or 64 steps. Each step is a 16th note, and the scale will be calculated automatically from the sample length and the BPM. The
assigned step locations will depend on this.
Scale/Beat
Slice sample
16
32
If a slice sample is shorter than the length, it will be assigned
repeatedly. If it is longer, the excess steps will be ignored.
Steps to which notes are assigned
1 2 3 4 5 6 7 8 9 10 11 12 13 14 15 16
1 2 3 4 5 6 7 8 9 10 11 12 13 14 15 16
1 3 5 7
1 3 4 6 7 9 10 12 13 15 16 18 19 21 22 24
1 3 4 6 7 9 10 12 13 15 16 18 19 21 22 24
9 11 13 15 17 19 21 23 25 27 29 31
30
1,4,6
3,5,
7
2
Time Slice cannot be used on a sample that has not been
saved, or on a sample that has not been saved after executing T runcate.
If you use a slice sample on sample parts 1—7B, it will
be handled as a conventional sample.
A slice sample cannot be used in Pattern mode unless it
is saved (☞p.32).
2
Page 31

○○○○○○○○○○○○○○○○○○○○○○○○○○○○○○○○○○○○○○○○○○○○○○○○
Start
End
0
before
Truncate
after
Truncate
4. Sample mode
Tips for achieving good results with Time Slice
• While it is best to first try to set a BPM that results in the
smoothest playback of the sampled phrase, this may not always result in the best Slice playback. In fact, it may be necessary to try different BPM values (including fractional BPM
settings) within a +/- 3 BPM range. This means that if you
have a sampled phrase that you know should playback at
120 BPM, when you make this setting and execute Slice, the
playback of your new Slice sample phrase possibly may not
be perfect when placed into a Pattern.
If this is the case it is likely that there would be an irregular
rhythm introduced. So to correct this you should delete the
newly sliced sample and try again setting the BPM to 119, or
118.5, or even 121. Trying a few settings like this will help
you to find the BPM setting which produces the best slicing.
• Even before you finish executing the Slice command you can
tell if a phrase is going to come out OK. After choosing a
BPM setting and pressing the Slice sample part key, the step
keys will light at certain note intervals based on the current
sensitivity setting. Now you can audition each lit step key to
hear how the slice is going to turn out. You should check the
timing of critical step keys, like step key 5 (beat 2), step key 9
(beat 3) etc. to hear if the sample timing is lining up with
critical downbeats in your phrase. If they’re sounding strange
you should press the Stop/Cancel key right away and start
the procedure again, this time using a different BPM setting
until you hear these critical step keys/beats matching up
better.
• When a phrase is cut into individual samples, each sample is
given a small loop at the end to keep the sample from ending
too abruptly. If the tonality of this short loop is not to your
liking try changing the sensitivity to a higher number. This
will result in less slices, so each slice will be longer and you
won’t notice these loops as much. Note that this may not allow you to vary the tempo of your phrase as much, but each
step will likely sound more natural.
• Phrases with swung, or irregular rhythms (including many
hip-hop and jazz rhythms) are the most difficult to get the
sliced timing right on. In these types of phrases you will need
to try a combination of different BPM settings and slice sensitivity. Finally, setting the Pattern Swing parameter to a
higher value will help to re-introduce the correct feel back
into your playback. Experimenting with combinations of
these ideas will yield the best results.
• If a newly sliced phrase has some space between the step,
you will find that after you run it through an effect (or two),
and change the tempo that this small gap is covered up, or
even adds a cool and unique quality to your music. So don’t
just listen back to the pure phrase and make a final judgement – play around with it, add some other parts, and listen
to how it works in context with your music. You may very
well like the new quality that was introduced during the slicing!
So with a little experimentation you will find the best results,
and remember that this is a new creative tool – you want to do
more than simply cut your phrase up, you want to use all the
parameters to create you own unique sound from the original
source. Enjoy!
Other functions for editing a sample
If you wish to save a sample that was edited using these
functions, you must perform the Write operation before
you move to another sample or turn off the power . (☞p.32
“Saving a sample (WRITE)”)
Normalize
This function boosts the level of the sample as far as possible
without causing it to become distorted.
1. Use the dial to select the sample that you wish to normalize.
2. Hold down the Shift key and press step key 11 (Normalize).
(Key 11 will blink.)
3. Press step key 1 1 once again to execute the Normalize operation. (Key 11 will go dark.)
If you decide to cancel without executing, press the Stop/Cancel key.
Maximum level
Truncate
This function deletes the portions of the sample that are earlier
than Start and later than End.
1. Use the dial to select the sample that you wish to Truncate.
2. Hold down the Shift key and press step key 12 (Truncate).
(Key 12 will blink.)
3. Press step key 12 once again to execute the Truncate operation. (Key 12 will go dark.)
If you decide to cancel without executing, press the Stop/Cancel key.
After the Truncate function has been executed, the Start
value will be 0 and the End value will be the length of the
sample.
After Truncate is executed, the sample cannot be deleted
(section below) until you save the sample or select another sample.
4. Sample mode
31
Page 32

○○○○○○○○○○○○○○○○○○○○○○○○○○○○○○○○○○○○○○○○○○○○○○○○
2
1,3
4. Sample mode
Deleting a sample (Delete Sample)
This function completely deletes a sample from memory.
1. Use the dial to select the sample that you wish to Delete.
2. Hold down the Shift key and press step key 14 (Delete
Sample). (Key 14 will blink.)
3. Press step key 14 once again to delete the sample. (Key 14
will go dark.)
If you decide to cancel without deleting, press the Stop/Cancel
key.
Once a sample has been deleted, it cannot be recovered.
1
Saving a sample (WRITE)
After you record or modify a sample, you must perform the
Write operation if you wish to keep the data. If you wish to
intentionally discard the changes you have made to a sample
and revert to the original data, simply change samples without
saving.
1. Press the Write key (the key will blink). The sample number
will blink in the display. In the case of a newly recorded
sample, the display will blink “- -.” (or “- -.S” for a stereo
sample).
2. Use the dial to select the writing destination sample number .
In the case of a monaural sample (including slice samples),
you can choose from “00.” through “99.” In the case of a stereo sample, you can choose from “00.S” through “49.S.”
When you choose the unused sample number, a period is indicated on the lower right
side of display.
3. Press the Write key once again, and the display will indicate
that the data is being saved. When saving is complete, the
display will change to the save destination number and the
Write key will go dark.
If you decide to cancel without writing, press the Stop/Cancel
key.
Lit
2
2,3
Checking the remaining amount of sampling area (Memory)
Use the cursor keys to make the parameter select LED indicate
Memory.
The display will indicate the remaining number of seconds of
sampling time.
It is not possible to edit the Memory parameter.
Since stereo sampling uses twice as much memory, the
available amount of sampling time will be half the amount
that is displayed.
With the factory settings, Memory Protect is turned on so
that data cannot be saved. You must turn off Memory Protect before you execute the Write operation. (☞p.56
“Memory Protect (Protect)”)
When you execute the Write operation, the sample that
had occupied the save destination will be overwritten.
The data locations within internal memory are optimized
when you write a sample, and this may take a certain
amount of time (maximum of approximately 90 seconds).
During this time, the display will show that the data is
currently being saved.
The animation is indicated on the display during writing
the sample. Never turn off the power until the data has
been completely saved (i.e., until the Write key goes dark).
There is no need to write a sliced sample to a different
location. The same location can play back the original
sample (if assigned to part 1—7B) or the sliced sample
(if assigned to slice part).
32
Page 33

○○○○○○○○○○○○○○○○○○○○○○○○○○○○○○○○○○○○○○○○○
Playing a pattern
5. Pattern mode
In this mode you can play patterns, or edit them to make new
patterns. Press the PATTERN mode key to enter Pattern mode.
Pattern (A01)
Sample 1 (stereo/mono)
(6 parameters, Motion Seq., FX On/Off)
Sample 2 (mono only)
(6 parameters, Motion Seq., FX On/Off)
Sample 3 (stereo/mono)
(6 parameters, Motion Seq., FX On/Off)
Sample 4 (mono only)
(6 parameters, Motion Seq., FX On/Off)
Sample 5 (mono only)
(6 parameters, Motion Seq., FX On/Off)
Sample 6A (mono only)
(6 parameters, Motion Seq., FX On/Off)
Sample 6B (mono only)
(6 parameters, Motion Seq., FX On/Off)
Sample 7A (mono only)
(6 parameters, Motion Seq., FX On/Off)
Sample 7B (mono only)
(6 parameters, Motion Seq., FX On/Off)
Slice (mono only)
(6 parameters, Motion Seq., FX On/Off)
Audio In
(5 parameters, Motion Seq., FX On/Off)
Accent
(Level)
128 patterns A01...b64
Rhythm patterns (maximum 64 steps)Parts
Step
Step
Step
Step
Step
Step
Step
Step
Step
Step
Step
Step
Step
Step
Step2Step
1
3
Step2Step
1
3
Step2Step
1
3
Step2Step
1
3
Step2Step
1
3
Step2Step
1
3
Step2Step
1
3
Step2Step
1
3
Step2Step
1
3
Step2Step
1
3
Step
Step8Step
Step
5
7
4
6
10
9
Step
Step
4
Step
Step
4
Step
Step
4
Step
Step
4
Step
Step
4
Step
Step
4
Step
Step
4
Step
Step
4
Step
Step
4
11
Step
Step
Step
Step8Step
Step
5
7
6
10
9
11
Step
Step
Step
Step8Step
Step
5
7
6
10
9
11
Step
Step
Step
Step8Step
Step
5
7
6
10
9
11
Step
Step
Step
Step8Step
Step
5
7
6
10
9
11
Step
Step
Step
Step8Step
Step
5
7
6
10
9
11
Step
Step
Step
Step8Step
Step
5
7
6
10
9
11
Step
Step
Step
Step8Step
Step
5
7
6
10
9
11
Step
Step
Step
Step8Step
Step
5
7
6
10
9
11
Step
Step
Step
Step8Step
Step
5
7
6
10
9
11
Step
Step14Step
Step18Step
Step
12
13
Step
Step14Step
Step
12
13
Step
Step14Step
Step
12
13
Step
Step14Step
Step
12
13
Step
Step14Step
Step
12
13
Step
Step14Step
Step
12
13
Step
Step14Step
Step
12
13
Step
Step14Step
Step
12
13
Step
Step14Step
Step
12
13
Step
Step14Step
Step
12
13
Step
Step16Step
Step
15
19
21
17
20
Step18Step
Step
Step16Step
Step
15
19
21
17
20
Step18Step
Step
Step16Step
Step
15
19
21
17
20
Step18Step
Step
Step16Step
Step
15
19
21
17
20
Step18Step
Step
Step16Step
Step
15
19
21
17
20
Step18Step
Step
Step16Step
Step
15
19
21
17
20
Step18Step
Step
Step16Step
Step
15
19
21
17
20
Step18Step
Step
Step16Step
Step
15
19
21
17
20
Step18Step
Step
Step16Step
Step
15
19
21
17
20
Step18Step
Step
Step16Step
Step
15
19
21
17
20
Step28Step
Step
Step25Step
Step
Step
Step
23
26
22
24
27
Step28Step
Step
Step25Step
Step
Step
Step
23
26
22
24
27
Step28Step
Step
Step25Step
Step
Step
Step
23
26
22
24
27
Step28Step
Step
Step25Step
Step
Step
Step
23
26
22
24
27
Step28Step
Step
Step25Step
Step
Step
Step
23
26
22
24
27
Step28Step
Step
Step25Step
Step
Step
Step
23
26
22
24
27
Step28Step
Step
Step25Step
Step
Step
Step
23
26
22
24
27
Step28Step
Step
Step25Step
Step
Step
Step
23
26
22
24
27
Step28Step
Step
Step25Step
Step
Step
Step
23
26
22
24
27
Step28Step
Step
Step25Step
Step
Step
Step
23
26
22
24
27
Step
29
30
Step
29
30
Step
29
30
Step
29
30
Step
29
30
Step
29
30
Step
29
30
Step
29
30
Step
29
30
Step
29
30
(Pattern Play)
Use the cursor keys to make the parameter select LEDs indicate
Pattern. Press the Play/Pause key to start pattern playback.
When the pattern finishes playing, it will return to the beginning and continue playing.
Step
Step
31
32
Step
Step
31
32
Step
Step
31
32
Step
Step
31
32
Step
Step
31
32
Step
Step
31
32
Step
Step
31
32
Step
Step
31
32
Step
Step
31
32
Step
Step
31
32
While listening to a pattern, you can strike the part keys along
with the rhythm, or move the knobs to modify the sound. By
taking advantage of the various functions of Pattern mode as
part of your performance technique, you can enjoy even wider
possibilities.
The timing at which patterns will change
If you switch patterns during playback, the change will occur
when the currently playing pattern finishes its last step. Until
the pattern actually changes, the pattern number selected in the
display will blink.
5. Pattern mode
Selecting a pattern
Pattern A01...b64
Use the cursor keys to make the parameter select LEDs indicate
Pattern.
Rotate the dial to select one of the 128 patterns: A01...A64,
b01...b64.
Setting the playback tempo
Tempo 20.0...300.0
• Using the dial to change the tempo
Use the cursor keys to make the parameter select LEDs indicate
Tempo. Rotate the dial to modify the tempo.
If you wish to change the tempo units below the decimal place,
hold down the Shift key and rotate the dial.
• Using the Tap Tempo key to change the tempo
While the pattern is playing, press the Tap key three times or
more at the desired tempo. The ES-1 will calculate the interval
at which you pressed the Tap key, and will change the tempo
accordingly. You can change the tempo in the same way even
when playback is stopped.
When you use the cursor keys to make the parameter select
LEDs indicate Tempo, and the tempo you modified will appear
in the display.
If you switch to a different pattern without writing the pattern whose tempo you modified, the pattern tempo will
return to the previous value. If you wish to k eep the modified tempo, you must perf orm the Write operation (☞p.32
"Saving a pattern").
If you press and hold the Tap key, the Part Mute function
(checking the Part Mute status) will be selected, and the
ES-1 will stop detecting the interval at which Tap tempo
was pressed.
Pattern is changed
Pattern A01
Begins playing
Pattern A21
Playing from the beginning of a pattern (Reset & Play)
If you hold down the Shift key when pressing the Play/Pause
key, the playback will be forced to playback from the beginning. By using this function in conjunction with setting the
tempo by the T ap key, you can synchronize the playback without using MIDI.
In order to ensure that the rhythm always matches, you
will need to perform this adjustment each time.
Pattern A01
Pattern A01
About the tempo when the pattern is changed
If you switch patterns during playback, the tempo of the previous pattern will always be maintained. If you wish to use the
tempo that is stored in the newly selected pattern, press the
Stop/Cancel key to stop playback, and then start playback once
again. The pattern’s own tempo will be applied from the point
at which the pattern was stopped.
5. Pattern mode
33
Page 34

5. Pattern mode
○○○○○○○○○○○○○○○○○○○○○○○○○○○○○○○○○○○○○○○○○
Selecting parts
The ES-1 has twelve parts, as follows.
• Nine sample parts to which a sample can be assigned
• A slice sample part to which a slice sample (which can inde-
pendently handle separate notes in a phrase) can be assigned
• An audio in part that allows gating of the audio signal input
from the AUDIO IN jack
• An accent part containing dynamics data for each step
When you press a part key, its sound will be heard, and simul-
taneously that part will be selected. During playback, you can
hold down the Shift key and press a part key to select that part
without sounding it.
When a part is selected, its part key will light, and the step keys
will show the rhythm pattern of that part. The controls of the
Synthesizer section will be enabled for that part.
During playback, each part key will light at the timing with
which it sounds, making it easy for you to determine which
sounds are playing. The step keys will continue to show the
rhythm pattern of that part, and will also indicate the rhythm
location.
When you sound a part by pressing its part key, it will
sound at the volume of when Accent is On.
The Part Solo function
By pressing the Solo key (the key will light) and pressing a part
key, you can hear only that part.
To solo two or more parts, hold down the Solo key and select
the desired parts. While the Solo key is lit, you can hold down
the Solo key (or Mute key) and press other part keys to add
more solo parts. If you press and then release the Solo key, the
Solo function will be canceled (the key will go dark).
Display when no parts are soloed
Solo one part
Select Slice sample part
Solo more than one part
Select Sample
parts 1 and 4
The Part Mute function
By holding down the Part Mute key (Tap key) while you press
a part key, you can mute (temporarily silence) that part.
While you hold down the Part Mute key (Tap key), the mute
status of each part will be displayed. The part key of unmuted
parts will light, and muted part keys will be dark.
You can also mute two or more parts. To cancel part muting,
press the corresponding part key.
Display when no parts
are muted
Mute Slice sample part and
Sample part 5
Display when Slice
sample part is soloed
Display when sample
parts 1 and 4 are soloed
Add Sample part 6A
to the soloed parts
Sample 1 and 4
If you press the Solo key , the P art Mute settings you made
will be canceled (i.e., no parts will be muted).
34
Display when Slice
sample part and Sample
part 5 are muted
When you hold down the Part Mute key (Tap key) to select the Mute function, pressing a part key will not sound
that part.
Page 35

○○○○○○○○○○○○○○○○○○○○○○○○○○○○○○○○○○○○○○○○○
5. Pattern mode
Creating a pattern
There are two ways to create a pattern. You can start with a
pattern that is similar to the desired result and then edit it, or
you can create a pattern from scratch by specifying the sound
and rhythm pattern for each part. Either way , the ES-1 makes it
easy for you to create your own original rhythm patterns.
If you wish to save a pattern you create, you must perform the Write operation before y ou select a different pattern or turn off the power.
Assigning a sample
Sample off, 00. (00.ıı) ... 99. (99.ıı)
00.S...49.S
The ES-1 has 150 sampling areas to hold the samples you r ecord
(100 monaural, 50 stereo). Samples you create can be freely assigned to the parts of each pattern.
It is not possible to make sample settings for the audio in
part or the accent part. (The display will indicate “- - -”.)
1. Use the cursor keys to make the parameter select LED indi-
cate Sample.
2. Press the part key to which you wish to assign the sample
(the key will light). At this time, the number of the sample
assigned to that key will appear in the display , and the sample
will be played.
3. Rotate the dial to select a sample. At this time if you pr ess the
part key that was selected in step 2, the selected sample number will be played, and the assignment will be completed.
If you do not want to assign any sample, select “oFF.”
Only slice samples (00.ıı...99.ıı) can be selected for the slice
sample part.
Stereo samples can be assigned only to sample parts 1
or 3.
If a stereo sample is assigned to sample part 1 or 3,
sample part 2 or 4 will not sound. In this case, the sample
number will blink if you select sample part 2 or 4.
If you use a slice sample in sample parts 1—7B, it will be
handled as an ordinary sample.
If the assigned sample has been deleted (☞p.32), the
sample number will blink.
A sliced sample that has been Normalized or Truncated
cannot be used in a slice part. In this case, the sample
number will blink.
Editing the sound of a part
Select a pattern that is close to what you have in mind (or a
pattern which contains no sound or rhythm). Strike the part
keys to hear each sound, and use the knobs and keys to edit the
sounds. At this time, the Original Value LED will light when
the knob etc. that you are currently moving reaches the same
value as the original sound of the pattern.
You can also edit while playing back a pattern. It is also possible to use an external MIDI device to control the value of each
knob (☞p.57 "About MIDI").
The parameters that are valid for each part are shown in the
following diagram.
1...5, 6A, 6B, 6A, 6B
Sample part × 9
Slice
Slice Sample part
Audio In part
Accent part
If the sound does not change when you rotate a knob or
switch the setting of a key, either that knob or key is not
valid for that part, or the Motion Sequence function (☞p.41
"Motion Sequence") is operating.
The Audio In parts are valid only when a signal is being
input to the audio input jacks.
Although sample parts 6A and 6B, and 7A and 7B can be
edited independently, they cannot be played simultaneously . If triggers for both exist at the same step, the 6B
or 7B part will sound.
Effect
This turns the effect on (lit) or off (dark) for each part.
Roll
This turns the Roll (successive strike) effect on (lit) or off (dark)
for each part. The roll interval is determined by the tempo of
the pattern and by the roll type (☞p.40 “Setting the roll type”).
If you press and hold a part key when Roll is on, roll playback
will continue as long as you continue holding the part key.
Roll playback of the Slice Sample part is not possible when pattern playback is stopped.
5. Pattern mode
Reverse
This turns Reverse Playback of the sample on (lit) or off (dark).
This has no effect for the Audio In part.
35
Page 36

5. Pattern mode
○○○○○○○○○○○○○○○○○○○○○○○○○○○○○○○○○○○○○○○○○
Pitch/Speed –64...63
This specifies the playback pitch of the sample. Raising the pitch
will speed up the playback, and lowering it will slow down the
playback. The pitch can be adjusted over a range of +/–2 octaves, and will change in the following way.
Knob value Pitch
63 2 octaves C5
41, 43...59, 61 ◊ C4, D4...A4, B4
39 1 octave C4
9, 12...33, 36 ◊ D3, D3...A3, B3
6 semitone up C3
0 (center) 0 C3
–7 semitone down B2
–10, –13...–37 ◊ A2, A2...C2
–40 –1 octave C2
–42, –44...–62 ◊ B1, A1...C1
–64 –2 octaves C1
For the Audio In part, this will function as a gate time (duration
of the sound) synchronized to the tempo.
Example pitches (C3 input)
Filter 0...127
Adjusts the cutoff frequency of the low pass filter . Rotating this
toward the left will cut the overtones that are higher than the
cutoff frequency, producing a milder tone.
Pan L64...R63
Adjusts the stereo position (panpot) of the sound. When the
knob is located at the center, the sound is panned to the center.
Rotating the knob toward the left will move the sound toward
the left, and rotating it toward the right will move the sound
toward the right.
Level 0...127
Adjusts the output level. Rotating the knob toward the right
will increase the level.
For the Accent part, this adjusts the accent level (the degree to
which the volume is emphasized when the accent is on). (☞p.40
“Adding accents to the rhythm pattern”)
Motion Seq (motion sequence)
This records and plays back knob movements. Each time you
press this key , it will alternate between on (Smooth lit), on (Trig
Hold lit), and off (dark). (☞p.41 “Playing motion sequences”)
Editing effect and delay
EFFECT
On the ES-1, you can select and use one of eleven types of effect
for each pattern. The effect can be turned on/off for each part
by using the Effect key in the Part Edit section. Use the two
knobs (Edit 1, Edit 2) to adjust the parameters, which will dif fer
depending on the selected type of effect.
Although the effect can be turned on/off independently
for each part, the type and parameter values cannot be
changed independently.
Motion Seq (motion sequence)
This is the motion sequence for the effect (☞p.41 “Motion sequence”). Each time you press the key, this will alternate between on (lit) and off (dark).
Effect types and parameters
Reverb
This simulates the reverberation and acoustics of a plate
reverb unit.
Edit 1 _ Time 0...127
The reverb time will lengthen as the knob is rotated toward
the right.
Edit 2 _ Level 0...127
The level of the reverberation will increase as the knob is
rotated toward the right.
Flg./Cho. (flanger/chorus)
Flanger and chorus are effects that modulate the pitch of a
slightly time-delayed copy of the sound and add it to the
original sound to create a sense of spaciousness, modulation, and vibrato.
Edit 1 _ LFO Rate 0...127
Adjusts the LFO speed of the flanger/chorus.
The LFO speed will become faster as the knob is rotated
toward the right.
Edit 2 _ Depth 0...127
Adjusts the depth of the flanger/chorus effect. The effect
will change from chorus to flanger as the knob is rotated
toward the right.
Raising the depth excessively ma y cause the sound
to distort.
Phaser
This effect adds modulation to the sound by mixing a cyclically phase-shifted sound with the original sound.
Edit 1 _ LFO Rate 0...127
Adjusts the LFO speed of the phaser. The LFO speed will
become faster as the knob is rotated toward the right.
Edit 2 _ Depth 0...127
Adjusts the depth of the phaser. The modulation will become greater as the knob is rotated toward the right.
36
Page 37

○○○○○○○○○○○○○○○○○○○○○○○○○○○○○○○○○○○○○○○○○
5. Pattern mode
Ring Mod. (ring modulation)
This effect applies modulation to the sound in order to create metallic resonances or unusual sound effects.
Edit 1 _ Frequency 0...127
Specifies the frequency of the modulation that will be applied. The frequency will rise as the knob is rotated toward
the right.
Edit 2 _ Balance 0...127
Specifies the balance of the effect sound and direct sound.
As the knob is rotated toward the right, the effect sound
will increase and the direct sound will decrease.
Pitch Shifter
This effect shifts the pitch.
Edit 1 _ Pitch 0...127
Specifies the amount of pitch shift. When the knob is in the
center position, the output pitch will be the same as the input pitch. As the knob is rotated toward the left the pitch
will become lower, and as the knob is rotated toward the
right the pitch will become higher. The available range of
pitch shift is +/-2 octaves, and will change as shown below .
Knob value Pitch
127 2 octaves C5
105, 107...125 ◊ C4, D4...B4
103 1 octave C4
73, 76...97, 100 ◊ D3, D3...A3, B3
70 semitone up C3
64 (center) 0 C3
57 semitone down B2
27, 30...51, 54 ◊ C2, D2...A2, A2
24 –1 octave C2
2, 4...20, 22 ◊ C1, D1...A1, B1
0 –2 octaves C1
Edit 2 _ Dry level 0...127
This adds the original sound to the pitch-shifted sound. As
the knob is rotated toward the right, increasing amounts of
the original sound will be added to the effect sound.
Example pitch (input note C3)
Compressor
A compressor boosts low level sounds and reduces high
level sounds in order to minimize differences in volume
and make the sound more consistent.
Edit 1 _ Sensitivity 0...127
Specifies the sensitivity of the compressor. When the knob
is in the far left position, there will be no effect. As the knob
is rotated toward the right, the effect will apply more
strongly.
Edit 2 _ Attack 0...127
Specifies the attack speed until the compressor begins to
take effect. The attack will become slower as the knob is
rotated toward the right.
Decimator
This effect lowers the sampling frequency and the number
of sampling bits, producing a grainy sound characteristic
of cheap samplers.
Edit 1 _ Sampling frequency 0...127
Rotating the knob toward the right produces a more lo-fi
sound, and rotating it toward the left produces a more hi-fi
sound.
Edit 2 _ Number of sampling bits 0...127
Rotating the knob toward the right will produce a sound
typical of fewer bits (lo-fi), and rotating it toward the left
will produce a sound typical of more bits (hi-fi).
If the input volume is extremely low, there may be no
output. If there is a high noise le vel during silent times,
noise may be generated.
Isolator
This effect cuts the sound of a specific frequency. You can
use this to cut just the vocal range, or just the bass range,
etc. Edit 2 (Mid Control) will take priority.
Edit 1 _ Low / High Control 0...127
This controls the low or high range. Rotating the knob toward the left will cut the high range, and rotating it toward
the right will cut the low range.
Edit 2 _ Mid control 0...127
This controls the mid range. Rotating the knob toward the
left will cut the mid range, and rotating it toward the right
will retain only the mid range.
Reso. Filt. (resonance filter)
This is a low pass filter with resonance. It cuts the overtones that are above the cutoff frequency, producing a milder
tone.
Edit 1 _ Cutoff Frequency 0...127
Adjusts the cutoff frequency of the low pass filter. The cutoff frequency will rise as the knob is rotated toward the right.
Edit 2 _ Resonance 0...127
This emphasizes the sound in the region of the cutoff frequency, adding a distinctive character to the sound.
Depending on the cutoff frequency or input sound, high
resonance settings may cause the sound to distort.
Wah
This is a wah that uses an LFO to control the cutoff frequency .
Edit 1 _ LFO Rate 0...127
Adjusts the speed of the LFO that controls the cutoff frequency. Rotating the knob toward the right will increase
the LFO speed.
Edit 2 _ Cutoff Frequency 0...127
Adjusts the cutoff frequency. Rotating the knob toward the
right will raise the cutoff frequency.
5. Pattern mode
Distortion
By boosting the volume appropriately , this ef fect causes the
sound to distort and produces a rich overtone structure.
Edit 1 _ Gain 0...127
Specifies the degree of distortion. The sound will be distorted more greatly as the knob is rotated toward the right.
Edit 2 _ Level 0...127
Adjusts the output level. The output level will increase as
the knob is rotated toward the right.
37
Page 38

5. Pattern mode
○○○○○○○○○○○○○○○○○○○○○○○○○○○○○○○○○○○○○○○○○
DELAY
Delay is an effect that adds one or more delayed "echoes" to the
sound. The delay effect of the ES-1 is a "cross-feedback delay."
This feeds the delayed L and R signal back into the opposite
side to produce a greater feeling of spaciousness from left to
right.
You can record delay knob movements as a Motion Sequence,
or use the effect as a Tempo Delay.
Left input
Delay
Delay
Right input
The delay effect will apply to the entire rhythm pattern,
and it is not possible to change the effect independently
for each part.
Motion Seq (motion sequence)
This is the delay motion sequence (☞p.41 “Motion Sequence”). Each time you press the key, the setting will alternate between on (lit) and off (dark).
BPM Sync
This allows the delay time to be automatically synchronized
to the tempo of the pattern. Each time you press the key,
the setting will alternate between on (lit) and off (dark).
When the MIDI Clock setting is Ext, the delay time can also
be synchronized to the clock of an external device (☞p.53
“Synchronizing the ES-1 and an external MIDI device (MIDI
Clock)”)
Left output
Right output
Length, Scale/Beat settings
Y ou can set the length (the length of the entire pattern) and the
basic beat (time signature).
The Length and Scale/Beat you specify here will affect the correspondence between step keys and note values, and the maximum number of steps as shown in the following diagram.
If Scale/Beat is set to "tri" (3 x 12) or "tr2" (3 x 12), step keys
13--16 will have no effect.
While the Shift key is held down, the upper line of select LEDs
(green) will indicate the length of the current pattern, and the
lower line of select LEDs (red) will indicate the beat.
Maximum number of steps
Length
Select LED
1 (green) lit
Select LEDs
1, 2 (green) lit
Select LEDs
1 to 3 (green) lit
Select LEDs
1 to 4 (green) lit
Scale/Beat
Select
LED 1 (red) lit
16
32
Correspondence between step keys
and note values
or
16
16
tri
tr2
or
12
12
Depth 0...127
Adjusts the level of the delay sound and the amount of feedback (the number of delay repeats).
Rotating the knob toward the right will increase the level of
the delay sound, and will also increase the amount of feedback.
The further left or right the Pan of each part is set, the more
the sound will be spread to left and right.
Raising the Depth excessively may cause the sound
to distort (clip).
Time (delay time) 5 msec ... 2 sec
(for BPM Sync) 1/4...8
Specifies the delay time. Rotating the knob toward the right
will lengthen the delay time. Rotating the knob toward the
left to shorten the delay time will produce a "doubling" effect (an impression as though multiple instruments are playing in unison).
When BPM Sync is "on", this parameter will let you set the
tempo in terms of sixteen different multiples of the tempo:
1/4, 1/3, 1/2, 2/3, 3/4, 1, 1.33, 1.5, 2, 2.5, 3, 4, 5, 6, 7, or 8.
If you change the delay time during playbac k, the pitch
of the delayed sound will change.
Depending on the tempo setting, it may be impossible to set the delay time. In such cases, set the delay time to half the desired value.
If the Time value is lowered excessively, the sound
may distort (clip).
Select
LED 2 (red) lit
12
Select
LED 3 (red) lit
12
Select
LED 4 (red) lit
3 3 3
3
3
3 3
3
3
It is not possible to view or change the Length or Beat/
Scale during playback or recording, or during Pattern Set
Play.
38
Page 39

○○○○○○○○○○○○○○○○○○○○○○○○○○○○○○○○○○○○○○○○○
2,4
3,5
3
1
5. Pattern mode
Setting the Length
1, 2, 3, 4
1. If a pattern is playing, press the Stop/Cancel key to stop play-
back.
2. Use the dial to select the pattern whose length you wish to
set.
3. Hold down the Shift key and press step key 1 (Length). (Key
1 will blink.)
4. The value will blink in the display. Use the dial to specify the
length.
5. Press step key 1 once again to finalize the value. (Key 1 will
go dark.)
If you wish to cancel without changing the setting, press the
Stop/Cancel key.
Setting the Scale/Beat
16, 32, tri, tr2
1. If a pattern is playing, press the Stop/Cancel key to stop play-
back.
2. Use the dial to select the pattern whose scale/beat you wish
to set.
3. Hold down the Shift key and press step key 2 (Scale/Beat).
(Key 2 will blink.)
4. The value will blink in the display. Use the dial to specify the
scale/beat.
5. Press step key 2 once again to finalize the value. (Key 2 will
go dark.)
If you wish to cancel without changing the setting, press the
Stop/Cancel key.
Swing settings
By adjusting the Swing settings you can offset the note timing
of the steps. For example, you can change a straight 16-beat by
adding a slight "bounce" or shuffle. The Swing value can be
adjusted from 50 to 75 (%), and will affect the note timing of
even-numbered steps. A setting of 50 will pr oduce a perfect 16beat, and a setting of 66 will produce a shuffle.
1. If a pattern is playing back, press the Stop/Cancel key to stop
playback.
2. Rotate the dial to select the pattern for which you wish to
make Swing settings.
3. Hold down the Shift key, and press step key 3 (Swing). (Key
3 will blink.)
4. A value will blink in the display. Rotate the dial to set the
Swing value.
5. Once again press step key 3 to execute the Swing setting (key
3 will go dark).
If you decide to cancel without making the setting, press the
Stop/Cancel key.
The Swing setting has no effect if Length or Scale/Beat is
set to "tri" (3 x 12) or "tr2" (3 x 12).
It is not possible to view or adjust the Swing parameter
during playback or recording, or during Pattern Set Play.
5. Pattern mode
39
Page 40

5. Pattern mode
○○○○○○○○○○○○○○○○○○○○○○○○○○○○○○○○○○○○○○○○○
Setting the Roll Type
2, 3, 4
If you specify the Roll Type, the part steps for which Roll is
“on” will be subdivided. You can select a subdivision of either
2, 3, or 4.
1. If a pattern is playing, press the Stop/Cancel key to stop playback.
2. Use the dial to select the pattern whose roll type you wish to
set.
3. Hold down the Shift key and press step key 4 (Roll Type).
(Key 4 will blink.)
4. The value will blink in the display . Use the dial to specify the
number of subdivisions for the roll type.
5. Press step key 4 once again to finalize the value. (Key 4 will
go dark.)
If you wish to cancel without changing the setting, press the
Stop/Cancel key.
It is not possible to change the Roll Type during playback, recording, or sampling, nor during Pattern Set Play .
2,4
Creating a Rhythm Pattern
There are two ways to create a rhythm pattern. The first is Step
Recording, in which you use the step keys to create the rhythm
as you view the lit/unlit condition of the keys. The second is
Realtime Recording, in which you strike the part keys at the
timing at which you want to record each note. If you wish to
erase the rhythm of each part before you create your own rhythm
data, refer to p.43 "Erasing rhythm data from a part."
• Using the step keys (Step Recording)
In this method, you use the sixteen step keys to create the rhythm
pattern while watching the lit/unlit condition of the keys to
verify the rhythm.
For details refer to p.18 "Using the step keys to edit the rhythm
(Step Recording)," in section 3. Basic operation (Quick Start).
• Using the part keys (Realtime Recording)
For details refer to p.19 "Using the part keys to edit the rhythm
(Realtime Recording)," in section 3. Basic operation (Quick Start).
Adding accents to the rhythm pattern (Accent)
You can apply accents (changes in volume) to the rhythm pattern. When Accent is on, the specified notes (steps) of the entire
pattern will be accented.
1. Press the Accent part key, and the accent pattern will be shown
1
3
3,5
by the step keys.
2. Each time you press a step key it will alternate on/off, allow-
ing you to specify the desired accent pattern. You can playback the pattern to hear the results as you create the accent
part.
3. The amount of the accent is adjusted by the Level knob in the
part edit section. Rotating the knob toward the right will increase the difference between on and off. If the knob is rotated all the way toward the left, there will be no effect. Play
back the pattern to hear the results as you make this setting.
Level(Velocity)
127
100
30
Accent On
Accent Off
Accent Level
40
Pressing the Accent part key by itself will not produce
sound. Also , if a part key is struck to play the sound, it will
be sounded with Accent on (i.e., the emphasized sound).
If you wish to hear the results of Accent, you need to play
back the pattern.
Page 41

○○○○○○○○○○○○○○○○○○○○○○○○○○○○○○○○○○○○○○○○○
5. Pattern mode
Motion sequence
Playing a motion sequence
A motion sequence can be played back in one of the following
two ways, and you can select the playback method independently for each part.
Smooth
Knob values will be connected smoothly , and the sound will
change smoothly.
Trig Hold (trigger hold)
The value of the motion sequence knob will be held at the
note timing of that part.
Playback the motion sequence
with Smooth setting
Knob movements when the motion
sequence was recorded
1
2345678 9 10 11 12 13 14 15 16
On On OnOn On On On On
Playback the motion sequence
1
2345678 9 10 11 12 13 14 15 16
On On OnOn On On On On
There will be no effect when the Motion Sequence LED
is dark (off).
Recording a motion sequence
You can record knob movements (motion sequence) for each
part. One knob per part and the Effect, Roll, and Reverse keys
are valid for a motion sequence. If you attempt to record a motion for another knob of the same part, the effect of the previous
knob will disappear.
For the procedure, refer to 3. Basic operation (Quick Start) p.21
“Using a motion sequence.”
T o modify a previously-recorded motion sequence, r efer to p.45
“Editing motion sequence data.”
Effect, Roll, and Rev erse will be play ed as Trig Hold even
if Smooth is selected as the type.
with Trig Hold setting
1
2345678 9 10 11 12 13 14 15 16
On On OnOn On On On On
Playing an effect motion sequence
This is a motion sequence dedicated to the effect. Unlike a part
motion sequence, the knobs of both knobs Edit 1 and Edit 2 can
be played simultaneously . The playback method is the same as
for the Smooth setting of a part motion sequence.
There will be no effect if the Motion Seq setting of the
effect is off (dark).
Recording an effect motion sequence
You can r ecord the movements of both Edit 1 and Edit 2 knobs.
1. Select the pattern that you wish to edit.
2. Turn the Motion Seq key on (lit).
3. Press the Rec key to enter record-ready mode. (The Rec key
will light, and the Play/Pause key will blink.)
4. Press the Play/Pause key to start the pattern. (The Rec key
and Play/Pause key will light.)
5. Move the Edit 1 knob to create various changes until the pat-
tern plays for one cycle (16 steps × length, or 12 steps × length).
6. When the pattern has played for one cycle after you began
moving the knob, the Rec key will automatically go dark and
playback will resume, allowing you to hear the motion sequence that you just recorded.
You can record the movements of the Edit 2
The effect motion sequence will not apply unless the effect of each part is on (lit).
1
5
2
3
4
5. Pattern mode
41
Page 42

5. Pattern mode
○○○○○○○○○○○○○○○○○○○○○○○○○○○○○○○○○○○○○○○○○
Playing a delay motion sequence
A "delay motion sequence" is a special motion sequence just for
the delay effect. Unlike a motion sequence for a part, the movements of two knobs, Delay Depth and Delay Time, can be recorded simultaneously . The playback method is the same as for
Smooth playback of a part motion sequence.
There will be no effect if the delay Motion Seq is off (dark).
Recording a delay motion sequence
Movements of the two knobs Delay Depth and Delay time can
be recorded. If BPM Sync is on (lit), the motion sequence will
synchronize to the tempo of the delay time.
1. Select the pattern that you wish to edit.
2. Turn the delay Motion Seq key on (lit).
3. Press the Rec key to enter record-ready mode. (The Rec key
will light, and the Play/Pause key will blink.)
4. Press the Play/Pause key to start the pattern. (The Rec key
and Play/Pause key will light.)
5. Move the Delay Depth knob to create various changes until
the pattern plays for one cycle (16 steps × length, or 12 steps
× length).
6. When the pattern has played for one cycle after you began
moving the knob, the Rec key will automatically go dark and
playback will resume, allowing you to hear the motion sequence that you just recorded.
You can record the movements of the Delay Time knob in the
same way.
Checking motion data
If motion sequence data has been recorded, you can hold down
the Shift key and press the Motion Sequence key to view the
status in the step keys.
• If motion sequence (selected part data) is included
Step keys 1, 2, 3, 4 will light
• If effect motion sequence (Edit 1 data) is included
Step keys 5 and 6 will light
• If effect motion sequence (Edit 2 data) is included
Step keys 7 and 8 will light
• If delay motion sequence (delay depth data) is included
Step keys 9 and 10 will light
• If delay motion sequence (delay time data) is included
Step keys 11 and 12 will light
It is not possible to check motion sequence data during
playback, recording, or sampling, nor during Pattern Set
Play.
1
5
2
3
4
42
Page 43

○○○○○○○○○○○○○○○○○○○○○○○○○○○○○○○○○○○○○○○○○
5. Pattern mode
Convenient functions for editing patterns
If you wish to save the pattern you edit using these functions, you must perform the Write operation before selecting a different pattern or turning off the power.
Erasing rhythm pattern data from a part
To erase the rhythm pattern data for the selected part, you can
use one of the following two methods in addition to turning
each of the sixteen step keys off.
• Erasing data during playback or recording (Erase)
1. Press a part key to select the part from which you wish to
erase data.
2. During playback or recording, hold down the Shift key and
press the Rec key . As long as you continue holding these keys,
data will be automatically be erased from the selected part.
Copying a part (Copy Part)
You can copy the sound settings and rhythm pattern data (including motion sequence) from another part to the selected part.
1. If the pattern is playing, press the Stop/Cancel key to stop
playback.
2. Press a part key to select the copy destination part (the key
will light).
3. Hold down the Shift key and press step key 5 (Copy Part).
(Key 5 will blink.) The display will begin blinking.
4. Rotate the dial to select the copy source pattern number.
5. Use the part keys to select the copy source part. (The copy
source key will blink, and the copy destination key will be
dark.)
6. Press step key 5 once again to execute the Copy Part operation.
To cancel, press the Stop/Cancel key.
If a sample is copied to a monaural part, the sound and
rhythm pattern data will be copied. However if a sample
is copied from stereo sample part 1 or 3 to a monaural
sample part, the sound will not be copied.
The sound and rhythm pattern data of a sample part
whose sample is stereo can be copied only between
sample parts 1 and 3.
For details on data copy within the same part, refer to the
following section "Data Copy within a part."
2
1
2
• Erasing all data from a part (Clear Part)
This operation erases all rhythm pattern and motion sequence
data at once.
1. If the pattern is playing, press the Stop/Cancel key to stop
playback.
2. Press a part key to select the part whose data you wish to
erase.
3. Hold down the Shift key and press step key 7 (Clear Part).
(Key 7 will blink.)
4. Once again press step key 7 to clear the data.
T o cancel without clearing the data, press the Stop/Cancel key.
Example
A01
b20
Part 1 (sound, rhythm pattern)
Part
Part 2 (sound, rhythm pattern)
Part
Part 3 (sound, rhythm pattern)
Part
3
3,6
Copy destinationCopy source
b01
Part 1 (copy part 1 from A20)
Part 2 (copy part 3 from A01)
Part 6B (copy part 1 from A01)
4
5. Pattern mode
2
5
2
3
3,4
43
Page 44

5. Pattern mode
○○○○○○○○○○○○○○○○○○○○○○○○○○○○○○○○○○○○○○○○○
Data Copy within a pattern
Phrase pattern data (including motion sequence data) that you
create for a pattern of length 1 can be copied to the steps of
lengths 2...4. This function is a convenient way to create a pattern that uses similar phrases repeatedly.
1. Create a pattern with a length of 1, and W rite it into memory.
(☞p.47 "Saving a pattern.")
2. At this point, the same data as in length 1 will automatically
be copied to the steps of lengths 2...4.
3. Change the pattern length to the desired length. (☞p.38,
"Length, Scale/Beat settings.")
4. The steps of lengths 2...4 will contain the same data as length
1. Now you can edit the data of lengths 2...4 to complete the
pattern.
The data will be copied in a similar way when the pattern length
is 2 or 3 (refer to the table below). If you shorten a pattern you
create, the data will be copied according to the shortened length.
Copy Pattern data
Pattern
length
1
2
3
Pattern data before
writing
A — — —
A B — —
A B C —
Pattern data
after writing
A A A A
A B A B
A B C C
Erasing part, effect, or delay motion sequence data (Clear Motion)
Here’s how you can erase the motion sequence data of a part,
the effect, or the delay in a single operation.
1. If a pattern is playing, press the Stop/Cancel key to stop playback.
2. Hold down the Shift key and press step key 6 (Clear Mo-
tion). (Key 6 will blink.)
3. Press a part key or the Motion Seq key of DELAY or EFFECT
to specify the motion sequence that you wish to erase. (The
key will blink.)
4. Press step key 6 once again to execute the Clear operation. If
you selected the DELAY motion sequence, both depth and
time will be cleared. If you selected the EFFECT motion sequence, both Edit 1 and Edit 2 will be cleared.
If you wish to cancel without clearing, press the Stop/Cancel
key.
3
3
3
The data that is copied automatically when you Write a
pattern does not force the pattern length (1--4) to change.
If the length is 4, data will not be copied within the pattern.
2
2,4
44
Page 45

○○○○○○○○○○○○○○○○○○○○○○○○○○○○○○○○○○○○○○○○○
3. Press a part key to select the part that you wish to edit.
Editing motion sequence data
You can edit the motion sequence of each part or the ef fect motion sequence. The data can be edited in units of individual steps.
4. Press a step key to select the step that you wish to edit. The
steps of a pattern whose length is two or greater can be selected successively by pressing the Select key.
5. Rotate the dial to edit the parameter value at that step. If the
display indicates “diS,” the motion sequence does not apply
to that step.
Selecting a motion sequence
5
Motion Dest. PCh (Pitch)...tin (Time)
1. Select the pattern that contains the motion sequence data you
wish to edit.
2. Use the cursor keys [▲][▼] to make the parameter select LED
indicate Motion Dest.
3. Rotate the dial to select the parameter that you wish to edit.
For PCh (Pitch/Speed), LEU (Level), FLt (filter), and PAn (Pan),
only one parameter is valid for each part.
EFF (Effect), roL (Roll), and rEU (Reverse) are valid for each
part.
Ed1 (Edit 1), Ed2 (Edit 2), dPt (Depth), and tin (Time) ar e valid
for the pattern (all parts).
1,3
2
Editing the parameter values of a motion sequence
Motion Value
PCh (Pitch/Speed) dis, –64...63
LEU (Level) dis, 0...127
1
3
4
For Pitch, Filter, Le vel, and P an motion sequences, using
Motion Dest. to change the parameter and editing will
cause all values to be initialized to “diS.”
If you move to another pattern without writing the edited
motion sequence, it will revert to the state of the original
motion sequence. If you wish to keep the edited motion
sequence, you must perf orm the Write operation (☞p.47
“Saving a pattern”).
While editing a motion sequence, it is not possible to use
the step keys to switch steps on/off.
Depending on the part, some parameters cannot be selected.
While recording a motion sequence, the display will indicate “rEC,” and it will not be possible to edit a motion
sequence.
While editing a motion sequence, the Rec key has no
effect.
5. Pattern mode
5. Pattern mode
FLt (filter) dis, 0...127
Pan (Pan) dis, L.64...r.63
EFF (Effect) dis, oFF...on
roL (Roll) dis, oFF...on
rEU (Reverse) dis, oFF...on
Ed1 (Edit 1) dis, 0...127
Ed2 (Edit 2) dis, 0...127
dPt (Depth) dis, 0...127
tin (Time) dis, 0...127
1. Use the cursor keys [▲][▼] to make the parameter select LED
indicate Motion Value.
2. The display will alternately show the parameter name you
selected in the preceding “Selecting a motion sequence,” and
the value of the parameter.
45
Page 46

5. Pattern mode
2
1
1,2
3,4
○○○○○○○○○○○○○○○○○○○○○○○○○○○○○○○○○○○○○○○○○
Pattern Set
Pattern Set is a function that lets you assign your favorite patterns to each of the sixteen step keys, and switch them at the
touch of a key.
During playback, you can successively switch patterns to perform a song.
By using the Select key in conjunction with this to switch pattern set groups, you can register and select 16 × 4 (total of 64)
patterns.
Using Pattern Set to perform (Pattern Set Play)
Press the Play/Pause key to begin playback.
Hold down the Pattern Set key and press a step key to switch to
the pattern that was registered for that step key.
By holding down the Pattern Set key and pressing a Select key,
you can switch to a different group of registered pattern sets.
The pattern set group will be indicated by the lower line of the
Select LEDs (red).
By holding down the Shift key and pressing the Pattern Set key ,
you can hold the Pattern Set function (the key will light).
To defeat the Hold condition, press the Pattern Set key once
again (the key will go dark).
Registering a pattern for Pattern Set
1. With playback stopped, continue pr essing the Pattern Set key
(or Hold it) and press the step key for the location that you
wish to register.
2. While continuing to press the Pattern Set key (or while Hold
is still in effect), rotate the dial to select the pattern number
that you wish to register. Release the Pattern Set key (or defeat Hold) to complete the registration process.
3. To save the pattern set registrations, press the Stop/Cancel
key to stop playback. Continue pressing the Pattern Set key,
and press the Write key (the Write key will blink).
4. The display will blink "PSt." Press the Write key once again
to save the data.
To cancel, press the Stop/Cancel key.
If the Global mode Memory Protect setting is on, it will
not be possible to write the data. In this case, turn off the
Global mode Memory Protect setting before you execute
the Write operation.
Never turn the power off during the Write operation. This
may damage the data.
Example
Step key
Select LED
1
2
3
4
Pattern set 1
In Pattern Set Play, the timing at which patterns will change,
tempo adjustment, and functions such as Reset & Play etc. are
the same as for Pattern Play.
Pattern Set cannot be used during recording. When you
enter recording (ready) mode, Pattern Set will be cancelled.
1 2 3 4 5 14 15 16
A01 A30 B03 B04 A51 A31 B43 B61
B21 B23 B56 B64 B28 B21 A07 A08
B01 B02 B04 B62 A04 A05 A45 A64
A11 A12 A13 A14 A15 A24 A25 A26
Pattern set 3
Hold down the Shift key and
press the Pattern Set key to
hold the function
46
Page 47

○○○○○○○○○○○○○○○○○○○○○○○○○○○○○○○○○○○○○○○○○
Saving a pattern (WRITE)
If you wish to keep the pattern data that you create, you must
perform this Write operation. When you perform the Write operation, "Data Copy within a pattern" (p.44) will occur automatically, depending on the pattern length.
If you intentionally want to discard your edits and revert to the
original pattern data, simply select a different pattern without
Writing.
1. If the pattern is playing, press the Stop/Cancel key to stop
playback. Use the cursor keys to make the parameter select
LEDs indicate Pattern.
2. Press the W rite key once (the key will blink). The pattern number will blink in the display.
3. Rotate the dial to select the writing destination pattern number.
4. Press the Write key once again to write the data.
To cancel, press the Stop/Cancel key.
3
5. Pattern mode
2,4
If the Global mode Memory Protect setting is on, it will
not be possible to Write. In this case, you must turn off
the Global mode Memory Protect setting before you execute the Write operation.
Never turn off the power during the Write operation. This
can damage the data.
5. Pattern mode
47
Page 48

6. Song mode
○○○○○○○○○○○○○○○○○○○○○○○○○○○○○○○○○○○○○○○○○○
6. Song mode
A song consists of patterns arranged in the desired or der of playback.
You can create and save up to sixteen songs in the internal
memory of the ES-1. In addition to pattern playback, songs can
also record rhythms and knob movements.
Press the SONG mode key to enter Song mode.
Song (S01)
Pattern A08
Pattern A10
(32Steps)
(64Steps)
Position
Position2Position3Position
1
+ Event data
Selecting a song
Song S01...S16
Use the cursor keys to make the parameter select LEDs indicate
Song.
Rotate the dial to select one of the sixteen songs S01 to S16.
S01...S16 16 songs
Pattern B01
Pattern B20
(36Steps)
(24Steps)
Pattern A01
Pattern B01
(16Steps)
(36Steps)
Position
Position
4
6
5
Pattern A01
(16Steps)
Position50Position
51
Playing a song (Song Play)
Press the Play/Pause key to begin playing the song. The song
will begin playing from the pattern of the currently selected
position. When the song ends, playback will automatically stop.
It is not possible to save edited sounds in a song. Please
use Pattern mode to edit sounds.
What is Position?
"Position" refers to the playback or recording order of the patterns within the song, and is the unit by which you edit a song.
Pattern A08
(32Steps)
Position
1
Fast-forward or rewind a song
During song playback, you can use the select keys to fast-forward or rewind. To fast-forward, press the [ ] select key. To
rewind, press the [ ] select key.
Pattern B01
(36Steps)
Pattern B20
Pattern A10
(64Steps)
Position2Position3Position
(24Steps)
4
Pattern A01
(16Steps)
Position
5
Pattern B01
(36Steps)
Position
6
...
Pattern A01
(16Steps)
Position
50
End
Position
51
Setting the playback tempo
Tempo 20.0...300.0
• Using the dial to set the tempo
Use the cursor keys to make the parameter select LEDs indicate
Tempo. Rotate the dial to set the tempo.
If you wish to change the tempo units below the decimal place,
hold down the Shift key and rotate the dial.
• Using the tap tempo key to set the tempo
While the song is playing, strike the T ap key three times or more
in succession at the desired tempo. The ES-1 will calculate the
interval at which the T ap key was pressed, and will set the tempo
accordingly. The tempo can be set in the same way even when
playback is stopped.
When you use the cursor keys to make the parameter select
LEDs indicate Tempo, and the tempo you modified will appear
in the display.
If you modify the tempo of a song but then switch to another song without Writing, the first song will return to its
original tempo. If y ou wish to k eep the tempo setting y ou
modified, you must perform the Write operation (☞p.52
"Saving a song").
Rewind Fast-forward
Switching songs
It is not possible to switch songs during playback, but it is possible to select the song number beforehand. If you select a song
number during playback, the display will blink to indicate the
selected number. When the currently playing song ends, playback will stop, and the newly selected number will now be
steadily lit. Press the Play/Pause key to playback the selected
song.
Playing from the beginning of a position or song (Reset & Play)
While a song is playing, you can hold down the Shift key and
press the Play/Pause key to start playback from the beginning
of the pattern specified for the currently-playing position. In
addition, you can press the Play/Pause key while a song is playing to pause the playback, and then hold down the Shift key
and press the Play/Pause key to playback from the beginning
of the song.
48
Page 49

○○○○○○○○○○○○○○○○○○○○○○○○○○○○○○○○○○○○○○○○○○
To playback the completed song from the beginning, press the
Creating a song
Creating a song from scratch
Here's how to create a song by placing patterns in the desired
order.
If you switch to a diff erent song while editing a song, your
edited data will be lost. If you wish to keep the edited
song, you must perform the Write operation to save the
song data.
Play/Pause key once, and then press the Stop/Cancel key.
Alternatively , use the cursor keys to make the parameter select
LEDs indicate Position, and rotate the dial or use the select keys
to set the position to "001." Then press the Play/Pause key.
3,5,6
Erasing song data (Clear Song)
1. If the song is playing, press the Stop/Cancel key to stop play-
back. Then select the song that you wish to erase.
2. Hold down the Shift key and press step key 10 (Clear Song).
(Key 10 will blink.)
3. Press step key 10 once again to erase the song data.
To cancel, press the Stop/Cancel key.
If you erase the song data by mistake, rotate the dial to re-select
the song before you save it. This will restore the data to its original condition.
If you wish to view the order of patterns in the song, or to reselect the pattern for a specific position, make the parameter
select LEDs indicate Pattern. Each time you press a select key,
you will move to the next or previous position. Y ou can use the
dial to change the pattern number that is displayed.
Pattern
1,2
4,6
Use the select keys to move through the positions,
and use the dial to select patterns
6. Song mode
2
2,3
Specifying a pattern for each position
Position 001...256
Pattern A01...b64
Here's how to specify the pattern for each position.
1. Use the cursor keys to make the parameter select LEDs indi-
cate Position. Notice that the display indicates "001."
2. Use the cursor keys to make the parameter select LEDs indi-
cate Pattern.
3. Rotate the dial to select the pattern that you wish to assign to
position "001."
4. Press the select [ ] key to advance to the next position. The
display will indicate "End."
5. Rotate the dial to select the pattern. The pattern you select
here will be the pattern for position "002."
6. When you select a pattern for the "End" position, the "End"
will move to the next position. Repeat steps 4 and 5 to assign
as many patterns as you wish.
7. If you stop specifying, use the cursor keys to make the pa-
rameter select LEDs indicate Song.
Alternatively, you can make the parameter select LEDs indicate Position, and use the dial or select key to select the position you wish to check. Then make the parameter select LEDs
indicate Pattern, and view or change the pattern.
At the Position setting use the select keys or dial to move;
then select Pattern and use the dial to select or view the pattern.
Position
Pattern
6. Song mode
49
Page 50

6. Song mode
3
2,4
2
○○○○○○○○○○○○○○○○○○○○○○○○○○○○○○○○○○○○○○○○○○
Editing a song
You can insert a new pattern into a song, or delete an existing
pattern. You can also add knob movements or your own performance to a song.
If you wish to keep the edited song, you must perf orm the
Write operation. If you select a different song or turn off
the power without performing the Write operation, the song
will return to the state in which it was before you edited it.
Inserting a pattern at a specified position (Insert Pattern)
Y ou can insert a pattern at a specified position, and subsequent
patterns will be moved backward (toward the end of the song).
Insert a new pattern at position 3
Pattern A08
Pattern B01
Before
inserting
After
inserting
Pattern A01
(16Steps)
Position
1
Pattern A01
(16Steps)
Position
1
(32Steps)
(36Steps)
Position2Position3Position4Position5Position6Position
Pattern B01
Pattern A08
(36Steps)
(32Steps)
Position
Position
2
3
1. If the song is playing, press the Stop/Cancel key to stop play-
back.
2. Hold down the Shift key and press step key 8 (Insert Pat-
tern). (The 8 key will blink.)
3. The position indication in the display will blink. Rotate the
dial to select the position at which you wish to insert a pattern. (For example if you wish to insert a pattern into position 3. make the display blink "003.")
4. Press step key 8 once again, and a pattern will be inserted in
front of that position.
To cancel, press the Stop/Cancel key.
The pattern that is inserted will be the pattern which had previ-
ously been at that position. Now you can specify the desired
pattern for the position that was inserted.
Data following the inserted pattern will be moved backward.
2
Pattern B20
(24Steps)
Pattern A01
(16Steps)
Pattern B01
(36Steps)
Pattern B20
(24Steps)
7
Pattern B01
(36Steps)
Pattern A01
(16Steps)
Pattern A08
(32Steps)
Position4Position5Position6Position7Position
3
2,4
Deleting a pattern from a specified position (Delete Pattern)
You can delete a pattern from a specified position, and subsequent patterns will be moved forward (toward the beginning
of the song).
Delete the pattern at position 5
Pattern A08
Before
deleting
After
deleting
1.
Pattern A01
(16Steps)
Position
1
Pattern A01
(16Steps)
Position
1
If the song is playing, press the Stop/Cancel key to stop playback.
Pattern B01
Pattern B20
(32Steps)
(36Steps)
Position
Position
3
2
Pattern A08
Pattern B01
(32Steps)
(36Steps)
Position2Position3Position4Position5Position
(24Steps)
Position
4
Pattern B20
(24Steps)
Pattern A10
(64Steps)
Position5Position
Pattern B01
(36Steps)
Pattern B01
(36Steps)
6
Pattern A01
(16Steps)
6
Pattern A01
(16Steps)
Position
7
Position
7
Position
8
2. Hold down the Shift key and press step key 9 (Delete Pattern). (The 9 key will blink.)
3. The position indication in the display will blink. Rotate the
dial to select the position from which you wish to delete the
pattern. (For example if you wish to delete the pattern from
position 5. make the display blink "005.")
8
4. Press step key 9 once again, and the pattern will be deleted.
To cancel, press the Stop/Cancel key.
When you delete a pattern, the event data (refer to the follow-
ing page) at that position will also be deleted.
Data following the inserted pattern will be moved forward.
Changing the pattern for a specific position
1. If you are playing back, press the Stop/Cancel key to stop
playback.
2. Use the cursor keys to make the parameter select LEDs indicate Position.
3. Use the dial to select the position that you wish to modify.
4. Use the cursor keys to make the parameter select LEDs indicate Pattern.
5. Use the dial to select the pattern that you wish to assign to
the selected position.
If you wish to audition the patterns as you select one,
press the Pattern mode key to enter Pattern mode, and
listen to the playback. To return to Song mode, press the
Stop/Cancel key to stop playback, and then press the
Song mode key.
50
Page 51

○○○○○○○○○○○○○○○○○○○○○○○○○○○○○○○○○○○○○○○○○○
6. Song mode
Recording performances or knob movements into a song (Event Recording)
In addition to putting patterns together to create a song, Song
mode also allows you to realtime-record knob movements and
your performances on the part keys.
Recording this data in Song mode is referred to as "event recording."
Four types of musical data (event data) can be recorded by event
recording.
· Pressing the part keys
· Using Part Mute or Part Solo
· Movements of the knobs or switches (only for the selected part)
· Tempo
Event recording allows you to recor d two or mor e types of events
in the same area, as long as the events are played at the same time.
Event recording always rewrites the previous data ("replace
recording"), and when you record your performance, any event
recording data previously in that area will be erased. (It is not
possible to layer event recording over the same area.)
1. Select the song on which you wish to record events.
2. Use the cursor keys to make the parameter select LEDs indi-
cate Position.
3. Use the dial or the Select keys to move to the position at which
you wish to begin recording.
4. Press the Rec key, and then press the Play/Pause key to begin event recording.
5. Use the part keys and/or the knobs to perform.
6. Press the Stop/Cancel key to stop event recording.
Deleting event data from a song
To delete event data from a song, you can perform event recording over the area that you wish to delete (without operating any knobs or keys).
Checking for song event data
If event data has been recorded in a song, holding down the
Shift key and pressing the Motion Sequence key will make step
keys 13 through 16 light.
It is not possible to check for event data during playback
or recording.
1,3
5
2
4
Knob movements that are event-recorded in Song mode will
always playback in a way that corresponds to the Smooth type
motion sequence setting (and not the Trig Hold type).
If you wish to save the e vent recording, y ou must perform
the Write operation. If you switch songs or turn off the
power without performing the Write operation, the recorded performance will be lost.
If during playback you operate a knob that had been e ventrecorded, playback of the e vents of that knob will be cancelled until it reaches the next position. However if you
modify the tempo that was event-recorded, the tempo will
be cancelled until the end of the song.
After rewinding a song, it may not be possible to playback exactly according to the event data.
4
55
6. Song mode
51
Page 52
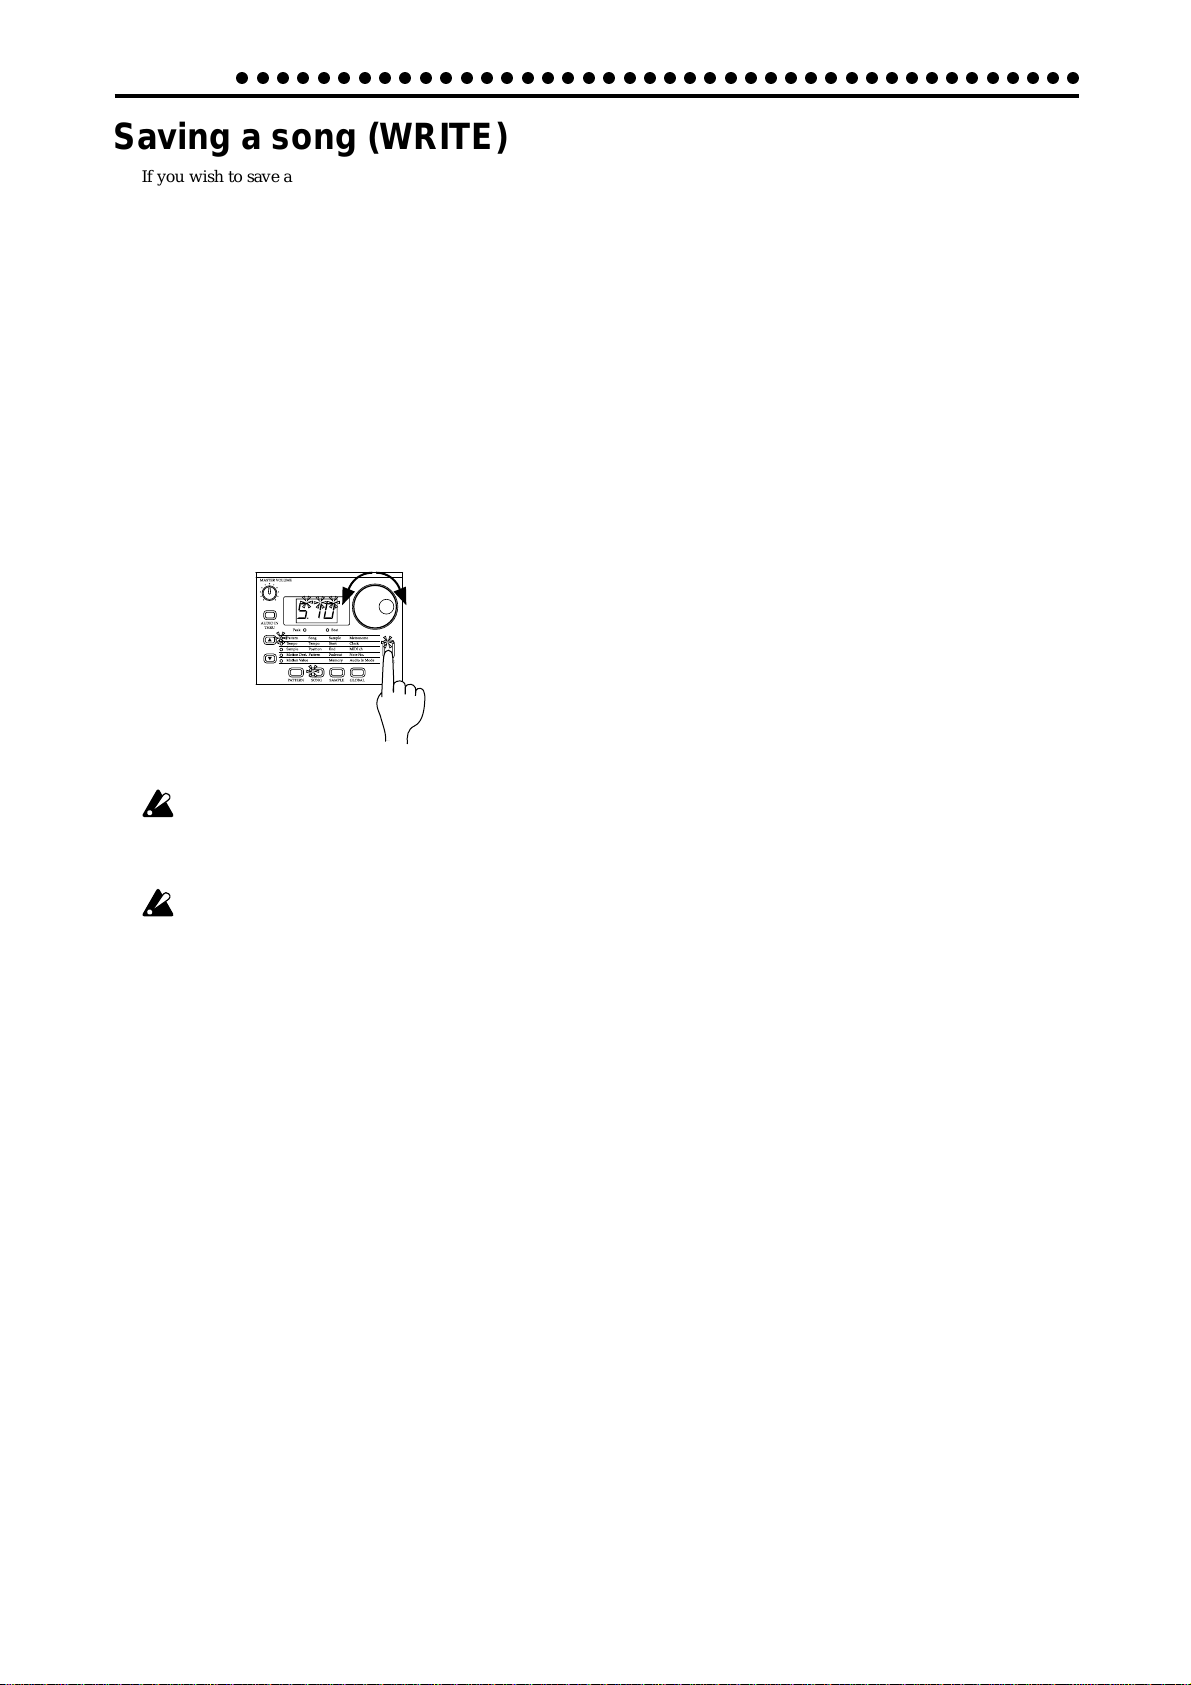
6. Song mode
○○○○○○○○○○○○○○○○○○○○○○○○○○○○○○○○○○○○○○○○○○
Saving a song (WRITE)
If you wish to save a song that you create, you must perform
this Write operation.
If you decide not to save the song data you create, simply switch
songs without performing the Write operation.
1. If the song is playing, press the Stop/Cancel key to stop playback.
2. Press the Write key once (the key will blink). The song number will blink in the display.
3. Rotate the dial to select the writing destination song number .
4. Press the W rite key once again to save the data. (The key will
light, and then go dark.)
To cancel, press the Stop/Cancel key.
3
2,4
If the Global mode Memory Protect setting is on, it will
not be possible to write the data. In this case, turn off the
Global mode Memory Protect setting before you execute
the Write operation.
Never turn the power off during the Write operation. This
may damage the data.
52
Page 53

○○○○○○○○○○○○○○○○○○○○○○○○○○○○○○○○○○○○○○○○○○
7. Global mode
7. Global mode
In Global mode you can set parameters such as MIDI or Protect. Press the GLOBAL mode key to enter Global mode.
To execute Global mode, press the previous mode key.
The settings you make in Global mode will be cancelled
if you turn off the power without Writing. If you wish to
save the settings you make, you must perform the Write
operation (☞p.56 "Saving the settings y ou modify in Global mode").
Metronome settings
Metronome oFF, r-0, r-1, r-2, on
Specify how the metronome will function. If you will be using
realtime recording to create a pattern from scratch, it is convenient to use the metronome. The metronome will sound at quarter-note timing.
oFF: The metronome will not sound.
r-0: The metronome will sound only during recording (when
the Rec and Play/Cancel keys are lit).
r-1: When recording, a one-measure count will be sounded
before recording begins. The metronome will sound only
during recording.
r-2: When recording, a two-measure count will be sounded
before recording begins. The metronome will sound only
during recording.
on: The metronome will sound during playback and record
ing. There will be no count before recording begins.
1. Use the cursor keys to make the parameter select LEDs indicate Metronome.
2. Rotate the dial to make the metronome setting.
3. Press the Pattern or Song key to return to the previous mode.
The metronome setting cannot be written. When you turn
on the power, it will alw a ys be "oFF."
Synchronizing the ES-1 with external MIDI devices (MIDI Clock)
Clock int, Ext
The Global mode Clock setting allows the tempo of the ES-1 to
be synchronized with the tempo of an external MIDI device that
is able to send or receive MIDI Clock messages.
For details on synchronization settings of your external MIDI
device, refer to the owner's manual for your device.
Even if you set Clock to Ext, the ES-1 will operate with its
own internal clock if no MIDI Clock messages are being
received at its MIDI IN connector.
Synchronizing the ES-1 to a master external MIDI device (Ext)
1. Use a MIDI cable to connect the MIDI IN connector of the
ES-1 to the MIDI OUT connector of the external MIDI device
(sequencer or synthesizer etc.).
2. Use the cursor keys to make the parameter select LEDs indicate Clock.
3. Rotate the dial to select "E t" (external clock).
4. Make settings on the external MIDI device (master) so that it
will transmit MIDI Clock messages.
5. Return to Pattern mode or Song mode.
6. When you start the sequencer of the external MIDI device,
the ES-1 will simultaneously begin playback.
7. If MIDI Clock data is being received at the MIDI IN connector, you can make the ES-1 playback in synchronization with
the external MIDI device by pressing the ES-1's Play/Pause
key.
2
MIDI IN
1
MIDI cable
MIDI keyboard or
1
sequencer etc.
1
If the MIDI Clock parameter is set to "E t" and the ES-1
is synchronized to the external MIDI clock, it will synchronize to the tempo of the external sequencer, and it will
not be possible to change the tempo on the ES-1.
If a MIDI Start message is received while the ES-1 is
already playing in synchronization with MIDI Clock, the
ES-1 will begin playback from the beginning of the currently playing pattern (or in the case of a song, from the
beginning of the pattern that was playing when the Start
message was received).
MIDI OUT
2
3
7. Global mode
53
Page 54

7. Global mode
○○○○○○○○○○○○○○○○○○○○○○○○○○○○○○○○○○○○○○○○○○
Synchronizing an external MIDI device to the ES-1 as master (int)
1. Use a MIDI cable to connect the MIDI OUT connector of the
ES-1 to the MIDI IN connector of the external MIDI device
(sequencer or synthesizer etc.).
2. Use the cursor keys to make the parameter select LEDs indicate Clock.
3. Rotate the dial to select "Int" (internal clock).
4. Make settings on the external MIDI device (slave) so that it
will receive MIDI Clock messages.
5. When you start playback on the ES-1, the external MIDI device will begin playback in synchronization.
When you perform the Reset & Play operation to begin
playback from the beginning of the pattern, the ES-1 will
transmit only a MIDI Start message.
3
MIDI keyboard or
sequencer etc.
1
MIDI cable
MIDI OUT
MIDI IN
1. Use the cursor keys to make the parameter select LEDs indi-
cate Note No.
2. Press the part key whose note number you wish to change
(the key will light).
3. Rotate the dial to select the note number.
The factory settings are as follows.
Part Note name Note number
Sample 1 C2 36
Sample 2 D2 38
Sample 3 E2 40
Sample 4 F2 41
Sample 5 G2 43
Sample 6A C4 60
Sample 6B C461
Sample 7A F242
Sample 7B A246
Slice Sample B2 47
Audio In A2 45
Note names will appear in the display as follows.
Display for A2
The correspondence between note names and note numbers will differ by manuf acturer. Please refer to the o wner’s
manual for the device you have connected.
Display for D–1Display for B4
2
MIDI channel settings (MIDI ch)
MIDI ch 1...16
This sets the MIDI channel. The same MIDI channel is used for
both transmission and reception.With the factory settings this
will be “11”
1. Use the cursor keys to make the parameter select LEDs indi-
cate MIDI ch.
2. Rotate the dial to select the channel.
Setting the MIDI note number for each part (Note No.)
In order to make this setting, you must enter Global mode
from Pattern or Song mode.
If you enter from Sample mode, the display will indicate “-
- -” and it will not be possible to change the setting.
Setting the audio in mode (Audio In Mode)
Audio In Mode
L (monaural), St. (stereo)
This setting specifies whether the sound that is input from the
audio in jack will be handled as monaural (left channel only) or
stereo. When using a monaural source such as MIC input, select “L.” When using a stereo source such as a CD player, select
“St..”
1. Use the cursor keys to make the parameter select LED indicate Audio In Mode.
2. Rotate the dial to select either “L” or “St..”
Even if the Audio In Mode is set to stereo, a Sampling Mode
setting of monaural will cause the left and right channels to be
mixed and sampled in monaural.
If you set the Audio In Mode to stereo, use a stereo phone plug
to make connections.
54
Note No. C-1...G9
Here you can specify the MIDI note number for each part.
If you specify the same note number for two or more parts, the
sounds of those parts will be played simultaneously when that
note is received from an external MIDI device.
Page 55

○○○○○○○○○○○○○○○○○○○○○○○○○○○○○○○○○○○○○○○○○○
7. Global mode
Using SmartMedia
The ES-1 allows you to use SmartMedia to save or load internal
data.
Samples (WAVE files, AIFF files) you create on your computer
can also be loaded into the ES-1.
The ES-1 can use 3 V (3.3V) SmartMedia of 4 MB — 64 MB.
WAVE, AIFF
Make sure that the SmartMedia card is oriented correctly, and
insert it all the way into the SmartMedia slot.
Orient the card
correctly
TM
Load a file
Save a file
Push all the way in
ES-1
IIf the Smart Media has not been formatted, or if it cannot
be recognized correctly, the display will indicate "For."
Please execute "Formatting Smart Media."
4. The display will indicate the file number that will be saved.
If the display indicates (for example) “-1-,” a new file is being saved. If the display indicates “[1],” data is being saved
to an existing file. (In this case the old data will be overwritten.) Use the dial to select a file.
5. Press key 15 to execute the Save operation. While the data is
being saved, the progress will be shown by the step keys.
When saving is complete, the display will return to the condition in which it was before you executed Save (key 15 will be
dark).
To cancel, press the
Stop/Cancel key.
If a write protect label is affixed to the SmartMedia, data
cannot be saved. In this case, remove the write protect
label from the SmartMedia before executing Save.
Never turn off the power or remov e the SmartMedia while
Save or Format is being executed. Doing so may render
the SmartMedia unusable.
Approximately 4 Mbytes of space is required to sav e one
file. Sa ving will not be possible if there is insufficient space
on the SmartMedia.
3
4
Formatting Smart Media (Format)
Here's how to format Smart Media for use on the ES-1.
1. Insert the SmartMedia card into the SmartMedia slot.
2. Hold down the Shift key, and press step key 15 (Card). (Key
15 will blink.)
3. The display will indicate “Lod.” Rotate the dial toward the
right to select “For,” and press key 15.
4. The display will indicate “no.” Turn the dial to the left to
select “yES,” and press key 15 to execute the formatting operation. While formatting is being performed, the progress
will be shown by the
step keys.
When formatting is
complete, or if you select “no” and press key 15, the display
will return to the previous state.
To cancel, press the Stop/Cancel key.
The entire contents of the SmartMedia will be lost when
you format it.
In some cases, SmartMedia that was formatted on a device other than the ES-1 will not be recognized correctly.
If so, please re-format it on the ES-1.
3
4
Saving data to SmartMedia (Save)
Here’s how to save all ES-1 Pattern data, Song data, Sample
data, and Global data on a SmartMedia card.
1. Insert the SmartMedia card into the SmartMedia slot.
2. Hold down the Shift key, and press step key 15 (Card). (Key
15 will blink.)
3. The display will indicate “Lod.” Rotate the dial toward the
right to select “SAU,” and press key 15.
Loading all data from SmartMedia to the ES-1 (All Load)
Here’s how to load all ES-1 Pattern data, Song data, Sample
data, and Global data from SmartMedia.
1. Insert the SmartMedia into the SmartMedia slot.
2. Hold down the shift key and press step key 15 (Card).
3. The display will indicate “Lod.” Press key 15.
4. The display will show a file number. Use the dial to select a
file number 1—9 (file “[E]” is not an ES-1 file, so do not select
it here), and then press key 15.
5. The display will indicate “ALL.” Press Write key to execute
the Load operation. (Key 15 will light, and the Write key will
blink.) The loading progress will be shown by the step keys
(the Write key will light.)
When loading is finished, the ES-1 will enter Pattern mode with
A01 selected.
If you decide to cancel the procedure, use the mode keys to
move to Pattern mode, Song mode, or Sample mode.
3
With the factory settings memory protect is turned on, so
that saving will not be possible. Turn off memory protect
before you execute Load. (☞p.56 “Memory Protect”)
4
5
7. Global mode
55
Page 56
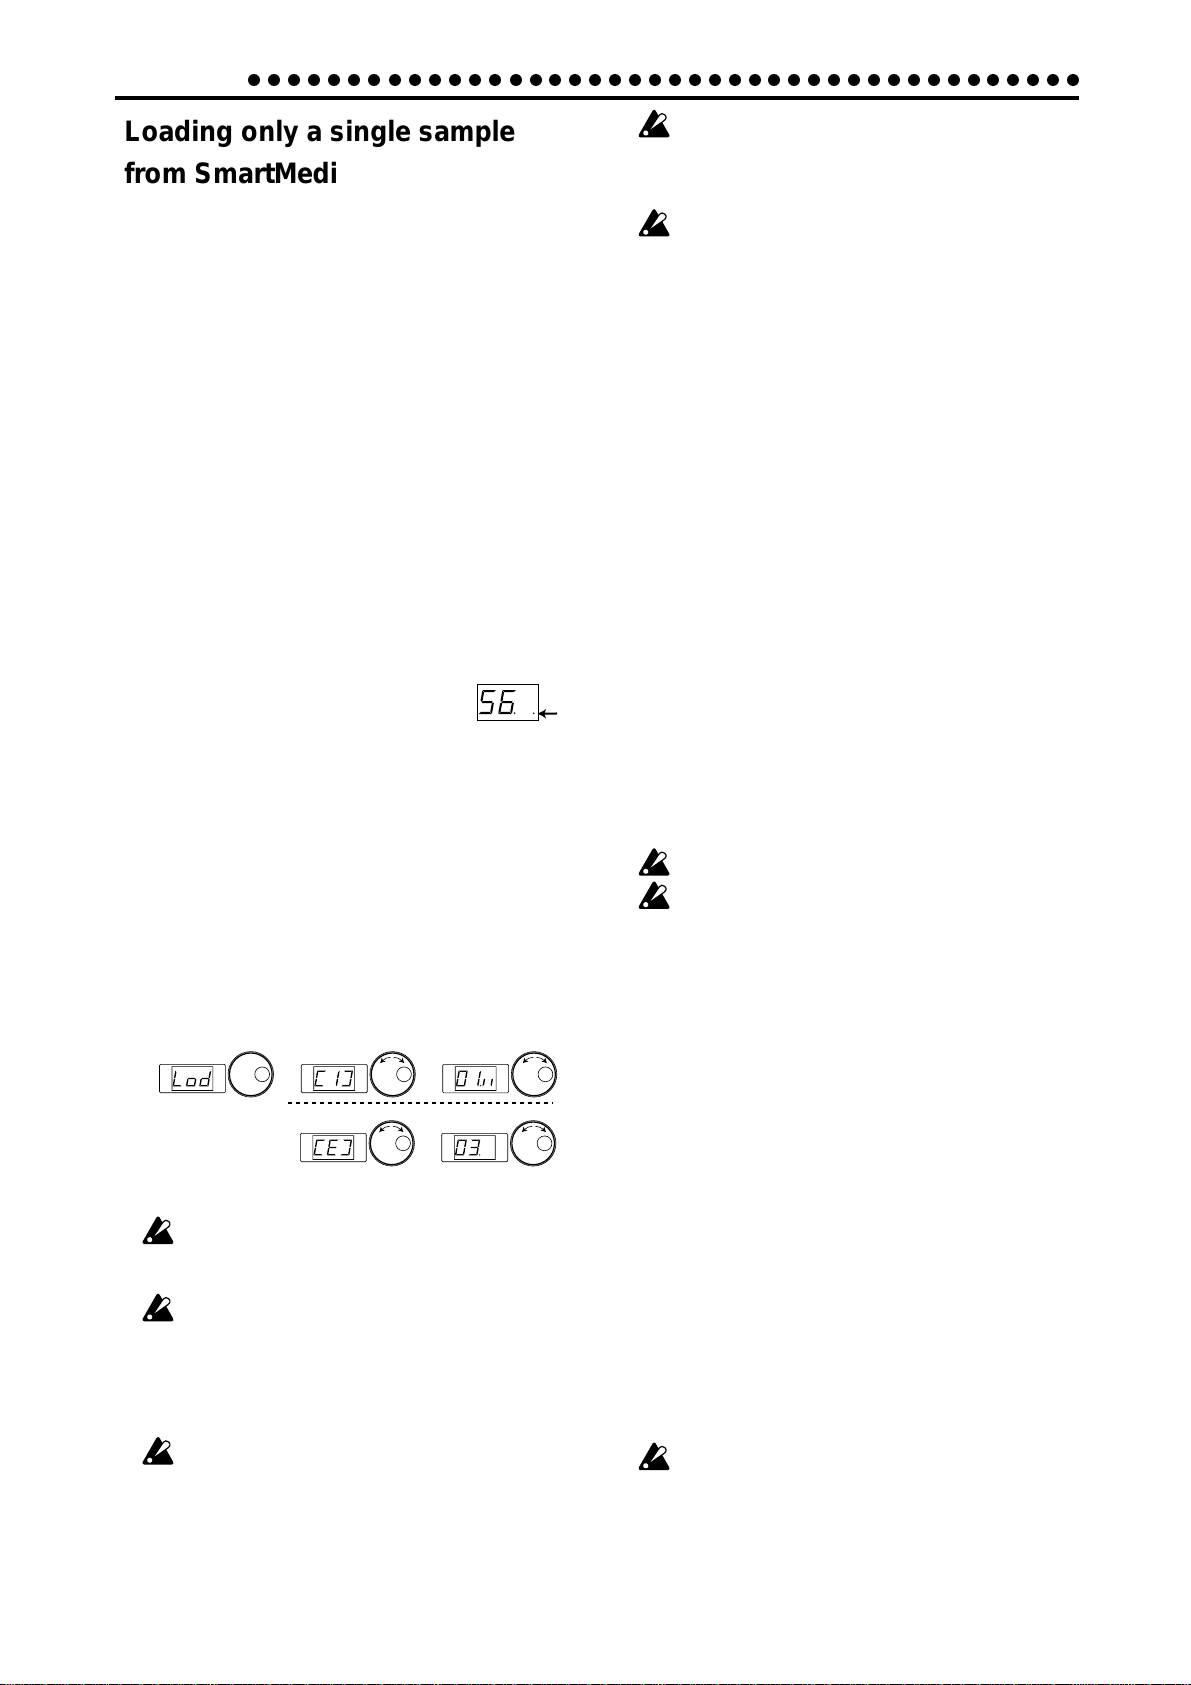
7. Global mode
○○○○○○○○○○○○○○○○○○○○○○○○○○○○○○○○○○○○○○○○○○
Loading only a single sample from SmartMedia (Sample Load)
1. Insert the SmartMedia into the SmartMedia slot.
2. Hold down the shift key, and press step key 15 (Card). (Key
15 will blink.)
3. The display will indicate “Lod.” Press key 15.
4. A file number will blink in the display. Use the dial to select
the desired file number. If you wish to load a WAVE file or
AIFF file that you created on your computer , select file “[E].”
After you select a file, press key 15.
5. The display will indicate “ALL” (if you selected file “[E],”
the number will blink). Rotate the dial toward the right and
the sample number will blink. At this time you can press the
Play/Pause key to play back the sample and audition it.
6. After selecting the sample, press key 15. (Key 15 will light,
and the Write key will blink.)
7. The load destination sample number will blink in the display. Use the dial to select the sample number. In the case of
a monaural sample (or slice sample) you can select from “00.”
through “99.” In the case of a stereo sample you can select
from “00.S” through “49.S”.
When you choose the unused sample number, a period is indicated on the lower right
side of display.
8. Press the W rite key to begin loading (the W rite key will light).
The loading progress will be shown by the step keys.
When loading ends (the Write key will go dark), you will return to step 5.
If you decide to cancel, use the mode keys to move to Pattern
mode, Song mode, or Sample mode.
Only WAVE files and AIFF files with filenames consisting of a
two-digit number plus an extension will be recognized; e.g.,
“00.wav” or “00.aif.” If both .wav and .aif files with the same
two-digit number exist, the WAVE file will be given priority.
If there is insufficient free memory within the ES-1, it may
not be possible to load the sample. Before you begin, use
the Sample mode Memory function (☞p.32) to check the
remaining amount of sampling time.
When a sample is loaded, the data locations of the internal memory are optimized. This may take a certain amount
of time. During this time, the displa y will indicate that data
is currently being loaded. Never turn off the power until
loading is complete (the Write key is dark).
Memory Protect (Protect)
This is the protect setting for Pattern mode, Song mode, and
Sample mode. When protect is “on,” the W rite key will not function, and it will not be possible to rewrite data or receive a MIDI
data dump.
When you wish to save edited data or receive a data dump,
turn protect “oFF.”
1. Press the Stop/Cancel key to stop playback.
2. Hold down the Shift key and press step key 16 (Protect). (Key
16 will blink.)
3. Rotate the dial to change the blinking display to either “on”
or “oFF.”
Lit
4. Press step key 16 once again to finalize the protect on/off
setting (key 16 will go dark).
If you decide to cancel without changing the setting, press the
Stop/Cancel key.
If you wish to save the protect setting, perform the Global mode
W rite operation (described below).
With the factory settings, this is turned on.
This setting is valid in Pattern mode, Song mode, and
Sample mode. In Global mode, it is always possible to
execute Write regardless of the Memory Protect setting.
Saving your changes in
3
for a WAVE or
AIFF file
The selected sample will play back for approximately 16
seconds (or 8 seconds for a stereo sample) from its beginning.
8/16 bit linear PCM mono/stereo format WAVE or AIFF
files can be loaded. Place the file in the root directory of
the SmartMedia.
WA VE or AIFF files with a sampling frequency other than
32 kHz will have a different pitch when played back on a
personal computer etc.
With the factory settings, memory protect is turned on so
that saving is not possible. Tur n off memory protect before loading. (☞p.56 “Memory Protect”)
4
4
5
5
Global mode (WRITE)
Here’s how you can save the changes you made in Global mode.
If you wish to save the changes you made, you must perform
this Write operation. The settings will take effect whenever the
power is turned on. Conversely, if you do not want to save the
changes you made, simply turn off the power without W riting.
1. Press the Stop/Cancel key to stop playback.
2. Press the Global mode key.
3. Press the W rite key once (the key will blink). The display will
indicate “– – –.”
4. Press the Write key once again to complete the operation.
If you decide to cancel, press the Stop/Cancel key.
In Global mode it is always possible to write, regardless of the
Memory Protect setting (preceding section).
Never turn off the power while data is being written into
memory. Doing so may destroy the data.
56
Page 57

○○○○○○○○○○○○○○○○○○○○○○○○○○○○○○○○○○○○○○○○○○
6. About synchronization
8. Appendices
About MIDI
1. MIDI channels
Similarly to a television, data can be received when the channel
of the receiving device matches the channel on which the data
is being transmitted.
The transmit/receive channel of the ES-1 is set by the MIDI
Channel setting in MIDI mode.
2. Note-on/off
When you strike a key pad, the note number assigned to that
pad and a velocity value will be transmitted as a Note-on message [9n, kk, vv] (n: channel, kk: note number, vv: velocity). On
the ES-1, the vv: velocity value is determined by the Accent
level. When you release a pad, a note-off message [8n, kk, vv] is
transmitted. However, most devices do not transmit note-off
velocity , and neither does the ES-1. When note-on/off messages
for a note number assigned to a part are received, that part will
sound.
Note-on/off messages are transmitted and received on the MIDI
channel that you specify in MIDI mode.
Two or more sequencers can be connected via MIDI and made
to playback in synchronization. Messages used for synchronization (realtime messages) include Timing Clock [F8], Start [F A],
Continue [FB], and Stop [FC]. In a synchronized system, one
synthesizer (the master) will transmit these messages, and the
other sequencer(s) (the slave(s)) will receive these messages. The
slave devices will playback according to the tempo specified by
the Timing Clock messages transmitted by the master. Twentyfour Timing Clock messages are transmitted for each quarter
note. When the ES-1’s Global mode parameter Clock is set to
INT, it will be the master device, and will transmit these r ealtime
messages. When Clock is set to EXT, it will be the slave device,
and will receive these realtime messages. However even when
Clock is set to EXT, the ES-1 will operate according to its own
internal clock if no Timing Clock messages are being received.
The Start message specifies when playback will begin. When
the Start/Pause key is pressed on the master device, it will transmit a Start message. Slave devices that receive this Start message will synchronize to the Timing Clock messages subsequently received, and will begin playback from the beginning.
If the Start/Pause key is pressed on the master devices when it
is paused, the master will transmit a Continue message. When
a slave device receives the Continue message, it will resume
playback from the point where it is currently stopped. If the
Stop key is pressed during playback, the master will transmit a
Stop message. Slave devices will stop playback when they receive a Stop message.
3. Switching patterns
8. Appendices
When you change patterns, a Program Change message is transmitted. At this time if a program change is received on a MIDI
channel that matches the MIDI channel setting of the ES-1, a
pattern of the same group (e.g., from A01 to A02, etc.) will be
selected.
4. Using NRPN messages to edit
NPRN (Non Registered Parameter No.) messages are messages
to which manufacturers are free to assign their own functions.
On the ES-1, NRPN are assigned to all knobs and keys except
for the accent part key of the Part Edit section and the Effect
section.
T o edit, first use NRPN (LSB) [Bn, 62, rr] and NRPN (MSB) [Bn,
63, mm] (control change #98 and 99) (rr, mm: lower and upper
bytes of the parameter no.) to select the parameter. Then transmit Data Entry (MSB) [Bn, 06, mm] and Data Entry (LSB) [Bn,
26, vv] (control change #06 and 38) (mm, vv: upper and lower
bytes of the value, together expressing 16,384 steps) to set the
value. The ES-1 uses only the MSB value (128 steps) of the Data
Entry message.
5. If "stuck notes" occur
If for some reason a note fails to stop sounding, you can usually
switch modes to stop the sound. If a note played via MIDI fails
to stop, you can simultaneously press the Shift key and the Stop/
Cancel key to perform a MIDI Reset.
7. Synchronization in Song mode
In Song mode, the ES-1 can transmit and receive Song Select
and Song Position Pointer messages. When you switch songs, a
Song Select [F3 ss] message will be transmitted (ss: song number, where one of 128 songs can be selected. On the ES-1 you
can select 16 songs.) If the ES-1 receives a Song Select message
in Song mode, it will switch songs. Transmission and r eception
of Song Select messages can be restricted by the MIDI Filter
settings of MIDI mode. If you change the current position on
the master device (i.e., the device whose Clock is set to INT)
when the song is stopped, a Song Position Pointer message [F2
pp pp] will be transmitted. (pp: the number of MIDI beats from
the beginning of the song; i.e., the number of Timing Clocks
divided by six.) Song Position Pointer indicates the location at
which the sequencer is currently stopped. When Song Position
Pointer is received in Song mode by a slave device (i.e., a device
whose Clock is set to EXT), it will change the location at which
its song is currently stopped to match the location of the master. However on the ES-1, the length of each pattern may be
different, so the master and slave will not necessarily be in the
same location. When the Start/Pause key is pressed on the
master device, a Continue message is transmitted, and the song
will begin playback from the currently selected position. When
the slave device receives the Continue message, it will synchronize to the Timing Clock messages and begin playback from
the current point in the song. In the same way as synchronizing
the playback from the beginning of the song, you can specify
the location at which playback will start, and then playback in
synchronization. If you use the dial or Select keys to fast-forward or rewind while the song is playing, Song Position Pointer
messages will not be transmitted. Be aware that if you perform
these operations during synchronized playback, the synchronization will be lost. Also, even if Song Position Pointer messages
are received during playback, the playback location will not
change.
8. Appendices
57
Page 58

8. Appendices
8.
About system exclusive messages
Manufacturers are free to use system exclusive messages in any
way they choose, and these messages are used mainly to transmit and receive parameters that are specific to particular devices, such as sound data and editing data.
The system exclusive message format of the ES-1 is [F0, 42, 3n,
57, ... F7] (n: exclusive channel).
However, some system exclusive messages have been defined
for use in a specific way, and these are called "universal system
exclusive messages."
Of the various types of universal system exclusive messages,
the ES-1 supports the following two types.
· When an Inquiry Message Request [F0, 7E, nn, 06, 01, F7]
message is received, the ES-1 will transmit an Inquiry Message [F0, 7E, nn, 06, 02, (9 bytes), F7] that means “I am a Korg
ES-1, and my system version is ...”
· When a Master Volume [F0, 7F, nn, 04, vv, vv, 01, F7] is received, the volume of the entire system will be adjusted.
○○○○○○○○○○○○○○○○○○○○○○○○○○○○○○○○○○○○○○○○○○
9.Transmitting sound settings
Troubleshooting
The display does not light up when I press the
Power switch!
• Is the AC adapter connected?
• Is the AC adapter plugged into an AC outlet?
No sound!
• Is your amp, mixer, or headphones connected to the correct
jack? (Can you playback a pattern? If so, the connections are
correct.)
• Are your amp or mixer powered-on and set correctly?
• Is the master volume knob of the ES-1 raised?
• Has the volume been lowered by a MIDI Master V olume mes-
sage?
Sound does not stop!
• When a pattern is played back, it will continue playing repeatedly. When you are finished listening to a pattern, press
the Stop/Cancel key (p.13, 14).
and other data (Data Dump)
Song, Pattern, and Global data can be transmitted as MIDI exclusive data, and stored on an external device. This data is transmitted and received on the MIDI channel selected in Global
mode. Data dumps will be transmitted when a Data Dump Request of the corresponding type is received.
10. Editing sounds etc.
By sending MIDI exclusive data dumps, you can rewrite all
patterns or individual programs. By using NRPN messages in
Pattern mode, you can edit the knobs that are active for each
part.
Sounds or operations are different than when I
edited!
• Did you perform the Write operation after editing? (p.47, 52)
After you have edited, you must perform the Write operation before switching songs or patterns, or turning off the
power.
• Did you edit the selected pattern or song after writing it?
Can't control via MIDI!
• Is the MIDI cable connected correctly?
When playing the ES-1 from an external device
• Has the ES-1 been set to receive MIDI data on the channel on
which the data is being transmitted? (p.54)
• Is the MIDI mode MIDI Channel parameter set to the desired
channel? (p.54)
When playing an external device from the ES-1
• Does the MIDI channel of the ES-1 match the MIDI channel
of the receiving device? (p.54)
Can't write a pattern or song!
• Is the Global mode Protect setting turned "on"? (p.56)
Striking a part key does not play the specified
sound!
• After editing the sound of a part, did you perform the Write
operation? (p.47)
• Is a motion sequence operating? (p.41)
58
Page 59

○○○○○○○○○○○○○○○○○○○○○○○○○○○○○○○○○○○○○○○○○○
8. Appendices
Error messages
Error messages will be cancelled when you press the Stop/Cancel key.
Er.1
Er.2
Er.3
Er.4
Er.7
Er.8
Er.9
Full
Writing could not be performed.
When writing a song to a song of a different
number, you exceeded the maximum number
of events that can be recorded. Delete unneeded
song event data.
There is insufficient space in internal memory
or on SmartMedia. You must first delete un
needed samples or files to create vacant space,
and then execute the Write or Save operation. 4
MB or more vacant space is required in order
to save ES-1 data on SmartMedia.
The file could not be loaded (or played) from
the SmartMedia. Either the file format is wrong,
or the data has been damaged. Files that can be
loaded are ES-1 files, WAVE files (8 bit or 16
bit, monaural/stereo), and AIFF files (8 bit or
16 bit, monaural/stereo).
An error occurred while loading a file from
SmartMedia or saving to SmartMedia.
The SmartMedia does not contain any file that
the ES-1 can recognize.
Protect is turned “on” for the memory of the
data you are attempting to write. In Global
mode, turn memory protect “oFF” (p.56).
A write protect label is affixed to the Smart
Media. Remove the write protect label from the
SmartMedia.
During song event recording, the event data
memory has filled up. Delete unneeded song
event to free up memory (p.51).
Specifications
System: Sampling
Number of parts: 12 parts
Sample parts × 9
Slice sample part
Audio in part
Accent part
Sample capacity: 150 (100 monaural, 50 stereo)
Maximum total of 95 seconds (monaural)
Memory capacity: 128 patterns, 16 songs
Master effects: Delay
Normal, Motion Sequence, BPM Sync
Insert effects: 11 types
Reverb, Flanger/Chorus, Phaser,
Ring Modulator, Pitch Shifter,
Compressor, Distortion, Decimator,
Isolator, Resonance Filter, Wah
Sequencer: Pattern
Maximum 64 steps per part,
Motion Sequence,
1 parameter per part, 64 events
Song
Maximum 256 steps per song,
Maximum 35,700 events of event
recording
Connectors: PHONES
Phone jack: stereo
Nominal level:
OUTPUT (L/MONO, R)
Phone jack: monaural x 2
Nominal output level: –10 dBu
Output impedance: 1 k-ohm
AUDIO IN (phone jack: mono/stereo)
Nominal input level: –10 dBu(LINE)
Input impedance: 47 k-ohm
MIDI (IN, OUT, THRU)
SmartMedia
Power supply: DC9V (included AC adapter)
Power consumption:6 W
Dimensions: 300 (W) x 224.9 (D) x 55.4 (H)
(including rubber feet)
Weight: 1.28 kg
* Specifications and appearance are subject to change without
notice for improvement.
* SmartMediaTM is a registered trademark of T oshiba Corpora-
tion.
21 mW + 21 mW (32 ohm)
–40 dBu(MIC)
TM
: 4—64 MB, 3V (3.3V)
8. Appendices
59
Page 60

8. Appendices
Index
○○○○○○○○○○○○○○○○○○○○○○○○○○○○○○○○○○○○○○○○○○
A
Accent ----------------------10, 40
All Load-------------------------- 55
Audio In----------- 10, 12, 22, 54
Audio In Mode ----------------- 54
Audio In Part -------------- 10, 22
AUDIO IN THRU ---------------- 8
B
Beat --------------------------- 8, 38
Beat LED-------------------------- 8
BPM Sync ------------------- 9, 38
C
Card ------------------------------ 55
Check
Motion Sequence----------- 42
Song Event------------------- 51
Chorus--------------------------- 36
Clear
Event -------------------------- 51
Motion ------------------------- 44
Part ---------------------------- 43
Song --------------------------- 49
Clock ----------------------------- 53
Compressor -------------------- 37
Copy------------------------------ 43
Part ---------------------------- 43
With in a pattern ------------ 44
D
Decimator----------------------- 37
DELAY ------------------------ 9, 38
Delay
BPM Sync -------------------- 38
Depth -------------------------- 38
Motion Sequence------38, 42
Time --------------------------- 38
Delete
Pattern ------------------------ 50
Sample------------------------ 32
Depth ------------------------ 9, 38
Distortion------------------------ 37
E
Edit
Delay -------------------------- 38
Effect -------------------------- 36
Motion Sequence----------- 45
Song --------------------------- 50
Sample sound----- 16, 17, 35
Edit 1 --------------------------9, 36
Edit 2 --------------------------9, 36
EFFECT ----------------------9, 36
Effect ----------------------------- 35
End ------------------------------- 28
Erase------------------------19, 43
Event
Data---------------------------- 51
Recording -------------------- 51
F
Fadeout-------------------------- 28
Fast-forward -------------------- 48
Filter ---------------------------9, 36
Flanger -------------------------- 36
Flg./Cho. ------------------------ 36
G
GLOBAL --------------------- 8, 53
Global mode ------------------- 53
I
Insert Pattern ------------------ 50
Isolator--------------------------- 37
L
Length -----------------18, 38, 39
LEVEL --------------------------- 12
Level -------------------------- 9, 36
Load
All Load ----------------------- 55
Sample Load ---------------- 56
M
MASTER VOLUME------------- 8
Memory-------------------------- 32
Memory Protect --------------- 56
Metronome --------------------- 53
MIDI ------------------------------ 12
MIDI
Channel------------------54, 57
Clock--------------------------- 53
Note Number ----------- 54, 57
NRPN ------------------------- 57
MIDI ch -------------------------- 54
Motion Sequence ------------- 21
Check ------------------------- 42
Clear--------------------------- 44
Delay -------------------------- 42
Destination ------------------- 45
Effect -------------------------- 41
Part ----------------------- 21, 41
Value -------------------------- 45
Mode
Global ------------------------- 53
Pattern ------------------------ 33
Sample------------------------ 27
Song --------------------------- 48
Motion Dest.-------------------- 45
Motion Seq ------------9, 36, 38
Motion V alue ------------------- 45
Mute------------------------- 10, 34
N
Normalize ----------------------- 31
Note-on/off---------------------- 57
Note No.------------------------- 54
O
Original Value LED --9, 16, 35
Original Value--------------------9
P
Pan ------------------------------- 36
PART ----------------------------- 15
Part
Accent--------------------10, 40
Audio In ------------------ 10, 22
Clear--------------------------- 43
Copy --------------------------- 43
Mute ----------------------10, 34
Solo ----------------------- 10, 34
PATTERN -------------------- 8, 33
60
Page 61

○○○○○○○○○○○○○○○○○○○○○○○○○○○○○○○○○○○○○○○○○○
8. Appendices
Pattern
Change timing--------------- 33
Play -----------------------14, 33
Rhythm-------------------18, 40
Set ------------------ 11, 25, 46
Write ----------------------20, 47
Pattern mode------------------- 33
Pattern Set---------------------- 11
Pattern Set
Play -----------------------25, 46
Registering------------------- 46
Write --------------------------- 46
Peak-------------------------------- 8
Peak LED ------------------------- 8
Phaser --------------------------- 36
Pitch Shifter -------------------- 37
Pitch/Speed ---------------- 9, 36
Play
Beginning of a pattern ---- 33
Beginning of a song ------- 48
Motion Sequence------21, 45
Pattern -------------------14, 33
Pattern Set --------------25, 46
Song ---------------------- 13, 48
Position--------------------- 48, 49
Protect --------------------------- 56
R
Realtime Recording -----19, 40
Recording
Event -------------------------- 51
Step-----------------------18, 40
Realtime -----------------19, 40
Registering
Pattern Set ------------------- 46
Resample
beginning --------------------- 28
middle ------------------------- 29
part----------------------------- 29
Rhythm pattern -------- 18, 40
Reverse----------------------- 35
Reverb ------------------------ 36
Ring Mod. -------------------- 37
Resonance --------------------- 37
Reso. Filt. ----------------------- 37
Reverb--------------------------- 36
Reverse --------------------- 9, 35
Rewind--------------------------- 48
Ring Mod.----------------------- 37
Roll ----------------------9, 35, 40
Roll Type ------------------------ 40
S
SAMPLE --------------------- 8, 27
Sample ----------- 23, 24, 27, 35
Sample Load------------------- 56
Sample sound
Play ----------------------- 14, 27
Assign -------------------- 24, 35
Load --------------------------- 56
Sampling -------------- 23, 27, 28
Sampling area ----------------- 32
Save------------------------------ 55
Scale/Beat -----------------18, 38
Select ---------------------------- 11
Select LED --------------------- 11
Shift ------------------------------ 11
Slice ------------------- 10, 24, 30
SmartMedia -------------------- 55
SmartMedia slot--------------- 12
Smooth -------------------------- 41
Solo ------------------------- 10, 34
SONG------------------------- 8, 48
Song
Event -------------------------- 51
Clear--------------------------- 49
Tempo --------------------15, 48
Fast-foward ------------------ 48
Rewind ------------------------ 48
Play ----------------------- 13, 48
Write --------------------------- 52
Specification ------------------- 59
Start ------------------------------ 28
Structure ------------------------ 13
Step Recording-----------18, 40
Swing ---------------------------- 39
Synchronizing-------------53, 54
Synchronized playback------ 26
System exclusive ------------- 58
T
TAP -------------- 10, 15, 33, 48
Tempo
Song ----------------------15, 48
Tap ------------ 10, 15, 33, 48
Pattern -------------------15, 33
Time-------------------------- 9, 38
Time Slice ---------------------- 30
Trig Hold------------------------- 41
Troubleshooting --------------- 58
Truncate ------------------------- 31
Type --------------------------- 9, 36
W
Wah ------------------------------ 37
WRITE--------8, 32, 47, 52, 56
Write
Global ------------------------- 56
Pattern -------------------20, 47
Pattern Set ------------------- 46
Sample------------------------ 32
Song --------------------------- 52
8. Appendices
61
Page 62

8. Appendices
○○○○○○○○○○○○○○○○○○○○○○○○○○○○○○○○○○○○○○○○○○
Pattern Name List
A Bank
No. Pattern Name Style Tempo
A01 Hardstep Drum’n’Bass 172
A02 Darkside Drum’n’Bass 170
A03 Crumb and Mace Drum’n’Bass 175
A04 Sizing it Up Drum’n’Bass 175
A05 Tribal Step Drum’n’Bass 175
A06 Mad Walking Bass Drum’n’Bass 183
A07 Cyber Funk Drum’n’Bass 170
A08 Rave Jump Up Drum’n’Bass 178
A09 Filter Bass Drum’n’Bass 178
A10 Dark & Cyber Drum’n’Bass 182
A11 Boosted Jazz Drum’n’Bass 175
A12 Flangungle Drum’n’Bass 164
A13 Digimix Drum’n’Bass 180
A14 Steppa Drum’n’Bass 190
A15 Bass Jacks
A16 Tek House
A17 Tribal House
A18 Phased House
A19 Crazy House
A20 Garage House
A21 System “R”
A22 Tech Garage
A23 Two Step
A24 Warped Tw o Step
A25 Deep Space
Techno/House
Techno/House
Techno/House
Techno/House
Techno/House
Techno/House
Techno/House
Techno/House
Techno/House
Techno/House
Techno/House
130
129
126
122
136
128
136
133
130
132
130
* Patterns for the demo song are assigned to bank B.
* If the factory preset patterns are rewritten or erased, they cannot be restored to their
original state. If you do not want to lose the factory preset patterns, purchase a SmartMedia
card and perform the Save operation to make a backup.
No. Pattern Name Style Tempo
A26 Sweep Trance
A27 Epic Trance
A28 Barealic
A29 Minimal
A30 Breakbeats T rance
A31 Psychedelic
A32 Filter Breakbeats
A33 Distorted Slice
A34 Machine Music
A35 Boom Room
A36 Hardcore Electro
A37 Can We Come Up?
A38 Glow Stix
A39 Brooklyn Style
A40 DJ Hop HipHop 80
A41 Wah Hop HipHop 82
A42 R&B Vibe HipHop 78
A43 Muddy Hop HipHop 75
A44 Rock’n’Hop HipHop 84
A45 Hum Ring HipHop 90
A46 Baggy Pants HipHop 90
A47 Bristol Beat HipHop 85
A48 Swingy Breakz HipHop 97
A49 B-Boy HipHop 106
A50 Future Jazz HipHop 136
Techno/House
Techno/House
Techno/House
Techno/House
Techno/House
Techno/House
Techno/House
Techno/House
Techno/House
Techno/House
Techno/House
Techno/House
Techno/House
Techno/House
No. Name Style Tempo
138
A51 Boomy Big Beat
137
A52 Pushin’
A53 Rollicking Breakz
137
140
A54 Sweep Rockin’ Beats
141
A55 Big Red Beets
A56 Spot
145
A57 Hardcore BreakBeat
137
A58 Digital Punk
144
A59 Expanded Onion
135
A60 Xplosive
140
142
A61 Rx Bros.
120
A62 Industrial
130
A63 Latin Funk
150
A64 African Deser t Other 94
Rock/BigBeat
Rock/BigBeat
Rock/BigBeat
Rock/BigBeat
Rock/BigBeat
Rock/BigBeat
Rock/BigBeat
Rock/BigBeat
Rock/BigBeat
Rock/BigBeat
Rock/BigBeat
Rock/BigBeat
Rock/BigBeat
127
118
123
133
120
120
116
119
125
130
120
144
117
Sample Name List
* If the factory preset samples are rewritten or erased, they cannot be restored to their
original state. If you do not want to lose the factory preset samples, purchase a SmartMedia
card and perform the Save operation to make a backup.
No. Sample Name
00. BD1-Boosted House
01. BD2-House
02. BD3-Dance
03. BD4-ES Dance
04. BD5-Ringy
05. BD6-Boosted Hip
06. SD1-Hip
07. SD2-House
08. SD3-Tiny Dance
09. SD4-ES Hip
10. SD5-Ringy
11. SD6-Saturated
12. CYM1-Crash Cymbal
13. CYM2-Ride-Edge
14. CYM3-HH Crisp Close
15. CYM4-HH Crisp Open
16. CYM5-HH Normal Close
17. CYM6-HH Normal Open
18. CYM7-HH Tite Old
19. TOM-R&B Tom
No. Sample Name
20. PRC1-Conga Lo Slap
21. PRC2-Conga Hi Slap
22. PRC3-Dance Clap
23. PRC4-Tambourine
24. PRC5-Shaker 1
25. PRC6-Shaker 2
26. VOX1-Uhh
27. VOX2-Funny
28. VOX3-OK
29. VOX4-Oops!
30. VOX5-Stupid
31. VOX6-CompuVoice-Test
32.ıı VOX7-CompuVoice-Do It
33. SE1-Cannon
34. SE2-Industry-Metal
35. SE3-Short Noise
36. SE4-Beep
37. SE5-Industrial Noise
38. SE6-Metal Hit
39. SE7-Zap
Song Name List
* If the factory preset songs are rewritten or erased, they cannot be restored to their
original state. If you do not want to lose the factory preset songs, purchase a
SmartMedia card and perform the Save operation to make a backup.
S01: Heavenly Beatbox
S02: DJ's Don't Dance
S03: Souped Up House
No. Sample Name
40. SE8-Record Reverse
41. SE9-Scratch
42. HIT1-Trance Hit
43.ıı HIT2-Organ Hit
44. HIT3-Raven Hit
45. BAS1-Acoustic Bass
46. BAS2-UK Garage Bass
47. BAS3-Boosted Bass
48. BAS4-Distorted Saw
49.ıı BAS5-Wah Guitar 060
50.ıı Drum Loop 107
51.ıı Drum Loop 120
52.ıı Percussion Loop 133
53.ıı Percussion Loop 100
62
©2000 KORG Inc. All rights reserved.
Page 63

[Sampler]
ELECTRIBE S (ES-1) MIDI Implementation Chart
Transmitted Recognized Remarks
Function ...
2000.5.15
Basic Default 1 – 16 1 – 16
channel Changed 1 – 16 1 – 16
Default 3
Mode Messages ××
Altered
Note 0– 127 0– 127 Specified by MIDI mode for each part
number : True voice
Velocity Note ON O 9n, v=30 – 127 O 9n, v=1 – 127
Note OFF ××
After Polyphonic ××
Touch Channel ××
Pitch Bender ××
98, 99 OONRPN(LSB,MSB)
8 OOData Entry(MSB)
Control Change
* * * * * * * * * * * * * *
* * * * * * * * * * * * * *
Memorized
Transmitted velocity is specified by Accent level
Program O 0 – 127 O 0 – 127
Change : True#
System Exclusive OO *2
: Song Pos OO
System Common : Song Sel O 0 – 15 O 0 – 15
: Tune ××
System Realtime : Clock OO *1
: Commands OO *1
Aux Messages :
Local ON/OFF
: All Notes OFF × O
: Active Sense OO
: Reset ××
* * * * * * * * * * * * * *
××
0 – 127
Transmitted/received in Pattern mode
Transmitted/received in Song mode *1
Notes *1: Sent but not received when Global mode Clock is “Int.”When set to “Ext,”
received but not sent.
*2: Master Volume and Inquiry messages are supported in addition to Korg
exclusive.
Mode 1: OMNI ON, POLY Mode 2: OMNI ON, MONO O : Yes
Mode 3: OMNI OFF, POLY Mode 4: OMNI OFF, MONO × : No
❋ Consult your local Korg distributor for more information on MIDI IMPLEMENTATION.
Page 64

C-560 Owner's Manual
ELECTRIBE·S ES-1 Owner’s Manual
NOTICE
KORG products are manufactured under strict specifications and voltages required by each
country. These products are warranted by the KORG distributor only in each country. Any
KORG product not sold with a warranty card or carrying a serial number disqualifies the
product sold from the manufacturer’s/distributor’s warranty and liability. This requirement
is for your own protection and safety.
KORG INC.
15 - 12, Shimotakaido 1 - chome, Suginami-ku, Tokyo, Japan.
©2000 KORG INC. 1207 TH Printed in Japan
E 3
 Loading...