

Page 1

CONTENTS
Circuit Diagram: Page 2-10
Block Diagram: Page 11
S
e
r
v
i
c
e
M
S
S
e
e
r
r
v
v
i
c
e
i
c
e
M
M
a
a
a
EMX1
n
n
n
u
u
u
a
a
a
l
l
l
Structural Diagram: Page 12
Test Mode: Page 13-19
Calibration: Page 20-21
Parts List: Page:22-24
4th Edition
Issued date: July 15, 2004
Issued by: KORG INC.
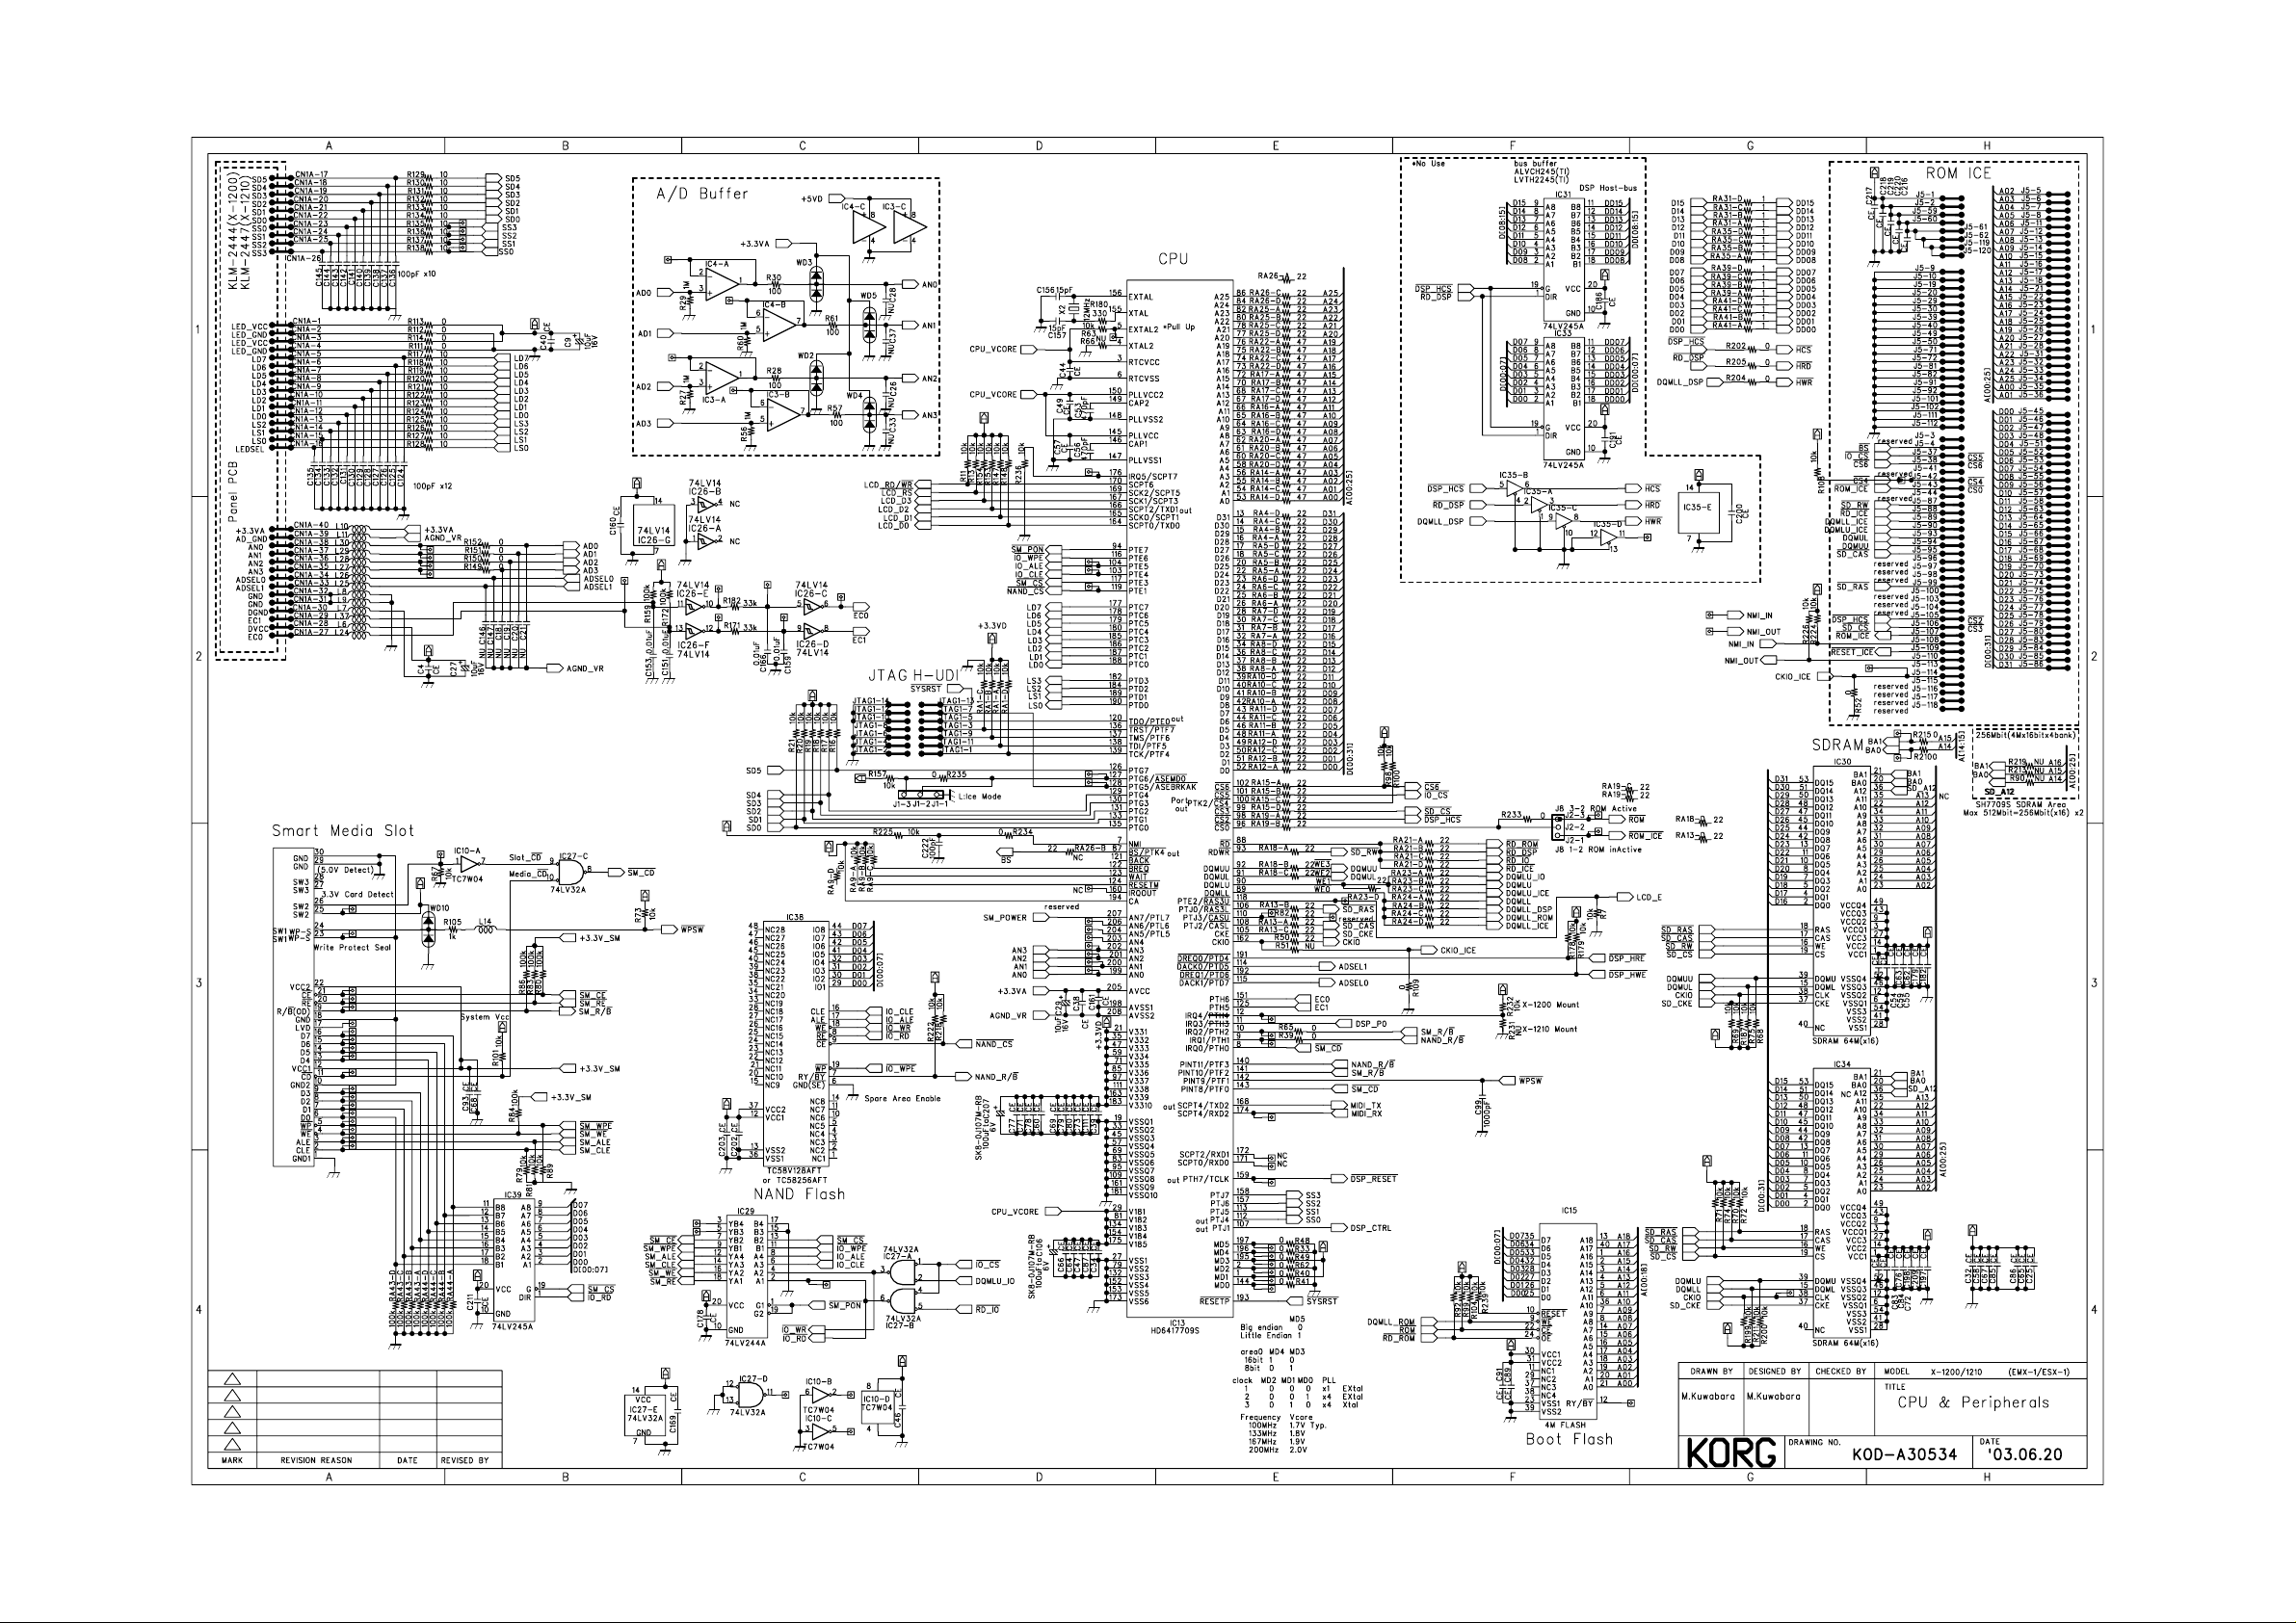
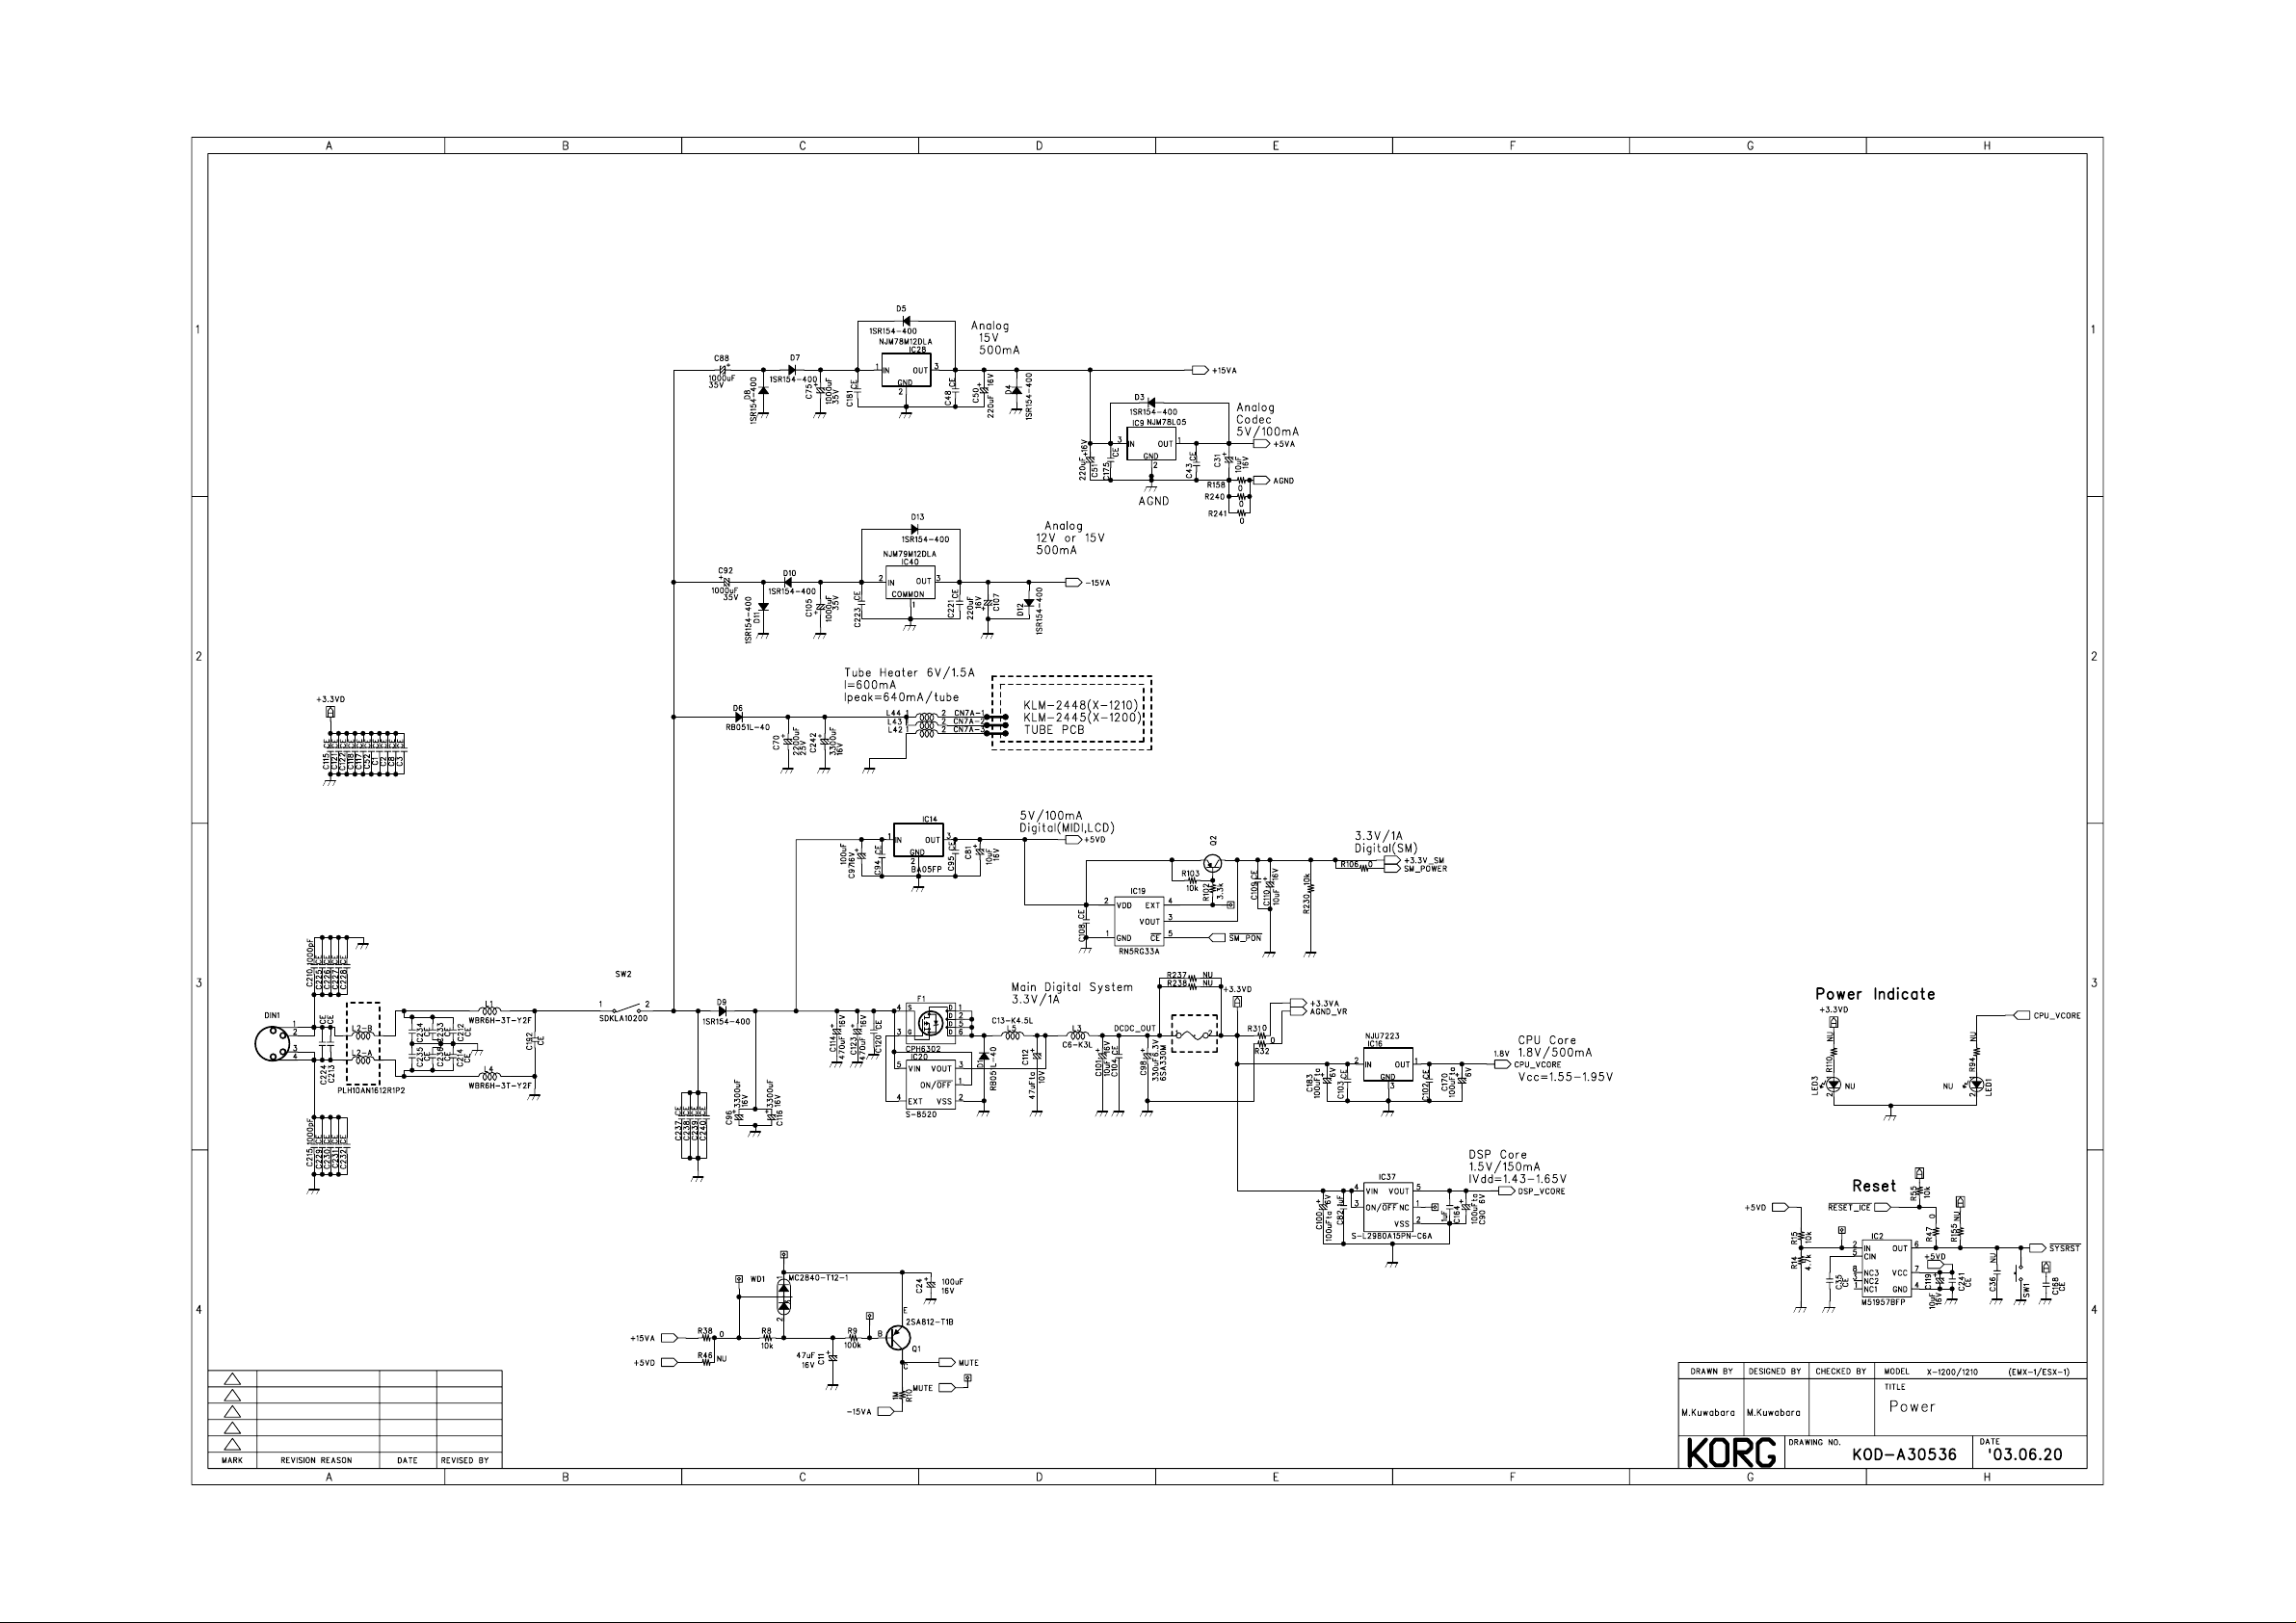
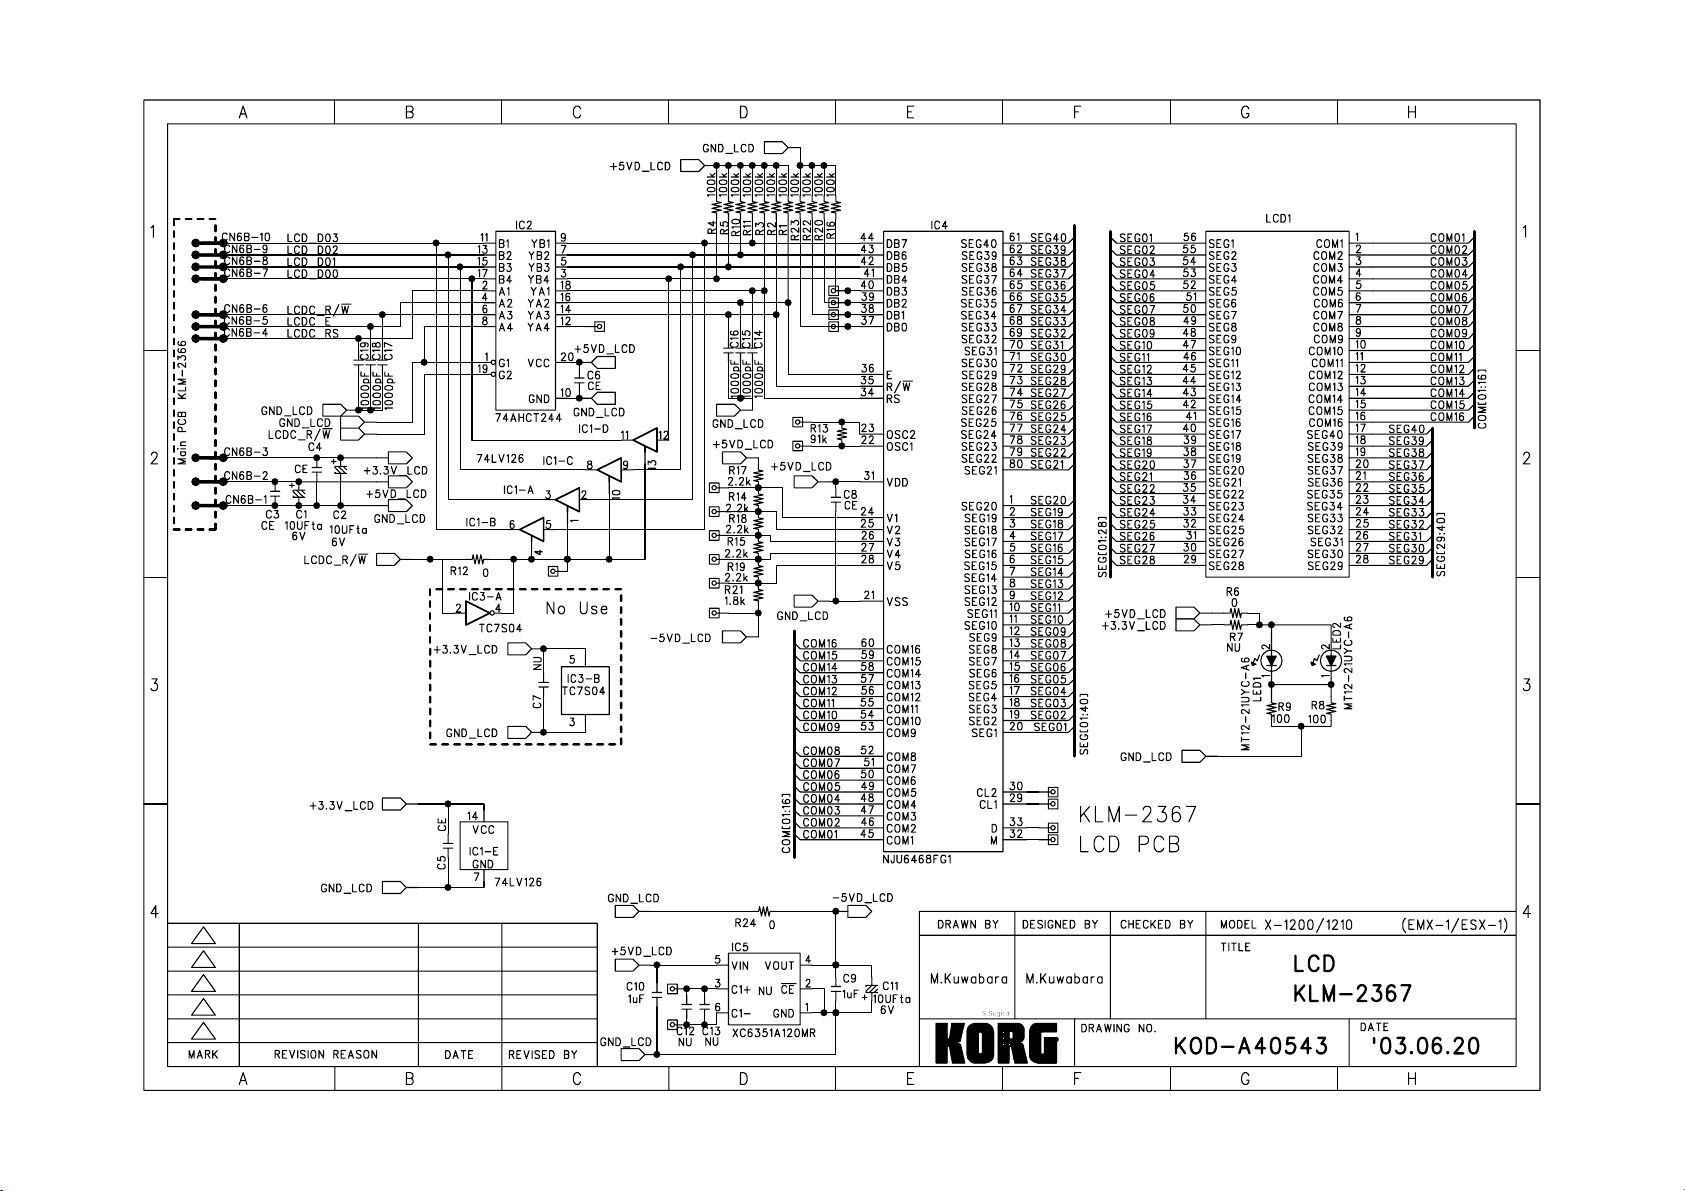
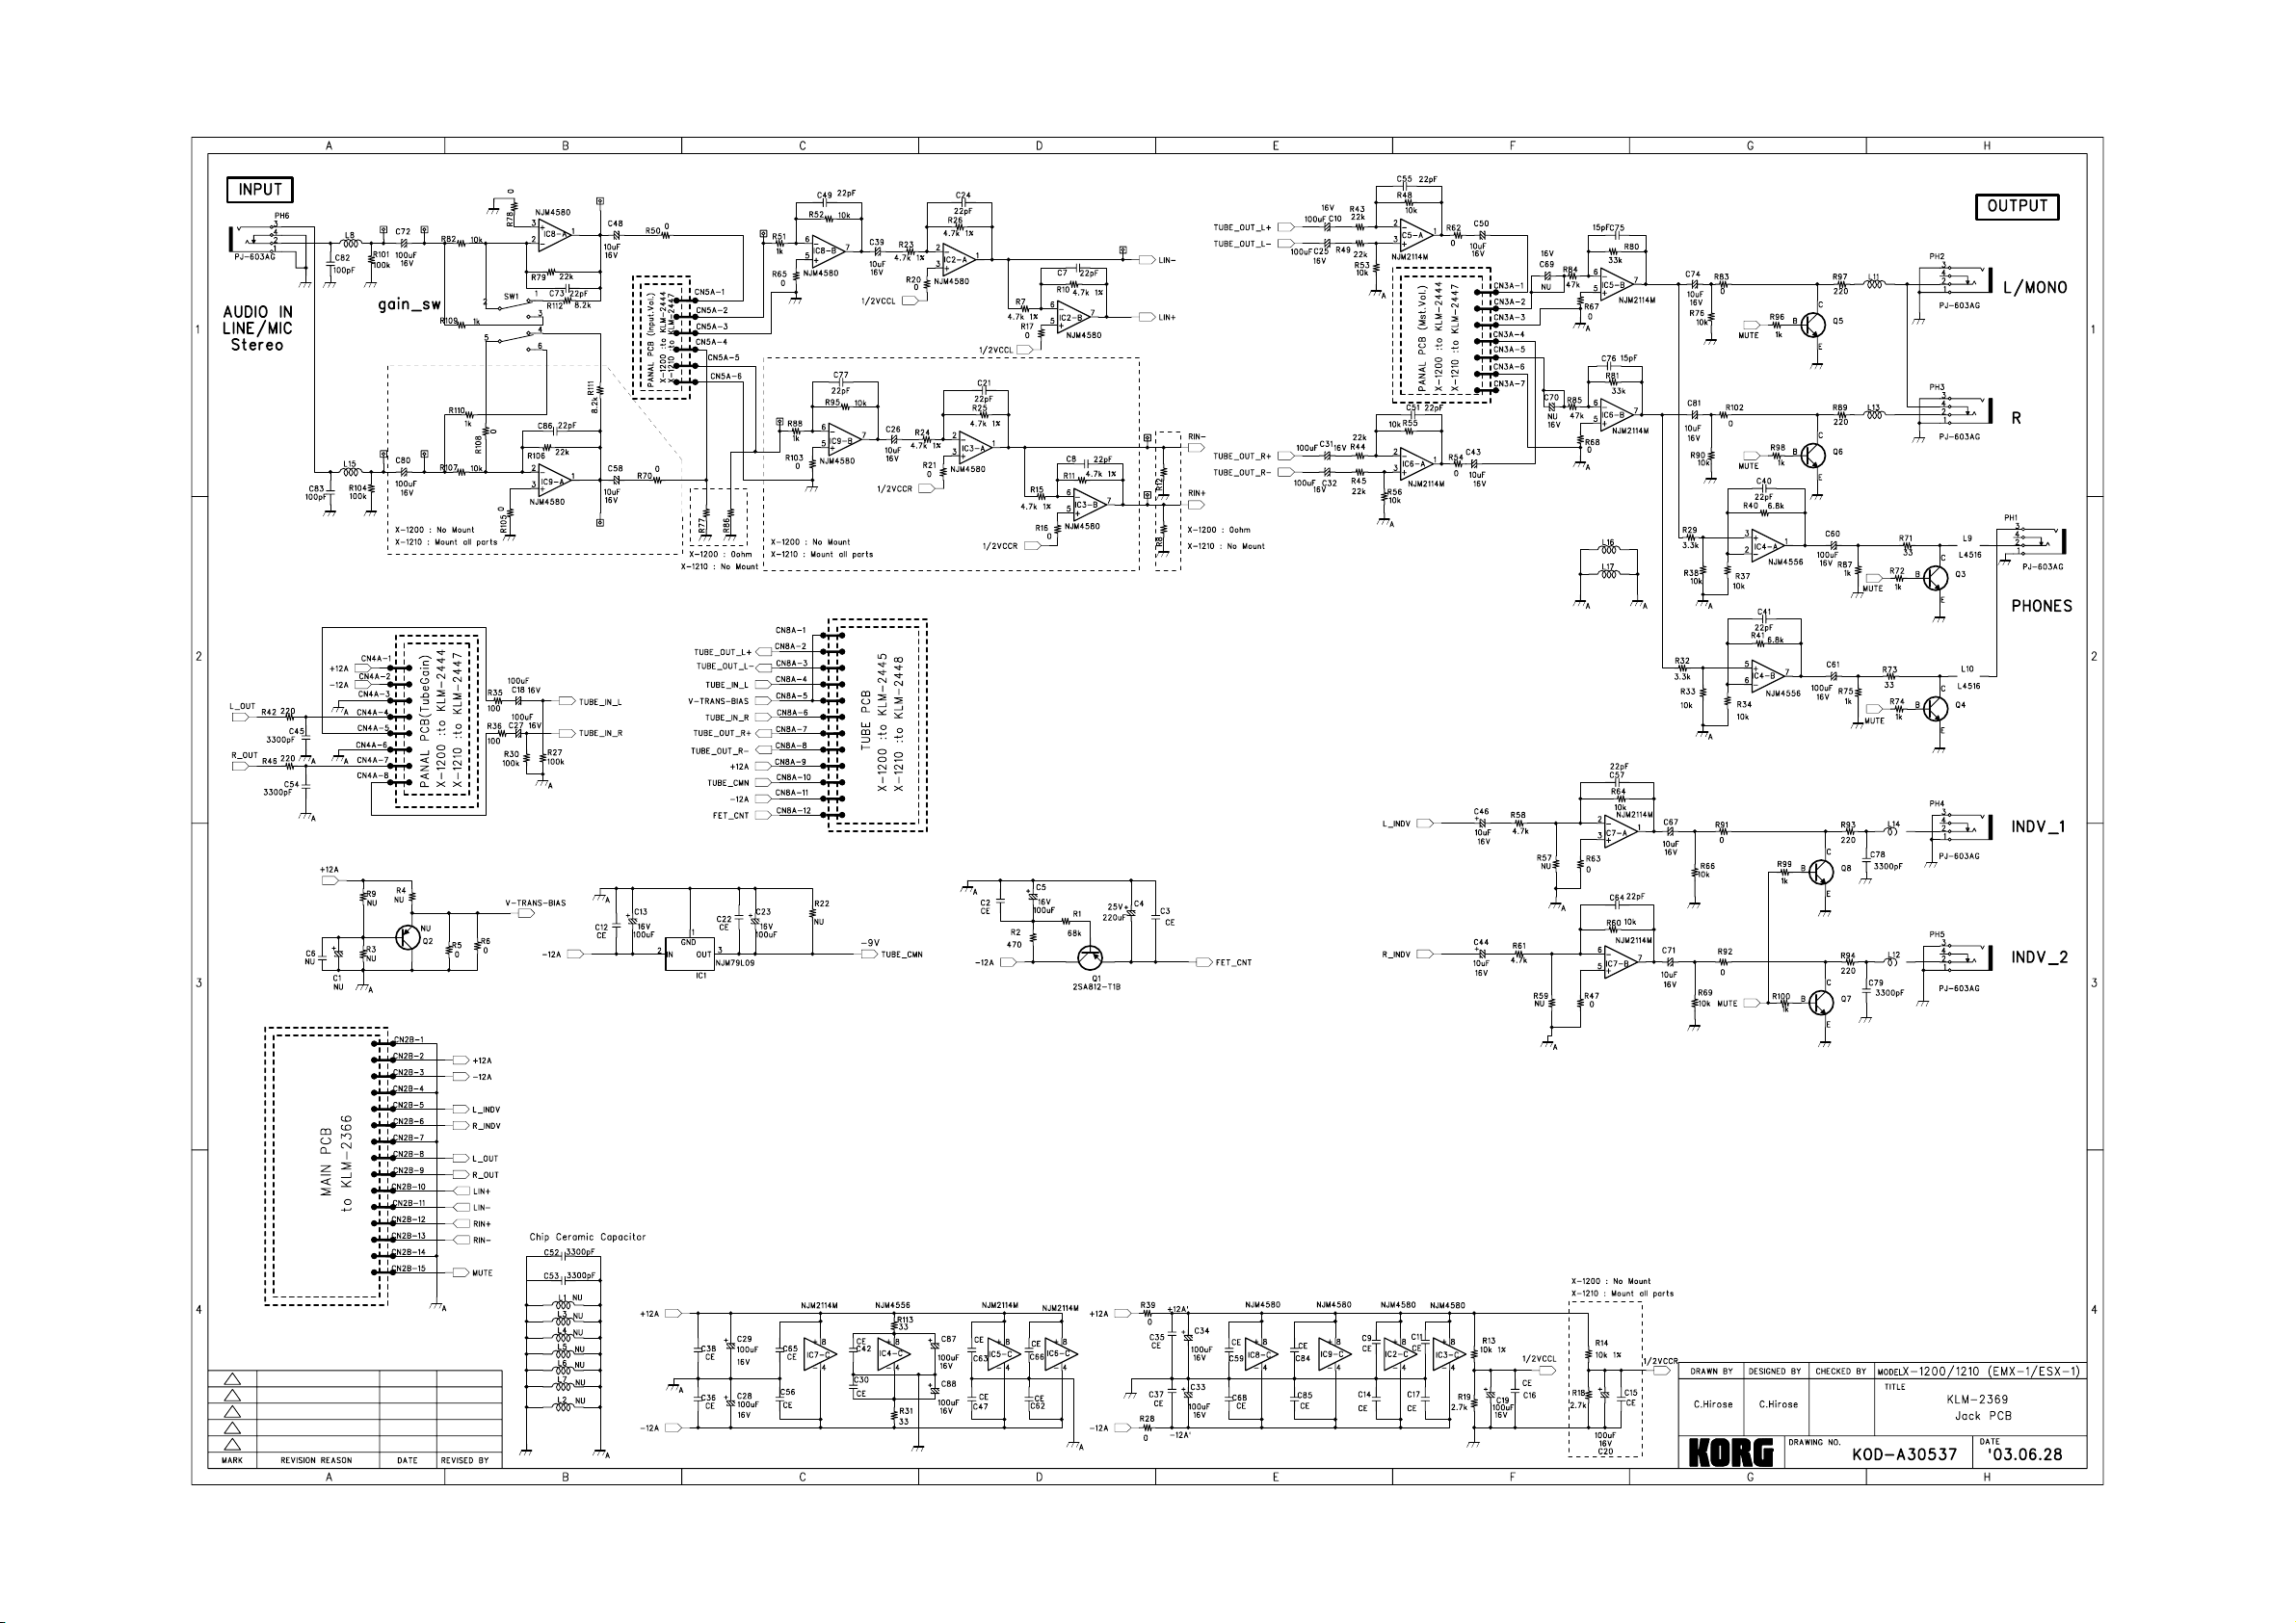
Page 2
Page 3

Page 4
Page 5
Page 6
Page 7

Page 8
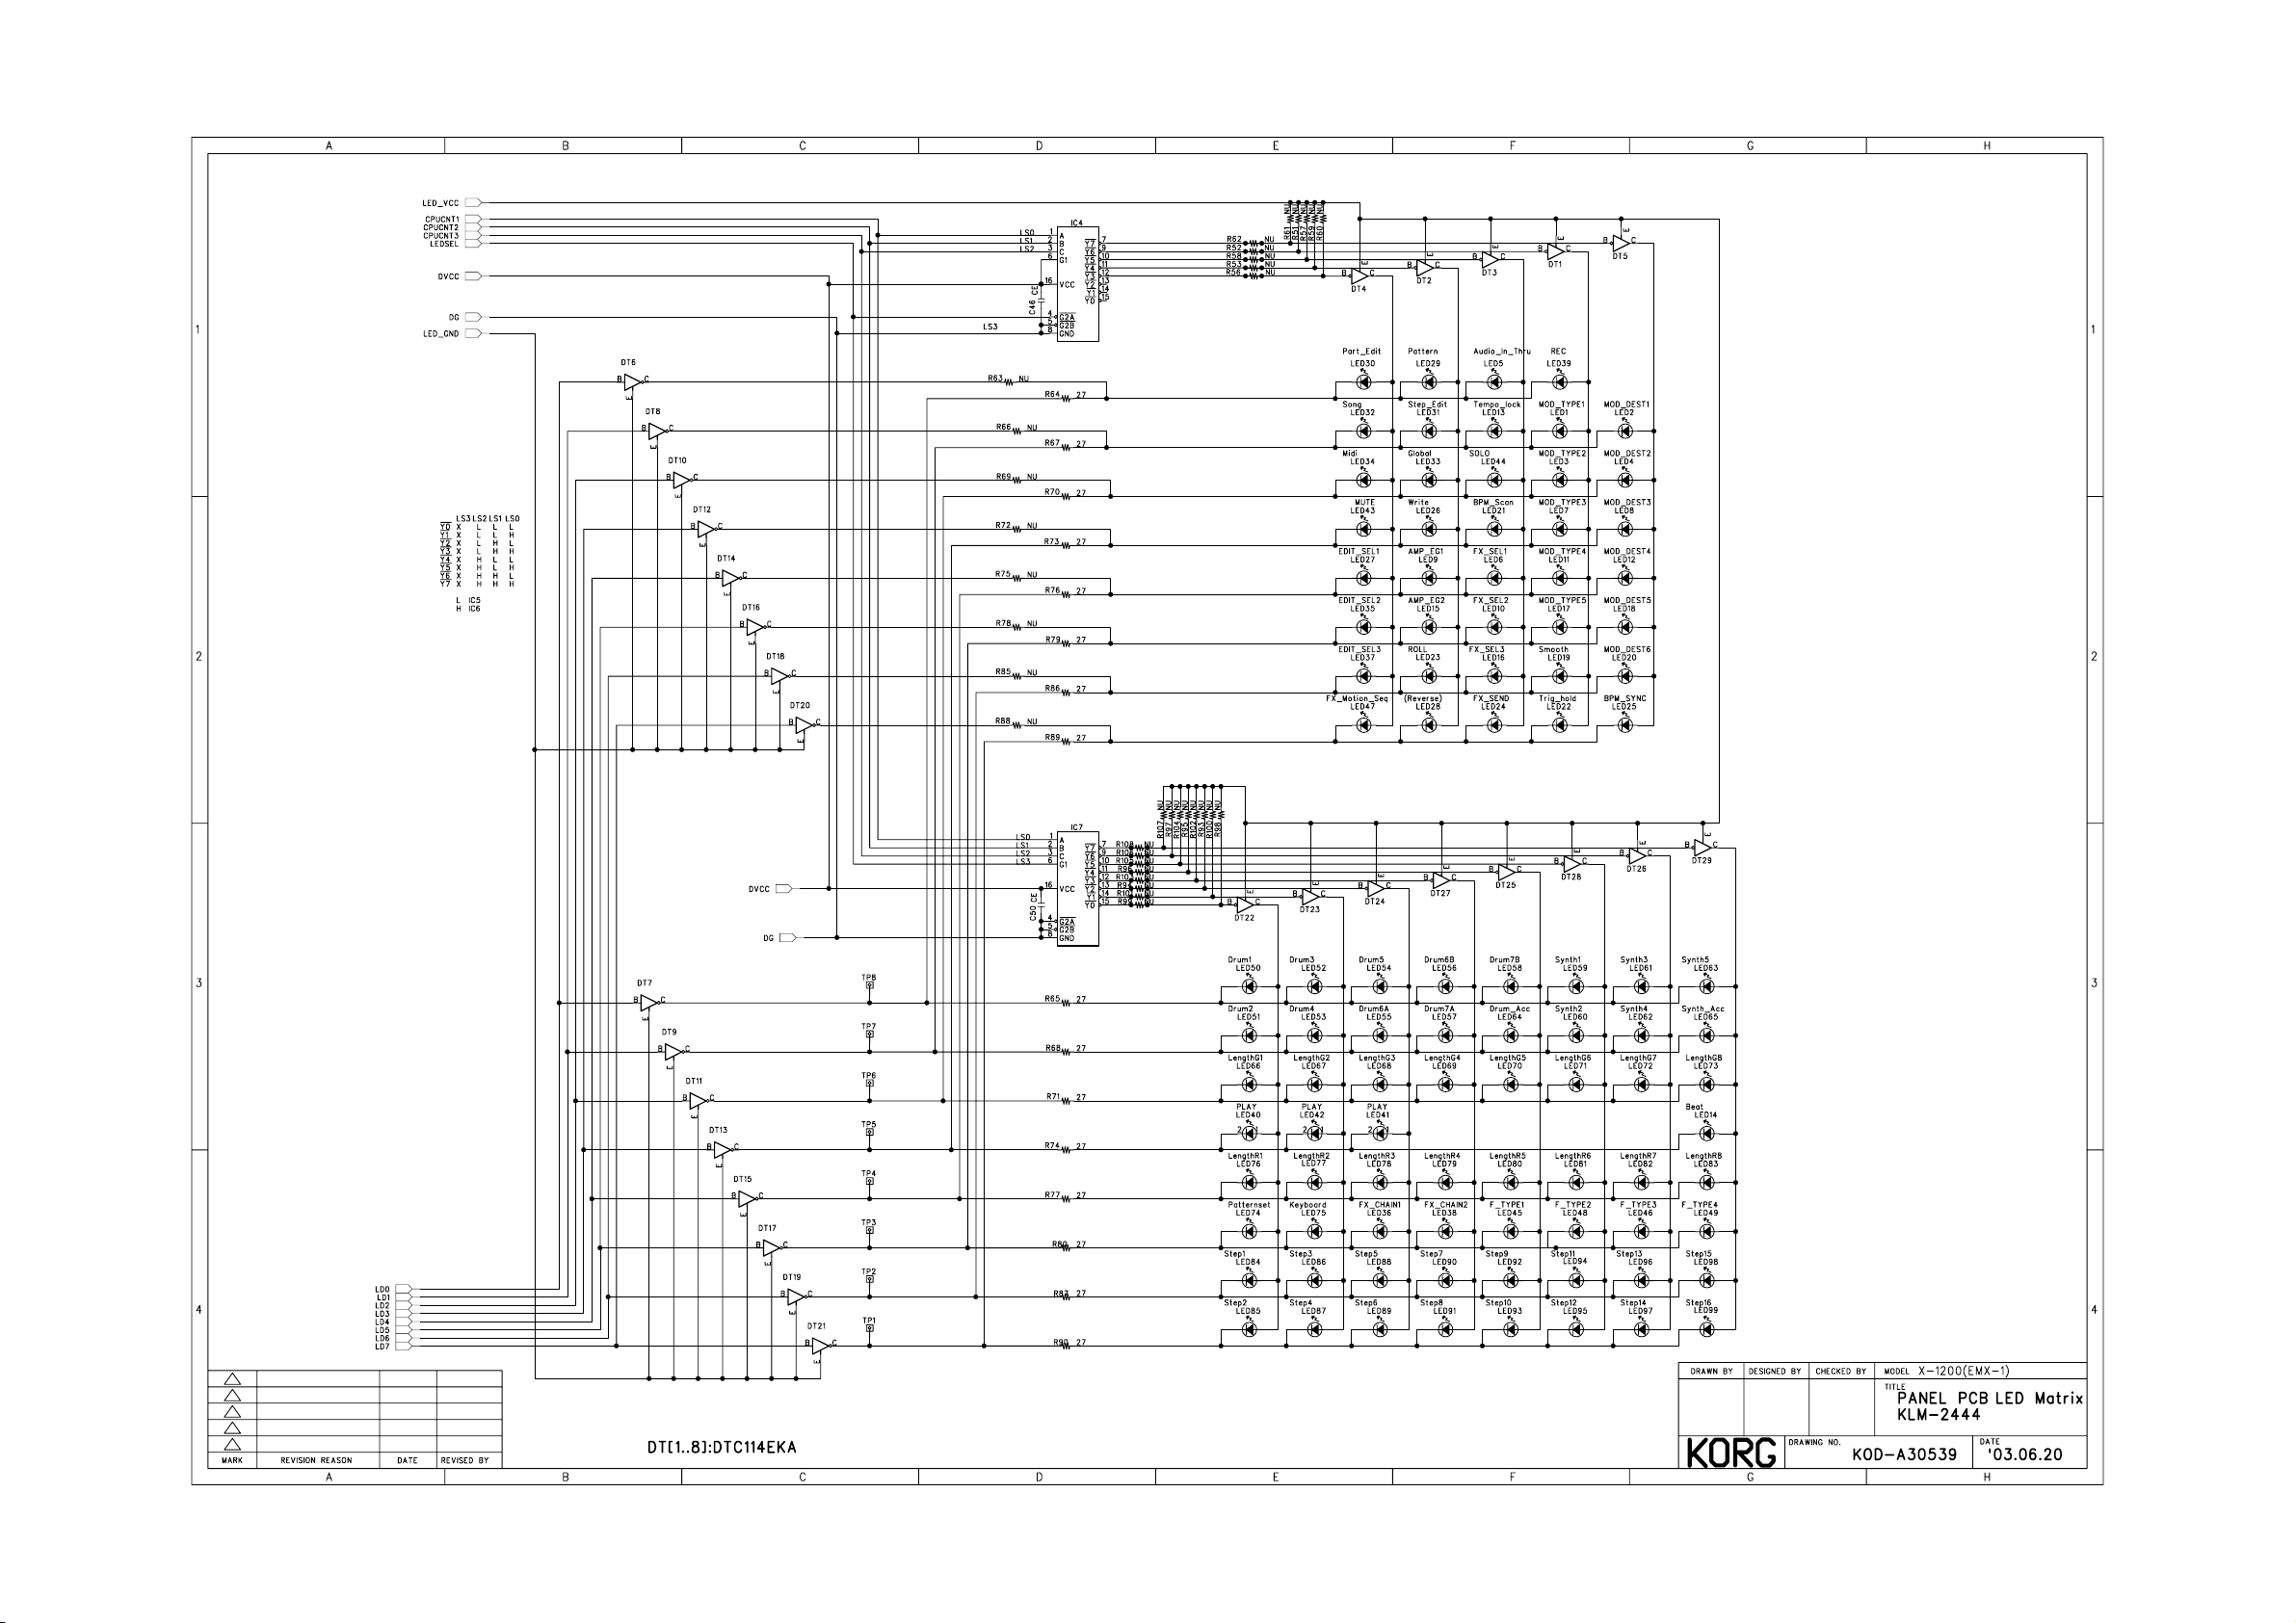
Page 9

Page 10

Page 11

Page 12

Page 13

EMX-1 Test Mode
How to start and operate the test mode:
ERASE + PATTERN & POWER ON: Internal test,
ERASE + STEP EDIT & POWER ON: Adjustment of valve circuit, L/R balance
calibration, Tube gain balance measurement
SHIFT + DRUM PART 1 & POWER ON: Internal skip
SHIFT + DRUM PART 3 & POWER ON: Audio test
16: Proceed the test
SHIFT + 15: Re-executing the test
: ITEM UP
: ITEM DOWN
>> : STEP UP
<< : STEP DOWN
NOTE:
To proceed the Smar tMedia tes t, it is requi red to prepar e a Sm artMedia whose capa city
is more than 16MB.
Page 14

EMX-1 Valve & L/R Balance A djust Cable
White
Red
2.2MΩ
White
Red
Metal Film Resistor
x 2
Page 15

Test M ode 1 (Internal test).
After replacing the main board, please take the following procedures firstly.
1. Connect the audio cable as follows:
Page 16

2. Set up the volume knob and switches as follows:
[MASTER VOLUME] : MAX
[TUBE GAIN] : MIN
[AUDIO IN LEVEL] : MAX
[MIC/LINE] : LINE
[EFFECT] : REVERB
[SYNTH OSCILLATOR] : AUDIO IN + COMB
3. Insert the SmartMedia, which is supplied by Korg.
4. Press [ERASE] + [PATTERN] + [STANDBY] (POWER ON)
5. Executing Internal Device check start....
If the internal checking works correctly, it proceeds to the next steps
automatically.
If "3>L MIC[16]" is displayed and stops for a while, please switch the
MIC/LINE switch to “MIC”.
6-1 Switch and LED check
Once "#PANEL" is displayed, all LED checks start. If OK, press [16].
Press switches indicated in the LED. (Start: [AUDIO IN] ...... End:[16])
6-2. Rotary encoder check <#R.Enc>
If [RE ->>1>-> +000] is displayed, rotate the Dial knob 24 steps to the right.
If [RE ->>1>-> +024] is displayed, press [16].
If [RE <-<1<<- -000] is displayed, rotate Dial knob 24 steps to the right.
If [RE <-<1<<- +024] is displayed, press [16].
6-3. Rotary select check <#R.Sel>
If [BPM SYNC EFFECT] is displayed, rotate EFFECT knob one by one
clockwise.
(BPM SYNC --> SHORT DL --> ..... REVERB)
Page 17

6-4. A/D check <#ADC>
Rotate the knobs to "MIN --> MAX --> MIN".
NOTE: As for the knobs with (c) as below, rotate the knob to the center
position and proceed to the next knob.
"MIN --> MAX --> MIN --> CENTER".
[PITCH/GLIDE(c)] -> [PAN(c)] -> [SPEED] -> [DEPTH(c)]
->[EG TIME(c)] -> [LEVEL]-> [FX EDIT 1] -> [FX EDIT 2]
->[CUTOFF] ->[RESONANCE] -> [EG INT(c)]
->[OscEdit1] -> [OscEdit2(c)]
Then, the step proceeds to the slider of the arppeggiator.
6-5. Ribbon check <#Ribbon>
Touch the Ribbon controller. Then <Ribbon ***> is displayed.
Drag upward on the Ribbon. If <Ribbon 127H> is displayed, OK.
Drag downward on the Ribbon. If <Ribbon 001LH> is displayed, OK.
Press [16].
6-6. LCD Dot check <#LCD>
All the LCD dots light up. If no problem, press [16].
All the LCD dots turn off. If no problem, press [16].
Light up the LCD dots half by half alternatively.
Turn off the STANDBY (POWER) switch.
Test M ode 2 (System Data Loading).
After replacing the main board, please take the following procedures secondly.
1. Turn the power ON while pressing ERASE and PARTEDIT. All system and
preload data are loaded into the product.
Page 18

2. Connect the stereo plug of the cable to PHONES and the monaural plug to
AUDIO IN.
2. Insert the SmartMedia, which is supplied by Korg.
3. Turn the power on while pressing [ERASE] + [PART EDIT].
1. "<NAND> Fmt OK"
2. "<NAND> Init"
3. "<NAND> Format"
4. "<NAND> Sys Ld"
5. "<NAND> DSP Ld"
ῌῌ
6."<NAND> UserLd"
Page 19

7."<NAND> UserLd"
8. "<NAND> Chking"
NOTE: If the step stops any of the above indications in the display, press
[SHIFT]+[15].
If the system data is loaded correctly, "Valv Wup ***sec"(000-160sec) is
indicated in the display.
If any other message is displayed such as "@@@@@ x:$$$", it might be an
error.
Wait until the tube test counter is displayed as "000sec" (approx 160 seconds
later). Then, please proceed to the Tube calibration test.
Page 20

EMX-1/ESX-1 Tube Calibration
Connect the stereo plug of the cable (see fig.) to PHONES and the monaural plug to
›ῐ
INPUT.
2. While pressing ERACE and STEP EDIT, turn the power on. “Valv Wup” is
indicated as stand-by for pre-heating, and also the waiting time is indicated.
Set up the volume knob and switches as follows:
MASTER VOLUME : MAX
TUBE GAIN : MIN
AUDIO IN LEVEL : MAX
MIC/LINE : MIC
3. “Ajst (L)” and a 4 digits figure are indicated in the LCD. If the value is leas than
0010, the test is O.K.. Press the 16 knob at the right bottom. If the value is over it, it is
required to adjust the valve. Adjust the vari able resis tors which correspond to the
channels referring to the photo below.
Page 21

4. As well as
Ajst(L)”, “Ajst (R)” and a 4 digits figure are indicated in the LCD.
ῧ
If the value is leas than 0010, the test is O.K.. Press the 16 knob at the right bottom. If
the value is over it, it is required to adjust the valve. Adjust the variable resistors
which correspond to the channels referring to the photo above.
5. Once the balance of L/R is automatically adjusted, “ValvGMax GainMx” is
indicated in the LCD. Turn the TUBE GAIN knob to MAX, and press the 16 knob.
6. Check the L/R balance of TUBE GAIN MAX, and return to the normal mode.
End.
Page 22

PART CODE PART NAME NOTE Q'TY
001236600 PCB ASSY KLM-2366 EMX-1 M.PART 1
001236700 PCB ASSY KLM-2367 EMX-1 M.PART 1
001236900 PCB ASSY KLM-2369 EMX-1 M.PART 1
001244400 PCB ASSY KLM-2444/45 EMX-1 M.PART 1
304000070 TR 2SA812-T1B (M5-7) (TS) KLM-2369 1
304000070 TR 2SA812-T1B (M5-7) (TS) KLM-2366 1
304010020 TR 2SB1120-F/G (TS) KLM-2366 1
304020230 TR 2SC3661-TA/TB(3K) (TS) KLM-2369 6
304020380 DIGITAL TR FP1L2Q-T1B (TS) KLM-2444/45 13
304050140 DIGITAL TR DTC114EKA T146(TS) KLM-2444/45 8
304060070 FET 2SK433-T12-1C (TS) KLM-2444/45 2
304060250 FET CPH6302-TL(TS) KLM-2366 1
312051600 LED SLP-190B-51 KLM-2444/45 8
312052300 LED SLP-290B-51 KLM-2444/45 9
314001400 DIODE RLS-73 TE-11 (TS) KLM-2366 1
314001400 DIODE RLS-73 TE-11 (TS) KLM-2444/45 9
314030600 DIODE 1SR154-400TE25(TS) KLM-2366 10
314030700 DIODE RB051L-40TE25(TS) KLM-2444/45 1
314030700 DIODE RB051L-40TE25(TS) KLM-2366 1
315000500 DOUBLE DIODE MC-2840-T12-1(TS) KLM-2366 10
315000600 DOUBLE DIODE MC2838-T12-1 (TS) KLM-2444/45 36
320001610 IC UPD77213GJ-301-8EN KLM-2366 1
320004688 IC HD6417709SF100B(S) KLM-2366 1
320009103 IC NJU6468FG1-00 KLM-2367 1
320012317 IC MBM29LV004TC-90TN KLM-2366 1
320018007 IC AK4527BVQ (S) KLM-2366 1
324003071 IC TC58128AFT(EL) KLM-2366 1
324007002 IC BA10358F-T1(2K) (TS) KLM-2366 2
324007005 IC BA05FP-E2 (TS) KLM-2366 1
324009004 IC NJM78L05UA-TE2 (TS) KLM-2366 1
324009036 IC NJM4556AM-T1 KLM-2369 1
324009039 IC NJM4580M-TE1 (TS) KLM-2369 2
324009041 IC NJM79L09UA-TE1(TS) KLM-2369 1
324009048 IC NJM2114M-TE2 (TS) KLM-2369 3
324009048 IC NJM2114M-TE2 (TS) KLM-2444/45 3
324009051 IC NJM78M12DLA-TE1(TS) KLM-2366 1
324009052 IC NJM79M12DLA-TE1(TS) KLM-2366 1
324017009 IC RN5RG33AA-TR (TS) KLM-2366 1
324017021 IC EM638165TS-10(TS) KLM-2366 2
324021014 IC SN74LV138ANS-EL (TS) KLM-2444/45 4
324021103 IC SN74LV32APWR (TS) KLM-2366 1
324021105 IC SN74LV245APWR (TS) KLM-2366 1
324021109 IC SN74LV244APWR (TS) KLM-2366 1
324021114 IC SN74LV05APWR (TS) KLM-2366 1
324023008 IC S-8520F33MC-BNS-T2(TS) KLM-2366 1
324046004 IC T15V2M16B-55S (44TSOP2) KLM-2366 1
334000600 PHOTO COUPLER PC-410K (TS) KLM-2366 1
335012200 XTAL OSC HC-49US 22.5792MHZ KLM-2366 1
350002222 SEMI FIXED VR RH0615C J3 2.2K KLM-2444/45 2
370004500 ROTARY ENCODER EC16B242041SA KLM-2444/45 1
370005700 4BIT ENCODER REB161PVB20FHGRY1 KLM-2444/45 2
375014800 PSW SDKLA10200 KLM-2366 1
404000500 CHIP INDUCTOR BLM21B102SPT TS KLM-2369 8
Page 23

PART CODE PART NAME NOTE Q'TY
A
A
A
A
A
A
A
A
A
G
404001070 CHIP INDUCTOR BLM11B102SPT:TS KLM-2366 48
415004500 TOUCH SHEET FS-MR048-08 10KS M.PART 1
454012707 DIN SOCKET DJ-004-C KLM-2366 1
454012709 DIN SOCKET DS-05-02(W/OUT SW) KLM-2366 3
474029500 SM CONNECTOR CN015R-3013-0 KLM-2366 1
620018200 POWER SW KNOB KOC-E40224 M.PART 1
644003000 X-507 GND SPRING KOC-C46014 M.PART 1
646077600 X-0400 BL PLATE KOC-E40525 M.PART 1
*12AX7EH VACUUM TUBE 12AX7EH KLM-2444/45 2
*312X120000 LED MT-12-21 UYC-A6 (YELLOW) KLM-2367 2
*312X120001 CHIP LED SML-212VTT86 (RED) KLM-2444/45 78
*312X120002 CHIP LED KM2520MGC03 (GREEN) KLM-2444/45 3
*312X120003 CHIP LED SML-212YT (YELLOW) KLM-2444/45 2
*313X120000 LCD DLC-90102G4GF M.PART 1
*324X040005 IC TC7WHU04FK KLM-2366 2
*324X040006 IC TC7WH04FK KLM-2366 2
*324X040007 IC TC7WH74FK KLM-2366 1
*324X040008 IC TC7WH08FK KLM-2366 1
*324X120000 IC M51957BFP-600C (TS) KLM-2366 1
*324X120001 IC S-L2980A15PN-C6ATF KLM-2366 1
*324X120002 IC NJU7223DL1-18 KLM-2366 1
*324X120003 IC HD74LV163A KLM-2366 3
*324X120004 IC HD74LV14A KLM-2366 1
*324X120005 IC SN74LV126APWR KLM-2367 1
*324X120006 IC SN74AHCT244PWR KLM-2367 1
*324X120007 IC SN74LV4052ANS (TS) KLM-2444/45 2
*324X120008 IC NJM7806FA KLM-2444/45 1
*335X120000 CRYSTAL OSC HC-49US 12.00MHZ KLM-2366 1
*335X120001 CRYSTAL OSC HC-49US 10.00MHZ KLM-2366 1
*362X120000 VR R1111NOA-V1B103FH00-00 10KB KLM-2444/45 9
*362X120001 VR R1111NOA-V1B103FH01-00 10KB KLM-2444/45 5
*362X120002 VR R1111RGOA-V1B103FH00 10KBX2 KLM-2444/45 2
*362X120003 VR R1111GOA-V1B503FH00 50KBX2 KLM-2444/45 1
*365X120000 SVR RS45111C6008 10KB KLM-2444/45 1
*373X150000 SLIDE SW SK-22D06G8 KLM-2369 1
*404X040001 CHIP INDUCTOR C6-K3.0L 10UH KLM-2366 1
*404X120001 CHIP INDUCTOR BLM41PG102SN1D KLM-2366 3
*404X120002 CHOKE COIL WBR6H-3T-Y2F KLM-2366 2
*404X120003 CHOKE COIL PLH10AN1112R6P2B KLM-2366 1
*404X120004 CHIP INDUCTOR C13-K4.5L 22UH KLM-2366 1
*404X120005 CHIP INDUCTOR BLM41PG102SN1 KLM-2369 2
*405X120000
*405X120001
*405X120001
*405X120001
*405X120002
*405X120003
*405X120003
*405X120003
*405X120003
*454X120000 PHONE JACK PJ-603AG KLM-2369 6
*464X120000 CHIP FUSE 0433.750NR KLM-2366 1
*471X120000 PIN HEADER JS-1125-3 KLM-2366 1
C ADAPTER KA-161E 100V M.PART 100JP 1
C ADAPTER KA-163E 120V M.PART 117EX 1
C ADAPTER KA-163E 120V M.PART 117US 1
C ADAPTER KA-163E 120V M.PART 117CN 1
C ADAPTER KA-165E 240V M.PART 240AU 1
C ADAPTER KA-169E 230V M.PART 230GE 1
C ADAPTER KA-169E 230V M.PART 230FR 1
C ADAPTER KA-169E 230V M.PART 230UK 1
C ADAPTER KA-169E 230V M.PART 230W
1
Page 24

PART CODE PART NAME NOTE Q'TY
*471X120001 PIN HEADER JS-1125-10 KLM-2366 1
*471X120002 PIN HEADER JS-1125-15 KLM-2366 1
*471X120003 FLAT CABLE CONNECTOR BA-40R KLM-2366 1
*471X120004 PIN HEADER JS-1125-6 KLM-2369 1
*471X120005 PIN HEADER JS-1125-8 KLM-2369 1
*471X120006 PIN HEADER JS-1125-12 KLM-2369 1
*471X120007 PIN HEADER JS-1125-7 KLM-2369 1
*471X120008 FPC CONNECTOR 5597-05APB KLM-2444/45 1
*475X120000 HARNESS HNS-3215 BOARD IN KLM-2367 1
*475X120001 HARNESS HNS-3214 BOARD IN KLM-2369 1
*475X120002 HARNESS HNS-3219 BOARD IN KLM-2444/45 1
*475X120003 HARNESS HNS-3217 BOARD IN KLM-2444/45 1
*475X120004 HARNESS HNS-3218 BOARD IN KLM-2444/45 1
*475X120005 HARNESS HNS-3220 BOARD IN KLM-2444/45 1
*475X120006 HARNESS HNS-3216 BOARD IN KLM-2444/45 1
*475X120007 HARNESS HNS-3213 BOARD IN KLM-2444/45 1
*480X120000 TUBE SOCKET 9PINPCG2C9-Y KLM-2444/45 2
*500X040000 INTER CONNECTOR YP L58XH6.0XW2 M.PART 2
*500X851003 X-8510 URETHANE-LEG F40709 M.PART 4
*575X120000 LED SPACER LEDH-6 KLM-2444/45 1
*575X120001 LED HOLDER KOC-E30318 KLM-2444/45 1
*580X120000 X-1200 LENS SHEET KOC-F41050 M.PART 2
*620X120000 X-1200 PATTERN KEY KOC-E30294 M.PART 1
*620X120001 X-1200 PART KEY KOC-E30295-1 M.PART 1
*620X120002 X-1200 EDIT KEY KOC-E30296-1 M.PART 1
*620X120003 X-1200 SELECT KEY-M KOC-E30297 M.PART 1
*620X120004 X-1200 SLIDER KNOB KOC-E40557 M.PART 1
*620X120005 X-1200 VR KNOB-S KOC-E30312 M.PART 17
*620X120006 X-1200 VR KNOB-L KOC-E30313 M.PART 2
*620X120007 X-1200 ENCODER KNOB KOC-E30301 M.PART 1
*630X040000 X-0400 REFLECTION SHEET F40971 M.PART 1
*630X040001 X-0400 SHEET KOC-F40972 M.PART 1
*630X120000 X-1200 LCD WINDOW KOC-E30311-1 M.PART 1
*630X120001 X-1200 TUBE LENS KOC-E30302 M.PART 1
*641X120000 X-1200 PANEL KOC-C20392 M.PART 1
*641X120001 X-1200 PANEL CHASSIS C20394 M.PART 1
*641X120002 X-1200 BOTTOM CASE KOC-C20395 M.PART 1
*641X120003 X-1200 TUBE BRACKET C30598 M.PART 1
*641X120004 X-1200 TUBE COVER KOC-C41286 M.PART 1
*641X120005 X-1200 TOUCH SHEET BRACKET M.PART 1
*646X120000 X-1200 SW FRAME KOC-E10206 M.PART 1
*646X120001 X-1200 SM SLOT KOC-E20224 M.PART 1
 Loading...