


Owner‘s Manual
E
1

Precautions
Location
Using the unit in the following locations can result in a
malfunction.
• In direct sunlight
• Locations of extreme temperature or humidity
• Excessively dusty or dirty locations
• Locations of excessive vibration
• Close to magnetic fields
Power supply
Please connect the designated AC/AC power supply
to an AC outlet of the correct voltage. Do not connect
it to an AC outlet of voltage other than that for which
your unit is intended.
Interference with other electrical devices
Radios and televisions placed nearby may experience
reception interference. Operate this unit at a suitable
distance from radios and televisions.
Handling
To avoid breakage, do not apply excessive force to
the switches or controls.
Care
If the exterior becomes dirty, wipe it with a clean, dry
cloth. Do not use liquid cleaners such as benzene or
thinner, or cleaning compounds or flammable
polishes.
Keep this manual
After reading this manual, please keep it for later
reference.
THE FCC REGULATION WARNING (for U.S.A.)
This equipment has been tested and found to comply with the
limits for a Class B digital device, pursuant to Part 15 of the
FCC Rules. These limits are designed to provide reasonable
protection against harmful interference in a residential
installation. This equipment generates, uses, and can radiate
radio frequency energy and, if not installed and used in
accordance with the instructions, may cause harmful
interference to radio communications. However, there is no
guarantee that interference will not occur in a particular
installation. If this equipment does cause harmful interference
to radio or television reception, which can be determined by
turning the equipment off and on, the user is encouraged to
try to correct the interference by one or more of the following
measures:
• Reorient or relocate the receiving antenna.
• Increase the separation between the equipment and
receiver.
• Connect the equipment into an outlet on a circuit different
from that to which the receiver is connected.
• Consult the dealer or an experienced radio/TV technician
for help.
Unauthorized changes or modification to this system can void
the user’s authority to operate this equipment.
CE mark for European Harmonized Standards
CE mark which is attached to our company’s products of AC
mains operated apparatus until December 31, 1996 means it
conforms to EMC Directive (89/336/EEC) and CE mark
Directive (93/68/EEC). And, CE mark which is attached after
January 1, 1997 means it conforms to EMC Directive (89/
336/EEC), CE mark Directive (93/68/EEC) and Low Voltage
Directive (73/23/EEC).
Also, CE mark which is attached to our company’s products
of Battery operated apparatus means it conforms to EMC
Directive (89/336/EEC) and CE mark Directive (93/68/EEC).
Keeping foreign matter out of y our equipment
Never set any container with liquid in it near this
equipment. If liquid gets into the equipment, it could
cause a breakdown, fire, or electrical shock.
Be careful not to let metal objects get into the
equipment. If something does slip into the equipment,
unplug the AC/AC power supply from the wall outlet.
Then contact your nearest Korg dealer or the store
where the equipment was purchased.

Table of Contents
1. Introduction ...................... 7
Main features ................................. 7
Saving your data on the EMX-1 ................................ 8
About the vacuum tubes ........................................... 8
What is ? ................................... 8
What is ? (Multi Modeling Technology) ............. 8
2. Parts and their functions .... 9
Top panel........................................ 9
Common section ........................................ 10
Edit section ................................................11
Part select section .......................................12
Step key section .........................................12
Arpeggiator section....................................13
Rear panel .................................... 14
Front panel ................................... 14
Card section ..............................................14
Items and functions in the display .. 15
3. Basic operation ............... 17
Preparations ................................. 17
Connections...............................................17
Turning the power on/off ............................ 17
To turn the power on .............................................. 17
To turn the power off .............................................. 17
About the timing of changing patterns ..................... 20
Setting the playback tempo .........................20
Using the dial to set the tempo. ............................... 20
To set the tempo more precisely ............................... 20
Using the TAP key to set the tempo........................... 21
Auto BPM Scanning ............................................... 21
Keeping a constant tempo as you change patterns
(TEMPO LOCK) .............................................. 21
Playing the sound of a part ........... 22
What is a Part? ...................................................... 22
— Drum parts (1–5, 6A-B, 7A-B) ............................ 22
— Synth parts (1–5) ............................................... 22
— Accent parts (drum, synth) .................................. 22
Listening to the sound of a part ...................22
Listening to the sound of a drum part ....................... 22
Listening to the sound of a synth part (the Keyboard
function) ........................................................ 22
Selecting a part ......................................... 23
Drum part ............................................................. 23
.... To select a part during playback without causing it to
sound ............................................................ 23
Synth part ............................................................. 23
Accent part ............................................................ 23
Muting a part ............................................ 23
Soloing a part ........................................... 23
Adding accents to a part ............................ 24
Specifying the accent locations and strength ............. 24
Specifying the parts that will be accented ................. 24
Transposing a phrase (Transpose) ................ 24
Making a pattern “swing”...........................25
Specifying the amount of swing ............................... 25
Specifying the parts that will swing .......................... 25
Applying a roll to a part .............................25
Selecting a part and turning on the roll effect ........... 25
Setting the roll type ................................................ 25
Assigning the output of each part ................26
Adding distortion to increase the impact of the
sound........................................................26
Playing a Demo song .................... 18
To pause playback ................................................. 18
To resume playback................................................ 18
To stop playback .................................................... 18
Demo Song List ..........................................18
4. Pattern mode .................. 19
Playing patterns ............................ 19
What is a Pattern? ................................................. 19
Playing a pattern .......................................19
To Start playback ................................................... 19
To pause playback ................................................. 19
To resume playback................................................ 19
To stop playback .................................................... 19
Selecting a pattern .....................................20
To check which patterns playing .............................. 20
To force playback to restart at the beginning of the
pattern .......................................................... 20
Using the arpeggiator ................... 27
Performing with the arpeggiator .................. 27
To arpeggiate a drum part ...................................... 27
To arpeggiate a synth part ...................................... 27
Specifying the center note ....................................... 27
Changing the scale of the arpeggiator ..................... 28
ARPEGGIO SCALE List .......................................... 28
Editing sounds .............................. 29
Editing the sound of a drum part .................29
Assigning a wave .................................................. 29
Editing the Part Common parameters ....................... 29
Modulation ............................................................ 30
Editing the sound of a synth part .................31
Synth oscillator ...................................................... 31
Synth filter ............................................................. 31
Part Common parameters ....................................... 32
Modulation ............................................................ 33
Adjusting the tuning of a synth part .............33
3

4
Oscillator type list ......................... 34
Drum PCM List ...........................................39
Synth PCM List ...........................................40
Effects........................................... 41
Using the effects ......................................... 41
To apply an effect................................................... 41
To edit an effect .........................................41
Effect types ................................................42
1. Stereo ............................................................... 42
2. Mono mix.......................................................... 42
3. Stereo cross ....................................................... 42
Effect parameters .......................... 43
Recording a phrase ....................... 47
Realtime recording ................................................. 47
Step recording ....................................................... 47
Recording a phrase during playback (Realtime
Recording).................................................47
To record a drum part ............................................ 47
To record a synth part ............................................ 47
To record during playback ...................................... 48
To erase unwanted triggers during playback (Erase) . 48
Step recording ...........................................48
To record a rhythm for a drum part ......................... 48
To record a phrase for a synth part.......................... 49
To input a rest or tie................................................ 49
To move the target step ........................................... 49
Editing sequence data ................... 50
Editing a phrase pattern (Note Edit)............. 50
Selecting the step you want to edit ........................... 50
Editing the trigger locations (the location of the notes) 50
Editing the note number (pitch) ................................ 51
Editing the gate time............................................... 51
Specifying the length and time signature of a
pattern ......................................................52
To check the length and beat ................................... 52
Setting the length ................................................... 52
Setting the beat ...................................................... 52
Setting the last step................................................. 53
Moving data within a pattern ......................54
To move data ......................................................... 54
To copy data repeatedly ......................................... 54
To move data randomly .......................................... 54
Transposing the pitch of a synth phrase part. 55
Shifting the pitch of note data ................................. 55
Randomly shifting the note data of a synth part ........ 55
Copying a part ..........................................56
Copying only the sound of a part ................56
Erasing the sequence data of a part ............56
To erase all of a part's performance data ................. 56
To erase trigger data while recording or playing back 57
Erasing all data from a pattern....................57
Comparing the currently-edited pattern with the
saved pattern (COMPARE) ..........................57
Motion sequence ........................... 58
What is a motion sequence? ................................... 58
Effects (FX1, FX2, FX3) ........................................... 58
Drum parts (1–7B).................................................. 58
Synth parts (1–5) ................................................... 58
Accent parts .......................................................... 58
Recording a motion sequence ..................... 58
Playing a motion sequence ......................... 59
Checking motion sequence data ..................59
If a motion sequence is recorded for ... The following key
will light ........................................................ 59
Editing motion sequence data ..................... 60
Selecting the motion sequence that you want to edit .. 60
Editing motion sequence parameter values ............... 60
Erasing a motion sequence for a part or effect .
................................................................61
Pattern Set .................................... 62
What is Pattern Set? ............................................... 62
Performing with a Pattern Set ......................62
Using Chain Play with Pattern Set ................62
Assigning a pattern to a Pattern Set .............63
Saving a pattern ........................... 64
If you decide not to save a pattern you create ........... 64
Saving by overwriting an existing pattern ....64
To overwrite onto a different pattern ........................ 64
Saving a pattern under a different name ......64
5. Song mode ..................... 65
What is a Song? .................................................... 65
What is the Position? .............................................. 65
Playing a song .............................. 66
To pause playback ................................................. 66
To resume playback................................................ 66
To stop playback .................................................... 66
Fast-forwarding or rewinding the playback .............. 66
Selecting a song.........................................66
Switching songs ..................................................... 66
To play back from the beginning of the current position
or song.......................................................... 66
To continue playing another a song ......................... 66
Setting the playback tempo .........................66
Using the dial to set the tempo ................................ 66
Using the tap tempo key to set the tempo ................. 67
Locking the tempo of a song ................................... 67
Creating a song ............................ 68
Specifying a pattern for each position .......... 68
To play back the completed song from the beginning 68
Transposing the pitch of a Pattern for a specific
Position .....................................................68
Editing a song............................... 70
Inserting a pattern ......................................70
Deleting a pattern ...................................... 70
Erasing data from a song ........................... 71
If you erase song data by accident .......................... 71
Changing the pattern in a specific position... 71
Maintaining the part mute settings even when
the pattern changes .................................... 71
Playing back songs in succession................. 71

Event recording ............................. 72
Recording song event data..........................72
To record using Event Recording.............................. 72
To erase event data from a song.............................. 72
To check the event data in a song ............................ 72
Saving a song ............................... 73
To simply save the song .......................................... 73
To overwrite onto a different song ........................ 73
To rename and save the song .................................. 73
6. Global mode................... 75
Setting the metronome ................................75
Matching the tuning with another instrument 75
Protecting the data in memory..................... 75
Exchangeing the arpeggiator functions ........75
Saving your Global mode settings ...............76
Synchronizing playback with an
external MIDI device................ 83
To use the EMX-1 as the master, and synchronize an
external MIDI device to it ................................ 83
To use the external MIDI device as the master, and
synchronize the EMX-1 to it............................. 83
Playing back in sync with other Electribe models
................................................................84
To make the ES-1 play in synchronization to the tempo
of the EMX-1.................................................. 84
To make the EMX-1 and ES-1 play back the identically-
numbered pattern in synchronization ............... 84
About the MIDI messages used for synchroniza-
tion ...........................................................84
Timing Clock.......................................................... 84
Start ...................................................................... 84
Continue, Stop ....................................................... 84
About synchronization in Song mode .......... 85
Song Select............................................................ 85
Song Position Pointer .............................................. 85
Using SmartMedia™ ..................... 76
About cards........................................................... 76
Handling precautions ............................................. 76
Formatting SmartMedia ..............................77
Saving data to SmartMedia (Save All) ......... 77
Loading all data from SmartMedia into the
EMX-1 ......................................................77
Loading a single pattern from SmartMedia
(Load Pattern) ............................................ 78
Deleting an EMX-1 file from SmartMedia
(Delete File) ............................................... 78
7. MIDI mode ...................... 79
About MIDI channels .............................................. 79
Using the EMX-1 as a sound module ........... 79
If you connect a multi-track MIDI sequencer to the EMX-1
..................................................................... 79
Setting the MIDI channel of each part .......... 79
MIDI Utility.................................... 80
Making MIDI filter settings ..........................80
Assigning the drum note numbers................80
About note-on/note-off .......................................... 81
Assigning a MIDI Control Change Number to a
knob .........................................................81
Editing sounds .............................. 85
Editing via NRPN .......................................85
About system exclusive messages ................ 85
Universal system exclusive messages........................ 85
8. Appendix........................ 87
Troubleshooting ............................ 87
Can’t control the EMX-1 via MIDI! ...............87
Sound is distorted! ..................................... 87
Error messages ............................. 88
CardFull ....................................................88
Restoring the factory settings .......................89
Specifications ................................ 89
Pattrn name list ............................. 90
Knob/Sw - MIDI List ...................................92
Index............................................ 93
Transmitting sound settings and other
data ....................................... 82
Transmitting/receiving a data dump ............82
Transmission .......................................................... 82
Reception .............................................................. 82
Switching patterns ...................................... 82
Setting the pitch bend range ....................... 83
Setting the pitch bend range ................................... 83
5

6

1. Introduction
Thank you for purchasing the ELECTRIBE MX
(subsequently referred to as the “EMX-1”).
The EMX-1 Music Production Station can be used
by anyone - from beginner to professional - to create stunningly original music.
The panel knobs and keys allow you to edit sounds
intuitively and easily, and to create rhythms and
phrase patterns without the need to use any other
equipment. The EMX-1 is the ideal tool for the musician, DJ, sound creator, or desktop-music user
who wants an easy way to add originality to their
music. It's also an ideal compliment to any of the
other models in the ELECTRIBE series.
Main features
The ideal tool for producing dance and many other types
of music
The EMX-1 provides nine drum parts and five
synth parts. Since song arrangement editing is unified with the sound editing for each part, song production is quick and easy.
“MMT (Multiple Modeling Technology)” tone generator
system
The synth engine of the EMX-1 features Korg’s latest technology — MMT (Multiple Modeling Technology). This system builds on the know-how that
was developed for the DSP technology used in the
Z1, MS2000, and Electribe series to create a wide
range of timbral variations with a few simple operations.
The oscillator section provides a total of sixteen
different synthesis models that include not only
standard analog synthesizer models such as Waveform, Sync, Cross Mod, and Ring Mod; but also new
types not previously available, such as a Chord type
that can produce a full chord from a single note, a
Unison type that lets you detune the pitch of up to
six oscillators to create an extremely thick sound,
and a Waveshape type that mixes two oscillators
and then modulates the result to generate complex
waveforms.
The carefully selected parameters of the filter and
modulation sections boast a greatly improved
range, speed, and sound quality. In addition to four
filter types that can dramatically vary the sound
generated from the oscillator, the new Drive control can create the distinctive sound of analog dis-
1. Introduction
tortion for sharp and powerful analog synth
sounds. For totally far-out sounds, we’ve added
BPF+ (Band Pass Filter Plus) with adjustable peaking, plus you can use other parameters in conjunction with modulation from the LFO or EG.
207 drum waves for immediate use in your dance music
The EMX-1 features 207 built-in drum waves that
have been pre-processed to sound their best in your
music, immediately.
Analog synthesizer-style ease of editing
The front panel provides knobs and switches for
important sound parameters, allowing you to edit
sounds in realtime while you perform, and letting
you create sounds in the same way as on an analog
synthesizer.
Three simultaneous stereo effects processors
The EMX-1 provides three stereo effect processors,
each featuring 16 cutting-edge effect types. You can
use the Chain function to modify the way in which
the effects are connected to each other.
192 internal patterns programmed for many genres of
dance music
The EMX-1 can hold 256 patterns in memory. Each
one lets you store a sound and sequence (of up to
128 steps) for each part. When shipped, 192 of the
internal patterns are pre-programmed specifically
for dance music and other modern music styles.
64 songs
A sequence of patterns, mute data, and knob movements can be saved as a “song” in each of the 64
song memories.
Intuitive pattern programming
The sixteen step keys on the front panel allow you
to enter data into pattern quickly, easily and intuitively. Of course, you can also use realtime recording or step recording.
Motion sequencing
The EMX-1’s Motion Sequence feature lets you
record and loop knob movements and switch operations, letting you create time-varying changes
in the tone during playback.
Newly-developed VALVE FORCE vacuum tube circuit
The EMX-1 features Korg’s newly-developed
VA LVE FORCE technology, a completely analog
circuit that contains two actual vacuum tubes and
can be used as a mastering effect to enhance the
overall sound level. It delivers a rich, warm, and
clearly-defined sound that cannot be replicated by
digital technology alone. Use the TUBE GAIN knob
7

to adjust the level of the EMX-1’s output signal
being sent through the vacuum tubes, controlling
the smooth distortion and rich overtone structure
that vacuum tubes add to the sound. Even at lower
volume levels, you can adjust the TUBE GAIN to
enjoy great tube-quality sound in any situation.
Process external audio sources
You can connect an audio source to the audio in
jack, and process that sound using the internal filter and on-board effects.
Two-channel individual output jacks
In addition to the L/MONO and R main stereo
audio outputs, you can route any combination of
parts to the two independent audio outputs.
Auto BPM detection
The EMX-1 can automatically detect the tempo of
an audio source connected to the audio in jack, and
apply that tempo to the current pattern. Of course,
you can also use tap tempo to input the tempo, or
synchronize to an external MIDI clock.
SmartMedia™ slot
Patterns and songs you create on the EMX-1 can be
saved on SmartMedia™.
Arpeggiator
Use the ribbon controller and slider for intuitive
and hands-on control of automatically generated
arpeggios.
Display
The large back-lit LCD keeps you informed of the
operating status and provides other information.
Pattern writing on-the fly
If you unexpectedly come up with a cool pattern
or riff while playing patterns, you can write and
save the pattern without stopping your performance.
Saving your data on the EMX-1
The patterns and songs you edit and create on the
EMX-1 will be lost (the patterns and songs will return to their un-edited state) if you select a new
pattern or song, or turn off the power before saving your changes.
If you want to save a pattern or song that you created or edited, or changes you made to global data,
you must perform the Write operation.
You can always restore all songs and patterns to
the factory settings if desired (☞p.89 “Restoring the
factory settings”).
About the vacuum tubes
Do not attempt to remove, replace or change the
tubes in the EMX-1. The tubes are not a user serviceable part.
What is ?
VA LVE FORCE is KORG’s proprietary vacuum
tube audio technology. The VALVE FORCE system provides the smooth distortion and rich
overtone structure that is uniquely characteristic of analog tube circuitry. By providing the
tube circuit with its own gain control, the
VA LVE FORCE system delivers excellent tonal
quality in any situation.
What is ? (Multi Modeling Technology)
KORG’s new cutting-edge MMT (Multi Modeling Technology) engine is based on the vast
knowledge aquired from years of DSP development — development that created the Prophecy, Z1, MS2000, OASYS PCI and Electribe series. This technology provides amazingly advanced sound possibilities while maintaing the
simple operation that has been the hallmark of
the Electribe series.
8

2. Parts and their functions
Top panel
2. Parts and their functions
1
23
4
5
9
1. MASTER VOLUME
This knob adjusts the output volume of the line
out jacks and the headphone jack. The master volume does not adjust the volume of the individual
out jacks.
6
7
8
5. Common section (☞p.10)
The controls grouped in the Common section allow you to switch modes, to use the display to edit
parameters, and to control playback and recording.
2. TUBE GAIN
This knob adjusts the level of the EMX-1’s output
signal that is being sent through the vacuum tubes.
As you increase this level, the vacuum tubes will
produce more distortion. Normally you will leave
this set to the minimum level.
The effect of the vacuum tubes applies to the line
out jacks (L/MONO, R) and headphone jac ks .
3. AUDIO IN LEVEL
This knob adjusts the input level of the audio input.
4. Display (☞p.15)
This shows the name of the currently selected pattern, and displays information such as parameter
values and messages.
6. Edit section (☞p.11)
Using these controls, you can edit the sound of
each part and edit the effect settings.
7. Part select section (☞p.12)
Here you can select each of the drum and synth
parts.
8. Step key section (☞p.12)
Here you can view and edit the triggers of the
rhythm or phrase pattern.
You can also use the step keys as a keyboard to
play the sounds of the synth parts.
9. Arpeggiator section (☞p.13)
This section lets you sound each part automatically.
9

Common section
5
1
2
6
3
4
7
8
9
10 11 12 13 14 15 16
1. AUDIO IN THRU key
Selecting this key will send the sound from the audio in jack directly to the line output jacks and
headphone jacks unchanged.
This key will hav e no effect f or a synth part whose
oscillator type is set to “A UDIO IN + COMB,” since
turning this key on would simply “thru” the audio
input signal unaffected.
2. TEMPO LOCK key
If this key is on, the tempo will stay at its current
value, even when you switch patterns.
3. AUTO BPM SCAN key
If this key is on, the tempo will be detected from
the music connected to the audio in jack.
4. WRITE/RENAME key
This key allows you to save the changes you make
in each mode, and to save any pattern set data you
edit.
By holding down the SHIFT key and pressing this
key, you can rename a pattern or song.
5. BEAT LED
This LED blinks at quarter-note intervals of the
current tempo.
6. Dial
Use this dial to edit the value shown in the display.
7. / (cursor keys)
Use these keys to select a parameter from the matrix menu. The currently selected parameter will
be shown in the display.
8. Matrix menu
The matrix menu lists the parameters that are
available in each mode. Use the cursor keys to select a parameter.
9. Mode keys
Use these keys to select either the PATTERN mode,
PA RT EDIT mode, STEP EDIT mode, SONG mode,
GLOBAL mode, or MIDI mode.
10
10. RESET, ERASE key
Pressing this key will immediately reset the current pattern or song back to the beginning. During playback, you can hold down the shift key and
press this key to erase data from the current part.
11. REC key
Use this key to record rhythms, phrases, or knob
movements. During playback or recording, you
can use this key to toggle recording on and off.
12. STOP/CANCEL key
Use this key to stop playback of a song or pattern,
or to cancel execution of an operation.
13. PLAY/PAUSE key
Use this key to begin, pause or resume the playback of a pattern or song.
14. TAP key
You can set the tempo by pressing this key at quarter-note intervals of the desired tempo.
15. PART MUTE, REST/TIE key
During playback, hold down this key and press a
part key to mute that part. When you mute a part,
this key will turn on (lit), and the muted part key
will go dark. During step recording, use this key
to input a rest or tie.
16. SOLO, TRANSPOSE key
During playback, hold down this key and press a
part key to “solo” that part (i.e., you will hear only
that part). When you solo a part, this key will turn
on (lit). If you want to solo more than one part,
hold down the solo key and select each part that
you want to solo. Press this key once again to turn
it off (dark) and defeat the solo function. Also, you
can hold down this key and turn the dial or use
the step keys to transpose a phrase. (☞p.24 “Transpose”)

2. Parts and their functions
Edit section
2 3
1
1. EFFECT
In this section you can select the type of effect and
adjust various parameters.
quence.
TYPE (effect type): Selects the type of effect.
FX EDIT1 (effect edit 1) : Adjusts the effect. The
actual parameter being controlled will
depend on the effect type.
FX EDIT2 (effect edit 2) : Adjusts the effect. The
actual parameter being controlled will
depend on the effect type.
FX CHAIN (effect chain): On the EMX-1, the output
of one effects processor can be fed to the
input of another. The connection will
change each time you press this, and the
connection that is lit will be used.
EDIT SELECT: Chooses which effects processor is
currently being edited.
MOTION SEQ. (motion sequence): Records and
plays back movements of the FX EDIT1
and FX EDIT2 knobs. This will alternate
between on (lit) and off (dark) each time
it is pressed.
2. PART COMMON
These are the parameters that are common to the
drum parts and to the synth parts.
motion sequence.
MOTION SEQ. (motion sequence): Turning this
function on will allow you to record and
playback knob movements for each part.
This key will change successively between on (SMOOTH lit), on (TRIG
HOLD lit), and off (dark) each time it is
pressed.
PITCH/GLIDE : For a drum part, this knob sets
the pitch. For a synth part, it specifies
the time it takes for the pitch to change
smoothly between two legato notes.
EG TIME : Adjusts the envelope time (the time it
takes for the note to decay) for each part.
: supports motion se-
54
: supports
PAN (panpot) : This controls the position of the
part in the stereo field for the line outputs (L/MONO, R) or headphones. If a
part is set to the individual (3/4) output
bus (☞p.26: Output bus) this control will
adjust the panning to the individual outputs (INDIV. OUT 3, 4).
LEVEL : Adjusts the volume of each part. For an
accent part, this will adjust the strength
of the accent.
AMP EG : Selects the amp envelope shape for each
part. The envelope will alternate between (decay) or (non-decay) each
time you press this.
ROLL : For each part, this will switch the roll ef-
fect on (lit) or off (dark).
FX SELECT (effect select) : Selects which effect
processor will be applied to each part.
If FX SEND is on, the selected effect will
be applied. This setting is ignored for
parts whose output bus (☞p.26: Output
bus) setting is 3/4.
FX SEND (effect send) : Selects whether the sound
of the current part will be sent to the selected effect. This will alternate between
on (lit) and off (dark) each time it is
pressed. This setting is ignored for parts
whose output bus (☞p.26: Output bus)
setting is 3/4.
3. MODULATION
These are the parameters such as LFO and EG that
create time-varying changes in the sound.
ports motion sequence.
SPEED : Adjusts the modulation speed.
DEPTH : Adjusts the modulation depth.
TYPE (modulation type) : Selects the type of
modulation.
DEST (destination) : Selects which parameter will
be affected by the modulation.
BPM SYNC : Turning this on (lit) will cause the
modulation to be in sync with the current tempo.
4. SYNTH OSCILLATOR
This section produces the waveform that is the
basis of the synth part.
quence.
TYPE (oscillator type): Selects the synthesis model
being used by the oscillator.
OSC EDIT1 (oscillator edit 1) : Modifies the os-
cillator waveform. The actual parameter
being adjusted will depend on the oscillator model.
OSC EDIT2 (oscillator edit 2) : Modifies the os-
cillator waveform. The actual parameter
being adjusted will depend on the oscillator model.
These parameters have no eff ect on drum parts.
: supports motion se-
: sup-
11

5. SYNTH FILTER
These parameters modify the tonal character of the
synth part.
CUTOFF : Adjusts the cutoff frequency of the fil-
EG INT (EG intensity) : Adjusts the depth of the
: supports motion sequence.
ter.
filter envelope.
Part select section
1234
RESONANCE : Adjusts the resonance of the fil-
ter.
DRIVE : Adjusts the amount of distortion being
introduced by overdriving the filter.
TYPE (filter type) : Selects the type of filter.
These parameters have no eff ect on drum parts.
1. (DRUM PART) 1...5, 6A-6B, 7A-7B (drum part keys)
These keys select drum parts. By pressing these
keys you can hear the sound that is assigned to
each part.
2. (DRUM PART) ACCENT (drum accent part key)
This key selects the drum accent part.
Step key section
123 4 5
6
1. SHIFT key
This key is used in conjunction with other keys.
Hold down this key and press another key to access the secondary function of that key.
SHIFT+RESET key: Erase data from a pattern.
SHIFT+step key: Execute the function printed be-
low the step key.
SHIFT+dial:
SHIFT+PATTERN key: Compare patterns.
For details on using the shift key with other keys,
refer to the explanation of each parameter.
Make larger or finer changes in the value.
(This will depend on the selected part.)
2. PATTERN SET key
By holding down this key and pressing the STEP
key, you can switch to the pattern that was registered for that step key (☞p.60: Pattern Set).
12
3. (SYNTH PART) 1...5 (synth part keys)
These keys select synth parts.
4. (SYNTH PART) ACCENT (synth accent part key)
This key selects the synth accent part.
3. KEYBOARD key
When this key is on (lit), you can use the sixteen
step keys as a keyboard to play a synth part
(☞p.22: Keyboard function). This key will alternate on/off each time it is pressed.
4. [ ][ ] (select keys)
These keys are used to control the current position in the lower row (red) of select LEDs. These
LEDs indicate different information - pattern set
group, keyboard octave, step key position - in conjunction with other keys. (☞p.13: Select LEDs)
In Song mode, you can use these keys as fast-forward / rewind keys.

2. Parts and their functions
5. Select LEDs
The upper row of LEDs (green) indicates the location within the currently-playing pattern (length
1 through 8).
The lower row of LEDs (red) indicates the position shown by the step keys (length 1 through 8).
When the Keyboard function is on, these LEDs
indicate the octave position.
When the Pattern Set function is on, these LEDs
indicate the pattern set group registered to the step
keys.
Arpeggiator section
21
6. Step keys 1...16
These keys can be used to enter data into a pattern, and will light to show the position or timing
where each part will sound.
When the KEYBOARD key is on (lit), you can use
these keys as a keyboard to play a synth part.
When the Pattern Set function is on (blinking), you
can use these keys to select patterns, as well as assigning patterns to the individual keys.
1. Ribbon controller
When you touch the ribbon controller, the selected
part will begin sounding automatically. When used
with a synth part, 16th notes will be sounded, and
the gate time will change depending on where you
touch the ribbon controller. When a drum part is
selected, the note resolution will depend on where
you touch the ribbon controller.
2. Slider
Moving this slider will change the pitches played
by the arpeggiator. If a drum part is selected, the
slider will have no effect.
The GLOBAL mode “ARP CONTROL” setting lets
you exchange the functions of the ribbon controller and the slider. (☞p.75)
13
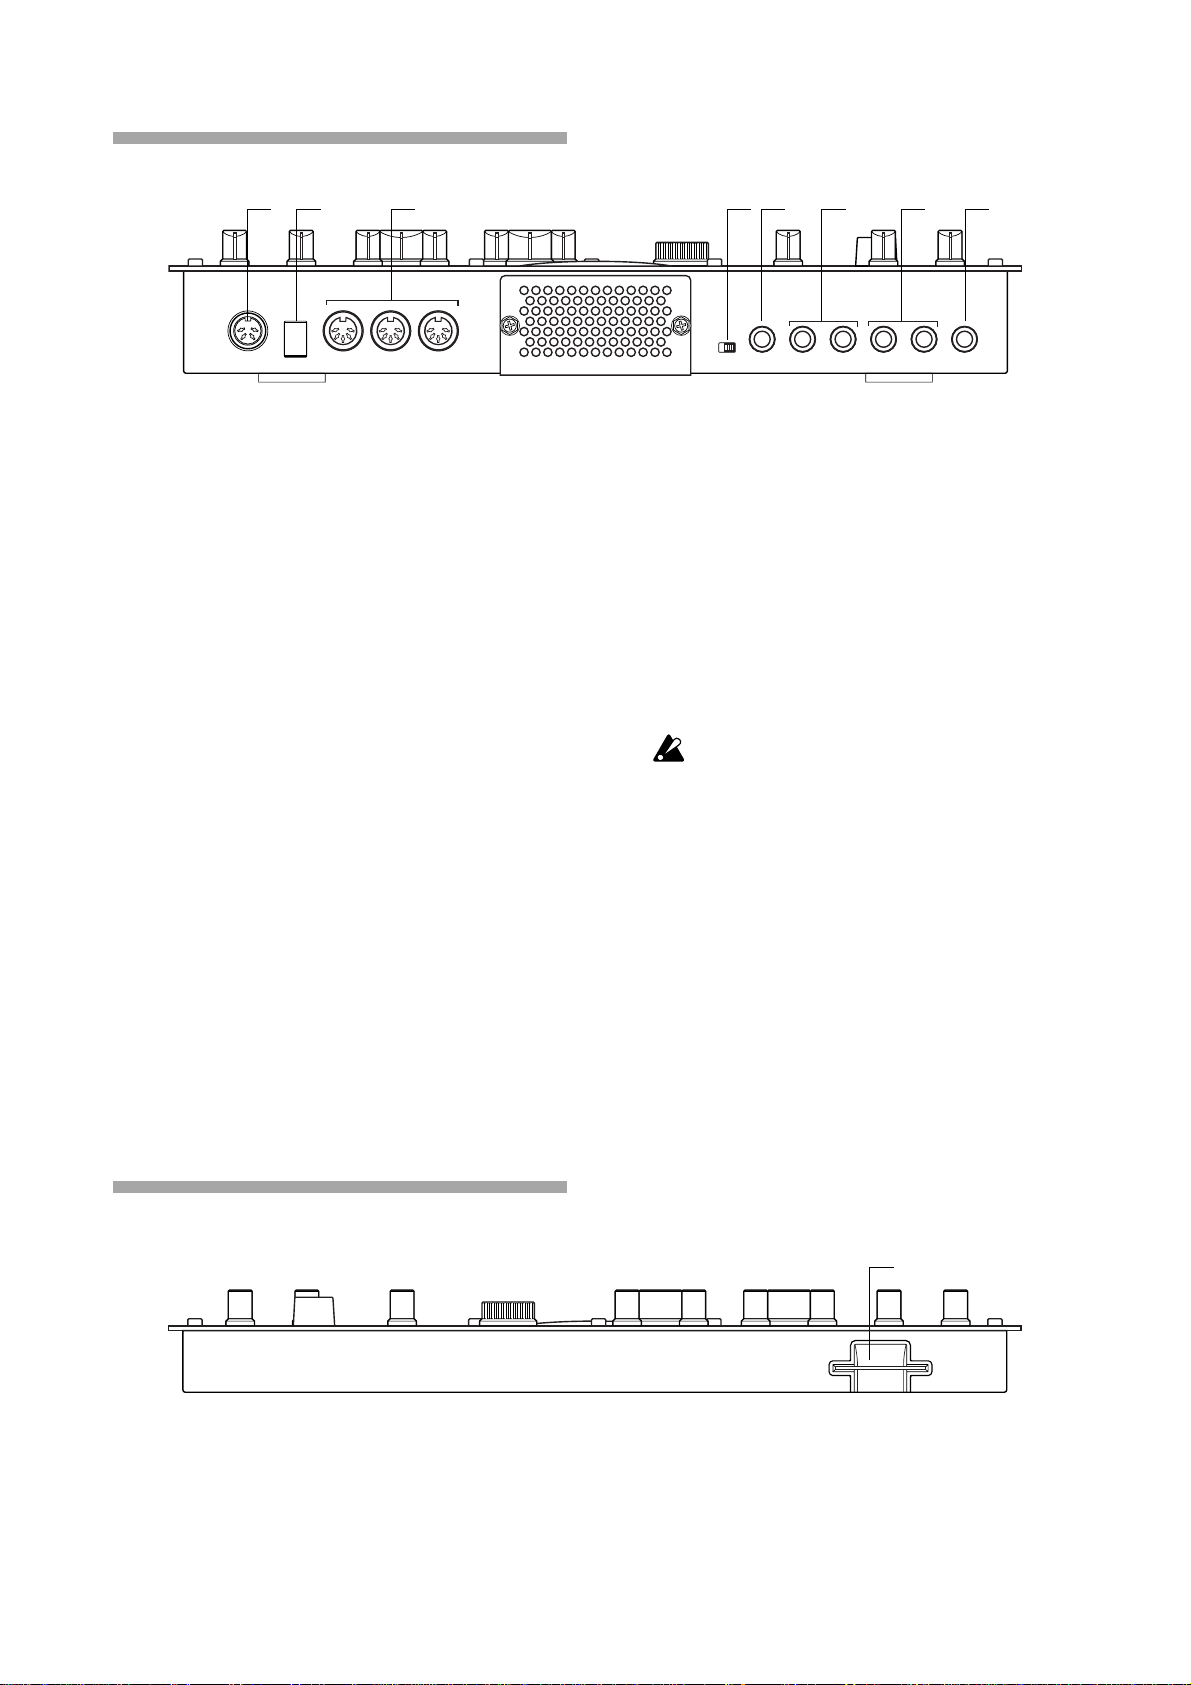
Rear panel
1 2 3 4 5 6 7 8
1. ~AC 9V
Connect the included AC/AC power supply to this
connector.
2. STANDBY, ON (power switch)
Pressing this switch will alternate between poweron and standby conditions.
3. MIDI connectors
IN This connector receives MIDI data. Use
this when you want to control the EMX1 from an external MIDI device, or to receive a data dump.
OUT This connector transmits MIDI data. Use
this when you want to use the EMX-1 to
control another MIDI device, or to transmit a data dump.
THRU This connector re-transmits MIDI data
that was received at the MIDI IN connector. Use this when you want to send
the same data to two or more MIDI devices.
4. MIC, LINE gain select switch
This switches the gain level of the audio in jack.
Set this to the MIC position if you are connecting
a mic, or to the LINE position if you are connecting a synthesizer or audio device.
5. AUDIO IN jack
This jack lets you use an external audio source as
an oscillator. When the synth oscillator is set to
AUDIO IN+COMB, the sound that is input here
will be used as the oscillator sound. This is a monaural jack.
6. INDIV.OUT 3, 4 (individual out) jacks
These are individual output jacks. If the output bus
of a part is set to 3/4, the sound of that part will
be output from these jacks.
For all of the factory-set sounds, the output b us is
set to the line out jacks (L/R).
7. OUTPUT L/MONO, R (line out) jacks
Connect audio cables from these jacks to your
mixer or powered monitor (amplified speaker)
system. If you are using a monaural connection,
use the L/MONO jack.
8. Headphone jack
You can connect a set of stereo headphones (phone
plug) to this jack.
Front panel
Card section
1. SmartMediaTM slot
You can insert a SmartMedia card here and use it
to store or load EMX-1 data.
14
1

Items and functions in the display
2. Parts and their functions
1
2
1. Parameter display
This area displays pattern names, song names, and
parameter names.
2. Value display
This area displays the selected parameter’s value.
3. PATTERN, SONG, WAVE indicator
When the number of a pattern or song is shown
in the value display, this will indicate the corresponding mode.
4. SmartMedia™ indicator
This indicator lights when data is being read or
written to the SmartMedia™.
Never remove the Smar tMedia™ or turn off the
power while this indicator is lit. Doing so may damage the data.
5. Input level meter
This meter shows the level of the signal connected
to the audio in jack. If the input level is too high,
the “CLIP” indicator will light. Adjust the AUDIO
IN LEVEL knob so that the “CLIP” indicator does
not light.
4
5
3
6
7
8
8. Part status indicator
This shows the status of the following parameters
for each part.
PLAY: Indicates the mute status of each part.
On (lit): This part is not muted.
Off (dark): This part is muted.
SWING: Indicates which parts have the Swing
function enabled. To change or view this setting,
use SWING SW in Part Edit mode.
On (lit): Swing is enabled for this part.
Off (dark): Swing is disabled for this part.
ACCENT: Indicates which parts will be accented.
To change or view this setting, use ACCENT SW
in Part Edit mode.
On (lit): Accent is enabled for this part.
Off (dark): Accent is disabled for this part.
OUTPUT L/R: Indicates the output jack assignment for each part. To change or view this setting,
use OUTPUT BUS in Part Edit mode.
On (lit): This part is being sent to the line out jacks
(L/MONO, R).
Off (dark): This part is being sent to the individual
out jacks (INDI.OUT 3,4).
6. Knob indicator
When you turn a knob, data for that knob will appear in the parameter display and value display,
and this indicator will light. After a time, it will
go dark and the previous display will reappear.
7. Original value indicator
This will light when the value of the currentlyoperated knob is the same as the value stored in
the pattern (i.e., the original value).
15

16

3. Basic operation
Preparations
Connections
MAIN OUTS
TAPE
TAPE
STEREO AUX RETURNS
AUX SEND
MIC
4
MIC
6
MIC
3
MIC
5
MIC
2
MIC
AC
MIXER etc.
1
BAL
BAL
OR
OR
UNBAL
UNBAL
LINE IN 3
LINE IN 2
LINE IN 1
LOW CUT
LOW CUT
75Hz
75Hz
18dB/OCT
18dB/OCT
B
B
d
d
V
V
0
0
0
1
1
1
-
-
-
G
G
A
A
C
I
I
C
C
N
I
N
I
I
M
M
M
U
U
U
10
10
10
60
60
+
10dB
+
10dB
+
10dB
-40dB
-40dB
TRIM
TRIM
TRIM
U
U
U
AUX
AUX
1
1
MON/
MON/
EFX
EFX
+15
+15
+15
U
U
U
2
2
EFX
EFX
+15
+15
+15
U
U
U
EQ
EQ
HI
HI
12kHz
12kHz
-15
-15
+15
+15
-15
+15
U
U
U
MID
MID
2.5kHz
2.5kHz
-12
-12
-12
+12
+12
+12
U
U
U
LOW
LOW
80Hz
80Hz
+15
+15
+15
-15
-15
-15
PAN
PAN
L
L
L
R
R
R
1
3
2
MUTE
MUTE
MUTE
ALT 3–4
ALT 3–4
ALT 3–4
dB
dB
dB
10
10
10
SOLO
SOLO
5
5
5
U
U
U
5
5
5
10
10
10
20
20
20
30
30
30
40
40
40
50
50
50
60
60
60
L
1
1
OUTPUT
INPUT
MICRO SERIES 1402-VLZ
L
14-CHANNEL MIC/LINE MIXER
2
R
2
R
BAL/UNBAL
ALL BAL/UNBAL
LEFT
(1/MONO)
RIGHT
BAL
BAL
BAL
BAL
MONO
MONO
MONO
MONO
OR
OR
OR
OR
UNBAL
UNBAL
UNBAL
UNBAL
L
L
L
L
LINE IN 4
LINE IN 6
LINE IN 5
BAL
BAL
BAL
BAL
LOW CUT
OR
OR
LOW CUT
OR
OR
LOW CUT
LOW CUT
75Hz
75Hz
75Hz
75Hz
UNBAL
UNBAL
UNBAL
UNBAL
18dB/OCT
18dB/OCT
18dB/OCT
18dB/OCT
B
d
V
0
B
B
B
d
d
d
V
V
V
0
1
0
1
-
1
-
-
R
R
R
R
G
A
G
G
A
G
A
A
I
C
N
I
I
C
I
I
C
N
N
N
I
I
M
M
M
U
U
U
LEVEL
LEVEL
LEVEL
LEVEL
+4
+4
+4
+4
10
60
PHONES
10
10
60
60
60
-10
-10
-10
-10
+
10dB
-40dB
+
10dB
+
10dB
-40dB
-40dB
-40dB
TRIM
LINE IN 7-8
LINE IN 13-14
LINE IN 9-10
LINE IN 11-12
TRIM
TRIM
U
U
AUX
AUX
AUX
1
1
1
MON/
MON/
MON/
EFX
EFX
EFX
+15
+15
U
U
2
2
2
EFX
EFX
EFX
+15
+15
U
U
EQ
EQ
EQ
HI
HI
HI
12kHz
12kHz
12kHz
-15
+15
-15
+15
U
U
MID
MID
MID
2.5kHz
2.5kHz
2.5kHz
-12
-12
+12
+12
U
U
LOW
LOW
LOW
80Hz
80Hz
80Hz
+15
+15
-15
-15
PAN
PAN
PAN
L
L
R
R
4
5
MUTE
MUTE
ALT 3–4
ALT 3–4
dB
dB
10
10
SOLO
SOLO
SOLO
5
5
U
U
5
5
10
10
20
20
30
30
40
40
50
50
60
60
U
U
U
U
U
U
U
AUX
AUX
AUX
AUX
AUX
1
1
1
1
1
MON/
MON/
MON/
MON/
MON/
EFX
EFX
EFX
EFX
EFX
1
+20
+10
+15
+15
+15
+15
+15
NORMALLED
U
U
U
U
U
U
AUX 1 MASTER
2
PRE
2
2
2
2
2
POST
EFX
EFX
EFX
EFX
EFX
AUX
EFX TO
AUX 1
+20
MONITOR
+15
+15
SELECT
+15
+15
+15
RETURNS
U
U
U
U
U
SOURCE
EQ
EQ
EQ
EQ
EQ
LEFT RIGHT
HI
HI
HI
HI
HI
MAIN
CLIP+28
12kHz
12kHz
12kHz
12kHz
12kHz
MIX
+10
-15
+15
-15
+15
-15
-15
+15
+15
-15
+15
+7
U
U
U
U
U
ALT
+4
3-4
MID
MID
MID
MID
MID
2.5kHz
2.5kHz
2.5kHz
2.5kHz
2.5kHz
+2
-12
-12
+12
-12
+12
-12
+12
+12
-12
+12
0
TAPE
U
U
U
U
U
-2
LOW
LOW
LOW
LOW
LOW
80Hz
80Hz
80Hz
80Hz
80Hz
-4
+15
+15
-15
+15
+15
-15
-15
-15
+15
-15
-7
ASSIGN
PAN
PAN
PAN
PAN
PAN
-10
TO MAIN MIX
-20
NORMAL(AFL)
-30
LEVEL SET(PFL)
L
R
L
L
L
R
R
R
L
R
0dB=0dBu
SOLO
MODE
9–10
13–14
6
11–12
7–8
MUTE
MUTE
MUTE
MUTE
MUTE
POWER
RUDE SOLO LIGHT
PHANTOM
ALT 3–4
ALT 3–4
ALT 3–4
ALT 3–4
ALT 3–4
CONTROL
/ PHONES
MAIN MIX
ROOM
dB
dB
dB
dB
dB
dB
dB
10
10
10
10
10
10
10
SOLO
SOLO
SOLO
SOLO
SOLO
5
5
5
5
5
5
5
U
U
U
U
U
U
U
5
5
5
5
5
5
5
10
10
10
10
10
10
10
20
20
20
20
20
20
20
30
30
30
30
30
30
30
40
40
40
40
40
40
40
50
50
50
50
50
50
50
60
60
60
60
60
60
60
You must turn off the power before making any connections. Careless operation
can damage your speaker system or other
equipment, and may cause malfunctions.
PHONES
1. Connect the included AC/AC power supply to the EMX-1’s ~AC
9V connector, and plug the AC/AC power supply to an AC outlet.
2. Connect audio cables from the EMX-1’s line out jacks (L/MONO, R)
to your mixer or powered monitor system (amplified speakers). If
you are using a monaural connection, use the L/MONO jack.
3. If you are using headphones, plug them into the headphone jack.
Sound will still be output from the line out jacks even if headphones
are plugged in.
Tur ning the power on/off
To turn the power on
1. Check the connections
2. Turn on the power switch.
3. Slightly turn up the EMX-1’s master volume, and touch the drum
part keys to produce sound so that you can check that the connections are correct.
4. Adjust the EMX-1’s master volume, and the gain and faders of your
mixer or powered monitor system to an appropriate listening level.
After you turn on the power, it will take approximately one minute
before the vacuum tubes reach a stable state of operation. During
this time, the output sound may be distorted even if the TUBE GAIN
knob is turned down.
You must first connect the AC/AC power
supply to the EMX-1, and then plug it into
the AC outlet.
To turn the power off
1. Turn down the master volume to the minimum position.
Also minimize the volume on your connected equipment.
2. Make sure that the card indicator in the display is not lit.
3. Set the power switch to the standby position.
If you will not be using the EMX-1 for an extended period of time,
unplug the AC/AC power supply from the AC outlet.
17

Playing a Demo song
The EMX-1 contains several demo songs. Here’s how you can listen to the demo
songs to get an idea of the EMX-1’s sound and potential.
1. Press the SONG key. The SONG key will light.
2. The display will show the current song name and number.
If it does not, press the SONG key a second time.
3. Turn the dial to select a song.
4. Press the PLAY/PAUSE key to play back the song (the key will light).
When the song ends, playback will stop automatically (the key will
go dark).
To pause playback
Press the PLAY/PAUSE key (the key will blink).
To resume playback
Press the PLAY/PAUSE key once again (the key will light).
To stop playback
Press the STOP/CANCEL key.
Demo Song List
S.01 Tales of the Epic / KORG
S.02 Garage / Oliver Munyak
S.03 Knob Twister / James Bernard
S.04 Smooth MX / James Sajeva
S.05 Butterflyz / Chris Petti
S.06 Jack! / Oliver Munyak
All Patterns and All Songs — © 2003 KORG Inc. All rights reserved.
The factory-set preset data has been created so that the optimal tone is produced
when the TUBE GAIN knob is at the "0"
position.
18

4. Pattern mode
Playing patterns
What is a Pattern?
A “pattern” is a short segment of a performance that consists of
rhythm patterns created by drum parts (drum sounds) and phrase
patterns (melodic lines) created by synth parts.
The EMX-1 lets you create and store 256 patterns. Each pattern consists of 16 parts. In addition to the sound of each part, a pattern
contains effect settings and phrases, and can also record knob movements.
Pattern
Drum
Part
Synth
Part
Accent
Part2
Part2
Part2
Part2
Part1
Edit
Wave
----------Motion sequence data------- ---
(101)
Part2
Part1
Edit
Wave
----------Motion sequence data------- ---
(21)
128
128
128
128
Pattern name
Tempo
Arp Scale
Effect
Fx1
Fx1
Fx1
Part(☞p.22)
Playing a pattern
To Start playback
1. Press the PATTERN key (the key will light).
2. Press the [ ] cursor key until the display indicates “(patter n name ).”
3. Press the PLAY/PAUSE key to play the pattern (the key will light).
When the pattern ends, playback will return to the beginning of the
pattern and will continue to loop.
While the pattern plays, you can use the Keyboard function to play
along using the step keys, play drum sounds using the drum part keys,
or operate the knobs and keys to modify the sound.
By using the various functions of Pattern mode as part of your performance technique, you can create a wide range of expressive variety.
To pause playback
Press the PLAY/PAUSE key (the key will blink).
To resume playback
Press the PLAY/PAUSE key once again (the key will light).
To stop playback
Press the STOP/CANCEL key.
2
1
STOP/CANCEL
PLAY/PAUSE
19

Selecting a pattern
1. Press the PATTERN key (the key will light).
2. Press the [ ] cursor key until the display indicates “(patter n name ).”
3. Turn the dial to select a pattern.
You can use the dial to select from a total of 256 patterns: A.01–A.64,
B.01–B.64, C.01–C.64, D.01–D.64.
You can also select patterns while the EMX-1 is playing.
To check which patterns playing
When the PATTERN key is lit, press the PATTERN key and the display will show “(pattern name ).”
To force playback to restart at the beginning of the pattern
During playback, you can press the RESET key to force the pattern
to play back from the beginning.
If you want to perform in synchronization with an external audio source,
you can use the TAP key to match the tempo, and then press the RESET
key at the beginning of each phrase to synchronize your performance
without using MIDI.
Pattern A.01
About the timing of changing patterns
If you change patterns during playback, the currently-playing pattern will finish playing first, and then the newly selected pattern
will begin to play. The name of the pattern waiting to be played next
will blink in the display until the change occurs.
If you change patterns during playback, you may hear noise or unwanted sounds at the transition due to the ef fect or delay settings, or
in some cases the effect sound may drop out.
If the patterns before and after the change use the same ef fect but
with dif ferent settings, the result will sound the same as if you had
turned those knobs.
Setting the playback tempo
TEMPO ................................................................ 20.0...300.0
Using the dial to set the tempo.
1. Press the PATTERN key (lit).
2. Use the [ ]/[ ] cursor keys until the display indicates “Tempo.”
3. Turn the dial to adjust the tempo.
4. If you want to save this tempo setting, write it into memory. (☞p.64
Saving a pattern )
The tempo of the pattern will return to its original setting if you select
another pattern without writing the new tempo.
If the TEMPO LOCK key is of f (dark), and you change patterns, the
tempo will change to the tempo stored with the new pattern.
To set the tempo more precisely
By holding down the shift key and turning the dial you can adjust
the tempo in units below the decimal point (i.e.: 120.4).
Pattern A.01
3
4
2
1
20

Using the TAP key to set the tempo
While a pattern is playing, press the TAP key twice or more at quarter-note intervals of the desired tempo. The intervals at which you
press the key will be detected and the tempo will be set accordingly.
You can set the tempo this way even when the EMX-1 is stopped or
paused.
Auto BPM Scanning
Detecting the tempo from the input of the AUDIO IN jacks
Here’s how you can automatically detect the tempo of an audio signal input to the AUDIO IN jacks, and specify it as the EMX-1’s tempo.
1. Press the AUTO BPM SCAN key to begin detection. (The key will
light.)
The parameter display will indicate “AutoBPM.”
At this time the tempo setting will remain unchanged.
2. When detection is completed, the AUTO BPM SCAN key will blink.
The display will show the detected tempo value.
If automatic detection is unable to determine the tempo, the tempo value
display will disappear, and will indicate “—.-”
3. Press the AUTO BPM SCAN key to finalize the tempo; the detected
tempo will be specified as the TEMPO setting.
If you decide not to apply the detected tempo value, press the TAP
key or the TEMPO LOCK key. The tempo value will remain at the
setting prior to automatic detection. Alternatively, you can cancel
the setting by pressing the [ ][ ] cursor keys or a different mode
key.
4. Pattern mode
Twice or more
Keeping a constant tempo as you change patterns (TEMPO LOCK)
When the TEMPO LOCK key is on (lit), the current tempo will be
used for each pattern you select, regardless of the tempo that was
saved in memory with the pattern. With the TEMPO LOCK key off
(dark), the tempo saved with each pattern will be used.
When the TEMPO LOCK key is on, the tempo will be held even if you
stop playback. If you want to return to the tempo that is stored in each
pattern, turn the TEMPO LOCK key off (dark), and then re-select the
pattern.
The state of the TEMPO LOCK key is not saved as part of the pattern data.
21

Playing the sound of a part
What is a Part?
A “part” is the smallest unit within a pattern. Each part contains a
sound, a rhythm or phrase pattern, effect on/off settings, and motion sequence data.
For each individual part, you can edit the sound, store a rhythm or
phrase pattern, and store motion sequence data (☞p.29 “Editing
sounds”).
The EMX-1 uses three types of parts, for a total of sixteen parts.
— Drum parts (1–5, 6A-B, 7A-B)
Each of the drum parts contains a drum sound, rhythm pattern (note
timing), and motion sequence data.
Drum Part
Edit
1 2 3 4 5 6 7 8
wave
---------------Motion sequence data----------------
(207)
128
— Synth parts (1–5)
Each of the synth parts contains a synth sound, phrase pattern (trigger, note number, gate time), and motion sequence data.
— Accent parts (drum, synth)
Accent parts do not contain any sound data. Instead, they can add
extra volume to particular beats or steps in a pattern. Each of the
accent parts contains an amount of volume emphasis (accents), and
motion sequence data.
Listening to the sound of a part
You can listen to the sound of each part by pressing the drum part keys, or by selecting
a synth part and pressing the step keys with the KEYBOARD key turned on. The
sound of the part will differ depending on the pattern. Turn the dial to select various
patterns, and try out the wide variety of sounds.
When you press a drum part key , the keyboard function of the step
keys will be cancelled; however , the keyboard function will automatically return to its previous setting when you once again select a
synth part.
Listening to the sound of a drum part
Press a drum part key 1 through 7B and you will hear the sound
assigned to each key.
Pressing the drum accent part key will not produce any sound.
Drum parts 6A and 6B cannot sound at the same time. The same is
true for parts 7A and 7B.
Synth Part
1 2 3 4 5 6 7 8
Edit
C4
wave
(76)
---------------Motion sequence data----------------
G4
128
F4
Listening to the sound of a synth part (the Keyboard function)
1. Press one of the synth part keys 1–5 (the key will light).
2. Press the KEYBOARD key (the key will light).
3. Use the step keys as a keyboard to play the part. Use the select keys
to change the octave.The select LEDs (lower row, red) will light to
indicate the pitch range.
Pressing the synth part accent key will not produce any sound.
You cannot turn the KEYBOARD key on/of f unless one of the synth
part keys 1–5 is selected.
Since each synth part is a monophonic synthesizer , it cannot sound
two or more notes simultaneously (polyphonically).
22
Pitch Range
A-1...C1
A0...C2
A1...C3
A2...C4
A3...C5
A4...C6
A5...C7
A6...C8

Selecting a part
Use the part keys to select the part that you want to edit.
Drum part
When you press a drum part key, the assigned sound will play and
that part will be selected (the part key will light).
The step keys will light to indicate the trigger locations for that part
within the rhythm pattern. During playback, the currently-playing
step will also light.
When you press a drum part key to make it sound, it will sound at its
accented volume.
To select a part during playback without causing it to sound
Hold down the shift key and press a drum part key.
Synth part
When you press a synth part key, the key will light and that part
will be selected. With the KEYBOARD key lit, you can play the part
using the step keys as a keyboard
The way in which the step keys will light at this time will depend on
the status of the KEYBOARD key.
On (lit): The keys corresponding to each pitch will light successively
during playback to indicate the pitch that is sounding at that
moment.
Off (dark): The keys will light at the trigger locations of the phrase pat-
tern for that part.
4. Pattern mode
Accent part
When you press an accent part key, the key will light and that part
will be selected. At this time, the step keys will light to indicate the
accented locations of that accent pattern.
Muting a part
Here's how to mute (temporarily silence) a part.
1. Hold down the PART MUTE key and press the part key that you
want to mute. (The PART MUTE key will light.)
2. While you hold down the PART MUTE key, the part status indicator
will show the mute status of each part. Unmuted part keys will light,
and muted part keys will be dark. You can mute more than one part
if desired.
3. To defeat all mute settings, press the SOLO key. To defeat muting
for individual parts, press the part key that you want to un-mute.
Soloing a part
1. Hold down the SOLO key and press the part key that you want to
solo. You will hear only that part. (The SOLO key and part key will
light.)
2. While the SOLO key is lit, you can press another part key to solo
that part.
3. If you want to solo two or more parts, hold down the SOLO key and
select the parts that you want to solo. Alternatively, hold down the
SOLO key (or PART MUTE key) while the SOLO key is already lit
and press a part key to add it to the soloed parts.
4. When you press and then release the SOLO key, the Solo function
and Mute function will be defeated (the key will go dark).
By holding down the SHIFT key and pressing one of the part keys, you
can turn all keys of that part (drum or synth) on/off.
PART MUTE
Part key
SOLO
23

Adding accents to a part
on off
Specifying the accent locations and strength
You can apply an accent (volume emphasis) independently to the
drum parts and to the synth parts.
If accent is on, notes at the accented location (step) will be emphasized.
1. Press either the drum part ACCENT key or the synth part ACCENT
key; the step keys will indicate the accented locations.
2. Each time you press a step key, the accent will be turned on/off for
that location, letting you specify the accent pattern.
3. Use the level knob in the Part Common section to adjust the amount
of accent. Turning the knob toward the right will produce a greater
difference between the accented and un-accented sounds. If you turn
the knob all the way to the left, there will be no difference between
the accented and un-accented sounds.
Pressing the accent part key will not produce any sound. Also, when
you press a part key to play its sound, the sound will play at the
accented level.
By playing back the pattern while you make this adjustment you can
hear the results.
Accent settings will not af fect a part whose ACCENT SW is turned
off.
Specifying the parts that will be accented
ACCENT SW ...............................................................On, Off
You can enable/disable the accent function separately for each part.
1. Press the PART EDIT key (it will light).
2. Use the [ ]/[ ] cursor keys until the parameter display shows “Accent Sw.” The “ ” symbols at the bottom of the screen will show the
accent status (enabled/disabled) of each part. Press a part key, and
turn the dial to switch the accent function on (lit) or off (dark) for
that part.
When you execute Pattern Clear, the accent switch will be turned on
for all parts.
Level(Velocity)
127
100
30
Accent On
Accent Off
Accent Level
Transposing a phrase (Transpose)
TRANSPOSE ............................................................... -24...24
Use this function to transposea the pitch of synth parts 1–5.
1. While you hold down the TRANSPOSE key, the display will indicate the current transpose setting.
2.
Hold down the TRANSPOSE key and turn the dial to transpose the
phrases in semitone steps. A setting of ±1 transposes the pitch by one
semitone, ±2 by a whole step, ±7 by a fifth, and ±12 by one octave.
If transposition is being used, the TRANSPOSE key will blink. When
you set the value to “0” the key will go dark.
You can also hold down the TRANSPOSE key and use the step keys
and select keys to specify the transpose amount.
If you hold down the TRANSPOSE key and press a step key to transpose, step key 4 will correspond to the normal pitch of “C."
If you transpose while soloing a part, the key will remain lit (not blinking). It will blink when you defeat the Solo setting.
The transpose setting is not remembered. It is reset to 0 when you
turn on the power .
If a wave of the PCM Chord Set category ( ☞p.40) is selected for the
synth part, the chord or octave may change if you edit the transpose
setting.
24
TRANSPOSE

Making a pattern “swing”
Specifying the amount of swing
SWING ....................................................................... 50...75
The Swing setting modifies the timing at which certain steps are
played. You can use this to transform a straight 16-beat rhythm by
giving it a slight shuffle character. You can adjust the amount of swing
in a range of 50 to 75 (%), and this will affect the timing of the evennumbered steps. A setting of 50 will produce a straight 16-beat
rhythm, and a setting of 66 will produce a shuffle.
The Part Edit mode SWING SW setting lets you enable/disable the
Swing setting independently for each part.
1. Press the PATTERN key (it will light).
2. Use the [ ]/[ ] cursor keys to call up “Swing” in the parameter
display
Turn the dial to adjust the amount of swing.
The swing setting is ignored if the beat is set to “8T ri” ( 3x12) or
“16Tri” ( 3 x12).
Specifying the parts that will swing
SWING SW.................................................................On, Off
This lets you enable/disable Swing independently for each part.
1. Press the PART EDIT key (lit).
2. Use the [ ]/[ ] cursor keys to select “SwingSw” in the parameter
display.
3. The “ ” symbols at the bottom of the screen will show the swing
status (enabled/disabled) of each part. Press a part key, and turn
the dial to switch Swing on (lit) or off (dark) for that part.
When you execute Pattern Clear, SWING SW will be turned on for
all parts.
4. Pattern mode
Applying a roll to a part
Selecting a part and turning on the roll effect
ROLL ......................................................................................
This switches the Roll (rapid successive strikes) effect on (lit) or off
(dark) independently for each part.
The interval between notes of the roll will depend on the tempo of
the pattern, the roll type, and the amount of swing (☞“Setting the
roll type”).
1. Press the part key for the part you want to play a roll.
2. Press the ROLL key (it will light). During playback, that part will
play a roll.
If the playback is stopped, and you press and hold a part key when
the ROLL key is on, that part will roll as long as you continue holding down the key.
Setting the roll type
ROLL TYPE .................................................................... 2, 3, 4
This setting specifies the number of times the sound will be played
during one step by one trigger when ROLL is on. If Roll is switched
on for a part, the part will sound the specified number of notes in
each step.
1. Press the PATTERN key (it will light).
2. Use the [ ]/[ ] cursor keys to select “RollType” in the parameter
display.
25

3. Turn the dial to set the roll type.
You cannot apply a roll to note-on data from an external MIDI device.
Assigning the output of each part
OUTPUT BUS ............................................................. L/R, 3/4
For each part, you can route the sound to the line out jacks (L/
MONO, R) or to the individual out jacks (3, 4).
1. Press the PART EDIT key (it will light).
2. Use the [ ]/[ ] cursor keys to select “OutBus” in the parameter
display. The “ ” symbols at the bottom of the screen indicate the
output destination of each part.
3. Press the part key for the part that you want to set, and turn the dial
to select either L/R (lit) or 3/4 (dark).
When you execute the Clear Pattern operation, OUTPUT BUS will
be set to “L/R” for all parts.
Adding distortion to increase the impact
of the sound
TUBE GAIN ............................................................................
This adjusts the level at which the output signal from the line out
jacks will be passed through the vacuum tubes. Even if you turn
down the master control, you can use the TUBE GAIN knob to adjust the amount of distortion.
This strengthens the distortion produced by the vacuum tube.
Raising the TUBE GAIN knob excessively may damage your exter nal speaker system. Please use caution.
This has no effect on the sound that is sent from the individual out
jacks (3, 4).
26

Using the arpeggiator
Performing with the arpeggiator
To arpeggiate a drum part
1. Select the drum part that you want to play.
2. When you touch the ribbon controller, the selected part will begin
playing automatically. The timing of the repeated notes will vary
depending on the location you touch. The speed of the repetition
will depend on the specified tempo.
If ARP CONTROL (☞p.75) is set to “Revers,” the slider will vary the
timing of the notes.
To arpeggiate a synth part
1. Select the synth part that you want to play.
2. Use the step keys to specify the pitches that you want to arpeggiate.
For example if you want to arpeggiate C–E–G, hold down the C key
and press the E and G keys.
3. When you touch the ribbon controller, the sound of the selected part
will play automatically. The gate time will change depending on
where the ribbon is touched. The speed will depend on the tempo.
The notes played by the arpeggiator will be retriggered each time
you (release and then) touch the ribbon controller. If you hold down
the SHIFT key, the arpeggiator will not retrigger when you release
and then touch the ribbon controller.
4. Operate the slider to change the pitch within the scale specified by
“ARPEGGIO SCALE.”
If you want, you can exchange the functions of the ribbon controller
and the slider. (☞p.75 “Exchanging the arpeggiator functions”)
4. Pattern mode
Specifying the center note
When using the arpeggiator with a synth part, you can specify the
note that will correspond to the center of the slider (i.e., the “center
note”). This setting is also saved when you save the pattern.
1. Press the Pattern mode key.
2. Select one of the synth parts, and turn on the keyboard function.
3. Use the [ ][ ] select keys to specify the pitch range, and press the
step key that you want to be the center note (press only one key).
4. Save the pattern.
The position of the slider when you make this setting has no ef fect
on the setting.
If ARP CONTROL (☞p.75) is set to “Revers,” the center note will be
the note produced by touching the center of the ribbon controller .
27

Changing the scale of the arpeggiator
ARPEGGIO SCALE ......................................... Chroma...Octave
You can change the scale that is being used when you arpeggiate a
synth part.
1. Press the PATTERN key (it will light).
2. Press the [ ] cursor key to select “ArpScale” in the parameter display.
3. Turn the dial to select the desired scale.
ARPEGGIO SCALE List
No.
Display Scale [Key C] Scale Name
1. Chroma C, Db, D, Eb, E, F, Gb, G, Ab, A, Bb, B, C Chromatic
2. Ionian C, D, E, F, G, A, B, C Ionian
3. Dorian C, D, Eb, F, G, A, Bb, C Dorian
4. Phrygi C, Db, Eb, F, G, Ab, Bb, C Phrygian
5. Lydian C, D, E, F#, G, A, B, C Lydian
6. MixLyd C, D, E, F, G, A, Bb, C Mixolydian
7. Aeolia C, D, Eb, F, G, Ab, Bb, C Aeolian
8. Locria C, Db, Eb, F, Gb, Ab, Bb, C Locrian
9. MBlues C, Eb, E, G, A, Bb, C Major Blues
10.mBlues C, Eb, F, Gb, G, Bb, C minor Blues
11.Dim C, D, Eb, F, F#, G#, A, B, C Diminish
12.ComDim C, Db, Eb, E, F#, G, A, Bb, C Combination Diminish
13.MPenta C, D, E, G, A, C Major Pentatonic
14.mPenta C, Eb, F, G, Bb, C minor Pentatonic
15.Raga1 C, Db, E, F, G, Ab, B, C Raga Bhairav
16.Raga2 C, Db, E, F#, G, A, B, C Raga Gamanasrama
17.Raga3 C, Db, Eb, F#, G, Ab, B, C Raga Todi
18.Spansh C, Db, Eb, E, F, G, Ab, Bb, C Spanish Scale
19.Gypsy C, D, Eb, F#, G, Ab, B, C Gypsy Scale
20.Arabia C, D, E, F, Gb, Ab, Bb, C Arabian Scale
21.Egypt C, D, F, G, Bb, C Egyptian Scale
22.Hawaii C, D, Eb, G, A, C Hawaiian Scale
23.Pelog C, Db, Eb, G, Ab, C Bali Island Pelog
24.Japan C, Db, F, G, Ab, C Japanese Miyakobushi
25.Ryukyu C, E, F, G, B, C Ryukyu Scale
26.Whole C, D, E, Gb, Ab, Bb, C Wholetone
28.m3rd C, Eb, Gb, A, C m3rd Interval
27.M3rd C, E, Ab, C M3rd Interval
29.4th C, F, Bb, C 4th Interval
30.5th C, G, C 5th Interval
31.Octave C, C Octave Interval
28
In the factory-set preset patterns, the center note and “ARPEGGIO
SCALE” are set so that the sound of synth part 5 will be played
optimally by the arpeggiator .

Editing sounds
For each drum part, you can select a drum sound wave, or sample. For each synth
part, you can select a synth oscillator model.
You can then edit the sound of each part using the oscillator, level, and pan knobs,
and the effect and amp EG keys.
Sounds can be edited even while the pattern is playing. You can also use an external MIDI device to control the values of each knob (☞p.79 “ MIDI mode”).
If you want to keep the sound that you modified, save it in the current pattern
by pressing the WRITE/RENAME key (☞p.64 “Saving a pattern”).
The available knobs will differ depending on the par t. If you find it
difficult to edit the sound because a motion sequence is affecting a
knob, you can turn motion sequence off while editing (☞p.58 “Mo-
tion sequence”).
Editing the sound of a drum part
Assigning a wave
WAVE ......................................................................... 1...207
You can choose one of 207 waves to assign to a drum part.
1. Press the PART EDIT key (it will light).
2. Press the [ ] cursor key until the display reads “(wave name ).” The
“WAVE” indicator in the lower right of the display will light.
3. Press the key for the drum part you wish to edit (the key will light).
The name of the wave currently assigned to that part will appear in
the display.
4. Turn the dial to select a wave, and press the part key to hear the
sound of the wave.
Editing the Part Common parameters
4. Pattern mode
2
1
Drum part key
PITCH .......................................................................-63...+63
Sets the playback pitch of the wave. Raising the pitch will speed up
the playback, and lowering the pitch will slow down the playback.
You can adjust the pitch over a range of ±2 octaves. The settings
correspond to the pitches shown below.
Raising the pitch may cause noise.
Knob value Pitch Example pitch (for an input of C3)
+63 2 octaves C5
+41, 43...59, 61 : C#4, D4...A#4, B4
+39 1 octave C4
+9, 12...33, 36 : D3, D#3...A#3, B3
+6 Semitone up C#3
0(center) ±0C3
-6 Semitone down B2
-9, -12...-36 : A#2, A2...C#2
-39 -1 octave C2
-41, -43...-61 : B1, A#1...C#1
-63 -2 octaves C1
EG TIME ...................................................................... 0...127
Sets the decay time of the EG. The way in which the volume decays
will depend on the Amp EG setting.
PAN ......................................................................... L63...R63
Sets the stereo position (panpot) of the sound. The sound will be
located in the center when the knob is set to the center. Turning the
knob toward the left moves the sound toward L, and turning it toward the right moves the sound toward R.
29

LEVEL .......................................................................... 0...127
Sets the output level. Turning the knob toward the right will increase
the level.
AMP EG ......................................................................... ,
Switches the operation of the amp EQ. Each time you press this key,
the envelope type will alternate between (the volume will gradually decay over the time specified by EG TIME) and (the sound
will stop after the time specified by EG TIME).
ROLL ........................................................................... On, Off
This enables (on) or disables (off) the Roll effect for each part.
The roll interval is determined by the tempo of the pattern, the Roll
Type, and the Swing setting (☞p.25 “Setting the Roll Type”).
If you hold down a part key when Roll is turned on, a roll will play
for as long as you hold down the key.
FX SELECT ......................................................... FX1, FX2, FX3
Here you can select which effect processor will be applied to the
part. The effect will switch each time you press the key. If the effect
send (FX SEND) is on, the selected effect will be applied. This does
not apply to parts whose output bus is set to 3/4. (☞p.26 “Assign-
ing the output of each part”)
FX SEND ..................................................................... On, Off
This specifies whether the selected effect will be applied. The setting will alternate on (lit) and off (dark) each time you press the key.
The FX SELECT setting selects the effects processor. This does not
apply to parts whose output bus is set to 3/4.
Modulation
These are the parameters that create time-varying change, such as
LFO and EG.
SPEED ......................................................................... 0...127
Adjusts the speed of modulation. If BPM SYNC is on, modulation
will synchronize to the tempo. The value will correspond to note
values of 8/1–1/64.
DEPTH ......................................................................-63...+63
Adjusts the depth of modulation.
TYPE................................................... , , , ,
Selects the type of modulation.
With settings other than EG, the modulation will vary cyclically. With
the EG setting, the effect will start at maximum and then decay
smoothly.
If the modulation type is “ ”, triggering will not reset the phase
of the modulation. For other types, the phase of modulation will be
reset at each trigger.
DEST ............................................................ PITCH, AMP, PAN
Selects which parameter will receive the modulation effect.
BPM SYNC ..................................................................On, Off
When you turn this function on, the speed of the modulation effect
will be synchronized to the tempo. If this is lit (on), modulation will
be synchronized with the tempo.
Although you can independently edit the sounds of drum parts 6A
and 6B, and 7A and 7B, these sounds cannot be played simultaneously.
If the sound does not change when you turn a knob or switch a key,
it may be that the knob or key is not v alid for the part you are editing,
or that a motion sequence (☞ p.58 “Motion sequence”) is operating.
30
 Loading...