

Korg EM-1 Owner's Manual

Thank you purchasing the Korg
ELECTRIBE·M EM-1. In order to
enjoy long and trouble-free use,
please read this manual carefully
and use the instrument correctly.
E 1

To ensure long, trouble-free operation, please r ead this manual carefully.
Precautions
Location
Using the unit in the following locations can result in a malfunction.
• In direct sunlight
• Locations of extreme temperature or humidity
• Excessively dusty or dirty locations
• Locations where excessive vibration exists
Power supply
Please connect the designated AC adaptor to an AC outlet of the correct voltage. Do not connect it to
an AC outlet of voltage other than that for which your unit is intended.
Interference with other electrical devices
This product contains a microcomputer. Radios and televisions placed nearby may cause reception
interference. Operate this unit at a suitable distance from radios and televisions.
Handling
To avoid breakage, do not apply excessive force to the switches or controls.
Care
If the exterior becomes dirty, wipe it with a clean, dry cloth. Do not use liquid cleaners such as
benzene or thinner, cleaning compounds or flammable polishes.
Keep this manual
After reading this manual, please keep it for later reference.
Keeping foreign matter out of your equipment
• Never set any container with liquid in it near this equipment. If liquid gets into the equipment, it could cause a breakdown, fire, or electrical shock.
• Be careful not to let metal objects get into the equipment. If something does slip into the
equipment, unplug the AC adaptor from the wall outlet. Then contact your nearest Korg
dealer or the store where the equipment was purchased.
THE FCC REGULATION WARNING (for U.S.A.)
This equipment has been tested and found to comply with the limits for a Class B digital device, pursuant to Part 15 of the FCC
Rules. These limits are designed to provide reasonable protection against harmful interfer ence in a residential installation. This
equipment generates, uses, and can radiate radio frequency energy and, if not installed and used in accordance with the instructions, may cause harmful interference to radio communications. However , ther e is no guarantee that interfer ence will not
occur in a particular installation. If this equipment does cause harmful interference to radio or television reception, which can
be determined by turning the equipment off and on, the user is encouraged to try to correct the interference by one or more of
the following measures:
• Reorient or relocate the receiving antenna.
• Increase the separation between the equipment and receiver.
• Connect the equipment into an outlet on a circuit different from that to which the receiver is connected.
• Consult the dealer or an experienced radio/TV technician for help.
Unauthorized changes or modification to this system can void the user’s authority to operate this equipment.
CE mark for European Harmonized Standards
CE mark which is attached to our company’s products of AC mains operated apparatus until December 31, 1996 means it
conforms to EMC Directive (89/336/EEC) and CE mark Directive (93/68/EEC). And, CE mark which is attached after January
1, 1997 means it conforms to EMC Directive (89/336/EEC), CE mark Directive (93/68/EEC) and Low Voltage Directive (73/
23/EEC).
Also, CE mark which is attached to our company’s products of Battery operated apparatus means it conforms to EMC Directive (89/336/EEC) and CE mark Directive (93/68/EEC).
Concerning data
In rare cases, incorrect operation may cause the contents of memory to be lost. Please save important
data on a system that can record System Exclusive data, like a sequencer or a data filer (storage device).
Korg Corporation can accept no responsibility for any damages resulting from loss of data.
2

Contents
1. Introduction ............................................................................. 6
Main features ................................................................................................................ 6
The data you create on the EM-1 ........................................................................................................ 6
Make connections and play! ........................................................................................7
Example connections................................................................................................................................ 7
Preparing to play ....................................................................................................................................... 7
2. Front and rear panel ............................................................... 8
Common section ...........................................................................................................8
Effect/Delay section ......................................................................................................9
Part common section....................................................................................................9
Synth filter section..................................................................................................... 10
Part Select section ..................................................................................................... 10
Sequence Control section......................................................................................... 10
Step Key section ........................................................................................................ 11
Connector section...................................................................................................... 12
3. Basic operation (Quick Start)................................................13
Conceptual diagram of the EM-1 .............................................................................. 13
Listening to a Song.................................................................................................... 13
Listening to Patterns .................................................................................................. 14
Trying out the functions ............................................................................................ 14
Changing the tempo of a song or pattern ............................................................................................ 14
• Using the dial to change the tempo ................................................................................................ 14
• Using the Tap Tempo key to change the tempo .............................................................................. 14
Pressing keys to play the sound of a Part............................................................................................ 15
Playing the sound of a drum part ...................................................................................................... 15
Playing the sound of a synth part (the Keyboard function)............................................................... 1 5
Modifying (editing) the sound of a part ................................................................................................ 16
Editing the sound of a drum part ....................................................................................................... 16
Editing the sound of a synth part ....................................................................................................... 16
Editing the effect or delay ...................................................................................................................... 17
Playing the sound of a part along with a song or pattern .................................................................. 17
Editing the sound of a part, effect, or delay while hearing a song or pattern ................................. 18
Modifying (editing) a rhythm or phrase pattern................................................................................... 18
Realtime recording............................................................................................................................. 19
Step Recording .................................................................................................................................. 20
Saving a pattern that you create............................................................................................................ 21
Using a Motion Sequence....................................................................................................................... 22
Playing with Pattern Set.......................................................................................................................... 23
Using the EM-1 as a tone generator module ........................................................................................ 23
Synchronizing the playback with other ELECTRIBE models............................................................. 24
4. Pattern mode ..........................................................................25
Selecting a pattern ..................................................................................................... 25
Setting the playback tempo ...................................................................................... 25
• Using the dial to change the tempo .................................................................................................... 25
• Using the Tap Tempo key to change the tempo ................................................................................. 25
3

Playing a pattern (Pattern Play) ................................................................................ 25
The timing at which patterns will change............................................................................................. 25
Playing from the beginning of a pattern (Reset & Play) ..................................................................... 25
About the tempo when you switch patterns (Tempo Lock)................................................................ 26
Selecting a part ........................................................................................................................................ 26
Drum parts ......................................................................................................................................... 26
Synth parts ......................................................................................................................................... 26
Accent parts ....................................................................................................................................... 26
The Part Mute function............................................................................................................................ 26
The Part Solo function ............................................................................................................................ 26
Creating a pattern ...................................................................................................... 27
Assigning a wave..................................................................................................................................... 27
Editing the sound of a part..................................................................................................................... 27
Drum part ........................................................................................................................................... 27
Synth part ........................................................................................................................................... 28
Accent parts ....................................................................................................................................... 28
Editing the effect or delay ...................................................................................................................... 29
EFFECT ............................................................................................................................................. 29
DELAY ................................................................................................................................................ 30
Length, Scale/Beat settings ................................................................................................................... 31
Setting the Length.............................................................................................................................. 31
Setting the Scale/Beat ....................................................................................................................... 31
Swing settings ......................................................................................................................................... 32
Setting the Roll Type ............................................................................................................................... 32
Creating a Pattern.................................................................................................................................... 32
Realtime recording ............................................................................................................................. 32
Step recording.................................................................................................................................... 32
Note editing ........................................................................................................................................ 32
Adding accents to the pattern (Accent)................................................................................................ 34
Motion sequence ........................................................................................................ 34
Playing a motion sequence .................................................................................................................... 34
Recording a motion sequence ............................................................................................................... 35
Checking motion sequence data ........................................................................................................... 35
Convenient functions for editing patterns............................................................... 35
Transposing a phrase (Transpose) ........................................................................................................ 35
Moving data within a part (Move Data) ................................................................................................. 36
Copying a part (Copy Part) ..................................................................................................................... 37
Data Copy within a pattern ..................................................................................................................... 37
Copying the sound of a part (Copy Sound) ........................................................................................ 37
Erasing motion sequence data from the part, effect, or delay (Clear Motion) ................................. 38
Erasing pattern data from a part............................................................................................................ 38
Erasing data during playback or recording (Erase)........................................................................... 38
Erasing all data from a part (Clear Part) ........................................................................................... 38
Exchanging data between parts (Swap Part) .......................................................................................39
Editing motion sequence data .................................................................................. 39
Selecting a motion sequence................................................................................................................. 39
Editing the parameter values of a motion sequence .......................................................................... 40
Pattern Set ................................................................................................................... 40
Using Pattern Set to perform (Pattern Set Play) .................................................................................. 40
Chain Play of pattern sets.................................................................................................................. 40
Assigning a pattern to a Pattern Set ..................................................................................................... 41
Saving a pattern (WRITE) .......................................................................................... 41
4

5. Song mode .............................................................................42
Selecting a song......................................................................................................... 42
Setting the playback tempo ...................................................................................... 42
• Using the dial to set the tempo ........................................................................................................... 42
• Using the tap tempo key to set the tempo ......................................................................................... 42
• Using the Tempo Lock key to fix the song tempo ............................................................................. 42
Playing a song (Song Play) ....................................................................................... 42
Fast-forward or rewind a song............................................................................................................... 42
Switching songs ...................................................................................................................................... 42
Playing from the beginning of a position or song (Reset & Play) ..................................................... 42
Creating a song .......................................................................................................... 43
Creating a song from scratch ................................................................................................................ 43
Erasing song data (Clear Song) ........................................................................................................ 43
Specifying a pattern for each position ............................................................................................... 43
Specifying the Note of each pattern...................................................................................................... 43
Editing a song .......................................................................................................................................... 44
Inserting a pattern at a specified position (Insert Pattern)................................................................ 44
Deleting a pattern from a specified position (Delete Pattern) ........................................................... 44
Changing the pattern for a specific position ...................................................................................... 44
Recording knob movements or your performance in a song (Event Recording).............................. 45
Deleting event data from a song........................................................................................................ 45
Checking for song event data ............................................................................................................ 45
Saving a song (WRITE).............................................................................................. 45
6. Global mode ...........................................................................46
Metronome settings ................................................................................................... 46
Synchronizing the EM-1 with external MIDI devices (MIDI Clock) ........................ 46
Synchronizing the EM-1 to a master external MIDI device (Ext)........................................................ 46
Synchronizing an external MIDI device to the EM-1 as master (int) .................................................. 46
Setting the MIDI channel of each part (MIDI ch) ..................................................... 47
Setting the MIDI note number of a drum part.......................................................... 47
MIDI filter settings ...................................................................................................... 47
Adjusting the pitch bend range ................................................................................ 47
Transmit/receive dump data...................................................................................... 48
Memory Protect (Protect) .......................................................................................... 48
Saving your changes in Global mode (WRITE)....................................................... 48
7. Appendices.............................................................................49
About MIDI .................................................................................................................. 49
Troubleshooting ......................................................................................................... 50
Error messages .......................................................................................................... 51
Restoring the factory set data .................................................................................. 51
Specifications ............................................................................................................. 51
Index ............................................................................................................................ 52
Pattern Name List....................................................................................................... 54
Song Name List .......................................................................................................... 54
MIDI Implementation Chart ....................................................................................... 55
Wave Name List.......................................................................................................... 56
5

1. Introduction
○○○○○○○○○○○○○○○○○○○○○○○○○○○○○○○○○○○○○○○○○
1. Introduction
Thank you for purchasing the ELECTRIBE•M(subsequently referred to as the EM-1).
The EM-1 is a pr oduction station designed for dance music that makes it easy for anyone from
beginner to enthusiast to create original music.
You can edit sounds intuitively by using the front panel knobs and keys, and easily create
complete rhythms and phrase patterns without requiring any additional equipment.
The EM-1 is the ideal tool for any musician, DJ, sound creator, or DTM user who wants an
easy way to add originality to their music.
Main features
• The EM-1 has eight drum parts and two synth parts, and you can assign sounds to each
part and edit them.
• By combining rhythm patterns created for each drum part together with phrase patterns
created for each synth part, you can easily create a song using no additional equipment.
• Internal memory contains numerous drum waves (144 types) and synth waves (50 types),
giving you access to a wide range of sonic expression.
• Up to 256 patterns (maximum of 64 steps each) can be created using the Sample data
and stored in internal memory.
• The EM-1 provides a Motion Sequence function that can record and loop knob move-
ments, and can be recorded for each part of each pattern.
• By combining multiple patterns and adding event data such as knob movements, you
can create and save up to sixteen songs.
• You can choose from realtime recording, step recording, and note editing.
• Since sounds and rhythm or phrase patterns can be modified instantly, you can use
these changes as part of your live performance expression.
• Eleven types of effect plus tempo delay are provided, and an Effect/Delay Motion Sequence
function allows knob movements to be recorded.
• A Keyboar d function lets you use the sixteen step keys as a keyboard on which to perform.
• The Pattern Set play function lets you assign 64 different patterns to the 16 step keys,
and successively select and play them.
• Tap Tempo and MIDI Clock can be used to synchronize the performance with an external sequencer, turntable, etc.
• The EM-1 can be controlled from an external sequencer or keyboard as a MIDI sound
module.
• The MIDI Dump function lets you save data on a computer or external sequencer etc.
The data you create on the EM-1
Patterns and songs that you create on the EM-1 by editing will return to their un-edited state
if you select a different pattern or song, or turn off the power before performing the Write
operation. If you wish to save an edited pattern, song, or global data, be sure to perform the
Write operation. Even after Writing the edited data, it is still possible to restore all songs and
patterns etc. to the factory settings. (Refer to p.51 “Restoring the factory set data.”)
6

○○○○○○○○○○○○○○○○○○○○○○○○○○○○○○○○○○○○○○○○○
Make connections and play!
Example connections
1. Introduction
Adapter cable holder
Power switch
AC Local Voltage
Preparing to play
Be sure to turn off the power before making connections. Careless operation may damage
your speaker system or cause malfunctions.
As shown in the above diagram, hook the A C adapter cable ar ound the adapter cable holder.
When removing the cable from the holder, do not use excessive force.
1. Connect the included AC adapter to the DC 9V jack, and plug the adapter into an AC
outlet.
2. Connect one end of your audio cables to the line out jacks of the EM-1 (L/MONO, R), and
connect the other end to your mixer or powered monitor speakers (amplified speakers) etc.
If you will be listening in mono, use the L/MONO jack. T o take full advantage of the EM-1's
sound quality, we recommend that you listen in stereo.
1. Introduction
3. If you will be using headphones, connect them to the headphone jack.
The output from the line out jacks will not be switched off even if headphones are plugged in.
Master volume
Drum part keys
4. When you have finished making connections, turn on the power. Slightly raise the master
volume of the EM-1, and strike the Drum part keys (1...6B) to check whether connections
have been made correctly. Use the master volume of the EM-1 and the gain and fader controls of your mixer or powered monitor system to adjust the volume to an appropriate
level.
7

2.Front and rear panel
○○○○○○○○○○○○○○○○○○○○○○○○○○○○○○○○○○○○○
2. Front and rear panel
The controls and other parts of the
EM-1 can be broadly grouped as
shown in the diagram.
Common section
Sequence
control section
Step key section
Common section
1. MASTER VOLUME
This knob adjusts the volume that is output from
the line out jacks and the headphone jacks.
2. Tempo Lock
When this key is on, the tempo will not change
when you select different patterns.
Connector section
1
2
7
3
56
Effect/Delay section
Synth filter section
Part common
section
Part select section
4
3. Display
This shows the value of the currently selected parameter, and various messages.
4. Dial
Use this to modify the value shown in the display.
5. MIDI (LED)
This will light when valid MIDI messages are received.
6. Beat (LED)
This will blink at quarter-note intervals to indicate the tempo.
7. [▲][▼] (cursor keys)
In each mode, use these keys to select parameters from the matrix shown in the display.
8. Matrix
The parameters that will appear in the display are listed here for each mode. Use the
cursor keys to make the desired parameter select LED light.
9. Mode keys
These keys are used to select PATTERN, STEP EDIT , SONG, or GLOBAL modes.
10. WRITE key
Use this key when you wish to save settings that you modified in Pattern, Song, or
Global mode, or to save Pattern Set data.
89
10
8

○○○○○○○○○○○○○○○○○○○○○○○○○○○○○○○○○○○○○○
Effect/Delay section
1. Type
Selects the effect type.
2. Original Value (LED)
This will light when the knob etc. that you are currently moving
arrives at the same position as originally programmed in the
pattern.
3. Delay Edit key
Each time you press this key, Delay Edit will be turned on (lit) or off (dark). When this
is on, you can use the Edit 1 and 2 knobs to control the delay. When you use the Type
knob to switch effects, this will be forced off.
4. Motion Seq (motion sequence) key
Each time you press this key, it will be turned on (lit) or off (dark). When this is on,
movements of the Edit 1 and 2 knobs will be recorded and played back. When Delay
Edit is on, Delay motion sequence will be selected. When Delay Edit is off, the motion
sequence of the effect selected by Type will be selected.
5. Edit 1/Time
This knob adjusts the character of the effect. The result will differ accor ding to the effect
type. When the Delay Edit key is on, this knob adjusts the length of the delay time.
1
2
3
2.Front and rear panel
5
6
4
2.Front and rear panel
6. Edit2/Depth
This knob adjusts the character of the effect. The result will differ accor ding to the effect
type. When the Delay Edit key is on, this knob adjusts the depth of the delay.
Part common section
1. Motion Seq (motion sequence)
This key lets you record and play back knob movements
for each part. Each time you press this key, the setting
will alternate between on (Smooth lit), on (Trig Hold lit),
and off (dark)
2. Amp EG
Select the amp envelope for each part. Each time you press
this key, the envelope will switch between a decaying envelope “ ” (key lit) and a
sustaining envelope “ ” (key dark).
3. Roll
For each part, this key switches the roll effect (successive strikes) on (lit) or off (dark).
4. Effect
For each part, this key switches the effect send on (lit) or off (dark).
5. EG Time
This knob adjusts the envelope time (the time until the sound disappears) for each part.
1
2
5
6
3
4
7
8
6. Pitch/Glide
This knob sets the pitch of the drum part. For a synth part, it sets the time over which
the pitch will change smoothly between two notes.
7. Level
This knob adjusts the level. For the Accent part, it adjusts the accent level.
8. Pan (panpot)
This knob sets the stereo location of the sound.
9
2.Front and rear panel
○○○○○○○○○○○○○○○○○○○○○○○○○○○○○○○○○○○○○
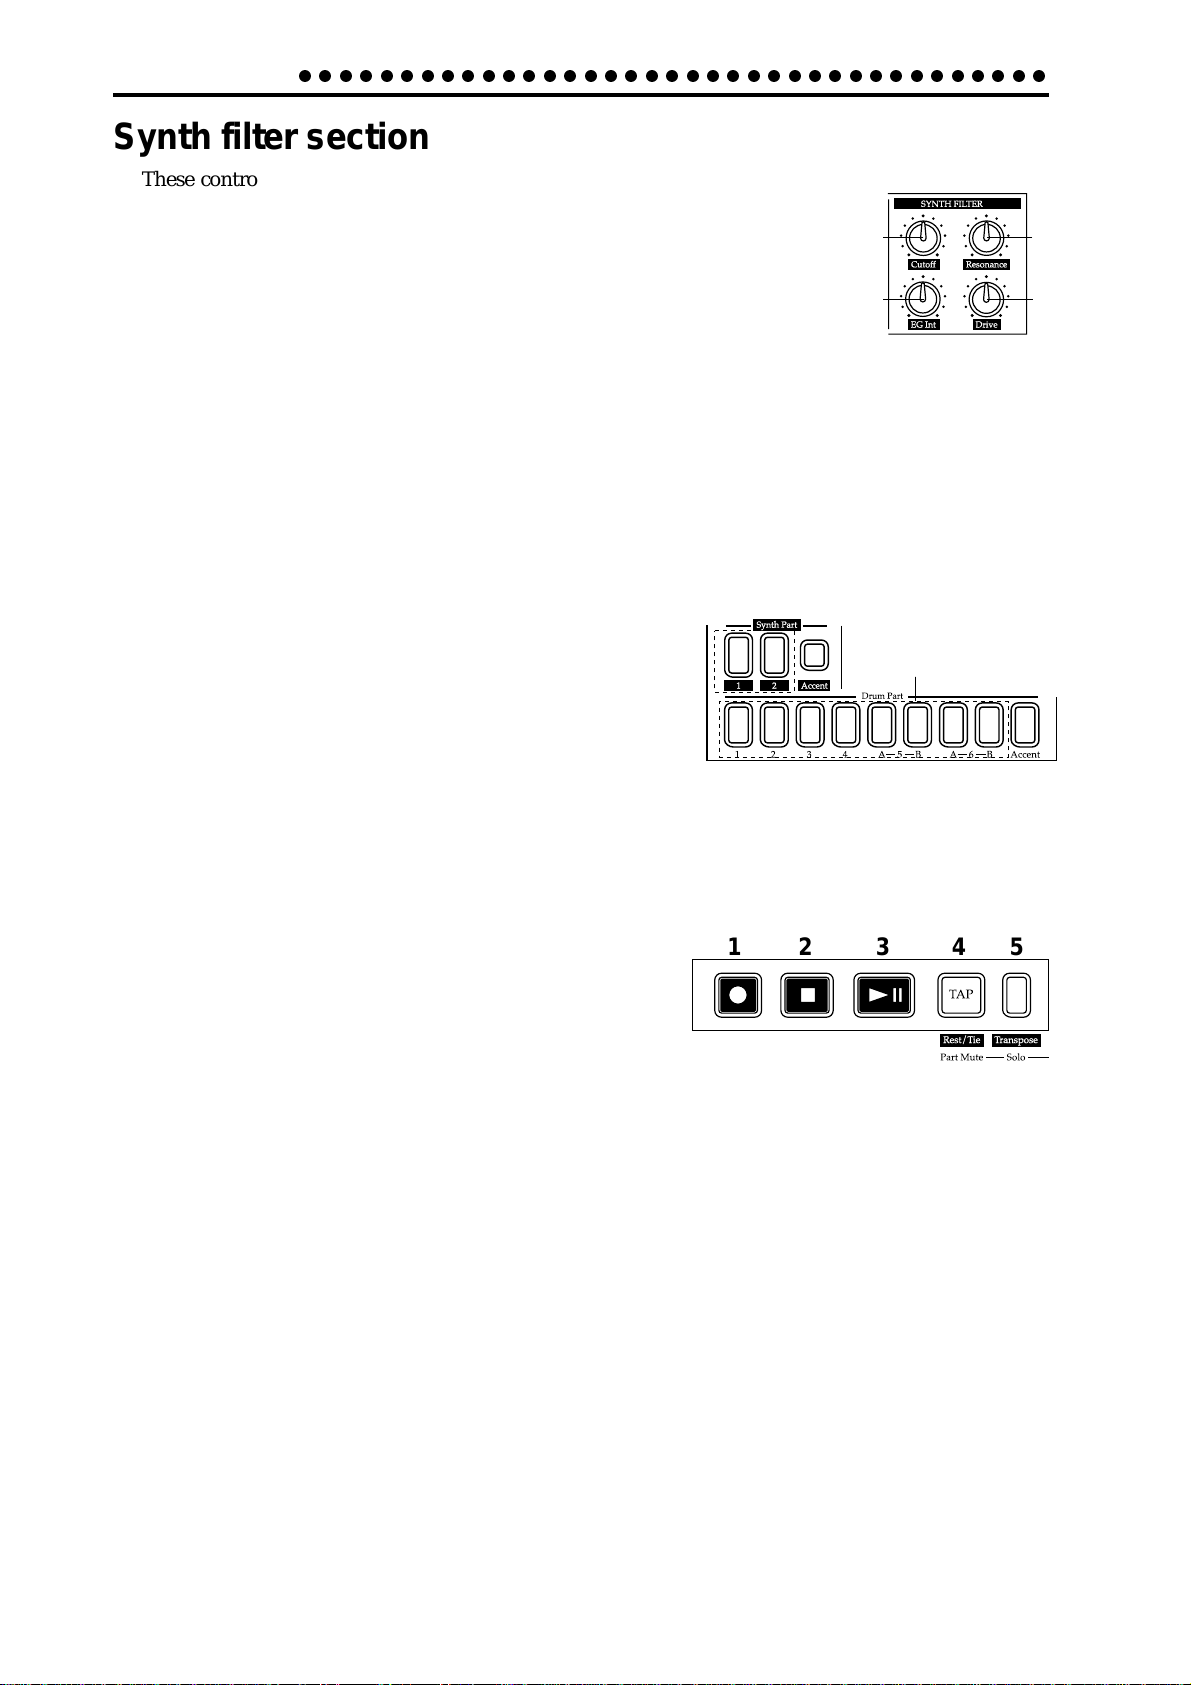
Synth filter section
These controls let you adjust the brightness of the sound or add a distinctive
tonal character.
1. Cutoff
Adjust the cutoff frequency of the filter.
3. Resonance
Adjust the resonance of the filter.
2. EG Int (EG intensity)
Adjust the depth of the filter envelope.
4. Drive
Adjust the degree of distortion for the sound of the filter . Driver makes between warmly
Analog Overdrive and Hard Distortion.
Part Select section
1. (Synth Part) 1, 2 keys
These keys select a synth part
2. (Synth Part) Accent key
This key selects the synth accent part.
3. (Drum Part) 1—4, 5A-5B, 6A-6B keys
These keys select a drum part. By pressing a key, you can
hear the sound that is assigned to the corresponding part.
1
1
3
2
3
2
4
4
4. (Drum Part) Accent key
This key selects the drum accent part.
Sequence Control section
1. Rec key
Use this key to record rhythms, phrases and movements
of the knobs etc. If you press this key during recording,
recording will end, and playback will continue.
2. Stop/Cancel key
This key stops playback of a pattern or song, or cancels an operation.
3. Play/Pause key
This key begins/pauses playback of a pattern or song.
4. TAP, Rest/Tie, Part Mute key
T ap on this key to enter a new tempo. During step r ecording, use this key to input a rest
or a tie. During playback, you can hold down this key and press a Part key to mute the
specified part.
5. Transpose, Solo key
Use this key to transpose a phrase. During playback, you can hold down this key and
press one or more Part keys to playback the specified part(s).
12 3 45
10

○○○○○○○○○○○○○○○○○○○○○○○○○○○○○○○○○○○○○○
Step Key section
2.Front and rear panel
1
2
3
4
5
1. Select keys
By pressing these keys to turn the Select LEDs on or off, you can use the sixteen step
keys below as up to 64 step keys.
When the Keyboard function is on, these keys are used to switch the octave.
In Song mode, these keys function as rewind and fast-forward keys. When the Pattern
Set function is on, they are used to switch Pattern Set groups.
2. Select LEDs
The upper row of LEDs (green) indicates the location (length 1...4) within the pattern of
the currently-playing pattern.
The lower row of LEDs (red) indicates the location (length 1...4) of the pattern indicated
by the step keys. When the Pattern Set function is on, these LEDs indicate the pattern
set group. When the Keyboard function is on, these LEDs indicate the octave position.
2.Front and rear panel
3. Step keys 1...16
Use these keys to modify and audition the rhythm or phrase pattern of each part.
When the Keyboard function key is on, these keys function as a keyboard, allowing
you to play sounds. When the Pattern Set function is on, use these keys to select patterns that you have assigned.
4. Keyboard, Pattern Set key
This makes the sixteen step keys function as a keyboard. Each time you press this key,
the setting will alternate on/off. By holding down this key and pressing one of the step
keys, you can switch to the pattern that you assigned to that key (Pattern Set function).
5. Shift key
This key is used in conjunction with other keys. When held down, it gives an additional
function to another key.
Shift + Play/Pause key:Playback from the beginning of the pattern.
Shift + Rec key:During playback, erase triggers from the pattern.
Shift + Step keys:Execute the function shown below each step key.
For other Shift key combinations, refer to the explanation of each parameter.
11

2.Parts
○○○○○○○○○○○○○○○○○○○○○○○○○○○○○○○○○○○○○○○○○○○
Connector section
1 23
1. Power switch
This switch turns the power on/off. Each time you press it, the power will alternate on
or off.
2. DC 9V
Connect the included AC adapter here.
3. Adapter cable holder
Hook the adapter cable around this so that it will not be disconnected accidentally.
4. MIDI connectors
IN MIDI data is received at this connector to control the EM-1 from an external
MIDI device or to receive a data dump.
OUT MIDI data is transmitted from this connector to control an external MIDI de
vice or to transmit a data dump.
THRU MIDI data received at the MIDI IN connector is re-transmitted without change
from this connector. This is used to "daisy-chain" multiple MIDI devices.
5. L/MONO, R (line output) jacks
Connect your audio cables from these jacks to your mixer or powered monitor system
(powered speakers) etc. If you wish to make monaural connections, connect the L/
MONO jack.
46
5
6. (headphone jack)
A set of stereo headphones fitted with a stereo jack plug can be connected here.
12

○○○○○○○○○○○○○○○○○○○○○○○○○○○○○○○○○○
3. Basic operation (Quick Start)
3. Basic operation (Quick Start)
Conceptual diagram of the EM-1
On the EM-1 , a song contains both Patterns (which consist of Parts, and effect and
delay settings) and event data (refer to p.45 "Recording knob movements or your performance in a song (Event Recording)").
Structure of Song
Songs: S.01...S.16
Pattern order
Effect
Type
Reverb
Flg./Cho.
á
á
Mod. Delay
A.03
d.53
b.07
A.06
A.52
C.17
á
á
á
End
Event data
Part Solo
Part Mute
Part Trigger
á
á
á
Parameter
Edit 1
Edit 2
Patterns: A.01...d.64
Pattern data
Tempo
Length
Beat/Scale
Swing
Effect
Delay
Motion sequence
Part data
Synth 1
Synth 2
Synth Accent
Drum 1
Drum 2
Drum 3
Drum 4
Drum 5A
Drum 5B
Drum 6A
Drum 6B
Drum Accent
Delay
Parameter
Delay Depth
Delay Time
Synth Part
Parameter
Wave
á
Effect On/Off
EG Time
Glide
á
Resonance
Drum Part
Parameter
Wave
á
Effect On/Off
EG Time
Pitch
Level
Pan
Motion sequence
Phrase pattern
Trigger
Note No.
Gate Time
Rhythm pattern
Trigger
Motion sequence
Motion sequence
Listening to a Song
1.Press the Song Mode key to enter Song mode (the key will light).
2.Use the cursor [▲][▼] keys to select Song (the top LED will light).
3.Rotate the dial to select the desired song (S.01...S.16 ).
4.Press the Play/Pause key to playback the song (the key will light). When
the song ends, playback will stop automatically (the key will go dark).
To pause during playback, press the Play/Pause key (the key will blink).
To resume playback, press the Play/Pause key once again (the key will
light). To stop playback, press the Stop/Cancel key.
It is not possible to change songs during playback.
What is a Song?
On the EM-1, a song is musical data consisting of Patterns arranged in the desired playback order. The EM-1
lets you create and store up to sixteen songs. In each song
you can arrange up to 256 patterns, and rhythm , phrase
and knob movements can also be recorded in addition
to the playback. (Refer to p.42 "Song mode.")
Song
Pattern(A.03)
Pattern(b.01)
Stop/
Cancel key
Pattern(A.01)
3. Basic operation (Quick Start)
3
2
1
4
Pattern(A.02)
13
3. Basic operation (Quick Start)
3
2
4
1
Stop/
Cancel key
○○○○○○○○○○○○○○○○○○○○○○○○○○○○○○○○○○
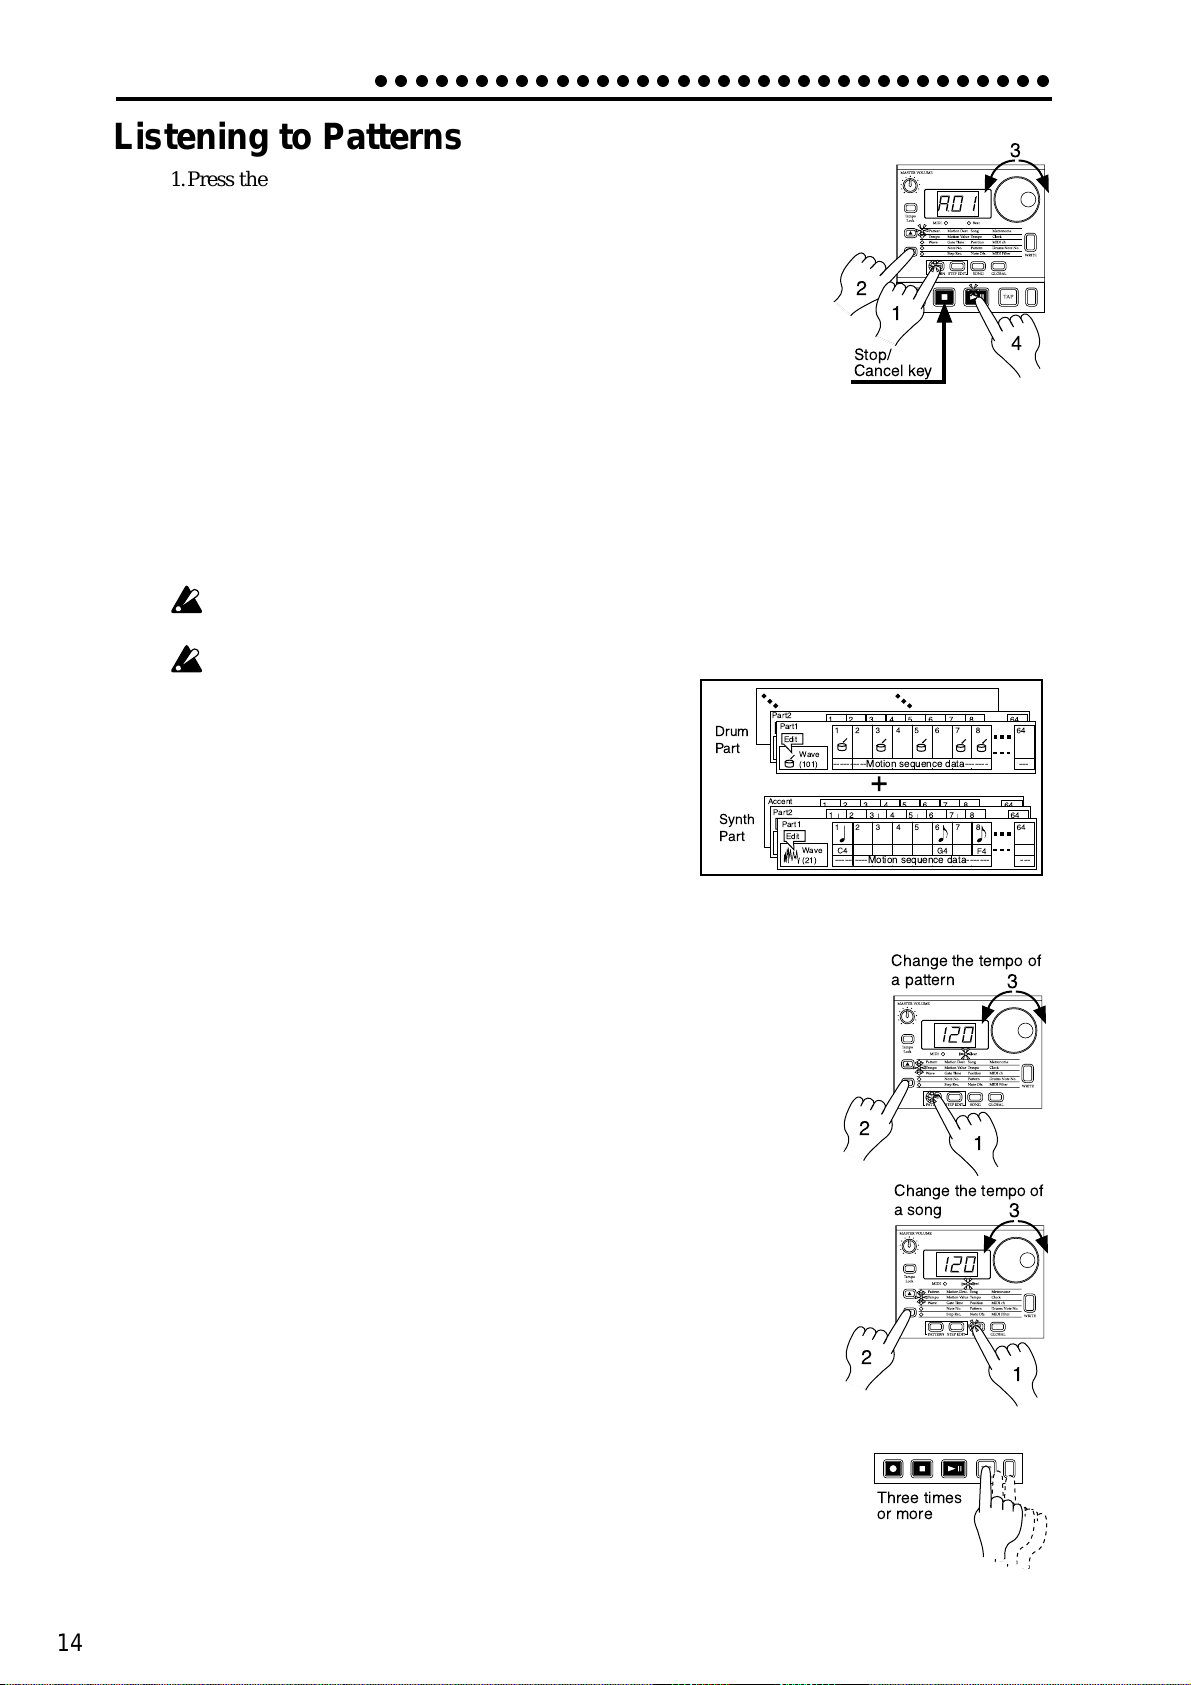
Listening to Patterns
1.Press the Pattern mode key to enter Pattern mode (the key will light).
2. Use the cursor [▲][▼] keys to select Pattern (the corresponding LED
will light).
3. Rotate the dial to select the desired pattern (A.01...A.64, b.01...b.64,
C.01...C.64, d.01...d.64 ).
4. Press the Play/Pause key to playback the pattern (the key will light).
When pattern playback ends, the pattern will return to the beginning,
and continue playing repeatedly.
To pause during playback, press the Play/Pause key (the key will blink). To resume
playback, press the Play/Pause key once again (the key will light). To stop playback,
press the Stop/Cancel key.
You can rotate the dial to select patterns when playback is stopped or even during
playback.
When you change patterns during playback, the change will actually occur at the
end of each pattern. (Refer to p.25 "The timing at which patterns will change.")
Depending on the effect and delay settings, slight
noise or unwanted sound may occur at the transition
Pattern
between patterns if they are changed during playback.
What is a Pattern?
A pattern is a performance of a specific length that consists of drum
sounds played as a rhythm, together with synth sounds played as
a phrase. The EM-1 lets you create and store 256 patterns. Each
pattern consists of 12 parts (see p.15). In addition to the sounds of
each part, you can also record phrases and knob movements (see
p.25 “Pattern mode”).
Trying out the functions
Changing the tempo of a song or pattern
There are two ways to change the tempo. When the Tempo Lock key is off
(key dark), switching patterns or songs will cause the tempo you set here to
return to the tempo of the selected pattern or song.
• Using the dial to change the tempo
1. Press the Mode key to enter Song mode or Pattern mode.
2. Use the cursor [▲][▼] keys to select Tempo (the corresponding LED will
light).
Drum
Part
Synth
Part
Part2
Accent
Part2
Part1
Edit
Wave
----------Motion sequence data------- ---
(101)
Part1
Edit
Wave
----------Motion sequence data------- ---
(21)
Change the tempo of
a pattern
2
Change the tempo of
a song
3
1
3
14
3. Rotate the dial to change the tempo.
If you wish to adjust the tempo in more detail, you can hold down the Shift
key and rotate the dial to modify the decimal portion of the value.
• Using the Tap Tempo key to change the tempo
While a song or pattern is playing, press the Tap key three times or more at
the desired tempo. The EM-1 will detect the interval at which you pressed
the T ap key , and will set the tempo accor dingly. The tempo can also be changed
in this way even if the EM-1 is not currently playing a song or pattern.
Use the cursor [▲][▼] keys to select Tempo (the corresponding LED will
light),and the tempo you modified will appear in the display.
2
Three times
or more
1

○○○○○○○○○○○○○○○○○○○○○○○○○○○○○○○○○○
Wave
(21)
----------Motion sequence data------- ---
Edit
Synth Part
Wave
(50)
----------Motion sequence data------- ---
Edit
Drum Part
3. Basic operation (Quick Start)
Pressing keys to play the sound of a Part
When you strike the drum part keys, or select a synth part, turn on the keyboard function and press the step keys, the sound of the corresponding part will be heard.
The sound of a part will differ depending on the pattern. Turn the dial to select various
parts, and listen to the wide variety of sounds.
When you press a drum part key, the keyboard function of the step keys will be
cancelled, but when you select a synth part once again, the keyboard function will
automatically return to the previous setting.
Parts for which Wave (see p.16 “What is a wave?”) is turned “oFF” cannot produce
sound.
What is a Part?
A part is the smallest unit of which a pattern is made, and consists of a
sound and rhythm or phrase, effect on/off settings, and motion sequences etc. Parts can be one of the following types, and there are a total
of 12 parts. (See p.25 “Pattern mode”)
• Drum parts (1—4, 5A-B, 6A-B)
A drum sound and rhythm pattern (timing of sounds), effect on/off,
motion sequence etc.
• Synth parts (1, 2)
A synth sound and phrase pattern (trigger, note number, gate time),
effect on/off, motion sequence etc.
• Accent part (drum, synth)
Points at which to emphasize the volume of the pattern (i.e., accent), motion sequence.
The sound can also be edited for each part, and you can also store the rhythm, phrase
pattern, effect on/off, and motion sequence etc. for each part. (See p.27 “Editing the
sound of a part”)
Playing the sound of a drum part
When you press drum part keys 1 through 6B, the sound assigned to each key will be
heard. (For each pattern, a different drum sound is assigned to each key.)
Pressing the drum accent part key will not produce sound. It is not possible to sim ultaneous play drum parts 5A and 5B or 6A and 6B - these parts are intended for
sounds which you want to cut each other off, like open and closed hi-hat etc..
Playing the sound of a synth part (the Keyboard function)
1.Turn on either synth part key 1 or 2 (the key will light).
2.Press the Keyboard key to turn on the Keyboar d function (the key will light).
3. The step keys will function as a keyboard, and can be
played.
T o change the octave, use the Select keys. The select LEDs
(lower row, red) will light to indicate the octave as follows.
Indication of octave
2
3
3. Basic operation (Quick Start)
1
Drum Part
Synth Part
LED(s) lit
Pitch range
Pressing the synth accent part key will not produce sound.
The Keyboard function cannot be turned on/off unless either synth part key 1 or 2 is
selected.
Each synth part is a monophonic synthesizer, and cannot play m ultiple notes sim ul-
taneously; i.e., it is not polyphonic.
A0...C2 A1...C3 A2...C4 A3...C5 A4...C6 A5...C7
15

3. Basic operation (Quick Start)
○○○○○○○○○○○○○○○○○○○○○○○○○○○○○○○○○○
Modifying (editing) the sound of a part
For a drum part you can select the wave of the drum sound, and for a synth part you
can select the wave of the synth sound.
Use the Level and Pan knobs and the Effect and Amp EG keys to edit the sound of each
part.
The sound of each part in the pattern that you edit in this way can be saved by the Write
operation. (See p.21 “Saving a pattern that you create.”)
When you press a drum part key, the keyboard function of the step keys will be
defeated, but will return to the previous setting when you once again select a synth
part.
The knobs that are valid will differ depending on the part. (See p.27 “Editing the
sound of a part.”)
If a motion sequence is operating for a knob and you ha ve difficulty editing the sound
as you wish, turn off the motion sequence before editing the sound. (See p.34 “Mo-
tion sequence.”)
What is a Wave?
“Waves” are the pieces of waveform data inside the EM-1 that are the basis for the sound of each part.
There are 144 waves for use by drum parts, and 50 waves for use by synth parts, making a total of 194
waves. You can freely assign these waves to each part. (See p.27 “Assigning a wave”)
Editing the sound of a drum part
1.Press the PATTERN mode key to enter Pattern Mode.
2. Use the cursor keys [▲][▼] to select Wave (the corre-
sponding LED wil light).
3. Press a Drum Part key to select the part that you wish
to edit.
4. Turn the dial to select a wave while you press the key
you selected in step 3 to hear the sound.
5. Operate the knobs and keys of the Part Common sec-
2
1
tion to modify the sound. When a knob position or key
setting is the same as the original sound, the Original
Value LED will light to indicate this.
Editing the sound of a synth part
1.Press the PATTERN mode key to enter Pattern mode.
2.Use the cursor keys [▲][▼] to select Wave (the corresponding LED wil light).
3.Use the Synth Part keys to select the part (1 or 2) whose sound you wish to edit.
4. Turn on the Keyboard function (the key will be lit),
and then press a step key to play the sound.
Original Value (LED)
4
3
Original Value (LED)
5
5
16
5.While pressing the step keys to hear the sound, turn
the dial to select a wave.
6. Operate the knobs and keys of the Synth Filter section or the Part Common section to modify the sound.
When a knob position or key setting is the same as
the original sound, the Original Value LED will light
to indicate this.
6
2
1
4
4,5
3
6

○○○○○○○○○○○○○○○○○○○○○○○○○○○○○○○○○○
3. Basic operation (Quick Start)
Editing the effect or delay
1.Press a drum part key to select a part for which it will be easy to hear the changes you
make to the effect.
2. To use a synth part while editing the effect, turn on the
Keyboard key, and press the step keys to play the sound.
3. To edit the effect, turn on the Effect key in the Part Common section (the key will light).
4. To edit the global delay, turn on the Delay Edit key in the
Effect/Delay section.
5.Operate the knobs and keys of the Effect/Delay section to
modify the effect or delay. When a knob position or key
setting is the same as the original effect or delay setting,
the Original Value LED will light to indicate this.
The pattern that you edit in this way can be saved by the Write operation (see p.21
“Saving a pattern that you create”).
When you press a drum part key, the keyboard function of the step keys will be
defeated, but will return to the previous setting when you once again select a synth
part.
Original Value
(LED)
2
5
4
2
3
1
2
The delay is a global effect, so it will al wa ys be on, regardless of the on/off status of
the Effect key.
The function of the knobs will differ depending on the type of effect. (See p.29 “EF-
FECT.”)
If a motion sequence is operating for a knob and you have difficulty editing the sound
as you wish, turn off the motion sequence before editing the sound. (See p.34 “Mo-
tion sequence.”)
Playing the sound of a part along with a song or pattern
1.Select the synth part (1 or 2) that you wish to play, and turn on the keyboard function.
2.In Song mode or Pattern mode, press the Play/Pause key to begin playback.
3.Press the drum part keys or the step keys to play along
with the song or pattern.
When you press a drum part key , the keyboard function of the step keys will be defeated, b ut will return
to the previous setting when you once again select
a synth part.
The synth parts are monophonic synthesizers. One
part cannot sound multiple notes simultaneously.
1
2
3. Basic operation (Quick Start)
1
3
3
17
 Loading...