

Page 1
3
Page 2
Precautions
Location
Using the unit in the following locations can result in a malfunction.
• In direct sunlight
• Locations of extreme temperature or humidity
• Excessively dusty or dirty locations
• Locations of excessive vibration
• Close to magnetic fields
Power supply
Please connect the designated AC adapter to an AC outlet of the
correct voltage. Do not connect it to an AC outlet of voltage other
than that for which your unit is intended.
Interference with other electrical devices
Radios and televisions placed nearby may experience reception interference. Operate this unit at a suitable distance from radios and
televisions.
Handling
To avoid breakage, do not apply excessive force to the switches or
controls.
Care
If the exterior becomes dirty, wipe it with a clean, dry cloth. Do not
use liquid cleaners such as benzene or thinner, or cleaning compounds or flammable polishes.
DECLARATION OF CONFORMITY (for USA)
Responsible Party : KORG USA INC.
Address : 316 SOUTH SERVICE ROAD, MELVILLE, NY
Telephone : 1-631-390-6500
Equipment Type : Music Production Station
Model : electribe2, electribe2s
This device complies with Part 15 of FCC Rules. Operation is
subject to the following two conditions:
(1) This device may not cause harmful interference,and (2) this
device must accept any interference received, including interference that may cause undesired operation.
Notice regarding disposal (for EU)
When this “crossed-out wheeled bin” symbol is displayed
on the product, owner’s manual, battery, or battery package, it signifies that when you wish to dispose of this product, manual, package or battery you must do so in an approved manner. Do not discard this product, manual,
package or battery along with ordinary household waste.
Disposing in the correct manner will prevent harm to human health and potential damage to the environment. Since the
correct method of disposal will depend on the applicable laws and
regulations in your locality, please contact your local administrative body for details. If the battery contains heavy metals in excess of the regulated amount, a chemical symbol is displayed
below the “crossed-out wheeled bin” symbol on the battery or battery package.
Keep this manual
After reading this manual, please keep it for later reference.
Keeping foreign matter out of your equipment
Never set any container with liquid in it near this equipment. If liquid
gets into the equipment, it could cause a breakdown, fire, or electrical shock.
Be careful not to let metal objects get into the equipment. If something does slip into the equipment, unplug the AC adapter from the
wall outlet. Then contact your nearest Korg dealer or the store
where the equipment was purchased.
THE FCC REGULATION WARNING (for USA)
NOTE: This equipment has been tested and found to comply with
the limits for a Class B digital device, pursuant to Part 15 of the
FCC Rules. These limits are designed to provide reasonable protection against harmful interference in a residential installation.
This equipment generates, uses, and can radiate radio frequency
energy and, if not installed and used in accordance with the instructions, may cause harmful interference to radio communications. However, there is no guarantee that interference will not
occur in a particular installation. If this equipment does cause
harmful interference to radio or television reception, which can be
determined by turning the equipment off and on, the user is encouraged to try to correct the interference by one or more of the
following measures:
• Reorient or relocate the receiving antenna.
• Increase the separation between the equipment and receiver.
• Connect the equipment into an outlet on a circuit different from
that to which the receiver is connected.
• Consult the dealer or an experienced radio/TV technician for
help.
If items such as cables are included with this equipment, you must
use those included items.
Unauthorized changes or modification to this system can void the
user’s authority to operate this equipment.
2
Regarding data
Unexpected malfunctions caused by inappropriate operation can cause the
contents of memory to be lost. Please save important data to other media
for safekeeping. Korg Corporation accepts no responsibility for any damages resulting from loss of data.
Regarding copyright
The use of copyrighted material for any purpose other than permitted uses
such as personal or home enjoyment, constitutes copyright infringement,
and may incur penalties including damages and restitution. The rights of the
copyright holder also apply to recordings of, or derivative works produced
using copyrighted material, meaning that reuse or distribution of such material is also a violation of copyright law. Korg Incorporated accepts no responsibility for any damages or penalties you may incur due to any copyright violation you may commit. If you have any questions regarding your
rights to use copyrighted material, please consult a specialist in copyright
law.
* All product names and company names are the trademarks or registered trade-
marks of their respective owners.
Page 3
Table of Contens
Introduction .................................. 4
1. Section names ................................................................ 4
2. Connection ..................................................................... 7
3. Connecting power supply ............................................... 7
4. Insert and remove memory card .................................... 8
Making sounds .............................. 8
1. To turn power on/off ...................................................... 8
2. Basic operation .............................................................. 8
3. To playback a pattern ..................................................... 8
4. Selecting a part .............................................................. 9
Playing music .............................. 10
1. Playing music with the trigger pad .............................. 10
2. Playing music with the touch pad. ............................... 10
3. Using the gate arpeggiator. .......................................... 10
4. Using master effects ..................................................... 11
5. Playing with pattern set ............................................... 11
Other setting ............................... 14
1. Setting metronome ...................................................... 14
2. Setting type of battery ................................................. 14
3. Adjusting LCD contrast ................................................. 14
4. Prolonging battery life ................................................. 14
5. Setting auto power off ................................................. 14
6. Setting global MIDI channel ......................................... 14
7. Playing by synchronizing with external device ............. 14
8. Using memory card ...................................................... 14
9. Using the Event Recorder ............................................. 15
10. Formatting user data .................................................. 15
electribe sampler features ........... 16
1. New functions of the electribe sampler ........................ 16
2.
Changes to specific controller functions ..................................16
Recording & Editing Samples ........ 16
1. Sampling ...................................................................... 16
6. Setting the BPM (tempo) ............................................. 11
Adding variation to sound by a knob .............................11
7.
Record playing ............................ 12
1. Real time recording ...................................................... 12
2. Step edit ....................................................................... 12
3. Record knob and button movements (motion sequence) .
.................................................................................. 12
4. Saving a pattern ........................................................... 12
Editing a pattern ......................... 13
1. Muting a part ............................................................... 13
2. Erasing a part ............................................................... 13
3. Copying a part .............................................................. 13
4. Changing pattern setting ............................................. 13
2. Resampling .................................................................. 17
3. Editing a sample........................................................... 17
4. Importing/exporting samples ...................................... 17
Appendix .................................... 18
1. Troubleshooting ........................................................... 18
2. Error message .............................................................. 19
Specifications .............................. 19
3
Page 4
Introduction
Thank you for purchasing the Korg electribe/electribe sampler
Music Production Station.
In order to take full advantage of your new instrument, please
read this instruction manual carefully and use the product as
directed. You should also keep the instruction manual for future
reference.
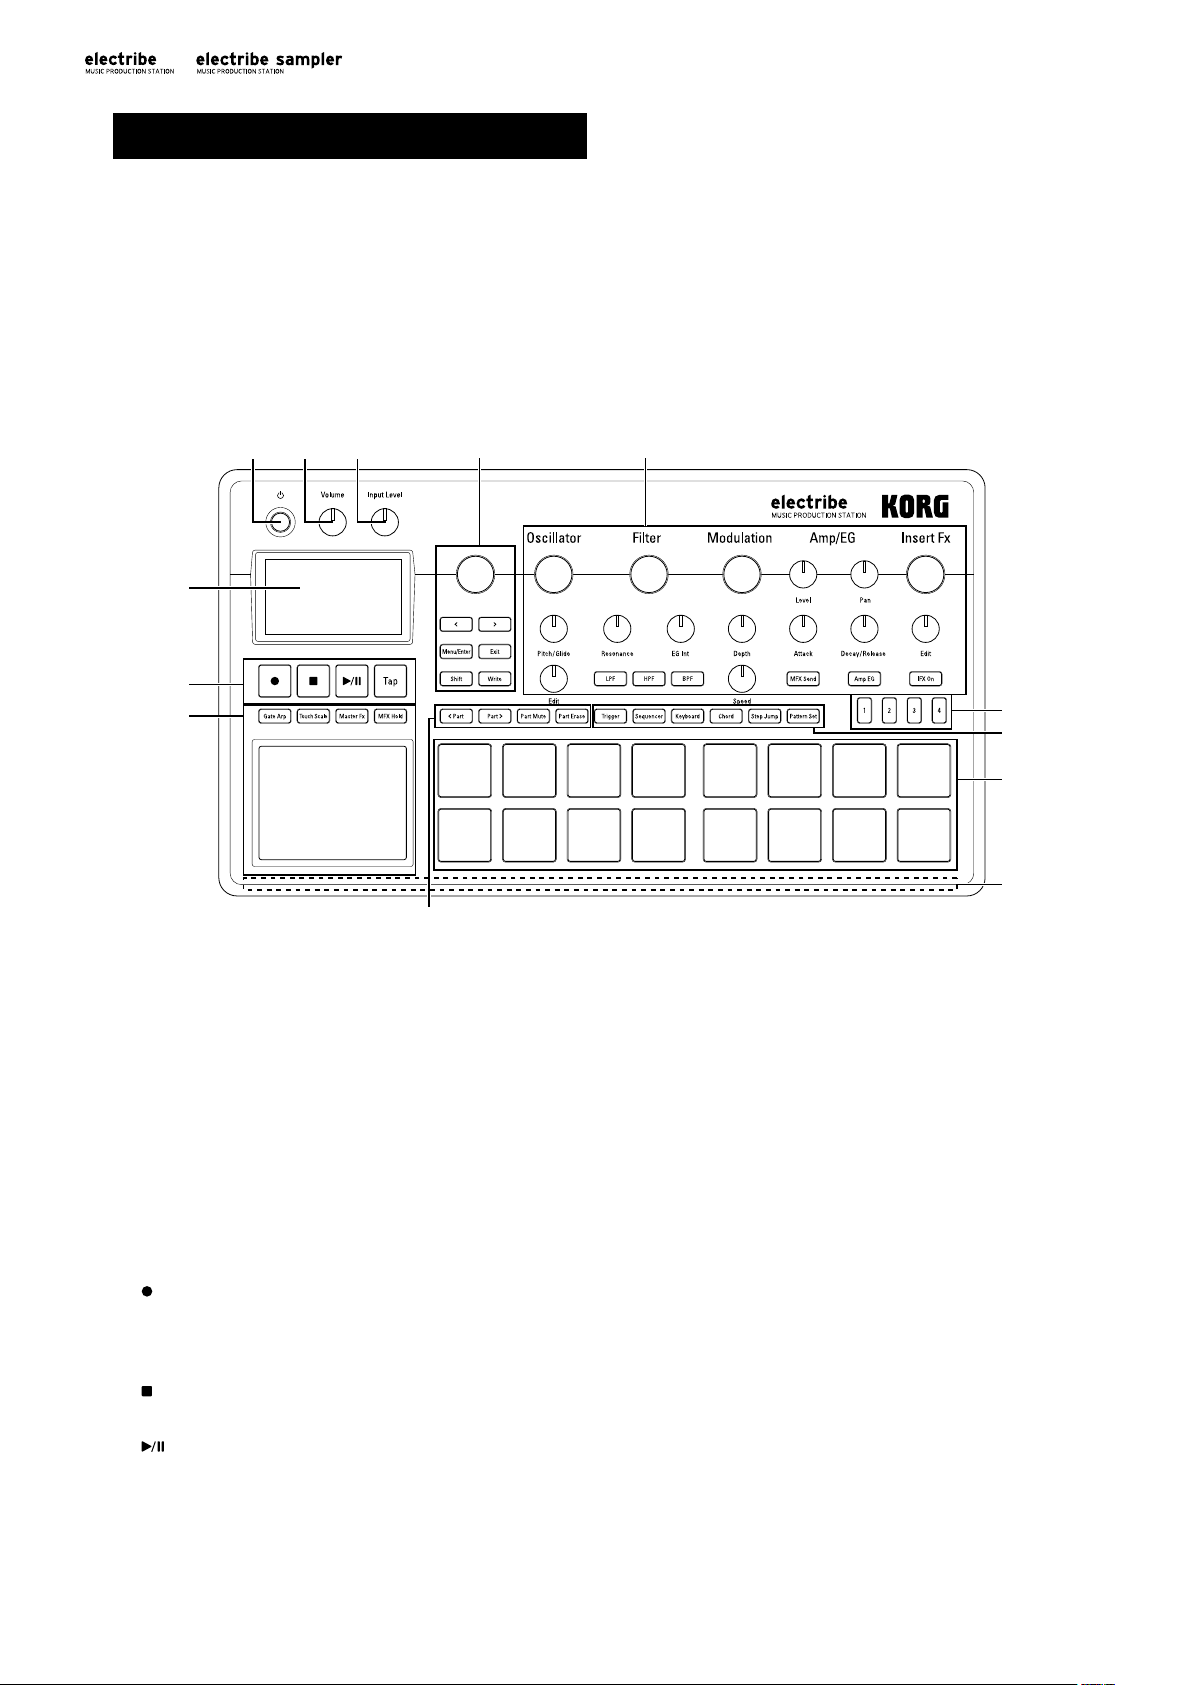
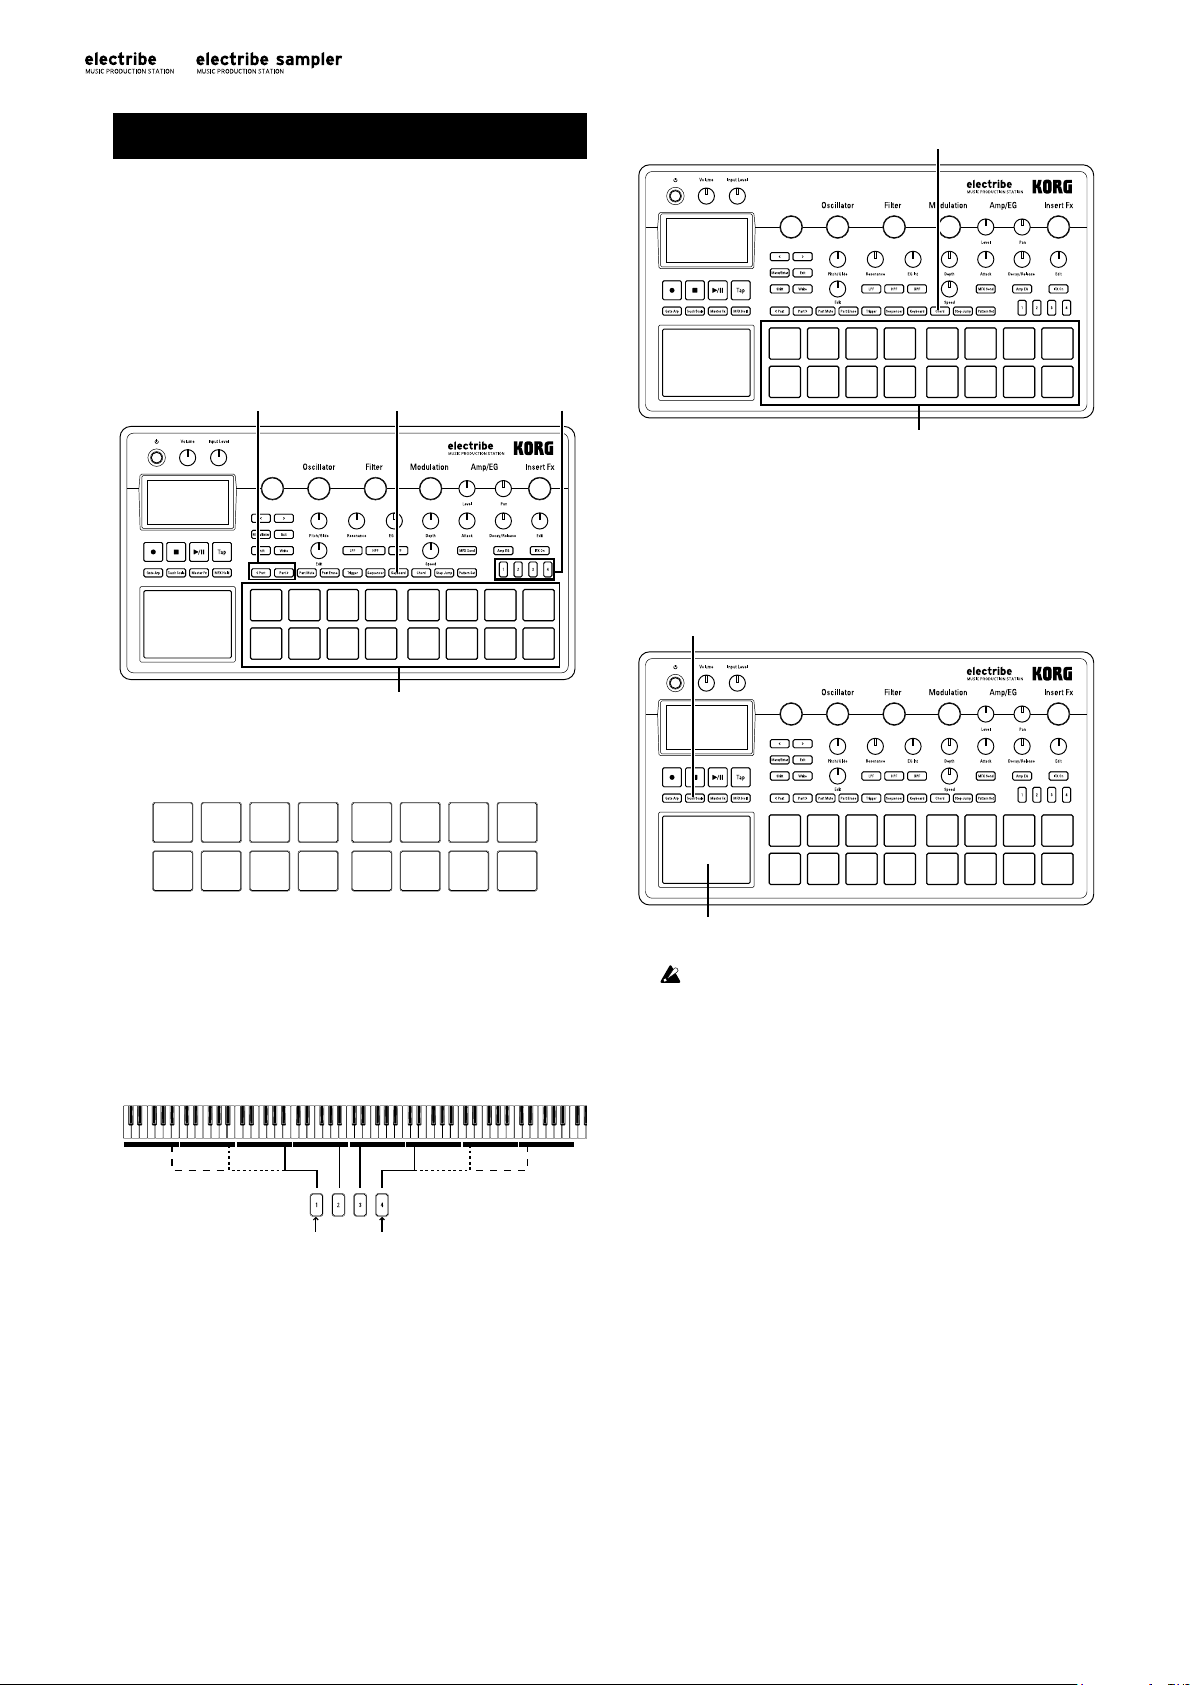
1. Section names
Top panel
1
2 3
4
5
6
7
The electribe/electribe sampler is a production station for dance
music that is capable of creating original music. Using the knobs
and the touch pad on the main unit enables you to edit sounds to
easily create rhythm and phrase patterns with a single unit.
Basic operation for the electribe sampler is the same as for the
electribe.
For additional explanations that apply to the electribe sampler,
refer to “electribe sampler features” (→ p. 16) and “Recording &
Editing Samples” (→ p. 16).
TIP Illustrations in this manual show the electribe.
8
9
11
10
1. Power button
This button turns power ON or OFF.
2. Volume knob
This knob adjusts the volume output from the Line Out jack or
the Headphone jack.
3. Input Level knob
This knob adjusts the input level from the Audio In jack.
4. Display
This shows information for patterns, parts and parameter
settings.
5. Transport section
(Rec) button
This button enables recording of rhythms, phrases or knob
movements. Pressing this button during recording will stop
the recording process and playback will continue.
(Stop) button
This button will stop playback.
(Play/Pause) button
This button starts playing a pattern or pauses it.
Tap button
Pressing this button a couple of times at the desired BPM will
change the tempo to your desired selection.
12
13
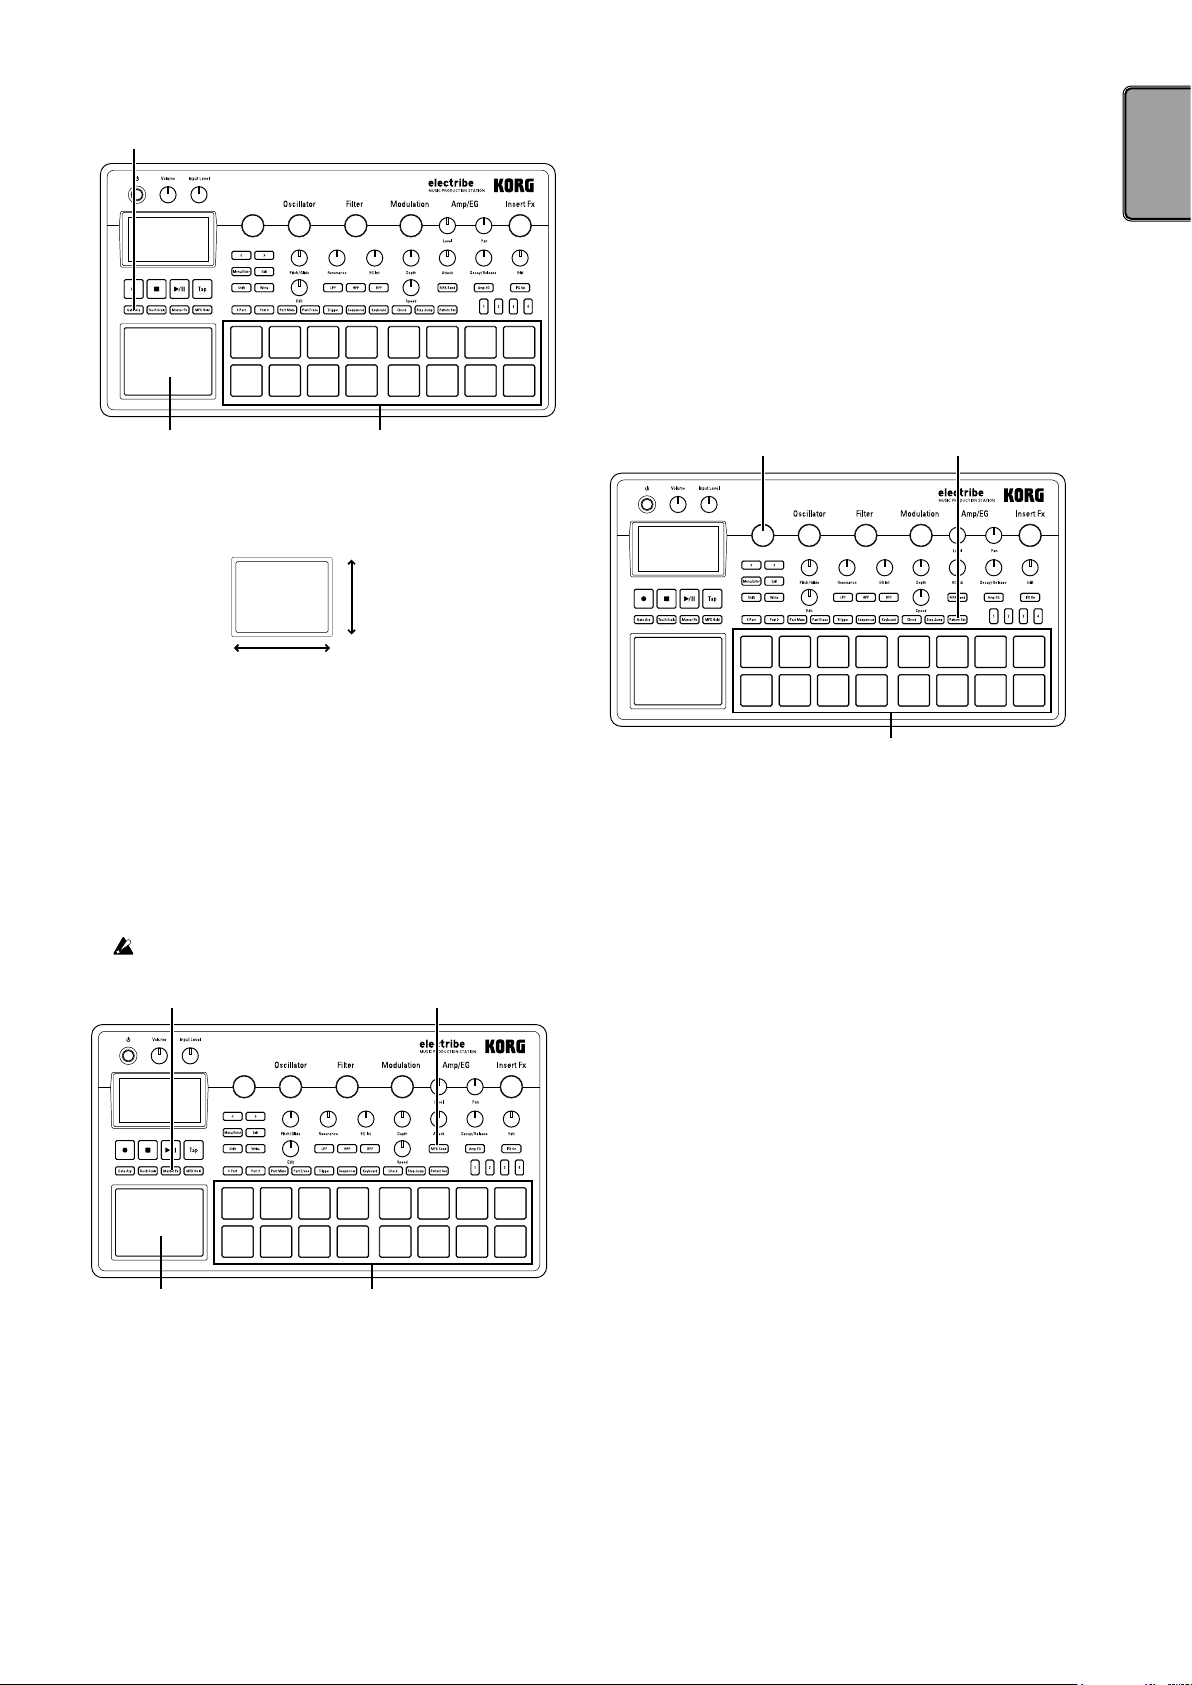
6. Touch pad section
Touch pad
This pad is used for playing with the functionality of the gate
arpeggiator or touch scale, or for controlling the master effect.
Gate Arp button
This button turns the gate arpeggiator function ON.
Touch Scale button
This button turns the touch scale function ON.
Master Fx button
This button turns the master effect control function ON or
OFF.
MFX Hold button
This button allows you to maintain the previously set master
effect status by using the touch pad even after letting your
fingers off the touch pad, when turning the Master FX button
ON.
TIP The ON / OFF status of the MFX Hold button can be
memorized in a pattern.
7. Common section
Value knob
This knob changes the value of the parameter that’s currently
shown on the display.
4
Page 5
<, > (cursor) buttons
These buttons are used to select the parameter that you want
to edit.
Menu/Enter button
This button is used to select parameters such as pattern, part,
global or utility, or it can also be used to confirm changes in
parameter settings.
Exit button
Pressing this button a couple of times enables you to return
from the edit screen to the pattern selection screen.
Shift button
This button executes various functions when pressed in
tandem with another button or a knob.
Shift button + < (cursor): Cancels the most recent operation
(undo function)
Shift button + Write button: Patterns can be named and
saved.
Shift button + Value knob: Either large or small value changes
can be made
TIP Large or small value changes depend on the selected
parameter.
Write button
This button is used to save pattern and global data to the
electribe/electribe sampler. Data is saved when you press the
Write button on the Global parameters page. The pattern data
will also be saved in other pages as well.
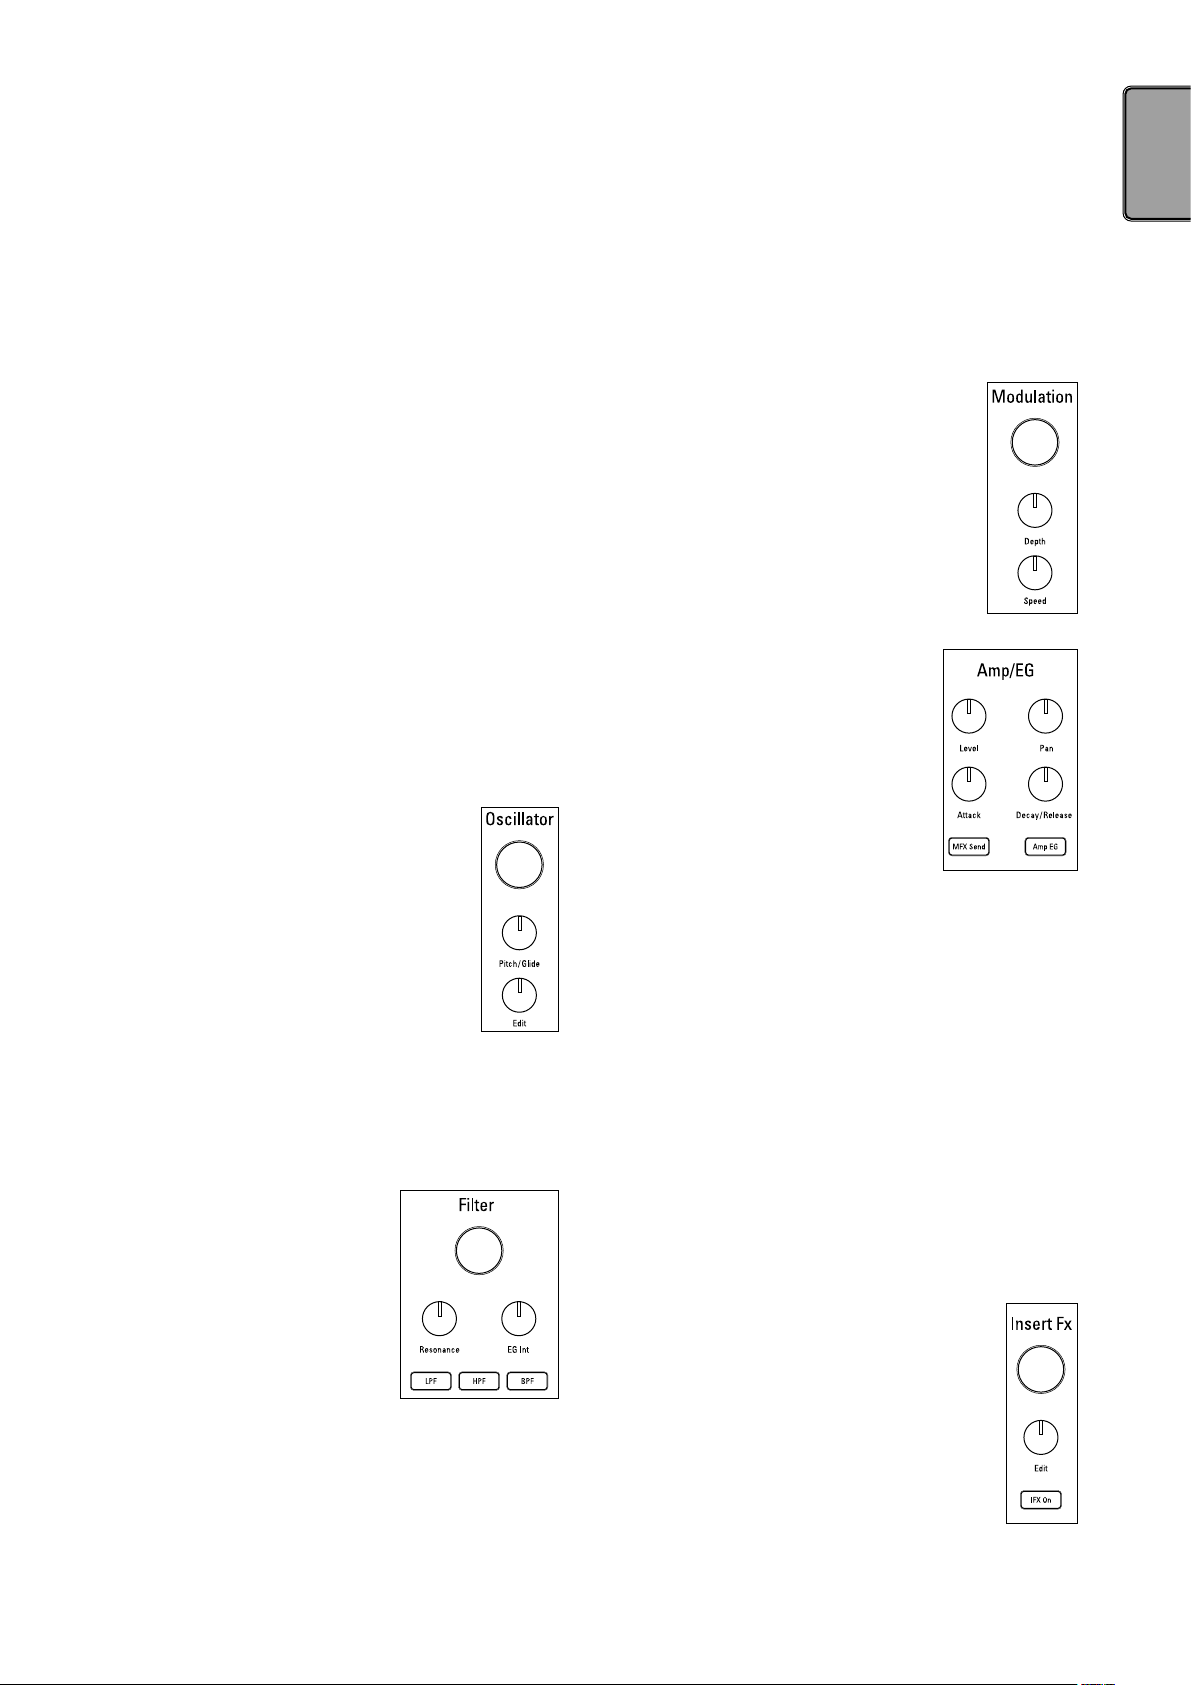
8. Edit section
Here is where can edit parameters for each part.
Oscillator (electribe sampler: Sample)
This is where you can select or adjust the sound
tone of the waveforms, such as: sawtooth, square,
noise or PCM.
Oscillator knob (electribe sampler:
Sample knob)
This knob selects the waveform.
Pitch/Glide knob
This knob adjusts the pitch (sound tone). You can
adjust the transition to smoothly change pitch
between two tones (Glide) for synth sounds by turning the
knob while you press and hold down the Shift button.
Edit knob
This knob adjusts style of the sound. The effect varies depending on type of waveform that’s being used.
Filter
The filter is used for adjusting the
sound tone (color of the sound) by
eliminating or enhancing frequency
components of the oscillator.
Filter knob
This knob adjusts the cut-off frequency.
Resonance knob
This knob adjusts the resonance of the
filter.
EG Int knob
This knob adjusts the volume of the temporal change of the
cut-off frequency for the filter by the envelope generator (EG)
that is set in the Amp/EG section.
LPF button
This button enables the low-pass filter.
Pressing the button repeatedly allows you to change type of
the filter.
HPF button
This button enables the high-pass filter.
Pressing the button repeatedly allows you to change type of
the filter.
BPF button
This button enables the band-pass filter.
Pressing the button repeatedly allows you to change type of
the filter.
Modulation
This is used to make temporal change to the
sound tone by LFO or EG.
Modulation knob
This knob adjusts type of modulation.
Depth knob
This knob adjusts the effect intensity of the
modulation.
Speed knob
This knob adjusts the speed of the modulation.
Amp/EG
You make setting of the amplifier that
adjusts volume and location of sound, and
of the envelope generator (EG) and the
master effect send that apply temporal
change.
Level knob
This knob adjusts the volume of a part.
Pan knob
This knob adjusts the location of a part.
Attack knob
This knob adjusts the attack speed of a sound.
Decay/Release knob
This knob adjusts the amount of time it will take for a sound to
decay.
MFX Send button
This button allows you to select whether the output of a part is
sent to the master effect or not. It switches between ON (lit)
and OFF (dark) each time the button is pressed.
Amp EG button
This button allows you to enable the envelope of the amplifier.
It switches between ON (lit) and OFF (dark) each time the
button is pressed. Sound volume changes in accordance with
the EG that you select by setting the Attack and Decay/Release
knobs when it is ON. The setting does not follow the EG
(organ envelope fixed) when it is OFF.
Insert Fx
The Insert Fx section is used for adding various
sound effects, such as distortion or surge to your
sound.
Insert Fx knob
This knob is used to select the type of insert effect.
Edit knob
This knob is where you can adjust the effect intensity of the insert effect. The effect varies depending
on the type of effect that’s selected.
IFX On button
This button allows you to select whether you the insert effect
5
Page 6

is enabled or not. It switches between ON (lit) and OFF (dark)
each time the button is pressed.
9. Step button
This button displays the location of a sequence or octave along
with the current function of the trigger pad. Pressing this
button allows you to change the location or octave of the
sequence being edited.
10. Part edit section
<Part, Part> buttons
This button selects a part to use. The display illustrates the
part that’s currently selected.
Part Mute button
Pressing a trigger pad while this button is ON (lit) mutes the
corresponding part. The trigger pad turns OFF (dark) at this
moment and the Part Mute button turns OFF. Pressing the
trigger pad for the selected part that is dark will turn off the
mute function (lit).
Part Erase button
While you press and hold the trigger pad after pressing the
Part Erase button during playing, you can eliminate the sound
of the selected part.
11. Pad mode section
Here is where you can select the function of the trigger pad.
Trigger button
Tapping on a trigger pad while this button is ON (lit) plays the
corresponding part. You can set how it plays back by editing
the TRIGGER MODE parameter.
Sequencer button
The trigger pad is used in step input mode while this button is
ON (lit).
Keyboard button
The trigger pad can be played as a keyboard while this button
is ON (lit). You can set the key or scale per pattern.
Chord button
The trigger pad can be used as a code pad while this button is
ON (lit). You can set the variation or the key or scale of the
code per pattern.
Step Jump button
Pressing any of the buttons ranging from step 1 to 16 during
sequencer play back while this button is ON (lit) enables you
to jump to that step instantly. Pressing multiple buttons will
play back the steps being pressed in sequence.
Pattern Set button
Pressing a trigger pad while this button is ON (lit) switches
the pattern to the one registered in the respective trigger pad.
Pressing a trigger pad while you press and hold down this
button enables you to assign the pattern that’s currently
selected to the trigger pad.
12. Trigger pad
The trigger pad is used for playing in accordance with the
setting of the pad mode section.
13. LED
The LED on the rear of the unit is illuminated in accordance
with the playing pattern.
6
Page 7
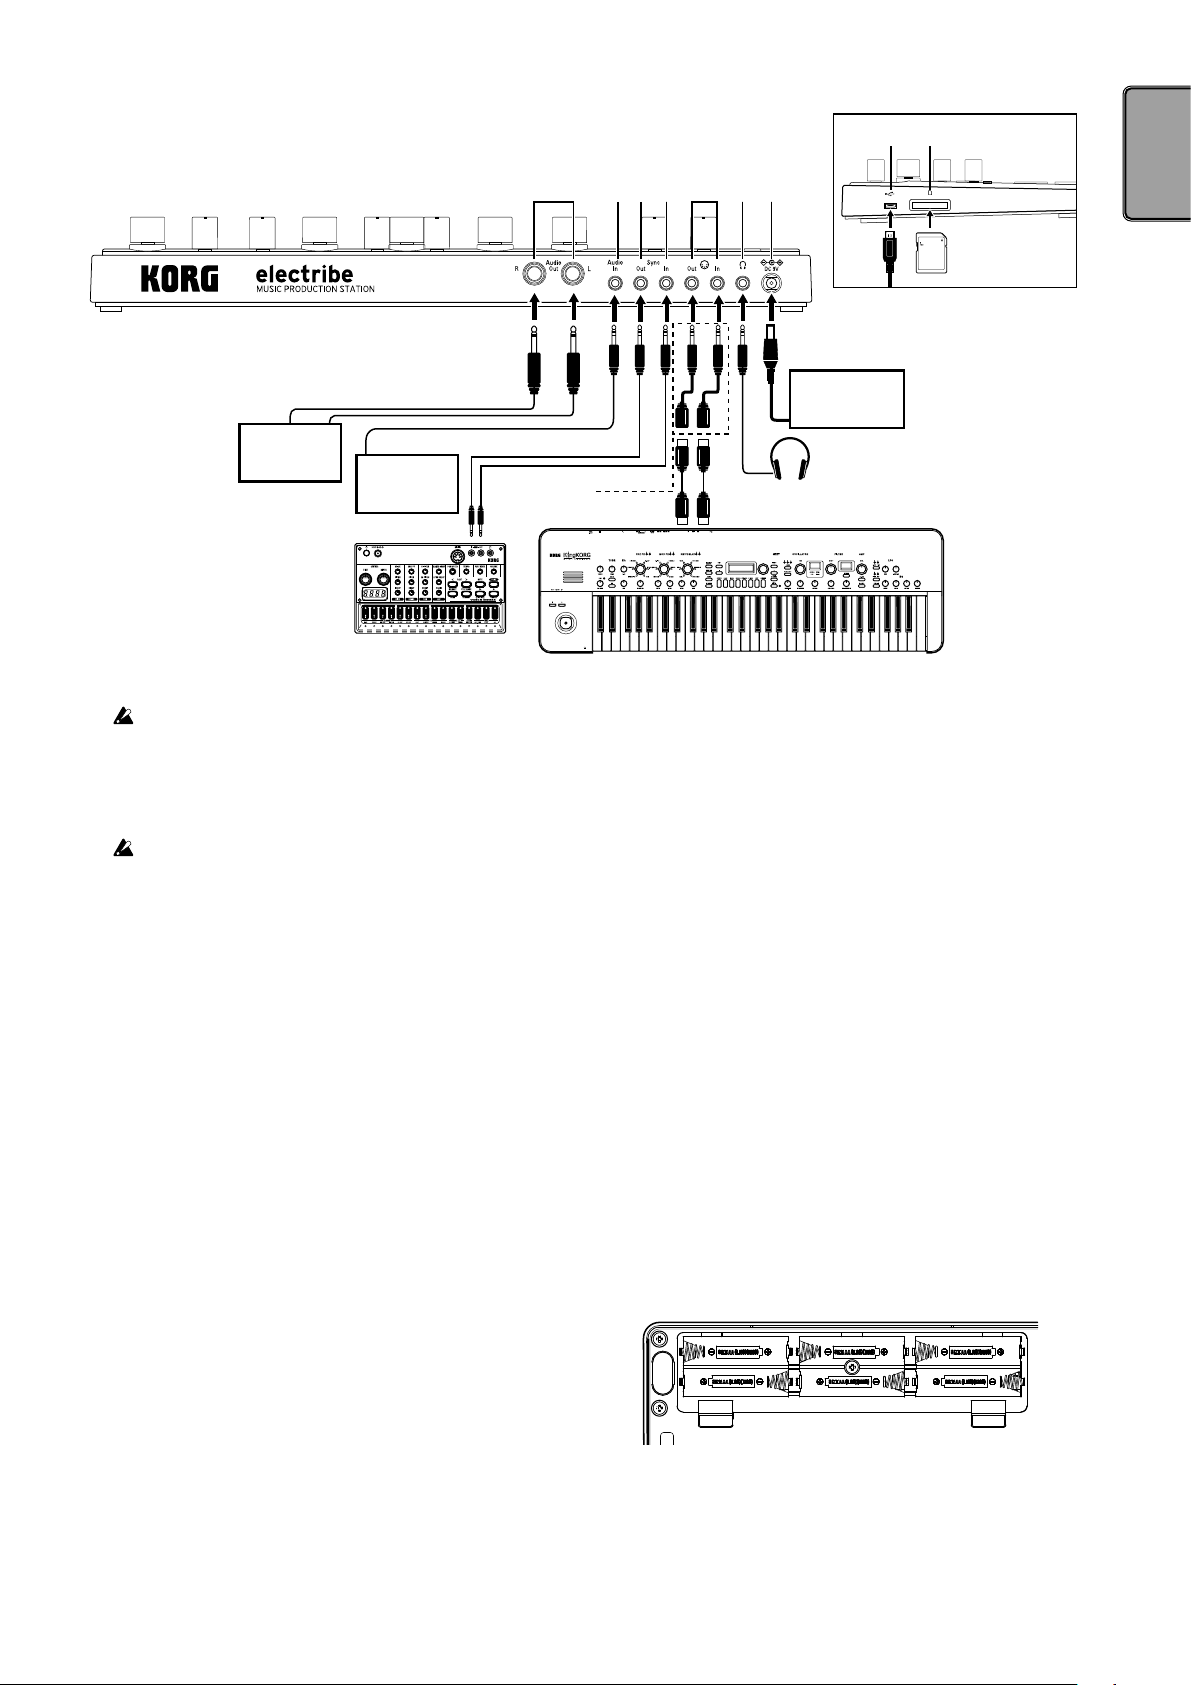
2. Connection
98
Mixer, powered
monitor
CD player,
MP3 player
1 2 3 4 5 6 7 8 9 10 11 12 13 14 15 16
1 2 3 4 5 6 7
Included MIDI
conversion cable
MIDI IN MIDI OUT
Included
AC adapter
Headphone
You must connect all devices with the power turned off.
Failure to observe this precaution may cause malfunctions
or damage to your speaker system.
TIP When you connect the unit to your Windows computer for
the first time, the driver included in the OS will be installed automatically.
The standard USB-MIDI driver included in the Windows
OS will not allow the electribe/electribe sampler to be used
by two or more applications simultaneously. To allow the
electribe/electribe sampler to be used by two or more
applications simultaneously, you need to install the KORG
USB-MIDI driver. Please download the KORG USB-MIDI
driver from the Korg website, and install it following the
instructions in the supplied document.
1. Audio Out L/R jack
The audio output of the electribe/electribe sampler is sent from
these jacks. Connecting a cable to the Left Audio Out jack only
without connecting a cable to the Right Audio Out jack will
mix the stereo output sound into monaural.
TIP While the output signal is sent in mono, the jack supports
both mono and stereo 1/4" cable connections.
2. Audio In jack
This jack is where the audio output from other audio sources
are input into the electribe/electribe sampler.
TIP Inputted sounds can be mixed by turning the AUDIO IN
THRU function ON in the global menu.
3. Sync Out jack
A 5 V pulse is outputted from this jack every 15 ms, for every
eighth note or sixteenth note.
This jack is used for synchronizing with the KORG volca series
products or other analog sequencers to this system.
TIP The pulse polarity and cycle are set in the global menu.
4. Sync In jack
When you set “Auto” or “Ext. Sync” in the clock mode in the
Global menu and you connect a pulse output from the sync
output or audio output from an analog device, the internal
step clock will be disabled in order to advance the step in
accordance with the input pulse.
TIP The settings for enabling/disabling SYNC IN, as well as for
the cycle and polarity of the pulse detected are in the
global menu. Refer to the “Parameter Guide” for additional details on this procedure.
5. MIDI IN/OUT jack
You can connect the system to a MIDI device by using included conversion cable.
6. Headphone jack
This jack is where headphones are to be connected .
7. DC 9V jack
This is where the included AC adapter is connected.
8. USB jack
This jack is used to connect the electribe/electribe sampler to a
computer.
9. Memory card slot
This slot is where a memory card can be inserted. You can use
a memory card to save (write) or load (read) playback or data.
(→ p.14)
3. Connecting power supply
Using battery
Open the battery case cover located on the back side of the unit to
insert six AA batteries, paying careful attention to observe the
correct polarity orientation of the batteries.
Compatible batteries
AA alkaline batteries or nickel metal hydride batteries are
approved for use in this product.
TIP You can select the type of battery in use by referring to the
BATTERY TYPE page in the global menu in order for
the electribe/electribe sampler to accurately detect and
display the amount of remaining charge.
7
Page 8
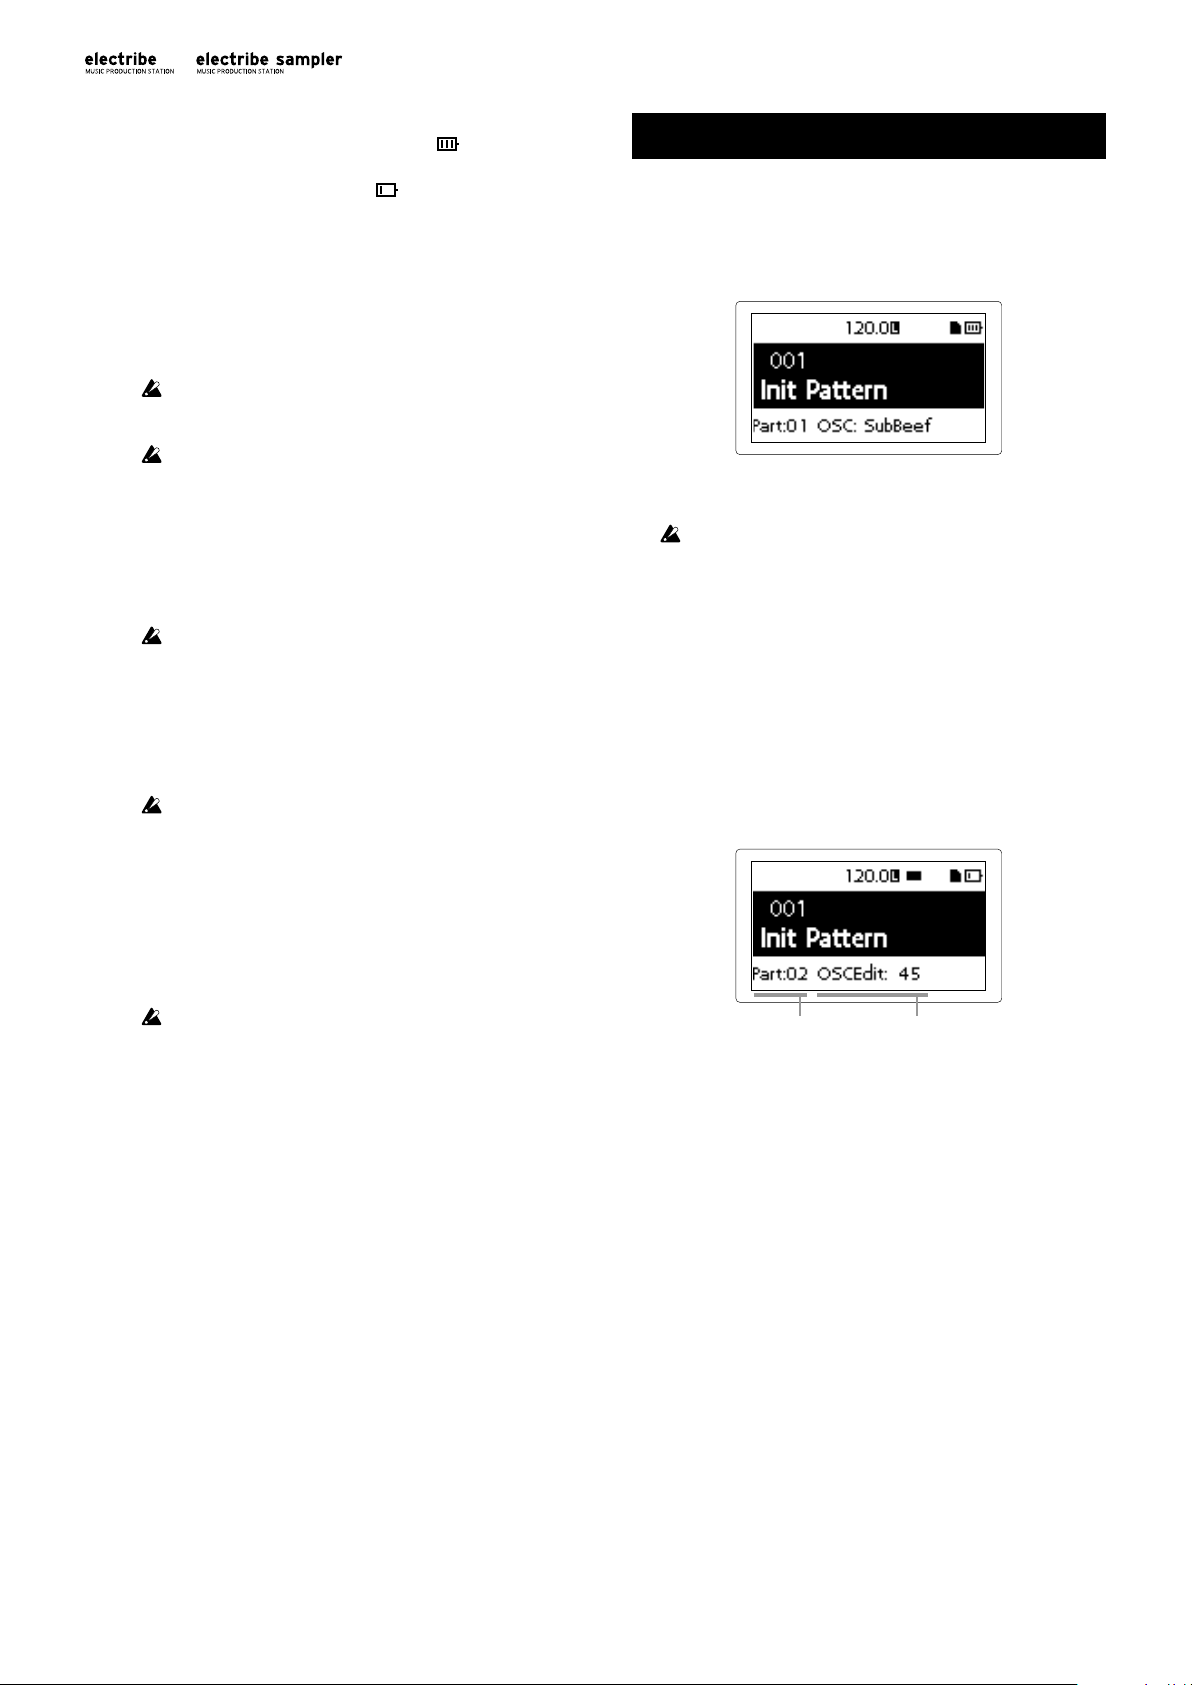
Displaying remaining battery charge
Part Parameter
The display shows the battery indicator “ ”(icon) which
indicates remaining charge of the batteries. When the display
shows the deplete battery icon, “ ” (icon) it’s indicating that
there is almost no remaining battery charge and it’s time to
replace the batteries.
TIP When there has been no user input for a while, the elec-
tribe/electribe sampler will enter the power save mode
while using batteries in order to reduce battery consumption. You can disable the power save mode by adjusting
the setting in the “Power Save Mode” page in Global
mode. (→p.14: 4. Prolonging battery life)
If the power supply is connected, make sure to turn the
electribe/electribe sampler off before replacing the batteries.
Remove unusable battery immediately. It’s also wise to
remove the batteries if you’re not planning on using the
electribe/electribe sampler for an extended period of time,
to eliminate the risk of battery leakage.
Making sounds
1. To turn power on/off
You can turn power on by pressing the power button until the
display shows the start-up screen.
Starting-up this system, the display will show the pattern selection
screen.
You can turn the power off by pressing the power button until the
display shuts off and becomes dark.
Do not touch any button or touch pad during power up.
Using AC adapter
Connect the included AC adapter to the DC 9V jack of the system
and then connect the adapter to power outlet.
Make sure to use included AC adapter only. Using an AC
adapter other than the included one may cause unexpected malfunctions.
4. Insert and remove memory card
You can use a memory card to save (write) or load (read) a song
for playback or to read data.
Never insert or remove the memory card with the system
power turned ON. You may lose data on the system or in
the memory card, or alternatively, you may damage the
memory card.
To insert card
1. Check that all display and LEDs are turned off and the power
supply is off.
2. Insert the memory card until you hear a clicking sound.
Insert the memory card all the way to the back of the slot
securely, paying attention to the orientation of the card.
Never force the card into the slot.
To remove card
1. Check that all display and LEDs are turned off and the power
supply is off.
2. Push the memory card in until you hear a clicking sound, and
then release your finger to remove the memory card.
Remove the card once it pops out to the front of the slot .
Memory cards that are usable in this system
Memory cards usable in this system are: SD cards ranging in
sizes from: 512MByte to 2GByte, and SDHC cards of 32GByte
or less.
TIP This system does not support SDXC cards.
Handling memory card
Thoroughly read the operation manual that came with your
memory card.
TIP No memory card is included in this system. Please pur-
chase it separately to take advantage of this feature.
Auto power off function
The electribe/electribe sampler is equipped with the auto power
off function. The auto power off function will turn off the power
automatically when there has been no user input for about 4
hours.
TIP You can disable this function by adjusting the settings
found on the “AUTO POWER OFF” section in the Global
menu. (→p.14: 5. Setting auto power off)
2. Basic operation
To use the screen
Press the < button or the > button on the pattern selection screen to
confirm the setting of the currently selected part.
Pressing the Menu/Enter button on the pattern selection screen
will allow you to enter the edit menu.
Press the < or > button to select the parameter you want to adjust.
You can set the parameter value by using the Value knob.
Pressing the Exit button a couple of times enables you to return
from the edit menu to the pattern selection screen.
TIP Refer to the "Parameter Guide" for additional details.
3. To playback a pattern
A pattern is a combination of phrases consisting 16 parts that is
created to be a segment of a larger performance.
This system is capable of creating and storing up to 250 patterns. A
single pattern consists of 16 parts and a master effect.
Selecting a pattern
1. Display the pattern selection screen.
2. Use the Value knob to select a pattern.
8
Page 9
TIP Pressing the Exit button a couple of times while another
screen is displayed will display the pattern selection
screen.
TIP You can change the pattern during playback as well.
<Part, Part> button
Playing back a pattern
1. Pressing the Play/Pause button will play back the pattern that’s
currently selected.
2. The pattern will start to play back from its beginning. It will
play through until its end, and then return to the beginning to
repeat playback.
3. Pressing the Stop button stops playback.
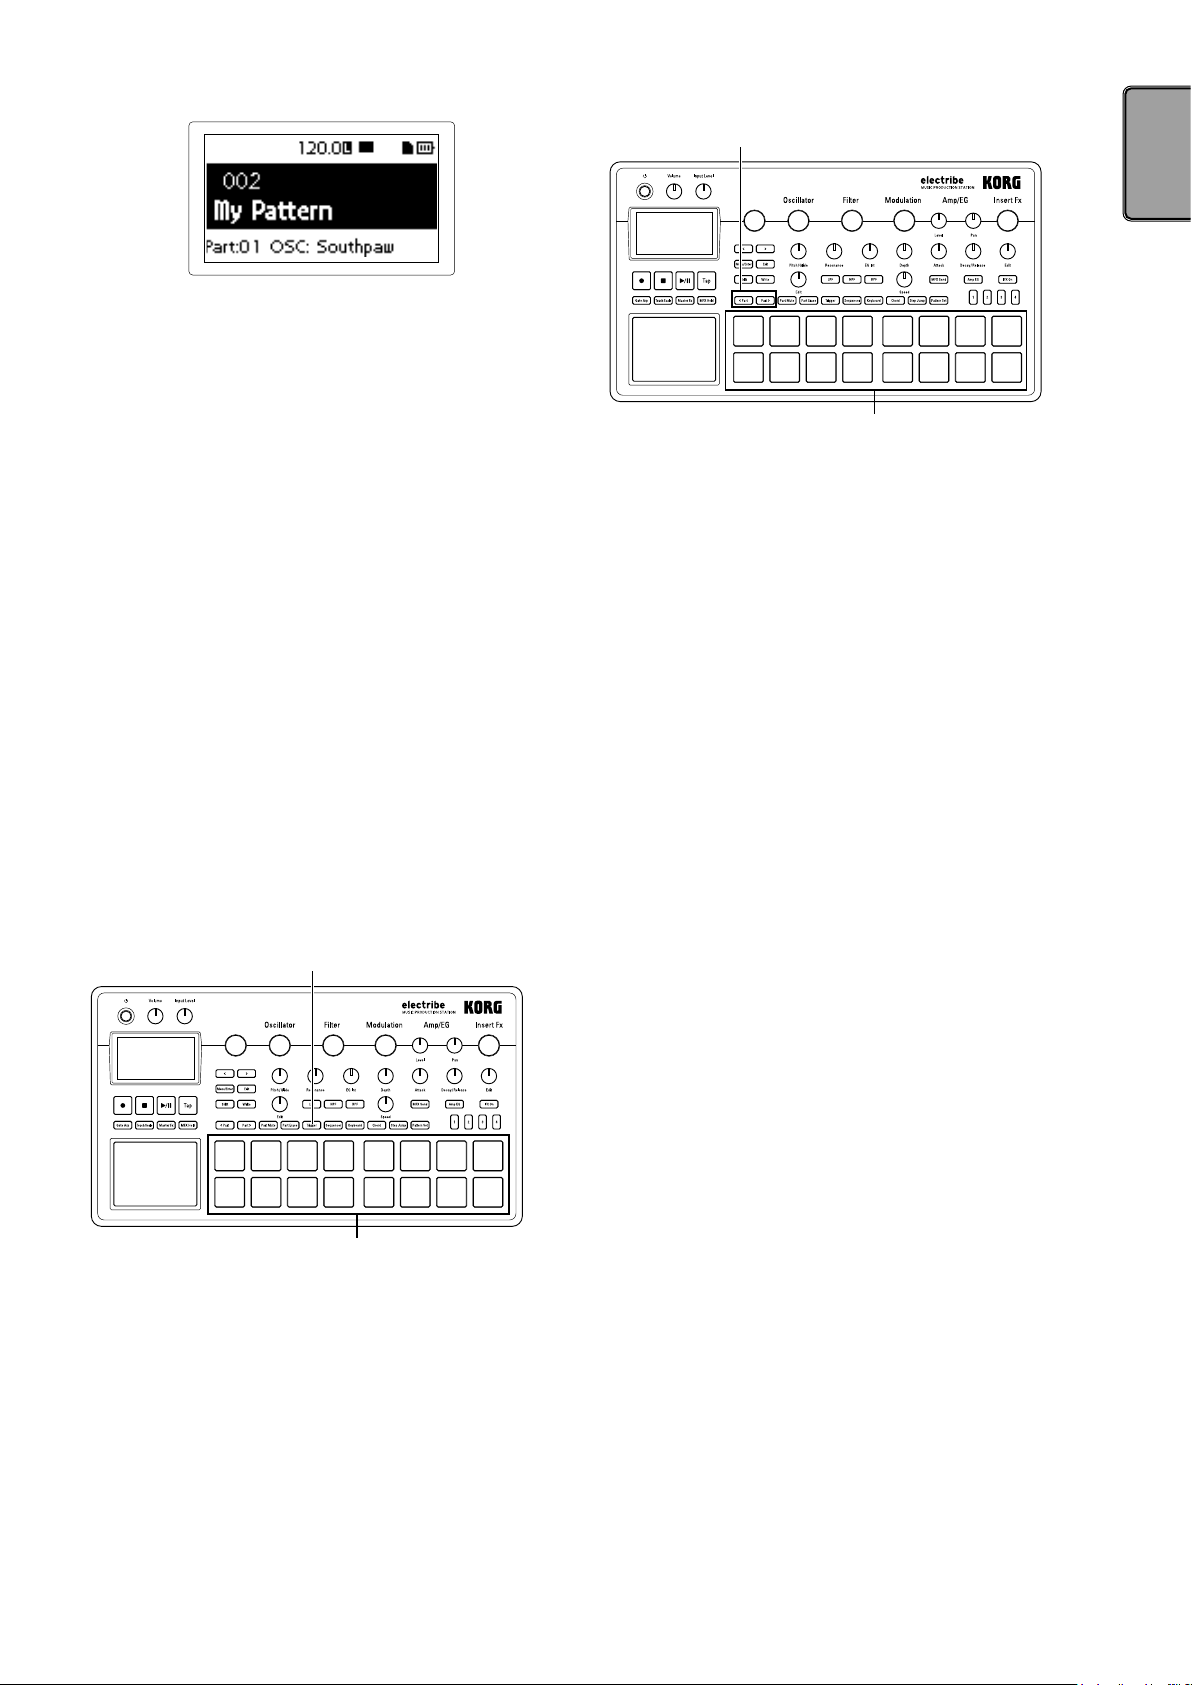
4. Selecting a part
What is a part?
A part is a minimum unit used to create a pattern. Parts are
comprised of sound tones and rhythms or phrases, as well as
the ON/OFF status for effects and motion sequences in addition to other elements.
You can process sound tones per part and record rhythms,
phrase patterns, motion sequences and insert effect status as
well as other parts.
Confirming sound of a part
1. Press the Trigger button to illuminate the button.
2. Pressing the trigger pad makes sound by selecting the part
and enables you to confirm the sound tone.
Trigger button
Trigger pad
Trigger pad
Select the part you want to use
Use the <Part, Part> buttons to select the part which you want to
use.
The trigger pad of the selected part is illuminated in blue.
You can change sound tone of the selected part by using the knob
in the edit section.
9
Page 10
Playing music
1. Playing music with the trigger pad
Tapping on the trigger pad will make sound.
You can enjoy using your electribe in different ways by changing
the pad mode.
Using the trigger pad as a keyboard
1. Press the Keyboard button.
2. Use the <Part, Part> buttons to select a part.
Keyboard button Step button<Part, Part> button
Trigger pad
Chord button
Trigger pad
2. Playing music with the touch pad.
1. Press the Touch Scale button to illuminate the button.
2. You can play by rubbing or tapping (hit lightly) the touch pad
with your fingers.
Touch Scale button
3. Play with the trigger pad.
Where, Key = C, Scale = Ionian
C D E F G A B C
C D E F G A B C
TIP You can choose the type of sound by using the Key and
Scale function in the edit menu. Pressing more than 2 pads
simultaneously will make different sounds depending on
the settings in the Voice Assign section .
4. You can change the sound range by using the step button.
Pressing step button 1 once decreases range for 1 octave and
pressing step button 4 once increases it for 1 octave.
Position of illuminated step button indicates range.
BlinkingBlinking Slow blinkingSlow blinking
Decreases 1 octave when
pressed once.
Increases 1 octave when
pressed once.
Playing chords with the trigger pad
1. Press the Chord button.
2. Play with the trigger pad.
TIP Select the part where the VOICE ASSIGN function in the
edit menu is set to Poly 1 or to Poly 2.
TIP You can change the chord variations by using the CHORD
SET feature in the edit menu.
Touch pad
Rubbing or pressing surface of the touch pad with a sharp
object could damage the pad. Make sure to only use your
finger tip to avoid damage to your electribe.
TIP Sounds can be set using the KEY and SCALE functions in
the edit menu. Operable sound range can be set using the
TOUCH SCALE RANGE function in the global menu.
TIP Sound range can be modified using the step button after
turning the Keyboard button ON.
TIP Sound tone may not change depending on the setting of
selected part.
3. Using the gate arpeggiator.
Automatically play the sound of selected part along with set
tempo or rhythm. You can change the length for a single sound
using the gate time parameter.
Playing gate arpeggiator
1. Press the Gate Arp button to illuminate the button.
2. Press the Trigger button and press and hold down the trigger
pad of the part to play to use the touch pad.
Or, you can use the touch pad while selecting the pitch with
the trigger pad after pressing the Keyboard or Chord button.
10
Page 11
Gate Arp button
Touch pad
3. Sounds can be modified by using the touch pad.
X axis: Alters the gate speed.
Y axis: Alters the length of sound.
Trigger pad
Y
X
TIP You can change pattern of the gate arpeggiator in the
GATE ARP page in the edit menu.
4. Using master effects
1. Press the Master Fx button.
2. Select the part where you want to apply the master effect, and
then press the MFX Send button to turn it ON.
3. Touching the touch pad will apply the effect.
TIP Select the master effect type in the MFX TYPE page of the
edit menu when you want to change effect types.
There may be some noise depending on position where
you touch the touch pad.
Master Fx button MFX Send button
5. Playing with pattern set
What is a pattern set?
A pattern set is a function used to register a pattern to the
trigger pad to enable easy pattern switching. You can switch
desired patterns one after another during playback.
Registering a pattern to a trigger pad
1. Press the Pattern Set button to illuminate the button.
2. Press a Step button from 1 to 4 to select a group to register.
3. Select a pattern to register by using the Value knob.
4. Press a trigger pad to register while you press and hold the
Pattern Set button.
Pattern Set buttonValue knob
Trigger pad
Playing with a pattern set
1. Press the Pattern Set button to illuminate the button.
2. Press the Step button (1 to 4) to select the group where the
desired pattern is registered.
3. Pressing a trigger pad will play back the pattern which is
registered to that respective trigger pad.
6. Setting the BPM (tempo)
You can select the tempo for the pattern or gate arpeggiator.
Touch pad
Trigger pad
Setting BPM
Pressing the Tap button fat the approximate tempo you want will
set the BPM value at the interval that you tap it.
You can also set the tempo manually by using the Value knob once
the BPM parameter is selected from the edit menu.
7.
Adding variation to sound by a knob
You can alter the sound by using the knob to change the Filter or
Oscillator Edit parameters of the edit section.
Refer to the “Parameter Guide” for details of each knob.
TIP Depending on the settings, there may be some noise or
audio dropouts in your signal.
11
Page 12
Record playing
1. Real time recording
Your performances can be recorded in real time when you’re using
the trigger pad or the touch pad. You also can record with the
metronome. (→ p.14)
Recording along with a pattern
You can record any phrase that pops up in your mind while you’re
playing, without having to stop playback.
1. Start playing back a pattern.
2. Select a part to record.
3. Press the Rec button to start recording with the button illumi-
nated.
4. Play with the trigger pad and other functions.
Recording will continue while the pattern repeats.
5. Press the Rec button again to stop recording (button becomes
dark).
Press the Play/Pause button to stop playback as well.
Delete unnecessary sounds during a performance
While you press and hold the trigger pad after pressing the Part
Erase button during playing, you can eliminate the sound of the
selected part.
2. Step edit
1. Select a part to record.
2. Press the Sequencer button to illuminate the button.
3. Press the step button to select the recording length. You can
check the length by looking at the number of red LEDs.
4. A pattern of selected part is indicated by illumination of the
trigger pad. Note switches between ON (lit) and OFF (dark)
each time the trigger pad is pressed.
TIP The note number that is input by pressing the trigger pad
is C4 (60) in the default setting. Turning ON again after
turning OFF the step that has been already input turns ON
with the original note.
TIP You can also record patterns during playback by pressing
Play/Pause button.
TIP You can select Step Edit on the edit menu to enable de-
tailed editing per each step. Refer to the “Parameter
Guide” for detail.
Additional motion sequence recording
1. Select a part where you want to add a motion sequence.
2. Select MOTION SEQ from the edit menu to select a part to be
edited, and set the motion sequence to Smooth or Trigger
Hold.
Smooth: Smoothly records knob motion.
Trigger Hold: Reads and memorizes knob information at the
sounding timing.
3. Press the Rec button to illuminate the button, and then press
Play/Pause button.
4. You can move the knob to alter the sound while a pattern is
playing back. The Rec button will blink while a motion sequence is recorded.
Once you pass a single cycle of the pattern once recording has
started, the motion sequence will automatically stop the
recording process and switch to playback of the recorded
motion sequence. You will need to press the Rec button again
to continue recording.
Deleting a motion sequence
Select CLEAR MOTION from the PART UTILITY in the edit
menu and execute it.
Deleting a motion sequence of the Master Fx only
Select CLEAR MFX MOTION from the edit menu and execute
the command.
4. Saving a pattern
Make sure to save (write) the created pattern data.
Selecting other patterns without saving will revert the
pattern you were editing to its original state. Make sure to
save your data when you want to keep edited contents.
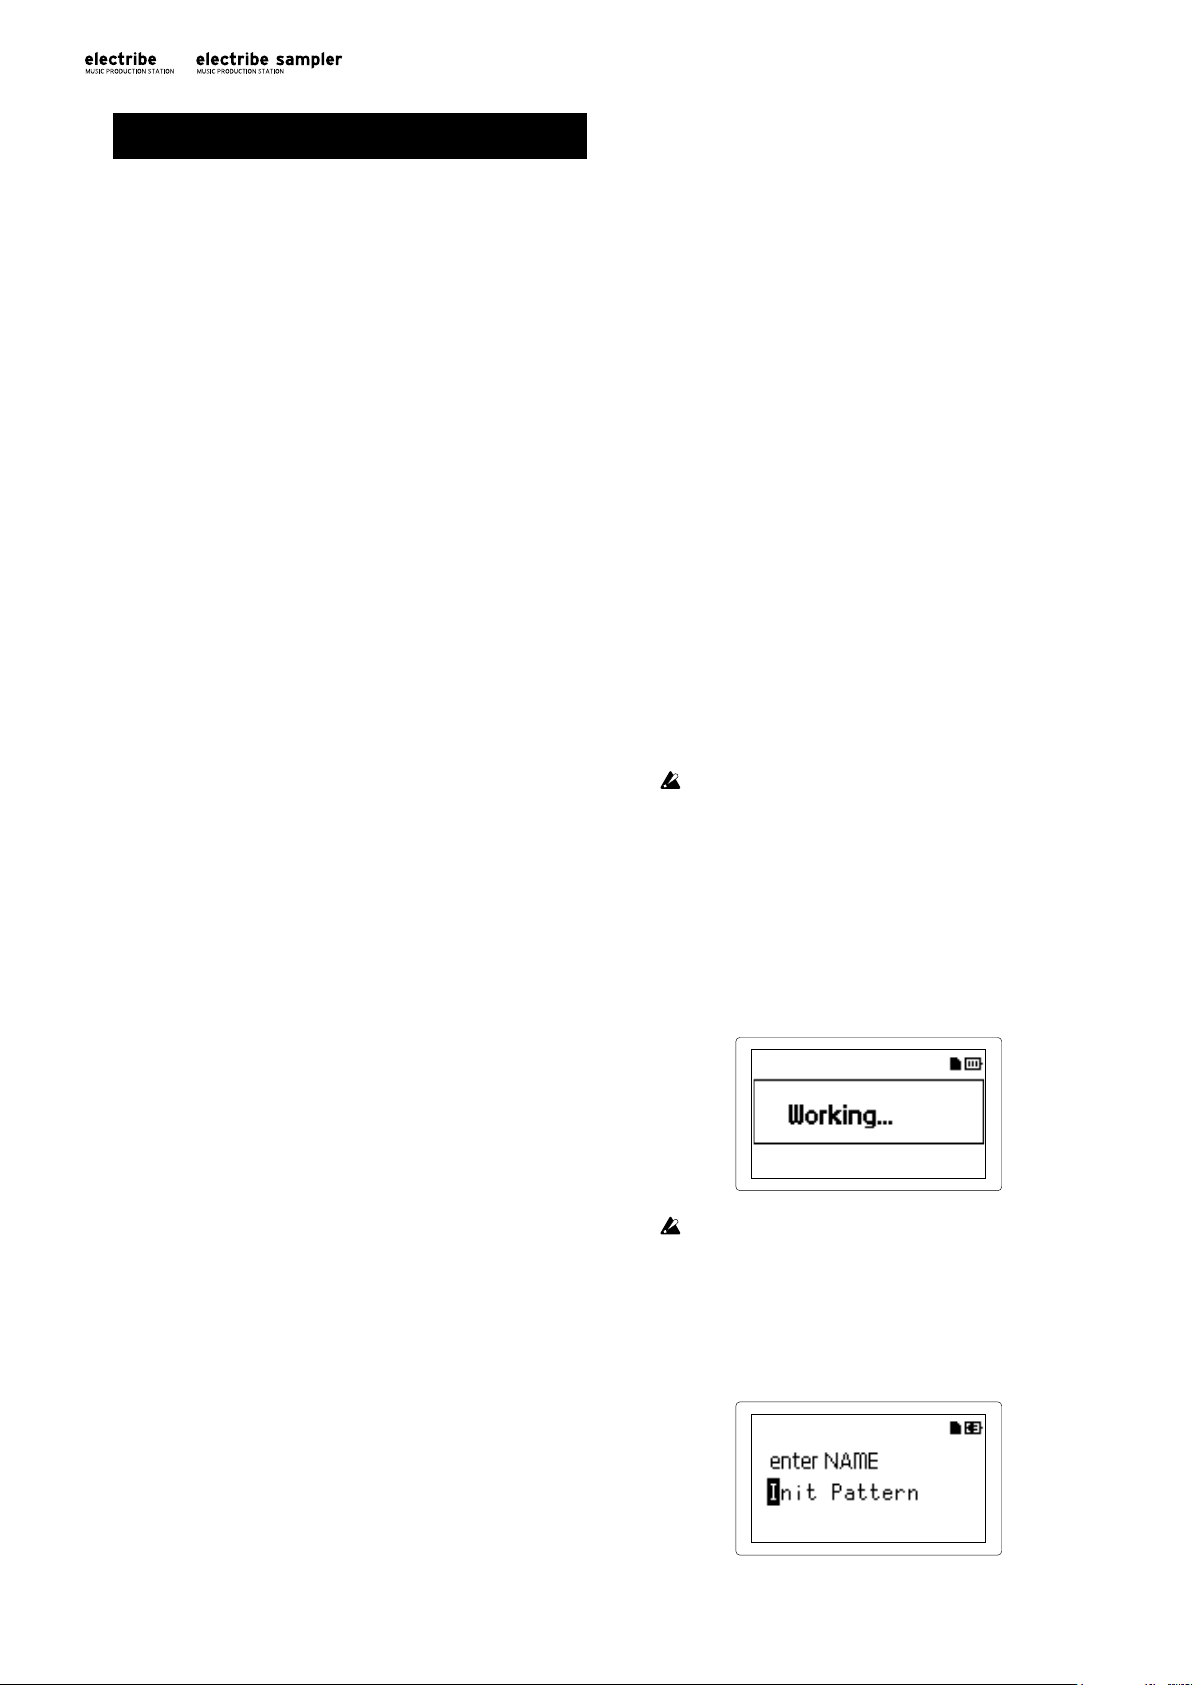
Overwriting a pattern
1. Press the Write button.
2. Select the save location by using the Value knob.
3. Press the Write button.
The display shows “Working...” and the write process will
begin. The Write button is illuminated while the save process
is taking place and the button becomes dark upon completion.
3. Record knob and button movements (motion sequence)
You can record knob and button motion for each part and effect
(motion sequence).
What is a motion sequence?
A motion sequence is a function which records changes to a sound
from the use of knobs and buttons to play it back.
The followings are knobs and buttons that can be recorded/ played
back as a motion sequence.
• OSC Edit, Pitch
• Filter Cutoff, Resonance, EG Int
• Modulation Speed, Depth
• Amp/EG Level, Pan, Attack, Decay/Release
• IFX Edit, IFX ON, MFX Send
• Master Fx On, Master Fx X, Master Fx Y
12
Never turn the power off while saving data as this may
cause unexpected malfunctions. (while Write button is
illuminated.)
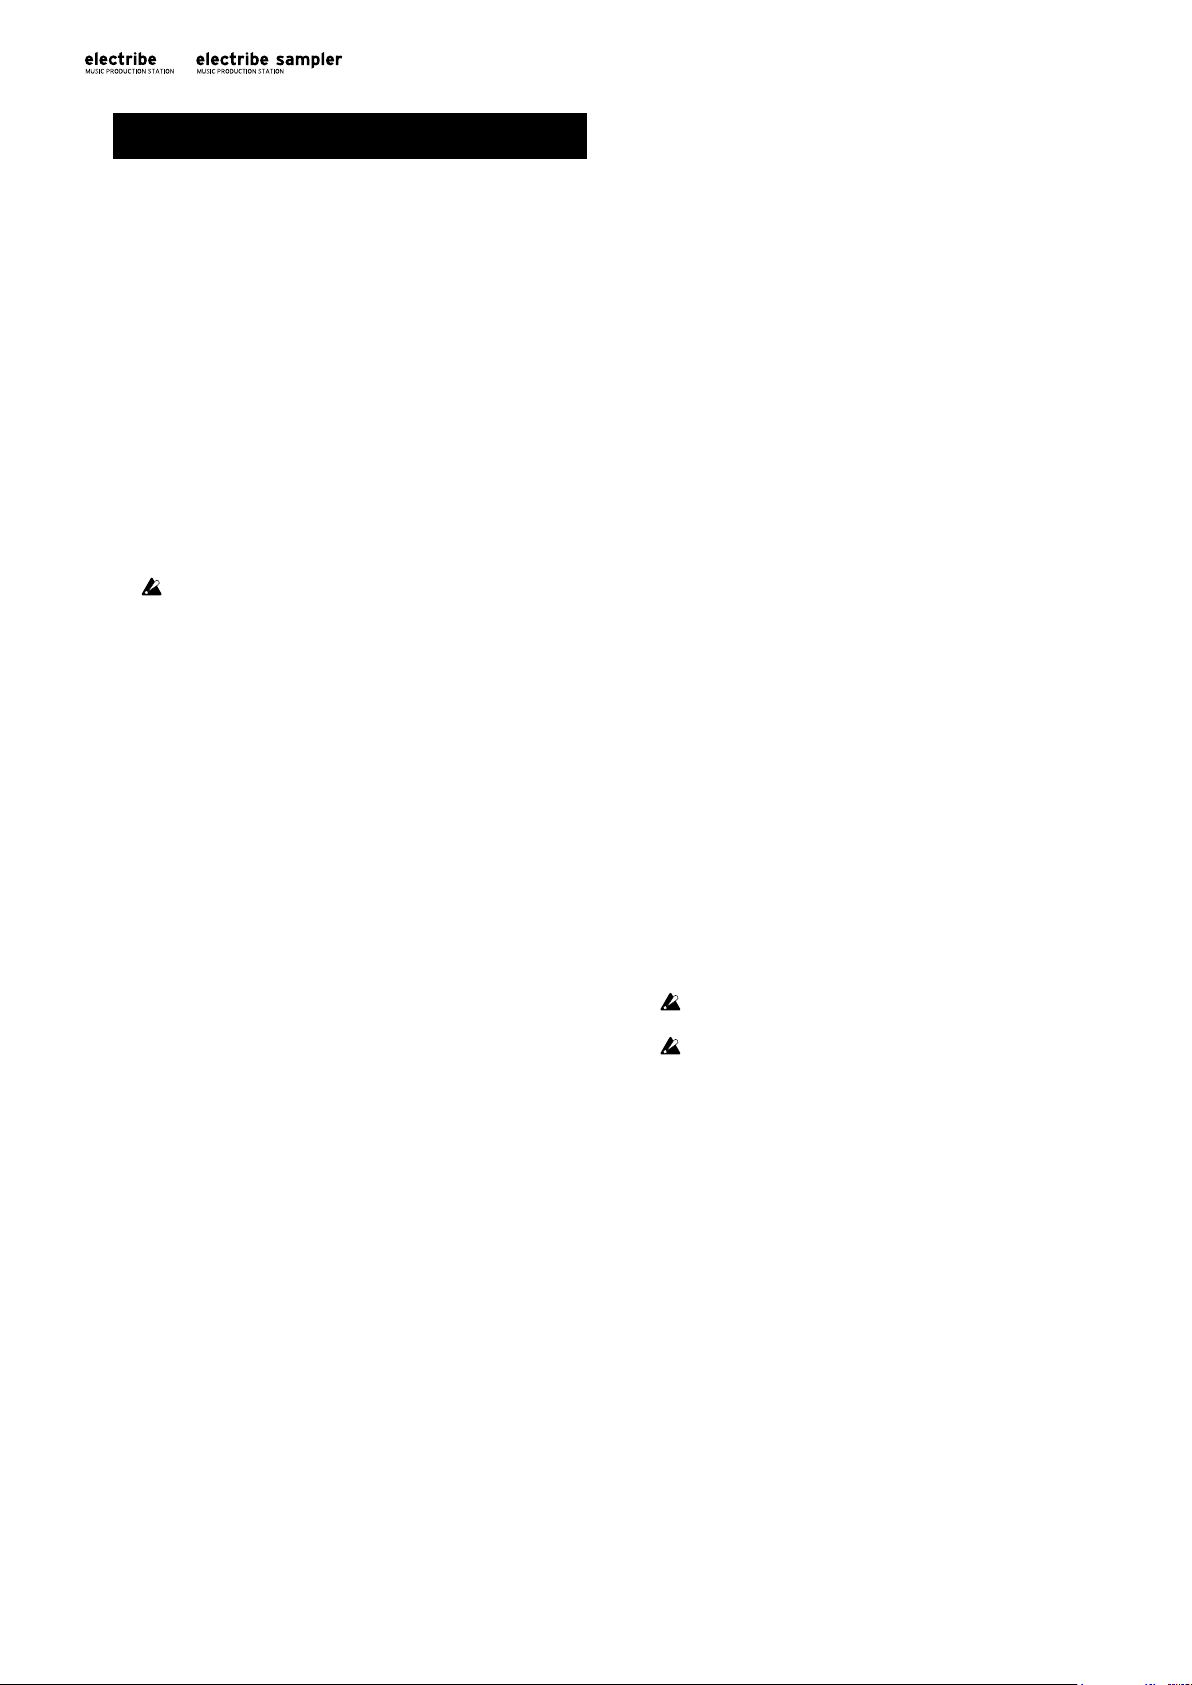
Saving with a different pattern name (copying pattern)
1. Press the Write button while you press and hold down the
Shift button.
The display shows “enter NAME.”
Page 13

2. Change the name of the pattern you want to save.
You can move the cursor on the display left and right using the
< button or the > button and determine the character you want
to change. Turn the Value knob to change the selected character and confirm it with Menu/Enter button.
3. Select a pattern number to save your data by using the Value
knob.
4. Press the Write button after you complete the process of
changing the pattern name.
Pressing the Write button starts the save process. The Write
button is illuminated while the save process is taking place
and the button becomes dark when upon completion.
TIP Press the Exit button to cancel the save process.
TIP The Pattern number where the edited pattern will be saved
is selected after you complete the save process.
Editing a pattern
1. Muting a part
1. Press the Part Mute button to illuminate the button.
2. Press the part of the trigger pad that you want to mute to turn
it off.
3. Press the trigger pad that is dark to illuminate it when you
release the mute.
2. Erasing a part
1. Press the Part Erase button to illuminate the button.
2. During playback, press the trigger pad of the part which you
want to erase.
While holding the trigger pad, note information of the selected
part will be erased.
TIP To erase all sequence information of the currently selected
part, select CLEAR SEQUENCE from PART UTILITY in
the edit menu and execute it.
TIP Execute the Clear Motion command in the edit menu to
erase the motion sequence.
3. Copying a part
1. Select COPY PART from PART UTILITY in the edit menu.
2. Select the pattern that includes the part you want to copy, and
press the Menu/Enter button.
3. Press the trigger pad corresponding to the copy source part.
4. Press the trigger pad corresponding to the copy destination
part.
4. Changing pattern setting
The following list introduces main setting related to patterns in the
edit menu.
Refer to the “Parameter Guide” for each setting.
SWING: Adds shuffling or hopping feelings by shifting sound
timing.
BEAT: Sets beat (rhythm) of a pattern.
LENGTH: Changes length of a pattern. You can set it to length
from 1 to 4.
PATTERN LEVEL: Adjusts sound volume of the entire pattern.
KEY: Sets pitch for scale reference.
SCALE: Sets scale for playing with the trigger pad or the touch
pad by turning the Keyboard button ON.
GROOVE TYPE and GROOVE DEPTH: Adds playing methods
of typical musical instruments and / or a groove which could
reproduce a feeling of the song to metronomic part sequence data.
CHAIN REPEAT, CHAIN TO: After playing back the selected
pattern, select the number of times to play back the same pattern,
and select the pattern to play back next. This will play multiple
patterns back as if they were a song.
13
Page 14
Other setting
You can set each global parameter, such as the settings for the
metronome, or you can execute utility functions, such as formatting a memory card.
TIP Please refer to the “Parameter Guide” for additional
details.
How to display each setting menu
1. Pressing Menu/Enter button on the pattern selection screen
enters the edit menu.
2. Pressing the < button or the > button to show “GLOBAL
PARAMETER” on display and then pressing Menu/Enter
button enables you to enter the global menu.
Pressing Menu/Enter button after showing “DATA UTILITY”
enables you to enter the DATA utility menu. Pressing Menu/
Enter button after showing “PART UTILITY” enables you to
enter the part utility menu.
3. Press the Write button after you complete each setting to save
the setting.
Turning power off without saving resumes to original
without saving the setting. Make sure to execute saving
when you want to keep the contents that you set.
1. Setting metronome
You can set the parameters for the metronome function. Using the
metronome is convenient when creating a pattern using the real
time recording function.
The metronome creates a sound in quarter tempo intervals.
1. Select the METRONOME from the Global menu.
2. Rotate the Value knob to adjust the settings.
When it’s on, the metronome will always make sound during
both playing back and recording. Setting the metronome to
Rec 0, Rec 1, Rec 2 allows it to run only during recording.
Setting the metronome to Off disables the metronome.
2. Setting type of battery
Set in accordance with type of batteries in use.
1. Select BATTERY TYPE from the global menu.
2. Rotate Value knob to make setting.
Set to “Ni-MH” to use nickel metal hydride batteries. Set to
“Alkali” to use alkaline batteries.
3. Adjusting LCD contrast
You can adjust brightness of the display.
1. Select LCD CONTRAST from the global menu.
2. Rotate Value knob to make setting.
4. Prolonging battery life
You can set enabling or disabling the power save mode. Using this
system with battery power enters the power save mode to dim
back light of the display and LEDs.
1. Select POWER SAVE MODE from the global menu.
2. Rotate Value knob to make setting.
You can disable the power save mode by setting it to “Disable.”
You can enable the power save mode all the time by setting it to
“Enable.”
You can enable it during using battery and disable it during
using the AC adapter by setting it to “Auto.”
Default setting is in “Auto.”
5. Setting auto power off
The auto power off function is a function to turn power off automatically when you leave it without any operation for about
continuing 4 hours. You can set enabling or disabling this function.
1. Select AUTO POWER OFF from the global menu.
2. Rotate Value knob to make setting.
Set it to “Off” to disable the auto power off function.
Set it to “4 hours” to enable the auto power off function.
Default setting is in "4 hours."
6. Setting global MIDI channel
You can set the global MIDI channel.
1. Select MIDI GLOBAL CH. from the global menu.
2. Rotate Value knob to make setting.
7. Playing by synchronizing with external device
This system can be set for synchronization with MIDI or Sync
signals.
1. Select CLOCK MODE from the global menu.
2. Rotate the Value knob to set signals to be used as the master.
Internal: Sets this system as the master.
Auto: Sets an external device as the master, when the device is
connected. In a regular setting, this system is set as the master.
Ext.USB, Ext.MIDI and Ext.Sync: Sets signals from devices
connected to each jack as the master.
8. Using memory card
You can save the status of each setting to a memory card. You can
reinstall saved data by loading it.
Formatting
You need to format your memory card using the electribe/electribe
sampler in order to use a memory card.
You will lose all contents of a memory card when format-
ting it.
Never turn off the power or remove the memory card
during this procedure.
1. Select the CARD FORMAT option from the DATA utility
menu.
2. Press the Menu/Enter button. Upon completion of the format
procedure, the display will indicate OK.
Saving to a memory card
1. Select the EXPORT PATTERN option from the DATA utility
menu.
2. Press the Menu/Enter button.
Loading from a memory card
1. Select the IMPORT PATTERN option from the DATA utility
menu.
2. Select the pattern data to be loaded with the Value knob.
Select a file from the folder by using the Value knob and enter
the folder by pressing the Menu/Enter button. To exit the
folder, select the “Upper Folder” with the Value knob and
press the Menu/Enter button to go back up one level.
3. Press the Menu/Enter button to confirm.
14
Page 15
Writing to a WAV file.
This screen is displayed during
You can write patterns or a pattern set to a memory card.
Exporting a pattern to a WAV file
1. Select the EXPORT AUDIO option from the DATA utility
menu.
2. Select the format (WAV file only, or Ableton Live Set) to write.
3. Pressing the Menu/Enter button will export current pattern.
Exporting a pattern set to a WAV file
1. Select the EXPORT P.SET AUDIO option from the DATA
utility menu.
2. Select the format (WAV file only, or Ableton Live Set) to write.
3. Set a range of patterns recorded as pattern sets from 1 to 64 to
be written as a file.
TIP A longer time may be required if a wide range of pattern
sets is set to be written.
4. Pressing the Menu/Enter button exports patterns recorded as
pattern sets in a WAV file format.
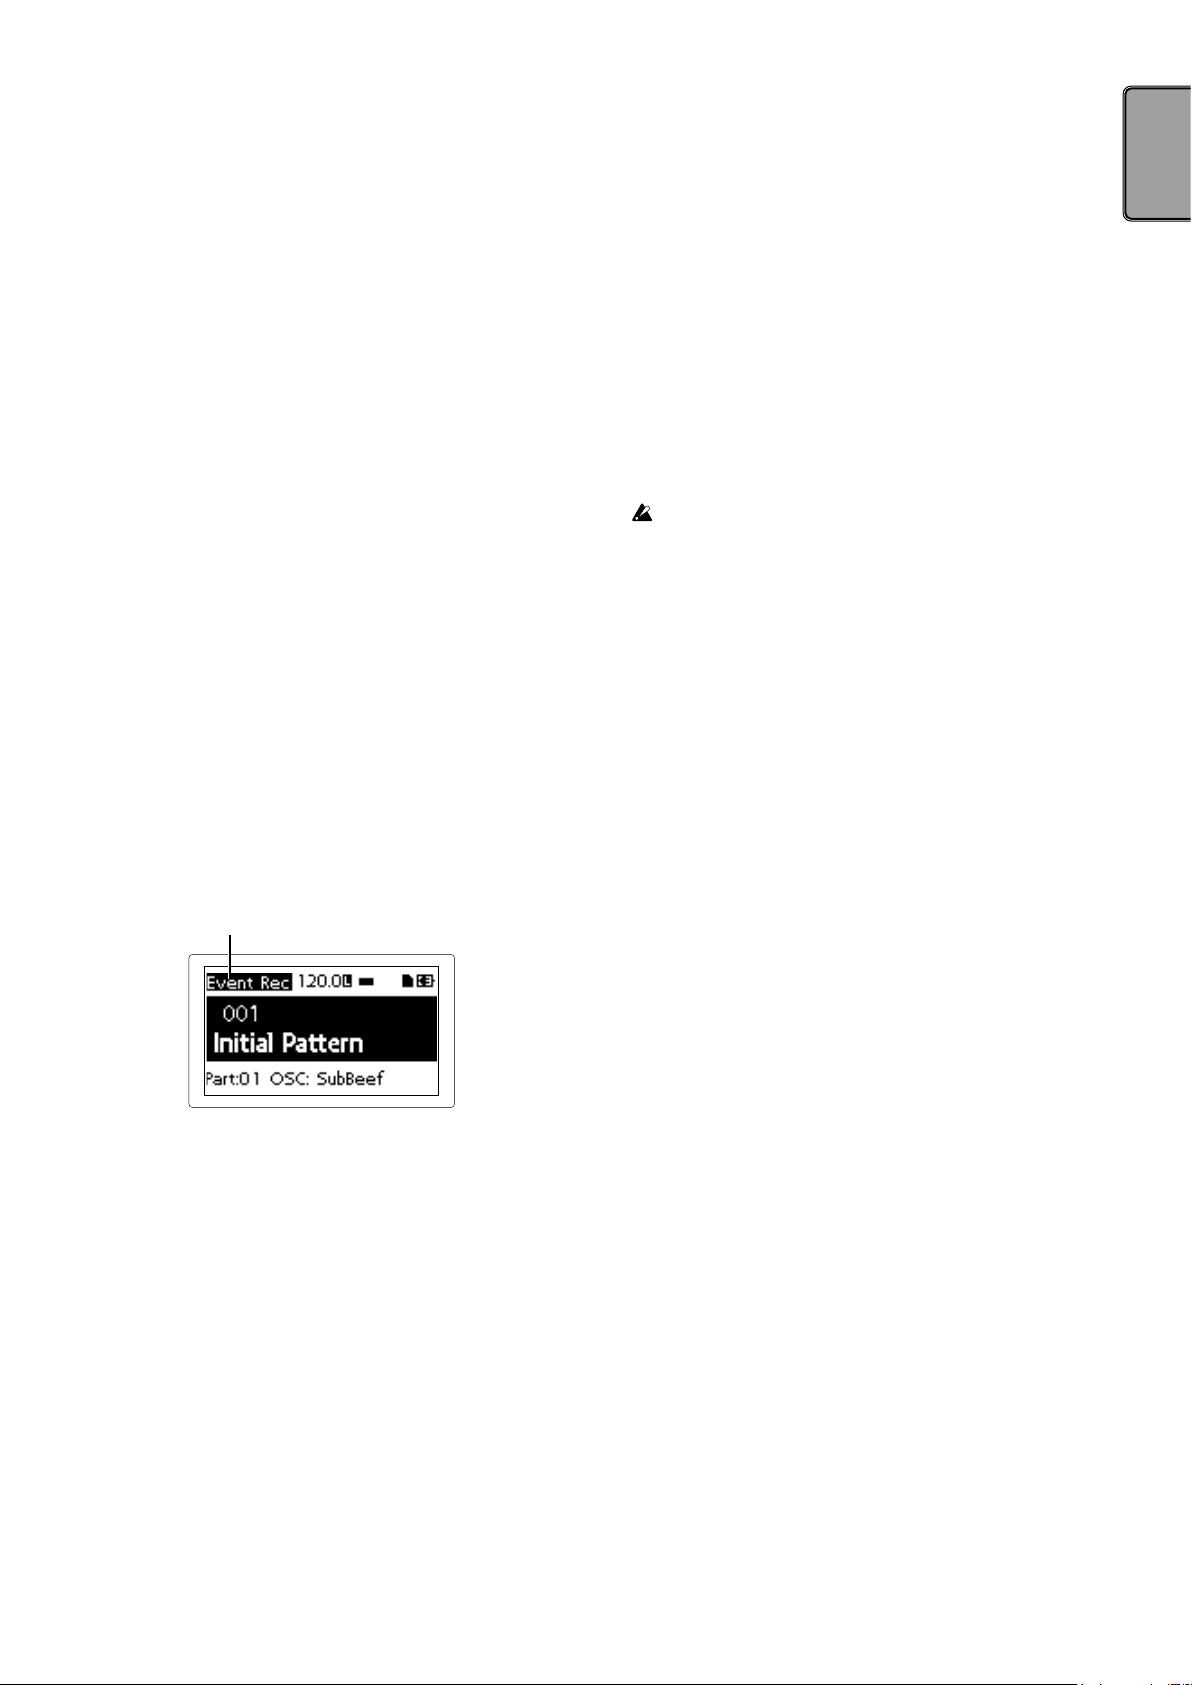
9. Using the Event Recorder
This is a function to record performances by using several patterns
or operating the knob or the trigger pad, etc. in the middle of
performance.
and the Menu/Enter button.
4. Playback the selected file by pressing the Play/Pause button.
5. Press the Stop button to stop playback and return to the
beginning of the played-back file.
6. Press the Exit button to end the Event Player.
TIP This function is not usable when the Event Recorder is
recording.
TIP During playback, other operations are not allowed.
10. Formatting user data
Formatting erases all patterns that you have created and resumes
default status.
You should backup all important data before formatting to prevent
loss of important data.
1. Select the Factory Reset option from the DATA utility menu.
2. Pressing the Menu/Enter button begins the format process.
Never turn off the power during formatting.
Recording
1. Select the EVENT REC/PLAY option from the edit menu and
press the Menu/Enter button.
2. Pressing the Menu/Enter button again sets the Event Recorder
to recording standby status.
3. Press the Play/Pause button to start recording.
4. Press the Exit button several times to return to the pattern
selection screen and perform by playing back patterns.
operation of the event recorder.
This records information, such as operation of the knob or the
trigger pad together with the pattern under playback to add
sounds or change the tempo, etc. In addition, you may perform with changing patterns.
5. Press the Stop button after ending performance.
6. The (name of) saved file will be displayed.
7. Press the Exit button to end recording.
TIP If the Event Recorder does not have a memory card, it will
display “No Card” and will not be usable.
TIP No information recorded on the Event Recorder will affect
the data recorded on a pattern. Also, it cannot save data on
a pattern.
Playing back
1. Select the EVENT REC/PLAY option from the edit menu and
press the Menu/Enter button.
2. Select EVENT PLAYER by pressing the < button or the >
button and press the Menu/Enter button.
3. Select the file name you wish to play by using the Value knob
15
Page 16

electribe sampler features
Sampling functionality has been added to the electribe’s functions.
The electribe sampler also provides the same analog modeling
sound engines as the electribe.
You can use up to 499 user samples with a total length of approximately 270 seconds when calculated as monaural. Numerous
preset samples of drums, drum/phrase loops, and hits are provided.
1. New functions of the electribe sampler
The electribe sampler adds powerful new features, and changes
the function of certain electribe controls.
Sampling function
The electribe sampler provides two methods of sampling:
• Sampling from an external audio source via the Audio In jack.
• Resampling the entire output of your electribe sampler perfor-
mance.
Sample editing
Sample editing allows you to edit the start and end points of a
sample, as well as the “slicing” of audio samples. These same
types of sample editing can also be used to edit the preset samples.
Stereo sample playback
Stereo samples—whether created on the electribe sampler or
loaded from a memory card—can be assigned to a part and played
as part of your performance.
2.
Changes to specific controller functions
Recording & Editing Samples
1. Sampling
Recording an external sound source via the Audio Input jack.
Preparing to sample
• Connect the output of the instrument, sound source, or audio
device that you wish to sample to the Audio In jack of the
electribe sampler. This Audio Input uses a stereo mini-jack, and
can accept either a stereo or mono mini-plug.
• Set the Audio In thru setting to On (Global page 14/17), and play
back some sound from your audio device.
• Adjust the output level of your external device (or adjust the
electribe sampler’s Input Level knob) so that the peak icon
(CLIP) does not light when the connected device’s output level
is at its maximum.
Setting the sampling mode
1. Hold down the Shift button and press the Rec button. The Rec
button and the Play/Pause button will now blink.
If you decide to cancel before you start sampling, press the
Exit button now.
2. Choose the sampling mode (the display indicates “Sampling
mode”).
Turn the Value knob to specify either stereo sampling “Stereo”
or monaural sampling “Mono.”
3. Press the > button to select the sampling source. Turn the
Value knob to specify “Audio In.”
4. Press the > button to see the available sampling time.
TIP The available sampling time is based on mono sampling.
For stereo sampling, the available sampling time is equal
to half of the value shown in the display.
“Oscillator” on panel is displayed as “Sample”
The Oscillator in the edit section is displayed as “Sample” on this
unit.
Sample Edit knob (Edit Section)
If a sample has been selected as the Oscillator, this knob can be
used to adjust the playback start point and to change the playback
direction.
Amp/EG Decay/Release knob
If a sample has been selected as the Oscillator, this knob can be
used to adjust the Gate Time—if the Amp EG is off.
If this knob is set to a value of 127, the sample plays to its end
regardless of the sample length.
TIP If the sample’s LOOP START POINT (Sample 5/10 page) is
specified, or if the OSC TYPE (oscillator type) is the
Analog or Audio In category, operation is the same as if
the electribe’s Amp EG is off.
Filter LPF/HPF/BPF buttons
The following filters can be individually activated, or turned off.
• electribe LPF ON or OFF
• electribe HPF ON or OFF
• electribe BPF ON or OFF
Sampling procedure:
1. When you’re ready to begin sampling, press the Play/Pause
button to start sampling.
The Rec button and the Play/Pause button will remain lit.
2. Press the Stop button to stop sampling.
The Rec button and the Play/Pause button will go dark.
TIP If you exceed the available recording time, sampling will
end automatically.
3. After sampling, the display will show “New Sample,” indicat-
ing that a new sample has been recorded.
Press the Play/Pause button to hear the newly recorded
sample.
You can save the newly recorded sample as a user sample by
pressing the Write button. If you decide not to save the newly
recorded sample, press the Exit button.
Even if you press the Write button to save the user sample,
it will be erased when you turn off the power. If you want
to keep the user samples, use the DATA utility menu
command EXPORT ALL SAMPLE or EXPORT SAMPLE to
write the sample data to a memory card before you turn
off the power.
TIP If you sample the Audio Input, the sample itself is record-
ed at the optimal volume, but the output volume during
playback is perceptually lower than the volume you heard
while sampling. This is by design, to minimize the distortion that might occur when playing that sample in Pattern.
By setting the play level to “+12 dB”(Sample page 9/10)
you can also play back the sample at approximately the
volume you heard during recording.
16
Page 17
Assigning the sample to a part
The recorded sample is added to the Oscillator selections as a user
sample.
Select a part, and then edit the Sample setting to select the sample
that you want to use.
TIP Stereo samples play in stereo if assigned to an odd-num-
bered part, and play as Mono Mix if assigned to an evennumbered part.
TIP If you created a pattern with a user sample assigned to a
part, use EXPORT ALL SAMPLE to write all sample data
to a card before you turn off the power.
2. Resampling
Recording the playback of an electribe sampler part,
pattern, or performance
electribe sampler can record the sound of its own playback to
create a new sample; this is called “resampling.”
Select the resampling mode
1. Select the pattern that you want to resample.
2. Hold down the Shift button and press the Rec button. The Rec
button will remain lit, and the Play/Pause button will blink.
If you decide to cancel before you start sampling, press the
Exit button now.
3. Choose the sampling mode (the display indicates “Sampling
mode”).
Turn the Value knob to specify either stereo sampling “Stereo”
or monaural sampling “Mono.”
4. Press the > button to select the sampling source. Turn the
Value knob to specify “Resampling.”
5. Press the > button to see the available sampling time.
Resampling procedure
1. There are two ways to resample:
• Resample the pattern playback. Press the Play/Pause button to
start resampling.
The Rec button and the Play/Pause button will be lit.
• Resample the sound of a specific part. Resampling starts when
you strike any trigger pad or touch pad.
2. Press the Stop button to stop resampling. The Rec button and
the Play/Pause button will go dark.
TIP If you exceed the available recording time, sampling will
end automatically.
3. After resampling, the display shows “New Sample,” indicating that a new sample has been recorded.
Press the Play/Pause button to hear the sample that you just
resampled. You can save the newly resampled sample as a
user sample by pressing the Write button.
If you decide not to save the newly resampled sample, press
the Exit button.
TIP When you resample, the playback volume of the sample is
raised so that the output volume of the playback is not
perceptually diminished. However since this decreases the
headroom margin, distortion may occur in some cases. If
this occurs, you can set the play level to “Normal”(Sample
page 9/10); the playback volume will be lower than during
recording, but the headroom margin will be maintained.
Even if you press the Write button to save the user sample,
it will be erased when you turn off the power. If you want
to keep the user samples, use the DATA utility menu
command EXPORT ALL SAMPLE or EXPORT SAMPLE to
write the sample data to a memory card before you turn
off the power.
3. Editing a sample
Once a sample has been recorded, it can be edited using the
electribe sampler’s internal controls.
1. Press the Menu/Enter button in the common section to open
the edit screen.
2. Use the < or > buttons to select SAMPLE EDIT, and press the
Menu/Enter button once again.
3. Use the Value knob to select the sample that you want to edit
(using the sample number).
4. Use the < or > buttons to access the following sample editing
functions.
For details on each editing function, refer to the “Parameter
Guide.”
• RENAME: Edits the name of the sample.
• START POINT: Specifies the playback start point.
• END POINT: Specifies the playback end point.
• LOOP START POINT: Specifies the loop start point. The sample
playback is looped from the point you specify here until the
END POINT.
• SAMPLE TUNE: Adjusts the pitch of the sample.
• Time Slice: Divides the sample by beats.
• CLEAR SLICE: Cancels the result of the TIME SLICE (divide
sample) operation.
• PLAY LEVEL: Changes the playback level of the sample. For a
resampled sample, this is automatically set to “+12 dB” in order
to reproduce the volume at which it was recorded.
• DELETE SAMPLE: Deletes a sample.
TIP To increase the available sampling time, delete unwanted
preset samples to free up more sampling area, and execute
EXPORT ALL SAMPLE while in this state; then load this
data when restarting. It will no longer be possible to select
the deleted preset sample numbers with the Sample knob.
TIP You can preview-play the sample by striking a trigger pad
or by using the touch pad assigned to Touch Scale.
TIP When editing a sample, the Filter, Modulation, Amp/EG,
and Insert FX sections are unavailable.
TIP When editing a sample, Voice Assign is set to Mono 2.
5. When you have finished editing, press the Write button to
save your changes.
Even if you press the Write button to save your edited
content, the user samples are erased when you turn off the
power. If you want to keep the user samples, use the
DATA utility menu command EXPORT ALL SAMPLE or
EXPORT SAMPLE to write the sample data to a memory
card before you turn off the power.
4. Importing/exporting samples
WAV files saved on a memory card can be imported into the
electribe sampler as samples. Samples can also be saved by writing
them to a memory card. From the DATA utility menu, choose the
desired command and execute it.
• Import SAMPLE: Loads a sample from the memory card.
• Export SAMPLE: Writes a sample to the memory card.
• Export ALL SAMPLE: Writes all samples saved in the electribe
sampler to the memory card as “all sample data.” The “all
sample data” written to the memory card will automatically be
loaded the next time the electribe sampler starts, returning it to
the state prior to power-off.
“All sample data” on the memory card is automatically
loaded at start-up. Since all samples saved in the electribe
sampler will be overwritten, take care not to inadvertently
17
Page 18

change the samples, for example if you swapped memory
cards.
• Export ALL PATTERN: Writes all patterns to the memory card.
• Import ALL PATTERN: Loads all patterns that were written to
the memory card by EXPORT ALL PATTERN. All patterns will
be overwritten.
Appendix
1. Troubleshooting
The display won’t turn on.
□ HaveyousecurelyconnectedtheACadapter?
□ HaveyouconnectedtheACadaptertothepoweroutlet?
□ Doyouhaveenoughbatterycharge?
There is no sound!
□ Haveyoucorrectlyconnectedtheamplifier,mixerorhead-
phonestothejack?
□ Haveyouturnedthepoweronfortheamplifierormixerand
setthemcorrectly?
□ HaveyousettheVolumeknoboftheelectribe/electribe
samplertoanappropriatelevel?
Playback won’t stop!
□ APatternkeepsplayingback,repeatingtheselectedpattern.
Press the Stop button after playback ends.
The sounds / motion sequence actions have changed
from what I created during editing!
□ Haveyoucompletedthewriteoperationafterediting?
→ After you have edited, write the data to memory before
switching the pattern in each mode or before you turn off the
power.
I can’t control MIDI!
□ HaveyoucorrectlyconnectedtheMIDIcable?
If you play this system from an external device:
□ HaveyoucorrectlysettheMIDIchannelinglobalmode?(→
p.14)
If you play an external device from this system:
□ HaveyousetthesameMIDIchannelforthereceivingdevice
andforthissystem?
I don’t hear anything when I’m playing on the trigger
pad.
□ Haveyousavedthepartafterediting?(→ p.12)
□ HaveyouturnedtheKeyboardbuttonON?
□ Haveyoudisabledthemotionsequence?(→ p.12)
I can’t seem to use my memory card.
□ Haveyouformattedthememorycardonlyinyourelectribe?
→ You need to re-format any memory card that has been format-
ted by a computer or digital camera with this system before it
can use it. (→ p.14)
□ Haveyoucorrectlyinsertedthememorycard?
→ Remove and insert the memory card again. (→ p.8)
□ Isthecardsizesupportedbythissystem?
→ This system supports SD cards from 512MB to 2GB, and SDHC
cards of 32GB or less.
18
Page 19
2. Error message
Pressing the Exit button will close the message window.
Card Error
Memory card is damaged.
→ Make a backup of all files in the memory card.
→ Make a backup of all data in your memory card to a computer,
etc. and then format the memory card with this system. Upon
completion, you can replace all of your data to the newly
formatted memory card.
Protected
Data protection is turned ON when you save data to a memory
card.
→ If the write protect switch on the memory card is locked,
unlock it.
Card Full
The memory card does not have sufficient available space.
→ Delete file(s) on the memory card to secure clear sufficient
space and then write or save your data again.
Event Over
The number of events exceeds the maximum number of events
that can be recorded.
File Error
File can’t be read/write correctly.
Memory Full
This system does not have sufficient memory capacity when you
load data from a memory card or copy data to this system.
→ Erase unnecessary data to increase the amount of available
space.
Specifications
The maximum number of sounds (entire pattern):
MAX. 24 voices (The number of simultaneous sounds in entire pattern depends on
the type of Oscillator, Filter or Insert Fx.)
The maximum number of sound (per part):
MAX, 4 voices
Connectors: Audio Out L jack (mono 1/4” phone jack),
Audio Out R jack (mono 1/4” phone jack),
Audio In jack (Stereo 1/8” mini phone
jack), Headphone jack (Stereo 1/8” mini
phone jack), Sync In jack, Sync Out jack,
MIDI OUT jack, MIDI IN jack, USB
connector (micro USB B type)
Power supply: AC adapter (DC 9V ),
Six AA batteries (alkaline or nickel-metal
hydride batteries)
Battery life: approximately five hours (Power Saving:
ON, with nickel-metal hydride batteries)
Current consumption: 500 mA or less
Dimensions (W x D x H):
Weight: 3.53 lbs. / 1.6 kg
Operating temperature
Included items: Owner’s manual, AC adapter, MIDI
* Specifications and appearance are subject to change without notice for improve-
ment.
13.35” x 7.44” x 1.77” / 339 x 189 x 45 mm
: 0–+40˚C(non-condensing)
conversion cable x 2
Motion Seq Full
Motion sequence cannot be recorded.
→ The electribe/electribe sampler can support up to 24 motion
sequence patterns. Erase any unnecessary motions and try to
add your motion sequence again.
19
Page 20
Précautions
Emplacement
L’utilisation de cet instrument dans les endroits suivants peut en
entraîner le mauvais fonctionnement.
• En plein soleil
• Endroits très chauds ou très humides
• Endroits sales ou fort poussiéreux
• Endroits soumis à de fortes vibrations
• A proximité de champs magnétiques
Alimentation
Branchez l’adaptateur secteur mentionné à une prise secteur de
tension appropriée. Evitez de brancher l’adaptateur à une prise de
courant dont la tension ne correspond pas à celle pour laquelle l’appareil est conçu.
Interférences avec d’autres appareils électriques
Les postes de radio et de télévision situés à proximité peuvent par
conséquent souffrir d’interférences à la réception. Veuillez dès lors
faire fonctionner cet appareil à une distance raisonnable de postes
de radio et de télévision.
Note concernant les dispositions (Seulement EU)
Quand un symbole avec une poubelle barrée d’une croix apparait sur le produit, le mode d’emploi, les piles ou le pack de piles,
cela signifie que ce produit, manuel ou piles doit être déposé
chez un représentant compétent, et non pas dans une poubelle
ou toute autre déchetterie conventionnelle. Disposer de cette
manière, de prévenir les dommages pour la santé humaine et les
dommages potentiels pour l’environnement. La bonne méthode
d’élimination dépendra des lois et règlements applicables dans
votre localité, s’il vous plaît, contactez votre organisme administratif pour
plus de détails. Si la pile contient des métaux lourds au-delà du seuil réglementé, un symbole chimique est affiché en dessous du symbole de la
poubelle barrée d’une croix sur la pile ou le pack de piles.
REMARQUE IMPORTANTE POUR LES CLIENTS
Ce produit a été fabriqué suivant des spécifications sévères et des besoins en tension applicables dans le pays où ce produit doit être utilisé.
Si vous avez acheté ce produit via l’internet, par vente par correspondance ou/et vente par téléphone, vous devez vérifier que ce produit est
bien utilisable dans le pays où vous résidez. ATTENTION: L’utilisation de
ce produit dans un pays autre que celui pour lequel il a été conçu peut
être dangereuse et annulera la garantie du fabricant ou du distributeur.
Conservez bien votre récépissé qui est la preuve de votre achat, faute de
quoi votre produit ne risque de ne plus être couvert par la garantie du
fabricant ou du distributeur.
Maniement
Pour éviter de les endommager, manipulez les commandes et les
boutons de cet instrument avec soin.
Entretien
Lorsque l’instrument se salit, nettoyez-le avec un chiffon propre et
sec. Ne vous servez pas d’agents de nettoyage liquides tels que du
benzène ou du diluant, voire des produits inflammables.
Conservez ce manuel
Après avoir lu ce manuel, veuillez le conserver soigneusement pour
toute référence ultérieure.
Evitez toute intrusion d’objets ou de liquide
Ne placez jamais de récipient contenant du liquide près de l’instrument. Si le liquide se renverse ou coule, il risque de provoquer des
dommages, un court-circuit ou une électrocution.
Veillez à ne pas laisser tomber des objets métalliques dans le boîtier
(trombones, par ex.). Si cela se produit, débranchez l’alimentation
de la prise de courant et contactez votre revendeur korg le plus
proche ou la surface où vous avez acheté l’instrument.
Remarque sur les données
Un dysfonctionnement dû à une erreur de manipulation peut provoquer la
perte du contenu de la mémoire. Veuillez donc archiver vos données importantes sur d’autres supports par précaution. Korg Corporation décline toute
responsabilité pour tout dommage résultant de la perte de données.
Remarque sur le copyright
L’utilisation de données protégées par un copyright ou des droits d’auteur à
toute autre fin que celles autorisées comme l’utilisation personnelle ou dans
le cadre familial, constitue une infraction punie par la loi. Les peines peuvent inclure des demandes de dommages et intérêts. Les droits du détenteur du copyright s’appliquent également aux enregistrements ou aux produits dérivés issus de données protégées. La réutilisation ou la distribution
de ce type de produits constitue également une infraction à la loi régissant
les droits d’auteur. Korg Corporation décline toute responsabilité pour les
dommages ou les peines que vous pouvez encourir après avoir enfreint la
loi sur les droits d’auteur/le copyright. Si vous avez des questions concernant l’utilisation de données protégées par des droits d’auteur/un copyright,
veuillez consulter un spécialiste de ce type de législation.
* Tous les noms de produits et de sociétés sont des marques commerciales ou
déposées de leur détenteur respectif.
20
Page 21
Sommaire
Introduction ................................ 22
1. Description par section ................................................................... 22
2. Connexions ..................................................................................... 25
3. Connexion de l’adaptateur secteur .................................................. 25
4. Insérer et retirer une carte de mémoire ...........................................26
Pour produire du son .................... 27
1. Mise sous tension/hors tension de l’instrument .............................. 27
2. Manipulations de base .................................................................... 27
3. Lecture d’un motif .......................................................................... 27
4. Sélection d’une partie ..................................................................... 27
Production de musique ................ 28
1. Jouer de la musique avec les pads de déclenchement ..................... 28
2. Jouer de la musique avec le pad tactile ........................................... 29
3. Utilisation de la fonction Gate Arpeggiator ..................................... 29
4. Utilisation des effets maîtres ........................................................... 29
5. Jeu avec un groupe de motifs ..........................................................30
6. Réglage du tempo (BPM) ................................................................ 30
7. Modifier le son avec les fonctions de jeu ......................................... 30
Enregistrement de données de jeu 30
1. Enregistrement en temps réel ......................................................... 30
2. Edition pas à pas ............................................................................. 30
3. Enregistrer les manipulations des fonctions de jeu (‘Motion Seq’) .. 30
4. Sauvegarde d’un motif .................................................................... 31
Edition d’un motif ........................ 32
1. Etouffement d’une partie (‘Part Mute’) ........................................... 32
2. Effacement d’une partie (‘Part Erase’) ............................................. 32
3. Copie d’une partie (‘Part Copy’) ...................................................... 32
4. Changer les réglages de motif ......................................................... 32
1. Réglage du métronome .................................................................. 32
2. Réglage du type de piles ................................................................. 32
3. Réglage de contraste de l’affichage. ................................................ 32
4. Mode d’économie d’énergie ............................................................ 32
5. Réglage de la fonction de coupure automatique d’alimentation ..... 33
6. Réglage du canal global MIDI.......................................................... 33
7. Synchronisation du jeu avec un dispositif externe ........................... 33
8. Utilisation d’une carte de mémoire ................................................. 33
9. Utilisation de la fonction Event Recorder .........................................33
10. Formatage des données utilisateur ............................................... 34
Fonctions de l’electribe sampler .... 34
1. Nouvelles fonctions de l’electribe sampler ...................................... 34
2. Changements apportés à des fonctions de jeu spécifiques .............. 34
Enregistrement et édition d’échantil-
lons ............................................ 35
1. Échantillonnage: ............................................................................ 35
2. Rééchantillonnage .......................................................................... 35
3. Édition d’un échantillon .................................................................. 36
4. Importer/exporter des échantillons ................................................ 36
Appendice ................................... 37
1. Guide de dépannage ....................................................................... 37
2. Messages d’erreur ........................................................................... 37
Fiche technique ........................... 38
Autres réglages ........................... 32
21
Page 22

Introduction
Nous vous remercions d’avoir choisi la station de production
musicale electribe/electribe sampler de Korg.
Afin de profiter pleinement de votre nouvel instrument, veuillez
lire attentivement ce mode d’emploi et suivre ses consignes
d’utilisation. Conservez ce mode d’emploi à portée de main pour
toute référence ultérieure.
1. Description par section
Panneau supérieur
1
2 3
4
7
L’échantillonneur electribe/electribe sampler est une station de
production de musique Dance offrant tous les outils nécessaires à
la création de compositions originales. Les commandes et le pad
tactile de l’instrument permettent d’éditer les sons et de produire
en toute facilité des motifs rythmiques et phrases musicales.
Le déroulement des opérations élémentaires sur l’electribe sampler
est identique à celui sur l’electribe.
Vous trouverez des explications supplémentaires dédiées à
l’electribe sampler sous les sections “Fonctions de l’electribe
sampler” (→ p. 34) et “Enregistrement et édition d’échantillons”
(→ p. 35).
ASTUCE Les illustrations dans ce manuel représentent l’electribe.
8
5
6
10
1. Bouton d’alimentation
Ce bouton sert à mettre l’instrument sous tension et hors
tension.
2. Commande Volume
Règle le volume du signal à la sortie ligne ou à la prise casque.
3. Commande Input Level
Règle le niveau d’entrée du signal reçu à la prise Audio In.
4. Ecran
Affiche des informations sur les motifs, parties et paramètres
de l’instrument.
5. Section de transport
Bouton
Cette bouton permet de lancer l’enregistrement de rythmes,
phrases ou manipulations des commandes (les “données de
jeu”). Une nouvelle pression sur cette bouton arrête l’enregistrement en cours et poursuit la lecture.
Bouton
Cette bouton permet d’arrêter la lecture.
Bouton
Une pression sur cette bouton lance ou interrompt temporairement (pause) la lecture.
Bouton Tap
Vous pouvez régler le tempo (BPM) en appliquant simplement
quelques pressions successives sur cette touche.
(enregistrement)
(arrêt)
(lecture/pause)
9
11
12
13
6. Section du pad tactile
Pad tactile
Cette surface (“pad”) est utilisée pour piloter les fonctions
Gate Arpeggiator et Touch Scale, ou pour contrôler l’effet
maître (“Master”).
Bouton Gate Arp
Cette bouton permet d’activer (ON) la fonction Gate Arpeggiator.
Bouton Touch Scale
Cette bouton permet d’activer (ON) la fonction Touch Scale.
Bouton Master Fx
Cette bouton permet d’activer (ON) et de désactiver (OFF) la
fonction de commande de l’effet maître.
Bouton MFX Hold
Quand le bouton Master Fx est active, le bouton MFX Hold
permet de conserver tel quel le statut de l’effet maître activé
avec le pad tactile, sans devoir garder les doigts sur le pad.
ASTUCE Vous pouvez mémoriser le statut actif/coupé (ON/
OFF) de le bouton de maintien d’effet maître (MFX Hold) dans
un motif.
7. Section commune
Commande de valeur
Cette commande change la valeur du paramètre affiché à
l’écran (le paramètre “actif”).
22
Page 23
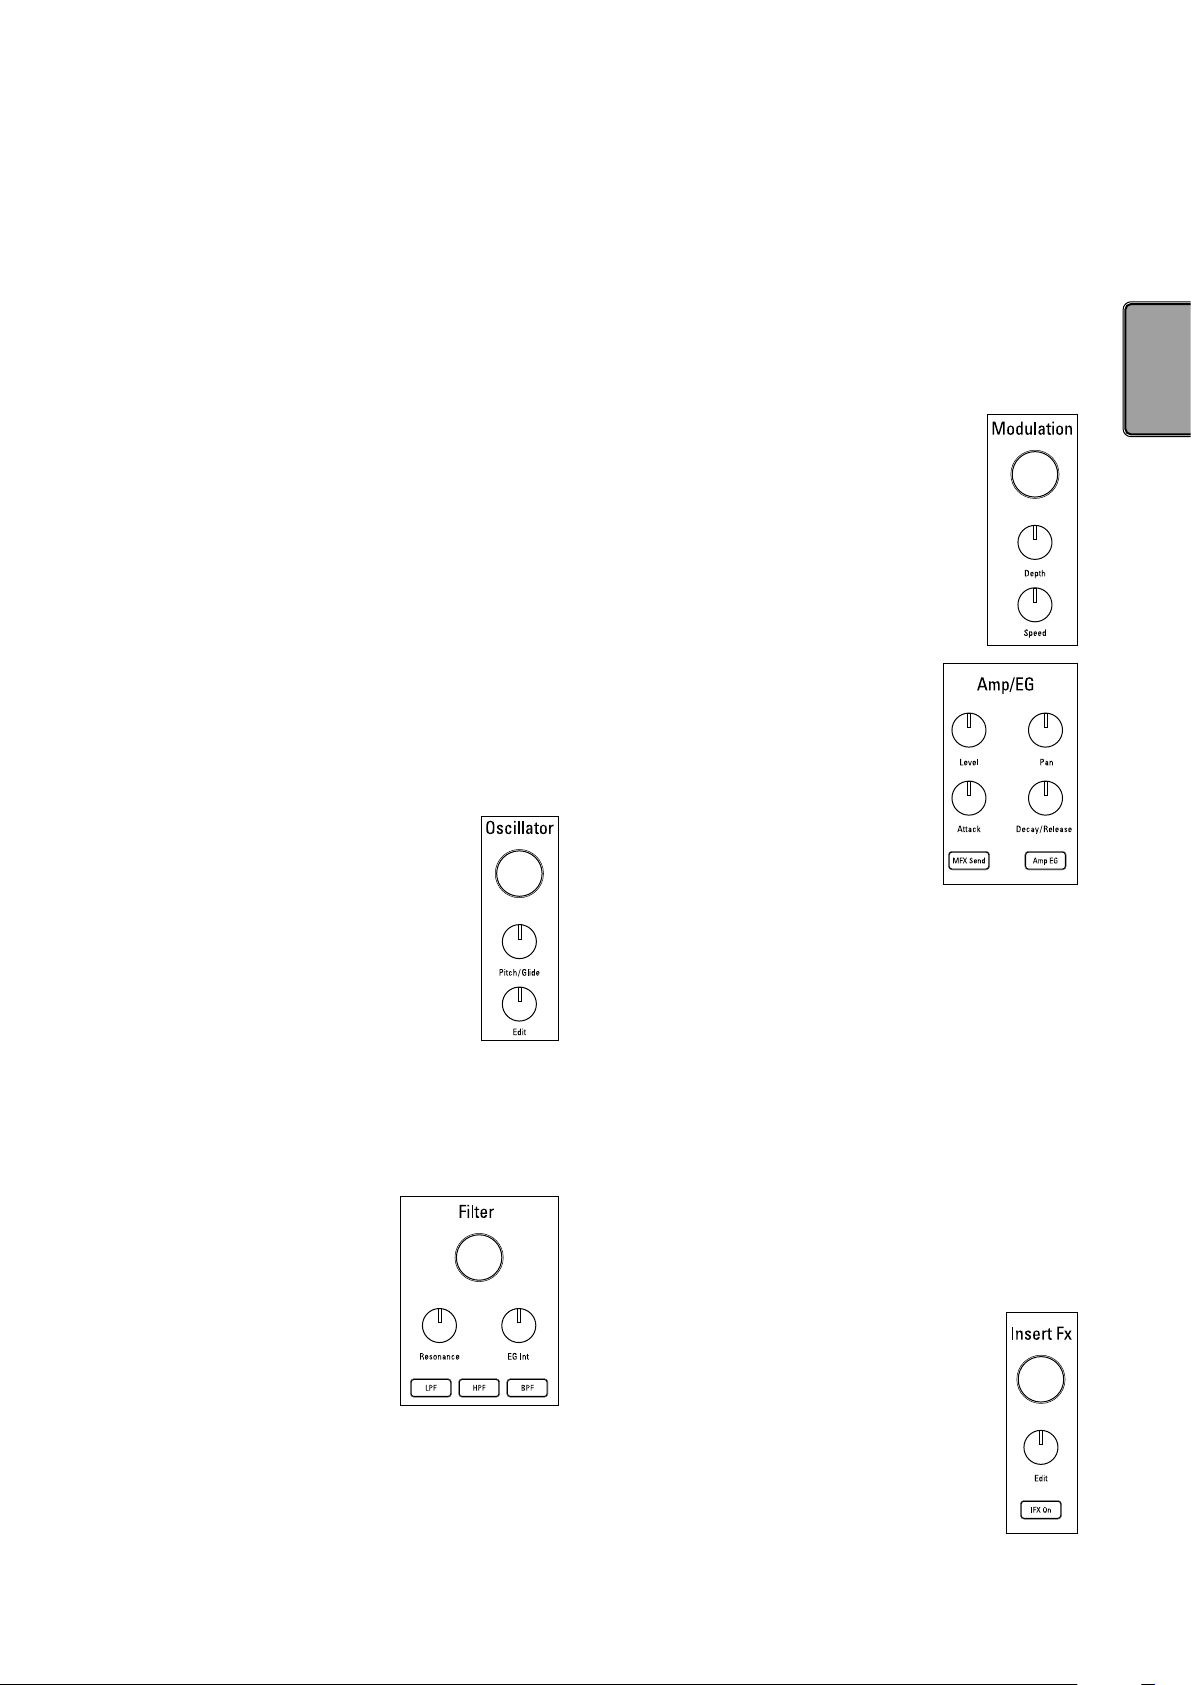
Boutons de curseur <, >
Ces boutons servent à sélectionner le paramètre que vous
souhaitez éditer.
Bouton Menu/Enter
Cette bouton permet de sélectionner les paramètres, tels que
les réglages de motif, de partie, les réglages Global ou Utility;
elle sert aussi à valider vos changements de réglages.
Bouton Exit
Deux pressions sur cette bouton permettent de retourner de
l’écran d’édition à l’écran de sélection de motif.
Bouton Shift
Utilisée en tandem avec une autre bouton ou commande, cette
bouton permet d’exécuter diverses fonctions.
Bouton Shift + < (curseur): Annule la toute dernière opération
(fonction d’annulation).
Boutons Shift + Write: Vous pouvez nommer et mémoriser les
motifs.
Bouton Shift + commande de valeur: Permet de changer les
valeurs par petits pas ou par pas plus importants.
ASTUCE La taille du pas de changement varie selon le paramètre sélectionné.
Bouton Write
Cette bouton sert à sauvegarder les données de motifs et les
réglages Global dans la mémoire de l’Electribe. Appuyez sur le
bouton Write pour mémoriser les données depuis la page de
paramètres Global. Les données de motifs peuvent aussi être
sauvegardées depuis les autres pages d’écran.
8. Section d’édition
Cette section permet de modifier les paramètres de chaque
partie.
Oscillator (electribe sampler: Sample)
Ces commandes permettent de choisir le type et de
régler le timbre des formes d’onde (onde en dent
de scie, carrée, bruit ou PCM) de l’oscillateur.
Commande Oscillator (electribe sampler: Com-
mande Sample)
Permet de sélectionner le type de forme d’onde.
Commande Pitch/Glide
Cette commande règle la hauteur (le timbre). Vous
pouvez produire une transition en douceur d’une
note à l’autre (“Glide”) pour les sons de synthé en
tournant cette commande tout en appuyant sur le bouton
Shift.
Commande Edit
Cette commande modifie la nature du son. L’effet de la commande dépend du type de forme d’onde actif.
Filter
Il s’agit du filtre utilisé pour modifier le
timbre (caractère du son) en atténuant
ou accentuant certaines portions du
spectre sonore de l’oscillateur.
Commande Filter
Cette commande règle la fréquence de
coupure du filtre.
Commande Resonance
Cette commande règle la résonance du
filtre.
Commande EG Int
Cette commande règle l’intensité du changement périodique
de fréquence de coupure du filtre produit par l’enveloppe
(“EG”) définie dans la section Amp/EG.
Bouton LPF
Cette bouton permet d’activer le filtre passe-bas (“LPF”).
Appuyez plusieurs fois sur cette bouton pour changer de type
de filtre.
Bouton HPF
Cette bouton permet d’activer le filtre passe-haut (“HPF”).
Appuyez plusieurs fois sur cette bouton pour changer de type
de filtre.
Bouton BPF
Cette bouton permet d’activer le filtre passe-bande (“BPF”).
Appuyez plusieurs fois sur cette bouton pour changer de type
de filtre.
Modulation
Ces commandes permettent de produire des
changements périodiques sur le timbre via le
LFO ou l’enveloppe.
Commande Modulation
Cette commande définit le type de modulation.
Commande Depth
Cette commande règle l’intensité de modulation.
Commande Speed
Cette commande règle la vitesse de modulation.
Amp/EG
Ces commandes règlent l’amplificateur
appliqué au son pour définir son volume
et sa position dans l’image stéréo, ainsi
que l’enveloppe (“EG”) et l’effet maître
utilisés pour produire des changements de
son périodiques.
Commande Level
Cette commande règle le volume d’une
partie.
Commande Pan
Cette commande définit la position de la partie dans l’image
stéréo.
Commande Attack
Cette commande règle la vitesse d’attaque du son.
Commande Decay/Release
Cette commande définit la durée de chute du son.
Bouton MFX Send
Cette bouton définit si le signal d’une partie est envoyé ou non
à l’effet maître (“Master FX”). Chaque pression sur cette
bouton alterne entre le statut actif (touche allumée) et coupé
(touche éteinte) d’envoi à l’effet maître.
Bouton Amp EG
Permet d’activer l’enveloppe (“EG”) de l’amplificateur. Chaque
pression sur cette bouton alterne entre le statut actif (touche
allumée) et coupé (touche éteinte) d’envoi à l’effet maître. Le
volume change conformément aux réglages d’enveloppe
définis avec les commandes Attack et Decay/Release quand la
fonction est active. Quand cette fonction est coupée, les
réglages d’enveloppe ne sont pas tenus en compte (enveloppe
d’orgue fixe).
Insert Fx
La section Insert Fx sert à appliquer divers effets au
son, comme des effets de type distorsion ou Surge.
Commande Insert Fx
Cette commande permet de sélectionner le type
d’effet d’insertion (“Insert FX”).
23
Page 24

Commande Edit
Cette commande règle l’intensité de l’effet d’insertion. L’effet
produit par cette commande varie selon le type d’effet choisi.
Bouton IFX On
Cette bouton sert à activer ou couper l’effet d’insertion.
Chaque pression sur cette bouton alterne entre le statut actif
(touche allumée) et coupé (touche éteinte) d’envoi à l’effet
maître.
9. Boutons Step
Ces boutons indiquent la position ou l’octave des séquences
ainsi que la fonction actuelle des pads de déclenchement. Une
pression sur ces boutons permet de changer la position ou
l’octave de la séquence en cours d’édition.
10. Section d’édition de partie
Boutons <Part, Part>
Ces boutons permettent de choisir la partie voulue. L’affichage
indique la partie actuellement sélectionnée.
Bouton Part Mute
Quand cette bouton est allumée (fonction active), vous pouvez
couper le son d’une partie en appuyant sur le pad de déclenchement correspondant. Le pad de déclenchement et le bouton
Part Mute s’éteignent alors. Une nouvelle pression sur le pad
de déclenchement de la partie coupée (pad éteint) annule la
coupure ; le pad s’allume.
Bouton Part Erase
Pour supprimer le son d’une partie, appuyez sur le bouton
Part Erase pendant le jeu, puis maintenez la pression sur le
pad de déclenchement de la partie voulue.
11. Section du mode de pad
Les boutons de cette section permettent de définir la fonction
des pads de déclenchement.
Bouton Trigger
Quand cette bouton est allumée (fonction active), vous pouvez
lancer une partie en appuyant sur le pad correspondant. Le
paramètre Trigger Mode permet de spécifier le mode de
lecture.
Bouton Sequencer
Quand cette bouton est allumée (fonction active), les pads de
déclenchement sont utilisés en mode d’entrée de pas.
Bouton Keyboard
Quand cette bouton est allumée (fonction active), les pads de
déclenchement fonctionnent comme les boutons d’un clavier.
Vous pouvez définir la tonique ou la gamme par motif.
Bouton Chord
Quand cette bouton est allumée (fonction active), les pads de
déclenchement permettent de jouer des accords. Vous pouvez
spécifier la variation ou la tonique/gamme de l’accord par
motif.
Bouton Step Jump
Quand cette bouton est allumée en mode de lecture du séquenceur, vous pouvez passer instantanément à tout pas voulu
(1 à 16) en appuyant sur le pad de déclenchement correspondant. Quand vous appuyez sur plusieurs pads de déclenchement, l’instrument joue successivement chaque pas selon
l’ordre d’enfoncement des pads.
Bouton Pattern Set
Quand cette bouton est allumée, une pression sur un pad de
déclenchement active le motif mémorisé dans le pad en
question. Maintenez cette bouton enfoncée tout en enfonçant
un pad de déclenchement pour assigner le motif actif à ce pad.
12. Pads de déclenchement
Le fonctionnement des pads de déclenchement est défini avec
les réglages de la section du mode des pads.
13. Diode
Le fonctionnement de la diode à l’arrière de l’instrument est
déterminé par le motif en cours de lecture.
24
Page 25
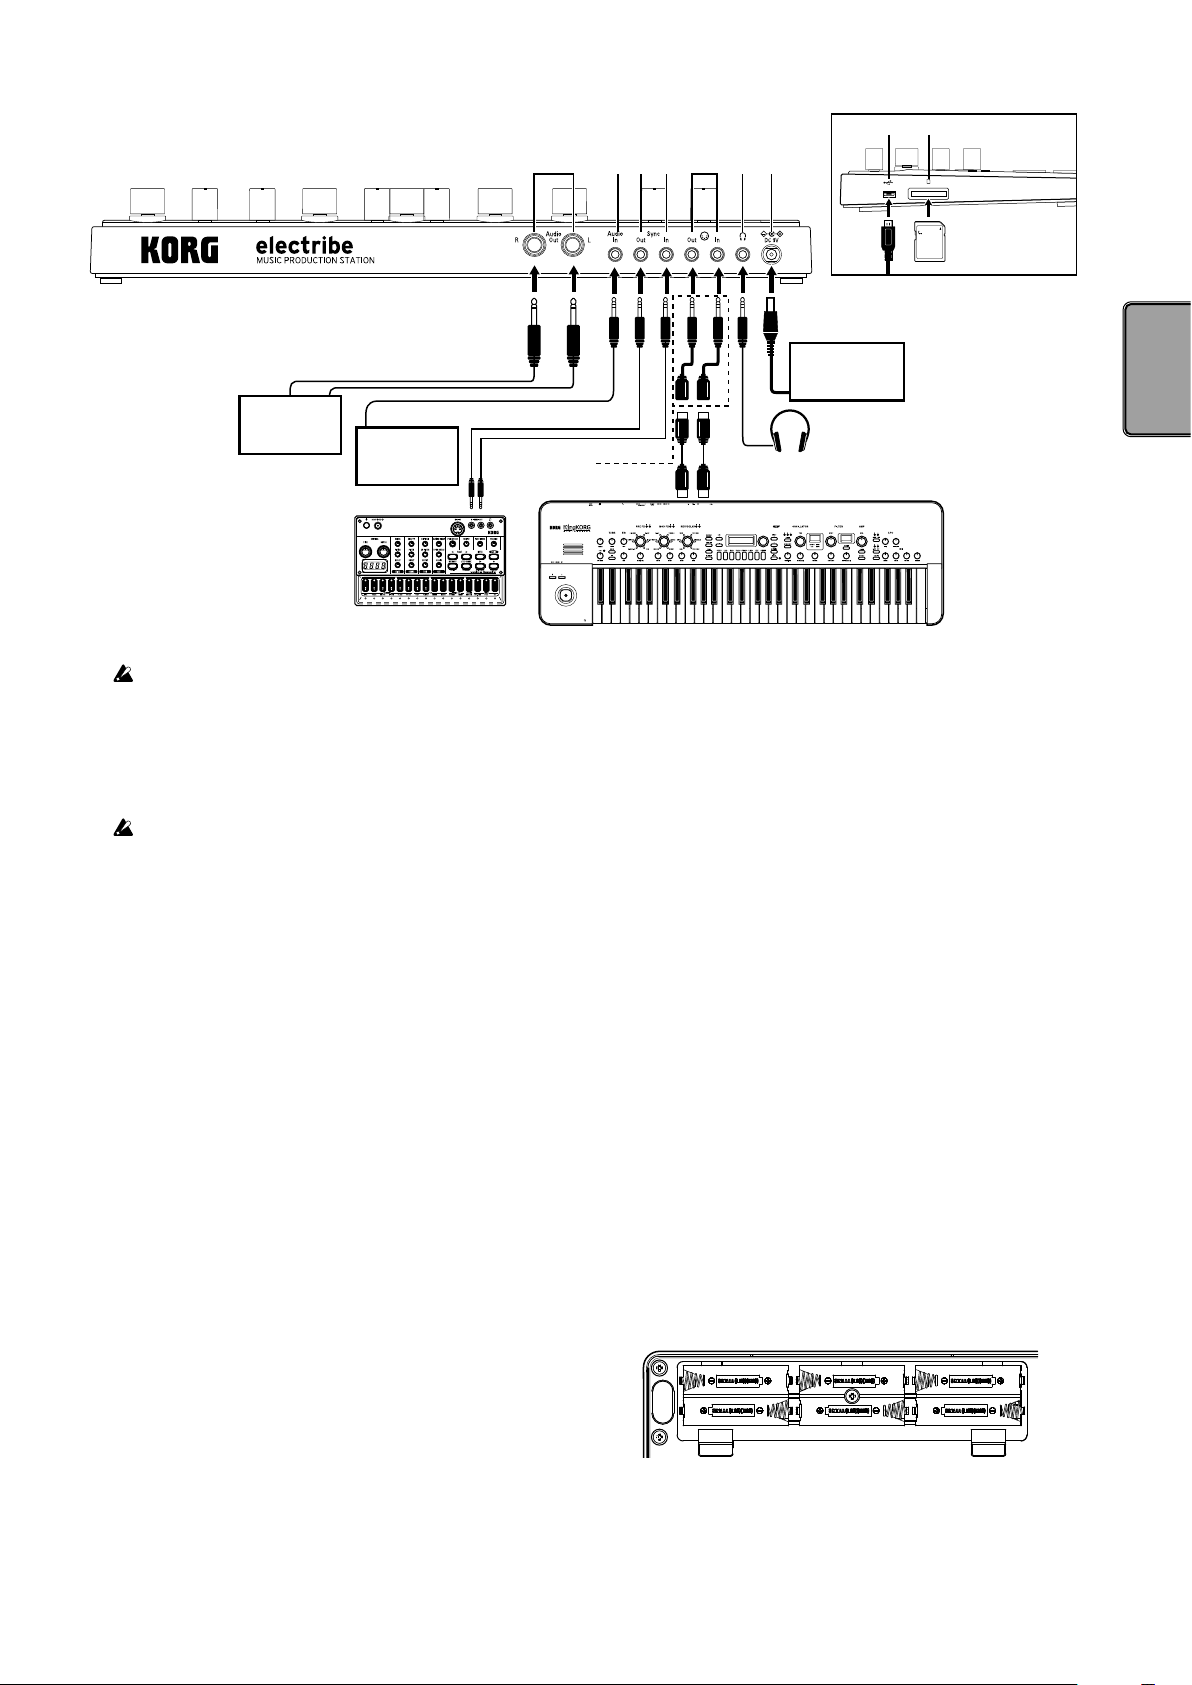
98
2. Connexions
Console,
moniteur actif
Lecteur CD,
lecteur MP3
1 2 3 4 5 6 7 8 9 10 11 12 13 14 15 16
1 2 3 4 5 6 7
Câble de conversion
MIDI fourni
Entrée MIDI Sortie MIDI
Adaptateur
secteur fourni
Casque d’écoute
Veillez à mettre tous les éléments hors tension avant
d’effectuer toute connexion. Ignorer cette précaution
pourrait provoquer des dysfonctionnements ou endomma-
ger vos moniteurs.
ASTUCE La première fois que vous branchez l’instrument à un
PC tournant sous Windows, le pilote inclus dans le système est
automatiquement installé.
Le pilote USB-MIDI standard inclus dans Windows ne
permet pas d’utiliser simultanément l’electribe avec
plusieurs applications. Pour pouvoir utiliser l’electribe
simultanément via plusieurs applications, vous devez
installer le pilote KORG USB-MIDI driver. Téléchargez le
pilote KORG USB-MIDI sur le site Internet de Korg et
installez-le en suivant les consignes de la documentation
fournie.
1. Prises Audio Out L/R
Ces prises de sortie acheminent le signal audio de l’Electribe.
Quand un seul câble est connecté à la prise Audio Out L
(aucun câble connecté à la prise Audio Out R), le signal de
sortie stéréo est transformé en un signal mono.
ASTUCE Dans le cas d’une connexion mono, la prise de sortie
de l’instrument est compatible avec des fiches mono et stéréo
de 6,35 mm (1/4”).
2. Prise Audio In
Cette prise permet à l’Electribe/electribe sampler de recevoir le
signal audio d’une source externe.
ASTUCE Le signal d’une source externe envoyé à l’instrument
peut être mélangé en activant la fonction AUDIO IN THRU
dans le menu Global.
3. Prise Sync Out
Cette prise produit à chaque croche ou double croche une
pulsation de 5V durant 15ms.
Elle sert à la synchronisation des produits de la série KORG
volca ou d’autres séquenceurs analogiques.
ASTUCE La polarité et le cycle de la pulsation sont définis sous
le menu Global.
4. Prise Sync In
Quand vous assignez le réglage “Auto” ou “Ext. Sync” au
mode d’horloge (menu Global) et transmettez une impulsion
à l’electribe/electribe sampler depuis la sortie de synchronisa-
tion ou sortie audio d’un dispositif analogique externe,
l’horloge interne de l’electribe/electribe sampler est désactivée
et la progression des pas se fait conformément à l’impulsion
reçue.
ASTUCE Vous pouvez activer/désactiver la fonction SYNC IN et
régler le cycle et la polarité de l’impulsion détectée sous le
menu Global. Pour plus de détails sur cette procédure, voyez
le Guide des paramètres.
5. Prises MIDI IN/OUT
Elles permettent de brancher l’instrument à un dispositif MIDI
via les câbles de conversion MIDI fournis
6. Prise casque
Cette prise permet de brancher un casque d’écoute.
7. Prise DC 9V
C’est ici que vous branchez l’adaptateur secteur fourni.
8. Prise USB
Cette prise permet de raccorder l’Electribe/electribe sampler à
un ordinateur.
9. Fente pour carte de mémoire
Elle permet de loger une carte de mémoire (SD). Vous pouvez
utiliser la carte de mémoire pour sauvegarder (copie de
sauvegarde) ou charger des données de jeu. (→ p.26)
3. Connexion de l’adaptateur secteur
Alimentation de l’instrument sur piles
Ouvrez le couvercle du compartiment des piles situé sur le dessous de l’instrument et insérez six piles de type AA en veillant à
les orienter dans le sens correct (en respectant les indications de
polarité).
Types de piles compatibles
Vous pouvez utiliser des piles alcalines de type AA ou des
piles au nickel-métal-hydrure.
ASTUCE Vous pouvez spécifier le type de piles utilisé à la page
“Battery Type” du menu Global, de sorte que l’Electribe/
25
Page 26
electribe sampler puisse détecter et afficher avec précision
l’autonomie résiduelle des piles.
Affichage de l’autonomie résiduelle des piles
L’affichage indique l’autonomie résiduelle des piles via l’icône
de pile “ ”. L’icône de pile épuisée “ ” indique que les
piles sont presque plates ; remplacez-les sans tarder par des
piles neuves du même type.
ASTUCE Quand l’instrument est alimenté sur piles et que vous
ne manipulez aucune de ses commandes pendant un certain
temps, l’Electribe/electribe sampler passe en mode d’économie
d’énergie pour préserver les piles. Un paramètre à la page
“Power Save Mode” du mode Global vous permet de désacti-
ver le mode d’économie d’énergie. (→ p.32: 4. Mode d’éco-
nomie d’énergie)
Si l’Electribe/electribe sampler est alimenté via son adapta-
teur secteur, mettez-le hors tension avant de remplacer les
piles.
Retirez immédiatement les piles si elles sont plates. Il est
aussi conseillé de retirer les piles de l’Electribe/electribe
sampler si vous ne comptez pas l’utiliser pendant une
période prolongée, cela afin d’éviter les risques de fuite
des piles.
Utilisation de l’adaptateur secteur
Branchez l’adaptateur secteur fourni à la prise DC 9V de l’instrument et branchez sa fiche secteur à une prise de courant.
Utilisez exclusivement l’adaptateur secteur fourni. L’utili-
sation de tout autre adaptateur secteur pourrait provoquer
des dysfonctionnements.
ASTUCE Aucune carte de mémoire n’est fournie avec l’instrument. Procurez-vous une carte de mémoire disponible dans le
commerce.
4. Insérer et retirer une carte de mémoire
Vous pouvez utiliser une carte de mémoire pour sauvegarder ou
charger des données de morceau ou lire des données.
N’insérez et ne retirez jamais une carte de mémoire quand
l’instrument est sous tension. Cela pourrait provoquer la
perte de données de l’instrument ou de la carte de mémoire, ou endommager cette dernière.
Insertion d’une carte de mémoire
1. Vérifiez que l’affichage et les témoins sont éteints et que
l’instrument est hors tension.
2. Insérez la carte de mémoire dans l’instrument jusqu’à ce que
vous entendiez un déclic.
Veillez à orienter la carte dans le sens correct et à l’insérer
à fond dans son logement. N’essayez jamais d’insérer la
carte de force si elle ne s’enfonce pas facilement.
Retrait de la carte de mémoire
1. Vérifiez que l’affichage et les témoins sont éteints et que
l’instrument est hors tension.
2. Enfoncez la carte jusqu’à ce que vous entendiez un déclic, puis
relâchez-la de sorte qu’elle s’éjecte d’elle-même.
Une fois la carte ressortie de son logement, retirez-la de
l’instrument.
Cartes de mémoire compatibles avec l’instrument
Cet instrument est compatible avec les types de cartes suivants
: cartes SD de 512Mo à 2Go, et cartes SDHC de 32Go ou moins.
ASTUCE Cet instrument n’est pas compatible avec les cartes
SDXC.
Manipulation des cartes de mémoire
Lisez attentivement les instructions d’utilisation fournies avec
votre carte de mémoire.
26
Page 27
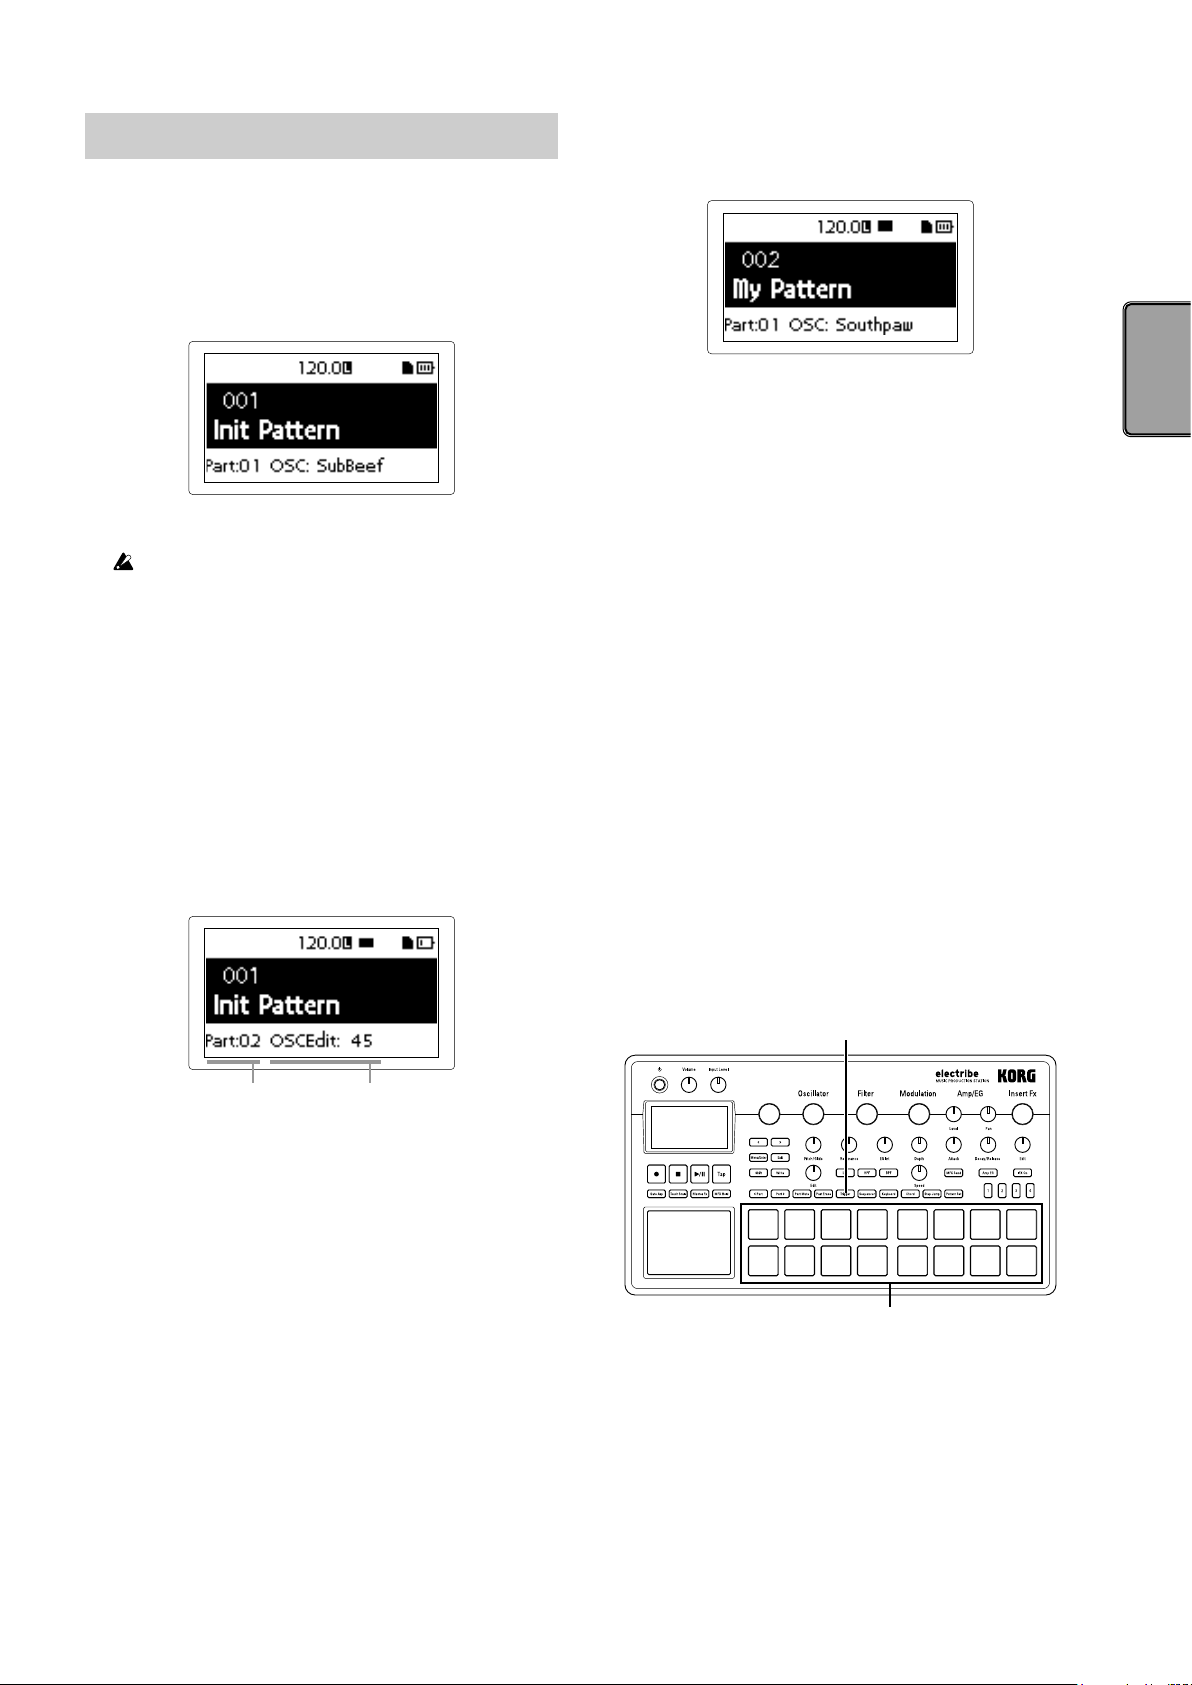
Pour produire du son
partie paramètre
Bouton Trigger
Pads de déclenchement
1. Mise sous tension/hors tension de l’instrument
Pour mettre l’instrument sous tension, appuyez sur son bouton
d’alimentation jusqu’à ce que l’écran de démarrage s’affiche.
Une fois l’instrument sous tension, il affiche l’écran de sélection de
motif.
Sélection d’un motif
1. Affichez l’écran de sélection de motif.
2. Choisissez un motif avec la commande de valeur.
ASTUCE Vous pouvez afficher l’écran de sélection de motif
depuis tout autre écran en appuyant deux fois sur le bouton
Exit.
ASTUCE Vous pouvez aussi changer de motif pendant la
lecture.
Pour mettre l’instrument hors tension, appuyez sur son bouton
d’alimentation jusqu’à ce que l’affichage s’éteigne.
Ne touchez aucun pad de déclenchement ni bouton
pendant la mise sous tension de l’instrument.
Fonction de mise hors tension automatique
L’Electribe/electribe sampler dispose d’une fonction de mise hors
tension automatique (“Auto Power Off”). Cette fonction met
automatiquement l’instrument hors tension quand 4 heures se
sont écoulées depuis la dernière manipulation.
ASTUCE Le paramètre “AUTO POWER OFF” du menu
Global permet de désactiver cette fonction. (→ p.33: 5.
Réglage de la fonction de coupure automatique d’alimentation)
2. Manipulations de base
Utilisation de l’affichage
Lecture d’un motif
1. Appuyez sur le bouton de lecture/pause pour lancer la lecture
du motif actif.
2. La lecture commence depuis le début du motif choisi. L’instrument lit le motif du début à la fin, puis retourne au début du
motif et répète la lecture.
3. Pour interrompre la lecture, appuyez sur le bouton d’arrêt.
4. Sélection d’une partie
Qu’est-ce qu’une “partie”?
Une “partie” est le plus petit bloc constituant d’un motif. Les
parties comprennent des sons et des rythmes ou phrases, ainsi
que le statut actif/coupé des effets et les données de jeu, plus
d’autres éléments.
Vous pouvez travailler les sons par partie et enregistrer des
rythmes, motifs de phrases, données de jeu et définir le statut
de l’effet d’insertion ainsi que d’autres éléments.
Ecoute du son d’une partie
1. Appuyez sur le bouton Trigger de sorte qu’elle s’allume.
2. Vous pouvez alors appuyer sur un pad de déclenchement
pour choisir la partie et juger du son en question.
Appuyez sur le bouton < ou > à l’écran de sélection de motif pour
valider le réglage de la partie actuellement sélectionnée.
Depuis l’écran de sélection de motif, vous pouvez activer le menu
d’édition en appuyant sur le bouton Menu/Enter.
Appuyez sur le bouton de curseur < ou > pour choisir le paramètre
à éditer.
Vous pouvez régler la valeur du paramètre choisi avec la commande de valeur.
Depuis le menu d’édition, vous pouvez retourner à l’écran de
sélection de motif en appuyant deux fois sur le bouton Exit.
ASTUCE Pour plus de détails, voyez le “Guide des paramètres”.
3. Lecture d’un motif
Un ‘motif’ est une combinaison de phrases constituées de 16
parties, et est utilisé comme bloc de composition musicale.
Cet instrument permet de créer et mémoriser jusqu’à 250 motifs.
Un motif est constitué de 16 parties et d’un effet maître.
Sélection de la partie voulue
Sélectionnez la partie voulue avec les boutons <Part, Part>.
Le pad de déclenchement de la partie choisie s’allume alors en
bleu.
Vous pouvez changer le son de la partie sélectionnée avec la
commande de la section d’édition.
27
Page 28
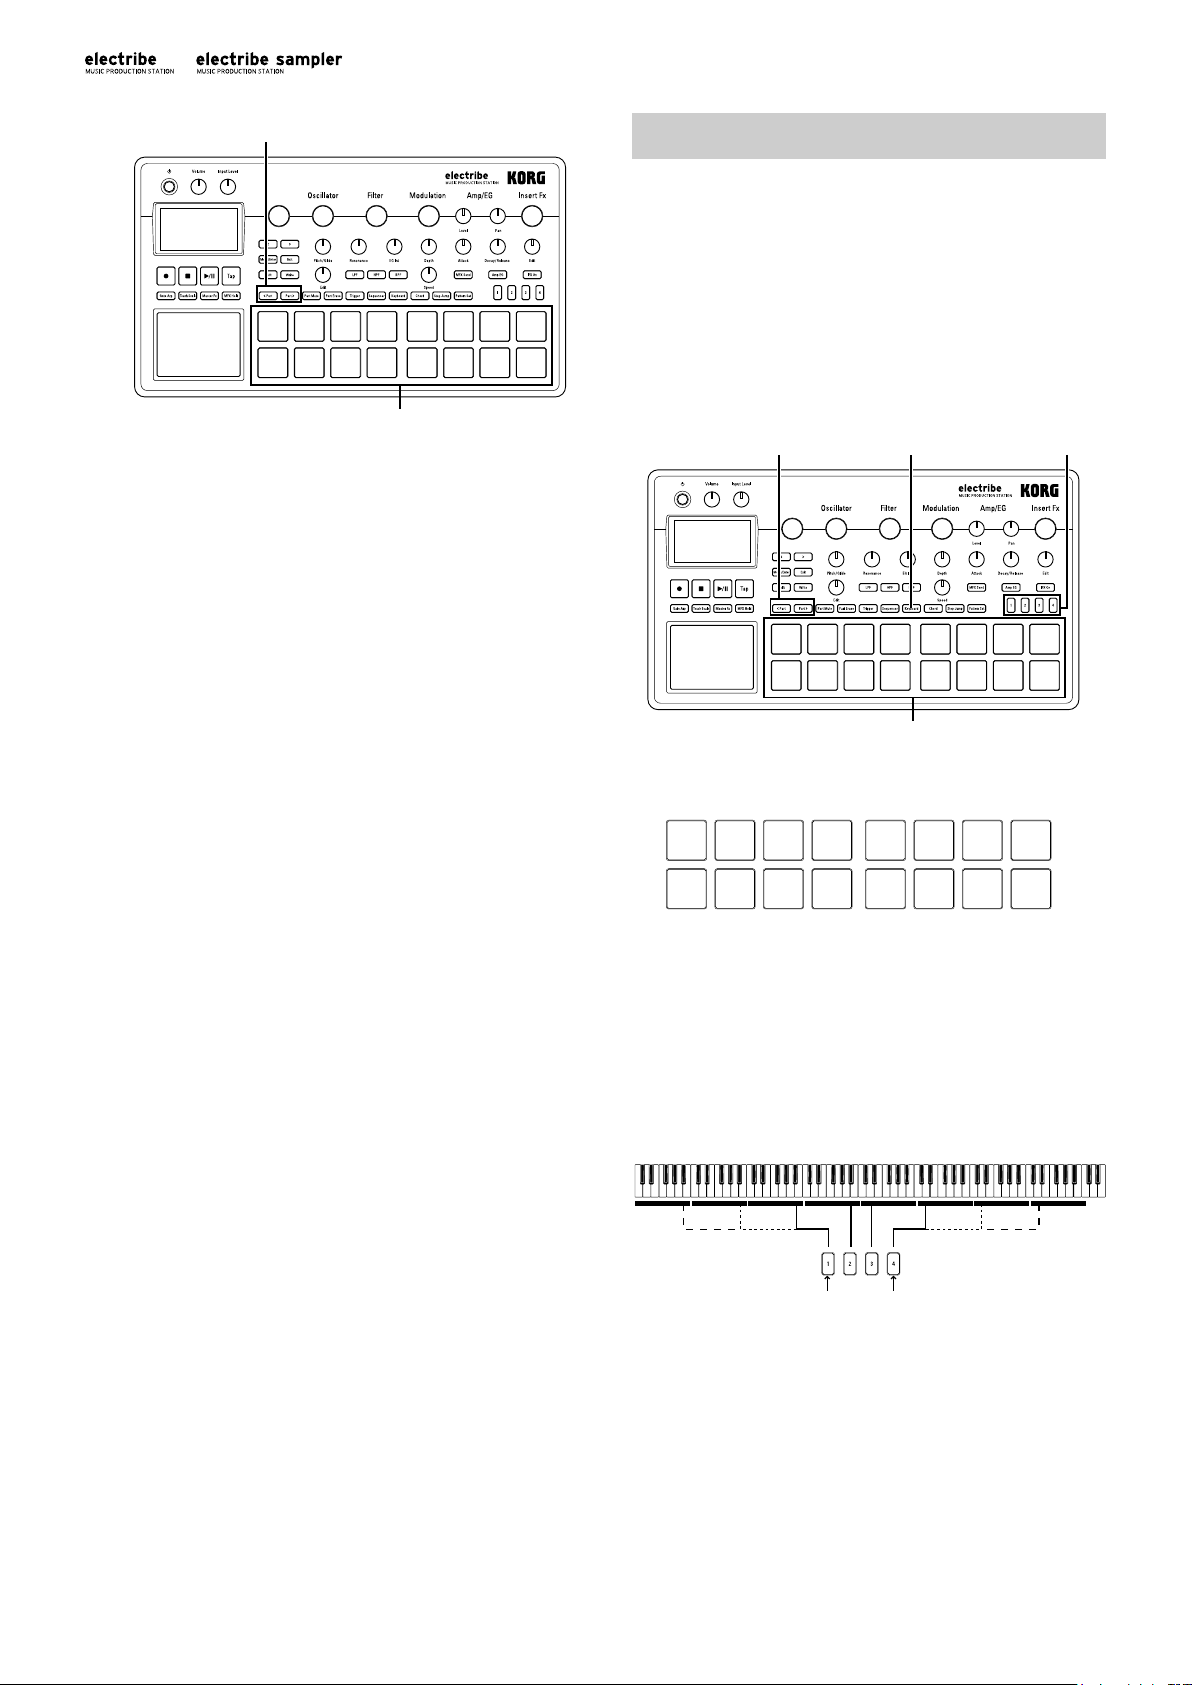
Boutons <Part, Part>
Pads de déclenchement
Production de musique
Bouton Keyboard Boutons StepBoutons <Part, Part>
Pads de déclenchement
Exemple : Key (tonique) = C (Do), Scale (mode) = Ionian (ionien)
d’une octave vers le haut.
Clignote lentement.
d’une octave vers le bas.
Le bouton de pas allumée indique le décalage.
1. Jouer de la musique avec les pads de déclenchement
Quand vous appuyez sur un pad de déclenchement, l’instrument
produit un son.
Les pads de déclenchement de l’electribe/electribe sampler proposent deux modes de jeu.
Mode de clavier des pads de déclenchement
1. Appuyez sur le bouton Keyboard.
2. Choisissez une partie avec les boutons <Part, Part>.
3. Utilisez les pads de déclenchement comme un clavier.
C D E F G A B C
C D E F G A B C
ASTUCE Les paramètres Key (tonique) et Scale (gamme) du
menu d’édition définissent le son produit par ce ‘clavier’. Le
son produit quand vous enfoncez plus de 2 pads à la fois
dépend des réglages de la section Voice Assign.
4. Les boutons de pas permettent de décaler le clavier par pas
d’une octave.
Une pression sur le bouton de pas 1 décale le clavier d’une
octave vers le bas, tandis qu’une pression sur le bouton de pas
4 le décale d’une octave vers le haut.
Clignote.Clignote. Clignote lentement.
Une pression décale le clavier
Une pression décale le clavier
Mode d’accord des pads de déclenchement
1. Appuyez sur le bouton Chord.
2. Utilisez les pads de déclenchement pour jouer des accords.
ASTUCE Choisissez une partie pour laquelle la fonction Voice
Assign du menu d’édition est réglée sur “Poly 1” ou “Poly 2”.
ASTUCE Vous pouvez changer les variations d’accord avec la
fonction Chord Set du menu d’édition.
28
Page 29
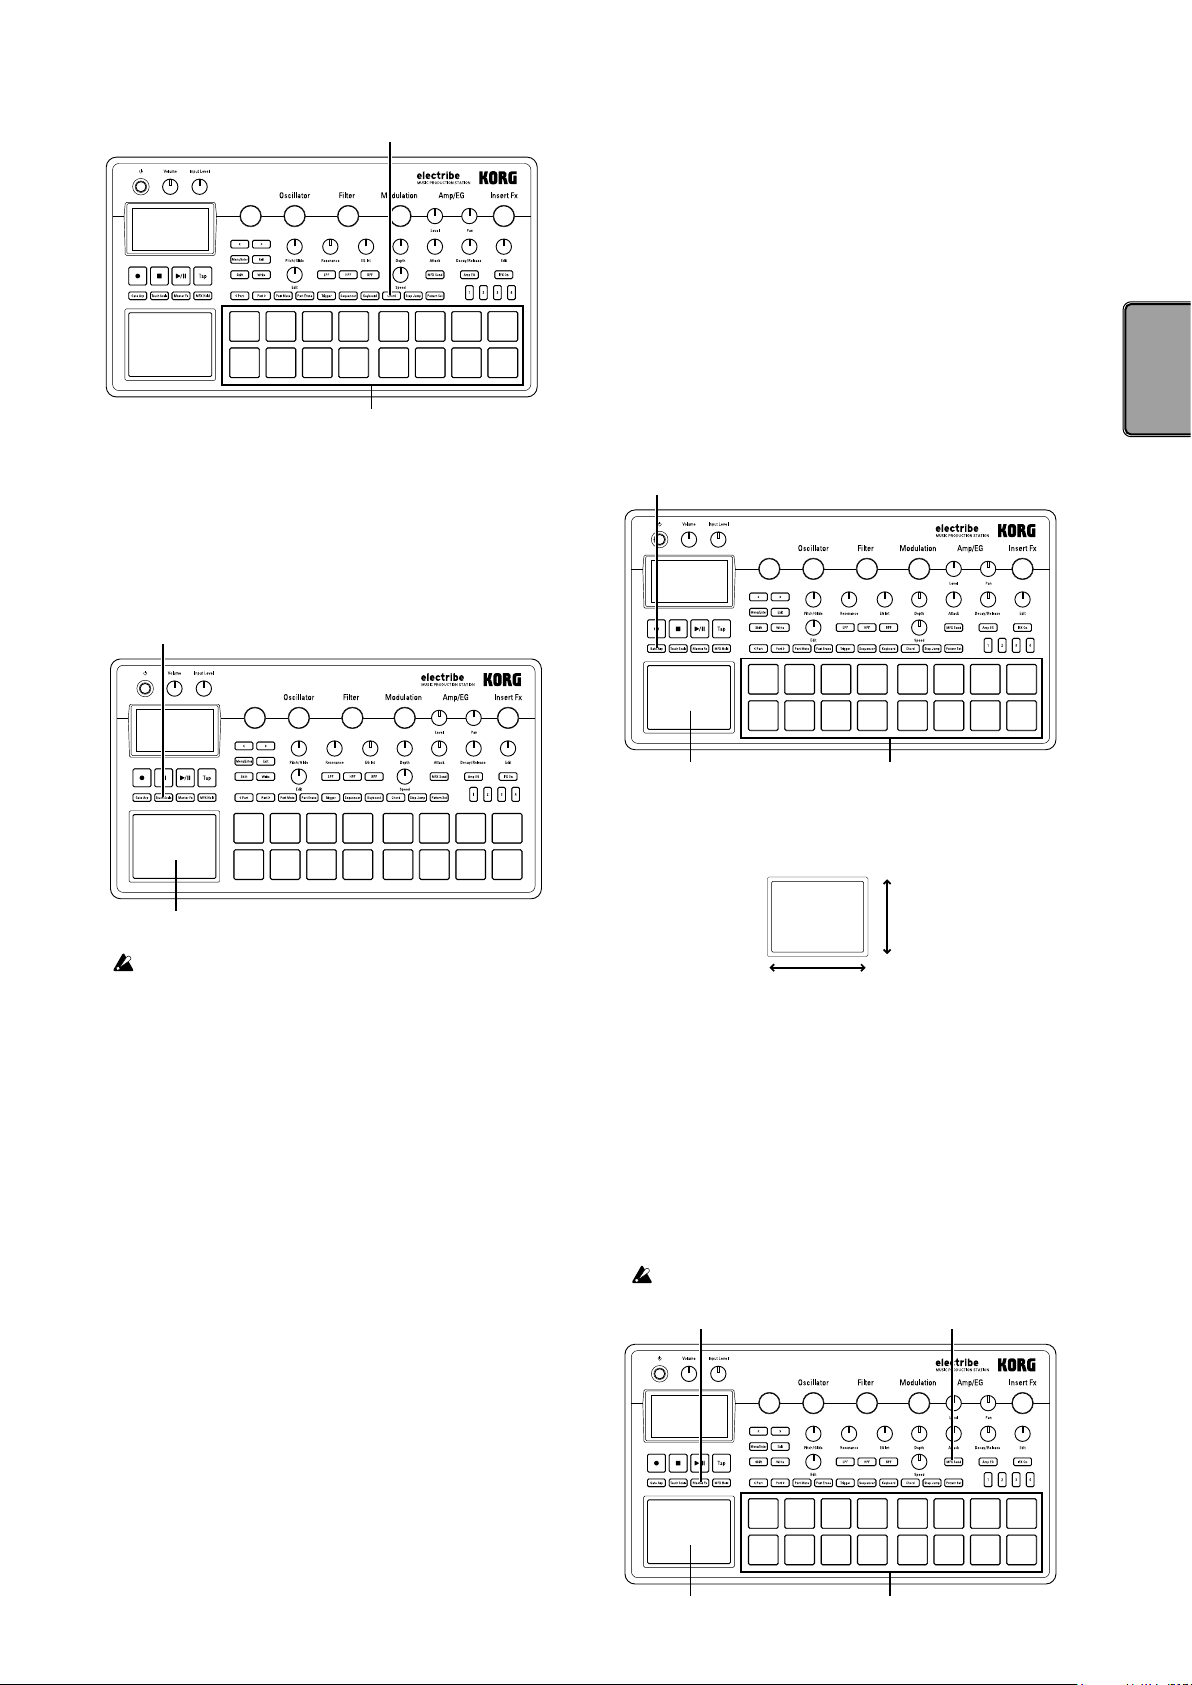
Bouton Chord
Pads de déclenchement
2. Jouer de la musique avec le pad tac-
Bouton Touch Scale
Pad tactile
Bouton Gate Arp
Pads de déclenchement
Pad tactile
Y
X
Bouton Master Fx Bouton MFX Send
Pads de déclenchement
Pad tactile
tile
1. Appuyez sur le bouton Touch Scale de sorte qu’elle s’allume.
2. Vous pouvez produire du son en frottant ou en tapotant le pad
tactile du bout des doigts (en douceur).
3. Utilisation de la fonction Gate Ar-
peggiator
Joue automatiquement le son de la partie sélectionnée au tempo
défini. Vous pouvez modifier la longueur des sons individuels
avec le paramètre Gate Time.
Jeu avec la fonction Gate Arpeggiator
1. Appuyez sur le bouton Gate Arp de sorte qu’elle s’allume.
2. Appuyez sur le bouton Trigger et maintenez enfoncé le pad de
déclenchement de la partie que vous voulez jouer avec le pad
tactile.
Vous pouvez aussi appuyer sur le bouton Keyboard ou Chord
et utiliser le pad tactile tout en spécifiant la hauteur avec le
pad de déclenchement.
Ne frottez et n’appuyez jamais sur la surface du pad tactile
avec un objet pointu ou tranchant, car cela risquerait
d’endommager le pad. Manipulez le pad tactile du bout
des doigts uniquement afin d’éviter d’endommager votre
electribe/electribe sampler.
ASTUCE Vous pouvez définir les sons avec les fonctions KEY et
SCALE du menu d’édition. La fonction TOUCH SCALE
RANGE du menu Global permet de définir la tessiture (plage
de hauteur) disponible pour le son.
ASTUCE Vous pouvez modifier la plage de hauteur avec les
boutons de pas après avoir activé le bouton Keyboard.
ASTUCE Selon les réglages de la partie sélectionnée, il se pourrait
que le timbre ne change pas.
3. Le pad tactile permet de modifier les sons comme suit.
Axe X : modifie la vitesse du Gate.
Axe Y : modifie la longueur du son.
ASTUCE Vous pouvez changer le motif piloté par le Gate
Arpeggiator à la page GATE ARP du menu d’édition.
4. Utilisation des effets maîtres
1. Appuyez sur le bouton Master Fx.
2. Sélectionnez la partie à laquelle vous voulez appliquer l’effet
maître, puis appuyez sur le bouton MFX Send pour l’allumer.
3. Touchez le pad tactile pour appliquer l’effet choisi.
ASTUCE Pour changer d’effet, sélectionnez le type d’effet maître
à la page MFX Type du menu d’édition.
Selon l’emplacement de votre doigt sur le pad tactile, vous
pourriez remarquer la présence de bruit.
29
Page 30
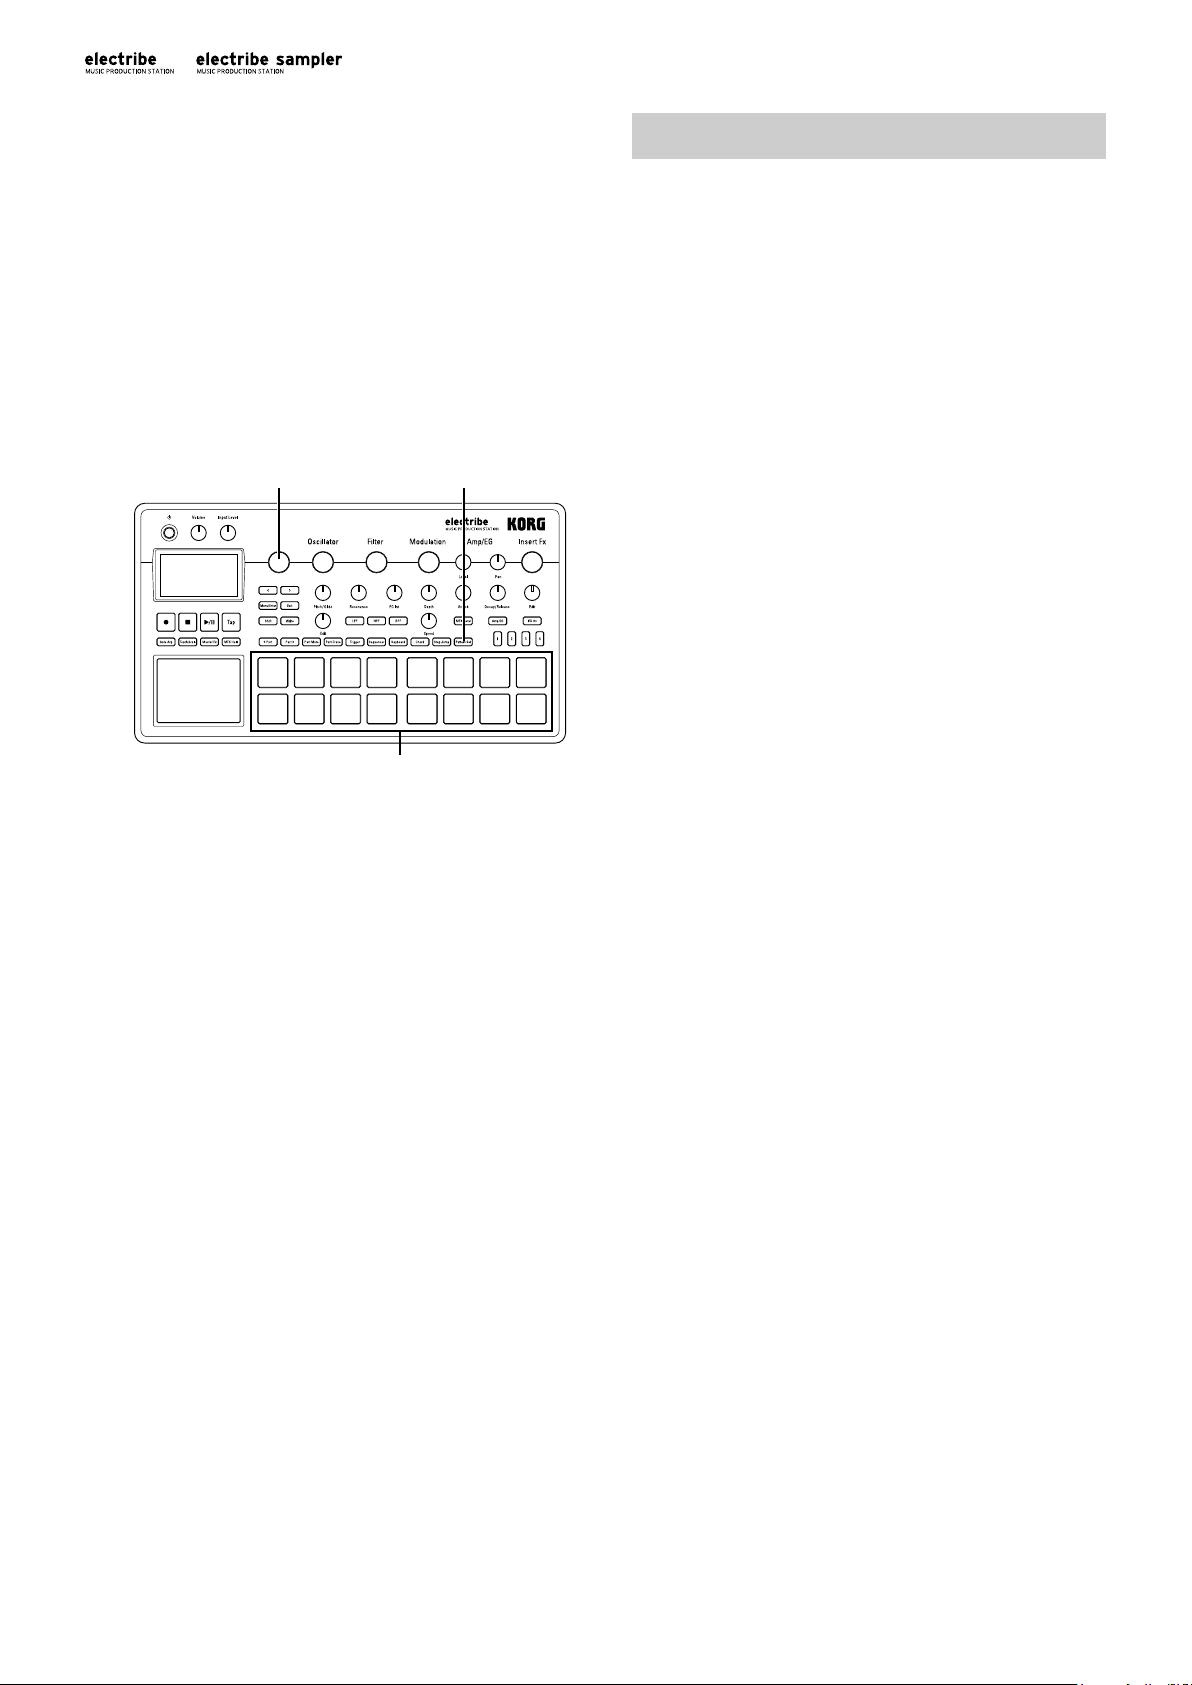
5. Jeu avec un groupe de motifs
Bouton Pattern SetCommande de valeur
Pads de déclenchement
Qu’est-ce qu’un “groupe de motifs”?
Un “groupe de motifs” est une fonction qui permet de mémoriser
un motif sous un pad de déclenchement afin de faciliter les
changements de motifs. Ce système permet d’enchaîner rapidement les motifs voulus pendant la lecture.
Enregistrement de données de jeu
1. Enregistrement en temps réel
Vous pouvez enregistrer en temps réel votre jeu sur les pads de
déclenchement ou le pad tactile. Vous pouvez aussi utiliser le
métronome pendant l’enregistrement. (→ p.32)
Assigner un motif à un pad de déclenchement
1. Appuyez sur le bouton Pattern Set de sorte qu’elle s’allume.
2. Choisissez le groupe auquel vous voulez assigner le motif en
appuyant sur une bouton de pas 1 à 4.
3. Sélectionnez le motif à assigner avec la commande de valeur.
4. Appuyez sur le pad de déclenchement de destination en
maintenant enfoncée le bouton Pattern Set.
Jeu avec un groupe de motif
1. Appuyez sur le bouton Pattern Set de sorte qu’elle s’allume.
2. Appuyez sur le bouton de pas (1 à 4) pour choisir le groupe où
vous désirez mémoriser le motif voulu.
3. Vous pouvez lancer un motif en appuyant sur le pad de
déclenchement assigné.
6. Réglage du tempo (BPM)
Vous pouvez régler le tempo du motif ou de la fonction Gate
Arpeggiator.
Procédure
Vous pouvez définir le tempo en tapant sur le bouton Tap au
tempo voulu : l’intervalle entre vos pressions est utilisé comme
base de tempo.
Vous pouvez aussi régler le tempo avec la commande de valeur
après avoir choisi le paramètre BPM sous le menu d’édition.
Enregistrement pendant le jeu d’un motif
Vous pouvez enregistrer toute phrase qui vous passe par le bout
des doigts sans interrompre la lecture du motif en cours.
1. Lancez la lecture d’un motif.
2. Sélectionnez la partie à enregistrer.
3. Appuyez sur le bouton de enregistrement pour démarrer
l’enregistrement (le bouton s’allume).
4. Utilisez les pads de déclenchement et d’autres fonctions de jeu.
Le motif est répété et l’enregistrement se poursuit.
5. Appuyez à nouveau sur le bouton de enregistrement pour
arrêter l’enregistrement (le bouton s’éteint).
Appuyez sur le bouton de lecture/pause pour arrêter la
lecture.
Effacer des sons indésirables pendant le jeu
Pour supprimer le son d’une partie, appuyez sur le bouton Part
Erase pendant le jeu, puis maintenez la pression sur le pad de
déclenchement de la partie voulue.
2. Edition pas à pas
1. Sélectionnez la partie à enregistrer.
2. Appuyez sur le bouton Sequencer de sorte qu’elle s’allume.
3. Définissez la longueur de l’enregistrement avec les boutons de
pas. Le nombre de diodes rouges allumées offre une indication
visuelle de la longueur.
4. Le pad de déclenchement allumé indique le motif de la partie
sélectionnée. Le statut de note alterne entre actif (“ON”, pad
allumé) et coupé (“OFF”, pad éteint) à chaque pression sur le
pad de déclenchement.
ASTUCE Par défaut, le numéro de note C4 (60) est produit
quand vous appuyez sur le pad de déclenchement. Quand
vous activez un pas existant après l’avoir désactivé, la note
originale lui est assignée.
ASTUCE Vous pouvez aussi lancer l’enregistrement de motif
pendant la lecture en appuyant sur le bouton de lecture/pause.
ASTUCE Vous pouvez choisir l’option Step Edit dans le menu
d’édition afin d’activer les options d’édition détaillée pour
chaque pas. Pour en savoir plus, voyez le “Guide des paramètres”.
7. Modifier le son avec les fonctions de jeu
Vous pouvez modifier le son avec les commandes de filtre ou
d’oscillateur de la section d’édition.
Voyez le “Guide des paramètres” pour en savoir plus sur chaque
commande.
ASTUCE Selon les réglages, il se pourrait que vous remarquiez
la présence de bruit ou de coupures du son.
30
3. Enregistrer les manipulations des
fonctions de jeu (‘Motion Seq’)
La fonction Motion Seq permet d’enregistrer dans une séquence
les manipulations des commandes et boutons (données de jeu)
pour chaque partie et effet.
Qu’est-ce qu’une “séquence de données de jeu” ?
Une “séquence de données de jeu” est simplement un enregistrement des manipulations effectuées avec les fonctions de jeu de
l’instrument.
Vous pouvez enregistrer (et lire par la suite) vos manipulations des
Page 31

commandes et boutons suivantes dans une séquence de données
de jeu :
• OSC Edit, Pitch
• Filter Cutoff, Resonance, EG Int
• Modulation Speed, Depth
• Amp/EG Level, Pan, Attack, Decay/Release
• IFX Edit, IFX ON, MFX Send
• Master Fx On, Master Fx X, Master Fx Y
Enregistrement d’une séquence de données de
jeu
1. Sélectionnez la partie pour laquelle vous voulez enregistrer
des données de jeu.
2. Sélectionnez “MOTION SEQ” sous le menu d’édition afin de
choisir une partie à éditer, puis réglez le type de séquence de
données de jeu sur “Smooth” ou “Trigger Hold”.
Smooth: Produit un timing fluide des données de jeu enregistrées.
Trigger Hold: Enregistre et reproduit l’action des fonctions de
jeu telles qu’elles ont été produites.
3. Appuyez sur le bouton de enregistrement de sorte qu’elle
s’allume, puis appuyez sur le bouton de lecture/pause.
4. Vous pouvez manipuler la commande pour modifier le son
pendant la lecture d’un motif. Le bouton de enregistrement
clignote pendant l’enregistrement de données de jeu avec
Motion Seq.
Une fois un cycle de motif écoulé, l’instrument arrête l’enregistrement des données de jeu et poursuit avec la lecture de la
séquence de données de jeu enregistrée. Pour continuer
l’enregistrement de données de jeu, appuyez à nouveau sur le
bouton de enregistrement.
Effacement d’une séquence de données de jeu
Sélectionnez “CLEAR MOTION” sous PART UTILITY dans
le menu d’édition et exécutez la fonction.
Effacement de la séquence des données de jeu de l’effet
maître
Pour ce faire, choisissez l’option “CLEAR MFX MOTION”
du menu d’édition et exécutez l’opération.
Ne mettez jamais l’instrument hors tension pendant la
sauvegarde de données car cela pourrait provoquer des
dysfonctionnements. (Attendez que le bouton Write soit
éteinte.)
Sauvegarde avec un nom de motif différent
(copie de motif)
1. Appuyez sur le bouton Write tout en maintenant le bouton
Shift enfoncée.
“enter NAME” apparaît sur l’affichage.
2. Renommez le motif que vous voulez sauvegarder.
Déplacez le curseur à gauche et à droite sur l’écran avec les
boutons < et > pour choisir le caractère à modifier. Changez le
caractère sélectionné et confirmez votre saisie avec le bouton
Menu/Enter.
3. Sélectionnez un numéro de motif pour la sauvegarde des
données avec la commande de valeur.
4. Une fois le motif entièrement renommé, appuyez à nouveau
sur le bouton Write.
L’instrument sauvegarde le motif. Le bouton Write est allumée
pendant toute la sauvegarde et s’éteint quand l’opération est
terminée.
ASTUCE Vous pouvez annuler la sauvegarde en appuyant sur
le bouton Exit.
ASTUCE A l’issue de la sauvegarde, l’instrument sélectionne le
numéro de motif choisi comme destination de sauvegarde
pour votre motif édité.
4. Sauvegarde d’un motif
Veillez à mémoriser (sauvegarder) les données de motif que vous
avez générées.
Changer de motif sans sauvegarder au préalable le motif
en cours d’édition entraîne la perte de tous les changements effectués. Veillez donc à toujours sauvegarder les
changements à conserver.
Sauvegarde (remplacement) d’un motif
1. Appuyez sur le bouton Write.
2. Choisissez l’emplacement de sauvegarde avec la commande de
valeur.
3. Appuyez sur le bouton Write.
“Working...” apparaît sur l’affichage et la sauvegarde commence. Le bouton Write est allumée pendant la sauvegarde et
s’éteint quand l’opération est terminée.
31
Page 32

Edition d’un motif
1. Etouffement d’une partie (‘Part Mute’)
1. Appuyez sur le bouton Part Mute de sorte qu’elle s’allume.
2. Appuyez sur le pad de déclenchement de la partie à couper (le
pad s’éteint).
3. Pour annuler la coupure, appuyez à nouveau sur le pad de
déclenchement éteint (le pad s’allume).
2. Effacement d’une partie (‘Part Erase’)
1. Appuyez sur le bouton Part Erase de sorte qu’elle s’allume.
2. Pendant la lecture, appuyez sur le pad de déclenchement de la
partie à effacer.
Maintenez la pression sur le pad de déclenchement pour
effacer les données de note de la partie sélectionnée.
ASTUCE Pour effacer toutes les données de séquence de la
partie sélectionnée, choisissez “CLEAR SEQUENCE” sous
PART UTILITY dans le menu d’édition et exécutez la fonction.
ASTUCE Pour effacer le contenu d’une séquence de données de
jeu, choisissez l’option “Clear Motion Seq” du menu d’édition.
3. Copie d’une partie (‘Part Copy’)
1. Sélectionnez “COPY PART” sous PART UTILITY dans le
menu d’édition.
2. Sélectionnez le motif incluant la partie à copier et appuyez sur
le bouton Menu/Enter.
3. Appuyez sur le pad de déclenchement correspondant à la
partie source à copier.
4. Appuyez sur le pad de déclenchement correspondant à la
partie de destination pour les données copiées.
4. Changer les réglages de motif
Les paramètres suivants correspondent aux principaux réglages
du menu d’édition liés aux motifs.
Pour en savoir plus sur chaque réglage, voyez le “Guide des
paramètres”.
SWING: Comme son nom l’indique, ce paramètre confère du
‘swing’ à votre jeu en décalant le timing des notes.
BEAT: Définit le battement (rythme) d’un motif.
LENGTH: Modifie la longueur d’un motif. Vous pouvez régler la
longueur du motif entre 1 et 4.
PATTERN LEVEL: Règle le volume du motif entier.
KEY: Définit la tonique de la gamme.
SCALE: Définit la gamme jouée avec les pads de déclenchement
ou le pad tactile quand le bouton Keyboard est activée.
GROOVE TYPE et GROOVE DEPTH: Définissent le type et
l’intensité du groove appliqué aux données d’une séquence pour
rompre la régularité métronomique et ‘humaniser’ le jeu.
CHAIN REPEAT, CHAIN TO: Après la lecture du motif sélectionné, définissez le nombre de fois que vous souhaitez lire le
même motif, puis sélectionnez le motif suivant à lire. Cela permet
d’enchaîner la lecture de plusieurs motifs comme s’il s’agissait
d’un morceau.
Autres réglages
Vous disposez de plusieurs paramètres Global, comme par
exemple les réglages de métronome, ainsi que des fonctions
Utility, qui servent par exemple à formater une carte de mémoire.
ASTUCE Pour plus de détails, reportez-vous au “Guide des
paramètres”.
Méthode d’affichage de chaque menu de réglage
1. Activez le menu d’édition en appuyant sur le bouton Menu/
Enter à l’écran de sélection de motif.
2. Pour activer le menu Global, appuyez sur le bouton < ou >
pour afficher “GLOBAL PARAMETER” sur l’écran, puis
appuyez sur le bouton Menu/Enter.
Pour activer le menu Data Utility, affichez “DATA UTILITY”
sur l’écran, puis appuyez sur le bouton Menu/Enter. Pour
activer le menu Part Utility, affichez “PART UTILITY” sur
l’écran, puis appuyez sur le bouton Menu/Enter.
3. Appuyez sur le bouton Write quand vos réglages sont terminés pour les sauvegarder.
Si vous mettez l’instrument hors tension sans sauvegarder
vos réglages, ils sont perdus au profit des réglages originaux. N’oubliez donc pas de sauvegarder vos réglages si
vous voulez les conserver.
1. Réglage du métronome
L’option “Metronome” permet de régler les paramètres du métronome de l’instrument. La fonction de métronome tombe à pic pour
créer un motif avec la fonction d’enregistrement en temps réel.
Le métronome produit un son sur chaque noire.
1. Choisissez l’option “METRONOME” du menu Global.
2. Réglez les paramètres du métronome avec la commande de
valeur.
Quand le métronome est actif, il est audible pendant la lecture
et l’enregistrement. Les réglages “Rec 0”, “Rec 1” et “Rec 2”
permettent d’utiliser le métronome uniquement pendant
l’enregistrement. Le réglage “Off” permet de désactiver le
métronome.
2. Réglage du type de piles
Choisissez le réglage correspondant au type de piles utilisées.
1. Choisissez l’option “BATTERY TYPE” du menu Global.
2. Sélectionnez le type de piles avec la commande de valeur.
Si vous utilisez des piles au nickel-métal-hydrure, choisissez le
type “Ni-MH”. Pour des piles alcalines, choisissez le type
“Alkali”.
3. Réglage de contraste de l’affi-
chage.
Ce paramètre permet d’ajuster la luminosité de l’affichage.
1. Choisissez l’option “LCD CONTRAST” du menu Global.
2. Réglez le contraste avec la commande de valeur.
4. Mode d’économie d’énergie
Activez ou désactivez ce mode fonction suivant votre utilisation de
l’instrument. Quand l’instrument est alimenté sur piles, vous
pouvez activer le mode d’économie d’énergie pour réduire la
luminosité de l’écran et des diodes de l’instrument.
1. Choisissez l’option “POWER SAVE” (économie d’énergie)
du menu Global.
2. Activez ou désactivez le mode avec la commande de valeur.
32
Page 33

L’option “Disable” désactive le mode d’économie d’énergie.
Pour activer le mode d’économie d’énergie de façon permanente, choisissez l’option “Enable”.
“Auto” active/désactive automatiquement le mode d’économie
d’énergie suivant l’utilisation (sur piles/secteur).
Par défaut, le mode d’économie d’énergie est réglé sur “Auto”.
5. Réglage de la fonction de coupure automatique d’alimentation
Cette fonction coupe automatiquement l’alimentation de l’instrument si vous n’utilisez aucune de ses commandes pendant environ
4 heures. Activez ou coupez cette fonction selon votre utilisation
de l’instrument.
1. Choisissez l’option “AUTO POWER OFF” du menu Global.
2. Activez ou désactivez la fonction de coupure automatique
d’alimentation avec la commande de valeur.
Choisissez l’option “Off” pour désactiver la fonction de
coupure automatique d’alimentation.
Pour utiliser cette fonction et économiser l’énergie, choisissez
l’option “4 hours”. Par défaut, ce paramètre est réglé sur “4
hours”.
6. Réglage du canal global MIDI
Vous pouvez spécifier le canal global MIDI.
1. Choisissez l’option “MIDI GLOBAL CH.” du menu Global.
2. Réglez le canal global MIDI avec la commande de valeur.
7. Synchronisation du jeu avec un dispositif externe
L’instrument peut être synchronisé via MIDI ou un signal de
synchronisation.
1. Choisissez l’option “CLOCK MODE” du menu Global.
2. Choisissez le signal de synchronisation avec la commande de
valeur.
Internal: L’instrument est le maître de synchronisation.
Auto: Le dispositif externe connecté est défini comme maître
de synchronisation. Dans une configuration normale, cet
instrument est le maître de synchro.
Ext.USB, Ext.MIDI et Ext.Sync: Permettent de choisir le
maître de synchronisation parmi les dispositifs connectés aux
prises de l’instrument.
8. Utilisation d’une carte de mémoire
Vous pouvez sauvegarder tous les réglages de l’instrument sur
une carte de mémoire. Cela permet de recharger à tout moment les
réglages sauvegardés de l’instrument.
Formatage
Avant de pouvoir utiliser une carte de mémoire sur votre electribe/
electribe sampler , vous devez la formater sur l’instrument.
Prudence, car le formatage d’une carte entraîne la perte de
toutes les données qu’elle contient.
Ne mettez jamais l’instrument hors tension et ne retirez
jamais la carte de mémoire pendant le formatage.
1. Choisissez l’option “FORMAT SD CARD” du menu DATA
UTILITY.
2. Appuyez sur le bouton Menu/Enter. Quand le formatage est
terminé, “OK” s’affiche.
UTILITY.
2. Appuyez sur le bouton Menu/Enter.
Chargement de données d’une carte de mémoire
1. Choisissez l’option “IMPORT PATTERN” du menu DATA
UTILITY.
2. Sélectionnez les données de motif à charger avec la commande
de valeur.
Sélectionnez un fichier dans le dossier avec la commande de
valeur et appuyez sur le bouton Menu/Enter pour ouvrir ce
dossier. Pour sortir du dossier, sélectionnez “Upper Folder”
(dossier supérieur) avec la commande de valeur et appuyez
sur le bouton Menu/Enter.
3. Appuyez sur le bouton Menu/Enter pour confirmer l’opération.
Sauvegarde sous forme de fichiers WAV
Vous pouvez sauvegarder des motifs ou un groupe de motifs sur
une carte de mémoire.
Exporter un motif sous forme de fichier WAV
1. Choisissez l’option “EXPORT AUDIO” du menu DATA
UTILITY.
2. Sélectionnez le format (fichier WAV uniquement, ou Ableton
Live Set) des données à mémoriser.
3. Appuyez sur le bouton Menu/Enter pour exporter le motif
sélectionné.
Exporter un groupe de motifs sous forme de fichier WAV
1. Choisissez l’option “EXPORT P.SET AUDIO” du menu
DATA UTILITY.
2. Sélectionnez le format (fichier WAV uniquement, ou Ableton
Live Set) des données à mémoriser.
3. Définit la série de motifs (de 1 à 64) enregistrés comme jeux de
motifs à sauvegarder dans un fichier.
ASTUCE La sauvegarde pourrait prendre plus de temps dans le
cas d’un nombre élevé de jeux de motifs.
4. Appuyez sur le bouton Menu/Enter pour exporter les motifs
enregistrés comme jeux de motifs sous forme d’un fichier
WAV.
9. Utilisation de la fonction Event Re-
corder
La fonction Event Recorder vous permet d’enregistrer les données
produites lorsque vous jouez des motifs ou manipulez des commandes ou les pads de déclenchement, etc. sur le vif.
Enregistrement
1. Sélectionnez l’option “EVENT REC/PLAY” du menu d’édition
et appuyez sur le bouton Menu/Enter.
2. Une nouvelle pression sur le bouton Menu/Enter active le
mode prêt à enregistrer de la fonction Event Recorder.
3. Appuyez sur le bouton de lecture/pause pour lancer l’enregistrement.
4. Appuyez plusieurs fois sur le bouton Exit pour retourner à
l’écran de sélection de motif et jouez en lançant des motifs.
Sauvegarde sur carte de mémoire
1. Choisissez l’option “EXPORT PATTERN” du menu DATA
33
Page 34

Cet écran est affiché durant l’ utilisation
de la fonction Event Recorder.
L’instrument enregistre les données de jeu, comme par
exemple l’utilisation des commandes ou pads de déclenchement ainsi que le motif reproduit, les changements de son et
de tempo, etc. En outre, vous pouvez jouer tout en changeant
de motifs rythmiques.
5. Une fois que vous avez fini de jouer, appuyez sur le bouton
d’arrêt.
6. Le nom du fichier sauvegardé s’affiche.
7. Appuyez sur le bouton Exit pour arrêter l’enregistrement.
ASTUCE Si Event Recorder ne dispose pas de carte de mémoire,
l’instrument affiche “No Card” (pas de carte) et la fonction est
inutilisable.
ASTUCE Les données de jeu enregistrées avec la fonction Event
Recorder n’affectent pas les données enregistrées dans un
motif. En outre, la fonction ne permet pas de sauvegarder des
données de jeu dans un motif.
Lecture
1. Sélectionnez l’option “Event Player” du menu d’édition et
appuyez sur le bouton Menu/Enter.
2. Choisissez “EVENT PLAYER” avec le bouton < ou >, puis
appuyez sur le bouton Menu/Enter.
3. Sélectionnez le nom du fichier que vous voulez lire avec la
commande de valeur et le bouton Menu/Enter.
4. Lisez le fichier sélectionné en appuyant sur le bouton de
lecture/pause.
5. Appuyez sur le bouton d’arrêt pour interrompre la lecture et
retourner au début du fichier.
6. Appuyez sur le bouton Exit pour quitter la fonction “Event
Player”.
ASTUCE Cette fonction n’est pas disponible pendant l’enregistrement avec la fonction “Event Recorder”.
ASTUCE Pendant la lecture, les autres opérations ne sont pas
autorisées.
10. Formatage des données utilisa-
Fonctions de l’electribe sampler
Cet instrument offre une fonction d’échantillonnage en plus des
fonctionnalités de l’electribe.
L’electribe sampler est en outre doté des mêmes générateurs de
son à modélisation analogique que l’electribe.
Vous pouvez enregistrer jusqu’à 499 échantillons utilisateur, pour
une durée totale d’environ 270 secondes (durée calculée pour un
échantillon mono). L’instrument est fourni avec une foule d’échantillons d’usine de sons de batterie, boucles de batterie et de
phrases, ainsi que des accents (“hits”).
1. Nouvelles fonctions de l’electribe sampler
L’electribe sampler propose de puissantes nouvelles fonctions et
modifie la fonction de certaines commandes de l’electribe.
Fonction d’échantillonnage
L’electribe sampler propose deux méthodes d’échantillonnage:
• L’échantillonnage d’une source audio externe via la prise
Audio In.
• Le rééchantillonnage du signal de sortie intégral de votre jeu
sur l’electribe sampler.
Édition d’échantillons
Les fonctions d’édition d’échantillon permettent de modifier le
point de départ et de fin d’un échantillon, ainsi que de “découper”
les échantillons audio. Ces fonctions d’édition permettent aussi de
modifier les échantillons d’usine.
Lecture d’échantillons stéréo
Les échantillons stéréo—qu’ils soient générés sur l’electribe
sampler ou chargés d’une carte de mémoire—peuvent être assignés à une partie et intégrés à votre jeu.
2. Changements apportés à des fonctions de jeu spécifiques
“Sample” est imprimé sur le panneau de l’instrument au lieu de “Oscillator”.
Sur cet instrument, la partie “Oscillator” de la section d’édition
s’intitule “Sample”.
Commande Sample Edit (section Edit)
Quand un échantillon est affecté à l’oscillateur, cette commande permet
d’ajuster le point de départ de lecture et de changer le sens de lecture.
teur
Le formatage efface tous les motifs créés par l’utilisateur et rétablit
les réglages d’usine.
Veillez à effectuer une copie de sauvegarde de toutes vos données
importantes avant d’effectuer le formatage.
1. Sélectionnez l’option “Factory Reset” du menu Utility.
2. Appuyez sur le bouton Menu/Enter pour démarrer le forma-
tage.
Ne mettez jamais l’instrument hors tension pendant le
formatage.
34
Commande Amp/EG Decay/Release
Quand un échantillon est affecté à l’oscillateur, cette commande
permet d’ajuster le paramètre Gate Time—à condition que Amp
EG soit désactivé.
Si vous réglez cette commande sur 127, l’échantillon est reproduit
jusqu’à la fin, indépendamment de sa longueur.
ASTUCE Si vous avez défini le point de départ de boucle de
l’échantillon (LOOP START POINT; page Sample 5/10), ou si le
type “Analog” ou “Audio In” est défini pour OSC TYPE (type
d’oscillateur), le fonctionnement est le même que lorsque le
paramètre Amp EG est désactivé.
Boutons Filter LPF/HPF/BPF
Les filtres suivants peuvent être activés ou coupés individuellement.
• electribe LPF ON ou OFF
• electribe HPF ON ou OFF
• electribe BPF ON ou OFF
Page 35

Enregistrement et édition d’échantillons
1. Échantillonnage
Enregistrement d’une source sonore externe via la prise Audio
Input
Préparatifs pour l’échantillonnage
• Connectez la sortie de l’instrument, de la source sonore ou du
périphérique audio à échantillonner à la prise Audio In de
l’electribe sampler. La prise Audio Input est de type minijack
stéréo. Branchez-y donc un câble à fiche minijack mono ou
stéréo.
• Réglez le paramètre Audio In thru sur “On” (page Global
14/17), et produisez du son avec la source audio à échantillonner.
• Réglez le niveau de sortie de votre dispositif externe (ou
ajustez la commande Input Level de l’electribe sampler) de
sorte que l’indicateur d’écrêtage (CLIP) ne s’allume pas quand
le signal de la source externe est à son niveau maximum.
Réglage du mode d’échantillonnage
1. Maintenez le bouton Shift enfoncé et appuyez sur le bouton de
enregistrement. Le bouton de enregistrement et le bouton de
lecture/pause se mettent à clignoter.
Pour annuler l’échantillonnage, appuyez sur le bouton Exit.
2. Choisissez le mode d’échantillonnage (l’écran indique “Sampling mode”).
Pour échantillonner en stéréo, choisissez “Stereo” avec la
commande de valeur. Pour un échantillonnage en mono,
choisissez “Mono”.
3. Choisissez la source d’échantillonnage avec le bouton >.
Sélectionnez “Audio In” avec la commande de valeur.
4. Vérifiez la durée d’échantillonnage disponible en appuyant
sur le bouton >.
ASTUCE La durée disponible affichée correspond à un échantillonnage mono. Pour un échantillonnage stéréo, divisez donc la
durée affichée par deux.
Procédure d’échantillonnage:
1. Quand vous êtes prêt, appuyez sur le bouton de lecture/pause
pour démarrer l’échantillonnage.
Le bouton de enregistrement et le bouton de lecture/pause
restent allumés pendant l’échantillonnage.
2. Appuyez sur le bouton d’arrêt pour interrompre l’échantillonnage.
Le bouton de enregistrement et le bouton de lecture/pause
s’éteignent.
ASTUCE Si vous dépassez la durée limite d’enregistrement,
l’échantillonnage s’arrête automatiquement.
3. Une fois l’échantillonnage terminé, l’écran affiche “New
Sample”, confirmant qu’un nouvel échantillon a été enregistré.
Appuyez sur le bouton de lecture/pause pour écouter votre
échantillon fraîchement enregistré. Vous pouvez sauvegarder
votre nouvel échantillon comme échantillon utilisateur en
appuyant sur le bouton Write.
Si vous ne souhaitez pas conserver le nouvel échantillon,
appuyez sur le bouton Exit.
Même si vous sauvegardez votre création comme échantil-
lon utilisateur avec le bouton Write, cet échantillon est
perdu à la mise hors tension. Si vous voulez conserver vos
échantillons utilisateur, choisissez l’option “EXPORT ALL
SAMPLE” ou “EXPORT SAMPLE” du menu DATA
UTILITY afin de mémoriser les données d’échantillon sur
une carte de mémoire avant de mettre l’instrument hors
tension.
ASTUCE Quand vous échantillonnez le signal reçu à la prise
Audio Input, l’échantillon est enregistré au volume optimal.
Toutefois, à la lecture, vous remarquerez que le volume de
l’échantillon est plus bas que durant l’échantillonnage. Ce
phénomène s’explique par la conception de l’instrument,
visant à minimiser la distorsion susceptible de se produire lors
de la lecture de l’échantillon dans un motif. Vous pouvez lire
l’échantillon plus ou moins au même volume que durant
l’échantillonnage en réglant le niveau de lecture sur “+12 dB”.
Assigner l’échantillon à une partie
L’échantillon enregistré vient s’ajouter aux options de l’oscillateur
comme échantillon utilisateur.
Sélectionnez une partie, puis choisissez l’échantillon voulu avec le
paramètre Sample.
ASTUCE Les échantillons stéréo sont lus en stéréo si vous les
assignez à une partie de nombre impair, et lus en mono s’ils
sont affectés à une partie de nombre pair.
ASTUCE Si vous avez créé un motif en affectant un échantillon
utilisateur à une partie, exécutez la commande “EXPORT ALL
SAMPLE” pour sauvegarder toutes les données d’échantillon
sur carte de mémoire avant de mettre l’instrument hors
tension.
2. Rééchantillonnage
Enregistrement de la lecture d’une partie, d’un
motif de l’electribe sampler ou de votre jeu sur
l’instrument
L’electribe sampler peut enregistrer le signal de sa propre lecture
pour générer un nouvel échantillon. C’est ce qu’on appelle le
“rééchantillonnage”.
Choix du mode de rééchantillonnage
1. Sélectionnez le motif à rééchantillonner.
2. Maintenez le bouton Shift enfoncé et appuyez sur le bouton de
enregistrement. Le bouton de enregistrement reste allumé et le
bouton de lecture/pause clignote.
Pour annuler le rééchantillonnage, appuyez sur le bouton Exit.
3. Choisissez le mode d’échantillonnage (l’écran indique “Sampling mode”).
Pour échantillonner en stéréo, choisissez “Stereo” avec la
commande de valeur. Pour un échantillonnage en mono,
choisissez “Mono”.
4. Choisissez la source d’échantillonnage avec le bouton >.
Choisissez “Resampling” avec la commande de valeur.
5. Vérifiez la durée d’échantillonnage disponible en appuyant
sur le bouton >.
Procédure de rééchantillonnage
1. Vous disposez de deux méthodes de rééchantillonnage:
• Le rééchantillonnage de la lecture de motif. Appuyez sur le
bouton de lecture/pause pour lancer l’enregistrement.
Le bouton de enregistrement et le bouton de lecture/pause
s’allument.
• Le rééchantillonnage du son d’une partie spécifique. Le
rééchantillonnage démarre dès que vous appuyez sur un pad
de déclenchement ou un pad tactile.
2. Appuyez sur la touche d’arrêt pour interrompre le rééchantillonnage. Le bouton de enregistrement et le bouton de lecture/
pause s’éteignent.
35
Page 36

ASTUCE Si vous dépassez la durée disponible d’enregistrement,
l’échantillonnage s’arrête automatiquement.
3. Quand le rééchantillonnage est terminé, l’écran indique “New
Sample”, confirmant qu’un nouvel échantillon a été enregistré.
Appuyez sur le bouton de lecture/pause pour écouter le
résultat de votre rééchantillonnage. Vous pouvez sauvegarder
l’échantillon fraîchement rééchantillonné comme échantillon
utilisateur en appuyant sur le bouton Write.
Si vous ne souhaitez pas conserver le nouvel échantillon,
appuyez sur le bouton Exit.
ASTUCE Quand vous rééchantillonnez, le volume de lecture de
l’échantillon est rehaussé pour éviter une baisse de niveau
perceptible. Toutefois, cela diminue la marge de réserve, de
sorte que vous pourriez remarquer l’apparition de distorsion
dans certains cas. Dans ce cas, réglez le niveau de lecture sur
“Normal”. Le niveau de lecture est alors inférieur à celui de
l’enregistrement, mais cela permet de conserver la marge de
réserve.
Même si vous sauvegardez votre création comme échantil-
lon utilisateur avec le bouton Write, cet échantillon est
perdu à la mise hors tension. Si vous voulez conserver vos
échantillons utilisateur, choisissez l’option “EXPORT ALL
SAMPLE” ou “EXPORT SAMPLE” du menu DATA
UTILITY afin de mémoriser les données d’échantillon sur
une carte de mémoire avant de mettre l’instrument hors
tension.
3. Édition d’un échantillon
Une fois que vous avez enregistré un échantillon, vous pouvez
l’éditer avec les commandes de l’electribe sampler.
1. Appuyez sur le bouton Menu/Enter de la section commune
pour afficher l’écran d’édition.
2. Choisissez “SAMPLE EDIT” avec les boutons < et > , puis
appuyez à nouveau sur le bouton Menu/Enter.
3. Choisissez l’échantillon à modifier avec la commande de
valeur (choisissez le numéro de l’échantillon voulu).
4. Choisissez ensuite la fonction d’édition d’échantillon voulue
parmi les suivantes avec les boutons < et >.
Pour plus de détails sur chaque fonction d’édition, voyez le
“Guide des paramètres”.
• RENAME: Pour renommer l’échantillon.
• START POINT: Pour définir le point de départ de lecture.
• END POINT: Pour définir le point de fin de lecture.
• LOOP START POINT: Pour définir le point de départ de
boucle. La lecture de l’échantillon est mise en boucle à partir
du point défini ici, jusqu’au point de fin (END POINT).
• SAMPLE TUNE: Pour régler la hauteur de l’échantillon.
• TIME SLICE: Pour découper (“trancher”) l’échantillon en
tranches rythmiques.
• CLEAR SLICE: Pour annuler l’effet de l’opération TIME
SLICE (découpe de l’échantillon).
• PLAY LEVEL: Pour régler le volume de lecture de l’échantillon. Dans le cas d’un échantillon rééchantillonné, le niveau est
automatiquement réglé sur “+12 dB” pour obtenir le volume
durant l’enregistrement.
• DELETE SAMPLE: Pour effacer un échantillon.
ASTUCE Pour accroître la durée d’échantillonnage disponible,
effacez les échantillons d’usine indésirables pour libérer de la
mémoire d’échantillonnage, puis exécutez la commande
EXPORT ALL SAMPLE. Chargez ensuite ces données au
redémarrage de l’instrument. Une fois les échantillons d’usine
effacés, vous ne pouvez plus les choisir avec la commande
Sample.
ASTUCE Vous pouvez prévisualiser l’échantillon en appuyant
sur un pad de déclenchement ou via le pad tactile affecté à
Touch Scale.
ASTUCE Pendant l’édition d’un échantillon, les sections Filter,
Modulation, Amp/EG et Insert FX ne sont pas disponibles.
ASTUCE Pendant l’édition d’un échantillon, le paramètre Voice
Assign est réglé sur “Mono 2”.
5. Quand vous avez terminé vos changements, appuyez sur le
bouton Write pour les sauvegarder.
Même si vous sauvegardez vos changements avec le
bouton Write, les échantillons utilisateur sont perdus à la
mise hors tension. Si vous voulez conserver vos échantillons utilisateur, choisissez l’option “EXPORT ALL
SAMPLE” ou “EXPORT SAMPLE” du menu DATA
UTILITY afin de mémoriser les données d’échantillon sur
une carte de mémoire avant de mettre l’instrument hors
tension.
4. Importer/exporter des échantillons
Des fichiers WAV sauvegardés sur carte de mémoire peuvent être
importés dans l’electribe sampler sous forme d’échantillons. Vous
pouvez également sauvegarder des échantillons sur une carte de
mémoire. Choisissez la commande voulue sous le menu DATA
UTILITY et exécutez-la.
• Import SAMPLE: Charge un échantillon contenu sur une carte
de mémoire.
• Export SAMPLE: Sauvegarde un échantillon sur la carte de
mémoire.
• Export ALL SAMPLE: Sauvegarde tous les échantillons
mémorisés dans l’electribe sampler sur la carte de mémoire
sous forme de données “all sample data” (contenant tous les
échantillons). Ce fichier “all sample data” sauvegardé sur la
carte de mémoire est chargé automatiquement la prochaine
fois que vous démarrez l’electribe sampler. Cela retourne
l’instrument à sa configuration juste avant la mise hors tension.
Les données “All sample data” de la carte de mémoire sont
automatiquement chargées au démarrage du système. Vu
que ce chargement remplace tous les échantillons sauvegardés sur l’electribe sampler, veillez à ne pas faire d’erreur de chargement - assurez-vous que la bonne carte de
mémoire est en place.
• Export ALL PATTERN: Sauvegarde tous les motifs sur la carte
de mémoire.
• Import ALL PATTERN: Charge tous les motifs sauvegardés
sur la carte de mémoire avec l’opération “EXPORT ALL
PATTERN”. Cette opération remplace tous les motifs.
36
Page 37

Appendice
1. Guide de dépannage
L’affichage ne s’allume pas.
□ L’adaptateursecteurest-ilcorrectementbranchéàl’instrument
?
□ L’adaptateursecteurest-ilcorrectementbranchéàuneprisede
courant?
□ Lespilesnesont-ellespasépuisées?
Pas de son !
□
Votre ampli, console ou casque est-il raccordé à la bonne prise
?
□ Votreampliet/ouconsolesont-ilssoustensionetcorrectement
réglés?
□ Avez-vousréglélacommandeVolumedel’electribesurun
niveausuffisant?
Le son ne s’arrête pas !
□ Quandvousjouezunmotif,ilestreproduitenboucle.Une
fois la lecture du motif terminée, appuyez sur le bouton
d’arrêt.
Les sons / opérations enregistrées dans une
séquence de données de jeu ne correspondent
pas à ce que vous avez joué.
□
Avez-vousbieneffectuélasauvegarde(“Write”)aprèsl’édition?
→ Après l’édition, vous devez sauvegarder les données en
mémoire avant de changer de motif ou de mettre l’instrument
hors tension.
Pilotage MIDI impossible !
□ Avez-vousbienbranchélescâblesMIDI?
Quand l’instrument est piloté depuis un dispositif externe :
□ Avez-vousbienréglélecanalMIDIenmodeGlobal?(→
p.33)
Quand vous pilotez un dispositif externe avec cet instrument :
□ Avez-vousdéfinilemêmecanalMIDIsurl’appareilrecevant
lesdonnéesetsurcetinstrument?
2. Messages d’erreur
Appuyez sur le bouton Exit pour refermer la fenêtre du message
d’erreur.
Card Error
La carte de mémoire est endommagée.
→ Faites une copie de sauvegarde de tous les fichiers contenus
sur la carte de mémoire.
→ Faites une copie de sauvegarde de toutes les données sur la
carte de mémoire, puis formatez-la sur l’electribe/electribe
sampler. Après l’opération, vous pouvez transférer toutes les
données sauvegardées sur la carte fraîchement formatée.
Protected
Vous essayez de sauvegarder des données sur une carte de mémoire protégée.
→ Si l’onglet de protection de la carte est en place, glissez-le pour
désactiver la protection.
Card Full
L’espace disponible sur la carte de mémoire est insuffisant.
→ Effacez un ou plusieurs fichiers de la carte de mémoire pour
libérer assez d’espace et essayez à nouveau la sauvegarde.
Event Over
Le nombre d’événements à sauvegarder dépasse le nombre
maximum d’événements autorisé.
File Error
Un fichier produit une erreur de lecture/d’écriture.
Memory Full
La capacité de la mémoire de l’instrument ne suffit pas pour
charger ou copier les données de la carte.
→ Libérez de l’espace sur l’instrument en effaçant des données
dont vous n’avez plus besoin.
Motion Seq Full
Impossible d’enregistrer la séquence de données de jeu.
→ L’electribe/electribe sampler peut enregistrer jusqu’à 24 motifs
de séquences de données de jeu. Libérez de l’espace en effaçant les données de jeu inutilisées, puis essayez à nouveau
d’enregistrer la séquence de données de jeu.
Les pads de déclenchement ne produisent aucun son.
□ Avez-vousbiensauvegardélapartieaprèsl’avoiréditée?(→
p.31)
□ LeboutonKeyboardest-ellebienactivée(allumée)?
□ Avez-vousdésactivélafonctiondeséquencededonnéesde
jeu(MotionSeq)?(→ p.30)
Impossible d’utiliser une carte de mémoire.
□ Avez-vousbienformatélacartesurvotreelectribe/electribe
sampler?
→ Toute carte de mémoire déjà formatée sur un ordinateur ou un
appareil photo numérique doit être reformatée sur cet instrument avant de pouvoir être utilisée. (→ p.33)
□ Avez-vousinsérécorrectementlacartedemémoiredansson
logement?
→ Retirez la carte de mémoire et insérez-la à nouveau. (→ p.26)
□ Lacapacitédelacartedemémoireest-ellecompatibleaveccet
instrument?
→ L’electribe/electribe sampler prend en charge les cartes SD de
512Mo à 2Go et les cartes SDHC jusqu’à 32Go.
37
Page 38

Fiche technique
Nombre maximum de sons (pour un motif entier) :
24 voix maximum (Le nombre de sons
simultanés par motif dépend du type
d’oscillateur, de filtre ou de l’effet d’insertion choisi.)
Nombre maximum de sons (par partie) :
Jusqu’à 4 voix
Prises : Audio Out L (prise jack mono de 6,35mm),
Audio Out R (prise jack mono de 6,35mm),
Audio In (prise minijack stéréo de 3,5mm),
Prise casque (prise minijack stéréo de
3,5mm), Sync In, Sync Out, MIDI OUT,
MIDI IN, port USB (de type micro USB B)
Alimentation électrique :
Autonomie des piles : 5 heures environ (pour des piles au
Consommation électrique :
Dimensions
Poids : 1,6 kg
Température de fonctionnement :
Accessoires fournis : Manuel d’utilisation, adaptateur secteur,
* Les spécifications techniques et l’aspect du produit sont susceptibles d’être
modifiés sans avis préalable en vue d’améliorations.
(L x P x H)
Adaptateur secteur (DC 9V ), six
piles AA (alcalines ou au nickel-métal-hydrure)
nickel-métal-hydrure, avec le mode
d’économie d’énergie actif)
500 mA max.
: 339 x 189 x 45 mm
0à40˚C(sanscondensation)
câble de conversion MIDI x 2
38
Page 39

Vorsichtsmaßnahmen
Aufstellungsort
Vermeiden Sie das Aufstellen des Geräts an Orten, an denen.
• es direkter Sonneneinstrahlung ausgesetzt ist;
• hohe Feuchtigkeit oder Extremtemperaturen auftreten können;
• Staub oder Schmutz in großen Mengen vorhanden sind;
• das Gerät Erschütterungen ausgesetzt sein kann.
• in der Nähe eines Magnetfeldes.
Stromversorgung
Schließen Sie das optionale Netzteil nur an eine geeignete Steckdose an. Verbinden Sie es niemals mit einer Steckdose einer anderen Spannung.
Störeinflüsse auf andere Elektrogeräte
Dieser kann bei in der Nähe aufgestellten Rund-funkempfängern
oder Fernsehgeräten Empfangsstörungen hervorrufen. Betreiben
Sie solche Geräte nur in einem geeigneten Abstand von diesem
Erzeugnis.
Bedienung
Vermeiden Sie bei der Bedienung von Schaltern und Reglern unangemessenen Kraftaufwand.
Reinigung
Bei auftretender Verschmutzung können Sie das Gehäuse mit einem trockenen, sauberen Tuch abwischen. Verwenden Sie keinerlei Flüssigreiniger wie beispielsweise Reinigungsbenzin, Verdünnungs- oder Spülmittel. Verwenden Sie niemals brennbare Reiniger.
Bedienungsanleitung
Bewahren Sie diese Bedienungsanleitung gut auf, falls Sie sie später noch einmal benötigen.
Flüssigkeiten und Fremdkörper
Stellen Sie niemals Behältnisse mit Flüssigkeiten in der Nähe des
Geräts auf. Wenn Flüssigkeit in das Gerät gelangt, können Beschädigung des Geräts, Feuer oder ein elek-trischer Schlag die Folge
sein.
Beachten Sie, daß keinerlei Fremdkörper in das Gerät gelangen.
Sollte ein Fremdkörper in das Gerät gelangt sein, so trennen Sie es
sofort vom Netz. Wenden Sie sich dann an Ihren KORG-Fachhändler.
Hinweis zur Entsorgung (Nur EU)
Wenn Sie das Symbol mit der „durchgekreuzten Mülltonne“
auf Ihrem Produkt, der dazugehörigen Bedienungsanleitung, der Batterie oder dem Batteriefach sehen, müssen
Sie das Produkt in der vorgeschriebenen Art und Weise
entsorgen. Dies bedeutet, dass dieses Produkt mit elektrischen und elektronischen Komponenten nicht mit dem nor-
malen Hausmüll entsorgt werden darf. Für Produkte dieser
Art existiert ein separates, gesetzlich festgelegtes Entsorgungssystem. Gebrauchte elektrische und elektronische Geräte müssen
separat entsorgt werden, um ein umweltgerechtes Recycling sicherzustellen. Diese Produkte müssen bei benannten Sammelstellen abgegeben werden. Die Entsorgung ist für den Endverbraucher
kostenfrei! Bitte erkundigen sie sich bei ihrer zuständigen Behörde,
wo sie diese Produkte zur fachgerechten Entsorgung abgeben
können. Falls ihr Produkt mit Batterien oder Akkumulatoren ausgerüstet ist, müssen sie diese vor Abgabe des Produktes entfernen
und separat entsorgen (siehe oben). Die Abgabe dieses Produktes
bei einer zuständigen Stelle hilft ihnen, dass das Produkt umweltgerecht entsorgt wird. Damit leisten sie persönlich einen nicht unerheblichen Beitrag zum Schutz der Umwelt und der menschlichen
Gesundheit vor möglichen negativen Effekten durch unsachgemäße Entsorgung von Müll. Batterien oder Akkus, die Schadstoffe
enthalten, sind auch mit dem Symbol einer durchgekreuzten Mülltonne gekennzeichnet. In der Nähe zum Mülltonnensymbol befindet sich die chemische Bezeichnung des Schadstoffes. Cd oder
NiCd steht für Cadmium, Pb für Blei und Hg für Quecksilber.
WICHTIGER HINWEIS FÜR KUNDEN
Dieses Produkt wurde unter strenger Beachtung von Spezifikationen und Spannungsanforderungen hergestellt, die im Bestimmungsland gelten. Wenn Sie dieses Produkt über das Internet,
per Postversand und/oder mit telefonischer Bestellung gekauft
haben, müssen Sie bestätigen, dass dieses Produkt für Ihr Wohngebiet ausgelegt ist. WARNUNG: Verwendung dieses Produkts in
einem anderen Land als dem, für das es bestimmt ist, verwendet
wird, kann gefährlich sein und die Garantie des Herstellers oder
Importeurs hinfällig lassen werden. Bitte bewahren Sie diese
Quittung als Kaufbeleg auf, da andernfalls das Produkt von der
Garantie des Herstellers oder Importeurs ausgeschlossen werden kann.
Über die Daten
Bei einer falschen Bedienung oder Funktionsstörung könnten alle
gespeicherten Daten verloren gehen. Vorsichtshalber sollten Sie
wichtige Daten daher auf mehreren Datenträgern sichern. Korg
Corporation haftet nicht für Schäden, die sich aus einem Datenverlust ergeben könnten.
Über das Urheberrecht
Die Verwendung von urheberrechtlich geschütztem Material für andere Zwecke als den Privatgebrauch daheim stellt eine Verletzung
des Urheberrechts dar, die ein Strafverfahren, eine Schadenersatzoder Unterlassungsklage nach sich ziehen kann. Der Anspruch des
Urheberrechtinhabers bezieht sich auch auf Aufnahmen oder Werke, die urheberrechtlich geschütztes Material enthalten oder aufbereiten. Konkret bedeutet dies, dass die Wiederverwendung oder der
Vertrieb von solchem Material ebenfalls gegen das Urheberrecht
verstößt. Korg Corporation haftet nicht für Schäden oder Strafen,
die sich aus der unerlaubten Verwendung von urheberrechtlich geschütztem Material ergeben. Bei Fragen zu den Urheberrechtsbestimmungen wenden Sie sich bitte an einen dahingehend spezialisierten Anwalt.
* Alle Produkt- und Firmennamen sind Warenzeichen oder eingetragene Warenzei-
chen der betreffenden Eigentümer.
39
Page 40

Inhalt
Einführung ...................................41
1. Bezeichnung der Sektionen ..............................................................41
2. Anschlüsse ........................................................................................44
3. Stromversorgung ..............................................................................45
4. Speicherkarte einsetzen und entnehmen .........................................45
Klänge erzeugen ..........................46
1. Ein-/Ausschalten ...............................................................................46
2. Grundlegende Bedienung ................................................................. 46
3. Pattern-Wiedergabe .........................................................................46
4. Auswahl eines Parts ..........................................................................46
Musik spielen ...............................47
1. Mit dem Triggerpad Musik spielen ....................................................47
2. Mit dem Touchpad Musik spielen ...................................................... 48
3. Den Gate Arpeggiator verwenden .....................................................48
4. Master-Effekte einsetzen ..................................................................48
5. Pattern Set ........................................................................................48
6. BPM (Tempo) einstellen ....................................................................49
7. Klangbearbeitung durch Regler ........................................................49
Aufnahme und Wiedergabe ...........49
1. Echtzeitaufnahme .............................................................................49
2. Step-Edit ...........................................................................................49
3. Aufzeichnen der Bewegungen von Reglern und Tasten (Motion
Sequence) .............................................................................................49
4. Pattern speichern ..............................................................................50
Weitere Einstellungen ..................51
1. Metronom einstellen ........................................................................51
2. Batterietyp einstellen. ......................................................................51
3. LCD-Kontrast einstellen .....................................................................51
4. Verlängern der Batterielebensdauer .................................................51
5. Automatische Energiesparfunktion ...................................................52
6. Den globalen MIDI-Kanal einstellen ..................................................52
7. Spielen bei Synchronisierung mit externem Gerät ............................52
8. Eine Speicherkarte verwenden .........................................................52
9. Bedienung des Event-Recorders ........................................................52
10. Nutzerdaten formatieren ................................................................53
Features des electribe Samplers ....53
1. Neue Funktionen des electribe sampler ............................................53
2. Geänderte Funktionen bestimmter Regler ........................................53
Aufnahme und Bearbeitung von Sam-
ples .............................................54
1. Sampeln: .......................................................................................... 54
2. Resampeln ........................................................................................54
3. Sample bearbeiten ............................................................................55
4. Samples importieren/exportieren .....................................................55
Anhang ........................................ 56
1. Fehlersuche und -Beseitigung ..........................................................56
2. Fehlermeldungen .............................................................................56
Pattern bearbeiten ....................... 51
1. Einen Part stummschalten ................................................................51
2. Einen Part löschen ............................................................................51
3. Einen Part kopieren ...........................................................................51
4. Patterneinstellungen verändern. ...................................................... 51
40
Technische Daten ..........................57
Page 41

Einführung
Vielen Dank, dass Sie sich für den Kauf einer Korg electribe/
electribe sampler Music Production Station entschieden haben.
Um das Beste aus Ihrem neuen Instrument herauszuholen, bitten
wir Sie, diese Bedienungsanleitung aufmerksam durchzulesen
und das Instrument wie dort beschrieben zu verwenden. Wir raten
Ihnen, diese Bedienungsanleitung aufzuheben, damit Sie bei
Bedarf jederzeit darin nachschlagen können.
1. Bezeichnung der Sektionen
Oberseite
1
2 3
4
5
6
7
Der electribe/electribe sampler ist eine Produktionsstation für
Dance-Musik, mit der Sie eigene Stücke kreieren können. Mit den
Reglern und dem Touchpad des Geräts können Sie ganz einfach
Sounds bearbeiten sowie Rhythmus- und Phrasenpattern erschaffen - alles mit demselben Gerät.
Die grundlegende Bedienung des electribe sampler entspricht der
des electribe.
Zusätzliche Erklärungen für den electribe sampler finden Sie unter
„Features des electribe Samplers“ (→ S. 53) und „Aufnahme und
Bearbeitung von Samples“ (→ S. 54).
TIPP Die Abbildungen in dieser Bedienungsanleitung zeigen
den electribe.
8
9
11
10
1. Einschalttaste
Zum Ein- und Ausschalten.
2. Volume-Regler
Zur Einstellung der Lautstärke des an der Line Out-Buchse
oder am Kopfhöreranschluss anliegenden Signals.
3. Input Level-Regler
Zur Einstellung der Eingangsempfindlichkeit der Audio
In-Buchse.
4. Display
Zeigt Informationen zu Pattern, Parts sowie Parametereinstellungen an.
5. Abspiel- und Aufnahme-Sektion
(Rec)-Taste
Zur Aufnahme von Rhythmen, Phrasen oder Reglerbewegungen. Wenn Sie während der Aufnahme diese Taste drücken,
endet die Aufnahme und die Wiedergabe läuft weiter.
(Stop)-Taste
Zum Anhalten der Wiedergabe.
(Play/Pause)-Taste
Zum Abspielen oder Pausieren eines Patterns.
Tap-Taste
Indem Sie diese Taste im gewünschten Tempo mehrmals
antippen, können Sie das Tempo entsprechend ändern.
12
13
6. Touchpad-Sektion
Touchpad
Mit diesem Pad können Sie mithilfe der Gate-Arpeggiatoroder Touch Scale-Funktion Musik spielen oder den MasterEffekt steuern.
Gate Arp-Taste
Hiermit schalten Sie die Gate-Arpeggiator-Funktion ein.
Touch Scale-Taste
Hiermit schalten Sie die Touch Scale-Funktion ein.
Master Fx-Taste
Hiermit schalten Sie die Bearbeitungsfunktion des MasterEffekts ein.
MFX Hold-Taste
Mit dieser Taste können Sie den zuvor durch die Bedienung
des Touchpads eingestellten Master-Effekt-Status halten, selbst
wenn Sie Ihre Finger vom Touchpad nehmen. Dazu muss die
Master FX-Taste aktiviert (ON) sein.
TIPP Sie können den Status der MFX Hold-Taste (ein/aus) in
einem Pattern speichern.
7. Common-Sektion
Value-Regler
Ändert die Werte des im Display angezeigten Parameters.
<, > (Cursor)-Tasten
Zur Auswahl des Parameters, den Sie bearbeiten möchten.
41
Page 42

Menu/Enter-Taste
Zur Auswahl von Parametern wie „pattern, part, global oder
utility“ sowie zum Bestätigen von Änderungen der Parametereinstellungen.
Exit-Taste
Indem Sie diese Taste mehrmals drücken, gelangen Sie von der
Editieranzeige zur Pattern-Auswahlanzeige.
Shift-Taste
Taste, die – gemeinsam mit bestimmten Tasten oder Reglern
gedrückt –deren Alternativfunktion aktiviert.
Shift-Taste + < (Cursor): Macht den letzten Bedienschritt
rückgängig (Undo-Funktion).
Shift-Taste + Write-Taste: Sie können Pattern benennen und
speichern.
Shift-Taste + Value-Regler: Zum Festlegen eines großen oder
kleinen Regelbereichs.
TIPP Je nach ausgewähltem Parameter empfiehlt sich ein großer
oder kleiner Regelbereich.
Write-Taste
Zum Speichern von Pattern und globalen Daten im internen
Speicher des electribe/electribe sampler. Die Datenspeicherung
erfolgt durch Drücken der Write-Taste in der Seite „Global
parameters“. Die Patterndaten können auch in anderen Seiten
gespeichert werden.
8. Editiersektion
Hier können Sie für jeden Part Parameter bearbeiten
Oszillator (electribe sampler: Sample)
Hier wählen Sie die Wellenform aus und stellen
deren Sounds ein, beispielsweise Sägezahn,
Rechteck, Rauschen oder PCM.
Oscilllator-Regler (electribe sampler: Sample-
Regler)
Zur Auswahl der Wellenform.
Pitch/Glide-Regler
Zur Einstellung der Tonhöhe. Sie können einen
sanften Tonhöhenübergang zwischen zwei Tönen
für Synthiesounds erzeugen (Glide), indem Sie die
Shift-Taste gedrückt halten.
Edit-Regler
Regelt die Art des Klangs. Der Effekt verändert sich abhängig
von der verwendeten Wellenform.
Filter
Zum Einstellen der Klangfarbe durch
Eliminieren oder Betonen bestimmter
Frequenzanteile des Oszillators.
Filter-Regler
Regelt die Cutoff-Frequenz des Filters.
Resonance-Regler
Regelt die Resonanz des Filters.
EG Int-Regler
Regelt die Lautstärke der zeitweiligen
Änderung der Cutoff-Frequenz des Filters durch den Hüllkurven-Generator (EG), den Sie in der Amp/EG-Sektion finden.
LPF-Taste
Aktiviert das Tiefpassfilter.
Durch wiederholtes Drücken dieser Taste können Sie den
Filtertyp ändern.
HPF-Taste
Aktiviert das Hochpassfilter.
Durch wiederholtes Drücken dieser Taste können Sie den
Filtertyp ändern.
BPF-Taste
Aktiviert das Bandpassfilter.
Durch wiederholtes Drücken dieser Taste können Sie den
Filtertyp ändern.
Modulation
Zum Vornehmen zeitweiliger Änderungen des
Klangs durch LFO oder EG.
Modulation-Regler
Regelt den Modulationstyp.
Depth-Regler
Regelt die Intensität der Modulation.
Speed-Regler
Regelt die Geschwindigkeit der Modulation.
Amp/EG
Zum Einstellen der Lautstärke und Balance des Verstärkers, des Hüllkurvengenerators (EG) und des Master-Effekt-Send, der
zeitweilige Änderungen vornimmt.
Level-Regler
Regelt die Lautstärke eines Parts.
Pan-Regler
Regelt die Position eines Parts im Stereofeld.
Attack-Regler
Regelt die Attack-Geschwindigkeit eines
Klangs.
Decay/Release-Regler
Regelt die Ausklingdauer eines Klangs.
MFX Send-Taste
Hiermit können Sie auswählen, ob ein bestimmter Part zum
Master-Effekt geführt wird oder nicht. Durch Drücken der
Taste schalten Sie zwischen ein (leuchtet) und aus (dunkel)
um.
Amp EG-Taste
Zur Aktivierung der Hüllkurve des Verstärkers. Durch Drücken der Taste schalten Sie zwischen ein (leuchtet) und aus
(dunkel) um. Die Lautstärke ändert sich gemäß der gewählten
Hüllkurve, die Sie bei eingeschalteter Taste mit den Attackund Decay/Release-Reglern einstellen. Bei ausgeschalteter
Taste wirkt sich die Hüllkurve nicht aus.
Insert Fx
Die Insert Fx-Sektion dient dem Hinzufügen
diverser Effekte zu Ihrem Sound, beispielsweise
eines Verzerrers.
Insert Fx-Regler
Zur Auswahl des eingeschleiften Effekttyps.
Edit-Regler
Zum Einstellen der Intensität des eingeschleiften
Effekts. Die Wirkung verändert sich abhängig vom
gewählten Effekttyp.
IFX On-Taste
Zum Aktivieren und Deaktivieren des eingeschleiften Effektes.
Durch Drücken der Taste schalten Sie zwischen ein (leuchtet)
und aus (dunkel) um.
9. Step-Taste
Zeigt den Ort einer Sequenz oder Oktave gemeinsam mit der
aktuellen Funktion des Triggerpads an. Mit dieser Taste
können Sie den Ort oder die Oktave der Sequenz ändern, die
Sie gerade bearbeiten.
10. Part-Editier-Sektion
<Part, Part>-Tasten
Zur Auswahl eines Parts. Im Display wird der aktuell gewähl-
42
Page 43

te Part angezeigt.
Part Mute-Taste
Ist diese Taste aktiviert (leuchtet), schalten Sie durch Drücken
des Triggerpads den entsprechenden Part stumm. Das Triggerpad schaltet sich nun aus (dunkel) und die Part Mute Taste
schaltet sich aus. Indem Sie das Triggerpad für den ausgewählten dunklen Part drücken, deaktivieren Sie die MuteFunktion (leuchtet).
Part Erase-Taste
Drücken Sie die Part Erase-Taste und halten Sie beim Spielen
das Triggerpad gedrückt, um den Sound des ausgewählten
Parts zu löschen.
11. Pad mode-Sektion
Hier wählen Sie die Funktion des Triggerpads aus.
Trigger-Taste
Ist diese Taste aktiviert (leuchtet), wird nach Antippen eines
Triggerpads der entsprechende Part wiedergegeben. Die Art
der Wiedergabe können Sie durch Bearbeiten des Parameters
“TRIGGER MODE“-einstellen.
Sequencer-Taste
Ist diese Taste aktiviert (leuchtet), wird das Triggerpad im
Schritt-Eingabemodus verwendet.
Keyboard-Taste
Ist diese Taste aktiviert (leuchtet) kann das Triggerpad als
Keyboard gespielt werden. Sie können für jedes Pattern eine
Tonart oder Tonleiter einstellen.
Chord-Taste
Ist diese Taste aktiviert (leuchtet) kann das Triggerpad als
Akkord-Pad verwendet werden. Sie können für jedes Pattern
Variation, Tonart und Tonleiter eines Akkords einstellen.
Step Jump-Taste
Ist diese Taste aktiviert (leuchtet), können Sie während der
Sequenzer-Wiedergabe durch Drücken der Tasten 1 bis 16
direkt zum entsprechenden Step springen. Drücken Sie
mehrere Tasten hintereinander, werden die Steps in der so
vorgegebenen Reihenfolge abgespielt.
Pattern Set-Taste
Ist diese Taste aktiviert (leuchtet), können Sie durch Drücken
eines Triggerpads das diesem zugewiesene Pattern aufrufen.
Halten Sie diese Taste gedrückt, können Sie durch Drücken
eines Triggerpads das aktuelle Pattern diesem Triggerpad
zuweisen.
12. Triggerpad
Mit dem Triggerpad können Sie gemäß den in der Pad modeSektion vorgenommenen Einstellungen spielen.
13. LED
Die LED auf der Rückseite des Geräts leuchtet passend zum
gespielten Pattern.
43
Page 44

2. Anschlüsse
1 2 3 4 5 6 7
98
Mischpult,
Aktivmonitor
CD-Player,
MP3-Player
1 2 3 4 5 6 7 8 9 10 11 12 13 14 15 16
MIDI-Adapterkabe
l (im Lieferumfang
enthalten)
MIDI IN MIDI OUT
Netzgerät
(im Lieferumfang
enthalten)
Kopfhörer
Vor Herstellen oder Lösen der Anschlüsse müssen Sie das
Instrument ausschalten. Anderenfalls kann es zu Störungen oder Schäden an Ihren Lautsprechern kommen.
TIPP Wenn Sie dieses Gerät erstmals mit Ihrem Windows-Com-
puter verbinden, wird der Treiber vom Betriebssystem
automatisch installiert.
Der Standard USB-MIDI-Treiber des Windows-Betriebs-
systems lässt nicht zu, den electribe/electribe sampler mit
mehreren Programmen simultan zu verwenden. Wenn Sie
den electribe/electribe sampler für die Simultansteuerung
mehrerer Programme verwenden möchten, müssen Sie
den USB-MIDI-Treiber von Korg installieren. Laden Sie
dazu den KORG USB-MIDI-Treiber von der Korg-Webseite herunter und befolgen Sie die beiliegenden Installationshinweise.
1. Audio Out L/R-Buchsen
An diesen Buchsen liegt das Audio-Ausgangssignal des
electribe/electribe sampler an. Wenn Sie nur ein Kabel an den
linken Audioausgang anschließen, wird das Stereoausgangssignal zu einem Monosignal zusammengeführt.
TIPP An dieser Buchse liegt in diesem Fall zwar ein Mono-
Ausgangssignal an - Sie können jedoch sowohl Kabel mit
6,35 mm Mono- als auch Stereoklinkenstecker anschließen.
2. Audio In-Buchse
Buchse zum Anschluss des Audioausgangs anderer Klangquellen an den electribe/electribe sampler.
TIPP Externe am Eingang anliegende Sounds können gemischt
werden, indem Sie im Global-Menü die AUDIO IN
THRU-Funktion aktivieren (ON).
3. Sync Out-Buchse
An dieser Buchse wird alle 15 ms ein 5 V Impuls für jede
Achtel- oder Sechzehntelnote ausgegeben.
Damit können Sie das Gerät mit Geräten der KORG volcaSerie oder anderen analogen Sequenzern synchronisieren.
TIPP Polarität und Zyklus des Impulses werden im Global-
Menü eingestellt.
4. Sync In-Buchse
Hier können Sie ein von einem analogen Gerät ausgegebenes
Impulssignal anschließen. Stellen Sie dazu im Clock-Modus
im Global-Menü „Auto“ oder „Ect. Sync“ ein, um die interne
Impulsuhr zu deaktivieren, damit das Gerät mit dem SyncImpuls des externen Geräts synchron läuft.
TIPP Die Einstellungen zur Aktivierung/Deaktivierung von
SYNC IN sowie für Zyklus und Polarität des ermittelten
Impulses finden Sie im Global-Menü. Weitere Hinweise
zur Vorgehensweise finden Sie im Parameter-Leitfaden.
5. MIDI IN/OUT-Buchse
Zum Anschluss eines MIDI-Geräts mithilfe des beigelegten
Adapterkabels.
6. Kopfhörerbuchse
Zum Anschluss eines Kopfhörers
7. DC 9V-Buchse
Zum Anschluss des AC-Netzteils.
8. USB-Buchse
Zum Anschluss des electribe/electribe sampler an einen
Computer.
9. Speicherkarten-Slot
Zum Aufnehmen einer Speicherkarte. Sie können die Speicherkarte zum Speichern (write) oder Laden (read) von Songs oder
Daten verwenden.
44
Page 45

3. Stromversorgung
4. Speicherkarte einsetzen und ent-
Batterien
Öffnen Sie den Batteriefachdeckel an der Unterseite des Geräts
und setzen Sie sechs AA-Batterien ins Batteriefach ein. Achten Sie
dabei auf die richtige Polung.
Kompatible Batterien
Für dieses Gerät sind AA-Alkalibatterien oder Nickel-Metallhydrid Akkus zugelassen.
TIPP In der Seite „BATTERY TYPE“ im Global-Menü können
Sie den verwendeten Batterietyp auswählen, damit die
Batterieanzeige des electribe/electribe sampler den genauen Ladezustand ermitteln und anzeigen kann
Batterieanzeige
Die Batterieanzeige im Display “ ”(icon) zeigt den Ladezustand der Batterien an. Erscheint im Display das Icon für eine
schwache Batterie “ ” (icon), sind die Batterien so gut wie
verbraucht und sollten ausgetauscht werden.
TIPP Wenn über eine gewisse Zeit hinweg keine Benutzereinga-
be erfolgt, fährt der electribe/electribe sampler bei Batteriebetrieb in den Energiesparmodus, um die Batterien zu
schonen. Sie können den Energiesparmodus in der Seite
„Power Save Mode“ im Global-Menü deaktivieren.
(→S.51)
Falls Sie ein Netzgerät angeschlossen haben, sollten Sie
den electribe/electribe sampler ausschalten, bevor Sie die
Batterien ersetzen.
Entfernen Sie verbrauchte Batterien sofort. Es ist zudem
ratsam, die Batterien herauszunehmen, wenn Sie den
electribe/electribe sampler über einen längeren Zeitraum
hinweg nicht benutzen – so verhindern Sie Schäden durch
auslaufende Batterien.
AC-Netzteil
Schließen Sie das beigelegte AC-Netzteil an der DC 9V-Buchse des
Geräts und anschließend erst an der Steckdose an.
Verwenden Sie ausschließlich das beigelegte AC-Netzteil.
Die Verwendung eines anderen AC-Netzteils kann zu
unerwünschten Fehlfunktionen führen.
nehmen
Sie können die Speicherkarte zum Speichern (write) oder Laden
(read) von Songs oder Daten verwenden.
Niemals die Speicherkarte bei eingeschaltetem Gerät
einsetzen oder entnehmen! Andernfalls drohen Datenverluste im internen Speicher oder der Speicherkarte,
schlimmstenfalls könnten Sie Ihre Speicherkarte beschädigen.
Karte einsetzen
1. Überprüfen Sie, ob sämtliche Displays und LEDs ausgeschaltet
sind und das Gerät richtig ausgeschaltet ist.
2. Führen Sie die Speicherkarte ein, bis Sie ein leises Klicken
hören.
Schieben Sie die Speicherkarte immer vorsichtig bis zum
Anschlag hinein und achten Sie darauf, sie richtig herum
einzusetzen. Wenden Sie hierbei niemals Gewalt an.
Karte entnehmen
1. Überprüfen Sie, ob sämtliche Displays und LEDs ausgeschaltet
sind und das Gerät richtig ausgeschaltet ist.
2. Drücken Sie die Speicherkarte leicht nach innen, bis ein leises
Klicken zu hören ist und nehmen Sie anschließend die Finger
weg.
Wenn die Karte aus dem Slot schaut, können Sie sie ganz
herausziehen.
Mit diesem Gerät kompatible Speicherkarten
Sie können mit diesem Gerät folgende Speicherkarten verwenden: SD-Karten mit 512 MByte bis 2 GByte Speichergröße
sowie SDHC-Karten mit maximal 32 GByte Speichergröße.
TIPP Das Gerät unterstützt keine SDXC-Karten.
Umgang mit Speicherkarten
Beachten Sie die Anleitung, die Ihrer jeweiligen Speicherkarte
beiliegt.
TIPP Diesem Gerät ist keine Speicherkarte beigelegt. Besorgen
Sie sich bitte eine Speicherkarte im Fachhandel, um dieses
Feature nutzen zu können.
45
Page 46

Klänge erzeugen
Part Parameter
Trigger-Taste
Triggerpad
1. Ein-/Ausschalten
Schalten Sie das Gerät ein, indem Sie die Einschalttaste so lange
drücken, bis im Display die Startanzeige erscheint.
Beim Hochfahren des Systems erscheint im Display die Patternauswahl-Anzeige.
Zum Ausschalten des Geräts drücken Sie die Einschalttaste so
lange, bis das Display erlischt.
Berühren Sie beim Hochfahren keine Tasten oder Touch-
pads.
Energiesparfunktion
Der electribe/electribe sampler besitzt eine Energiesparfunktion.
Diese schaltet das Gerät automatisch aus, wenn über etwa 4
Stunden hinweg keine Benutzereingabe erfolgt
TIPP Sie können diese Funktion mit der entsprechenden Ein-
stellung in der Seite „AUTO POWER OFF“ im GlobalMenü deaktivieren. (→S.52)
2. Grundlegende Bedienung
Umgang mit der Anzeige
Drücken Sie in der Patternauswahl-Anzeige die <- oder oder
>-Taste, um die Einstellungen des aktuell ausgewählten Parts zu
speichern.
Durch Drücken der Menu/Enter-Taste gelangen Sie von der
Patternauswahl-Anzeige ins Editiermenü.
Wählen Sie mit der < oder >-Taste den Parameter aus, den Sie
bearbeiten wollen.
Stellen Sie den Parameterwert mit dem Value-Regler ein.
Durch mehrmaliges Drücken der Exit-Taste gelangen Sie vom
Editiermenü wieder zur Patternauswahl-Anzeige
TIPP Weitere Hinweise finden Sie im Parameter-Leitfaden.
3. Pattern-Wiedergabe
Ein Pattern ist eine Kombination von Phrasen bestehend aus 16
Parts und stellt ein Segment einer größeren Einspielung dar.
Mit diesem Gerät können Sie bis zu 250 Pattern erzeugen und
speichern. Ein einzelnes Pattern besteht aus 16 Parts und einem
Master-Effekt.
Auswahl eines Patterns
1. Rufen Sie die Patternauswahl-Anzeige auf.
2. Wählen Sie mit dem Value-Regler ein Pattern aus.
TIPP Durch mehrmaliges Drücken der Exit-Taste gelangen Sie
vom Editiermenü wieder zur Patternauswahl-Anzeige.
TIPP Sie können auch während der Wiedergabe ein Pattern
auswählen.
Wiedergabe eines Patterns
1. Durch Drücken der Play/Pause-Taste wird das aktuell ausge-
wählte Pattern wiedergegeben.
2. Die Wiedergabe beginnt mit dem Anfang des Patterns, läuft
bis zu dessen Ende und wird anschließend wiederholt.
3. Durch Drücken der Stop-Taste wird die Wiedergabe angehal-
ten.
4. Auswahl eines Parts
Was ist ein Part?
Ein Part ist der kleinste Bestandteil eines Patterns. Parts
bestehen aus Sounds sowie Rhythmen oder Phrasen und
enthalten u. a. Informationen zum Status der Effekte sowie zu
Motion Sequences.
Sie können jedem Part eigene Sounds und Rhythmen, Phrasen,
Motion Sequences, den Status der Insert-Effekte und so weiter
zuweisen.
Sound eines Parts anhören
1. Drücken Sie die Trigger-Taste, damit diese leuchtet.
2. Durch Drücken eines Triggerpads können Sie den Klang eines
entsprechenden Parts zur Kontrolle aufrufen.
46
Page 47

Einen Part zur Bearbeitung auswählen
<Part, Part>-Tasten
Triggerpad
Keyboard-Taste Step-Taste<Part, Part>-Tasten
Triggerpad
Belegung bei Tonart C und ionischer Tonleiter
Einmaliges Drücken versetzt um eine Oktave nach oben.
Wählen Sie mit den <Part, Part>-Tasten den Part aus, den Sie
bearbeiten wollen.
Das dem entsprechenden Part zugeordnete Triggerpad leuchtet
blau.
Nun können Sie den Klang dieses Parts mit den Reglern der
Editier-Sektion ändern.
Musik spielen
1. Mit dem Triggerpad Musik spielen
Das Antippen eines Triggerpads erzeugt einen Sound.
Hierbei bietet Ihnen der electribe/electribe sampler zwei unterschiedliche Pad-Modi an.
Das Triggerpad als Keyboard nutzen
1. Drücken Sie die Keyboard-Taste.
2. Wählen Sie mit den <Part, Part>-Tasten einen Part aus.
3. Spielen Sie auf dem Triggerpad.
C D E F G A B C
C D E F G A B C
TIPP Mithilfe der Funktion „Key and Scale“ im Editiermenü
können Sie den Sound auswählen. Je nach den unter
„Voice-Assign“ vorgenommenen Einstellungen erzeugt
das Antippen von mehr als 2 Pads gleichzeitig unterschiedliche Sounds.
4. Mit den Step-Tasten können Sie den Notenbereich ändern.
Durch Drücken der Step-Taste 1 wird der Notenbereich um
eine Oktave nach unten versetzt, durch Drücken der StepTaste 4 um eine Oktave nach oben.
BlinktBlinkt Blinkt langsamBlinkt langsam
Einmaliges Drücken versetzt um
eine Oktave nach unten.
Art der Illumination der Step-Taste
zeigt Notenbereich an.
Mit dem Triggerpad Akkorde spielen
1. Drücken Sie die Chord-Taste.
2. Spielen Sie auf dem Triggerpad.
TIPP Wählen Sie einen Part aus, dessen Voice Assign-Funktion
im Editiermenü auf Poly 1 oder Poly 2 eingestellt ist.
TIPP Sie können mit dem Feature „Chord Set-“ im Editiermenü
die Akkordvariationen verändern.
47
Page 48

Chord-Taste
Triggerpad
2. Mit dem Touchpad Musik spielen
Touch Scale-Taste
Touchpad
Gate Arp-Taste
Triggerpad
Touchpad
Master Fx-Taste MFX Send-Taste
Triggerpad
Touchpad
1. Drücken Sie die Touch Scale-Taste, damit diese leuchtet.
2. Nun können Sie Musik spielen, indem Sie das Touchpad mit
den Fingern reiben oder leicht antippen.
Die Bearbeitung des Touchpads mit einem harten oder
scharfen Objekt kann das Pad beschädigen. Bedienen Sie
es immer nur mit ihren Fingerspitzen, um eine Beschädigung Ihres electribe/electribe sampler zu vermeiden
TIPP Mit den Funktionen KEY und SCALE im Editiermenü
können Sie Sounds bearbeiten. Den Klangbereich können
Sie mit der TOUCH SCALE RANGE-Funktion im GlobalMenü einstellen.
TIPP Sie können den Klangbereich auch mit der Step-Taste
ändern, nachdem Sie zuvor die Keyboard-Taste aktiviert
haben (ON).
TIPP Je nach Einstellungen des ausgewählten Parts kann es
vorkommen, dass sich der Klang nicht ändert.
3. Mit dem Touchpad kann der Klang wie folgt geändert werden.
X-Achse: Regelt das Gate-Tempo.
Y-Achse. Regelt die Länge des Klangs.
Y
X
TIPP Sie können das Pattern des Gate-Arpeggiators in der
GATE ARP-Seite im Editiermenü ändern.
4. Master-Effekte einsetzen
1. Drücken Sie die Master-Fx-Taste
2. Wählen Sie den Part aus, dem Sie den Master-Effekt zuweisen
möchten und aktivieren Sie den Effekt durch Drücken der
MFX Send-Taste
3. Durch Berühren des Touchpads wird der Effekt zugewiesen.
TIPP Wählen Sie den Master-Effekttyp in der MFX Type-Seite
des Editiermenüs aus, wenn Sie einen anderen Effekttyp
verwenden wollen.
Je nach der Position, wo Sie das Touchpad berühren, kann
dabei ein leichtes Rauschen auftreten.
3. Den Gate Arpeggiator verwenden
Automatisches Abspielen des ausgewählten Parts im eingestellten
Tempo oder Rhythmus. Über die Gatezeit können Sie die Länge
eines Einzelklangs ändern.
Den Gate Arpeggiator spielen
1. Drücken Sie die Gate Arp-Taste, damit diese leuchtet.
2. Drücken Sie die Trigger-Taste und halten Sie das Triggerpad
des wiederzugebenden Parts gedrückt, um das Touchpad
verwenden zu können.
Alternativ können Sie auch das Touchpad verwenden, während Sie nach dem Drücken der Keyboard- oder Chord-Taste
die Tonhöhe mit dem Triggerpad auswählen.
48
Page 49

5. Pattern Set
Pattern Set-TasteValue-Regler
Triggerpad
Was ist Pattern Set?
Pattern Set ist eine Funktion, mithilfe der jedem Triggerpad ein
Pattern zugewiesen werden kann. Dadurch können Sie während
der Wiedergabe einfach von einem Pattern zum nächsten wechseln.
Aufnahme und Wiedergabe
1. Echtzeitaufnahme
Sie können Ihr Spiel auf dem Triggerpad oder Touchpad in Echtzeit aufnehmen. Sie können bei der Aufnahme auch das Metronom verwenden. (→ S.51)
Ein Pattern einem Triggerpad zuweisen
1. Drücken Sie die Pattern Set-Taste, damit diese leuchtet.
2. Wählen Sie mit einer der Step-Tasten 1 bis 4 die Gruppe aus, in
der das gewünschte Pattern gespeichert werden soll.
3. Wählen Sie das entsprechende Pattern mit dem Value-Regler
aus.
4. Halten Sie die Pattern Set-Taste gedrückt und drücken Sie das
Triggerpad, dem Sie das Pattern zuzuweisen möchten.
Mit einem Pattern Set spielen
1. Drücken Sie die Pattern Set-Taste, damit diese leuchtet.
2. Wählen Sie mit einer der Step-Tasten (1 bis 4) die Gruppe aus,
in der das gewünschte Pattern gespeichert ist.
3. Mit einem Druck auf ein Triggerpad wird die Wiedergabe des
diesem zugewiesenen Patterns gestartet.
6. BPM (Tempo) einstellen
Sie können das Tempo eines Patterns oder des Gate Arpeggiators
einstellen.
BPM einstellen
Sie können das Tempo einstellen, indem Sie die Tap-Taste mehrmals hintereinander im gewünschten Tempo antippen.
Sie können das Tempo auch manuell mit dem Value-Regler einstellen, wenn Sie im Editiermenü den Parameter „BPM“ aufgerufen
haben.
Begleiten eines Patterns aufnehmen
Sie können jede Phrase aufnehmen, die Ihnen beim Spielen in den
Sinn kommt, ohne dazu die Wiedergabe anhalten zu müssen.
1. Starten Sie die Wiedergabe eines Patterns
2. Wählen Sie einen Part zur Aufnahme aus.
3. Drücken Sie die Rec-Taste - wenn die Taste leuchtet, beginnt
die Aufnahme.
4. Spielen Sie auf dem Triggerpad oder mit anderen Funktionen.
Die Aufnahme läuft weiter, während das Pattern wiederholt
wird.
5. Drücken Sie die Rec-Taste erneut, um die Aufnahme anzuhalten (Taste erlischt).
Beenden Sie die Wiedergabe mit der Play/Pause-Taste.
Löschen von nicht benötigten Sounds während einer
Darbietung
Drücken Sie die Part Erase-Taste und halten Sie beim Spielen das
Triggerpad gedrückt, um den Sound des ausgewählten Parts zu
löschen.
2. Step-Edit
1. Wählen Sie einen Part zur Aufnahme aus.
2. Drücken Sie die Sequencer-Taste, damit diese leuchtet.
3. Drücken Sie die Step-Taste, um die Aufnahmelänge auszuwäh-
len. Sie können die Länge anhand der Anzahl der roten LEDs
überprüfen.
4. Ein aus ausgewählten Parts bestehendes Pattern wird durch
die Beleuchtung des Triggerpads angezeigt. Mit jedem Drücken des Triggerpads schalten Sie die Note ein (leuchtet) und
aus (dunkel).
TIPP Als Notennummer, die beim Drücken des Triggerpads
eingegeben wird, ist werksseitig C4 (60) eingestellt. Wenn
Sie eine ausgeschaltete Note eines bereits eingegebenen
Steps wieder einschalten, wird die originale Note aktiviert.
TIPP Sie können durch Drücken der Play/Pause-Taste Pattern
auch während der Wiedergabe aufnehmen.
TIPP Wenn Sie im Editiermenü „Step Edit“ auswählen, können
Sie jeden Step detailliert bearbeiten. Genauere Hinweise
darüber finden Sie im Parameter-Leitfaden.
7. Klangbearbeitung durch Regler
Sie können den Klang bearbeiten, indem Sie mit dem Regler die
Parameter „Filter“ oder „Oscillator Edit“ der Editiersektion
ändern. Detaillierte Hinweise zu jedem Regler finden Sie im
Parameter-Leitfaden.
TIPP Je nach Einstellung kann es hierbei zu leichtem Rauschen
oder Aussetzern im Audiosignal kommen.
49
Page 50
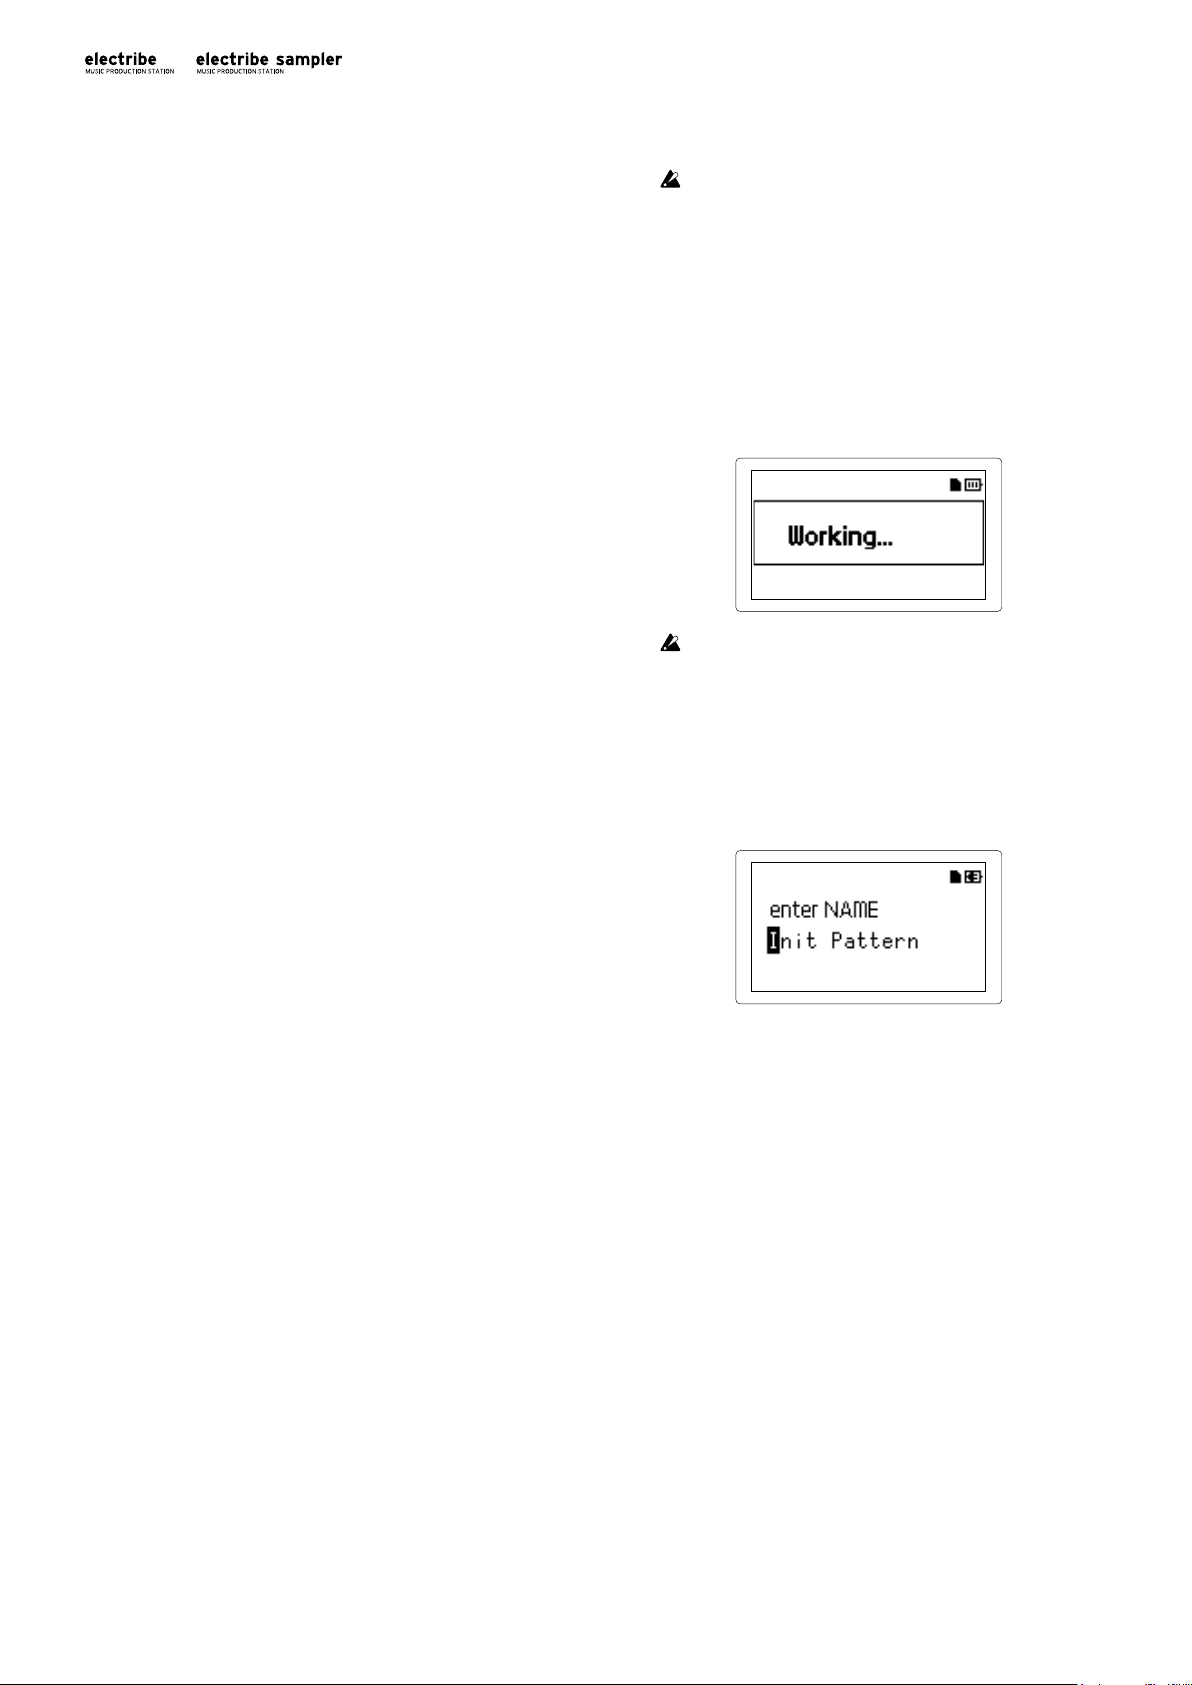
3. Aufzeichnen der Bewegungen von
Reglern und Tasten (Motion Sequence)
Sie können für jeden Part und Effekt die an Reglern und Tasten
vorgenommenen Änderungen aufzeichnen (Motion Sequence).
Was ist eine Motion Sequence?
Motion Sequence ist eine Funktion, die die durch Bedienung von
Reglern und Tasten erfolgten Änderungen eines Sounds aufzeichnet und somit jederzeit wiedergeben kann.
Die Bedienung folgender Regler und Tasten kann als Motion
Sequence aufgezeichnet und wiedergegeben werden.
• OSC Edit, Pitch
• Filter Cutoff, Resonance, EG Int
• Modulation Speed, Depth
• Amp/EG Level, Pan, Attack, Decay/Release
• IFX Edit, IFX ON, MFX Send
• Master Fx On, Master Fx X, Master Fx Y
Zusätzliche Aufzeichnung einer Motion Sequence
1. Wählen Sie einen Part aus, dem Sie eine Motion Sequence
hinzufügen möchten.
2. Rufen Sie im Editiermenü die Seite „MOTION SEQ“ auf, um
einen Part zur Bearbeitung auszuwählen und stellen Sie die
Motion Sequence auf „Smooth“ oder „Trigger Hold“.
Smooth: Geglättete Aufzeichnung der Reglerbewegung.
Trigger Hold: Speichern der Reglerinformation zum Zeit-
punkt des Klangereignisses.
3. Drücken Sie die Rec-Taste, damit diese leuchtet und drücken
Sie anschließend die Play/Pause-Taste.
4. Nun können Sie während der Wiedergabe eine Patterns den
Sound durch Bewegen der Regler ändern. Während eine
Motion Sequence aufgezeichnet wird, blinkt die Rec-Taste.
Sobald das Pattern nach Beginn der Aufnahme einmal durchgelaufen ist, stoppt die Motion Sequence-Funktion automatisch die Aufnahme und schaltet zur Wiedergabe der aufgezeichneten Motion Sequence um. Falls Sie die Aufnahme
fortsetzen wollen, müssen Sie die Rec-Taste erneut drücken.
Löschen einer Motion Sequence
Wählen Sie unter PART UTILITY im Editiermenü „CLEAR
MOTION“ aus und bestätigen Sie den Befehl.
Alleiniges Löschen einer Motion Sequence des Master Fx
Rufen Sie im Editiermenü „CLEAR MFX MOTION“ auf und
führen Sie den Befehl aus.
4. Pattern speichern
Sie sollten die erzeugten Patterndaten speichern (write).
Ansonsten gehen die erfolgten Änderungen am Pattern
verloren, sobald Sie ein anderes Pattern auswählen.. Wenn
Sie Ihre vorgenommenen Einstellungen beibehalten
möchten, sollten Sie diese speichern.
Pattern überschreiben
1. Drücken Sie die Write-Taste.
2. Wählen Sie den Speicherort mit dem Value-Regler aus.
3. Drücken Sie die Write-Taste.
Im Display erscheint „Working...“ und der Speichervorgang
beginnt. Während des Speichervorgangs leuchtet die WriteTaste - erlischt die Taste, ist der Speichervorgang beendet.
Schalten Sie das Gerät während des Speichern niemals
aus, sonst kann es zu Datenverlust und unerwarteten
Fehlfunktionen kommen. (Während Write-Taste leuchtet.)
Pattern unter einem anderen Namen speichern
(Pattern kopieren)
1. Halten Sie die Shift-Taste gedrückt und drücken Sie die
Write-Taste.
Im Display erscheint „enter Name.“
2. Ändern Sie den Namen des Patterns, das Sie speichern möchten.
Sie können den Cursor im Display mit der <- oder >-Taste nach
links und rechts bewegen, um den Buchstaben auswählen, den
Sie ändern möchten. Wählen Sie mit dem Value-Regler den
neuen Buchstaben aus und bestätigen Sie ihn mit der Menu/
Enter-Taste.
3. Wählen Sie mit dem Value-Regler eine Patternnummer zum
Speichern Ihrer Daten aus.
4. Drücken Sie nach erfolgter Namensänderung des Patterns die
Write-Taste.
Das Drücken der Write-Taste startet den Speichervorgang.
Während des Speichervorgangs leuchtet die Write-Taste - erlischt die Taste, ist der Speichervorgang beendet.
TIPP Mit der Exit-Taste können Sie den Speichervorgang
abbrechen.
TIPP Die Patternnummer, unter der das editierte Pattern
gespeichert wird, wird nach erfolgtem Speichervorgang
ausgewählt.
50
Page 51

Pattern bearbeiten
1. Einen Part stummschalten
1. Drücken Sie die Part Mute-Taste, damit diese leuchtet.
2. Drücken Sie das Triggerpad des Parts, den sie stummschalten
wollen.
3. Zum Deaktivieren der Stummschaltung drücken Sie das
entsprechende Triggerpad, das nun wieder leuchtet.
2. Einen Part löschen
1. Drücken Sie die Part Erase-Taste, damit diese leuchtet.
2. Drücken Sie während der Wiedergabe das Triggerpad des
Parts, den Sie löschen wollen.
Während Sie das Triggerpad gedrückt halten, werden die
Noteninformationen des ausgewählten Parts gelöscht.
TIPP Um sämtliche Sequenz-Informationen des ausgewählten
Parts zu löschen, wählen Sie unter PART UTILITY im
Editiermenü CLEAR SEQUENCE aus und bestätigen Sie
den Befehl.
TIPP Zum Löschen der Motion Sequence führen Sie den Befehl
„CLEAR MOTION“ im Editiermenü aus.
Weitere Einstellungen
Sie können sämtliche globalen Parameter wie die Einstellungen
des Metronoms einstellen sowie weitere Utility-Funktionen wie
beispielsweise die Formatierung einer Speicherkarte ausführen.
TIPP Weitere Hinweise finden Sie im Parameter-Leitfaden.
So rufen Sie die jeweiligen Einstellungsmenüs auf
1. Durch Drücken der Menu/Enter-Taste gelangen Sie von der
Patternauswahl-Anzeige ins Editiermenü.
2. Drücken Sie die < oder >-Taste, bis im Display „GLOBAL
PARAMETER“ erscheint. Nun können Sie mit der Menu/
Enter-Taste das Global-Menü aufrufen.
Erscheint im Display „DATA UTILITY“, gelangen Sie mit der
Menu/Enter-Taste ins Data Utility-Menü. Erscheint im Display
„PART UTILITY“, gelangen Sie mit der Menu/Enter-Taste ins
Part Utility-Menü.
3. Drücken Sie nach Vornehmen jeder Einstellung die WriteTaste, um die Einstellung zu speichern.
Schalten Sie das Gerät aus ohne zu speichern, gehen die
zuvor vorgenommenen Einstellungen verloren. Stellen Sie
deshalb sicher, Ihre geänderten Einstellungen zu speichern, wenn Sie diese behalten wollen.
3. Einen Part kopieren
1. Wählen Sie unter PART UTILITY im Editiermenü COPY PART
aus.
2. Wählen Sie das Pattern mit dem Part, den Sie kopieren möchten und drücken Sie die Menu/Enter-Taste.
3. Drücken Sie das Triggerpad des Parts, den Sie kopieren
möchten (Quelle).
4. Drücken Sie das Triggerpad des Parts, in dem die Kopie
abgelegt werden soll (Ziel).
4. Patterneinstellungen verändern.
Die folgende Liste zeigt die wichtigsten Einstellungen der Pattern
im Editiermenü an.
Hinweise zu jeder Einstellung finden Sie im Parameter-Leitfaden.
SWING: Erzeugt durch Timing-Verschiebungen ein Shuffle-Feeling.
BEAT: Wählt den Beat (Rhythmus) eines Patterns.
LENGTH: Ändert die Länge eines Patterns. Sie können es auf eine
Länge von 1 bis 4 einstellen.
PATTERN LEVEL: Ändert den Pegel des gesamten Patterns.
KEY: Wählt die Tonart einer Tonleiter aus.
SCALE: Wählt die Tonleiter zum Spielen auf dem Triggerpad
oder Touchpad bei aktivierter Keyboard Taste aus.
GROOVE TYPE und GROOVE DEPTH: Fügt einem Part eine
Begleitung typischer Musikinstrumente und/oder einen Groove im
Tempo seiner Sequenzdaten hinzu, um ein Songfeeling zu erzeugen.
CHAIN REPEAT, CHAIN TO: Nach der Wiedergabe des gewählten Patterns können Sie wählen, wie oft dasselbe Pattern wiedergegeben wird und das Pattern wählen, das als nächstes wiedergeben
wird. So werden mehrere Pattern hintereinander wie ein Song
wiedergegeben.
1. Metronom einstellen
Sie können die Parameter der Metronom-Funktion einstellen Das
Metronom ist vor allem dann hilfreich, wenn Sie mit der Echtzeitaufnahme-Funktion ein Pattern erzeugen wollen.
Das Metronom schlägt in Viertelnotenintervallen.
1. Rufen Sie im Global-Menü „METRONOME“ auf.
2. Ändern Sie die Einstellungen mit dem Value-Regler.
Ein aktiviertes Metronom (on) läuft sowohl bei der Aufnahme
als auch bei der Wiedergabe mit. In den Einstellungen „Rec 0,
Rec 1, Rec 2“ läuft das Metronom nur während der Aufnahme
mit. In der Einstellung Off ist das Metronom deaktiviert.
2. Batterietyp einstellen.
Zum Anpassen an den verwendeten Batterietyp.
1. Rufen Sie im Global-Menü „BATTERY TYPE“ auf.
2. Wählen Sie mit dem Value-Regler die passende Einstellung aus.
Wählen Sie Ni-MH für den Betrieb mit Nickel-MetallhydridAkkus. Wählen Sie Alkali für den Betrieb mit Alkalibatterien.
3. LCD-Kontrast einstellen
Sie können die Helligkeit des Displays einstellen.
1. Rufen Sie im Global-Menü „LCD CONTRAST“ auf.
2. Wählen Sie mit dem Value-Regler die passende Einstellung
aus.
4.
Verlängern der Batterielebensdauer
Sie können den Energiesparmodus auch deaktivieren. Im Batteriebetrieb fährt das Gerät in den Energiesparmodus und regelt die
Helligkeit von Display und LEDs herab.
1. Rufen Sie im Global-Menü „POWER SAVE MODE“ auf.
2. Wählen Sie mit dem Value-Regler die passende Einstellung
aus.
Auf „Disable“ ist der Energiesparmodus deaktiviert.
Auf „Enable“ ist der Energiesparmodus jederzeit aktiviert.
Auf „Auto“ ist der Energiesparmodus für den Batteriebetrieb
aktiviert und für den Betrieb mit dem AC-Netzteil deaktiviert.
Werksseitig ist „Auto“ eingestellt.
51
Page 52

5. Automatische Energiesparfunktion
Diese Anzeige erscheint bei Betrieb des
Die automatische Energiesparfunktion schaltet das Gerät automatisch aus, wenn über etwa 4 Stunden hinweg keine Benutzereingabe erfolgt. Sie können diese Funktion auch deaktivieren.
1. Rufen Sie im Global-Menü „AUTO POWER OFF“ auf.
2. Wählen Sie mit dem Value-Regler die passende Einstellung
aus.
Auf Off ist die Energiesparfunktion deaktiviert.
Auf „4 hours“ ist die Energiesparfunktion aktiviert. Werksseitig ist die Energiesparfunktion aktiviert.
6. Den globalen MIDI-Kanal einstellen
Den globalen MIDI-Kanal stellt man folgendermaßen ein.
1. Rufen Sie im Global-Menü „MIDI GLOBAL CH.“ auf.
2. Wählen Sie mit dem Value-Regler die passende Einstellung
aus.
7. Spielen bei Synchronisierung mit externem Gerät
Sie können dieses Gerät über MIDI- oder Sync-Signale synchronisieren.
1. Rufen Sie im Global-Menü CLOCK MODE auf.
2. Wählen Sie mit dem Value-Regler die als Master verwendeten
Signale aus.
Internal: Dieses Gerät dient als Master.
Auto: Ein externes Gerät dient als Master, sobald es an dieses
angeschlossen wird. Werksseitig eingestellt dient dieses Gerät
als Master.
Ext.USB, Ext.MIDI und Ext.Sync: Die Signale der an diese
Buchsen angeschlossenen Geräte dienen als Master.
8. Eine Speicherkarte verwenden
Sie können die Einstellungen sämtlicher Parameter auf einer
Speicherkarte speichern und bei Bedarf wieder in den internen
Speicher des Geräts laden.
Formatieren
Um Ihre Speicherkarte mit dem electribe/electribe sampler zu
verwenden, müssen Sie diese mit dem Gerät formatieren.
Beim Formatieren gehen alle Inhalte einer Speicherkarte
verloren.
Schalten Sie beim Formatieren das Gerät nie aus und
entnehmen Sie dabei nie die Speicherkarte.
1. Rufen Sie im Utility-Menü die Option „CARD FORMAT“ auf.
2. Drücken Sie die Menu/Enter-Taste. Nach erfolgter Formatie-
rung zeigt das Display „OK“ an.
und öffnen Sie den Ordner, indem Sie die Menu/Enter-Taste
drücken. Um den Ordner zu schließen, wählen Sie mit ValueRegler „Upper Folder“ aus und drücken Sie die Menu/EnterTaste, um in den übergeordneten Ordner zu gelangen.
3. Bestätigen Sie mit der Menu/Enter-Taste.
Eine WAV-Datei speichern
Sie können Pattern oder ein Pattern Set auf eine Speicherkarte
speichern.
Ein Pattern als WAV-Datei exportieren
1. Rufen Sie im Data Utility-Menü die Option „EXPORT AUDIO“ auf.
2. Wählen Sie das Format zum Speichern aus (nur WAV-Datei
oder Ableton Live Set).
3. Drücken Sie die Menu/Enter-Taste, um das aktuelle Pattern zu
exportieren.
Ein Pattern Set als WAV-Datei exportieren
1. Rufen Sie im Data Utility-Menü die Option „EXPORT P.SET
AUDIO“ auf.
2. Wählen Sie das Format zum Speichern aus (nur WAV-Datei
oder Ableton Live Set).
3. Wählen Sie unter den von 1 bis 64 gespeicherten Patternsets
dasjenige aus, das als Datei gespeichert werden soll.
TIPP Es kann eine Weile dauern, ein umfangreiches Patternset
als Datei zu speichern.
4. Durch Drücken der Menu/Enter-taste werden in einem Patternset aufgezeichnete Pattern ins WAV-Dateiformat exportiert.
9. Bedienung des Event-Recorders
Diese Funktion erlaubt Ihnen die Aufnahme während des Spielens. Hierbei werden sämtliche Pattern, Reglerbewegungen und
Betätigungen des Triggerpads Ihrer Darbietung aufgezeichnet.
Aufnahme
1. Rufen Sie im Editiermenü die Option „EVENT REC/PLAY“
auf und drücken Sie die Menu/Enter-Taste.
2. Durch erneutes Drücken der Menu/Enter-Taste schalten Sie
den Event Recoder auf Standby.
3. Drücken Sie die Play/Pause-Taste, um die Aufnahme zu
beginnen.
4. Drücken Sie mehrmals die Exit-Taste, um zur PatternauswahlAnzeige zurückzukehren und Pattern wiedergeben zu können.
Event-Recorders.
Speichern auf einer Speicherkarte
1. Rufen Sie im Editiermenü die Option „EXPORT PATTERN“
auf.
2. Drücken Sie die Menu/Enter-Taste.
Laden der auf einer Speicherkarte vorhandenen
Daten.
1. Rufen Sie im Editiermenü die Option „IMPORT PATTERN“
52
auf.
2. Wählen Sie die Daten der Pattern, die Sie laden möchten, mit
dem Value-Regler aus.
Wählen Sie mit dem Value-Regler eine Datei aus dem Ordner
Hierbei werden sämtliche Informationen wie die Bedienung
von Reglern oder des Triggerpads zum Ändern von Sounds,
Tempo usw. während der Wiedergabe des Patterns aufgezeichnet. Zudem können Sie auch mit unterschiedlichen Pattern
spielen.
5. Drücken Sie am Ende Ihrer Wiedergabe die Stop-Taste.
6. Der Name der gespeicherten Datei wird angezeigt.
Page 53

7. Beenden Sie die Aufnahme mit der Exit-Taste.
TIPP Ohne Speicherkarte können Sie den Event Recorder nicht
verwenden - in diesem Fall wird „No Card“ angezeigt.
TIPP Die mit dem Event Recorder aufgezeichneten Informatio-
nen beeinflussen nicht die in einem Pattern aufgezeichneten Daten. Der Event Recorder kann zudem keine Daten in
einem Pattern speichern.
Wiedergabe
1. Rufen Sie im Editiermenü die Option „Event Player“ auf und
drücken Sie die Menu/Enter-Taste.
2. Wählen Sie mit der <- oder >-Taste EVENT PLAYER und
drücken Sie die Menu/Enter-Taste.
3. Drücken Sie die Menu/Enter-Taste, um das aktuelle Pattern Set
zu exportieren.
4. Drücken Sie zur Wiedergabe der ausgewählten Datei die Play/
Pause-Taste.
5. Mit der Stop-Taste beenden Sie die Wiedergabe und kehren
zum Anfang der wiedergegebenen Datei zurück.
6. Beenden Sie den Event Player mit der Exit-Taste.
TIPP Diese Funktion steht während einer Event Recorder-Auf-
nahme nicht zur Verfügung.
TIPP Während der Wiedergabe sind andere Bedienschritte nicht
zulässig.
10. Nutzerdaten formatieren
Diese Formatierung löscht sämtliche von Ihnen erzeugte Pattern
und setzt das Gerät in den Lieferzustand zurück.
Um keine wichtigen Daten zu verlieren, sollten Sie diese vor der
Formatierung auf einem externen Datenträger als Backup speichern.
1. Rufen Sie im Data Utility-Menü die Option „Factory Reset“
auf.
2. Das Drücken der Edit-Taste startet die Formatierung.
Schalten Sie das Gerät während der Formatierung nicht
aus!
Features des electribe Samplers
Der electribe sampler ist mit einer Sampler-Funktion ausgestattet,
bietet Ihnen aber weiterhin dieselben analog-modeling Klanggeneratoren wie der electribe.
Zusätzlich können Sie bis zu 499 User-Samples verwenden – mit
einer Gesamtlänge von etwa 270 Sekunden für Mono-Samples.
Zahlreiche Samples von Drums, Drum- /Phraseloops und Percussion-Soundbits stehen als Presets zur Verfügung.
1. Neue Funktionen des electribe sampler
Der electribe sampler bietet Ihnen großartige neue Features, wobei
bestimmten Reglern geänderte Funktionen zukommen.
Sample-Funktion
Der electribe-sampler bietet zwei unterschiedliche Sample-Methoden:
• Sampeln externer Audioquellen über die Audio In-Buchse.
• Resampeln Ihrer gesamten Darbietung auf dem electribe
sampler.
Sample-Bearbeitung
Sie können Anfangs- und Endpunkt eines Samples bearbeiten
sowie Audiosamples in mehrere Stücke schneiden. Diese Funktionen stehen Ihnen auch zur Bearbeitung der Preset-Samples zur
Verfügung.
Wiedergabe von Stereo-Samples
Sie können Stereo-Samples – ob mit dem electribe sampler selbst
erzeugt oder von einer Speicherkarte geladen – einem Part zuweisen und mit Ihrer Darbietung wiedergeben.
2. Geänderte Funktionen bestimmter Regler
„Oscillator“ auf der Oberseite wird als „Sample“
angezeigt.
Der Oszillator in der Editiersektion wird an diesem Gerät als
„Sample“ angezeigt.
Samlple Edit-Regler (Editiersektion)
Falls Sie ein Sample als Oszillator gewählt haben, können Sie
hiermit den Anfangspunkt der Wiedergabe einstellen und die Wiedergaberichtung ändern.
Amp/EG Decay/Release-Regler
Falls Sie ein Sample als Oszillator gewählt haben, können Sie hiermit
die Gatezeit einstellen - Dazu muss Amp-EG ausgeschaltet sein.
Wenn dieser Regler auf den Wert 127 gedreht ist, wird das Sample
unabhängig von seiner Länge bis zu seinem Ende wiedergegeben.
TIPP Wenn Sie den LOOP START POINT (Sample-Seite 5/10)
angegeben oder unter OSC TYPE einen Oszillatortyp der
analogen oder Audio In-Kategorie gewählt haben, arbeitet
der Regler wie bei ausgeschalteter Amp EG
Filter LPF/HPF/BPF-Tasten
Sie können folgende Filter unabhängig voneinander aktivieren
oder deaktivieren.
• electribe LPF ON oder OFF
• electribe HPF ON oder OFF
• electribe BPF ON oder OFF
53
Page 54

Aufnahme und Bearbeitung von Samples
1. Sampeln:
Sampeln externer Audioquellen über die Audio In-Buchse.
Vorbereitung
• Schließen Sie den Ausgang der Audioquelle - ob Instrument
oder Audioplayer - an die Audio in-Buchse des electribe
sampler an. Sie können hierfür sowohl einen Stereo- als auch
einen Mono-Miniklinkenstecker verwenden.
• Stellen Sie die Einstellung Audio In thru auf On (Global Seite
14/17) und starten sie die Wiedergabe an Ihrem Audiogerät
oder spielen Sie Ihr Instrument.
• Regeln Sie den Ausgangspegel der Audioquelle (oder den
Eingangspegel des electribe sampler mit dem Input LevelRegler), bis die die Peakanzeige bei maximalen Ausgangspegeln (CLIP) nicht mehr aufleuchtet.
Sample-Modus wählen
1. Halten Sie die Shift-Taste gedrückt und drücken Sie die
Rec-Taste. Die Rec-Taste und die Play/Pause-Taste blinken.
Falls Sie vor Beginn des Sampelns abbrechen wollen, drücken
Sie die Exit-Taste.
2. Wählen Sie den Sample-Modus (im Display erscheint „Sampling Mode“).
Wählen Sie mit dem Value-Regler zwischen Stereo- „Stereo“
oder Mono-Samples „Mono.“
3. Drücken Sie die >-Taste, um die Samplequelle auszuwählen.
Wählen Sie mit dem Value-Regler „Audio In.“
4. Drücken Sie die >-Taste, um die verbleibende Samplezeit
angezeigt zu bekommen.
TIPP Die verbleibende Samplezeit gilt für Mono-Samples. Für
Stereo-Samples müssen Sie die im Display angezeigte
verbleibende Samplezeit halbieren.
Aufnahme des Samples:
1. Ist alles vorbereitet, drücken Sie die Play/Pause-Taste, um mit
der Aufnahme des Samples zu beginnen.
Die Rec-Taste und die Play/Pause-Taste leuchten.
2. Beenden Sie die Aufnahme des Samples mit der Stop-Taste.
Die Rec-Taste und die Play/Pause-Taste erlöschen.
TIPP Falls Sie die verbleibende Aufnahmezeit überschreiten,
endet die Sample-Aufnahme automatisch.
3. Nach dem Sampeln erscheint im Display „New Sample“ als
Bestätigung der Aufnahme des neuen Samples.
Drücken Sie die Play/Pause-Taste, um das neue Sample
anzuhören. Sie können das neue Sample durch Drücken der
Write-Taste als User-Sample speichern.
Falls Sie es nicht speichern wollen, drücken Sie die Exit-Taste.
Selbst wenn Sie das User-Sample mit der Write-Taste
speichern, wird es beim Ausschalten gelöscht. Falls Sie
User-Samples speichern wollen, müssen Sie dies über das
Utility-Menü DATA tun. Dort können Sie mit dem Befehl
EXPORT ALL SAMPLE oder EXPORT SAMPLE Sampledateien vor dem Ausschalten auf einer Speicherkarte
speichern.
TIPP Wenn sie vom Audioeingang sampeln, wird das Sample in
optimaler Lautstärke aufgenommen. Während der Wiedergabe ist die Lautstärke jedoch deutlich leiser als beim
Sampeln. Dies ist absichtlich so, um eventuelle Verzerrungen bei der Wiedergabe von Samples in Pattern zu minimieren. Indem Sie den Wiedergabepegel auf „+12 dB“
setzen, können Sie das Sample in etwa derselben Lautstärke wie bei der Aufnahme wiedergeben.
Sample einem Part zuweisen
Das aufgenommene Sample wird als User-Sample der OszillatorAuswahl hinzugefügt.
Wählen Sie erst einen Part und dann über die Bearbeitung SampleEinstellungen das gewünschte Sample aus.
TIPP Stereo-Samples werden in Stereo wiedergegeben, wenn sie
einem ungeradzahligen Part zugewiesen werden oder als
Mono-Mix, wenn Sie einem geradzahligen Part zugewiesen werden.
TIPP Wenn Sie ein Pattern mit einem Part erzeugt haben, dem
ein User-Sample zugewiesen ist, sollten Sie vor dem
Ausschalten mit EXPORT ALL SAMPLE alle Sampledaten
auf einer Speicherkarte speichern.
2. Resampeln
Aufnahme der Wiedergabe eines Parts oder Ihrer
Darbietung auf dem electribe sampler
Der electribe sampler kann seine Wiedergabe als neues Sample
aufnehmen – dies nennt man Resampeln.
Resample-Modus wählen
1. Wählen Sie das Pattern aus, das Sie resampeln wollen.
2. Halten Sie die Shift-Taste gedrückt und drücken Sie die
Rec-Taste. Die Rec-Taste leuchtet, die Play/Pause-Taste blinkt.
Falls Sie vor Beginn des Sampelns abbrechen wollen, drücken
Sie die Exit-Taste.
3. Wählen Sie den Sample-Modus (im Display erscheint „Sampling Mode“).
Wählen Sie mit dem Value-Regler zwischen Stereo- „Stereo“
oder Mono-Samples „Mono.“
4. Drücken Sie die >-Taste, um die Samplequelle auszuwählen.
Wählen Sie mit dem Value-Regler „Resampling.“
5. Drücken Sie die >-Taste, um die verbleibende Samplezeit
angezeigt zu bekommen.
Aufnahme des Resamples:
1. Hierfür gibt es zwei Möglichkeiten:
• Resampeln der Pattern-Wiedergabe. Drücken Sie die Play /
Pause-Taste, um die Aufnahme zu beginnen.
Die Rec-Taste und die Play/Pause-Taste leuchten.
• Resamplen des Sounds eines bestimmten Parts. Die Aufnahme
beginnt, sobald sie ein beliebiges Triggerpad oder Touchpad
antippen.
2. Beenden Sie die Aufnahme des Resamples mit der Stop-Taste.
Die Rec-Taste und die Play/Pause-Taste erlöschen.
TIPP Falls Sie die verbleibende Aufnahmezeit überschreiten,
endet die Resample-Aufnahme automatisch.
3. Nach dem Resampeln erscheint im Display „New Sample“ als
Bestätigung der Aufnahme des neuen Samples.
Drücken Sie die Play/Pause-Taste, um das neue Sample
anzuhören. Sie können das neue Sample durch Drücken der
Write-Taste als User-Sample speichern.
Falls Sie es nicht speichern wollen, drücken Sie die Exit-Taste.
TIPP Beim Resampeln wird die Wiedergabelautstärke des
Samples angehoben, um den Höreindruck bei der Wiedergabe möglichst unverändert zu halten. Da dadurch jedoch
die Aussteuerungsreserve verringert wird, können in
manchen Fällen Verzerrungen auftreten. Ist dies der Fall,
können Sie den Wiedergabepegel auf „Normal“ setzen.
Dadurch ist die die Wiedergabe leiser als während der
Aufnahme, die Aussteuerungsreserve jedoch wird beibehalten.
54
Page 55

Selbst wenn Sie das User-Sample mit der Write-Taste
speichern, wird es beim Ausschalten gelöscht. Falls Sie
User-Samples speichern wollen, müssen Sie dies über das
Utility-Menü DATA tun. Dort können Sie mit dem Befehl
EXPORT ALL SAMPLE oder EXPORT SAMPLE Sampledateien vor dem Ausschalten auf einer Speicherkarte
speichern.
3. Sample bearbeiten
Sie können ein erstelltes Sample mit den Reglern des electribe
sampler bearbeiten.
1. Drücken Sie die Menu/Enter-Taste in der Common-Sektion,
um die Editieranzeige aufzurufen.
2. Wählen Sie mit den < oder >-Tasten SAMPLE EDIT aus und
drücken Sie die Menu/Enter-Taste erneut.
3. Wählen Sie mit dem Value-Regler das zu bearbeitende Sample
aus (über die Sample-Nummer).
4. Wählen Sie mit den < oder >-Tasten unter folgenden Funktionen zur Sample-Bearbeitung.
Genauer Angaben zur jeweiligen Funktion finden Sie im
Parameter-Leitfaden.
• RENAME: Bearbeitet den Namen des Samples.
• START POINT: Bestimmt den Anfangspunkt der Wiedergabe.
• END POINT: Bestimmt den Endpunkt der Wiedergabe.
• LOOP START POINT: Bestimmt den Anfangspunkt des
Loops. Die Samplewiedergabe wird von dem hiermit angegebenen Punkt bis zum END POINT geloopt.
• SAMPLE TUNE: Regelt die Tonhöhe des Samples.
• TIME SLICE: Teilt ein Sample durch Taktschläge.
• CLEAR SLICE: Löscht das Ergebnis von TIME SLICE (Sample-Teil-Funktion).
• PLAY LEVEL: Ändert den Wiedergabepegel des Samples. Bei
einem Resample beträgt dieser Pegel automatisch „+12dB“,
damit es in der Lautstärke wiedergegeben wird, in der es
aufgenommen wurde.
• DELETE SAMPLE: Löscht ein Sample.
TIPP Um die verbleibende Samplezeit zu erhöhen, können Sie
durch Löschen unerwünschter Preset-Samples mehr
Speicherplatz freigeben. Führen Sie hierbei EXPORT ALL
SAMPLE aus und laden Sie anschließend diese Daten
beim Neustart. Danach können Sie die Nummern der
gelöschten Preset-Samples jedoch nicht mehr mit dem
Sample-Regler auswählen.
TIPP Sie können das Sample probehören, indem Sie ein Trigger-
pad oder das der Touch-Scale-Funktion zugewiesene
Touchpad antippen.
TIPP Bei der Bearbeitung eines Samples sind die Sektionen
Filter, Modulation Amp/EG und Insert FX unwirksam.
TIPP Bei der Bearbeitung eines Samples ist Voice Assign auf
Mono 2 eingestellt.
5. Sind Sie mit der Bearbeitung fertig, drücken Sie die WriteTaste, um Ihre Änderungen zu speichern.
Selbst wenn Sie das bearbeitete Sample mit der Write-
Taste speichern, wird es mit den anderen User-Samples
beim Ausschalten gelöscht. Falls Sie User-Samples speichern wollen, müssen Sie dies über das Utility-Menü
DATA tun. Dort können Sie mit dem Befehl EXPORT ALL
SAMPLE oder EXPORT SAMPLE Sampledateien vor dem
Ausschalten auf einer Speicherkarte speichern.
4. Samples importieren/exportieren
Sie können WAV-Dateien von einer Speicherkarte als Samples in
den electribe sampler importieren. Sie können zudem Ihre Samples auf eine Speicherkarte speichern. Wählen Sie im Utility-Menü
DATA den gewünschten Befehl und führen Sie ihn aus.
• Import SAMPLE: Lädt ein Sample von der Speicherkarte.
• Export SAMPLE: Speichert ein Sample auf der Speicherkarte.
• Export ALL SAMPLE: Speichert alle im electribe sampler
gespeicherten Samples auf der Speicherkarte als „all sample
data“. Die auf der Speicherkarte gespeicherten „all sample
data“ werden automatisch beim nächsten Einschalten des
electribe samplers geladen, so dass Sie da weitermachen
können, wo Sie beim letzten Ausschalten aufgehört haben.
“All sample data” auf der Speicherkarte wird beim Hoch-
fahren automatisch geladen. Hierbei werden alle im
electribe sampler gespeicherten Samples überschrieben.
Achten Sie also darauf, keine Samples unbeabsichtigt zu
löschen, zum Beispiel weil mittlerweile eine andere
Speicherkarte eingesetzt wurde.
• Export ALL PATTERN: Speichert alle Pattern auf der Speicherkarte.
• Import ALL PATTERN: Lädt alle durch die Funktion EXPORT
ALL PATTERN auf der Speicherkarte gespeicherten Pattern.
Hierbei werden alle Pattern überschrieben.
55
Page 56

Anhang
2. Fehlermeldungen
Mit der Exit-Taste schließen Sie das Fenster mit der Meldung.
1. Fehlersuche und -Beseitigung
Das Display schaltet sich nicht an.
□ HabenSiedasNetzgerätrichtigangeschlossen?
□ SitztderSteckerdesNetzgerätsfestinderSteckdose?
□ IstdieBatterienochstarkgenug?
Es ist nichts zu hören!
□ HabenSieVerstärker,MischpultoderKopfhörerordentlich
angeschlossen?
□ HabenSieIhrenVerstärkeroderIhrMischpulteingeschaltet
unddarandierichtigenEinstellungenvorgenommen?
□ HabenSiedenLautstärkereglerdeselectribe/electribesampler
genügendweitaufgedreht?
Die Wiedergabe hört nicht auf!
□ DieWiedergabeeinesPatternswirdständigwiederholt.
Drücken Sie zum Beenden der Wiedergabe die Stop-Taste.
Die während der Bearbeitung eingestellten Sounds
sowie Motion Sequence-Aktionen haben sich geändert!
□ HabenSienachdemBearbeitenauchallesrichtiggespeichert?
→ Nach dem Editieren müssen Sie die Daten speichern, bevor Sie
ein anderes Pattern aufrufen oder bevor Sie das Gerät ausschalten.
Card Error
Speicherkarte ist beschädigt.
→ Machen Sie ein Backup sämtlicher auf der Speicherkarte
vorhandenen Dateien.
→ Speichern Sie das Backup sämtlicher auf der Speicherkarte
vorhandener Daten beispielsweise auf einem Computer und
formatieren Sie die Speicherkarte mit Ihrem electribe/electribe
sampler. Nach der Formatierung können Sie Ihre Daten auf
die Speicherkarte zurück kopieren.
Protected
Erscheint, wenn Sie auf einer Speicherkarte speichern wollen,
deren Schreibschutz aktiviert ist.
→ Legen Sie gegebenenfalls den Lock-Schalter an der Seite Ihrer
Speicherkarte um.
Card Full
Der verfügbare Speicherplatz Ihrer Speicherkarte reicht nicht aus.
→ Schaffen Sie durch Löschen nicht mehr benötigter Dateien
ausreichend Speicherplatz auf Ihrer Speicherkarte und
speichern Sie die Daten erneut.
Event Over
Die Anzahl der Ereignisse übersteigt die maximal mögliche
Anzahl der Ereignisse, die aufgenommen werden können.
File Error
Datei kann nicht korrekt gelesen/gespeichert werden.
Ich kann nicht über MIDI steuern!
□ IstdasMIDI-Kabelkorrektangeschlossen?
Falls Sie den electribe/electribe sampler über ein externes
Gerät steuern:
□ HabenSieimGlobal-MenüdenrichtigenMIDI-Kanalaus-
gewählt?(→ S.52)
Falls Sie mit dem electribe/electribe sampler ein externes
Gerät steuern:
□ HabenSieamexternenGerätundamelectribe/electribe
samplerdenselbenMIDI-Kanaleingestellt?
Beim Spielen auf dem Triggerpad ist nichts zu hören.
□ HabenSiedenPartnachdemBearbeitengespeichert?(→
S.50)
□ HabenSiedieKeyboard-Tasteaktiviert?
□ HabenSieMotionSequencedeaktiviert?(→ S.50)
Offenbar funktioniert meine Speicherkarte nicht.
□ HabenSiedieSpeicherkarteinIhremelectribe/electribe
samplerformatiert?
→ Speicherkarten, die zuvor mit einem Computer oder einer
Digitalkamera formatiert wurden, müssen vor der Verwendung mit diesem Gerät neu formatiert werden.. (→ S.52)
□ HabenSiedieSpeicherkarterichtigeingesetzt?
→ Entnehmen Sie die Speicherkarte und setzen Sie sie erneut ein.
(→ S.45)
□ WirddieKartengrößevondiesemGerätunterstützt?
→ Dieses Gerät unterstützt SD-Karten von 512MB bis 2GB sowie
SDH- Karten von maximal 32GB.
Memory Full
Der interne Speicherplatz des Geräts reicht nicht aus, um Daten
von einer Speicherkarte zu laden.
→ Schaffen Sie durch Löschen nicht benötigter Daten aus-
reichend Speicherplatz.
Motion Seq Full
Eine Motion Sequence kann nicht aufgezeichnet werden.
→ Der electribe/electribe sampler unterstützt bis zu 24 Motion
Sequence Pattern. Löschen Sie nicht mehr benötigte Motion
Sequences und wiederholen Sie die Aufzeichnung.
56
Page 57

Technische Daten
Maximale Anzahl von Sounds (komplette Pattern):
Max. 24 Stimmen (Die Anzahl der simultanen Sounds eines Patterns hängt vom
Oszillator- und Filtertyp sowie vom
gewählten Insert Fx ab).
Maximale Anzahl von Sounds (pro Part):
Max. 4 Stimmen
Anschlüsse: Audio Out L-Buchse (mono, 6,35 mm
Klinke), Audio Out R-Buchse (mono, 6,35
mm Klinke), Audio In-Buchse (stereo, 3,5
mm Miniklinke), Kopfhörerbuchse (stereo,
3,5 mm Miniklinke), Sync In-Buchse,
Sync-Out Buchse, MIDI OUT-Buchse,
MIDI IN-Buchse, USB-Anschluss (MicroUSB Typ B)
Stromversorgung: AC Netzteil (DC 9V ), Sechs
AA-Batterien (Alkali-Batterien oder
Nickel-Metallhydrid-Akkus)
Batterielebensdauer: Ungefähr fünf Stunden (Energiesparfunk-
tion aktiviert, mit Nickel-Metallhydrid-
Akkus)
Stromverbrauch: 500 mA oder weniger
Abmessungen (B x T x H)
Gewicht: 1,6 kg
Betriebstemperatur: 0–+40° C (ohne Kondenswasserbildung)
Lieferumfang: Bedienungsanleitung, Netzteil, MIDI-
* Änderungen der technischen Daten und des Designs ohne vorherige Ankündi-
gung vorbehalten.
: 339 x 189 x 45 mm
Adapterkabel x 2
57
Page 58

Precauciones
Ubicación
El uso de la unidad en las siguientes ubicaciones puede dar como
resultado un mal funcionamiento:
• Expuesto a la luz directa del sol
• Zonas de extremada temperatura o humedad
• Zonas con exceso de suciedad o polvo
• Zonas con excesiva vibración
• Cercano a campos magnéticos
Fuente de alimentación
Por favor, conecte el adaptador de corriente designado a una toma
de corriente con el voltaje adecuado. No lo conecte a una toma de
corriente con voltaje diferente al indicado.
Interferencias con otros aparatos
Las radios y televisores situados cerca pueden experimentar interferencias
en la recepción. Opere este dispositivo a una distancia prudencial de radios
y televisores.
Manejo
Para evitar una rotura, no aplique excesiva fuerza a los conmutadores o
controles.
Cuidado
Si exterior se ensucia, límpiese con un trapo seco. No use líquidos
limpiadores como disolvente, ni compuestos inflamables.
Guarde este manual
Después de leer este manual, guárdelo para futuras consultas.
Nota respecto a residuos y deshechos (solo UE)
Cuando aparezca el símbolo del cubo de basura tachado
sobre un producto, su manual de usuario, la batería, o el
embalaje de cualquiera de éstos, significa que cuando
quiere tire dichos artículos a la basura, ha de hacerlo en
acuerdo con la normativa vigente de la Unión Europea. No
debe verter dichos artículos junto con la basura de casa.
Verter este producto de manera adecuada ayudará a evitar daños a su salud pública y posibles daños al medioambiente.
Cada país tiene una normativa específica acerca de cómo verter
productos potencialmente tóxicos, por tanto le rogamos que se
ponga en contacto con su oficina o ministerio de medioambiente
para más detalles. Si la batería contiene metales pesados por
encima del límite permitido, habrá un símbolo de un material químico, debajo del símbolo del cubo de basura tachado.
NOTA IMPORTANTE PARA EL CONSUMIDOR
Este producto ha sido fabricado de acuerdo a estrictas especificaciones y requerimientos de voltaje aplicables en el país para el
cual está destinado. Si ha comprado este producto por internet, a
través de correo, y/o venta telefónica, debe usted verificar que el
uso de este producto está destinado al país en el cual reside.
AVISO: El uso de este producto en un país distinto al cual está
destinado podría resultar peligroso y podría invalidar la garantía
del fabricante o distribuidor.
Por favor guarde su recibo como prueba de compra ya que de
otro modo el producto puede verse privado de la garantía del fabricante o distribuidor.
Mantenga los elementos externos alejados del equipo
Nunca coloque ningún recipiente con líquido cerca de este equipo,
podría causar un cortocircuito, fuero o descarga eléctrica. Cuide de
que no caiga ningún objeto metálico dentro del equipo.
Gestión de datos
Un uso incorrecto o un funcionamiento anómalo pueden provocar
una pérdida del contenido de la memoria. Utilice el Editor incluido
para realizar copias de los datos importantes en el ordenador u otro
soporte. Tenga en cuenta que Korg no acepta ningún tipo de responsabilidad por cualquier daño que pueda producirse por la pérdida de datos.
Avisos de copyright
Este dispositivo profesional sólo puede utilizarse con las obras de
las que usted mismo posee el copyright, con las que dispone del
permiso del titular del copyright para interpretar, grabar, emitir, vender y duplicar públicamente, o las relacionadas con las actividades
que constituyen un “uso justo” según la ley de derechos de autor. Si
usted no es el titular del copyright, o no ha recibido el permiso del
titular del copyright o no ha realizado un uso justo de las obras,
puede incurrir en una violación de la ley de derechos de autor, ser
responsable de daños y recibir posibles sanciones. Si tiene dudas
acerca de sus derechos respecto a alguna obra, consulte con un
abogado especializado en derechos de autor.
KORG NO ASUME NINGUNA RESPONSABILIDAD POR CUALQUIER INFRACCIÓN COMETIDA MEDIANTE EL USO DE PRODUCTOS KORG.
* Todos los nombres de productos y compañías son marcas comerciales o marcas
registradas de sus respectivos propietarios.Instalar la baterí.
58
Page 59

Table of Contens
Introducción ................................ 60
1. Denominación de las secciones ....................................................... 60
2. Conexión ......................................................................................... 63
3. Conexión de la alimentación ........................................................... 63
4. Inserción y extracción de una tarjeta de memoria ........................... 64
Fabricación de sonidos ................. 65
1. Para conectar/desconectar la alimentación..................................... 65
2. Operación básica ............................................................................. 65
3. Para reproducir un patrón ............................................................... 65
4. Selección de una parte .................................................................... 65
Toque de música .......................... 66
1. Toque de música con los pads de disparo ........................................ 66
2. Toque de música con el panel táctil ................................................. 66
3. Utilización del arpegiador de compuerta ........................................ 67
4. Utilización de efectos principales .................................................... 67
5. Toque con un juego de patrones ...................................................... 67
6. Establecimiento de BPM (pulsaciones por minuto) (tempo) ........... 67
7. Adición de variación al sonido mediante un mando ........................ 68
Grabación de interpretaciones ...... 68
1. Grabación en tiempo real ................................................................ 68
2. Edición de pasos .............................................................................. 68
3. Grabación de los movimientos de mandos y botones (secuencia de
movimientos) ..................................................................................... 68
4. Almacenamiento de un patrón........................................................ 69
Otros ajustes ............................... 70
1. Configuración del metrónomo ........................................................ 70
2. Configuración del tipo de pilas/baterías ..........................................70
3. Ajuste del contraste del LCD ............................................................ 70
4. Prolongación de la duración útil de las pilas/baterías ..................... 70
5. Configuración del apagado automático ...........................................70
6. Configuración del canal global MIDI ................................................ 70
7. Reproducción mediante sincronización con dispositivo externo ...... 70
8. Utilización de una tarjeta de memoria ............................................ 70
9. Uso del grabador de eventos ........................................................... 71
10. Formateo de datos de usuario ....................................................... 71
Características del electribe sampler .
............................................... 72
1.
Nuevas funciones del electribe sampler .......................................................72
2. Cambios en funciones de controlador específicas ............................ 72
Grabación y edición de muestras ... 72
1. Muestreo: ....................................................................................... 72
2. Nuevo muestreo .............................................................................. 73
3. Edición de una muestra ................................................................... 73
4. Importación/exportación de muestras ............................................ 74
Apéndice ..................................... 74
1. Solución de problemas .................................................................... 74
2. Mensajes de error ............................................................................ 75
Edición de un patrón .................... 69
1. Silenciamiento de una parte ........................................................... 69
2. Borrado de una parte ...................................................................... 69
3. Copia de una parte .......................................................................... 69
4. Cambio del ajuste de patrón ........................................................... 69
Especificaciones ........................... 75
59
Page 60

Introducción
Gracias por adquirir la estación de producción de música electribe/
electribe sampler de Korg.
Para sacar todo el provecho de su nuevo instrumento, lea detenidamente este manual de instrucciones y utilice el producto de
acuerdo con las indicaciones. También deberá conservar el manual
de instrucciones para referencia futura.
1. Denominación de las secciones
Panel superior
1
2 3
4
7
El electribe/electribe sampler es una estación de producción de
música de baile que es capaz de crear música original. El uso de
los mandos y el panel táctil de la unidad principal permite editar
sonidos para crear fácilmente los patrones rítmicos y de frases con
una sola unidad.
El funcionamiento básico del electribe sampler es el mismo que el
del electribe.
Para ver más descripciones referidas al electribe sampler, consulte
“Características del electribe sampler” (→p. 72) y “Grabación y
edición de muestras” (→p. 72).
SUGERENCIA Las ilustraciones de este manual muestran el
electribe.
8
5
6
10
1. Botón de la alimentación
Este botón conecta o desconecta la alimentación.
2. Mando Volume (Volumen)
Este mando ajuste el volumen de salida del jack de salida de
línea o del jack para auriculares.
3. Mando Input Level (Nivel de entrada)
Este mando ajuste el nivel de entrada del jack de entrada de
audio.
4. Visualizador
Muestra información para ajustes de patrones, partes, y
parámetros.
5. Sección de transporte
Botón
Botón
(Grabación)
Este botón permite la grabación de ritmos, frases, o movimientos de mandos Al pulsar este botón durante la grabación se
detendrá el proceso de grabación y la reproducción continuará.
(Parada)
Este botón detiene la reproducción.
9
11
12
13
Botón (Reproducción/Pausa)
Este botón inicia la reproducción de un patrón o hace una
pausa en ella.
Botón Tap (Punteo)
Al pulsar el botón Tap con el tempo aproximado que desee, se
establecerá el valor de BPM (pulsaciones por minuto) con el
intervalo que lo golpee.
6. Sección del panel táctil
Panel táctil
Este panel se utiliza para tocar con la funcionalidad del
arpegiador de com puerta o escala de toque, o para controlar
el efecto principal.
Botón Gate Arp (Arpegiador de compuerta)
Este botón activa el arpegiador de compuerta.
Botón Touch Scale (Escala de toque)
Este botón activa la función de escala de toque.
Botón Master Fx (Efecto principal)
Este botón activa o desactiva la función de control del efecto
principal.
60
Page 61

Botón MFX Hold (Retención)
Este botón le permite mantener el estado del efecto principal
ajustado previamente utilizando el panel táctil incluso después
de retirar los dedos del panel, al activar el botón Master FX.
SUGERENCIA El estado de activación/desactivación del botón
MFX Hold puede memorizarse en un patrón.
7. Sección común
Mando Value (Valor)
Este mando cambia el valor del parámetro que está mostrándose actualmente en el visualizador.
Botones <, > (cursor)
Estos botones se utilizan para seleccionar el parámetro que se
desea editar.
Botón Menu/Enter (Introducir)
Este botón se utiliza para seleccionar parámetros tales como
patrón, parte, global, o utilidad, o también se puede usar para
confirmar los cambios en los ajustes de parámetros.
Botón Exit (Salir)
Pulsando este botón un par de veces podrá volver de la
pantalla de edición a la pantalla de selección de parámetros.
Botón Shift (Cambio)
Este botón ejecuta diversas funciones cuando se pulsa junto
con otro botón o un mando.
Botón Shift + < (cursor): Permite cancelar la operación más
reciente (función de deshacer)
Botón Shift + Botón Write: Permiten asignar nombres a los
patrones y guardarlos.
Botón Shift + Botón Value: Permiten realizar cambios de valor
grandes o pequeños
SUGERENCIA Los cambios de valor grandes o pequeños dependen
del parámetro seleccionado.
Botón Write (Escribir)
Este botón se utiliza para almacenar datos de patrones y
globales en el electribe/electribe sampler. Los datos se almacenarán cuando pulse el botón Write en la página de parámetros
globales. Los datos de patrones también se almacenarán en
otras páginas.
8. Sección de edición
Aquí es donde se pueden editar parámetros para cada parte.
Oscillator (Oscilador) (electribe sampler: Sample)
Aquí es donde se puede seleccionar o ajustar el
tono del sonido de las formas de onda, tales como
diente de sierra, cuadrada, ruido, o PCM.
Mando Oscillator (Oscilador) (electribe sampler:
Mando Sample)
Este mando selecciona la forma de onda.
Mando Pitch/Glide (Tonalidad/Ligadura)
Este mando permite ajustar la tonalidad (tono del
sonido). Girando el mando mientras se mantenga
pulsado el botón Shift, se podrá ajustar la transición para
cambiar uniformemente la tonalidad entre dos tonos (Ligadura) para sonidos de sintetizador.
Mando Edit (Editar)
Este mando permite ajustar el estilo del sonido. El efecto
variará dependiendo del tipo de forma de onda que esté
utilizándose.
Filter (Filtro)
El filtro se utiliza para ajustar el tono
del sonido (color del sonido) mediante
la eliminación o la mejora de componentes de frecuencia del oscilador.
Mando Filter (Filtro)
Este mando permite ajustar la frecuencia de corte.
Mando Resonance (Resonancia)
Este mando permite ajustar la resonancia del filtro.
Mando EG Int (Intensidad del generador de envolvente)
Este mando permite ajustar el volumen del cambio temporal
de la frecuencia de corte para el filtro mediante el generador
de envolvente (EG) que se establece en la sección Amp/EG.
Botón LPF (Filtro de paso bajo)
Este botón activa el filtro de paso bajo.
Al pulsar este botón varias veces se puede cambiar el tipo de
filtro.
Botón HPF (Filtro de paso alto)
Este botón activa el filtro de paso alto.
Al pulsar este botón varias veces se puede cambiar el tipo de
filtro.
Botón BPF (Filtro de paso de banda)
Este botón activa el filtro de paso de banda.
Al pulsar este botón varias veces se puede cambiar el tipo de
filtro.
Modulation (Modulación)
Se utiliza para realizar un cambio temporal en el
tono del sonido mediante el oscilador de baja
frecuencia (LFO) o el generador de envolvente
(EG).
Mando Modulation (Modulación)
Este mando permite ajustar el tipo de modulación.
Mando Depth (Profundidad)
Este mando permite ajustar la intensidad del
efecto de la modulación.
Mando Speed (Velocidad)
Este mando permite ajustar la velocidad de la modulación.
Amp/EG (Amplificador/Generador de envolvente)
Permite configurar el amplificador que
ajusta el volumen y la ubicación del
sonido, y el generador de envolvente (EG)
y el envío al efecto principal que aplican
cambio temporal.
Mando Level (Nivel)
Este mando permite ajustar el volumen de
una parte.
Mando Pan (Panoramización)
Este mando permite ajustar la ubicación de
una parte.
Mando Attack (Ataque)
61
Page 62

Este mando permite ajustar la velocidad de ataque de un
sonido.
Mando Decay/Release (Extinción/Liberación)
Este mando permite ajustar el tiempo que tardará en extinguirse un sonido.
Botón MFX Send (Envío de efecto principal)
Este botón permite seleccionar si la salida de una parte se
transmite al efecto principal o no. Cada vez que se pulsa el
botón, se cambia entre activación (iluminado) y desactivación
(apagado).
Botón Amp EG (Generador de envolvente del amplificador)
Este botón permite activar el generador de envolvente del
amplificador. Cada vez que se pulsa el botón, se cambia entre
activación (iluminado) y desactivación (apagado). Cuando esté
activado, el volumen del sonido cambia de acuerdo con la
envolvente que se haya seleccionado ajustando los mandos
Attack y Decay/Release. Cuando está desactivado, el ajuste no
sigue la envolvente (envolvente de órgano fija).
Insert Fx (Insertar efecto)
La sección Insert Fx se utiliza para agregar varios
efectos de sonido, tales como la distorsión o aumento al sonido.
Mando Insert Fx (Insertar efecto)
Este mando se utiliza para seleccionar el tipo de
efecto que desea insertarse.
Mando Edit (Editar)
Este mando permite ajustar la intensidad del efecto
insertado. El efecto variará dependiendo del tipo de
efecto que se haya seleccionado.
Botón IFX On (Activación de inserción de efecto)
Este botón permite seleccionar si desea activar la inserción de
efecto o no. Cada vez que se pulsa el botón, se cambia entre
activación (iluminado) y desactivación (apagado).
9. Botones de paso
Estos botones permiten mostrar la ubicación de una secuencia
u octava junto con la función actual del pad de disparo.
Pulsando estos botones se podrá cambiar la ubicación u octava
de la secuencia que esté editándose.
10. Sección de edición de partes
Botones <Part, Part> (Parte anterior, Parte siguiente)
Este botón permite seleccionar la parte que desee utilizarse. El
visualizador muestra la parte actualmente seleccionada.
Botón Part Mute (Silenciar parte)
Al golpear un pad de disparo mientras el botón esté activado
(iluminado), se silenciará la parte correspondiente. En este
momento se desactivará (apagado) el pad de disparo y también el botón Part Mute. Al golpear el pad de disparo de la
parte seleccionada que esté apagada, se desactivará la función
de silenciamiento (iluminado).
Botón Part Erase (Borrar parte)
Al mantener pulsado el pad de disparo después de pulsar el
botón Part Erase durante la reproducción, puede eliminar el
sonido de la parte seleccionada.
11. Sección de modo de pads
Aquí es donde se puede seleccionar la función de los pads de
disparo.
Botón Trigger (Disparo)
Al golpear un pad de disparo mientras el botón esté activado
(iluminado), se reproducirá la parte correspondiente. Se puede
configurar cómo se reproducirá mediante la edición del
parámetro TRIGGER MODE (modo de disparo).
Botón Sequencer (Secuenciador)
El pad de disparo se utiliza en el modo de entrada de paso
mientras este botón esté activado (iluminado).
Botón Keyboard (Teclado)
El pad de disparo puede utilizarse como teclado mientras este
botón esté activado (iluminado). Es posible establecer la clave
o la escala por patrón.
Botón Chord (Acorde)
El pad de disparo puede utilizarse como pad de acorde
mientras este botón esté activado (iluminado). Es posible
establecer la variación o la clave o la escala del acorde por
patrón.
Botón Step Jump (Saltar a paso)
Pulsando cualquiera de los botones que van desde el paso 1 al
16 durante la reproducción del secuenciador mientras este
botón esté activado (iluminado) se podrá saltar instantáneamente a tal paso. Al pulsar múltiples botones se reproducirán
secuencialmente los pasos correspondientes.
Botón Pattern Set (Patrón establecido)
Al golpear un pad de disparo mientras este botón esté activado (iluminado) el patrón cambiará al registrado en dicho pad
de disparo. Al golpear un pad de disparo manteniendo
pulsado este botón se podrá asignar el patrón actualmente
seleccionado a tal pad de disparo.
12. Pads de disparo
Los pads de disparo se utilizan para tocar de acuerdo con la
configuración de la sección de modo de pads.
13. LED
El LED de la parte posterior de la unidad se iluminará de
acuerdo con el patrón que esté reproduciéndose.
62
Page 63

2. Conexión
1 2 3 4 5 6 7
98
Mezclador,
monitor activo
Reproductor de
CD, reproductor
de MP3
1 2 3 4 5 6 7 8 9 10 11 12 13 14 15 16
Cable de
conversión
MIDI incluido
MIDI IN MIDI OUT
Adaptador de
CA incluido
Auriculares
Todos los dispositivos deberán conectarse con la alimenta-
ción desconectada. El incumplimiento de esta precaución
puede causar averías o daños en su sistema de altavoces.
SUGERENCIA Cuando conecte por primera vez la unidad a su
ordenador Windows, se instalará automáticamente el controlador incluido el sistema operativo.
El controlador USB-MIDI estándar incluido en el sistema
operativo Windows no permitirá utilizar el electribe/
electribe sampler con dos o más aplicaciones a la vez. Para
poder utilizar el electribe/electribe sampler con dos o más
aplicaciones a la vez, tendrá que instalar el controlador
KORG USB-MIDI. Descargue el controlador KORG
USB-MIDI de la página web de Korg e instálelo siguiendo
las instrucciones del documento suministrado.
1. Jacks Audio Out L/R (Salida de audio izquierda/derecha)
La salida de audio del electribe/electribe sampler se envía a
través de estas jacks. La conexión de un cable al jack Audio
Out L (izquierda) solamente sin conectar un cable al jack
Audio Out R (derecha) hará que el sonido de salida estéreo se
mezcle en forma monoaural.
SUGERENCIA Aunque la señal de salida se envíe en forma monoaural, el jack admite conexiones de cables de 1/4” tanto
monoaurales como estéreo.
2. Jack Audio In (Entrada de audio)
Esta jack es para conectar la salida de audio de otras fuentes
de audio al electribe/electribe sampler.
SUGERENCIA Los sonidos de entrada se pueden mezclar activando
la función AUDIO IN THRU en el menú global.
3. Jack Sync Out (Salida de sincronización)
Este jack emite un pulso de 5 V cada 15 ms, para cada corchea
o semicorchea.
Esta jack se utiliza para realizar la sincronización de productos
de la serie volca de KORG u otros secuenciadores analógicos
con este sistema.
SUGERENCIA La polaridad y el ciclo del pulso se establecen en el
menú global.
4. Jack Sync In (Entrada de sincronización)
Cuando establezca “Auto” o “Ext. Sync” en el modo de reloj en
el menú global y conecte una salida de pulso desde la salida
de sincronización o la salida de audio de un dispositivo
analógico, el reloj de paso interno se desactivará con el fin de
avanzar el paso de acuerdo con el pulso de entrada.
SUGERENCIA Los ajustes para habilitar/deshabilitar SYNC IN, así
como para el ciclo y la polaridad del pulso detectado se
encuentran en el menú global. Con respecto a detalles adicionales sobre este procedimiento, consulte la Guía de parámetros.
5. Jack MIDI IN/OUT (Entrada(salida MIDI)
Puede conectar el sistema a un dispositivo MIDI utilizando el
cable de conversión incluido.
6. Jack para auriculares
Esta jack es para conectar unos auriculares.
7. Jack DC 9V (9 V CC)
Esta jack es para conectar el adaptador de CA incluido.
8. Jack USB
Esta jack es para conectar el electribe/electribe sampler a un
ordenador.
9. Ranura para tarjeta de memoria
Esta ranura es para insertar una tarjeta de memoria. Puede
utilizar una tarjeta de memoria para almacenar (escribir) o
cargar (leer) la reproducción o datos. (→p.64)
3. Conexión de la alimentación
Utilización de pilas/baterías
Abra la cubierta de la caja de pilas/baterías situada en la parte
posterior de la unidad para insertar seis pilas/baterías AA, prestando especial atención a la observación de la orientación correcta
polaridad de las pilas/baterías.
Pilas/baterías compatibles
Para utilizar en este producto se autorizan pilas alcalinas o
baterías de hidruro metálico de níquel
SUGERENCIA Puede seleccionar el tipo de pila/batería en uso
refiriéndose a la página “BATTERY TYPE” en el menú
63
Page 64

global para que el electribe/electribe sampler detecte y muestre
con precisión la cantidad de carga restante.
Indicación de carga restante de las pilas/baterías
El visualizador muestra el indicador de pilas/baterías “ ”
(icon) que señala carga de las pilas/baterías. Cuando el visuali-
zador muestre el icono de pilas/baterías agotadas “ ” (icon)
significará que no hay prácticamente ninguna carga restante y
que es el momento de reemplazar las pilas/baterías.
SUGERENCIA Cuando se estén utilizando pilas/baterías y no haya
habido ninguna introducción de usuario durante cierto
tiempo, el electribe/electribe sampler entrará en el modo de
ahorro de energía de reducir el consumo de dichas pilas/
baterías. Puede desactivar el modo ahorro de energía en la
ajustando la configuración de la página “Power Save Mode”
en el menú global.
Antes de reemplazar las pilas/baterías asegúrese de
desconectar la alimentación del electribe/electribe sampler.
Retire inmediatamente las pilas/baterías inservibles.
También es aconsejable retirar las pilas/baterías si se
planea no utilizar el electribe/electribe sampler durante un
período prolongado de tiempo, para eliminar el riesgo de
fugas de las pilas/baterías.
Extraiga la tarjeta una vez que salga al frente de la ranura.
Tarjetas de memoria que pueden utilizarse en este sistema
Las tarjetas de memoria que pueden utilizarse en este sistema
son: Tarjetas de memoria con los tamaños siguientes: 512
MBytes a 2 GBytes, y tarjetas SDHC de 32 GBytes o menos.
SUGERENCIA Este sistema no admite tarjetas SDXC.
Manejo de tarjetas de memoria
Lea detenidamente el manual de instrucciones que viene con
su tarjeta de memoria.
SUGERENCIA Con este sistema no se incluye tarjeta de memoria.
Adquiérala por separado para aprovechar las ventajas de esta
característica.
Utilización de adaptador de CA
Conecte el adaptador de CA incluido en el jack DC 9V del sistema
y después conecte el adaptador a una jack de corriente.
Asegúrese de utilizar solamente el adaptador de CA
incluido. La utilización de un adaptador de CA que no
fuese el incluido podría causar averías inesperadas.
4. Inserción y extracción de una tarjeta de memoria
Puede utilizar una tarjeta de memoria para almacenar (escribir) o
cargar (leer) una canción para reproducción o para leer datos.
Nunca inserte ni extraiga una tarjeta de memoria con la
alimentación del sistema conectada. Podría perder datos
del sistema o de la tarjeta de memoria o, alternativamente,
dañar la tarjeta de memoria.
Para insertar una tarjeta
1. Compruebe que el visualizador y todos los LEDs estén apaga-
dos y la alimentación desconectada.
2. Inserte la tarjeta de memoria hasta que oiga un sonido de clic.
I
nserte la tarjeta de memoria a fondo hasta la parte posterior
de la ranura de forma segura, prestando atención a la orientación de la tarjeta. No fuerce nunca la tarjeta en la ranura.
Para extraer la tarjeta
1. Compruebe que el visualizador y todos los LEDs estén apagados y la alimentación desconectada.
2. Empuje la tarjeta de memoria hasta que oiga un sonido de clic,
y después suelte el dedo para extraerla.
64
Page 65

Fabricación de sonidos
parte parámetro
Botón Trigger
Pads de disparo
1. Para conectar/desconectar la alimentación
Puede conectar la alimentación pulsando el botón de alimentación
hasta que el visualizador muestre la pantalla de inicio.
Al iniciar este sistema, el visualizador mostrará la pantalla de
selección de patrón.
3. Para reproducir un patrón
Un patrón es una combinación de frases que constan de 16 piezas
que se crea para ser un segmento de una interpretación mayor.
Este sistema es capaz de crear y almacenar hasta 250 patrones. Un
solo patrón consta de 16 partes y un efecto principal.
Selección de un patrón
1. Haga que se muestre la pantalla de selección de patrón.
2. Utilice el mando Value para seleccionar un patrón.
Puede desconectar la alimentación pulsando el botón de alimentación hasta que el visualizador se apague y quede oscuro.
No toque ningún botón ni el panel táctil durante la cone-
xión de la alimentación.
Función de apagado automático
El electribe/electribe sampler dispone de función de apagado
automático. Esta función desconectará automáticamente la alimentación cuando no haya introducción de usuario durante unas 4
horas.
SUGERENCIA Esta función podrá desactivarse ajustando la configuración de la sección “AUTO POWER OFF” del menú
global.
2. Operación básica
Para utilizar la pantalla
SUGERENCIA Al pulsar el botón Exit un par de veces mientras se
esté visualizando otra pantalla, se mostrará la pantalla de
selección de patrón.
SUGERENCIA También puede cambiar el patrón durante la reproducción.
Reproducción de un patrón
1. Al pulsar el botón Reproducción/Pausae se reproducirá el
patrón actualmente seleccionado.
2. El patrón comenzará a reproducirse desde el principio. Se
reproducirá hasta el final, volverá al principio, y se repetirá su
reproducción.
3. Al pulsar el botón Parada la reproducción se parará.
4. Selección de una parte
¿Qué es una parte?
Una parte es la unidad mínima para crear un patrón. Las partes se
componen de tonos de sonido y ritmos o frases, así como el estado
de activación/desactivación de efectos y secuencias de movimientos además de otros elementos.
Puede procesar los sonidos y tonos por parte, y registrar ritmos,
patrones de frases, secuencias de movimientos y estados de efectos
de inserción, así como otras partes.
Pulse el < botón o el > botón en la pantalla de selección de patrón
para confirmar el ajuste de la parte seleccionada actualmente.
Pulsando el botón Menu/Enter en la pantalla de selección de
patrón podrá entrar en el menú de edición.
Pulse el botón < o > para seleccionar el parámetro que desee
ajustar.
También puede establecer el valor del parámetro utilizando el
mando Value.
Pulsando el botón Exit un par de veces podrá volver del menú de
edición a la pantalla de selección de patrón.
SUGERENCIA Con respecto a detalles adicionales, consulte la
“Guía de parámetros”.
Confirmación del sonido de una parte
1. Pulse el botón Trigger para hacer que se ilumine.
2. Al golpear el pad de disparo se producirá sonido al seleccio-
narse la parte y se podrá confirmar el tono del sonido.
65
Page 66

Selección de la parte que desea utilizarse
Botones <Part, Part>
Pads de disparo
Botón Keyboard Botones de pasoBotones <Part, Part>
Pads de disparo
Donde, Key = C, Scale = Ionian
Aumenta 1 octava cuando se pulsa una vez.
Botón Chord
Pads de disparo
Botón Touch Scale
Panel táctil
Utilice los botones <Part, Part> para seleccionar la parte que desee
utilizar.
El pad de disparo de la parte seleccionada se encenderá en azul.
Puede cambiar tono de sonido de la parte seleccionada utilizando
el mando de la sección de edición.
Al pulsar una vez el botón de paso 1 el margen se reducirá 1
octava y al pulsar una vez el botón de paso 4 se aumentará 1
octava.
Toque de música
1. Toque de música con los pads de disparo
Al golpear un pad de disparo se producirá sonido.
Puede disfrutar utilizando su electribe/electribe sampler de formas
diferentes cambiando el modo de pads.
Utilización de los pads de disparo como teclado
1. Pulse el botón Keyboard.
2. Utilice los botones <Part, Part> para seleccionar una parte.
Parpadeando
lentamente
Se reduce 1 octava cuando se pulsa
una vez.
ParpadeandoParpadeando Parpadeando
La posición del botón de paso
iluminado indica el margen.
lentamente
Toque de acordes con los pads de disparo
1. Pulse el botón Chord.
2. Toque con los pads de disparo
SUGERENCIA S
del menú de edición está establecida a Poly 1 o a Poly 2.
SUGERENCIA Puede cambiar las variaciones de acordes utilizando la función Chord Set en el menú de edición.
eleccione la parte en la que la función Voice Assign
2. Toque de música con el panel táctil
1. Pulse el botón Touch Scale para hacer que se ilumine.
2. Puede tocar frotando o golpeando (ligeramente) el panel táctil
con sus dedos.
3. Toque con los pads de disparo
C D E F G A B C
C D E F G A B C
SUGERENCIA Puede elegir el tipo de sonido utilizando la función
Key y Scale en el menú de edición. Al golpear simultáneamente más de 2 pads obtendrá sonidos diferentes dependiendo de
la configuración de la sección Voice Assign.
4. Puede cambiar el margen de sonido utilizando los botones de
paso.
66
Frotar o presionar la superficie del panel táctil con un
objeto punzante podría dañar dicho panel. Asegúrese de
utilizar solamente la punta de su dedo para evitar dañar
su electribe/electribe sampler.
SUGERENCIA Los sonidos se pueden ajustar utilizando las
funciones KEY y SCALE en el menú de edición. El margen de
sonido operativo se puede ajustar utilizando la función
TOUCH SCALE RANGE en el menú global.
SUGERENCIA El margen de sonido se puede modificar utilizando
Page 67

el botón de paso después de activar el botón Keyboard.
Botón Gate Arp
Pads de disparo
Panel táctil
Y
X
Botón Master Fx Botón MFX Send
Pads de disparo
Panel táctil
Botón Pattern SetMando Value
Pads de disparo
SUGERENCIA Es posible que el tono de sonido no cambie dependiendo del ajuste de la parte seleccionada.
3. Utilización del arpegiador de compuerta
Reproduzca automáticamente el sonido de la parte seleccionada
junto con el tempo o el ritmo ajustado. Puede cambiar la duración
de un solo sonido utilizando el tiempo de compuerta.
Toque con el arpegiador de compuerta
1. Pulse el botón Gate Arp para hacer que se ilumine.
2. Pulse el botón Trigger y mantenga pulsado el pad de disparo
de la parte que desee tocar para utilizar el panel táctil.
O también, puede utilizar el panel táctil mientras selecciona la
tonalidad con el pad de disparo después de pulsar el botón
Keyboard o Chord.
5. Toque con un juego de patrones
¿Qué es un juego de patrones?
Juego de patrones es una función que se utiliza para registrar
un patrón en un pad de disparo para facilitar el cambio de
patrón. También podrá cambiar los patrones deseados uno tras
otro durante la reproducción.
Registro de un patrón en un pad de disparo
1. Pulse el botón Pattern Set para hacer que se ilumine.
2. Pulse un botón Step (1 a 4) para seleccionar el grupo que desee
registrar.
3. Seleccione el patrón que desee registrar utilizando el mando
Value.
4. Pulse el pad de disparo que desee registrar mientras mantenga
pulsado el botón Pattern Set.
3. Los sonidos pueden modificarse utilizando el panel táctil.
Eje X: Altera la velocidad de compuerta.
Eje Y: Altera la duración del sonido.
SUGERENCIA Puede cambiar el patrón del arpegiador de compuerta en la página GATE ARP del menú de edición.
4. Utilización de efectos principales
1. Pulse el botón Master Fx.
2. Seleccione la parte en la que desee aplicar el efecto principal, y
después pulse el botón MFX Send para activarla.
3. Al tocar el panel táctil se aplicará el efecto.
SUGERENCIA Seleccione el tipo de efecto principal en la página
MFX Type del menú de edición cuando desee cambiar los
tipos de efectos.
Puede haber cierto de ruido dependiendo de la posición
en que toque el panel táctil.
Toque con juego de patrones
1. Pulse el botón Pattern Set para hacer que se ilumine.
2. Pulse un botón Step (1 a 4) para seleccionar el grupo en el que
esté registrado el patrón deseado.
3. Al golpear un pad de disparo se reproducirá el patrón registrado en dicho pad de disparo.
6. Establecimiento de BPM (pulsacio-
nes por minuto) (tempo)
Puede seleccionar el tempo para el patrón o el arpegiador de
compuerta.
Establecimiento de BPM (pulsaciones por minuto)
Al pulsar el botón Tap con el tempo aproximado que desee, se
67
Page 68

establecerá el valor de BPM (pulsaciones por minuto) con el
intervalo que lo golpee.
También puede establecer el tempo manualmente utilizando el
mando Value una vez seleccionado el parámetro BPM en el menú
de edición.
7. Adición de variación al sonido mediante un mando
Puede alterar el sonido utilizando el mando para cambiar los
parámetros Filter u Oscillator Edit de la sección de edición.
Consulte la “Guía de parámetros” para ver información detallada
sobre cada mando.
SUGERENCIA Dependiendo de la configuración, puede haber
cierto ruido o pérdidas de audio en su señal.
Grabación de interpretaciones
1. Grabación en tiempo real
Puede grabar sus interpretaciones en tiempo real cuando utilice
los pads de disparo o el panel táctil. También puede grabar con
micrófono. (→ p.70)
Grabación junto con un patrón
Puede grabar cualquier frase que aparezca en su mente mientras
esté tocando, sin tener que detener la reproducción.
1. Inicie la reproducción de un patrón
2. Seleccione la parte que desee grabar.
3. Pulse el botón Grabación para iniciar la grabación con el botón
iluminado.
4. Toque con los pads de disparo y otras funciones.
La grabación continuará mientras se repita el patrón.
5. Para detener la grabación vuelva a pulsar el botón Grabación
(el botón se apagará).
También puede pulsar el botón Reproducción/Pausa para detener la grabación.
Borrado de sonidos innecesarios durante una interpretación
Al mantener pulsado el pad de disparo después de pulsar el botón
Part Erase durante la reproducción, puede eliminar el sonido de la
parte seleccionada.
2. Edición de pasos
1. Seleccione la parte que desee grabar.
2. Pulse el botón Sequencer para hacer que se ilumine.
3. Pulse un botón de paso para seleccionar la duración de
grabación. Puede comprobar la duración observando el
número de LEDs iluminados.
4. El patrón de una parte seleccionada se indica mediante la
iluminación del pad de disparo. La nota cambia entre activada
(iluminado) y desactivada (apagado) cada vez que se golpea el
pad de disparo.
SUGERENCIA El número de nota que se introduce pulsando el
pad de disparo es C4 (60) en el ajuste por defecto. Si se vuelve
a activar después de desactivarlo, el paso que ya se ha introducido se activa con la nota original.
SUGERENCIA También puede grabar patrones durante la reproducción pulsando el botón Reproducción/Pausa.
SUGERENCIA Puede seleccionar Step Edit en el menú de edición
para activar la edición detallada de cada paso. Consulte la
“Guía de parámetros” para ver información detallada.
3. Grabación de los movimientos de
mandos y botones (secuencia de movimientos)
Puede grabar el movimiento de mandos y botones para cada parte
y efecto (secuencia de movimientos).
¿Qué es una secuencia de movimientos?
Una secuencia de movimientos es una función que graba los
cambios de un sonido debido a la utilización de mandos y botones
para reproducirlo.
A continuación se indican los mandos y botones que pueden
grabar/reproducirse como secuencia de movimientos.
• OSC Edit, Pitch
• Filter Cutoff, Resonance, EG Int
• Modulation Speed, Depth
• Amp/EG Level, Pan, Attack, Decay/Release
• IFX Edit, IFX ON, MFX Send
• Master Fx On, Master Fx X, Master Fx Y
Grabación de una secuencia de movimientos adicional
1. Seleccione la parte en la que desee añadir una secuencia de
movimientos.
2. Seleccione Motion Seq en el menú de edición para seleccionar
la parte que desea editar y ajuste la secuencia de movimiento
en Smooth o Trigger Hold.
Smooth: Registra el movimiento del mando de manera
uniforme.
Trigger Hold: Lee y memoriza la información del mando en la
sincronización de sonido.
3. Pulse el botón Grabación para hacer que se ilumine, y después
pulse el botón Reproducción/Pausa.
4. Puede mover un mando para alterar el sonido mientras el
patrón esté reproduciéndose. El botón Grabación parpadeará
mientras se esté grabando una secuencia de movimientos.
Cuando haya pasado un solo ciclo del patrón una vez iniciada
la grabación, la secuencia de movimientos detendrá automáticamente el proceso de grabación y cambiará a la reproducción
de la secuencia de movimientos grabada. Para continuar la
grabación tendrá que volver a pulsar el botón Grabación.
Borrado de una secuencia de movimientos
Seleccione CLEAR MOTION en PART UTILITY del menú de
edición y ejecútelo.
Borrado de una secuencia de movimientos de Master Fx
solamente
Seleccione CLEAR MFX MOTION en el menú de edición y
ejecute el comando.
68
Page 69

4. Almacenamiento de un patrón
Cerciórese de almacenar (escribir) los datos del patrón creado.
La selección de otros patrones sin haber almacenado
devolverá el patrón que estaba editando a su estado
original. Asegúrese de almacenar sus datos cuando desee
conservar el contenido editado.
Sobrescritura de un patrón
1. Pulse el botón Write.
2. Seleccione la ubicación de almacenamiento utilizando el
mando Value.
3. Pulse el botón Write.
El visualizador mostrará “Working...” y se iniciará el proceso
de escritura. El botón Write estará iluminado mientras tenga
lugar el proceso de almacenamiento y se apagará al terminar.
Edición de un patrón
1. Silenciamiento de una parte
1. Pulse el botón Part Mute para hacer que se ilumine.
2. Pulse el pad de disparo de la parte que desee silenciar para
desactivarla.
3. Para cancelar el silenciamiento pulse el pad de disparo apagado para hacer que se ilumine.
2. Borrado de una parte
1. Pulse el botón Part Erase para hacer que se ilumine.
2. Durante la reproducción, pulse el pad de disparo de la parte
que desea borrar.
Con el pad de disparo pulsado, se borrará la información
sobre nota de la parte seleccionada.
SUGERENCIA Para borrar toda la información de secuencia de la
parte seleccionada actualmente, seleccione CLEAR SEQUENCE en PART UTILITY del menú de edición y ejecútelo.
SUGERENCIA Para borrar una secuencia de movimientos, ejecute el
comando CLEAR MOTION en el menú de edición.
No desconecte nunca la alimentación durante el almacena-
miento de datos (mientras el botón Write esté iluminado)
ya que podría causar averías inesperadas.
Almacenamiento con un nombre de patrón diferente
(copia de patrón)
1. Pulse el botón Write mientras mantenga pulsado el botón
Shift.
El visualizador mostrará “enter Name”.
2. Cambie el nombre del patrón que desee almacenar.
Puede mover el cursor por el visualizador a izquierda y
derecha utilizando el < botón o el > botón y determinar el
carácter que desea cambiar. Gire le mando Value para cambiar
el carácter seleccionado y confírmelo con el botón Menu/Enter.
3. Seleccione un número de patrón para guardar sus datos
utilizando el mando Value.
4. Pulse el botón Write después de haber finalizado el proceso de
cambio de nombre del patrón.
Al pulsar el botón Write se iniciará el proceso de almacenamiento. El botón Write estará iluminado mientras tenga lugar
el proceso de almacenamiento y se apagará al terminar.
SUGERENCIA Para cancelar el proceso de almacenamiento, pulse el
botón Exit.
SUGERENCIA El número de patrón en el que se almacenará el
patrón editado se selecciona después de completar el proceso
de almacenamiento.
3. Copia de una parte
1. Seleccione COPY PART en PART UTILITY en el menú de
edición.
2. Seleccione el patrón que incluye la parte que desea copiar y
pulse el botón Menu/Enter.
3. Pulse el pad de disparo correspondiente a la parte de origen
de copia.
4. Pulse el pad de disparo correspondiente a la parte de destino
de copia.
4. Cambio del ajuste de patrón
En la lista siguiente se presenta el ajuste principal relacionado con
los patrones del menú de edición.
Consulte la “Guía de parámetros” de cada ajuste.
SWING: Añade efectos de reproducción aleatoria o salto cambiando la sincronización de sonido.
BEAT: Ajusta el compás (ritmo) de un patrón.
LENGTH: Cambia la duración de un patrón. Puede ajustarla la
duración de 1 a 4.
PATTERN LEVEL: Ajusta el volumen de sonido del patrón
completo.
KEY: Ajusta la tonalidad de la referencia de escala.
SCALE: Ajusta la escala para la reproducción con el pad de
disparo o el panel táctil activando el botón Keyboard.
GROOVE TYPE y GROOVE DEPTH: Añade métodos de reproducción de instrumentos musicales habituales o una onda que
puede reproducir un efecto de la canción en los datos de secuencia
de parte metronómica.
CHAIN REPEAT, CHAIN TO: Después de reproducir el patrón
seleccionado, seleccione el número de veces que desea reproducir
el mismo patrón y seleccione el patrón que se va a reproducir a
continuación. Esto permitirá reproducir varios patrones como su
fueran una canción.
69
Page 70

Otros ajustes
Puede configurar cada parámetro global, como la configuración
del metrónomo, o puede ejecutar funciones de utilidad, tales como
el formateo de una tarjeta de memoria.
SUGERENCIA Con respecto a detalles adicionales, consulte la
“Guía de parámetros”.
Cómo visualizar cada menú de ajuste
1. Al pulsar el botón Menu/Enter en la pantalla de selección de
patrón podrá acceder al menú de edición.
2. Al pulsar el < botón o el > botón se mostrará “GLOBAL
PARAMETER” en el visualizador y si después pulsa el botón
Menu/Enter podrá acceder al menú global.
Al pulsar el botón Menu/Enter después de que se muestre
“DATA UTILITY” podrá acceder al menú de utilidades DATA.
Al pulsar el botón Menu/Enter después de que se muestre
“PART UTILITY” podrá acceder al menú de utilidades de
partes.
3. Pulse el botón Write después de haber finalizado cada ajuste
para guardar el ajuste.
Si desconecta la alimentación sin guardar, se recuperan los
valores originales sin guardar el ajuste. Asegúrese de
realizar el guardado cuando desee conservar el contenido
que ha ajustado.
ahorro de energía para atenuar la luz de fondo del visualizador y
los LEDs.
1. Seleccione POWER SAVE MODE en el menú global.
2. Gire el mando Value para realizar el ajuste.
Puede desactivar el modo de ahorro de energía estableciéndolo a Disable.
Puede activar el modo de ahorro de energía estableciéndolo a
Enable.
Puede activarlo durante el uso de pilas/baterías y desactivarlo
durante el uso del adaptador de AC estableciéndolo a Auto.
El valor predeterminado es Auto.
5. Configuración del apagado automático
El apagado automático es una función para desconectar automáticamente la alimentación cuando no se realice ninguna operación
durante unas 4 horas continuas. Puede activar o desactivar esta
función.
1. Seleccione AUTO POWER OFF en el menú global.
2. Gire el mando Value para realizar el ajuste.
Para desactivar la función de apagado automático establezca
Off.
Para activar la función de apagado automático establezca “4
hours”. El valor predeterminado es “4 hours”.
1. Configuración del metrónomo
Puede configurar los parámetros para la función de metrónomo.
EL uso del metrónomo es muy conveniente cuando se crea un
patrón utilizando la función de grabación en tiempo real.
El metrónomo crea un sonido a intervalos de negra.
1. Seleccione METRONOME en el menú global.
2. Gire el mando Value para realizar la configuración.
Cuando esté activado, el metrónomo siempre emitirá sonido
tanto durante la reproducción como la grabación. Si configura
el metrónomo a Rec 0, Rec 1, Rec 2 permite solamente funcionará durante la grabación. La configuración del metrónomo a
Off lo desactivará.
2. Configuración del tipo de pilas/
baterías
Realícelo de acuerdo con el tipo de pilas/baterías que utilice.
1. Seleccione BATTERY TYPE en el menú global.
2. Gire el mando Value para realizar el ajuste.
Establezca Ni-MH para utilizar baterías de hidruro metálico
de níquel. Establezca Alkali para utilizar pilas alcalinas.
3. Ajuste del contraste del LCD
Puede ajustar el brillo del visualizador.
1. Seleccione LCD CONTRAST en el menú global.
2. Gire el mando Value para realizar el ajuste.
4. Prolongación de la duración útil de
las pilas/baterías
Puede activar o desactivar el modo de ahorro de energía. Cuando
se utilice este sistema con pilas/baterías, entrará en el modo de
6. Configuración del canal global MIDI
Puede configurar el canal global MIDI.
1. Seleccione MIDI GLOBAL CH. en el menú global.
2. Gire el mando Value para realizar el ajuste.
7. Reproducción mediante sincronización con dispositivo externo
Este sistema se puede ajustar para la sincronización con señales
MIDI o Sync.
1. Seleccione CLOCK MODE en el menú global.
2. Gire el mando Value para ajustar las señales que se van a
utilizar como la principal.
Internal: Ajusta este sistema como el principal.
Auto: Ajusta un dispositivo externo como el principal, cuando
el dispositivo está conectado. En un ajuste normal, este
sistema está ajustado como el principal.
Ext.USB, Ext.MIDI y Ext.Sync: Ajusta señales de los dispositivos conectados a cada jack como el principal.
8. Utilización de una tarjeta de memoria
Puede almacenar el estado de cada configuración en una tarjeta de
memoria. Puede reinstalar los datos almacenados cargándolos.
Formateo
Para utilizar una tarjeta de memoria tendrá que formatearla
utilizando el electribe/electribe sampler.
Cuando formatee una tarjeta de memoria, perderá todo su
contenido.
No desconecte la alimentación ni extraiga nunca la tarjeta
70
Page 71

de memoria durante este procedimiento.
Esta pantalla se muestra durante el
1. Seleccione la opción CARD FORMAT en el menú de utilidades
DATA.
2. Pulse el botón Menu/Enter. Cuando finalice el procedimiento
de formateo, el visualizador mostrará OK.
Almacenamiento en una tarjeta de memoria
1. Seleccione la opción EXPORT PATTERN en el menú de
utilidades DATA.
2. Pulse el botón Menu/Enter.
Carga desde una tarjeta de memoria
1. Seleccione la opción IMPORT PATTERN en el menú de
utilidades DATA.
2. Seleccione los datos del patrón que desee cargar utilizando el
mando Value.
Seleccione un archivo de la carpeta utilizando el mando Value
y acceda a la carpeta pulsando el botón Menu/Enter. Para salir
de la carpeta, seleccione “Upper Folder” con el mando Value y
pulse el botón Menu/Enter para subir un nivel.
3. Pulse el botón Menu/Enter para confirmar.
Escritura en un archivo WAV
Puede escribir patrones o un juego de patrones en una tarjeta de
memoria.
Exportación de un patrón a un archivo WAV
1. Seleccione la opción EXPORT AUDIO en el menú de utilidades DATA.
2. Seleccione el formato (solo archivo WAV o sistema Ableton
Live) de escritura.
3. Al pulsar el botón Menu/Enter se exportará el patrón actual.
Exportación de un juego de patrones a un archivo WAV
1. Seleccione la opción EXPORT P.SET AUDIO en el menú de
utilidades DATA.
2. Seleccione el formato (solo archivo WAV o sistema Ableton
Live) de escritura.
3. Ajuste un margen de patrones grabados como conjuntos de
patrones del 1 al 64 para su escritura como un archivo.
SUGERENCIA Puede que se necesite más tiempo si se ajusta la
escritura de un margen amplio de conjuntos de patrones.
4. Al pulsar el botón Menu/Enter se exportan los patrones
grabados como conjuntos de patrones en formato de archivo
WAV.
9. Uso del grabador de eventos
Esta función permite grabar interpretaciones utilizando varios
patrones o empleando el mando o el pad de disparo, etc. durante
la interpretación.
Grabación
1. Seleccione la opción EVENT REC/PLAY en el menú de edición
y pulse el botón Menu/Enter.
2. Al pulsar el botón Menu/Enter de nuevo se establece el
grabador de eventos en un estado de espera de grabación.
3. Pulse el botón Reproducción/Pausa para iniciar la grabación.
4. Pulse el botón Exit varias veces para volver a la pantalla de
selección de patrón e interpretar reproduciendo los patrones.
funcionamiento del grabador de eventos.
Esta operación graba información, como el funcionamiento del
mando o del pad de disparo junto con el patrón en reproducción para añadir sonidos o cambiar el tempo, etc. Además,
puede realizar la interpretación con patrones cambiantes.
5. Pulse el botón Parada cuando finalice la interpretación.
6. Se mostrará el (nombre del) archivo almacenado.
7. Pulse el botón Exit para finalizar la grabación.
SUGERENCIA Si el grabador de eventos no tiene una tarjeta de
memoria, mostrará “No Card” y no se podrá utilizar.
SUGERENCIA La información grabada en el grabador de eventos
no afectará a los datos grabados en un patrón. Tampoco puede
guardar datos en un patrón.
Reproducción
1. Seleccione la opción Event Player en el menú de edición y
pulse el botón Menu/Enter.
2. Seleccione EVENT PLAYER pulsando el < botón o el > botón y
pulse el botón Menu/Enter.
3. Seleccione el nombre de archivo que desee reproducir utilizando el mando Value y el botón Menu/Enter.
4. Reproduzca el archivo seleccionado pulsando el botón Reproducción/Pausa.
5. Pulse el botón Parada para detener la reproducción y volver al
principio del archivo reproducido.
6. Pulse el botón Exit para finalizar el reproductor de eventos.
SUGERENCIA Esta función no se puede utilizar cuando el grabador
de eventos está grabando.
SUGERENCIA Durante la reproducción, no es posible realizar otras
operaciones.
10. Formateo de datos de usuario
El formateo borrará todos los patrones que se hayan creado y se
restablecerá el estado predeterminado.
Antes de formatear deberá realizar una copia de seguridad de
todos los datos importantes para evitar que se pierdan,
1. Seleccione la opción FACTORY RESET en el menú de utilidades.
2. Al pulsar el botón Menu/Enter se iniciará el proceso de formateo.
No desconecte nunca la alimentación durante el formateo.
71
Page 72

Características del electribe sampler
Se ha incorporado la funcionalidad de muestreo a las funciones
del electribe.
El electribe sampler también proporciona los mismos motores de
sonido de modelado analógico que el electribe.
Puede utilizar hasta 499 muestras de usuario con una longitud
total de aproximadamente 270 segundos cuando se calcula como
mono. Se proporcionan numerosas muestras predefinidas de
baterías, bucles de batería/frase y golpes.
1.
Nuevas funciones del electribe sampler
El electribe sampler incorpora nuevas y potentes características y
cambia la función de determinados controles del electribe.
Función de muestreo
El electribe sampler proporciona dos métodos de muestreo:
• Muestreo a partir de una fuente de audio externa a través del
jack Audio In.
• Nuevo muestreo de la salida completa de la interpretación de su
electribe sampler.
Edición de muestras
La edición de muestras le permite editar los puntos inicial y final
de una muestra, así como la “segmentación” de las muestras de
audio. Estos mismos tipos de edición de muestras también se
pueden usar para editar las muestras predefinidas.
Reproducción de muestras estéreo
Las muestras estéreo, tanto si se han creado en el electribe sampler
como si se han cargado desde una tarjeta de memoria, pueden
asignarse a una parte y reproducirse como parte de su interpretación.
2. Cambios en funciones de controla-
dor específicas
Grabación y edición de muestras
1. Muestreo:
Grabación de una fuente de sonido externa a través del jack de
entrada de audio.
Preparación de una muestra
• Conecte la salida del instrumento, la fuente de sonido o el
dispositivo de audio que desea muestrear al jack Audio In del
electribe sampler. La entrada de audio usa un jack mini estéreo
y puede aceptar un miniconector estéreo o mono.
• Configure el ajuste Audio In thru en On (página global 14/17) y
reproduzca sonidos desde su dispositivo de audio.
• Ajuste el nivel de salida de su dispositivo externo (o ajuste el
mando Input Level del electribe sampler) de modo que el icono
de pico (CLIP) no se ilumine cuando el nivel de salida del
dispositivo conectado esté al máximo.
Ajuste del modo de muestreo
1. Mantenga pulsado el botón Shift y pulse el botón Grabación.
Los botones Grabación y Reproducción/Pausa parpadearán.
Si decide cancelar antes de iniciar el muestreo, pulse el botón
Exit ahora.
2. Elija el modo de muestreo (en la pantalla aparece “Sampling
mode”).
Gire el mando Value para especificar el muestreo estéreo
“Stereo” o el muestreo mono “Mono”.
3. Pulse el botón > para seleccionar la fuente de muestreo. Gire el
mando Value para especificar “Audio In”.
4. Pulse el botón > para ver el tiempo de muestreo disponible.
SUGERENCIA El tiempo de muestreo disponible se basa en el
muestreo mono. Para el muestreo estéreo, el tiempo de muestreo disponible es igual a la mitad del valor mostrado en la
pantalla.
“Oscillator” en el panel se muestra como “Sample”
El valor de Oscillator en el menú de edición se muestra como
“Sample” en esta unidad.
Mando Sample Edit (sección de edición)
Si se ha seleccionado una muestra como el oscilador, este mando
se puede usar para ajustar el punto inicial de la reproducción y
para cambiar la dirección de reproducción.
Mando Amp/EG Decay/Release
Si se ha seleccionado una muestra como el oscilador, este mando
se puede usar para ajustar el tiempo de compuerta, si el Amp EG
está desactivado. Si este mando se ajusta en un valor de 127, la
muestra se reproduce hasta el final sin importar su longitud.
SUGERENCIA
5/10 de muestras) de la muestra, o si el valor OSC TYPE (tipo de
oscilador) es la categoría Analog o Audio In, la operación es la
misma que si el Amp EG del electribe estuviera apagado.
Si se especifica el valor LOOP START POINT (página
Botones de filtro LPF/HPF/BPF
Los siguientes filtros pueden activarse individualmente o desactivarse.
• LPF del electribe ON u OFF
• HPF del electribe ON u OFF
• BPF del electribe ON u OFF
Procedimiento de muestreo:
1. Cuando esté preparado para comenzar a muestrear, pulse el
botón Reproducción/Pausa para iniciar el muestreo.
Los botones Grabación y Reproducción/Pausa permanecerán
encendidos.
2. Pulse el botón Stop para detener el muestreo.
Los botones Grabación y Reproducción/Pausa se oscurecerán.
SUGERENCIA Si supera el tiempo de grabación disponible, el
muestreo terminará automáticamente.
3. Tras el muestreo, en la pantalla aparecerá “New Sample” para
indicar que se ha grabado una nueva muestra.
Pulse el botón Reproducción/Pausa para escuchar la muestra
recién grabada. Puede guardar la muestra recién grabada
como una muestra de usuario pulsando el botón Write.
Si decide no guardar la muestra recién grabada, pulse el botón
Exit.
Aunque pulse el botón Write para guardar la muestra de
usuario, se borrará al apagar el equipo. Si desea conservar
las muestras de usuario, utilice el comando EXPORT ALL
SAMPLE o EXPORT SAMPLE del menú de utilidades
DATA para escribir los datos de muestra en una tarjeta de
memoria antes de apagar el equipo.
SUGERENCIA Si muestrea la entrada de audio, la muestra como
72
Page 73

tal se graba con el volumen óptimo, pero el volumen de salida
durante la reproducción se percibe más bajo que el volumen
que escuchó durante el muestreo. Se trata de un ajuste de
fábrica para minimizar la distorsión que podría producirse al
reproducir esa muestra en el patrón. Si ajusta el nivel de
reproducción en “+12 dB” también puede reproducir la
muestra a aproximadamente el volumen que escuchó durante
la grabación.
Asignación de una muestra a una parte
La muestra grabada se añade a las selecciones del oscilador como
una muestra de usuario.
Seleccione una parte y, a continuación, edite el ajuste Sample para
seleccionar la muestra que desee usar.
SUGERENCIA Las muestras estéreo se reproducen en estéreo si se
asignan a una parte impar, y se reproducen como mezcla
mono si se asignan a una parte par.
SUGERENCIA Si ha creado un patrón con una muestra de usuario
asignada a una parte, utilice EXPORT ALL SAMPLE para
escribir todos los datos de muestra en una tarjeta antes de
apagar el equipo.
2. Nuevo muestreo
3. Tras el nuevo muestreo, en la pantalla aparecerá “New Sample” para indicar que se ha grabado una nueva muestra.
Pulse el botón Reproducción/Pausa para escuchar la muestra
para la que acaba de realizar el nuevo muestreo. Puede
guardar la muestra para la que acaba de realizar el nuevo
muestreo como una muestra de usuario pulsando el botón
Write.
Si decide no guardar la muestra recién grabada, pulse el botón
Exit.
SUGERENCIA Cuando realiza el nuevo muestreo, el volumen de
reproducción de la muestra sube para que no se perciba que el
volumen de salida de la reproducción se ha reducido. Sin
embargo, debido a que esto reduce el margen de espacio, en
algunos casos puede producirse distorsión. En tal caso, puede
ajustar el nivel de reproducción en “Normal”; el volumen de
reproducción será menor que el que se escucha durante la
grabación, pero el margen de espacio se mantendrá.
Aunque pulse el botón Write para guardar la muestra de
usuario, se borrará al apagar el equipo. Si desea conservar
las muestras de usuario, utilice el comando EXPORT ALL
SAMPLE o EXPORT SAMPLE del menú de utilidades
DATA para escribir los datos de muestra en una tarjeta de
memoria antes de apagar el equipo.
Grabación de la reproducción de una parte, patrón o
interpretación del electribe sampler
El electribe sampler puede grabar el sonido de su propia reproducción para crear una nueva muestra; esto se denomina “nuevo
muestreo”.
Selección del modo de nuevo muestreo
1. Seleccione el patrón para el que desea realizar el nuevo
muestreo.
2. Mantenga pulsado el botón Shift y pulse el botón Grabación.
El botón Grabación permanecerá encendido y el botón Reproducción/Pausa parpadeará.
Si decide cancelar antes de iniciar el muestreo, pulse el botón
Exit ahora.
3. Elija el modo de muestreo (en la pantalla aparece “Sampling
mode”).
Gire el mando Value para especificar el muestreo estéreo
“Stereo” o el muestreo mono “Mono”.
4. Pulse el botón > para seleccionar la fuente de muestreo. Gire el
mando Value para especificar “Resampling”.
5. Pulse el botón > para ver el tiempo de muestreo disponible.
Procedimiento de nuevo muestreo
1. Hay dos formas de realizar el nuevo muestreo:
• Realice el nuevo muestreo de la reproducción de patrón. Pulse
el botón Reproducción/Pausa para iniciar el nuevo muestreo.
Los botones Grabación y Reproducción/Pausa se encenderán.
• Realice el nuevo muestreo del sonido de una parte específica. El
nuevo muestreo se inicia al tocar cualquier pad de disparo o
panel táctil.
2. Pulse el botón Parada para detener el nuevo muestreo. Los
botones Grabación y Reproducción/Pausa se oscurecerán.
SUGERENCIA Si supera el tiempo de grabación disponible, el
muestreo terminará automáticamente.
3. Edición de una muestra
Una vez que se ha grabado una muestra, se puede editar con los
controles internos del electribe sampler.
1. Pulse el botón Menu/Enter en la sección común para abrir la
pantalla de edición.
2. Utilice los botones < or > para seleccionar SAMPLE EDIT y
pulse el botón Menu/Enter de nuevo.
3. Utilice el mando Value para seleccionar la muestra que desea
editar (usando el número de muestra).
4. Utilice los botones < or > para acceder a las siguientes funciones de edición de muestras.
Para ver información detallada sobre cada función de edición,
consulte la “Guía de parámetros”.
• RENAME: edita el nombre de la muestra.
• START POINT: especifica el punto inicial de la reproducción.
• END POINT: especifica el punto final de la reproducción.
• LOOP START POINT: especifica el punto inicial del bucle. Se
inicia el bucle de la reproducción de muestra desde el punto que
especifica aquí hasta el valor END POINT.
• SAMPLE TUNE: ajusta la tonalidad de la muestra.
• TIME SLICE: divide la muestra por compases.
• CLEAR SLICE: cancela el resultado de la operación de TIME
SLICE (dividir muestra).
• PLAY LEVEL: cambia el nivel de reproducción de la muestra.
Para una muestra para la que acaba de realizar el nuevo muestreo, se ajusta automáticamente en “+12 dB” para reproducir el
volumen con el que se grabó.
• DELETE SAMPLE: elimina una muestra.
SUGERENCIA Para aumentar el tiempo de muestreo disponible,
elimine las muestras predefinidas no deseadas para liberar
una mayor área de muestreo y ejecute EXPORT ALL SAMPLE
mientras se encuentra en este estado; a continuación, cargue
estos datos al reiniciar. No podrá volver a seleccionar los
números de muestras predefinidas eliminados con el mando
Sample.
SUGERENCIA Puede realizar una reproducción previa de la
73
Page 74

muestra tocando un pad de disparo o usando el panel táctil
asignado a Touch Scale.
SUGERENCIA Al editar una muestra, las secciones Filter, Modulation, Amp/EG e Insert FX no están disponibles.
SUGERENCIA Al editar una muestra, la función Voice Assign se
ajusta en Mono 2.
5. Cuando termine de editar, pulse el botón Write para guardar
los cambios.
Aunque pulse el botón Write para guardar el contenido
editado, las muestras de usuario se borrarán al apagar el
equipo. Si desea conservar las muestras de usuario, utilice
el comando EXPORT ALL SAMPLE o EXPORT SAMPLE
del menú de utilidades DATA para escribir los datos de
muestra en una tarjeta de memoria antes de apagar el
equipo.
4. Importación/exportación de mues-
tras
Los archivos WAV guardados en una tarjeta de memoria se
pueden importar en el electribe sampler como muestras. Las
muestras también se pueden guardar escribiéndolas en una tarjeta
de memoria. Desde el menú de utilidades DATA, elija el comando
deseado y ejecútelo.
• Import SAMPLE: carga una muestra desde la tarjeta de memo-
ria.
• Export SAMPLE: escribe una muestra en la tarjeta de memoria.
• Export ALL SAMPLE: escribe todas las muestras guardadas en
el electribe sampler en la tarjeta de memoria como “all sample
data”. El “all sample data” escrito en la tarjeta de memoria se
cargará automáticamente la próxima vez que se inicie el electribe sampler, devolviéndolo al estado previo al apagado.
El “All sample data” en la tarjeta de memoria se cargará
automáticamente durante el inicio. Debido a que todas las
muestras guardadas en el electribe sampler se sobrescribirán, evite cambiar las muestras por accidente, por ejemplo
si ha intercambiado la tarjeta de memoria.
• Export ALL PATTERN: escribe todos los patrones en la tarjeta
de memoria.
• Import ALL PATTERN: carga todos los patrones que EXPORT
ALL PATTERN escribió en la tarjeta de memoria. Se sobrescribirán todos los patrones.
Apéndice
1. Solución de problemas
El visualizador no se activa.
□ ¿HaconectadoconseguridadeladaptadordeCA?
□ ¿HaconectadoeladaptadordeCAaunajackcorriente?
□ ¿Tienensuficientecargalaspilas/baterías?
¡No hay sonido!
□ ¿Haconectadocorrectamenteelamplificador,elmezclador,o
losauricularesalosjacks?
□ ¿Haconectadolaalimentacióndelamplificadorodelmezcla-
doryloshaajustadocorrectamente?
□ ¿HaajustadoelmandoVolumedelelectribe/electribesampler
alnivelapropiado?
¡La reproducción no se detiene!
□ Unpatrónseleccionadocontinuaráreproduciéndoserepetida-
mente. Pulse el botón Stop cuando finalice la reproducción.
¡Los sonidos/las acciones de secuencias de movimientos
han cambiado de lo creado durante la edición!
□ ¿Hacompletadolaoperacióndeescrituradespuésdela
edición?
→ Después de la edición, escriba los datos en la memoria antes
de cambiar el patrón en cada modo o antes de desconectar la
alimentación.
¡No es posible controlar MIDI!
□ ¿HaconectadocorrectamenteelcableMIDI?
Si controla este sistema desde un dispositivo externo:
□ ¿HaconfiguradocorrectamenteelcanalMIDIenelmodo
global?(→ p.70)
Si controla un dispositivo externo desde este sistema:
□ ¿HaconfiguradoelmismocanalMIDIparaeldispositivo
receptoryparaestesistema?
74
¡No se oye nada al tocar con los pads de disparo!
□ ¿Haalmacenadolapartedespuésdelaedición?(→ p.69)
□ ¿HaactivadoelbotónKeyboard?
□ ¿Hadesactivadolasecuenciademovimientos?(→ p.68)
¡Parece ser que no se puede utilizar la tarjeta de memoria!
□ ¿Haformateadolatarjetadememoriasolamenteconsu
electribe/electribesampler?
→ Antes de utilizar una tarjeta de memoria formateada con un
ordenador o una cámara digital habrá que reformatearla con
este sistema. (→ p.70)
□ ¿Hainsertadocorrectamentelatarjetadememoria?
→ Extraiga y vuelva a insertar la tarjeta de memoria. (→ p.64)
□ ¿Admiteestesistemaeltamañodelatarjeta?
→ Este sistema admite tarjetas SD de 512 MB a 2 GB, y tarjetas
SDHC de 32 GB o menos.
Page 75

2. Mensajes de error
Al pulsar el botón Exit se cerrará la ventana de mensajes.
Card Error
La tarjeta de memoria está dañada.
→ Haga una copia de seguridad de todos los archivos de la
tarjeta de memoria.
→ Haga una copia de seguridad de todos los datos de su tarjeta
de memoria en un ordenador, etc., y después formatee la
tarjeta de memoria con este sistema. Cuando finalice, podrá
devolver todos sus datos a la tarjeta de memoria recién formateada.
Protected
La protección de datos se activará cuando almacene datos en una
tarjeta de memoria.
→ Si el interruptor de protección contra escritura en la tarjeta de
memoria está bloqueado, desbloquéelo.
Card Full
La tarjeta de memoria no tiene suficiente espacio disponible.
→ Borre archivo(s) de la tarjeta de memoria para asegurar
espacio suficiente, y después vuelva a escribir o almacenar sus
datos.
Event Over
El número de eventos supera el número máximo de eventos que se
pueden grabar.
File Error
El archivo no puede leer/escribirse correctamente.
Memory Full
Este sistema no tiene suficiente capacidad de memoria al cargar
datos de una tarjeta de memoria o copiar datos a este sistema.
→ Borre datos innecesarios para aumentar la cantidad de espacio
disponible.
→ Elprocedimientodedesfragmentación(?)delmenúglobal
puede evitar esto.
Especificaciones
Máximo número de sonidos (patrón completo):
Máximo de 24 voces (El número de
sonidos simultáneos en el patrón completo
depende del tipo de Oscillator, Filter o
Insert Fx)
Máximo número de sonidos (por parte):
Máximo de 4 voces
Conectores: Jack Audio Out L (jack telefónica monoau-
ral de 1/4”), jack Audio Out R (jack telefónica monoaural de 1/4”), jack Audio In
(minijack telefónica estéreo de 1/8”), jack
para auriculares (minijack telefónica
estéreo de 1/8”), jack Sync In, jack Sync
Out, jack MIDI OUT, jack MIDI IN,
conector USB (micro USB tipo B)
Fuente de alimentación:
Duración de las pilas/baterías:
Consumo de corriente: 500 mA o menos
Dimensiones (An x Prf x Al):
Peso: 1,6 kg
Temperatura de funcionamiento:
Elementos incluidos: Manual de usuario, Adaptador de CA,
* Las especificaciones y el aspecto están sujetos a cambios sin previo aviso para
mejora.
Adaptador de CA (DC 9V ), Seis
pilas alcalinas/baterías de hidruro metálico de níquel AA
Aproximadamente cinco horas (Ahorro de
energía: activado, con baterías de hidruro
metálico de níquel)
339 x 189 x 45 mm
0–+40˚C(sincondensación)
Cable de conversión MIDI x 2
Motion Seq Full
No es posible grabar una secuencia de movimientos.
→ El electribe/electribe sampler admite hasta 24 patrones de
secuencias de movimientos. Borre cualquier movimiento
innecesario y pruebe a añadir de nuevo su secuencia de
movimientos.
75
Page 76

注意事项
使用场所
在以下地方使用本乐器将导致乐器故障:
• 阳光直接照射下
• 极端温度或湿度条件下
• 有过量灰尘、肮脏的地方
• 经常产生振动的地方
• 接近磁场的地方
用户重要提示
本产品严格按照产品使用国家的生产标准和电压要求制造。
如果您通过网路、邮件或者电话销售购买本产品,您必须核
实本产品是否适于在您所在的国家使用。
警告:在本产品适用国家之外的其他国家使用本产品极其危
险,同时制造商和经销商将不再履行质量担保。
请妥善保存您的购买收据作为购买凭证,否则您的产品将不
能享有制造商或经销商的质量担保。
电源
请将指定的交流电源适配器连接到电压正确的交流电插座
上。不要将交流电变压器连接到非本乐器规定使用电压的交
流电插座上。
与其他电器设备的干扰
摆放在附近的收音机和电视可能会受到干扰。使用本乐器
时,请保持乐器与收音机和电视的适当距离。
操作
为了避免损坏,请不要过度用力操作开关或控制按钮。
保养
如果乐器表面有灰尘,用清洁的干布擦拭。不要使用如苯或
稀释剂等液体清洗剂或易燃的上光剂。
保存本手册
通读本手册后,请保管好以便日后参考之用。
将异物远离本乐器
不要在本乐器附近放置盛放液体的容器。如果液体进入本乐
器,将导致乐器损坏、燃烧或触电。注意不要使金属物体进
入本乐器。一旦有金属物体滑入本乐器,从电源插座拔掉交
流电源适配器,然后联系您最近的Korg经销商或本乐器购买
的商店。
* 本手册内使用的所有产品名称和公司名称均为所属公司或所有者
的注册商标。
76
Page 77

目录
简介.........................................78
1.区域名称 ..................................... 78
2.连接 ......................................... 80
3.连接电源 ..................................... 80
4.插入和取出内存卡 ............................. 81
发声.........................................81
1.打开/关闭电源 ................................ 81
2.基本操作 ..................................... 81
3.播放乐段 ..................................... 81
4.选择声部 .................................... 82
播放音乐.....................................82
1.使用触发垫播放音乐 ........................... 82
2.使用触摸板演奏音乐。 ......................... 83
3.使用循环琶音器 ............................... 83
4.使用主效果 ................................... 83
5.演奏乐段集 ................................... 83
6.选择 BPM(节奏) ............................. 84
7.使用旋钮将变奏添加至声音 ..................... 84
录制演奏.....................................84
1.实时录制 ..................................... 84
2.音级编辑 ..................................... 84
3.录制旋钮和按钮变化(运动序列) ............... 84
4.保存乐段 ..................................... 85
编辑乐段.....................................85
1.静音某个声部 ................................. 85
2.擦除声部 ..................................... 85
3.复制声部 ..................................... 85
4.更改模式设置 ................................. 85
其他设置.....................................86
1.设置节拍器 ................................... 86
2.设置电池类型 ................................. 86
3.调整 LCD 对比度 .............................. 86
4.延长电池寿命 ................................. 86
5.设置自动关机 ................................. 86
6.设置全局 MIDI 通道 ........................... 86
7.与外部设备一起同步播放 ....................... 86
8.使用内存卡 ................................... 86
9.使用 Event Recorder .......................... 87
10.格式化用户数据 .............................. 87
electribe sampler功能........................87
1.electribe sampler新功能 ...................... 87
2.对特定控制器功能的更改 ....................... 87
录制和编辑样本...............................88
1.采样: ...................................... 88
2.重新采样 ..................................... 88
3.编辑样本 ..................................... 88
4.导入/导出样本 ................................ 89
附录.........................................89
1.故障排除 ..................................... 89
2.错误消息 ..................................... 89
技术规范.....................................90
77
Page 78

简介
1
4
5
6
2 3
7
10
8
11
12
13
感谢您购买 Korg electribe/electribe sampler 音乐制作
工作站。
为了能够完全发挥新乐器的优势,请仔细阅读本说明手册,
按照说明使用本产品。您应保留本说明书以备将来使用。
1.区域名称
顶部面板
electribe/electribe sampler 取样器是一款能够为舞蹈音
乐创制原始音乐的工作站。您可以使用主机上的旋钮和触摸
板编辑声音,使用单机轻松创建韵律和乐句。
lectribe sampler的基本操作与 electribe 一样。
有关如何使用 electribe sampler的更多说明,请参
阅“electribe sampler功能”(p.87)和“录制和编辑样
本”(p.88)。
提示: 本手册中的插图显示的是 electribe。
9
1. 电源按钮
可使用该按钮打开 ON 和关闭 OFF 本机。
2. Volume 旋钮
可使用该旋钮调节从 Line Out 插孔或耳机插孔中输出的
音量。
3. Input Level 旋钮
可使用该旋钮调节从 Audio In 插孔输入的电平。
4. 显示屏
其显示有关乐段、声部和参数设置。
5. 传送部分
(录制)按钮
可使用该按钮录制韵律、乐句或旋钮转动。录制期间按下
该按钮将停止录制过程,播放将继续。
(停止)按钮
该按钮将停止播放。
(播放/暂停)按钮
该按钮将开始或暂停播放乐段。
Tap 按钮
按照所需的每分钟几拍(BPM)按下该按钮一段时间,将
会将节奏更改至所需的选择。
6. 触摸板区域
触摸板
该触摸板用于配合循环琶音器或 TOUCH SCALE 功能一起
演奏,或者用于控制主效果器。
Gate Arp 按钮
该按钮可打开循环琶音器功能。
Touch Scale 按钮
该按钮可打开触摸音阶功能。
Master Fx 按钮
该按钮可打开或关闭主效果器控制功能。
MFX Hold 按钮
通过使用该按钮,您可以使用触摸板维护先前设置的主效
果器状态,开启“Master FX”按钮后甚至能够允许您从
触摸板上移开手指。
提示:
样式中可以记忆 MFX Hold 按钮的 ON/OFF 状态。
7. 公共部分
值旋钮
该值可改变显示屏上当前显示的参数值。
<,>(箭头)按钮
这些按钮用于选择要编辑的参数。
Menu/Enter 按钮
该按钮用于选择诸如乐句参数、声部参数、全局参数或实用工
具之类的参数,或者也可用于确认参数设置中的更改内容。
Exit 按钮
按下几次该按钮可从编辑屏幕中返回至乐句选择屏幕。
Shift 按钮
与其他按钮或旋钮配合使用时,该按钮可执行各种功能。
Shift 按钮加 <(箭头):取消最近的操作(撤销功能)
Shift 按钮 + Write 按钮:可以命名并保存样式。
Shift 按钮 + 值旋钮:可更改为较大值或较小值
提示: 大值或小值根据选定参数而变化。
Write 按钮
该按钮用于将乐句和全局数据保存至 Electribe/
electribe sampler。当您在 Global 参数页面中按下 Write
按钮时数据将被保存。乐句数据也将在其他页面中被保存。
78
Page 79

8. Edit 部分
可以在这里编辑每个声部的参数。
Oscillator (electribe sampler: Sample)
可在这里调整音调波形,例如:锯齿波、方
波、噪音或 PCM。
Oscillator 旋钮 (electribe sampler:
Sample 旋钮)
可使用该旋钮选择波形。
Pitch/Glide 旋钮
可使用该旋钮调整音高(音调)。可在按住 Shift
按钮的同时调谐旋钮,以此调整过渡效果以平缓
更改合成声音中两个音调(Glide)之间的音高。
Edit 旋钮
可使用该旋钮调整声音样式。根据所用波形类型的不同,
效果亦不同。
Filter
滤波器可通过消除或增强振荡器的频
率元素调节音调(声音的颜色)。
Filter 旋钮
该旋钮可调节截止频率。
Resonance 旋钮
该旋钮可调节过滤器的共鸣。
EG Int 旋钮
该旋钮通过 Amp/EG 区域中设定的
包络发生器调整滤波器的截止频率的时间更改量。
LPF 按钮
该按钮可启用低通滤波器。
反复按此按钮可切换滤波器类型。
HPF 按钮
该按钮可启用高通滤波器。
反复按此按钮可切换滤波器类型。
BPF 按钮
该按钮可启用带通滤波器。
反复按此按钮可切换滤波器类型。
Modulation
可使用 LFO 或 EG 对音调做出时间更改。
Modulation 旋钮
该旋钮可调节转调类型。
Depth 旋钮
该旋钮可调节转调的效果强度。
Speed 旋钮
该旋钮可调节转调的速度。
Amp/EG
您可以设置调整音量大小和声音位置的放大
器,也可以设置包络发生器(EG)和应
用时间更改的主效果器。
Level 旋钮
该旋钮可调整声部的音量。
Pan 旋钮
该旋钮可调整声部的位置。
Attack 旋钮
该旋钮可调整声音的起音速度。
Decay/Release 旋钮
该旋钮可调整声音减退的时间。
MFX Send 按钮
该按钮允许您选择是否将声部的输出信号发送至主效果器。每
次按下按钮时该按钮在 ON(点亮)和 OFF(暗)之间变换。
Amp EG 按钮
该按钮允许您启用放大器的包络。每次按下按钮时该按钮
在 ON(点亮)和 OFF(暗)之间变换。该按钮开启状态
(ON)时,音量根据您使用 Attack 和 Decay/Release
旋钮设定选择 EG 而发生相同变化。按钮关闭时(OFF)
时,该设置不会跟随 EG(固定的风琴包络)。
Insert Fx
Insert Fx 区域用于添加各种不同的声音效
果,例如向声音中添加失真效果或浪涌效果。
Insert Fx 旋钮
该旋钮用于选择所插入效果器的类型。
Edit 旋钮
可使用该旋钮调整插入效果器的效果强度。根
据所选定效果器类型的不同,效果亦不同。
IFX On 按钮
该按钮允许您选择是否启用插入效果器。每次按
下按钮时该按钮在 ON(点亮)和 OFF(暗)之间变换。
9.Step 按钮
该按钮将显示序列或八度的位置,以及触发垫的当前功
能。按下该按钮可更改所编辑序列的八度或位置。
10.声部编辑区域
<Part,Part> 按钮
可使用该按钮选择要使用的声部。显示屏将显示当前所选
的声部。
Part Mute 按钮
该按钮处于打开 ON(亮起)状态时,按下触发垫将静音
相应的声部。此时触发垫关闭 OFF(暗),Part Mute 按
钮关闭 OFF。按下选定的变暗的声部所对应的触发垫将关
闭静音功能(亮起)。
Part Erase 按钮
当您在播放期间按下“Part Erase”按钮后再按住触发垫
时,您可以消除选定部分的声音。
11.触摸板模式区域
您可以在此处选择触发垫的功能。
Trigger 按钮
该按钮处于打开状态 ON(亮起)时按下触发垫将演奏相
应的声部。可以通过编辑触发模式参数设定如何播放。
Sequencer 按钮
该按钮处于打开状态 ON(亮起)时,触发垫在音级输入
模式下工作。
Keyboard 按钮
该按钮处于打开状态 ON(亮起)时,可将触发垫用作键
盘。可以设置每个乐句的键或音阶。
Chord 按钮
该按钮处于打开状态 ON(亮起)时,可将触发垫用作和
弦板。可以设置每个乐句的和弦的变奏、键或音阶。
Step Jump 按钮
该按钮处于打开状态 ON(亮起)时,在音序器播放期间
按下音级 1 至 16 中的任意按钮可直接跳至该音级。按
下多个按钮时将按照按下的顺序播放音级。
Pattern Set 按钮
该按钮处于打开状态 ON(亮起)时,按下触发垫可将乐
段切换至相应的触发垫注册的乐段。按住该按钮的同时按
下触发垫,可将当前选定的乐段分配给触发垫。
12.触发垫
触发垫用于与触摸板模式区域中的设置协作演奏。
13.LED
本机背面的 LED 将根据播放乐段协作亮起。
79
Page 80

98
2.连接
1 2 3 4 5 6 7
调音台,自供电
监控器
CD 播放机,MP3
播放机
1 2 3 4 5 6 7 8 9 10 11 12 13 14 15 16
随机 MIDI 转换线缆
随机交流电适配器
耳机
MIDI IN MIDI OUT
必须在关闭电源的情况下连接所有设备。未能遵循
该预防措施将会导致扬声器系统损坏或发生故障。
提示: 首次将本机连接至 Windows 计算机时,操作系统
内包括的驱动程序将自动安装。
Windows 操作系统中包括的标准 USB-MIDI 驱动程
序不允许两个或两个以上的应用程序同时使用
electribe/electribe sampler。若要允许两个或
更多应用程序同时使用 electribe/electribe
sampler,您需要安装 KORG USB-MIDI 驱动程序。
请从 Korg 网站下载 KORG USB-MIDI 驱动程序,
然后按照随附文档中的说明进行安装。
1. Audio Out L/R 插孔
electribe/electribe sampler的音频输出自这些插孔。
仅将线缆连接至左侧 Audio Out插孔而不连接右侧 Audio
Out 插孔会将立体声输出为单声道声音。
提示: 以单声道发送输出信号时,该插孔支持单声道和立
体声 1/4” 线缆连接。
2. Audio In 插孔
这个插孔是从其他音频源输出的音频输入至 electribe/
electribe sampler的插孔。
提示: 在全局菜单中打开“AUDIO IN THRU”功能即可混
合输入的声音。
3. Sync Out 插孔
该插孔每隔 15 毫秒每八个音符或十六音符输出 5V 脉
冲,该插孔用于将 KORG volca 系列产品或其他模拟音序
器与本系统进行同步。
提示: 脉冲极性和周期在全局菜单中进行设置。
4. Sync In 插孔
当您在全局菜单的时钟模式中设置“Auto”或“Ext.
Sync”,并且连接同步输出中的脉冲输出时,或者连接模
拟设备的音频输出时,内部音级时钟将被禁用,以便推进
音级与输入脉冲一致。
提示: 启用/禁用 SYNC IN 的设置以及检测到的周期和脉
冲极性在全局菜单中。请参阅参数指南以了解本步
骤的更多详情。
5. MIDI IN/OUT 插孔
可以使用随机转换线缆系统连接至 MIDI 设备。
6. 耳机插孔
这是连接耳机的插孔。
7. DC 9V 插孔
这是连接随机交流适配器的插孔。
8. USB 插孔
这是将 electribe/electribe sampler连接至计算机的插
孔。
9. 内存卡插槽
这是插入内存卡的插槽。可以使用内存卡保存(写入)或
加载(读取)播放信息或数据。(→ p.12)
3.连接电源
使用电池
打开位于本机背面的电池盖板,插入六节 AA 电池,请注意
所插入电池的极性方向。
兼容电池
AA 碱性电池或镍氢电池可用于本机。
提示: 可参阅全局菜单的“电池类型”页面选择所使用的
电池类型,以便 electribe/electribe sampler能
够准确检测和显示剩余电量。
显示剩余电池电量
显示屏将显示电池指示器“ ”(图标),指示了电池的
剩余电量。显示屏显示电池耗尽图标“
说明几乎没有电量剩余,需要更换电池。
提示: 如果长时间没有用户输入,使用电池供电时
electribe/electribe sampler将进入节电模式,
以降低电池消耗。可以在全局菜单中的“节电模
式”页面内调整设置,禁用节电模式。
如果连接了电源,更换电池时请确保关闭了
Electribe/electribe sampler。
”(图标)时,
80
Page 81

立即取出不可用的电池。如果您计划长时间不使用
声部 参数
Electribe/electribe sampler,最好能取出电
池,以降低电池液泄漏的危险。
使用交流电适配器
将随机交流电适配器连接至系统的 DV 9V 插孔中,然后将
适配器连接至电源插座。
应确保仅使用随机交流电适配器。使用非随机附带
的交流电适配器将导致意外的故障。
4.插入和取出内存卡
您可以使用内存卡保存(写入)和加载(读取)歌曲,或读
取数据。
系统加电打开时切勿插入或取出内存卡。这可能会
丢失系统数据或者内存卡上的数据,或者可能会损
坏内存卡。
插入内存卡
1. 检查所有显示屏和 LED 均已关闭,并且电源已关闭。
2. 插入内存卡,直至听到咔哒声。
将内存卡全部安全插入卡槽,要注意内存卡方向。
插入卡槽时切勿用力。
取出内存卡
1. 检查所有显示屏和 LED 均已关闭,并且电源已关闭。
2. 推入内存卡直至听到咔哒声,然后松开手指,取出内存
卡。
内存卡一旦弹出卡槽即可取出。
本系统中可用的内存卡
本系统中可用的内存卡为:以下容量的 SD 卡:512M 至
2GB 和 32G 或更低的 SDHC 卡。
提示: 本系统不支持 SDXC 卡。
处理内存卡
通篇阅读您的内存卡随附的操作手册。
提示: 本系统中不包含任何内存卡。请单独购买内存卡以
便使用该功能。
发声
1.打开/关闭电源
您可以按下电源按钮接通电源,直至显示屏显示启动屏幕。
启动本系统,显示屏将显示乐段选择屏幕。
按电源按钮,显示屏关闭并变暗即可关机。
启动过程中请勿触摸任何按钮或触摸板。
自动关机功能
electribe/electribe sampler拥有自动关机功能。无用户
输入大约 4 小时之后本机将自动关闭电源。
提示: 您可以调整全局菜单中的“自动关机”区域中的设
置禁用该功能。
2.基本操作
使用屏幕
在样式选择屏幕上按 < 按钮或 > 按钮即可确定当前选定部
分的设置。
在乐段选择屏幕上按 Menu/Enter 按钮可输入编辑菜单。
按 < 或 > 按钮选择要调整的参数。
可使用值旋钮设置参数值。
按几次 Exit 按钮可从编辑菜单返回至乐段选择屏幕。
提示: 请参阅“参数指南”获取更多详情。
3.播放乐段
乐段是由包含 16 个声部的乐句的组合,用作较大演奏的一
部分。
本系统能够创建并存储最多 250 个乐段。单个乐段包含 16
个声部和一个主效果。
选择乐段
1. 显示乐段选择屏幕。
2. 使用值旋钮选择乐段。
提示: 显示其他屏幕时按几次 Exit 按钮将显示乐段选择
屏幕。
提示: 也可以在播放期间更改乐段。
81
Page 82

播放乐段
Trigger 按钮
触发垫
<Part,Part> 按钮
触发垫
Keyboard 按钮 Step 按钮
触发垫
<Part,Part> 按钮
亮起的音级按钮位置指示了范围。
1. 按 播放/暂停 按钮可播放当前选择的乐段。
2. 乐段将从开头开始播放。将播放至结束,然后返回至开始
重复播放。
3. 按 停止 按钮停止播放。
4.选择声部
什么是声部?
声部是用于创建乐段的最小单元。声部包含音调和韵律或乐
句,以及多于其他元素的效果器和运动音序的 ON/OFF 状
态。
您可以处理每个声部的音调,记录韵律、乐句乐段、运动音
序并插入效果器状态以及其他声部。
确认声部的声音
1. 按 Trigger 按钮点亮按钮。
2. 选择声部按下触发垫发声,您可以藉此确认音调。
播放音乐
1.使用触发垫播放音乐
在触发垫上敲击即可发声。
您可以使用 electribe/electribe sampler 以不同的方式
更改触摸板模式。
将触发垫用作键盘
1. 按 Keyboard 按钮
2. 使用 <Part,Part> 按钮选择声部。
选择要使用的声部
使用 <Part,Part> 按钮选择要使用的声部。
选定声部的触发垫点亮为蓝色。
您可以使用编辑区域中的旋钮更改选定声部的音调s。
3.使用触发垫演奏
其中,Key = C,Scale = Ionian
C D E F G A B C
C D E F G A B C
提示: 您可以在编辑菜单中通过使用键和音阶功能选择声
音类型。根据“声音分配”区域中的设置,同时按
2 个触摸板将发出不同的声音。
4. 您可2q以使用音级按钮更改声音范围。
按一次音级按钮 1 可降低 1 个八度,按一次音级按钮 4
可增加 1 个八度。
闪烁闪烁 缓慢闪烁缓慢闪烁
按一次降低 1 个八度。
使用触发板演奏和弦
1. 按 Chord 按钮
2. 使用触发垫演奏
提示: 选择其在编辑菜单中“声音分配”功能设置为
Poly 1 或 Poly 2 的声部。
提示: 您可以在编辑菜单中使用“和弦设置”功能更改和
弦变奏。
按一次增加 1 个八度。
82
Page 83

Chord 按钮
触发垫
2.使用触摸板演奏音乐。
Touch Scale 按钮
触摸板
Gate Arp 按钮
触摸板
触发垫
Y
X
Master Fx 按钮 MFX Send 按钮
触发垫
1. 按 Touch Scale 按钮点亮按钮。
2. 您可以使用手指摩擦或在触摸板上敲击(轻击)的方式进
行演奏。
使用尖锐物体摩擦或按压触摸板的表面会损坏触摸
板。请确保仅适用手指尖弹奏以避免损伤
electribe/electribe sampler。
提示: 可以在编辑菜单中使用 KEY 和 SCALE 功能设置声
音。可以在全局菜单中使用“TOUCH SCALE
RANGE”功能设置可用的声音范围。
提示: 开启“Keyboard”按钮后,可使用步进按钮修改声
音范围。
提示: 根据选定部分设置的不同,可能无法更改声音音
调。
3.可使用触摸板编辑声音。
X 轴:更改循环速度。
Y 轴:更改声音长度。
提示: 您可以在编辑菜单中在“GATE ARP”页面上更改循
环琶音器的模式。
4.使用主效果
1. 按 Master Fx 按钮
2. 选择您要应用主效果器的声部,然后按 MFX Send 按钮打
开 ON。
3. 按下触摸板将应用效果器。
提示: 当您需要更改效果器类型时,可以在编辑菜单中
的“MFX Type”页面中选择主效果器类型。
根据您所按触摸板的位置,可能会有些噪音。
3.使用循环琶音器
根据设置速度或节奏自动播放选定部分的声音。您可以更改
每个声音的循环时间长度。
使用循环琶音器演奏
1. 按 Gate Arp 按钮点亮该按钮。
2. 按 Trigger 按钮,然后按下声部的触发垫使用触摸板。
或者您可以在按 Keyboard 或 Chord 按钮之后使用触发
垫选择音调时使用触摸板。
触摸板
5.演奏乐段集
什么是乐段集?
乐段集是一种用于将乐段注册至触发垫以启用简易乐段切换
的功能。您可以在播放期间逐个切换所需的乐段。
将乐段注册至触发垫
1. 按 Pattern Set 按钮点亮该按钮。
2. 从 1 至 4 按 Step 按钮选择要注册的群组。
3. 使用值旋钮选择要注册的乐段。
83
Page 84

4. 按住 Pattern Set 按钮的同时按下触发垫进行注册。
Pattern Set 按钮值旋钮
触发垫
使用乐段集播放
1. 按 Pattern Set 按钮点亮该按钮。
2. 按 Step 按钮(1 至 4)选择注册所需乐段的组。
3. 按触发垫将演奏已注册至相应触发垫的乐段。
录制演奏
1.实时录制
您可以在使用触发垫或触摸板时实时录制演奏。您也可以使
用节拍器进行录制。(→ p.86)
录制乐段
您可以录制在演奏期间任何所需的乐句,无需中断播放。
1. 开始播放乐段。
2. 选择要录制的声部。
3. 按 录制 按钮开始录制,按钮亮起。
4. 使用触发垫和其他功能进行演奏。
乐段重复期间录制仍继续。
5. 再次按 录制 按钮停止录制(按钮变暗)。
按 播放/暂停 按钮也可以停止播放。
删除演奏期间不需要的声音。
当您在播放期间按下“Part Erase”按钮后再按住触发垫
时,您可以消除选定部分的声音。
6.选择 BPM(节奏)
您可以为乐段或循环琶音器选择节奏。
设置 BPM
按照您需要的大约的节奏按 Tap 按钮设置会按照您敲击的
间隔设置 BPM 的值。
从编辑菜单中选择了 BPM 参数后,也可以使用值旋钮手动
设置节奏。
7.使用旋钮将变奏添加至声音
您可以使用旋钮更改编辑区域中的滤波器或振荡器编辑参数
来改变声音。请参阅“
明。
提示: 根据设置的不同,信号中可能会有某些噪音或音频
泄露。
参数指南
”以获取每个旋钮的详细说
2.音级编辑
1. 选择要录制的声部。
2. 按 Sequencer 按钮亮起该按钮。
3. 按音级按钮选择录制长度。您可以查看红色 LED 的数量
检查长度。
4. 选定声部的乐段有触发垫的亮度进行指示。注意每次按下
触发垫时在 ON(亮起)和 OFF(暗)之间的变换。
提示: 按下触发垫所输入的音符默认设置为 C4 (60)。关
闭已输入的步进之后再次开启将会打开原始音符。
提示: 可以在播放期间按 播放/暂停 按钮录制乐段。
提示: 您可以在编辑菜单中选择“Step Edit”为每个步
进编辑详细设置。请参阅
“
参数指南”获取详情。
3.录制旋钮和按钮变化(运动序列)
您可以为每个声部和效果器录制按钮和按钮变化(运动序
列)。
什么是运动序列?
运动序列是一种功能,将播放期间旋钮和按钮的变化记录至
声音。
以下是可录制为运动序列/进行播放的旋钮和按钮。
• OSC Edit,Pitch
• Filter Cutoff,Resonance,EG Int
• Modulation Speed,Depth
• Amp/EG Level,Pan,Attack,Decay/Release
• IFX Edit,IFX ON,MFX Send
• Master Fx On,Master Fx X,Master Fx Y
84
附加运动序列录制
1. 选择您要添加运动序列的声部。
2. 从编辑菜单中选择“Motion Seq”以选择要编辑的部分,
将运动序列设置为“Smooth”或“Trigger Hold”。
Smooth:流畅地记录旋钮运动。
Trigger Hold:记录声音时间轴时读取并记忆旋钮信息。
3. 按 录制 按钮点亮该按钮,然后按 播放/暂停 按钮。
4. 您可以在播放乐段期间转动旋钮更改声音。录制 按钮将
在运动序列录制期间闪烁。
录制启动后完成单个乐段循环后,运动序列将自动停止录
Page 85

制处理,然后切换至播放已录制的运动序列。您需要再次
按 录制 按钮才能继续录制。
删除运动序列
在编辑菜单内从“PART UTILITY”中选择“Clear
Motion”,然后执行操作。
仅删除 Master Fx 的运动序列
从编辑菜单中选择 Clear MFX Motion,然后执行命令。
编辑乐段
1.静音某个声部
1. 按 Part Mute 按钮点亮该按钮。
2. 按您要静音的声部的触发垫进行关闭。
3. 当您释放静音时,按变暗的触发垫进行点亮。
4.保存乐段
请确保保存(写入)已创建的乐段数据。
选择未保存的其他乐段会将您正在编辑的乐段返回
至其原始状态。当您希望保存已编辑内容时,请确
保保存数据。
复写乐段
1. 按下 Write 按钮。
2. 使用值旋钮选择保存位置。
3. 按下 Write 按钮。
显示屏将显示“Working...”,写入过程将开始。保存过
程进行中 Write 按钮将亮起,完成后该按钮变暗。
数据保存期间切勿关闭电源,否则会造成未预期的
故障。(Write 按钮点亮时。)
使用其他乐段名称进行保存(复制乐段)
1. 按下 Shift 按钮的同时按 Write 按钮。
显示屏将显示“enter Name”。
2. 更改您要保存的乐段的名称。
您可以使用 < 按钮或 > 按钮在显示屏上左右移动光标,
然后确定要更改的特征。旋转值旋钮更改所选的字符,然
后使用 Menu/Enter 按钮确认选择
3. 使用值旋钮选择样式编号保存 您的数据。
4. 完成乐段名称更改过程后,按 Write 按钮。
按 Write 按钮开始保存过程。保存过程开始后 Write 按
钮将亮起,完成后该按钮变暗。
提示: 可以按 Exit 按钮取消保存过程。
提示: 要保存已编辑乐段的乐段编号将在您完成保存过程
后进行选择。
2.擦除声部
1. 按 Part Erase 按钮点亮该按钮。
2. 在播放期间,按下您要清除的部分的触发垫。
按下触发垫时,选定部分的备注信息将被清除。
提示: 若要清除当前选定部分所有的序列信息,应在编辑
菜单内的“PART UTILITY”中选择“CLEAR
SEQUENCE”,然后执行操作。
提示: 您通过触发垫选择的声部的所有内容将被擦除。执
行编辑菜单中的“CLEAR MOTION”命令擦除运动序
列。
3.复制声部
1. 在编辑菜单内的“PART UTILITY”中选择“COPY PART”。
2. 选择您要复制声部的韵律,按menu/Enter按钮。
3. 按与复制源声部对应的触发垫。
4. 按与复制目标声部对应的触发垫。
4.更改模式设置
下列列表说明了编辑菜单中与模式相关的主要设置。
请参阅每个参数的“
SWING:通过转换声音时间轴添加韵律或跳跃感。
BEAT:设置模式的拍子(节奏)。
LENGTH:更改模式长度。您可以从 1 至 4 设置长度。
PATTERN LEVEL:调整整个模式的声音音量。
KEY:设置音节参考的音调。
SCALE:通过开启“Keyboard”按钮设置使用触发垫或触摸
板时的音阶。
GROOVE TYPE 和 GROOVE DEPTH:添加传统乐器的演奏方法
和/或将能够重现歌曲感的 GROOVE 添加至序列数据的韵律
部分。
CHAIN REPEAT、CHAIN TO:播放选定韵律后,选择播放相同
韵律的次数,选择下次要播放的韵律。将像歌曲一样播放多
个韵律。
参数指南
”。
85
Page 86

其他设置
您可以设置每个全局参数,例如节拍器的设置,或者您可以
执行实用工具功能,例如格式化内存卡。
提示: 请参阅“参数指南”获取附加详情。
如何显示每个设置菜单
1. 在模式选择屏幕上按“Menu/Enter”按钮进入编辑菜单。
2. 按 < 按钮或 > 按钮在显示屏上显示“GLOBAL
PARAMETER”,然后按“Menu/Enter”按钮进入全局菜
单。
显示“DATA UTILITY”后按“Menu/Enter”按钮进
入“DATA”实用工具菜单。显示“PART UTILITY”后
按“Menu/Enter”按钮进入部分实用工具菜单。
3. 完成每个设置后按“Write”按钮保存设置。
不保存设置关闭机器电源会将机器返回至原始状态
而不保存设置。当您希望保存所做设置时,应确保
执行保存操作。
1.设置节拍器
您可以设置节拍器的参数。使用实时录制功能创建乐段时使
用节拍器会很方便。
节拍器按照四分音符音程创建声音。
1. 从 Global 菜单中选择 METRONOME。
2. 旋转值旋钮调节设置。
开启状态时,播放和录制期间节奏器将始终发声。将节拍
器设置为 Rec 0、Rec 1、Rec 2 可使其尽在录制期间运
行。将节拍器设置为 OFF 即可禁用节拍器。
2.设置电池类型
根据在用电池类型进行设置。
1. 从全局菜单中选择 BATTERY TYPE。
2. 旋转值旋钮进行设置。
设置为 Ni-MH 使用镍氢电池。设置为 Alkali 使用碱性
电池。
3.调整 LCD 对比度
您可调整显示屏的亮度。
1. 从全局菜单中选择 LCD CONTRAST。
2. 旋转值旋钮进行设置。
4.延长电池寿命
您可以启用或禁用节电模式。通过电池供电使用本系统将进
入节电模式,会将显示屏和 LED 的背光变暗。
1. 从全局菜单中选择 POWER SAVE MODE。
2. 旋转值旋钮进行设置。
可将节电模式设置为 Disable 进行禁用。
随时可以将节电模式设置为 Enable 启用。
可通过设置为 Auto 在使用电池期间启用节电模式,在使
用交流电适配器期间禁用。
默认设置为 Auto。
5.设置自动关机
自动关机功能是一种当您无操作 4 小时后系统将自动关闭
的功能。您可以启用或禁用该功能。
1. 从全局菜单中选择 AUTO POWER OFF。
2. 旋转值旋钮进行设置。
将其设置为 OFF 可禁用自动关机功能。
将其设置为“4 hours”可启用自动关机功能。默认设置
为“4 hours”。
6.设置全局 MIDI 通道
您可以设置全局 MIDI 通道。
1. 从全局菜单中选择 MIDI GLOBAL CH.。
2. 旋转值旋钮进行设置。
7.与外部设备一起同步播放
可以设置该系统与 MIDI 或 Sync 信号进行同步。
1. 从全局菜单中选择“CLOCK MODE”。
2. 旋转“Value”旋钮设置作为主旋钮的信号。
Internal:将该系统设置为主系统。
Auto:连接了设备时,将外部设备设置为主设备。在常规
设置中,该系统将被设置为主系统。
Ext.USB、Ext.MIDI 和 Ext.Sync:将连接至每个插孔的
设备中输出的信号设置为主信号。
8.使用内存卡
您可以将每个设置的状态保存至内存卡。可通过加载数据重
新安装保存的数据。
格式化
使用 electribe/electribe sampler需要格式化您的内存卡
才能使用。
格式化时您将丢失所有内存卡内容。
格式化过程中切勿关闭电源或取出内存卡。
1. 从实用工具菜单中选择 CARD FORMAT 选项。
2. 按 Menu/Enter 按钮格式化完毕后,显示屏将显示 OK。
保存至内存卡
1. 从“DATA”编辑菜单中选择 EXPORT PATTERN 选项。
2. 按 Menu/Enter 按钮
从内存卡中加载数据
1. 从“DATA”编辑菜单中选择 IMPORT PATTERN 选项。
2. 使用值旋钮选择要载入的乐段数据。
按“Menu/Enter”按钮进入文件夹,使用值旋钮在文件夹
中选择文件。若要退出文件夹,使用值旋钮选择“Upper
Folder”,然后按“Menu/Enter”按钮转至上一级。
3. 按 Menu/Enter 按钮确认。
写入 WAV 文件。
您可以将乐段写入内存卡中。
将乐段导出至 WAV 文件
1. 从“DATA”编辑菜单中选择 EXPORT AUDIO 选项。
2. 选择要写入的格式(仅 WAV 文件或 Ableton Live Set)
。
3. 按 Menu/Enter 按钮将导出当前乐段。
将乐段集导出至 WAV 文件
1. 从“DATA”编辑菜单中选择 EXPORT P.SET AUDIO 选
项。
2. 选择要写入的格式(仅 WAV 文件或 Ableton Live Set)
。
3. 将记录为从 1 至 64 的模式集的模式范围写入文件。
提示: 如果要写入的模式范围较宽,则需要较长的时间。
86
Page 87

4. 按“Menu/Enter”按钮以 WAV 文件格式导出记录为模式
事件记录器运行期间将显示该屏幕。
集的样式。
9.使用 Event Recorder
这是一个功能,可以在演出中通过使用多个样式或操作旋
钮,或者使用触发垫等录制演出。
录制
1. 从编辑菜单中选择“EVENT REC/PLAY”选项,然后按
Menu/Enter 按钮。
2. 再次按 Menu/Enter 按钮将“Event Recorder”设置为录
制待机状态。
3. 按 播放/暂停 按钮开始录制。
4. 按下 Exit 按钮若干次,返回至模式选择屏幕,然后播放
模式。
这将会记录某些信息,例如在播放时使用样式配合操作旋
钮或触发垫添加声音或更改节奏等。此外还可以更改样
式。
5. 演奏结束后按 停止 按钮。
6. 系统将显示保存文件的名称。
7. 按 Exit 按钮结束录制。
提示: 如果 Event Recorder 没有内存卡,显示屏将显
示“No Card”并且无法使用 Event Recorder。
提示: Event Recorder 上录制的任何信息都不会影响某
个样式录制的数据。同样,它也无法以某个样式保
存数据。
播放
1. 从编辑菜单中选择“EVENT REC/PLAY”选项,然后按
Menu/Enter 按钮。
2. 按 < 按钮或 > 按钮,然后按 Menu/Enter 按钮选
择“EVENT PLAYER”。
3. 使用值旋钮和 Menu/Enter 按钮选择您要播放的文件名。
4. 按 播放/暂停 按钮播放选定文件。
5. 按 停止 按钮停止播放,并返回至已播放文件的开头。
6. 按 Exit 按钮结束 Event Player。
提示: Event Recorder 正在录制时无法使用该功能。
提示: 播放期间,不允许其他操作。
electribe sampler功能
Electribe 已添加了采样功能。
electribe sampler也提供了与 electribe 相同的模拟调制
声音引擎。
按照单声道计算时间时,您可以使用最多 499 个用户样
本,总时长大约 270 秒。提供了大量的预设鼓声、鼓声/乐
句循环和打击乐样本。
1.electribe sampler新功能
electribe sampler新增了众多强大的新功能,更改了某些
electribe 控制器的功能。
采样功能
electribe sampler提供两个采样方式:
• 通过 Audio In 插孔从外部音频源采样。
• 重新对 electribe sampler演奏的整个输出进行采样。
编辑采样
采样编辑功能允许您编辑样本的起始和结束点,也可以编辑
音频样本的片段。也可以将这些样本编辑功能应用于编辑预
设的样本。
播放立体声样本
立体声样本 - 无论是 electribe sampler创建的样本还是
从存储卡载入的样本,都可以被分配到某个声部,并作为您
演奏的一部分进行播放。
2.对特定控制器功能的更改
面板上的“Oscillator”将显示为“Sample”。
本机编辑区域中的 Oscillator 将显示为“Sample”。
Sample 编辑旋钮(编辑区域)
如果已将某个采样设定为 Oscillator,可将该旋钮用作调
整播放起始点,更改播放方向。
Amp/EG Decay/Release 旋钮
如果已将某个采样设定为 Oscillator,可将该旋钮用作调
整循环时间- 如果关闭了 Amp EG。如果该旋钮值设定为
127,样本将播放至结束,与样本长度无关。
提示: 如果指定了样本的 LOOP START POINT(样本 5/10
页),或者如果 OSC TYPE(振荡器类型)是
Analog 或 Audio In 类别,运行方式与
electribe/electribe sampler的 Amp EG 关闭一
样。
Filter LPF/HPF/BPF 按钮
可以单独激活或关闭以下过滤器。
• electribe LPF ON 或 OFF
• electribe HPF ON 或 OFF
• electribe BPF ON 或 OFF
10.格式化用户数据
格式化将擦除您创建的所有乐段并恢复至默认状态。
格式化之前您应备份所有重要数据,以防止丢失重要数据。
1. 从使用工具菜单中选择 FACTORY RESET 选项。
2. 按 Menu/Enter 按钮开始格式化工程。
格式化期间切勿关闭电源。
87
Page 88

录制和编辑样本
1.采样:
通过音频输入插孔从外部音频源采样
提示: 如果您使用已分配声部的用户采样创建模式,关机
前请使用 EXPORT ALL SAMPLE 命令将所有采样数
据写入内存卡中。
2.重新采样
预备采样
• 将您要采样的乐器、音源或音频设备的输出信号连接至
electribe sampler的音频输入插孔。这个音频输入使用
立体声迷你插孔,可接受立体声和单声道模拟插头。
• 将音频输入设置设定为“On”(全书第 14/17 页),从
您的音频设备上播放些声音。
• 调整外部设备的输出音量(或者调整 electribe
sampler的 Input Level 旋钮),以便当所连接设备的
输出音量达到其最大值时峰值图标(CLIP)不会亮起。
设置采样方式
1. 按住 Shift 按钮的同时按下 录制 按钮。录制 按钮和
播放/暂停 按钮现在将闪烁。
如果您想要在开始采样前取消,则立即按 Exit 按钮。
2. 选择采样方式(显示屏显示“Sampling mode”)。
旋转 Value 旋钮指定立体声采样“Stereo”或单声道采
样“Mono”。
3. 按 > 按钮选择采样源。旋转 Value 旋钮指定“Audio
In”。
4. 按 > 按钮查看可用的采样时间。
提示: 可用的采样时间基于单声道采样计算。对于立体声
采样,可用采样时间等于显示屏上所显示时间的一
半。
采样步骤:
1. 当您准备好开始采样时,按 播放/暂停 按钮开始采样。
录制 按钮和 播放/暂停 按钮将持续亮起。
2. 按 停止 按钮可停止采样。
录制 按钮和 播放/暂停 按钮将变暗。
提示: 如果您超过了可用的录制时间,采样将自动结束。
3. 采样后,显示屏将显示“New Sample”,指示已录制新
的采样。
按 播放/暂停 按钮可听到新录制的样本。您可以按
Write 按钮将新录制的采样保存为用户采样。
如果您决定不保存新录制的采样,可以按 Exit 按钮。
即使您按了 Write 按钮保存用户采样,当您关闭
设备电源时也会擦除这些采样。如果您希望保存用
户采样,请使用 DATA 实用工具菜单命令 EXPORT
ALL SAMPLE 或 EXPORT SAMPLE 在关闭电源之前将
采样数据写入内存卡。
提示: 如果您对音频输入信号进行采样,采样本身按照优
化音量进行录制,但是在播放期间的输出音量会低
于您在采样时使用的音量。这是经过设计的功能,
当您在模式中播放采样时可以最小化可能出现的失
真。通过将播放音量设定为“+12 dB”,您也可以
按照录制期间您听到的音量播放采样。
将采样分配到声部
录制的采样将以用户采样的方式添加至 Oscillator 选择
中。
选择声部,然后编辑 Sample 设置选择您要使用的采样。
提示: 如果分配到奇数编号的声部中,立体声采样将以立
体声的方式播放,如果分配到偶数编号的声部中将
以单声道混合的形式进行播放。
录制 electribe sampler声部、模式或演奏的播放信
号。
electribe sampler可以记录自己播放的声音,创建新的采
样,这称为“重新采样”。
选择重新采样方式
1. 选择您要进行重新采样的模式
2. 按住 Shift 按钮的同时按下 录制 按钮。录制 按钮将
持续亮起,播放/暂停 按钮将闪烁。
如果您想要在开始采样前取消,则立即按 Exit 按钮。
3. 选择采样方式(显示屏显示“Sampling mode”)。
旋转 Value 旋钮指定立体声采样“Stereo”或单声道采
样“Mono”。
4. 按 > 按钮选择采样源。旋转 Value 旋钮指
定“Resampling”。
5. 按 > 按钮查看可用的采样时间。
重新采样步骤:
1. 有两种方式可以进行重新采样:
• 对模式播放进行重新采样。按 播放/暂停 按钮开始重新
采样。
录制 按钮和 播放/暂停 按钮将亮起。
• 对指定声部的声音进行重新采样。当您敲击任何触发垫
或触摸板时重新采样过程开始。
2. 按 停止 按钮可停止重新采样。录制 按钮和 播放/暂停
按钮将变暗。
提示: 如果您超过了可用的录制时间,采样将自动结束。
3. 重新采样后,显示屏将显示“New Sample”,指示已录
制新的采样。
按 播放/暂停 按钮可听到刚才重新采样的样本。您可以
按 Write 按钮将刚才重新采样的样本保存为用户采样。
如果您决定不保存新录制的采样,可以按 Exit 按钮。
提示: 当您重新采样时,样本的播放音量将升高,以便播
放时输出音量不会有明显的降低。但是因为这降低
了动态余量,在某些情况下可能会出现失真。如果
发生失真,您可以将播放音量设定为“Normal”,
播放音量将低于录制期间的音量,但是仍保持相同
的动态余量。
即使您按了 Write 按钮保存用户采样,当您关闭
设备电源时也会擦除这些采样。如果您希望保存用
户采样,请使用 DATA 实用工具菜单命令 EXPORT
ALL SAMPLE 或 EXPORT SAMPLE 在关闭电源之前将
采样数据写入内存卡。
3.编辑样本
录制完毕样本后,可以使用 electribe sampler的内部控制
器编辑样本。
1. 按公共区域的 Menu/Enter 按钮打开编辑窗口。
2. 使用 < 或 > 按钮选择 SAMPLE EDIT,然后再次按
Menu/Enter 按钮。
3. 使用音量旋钮选择要编辑的样本(使用样本编号)
4. 使用 < 或 > 按钮访问以下样本编辑功能。
88
Page 89

有关每个编辑功能的详情,请参阅“参数指南”。
• RENAME(重命名):编辑样本的名称。
• START POINT(起始点):指定播放的开始点。
• END POINT(结束点):指定播放的结束点。
• LOOP START POINT(循环起始点):指定循环播放的开
始点。样本播放从您在此处指定的点开始循环,直至
END POINT。
• SAMPLE TUNE(样本调谐):调整样本的音高。
• TIME SLICE:按节拍分割样本。
• CLEAR SLICE:取消 TIME SLICE(分割样本)操作。
• PLAY LEVEL:更改样本的播放音量。对于重新采样的样
本,这自动设定为“+12 dB”以便按照录制时的音量重
新生成音量。
• DELETE SAMPLE(删除样本):删除样本。
提示: 若要增加可用的采样时间,可删除不需要的预设样
本释放更多的采样存储空间,只需在需要时执行
EXPORT ALL SAMPLE,然后在重新启动时载入该数
据。无法再使用 Sample 旋钮选择已删除的预设样
本编号。
提示: 您可以敲击触发垫或使用分配到触发条的触发垫预
播放样本。
提示: 编辑样本时,Filter、Modulation、Amp/EG 和
Insert FX 部分将不可用。
提示: 编辑样本时,Voice Assign 设定为 Mono 2。
5. 当您完成编辑时,按 Write 按钮保存您的更改。
即使您按了 Write 按钮保存编辑的内容,当您关
闭设备电源时也会擦除这些用户采样。如果您希望
保存用户采样,请使用 DATA 实用工具菜单命令
EXPORT ALL SAMPLE 或 EXPORT SAMPLE 在关闭电
源之前将采样数据写入内存卡。
4.导入/导出样本
内存卡上保存的 WAV 文件可以作为样本导入 electribe
sampler。也可以将样本写入内存卡进行保存。从 DATA 实
用工具菜单中,选择所需的命令并执行。
• Import SAMPLE(导入样本):从内存卡中载入样本。
• Export SAMPLE(导出样本):将样本写入内存卡。
• Export ALL SAMPLE(导出所有样本):将 electribe
sampler中保存的所有样本作为“所有样本数据”写入内
存卡。写入到内存卡中的“所有样本数据”将在
electribe sampler下次启动时自动载入,关机时全部消
失。
内存卡中“所有样本数据”将在启动时自动载入。
既然 electribe sampler中的所有样本数据能够被
覆盖,要小心不要误更换样本,例如切换内存卡
时。
• Export ALL PATTERN(导出所有模式):将所有模式写
入内存卡。
• Import ALL PATTERN(导入所有模式):载入所有通过
EXPORT ALL PATTERN 命令写入内存卡的模式。所有模式
都将被覆盖。
附录
1.故障排除
显示屏不亮。
□ 是否已安全牢固连接交流电适配器?
□ 是否已将交流电适配器连接至电源插座?
□ 电池电量是否充足?
没有声音!
□ 是否将放大器、调音台或耳机正确连接至插孔?
□ 是够接通了放大器或调音台的电源并且正确设置?
□ 是否将 electribe/electribe sampler 的 Volume 旋钮
旋转至适当的音量?
播放无法停止!
□ 乐段将保持播放状态,重复所选乐段。播放结束时按 停
止 按钮。
声音/运动序列动作与我在编辑期间创建的不同!
□ 编辑完毕后是否进行了写入操作?
→ 当您编辑完毕后,在每个模式中切换乐段时或者在关闭电
源时要将数据写入内存卡。
我无法控制 MIDI!
□ 是否正确连接了 MIDI 线缆?
如果从外部设备播放本系统:
□ 是否在全局模式中正确设置了 MIDI 通道?(→ p.86)
如果使用本系统播放外部设备:
□ 是否为接收设备和本系统设置了相同的 MIDI 通道?
使用触发垫时听不到声音。
□ 编辑后是否保存了声部?(→ p.85)
□ 是否打开了 Keyboard 按钮?
□ 是否禁用了运动序列?(→ p.84)
我无法使用内存卡。
□ 是否在 electribe/electribe sampler 中格式化过该内
存卡?
→ 应该在使用前使用本系统重新格式化被计算机或数码相机
格式化过的内存卡。(→ p.86)
□ 是否正确插入了内存卡?
→ 取出并重新插入内存卡。(→ p.81)
□ 本系统是否支持该卡的容量?
→ 本系统支持从 512MB 至 2GB 的 SD 卡和 32GB 或更低的
SDHC 卡。
2.错误消息
按 Exit 按钮可关闭消息窗口。
Card Error
内存卡已损坏。
→ 备份内存卡上的所有文件。
→ 将内存卡上的所有文件保存至计算机等,然后使用本系统
格式化内存卡。完成后,将所有数据保存至新格式化的内
存卡。
Protected
当您将数据保存至内存卡时数据保护已开启。
→ 如果内存卡上的写保护开关已锁定,解除锁定。
89
Page 90

Card Full
内存卡没有足够的可用空间。
→ 删除内存卡上的文件,安全清理出足够的空间,然后重新
写入或保存数据。
Event Over
事件的数量超过可以录制的事件的最大数量。
File Error
无法正确读取/写入文件。
Memory Full
当您从内存卡载入数据,或将数据复制至本系统时,本系统
没有足够的内存容量。
→ 擦除不需要的数据增加可用空间容量。
Motion Seq Full
无法录制运动序列。
→ electribe/electribe sampler可以支持最多 24 个运动
序列乐段。擦除任何不需要的运动,然后再次尝试添加运
行序列。
技术规范
声音的最大数量(整个乐段):
最大24 声音(整个样式中同时播放的
声音数量取决于振荡器、过滤器或插
入效果器。)
声音最大数量(每个声部):
最大 4 声音
连接端子: Audio Out L 插孔(单声道 1/4” 耳
机插孔),Audio Out R 插孔(单声
道 1/4” 耳机插孔),Audio In j插
孔(立体声 1/8” 迷你耳机插孔),
耳机插孔(立体声 1/8” 迷你耳机插
孔),Sync In 插孔,Sync Out 插
孔,MIDI OUT 插孔,MIDI IN 插
孔,USB 连接端子(micro USB B
类)
电源: 交流电适配器(DC 9V
节 AA 电池(碱性或镍氢电池)
电池寿命: 大约五小时(节电:开启,镍氢电
池)
当前功耗: 500 mA 或更少
(宽 x 长 x 高)
尺寸
重量: 1.6 kg
运行温度: 0–+40 ˚C(非冷凝)
随机物品: 用户手册、交流电适配器、MIDI 转换
* 技术规范和外观如有变更,恕不另行通知。
: 339 x 189 x 45 mm
线缆 x 2
),六
90
Page 91

安全上のご注意
ご使用になる前に必ずお読みください
ここに記載した注意事項は、製品を安全に正しくご使用いただき、
あなたや他の方々への危害や損害を未然に防ぐためのものです。
注意事項は誤った取り扱いで生じる危害や損害の大きさ、または切
迫の程度によって、内容を「警告」、「注意」の 2 つに分けています。
これらは、あなたや他の方々の安全や機器の保全に関わる重要な内
容ですので、よく理解した上で必ずお守りください。
火災・感電・人身障害の危険を防止するには
図記号の例
記号は、注意(危険、警告を含む)を示しています。記
号の中には、具体的な注意内容が描かれています。左の図は「一
般的な注意、警告、危険」を表しています。
記号は、禁止(してはいけないこと)を示しています。記
号の中には、具体的な注意内容が描かれることがあります。
左の図は「分解禁止」を表しています。
記号は、強制(必ず行うこと)を示しています。記号の中
には、具体的な注意内容が描かれることがあります。左の図
は「電源プラグをコンセントから抜くこと」を表しています。
以下の指示を守ってください
・風呂場、シャワー室で使用や保管はしない。
・雨天時の野外のように、湿気の多い場所や水滴のかかる場所で、
使用や保管はしない。
・本製品の上に、花瓶のような液体が入ったものを置かない。
・本製品に液体をこぼさない。
・濡れた手で本製品を使用しない。
注 意
この注意事項を無視した取り扱いをすると、傷害を負う可能性
または物理的損害が発生する可能性があります
・正常な通気が妨げられない所に設置して使用する。
・ラジオ、テレビ、電子機器などから十分に離して使用する。
ラジオやテレビ等に接近して使用すると、本製品が雑音を受
けて誤動作する場合があります。また、ラジオ、テレビ等に
雑音が入ることがあります。
・外装のお手入れは、乾いた柔らかい布を使って軽く拭く。
・AC アダプターをコンセントから抜き差しするときは、必ずプラ
グを持つ。
・長時間使用しないときは、電池の液漏れを防ぐために電池を抜
く。
・電池は幼児の手の届かないところへ保管する。
・長時間使用しないときは、AC アダプターをコンセントから抜く。
警 告
この注意事項を無視した取り扱いをすると、死亡や重傷を負う
可能性が予想されます
・AC アダプターのプラグは、必ず AC100V の電源コンセントに
差し込む。
・AC アダプターのプラグにほこりが付着している場合は、ほこり
を拭き取る。
感電やショートの恐れがあります。
・本製品はコンセントの近くに設置し、AC アダプターのプラグへ
容易に手が届くようにする。
・次のような場合には、直ちに電源を切って AC アダプターのプ
ラグをコンセントから抜く。
○ AC アダプターが破損したとき
○ 異物が内部に入ったとき
○ 製品に異常や故障が生じたとき
修理が必要なときは、コルグお客様相談窓口へ依頼してくだ
さい。
・本製品を分解したり改造したりしない。
・修理、部品の交換などで、取扱説明書に書かれてること以外は
絶対にしない。
・AC アダプターのコードを無理に曲げたり、発熱する機器に近づ
けない。また、AC アダプターのコードの上に重いものをのせな
い。
コードが破損し、感電や火災の原因になります。
・大音量や不快な程度の音量で長時間使用しない。
大音量で長時間使用すると、難聴になる可能性があります。
万一、聴力低下や耳鳴りを感じたら、専門の医師に相談して
ください。
・本製品に異物(燃えやすいもの、硬貨、針金など)を入れない。
・温度が極端に高い場所(直射日光の当たる場所、暖房機器の近く、
発熱する機器の上など)で使用や保管はしない。
・振動の多い場所で使用や保管はしない。
・ホコリの多い場所で使用や保管はしない。
・付属の AC アダプターは、他の電気機器で使用しない。
付属の AC アダプターは本製品専用です。他の機器では使用
できません。
・他の電気機器の電源コードと一緒にタコ足配線をしない。
本製品の定格消費電力に合ったコンセントに接続してくださ
い。
・電池を過度の熱源(日光、火など)にさらさない。
・スイッチやツマミなどに必要以上の力を加えない。
故障の原因になります。
・外装のお手入れに、ベンジンやシンナー系の液体、コンパウン
ド質、強燃性のポリッシャーは使用しない。
・不安定な場所に置かない。
本製品が転倒してお客様がけがをしたり、本製品が故障する
恐れがあります。
・本製品の上に乗ったり、重いものをのせたりしない。
本製品が転倒または損傷してお客様がけがをしたり、本製品
が故障する恐れがあります。
・本製品の隙間に指などを入れない。
お客様がけがをしたり、本製品が故障する恐れがあります。
データについて
操作ミス等により万一異常な動作をしたときに、メモリー内容が消
えてしまうことがあります。大切なデータは、あらかじめ他のメディ
ア等へセーブしておいてください。データの消失による損害につい
ては、当社は一切の責任を負いかねますのでご了承ください。
著作権について
著作権者から許諾を得ていない著作物を、個人、家庭内、またはそ
の他のこれに準ずる限られた範囲以外で使用した場合、著作権侵害
となり、損害賠償を含む補償を負う場合があります。そのような著
作物を録音したものはもちろん、著作物に手を加えて作られたもの
にも、著作権者の権利が含まれていますので、これら成果物の転載、
配信などは、著作権侵害となります。著作権侵害によって発生した
損害賠償などは、当社は一切の責任を負いかねます。使用者自身の
権利について不明確なときは、法律の専門家に相談してください。
すべての製品名および会社名は、各社の商標または登録商標です。
※
91
Page 92

目次
はじめに............................................................. 93
1.各部の名称........................................................................93
2. 接 続...................................................................................96
3.電源を接続する.................................................................97
4.メモリー・カードを入れる、取り出す.............................. 97
音を出す.............................................................98
1.電源の入れ方、切り方.......................................................98
2.基本操作............................................................................ 98
3.パターンの再生.................................................................98
4.パートを選ぶ..................................................................... 98
演奏する.............................................................99
1.トリガー・パッドで演奏する............................................ 99
2.タッチ・パッドで演奏する.............................................. 100
3.ゲート・アルペジエーターを使う...................................100
4.マスター・エフェクトを使う..........................................100
5.パターン・セットで演奏する..........................................101
6.BPM(テンポ)を設定する............................................ 101
7.ノブで音に変化を加える.................................................101
演奏を録音する.................................................101
1.リアルタイム・レコーディング....................................... 101
2.ステップ・エディット..................................................... 101
3.ノブやボタンの動きを録音する(モーション・シーケンス)
......................................................................................102
4.パターンを保存する........................................................102
その他の設定....................................................103
1.メトロノームを設定する.................................................103
2.電池の種類を設定する.....................................................103
3.LCD コントラストを調節する.........................................103
4.電池を長持ちさせる........................................................ 104
5.オート・パワー・オフを設定する...................................104
6.グローバル MIDI チャンネルを設定する......................... 104
7.外部機器に同期して演奏する.......................................... 104
8.メ モリー ・カードを使 う .................................................104
9.イベント・レコーダーを使う.......................................... 105
10.ユーザー・データを初期化する..................................... 105
electribesampler について...........................105
1.electribesampler の機能..............................................105
2.ノブやボタンの機能の変更..............................................105
サンプラー機能を使う.......................................106
1.オーディオ・インの音をサンプリングする.....................106
2.リサンプリング................................................................106
3.サンプルをエディットする.............................................. 107
4.サンプルを読み込み / 書き出しする...............................107
付録..................................................................108
1.故障かなと思ったら........................................................ 108
2.エラー・メッセージ........................................................108
おもな仕様........................................................109
パターンをエディットする.................................103
1.パートをミュートする.....................................................103
2.パートを消去する............................................................ 103
3.パートをコピーする........................................................ 103
4.パターンの設定を変更する..............................................103
92
Page 93

はじめに
このたびはコルグ・ミュージック・プロダクション・ステーション
electribe/electribe sampler をお買い上げいただき、誠にありが
とうございます。
本機を末永くご愛用いただくためにも、取扱説明書をよくお読みに
なって正しい方法でご使用ください。また、取扱説明書は大切に保
管してください。
1. 各部の名称
トップ・パネル
1
2 3
4
5
6
7
electribe/electribe sampler は、オリジナリティーのある音楽を
生み出すことができるダンス・ミュージック用プロダクション・ス
テーションです。本体上のノブやタッチ・パッドを使って感覚的に
音色をエディットすることができ、1 台で簡単にリズム、フレーズ・
パターンを作成することができます。
electribe sampler の 基 本 操 作 は electribe と 共 通 で す。
electribesampler の追加説明については「electribesampler に
ついて」(→ p. 105 )と「サンプラー機能を使う」(→ p.106)
を参照してください。
TIP
本文中のイラストは electribe を使用しています。
8
9
11
10
1. 電源ボタン
電源をオン、またはオフにします。
2. Volume ノブ
LineOut 端子や、ヘッドホン端子から出力される音量を調節
します。
3. InputLevel ノブ
AudioIn 端子からの入力音の入力レベルを調節します。
4. ディスプレイ
パターンやパートの情報やパラメーターの設定内容を表示しま
す。
5. トランスポート・セクション
(Rec) ボタン
リズムやフレーズ、ノブの動きを録音します。録音中にこのボ
タンを押すと、録音を解除して、演奏を続けます。
(Stop) ボタン
パターンの演奏を停止します。
(Play/Pause) ボタン
パターンの演奏開始、一時停止をします。
Tap ボタン
入力したいテンポの 4 分音符に合わせて、このボタンを数回押
すと、そのテンポを検出し設定します。
12
13
6. タッチ・パッド・セクション
タッチ・パッド
ゲート・アルペジエーターやタッチ・スケール機能を使った演
奏や、マスター・エフェクトをコントロールするときに使いま
す。
GateArp ボタン
ゲート・アルペジエーター機能をオン、またはオフにします。
TouchScale ボタン
タッチ・スケール機能をオン、またはオフにします。
MasterFx ボタン
マスター・エフェクト・コントロール機能をオン、またはオフ
にします。
MFXHold ボタン
MasterFX ボタンをオンにしたときに、タッチ・パッドに触
れているときのマスター・エフェクトの効果状態を、指を離し
ても保持します。
TIP
MFX Hold ボタンのオン、オフの状態は、パターンに記憶
することができます。
7. コモン・セクション
Value ノブ
現在ディスプレイに表示されているパラメーターの値を変更し
ます。
93
Page 94

<、>(カーソル)ボタン
エディットしたいパラメーターを選びます。
Menu/Enter ボタン
パターン、パート、グローバル、ユーティリティなどのパラメー
ターの項目を決定したり、パラメーターの設定変更を決定した
りします。
LPF ボタン
フィルターをローパス・フィルターに設定します。
繰り返し押すとフィルターの種類を変更することができます。
HPF ボタン
ハイパス・フィルターに設定します。
繰り返し押すとフィルターの種類を変更することができます。
Exit ボタン
数回押すとエディット画面からパターン選択画面に戻ります。
Shift ボタン
このボタンを押しながら他のボタンやノブと組み合わせて使用
することで、いろいろな機能を実行することができます。
Shiftボタン+<(カーソル):直前の操作を取り消します。( ア
ンドゥ機能 )
Shift ボタン +Write ボタン:パターンに名前をつけて保存す
ることができます。
Shift ボタン +Value ノブ : 値を大幅に、または細かく変更す
ることができます。
TIP
選択しているパラメーターによって異なります。
Write ボタン
パターンとグローバルのデータを本体内部に保存します。グ
ローバル・パラメーターのページで Write ボタンを押した場合
には、グローバル・データを保存します。それ以外のページの
場合にはパターン・データを保存します。
8. エディット・セクション
パートごとのパラメーターをエディットします。
Osillator
ノコギリ波、矩形波、ノイズ、PCM などの波形を選ん
だり、波形の音程などを調節します。
(electribesampler:Sample)
BPF ボタン
バンドパス・フィルターに設定します。
繰り返し押すとフィルターの種類を変更することができます。
Modulation
LFO や EG で音色に時間的な変化を与えるときに使
用します。
Modulation ノブ
モジュレーションの種類を選びます。
Depth ノブ
モジュレーションのかかり具合を調節します。
Speed ノブ
モジュレーションのスピードを調節します。
Amp/EG
音量、定位を調整するアンプ、時間的変化を与
えるエンベロープ・ジェネレーター(EG)、マ
スター・エフェクト・センドを設定します。
Level ノブ
パートの音量を調節します。
Pan ノブ
パートの定位を調節します。
Oscillator ノブ
(electribesampler:Sample ノブ)
波形を選択します。
Pitch/Glide ノブ
ピッチ(音程)を調節します。Shift ボタンを押し
ながらノブを回すとシンセ音では2音間のピッチを
滑らかに変化させる (Glide) 時間を調節します。
Edit ノブ
音の鳴り方を調整します。波形のタイプによって効果が異なりま
す。
Filter
フィルターは、オシレーターの周波数成分
を削ったり強調したりすることで、音色(音
の明暗など)を調節するときに使用します。
Filter ノブ
カットオフ周波数を調節します。
Resonance ノブ
フィルターのレゾナンスを調節します。
EGInt ノブ
Amp/EG セクションで設定したエンベロープ・ジェネレーター
(EG)によってフィルターのカットオフ周波数を時間的に変化
させる量を調整します。
Attack ノブ
音の立ち上がり速度を調節します。
Decay/Release ノブ
音の減衰速度を調節します。
MFXSend ボタン
パートの出力をマスター・エフェクトに送る、送らないを設定
します。このボタンを押すたびにオン(点灯)、オフ(消灯)
が切り替わります。
AmpEG ボタン
アンプのエンベロープを選びます。このボタンを押すたびにオ
ン ( 点灯 )、オフ ( 消灯 ) が切り替わります。オンのときは、音
量が Attack、Decay/Release ノブで 設定した EG に従って
変化します。オフのときは、EG に従わない設定(オルガン・
エンベロープ固定)になります。
InsertFx
サウンドに歪みやうねりなどのさまざまな音響効果を加
えるときに使用します。
InsertFx ノブ
インサート・エフェクトのタイプを選びます。
Edit ノブ
インサート・エフェクトの掛かり具合を調整します。
エフェクトのタイプによって効果が異なります。
94
Page 95

IFXOn ボタン
インサート・エフェクトを使用するかしないかを選びます。こ
のボタンを押すたびにオン ( 点灯 )、オフ ( 消灯 ) が切り替わ
ります。
9. ステップ・ボタン
シーケンスの位置や octave などが、現在のトリガー・パッド
の機能に合わせて表示されます。ボタンを押すと、編集したい
シーケンスの位置や octave を変更することができます。
10. パート・エディット・セクション
<Part、Part> ボタン
操作するパートを選択します。現在のパートがディスプレイに
表示されます。
PartMute ボタン
このボタンがオン ( 点灯 ) のとき、トリガー・パッドを押すと
そのパートがミュートします。このときトリガー・パッドがオ
フ ( 消灯 ) となり、ミュートしたパート・ボタンが消灯します。
消灯しているパートのトリガー・パッドを押した場合はミュー
トが解除(点灯 ) します。
PartErase ボタン
演奏時に Part Erase ボタンを押してからトリガー・パッドを
押すと、その間選択しているパートの発音を消すことができま
す。
12.
トリガー・パッド
パッド・モード・セクションの設定に応じて演奏するときに使
います。
13.
LED(底面)
再生しているパターンに合わせて底面の LED が点灯します。
11.
パッド・モード・セクション
トリガー・パッドの機能を選びます。
Trigger ボタン
このボタンがオン ( 点灯 ) のとき、トリガー・パッドを叩く
と各パートの音が発音します。発音の仕方を、TRIGGER
MODE パラメーターで設定することができます。
Sequencer ボタン
このボタンがオン ( 点灯 ) のとき、ステップ入力モードでトリ
ガー・パッドを使用します。
Keyboard ボタン
こ の ボ タ ン が オ ン ( 点 灯 ) の と き 、 ト リ ガ ー・パ ッ ド を キ ー ボ ー
ドとして使用します。パターンごとにキーやスケールを設定す
ることができます。
Chord ボタン
このボタンがオン ( 点灯 ) のとき、トリガー・パッドをコード・
パッドとして使用します。パターンごとにコードのバリエー
ションやキーやスケールを設定することができます。
StepJump ボタン
このボタンがオン ( 点灯 ) のとき、シーケンサー再生中にステッ
プ 1 ~ 16 のいずれかのボタンを押すと、そのステップに瞬時
に移動します。複数のボタンを押すと押しているステップを順
番に再生します。
PatternSet ボタン
このボタンがオン ( 点灯 ) のとき、トリガー・パッドを押すと、
それぞれのトリガー・パッドに登録したパターンに切り替わり
ます。このボタンを押しながらトリガー・パッドを押すと、現
在選択中のパターンをトリガー・パッドに割り当てることがで
きます。
95
Page 96

2. 接続
98
ミキサー、
パワード・モニター
CD プレーヤー
MP3 プレーヤー
1 2 3 4 5 6 7 8 9 10 11 12 13 14 15 16
1 2 3 4 5 6 7
付属変換ケーブル
MIDI IN MIDI OUT
付属ACアダプター
ヘ ッド ホ ン
接続は、必ず電源を切った状態で行ってください。不注意
な操作を行うと、スピーカー・システムなどを破損したり、
誤動作を起こす原因となりますので、十分に注意してくだ
さい。
TIP
初めて Windows コンピューターに接続すると、自動的に
OS 内蔵のドライバーがインストールされます。
Windows OS 内蔵の標準 USB-MIDI ドライバーは、同時
に複数のアプリケーションから本機を使用することができ
ません。複数のアプリケーションで本機を同時に使用する
場合は、KORGUSB-MIDI ドライバーをインストールす
る必要があります。コルグ・ホームページ(http://www.
korg.com/)より KORGUSB-MIDI ドライバーをダウン
ロードし、付属のドキュメントに従ってインストールして
ください。
1. AudioOutL/R 端子
ミキサーやパワード・モニターなどの音声入力端子に接続しま
す。Audio Out R 端子にケーブルを接続せずに、 AudioOut
L 端子のみに接続した場合は、L/R の音がミックスされモノラ
ルで出力します。
TIP
出力信号はモノラルですが、モノラル・フォーン・プラグ、
またはステレオ・フォーン・プラグ ( 不均衡 ) の両方に対
応しています。
2. AudioIn 端子
シンセサイザーやオーディオ機器などの音声出力端子に接続し
ます。
TIP
グローバル・メニューの AUDIO IN THRU を On にする
と入力した音声をミックスすることができます。
4. SyncIn 端子
グローバル・メニューの CLOCKMODE で“Auto”または“Ext.
Sync”に設定した場合にコルグ volca やその他のアナログ・シー
ケンサーなどの SYNC アウトやオーディオ・アウトから出力さ
れるパルス信号を SyncIn 端子に接続すると、内部のステップ・
クロックが無効になり、入力されたパルスに応じてステップが
進みます。
TIP
SYNCIN の有効 / 無効、周期、検出するパルスの極性は
グローバル・メニューで設定します。詳しくは「パラメー
ター・ガイド」を参照してください。
5. MIDIIN/OUT 端子
付属の変換ケーブルを使用することで、MIDI 機器と接続する
ことができます。
6. ヘッドホン端子
ヘッドホン(ステレオ・ミニ・プラグ)を接続します。
7. DC9V 端子
付属のAC アダプターを接続します。
8. USB 端子
コンピューターと接続します。
9. メモリー・カード・スロット
メモリー・カードを使って、演奏やデータをセーブ(保存)し
たり、ロード(読み出し)したりすることができます。(→ p.104:
メモリー・カードを使う)
3. SyncOut 端子
8 分または 16 分音符毎に 15ms のパルスを 5V で出力します。
コルグ volca やその他のアナログ・シーケンサーなどを本機に
同期する場合に使用します。
TIP
パルスの極性と周期はグローバル・メニューで設定します。
96
Page 97

3. 電源を接続する
電池を使用する場合
底面の電池ケース蓋を開けて、単 3 形乾電池 6 本を、電池の極性
に注意して入れてください。
使用できる電池
単 3 形アルカリ乾電池、またはニッケル水素電池を使用すること
ができます。
TIP
残量の検出、表示を正確におこなうためにグローバル・メ
ニューの BATTERYTYPE ページでお使いの電池の種類
を設定してください。( → p.103:電池の種類を設定する )
残量表示
ディスプレイに電池の残量を示すバッテリー・インジケーター (
)
が表示されています。バッテリー・インジケーターに が表示
されているときは、電池の残量がほとんどありません。お早めに新
しい電池と交換してください。
TIP
電池使用時は電池の消費を抑えるためにパワー・セーブ・
モードになります。パワー・セーブ・モードを無効にした
いときはグローバル・メニューの“Power Save Mode”
ページで設定することができます。(→p.104:電池を長持ち
させる)
電池の交換時は電源を切ってください。
使えなくなった電池は、すぐに取り出してください。また、
長時間使用しないときは、電池を外しておいてください。
AC アダプターを使用する場合
付属の AC アダプターを本体の DC9V 端子に接続し、AC アダプ
ターをコンセントに差してください。
AC アダプターは、必ず付属のものを使用してください。
指定以外の AC アダプターを使用した場合、故障の原因と
なります。
電源は必ず AC100V を使用してください。
4. メモリー・カードを入れる、取り出す
メモリー・カードを使って、演奏やデータをセーブ(保存)したり、
ロード(読み出し)したりすることができます。
本機の電源を入れたまま、メモリー・カードの抜き差しを
しないでください。本体やメモリー・カードのデータが失
われる、またはメモリー・カードが使えなくなる可能性が
あります。
入れ方
1. ディスプレイの表示、LED がすべて消えて、電源が切れてい
ることを確認します。
2. メモリー・カードを入れるときはカチッと音がするまでメモ
リー・カードを押し込みます。
メモリー・カードは挿入方向や表裏に注意し、確実に奥まで
差し込んでください。また、無理な挿入はしないでください。
取り出し方
1. ディスプレイの表示、LED がすべて消えて、電源が切れてい
ることを確認します。
2. メモリー・カードを取り出すときはカチッと音がするまでメモ
リー・カードを押し込み、指を離します。
メモリー・カードが手前に出てきたら、取り出します。
本機で使えるメモリー・カード
本 機 が 使 用 で き る メ モ リ ー・ カ ー ド は、512MByte ~
2GByte の SD カードと最大 32GByte までの SDHC カード
です。
TIP
本機では SDXC カードを使用することはできません。
メモリー・カードの取り扱いについて
メモリー・カードに付属している取扱説明書をよくお読みくだ
さい。
TIP
メモリー・カードは付属していません。別途お買い求めく
ださい。
97
Page 98

音を出す
パート パラメーター
1. 電源の入れ方、切り方
電源を入れるには、ディスプレイに起動画面が表示されるまで電源
ボタンを押します。本機が起動するとディスプレイにパターン選択
画面が表示されます。
電源を切るには、ディスプレイの表示が消えるまで電源ボタンを押
します。
電源を入れるときには、ボタンやタッチ・パッドなどには
触れないでください。
オート・パワー・オフ機能
本機にはオート・パワー・オフ機能がついています。オート・パワー・
オフ機能は、操作をしない状態が約 4 時間続くと、自動的に電源
が切れる機能です。
TIP
この機能を無効にするには、グローバル・メニューの
AUTOPOWEROFF を“O”に設定します。(→p.104:オー
ト・パワー・オフを設定する)
2. 基本操作
3. パターンの再生
パターンとは
パターンとは、16 のパートで作るフレーズを組み合わせて、一区
切りの演奏に仕上げたものです。
本機は 250 のパターンを作成し保存することができます。1 つの
パターンは 16 のパートとマスター・エフェクトから成り立ってい
ます。
パターンを選ぶ
1. パターン選択画面を表示します。
2. Value ノブを操作して、パターンを選択します。
TIP
他の画面を表示しているときは、Exit ボタンを数回押すと
パターン選択画面が表示されます。
TIP
パターンは再生中にも変更することができます。
パターンを再生する
1. Play/Pause ボタンを押すと、現在選択しているパターンを再
生します。
2. パターンは先頭から再生を開始し、そのパターンの最後まで演
奏すると先頭に戻り、繰り返し再生されます。
3. Stop ボタンを押すと再生が停止します。
画面の操作方法
パターン選択画面で<、>ボタンを押すと、現在選択中のパートの
設定を確認することができます。
パターン選択画面で Menu/Enter ボタンを押すとエディット・メ
ニューに入ります。
<、>ボタンを押して、設定するパラメーターを選択します。
Value ノブでパラメーターの値を設定します。
Exit ボタンを数回押すとエディット・メニューからパターン選択画
面に戻ります。
TIP
パラメーターの詳細は「パラメーター・ガイド」を参照し
てください。
4. パートを選ぶ
パートとは
パートとは、音色とリズムまたはフレーズ、エフェクトのオン / オ
フ、モーション・シーケンス等で構成されたパターンを作るための
最小単位です。パートごとに音色を加工することができ、リズム、
フレ ー ズ・パ ター ン 、 モ ーショ ン・シ ー ケ ンス 、 イ ン サート・エ フ ェ
クト等もパートごとに記録することができます。
パートの音を確認する
1. Trigger ボタンを押してボタンを点灯させます。
2. トリガー・パッドを押すと、そのパートが選択され発音し、音
色を確認することができます。
Trigger
ボタン
98
トリガー・パッド
Page 99

操作するパートを選ぶ
<Part、Part> ボタンを使って、操作するパートを選択します。
選択しているパートのトリガー・パッドが青色に点灯します。
エディット・セクションのノブを操作すると選んだパートの音色が
変化します。
<Part, Part>
ボタン
トリガー・パッド
演奏する
1. トリガー・パッドで演奏する
トリガー・パッドを使って音を鳴らすことができます。
パッド・モードを変更することで、さまざまな演奏ができます。
鍵盤のように使用する
1. Keyboard ボタンを押します。
2. <Part、Part> ボタンを使って、パートを選びます。
<Part, Part>
ボタン
Keyboard
ボタン
トリガー・パッド
ステップ・ボタン
3. トリガー・パッドを使って演奏します。
Key = C、Scale=Ionian のとき
C D E F G A B C
C D E F G A B C
TIP
どのような音が鳴るかは エディット・メニューの KEY と
SCALE で設定することができます。2 つ以上のパッドを
同時に押した場合、VOICEASSIGN の設定によって発音
が異なります。
4. ステップ・ボタンで音域を変更します。
ステップ・ボタン 1 を押すごとに 1 オクターブずつ下がり、ス
テップ・ボタン 4 を押すごとに 1 オクターブずつ上がります。
点灯しているステップ・ボタンの位置で音域を示しています
点滅点滅 遅い点滅遅い点滅
押すたびに 1 オクターブ下がります
トリガー・パッドでコード演奏を行う
1. Chord ボタンを押します。
2. トリガー・パッドを使って演奏します。
TIP
エディット・メニューの VOICEASSIGN を Poly1 または
Poly2 に設定したパートを選んでください。
TIP
エディット・メニューの CHORD SET で、コードのバリ
エーションが変わります。
押すたびに 1 オクターブ上がります
99
Page 100

Chord
ボタン
Gate Arp
ボタン
トリガー・パッド
2. タッチ・パッドで演奏する
1. TouchScale ボタンを押し、ボタンを点灯させます。
2. タッチ・パッドを指でこすったり、タップ(軽く叩く)して、
演奏します。
Touch Scale
タッチ・パッド
TIP
TIP
TIP
ボタン
タッチ・パッドの表面をとがったものでこすったり、押し
たりするとキズがつきますので、必ず指先で操作してくだ
さい。
エディット・メニューの Key、Scale で発音の仕方を設定
することができます。操作できる音域の範囲はグローバル・
メニューの TOUCHSCALERANGE で設定できます。
Keyboard ボタンをオンにするとステップ・ボタンで音域
を変更することができます。
選択したパートの設定によっては、音程が変わらない場合
があります。
タッチ・パッド
3. タッチ・パッドで発音の仕方が変化します。
X 軸:ゲート・スピードを操作します。
Y 軸:発音の長さを操作します。
トリガー・パッド
Y
X
TIP
ゲート・アルペジエーターのパターンは、エディット・メ
ニューの GATEARP ページで変更することができます。
4. マスター・エフェクトを使う
1. MasterFx ボタンを押します。
2. マスター・エフェクトをかけたいパートを選択し、MFXSend
ボタンを押してオンに設定します。
3. タッチ・パッドに触ると、マスター・エフェクトの効果がかか
ります。
TIP
エフェクトのタイプを変更したい場合は、エディット・メ
ニューの MFXTYPE ページでマスター・エフェクトのタ
イプを選びます。
タッチ・パッドを触る位置によっては、ノイズが出る場合
があります。
Master Fx
ボタン
MFX Send
ボタン
3. ゲート・アルペジエーターを使う
選択したパートの音を設定したテンポやリズムに合わせて自動的に
演奏します。ゲート・タイムで 1 音ごとの長さを変化させることも
できます。
ゲート・アルペジエーターで演奏する
1. GateArp ボタンを押し、ボタンを点灯させます。
2. Trigger ボタンを押して、演奏するパートのトリガー・パッド
を押しながらタッチ・パッドを操作します。
または Keyboard ボタンや Chord ボタンを押してから、トリ
ガー・パッドで音の高さを選びながらタッチ・パッドを操作す
ることもできます。
100
タッチ・パッド
トリガー・パッド
 Loading...