

Page 1
CONCERT-800
OWNER'S MANUAL
Page 2

I M P O R T A N T S A F E T Y I N S T R U C T I O N S
WARNING —When using electric products, basic precautions should always be followed,
including the following:
1. Read all the instructions before using the product2- To reduce the risk of injury, close supervision is necessary when a product is
used near children.
3- Do not use this product near water - for example, near a bathtub, washbowl,
kitchen sink, in a wet basement, or near a swimming pool, or the like-
4- This product should be used only with a cart or stand that is recommended by the
manufacturer-
5- This product, either alone or in combination with an amplifier and headphones or
speakers, may be capable of producing sound levels that could cause permanent
hearing loss- Do not operate for a long period of time at a high volume level or
at a level that is uncomfortable. If you experience any hearing loss or ringing
in the ears, you should consult an audiologist-
6- The product should be located so that its location or position does not
interfere with its proper ventilation-
7- The product should be located away from heat sources such as radiators, heat
registers, or other products that produce heat-
8- The product should be connected to a power supply only of the type described in
the operating instructions or as marked on the product.
9- The power-supply cord of the product should be unplugged from the outlet when
left unused for a long period of time-
10- Care should be taken so that objects do not fall and liquids are not spilled
into the enclosure through openings.
11- The product should be serviced by qualified service personnel when:
A- The power-supply cord or the plug has been damaged: or
B- Objects have fallen, or liquid has been spilled into the product: or
C. The product has been exposed to rain: or
D. The product does not appear to operate normally or exhibits a marked change
in performance: or
E- The product has been dropped, or the enclosure damaged.
12- Do not attempt to service the product beyond that described in the user-mainte
nance instructions. All other servicing should be referred to qualified service
personnel.
S A V E T H E S E I N S T R U C T I O N S
CAUTION
RISK OF ELECTRIC SHOCK
A
CAUTION: TO REDUCE THE RISK OF ELECTRIC SHOCK,
DO NOT REMOVE COVER (OR BACK).
NO USER-SERVICEABLE PARTS INSIDE.
REFER SERVICING TO QUALIFIED SERVICE PERSONNEL.
DO NOT OPEN
A
Page 3

C o n t e n t s
Precautions
Names of the Parts
Before Playing Your C-800
Basic Keyboard Play
Using the Pedals
Transposition and Pitch Control
Using MIDI
Using Multi-Mode Play
Setting MIDI Functions
Using the Program Change Function
Troubleshooting
Specifications, Options
.............................................
.......................................
...............................
.....................................
.........................................
...............................................
...................................
...................................
.........................................
.................................
P r e c a u t i o n s
.........................
........................
2
3
5
5
7
8
9
10
15
17
18
19
о c a t ion
Do not use the C-800 for an extended time in locations subject to strong sunlight,
unusually high or low, temperatures or humidity, or in sandy or dusty locations.
Be sure to use only a 110/120 volt AC power source. Also, plugging several units
into the same wall outlet can cause noise or reduce sound quality.
Input/Output Jacks and Connecting Cables
The rear panel audio jacks are standard RCA phono jacks. Use only cables equipped
with standard phono plugs.
andle Controls Gently
Don’t use force when operating the controls,
leaning
When cleaning the case, be sure to use a soft, dry cloth. Never use solvents such
as benzine or thinner, or abrasives such as cleaning compounds or polishes.
cep the Owner’s Manual in a Safe Place
Read this manual carefully and keep it safely for future reference.
Page 4

N a m e s o f t h e P a r t s
-jir Front Pane
Page 5
N a m e s o f t h e P a r t s
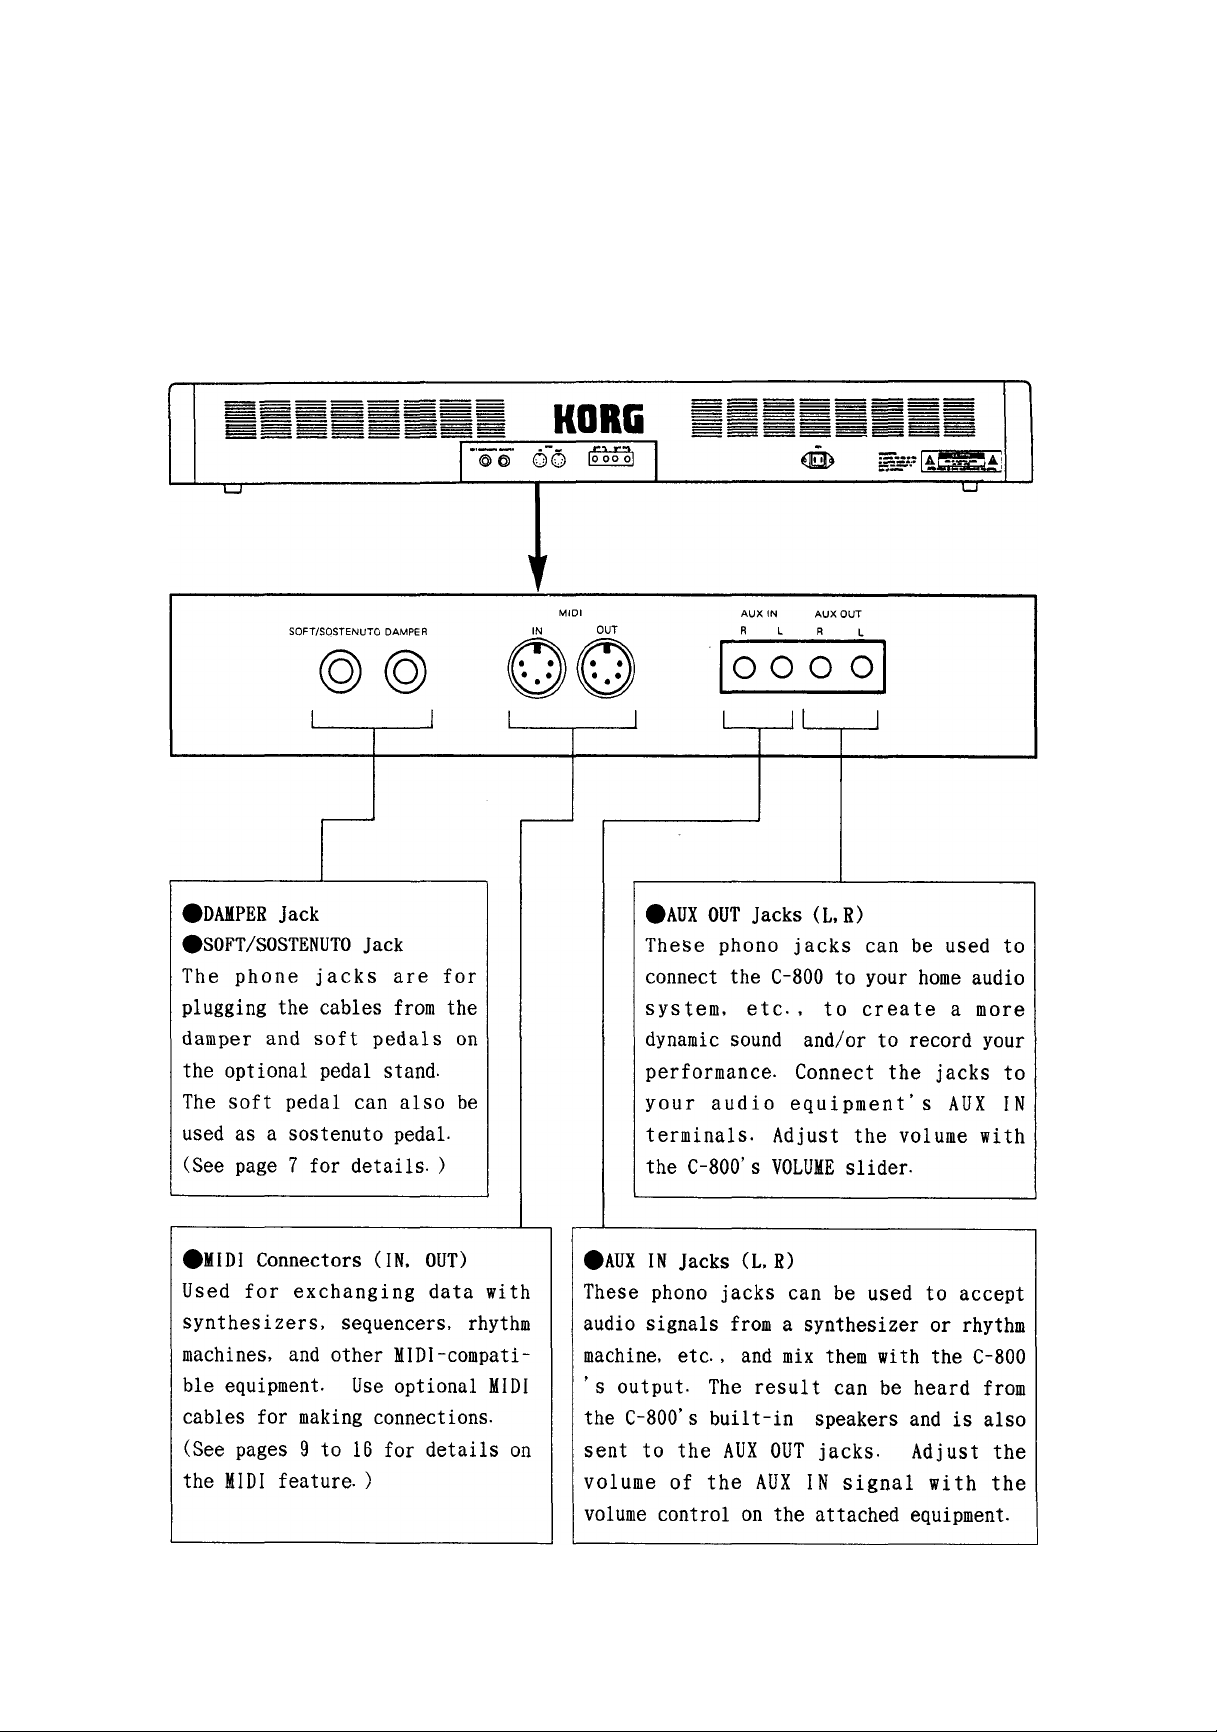
lir Rear Panel
Page 6
B e f o r e P l a y i n g Y o u r C - 8 0 0
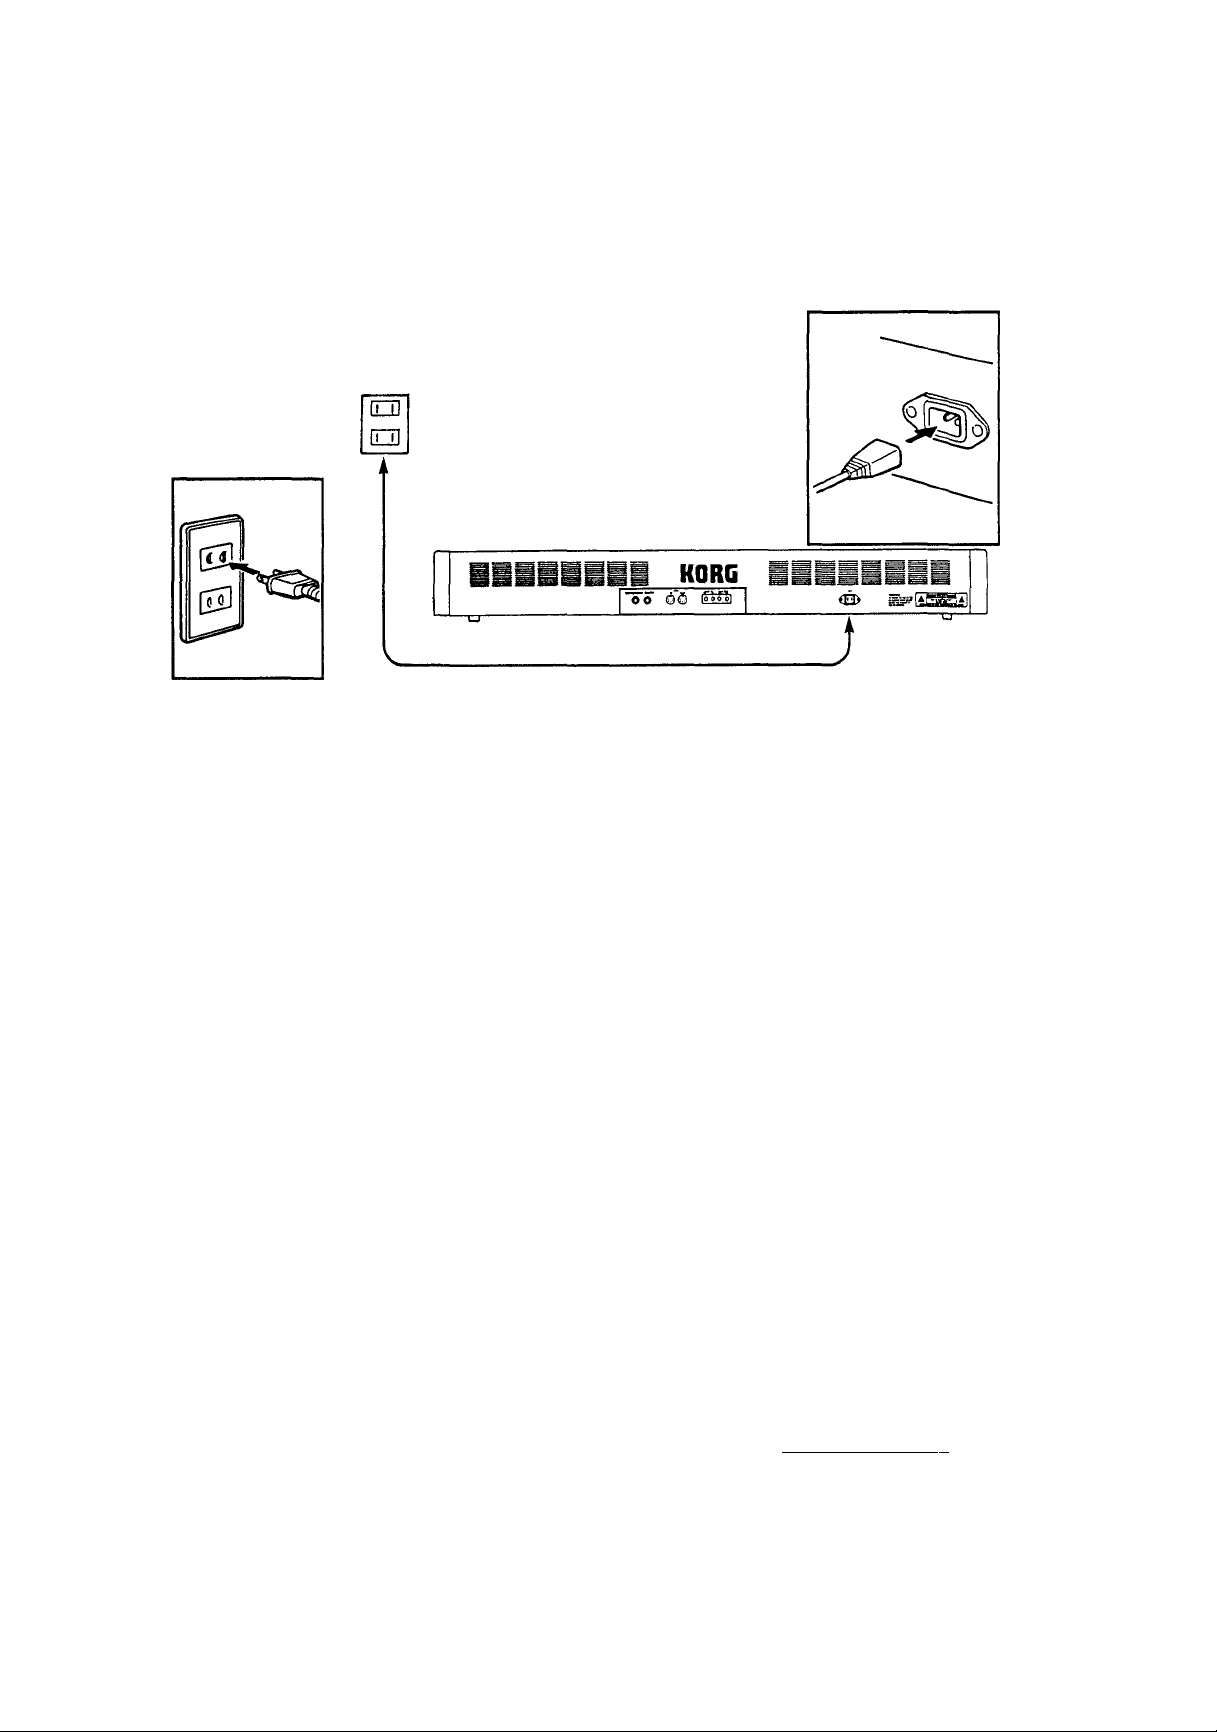
1. Before turning on the power switch, plug the supplied AC line cord into the rear
panel AC power socket and connect it to an AC outlet.
2. When using the optional pedal stand, refer to "Assembling the Stand" and plug
the cables from the damper and soft pedals into the DAMPER and SOFT/SOSTENUTO
jacks respectively.
B a s i c K e y b o a r d P i a y
1. Turn on the POWER Switch.
I I I
\ \ //'
PIANO I
10
I
When power is first turned on, the PIANO
timbre is selected. The keyboard can be
played after a delay of about 2 seconds.
The Surround mode is automatically set
to ROOM.
2* Adjust the VOLUME sMder.
Use the VOLUME slider to adjust the volume
level. At the leftmost ”0" position no
sound will be heard. Moving the slider to
the right increases the volume level.
POWER
I I I I
• VOLUME-
3, To change to another
To change the timbre (instrument voice),
press the switch corresponding to the
desired timbre. Six different timbres are
provided.
t i mb r e
- Jl - ni - II =~ll - I
HARPS! ORGAN VIBES STRINGS «Ir'Î'ngS
-5-
Page 7

B a s i c K e y b o a r d P l a y
Timbre
P r ANO
HAR PS i
OROAN
A bright, spirited concert piano sound.
An authentic classical harpsichord sound.
The deep sound of a church’s pipe organ.
Expi anat ion
VIBES A round, buoyant vibe sound.
STRINGS
PIANO & STRINGS
★ The C-800 allows
(However, only 8
The sound of a large ensemble of violins and other strings-
Piano and strings played together.
up to 16 notes to be played at once.
notes can be played at once with PIANO & STRINGS. )
4. To apply a Surround effect.
The Surround function creates the dynamic
reverberations of a large hall. You’ll feel
as if you’re performing for a big audience.
E f feet
ROOM
Performance in an acoustically "live” room.
STAGE Performance in a small hall or gymnasium-
HALL
★To turn the reverberation function off, press the reverberation button that is
currently lit.
Gives the ambience of a large concert hall-
5. To create a layered effect (two or more timbres together).
The C-800 allows five of the above timbres to be com
□iz
[Adjusting the Balance Between the Layered Timbres]
A handy aspect of the C-800’s layering function is the ability to change the
relative volume level of the two timbres. For example, press the PIANO and VIBES
switches together to select layering, but don’t release the switches yet. Continue
holding the PIANO switch down and release only the VIBES switch. Still holding the
PIANO switch down, press the VIBES switch one or more times to increase the volume
level of the vibes relative to the piano. If you go too far, press and hold the
VIBES switch, release the PIANO switch, and then press the PIANO switch one or
more times to increase the volume level of the piano relative to the vibes.
Releasing both switches locks in the current balance setting. (Pressing the timbre
switches or entering Multi Mode resets the balance to its original setting. )
bined and played two at a time (except PIANO & STRINGS).
This is called "layering”. Pressing two timbre switches
at a time, for example the PIANO and VIBES switches,
allows simultaneous play of both these timbres.
Layering reduces the number of simultaneous notes that
can be played to 8.
Page 8

U s i n g t h e P e d a l s
Here’s how to use the optional pedal stand for
more flexible control of your performance.
The pedal connected to the DAMPER jack is called
the damper pedal, while the pedal connected to
the SOFT/SOSTENUTO jack is called the soft pedal.
It is possible to use the soft pedal as a
sostenuto pedal if you want. These pedals work in
the same way as the pedals of an ordinary piano.
[Using the Soft Pedal as a Sostenuto Pedal]
Í While holding down the MIDI/TRANSPOSE switch, press the soft pedal once to I
switch it over for use as a sostenuto pedal. Repeating the procedure restores
the original soft pedal function.
★The pedal always starts out in soft pedal mode when power is first turned on.
Effect of the Hamper i Pedal
Extends the duration of each note beyond the time when the key is released, for a
rich, connected sound.
lEffect of the Soft Pedal
Keys struck while the pedal is depressed are played at lower volume.
¡Effect of the Sostenuto Pedal
Notes already being played at the instant the pedal is pressed are extended beyond
the time when their keys are released--in effect a selective damper pedal.
[Applying the Damper and Sostenuto Effects to Only One of Two Layered Timbres]
MIDI/TRANSPOSE
Normally when layering, the damper and sos
tenuto pedals affect both of the layered tim
bres. However it is possible to select one or
the other to be independently affected.
Assuming that piano and vibes are selected;
©Pressing the damper pedal while holding
down the MIDI/TRANSPOSE switch directs the
C-800 to apply the damper and sostenuto
effects to the piano (or vibes) timbre only.
(DPressing the pedal again selects the vibes
(or piano) timbre only.
(©Pressing the pedal a third time returns to
the initial state. (See diagram at right. )
©
PLANO VIBES
(D
1
; PIANO
1
©
PLANO VIBES
VIBES
-7-
Page 9

T r a n s p o s i t i o n a n d P i t c h C o n t r o l
Keys used for pitch control Keys used for transposition
Transpos i t i on
Transposition is the ability to shift the keyboard into a higher or lower key. This
is extremely useful when accompanying a vocalist, for instance, to bring a given
song into the vocalist’s range.
The keyboard can be transposed up to one octave either up or down.
Procedure:
Press one the notes in the range F6#
to F7 while holding down the MIDI/
TRANSPOSE switch. The keyboard trans
poses into the selected key; that is.
the selected note may now be played
by pressing C7. and all other notes
are shifted accordingly.
MIDI/TRANSPOSE
(5
Example:
Pressing D7 while holding down the
MIDI/TRANSPOSE switch transposes as
follows:
:t/ ^ V. 1
y :l—d
r
C major D major
^Turning off power returns to the
original key (A = 440 Hz).
\—~0
d
Pitch Control
Pitch control is the ability to make minor adjustments in the C-800’s pitch. This is
especially useful for matching to the pitch of other instruments when playing in an
ensemble. (Range of adjustment is +50 cents. )
Procedure: To raise the pitch.
While holding down the leftmost two
white keys (AO and BO), press one of
the pitch control keys (C4 to B4).
Each press of the key raises the pitch
by about 2 cents.
_________
Procedure: To lower the pitch.
While holding down the leftmost two
keys (AO and AO#), press one of the
pitch control keys. Each press of the
key lowers the pitch by about 2 cents.
_________
Pliillliil
■■fe-
^Turning off power returns the C-800
to the original pitch (A = 440 Hz).
Page 10

U s i n g M I D I
MIDI is an abbreviation for Musical Instrument Digital Interface and is an inter
national standard for connecting a wide variety of electronic musical instruments
together by means of digital signals. Using MIDI to connect several instruments
together allows many instruments to be played simultaneously from the same keyboard,
and also allows equipment such as sequencers and computers to play one or more
instrument automatically.
¡Example 1;
Connect the C-800 to a Korg ’’Concerto” Digital Recorder to allow recording and
playback of your performance.
In this case two MIDI cables are used to connect the C-800 and the Concerto as in
the diagram below. Putting the Concerto into Record mode and playing the C-800
causes the Concerto to record what you play. Next, putting the Concerto into Play
mode causes the C-800 to automatically perform the piece you just recorded. It is
possible to play back the piece at a different speed from the one at which it was
recorded, so you can record a difficult piece slowly and then play it back at
normal speed. Or you can record the left-hand part of a piece separately and play
it back while practicing the right-hand part. (For details, refer to the Concerto
Owner’s Manual. )
¡Example 2:
Connect the C-800 to the Korg ’’Symphony” Orchestra Module to allow multi-layered
performance with a single keyboard. One MIDI cable is used, and is connected as
shown below. You can select the chorus timbre on the Symphony to play in ensemble
with the C-800’s piano timbre. (For details, refer to the Concerto Owner’s Manual. )
-9-
Page 11

U s i n g M u l t i - M o d e P l a y
The term ’’multi mode” refers to the ability to play two or more ’’parts” simul
taneously.
It is often used with a sequencer or computer for automatic playIt is also possible to manually play one of the parts at the same time on the key
board. (When multi mode is not selected, the unit is said to be in single mode. )
(^Two out of the C-800’s five timbres can be selected at a time (except PIANO &
STRINGS), and one of these two may be played on the keyboard.
d)An additional timbre can be added with the Symphony orchestra module, etc., for a
total of three, and any one of these may be played on the keyboard.
Selecting Multi Mode________________________________________
To automatically Enter Multi Mode when Power Is Turned on
©Connect the Concerto to the C-800 as shown below.
(Be sure to turn off power on both units first. )
(DSet the mode switches on the Concerto rear panel as shown at the right. (This sets
up the Concerto for proper operation and also informs the C-800 that it should
enter multi mode when power is turned on. )
(DTurn on the power to the Concerto.
©Turn on the C-800. (After a few seconds
delay, all the LEDs will blink three times. )
To Manually Change from Single Mode to Multi Mode.
”1
1 2
MODE SW
L
'm
OFF
ON
3 4 5
©Set up the C-800 and the Concerto (or another seqencer) as in © above.
(Not necessary to turn off power. )
(2)Set the Concerto mode switch as in (2) above.
(DPress the PIANO & STRINGS switch while holding down the MIDI/TRANSPOSE switch.
The C—800 is now in multi
mo;d:e,
★When in multi mode, pressing the MIDI/TRANSPOSE switch causes the PIANO & STRINGS
light to flash continuously.
★Pressing the PIANO & STRINGS switch while holding down the MI DI/TRANSPOSE switch
returns the C-800 to single mode, extinguishing the light.
-10-
Page 12

U s i n g M u l t i - M o d e P l a y
@Selecting two out of the C-600's five timbres at a time and playing one of these
two on the keyboard-________________________________________________________________________
Here’s how to play the piano left hand and the strings automatically, allowing the
piano right hand to be played on the keyboard- Once you have mastered these
examples, you may wish to refer to the section on ’’parts” on page 00 for more
information on this mode of operation.
0When power is first turned on and multi mode
entered, playing the keyboard will produce
the piano timbre. Set the Concerto to record
mode and record the left-hand piano part into
Song 1.
(See the Concerto Owner’s Manual for dataiIs. )
(DPress the HARPSI switch while holding the
MIDI/TRANSPOSE switch down.
The HARPSI switch will light indicating that
Part 2 has been selected. When you let go of
the MIDI/TRANSPOSE switch, the STRINGS switch
will light indicating that the Strings timbre
is now selected for Part 2- Playing the key
board will now produce the strings timbre.
Set the Concerto to record mode and record
the strings part into Song 2-
(DPress the PIANO switch while holding the MIDI
/TRANSPOSE switch down. The PIANO switch will
light indicating that Part 1 has been select
ed. (When you let go of the MIDI/TRANSPOSE
switch, the PIANO switch will light indica
ting that the Piano timbre is selected for
Part 1. ) Playing the keyboard will now
produce the piano timbre-
(Switch)
(PIANO timbre from keyboard)
(Switch)
(Switch)
(STRINGS timbre from keyboard)
(Switch)
(PIANO timbre from keyboard)
A /
\ L
I
A /
STRINGS
@Use the Concerto to play back the
piano data from Song 1 and the
strings data from Song 2You can use the keyboard to play
along on the piano-
ilWIiililMilffi
-11-
I
---
PIANO & STRINGS timbres
from CONCERTO)
(PIANO timbre from keyboard)
Page 13

U s i n g M u l t i - M o d e P l a y
The current state of the C-800 and Concerto is shown on the next page. In recording
mode, choosing Part 1 sends piano data from the keyboard to Concerto Song 1- The
piano timbre will be used for Part 1 data- MIDI channel 1 is used to tie Part 1
to Song 1- In the same way. choosing Part 2 sends strings data from Part 2 to Song
2, via MIDI channel ”2”.
In playback mode, the piano and strings timbres are "played” automatically by the
data received from the Concerto, regardless of the current Part selection.
Selecting Part 1 allows that timbre to be played from the keyboard.
(pCreating an additional timbre with the Symphony orchestra module, etc, and playing
one of these from the keyboard-_______________________________________________________
Next we will describe how to add the Chorus timbre from the Symphony to the piano
and strings timbres used in ®. First, connect the C-800, Concerto, and Symphony
together as shown below.
(DChoose the Chorus timbre, MIDI channel 3, and Omni Off on the Symphony.
(See the Symphony Owner’s Manual for details. )
-12-
Page 14

U s i n g M u l t i - M o d e P l a y
i
©After performing step (^, parts (I) and © on
page 11, press the ORGAN switch while holding
down the MIDI/TRANSPOSE switch. (The ORGAN
switch lights indicating that Part 3 has been
selected. ) When you let go of the MIDI/TRANSPOSE switch, all the timbre switches will
light indicating that an external source has
been selected for Part 3. Playing the keyboard
will now produce the Chorus timbre. Set the
Concerto to record mode and record the Chorus
part into Song 3.
©Press the PIANO switch while holding the MIDI
/TRANSPOSE switch down. The PIANO switch will
light indicating that Part 1 has been select
ed and will remain lit even after you let go
of the MIDI/TRANSPOSE switch because the
piano timbre is selected for Part 1. Playing
the keyboard now produces the piano timbre.
©Use the Concerto to play back the
left-hand piano data from Song 1,
the strings data from Song 2, and
the Chorus data from Song 3.
You can play the right-hand piano
using the keyboard. (Piano, Chorus,
and strings from Concerto)
liiüiWIlliPIWIlilü
(Switch)
ORGAN
_
\ ' I /
I
'y \ '
\ \ 1 I /
EZ1CZ5Z1C
VIBES STHINOS V-ZHiSri
(Switch)
(PIANO timbre from keyboard)
(Switch)
lilllllllHilllll
(PIANO timbre from keyboard)
(PIANO, STRINGS & CHORUS timbres
from CONCERTO)
(PIANO timbre from keyboard)
-13-
SYiiiiîi -I
CHORUS
! MIDI CH =3 !
Page 15

U s i n g M u l t i - M o d e P l a y
In record mode. Chorus data travels from the keyboard (and the Symphony) through
Part 3 to Song 3 in the Concerto. The ’’MIDI channel” is used to connect Part 3,
Song 3, and the Symphony.
The C-800’s ’’Parts” and MIDI ’’channels” will be explained below.
Parts
The C-800 can process up to three ’’Parts”. Part 1 and Part 2 can be allocated to
built-in timbres, while Part 3 can be allocated to an external sound source.
One of the 3 Parts can also be chosen to be played from the keyboard. When power
is first turned on. Part 1 is set to the piano timbre, while Part 2 is set to
strings. The following procedure can be used to change the selected Part or
timbres, but turning off power will restore the original settings.
[Choosing a Part]
Hold the MIDI/TRANSPOSE switch down and press the PIANO switch to select Part 1,
the HARPSI switch to select Part 2, and the ORGAN switch to select Part 3.
3C
3C
Parti Part2 Part3
[Allocating Parts to Timbres]
Select Part 1, and then press one of the timbre switches (other than PIANO &
STRINGS). The timbre you selected will be associated with Part 1. In the same way,
select Part 2 and choose a timbre to be associated with it.
MIDI Channels
When using MIDI it is necessary to set up the MIDI channel identically at the send
ing and receiving ends. When performing more than one timbre using separate Parts,
the use of different MIDI channels ensures that each Part or timbre is played by
the correct data. Therefore, if Channel 1 is the piano timbre (allocated to Part 1)
then the piano data must be sent on Channel 1. When the power is first turned on.
Part 1 is set to Channel 1 and Part 2 is set to Channel 2. These settings may be
changed as follows, but when the power is turned off the original settings will be
restored.
[Channel Settings]
In multi mode, after choosing a part and allocating it to a timbre, press one of
the 16 channel-select keys on the keyboard (C2 to D3#) while holding the MIDI/
TRANSPOSE switch down. Receive and transmit channels are both set identically on
the C-800.
Channel number
-14-
Page 16

S e t t i n g M I D I F u n c t i o n s
We will now explain further details of MIDI functions.
MIDI is used to connect together two or more electronic musical instruments. The C800 is provided with the following features to enable it to function in MIDI mode.
1 mt
PIANO
1
Omni Kode
1
Lit when
Omni off
11 - ir
HARPSl
1
Local Mode
(Single)
Lit when
local off
mm
ORGAN
1
1
Program
Change
Cancel
1
1
Lit when
on
11 -
VIBES
Control
Change
Cancel
Lit when
on
]C
STRINGS
1
1
‘■(Multif® «“de
1
1
Lit when Flashes in
local off multi mode
PIANO &
STRINGS
(Features)
[Indicator]
V lamps j
mnI Mode
When this mode is selected (Omni on), all data received by the C-800 will be
accepted regardless of channel. When not selected (Omni off), only data on the
selected channel(s) is accepted.
[Single mode operationl
When power is first turned on, Omni mode is
automatically selected. Pressing the PIANO
switch while holding the MID I/TRANSPOSE
switch down turns Omni off. and pressing it
again turns it back on.
MIDl/TRANSPOSE
[Using multi mode operation]
Omni mode is always off in multi mode.
Ocal Mode
Local mode selects whether or not to audibly sound notes played on the keyboard.
When other sound sources are connected using MIDI, playing the keyboard with
local mode off will not sound the note at the C-800, but will instead will play
the other source. With local mode on the note will be sounded at the C-800.
[In single mode]
Press the HARPSl switch while holding the
MIDI/TRANSPOSE switch down to turn local
off or back on.
MIDl/TRANSPOSE
(5
[In multi mode]
Press the STRINGS switch while holding the
MIDl/TRANSPOSE switch down to turn local
off or back on.
T(d(g:T(a(m/-xG>h->á':n-:g:OT/':G:aT
’’Program change” is data that changes the selected timbre. Turn on program change
cancel in order to inhibit sending and receiving program changes.
[In single mode]
Press the ORGAN switch while holding the I ^
MIDl/TRANSPOSE switch down.
This turns program change cancel on and off.
MIDl/TRANSPOSE
_____
MIDl/TRANSPOSE
-15-
Page 17

S e t t i n g M I D I F u n c t i o n s
[In multi mode]
Program change cancel cannot be set in multi mode. However, it is possible to set
program change cancel in single mode and then change to multi mode, thereby
achieving the same effect.
"Control change" is data that changes the way that the damper pedal, soft pedal,
and sostenuto pedal are handled. Turn on control change cancel in order to
inhibit sending and receiving of control changes from a sequencer, for example.
[In single mode]
Press the VIBES switch while holding the
MIDI/TRANSPOSE switch down.
This turns program change cancel on and off.
[In multi mode]
Control change cancel cannot be set in multi mode. However, it is possible to set
control change cancel in single mode and then change to multi mode, thereby
achieving the same effect.
MJDWTRANSPOSE
power;/
Single Mode Multi Mode
Omn i Mode
Local Mode
Program Change Cancel
Control Change Cancel
MIDI Cartnel
When power is turned on in multi mode, the settings are as follows:
MIDI Send Channel MIDI Receive Channel T i mh r e
Parti
PartsC h a n n e 1
elocity Curve Select
Velocity refers to the strength with which keyboard keys are struck.
The C-800 controls the volume and timbre in response to velocity in the same way
as a piano does. When the C-800 is connected to a synthesizer, the effect may be
somewhat unnatural. If this is the case, set the velocity curve to "synthesizer".
Press B7 while holding MIDI/TRANSPOSE down to choose synthesizer, or press C8 to
choose piano.
C h a n n e 1
Channel
Omn i 0 n Omn i off
Local on Local off
off off
off off
1
2
3
1
Channel 1
Channel 2
Not accepted
See chart below
Strings
Not sounded
Piano
★MIDI mode can’t be entered when holding down keyboard keys or the pedals. Also, no
sound will be heard from the speakers in MIDI mode.
★Part 3 will always accept program change and program control data regardless of
program change cancel and program control cancel.
-16-
Page 18

U s i n g t h e P r o g r a m C h a n g e F u n c t i o n
ihi Using the Program Change Function to Change the Timbre
^ The following is an example of how to connect the C-800 to the Symphony-
The Symphony has seven built-in timbres: Stringsl, Strings2, Chorus, Brass,
Bass/Guitar/Drums, Organl, and 0rgan2- We can think of these as being Symphony
MIDI program numbers 0 through 6- The C-800 also has six built-in timbres:
piano, harpsichord, organ, vibes, strings, and piano & strings. We can think
of these as being C-800 MIDI program numbers 0 through 5- Assuming the
"program change cancel” function (see page 00) is turned off, selecting a new
timbre(program) on the C-800 will send that program number to the Symphony,
thereby selecting the corresponding timbre. For example, pressing the HARPSI
switch on the C-800 will select the Strings 2 timbre on the Symphony.
However, if the C-800 is in multi mode with Part 1 or Part 2 selected, only
timbre numbers 0 through 4 may be sent to the Symphony.
C-800
6
0RGAN2
Some Synthesizers Have Over 100 Built-In Timbres
When the C-800 is connected to a sound source with a larger number of timbres
than the C-800, the keyboard can be used to send the higher timbre numbers
needed to perform a program change. While holding down the MIDI/TRANSPOSE
switch, use the digit keys on the keyboard shown in the diagram below to enter
the timbre number. Timbres 0 through 99 are entered as a two-digit codeTimbre 0 is entered as ”00”, 1 is entered as ”01”, and 99 as ”99”, etc. For
timbre numbers greater than 100, the last two digits are entered first,
followed by the digits ”100”. 100 is entered as "00100”, 101 is entered as
”01100”, and 127 as ”27100”. (The highest timbre number that can be sent is
127. ) Timbre numbers may be sent in this way even if program change cancel is
turned on.
-17-
Page 19

U s i n g t h e P r o g r a m C h a n g e F u n c t i o n
The Following Timbre Numbers Are Accepted by the C-800 to over Layered Timbres
Using Program Changes
Timbre numbers 6 through 15 are accepted by the C-800 from the MIDI, and are
used to select layered timbres as shown in the chart below. Also, pressing
two timbre keys simultaneously sends the corresponding program change
function over MIDI, and may therefore be used for sending timbre numbers 6
through 15 to synthesizer instead of using procedure (2) above- For example,
if the C-800 receives timbre number 10 over MIDI, the organ and harpsichord
timbres will both be selected for layered play. On the other hand, pressing
the PIANO and ORGAN switches on the C-800 simultaneously will send a program
/timbre change number 7 to the connected equipment over MIDI.
PI AMO
HABPSl
ORGAN
VIBES
STRINGS
PIANO ii/iilASPSl
—
— —
— — —
—
— — — —
6 7 8
— — —
ORG^ii/i
1 0
VIBES
1 1
1 3 1 4
STRINGS
9
1 2
1 5
—
T r o u b l e s h o o t i n g
If the C-800 doesn t seem to be functioning properly, check the following points- If
the problem persists, call your local Korg Service Center.
Indicator lamps
don t light
No sound is heard
Check that the AC plug is firmly connected to a properly
rated wall outlet-
®!s volume set to 0?
<2)If in MIDI mode, is local off?
(Dis multi mode part 3 selected with no external sound
source connected?
-18-
Page 20

C-8 0 0
Speci f icat ions. Opt ions
Keyboard
Timbres
Effects
Controls
Connectors Headphones, AUX 0UT(L R), AUX IN(L R), DAMPER,
Main amp
Speakers
Power consumption
Dimensions
Weight
Accessories
Options Headphones: KH-IOOO, Pedal stand: ST-800, Bench,
* When not using the pedal stand, use the PS-2 foot pedal or equivalent.
88 keys (AO through C8), velocity sensitive
Piano, harpsichord, organ, vibes, strings, piano & strings
Surround: room/stage/hall, damper pedal,
soft/sostenuto pedal
Power switch, volume slider, MIDI/TRANSPOSE switch,
pitch control
SOFT/SOSTENUTO. MIDKlN. OUT)
8W X 2
16cm X 2
25W
1381. 6 X 446 X 157. 5 mm, height with stand 786 mm
26. 5kg
Music stand, AC cord, music clip
MIDI cables. Keyboard cover: KC-800
t Specifications subject to change without notice.
NOTICE:
Korg products are manufactured under strict specifications and voltages
required by each country. These products are warranted by the Korg
distributor only in each country. Any Korg product not sold with a
warranty card or carrying a serial number disqualifies the product sold
from the manufacturer's/distributor's warranty and liability. This
requirement is for your own protection and safety.
KORG INC.
15-12, Shimotakaido 1-chome, Suginami-ku, Tokyo, Japan
©KORG INC. 1990 0205 CTH Printed in Japan ®
©
 Loading...