

Page 1

User Guide
32"/37"/42"/46" LCD, 120 Hz 1080p
NS-32L550A11/NS-37L550A11/NS-42L550A11/NS-46L550A11
Page 2

Contents
CHILD SAFETY . . . . . . . . . . . . . . . . . . . . . . . . . . . . . . . . . . . . . . . . . . . . . . . . . . .1
Important safety instructions . . . . . . . . . . . . . . . . . . . . . . . . . . . . . . . . . . . . .2
Warnings . . . . . . . . . . . . . . . . . . . . . . . . . . . . . . . . . . . . . . . . . . . . . . . . . . . . . . . . 2
Cautions . . . . . . . . . . . . . . . . . . . . . . . . . . . . . . . . . . . . . . . . . . . . . . . . . . . . . . . . . 3
Introduction . . . . . . . . . . . . . . . . . . . . . . . . . . . . . . . . . . . . . . . . . . . . . . . . . . . . .4
Install the stand or wall-mount bracket . . . . . . . . . . . . . . . . . . . . . . . . . . .5
Installing the stand . . . . . . . . . . . . . . . . . . . . . . . . . . . . . . . . . . . . . . . . . . . . . . 5
Installing a wall-mount bracket . . . . . . . . . . . . . . . . . . . . . . . . . . . . . . . . . . . 5
TV components . . . . . . . . . . . . . . . . . . . . . . . . . . . . . . . . . . . . . . . . . . . . . . . . . .6
Accessories . . . . . . . . . . . . . . . . . . . . . . . . . . . . . . . . . . . . . . . . . . . . . . . . . . . . . . 6
Front . . . . . . . . . . . . . . . . . . . . . . . . . . . . . . . . . . . . . . . . . . . . . . . . . . . . . . . . . . . . 6
Back . . . . . . . . . . . . . . . . . . . . . . . . . . . . . . . . . . . . . . . . . . . . . . . . . . . . . . . . . . . . . 7
Side . . . . . . . . . . . . . . . . . . . . . . . . . . . . . . . . . . . . . . . . . . . . . . . . . . . . . . . . . . . . . 7
Remote control . . . . . . . . . . . . . . . . . . . . . . . . . . . . . . . . . . . . . . . . . . . . . . . . . . 8
Using the remote control . . . . . . . . . . . . . . . . . . . . . . . . . . . . . . . . . . . . . . . . .9
Installing remote control batteries . . . . . . . . . . . . . . . . . . . . . . . . . . . . . . . . 9
Aiming the remote control . . . . . . . . . . . . . . . . . . . . . . . . . . . . . . . . . . . . . . 10
Using the remote control holder . . . . . . . . . . . . . . . . . . . . . . . . . . . . . . . . 10
Programming your universal Insignia remote control . . . . . . . . . . . . 10
Programming a different universal remote control . . . . . . . . . . . . . . . 13
Making connections . . . . . . . . . . . . . . . . . . . . . . . . . . . . . . . . . . . . . . . . . . . . 14
Connecting the power . . . . . . . . . . . . . . . . . . . . . . . . . . . . . . . . . . . . . . . . . . 14
Connecting an antenna or cable TV (no box) . . . . . . . . . . . . . . . . . . . . . 14
Connecting a cable or satellite box . . . . . . . . . . . . . . . . . . . . . . . . . . . . . . 14
Connecting an HDMI device . . . . . . . . . . . . . . . . . . . . . . . . . . . . . . . . . . . . . 15
Connecting a component video device . . . . . . . . . . . . . . . . . . . . . . . . . . 15
Connecting an S-Video device . . . . . . . . . . . . . . . . . . . . . . . . . . . . . . . . . . . 16
Connecting a camcorder or game console . . . . . . . . . . . . . . . . . . . . . . . 16
Connecting a VCR . . . . . . . . . . . . . . . . . . . . . . . . . . . . . . . . . . . . . . . . . . . . . . . 17
Connecting a computer . . . . . . . . . . . . . . . . . . . . . . . . . . . . . . . . . . . . . . . . . 17
Connecting headphones . . . . . . . . . . . . . . . . . . . . . . . . . . . . . . . . . . . . . . . . 18
Connecting a digital sound system . . . . . . . . . . . . . . . . . . . . . . . . . . . . . . 18
Connecting an analog sound system . . . . . . . . . . . . . . . . . . . . . . . . . . . . 18
Turning on your TV for the first time . . . . . . . . . . . . . . . . . . . . . . . . . . . . 19
Understanding the basics . . . . . . . . . . . . . . . . . . . . . . . . . . . . . . . . . . . . . . 20
Turning your TV on or off . . . . . . . . . . . . . . . . . . . . . . . . . . . . . . . . . . . . . . . . 20
Selecting the video input source . . . . . . . . . . . . . . . . . . . . . . . . . . . . . . . . 20
On-screen menu overview . . . . . . . . . . . . . . . . . . . . . . . . . . . . . . . . . . . . . . 20
Navigating the menus . . . . . . . . . . . . . . . . . . . . . . . . . . . . . . . . . . . . . . . . . . 21
Selecting a channel . . . . . . . . . . . . . . . . . . . . . . . . . . . . . . . . . . . . . . . . . . . . . 21
Adjusting the volume . . . . . . . . . . . . . . . . . . . . . . . . . . . . . . . . . . . . . . . . . . . 21
Displaying additional information . . . . . . . . . . . . . . . . . . . . . . . . . . . . . . . 22
Adjusting the picture . . . . . . . . . . . . . . . . . . . . . . . . . . . . . . . . . . . . . . . . . . . 22
Adjusting the TV picture . . . . . . . . . . . . . . . . . . . . . . . . . . . . . . . . . . . . . . . . 22
ii
www.insigniaproducts.com
Page 3

Contents
Adjusting component video . . . . . . . . . . . . . . . . . . . . . . . . . . . . . . . . . . . . 23
Adjusting the computer image . . . . . . . . . . . . . . . . . . . . . . . . . . . . . . . . . . 23
Turning Game Mode on or off . . . . . . . . . . . . . . . . . . . . . . . . . . . . . . . . . . . 24
Adjusting the sound . . . . . . . . . . . . . . . . . . . . . . . . . . . . . . . . . . . . . . . . . . . 25
Adjusting sound settings . . . . . . . . . . . . . . . . . . . . . . . . . . . . . . . . . . . . . . . . 25
Playing TV audio only . . . . . . . . . . . . . . . . . . . . . . . . . . . . . . . . . . . . . . . . . . . 25
Changing channel settings . . . . . . . . . . . . . . . . . . . . . . . . . . . . . . . . . . . . . 26
Automatically scanning for channels . . . . . . . . . . . . . . . . . . . . . . . . . . . . 26
Hiding channels . . . . . . . . . . . . . . . . . . . . . . . . . . . . . . . . . . . . . . . . . . . . . . . . 27
Setting up a favorite channel list . . . . . . . . . . . . . . . . . . . . . . . . . . . . . . . . 27
Viewing a favorite channel . . . . . . . . . . . . . . . . . . . . . . . . . . . . . . . . . . . . . . 28
Adding or changing a channel label . . . . . . . . . . . . . . . . . . . . . . . . . . . . . 28
Checking the digital signal strength . . . . . . . . . . . . . . . . . . . . . . . . . . . . . 28
Setting parental controls . . . . . . . . . . . . . . . . . . . . . . . . . . . . . . . . . . . . . . . 29
Setting or changing the password . . . . . . . . . . . . . . . . . . . . . . . . . . . . . . . 29
Locking control buttons . . . . . . . . . . . . . . . . . . . . . . . . . . . . . . . . . . . . . . . . . 30
Blocking unrated TV . . . . . . . . . . . . . . . . . . . . . . . . . . . . . . . . . . . . . . . . . . . . 30
Setting parental control levels . . . . . . . . . . . . . . . . . . . . . . . . . . . . . . . . . . . 31
Downloading rating information . . . . . . . . . . . . . . . . . . . . . . . . . . . . . . . . 32
Using closed captioning . . . . . . . . . . . . . . . . . . . . . . . . . . . . . . . . . . . . . . . . 33
Turning closed captioning on or off . . . . . . . . . . . . . . . . . . . . . . . . . . . . . 33
Selecting the closed captioning mode . . . . . . . . . . . . . . . . . . . . . . . . . . . 33
Customizing digital closed captioning styles . . . . . . . . . . . . . . . . . . . . . 34
Adjusting time settings . . . . . . . . . . . . . . . . . . . . . . . . . . . . . . . . . . . . . . . . . 35
Setting the time . . . . . . . . . . . . . . . . . . . . . . . . . . . . . . . . . . . . . . . . . . . . . . . . 35
Setting the sleep timer . . . . . . . . . . . . . . . . . . . . . . . . . . . . . . . . . . . . . . . . . . 36
Adjusting menu settings . . . . . . . . . . . . . . . . . . . . . . . . . . . . . . . . . . . . . . . 36
Selecting the menu language . . . . . . . . . . . . . . . . . . . . . . . . . . . . . . . . . . . 36
Adjusting the menu transparency . . . . . . . . . . . . . . . . . . . . . . . . . . . . . . . 37
Turning Auto Input Sensing on or off . . . . . . . . . . . . . . . . . . . . . . . . . . . . 37
Labeling an input source . . . . . . . . . . . . . . . . . . . . . . . . . . . . . . . . . . . . . . . . 38
Using INlink . . . . . . . . . . . . . . . . . . . . . . . . . . . . . . . . . . . . . . . . . . . . . . . . . . . . 38
Restoring settings to the defaults . . . . . . . . . . . . . . . . . . . . . . . . . . . . . . . 39
Using USB . . . . . . . . . . . . . . . . . . . . . . . . . . . . . . . . . . . . . . . . . . . . . . . . . . . . . 40
Switching to USB mode . . . . . . . . . . . . . . . . . . . . . . . . . . . . . . . . . . . . . . . . . 40
Browsing photos . . . . . . . . . . . . . . . . . . . . . . . . . . . . . . . . . . . . . . . . . . . . . . . 40
Setting up a favorite photos list . . . . . . . . . . . . . . . . . . . . . . . . . . . . . . . . . 41
Viewing favorite photos . . . . . . . . . . . . . . . . . . . . . . . . . . . . . . . . . . . . . . . . . 41
Viewing all photos in a slideshow . . . . . . . . . . . . . . . . . . . . . . . . . . . . . . . 42
Viewing favorite photos in a slideshow . . . . . . . . . . . . . . . . . . . . . . . . . . 43
Customizing slideshow settings . . . . . . . . . . . . . . . . . . . . . . . . . . . . . . . . . 43
Maintaining . . . . . . . . . . . . . . . . . . . . . . . . . . . . . . . . . . . . . . . . . . . . . . . . . . . . 44
Cleaning the TV cabinet . . . . . . . . . . . . . . . . . . . . . . . . . . . . . . . . . . . . . . . . . 44
Cleaning the TV screen . . . . . . . . . . . . . . . . . . . . . . . . . . . . . . . . . . . . . . . . . . 44
Troubleshooting . . . . . . . . . . . . . . . . . . . . . . . . . . . . . . . . . . . . . . . . . . . . . . . 44
Specifications . . . . . . . . . . . . . . . . . . . . . . . . . . . . . . . . . . . . . . . . . . . . . . . . . . 45
Manufacturers’ codes . . . . . . . . . . . . . . . . . . . . . . . . . . . . . . . . . . . . . . . . . . 46
Legal notices . . . . . . . . . . . . . . . . . . . . . . . . . . . . . . . . . . . . . . . . . . . . . . . . . . . 58
Two-year limited warranty . . . . . . . . . . . . . . . . . . . . . . . . . . . . . . . . . . . . . . 59
www.insigniaproducts.com
iii
Page 4

US and Canada Markets . . . . . . . . . . . . . . . . . . . . . . . . . . . . . . . . . . . . . . . . . 59
Mexico Market . . . . . . . . . . . . . . . . . . . . . . . . . . . . . . . . . . . . . . . . . . . . . . . . . . 59
Contents
iv
www.insigniaproducts.com
Page 5
f
It makes a difference how and where you use
As you enjoy your new product, keep these
The issue
The home theater entertainment experience is a growing trend, and larger TVs are popular
purchases. However, TVs are not always supported on the proper stands or installed
according to the manufacturer’s recommendations. We and the consumer electronics
industry are committed to making home entertainment enjoyable and safe.
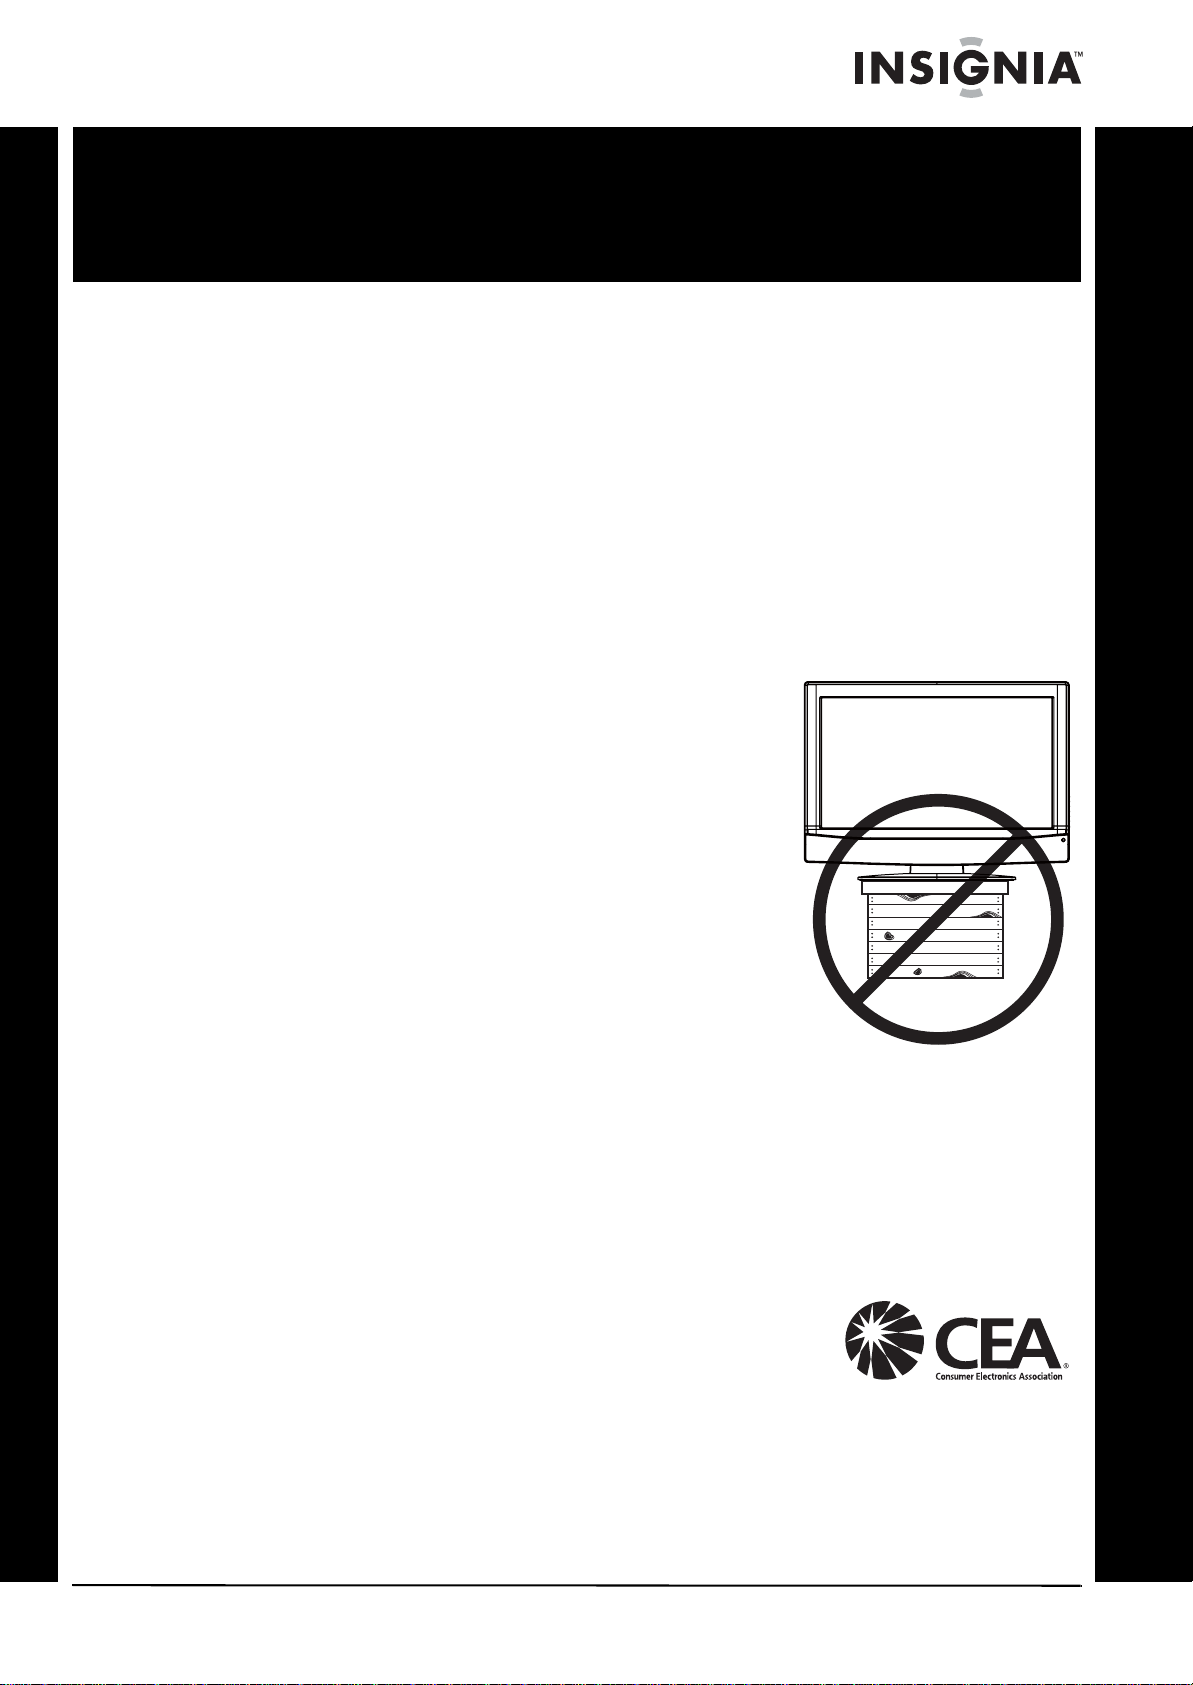
TVs that are inappropriately placed on dressers, bookcases, shelves, desks, speakers, chests, or
carts may fall over and cause injury.
Tune into safety
• One size of TV stand does not fit all. Use only a TV stand
rated for the weight of your TV.
• Carefully read and understand all enclosed instructions
for proper use of this product.
• Don’t let children climb on or play with entertainment
system furniture and TVs.
• Don’t place TVs on furniture that can easily be used as
steps, such as a crate or chest of drawers.
• Remember that children can become excited while
watching a program, especially on a “larger-than-life” TV.
Make sure that you place or install the TV where it cannot
be pushed, pulled over, or knocked down.
• Make sure that you route all cords and cables so that they
cannot be pulled or grabbed by curious children.
CHILD SAFETY
your flat panel display
safety tips in mind
Wall mounting
If you decide to wall mount your TV, always remember:
• One size of wall mount does not fit all. Use only a wall mount rated for the weight of
your TV and that has been recommended by this TV manufacturer, listed in this
manual, or otherwise listed by an independent laboratory as suitable for your TV.
• Follow all instructions supplied by the TV and wall mount manufacturers.
• If you have any doubts about your ability to safely wall mount your TV, get help from a
professional installer.
• Make sure that the wall where you are mounting the TV is
appropriate. Some wall mounts are not designed to be
mounted to walls backed with steel studs or cinder blocks. If
you are unsure, ask a professional installer.
• TVs can be heavy. At least two people are required for safe wall mount installation.
www.insigniaproducts.com
1
Page 6

NS-32L550A11/NS-37L550A11/NS-42L550A11/NS-46L550A11
Important safety instructions
CAUTION
RISK OF ELECTRIC SHOCK
DO NOT OPEN
This symbol indicates that dangerous
voltage constituting a risk of electric
shock is present within your TV. This
label is located on the back of your TV.
This symbol indicates that there are
important operating and maintenance
instructions in the literature
accompanying your TV.
1 Read these instructions.
2 Keep these instructions.
3 Heed all warnings.
4 Follow all instructions.
5 Do not use this apparatus near water.
6 Clean only with a dry cloth.
7 Do not block any ventilation openings. Install in
accordance with the manufacturer's
instructions.
8 Do not install near any heat sources such as
radiators, heat registers, stoves, or other
apparatus (including amplifiers) that produce
heat.
9 Do not defeat the safety purpose of the
polarized or grounding-type plug. A polarized
plug has two blades with one wider than the
other. A grounding type plug has two blades
and a third grounding prong. The wide blade or
the third prong are provided for your safety. If
the provided plug does not fit into your outlet,
consult an electrician for replacement of the
obsolete outlet.
10 Protect the power cord from being walked on or
pinched particularly at plugs, convenience
receptacles, and the point where they exit from
the apparatus.
11 Only use attachments/accessories specified by
the manufacturer.
12 Use only with a cart, stand, tripod,
bracket, or table specified by the
manufacturer, or sold with the
apparatus. When a cart is used, use
caution when moving the
cart/apparatus combination to avoid injury from
tip-over.
13 Unplug this apparatus during lightning storms
or when unused for long periods of time.
14 Refer all servicing to qualified service personnel.
Servicing is required when the apparatus has
been damaged in any way, such as
power-supply cord or plug is damaged, liquid
has been spilled or objects have fallen into the
apparatus, the apparatus has been exposed to
rain or moisture, does not operate normally, or
has been dropped.
S3125A
15 The wall plug is the disconnecting device. The
plug must remain readily operable.
16 An apparatus with three-prong, grounding-type
plug is a Class I apparatus which needs to be
grounded to prevent possible electric shock.
Make sure that you connect the Class I
apparatus to a grounding-type, three-prong
outlet.
17 Remote control batteries should not be exposed
to excessive heat such as sunshine, fire, or the
like.
18 The apparatus should not be exposed to
dripping or splashing, and no objects filled with
liquids, such as vases, should be placed on the
apparatus.
Warnings
Electric shock hazard
To reduce the risk of fire or electric shock, do not
remove any cover or expose the device to rain or
moisture. No user-serviceable parts are inside. Refer
servicing to qualified service technicians.
Lightning
For added protection for your device receiver
during a lightning storm, or when it is left
unattended and unused for long periods of time,
unplug it from the power outlet and disconnect any
antenna or cable system. This helps prevent
property damage and personal injury from
lightning and power line surges.
Power lines
An outside antenna system should not be located in
the vicinity of overhead power lines or other
electric light or power circuits, or where it can fall
into such power lines or circuits. When installing an
outside antenna system, extreme care should be
taken to keep from touching such power lines or
circuits as contact with them might be fatal.
Handling the LCD panel
• Your TV’s screen is made of glass. Do not drop
your TV or hit, jolt, or press hard against the LCD
panel. If the screen breaks, be careful of broken
glass.
• If the LCD panel is broken, make absolutely sure
that you do not touch the liquid in the panel. This
may cause skin inflammation.
• If the liquid gets in your mouth, immediately
gargle, rinse, and consult with your doctor. Also, if
the liquid gets in your eyes or touches your skin,
consult with your doctor after rinsing for at least
15 minutes or longer in clean water.
Replacement parts
When replacement parts are required, make sure
that the service technician uses replacement parts
specified by the manufacturer that have the same
characteristics as the original part. Unauthorized
substitutions may result in fire, electric shock,
personal injury, or other hazards.
Safety check
After completing any service or repair to this device,
ask the service technician to perform routine safety
checks to determine that your TV is in correct
operating condition.
2
www.insigniaproducts.com
Page 7
Power source
Operate your TV only from the type of power source
indicated on the marking label. If you are not sure
of the type of power supplied to your home, consult
an electrician or your local power company.
Cautions
Damage requiring service
Unplug this TV from the power outlet and refer
servicing to qualified service personnel under the
following conditions:
• When the power supply cord or plug is damaged
or frayed.
• If liquid has been spilled or objects have fallen
into your TV.
• If your TV has been exposed to rain or water.
• If your TV does not operate normally by following
the operating instructions. Adjust only those
controls that are covered by the operating
instructions because incorrect adjustment of
other controls may result in damage and will
often require extensive work by a qualified
technician to restore your TV to its normal
operation.
• If your TV has been dropped or damaged in any
way.
• When your TV exhibits a distinct change in
performance.
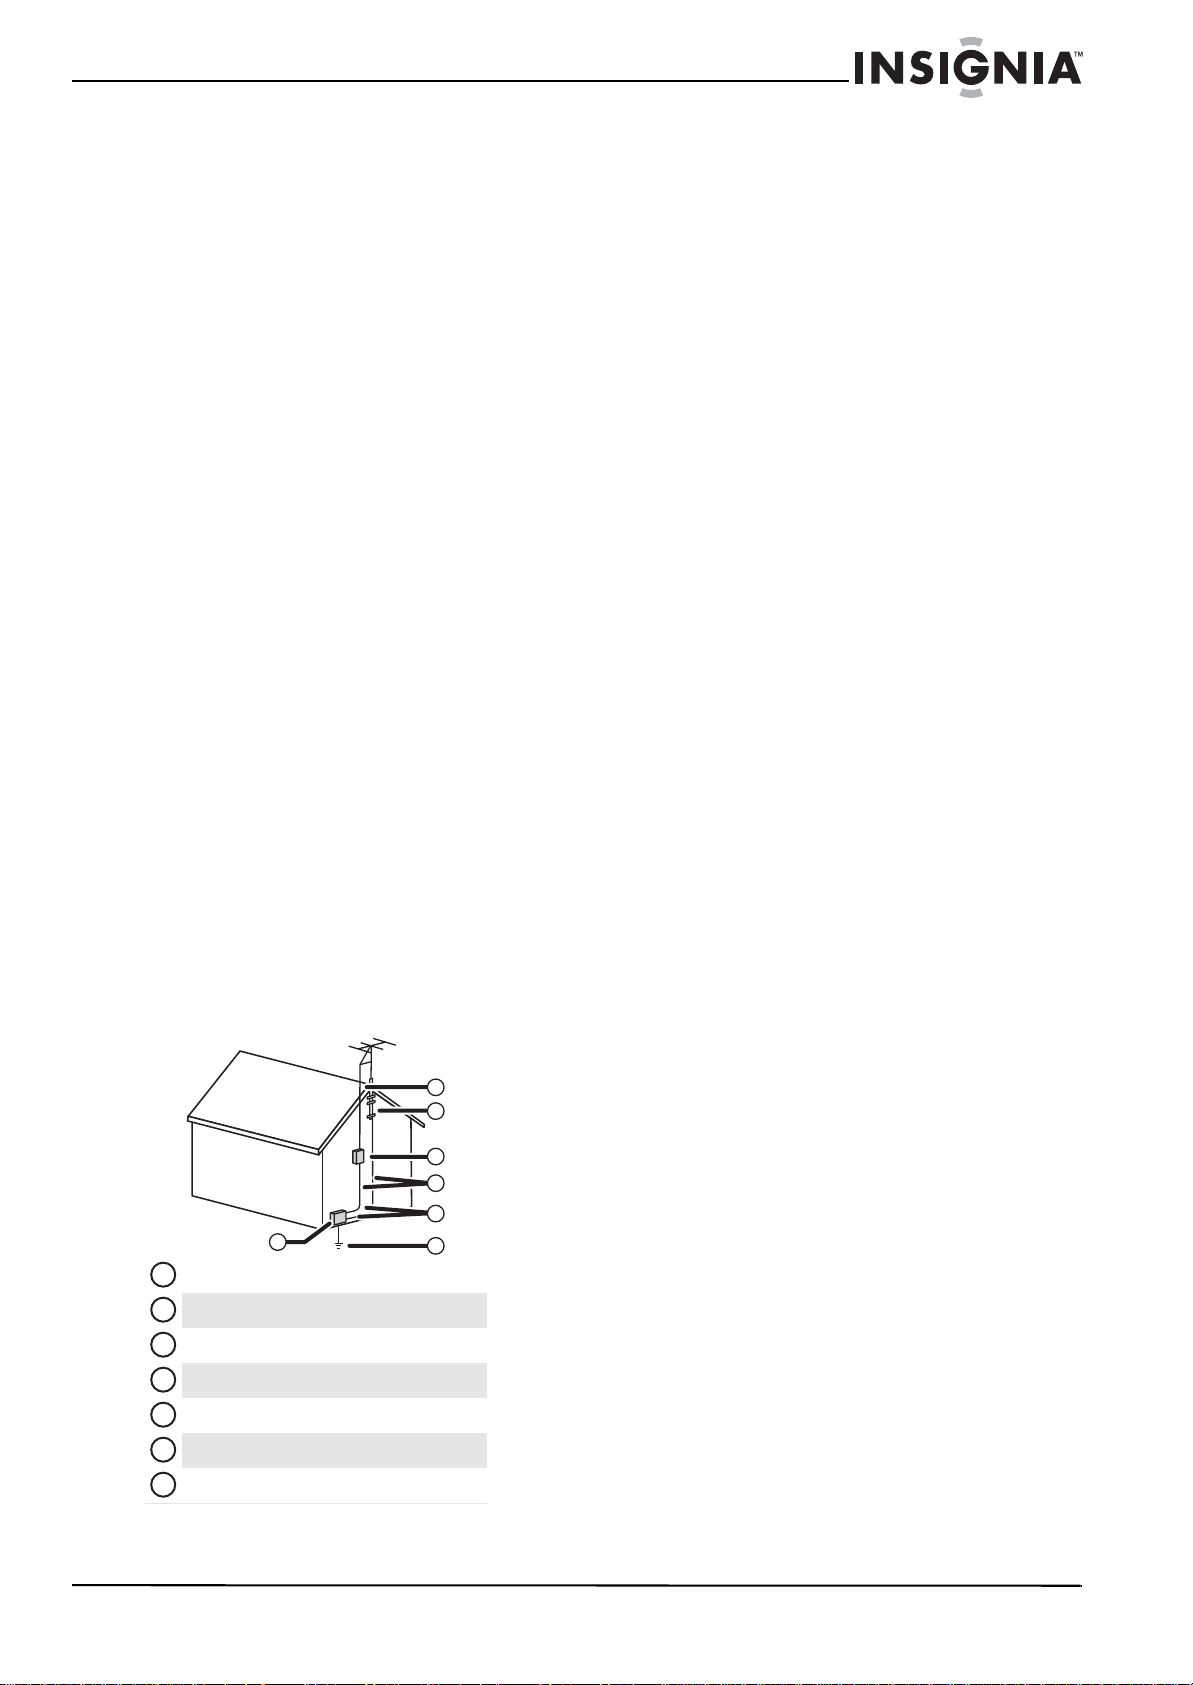
Outdoor antenna grounding
If an outside antenna or cable system is connected
to your TV, make sure that the antenna or cable
system is grounded to provide some protection
against voltage surges and built-up static charges.
Article 810 of the National Electrical Code,
ANSI/NFPA No. 70, provides information with
respect to correct grounding of the mast and
supporting structure, grounding of the lead-in wire
to an antenna discharge unit, size of grounding
conductors, location of the antenna-discharge unit,
connection to grounding electrodes, and
requirements for the grounding electrode.
Note to CATV system installer
Article 820 of the National Electrical Code,
ANSI/NFPA No. 40 provides guidance for correct
grounding. Specifically, it states that the cable
ground must be connected to the grounding
system of the building as close to the point of cable
entry as practical.
Condensation
Moisture will form on the TV if the TV is brought
from cool surroundings into a warm room or if the
temperature of the room rises suddenly. When this
happens, the TV's performance may be impaired. To
prevent this, let the TV stand in its new
surroundings for about an hour before switching it
on, or make sure that the room temperature rises
gradually.
Condensation may also form during the summer if
the TV is exposed to the breeze from an air
conditioner. In such cases, change the location of
the TV.
Mobile telephone warning
To avoid interference with your TV picture and
sound, operating problems, or even damage, keep
your cordless and cellular telephones away from
the TV.
End of life directives
Your TV contains tin-lead solder and a fluorescent
lamp containing a small amount of mercury.
Disposal of these materials may be regulated for
environmental reasons. Your TV also contains
material that can be recycled and reused. For
disposal or recycling information, contact your local
authorities or the Electronic Industries Alliance at
www.eia.org to find a recycler in your area.
Non-active pixels
The LCD panel contains almost 3 million thin film
transistors, which provide exceptionally sharp video
quality. Occasionally, a few non-active pixels may
appear on the screen as a fixed blue, green, or red
point. These non-active pixels do not adversely
affect the performance of your TV, and are not
considered defects.
1
2
7
Antenna lead-in wire
1
Grounding clamp
2
3
Antenna discharge unit
Grounding conductors
4
5
Ground clamps
Power service grounding electrode system
6
Electric service equipment
7
3
4
5
6
www.insigniaproducts.com
3
Page 8

NS-32L550A11/NS-37L550A11/NS-42L550A11/NS-46L550A11 32"/37"/42"/46" LCD, 120 Hz
32"/37"/42"/46" LCD, 120 Hz 1080p
Introduction
Congratulations on your purchase of a high-quality
Insignia product. Your NS-32L550A11,
NS-37L550A11, NS-42L550A11, or NS-46L550A11
represents the state of the art in LCD TV design and
is designed for reliable and trouble-free
performance.
AUDYSSEY Dynamic Volume plus Dynamic EQ:
Have you ever caught yourself wishing that you
didn't constantly need to adjust the volume:
wishing that the commercials wouldn't blare and
that you could better hear whispering during a
movie scene? Audyssey Dynamic Volume is a
feature that lets you put the remote control down
and enjoy your show while Audyssey adjusts the
sound levels for you automatically. Audyssey
Dynamic EQ is a feature that automatically finds the
richest sound settings-including enhanced bass-for
each scene, even when the volume level is held
steady, making the sound coming from your TV
speakers sound more lifelike. See page 25 for
instructions on how to adjust the audio settings to
take advantage of Audyssey.
SRS TruSurround HD:
At Insignia, providing you with superior audio
quality is just as important as exceptional picture
quality. That's why we added SRS TruSurround HD,
which provides you with a theater-like
surround-sound experience, with the clearer dialog
and the enhanced bass sounds that movie viewers
and gamers crave.
Insignia Motion 120Hz:
With a 120 Hz screen refresh rate twice the rate of a
60 Hz screen, a screen with 1,080 lines of resolution
(up from 720 lines in the last generation of HDTVs),
and special motion-detection technology, you will
be experiencing a picture with clearer detail and
brightness, smoother transitions, and reduced
motion blurring, particularly when watching
fast-motion sports and action scenes. (See page 22
for instructions on how to adjust the TV picture)
SupraHD by Zoran:
An advanced-design microprocessor enables the
exceptional picture and sound quality that you
expect from today's home theater.
Game mode:
Video games generally require adjustments to the
television picture settings to get the maximum
experience. By simply pressing a button on your
remote control, your television settings will
automatically adjust for video games. It couldn't be
easier. (See page 24 for instruction on how to turn
Game Mode on and off )
INlink:
Enjoy the benefit of having HDMI CEC compatible
products plug and play! No setup is needed! CEC
technology lets different components discover and
communicate with each other. (See page 38 for
instructions on how to use INlink)
4
www.insigniaproducts.com
Page 9
32"/37"/42"/46" LCD, 120 Hz 1080p
Install the stand or wall-mount bracket
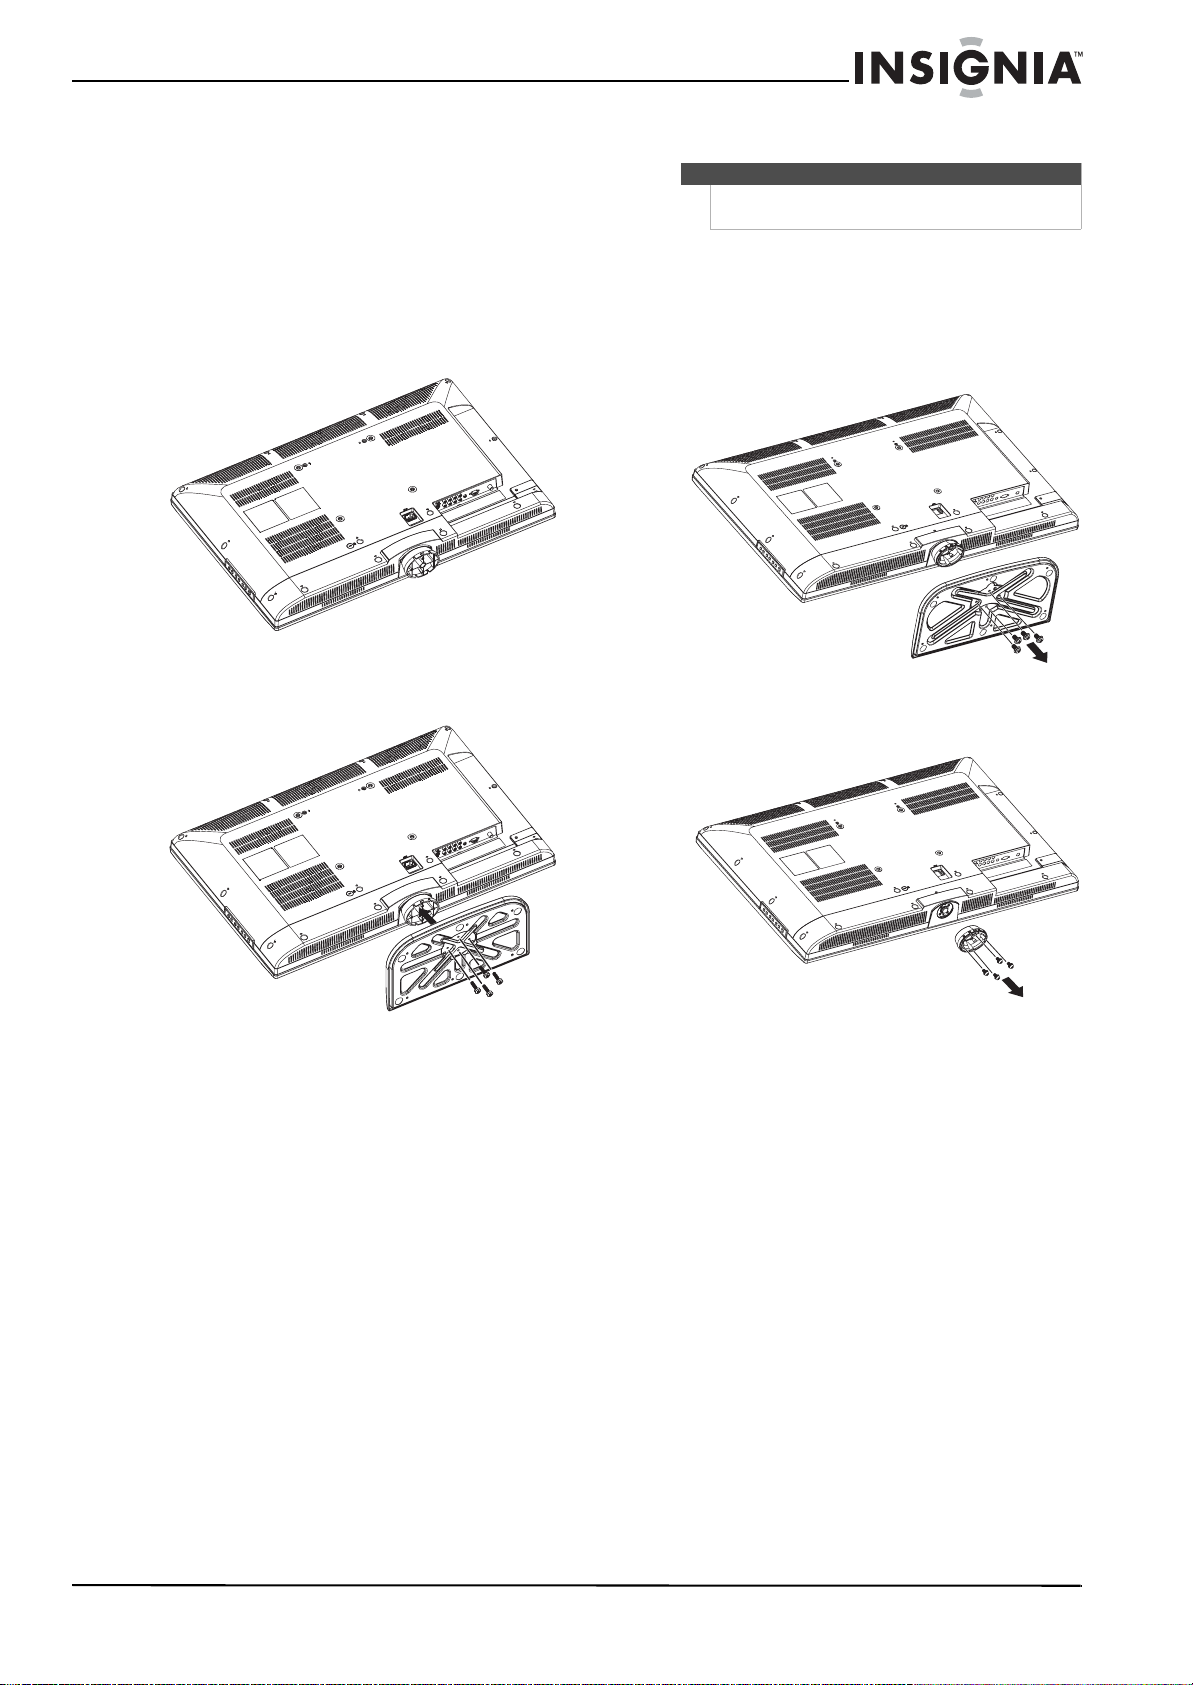
Installing the stand
To install the stand:
1 Carefully place your TV screen face-down on a
cushioned, clean surface to protect the screen
from damages and scratches.
2 Secure the stand to the screen with the four
provided screws.
Installing a wall-mount bracket
Warni ng
This apparatus is intended to be supported by a UL
Listed wall mount bracket.
To attach your TV to a wall-mount bracket:
1 Carefully place your TV screen face-down on a
cushioned, clean surface to protect the screen
from damages and scratches.
2 Remove the four screws that secure the base to
the stand, then remove the base.
3 Remove the four screws that secure the stand
column, then remove the column.
4 Attach the wall-mount bracket with thread ISO
www.insigniaproducts.com
M6 type screws only (not included). Make sure
that the insertion length (B) of the M6 screws is
between 0.39 ~ 0.47 inches (10 ~ 12mm). A
shorter length might make the TV
wall-mounting insecure. A longer length might
create a space between the wall-mount bracket
and TV.
5
Page 10

NS-32L550A11/NS-37L550A11/NS-42L550A11/NS-46L550A11 32"/37"/42"/46" LCD, 120 Hz
NS-32L550A11 (32-inch)
NS-37L550A11 (37-inch)
7.84 in. (200 mm)
NS-42L550A11 (42-inch)
15.75 in. (400 mm)
Wall mount brack ets
TV components
Accessories
Remote control and batteries (2 AA)
Stand with screws
Component cable
Audio cable
Remote control holder
Cleaning cloth
7.84 in. (200 mm)
Quick Setup Guide
Front
1
2
3
4
NS-46L550A11 (46-inch)
15.75 in. (400 mm)
Wall moun t brac kets
Wall -mou nt bra cker s
5
7.84 in. (200 mm)
# Item Description
1
VOL+/VOL– Press to increase or decrease the volume.
Press to go to the next or previous channel in the
2
CH /CH
3
MENU
4
INPUT
5
(power)
7.84 in. (200 mm)
channel list. For more information, see “Selecting a
channel” on page 21.
Press to open the on-screen menu. For more
information, see “Navigating the menus” on page 21.
Press to open the Source List, then press or to
select a video input source.
In menu mode, press to confirm selections.
Press to turn your TV on or off (Standby mode). When
your TV is off, power still flows into it. To disconnect
power, unplug the power cord.
6
www.insigniaproducts.com
Page 11

32"/37"/42"/46" LCD, 120 Hz 1080p
Back Side
9 8
1
2
1
2
3
4
# Item Description
1
AUDIO O UT
2
AV I N S- VIDEO
3
AV I N VI DEO
4
AV I N L/ R au dio
5
PC/DVI AUDIO IN
6
VGA
7
ANT/CABLE IN
8
COMPONENT L/R audio
9
COMPONENT Y/PB/PR
Connect an external sound system to these jacks. For
more information, see “Connecting an analog sound
system” on page 18.
Connect the video for an S-Video device to this jack.
For more information, see “Connecting an S-Video
device” on page 16.
Connect the video for a standard AV device to this jack.
For more information, see “Connecting a VCR” on
page 17.
Connect the audio for an S-Video or standard AV device
to these jacks. For more information, see “Connecting
an S-Video device” on page 16 or “Connecting a VCR”
on page 17.
Connect the audio for a computer or a DVI device to
this jack. For more information, see “Connecting a
computer” on page 17 or “Connecting an HDMI
device” on page 15.
Connect the video (VGA) for a computer to this jack.
For more information, see “Connecting a computer” on
page 17.
Connect an antenna or cable TV to this jack. For more
information, see “Connecting an antenna or cable TV
(no box)” on page 14.
Connect the audio for a component video device to
these jacks. For more information, see “Connecting a
component video device” on page 15.
Connect the video for a component video device to
these jacks. For more information, see “Connecting a
component video device” on page 15.
5 6 7
# Item Description
1
2
USB
HDMI1/HDMI2/
3
HDMI3/HDMI4
4
SPDIF
(headphone)
Connect headphones to this jack. For more
information, see “Connecting headphones” on
page 18.
Connect a USB device, such as USB flash drive, to this
jack.
Connect an HDMI devices to these jacks. An HDMI
cable carries both video and sound. You do not need to
make an audio connection for an HDMI device.
For more information, see “Connecting an HDMI
device” on page 15.
When connecting a DVI device using an HDMI-DVI
adapter, connect the device to the HDMI1 jack.
Connect an audio amplifier to this jack. For more
information, see “Connecting a digital sound system”
on page 18.
3
4
www.insigniaproducts.com
7
Page 12
NS-32L550A11/NS-37L550A11/NS-42L550A11/NS-46L550A11 32"/37"/42"/46" LCD, 120 Hz
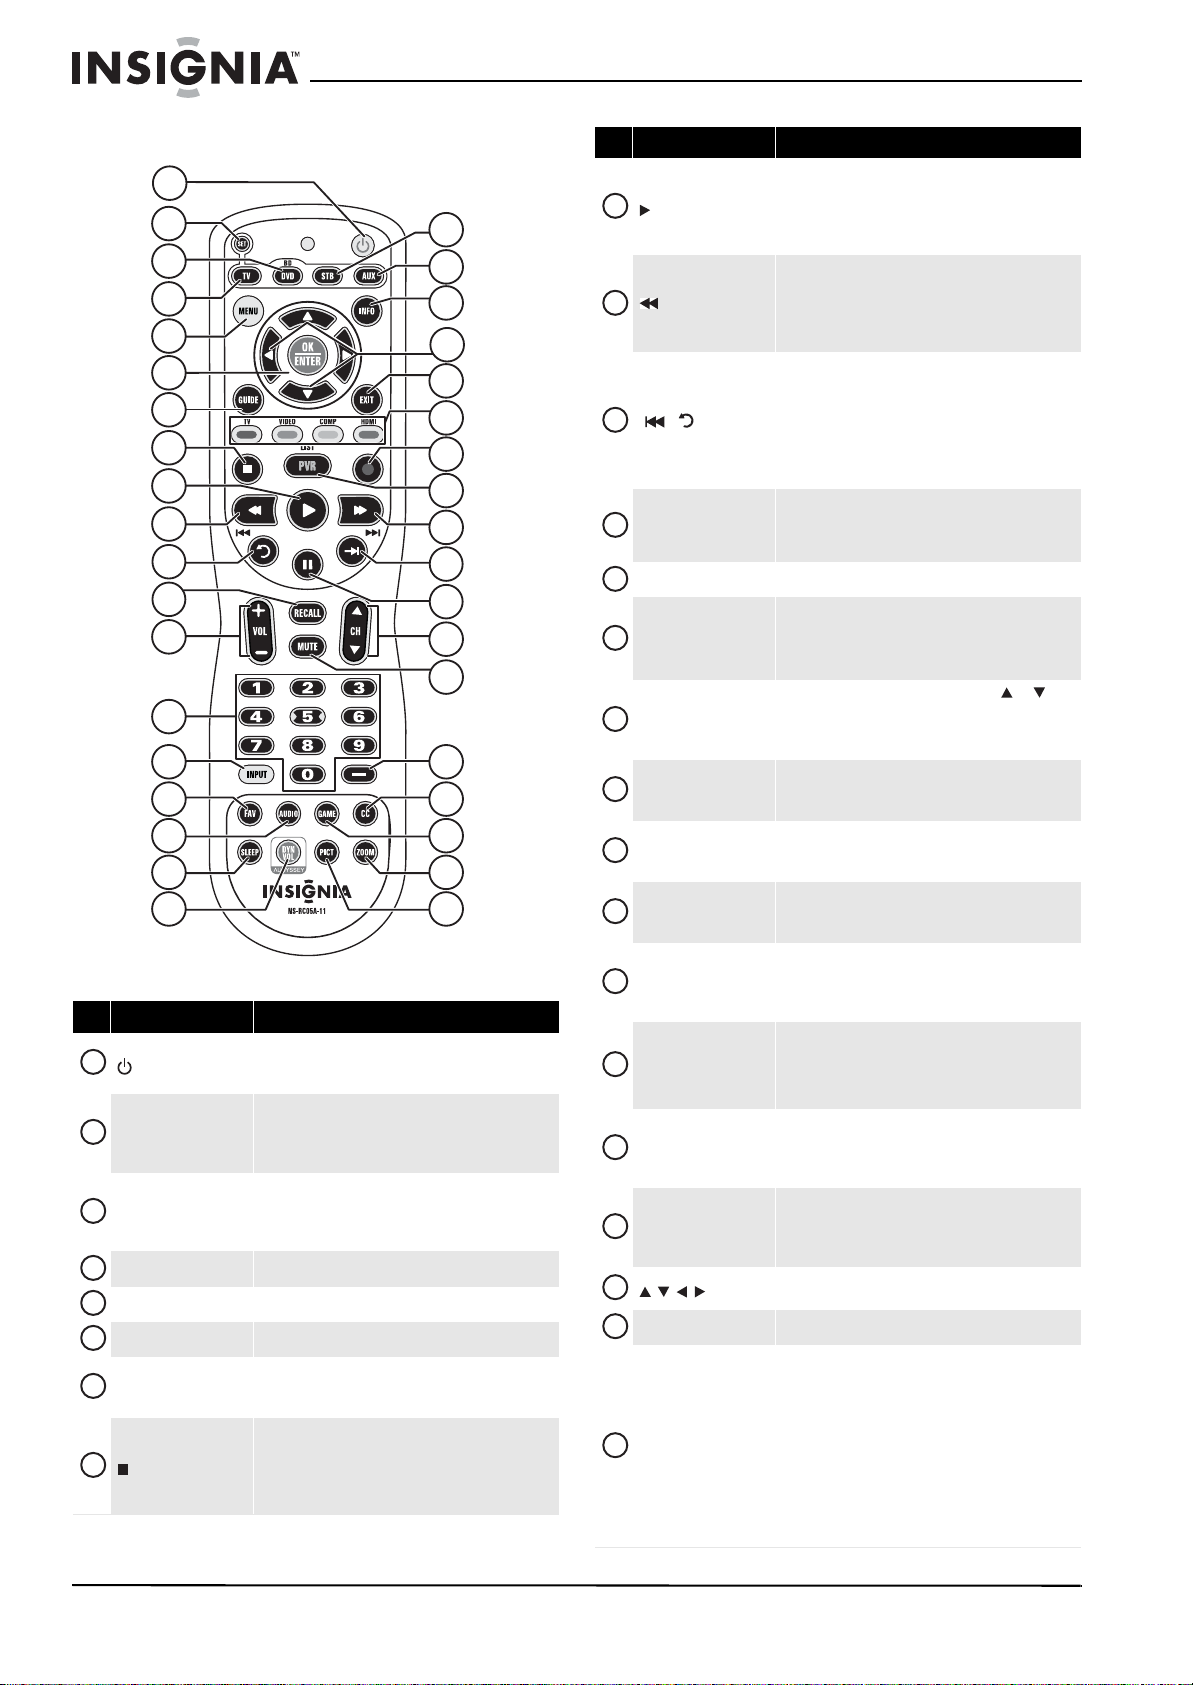
Remote control
1
2
3
4
5
6
7
8
9
10
11
12
13
14
15
16
17
18
19
# Item Description
Press to turn your TV on or off (Standby mode). When
1
(power)
2
SET
3
BD/DVD
4
TV Press to control your TV.
5
MENU Press to open the on-screen menu.
6
OK/ENTER Press to confirm selections or changes.
7
GUIDE
8
(stop)
your TV is off, power still flows into it. To disconnect
power, unplug the power cord.
Press to program the remote control to control
connected devices. For more information, see
“Progra mming your u niversal In signia rem ote control”
on page 10.
Press to control a connected Blu-ray or DVD player. You
must program the remote control before this button
works. For more information, see “Programming your
universal Insignia remote control” on page 10.
Press to display the program guide. For more
information, see “Displaying additional information”
on page 22.
Press to stop playback on DVD, DVR, PVR, or CD
devices. You need to program the remote control to
control connected devices. For more information, see
“Progra mming your u niversal In signia rem ote control”
on page 10.
20
21
22
23
24
25
26
27
28
29
30
31
32
33
34
35
36
37
# Item Description
Press to start playback on DVD, DVR, PVR, or CD
devices. You need to program the remote control to
9
(play)
10
(fast reverse)
11
/ (skip back)
12
RECALL
VOL+/VOL–
13
Numbers
14
INPUT
15
FAV
16
17
AUDIO
SLEEP
18
19
DYN VOL
STB
20
AUX
21
INFO
22
23
EXIT
24
25
Video input selection
control connected devices. For more information, see
“Progra mming your u niversal In signia remo te control”
on page 10.
Press to fast reverse on DVD, DVR, PVR, or CD devices.
You need to program the remote control to control
connected devices. For more information, see
“Progra mming your u niversal In signia remo te control”
on page 10.
In DV D, DVR, P VR, or CD mod e, pres s to sk ip back to the
previous title or track. You need to program the
remote co ntrol to control connected devices. For more
information, see “Programming your universal
Insign ia remote control” on p age 10.
In DVR mode, the behavior of this button depends on
how you p rogrammed your remote control.
In TV mode, press to return to the previous channel.
In USB mode, press to switch back to a higher level
folder.
Press to increase or decrease the volume.
Press to enter channel numbers and the parental
control password.
When pro gramming th e remote contro l, press to enter
device and programming codes.
Press to open the Source List, then press or to
cycle through the available input sources. For more
information, see “Selecting the video input source” on
page 20.
Press to open th e Favorite Channel list. For more
information, see “Setting up a favorite channel list” on
page 27.
Press to select SRS, Bass, Treble, Balance, or Reset
Audio Settings. For more information, see
“Adjusting sound settings” on page 25.
Press to set the sleep timer. You can select Off, 5, 10,
15, 30, 60, 90, 120, 180, or 240 minutes. For more
information, see “Setting the sleep timer” on page 36.
Press to select the level of Audyssey Dynamic Volume.
You ca n se lec t Heavy, Medium, Light, or Off. For
information see “Adjusting sound settings” on
page 25.
Press to control a connected set-top box. You need to
program the remote control to control connected
devices. For more information, see “Programming your
universal Insignia remote control” on page 10.
Press to control a connected device. You need to
program the remote control to control connected
devices. For more information, see “Programming your
universal Insignia remote control” on page 10.
Press to display TV status information, such as the
channel number, channel name (if available), or signal
source. For more information, see “Displaying
additional information” on page 22.
Press to move left, right, up, or down in on-screen
menus.
Press to close the on-screen menu.
TV—Press to select T V as the video source.
VIDEO— Press to select the device connected to the
AV IN jacks.
COMP—Press to select the device connected to the
COMPONENT video jacks.
HDMI—Press one or more times to select the device
connected to the HDMI 1, HDMI 2, HDMI 3, or
HDMI 4 jack.
For more information, see “Selecting the video input
source” on page 20.
8
www.insigniaproducts.com
Page 13
32"/37"/42"/46" LCD, 120 Hz 1080p
# Item Description
In DVD, DVR, PVR, or CD mode, press to begin
recording. You need to program th e remote control to
26
27
28
29
30
31
32
33
34
35
36
37
(record)
PVR/LIST
(fast forward)
/ (skip
forward)
(pause)
CH /CH
MUTE
—
CC
GAME
ZOOM
PICT
control connected devices. For more information, see
“Progra mming your u niversal In signia rem ote control”
on page 10.
Press to list all the recorded programs in a PVR/STB.
You need to program the remote control to control
connected devices. For more information, see
“Progra mming your u niversal In signia rem ote control”
on page 10.
Press to fast forward on DVD, DVR, PVR, or CD devices.
You need to program the remote control to control
connected devices. For more information, see
“Progra mming your u niversal In signia rem ote control”
on page 10.
In DVR mode, the behavior of this button depends on
how you programm ed your remote control.
In DVD, DVR, PVR, or CD mode, press to skip forward to
the next title or track. You need to program the remote
control to control connected devices. For more
information, see “Programming your universal
Insignia remote control” on page 10.
Press to pause playback on DVD, DVR, PVR, or CD
devices. You need to program the remote control to
control connected devices. For more information, see
“Progra mming your u niversal In signia rem ote control”
on page 10.
Press to change TV channels. For more information,
see “Selecting a channel” on page 21.
Press to mute the sound. Press again to restore the
sound.
Press to enter a digital sub-channel number. For more
information, see “Selecting a channel” on page 21.
Press t o turn clo sed capt ioning on or off. You can select
CC Off, CC On, or CC On when Mute. For more
information, see “Selecting the closed captioning
mode” on page 33.
Press to display the Game mode status. Press this
button again to turn Game mode On or Off. For more
information, see “Turning Game Mode on or off” on
page 24.
Press to select the aspect ratio. For more information,
see “Adjusting the TV picture” on page 22.
Press to select the video modes. You can select Vivid,
Standard, Energy Savings, Theater, Sports, or
Custom. For more information, see “Adjusting the TV
picture” on page 22.
Using the remote control
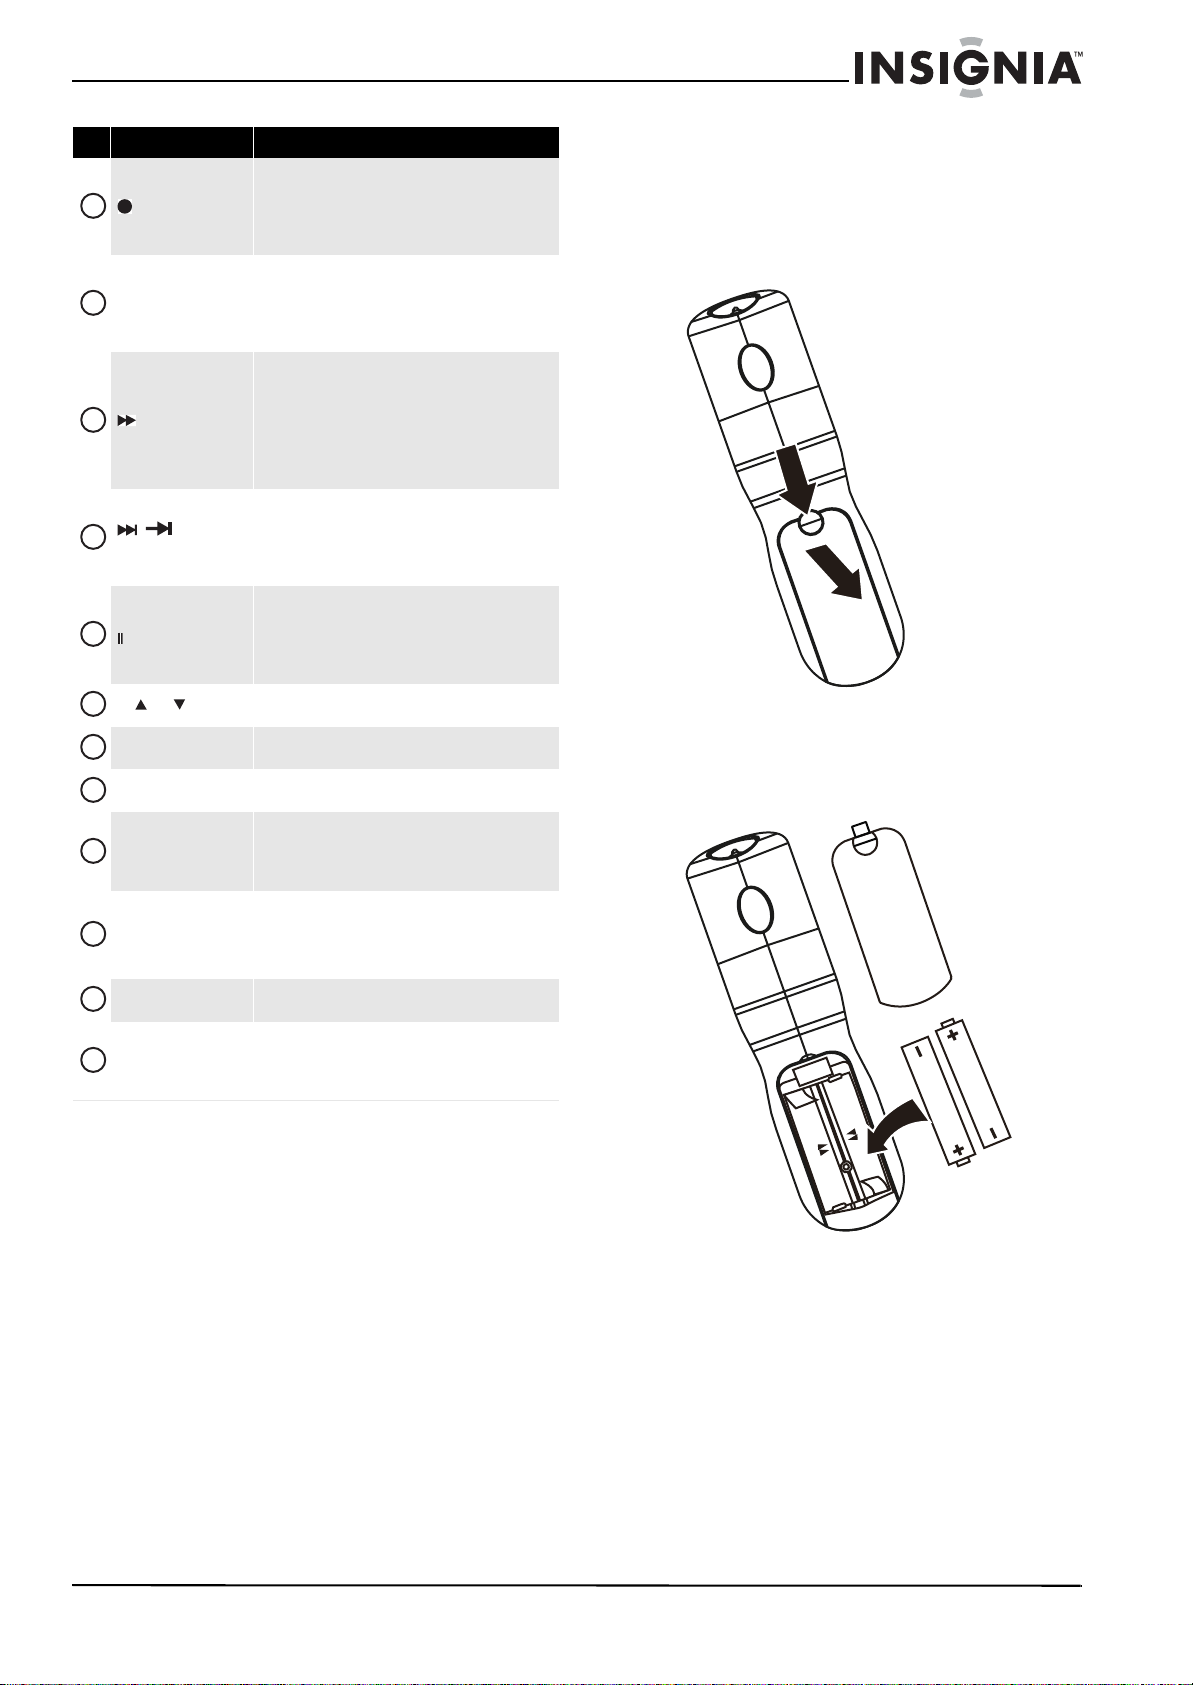
Installing remote control batteries
To install the remote control batteries:
1 Remove the battery cover.
2 Insert two AA batteries into the battery
compartment. Make sure that you match the +
and – symbols on the batteries with the + and –
symbols in the battery compartment.
www.insigniaproducts.com
9
Page 14
NS-32L550A11/NS-37L550A11/NS-42L550A11/NS-46L550A11 32"/37"/42"/46" LCD, 120 Hz
3 Replace the battery cover.
Cautions
• Batteries should not be exposed to excessive
heat, such as sunshine, heat registers, or fire.
• Battery chemicals can cause a rash. If the
batteries leak, clean the battery compartment
with a cloth. If chemicals touch your skin, wash
immediately.
• Make sure that batteries are disposed of
correctly. Do not burn or incinerate.
Notes
• Do not mix batteries of different types.
• Do not mix old and new batteries.
• Remove batteries when the charge is depleted.
• If the remote control is not going to be used for
an extended period of time, remove the
batteries.
Aiming the remote control
To aim the remote control:
• Point the remote control towards the remote
sensor on the front of your TV.
Notes
• Do not expose the remote control to shock or
liquids.
• Do not use the remote control in an area with
high humidity.
• Do not place the remote control in direct
sunlight.
• Do not place objects, such as furniture, between
the remote control and the remote sensor.
• The remote control may not work if direct
sunlight or bright light shines on the remote
sen sor. Eit her mo ve your TV or ch ange the a ngle
at which you use the remote control.
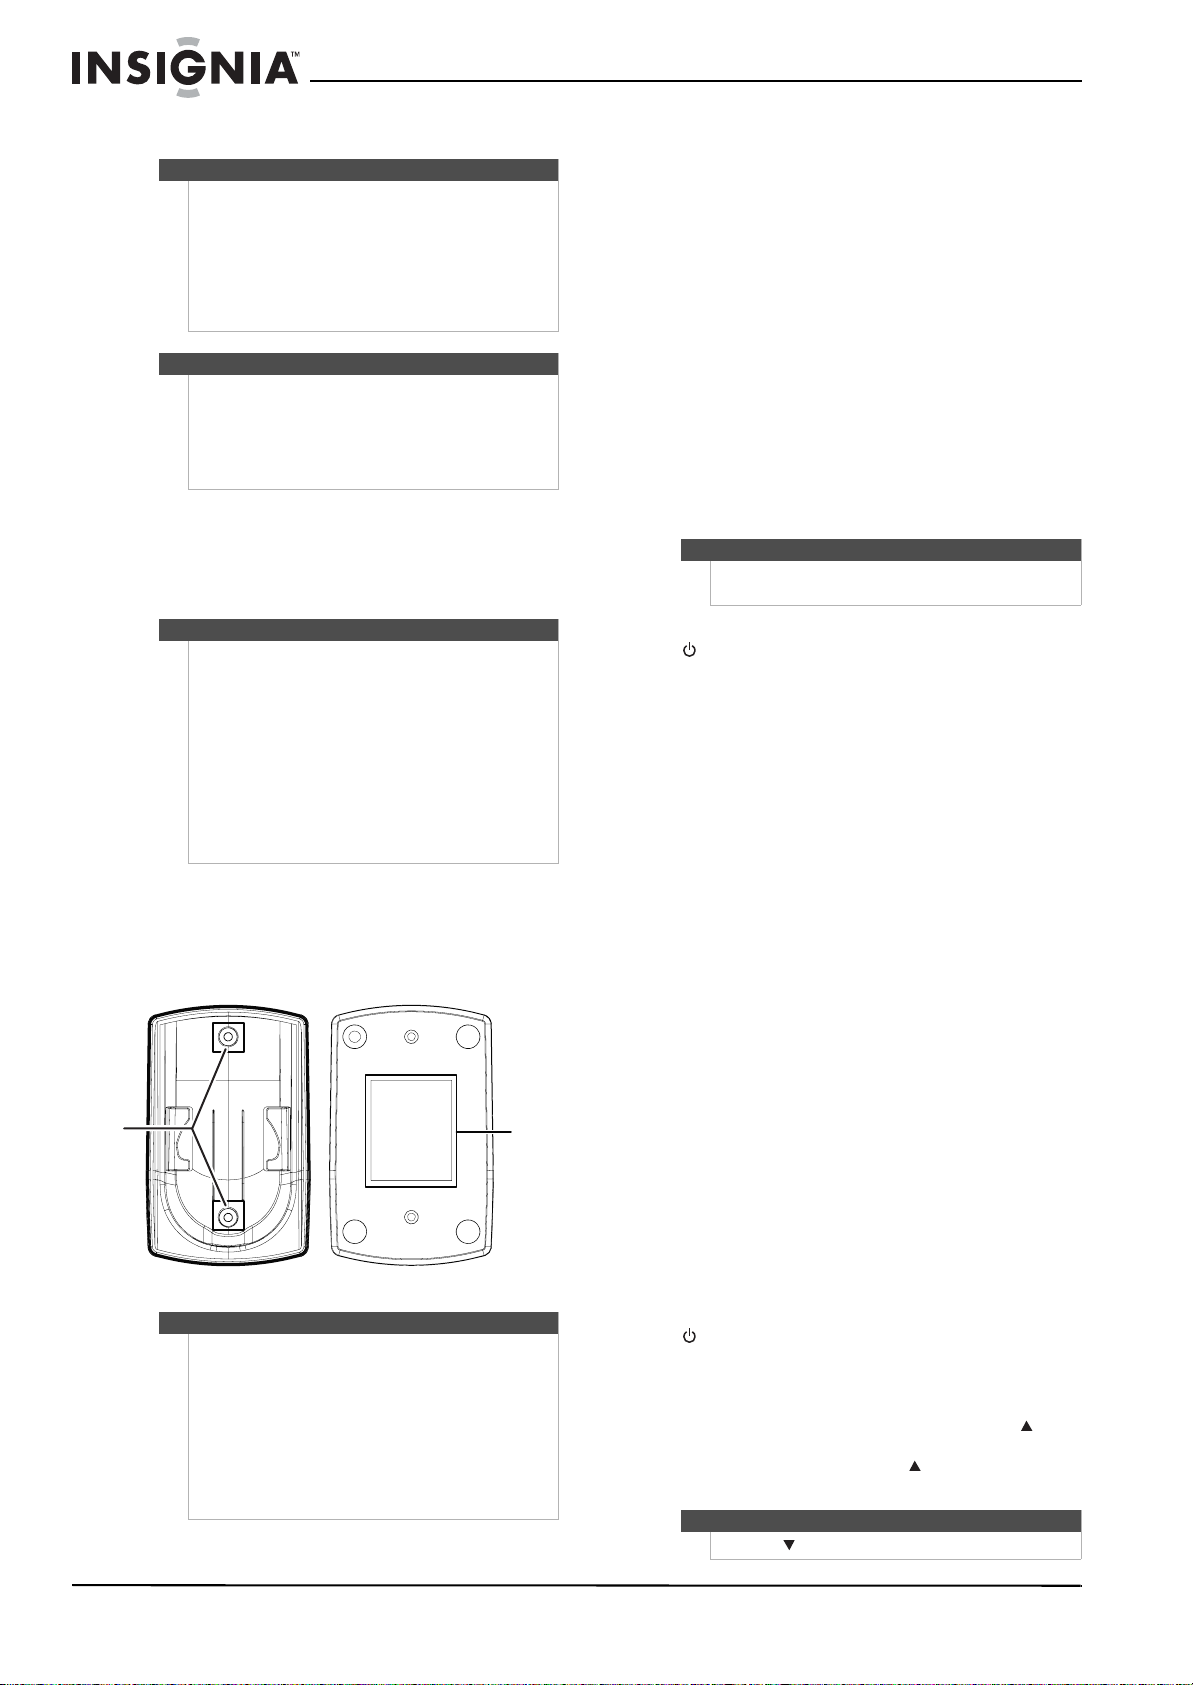
Using the remote control holder
Your TV comes with a remote control holder you
can put the remote control in when you are not
using it. You can put the holder on a table or mount
it on a wall.
Screws (not
included)
Tips
• Different types of walls may require different
types of screws. If you want to wall mount the
remote control holder, make sure that you use
the correct screws for the type of wall. (Screws
are not provided.)
• The remote control holder is shipped with
separate adhesive tape for wall mounting. This
tape may not work with all types of walls. Make
sure that you use the correct tape for the type of
wall.
Tap e
Programming your universal Insignia remote control
To program your remote control:
1 Find the codes for the devices you want to
program in “Manufacturers’ codes” on page 46
and write them down or highlight them.
2 Turn on the device (for example, a DVD player)
and, if needed, load media such as a DVD.
3 Press the device button on the TV remote for the
device that you want to program (TV, DVD, STB,
or AUX).
4 Press and hold SET until the red LED blinks
twice, then release.
5 Enter the first five-digit code for the device and
brand that you want to program. The LED blinks
once as each digit is entered. If the code is valid,
the LED blinks twice.
Note
If the LED does not blink twice, repeat steps 2 to 4
and try entering the code again.
6 Aim the remote at the device and press
(power). The device should turn off. If it does
not, repeat Steps 3 through 5, trying each code
for your brand until you find one that works. If
you cannot find a code that works, see
“Searching for your code” below.
7 Repeat Steps 1 to 5 for the other devices you
want to control. For future reference, write down
each working device code.
Searching for your code
If your device does not respond to the remote
control after trying all codes listed for your brand, or
if your brand is not listed, try searching for your
code.
To search for your code:
1 Turn on the device you want to control.
2 Press the device button on your TV remote
control (TV, DVD, STB, or AUX) once.
3 Press and hold SET until the red LED blinks
twice, then release.
4 Enter 9 9 1. The LED blinks twice.
5 Press the number that matches your device
type.
• 0—Cable converters, video accessories,
satellite receivers
• 1—TVs
• 2—VCRs, DVD players, Blu-ray Disc players
• 3—Audio amplifiers, audio amplifiers/tuners,
CD players
6 Aim the remote at the device and press
(power). The remote sends IR codes from its
library to the selected device, starting with the
most popular code first. If the device responds,
go to Step 8.
7 If the device does not respond, press CH and
the remote tests the next code for that device
type. Continue to press CH until the device
turns off.
Note
Press CH to try the previous code.
10
www.insigniaproducts.com
Page 15

32"/37"/42"/46" LCD, 120 Hz 1080p
8 Now that you have found the correct code, press
SET to save the code that worked for your
device. The LED blinks twice to indicate that the
code has been saved.
9 To search for other device codes, repeat Steps 1
to 8.
Checking the codes
If you have set up the remote using the procedure
in “Searching for your code” on page 10, you may
need to find out which five-digit code is operating
your equipment.
To find out which code is assigned to your TV
(for example):
1 Press TV once.
2 Press and hold SET until the red LED blinks
twice, then release.
3 Enter 9 9 0. The LED blinks twice.
4 To view the code for the first digit, press 1.
Count the red LED blinks (for example, three
blinks = 3), then write down the number in the
appropriate code listing at the top of this
column.
Note
If the LED does not blink, the code digit is 0.
5 Repeat Step 4 for the four remaining digits,
using 2 for the second digit, 3 for the third digit,
4 for the fourth digit, and 5 for the fifth digit.
6 To check for other device codes, repeat Steps 1
through 5, substituting the device button for
the device you would like to check.
Using learning
This universal remote control includes a learning
feature so you can add functions that are unique to
your home entertainment devices (such as VCR
Tracking Up or Down). However, there are some
considerations to keep in mind.
Precautions
• Your original remote controls must be in working
order for learning to work properly.
• Learned buttons are mode-specific, so each one
can store a unique function for each mode.
• Do not use the following buttons for learning:
Device buttons, SET, or (record).
• Learning capacity is approximately 42 to 75
buttons, depending on the code being learned.
• Certain device functions are not learnable,
including multi-frequency types, some high
frequency functions, and other unusual formats.
• For optimum learning, avoid high levels of
ambient light such as natural sunlight or
energy-efficient fluorescent lights.
Note
Have your original remote controls handy before
programming learning.
2 Locate the button on your original remote
control that you want the Insignia remote
control to learn. Press the mode button you
want to learn functions on.
3 Press and hold SET until the LED blinks twice,
then release.
4 Enter 9 7 5. The LED blinks twice.
Note
If more than 10 seconds pass between button
presses, the remote exits programming.
If the LED displays one long flash instead, replace the
batteries. If the remote control continues to display
one long flash, the remote control cannot learn a
new button.
5 Press the button on your TV’s remote control
that you want to program. The feedback LED
stays lit for three seconds, indicating that the
remote is ready to learn.
6 On the original remote, press and hold the
button to be learned. Continue holding the
button on the original remote until the Insignia’s
LED blinks twice.
Note
If the red LED displays one long blink, a learning error
has occurred. Try repeating this step again until a
successful capture occurs. If the function is still not
captured, press and hold SET to exit programming
and review the Precautions” above. After reviewing,
start programming again at Step 1.
7 Repeat Steps 4 and 5 to program another
button. Once you have completed
programming all the buttons you want, press
and hold SET until the LED blinks twice to save
all data learned.
Deleting a single learning button
This process returns the button to its original
programming for the mode you select. You can also
delete learned programming by teaching a
different function to the button (see “Programming
a Learned button” above).
Note
If more than 10 seconds pass between button
presses, the remote exits programming.
If the LED displays one long flash instead, replace the
batteries. If the remote control continues to display
one long flash, the remote control cannot learn a
new button.
Programming a learned button
To program a learned button:
1 Place your Insignia remote control
head-to-head (about 2" apart) from your
original remote control (the one that came with
the device).
www.insigniaproducts.com
11
Page 16

NS-32L550A11/NS-37L550A11/NS-42L550A11/NS-46L550A11 32"/37"/42"/46" LCD, 120 Hz
To delete a single learned button:
1 Press the mode button that you want to remove
the learned button from.
2 Press and hold SET until the LED blinks twice,
then release.
3 Enter 9 7 6. The LED blinks twice.
4 Press the button containing the learned
function to be deleted, twice. The LED blinks
twice and programming ends.
Deleting all learned buttons in a specific mode
Note
If more than 10 seconds pass between button
presses, the remote exits programming.
If the LED displays one long flash instead, replace the
batteries. If the remote control continues to display
one long flash, the remote control cannot learn a
new button.
To delete all learned buttons in a specific mode:
1 Press and hold SET until the LED blinks twice,
then release.
2 Press 9 7 6. The LED blinks twice.
3 Press a mode button twice (for example, TV,
DVD, STB, or AUX) to clear all the learned
buttons for that mode. The LED blinks twice and
programming ends.
Changing volume lock
Volume Lock sets the volume and mute buttons to
the device you select, regardless of what mode you
are in. For example, if you lock the volume to your
DVD player and then go to TV mode, when you
press the volume button on your Insignia remote,
the volume will change on the DVD player and not
on your TV.
To lock volume control:
1 Press and hold SET until the red LED blinks
twice, then release.
2 Enter 9 9 3, the LED blinks twice.
3 Press the mode button for the device you want
to control (for example, TV).
4 The LED blinks twice. Now when you press
VOL+, VOL–, or Mute, the selected device
controls the volume regardless of the current
mode.
To unlock all volume control:
1 Press and hold SET until the red LED blinks
twice, then release.
2 Enter 9 9 3, the LED blinks twice.
3 Press VOL+. The LED blinks four times. Volume is
independently controlled for all programmed
devices.
To unlock a single device’s volume control:
1 Press the device mode button (TV, DVD, STB, or
AUX).
2 Press and hold SET until the red LED blinks
twice, then release.
3 Enter 9 9 3. The LED blinks twice.
4 Press VOL-. The red LED blinks four times.
Volume is independently controlled for the
selected devices.
Programming channel lock
Channel control can be locked so that the Insignia
remote controls a single device’s channel-changing
functions, regardless of operating mode. This is
often enabled by users who watch all broadcast TV
through one device, such as a cable set-top box.
The affected buttons are 1 through 0, CH , CH ,
and RECALL.
To lock all channel controls to one device:
1 Press the mode button for the device that you
want to use for changing channels, such as STB
for your cable set top box.
2 Press and hold SET until the mode LED blinks
twice, then release.
3 Enter 9 7 3.The mode LED blinks twice.
4 Press CH once. The mode LED blinks twice.
Now, regardless of what mode you select, the
channel buttons will only change channels on
the assigned device.
To unlock channel locks:
1 Press and hold SET until the mode LED blinks
twice, then release.
2 Enter 9 7 3. The mode LED blinks twice.
3 Press CH once. The mode LED blinks four
times.
Now the channel functions will correlate to the
active mode (for example, press CH in TV
mode and the TV changes channel accordingly).
Using buttonmover
Your Insignia universal remote control includes a
buttonmover feature that lets you copy buttons
from one mode (such as source mode) to another
mode (such as destination mode) or to a different
button in the same mode.
Note
Do not use any of the Device buttons, (power),
RECORD, or SET as a source or destination button.
To move buttons in the same device mode:
1 Press the device button (TV, DVD, STB, or AUX).
2 Press and hold SET until the LED blinks twice,
then release.
3 Press 9 9 4. The LED blinks twice.
4 Press the button you want to move.
5 Press the new button that should perform the
function. The LED blinks twice.
6 Repeat Steps 1-5 to move additional buttons.
To move buttons to a different device mode:
1 Press and hold SET until the LED blinks twice,
then release.
2 Press 9 9 4. The LED blinks twice.
3 Press the device button that contains the
function you want to move (for example, DVD).
4 Press the button you want to move (such as
Play).
5 Press the device button that you want to move
the function to (such as TV).
12
www.insigniaproducts.com
Page 17

32"/37"/42"/46" LCD, 120 Hz 1080p
6 Press the button in the new mode that should
perform the function (for example, Play). The
LED blinks twice.
7 Repeat Steps 1-6 to move additional buttons.
To restore all buttonmoved data in a specific
mode:
1 Press and hold SET until the LED blinks twice,
then release.
2 Press 9 9 4. The LED blinks twice.
3 Press the device button you want to remove all
buttonmoved data from twice. The LED blinks
twice.
4 Repeat for each device you want to restore.
To restore original button function:
1 Press the device button for which you want to
remove the buttonmoved data from a specific
button.
2 Press and hold SET until the LED blinks twice,
then release.
3 Enter 9 9 4. The LED blinks twice.
4 Press the button you want to remove the
buttonmoved data from twice. The LED blinks
twice.
5 Repeat Steps 1-4 for additional buttons you
want to remove.
Programming macros
Your Insignia universal remote control includes the
ability to program any button (other than the SET
button) with a macro function. Each one can be set
up to perform a pre-programmed set of sequential
button presses with the press of a single button. A
macro can be used to control a home theater
operation, to set a favorite channel, or for other
functions you would like to control with one button
press. Each macro button can hold up to 15 button
presses, total.
Note
Programming a new macro over an existing one
erases the original macro.
To program a mode-independent macro:
1 Press and hold SET until the red LED blinks
twice, then release.
2 Press 9 9 5. The LED blinks twice.
3 Press the button you want to assign to a macro.
4 Enter the series of commands you want the
macro to execute (up to 15 commands).
5 Press and hold SET until the red LED blinks
twice, then release.
Now, when you press the preset macro button,
the remote sends the series of commands you
have entered, regardless of what mode you are
in. For example, you could program a macro
button to turn on both your TV and cable box
and select a particular channel.
Note
To clear the macro, repeat Steps 1-5, but do not enter
a series of commands at Step 4.
To program a mode-dependent macro:
1 Press the device mode button (TV, DVD, STB, or
AUX).
2 Press and hold SET until the LED blinks twice,
then release.
Press 9 7 8. The LED blinks twice.
3
4 Press the button you want to assign to a macro.
5 Enter the series of commands you want the
macro to execute (up to 15 commands).
6 Press and hold SET until the red LED blinks
twice, then release.
Now, when you press the macro button, the
remote sends the series of commands you have
entered, but only if you are in the mode you
selected in Step 1. For example, you could
program the macro button to turn on both your
TV and cable box and select a particular
channel, but only if you are in TV mode. If you
are in DVD mode, this button does not execute
the macro you set up in TV mode.
Note
To clear the macro, repeat Steps 1-6, but do not enter
a series of commands at Step 5.
Programming a different universal remote control
You can operate your Insignia TV with a new or
existing universal remote control.
To program a different universal remote control:
1 See the table below for common codes. If you
have problems programming your remote or
need a different remote control code, visit
www.insigniaproducts.com for the latest
remote control code information.
Insignia TV codes for universal remote controls
(for all Insignia TVs manufactured after Jan. 1, 2007)
Universal remote control makes and models
Philips PHDVD5,
PH5DSS,
PMDVR8, PDVR8
115 135 0464 8043
Comca st
M1057
0463 720 0463 0091 10463
RCA
RCU807
One for All
URC-6690
Sony
RM-VL600
Set-top box makes and models
Dish Network
VIP508, VIP622
Motorola
DRC800
TIVO
Series 3, HD
DirectTV
RC23
Codes for other remote controls are available
online at: www.insigniaproducts.com
Tips
• The brand name is often visible on the front of
the universal remote control, and the model
number is often visible on the back.
• If your universal remote control isn’t listed on
the chart, refer to your universal remote
control’s instructions and try codes for the
brands Orion, Emerson, Memorex, Sansui,
Sylvania, or Zenith. You may need to try several
codes before finding a match.
www.insigniaproducts.com
13
Page 18
NS-32L550A11/NS-37L550A11/NS-42L550A11/NS-46L550A11 32"/37"/42"/46" LCD, 120 Hz
2 Follow your universal remote control’s
instructions to enter the TV code you found in
Step 1.
Tips
• If your universal remote control has a code
search feature, run a code search to identify a
code that matches your TV. See your universal
remote control’s instructions for details.
• If your universal remote control has a “Learn”
feature, you can manually program it using the
Insignia TV remote to “teach” the commands
one at a time. See your universal remote
control’s instructions for details.
3 If all else fails, you must use a different universal
remote control that can operate both your
set-top box and your TV. Four such remotes are
listed on the chart, but many other compatible
models are available in the market.
For more help, go to insigniaproducts.com or
call technical support for your universal remote
control or set-top box manufacturer, or call the
Insignia Customer Care Center. For US and
Canada markets, call 1-877-467-4289. For
Mexico markets, call 01 800-926-3000.
Making connections
Connection type Video quality
S-Video Better than composite or coaxial
Compo site Better than coaxial
Coaxial Good
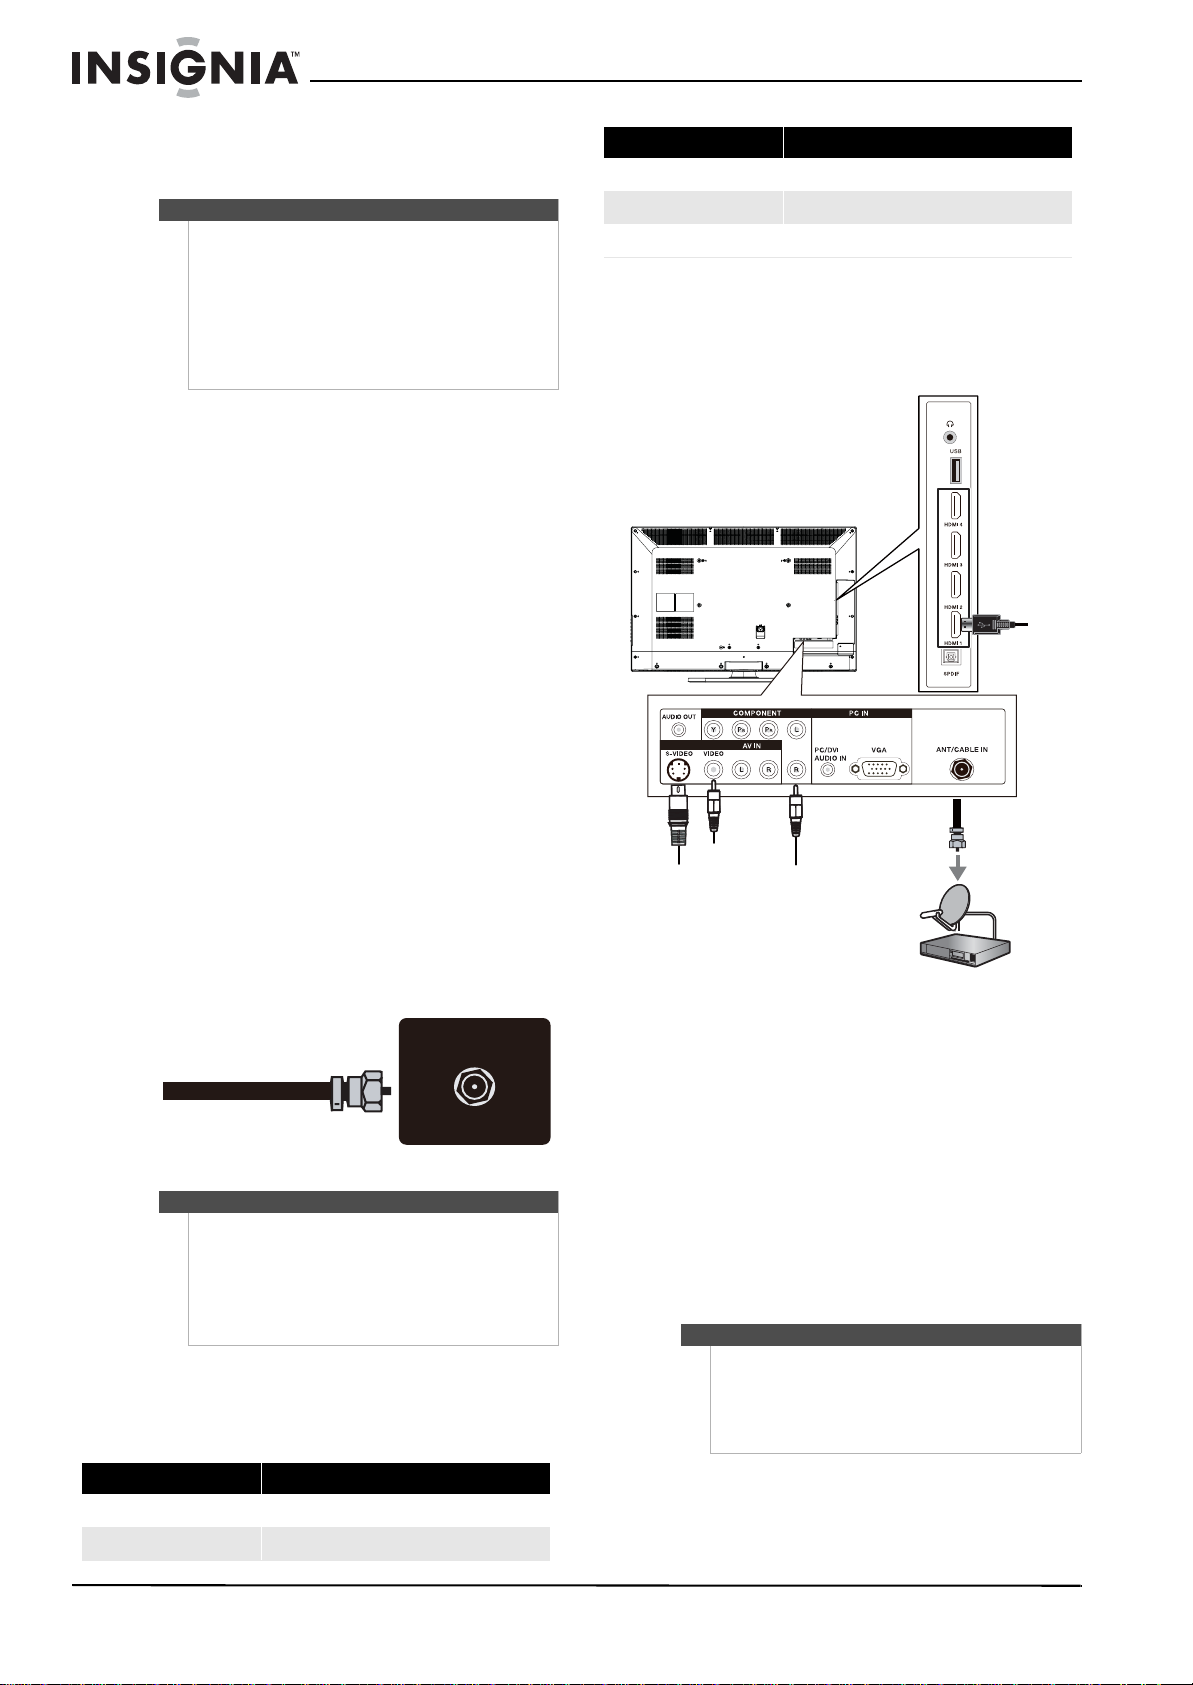
To connect a cable or satellite box:
1 Connect the incoming cable from the cable TV
or satellite TV wall jack to the cable-in jack on
the cable box.
HDMI
Connecting the power
To connect the power:
• Plug the power cord into a power outlet.
Connecting an antenna or cable TV (no box)
To connect an antenna or cable TV (no box):
1 Turn off your TV and all connected equipment.
2 Connect a coaxial cable to the ANT/CABLE IN
jack on the back of your TV and to the antenna
or cable TV wall jack.
ANT/CABLE IN
Notes
• Use a coaxial cable to eliminate interference and
noise from radio waves.
• Do not bundle the coaxial cable with the power
cord or other cables.
• If the antenna is not installed correctly, contact
qualified service personnel to correct the
problem.
Connecting a cable or satellite box
Many cable or satellite TV boxes have more than
one connection type. To get the best video, you
should use the best connection type available.
Composit e
S-Video Component
2 Depending on the jacks available on the cable
or satellite TV box, connect a cable from the
outgoing jacks on the cable or satellite TV box
to the corresponding jacks on the back or side
of your TV. The connection can be to an HDMI
jack, COMPONENT Y/P
B/PR jacks, AV IN
S-VIDEO, or AV IN VIDEO jack.
3 If you use the COMPONENT Y/P
B/PR jacks,
connect an audio cable (provided) to the
COMPONENT L/R audio jacks.
Or,
If you use the AV IN S -VIDEO or AV I N VIDEO
jack, connect an audio cable (not provided) to
the AV IN L/R audio jacks.
Note
If the cable or satellite TV box does not have an
HDMI, component, S-Video, or composite jack,
connect the cable or satellite T V box to the
ANT/CABLE IN jack on the back of your TV. For more
information, see “Connecting an antenna or cable TV
(no box)” on page 14.
Connection type Video quality
HDMI Best
Compone nt Better than composite, S-Video, or coaxial
14
www.insigniaproducts.com
Page 19

32"/37"/42"/46" LCD, 120 Hz 1080p
Connecting an HDMI device
Note
If your device has an HDMI connection, we
recommend that you use the HDMI connection to
get the best quality possible.
To connect an HDMI device:
1 Make sure that your TV’s power cord is
unplugged and the HDMI device is turned off.
2 Connect an HDMI cable (not provided) to the
HDMI 1, HDMI 2, HDMI 3, or HDMI 4 jack on
the side of your TV and to the HDMI OUT jack
on the HDMI device.
Side of TV
HDMI device
Connecting a component video device
To connect a component video device:
1 Make sure that your TV’s power cord is
unplugged and the component video device is
turned off.
2 Connect a component video cable to the
COMPONENT Y/P
TV and to the COMPONENT OUT video jacks on
the component video device.
Back of TV
3 Connect an audio cable to the
COMPONENT L/R audio jacks on the back of
your TV and to the COMPONENT AUDIO OUT
jacks on the component video device.
4 Turn on your TV, then turn on the component
video device.
5 Press INPUT to open the Source List.
6 Press or to highlight COMPONENT, then
press OK/ENTER.
B/PR jacks on the back of your
Component video device
3 Turn on your TV, then turn on the HDMI device.
4 Press INPUT to open the Source List.
5 Press or to highlight HDMI 1, HDMI 2,
HDMI 3, or HDMI 4, then press OK/ENTER.
Notes
To connect a DVI device, you need an HDMI-DVI
adapter (not included) and a 3.5 mm audio cable (not
included). Connect the adapter to the DVI device and
the HDMI 1 jack on the side of your TV. Connect the
audio cable to the DVI device and to the
PC/DVI AUDIO IN jack on the back of your TV.
www.insigniaproducts.com
15
Page 20
NS-32L550A11/NS-37L550A11/NS-42L550A11/NS-46L550A11 32"/37"/42"/46" LCD, 120 Hz
Connecting an S-Video device
Note
The AV IN S-VID EO jack and the AV IN VI DEO jack
share the same audio jacks. You cannot connect both
types of devices at the same time.
To connect an S-Video device:
1 Make sure that your TV’s power cord is
unplugged and the S-Video device is turned off.
2 Connect an S-Video cable (not included) to the
AV IN S -VI DE O jack on the back of your TV and
the S-VIDEO OUT jack on the S-Video device.
Back of TV
S-Video device
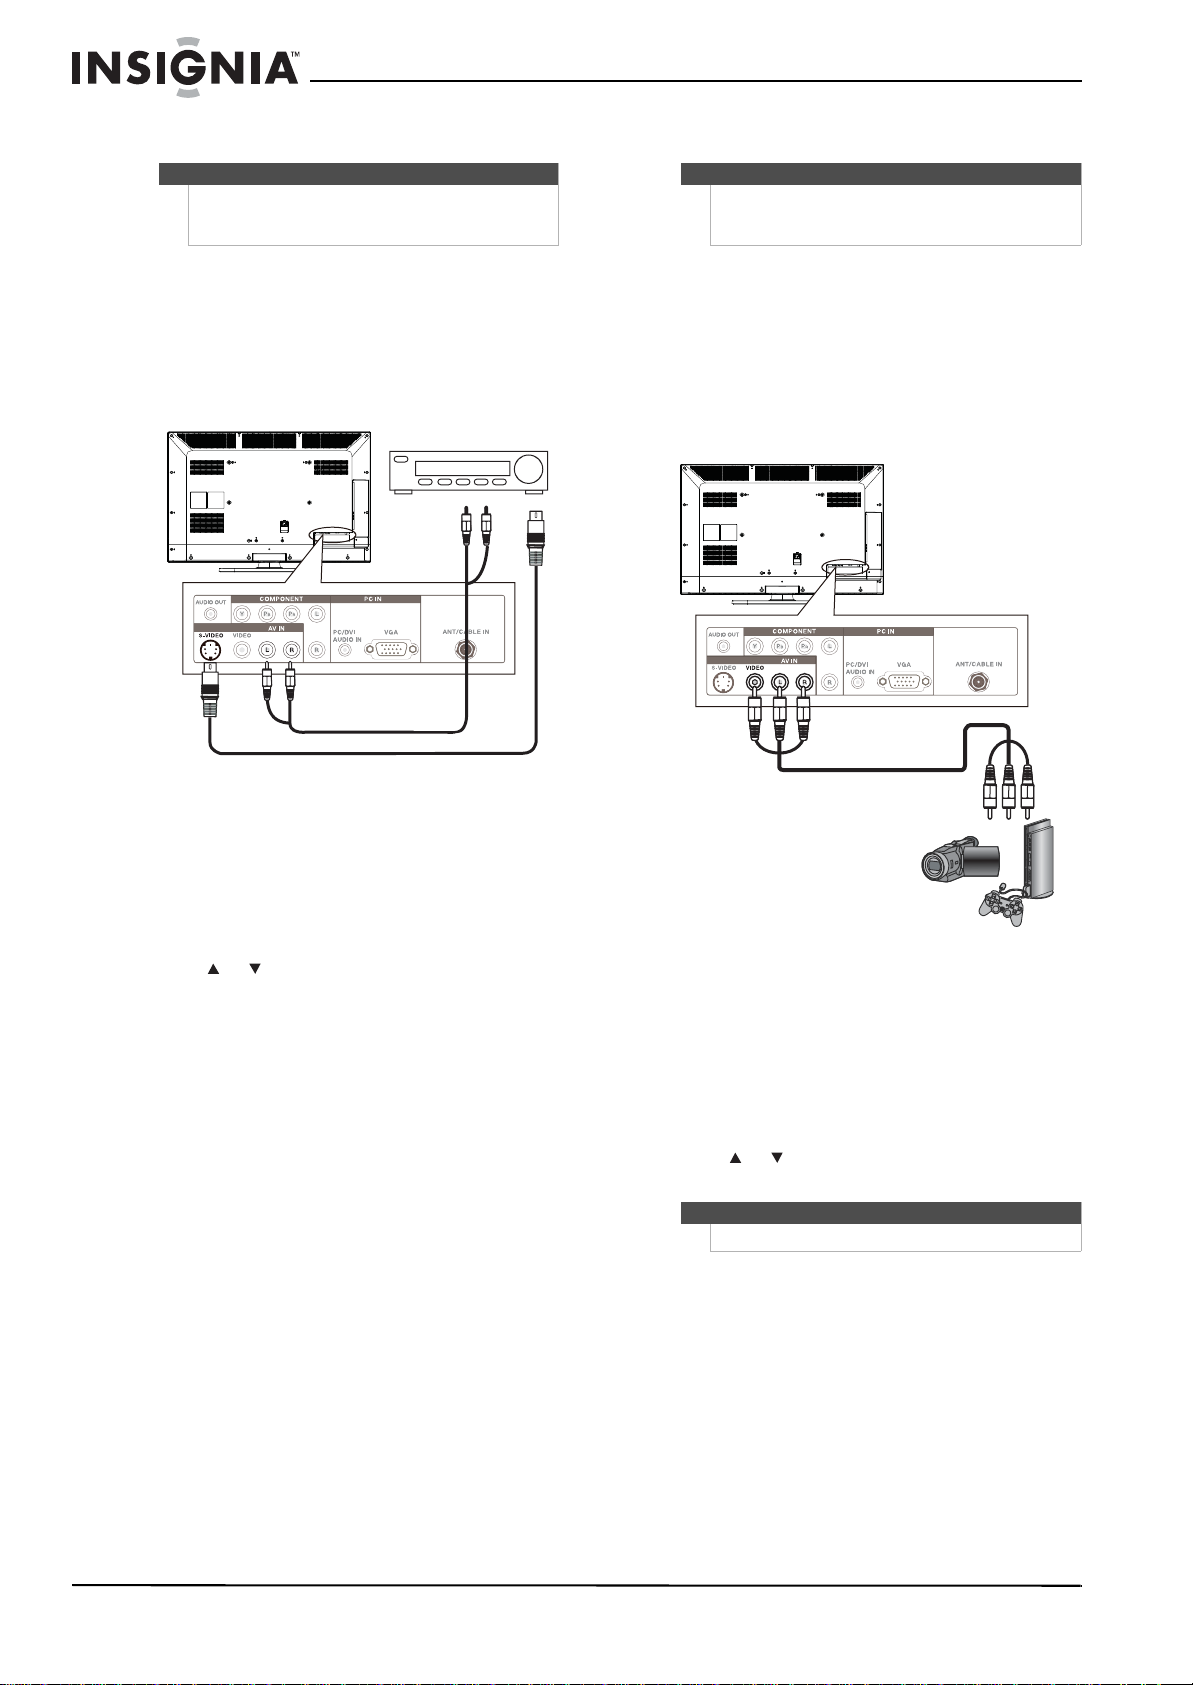
Connecting a camcorder or game console
Note
The AV I N VIDE O jack and the AV IN S-VI DEO jack
share the same audio jacks. You cannot connect both
types of devices at the same time.
To connect a camcorder or game console:
1 Make sure that your TV’s power cord is
unplugged and the camcorder or game console
is turned off.
2 Connect the video connector on a composite
cable (not included) to the AV IN V ID EO jack on
the back of your TV and the VIDEO OUT jack on
the camcorder or game console.
Back of TV
Cables are often color-coded to
match color-coded jacks. Connect
yellow to yellow, red to red, and
white to white.
3 Connect an audio cable (not included) to the
AV IN L /R audio jacks on the back of your TV
and to the AV O UT audio jacks on the S-Video
device.
4 Turn on your TV, then turn on the S-Video
device.
5 Press INPUT to open the Source List.
6 Press or to highlight AV, then press
OK/ENTER.
Camcorder or game console
3 Connect the left and right audio connectors on
the composite cable to the AV I N L /R audio
jacks on the back of your TV and to the AU DIO
OUT jacks on the camcorder or game console.
4 Turn on your TV, then turn on the camcorder or
game console.
5 Press INPUT to open the Source List.
6 Press or to highlight AV, then press
OK/ENTER.
Note
To turn Game Mode on or off, press GAME.
16
www.insigniaproducts.com
Page 21

32"/37"/42"/46" LCD, 120 Hz 1080p
Connecting a VCR
Note
The AV IN VIDEO jack and the AV IN S -VID EO jack
share the same audio jacks. You cannot connect both
types of devices at the same time.
To connect a VCR:
1 Make sure that your TV’s power cord is
unplugged and the VCR is turned off.
2 Connect the video connector on a composite
cable (not included) to the AV I N V ID EO jack on
the back of your TV and the VIDEO OUT jack on
the VCR.
Back of TV
Cables are often color-coded to
match color-coded jacks.
Connect yellow to yellow, red to
red, and white to white.
Connecting a computer
To connect a computer:
1 Make sure that your TV’s power cord is
unplugged and the computer is turned off.
2 Connect a VGA cable (not included) to the VGA
jack on the back of your TV and to the VGA jack
on the computer.
Back of TV
VCR
3 Connect the left and right audio connectors on
the composite cable to the AV I N L /R audio
jacks on the back of your TV and to the AUDIO
OUT jacks on the VCR.
4 Turn on your TV, then turn on the VCR.
5 Press INPUT to open the Source List.
6 Press or to highlight AV, then press
OK/ENTER.
7 Insert a videotape into the VCR, then press the
play button.
3 Connect an audio cable to the
PC/DVI AUDIO IN jack on the back of your TV
and to the AUDIO OUT jack on the computer.
4 Turn on your TV, then turn on the computer.
5 Press INPUT to open the Source List.
6 Press or to highlight VGA, then press
OK/ENTER.
Note
When the computer enters Standby mode, your TV
turns off. If your TV does not turn on when you
“wake” your computer, press (power) on your TV
or remote control.
For HDMI-DVI input from PC, the TV will enter
Standby mode after one minute if no signal is
detected.
www.insigniaproducts.com
17
Page 22

NS-32L550A11/NS-37L550A11/NS-42L550A11/NS-46L550A11 32"/37"/42"/46" LCD, 120 Hz
Connecting headphones
The TV speakers are muted when headphones are
attached.
Warnin g
Loud noise can damage your hearing. When using
headphones, use the lowest volume setting on your
headphones that still lets you hear the sound.
To connect headphones:
• Connect headphones to the on the side of
your TV.
Connecting a digital sound system
To connect a digital sound system:
• Connect a digital audio cable to the SPDIF jack on
the side of your TV and to the digital audio jack on
the amplifier.
Digital sound system
Side of TV
Side of TV
Connecting an analog sound system
To connect an analog sound system:
• Connect a 3.5 mm audio cable (not included) to
the AUDIO OUT jacks on the back of your TV and
to the AUDIO IN jacks on the sound system.
Back of TV
Note:
If you connect the audio output from DVD player,
VCR, set top box, cable box, satellite box, game
console, or other video devices directly to an
amplifier without passing the audio through your TV
set, you need to fine-tune the lip/audio sync on the
amplifier to synchronize the video.
Analog sound system
18
www.insigniaproducts.com
Page 23

32"/37"/42"/46" LCD, 120 Hz 1080p
Turning on your TV for the first time
The first time you turn on your TV, the Setup Wizard
opens. The Setup Wizard guides you through
setting up basic settings including the menu
language, time mode, picture mode, and TV signal
source.
To set up your TV:
1 Make sure that you have:
• Installed the remote control batteries. (See
page 9 for details).
• Connected an antenna, cable TV, or satellite
TV. (See page 14 for details.)
• Connected the power cord. (See page 14 for
details.)
2 Press (power) to turn on your TV. The Choose
your menu language screen opens.
Choose your menu Language
English
Français
Español
5 Press or to highlight Time Zone, then press
or to select your time zone. You can select
Eastern, Central, Mountain, Pacific, Alaska,
Hawaii, Atlantic, or Newfoundland.
6 Press or to highlight Daylight Savings,
then press or to select On (if your viewing
area observes Daylight Savings Time) or Off (if
your viewing area does not observe Daylight
Savings Time).
7 If you selected Manual for Mode, set the date
by pressing or to highlight Year, Month, or
Day, then press or to adjust the setting.
8 If you selected Manual for Mode, set the time
by pressing or to highlight Time, then
pressing or to select the hour, minute, or
AM/PM field. Press or to adjust the setting.
9 Press OK/ENTER. The
Choose your Picture Mode
screen opens.
Choose your Picture Mode
Home Mode
Retail Mode
OK
MOVE SELECT PREVIOUS EXIT
Set menu language to English, Français, or Español
ENTER
MENU
EXIT
3 Press or to highlight English, Francais, or
Español, then press OK/ENTER. The Time screen
opens.
Time
Time Zone
Daylight Savings
Year
Month
Day
Time
OK
MOVE SELECT PREVIOUS EXIT
If Automatic, options are automatically set by TV source
ENTER
MENU
otuAedoM
Newfoundland
On
2010
Jan
1
12 : 01 AM
EXIT
4 Press or to select Auto or Manual, then
press OK/ENTER.
Notes
• If you set the time mode to Auto, the date and
time are set based on a time signal received
from a DTV channel, and the only options you
can adjust are Time Zone and Daylight Savings.
• You can change the menu language or scan for
channels at a later date. For more information,
see “Selecting the menu language and
transparency” on page 13 or “Automatically
scanning for channels” on page 13.
OK
MOVE SELECT PREVIOUS EXIT
Reduces total power consumption
ENTER
MENU
EXIT
10 Press or to highlight Home Mode (default)
or Retail Mode, then press OK/ENTER.
If you selected Retail Mode, a message appears
“Are you sure you want Retail mode? Since in
this mode Energy saving is not realized.” Select
Ye s to continue, or select No to change your
selection.
The Choose your TV source screen opens.
Choose your TV source
Antenna
Cable
Cable/Satellite box
OK
MOVE SELECT PREVIOUS EXIT
Channel scan may take 20+ minutes
ENTER
Digital Channels
0
Analog Channels
0
Scanning for digital channels
MENU
EXIT
11 Press or to highlight Antenna, Cable, or
Cable/Satellite Box (if your cable TV uses a box,
select Cable/Satellite Box), then press
OK/ENTER. If you chose Antenna or Cable, your
TV automatically starts scanning for channels
available in your viewing area. If you chose
Cable/Satellite box, your TV does not need to
scan for channels.
www.insigniaproducts.com
19
Page 24

NS-32L550A11/NS-37L550A11/NS-42L550A11/NS-46L550A11 32"/37"/42"/46" LCD, 120 Hz
During auto channel search, your TV searches
Selecting the video input source
for digital channels first. If you chose Antenna,
when the digital channel search is complete, a
message appears asking if you want to search
for analog channels. If you do not need to
search for analog channels, press MENU or EXIT
stop searching for channels.
When the scan is complete, the Setup Wizard
closes automatically.
Note
You can press EXIT to stop the auto channel search,
but you will need to run the auto channel search
again to create a channel list.
Understanding the basics
Note
Unless otherwise noted, all tasks in this section are
based on using the remote control.
Turning your TV on or off
To turn your TV on or off:
1 Make sure that the power cord is connected to a
power outlet.
2 Press (power) to turn on your TV. The power
indicator LED turns blue.
3 Press (power) again to turn off your TV. Your
TV enters Standby mode and the power
indicator LED turns red.
Warnin g
When your TV is in Standby mode, it is still receiving
power. To completely disconnect power, unplug the
power cord.
Note
If your TV does not receive an input signal for several
minutes, it automatically goes into Standby mode.
On-screen menu overview
To select the video input source:
1 Turn on your TV, then press INPUT. The Source
List opens.
Source List
TV
AV
Component
VGA
HDMI 1
HDMI 2
HDMI 3
HDMI 4
USB
2 Press or to highlight a video input source,
then press OK/ENTER.
You can also press a direct input button to select
the video input source.
• Press TV to select TV.
• Press VIDEO to select AV.
• Press COMP to select Component.
• Press HDMI once to select HDMI 1.
• Press HDMI twice to select HDMI 2.
• Press HDMI three times to select HDMI 3.
• Press HDMI four times to select HDMI 4.
Note
If Auto Input Sensing is set to On, only the jacks that
have connected devices are active. The other inputs
are grayed and cannot be selected.
Picture menu
Picture
Mode
Brightness
Contrast
Color
Tint
MOVE SELECT PREVIOUS EXIT
Adjust settings to affect picture quality
Audio menu
Audio
Audyssey Dynamic Volume
SRS TruSurround HD
Treble
Bass
Balance
Digital Audio/SPDIF
MOVE SELECT PREVIOUS EXIT
Adjust settings to affect sound quality
PICTURE AUDIO CHANNELS SETTINGS USB
OK
ENTER
OK
ENTER
MENU EXIT
PICTURE AUDIO CHANNELS SETTINGS
MENU
Energy Savings
50
48
70
0
0ssenprahS
USB
Medium
Off
32
32
0
PCM
EXIT
20
www.insigniaproducts.com
Page 25

32"/37"/42"/46" LCD, 120 Hz 1080p
Channels menu
Channels
Auto Channel Search
Add/Skip Channels
Favorites
Channel Labels
Channel Strength
MOVE SELECT PREVIOUS EXIT
Adjust channel options
Settings menu
Settings
Parental Controls
Closed Caption
Time
Menu Settings
Auto Input Sensing
Input Labels
MOVE SELECT PREVIOUS EXIT
Set various TV options
OK
ENTER
OK
ENTER
PICTURE AUDIO CHANNELS SETTINGS
MENU EXIT
PICTURE AUDIO CHANNELS SETTINGS
MENU
EXIT
Navigating the menus
USB
ffOylnO oiduA
USB
On
Press MENU to open the on-screen menu
Press the right or left arrow to move the cursor on the
screen or to adjust a selected item.
Press the up or down arrow to select menu options.
Press OK/ENTER to confirm a selection or enter a
sub-menu.
Press MENU to return to the previous menu.
Press EXIT to close t he menu
USB menu
USB
Browse Photos
Favorite Photos
View Slideshow
Settings
Find photos that are on the USB device
Photos
MOVE SELECT PREVIOUS EXIT
ENTER
PICTURE AUDIO CHANNELS SETTINGS
OK
MENU
EXIT
USB
Selecting a channel
• Press CH or CH to go to the next or previous
channel on the memorized channel list.
• Press the number buttons to enter the channel
number you want, then wait for the channel to
change or press OK/ENTER to immediately
change the channel.
• To select a digital sub-channel, press the number
buttons to select the main digital channel, press
—, then press the number button for the
sub-channel. Wait for the channel to change, or
press OK/ENTER to immediately change the
channel. For example, to tune to channel 5.1,
press 5, —, then 1.
• Press RECALL to go to the last viewed channel.
• Press FAV to open the favorite channel list, press
or to highlight a channel, then press
OK/ENTER.
Note
If the favorite channel list has more than one page,
press or to scroll through the pages.
Adjusting the volume
To adjust the volume:
• Press VOL + or VOL – to increase or decrease the
volume.
• Press MUTE to turn off the sound. Press MUTE
again to turn the sound back on.
www.insigniaproducts.com
21
Page 26

NS-32L550A11/NS-37L550A11/NS-42L550A11/NS-46L550A11 32"/37"/42"/46" LCD, 120 Hz
Displaying additional information
• Press INFO. Your TV displays status information,
such as the channel number, channel name (if
available), signal source, program description, and
DTV signal strength.
No Program Title
No Program Description
NONE Default
• Press GUIDE to show the digital program guide,
which may show current channel name, program
name, time, rating, and summaries, depending on
the information provided by the broadcaster.
Henry’s World {V-ME}
1/11 11:00AM - 11:30AM Next28-3 KCET-Vm
TV-Rating
Super Hero Henry/The Treasure Hunt
Adjusting the picture
Note
Unless otherwise noted, all tasks in this section are
based on using the remote control.
DTV
-3
7
WABCnow
Sound On
09:10PM2009 March 1
• Contrast—Adjusts the white level of the
picture.
• Color—Adjusts the color intensity of the
picture.
• Tint—Adjusts the picture tint.
• Sharpness—Adjusts the sharpness.
• Advanced Video—Opens the Advanced Video
menu where you can adjust additional video
options.
Advanced Video
Picture
Aspect Ratio
Overscan
Color Temperature
Noise Reduction
Insignia Motion 120 Hz
Backlight
MOVE SELECT PREVIOUS EXIT
Adjust how the picture fills the screen
PICTURE AUDIO CHANNELS SETTINGS
OK
ENTER
MENU EXIT
Auto
Cool
Middle
Low
USB
On
20
• Aspect Ratio—Selects the aspect ratio.
You can select Normal, Zoom, Wide,
Cinema, or Auto. Auto is only available in
TV mode and when Auto Zoom on the
Channels menu is set to On. When a
computer is connected to the VGA jack or
HDMI jack, only Wide and Normal are
available.
• Overscan—Adjusts the picture’s
reproduction rate. You can select On or
Off. Overscan is set to off when viewing a
computer’s image to show the full image
on your TV.
Note
The Overscan option is only available in digital TV,
Component, and HDMI modes.
Adjusting the TV picture
1 Press MENU. The on-screen menu opens with
the Picture menu displayed.
Picture
Mode
Brightness
Contrast
Color
Tint
OK
MOVE SELECT PREVIOUS EXIT
Adjust settings to affect picture quality
2 Press to highlight an option, then press
OK/ENTER to access the submenu. You can
select:
• Mode—Selects the picture mode. You can
select Vivid, Standard, Energy Savings,
Theater, Sports, or Custom.
• Brightness—Adjusts the brightness of dark
areas of the picture.
ENTER
PICTURE AUDIO CHANNELS SETTINGS USB
Energy Savings
50
48
70
0
0ssenprahS
MENU EXIT
• Color Temperature—Selects the color
temperature to change the overall color of
the picture. You can select Cool, Normal,
or Warm.
• Noise Reduction—Controls video noise.
You can select Off, Low, Middle, or High.
• Insignia Motion 120 Hz—Eliminates
motion blur to provide clear detail and
smooth motion. You can select:
• Off—Disables Insignia Motion 120 Hz.
• Low—Sets Insignia Motion 120 Hz effect
to minimum (default).
• Medium—Provides smooth and clear
picture motion for normal use.
• High—Eliminates motion blur with clear
detail and smooth motion.
• 24p film mode—Provides smooth and
clear motion from film-based video.
Note
• If you notice a ghosting type effect (or other
artifact) in some content, artifact, select LO W.
• For certain gaming applications, select Game
mode or turn off the Insignia Motion 120Hz in
the Advanced Video menu.
• If the Game mode is turned On, Insignia
Motion 120Hz will be set to Off automatically.
22
www.insigniaproducts.com
Page 27

32"/37"/42"/46" LCD, 120 Hz 1080p
• Backlight—Controls the overall brilliance
of the screen. You can adjust the backlight
through a range of 0 ~ 30.
• Advanced Contrast—When you see the
pop-up menu, set Adaptive Contrast to
On to adjust picture detail and brightness
automatically or to set Dynamic Contrast
Ratio to On to automatically adjust the
contrast between the light and dark areas
of the picture.
• Reset Picture Settings—Resets all picture
settings to the factory defaults. When you
select this option, a confirmation box opens.
Press or to select Ye s or No, then press
OK/ENTER to confirm.
3 Press or to adjust the option, or press or
to select a setting.
4 Press MENU to return to the previous menu, or
press EXIT to close the menu.
Adjusting component video
Note
This setting is available only when the video input
source is set to Component and your TV is receiving
a component signal.
To adjust component video:
1 Press MENU. The on-screen menu opens.
Picture
Mode
Brightness
Contrast
Color
Tint
MOVE SELECT PREVIOUS EXIT
Adjust settings to affect picture quality
2 Press or to highlight SETTINGS. The
Settings menu opens.
PICTURE AUDIO CHANNELS SETTINGS USB
OK
ENTER
Energy Savings
MENU EXIT
3 Press to highlight Component Settings, then
press OK/ENTER or . The Component Settings
screen opens.
Settings
Component Settings
Phase
Reset Component Settings
MOVE SELECT PREVIOUS EXIT
Minimizes horizontal distortion
ENTER
PICTURE AUDIO CHANNELS SETTINGS
OK
MENU EXIT
USB
50
4 Press or to highlight an option, then press
or to adjust the option. You can select:
• Phase—Minimizes horizontal distortion.
(0 ~ 100)
• Reset Component Settings—Resets
component settings to the factory defaults.
5 Press MENU to go to the previous menu or press
EXIT to close the menu.
Adjusting the computer image
To adjust the computer image:
1 Make sure that your TV is in VGA mode. For
more information, see “Selecting the video
input source” on page 20.
50
48
70
0
0ssenprahS
2 Press MENU. The on-screen menu opens.
Picture
Mode
Brightness
Contrast
Color
Tint
MOVE SELECT PREVIOUS EXIT
Adjust settings to affect picture quality
PICTURE AUDIO CHANNELS SETTINGS USB
OK
ENTER
MENU EXIT
Energy Savings
50
48
70
0
0ssenprahS
Settings
Parental Controls
Closed Caption
Time
Menu Settings
Auto Input Sensing
Input Labels
MOVE SELECT PREVIOUS EXIT
Set various TV options
ENTER
PICTURE AUDIO CHANNELS SETTINGS
OK
MENU
USB
3 Press or to highlight SETTINGS. The
On
EXIT
www.insigniaproducts.com
Settings menu opens.
Settings
Parental Controls
Closed Caption
Time
Menu Settings
Auto Input Sensing
Input Labels
MOVE SELECT PREVIOUS EXIT
Set various TV options
ENTER
PICTURE AUDIO CHANNELS SETTINGS
OK
MENU
USB
On
EXIT
23
Page 28

NS-32L550A11/NS-37L550A11/NS-42L550A11/NS-46L550A11 32"/37"/42"/46" LCD, 120 Hz
4 Press or to scroll down the list of options
and highlight Computer Settings.
Settings
Auto Input Sensing
Input Labels
INlink
Game Mode
Computer Settings
Component Settings
MOVE SELECT PREVIOUS EXIT
Set options for when a computer is cnnected to the TV
ENTER
PICTURE AUDIO CHANNELS SETTINGS
OK
MENU
USB
On
On
EXIT
5 Press OK/ENTER or . The Computer Settings
menu opens.
Settings
Computer Settings
Auto Adjust
H. Position
V. Position
Clock
Phase
Reset Computer Settings
MOVE SELECT PREVIOUS EXIT
Adjust to the PC signal timing automatically when ON
ENTER
PICTURE AUDIO CHANNELS SETTINGS
OK
MENU
USB
50
50
50
50
EXIT
6 Press or to highlight an option, then press
or to adjust the option. You can select:
• Auto Adjust—Automatically adjusts the
image settings such as position and phase.
• H. Position—Moves the image right or left.
(0 ~ 100)
• V. Position—Moves the image up or down.
(0 ~ 100)
• Clock—Minimizes vertical stripes in the
screen image. (0 ~ 100)
• Phase—Minimizes horizontal distortion.
(0 ~ 100)
• Reset Computer Settings—Resets the
computer settings to the factory default.
7 Press MENU to return to the previous menu, or
press EXIT to close the menu.
Turning Game Mode on or off
To get the maximum gaming experience, your TV
offer a Game Mode setting to optimize the picture
for playing games.
To turn Game Mode on or off:
1 Press MENU. The on-screen menu opens.
Picture
Mode
Brightness
Contrast
Color
Tint
MOVE SELECT PREVIOUS EXIT
Adjust settings to affect picture quality
2 Press or to highlight SETTINGS. The
Settings menu opens.
Settings
Parental Controls
Closed Caption
Time
Menu Settings
Auto Input Sensing
Input Labels
MOVE SELECT PREVIOUS EXIT
Set various TV options
3 Press or to scroll down the list of options
and highlight Game Mode.
Settings
Auto Input Sensing
Input Labels
INlink
Game Mode
Computer Settings
Component Settings
MOVE SELECT PREVIOUS EXIT
Game Mode
PICTURE AUDIO CHANNELS SETTINGS USB
OK
ENTER
OK
ENTER
OK
ENTER
MENU EXIT
PICTURE AUDIO CHANNELS SETTINGS
MENU
PICTURE AUDIO CHANNELS SETTINGS
MENU
Energy Savings
50
48
70
0
0ssenprahS
USB
On
EXIT
USB
On
On
EXIT
24
4 Press OK/ENTER or to access the submenu,
then press or to select On or Off.
5 Press MENU to return to the previous menu, or
press EXIT to close the menu.
www.insigniaproducts.com
Page 29

32"/37"/42"/46" LCD, 120 Hz 1080p
Adjusting the sound
Note
Unless otherwise noted, all tasks in this section are
based on using the remote control.
Adjusting sound settings
To adjust sound settings:
1 Press MENU. The on-screen menu opens.
Picture
Mode
Brightness
Contrast
Color
Tint
MOVE SELECT PREVIOUS EXIT
Adjust settings to affect picture quality
2 Press or to highlight AU DIO. The Audio
menu opens.
Audio
Audyssey Dynamic Volume
SRS TruSurround HD
Treble
Bass
Balance
Digital Audio/SPDIF
MOVE SELECT PREVIOUS EXIT
Adjust settings to affect sound quality
PICTURE AUDIO CHANNELS SETTINGS USB
OK
ENTER
OK
ENTER
MENU EXIT
PICTURE AUDIO CHANNELS SETTINGS
MENU
Energy Savings
Medium
EXIT
PCM
• MTS/SAP—Selects the sound mode (for
analog channels only). You can select:
• Mono—Produces a clearer sound if stereo
sound is difficult to hear.
• Stereo—Produces dynamic stereo sound
for sporting events and concerts.
• SAP—Selects a second language, weather,
or added commentary, if available.
4 Reset Audio Settings— Reset all audio settings
to factory defaults. When you select this option,
a confirmation box opens. Press or to select
No, then press OK/ENTER to confirm.
Ye s or
5 Press or to modify a scale or to move from
left to right to make a choice in a submenu.
Press or to move up or down when
50
48
70
0
0ssenprahS
Playing TV audio only
selecting from a list of choices in a submenu.
6 Press MENU to go to the previous menu or EXIT
to close the menu.
You can turn off the picture on your TV and listen to
the program audio only.
To play TV audio only:
1 Press MENU. The on-screen menu opens.
Picture
USB
Off
32
32
0
Mode
Brightness
Contrast
Color
Tint
MOVE SELECT PREVIOUS EXIT
Adjust settings to affect picture quality
PICTURE AUDIO CHANNELS SETTINGS USB
OK
ENTER
MENU EXIT
Energy Savings
50
48
70
0
0ssenprahS
3 Press to highlight an option, then press
OK/ENTER to access the submenu. You can
select:
• Audyssey Dynamic Volume—Adjusts the
volume to keep the volume level consistent.
You can select Off, Light, Medium, or Heavy.
This option is automatically set to Off when
SRS TruSurround HD is switched from Off to
On.
• SRS TruSurround HD—Provides the ultimate
home theater sound solution. You can select
On or Off. The option is automatically set to
Off when Audyssey Dynamic Volume is
switched from Off to On.
• Tre ble —Adjust high frequency sound.
• Bass—Adjust low frequency sound.
• Balance—Adjusts the sound between the left
and right speakers.
• Digital Audio/SPDIF—Sends digital audio to
an external audio system. You can select RAW
or PCM.
• Audio Language—Selects the audio
language based on the languages supported
by a digital TV channel.
2 Press or to highlight CHANNELS. The
Channels menu opens.
Channels
Auto Channel Search
Add/Skip Channels
Favorites
Channel Labels
Channel Strength
MOVE SELECT PREVIOUS EXIT
Adjust channel options
ENTER
PICTURE AUDIO CHANNELS SETTINGS
OK
MENU EXIT
3 Press to highlight Audio Only, then press
OK/ENTER or to access the submenu.
4 Press or to select On.
USB
ffOylnO oiduA
www.insigniaproducts.com
25
Page 30

NS-32L550A11/NS-37L550A11/NS-42L550A11/NS-46L550A11 32"/37"/42"/46" LCD, 120 Hz
5 Press MENU to return to the previous menu, or
press EXIT to close the menu.
Notes
• It takes about 3 seconds after the menu closes
and the picture disappears before the audio
plays.
• Aud io Only works only when the input source is
TV and your TV is receiving a broadcast signal.
• To exit audio only mode, press any button.
When you exit audio only mode, the Audio
Only option is automatically reset to Off.
Changing channel settings
Note
Unless otherwise noted, all tasks in this section are
based on using the remote control.
Automatically scanning for channels
When you scan for channels, your TV searches for
channels with signals and stores the channel
information in the channel list. When you press
CH or CH , your TV goes to the next or previous
channel in the channel list.
If the TV signal source changes, for example you
change from an outdoor antenna to cable TV (no
box), you need to scan for channels.
To automatically scan for channels:
1 Press MENU. The on-screen menu opens.
Picture
Mode
Brightness
Contrast
Color
Tint
MOVE SELECT PREVIOUS EXIT
Adjust settings to affect picture quality
PICTURE AUDIO CHANNELS SETTINGS USB
OK
ENTER
MENU EXIT
Energy Savings
50
48
70
0
0ssenprahS
3 Press to highlight Auto Channel Search, then
press OK/ENTER or to access the submenu.
The Auto Channel Search screen opens.
Auto Channel Search
Channels
Choose your TV source
Antenna
Cable
Cable/Satellite Box
MOVE SELECT PREVIOUS EXIT
Select Antenna if using an antenna for standard or HD TV
ENTER
PICTURE AUDIO CHANNELS SETTINGS
OK
Analog Channels
0
Digital Channels
0
MENU EXIT
USB
4 Press to highlight Antenna, Cable, or
Cable/Satellite Box, then press OK/ENTER to
start the scan.
• If you are using an antenna for a standard or
HD TV signal, select Antenna.
• If your cable is connected directly to the TV
(using no tuner box), select Cable.
• If your cable is connected to your TV through a
tuner box, select Cable/Satellite Box.
If you selected Antenna or Cable, your TV
searches automatically for available channels in
your area and stores the channel information in
the channel list. This may take several minutes.
While searching, the TV displays a progress
report.
Or,
If you selected Cable/Satellite Box, the channel
search is not necessary. Press EXIT to close the
menu.
Note
You can pre ss EXIT to stop the auto channel search,
but you will need to run the auto channel search
again to create a channel list.
26
2 Press or to highlight CHANNELS. The
Channels menu opens.
Channels
Auto Channel Search
Add/Skip Channels
Favorites
Channel Labels
Channel Strength
MOVE SELECT PREVIOUS EXIT
Adjust channel options
ENTER
PICTURE AUDIO CHANNELS SETTINGS
OK
MENU EXIT
www.insigniaproducts.com
USB
ffOylnO oiduA
Page 31

32"/37"/42"/46" LCD, 120 Hz 1080p
Hiding channels
You can hide channels in the channel list. When you
press CH or CH , your TV will skip the hidden
channels. You can still tune to a hidden channel by
pressing the number buttons for the channel.
To hide c h a n nels :
1 Press MENU. The on-screen menu opens.
Picture
Mode
Brightness
Contrast
Color
Tint
MOVE SELECT PREVIOUS EXIT
Adjust settings to affect picture quality
2 Press or to highlight CHANNELS. The
Channels menu opens.
Channels
Auto Channel Search
Add/Skip Channels
Favorites
Channel Labels
Channel Strength
MOVE SELECT PREVIOUS EXIT
Adjust channel options
PICTURE AUDIO CHANNELS SETTINGS USB
OK
ENTER
OK
ENTER
MENU EXIT
PICTURE AUDIO CHANNELS SETTINGS
MENU EXIT
Energy Savings
Setting up a favorite channel list
To set up a favorite channel list:
1 Press MENU. The on-screen menu opens.
Picture
Mode
Brightness
Contrast
Color
Tint
50
48
70
0
0ssenprahS
MOVE SELECT PREVIOUS EXIT
Adjust settings to affect picture quality
2 Press or to highlight CHANNELS. The
Channels menu opens.
Channels
Auto Channel Search
Add/Skip Channels
USB
ffOylnO oiduA
Favorites
Channel Labels
Channel Strength
MOVE SELECT PREVIOUS EXIT
Adjust channel options
3 Press to highlight Favorites, then press
OK/ENTER or . The Fav orit es screen opens.
PICTURE AUDIO CHANNELS SETTINGS USB
OK
ENTER
OK
ENTER
MENU EXIT
PICTURE AUDIO CHANNELS SETTINGS
MENU EXIT
Energy Savings
50
48
70
0
0ssenprahS
USB
ffOylnO oiduA
3 Press to highlight Add/Skip Channels, then
press OK/ENTER or . The Add/Skip Channels
screen opens.
OK
PICTURE AUDIO CHANNELS
Ch 9-2 WNYW DT
Ch 60-1
Ch 60-3
Ch 60-7
MENU EXIT
Channels
Add/Skip Channels
Ch 5-0 Ch 9-0
Ch 9-1 WWOR DT
Ch 10-0
Ch 60-2
Ch 60-4
MOVE SELECT PREVIOUS EXIT
Manually add and skip channels in your program list
ENTER
SETTINGS
USB
4 Press or to highlight the channel you
want to hide, then press OK/ENTER. The check
mark disappears.
Notes
• A channel with a check mark is not hidden. A
channel with no check mark is hidden.
• If the list has more than one page, press or
to scroll through the pages.
5 Press MENU to return to the previous menu, or
press EXIT to close the menu.
Favorites
Channels
Ch 5-0
Ch 9-1 WWOR DT
Ch 10-0
Ch 60-2
Ch 60-4
MOVE SELECT PREVIOUS EXIT
Add channels to create a favorites list
ENTER
PICTURE AUDIO CHANNELS SETTINGS
OK
Ch 9-0
Ch 9-2 WNYW DT
Ch 60-1
Ch 60-3
Ch 60-7
MENU
USB
EXIT
4 Press or to highlight the channel you
want to add to the favorites list, then press
OK/ENTER. A check mark appears next to the
channel.
Notes
• To remove a channel from the favorites list,
highlight the channel, then press ENTER. The
check mark disappears and the channel is
removed from the list.
• If the list has more than one page, press or
to scroll through the pages.
5 Press MENU to return to the previous menu, or
press EXIT to close the menu.
www.insigniaproducts.com
27
Page 32

NS-32L550A11/NS-37L550A11/NS-42L550A11/NS-46L550A11 32"/37"/42"/46" LCD, 120 Hz
Viewing a favorite channel
To view a favorite channel:
1 Press FAV on your remote control. The favorite
channel list opens.
Favorites
Ch 5-0
Ch 10-0
Ch 60-3
Ch 60-8
Ch 60-11
Ch 60-12
OK
MOVE SELECT PREVIOUS EXIT
Select your favorite channel
ENTER
MENU
2 Press or to highlight a channel, then press
OK/ENTER to tune to the channel.
3 Press EXIT to close the favorite channel list.
Notes
If the list has more than one page, press or to
scroll through the pages.
Adding or changing a channel label
1 Press MENU. The on-screen menu opens.
3 Press to highlight Channel Labels, then press
OK/ENTER or . The Channel Labels screen
opens.
Channels
Channels Labels
Ch 5-0
MOVE SELECT PREVIOUS EXIT
EXIT
Create labels for channels, up to 11 characters
ENTER
PICTURE AUDIO CHANNELS SETTINGS
OK
ABC
MENU
USB
EXIT
4 Press or to select the channel you want to
label, then press to move to the channel label
field.
5 Press or to select a letter, then press to
move to the next letter. Repeat this step to enter
additional letters. You can enter as many as 11
letters.
6 Press OK/ENTER to confirm the label.
7 Press or to check Ye s or No, then press
OK/ENTER.
8 Press MENU to go to the previous menu, or
press EXIT to close the menu.
Picture
Mode
Brightness
Contrast
Color
Tint
MOVE SELECT PREVIOUS EXIT
Adjust settings to affect picture quality
PICTURE AUDIO CHANNELS SETTINGS USB
OK
ENTER
MENU EXIT
Energy Savings
2 Press or to highlight CHANNELS. The
Channels menu opens.
Channels
Auto Channel Search
Add/Skip Channels
Favorites
Channel Labels
Channel Strength
MOVE SELECT PREVIOUS EXIT
Adjust channel options
ENTER
PICTURE AUDIO CHANNELS SETTINGS
OK
MENU EXIT
Checking the digital signal strength
To check the digital signal strength:
50
48
70
0
0ssenprahS
USB
ffOylnO oiduA
1 Press MENU. The on-screen menu opens.
Picture
Mode
Brightness
Contrast
Color
Tint
MOVE SELECT PREVIOUS EXIT
Adjust settings to affect picture quality
PICTURE AUDIO CHANNELS SETTINGS USB
OK
ENTER
MENU EXIT
Energy Savings
2 Press or to highlight CHANNELS. The
Channels menu opens.
Channels
Auto Channel Search
Add/Skip Channels
Favorites
Channel Labels
Channel Strength
MOVE SELECT PREVIOUS EXIT
Adjust channel options
ENTER
PICTURE AUDIO CHANNELS SETTINGS
OK
MENU EXIT
50
48
70
0
0ssenprahS
USB
ffOylnO oiduA
28
www.insigniaproducts.com
Page 33

32"/37"/42"/46" LCD, 120 Hz 1080p
3 Press to highlight Channel Strength, then
press OK/ENTER or . The DTV signal meter
screen opens.
Channel Strength
MOVE SELECT PREVIOUS EXIT
Display signal strength of selected digital channel
CH 7-3
OK
ENTER
Now
0%
MENU EXIT
4 Press MENU to go to the previous menu, or
press EXIT to close the menu.
Note
When you are tuned to a digital TV channel, you can
press INFO to see the DTV signal strength.
Setting parental controls
Note
Unless otherwise noted, all tasks in this section are
based on using the remote control.
Setting or changing the password
Your TV has a V-chip that lets you control the type
of programs your children can watch. Parental
controls include two ratings: MPAA (based on age)
and TV Parental Guidelines (based on content and
age). A TV program may have an MPAA or TV
Parental Guidelines rating, so you should set
controls for both ratings.
Before you can select ratings, you need to set up a
parental controls password.
To set up a password:
1 Press MENU. The on-screen menu opens.
3 Press to highlight Parental Controls, then
press OK/ENTER or . The Enter Password
screen opens.
0010
Enter Password
4 Press the number buttons to enter the
password. If you have not set a password, enter
0000. The Parental Controls menu opens.
Settings
Parental Controls
Button Lock
Block Unrated TV
USA Parental Locks
Canadian Parental Locks
Change Password
MOVE SELECT PREVIOUS EXIT
Lock or unlock the buttons on the TV
ENTER
PICTURE AUDIO CHANNELS SETTINGS
OK
MENU
USB
Off
Off
EXIT
5 Press or to highlight Change Password,
then press OK/ENTER or . The Enter New
Password screen opens.
Enter New Password
Picture
Mode
Brightness
Contrast
Color
Tint
MOVE SELECT PREVIOUS EXIT
Adjust settings to affect picture quality
PICTURE AUDIO CHANNELS SETTINGS USB
OK
ENTER
MENU EXIT
Energy Savings
2 Press or to highlight SETTINGS. The
Settings menu opens.
Settings
Parental Controls
Closed Caption
Time
Menu Settings
Auto Input Sensing
Input Labels
MOVE SELECT PREVIOUS EXIT
Set various TV options
ENTER
PICTURE AUDIO CHANNELS SETTINGS
OK
MENU
EXIT
Confirm New Password
50
48
70
0
0ssenprahS
6 Press the number buttons to enter the new
password, then enter the new password again.
Note
Write down your password and save it for future use.
If you forget your password, enter 9999 as the
password. This password always remains valid for
resetting your password.
USB
On
www.insigniaproducts.com
29
Page 34

NS-32L550A11/NS-37L550A11/NS-42L550A11/NS-46L550A11 32"/37"/42"/46" LCD, 120 Hz
Locking control buttons
You can lock the control buttons on the TV. When
the buttons are locked, you can only operate the TV
using the remote control.
To lock control buttons:
1 Press MENU. The on-screen menu opens.
Picture
Mode
Brightness
Contrast
Color
Tint
MOVE SELECT PREVIOUS EXIT
Adjust settings to affect picture quality
PICTURE AUDIO CHANNELS SETTINGS USB
OK
ENTER
MENU EXIT
2 Press or to highlight SETTINGS. The
Settings menu opens.
Settings
Parental Controls
Closed Caption
Time
Menu Settings
Auto Input Sensing
Input Labels
MOVE SELECT PREVIOUS EXIT
Set various TV options
ENTER
PICTURE AUDIO CHANNELS SETTINGS
OK
MENU
3 Press to highlight Parental Controls, then
press OK/ENTER or . The Enter Password
screen opens.
Enter Password
Energy Savings
EXIT
5 Press or to highlight Button Lock, then
press OK/ENTER or to access the submenu.
6 Press or to select On or Off.
7 Press MENU to go to the previous menu, or
press EXIT to close the menu.
Blocking unrated TV
To block unrated TV:
1 Press MENU. The on-screen menu opens.
50
48
70
0
0ssenprahS
Picture
Mode
Brightness
Contrast
Color
Tint
MOVE SELECT PREVIOUS EXIT
Adjust settings to affect picture quality
2 Press or to highlight SETTINGS. The
USB
On
Settings menu opens.
Settings
Parental Controls
Closed Caption
Time
Menu Settings
Auto Input Sensing
Input Labels
MOVE SELECT PREVIOUS EXIT
Set various TV options
3 Press to highlight Parental Controls, then
press OK/ENTER or . The Enter Password
screen opens.
PICTURE AUDIO CHANNELS SETTINGS USB
OK
ENTER
OK
ENTER
MENU EXIT
PICTURE AUDIO CHANNELS SETTINGS
MENU
Energy Savings
50
48
70
0
0ssenprahS
USB
On
EXIT
30
4 Press the number buttons to enter the
password. If you have not set a password, enter
0000. The Parental Controls menu opens.
Settings
Parental Controls
Button Lock
Block Unrated TV
USA Parental Locks
Canadian Parental Locks
Change Password
MOVE SELECT PREVIOUS EXIT
Lock or unlock the buttons on the TV
ENTER
PICTURE AUDIO CHANNELS SETTINGS
OK
MENU
EXIT
www.insigniaproducts.com
Enter Password
USB
Off
Off
Page 35

32"/37"/42"/46" LCD, 120 Hz 1080p
4 Press the number buttons to enter the
password. If you have not set a password, enter
0000. The Parental Controls menu opens.
Settings
Parental Controls
Button Lock
Block Unrated TV
USA Parental Locks
Canadian Parental Locks
Change Password
MOVE SELECT PREVIOUS EXIT
Block TV programs that do not have a rating
ENTER
PICTURE AUDIO CHANNELS SETTINGS
OK
MENU
5 Press or to highlight Block Unrated TV,
then press OK/ENTER or to access the
submenu.
6 Press or to select On (blocks unrated TV) or
Off (does not block unrated TV).
7 Press MENU to go to the previous menu, or
press EXIT to close the menu.
Setting parental control levels
You can set parental controls for the U.S. and
Canada.
U.S. TV ratings
NONE Not rated
TV-Y All children
TV-Y7 Children over seven years of age
TV-G General audiences
TV-PG Parental guidance suggested
TV-14 Parents strongly cautioned
TV-MA Mature audiences only
Canadian English ratings
E Exempt programming
C Children
USB
Off
Off
C8+ Children over 8 years old
G General audiences
PG Parental guidance
14+ Over 14 years old
18+ Adult programming
EXIT
Canadian French ratings
E Exempt programming
G General audiences
8ans+ Over 8 years old
13ans+ Over 13 years old
16ans+ Over 16 years old
18ans+ Ad ult programming
To set parental control levels:
1 Press MENU. The on-screen menu opens.
Picture
Mode
Brightness
Contrast
Color
Tint
MOVE SELECT PREVIOUS EXIT
Adjust settings to affect picture quality
PICTURE AUDIO CHANNELS SETTINGS USB
OK
ENTER
MENU EXIT
Energy Savings
50
48
70
0
0ssenprahS
Some of the age-based TV Parental Guidelines
ratings also have content-based ratings.
U.S. TV content ratings
FV Fantasy violence
L Adu lt language
SSexual situations
V Violen ce
D Sexually suggestive dialog
U.S. movie (MPAA) ratings
None Movie not rated
G General audiences
PG Parental guidance suggested
PG-13 Suitable for children 13 and older
R Parental guidance suggested for
children under 17
NC-17 Not suitable for children under 17
X Adults only
N/A Not rated
2 Press or to highlight SETTINGS. The
Settings menu opens.
Settings
Parental Controls
Closed Caption
Time
Menu Settings
Auto Input Sensing
Input Labels
MOVE SELECT PREVIOUS EXIT
Set various TV options
ENTER
PICTURE AUDIO CHANNELS SETTINGS
OK
MENU
USB
On
EXIT
3 Press to highlight Parental Controls, then
press OK/ENTER or . The Enter Password
screen opens.
Enter Password
www.insigniaproducts.com
31
Page 36

NS-32L550A11/NS-37L550A11/NS-42L550A11/NS-46L550A11 32"/37"/42"/46" LCD, 120 Hz
4 Press the number buttons to enter the
password. If you have not set a password, enter
0000. The Parental Controls menu opens.
Settings
Parental Controls
Button Lock
Block Unrated TV
USA Parental Locks
Canadian Parental Locks
Change Password
MOVE SELECT PREVIOUS EXIT
Lock or unlock the buttons on the TV
ENTER
PICTURE AUDIO CHANNELS SETTINGS
OK
MENU
Off
Off
EXIT
5 Press to highlight USA Parental Locks or
Canadian Parental Locks, then press
OK/ENTER or . The USA Parental Locks or
Canadian Parental Locks screen opens.
Parental Controls USA Parental Locks
Settings
None
G
PG
PG-13
R
NC-17
X
MOVE SELECT PREVIOUS EXIT
Restrict movie and TV programs by US Ratings
ENTER
PICTURE AUDIO CHANNELS SETTINGS
None
TV-Y
TV-Y7
TV-G
TV-PG
TV-14
TV-MA
OK
TV RatingsMPAA Rating
FV L S V D
MENU EXIT
USB
Downloading rating information
You can download rating information to use when
setting parental controls.
USB
To download rating information:
1 Press MENU. The on-screen menu opens.
Picture
Mode
Brightness
Contrast
Color
Tint
MOVE SELECT PREVIOUS EXIT
Adjust settings to affect picture quality
PICTURE AUDIO CHANNELS SETTINGS USB
OK
ENTER
MENU EXIT
Energy Savings
2 Press or to highlight SETTINGS. The
Settings menu opens.
Settings
Parental Controls
Closed Caption
Time
Menu Settings
Auto Input Sensing
Input Labels
MOVE SELECT PREVIOUS EXIT
Set various TV options
ENTER
PICTURE AUDIO CHANNELS SETTINGS
OK
MENU
EXIT
50
48
70
0
0ssenprahS
USB
On
Settings
Parental Controls Canadian Parental Locks
MOVE SELECT PREVIOUS EXIT
Restrict movie and TV programs by Canadian Ratings
ENTER
PICTURE AUDIO CHANNELS SETTINGS
English Rating French Rating
E
C
C8+
G
PG
14+
18+
OK
MENU
E
G
8 ans+
13 ans+
16 ans+
18 ans+
EXIT
6 Press or to highlight a rating, then
press OK/ENTER to block or unblock the rating.
When you block a rating, that rating and all
higher ratings are blocked.
7 Press MENU to go to the previous menu, or
press EXIT to close the menu.
Note
• When you first set parental controls, they take
effect immediately.
• If you have set parental controls then tune to a
blocked channel or program, you are prompted
to enter the password. After you enter the
password, parental controls are tuned off. To
turn parental controls back on, turn off your TV
then turn it back on. Parental controls will be
turned back on.
USB
3 Press to highlight Parental Controls, then
press OK/ENTER or . The Enter Password
screen opens.
Enter Password
4 Press the number buttons to enter the
password. If you have not set a password, enter
0000. The Parental Controls menu opens.
Settings
Parental Controls
Button Lock
Block Unrated TV
USA Parental Locks
Canadian Parental Locks
Change Password
MOVE SELECT PREVIOUS EXIT
Lock or unlock the buttons on the TV
ENTER
PICTURE AUDIO CHANNELS SETTINGS
OK
MENU
USB
Off
Off
EXIT
32
www.insigniaproducts.com
Page 37

32"/37"/42"/46" LCD, 120 Hz 1080p
5 Press or to scroll down the list of options
and highlight RRT5.
Settings
Parental Controls
Block Unrated TV
USA Parental Locks
Canadian Parental Locks
Change Password
RRT5
OK
MOVE SELECT PREVIOUS EXIT
Display an advanced V-Chip ratings table for digital channels
ENTER
PICTURE AUDIO CHANNELS SETTINGS
MENU
USB
Off
EXIT
6 Press OK/ENTER or . The RRT5 screen opens.
7 Press to highlight an option, then press
OK/ENTER or to open the submenu.
8 Press or to select a rating.
9 Press MENU to go to the previous menu, or
press EXIT to close the menu.
Note
• If the program is broadcast with RRT5 rating
information, the information is downloaded
automatically and can be used for parental
controls.
• If the program is not broadcast with RRT5 rating
information, no information is downloaded.
2 Press or to highlight SETTINGS. The
Settings menu opens.
Settings
Parental Controls
Closed Caption
Time
Menu Settings
Auto Input Sensing
Input Labels
MOVE SELECT PREVIOUS EXIT
Set various TV options
ENTER
PICTURE AUDIO CHANNELS SETTINGS
OK
MENU
USB
On
EXIT
3 Press to highlight Closed Caption, then press
OK/ENTER or . The Closed Caption menu
opens.
Settings
Closed Caption
Analog Caption
Digital CC Settings
MOVE SELECT PREVIOUS EXIT
Adjust Closed Captioning settings
ENTER
PICTURE AUDIO CHANNELS SETTINGS
OK
MENU
USB
CC OffCaption Control
CC1
CS1Digital Caption
EXIT
Using closed captioning
Note
Unless otherwise noted, all tasks in this section are
based on using the remote control.
Turning closed captioning on or off
To turn closed captioning on or off:
• Press CC to select CC Off, CC On, or CC On When
Mute.
Selecting the closed captioning mode
To select the closed captioning mode:
1 Press MENU. The on-screen menu opens.
Picture
Mode
Brightness
Contrast
Color
Tint
MOVE SELECT PREVIOUS EXIT
Adjust settings to affect picture quality
PICTURE AUDIO CHANNELS SETTINGS USB
OK
ENTER
MENU EXIT
Energy Savings
50
48
70
0
0ssenprahS
4 Press or to highlight Analog Caption or
Digital Caption, then press OK/ENTER or to
open the submenu.
5 Press or to select a setting. You can
select:
• CC1 through CC4—Closed captioning
appears in a small banner across the bottom
of the screen. The closed captioning displayed
depends on the content provided by the
broadcaster.
• Tex t 1 through Te x t4 —Closed captioning that
covers half or all of the screen. Te x t1 through
Tex t 4 display content provided by the
broadcaster.
6 Press MENU to go to the previous menu, or
press EXIT to close the menu.
www.insigniaproducts.com
33
Page 38

NS-32L550A11/NS-37L550A11/NS-42L550A11/NS-46L550A11 32"/37"/42"/46" LCD, 120 Hz
Customizing digital closed captioning styles
To customize digital closed captioning styles:
1 Press MENU. The on-screen menu opens.
Picture
Mode
Brightness
Contrast
Color
Tint
MOVE SELECT PREVIOUS EXIT
Adjust settings to affect picture quality
2 Press or to highlight SETTINGS. The
Settings menu opens.
Settings
Parental Controls
Closed Caption
Time
Menu Settings
Auto Input Sensing
Input Labels
MOVE SELECT PREVIOUS EXIT
Set various TV options
3 Press to highlight Closed Caption, then press
OK/ENTER or . The Closed Caption screen
opens.
Settings Closed Caption
Analog Caption
Digital CC Settings
PICTURE AUDIO CHANNELS SETTINGS USB
OK
ENTER
OK
ENTER
MENU EXIT
PICTURE AUDIO CHANNELS SETTINGS
MENU
PICTURE AUDIO CHANNELS SETTINGS
Energy Savings
50
48
70
0
0ssenprahS
USB
On
EXIT
USB
CC OffCaption Control
CC1
CS1Digital Caption
4 Press or to highlight Digital CC Settings,
then press OK/ENTER or . The Digital CC
Settings screen opens.
Digital CC Settings
Style
Size
Font
Text Color
Text Opacity
Background Color
Background Opacity
Edge Effect
Edge Color
DECIDED BY AUTO
OK
MOVE SELECT PREVIOUS EXIT
Set the look of digital CC. Automatic uses broadcaster’s style.
ENTER
Automatic
Automatic
Automatic
Automatic
Automatic
Automatic
Automatic
Automatic
Automatic
MENU EXIT
5 Press to highlight Style, then press or to
select Custom. If Style is set to Automatic, you
cannot adjust individual style options.
6 Press to highlight an option, then press or
to adjust the option. You can select:
• Style—Selects the digital closed captioning
style. This option must be set to Custom to
change individual style options.
• Size—Selects the font size.
• Font—Selects the font type.
• Tex t Color—Selects the text color.
• Tex t Opacit y—Selects the text opacity.
• Background Color—Selects the background
color.
• Background Opacity—Selects the
background opacity.
• Edge Effect—Selects the edge style.
• Edge Color—Selects the edge color.
7 Press MENU to go to the previous menu, or
press EXIT to close the menu.
34
OK
MOVE SELECT PREVIOUS EXIT
Customize the look of digital Closed Captioning
ENTER
MENU EXIT
www.insigniaproducts.com
Page 39

32"/37"/42"/46" LCD, 120 Hz 1080p
Adjusting time settings
Note
Unless otherwise noted, all tasks in this section are
based on using the remote control.
Setting the time
To set the time:
1 Press MENU. The on-screen menu opens.
Picture
Mode
Brightness
Contrast
Color
Tint
MOVE SELECT PREVIOUS EXIT
Adjust settings to affect picture quality
2 Press or to highlight SETTINGS. The
Settings menu opens.
Settings
Parental Controls
Closed Caption
Time
Menu Settings
Auto Input Sensing
Input Labels
MOVE SELECT PREVIOUS EXIT
Set various TV options
3 Press to highlight Time, then press OK/ENTER
or . The Time menu opens.
PICTURE AUDIO CHANNELS SETTINGS USB
OK
ENTER
OK
ENTER
MENU EXIT
PICTURE AUDIO CHANNELS SETTINGS
MENU
Energy Savings
50
48
70
0
0ssenprahS
USB
On
EXIT
4 Press or to highlight Date/Time, then press
OK/ENTER. The Date/Time screen opens.
Settings Time Date/Time
Mode
Time Zone
Daylight Savings
Year
Month
MOVE SELECT PREVIOUS EXIT
If Automatic, options are automatically set by TV source
ENTER
PICTURE AUDIO CHANNELS SETTINGS
OK
MENU
Pacific
2009
Jan
EXIT
USB
Auto
On
1Day
5 Press or to highlight Mode, then press
ENTER. A menu opens.
6 Press or to highlight Manual (to set the
options manually) or Auto (the options are
automatically set by the TV signal source).
7 Press OK/ENTER to close the menu.
8 Press or to highlight Time Zone, then press
ENTER. The Time Zone menu opens.
9 Press or to select your time zone. You can
select Eastern, Central, Mountain, Pacific,
Alaska, Hawaii, Atlantic, or Newfoundland.
10 Press ENTER to close the menu.
11 If your viewing area observes daylight savings
time, press or to highlight Daylight
Savings, then press OK/ENTER.
12 Press or to select On, then press OK/ENTER
to close the menu.
13 If you selected Custom for Mode:
• Press or to highlight Year,
Month, or
Date, then press or to adjust the setting.
• Press or to highlight Time, press or to
select the hour, minute, or AM/PM field, then
press or to adjust the setting.
14 Press MENU to return to the previous menu, or
press EXIT to close the menu.
Settings Time
Date/Time
MOVE SELECT PREVIOUS EXIT
Adjust the date and time to get the correct program times
ENTER
PICTURE AUDIO CHANNELS SETTINGS
OK
MENU
USB
OffSleep Timer
EXIT
www.insigniaproducts.com
35
Page 40

NS-32L550A11/NS-37L550A11/NS-42L550A11/NS-46L550A11 32"/37"/42"/46" LCD, 120 Hz
Setting the sleep timer
To set the sleep time:
1 Press MENU. The on-screen menu opens.
Picture
Mode
Brightness
Contrast
Color
Tint
OK
MOVE SELECT PREVIOUS EXIT
Adjust settings to affect picture quality
2 Press or to highlight SETTINGS. The
Settings menu opens.
Settings
Parental Controls
Closed Caption
Time
Menu Settings
Auto Input Sensing
Input Labels
Set various TV options
ENTER
OK
MOVE SELECT PREVIOUS EXIT
ENTER
PICTURE AUDIO CHANNELS SETTINGS USB
Energy Savings
50
48
70
0
0ssenprahS
MENU EXIT
PICTURE AUDIO CHANNELS SETTINGS
On
MENU
EXIT
5 Press or to select the amount of time before
your TV turns off automatically. To turn off the
sleep timer, select Off.
6 Press MENU to return to the previous menu, or
press EXIT to close the menu.
Note
You can also press SLEEP one or more times to set
the sleep timer. You can select Off, 5, 10, 15, 30, 60,
90, 120, 180, or 240 minutes.
Adjusting menu settings
Note
Unless otherwise noted, all tasks in this section are
based on using the remote control.
Selecting the menu language
To select the menu language:
1 Press MENU. The on-screen menu opens.
USB
Picture
Mode
Brightness
Contrast
Color
Tint
MOVE SELECT PREVIOUS EXIT
Adjust settings to affect picture quality
PICTURE AUDIO CHANNELS SETTINGS USB
OK
ENTER
MENU EXIT
Energy Savings
50
48
70
0
0ssenprahS
3 Press to highlight Time, then press OK/ENTER
or . The Time menu opens.
Settings Time
Date/Time
MOVE SELECT PREVIOUS EXIT
Adjust the date and time to get the correct program times
ENTER
PICTURE AUDIO CHANNELS SETTINGS
OK
MENU
USB
OffSleep Timer
EXIT
4 Press or to highlight Sleep Timer, then
press OK/ENTER or to access the sleep timer
list.
PICTURE AUDIO CHANNELS SETTINGS
Settings Time
Date/Time
OK
MOVE SELECT PREVIOUS EXIT
ENTER
Off
5 minutes
10 minutes
15 minutes
30 minutes
60 minutes
90 minutes
120 minutes
180 minutes
240 minutes
MENU EXIT
USB
OffSleep Timer
2 Press or to highlight SETTINGS. The
Settings menu opens.
Settings
Parental Controls
Closed Caption
Time
Menu Settings
Auto Input Sensing
Input Labels
MOVE SELECT PREVIOUS EXIT
Set various TV options
ENTER
PICTURE AUDIO CHANNELS SETTINGS
OK
MENU
USB
On
EXIT
3 Press to highlight Menu Settings, then press
OK/ENTER or . The Menu Settings menu opens.
Settings
Menu Settings
Transparency 0
Language
MOVE SELECT PREVIOUS EXIT
Set menu language to English, Français, or Español
ENTER
PICTURE AUDIO CHANNELS SETTINGS
OK
MENU
USB
0
English
EXIT
36
www.insigniaproducts.com
Page 41

32"/37"/42"/46" LCD, 120 Hz 1080p
4 Press or to select a language. You can select
English, Francais, or Español.
5 Press MENU to return to the previous menu, or
press EXIT to close the menu.
Adjusting the menu transparency
To select the menu language:
1 Press MENU. The on-screen menu opens.
Picture
Mode
Brightness
Contrast
Color
Tint
MOVE SELECT PREVIOUS EXIT
Adjust settings to affect picture quality
2 Press or to highlight SETTINGS. The
Settings menu opens.
Settings
Parental Controls
Closed Caption
Time
Menu Settings
Auto Input Sensing
Input Labels
MOVE SELECT PREVIOUS EXIT
Set various TV options
3 Press to highlight Menu Settings, then press
OK/ENTER or . The Menu Settings menu opens.
PICTURE AUDIO CHANNELS SETTINGS USB
OK
ENTER
OK
ENTER
MENU EXIT
PICTURE AUDIO CHANNELS SETTINGS
MENU
Energy Savings
EXIT
Turning Auto Input Sensing on or off
When the Auto Input Sensing feature is turned on,
your TV automatically detects which video jacks
have devices connected to them. Your TV uses this
information to determine what options are
highlighted on the Source List when you press
INPUT. If no device is connected to a video jack, the
option if greyed on the Source List and cannot be
selected.
To turn Auto Input Sensing on or off:
1 Press MENU. The on-screen menu opens.
50
48
70
0
0ssenprahS
Picture
Mode
Brightness
Contrast
Color
Tint
MOVE SELECT PREVIOUS EXIT
Adjust settings to affect picture quality
2 Press or to highlight SETTINGS. The
USB
On
Settings menu opens.
Settings
Parental Controls
Closed Caption
Time
Menu Settings
Auto Input Sensing
Input Labels
MOVE SELECT PREVIOUS EXIT
Set various TV options
PICTURE AUDIO CHANNELS SETTINGS USB
OK
ENTER
OK
ENTER
MENU EXIT
PICTURE AUDIO CHANNELS SETTINGS
MENU
Energy Savings
50
48
70
0
0ssenprahS
USB
On
EXIT
Settings
Menu Settings
Language
MOVE SELECT PREVIOUS EXIT
Adjust how transparent the TV menu appears
ENTER
PICTURE AUDIO CHANNELS SETTINGS
0ycnerapsnarT
OK
MENU
USB
0
English
EXIT
4 Press or to select Transparency, then press
OK/ENTER or to access the submenu.
5 Press or to adjust the transparency.
6 Press MENU to return to the previous menu, or
press EXIT to close the menu.
www.insigniaproducts.com
3 Press to highlight Auto Input Sensing, then
press OK/ENTER or to access the submenu.
Settings
Parental Controls
Closed Caption
Time
Menu Settings On
Auto Input Sensing
Input Labels
MOVE SELECT PREVIOUS EXIT
Allows selection of active sources connected to input jacks with INPUT key
ENTER
PICTURE AUDIO CHANNELS SETTINGS
Off
OK
MENU
USB
On
EXIT
4 Press or to select On (video input sources
for connected devices are highlighted in the
Source List) or Off (no video input sources are
highlighted in the Source List).
5 Press MENU to go to the previous menu or press
EXIT to close the menu.
37
Page 42

NS-32L550A11/NS-37L550A11/NS-42L550A11/NS-46L550A11 32"/37"/42"/46" LCD, 120 Hz
Labeling an input source
To labe l a n in p u t sou r c e :
1 Press MENU. The on-screen menu opens.
Picture
Mode
Brightness
Contrast
Color
Tint
OK
MOVE SELECT PREVIOUS EXIT
Adjust settings to affect picture quality
2 Press or to highlight SETTINGS. The
Settings menu opens.
Settings
Parental Controls
Closed Caption
Time
Menu Settings
Auto Input Sensing
Input Labels
Set various TV options
3 Press to highlight Input Labels, then press
OK/ENTER or . The Input Labels screen opens.
ENTER
OK
MOVE SELECT PREVIOUS EXIT
ENTER
PICTURE AUDIO CHANNELS SETTINGS USB
Energy Savings
50
48
70
0
0ssenprahS
MENU EXIT
PICTURE AUDIO CHANNELS SETTINGS
On
MENU
EXIT
Using INlink
INlink lets you control HDMI CEC-compatible
devices connected to the HDMI jacks on your TV
using the remote control that came with your TV.
To use INlink, you must set the INlink Control
option on the INlink menu to On.
To turn INlink on or off:
1 Press MENU. The on-screen menu opens.
Picture
Mode
Brightness
Contrast
Color
Tint
MOVE SELECT PREVIOUS EXIT
Adjust settings to affect picture quality
USB
2 Press or to highlight SETTINGS. The
Settings menu opens.
Settings
Parental Controls
Closed Caption
Time
Menu Settings
Auto Input Sensing
Input Labels
MOVE SELECT PREVIOUS EXIT
Set various TV options
PICTURE AUDIO CHANNELS SETTINGS USB
OK
ENTER
OK
ENTER
MENU EXIT
PICTURE AUDIO CHANNELS SETTINGS
MENU
Energy Savings
50
48
70
0
0ssenprahS
USB
On
EXIT
Settings Input Labels
MOVE SELECT PREVIOUS EXIT
Create labels for the devices connected to your TV
PICTURE AUDIO CHANNELS SETTINGS
AV
OK
ENTER
DVD
MENU EXIT
USB
4 Press or to select the input you want to
change the label for (for example, AV ).
5 Press to move the cursor to the label selection
field.
6 Press or to select the label you want (—,
VCR, DVD, Set Top Box, Satellite, Cable Box,
DVD/PVR, Blue-ray, Game 1, Game 2,
Camcorder, Receiver, PC, or Custom), then
press OK/ENTER to confirm the change.
7 Press or to check Ye s or No, then press
OK/ENTER to confirm.
8 To change another input label, press to move
the cursor to the input selection field, then
repeat Step 4 through Step 7.
9 Press MENU to go to previous menu or press
EXIT to close the on-screen menu.
3 Press or to scroll down the list of options
and highlight INlink.
Settings
Closed Caption
Time
Menu Settings
Auto Input Sensing
Input Labels
INlink
MOVE SELECT PREVIOUS EXIT
Allow the TV to automatically control CEC devices connected to the TV via HDMI
ENTER
PICTURE AUDIO CHANNELS SETTINGS
OK
MENU EXIT
USB
On
38
www.insigniaproducts.com
Page 43

32"/37"/42"/46" LCD, 120 Hz 1080p
4 Press OK/ENTER or . The INlink menu opens.
Settings
INlink
INlink Control
Device Auto Power Off
TV Auto Power On
INlink Device Lists
MOVE SELECT PREVIOUS EXIT
Allow the TV to automatically control CEC devices connected to the TV via HDMI
ENTER
PICTURE AUDIO CHANNELS SETTINGS
OK
MENU
USB
On
On
On
EXIT
5 Press or to select an option, then press
OK/ENTER or to access the submenu. You can
select:
• INlink Control—Lets your TV automatically
control CEC devices connected to the TV
through HDMI. Press or OK/ENTER to select
On or Off.
• Device Auto Power Off—Turns off connected
HDMI CEC-compatible devices when you turn
off your TV. Press or OK/ENTER to select On
or Off.
• TV Auto Power On—Turns on your TV when a
connected HDMI CEC-compatible device is
turned on. Press or OK/ENTER to select On
or Off.
• INlink Device Lists—Displays the device list
to register or remove the connected HDMI
CEC-compatible devices from the list.
• Connect—Wakes up the connected
HDMI/CEC device.
• Root Menu—Accesses the menu of
connected HDMI CEC-compatible device
with your TV remote control.
Press OK/ENTER or . Your TV scans for
connected HDMI CEC-compatible devices and
displays the devices in a list.
6 Press MENU to go to previous menu or press
EXIT to close the on-screen menu.
Note
• The INlink function only works when the TV
remote control is set to TV.
• Turn on the HDMI/CEC feature for the
HDMI/CEC-compatible device that you are
connecting to your TV before you access the
INlink function.
• Some HDMI CEC-compatible devices might not
support this INlink feature.
• The TV remote control may not work correctly
under certain conditions. If this occurs, re-select
the INlink Device Lists option and select the
registered HDMI CEC-compatible device.
Restoring settings to the defaults
To restore settings to the defaults:
1 Press MENU. The on-screen menu opens.
Picture
Mode
Brightness
Contrast
Color
Tint
MOVE SELECT PREVIOUS EXIT
Adjust settings to affect picture quality
2 Press or to highlight SETTINGS. The
Settings menu opens.
Settings
Parental Controls
Closed Caption
Time
Menu Settings
Auto Input Sensing
Input Labels
MOVE SELECT PREVIOUS EXIT
Set various TV options
3 Press to highlight Reset to Default, select
Ye s , then press OK/ENTER to confirm. All setting
except the channel list and parental control
password will be reset to the default settings.
Note
You may need to scroll down to see the Reset to
Default option.
4 Press MENU to go to the previous menu or press
EXIT to close the menu.
PICTURE AUDIO CHANNELS SETTINGS USB
OK
ENTER
OK
ENTER
MENU EXIT
PICTURE AUDIO CHANNELS SETTINGS
MENU
Energy Savings
50
48
70
0
0ssenprahS
USB
On
EXIT
www.insigniaproducts.com
39
Page 44

NS-32L550A11/NS-37L550A11/NS-42L550A11/NS-46L550A11 32"/37"/42"/46" LCD, 120 Hz
Using USB
Note
Unless otherwise noted, all tasks in this section are
based on using the remote control.
You can view JPEG photos stored on a USB flash
drive, by connecting the flash drive to the USB port
on your TV.
Notes
• Never remove the USB device or turn off your TV
while viewing JPEG pictures.
• We recommend that you back up the data on
your USB device.
• The JPEG picture viewer only supports JPEG
format images (with “.jpg” file extensions) and
not all JPEG files are compatible with the TV.
• The maximum supported JPEG format image
should be under 15360 × 8640 pixels (132 MB
pixels).
Switching to USB mode
To switch to USB mode:
1 Connected the USB flash drive to the USB port
on the back of your TV. A message asks if you
want to view photos on the flash drive.
Show Photos with USB Flash Drive?
Browsing photos
To browse photos:
1 Make sure that you have switched to USB mode.
For more information, see “Switching to USB
mode” on page 40.
2 Press MENU. The on-screen menu opens with
the USB menu displayed.
Photos
USB
Browse Photos
Favorite Photos
View Slideshow
Settings
MOVE SELECT PREVIOUS EXIT
Find photos that are on the USB device
3 Press to highlight Browse Photos, then press
OK/ENTER. The browse screen opens.
File name File name File name File name
OK
ENTER
PICTURE AUDIO CHANNELS SETTINGS
MENU
EXIT
USB
Yes
No
2 Press or to select Ye s , then press
OK/ENTER. The on-screen menu opens with the
USB menu displayed.
Photos
USB
Browse Photos
Favorite Photos
View Slideshow
Settings
MOVE SELECT PREVIOUS EXIT
ENTER
Find photos that are on the USB device
Note
• If your USB flash drive is already inserted at the
USB port, you will be asked if you want to view
photos stored on the USB flash drive.
•If you select No, your TV switches to the last
video input source it was in when your TV was
turned off.
•If the USB menu disappears, press MENU again
before you press any other button.
PICTURE AUDIO CHANNELS SETTINGS
OK
MENU
EXIT
USB
OK
MOVE SELECT PREVIOUS FAVORITE EXIT
ENTER
Number of Folders : 4
Number of Files : 0
MENU FAV EXIT
4 Press or to select a folder that contains
photos, then press OK/ENTER to open the
folder.
USB
Browse Photos
Favorite Photos
View Slideshow
File name
PICTURE AUDIO CHANNELS SETTINGS
Photos
USB
Browse Photos
Favorite Photos
View Slideshow
Settings
OK
MOVE SELECT PREVIOUS EXIT
ENTER
Find photos that are on the USB device
PICTURE AUDIO CHANNELS SETTINGS
Photos
USB
Browse Photos
Favorite Photos
View Slideshow
Settings
OK
MOVE SELECT PREVIOUS EXIT
ENTER
Find photos that are on the USB device
Settings
OK
MOVE SELECT PREVIOUS EXIT
ENTER
Find photos that are on the USB device
USB
Photos
USB
Browse Photos
Favorite Photos
View Slideshow
Settings
MENU EXIT
Number of Folders : 0
MENU EXIT
Number of Files : 17
OK
MOVE SELECT PREVIOUS EXIT
ENTER
Find photos that are on the USB device
USB
Photos
USB
Browse Photos
OK
Favorite Photos
View Slideshow
MOVE SELECT PREVIOUS FAVORITE EXIT
ENTER
Settings
OK
MOVE SELECT PREVIOUS EXIT
ENTER
Find photos that are on the USB device
MENU EXIT
PICTURE AUDIO CHANNELS SETTINGS
MENU EXIT
PICTURE AUDIO CHANNELS SETTINGS
MENU EXIT
USB
Browse Photos
Favorite Photos
View Slideshow
Settings
Find photos that are on the USB device
USB
USB
Browse Photos
Favorite Photos
View Slideshow
Settings
Find photos that are on the USB device
USB
USB
Browse Photos
Favorite Photos
MENU FAV
View Slideshow
Settings
Find photos that are on the USB device
USB
PICTURE AUDIO CHANNELS SETTINGS
Photos
PICTURE AUDIO CHANNELS SETTINGS
Photos
OK
MENU EXIT
MOVE SELECT PREVIOUS EXIT
ENTER
PICTURE AUDIO CHANNELS SETTINGS
Photos
OK
MENU EXIT
MOVE SELECT PREVIOUS EXIT
ENTER
PICTURE AUDIO CHANNELS SETTINGS
Photos
OK
MENU EXIT
MOVE SELECT PREVIOUS EXIT
ENTER
USB
USB
USB
PICTURE AUDIO CHANNELS SETTINGS
Photos
USB
Browse Photos
Favorite Photos
View Slideshow
Settings
OK
MENU EXIT
MOVE SELECT PREVIOUS EXIT
ENTER
Find photos that are on the USB device
PICTURE AUDIO CHANNELS SETTINGS
Photos
USB
Browse Photos
Favorite Photos
View Slideshow
Settings
OK
MENU EXIT
MOVE SELECT PREVIOUS EXIT
ENTER
Find photos that are on the USB device
PICTURE AUDIO CHANNELS SETTINGS
Photos
USB
Browse Photos
Favorite Photos
EXIT
View Slideshow
Settings
OK
MENU EXIT
MOVE SELECT PREVIOUS EXIT
ENTER
Find photos that are on the USB device
USB
USB
USB
5 Press or to select a photo, then press
OK/ENTER to view the photo.
6 Press or to view the next photo. Press or
to view the previous photo.
7 To enlarge the image, press ZOOM one or more
times. In zoom mode:
• Press or to navigate around the
screen.
• To go to next photo, press ZOOM one or more
times until “Zoom Fill” mode pops up, then
press or to select another photo.
40
www.insigniaproducts.com
Page 45

32"/37"/42"/46" LCD, 120 Hz 1080p
8 If you are in a subfolder, press RECALL to return
to the root folder.
Setting up a favorite photos list
To set up a favorite photos list:
1 Make sure that you have switched to USB mode.
For more information, see “Switching to USB
mode” on page 40.
2 Press MENU. The on-screen menu opens with
the USB menu displayed.
Photos
USB
Browse Photos
Favorite Photos
View Slideshow
Settings
MOVE SELECT PREVIOUS EXIT
ENTER
Find photos that are on the USB device
3 Press to highlight Browse Photos, then press
OK/ENTER. The browse screen opens.
PICTURE AUDIO CHANNELS SETTINGS
OK
MENU
Viewing favorite photos
Note
You have to set up the favorite photo list before you
can view favorite photos.
To view favorite photos:
1 Make sure that you have switched to USB mode.
For more information, see “Switching to USB
mode” on page 40.
2 Press MENU. The on-screen menu opens with
the USB menu displayed.
USB
USB
Photos
PICTURE AUDIO CHANNELS SETTINGS
Browse Photos
Favorite Photos
View Slideshow
Settings
EXIT
Find photos that are on the USB device
OK
MOVE SELECT PREVIOUS EXIT
ENTER
MENU
3 Press to highlight Browse Photos, then press
OK/ENTER. The browse screen opens.
USB
EXIT
File name File name File name File name
OK
MOVE SELECT PREVIOUS FAVORITE EXIT
ENTER
Number of Folders : 4
Number of Files : 0
MENU FAV EXIT
4 Press or to select a folder that contains
photos, then press OK/ENTER to open the
folder.
USB
PICTURE AUDIO CHANNELS SETTINGS
Photos
USB
Browse Photos
Favorite Photos
View Slideshow
File name
PICTURE AUDIO CHANNELS SETTINGS
Photos
USB
Browse Photos
Favorite Photos
View Slideshow
Settings
OK
MOVE SELECT PREVIOUS EXIT
ENTER
Find photos that are on the USB device
PICTURE AUDIO CHANNELS SETTINGS
Photos
USB
Browse Photos
Favorite Photos
View Slideshow
Settings
OK
MOVE SELECT PREVIOUS EXIT
ENTER
Find photos that are on the USB device
Settings
OK
MOVE SELECT PREVIOUS EXIT
ENTER
Find photos that are on the USB device
USB
PICTURE AUDIO CHANNELS SETTINGS
Photos
USB
Browse Photos
Favorite Photos
View Slideshow
Settings
MENU EXIT
Number of Folders : 0
MENU EXIT
Number of Files : 17
OK
MOVE SELECT PREVIOUS EXIT
ENTER
Find photos that are on the USB device
USB
PICTURE AUDIO CHANNELS SETTINGS
Photos
USB
Browse Photos
OK
Favorite Photos
View Slideshow
MOVE SELECT PREVIOUS FAVORITE EXIT
ENTER
Settings
OK
MOVE SELECT PREVIOUS EXIT
ENTER
Find photos that are on the USB device
MENU EXIT
MENU EXIT
MENU EXIT
Photos
USB
Browse Photos
Favorite Photos
View Slideshow
Settings
Find photos that are on the USB device
USB
Photos
USB
Browse Photos
Favorite Photos
View Slideshow
Settings
MOVE SELECT PREVIOUS EXIT
Find photos that are on the USB device
USB
Photos
USB
Browse Photos
Favorite Photos
MENU FAV
View Slideshow
Settings
MOVE SELECT PREVIOUS EXIT
Find photos that are on the USB device
PICTURE AUDIO CHANNELS SETTINGS
OK
MENU EXIT
MOVE SELECT PREVIOUS EXIT
ENTER
PICTURE AUDIO CHANNELS SETTINGS
OK
MENU EXIT
ENTER
PICTURE AUDIO CHANNELS SETTINGS
OK
MENU EXIT
ENTER
USB
USB
USB
PICTURE AUDIO CHANNELS SETTINGS
Photos
USB
Browse Photos
Favorite Photos
View Slideshow
Settings
OK
MENU EXIT
MOVE SELECT PREVIOUS EXIT
ENTER
Find photos that are on the USB device
PICTURE AUDIO CHANNELS SETTINGS
Photos
USB
Browse Photos
Favorite Photos
View Slideshow
Settings
OK
MENU EXIT
MOVE SELECT PREVIOUS EXIT
ENTER
Find photos that are on the USB device
PICTURE AUDIO CHANNELS SETTINGS
Photos
USB
Browse Photos
Favorite Photos
EXIT
View Slideshow
Settings
OK
MENU EXIT
MOVE SELECT PREVIOUS EXIT
ENTER
Find photos that are on the USB device
USB
USB
USB
File name File name File name File name
OK
MOVE SELECT PREVIOUS FAVORITE EXIT
ENTER
Number of Folders : 4
Number of Files : 0
MENU FAV EXIT
4 Press or to select a folder that contains
photos, then press OK/ENTER to open the
folder.
USB
Browse Photos
Favorite Photos
View Slideshow
File name
PICTURE AUDIO CHANNELS SETTINGS
Photos
USB
Browse Photos
Favorite Photos
View Slideshow
Settings
OK
MOVE SELECT PREVIOUS EXIT
ENTER
Find photos that are on the USB device
PICTURE AUDIO CHANNELS SETTINGS
Photos
USB
Browse Photos
Favorite Photos
View Slideshow
Settings
OK
MOVE SELECT PREVIOUS EXIT
ENTER
Find photos that are on the USB device
Settings
OK
MOVE SELECT PREVIOUS EXIT
ENTER
Find photos that are on the USB device
USB
Photos
USB
Browse Photos
Favorite Photos
View Slideshow
Settings
MENU EXIT
Number of Folders : 0
MENU EXIT
Number of Files : 17
OK
MOVE SELECT PREVIOUS EXIT
ENTER
Find photos that are on the USB device
USB
Photos
USB
Browse Photos
OK
Favorite Photos
View Slideshow
MOVE SELECT PREVIOUS FAVORITE EXIT
ENTER
Settings
OK
MOVE SELECT PREVIOUS EXIT
ENTER
Find photos that are on the USB device
MENU EXIT
PICTURE AUDIO CHANNELS SETTINGS
MENU EXIT
PICTURE AUDIO CHANNELS SETTINGS
MENU EXIT
USB
Browse Photos
Favorite Photos
View Slideshow
Settings
Find photos that are on the USB device
USB
USB
Browse Photos
Favorite Photos
View Slideshow
Settings
Find photos that are on the USB device
USB
USB
Browse Photos
Favorite Photos
MENU FAV
View Slideshow
Settings
Find photos that are on the USB device
USB
PICTURE AUDIO CHANNELS SETTINGS
Photos
PICTURE AUDIO CHANNELS SETTINGS
Photos
OK
MENU EXIT
MOVE SELECT PREVIOUS EXIT
ENTER
PICTURE AUDIO CHANNELS SETTINGS
Photos
OK
MENU EXIT
MOVE SELECT PREVIOUS EXIT
ENTER
PICTURE AUDIO CHANNELS SETTINGS
Photos
OK
MENU EXIT
MOVE SELECT PREVIOUS EXIT
ENTER
USB
USB
USB
PICTURE AUDIO CHANNELS SETTINGS
Photos
USB
Browse Photos
Favorite Photos
View Slideshow
Settings
OK
MENU EXIT
MOVE SELECT PREVIOUS EXIT
ENTER
Find photos that are on the USB device
PICTURE AUDIO CHANNELS SETTINGS
Photos
USB
Browse Photos
Favorite Photos
View Slideshow
Settings
OK
MENU EXIT
MOVE SELECT PREVIOUS EXIT
ENTER
Find photos that are on the USB device
PICTURE AUDIO CHANNELS SETTINGS
Photos
USB
Browse Photos
Favorite Photos
EXIT
View Slideshow
Settings
OK
MENU EXIT
MOVE SELECT PREVIOUS EXIT
ENTER
Find photos that are on the USB device
USB
USB
USB
5 Press or to select a photo, then press
FAV on your remote control to check the
selected photo and add it to the favorite list. You
can remove a selected photo from the favorite
list by selecting it and pressing FAV again.
Note
Favorite photos are labeled in the upper-right corner
with a heart-shaped icon.
www.insigniaproducts.com
41
Page 46

NS-32L550A11/NS-37L550A11/NS-42L550A11/NS-46L550A11 32"/37"/42"/46" LCD, 120 Hz
5 Press MENU to open the USB menu, then press
to highlight Favorite Photos.
USB
Photos
PICTURE AUDIO CHANNELS SETTINGS
Browse Photos
Favorite Photos
View Slideshow
Settings
OK
MOVE SELECT PREVIOUS EXIT
View only the photos you selected as your favorites
ENTER
MENU
USB
EXIT
6 Press OK/ENTER. The favorite photos screen
opens.
PICTURE AUDIO CHANNELS SETTINGS
Photos
OK
MENU EXIT
MOVE SELECT PREVIOUS EXIT
ENTER
OK
ENTER
USB
MENU EXIT
Photos
USB
Browse Photos
Favorite Photos
View Slideshow
Settings
OK
MOVE SELECT PREVIOUS EXIT
ENTER
Find photos that are on the USB device
USB
Browse Photos
Favorite Photos
View Slideshow
Settings
MENU EXIT
Find photos that are on the USB device
MOVE SELECT PREVIOUS EXIT
Number of Files : 2
USB
PICTURE AUDIO CHANNELS SETTINGS
7 Press or to select the favorite photo
you want to view first, then press OK/ENTER.
8 Press or to view the next photo. Press or
to view the previous photo.
3 Press to highlight Browse Photos, then press
OK/ENTER. The browse screen opens.
File name File name File name File name
OK
MOVE SELECT PREVIOUS FAVORITE EXIT
ENTER
Number of Folders : 4
Number of Files : 0
MENU FAV EXIT
4 Press or to select a folder that contains
photos, then press OK/ENTER to open the
folder.
5 Press MENU to open the USB menu.
USB
Photos
PICTURE AUDIO CHANNELS SETTINGS
Browse Photos
Favorite Photos
View Slideshow
Settings
OK
MOVE SELECT PREVIOUS EXIT
Find photos that are on the USB device
ENTER
MENU
USB
EXIT
6 Press to highlight View Slideshow.
Viewing all photos in a slideshow
To view all photos in a slideshow:
1 Make sure that you have switched to USB mode.
For more information, see “Switching to USB
mode” on page 40.
2 Press MENU. The on-screen menu opens with
the USB menu displayed.
Photos
USB
Browse Photos
Favorite Photos
View Slideshow
Settings
MOVE SELECT PREVIOUS EXIT
Find photos that are on the USB device
ENTER
PICTURE AUDIO CHANNELS SETTINGS
OK
MENU
USB
Photos
PICTURE AUDIO CHANNELS SETTINGS
USB
Browse Photos
Favorite Photos
View Slideshow
Settings
USB
OK
MOVE SELECT PREVIOUS EXIT
View your photos in a slideshow
ENTER
MENU EXIT
7 Press OK/ENTER or to start the slideshow,
8 To stop the slideshow, press MENU or EXIT.
EXIT
42
www.insigniaproducts.com
Page 47

32"/37"/42"/46" LCD, 120 Hz 1080p
Viewing favorite photos in a slideshow
To view favorite photos in a slideshow:
1 Make sure that you have switched to USB mode.
For more information, see “Switching to USB
mode” on page 40.
2 Press MENU. The on-screen menu opens with
the USB menu displayed.
Photos
USB
Browse Photos
Favorite Photos
View Slideshow
Settings
MOVE SELECT PREVIOUS EXIT
Find photos that are on the USB device
ENTER
3 Press to highlight Browse Photos, then press
OK/ENTER. The browse screen opens.
File name File name File name File name
PICTURE AUDIO CHANNELS SETTINGS
OK
MENU
6 Press to highlight Favorite Photos, then press
OK/ENTER to open the Favorite Photos screen.
PICTURE AUDIO CHANNELS SETTINGS
OK
MENU EXIT
MOVE SELECT PREVIOUS EXIT
ENTER
OK
ENTER
USB
MENU EXIT
USB
USB
PICTURE AUDIO CHANNELS SETTINGS
Photos
USB
Browse Photos
Favorite Photos
View Slideshow
Settings
OK
MOVE SELECT PREVIOUS EXIT
ENTER
Find photos that are on the USB device
Photos
USB
Browse Photos
Favorite Photos
View Slideshow
Settings
MENU EXIT
Find photos that are on the USB device
MOVE SELECT PREVIOUS EXIT
Number of Files : 2
7 Press MENU to open the USB menu.
EXIT
USB
Photos
PICTURE AUDIO CHANNELS SETTINGS
Browse Photos
Favorite Photos
View Slideshow
Settings
OK
MOVE SELECT PREVIOUS EXIT
Find photos that are on the USB device
ENTER
MENU
USB
EXIT
OK
MOVE SELECT PREVIOUS FAVORITE EXIT
ENTER
Number of Folders : 4
Number of Files : 0
MENU FAV EXIT
4 Press or to select a folder that contains
photos, then press OK/ENTER to open the
folder.
5 Press MENU to open the USB menu.
USB
Photos
PICTURE AUDIO CHANNELS SETTINGS
Browse Photos
Favorite Photos
View Slideshow
Settings
OK
MOVE SELECT PREVIOUS EXIT
Find photos that are on the USB device
ENTER
MENU
USB
EXIT
8 Press to highlight View Slideshow, then press
OK/ENTER or to start the slideshow.
9 To stop the slideshow, press MENU or EXIT.
Customizing slideshow settings
To customize slideshow settings:
1 Make sure that you have switched to USB mode.
For more information, see “Switching to USB
mode” on page 40.
2 Press MENU. The on-screen menu opens with
the USB menu displayed.
Photos
USB
Browse Photos
Favorite Photos
View Slideshow
Settings
MOVE SELECT PREVIOUS EXIT
Find photos that are on the USB device
ENTER
PICTURE AUDIO CHANNELS SETTINGS
OK
MENU
USB
EXIT
www.insigniaproducts.com
43
Page 48

NS-32L550A11/NS-37L550A11/NS-42L550A11/NS-46L550A11 32"/37"/42"/46" LCD, 120 Hz
3 Press to highlight Settings.
Photos
USB
Browse Photos
Favorite Photos
View Slideshow
Settings
MOVE SELECT PREVIOUS EXIT
Change slideshow settings
ENTER
PICTURE AUDIO CHANNELS SETTINGS
OK
MENU
USB
EXIT
4 Press OK/ENTER or . The Settings menu opens.
Photos Settings
USB
Repeat On
Shuffle
Speed
Transition
MOVE SELECT PREVIOUS EXIT
Repeat the slideshow when it reaches the end
ENTER
PICTURE AUDIO CHANNELS SETTINGS
OK
MENU
USB
Off
4Sec
None
EXIT
Maintaining
• Do not use your TV in areas that are too hot or too
cold, because the cabinet may warp or the screen
may malfunction. Your TV works best in
temperatures that are comfortable to you.
• Storage temperatures are 32° to 122°F (0° to 50°C).
• Working temperatures are 41° to 104°F
(5° to 40°C).
• Do not place your TV in direct sunlight or near a
heat source.
Cleaning the TV cabinet
Clean the cabinet with a soft, lint-free cloth. If the
cabinet is especially dirty, moisten a soft, lint-free
cloth in a weak detergent solution, squeeze the
excess moisture from the cloth, then wipe the
screen or cabinet with the cloth. Use a clean cloth to
dry the screen or cabinet.
Cleaning the TV screen
Clean the screen with a soft, lint-free cloth.
Troubleshooting
Warni ng
Do not try to repair your TV yourself. Refer all service
to a qualified service technician.
5 Press to highlight a setting, then press or
to adjust the setting. You can select:
• Repeat—Repeats the slideshow when it
reaches the end. You can select On or Off.
• Shuffle—Displays the slideshow photos in
random order. You can select On or Off.
• Speed—Sets the amount of time a photo is
displayed before the slideshow moves to the
next photo. You can select 2 Sec, 4 Sec, 6 Sec,
or 8 Sec.
• Tra nsi tion —Selects a transition effect when
moving to the next file in the slideshow. You
can select None, Fade to Black, Vert ical
Wipe, Horizontal Wipe, or Random.
6 Press EXIT to close the menu.
Problem Solution
Power
No power
• Ma ke s ure that the power cord is correct ly
connected to a power outlet.
See”Connecting the power” on page 14.
• Unplug the power cord, wait 60 seconds,
then plug the cord back in and turn on
your TV.
General remote control
Remote control does not work
Remote control code cannot be
detected by a universal remote
• Make sure that there are no obstructions
between the remote control and the
remote co ntrol sensor o n the front of your
TV.
• Clean the remote sensor on the front of
your TV.
• Bright or fluorescent lighting may
interfere with the remote control signal.
Turn off the light or move your TV.
• Replace the batteries. Make sure that the
+ and – symbols on the batteries align
with the + and – symbols in the battery
compartment. See “Installing remote
control batteries” on page 9.
• Purchase a separate learning remote
control.
• Go to www.insigniaproducts.com for a list
of remote contro l codes.
Programmed remote control functions
The LED does not blink when
you press a button
The LED blinks when you press
a button but the device does
not respond.
• Try pressing different buttons.
• The batteries may already be drained.
Replace the batteries.
• Make sure the remote is aimed at your
device and is not more than 40 feet
(12.2 m) away.
44
www.insigniaproducts.com
Page 49

32"/37"/42"/46" LCD, 120 Hz 1080p
Problem Solution
The LED blinks one long blink
while in SET mode
When programming the
remote control, the remote
does not control devices or
commands are not working
correctly
No volume on a device
Channels do not change
correctly when directly
entering numbers to cha nge
channels
• An entry error has occurred (for example,
• Try all listed codes for the device.
• Make sure the device operates with an
• Refer to “Changing volume lock” on page
• If the origin al remote con trol required you
Picture
No picture
Good sound but poor color
Poor pictu re
Horizontal dotted line
“Ghost” or double image
Snowy picture or noise
VGA picture is not stable or
synchronized
After images appear
•Make sure that the Audio Only option is
• Make sure that the video cables are
• Adjust the contrast and brightness. See
• Make sure that the correct video mode is
• Make sure that the incoming signal is
• Make sure the antenna is connected
• Check the closed caption settings. Some
• Adjust the contrast, color, and brightness
• Make sure that the room is not too bright.
• If an S-VHS camera or a camcorder is
• Your TV may be too close to another
• Obstructions, such as high-rise building or
• Make sure that the AV and antenna cables
• Make sure that you have selected the
• Do not display a still image, such as a logo,
wrong button was pressed). Try entering
the sequence again.
infrared remote control.
12 and make sure the volume is not
locked to a different mode already.
to press ENTER to change channels, press
OK/ENTER on your TV remote control
after entering the channel number.
set to Off. See “Playing TV audio only” on
page 25.
connected securely to the back of your TV.
See “Making connections” on page 14.
“Adjusting the TV picture” on page 22.
selected. See “Selecting the video input
source” on page 20.
compatib le.
correctly. See “Connecting an antenna or
cable TV (no box)” on page 14.
TEXT modes can block the screen. See
“Selecting the closed captioning mode”
on page 33.
settings. See “Adjusting the TV picture”
on page 22.
Light reflecting off the screen can make
the picture difficult to see.
connected while another connected
device is turned on, the picture may be
poor. Turn off one or more devices.
electrical device, such as a hair dryer or
neon light. Turn off the device or move
your T V.
hills, may be preventing your antenna
from receiving a clear signal. Using a
highly directional antenna may improve
the picture quality.
are connected securely.
correct VGA mode on your computer.
game, or computer image, for an
extended period of time. This can cause a
permanent after-image to be burned into
the screen. This type of damage is not
covered by your warranty.
Problem Solution
Picture has a few bright or dark
spots
• A few bright or dark dots on an LCD screen
is normal. It does not affect the operation
of this TV.
Audio
Good picture but no sound
No output from one of the
speakers
• Increase the volume.
• Make sure that the sound is not muted.
• Make sure that the correct audio mode is
selected. See “Adjusting sound settings”
on page 25.
• Adjust the balance in the Audio menu. See
“Adjusting sound settings” on page 25.
Other
Buttons on the front of the TV
do not work
INlink does not work
•Make sure that the Button Lock option is
set to Off. See “Locking control buttons”
on page 30.
•Unplug the power cord, wait a few
seconds, then plug the cord back in and
turn on your TV.
• Make sure that the device you want to
control is HDMI CEC-compatible.
• Make sure that the HDMI device’s power
cord is connected correctly.
• Make sure that the INlink Control option is
set to On in the INlink menu. See “Using
INlink” on page 38.
• Scan for INlink devices again. See “Using
INlink” on page 38.
• Connect an INlink device using an
HDMI 1.3 cable.
• If it the HDMI cable is disconnected then
reconnected or if the power is turned off
scan for INlink devices again. See “Using
INlink” on page 38.
Specifications
Design and specifications are subject to change
without notice.
Analog standard NTSC
Digital standard ATS C, 8 -VS B, C lea r-QAM
Photo standard JPEG format
Screen size NS-32L550A11: 32"
NS-37L550A11: 37"
NS-42L550A11: 42"
NS-46L550A11: 46"
Channel coverage VHF: 2-13
UHF: 14-69
CATV: Mid band - A-8 ~ A-1, A ~ I
Super band - J ~ W
Hyper band - AA ~ ZZ, AAA, BBB
Ultra band - 65 ~ 94, 100 ~ 135
Power source AC 120 V ~ 60 Hz
Power consumption 32": 150W with TV on
37": 150W with TV on
42": 220W with TV on
46": 210W with TV on
<1W in Standby mode
Audio power 32": 10 W + 10 W internal speaker
37"/42"/46": 12 W + 12 W internal speaker
S-Video input (1) Y: 1 V (p-p), 75 ohm, negative sync
C: 0.286 V (p-p) (burst signal), 75 ohm
www.insigniaproducts.com
45
Page 50

NS-32L550A11/NS-37L550A11/NS-42L550A11/NS-46L550A11 32"/37"/42"/46" LCD, 120 Hz
AV i npu t (1 ) Video: 1 V (p-p), 75 ohm, negative sync
Audio: 500 mV (rms)
Component video input (1) Y: 1 V (p-p), 75 ohm, including sync
PR/CR: ±0.35 V (p-p), 75 ohm
PB/CB: ±0.35 V (p-p), 75 ohm
Audio: 500 mV (rms)
Suggested resolutions: 1080i, 720p, 480p, 480i
HDMI input (4) 4 HDMI input jacks
HDCP compliant
E-EDID compliant
Suggested scan rates: 1080p, 1080i, 720p, 480p, 480i
VGA input (1) E-EDID compliant
Suggested scan rates: 640x480/60 Hz, 800x600/60 Hz,
1024x768/60 Hz, 1280x1024/60 Hz, 1680x1050/60Hz,
1920x1080/60 Hz
Audio input: Headphone mini-jack for stereo
Accessories Remote control and batteries (2 AA)
AC power cord
Component cable with L/R audio cable
Quick Setup Guide
RC Holder
Cleaning Cloth
Dimensions NS-32L550A11:
With s tand
30.63 × 21.77 × 8.71 in.
(778.08 × 553.04 × 221.28 mm)
Witho ut stand
30.63 × 20.03 × 3.13 in.
(778.08 × 508.78 × 79.6 mm)
NS-37L550A11:
With s tand
35.5 × 24.55 × 9.5 in.
(901.1 × 623.6 × 241.4 mm)
Witho ut stand
35.5 × 22.8 × 3.5 in.
(901.1 × 579.3 × 89.5 mm)
NS-42L550A11:
With s tand
39.8 × 27.48 × 10.3 in.
(1011.0 × 698.0 × 261.7 mm)
Witho ut stand
39.8 × 25.58 × 4.25 in.
(1011.0 × 649.7 × 108.0 mm)
NS-46L550A11:
With s tand
43.5 x 29.6 x 10.5 in.
(1104.9 x 751.8 x 266.7 mm)
Witho ut stand
43.5 x 27.6 x 4.7 in.
(1104.9 x 701.0 x 119.4 mm)
Weig ht NS-32L550A11
With stand 26.4 lbs. (12.0 kg)
Without stand 22.9 lbs. (10.4 kg)
NS-37L550A11
With stand 32.4 lbs. (14.7 kg)
With standout 27.6 lbs. (12.5 kg)
NS-42L550A11
With stand 44.1 lbs. (20.0 kg)
Without stand 37.4 lbs. (17.0 kg)
NS-46L550A11
With stand 51.8 lbs. (23.5 kg)
Without stand 45.2 lbs. (20.5 kg)
Manufacturers’ codes
Audio amplifiers
Audio amplifiers
Adcom 30577, 31100
Anthem 32220
Bose 30674
Carver 30892
Durabrand 31561
Elan 30647
GE 30078
Harman/Kardon 30892
JVC 30331
Left Coast 30892
Lenoxx 31561
Marantz 30892
McIntosh 30251
Modulaire 30395
NEC 30264
Optimus 30395, 30823
Philips 30892
Pioneer 30823
Polk Audio 30892
RadioShack 30395
RCA 30823
Realistic 30395
Shure 30264
Sony 30689, 30815
Soundesign 30078
Victor 30331
Wards 30078
Yamaha 30354, 30133
Audio accessories
Audio accessories
Accurian 31106
Altec Lansing 30607, 31056
Apple 31115
Creative 30872
DLO 31155
GPX 32113
Griffin 31891
iDeck 31106
iHome 32152
iLive 32113
Imerge 31491
iPort 31917
Klipsch 31339
Marantz 31491
Memorex 32119
Monitor Audio 31106
Motorola 31464
Omnifi 31605
Roku 31828
Sonance 31917
Yamaha 31809, 31810, 32021
46
www.insigniaproducts.com
Page 51

32"/37"/42"/46" LCD, 120 Hz 1080p
Audio receivers
Audio receivers
ADC 30531
Adcom 30616
Aiwa 31405, 30189, 30121, 31089, 31388, 31641
Akai 30244, 31512
Alco 31390
AMC 31077
Amphion Media Works 31563
AMW 31563
Anam 31609, 31074
Anthem 31185
Apex Digital 31257, 31430, 31774
Arcam 31189
Audiotronic 31189
Audiovox 31390
B & K 30702, 30820, 30840
BK 30702
Bose 31229, 30639, 31253, 31629, 31841, 31933
Cairn 30189
Cambridge Soundworks 31370
Capetronic 30531
Carver 31189, 30189, 30121, 31089, 31289
Coby 31389
Curtis Mathes 30014
Daewoo 31250
Denon 31360, 30121, 31104, 31142, 31306, 32857
Emerson 30531
Fisher 31801
Garrard 30463
Grundig 30189
Harman/Kardon 30110, 30189, 30891, 31289, 31304, 31306,
32241
Hitachi 31273, 31801
iLive 32013
Inkel 30491
Insignia 31030, 31077, 31893, 32169, 32175
Integra 30135, 30842, 31298, 31320, 31805
iSymphony 32258
JBL 30110, 31306
JVC 31058, 30074, 31374, 31495, 31871, 32239
Kawasaki 31390
Kenwood 31313, 31570, 30077, 30186, 31027
KLH 31390, 31412, 31428
Koss 31366, 31497
Lexicon 31076
LG 31293, 32197
Linn 30189
Liquid Video 31497
Magnavox 31189, 31269, 30189, 30391, 30531, 31089,
31266,31514
Marantz 31189, 31269, 30189, 30891, 31089, 31289
McIntosh 31289
Micromega 31189, 30189
Mitsubishi 31393
Musicmagic 31089
Myryad 31189
Nakamichi 31313, 30097, 31555
Norcent 31389
Audio receivers
Nova 31389
Onkyo 30135, 30842, 31298, 31320, 31531, 31805,
31905
Optimus 31023, 30074, 30014, 30121, 30186, 30531,
31074
Oritron 31366, 31497
Outlaw 30391
Panasonic 31308, 31518, 30367, 31275, 31288, 31316,
31548,31633, 31763, 31764
Philips 31189, 31269, 30189, 30391, 30891, 31089,
31266
Pioneer 31023, 30014, 30150, 30244, 30531, 30630,
31123,31384, 31935
Polaroid 31508
Polk Audio 30189, 31289
Proscan 31254
RadioShack 31609
RCA 31023, 31609, 31254, 30531, 31074, 31123,
31390,31511
Realistic 31609, 30121, 30186
Revox 30189
Rio 31869
Samsung 31295, 31304, 31500
Sangean 32165
Sansui 31189, 30189, 31089
Sanyo 31251, 31469, 31801
Sharp 30186, 31286
Sharper Image 31556
Sherwood 30491, 31077, 31653, 31905, 32169
Sherwood Newcastle 32169
Sonic Blue 31869
Sonic Frontiers 31185
Sony 31058, 31441, 31258, 31759, 31622, 30474,
31158,31406, 31558, 31658, 31758, 31822,
31858
Stereophonics 31023
Sunfire 31313
Teac 30463, 31074, 31390, 31528
Technics 31308, 31518, 31633
Thorens 31189
Toshiba 30135, 30842, 31123, 31788
Venturer 31390
Victor 30074
Wards 30189, 30014
XM 31406
Yamaha 31023, 30176, 30186, 30376, 31176, 31276,
31331,31375, 31376, 31476, 31815, 32061
Zenith 30857, 31293
Cable converters
Cable converters
A-Mark 00008,00144
ABC 00237,00003,00008
Accuphase 00003
Acorn 00237
Action 00237
Active 00237
ADB 02586
Americast 00899
Amino 01602,01822
www.insigniaproducts.com
47
Page 52

NS-32L550A11/NS-37L550A11/NS-42L550A11/NS-46L550A11 32"/37"/42"/46" LCD, 120 Hz
Cable converters
Archer 00237
BCC 00276
Bell South 00899
British Telecom 00003
Century 00008
Cisco 01877,00877,01982
Clearmaster 00883
ClearMax 00883
Cool Box 00883
Coolmax 00883
Digeo 01187, 02187
Director 00476
Fosgate 00276
GE 00144
General Instrument 00476,00810,00276,00003
Gibralter 00003
GMI 00883
GoldStar 00144
Hamlin 00009,00273
Hitachi 00003,00008, 00009
i3 Micro 01602
Insight 00476,00810
Jerrold 00476,00810, 00276, 00003
Memorex 00000
Mitsubishi 00003
Motorola 01376,00476, 00810, 00276, 01187, 01106,
01982
Multitech 00883
Myrio 01602,01822
Nova Vision 00008
Novaplex 00008
Pace 01877,00877,00237,00008,01982
Panasonic 00000,00008,00144,00107,01982
Paragon 00000,00008, 00525
Penney 00000
Philips 01305,00317
Pioneer 01877,00877, 00144, 00533
Pulsar 00000
Quasar 00000
RadioShack 00883
RCA 01256
Regal 00276,00279,00273
Runco 00000
Samsung 00003,00144,01982
Scientific Atlanta 01877,00877,00477,00237,00003,00000,00008,0
1982
Sejin 01602
Sony 01006
Sprucer 00144
Starcom 00003
Supercable 00276
Supermax 00883
Thomson 01256
Cable/PVR combos
Cable/PVR combos
Americast 00899
Amino 01822
Cable/PVR combos
Cisco 01877, 01982
Digeo 01187, 02187
General Instrument 00810
Jerrold 00810
Motorola 01376, 00810, 01187, 01106, 01982
Myrio 01822
Pace 01877, 00237, 01982
Pioneer 01877
RCA 01256
Scientific Atlanta 01877, 01982
Sony 01006
Supercable 00276
Thomson 01256
Zenith 00899
CD players
CD players
Acoustic Research 30420
Aiwa 30157
Arcam 30157
Audio Research 30157
Burmester 30420
Cairn 30157
California Audio Labs 30029
Cambridge Soundworks 30157
Carver 30157
Curtis Mathes 30032
Denon 30034
DKK 30000
DMX Electronics 30157
Fisher 30000
Garrard 30393,30420
Genexxa 30032
Grundig 30157
Hafler 30173
Harman/Kardon 30100,30157,30173
Hitachi 30032
Inkel 30157,30180
Integra 30101
JVC 30032,30072
Kenwood 30626,30000,30029,30028,30190
KLH 31318,31711
Krell 30157
Linn 30157
Magnavox 30157,30038,30274
Marantz 30626,30029,30157,30038,30180,30435
Matsui 30157
McIntosh 30256,30290,30660
MCS 30029
Memorex 30000, 30032,30420
Micromega 30157
Miro 30000
Mission 30157
Modulaire 30000,30032,30087,30180,30420
MTC 30420
Myryad 30157
NSM 30157
Onkyo 31327,30101
48
www.insigniaproducts.com
Page 53

32"/37"/42"/46" LCD, 120 Hz 1080p
CD players
Optimus 30000,30032,30087,30393,30420
Panasonic 30029,30388,30752
Parasound 30420
Penney 30029
Philips 30626,30157,30274
Pioneer 31062,30032,31087
Polk Audio 30157
Proceed 30420
Proton 30157
QED 30157
Quad 30157
Quasar 30029
RadioShack 30000,30032,30180,30420
RCA 31062, 30032,30053,30420
Realistic 30000,30032,30087,30180,30420
Revox 30157
Roksan 30435
Rotel 30157,30420
SAE 30157
Sansui 30000,30157
Sanyo 30000,30087
Sharp 30180
Sherwood 30180
Sonic Frontiers 30157
Sony 30490,30000,30100,31364,30185
Sugden 30157
Sylvania 30157
Symphonic 30180
TAG McLaren 30157
Tandy 30032
Tascam 30393,30420
Teac 30490,30180,30393,30420
Technics 30029
Thule Audio 30157
Victor 30072
Wards 30032,30157,30053,30087
Yamaha 30490,30036,31292
Yorx 30000
DVD players
DVD players
3D LAB 20503, 20539
Accurian 20675, 21072, 21416
Advent 21016
Afreey 20698
Aiwa 20641
Akai 20695, 20705, 20770, 20899, 21089
Alba 20672, 20717
Alco 20790
Allegro 20869
Amphion Media Works 20872
AMW 20872
Apex Digital 20533, 20672, 20717, 20755, 20794, 20796,
20797, 20830, 21004, 21020, 21056, 21061,
21100
Arrgo 21023
Aspire Digital 21168, 21407
Astar 21489
DVD players
Audiovox 20717, 20790, 21041, 21071, 21072, 21121,
21122
Axion 21071, 21072
B & K 20655, 20662
BBK 21224
Bel Canto Design 21571
Blaupunkt 20717
Blue Parade 20571
Blue Sky 20695
Bose 21895, 22023
Brandt 20651
Broksonic 20695, 20868
California Audio Labs 20490
Celestial 21020
Centrex 20672, 21004
Cinea 20831
CineVision 20876, 20833, 20869
Citizen 21003, 20695, 21277
Clairtone 20571
Coby 20778, 21077, 21086, 21107, 21177
Craig 20831
Creative 20503, 20539
Curtis Mathes 21087
CyberHome 20816, 20874, 21023, 21024, 21117, 21129,
21502, 21537
Cytron 20705
Daewoo 20784, 20705, 20770, 20833, 20869, 21169,
21172, 21234, 21242
Dansai 20770
Daytek 20872
Decca 20770
Denon 20490, 20634, 22258
Denver 20778
Desay 21407
DigitalMax 21738
Digitrex 20672
Disney 20675, 21270
DiViDo 20705
Dual 20675, 21068, 21085
Durabrand 21127
DVD2000 20521
Electrohome 21003
Emerson 20591, 20675, 20821, 21268
Enterprise 20591
Entivo 20503, 20539
Enzer 20770
ESA 20821, 21268
Firstline 20651
Fisher 20670
Funai 20675, 21268, 21334
Gateway 21073, 21077, 21158
GE 20522, 20815, 20717
Go Video 20573, 20744, 20717, 20715, 20741, 20783,
20833, 20869, 21044, 21075, 21099, 21158,
21304, 21730
Go Vision 21071, 21072
GoldStar 20741, 20869
Goodmans 20790
Gradiente 20490, 20651
www.insigniaproducts.com
49
Page 54

NS-32L550A11/NS-37L550A11/NS-42L550A11/NS-46L550A11 32"/37"/42"/46" LCD, 120 Hz
DVD players
Greenhill 20717
Grundig 20539, 20705
Harman/Kardon 20582, 20702
Hello Kitty 20831
Hitachi 20573, 20664, 21247
Hiteker 20672
Humax 21500, 21588
iLo 21348
Initial 20717
Insignia 21268
Integra 20571, 20627, 21769
IRT 20783
JBL 20702
Jensen 21016
JMB 20695
JVC 20558, 20623, 20867, 21164, 21275, 21550
Kawasaki 20790
Kenwood 20490, 20534
KLH 20717, 20790, 21020, 21149
Kloss 20533
Koss 20651, 21061
Lasonic 20627, 20798
Lecson 21533
Lenoxx 21127
LG 20591, 20741, 20869
LiteOn 21058, 21158, 21416, 21440, 21656, 21738
Loewe 20511, 20741
Logix 20783
Magnasonic 20651, 20675
Magnavox 20503, 20539, 20646, 20675, 20821, 21268,
21354, 21506
Marantz 20503, 20539, 20675
McIntosh 21533, 21273
Medion 20651
Memorex 20695, 20831, 21270
Microsoft 20522, 22083
Minato 20752
Mintek 20839, 20717
Mitsubishi 21521, 20521
NAD 20741
Naiko 20770
NEC 20785, 20869
Nesa 20717
NexxTech 21402
Norcent 21003, 20872, 21107, 21265
Onkyo 20503, 20627, 21769
Oppo 20575, 21224
Optimus 20571
Oritron 20651
Palsonic 20672
Panasonic 20503, 20490, 20571, 20632, 20703, 21362,
21462, 21490, 21641, 21762
Philco 20675
Philips 20503, 20539, 20646, 20675, 20854, 21260,
21267, 21340, 21354, 22056, 22084
PianoDisc 21024
Pioneer 20525, 20571, 20142, 20631, 20632, 21460,
21512, 21571
Polaroid 21020, 21061, 21086
DVD players
Polk Audio 20539
Portland 20770
Presidian 20675, 21072, 21738
Prima 21016
Proceed 20672
Proscan 20522
ProVision 20778
Qwestar 20651
Radionette 20741
RadioShack 20571
RCA 20522, 20571, 20717, 20790, 20822, 21022,
21132, 21769
Realistic 20571
Reoc 20752
Rio 20869
Rotel 20623, 21178
Rowa 20823, 21004
Saba 20651
Sampo 20698, 20752
Samsung 20490, 20573, 20744, 20199, 20820, 20899,
21044, 21075
Sansui 20695
Sanyo 20670, 20675, 20695, 20873, 21334
Schneider 20783
Schwaiger 20752
Sensory Science 21158
Sharp 20630, 20675, 20752, 21256, 22250
Sharper Image 21117
Sherwood 20770, 21043, 21077
Sherwood Newcastle 21077
Shinsonic 20533, 20839
Slim Art 20784
Sonic Blue 20573, 20715, 20783, 20869, 21099
Sony 20533, 21533, 20864, 21033, 21070, 21431,
21516
Sova 21122
Superscan 20821
SVA 20717
Sylvania 20675, 20821, 21268
Symphonic 20675, 20821, 21268, 21334
Tatung 20770
Teac 20571, 20717, 20790
Technics 20490, 20703
Technika 20770
Terapin 21031
Tevion 20651
Theta Digital 20571
Thomson 20522, 20511
Tivo 21503, 21512, 21588
Toshiba 20503, 20573, 20539, 20695, 21045, 21154,
21503, 21510, 21588, 21769
Unimax 20770
Universum 20591
Urban Concepts 20503, 20539
US Logic 20839
V 21064, 21226
Venturer 20790
Vizio 21064, 21226
Xbox 20522, 22083
50
www.insigniaproducts.com
Page 55

32"/37"/42"/46" LCD, 120 Hz 1080p
DVD players
Yamaha 20490, 20539, 20545
Yamakawa 20872
Zenith 20503, 20591, 20741, 20869
Zeus 20784
Zoece 21265
DVD players (Blu Ray and HD-DVD)
DVD players (Blu Ray and HD-DVD)
Denon 22258
Integra 21769
LG 20741
Microsoft 22083
Onkyo 21769
Panasonic 21641
Philips 22084
Pioneer 20142
RCA 21769
Samsung 20199
Sharp 22250
Sony 21516
Toshiba 21769
Xbox 22083
DVD/PVR combos controlled by the DVD
DVD/PVR combos controlled by the DVD
Go Video 21730
Humax 21500, 21588
LG 20741
Panasonic 20490
Philips 21340
Pioneer 20631, 21512
RCA 20522
Sharp 21256
Sony 21033, 21070
Sylvania 20675
Tivo 21512
Toshiba 21503, 21510, 21588
Home automation
Home automation
Accutek 31215
Amana 31716
Bionaire 30846, 31215, 31861
Da-Lite 31794
Draper 32190
Frigidaire 31333
GE 30240
GoldStar 31537
Holmes 31215
Kenmore 31537
Lasko 30846, 31890
LG 31537
Lightolier 30184
Lutron 30597, 30318, 31239, 31597
Marmitek 30167
One For All 30167
PCS 30184
RadioShack 30240
Home automation
Screen Research 32097
Security System 30167
Sharper Image 30846
SmartLinc 30184
Universal 30167
Universal X10 30167
Whirlpool 31332
Windmere 31215
X10 30167
DVR/PVR Systems for satellite receivers
DVR/PVR systems for satellite receivers
AlphaStar 00772
Bell ExpressVu 00775, 01170
Chaparral 00216
Coolsat 01806
Crossdigital 01109
DirecTV 01377, 00392, 00566, 00639, 01639, 01142,
Dish Network System 01505, 00775, 01170, 01775
Dishpro 01505, 00775, 01775
Echostar 01505, 00775, 01170, 01775
Expressvu 00775, 01775
Fortec Star 01821
Funai 01377
GE 00392, 00566
General Instrument 00869
GOI 00775, 01775
Hitachi 00749, 00819
Houston 00775
HTS 00775, 01775
Hughes Network
Systems
Humax 01790
Innova 00099
Jerrold 00869
JVC 00775, 01170, 01775
LG 01226, 01414
Magnavox 00722
McIntosh 00869
Mitsubishi 00749
Motorola 00869
Netsat 00099
Next Level 00869
Panasonic 00247, 00701
Pansat 01807
Philips 01142, 00749, 01749, 00775, 00819, 01076,
Primestar 00869
Proscan 00392, 00566
RadioShack 00566, 00775, 00869
RCA 00392, 00566, 01142, 00775, 00855, 00143,
Samsung 01377, 01142, 01276, 01108, 01109, 01442,
SKY 00099
Sony 00639, 01639, 01640
Star Choice 00869
00247, 00749, 01749, 00819, 01856, 01076,
01108, 00099, 01109, 01392, 01414, 01442,
01443, 01444, 01609, 01640
01142, 00749, 01749, 01442, 01443, 01444
00722, 00099, 01442
01392, 01442
01609
www.insigniaproducts.com
51
Page 56

NS-32L550A11/NS-37L550A11/NS-42L550A11/NS-46L550A11 32"/37"/42"/46" LCD, 120 Hz
DVR/PVR systems for satellite receivers
Star Trak 00772, 00869
Thomson 00392, 00566
Tivo 01142, 01442, 01443, 01444
Toshiba 00749, 01749, 00790, 01285
UltimateTV 01392, 01640
Ultrasat 01806
Uniden 00722
Voom 00869
Zenith 01856
TVs
TVs
A-Mark 10047, 10054
Accurian 11803
Accuscan 10047
Action 10030, 10873
Admiral 10047, 10054, 10017, 10051, 10093, 10463,
10180
Advent 10761, 10783, 10815, 10817, 10842
Adventuri 10000
Agna 10150
Aiko 10092
Akai 10060, 10812, 10702, 10030, 10145, 10056,
10672, 11675, 11676, 11935
Albatron 10700, 10843
Alfide 10672
Alleron 10030
Ambassador 10150, 10177
America Action 10180
American High 10000, 10060
Ampro 10751
Amstrad 10171, 10177
Amtron 10000, 10180
Anam 10180
AOC 10180, 10030, 11365
Aomni 11623
Apex Digital 10156, 10748, 10879, 10765, 10767, 10890,
11217
Astar 11531, 11738
Audinac 10180
Audiovox 10451, 10180, 10092, 10623, 10802, 10846,
10875, 11937, 11951, 11952
Aventura 10171
Axion 11937
Baysonic 10180
Beaumark 10017, 10178, 10030
Belcor 10030
Bell & Howell 10054, 10154, 10093
BenQ 11032, 11212, 11315
Boxlight 10893
Bradford 10180
Brockwood 10178, 10030, 10056
Broksonic 10236, 10463, 10180, 10177, 11935
Byd:sign 11309
Candle 10030, 10056
Capehart 10017, 10178, 10030, 10092
Carnivale 10030
Carver 10054
Celebrity 10000
TVs
Celera 10765
Changhong 10156, 10765, 10767, 10783
Cineral 10451, 10092
Citek 10047
Citizen 10054, 10000, 10451, 10463, 10180, 10060,
10030, 10171, 10092, 10056, 11935
Clarion 10180
Classic 10030, 10092, 10056
Colortyme 10047, 10054, 10017, 10060, 10178, 10030
Commercial Solutions 11447, 10047
Concerto 10056
Conic 10178
Contec 10180
Craig 10180, 10171
Crosley 10054, 10000, 10180, 10030, 10171
Crown 10093, 10180, 10056, 10672
Crown Mustang 10672
Curtis Mathes 10047, 10054, 10154, 10000, 10051, 10451,
10093, 10180, 10060, 10702, 10178, 10030,
10145, 10166, 10056, 10466, 11147, 11347
CXC 10180
Cytron 11326
Daewoo 10451, 10178, 10092, 11661, 11756, 10623,
10661, 10672, 11755
Dayton 10092
Daytron 10178, 10030, 10092, 10056
Dell 11080, 11178, 11264, 11403, 11863
Denon 10145
Digital Life 10872
Dream Vision 11164
Dumont 10017, 10180, 10178
Durabrand 10463, 10180, 10178, 10171, 11034
Dwin 10093, 10720, 10774
Dynex 11463, 11780, 11785, 11810
Eaton 10060
Electroband 10000
Electrograph 11623, 11755
Electrohome 10154, 10000, 10463, 10150, 10178, 10030,
10056
Emerald 10178, 10177
Emerson 10047, 10154, 10451, 10236, 10463, 10180,
10150, 10178, 10171, 10177, 10623, 11394,
11963
Emprex 11422
Envision 10030, 10813, 11365
Epson 10833, 10840
ESA 10812, 10171, 11963
Fisher 10054, 10154, 10000
Fortress 10093
Fujitsu 10683, 10809, 10853
Funai 10000, 10180, 10171, 11271, 11963
Futuretech 10180
Gateway 11756, 11755
GE 11447, 10047, 10000, 10051, 10451, 10060,
10178, 10030, 11147, 11347
Gemini 10047
Gibralter 10017, 10000, 10030
Go Video 10886
Go Vision 11937
GoldStar 10047, 10054, 10178, 10030, 10056, 11154
52
www.insigniaproducts.com
Page 57

32"/37"/42"/46" LCD, 120 Hz 1080p
TVs
Gradiente 10053, 10056
Grundig 10706, 10672, 10683
Grundy 10180
Grunpy 10180
Haier 11034
Hallmark 10236, 10180, 10178
Hannspree 11348, 11351, 11745
Harley Davidson 10000, 10180, 10060, 10178, 10030
Harman/Kardon 10054
Harvard 10180
Havermy 10093
Heathkit 10017
Helios 10865
Hello Kitty 10451
Hewlett Packard 11494, 11502, 11642
Hisense 10748
Hitachi 10047, 10054, 10017, 10000, 10051, 11145,
10145, 10056, 11445, 11643
HP 11494, 11502, 11642
Hyundai 10849, 10865, 11219, 11294
iLo 11286, 11603, 11684, 11990
Ima 10236, 10180, 10178
Infinity 10054
InFocus 11164
Initial 11603, 11990
Insignia 10171, 11204, 11326, 11517, 11564, 11641,
11710, 11780, 11963, 12002
Inteq 10017, 10145
JBL 10054
JCB 10000
Jensen 10761, 10815, 10817
JIL 10030
Jutan 10030
JVC 10054, 10053, 10030, 10650, 10731, 11253,
11774
Kamp 10017, 10180
Kawasho 10030
KEC 10180, 10060
Kenwood 10180, 10030
KLH 10156, 10180, 10765, 10767
Kloss 10030
Konka 10180, 10720
KTV 10463, 10180, 10030
Lark 10154
LG 10054, 11265, 10060, 10178, 10030, 10056,
10700, 10856, 11154, 11178, 11423, 11993
Lloyd's 10236, 10180, 10030, 10056
Logik 10236, 10180, 10056
Luxman 10056
LXI 10047, 10054, 10017, 10154, 10000, 10156,
10051, 10093, 10060, 10053, 10178, 10030,
10171, 10166, 10056
Magnasonic 10054, 10000, 10156, 10093, 10030, 10092,
10056
Magnavox 10047, 11454, 10054, 10154, 10000, 10250,
10051, 10180, 10060, 10030, 10171, 10092,
10706, 10802, 11198, 11254, 11365, 11755,
11866, 11963, 11990
Majestic 10017
Marantz 11454, 10054, 10030, 10704, 10855, 11154,
11398
TVs
Matsui 10056, 10177
Matsushita 10250, 10051, 10650
Maxent 11756, 10762, 11211, 11714, 11755, 11757
Megapower 10700
Megatron 10047, 10178, 10145, 10056
Memorex 10154, 10463, 10180, 10150, 10178, 10030,
10056
MGA 10150, 10178, 10030
MGN Technology 10178
Micro Genius 10150
Midland 10047, 10017, 10051, 10056
Mintek 11603, 11990
Mitsubishi 10154, 10093, 11250, 10150, 10178, 10030,
10836, 10868, 11392
Monivision 10700, 10843
Motorola 10054, 10051, 10093, 10150
MTC 10180, 10060, 10030, 10092, 10056
Multitech 10180
NAD 10156, 10178, 10166, 10056, 10866, 11156
NEC 10047, 10178, 10030, 10056, 10497, 10704,
10882, 11398, 11704
NetTV 10762, 11755
New Tech 10056
Nikko 10178, 10030, 10092
Nikkodo 10178, 10030, 10092
Nishi 10030
Norcent 10748, 10824, 11365
Norwood Micro 11286
NTC 10092
Nyon 10000
Olevia 11144, 11240, 11331, 11610
Onwa 10180
Optimus 10154, 10250, 10093, 10180, 10150, 10178,
10030, 10166, 10056, 10650
Optoma 11348
Optonica 10093
Orion 10017, 10236, 10463, 10180, 10178, 11463,
10177
Pace 10092
Panasonic 10054, 10000, 10156, 10250, 10051, 10236,
10030, 10650, 11291, 11310, 11410, 11480,
11941
Panda 10706
Paxonic 10060, 10030
PCE 10156, 10060
Penney 10047, 10000, 10156, 10250, 10051, 10060,
10178, 10030, 10056, 11347
Petters 11523
Philco 10054, 10463, 10030, 10145
Philips 11454, 10054, 10030, 10171, 10056, 10690,
11154, 11254, 11744, 11867
Pilot 10051, 10060, 10178, 10030, 10056
Pioneer 10166, 10679, 10866, 11260, 11398, 11457
Planar 11496
Polaroid 10765, 10865, 11276, 11314, 11326, 11328,
11341, 11523, 11766, 12002
Portland 10451, 10092
Precision 10236, 10180, 10177
Prima 10761, 10783, 10815, 10817, 11785
Princeton 10700, 10717
Prism 10250, 10051
www.insigniaproducts.com
53
Page 58

NS-32L550A11/NS-37L550A11/NS-42L550A11/NS-46L550A11 32"/37"/42"/46" LCD, 120 Hz
TVs
Proscan 11447, 10047, 10466, 11347
Proton 10178, 10466
Pulsar 10017, 10092
Pulser 10178, 10092
Quartz 10150, 10178
Quasar 10250, 10051, 10650
Rabbit 10047
RadioShack 10047, 10154, 10180, 10150, 10178, 10030,
10056
RCA 11447, 10047, 10054, 10000, 10051, 10093,
10178, 12002, 11958, 11781, 11547, 11347,
11247, 11147, 11047, 10774, 10679, 10090
Realistic 10047, 10154, 10180, 10150, 10178, 10030,
10056
RevolutionHD 11623
Runco 10017, 10060, 10030, 10497, 10603, 11292,
11398, 11629
Sampo 10047, 10030, 11756, 10762, 11755
Samsung 10047, 10054, 10017, 10154, 10060, 10812,
10702, 10178, 10030, 10056, 10587, 10766,
10814, 11060, 11575
Sanky 10060, 10030
Sansui 10463, 10060, 10030, 11409, 11935
Sanyo 10047, 10054, 10154, 10000, 10463, 10171,
10088, 10799, 10893, 11142, 11755
Saville 10060
Sceptre 10878, 11217, 11360, 11599
Scotch 10178
Scott 10236, 10180, 10178, 10030, 10177, 11711
Sears 10047, 10054, 10017, 10154, 10000, 10156,
10051, 10093, 10060, 10053, 10178, 10030,
10171, 10166, 10056
Seleco 11351
Sharp 10054, 10093, 10180, 10491, 10688, 10689,
10818, 10851, 11602
Sheng Chia 10093
Shivaki 10178
Siemens 10145
Signature 10047, 10093, 10030
Simpson 10178, 10030
Singer 10060, 10092
Solar Drape 10000
Sole 10813, 11623
Sony 10017, 10154, 11100, 10000, 10150, 10053,
10834, 11685
Soundesign 10180, 10178, 10056
Sova 11952
Soyo 11520, 11826
Spectravision 10156, 10178
Squareview 10171
SR2000 10154, 10171
SSS 10180
Starlite 10236, 10180
Studio Experience 10843
Superscan 10093, 10864
Supreme 10000
SV2000 10054
SVA 10748, 10587, 10865, 10870, 10871, 10872
Sylvania 10047, 10054, 10154, 10000, 10051, 10178,
10030, 10171, 10092, 10056, 11271, 11314,
11394, 11864, 11963
Symphonic 10000, 10180, 10178, 10171
TVs
Syntax 11144, 11240, 11331, 11610
Tandy 10093
Tatung 10000, 10051, 11756, 11286
Teac 10154, 10706, 10689
Technics 10054, 10250, 10051
Technovox 10030
Techview 10847, 12004
Techwood 10250, 10051, 10060, 10056
Teco 11040
Teknika 10054, 10463, 10180, 10150, 10060, 10178,
10092, 10056
Telecolor 10017
Telefunken 10702, 10056
Thomas 10047, 10178, 10056
Thomson 11447, 10047
TMK 10236, 10180, 10178, 10056, 10177
TNCi 10017
Tocom 10156
Toshiba 10154, 11256, 10156, 10150, 11265, 10060,
11145, 10145, 10166, 12006, 11935, 11704,
11656, 11635, 11524, 11356, 11164, 11156,
10845, 10832, 10822, 10650
Totevision 10051
Toyomenka 10178
Truetone 10250, 10051
TruTech 11723
TVS 10463
Ultra 10092
Universal 10047
Universum 10177
US Logic 11286
V 11756, 10864, 10885, 11755
Vector Research 10030
Victor 10053
Vidikron 10054, 11292, 11398, 11629
Vidtech 10178
Viewsonic 10857, 10864, 10885, 11330, 11578, 11627,
11640, 11755, 12014
Viking 10060
Viore 11684
Vizio 11756, 11758, 10864, 10885, 11755
Wards 10047, 10054, 10017, 10154, 10000, 10051,
10093, 10236, 10178, 10030, 10166, 10056,
10866, 11156
Waycon 10156
Welton 10178
Westinghouse 10000, 10451, 10885, 10889, 10890, 11282,
11577, 11712
White Westinghouse 10451, 10236, 10463, 10623, 10889
World 10451, 10236, 10463, 10180
Wyse 11365
XR-1000 10154, 10180, 10171
Yamaha 10030, 10769, 10833, 10839, 11526
Yorx 10030
Zenith 10047, 10017, 10000, 10093, 10463, 11265,
10812, 10178, 10030, 11145, 10145, 10171,
10092
54
www.insigniaproducts.com
Page 59

32"/37"/42"/46" LCD, 120 Hz 1080p
TV/DVD combination controlled by the DVD
TV/DVD combination controlled by the DVD
Advent 21016
Akai 20695
Apex Digital 20830
Audiovox 21071, 21121, 21122
Axion 21071
Broksonic 20695
Citizen 20695
Emerson 20675, 21268
ESA 21268
Funai 21268
Go Vision 21071
Hitachi 21247
Insignia 21268
Jensen 21016
Magnavox 21268
Panasonic 21490
Philips 20854, 21260
Prima 21016
RCA 21022
Samsung 20899
Sansui 20695
Sova 21122
Sylvania 20675, 21268
Toshiba 20695
TV/DVD combination controlled by the TV
TV/DVD combination controlled by the TV
Accurian 11803
Akai 11675, 11935
Audiovox 11937, 11951, 11952
Axion 11937
Broksonic 11935
Citizen 11935
Dynex 11810
Emerson 11394, 11963
ESA 11963
Funai 11963
iLo 11990
Initial 11990
Insignia 11963, 12002
LG 11993
Magnavox 11866, 11963, 11990
Maxent 11714
Mintek 11990
Panasonic 11941
Polaroid 11523, 11766, 12002
RCA 11958, 12002
Sansui 11935
Sova 11952
Sylvania 11394, 11864, 11963
Techview 12004
Toshiba 11524, 11635, 11935, 12006
TV/VCR combination controlled by the TV
TV/VCR combination controlled by the TV
America Action 10180
Audiovox 10180
Emerson 10236
TV/VCR combination controlled by the VCR
TV/VCR combination controlled by the VCR
Broksonic 20479, 21479
Citizen 21278
Curtis Mathes 21035
Daewoo 21278
Emerson 20479, 20593, 21278, 21479
Funai 20000
GE 20807, 21035, 21060
GoldStar 21237
Harley Davidson 20000
Hitachi 20000
LG 21037
Lloyd's 20000
Magnasonic 20593, 21278
Magnavox 20000, 20593, 21781
Memorex 20162, 21037, 21162, 21237, 21262
Mitsubishi 20807
Optimus 20162, 20593, 21162, 21262
Orion 20479, 21479
Panasonic 20162, 21035, 21162, 21262
Penney 21035, 21237
Quasar 20162, 21035, 21162
RadioShack 20000, 21037
RCA 20807, 21035, 21060
Samsung 21014
Sansui 20000, 20479, 21479
Sears 20000, 21237
Sony 20000, 21232
Sylvania 21781
Symphonic 20000, 20593
Thomas 20000
Toshiba 20845, 21145
Zenith 20000, 20479, 21479
TV/VCR/DVD combination controlled by the DVD
TV/VCR/DVD combination controlled by the DVD
Akai 20899
Broksonic 20868
Emerson 20821
ESA 20821
Funai 21334
Magnavox 20821
Panasonic 21362, 21462
RCA 21132
Sharp 20630
Superscan 20821
Sylvania 20821
Symphonic 20821
Toshiba 21045
www.insigniaproducts.com
55
Page 60

NS-32L550A11/NS-37L550A11/NS-42L550A11/NS-46L550A11 32"/37"/42"/46" LCD, 120 Hz
TV/VCR/DVD combination controlled by the VCR
TV/VCR/DVD combination controlled by the VCR
Sharp 20807
VCRs
VCRs
A-Mark 20037, 20000, 20046
ABS 21972
Accurian 20000
Admiral 20060, 20048, 20039, 20209, 20479
Adventura 20037, 20000
Aiwa 20037, 20000
Alba 20209
Alienware 21972
Allegro 20039
American High 20035, 20081
Amstrad 20000
Astra 20035
Audiovox 20037, 20038
Avis 20000
Bell & Howell 20035, 20048, 20039, 20000, 20046, 20479
Broksonic 20184, 20121, 20209, 20479, 21479
Calix 20037
Candle 20037, 20038
Canon 20035
Carver 20035, 20081
Citizen 20035, 20037, 20000, 20209, 20479, 21278
Classic 20037
Colortyme 20060, 20035, 20045
Colt 20000
Craig 20037
Criterion 20000
Crosley 20035, 20081, 20000, 20149
Curtis Mathes 20060, 20035, 20162, 20000, 21035
CyberPower 21972
Daewoo 20037, 20045, 20046, 21278
Daytron 20037
Dell 21972
Denon 20081, 20042
DirecTV 20739
Dual 20000
Durabrand 20039, 20038
Dynatech 20000
Electrohome 20060, 20037, 20000, 20043, 20209
Electrophonic 20037
Emerald 20184, 20121
Emerex 20032
Emerson 20037, 20184, 20000, 20121, 20043, 20209,
20479, 20593, 21278, 21479, 21593
Fisher 20039, 20000, 20046
Fuji 20035, 20033
Fujitsu 20000
Funai 20037, 20000, 20593, 21593
Garrard 20000
Gateway 21972
GE 20060, 20035, 20048, 20000, 20149, 20807,
21035, 21060
Gemini 20060
Genexxa 20037, 20000
VCRs
Go Video 20614
GoldStar 20035, 20037, 20039, 20000, 20038, 21237
Goodmans 20037, 20081, 20000
Gradiente 20000
Granada 20081, 20042
Grundig 20081
Harley Davidson 20000
Harman/Kardon 20081, 20038
Headquarter 20046
Hewlett Packard 21972
HI-Q 20035, 20000
Hitachi 20035, 20037, 20045, 20000, 20042, 20089
Howard Computers 21972
HP 21972
Hughes Network
Systems
Humax 20739
Hush 21972
Hytek 20000
iBUYPOWER 21972
Instant Replay 20035
Jensen 20067
JVC 20067, 21162
KEC 20037
Kenwood 20067, 20038, 20046
Kodak 20035, 20037
KTV 20000
LG 20037, 20038, 21037
Linksys 21972
Lloyd's 20000, 20038
Loewe 20081
Logik 20000
Luxor 20046
LXI 20037, 20000, 20042, 20067
Magnasonic 20037, 20000, 20593, 21278
Magnavox 20035, 20037, 20048, 20039, 20081, 20000,
Marantz 20035, 20081, 20038
Marta 20037
Matsui 20037, 20209
Matsushita 20035, 20162, 20081, 21162
Media Center PC 21972
MEI 20035
Memorex 20035, 20162, 20037, 20048, 20039, 20000,
Metz 20037
MGA 20060, 20043
Microsoft 21972
Mind 21972
Minolta 20042
Mitsubishi 20060, 20048, 20000, 20042, 20067, 20043,
Motorola 20035, 20048
MTC 20000
MTX 20000
Multitech 20039, 20000
NEC 20067, 20038
Nikko 20037
20042, 20739
20149, 20563, 20593, 20618, 21593, 21781
20209, 20046, 20479, 21037, 21162, 21237,
21262
20807
56
www.insigniaproducts.com
Page 61

32"/37"/42"/46" LCD, 120 Hz 1080p
VCRs
Nikkodo 20037
Niveus Media 21972
Northgate 21972
Olympus 20035, 20162
Optimus 21062, 20035, 20162, 20037, 20048, 20000,
20593, 21162, 21262
Orion 20184, 20000, 20121, 20209, 20479, 21479
Panama 20035
Panasonic 21062, 20035, 20162, 20000, 20225, 20614,
20616, 21035, 21162, 21262 Penney 20035,
20162, 20037, 20081, 20000, 20042, 20067,
20038, 21035, 21237
Pentax 20042
Philco 20035, 20081, 20000, 20209, 20479
Philips 20035, 20162, 20048, 20081, 20045, 20000,
20209, 20616, 20618, 20739, 21081, 21181
Pilot 20037
Pioneer 20162, 20081, 20042, 20067
Polk Audio 20081
Presidian 21593
Proscan 20060, 21060
Protec 20000
Pulsar 20039
Quarter 20046
Quartz 20035, 20046
Quasar 20035, 20162, 21035, 21162
RadioShack 20035, 20162, 20037, 20048, 20000, 20046,
21037, 21162
Radix 20037
Randex 20037
RCA 20060, 20035, 20048, 20045, 20000, 20042,
20149, 20807, 20880, 21035, 21060
Realistic 20035, 20162, 20037, 20048, 20000, 20121,
20046, 21162
ReplayTV 20614, 20616
Ricavision 21972
Runco 20039
Samsung 20060, 20045, 20000, 20038, 20739, 21014
Sanky 20048, 20039
Sansui 20000, 20067, 20209, 20479, 21479
Sanyo 20000, 20046, 20479
Scott 20184, 20045, 20121, 20043
Sears 20060, 20035, 20162, 20037, 20048, 20039,
20033, 20045, 20000, 20042, 20067, 20043,
20209, 20046, 21237
Sharp 20048, 20032, 20000, 20807, 20848
Shintom 20039, 20000
Siemens 20037
Signature 20060, 20035, 20037, 20048, 20000, 20149,
20046, 20479
Singer 20037
Sonic Blue 20614, 20616
Sonographe 20046
Sony 20035, 20032, 20033, 20000, 20067, 20046,
20636, 21032, 21232, 21972
Soundmaster 20000
Stack 9 21972
STS 20042
SV2000 20000
SVA 20000
VCRs
Sylvania 20035, 20081, 20000, 20043, 20593, 21593,
21781
Symphonic 20000, 20593, 21593
Systemax 21972
Tagar Systems 21972
Tandy 20000
Tashiko 20037
Tatung 20048, 20081, 20000, 20067
Teac 20000, 20067
Technics 20035, 20162, 20037, 20000
Teknika 20035, 20037, 20000
Tevion 20479
Thomas 20000
Thomson 20060
Tivo 20618, 20636, 20739, 21996
TMK 20000
TNIX 20037
Toshiba 20045, 20000, 20043, 20209, 20845, 21008,
21145, 21972, 21996
Totevision 20037
Touch 21972
Trix 20037
Ultra 20045
Vector 20045
Vector Research 20184, 20038
Victor 20067
Video Concepts 20045
Videomagic 20037
Videosonic 20000
Viewsonic 21972
Villain 20000
Voodoo 21972
Wards 20060, 20035, 20037, 20048, 20081, 20033,
20045, 20000, 20042, 20043, 20038, 20149,
20046, 20479
Wharfedale 20593
White Westinghouse 20000, 20209, 20479
World 20209, 20479
XR-1000 20035, 20000
Yamaha 20038
Zenith 20037, 20039, 20033, 20000, 20209, 20479,
21479
ZT Group 21972
Video Accessories
Video Accessories
2Wire 02045
ABS 01272
Access HD 02185
Accurian 01653
Alienware 01272
Amino 01481
AT&T 00858, 02045
Buffalo 01739
CASTi 02305
CyberPower 01272
D-Link 01554, 01731, 02186
Digital Stream 02303
Epson 01563
www.insigniaproducts.com
57
Page 62

NS-32L550A11/NS-37L550A11/NS-42L550A11/NS-46L550A11 32"/37"/42"/46" LCD, 120 Hz
Video Accessories
Gateway 01272
Hewlett Packard 01272, 01267
Howard Computers 01272
HP 01272, 01267
Hush 01272
iBUYPOWER 01272
Insignia 01415
KoolConnect 01481
LG 01415
Linksys 01272, 01365
Media Center PC 01272
Microsoft 01272, 02049
Mind 01272
Motorola 00858, 01363, 01998
Netgear 02036
Niveus Media 01272
Northgate 01272
Panasonic 01120
Pioneer 01010
Ricavision 01272
Roku 01486
Samsung 01190, 01490
Scientific Atlanta 00858
Sensory Science 01126
Sharp 01010
SMC 01456
Sony 01272, 01324, 01364
Stack 9 01272
SureWest 01481
Sylvania 01563
Systemax 01272
Tagar Systems 01272
Toshiba 01272
Touch 01272
Viewsonic 01272, 01329
Vizio 01126
Voodoo 01272
VUDU 02298
Xbox 02049
Zenith 01415
ZT Group 01272
Legal notices
FCC Part 15
This device complies with Part 15 of the FCC Rules. Operation of
this product is subject to the following two conditions: (1) this
device may not cause harmful interference, and (2) this device
must accept any interference received, including interference
that may cause undesired operation.
This equipment has been tested and found to comply within the
limits for a class B digital device, pursuant to Part 15 of the FCC
Rules. These limits are designed to provide reasonable
protection against harmful interference in a residential
installation. This equipment generates, uses, and can radiate
radio frequency energy and, if not installed and used in
accordance with the instructions, may cause harmful
interference to radio communications. However, there is no
guarantee that interference will not occur in a particular
installation. If this equipment does cause harmful interference to
radio or television reception, which can be determined by
turning the equipment off and on, the user is encouraged to try
to correct the interference by one or more of the following
measures:
• Reorient or relocate the receiving antenna.
• Increase the separation between the equipment and
receiver.
• Connect the equipment into an outlet on a circuit different
from that to which the receiver is connected.
• Consult the dealer or an experienced radio/TV technician
for help.
FCC warning
Changes or modifications not expressly approved by the party
responsible for compliance with the FCC Rules could void the
user’s authority to operate this equipment.
Cables
Connections to this device must be made with shielded cables
with metallic RF/EMI connector hoods to maintain compliance
with FCC Rules and Regulations.
Canada ICES-003 statement
This Class B digital apparatus complies with Canadian ICES-003.
Standard Television Receiving Apparatus — Appareil de
réception télévision ordinaire, Canada BETS-7 / NTMR-7
Dolby License Notice and Trade ark Acknowledgement
Manufactured under license from Dolby
Laboratories. Dolby and the double-D symbol
are trademarks of Dolby Laboratories.
HDMI
HDMI, the HDMI logo, and
High-Definition Multimedia Interface are
trademarks or registered trademarks of
HDMI Licensing LLC.
Audyssey
58
Energy Star
SRS TruSurround HD
www.insigniaproducts.com
Audyssey Dynamic Volume™
To meet Energy Star requirements, keep TV settings at
the factory default settings.
is a trakemark of SRS Labs, Inc. TruSurround
HD technology is incorporated under license
from SRS Labs, Inc.
Page 63

32"/37"/42"/46" LCD, 120 Hz 1080p
Two-year limited warranty
US and Canada Markets
Definitions:
Insignia Products (“Insignia”) warrants to you, the original
purchaser of this new Insignia-branded television (“Product”),
that the Product shall be free of defects in the original
manufacturer of the material or workmanship for a period of two
(2) years from the date of your purchase of the Product
(“Warranty Period”). For this warranty to apply, your Product
must be purchased in the United States or Canada from a Best
Buy or Future Shop authorized dealer of Insignia brand products
only that are packaged with this warranty statement.
How long does the coverage last?
The Warranty Period lasts for 2 years (730 days) from the date
you purchased the Product. Your purchase date is printed on the
receipt you received with the Product.
What does this warranty cover?
During the Warranty Period, if the original manufacture of the
material or workmanship of the Product is determined to be
defective by an authorized Insignia repair center or store
personnel, Insignia will (at its sole option): (1) repair the Product
with new or rebuilt parts; or (2) replace the Product at no charge
with new or rebuilt comparable products or parts. Products and
parts replaced under this warranty become the property of
Insignia and are not returned to you. If service of Products or
parts are required after the Warranty Period expires, you must
pay all labor and parts charges. This warranty lasts as long as you
own your Insignia Product during the Warranty Period. Warranty
coverage terminates if you sell or otherwise transfer the Product.
How to obtain warranty service?
If you purchased the Product at a Best Buy or Future Shop retail
store location and your television Product has a screen size of
less than 37 inches, please take your original receipt and the
Prod uct to any Be st Buy or Future Shop store. Make s ure that yo u
place the Product in its original packaging or packaging that
provides the same amount of protection as the original
packaging. If you purchased the Product from a Best Buy or
Future Shop online web site, mail your original receipt and the
Product to the address listed on the web site. Make sure that you
put the Product in its original packaging or packaging that
provides the same amount of protection as the original
packaging.
To obtain in-home warranty service for a television with a screen
37 inches or larger, in the United States call 1-888-BESTBUY,
Canada call 1-866-BESTBUY for Future Shop call 1-800-663-2275.
Call agents will diagnose and correct the issue over the phone or
will have an Insignia-approved repair technician dispatched to
your home.
Where is the warranty valid?
This warranty is valid only to the original purchaser of the
product in the United States and Canada at Best Buy or Future
Shop branded retail stores or websites.
What does the warranty not cover?
This warranty does not cover:
• Customer instruction/education
•Installation
• Set up adjustments
•Cosmetic damage
• Damage due to acts of God, such as power surges
• Accident(s)
•Misuse
•Abuse
• Negligence
• Commercial purposes/use, including but not limited to use
in a place of business or in communal areas of a multiple
dwelling condominium or apartment complex, or
otherwise used in a place of other than a private home.
• Modification of any part of the Product, including the
antenna
• Plasma display panel damaged by static (non-moving)
images applied for lengthy periods (burn-in).
• Damage due to incorrect operation or maintenance
• Connection to an incorrect voltage or power supply
• Attempted repair by any person not authorized by Insignia
to service the Product
• Products sold “as is” or “with all faults”
• Consumables, including but not limited to batteries (i.e. AA,
AAA, C etc.)
• Products where the factory applied serial number has been
altered or removed
• Loss or Theft of this product or any part of the product
REPAIR REPLACEMENT AS PROVIDED UNDER THIS WARRANTY IS
YOUR EXCLUSIVE REMEDY FOR BREACH OF WARRANTY. INSIGNIA
SHALL NOT BE LIABLE FOR ANY INCIDENTAL OR
CONSEQUENTIAL DAMAGES FOR THE BREACH OF ANY EXPRESS
OR IMPLIED WARRANTY ON THIS PRODUCT, INCLUDING, BUT
NOT LIMITED TO, LOST DATA, LOSS OF USE OF YOUR PRODUCT,
LOST BUSINESS OR LOST PROFITS. INSIGNIA PRODUCTS MAKES
NO OTHER EXPRESS WARRANTIES WITH RESPECT TO THE
PRODUCT, ALL EXPRESS AND IMPLIED WARRANTIES FOR THE
PRODUCT, INCLUDING, BUT NOT LIMITED TO, ANY IMPLIED
WARRANTIES OF AND CONDITIONS OF MERCHANTABILITY AND
FITNESS FOR A PARTICULAR PURPOSE, ARE LIMITED IN
DURATION TO THE WARRANTY PERIOD SET FORTH ABOVE AND
NO WARRANTIES, WHETHER EXPRESS OR IMPLIED, WILL APPLY
AFTER THE WARRANTY PERIOD. SOME STATES, PROVINCES AND
JURISDICTIONS DO NOT ALLOW LIMITATIONS ON HOW LONG AN
IMPLIED WARRANTY LASTS, SO THE ABOVE LIMITATION MAY NOT
APPLY TO YOU. THIS WARRANTY GIVES YOU SPECIFIC LEGAL
RIGHTS, AND YOU MAY ALSO HAVE OTHER RIGHTS, WHICH VARY
FROM STATE TO STATE OR PROVINCE TO PROVINCE.
Contact Insignia:
For customer service please call 1-877-467-4289
www.insigniaproducts.com
Distributed by Best Buy Purchasing, LLC
7601 Penn Avenue South, Richfield, Minnesota, U.S.A.
55423-3645
© 2010 BBY Solutions, Inc.
All rights reserved. INSIGNIA is a trademark of BBY Solutions, Inc.
Registered in some countries. All other products and brand
names are trademarks of their respective owners.
Mexico Market
PLACE STICKER OF PRODUCT MAKE & MODEL HERE
DATE OF
PURCHASE:____________________________
Definitions:
Insignia Products (“Insignia”) warrants to you, the original
purchaser of this new Insignia-branded television (“Product”),
that the Product shall be free of defects in the original
manufacturer of the material or workmanship for a period of two
(2) years from the date of your purchase of the Product
(“Warranty Period”). For this warranty to apply, your Product
must be purchased in Mexico from a Best Buy authorized dealer
of Insignia brand products only that are packaged with this
warranty statement.
How long does the coverage last?
The Warranty Period lasts for 2 years (730 days) from the date
you purch ased the Prod uct. Your p urchase date is print ed on the
receipt you received with the Product.
What does this warranty cover?
During the Warranty Period, if the original manufacture of the
material or workmanship of the Product is determined to be
defective by an authorized Insignia repair center or store
personnel, Insignia will (at its sole option): (1) repair the Product
with new or rebuilt parts; or (2) replace the Product at no charge
with new or rebuilt comparable products or parts. Products and
parts replaced under this warranty become the property of
Insignia and are not returned to you. and parts charges. This
warranty lasts as long as you own your Insignia Product during
the Warranty Period. Warranty coverage terminates if you sell or
otherwise transfer the Product.
www.insigniaproducts.com
59
Page 64

NS-32L550A11/NS-37L550A11/NS-42L550A11/NS-46L550A11 32"/37"/42"/46" LCD, 120 Hz
How to obtain warranty service?
If you purchased the Product at a Best Buy retail store location
and your television Product has a screen size of less than 37
inches, please take your original receipt and the Product to any
Best store. Make sure that you place the Product in its original
packaging or packaging that provides the same amount of
protection as the original packaging. If you purchased the
Product from a Best Buy a online web site, mail your original
receipt and the Product to the address listed on the web site.
Make sure that you put the Product in its original packaging or
packaging that provides the same amount of protection as the
original packaging.
To obtain in-home warranty service for a television with a screen
37 inches or larger, in Mexico call 01 800-433-5778. Call agents
will diagnose and correct the issue over the phone or will have
an Insignia-approved repair technician dispatched to your home.
Where is the warranty valid?
This warranty is valid only to the original purchaser of the
product in Mexico at a Best Buy branded retail store or website.
What does the warranty not cover?
This warranty does not cover:
• Customer instruction/education
•Installation
• Set up adjustments
•Cosmetic damage
• Damage due to acts of God, such as power surges
• Accident(s)
•Misuse
•Abuse
• Negligence
• Commercial purposes/use, including but not limited to use
in a place of business or in communal areas of a multiple
dwelling condominium or apartment complex, or
otherwise used in a place of other than a private home.
• Modification of any part of the Product, including the
antenna
• Plasma display panel damaged by static (non-moving)
images applied for lengthy periods (burn-in).
• Damage due to incorrect operation or maintenance
• Connection to an incorrect voltage or power supply
• Attempted repair by any person not authorized by Insignia
to service the Product
• Products sold “as is” or “with all faults”
• Consumables, including but not limited to batteries (i.e. AA,
AAA, C etc.)
• Products where the factory applied serial number has been
altered or removed
• Loss or Theft of this product or any part of the product
REPAIR REPLACEMENT AS PROVIDED UNDER THIS WARRANTY IS
YOUR EXCLUSIVE REMEDY FOR BREACH OF WARRANTY. INSIGNIA
SHALL NOT BE LIABLE FOR ANY INCIDENTAL OR
CONSEQUENTIAL DAMAGES FOR THE BREACH OF ANY EXPRESS
OR IMPLIED WARRANTY ON THIS PRODUCT, INCLUDING, BUT
NOT LIMITED TO, LOST DATA, LOSS OF USE OF YOUR PRODUCT,
LOST BUSINESS OR LOST PROFITS. INSIGNIA PRODUCTS MAKES
NO OTHER EXPRESS WARRANTIES WITH RESPECT TO THE
PRODUCT, ALL EXPRESS AND IMPLIED WARRANTIES FOR THE
PRODUCT, INCLUDING, BUT NOT LIMITED TO, ANY IMPLIED
WARRANTIES OF AND CONDITIONS OF MERCHANTABILITY AND
FITNESS FOR A PARTICULAR PURPOSE, ARE LIMITED IN
DURATION TO THE WARRANTY PERIOD SET FORTH ABOVE AND
NO WARRANTIES, WHETHER EXPRESS OR IMPLIED, WILL APPLY
AFTER THE WARRANTY PERIOD. SOME STATES, PROVINCES AND
JURISDICTIONS DO NOT ALLOW LIMITATIONS ON HOW LONG AN
IMPLIED WARRANTY LASTS, SO THE ABOVE LIMITATION MAY NOT
APPLY TO YOU. THIS WARRANTY GIVES YOU SPECIFIC LEGAL
RIGHTS, AND YOU MAY ALSO HAVE OTHER RIGHTS, WHICH VARY
FROM STATE TO STATE OR PROVINCE TO PROVINCE.
Contact Insignia:
For customer service please call 1-800-926-3000
www.insigniaproducts.com
Distributed by Best Buy Purchasing, LLC
7601 Penn Avenue South, Richfield, Minnesota, U.S.A.
55423-3645
© 2010 BBY Solutions, Inc.
All rights reserved. INSIGNIA is a trademark of BBY Solutions, Inc.
Registered in some countries. All other products and brand
names are trademarks of their respective owners.
Mexico Retailer Address:
Best Buy Mundo E
Boulevard Manuel Avila Camacho 1007
Periferico Norte Santa Monica
Col. San Lucas Tepetlacalco
60
www.insigniaproducts.com
Page 65

TM
If the power cord has been damaged, it should be replaced by the manufacturer, your service
provider or qualified personnel to avoid risks.
Si el cordón de alimentación es dañado, este debe ser remplazado por el fabricante o su agente de servicio o por personal calificado para evitar el riesgo.
www.insigniaproducts.com
US & Canada: 1 (877) 467-4289
Mexico: 01 (800) 926 - 3000
Distributed by Best Buy Purchasing, LLC
7601 Penn Avenue South, Richfield, MN USA 55423-3645
© 2010 BBY Solutions, Inc.
All rights reserved. INSIGNIA is a trademark of BBY Solutions, Inc. Registered in some countries.
All other products and brand names are trademarks of their respective owners.
Best Buy Imports, S. de R.L. de C.V. Av. Santa Fe 485, Segundo Piso, Colonia Cruz Manca, Programa Parcial de Desarrollo Santa Fe, Delegación Cuajimalpa, Distrito
Federal, México 05349 RFC#BBI0802114Q2
Se incluye el manual. Favor de leer este manual antes de usar el producto.
Para el Soporte técnico de Insignia en México, favor llame al: http://www.insigniaproducts.com
ENGLISH
10-0465
 Loading...