

IP-411
P r i n t C o n t r o l l e r
User's Guide

© 1999 by Konica Business Technologies, Inc.
Acknowledgments
All brands and product names are trademarks or registered trademarks of their respective companies.
PostScript ®
A registered trademark of Adobe Systems, Inc.
Agfa Intellifont® Scalable Typefaces
A registered trademark from Agfa Corporation
TrueType ™
A trademark of Apple Computer, Inc.
Centronics ®
A registered trademark of Centronics Data Computer Corporation
HP ®, PCL ®, HP-GL ®
A registered trademark of Hewlett-Packard Company
Microsoft ®
A registered trademark of Microsoft Corporation
Windows ™
A trademark of Microsoft Corporation
PowerPage ® & Power Smoothing ®
A trademark of Electronics for Imaging, Inc. (EFI)
This product contains the PowerPage ® interpreter from EFI.
User's Guide Version Number
OP-IP411-01
Web Site Address on the Internet
http://www.konicabt.com
Disclaimer Notice
Konica Business Technologies, Inc. has made every effort to ensure that information in this manual is complete and accurate.
However, constant efforts are also being made to improve and update the product. Therefore, Konica Business Technologies, Inc.
shall not be liable for errors in this manual or for any consequential damages resulting from the use of this manual. Information
contained herein is subject to change without notice.

e l c o m e t o K o n i c a' s n e w p r i n t c o n t r o l l e r.
WW
W
WW
main body, enabling you to print directly from your workstation.
Use this equipment according to instructions in this manual, which includes print controller specifications
as well as detailed information on printer functions, printer drivers and driver screens. A display of fonts,
symbol sets and printer commands is also included in this manual.
Other product-related manuals include the main body engine user's manual and the network interface card
user's guide for the network administrator.
Should you need assistance on technical matters not covered in this manual, please phone the Konica
support center at 1(800)825-5664.
Konica is committed to serving you the best way possible and we welcome your comments on this manual.
Please send correspondence regarding this manual to our mailing address shown below.
We also invite you to visit Konica's Web Site to view or print user's manuals directly from your PC and to
learn more about our full product line. Our Web Site address is:
This new print controller is an image processing device that interfaces with your Konica printer
http://www.konicabt.com
Mailing Address:
KONICA BUSINESS TECHNOLOGIES, INC.
Marketing/DSSG
500 Day Hill Road
Windsor, CT 06095
iii

Definition of Terms
DPI - Dots Per Inch
The image resolution of the printer engine.
Double-Buffering
The embedded print controller is designed with an asynchronous connection between its Main CPU and the
print engine. This allows the main CPU to rasterize pages into memory even when the print engine is busy
printing pages from a previous job, or is being fed pages. This is commonly known as 'double-buffering' and
allows higher throughput.
E-RDH - Electronic Recirculating Document Handler
An electronic memory and processing system where each image is scanned once and stored in memory.
Each image is output face down in the desired order and according to special options.
Error Diffusion
A 'dithering' or half toning system that does not use 'patterns' of dots, but places the dots in a pseudorandom
distribution.
I/O - Input/Output
Refers to the Input and Output channels of the system.
OHP/OHT - Overhead Projection/Overhead Transparency
The transparency media used in the bypass.
PCL - Printer Control Language
A term introduced by Hewlett Packard in their LaserJet series of printers. This product utilizes PCL-5E.
PostScript
A page description language designed by Adobe Systems Inc. This product utilizes Adobe PostScript
Level 2.
iv

NONEXCLUSIVE LICENSE AGREEMENT
READ THE TERMS AND CONDITIONS OF THIS
LICENSE AGREEMENT CAREFULL Y.
BY USING THE PRODUCTS DESCRIBED IN THIS USER MANUAL OR DOWNLOADING SOFTWARE OR PRINTER DRIVERS TO YOUR COMPUTER YOU AGREE TO BE BOUND BY THE
TERMS OF THIS LICENSE.
The computer programs embedded in the equipment, the accompanying printer drivers (the “Software”) and user documentation are
copyrighted and licensed (not sold) to you by Konica Business Technologies, Inc. (“KONICA or LICENSOR”), 500 Day Hill Road,
Windsor, Connecticut. This license agreement represents the entire agreement concerning the Software between you and KONICA and
it supersedes any prior proposal, representation, or understanding between the parties. KONICA reserves any rights not expressly
granted to you.
1. LICENSE GRANT. You do not receive title to the Software or User Documentation. Licensor grants to you, and you accept, a
nonexclusive license to use the Software embedded in the Equipment in machine-readable, object code form only (referred to as the
“Computer Program”), the accompanying User Documentation, and Printer Drivers furnished to you, (collectively the “Licensed Articles”) only as authorized in this License Agreement. The Computer Program may be used only on the Equipment in which it is
embedded and may not be shared with or transferred to any other equipment. The Printer Drivers shall be used only with printer products
designed to work with the equipment containing the embedded Computer Program. You may make a single archival copy of the Printer
Drivers, provided that it includes all copyright notices, markings and proprietary legends on the original, including the markings of any
other company contained therein. This archival copy may not be in use at any time and must remain in your possession and control. You
may not copy the drivers to a bulletin board or other similar system.
2. RESTRICTIONS. YOU MAY NOT ASSIGN, SUBLICENSE, MODIFY , ADAPT , TRANSFER, PLEDGE, LEASE, RENT OR SHARE
YOUR RIGHTS UNDER THIS LICENSE AGREEMENT. YOU MAY NOT REVERSE ASSEMBLE, REVERSE COMPILE,
OR OTHERWISE TRANSLATE THE SOFTWARE OR PRINTER DRIVERS, OR USE ANY OTHER METHOD TO DISCOVER THE PRINTER DRIVER’S OR SOFTW ARE’S SOURCE CODE. YOU MAY NOT CREATE DERIVATIVE WORKS
BASED UPON THE SOFTWARE OR ANY PART THEREOF. YOU MAY NOT COPY THE LICENSED ARTICLES EXCEPT AS SPECIFICALLY PROVIDED IN THIS LICENSE AGREEMENT.
3. LICENSOR’S RIGHTS. You acknowledge and agree that the Licensed Articles are proprietary products of Licensor or its suppliers and
are protected under U.S. copyright law. You further acknowledge and agree that all right, title and interest in and to the Licensed
Articles, including associated intellectual property rights, are and shall remain with Licensor or its supplier. Licensor’s suppliers may
protect their rights in the Licensed Articles in the event of a violation of this License Agreement. This License Agreement does not
convey to you an interest in or to the Licensed Articles, but only a limited right of use revocable in accordance with the terms of this
License Agreement.
4. LICENSE FEES. The license fees of $250.00 (included in the purchase price of the Equipment) paid by you are paid in consideration
of the licenses granted under this License Agreement.
5. TERMINATION. This License Agreement is effective upon the purchase and acceptance of the Equipment by you or the downloading
of any Software or Printer Driver from KONICA’s Website or other authorized electronic medium and shall continue until terminated.
This License Agreement will terminate upon your sale, transfer or disposal of the Equipment having the Software embedded therein.
Licensor may terminate this License Agreement upon the breach by you of any term hereof. Upon such termination by Licensor, you
agree to delete the Software and Printer Drivers from the hard drive of the Equipment and destroy all copies of the Software and Printer
Drivers and User Documentation.
(Continued)
v

NONEXCLUSIVE LICENSE AGREEMENT (continued)
6. LIMITED WARRANTY. Licensor warrants, for your benefit alone, for a period of 90 days from the date of commencement of this
License Agreement (referred to as the “Warranty Period”) that the Software and Printer Drivers shall operate substantially in accordance
with the functional specifications in the User Documentation. KONICA specifically does not warrant that the Software or Printer
Drivers will operate uninterrupted or error-free. If during the Warranty Period, a defect in the Software or Printer Drivers appears, you
may contact the Licensor for either a replacement or, if so elected by Licensor, refund of amounts paid by you under this License
Agreement. You agree that the foregoing constitutes your sole and exclusive remedy for breach by Licensor of any warranties made
under this Agreement. EXCEPT FOR THE WARRANTIES SET FORTH ABOVE, THE LICENSED ARTICLES, AND THE SOFTWARE CONTAINED THEREIN, ARE LICENSED “AS IS,” AND LICENSOR DISCLAIMS ANY AND ALL OTHER WARRANTIES, WHETHER EXPRESS OR IMPLIED, INCLUDING, WITHOUT LIMITATION, ANY IMPLIED WARRANTIES OF MERCHANTABILITY OR FITNESS FOR A P A R TICULAR PURPOSE.
7. LIMITATION OF LIABILITY. Licensor’s cumulative liability to you or any other party for any loss or damages resulting from any claims,
demands, or actions arising out of or relating to this Agreement shall not exceed $250.00. In no event shall Licensor be liable for any
indirect, incidental, consequential, special, or exemplary damages or lost profits, even if Licensor has been advised of the possibility of
such damages. SOME STATES DO NOT ALLOW THE LIMITATION OR EXCLUSION OF LIABILITY FOR INCIDENTAL OR
CONSEQUENTIAL DAMAGES, SO THE ABOVE LIMITATION OR EXCLUSION MAY NOT APPLY TO YOU.
8. GOVERNING LAW. This License Agreement shall be construed and governed in accordance with the laws of the State of Connecticut.
Should any term of this License Agreement be declared void or unenforceable by any court of competent jurisdiction, such declaration
shall have no effect on the remaining terms hereof.
9. COSTS OF LITIGATION. If any action is brought by either party to this License Agreement against the other party regarding the subject
matter hereof, the prevailing party shall be entitled to recover, in addition to any other relief granted, reasonable attorney fees and
expenses of litigation.
10. NO WAIVER. The failure of any party to enforce any rights granted hereunder or to take action against the another party in the event
of any breach hereunder shall not be deemed a waiver by that party as to subsequent enforcement of rights or subsequent actions in the
event of future breaches.
11. U.S. GOVERNMENT RESTRICTED RIGHTS. The Licensed Articles are provided with restricted rights. Use, duplication, or disclosure by
the government is subject to restrictions set forth in subparagraph (c)(1)(ii) of the Rights in Technical Data and Computer Software
clause at DFARS 252.277-7013, and paragraph (c)(1) and (2) of the Commercial Computer Software - Restricted Rights clause at FAR
52.277-19. The manufacturer is: Konica Business Technologies, Inc., 500 Day Hill Road, Windsor, Connecticut 06095.
vi

Konica IP-411
FCC Regulations
The Konica IP-411 generates, uses, and can radiate radio frequency energy. If the equipment is not installed and used in
accordance with the instruction manual, interference with radio communica tions may result. This equipment has been tested and
found to comply with the limits for a Class A computing device , pursuant to Subpart J, Part 15, of FCC rules, which are designed
to provide reasonable protection against interference from such equipment when it is operating in a commercial environment.
Users operating this equipment in a residential area are like ly to cause interference, in which case they may be required to correct
the interference at their own expense.
Canadian Department of Communications Regulations
Le présent appareil n’émet pas de bruits radioélectriques dépassant les limites applicables aux de Class A prescrites dans le
règlement sur la brouillage radioélectrique édicté par Le Ministère des Communications du Canada.
This equipment does not exceed the Class A limits for r adio noise emissions as set out in the radio interference regulations of the
Canadian Department of Communications.
EN60950
EN50081-1
EN50082-1
vii


W elcome to Konica's New Printer Controller .............................................................................. iii
Definition of Terms ....................................................................................................................... iv
Section 1: The Print Controller
Introduction ...................................................................................................................................1-2
System Configuration ................................................................................................................... 1-3
Settings .......................................................................................................................................... 1-3
Media Support ...............................................................................................................................1-4
Layout ............................................................................................................................................1-5
I/O Interfaces .................................................................................................................................1-6
Memory Configuration ......................................................................................................... 1-7
Specifications ........................................................................................................................1-8
Section 2: Printer Drivers
Installing Printer Drivers ...................................................................................................... 2-2
Checking the Version of A Printer Driver .............................................................................2-4
Printing Modes ..................................................................................................................... 2-5
Tray Selection/Paper Selection .............................................................................................2-7
Font Selection ....................................................................................................................... 2-8
Font Characteristics .............................................................................................................. 2-9
PostScript Printer Language Fonts ............................................................................................... 2-10
PCL 5 Printer Language Fonts ..................................................................................................... 2-11
Contents
Section 3: Printer Driver Screens
Overview ...............................................................................................................................3-2
Windows 3.1 PostScript Driver Screens ...............................................................................3-3
Windows 3.1 PCL Driver Screens ........................................................................................3-16
Windows 95 PostScript Driver Screens ................................................................................3-43
Windows 95 PCL Driver Screens .........................................................................................3-77
Windows NT PostScript Driver Screens .............................................................................. 3-106
Windows NT PCL Driver Screens ........................................................................................3-136
Section 4: Symbol Sets & Conversion Tables
Symbol Sets ...................................................................................................................................4-2
Roman-8 Character Conversion Tables ................................................................................ 4-21
Section 5: PCL Printer Commands
PCL 5 Printer Commands .............................................................................................................5-2

Section 1: The Print Controller

The Print Controller
Introduction
The print controller interfaces directly with your Konica printer main body, enabling you to print directly
from your PC or network. Please note that the network interface manual is provided separately for the
network administrator..
This print controller supports PCL 5E and PostScript Level 1 & 2 compliant files and automatically uses
the correct language for each print job, provided the print job follows specific industry standard conventions for detecting the beginning and end of each job.
Basically, print controller language detection works as follows:
• To determine the language in which a job was created, the preprocessor checks the beginning of each job.
• When a specific language code is detected, the preprocessor switches to that language, then processes the
job.
• If the preprocessor cannot determine which language to use, the default language will be used for the job.
• The system determines when the end of the job is reached by the end-of-file command of each language
or by a 30-second time-out.
• For language switching to function correctly, the system must be able to detect when the end of the job is
reached.
PCL 5E: The PCL 5E interpreter of the print controller is PowerPCL from Pipeline Associates, Inc.
PowerPCL is an HP PCL 5E clone that supports multiple resolutions and PJL commands.
PostScript: The optional PostScript interpreter for the print controller is PowerPage2 from Electronics for
Imaging, Inc. This is a Level 2 PostScript interpreter that also has Level 1 compatibility. The PostScript
programming language is specifically tailored to produce images in a device independent manner.
PostScript language programs are reproducible on virtually any device without significant differences,
except for differences created in the devices themselves.
PJL Commands: Many of the PJL commands, as defined by HP, are supported by the print controller.
Several special functions are controlled in PCL mode via the PJL commands. In addition, commands to
provide bidirectional (BiDi) functionality are also supported.
The Print Controller 1-2

The Print Controller
System Configuration
The Konica IP-411 Print Controller is an embedded control board for the Konica 7040/7033 Copier engine
and is based on an IBM compatible PC architecture that includes the following:
Intel Pentium 233 MMX CPU
PCI bus interface to 7040/7033 Copier engine
PCI bus interface to optional network board (KN-302)
Standard 32 MB 168 pin DIMM memory
IDE 8 MB Flash (standard)
IDE Hard Drive (optional HD-104)
The IP-411 embedded control board contains custom hardware and software for communicating with and
controlling the print engine. The IP-411 embedded control board can be reprogrammed in the field via the
Parallel Port or through the network.
Settings
Default Settings
Default Paper Size Letter
Default Resolution 400 dpi
Default Emulation PCL 5E
Default Printer Quality Text Mode
Other Settings
E-RDH Print Order Normal
Duplex Off
Sheet Insertion Off
Paper Thickness Normal
Print Density Engine default
Finisher Mode Job Offset
The Print Controller 1-3

The Print Controller
Media Support
The Print Controller supports the following paper dimensions and orientations through the printer's main
body.
USA (inches)
Tabloid-R (11 x 17)
Legal-R (8.5 x 14)
Letter-R (8.5 x 11)
Letter (11 x 8.5)
Half-Letter-R (5.5 x 8.5)
A4 (297 x 210 mm)
A4R (210 x 297 mm)
B4R (364 x 257)
Europe (millimeters)
A3R (297 x 420)
A4 (297 x 210)
A4R (210 x 297)
A5R (210 x 148)
B4R (364 x 257)
B5 (182 x 257)
B5R (257 x 182)
F4R (330.2 x 203.2)
NOTE: An 'R' next to the paper size indicates that the short edge feeds first.
Special Media
Paper type can be specified from the print job screen. Overhead transparency material (OHT/OHP), thick
paper, and thin paper can only be used through the manual bypass tray. After selecting the manual bypass
tray, you will be prompted to insert the requested paper size into the tray.
The Print Controller 1-4
The Print Controller
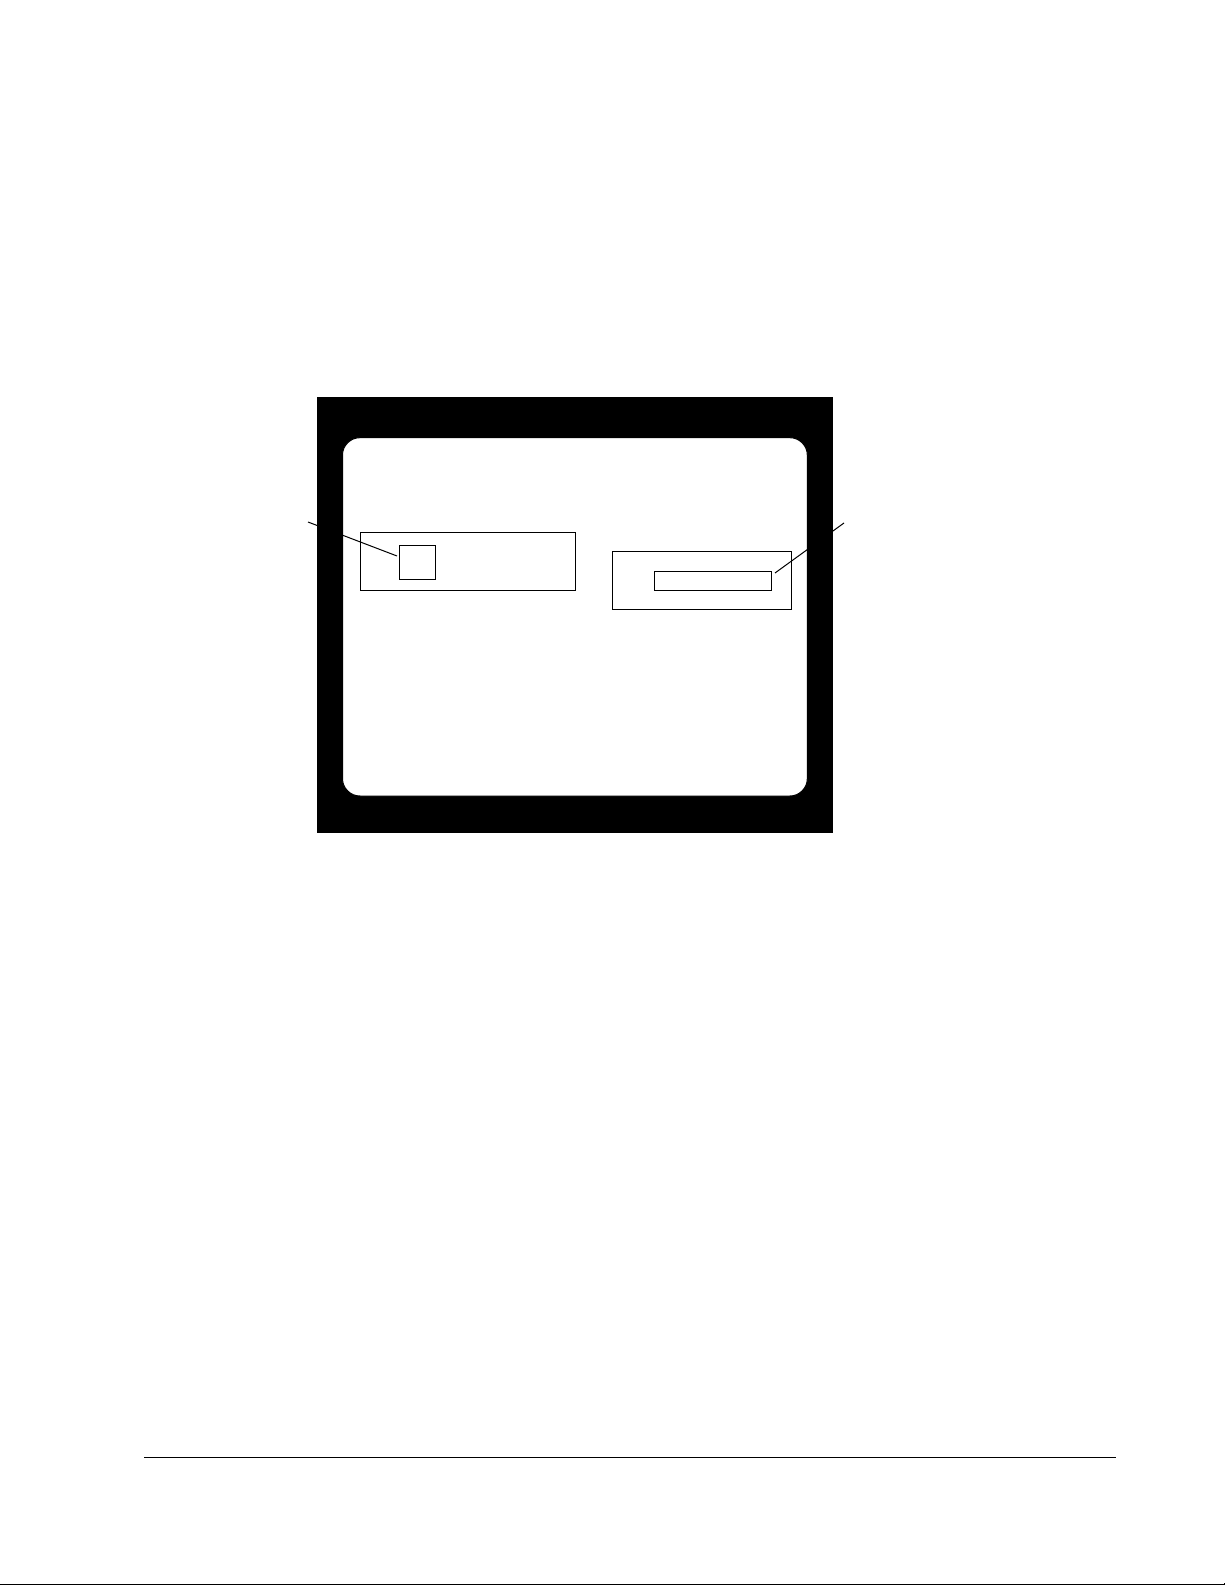
Layout
Main Body En gine Rear View
KN-302 RJ-45 & LEDs
Parallel Port Connector
The Print Controller 1-5
The Print Controller
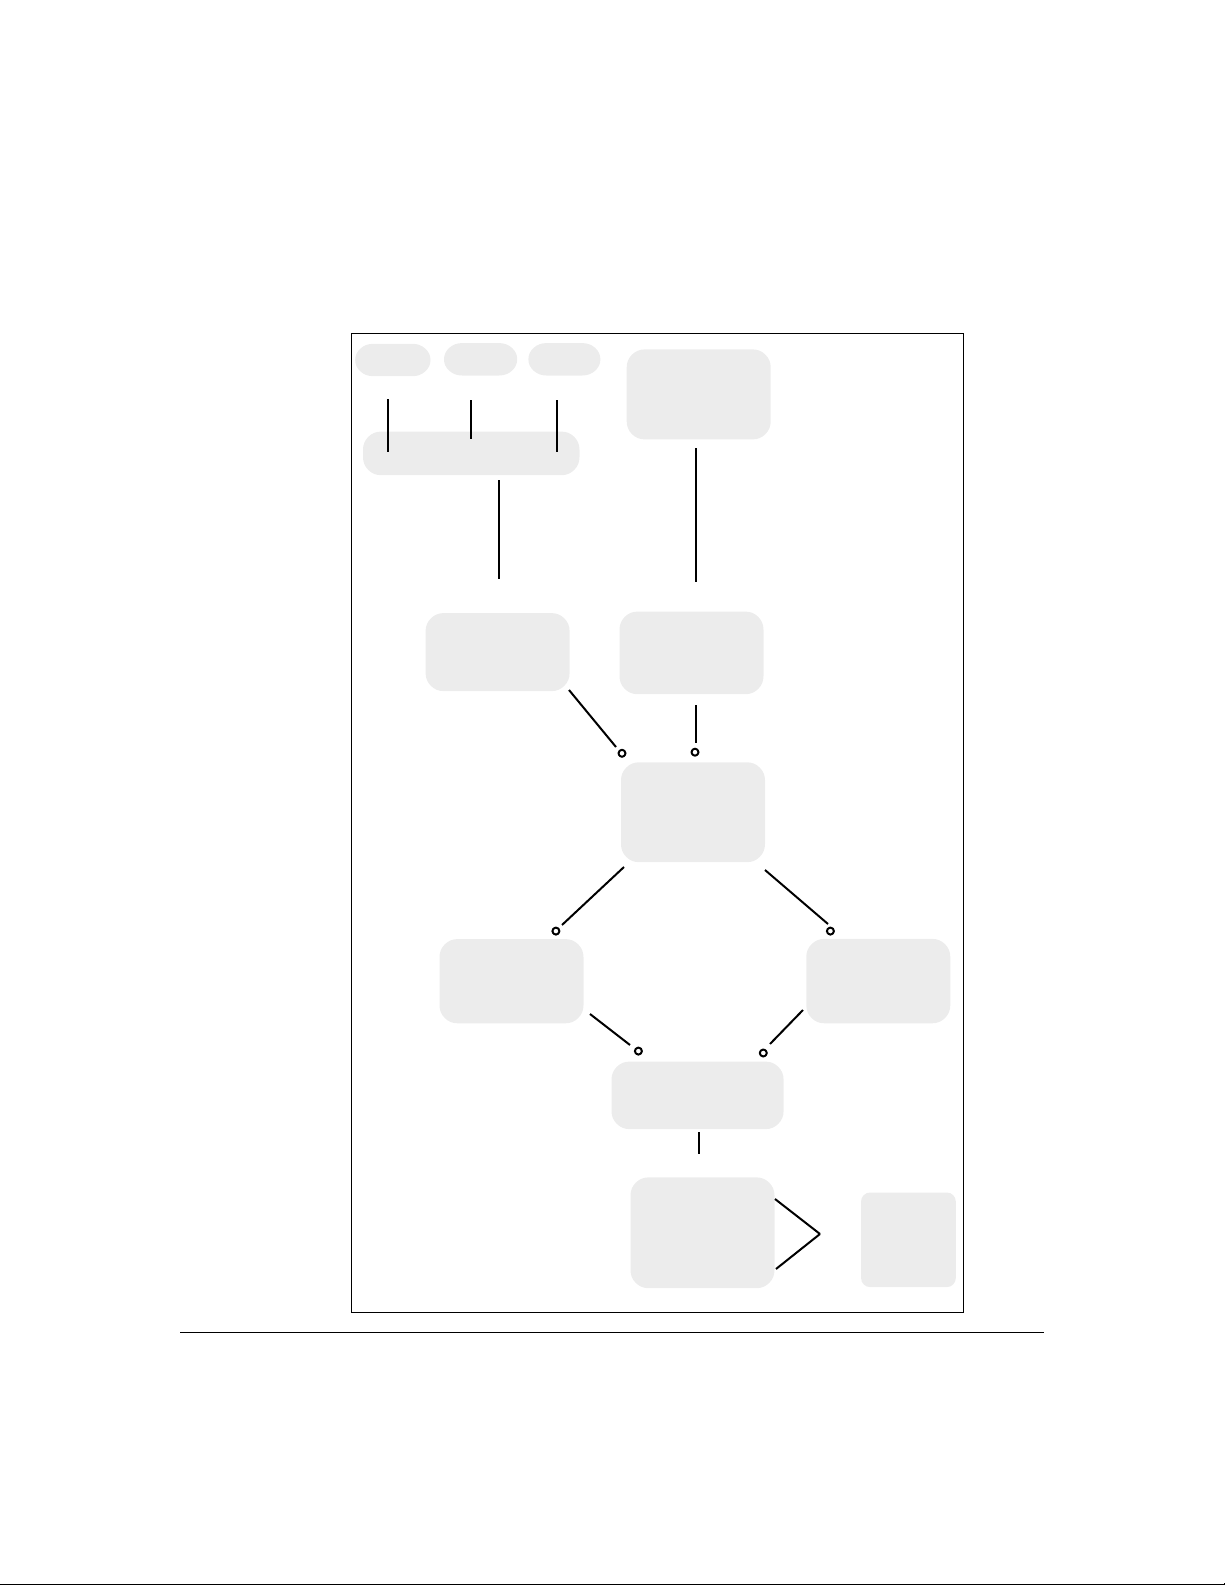
I/O Interfaces
Server Mac PC
-------Ethernet--------
V
Network
Interface Card
PC or Print
Server
V
Parallel
Port
KN-302
Input Buffer
The Print Controller 1-6
PCL 5E
Interpreter
Print Controller
plus Memory
V
Controller
Interface
PostScript
Interpreter
7040 Engine
PCI
Interface
Bus

The Print Controller
Memory Configuration
Most of the print controller memory is used for rasterizing the image. A small portion (~2.7 MB) is used
for the system operation.
The basic print controller configuration includes 32 MB of RAM. Even with 16 MB, 1-bit mode printing at
400 dpi is available on all paper sizes. By replacing the standard 32 MB DIMM, the print controller may be
upgraded to 64 MB (standard) to allow 8.5"x11" grayscale printing; or 128 MB (optional) to allow 11"x17"
or A3 grayscale printing or double buffering on smaller paper sizes.
When using the E-RDH in the one-sided mode, printing will be performed simultaneously while the print
controller rasterizes the pages in the print job and sends them to the E-RDH memory. While pages are
being printed from the E-RDH memory, the print controller continues to rasterize the next print job in the
sequence.
The more memory in the print controller, the more pages it can rasterize while waiting for the previous job
to print. A typical example of the memory requirements for a Letter page is as follows:
1-Bit 8-Bit
400 DPI 1,870 Kbytes 14.96 Mbytes
600 DPI 4,207 Kbytes 33.66 Mbytes
32 MBytes installed = 15 pages @ 1-Bit, 400 DPI
You may select various image quality modes from your print driver screen to produce various levels of
grayscale. The following Table shows the available image quality modes and the grayscale levels they
produce.
Print Mode Print Engine Print Controller Grayscale
Text 1-Bit Mode 1-Bit Mode 2 Levels
(PCL/PS)
High 8-Bit Mode 8-Bit Mode 256 Levels
(PS)
Memory Upgrade Modules
To obtain optimal printer performance, Konica recommends that DIMM modules be installed by a Konica
certified technician. For details, contact your Konica service representative; or the Konica National Systems
Solutions Group at 1(800) 825-5664.
The Print Controller 1-7

The Print Controller
Specifications
System
Architecture IBM Compatible PC System
Processor 233 MHz Intel Pentium MMX
Memory 32 MB standard - MU105
64 MB - MU301
128 MB - MU302
Hard Drive IDE Compatible - Laptop HD-104
IDE Flash 8 MB
Input/Output Interfaces
Parallel IEEE 1284 compatible bidirectional compatible
Network Connectivity Optional KN-302
Ethernet Network Interface (10Base2/10Base-T)
NetWare 3.x, 4.x (IPX/SPX)
Apple T alk (Ether Talk)
TCP/IP (LPD/LPR)
LAN Manager/Server (NetBios) via TCP/IP
SNMP
PDL Support
Standard PCL 5E
Optional PostScript 2
Font Support
PCL 45 PCL Fonts
PostScript 35 PostScript Fonts (optional)
Driver Software Windows 3.1, 3.11, Windows 95
Windows NT Workstation & Server (ver. 3.x, 4.x)
Macintosh and UNIX
Print Controller Features IP-411 w/o Hard Disk IP-411 w/Hard Disk
Job Spooling No Yes
Job Recovery No Yes
Font Download No Yes
Forms Overlay No Ye s
Rec. Oper. Environment 50°~86°F (10°~30° C); 10~80% RH
Warm Up Approx. 1.5 min. @ 68°F (20°C); 50% RH
Power Source +5V/4.8A; +12V/.13A; -12V/0A
Power Consumption 25.56 W (Running Mode)
Radio Interference FCC Rules part 15, Class A; CE Class B
Main Body Safety Std. UL 1950; TUV-GS
The Print Controller 1-8

Section 2: Printer Drivers

Printer Drivers
Installing Printer Drivers
Windows 3.x
The Printer Drivers that come with the IP-411 Print Controller are actually software programs that enable
you to control all the printing settings for the selected printer.
Before you can print from your application (e.g., spreadsheet or word processor), the appropriate printer
driver must be installed on your computer system.
Installing Printer Drivers is a simple procedure that includes the following:
• Installing a specific printer driver
• Assigning a port to the printer
• Specifying settings for your printer (optional)
• Setting the default printer
Installing a Specific Printer Driver (ex. Windows 3.x Printer Driver)
1. Double-click the Main icon in Program Manager.
2. Choose the Control Panel icon.
3. In the Control Panel window, choose the Printers icon.
4. Choose the Add button.
5. In the List Of Printers box, select Install Unlisted or Updated Printer.
Depending on your printer driver version, you may need to click the Browse button to find and select the
printer driver. Then, click OK until the Add Unlisted or Updated Printer box displays. To install a driver
that is listed but not installed, highlight it in the List of Printers box.
6. Choose the Install button.
7. Insert the disk containing the printer driver into your floppy drive, The default for the Konica drivers is
drive A. If you are using a different drive, specify it. When the appropriate drive is selected, click on OK.
8. In the Add Unlisted or Updated Printer box, select the appropriate driver and click on OK.
9. The printer name will appear in the list of installed printers.
2-2 Printer Drivers

Printer Drivers
Installing Printer Drivers
Windows 3.x
Assigning a Port
By default, LPT1 will be assigned to the newly installed printer.
1. To assign a different port, click on the Connect button.
2. In the Ports list, select the port you want to assign to the printer.
NOTE: When installing to a network, up to three LPT printers can be assigned (LPT1, LPT2, LPT3) without having to add more
through the WIN.INI file. Should it be necessary to add more than three printers, click on the Help button in the Connect box for
instructions.
Tip: If you print to LPT1 in Windows 3.x and LPT1 is redirected to another port, the printer will not print.
To correct this, select LPT1.DOS in the Connect dialog box.
Specifying Printer Settings
This is an optional step for making changes to the default printer settings, such as paper size or orientation.
These settings can be temporarily overridden from within your application.
1. Click on the Setup button in the Printers dialog box.
2. When the Setup box is displayed, make the desired selections.
Setting the Default Printer
When you install a printer, it will automatically be highlighted in the Printers dialog box.
1. Highlight the printer you want as the default printer.
2. Click on the Set As Default Printer button.
NOTE: Some applications act as a control panel, making their settings become the system default. This is
not a function of the driver.
Printer Drivers 2-3

Printer Drivers
Checking the Version of A Printer Driver
Windows 3.x
There may be times when you need to know if you are using the most up-to-date printer driver. Use the
following procedure to check the version of a printer driver.
1. Highlight the driver in the Printers dialog box.
2. Click on the Setup button.
3. Click on the About button.
4. The About dialog box will be displayed with the printer version shown.
2-4 Printer Drivers

Printer Drivers
Printing Modes
Output Quality
High Mode (PostScript)
High Mode produces 256-level grayscale printing with 8 bits per pixel.
Text Mode (PCL/PostScript)
Text Mode performs normal quality 2-level grayscale printing.
Normal/Reverse Print Order
Some applications have a Reverse Print Order setting; if selected, the setting will do exactly as it indicates.
Duplex Mode
Stackless duplex means that the duplex mode makes unlimited 2-sided prints.
Mode Restriction: Duplex Mode cannot be used together with the manual Feed Tray or High Mode.
Offset Stacker/Stapler
Multiple sets are copied and offset from each other with or without stapling.
Mode Restriction: Job Offset or Stapling cannot be used with the Manual Feed Tray.
NOTE: When switching resolution, wait up to 5 min. for the temperature adjustment to take place.
Printer Drivers 2-5

Printer Drivers
Printing Modes
Real T ime Mode Pri n t
The print controller performs page printing and starts printing as soon as it starts receiving a print job. This
is different from document printing, where a printer starts printing only after receiving the entire print job.
Dual Access
The Dual Access function provides an efficient means for the printer to simultaneously handle different
types of printer/copier jobs. Dual Access capabilities are shown below:
• Scanning-Printing
• Printing - Copying
• Printing - Printing
• Copying- Copying
• Copying - Printing
The Electronic Recirculating Document Handler (E-RDH) allows the print engine to receive a job while it
is printing your scanned or stored documents.
The print engine controls and creates the messages on the operation panel screen. The operation panel
screen generates a Job Status screen, which is a copier type tab-based screen.
When you access printer setting values and parameters, the print controller will take over the control of the
operation panel screen.
Image Density Selection
Controlling the Print Density level provides an efficient way to save toner. You may select this function
directly from your print driver screen.
There are five distinct Print Density modes that can be used. Each mode is listed below, along with the
corresponding level of toner density used by the mode.
• Normal 100%
• Toner Save Mode 80%
• Draft Mode 60%
2-6 Printer Drivers

Printer Drivers
Tra y Selection/Paper Selection
The system selects the paper size and paper tray in the manner specified below.
When Paper Size is Not Specified
? When a print job does not specify paper size, the default paper size will be used.
When a Paper Tray is Specified
? When the print job specifies a tray, one of the following occurs:
(a) If the requested tray contains paper, the printer will use the requested tray.
(b) If the requested tray contains no paper, the printer will NOT look for another
tray that may contain the requested paper size.
NOTE: Make sure the tray you specify is supplied with the desired paper type and size.
A uto Tray Selection Mode
? If you request a paper size in the application screen, the printer will locate the paper source for
that paper size and print the job.
? If a paper size you requested in the application screen cannot be located, the system will prompt
you with a message on the control panel to request another paper size. In the event you are
prompted to request another paper size, you may do one of the following:
(a) Load the desired paper size in the manual tray or in tray 1 and continue printing.
(b) Select another paper size and print.
(c) Abort the job.
Special Paper (OHP/Thin/Thick)
? If there is no paper installed, or if the wrong size paper is installed, the system will prompt you to
install paper.
Printer Drivers 2-7

Printer Drivers
Font Selection
Standard fonts of the PostScript and PCL 5e languages are displayed on the following pages. The
PostScript fonts shown are the visual equivalent of the Adobe fonts with the same names.
A PostScript compatible file system is provided for storing downloaded fonts or other files. At this time,
PCL 5e does not support storing downloaded fonts on a hard drive.
Fonts that are downloaded with a print job are lost when the language changes or when the power is turned
off. PostScript fonts can be permanently installed on the hard drive. Refer to your software documentation
for font installation procedures.
Selecting Fonts from Application Software
Fonts can be selected through your application software after you have set up your hard disk with the
necessary printer files and font files. Refer to your application software documentation for details.
Selecting PCL 5 Fonts using Embedded Printer Commands
Some applications allow embedded commands to be entered in your file from within your document. When
an embedded printer command is entered, the printer performs a font search to match the certain font
characteristics, e.g., spacing, pitch, point size. Printer commands for PCL 5 are included in Section 5.
NOTES:
1. Temporary soft fonts that are downloaded for a specific document are deleted when the font printout is generated; and they do
not appear on the font printout.
2. Downloaded permanent soft fonts remain resident in the printer until they are replaced with other fonts or until the printer is
turned off .
3. PostScript fonts listed are the visual equivalent of Adobe font names and are not the actual Adobe fonts.
2-8 Printer Drivers

Printer Drivers
Font Characteristics
A font is described by its Symbol Set and font characteristics, such as, Typeface, Point Size, Pitch, Spacing,
Stroke Weight and Style.
Symbol Set: A Symbol Set relates to the unique set of all av ailable alphanumeric, punctuation, and special
symbols in a font. More than one Symbol Set can be used by one font, e.g., the math symbol set, legal
symbol set, and Roman-8 symbol set.
Typefaces: Times Roman abcdefABCDEF&%!Helv etica abcdefABCDEF 12345&%!
Typeface relates to the design of all the ch aracters and symbols that make up a font, including serif and
sans serif design. Times Roman displays the serif design, Helvetica displays the san serif design.
Point Size: 8 Point abcdefABCDEF12345&%! 12 Point abcdefABCDEF 12345&%!
Point size relates to font height, and is measured in points at 72 points per inch. Point size is fixed in a
bitmapped font, and variable in a scalable font.
Pitch: Courier 10 Point 12 Pitch Courier 12 Point 10 Pitch
Pitch relates to the number of characters per horizontal inch. Fonts have either fixed pitch or proportional
spacing. Proportional spacing means the number of characters per inch is variable. A 12 pitch font, for
example, prints 12 characters per horizontal inch.
Spacing: Fixed Spacing Courier 10 Proportional Spacing Times Roman 10
Spacing relates to the amount of space allotted to each character, as for [i] and [x]. In Fixed Spacing, each
character occupies either the same amount of space and is fixed. In Proportional Spacing, each character
space varies according to the width of the character and is proportional. Whether Fi xed or Proportional, the
specified amount of space allotted to characters is specified for the entire font.
Str oke W eight: Helvetica Narrow abcdefABCDEF12345&%! Helvetica Bold abcdefABCDEF12345&%!
Stroke weight relates to print thickness of each character and is measured in terms of light (as in Helvetica
Narrow), medium (as in Helvetica), and bold (as in Helvetica Bold).
Style:
Helvetica Ob lique abcdefABCDEF12345&%!
Style relates to posture (upright, italics), width (condensed, normal, expanded), and structure (outline,
solid, shadow).
Printer Drivers 2-9

Printer Drivers
PostScript Printer Language F onts
The following fonts are the visual equivalent of Adobe font names.
AvantGarde-Book ABCDEFGHIJ1234567890
AvantGarde-BookOblique ABCDEFGHIJ1234567890
AvantGarde-Demi ABCDEFGHIJ1234567890
AvantGarde-DemiOblique ABCDEFGHIJ1234567890
Bookman-Demi ABCDEFGHIJ1234567890
Bookman-DemiItalic ABCDEFGHIJ1234567890
Bookman-Light ABCDEFGHIJ1234567890
Bookman-LightItalic ABCDEFGHIJ1234567890
Courier ABCDEFGHIJ1234567890
Courier-Bold ABCDEFGHIJ1234567890
Courier-BoldOblique ABCDEFGHIJ1234567890
Courier-Oblique ABCDEFGHIJ1234567890
Helvetica ABCDEFGHIJ1234567890
Helvetica-Oblique ABCDEFGHIJ1234567890
Helvetica-Bold ABCDEFGHIJ1234567890
Helvetica-BoldOblique ABCDEFGHIJ1234567890
Helvetica-Narrow ABCDEFGHIJ1234567890
Helvetica-Narrow-Oblique ABCDEFGHIJ1234567890
Helvetica-Narrow-Bold ABCDEFGHIJ1234567890
Helvetica-Narrow-BoldOblique ABCDEFGHIJ1234567890
NewCenturySchlbk-Bold ABCDEFGHIJ1234567890
NewCenturySchlbk-BoldItalic ABCDEFGHIJ1234567890
NewCenturySchlbk-Italic ABCDEFGHIJ1234567890
NewCenturySchlbk-Roman ABCDEFGHIJ1234567890
Palatino-Bold ABCDEFGHIJ1234567890
Palatino-BoldItalic ABCDEFGHIJ1234567890
Palatino-Italic ABCDEFGHIJ1234567890
Palatino-Roman ABCDEFGHIJ1234567890
Symbol ΑΒΧ∆ΕΦΓΗΙϑ1234567890
Times-Bold ABCDEFGHIJ1234567890
Times-BoldItalic ABCDEFGHIJ1234567890
Times-Italic ABCDEFGHIJ1234567890
Times-Roman ABCDEFGHIJ1234567890
ZapfChancery-MediumItalic ABCDEFGHIJ1234567890
ZapfDingbats ✡✢✣✤✥✦✧★✩✪✑✒✓✔✕✖✗✘✙✐
2-10 Printer Drivers
Printer Drivers
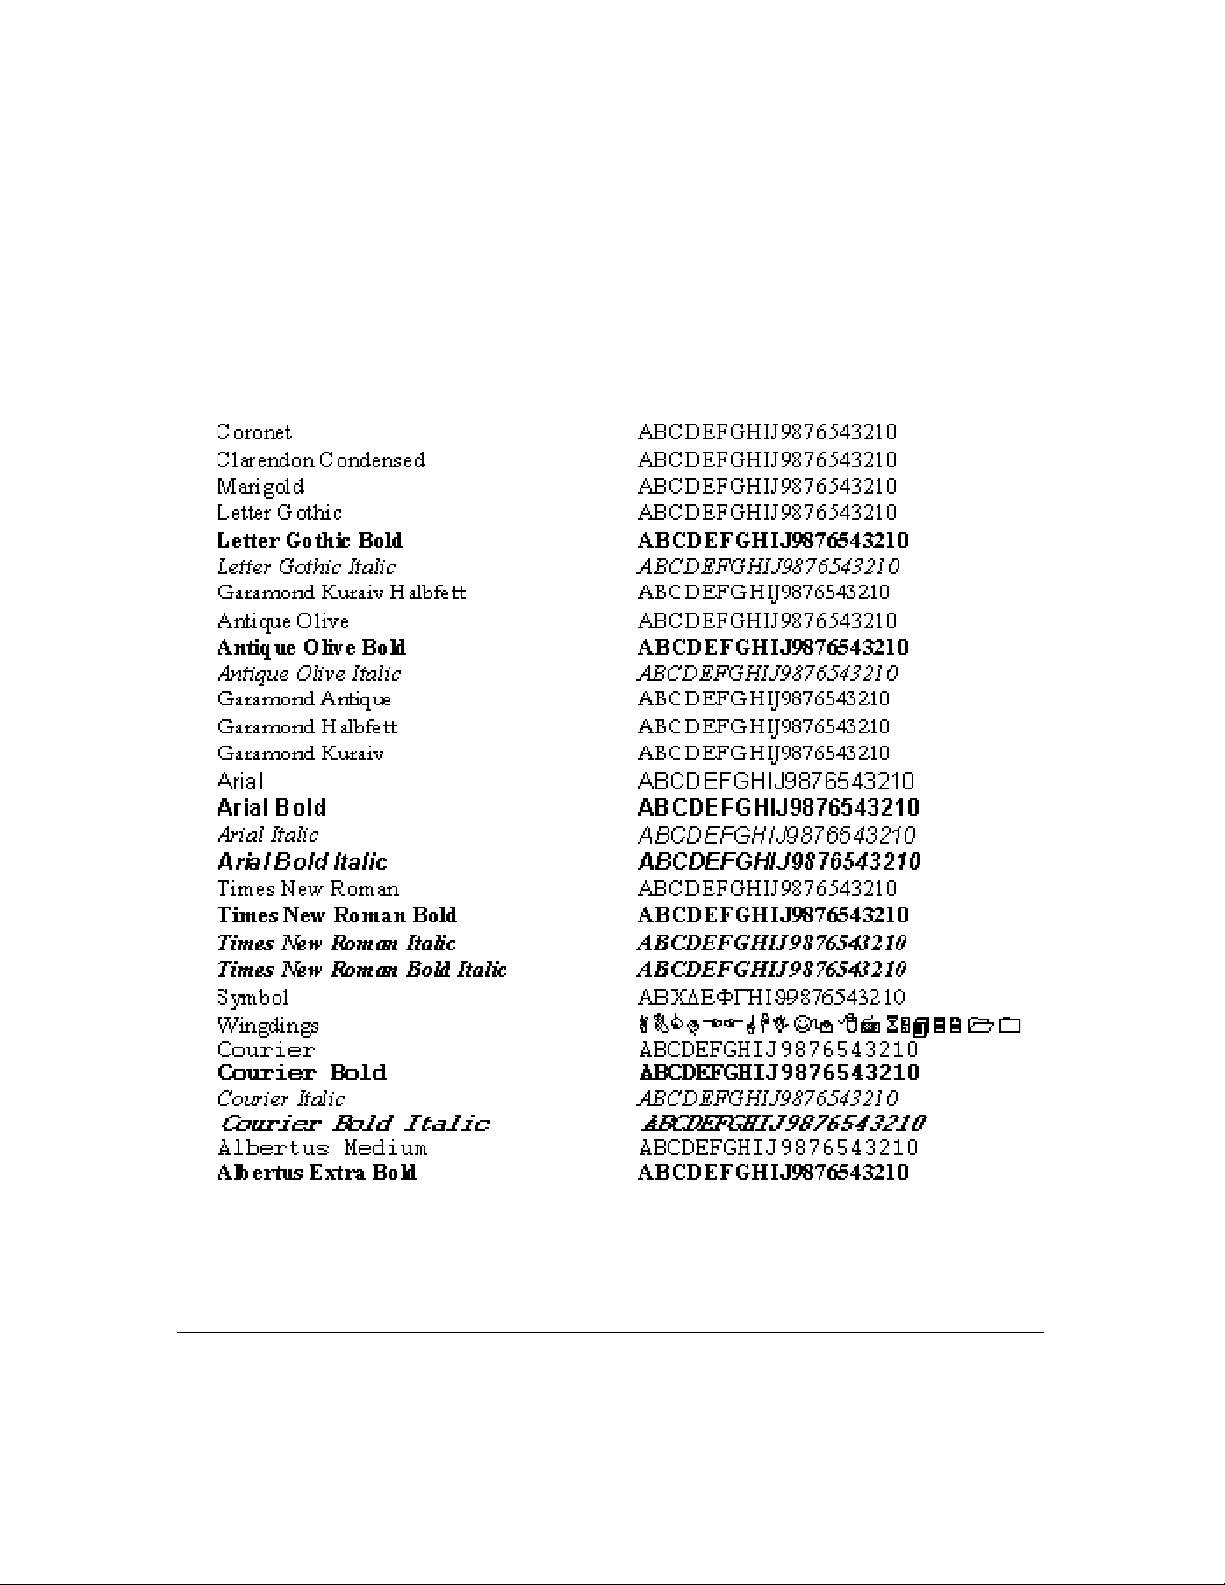
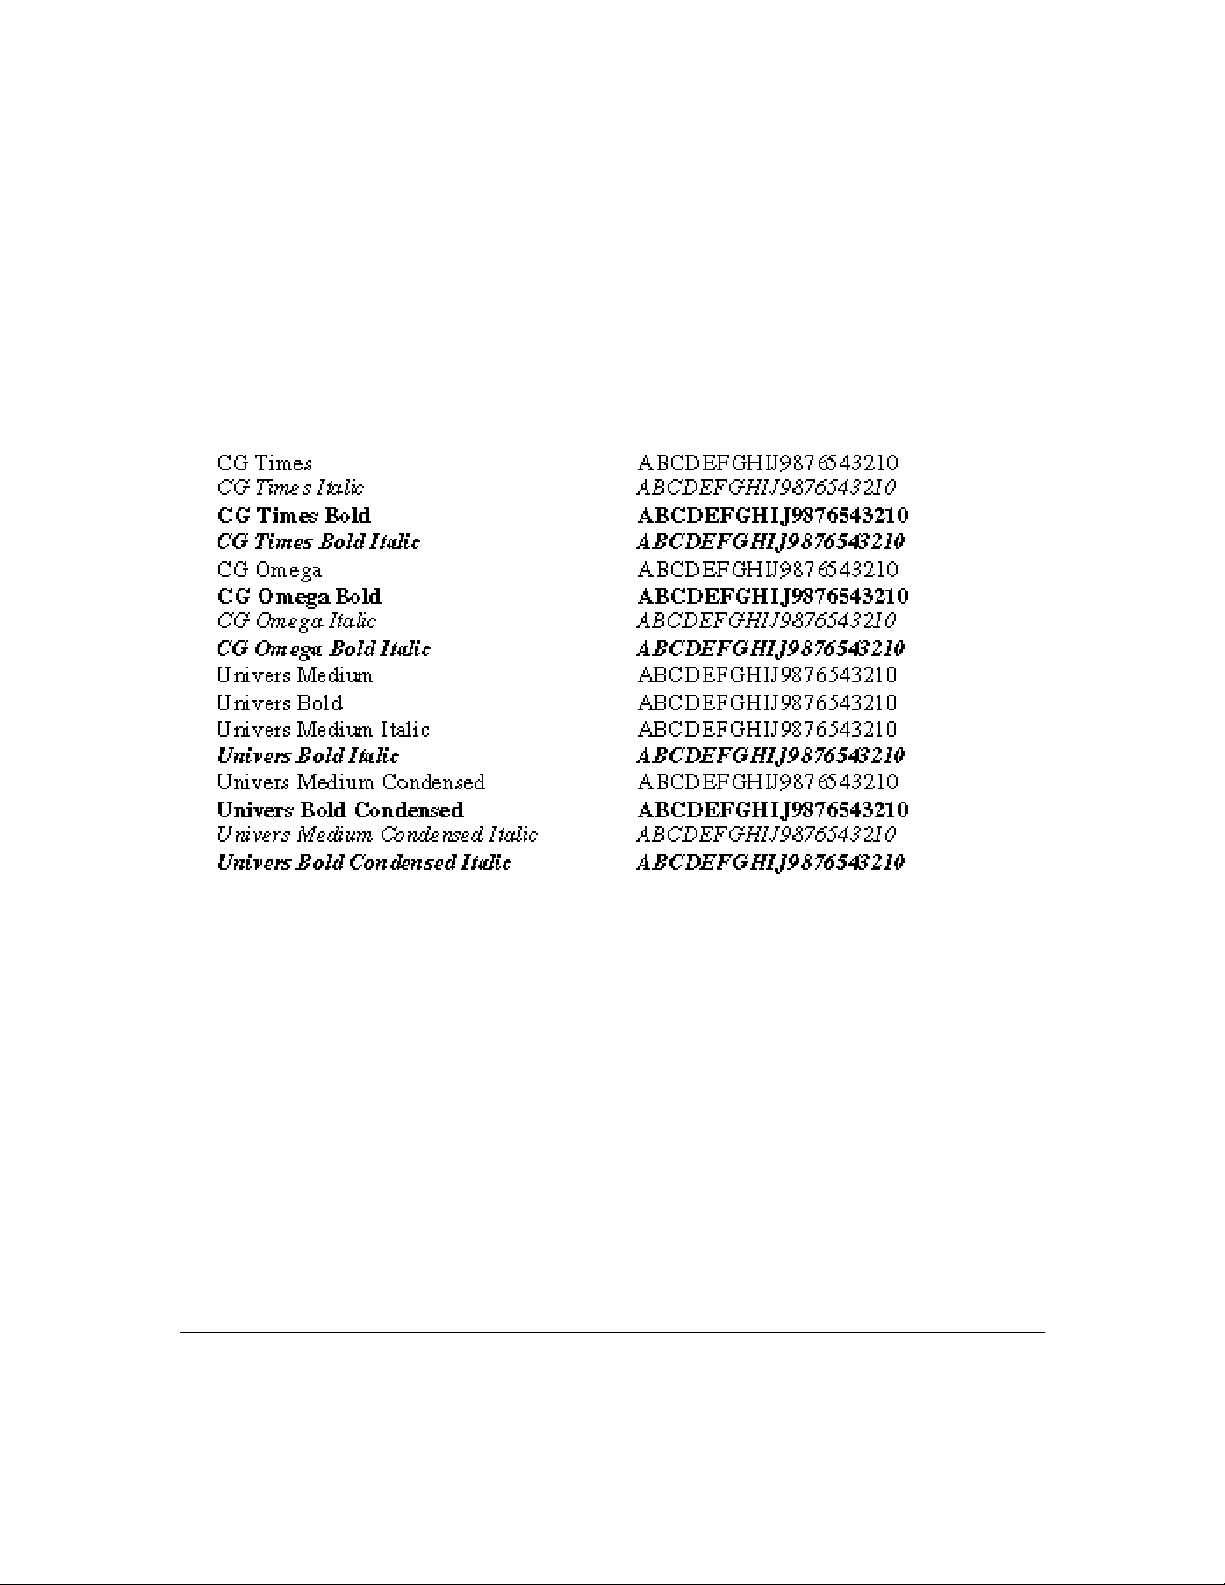
PCL Printer Language Fonts
The interpreter for the PCL language interprets the following fonts for a PCL print job.
(Continued)
Printer Drivers 2-11
Printer Drivers
PCL Printer Language Fonts
The interpreter for the PCL language interprets the following fonts for a PCL print job.
(Continued from previous page)
2-12 Printer Drivers

Section 3: Printer Driver Screens

Printer Driver Screens
Overview
This section shows the various printer driver screens you will encounter when making printing selections,
depending the printer driver installed. Samples include PostScript and PCL printer driver screens for
Windows 3.1; and PostScript and PCL printer driver screens for Windows 95.
Windows 3.1 screens are similar to the screens in Windows for Workgroups. Many Windows 95 screens are
similar to the screens in Windows NT.
When you select Print from your application screen, the following basic Windows screen displays.
Use the default settings shown on the screen or select options associated with each printing mode.
The following pages show a typical array of screens for the following printer drivers:
Windows 3.1 PS
Windows 3.1 PCL
Windows 95 PS
Windows 95 PCL
Windows NT4 PS
Windows NT4 PCL
3-2 Printer Driver Screens

PostScript Driver Screens for Windows 3.1

Printer Driver Screens
PostScript Driver Screens for Windows 3.1 Paper Source
The Print selection screen indicates the current settings for Paper Source, Paper Size and
Orientation.
Paper Source
Auto Select mode is the default setting, which means the printer will select an appropriate
tray containing the desired paper size. If you do not wish to use the Auto Select mode,
you may select a specific tray.
When a specific tray is selected, as from the list of tray options shown in this sample
screen, the selected tray will be used if it contains paper. If the specified tray does not
contain paper, the system will not use another tray, even if another tray contains the
desired paper.
Paper Size
The default Paper Size is Letter size. If a different paper size is specified, it will be used if
it is loaded in a tray.
Orientation
The default orientation is Portrait, which describes the vertical rather than horizontal
(Landscape) positioning of the page
If you wish to view or change other printing settings, click Options to display the screen
shown on the next page.
3-4 Printer Driver Screens

Printer Driver Screens
PostScript Driver Screens for Windows 3.1 Options
When Options is selected from the initial print selection screen shown on the previous page, the above
screen displays the features that allow you to control the finishing style of your print job. Features include
the following:
Offset or Staple
When printing multiple sets, the Staple mode staples each separate set.
The Offset mode keeps the sets separated without stapling them.
Print Quality
When printing image that requires higher resolution than text you may select higher resolution for
graphics and halftone images. The Text mode is the default.
Print Density
Reduce toner consumption by 20% with the Toner Saver mode or by 40% with the Draft mode.
The default mode is Normal.
Edge Smoothing
Set this mode On to enhance the image by filling in feathered edges with extra toner.
The default mode setting is Off.
Printer Driver Screens 3-5

Printer Driver Screens
PostScript Driver Screens for Windows 3.1 Advanced Options
The Advanced Options screen allows you to select the following:
Fonts
You may change the default font currently in use by clicking the arrow in the [Send to Printer as:] field to
display the list of available fonts .
Memory
Increase the amount of memory that is currently allocated for storing pages.
Graphics
Increase the current resolution setting to handle complicated text or halftone images.
Click the Resolution arrowto display the setting options. The default setting is 400 dpi.
3-6 Printer Driver Screens

Printer Driver Screens
PostScript Driver Screens for Windows 3.1 Offset Mode
From the Options screen, use the arrow under Printer features to scroll through the list of available options.
When printing multiple sets you may select the Offset mode to keep the sets separated.
1 Highlight the Offset feature.
2 In the [Setting for: Offset] field, click Offset On.
3 Then click OK.
Printer Driver Screens 3-7

Printer Driver Screens
PostScript Driver Screens for Windows 3.1 Staple Mode
From the Options screen, use the arrow under Printer features to scroll through the list of available options.
When printing multiple sets you may select the Staple mode to staple each set.
1 Highlight the Staple feature.
2 Then, select the preferred staple style under [Setting for: Staple].
• Single Portrait mode places a staple in the upper left corner of a portrait document.
• Single Landscape mode places a single staple in the upper left corner of a landscape document.
• Double Staple mode places two staples along the left edge of a portrait or landscape document.
3 When the correct setting is made, click OK.
3-8 Printer Driver Screens

Printer Driver Screens
PostScript Driver Screens for Windows 3.1 Print Quality
From the Options screen, use the arrow under Printer features to scroll through the list of available options.
When your document includes graphic or halftone images that require a higher resolution than that used
for text you may change the Print Quality setting.
Mode settings include: Text, Medium, High and Very High.
1 Highlight Print Quality to display the current setting.
2 Use the arrow to scroll through a list of mode options.
3 Select the desired Print Quality mode, then click OK..
Note: Use the Very high mode for true grayscale printing.
Printer Driver Screens 3-9

Printer Driver Screens
PostScript Driver Screens for Windows 3.1 Print Density
Print Density allows you to reduce toner consumption by using the Toner Saver mode or Draft mode.
1 From the Options screen, use the arrow under Printer features to scroll through the list of available
options, then highlight Print Density.
• Toner Saver mode reduces the amount of toner normally used by 20%.
• Draft mode reduces the amount of toner normally used by 40%.
The current Print Density setting will be displayed in the [Setting for: Print Density] field.
2 Use the arrow to scroll to the desired setting.
3 Click on the desired mode, then click OK.
3-10 Printer Driver Screens

Printer Driver Screens
PostScript Driver Screens for Windows 3.1 Paper Size
The Print screen indicates the current setting for paper size.
1 Use the Paper Size arrow to scroll through the list of options if you wish to select another paper size.
2 Double click on your selection, then click OK.
Note: If a specific paper size is selected along with a specific tray, be sure the correct paper is loaded in the
selected tray, as no other tray will be used.
Printer Driver Screens 3-11

Printer Driver Screens
PostScript Driver Screens for Windows 3.1 Resolution
The Advanced Options screen indicates the current advanced settings and the default Resolution setting of
400 dpi.
1 To change the Resolution setting, click on the arrow to display the options.
2 Double click the desired Resolution, then click OK.
3-12 Printer Driver Screens

Printer Driver Screens
PostScript Driver Screens for Windows 3.1 Edge Smoothing
Edge Smoothing
The default setting is Off. When Edge Smoothing is turned On, edges of text or objects are filled in with
extra toner and feathered edges are closed to enhance the image.
1 From the Options screen, use the arrow under Printer features to scroll through the list of available
options.
2 Click on the Edge Smoothing feature.
Notice that the default setting of Off is indicated in the [Setting for: Edge Smoothing] field.
3 To turn the setting On, click the arrow to highlight the On setting.
Other settings are: On for Text only and On for All Objects.
4. When the setting you want is indicated, click OK.
To leave the setting unchanged, click Cancel.
Printer Driver Screens 3-13

Printer Driver Screens
PostScript Driver Screens for Windows 3.1 Output Bin
Output Bin
1. From the Options screen, use the arrow under Printer features to scroll through the list of available
options.
2 Click on the Output Bin feature.
Output Bin describes which area of the finisher will be used as the output tray. This enables you to control
a special or high volume job you may want to run from one source. The current Output Bin setting is
indicated in Setting for: Output Bin. The default setting is for the middle tray.
3 To change the setting, click the arrow to view further setting options, then select another output tray.
4 When the correct setting is indicated, click OK.
To leave the setting unchanged, click Cancel.
3-14 Printer Driver Screens

Printer Driver Screens
PostScript Driver Screens for Windows 3.1 Output Order
1 From the Options screen, use the arrow under Printer features to scroll through the list of available
options.
2 Click on the Output Order feature to display the current setting in Setting for: Output Order. The default
setting is Face Up. Use the face up mode when the sequential order of your document is not required. This
mode is speedier than the face down mode. Select the face down mode when the sequential order of your
document is required.
3 When the correct setting is indicated, click OK.
To leave the setting unchanged, click Cancel.
Printer Driver Screens 3-15

PCL Driver Screens for Windows 3.1

Printer Driver Screens
PCL Driver Screens for Windows 3.1 Select Print
Select Print
When you select Print from your Windows application screen, the Windows Print screen displays the
current settings as shown above.
To change settings, click on the Setup key to display the PCL Printer Driver screen shown on the next page.
Printer Driver Screens 3-17

Printer Driver Screens
PCL Driver Screens for Windows 3.1 Print Setup
View Current Printer Settings
When Setup is selected from the Print screen (see previous page), the Print Setup screen displays the current
settings.
The current settings indicate that the Konica 7040 printer is set up on the LPT1 port with portrait orientation, letter size paper and Auto Select mode already selected. If no changes are made, your print job will be
performed according to these settings.
To view optional paper sizes, click the arrow next to paper size. (See next page.)
To leave the settings unchanged, click Cancel.
3-18 Printer Driver Screens

Printer Driver Screens
PCL Driver Screens for Windows 3.1 Print Setup
Paper Size
When you click the arrow next to paper size, optional paper sizes are listed.
If you wish to select another paper size, be sure to load that size in one of the paper trays before selecting it.
Printer Driver Screens 3-19

Printer Driver Screens
PCL Driver Screens for Windows 3.1 Print Setup
Paper T ray Source
Using Auto Select
Auto Select is the default mode for paper tray Source, which means the printer will automatically locate the
tray containing the selected paper size without your intervention. To view other tray options, click the
arrow next to the curr ent tray Source setting. Other paper trays are shown in the above screen.
Selecting A Paper T ray
If you specify a tray, that tray will be used if it contains paper. If the selected tray is empty, the printer will
not search for another tray, even if another tray contains paper.
• When the desired paper tray is indicated in the Source field, click OK.
• To see other print settings, click Options to view the screen shown on the next page.
To leave the settings unchanged, click Cancel.
3-20 Printer Driver Screens

Printer Driver Screens
PCL Driver Screens for Windows 3.1 Setup Tab
Setup Screen
The Setup tab brings you to a screen that shows the current settings for Paper Size, Paper Tr ay , Resolution
and Orientation. This sample screen indicates that your print job will be performed on letter size paper
selected by Auto Select mode with 400dpi resolution, and the paper will be output in the portrait style.
1. To change settings, click the arrow next to a current setting and highlight another setting.
2. When the setting(s) you want are indicated on the screen, click OK.
To leave the settings unchanged, click Cancel.
Printer Driver Screens 3-21

Printer Driver Screens
PCL Driver Screens for Windows 3.1 Watermarks Tab
Watermarks
The Watermarks screen allows you to select <None>, CONFIDENTIAL, COPY, or DRAFT for your
Watermark setting. You may Add a new Watermark to the list by clicking Add, and you may Edit or Delete
a highlighted Watermark by clicking Edit or Delete.
To select a Watermark you want to print out on your documents, highlight it, then click OK.
If you want to edit the Watermark before printing it, click Edit to display the screen shown on the next
page.
To leave the settings unchanged, click Cancel.
3-22 Printer Driver Screens

Printer Driver Screens
PCL Driver Screens for Windows 3.1 Edit Watermark
Edit W atermar k
The Edit screen allows you to change the Font, Size, Style and Color of the highlighted text.
Other settings allow you to adjust the Saturation and Intensity of the color.
You may also change the angle of the Watermark by clicking the left or right arrow and selecting the
desired value (+) or (-) for the angle. The angle in the example shown above is 35°, which is a (+) value.
When all settings changes are made, click OK.
To leave the settings unchanged, click Cancel.
Printer Driver Screens 3-23

Printer Driver Screens
PCL Driver Screens for Windows 3.1 Add Watermark
Add Watermark
When you click Add on the W atermarks screen, the Add W aterma rk screen displays, as shown above.
In the Text field, enter the text for a new watermark and select other attributes as desired, such as Font,
Size, Style, etc.
The text for the new watermark will appear in the box on the right, as shown in the example above.
When settings are completed, click OK.
3-24 Printer Driver Screens

Printer Driver Screens
PCL Driver Screens for Windows 3.1 Fonts Tab
Fonts Settings
The Fonts tab displays a screen indicating the current font substitution method, along with three other
options.
The default setting is Auto Match, which means TrueType fonts will be replaced by exact match built-in
fonts that usually print faster. Thus, when jobs are output from different printers, the built-in exact match
fonts will look identical.
If you wish to edit the Fonts Substitution Table select Edit the Table on the above screen and follow
instructions on the next page.
Printer Driver Screens 3-25

Printer Driver Screens
PCL Driver Screens for Windows 3.1 Font Substitutions Table
Font Substitutions T a ble
When you click Edit the Table on the previous screen, a list of True Type fonts displays on the screen along
with the printer's method of using each font.
The [Printer font for: Algerian] field indicates that the Algerian host font is downloaded to the printer .
Use the arrows to scroll through the font list to see how each font is currently specified, i.e., as a downloaded font or as a built in printer font.
When the selection you want is indicated, click OK.
If no changes are required, click Cancel.
3-26 Printer Driver Screens

Printer Driver Screens
PCL Driver Screens for Windows 3.1 Fonts Substitution Table
Font Substitutions T a ble
1. Highlight the desired font.
In this screen, Courier New is highlighted.
2. Use the arrow in the [Printer font for: ] field and scroll down to the desired setting.
In this sample screen, the [Printer font for: Courier New] field indicates that Courier is selected as the builtin auto-match printer font.
3. When the setting change is made, click OK.
To leave the setting unchanged, click Cancel.
Printer Driver Screens 3-27

Printer Driver Screens
PCL Driver Screens for Windows 3.1 Job Tab
Job Settings
The current Job settings indicate that the Duplex Mode, Wait Mode and Special Modes are Off.
To view or change these settings, click the arrow next to the setting to display option settings, then click
OK.
To view or change Duplex Mode settings, see next page.
3-28 Printer Driver Screens

Printer Driver Screens
PCL Driver Screens for Windows 3.1 Job - Duplex Mode
Duplex Mode
1. When you click the arrow next to Duplex Mode, option settings are displayed.
• Select Short Edge Binding to bind the document along the short edge (Landscape orientation).
• Select Long Edge Binding to bind the document along the long edge (Portrait orientation).
2. When the correct setting for binding style is indicated in the Duplex Mode field, click OK.
To leave the settings unchanged, click Cancel.
Printer Driver Screens 3-29

Printer Driver Screens
PCL Driver Screens for Windows 3.1 Job - Wait Mode
Wait Mode
From the Job tab screen, click the arrow next to the Wait Mode field.
Select Wait On to be prompted to install special paper, such as OHP, Thin stock or Thick stock before the
printing job is started. Or, select Wait with Proof to be prompted to print a proof set before printing
multiple sets.
When the setting you want is indicated in the Wait Mode field, click OK.
To leave the settings unchanged, click Cancel.
3-30 Printer Driver Screens

Printer Driver Screens
PCL Driver Screens for Windows 3.1 Job - Special Modes
Special Modes
From the Job tab screen, click the arrow next to the Special Modes field to display the Special Modes
options.
Select 2-in-1 to print two pages (images) on one standard sheet, or, select Booklet to print four
pages (images) on one standard sheet. When the setting you want is indicated in the Special Modes
field, click OK.
To leave the settings unchanged, click cancel.
Printer Driver Screens 3-31

Printer Driver Screens
PCL Driver Screens for Windows 3.1 Covers Tab
Front and Back Covers
The Covers tab displays the above screen that shows the default settings for Front Cover, Front Cover Tray,
Back Cover mode and Back Cover Tray.
To view or change these settings, click the arrow next to one of the settings.
Options for the Front Cover mode are shown on the nex t page.
To leave the settings unchanged, click Cancel.
3-32 Printer Driver Screens

Printer Driver Screens
PCL Driver Screens for Windows 3.1 Covers
Front Cover Mode
The Front Cover mode is Off by default. To view options, click the arrow next to the Front Cover field.
Select Printed to print on the Front Cover sheets before inserting them into your document.
Select Blank to insert Front Cover sheets into your document without printing them first.
Front Cover sheets do not have to be plain and can be colored or preprinted (as letterhead).
In the Blank mode, preprinted Front Cover sheets will be inserted without any changes.
In the Printed mode, you may print directly on the preprinted Front Cover sheets.
To leave the settings unchanged, click Cancel.
Printer Driver Screens 3-33

Printer Driver Screens
PCL Driver Screens for Windows 3.1 Covers
Front Cover Tray
Click on the arrow next to the Front Cover Tray field to view tray options.
Highlight the tray you want to use for the Front Covers, then click OK. In this example, Tray 1 is selected.
If you are using colored or preprinted paper for the Front Covers, be sure to load the paper in the tray
selected, otherwise the paper currently loaded will be used.
Remember that Thick Paper must be fed manually through the Bypass tray.
To leave the settings unchanged, click on Cancel.

Printer Driver Screens
PCL Driver Screens for Windows 3.1 Covers
Back Cover Mode
The Back Cover mode is Off by default. To view options, click the arrow next to the Back Cover field.
• Select Printed to print on the Back Cover sheets before inserting them into your document.
(Even colored or preprinted Letterhead sheets will be printed in this mode.)
• Select Blank to insert the Back Cover sheets into your document without printing them first.
Sheets for Back Cover insertion can be plain, colored or preprinted (as letterhead).
To leave the settings unchanged, click Cancel.
Printer Driver Screens 3-35

Printer Driver Screens
PCL Driver Screens for Windows 3.1 Covers
Back Cover Tray
1. Click on the arrow next to the Back Cover Tray field to view tray options.
2. Highlight the tray you want to use for Back Covers, then click OK.
In this example, Tray 2 is selected.
If you are using colored or preprinted paper for the Back Covers, be sure to load the paper in the tray
selected, otherwise the paper currently loaded will be used. Remember to manually feed Thick Paper
through the Bypass tray.
To leave the setting unchanged, click Cancel.
3-36 Printer Driver Screens

Printer Driver Screens
PCL Driver Screens for Windows 3.1 Media Tab
Media Settings
When you click on the Media tab, current settings are displayed for Print Density and Media Type.
This screen shows that Normal is selected for Print Density and Plain Paper is selected for Media Type.
To change either of these settings, click the arrow next to the current setting to display options, highlight the
setting you want, then click OK (see next page).
To leave the settings unchanged, click Cancel.
Printer Driver Screens 3-37

Printer Driver Screens
PCL Driver Screens for Windows 3.1 Media Settings
Print Density
1. Click the arrow next to the Print Density setting to display density options.
• Select the Toner Save mode to use only 80% of the toner normally used.
• Select Draft mode to use only 60% of the toner normally used.
2. When the setting you want is displayed, click OK.
To leave the settings unchanged, click Cancel
3-38 Printer Driver Screens

Printer Driver Screens
PCL Driver Screens for Windows 3.1 Media Type
Media Type
1. Click on the arrow next to the Media Type setting to display a list of options, including OHP Transpar-
ency, Thin Paper and Thick Paper.
2. Highlight the desired setting.
This screen shows that OHP Transparency is highlighted.
3. Click OK to complete the selection.
Keep in mind that special stock must be fed manually through the Bypass.
To leave the settings unchanged, click Cancel.
Printer Driver Screens 3-39

Printer Driver Screens
PCL Driver Screens for Windows 3.1 Finishing Tab
Finishing Settings
The Finishing screen shows the default settings for Collate, Stapling and Output Bin.
The default setting for Stapling is Off. Click the arrow in the Stapling field to display optional Stapling
settings. (See next page.)
To leave the settings unchanged, click Cancel.
3-40 Printer Driver Screens

Printer Driver Screens
PCL Driver Screens for Windows 3.1 Finishing
Stapling
1. Click the arrow in the Stapling field to display stapling options.
• Single stapling inserts one staple in the upper left corner of your document.
• Double Top stapling inserts two staples across the top edge of your document.
• Double Side stapling inserts two staples along the left edge of your document.
2. Highlight the desired Stapling option, then click OK.
To leave the settings unchanged, click Cancel.
Printer Driver Screens 3-41

Printer Driver Screens
PCL Driver Screens for Windows 3.1 Options (Device)
Device Settings
The Options screen shows the default settings for Finisher, Drawer Base and Memory installed.
To view or change the current Drawer Base setting, click on the arrow in the Drawer Base field (see next
page.)
To leave the settings unchanged, click Cancel.
3-42 Printer Driver Screens

Printer Driver Screens
PCL Driver Screens for Windows 3.1 Drawer Base Setting
Drawer Base Setting
The current Drawer Base setting is displayed along with optional settings.
1. To change the setting, highlight the desired setting.
2. When the desired setting is indicated, click OK.
To leave the setting unchanged, click Cancel.
Printer Driver Screens 3-43

PostScript Driver Screens for Windows 95

Printer Driver Screens
PostScript Dri ver Screens for Windows 95 General Tab
General Screen
The General tab brings you to the above basic screen that identifies the name of your printing device.
Click on Browse to review your printing environment and get questions answered up front. Or, click Print
Test Page to print a test page.
Type a key word in the Comment field and click OK. The system will search for the topic and guide you
further. Click on the Separator page arrow to display option settings.
The following pages show the screens for each tab selection.
3-44 Printer Driver Screens

Printer Driver Screens
PostScript Driver Screens for Windows 95 Graphics Tab
Resolution & Halftoning
The Graphics tab brings you to a screen that displays default settings for Resolution & Halftoning.
The default setting for Resolution is 400 dpi with no special Halftoning selected.
If desired, select 600 dpi Resolution or a Halftoning special mode, then click OK.
To leave the setting unchanged and exit from the screen, click Cancel.
To restore the default settings, click Restore Defaults.
Printer Driver Screens 3-45

Printer Driver Screens
PostScript Driver Screens for Windows 95 Sharing Tab
Sharing On A Network
The Sharing tab displays a screen that shows whether your printer is being shared on a network.
The Not Shared status is indicated in the above screen.
If your printer is being shared, details will be indicated in the [Shared As:] field.
3-46 Printer Driver Screens

Printer Driver Screens
PostScript Dri ver Screens for Windows 95 Fonts Tab
Fonts Screen
The Fonts screen displays the current Font selection settings.
The default setting is: Send True Type fonts to printer according to the font Substitution Table.
Keep in mind that built-in printer fonts usually print faster than downloaded fonts.
To edit the tabl e, click Edit the Table and follow instructions on the next page.
Printer Driver Screens 3-47

Printer Driver Screens
PostScript Driver Screens for Windows 95 Font Substitutions Table
Font Substitutions T a ble
The Font Substitutions Table displays w hen you select Edit the Table from the Fonts screen shown on the
previous page.
This Table lets you specify host fonts you want to be replaced with built-in printer fonts. Keep in mind that
printing is faster with built-in fonts.
In this sample screen, the Arial font is downloaded for the Helvetica font.
1 Use the arrows to scroll through the font list to see how they are currently specified.
2 Highlight the font substitution you want, then click OK.
To leave the setting unchanged, click Cancel.
3-48 Printer Driver Screens

Printer Driver Screens
PostScript Driver Screens for Windows 95 Details Tab - Printer Port
Printer Port
The Details tab displays a screen indicating the current print port setting. The default setting is LPT1.
1 Click on the arrow next to the current setting to display the optional port settings (see next page).
2 When the port setting you require is indicated, click OK.
This screen also allows you to change the Capture Printer Port. . . Timeout settings used for capturing files
for printing. You may need to adjust this timeout setting when printing very large files, but you will not
need to change this setting to print ordinary jobs.
Printer Driver Screens 3-49

Printer Driver Screens
PostScript Driver Screens for Windows 95 Details Tab - Printer Port
Printer Port Setting Options
The default printer port setting is LPT1.
1 Click the arrow next to the current setting to display port options.
2 Highlight the desired printer port setting, then click OK.
To leave the setting unchanged, click Cancel.
3-50 Printer Driver Screens

Printer Driver Screens
PostScript Dri ver Screens for Windows 95 Details Tab
Spool Settings
When you click Spool Settings from the Details screen, the Spool Setting screen appears, as shown above.
The default Spool setting is Start printing after first page is spooled. This setting enables printing to start
after the first page is spooled so that the print job finishes faster.
You may change this setting to Start printing after the last page is spooled, or you may Print directly to the
printer.
1 Highlight the desired Spool setting.
2 Click OK.
To leave the setting unchanged and exit from the screen, click Cancel.
To restore the default settings before exiting from this screen, click on the Restore Defaults button.
Printer Driver Screens 3-51

Printer Driver Screens
PostScript Driver Screens for Windows 95 Device Options Tab
Device Options
The Device Options screen displays the current settings for Printer features and Installable options.
1 To view setting options, click the arrow next to Printer features or Installable options.
2 Highlight the desired setting, then click OK.
Refer to the next several pages for screen details of all Printer features and Installable options.
To exit from the screen without making changes, click Cancel.
3-52 Printer Driver Screens

Printer Driver Screens
PostScript Driver Screens for Windows 95 Device Options Tab
Printer Features - Print Quality
The default setting for Print Quality is Text. To change the default setting:
1 Use the arrow in the [Change setting for: Print Quality] field to view options.
2 Highlight the desired mode, then click OK.
• Select High mode to print image that requires finer resolution.
To leave settings unchanged and exit from the screen, click Cancel.
Printer Driver Screens 3-53

Printer Driver Screens
PostScript Driver Screens for Windows 95 Device Options Tab
Printer Features - Edge Smoothing
The default setting for Edge Smoothing is Off. When Edge Smoothing On, feathered edges are filled in
with extra toner to make the printed image clearer.
To change the default setting and turn Edge Smoothing ON:
1 Use the arrow in the [Change setting for: Edge Smoothing] field to view options.
2 Highlight On, then click OK.
To leave the setting unchanged and exit from the screen, click Cancel.
3-54 Printer Driver Screens

Printer Driver Screens
PostScript Driver Screens for Windows 95 Device Options Tab
Printer Features - Print Density
The default setting for Print Density is Normal. To change the default setting:
1 Use the arrow in the [Change setting for: Print Density] field to view options.
2 Highlight the desired option, such as, Toner Save mode or Draft mode, then click OK.
• Toner Save uses 80% of the toner amount used in Normal mode.
• Draft mode uses 60% of the toner amount used in Normal mode.
To leave the setting unchanged and exit from the screen, click Cancel.
Printer Driver Screens 3-55

Printer Driver Screens
PostScript Driver Screens for Windows 95 Device Options Tab
Printer Features - Job Offset
Job Offset mode delivers multiple printed set to the finisher with sets offset from one another.
The default setting for Job Offset is Off. To change the default setting and turn Job Offset ON:
1 Use the arrow in the [Change setting for: Job Offset] field to view options.
2 Highlight On, then click OK.
To leave the setting unchanged and exit from the screen, click Cancel.
3-56 Printer Driver Screens

Printer Driver Screens
PostScript Driver Screens for Windows 95 Device Options Tab
Printer Features - Collate
The Collate mode allows you to Sort together multiple copies of the original set or Group together
multiple copies of each original page.
The default setting for Collate is Sort. To change the default setting:
1 Use the arrow in the [Change setting for: Collate] field to view options.
2 Highlight Group, then click OK.
To leave the setting unchanged and exit from the screen, click Cancel.
Printer Driver Screens 3-57

Printer Driver Screens
PostScript Driver Screens for Windows 95 Device Options Tab
Printer Features - Special Modes
The default setting for Special Modes is Off. To change the default setting:
1 Use the arrow in the [Change setting for: Special Modes] field to view options.
2 Highlight another setting, then click OK.
• Select 2-in-1 mode to print two pages (images) on one standard size sheet.
• Select the Booklet mode to print four pages (images) on one standard size sheet.
To leave the setting unchanged and exit from the screen, click Cancel.
3-58 Printer Driver Screens

Printer Driver Screens
PostScript Driver Screens for Windows 95 Device Options Tab
Printer Features - Stapling
The default setting for Stapling is Off. To change the default setting:
1 Use the arrow in the [Change setting for: Stapling] field to view options.
2 Highlight another setting, then click OK.
Select Single or Double stapling on Portrait or Landscape orientation, as desired.
To leave the setting unchanged and exit the screen, click Cancel.
Printer Driver Screens 3-59

Printer Driver Screens
PostScript Driver Screens for Windows 95 Device Options Tab
Printer Features - Wait Mode
The default setting for Wait Mode is Off. To change the default setting:
1 Use the arrow in the [Change setting for: Wait Mode] field to view options.
2 Select the desired setting, then click OK.
• Wait means you will be prompted to install special paper, e.g., OHP, Thin or Thick stock.
• Wait with Proof means that you will be prompted to print a proof set before printing multiple sets.
To leave the setting unchanged and exit from the screen, click Cancel.
3-60 Printer Driver Screens

Printer Driver Screens
PostScript Driver Screens for Windows 95 Device Options Tab
Printer Features - Front Cover
The default setting for Front Cover is Off. To change the default setting:
1 Use the arrow in the [Change setting for: Front Cover] field to view options.
2 Highlight On, then click OK.
• Printed means that the cover sheet will be printed prior to being inserted.
• Blank means that a blank cover sheet will be inserted, i.e., without being copied.
To leave the setting unchanged and exit from the screen, click Cancel.
Printer Driver Screens 3-61

Printer Driver Screens
PostScript Driver Screens for Windows 95 Device Options Tab
Printer Features - Front Cover Tray
The default setting for Front Cover Tray is None. To change the default setting:
1 Use the arrow in the [Change setting for: Front Cover Tray] field to view options.
2 Highlight another setting, then click OK.
• Manual feed enables you to stack 20 lb bond paper in the bypass tray for front cover insertion.
• Manual Feed (Thick) enables you to manually feed up to 32 lb bond covers from the bypass tray.
• Tray 1 enables you to feed 20 lb paper from Tray 1 for front cover insertion.
To leave the setting unchanged and exit from the screen, click Cancel.
3-62 Printer Driver Screens

Printer Driver Screens
PostScript Driver Screens for Windows 95 Device Options Tab
Printer Features - Back Cover
The default setting for Back Cover is Off. To change the default setting:
1 Use the arrow in the [Change setting for: Back Cover] field to view options.
2 Highlight On, then click OK.
• Printed means that back covers will be copied prior to being inserted.
• Blank means that back covers will be inserted as blank sheets, i.e., without being copied.
To leave the setting unchanged, click Cancel.
Printer Driver Screens 3-63

Printer Driver Screens
PostScript Driver Screens for Windows 95 Device Options Tab
Printer Features - Back Cover Tray
The default setting for Back Cover Tray is Off. To change the default setting:
1 Use the arrow in the [Change setting for: Back Cover Tray] field to view options.
2 Highlight another setting, then click OK.
• Manual Feed enables you to stack 20 lb bond paper in the bypass tray for back cover insertion.
• Manual Feed (Thick) enables you to manually feed up to 32 lb bond back covers from the bypass.
• Tray 1 enables you to feed 20 lb paper from Tray 1 for ba ck cover insertion.
To leave the setting unchanged and exit from the screen, click Cancel.
3-64 Printer Driver Screens

Printer Driver Screens
PostScript Driver Screens for Windows 95 Device Options Tab
Printer Features - Output Order
The default setting for Output Order is Face Down. To change the default setting:
1 Use the arrow in the [Change setting for: Output Order] field to view options.
2 Highlight Face Up, then click OK.
• Use Face Down to output the job face down and in proper order.
• Use Face Up to output the job face up without sequential order.
To leave the setting unchanged and exit from the screen, click Cancel.
Printer Driver Screens 3-65

Printer Driver Screens
PostScript Driver Screens for Windows 95 Device Options Tab
Installable Options - Drawer Base
The Device Options screen displays a list of Installable options. When Drawer Base is highlight in the
Installable options field, the current setting displays. This screen shows that a Drawer Base is Not Installed.
1 Click the arrow in the [Change Setting for: Drawer Base] field to view option settings.
2 Highlight DB-208, DB-608, or DB-208A, as desired, then click OK.
To leave the setting unchanged and exit from the screen, click Cancel.
To resume the default setting, click Restore Defaults.
Note: Refer to the main body User's Manual for Drawer Base specifications.
3-66 Printer Driver Screens

Printer Driver Screens
PostScript Driver Screens for Windows 95 Device Options Tab
Installable Options - Finisher
The Device Options screen displays a list of Installable options. When Finisher Installed is highlighted in
the Installable options field, the current setting displays. This screen shows that the FS-105 finisher is
installed.
1 Click the arrow in the [Change Setting for: Finisher Installed] field to view the option settings.
2 Highlight the desired setting, then click OK.
To leave the setting unchanged and exit from the screen, click Cancel.
To resume the default setting, click Restore Defaults.
Printer Driver Screens 3-67

Printer Driver Screens
PostScript Driver Screens for Windows 95 Device Options Tab
Installable Options - VMOption (Virtual Memory)
The Device Options screen displays a list of Installable options. When VMOption is highlighted in the
Installable options field, the current setting displays. This screen shows that 16 MB RAM is installed.
1 Click the arrow in the [Change setting for: VMOption] field to view option settings.
2 Highlight 32 MB, 48 MB or 64 MB, as desired, then click OK.
To leave the setting unchanged and exit from the screen, click Cancel.
To resume the default settings, click Restore Defaults.
3-68 Printer Driver Screens

Printer Driver Screens
PostScript Driver Screens for Windows 95 Paper Tab
Paper Size
When you click the Paper tab, the above screen displays the current settings for Paper Size , Layout,
Orientation, Paper Source, and a setting for the number of Copies.
The default Paper Size setting is Letter.
1 To change the setting, highlight the desired paper size.
2 Click OK.
To leave the setting unchanged, click Cancel.
To resume the default setting, click Restore Defaults.
To view other Paper settings, click on More Options and refer to the following pages.
Printer Driver Screens 3-69

Printer Driver Screens
PostScript Driver Screens for Windows 95 Paper Tab
Paper Source
The default setting for Paper Source is AutoSelect Tray, which means the printer will use the appropriate
tray for the selected paper size. I you wish to leave the current setting unchanged, click Cancel. If you wish
to specify a paper tray, keep in mind that the system will look for the selected paper size in that tray but it
will not look for the paper in another tray, even if another tray contains that paper size.
1 To specify a tray, click the arrow in the [Paper source] field to view setting options.
2 Highlight a specific tray source, as desired, then click OK.
Note: Trays indicated by N are unavailable due to a conflict with another setting. If you select an unavailable tray, a dialog box will display to describe the conflict and provide you with an opportunity to change
the incompatible setting.
3-70 Printer Driver Screens
 Loading...