

Page 1

eCopy ShareScan® OP
Version 4.0
Installation and Setup Guide
for Konica Minolta devices
Part Number: 73-00147 (6/2006)
Page 2

Licensing, Copyright, and Trademark Information
The information in this document is subject to change and does not represent a commitment on
the part of eCopy, Inc. The software described in this document is furnished under a license
agreement. The software may be used or copied only in accordance with the terms of the
agreement. It is against the law to copy the software on any medium except as specified in the
license agreement. No part of this document may be reproduced, transmitted in any form or by
any means, electronic or mechanical, including photocopying, recording, or information storage
and retrieval systems, or translated into any language for any purpose other than the purchaser’s
personal use, without the written permission of eCopy, Inc.
© 2004 - 2006 eCopy, Inc.
The eCopy logo, eCopyFax, the Simplify logo, the MailRoom logo, eCopy ShareScan, eCopy
ShareScan OP, eCopy ScanStation, eCopy ScanStation OP, eCopy Desktop, eCopy Quick Connect,
eCopy Xpert Compression, UniDoc, SpeedFax, and SpeedPrint are trademarks of eCopy, Inc.
ShareScan, Simplify, and MailRoom are registered trademarks of eCopy, Inc.
Captaris and RightFax are trademarks of Captaris, Inc.
IBM, Lotus, and Lotus Notes are trademarks and/or registered trademarks of Lotus Development
Corporation and/or IBM Corporation in the United States, other countries or both.
Intel and Pentium are registered trademarks of Intel Corporation.
Microsoft, Windows, Windows NT, Outlook, and MS-DOS are registered trademarks and
Windows Server is a trademark of Microsoft Corporation in the USA and in other countries.
Part of the software embedded in this product is gSOAP software. Portions created by gSOAP are
Copyright (C) 2001-2004 Robert A. van Engelen, Genivia inc. All Rights Reserved.
The software in this product was in part provided by Genivia Inc and any express or implied
warranties, including, but not limited to, the implied warranties of merchantability and fitness for
a particular purpose are disclaimed. in no event shall the author be liable for any direct, indirect,
incidental, special, exemplary, or consequential damages (including, but not limited to,
procurement of substitute goods or services; loss of use, data, or profits; or business interruption)
however caused and on any theory of liability, whether in contract, strict liability, or tort
(including negligence or otherwise) arising in any way out of the use of this software, even if
advised of the possibility of such damage.
All other terms and products are trademarks or registered trademarks of their respective owners
and are hereby acknowledged.
Page 3

Table of Contents
Getting Started . . . . . . . . . . . . . . . . . . . . . . . . . . . . . . . . . . . . . . . . 1
About this guide . . . . . . . . . . . . . . . . . . . . . . . . . . . . . . . . . . . . . . . . . . . . . . . . . . . . . . . . . . . . . . . . . . . 1
Further information . . . . . . . . . . . . . . . . . . . . . . . . . . . . . . . . . . . . . . . . . . . . . . . . . . . . . . . . . . . . . . . . 1
Technical support . . . . . . . . . . . . . . . . . . . . . . . . . . . . . . . . . . . . . . . . . . . . . . . . . . . . . . . . . . . . . . . . . . 2
What’s new in ShareScan OP v4.0 . . . . . . . . . . . . . . . . . . . . . . . . . . . . . . . . . . . . . . . . . . . . . . . . . . . .3
Things to know if you are using ShareScan OP v3.x add-on connectors . . . . . . . . . . . . . . . . . . . . . . . . . . 7
Quick Start: Installing and setting up eCopy ShareScan OP . . . 11
Product overview . . . . . . . . . . . . . . . . . . . . . . . . . . . . . . . . . . . . . . . . . . . . . . . . . . . . . . . . . . . . . . . . .11
Installation overview . . . . . . . . . . . . . . . . . . . . . . . . . . . . . . . . . . . . . . . . . . . . . . . . . . . . . . . . . . . . . .12
Installing a TWAIN driver . . . . . . . . . . . . . . . . . . . . . . . . . . . . . . . . . . . . . . . . . . . . . . . . . . . . . . . . . .13
Installing the Konica Minolta TWAIN driver . . . . . . . . . . . . . . . . . . . . . . . . . . . . . . . . . . . . . . . . . . . . . . . . 13
Installing the UPDD driver . . . . . . . . . . . . . . . . . . . . . . . . . . . . . . . . . . . . . . . . . . . . . . . . . . . . . . . . .14
Configuring the touch screen . . . . . . . . . . . . . . . . . . . . . . . . . . . . . . . . . . . . . . . . . . . . . . . . . . . . . . . . . . . . . 15
Installing eCopy ShareScan OP . . . . . . . . . . . . . . . . . . . . . . . . . . . . . . . . . . . . . . . . . . . . . . . . . . . . . .16
Licensing scanning devices . . . . . . . . . . . . . . . . . . . . . . . . . . . . . . . . . . . . . . . . . . . . . . . . . . . . . . . . .18
Configuring and activating connector profiles . . . . . . . . . . . . . . . . . . . . . . . . . . . . . . . . . . . . . . . . .22
Starting the ScanStation OP client . . . . . . . . . . . . . . . . . . . . . . . . . . . . . . . . . . . . . . . . . . . . . . . . . .34
What’s next? . . . . . . . . . . . . . . . . . . . . . . . . . . . . . . . . . . . . . . . . . . . . . . . . . . . . . . . . . . . . . . . . . . . . . 38
Quick Start: Setting up MFP devices to use with Send to eCopy 39
Overview . . . . . . . . . . . . . . . . . . . . . . . . . . . . . . . . . . . . . . . . . . . . . . . . . . . . . . . . . . . . . . . . . . . . . . . .39
Translation Convention . . . . . . . . . . . . . . . . . . . . . . . . . . . . . . . . . . . . . . . . . . . . . . . . . . . . . . . . . . . . . . . . . . 39
Creating a network shared folder . . . . . . . . . . . . . . . . . . . . . . . . . . . . . . . . . . . . . . . . . . . . . . . . . . . .39
Supported scan settings . . . . . . . . . . . . . . . . . . . . . . . . . . . . . . . . . . . . . . . . . . . . . . . . . . . . . . . . . . . .40
Configuring a Konica Minolta MFP . . . . . . . . . . . . . . . . . . . . . . . . . . . . . . . . . . . . . . . . . . . . . . . . . .40
Configuring Send to eCopy . . . . . . . . . . . . . . . . . . . . . . . . . . . . . . . . . . . . . . . . . . . . . . . . . . . . . . . . .42
Sending to the scan destination . . . . . . . . . . . . . . . . . . . . . . . . . . . . . . . . . . . . . . . . . . . . . . . . . . . . . . . . . . . 43
Using scanned documents with the ScanStation client . . . . . . . . . . . . . . . . . . . . . . . . . . . . . . . . . 44
Page 4

iv | Table of Contents
Reference: Configuring the system . . . . . . . . . . . . . . . . . . . . . . . . 45
Overview . . . . . . . . . . . . . . . . . . . . . . . . . . . . . . . . . . . . . . . . . . . . . . . . . . . . . . . . . . . . . . . . . . . . . . . . 45
Starting and stopping the Services Manager . . . . . . . . . . . . . . . . . . . . . . . . . . . . . . . . . . . . . . . . . . 46
Configuring system properties . . . . . . . . . . . . . . . . . . . . . . . . . . . . . . . . . . . . . . . . . . . . . . . . . . . . . . 46
Specifying general properties . . . . . . . . . . . . . . . . . . . . . . . . . . . . . . . . . . . . . . . . . . . . . . . . . . . . . . . . . . . . .46
Specifying advanced properties . . . . . . . . . . . . . . . . . . . . . . . . . . . . . . . . . . . . . . . . . . . . . . . . . . . . . . . . . . .47
Configuring keyboard settings . . . . . . . . . . . . . . . . . . . . . . . . . . . . . . . . . . . . . . . . . . . . . . . . . . . . . . . . . . . .48
Configuring Session Logon . . . . . . . . . . . . . . . . . . . . . . . . . . . . . . . . . . . . . . . . . . . . . . . . . . . . . . . . . . . . . . .49
Configuring system tracing . . . . . . . . . . . . . . . . . . . . . . . . . . . . . . . . . . . . . . . . . . . . . . . . . . . . . . . . . . . . . . .51
About licensing devices . . . . . . . . . . . . . . . . . . . . . . . . . . . . . . . . . . . . . . . . . . . . . . . . . . . . . . . . . . . .51
Adding product keys . . . . . . . . . . . . . . . . . . . . . . . . . . . . . . . . . . . . . . . . . . . . . . . . . . . . . . . . . . . . . . . . . . . . .52
Deleting product keys . . . . . . . . . . . . . . . . . . . . . . . . . . . . . . . . . . . . . . . . . . . . . . . . . . . . . . . . . . . . . . . . . . . .53
Adding a device with an embedded client . . . . . . . . . . . . . . . . . . . . . . . . . . . . . . . . . . . . . . . . . . . . . . . . . . .54
Activating licenses . . . . . . . . . . . . . . . . . . . . . . . . . . . . . . . . . . . . . . . . . . . . . . . . . . . . . . . . . . . . . . . . . . . . . .55
Monitoring activity on the Services Manager . . . . . . . . . . . . . . . . . . . . . . . . . . . . . . . . . . . . . . . . . 56
Reporting scanning activity . . . . . . . . . . . . . . . . . . . . . . . . . . . . . . . . . . . . . . . . . . . . . . . . . . . . . . . .56
Backing up or sharing configuration files . . . . . . . . . . . . . . . . . . . . . . . . . . . . . . . . . . . . . . . . . . . . . 56
Remote administration . . . . . . . . . . . . . . . . . . . . . . . . . . . . . . . . . . . . . . . . . . . . . . . . . . . . . . . . . . . .58
Configuring connectors . . . . . . . . . . . . . . . . . . . . . . . . . . . . . . . . . 59
Overview . . . . . . . . . . . . . . . . . . . . . . . . . . . . . . . . . . . . . . . . . . . . . . . . . . . . . . . . . . . . . . . . . . . . . . . . 59
Installing connectors and services . . . . . . . . . . . . . . . . . . . . . . . . . . . . . . . . . . . . . . . . . . . . . . . . . . . . . . . . .60
Removing add-on connectors . . . . . . . . . . . . . . . . . . . . . . . . . . . . . . . . . . . . . . . . . . . . . . . . . . . . . . . . . . . . .60
About connector profiles . . . . . . . . . . . . . . . . . . . . . . . . . . . . . . . . . . . . . . . . . . . . . . . . . . . . . . . . . . . . . . . . .60
Creating and saving connector profiles . . . . . . . . . . . . . . . . . . . . . . . . . . . . . . . . . . . . . . . . . . . . . . . . . . . . .61
Activating connector profiles . . . . . . . . . . . . . . . . . . . . . . . . . . . . . . . . . . . . . . . . . . . . . . . . . . . . . . . . . . . . .62
About configuring general Properties settings . . . . . . . . . . . . . . . . . . . . . . . . . . . . . . . . . . . . . . . . 63
Configuring the Display settings . . . . . . . . . . . . . . . . . . . . . . . . . . . . . . . . . . . . . . . . . . . . . . . . . . . . . . . . . .63
Configuring the Content settings . . . . . . . . . . . . . . . . . . . . . . . . . . . . . . . . . . . . . . . . . . . . . . . . . . . . . . . . . .64
Configuring Express . . . . . . . . . . . . . . . . . . . . . . . . . . . . . . . . . . . . . . . . . . . . . . . . . . . . . . . . . . . . . . . . . . . . .66
Configuring Search while typing . . . . . . . . . . . . . . . . . . . . . . . . . . . . . . . . . . . . . . . . . . . . . . . . . . . . . . . . . . .68
About the Field Editor . . . . . . . . . . . . . . . . . . . . . . . . . . . . . . . . . . . . . . . . . . . . . . . . . . . . . . . . . . . . . . . . . . .69
Configuring the fax address format . . . . . . . . . . . . . . . . . . . . . . . . . . . . . . . . . . . . . . . . . . . . . . . . . . . . . . . .70
About configuring MSDE for address book support . . . . . . . . . . . . . . . . . . . . . . . . . . . . . . . . . . . . . . . . . .71
Page 5

About configuring connector Services . . . . . . . . . . . . . . . . . . . . . . . . . . . . . . . . . . . . . . . . . . . . . . . .75
Document Settings . . . . . . . . . . . . . . . . . . . . . . . . . . . . . . . . . . . . . . . . . . . . . . . . . . . . . . . . . . . . . . . . . . . . . . 75
Configuring Scanner Settings . . . . . . . . . . . . . . . . . . . . . . . . . . . . . . . . . . . . . . . . . . . . . . . . . . . . . . . . . . . . . 78
Configuring Tracing settings . . . . . . . . . . . . . . . . . . . . . . . . . . . . . . . . . . . . . . . . . . . . . . . . . . . . . . . . . . . . . 79
Connector-specific configuration information . . . . . . . . . . . . . . . . . . . . . . . . . . . . . . . . . . . . . . . . .80
Copy . . . . . . . . . . . . . . . . . . . . . . . . . . . . . . . . . . . . . . . . . . . . . . . . . . . . . . . . . . . . . . . . . . . . . . . . . . . . . . . . . . 80
eCopy Connector for Microsoft Exchange . . . . . . . . . . . . . . . . . . . . . . . . . . . . . . . . . . . . . . . . . . . . . . . . . .81
eCopy Connector for Fax via Microsoft Exchange . . . . . . . . . . . . . . . . . . . . . . . . . . . . . . . . . . . . . . . . . . . . 85
eCopy Connector for Fax via Print . . . . . . . . . . . . . . . . . . . . . . . . . . . . . . . . . . . . . . . . . . . . . . . . . . . . . . . . .88
eCopy Connector for Lotus Notes Mail . . . . . . . . . . . . . . . . . . . . . . . . . . . . . . . . . . . . . . . . . . . . . . . . . . . . . 89
eCopy Connector for Fax via Lotus Notes . . . . . . . . . . . . . . . . . . . . . . . . . . . . . . . . . . . . . . . . . . . . . . . . . . . 92
eCopy Connector for SMTP using LDAP . . . . . . . . . . . . . . . . . . . . . . . . . . . . . . . . . . . . . . . . . . . . . . . . . . . . 96
eCopy Connector for Fax via SMTP . . . . . . . . . . . . . . . . . . . . . . . . . . . . . . . . . . . . . . . . . . . . . . . . . . . . . . .107
Quick Connect . . . . . . . . . . . . . . . . . . . . . . . . . . . . . . . . . . . . . . . . . . . . . . . . . . . . . . . . . . . . . . . . . . . . . . . . .111
eCopy Connector for Captaris RightFax . . . . . . . . . . . . . . . . . . . . . . . . . . . . . . . . . . . . . . . . . . . . . . . . . . . 124
Scan to eCopy Desktop . . . . . . . . . . . . . . . . . . . . . . . . . . . . . . . . . . . . . . . . . . . . . . . . . . . . . . . . . . . . . . . . . 127
Scan to Printer . . . . . . . . . . . . . . . . . . . . . . . . . . . . . . . . . . . . . . . . . . . . . . . . . . . . . . . . . . . . . . . . . . . . . . . . 135
| v
Configuring eCopy Services . . . . . . . . . . . . . . . . . . . . . . . . . . . . 137
Configuring Bates Numbering . . . . . . . . . . . . . . . . . . . . . . . . . . . . . . . . . . . . . . . . . . . . . . . . . . . . .137
Bates Numbering format window . . . . . . . . . . . . . . . . . . . . . . . . . . . . . . . . . . . . . . . . . . . . . . . . . . . . . . . .140
About Bates page numbering . . . . . . . . . . . . . . . . . . . . . . . . . . . . . . . . . . . . . . . . . . . . . . . . . . . . . . . . . . . . 141
Using the Cost Recovery Service . . . . . . . . . . . . . . . . . . . . . . . . . . . . . . . . . . . . . . . . . . . . . . . . . . .142
Managing eCopy-enabled devices . . . . . . . . . . . . . . . . . . . . . . . 143
Specifying the default device . . . . . . . . . . . . . . . . . . . . . . . . . . . . . . . . . . . . . . . . . . . . . . . . . . . . . .143
Specifying default scanner settings . . . . . . . . . . . . . . . . . . . . . . . . . . . . . . . . . . . . . . . . . . . . . . . . .144
Configuring activity tracking for devices . . . . . . . . . . . . . . . . . . . . . . . . . . . . . . . . . . . . . . . . . . . .145
Configuring additional activity tracking fields . . . . . . . . . . . . . . . . . . . . . . . . . . . . . . . . . . . . . . . . . . . . . .147
Using the Field Editor . . . . . . . . . . . . . . . . . . . . . . . . . . . . . . . . . . . . . . . . . . . . . . . . . . . . . . . . . . . . . . . . . .148
Configuring Document Tracking . . . . . . . . . . . . . . . . . . . . . . . . . . . . . . . . . . . . . . . . . . . . . . . . . . .149
Publishing connector profiles . . . . . . . . . . . . . . . . . . . . . . . . . . . . . . . . . . . . . . . . . . . . . . . . . . . . . .150
Publishing prerequisites . . . . . . . . . . . . . . . . . . . . . . . . . . . . . . . . . . . . . . . . . . . . . . . . . . . . . . . . . . . . . . . .150
The publishing process . . . . . . . . . . . . . . . . . . . . . . . . . . . . . . . . . . . . . . . . . . . . . . . . . . . . . . . . . . . . . . . . .150
Managing groups of connector profiles . . . . . . . . . . . . . . . . . . . . . . . . . . . . . . . . . . . . . . . . . . . . . . . . . . . .155
Page 6

vi | Table of Contents
Managing and using the client application . . . . . . . . . . . . . . . . 157
Managing embedded clients . . . . . . . . . . . . . . . . . . . . . . . . . . . . . . . . . . . . . . . . . . . . . . . . . . . . . . .157
Managing ScanStation OP clients . . . . . . . . . . . . . . . . . . . . . . . . . . . . . . . . . . . . . . . . . . . . . . . . . .157
Selecting a different TWAIN driver for the ScanStation client . . . . . . . . . . . . . . . . . . . . . . . . . . . . . . . 158
Configuring the client to use the TWAIN driver’s user interface . . . . . . . . . . . . . . . . . . . . . . . . . . . . . . 158
Starting and stopping the ScanStation client from the console . . . . . . . . . . . . . . . . . . . . . . . . . . . . . . . 159
Specifying an exit password for the ScanStation client . . . . . . . . . . . . . . . . . . . . . . . . . . . . . . . . . . . . . . 160
Configuring the keyboard for the ScanStation client . . . . . . . . . . . . . . . . . . . . . . . . . . . . . . . . . . . . . . . 161
Configuring ScanStation logon settings . . . . . . . . . . . . . . . . . . . . . . . . . . . . . . . . . . . . . . . . . . . . . . . . . . 162
Configuring advanced ScanStation settings . . . . . . . . . . . . . . . . . . . . . . . . . . . . . . . . . . . . . . . . . . . . . . . 163
Using ShareScan OP connectors . . . . . . . . . . . . . . . . . . . . . . . . . . . . . . . . . . . . . . . . . . . . . . . . . . . .164
Quick reference to using a ShareScan OP connector . . . . . . . . . . . . . . . . . . . . . . . . . . . . . . . . . . . . . . . . 166
Copy . . . . . . . . . . . . . . . . . . . . . . . . . . . . . . . . . . . . . . . . . . . . . . . . . . . . . . . . . . . . . . . . . . . . . . . . . . . . . . . . 174
eCopy Connector for Microsoft Exchange . . . . . . . . . . . . . . . . . . . . . . . . . . . . . . . . . . . . . . . . . . . . . . . . . 175
eCopy Connector for Fax via Microsoft Exchange . . . . . . . . . . . . . . . . . . . . . . . . . . . . . . . . . . . . . . . . . . 178
eCopy Connector for Lotus Notes Mail . . . . . . . . . . . . . . . . . . . . . . . . . . . . . . . . . . . . . . . . . . . . . . . . . . . 180
eCopy Connector for Fax via Lotus Notes . . . . . . . . . . . . . . . . . . . . . . . . . . . . . . . . . . . . . . . . . . . . . . . . . 182
eCopy Connector for SMTP using LDAP . . . . . . . . . . . . . . . . . . . . . . . . . . . . . . . . . . . . . . . . . . . . . . . . . . 184
eCopy Connector for Fax via SMTP . . . . . . . . . . . . . . . . . . . . . . . . . . . . . . . . . . . . . . . . . . . . . . . . . . . . . . 186
Quick Connect . . . . . . . . . . . . . . . . . . . . . . . . . . . . . . . . . . . . . . . . . . . . . . . . . . . . . . . . . . . . . . . . . . . . . . . . 188
eCopy Connector for Captaris™ RightFax™ . . . . . . . . . . . . . . . . . . . . . . . . . . . . . . . . . . . . . . . . . . . . . . . . 192
Scan to eCopy Desktop . . . . . . . . . . . . . . . . . . . . . . . . . . . . . . . . . . . . . . . . . . . . . . . . . . . . . . . . . . . . . . . . . 196
Scan to Printer . . . . . . . . . . . . . . . . . . . . . . . . . . . . . . . . . . . . . . . . . . . . . . . . . . . . . . . . . . . . . . . . . . . . . . . . 200
Fax via Print . . . . . . . . . . . . . . . . . . . . . . . . . . . . . . . . . . . . . . . . . . . . . . . . . . . . . . . . . . . . . . . . . . . . . . . . . . 202
Page 7

| vii
Installation Environment . . . . . . . . . . . . . . . . . . . . . . . . . . . . . . 203
Network environment . . . . . . . . . . . . . . . . . . . . . . . . . . . . . . . . . . . . . . . . . . . . . . . . . . . . . . . . . . . .203
Hardware configuration guidelines . . . . . . . . . . . . . . . . . . . . . . . . . . . . . . . . . . . . . . . . . . . . . . . . .204
ShareScan OP Services Manager PC worksheet . . . . . . . . . . . . . . . . . . . . . . . . . . . . . . . . . . . . . . .205
Device worksheet . . . . . . . . . . . . . . . . . . . . . . . . . . . . . . . . . . . . . . . . . . . . . . . . . . . . . . . . . . . . . . . .206
Firewall and switch worksheet . . . . . . . . . . . . . . . . . . . . . . . . . . . . . . . . . . . . . . . . . . . . . . . . . . . . .207
Network infrastructure worksheet . . . . . . . . . . . . . . . . . . . . . . . . . . . . . . . . . . . . . . . . . . . . . . . . .208
DNS . . . . . . . . . . . . . . . . . . . . . . . . . . . . . . . . . . . . . . . . . . . . . . . . . . . . . . . . . . . . . . . . . . . . . . . . . . . .209
Configuring the HOSTS file . . . . . . . . . . . . . . . . . . . . . . . . . . . . . . . . . . . . . . . . . . . . . . . . . . . . . . . . . . . . . 209
Novell support . . . . . . . . . . . . . . . . . . . . . . . . . . . . . . . . . . . . . . . . . . . . . . . . . . . . . . . . . . . . . . . . . . .210
Index . . . . . . . . . . . . . . . . . . . . . . . . . . . . . . . . . . . . . . . . . . . . . . . . 211
Page 8

Page 9
eCopy ShareScan OP Installation and Setup Guide | 1
Getting Started
About this guide
This guide is intended for administrators responsible for installing and configuring eCopy
ShareScan® OP. It provides a product overview and describes system requirements and installation
procedures.
Further information
The documentation set consists of the following documents:
■ eCopy ScanStand™ Assembly Instructions: Provides information about assembling the
ScanStand that is used with eCopy ScanStation.
■ ShareScan OP Installation and Setup Guide: The Quick Start section of this document guides
you through the initial installation and setup process. The Reference section provides more
detailed information about configuring the system, the eCopy connectors included with the
software, and the add-on eCopy Services. It also describes how to manage the client application
and use the ShareScan OP connectors.
■ ShareScan OP Help: The Help files contain information about configuring the system, the
connectors, and the scanning devices. You can easily access the Help from the console.
To access the ShareScan OP Administration console help, in the console tree, select a
node, such as “ShareScan OP” and then click the Help button. The Help opens in the
Microsoft Management Console.
To access help for a specific connector, in the console tree, select the connector and then
click the Connector Help button, or right-click the connector name and select
Connector Help from the menu.
Page 10

2 | Getting Started
Technical support
Technical support is available to registered users of eCopy software during the warranty period or
for the duration of your software support and maintenance agreement. Contact your supplier for
details.
The maintenance agreement identifies the service provider. In most cases the dealer or distributor
who provided the eCopy product to your organization also provides support. The dealer or
distributor provides information about getting assistance for product installation,
implementation, and usage. The eCopy Technical Support, Quality Assurance, and Development
organizations provide backup support to the network of dealers and distributors. Policies
established with each distributor of eCopy products determine how customer inquiries are
escalated.
When you open a Technical Support case, your service provider will tell you what identification
information you need to provide to validate the status of your support contract.
In addition to support provided by your dealer or distributor, the eCopy Technical Support Web
site — www.ecopy.com/support — provides access to a knowledge base that includes Frequently
Asked Questions (FAQs), product support matrices, product information, and Technical Support
contact information.
Page 11

eCopy ShareScan OP Installation and Setup Guide | 3
What’s new in ShareScan OP v4.0
ShareScan OP v4.0 includes new features and enhancements.
■ Session Logon: When you enable Session Logon, users only need to log on a single time to the
ShareScan OP client; their logon information is effective for the entire session. The users do
not have to enter their logon information each time they select a connector during the current
session; the Services Manager passes the session logon information to the connector. You can
configure this feature, on the System Properties pane, for use with Windows Active Directory
or Novell Directory Services (NDS).
■ Connector profiles: You can now activate multiple profiles per connector, on a single scanning
device. For example, you can create two unique profiles for the eCopy Connector for Microsoft
Exchange and activate both profiles on Device X:
Profile name Profile description Device
Expense Reports Scans and sends expense reports to a Payroll
inbox
Resumes Scans and sends resumes to a Human Resources
inbox
Note: Prior to v4.0, you could create multiple profiles for a connector, but you could not
activate more than one profile per connector on the same device.
Device X
Device X
®
You can activate up to nine connector profiles on a single device. For example, you can activate
the following collection of profiles on a single device:
2 Exchange profiles
1 Fax via Exchange profile
3 Quick Connect profiles
2 Scan to Printer profiles
1 Scan to Desktop Profile
Page 12

4 | Getting Started
■ Connector services: The new Services node contains all the services that used to be on the
Advanced and Tracing tabs. The following table illustrates the services and options available on
each tab, if the connector supports the service.
Document Settings tab Scanner Settings tab Traci n g t a b
Encryption Input Paper Size File
Searchable Text Output Paper Size Location
File Formats Scaling (20 - 100%)
Document Name Resolution
Blank Page Removal Two-Sided
Bates Numbering Color Depth (Pixel)
Batching
Document Tracking
The following services, and their enhancements, are now available to many connectors:
>
Encryption: This service now enables you to set Document and Permissions passwords for
documents scanned using the PDF or eCopy format. You can create a connector profile that
requires assignment of a user password to the scanned document; the recipient must enter
the user password before opening the document. You can also set permissions that restrict
printing and editing of the scanned document, and changes to the document’s security
settings.
>
Advanced File Naming: This service, which was previously available only in Quick Connect,
enables you to create a connector profile that generates a file name composed of one or
more fields. If you enable Session Logon, you can include an “Authenticated User Name”
field in the file name.
>
Blank Page Removal: This service enables you to create a connector profile that removes
blank pages from a scanned black and white document before sending the scanned
document.
>
Batching: This service enables you to create a connector profile that splits a stack of pages
into separate documents. The connector creates a new document after a fixed number of
pages, when the file reaches a specified size, or when it finds a blank page. This service is
now available to all the mail connectors as well as to Quick Connect.
>
Bates Numbering: This service now enables you to create a Bates format that endorses a
scanned document with date and time information. In addition, when the user enables
Bates Numbering, the service displays the format information on the current page in the
scan preview window.
Page 13

eCopy ShareScan OP Installation and Setup Guide | 5
> Document Tracking: This service enables you to create a connector profile that saves a copy
of every scanned document, as a PDF file, in a secure network location (in the same domain
as the ShareScan OP Services Manager computer). It also adds the name of the PDF file to
the Activity Tracking log.
Even if you use the batching service, the document tracking service will only create a single
large document.
This service does not save a copy of fax cover pages.
>
Scanner Settings: This service enables you to create a connector profile that uses the same
settings for every scan job. When you create this type of profile, the user does not have to
change scanner settings at the device.
■ Zoom preview: The scan preview screen on the client now includes a Zoom button so that
users can enlarge the preview image.
■ Proxy server support: Version 4.0 detects any proxy server configuration on the computer
where you are installing the software. It uses that information to access the eCopy activation
server on the Web.
■ Express: This feature enables you to create a connector profile that makes it easy for a user to
quickly scan and send a document without having to enter additional information at the
device. For example, you can create multiple Exchange connector profiles. Then, on the Express
tab for
each profile, you can specify unique subject and recipient information for the scanned
documents. The user will not even see the Send screen at the device.
■ Quick Connect: The connector now supports relational databases for accessing and saving
index field values, and for saving scanned documents.
>
New type of index field: The Database field tells the connector to read a list of values from
a database and display them in a drop-down list on the screen where users enter index field
values.
>
New index file format: The Database format saves the index file in the specified database.
>
New destination: The Database destination saves scanned documents in the specified
database.
The connector now supports the TSV (tab-separated-values) format for the index file.
Page 14
6 | Getting Started
■ Send to self: This option, which is available for all the mail connectors, enables you to create a
connector profile that sends scanned documents only to the logged on user. The user will not
see the Send screen at the device. (You can use the file name variable in the Subject line or the
Notes line to distinguish between the scanned documents.)
■ Content tab: You can use three new variables to specify available subject lines (in mail or fax
connectors) and available notes (in fax connectors). You use these variables to include file size,
file name, and number of pages information. The variables are:
$$FILESIZE$$
$$FILENAME$$
$$PAGECOUNT$$
■ eCopy Connector for SMTP using LDAP: This connector provides many new enhancements
and features:
> You can create a connector profile using a wizard. You enter a few settings and the wizard
fills in the remaining settings.
> The Advanced LDAP tab enables you to create a connector profile that uses the LDAP
attributes you specify to search for senders and recipients in the selected directory service.
You can specify the Class, User ID, email, First Name, Last Name, and Common Name
attributes. For example, if you configure the profile to search Microsoft Active Directory by
User ID, then, on the Advanced LDAP tab, you select SAMAccountName as the attribute in
the User ID field. The ShareScan OP client will then display the SAMAccountName
attribute.
The Advanced LDAP tab also enables you to display custom LDAP attributes with the
sender and recipient names. This feature is useful if you need to include additional
attributes next to the name, for example, to distinguish among users with similar names.
For example, if there are two recipients named “John Smith”, you could include an attribute
named “title” to distinguish between “John Smith” (Principal Engineer) and “John Smith”
(Vice-President of Marketing).
> You can specify the scope of a search.
> You can now configure the LDAP server to use the Secure Sockets Layer (SSL) protocol for
communication.
> This connector provides additional security options for performing authentication on the
SMTP server.
Page 15
eCopy ShareScan OP Installation and Setup Guide | 7
■ Cc: The Cc: (carbon copy) feature, which is available for all the mail connectors, allows users to
send a copy of a message to one or more recipients who are not the primary recipients.
■ Scan to eCopy Desktop: This connector now works with eCopy Desktop version 9.0.
Things to know if you are using ShareScan OP v3.x add-on connectors
The following list describes what you need to know if you are using a v3.x add-on connector,
purchased from eCopy or from other companies, with ShareScan OP v4.0:
Note: This information does not apply to the eCopy connectors supplied with the ShareScan OP
v4.0 product. Those connectors have been upgraded to v4.0.
■ In version 3.x, all the tabs used to configure a connector were on the connector’s Properties
pane.
v3.1 Properties pane
Version 4.0 introduces a Services pane with three tabs: Document Settings, Scanner Settings,
and Tracing. The new Document Settings tab contains the options, such as Encryption, that
were on the Advanced tab on the v3.1 Properties pane (shown in the preceding screen).
Page 16
8 | Getting Started
v4.0 Services pane
■ However, the v3.x Advanced and Tracing tabs still appear on the v4.0 Properties pane, as
shown in the following WorkSite Properties screen.
v4.0 Properties pane with v3.x Advanced and Tracing tabs
Page 17
eCopy ShareScan OP Installation and Setup Guide | 9
■ The v3.x connectors will use the “Advanced” settings that you specify on the Document
Settings tab (which is on the 4.0 Services pane)
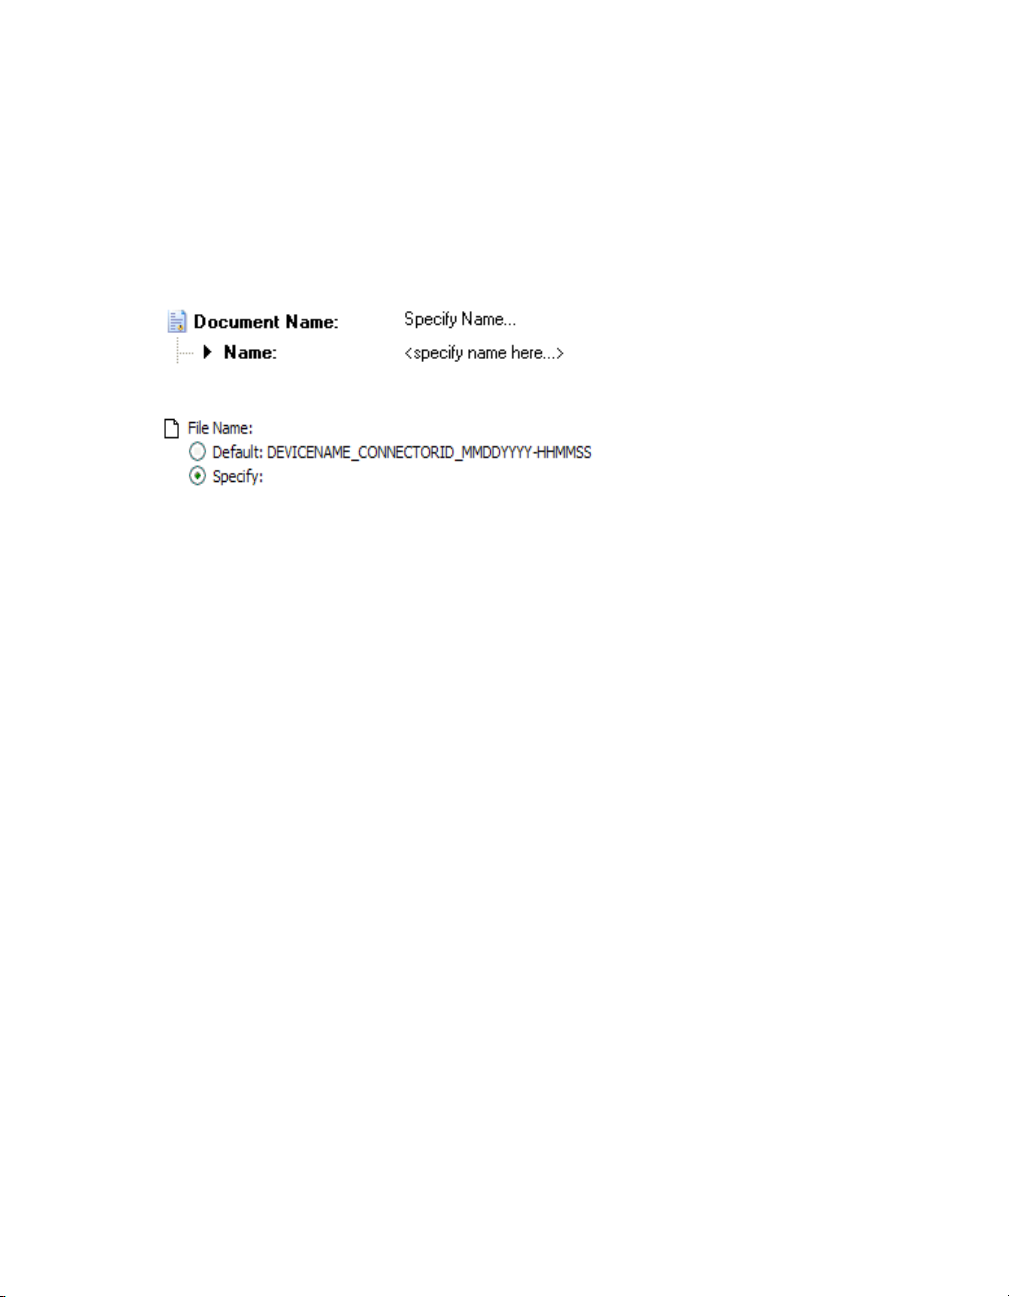
■ Whatever file naming scheme you specify on the v3.x Advanced tab must match the scheme
except for the File Naming option.
you specify on the v4.0 Document Settings tab. For example, if you specify a name using the
Advanced File Naming option on the Document Settings tab, you must then set the File Name
option to Specify Name on the Advanced tab.
v4.0 Document Settings tab
(Services pane)
v3.x Advanced tab (Properties
pane)
■ The connectors will use the settings that you specify on the Tracing tab (v4.0 Properties pane).
They will not use any settings that you specify on the Tracing tab that is on the v4.0 Services
pane.
Page 18

Page 19
eCopy ShareScan OP Installation and Setup Guide | 11
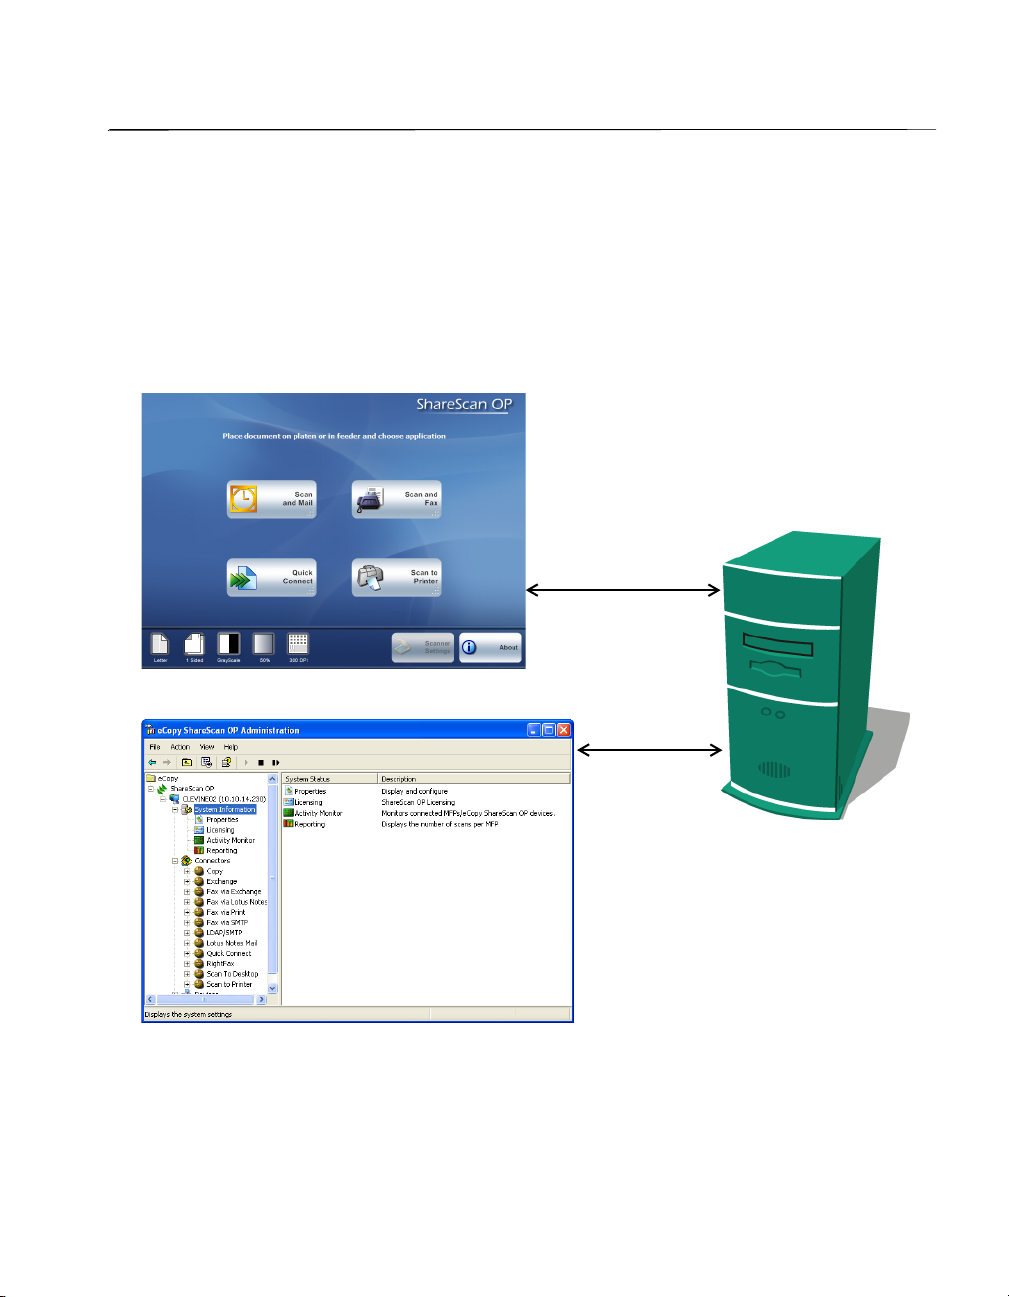
Quick Start: Installing and setting up eCopy ShareScan OP
Product overview
eCopy ShareScan OP (Open Platform) extends the capabilities of digital copiers and scanners. A
complete system includes the following components:
Client (ScanStation)
Administration console
Network computer running
eCopy ShareScan OP Services
Manager and one or more
connectors (applications
connected to enterprise
applications, such as e-mail and
fax).
Page 20

12 | Quick Start: Installing and setting up eCopy ShareScan OP
The ShareScan OP client is installed on your ScanStation. It displays the user interface and
handles user input. It passes all information, including the raw scanned image file, to the Services
Manager for processing.
The
ShareScan OP Services Manager resides on a network computer running Microsoft®
Windows® 2000, Windows 2003, or Windows XP. ShareScan OP does not require any special server
hardware. The Services Manager handles requests from the client, returns user interface forms
and thumbnail images to the client, and creates the master image file according to the selected
options (file type, searchable text, encryption, etc.).
The
connectors, which reside on the same computer as the Services Manager, provide connectivity
to back-end applications. For example, the eCopy Connector for Microsoft Exchange enables users
to scan documents and e-mail them using Microsoft Exchange. The eCopy Connector for Fax via
Lotus Notes enables users to scan documents and fax them using Lotus Notes.
The
Administration console is a Microsoft Management Console (MMC) snap-in that enables
system administrators to configure and administer the Services Managers, connectors, services,
and scanning devices.
Installation overview
To install and configure ShareScan OP, you perform the following tasks:
■ Install a TWAIN driver.
Note: You use a single product key to license a ScanStation for use with a TWAIN-enabled
device or with Send to eCopy. If you are using the ScanStation only with Send to eCopy,
you do not need to install a TWAIN driver.
■ Install the Universal Pointer Device Driver (UPDD), which is also called the touch screen driver,
on the ScanStation. However, you do not need to install this driver if you have an existing
ScanStation on which the driver was pre-loaded.
■ Install the ShareScan OP software (Services Manager, Administration console, connectors, and
client application) on the ScanStation.
■ License and configure the ScanStation device.
■ Configure and activate connector profiles.
Page 21

eCopy ShareScan OP Installation and Setup Guide | 13
Installing a TWAIN driver
The eCopy ScanStation uses a TWAIN driver to get input from the scanning device. You must
install and configure the driver before licensing the scanning device.
Installing the Konica Minolta TWAIN driver
You can use Konica Minolta’s TWAIN driver Ver. 2 with ScanStations.
To install the driver:
Insert the eCopy ShareScan OP CD (Disk 2) in your drive.
1
2 Open the Konica Minolta folder, then navigate to the location where the driver is stored.
3 Double-click Setup.exe, then follow the installation instructions.
4 When the installation is complete, click Finish.
Page 22

14 | Quick Start: Installing and setting up eCopy ShareScan OP
Installing the UPDD driver
The Universal Pointing Device Driver (UPDD) is used to configure the touch screen. If you are
using a new ScanStation, you must calibrate the touch screen. If you are using an existing
ScanStation, you probably do not need to calibrate the touch screen.
To install the driver:
Insert the eCopy ShareScan OP CD (Disk 1) in the drive.
1
2 When the Launch window opens, click Drivers.
3 Click Explore Touchscreen Drivers.
4 Run Setup.exe.
5 When the Welcome window opens, click Next.
6 When the License Agreement window opens, read the agreement, then click Accept. The
Select folder window opens.
7 Follow the prompts on subsequent screens, using the following information to specify the
driver settings:
Window name Field Value
Number of devices Number of devices 1
Desktop segment Logical desktop segment Whole Desktop
Select controller Controller type
Port Port COM1
1
Do not select any controller type other than “DynaPro, SC3, Serial”
DynaPro, SC3, Serial
1
8 When the Ready to install window opens, click Next to finish the installation.
9 When the installation is complete, click Finish.
Page 23

eCopy ShareScan OP Installation and Setup Guide | 15
Configuring the touch screen
The UPDD program enables you to configure the touch screen, which includes setting the correct
baud rate and calibrating the screen. The program sets the default baud rate to 19200, which is
required on a new ScanStation.
Important! Older ScanStations use a baud rate of 2400. If you are installing ShareScan OP on an
older ScanStation, do not change the baud rate. You have an older ScanStation if the
model number on the outside of the ScanStation PC is “D530S” or “D510”.
To calibrate the touch screen:
Click Start > Programs > UPDD > Settings. (You can also access the program by selecting
1
Pointer Devices in Control Panel.) The Pointer Device Properties window opens.
2 Select the Calibration tab, then set the number of calibration points to 9. (The default is 5.)
3 Click Calibrate.
4 Follow the calibration instructions on the touch screen.
Page 24

16 | Quick Start: Installing and setting up eCopy ShareScan OP
Installing eCopy ShareScan OP
Use the eCopy ShareScan OP Setup program to install the following components on a network
computer:
■ Client
■ ShareScan OP Services Manager
■ ShareScan OP Administration console
■ One or more connectors
To install the software:
Insert the eCopy ShareScan OP CD (Disk 1) in the computer’s drive. When the launch window
1
opens, click
2 Select the language for the installation, then click OK.
3 When the wizard’s Welcome window opens, click Next.
If your computer does not meet the minimum requirements, Setup displays a system
requirements message. Read the message, then click
4 When the Welcome window opens again, click Next.
5 In the Components window, click Next.
Install ShareScan OP.
Install to proceed.
6 In the Connectors window, select the connectors you want to install.
Installing connectors is not the same as activating them. You can install all the connectors
suitable to your environment now and activate them when you need to use them. For example,
if you are in a Windows environment, you do not need to install the Lotus Notes Mail and Fax
connectors. (If you want to install a connector later, you must go through the installation
process again.)
Note: You can use Copy only on an eCopy-enabled device with some embedded clients. If you
try to activate a Copy profile on an unsupported device, the system will display an error
message. You can use Fax via Print only on an eCopy ScanStation.
Page 25

eCopy ShareScan OP Installation and Setup Guide | 17
7 When you have selected the connectors you want to install, click Next.
If you selected a Lotus Notes e-mail or fax connector and the Lotus Notes client is
not installed
on the computer, Setup displays a message, reminding you that you must install the Lotus
Notes client before you can use it, and that you must specify the path to its executable file in
the Path environment variable. Click
Note: When you install the Lotus Notes client, make sure that you select the Only for me
(Single User Install) option.
OK to continue the installation.
If you selected an e-mail or fax connector, the Internet Address Book Support window opens.
ShareScan OP uses Microsoft SQL Server Desktop Engine (MSDE 2000) to store manually
entered addresses and fax numbers in a database (see “About configuring MSDE for address
book support” on page 71).
If you do not plan to install the address book database on this computer, select
Next. If you plan to install the address book database, select Ye s, then click Next to check for
No, then click
the required components. After reading the message about the required components, click
8 When the Ready to Install window opens, click Install.
9 When the installation is complete, click Finish.
OK.
Page 26
18 | Quick Start: Installing and setting up eCopy ShareScan OP
Licensing scanning devices
You license the product from the ShareScan OP Administration console. To do this, you perform
the following tasks:
■ Start eCopy ShareScan OP Administration and select your ShareScan OP Services Manager.
■ License a ScanStation by performing the following tasks:
> Add the product key to the local license database.
> Activate the product key.
■ Set up a supported multifunction product (MFP) device that you plan to use with the
ScanStation’s Send to eCopy feature.
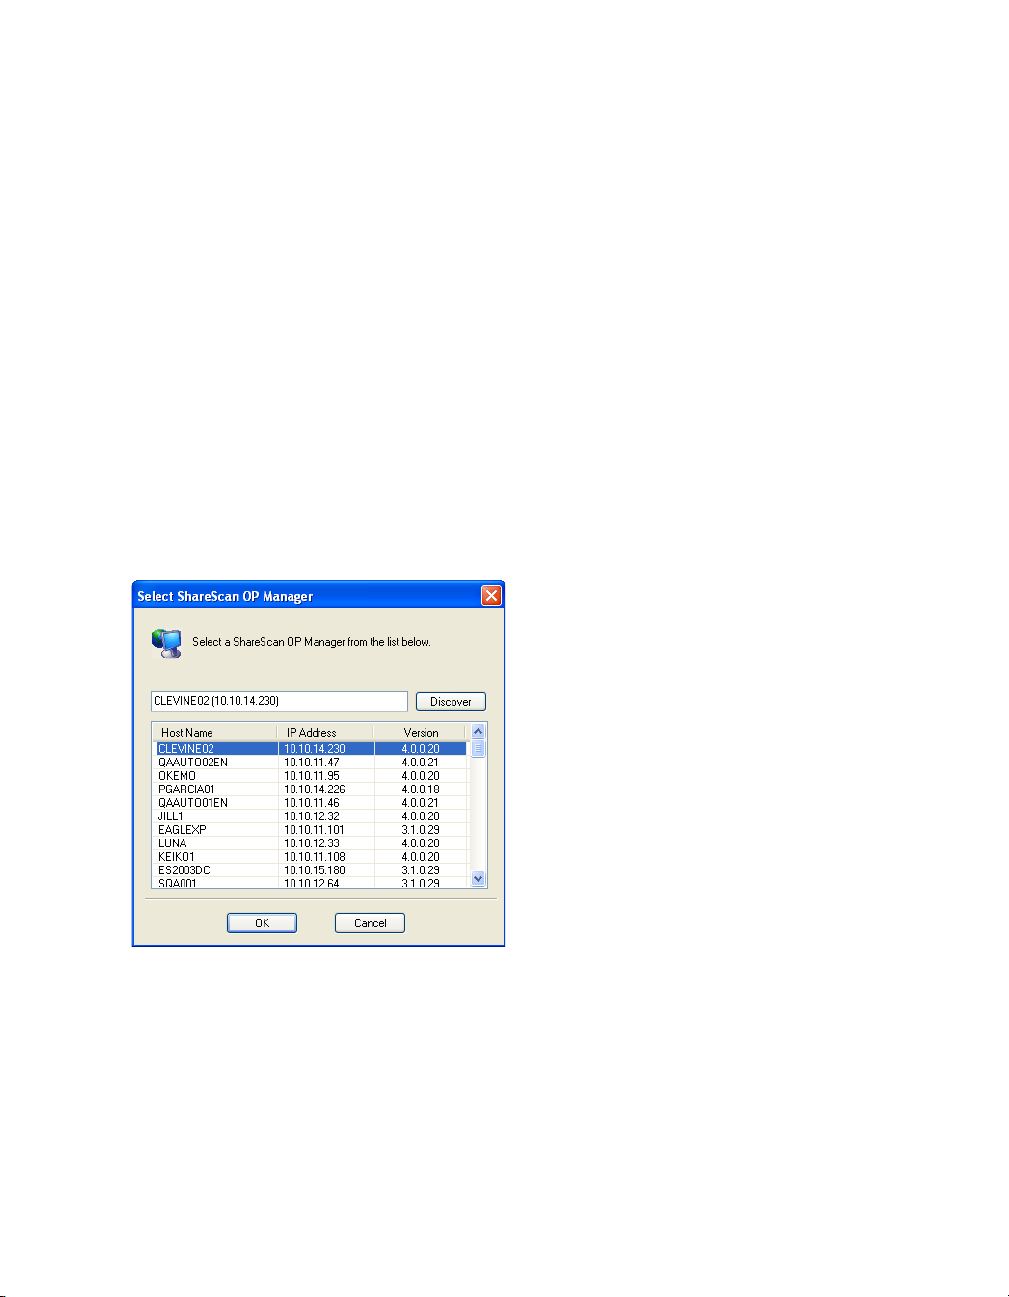
To select a Services Manager:
1 Click Start > Programs > eCopy Applications > ShareScan OP Administration.
The
Select ShareScan OP Manager window opens. The first Services Manager in the list is
most often the local computer, the one that you typically want to administer.
2 In the list, select the Services Manager.
If the Services Manager you want is not listed, click
Discover to refresh the list.
If the Services Manager is still not listed, enter the machine name and IP address in the edit
field, for example,
ECOPY1 (10.10.10.10).
Page 27
eCopy ShareScan OP Installation and Setup Guide | 19
3 Click OK. The Administration console opens.
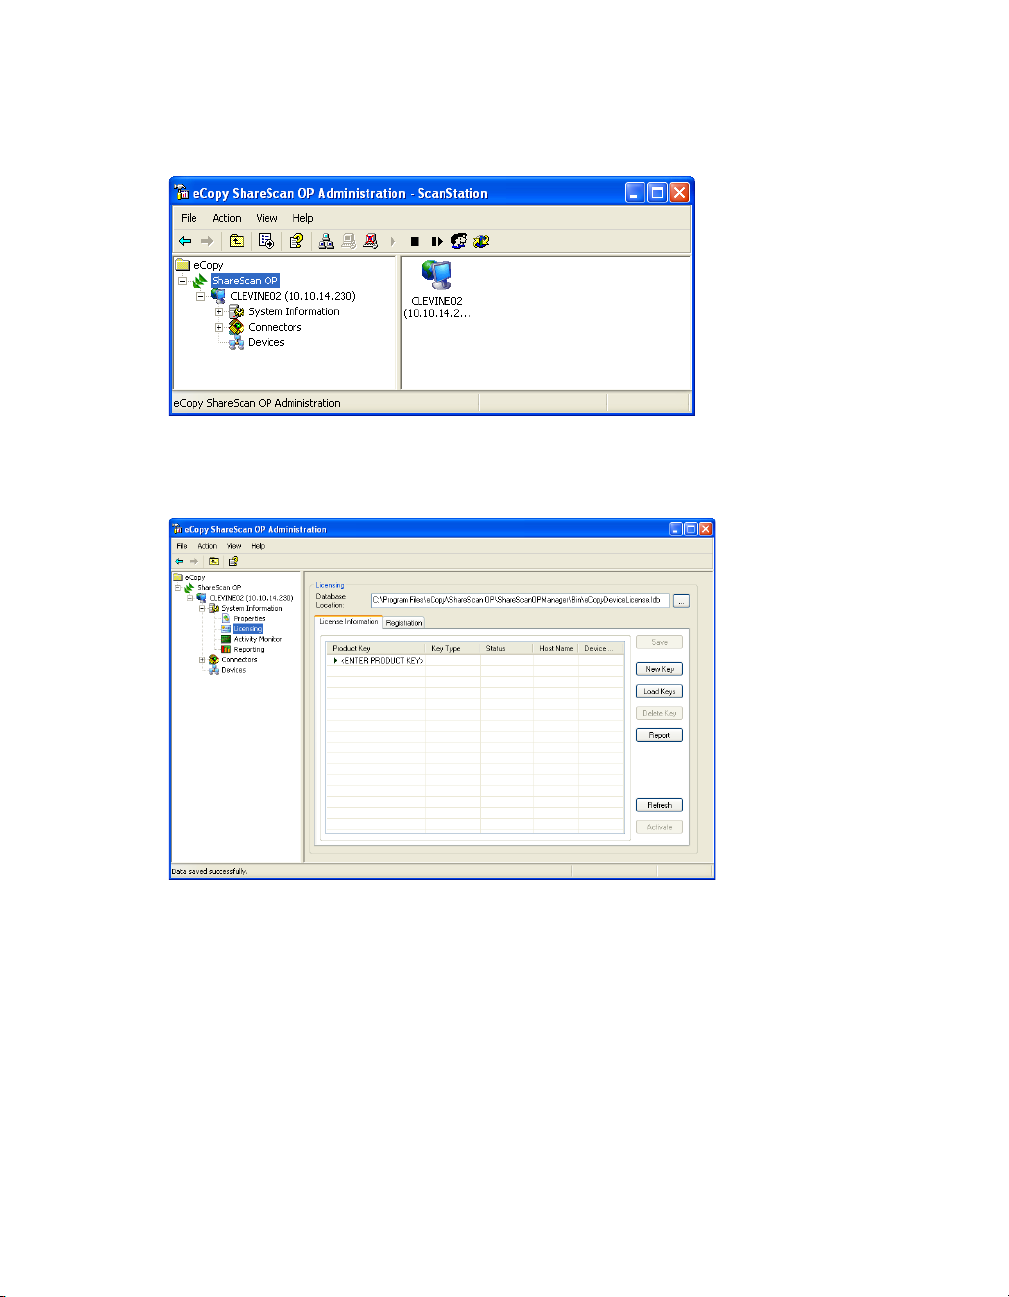
To license a scanning device:
In the console tree, double-click System Information, then click Licensing.
1
2 Enter the product key using either of the following methods. (If you received your key in
electronic form, you may want to copy and paste it.)
>Click
>Click
New Key and enter the key (manually or by pasting a copied key).
<ENTER PRODUCT KEY> to make the edit box active, enter the key, and then press
E
NTER.
Page 28
20 | Quick Start: Installing and setting up eCopy ShareScan OP
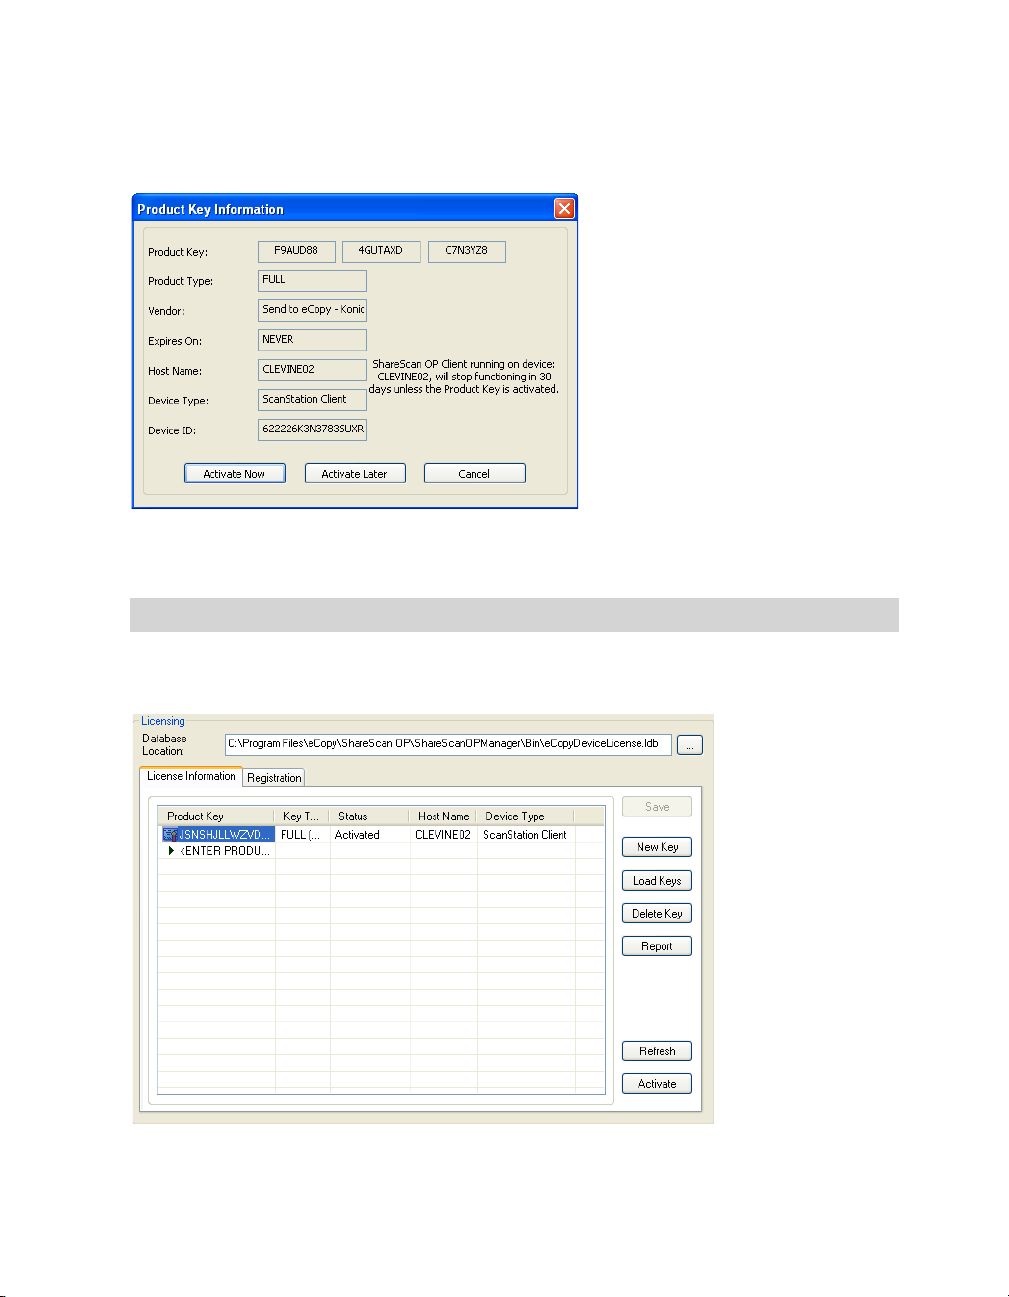
When you have added the product key, the Product Key Information window opens. You use
the same Send to eCopy key to license TWAIN-enabled devices.
3 Click Activate Now to activate the license through the Internet; the activation process only
takes a couple of minutes. Read the registration message, click
Note: If you cannot activate a license immediately, you have 30 days in which to activate it.
4 As soon as you activate your licenses, generate a license report by clicking Report on the
Licensing pane.
OK, then click Done.
Page 29
eCopy ShareScan OP Installation and Setup Guide | 21
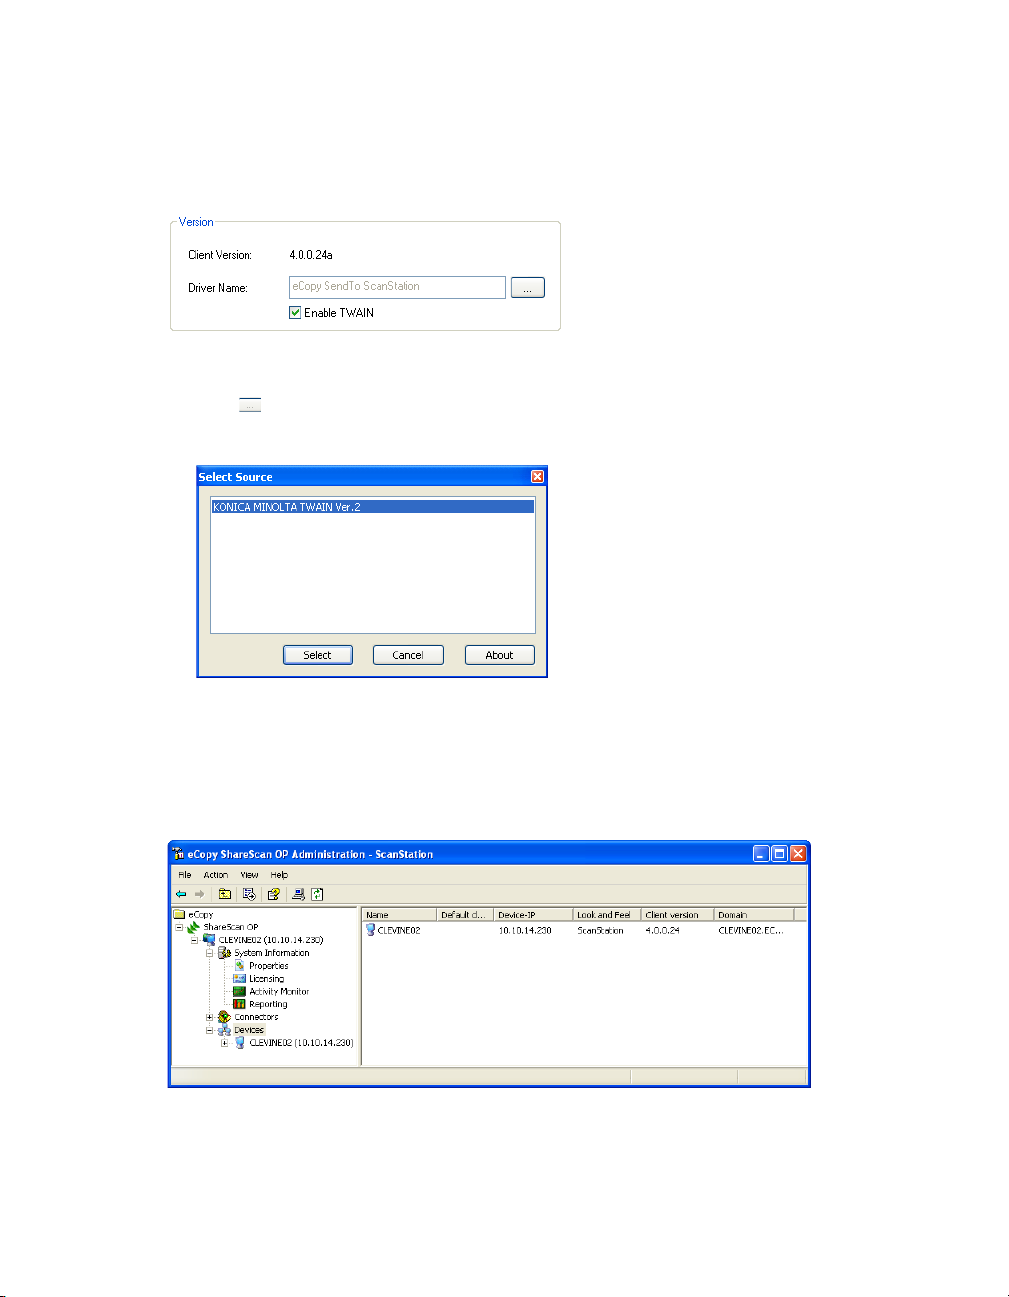
5 In the console tree, click Devices > <device_name> > Manage > Status, then select the Enable
TWAIN
check box.
To s elec t the driver:
> Click (Browse). The Services Manager prompts you to select the source (the TWAIN
driver).
> Select the Konica Minolta TWAIN driver.
> In the Manage ScanStation OP Client pane, click
6 In the console tree, click Devices. The device is listed in the right pane. (To change the view,
right-click in the right pane, click
View, then select the desired view.)
Save.
Page 30
22 | Quick Start: Installing and setting up eCopy ShareScan OP
Configuring and activating connector profiles
After licensing a scanning device, you configure profiles for each connector that you want to use,
and then activate them on the device.
When you create a connector profile, you associate it with a button that appears in the ShareScan
OP client application. When a user presses a button, such as the Exchange Example button, the
connector uses the properties and services specified in the connector profile, such as
“exchange_express”, associated with the button.
You can create multiple profiles for each connector, and you can display up to nine buttons in the
client application.
This section describes the basic process of creating and activating a connector profile, using the
eCopy Connector Microsoft Exchange as an example. For detailed information about each
connector and its settings, refer to the Help.
Note: Make sure that Microsoft Outlook is the default mail package. You must configure Microsoft
Outlook 2000 to work with your Exchange server prior to using the ScanStation client. eCopy
also recommends that you configure Microsoft Outlook 2002 and 2003 to work with the
Exchange server. You must install Outlook on the same computer as the eCopy ShareScan OP
Services Manager so that the two applications can share common DLLs.
Before configuring this connector, you should create a generic Microsoft Exchange account for
ShareScan OP to use. The connector uses the ShareScan OP User Account information to log on to
the Exchange server and retrieve the global address list.
Page 31

eCopy ShareScan OP Installation and Setup Guide | 23
To specify connector properties:
In the console tree, double-click Connectors. The console displays all the installed connectors.
1
(To change the view, right-click in the right pane, click
View, then select the view you want to
use.)
2 Double-click Exchange. The console displays the Properties and Services icons.
Page 32

24 | Quick Start: Installing and setting up eCopy ShareScan OP
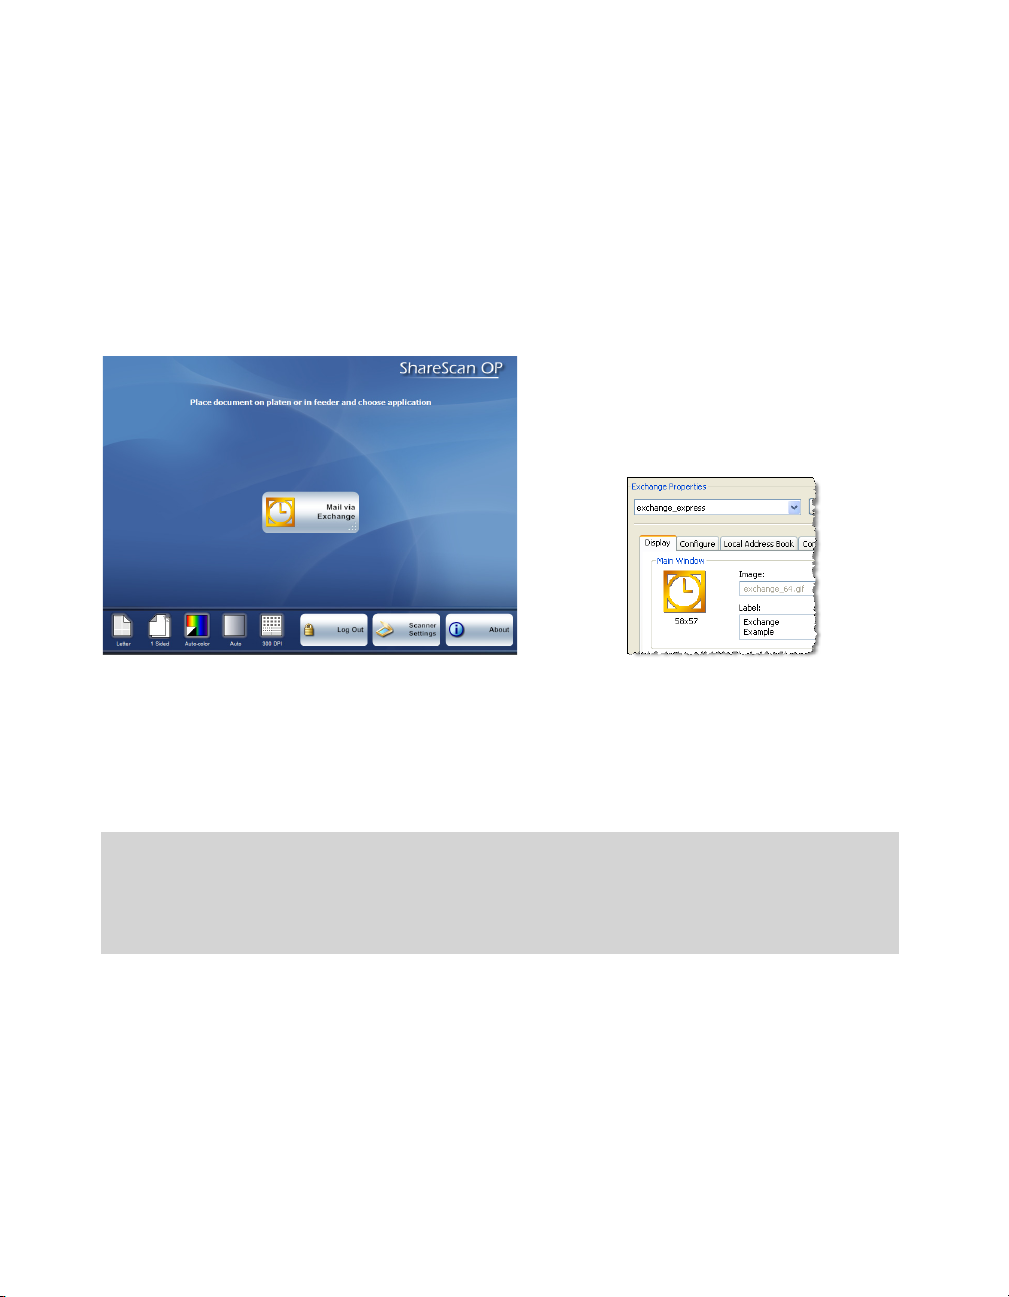
3 Double-click Properties. The console displays the Exchange Properties pane.
4 On the Display tab, leave the default image. Enter Exchange Example in the Label field, as
shown in the following screen. This label will appear on the button in the client application.
Page 33

eCopy ShareScan OP Installation and Setup Guide | 25
5 Select the Configure tab. (This tab looks a little different for each connector, but contains
similar types of settings.)
6 Click the Properties button in the lower right corner of the pane. On the Basic Settings tab,
enter the ShareScan OP User information, then click
Te st . When the console displays “Test
successful”, proceed to the next step.
Page 34

26 | Quick Start: Installing and setting up eCopy ShareScan OP
7 Select the Advanced Settings tab. You can configure the Exchange connector to allow users to
send scanned documents as e-mail attachments from their personal Microsoft Exchange
account. If you do not select the
Send from personal account option, the connector sends the
documents from the ShareScan OP User Account (specified on the Basic Settings tab).
If you select the
logged on user. The user will not see the
8 When you have specified the basic and advanced settings, click OK. The Settings Summary
Send to self option, the connector will send scanned documents only to the
Send screen at the device.
displays the current basic and advanced settings.
9 Select the Local Address Book tab see “About configuring MSDE for address book support” on
page 71).
Page 35

eCopy ShareScan OP Installation and Setup Guide | 27
10 Select the Content tab. This tab enables you to specify the default subject or note information
that will be available to the user at the scanning device. This version of the product supports
several new variables (see page 6). The user can accept the default text or enter new text at the
device.
Page 36

28 | Quick Start: Installing and setting up eCopy ShareScan OP
11 Select the Express tab. You use this new feature (see page 5) to create a profile that minimizes
user interaction at the device. For example, if you specify a list of recipients and a subject line,
the user will not be able to select recipients or specify a subject line at the device. (The user will
not see the
Send screen.)
12 To configure the Express feature:
> Select the
> Enter information in the
will not use the default subject line or notes specified on the
> To specify one or more recipients, click the
Add Recipients window opens.
With the
Enable check box.
Subject and Note fields. (When you use Express, the connector
Content tab.)
Add button associated with the To : field. The
Search while typing check box selected, enter the first few characters of a
recipient’s name. As you type, the system displays the names of users that match the
characters you entered.
Select each recipient that you want to include on the
Recipients
area.
To : list, then click To - > in the Message
Page 37

eCopy ShareScan OP Installation and Setup Guide | 29
Click OK. The console displays the recipients in the To : list.
13 Click Save to save the settings in a connector profile.
14 In the Save Profile window, type exchange_express as the name of the profile (or leave
“default” as the name), then click
Save.
Page 38

30 | Quick Start: Installing and setting up eCopy ShareScan OP
To specify connector services:
In the console tree, click Exchange > Services.
1
2 On the Document Settings tab, specify the default settings that you want available to the user
for each option.
Select the
User modify check box if you want to allow the user to change the default setting for
an option at the device.
Page 39

eCopy ShareScan OP Installation and Setup Guide | 31
3 Select the Scanner Settings tab. Then select the Enable Scanner Settings check box and
specify the default scanner settings that you want this connector profile to use. (You can create
additional profiles for the same connector that use different scanner settings at the same
device.)
4 Click Save to save the settings in the connector profile.
Page 40

32 | Quick Start: Installing and setting up eCopy ShareScan OP
To activate a connector profile on a device:
In the console tree, click Devices > <device_name> > Properties. The console displays the list of
1
available connectors and the number of profiles that have been created for each connector.
Note: The Arrange button allows you to position connector buttons in a particular order on
the client screen.
2 Select the Activate Connector check box for Exchange. The Select Connector Profiles window
opens. If you have not saved a profile’s settings, the profile name appears in red.
Page 41

eCopy ShareScan OP Installation and Setup Guide | 33
3 Select a configured profile, such as “exchange_express”, then click OK. The No. of Profiles
column now indicates that you have activated one connector profile.
4 In the Device Properties pane, click Save. When you run the client, it will display a button for
each active connector profile, up to a maximum of nine buttons. (If you are using the client
with Send to eCopy, the settings in the lower left corner of the screen will not appear.)
Page 42

34 | Quick Start: Installing and setting up eCopy ShareScan OP
Starting the ScanStation OP client
This section provides you with basic information about configuring and starting the ScanStation
OP client. For information about managing the ScanStation OP client, see “Managing and using
the client application” on page 157.
Note: If you are using the ScanStation OP client with Send to eCopy, you must set up and configure
the MFP device before starting the client (see “Quick Start: Setting up MFP devices to use
with Send to eCopy” on page 39).
You can also start the ScanStation OP client by clicking
ScanStation Client.
To start the ScanStation OP client from the Administration console:
In the console tree, click Devices > <device_name> > Manage. The Manage ScanStation OP
1
Client
pane displays client information and enables you to configure settings for the client. The
information in the
Driver Name field is based on the product key.
Start > Programs > eCopy Applications >
Use TWAIN user interface for settings check box allows you to configure the client to
The
display the interface provided by the TWAIN driver.
Page 43

eCopy ShareScan OP Installation and Setup Guide | 35
If you set up a multifunction product (MFP) device to use with Send to eCopy, this pane will
include a
2 Select the Settings tab, enter a password in the Password (Exit) field, then click Save.
Send to eCopy tab.
Specifying an exit password prevents unauthorized users from quitting the client application.
Page 44

36 | Quick Start: Installing and setting up eCopy ShareScan OP
Important! By default, the system keys are secured and the taskbar is hidden. This
ensures that users cannot shut down the ScanStation PC, invoke the Start
menu, or access other applications. You cannot disable this option.
However, even though the system keys are secured, authorized users can
quit the client application (see “Specifying an exit password for the
ScanStation client” on page 160).
The system key Ctrl+Alt+Del invokes the Windows Security dialog. If the
client is running under an account with local administrator privileges, the
Task Manager button is disabled. If the client is running under an account
with user privileges, the Task Manager button is not disabled. However, if
the user clicks it, the Task Manager opens, and then closes immediately.
3 Select the ScanStation Logon tab.
Make sure this tab contains logon credentials. The client will not start if the credentials fields
are blank.
Select the
your user name, password, and domain, and click
4 Select the Status tab.
5 Under Client Status, click Start. The client application opens on the touch screen.
Note: Depending on the device that is connected to the ScanStation, you may be prompted to
Use preceding credentials to start/stop the ScanStation OP Client check box, enter
Save.
select the device the first time that you start the client or the first time that you select a
connector.
A button appears for each connector that you have configured for the device.
Page 45

eCopy ShareScan OP Installation and Setup Guide | 37
The scanner settings that you specified on the device’s Scanner Settings tab are displayed in
the lower left corner of the screen, unless you enabled use of the TWAIN driver’s interface.
If you are using the client with Send to eCopy, the settings in the lower left corner of the screen
will not appear.
6 Select the connector button.
If prompted, select your TWAIN-enabled device.
If the TWAIN driver’s user interface window opens, specify the settings that you want to use,
then press the “Scan” button.
For information about using the connectors, see “Connector-specific configuration
information” on page 80).
7 To quit the client application, use either of the following methods:
> If you are using the hard keyboard, press
the exit password, then select
Yes.
> If you are using the on-screen (soft) keyboard, press
tab, enter the exit password, then press
ESC or Alt+F4. When the Exit window opens, enter
About, press (Exit) on the Vers ion
Yes.
Page 46

38 | Quick Start: Installing and setting up eCopy ShareScan OP
What’s next?
The rest of this guide contains reference information for configuring the system, managing
devices, and using the client application.
Page 47

eCopy ShareScan OP Installation and Setup Guide | 39
Quick Start: Setting up MFP devices to use with Send to eCopy
Overview
eCopy ScanStation OP enables users of supported multifunction product (MFP) devices to scan
documents and send them to a shared storage folder on a ScanStation. The ScanStation must be
licensed to use eCopy Send to eCopy.
To set up the device, you must perform the following tasks:
■ Install and license eCopy ShareScan OP.
■ Create a folder to temporarily store the scanned image files. Depending on the device, the
storage folder can be a
■ Configure the device.
■ Configure the ScanStation client to use Send to eCopy.
■ Create connector profiles and activate them on the ScanStation that you are using with Send to
eCopy.
network shared folder or an FTP fol d e r.
Translation Convention
Some translations appear in parentheses because they refer to functions in software products not
manufactured by eCopy. We have attempted to provide the best translation of those functions. If
you are unsure of the meaning of any of these translations, please consult the manufacturer's
documentation.
Creating a network shared folder
eCopy recommends that you create a shared folder on the ScanStation before you configure the
device. Make sure that you assign the appropriate permissions to the folder; the MFP requires
write access to the folder.
Page 48

40 | Quick Start: Setting up MFP devices to use with Send to eCopy
Supported scan settings
Send to eCopy can retrieve image files from the designated SMB folder or FTP folder only when
they have been scanned using the following supported settings:
■ Black-and-white scans — 300/400/600 dots per inch (DPI).
■ Color and gray-scale scans: 300 DPI.
■ Auto Color: 300 DPI.
■ Black-and-white — single-page TIFF format.
■ Color — single-page JPEG.
Configuring a Konica Minolta MFP
Configuring a Konica Minolta MFP to use with Send to eCopy involves the following tasks:
■ Registering the destination that you created for the scanned documents.
■ Registering a “program” for use at the device. The “program” refers to a destination and a set of
scan settings that are registered together.
To configure the MFP:
Make sure the device is running.
1
2 Open a browser. In the Address bar, enter the IP address of the device, as in the following
example:
http://10.10.12.999
The Konica Minolta Web Connection page for a public user opens. It displays information
about the device.
Page 49

3 To register a destination:
eCopy ShareScan OP Installation and Setup Guide | 41
>Click
>Click
>Select
4 When the “Address Book registration is complete” message appears, click OK. The new
Scan. The Address Book List page opens.
New Registration. The New Registration page opens.
SMB, then click Next. The Address Book (SMB) page opens. Specify the settings,
then click
Field Description
Name Enter the name of the destination.
Index Select the index tab on which you want the destination to appear.
Host Address Enter the IP address of the ScanStation where you created the SMB
File Path Enter the path to the SMB folder.
User ID Enter the ID used to log on to the ScanStation.
Password Enter the password used to log on to the ScanStation.
Apply.
folder.
destination appears in the Address Book list.
5 To register the program:
> In the navigation pane, click
>Click
>Select
New Registration. The New Registration page opens.
SMB, then click Next. The Program (SMB) page opens. For Send to eCopy, you must
Program. The Program List page opens.
at least specify the settings in the following table. However, you can specify any other scan
settings that you want the program to use.
Field Description
No. Enter the registration number. This number identifies the program on
the Program tab at the device.
Name Enter the registration name, such as “eCopy Scans”.
Destination
Information
>Click
6 When the “Program registration is complete” message appears, click OK. The program appears
Apply.
Select Select from Address Book, click the icon next to the field, then
select the destination that you registered in step 3. Click Apply.
in the Program List.
Page 50

42 | Quick Start: Setting up MFP devices to use with Send to eCopy
Configuring Send to eCopy
The Send to eCopy tab is available in the eCopy ShareScan OP Administration console only after
you license the ScanStation using a Send to eCopy product key.
To configure Send to eCopy:
Start ShareScan OP Administration (Start > Programs > eCopy Applications > ShareScan OP
1
Administration
2 In the console tree, click Devices > <device_name> > Manage.
Note: On the Status tab, make sure that the Enable TWAIN check box is not selected.
3 Select the Send to eCopy tab.
).
4 Under Configuration, specify a number of seconds. When the ScanStation software finds files
in the storage folder that are older than the specified number of seconds, it deletes them.
Page 51

eCopy ShareScan OP Installation and Setup Guide | 43
5 Under Location, specify the following information about the target storage folder:
>
Ty pe : Select SMB.
>
Folder: For an SMB location, enter the path to the shared folder, such as:
C:\\KonicaMinolta_drop
> Hostname: For an SMB location, enter the IP address of the computer where the ShareScan
OP Services Manager is installed, such as:
>
Login: Enter the name of the user who has access to the storage folder.
>
Password: Enter the password associated with the user name.
6 Click Save.
7 Create the eCopy connector profiles that you want to use, then activate them on the
10.10.9.111.
ScanStation (see "Configuring and activating connector profiles" on page 22).
8 Restart the ShareScan OP Services Manager.
Sending to the scan destination
The scan destination is the shared network folder that you created for use with Send to eCopy.
To send to the scan destination:
Load your originals into the MFP device.
1
2 Press the Scan button on the control panel.
3 On the Program tab, select the program you registered, such as “eCopy Scans”.
4 Press the Start button on the control panel to start scanning.
Page 52

44 | Quick Start: Setting up MFP devices to use with Send to eCopy
Using scanned documents with the ScanStation client
After a user scans documents to the specified destination, the scanned documents become
available for use with connectors installed on the ScanStation client.
To use scanned documents with the ScanStation client:
At the ScanStation, click Scanner Settings if you want to modify the output and image
1
processing options before retrieving the scanned documents.
2 Press a connector button, such as “Scan and Mail”. The connector retrieves the scanned
documents from the storage folder and opens them in the scan preview window.
Page 53

eCopy ShareScan OP Installation and Setup Guide | 45
Reference: Configuring the system
The eCopy ShareScan OP Administration console is an MMC (Microsoft Management Console)
snap-in that enables you to manage ShareScan OP Services Managers, connectors, and eCopyenabled devices.
An eCopy-enabled device is:
■ A multifunction product (MFP) device or scanner that is connected to an eCopy ScanStation.
or
■ An MFP with the eCopy ShareScan OP client installed, or embedded, in the device.
Overview
When you install ShareScan OP, the console snap-in is installed along with the ShareScan OP
Services Manager and any selected connectors. You use the console to configure system properties
and connectors, and to manage devices.
The Services Manager supports a single device connected to a ScanStation or multiple devices with
embedded clients.
The Administration console automatically detects the ShareScan OP Services Managers on your
network and lets you select the manager that you want to use. For each manager you can perform
the following tasks:
■ Start and stop the Services Manager (see “Starting and stopping the Services Manager” on
page 46).
■ Configure system properties (see “Configuring system properties” on page 46).
■ Specify licensing information (see “About licensing devices” on page 51).
■ Monitor activity on the Services Manager (see “Monitoring activity on the Services Manager”
on page 56).
■ Report scanning activity (see “Reporting scanning activity” on page 56).
■ Back up or share configuration files (see “Backing up or sharing configuration files” on
page 56).
■ Set up remote administration (see “Remote administration” on page 58).
Page 54

46 | Reference: Configuring the system
Starting and stopping the Services Manager
The ShareScan OP Services Manager runs as a Windows service. You can start or stop the
ShareScan OP Services Manager from the Administration console. (The Services Manager must be
running when you add a manager.)
■ To start a Services Manager, right-click the Services Manager name, then click Start ShareScan
OP Manager
■ To stop a Services Manager, right-click the Services Manager name, then click Stop ShareScan
OP Manager
■ To restart (stop and then start) a manager, right-click the Services Manager name, then click
Restart ShareScan OP Manager, or click on the Administration console toolbar.
, or click on the Administration console toolbar.
, or click on the Administration console toolbar.
Configuring system properties
You can specify system properties that apply to all devices connected to the selected Services
Manager.
The
System Properties pane contains a Bates Numbering tab. Bates Numbering is an add-on
eCopy service. For information about configuring this service, see “Configuring Bates Numbering”
on page 137.
Specifying general properties
The General tab provides you with version, language, operating system, and port information. It
also allows you to specify a scanning mode for eCopy-enabled devices with embedded clients.
To specify general properties:
In the console tree, click System Information > Properties and select the General tab.
1
2 Specify the general system properties.
Section Field
Product
Information
Scanning
Mode
3 Click Save.
Name
Port The TCP/IP port to use for communication between the ShareScan OP
Enable
Start
Button
Description
Services Manager and eCopy-enabled devices (the default is 9100).
If you need to change this setting, make sure that you also change
the port number that is specified on each device’s Manage node.
Allows the Start button on a device with an embedded client to be
used to initiate scanning. When this option is enabled, users must
press the Start button after selecting a scanning function, or when
they want to scan additional pages from the scan preview window.
Page 55

eCopy ShareScan OP Installation and Setup Guide | 47
Specifying advanced properties
The Advanced tab allows you to specify properties for encryption, the searchable text engine,
secure deletion of temporary files, and color compression.
To specify advanced properties:
In the console tree, click System Information > Properties and select the Advanced tab.
1
2 Specify the advanced properties.
Section Field Name Description
Encryption
properties
Password
Minimum
1
Length
Password
must be
alphanumeric
Searchable
Text engine
properties
Select a
language for
searchable
text creation
Secure
Delete
Enable secure
delete of
temporary
files
Color
Compression
1
Document encryption is only as strong as the password used to generate the encryption key. The rules specified
on this tab are enforced when encryption is enabled for specific connector profiles (on the connector’s
Services > Document Settings tab). If a user (at the device) enters a password that does not meet the
requirements, a message is displayed and the user must enter a different password.
High The best text quality and the smallest file size.
Medium The best image quality.
The minimum number of characters that make up the
password. When you specify the minimum password length,
remember that the longer the password, the more difficult it is
to break.
Requires that passwords include a combination of characters
and numbers. This helps ensure that passwords are not
dictionary words and are not easily guessed.
The language that you want the Searchable Text engine (the
OCR engine) to use. The default is the language specified on
the Keyboard Settings tab.
The list of languages depends on the YTR files that are
installed in the ShareScanOPManager\OCR\Lib folder. The
ShareScan OP installation program installs the language files
that are supported by the current version.
Allows you to ensure that temporary image files are
completely deleted from the PC running ShareScan OP Services
Manager. When this check box is selected, ShareScan OP
writes over the files in the ShareScanOPTemp folder multiple
times with random characters. There may be a small
performance penalty associated with selecting this option.
3 Click Save.
Page 56

48 | Reference: Configuring the system
Configuring keyboard settings
The Keyboard Settings tab allows you to configure the on-screen keyboard. Devices with
embedded clients always use the on-screen keyboard. You can configure a ScanStation to use
either a hard keyboard or the on-screen keyboard.
To configure keyboard settings:
In the console tree, click System Information > Properties and select the Keyboard settings
1
tab.
2 Specify the keyboard settings.
Section Field Name Description
Keyboard
Settings
Select a language for
the keyboard
Default .com entry The default extension for the .com key on the soft
Add more entries Any additional extensions to include in the list that appears
The keyboard language.
keyboard, such as .com.
when the user clicks the arrow next to the .com key.
Type each entry, such as “.co.uk”, in the field and then click
.
To delete an extension, select it and then click the red X
3 Click Save.
.
Additional entries can contain more than eight characters.
Page 57

eCopy ShareScan OP Installation and Setup Guide | 49
Configuring Session Logon
When you enable Session Logon, users only need to log on a single time to the ShareScan OP
client; their logon information is effective for the entire session. The users do not have to enter
their logon information each time they select a connector during the current session; the Services
Manager passes the session logon information to the connector.
If a user accesses different servers, the user name and password must be the same. Otherwise, the
user will be prompted to enter their logon information.
To configure Session Logon:
In the console tree, click System Information > Properties and select the Session Logon tab.
1
2 Specify the Session Logon settings.
Section Field Name Description
Enable Session
Logon
Directory
Services
Domain The Windows domain, or, for Novell, the preferred NDS
Enables or disables the Session Logon functionality at the
client.
The directory service that manages your list of users:
> Windows Active Directory
> Novell Directory Services.
Server Name or IP address.
Page 58

50 | Reference: Configuring the system
Section Field Name Description
Search
Search On The search criterion by which the system searches the user
Parameters
Base DN The base DN (distinguished name), or directory root, which
Scope Sets the scope of the search at one level down from the
Directory
Access
Search while
typing
Authentication
Ty pe
list:
> Windows Active Directory: First Name, Last Name,
Display Name, or Account Name
> Novell Directory Services: First Name, Last Name, or User
ID
is the starting point of the search. This option defaults to
the root of the main tree. Use this option to select the
specific DN or Context where you want the search to begin.
Base DN or down to the lowest level of the tree.
The type of access required to retrieve user names from the
directory:
> Anonymous: No user name or password required. This
is the default setting.
> Use Credentials: User name and password required to
access the Directory Services to search the user list.
Enables or disables the Search while typing option at the
client.
The type of authentication required by the server: Windows
or Novell. Displays the authentication type you select under
Directory Services
3 Click Save.
4 Restart the Services Manager to apply your settings.
Page 59

eCopy ShareScan OP Installation and Setup Guide | 51
Configuring system tracing
You can write transaction information to a trace file to help with troubleshooting. You typically
only do this when you are working with Technical Support. Enabling tracing will slow down overall
system performance.
To configure system tracing:
In the console tree, click System Information > Properties and then select the Tra ci ng tab.
1
2 Specify the tracing settings:
Section Field Name Description
File Tracing
Properties
3 Click Save.
Off/On Disables or enables file tracing.
Directory The location of the trace file.
Max. Size The maximum size of the trace file.
About licensing devices
Every device that you use with eCopy software requires a valid license. To obtain a license, you
enter a unique product key, valid for use with a single device, into the local license database (see
“Adding product keys” on page 52). You activate the product key by obtaining a license code from
the eCopy activation Web site (see “Activating licenses” on page 55).
To license a device running embedded ShareScan OP software, you must add the device to the
Services Manager after entering the product key (see “Adding a device with an embedded client”
on page 54).
A product key must be added to the license database before the ShareScan OP Services Manager
can assign it to a device. When the key is assigned to a device, it is no longer available for use with
other devices. (However, you can assign the device to another Services Manager, in which case the
license moves with the device.)
Page 60

52 | Reference: Configuring the system
In the Administration console, the License Information tab displays the status of each product key
in the database. If you are using ShareScan OP on a ScanStation, a single product key will be listed.
The following list describes the license status options:
■ Activated: The key has been assigned to a device and the license has been activated.
■ Not Activated: The key has been assigned to a device but the license has not been activated (30
day grace period is in effect).
■ Expired: The key has been assigned to a device but has expired (you must delete the key and
obtain a new key).
■ Activation Required: The key has been assigned to a device but has not been activated and the
30 day grace period has expired (you must activate the license to use the device).
■ Blank: The key has not been assigned to a device and is available for use.
Adding product keys
You add product keys to the license database. eCopy recommends that you leave the license
database on the local hard drive. There are three ways to add product keys to the database:
■ Enter each key manually.
You must use this method when licensing a device connected to a ScanStation. It is
recommended that you copy and paste the key (to avoid typing errors).
■ Import the keys from a text file.
Use this method when licensing devices with embedded clients.
This is the easiest method to use if you receive your product keys electronically. If you buy a 10pack of the product, you receive a separate CD that contains a text file with the keys that you
can import.
■ Use a site license.
Page 61

eCopy ShareScan OP Installation and Setup Guide | 53
To enter a product key manually:
In the console tree, click System Information > Licensing.
1
2 Click <ENTER PRODUCT KEY> to make the edit field active, enter your product key in the field,
and then press E
NTER.
or
Click
New Key and enter your product key in the dialog box. The system automatically fills in
the remaining fields with information about the product key.
3 Click OK.
When you add a product key for a ScanStation, the
appropriate TWAIN driver and then click
devices and displays the
Product Key Information dialog box. You can immediately activate the
Select. The system adds the ScanStation to the list of
Select Source dialog box opens. Select the
key via the Internet (recommended), or activate it later (see “Activating licenses” on page 55).
When you add a product key for a device running embedded ShareScan OP software, the
License Information tab displays product key information. You must now add the device (see
“Adding a device with an embedded client” on page 54).
To import product keys:
Use this method only when licensing devices with embedded clients.
1 Create a text (.txt) file containing all your product keys, or, if you received a CD with product
keys, access the text file on the CD. If you received your product keys by e-mail, you can copy
and paste them into Notepad and save the file with a .txt extension.
Make sure you enter the product keys accurately. The Load Keys function does not report
invalid keys.
2 In the console tree, click System Information > Licensing.
3 Click Load Keys.
4 Select the text file containing the product keys and click Open. The License Information tab
displays the imported keys.
Deleting product keys
You should only delete a key if you are upgrading the license type, for example, if you are
upgrading the key from Evaluation to Full Product. If you delete a key that has been activated, you
may lose the use of that key.
Note: If you assign a device to another ShareScan OP Services Manager, the license moves with the
device; therefore, you do not need to delete the key manually.
Page 62

54 | Reference: Configuring the system
Adding a device with an embedded client
Note: This section does not apply to devices connected to eCopy ScanStations. These devices are
automatically added to the Services Manager when a valid product key is added to the license
database and the TWAIN driver is selected.
You can manage multiple embedded devices from the Administration console. Each device is
associated with a ShareScan OP Services Manager. New devices inherit their initial settings from
the default device.
To add a device with an embedded client:
Make sure the client is installed and running.
1
2 In the console tree, click System Information > Licensing and verify that you have an available
product key of the appropriate type. (To add a product key, see “Adding product keys” on
page 52.)
3 In the console tree, right-click Devices and then click Add a new device.
The ShareScan OP Services Manager can detect devices using Multicast UDP or SNMP. While
UDP is generally faster, it may not work in certain network environments (see “Network
environment” on page 203).
4 If the device you want to add is listed, select it and then click OK.
If no devices are listed, select
If there are still no devices listed, click
and then click
5 If the device is already configured for use with another ShareScan OP Services Manager, the
OK.
SNMP in the Protocol list and then click Refresh.
Advanced, enter the name or IP address of the device,
system displays a notification message.
Click
Yes if you want to transfer ownership to the current Services Manager. An X will appear
next to the device name in the original manager's device list. The original manager can reacquire the device only by right-clicking the device name and then clicking
Re-acquire device;
this is because the device no longer appears in the device list.
6 If prompted, choose Activate Now to activate your license immediately, or Activate Later to
activate your license at a later time (see “Activating licenses” on page 55).
Page 63

eCopy ShareScan OP Installation and Setup Guide | 55
Activating licenses
When you assign a product key to a device, you can activate the device’s license immediately
(recommended), or you can activate it later. You have 30 days in which to activate the license.
Internet activation is fast and easy.
If you do not have an Internet connection, use the
Report button on the License Information tab
to generate a text file containing your product key information. Print the report file. Then, from
any computer with an Internet connection, go to https://activation.ecopy.biz and obtain a license
code for each key. You can then activate each license individually on the
To activate all licenses:
License Information tab.
This operation requires an Internet connection.
1 On the License Information tab, click Activate.
2 When prompted, click Ye s to continue.
To activate a single license:
In the console tree, click System Information > Licensing.
1
2 On the License Information tab, double-click the product key you want to activate.
3 If you have an Internet connection, click Activate via Internet. The information is sent to the
eCopy activation Web server and a license code is returned. Use the license code to activate
your license.
If you do not have an Internet connection, click
Activate Manually and follow the instructions
for obtaining a license code manually.
Important! As soon as you activate your licenses, generate a license report (see “Generating a
license report” on page 55).
Generating a license report
The license report helps you recover your product keys and license codes, if necessary. You should
generate a license report whenever you activate your licenses. Keep the report in a safe place in
case you need to restore the license information. A printed report is also useful if you need to
manually activate product keys from another computer.
To generate a license report:
In the console tree, select System Information > Licensing.
1
2 On the License Information tab, click Report. The Save as window opens.
3 Specify a location for the file and click Save.
Page 64

56 | Reference: Configuring the system
Monitoring activity on the Services Manager
The Activity Monitor enables you to monitor scanning activity on a ShareScan OP Services
Manager. This is useful for finding bottlenecks as it shows all activity and timing information in
real time.
To send a text version of the contents of the activity list to a file, right-click in the list and select
Send to File. The system prompts you to select a location and file name for the saved document.
To access and manage the activity log:
In the console tree, click System Information > Activity Monitor. The Activity area displays a
1
list of all requests and status information.
2 Click Start Monitoring or Stop Monitoring.
3 In the Filter list, select “none” to view activity for all managers or select a specific device whose
activity you want to view.
4 Click Clear if you want to clear all existing entries from the activity log.
Reporting scanning activity
The Reporting function uses bar graphs to display the total number of pages scanned. The report
can include all devices connected to a Services Manager or a single device.
To view a report of scanning activity:
In the console tree, click System Information > Reporting.
1
2 Select Manager to display the total number of pages scanned by each device connected to this
Services Manager, or select
Device to display the total number of pages scanned by a specific
device.
If you select
Device, select a device and then specify the time period for which you want to
create the report.
3 Click Print if you want to print the current bar graph.
4 Click Refresh if you want to update the graph to reflect recent activity.
Backing up or sharing configuration files
The Export/Import utility lets you copy configuration files to a backup directory. The
configuration files include the following items:
■ The system profile and forms (System*.xml).
■ The profiles and forms associated with all installed connectors (<connector>*.xml).
■ All image files used by the connectors.
Page 65

eCopy ShareScan OP Installation and Setup Guide | 57
Export/Import also lets you restore the ShareScan OP Services Manager to a previously-saved
configuration and copy the configuration files to other ShareScan OP Services Managers.
Notes: When you import connector profiles and forms, the imported information overwrites the
existing information. For example, if you configure several profiles for a single connector and
then import the ShareScan OP v3.0 connector profile information, the system overwrites all
the profiles that you created for the connector.
When you import connector profile information from ShareScan OP v3.0 to ShareScan OP
v4.0, the services settings that appear on the Advanced and Tracing tabs of the connector’s
Properties window are available from the connector’s Services node in ShareScan OP v4.0.
To export files:
Select your ShareScan OP Services Manager and click or right-click your Services Manager
1
and then click
2 In the Export / Import Utility window, click Export configuration.
3 Select the items and connectors to back up. The utility copies files from the \Data and \Images
Export / Import Utility.
folders associated with each selected connector, including the System connector.
4 Select the target folder. If you are copying files to share them with other Services Managers,
select a shared folder that the other devices can access.
5 Click Export. ShareScan OP creates a time-stamped subdirectory within the target folder and
copies the files.
6 When the copying is complete, click Done.
To import files:
1
Select your ShareScan OP Services Manager and click or right-click your Services Manager
and then click
2 In the Export / Import Utility window, click Import configuration.
3 Select the files and connectors to restore. If you are importing files that were exported by
Export / Import Utility.
another Services Manager, system data is not imported.
4 Select the folder containing the files you want to use.
5 Click Import.
6 Click Yes to shut down the Services Manager while the files are imported. (The Services
Manager will be restarted when the import is complete.)
7 Click Done.
Page 66

58 | Reference: Configuring the system
Remote administration
When the ShareScan OP Services Manager, the Administration console, and all available
connectors are installed on a network computer (for example, in an IT department), you can
perform the following tasks for eCopy-enabled devices on the network:
■ Connect remotely to a single device and configure its system properties.
■ Connect remotely to a single device and configure its device properties.
■ Publish sets of connector profiles to multiple devices.
Note: You cannot configure connectors from an Administration console on a remote computer.
Setting up remote administration involves installing ShareScan OP on a remote computer and
then granting the appropriate access rights.
By default, remote access to the ShareScan OP Services Manager is limited to domain
administrators. Anyone else who needs remote access to a Services Manager must be granted
access rights by a domain administrator. Only users who will configure system and device
properties need remote access rights. Users who publish connector profiles do not need remote
access rights.
To provide users with remote access to a Services Manager:
In the console tree, right-click the Services Manager name and select Display user list, or click
1
the Services Manager name and then click the
The
Select Users window opens.
2 In the Domain list, select your domain controller.
3 In the Name field, enter the first few letters of the first name of the person whose name you
Select Users icon on the toolbar.
want to add to the list.
4 Select the name from the list, then click Add. The user is added to the user list.
5 Repeat steps 3 and 4 until you have added all the names you require to the list, then click OK.
Note: To remove a user from the user list, select the name, then click Remove.
Page 67

eCopy ShareScan OP Installation and Setup Guide | 59
Configuring connectors
An eCopy ShareScan OP system can use any of the base connectors provided by eCopy, Inc. as well
as add-on connectors or services that you have purchased.
You configure connectors by creating connector profiles that specify various settings, such as the
appearance of the connector’s button and the image format you want to use. You can create
multiple profiles for each connector and each connector profile can be activated on multiple
devices. You can also publish groups of connector profiles to all eCopy-enabled devices on the
network.
Overview
Managing connectors and services involves the following tasks:
■ Installing connectors and services (see “Installing connectors and services” on page 60).
■ Removing add-on connectors (see “Removing add-on connectors” on page 60).
■ Creating and saving connector profiles (see “Creating and saving connector profiles” on
page 61).
■ Activating connector profiles (see “Activating connector profiles” on page 62).
This chapter also provides information about the following tasks:
■ Configuring properties that are common to many connectors (see “About configuring general
Properties settings” on page 63). For example, you configure the Display settings for all the
connectors and you configure the fax address format for all the fax connectors.
■ Configuring connector services (see “About configuring connector Services” on page 75). For
example, you configure document settings, such as encryption, for most of the connectors.
■ Configuring individual connectors (see “Connector-specific configuration information” on
page 80).
Page 68

60 | Configuring connectors
Installing connectors and services
To install a base connector that you did not install during initial installation of the ShareScan OP
software, run the setup program again and then select the
Modify option.
To install an add-on connector or service, you must run the setup program included with it. The
setup program installs the software and registers it on the ShareScan OP Services Manager. Once
registered, the connector appears in the console tree and the service appears in the appropriate
location in the console.
Note: To refresh the list of connectors, right-click Connectors and then click Refresh Connectors
or click the Refresh connectors button that appears on the toolbar when the Connectors
node is selected.
Removing add-on connectors
You can remove an add-on connector from the Connectors node in the console tree only when the
Remove icon appears next to the connector name, indicating that the connector has been
uninstalled or is otherwise unavailable.
To remove an add-on connector:
Run the connector's setup program and then select the Uninstall option.
1
2 When the uninstall is complete, in the console tree, right-click the connector name and then
click
Delete.
About connector profiles
You can define multiple profiles for each connector. Each profile defines a set of configuration
options for that connector. You can activate multiple profiles for each connector, on a single
scanning device. For example, you can create two unique profiles for the Exchange connector and
activate both on Device X.
Profile Name Profile Description Device
Expense Reports Scans and sends expense reports to a Payroll inbox. Device X
Resumes Scans and sends resumes to a Human Resources inbox. Device X
Each connector profile that is enabled for a device is represented by a separate button on the client
screen at the device. You can create as many profiles as you like for any connector, and you can
activate up to nine connector profiles on a single device. These can be profiles for the same
connector or for different connectors.
When you install the connectors, a default profile is included for each connector. Before you can
enable a connector for use with a device, you must configure at least one profile for it.
Page 69

eCopy ShareScan OP Installation and Setup Guide | 61
Creating and saving connector profiles
You must configure a connector's profile and test the settings before you can activate it for use
with a device.
To create a new profile:
In the console tree, select the connector for which you want to create a profile.
1
2 Specify the Properties settings for the profile and click Save.
The
Save Profile window opens.
3 Enter a name for the new profile and click Save.
You r
Properties settings are saved for the profile.
4 Specify the Services settings for the profile and click Save.
You r
Services settings are saved for the profile.
The profile is configured and available for activation in the
Devices > <device name> > Properties
window.
To update an existing profile:
In the console tree, select the connector whose profile you want to modify.
1
2 In the list of profiles, select the profile you want to modify.
3 Update the Properties settings as appropriate, and click Save.
4 In the Save Profile window, select the target profile and click Save.
5 Update the Services settings as appropriate, and click Save.
You r
Services settings are saved for the profile.
Note: If you make changes to the Services settings before making changes to the Properties
settings, when you click Save, the Save Profile window opens and you must select the
connector profile at that point.
Page 70

62 | Configuring connectors
Activating connector profiles
To make connector profiles available at a device, you activate the connectors and then select the
connector profiles. You can enable up to nine connector profiles on each device.
To activate connectors profiles:
In the console tree, select Devices > <device_name > Properties.
1
2 On the Selection tab, select the Activate Connector check box for your connector.
The
Select Connector Profiles window opens.
3 From the Select Profiles column, select the connector profile that you want to activate and
click
Save.
You can only select configured profiles; these appear in black. Unconfigured profiles appear in
red.
4 On the Selection tab, click Arrange.
The
Arrange Profiles window opens.
5 Use Move Up and Move Down to arrange the connectors in the list in the order in which you
want the client to display the connector buttons, then click
6 On the Selection tab, click Save.
Save.
The profile is now activated for the device.
Note: You can publish connector profiles individually or in groups to one or more
eCopy-enabled devices (see “Publishing connector profiles” on page 150).
Page 71

eCopy ShareScan OP Installation and Setup Guide | 63
About configuring general Properties settings
Each connector displays its own Properties settings in the eCopy ShareScan OP Administration
console. Properties settings for each connector profile are set in the tabs in the Properties window.
Certain properties are used by a number of connectors and are grouped under general Properties
settings in this document. See the “About configuring general Properties settings” topic in the
Administration console Help for a table that lists each setting and the connector that uses it.
Configuring the Display settings
The Display tab specifies the image and label that will be used on the connector button on the
client screens.
To configure the Display settings:
In the console tree, select <connector_name> > Properties.
1
2 On the Display tab, specify the Image and Label settings.
Field Description
Image Browse to select a .gif or .jpg file. .gif files have the advantage of transparency.
Maximum dimensions for the image are 64x64 pixels.
Label Enter up to three short lines of text. Press ENTER between each line.
Click Save, select or specify the profile name, and then click Save.
To make sure the lines of text fit on the button, save the connector profile,
activate the connector on a device, and view the button on the client.
Defaults Return the Image and Label fields to their original settings.
3 Click Save, select or specify the profile name, then click Save.
Page 72

64 | Configuring connectors
Configuring the Content settings
The Content tab is used to configure settings for messages and bylines included in messages for
mail and fax connectors
To configure the Content settings:
In the console tree, select <connector name> > Properties.
1
2 On the Content tab, specify the settings.
Section Field Description
Message (applies to
mail connectors)
Select Subjects to display
the available subject lines
or Notes to display the
available notes. Notes are
included in the message
body.
Subjects (applies to fax
connectors)
Enter a subject line.
Cover Sheet Notes
(applies to RightFax
connector)
Enter a cover sheet note.
Note: Users can select an
existing subject line or
note, or enter their own,
at the device.
Add Adds a new subject or note.
You can use the following variables in subject lines
and notes:
> $$USER_NAME$$ Can be used in a subject line
or in a note. Replaces the variable with the sender
name.
> $$RECIPIENTS$$ Can be used only in a note.
Replaces the variable with the recipient name(s).
You can use this variable, however, in a RightFax
connector cover sheet note.
> $$FILESIZE$$ Can be used in a subject line or in a
note. Replaces the variable with the size of the file
(in KB) in the message.
> $$FILENAME$$ Can be used in a subject line or in
a note. Replaces the variable with the name of the
file in the message.
> $$PAGECOUNT$$ Can be used in a subject line
or in a note. Replaces the variable with the
number of pages in the document in the message.
Edit Edits the selected entry.
Delete Deletes the selected entry from the list.
Move Up/
Move
Down
Defaults Restores the default lists of subjects and notes,
Moves the selected entry up or down in the list. The
top item in the list is the default.
deleting any custom entries.
Page 73

eCopy ShareScan OP Installation and Setup Guide | 65
Section Field Description
Email Address Format
in Message Content
(applies only to the Lotus
Notes Mail connector)
Select how you would
like recipient names to
Name@Do
main.com
FirstName
MI
LastName
Displays the recipient’s Internet e-mail address.
Displays the recipient’s “friendly” name, as it appears
in the Lotus Notes address list. If the name does not
appear in the Notes address list, the recipient’s
Internet e-mail address appears.
appear in the body of the
message when the
$$RECIPIENTS$$ variable
is included.
Important! When you
send mail to multiple
recipients from a personal
Lotus Notes account, the
eCopy agent on the
Domino server creates an
individual message for
each recipient. Including
the $$RECIPIENTS$$
variable in a note enables
recipients to see who else
received the message.
Byline (mail connectors
only)
The byline appears at the
bottom of the message
body. The byline used
depends on the format of
the scanned document
attachment.
Custom Creates a custom byline for scanned documents
whose format is PDF or TIFF. Enter the byline text in
the Custom field.
Enable
.cpy file
format
byline
Use the standard eCopy byline for scanned documents
whose format is eCopy (CPY). The standard byline is:
"To view .cpy files, download the latest free eCopy
Viewer at: http://www.ecopy.com/downloads/viewer."
3 Click Save, select or specify the profile name, then click Save.
Page 74

66 | Configuring connectors
Configuring Express
Express allows you to reduce the amount of time that your users spend at the device. You do this
by enabling Express in a connector profile and specifying information, such as a recipient's name,
on the Express tab. The profile allows the user to scan and send documents without having to
enter additional information at the device.
You can create multiple profiles and configure each to store documents in a different destination.
If you enable Session Logon, the user must enter logon information on the Logon screen at the
device.
Depending on the type of connector, the Express tab allows you to preconfigure information that
accompanies the scanned document.
Important! Before you configure Express, you must configure the settings on all the other tabs for
the connector. If you enable Express and try to save the profile without first configuring
the other settings, the system displays an error message and you cannot save the profile.
To configure a connector to use Express:
After configuring the settings on the other tabs for the connector, select the Express tab.
1
2 Specify the Express settings for the connector. Settings will vary depending on the connector.
Section Field Name Description
eCopy Connectors
for:
Microsoft Exchange
Lotus Notes
SMTP using LDAP
eCopy Connectors
for:
Fax via Lotus Notes
Fax via Microsoft
Exchange
Fax via SMTP
Enable Enables Express for the connector.
Subject The subject line for the e-mail to which the scanned
document is attached.
Note The text included in the body of the e-mail to which
the scanned document is attached.
To: List of e-mail addresses that will receive the e-mail. To
Cc:
Enable Enables Express for the connector.
Subject The subject line for the fax to which the scanned
Fax Number The fax number to which the scanned document is
Attach Cover
Page/Sheet
add more recipients press Add and use the Add
Recipients window to add recipients from your
address book. See the “Express Add Recipients
settings” topic in the Connector Help.
document is attached.
sent.
Attaches a cover page to the fax.
Page 75

eCopy ShareScan OP Installation and Setup Guide | 67
Section Field Name Description
eCopy Connector for
Captaris RightFax
Enable Enables Express for the connector.
Billing Code 1 Includes the first billing code set on the Configure tab.
Test Tests that the billing code is correctly configured for
RightFax.
When you click Te st , the labels of the fields Billing
Code 1 and Billing Code 2 change to reflect the field
titles shown on the Configure tab.
Billing Code 2 Includes the second billing code set on the
Configuration tab.
Description Description of the billing code.
Name The name of the fax recipient.
Fax Number The fax number to which the scanned document is
sent.
Note The text included in the body of the fax to which the
scanned document is attached
Attach Cover
Sheet
Attaches a cover page to the fax.
Important! A cover sheet can only be sent with a fax if
the Use Cover Sheet option is enabled in the RightFax
FaxUtil client for the authenticated user (see your
RightFax documentation).
3 Click Save, select or specify the profile name, then click Save.
To configure the Scan to eCopy Desktop connector to use Express:
There is no separate Express tab for Scan to eCopy Desktop. To provide Express functionality in a
Scan to eCopy Desktop profile, follow these steps:
1 Enable Session Logon.
2 On the Configure tab, select Allow Single recipients only and select Authenticate users.
3 Click Save, select or specify the profile name, then click Save.
Note: Users must sign up for Scan to eCopy Desktop the first time they use the connector;
subsequently, the connector does not show the Recipient and Logon screens, and the
connector sends the scanned document directly to the inbox.
Page 76

68 | Configuring connectors
Configuring Search while typing
The Search while typing function enables ShareScan OP to automatically search for matching
address list entries after each character the user enters. This is a useful feature when the user is
searching a long list for an entry. The user does not have to type the entire name in the field.
Example:
A user wants to enter “Chris Levesque” in a user name field. As the user enters “c”, the client
displays the first address entry that begins with ‘c’. As the user enters “h”, the client
displays the first address entry that begins with “ch”. As the user enters “r”, the client
displays the first address entry that begins with “chr”. If there are multiple users with the
name “Chris”, the user can press the down arrow and select “Chris Levesque”.
eCopy recommends that you select this option only when the address list server responds fast
enough to allow rapid auto-completion.
By default, this function is enabled. If you do not want to use it, you must clear the
typing
check box.
Search while
If the Search while typing option is not enabled, a user can manually activate the option. If the
client is configured to use the hard keyboard, the user enters one or more characters and then
presses the Search icon. If the client is configured to use the on-screen (soft) keyboard, the user
enters one or more characters and then presses the Search button. For example, the user enters ‘c’
and nothing happens. The user then presses the Search icon or button; the client then fills in the
field with the first address list entry beginning with ‘c’.
Page 77

eCopy ShareScan OP Installation and Setup Guide | 69
About the Field Editor
When you create file name fields or index fields, you select the field type in the Field Editor or in
the Index Field Editor. The following table lists all available field types. Each editor supports a
unique group of field types.
Field Type Description
Alphanumeric Field size: The minimum and maximum number of characters allowed.
Remember: The number of previous entries to display when the user is prompted
for the naming information. If set to zero, no previous values are displayed.
Batch Number Length: The maximum number of digits allowed for the batch number, including
leading zeroes.
Leading zeroes: Use leading zeroes in the batch number. For example, if you
specify 3 in the Length field and you enable leading zeroes, batches are numbered
“001”, “002”, … , “010”, “011”, … , “100”, “101”, … , “999”.
If you do not enable leading zeroes, batches are numbered “1”, “2”, etc.
Database The database location in which the list of values for the field is stored. Only
available in Quick Connect.
Date Format: The appropriate date format according to local conventions.
Destination Path The path to the destination on the network where the document is stored.
Device Name No additional settings.
File Name The name of the scanned file.
File Size The size (in KB) of the scanned file.
List Set as Default: Click to make the selected list member the default selection.
: Creates a new list entry.
: Deletes the selected list entry.
: Moves the selected list entry up or down.
Logged on User The user whose credentials were used to scan the file at the device.
Number of Pages The number of pages in the scanned file.
Numeric Field Size: The minimum and maximum number of digits allowed.
Leading zeroes: Pads all values with leading zeroes to make their length equal to
the maximum field size.
Remember: The number of previous entries to display when the user is prompted
for the naming information. If set to zero, no previous values are displayed.
Separator Value: The field separator character.
Time Format: Select the time format.
Page 78

70 | Configuring connectors
Configuring the fax address format
For fax connectors, you must define the fax address format required by your fax server application
or Internet fax service.
To configure the fax address format:
In the console tree, click the name of the fax connector.
1
2 On the Fax Format tab, click the Format button. The Fax Address Format window opens.
3 Refer to the documentation for your fax application to obtain the correct format for fax
addresses. A sample format is shown below:
Recipient Name Fax Number
[FAX:Jane Doe@/FN=555-1212/CS=]
Prefix
Name Separator
Important! Since fax application vendors change these formatting schemes frequently, make
sure you obtain the current format.
1 Start building the address by adding components. For example, to include a prefix, select Prefix
from the list on the left and then click
2 You can re-order the fax address components using the Move Up and Move Down buttons.
Fax Prefix Cover Page Attached
Add.
Suffix
Page 79

eCopy ShareScan OP Installation and Setup Guide | 71
3 For each component, select the Value field (for example, Prefix Value), click Modify, enter the
appropriate prefix value in the
appears in the
4 When you finish building the fax address, click OK to close the Fax Address Format window.
Fax Address Format window.
Modify Value window, and then click OK. The completed string
About configuring MSDE for address book support
MSDE address book support is available for all ShareScan OP mail and fax connectors.
eCopy ShareScan OP’s address book database stores e-mail and fax addresses typed in at the
eCopy-enabled device. This enables users to select addresses from a local address book instead of
having to type a recipient’s complete address each time.
ShareScan OP uses Microsoft SQL Server Desktop Engine (MSDE) to store these addresses.
Important! You must use MSDE SP3, which is included with ShareScan OP; this is because
ShareScan OP has not been tested with other versions.
MSDE SP3 requires MDAC 2.8 or later. If you are using Microsoft Windows 2000, you
must install MDAC 2.8 because it is not included with Windows 2000.
All ShareScan OP Services Managers can share the address book database, which can be on any
machine on your network. You can, however, choose to create multiple address book databases on
the same MSDE installation. For example, you can create a database for Engineering and another
one for Sales. If you are using e-mail and fax connectors, you should create a separate database for
each.
All mail and fax connectors provided by eCopy, Inc., include global address book support that
allows users to select recipients from the Global Address List. Therefore, you do not need to
configure MSDE for global address book support.
Page 80

72 | Configuring connectors
Installing MSDE
You install MSDE SP3 using the ShareScan OP Setup program.
To install MSDE:
Insert the ShareScanOP installation CD into the CD drive and then click Optional
1
Components
2 Select Install MSDE SP3.
.
During installation, MSDE will prompt you for a password. You will need this password when
you create an address book database.
3 When the installation is finished, restart the computer and verify that SQL Server is running.
Verifying that SQL Server is running
To verify that SQL Server is running:
■ Check the MSSQLServer icon in the taskbar status area. The green arrow indicates that SQL
Server is running. You can create a database (see “Creating an address book database” on
page 73).
■ When the arrow is not green or is missing, SQL Server is not running. You must manually
configure the protocols.
To manually configure the SQL Server networking protocols:
Run the SQL Server Network Utility by executing the following command:
1
C:\Program Files\Microsoft SQL Server\80\Tools\Binn\SVRNETCN.exe
2 In the SQL Server Network Utility window, enable Named Pipes and TCP/IP and then click OK.
3 Open the SQL Service Manager by double-clicking the server icon in the taskbar status area. If
the icon is not displayed, execute the following command:
C:\Program Files\Microsoft SQL Server\80\Tools\Binn\sqlmangr.exe
4 Select your server and SQL Server as the service and then click Stop.
5 Click Start/Continue and then restart the computer.
SQL Server should now be running and the icon should have a green arrow.
Page 81

eCopy ShareScan OP Installation and Setup Guide | 73
Creating an address book database
You can create an address book database on any PC running ShareScan OP Services Manager. Once
you have created the database, you can select it from other Services Managers.
Note: If the Windows Firewall is on, sqlserver.exe must be in the exceptions list.
To create an address book database:
In the console tree, select your e-mail or fax connector, click Properties, and then select the
1
Address Books or Local Address Book tab.
2 Under Internet Address book for mail connectors or under Address Books for fax connectors,
click
Create. The Create an Internet/Fax Address Book Database window opens.
>In the
> Enter the administrator’s user ID (
SQL Server Name list, select the machine where you installed MSDE.
sa) and the password you entered when you installed
MSDE.
>In the
>Click
3 To use the new database with the current Services Manager, click Connect Now. After
Address Book Name field, enter a name for the database.
Create.
connecting to the database, a sample entry appears.
4 To enable the database for use with the connector, select the Enable check box.
5 Click Save, select or specify the profile name, then click Save.
Page 82

74 | Configuring connectors
Configuring a connector to use the address book
After creating and enabling the address book, you can configure connectors to use it.
To configure a connector to use the address book:
In the console tree, click your mail or fax connector, click Properties, and then click the Local
1
Address Book
2 Under Internet Address Book for mail connectors or Fax Address Book for fax connectors,
click
Choose. The Data Link Properties window opens.
3 Select the Provider tab and select Microsoft OLE DB Provider for SQL Server.
4 Select the Connection tab.
Step Option Description
Select or enter a
server name.
Enter information to
log on to the server.
Select the database
on the server.
or Address Books tab.
Use a specific user
name and
password
Allow saving
password
Test Connection Click to test the connection to the database.
The name of your server.
User name: sa
Password: The password specified when you
installed MSDE.
You must select this option to correctly configure
the address book.
The address book database that you want the
connector to use.
5 Click OK to close the window and return to the Local Address Book or Address Books tab.
6 To verify that you can manually add an entry to the database, click Add, enter user information
in the
Add a Contact window, then click Add.
7 If the address book is not enabled, select the Enable check box.
8 Click Save, select or specify the profile name, then click Save.
Page 83

eCopy ShareScan OP Installation and Setup Guide | 75
About configuring connector Services
Use the tabs in the connector Services window to configure Services settings for each connector
profile.
Document Settings
Use the Document Settings tab to specify default settings for connector profile-specific options,
including encryption, searchable text, and image format, and to specify whether the user can
change the settings at the eCopy-enabled device. The user-modifiable options are available when
the user presses
Note: The table in step 2 lists all available settings. Each connector supports a unique group of
To specify the Document Settings:
In the console tree, click <connector name> > Services, then click the Document Settings tab.
1
2 Specify the Document Settings for the connector. The following table lists all available settings.
To see which settings are available for each connector, see the Document Settings Matrix topic
in the Help.
Services in the scan preview window.
settings.
Option Setting Description
Encryption
This option is
for PDF and
eCopy file
formats only.
Searchable
Te xt
This option is
for PDF and
eCopy file
formats only.
On The connector prompts the user to enter an encryption
password. All scanned documents will be encrypted by default.
If you select User modify, the user can choose encryption on a
document by document basis at the device.
Off Document encryption will not be available for use with the
selected profile.
User modify The user can override the default encryption setting at the
device.
Document
Security
On The connector processes all scanned documents using the OCR
Off Searchable text will not be available for use with the selected
User modify The user can override the default searchable text setting at the
Set document passwords and permissions in the Document
Security window (see the Document Security Settings topic in
the Connector help).
engine, and embeds searchable text in the image file.
If you select User modify, the user can choose not to make
the document text searchable on a document by document
basis at the device.
profile.
device.
Page 84

76 | Configuring connectors
Option Setting Description
File Format TIF Fax
Document
Name
Blank Page
Removal
This option is
only available
for black and
white
documents.
Bates
Numbering
Specifies the default image format for use with the selected
TIF
PDF
eCopy
profile. TIF Fax supports Group3 2D 1-bit. TIF supports Group4
2D 1-bit, GrayScale 8-bit, and Color 24-bit.
If you select a TIF option, you must disable the Searchable
Te xt and Encryption options; they are not compatible with
the TIF format.
Color pages that are scanned using the PDF or eCopy format
are automatically compressed.
User modify The user can override the default image format at the device.
Default Image files will be named using the default naming format:
DeviceName_ConnectorID_<DateTime>.ext
Specify
Name
Select Specify name and click <specify name here>. Enter a
default file name.
Advanced Allows you to build a file name by specifying the fields that
make up the name. Use the Add/Edit File Name Fields
window and the Field Editor to specify the fields in the file
name.
The connector only adds the Authenticated User name to the
file name if Session Logon is enabled.
User modify Only available if you select Specify Name. Allows the user to
change the file name at the device.
On Removes blank pages from scanned documents when the
connector finds them within the file size range specified in the
Threshold field.
Off Retains blank pages in the scanned documents.
Threshold If Blank page removal is On, the Threshold value is the size of
the file, in kilobytes, that triggers a search for blank pages in
the scanned documents. The threshold can be an absolute
value or a range, for example: 10 or 10-25.
User modify The user can override the default setting at the device.
On Bates Numbering will be available for use with the selected
profile. When Bates Numbering is enabled, the Bates button
appears in the client’s scan preview window.
Off Bates Numbering will not be available able for use with the
selected profile.
Page 85

Option Setting Description
Batching
This option is
for PDF and
eCopy file
formats only.
Off Batching will not be available for the selected profile at the
device.
Number of
pages
Creates a new document after a specified number of pages.
Click Pages and enter the number of pages.
File size Creates a new document when the file reaches a specified size.
Click Size and enter the file size, in KB.
Blank page Creates a new document when the system finds a blank page
within the range specified in the Threshold field. For black and
white documents, if Blank Page Removal is On, the blank
pages that divide the documents are removed from the final
document(s).
User modify The user can turn batching on or off at the device, but cannot
change the typeof batching.
Document
Trac ki ng
Not available
for the Copy
connector.
On When Activity Tracking is enabled for the device, this option
creates a black and white PDF file, without including encryption
or searchable text information, and stores it in the folder
specified on the Document Tracking tab located on the
Activity Tracking pane.
The file name for the document will be added to the Activity
Tracking log.
Off Disables Document Tracking. Activity Tracking, which is a
separate feature, may still be enabled.
eCopy ShareScan OP Installation and Setup Guide | 77
3 Click Save, select or specify the profile name, and then click Save.
Page 86

78 | Configuring connectors
Configuring Scanner Settings
Use Scanner Settings to attach scanner settings to a connector profile. For example, assume that a
user always needs Legal as the output paper size, with the content scaled down to 90%. You can
specify these settings in a profile so that the user does not have to change the settings at the
device.
If the device does not support a setting that you select, the connector uses the device’s default
settings.
To specify the Scanner Settings:
In the console tree, click <connector name> > Services, then click the Scanner Settings tab.
1
2 Specify the Scanner Settings for the connector.
Setting Description
Enable Scanner
Settings
Input Paper Size Select the paper size from the list. The list contains a complete list of
Output Paper Size Select the paper size from the list. The list contains a complete list of
Scaling Set the value between 20 and 100 percent.
Resolution Select from all available supported resolutions between 100 – 600 dpi.
Two-Sided Select from the list of standard options, for example: single-sided,
Color Depth (Pixel) Select from the list of supported color types.
Activates the scanner settings for this profile.
paper sizes currently supported by the Services Manager.
The default setting is Use Default. This allows the profile to use the
default device setting.
paper sizes currently supported by the Services Manager.
The default setting is Use Default. This allows the profile to use the
default device setting.
double-sided (book type) and double-sided (calendar type).
3 Click Save, select or specify the profile name, and then click Save.
Page 87

eCopy ShareScan OP Installation and Setup Guide | 79
Configuring Tracing settings
Use the Tracing tab to configure how you want to capture trace information in a log file to help
troubleshoot connector issues. You typically do this only when working with Technical Support.
Tracing will slow down overall system performance.
To configure the Tracing settings:
In the console tree, select <connector name> > Services.
1
2 On the Tr ac in g tab, specify the Tracing settings.
Section Field Name Description
Enable
Trac in g
File Daily Creates a new log file each day.
Log file
Location
On/Off Enables or disables tracing.
Unlimited file size Adds all log entries to a single file.
When file size
reaches
Rolling filenames If Tracing is configured for the automatic creation of new
Creates a new file when the file size reaches the specified
limit.
files, appends a numeric identifier to ensure uniqueness of
file names.
Specifies the folder where log files will be stored.
3 Click Save, select or specify the profile name, and then click Save.
Page 88

80 | Configuring connectors
Connector-specific configuration information
This section provides information about configuring each connector. For information about
configuring general properties, see “About configuring general Properties settings” on page 63.
For information about configuring connector services, see “About configuring connector Services”
on page 75.
Copy
Copy enables users to perform a variety of copying functions using an eCopy ShareScan OP client
embedded on a scanning device. When you activate Copy on a device running an embedded client,
the user does not need to quit the application to make copies.
Note: You can create Copy profiles on any ShareScan OP Services Manager, and publish them to any
Services Manager that supports the embedded client. However, you cannot run Copy on an
eCopy ScanStation.
Note: Copy is available for some, but not all, embedded clients. If you try to activate a Copy profile
on an unsupported device, the system will display an error message.
To configure a Copy profile:
In the console tree, select Copy > Properties.
1
2 On the Display tab, specify the Image and Label settings (see “Configuring the Display
settings” on page 63).
3 Click Save, select or specify the profile name, then click Save.
4 In the console tree, select Copy > Services.
Tracing is the only service available for this connector.
5 On the Tr ac in g tab, specify the Tr ac in g settings (see “Configuring Tracing settings” on
page 80).
6 Click Save, select the profile name, then click Save.
Page 89

eCopy ShareScan OP Installation and Setup Guide | 81
eCopy Connector for Microsoft Exchange
The eCopy connector for Microsoft Exchange enables users to send scanned documents from an
eCopy-enabled device as e-mail attachments from a generic account or from their personal
Microsoft Exchange account. eCopy recommends that you create a generic Microsoft Exchange
account for use by ShareScan OP.
ShareScan OP always uses the ShareScan OP User account information to log on to the Exchange
server and retrieve the Global Address List. It sends scanned documents from this account only if
you do not select the
User account.
Send from personal account option when you configure the ShareScan OP
If you select the
Send from personal account option, the connector prompts users to log on and a
copy of the message is automatically delivered to the sender's Sent Items folder.
Note: Make sure that Microsoft Outlook is the default mail package. You must configure Microsoft
Outlook 2000 to work with your Exchange server prior to using the ScanStation client.
eCopy also recommends that you configure Microsoft Outlook 2002 and 2003 to work with
the Exchange server. You must install Outlook on the same computer as the eCopy
ShareScan OP Services Manager so that the two applications can share common DLLs.
To configure properties for the eCopy Connector for Microsoft Exchange:
In the console tree, select Exchange > Properties.
1
2 On the Display tab, specify the Image and Label settings (see “Configuring the Display
settings” on page 63).
3 Select the Configure tab.
Field Description
Settings Summary Displays a read-only list of the settings you configure through the
Properties window.
Properties Opens the Properties window and allows you to configure custom
connector settings or to edit existing settings.
Defaults Restores the default settings for this tab.
Page 90

82 | Configuring connectors
4 Click Properties , then specify the basic settings.
Section Field/Button Name Description
ShareScan
OP User
1
User name The user name for logging on to the Exchange server.
Password The account password.
Domain The domain to which this user belongs (for Windows
Exchange server The name of the Exchange server.
Advanced Allows you to change the Active Directory Global
Test Click Te st to verify the logon information.
Search Search while typing Enables or disables the Search while typing function at
1
eCopy recommends that you create a generic Microsoft Exchange account for use by ShareScan OP.
The user name specified in this field must match the
name of the associated Exchange mailbox.
Note: The eCopy Connector for Microsoft Exchange
does not accept user names that contain spaces.
Make sure that the User Logon Name specified in the
Windows Active Server Directory or Exchange account
does not contain spaces.
authentication).
Catalog Server settings. You can change the server
and the port number, and specify whether the server
requires SSL for communication. After changing the
settings, click OK to return to the Basic Settings tab.
the device (see “Configuring Search while typing” on
page 68.)
Page 91

eCopy ShareScan OP Installation and Setup Guide | 83
5 Select the Advanced Settings tab, then specify the advanced settings.
Section Field Name Description
Sender Settings Send from personal
account
Prompts the user at the device to log on to
Exchange. The user can enter their personal logon
information or, if authorized, another user’s logon
information. The connector sends each e-mail
from the specified account.
If you do not select this check box, the connector
sends all e-mails from the user account specified
on the Basic Settings tab.
Add messages to
Send Items folder
Recipient Settings Allow user to select
recipients
Allow user to add
recipients to Cc list
Saves sent messages in the user’s Sent Items
folder.
Allows the user at the device to select recipients
for the scanned document.
Allows users to send a copy of a message to one or
more recipients who are not the primary recipients.
Send to self Disables the list of recipients and sends the
scanned documents only to the logged on user.
The user never selects any recipients. (You can use
the file name variable in the Subject or Notes line
to distinguish between the scanned documents.)
Other Advanced
Settings
Search Global
Address List
Search Outlook
Contacts
Allows the user at the device to search the Global
Address List and select recipients from it.
Allows the user at the device to search and select
recipients from their Outlook Contacts folder.
While Microsoft Outlook supports more than one
Contacts folder per user, the connector searches
for address entries only in the default Contacts
folder. If a user needs access to the addresses in a
specific Contacts folder, the user must make that
folder the default folder. For example, in Outlook
2002, click To ol s > Address Book. Click Tools >
Options, then select Contacts from the “Keep
personal addresses in” list. Since this procedure is
not the same for all Outlook clients, refer to your
Outlook documentation for information about
how to make a Contacts folder the default folder.
Enable user to
manually enter
addresses when
Allows the user at the device to enter e-mail
addresses not belonging to any of the other
address books or to the Contacts folder.
sending e-mail
6 Click OK.
Page 92

84 | Configuring connectors
7 Select the Local Address Book tab, then specify the settings.
Field Name Description
Enable
1
Allows you to configure the local address book that stores Internet e-mail
addresses entered at the device, and that are not in the Global Address
List or in the Contacts folder.
When you enable the Internet Address book, you can add, delete, import,
and export addresses. An imported address list must be a text file with a
list of comma-separated values (CSV) in the following format:
Last_Name,First_Name,Email_Address. You export the address book
database to a CSV file.
Search On Select the address book field against which the connector searches for
addresses.
Create Opens the Create an Internet Address Book Database window, where you
can create a new address book database using MSDE.
Choose Configures the connector to use the address book.
1
When Internet Address Book is enabled on the Local Address Book tab and Enable user to manually enter
addresses when sending email is selected on the Advanced Settings tab, the address entered by the user
at the device is automatically added to the address book.
8 On the Content tab, specify the settings (see “Configuring the Content settings” on page 64).
9 On the Express tab, specify the Express settings (see “Configuring Express” on page 66).
10 Click Save select or specify the profile name, then click Save.
To configure services for the eCopy Connector for Microsoft Exchange:
In the console tree, select Exchange > Services.
1
2 Configure the connector services (see “About configuring connector Services” on page 75).
3 Click Save, select the profile name, then click Save.
Page 93

eCopy ShareScan OP Installation and Setup Guide | 85
eCopy Connector for Fax via Microsoft Exchange
The eCopy connector for Fax via Microsoft Exchange enables users to scan and fax documents
from an eCopy-enabled device through an e-mail-to-fax gateway on the Microsoft Exchange
server. To use this connector, you must have a network fax server and the appropriate Exchange
server plug-in.
The scanned document, along with sender and recipient information, is sent to the Exchange
server using the local Microsoft Outlook client.
Note: Make sure that Microsoft Outlook is the default mail package. You must configure Microsoft
Outlook 2000 to work with your Exchange server prior to using the ScanStation client.
eCopy also recommends that you configure Microsoft Outlook 2002 and 2003 to work with
the Exchange server. You must install Outlook on the same computer as the eCopy
ShareScan OP Services Manager so that the two applications can share common DLLs.
The recipient’s fax number is included in the
To field (on the client) in the format required by the
fax server. The Exchange server plug-in recognizes the recipient address as a fax number and
hands the request off to the network fax server for delivery as a fax.
To configure properties for the eCopy Connector for Fax via Microsoft Exchange:
In the console tree, select Fax Exchange > Properties.
1
2 On the Display tab, specify the Image and Label settings (see “Configuring the Display
settings” on page 63).
Page 94

86 | Configuring connectors
3 Select the Configure tab, then specify the settings.
Section Field Name Description
ShareScan OP
1
User
User name The user name for logging on to the Exchange
Password The account password.
Domain The domain to which this user belongs (for
Exchange server The name of the Exchange server.
Test Verifies the logon information. If the test fails, click
Send from personal
mail account
Add messages to
Send Items folder
1
eCopy recommends that you create a generic Microsoft Exchange account for use by ShareScan OP.
server. The user name specified in this field must
match the name of the associated Exchange
mailbox.
Note: The eCopy Connector for Microsoft
Exchange does not accept user names that contain
spaces. Make sure that the User Logon Name
specified in the Windows Active Server Directory or
Exchange account does not contain spaces.
Windows authentication).
Show Details and resolve the connection issue
before proceeding. For example, make sure that
the user name matches the name of the associated
Exchange mailbox, and that the domain and
Exchange server names are accurate.
Prompts the user at the device to log on to
Exchange. The user can enter their personal logon
information or, if authorized, another user’s logon
information. The connector sends each message
from the specified account.
If you do not select this check box, the connector
sends all messages from the user account specified
on this tab.
Saves sent messages in the user’s Sent Items
folder.
4 Select the Fax Format tab, which displays samples of the current fax address format, then
specify the Fax format (see “Configuring the fax address format” on page 70).
If your fax server uses an embedded tag, enter the tag in the
Cover Page Via Embedded Tag
field. (Some fax servers, including Captaris RightFax, use an embedded tag to indicate that a
cover page is required.) Whenever the user requests a cover page, ShareScan OP adds the
embedded tag string to the body of the message.
Page 95

eCopy ShareScan OP Installation and Setup Guide | 87
5 Click the Address Books tab, then specify the settings.
Section Field Name Description
Fax Address
Book
Search Search while
Create Opens the Create a Fax Address Book Database window,
where you can create a new address book database using
MSDE (see “Creating an address book database” on
page 73).
Choose Configures the connector to use the address book (see
“Configuring a connector to use the address book” on
page 74).
Enable Allow users to search for and select recipients from the local
fax address book instead of having to type the fax number
each time. The local address book stores fax addresses
entered at the device.
When the address book is enabled, you can add, delete,
import, and export addresses. An imported address list must
be a text file with a list of comma-separated values (CSV) in
the following format:
Last_Name,First_Name,Fax_Number.
You export the address book database to a CSV file.
Enables or disables the Search while typing function at the
typing
device (see “Configuring Search while typing” on page 68).
6 On the Content tab, specify the Content settings (see “Configuring the Content settings” on
page 64).
7 On the Express tab, specify the Express settings (see “Configuring Express” on page 66).
8 Click Save, select or specify the profile name, then click Save.
To configure services for the eCopy Connector for Fax via Microsoft Exchange:
In the console tree, select Fax via Exchange > Services.
1
2 Configure the connector services (see “About configuring connector Services” on page 75).
3 Click Save, select the profile name, then click Save.
Page 96

88 | Configuring connectors
eCopy Connector for Fax via Print
The eCopy Connector for Fax via Print enables users to fax documents from an eCopy-enabled
device by sending the scanned document to a third-party fax driver. The fax driver then displays
its own user interface, if any, on the ScanStation client. Some fax drivers display an e-mail client.
Note: You can create Fax via Print profiles on any ShareScan OP Services Manager, and publish
them to any Services Manager that supports the embedded client. However, you cannot
run Fax via Print on a device with an embedded client.
You must configure the ScanStation client to use the hard keyboard. This is because the soft
keyboard does not support third-party fax driver interfaces.
Before configuring this connector, install the fax driver on the ScanStation, or, if supported by the
driver, on a network print server.
To configure properties for the eCopy Connector for Fax via Print:
In the console tree, click Fax via Print > Properties.
1
2 On the Display tab, specify the Image and Label settings (see “Configuring the Display
settings” on page 63).
3 Select the Configure tab, then specify the settings.
Field Name Description
Print Driver Displays the available print drivers.
Authentication Displays the types of user authentication:
> None: The connector will not prompt the user for logon information.
> Windows: Select the default domain.
> Novell NetWare: Specify the default tree.
Users can change the domain or tree when they enter their logon
information on the Logon screen at the device.
4 Click Save, select or specify the profile name, then click Save.
To configure services for the eCopy Connector for Fax via Print:
In the console tree, select Fax via Print > Services.
1
2 Configure the connector services (see “About configuring connector Services” on page 75).
3 Click Save, select the profile name, then click Save.
Page 97

eCopy ShareScan OP Installation and Setup Guide | 89
eCopy Connector for Lotus Notes Mail
The eCopy Connector for Lotus Notes Mail enables users to send scanned documents from an
eCopy-enabled device as e-mail attachments from either a generic account or from their own
personal Lotus Notes account. It is recommended that you create a generic Lotus Notes account
for use by ShareScan OP.
Before sending e-mail from a personal Lotus Notes account, you must first configure the
eCopyMail pass-through database on a Domino HTTP server. Refer to the technical
documentation in the following directory for further information and setup instructions:
c:\Program
Files\eCopy\ShareScanOP\ShareScanOPManager\Connectors\LNotesMail\PassThruDB
The connector provides access to the Lotus Notes address book as well as to the local Internet
address book. When sending from a personal e-mail account, a copy of the message is
automatically delivered to the sender’s Inbox folder.
Important! You must install the Lotus Notes client on the ShareScan OP Services Manager PC before
installing ShareScan OP. If you install the Notes client after installing ShareScan OP, you
must manually add the Notes client executable to the Path environment variable.
ShareScan OP typically uses the login name specified in the Active ID file to access the Global
Address List, while sending messages from the user’s personal Notes email account.
To configure properties for the eCopy Connector for Lotus Notes Mail:
In the console tree, select Lotus Notes Mail > Properties.
1
2 On the Display tab, specify the Image and Label settings (see “Configuring the Display
settings” on page 63).
Page 98

90 | Configuring connectors
3 Select the Configure tab, then specify the account settings.
Section Field Name Description
ShareScan OP
User
Specifies the
information about
the account used to
access the Global
Address List.
Active ID File The name of the Lotus Notes ID file installed on
the local machine.
User Name The user name associated with the Active ID file.
Password The password associated with the Active ID file.
Test Click Te st to verify the logon information. If the
test fails, click Show Details and resolve the
connection issue before proceeding.
Email Send
Options
Send from personal
account
Allows users to send e-mail from their personal
Notes e-mail account, rather than from the
ShareScan OP User account. This option is not
available if the Lotus Notes Address Book option
on the Address Books tab is disabled.
If you select this option, you must configure a
Domino HTTP/HTTPS server to use the eCopyMail
pass-through database. Then specify the Domino
Server, Mail Send Port, and encryption options,
which are available only if you select the Send
from personal account option.
Domino Server The name of the Domino HTTP/HTTPS server
where the eCopyMail pass-through database is
installed. If using HTTP, enter the server name, IP
address, or fully qualified domain name, as
appropriate, for your Domino environment. If
using SSL/HTTPS, enter the server name exactly as
it appears in the SSL certificate. For example, if the
name is “lsphere.ecopydocs.com”, enter this text
in the field.
Mail Send Port
The port number used to send mail (defaults are
80 for HTTP; 443 for SSL/HTTP).
Use SSL/HTTPS Select this check box if you want to encrypt
communication with the HTTP server using SSL/
HTTPS
Send to self A connector profile that uses this option sends
scanned documents only to the logged on user.
The user never selects any recipients. (You can use
the file name variable in the Subject or Notes line
to distinguish between the scanned documents.)
Enable user to Cc recipients when
sending mail
Allows users to send a copy of a message to one or
more recipients who are not the primary recipients.
Page 99

eCopy ShareScan OP Installation and Setup Guide | 91
4 Click the Address Books tab, then specify the settings.
Section Field Name Description
Lotus Notes
Address Book
Enable Allows users to search for and select recipients from the
Lotus Notes address book.
Sender selection is available only when the Send from
personal account check box is selected on the Configure
tab.
Address Book Select the Global Address List.
Search on Search options: First Name, First Name Long Format, or Last
Name.
Internet
Address Book
Enable Enables the local address book that is used to store Internet
e-mail addresses entered manually at the device.
When the address book is enabled, you can add, delete,
import, and export addresses. An imported address list must
be a text file with a list of comma-separated values (CSV) in
the following format: Last_Name,First_Name,Fax_Number.
You export the address book database to a CSV file.
Search on Search options: First Name, Last Name, Email Address.
Create Opens the Create an Internet Address Book Database
window, where you can create a new address book
database using MSDE (see “Creating an address book
database” on page 73).
Choose Configures the connector to use the address book (see
“Configuring a connector to use the address book” on
page 74).
Search Search while
typing
Enables or disables the Search while typing function at the
device (see “Configuring Search while typing” on page 68).
5 On the Content tab, specify the settings (see “Configuring the Content settings” on page 64).
6 On the Express tab, specify the Express settings (see “Configuring Express” on page 66).
7 Click Save, select or specify the profile name, then click Save.
To configure services for the eCopy Connector for Lotus Notes Mail:
In the console tree, select Lotus Notes Mail > Services.
1
2 Configure the connector services (see “About configuring connector Services” on page 75).
3 Click Save, select or specify the profile name, then click Save.
Page 100

92 | Configuring connectors
eCopy Connector for Fax via Lotus Notes
The eCopy Connector for Fax via Lotus Notes enables users to scan and fax documents from an
eCopy-enabled device through an e-mail-to-fax gateway on the Lotus Notes server. To use this
connector, you must have a network fax server and the appropriate Notes server plug-in.
The scanned document, along with sender and recipient information, is sent to the Notes server
using the local Lotus Notes client. eCopy recommends that you create a generic Lotus Notes
account for use by ShareScan OP.
Before faxing from a personal Lotus Notes account, you must first configure the eCopyMail passthrough database on a Domino HTTP server. Refer to the technical documentation in the
following directory for further information and setup instructions:
c:\Program
Files\eCopy\ShareScanOP\ShareScanOPManager\Connectors\LNotesMail\PassThruDB
The connector provides access to the Lotus Notes address book as well as to the local Internet
address book. When sending from a personal e-mail account, a copy of the message is
automatically delivered to the sender’s Inbox folder.
Important! You must install the Lotus Notes client on the ShareScan OP Services Manager PC before
installing ShareScan OP. If you install the Notes client after installing ShareScan OP, you
must manually add the Notes client executable to the Path environment variable.
The recipient’s fax number is included in the
To field (on the client) in the format required by the
fax server. The Notes server plug-in recognizes the recipient address as a fax number and hands
the request off to the network fax server for delivery as a fax.
ShareScan OP typically uses the login name specified in the Active ID file to access the global
address list, while sending messages from the user’s personal Notes email account.
To configure properties for the eCopy Connector for Fax via Lotus Notes:
In the console tree, select Fax via Lotus Notes > Properties.
1
2 On the Display tab, specify the Image and Label settings (see “Configuring the Display
settings” on page 63).
 Loading...