


ii |
PRO EVOLUTION SOCCER 2011 |
|
 WARNING Before playing this game, read the Xbox 360® console and accessory manuals for important safety and health information. Keep all manuals for future reference. For replacement console and accessory manuals, go to www.xbox.com/support.
Important Health Warning About Playing Video Games
Photosensitive seizures
A very small percentage of people may experience a seizure when exposed to certain visual images, including flashing lights or patterns that may appear in video games. Even people who have no history of seizures or epilepsy may have an undiagnosed condition that can cause these “photosensitive epileptic seizures” while watching video games.
These seizures may have a variety of symptoms, including lightheadedness, altered vision, eye or face twitching, jerking or shaking of arms or legs, disorientation, confusion, or momentary loss of awareness. Seizures may also cause loss of consciousness or convulsions that can lead to injury from falling down or striking nearby objects.
Immediately stop playing and consult a doctor if you experience any of these symptoms. Parents should watch for or ask their children about the above symptoms—children and teenagers are more likely than adults to experience these seizures. The risk of photosensitive epileptic seizures may be reduced by taking the following precautions: Sit farther from the screen; use a smaller screen; play in a well-lit room; do not play when you are drowsy or fatigued.
If you or any of your relatives have a history of seizures or epilepsy, consult a doctor before playing.
ESRB Game Ratings
The Entertainment Software Rating Board (ESRB) ratings are designed to provide consumers, especially parents, with concise, impartial guidance about the ageappropriateness and content of computer and video games. This information can help consumers make informed purchase decisions about which games they deem suitable for their children and families.
ESRB ratings have two equal parts:
•Rating Symbols suggest age appropriateness for the game. These symbols appear on the front of virtually every game box available for retail sale or rental in the United States and Canada.
•Content Descriptors indicate elements in a game that may have triggered a particular rating and/or may be of interest or concern. The descriptors appear on the back of the box next to the rating symbol.
ON FRONT |
|
|
|
ON BACK |
|||||
|
|
VIDEO |
|
|
|
||||
|
|
|
|||||||
|
|
GAME |
|
|
|
|
|
|
|
|
|
|
|
|
|
|
|
|
|
|
|
|
|
|
|
|
|
|
|
|
|
E |
|
|
|
||||
|
|
|
|||||||
For more information, visit www.ESRB.org.
PRO EVOLUTION SOCCER 2011 |
01 |
CONTENTS |
Getting Started |
02 |
Controls |
02 |
Basic Controls |
03 |
Dribbling & Trapping |
03 |
Passing |
03 |
Crossing |
04 |
Shooting |
04 |
Tricks & Skills |
04 |
Defense, General Controls |
06 |
Set-Pieces & Dead-Ball Situations |
06 |
Match Screens |
07 |
Game Plan |
08 |
Game Modes |
09 |
Edit Mode |
10 |
Gallery |
11 |
System Settings |
11 |
UEFA Champions League |
11 |
Master League |
11 |
Become a Legend |
12 |
Connect to Xbox LIVE (Online) |
13 |
Legal |
14 |
Warranty/Product Support |
15 |
Thank you for purchasing PES® 2011 from Konami. Please read this manual thoroughly before playing the game. Also, please keep this manual in a safe place so you can refer to it easily later.
Note: Konami does not re-issue manuals.
Konami is continuously striving to improve its products. As a result this product may differ slightly from another depending on the purchase date.
02 |
PRO EVOLUTION SOCCER 2011 |
GETTING STARTED / CONTROLS |
 Getting Started
If this is your first time playing, press any button on the Title Screen to move to the Default Settings Screen. If you have previously saved game data, you will advance to the Top Menu.
 Default Settings
Before playing a game for the first time, you can select between five different levels of difficulty. You can also change the difficulty after you begin your game. System data, where all game information is saved, will then be created automatically. After confirming this step has been completed, proceed to the Top Menu.
 Saving Data and Memory Required
In order to store and update your “System data” and “Edit data” and save your progress in competitions, you will need a Xbox 360 Hard Drive or a Xbox 360 Memory Unit in memory unit port A. The “System data” and “Edit data” can only be saved to or loaded from a Xbox 360 Hard Drive or a Xbox 360 Memory Unit inserted into memory unit port A. Each file saved to the Xbox 360 Hard Drive or a Xbox 360 Memory Unit requires a certain amount of free space, as the following table explains.
 Top Menu Screen
The Top Menu select screen provides access to PES 2011 competitions, options, and features. Use the left stick or D-pad to highlight the required option, and then press the Abutton to make your selection.
 Using the Help Function
PES 2011 is a massive, feature-packed game, but every effort has been made to make it as accessible as possible. When the Help icon appears at the bottom of the screen, you can press the corresponding button to call up the Help Menu to view helpful advice. Please select your preferred language from the language selection screen displayed when booting up the game.
Note: This game is presented in Dolby Digital 5.1 surround sound. Connect your Microsoft Xbox 360 to a sound system with Dolby Digital technology using a digital optical cable. Connect the digital optical cable to the base of an Xbox 360 Component HD AV Cable, Xbox 360 VGA HD AVCable, or Xbox 360 S-Video AV Cable. From the “system” blade of the Xbox 360 dashboard, choose “console settings,” then select “audio options,” then “digital output,” and finally select “Dolby Digital 5.1” to experience the excitement of surround sound.
 Family Settings
These easy and flexible tools enable parents and caregivers to decide which games young game players can access based on the content rating. For more information, go to www.xbox.com/familysettings
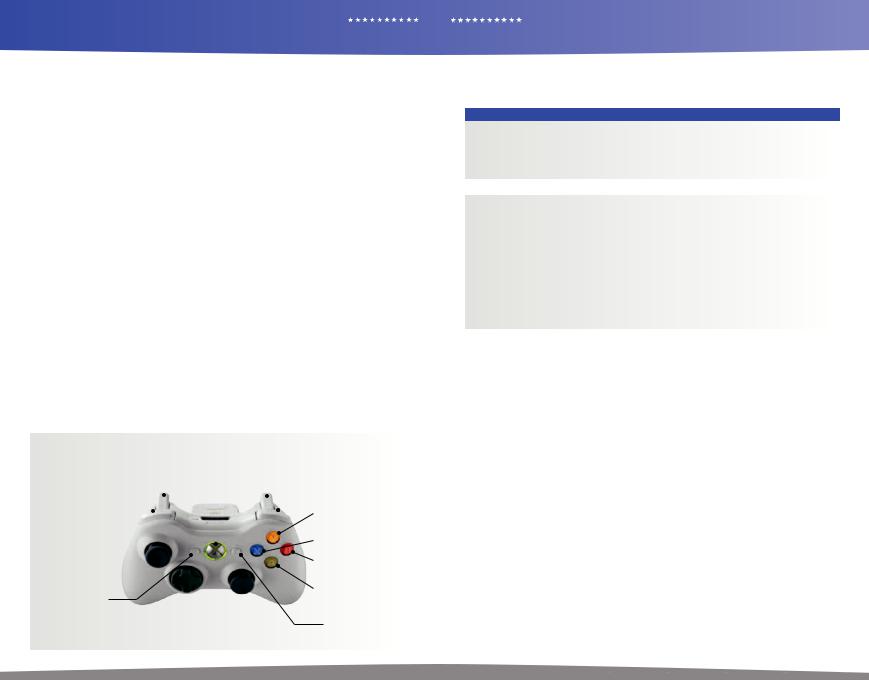
 Default Controls
Use your controller to navigate menu screens. Use left stick or D-pad to move through menus, the A button to confirm a selection, and the B button to cancel or move back through screens.
Left Trigger ] |
|
|
à |
|
x Right Trigger |
||||||||
|
|
|
|
|
|
|
|
|
|
|
|
||
Left Bumper _ |
|
|
|
Xbox Guide Button |
|
|
|
` Right Bumper |
|||||
|
|
|
|
|
|
|
|
|
|
|
|||
|
|
|
|
|
|
|
|||||||
|
|
|
|
|
|
|
|
|
|
|
|
|
Y |
|
|
|
|
|
|
|
|
|
|
|
|
|
|
Left Stick L |
|
|
|
|
|
|
|
|
|
|
|
|
X |
|
|
|
|
|
|
|
|
|
|
B |
|||
|
|
|
|
|
|
|
|
|
|||||
|
|
|
|
|
|
|
|
|
|
|
|
|
|
< |
|
|
|
|
|
|
|
|
|
|
|
|
A |
|
|
|
|
|
|
|
|
|
|
||||
|
|
|
|
|
|
|
|
|
|
||||
|
|
|
|
|
|
|
|
|
|
|
|
|
|
|
|
|
|
|
|
|
|
|
|
|
|
|
|
|
|
|
|
|
|
C |
> |
||||||
|
|
|
|
|
l |
|
|||||||
|
|
|
|
|
D-pad |
|
Right Stick |
||||||
PRO EVOLUTIONCONTROLSSOCCER 2011 03
For the basic controls used during a match, refer to the table below. Read pages 3-7 for more advanced controls. You can change the assignments for each button by going to“Controller Settings”in“System Settings.”(See System Settings, page 11). For this game, the left stick and D-pad control the same actions. When this manual refers to“left stick,” you may also use the D-pad in the same manner.
BASIC ATTACKING CONTROLS
ybutton: |
Switch between players |
Bbutton: |
Cross/long pass |
|
zbutton: |
Dash |
|
Abutton: |
Short pass |
Left Stick: |
Player movement, dribbling |
Xbutton: |
Shoot |
|
D-pad: |
Player movement, dribbling |
Right Stick: |
Manual pass |
|
Ybutton: |
Through ball |
|
|
|
|
|
|
|
|
BASIC DEFENSE CONTROLS |
|
|
|
|
ybutton: |
|
Switch between players |
|
|
zbutton: |
|
Dash |
|
|
Left Stick: |
|
Player movement |
|
|
D-pad: |
|
Player movement |
|
|
Ybutton (hold down): |
Goalkeeper |
|
|
|
Bbutton: |
|
Sliding tackle |
|
|
Abutton (hold down): |
Tackle/apply pressure with player you are controlling |
|||
Xbutton (hold down): |
Clearance/apply pressure with player you are not controlling |
|||
|
|
(hold down button) |
|
|
Players only go and pressure opposition players if you press the Abutton + the left stick.
Otherwise, players try to hold up the opposition by positioning themselves right in front of them and tracking their moves.
 Dribbling & Trapping
Dribbling: Push the left stick to move when the ball is at your player’s feet.
Sideways Dribble: Hold the xand push the left stick at 90° to the direction of movement. Just a small number of players can perform this dribble.
Dash Dribble: Press the zbutton while dribbling to sprint.
Extend Time between Ball Touches: While holding the z button to sprint with the ball at your player’s feet, rapidly push the left stick two or three times between touches to knock the ball further ahead. You can also achieve the same effect by repeatedly tapping the zbutton.
Greater Distance between Ball Touches: While running with the ball with the zbutton depressed, hold the x button and push the left stick 45° to either side of the current direction of movement.
Slow Dribble: Keep the xbutton depressed while dribbling to perform a “slow dribble.”The ball will hardly leave your player’s feet as you perform this technique, and it can be followed by a quick change of direction or one of many feints.
Stop the Ball 1: Release the left stick and press the z button to stop the ball’s movement while dribbling. Stop the Ball 2: Release the left stick and press the x button to instruct your player to stop and face your opponent’s goal.
Jump: When an opponent executes a sliding tackle, press the xbutton to attempt to jump over it. Control Ball: When receiving a pass, push the left stick to control the ball.
Turn without Touching the ball: To instruct a player to turn and run onto an incoming pass without making an initial touch, hold the zbutton and push the left stick in the direction that the ball is moving.
 Passing
Note: Push the left stick to specify the direction a pass should be played in.
Short Pass/Head Ball: Press the Abutton to make a short pass along the ground or head the ball. Hold the A button for longer to pass to a more distant player.
Backheel: Quickly push the left stick away from the player’s current direction of movement and then press the A button.
First-Time Pass: Press the Abutton before your player traps the ball.
Long Pass: Press the Bbutton. The distance of the pass depends on the length of time that the Bbutton is held. First-Time Long Pass: Press the Bbutton before your player traps the ball.
04 PROCONTROLSEVOLUTION SOCCER 2011
Through Ball: Press the Y button. Holding the Y button down for longer will direct the pass to a more distant player.
First-Time Through Ball: Press the Y button before your player traps the ball. Chipped Through Ball: Hold the ybutton and press the Y button.
One-Two Pass: Hold down the ybutton and press the Abutton to make a short pass, then press the Ybutton before your teammate receives the ball to execute a return pass.
One-Two Pass with Chipped Return Ball: Hold down the y button and press the A or Y button to make a short pass, then press the y + Ybuttons before your teammate receives the ball to execute a chipped return pass.
Pass and Move: Press the xbutton immediately after passing the ball to instruct the player to make a forward run. Manual Pass: While holding the w button, push the right stick in the desired direction and press the A or Y button to execute the pass.
Manual Long Pass: While holding the wbutton + push the right stick in the desired direction to execute the pass.
 Crossing
Note: Push the left stick to specify the direction of a cross.
High Cross: From deep in your opponent’s half, press the B button.
Low Cross: From deep inside your opponent’s half, press the Bbutton twice.
Cross along the Ground: From deep inside your opponent’s half, press the B button three times to send in a low cross along the ground.
Lofted Ball: Press the xbutton while delivering a cross to loft the ball high into the air.
Early Cross: Hold the yand Bbuttons to cross the ball from any position in your opponent’s half.
 Shooting
Notes on shooting: Press the X button to build up the power gauge. Release the X button when the power gauge reaches the desired level, and your player will send a shot towards the goal. The length of the power gauge determines the power and height of your shot. Push the left stick to specify the required direction as the shot is made.
Shoot: Press the X button.
First-Time Shot/Head Ball: Press the Xbutton just before the ball reaches your player to make a first-time shot or header on goal.
Controlled Shot: Press the xbutton when the power gauge reaches the desired level to make a shot that trades power for precision.
Chip Shot: Hold the ybutton and press the X button.
Chip Shot Type 2: For a lob with a lower trajectory, press the Xbutton and then press the zbutton when the power gauge appears.
 Tricks & Skills
Note: All moves are assuming that the player is facing forward.
Shoulder Feint Skills
Upper body Feint: From a stationary position, push the right stick to the side.
Matthews Feint: From a stationary position, push and hold the right stick to the left, then push the left stick diagonally right. (Or hold the right stick to the right, then push the left stick diagonally left).
Matthews Feint into Side-Slip: From a stationary position, push and hold the right stick to the left, then push the left stick to the right. (Or hold the right stick to the right, then push the left stick to the left).
Scissors Feint Skills:
Step over Dummy: Rotate the right stick from forward to 90° left or right. If executed from a stationary position, the player will step over the ball on the spot.
Reverse Step over Dummy: Rotate the right stick from 90° left or right back to forward. If executed from a stationary position, the player will step over the ball on the spot.
Step Over Fake: Rotate the right stick from 90° left or right back to forward. Then while holding the right stick, push the left stick to back left or back right. (Depending on the direction you initially pressed the right stick).
PRO EVOLUTIONCONTROLSSOCCER 2011 05
Step On Skills
Step On & Drag: From a stationary position, press the wbutton and back on the right stick.
Step On & Slide: From a stationary position, press the wbutton and left or right on the right stick depending on which direction you want to take the ball.
L Feint (If Right Footed): From a stationary position, press the w button and back on the right stick. Then, while holding the right stick, push the left stick to the right. (For a left footed player, you must push the left stick to the left.)
Backheel Feint: From a stationary position, push and hold the wbutton, then rotate the right stick from back to 90° left. Then while holding the right stick, push the left stick to the right or left.
Drag Back into Right Take / Left Take: From a stationary position, press and hold the w button, then push the right stick to the back. Then, while holding the right stick, push the left stick diagonally left or right. (If the player is left footed, you must reverse the directions.)
Inside Bounce: From a stationary position, press the wbutton and back on the right stick. Then, while holding the right stick, push the left stick forward.
Running Inside Bounce into Diagonal Take: While Dribbling, press the w button and back on the right stick. Then, while holding the right stick, push the left stick diagonally left or right.
Flip Flap Skills
Flip Flap: While Dribbling, press the wbutton and the right stick diagonally right. Then, while holding the right stick, push the left stick diagonally left. (If the player is left footed, you must reverse the directions.)
Reverse Flip Flap: While Dribbling, press the w button and the right stick diagonally left. Then, while holding the right stick, push the left stick diagonally right. (If the player is left footed, you must reverse the directions.)
Roulette Skills
Roulette: Press the w button, then rotate the right stick a full 360°. The direction in which the player spins depends on which way you rotate the right stick. Certain players may have different Roulette motions.
Turn Skills
Cross Over Turn: While Dribbling, press the w button and the right stick to the side, followed by the left stick. (Towards the same side you pushed the right stick).
Flicking Skills
Front Flick: Press and hold the wbutton and click the right stick. Then, push the left stick diagonally left or right. (Can also be executed while dribbling).
Rainbow Flick: Press and hold the w button , then click the right stick button twice. (Can also be executed while dribbling.)
Sideway Dribble Skills
Sideway Dribble: While dribbling, press and hold the w button. Then, push the right stick forward or to either side.
Sideway Scissors: During Sideway Dribble (to the left), press and hold the wbutton, then rotate the right stick 180° from the left all the way to the right. Finally, push the left stick to the left. (You must reverse the directions if you were initially moving towards the right.)
Sideward Stepover: During Sideway Dribble (to the left), press and hold the wbutton, then rotate the right stick 90° from left back to forward. Finally, push the left stick to the left while holding the right stick. (You must reverse the directions if you were initially moving towards the right.)
 Link Feints
A feature new to PES 2011, Link Feints allow you to pull a trick combination consisting of up to 4 moves by simply pressing yand C/ Z/ V/ Xon the right stick. These Link Feints can be customized and configured in Game Plan, so why not create your very own set of tricks and give yourself the edge over your rivals by showcasing your trickery?
The Default Link Feints are as follows:
|
|
|
|
|
|
|
|
|
|
|
Command |
1st Move |
[ 2nd Move |
|
3rd Move |
|
4th Move |
||
|
y / z C |
Running Upper |
[ |
Matthews Feint (R) |
|
|
|
|
|
|
Body Feint (R) |
|
|
|
|
|
|
||
|
y / z V |
Upper Body |
[ |
Step On & Slide (R) |
[ |
Step On & Slide (L) |
[ |
V Feint (R) |
|
|
Feint (L) |
|
|
|
|
||||
|
y / z Z |
Running Upper |
|
Reverse Stepover |
[ |
Roulette (L) |
|
|
|
|
Body Feint (R) |
[ Dummy (R) |
|
|
|
|
|||
|
y / z X |
Running Stepover |
[ |
Stepover Fake (R) |
|
|
|
|
|
|
Dummy (L) |
|
|
|
|
|
|
||
|
|
|
|
|
|
|
|
|
|
06 PROCONTROLSEVOLUTION SOCCER 2011
 Defense
Tackle/Apply Pressure: Press the Abutton and hold the left stick towards the opposition player with the ball. Delay 1 (Hold up the opposition): Press the Abutton. The player holds up an opposition attacker by taking up a position to block his path to goal. The defending player will remain stationary.
Delay 2 (Hold up the opposition): Press the A button and the left stick (pull towards the defending player’s goal). This makes the player backtrack towards his goal while still facing his opponent and holding him up. Close Down: Hold the Xbutton when the opposing team is in possession to have the player closest to the ball (not counting the player you are controlling) close down the player on the ball.
Sliding Tackle: Press the B button.
Clearance: When the ball is deep inside your half, press the Xbutton to clear the ball.
Rush Keeper from Goal: Press the Ybutton while defending to make the goalkeeper sprint towards the ball. Goal Kick: Press the Bbutton or Xbutton to kick the ball upfield. Use the left stick to aim.
Throw Ball: When your goalkeeper is holding the ball, press the Abutton to throw the ball to a teammate. Drop Ball: When your goalkeeper is holding the ball (with no left stick pushed), press the zbutton to instruct him to drop the ball at his feet.
Goalkeeper: Click the right stick + ybuttons to switch control between an outfield player and the keeper.
 General Controls
Change Player: Press the ybutton to switch control to the player closest to the ball.
Control Player When Ball is Airborne: When the ball is in the air, hold the x button and use the left stick to position the player to meet it.
Super Cancel: When a player is automatically running after the ball, press the zand xbuttons simultaneously to bring the player to a halt, or to regain full control.
Activate/Cancel Strategies (Manual Mode): Hold down the < button and then press the B button, the A button, the Y button, or the Xbutton to activate or cancel strategies assigned to those buttons. Attack/Defense Level: Press the<and z buttons together to increase the Attack/Defense gauge level, thus instructing your players to push forward. Press the wand xbuttons together to reduce it.
Dive: Click the left and right sticks together.
Kick/Pass Feint: Press the A, X, or Bbutton and then press the Abutton after the power gauge appears.
 Set-Pieces & Dead-Ball Situations
Note: For free kicks and corners, hold the relevant button down to increase the power gauge to the required level.
Corners
Regular: Press the B button.
High Cross: Hold down the xbutton + B button. Low Cross: Push the left stick up + the B button. Along the Ground: Left stick down + B button.
Apply Curl: Push left stick left or right while the power gauge is onscreen.
Short Corner: Press the Abutton to send a short pass to your nearest teammate.
Free Kicks: Passing.
Short Pass: Choose a direction with the left stick and then press the A button.
Regular Long Pass: Press the B button.
High Ball: Hold down the x button + B button. Low Ball: Up on the left stick + B.
Along the Ground: Down on the left stick + B button.
Curl: Left or right on the left stick while the power gauge is displayed.
Through Ball: Press the Ybutton when taking a free kick to send a ball through the defense. Push the left stick to aim the pass.
Free Kicks: Shooting
Regular Shot: Press the X button.
Hard Shot: Up on the left stick + the X button. Weak Shot: Down on the left stick + the X button.
Moderately Hard Shot: Press the X button, and just as the player makes contact, press the Y button. Moderately Weak Shot: Press the Xbutton and then, just as the player makes contact, press the A button. Apply Curl: Hold the left stick left or right when the power gauge is displayed.
PRO EVOLUTION SOCCER 2011 |
07 |
CONTROLS / MATCH SCREENS |
Free Kicks: General Controls
Quick Restart: This only works with the correct timing when a player is positioning the ball for a quick free kick using his hands. When this happens, specify a direction by holding the left stick and press the Aor Ybutton to quickly restart the game with a simple pass.
Changing the Number of Kickers: Press the yand zbuttons simultaneously to cycle through the following free kick configurations: one kicker (default), two kickers (second kicker: right side), two kickers (second kicker: left side).
Using the Second Kicker: Execute the free kick while holding the y button to make the second kicker make the shot or cross pass.
Second Kicker Rolls Ball Forward: Hold down the ybutton and then press the Abutton to make the second kicker roll the ball forward. You can then make a shot or pass from open play with the second kicker.
Free Kicks: Wall Control
When the opposing team has a free kick, press and hold the following buttons to control the players in the defensive wall:
Increase/decrease number of players in the wall: Hold down the wbutton and press up on the left stick to add up to two more players to the wall. To remove these players hold down the xor wbutton and press down on the left stick. Only players that have been added can be later removed.
All Players Jump: Press the X button. Players Hold Position: Press the A button.
Players Charge Forward + Jump: Press the B button.
Players Charge Forward: Press the Band Abuttons together. Random: No buttons pressed.
Throw-ins
Short/ Long Throw-in: Press the Abutton to throw the ball. Distance depends on length of gauge.
Penalty Kicks
Kicker: The height and the direction of the shot depends on how long the player presses the left stick towards goal and to either side respectively when running up to take the penalty. (Player automatically runs up to take the shot).
Goalkeeper: Hold the left stick and the Xbutton for a length of time that’s proportional to how high or wide you want to jump in order to save the shot. You must match the timing of the kicker. If you don’t input a direction, your keeper stay still and cover the goal center.
Unique controls for when the cursor is set to Fixed
Calling for the Ball: When a teammate has the ball, press the x button twice to call for a pass. The more frequently you press the button, the more strident your appeal for the ball will be.
 Match Screens
This section explains the various features and functions of screens you will encounter during a match.
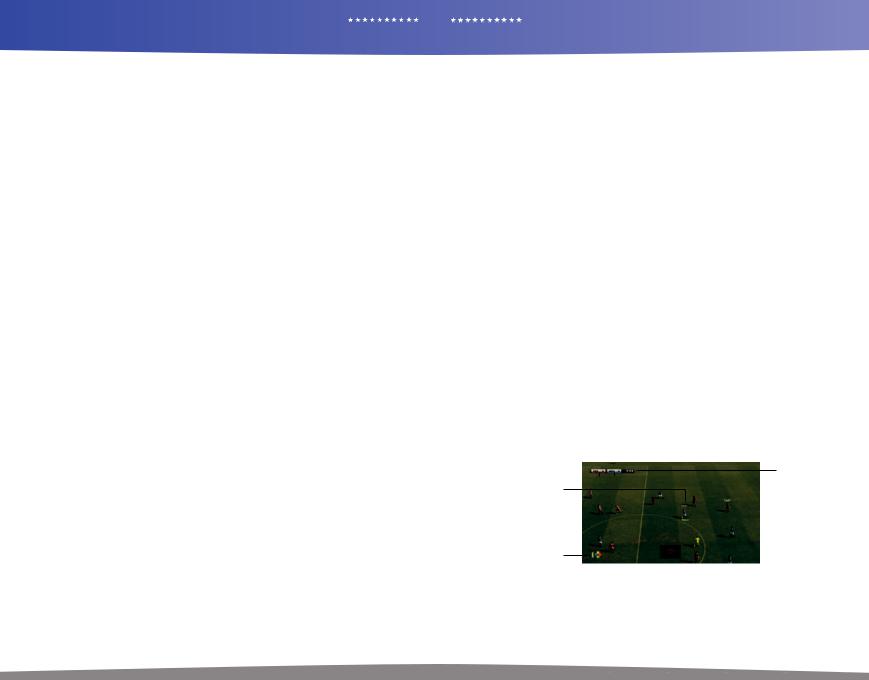
Match Display |
|
|
|
|
|
|
|
|
|
|
|
Elapsed Time |
|
|
|
|
|
|
|
|
|
|
|
|
|||
|
|
|
|
|
|
|
|
|
|
|
|||
Score |
|
|
|
|
|
|
|
|
|
|
|
|
|
Active Player (Cursor) |
|
|
|
|
|
|
|
|
|
|
|
Name |
|
|
|
|
|
|
|
|
|
|
|
|
|
||
(indicating player under control) |
|
|
|
|
|
|
|
|
|
|
|
Active Player |
|
•Yellow name/number above |
|
|
|
|
|
|
|
|
|
|
|
(Cursor)/ |
|
cursor: Player got booked |
|
|
|
|
|
|
|
|
|
|
|
Stamina Gauge |
|
•Yellow/red checkered flag: |
|
|
|
|
|
|
|
|
|
|
|
|
|
|
|
|
|
|
|
|
|
|
|
|
|
||
Your controlled player is in an |
|
|
|
|
|
|
|
|
|
|
|
|
|
offside position |
|
|
|
|
|
|
|
|
|
|
|
|
|
Attack/Defence Mindedness |
|
|
|
|
|
|
|
|
|
|
|
Power Gauge |
|
|
|
|
|
|
|
|
|
|
|
|
|||
|
|
|
|
|
|
|
|
|
|
|
|
||
|
|
|
|
|
|
|
|
|
|
|
|
|
|
|
|
|
|
|
|
|
|
|
|
|
|
|
|
|
|
|
|
|
|
|
|
|
|
||||
|
Strategy Mark |
Radar |
|||||||||||
Attack/Defense Mindedness: This gauge indicates your team’s current mentality. The redder the bar is, the more attacking the team will be; conversely, a blue bar indicates that a team is pulling back to defend.
Strategy Mark: Button symbols representing Manual Strategies appear in this area when active.
Stamina Gauge: Displays a player’s current stamina. The gauge will turn red when stamina is dangerously low, indicating a drop in that player’s performance.
08 |
PRO EVOLUTION SOCCER 2011 |
MATCH SCREENS / GAME PLAN |
Active Player:
The active player under control will be highlighted by a bar (or “Cursor”) above his head. Each user will be displayed be a different color, which you’ll see when selecting sides (see also page 11).
Power Gauge:
The Power Gauge is shown underneath the player once you initiate a pass or shot. The longer you keep the respective button pressed, the more the gauge will be filled and the more powerful a pass or shot will be.
Event Icons: The following symbols will appear in the top left-hand corner of the screen during matches.
Blue - Returning to the Match (No Injury):
A player is returning to the pitch with a clean bill of health.
Yellow - Returning to the Match (Slight Injury):
A player is returning to the pitch, but is carrying an injury that will have an impact on his performance.
Red - Not Returning to the Match (Due to Injury):
An injured player cannot return to the pitch, and must be substituted (if possible).
Gray - Indirect Free Kick:
An indirect free kick has been awarded.
Gray - Stoppage Time:
This indicates the game minutes of stoppage time that will be played.
 Game Plan
Before starting a match, you can set your team’s formation, line-up, captain and set piece takers, and other settings on the Game Plan Screen. Make sure you are well prepared for the match.
 Information Windows
When you first select Game plan, you will be presented with 3 options as ways to set up your team. These are “Leave to Manager”, “Simple Settings” and “Choose Manually”. If you want to have your formation and lineup chosen for you automatically, choose “Leave to Manager”.
Simple Settings
Allows you to choose the formation and the team’s attack pattern. The rest of the game plan will be formed automatically.
Management Edit
Choose a strategy fit for certain time periods or situations during the match. Strategies will then be automatically implemented if the conditions are met.
Choose Auto Trigger Setting to choose whether you want certain strategies such as Offside traps to be triggered automatically.
Choose Manually
Choose all Game Plan settings manually
Press the y or z button while the pitch diagram is shown to switch between Player form/Stamina (Arrows indicate Form and the green gauge indicates stamina), Position/Overall Rating and Player Icon.
|
1 |
2 |
3 |
4 |
5 |
6 |
7 |
Green |
Red |
Yellow |
Purple |
Globe |
Yellow |
|
Red |
Cross |
Cross |
Cross |
Dash |
|
Cards |
|
Cards |
Injuries
1 Returning to Full Fitness 2 Severe Injury 3 Slight Injury 4 Injury Status Unclear
Unavailable
5 On International Duty 6 Suspended due to Cumulative Yellow Cards 7 Suspended due to a Red Card
 Assisted Settings
Move the sliders to adjust Lineup, Formation, Tactics, and Set Piece Settings.
Once you’ve chosen the settings to change, use left and right on the left stick to move the sliders. The settings will automatically change to match the slider’s position.
 Lineup
The circular icons shown on the pitch diagram represent players and their positions. Make use of “Edit Position” and “Substitutions” to form your game plan.
PRO EVOLUTION SOCCER 2011 |
09 |
GAME PLAN / GAME MODES |
Player Abilities
To look at the player’s abilities, move the cursor on to a player of your choice and press the Ybutton. Once the stats are on screen, press the yor zbutton to see what Skill Cards or Playing Style Cards the player has.
Note: If you need details on player abilities, please refer to the Edit Mode of PES 2011, where you can find detailed descriptions for them.
 Set Formation
Move the cursor onto a player on the pitch, then press the Abutton to grab him. The player can then be freely moved around the pitch until you release him at the desired position by pressing Aagain. To substitute players, drag the player onto the icon representing the player you want to replace him with. Also, you can press the X button when an on-pitch Player icon is highlighted to choose:
1) The player’s Role
2) Whether to appoint the player as Captain 7
3) Mark Settings
Card System
Through the Card System, you can take advantage of a player’s unique abilities. This offers you endless possibilities and strategic options as never seen before.
The Card System offers two different categories:
1)P = Playstyle Cards represent individual playstyles like “Pinpoint Pass.”
2)S = Skill Cards identify skills (for example, “Penalty Saver”) that players own, and can’t be changed or deactivated.
Note: The available Playstyle Cards may differ depending on the player’s role and attack level.
If you are using a Playstyle Card that goes against your current tactics, the tactics will be given priority.
 Other Settings
Make use of various options by choosing the icons shown at the bottom of the screen to fine tune your Game Plan such as:
Link Feints
Configure up to 4 custom-made chain of tricks and skills which can be executed by pressing the wbutton + right stick (C, V, Z and X). First, choose a controller you want to assign the Link Feints to. Then, select “Create New” to design a new set then proceed to the edit screen. Or alternatively, you can choose “PRESET” to edit existing Link Feints. Link Feints can be saved and loaded in “Data Management” and can be configured to each unique controller. However, if you share your Game Plan Data with friends (for example in a multi-player game), then choose to load Link Feints in “Data Management”, your data will be overwritten by that of “The Leader”.
Note: “The Leader” refers to the player who has control of the Game Plan in a multi-player game. (Usually, the one with the smallest number on each side).
UEFA Champions League (page 11)
Pit your club against the elite of European soccer in the exclusive UEFA Champions League mode.
Copa Santander Libertadores
Take on the very best of Latin American Football in the also Exclusive Copa Santander Libertadores mode.
Exhibition
First, if you want to quickly start a match, choose whether you will compete against a friend (VS. PLAYER) or the computer (VS. COM). This is the quickest way to get the ball rolling, while a custom match (CUSTOM) gives you more options from the start. Besides very obvious selections for the team, uniform, or stadium, you will find the following pre-match options depending on the selected mode:
Game Options
For each controller you have connected, decide whether the corresponding players will compete against one another or play on the same team. Also, choose whether you or the computer will control the players during the match. By pressing the X button, you can adjust “Cursor Settings.” (See “Cursor Settings,” page 11.)
Home/Away: Push left or right on the left stick to switch between the home and away sides.
Coach Mode: Issue tactical commands while the computer controls the players on the pitch. Switch to Coach
Mode by pushing left on the left stick when the controller icon is on the home side, or by pushing right on the left stick when the controller icon is on the away side.
 Loading...