

PRO EVOLUTION SOCCER 2010
ii
PRO EVOLUTION SOCCER 2010
WARNING Before playing this game, read the Xbox 360® console and
accessory manuals for important safety and health information. Keep all manuals
for future reference. For replacement console and accessory manuals, go to
www.xbox.com/support.
Important Health Warning About Playing Video Games
Photosensitive seizures
A very small percentage of people may experience a seizure when exposed to certain
visualimages,includingashinglightsorpatternsthatmayappearinvideogames.
Even people who have no history of seizures or epilepsy may have an undiagnosed
condition that can cause these “photosensitive epileptic seizures” while watching
video games.
These seizures may have a variety of symptoms, including lightheadedness, altered
vision, eye or face twitching, jerking or shaking of arms or legs, disorientation,
confusion, or momentary loss of awareness. Seizures may also cause loss of
consciousness or convulsions that can lead to injury from falling down or striking
nearby objects.
Immediately stop playing and consult a doctor if you experience any of these
symptoms. Parents should watch for or ask their children about the above symptoms—
children and teenagers are more likely than adults to experience these seizures. The risk
of photosensitive epileptic seizures may be reduced by taking the following precautions:
Sit farther from the screen; use a smaller screen; play in a well-lit room; do not play
when you are drowsy or fatigued.
If you or any of your relatives have a history of seizures or epilepsy, consult a doctor
before playing.
ESRB Game Ratings
The Entertainment Software Rating Board (ESRB) ratings are designed to provide
consumers, especially parents, with concise, impartial guidance about the ageappropriateness and content of computer and video games. This information can
help consumers make informed purchase decisions about which games they deem
suitable for their children and families.
ESRB ratings have two equal parts:
• Rating Symbols suggest age appropriateness for the game. These symbols
appear on the front of virtually every game box available for retail sale or
rental in the United States and Canada.
• Content Descriptors indicate elements in a game that may have triggered a
particular rating and/or may be of interest or concern. The descriptors appear
on the back of the box next to the rating symbol.
ON FRONT
For more information, visit www.ESRB.org.
VIDEO
VIDEO
GAME
GAME
E
ON BACK
CONTENTS
Getting Started 02
Controls 02
Basic Controls 03
Dribbling & Trapping 03
Passing 03
Crossing 04
Shooting 04
Tricks & Skills 04
Defense, General Controls 05
Set-Pieces & Dead-Ball Situations 05
Match Screens 07
Game Plan 07
Game Modes 08
Edit Mode 10
Gallery 10
System Settings 10
UEFA Champions League 10
Master League 11
Become a Legend 12
Connect to Xbox LIVE (Online) 13
Legal 14
Warranty/Product Support 15
French 16
Thank you for purchasing PES 2010 from Konami. Please read this manual thoroughly before playing the game.
Also, please keep this manual in a safe place so you can refer to it easily later. NOTE: Konami does not re-issue
manuals.
Konami is continuously striving to improve its products. As a result this product may dier slightly from another
depending on the purchase date.
01
PRO EVOLUTION SOCCER 2010
PRO EVOLUTION SOCCER 2010
02 03
GETTING STARTED/ CONTROLS CONTROLS
Getting Started
If this is your rst time playing, press the Start button on the Title Screen to move to the Default Settings Screen.
If you have previously saved game data, you will advance to the Top Menu.
Default Settings
Before playing a game for the rst time, you can select between ve dierent levels of diculty. You can also
change the diculty after you begin your game. System data, where all game information is saved, will then be
created automatically. After conrming this step has been completed, proceed to the Top Menu.
Saving Data and Memory Required
In order to store and update your “System data” and “Edit data” and save your progress in competitions, you will
need a Xbox 360 Hard Drive or a Xbox 360 Memory Unit in memory unit port A. The “System data” and “Edit data”
can only be saved to or loaded from a Xbox 360 Hard Drive or a Xbox 360 Memory Unit inserted into memory
unit port A. Each le saved to the Xbox 360 Hard Drive or a Xbox 360 Memory Unit requires a certain amount of
free space, as the following table explains.
Top Menu Screen
The Top Menu select screen provides access to PES 2010’s competitions, options, and features. Use the directional
pad or left stick to highlight the required option, and then press the A button to make your selection.
Using the Help Function
PES 2010 is a massive, feature-packed game, but every eort has been made to make it as accessible as possible.
When the Help icon appears at the bottom of the screen, you can press the corresponding button to call up the
Help Menu to view helpful advice at any time.
Note: This game is presented in Dolby Digital 5.1 surround sound. Connect your Microsoft Xbox 360 to a sound
system with Dolby Digital technology using a digital optical cable. Connect the digital optical cable to the base
of an Xbox 360 Component HD AV Cable, Xbox 360 VGA HD AVCable, or Xbox 360 S-Video AV Cable. From the
“system” blade of the Xbox 360 dashboard, choose “console settings,” then select “audio options,” then “digital
output,” and nally select “Dolby Digital 5.1” to experience the excitement of surround sound.
Family Settings
These easy and exible tools enable parents and caregivers to decide which games young game players can
access based on the content rating. For more information, go to www.xbox.com/familysettings
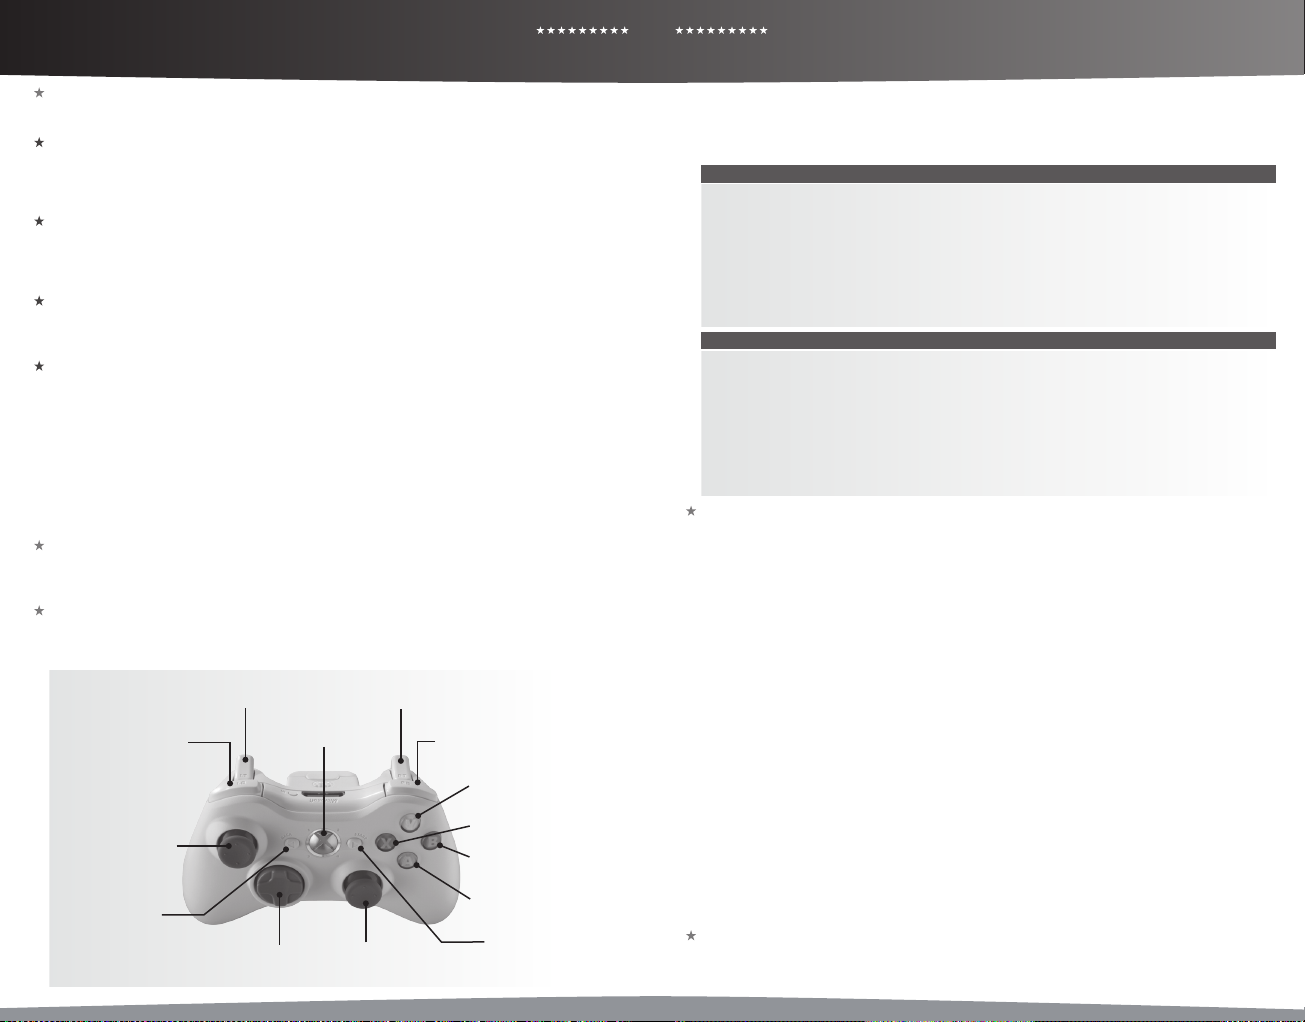
Default Controls
Use your controller to navigate menu screens. Use directional pad or left stick to move through menus, the A
button to conrm a selection, and the B button to cancel or move back through screens.
]
x
Right TriggerLeft Trigger
à
Left Bumper
_
Xbox Guide Button
`
Right Bumper
Y
X
Left Stick
<
L
l
C
Right StickDirectional Pad
B
A
>
For the basic controls used during a match, refer to the table below. Read pages 3-6 for more advanced controls.
You can change the assignments for each button by going to “Controller Settings” in “System Settings.” (See System
Settings, page 10). For this game, the directional pad and left stick control the same actions. When this manual refers
to the “directional pad,” you may also use the left stick in the same manner.
BASIC ATTACKING CONTROLS
y button: Switch between players
z button: Dash
Directional Pad: Player movement, dribbling
Left Stick: Player movement, dribbling
Y button: Through ball
B button: Cross/long pass
A button: Shor t pass
X button: Shoot
Right Stick: Manual pass
BASIC DEFENSE CONTROLS
y button: Switch between players
z button: Dash
Directional Pad: Player movement
Left Stick: Player movement
Y button (hold down): Goalkeeper
B button: Sliding tackle
A button (hold down): Tackle/apply pressure with player you are controlling
X button (hold down): Clearance/apply pressure with player you are not controlling
(hold down button)
Dribbling & Trapping
Dribbling: Use directional pad to move when the ball is at your player’s feet.
Sideways Dribble: Hold the x and press the directional pad at 90° to the direction of movement. Just a small
number of players can perform this dribble.
Dash Dribble: Press the z button while dribbling to sprint.
Extend Time between Ball Touches: While holding the z button to sprint with the ball at your player’s feet,
rapidly press the directional pad two or three times between touches to knock the ball further ahead.
Greater Distance between Ball Touches: While running with the ball with the z button depressed, hold the the
x button and press the directional pad 45° to either side of the current direction of movement.
Slow Dribble: Keep the x button depressed while dribbling to perform a “slow dribble.” The ball will hardly leave
your player’s feet as you perform this technique, and it can be followed by a quick change of direction or one of
many feints.
Sidestep: To move at right angles to the current direction of movement, press the directional pad 90° in either
direction.
Stop the Ball 1: Release the directional pad and press the z button to stop the ball’s movement while dribbling.
Stop the Ball 2: Release the directional pad and press the x button to instruct your player to stop and face your
opponent’s goal.
Jump: When an opponent executes a sliding tackle, press the x button to attempt to jump over it.
Control Ball: When receiving a pass, press the directional pad to control the ball.
Stop the Ball: When receiving a pass, press the directional pad while holding the x button to stop the ball and
face the specied direction.
Stop the Ball & Turn to Face Goal: When receiving a pass, release the directional pad and press the x button to
turn to face the opponent’s goal while trapping the ball.
Run Onto Pass: To instruct a player to turn and run onto an incoming pass without making an initial touch, hold the
z button and press the directional pad in the direction that the ball is moving.
Passing
Note: Use the directional pad to specify the direction a pass should be played in.
Short Pass/Head Ball: Press the A button to make a short pass along the ground or head the ball. Hold the A
button for longer to pass to a more distant player.
PRO EVOLUTION SOCCER 2010
PRO EVOLUTION SOCCER 2010
CONTROLS CONTROLS
0504
Backheel: Quickly push the directional pad away from the player ’s current direction of movement and then
press the A button.
First-Time Pass: Press the A button before your player traps the ball.
Long Pass: Press the B button. The distance of the pass depends on the length of time that the B button is
held.
First-Time Long Pass: Press the B button before your player traps the ball.
Through Ball: Press the Y button. Holding the Y button down for longer will direct the pass to a more distant
player.
First-Time Through Ball: Press the Y button before your player traps the ball.
Lofted Through Ball: Hold the y button and press the Y button.
One-Two Pass: Hold down the y button and press the A button to make a shor t pass, then press the Y
button before your teammate receives the ball to execute a return pass.
One-Two Pass with Lofted Return Ball: Hold down the the y button and press the A button to make a short
pass, then press the y + Y buttons before your teammate receives the ball to execute a chipped return pass.
Pass and Move: Press the x button immediately after passing the ball to instruct the player to make a forward
run.
Manual Pass: Push the right stick in the desired direction to execute the pass. The strength of the pass is
determined by how long the right stick is pushed.
Manual Long Pass: Hold down the y button and push the right stick in the desired direction to execute the
long pass. The strength of the pass is determined by how long the right stick is pushed.
Crossing
Note: Use the directional pad to specify the direction of a cross.
High Cross: From deep in your opponent’s half, press the B button.
Low Cross: From deep inside your opponent’s half, press the B button twice.
Cross along the Ground: From deep inside your opponent’s half, press the B button three times to send in a
low cross along the ground.
Lofted Ball: Press the x button while delivering a cross to loft the ball high into the air.
Early Cross: Hold the y and B buttons to cross the ball from any position in your opponent’s half.
Shooting
Notes on shooting: Press the X button to build up the power gauge. Release the X button when the power
gauge reaches the desired level, and your player will send a shot towards the goal. The length of the power
gauge determines the power and height of your shot. Use the directional pad to specify the required direction
as the shot is made.
Shoot: Press the X button.
First-Time Shot/Head Ball: Press the X button just before the ball reaches your player to make a rst-time
shot or header on goal.
Controlled Shot: Press the x button when the power gauge reaches the desired level to make a shot that
trades power for precision.
Chip Shot: Hold the y button and press the X button.
Chip Shot Type 2: For a lob with a lower trajectory, press the X button and then press the z button when the
power gauge appears.
Tricks & Skills
Note: Tricks and skills on the directional buttons can also be performed by advanced users while holding the
w button in combination with the right stick. Check out the Command List on the pause menu for details. But
remember: You always need to use the w button on these unocially called “Expert Controls”.
Step Over (Long): Press the y button twice.
Step Over (Short): Press the x button twice.
Stationary Feint: When your player is standing still with the ball at his feet, instruct your player to pretend to
move with the ball by pressing the y or x button twice.
Kick & Pass Feints: When the shot or pass gauge is displayed, press the A button to cancel the kick. The feint
will dier depending on the directional pad input prior to pressing the A button.
Dive: Fall to the ground intentionally by pressing the y + w + z buttons at the same time. A foul may be
called on an opponent, or you may end up with a yellow card.
Reverse Flip Flap: If the player’s stronger foot is his right, push the directional pad to diagonally left then
diagonally right quickly when dribbling. If his stronger foot is his left, the input is reversed. Only a small number
of players can perform this move.
Body Feint 1: Quickly press the directional pad in either diagonal direction immediately to the left or right of
the direction of the run.
Body Feint 2: When both player and ball are stationary, press the directional pad twice at a right angle to the
direction that the player is facing.
Drag Back: From a stationary position, press once the directional pad in the opposite direction to which the
player is facing, then press the directional pad in a 45 degree diagonal towards the player’s strongest foot.
Matthews Trick: With the ball at rest, tap the directional pad 90 degrees to the left or right of the direction that
the player is facing, then immediately press and hold the opposite direction. Players must have a Dribbling stat
of 70 points or more to perform this trick.
Through Feint: Just before a pass reaches a player, release the directional pad and then press and hold the z
button to step over the ball and allow it to continue to another player.
Roulette: Rotate the directional pad while dribbling. The direc tion you rotate the directional pad determines
the direction of the turn. Only a small number of players can perform this move, and they might execute the
move dierently.
Lift the Ball: Press the directional pad back and then quickly forward to ick the ball up into the air.
Defense
Tackle/Pressure: Press the A button to attempt a tackle. You can also hold the A button to instruc t your
player to automatically close down an opponent and apply pressure. This can be used in conjunc tion with the
z button.
Close Down: Hold the X button when the opposing team is in possession to have the player closest to the ball
(not counting the player you are controlling) close down the player on the ball.
Sliding Tackle: Press the B button.
Clearance: When the ball is deep inside your half, press the X button to clear the ball.
Rush Keeper from Goal: Press the Y button while defending to make the goalkeeper sprint towards the ball.
Goal Kick: Press the B button or X button to kick the ball upeld. Use the directional pad to aim.
Throw Ball: When your goalkeeper is holding the ball, press the A button to throw the ball to a teammate. Use
the directional pad to aim.
Drop Ball: When your goalkeeper is holding the ball (with no directional button pressed), press the z button
to instruct him to drop the ball at his feet.
Goalkeeper: Press the right stick + y buttons to switch control between an outeld player and the keeper.
General Controls
Change Player: Press the y button to switch control to the player closest to the ball.
Control Player When Ball is Airborne: When the ball is in the air, hold the x button and use the directional
pad to position the player to meet it.
Super Cancel: When a player is automatically running after the ball, press the z and x buttons simultaneously
to bring the player to a halt, or to regain full control.
Activate/Cancel Strategies (Manual Mode): Hold down the w button and then press the B button, the A
button, the Y button, or the X button to activate or cancel strategies assigned to those buttons.
Activate and Cancel Strategies (Semi-Auto Mode): Press the w button to activate or cancel your chosen
strategy.
Attack/Defense Level: Press the w and z buttons together to increase the Attack/Defense gauge level, thus
instructing your players to push forward. Press the w and x buttons together to reduce it.
Set-Pieces & Dead-Ball Situations
Note: For free kicks and corners, hold the relevant button down to increase the power gauge to the required
level.
Corners
Regular: Press the B button.
High Cross: Hold down the x button + B button.
Low Cross: Press directional pad up + the B button.
Along the Ground: Directional pad down + B button.
Apply Curl: Directional pad left or right while the power gauge is onscreen.
Short Corner: Press the A button to send a short pass to your nearest teammate.
PRO EVOLUTION SOCCER 2010
PRO EVOLUTION SOCCER 2010
CONTROLS MATCH SCREENS/ GAME PLAN
0706
Set-Pieces & Dead-Ball Situations (continued)
Free Kicks: Passing.
Short Pass: Choose a direction with the directional pad and then press the A button.
Regular Long Pass: Press the B button.
High Ball: Hold down the x button + B button.
Low Ball: Up on the directional pad + B.
Along the Ground: Down on the directional pad + B button.
Curl: Left or right on the directional pad while the power gauge is displayed.
Through Ball: Press the Y button when taking a free kick to send a ball through the defense. Use the directional
pad to aim the pass.
Free Kicks: Shooting
Regular Shot: Press the X button.
Hard Shot: Up on the directional pad + the X button.
Weak Shot: Down on the directional pad + the X button.
Moderately Hard Shot: Press the X button, and just as the player makes contact, press the Y button.
Moderately Weak Shot: Press the X button and then, just as the player makes contact, press the A button.
Apply Curl: Hold the directional pad left or right when the power gauge is displayed.
Free Kicks: General Controls
Quick Restart: This only works with the correct timing when a player is positioning the ball for a quick free kick
using his hands. When this happens, specify a direction using the directional pad and press the A button to
quickly restart the game with a simple pass.
Changing the Number of Kickers: Press the y and z buttons simultaneously to cycle through the following
free kick congurations: one kicker (default), two kickers (second kicker: right side), two kickers (second kicker:
left side).
Using the Second Kicker: Execute the free kick while holding the y button to make the second k icker make
the shot or cross pass.
Second Kicker Rolls Ball Forward: Hold down the y button and then press the A button to make the second
kicker roll the ball forward. You can then make a shot or pass from open play with the second kicker.
Free Kicks: Wall Control
When the opposing team has a free kick, press and hold the following buttons to control the players in the
defensive wall:
Increase/decrease number of players in the wall: Hold down the w button and press up on the directional
pad to add more players to the wall. To reduce this number, hold down the w button and press down on the
directional pad.
All Players Jump: Press the X button.
Players Hold Position: Press the A button.
Players Charge Forward + Jump: Press the B button.
Players Charge Forward: Press the B and A buttons together.
Random: No buttons pressed.
Free Kicks: Goalkeeper
Move Keeper behind Wall: When the opposing team is preparing to take a free kick, press and hold the Y
button to instruct your goalkeeper to move behind his defensive wall.
Throw-ins
Short Throw-in: Press the A button to throw the ball to your nearest teammate in the direction of the throw.
Long Throw-in: Press and hold the B button to make a longer throw-in in the direction the thrower is facing.
Penalty Kicks
Kicker: Hold the directional pad and the X button for a length of time that’s proportional to how high or wide
you want to shoot.
Goalkeeper: Hold the directional pad and the X button for a length of time that’s proportional to how high or
wide you want to jump in order to save the shot. You must match the timing of the kicker. If you don’t input a
direction, your keeper stay still and cover the goal center.
Change Cursor set to “Unassisted” and/or Select Player set “On”
Calling for the Ball: When a teammate has the ball, press the x button twice to call for a pass. The more
frequently you press the button, the more strident your appeal for the ball will be.
Match Screens
This section explains the various features and functions of screens you will encounter during a match.
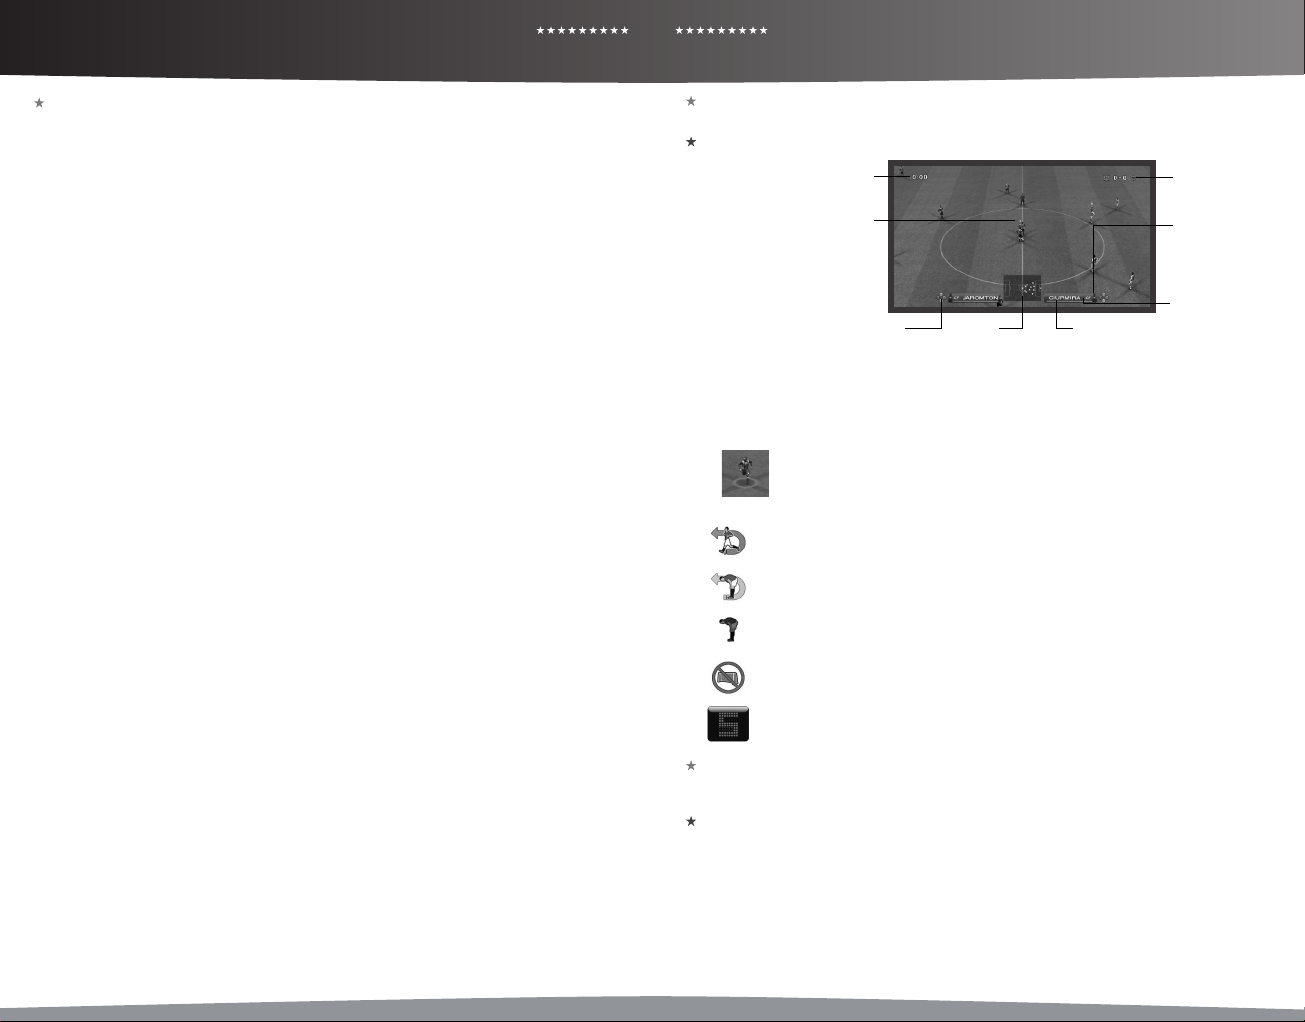
Match Display
Elapsed Time
(indicating player under control)
- red outline: player has no stamina
- white inner triangle: auto-move
- yellow name/number above cursor:
- yellow/red checkered ag: your
controlled player is in an oside position
Attack/Defense Mindedness: This gauge indicates your team’s current mentality. The redder the bar is, the
more attacking the team will be; conversely, a blue bar indicates that a team is pulling back to defend.
Strategy Mark: Button symbols representing Manual Strategies appear in this area when active.
Stamina Gauge: Displays a player’s current stamina. The gauge will tur n red when stamina is dangerously low,
indicating a drop in that player’s performance.
Event Icons: The following symbols will appear in the top left-hand corner of the screen during matches.
Blue - Returning to the Match (No Injury):
A player is returning to the pitch with a clean bill of health.
Yellow - Returning to the Match (Slight Injury):
A player is returning to the pitch, but is carrying an injury that will have an impact on his performance.
Red - Not Returning to the Match (Due to Injury):
An injured player cannot return to the pitch, and must be substituted (if possible).
Gray - Indirect Free Kick:
An indirect free kick has been awarded.
Red - Stoppage Time:
This indicates the game minutes of stoppage time that will be played.
Game Plan
Before star ting a match, you can set your team’s formation, line-up, captain and set piece takers, and other
settings on the Game Plan Screen. Make sure you are well prepared for the match.
Information Windows
The Information Windows at the top of the screen (left: home team, right: away team) contain information on
the currently selected Game Plan topic. For example, if you choose “Lineup,” you can check the currently selected
player’s name, total warnings (yellow cards), role, dominant leg, and height.
Player Name and Status
From the left: Role, Player Name, Play Style Card, Total Points, Stamina, Condition.
Stamina and Conditioning
Check players’ stamina and conditioning in status displays. Fatigue may also appear, depending on the mode and
settings you are using. The more fatigue a player has, the slower he will recover stamina. Tired players are also
more prone to injury. A special mark is displayed next to players who are injured or cannot appear in matches.
Cursor
player got booked
Strategy Mark Stamina GaugeRadar
Player Under Control:
When playing with the “Select Player” option activated, the player(s) under your control will be
highlighted through a circle (see also page 10).
Score
Attack/ Defense
Mindedness
Player name and
position
PRO EVOLUTION SOCCER 2010
PRO EVOLUTION SOCCER 2010
08 09
GAME PLAN
GAME PLAN/ GAME MODES
The green gauge represents stamina, while the arrow shows conditioning. The blue gauge underneath the
stamina gauge shows fatigue.
Special Icons: The following icons appear on Status Display pages to provide information on player condition
and availability.
1 2 3 4 5 6 7
Green Cross Red Cross Yellow Cross Blue Dash Globe Yellow Cards Red Card
Injuries
1 Returning to Full Fitness 2 Severe Injury 3 Slight Injury 4 Injury Status Unclear
Unavailable
5 On International Duty 6 Suspended due to Cumulative Yellow Cards 7 Suspended due to a Red Card
Assisted Settings
Move the sliders to adjust Lineup, Formation, Tactics, and Set Piece Settings.
Once you’ve chosen the settings to change, use left and right on the directional pad to move the sliders. The
settings will automatically change to match the slider’s position.
Lineup
Select the players who will compete in the match. Use the directional pad to selec t players, then press the A
button to switch them. Press the X button while selecting a player to make that player Captain (displayed
through a yellow mark).
Player Abilities
Press the buttons displayed on-screen to switch between player abilities. There are normal abilities such as
Position, Agility, Pass, and Shot, as well as special abilities making a player very skilled in certain areas of his
play.
Note: If you need details on player abilities, please refer to the Edit Mode of PES 2010, where you can nd
detailed descriptions for them.
Set Formation
Adjust each player’s position and change the formation. You can also select the players to mark from the
opponent team.
Note: Player Positions
In each formation, players are placed in positions such as centre forward or side back. Each player is already
assigneda position where they can play at their best. Please note that placing the player in any other role will
decrease that player’s abilities.
Card System
Through the new Card System, you can set each player’s Attack Level and choose whether or not to take
advantage of a player’s unique abilities.
This oers you endless possibilities and strategic options as never seen before.
The Card System oers three dierent categories:
1) C = Consciousness Cards allow you to determine if players should play their roles in a balanced,
defensive, or oensive way.
2) P = Playstyle Cards represent individual playstyles like “Pinpoint Pass.” You can deactivate any cards if you
don’t want a player to perform certain styles; if, for example, they don’t t with your overall strategy.
3) S = Skill Cards identify skills (for example, “Penalty Saver”) that players own, and can’t be changed or
deactivated.
Note: The available Playstyle Cards may dier depending on the player’s role and attack level.
If you are using a Playstyle Card that goes against your current tactics, the tactics will be given priority.
Tactics
Set the entire team’s play awareness and strategies.
Team Style
Set awareness towards plays. Move the slider to change the settings for each item. In general, moving the slider
to the right will increase attack, and moving it to the left will increase defense.
Choosing “Covering” as your “Defensive Strategy” type will make your players protect the space created when
their team-mates move without marking specic opposition players.
Strategy
Select up to four strategies you wish to use and assign them to your preferred buttons. When you want to
execute strategies during a match manually, set the corresponding slider at the Assisted Settings menu to “O.”
Please be aware that some strategies, such as “Counterattack,” “All out Attack,” “Pressing,” and “Total Defense”
cannot be executed simultaneously.
Set-Piece Settings
Here, you choose kickers for set-pieces and players to join the attack. The latter can be players who normally
don’t participate, such as the center-back coming up to participate in a corner.
UEFA Champions League (page 10)
Pit your club against the elite of European soccer with the all new and exclusive UEFA Champions League.
Exhibition
First, if you want to quickly start a match, choose whether you will compete against a friend (VS. PLAYER) or the
computer (VS. COM). This is the quickest way to get the ball rolling, while a custom match (CUSTOM) gives you
more options from the start. Besides very obvious selections for the team, uniform, or stadium, you will nd the
following pre-match options depending on the selected mode:
1 Game Options
For each controller you have connected, decide whether the corresponding players will compete against one
another or play on the same team. Also, choose whether you or the computer will control the players during
the match.
By pressing the X button, you can adjust “Cursor Settings.” (See “Cursor Settings,” page 10.)
Home/Away: Press left or right on the directional pad to switch between the home and away sides.
Coach Mode: Issue tactical commands while the computer controls the players on the pitch. Switch to Coach
Mode by pressing left on the directional pad when the controller icon is on the home side, or by pressing right
on the directional pad when the controller icon is on the away side.
Spectator Mode: Press the Y button to watch two computer-controlled teams play each other.
2 Options
Choose settings for Diculty Level, Match Duration, Injuries, Team Conditions, and more. Then, select “Conrm.”
Please note that some options such as “Rule Settings” and “Player Development” are unique to particular game
modes.
Master League (page 11)
Compete in league play, developing your players and looking to strengthen your team in the transfer market.
Become a Legend (page 12)
This challenging mode recreates the career of one specic player of your choice.
If you put in good performances, your reputation will grow, which will result in transfer oers to join dierent
clubs. Can you write your name in the history books?
League & Cup
Enjoy various league and cup competitions. A good table standing in the league will enable you to enter the
UEFA Europa League or even the UEFA Champions League the following season.
Community
“Community” is a mode which supports the matches you have with your closest friends. By registering your
mates in a community, you can compete together using various competition formats.
Xbox LIVE (Network Mode) (page 13)
Connect to Xbox LIVE® and enjoy matches against players from many dierent countries playing the same
version of PES 2010.
Training
Move your players freely as you practice the game’s controls. By adjusting the settings, you can focus on specic
areas such as free kicks and corners. Please note that you cannot choose “Spectator Mode” in Player Settings.
PRO EVOLUTION SOCCER 2010
10
PRO EVOLUTION SOCCER 2010
11
EDIT MODE/ GALLERY / SYSTEM SETTINGS/ UEFA A CHAMPION LEAGUE UEFA A CHAMPION LEAGUE/ MASTER LEAGUE
Edit
This option enables you to customize many things, such as teams and players as well as stadium and cup names
featured in PES 2010. You can create your own original club. Activate the Help menu (look for the prompt at
the bottom of the screen) to view more detailed instructions on how to use this mode’s various options and
features.
Adding Your Own Images
You can add images for player faces, uniform logos, and emblems by using existing image data, an Xbox
LIVE Vision Camera, or similar equipment. Wherever the camera symbol appears, just follow the on-screen
instructions.
Note: Data for up to 400 faces, 200 uniform logos and 40 emblems can be stored, depending on the capacity of
your Xbox 360 Hard Drive or Xbox 360 Memory Unit.
Registering a Created Player with a Team
To register a player you made in “Create Player” with a team, go to “Team” from the Edit Menu, and select “Register
Player.” Then, choose the team you would like the player to join. Next, after a list of that team’s players appears,
either select “Add Player” or choose an existing player to switch with the created player. Finally, select “Other” and
choose the player you just made.
Gallery
The gallery combines a lot of fun and informative features.
Playlist Editor: Listen to the game’s background music. You can also change the background music that plays
during the game.
Track Record: View a history of what you have played in the game.
Replay Playback: Watch replays that you have saved.
Credits: View sta credits.
System Settings
Adjust settings for controls and saving data.
Controller Settings: Change how the controls are used. You can also adjust other settings, deciding, for example,
how the player cursor is displayed and how it is switched. (See Player Cursor, page 10.)
On-Screen Display: Decide the on-screen information and position shown during matches.
Sound Settings: Adjust various items related to sound, such as Commentary Volume and Sound Eect Volume.
Screen Adjustments: Change screen position and color settings.
System Data: Enable or disable autosave. Save or load system data.
Language: Change the language that is used in the game.
Download: Additional contents and roster updates, if available, can be downloaded here.
Cursor Settings
Go to “Cursor Settings” in “Controller Settings” to change how the player cursor is displayed and how it is
switched. Among the items available, Change Cursor in particular has a great eect on the game’s controls. Be
sure to choose a “Change Cursor” option that makes it easy for you to control the action.
Change Cursor
Assisted: Cursor switches automatically. You can also switch manually between players when pressing the y
button.
Semi-assisted: When on attack, the cursor will switch automatically to the player receiving the ball. On defense,
the cursor is switched manually through pressing the y button.
Unassisted: The cursor only switches when you press the y button.
Download: Additional contents and roster updates, if available, can be downloaded here.
Select Player
With this being switched on, you can set the cursor permanently on one player (except the goalkeeper).
Note: You can access the settings for “Change Cursor” also through “Player Settings” before and during a match.
UEFA Champions League
Pit your club against the elite of European soccer with the all new and exclusive UEFA Champions League mode. Is
your team strong enough to negotiate the group stages? Will you rise to the challenge of knock-out games? Can
you become one of the few to lift the cup every player, manager, and fan dreams of?
UEFA Champions League Preparations
Select either “Exhibition” or “Competition,” then choose “Game Settings.”
Either select “New Game” or “Load Data.” Select a team registered to the UEFA Champions League to play a single
match.
The Competition Format
32 teams all eyeing European glory will rst take part in a group stage where they are divided into eight groups of
four. The winners and the runners-up in each group advance to the Knockout Stage.
1 Group Stage
Four teams in each group contest the Group Stage playing each other twice in a home and away format. The
teams nishing in the top two places advance to the Knockout Stage.
2 The First Entry Draw
A draw determines who each of the 16 teams that made it through the Group Stages will face. Group winners
from one group will face the team that nished runners-up in another. However, they will not face teams that
are from the same league. Note that this may change if you enter more than four teams from one league.
3 First Knockout Round
Ties will be decided over two matches on a Home and Away basis. The team with the greater number of
aggregate goals advances or (in the event of a tie) the team that scored more away goals. If the Away Goals
rule proves inconclusive, extra time will be played. If there are no goals in extra time, the winner is decided
by a Penalty Shoot-out.
4 The Second Entry Draw
The second draw determines which team each of the eight teams that won their First-round ties will face.
Unlike the First Draw, teams can be paired with those from the same group or league.
5 Quarter-Finals & Semi-Finals
Much in the same way as the First-round ties, they will be decided over two matches on a Home and Away
basis. There will be no third place play-o for the defeated Semi-Finalists.
6 Final
The Final of the UEFA Champions League will be contested as a single match.
Master League
In this, you must choose a team and then lead it to success in league and cup competitions over an unlimited
number of seasons. As well as generating revenue through success on the eld and keeping your squad at peak
tness, you’ll need to make astute forays into the transfer market and carefully nurture up-and-coming talent to
transform your club into a dominant force in world soccer.
Note: The Master League in PES 2010 oers a whole bunch of new features and improvements, some of which are
featured below. And of course you can now qualify and participate for the world’s most prestigious events in club
soccer: the UEFA Europa League and UEFA Champions League.
Advancing through Master League
Master League seasons begin during the August transfer period and last until the middle of the last week in July of
the following year. As matches are held and the schedule progresses, time will advance on a half-week basis.
Team Management
As in the real world, it’s all about money. You need it to pay costs like sta/player salaries and fan club management.
Money can be earned from tournament prizes, fan club fees, sponsors, and other sources. You can acquire new
players, invest in a youth team, and improve the team’s performance with your money.
Note: You can change sta salaries during August within Management Costs.
Losing Money & Going Bankrupt
Expenses are calculated in the rst week of September. If your funds are in the red at that point, your team will
go bankrupt. Even if the team goes bankrupt, it will still be able to play matches as usual, but the number of
times it goes bankrupt will be recorded in your save data. While your funds are in the red, you will be incapable of
conducting negotiations. So you should quickly try to reduce costs, for example through selling players, well in
advance of September. Otherwise, the game will do this automatically.

PRO EVOLUTION SOCCER 2010
12
PRO EVOLUTION SOCCER 2010
13
MASTER LEAGUE/ BECOME A LEGEND BECOME A LEGEND/ XBOX LIVE (ONLINE)
Stadium Walk
This is the central screen for the Master League. Here you move between your Club House and Oce, check
information for your next upcoming match, and more. You can also save your progress. At the Club House, you
can change game plans and each player’s training regimen. Furthermore, information from the youth team can
be viewed here. While at your Oce, you are able to check match dates and current management costs, and
conduct transfer negotiations.
Transfer Negotiations
Transfer Negotiations are held over the course of the season. There are four major patterns to these negotiations:
Instigating Negotiations, Receiving Negotiation Oers, Releasing Players, and Renewing Contracts. When
negotiating with players, a scout will handle the proceedings. ( You can also appoint your scout to perform
everything, from player selection to negotiations and signing. This is turned o by default.)
Check the Youth Team
The Youth Team option in the Club House lets you pick from up to ten talented young players as possible additions
to your team. Because these players don’t need to be negotiated with or require transfer fees to be paid, you can
sign them up anytime during the season. Finally, players signed from the youth team will have great aection for
your team and will be less likely to transfer to other teams in the future.
Become a Legend
Create a player and aim to become the World Player of the Year. Enjoy your career from your professional debut
to your retirement from the game.
Advancing through Become a Legend
First, a scout match will take place. When this match nishes, oers from clubs in the selected league will be
received and you must select a club to play for.
Opportunities to play matches will be scarce from your debut. You must work hard and impress in inter-squad
training matches to win a place on the bench. Put in good performances o the bench to win a regular starting
spot in the team. Good match performances will lead to oers from other clubs. After transferring, lead your new
team to victory but also aim to win personal accolades such as the league MVP or top goal scorer. Titles such as
these can often result in oers from major clubs and even national team call-ups. A player’s career begins at the
age of 17 and increases by one year at the start of the new season. At the age of 27 you can choose to retire, or
play until 35 when retirement is forced and “Become a Legend” is concluded.
Note: In PES 2010 you may use your developed Become a Legend player online in the Legends Mode as well as
in Master League. To do so, go to “Options” in the Become a Legend menu.
Furthermore, you can now qualify for the UEFA Europa League and UEFA Champions League within Become a
Legend.
Auto-Move: Turn the auto-move function ON/OFF. If ON, your player will move automatically if you keep the y
button pressed (the cursor above the player will change from solid blue to transparent).
Matches
Starting players, team formation, substitutions etc. will be decided automatically by the CPU. You control only
your created player. When you are not playing, you can view the match as a spectator (accelerate the match
speed on the “Fast-Forward Menu” if you wish).
Player Development
Playing in matches allows players to acquire experience points, which also increase based on good match
performances. Once a certain amount is acquired, the player’s ability will increase in accordance with the
development curve.
Note: If a certain age is reached, the player’s ability may decrease. Match experience can also lead to special skills
being acquired (up to eight).
Focus Point Settings
In the “Become a Legend” menu, select “Player Information & Settings”/”Focus” to change the player parameter
development policy. Select “Focus” topics and distribute the twelve points between the abilities. The player will
develop a skill more quickly if you allocate more points to it.
Requesting a Pass from a Team-mate
Tap the x button repeatedly to request a pass from a team-mate. If you’re in a good position, he will pass you
the ball.
Xbox LIVE
Xbox LIVE® brings more of the entertainment you love right to your living room. Raise the curtain on your own
instant movie night with thousands of HD movies, TV shows, and videos downloaded in a snap from Xbox LIVE
and Netix. Find the perfect game for any player with a free trial of hundreds of titles from the largest library
available. With downloadable Game Add-Ons like maps, songs, weapons and levels, you’ll get more out of every
game by putting more into it. And don’t forget to connect and play with friends wherever they happen to be.
With Xbox LIVE, your fun never ends.
Connecting
Before you can use Xbox LIVE, connect your Xbox 360 console to a high-speed Internet connection and sign up
to become an Xbox LIVE member. For more information about connecting, and to determine whether Xbox LIVE
is available in your region, go to www.xbox.com/live/countries.
Family Settings
These easy and exible tools enable parents and caregivers to decide which games young game players can
access based on the content rating. Parents can restrict access to mature-rated content. Approve who and how
your family interacts with others online with the Xbox LIVE service. And set time limits on how long they can play.
For more information, go to www.xbox.com/familysettings.
Network Preparations
After selecting “Online” from the Top Menu, follow the steps below to set up your game.
1 Create User Data/Check Details
You will be taken to the “Create User Data” screen if there is no user data available. Please beware that user data
created cannot be deleted until a certain time period has passed.
2 Update Division
Divisions will be updated once a week during online service periods.
A division is a group of teams that changes based on player results. From strongest to weakest, there are ve
dierent divisions: “Division 1,” “Division 2,” “Division 3A,” “Division3B,” and “Division 3C.” When you start your
game, you will rst be listed under “No Division.”
Note: Players who have not logged in for six days (approximately) will be returned to “No Division.”
3 Xbox LIVE Game Modes
If you’re up for a Quick Match, you can do so anytime you like. Ranked or unranked, that’s your decision as well as
whether to play 1vs1, 2vs2 or any other combination with up to four players in total. (Combinations other than
1vs1 and 2vs2 can only be selected through the Match Room menu.)
4 Icons in Network Mode
Player Status Icons
Player Icons Logged In Not Logged In
(Red) (Blue) (Gray)
Player Icons
You Friend
(Green) (Blue) (Red) (Gray)
Transmission Status Icons
These icons inform you about the network connection quality:
Good Average Bad No Communication Searching
(Green) (Yellow) (Orange)
Player from your
Blacklist
Other Player
PRO EVOLUTION SOCCER 2010
14
PRO EVOLUTION SOCCER 2010
15
WARRANTY
Konami Digital Entertainment, Inc. warrants to the original purchaser of this Konami software product that
the medium on which this computer program is recorded is free from defects in materials and
workmanship for a period of ninety (90) days from the date of purchase. This Konami product is sold "as is,"
without express or implied warranty of any kind, and Konami is not liable for any losses or damages of any
kind resulting from use of this program. Konami agrees for a period of ninety (90) days to either repair or
replace, at its option, free of charge, any Konami product, postage paid, with proof of date of purchase, at
its Factory Service Center. This warranty is not applicable to normal wear and tear. This warranty shall not
be applicable and shall be void if the defect in the Konami software product has arisen through abuse,
unreasonable use, mistreatment, or neglect.
THIS WARRANTY IS IN LIEU OF ALL OTHER WARRANTIES AND NO OTHER REPRESENTATIONS OR
CLAIMS OF ANY NATURE SHALL BE BINDING ON OR OBLIGATE KONAMI. ANY IMPLIED WARRANTIES
APPLICABLE TO THIS SOFTWARE PRODUCT, INCLUDING WARRANTIES OF MERCHANTABILITY AND
FITNESS FOR A PARTICULAR PURPOSE, ARE LIMITED TO THE NINETY (90) DAY PERIOD DESCRIBED
ABOVE. IN NO EVENT WILL KONAMI BE LIABLE FOR ANY SPECIAL INCIDENTAL OR CONSEQUENTIAL
DAMAGES RESULTING FROM POSSESSION, USE OR MALFUNCTION OF THIS KONAMI PRODUCT.
Some states do not allow limitations as to how long an implied warranty lasts and/or exclusions or
limitations of incidental or consequential damages so the above limitations and/or exclusions of liability
may not apply to you. This warranty gives you specific rights, and you may also have other rights which
vary from state to state.
If you experience technical problems with your game, please call our Warranty and Technical Service
number at 310.220.8330 or 310.220.8331 from 9:00 am PST to 5:00 pm PST, Monday-Friday, or send an email
to support@konami.com. All products must be deemed defective by a Konami Customer Service
representative and an RMA number assigned prior to returning the product. All products received not
matching this criteria will be returned if a Konami Customer Service Representative cannot reach you
within three days upon receipt of the unauthorized return.
Konami Digital Entertainment, Inc.
Attention: Customer Service-RMA # XXXX
2381 Rosecrans Ave, Suite 200
El Segundo, CA 90245
USA
CUSTOMER SERVICE
If you feel stuck in the game or just need a boost, don’t worry! You can write to our game experts at
support@konami.com or view our Support section at www.konami.com.
Register now at www.konami.com to receive exclusive product news, special offers and more!
Ocial Licensed
Product
Ocial Licensed
Product
XBOX LIVE (ONLINE)/ LEGAL WARRANTY/ PRODUCT SUPPORT
Manner Icons
If you want to know the manner of an opponent, these icons will tell (declining from left to right). The manner
reects, for example, if a player is quitting matches early.
Note: Users with poor manners will not be eligible for online rankings.
IMPORTANT MESSAGE
Konami reserve the right to penalize or ban any player using the chat function to abuse others. The penalty will
be decided by Konami and may result in a temporary or permanent ban from the chat function or online play
with or without further warning.
We thank you for your understanding and continued good sportsmanship.
Ocial Licensed Product of UEFA CHAMPIONS LEAGUE™. Ocial Licensed Product of UEFA EUROPA LEAGUE™. All names, logos and
trophies of UEFA are the property, registered trademarks and/or logos of UEFA and are used herein with the permission of UEFA. No
reproduction is allowed without the prior written approval of UEFA. “adidas”, the 3-Bars logo, the 3-Stripe trade mark and TUN iT are
registered trade marks of the adidas Group, used with permission. adiPURE is a trade mark of the adidas Group, used with permission.
the use of real player names and likenesses is authorised by FIFPro and its member associations Ocially licensed by Czech National
Football Association Ocially licensed by CFF © 2009, DFB Licence granted by m4e AG, Grünwald © The Football Association Ltd
2009. The FA Crest and FA England Crest are ocial trade marks of The Football Association Limited and are the subject of extensive
trade mark registrations worldwide. copyright FFF © 1996 JFA Ocially licensed by FIGC and AIC © 2001 Korea Football Association
Licensed by OLIVEDESPORTOS (Ocial Agent of the FPF) Producto ocial licenciado RFEF © 2002 Ligue de Football Professionnel ® ©
& TM 2009 Liverpool Football Club & Athletic Grounds Ltd Ocial Licensed Product of A.C. Milan Manchester United crest and imagery
© MU Ltd © Real Madrid (09) Ocial produc t manufactured and distributed by Konami Digital Entertainment under licence granted
by Soccer s.a.s. di Brand Management S.r.l. © Adagp, Paris 2009../M acary – Zublena & Regembal – Costantini, Architects Wembley,
Wembley Stadium and the Arch device are ocial trade marks of Wembley National Stadium Limited and are subject to ex tensive trade
mark registrations. All other copyrights or trademarks are the property of their respective owners and are used under license. ©2009
Konami Digital Entertainment
This software is based in part on the work of the Independent JPEG Group.
Dolby and the double-D symbol are trademarks of Dolby Laboratories.
©2009 Konami Digital Entertainment. KONAMI is a registered trademark of KONAMI CORPORATION.
www.konami.com/pes2010

PRO EVOLUTION SOCCER 2010
16
PRO EVOLUTION SOCCER 2010
17
AVERTISSEMENT Avant de jouer à ce jeu, veuillez lire les manuels de la console
Xbox 360MDetdesaccessoirespourdesinformationsimportantesdesantéetdesécurité.
Veillez à conserver tous les manuels pour une utilisation future. Pour les manuels de
consolederemplacementetd’accessoires,rendez-vousàwww.xbox.com/support.
Avis important sur la santé des personnes jouant aux jeux vidéo
Crises d’épilepsie photosensible
Pouruntrèsfaiblepourcentagedepersonnes,l’expositionàcertainseffetsvisuels,
notammentleslumièresoumotifsclignotantspouvantapparaîtredanslesjeuxvidéo,
risquedeprovoquerunecrised’épilepsiephotosensible,mêmechezdespersonnessans
antécédentépileptique.
Lessymptômesdecescrisespeuventvarier;ilscomprennentgénéralementdes
étourdissements,unealtérationdelavision,desmouvementsconvulsifsdesyeuxou
duvisage,lacrispationouletremblementdesbrasoudesjambes,unedésorientation,
uneconfusionouunepertedeconnaissancemomentanée.Cescrisespeuvent
égalementprovoquerunepertedeconnaissanceoudesconvulsionspouvant
engendrer des blessures dues à une chute ou à un choc avec des objets avoisinants.
Cessezimmédiatementdejoueretconsultezunmédecinsivousressentezdetels
symptômes.Ilestconseilléauxparentsdesurveillerleursenfantsetdeleurposer
des questions concernant les symptômes ci-dessus: les enfants et les adolescents sont
effectivementplussujetsàcegenredecrisequelesadultes.Pourréduirelerisqued’une
crised’épilepsiephotosensible,ilestpréférabledeprendrelesprécautionssuivantes:
s’asseoiràunedistanceéloignéedel’écran,utiliserunécrandepetitetaille,jouerdans
unepiècebienéclairéeetéviterdejouerencasdesomnolenceoudefatigue.
Sivous,ouunmembredevotrefamille,avezdesantécédentsdecrisesd’épilepsie,
consultezunmédecinavantdejouer.
Lesclassicationsdel’EntertainmentSoftwareRatingBoard(ESRB)sontconçues
pour fournir aux consommateurs, aux parents en particulier, des conseils objectifs
etclairsausujetdel’âgeappropriéetducontenudesjeuxinformatiqueset
desjeuxvidéo.Cesinformationspermettentauxconsommateursd’acheterles
jeuxqu’ilsconsidèrentappropriéspourleursenfantsetleursfamillesentoute
connaissance de cause.
LesclassicationsESRBsedivisentendeuxpartieségales:
• Lessymboles de classicationsuggèrentl’âgeappropriépourlejeu.
Ces symboles apparaissent sur quasiment chaque boîte de jeu disponible
à la vente ou à la location aux États-Unis et au Canada.
• Lesdescriptions de contenuindiquentquelsélémentsdujeupourraient
avoirinuencéunetelleclassicationet/oupourraientêtresourcesd’intérêt
oud’inquiétude.Cesdescriptionsapparaissentaudosdelaboîteprèsdu
symboledeclassication.
Pourplusd’informations,consultezlesitewww.ESRB.org.
Classications ESRB pour les jeux
RECTO
JEU
VIDÉO
E
VERSO
CONTENUS
Pour Commencer 18
Commande 18
Commandes Élémentaires 19
Dribbles et Contrôle du Ballon 19
Passes 19
Centres 20
Tirs 20
Mouvements & Feintes 20
Commandes Générales, Défense 21
Coups de Pieds Arrêtés & Remises en Jeu 21
Ecrans du Match 23
Plan du Match 23
Modes de Jeu 24
Mode Modier 26
Galerie 26
Réglages Système 26
Ligue des Champions UEFA 26
Ligue des Masters 27
Devenez une Légende 28
Se connecter à Xbox LIVE (En ligne) 29
Mentions Legales 30
Garantie/ Support Produit 31
Merci d’avoir acheté PES 2010 de Konami. Avant de commencer à jouer, nous vous recommandons de lire
attentivement ce manuel. Nous vous conseillons également de le conserver précieusement pour pouvoir le
consulter ultérieurement. REMARQUE: Konami ne réédite pas ses manuels.
Konami vise constamment à améliorer ses produits. C’est pourquoi les produits peuvent présenter de légères
diérences selon la date à laquelle ils ont été achetés.
PRO EVOLUTION SOCCER 2010
18
PRO EVOLUTION SOCCER 2010
19
DEMARRER/ COMMANDES COMMANDES
Introduction
Si vous jouez pour la première fois, appuyez sur le bouton Démarrage sur l’écran principal an d’aller à l’écran des
Réglages Standard. Si vous avez sauvegardé des données de jeu récemment, avancez au Menu Principal.
Réglages Standard
Avant de jouer un jeu pour la première fois, vous pouvez choisir entre cinq niveaux de diculté. Vous pouvez
aussi modier le niveau de diculté une fois que votre jeu est lancé. Les données relatives au système contenant
toutes les informations sauvegardées du jeu seront ensuite créées automatiquement. Après avoir conrmé cette
étape, allez au Menu Principal.
Sauvegarde des Données et Mémoire Nécessaire
An de stocker et de mettre à jour votre «Système de données» et «Modier les données», puis enregistrer votre
progression dans les compétitions, vous aurez besoin d’un disque dur Xbox 360 ou une carte mémoire Xbox 360
insérée dans le port mémoire A. Chaque chier sauvegardé dans le disque dur Xbox 360 ou dans la carte mémoire
Xbox 360 nécessite une certaine quantité d’espace libre, comme indiqué dans le tableau suivant.
Ecran Menu Principal
L’écran de sélection du Menu Principal vous permet d’accéder aux compétitions, aux options et aux réglages de
PES 2010. Utilisez le bouton multidirectionnel ou le stick analogique gauche pour surligner l’option demandée, et
ensuite appuyez sur le bouton A pour faire votre sélection.
Utiliser la Fonction D’Aide
PES 2010 est un jeu palpitant qui comprend un nombre de fonctions incroyable, mais tous les eorts nécessaires
ont été fournis an de le rendre aussi accessible que possible. Quand l’icône Aide apparaît en bas de l’écran, vous
pouvez appuyer sur le bouton correspondante an d’accéder au menu de l’aide pour découvrir des conseils utiles
à tout moment.
Remarque: Ce jeu est présenté en Dolby Digital 5.1 en son multicanal. Connectez votre Microsoft Xbox 360 à un
système sonore avec une technologie de codage Dolby en utilisant un câble optique numérique. Connectez le
câble optique numérique à la base d’un câble audio/vidéo haute dénition Xbox 360, un câble audio/vidéo haute
dénition VGA Xbox 360, ou un câble audio/vidéo S-Vidéo Xbox 360. A partir de l’interface Xbox 360, sélectionnez
«Réglages de console», ensuite sélectionnez «options audio», ensuite «sortie numérique» et enn «Dolby Digital
5.1» an de proter de la qualité exceptionnelle du son ambiophonique.
Contrôle Parental
Ces outils simples et exibles permettent aux parents et aux responsables de décider à quels jeux les jeunes
joueurs peuvent avoir accès selon la classication du contenu. Pour plus d’informations, allez sur www.xbox.
com/familysettings
Commandes par Défaut
Utilisez votre manette pour naviguer sur les écrans de menu. Utilisez le bouton multidirectionnel ou le stick
analogique gauche pour vous déplacer dans les menus, le bouton A pour conrmer la sélection et le bouton B
pour annuler votre choix ou revenir aux menus précédents.
Gâchette Gauche
]
x
Gâchette Droite
à
Gâchette
Haute Gauche
_
Bouton Xbox Guide
`
Gâchette Haute
Droite
Y
Stick
Analogique
Gauche
<
L
l
C
Stick Analogique DroitBouton Multidirectionnel
X
B
A
>
Pour les commandes de base utilisées pendant un match, référez-vous au tableau ci-dessous. Lisez les pages 1922 pour les commandes avancées. Vous pouvez changer les fonctions de chaque touche en allant dans « Réglages
de manette » dans les «Réglages de Système». (Voir réglages du système, page 26). Le bouton multidirectionnel
et le stick analogique gauche contrôlent les mêmes actions pour ce jeu. Quand le manuel se réfère au «bouton
multidirectionnel», vous pouvez aussi utiliser le stick analogique gauche de la même manière.
COMMANDES D’ATTAQUE DE BASE
Bouton y: Changement de joueur
Bouton z: Course
Bouton Multidirectionnel: Mouvement du joueur, dribble
Stick Analogique Gauche: Mouvement du joueur, dribble
Bouton Y: Passe en profondeur
Bouton B: Passe longue/ centre
Bouton A: Passe courte
Bouton X: Tir
Stick Analogique Droit: Passe manuelle
COMMANDES DE DEFENSE ELEMENTAIRE
Bouton y: Changement de joueur
Bouton z: Course
Bouton Multidirectionnel: Mouvement joueur
Stick Analogique Gauche: Mouvement joueur
Bouton Y (maintenir enfoncé): Gardien de but
Bouton B: Tacle glissé
Bouton A (maintenir enfoncé): Tacle/ mettre sous pression avec le joueur que vous contrôlez
Bouton X (maintenir enfoncé): Tacle/ mettre sous pression un joueur que vous ne contrôlez pas
(maintenir enfoncé le bouton)
Dribbles et Contrôle du Ballon
Dribbles: Utilisez le bouton multidirectionnel pour déplacer votre joueur quand le ballon est à ses pieds.
Dribble Oblique: Maintenez le bouton x et appuyez sur le bouton multidirectionnel à 90°dans le sens de
déplacement. Seul un petit nombre de joueurs est capable de réaliser ce dribble.
Dribble Rapide: Appuyez sur le bouton z pendant le dribble pour sprinter.
Plus de Temps entre les Contacts Avec le Ballon: Maintenez le bouton z enfoncé pour sprinter balle au pied
et appuyez rapidement sur le bouton multidirectionnel deux ou trois fois entre les contacts avec le ballon pour le
pousser encore plus loin.
Longue Distance entre les Contacts Avec le Ballon: Lorsque vous sprintez balle au pied avec le bouton z
enfoncée, maintenez le bouton x et appuyez sur le bouton multidirectionnel à 45° à droite ou à gauche dans le
sens de la course.
Dribble Lent: Gardez le bouton x enfoncé pendant que vous dribblez an de réaliser un “Dribble lent”. Grâce à cette
technique, le ballon colle aux pieds de votre joueur et il peut alors exécuter de brusques changements de direction
ou une des nombreuses feintes possibles.
Dribble Latéral: Pour vous déplacer perpendiculairement à la direction de votre mouvement, appuyez sur le bouton
multidirectionnel à 90° dans chaque direction.
Bloquer le Ballon 1: Relâchez le bouton multidirectionnel et appuyez sur le bouton z pour immobiliser le ballon
pendant le dribble.
Bloquer le Ballon 2: Relâchez le bouton multidirectionnel et appuyez sur le bouton x pour donner l’ordre à votre de
joueur de s’arrêter et de faire face au but de vos adversaires.
Sauter: Lorsqu’un adversaire exécute un tacle glissé, appuyez sur le bouton x pour tenter de sauter par-dessus.
Contrôle du Ballon: Quand vous recevez une passe, appuyez sur le bouton multidirectionnel pour contrôler le ballon.
Bloquer le Ballon: Lors de la réception d’une passe, appuyez sur le bouton directionnel tout en maintenant le bouton
x enfoncé pour arrêter le ballon et se diriger dans la direction indiquée.
Arrêter le Ballon et S’orienter vers le but Adverse: Lors de la réception d’une passe, relâchez le bouton
multidirectionnel et appuyez sur le bouton x pour se tourner vers le but adverse tout en bloquant le ballon.
Feinte de Réception: Pour demander à votre joueur de suivre le ballon quand une passe lui est destine sans qu’il le touche,
maintenez le bouton z enfoncée et appuyez sur le bouton multidirectionnel dans la direction de la course du ballon.
Passes
Remarque: Utilisez le bouton multidirectionnel an de spécier la direction des passes.
Passe Courte/Tête: Appuyez sur le bouton A pour eectuer une passe courte près du sol ou une tête. Maintenez le
bouton A enfoncé plus longtemps pour eectuer une passe vers un joueur plus éloigné.
PRO EVOLUTION SOCCER 2010
20
PRO EVOLUTION SOCCER 2010
21
COMMANDES COMMANDES
Talonnade: Appuyez rapidement sur le bouton multidirectionnel dans la direction opposée au déplacement du
joueur puis appuyez sur le bouton A.
Passe Sans Contrôle: Appuyez sur le bouton A avant que votre joueur ne réceptionne le ballon.
Passe Longue: Appuyez sur le bouton B. La longueur de la passe dépend de la durée pendant laquelle le bouton
B est maintenue enfoncé.
Passe Longue Sans Contrôle: Appuyez sur le bouton B avant que votre joueur ne réceptionne le ballon.
Passe en Profondeur: Appuyez sur le bouton Y. En maintenant le bouton Y enfoncée le plus longtemps, vous
adressez votre passe à un joueur plus éloigné.
Passe en Profondeur Sans Contrôle: Appuyez sur le bouton Y avant que votre joueur ne réceptionne le ballon.
Passe en Profondeur Aérienne: Maintenez le bouton y enfoncé et appuyez sur le bouton Y.
Une-Deux: Maintenez le bouton y et appuyez sur le bouton A pour eectuer une passe courte, ensuite
appuyez sur le bouton Y avant que votre coéquipier ne reçoive le ballon an qu’il vous renvoie le ballon.
Une-Deux Piqué avec Retour de Passe Lobé: Maintenez le bouton y et appuyez sur le bouton A pour
eectuer une passe courte, ensuite appuyez sur les boutons y + Y avant que votre coéquipier ne reçoive le
ballon an qu’il vous renvoie une balle piquée.
Passe et Accélération: Appuyez sur le bouton x immédiatement après avoir passé le ballon pour donner l’ordre
au joueur de courir en avant.
Passe Manuelle: Orientez le joystick analogique droit dans la direction souhaitée pour eectuer une passe. La
longueur de la passe dépend de la durée de pression du joystick analogique droit.
Passe Longue Manuelle: Maintenez le bouton y enfoncé et orientez le joystick analogique droit dans la
direction souhaitée pour eectuer la passe longue. La longueur de la passe dépend de la durée de pression du
joystick analogique droit.
Les centres
Remarque: Utilisez le bouton multidirectionnel pour spécier la direction des centres.
Centre Haut: Quand vous êtes loin dans la moitié de terrain adverse, appuyez sur le bouton B.
Centre Bas: Quand vous êtes loin dans la moitié de terrain adverse, appuyez deux fois sur le bouton B.
Centre Bas Au Ras Du Sol: Quand vous êtes loin dans la moitié de terrain adverse, appuyez trois fois sur le bouton
B pour adresse un centre à ras de terre.
Centre Flottant: Appuyez sur le bouton x pendant que vous exécutez le centre pour envoyer le ballon en l’air.
Centre Rapide: M aintenez le boutons y et B enfoncés pour exécuter un centre à partir de n’importe quelle
position dans la moitié de terrain adverse.
Tirs
Notes sur les tirs: Appuyez sur le bouton X pour remplir la jauge de tir. Relâchez le bouton X quand la jauge de
tir atteint le niveau désiré et votre joueur tirera en direction du but. Le niveau atteint par la jauge de tir détermine la
force et la hauteur de votre tir. Utilisez le bouton multidirectionnel pour dénir la direction voulue pendant le tir.
Tir: Appuyez sur le bouton X.
Tir Sans Contrôle /Tête: Appuyez sur le bouton X juste avant que le ballon n’atteigne votre joueur pour eectuer
un tir sans contrôle ou une tête vers le but.
Tir Contrôlé: Appuyez sur le bouton x lorsque la jauge de puissance atteint le niveau souhaite pour exécuter un
tir plus axé sur la précision que sur la force.
Tir Lobé: Maintenez le bouton y enfoncé et appuyez sur le bouton X.
Tir Lobé Type 2: Pour eectuer un lob moins piqué, appuyez sur le bouton X, puis appuyez sur le bouton z
quand la jauge de tir apparaît.
Mouvements & Feintes
Remarque: Des mouvements et des feintes avec les boutons multidirectionnels peuvent également être
eectués par les utilisateurs avancés en maintenant le bouton w et le stick analogique droit. Consultez la liste des
commandes dans le menu pause pour plus de détails. Cependant souvenez-vous: De toujours utiliser le bouton
w avoir accès à cette option ocieusement appelée «Commandes pour spécialiste».
Passement de Jambes (Long): Appuyez sur le bouton y deux fois.
Passement de Jambes (Court): Appuyez deux fois sur le bouton x.
Faux Dépar t: Quand votre joueur est immobile avec le ballon à ses pieds, faites-lui faire un faux départ en
appuyant deux fois sur le bouton y ou sur le bouton x.
Feintes de Tir et de Passe: Quand la jauge de tir ou de passe est achée, appuyez sur le bouton A bannuler le tir.
La feinte diérera en fonction l’entrée sur le bouton multidirectionnel avant d’appuyer sur le bouton A.
Plonger: Jetez-vous à terre intentionnellement en appuyant simultanément sur les boutons y + w + z. Une
faute peut être accordée à un adversaire ou vous pouvez nir avec un carton jaune.
Flip Flap Inversé: Si le pied fort du joueur est le droit, appuyez que le bouton multidirectionnel de la manette vers
la diagonale gauche puis vers la diagonale droite rapidement pendant que vous dribblez. Si son pied fort est le
gauche, la commande sera inversée. Seul un petit nombre de joueurs est capable de réaliser cette feinte.
Feinte de Corps 1: Appuyez rapidement sur le bouton multidirectionnel vers la gauche ou vers la droite dans la
diagonale de la course du joueur.
Feinte de Corps 2: Quand le joueur et le ballon sont immobiles, appuyez deux fois sur le bouton multidirectionnel
perpendiculairement par rapport à l’orientation du joueur.
Feinte en V: A l’arrêt, appuyez une fois sur le bouton multidirectionnel dans la direction opposée de celle de la
course du joueur, ensuite appuyez sur le bouton multidirectionnel en diagonale à 45 degrés du côté de son pied
le plus fort.
Feinte de Matthews: A l’arrêt, orientez le bouton multidirectionnel perpendiculairement au joueur à droite ou
à gauche du joueur, puis maintenez-le immédiatement enfoncé dans la direction opposée. Les joueurs doivent
posséder une statistique de Dribble de 70 ou plus pour réaliser ce geste.
Laisser ler le Ballon: Juste avant qu’un joueur ne reçoive une passe, relâchez le bouton multidirectionnel et
maintenez ensuite le bouton z enfoncée pour passer le ballon entre les jambes et le laisser ler vers un autre
joueur.
La roulette Marseillaise: Décrire un tour avec le bouton multidirectionnel pendant que vous dribblez. Le sens
de rotation du bouton multidirectionnel détermine celui du joueur. Seul un petit nombre de joueurs est capable
de réaliser ce mouvement, et peut l’eectuer diéremment.
Piquer le Ballon : Appuyez sur le bouton multidirectionnel de la manette en arrière, puis vers l’avant rapidement
pour que le joueur pique le ballon.
Défense
Tacle/ Pressing: Appuyez sur le bouton A pour tenter un tacle. Vous pouvez aussi maintenir le bouton A
enfoncé pour que votre joueur marque automatiquement un adversaire et eectue un pressing. Cette commande
peut être eectuée conjointement avec le bouton z.
Pressing d’un Partenaire: Maintenez le bouton X enfoncé quand l’équipe adverse est en possession du ballon an
que le joueur le plus près du ballon (les joueurs que vous contrôlez ne comptent pas) marque le porteur du ballon.
Tacle Glissé: Appuyez sur le bouton B.
Dégagement: Quand le ballon se trouve dans votre moitié de terrain, appuyez sur le bouton X pour le
dégager.
Faire Sortir le Gardien: Appuyez sur le bouton Y en situation de défense pour que le gardien se rue vers le ballon.
Dégagement du Gardien: Appuyez sur le bouton B ou sur le bouton X pour dégager le ballon avec le pied.
Utilisez le bouton multidirectionnel pour viser.
Relance à la Main: Quand votre gardien a le ballon en main, appuyez sur le bouton A pour lancer le ballon à un
coéquipier. Utilisez le bouton multidirectionnel pour viser.
Relâcher le Ballon: Quand votre gardien a le ballon en main (avec aucun bouton directionnel appuyé), appuyez
sur le bouton z pour lui ordonner de relâcher le ballon à ses pieds.
Gardien: Appuyez sur le stick analogique droit + le bouton y pour passer entre un joueur du champ extérieur
et le gardien.
Commandes Générales
Changer de Joueur: Appuyez sur le bouton y pour transférer le contrôle au joueur le plus proche du ballon.
Contrôle du Joueur Quand le Ballon est en l’air: Lorsque le ballon est dans les airs, maintenez le bouton x
enfoncé et utilisez le bouton multidirectionnel pour positionner le joueur an de le réceptionner.
Super Cancel: Quand un joueur cour t automatiquement après le ballon, appuyez sur les boutons z et x
simultanément pour stopper le joueur ou pour en reprendre le contrôle.
Activer/ Annuler une Stratégie (en Mode Manuel): Maintenez le bouton w enfoncé et appuyez sur les boutons
B, A, Y ou X pour activer ou annuler les stratégies attribuées à ces boutons.
Activer/ Annuler une Stratégie (en Mode Semi-Auto): Appuyez sur le bouton w pour activer ou annuler la
stratégie choisie.
Niveau d’Attaque/ de Défense: Appuyez sur les boutons w et z ensemble pour augmenter le niveau de votre
jauge d’attaque / de défense ce pour faire avancer vos joueurs. Appuyez simultanément sur les boutons w et x
pour réduire le niveau de la jauge.
Coups de Pieds Arrêtés et Remises en Jeu
Remarque: Pour les coups francs et les corners, maintenez le bouton approprié enfoncée pour augmenter la
jauge de tir au niveau désiré.
Corners
Classique: Appuyez sur le bouton B.
Centre Haut: Maintenez le boutons x + B enfoncés.
Centre Bas: Maintenez le bouton multidirectionnel vers le haut et appuyez sur le bouton B.
Passe à ras de Terre: Maintenez le bouton multidirectionnel vers le bas et appuyez sur le bouton B.
Eet: Appuyez sur le bouton multidirectionnel gauche ou droit pendant que la jauge de tir est achée.
Corner Court: Appuyez sur le bouton A pour envoyer une passe courte vers votre coéquipier le plus proche.

PRO EVOLUTION SOCCER 2010
22
PRO EVOLUTION SOCCER 2010
23
COMMANDES ECRANS DU MATCH/ PLAN DU MATCH
Coups de Pieds Arrêtés et Remises en Jeu (Suite)
Coups Francs: Les passes.
Passe Courte: Choisissez une direction avec le bouton multidirectionnel puis appuyez sur le bouton A.
Passe Longue Classique: Appuyez sur le bouton B.
Passe Haute: Maintenez les boutons x et B enfoncés.
Passe Basse: Bouton multidirectionnel vers le haut + bouton B.
Passe à ras de Terre: Bouton multidirectionnel vers le bas + bouton B.
Eet: Bouton multidirectionnel droit ou gauche pendant que la jauge de tir est achée.
Passe en Profondeur: Appuyez sur le bouton Y au cours d’un coup franc pour envoyer le ballon à travers la
défense. Utilisez le bouton multidirectionnel pour orienter la passe.
Coups Francs: Tirs
Tir: Appuyez sur le bouton X.
Tir Appuyé: Bouton multidirectionnel vers le haut + bouton X.
Tir Modéré: Bouton multidirectionnel vers le bas + bouton X.
Tir Légèrement Appuyé: Appuyez sur le bouton X et au moment où le joueur entre en contact avec le ballon,
appuyez sur le bouton Y.
Tir Légèrement Faible: Appuyez sur le bouton X et au moment où le joueur entre en contact avec le ballon,
appuyez sur le bouton A.
Eet: Maintenez le bouton multidirectionnel droit ou gauche enfoncé pendant que la jauge de tir est achée.
Coups Francs: Commandes Générales
Remise en Jeu Rapide: Cela fonctionne seulement avec le bon timing quand un joueur positionne le ballon pour
eectuer un coup franc rapide en utilisant ses mains. Dans ce cas, déterminez une direction en utilisant le bouton
multidirectionnel et appuyez sur le bouton A pour redémarrer rapidement le jeu avec une simple passe.
Modier le Nombre de Tireurs: Appuyez simultanément sur les boutons y et z pour choisir entre les
diérentes congurations de coup franc: un tireur (réglage d’origine), deux tireurs (deuxième tireur : côté droit),
deux tireurs (deuxième tireur : côté gauche).
Utiliser le Second Tireur: Lorsque vous tirez le coup franc, maintenez le bouton y enfoncé an que le deuxième
tireur soit l’auteur d’un tir ou d’une passe longue.
Le Second Tireur Pousse le Ballon: Maintenez le bouton y enfoncé et puis appuyez sur le bouton A an que le
second tireur pousse le ballon devant lui. Vous pourrez alors exécuter un tir ou une passe avec le second joueur.
Coups Francs: Contrôle du Mur
Quand l’équipe adverse obtient un coup franc, maintenez les boutons suivants enfoncés pour contrôler les
joueurs qui forment le mur:
Augmenter/ Réduire le nombre de joueurs formant le mur: Maintenez enfoncé le bouton w et appuyez sur le
bouton multidirectionnel en haut pour ajouter plus de joueur au mur. Pour réduire ce nombre, maintenez enfoncé
le bouton w et appuyez sur le bouton multidirectionnel en bas.
Faire Sauter Tous les Joueurs: Appuyez sur le bouton X.
Les Joueurs Restent Immobiles: Appuyez sur le bouton A.
Les Joueurs Sautent et Se Ruent Vers l’avant: Appuyez sur le bouton B.
Les Joueurs Se Ruent Vers l’avant: Appuyez simultanément le boutons B et A.
Comportement Aléatoire: Aucun bouton.
Coups Francs: Gardien de but
Déplacer le Gardien Derrière le Mur: Quand l’équipe adverse se prépare à réaliser un coup franc, maintenez le
bouton Y enfoncé pour que votre gardien de but se place derrière le mur.
Remises en jeu
Touche Court: Appuyez sur le bouton A pour lancer le ballon à l’équipier le plus proche dans la direction dénie.
Touche Longue: Maintenez le bouton B enfoncée pour réaliser une touche plus longue dans l’axe du lanceur.
Penalties
Tireur: Maintenez le bouton multidirectionnel et le bouton X pour une durée de temps proportionnelle à la
hauteur ou la grandeur du tir.
Gardien: Maintenez le bouton multidirectionnel et le bouton X pour une durée de temps proportionnelle à la
hauteur ou la grandeur du saut souhaité an d’éviter le tir. Vous devez être dans le même rythme que le tireur. Si
vous n’entrez pas une direction, votre gardien reste immobile et couvre le centre du but.
Changer le Curseur à « Manuel» et/ou Choisir Joueur sur « Activé »
Demander le Ballon: Lorsqu’un coéquipier possède le ballon, appuyez sur le bouton x deux fois pour demander
une passe. Plus vous appuyez sur le bouton, plus vous augmentez la probabilité qu’il vous passe le ballon.
Ecrans du Match
Cette section fournit des explications sur les diérentes fonctionnalités et options des écrans que vous
rencontrerez au cours d’un match.
Achage du Match
Temps Écoulé
(Indiquant le joueur contrôlé)
- contour rouge : le joueur n’a pas
- triangle blanc intérieur : mouvement
- nom jaune / numéro au-dessus du
curseur : joueur a été réservé
-drapeau rouget jaune : le joueur que vous
Attitude Oensive/ Défensive: Cette jauge indique l’état d’esprit actuel de votre équipe. Plus la barre est rouge, plus
l’équipe se montrera oensive ; au contraire, une barre bleue indique que l’équipe se met en position de défense.
Marquage de Stratégie: Les symboles de touche représentant les Stratégies Manuelles apparaissent dans cette
zone quand elle est active.
Jauge d’endurance: Ache le niveau d’endurance actuel d’un joueur. La jauge devient rouge quand le niveau
d’endurance est très faible, ce qui indique une baisse de la performance du joueur.
Icônes d’information: Les symboles qui suivent apparaitront dans le coin supérieur gauche de l’écran durant les Matchs.
Plan du Match
Avant de commencer un match, vous pouvez congurer la formation de votre équipe, le capitaine et les tireurs de
coups de pieds arrêtés et eectuer d’autres Réglages sur l’écran pour le plan du match. Assurez-vous d’être bien
préparé pour disputer le match.
Fenêtres D’information
Les fenêtres d’information situées en haut de l’écran principal (gauche: Equipe locale, droite: équipe visiteuse)
contiennent des renseignements sur le thème sélectionné pour le Plan du match. Par exemple, si vous choisissez
«Composition», vous pouvez vérier le nom des joueurs sélectionnés, le nombre total d’avertissement (carton
jaune), le rôle, la jambe forte, et la hauteur.
Nom et état du Joueur
A partir de la gauche: Rôle, Nom du Joueur, Carte du Style de Jeu, Nombre Total de Point, Endurance, Condition.
Endurance et Condition Physique
Vériez l’endurance et la condition physique des joueurs dans les achages de l’état. La fatigue peut aussi
apparaître selon le mode et les Réglages que vous utilisez. Plus un joueur est fatigué, plus il sera lent pour
récupérer. Les joueurs fatigués se blessent aussi plus rapidement. Un marquage spécial est aché à côté des
joueurs qui sont blessés ou qui ne peuvent pas apparaître dans les matchs.
Joueur Contrôlé:
Lorsque vous jouez avec l’option «Sélectionnez Joueur» activée, le(s) joueur(s) que vous contrôlé(s)
sera indiqué par un cercle (voir également page 26).
Bleu - Retourner au Match (Pas de Blessure) :
Un joueur revient sur le terrain en pleine forme.
Jaune - Retourner au Match (Blessure Légère):
Un joueur revient sur le terrain mais il est légèrement blessé, ce qui aura un eet sur sa performance.
Rouge - Ne Revient pas sur le Terrain (Pour Cause de Blessure):
Un joueur blessé ne peut pas revenir sur le terrain et doit être remplacé (si possible).
Gris - Coup franc Indirect :
Un coup franc indirect a été accordé.
Rouge - Temps Supplémentaire :
Cela indique le nombre de minutes de jeu supplémentaires qui vont être jouées.
Curseur
d’endurance
automatique
contrôlez est hors-jeu
Marquage de Stratégie Jauge D’enduranceRadar
Score
Attitude
Oensive/
Défensive
Nom et
position du
joueur

PRO EVOLUTION SOCCER 2010
24
PRO EVOLUTION SOCCER 2010
25
PLAN DU MATCH
PLAN DU MATCH/ MODES DE JEU
La jauge verte représente l’endurance tandis que la èche indique la condition physique. La jauge bleue en
dessous de la jauge d’endurance indique la fatigue.
Icônes Spéciales: Les icônes suivantes apparaissent sur les pages de l’Achage de l ’Etat pour fournir des
informations sur la condition physique et la disponibilité des joueurs.
1 2 3 4 5 6 7
Vert Centre Rouge Centre Jaune Centre Bleu Courir Monde entier Cartons
Blessures
1 Retour après Blessure 2 Blessure Grave 3 Blessure Légère 4 Gravité de la Blessure Indéterminée
Indisponible
5 Engagement International 6 Suspendu pour cause de Cartons Jaunes 7 Suspendu pour cause de Carton Rouge
Réglages Assistées
Déplacez les cases de délement pour ajuster les réglages de la composition de l’équipe, de la formation, des
tactiques et des coups de pieds arrêtés. Une fois que vous avez choisi les réglages à modier, utilisez le bouton
multidirectionnel à gauche et à droite pour déplacer les cases de délement. Les réglages seront automatiquement
modiés an de correspondre à la position des cases de délement.
Composition de l’équipe
Sélectionnez les joueurs qui participeront au match. Utilisez le bouton multidirectionnel pour sélectionner les
joueurs, puis appuyez sur le bouton A pour les inter vertir. Appuyez sur le bouton X tout en sélectionnant un
joueur pour qu’il soit capitaine (indiqué par un repère jaune).
Capacités Joueurs
Appuyez sur les boutons comme indiqué sur l’écran pour naviguer entre les capacités du joueur. Il y a des capacités
normales comme Position, Agilité, Passe et Tir ainsi que des capacités spéciales, rendant un joueur très compétent
dans certains domaines de son jeu.
Remarque: Si vous avez besoin de plus de détails sur les capacités des joueurs, consultez le Mode Modier de PES
2010 où vous pouvez trouver des descriptions détaillées des capacités.
Dénir la Formation
Ajustez chaque position des joueurs et modiez la formation. Vous pouvez également sélectionner les joueurs
pour marquer l’équipe adverse.
Remarque: Positions des Joueurs
Dans chaque formation, des positions comme les avants-centres ou arrières latéraux sont attribuées aux joueurs.
La position qui lui correspond le mieux est déjà attribuée à chaque joueur. Notez que le placement du joueur à
une autre position réduira ses capacités.
Système de Carte
Grâce au nouveau système de car vous pouvez régler le niveau d’attaque de chaque joueur et choisir de tirer parti
ou non des capacités uniques d’un joueur.
Ceci vous ore des possibilités innies et des options stratégiques encore jamais vu auparavant.
Le Système de Carte ore trois diérentes catégories :
1) C = Les cartes de connaissance vous permettent de déterminer si les joueurs jouent leurs rôles de façon
équilibrée, défensive ou oensive.
2) P = Les cartes du style de jeu représentent les styles de jeu individuels tels que des «Passes localisées».
Vous pouvez désactiver toutes les cartes si vous ne voulez pas d’un joueur qui exécute certains styles, si,
par exemple les styles ne cadrent pas avec votre stratégie globale.
3) S = Les cartes de compétence identient les compétences (par exemple, «économiseur de tir au but») que
les joueurs possèdent, et ne peuvent pas être modiées ou désactivées.
Remarque: Les cartes de style de jeu disponibles peuvent diérer selon le rôle des joueurs et le niveau d’attaque. Si
vous utilisez la carte du style de jeu qui va à l’encontre de vos tactiques en cours, elles seront traitées en priorité.
Tactiques
Réglez la sensibilité et les stratégies de l’ensemble de l’équipe.
Style de l’équipe
Réglez la sensibilité du match. Déplacez la case de délement pour modier les paramètres pour chaque élément.
En général, déplacez la case de délement vers la droite augmentera le niveau d’attaque, et vers la gauche
augmentera celui la défense.
Choisir «Couverture» comme votre type de «Stratégie de défense» permettra à vos joueurs de protéger l’espace
créé lorsque leurs coéquipiers se déplacent sans marquer des adversaires spéciques.
Jaunes
Cartons
Rouge
Stratégie
Sélectionnez jusqu’à quatre stratégies que vous souhaitez utiliser et aectez-leur les boutons de votre choix.
Lorsque vous voulez eectuer des stratégies pendant un match manuellement, réglez la case de délement
correspondante dans le menu des réglages assistés sur «Désactivé». Veuillez prendre en compte que certaines
stratégies, telles que «Contre-attaque», «Attaque suprême», «Pression» et «Défense globale» ne peuvent être
exécutées simultanément.
Réglages des Coups de Pieds Arrêtés
Ici, vous choisissez les tireurs pour les coups de pieds arrêtés et les joueurs pour rejoindre l’attaque. Ces derniers
peuvent être des joueurs qui, normalement n’y participent pas, tels que les centres arrière qui remontent le terrain
lors d’un corner.
Ligue des Champions UEFA (page 26)
Opposez votre club à l’élite du football européen avec le tout nouveau mode exclusif de la Ligue des Champions
UEFA.
Exhibition
Tout d’abord, si vous voulez démarrer rapidement un match, choisissez de vous mesurer contre un ami (CONTRE
AMI) ou l’ordinateur (CONTRE ORDI.) C’est le moyen le plus rapide pour pousser ballon, alors qu’un match
personnalisé (PERSONNALISER) vous ore plus d’options dès le départ. Outre des nombreux choix évidents pour
les équipes, les uniformes ou le stade, vous trouverez les options suivantes pour le match préalable en fonction
du mode sélectionné:
1 Options du Jeu
Pour chaque manette que vous avez connectée, décidez si les joueurs correspondants vont être en compétition
ou jouer dans la même équipe. Choisissez aussi si vous souhaitez que les joueurs soient contrôlés par vous ou par
l’ordinateur durant le match.
En appuyant sur le bouton X, vous pouvez ajuster les «Réglages de Curseur». (Voir «Réglages curseur», page 26).
Match à Domicile/ Ex térieur: Appuyez sur le bouton multidirectionnel droit ou gauche pour changer entre les
équipes à domicile et à l’extérieur.
Mode Entraineur: Prenez des décisions tactiques pendant que l’ordinateur contrôle les joueurs sur le terrain. Passez
au Mode entraineur en appuyant à gauche du bouton multidirectionnel quand l’icône de la manette est du côté
domicile ou en appuyant à gauche du bouton multidirectionnel quand l’icône de la manette est du côté extérieur.
Mode Spectateur: Appuyez sur le bouton Y pour regarder jouer deux équipes contrôlées par l’ordinateur.
2 Options
Choisissez les Réglages pour le Niveau de Diculté, la Durée du Match, les Blessures, les Conditions d’Equipe etc.
Ensuite, sélectionnez «Conrmer». Notez que certains réglages tels que «Réglages de Règles» et «Développement
des Joueurs» sont propres à des modes de matchs particuliers.
Ligue des Masters (page 27)
Jouez en compétition dans la ligue, faites évoluer vos joueurs et cherchez à renforcer votre équipe sur le marché
des transferts.
Devenez une Légende (page 28)
Ce mode passionnant recrée la carrière d’un joueur spécique de votre choix.
Si vous montrez de bonnes performances, votre réputation sera meilleure ce qui provoquera des ores de
transfert pour rejoindre des clubs diérents. Pouvez-vous écrire votre nom dans les livres d’histoire?
Ligue et Coupe
Protez des diérents types de compétitions et de coupe. Un bon classement dans le tableau du tournoi vous
permettra d’entrer dans la Ligue Europa UEFA ou éventuellement dans la ligue des champions UEFA la prochaine
saison.
Communauté
«Communauté» est un mode qui supporte les correspondances que vous avez avec vos amis les plus proches. En
enregistrant vos compagnons dans une communauté, vous pouvez ainsi la concurrence en utilisant diérents
formats de compétition.
Xbox LIVE (Mode réseau) (page 29)
Connectez-vous à Xbox LIVE® et protez des matchs contre des joueurs venant de diérents pays qui jouent à la
même version de PES 2010.
Entraînement
Déplacez vos joueurs librement pendant que vous pratiquez les commandes du match. En ajustant les Réglages,
vous pouvez vous concentrer sur des domaines spéciques tels que coups francs et corners. Notez que vous ne
pouvez pas choisir le « Mode Spectateur » dans les Réglages Joueur.

PRO EVOLUTION SOCCER 2010
26
PRO EVOLUTION SOCCER 2010
27
MODE MODIFIER/ GALLERIE / REGLAGES SYSTEME/ LIGUE DES CHAMPIONS UEFA LIGUE DES CHAMPIONS UEFA/ LIGUE DES MASTER
Modier
Cette option vous permet de personnaliser la multitude d’équipe et de joueurs proposés dans PES 2010. Vous pouvez
même créer votre propre équipe. Activez le Menu d’Aide (son icône apparaît en bas de l’écran) pour consulter des
instructions plus détaillées sur la manière d’utiliser les nombreuse options et fonctionnalités de ce mode.
Ajouter vos Propres Images
Vous pouvez ajouter des images de têtes de joueurs, de logos d’uniformes et d’emblèmes en utilisant des données
d’image existantes, une caméra Xbox LIVE Vision ou un équipement similaire. Peu importe l’endroit où le symbole
de la caméra apparaît, suivez les instructions sur l’écran.
Remarque: Des données pour plus de 400 visages, 200 logos d’uniformes et 40 emblèmes peuvent être stockées,
selon la capacité de votre Disque dur Xbox 360 ou de la carte de mémoire Xbox 360.
Inscrire un Joueur créé Avec une Equipe
An d’inscrire un joueur que vous avez créé dans « Créer Joueur » avec une équipe, allez dans « Equipe » à partir
du Menu Modier et sélectionnez « Inscrire Joueur ». Ensuite, choisissez l’équipe à laquelle vous souhaitez que le
joueur adhère. Ensuite, après qu’une liste des joueurs de cette équipe ai été achée, sélectionnez « Ajouter joueur
» ou choisissez un joueur existant à échanger contre le joueur créé. Enn, sélectionnez « Autres » et choisissez le
joueur que vous venez juste de créer.
Galerie
La galerie combine beaucoup de divertissements et des fonctions instructives.
Gestion de la Musique: Ecoutez la musique de fond du match. Vous pouvez aussi changer la musique de fond
qui est jouée pendant le match.
Historique Musical: Visualisez un historique de ce que vous avez joué pendant le match.
Visionner les Ralentis: Regarder les matchs que vous avez sauvegardés.
Générique: Voir le générique de l’équipe.
Réglages Système
Ajustez les Réglages pour les commandes et la sauvegarde des données.
Réglages Manette: Changez la manière d’utiliser les commandes. Vous pouvez aussi ajuster d’autres Réglages et décider
par exemple comment le curseur de joueur est aché et comment il est changé. (Voir «Réglages joueurs», page 26.)
Achage Ecran: Déterminez les informations achées à l’écran et la position indiquée pendant les matchs.
Réglages Son: Ajustez diérents éléments relatifs au son, comme par exemple le volume des commentaires et
des eets sonores.
Ajustements Ecran: Changez la position de l’écran et les réglages de couleurs.
Données Système: Activez ou désactivez la sauvegarde automatique. Sauvegardez ou chargez les données
système.
Langue: Changez la langue utilisée pendant le match.
Téléchargement: Des contenus supplémentaires et des listes de mise à jour, si disponible, vous pouvez télécharger ici.
Réglages Curseur
Allez dans « Réglages Curseur » dans « Réglages Manette » pour changer le type d’achage et de déplacement du
curseur. Parmi les articles disponibles, «Modier le curseur» a en particulier un grand impacte sur les commandes
du jeu. Veillez choisir l’option «Modier Curseur» qui vous facilite les commandes pour l’action.
Changer Curseur
Automatique: Le curseur se déplace automatiquement. Vous pouvez aussi changer manuellement entre les
joueurs en appuyant sur le bouton y.
Semi-automatique: Lors d’une attaque le curseur se déplace automatiquement vers le joueur qui reçoit la balle.
Lors d’une situation de défense, le curseur passe en mode manuel en appuyant sur le bouton y.
Manuel: Le curseur se déplace seulement lorsque vous appuyez sur le bouton y.
Téléchargement: Des contenus supplémentaires et des listes de mise à jour, si disponible, vous pouvez télécharger ici.
Choix d’un Joueur
ette option vous permet de mettre le curseur constamment sur un joueur (sauf le gardien de but).
Remarque: Vous pouvez aussi accéder aux Réglages pour « Changer Curseur » en passant par « Réglages Joueur
» avant et pendant un match.
Ligue des Champions UEFA
Opposez votre club à l’élite du football européen avec le tout nouveau mode exclusif de la Ligue des Champions
UEFA. Votre équipe est-elle assez forte pour négocier les niveaux de groupe? Allez-vous faire face au challenge des
matchs éliminatoires? Etes-vous capable de devenir un des rares à remporter la coupe, ce dont tous les joueurs,
managers et supporters rêvent?
Préparations Ligue des Champions UEFA
Sélectionnez soit « Tournoi » soit « Exhibition », ensuite choisissez « Réglages du Match ».
Sélectionnez « Nouveau Match » ou « Charger Match ». Sélectionnez une équipe inscrite à la Ligue des Champions
pour jouer un seul match.
Format de la Compétition
Les 32 équipes lorgnant la victoire en Europe prendront tout d’abord part à un niveau de ligue où ils sont répartis en
huit groupes de quatre. Les gagnants et les nalistes de chaque groupe se qualieront jusqu’en Matchs Éliminatoires.
1 Groupe de Ligue
Quatre équipes dans chaque groupe comprennent le niveau de ligue, ils joueront deux fois l’une comme
l’autre dans un match à domicile et visiteur. Les équipes qui termineront au deux premières places
avanceront jusqu’au Matchs Éliminatoires.
2 Premier Tirage au Sort
Un tirage au sort détermine à qui les 16 équipes sorties des niveaux de ligue devront se confronter. Les
vainqueurs du groupe d’une ligue devront aronter l’équipe qui a ni naliste dans un autre match.
Cependant, ils ne se confronteront pas aux équipes de la même ligue. Remarquez que cela peut changer si
vous entrez plus de quatre équipes d’une même ligue.
3 Première Éliminatoire
Les égalités seront départagées par deux matchs domiciles et visiteurs. L’équipe avec le plus grand nombre
total de buts marqués progressera, ou en cas d’égalité, ce sera celle qui aura marqué le plus de buts en
visiteur. Si le règlement concernant buts en visiteur reste peu concluant, un temps supplémentaire sera joué.
Si aucun but n’est marqué pendant les prolongations, le vainqueur sera départagé par des tirs au but.
4 Second Tirage au Sort
Le deuxième tirage au sor t détermine avec quelle équipe parmi les huit présentes qui ont remportée la
première égalité se mesureront. Contrairement au premier tirage, les équipes peuvent être jumelées avec
celles du même groupe ou ligue.
5 Quarts de Finales et Femi-Finales
La majeure partie reste identique à la première série d’égalités, les joueurs seront départagés par deux matchs
à domicile et en visiteurs. Il n’y aura pas d’éliminatoire en troisième place pour les Demi-Finalistes vaincus.
6 Finale
La nale de Ligue des Champions UEFA sera disputée en match unique.
Master League
Dans ce mode, vous devez choisir une équipe puis la menez au succès au cours des compétitions de Ligue et de
Coupe pour un nombre de saisons illimité. Tout en générant des revenus avec chaque victoire sur le terrain et en
gardant votre équipe au meilleur de sa forme, vous devrez vous illustrer sur le marché des transferts et faire progresser
consciencieusement vos jeunes talents an de transformer votre club en une valeur sûre du football mondial.
Remarque: La ligue des Masters dans PES 2010 ore une myriade de nouvelles fonctionnalités et des améliorations,
dont certaines sont présentées ci-dessous. Et bien sûr, vous pouvez désormais vous qualier et participer aux
événements les plus prestigieux des clubs de football: La ligue Europa UEFA et la Ligue des Champions UEFA.
Progresser à travers la Ligue des Masters
Les saisons de la Ligue Master débutent au cours de la période de transfert du mois d’août et durent jusqu’au
milieu de la dernière semaine du mois de juillet de l’année suivante. A mesure que les matchs sont tenus et que
le calendrier progresse, le temps s’écoulera par tranche de demi-semaine.
Gestion de L’équipe
Comme dans le monde réel, tout est question d’argent. Vous êtes tenu de payer les frais tels que les salaires du
personnel, des joueurs et pour la gestion du fan club. Il est possible de gagner de l’argent avec des prix obtenus
lors de tournoi, les frais liés au fan club, et d’autres sources. Vous pouvez acquérir des nouveaux joueurs, investir
dans une jeune équipe, et améliorer les performances de l’équipe avec votre argent.
Remarque: Vous pouvez changer les salaires du personnel au cours du mois d’août lors de la gestion des
comptes.
Perdre de L’argent et Faillite
Les dépenses sont calculées dans la première semaine de septembre. Si vos fonds sont dans le rouge à ce moment,
votre équipe fera faillite. Même si l’équipe fait faillite, il sera toujours possible de jouer des matchs normalement,
mais la fréquence des dépôts de bilan sera enregistrée dans vos données de sauvegarde.
Lorsque vos fonds sont dans le rouge, vous ne serez pas en mesure de mener des négociations. Donc, vous
serez forcé de tenter de réduire les frais rapidement, par exemple en vendant des joueurs, bien avant le mois de
septembre. Sinon, le jeu s’en occupera automatiquement.
Arpenter le Stade
Il s’agit de l’écran central pour la ligue des Masters. Ici, vous vous déplacez entre votre pavillon-club et bureau,

PRO EVOLUTION SOCCER 2010
28
PRO EVOLUTION SOCCER 2010
29
LIGUE DES MASTER/ DEVENEZ UNE LEGENDE XBOX LIVE (EN LIGNE)
vériez les informations pour le prochain match et plus encore. Vous pouvez également sauvegarder votre
progression. Au pavillon-club, vous pouvez changer les plans du match et le régime d’entraînement des joueurs.
En outre, vous pouvez consulter les informations sur les jeunes équipes ici. Au bureau, vous êtes en mesure de
vérier les dates des matchs, les frais de gestion en cours, et de mener des négociations de transfert.
Négociations de Transfert
Les négociations de transfert se tiennent au cours de la saison. I l existe quatre modèles principaux pour ces
négociations; Instigation de négociation, réceptions des ores de négociation, mis en vente de joueurs et
renouvellement des contrats. Lors de la négociation avec les joueurs, un observateur se chargera de la procédure.
(Vous pouvez également designer votre observateur an qu’il s’occupe de tout, de la sélection des joueurs aux
négociations et pour la signature. Cette option est désactivée par défaut).
Vérier les Jeunes Équipes
L’option jeune équipe dans le pavillon-club vous permet de choisir parmi plus de 10 jeunes joueurs talentueux en
tant que nouvelles recrues pour votre équipe. Aucune négociation n’est nécessaire avec ces joueurs ou encore
frais de transfert à payer, donc vous pouvez signer avec eux à tout moment durant la saison. Enn, les joueurs qui
ont signé provenant d’une jeune équipe seront très attachés à votre équipe et seront moins susceptibles de se
faire transférer pour une autre équipe dans le futur.
Devenez une Légende
Créez un joueur et visez le titre de Joueur Mondial de l’Année. Vivez votre carrière depuis votre début professionnel
jusqu’à la retraite.
Progresser à travers le mode Devenez une Légende
Tout d’abord un match des espoirs aura lieu. Quand ce match est terminé, les ores venant de clubs dans la ligue
sélectionnée seront reçues et vous devrez sélectionner un club pour lequel vous souhaitez jouer.
Les possibilités de jouer des matchs seront peu nombreuses au début. Vous allez devoir travailler dur et
impressionner les gens pendant les matchs d’équipe pour mériter votre place sur le banc. Montrez vos bonnes
performances en dehors du banc pour gagner votre place xe dans l’équipe. De bonnes performances de jeu
ouvriront le chemin à des ores venant d’autres clubs. Après le transfert, faites gagner votre équipe, mais visez
aussi à gagner des récompenses personnelles comme la MVP de la ligue ou le titre de meilleur marqueur. De tels
titres peuvent souvent provoquer des ores faites par des clubs plus importants et même un appel en équipe
nationale. La carrière d’un joueur commence à 17 ans et augmente d’un an au début d’une nouvelle saison. A 27
ans, vous pouvez décider de prendre votre retraite ou de continuer à jouer jusqu’à l’âge de 35 ans, âge auquel la
retraite est obligatoire et « Devenez une légende » se termine.
Remarque: Dans PES 2010 vous pouvez utiliser votre joueur développé du mode Devenez une légende en ligne
ainsi qu’en ligue des Masters. Pour ce faire, allez dans «Options» dans le menu Devenez une légende.
En outre, vous pouvez désormais vous qualier pour la ligue Europa UEFA et la ligue des Champions UEFA au sein
du mode Devenez une légende.
Mouvement Automatique: Activez ou désactivez la fonction de mouvement automatique. Si elle est ACTIVEE,
votre joueur bouge automatiquement si vous maintenez le bouton y enfoncé (le curseur au-dessus du joueur
change d’un bleu opaque à transparent).
Matchs
Les joueurs qui vont jouer, la formation de l’équipe, les remplacements, etc. sont décidés automatiquement par
l’ordinateur. Vous contrôlez seulement votre joueur créé. Quand vous ne jouez pas, vous pouvez regarder le match
en tant que spectateur (accélérez la vitesse du match dans le « Menu Avance Rapide » si vous le souhaitez).
Développement Joueur
Jouer des matchs permet aux joueurs d’acquérir des points d’expérience qui augmentent également avec de
bonnes performances de jeu. Une fois que vous avez acquis un certain nombre de points, les capacités du joueur
vont augmenter en accord avec la courbe de développement.
Remarque: Une fois un certain âge atteint, les capacités du joueur peuvent décliner. L’expérience peut également
apporter des compétences spéciales (jusqu’à huit).
Paramètres de Mise au Point
Dans le menu «Devenez une légende», sélectionnez «Informations et Réglages de Joueurs» / «Mise au point»
pour changer la politique de développement des Réglages du joueur. Sélectionnez les sujets «Mise au point» et
répartissez les douze points entre les capacités. Le joueur développe une compétence plus rapidement si vous
lui attribuez plus de points.
Demander une Passe à un Coéquipier
Appuyez de manière répétitive sur le bouton x pour demander une passe à un coéquipier. Si vous êtes dans une
bonne position, il vous passera le ballon.
Xbox LIVE
Xbox LIVE® vous apporte les divertissements que vous aimez dans votre salon. Trouvez le jeu idéal pour tous les
joueurs grâce à une période d’essai gratuite sur des centaines de jeux de la plus grande ludothèque disponible.
Avec des modules de jeux téléchargeables comme des cartes, des chansons, des armes et des niveaux, vous
obtiendrez plus de chacun de vos jeux. Et n’oubliez pas de vous connecter et de jouer avec des amis où qu’ils
soient. Avec Xbox LIVE, l’amusement ne cesse jamais.
Connexion
Avant de pouvoir utiliser Xbox LIVE, vous devez raccorder votre console Xbox 360 à une connexion à large bande
ou haut débit et vous inscrire pour devenir membre du service Xbox LIVE. Pour savoir si Xbox LIVE est disponible
dans votre région et pour de plus amples renseignements sur la connexion au service Xbox LIVE, rendez-vous
sur le site www.xbox.com/live/countries.
Contrôle Parental
Ces outils exibles et faciles d’utilisation permettent aux parents et aux tuteurs de décider à quels jeux les jeunes
joueurs peuvent accéder en fonction de la classication du contenu du jeu. Les parents peuvent restreindre l’accès
aux contenus classés pour adulte. Approuvez qui et comment votre famille interagit avec les autres personnes en
ligne sur le ser vice Xbox LIVE et xez une limite de temps de jeu autorisé. Pour plus d’informations, rendez-vous
sur le site www.xbox.com/familysettings.
Préparations de Réseau
Après avoir sélectionné «En ligne» dans le Menu Principal, suivez les étapes ci-dessous pour congurer votre partie.
1 Création de Données Utilisateur/ Vérication de Détails
Vous serez dirigé vers l’écran « Création de données utilisateur » s’il n’y a pas de données utilisateurs disponibles.
Soyez conscient que les données utilisateur créées ne peuvent pas être supprimées pendant un certain temps.
2 Mette à jour Division
Les divisions seront mise à jour une fois pas semaine pendant les périodes d’utilisation du service en ligne
Une division est un groupe composé d’équipes qui varie d’après les résultats des joueurs. Du plus fort au plus faible,
il y a cinq divisions diérentes : « Division 1 » ; « Division 2 » ; « Division 3A » ; « Division 3B » et « Division 3C ». Lorsque
vous commencez une partie, vous serez d’abord listé sous «Pas de division».
Remarque: Les joueurs qui ne se sont pas connectés pendant six jours (environ) sont renvoyés à « Pas de
Division».
3 Modes de Jeu Xbox LIVE
Si vous êtes partant pour un match rapide, vous pouvez le faire quand vous voulez. Classée ou non classés, c’est
votre décision ainsi que l’opportunité de jouer 1vs1, 2vs2 ou toute autre combinaison avec jusqu’à quatre joueurs
au total. (Regroupements d’autres que les 1vs1 et 2vs2 ne peuvent être sélectionnés via le menu Salle du match).
4 Icônes en Mode Réseau
Icônes État des Joueurs
Partie en cours Connecté Non Connecté
(Rouge) (Bleu) (Gris)
Icônes Joueurs
Vous Ami
(Vert) (Bleu) (Rouge) (Gris)
Icône Etat de Transmission
Ces icônes vous informent de la qualité de la connexion réseau:
Bon Moyen Mauvais Pas de Communication Recherche
(Vert) (Jaune) (Orange)
Joueur de votre
Liste Noire
Autre Joueur
en cour

PRO EVOLUTION SOCCER 2010
30
PRO EVOLUTION SOCCER 2010
31
WARRANTY
Konami Digital Entertainment, Inc. garantit à l’acheteur original de ce jeu Konami que le média sur lequel
ce logiciel est enregistré est franc de tout vice de matériel ou de main-d’œuvre pour une période de
quatre-vingt-dix (90) jours à compter de sa date d’achat. Ce produit Konami est vendu « tel quel » et sans
aucune garantie expresse ou tacite et Konami ne peut être tenu responsable de quelque dommage ou
perte découlant de l’usage de ce logiciel. Konami accepte, pour une période de quatre-vingt-dix (90) jours,
de remplacer ou de réparer sans frais, à sa discrétion, tout produit Konami, dont les frais d’envoi postal
ont été payés, avec une preuve d’achat, acheminé à son Centre de service. La présente garantie ne peut
être invoquée lorsque le vice résulte de l’usure normale ou d’égratignures. La présente garantie sera
également nulle et sans effet si le vice du jeu Konami résulte d’un usage abusif ou déraisonnable, d’un
acte délibéré ou d’une négligence.
L’OBLIGATION DÉCOULANT DE LA PRÉSENTE GARANTIE TIENT LIEU DE TOUTE AUTRE GARANTIE ET
NULLE AUTRE ASSERTION OU REPRÉSENTATION DE QUELQUE NATURE QUE CE SOIT N’ENGAGE
KONAMI. TOUTE GARANTIE TACITE S’APPLIQUANT AU PRÉSENT LOGICIEL, Y COMPRIS TOUTE
GARANTIE QUANT À SA VALEUR MARCHANDE OU À SA PERTINENCE EN REGARD D’UN USAGE
PARTICULIER, SE LIMITE À LA PÉRIODE DE QUATRE-VINGT-DIX (90) JOURS DÉCRITE CI-DESSUS.
KONAMI NE SAURAIT EN AUCUN CAS ÊTRE TENU RESPONSABLE DES DOMMAGES SPÉCIAUX,
ACCESSOIRES OU CIRCONSTANTIELS RÉSULTANT DE LA POSSESSION, DE L’UTILISATION OU DE LA
DÉFAILLANCE DE CE PRODUIT KONAMI.
Certains états ou provinces ne permettent ni les limites sur la période de garantie tacite, et/ou les
exclusions ou limites vis-à-vis des dommages accessoires ou circonstanciels. Le cas échéant, les limites
et/ou exclusions de responsabilité qui précèdent peuvent ne pas s’appliquer à vous. Cette garantie vous
octroie des droits spécifiques et vous pourriez bénéficier d’autres droits qui varient d’un état ou d’une
province à l’autre.
Si vous avez des problèmes techniques avec votre jeu, veuillez appeler notre Centre de Garantie et de
Support Technique au (310) 220-8330 ou au (310) 220-8331 du lundi au vendredi de 9 heures à 17 heures,
heure normale du Pacifique, ou envoyez un courriel à support@konami.com. Tout produit doit être jugé
défectueux par un représentant au service à la clientèle de Konami et un numéro d’autorisation de retour
de produit (#RMA) doit vous être attribué avant l’envoi du produit; tout produit reçu sans ces critères vous
sera retourné si un représentant du service à la clientèle de Konami ne peut pas vous rejoindre dans les
trois (3) jours suivant la réception du produit retourné non autorisé.
Konami Digital Entertainment, Inc.
Attention: Customer Service-RMA # XXXX
2381 Rosecrans Ave, Suite 200
El Segundo, CA 90245
USA
SERVICE À LA CLIENTÈLE
Si vous êtes pris ou que vous avez simplement besoin d’aide, ne vous en faites pas! Vous pouvez écrire à
nos experts en jeux à support@konami.com ou consulter notre section de soutien au www.konami.com.
Inscrivez-vous dès aujourd’hui au www.konami.com afin de recevoir des informations exclusives sur les
nouveaux produits, des offers spéciales et bien plus encore!
Ocial Licensed
Product
Ocial Licensed
Product
XBOX LIVE (EN LIGNE)/ MENTIONS LEGALES GARANTIE/ SUPPORT PRODUIT
Icônes de Comportement
Si vous voulez connaître l’évaluation de l ’attitude d’un adversaire, ces icônes vous le diront (par ordre décroissant
de gauche à droite). L’attitude reète, par exemple, si un joueur abandonne un match prématurément.
Remarque: Les utilisateurs avec une mauvaise attitude n’auront pas accès aux classements en ligne.
MESSAGE IMPORTANT
Konami se réserve le droit de pénaliser ou condamner chaque joueur utilisant de la fonction de chat pour abuser
de tiers. La pénalité sera décidée par Konami et peut provoquer un bannissement temporaire ou permanent de
la fonction de chat ou du jeu en ligne avec ou sans préavis.
Nous vous remercions pour votre compréhension et votre fair-play.
Produit ociel sous licence LIGUE DES CHAMPIONS UEFA. Tous les noms, logos et trophées d’UEFA sont la propriété, les marques
déposées et/ou les logos d’UEFA et sont utilisées ici avec l’autorisation d’UEFA. Aucune reproduction n’est autorisée sans consentement
écrit préalable d’UEFA. “adidas”, le logo à 3 barres et la marque de fabrique 3-Stripes sont des marques déposées du groupe adidas dont
l’utilisation est autorisée. adiPUREmarque de fabrique du groupe adidas utilisée avec une autorisation. L’utilisation des noms de joueurs
réels est autorisée par FIFPro et ses associations membres. Sous licence ocielle de l’Asociación del Fútbol Argentino Sous licence
ocielle de Czech National Football Association Sous License ocielle de CFF © 2009, le Permis de DFB accordé par m4e AG, Grünwald
© The Football Association Ltd. 2009. O FA Crest e FA England Crest são marcas ociais da The Football Association Limited e são marcas
registradas mundialmente. marca registrada FFF © 1996 JFA Ocialmente licenciado por FIGC e AIC © 2001 Korea Football Association
Licencié par OLIVEDESPORTOS (Agent ociel de FPF) Producto ocial licenciado RFEF © 2002 Ligue de Football Professionnel ® Licencié
ociellement par Eredivisie CV © & TM 2009 Liverpool Football Club & Athletic Grounds Ltd Ocial Produit licencié ociellement par l’A.C.
Milan Manchester United crest and imager y © MU Ltd © Real Madrid (09) Produit ociel manufacturé et distribué par Konami Digital
Entertainment sous licence octroyée par Soccer s.a.s. di Brand Management S.r.l. © Adagp, Paris 2009../Macary - Zublena & Regembal
- Constantini, les Architectes. Wembley, le Stade de Wembley et l’appareil d’Arc est les marques de commerce ocielles de Wembley le
Stade National A Limité et est assujetti aux enregistrements de marque de commerçant vastes Tous les autres copyrights ou marques
déposées sont la propriété de leurs propriétaires respectifs et sont utilisés sous licence. ©2009 Konami Digital Entertainment .
Ce logiciel est basé sur une partie du travail de l’Independent JPEG Group.
Dolby et le symbole de double-d est des marques déposées de Dolby Laboratories.
©2009 Konami Digital Entertainment. KONAMI est une marque déposée de KONAMI CORPORATION.
GARANTIE
www.konami.com/pes2010

PRO EVOLUTION SOCCER 2010
32
PRO EVOLUTION SOCCER 2010
33
NOTES NOTES

PRO EVOLUTION SOCCER 2010
34
PRO EVOLUTION SOCCER 2010
35
NOTESNOTES

Ofcial Licensed Product of UEFA CHAMPIONS LEAGUE™. Ofcial Licensed Product of UEFA EUROPA
LEAGUE™. All names, logos and trophies of UEFA are the property, registered trademarks and/or logos
of UEFA and are used herein with the permission of UEFA. No reproduction is allowed without the prior
written approval of UEFA. “adidas”, the 3-Bars logo, the 3-Stripe trade mark and TUNiT are registered
trade marks of the adidas Group, used with permission. adiPURE is a trade mark of the adidas Group,
used with permission. All other copyrights or trademarks are the property of their respective owners and
are used under license. ©2009 Konami Digital Entertainment KONAMI is a registered trademark
Xbox, Xbox 360, Xbox LIVE, and the Xbox logos are trademarks of the
Microsoft group of companies and are used under license from Microsoft.
Xbox, Xbox 360, Xbox LIVE, et les logos Xbox sont des marques de commerce
du groupe Microsoft et sont utilisés sous licence Microsoft.
of KONAMI CORPORATION.
30082


PRO EVOLUTION SOCCER 2010
ii
PRO EVOLUTION SOCCER 2010
WARNING Before playing this game, read the Xbox 360® console and
accessory manuals for important safety and health information. Keep all manuals
for future reference. For replacement console and accessory manuals, go to
www.xbox.com/support.
Important Health Warning About Playing Video Games
Photosensitive seizures
A very small percentage of people may experience a seizure when exposed to certain
visualimages,includingashinglightsorpatternsthatmayappearinvideogames.
Even people who have no history of seizures or epilepsy may have an undiagnosed
condition that can cause these “photosensitive epileptic seizures” while watching
video games.
These seizures may have a variety of symptoms, including lightheadedness, altered
vision, eye or face twitching, jerking or shaking of arms or legs, disorientation,
confusion, or momentary loss of awareness. Seizures may also cause loss of
consciousness or convulsions that can lead to injury from falling down or striking
nearby objects.
Immediately stop playing and consult a doctor if you experience any of these
symptoms. Parents should watch for or ask their children about the above symptoms—
children and teenagers are more likely than adults to experience these seizures. The risk
of photosensitive epileptic seizures may be reduced by taking the following precautions:
Sit farther from the screen; use a smaller screen; play in a well-lit room; do not play
when you are drowsy or fatigued.
If you or any of your relatives have a history of seizures or epilepsy, consult a doctor
before playing.
ESRB Game Ratings
The Entertainment Software Rating Board (ESRB) ratings are designed to provide
consumers, especially parents, with concise, impartial guidance about the ageappropriateness and content of computer and video games. This information can
help consumers make informed purchase decisions about which games they deem
suitable for their children and families.
ESRB ratings have two equal parts:
• Rating Symbols suggest age appropriateness for the game. These symbols
appear on the front of virtually every game box available for retail sale or
rental in the United States and Canada.
• Content Descriptors indicate elements in a game that may have triggered a
particular rating and/or may be of interest or concern. The descriptors appear
on the back of the box next to the rating symbol.
ON FRONT
For more information, visit www.ESRB.org.
VIDEO
VIDEO
GAME
GAME
E
ON BACK
CONTENTS
Getting Started 02
Controls 02
Basic Controls 03
Dribbling & Trapping 03
Passing 03
Crossing 04
Shooting 04
Tricks & Skills 04
Defense, General Controls 05
Set-Pieces & Dead-Ball Situations 05
Match Screens 07
Game Plan 07
Game Modes 08
Edit Mode 10
Gallery 10
System Settings 10
UEFA Champions League 10
Master League 11
Become a Legend 12
Connect to Xbox LIVE (Online) 13
Legal 14
Warranty/Product Support 15
Spanish 16
Thank you for purchasing PES 2010 from Konami. Please read this manual thoroughly before playing the game.
Also, please keep this manual in a safe place so you can refer to it easily later. NOTE: Konami does not re-issue
manuals.
Konami is continuously striving to improve its products. As a result this product may dier slightly from another
depending on the purchase date.
01

PRO EVOLUTION SOCCER 2010
PRO EVOLUTION SOCCER 2010
02 03
GETTING STARTED/ CONTROLS CONTROLS
Getting Started
If this is your rst time playing, press the Start button on the Title Screen to move to the Default Settings Screen.
If you have previously saved game data, you will advance to the Top Menu.
Default Settings
Before playing a game for the rst time, you can select between ve dierent levels of diculty. You can also
change the diculty after you begin your game. System data, where all game information is saved, will then be
created automatically. After conrming this step has been completed, proceed to the Top Menu.
Saving Data and Memory Required
In order to store and update your “System data” and “Edit data” and save your progress in competitions, you will
need a Xbox 360 Hard Drive or a Xbox 360 Memory Unit in memory unit port A. The “System data” and “Edit data”
can only be saved to or loaded from a Xbox 360 Hard Drive or a Xbox 360 Memory Unit inserted into memory
unit port A. Each le saved to the Xbox 360 Hard Drive or a Xbox 360 Memory Unit requires a certain amount of
free space, as the following table explains.
Top Menu Screen
The Top Menu select screen provides access to PES 2010’s competitions, options, and features. Use the directional
pad or left stick to highlight the required option, and then press the A button to make your selection.
Using the Help Function
PES 2010 is a massive, feature-packed game, but every eort has been made to make it as accessible as possible.
When the Help icon appears at the bottom of the screen, you can press the corresponding button to call up the
Help Menu to view helpful advice at any time.
Note: This game is presented in Dolby Digital 5.1 surround sound. Connect your Microsoft Xbox 360 to a sound
system with Dolby Digital technology using a digital optical cable. Connect the digital optical cable to the base
of an Xbox 360 Component HD AV Cable, Xbox 360 VGA HD AVCable, or Xbox 360 S-Video AV Cable. From the
“system” blade of the Xbox 360 dashboard, choose “console settings,” then select “audio options,” then “digital
output,” and nally select “Dolby Digital 5.1” to experience the excitement of surround sound.
Family Settings
These easy and exible tools enable parents and caregivers to decide which games young game players can
access based on the content rating. For more information, go to www.xbox.com/familysettings
Default Controls
Use your controller to navigate menu screens. Use directional pad or left stick to move through menus, the A
button to conrm a selection, and the B button to cancel or move back through screens.
]
x
Right TriggerLeft Trigger
à
Left Bumper
_
Xbox Guide Button
`
Right Bumper
Y
X
Left Stick
<
L
l
C
Right StickDirectional Pad
B
A
>
For the basic controls used during a match, refer to the table below. Read pages 3-6 for more advanced controls.
You can change the assignments for each button by going to “Controller Settings” in “System Settings.” (See System
Settings, page 10). For this game, the directional pad and left stick control the same actions. When this manual refers
to the “directional pad,” you may also use the left stick in the same manner.
BASIC ATTACKING CONTROLS
y button: Switch between players
z button: Dash
Directional Pad: Player movement, dribbling
Left Stick: Player movement, dribbling
Y button: Through ball
B button: Cross/long pass
A button: Shor t pass
X button: Shoot
Right Stick: Manual pass
BASIC DEFENSE CONTROLS
y button: Switch between players
z button: Dash
Directional Pad: Player movement
Left Stick: Player movement
Y button (hold down): Goalkeeper
B button: Sliding tackle
A button (hold down): Tackle/apply pressure with player you are controlling
X button (hold down): Clearance/apply pressure with player you are not controlling
(hold down button)
Dribbling & Trapping
Dribbling: Use directional pad to move when the ball is at your player’s feet.
Sideways Dribble: Hold the x and press the directional pad at 90° to the direction of movement. Just a small
number of players can perform this dribble.
Dash Dribble: Press the z button while dribbling to sprint.
Extend Time between Ball Touches: While holding the z button to sprint with the ball at your player’s feet,
rapidly press the directional pad two or three times between touches to knock the ball further ahead.
Greater Distance between Ball Touches: While running with the ball with the z button depressed, hold the the
x button and press the directional pad 45° to either side of the current direction of movement.
Slow Dribble: Keep the x button depressed while dribbling to perform a “slow dribble.” The ball will hardly leave
your player’s feet as you perform this technique, and it can be followed by a quick change of direction or one of
many feints.
Sidestep: To move at right angles to the current direction of movement, press the directional pad 90° in either
direction.
Stop the Ball 1: Release the directional pad and press the z button to stop the ball’s movement while dribbling.
Stop the Ball 2: Release the directional pad and press the x button to instruct your player to stop and face your
opponent’s goal.
Jump: When an opponent executes a sliding tackle, press the x button to attempt to jump over it.
Control Ball: When receiving a pass, press the directional pad to control the ball.
Stop the Ball: When receiving a pass, press the directional pad while holding the x button to stop the ball and
face the specied direction.
Stop the Ball & Turn to Face Goal: When receiving a pass, release the directional pad and press the x button to
turn to face the opponent’s goal while trapping the ball.
Run Onto Pass: To instruct a player to turn and run onto an incoming pass without making an initial touch, hold the
z button and press the directional pad in the direction that the ball is moving.
Passing
Note: Use the directional pad to specify the direction a pass should be played in.
Short Pass/Head Ball: Press the A button to make a short pass along the ground or head the ball. Hold the A
button for longer to pass to a more distant player.

PRO EVOLUTION SOCCER 2010
PRO EVOLUTION SOCCER 2010
CONTROLS CONTROLS
0504
Backheel: Quickly push the directional pad away from the player ’s current direction of movement and then
press the A button.
First-Time Pass: Press the A button before your player traps the ball.
Long Pass: Press the B button. The distance of the pass depends on the length of time that the B button is
held.
First-Time Long Pass: Press the B button before your player traps the ball.
Through Ball: Press the Y button. Holding the Y button down for longer will direct the pass to a more distant
player.
First-Time Through Ball: Press the Y button before your player traps the ball.
Lofted Through Ball: Hold the y button and press the Y button.
One-Two Pass: Hold down the y button and press the A button to make a shor t pass, then press the Y
button before your teammate receives the ball to execute a return pass.
One-Two Pass with Lofted Return Ball: Hold down the the y button and press the A button to make a short
pass, then press the y + Y buttons before your teammate receives the ball to execute a chipped return pass.
Pass and Move: Press the x button immediately after passing the ball to instruct the player to make a forward
run.
Manual Pass: Push the right stick in the desired direction to execute the pass. The strength of the pass is
determined by how long the right stick is pushed.
Manual Long Pass: Hold down the y button and push the right stick in the desired direction to execute the
long pass. The strength of the pass is determined by how long the right stick is pushed.
Crossing
Note: Use the directional pad to specify the direction of a cross.
High Cross: From deep in your opponent’s half, press the B button.
Low Cross: From deep inside your opponent’s half, press the B button twice.
Cross along the Ground: From deep inside your opponent’s half, press the B button three times to send in a
low cross along the ground.
Lofted Ball: Press the x button while delivering a cross to loft the ball high into the air.
Early Cross: Hold the y and B buttons to cross the ball from any position in your opponent’s half.
Shooting
Notes on shooting: Press the X button to build up the power gauge. Release the X button when the power
gauge reaches the desired level, and your player will send a shot towards the goal. The length of the power
gauge determines the power and height of your shot. Use the directional pad to specify the required direction
as the shot is made.
Shoot: Press the X button.
First-Time Shot/Head Ball: Press the X button just before the ball reaches your player to make a rst-time
shot or header on goal.
Controlled Shot: Press the x button when the power gauge reaches the desired level to make a shot that
trades power for precision.
Chip Shot: Hold the y button and press the X button.
Chip Shot Type 2: For a lob with a lower trajectory, press the X button and then press the z button when the
power gauge appears.
Tricks & Skills
Note: Tricks and skills on the directional buttons can also be performed by advanced users while holding the
w button in combination with the right stick. Check out the Command List on the pause menu for details. But
remember: You always need to use the w button on these unocially called “Expert Controls”.
Step Over (Long): Press the y button twice.
Step Over (Short): Press the x button twice.
Stationary Feint: When your player is standing still with the ball at his feet, instruct your player to pretend to
move with the ball by pressing the y or x button twice.
Kick & Pass Feints: When the shot or pass gauge is displayed, press the A button to cancel the kick. The feint
will dier depending on the directional pad input prior to pressing the A button.
Dive: Fall to the ground intentionally by pressing the y + w + z buttons at the same time. A foul may be
called on an opponent, or you may end up with a yellow card.
Reverse Flip Flap: If the player’s stronger foot is his right, push the directional pad to diagonally left then
diagonally right quickly when dribbling. If his stronger foot is his left, the input is reversed. Only a small number
of players can perform this move.
Body Feint 1: Quickly press the directional pad in either diagonal direction immediately to the left or right of
the direction of the run.
Body Feint 2: When both player and ball are stationary, press the directional pad twice at a right angle to the
direction that the player is facing.
Drag Back: From a stationary position, press once the directional pad in the opposite direction to which the
player is facing, then press the directional pad in a 45 degree diagonal towards the player’s strongest foot.
Matthews Trick: With the ball at rest, tap the directional pad 90 degrees to the left or right of the direction that
the player is facing, then immediately press and hold the opposite direction. Players must have a Dribbling stat
of 70 points or more to perform this trick.
Through Feint: Just before a pass reaches a player, release the directional pad and then press and hold the z
button to step over the ball and allow it to continue to another player.
Roulette: Rotate the directional pad while dribbling. The direc tion you rotate the directional pad determines
the direction of the turn. Only a small number of players can perform this move, and they might execute the
move dierently.
Lift the Ball: Press the directional pad back and then quickly forward to ick the ball up into the air.
Defense
Tackle/Pressure: Press the A button to attempt a tackle. You can also hold the A button to instruc t your
player to automatically close down an opponent and apply pressure. This can be used in conjunc tion with the
z button.
Close Down: Hold the X button when the opposing team is in possession to have the player closest to the ball
(not counting the player you are controlling) close down the player on the ball.
Sliding Tackle: Press the B button.
Clearance: When the ball is deep inside your half, press the X button to clear the ball.
Rush Keeper from Goal: Press the Y button while defending to make the goalkeeper sprint towards the ball.
Goal Kick: Press the B button or X button to kick the ball upeld. Use the directional pad to aim.
Throw Ball: When your goalkeeper is holding the ball, press the A button to throw the ball to a teammate. Use
the directional pad to aim.
Drop Ball: When your goalkeeper is holding the ball (with no directional button pressed), press the z button
to instruct him to drop the ball at his feet.
Goalkeeper: Press the right stick + y buttons to switch control between an outeld player and the keeper.
General Controls
Change Player: Press the y button to switch control to the player closest to the ball.
Control Player When Ball is Airborne: When the ball is in the air, hold the x button and use the directional
pad to position the player to meet it.
Super Cancel: When a player is automatically running after the ball, press the z and x buttons simultaneously
to bring the player to a halt, or to regain full control.
Activate/Cancel Strategies (Manual Mode): Hold down the w button and then press the B button, the A
button, the Y button, or the X button to activate or cancel strategies assigned to those buttons.
Activate and Cancel Strategies (Semi-Auto Mode): Press the w button to activate or cancel your chosen
strategy.
Attack/Defense Level: Press the w and z buttons together to increase the Attack/Defense gauge level, thus
instructing your players to push forward. Press the w and x buttons together to reduce it.
Set-Pieces & Dead-Ball Situations
Note: For free kicks and corners, hold the relevant button down to increase the power gauge to the required
level.
Corners
Regular: Press the B button.
High Cross: Hold down the x button + B button.
Low Cross: Press directional pad up + the B button.
Along the Ground: Directional pad down + B button.
Apply Curl: Directional pad left or right while the power gauge is onscreen.
Short Corner: Press the A button to send a short pass to your nearest teammate.

PRO EVOLUTION SOCCER 2010
PRO EVOLUTION SOCCER 2010
CONTROLS MATCH SCREENS/ GAME PLAN
0706
Set-Pieces & Dead-Ball Situations (continued)
Free Kicks: Passing.
Short Pass: Choose a direction with the directional pad and then press the A button.
Regular Long Pass: Press the B button.
High Ball: Hold down the x button + B button.
Low Ball: Up on the directional pad + B.
Along the Ground: Down on the directional pad + B button.
Curl: Left or right on the directional pad while the power gauge is displayed.
Through Ball: Press the Y button when taking a free kick to send a ball through the defense. Use the directional
pad to aim the pass.
Free Kicks: Shooting
Regular Shot: Press the X button.
Hard Shot: Up on the directional pad + the X button.
Weak Shot: Down on the directional pad + the X button.
Moderately Hard Shot: Press the X button, and just as the player makes contact, press the Y button.
Moderately Weak Shot: Press the X button and then, just as the player makes contact, press the A button.
Apply Curl: Hold the directional pad left or right when the power gauge is displayed.
Free Kicks: General Controls
Quick Restart: This only works with the correct timing when a player is positioning the ball for a quick free kick
using his hands. When this happens, specify a direction using the directional pad and press the A button to
quickly restart the game with a simple pass.
Changing the Number of Kickers: Press the y and z buttons simultaneously to cycle through the following
free kick congurations: one kicker (default), two kickers (second kicker: right side), two kickers (second kicker:
left side).
Using the Second Kicker: Execute the free kick while holding the y button to make the second k icker make
the shot or cross pass.
Second Kicker Rolls Ball Forward: Hold down the y button and then press the A button to make the second
kicker roll the ball forward. You can then make a shot or pass from open play with the second kicker.
Free Kicks: Wall Control
When the opposing team has a free kick, press and hold the following buttons to control the players in the
defensive wall:
Increase/decrease number of players in the wall: Hold down the w button and press up on the directional
pad to add more players to the wall. To reduce this number, hold down the w button and press down on the
directional pad.
All Players Jump: Press the X button.
Players Hold Position: Press the A button.
Players Charge Forward + Jump: Press the B button.
Players Charge Forward: Press the B and A buttons together.
Random: No buttons pressed.
Free Kicks: Goalkeeper
Move Keeper behind Wall: When the opposing team is preparing to take a free kick, press and hold the Y
button to instruct your goalkeeper to move behind his defensive wall.
Throw-ins
Short Throw-in: Press the A button to throw the ball to your nearest teammate in the direction of the throw.
Long Throw-in: Press and hold the B button to make a longer throw-in in the direction the thrower is facing.
Penalty Kicks
Kicker: Hold the directional pad and the X button for a length of time that’s proportional to how high or wide
you want to shoot.
Goalkeeper: Hold the directional pad and the X button for a length of time that’s proportional to how high or
wide you want to jump in order to save the shot. You must match the timing of the kicker. If you don’t input a
direction, your keeper stay still and cover the goal center.
Change Cursor set to “Unassisted” and/or Select Player set “On”
Calling for the Ball: When a teammate has the ball, press the x button twice to call for a pass. The more
frequently you press the button, the more strident your appeal for the ball will be.
Match Screens
This section explains the various features and functions of screens you will encounter during a match.
Match Display
Elapsed Time
(indicating player under control)
- red outline: player has no stamina
- white inner triangle: auto-move
- yellow name/number above cursor:
- yellow/red checkered ag: your
controlled player is in an oside position
Attack/Defense Mindedness: This gauge indicates your team’s current mentality. The redder the bar is, the
more attacking the team will be; conversely, a blue bar indicates that a team is pulling back to defend.
Strategy Mark: Button symbols representing Manual Strategies appear in this area when active.
Stamina Gauge: Displays a player’s current stamina. The gauge will tur n red when stamina is dangerously low,
indicating a drop in that player’s performance.
Event Icons: The following symbols will appear in the top left-hand corner of the screen during matches.
Blue - Returning to the Match (No Injury):
A player is returning to the pitch with a clean bill of health.
Yellow - Returning to the Match (Slight Injury):
A player is returning to the pitch, but is carrying an injury that will have an impact on his performance.
Red - Not Returning to the Match (Due to Injury):
An injured player cannot return to the pitch, and must be substituted (if possible).
Gray - Indirect Free Kick:
An indirect free kick has been awarded.
Red - Stoppage Time:
This indicates the game minutes of stoppage time that will be played.
Game Plan
Before star ting a match, you can set your team’s formation, line-up, captain and set piece takers, and other
settings on the Game Plan Screen. Make sure you are well prepared for the match.
Information Windows
The Information Windows at the top of the screen (left: home team, right: away team) contain information on
the currently selected Game Plan topic. For example, if you choose “Lineup,” you can check the currently selected
player’s name, total warnings (yellow cards), role, dominant leg, and height.
Player Name and Status
From the left: Role, Player Name, Play Style Card, Total Points, Stamina, Condition.
Stamina and Conditioning
Check players’ stamina and conditioning in status displays. Fatigue may also appear, depending on the mode and
settings you are using. The more fatigue a player has, the slower he will recover stamina. Tired players are also
more prone to injury. A special mark is displayed next to players who are injured or cannot appear in matches.
Cursor
player got booked
Strategy Mark Stamina GaugeRadar
Player Under Control:
When playing with the “Select Player” option activated, the player(s) under your control will be
highlighted through a circle (see also page 10).
Score
Attack/ Defense
Mindedness
Player name and
position

PRO EVOLUTION SOCCER 2010
PRO EVOLUTION SOCCER 2010
08 09
GAME PLAN
GAME PLAN/ GAME MODES
The green gauge represents stamina, while the arrow shows conditioning. The blue gauge underneath the
stamina gauge shows fatigue.
Special Icons: The following icons appear on Status Display pages to provide information on player condition
and availability.
1 2 3 4 5 6 7
Green Cross Red Cross Yellow Cross Blue Dash Globe Yellow Cards Red Card
Injuries
1 Returning to Full Fitness 2 Severe Injury 3 Slight Injury 4 Injury Status Unclear
Unavailable
5 On International Duty 6 Suspended due to Cumulative Yellow Cards 7 Suspended due to a Red Card
Assisted Settings
Move the sliders to adjust Lineup, Formation, Tactics, and Set Piece Settings.
Once you’ve chosen the settings to change, use left and right on the directional pad to move the sliders. The
settings will automatically change to match the slider’s position.
Lineup
Select the players who will compete in the match. Use the directional pad to selec t players, then press the A
button to switch them. Press the X button while selecting a player to make that player Captain (displayed
through a yellow mark).
Player Abilities
Press the buttons displayed on-screen to switch between player abilities. There are normal abilities such as
Position, Agility, Pass, and Shot, as well as special abilities making a player very skilled in certain areas of his
play.
Note: If you need details on player abilities, please refer to the Edit Mode of PES 2010, where you can nd
detailed descriptions for them.
Set Formation
Adjust each player’s position and change the formation. You can also select the players to mark from the
opponent team.
Note: Player Positions
In each formation, players are placed in positions such as centre forward or side back. Each player is already
assigneda position where they can play at their best. Please note that placing the player in any other role will
decrease that player’s abilities.
Card System
Through the new Card System, you can set each player’s Attack Level and choose whether or not to take
advantage of a player’s unique abilities.
This oers you endless possibilities and strategic options as never seen before.
The Card System oers three dierent categories:
1) C = Consciousness Cards allow you to determine if players should play their roles in a balanced,
defensive, or oensive way.
2) P = Playstyle Cards represent individual playstyles like “Pinpoint Pass.” You can deactivate any cards if you
don’t want a player to perform certain styles; if, for example, they don’t t with your overall strategy.
3) S = Skill Cards identify skills (for example, “Penalty Saver”) that players own, and can’t be changed or
deactivated.
Note: The available Playstyle Cards may dier depending on the player’s role and attack level.
If you are using a Playstyle Card that goes against your current tactics, the tactics will be given priority.
Tactics
Set the entire team’s play awareness and strategies.
Team Style
Set awareness towards plays. Move the slider to change the settings for each item. In general, moving the slider
to the right will increase attack, and moving it to the left will increase defense.
Choosing “Covering” as your “Defensive Strategy” type will make your players protect the space created when
their team-mates move without marking specic opposition players.
Strategy
Select up to four strategies you wish to use and assign them to your preferred buttons. When you want to
execute strategies during a match manually, set the corresponding slider at the Assisted Settings menu to “O.”
Please be aware that some strategies, such as “Counterattack,” “All out Attack,” “Pressing,” and “Total Defense”
cannot be executed simultaneously.
Set-Piece Settings
Here, you choose kickers for set-pieces and players to join the attack. The latter can be players who normally
don’t participate, such as the center-back coming up to participate in a corner.
UEFA Champions League (page 10)
Pit your club against the elite of European soccer with the all new and exclusive UEFA Champions League.
Exhibition
First, if you want to quickly start a match, choose whether you will compete against a friend (VS. PLAYER) or the
computer (VS. COM). This is the quickest way to get the ball rolling, while a custom match (CUSTOM) gives you
more options from the start. Besides very obvious selections for the team, uniform, or stadium, you will nd the
following pre-match options depending on the selected mode:
1 Game Options
For each controller you have connected, decide whether the corresponding players will compete against one
another or play on the same team. Also, choose whether you or the computer will control the players during
the match.
By pressing the X button, you can adjust “Cursor Settings.” (See “Cursor Settings,” page 10.)
Home/Away: Press left or right on the directional pad to switch between the home and away sides.
Coach Mode: Issue tactical commands while the computer controls the players on the pitch. Switch to Coach
Mode by pressing left on the directional pad when the controller icon is on the home side, or by pressing right
on the directional pad when the controller icon is on the away side.
Spectator Mode: Press the Y button to watch two computer-controlled teams play each other.
2 Options
Choose settings for Diculty Level, Match Duration, Injuries, Team Conditions, and more. Then, select “Conrm.”
Please note that some options such as “Rule Settings” and “Player Development” are unique to particular game
modes.
Master League (page 11)
Compete in league play, developing your players and looking to strengthen your team in the transfer market.
Become a Legend (page 12)
This challenging mode recreates the career of one specic player of your choice.
If you put in good performances, your reputation will grow, which will result in transfer oers to join dierent
clubs. Can you write your name in the history books?
League & Cup
Enjoy various league and cup competitions. A good table standing in the league will enable you to enter the
UEFA Europa League or even the UEFA Champions League the following season.
Community
“Community” is a mode which supports the matches you have with your closest friends. By registering your
mates in a community, you can compete together using various competition formats.
Xbox LIVE (Network Mode) (page 13)
Connect to Xbox LIVE® and enjoy matches against players from many dierent countries playing the same
version of PES 2010.
Training
Move your players freely as you practice the game’s controls. By adjusting the settings, you can focus on specic
areas such as free kicks and corners. Please note that you cannot choose “Spectator Mode” in Player Settings.

PRO EVOLUTION SOCCER 2010
10
PRO EVOLUTION SOCCER 2010
11
EDIT MODE/ GALLERY / SYSTEM SETTINGS/ UEFA A CHAMPION LEAGUE UEFA A CHAMPION LEAGUE/ MASTER LEAGUE
Edit
This option enables you to customize many things, such as teams and players as well as stadium and cup names
featured in PES 2010. You can create your own original club. Activate the Help menu (look for the prompt at
the bottom of the screen) to view more detailed instructions on how to use this mode’s various options and
features.
Adding Your Own Images
You can add images for player faces, uniform logos, and emblems by using existing image data, an Xbox
LIVE Vision Camera, or similar equipment. Wherever the camera symbol appears, just follow the on-screen
instructions.
Note: Data for up to 400 faces, 200 uniform logos and 40 emblems can be stored, depending on the capacity of
your Xbox 360 Hard Drive or Xbox 360 Memory Unit.
Registering a Created Player with a Team
To register a player you made in “Create Player” with a team, go to “Team” from the Edit Menu, and select “Register
Player.” Then, choose the team you would like the player to join. Next, after a list of that team’s players appears,
either select “Add Player” or choose an existing player to switch with the created player. Finally, select “Other” and
choose the player you just made.
Gallery
The gallery combines a lot of fun and informative features.
Playlist Editor: Listen to the game’s background music. You can also change the background music that plays
during the game.
Track Record: View a history of what you have played in the game.
Replay Playback: Watch replays that you have saved.
Credits: View sta credits.
System Settings
Adjust settings for controls and saving data.
Controller Settings: Change how the controls are used. You can also adjust other settings, deciding, for example,
how the player cursor is displayed and how it is switched. (See Player Cursor, page 10.)
On-Screen Display: Decide the on-screen information and position shown during matches.
Sound Settings: Adjust various items related to sound, such as Commentary Volume and Sound Eect Volume.
Screen Adjustments: Change screen position and color settings.
System Data: Enable or disable autosave. Save or load system data.
Language: Change the language that is used in the game.
Download: Additional contents and roster updates, if available, can be downloaded here.
Cursor Settings
Go to “Cursor Settings” in “Controller Settings” to change how the player cursor is displayed and how it is
switched. Among the items available, Change Cursor in particular has a great eect on the game’s controls. Be
sure to choose a “Change Cursor” option that makes it easy for you to control the action.
Change Cursor
Assisted: Cursor switches automatically. You can also switch manually between players when pressing the y
button.
Semi-assisted: When on attack, the cursor will switch automatically to the player receiving the ball. On defense,
the cursor is switched manually through pressing the y button.
Unassisted: The cursor only switches when you press the y button.
Download: Additional contents and roster updates, if available, can be downloaded here.
Select Player
With this being switched on, you can set the cursor permanently on one player (except the goalkeeper).
Note: You can access the settings for “Change Cursor” also through “Player Settings” before and during a match.
UEFA Champions League
Pit your club against the elite of European soccer with the all new and exclusive UEFA Champions League mode. Is
your team strong enough to negotiate the group stages? Will you rise to the challenge of knock-out games? Can
you become one of the few to lift the cup every player, manager, and fan dreams of?
UEFA Champions League Preparations
Select either “Exhibition” or “Competition,” then choose “Game Settings.”
Either select “New Game” or “Load Data.” Select a team registered to the UEFA Champions League to play a single
match.
The Competition Format
32 teams all eyeing European glory will rst take part in a group stage where they are divided into eight groups of
four. The winners and the runners-up in each group advance to the Knockout Stage.
1 Group Stage
Four teams in each group contest the Group Stage playing each other twice in a home and away format. The
teams nishing in the top two places advance to the Knockout Stage.
2 The First Entry Draw
A draw determines who each of the 16 teams that made it through the Group Stages will face. Group winners
from one group will face the team that nished runners-up in another. However, they will not face teams that
are from the same league. Note that this may change if you enter more than four teams from one league.
3 First Knockout Round
Ties will be decided over two matches on a Home and Away basis. The team with the greater number of
aggregate goals advances or (in the event of a tie) the team that scored more away goals. If the Away Goals
rule proves inconclusive, extra time will be played. If there are no goals in extra time, the winner is decided
by a Penalty Shoot-out.
4 The Second Entry Draw
The second draw determines which team each of the eight teams that won their First-round ties will face.
Unlike the First Draw, teams can be paired with those from the same group or league.
5 Quarter-Finals & Semi-Finals
Much in the same way as the First-round ties, they will be decided over two matches on a Home and Away
basis. There will be no third place play-o for the defeated Semi-Finalists.
6 Final
The Final of the UEFA Champions League will be contested as a single match.
Master League
In this, you must choose a team and then lead it to success in league and cup competitions over an unlimited
number of seasons. As well as generating revenue through success on the eld and keeping your squad at peak
tness, you’ll need to make astute forays into the transfer market and carefully nurture up-and-coming talent to
transform your club into a dominant force in world soccer.
Note: The Master League in PES 2010 oers a whole bunch of new features and improvements, some of which are
featured below. And of course you can now qualify and participate for the world’s most prestigious events in club
soccer: the UEFA Europa League and UEFA Champions League.
Advancing through Master League
Master League seasons begin during the August transfer period and last until the middle of the last week in July of
the following year. As matches are held and the schedule progresses, time will advance on a half-week basis.
Team Management
As in the real world, it’s all about money. You need it to pay costs like sta/player salaries and fan club management.
Money can be earned from tournament prizes, fan club fees, sponsors, and other sources. You can acquire new
players, invest in a youth team, and improve the team’s performance with your money.
Note: You can change sta salaries during August within Management Costs.
Losing Money & Going Bankrupt
Expenses are calculated in the rst week of September. If your funds are in the red at that point, your team will
go bankrupt. Even if the team goes bankrupt, it will still be able to play matches as usual, but the number of
times it goes bankrupt will be recorded in your save data. While your funds are in the red, you will be incapable of
conducting negotiations. So you should quickly try to reduce costs, for example through selling players, well in
advance of September. Otherwise, the game will do this automatically.

PRO EVOLUTION SOCCER 2010
12
PRO EVOLUTION SOCCER 2010
13
MASTER LEAGUE/ BECOME A LEGEND BECOME A LEGEND/ XBOX LIVE (ONLINE)
Stadium Walk
This is the central screen for the Master League. Here you move between your Club House and Oce, check
information for your next upcoming match, and more. You can also save your progress. At the Club House, you
can change game plans and each player’s training regimen. Furthermore, information from the youth team can
be viewed here. While at your Oce, you are able to check match dates and current management costs, and
conduct transfer negotiations.
Transfer Negotiations
Transfer Negotiations are held over the course of the season. There are four major patterns to these negotiations:
Instigating Negotiations, Receiving Negotiation Oers, Releasing Players, and Renewing Contracts. When
negotiating with players, a scout will handle the proceedings. ( You can also appoint your scout to perform
everything, from player selection to negotiations and signing. This is turned o by default.)
Check the Youth Team
The Youth Team option in the Club House lets you pick from up to ten talented young players as possible additions
to your team. Because these players don’t need to be negotiated with or require transfer fees to be paid, you can
sign them up anytime during the season. Finally, players signed from the youth team will have great aection for
your team and will be less likely to transfer to other teams in the future.
Become a Legend
Create a player and aim to become the World Player of the Year. Enjoy your career from your professional debut
to your retirement from the game.
Advancing through Become a Legend
First, a scout match will take place. When this match nishes, oers from clubs in the selected league will be
received and you must select a club to play for.
Opportunities to play matches will be scarce from your debut. You must work hard and impress in inter-squad
training matches to win a place on the bench. Put in good performances o the bench to win a regular starting
spot in the team. Good match performances will lead to oers from other clubs. After transferring, lead your new
team to victory but also aim to win personal accolades such as the league MVP or top goal scorer. Titles such as
these can often result in oers from major clubs and even national team call-ups. A player’s career begins at the
age of 17 and increases by one year at the start of the new season. At the age of 27 you can choose to retire, or
play until 35 when retirement is forced and “Become a Legend” is concluded.
Note: In PES 2010 you may use your developed Become a Legend player online in the Legends Mode as well as
in Master League. To do so, go to “Options” in the Become a Legend menu.
Furthermore, you can now qualify for the UEFA Europa League and UEFA Champions League within Become a
Legend.
Auto-Move: Turn the auto-move function ON/OFF. If ON, your player will move automatically if you keep the y
button pressed (the cursor above the player will change from solid blue to transparent).
Matches
Starting players, team formation, substitutions etc. will be decided automatically by the CPU. You control only
your created player. When you are not playing, you can view the match as a spectator (accelerate the match
speed on the “Fast-Forward Menu” if you wish).
Player Development
Playing in matches allows players to acquire experience points, which also increase based on good match
performances. Once a certain amount is acquired, the player’s ability will increase in accordance with the
development curve.
Note: If a certain age is reached, the player’s ability may decrease. Match experience can also lead to special skills
being acquired (up to eight).
Focus Point Settings
In the “Become a Legend” menu, select “Player Information & Settings”/”Focus” to change the player parameter
development policy. Select “Focus” topics and distribute the twelve points between the abilities. The player will
develop a skill more quickly if you allocate more points to it.
Requesting a Pass from a Team-mate
Tap the x button repeatedly to request a pass from a team-mate. If you’re in a good position, he will pass you
the ball.
Xbox LIVE
Xbox LIVE® brings more of the entertainment you love right to your living room. Raise the curtain on your own
instant movie night with thousands of HD movies, TV shows, and videos downloaded in a snap from Xbox LIVE
and Netix. Find the perfect game for any player with a free trial of hundreds of titles from the largest library
available. With downloadable Game Add-Ons like maps, songs, weapons and levels, you’ll get more out of every
game by putting more into it. And don’t forget to connect and play with friends wherever they happen to be.
With Xbox LIVE, your fun never ends.
Connecting
Before you can use Xbox LIVE, connect your Xbox 360 console to a high-speed Internet connection and sign up
to become an Xbox LIVE member. For more information about connecting, and to determine whether Xbox LIVE
is available in your region, go to www.xbox.com/live/countries.
Family Settings
These easy and exible tools enable parents and caregivers to decide which games young game players can
access based on the content rating. Parents can restrict access to mature-rated content. Approve who and how
your family interacts with others online with the Xbox LIVE service. And set time limits on how long they can play.
For more information, go to www.xbox.com/familysettings.
Network Preparations
After selecting “Online” from the Top Menu, follow the steps below to set up your game.
1 Create User Data/Check Details
You will be taken to the “Create User Data” screen if there is no user data available. Please beware that user data
created cannot be deleted until a certain time period has passed.
2 Update Division
Divisions will be updated once a week during online service periods.
A division is a group of teams that changes based on player results. From strongest to weakest, there are ve
dierent divisions: “Division 1,” “Division 2,” “Division 3A,” “Division3B,” and “Division 3C.” When you start your
game, you will rst be listed under “No Division.”
Note: Players who have not logged in for six days (approximately) will be returned to “No Division.”
3 Xbox LIVE Game Modes
If you’re up for a Quick Match, you can do so anytime you like. Ranked or unranked, that’s your decision as well as
whether to play 1vs1, 2vs2 or any other combination with up to four players in total. (Combinations other than
1vs1 and 2vs2 can only be selected through the Match Room menu.)
4 Icons in Network Mode
Player Status Icons
Player Icons Logged In Not Logged In
(Red) (Blue) (Gray)
Player Icons
You Friend
(Green) (Blue) (Red) (Gray)
Transmission Status Icons
These icons inform you about the network connection quality:
Good Average Bad No Communication Searching
(Green) (Yellow) (Orange)
Player from your
Blacklist
Other Player

PRO EVOLUTION SOCCER 2010
14
PRO EVOLUTION SOCCER 2010
15
WARRANTY
Konami Digital Entertainment, Inc. warrants to the original purchaser of this Konami software product that
the medium on which this computer program is recorded is free from defects in materials and
workmanship for a period of ninety (90) days from the date of purchase. This Konami product is sold "as is,"
without express or implied warranty of any kind, and Konami is not liable for any losses or damages of any
kind resulting from use of this program. Konami agrees for a period of ninety (90) days to either repair or
replace, at its option, free of charge, any Konami product, postage paid, with proof of date of purchase, at
its Factory Service Center. This warranty is not applicable to normal wear and tear. This warranty shall not
be applicable and shall be void if the defect in the Konami software product has arisen through abuse,
unreasonable use, mistreatment, or neglect.
THIS WARRANTY IS IN LIEU OF ALL OTHER WARRANTIES AND NO OTHER REPRESENTATIONS OR
CLAIMS OF ANY NATURE SHALL BE BINDING ON OR OBLIGATE KONAMI. ANY IMPLIED WARRANTIES
APPLICABLE TO THIS SOFTWARE PRODUCT, INCLUDING WARRANTIES OF MERCHANTABILITY AND
FITNESS FOR A PARTICULAR PURPOSE, ARE LIMITED TO THE NINETY (90) DAY PERIOD DESCRIBED
ABOVE. IN NO EVENT WILL KONAMI BE LIABLE FOR ANY SPECIAL INCIDENTAL OR CONSEQUENTIAL
DAMAGES RESULTING FROM POSSESSION, USE OR MALFUNCTION OF THIS KONAMI PRODUCT.
Some states do not allow limitations as to how long an implied warranty lasts and/or exclusions or
limitations of incidental or consequential damages so the above limitations and/or exclusions of liability
may not apply to you. This warranty gives you specific rights, and you may also have other rights which
vary from state to state.
If you experience technical problems with your game, please call our Warranty and Technical Service
number at 310.220.8330 or 310.220.8331 from 9:00 am PST to 5:00 pm PST, Monday-Friday, or send an email
to support@konami.com. All products must be deemed defective by a Konami Customer Service
representative and an RMA number assigned prior to returning the product. All products received not
matching this criteria will be returned if a Konami Customer Service Representative cannot reach you
within three days upon receipt of the unauthorized return.
Konami Digital Entertainment, Inc.
Attention: Customer Service-RMA # XXXX
2381 Rosecrans Ave, Suite 200
El Segundo, CA 90245
USA
CUSTOMER SERVICE
If you feel stuck in the game or just need a boost, don’t worry! You can write to our game experts at
support@konami.com or view our Support section at www.konami.com.
Register now at www.konami.com to receive exclusive product news, special offers and more!
Ocial Licensed
Product
Ocial Licensed
Product
XBOX LIVE (ONLINE)/ LEGAL WARRANTY/ PRODUCT SUPPORT
Manner Icons
If you want to know the manner of an opponent, these icons will tell (declining from left to right). The manner
reects, for example, if a player is quitting matches early.
Note: Users with poor manners will not be eligible for online rankings.
IMPORTANT MESSAGE
Konami reserve the right to penalize or ban any player using the chat function to abuse others. The penalty will
be decided by Konami and may result in a temporary or permanent ban from the chat function or online play
with or without further warning.
We thank you for your understanding and continued good sportsmanship.
Ocial Licensed Product of UEFA CHAMPIONS LEAGUE™. Ocial Licensed Product of UEFA EUROPA LEAGUE™. All names, logos and
trophies of UEFA are the property, registered trademarks and/or logos of UEFA and are used herein with the permission of UEFA. No
reproduction is allowed without the prior written approval of UEFA. “adidas”, the 3-Bars logo, the 3-Stripe trade mark and TUNiT are
registered trade marks of the adidas Group, used with permission. adiPURE is a trade mark of the adidas Group, used with permission.
the use of real player names and likenesses is authorised by FIFPro and its member associations Ocially licensed by Czech National
Football Association Ocially licensed by CFF © 2009, DFB Licence granted by m4e AG, Grünwald © The Football Association Ltd
2009. The FA Crest and FA England Crest are ocial trade marks of The Football Association Limited and are the subject of extensive
trade mark registrations worldwide. copyright FFF © 1996 JFA Ocially licensed by FIGC and AIC © 2001 Korea Football Association
Licensed by OLIVEDESPORTOS (Ocial Agent of the FPF) Producto ocial licenciado RFEF © 2002 Ligue de Football Professionnel ® ©
& TM 2009 Liverpool Football Club & Athletic Grounds Ltd Ocial Licensed Product of A.C. Milan Manchester United crest and imagery
© MU Ltd © Real Madrid (09) Ocial produc t manufactured and distributed by Konami Digital Entertainment under licence granted
by Soccer s.a.s. di Brand Management S.r.l. © Adagp, Paris 2009../M acary – Zublena & Regembal – Costantini, Architects Wembley,
Wembley Stadium and the Arch device are ocial trade marks of Wembley National Stadium Limited and are subject to ex tensive trade
mark registrations. All other copyrights or trademarks are the property of their respective owners and are used under license. ©2009
Konami Digital Entertainment
This software is based in part on the work of the Independent JPEG Group.
Dolby and the double-D symbol are trademarks of Dolby Laboratories.
©2009 Konami Digital Entertainment. KONAMI is a registered trademark of KONAMI CORPORATION.
www.konami.com/pes2010

PRO EVOLUTION SOCCER 2010
16
PRO EVOLUTION SOCCER 2010
17
ADVERTENCIAAntesdeempezarajugar,lealosapartadosdeinformaciónde
seguridad y salud de los manuales de la consola Xbox 360® y los accesorios. Guarde
todos los manuales para poder consultarlos más adelante. Para conseguir los manuales
de la consola y los accesorios, visite a www.xbox.com/support.
Información importante acerca de los videojuegos.
Ataques epilépticos fotosensibles
Un porcentaje escaso de personas pueden sufrir un ataque epiléptico fotosensible
cuando se exponen a ciertas imágenes visuales, entre las que se incluyen los patrones
y las luces parpadeantes que aparecen en los videojuegos. Incluso las personas que no
tengan un historial de este tipo de ataques o de epilepsia pueden ser propensas a estos
“ataquesepilépticosfotosensibles”cuandojanlavistaenunvideojuego.
Estosataquespresentanvariossíntomas:mareos,visiónalterada,ticsnerviososenla
caraolosojos,tembloresdebrazosopiernas,desorientación,confusiónopérdida
momentánea del conocimiento. Además, pueden ocasionar la pérdida del conocimiento
oinclusoconvulsionesqueterminenprovocandounalesióncomoconsecuenciadeuna
caída o de un golpe con objetos cercanos.
Si sufre cualquiera de estos síntomas, deje de jugar inmediatamente y consulte a un
médico. Los padres deben observar a sus hijos mientras juegan y/o asegurarse de que
no hayan experimentado los síntomas antes mencionados; los niños y los adolescentes
son más susceptibles que los adultos a estos ataques. El riesgo de sufrir un ataque
epiléptico fotosensible puede reducirse tomando las siguientes precauciones: siéntese
a una distancia considerable de la pantalla; utilice una pantalla más pequeña; juegue
enunahabitaciónbieniluminadaynojueguecuandoestésomnolientoocansado.
Si usted o algún miembro de su familia tiene historial de ataques epilépticos, consulte
a su médico antes de jugar.
ÍNDICE
Inicio 18
Controles 18
Controles Básicos 19
Hacer regates y Parar el balón 19
Pasar 19
Pases cruzados 20
Remates 20
Trucos y Habilidades 20
Defensa, Controles Generales 21
Jugadas Preparadas y Situaciones de Balón Parado 21
Pantallas de Partido 23
Plan del Juego 23
Modos de Juego 24
Modo Edición 26
Galería 26
Conguración del Sistema 26
Liga de Campeones UEFA 26
Liga Master 27
Conviértete en una Leyenda 28
Conectarse a Xbox LIVE (En línea) 29
Términos Legales 30
Garantía/ Servicio de Atención al Cliente 31
LascalicacionesdelaESRB(JuntadeCalicacióndeSoftwaredeEntretenimiento)
están diseñadas para aconsejar a los consumidores, especialmente a los padres,
sobrelasedadesapropiadasdelosvideojuegos.Estainformaciónayudaalos
consumidores a decidir qué juegos son apropiados para sus hijos y su familia.
LascalicacionesdelaESRBconstandedospartes:
• Los símbolos de calicación sugieren la edad apropiada del juego. Estos
símbolos aparecen prácticamente en todas las cajas de juegos disponibles para
compra o alquiler en los Estados Unidos y Canadá.
• Las descripciones de contenido indican los elementos del juego que pueden
tenerunacalicaciónespecícay/opuedenserdeinterésparaelconsumidor.
Las descripciones aparecen en la parte trasera de la caja al lado del símbolo de
clasicación.
Paramásinformación,visitewww.ESRB.org.
Calicación ESRB del juego
DELANTE
VIDEOJUEGO
E
DETRÁS
Gracias por comprar PES 2010 de Konami. Lee este manual cuidadosamente antes de comenzar a jugar.
Guarda este manual en un lugar seguro para poder consultarlo fácilmente en el futuro. NOTA: Konami no reedita
manuales.
Konami está continuamente buscando formas de mejorar sus productos. Por lo tanto, este producto podría tener
algunas diferencias con respecto a otros, según la fecha de compra.

PRO EVOLUTION SOCCER 2010
18
PRO EVOLUTION SOCCER 2010
19
INICIO/ CONTROLES CONTROLES
Inicio
Si esta es la primera vez que juegas, pulsa el botón Inicio en la pantalla de Títulos para pasar a la pantalla de
Conguración predeterminada. Si ya has guardado datos de juego anteriormente, avanzarás al Menú Principal.
Conguración Predeterminada
Antes de jugar un partido por primera vez, puedes escoger entre cinco niveles diferentes de dicultad. También
puedes cambiar la dicultad después de empezar tu juego. Los datos del sistema, en los que está guardada toda
la información del juego, se crearán automáticamente. Luego de conrmar que este paso se ha completado, pasa
al Menú Principal.
Guardado de Datos y Memoria Necesaria
Para almacenar y actualizar tus “Datos del sistema” y de “Editar datos”, y guardar tu progreso en las competencias,
deberás colocar un disco duro Xbox 360 o una unidad de memoria Xbox 360 en el puerto A de unidad de memoria.
Los “Datos del sistema” y de “Editar datos” sólo se pueden guardar en o descargar de un disco duro Xbox 360 o una
unidad de memoria Xbox 360 que colocas en el puerto A de unidad de memoria. Cada archivo que guardas en el
disco duro Xbox 360 o en una unidad de memoria Xbox 360 requiere una cantidad determinada de espacio libre,
según se explica en la siguiente tabla.
Pantalla del Menú Principal
La pantalla de selección del menú Principal te da acceso a las competiciones, las opciones y las características
de PES 2010. Usa el mando de dirección o el stick izquierdo para seleccionar la opción deseada, y luego pulsa el
botón A para realizar tu selección.
Cómo Usar la Función de Ayuda
PES 2010 es un juego muy amplio y lleno de atributos, pero se han hecho todos los esfuerzos para hacerlo lo más
accesible posible. Cuando aparece el icono de Ayuda en la parte inferior de la pantalla, puedes pulsar el botón
correspondiente para que aparezca el menú de Ayuda y puedas ver consejos útiles en cualquier momento.
Nota: Este juego se presenta con sonido envolvente Dolby Digital 5.1. Conecta tu Microsoft Xbox 360 a un sistema
de sonido con tecnología Dolby Digital mediante un cable óptico digital. Conecta el cable óptico digital a una
entrada de un cable audio/vídeo de alta denición por componentes Xbox 360, un cable audio/vídeo de alta
denición VGA Xbox 360, o un cable audio/vídeo S-Video Xbox 360. Desde la cha “sistema” de la interfaz Xbox
360 elige “conguración de consola”, luego selecciona “opciones de audio”, luego “salida digital” y nalmente
selecciona “Dolby Digital 5.1” para experimentar la estimulante sensación del sonido envolvente.
Control Parental
Estas herramientas exibles y fáciles de usar les permiten a los padres y encargados de cuidar a los niños decidir
a qué juegos pueden acceder los jóvenes jugadores según la clasicación de contenido de éstos. Si deseas más
información, visita www.xbox.com/familysettings
Controles Predeterminados
Usa tu mando para navegar por las pantallas de los menúes. Usa el mando de dirección o el stick izquierdo para
moverte a través de los menús, el botón A para conrmar una selección, y el botón B para cancelar o retroceder
en las pantallas.
]
x
Gatillo DerechoGatillo Izquierdo
à
Botón Superior
Frontal Izquierdo
_
Botón Guía Xbox
`
Botón Superior
Frontal Derecho
Y
X
Stick
L
Izquierdo
<
l
C
Stick DerechoMando de Dirección
B
A
>
Si deseas consultar los controles básicos que se usan durante un partido, consulta la tabla que se encuentra a
continuación. Lee las páginas 19-22 para conocer controles más avanzados. Puedes cambiar las funciones de cada
botón en “Conguración del mando”, dentro de “Conguración del sistema”. (Consulta la sección de Conguración del
sistema en la página 26). Para este juego, el mando de dirección y el stick izquierdo controlan las mismas acciones.
Cuando este manual se reere al “mando de dirección”, también puedes usar el stick izquierdo.
CONTROLES BÁSICOS DE ATAQUE
Botón y : Cambiar entre jugadores
Botón z: Correr a toda velocidad
Mando de Dirección: Movimiento del jugador, regate
Stick Izquierdo: Movimiento del jugador, regate
Botón Y: Balón al vacío
Botón B: Cruce/pase largo
Botón A: Pase corto
Botón X: Rematar
Stick Derecho: Pase manual
CONTROLES BÁSICOS DE DEFENSA
Botón y: Cambiar entre jugadores
Botón z: Correr a toda velocidad
Mando de Dirección: Movimiento del jugador
Stick Izquierdo: Movimiento del jugador
Botón Y (mantener pulsado): Portero
Botón B: Entrada a ras de suelo
Botón A (mantener pulsado): Entrada/ aplicar presión con el jugador que estás controlando
Botón X (mantener pulsado): Despeje / aplicar presión con el jugador que no estás controlando
(mantener el botón pulsado)
Hacer regates y Parar el balón
Hacer regates: Usa el mando de dirección para moverte cuando el balón está en los pies de tu jugador.
Regate Hacia los Costados: Mantén pulsado el botón x y pulsa el mando de dirección a 90º en la dirección del
movimiento. Sólo un reducido número de jugadores puede realizar este regate.
Regate en Velocidad: Pulsa el botón z mientras haces un regate para esprintar.
Extender el Tiempo entre los Toques del Balón: Mientras pulsas el botón z para esprintar con el balón en los
pies de tu jugador, pulsa rápidamente el mando de dirección dos o tres veces entre toques para patear la pelota
más adelante.
Mayor Distancia entre los Toques de Balón: Mientras corres con el balón con el botón z pulsado, pulsa el botón
x y pulsa el mando de dirección a 45º hacia cualquiera de los lados de la dirección actual del movimiento.
Regate Lento: Mantén el botón x pulsado mientras haces un regate para hacer un “regate lento”. El balón
prácticamente no se separará del pie de tu jugador mientras realizas esta técnica. Además puede estar seguida por
un rápido cambio de dirección o uno de los muchos amagos posibles.
Esquivar: Para moverte en ángulos rectos a la dirección actual del movimiento, pulsa el mando de dirección a 90° en
cualquiera de las dos direcciones.
Parar el Balón 1: Suelta el mando de dirección y pulsa el botón z para detener el movimiento del balón mientras
haces un regate.
Parar el Balón 2: Suelta el mando de dirección y pulsa el botón x para indicarle a tu jugador que se detenga y mire
hacia el arco rival.
Saltar: Cuando un adversario realice una entrada a ras de suelo, pulsa el botón x para intentar saltar por encima
de éste.
Controlar el Balón: Al recibir un pase, pulsa el mando de dirección para controlar el balón.
Parar el Balón: Al recibir un pase, pulsa el mando de dirección mientras mantienes pulsado el botón x para detener
el balón y apuntar en la dirección deseada.
Parar el Balón y Girar Hacia el Arco: Al recibir un pase, suelta el mando de dirección y pulsa el botón x para girar
hacia el arco rival mientras atrapas el balón.
Correr Hacia el Pase: Para indicarle a un jugador que gire y corra hacia un pase entrante sin realizar un toque inicial,
sostén el botón z y pulsa el mando de dirección hacia la dirección en la que el balón se está moviendo.
Passar
Nota: Usa el mando de dirección para determinar la dirección en que se debe hacer un pase.
Pase Corto/ Cabecear Balón: Presiona el botón A para hacer un pase corto por el suelo o para cabecear el balón.
Mantén el botón A pulsado por más tiempo para pasarle el balón a un jugador que está más lejos.

PRO EVOLUTION SOCCER 2010
20
PRO EVOLUTION SOCCER 2010
21
CONTROLES CONTROLES
Pase de taco: Pulsa rápidamente el mando de dirección hacia el lado opuesto de la dirección actual de movimiento
del jugador y luego pulsa el botón A.
Pase de Primera: Pulsa el botón A antes de que tu jugador pare el balón.
Pase Largo: Pulsa el botón B. La distancia del pase depende del tiempo en el que el botón B se mantenga pulsado.
Pase Largo de Primera: Pulsa el botón B antes de que tu jugador pare el balón.
Balón al Vacío: Pulsa el botón Y. Al sostener el botón Y pulsado por más tiempo, el pase irá dirigido a un
jugador más distante.
Balón al Vacío de Primera: Pulsa el botón Y antes de que tu jugador pare el balón.
Balón Elevado al Vacío: Mantén pulsado el botón y y pulsa el botón Y.
Pase Uno-Dos: Mantén pulsado el botón y. También pulsa el botón A para realizar un pase corto, luego pulsa
el botón Y antes de que tu compañero de equipo reciba el balón para que éste devuelva el pase.
Pase Uno-Dos con Devolución de Balón en Alto: Mantén pulsado el botón y. También pulsa el botón A para
realizar un pase corto, luego pulsa los botones y + Y antes de que tu compañero de equipo reciba el balón
para que éste devuelva el pase.
Pasar y Moverse: Pulsa el botón x inmediatamente después de pasar el balón para indicarle a tu jugador que
corra hacia adelante.
Pase Manual: Acciona el joystick derecho en la dirección deseada para ejecutar el pase. La fuerza del pase estará
determinada por el tiempo en el que mantengas accionado el joystick derecho.
Pase Largo Manual: Mantén pulsado el botón y. También acciona el stick derecho en la dirección deseada
para ejecutar el pase largo. La fuerza del pase estará determinada por el tiempo en el que mantengas accionado
el joystick derecho.
Realizar un pase cruzado
Nota: Usa el mando de dirección para determinar la dirección en que se debe hacer un cruce.
Pase cruzado Alto: Desde bien adentro de la mitad del campo de tu oponente, pulsa el botón B.
Pase cruzado Bajo: Desde bien adentro de la mitad del campo de tu oponente, pulsa el botón B dos veces.
Pase cruzado por todo el Campo: Desde bien adentro de la mitad del campo de tu oponente, pulsa el botón B
tres veces para enviar un cruce bajo por todo el campo.
Balón Elevado: Presiona el botón x al hacer un cruce para que el balón se eleve en el aire.
Pase cruzado Anticipado: Mantén pulsado los botones y y B para realizar un pase cruzado desde cualquier
posición en el campo de tu oponente.
Rematar
Notas sobre el remate: Pulsa el botón X para acumular fuerza en el indicador de potencia. Suelta el botón X
cuando el indicador de potencia alcance el nivel deseado y el jugador hará un remate al arco. La longitud del
indicador de potencia determina la fuerza y altura de tu remate. Usa el mando de dirección para determinar la
dirección deseada al realizar el remate.
Remate: Pulsa el botón X.
Remate de Primera/ Cabecear Balón: Pulsa el botón X justo antes de que el balón alcance a tu jugador para
realizar un remate de primera o para cabecear al arco.
Remate Controlado: Presiona el botón x cuando el indicador de potencia alcance el nivel deseado para hacer
un remate que cambie fuerza por precisión.
Remate de Emboquillada: Mantén pulsado el botón y y pulsa el botón X.
Remate de Emboquillada Tipo 2: Para realizar un pase elevado con una trayectoria más baja, pulsa el botón X
y luego pulsa el botón z cuando aparezca el indicador de potencia.
Trucos y Habilidades
Nota: Los trucos y las habilidades que se realizan con los botones de dirección también pueden ser realizados
por usuarios avanzados combinando el botón w (pulsado) y el joystick derecho. Consulta la Lista de comandos
en el menú pausa para más detalles. Pero recuerda: siempre necesitas usar el botón w en estos controles
extraocialmente denominados “controles para expertos”.
Pase por Encima (Largo): Pulsa el botón y dos veces.
Pase por Encima (Corto): Pulsa el botón x dos veces.
Amago en el Lugar: Cuando tu jugador esté parado con el balón en sus pies, indícale que simule moverse con el
balón pulsando el botón y ó x dos veces.
Amagos de Tiro y de Pase: Cuando visualices el indicador de remate o pase, pulsa el botón A para cancelar el
tiro. El amago variará según lo que se haga con el mando de dirección antes de pulsar el botón A.
Tirarse: Cáete al suelo intencionalmente pulsando los botones y + w + z al mismo tiempo. Pueden cobrarle
falta al adversario o puede que te sancionen con una tarjeta amarilla.
Flip Flap Inverso: Si el pie más fuerte del jugador es el derecho, empuja el mando de dirección hacia la izquierda
en diagonal y luego rápidamente hacia la derecha en diagonal mientras haces un regate. Si su pie más fuerte es el
izquierdo, debes hacer lo opuesto. Sólo un pequeño número de jugadores puede realizar este movimiento.
Amago con el Cuerpo 1: Pulsa rápidamente el mando de dirección en cualquiera de las dos direcciones
diagonales inmediatamente para la izquierda o para la derecha de la dirección de la carrera.
Amago con el Cuerpo 2: Cuando el jugador y el balón estén inmóviles, pulsa el mando de dirección dos veces en
ángulo recto hacia la dirección a la que el jugador está apuntando.
Patear el Balón Hacia Atrás: Desde una posición inmóvil, pulsa el mando de dirección una vez en dirección
opuesta a la que el jugador está mirando, luego pulsa el mando de dirección en diagonal a 45 grados hacia el pie
más fuerte del jugador.
Truco de Matthews: Con el balón inmóvil, pulsa el mando de dirección a 90 grados hacia la izquierda o la derecha
de la dirección a la que el jugador está mirando, inmediatamente después pulsa y sostén en la dirección contraria.
Los jugadores deben poseer estadísticas de regate de 70 puntos o más para poder realizar este truco.
Amago al Vacío: Justo antes de que un pase alcance a un jugador, suelta el mando de dirección y luego pulsa y
mantén el botón z para pasar por encima del balón y dejar que éste pase a otro jugador.
Ruleta: Haz rotar el mando de dirección mientras haces un regate. La dirección en la que hagas rotar el mando de
dirección determina la dirección del giro. Sólo un reducido número de jugadores puede realizar este movimiento
y es posible que lo realicen de maneras diferentes.
Levantar el Balón: Pulsa el mando de dirección hacia atrás y luego rápidamente hacia delante para levantar el
balón en el aire.
Defensa
Entrada/Presión: Pulsa el botón A para intentar hacer una entrada. También puedes mantener pulsado el botón
A para indicarle a tu jugador que encierre a un adversario y aplique presión sobre éste. Esto puede ser usado
junto con el botón z.
Encierro: Mantén presionado el botón X cuando el equipo contrario esté en posesión del balón para que el
jugador que se encuentre más cerca del balón (sin contar al jugador que tú estás controlando) encierre al jugador
que tiene el balón.
Entrada a ras de Suelo: Pulsa el botón B.
Despeje: Cuando el balón esté bien adentro de tu campo, pulsa el botón X para despejarlo.
Hacer salir al Portero Rápidamente: Pulsa el botón Y mientras deendes para hacer que el portero esprinte
hacia el balón.
Saque de Arco: Pulsa el botón B o el X para patear el balón hacia el campo. Usa el mando de dirección para apuntar.
Lanzar el Balón: Cuando tu portero esté sosteniendo el balón, presiona el botón A para lanzárselo a un
compañero. Usa el mando de dirección para apuntar.
Dejar caer el Balón: Cuando tu portero esté sosteniendo el balón (con ningún botón direccional apretado),
presiona el botón z para indicarle que lo deje caer a sus pies.
Portero: Pulsa los botones del joystick izquierdo + y para cambiar el control entre un jugador de campo abierto
y el portero.
Controles Generales
Cambiar Jugador: Pulsa el botón y para cambiar el control al jugador que se encuentra más cerca del balón.
Controlar Jugador Cuando el Balón Está en el Aire: Cuando el balón está en el aire, sostén el botón x y usa el
mando de dirección para posicionar al jugador de manera que se encuentre con el balón.
Supercancelación: Cuando un jugador esté corriendo automáticamente hacia el balón, presiona el botón z y el
botón x simultáneamente para hacer que el jugador se detenga, o para recuperar el control total.
Activar/Cancelar Estrategias (Modo Manual): Mantén pulsado el botón w y luego pulsa el botón B, el botón
A, el botón Y o el botón X para activar o cancelar las estrategias asignadas a estos botones.
Activar/Cancelar Estrategias (Modo Semiautomático): Pulsa el botón w para activar o cancelar la estrategia
que elegiste.
Nivel de Ataque/Defensa: Presiona los botones w y z al mismo tiempo para aumentar el nivel del indicador
de Ataque/defensa, indicándoles a tus jugadores que presionen más hacia adelante. Pulsa los botones w y x al
mismo tiempo para reducirlo.
Jugadas Preparadas y Situaciones de Balón Parado
Nota: Para los tiros libres y los tiros de esquina, mantén pulsado el botón correspondiente para llevar el indicador
de potencia hasta el nivel deseado.
Tiros de esquina
Regular: Pulsa el botón B.
Pase cruzado Alto: Mantén pulsado el botón x + el botón B.
Pase cruzado Bajo: Pulsa el mando de dirección hacia arriba + el botón B.
A través de todo el Campo: Mando de dirección hacia abajo + botón B.
Dar Efecto al balón: Mando de dirección hacia la izquierda o hacia la derecha mientras el indicador de potencia
está en pantalla.
Tiro de Esquina corto: Pulsa el botón A para enviarle un pase corto a tu compañero más cercano.

PRO EVOLUTION SOCCER 2010
22
PRO EVOLUTION SOCCER 2010
23
CONTROLES PANTALLAS DE PARTIDO/ PLAN DEL JUEGO
Jugadas Preparadas y Situaciones de Balón Parado (continuación)
Tiros Libres: Pasar.
Pase Corto: Elige una dirección con el mando de dirección y luego pulsa el botón A.
Pase Largo Común: Pulsa el botón B.
Balón Alto: Mantén pulsado el botón x + el botón B.
Balón Bajo: Pulsa el mando de dirección hacia arriba + el botón B.
Por todo el Campo: Pulsa el mando de dirección hacia abajo + el botón B.
Efecto: Hacia la izquierda o hacia la derecha con el mando de dirección mientras se muestra el indicador de
potencia.
Balón al Vacío: Presiona el botón Y en un tiro libre para enviar el balón a través de la defensa. Usa el mando de
dirección para apuntar.
Tiros Libres: Rematar
Remate Común: Pulsa el botón X.
Remate Fuerte: Pulsa el mando de dirección hacia arriba + el botón X.
Remate Débil: Pulsa el mando de dirección hacia abajo + el botón X.
Remate Moderadamente Fuerte: Pulsa el botón X y justo cuando el jugador hace contacto, pulsa el botón Y.
Remate Moderadamente Débil: Presiona el botón X y justo cuando el jugador hace contacto, pulsa el botón A.
Dar efecto al Balón: Pulsa el mando de dirección hacia la izquierda o hacia la derecha mientras se muestra el
indicador de potencia.
Tiros Libres: Controles Generales
Reinicio Rápido: Funciona en el momento adecuado sólo cuando el jugador está posicionando el balón con sus
manos para un tiro libre. Cuando esto sucede, determina una dirección usando el mando de dirección y pulsa el
botón A para reiniciar rápidamente el partido con un pase simple.
Cambiar el Número de Ejecutores: Presiona los botones y y z simultáneamente para navegar por las
siguientes conguraciones de tiros libres: un ejecutor (predeterminado), dos ejecutores (segundo ejecutor: lado
derecho), dos ejecutores (segundo ejecutor: lado izquierdo).
Cómo usar el Segundo Ejecutor: Ejecuta el tiro libre mientras mantienes presionado el botón y para que el
segundo ejecutor realice el tiro o el pase cruzado.
Hacer que el Segundo Ejecutor Haga Rodar el Balón Hacia Delante: Mantén presionado el botón y. Luego
pulsa el botón A para hacer que el segundo ejecutor haga rodar el balón hacia delante. Entonces puedes realizar
un remate o un pase a partir de una jugada abierta con el segundo ejecutor.
Tiros Libres: Control de la Barrera
Cuando el equipo contrario tenga un tiro libre, mantén pulsados los siguientes botones para controlar a los
jugadores en la barrera defensiva:
Aumentar/reducir el número de jugadores en la barrera: Mantén pulsado el botón w y pulsa el mando de
dirección hacia arriba para agregar más jugadores a la barrera. Para reducir el número de jugadores, mantén
pulsado el botón w y pulsa el mando de dirección hacia abajo.
Todos los Jugadores Saltan: Pulsa el botón X.
Los Jugadores Mantienen su Posición: Pulsa el botón A.
Los Jugadores Avanzan + Saltan: Pulsa el botón B.
Los Jugadores Avanzan: Pulsa los botones B y A al mismo tiempo.
Aleatorio: No se pulsa ningún botón.
Tiros Libres: Portero
Mover al Portero detrás de la Barrera: Cuando el equipo contrario se esté preparando para ejecutar un tiro libre,
mantén pulsado el botón Y para indicarle a tu portero que se mueva detrás de su barrera defensiva.
Saques de banda
Saque de banda Corto: Pulsa el botón A para lanzarle el balón a tu compañero más cercano en la dirección
del lanzamiento.
Saque de banda Largo: Mantén pulsado el botón B para realizar un saque de banda más largo en la dirección
en la que el lanzador esté apuntando.
Penales
Ejecutor: Mantén el mando de dirección y el botón X durante un tiempo que sea proporcional a la altura o al
ancho con que quieres rematar.
Portero: Mantén el mando de dirección y el botón X durante un tiempo que sea proporcional a la altura o
al ancho con que quieres saltar para rematar. Debes hacerlo coincidir con el tiempo del ejecutor. Si le das una
dirección, tu portero no se moverá sino que cubrirá el centro del arco.
Cambiar cursor a “No asistido” y activar “Seleccionar Jugador”
Pedir el Balón: Cuando un compañero tenga el balón, pulsa el botón x dos veces para pedirle que te lo pase.
Cuanto más frecuentemente pulses el botón, más evidente será tu deseo de que te pasen el balón.
Pantallas del Partido
Esta sección explica las diferentes características y funciones de las pantallas con las que te encontrarás durante
un juego.
Pantalla de Partido
Mentalidad de Ataque/Defensa: Este indicador muestra la mentalidad actual de tu equipo. Cuanto más roja
esté la barra, más actitud de ataque tendrá el equipo; por el contrario, una barra azul indica que el equipo se está
echando atrás para defenderse.
Marca de Estrategia: Los símbolos de los botones que representan las estrategias manuales aparecen en esta
área cuando éstas están activas.
Indicador de Energía: Muestra la energía actual de un jugador. El indicador se vuelve rojo cuando la energía es
muy baja, lo cual indica un deterioro en el desempeño de ese jugador.
Íconos de Evento: Los siguientes símbolos aparecerán en la esquina superior izquierda de la pantalla durante
los partidos.
Plan del Juego
Antes de comenzar un partido, puedes establecer la formación, la alineación, el capitán y los ejecutores de las
jugadas preparadas de tu equipo, junto con otras conguraciones en la pantalla Plan del juego. Asegúrate de
estar bien preparado para el partido.
Ventanas de Información
Las Ventanas de información en la parte superior de la pantalla (izquierda: equipo local, derecha: equipo visitante)
contienen información acerca del tema del Plan de Juego que está seleccionado. Por ejemplo, si eliges “Alineación”,
puedes ver el nombre del jugador que esté seleccionado, la cantidad total de advertencias (tarjetas amarillas), el
rol, la pierna dominante y la altura.
Nombre y Estado del Jugador
Desde la izquierda: Rol, Nombre del Jugador, Tarjeta de Estilo de Juego, Puntos Totales, Energía, Estado.
Energía y Estado Físico
Examina la energía y el estado físico de los jugadores en la visualización de estado. También se puede ver la fatiga,
según el modo y la conguración que estés utilizando. Cuanto más fatiga tenga un jugador, más lentamente
recobrará su energía. Los jugadores cansados son también más propensos a lesionarse. Se muestra una marca
especial al lado de los jugadores que están lesionados o que no pueden participar en los partidos.
Tiempo Transcurrido
(indica el jugador que está bajo control)
- contorno rojo: el jugador no tiene
- triángulo interno blanco: movimiento
- número o nombre amarillo sobre el
cursor: el jugador fue amonestado
- bandera a cuadros amarilla y roja: el
jugador que estás controlando está
Jugador Bajo Control:
Cuando juegues con la opción “Seleccionar jugador” activada, el/los jugador(es) que estén bajo tu
control estarán resaltados por medio de un círculo (consulta también la página 26).
Azul - Volviendo al Juego (Sin Lesión):
Un jugador está volviendo al campo con buen estado de salud.
Amarillo - Volviendo al Juego (Con Lesión Leve):
Un jugador está volviendo al campo, pero tiene una lesión que afectará su desempeño.
Rojo - Imposibilidad de Volver al Juego (Debido a una Lesión):
Un jugador lesionado no puede volver al campo y debe ser reemplazado (si es posible).
Gris - Tiro Libre Indirecto:
Se ha cobrado un tiro libre indirecto.
Rojo - Tiempo de Descuento:
Esto indica los minutos de tiempo de descuento que se jugarán.
Cursor
energía
automático
fuera de juego
Marca de Estrategia Indicador de EnergíaRadar
Puntaje
Mentalidad de
Ataque/Defensa
Nombre y posición
del jugador

PRO EVOLUTION SOCCER 2010
24
PRO EVOLUTION SOCCER 2010
25
PLAN DEL JUEGO
PLAN DEL JUEGO/ MODOS DE JUEGO
El indicador verde representa la energía, mientras que la echa representa el estado físico. El indicador azul que
está debajo del indicador de energía muestra la fatiga.
Iconos Especiales: Los siguientes íconos aparecen en las páginas de Visualización de estado para brindar
información acerca del estado físico y la disponibilidad del jugador.
1 2 3 4 5 6
Cruz Verde Cruz Roja Cruz Amarilla Guión Azul Globo Tarjetas
Lesiones
1 Vuelve Plenamente Sano 2 Lesión Grave 3 Lesión Leve 4 Estado de Lesión Incierto
No disponible
5 Con Obligaciones Internacionales 6 Suspendido por Acumulación de Tarjetas Amarillas 7 Suspendido Debido
a una Tarjeta Roja
Ajustes Asistidos
Mueve los controles deslizantes para ajustar la conguración de la Alineación, la Formación, la Táctica y las
Jugadas Preparadas.
Cuando hayas elegido la conguración que deseas cambiar, usa la parte izquierda o derecha del mando de
dirección para mover los controles deslizantes. Los ajustes cambiarán automáticamente para coincidir con la
posición del control deslizante.
Alineación
Selecciona a los jugadores que competirán en el partido. Usa el mando de dirección para seleccionar a los
jugadores, luego pulsa el botón A para cambiarlos. Pulsa el botón X mientras seleccionas un jugador para
hacer que ese jugador sea el Capitán (que estará indicado por una marca amarilla).
Habilidades del Jugador
Pulsa los botones que se muestran en la pantalla para alternar entre las habilidades del jugador. Hay habilidades
normales, tales como Posición, Agilidad, Pase y Remate; así como también habilidades especiales que convierten
a un jugador en experto en ciertas áreas especícas de su juego.
Nota: Si quieres conocer detalles sobre las habilidades de los jugadores, consulta el Modo edición de PES 2010,
donde encontrarás descripciones detalladas de éstas.
Establecer la Formación
Ajusta la posición de cada jugador y cambia la formación. También puedes seleccionar a los jugadores del equipo
contrario que marcarás.
Nota: Posiciones de los Jugadores
En cada formación, los jugadores se colocan en posiciones tales como mediocampista o lateral. A cada jugador
se le asigna la posición en la que mejor se desempeña. Ten en cuenta que al colocar al jugador en cualquier otra
posición disminuirán sus capacidades.
Sistema de Tarjetas
Por medio del nuevo Sistema de Tarjetas puedes congurar el Nivel de ataque de cada jugador y elegir si
aprovechar o no las habilidades únicas de un jugador.
Esto te ofrece innitas posibilidades y opciones estratégicas que antes no estaban disponibles.
El Sistema de Tarjetas ofrece tres categorías diferentes:
1) C = Las Tarjetas de conciencia te permiten determinar si los jugadores deberían desempeñar sus roles de
manera equilibrada, defensiva u ofensiva.
2) P = Las tarjetas de estilo de juego representan estilos de juego individuales como un “pase preciso”.
Puedes desactivar cualquier tarjeta si no quieres que un jugador desempeñe ciertos estilos, si, por
ejemplo, los estilos no concuerdan con tu estrategia general.
3) S = Las Tarjetas de habilidad identican habilidades de los jugadores (por ej. “atajador de penales”) y no
pueden cambiarse ni desactivarse.
Nota: Las Tarjetas de estilo de juego pueden variar según el rol del jugador y el nivel de ataque. Si estás usando
una Tarjeta de estilo de juego que no concuerda con tu táctica vigente, la táctica tendrá prioridad.
Táctica
Congura la conciencia y las estrategias de juego de todo el equipo.
Estilo de Equipo
Congura la conciencia hacia los juegos. Mueve el control deslizante para cambiar los ajustes de cada elemento.
En general, al mover el control deslizante hacia la derecha, se aumentará la actitud ofensiva y al moverlo hacia la
izquierda se aumentará la actitud defensiva.
Si eliges “Cubrir” como tu “Estrategia defensiva”, tus jugadores protegerán el espacio creado cuando sus
Amarillas
Tarjeta Roja
7
compañeros de equipo se mueven, sin marcar jugadores especícos del equipo contrario.
Estrategia
Selecciona hasta cuatro estrategias que desees usar y asígnalas a tus botones preferidos. Cuando quieras ejecutar
manualmente las estrategias durante un partido, coloca el control deslizante correspondiente en el menú de
Ajustes asistidos en “Desactivado”. Ten en cuenta que algunas estrategias, tales como “Contraataque”, “Todos al
ataque”, “Presionar” y “Defensa total” no pueden ejecutarse simultáneamente.
Ajustes de Jugadas Preparadas
Aquí eliges ejecutores para jugadas preparadas y jugadores que se unirán al ataque. Los últimos pueden ser
jugadores que generalmente no participan, tales como el zaguero que participa en un tiro de esquina.
Liga de Campeones de la UEFA (página 26)
Enfrenta a tu club con la elite del fútbol europeo utilizando el nuevo y exclusivo modo Liga de Campeones de
la UEFA.
Exhibición
Primero, si deseas iniciar un partido rápidamente, elige si competirás contra un amigo (VS. JUGADOR) o contra la
computadora (VS. COM). Aunque ésta es la forma más rápida de hacer que comience a rodar el balón, un partido
personalizado (PERSONALIZADO) te brinda más opciones desde el comienzo. Además de todas las opciones que
puedes seleccionar para el equipo, el uniforme o el estadio, tendrás las siguientes opciones previas al partido
según el modo que selecciones:
1 Opciones de Juego
Para cada mando que tengas conectado, decide si los jugadores correspondientes jugarán en equipos contrarios
o si jugarán en el mismo equipo. También decide si los jugadores serán controlados por ti o por la computadora
durante el partido.
Para ajustar la “Conguración del cursor”, pulsa el botón X (Ver “Conguración del cursor” en la página 26.)
Local/ Visitante: Pulsa izquierda o derecha en el mando de dirección para cambiar entre las opciones local y
visitante.
Modo Entrenador: Establece órdenes tácticas mientras la computadora controla a los jugadores en el campo.
Para cambiar a modo Entrenador, pulsa izquierda en el mando de dirección cuando el ícono del mando está del
lado local, o pulsa derecha en el mando de dirección cuando el ícono del mando está del lado visitante.
Modo Espectador: Para ver a dos equipos controlados por la computadora jugando entre sí, pulsa el botón Y.
2 Opciones
Elige la conguración para el Nivel de dicultad, la Duración del partido, las Lesiones, las Condiciones del equipo y
demás características. Luego, selecciona “Conrmar”. Ten en cuenta que algunas opciones como la “Conguración
de reglas” y el “Desarrollo de los jugadores” son únicas para ciertos modos de juego en particular.
Liga Master (página 27)
Para competir en una liga, desarrolla tus jugadores e intenta fortalecer a tu equipo en el mercado de las
transferencias de jugadores.
Conviértete en una Leyenda (página 28)
Este desaante modo recrea la carrera profesional de un jugador especíco que tú elijas.
Si tienes buenas actuaciones, tu reputación aumentará y obtendrás ofertas para jugar en diferentes clubes.
¿Podrás dejar tu nombre escrito en la historia?
Liga y Copa
Disfruta de varias competencias de liga y de copa. Un buen desempeño en la tabla de posiciones de la liga
te permitirá entrar a la Liga Europea de la UEFA o incluso a la Liga de Campeones de la UEFA en la siguiente
temporada.
Comunidad
“Comunidad” es un modo que apoya los par tidos que tiene con sus amigos más cercanos. Al registrar sus
compañeros en una comunidad, que pueden competir entre sí mediante diversos formatos de competición.
Xbox LIVE (Modo Red) (página 29)
Conéctate a Xbox LIVE® y disfruta de partidos contra jugadores de diferentes países que juegan con la misma
versión de PES 2010.
Entrenamiento
Mueve a tus jugadores libremente mientras practicas los controles del juego. Al ajustar la conguración, puedes
concentrarte en áreas especícas tales como tiros libres y tiros de esquina. Ten en cuenta que no podrás elegir el
“modo Espectador” en Conguración de los Jugadores.

PRO EVOLUTION SOCCER 2010
26
PRO EVOLUTION SOCCER 2010
27
MODO EDICIÓN / GALERÍA / CONFIGURACIÓN DEL SISTEMA/
LIGA DE CAMPEONES DE LA UEFA
Editar
Esta opción te permite personalizar muchas de las características que ofrece PES 2010, como equipos y jugadores,
así como nombres de estadios y de copas. Puedes crear tu propio club. Activa el menú Ayuda (busca el mensaje
en la parte inferior de la pantalla) para ver instrucciones más detalladas sobre cómo usar las diferentes opciones
y características de este modo.
Agregar tus Propias Imágenes
Puedes agregar imágenes para los rostros de los jugadores, los logotipos de los uniformes y los emblemas
utilizando imágenes actuales, una cámara Xbox LIVE Vision o un equipo similar. Donde veas que aparece el
símbolo de la cámara, simplemente sigue las instrucciones que se ven en pantalla.
Nota: Se pueden guardar datos de hasta 400 rostros, 200 logotipos de uniformes y 40 emblemas, según la
capacidad del disco duro Xbox 360 o de tu unidad de memoria Xbox 360.
Registrar a un Jugador Creado en un Equipo
Para registrar a un jugador que creaste con “Crear jugador ” en un equipo, ve a “Equipo” en el menú Editar y
selecciona “Registrar jugador”. Luego elige el equipo en el que te gustaría que juegue el jugador. Luego, una vez
que aparezca la lista de jugadores de ese equipo, selecciona “Agregar jugador” o bien escoge a un jugador existente
e intercámbialo con el jugador que creaste. Finalmente, selecciona “Otro” y elige al jugador que acabas de crear.
Galería
La galería combina mucha diversión con elementos informativos.
Editor de lista de Canciones: Escucha la música de fondo del juego. También puedes cambiar la música de fondo
que se escucha durante el juego.
Registro de Pistas: Mira el historial de la música que se reprodujo durante el juego.
Reproducción de Repeticiones: Mira las repeticiones que has guardado.
Créditos: Puedes ver los logros de los creadores.
Conguración del Sistema
Ajusta la conguración de los controles y del guardado de datos.
Conguración del Mando: Modica el modo en que se usan los controles. También puedes ajustar otras
conguraciones y decidir, por ejemplo, cómo se muestra el cursor del jugador y cómo se lo cambia a otro jugador.
(Consulta la sección de Conguración del cursor en la página 26.)
Visualización en Pantalla: Selecciona qué información y qué posición se mostrará en pantalla durante los
partidos.
Conguración del Sonido: Regula diversos ajustes de sonido, como el Volumen de los comentarios y el Volumen
de los Efectos de Sonido.
Ajustes de Pantalla: Cambia la posición de la pantalla y la conguración de los colores.
Datos del Sistema: Activa o desactiva la opción de guardado automático. Guarda o carga los datos del sistema.
Idioma: Cambia el idioma del juego.
Descarga: Aquí se pueden descargar contenidos adicionales y actualizaciones de las listas de jugadores, si están
disponibles.
Conguración del Cursor
Selecciona “Conguración del cursor” en “Conguración de mando” para cambiar cómo se muestra el cursor del
jugador y cómo se lo cambia a otro jugador. Entre los elementos disponibles, “Cambio de cursor”, en particular,
tiene un gran efecto en los controles del juego. Asegúrate de elegir una opción de “Cambio de cursor” que te
ayude a controlar la acción.
Cambio de Cursor
Asistido: El cursor pasa a otro jugador automáticamente. También puedes pulsar el botón y para cambiar de
jugador manualmente.
Semiasistido: Durante el ataque, el cursor pasará automáticamente al jugador que reciba el balón. Durante la
defensa, el cursor pasa manualmente a otro jugador cuando pulsas el botón y.
No asistido: : El cursor sólo pasa a otro jugador cuando tú pulsas el botón y.
Descarga: Aquí se pueden descargar contenidos adicionales y actualizaciones de las listas de jugadores, si están
disponibles.
Seleccionar Jugador
Con esta opción activada, puedes mantener el cursor en un jugador (excepto el portero) de forma permanente).
Nota: También puedes acceder a la conguración de “Cambio de cursor” a través de la “Conguración del jugador”
antes o durante un partido.
Liga de Campeones de la UEFA
Enfrenta a tu club con la elite del fútbol europeo utilizando el nuevo y exclusivo modo Liga de Campeones de la
UEFA. ¿Es tu equipo lo sucientemente fuerte como para superar la fase de grupos? ¿Te animas al desafío de los
partidos eliminatorios? ¿Quieres convertirte en uno de los pocos que levantarán la copa con la que sueñan todos
los jugadores, directores técnicos y fanáticos?
LIGA DE CAMPEONES DE LA UEFA/ LIGA MASTER
Preparativos para la Liga de Campeones de la UEFA
Selecciona “Exhibición” o “Competencia”, y luego elige “Conguración del juego”.
Selecciona “Juego nuevo” o “Cargar datos”. Selecciona un equipo registrado en la Liga de Campeones de la UEFA
para jugar un único partido.
El Formato de la Competencia
32 equipos en busca de la gloria europea participarán en una fase de grupos en la que están divididos en ocho grupos de
cuatro. Los equipos que obtienen el primer y segundo lugar en cada grupo avanzan a la fase Partidos Eliminatorios.
1 Fase de Grupos
Cuatro equipos en cada grupo conforman la fase de grupo. Juegan unos contra otros dos veces, una vez de local
y otra de visitante. Los equipos que terminan en los dos mejores lugares pasan a la fase Partidos Eliminatorios.
2 Sorteo para la Primera Ronda
Un sorteo determina con qué equipos se enfrentará cada uno de los 16 equipos que pasaron las fases de
grupo. Los equipos que obtuvieron el primer lugar en un grupo se enfrentarán a los que obtuvieron el
segundo lugar en otro. No obstante, no se enfrentarán a equipos que pertenecen a la misma liga. Ten en
cuenta que esto puede cambiar si ingresaste más de cuatro equipos de una misma liga.
3 Primera Ronda Eliminatoria
Los empates se resolverán con dos partidos, uno de local y uno de visitante. El equipo que sume la mayor
cantidad de goles avanza y (en el caso de un empate) el que avanza es el equipo que consiga la mayor
cantidad de goles de visitante. Si la regla de los goles de visitante no es concluyente, se jugará tiempo extra.
Si no se marcan goles durante el tiempo extra, el primer lugar se obtiene por penales.
4 Sorteo para la Segunda Ronda
El segundo sorteo determina con qué equipos se enfrentará cada uno de los ocho equipos que ganaron la
primera ronda. A diferencia del primer sorteo, los equipos pueden enfrentarse a otros del mismo grupo o liga.
5 Cuartos de Finales y Seminales
De la misma manera que para los empates de la primera ronda, éstos se resolverán con dos partidos, uno
de local y uno de visitante. No habrá un partido para determinar el tercer lugar para los seminalistas
derrotados en el desempate.
6 Final
La nal de la Liga de Campeones de la UEFA se jugará como un partido único.
Liga Master
En este modo, debes elegir un equipo y luego llevarlo a la victoria en competencias de liga y de copa a lo largo de una
cantidad ilimitada de temporadas. Además de generar ingresos a través de los triunfos en el campo de juego y mantener
a tu equipo en un estado físico óptimo, deberás hacer incursiones inteligentes en el mercado de las transferencias y
fomentar a los talentos prometedores para transformar a tu club en una fuerza líder del fútbol mundial.
Nota: La Liga Master en PES 2010 ofrece una variedad de características nuevas y mejoras. Algunas de ellas
se describen a continuación. Ahora puedes calicar y participar en los eventos futbolísticos de clubes más
prestigiosos del mundo: la Liga Europea de la UEFA y la Liga de Campeones de la UEFA.
Cómo avanzar en la Liga Master
Las temporadas de la Liga Master comienzan durante el periodo de transferencias de jugadores de agosto y duran
hasta la mitad de la última semana de julio del año siguiente. A medida que se juegan los partidos y que avanza
el cronograma, el tiempo avanzará cada media semana.
Gestión del Equipo
Al igual que en la vida real, todo depende del dinero. Lo necesitas para pagar costos como los sueldos del personal
o de los jugadores, y para la gestión del club de fanáticos. Se puede obtener dinero de los premios de los torneos,
de las cuotas del club que pagan los fanáticos, de los auspiciantes y de otras fuentes. Con tu dinero, puedes
adquirir jugadores nuevos, invertir en un equipo juvenil y mejorar el desempeño del equipo.
Nota: en Costos de gestión, puedes modicar los sueldos del personal durante agosto.
Pérdida de Dinero y Quiebra
Los gastos se calculan durante la primera semana de septiembre. Si en ese momento tienes pérdidas, tu equipo irá
a la quiebra. Incluso si el equipo va a la quiebra, podrá continuar jugando partidos como lo hace habitualmente,
pero la cantidad de veces que va a la quiebra se registrará en tus datos guardados. Mientras tengas pérdidas, no
podrás realizar negociaciones. Por lo tanto, debes intentar reducir los costos rápidamente, por ejemplo, mediante
la venta de jugadores mucho antes de septiembre. De lo contrario, el juego lo hará automáticamente.
Aledaños del Estadio
Ésta es la pantalla central de la Liga Master. Aquí puedes moverte entre la Sede del club y la Ocina, controlar
información para el próximo partido y más. También puedes guardar tu progreso. En la Sede del club, puedes

PRO EVOLUTION SOCCER 2010
28
PRO EVOLUTION SOCCER 2010
29
LIGA MASTER/ CONVIÉRTETE EN UNA LEYENDA CONVIÉRTETE EN UNA LEYENDA/ XBOX LIVE (EN LÍNEA)
cambiar los planes del juego y el régimen de entrenamiento de todos los jugadores. Además, aquí también
puedes encontrar información sobre el equipo juvenil. Mientras estés en la Ocina, puedes consultar las fechas de
los partidos, los costos de gestión actuales y realizar las negociaciones de transferencias.
Negociaciones de Transferencia
Las negociaciones de transferencias se realizan durante el transcurso de la temporada. Para estas negociaciones
existen cuatro patrones principales: promover negociaciones, recibir ofertas de negociación, liberar jugadores
y renovar contratos. Cuando negocias con los jugadores, un cazatalentos se encargará del proceso. ( También
puedes designar a tu cazatalentos para que se encargue de todo, desde la selección de jugadores hasta las
negociaciones y las contrataciones. Esta opción está desactivada por defecto).
Control del Equipo Juvenil
La opción de Equipo juvenil en la Sede del club te permite elegir hasta diez jugadores juveniles talentosos como
posibles incorporaciones a tu equipo. Como no debes negociar con estos jugadores ni pagar las transferencias,
puedes incorporarlos en cualquier momento de la temporada. Finalmente, los jugadores del equipo juvenil
incorporados tendrán una gran ación por tu equipo y existen menos posibilidades de que se transeran a otros
equipos en el futuro.
Conviértete en una Leyenda
Crea un jugador e intenta convertirte en el Mejor jugador del mundo del año. Disfruta tu carrera desde tu debut
profesional hasta tu retiro del juego.
Cómo avanzar en Conviértete en una Leyenda
En primer lugar, se jugará un partido de reclutamiento. Cuando termine este partido, se recibirán ofertas de
clubes de la liga seleccionada y debes elegir el club para el que jugarás.
Las oportunidades de jugar partidos serán escasas después de tu debut. Debes esforzarte mucho e dar una
buena imagen en los partidos de entrenamiento con tus compañeros de equipo para ganarte un lugar en el
banco. Demuestra buenas actuaciones fuera del banco para ganarte un lugar jo en el equipo para empezar. Con
las buenas actuaciones en los partidos obtendrás ofertas de otros clubes. Luego de la transferencia, lleva a tu
nuevo equipo a la victoria, pero intenta también lograr distinciones personales como la de Jugador más valioso
o el máximo goleador de la liga. Con títulos como estos pueden surgir ofertas de clubes importantes y hasta
convocatorias de la selección nacional. La carrera profesional de un jugador comienza a los 17 años y aumenta
por años al comienzo de la nueva temporada. A los 27 años puedes elegir retirarte o jugar hasta los 35, momento
en el que el retiro es obligatorio y “Conviértete en una leyenda” llega a su n.
Nota: En PES 2010, puedes usar a tu jugador que se convirtió en una leyenda en línea en el modo Leyendas y en
la Liga Master. Para esto, ve a “Opciones” en el menú Conviértete en una leyenda.
Además, dentro de Conviértete en una leyenda, ahora puedes calicar para la Liga Europea de la UEFA y la Liga
de Campeones de la UEFA.
Movimiento Automático: Activa/Desactiva la función movimiento automático. Si está activada, tu jugador se
moverá automáticamente, si mantienes el botón y pulsado (el cursor que está sobre el jugador cambiará de
azul a transparente).
Partidos
La CPU decidirá automáticamente los jugadores iniciales, la formación del equipo, los suplentes, etc. Tú sólo
controlas al jugador que creaste. Cuando no estés jugando, puedes ver el partido como espectador (puedes
acelerar la velocidad del partido en el menú Avance rápido, si lo deseas).
Desarrollo del Jugador
Jugar par tidos permite que los jugadores adquieran puntos por experiencia, que también aumentan con las
buenas actuaciones en los partidos. Una vez que se logra cierto nivel, la capacidad del jugador aumentará
conforme a la curva de desarrollo.
Nota: si se llega a cierta edad, la capacidad del jugador puede disminuir. Con la experiencia en partidos también
se pueden obtener habilidades especiales (hasta ocho).
Conguración de los Puntos de Concentración
En el menú “Conviértete en una Leyenda”, selecciona “Información y Conguración del Jugador” o “Concentración”
para cambiar la política de desarrollo de los parámetros del jugador. Selecciona los temas de la “Concentración”
y distribuye los doce puntos entre las habilidades. El jugador desarrollará determinada habilidad más rápido si
le asignas más puntos.
Solicitud de un Pase de un Compañero de Equipo
Si das golpes ligeros varias veces en el botón x, puedes solicitar un pase de un compañero de equipo. Si te
encuentras en una buena posición, te pasará el balón.
Xbox LIVE
Xbox LIVE® abre un nuevo mundo de posibilidades para los amantes de los videojuegos. Cada jugador puede
encontrar el juego perfecto y probar las versiones gratuitas de los cientos de títulos de nuestra biblioteca.
Además, gracias a componentes descargables como mapas, canciones, armas y niveles, los jugadores podrán
sacar aún más partido a cada juego. ¡No olvides conectarte y jugar con tus amigos estén donde estén! Con
Xbox LIVE, la diversión nunca acaba.
Conectando
Antes de poder utilizar Xbox LIVE, debe conectar su consola Xbox 360 a Internet mediante una conexión de alta
velocidad y registrarse en el servicio de Xbox LIVE. Para comprobar si Xbox LIVE se encuentra disponible en su
territorio y para obtener información sobre cómo conectarse a Xbox LIVE, visite www.xbox.com/live/countries.
Control Parental
Esta herramienta de fácil uso permite a los padres y cuidadores decidir a qué juegos pueden jugar los más
pequeños de acuerdo con la clasicación del contenido del juego. Los padres pueden restringir el acceso a
contenido para adultos. Decida con quién y cómo interactúa su familia en Internet con el servicio Xbox LIVE y
establezca un límite de horas de juego. Para más información, visite www.xbox.com/familysettings.
Preparativos para la Red
Luego de seleccionar “En línea” en el menú Principal, sigue los pasos que se detallan aquí para congurar el
juego.
1 Crear los Datos de Usuario o Vericar los Datos
Serás dirigido a la pantalla “Crear datos de usuario” si no hay datos de usuario disponibles. Ten en cuenta que los
datos de usuario creados no se pueden eliminar hasta que haya transcurrido un determinado período.
2 Actualizar la División
Una división es un grupo de equipos que cambia según los resultados de los jugadores. Desde las superiores a
las inferiores, hay cinco divisiones diferentes: “División 1”, “División 2”, “División 3A”, “División 3B” y “División 3C”.
Cuando inicies tu juego, aparecerás en la lista de “Sin División.”
Nota: Los jugadores que no hayan iniciado sesión en seis días (aproximadamente) volverán a la lista “Sin
división.”
3 Modos de Juego Xbox LIVE
Si usted está para un partido rápido, puede hacerlo en cualquier momento que desee. Ranked o sin rango, que es
su decisión, así como la posibilidad de jugar 1vs1, 2vs2 o cualquier otra combinación de hasta cuatro jugadores
en total. (Otras combinaciones de 1vs1 y 2vs2 sólo puede ser seleccionado por el menú de la habitación del
partid.)
4 Iconos del modo Red
Iconos de Estado del Jugador
Jugando Conectado No Conectado
(Rojo) (Azul) (Gris)
Iconos de los Jugadores
Tú Amigo
(Verde) (Verde) (Rojo) (Gris)
Iconos del Estado de la Transmisión
Estos iconos te informan sobre la calidad de la conexión a la red:
Buena Normal Mala Sin Comunicación Buscando
(Verde) (Amarillo) (Naranja)
Jugador de tu Lista
negra
Otro Gugador

PRO EVOLUTION SOCCER 2010
30
PRO EVOLUTION SOCCER 2010
31
WARRANTY
Konami Digital Entertainment, Inc. garantiza al comprador original de este producto Konami que los
medios en los cuales está grabado este programa de computadora están libres de defectos en materiales
y mano de obra por un periodo de noventa (90) días a partir de la fecha de compra. Este producto Konami
es vendido "tal como es", sin garantía expresa o implícita de cualquier tipo y Konami no es responsable de
perdidas o daños de cualquier tipo resultantes del uso de este programa. Konami acepta reparar o
reemplazar, sin ningún cargo, cualquier producto Konami por un periodo de noventa (90) días, con
franqueo pagado y con prueba de la fecha de compra, en el Centro de Servicio de su Fábrica. Esta
garantía no es aplicable al uso normal del producto. Esta garantía no será aplicable y será inválida si el
defecto en el producto Konami es originado por maltrato, uso indebido, abuso o descuido.
ESTA GARANTÍA SUSTITUYE A TODAS LAS DEMÁS GARANTÍAS Y NINGUNA OTRA PROTESTA O
RECLAMO DE NINGUNA NATURALEZA VINCULARÁ U OBLIGARÁ A KONAMI A NINGUNA GARANTÍA
APLICABLE A ESTE PRODUCTO, LAS GARANTÍAS MERCANTILES Y APTITUDES INCLUIDAS PARA UN FIN
PARTICULAR, ESTÁN LIMITADAS AL PERIODO DE NOVENTA (90) DÍAS DESCRITO ANTERIORMENTE. POR
NINGUNA CIRCUNSTANCIA KONAMI SERÁ RESPONSABLE DE DAÑOS INCIDENTALES O
CONSECUENTES RESULTANTES DE LA POSESIÓN, USO O MAL FUNCIONAMIENTO DE ESTE PRODUCTO
KONAMI
Algunos estados no permiten limitaciones en lo que respecta a la vigencia de la garantía implícita y/o
exclusiones o limitaciones de daños incidentales o consecuentes, así que las limitaciones y/o exclusiones
anteriores de responsabilidad podrían no aplicar a usted. Esta garantía le da derechos específicos y usted
podría tener otros derechos que varían entre un estado y otro.
Si usted experimenta problemas técnicos con su juego, por favor marque nuestros números de Garantía o
Servicio Técnico que son 310.220.8330 ó 310.220.8331 de las 9:00 a.m. PST a 5:00 p.m. PST, de lunes a
viernes o envíe un correo electrónico a support@konami.com. Todos los productos deben ser
considerados defectuosos por un representante de Servicio al Cliente de Konami y con un número RMA
asignado antes de regresar el producto, todos lo productos que se reciban sin estas características serán
devueltos si un Representante de Servicio al Cliente de Konami no puede localizarlo tres días después de
recibida la devolución no autorizada.
Konami Digital Entertainment, Inc.
Attention: Customer Service-RMA # XXXX
2381 Rosecrans Ave, Suite 200
El Segundo, CA 90245
USA
SERVICIO AL CLIENTE
Si siente que no avanza en el juego o necesita ayuda, ¡no se preocupe! Puede escribir a nuestros
expertos en juegos a support@konami.com o visitar nuestra sección de Ayuda en www.konami.com.
Regístrate ahora en www.konami.com y ¡recibe información exclusive sobre productos, ofertas
especiales y más!
Ocial Licensed
Product
Ocial Licensed
Product
XBOX LIVE (EN LÍNEA)/ MENTIONS LEGALES GARANTÍA/ SERVICIO DE ATENCIÓN AL CLIENTE
Iconos de Modales
Si quieres conocer los modales de un adversario, estos iconos te lo dirán (disminuye de izquierda a derecha).
Los modales indican, por ejemplo, si un jugador abandona los partidos antes de tiempo.
Nota: Los usuarios que tengan malos modales, no serán elegibles para las tablas de clasicaciones en línea.
MENSAJE IMPORTANTE
Konami se reserva el derecho de sancionar o suspender a cualquier jugador que utilice la función de chat para
insultar a los demás. La sanción será decidida por Konami y puede consistir en una suspensión temporal o
permanente de la función de chat o de juego en línea con o sin aviso.
Te agradecemos por tu comprensión y tu constante espíritu deportivo.
Producto ocial autorizado de la LIGA DE CAMPEONES UEFA. Todos los nombres, logotipos y trofeos de la UEFA son propiedad, marcas
registradas y/o logotipos de la UEFA y se emplean aquí bajo su autorización. No se permite ningún tipo de reproducción sin la autorización
previa y por escrito de la UEFA. “adidas”, el logotipo de las 3 barras y la marca de las 3 bandas son marcas registradas del Grupo adidas y
se utilizan con autorización. adiPURE es una marca registrada del Grupo adidas, utilizada con autorización. El uso de nombres reales de
jugadores y de semejanzas está autorizado por FIFPro y sus asociaciones miembro. Autorizado ocialmente por la Asociación del Fútbol
Argentino Autorizado ocialmente por la Czech National Football Association Autorizado ocialmente por CFF © 2009, la Licencia de
DFB otorgada por AG m4e, Grünwald © The Football Association Ltd 2009. El emblema de la FA y el emblema de la FA England son marcas
registradas ociales de The Football Association Limited y son objeto de numerosos registros de marcas en todo el mundo. copyright FFF
© 1996 JFA Autorizado ocialmente por FIGC y AIC © 2001 Korea Football Association LAutorizado por OLIVEDESPORTOS (Agente Ocial
de la FPF) Producto ocial licenciado RFEF © 2002 Ligue de Football Professionnel ® Autorizado ocialmente por Eredivisie CV © & TM
2009 Liverpool Football Club & Athletic Grounds Ltd Producto ocial autorizado de A.C. Milan Emblema e imágenes de Manchester
United © MU Ltd © Real Madrid (09) Producto ocial fabricado y distribuido por Konami Digital Entertainment bajo licencia otorgada
por Soccer s.a.s. di Brand Management S.r.l. © Adagp, París 2009../Macary - Zublena & Regembal - Constantini, los Arquitectos. Wembley,
el Estadio de Wembley y el dispositivo de Arco son marcas de fábrica ociales de Wembley el Estadio que Nacional Limitó y es susceptible
a matrículas extensas de marca de comerciante. Todos los demás derechos de reproducción o las marcas comerciales son propiedad de
sus respectivos dueños y se utilizan bajo licencia. ©2009 Konami Digital Entertainment.
Este software está basado parcialmente en el trabajo del Independent JPEG Group.
Dolby y el símbolo doble-D son marcas registradas de Dolby Laboratories.
©2009 Konami Digital Entertainment. KONAMI es una marca registrada de KONAMI CORPORATION.
GARANTÍA
www.konami.com/pes2010

PRO EVOLUTION SOCCER 2010
32
PRO EVOLUTION SOCCER 2010
33
NOTES NOTES

PRO EVOLUTION SOCCER 2010
34
PRO EVOLUTION SOCCER 2010
35
NOTES NOTES

Ofcial Licensed Product of UEFA CHAMPIONS LEAGUE™. Ofcial Licensed Product of UEFA EUROPA
LEAGUE™. All names, logos and trophies of UEFA are the property, registered trademarks and/or logos
of UEFA and are used herein with the permission of UEFA. No reproduction is allowed without the prior
written approval of UEFA. “adidas”, the 3-Bars logo, the 3-Stripe trade mark and TUNiT are registered
trade marks of the adidas Group, used with permission. adiPURE is a trade mark of the adidas Group,
used with permission. All other copyrights or trademarks are the property of their respective owners and
are used under license. ©2009 Konami Digital Entertainment KONAMI is a registered trademark
Xbox, Xbox 360, Xbox LIVE, and the Xbox logos are trademarks of the
Microsoft group of companies and are used under license from Microsoft.
Xbox, Xbox 360, Xbox LIVE y los logotipos de Xbox son marcas registradas
del grupo de empresas Microsoft y se usan bajo licencia de Microsoft.
of KONAMI CORPORATION.
30081
 Loading...