

Page 1
BEFORE YOU BEGINBEFORE YOU BEGIN
M
M MODULAR
INSTALLATION INSTRUCTIONS
()
MIRRORED CABINET W/ADJUSTING LIGHTING
K-98835T-L 16" ( )
K-98835T-R 16" ( )
K-98836T-L 24" ( )
K-98836T-R 24" ( )
·
Please read these instructions carefully to familiarize
yourself with the required tools, materials, and installation
sequences. Follow the sections that pertain to your
particular installation . This will help you avoid costly
mistakes. In addition to proper installation, read all
operating and safety instructions.
·
All information in these instructions is based upon the
latest product information available at the time of
publication. Kohler China. reserves the right to make
changes in product characteristics, packaging, or
availability at any time without notice.
·
These instructions contain important care, cleaning, and
warranty information-
consumer.
·
Before installation carefully inspect the new fixture for any
signs of damage.
WARNING: Risk of injury or product damage.
Tempered glass cannot be cut.
WARNING:
alcohol to clean the wooden surface. Use a dampened
cloth to clean.
please leave instructions for the
Don't use acidic or alkalic cleaners or
PARTS
Parts supplied with your cabinet. (For cabinet body and door
replacement, call customer service with model number.) Be
sure to check the cardboard supports in the carton, glass
parts are packed in them.
·
·
·
·
-
ACCESSORIES LISTACCESSORIES LIST
Glass Shelves
X3
Mounting Bar
X1
1240482-T01-B
Snap-in Pins
X12
Wall Anchors
X5
Top Clips
X2
Screws ST4.2 12
ST4.2 12
X8
Connector Block
X2
-1-
Caps of Screw
X10
Screws ST3.5 35
X5
13-1 528437
Copyright Kohler China Ltd., 2014
ST3.5 35
Hole Plugs
X40
, 2014
Page 2
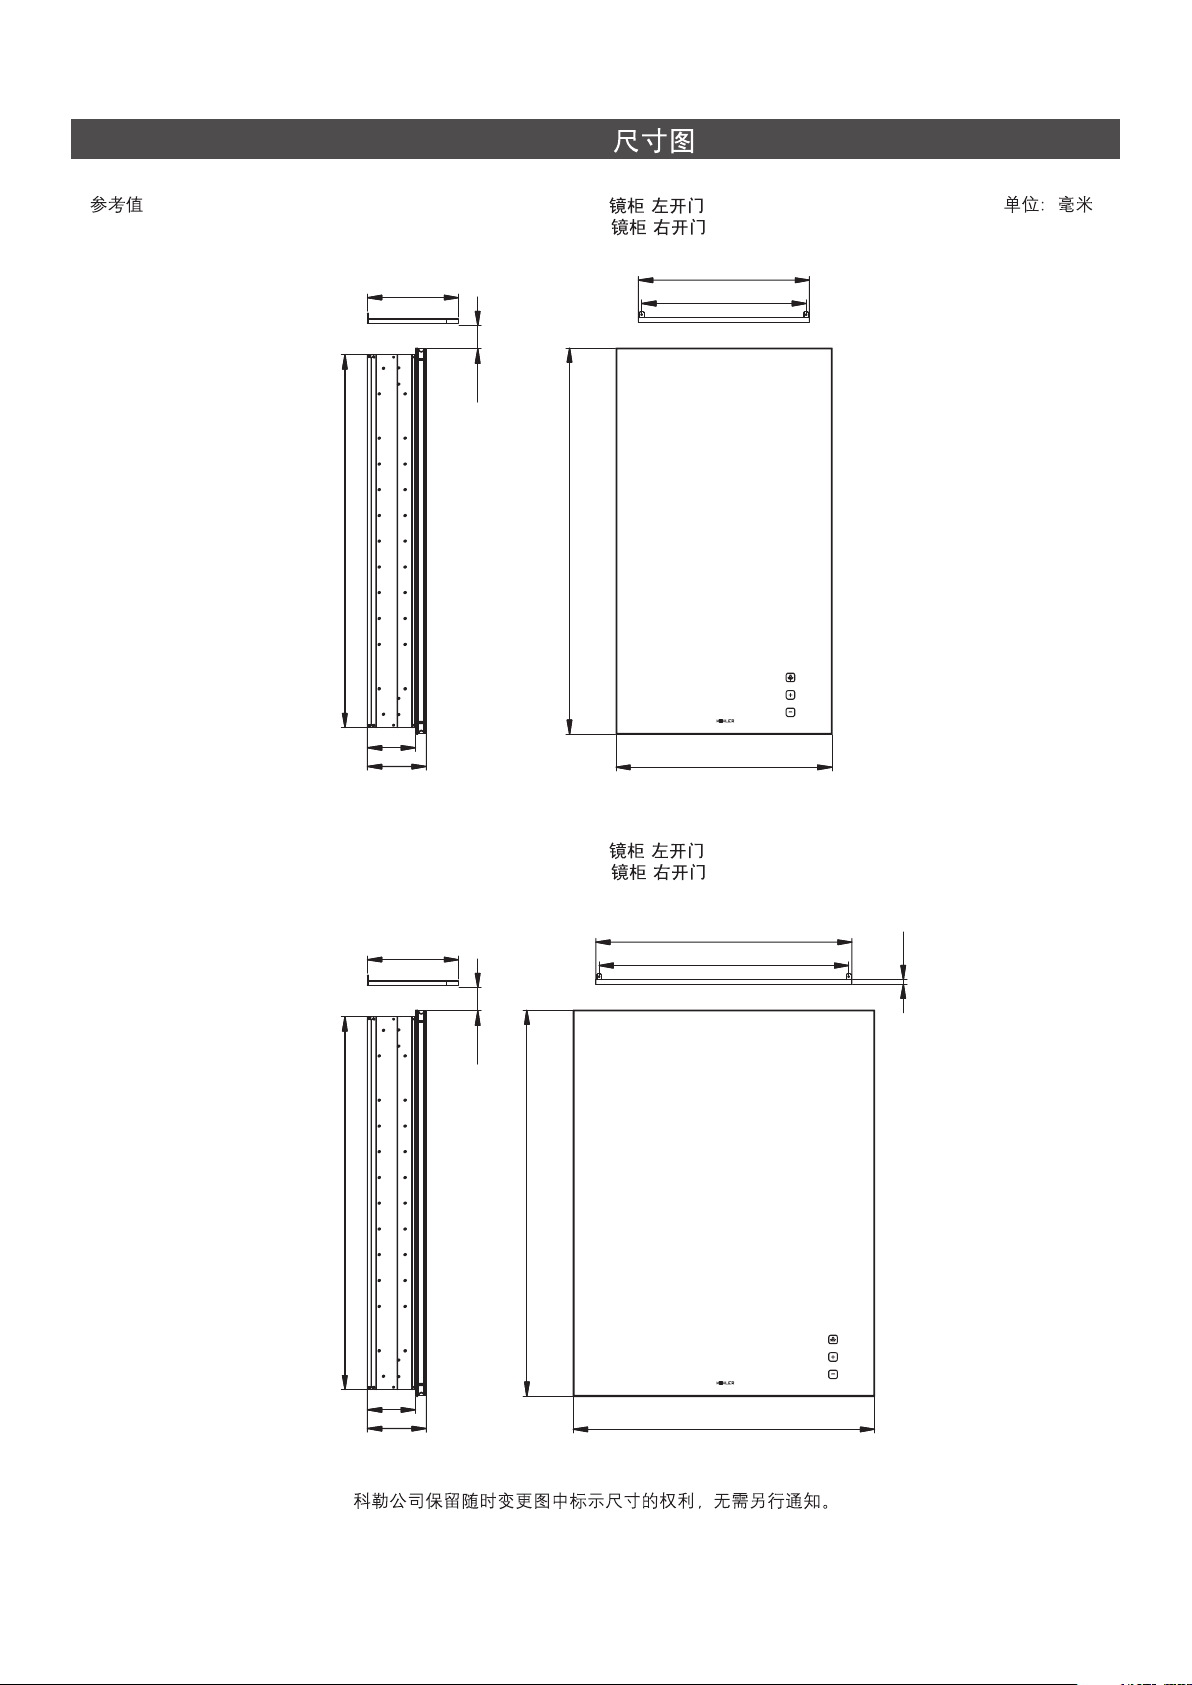
ROUGHING-IN
Reference Value
735
99
116
178
Unit:mm
K-98835T-L 16" ( )
K-98835T-R 16" ( )
370
360
25
762
386
735
99
116
178
K-98836T-L 24" ( )
K-98836T-R 24" ( )
25
762
500
490
10
590
1240482-T01-B
Kohler reserves the right to change marked dimensions without prior notice.
-2-
Page 3
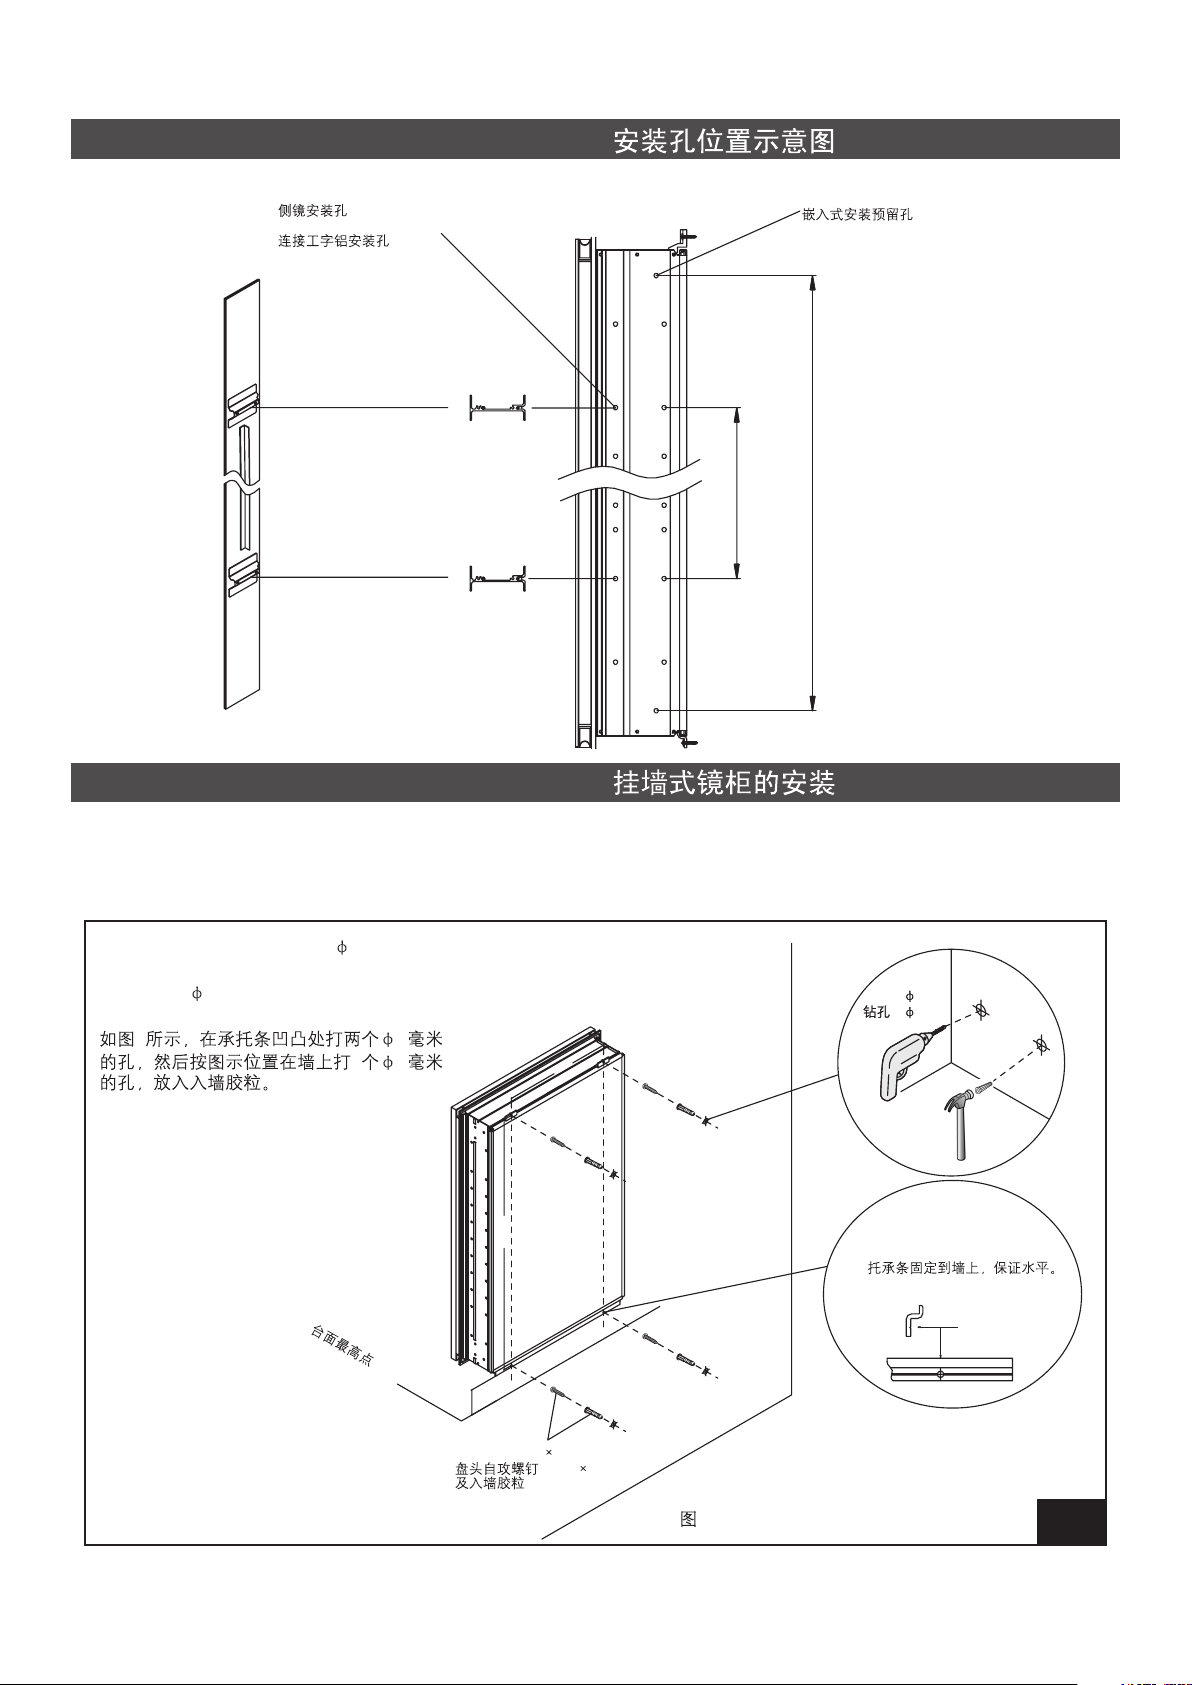
PRE-DRILLED HOLEPRE-DRILLED HOLE
Pre-Drilled Hole for Side Kits
Pre-Drilled Hole for Cabinet-to-Cabinet
406
Pre-Drilled Hole for Recessed Cabinet
682
SURFACE MOUNTING THE MIRRORED CABINET ON A WALL
NOTE:
Installing the mirrored cabinet on a wall without the door
attached can make installing easier for one person. Do not
mount the doors until the boxes is in or on the wall.
As shown in Fig 1, drill two 2- 5mm holes
in bottom mounting bar at indent location,
then drill 4- 6mm holes in wall at locations
shown in Fig 1, insert wall anchors.
15
46
The highest point of table
320
750
Drill holes
Drill holes
4- 6mm
4- 6mm
4- 6mm
4- 6mm
Fix the mounting bar to the
wall, level the mounting bar.
1240482-T01-B
20
Screws ST3.5 35 & Wall anchor
ST3.5 35
-3-
Fig.1
1
STEP
1
Page 4

Sit the mirrored cabinet on the mounting bar, then lower and tighten the
screws into place, as shown in Fig.2.
2
2 Top clips
2
Top clip for
surface mount
2 per cabinet
Top of cabinet frame member
Top clips slide into this screw
channel from center opening.
Screws ST3.5 35 & Wall anchor
ST3.5 35
WALL
Fig.2
2
COMBINATION INSTALLATION OF SEVERAL MIRRORED CABINETS
Connect the cabinets by fixing the connector blocks to the side of the mirrored cabinet with ST4.2x12 screws.
ST4.2x12
STEP
2
For surface mounting installation, please fix the side kits bracket at the two sides of the combined cabinets with M4
screws.(Note: Side kits shall be purchased separately)
M4 ( )
Connector Blocks
Mirrored Cabinet Mirrored Cabinet
Side Kits
Mirrored Cabinet
Fig.3 3
STEP
1
1051705-T01-A
1240482-T01-B
-4-
Page 5

Door adjustments
This screw releases the door from the cabinet and allows up and down adjustment. Fig.6-A & 7.
·
6-A 7
These screws allow you to plumb the door as shown in Fig.6-B & 8.
·
6-B 8
The screws you use for attaching the hinges. (Supplied with hinges)
·
()
B
A
Fig.4 4
Fig.5 5
Fig.6 6
Push/twist the pins into place & Fill the remaining holes with the plugs
&
Push one side of the shelf into the left or right clips.
!
Snap the shelf down into the opposite side. If the shelf is too tight, repeat the process from the other side.
!
A
B
STEP
2
1240482-T01-B
Fig.7 7
Fig.8 8
STEP
3
-5-
Page 6

INSTALLATION OF LIGHTINGINSTALLATION OF LIGHTING
As shown, install the light about 25mm over the mirrored cabinet.
25mm
Fig.9 9
CONNECT TO POWER LINECONNECT TO POWER LINE
!
Wire connection of defogger(Fig.A)
A
1. Open the wire box and pull out the terminal block.
2. Connect to 220V/50Hz power supply. The brown wire is connected with L line and blue wire is connected with N line.
220V/50Hz
3. Put the terminal block back after connecting the power lines and then close the wire box.
4. It is suggested to arrange the defogger switch at the bathroom door and the share the same switch with bathroom
lighting.
!
Wire connection of lighting(Fig.B)
1. Make sure the positive and negative wires are correctly connected. It is suggested to wipe the joint with electrical
insulation tape.
2. Connect to 220V/50Hz power supply. The brown wire is connected with L line and blue wire is connected with N line.
LED 220V/50Hz
3. The lighting flashes at stand-by mode. Touch the three buttons to switch on and adjust the lighting.
A
STEP
1
A
1240482-T01-B
B
Defogger Input
LED Power Supply
LED
B
Fig.10 10
Power Input
220V/50Hz
STEP
1
-6-
Page 7

BUTTON FUNCTIONSBUTTON FUNCTIONS
NO
1
2
3
Button
Power
Increase Brightness
Decrease Brightness
Icon
USER MAINTENANCEUSER MAINTENANCE
Warning! Risk of product damage.
1.
Many cleansers contain abrasive and chemical substance
which is not suitable for cleaning stainless steel, enamel,
plating or plastic products. You may use mild cleansers or
soaps to clean the surfaces. Wipe any splashes of cleaner
solutions from the surface with clean soft cloth.
2.
Maintain ventilation in the bathroom, and separate the dry
area from the damp one if conditions permit. Try to open
the door and windows of the bathroom and maintain good
ventilation.
3.
Kohler mirrored cabinet are dealt with strict procedures for
damp-proof, whose good damp-proof function ensures
good performance even in bathroom of huge humidity. Yet
do not splash and pour water directly on the mirrored
cabinet. Make sure that the bathroom is not over damp
and wipe any splashes from surfaces immediately.
Functions
Switch on or switch off power(the light flashes under standby mode)
()
Press this button to increase brightness.
Press this button to decrease brightness.
1.
2.
3.
4.
Maintenance of door board: Clean and wipe door board
regularly, and wipe the condensation vapor with dry and
soft cloth.
5. The mirrored cabinet door and interior are constructed of
mirror and aluminum. Use only a damp cloth to clean.
Spray the cloth, not the mirror when cleaning. Mirrors are
damaged by the use of ammonia or vinegar based
cleaners. Rubbing alcohol can be used for stubborn stains
6. Use no abrasive cleansers on any part of the mirrored
cabinet.
7. The black frame should be cleaned with a damp cloth only.
4.
5. .
.
6. .
7.
1240482-T01-B
-7-
 Loading...