

Page 1
Installation Guide
Premium Remote Control
K-7420
M product numbers are for Mexico (i.e. K-12345M)
Los números de productos seguidos de
M corresponden a México (Ej.
K-12345M)
Français, page “Français-1”
Español, página “Español-1”
1197249-2-A
Page 2
Remote Control Compliance
This device complies with Part 15 of the FCC Rules. Operation is
subject to the following two conditions:
1. This device may not cause harmful interference, and
2. This device must accept any interference received, including
interference that may cause undesired operation.
Changes or modifications not expressly approved by the party
responsible for compliance could void the user’s authority to operate
the equipment.
This equipment has been tested and found to comply with the limits
for a Class B digital device, pursuant to Part 15 of the FCC Rules.
These limits are designed to provide reasonable protection against
harmful interference in a residential installation. This equipment
generates, uses, and can radiate radio frequency energy and, if not
installed and used in accordance with the instructions, may cause
harmful interference to radio communications. However, there is no
guarantee that interference will not occur in a particular installation. If
this equipment does cause harmful interference to radio or television
reception, which can be determined by turning the equipment off and
on, the user is encouraged to try to correct the interference by one of
the following measures:
•
Reorient or relocate the receiving antenna.
•
Increase the separation between the equipment and receiver.
•
Connect the equipment into an outlet on a circuit different from
that to which the receiver is connected.
•
Consult the dealer or an experienced radio/TV technician for
help.
RF Exposure Warning
This portable transmitter with its antenna complies with FCC’s RF
exposure limits for general population/uncontrolled exposure.
This device must not be co-located or operated in conjunction with any
other antenna or transmitter.
CANADA IC: 4554A-KOHLER005
This device complies with Industry Canada license-exempt RSS
standard(s).
Operation is subject to the following two conditions:
1. This device may not cause interference, and
1197249-2-A 2 Kohler Co.
Page 3
Remote Control Compliance (cont.)
2. This device must accept any interference, including interference that
may cause undesired operation of the device.
This portable transmitter with its antenna complies with Industry
Canada RF Exposure Limits for General Population/Uncontrolled
Exposure.
This Class B digital apparatus complies with Canadian ICES-003.
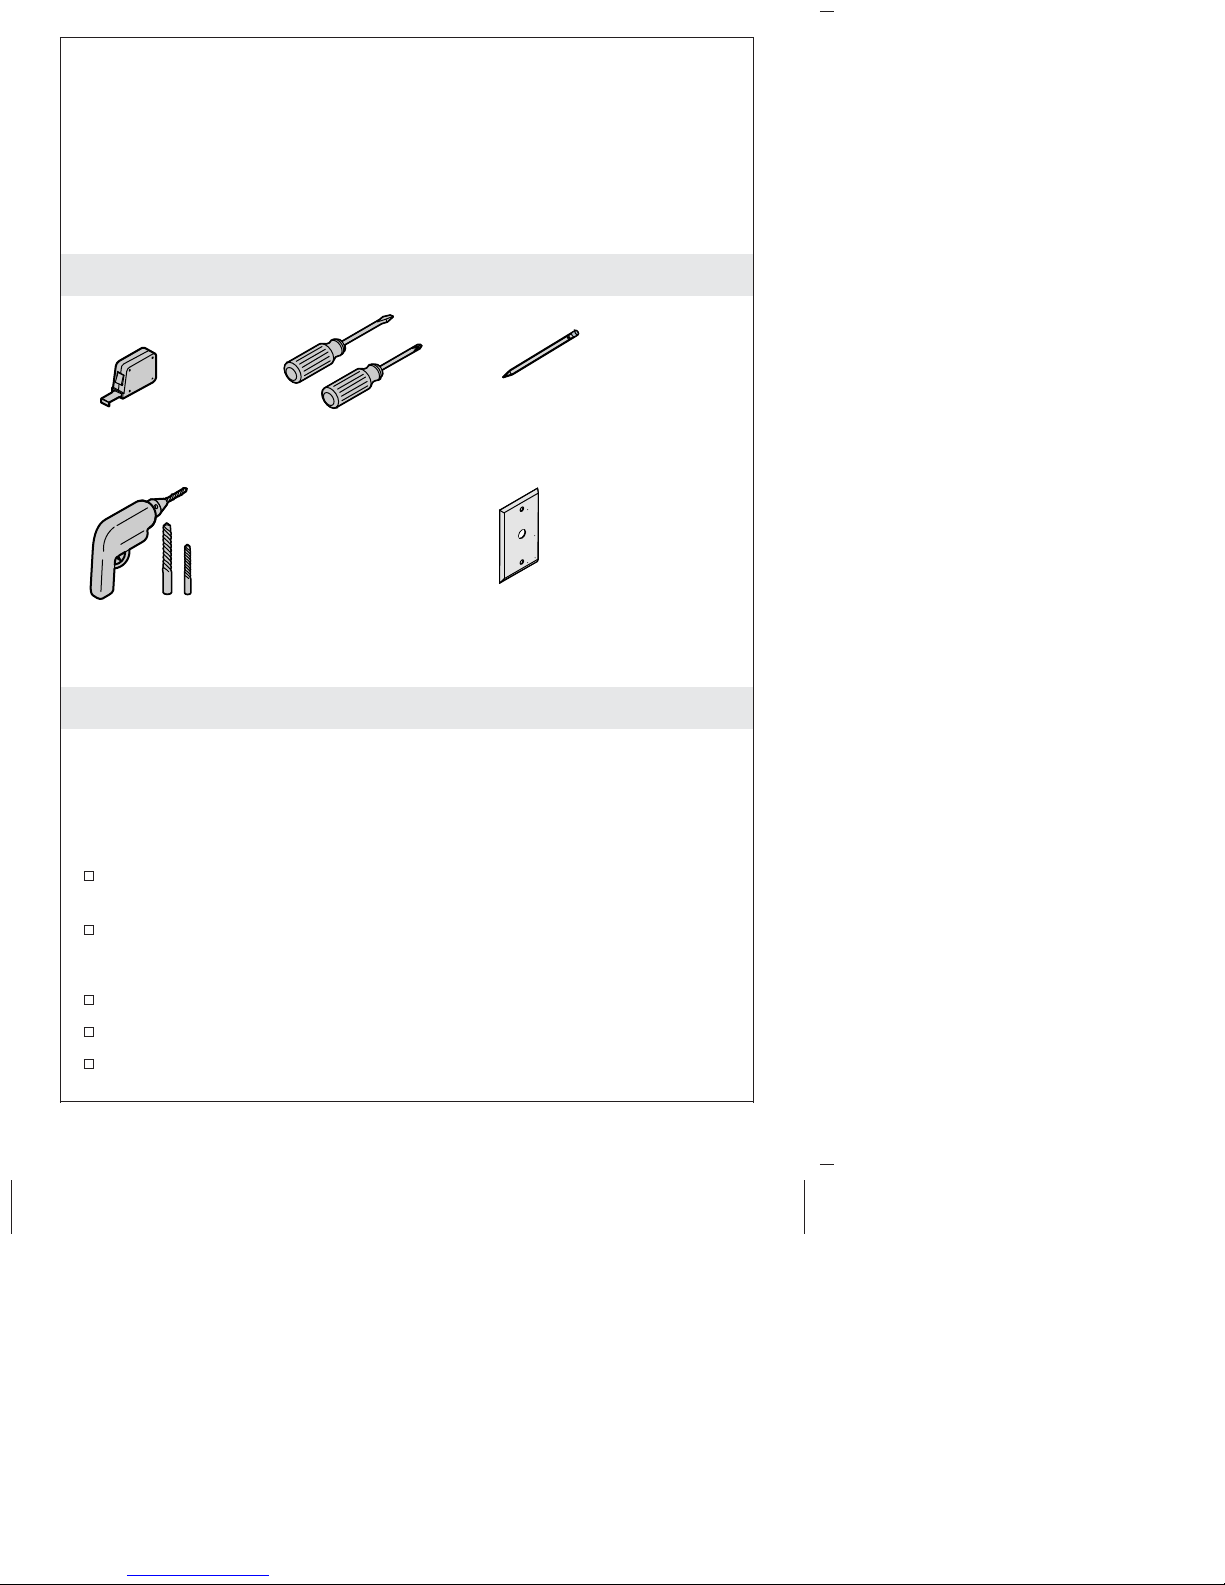
Tools and Materials
Plus:
• Tape
Assorted
Screwdrivers
Drill with Assorted Bits
Wall Plate
Before You Begin
NOTICE: Follow all local plumbing and electrical codes.
NOTE: Install this remote control before installing the toilet.
NOTE: The remote control connects to the docking station
magnetically.
Carefully inspect the remote control and docking station for
damage.
Confirm all the listed components are packed.
Remote Control Box Contents
Docking Station
Remote Control
Docking Station Power Cord
Kohler Co. 3 1197249-2-A
Page 4

Before You Begin (cont.)
FM External Antenna
AUX In Audio Cord
1197249-2-A 4 Kohler Co.
Page 5
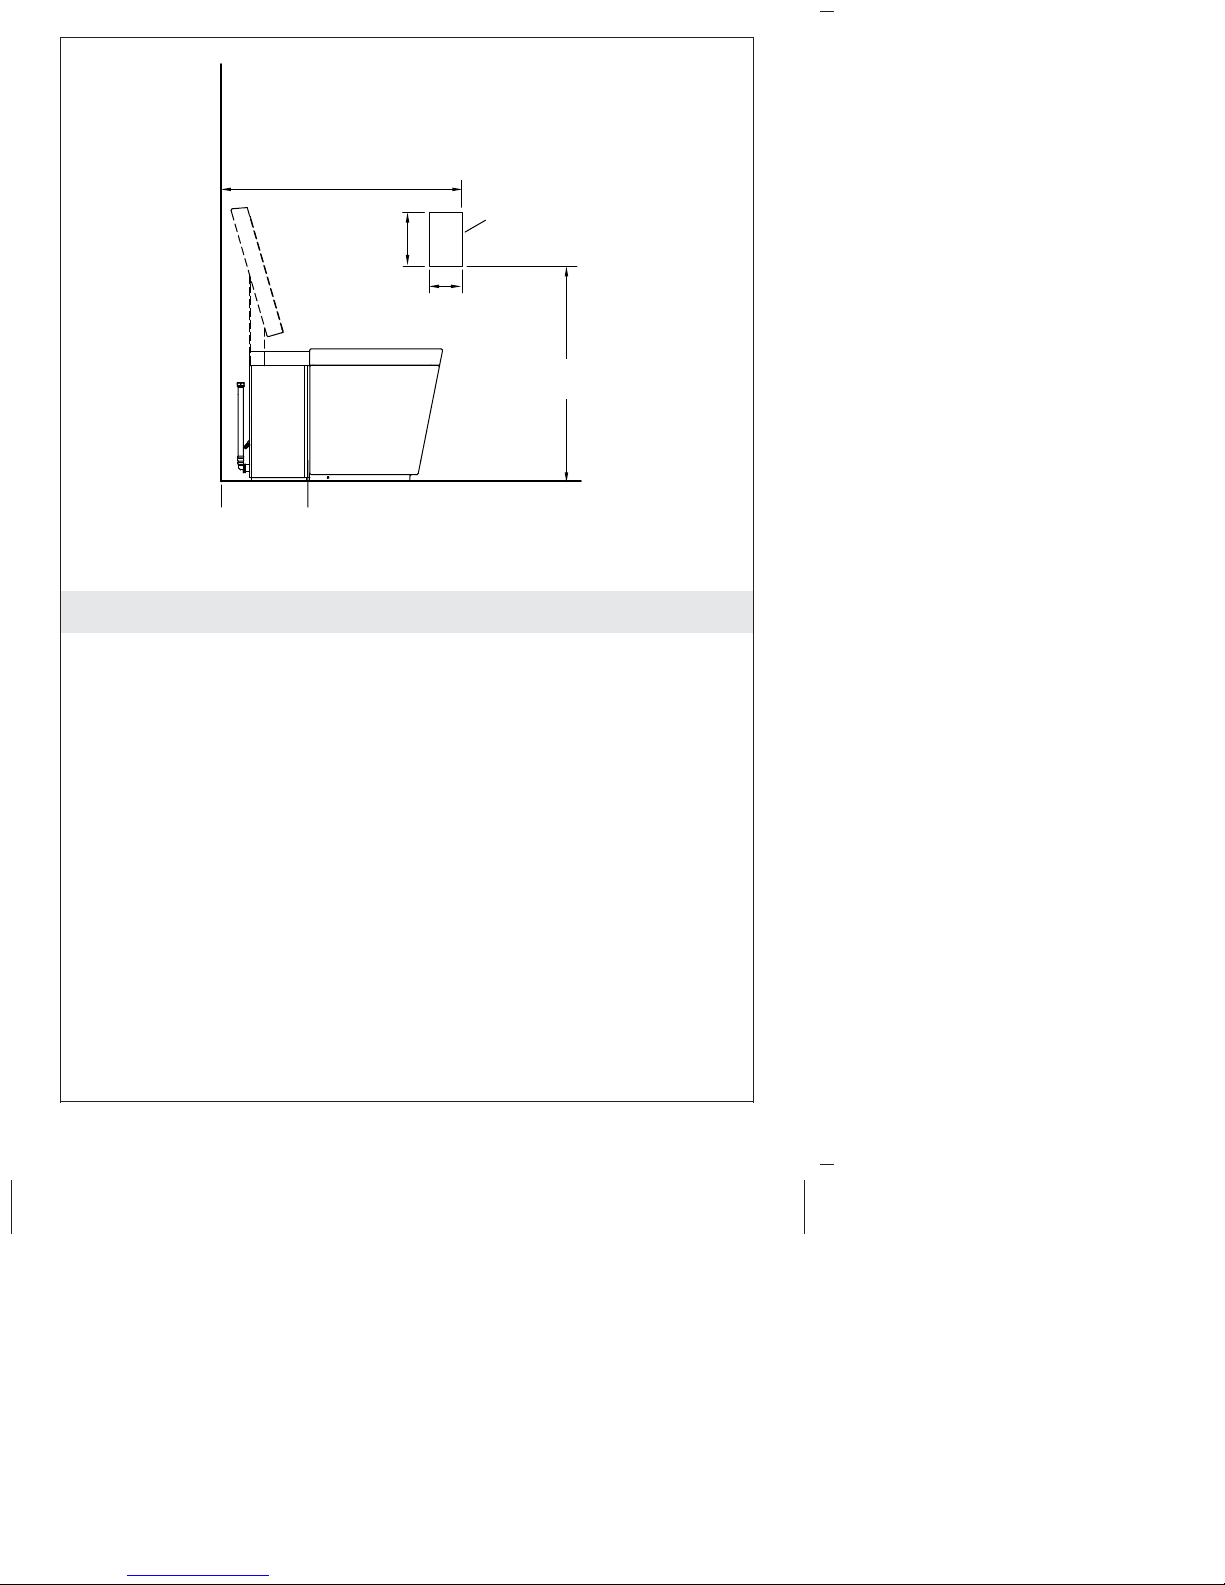
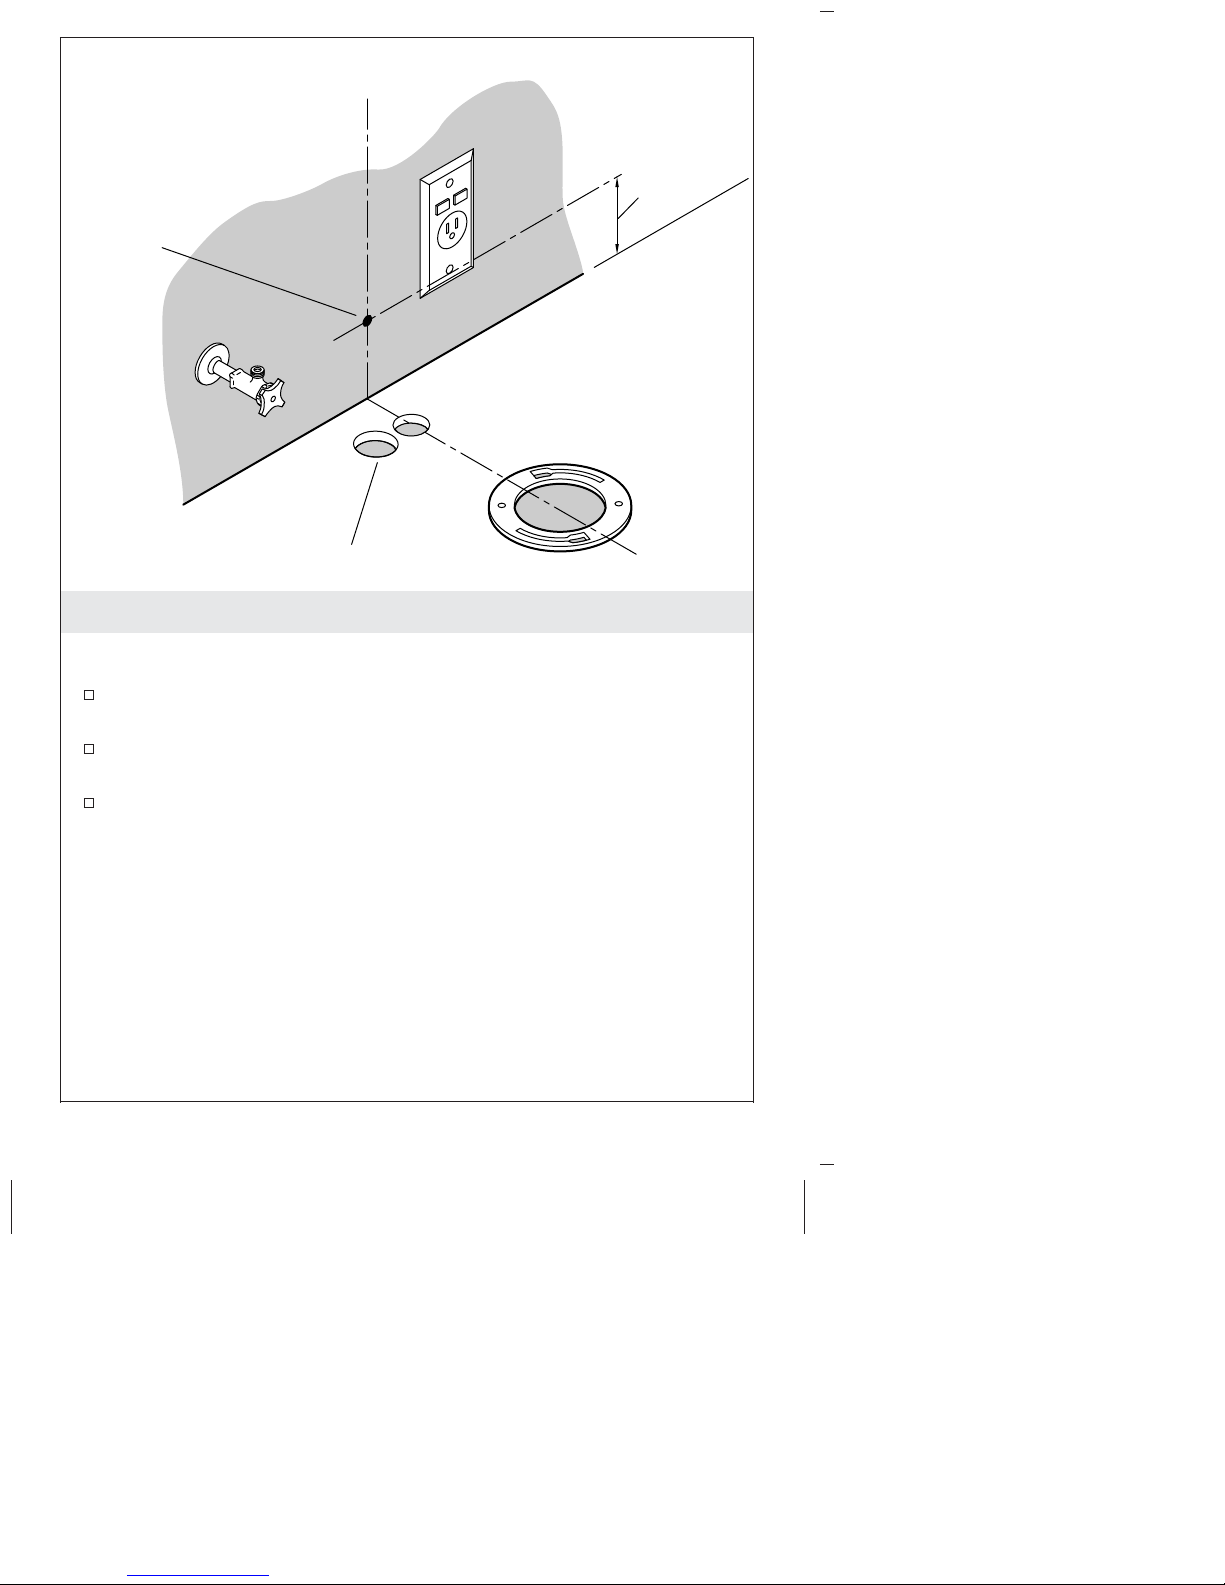
38" (965 mm) - 66" (1676 mm)
5-15/16"
Docking Station
(151 mm)
4-1/16"
(104 mm)
41" (1041 mm) -
66" (1676 mm)
Remote Control Location
NOTICE: The locations for the docking station cord are suggested
locations. Make sure all installations adhere to applicable codes and
standards.
NOTE: The remote docking station is equipped with a 15’ (4.5 m)
power cord. The station mounting location shown for the docking
station is ADA compliant.
Kohler Co. 5 1197249-2-A
Page 6
Power
Cord
1. Install the Power Cord
NOTE: The power cord may be routed through the wall or
externally on the face of the wall.
If the finished wall has not been installed, route the power cord if
the cord will be routed through the wall.
If the finished wall is installed, drill a 3/8″ (10 mm) hole in the
wall behind the toilet location for the power cord.
If the power cord is routed through the wall, route the power
cord to the docking station location from the toilet end.
4"
(102 mm)
1197249-2-A 6 Kohler Co.
Page 7
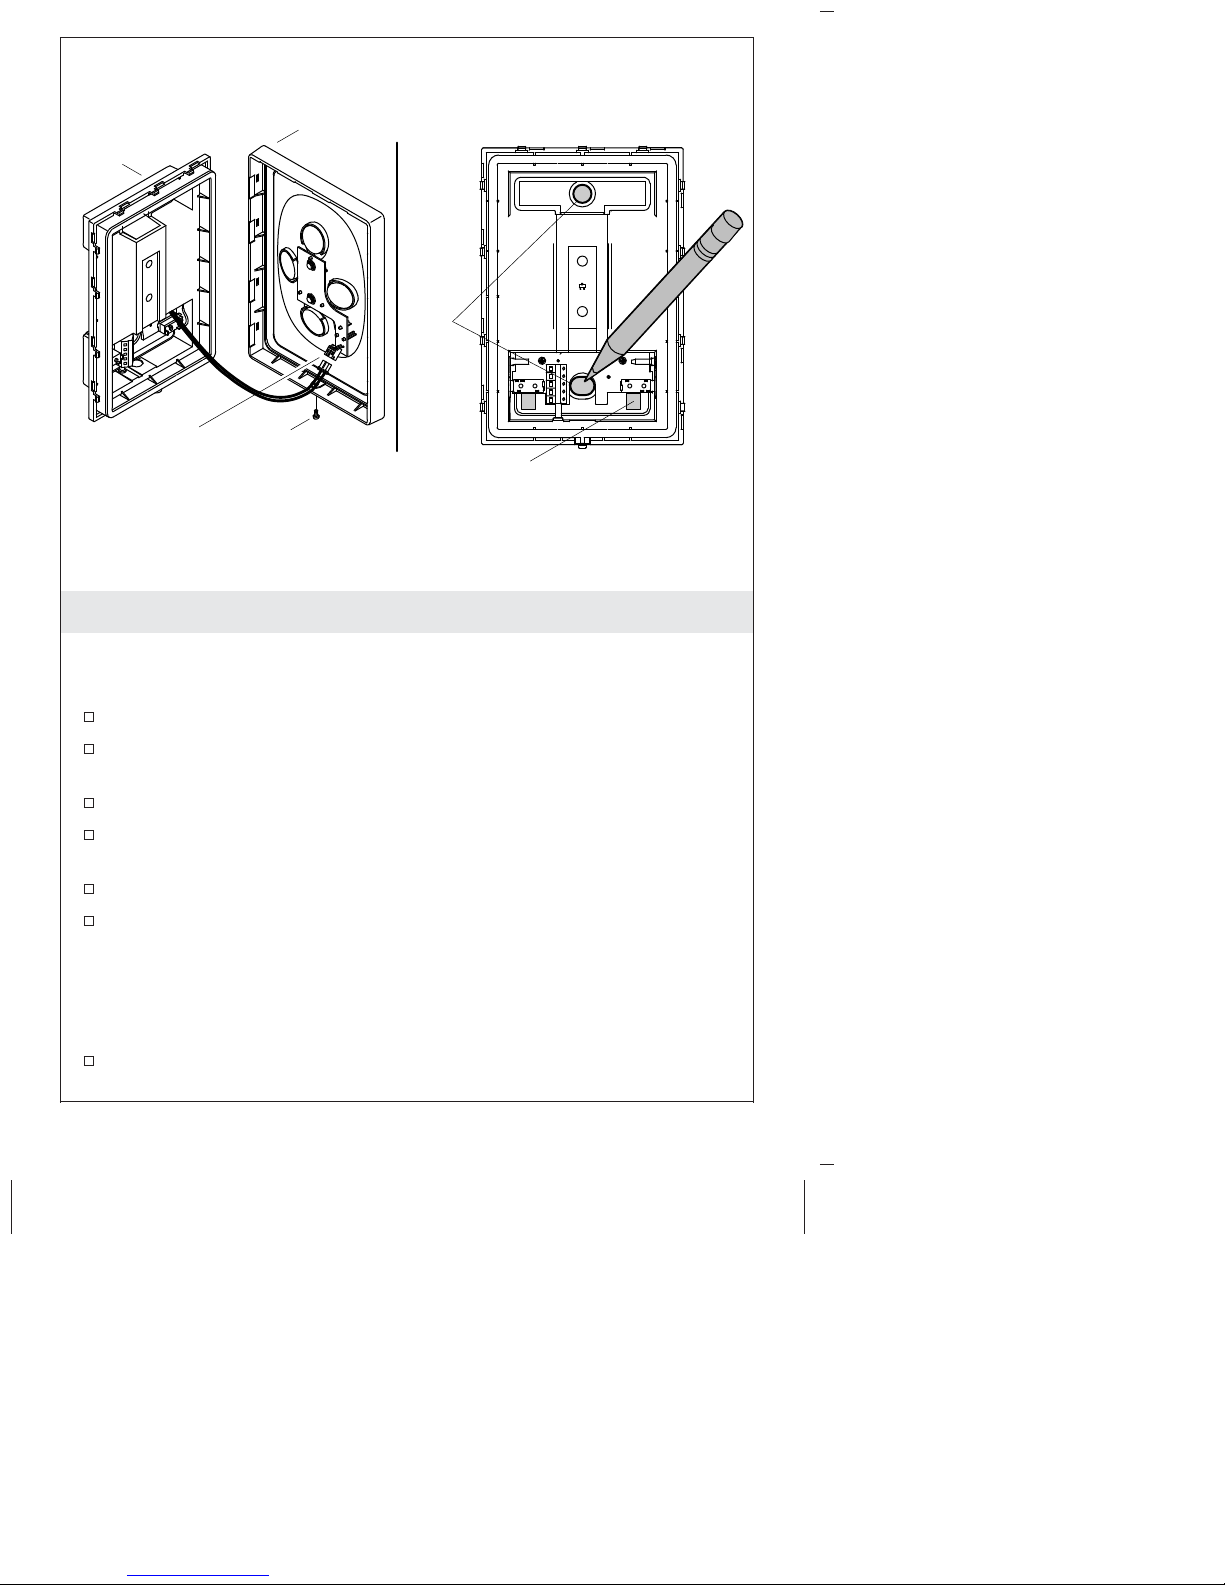
Rear
Plate
Front Plate
Holes
Disconnect.
Screw
Back Cord
Opening
2. Mark the Installation Location
NOTE: The docking station comes with a 15’ (4.6 m) power cord.
Locate the docking station to allow the power cord to reach the
toilet.
Unpack the box containing the remote control components.
Remove the remote control from the docking station and set it
aside.
Remove the small screw on the bottom of the docking station.
Carefully remove the front plate by gently prying the sides of the
front plate out until they disconnect from the dock.
Carefully disconnect the cable.
Tape the screw to the front plate and set it aside.
NOTE: When the power cord is routed externally through the wall,
it may be easier to use the back cord opening. When the cord is
routed externally along the face of the wall, use the bottom cord
opening.
For installations using the back cord opening, route the power
cord through the back cord opening.
Kohler Co. 7 1197249-2-A
Page 8
Mark the Installation Location (cont.)
For installations using the bottom cord opening, route the power
cord through the bottom cord opening.
Position the rear plate in the installation position.
Mark the screw locations using the rear plate as a template.
Drill appropriate size mounting holes at the screw mounting
locations. The size of the hole will depend on the need for wall
anchors, wall material, and installation requirements.
Install wall anchors in the holes if needed.
1197249-2-A 8 Kohler Co.
Page 9
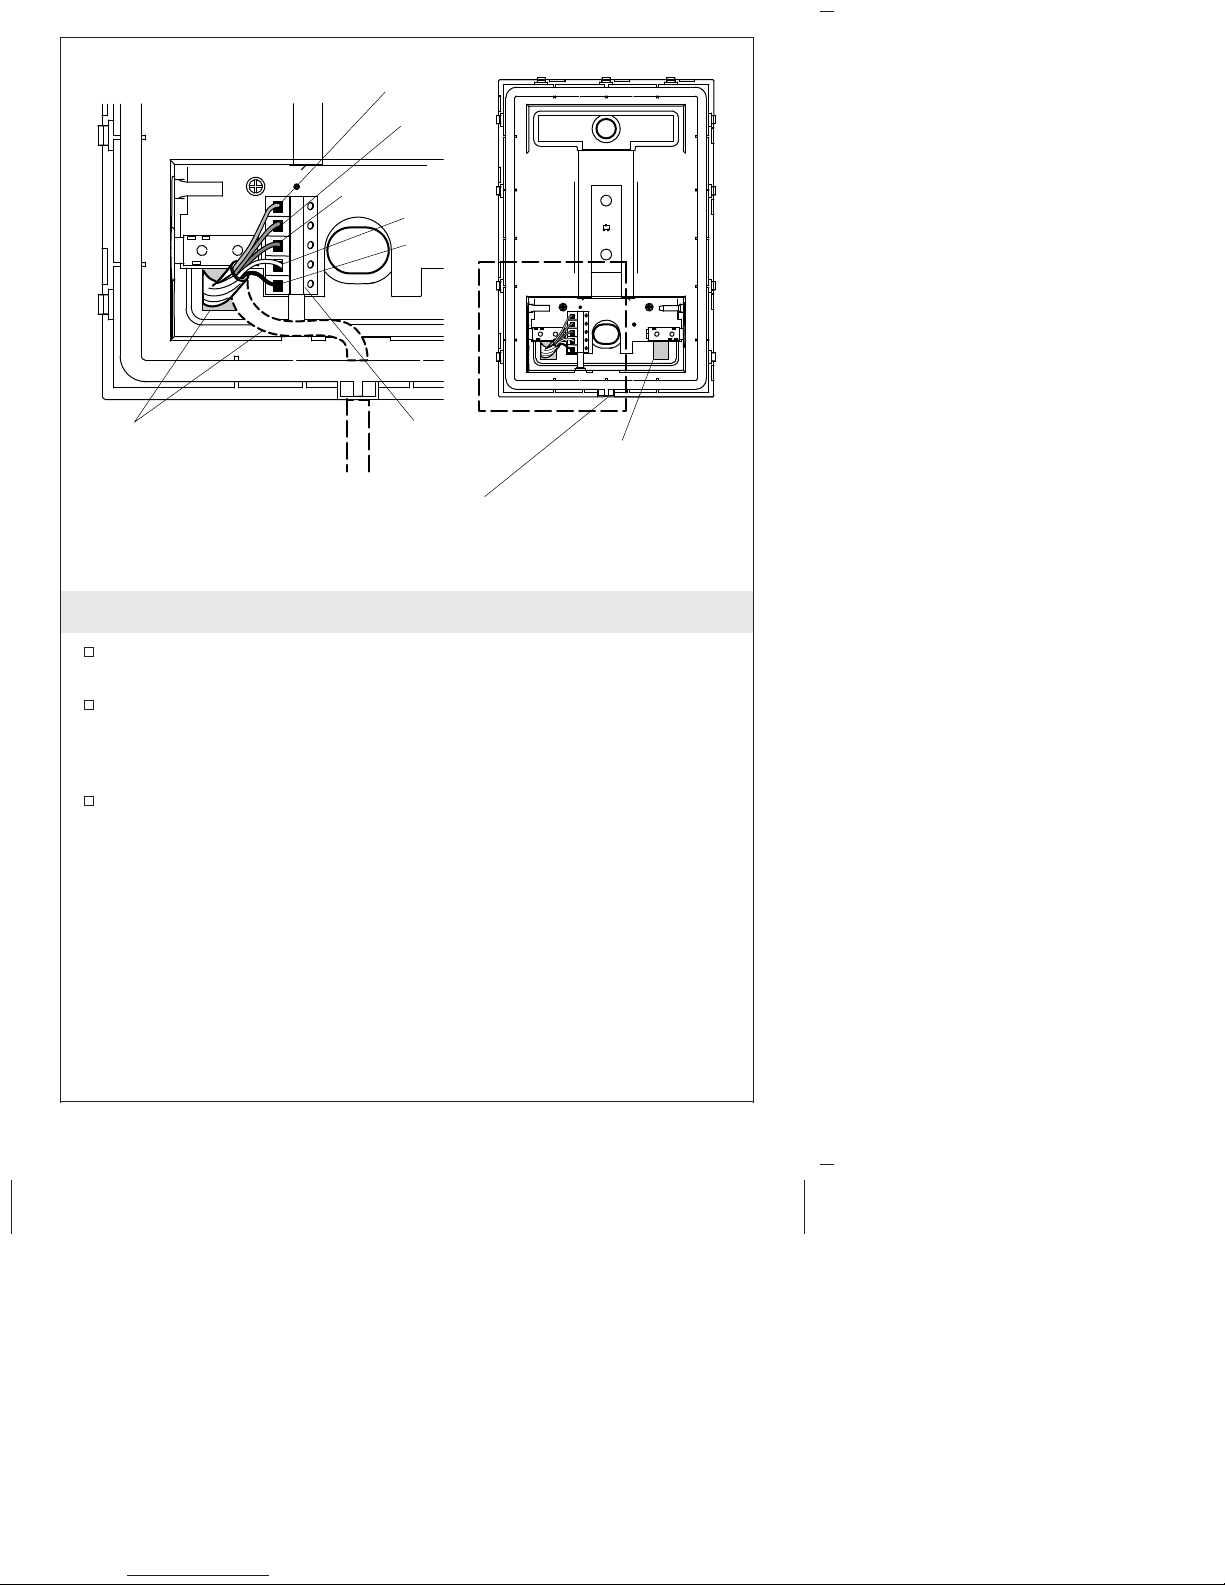
Red
Orange
Blue
White
Black
Power Cord
Connector
Harness
Back Cord
Opening
Bottom Cord
Opening
3. Connect the Power Cord
Loosen each of the five small screws located where the wires will
be connected.
Route the power cord into the docking station.
NOTE: There is a wiring schematic on the inside of the docking
station. Refer to the schematic when attaching the wires.
Slide the bare ends of the wires into the correct ports (as shown)
and tighten each screw to secure the wires in place.
Kohler Co. 9 1197249-2-A
Page 10
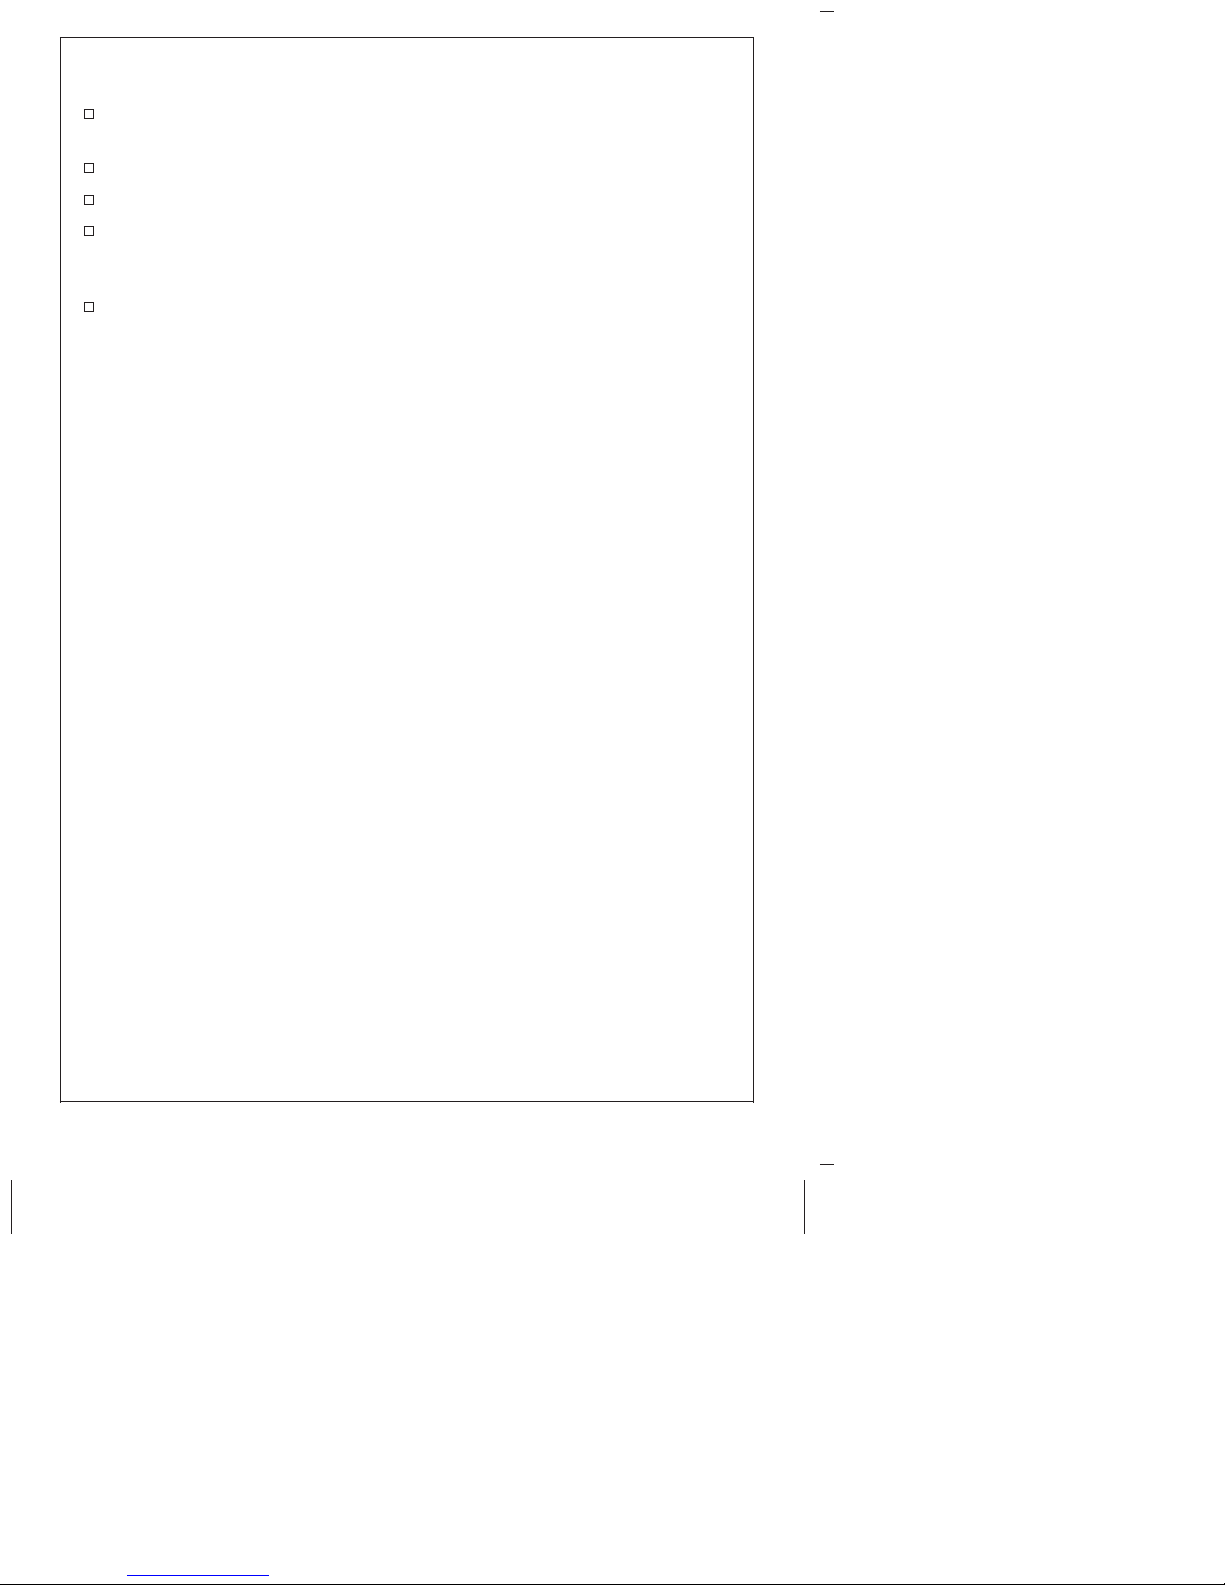
Rear
Reconnect.
Plate
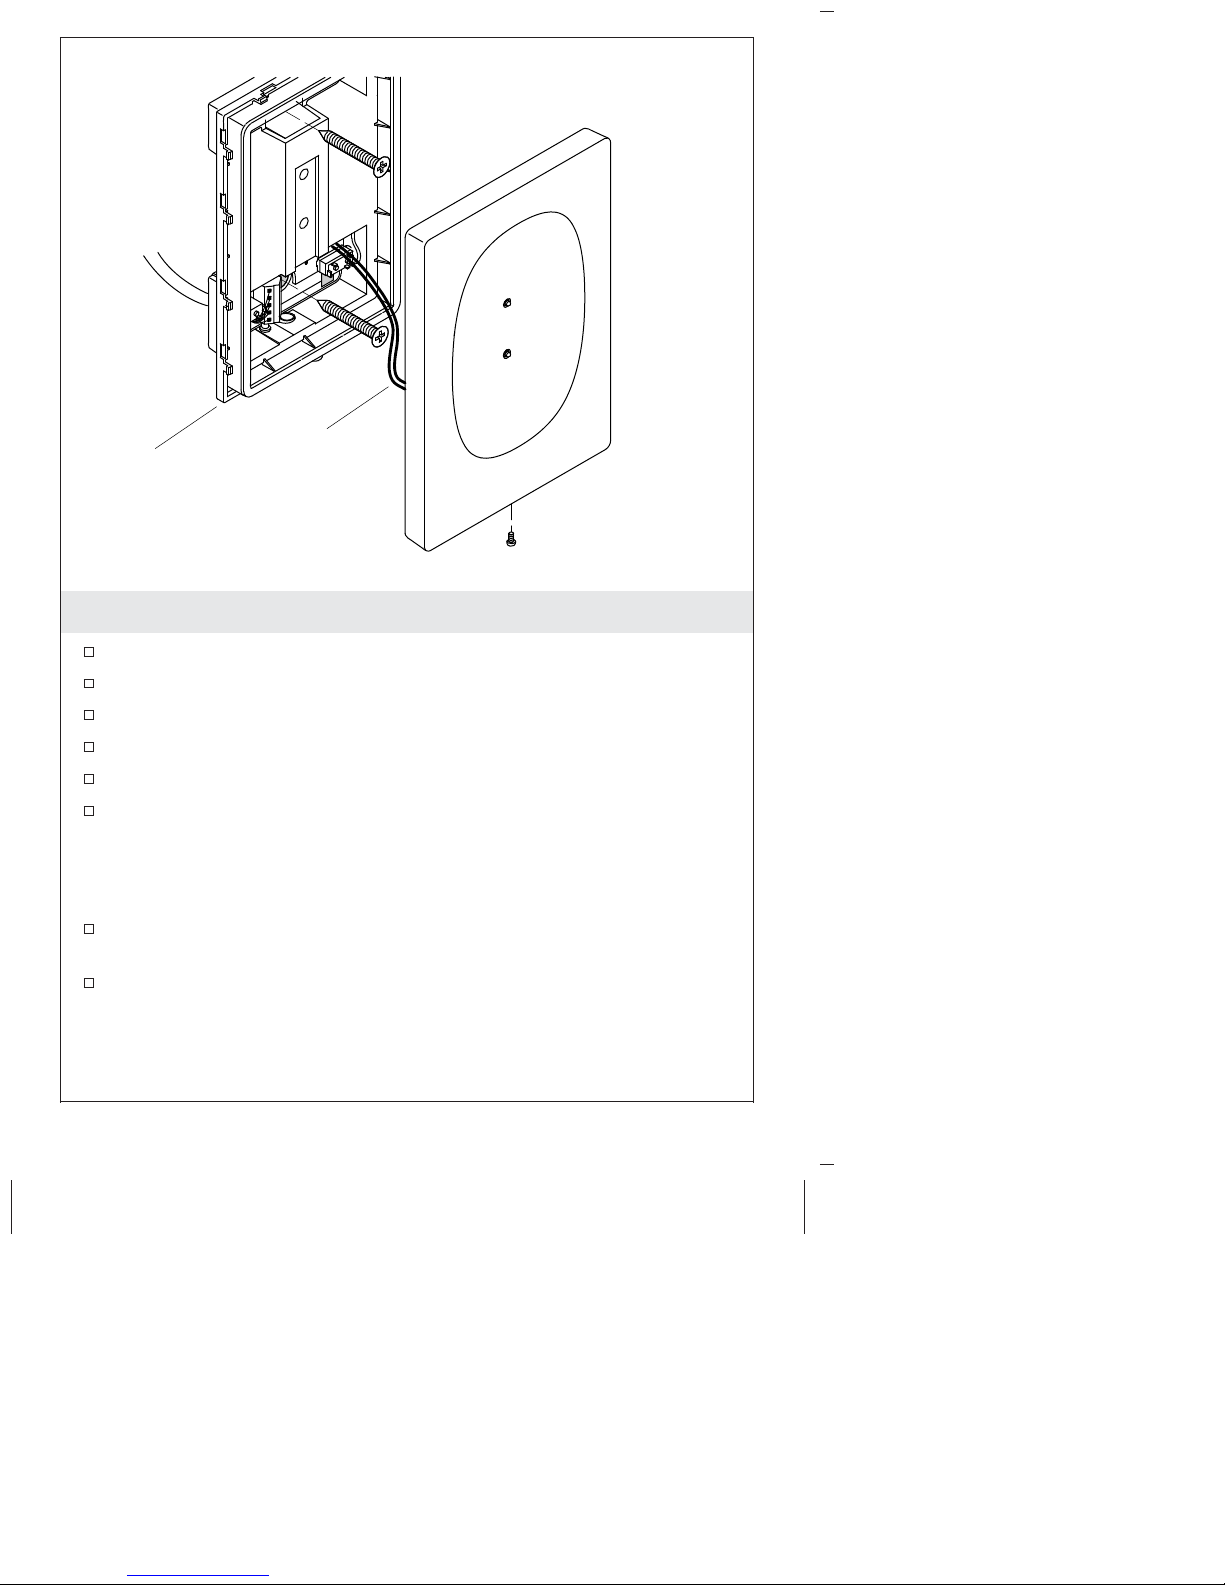
4. Complete the Installation
Position the rear plate over the installation location.
Connect the rear plate to the wall using two screws.
Reconnect the cover plate cable to the base.
Snap the cover plate back into place.
Remove the screw and tape from the cover plate.
Secure the cover plate to the base with the screw.
NOTE: The remote control will not charge until the power cord has
been attached to the toilet. The remote control must charge for
approximately 30 minutes before it will be functional.
Position the remote control on the docking station. It attaches
magnetically.
After the toilet is installed, pair the remote control with the toilet
following the instructions in the toilet installation guide.
1197249-2-A 10 Kohler Co.
Page 11

Warranty
THREE YEAR LIMITED WARRANTY FOR VITREOUS CHINA
COMPONENT
THREE YEAR LIMITED WARRANTY FOR MECHANICAL PARTS
Kohler Co. warrants the vitreous china component on the KOHLER
Numi toilet to be free of defects in material and workmanship during
normal residential use for three (3) years from the date of installation.
Kohler Co. will further warrant all mechanical parts in the KOHLER
Numi toilet to be free of defects in material and workmanship during
normal residential use for three (3) years from the date of installation.
This warranty only applies to the KOHLER Numi toilet when installed
in the United States of America and Canada.
If a defect is found in normal use, Kohler Co. will, at its election,
repair, replace or make appropriate adjustment where Kohler Co.
inspection discloses any such defects. Damage caused by accident,
misuse or abuse is not covered by this warranty. This warranty
expressly excludes labor charges, removal charges, installation, or other
incidental or consequential costs. Improper care and cleaning will void
the warranty. Use of in-tank toilet cleaners will void the warranty. In
no event shall the liability of Kohler Co. exceed the purchase price of
the product.
If you believe that you have a warranty claim, contact your Dealer,
Plumbing Contractor, Home Center or E-tailer, or by writing Kohler
Co., Attn: Customer Care Center, 444 Highland Drive, Kohler, WI
53044, USA. Please be sure to provide all pertinent information
regarding your claim, including a complete description of the problem,
the product, model number, color, the date the product was purchased
and from whom the product was purchased. Also include your original
receipts. For other information or to obtain the name and address of
the service and repair facility nearest you, call 1-800-4KOHLER
(1-800-456-4537) from within the USA and Canada and
001-800-456-4537 from within Mexico.
KOHLER CO. AND/OR SELLER ARE PROVIDING THESE
WARRANTIES IN LIEU OF ALL OTHER WARRANTIES, EXPRESS
OR IMPLIED, INCLUDING BUT NOT LIMITED TO THE IMPLIED
WARRANTIES OF MERCHANTABILITY AND FITNESS FOR A
PARTICULAR PURPOSE. KOHLER CO. AND/OR SELLER
DISCLAIM ANY LIABILITY FOR SPECIAL, INCIDENTAL OR
CONSEQUENTIAL DAMAGES. Some states/provinces do not allow
limitations on how long an implied warranty lasts, or the exclusion
or limitation of special, incidental or consequential damages, so
these limitations and exclusions may not apply to you. This warranty
gives you specific legal rights. You may also have other rights which
vary from state/province to state/province.
Kohler Co. 11 1197249-2-A
Page 12

Warranty (cont.)
This is Kohler Co.’s exclusive written warranty.
1197249-2-A 12 Kohler Co.
Page 13

Guide d’installation
Télécommande supérieure
Conformité de la télécommande
Cet appareil est conforme à la section 15 des réglementations FCC.
L’appareil est soumis aux deux conditions d’exploitation suivantes:
1. Cet appareil ne doit pas causer d’interférences nuisibles, et
2. Cet appareil doit accepter toutes les interférences reçues, y compris
celles qui pourraient causer des opérations non souhaitées.
Tous changements ou modifications non expressément approuvés par
la partie responsable garantissant la conformité, pourraient annuler le
droit à l’utilisateur d’opérer l’équipement.
Cet appareil a été testé et est considéré conforme aux limitations d’un
appareil numérique de classe B, selon la section 15 des réglementations
FCC. Ces limites sont conçues pour fournir une protection raisonnable
contre toute interférence nuisible lors d’une installation résidentielle.
Cet appareil génère, utilise et peut émettre une énergie de
radiofréquence et, s’il n’est pas installé et utilisé conformément aux
instructions, pourrait être la cause d’interférences nuisibles aux
communications par radio. Cependant, il n’est pas garanti qu’aucune
interférence n’aura lieu dans une installation particulière. Si cet
équipement cause des interférences radio nuisibles à la réception de
radio ou de télévision, ce qui peut être déterminé en éteignant
l’équipement et en le rallumant, l’utilisateur est encouragé à essayer de
rectifier cette interférence par l’un des moyens suivants:
•
Réorienter ou changer l’emplacement de l’antenne de réception.
•
Augmenter la séparation entre l’équipement et le récepteur.
•
Brancher l’équipement sur une prise d’un circuit différent de celui
auquel le récepteur est connecté.
•
Consulter un revendeur ou un technicien radio/TV expérimenté
pour obtenir de l’assistance.
Avertissement d’exposition RF
Cet émetteur portable et son antenne sont conformes aux limites
d’exposition RF de FCC pour le public général/exposition non
contrôlée.
Kohler Co. Français-1 1197249-2-A
Page 14

Conformité de la télécommande (cont.)
Cet appareil ne doit pas être co-localisé ou opéré avec toute autre
antenne ou tout autre émetteur.
CANADA IC: 4554A-KOHLER005
Cet appareil est conforme aux normes CNR sur le matériel exempt de
licence d’Industrie Canada.
L’appareil est soumis aux deux conditions d’exploitation suivantes:
1. Cet appareil ne doit pas causer de brouillage et
2. Cet appareil doit accepter tout brouillage, y compris un brouillage
pouvant provoquer un fonctionnement indésirable de l’appareil.
Cet émetteur portable et son antenne sont conformes aux limites
d’exposition RF d’Industrie Canada pour le public général/l’exposition
non contrôlée.
Cet appareil numérique de classe B est conforme à la norme NMB-003
du Canada.
Outils et matériaux
Plus:
• Ruban adhésif
Tournevis
variés
Perceuse avec mèches variées
Plaque murale
Avant de commencer
AVIS: Respecter tous les codes de plomberie et électriques locaux.
REMARQUE: Installer cette télécommande avant d’installer le W.C.
1197249-2-A Français-2 Kohler Co.
Page 15

Avant de commencer (cont.)
REMARQUE: La télécommande se raccorde à la station d’accueil
par aimantation.
Contrôler soigneusement l’état de la télécommande et de la
station d’accueil.
Vérifier que tous les éléments indiqués se trouvent dans
l’emballage.
Contenu du carton de la télécommande
Station d’accueil
Télécommande
Cordon d’alimentation de la station d’accueil
Antenne FM externe
Cordon audio AUX In
Kohler Co. Français-3 1197249-2-A
Page 16

38" (965 mm) - 66" (1676 mm)
5-15/16"
Station d'accueil
(151 mm)
4-1/16"
(104 mm)
41" (1041 mm) -
66" (1676 mm)
Emplacement de la télécommande
AVIS: Les emplacements pour le cordon de la station d’accueil sont
des emplacements suggérés. S’assurer que toutes les installations
respectent les codes et normes applicables.
REMARQUE: La station d’accueil à distance est munie d’un cordon
d’alimentation de 15’ (4,5 m). L’emplacement de fixation de la
station indiqué pour la station d’accueil est conforme aux normes
ADA.
1197249-2-A Français-4 Kohler Co.
Page 17

Cordon
d'alimentation
1. Installer le cordon d’alimentation
REMARQUE: Le cordon d’alimentation peut être tiré à travers le
mur ou posé en surface sur le mur.
Si la finition murale n’a pas été installée, poser le cordon dans le
mur s’il est prévu de le tirer à travers le mur.
Si la finition murale est en place, percer un trou de 3/8″ (10 mm)
dans le mur à l’arrière de l’emplacement du W.C. pour le cordon
d’alimentation.
Si le cordon de la station d’accueil est acheminé à travers le mur,
acheminer le cordon d’alimentation vers l’emplacement de la
station d’accueil depuis le côté W.C.
4"
(102 mm)
Kohler Co. Français-5 1197249-2-A
Page 18

Plaque
arrière
Plaque avant
Orifices
Déconnecter.
Vis
Ouverture
de cordon
arrière
2. Marquer l’emplacement de l’installation
REMARQUE: La station d’accueil est fournie avec un cordon de 15’
(4,6 m). Placer la station d’accueil de manière à permettre au cordon
d’atteindre le W.C.
Déballer le carton comprenant les composants de la
télécommande.
Retirer la télécommande de la station d’accueil et la mettre de
côté.
Retirer la petite vis sur le fond de la station d’accueil.
Retirer avec précaution la plaque frontale en écartant doucement
les côtés de la plaque, jusqu’à les séparer de la station d’accueil.
Débrancher le câble avec précaution.
Attacher la vis sur la plaque frontale avec du ruban adhésif et
mettre celle-ci de côté.
REMARQUE: Lorsque le cordon d’alimentation est tiré par
l’extérieur à travers le mur, il peut être plus facile d’utiliser le
passage de cordon arrière. Si le cordon est tiré le long de l’extérieur
du mur, utiliser le passage de cordon inférieur.
1197249-2-A Français-6 Kohler Co.
Page 19

Marquer l’emplacement de l’installation (cont.)
Pour les installations utilisant le passage de cordon arrière, tirer le
cordon d’alimentation à travers le passage arrière.
Pour les installations utilisant passage de cordon inférieure, tirer
le cordon d’alimentation à travers le passage inférieur.
Mettre la plaque arrière dans sa position d’installation.
Marquer l’emplacement des vis en se servant de la plaque comme
gabarit.
Percer des trous de fixation de la taille appropriée aux
emplacements de fixation des vis. La taille du trou dépend
l’utilisation éventuelle de chevilles d’ancrage, du matériau du
mur et des exigences d’installation.
Poser des chevilles d’ancrage dans les trous le cas échéant.
Kohler Co. Français-7 1197249-2-A
Page 20

Orange
Rouge
Bleu
Blanc
Noir
Cordon
d'alimentation
Faisceau
connecteur
Passage
de cordon
arrière
Passage
de cordon
inférieur
3. Raccorder le cordon d’alimentation
Desserrer chacune des cinq petites vis des bornes de
raccordement.
Tirer le cordon d’alimentation jusque dans la station d’accueil.
REMARQUE: Un schéma de câblage se trouve à l’intérieur de la
station d’accueil. Se reporter au schéma lors du branchement des
fils.
Enfiler les bouts dénudés des fils dans les bornes correctes
(comme sur l’illustration) et serrer chaque vis pour bloquer les
fils.
1197249-2-A Français-8 Kohler Co.
Page 21

Plaque
Rebrancher.
arrière
4. Terminer l’installation
Mettre la plaque arrière sur son emplacement d’installation.
Fixer la plaque arrière au mur avec deux vis.
Rebrancher le câble du couvercle à la base.
Réenclencher le couvercle en place.
Décoller la vis et le ruban adhésif du couvercle.
Fixer le couvercle à la base avec la vis.
REMARQUE: La télécommande ne se charge pas tant que le cordon
d’alimentation n’est pas raccordé au W.C. La télécommande doit
charger pendant 30 minutes environ avant d’être fonctionnelle.
Placer la télécommande sur la station d’accueil. Elle s’attache par
aimantation.
Après l’installation du W.C., apparier la télécommande avec le
W.C. conformément aux instructions du guide d’installation du
W.C.
Kohler Co. Français-9 1197249-2-A
Page 22

Garantie
GARANTIE LIMITÉE POUR COMPOSANT EN PORCELAINE VITRIFIÉE
GARANTIE LIMITÉE DE TROIS ANS POUR LES PIÈCES
MÉCANIQUES
Kohler Co. garantit l’élément en porcelaine vitrifiée du W.C. Numi de
KOHLER contre tout vice de matériau et de fabrication lors d’une
utilisation domestique normale pendant trois (3) ans à partir de la date
d’installation. Kohler Co. garantit également toutes les pièces
mécaniques du W.C. Numi de KOHLER contre tout vice de matériau et
de fabrication lors d’une utilisation domestique normale pendant trois
(3) ans à partir de la date d’installation. Cette garantie s’applique
uniquement au W.C. Numi de KOHLER installé aux États-Unis et au
Canada.
Si un vice est découvert au cours d’une utilisation normale, Kohler Co.
choisira, à sa discrétion, la réparation, le remplacement ou la
rectification appropriée après inspection desdits vices par Kohler Co.
Tout dommage dû à un accident, un mauvais usage ou un mauvais
traitement n’est pas couvert par la présente garantie. La présente
garantit exclut expressément les frais de main-d’oeuvre, d’enlèvement,
d’installation ou tout autre frais particulier accessoire ou indirect. Un
entretien et un nettoyage inadéquats annulent la présente garantie.
L’utilisation de nettoyants à l’intérieur du réservoir annule la
garantie. La responsabilité de Kohler Co. ne dépassera en aucun cas le
prix d’achat du produit.
Pour toute réclamation au titre de la présente garantie, contacter le
vendeur, plombier, centre de rénovation ou revendeur par internet, ou
bien par écrit à l’adresse suivante Kohler Co., Attn.: Customer Care
Center, 444 Highland Drive, Kohler, WI 53044, USA. Fournir tous les
renseignements pertinents à la réclamation, dont notamment une
description complète du problème et du produit, le numéro de modèle,
la couleur, la date et le lieu d’achat du produit. Joindre également
l’original de la facture. Pour de plus amples renseignements ou pour
obtenir les coordonnées du service de réparation le plus proche,
appeler le 1-800-4KOHLER (1-800-456-4537) à partir des É.-U. et du
Canada ou le 001-800-456-4537 à partir du Mexique.
KOHLER CO. ET/OU LE REVENDEUR FOURNISSENT CES
GARANTIES AU LIEU ET PLACE DE TOUTES AUTRES
GARANTIES, EXPRESSES OU TACITES, Y COMPRIS LES
GARANTIES TACITES DE COMMERCIALITÉ ET D’ADAPTATION
À UN USAGE PARTICULIER. KOHLER CO. ET/OU LE
REVENDEUR DÉCLINENT TOUTE RESPONSABILITÉ CONTRE
LES DOMMAGES PARTICULIERS, ACCESSOIRES OU
INDIRECTS. Certains états et provinces ne permettent pas de limite
sur la durée de la garantie tacite, ni l’exclusion ou la limite des
1197249-2-A Français-10 Kohler Co.
Page 23

Garantie (cont.)
dommages particuliers, accessoires ou indirects, et, par conséquent,
lesdites limites et exclusions peuvent ne pas s’appliquer à votre cas.
Cette garantie vous donne des droits juridiques particuliers. Vous
pouvez également avoir d’autres droits qui varient d’un état ou d’une
province à l’autre.
Ceci constitue la garantie écrite exclusive de Kohler Co.
Kohler Co. Français-11 1197249-2-A
Page 24

Guía de instalación
Control remoto Premium
Conformidad del control remoto
Este equipo cumple con lo establecido en la sección 15 de las normas
de la FCC. El funcionamiento está sujeto a las dos condiciones
siguientes:
1. Este aparato no debe causar interferencias perjudiciales, y
2. Este dispositivo debe aceptar cualquier interferencia recibida,
incluyendo las interferencias que causen un funcionamiento no
deseado.
Cualquier modificación o cambio que no haya sido aprobado
expresamente por la parte responsable de la conformidad puede anular
el derecho del usuario de utilizar el producto.
Este equipo ha sido probado y se ha encontrado que cumple con los
límites de un aparato digital Clase B, en cumplimiento con la sección
15 de las normas de la FCC. Estos límites están diseñados para proveer
protección razonable contra la interferencia perjudicial en una
instalación residencial. Este equipo genera, usa y puede radiar energía
de radiofrecuencia y, si no se instala y utiliza en cumplimiento con las
instrucciones, puede causar interferencia perjudicial a las
comunicaciones de radio. Sin embargo, no se garantiza que la
interferencia no ocurrirá en una instalación particular. Si este equipo
causa interferencia perjudicial a la recepción de radio o televisión, lo
que se puede determinar encendiendo y apagando el equipo, se anima
al usuario a que trate de corregir la interferencia mediante una de las
siguientes medidas:
•
Cambie la orientación o el lugar de la antena receptora.
•
Aumente la separación entre el equipo y el receptor.
•
Conecte el equipo a un tomacorriente en un circuito diferente del
que utiliza el receptor.
•
Consulte con el distribuidor o con un técnico con experiencia en
radio/televisión para obtener ayuda.
Advertencia sobre la exposición a la radiofrecuencia
Este transmisor portátil con su antena cumple con los límites de
exposición de radiofrecuencia (RF) de la FCC para la exposición no
controlada/población general.
Kohler Co. Español-1 1197249-2-A
Page 25

Conformidad del control remoto (cont.)
Este dispositivo no debe ubicarse ni hacerse funcionar con ninguna
otra antena o transmisor.
IC DE CANADÁ: 4554A-KOHLER005
Este dispositivo cumple con la norma RSS de excepción de licencia de
la Industria de Canadá.
El funcionamiento está sujeto a las dos condiciones siguientes:
1. Este equipo no debe causar interferencia, y
2. Este equipo debe aceptar cualquier interferencia, incluyendo la
interferencia que pueda causar un funcionamiento no deseado.
Este transmisor portátil con su antena cumple con los límites de
exposición de radiofrecuencia (RF) de la Industria de Canadá para la
exposición no controlada/población general.
Este aparato digital Clase B cumple con la norma canadiense ICES-003.
Herramientas y materiales
Más:
• Cinta adhesiva
Destornilladores
surtidos
Taladro con brocas surtidas
Placa mural
Antes de comenzar
AVISO: Cumpla con todos los códigos locales de electricidad y de
plomería.
NOTA: Instale este control remoto antes de instalar el inodoro.
Kohler Co. Español-2 1197249-2-A
Page 26

Antes de comenzar (cont.)
NOTA: El control remoto se conecta magnéticamente con la estación
de conexión.
Revise con cuidado que el control remoto y la estación de
conexión no presenten daños.
Verifique que todos los componentes indicados se hayan incluido
en el embalaje.
Contenido de la caja del control remoto
Estación de conexión
Control remoto
Cable eléctrico de la estación de conexión
Antena FM externa
Cable audio de entrada AUX
1197249-2-A Español-3 Kohler Co.
Page 27

38" (965 mm) - 66" (1676 mm)
5-15/16"
conexión
(151 mm)
4-1/16"
(104 mm)
41" (1041 mm) -
66" (1676 mm)
Ubicación del control remoto
AVISO: Las ubicaciones para el cable de la estación de conexión
son ubicaciones que se sugieren. Asegúrese de que todas las
instalaciones cumplan con los códigos y normas aplicables.
NOTA: La estación de conexión remota está equipada con un cable
eléctrico de 15’ (4,5 m). La ubicación de montaje de la estación que
se muestra para la estación de conexión cumple con la ADA.
Estación de
Kohler Co. Español-4 1197249-2-A
Page 28

4"
(102 mm)
Cable
eléctrico
1. Instale el cable eléctrico
NOTA: El cable eléctrico se puede tender a través de la pared o
externamente en la cara de la pared.
Si la pared acabada no se ha instalado, tienda el cable eléctrico, si
el cable se instalará en la pared.
Si la pared acabada ya está instalada, taladre un orificio de 3/8″
(10 mm) en la pared que se encuentra detrás del inodoro para el
cable eléctrico.
Si el cable eléctrico se tiende en la pared, tienda el cable eléctrico
a la estación de conexión desde el extremo del inodoro.
1197249-2-A Español-5 Kohler Co.
Page 29

Placa
posterior
Placa frontal
Orificios
Desconecte.
Tornillo
Abertura
trasera
para cable
2. Marque el lugar de instalación
NOTA: La estación de conexión viene con un cable eléctrico de 15’
(4,6 m). Ubique la estación de conexión de manera que permita que
el cable eléctrico alcance el inodoro.
Desembale la caja que contiene los componentes del control
remoto.
Retire el control remoto de la estación de conexión y colóquelo a
un lado.
Retire el tornillo pequeño del lado inferior de la estación de
conexión.
Con cuidado retire la placa frontal apalancándola suavemente de
los lados hacia fuera hasta que se desconecte de la estación.
Desconecte con cuidado el cable.
Pegue con cinta adhesiva el tornillo a la placa frontal y coloque a
un lado.
NOTA: Cuando el cable eléctrico se tiende externamente a través de
la pared, puede ser más fácil utilizar la abertura posterior para el
Kohler Co. Español-6 1197249-2-A
Page 30

Marque el lugar de instalación (cont.)
cable. Cuando el cable se tienda externamente a lo largo de la cara
de la pared, utilice la abertura inferior para cable.
Para instalaciones que utilizan la abertura posterior para cable,
tienda el cable eléctrico a través de la abertura posterior para
cable.
Para instalaciones que utilizan la abertura inferior para cable,
tienda el cable eléctrico a través de la abertura inferior para cable.
Coloque la placa posterior en la posición de instalación.
Marque las ubicaciones para los tornillos usando la placa
posterior como plantilla.
Taladre los orificios de fijación del tamaño adecuado en los
lugares marcados para los orificios de fijación. El tamaño del
orificio dependerá de la necesidad de anclajes de pared, el
material de la pared y los requisitos de instalación.
Instale los anclajes de pared en los orificios si es necesario.
1197249-2-A Español-7 Kohler Co.
Page 31

Anaranjado
Rojo
Azul
Blanco
Negro
Cable eléctrico
Arnés del
conector
Abertura
trasera
para cable
Abertura
inferior
para cable
3. Conecte el cable eléctrico
Afloje cada uno de los cinco tornillos pequeños ubicados donde
se conectarán los cables.
Tienda el cable eléctrico a la estación de conexión.
NOTA: Hay un esquema de conexiones eléctricas en el interior de
la estación de conexión. Consulte el esquema al conectar los cables.
Deslice los extremos desnudos de los cables en los puertos
correctos (como se muestra) y apriete cada tornillo para fijar los
cables en su lugar.
Kohler Co. Español-8 1197249-2-A
Page 32

Placa
posterior
conectar.
4. Termine la instalación
Coloque la estación de conexión sobre el lugar de la instalación.
Conecte la placa posterior a la pared utilizando dos tornillos.
Vuelva a conectar el cable de la placa tapa a la base.
Encaje la placa tapa nuevamente en su lugar.
Retire el tornillo y la cinta adhesiva de la placa tapa.
Fije la placa tapa a la base con el tornillo.
NOTA: El control remoto no se cargará hasta que el cable eléctrico
se haya conectado al inodoro. El control remoto se tiene que cargar
por aproximadamente 30 minutos antes de que pueda funcionar.
Coloque el control remoto en la estación de conexión. Se conecta
magnéticamente.
Después de instalar el inodoro, conecte la comunicación del
control remoto al inodoro siguiendo las instrucciones de la guía
de instalación del inodoro.
Vuelva a
1197249-2-A Español-9 Kohler Co.
Page 33

Garantía
GARANTÍA LIMITADA DE TRES AÑOS DEL COMPONENTE DE
PORCELANA VITRIFICADA
GARANTÍA LIMITADA DE TRES AÑOS DE LAS PIEZAS MECÁNICAS
Kohler Co. garantiza que el componente de porcelana vitrificada del
inodoro KOHLER Numi está libre de defectos de fabricación en
material y mano de obra durante el uso residencial normal por (3) tres
años a partir de la fecha de instalación. Además, Kohler Co. garantiza
que todas las piezas mecánicas del inodoro KOHLER Numi están libres
de defectos de fabricación en material y mano de obra durante el uso
residencial normal por (3) tres años a partir de la fecha de instalación.
Esta garantía se aplica sólo al inodoro KOHLER Numi instalado en los
Estados Unidos de América y Canadá.
Si se encuentra un defecto durante el uso normal, Kohler Co., a su
criterio, reparará, reemplazará o realizará los ajustes pertinentes en los
casos en que la inspección realizada por Kohler Co. determine dichos
defectos. Esta garantía no cubre daños causados por accidente, abuso o
uso indebido. Esta garantía expresamente excluye costos de mano de
obra, desinstalación, instalación u otros costos incidentales o indirectos.
El cuidado y la limpieza indebidos anularán la garantía. El uso de
limpiadores de inodoro que se colocan dentro del tanque anulará la
garantía. En ningún caso la responsabilidad de Kohler Co. excederá el
precio de compra del producto.
Si usted considera que tiene una reclamación en virtud de la garantía,
comuníquese con su distribuidor, contratista de plomería, centro de
remodelación o distribuidor por Internet, o escriba a Kohler Co., Attn:
Customer Care Center, 444 Highland Drive, Kohler, WI 53044, USA.
Por favor, asegúrese de proporcionar toda la información pertinente a
su reclamación, incluyendo una descripción completa del problema, el
producto, el número de modelo, el color, la fecha de compra y el lugar
de compra del producto. También incluya los recibos de compra
originales. Para información adicional, o para obtener el nombre y
dirección del lugar de reparación y servicio más cercano a usted, llame
al 1-800-4-KOHLER (1-800-456-4537) desde los EE.UU. y Canadá, y al
001-800-456-4537 desde México.
KOHLER CO. Y/O EL VENDEDOR OFRECEN ESTAS GARANTÍAS
QUE SUSTITUYEN TODAS LAS DEMÁS GARANTÍAS, EXPRESAS
O IMPLÍCITAS, INCLUYENDO, ENTRE OTRAS, LAS GARANTÍAS
IMPLÍCITAS DE COMERCIALIZACIÓN E IDONEIDAD PARA UN
USO DETERMINADO. KOHLER CO. Y/O EL VENDEDOR
DESCARGAN TODA RESPONSABILIDAD POR CONCEPTO DE
DAÑOS PARTICULARES, INCIDENTALES O INDIRECTOS.
Algunos estados/provincias no permiten limitaciones en cuanto a la
duración de una garantía implícitaoalaexclusión o limitación de
Kohler Co. Español-10 1197249-2-A
Page 34

Garantía (cont.)
daños particulares, incidentales o indirectos, por lo que estas
limitaciones y exclusiones pueden no aplicar a su caso. Esta garantía
le otorga ciertos derechos legales específicos. Además, usted puede
tener otros derechos que varían de estado a estado y provincia a
provincia.
Ésta es la garantía exclusiva por escrito de Kohler Co.
1197249-2-A Español-11 Kohler Co.
Page 35

1197249-2-A
Page 36

USA/Canada: 1-800-4KOHLER
México: 001-800-456-4537
kohler.com
©2013 Kohler Co.
1197249-2-A
 Loading...