

Page 1
Installation Guide
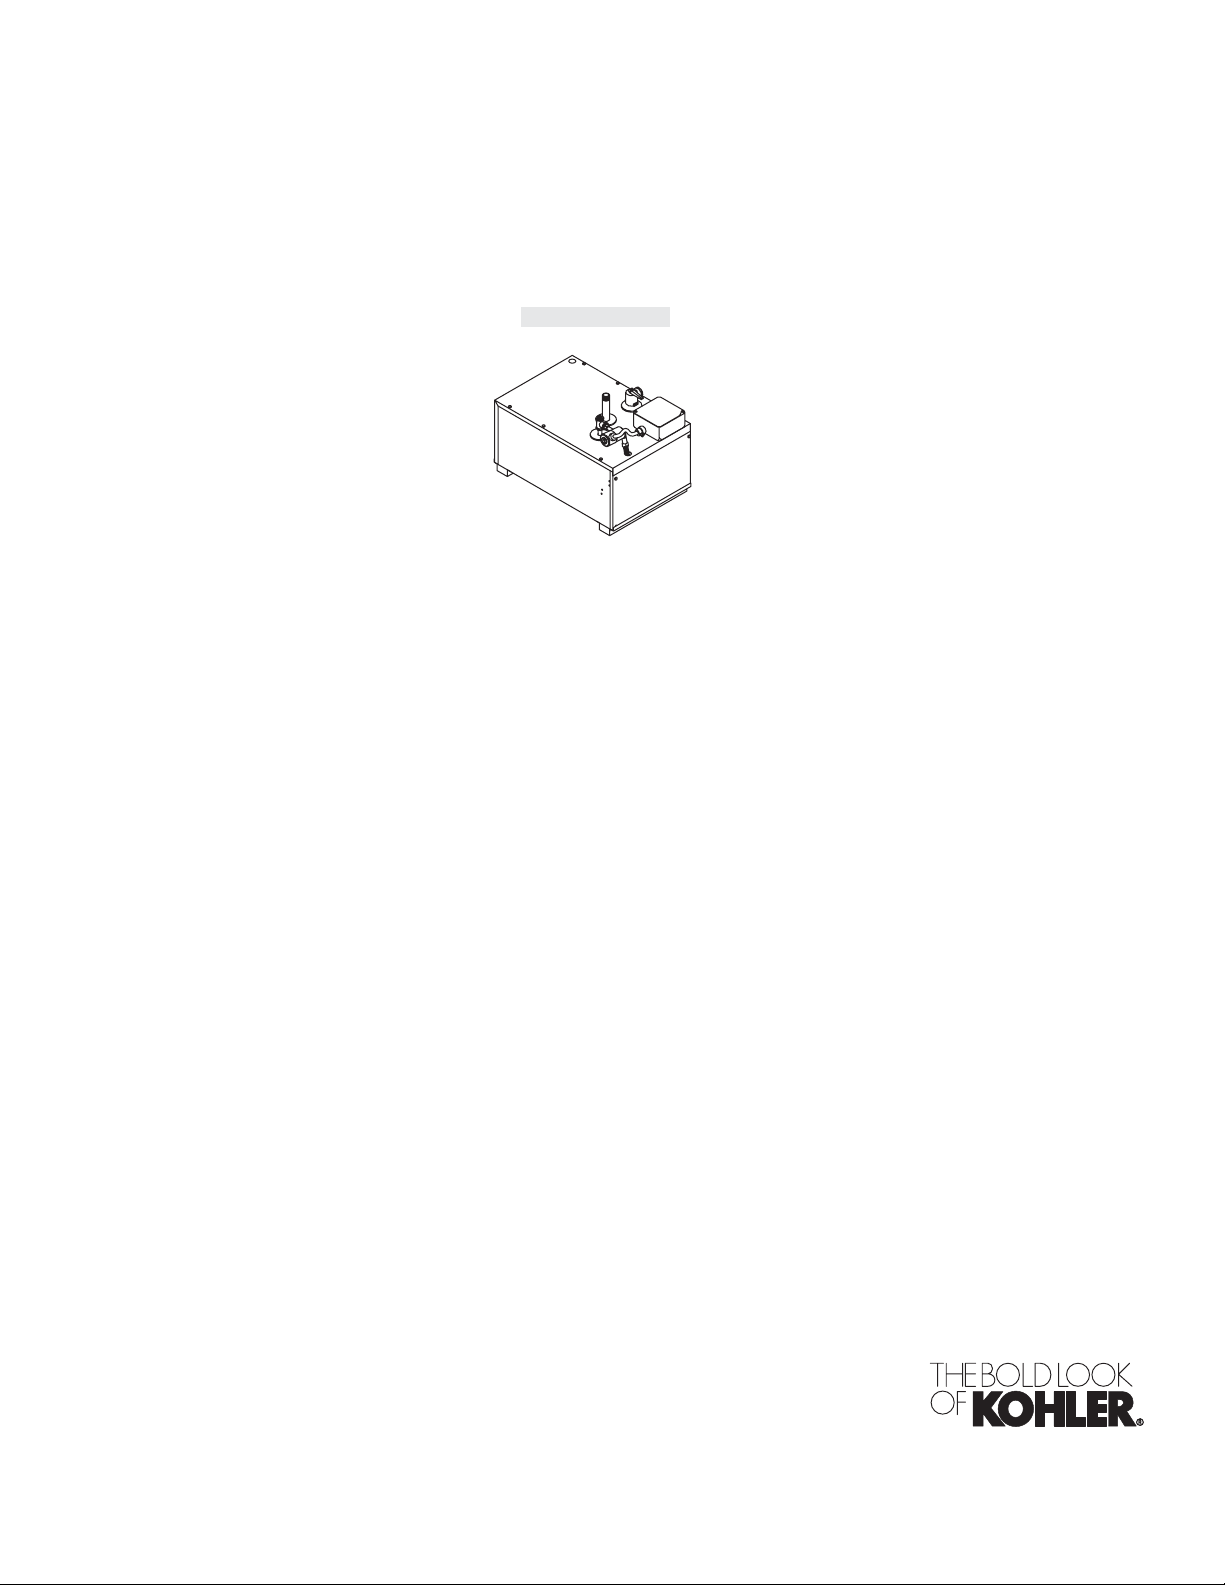
Steam Generator
K-1696, K-1713
M product numbers are for Mexico (i.e. K-12345M)
Los números de productos seguidos de M corresponden a México
(Ej. K-12345M)
Français, page“ Français-1”
Español, página“ Español-1”
1053772-2-E
Page 2
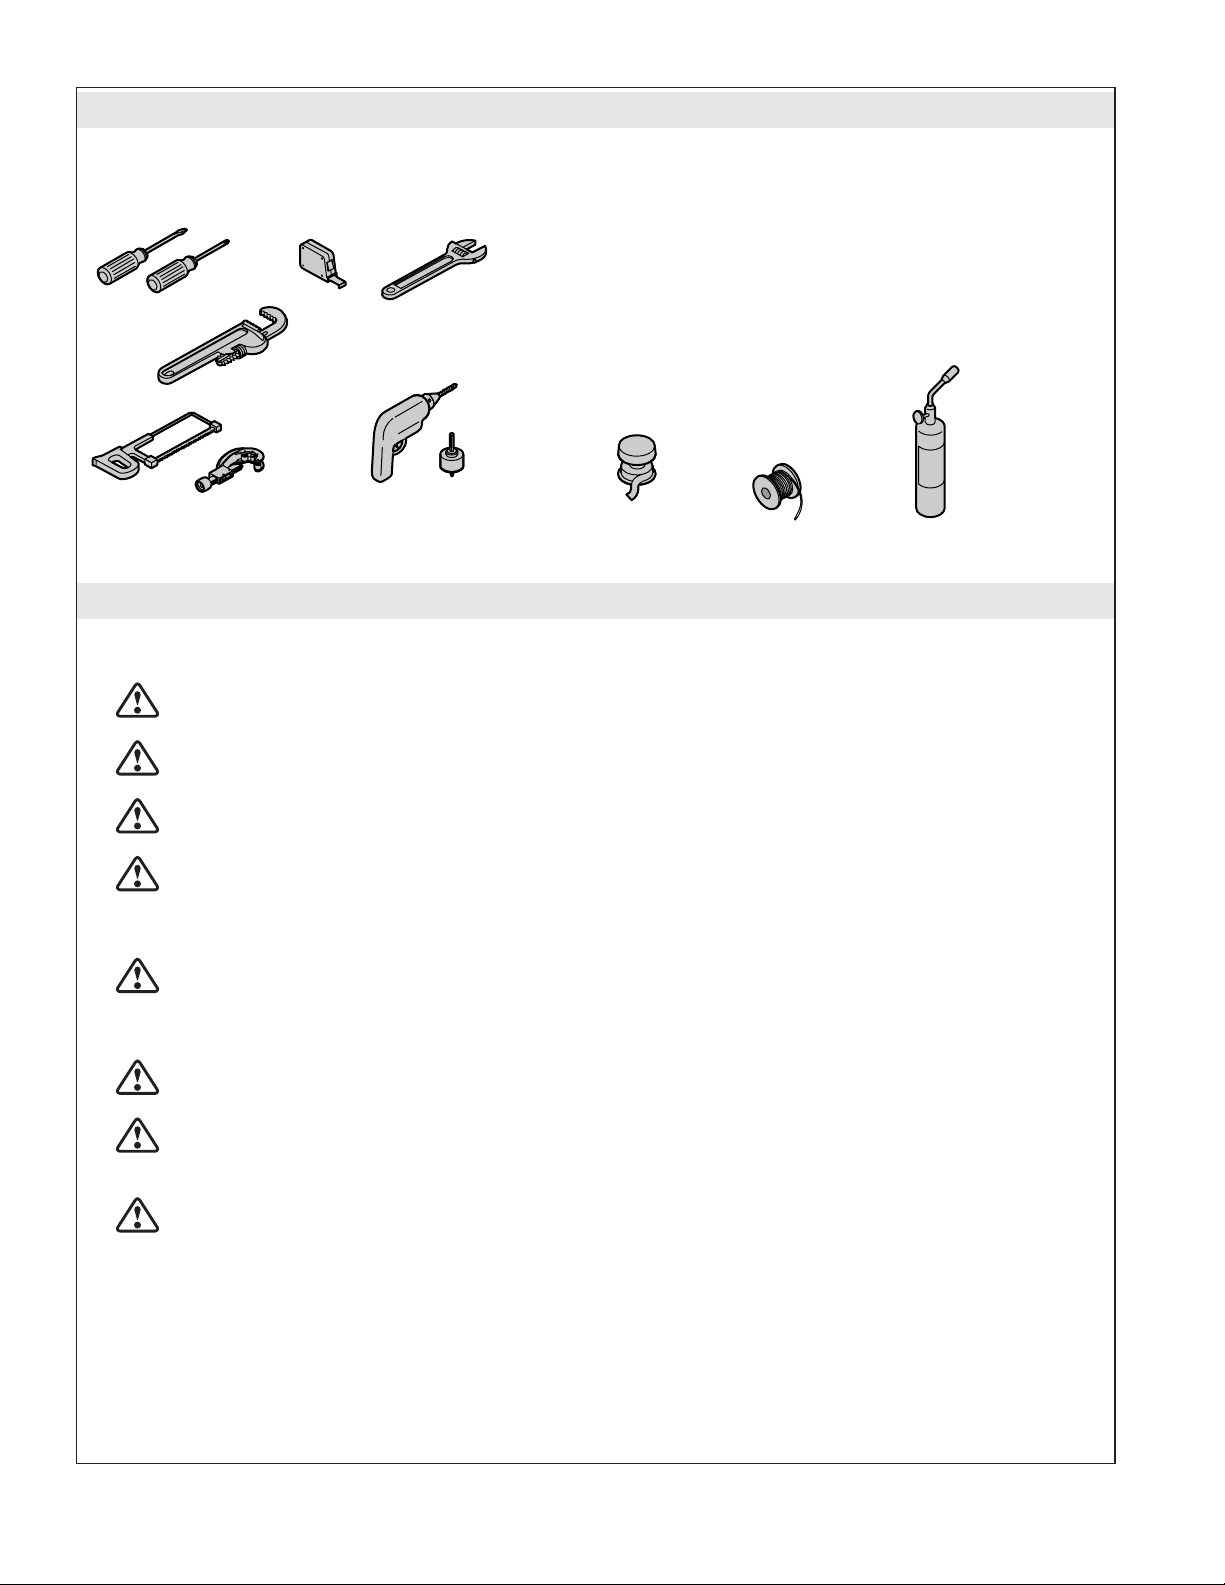
Tools and Materials
Plus:
• Drain/spill pan
• 1/2" copper tubing
• Assorted copper fittings; 3/8", 1/2"
and 3/4" copper NPT unions
• Wire Cutters or Wire Strippers
• Conventional woodworking tools and materials
• 45 and 90 degree elbows
• Support Blocks (heat resistant)
Hacksaw or Tube Cutter
Drill w/ 1-1/4" &
2-1/2" Hole Bit
Sealant Tape
Solder
Before You Begin
IMPORTANT! When using this unit, basic precautions should always be followed.
DANGER: Risk of electrocution. Disconnect the electricity to the working area at the main breaker
panel before performing these installation steps.
WARNING: Risk of personal injury. If you become uncomfortable while taking a steam bath, you
should power off the unit. Cool off with the shower, open the door, or exit the unit.
WARNING: Risk of allergic reaction. Before adding any oils, aromatic therapies, or skin care
products to the aromatherapy well, make sure they will not cause an allergic reaction to the user.
WARNING: Risk of personal injury. This steam bath may not be suitable for use if you are
pregnant, have a heart condition, have high blood pressure, have circulatory problems, are under
the influence of alcohol, are taking drugs or are under the care of a physician. A steam bath can put
undue stress on the body, as does any hot bath, shower, or sauna.
WARNING: Risk of personal injury. DO NOT consume alcoholic beverages or take
medications/drugs prior to or when using the steam bath. Alcohol and drugs affect mental
judgement and inhibit bodily functions such as heartbeat and respiration, resulting in potentially
dangerous effects.
WARNING: Risk of injury to children. Do not allow children to use this unit unless they are
closely supervised at all times. The steam generator is not designed to be used by children.
Propane Torch
WARNING: Risk of personal injury. Do not plumb a trap in the steam line or plumb the pressure
relief valve into the steam line. Plumbing the pressure relief valve into the steam line can be
hazardous if the steam outlet is capped.
WARNING: Risk of personal injury or property damage. Avoid coming in contact with the water
tank and/or steam discharge line while the generator is operating or shortly after shutdown. Wear
eye protection and protective clothing when servicing the steam generator. The steam generator
operates at high temperatures.
NOTICE: Use this unit only for its intended use as specified in this manual. DO NOT use attachments not
recommended by Kohler Co.
NOTICE: Do not apply excessive heat to the generator connections when you solder connections. Do not
apply flux or acids directly to the generator, as damage to the seals, plastic components, and trim finish
may result. Do not apply petroleum-based lubricants to the generator components, as damage may result.
1053772-2-E 2 Kohler Co.
Page 3

Before You Begin (cont.)
Inspect the product for any damage. Contact the KOHLER Customer Care Center using the
information on the back of this guide.
Follow all local plumbing and electrical codes. All electrical work should be done by a qualified
electrician.
Disconnect all power before making any electrical connections.
Connect the steam generator to water supply lines that meet all applicable plumbing codes.
For custom installations, locate the steam head 6″ (15.2 cm) from the floor and 4-1/2″ (11.4 cm) from
the inside of the threshold.
Kohler Co. reserves the right to make revisions in the design of products without notice, as specified
in the Price Book.
Kohler Co. 3 1053772-2-E
Page 4
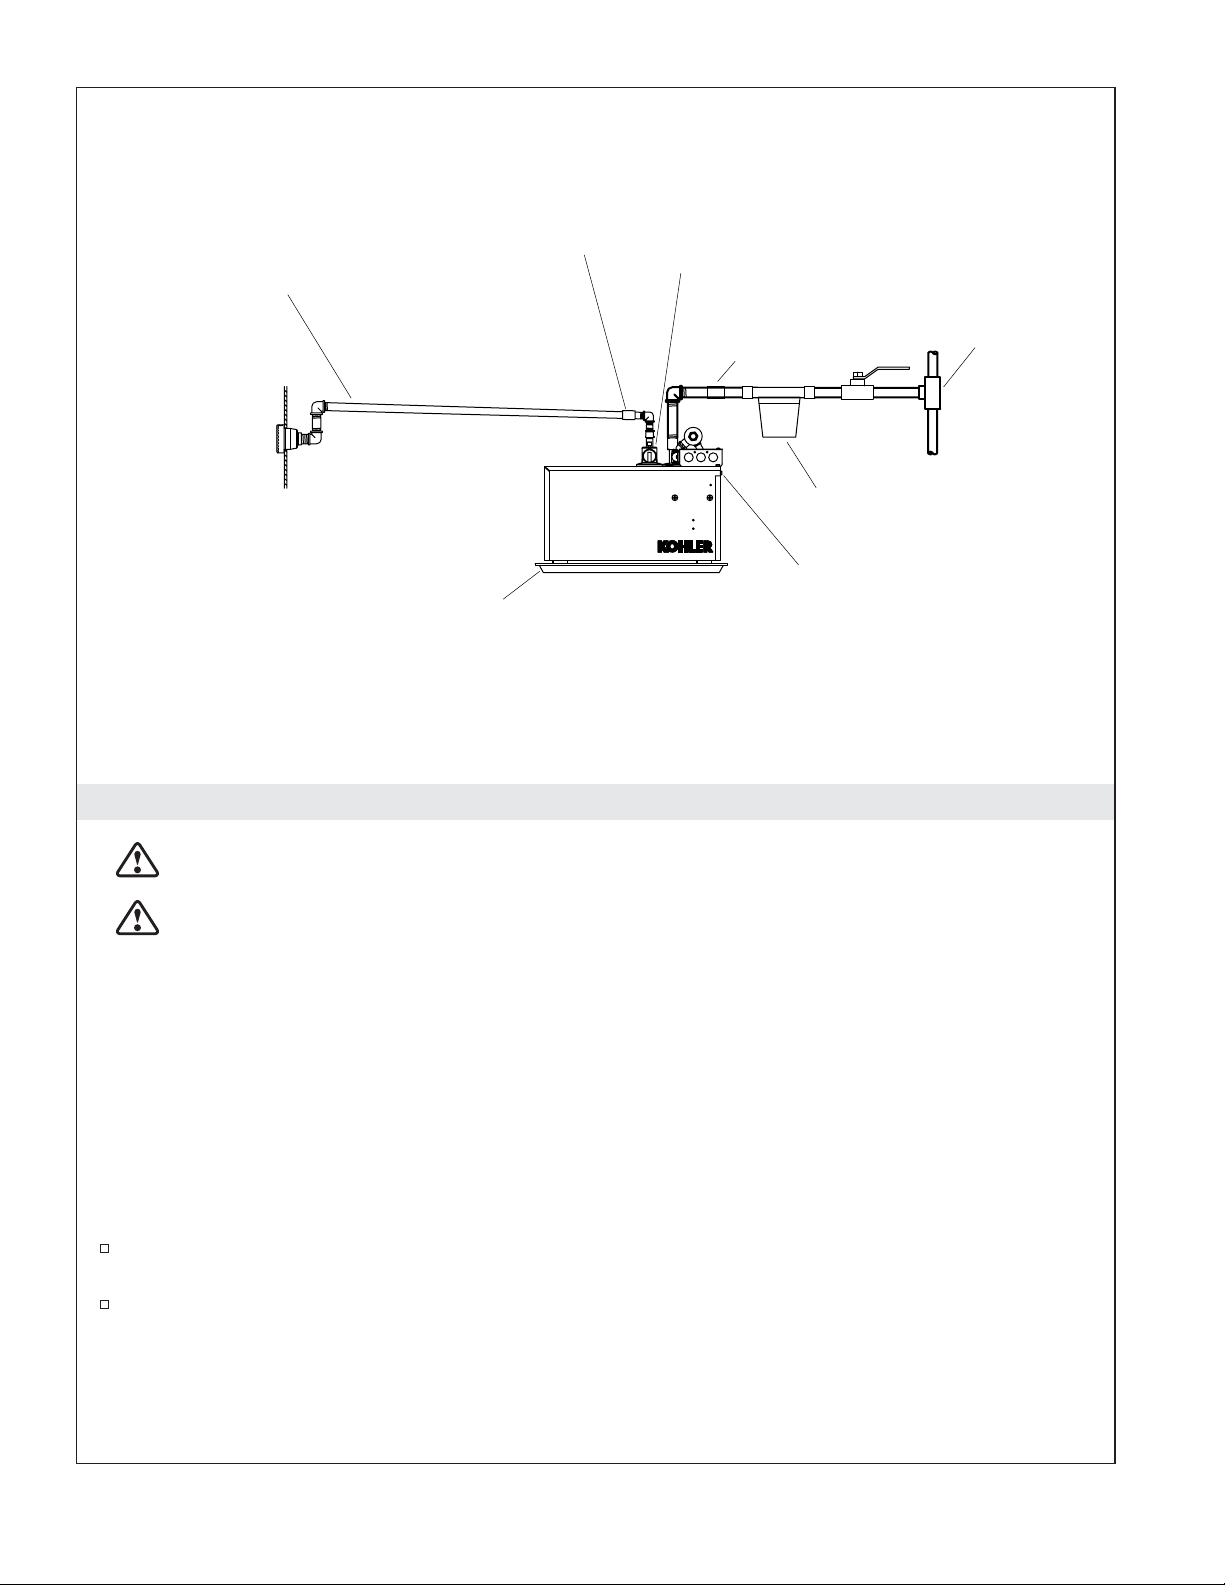
Pitch toward generator.
Install copper union as close
as possible to steam generator.
Pressure Relief Valve
Steam Head
1. Determine the Layout
WARNING: Risk of property damage. Allow a minimum of 12″ (30.5 cm) of air space around the
steam generator at all times. This provides an area for the heat generated by the unit to dissipate.
WARNING: Risk of personal injury. Do not install the Steam Control User Interface outside the
steam enclosure. The User Interface must be installed within the enclosure to allow the sensors to
regulate the temperature and control the flow of steam. Refer to the Installation Guide for the
Steam Control Kit.
Drain Pan
Front of Generator
(Access Panel)
Copper
Union
Shut-Off
Valve
Water
Inlet
Recommended
In-Line Water Filter
Control Cable Input
Tee
NOTICE: When installing the control kit, allow room in the control cable for a drip loop. The drip loop
will discourage moisture from following the control cable to the steam generator.
NOTICE: The steam generator will perform best when installed as close as possible to the steam head. The
unit should be installed within 25’ (7.62 m) of the steam head.
NOTICE: For optimum performance install the steam generator below the level of the steam head.
NOTE: When possible, use 45 degree elbows. Performance will be increased when 45 degree elbows are
used.
Determine the location of the steam generator. Allow for a 12″ (30.5 cm) air gap on all sides of the
generator. Allow for a drain pan.
Choose a drain pan appropriate for your installation. The drain pan is not supplied.
1053772-2-E 4 Kohler Co.
Page 5
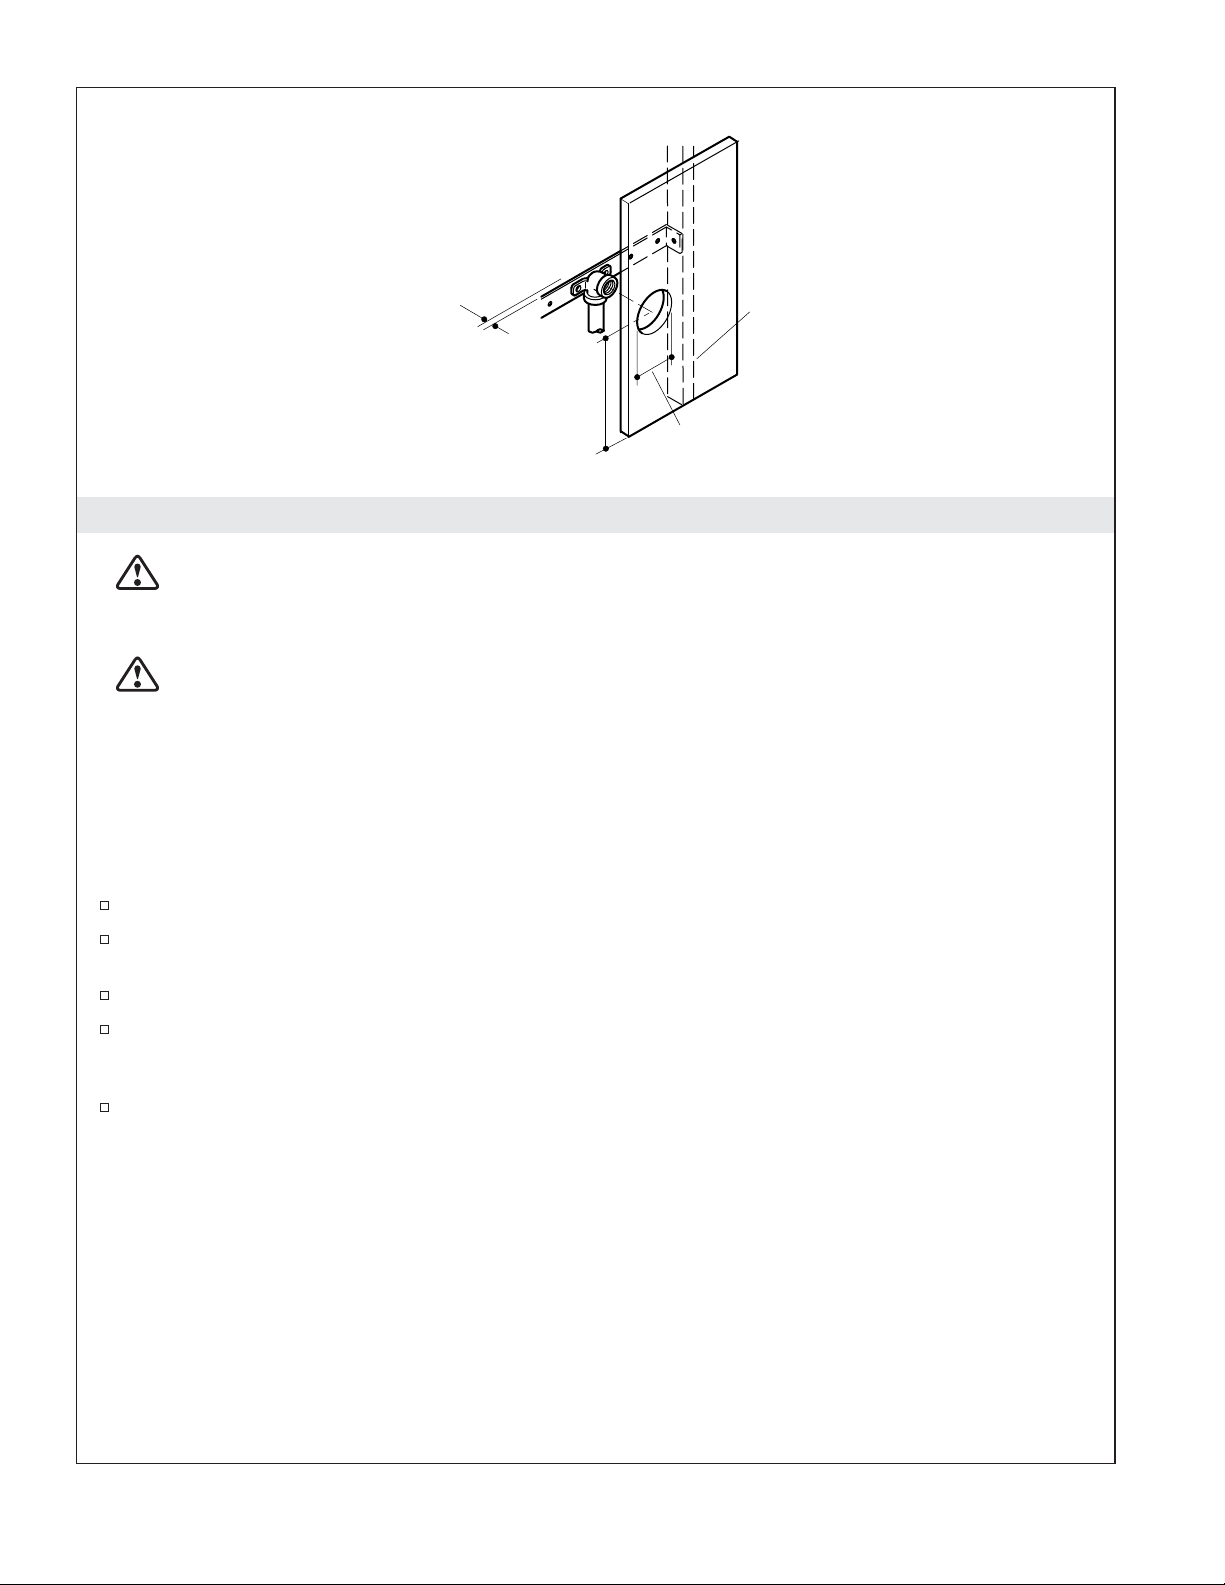
Provide clearance
from wall.
Wall Stud
6" (15.2 cm) from Floor
2-1/2" (6.4 cm)
2. Determine the Location of the Steam Hardware
WARNING: Risk of personal injury. Do not install the Steam Control User Interface outside the
steam enclosure. The User Interface must be installed within the enclosure to allow the sensors to
regulate the temperature and control the flow of steam. Refer to the Installation Guide for the
Steam Control Kit.
WARNING: Risk of scalding. Do not block the steam head or locate it near a seat or bench, as the
steam head is hot during operation and may scald the user if touched.
Steam Head and Control Applications
NOTE: All dimensions should be taken from the inside of the shower.
IMPORTANT! Do not install the Steam Control User Interface outside the steam enclosure. Review the
Installation Guide for the Steam Control Kit. Do not install the control directly above or in-line with the
steam head.
Refer to the Steam Control Kit Installation Instructions for more information.
It is recommended to locate the steam heads and the steam control on the same wall as the
plumbing controls.
Locate the steam heads 6″ (15.2 cm) above the shower floor and 4 1/2″ (11.4 cm) from the threshold.
Locate the steam control 60″ (152.4 cm) above the floor of the shower, but not directly in-line with
the steam heads. Refer to the Steam Control Kit Installation Instructions for more dimensional and
installation information.
Make sure there is adequate clearance between the steam lines and any surrounding surfaces.
Kohler Co. 5 1053772-2-E
Page 6
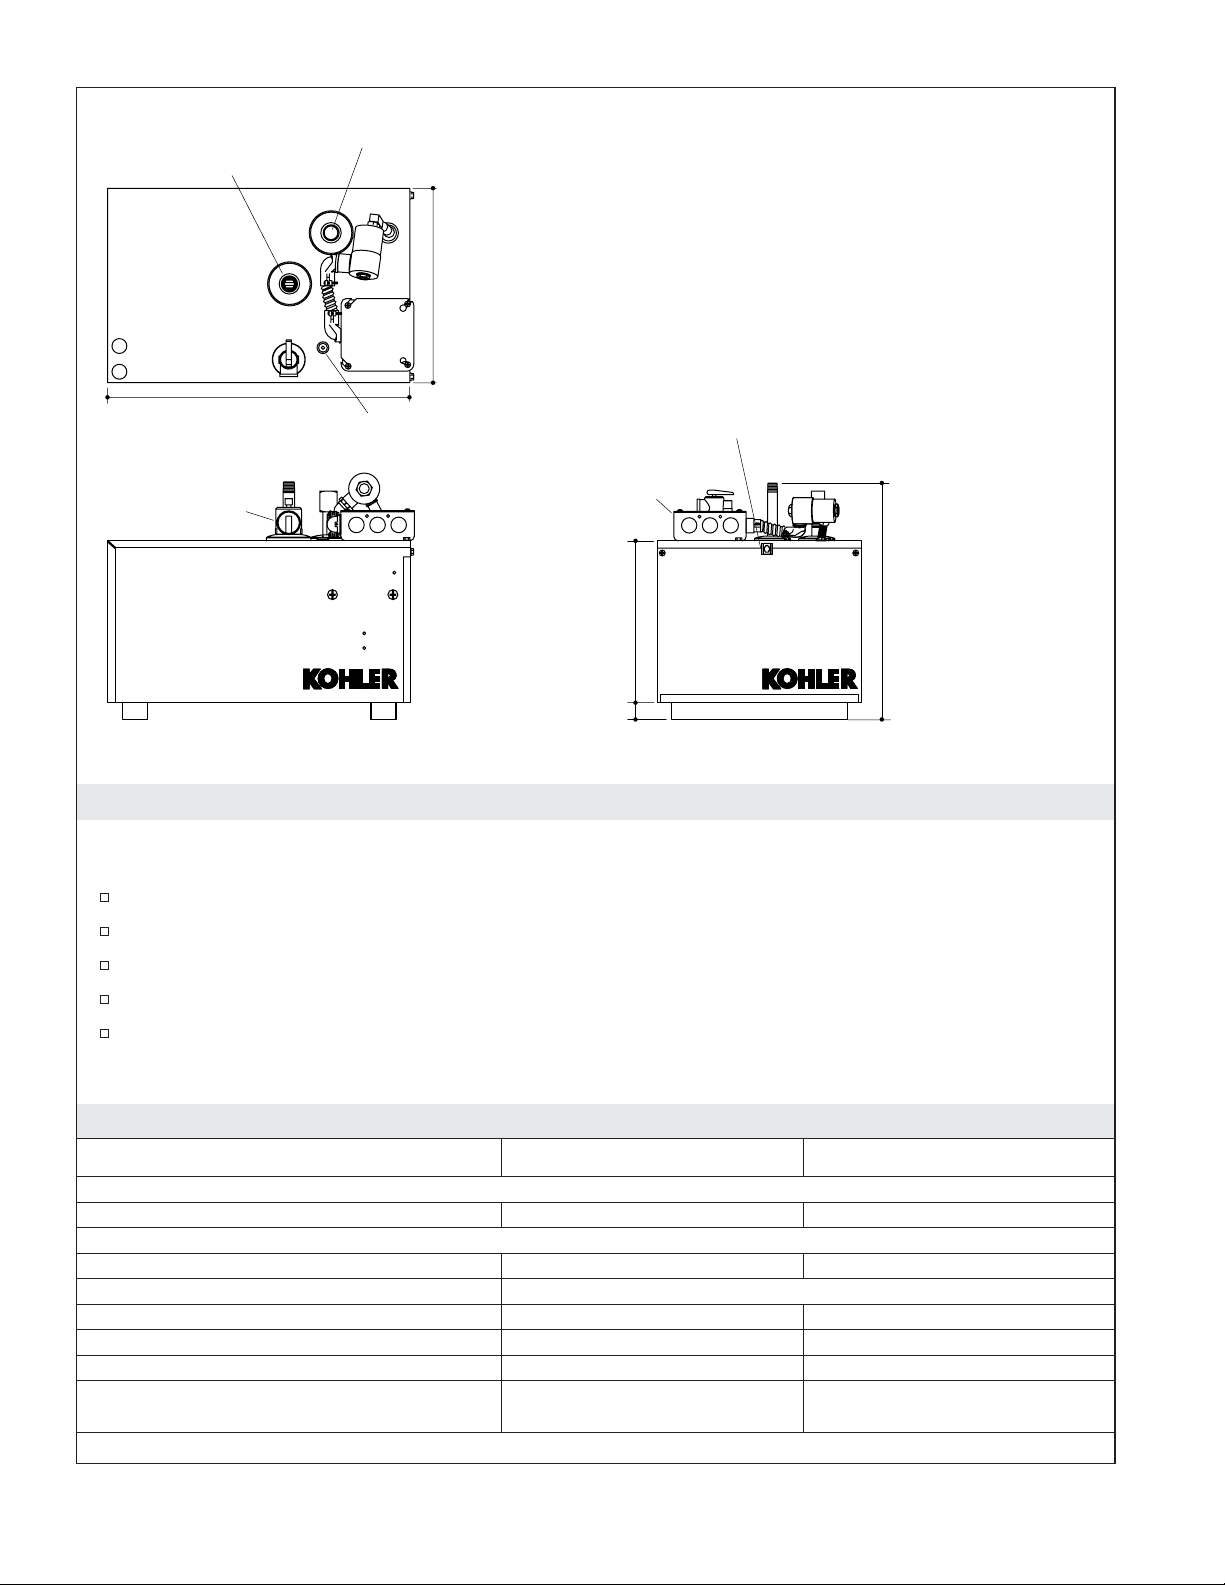
Steam Outlet
Water Inlet
11-3/4"
(29.8 cm)
Minimum required access panel is
24" (61 cm) L x 15" (38.1 cm) H.
Allow for a minimum of 12" (30.5 cm) of
space around all sides of the steam generator.
Allow for the Drain/Spill Pan.
17-3/4" (45.1 cm)
3/4" NPT
Pressure Relief
Green LED
Diagnostic Light
Field Wiring
Service Box
8-3/8"
(21.3 cm)
3/4" (1.9 cm) Min
Control
Cable Input
12"
(30.5 cm)
3. Determine the Location of the Steam Generator
IMPORTANT! The minimum required access panel is 24″ (61 cm) L x 15″ (38.1 cm) H. Allow for a
minimum 12″ (30.5 cm) space around all sides of the steam generator.
Ensure clearance between the steam line and any surrounding surfaces.
Allow for access to the steam generator after installation.
Allow for a 12″ (30.5 cm) air gap on all sides of the generator.
Allow for a drain or spill pan.
For optimum performance, install the steam generator below the level of the steam head and as
close as possible to the steam head. The steam generator should be installed within 25 ft (7.62 m) of
the steam head in a dry, well-ventilated area
4. Install the Electrical Supply
Model K-1696-NA K-1713-NA
Required Electrical Service
Generator Dedicated Circuit 13 kW, 240 V, 80 A, 50/60 Hz 15 kW, 240 V, 90 A, 50/60 Hz
Product Information
Weight 32 lbs (14.5 kg ) 32 lbs (14.5 kg )
Size 18″ (45.7 cm) L x 12″ (30.5 cm) x 13″ (33 cm)
Electrical Rating 240 V, 59 A, 50/60 Hz 240 V, 68 A, 50/60 Hz
Water Supply 3/8″ copper line 3/8″ copper line
Water Supply Shut-Off Valve 3/8″ NPT female 3/8″ NPT female
Steam Line 1/2″ copper line (1/2″ NPT
thread)
1053772-2-E 6 Kohler Co.
1/2″ copper line (1/2″ NPT
thread)
Page 7
Install the Electrical
Supply (cont.)
Pressure Relief Valve (supplied) 3/4″ NPT female thread 3/4″ NPT female thread
Sizing The Steam Room 447 cu ft (13 cu m) 500 cu ft (14 cu m)
DANGER: Risk of electrocution. Disconnect the electricity to the working area at the main breaker
panel before performing these installation steps.
Follow all local electrical codes. All electrical work should be done by a qualified electrician.
Review the illustration showing specific Steam Generator Installation Requirements for your Steam
Generator.
Install the appropriate electrical supply.
Kohler Co. 7 1053772-2-E
Page 8
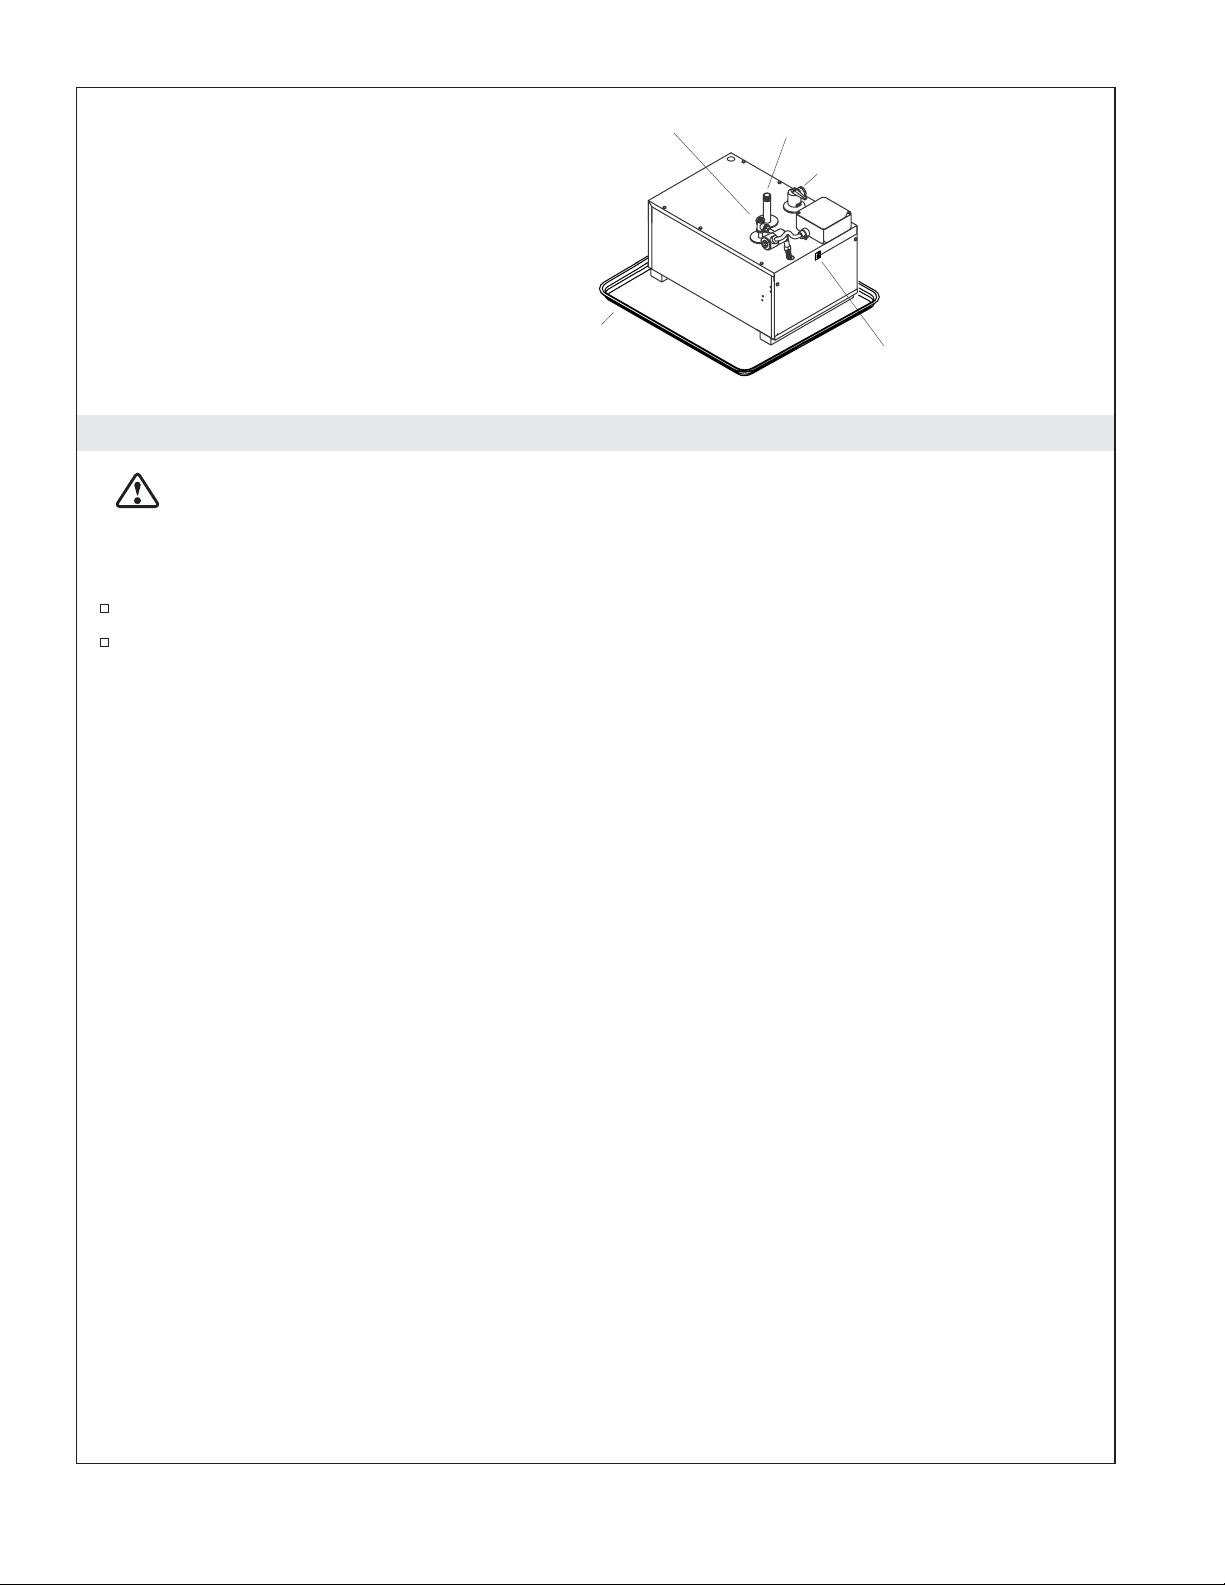
Maintain a 12" (30.5 cm) minimum
space around the units.
Inlet
Drain Pan
Steam Outlet
Pressure Relief Valve
Control Cable
Input
5. Install the Steam Generator
WARNING: Risk of property damage. Allow a minimum of 12″ (30.5 cm) of air space around the
steam generator at all times. This provides an area for the heat generated by the unit to dissipate.
NOTICE: For optimum performance, install the steam generator as close as possible to the steam head.
The steam generator must be installed within 25’ (7.62 m) of the steam head.
Install the desired drain pan at the steam generator location.
Position the steam generators on the support blocks.
1053772-2-E 8 Kohler Co.
Page 9

Steam Head
Steam Trap
Pitch toward generator.
Drain Pan
Do not run pipes
down and then up.
Copper
Union
Recommended
In-Line Water Filter
Provide clearance
from wall.
Shut-Off
Valve
Tee
1" (2.5 cm) Min
6" (15.2 cm)
from Floor
Water Inlet
Temporary
Nipple
Wall Stud
2-1/2" (6.4 cm)
6. Install the Water Supply and Steam Line
WARNING: Risk of scalding. Do not plumb a trap, shut-off valve, or pressure relief valve into the
steam line. Plumbing the pressure relief valve into the steam line can be hazardous, if the steam
outlet is capped.
Install the Water Supply Line to the Generator
NOTE: For all NPT threaded connections, use pipe tape or pipe sealant. Do not overtighten the fittings.
Connect to an existing cold water line, and run a 3/8″ cold water line to a shut-off valve before the
in-line water filter.
Before final connection to the steam generator, flush out the water supply line into a large pail. This
removes any debris, silt, sand, or other material that may be in the line.
Install 3/8″ copper tubing with a union fitting between the in-line water filter and the water inlet to
the steam generator.
Connect the water supply line to the steam generator.
Fill the steam generator with water and check for leaks.
NOTICE: Steam generators are equipped with an automatic shut-off. The water will stop after the unit is
full. If the water flows out of the steam outlet shut off the water and consult the ″Troubleshooting Guide″
or contact the Customer Care Center using the number located on the back of this document.
If the water supply line exceeds 10’ (3 m) or is exposed to cold areas, insulate the piping with
appropriate insulation.
Install the Steam Line
Kohler Co. 9 1053772-2-E
Page 10
Install the Water Supply and Steam Line (cont.)
WARNING: Risk of scalding. Do not locate the steam head near a seat or bench or scalding may
occur upon contact with the steam head.
NOTICE: Never run the steam line down, then up. Running the steam line down and then up will create
a steam trap, blocking the flow of steam. The steam line should run up to the steam head from the steam
generator, at a pitch of 3/8″ (1 cm) to 1/2″ (1.3 cm) per 12″ (30.5 cm) of pipe.
NOTICE: Provide clearance between the back wall and the elbow leading into the steam housing. The
elbow must not contact any wall material.
NOTICE: Provide clearance between the steam line and surrounding surfaces.
NOTICE: Do not apply excessive heat to the generator connections when you solder connections. Do not
apply flux or acids directly to the steam generator, as damage to the seals, plastic components, and trim
finish may result. Do not apply petroleum-based lubricants to the steam generator components, as damage
may result.
NOTE: For all the threaded connections, use thread sealant tape or pipe sealant. Do not overtighten the
fittings.
NOTE: Use 1/2″ copper tube for the steam line.
NOTE: Always install a union fitting as close to the steam generator as possible.
Add blocking behind the desired steam head location.
Install and secure a 1/2″ NPT elbow to the blocking directly behind the desired steam head
location.
Cut a hole through the wall material to accept a temporary 1/2″ copper tube nipple.
Add a temporary 1/2″ copper tube nipple.
1053772-2-E 10 Kohler Co.
Page 11

240 VAC Source
N
L1
L2
Breaker Box
Typical Two-Pole
Circuit Breaker
without GFCI
*L2
120V
Neutral Bus
(In Breaker Box)
240V
*L1
120V
240V
*Equipment Ground
Ground
Green
7. Connect the Electrical Supply
DANGER: Risk of electrocution. Disconnect all power before performing these installation steps.
NOTICE: All electrical work should be done by a qualified electrician.
Black - L2
Ground
Black - L1
Wire Connector (3)
Electrician to provide
suitable strain relief cable.
L1
L2
Generator
NOTICE: All electrical wiring must be done in accordance with local codes.
NOTICE: Each steam generator requires a dedicated circuit.
Connect the Power
Turn off all electricity to the working area at the main circuit breaker panel.
Connect 240 VAC electrical line to the wires labeled ″L1″, ″L2″, and the green (ground) wire coming
out of the steam generator field service box located on top of the steam generator.
Confirm the ground connection has been made in the field service box.
Close the field service box.
Turn on the main power.
The function light should display a green light. If the function light is not green, consult the
″Troubleshooting Guide″ or contact the Customer Care Center using the number located on the back
of this document.
8. Complete the Installation
Install the steam housing and steam head following the instructions packed with the Steam Control
Kit.
Install the steam control following the instructions packed with the Steam Control Kit.
Kohler Co. 11 1053772-2-E
Page 12
Complete the Installation (cont.)
To operate the steam control, follow the operation instructions provided with the Steam Control
Kit.
Warranty
KOHLER Steam Generator
THREE-YEAR LIMITED WARRANTY
Kohler steam generator units manufactured after September 15, 2001, are warranted to the original consumer
purchaser to be free of manufacturing defects in material and workmanship during normal residential usage
for three (3) years from the date of installation. This warranty only applies to KOHLER steam generator units
installed in the United States of America, Canada or Mexico (″North America″).
If a defect is found in normal residential usage, Kohler Co. will, at its election, repair or replace the unit, or
make appropriate adjustment. Damage caused by accident, misuse or abuse is not covered by this warranty.
Proof of purchase (original sales receipt) must be provided to Kohler Co. with all warranty claims. Kohler
Co. is not responsible for labor charges, removal charges, installation, or other consequential costs. In no
event shall the liability of Kohler Co. exceed the purchase price of the unit.
If this unit is used commercially or installed outside of North America, Kohler Co. warrants the unit to be
free from defects in material and workmanship for one (1) year from the date of installation with all other
terms of this warranty applying except duration.
To obtain warranty service contact Kohler Co., either through your Dealer, Plumbing Contractor, Home
Center or E-tailer or by writing Kohler Co., Attn: Customer Care Center, 444 Highland Drive, Kohler, WI
53044, USA, or by calling 1-800-4-KOHLER (1-800-456-4537) from within the USA and Canada, and
001-800-456-4537 from within Mexico, or visit www.kohler.com within the USA, www.ca.kohler.com from
within Canada, or www.mx.kohler.com in Mexico.
KOHLER CO. AND/OR SELLER ARE PROVIDING THESE WARRANTIES IN LIEU OF ALL OTHER
WARRANTIES, EXPRESSED OR IMPLIED, INCLUDING BUT NOT LIMITED TO THE IMPLIED
WARRANTIES OF MERCHANTABILITY AND FITNESS FOR A PARTICULAR PURPOSE. KOHLER CO.
AND/OR SELLER DISCLAIM ANY LIABILITY FOR SPECIAL, INCIDENTAL OR CONSEQUENTIAL
DAMAGES. Some states/provinces do not allow limitations on how long an implied warranty lasts, or the
exclusion or limitation of special, incidental or consequential damages, so these limitations and exclusions
may not apply to you. This warranty gives you specific legal rights. You may also have other rights, which
vary from state/providence to state/providence.
This is Kohler Co.’s exclusive written warranty.
Troubleshooting Guide
CAUTION: Troubleshooting steps involving internal wires or electrical components should be
performed by a qualified electrician.
NOTE: This troubleshooting only applies to the steam generator. For issues involving the steam control,
consult the troubleshooting guide provided with the Steam Control Kit documentation.
The troubleshooting guide is for general aid only. For service and installation issues and concerns, contact
the Customer Care Center using the information on the back of this guide.
1053772-2-E 12 Kohler Co.
Page 13

Troubleshooting Guide (cont.)
Symptoms Probable Causes Recommended Action
1. The green LED light is
not on.
A. No electrical power at generator. A1. Reset the power at the breaker.
A2. Have a qualified electrician verify
that 240 V of power is present at
the generator.
B. Circuit breaker is in the ″Off″
B. Turn on the power at the breaker.
position.
C. Circuit breaker is not the correct
size.
C. Verify the circuit breaker is sized
appropriately. If it is the wrong
size, replace it.
D. Electrical connection in the field
service box on the generator is
loose.
D. Turn off all electrical power to the
generator. Have a qualified
electrician open the field service
box and check all connections.
Have a qualified electrician repair
any poor connections.
2. There is a continuous
flow of water from the
steam head. Water flow
during the power clean
cycle is normal.
A. Components internal to the
generator are not functioning
properly.
A1. Shut off the water supply and
drain the water from the generator.
Close the drain valve.
A2. Partially open the supply shut-off
valve a small amount.
A3. Allow the water to gradually fill
the tank inside the generator (may
take several minutes). If the water
continues to flow from the steam
head, A1.
A4. Fully open the water supply
shut-off valve.
A5. On models with power clean
option only, if water continues to
flow from the steam head, run the
power clean cycle.
A6. If water continues to flow from the
steam head, contact the Customer
Care Center using the information
on the back of this guide.
B. The water supply is incorrectly
connected to the generator.
B. Review the installation guide and if
necessary reconnect the water
supply to the proper location.
Kohler Co. 13 1053772-2-E
Page 14

Guide d’installation
Générateur de vapeur
Outils et matériels
Plus:
• Plateau de dégivrage
• Tube en cuivre de 1/2"
• Raccords en cuivre assortis; Union en cuivre NPT 3/8", 1/2" & 3/4"
• Coupe-câble et outil à dénuder
• Outils conventionnels de menuiserie et matériels
• Coudes de 45 et 90 degrés
• Blocs de support (résistante à la chaleur)
Scie à métaux ou
coupe tube
Percer un orifice avec
mèche de 1-1/4" & 2-1/2"
Ruban
d'étanchéité
Soudure
Chalumeau à propane
Avant de commencer
IMPORTANT! Des précautions de base devraient toujours être observées lors de l’utilisation de cette
unité.
DANGER: Risque d’électrocution. Débrancher au disjoncteur principal avant de procéder à ces
étapes d’installation.
AVERTISSEMENT: Risque de blessures corporelles. Si vous vous sentez mal à l’aise lors du bain,
éteindre l’unité. Se rafraîchir avec la douche, ouvrir la porte, ou sortir de l’unité.
AVERTISSEMENT: Risque d’allergie. Avant d’ajouter des huiles, thérapies aromatiques, ou
produits de soin de la peau à l’aromathérapie, s’assurer que ces produits n’entraîne aucune réaction
allergique à l’utilisateur.
AVERTISSEMENT: Risque de blessures corporelles. Ce bain de vapeur n’est pas conseillé aux
femmes enceintes, aux personnes souffrant de maladies cardiaques, d’hypertension, de problèmes
de circulation, ou sous l’emprise d’alcool, de drogues ou sous traitement médical. Le bain de
vapeur peut infliger de la fatigue au corps, de même façon que tout bain chaud, douche, ou sauna.
AVERTISSEMENT: Risque de blessures corporelles. NE PAS consommer de boissons alcoolisées
ou de médicaments/drogues avant ou pendant l’utilisation du bain de vapeur. L’alcool et les
drogues peuvent affecter les facultés mentales et inhiber certaines fonctions corporelles telles que le
battement de coeur et la respiration, entraînant des effets potentiellement dangereux.
AVERTISSEMENT: Risque de blessure aux enfants. Ne pas permettre aux enfants d’utiliser l’unité
sans surveillance à tout moment. Le générateur de vapeur n’est pas conçu pour les enfants.
AVERTISSEMENT: Risque de blessures corporelles. Ne pas niveler un siphon ou une valve de
décharge avec la ligne de vapeur. L’installation d’une soupape de décharge à cet endroit peut créer
un danger si la sortie de vapeur est bouchée.
Kohler Co. Français-1 1053772-2-E
Page 15

Avant de commencer (cont.)
AVERTISSEMENT: Risque de blessures ou d’endommagement du produit. Éviter de toucher le
réservoir d’eau et/ou le tuyau d’évacuation de vapeur pendant l’opération du générateur ou juste
après son arrêt. Utiliser des lunettes et des vêtements de protection pendant l’entretien du
générateur de vapeur. Le générateur de vapeur fonctionne à hautes températures.
AVIS: N’utiliser cette unité que pour l’usage destiné tel qu’indiqué dans ce manuel. NE PAS utiliser des
dispositifs de fixation non recommandés par la Kohler Co.
AVIS: Ne pas appliquer de chaleur excessive sur les raccords de générateur pendant le soudage des
connexions. Ne pas mettre de décapant ou d’acide directement sur le générateur, pour éviter
d’endommager les joints, composants en plastique ou pièces internes. Ne pas appliquer de lubrifiants à
base de pétrole sur les composants du générateur, au risque de l’endommager.
Inspecter le produit pour s’assurer de l’absence de tout dommage. Contacter le service d’assistance à
la clientèle de KOHLER en utilisant l’information fournie à l’arrière de ce guide.
Respecter tous les codes de plomberie et électriques locaux. Tout le travail électrique doit être réalisé
par un électricien qualifié.
Débrancher avant d’effectuer toute connexion électrique.
Connecter le générateur aux lignes d’alimentation d’eau qui sont conformes à tous les codes de
plomberie.
Pour des installations customisées, localiser la tête de vapeur à 6″ (15,2 cm) du sol et 4-1/2″ (11,4
cm) de l’intérieur du seuil.
Kohler Co. se réserve le droit d’apporter toutes modifications sur le design des produits et ceci sans
préavis, tel que spécifié dans le catalogue des prix.
Kohler Co. Français-2 1053772-2-E
Page 16

Installer le raccord en cuivre aussi près
que possible du générateur de vapeur.
Incliner vers le
générateur.
Valve de décharge
Union
en cuivre
Valve de
fermeture
T
Tête de
vapeur
Plateau de drain
1. Déterminer la disposition
AVERTISSEMENT: Risque d’endommagement du matériel. Laisser un minimum de 12″ (30,5 cm)
de dégagement d’air autour du générateur de vapeur à tout moment. Ceci fournit un espace pour
que la chaleur générée par l’unité se dissipe.
AVERTISSEMENT: Risque de blessures corporelles. Ne pas installer l’interface utilisateur de
contrôle de vapeur hors de l’enceinte à vapeur. L’interface utilisateur doit être installée dans
l’enceinte pour permettre aux capteurs de régler la température et commander le débit de la vapeur.
Se reporter au guide d’installation pour la trousse de commande de vapeur.
Avant du générateur
(Panneau d'accès)
Entrée eau
Flitre d'eau en ligne
recommandé
Entrée câble de contrôle
AVIS: Lors de l’installation du kit de contrôle, prévoir de l’espace pour un anneau d’écoulement du câble
de contrôle. L’ anneau d’écoulement préviendra l’humidité de s’écouler le long du câble de contrôle au
générateur de vapeur.
AVIS: Le générateur de vapeur fonctionnera mieux lorsqu’il est installé plus proche de la tête de vapeur.
L’unité doit être installée à une distance maximale de 25’ (7,62 m) par rapport à la tête de vapeur.
AVIS: Pour un rendement optimal, installer le générateur de vapeur au-dessous du niveau de la tête de
vapeur.
REMARQUE: Lorsque possible, utiliser des coudes de 45 degrés. La performance sera meilleure lorsque
des coudes de 45 degrés sont utilisés.
Déterminer l’emplacement du générateur de vapeur. Permettre un passage d’air de 12″ (30,5 cm) sur
tous les côtés du générateur. Laisser de l’espace pour le placement d’un plateau de drain.
Choisir un plateau de drain approprié pour l’installation en question. Le plateau de dégivrage n’est
pas inclus.
1053772-2-E Français-3 Kohler Co.
Page 17

Fournir un
dégagement
du mur.
6" (15,2 cm) du sol
2-1/2" (6,4 cm)
Montant
mural
2. Déterminer l’emplacement du matériel pour la vapeur
AVERTISSEMENT: Risque de blessures corporelles. Ne pas installer l’interface utilisateur de
contrôle de vapeur hors de l’enceinte à vapeur. L’interface utilisateur doit être installée dans
l’enceinte pour permettre aux capteurs de régler la température et commander le débit de la vapeur.
Se reporter au guide d’installation pour la trousse de commande de vapeur.
AVERTISSEMENT: Risque de brûlures. Ne pas bloquer la tête de vapeur ou localiser près d’un
siège ou banc, car elle est chaude durant l’opération et pourrait brûler l’utilisateur.
Applications de têtes de vapeur et de la commande
REMARQUE: Toutes les dimensions doivent être prises à partir de l’intérieur de la douche.
IMPORTANT! Ne pas installer l’interface utilisateur de contrôle de vapeur hors de l’enceinte à vapeur.
Lire le guide d’installation pour la trousse de commande de vapeur. Ne pas installer la commande
directement au-dessus de la tête de vapeur ou en ligne avec celle-ci.
Se reporter aux instructions d’installation du kit de commande de vapeur pour obtenir des
informations supplémentaires.
Il est recommandé de placer les têtes de vapeur et la commande de vapeur sur le même mur que
celui portant les commandes de plomberie.
Placer les têtes de vapeur à 6″ (15,2 cm) au-dessus du sol de la douche et à un minimum de 4-1/2″
(11,4 cm) du seuil.
Placer la commande de vapeur à 60″ (152,4 cm) au-dessus du sol de la douche, mais pas
directement en ligne avec les têtes de vapeur. Se reporter aux instructions d’installation du kit de
commande de vapeur pour obtenir des informations sur les dimensions et l’installation.
S’assurer qu’ilyaundégagement adéquat entre les conduits de vapeur et les surfaces alentour.
Kohler Co. Français-4 1053772-2-E
Page 18

Sortie de vapeur
Entrée eau
11-3/4" (29,8 cm)
Le panneau d'accès minimum requis est de
24" (61 cm) L x 15" (38,1 cm) H.
Laisser un espace minimum de 12" (30,5 cm)
autour de tous les côtés du générateur de vapeur.
Prévoir pour le plateau de drain/déversement.
17-3/4" (45,1 cm)
Soupape de
décharge 3/4" NPT
Voyant de diagnostic
DEL vert
Boîtier
service câblage
8-3/8"
(21,3 cm)
3/4" (1,9 cm) Min
Entrée câble
de contrôle
12" (30,5 cm)
3. Déterminer l’emplacement du générateur de vapeur
IMPORTANT! Le panneau d’accès minimum requis est de 24″ (61 cm) L x 15″ (38,1 cm) H. Laisser un
espace minimum de 12″ (30,5 cm) autour de tous les côtés du générateur de vapeur.
S’assurer que le dégagement entre le conduit de vapeur et toute surface alentour.
Laisser un espace d’accès au générateur après l’installation.
Permettre un passage d’air de 12″ (30,5 cm) sur tous les côtés du générateur.
Laisser de l’espace pour le placement d’un plateau de drain ou de déversement.
Pour une performance optimale, installer le générateur de vapeur au-dessous du niveau de la tête
de vapeur et aussi proche de cette dernière que possible. Le générateur de vapeur doit être installé
dans les 25 pieds (7,62 m) de la tête de vapeur dans un endroit sec et bien ventilé.
4. Installer l’alimentation électrique
Modèle K-1696-NA K-1713-NA
Branchement électrique requis
Circuit dédié au générateur 13 kW, 240 V, 80 A, 50/60 Hz 15 kW, 240 V, 90 A, 50/60 Hz
Information sur le produit
Poids 32 lbs (14,5 kg) 32 lbs (14,5 kg)
Taille 18″ (45,7 cm) L x 12″ (30,5 cm) x 13″ (33 cm)
Caractéristiques électriques 240 V, 59 A, 50/60 Hz 240 V, 68 A, 50/60 Hz
Alimentation d’eau Ligne en cuivre de 3/8″ Ligne en cuivre de 3/8″
Valve d’arrêt d’alimentation en eau 3/8″ NPT femelle 3/8″ NPT femelle
Conduite de vapeur Tuyau de 1/2″ en cuivre
(filetage de 1/2″ NPT)
1053772-2-E Français-5 Kohler Co.
Tuyau de 1/2″ en cuivre
(filetage de 1/2″ NPT)
Page 19

Installer l’alimentation
électrique (cont.)
Valve de décharge (fournie) Filetage femelle de 3/4″ NPT Filetage femelle de 3/4″ NPT
Évaluer la taille du bain à vapeur 447 pi cubes (13 m cubes) 500 pi cubes (14 m cubes)
DANGER: Risque d’électrocution. Débrancher au disjoncteur principal avant de procéder à ces
étapes d’installation.
Suivre tous les codes électriques locaux. Tout le travail électrique doit être réalisé par un électricien
qualifié.
Examiner l’illustration indiquant les exigences d’installation spécifiques relatives au générateur de
vapeur pour votre générateur de vapeur.
Installer l’alimentation électrique appropriée.
Kohler Co. Français-6 1053772-2-E
Page 20

Maintenir un espace minimum de
12" (30,5 cm) autour des unités.
Plateau de drainage
Entrée
Sortie de vapeur
Valve de décharge
Entrée câble
de contrôle
5. Installer le générateur de vapeur
AVERTISSEMENT: Risque d’endommagement du matériel. Laisser un minimum de 12″ (30,5 cm)
de dégagement d’air autour du générateur de vapeur à tout moment. Ceci fournit un espace pour
que la chaleur générée par l’unité se dissipe.
AVIS: Pour obtenir une performance optimale, installer le générateur de vapeur aussi près que possible de
la tête de vapeur. Le générateur de vapeur doit être installé à une distance maximale de 25’ (7,62 m) par
rapport à la tête de vapeur.
Installer le plateau de drain souhaité à l’emplacement du générateur de vapeur.
Positionner les générateurs de vapeur sur les blocs de support.
1053772-2-E Français-7 Kohler Co.
Page 21

Incliner vers le générateur.
Tête de vapeur
Plateau de drainage
Raccord
en cuivre
Flitre d'eau en
ligne recommandé
Fournir un dégagement
du mur.
6" (15,2 cm) du sol
Valve
d'arrêt
T
1" (2,5 cm) Min.
Entrée d'eau
Mamelon
temporaire
Montant
mural
Purgeur de
vapeur
Ne pas acheminer les tuyaux
vers le bas puis vers le haut.
2-1/2" (6,4 cm)
6. Installer l’alimentation en eau et le conduit de vapeur
AVERTISSEMENT: Risque de brûlures. Ne pas plomber un siphon, une valve d’arrêt ou une valve
de décharge à la conduite de vapeur. L’installation d’une soupape de décharge à cet endroit peut
créer un danger si la sortie de vapeur est bouchée.
Installer le conduit d’alimentation en eau sur le générateur
REMARQUE: Pour toutes les connexions filetées NPT, utiliser du ruban ou du mastic d’étanchéité pour
tuyaux. Ne pas trop serrer les raccords.
Connecter sur un conduit d’eau froide existant et acheminer un conduit d’eau froide de 3/8″ sur un
valve d’arrêt avant le filtre d’eau intégré.
Avant la connexion finale au générateur de vapeur, vidanger le conduit d’alimentation en eau dans
une grand seau. Ceci élimine tous les débris, tout le limon, tout le sable et tout autre matériau qui
pourrait se trouver dans le conduit.
Installer une tubulure en cuivre de 3/8″ avec un raccord-union entre le filtre d’eau intégré et l’entrée
d’eau vers le générateur de vapeur.
Connecter le conduit d’alimentation en eau au générateur de vapeur.
Remplir le générateur de vapeur avec de l’eau et rechercher des fuites.
AVIS: Les générateurs de vapeur sont munis d’un arrêt automatique. L’eau s’arrêtera lorsque l’unité est
remplie. Si de l’eau s’écoule de la sortie de vapeur, couper l’eau et consulter le ″Guide de dépannage″ ou
appeler le service d’assistance à la clientèle en utilisant le numéro situé sur la page arrière de ce document.
Si le tuyau d’alimentation en eau dépasse 10’ (3 m) ou s’il est exposée à des emplacements froids,
isoler cette tuyauterie avec une isolation appropriée.
Kohler Co. Français-8 1053772-2-E
Page 22

Installer l’alimentation en eau et le conduit de vapeur (cont.)
Installer le conduit de vapeur
AVERTISSEMENT: Risque de brûlures. Ne pas localiser la tête de vapeur près d’un siège ou d’un
banc car des brûlures pourraient être causées par contact avec la tête de vapeur.
AVIS: Ne jamais faire passer la ligne de vapeur vers le bas puis le haut. Cela provoquera l’obstruction de
la vapeur, bloquant le débit de vapeur. Le conduit de vapeur devrait aller à la tête de vapeur à partir du
générateur de vapeur, à une inclinaison comprise entre 3/8″ (1 cm) et 1/2″ (1,3 cm) par 12″ (30,5 cm) de
tuyau.
AVIS: Fournir un dégagement entre le mur arrière et le coude allant dans le logement de la vapeur. Le
coude ne doit pas entrer en contact avec du matériau mural.
AVIS: Fournir un dégagement entre le conduit de vapeur et les surfaces alentour.
AVIS: Ne pas appliquer de chaleur excessive sur les raccords de générateur pendant le soudage des
connexions. Ne pas mettre de flux décapants ou d’acides directement sur le générateur de vapeur, vu que
ceci pourrait endommager les joints, les composants en plastique ou la finition des garnitures. Ne pas
appliquer de lubrifiants à base de pétrole sur les composants du générateur de vapeur, vu que ceci
pourrait créer des dommages.
REMARQUE: Pour toutes les connexions filetées, utiliser du ruban ou du mastic d’étanchéité pour tuyaux.
Ne pas trop serrer les raccords.
REMARQUE: Utiliser un tube en cuivre de 1/2″ pour le conduit de vapeur.
REMARQUE: Toujours installer un raccord-union aussi près du générateur de vapeur que possible.
Ajouter un blocage à l’arrière de l’emplacement souhaité pour la tête de vapeur.
Installer et fixer un coude NPT de 1/2″ sur le blocage, directement à l’arrière de l’emplacement de
tête de vapeur souhaité.
Découper un trou à travers le matériau du mur pour accepter un mamelon de tube en cuivre
temporaire de 1/2″.
Ajouter un mamelon de tube en cuivre temporaire de 1/2″.
1053772-2-E Français-9 Kohler Co.
Page 23

Source 240 V c.a.
N
Bus neutre (dans le boîtier du disjoncteur)
L1
120 V
120 V
240 V
* Terre de l'équipement
Boîtier du
L2
disjoncteur
Disjoncteur typique à deux
pôles sans GFCI
*L2
240 V
*L1
Terre
Vert
L'électricien doit fournir un
câble réducteur de tension adapté.
Noir - L2
Terre
L1
L2
Noir - L1
Connecteur de fil (3)
Générateur
7. Connecter l’alimentation électrique
DANGER: Risque d’électrocution. Débrancher avant de réaliser ces étapes d’installation.
AVIS: Tout le travail électrique doit être réalisé par un électricien qualifié.
AVIS: Tout le câblage électrique doit être conforme aux codes locaux.
AVIS: Chaque générateur de vapeur exige un circuit dédié.
Connecter l’alimentation
Couper toute l’électricité vers l’emplacement de travail au niveau du panneau du disjoncteur
principal.
Connecter un conduit électrique de 240 V c.a. aux fils étiquetés ″L1″, ″L2″, ainsi qu’au fil vert (terre)
sortant du boîtier de service du générateur de vapeur situé sur le dessus du générateur de vapeur.
Confirmer que la connexion à la terre a été effectuée dans le boîtier de service.
Fermer le boîtier de service.
Mettre l’alimentation principale en marche.
Le voyant de fonction doit s’afficher en vert. Si le voyant de fonction n’est pas vert, consulter le
″Guide de dépannage″ ou contacter le service d’assistance à la clientèle en utilisant le numéro situé
à l’arrière de ce document.
Kohler Co. Français-10 1053772-2-E
Page 24

8. Terminer l’installation
Installer le boîtier de vapeur et la tête de vapeur en suivant les instructions accompagnant le kit de
commande de vapeur.
Installer la commande de vapeur en suivant les instructions accompagnant le kit de commande de
vapeur.
Pour faire fonctionner la commande de vapeur, suivre les instructions d’opération fournies avec la
trousse de commande de vapeur.
Garantie
Générateur de vapeur KOHLER
GARANTIE LIMITÉE DE TROIS ANS
Les unités de générateur de vapeur Kohler fabriqués après le 15 Septembre 2001, sont garantis au
consommateur acquéreur original être sans défaut de matériel et de fabrication durant une utilisation
résidentielle normale pendant trois (3) ans à partir de la date d’installation. Cette garantie s’applique
uniquement aux générateurs de vapeur KOHLER installés aux États-Unis, au Canada ou au Mexique
(″Amérique du Nord″).
Si un défaut est décelé en cours d’usage normal domestique, Kohler Co. décidera, à son choix, de réparer ou
de remplacer l’unité ou d’effectuer les réglages appropriés. Un endommagement causé par un accident,
mauvais usage ou mauvais traitement n’est pas couvert par cette garantie. Une preuve d’achat (ticket de
caisse original) doit être présentée à Kohler Co. avec tous les recours en garantie. Kohler Co. n’est pas
responsable des coûts de main-d’oeuvre, de démontage, d’installation ou d’autres frais qui en découlent. La
responsabilité de Kohler Co. n’excédera en aucun cas le prix d’achat de l’unité.
Si cette unité est utilisée dans un commerce ou si elle est installée hors d’Amérique du Nord, Kohler Co.
garantit l’unité contre tout défaut de matériel et de fabrication pour un (1) an à partir de la date
d’installation, en plus de respecter tous les autres termes de cette garantie, excepté la durée.
Pour obtenir un service-garantie, contacter Kohler Co. par l’intermédiaire de votre vendeur, plombier, centre
de rénovation, revendeur par Internet ou par écrit à Kohler Co. à l’attention de: Customer Care Center, 444
Highland Drive, Kohler, WI 53044, États-Unis, ou appeler le 1-800-4-KOHLER (1-800-456-4537) des États-Unis
et du Canada, et le 001-800-456-4537 du Mexique, ou consulter le site www.kohler.com aux États-Unis,
www.ca.kohler.com au Canada ou www.mx.kohler.com au Mexique.
KOHLER CO. ET/OU LE REVENDEUR FOURNISSENT CES GARANTIES AU LIEU DE TOUTES
AUTRES GARANTIES, EXPRESSES OU TACITES, Y COMPRIS LES GARANTIES IMPLICITES
MARCHANDES ET D’APTITUDE À UN EMPLOI PARTICULIER. KOHLER CO. ET/OU LE
REVENDEUR DÉNIENT TOUTE RESPONSABILITÉ POUR DES DOMMAGES PARTICULIERS,
INDIRECTS OU CONSÉCUTIFS. Certains états/provinces ne permettent pas les limitations sur la durée
de la garantie implicite, ou l’exclusion ou la limitation de dommages particuliers, indirects ou consécutifs,
et, par conséquent, ces limitations et exclusions pourraient ne pas s’appliquer dans votre cas. Cette
garantie vous donne des droits légaux spécifiques. Vous pouvez également avoir d’autres droits qui
varient d’un état/d’une province à l’autre.
Ceci constitue la garantie écrite exclusive de Kohler Co.
Guide de dépannage
ATTENTION: Les procédures de dépannage impliquant des fils internes ou des composants
électriques doivent être effectuées par un électricien qualifié.
REMARQUE: Ce dépannage est seulement applicable au générateur de chaleur. Pour les problèmes relatifs
à la commande de vapeur, consulter le guide de dépannage fourni avec la documentation du kit de
commande de vapeur.
Le guide de dépannage est seulement destiné à une aide générale. Pour les problèmes d’entretien et
d’installation, contacter le service d’assistance à la clientèle en utilisant l’information fournie à l’arrière de ce
guide.
1053772-2-E Français-11 Kohler Co.
Page 25

Guide de dépannage (cont.)
Symptômes Causes probables Action recommandée
1. Le voyant DEL vert n’est
pas allumé.
A. Aucune alimentation électrique
au niveau du générateur.
A1. Réinitialiser le courant au
disjoncteur.
A2. Demander à un électricien qualifié
de vérifier qu’une alimentation de
240 V est présente au niveau du
générateur.
B. Le disjoncteur est d’arrêt. B. Mettre l’alimentation en marche au
niveau du disjoncteur.
C. La taille du disjoncteur est
incorrecte.
C. Vérifier que la taille du disjoncteur
est appropriée. Si la taille est
incorrecte, le remplacer.
D. La connexion électrique dans le
boîtier de service sur le
générateur est desserrée.
D. Couper tout le courant électrique
vers le générateur. Demander à un
électricien qualifié d’ouvrir le
boîtier de service et de vérifier
toutes les connexions. Demander à
un électricien qualifié de réparer
toutes les mauvaises connexions.
2. Ilyaundébit continu
d’eau depuis la tête de
vapeur. Le débit d’eau
durant le cycle de
nettoyage pression
normal.
A. Les composants internes vers le
générateur ne fonctionnent pas
correctement.
A1. Couper l’alimentation en eau et
vidanger l’eau du générateur.
Fermer la valve de drain.
A2. Ouvrir partiellement la valve
d’arrêt d’alimentation, d’une petite
quantité.
A3. Laisser l’eau remplir le réservoir
graduellement à l’intérieur du
générateur (ceci peut prendre
plusieurs minutes). Si l’eau
continue à s’écouler à partir de la
tête de vapeur, A1.
A4. Ouvrir complètement la valve
d’arrêt d’alimentation.
A5. Sur les modèles avec l’option de
nettoyage pression seulement, si
l’eau continue à s’écouler à partir
de la tête de vapeur, faire
fonctionner le cycle de nettoyage
pression.
A6. Si l’eau continue à s’écouler de la
tête de vapeur, contacter le service
d’assistance à la clientèle en
utilisant l’information fournie à
l’arrière de ce guide.
B. L’alimentation en eau est
connectée incorrectement au
générateur de vapeur.
B. Examiner le guide d’installation et,
au besoin, reconnecter
l’alimentation en eau à
l’emplacement approprié.
Kohler Co. Français-12 1053772-2-E
Page 26

Guía de instalación
Generador de vapor
Herramientas y materiales
Más:
• Bandeja de goteo
• Tubería de cobre de 1/2"
• Varias conexiones de cobre; uniones NPT de cobre de 3/8", 1/2" y
3/4"
• Cortacables o desforrador de alambre
• Herramientas y materiales convencionales de carpintería
• Codos de 45 y 90 grados
• Bloques de soporte (resistentes al calor)
Sierra para metales
o cortatubos
Taladro con broca para
orificios de 1-1/4" y 2-1/2"
Cinta
selladora
Antes de comenzar
¡IMPORTANTE! Al usar esta unidad, siempre siga las precauciones básicas.
PELIGRO: Riesgo de electrocución. Antes de realizar estos pasos de instalación, desconecte la
corriente eléctrica al área de trabajo desde el panel principal de interruptores.
ADVERTENCIA: Riesgo de lesiones personales. Si usted no se siente bien mientras toma el baño
de vapor, apague la unidad. Tome una ducha fría, abra la puerta o salga de la unidad.
ADVERTENCIA: Riesgo de reacciones alérgicas. Antes de agregar aceites, productos terapéuticos
aromáticos o productos para el cuidado de la piel al recipiente para aromaterapia, asegúrese de que
éstos no causen una reacción alérgica al usuario.
ADVERTENCIA: Riesgo de lesiones personales. Este baño de vapor no es recomendable para
mujeres embarazadas, personas que padezcan problemas cardíacos, hipertensión, problemas
circulatorios, así como personas que estén bajo la influencia de bebidas alcohólicas, drogas,
medicamentos o bajo la atención de un médico. El baño de vapor puede causar fatiga, tal como lo
hacen los baños calientes, las duchas y los baños sauna.
ADVERTENCIA: Riesgo de lesiones personales. NO consuma bebidas alcohólicas ni tome
medicamentos antes o durante el uso del baño de vapor. El uso de alcohol y drogas afecta la
capacidad mental e inhibe ciertas funciones corporales tales como el ritmo cardíaco y la respiración,
lo cual constituye un serio peligro.
Suelda
Soplete de propano
ADVERTENCIA: Riesgo de lesiones a los niños. No permita que los niños utilicen esta unidad sin
estricta supervisión en todo momento. El generador de vapor no está diseñado para que lo usen los
niños.
ADVERTENCIA: Riesgo de lesiones personales. No instale una trampa en la línea de vapor ni una
válvula de alivio de presión en la línea de vapor. La instalación de una válvula de alivio de presión
en la línea de vapor puede ser peligrosa si la salida de vapor se tapa.
Kohler Co. Español-1 1053772-2-E
Page 27

Antes de comenzar (cont.)
ADVERTENCIA: Riesgo de lesiones personales o daños a la propiedad. Evite el contacto con el
tanque de agua y las líneas de descarga de vapor durante el funcionamiento del generador o
inmediatamente después de apagarlo. Utilice lentes de seguridad y ropa protectora al dar
mantenimiento al generador de vapor. El generador de vapor funciona a altas temperaturas.
AVISO: Use esta unidad solamente para el fin con el que se ha diseñado, como se especifica en este
manual. NO use equipos adicionales que no estén recomendados por Kohler Co.
AVISO: Al soldar las conexiones, no aplique calor excesivo a las conexiones del generador. No aplique
fundente ni ácidos directamente al generador, pues ello podría dañar los sellos, los componentes plásticos
y el acabado de la guarnición. No aplique lubricantes derivados del petróleo a los componentes del
generador, pues se pueden causar daños.
Revise que el producto que presente daño. Comuníquese con el Centro de atención al cliente
KOHLER utilizando la información de la última página de esta guía.
Cumpla con todos los códigos locales de electricidad y de plomería. Todas las conexiones eléctricas
deben ser realizadas por un electricista calificado.
Desconecte toda la energía eléctrica antes de hacer las conexiones eléctricas.
Conecte el generador de vapor a líneas de suministro de agua que cumplan con todos los códigos
de plomería correspondientes.
Para instalaciones a la medida, coloque el cabezal de vapor a 6″ (15,2 cm) del piso y 4-1/2″ (11,4
cm) del interior del umbral.
Kohler Co. se reserva el derecho de modificar el diseño de los productos sin previo aviso, tal como
se especifica en la lista de precios.
Kohler Co. Español-2 1053772-2-E
Page 28

Instale la unión de cobre lo más
cerca posible del generador de vapor.
Incline hacia
el generador.
Válvula de alivio de presión
Cabezal de vapor
Bandeja de goteo
1. Determine la disposición
ADVERTENCIA: Riesgo de daños a la propiedad. Deje un espacio libre mínimo de 12″ (30,5 cm)
alrededor del generador de vapor en todo momento. Esta área permitirá la disipación del calor
generado por la unidad.
Frente del generador
(panel de acceso)
Unión de
cobre
Entrada del cable de control
Llave
de paso
Entrada de agua
Filtro de agua en
línea recomendado
T
ADVERTENCIA: Riesgo de lesiones personales. No instale la Interface de usuario del control de
vapor afuera de la cabina de vapor. La Interface de usuario se tiene que instalar dentro de la cabina
para permitir que los sensores regulen la temperatura y controlen el flujo de vapor. Consulte la
Guía de instalación del kit de control de vapor.
AVISO: Al instalar el kit de control, deje suficiente cable de control para un lazo de goteo. El lazo de goteo
ayudará a impedir que la humedad siga el cable de control al generador de vapor.
AVISO: El generador de vapor funcionará mejor si se instala lo más cerca posible del cabezal de vapor. La
unidad debe instalarse dentro de una distancia de 25’ (7,62 m) del cabezal de vapor.
AVISO: Para un óptimo desempeño, instale el generador de vapor a un nivel más abajo que el cabezal de
vapor.
NOTA: Cuando sea posible, utilice codos de 45 grados. El rendimiento será mayor cuando se utilicen
codos de 45 grados.
Determine el lugar de instalación del generador de vapor. Deje un espacio de 12″ (30,5 cm) en todos
los lados del generador. Deje espacio para una bandeja de goteo.
Elija una bandeja que sea apta para su instalación. La bandeja de goteo no se provee.
1053772-2-E Español-3 Kohler Co.
Page 29

Deje espacio
desde
la pared.
6" (15,2 cm) desde el piso
2-1/2" (6,4 cm)
Poste de
la pared
2. Determine el lugar de instalación del herraje de vapor
ADVERTENCIA: Riesgo de lesiones personales. No instale la Interface de usuario del control de
vapor afuera de la cabina de vapor. La Interface de usuario se tiene que instalar dentro de la cabina
para permitir que los sensores regulen la temperatura y controlen el flujo de vapor. Consulte la
Guía de instalación del kit de control de vapor.
ADVERTENCIA: Riesgo de quemaduras. No bloquee el cabezal de vapor ni lo instale cerca de un
asiento o banca, puesto que el cabezal de vapor se calienta durante el funcionamiento y si el
usuario lo toca puede quemarse.
Aplicaciones del cabezal de vapor y el control
NOTA: Todas las dimensiones deben tomarse desde el interior de la ducha.
¡IMPORTANTE! No instale la Interface de usuario del control de vapor afuera de la cabina de vapor.
Consulte la Guía de instalación del kit de control de vapor. No instale el control directamente arriba o en
línea con el cabezal de vapor.
Consulte las instrucciones de instalación del Kit de Control de Vapor para obtener más información.
Se recomienda que coloque los cabezales de vapor y el control de vapor en la misma pared que
tiene los controles de plomería.
Instale el cabezal de vapor 6″ (15,2 cm) arriba del piso de la ducha y 4-1/2″ (11,4 cm) del umbral.
Coloque el control de vapor 60″ (152,4 cm) arriba del piso de la ducha, pero no directamente en
línea con los cabezales de vapor. Consulte las instrucciones de instalación del Kit de Control de
Vapor para obtener más información sobre las dimensiones y la instalación.
Asegúrese de que haya suficiente espacio libre entre las líneas de vapor y las superficies de
alrededor.
Kohler Co. Español-4 1053772-2-E
Page 30

Salida de vapor
Entrada de agua
Se requiere un panel de acceso mínimo
de 24" (61 cm) de largo x 15" (38,1 cm) de alto.
Deje un mínimo de 12" (30,5 cm) de espacio
al rededor de todos los lados de generador de vapor.
Deje espacio para la bandeja de goteo.
Entrada del
cable de control
12"
(30,5 cm)
17-3/4" (45,1 cm)
Alivio de
presión
de 3/4" NPT
11-3/4"
(29,8 cm)
Luz de diagnóstico
LED verde
Caja de
servicio en terreno
8-3/8"
(21,3 cm)
3/4" (1,9 cm) Mín
3. Determine el lugar de instalación del generador de vapor
¡IMPORTANTE! El panel de acceso requerido mínimo es de 24″ (61 cm) de largo x 15″ (38,1 cm) de alto.
Deje un mínimo de espacio libre de 12″ (30,5 cm) alrededor de todos los lados del generador de vapor.
Asegure el espacio libre entre la línea de vapor y las superficies de alrededor.
Planee el acceso al generador de vapor después de la instalación.
Deje un espacio de 12″ (30,5 cm) en todos los lados del generador.
Deje espacio para una bandeja de goteo.
Para un óptimo desempeño, instale el generador de vapor a un nivel más abajo que el cabezal de
vapor y lo más cerca posible al cabezal de vapor. El generador de vapor debe instalarse dentro de
una distancia de 25 pies (7,62 m) del cabezal de vapor, en un lugar seco y bien ventilado
4. Instale el suministro eléctrico
Modelo K-1696-NA K-1713-NA
Requisitos eléctricos
Circuito dedicado para el generador 13 kW, 240 V, 80 A, 50/60 Hz 15 kW, 240 V, 90 A, 50/60 Hz
Información sobre el producto
Peso 32 lbs (14,5 kg ) 32 lbs (14,5 kg )
Tamaño 18″ (45,7 cm) de largo x 12″ (30,5 cm) x 13″ (33 cm)
Capacidad eléctrica 240 V, 59 A, 50/60 Hz 240 V, 68 A, 50/60 Hz
Suministro de agua Línea de cobre de 3/8″ Línea de cobre de 3/8″
Llave de paso del suministro de agua Hembra NPT de 3/8″ Hembra NPT de 3/8″
Línea de vapor Línea de cobre de 1/2″ (rosca
NPT de 1/2″)
1053772-2-E Español-5 Kohler Co.
Línea de cobre de 1/2″ (rosca
NPT de 1/2″)
Page 31

Instale el suministro
eléctrico (cont.)
Válvula de alivio de presión (provista) Rosca hembra NPT de 3/4″ Rosca hembra NPT de 3/4″
Tamaño del cuarto de vapor 447 pies cúbicos (13 metros
cúbicos)
PELIGRO: Riesgo de electrocución. Antes de realizar estos pasos de instalación, desconecte la
corriente eléctrica al área de trabajo desde el panel principal de interruptores.
Cumpla con todos los códigos eléctricos locales. Todas las conexiones eléctricas deben ser realizadas
por un electricista calificado.
Repase la ilustración que muestra los requisitos de instalación para el generador de vapor específico.
Instale el suministro eléctrico correcto.
500 pies cúbicos (14 metros
cúbicos)
Kohler Co. Español-6 1053772-2-E
Page 32

Mantenga un espacio libre de 12" (30,5 cm)
alrededor de las unidades.
Bandeja de goteo
Entrada
Salida de vapor
Válvula de alivio de presión
Entrada del
cable de control
5. Instale el generador de vapor
ADVERTENCIA: Riesgo de daños a la propiedad. Deje un espacio libre mínimo de 12″ (30,5 cm)
alrededor del generador de vapor en todo momento. Esta área permitirá la disipación del calor
generado por la unidad.
AVISO: Para un óptimo rendimiento, instale el generador de vapor lo más cerca posible al cabezal de
vapor. El generador de vapor debe instalarse dentro de una distancia de 25’ (7,62 m) del cabezal de vapor.
Instale la bandeja de goteo que desee en el lugar de instalación del generador de vapor.
Coloque los generadores de vapor en los bloques de soporte.
1053772-2-E Español-7 Kohler Co.
Page 33

Cabezal de vapor
Bandeja de goteo
Trampa de
vapor
Incline hacia el generador.
No permita que la tubería corra
hacia abajo y luego hacia arriba.
Unión de
cobre
Filtro de agua en
línea recomendado
Deje espacio
desde la pared.
6" (15,2 cm)
desde el piso
Llave de
paso
T
1" (2,5 cm) Mín.
Entrada de agua
Niple
provisional
Poste de
la pared
2-1/2" (6,4 cm)
6. Instale la línea de suministro de agua y de vapor
ADVERTENCIA: Riesgo de quemaduras. No instale una trampa, llave de paso ni válvula de alivio
de presión en la línea de vapor. La instalación de una válvula de alivio de presión en la tubería de
vapor puede presentar un peligro en caso de que se tape la salida de vapor.
Instale la línea del suministro de agua al generador.
NOTA: Para todas las conexiones roscadas NPT, utilice cinta selladora de rosca o sellador de tubos. No
apriete demasiado las conexiones.
Conecte a una línea de agua fría existente y tienda una línea de agua fría de 3/8″ a una llave de
paso antes del filtro de agua en línea.
Antes de la conexión final al generador de vapor, descargue la línea de suministro de agua dentro
de una cubeta grande. Esto retira las particular, lodos, arena, u otro material que pueda haber en la
línea.
Instale tubo de cobre de 3/8″ con una conexión de unión entre el filtro de agua en línea y la entrada
de agua al generador de vapor.
Conecte la línea del suministro de agua al generador de vapor.
Llene el generador de vapor con agua y verifique que no haya fugas.
AVISO: Los generadores de vapor están equipados con una llave de paso automática. El agua dejará de
fluir una vez que la unidad esté llena. Si fluye agua de la salida de vapor cierre el agua y consulte la
″Guía para resolver problemas″ o llame al Centro de Atención al Cliente utilizando el número que se
indica en la última página de este dcoumento.
Si la línea de suministro de agua excede 10’ (3 m) o queda expuesta a zonas frías, aisle la tubería
con aislamiento adecuado.
Kohler Co. Español-8 1053772-2-E
Page 34

Instale la línea de suministro de agua y de vapor (cont.)
Instale la línea de vapor
ADVERTENCIA: Riesgo de quemaduras. No instale el cabezal de vapor cerca de un asiento o
banca, pues pueden ocurrir quemaduras por contacto con el cabezal de vapor.
AVISO: Nunca instale tubería de vapor que corra hacia abajo y luego hacia arriba. Si la línea de vapor
corre hacia abajo y luego hacia arriba, el vapor se condensará y bloqueará el flujo de vapor. La línea de
vapor debe correr hacia arriba hasta el cabezal de vapor desde el generador de vapor, con una inclinación
de 3/8″ (1 cm) a 1/2″ (1,3 cm) por cada 12″ (30,5 cm) de tubo.
AVISO: Deje espacio entre la pared posterior y el codo que dirige el flujo dentro del alojamiento del vapor.
El codo no debe entrar en contacto con el material de la pared.
AVISO: Provea el espacio libre entre la línea de vapor y las superficies de alrededor.
AVISO: Al soldar las conexiones, no aplique calor excesivo a las conexiones del generador. No aplique
fundente ni ácidos directamente al generador de vapor, pues ello podría dañar los sellos, los componentes
plásticos y el acabado de la guarnición. No aplique lubricantes derivados del petróleo a los componentes
del generador de vapor, pues se pueden causar daños.
NOTA: Para todas las conexiones roscadas, utilice cinta selladora de rosca o sellador de tubos. No apriete
demasiado las conexiones.
NOTA: Utilice tubo de cobre de 1/2″ para la línea de vapor.
NOTA: Siempre instale la unión lo más cerca posible del generador de vapor.
Agregue bloques detrás del lugar deseado de instalación del cabezal de vapor.
Instale y fije un codo de 1/2″ NPT a los bloques directamente detrás del lugar deseado para el
cabezal de vapor.
Corte un orificio a través del material de la pared para aceptar un niple de cobre de 1/2″
provisional.
Agregue un niple provisional de cobre de 1/2″.
1053772-2-E Español-9 Kohler Co.
Page 35

Fuente de 240 VCA
N
Bus neutro
(En caja de disyuntores)
L1
120V
120V
240V
* Tierra del equipo
Caja de
L2
disyuntores
Interruptor típico
de dos polos
sin GFCI
*L2
240V
*L1
Verde tierra
Negro - L2
Tierra
L1
L2
Negro - L1
Conector de cable (3)
Generador
El electricista debe proveer el cable
adecuado con protección contra tirones.
7. Conecte el suministro eléctrico
PELIGRO: Riesgo de electrocución. Desconecte toda la energía eléctrica antes de seguir estos pasos
de instalación.
AVISO: Todas las conexiones eléctricas deben ser realizadas por un electricista calificado.
AVISO: Todo el cableado eléctrico debe realizarse de conformidad con los códigos locales.
AVISO: Cada generador de vapor requiere un circuito dedicado.
Conecte la alimentación eléctrica
Corte toda la corriente eléctrica al área de trabajo desde el panel principal de interruptores.
Conecte la línea eléctrica de 240 VCA a los cables identificados como ″L1″, ″L2″, y el cable verde
(tierra) que sale de la caja de servicio en campo del generador de vapor ubicada en la parte superior
del generador de vapor.
Confirme que la conexión a tierra se haya hecho en la caja de servicio en campo.
Cierre la caja de servicio en campo.
Active la alimentación eléctrica principal.
La luz de función debe mostrar una luz verde. Si la luz de función no es verde, consulte la ″Guía
para resolver problemas″ o comuníquese con el centro de atención al cliente, mediante el número
que se encuentra en la última página de este documento.
Kohler Co. Español-10 1053772-2-E
Page 36

8. Termine la instalación
Instale el alojamiento de vapor y el cabezal de vapor siguiendo las instrucciones que vienen con el
kit de control de vapor.
Instale el control de vapor siguiendo las instrucciones que vienen con el kit de control de vapor.
Para operar el control de vapor, siga las instrucciones de funcionamiento provistas con el kit de
control de vapor.
Garantía
Generador de vapor KOHLER
GARANTÍA LIMITADA DE TRES AÑOS
Se garantiza al comprador consumidor original que las unidades de generador de vapor Kohler fabricados
después del 15 de septiembre del 2001, están libres de defectos de fabricación en cuanto al material y mano
de obra durante el uso residencial normal durante (3) tres años a partir de la fecha de instalación. Esta
garantía sólo aplica a las unidades de generador de vapor KOHLER instaladas en los Estados Unidos de
América, Canadá o México (Norteamérica).
En caso de que se presente algún defecto durante el uso residencial normal, Kohler Co., a su criterio,
reparará o reemplazará la unidad, o realizará los ajustes pertinentes. Los daños causados por accidentes, uso
indebido o abuso no están cubiertos en la presente garantía. Al presentar las reclamaciones de garantía a
Kohler Co., es necesario incluir la prueba de compra (recibo original). Kohler Co. no se hace responsable de
los gastos de mano de obra, desinstalación, instalación u otros gastos indirectos. En ningún caso la
responsabilidad de Kohler Co. excederá el precio de compra de la unidad.
Si este producto se usa comercialmente o se instala fuera de Norteamérica, Kohler Co. garantiza que la
unidad está libre de defectos de material y mano de obra por un (1) año, a partir de la fecha de instalación,
estando en efecto todas las demás condiciones de la presente garantía, excepto la duración.
Para obtener el servicio de garantía, comuníquese con Kohler Co., a través de su distribuidor, contratista de
plomería o distribuidor a través de Internet, o escriba directamente a: Kohler Co., Attn: Customer Care
Center, 444 Highland Drive, Kohler, WI 53044, U.S.A. o llame al 1-800-4-KOHLER (1-800-456-4537) desde los
Estados Unidos y Canadá, o al 001-800-456-4537 desde México, o visite www.kohler.com desde los Estados
Unidos, www.ca.kohler.com desde Canadá, o www.mx.kohler.com en México.
KOHLER CO. Y/O EL VENDEDOR OFRECE ESTAS GARANTÍAS QUE SUSTITUYEN A TODAS LAS
DEMÁS GARANTÍAS, EXPRESAS O IMPLÍCITAS, INCLUYENDO, ENTRE OTRAS, LAS GARANTÍAS
IMPLÍCITAS DE COMERCIALIZACIÓN E IDONEIDAD PARA UN PROPÓSITO EN PARTICULAR.
KOHLER CO. Y/O EL VENDEDOR POR MEDIO DE LA PRESENTE DESCARGAN TODA
RESPONSABILIDAD POR CONCEPTO DE DAÑOS PARTICULARES, INCIDENTALES O
INDIRECTOS. Algunos estados/provincias no permiten limitaciones en cuanto a la duración de una
garantía implícitaoalaexclusión o limitación de daños particulares, incidentales o indirectos, por lo que
estas limitaciones y exclusiones pueden no aplicar a su caso. Esta garantía le otorga ciertos derechos
legales específicos. Además, usted puede tener otros derechos que varían de estado a estado y provincia a
provincia.
El presente documento constituye la garantía exclusiva por escrito de Kohler Co.
Guía para resolver problemas
PRECAUCIÓN: Los pasos para resolver problemas que involucran cables internos o componentes
eléctricos deben ser realizados por un electricista calificado.
NOTA: Esta guía para resolver problemas aplica sólo al generador de vapor. Para cuestiones con el control
de vapor, consulte la guía para resolver problemas provista con la documentación del Kit de control de
vapor.
La guía para resolver problemas está diseñada únicamente como ayuda general. Para cuestiones y preguntas
sobre el servicio y la instalación, comuníquese con el Centro de atención al cliente mediante la información
que se encuentra en la última página de esta guía.
1053772-2-E Español-11 Kohler Co.
Page 37

Guía para resolver problemas (cont.)
Síntomas Causas probables Acción recomendada
1. La luz LED verde no está
encendida.
A. No hay energía eléctrica al
generador.
A1. Restablezca la corriente eléctrica en
el interruptor principal.
A2. Pida a un electricista calificado que
verifique que la energía de 240 V
esté presente en el generador.
B. El interruptor tomacorriente está
en la posición apagada.
C. El interruptor tomacorriente no
es del tamaño correcto.
B. Encienda la corriente eléctrica en el
interruptor principal.
C. Verifique que el interruptor
tomacorriente sea del tamaño
correcto. Si es de un tamaño
equivocado, reemplácelo.
D. La conexión eléctrica en la caja
de servicio en campo del
generador está floja.
D. Desactive la energía eléctrica al
generador. Pida a un electricista
calificado que abra la caja de
servicio en campo y que verifique
todas las conexiones. Pida a un
electricista calificado que repare las
conexiones malas.
2. El cabezal de vapor tiene
un flujo continuo de agua.
El flujo de agua durante
el ciclo de autolimpieza es
normal.
A. Los componentes internos del
generador no funcionan
correctamente.
A1. Cierre el suministro de agua y
drene el agua del generador. Cierre
la válvula de desagüe.
A2. Abra parcialmente la llave de paso
del suministro una cantidad
pequeña.
A3. Deje que el agua llene
gradualmente el tanque dentro del
generador (puede tomar varios
minutos). Si el agua continúa
fluyendo del cabezal de vapor, A1.
A4. Abra completamente la llave de
paso del suministro de agua.
A5. En modelos con opción de
autolimpieza solamente, si el agua
continúa fluyendo del cabezal de
vapor, corra el ciclo de
autolimpieza.
A6. Si el agua continúa fluyendo del
cabezal de vapor, comuníquese con
el Centro de atención al cliente
mediante la información que se
encuentra en la última página de
esta guía.
B. El suministro de agua no está
bien conectado al generador.
B. Repase la guía de instalación y si
es necesario, vuelva a conectar el
suministro de agua en el lugar
correcto.
Kohler Co. Español-12 1053772-2-E
Page 38

1053772-2-E
Page 39

1053772-2-E
Page 40

USA/Canada: 1-800-4KOHLER
México: 001-800-456-4537
kohler.com
©2011 Kohler Co.
1053772-2-E
 Loading...