

Page 1

Spend some quality time with your User Guide. You’ll reward
yourself with great pictures to print, email, and share on your
favorite social networking sites.
About this User Guide
Keep learning
For more in-depth information about your camera, including its
advanced features:
• Go to www.kodak.com/go/Z5120manuals
• Choose the Z5120 Extended User Guide
The Extended User Guide details every feature, button, and menu
choice. It’s indexed, searchable, and in color. (It’s also too big to fit
in this box.)
Keep your camera close to you
Be ready—to capture the unexpected, to see your world from
new angles, to take and share twice as many photographs
as last year.
Because pictures hold memories. Sharing brings them to life.
www.kodak.com/go/Z5120support 1
ENGLISH
Page 2

Table of contents
Setting up your camera 3
Charging the rechargeable batteries 3
Loading the batteries 4
Storing pictures on an SD/SDHC Card 5
Turning on the camera 6
Setting the language, date/time 7
Installing the Share Button App 9
Installing the software 9
Setting up the Share Button App (one-time setup) 10
After setting up the Share Button App 11
Adding new email addresses to your camera 11
Taking pictures and videos 12
Taking pictures in Smart Capture mode 12
Changing between Tools view and Clean view 13
Taking a video 15
Using other picture-taking modes 15
Using the Zoom lever 16
Using the Flash button 16
Using the Focus button 17
Reviewing pictures 18
Choosing pictures to share 19
Transferring, sharing pictures 20
Using an EYE-FI Card (optional accessory) 21
Solving camera problems 24
Appendix 25
2 www.kodak.com/go/support
Page 3
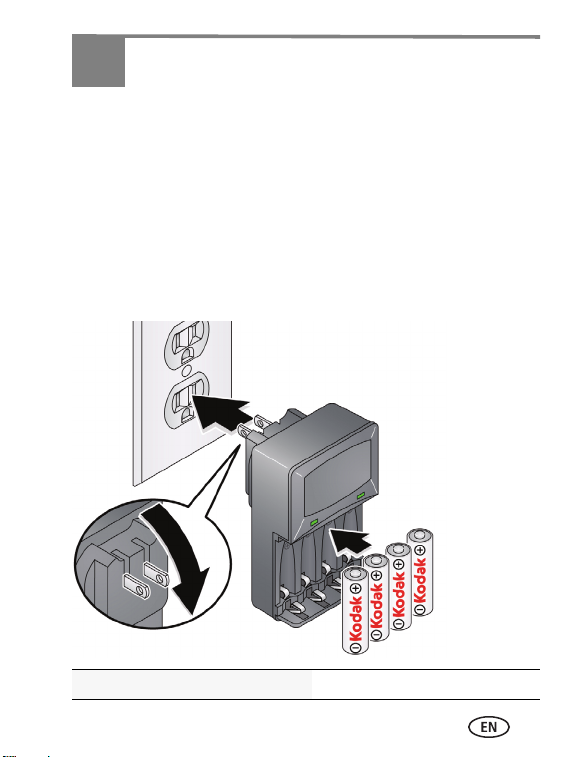
1 Setting up your camera
Lights are on while
the charger is plugged
in.
See the charger
documentation for
instructions and
charging times.
Your plug may differ.
IMPORTANT! If your package includes:
■ Ni-MH batteries and a charger, see Charging the rechargeable
batteries.
■ Alkaline batteries (and no charger), go to Loading the batteries,
page 4.
Charging the rechargeable batteries
Charging time varies by battery level. All batteries lose power over
time–even if they’re not being used. For longer life, fully charge KODAK
Ni-MH Rechargeable Batteries AA prior to use.
Purchase batteries, chargers www.kodak.com/go/accessories
www.kodak.com/go/Z5120support 3
Page 4
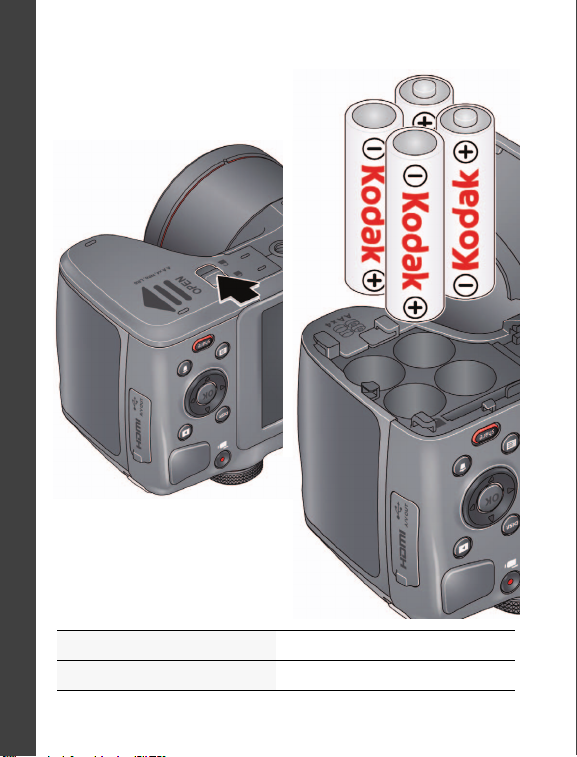
ENGLISH
12
Press the door lock while sliding
open the door.
Loading the batteries
Purchase extra batteries www.kodak.com/go/accessories
Monitor the battery level See page 14
4 www.kodak.com/go/support
Page 5
CAUTION:
Accessory
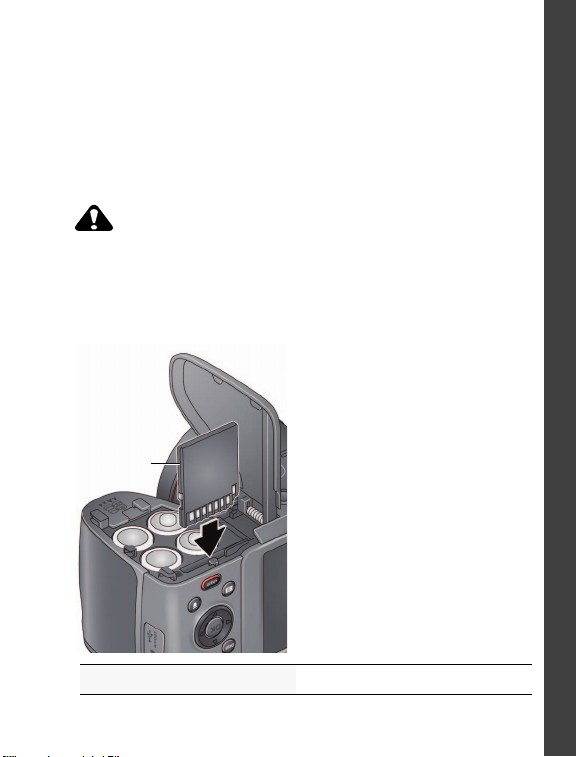
Storing pictures on an SD/SDHC Card
Your camera has enough internal memory for a couple practice pictures.
We highly recommend purchasing a Class 4 or higher SD/SDHC Card (up
to 32 GB) to conveniently store more pictures/videos. (Card class is
typically shown on the card and/or packaging.)
NOTE: Your camera also accepts EYE-FI Cards (type X2). To learn more, go to
www.eye.fi
A card can only be inserted one way; forcing it may
cause damage. Inserting or removing a card while the
camera is on may damage the pictures, the card, or the
camera.
.
1 Turn off the camera, then open
the door.
2 Insert a card until it clicks into
place. To remove a card, press
and release it.
IMPORTANT: When you turn on
the camera, it checks to see if a card
is inserted. If pictures/videos are
detected in internal memory, the
camera prompts you to move them
to the card. New pictures/videos are
stored on the card.
ENGLISH
Purchase memory cards www.kodak.com/go/accessories
www.kodak.com/go/Z5120support 5
Page 6
ENGLISH
If the lens cap is attached, remove it.
1
2
Pull back the On/Off switch, then release it.
Turning on the camera
6 www.kodak.com/go/support
Page 7
Back
OK
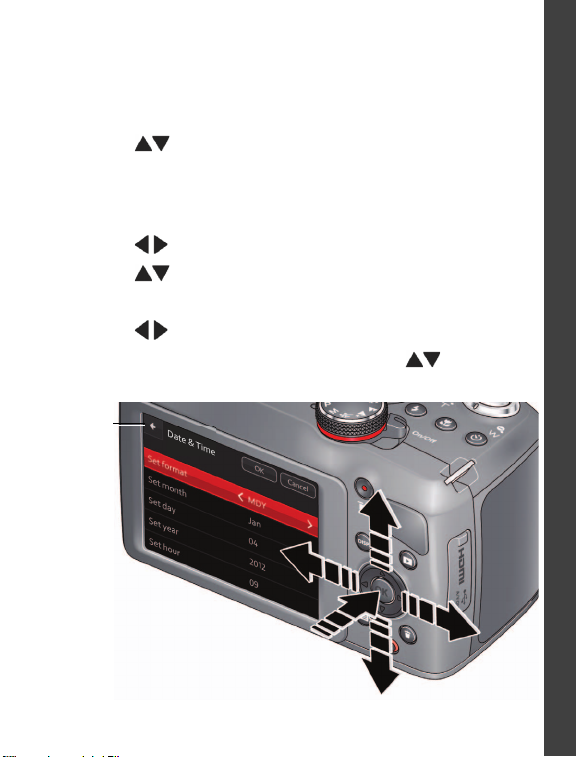
Setting the language, date/time
The first time you turn on the camera, you’re prompted to choose your
language and set the date/time.
Choose your language:
1 Press to highlight your language.
2 Press the OK button.
Set the date and time:
1 Press to change the date format, if desired.
2 Press to highlight the year, month, date, hours, or minutes.
NOTE: You may need to scroll down to see all fields.
3 Press to change the value.
4 When finished setting the date and time, press to highlight
OK. Then press the camera OK button.
ENGLISH
www.kodak.com/go/Z5120support 7
Page 8
ENGLISH
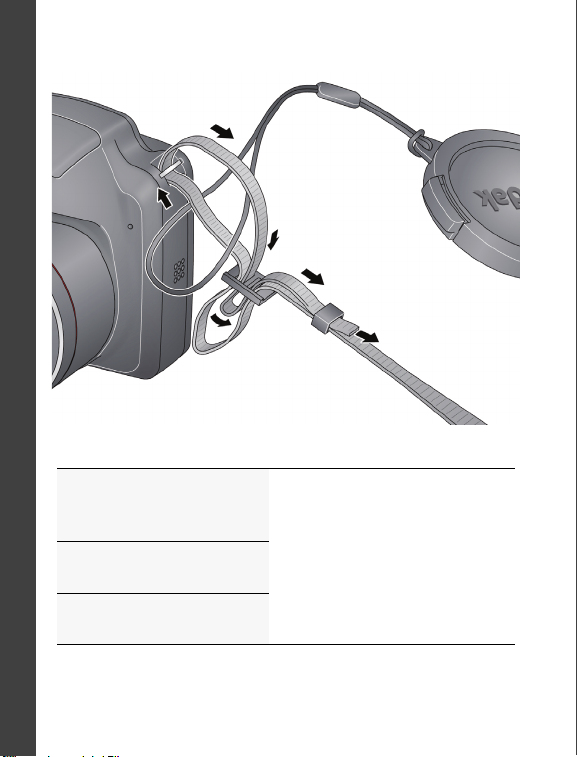
Attaching the strap
Purchasing accessories
KODAK Ni-MH
Rechargeable AA
Batteries, chargers
SD/SDHC Card
(Class 4 or higher)
KODAK Camera USB Cable
Micro B / 5-Pin
www.kodak.com/go/accessories
8 www.kodak.com/go/support
Page 9
2 Installing the Share Button App
Before you can share pictures/videos, you must:
■ Install the KODAK Share Button App
See Installing the software (below) and
■ Perform a one-time setup
See Setting up the Share Button App (one-time setup), page 10
IMPORTANT:
camera Share button is not enabled.
Until you install and set up the Share Button App, the
Installing the software
1 Make sure the computer is connected to the Internet.
2 Tur n off the camera.
3 Using the USB cable, connect the camera to a computer USB port.
The camera turns on. The Camera Setup App runs. (If there are many
pictures/videos on your memory card, this step could take several
minutes.)
4 Watch your computer—when the
Camera Setup App prompts you,
click Install Now. (If you are
prompted to allow the Camera
Setup App to run, click Allow.)
5 When prompted, click Finish.
www.kodak.com/go/Z5120support 9
Page 10

Installing the Share Button App
If you successfully installed the software
See “Setting up the Share Button App (one-time setup)” on page 10.
If installation does not begin after several minutes:
1 Make sure the computer is connected to the Internet.
2 Open My Computer. (For MAC OS, go to the Finder.)
3 Open the KODAK Setup App. (For MAC OS, open the KODAK
Camera Setup App.)
If the installation still doesn’t begin
1 Download the Share Button App from
www.kodak.com/go/camerasw.
2 After the Share Button App is downloaded, double-click to install it.
Setting up the Share Button App (one-time setup)
After you install the Share Button App on your computer and click
Finish, the App automatically starts.* It prompts you through a one-time
setup of your email and social networking preferences. The addresses
and sites that you choose will appear on your camera when you press
the Share button.
If you successfully set up the software
See “After setting up the Share Button App” on page 11.
* If the App didn't start when you clicked Finish
The camera may have timed out. Unplug the camera from the USB cable
and turn it off. Plug it back in and turn it on. When the App starts,
perform the one-time setup, above.
10 www.kodak.com/go/support
Page 11

Installing the Share Button App
After setting up the Share Button App
Congratulations—you’re ready to share!
■ Take some pictures (see page 12).
■ Choose pictures to share (see page 19).
■ Connect the camera to your computer (see page 20).
Each time you connect:
■ Pictures are transferred to your computer.
■ The Share Button App emails and/or shares your chosen pictures on
your social networking sites.
Adding new email addresses to your camera
Use the Share Button App
your camera
address list.
1 Start the Share Button App on your computer.
2 Click Settings.
3 Click Email List Setup.
4 Click +Add Email.
5 Add an email address.
The next time you connect the camera to the computer, the email
address is added to your camera.
IMPORTANT:
email. See “Setting up the Share Button App (one-time setup)” on page 10.
You must set up Email Sharing before you can share by
on your computer
to add email addresses
to
www.kodak.com/go/Z5120support 11
Page 12

3 Taking pictures and videos
Focus
brackets
Press halfway,
then all the way
down.
Taking pictures in Smart Capture mode
When you turn on the camera the first time, it’s ready to take pictures in
Smart Capture mode . (After that, it remembers the last mode you
used.)
1 Use the LCD to compose the picture
2 Press the Shutter button halfway down to focus and set exposure.
Focus brackets indicate the camera focus area. If the camera is not
focusing on the desired subject, release the Shutter button and
recompose the scene.
3 When the Focus brackets turn green, press the Shutter button
completely down.
The new picture is briefly displayed. It’s saved unless you press the Delete
button . To dismiss the quickview and get back to taking pictures right
away, press the Shutter button halfway down.
.
NOTE: To choose a different picture-taking mode, see page 15.
12 www.kodak.com/go/support
Page 13

Taking pictures and videos
Tools view
Tools appear at the
top of the LCD.
Clean view
A “clean” look; no tools appear.
to choose a Tool, then press OK.
Press
(Press the Menu button to change settings.)
Press the Display button
Clean view and Tools view.
Tools view + Histogram
Tools appear at the top of the LCD.
to change between
(Turn on the Framing Grid in Settings.)
Changing between Tools view and Clean view
www.kodak.com/go/Z5120support 13
Page 14

Taking pictures and videos
Zoom slider
Battery level
Exposure compensation
ISO
White balance
Focus/Exp. zone
Pictures/video time remaining
EYE-FI Card (accessory,
appears only if inserted)
Color mode
Sharpness
Tool descriptions
Date stamp
Contrast
Aperture
Shutter speed
Flash compensation
Picture Quality
Flash setting
More tools
NOTE: Settings vary by picture-taking mode.
Monitoring the battery level
Keep your batteries fully charged or keep fresh batteries on hand.
14 www.kodak.com/go/support
Full
Three Quarters
Half
One Quarter/Critical
Page 15

Taking pictures and videos
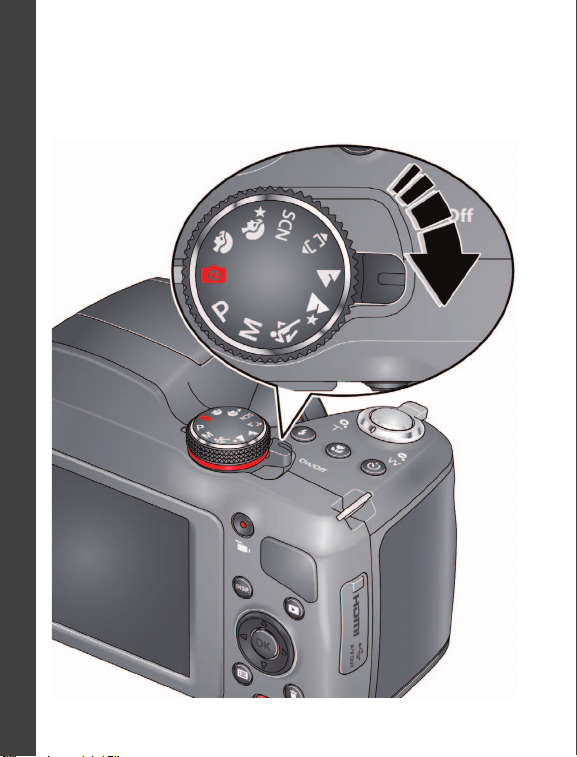
Turn the Mode dial.
Note: If you choose SCN (Scene), press
to highlight a Scene
mode, then press OK.
P
M
Taking a video
The camera is always ready to take a video—just press and release the
Record Video button . (Press and release it again to stop.)
Using other picture-taking modes
Capture modes
Smart Capture Landscape
Program AE Panorama Right-to Left,
Left-to-Right
Manual Exposure Scene Modes
www.kodak.com/go/Z5120support 15
Sport Night Portrait
Night Landscape Portrait
Page 16

Taking pictures and videos
Pointer:
Zoom
in
Zoom
out
• Zoom in, Telephoto, T (+)
• Zoom out, Wide Angle, W (-)
Press the Flash button to cycle through
flash modes.The current flash mode
appears at the bottom of the LCD.
Using the Zoom lever
Using the Flash button
Use the flash when you take pictures at night, indoors, or in shadow.
Flash modes (vary by picture-taking mode)
16 www.kodak.com/go/support
Auto Red-eye Reduction
Fill Off
Page 17

Using the Focus button
Press the Focus button to cycle through
focus modes. The current focus mode
appears at the bottom of the LCD.
Mode For
Normal AF
(Auto Focus)
Infinity AF
Macro
Super Macro
AF
Normal picture taking.
Distant scenery or taking pictures
through a window. (Turn off the flash
when taking pictures through glass.)
Subject-to-lens distances from:
• 10–60 cm (3.9–23.6 in.) @ wide
• 2.2–3.0 m (7.2–9.8 ft) @ telephoto
Subject-to-lens distances from:
1–15 cm (0.4–5.9 in.) @ wide
Taking pictures and videos
www.kodak.com/go/Z5120support 17
Page 18

4 Reviewing pictures
Press the Review button
.
The most recent picture/video is
displayed.
Press to view the previous
1
2
or next picture.
■ To play a video, press the OK button.
■ To return to picture-taking mode, press the Shutter button halfway
down.
See the Extended
User Guide
www.kodak.com/go/Z5120manuals
18 www.kodak.com/go/support
Page 19

5 Choosing pictures to share
Use this procedure if an EYE-FI Card is not installed. (If an EYE-FI Card
is installed, see page 21.)
IMPORTANT:
network sharing, you must install and set up the KODAK Share Button App
(see page 9).
1 Press the Share button.
2 Press to find a picture/video.
3 Press to highlight a sharing destination, then press OK. (Press
OK again to remove a check mark.)
4 To share other pictures, repeat steps 2 and 3. When finished,
highlight Done, then press OK.
When you connect the camera to your computer, these pictures are sent
to the sharing destinations you chose.
To enable the camera Share button for email and social
See the Extended
User Guide
www.kodak.com/go/Z5120support 19
www.kodak.com/go/Z5120manuals
Page 20

6 Transferring, sharing pictures
When you transfer pictures/videos to your computer, any that you
tagged for emailing or sharing on social networking sites are emailed or
shared.
You can transfer in 2 ways:
■ Using the included USB cable (see below)
■ Using an optional EYE-FI Card (see page 21)
IMPORTANT:
network sharing, you must install and set up the KODAK Share Button App
(see page 9).
1 Tur n off the camera.
See the Extended
User Guide
To enable the camera Share button for email and social
2 Using the USB cable, connect the
camera to a computer USB port.
(Use only the cable included with
this camera.)
The camera turns on.
3 Follow the computer prompts to
transfer pictures/videos to your
computer.
Pictures/videos that you tagged for
sharing are emailed or uploaded to
social networking sites. See more
about tagging pictures in the
Extended User Guide.
www.kodak.com/go/Z5120manuals
20 www.kodak.com/go/support
Page 21

7 Using an EYE-FI Card (optional
CAUTION:
accessory)
This chapter pertains only if you’re using an EYE-FI Card.
An EYE-FI Card stores pictures just like an SD/SDHC Card does. It also
has a built-in Wi-Fi antenna that uses your Wi-Fi network to transfer
pictures from your camera to your computer or mobile device. Choose
an EYE-FI Card type X2 or higher.
To set up and use the EYE-FI Card and EYE-FI Center Software, follow
the EYE-FI documentation that accompanied the card.
Before using an EYE-FI Card in this camera, it’s critical that
you disable (do not turn on) Endless Memory Mode in EYE-FI
Center Software.
1 Turn off the camera, then open the door.
2 Insert a card until it clicks into place.
To remove a card, press and release it.
NOTE: When you turn on the camera, it checks to see if a card is inserted. If
pictures/videos are detected in internal memory, the camera prompts you to move
them to the card. New pictures/videos are stored on the card.
Purchase EYE-FI cards www.eye.fi
Get support for EYE-FI Cards and Software
support.eye.fi
www.kodak.com/go/Z5120support 21
Page 22

Using an EYE-FI Card (optional accessory)
Sharing pictures using an EYE-FI Card
You can transfer pictures from your camera to a computer or mobile
device and share pictures to social networking sites.
1 After taking pictures, press the Share button.
2 At the “Share via EYE-FI?” prompt, highlight Yes, then press OK.
IMPORTANT:
computer or mobile device, the rear (LCD side) of the camera should face the
Wi-Fi access point.
For the best reception when transferring pictures to a
3 When you’re in range of your known Wi-Fi network or mobile
device, turn on the camera to transfer and share pictures.
Pictures are transferred to your computer and shared to your social
networking sites according to your EYE-FI settings.
EYE-FI Status icons
IMPORTANT:
pictures.
Icon Meaning
EYE-FI is idle, set to On, and not currently transferring.
EYE-FI is on the network and transferring pictures.
IMPORTANT:
transferring pictures.
Error
EYE-FI is off.
The camera must be turned on to transfer and share
Do not turn off the camera while the EYE-FI Card is
Get support for EYE-FI Cards and Software
22 www.kodak.com/go/support
support.eye.fi
Page 23

Using an EYE-FI Card (optional accessory)
Choosing the Selective Share setting—recommended
1 In a picture-taking mode, press the Menu button.
The Settings menu appears.
2 Press to highlight EYE-FI, then press the OK button.
3 Choose Selective Share (recommended).
When you’re in range of your known Wi-Fi network, turn on the camera
to transfer pictures to your computer or mobile device.
Other EYE-FI Information
■ It’s critical that you disable (do not turn on) Endless
Memory Mode in EYE-FI Center Software.
■ As of December 2010, EYE-FI Cards are certified for use in the
countries and regions in which they were purchased.
■ The EYE-FI Card has a wireless LAN function. Do not insert the
EYE-FI Card where Wi-Fi is prohibited, such as while aboard an
airplane or in a hospital.
■ Even when you set EYE-FI to Off, the card may transmit radio waves.
■ The card may become warm during use. This is normal.
■ Battery life is reduced when using an EYE-FI Card.
■ For the best reception when transferring pictures to a computer or
mobile device, the rear (LCD side) of the camera should face the
Wi-Fi access point.
Get support for EYE-FI Cards and Software support.eye.fi
www.kodak.com/go/Z5120support 23
Page 24

8 Solving camera problems
Go to www.kodak.com/go/Z5120support for the Extended User Guide,
firmware updates, and answers to your questions.
Status Solution
Camera does not
turn on, off; buttons do
not function.
Camera freezes when a
card is inserted or
removed.
Memory card not
recognized.
Get support for EYE-FI
Cards and Software.
Getting help on the Web
See the Extended User Guide. www.kodak.com/go/Z5120manuals
Get support for your product. www.kodak.com/go/Z5120support
Download the latest camera
firmware.
Register your camera. www.kodak.com/go/register
Contact Kodak. www.kodak.com/go/contact
■ Charge rechargeable batteries (see
page 3); replace non-rechargeable
batteries.
■ Turn the camera off, then back on. Make
sure the camera is turned off before
inserting or removing a card.
■ Card may be corrupted. Format the card in
the camera. (Find the Format feature in
the Settings menu.)
■ Caution: Formatting a card deletes
all pictures and videos, including
protected files.
■ Use another memory card.
Go to support.eye.fi
www.kodak.com/go/Z5120downloads
24 www.kodak.com/go/support
Page 25

9 Appendix
CAUTION:
Do not disassemble this product; there are no user-serviceable parts
inside. Refer servicing to qualified service personnel. KODAK AC
Adapters and Battery Chargers are intended for indoor use only. The
use of controls, adjustments, or procedures other than those specified
herein may result in exposure to shock and/or electrical or mechanical
hazards. If the LCD breaks, do not touch the glass or liquid. Contact
Kodak customer support.
■ The use of an accessory that is not recommended by Kodak may cause fire,
electric shock, or injury. For approved accessories, go to
www.kodak.com/go/accessories.
■ Use only a USB-certified computer equipped with a current-limiting
motherboard. Contact your computer manufacturer if you have questions.
■ If using this product in an airplane, observe all instructions of the airline.
■ When removing the battery, allow it to cool; it may be hot.
■ Follow all warnings and instructions supplied by the battery manufacturer.
■ Use only batteries approved for this product to avoid risk of explosion.
■ Keep batteries out of the reach of children.
■ Do not allow batteries to touch metal objects, including coins. Otherwise, a
battery may short circuit, discharge energy, become hot, or leak.
■ Do not disassemble, install backward, or expose batteries to liquid, moisture,
fire, or extreme temperature.
■ Remove the battery when the product is stored for an extended period of
time. In the unlikely event that battery fluid leaks inside the product, contact
Kodak customer support.
■ In the unlikely event that battery fluid leaks onto your skin, wash
immediately with water and contact your local health provider. For additional
health-related information, contact your local Kodak customer support.
■ See www.kodak.com/go/reach for information about the presence of
substances included on the candidate list according to article 59(1) of
Regulation (EC) No. 1907/2006 (REACH).
■ Dispose of batteries according to local and national regulations. Go to
www.kodak.com/go/kes.
www.kodak.com/go/Z5120support 25
Page 26

Appendix
Limited Warranty
Kodak warrants its digital cameras and accessories (excluding batteries) to be
free from malfunctions and defects in both materials and workmanship for the
warranty period specified on your KODAK Product packaging. Retain the original
dated sales receipt. Proof of purchase date is required with any request for
warranty repair.
Limited warranty coverage
Warranty service is only available from within the country where the products
were originally purchased. You may be required to ship products, at your
expense, to the authorized service facility for the country where the products
were purchased. Kodak will repair or replace products if they fail to function
properly during the warranty period, subject to any conditions and/or limitations
stated herein. Warranty service will include all labor as well as any necessary
adjustments and/or replacement parts. If Kodak is unable to repair or replace a
product, Kodak will, at its option, refund the purchase price paid for the product
provided the product has been returned to Kodak along with proof of the
purchase price paid. Repair, replacement, or refund of the purchase price are the
sole remedies under the warranty. If replacement parts are used in making
repairs, those parts may be remanufactured, or may contain remanufactured
materials. If it is necessary to replace the entire product, it may be replaced with
a remanufactured product. Remanufactured products, parts and materials are
warranted for the remaining warranty term of the original product, or 90 days
after the date of repair or replacement, whichever is longer.
Limitations
This warranty does not cover circumstances beyond Kodak’s control. This
warranty does not apply when failure is due to shipping damage, accident,
alteration, modification, unauthorized service, misuse, abuse, use with
incompatible accessories or attachments, failure to follow Kodak’s operation,
maintenance or repacking instructions, failure to use items supplied by Kodak
(such as adapters and cables), or claims made after the duration of this warranty.
Kodak makes no other express or implied warranty for this product,
and disclaims the implied warranties of merchantability and fitness
for a particular purpose. In the event that the exclusion of any implied
warranty is ineffective under the law, the duration of the implied warranty will be
one year from the purchase date or such longer period as required by law. The
option of repair, replacement, or refund is Kodak’s only obligation. Kodak will not
be responsible for any special, consequential or incidental damages resulting
from the sale, purchase, or use of this product regardless of the cause. Liability
26 www.kodak.com/go/support
Page 27

Appendix
for any special, consequential or incidental damages (including but not limited to
loss of revenue or profit, downtime costs, loss of the use of the equipment, cost
of substitute equipment, facilities or services, or claims of your customers for
such damages resulting from the purchase, use, or failure of the product),
regardless of cause or for breach of any written or implied warranty is expressly
disclaimed. The limitations and exclusions of liability set forth herein apply to
both Kodak and its suppliers.
Your rights
Some states or jurisdictions do not allow exclusion or limitation of incidental or
consequential damages, so the above limitation or exclusion may not apply to
you. Some states or jurisdictions do not allow limitations on how long an implied
warranty lasts, so the above limitation may not apply to you. This warranty gives
you specific rights, and you may have other rights which vary from state to state
or by jurisdiction.
Outside the United States and Canada
In countries other than the United States and Canada, the terms and conditions
of this warranty may be different. Unless a specific Kodak warranty is
communicated to the purchaser in writing by a Kodak company, no warranty or
liability exists beyond any minimum requirements imposed by law, even though
defect, damage, or loss may be by negligence or other act.
FCC compliance and advisory
This equipment has been tested and found to comply with the limits for a Class B
digital device, pursuant to Part 15 of the FCC Rules. These limits are designed to
provide reasonable protection against harmful interference in a residential
installation. The USB AC Adapter complies with part 15 of the FCC Rules.
Operation is subject to the following two conditions: (1) This device may not
cause harmful interference, and (2) this device must accept any interference
received, including interference that may cause undesired operation.
Canadian DOC statement
DOC Class B Compliance: This Class B digital apparatus complies with Canadian
ICES-003.
Observation des normes-Classe B: Cet appareil numérique de la classe B est
conforme à la norme NMB-003 du Canada.
www.kodak.com/go/Z5120support 27
Page 28

Appendix
N137
China RoHS
Australian C-Tick
VCCI Class B ITE
Korean Class B ITE
28 www.kodak.com/go/support
Page 29

Eastman Kodak Company
Rochester, New York 14650
© Kodak, 2012
Kodak and EasyShare are trademarks of Eastman Kodak Company.
Eye-Fi is a trademark of Eye-Fi, Inc.
4H8852_en
Appendix
www.kodak.com/go/Z5120support 29
 Loading...